Embed Size (px)
Citation preview
ERP Consulting Web Development
Custom Programming Solutions Desktop & Web Applications for Manfact
NorthClark Computing, Inc.
Work Order Batch Creation User Guide
Web and Desktop Applications for Manfact by Epicor
September, 2006 ©2006 NorthClark Computing, Inc. All Rights Reserved This document contains information that is the property of and proprietary to NorthClark Computing, Inc. Any unauthorized duplication in whole or in part is prohibited. Epicor and Manfact are trademarks of Epicor Software Corporation. Microsoft, Windows and NT are trademarks or registered trademarks of Microsoft Corporation. Universe is a registered trademark of IBM Corporation. All other trademarks acknowledged. Published in the U.S.A. This document is for informational purposes only and is subject to change without notice. NorthClark makes no warranties, express or implied in this document. The contents of this document are believed to be current and accurate as of its date of publication.
NorthClark Computing, Inc.
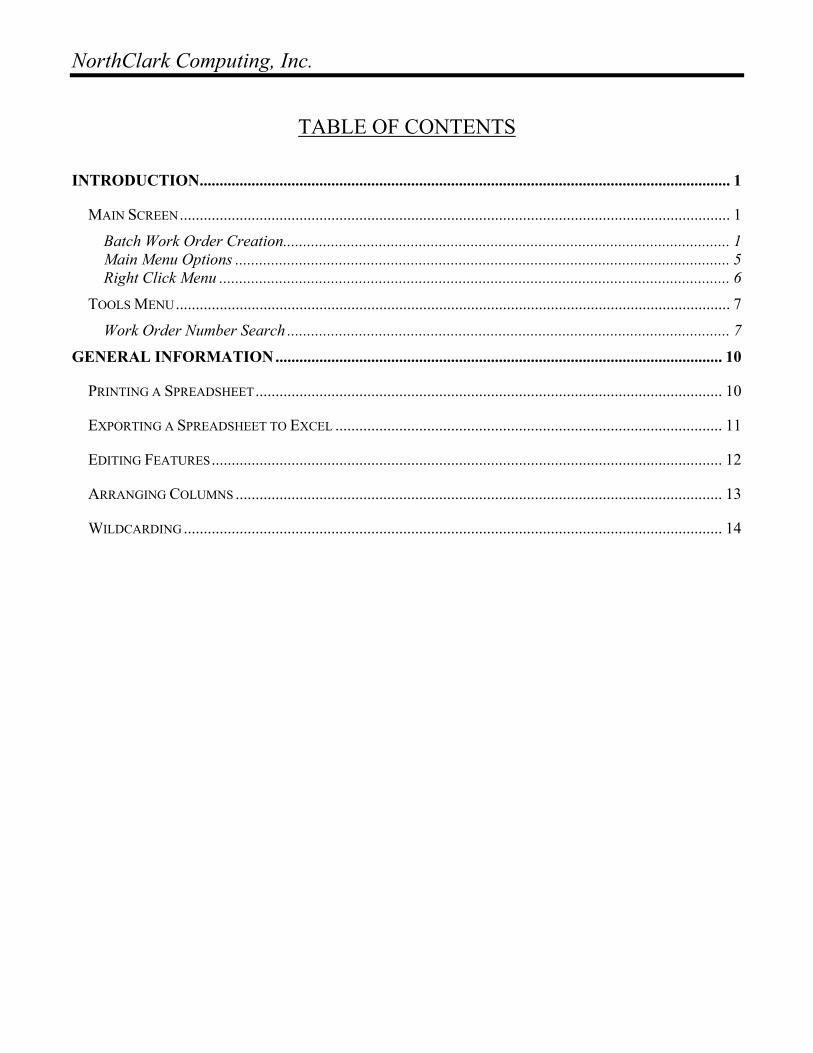
TABLE OF CONTENTS
INTRODUCTION..................................................................................................................................... 1
MAIN SCREEN.......................................................................................................................................... 1
Batch Work Order Creation................................................................................................................ 1 Main Menu Options ............................................................................................................................ 5 Right Click Menu ................................................................................................................................ 6
TOOLS MENU........................................................................................................................................... 7
Work Order Number Search ............................................................................................................... 7
GENERAL INFORMATION................................................................................................................ 10
PRINTING A SPREADSHEET..................................................................................................................... 10
EXPORTING A SPREADSHEET TO EXCEL ................................................................................................. 11
EDITING FEATURES................................................................................................................................ 12
ARRANGING COLUMNS .......................................................................................................................... 13
WILDCARDING ....................................................................................................................................... 14
NorthClark Computing, Inc.
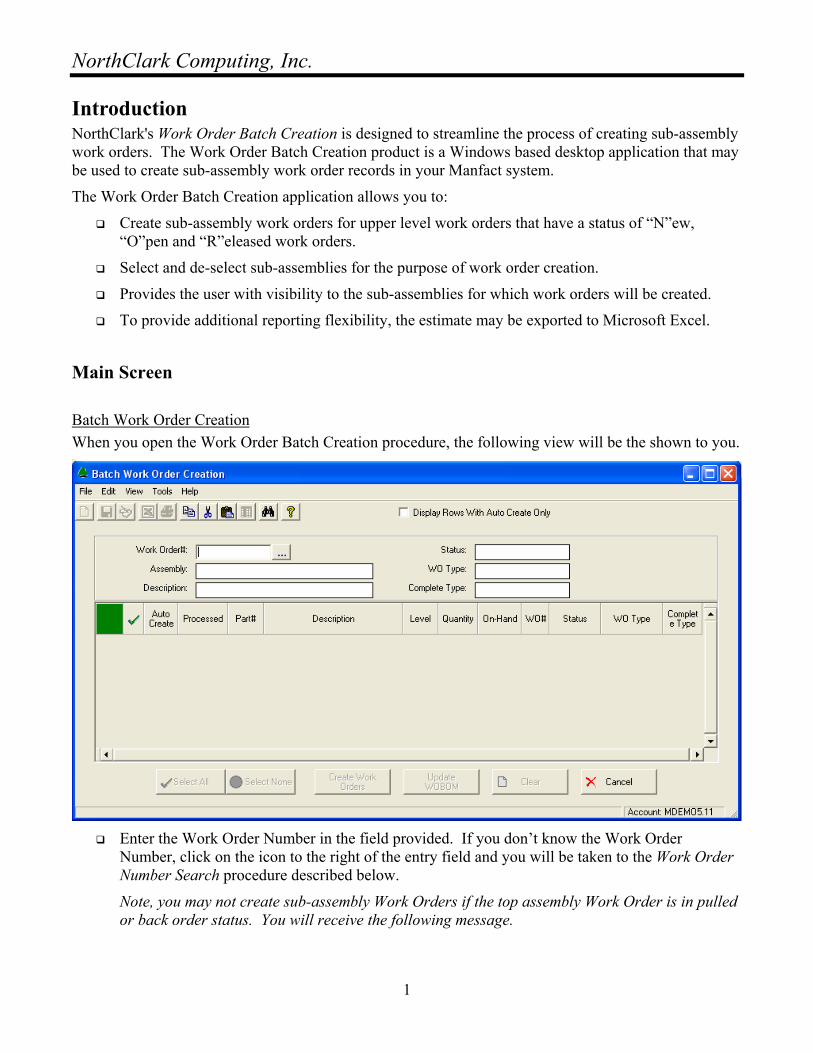
Introduction NorthClark's Work Order Batch Creation is designed to streamline the process of creating sub-assembly work orders. The Work Order Batch Creation product is a Windows based desktop application that may be used to create sub-assembly work order records in your Manfact system.
The Work Order Batch Creation application allows you to:
Create sub-assembly work orders for upper level work orders that have a status of “N”ew, “O”pen and “R”eleased work orders.
Select and de-select sub-assemblies for the purpose of work order creation.
Provides the user with visibility to the sub-assemblies for which work orders will be created.
To provide additional reporting flexibility, the estimate may be exported to Microsoft Excel.
Main Screen
Batch Work Order Creation When you open the Work Order Batch Creation procedure, the following view will be the shown to you.
Enter the Work Order Number in the field provided. If you don’t know the Work Order
Number, click on the icon to the right of the entry field and you will be taken to the Work Order Number Search procedure described below.
Note, you may not create sub-assembly Work Orders if the top assembly Work Order is in pulled or back order status. You will receive the following message.
1
NorthClark Computing, Inc.
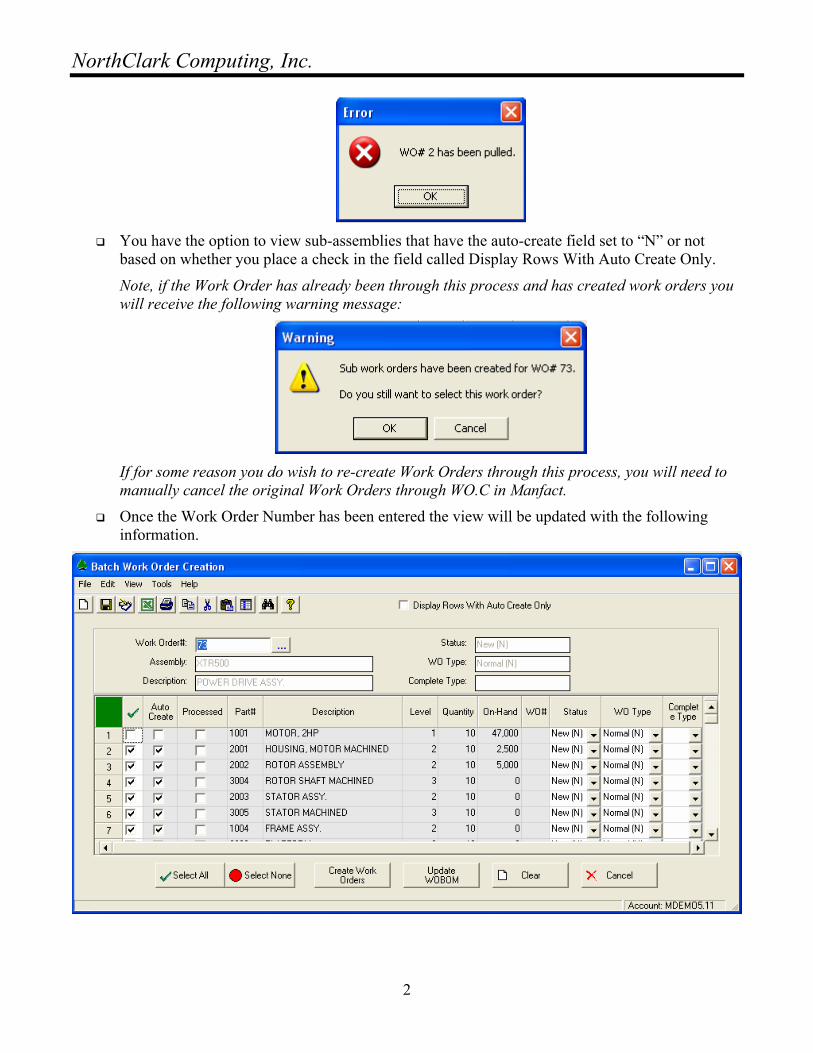
You have the option to view sub-assemblies that have the auto-create field set to “N” or not
based on whether you place a check in the field called Display Rows With Auto Create Only.
Note, if the Work Order has already been through this process and has created work orders you will receive the following warning message:
If for some reason you do wish to re-create Work Orders through this process, you will need to manually cancel the original Work Orders through WO.C in Manfact.
Once the Work Order Number has been entered the view will be updated with the following information.
2
NorthClark Computing, Inc.
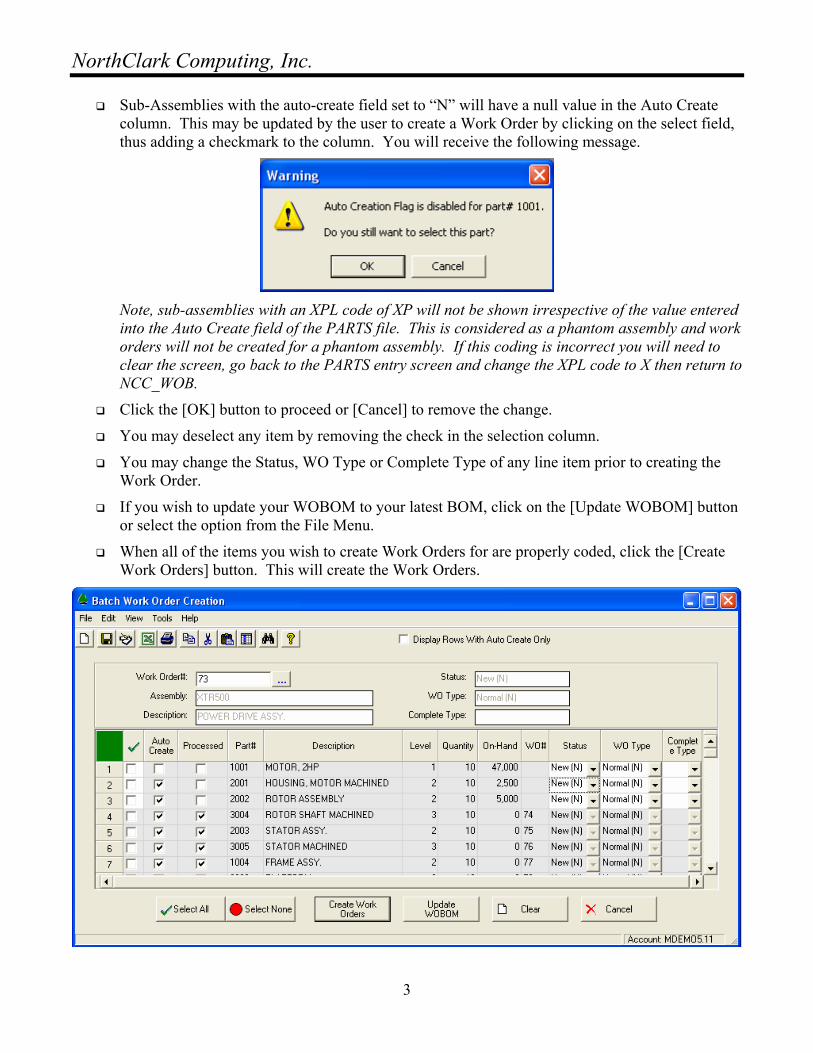
Sub-Assemblies with the auto-create field set to “N” will have a null value in the Auto Create column. This may be updated by the user to create a Work Order by clicking on the select field, thus adding a checkmark to the column. You will receive the following message.
Note, sub-assemblies with an XPL code of XP will not be shown irrespective of the value entered into the Auto Create field of the PARTS file. This is considered as a phantom assembly and work orders will not be created for a phantom assembly. If this coding is incorrect you will need to clear the screen, go back to the PARTS entry screen and change the XPL code to X then return to NCC_WOB.
Click the [OK] button to proceed or [Cancel] to remove the change.
You may deselect any item by removing the check in the selection column.
You may change the Status, WO Type or Complete Type of any line item prior to creating the Work Order.
If you wish to update your WOBOM to your latest BOM, click on the [Update WOBOM] button or select the option from the File Menu.
When all of the items you wish to create Work Orders for are properly coded, click the [Create Work Orders] button. This will create the Work Orders.
3
NorthClark Computing, Inc.
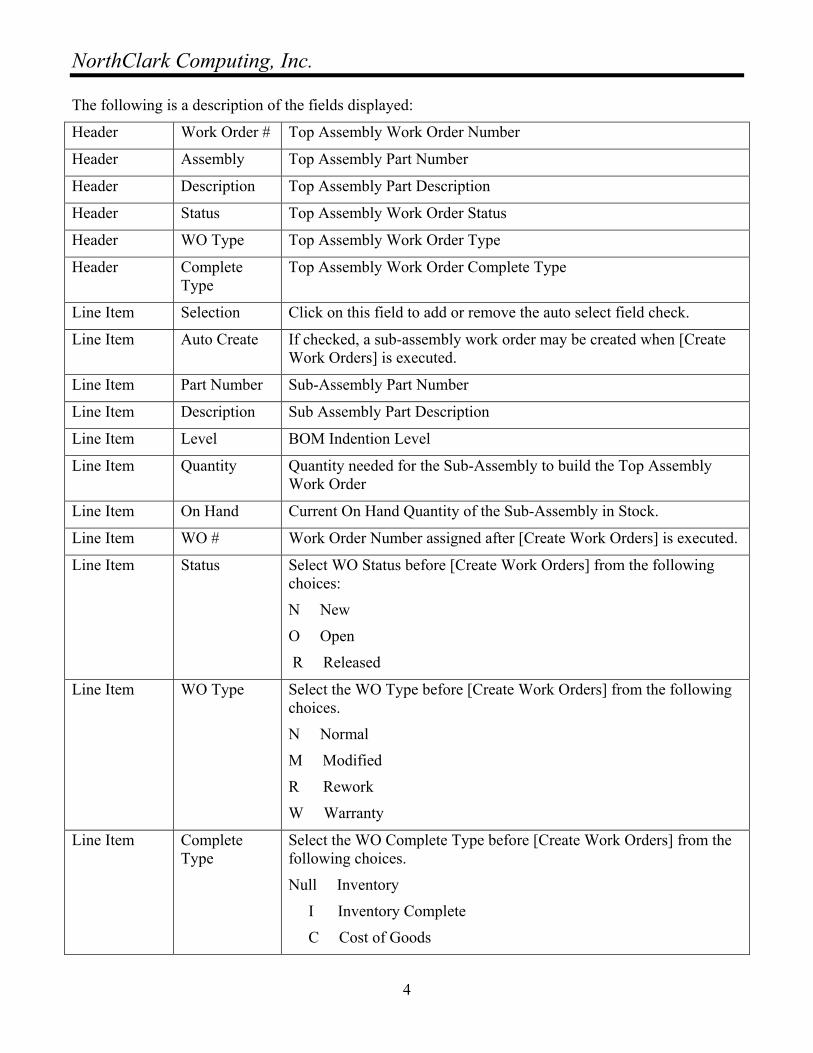
The following is a description of the fields displayed:
Header Work Order # Top Assembly Work Order Number
Header Assembly Top Assembly Part Number
Header Description Top Assembly Part Description
Header Status Top Assembly Work Order Status
Header WO Type Top Assembly Work Order Type
Header Complete Type
Top Assembly Work Order Complete Type
Line Item Selection Click on this field to add or remove the auto select field check.
Line Item Auto Create If checked, a sub-assembly work order may be created when [Create Work Orders] is executed.
Line Item Part Number Sub-Assembly Part Number
Line Item Description Sub Assembly Part Description
Line Item Level BOM Indention Level
Line Item Quantity Quantity needed for the Sub-Assembly to build the Top Assembly Work Order
Line Item On Hand Current On Hand Quantity of the Sub-Assembly in Stock.
Line Item WO # Work Order Number assigned after [Create Work Orders] is executed.
Line Item Status Select WO Status before [Create Work Orders] from the following choices:
N New
O Open
R Released
Line Item WO Type Select the WO Type before [Create Work Orders] from the following choices.
N Normal
M Modified
R Rework
W Warranty
Line Item Complete Type
Select the WO Complete Type before [Create Work Orders] from the following choices.
Null Inventory
I Inventory Complete
C Cost of Goods
4
NorthClark Computing, Inc.
E Expense
M Manual
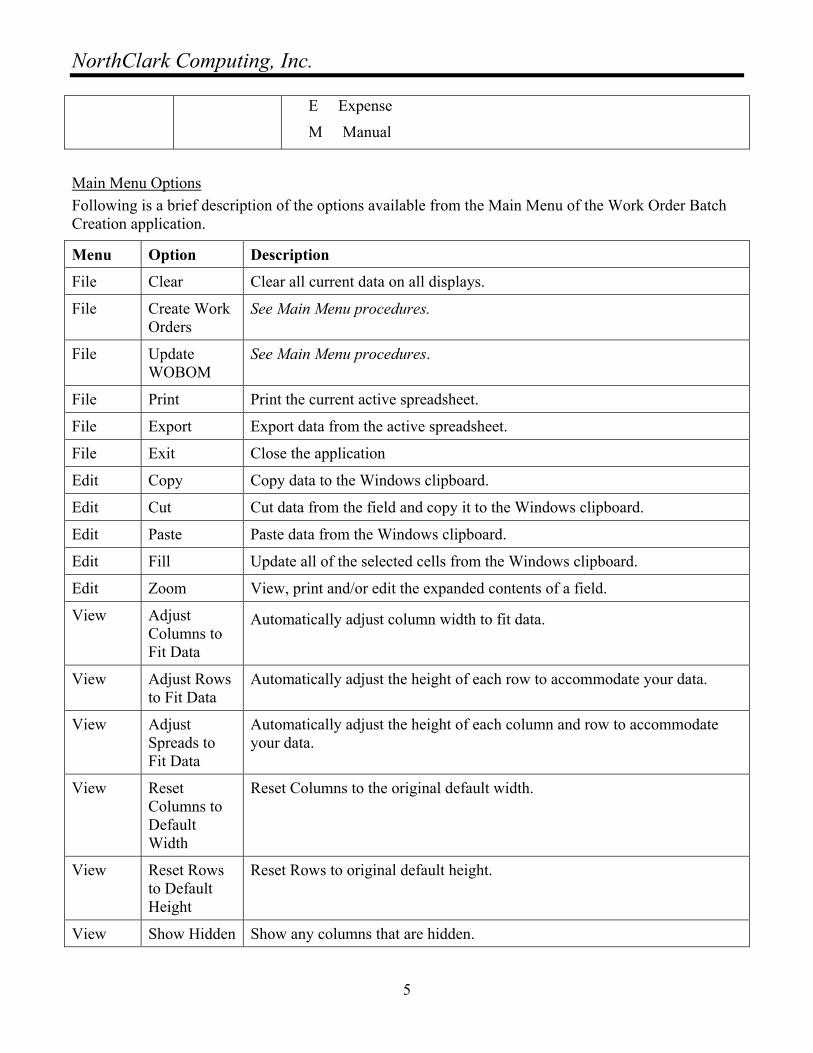
Main Menu Options Following is a brief description of the options available from the Main Menu of the Work Order Batch Creation application.
Menu Option Description
File Clear Clear all current data on all displays.
File Create Work Orders
See Main Menu procedures.
File Update WOBOM
See Main Menu procedures.
File Print Print the current active spreadsheet.
File Export Export data from the active spreadsheet.
File Exit Close the application
Edit Copy Copy data to the Windows clipboard.
Edit Cut Cut data from the field and copy it to the Windows clipboard.
Edit Paste Paste data from the Windows clipboard.
Edit Fill Update all of the selected cells from the Windows clipboard.
Edit Zoom View, print and/or edit the expanded contents of a field.
View Adjust Columns to Fit Data
Automatically adjust column width to fit data.
View Adjust Rows to Fit Data
Automatically adjust the height of each row to accommodate your data.
View Adjust Spreads to Fit Data
Automatically adjust the height of each column and row to accommodate your data.
View Reset Columns to Default Width
Reset Columns to the original default width.
View Reset Rows to Default Height
Reset Rows to original default height.
View Show Hidden Show any columns that are hidden.
5
NorthClark Computing, Inc.
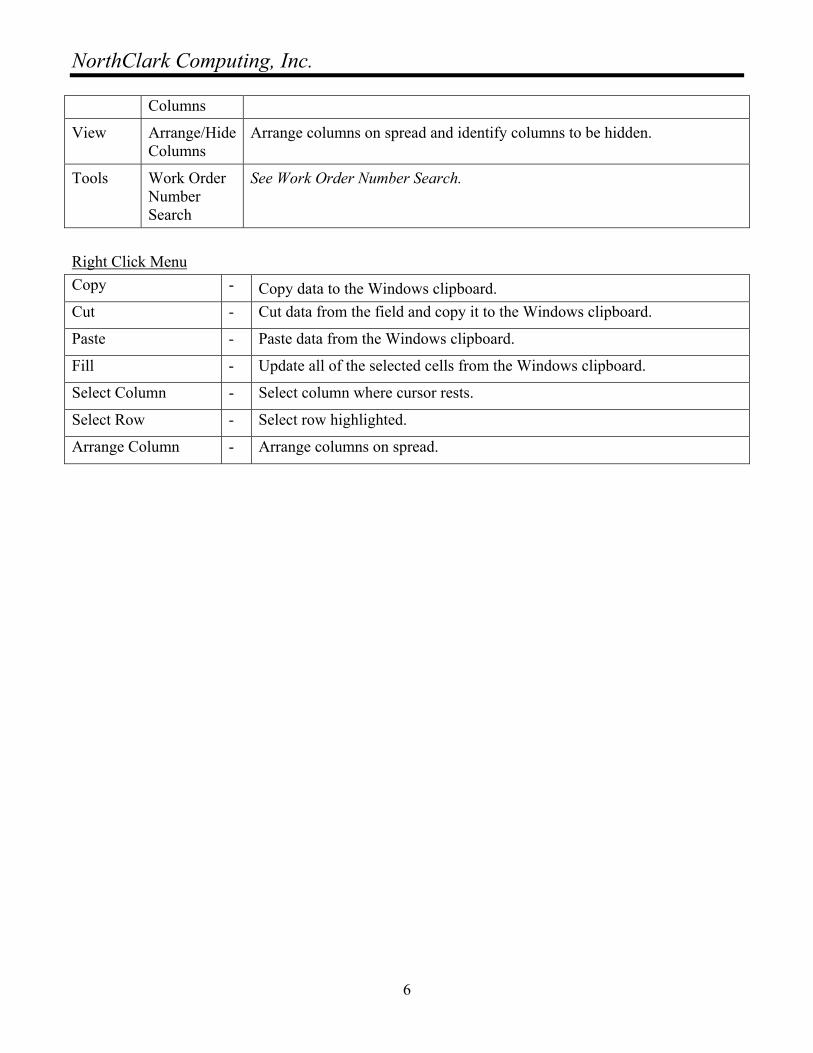
Columns
View Arrange/Hide Columns
Arrange columns on spread and identify columns to be hidden.
Tools Work Order Number Search
See Work Order Number Search.
Right Click Menu Copy - Copy data to the Windows clipboard. Cut - Cut data from the field and copy it to the Windows clipboard.
Paste - Paste data from the Windows clipboard.
Fill - Update all of the selected cells from the Windows clipboard.
Select Column - Select column where cursor rests.
Select Row - Select row highlighted.
Arrange Column - Arrange columns on spread.
6
NorthClark Computing, Inc.
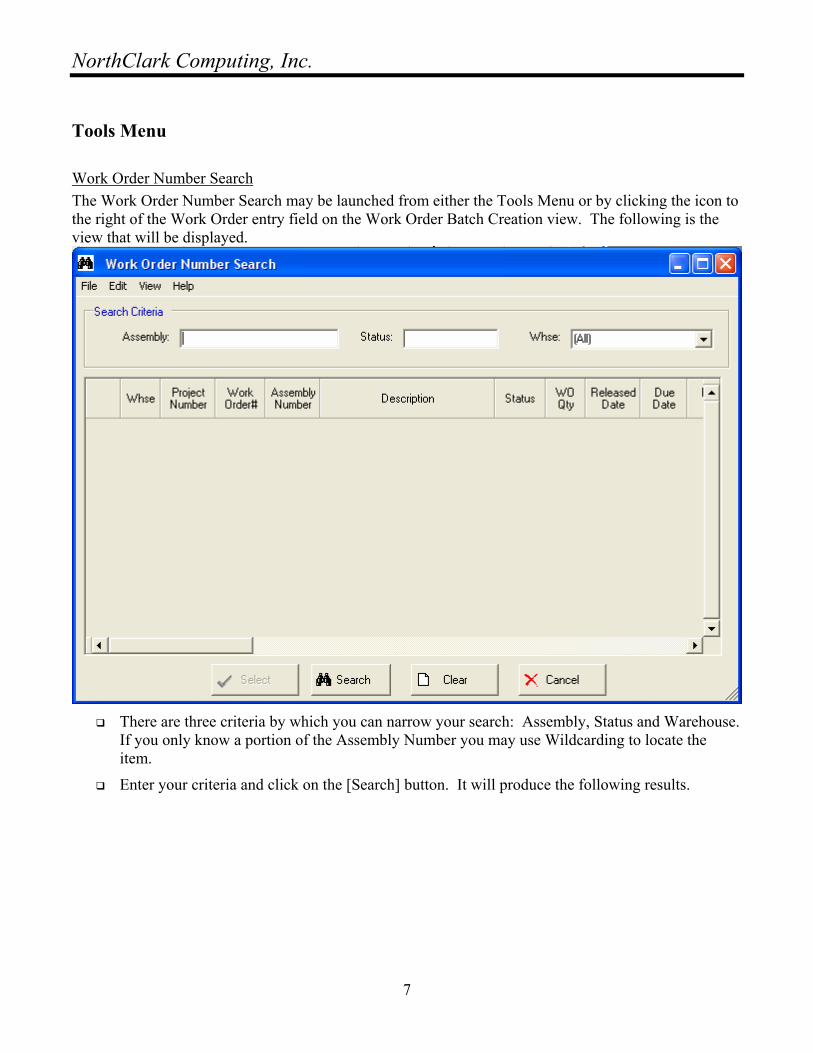
Tools Menu
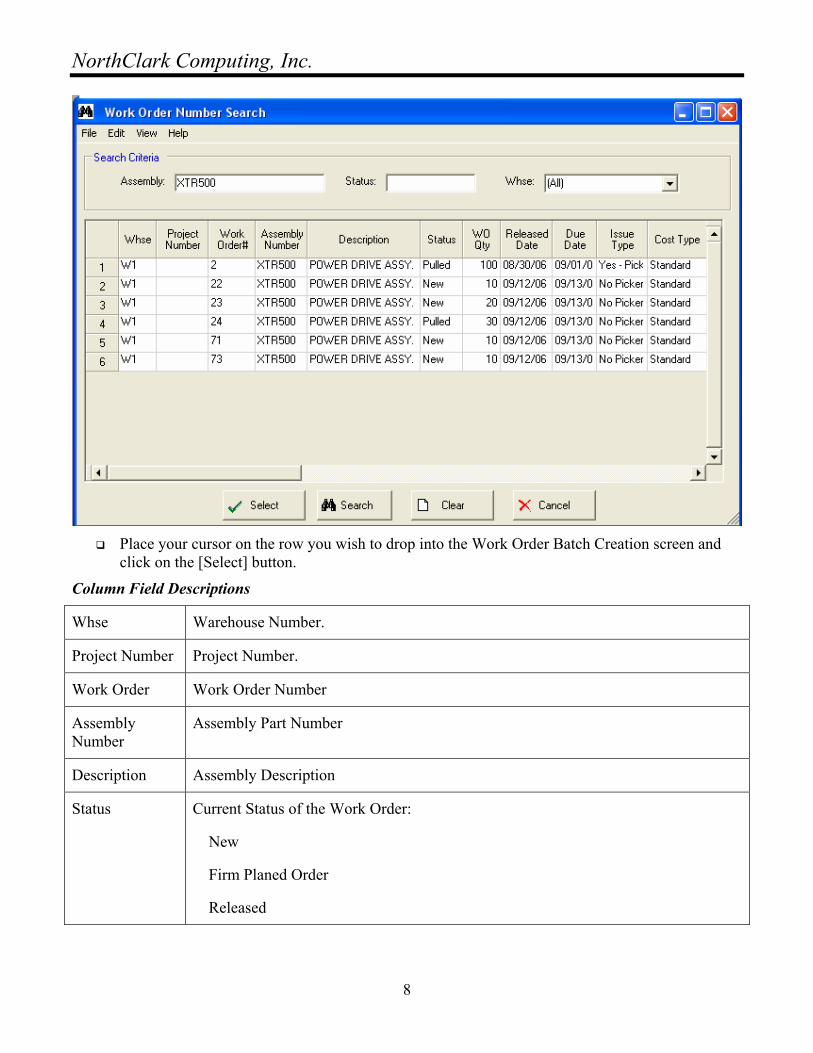
Work Order Number Search The Work Order Number Search may be launched from either the Tools Menu or by clicking the icon to the right of the Work Order entry field on the Work Order Batch Creation view. The following is the view that will be displayed.
There are three criteria by which you can narrow your search: Assembly, Status and Warehouse.
If you only know a portion of the Assembly Number you may use Wildcarding to locate the item.
Enter your criteria and click on the [Search] button. It will produce the following results.
7
NorthClark Computing, Inc.
Place your cursor on the row you wish to drop into the Work Order Batch Creation screen and
click on the [Select] button.
Column Field Descriptions
Whse Warehouse Number.
Project Number Project Number.
Work Order Work Order Number
Assembly Number
Assembly Part Number
Description Assembly Description
Status Current Status of the Work Order:
New
Firm Planed Order
Released
8
NorthClark Computing, Inc.
Picked
Backordered
Completed
Final
WO Qty Work Order Quantity
Release Date Date Work Order was Released.
Due Date Date Work Order is Due
Issue Type Issue Type for the Work Order
Pick
No Picker
Backflush
Manual
Cost Type Cost Type for the Work Order
Standard
Project
Expense
9
NorthClark Computing, Inc.
General Information
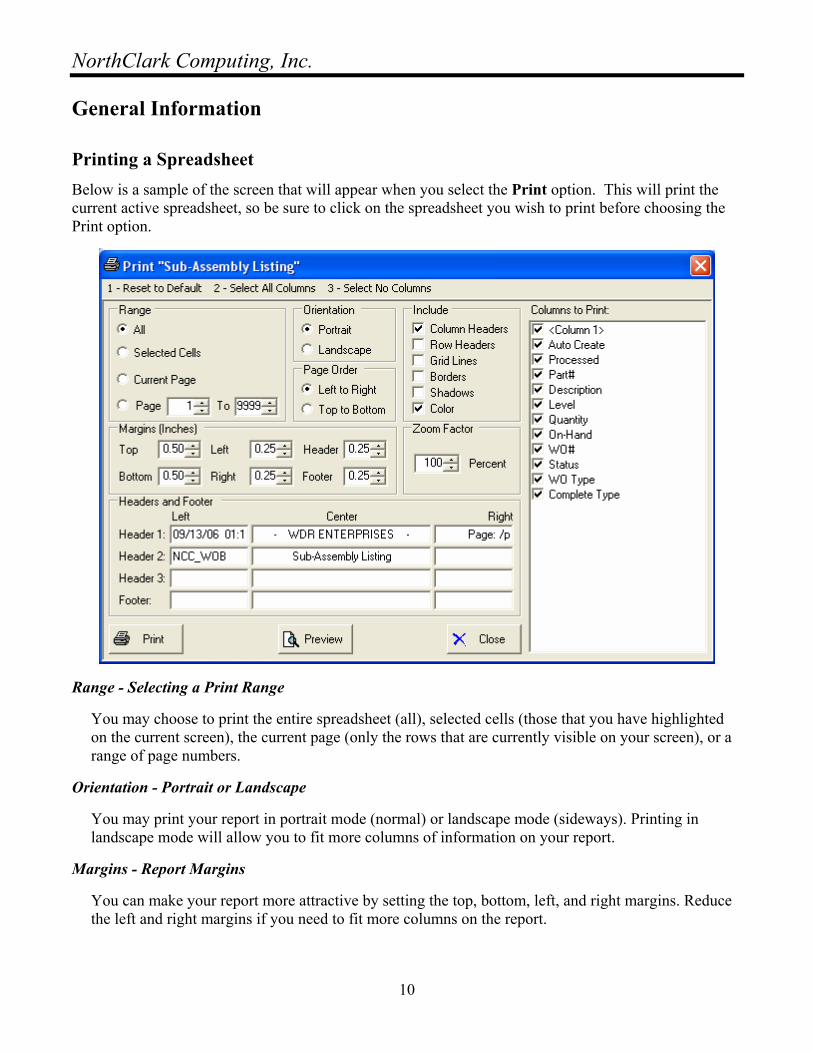
Printing a Spreadsheet Below is a sample of the screen that will appear when you select the Print option. This will print the current active spreadsheet, so be sure to click on the spreadsheet you wish to print before choosing the Print option.
Range - Selecting a Print Range
You may choose to print the entire spreadsheet (all), selected cells (those that you have highlighted on the current screen), the current page (only the rows that are currently visible on your screen), or a range of page numbers.
Orientation - Portrait or Landscape
You may print your report in portrait mode (normal) or landscape mode (sideways). Printing in landscape mode will allow you to fit more columns of information on your report.
Margins - Report Margins
You can make your report more attractive by setting the top, bottom, left, and right margins. Reduce the left and right margins if you need to fit more columns on the report.
10
NorthClark Computing, Inc.
Page Order
If your report is too wide, it may span multiple pages. When this occurs, do you want the report printed from top to bottom or left to right?
What Do You Want to Print?
You can customize the appearance of your report by printing (or not printing) column headers, row headers, grid lines, borders, shadow, and color.
Headers and Footers
Your report may have up to three lines for the heading, and one line for the footer. The system initially displays a default heading, which you may modify if desired.
Tip: Use /p to designate a page number.
Which Columns Do You Want to Print? The columns that are available for printing are listed. Select the columns you wish to include on your report.
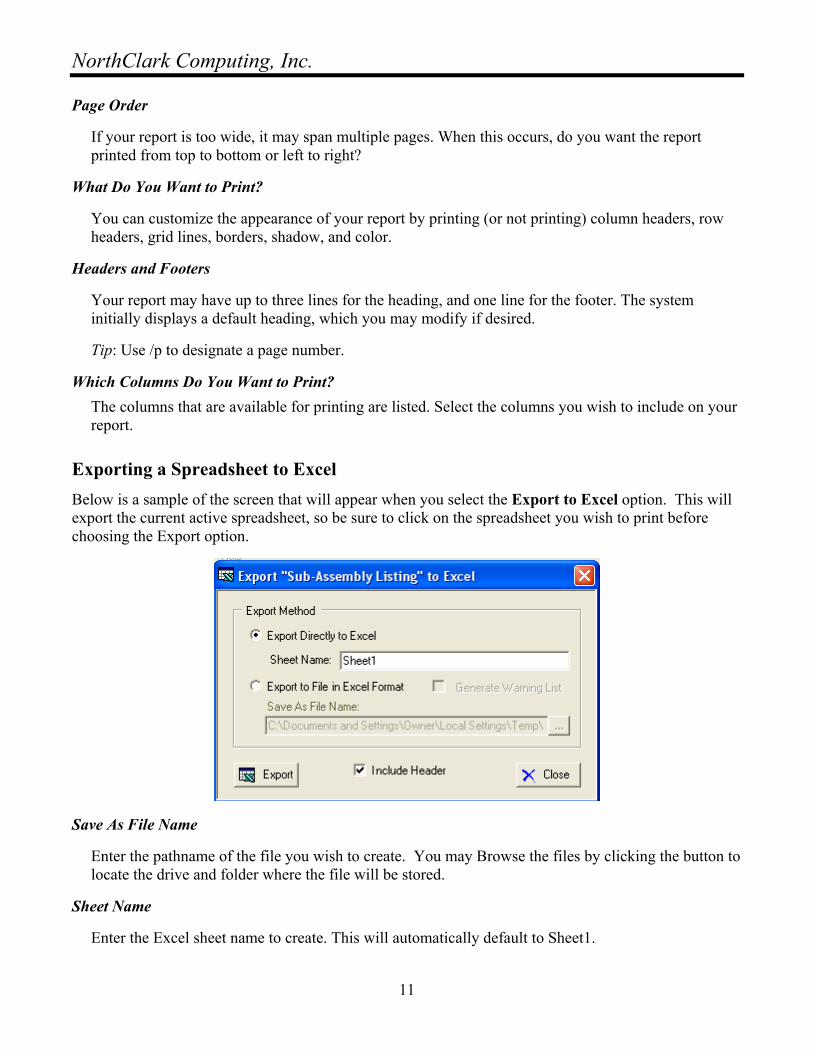
Exporting a Spreadsheet to Excel Below is a sample of the screen that will appear when you select the Export to Excel option. This will export the current active spreadsheet, so be sure to click on the spreadsheet you wish to print before choosing the Export option.
Save As File Name
Enter the pathname of the file you wish to create. You may Browse the files by clicking the button to locate the drive and folder where the file will be stored.
Sheet Name
Enter the Excel sheet name to create. This will automatically default to Sheet1.
11
NorthClark Computing, Inc.
Export to Excel or to a File?
You may export the contents of the display directly to Excel, or you may choose to create a file in Excel format.
Generate Warning List?
Select this option to create a log file. The log file contains error messages and other information about how your Excel file was created. The name of the log file is "CreateExcelFile.log", and it will be stored in the same folder as your spreadsheet.
Include Header?
Check if you want to include the Header.
[Export] Button
After all required information has been entered, click this button to export your data to Microsoft Excel.
Editing Features Copy, Cut, Paste and Fill You may use the standard Windows Copy, Cut, and Paste features to copy data to the Windows clipboard, or to paste data from the clipboard into a cell.
To copy data, hold down the left mouse button and highlight one or more cells, then choose Copy. There are multiple ways to enter this command:
1. From the Edit menu choose Copy.
2. Click the Right Mouse button, and then choose Copy from the pop-up menu.
3. Click the corresponding icon on the toolbar.
4. Hold down the Ctrl key and type the letter C (Ctrl-C).
You can use the Cut command (Ctrl-X) and the Paste command (Ctrl-V) in similar fashion.
To copy the contents of an entire row, click once on the row header (the number displayed on the left side of the first cell), and then choose Copy. Now click on the row header that you want to copy the data to and choose Paste.
If you want to update several cells with the same value, highlight all of the cells you wish to update then choose Fill Cells. This command will update each cell with the current information from the clipboard. Zoom This feature allows you to view, print and/or edit the expanded contents of a field. It is especially useful for multi-line information such as notes and long descriptions.
12
NorthClark Computing, Inc.
• You may "Zoom in" on any selected item by selecting Zoom from the Edit Menu, clicking the magnifying glass on the toolbar, or selecting Zoom from the right click menu.
• The Column Name will appear in the Title Bar with "Edit" or "View". You may edit the field when it is allowed. Click "OK" when finished, or "Cancel" to revert to the original data.
• To print the selected item, click on the printer icon and the information will be sent to your local printer.
Locked fields may be viewed but not modified using the Zoom Feature. If the field is locked, "View" will appear in the Title Bar, and there will only be a single command button labeled "Done".
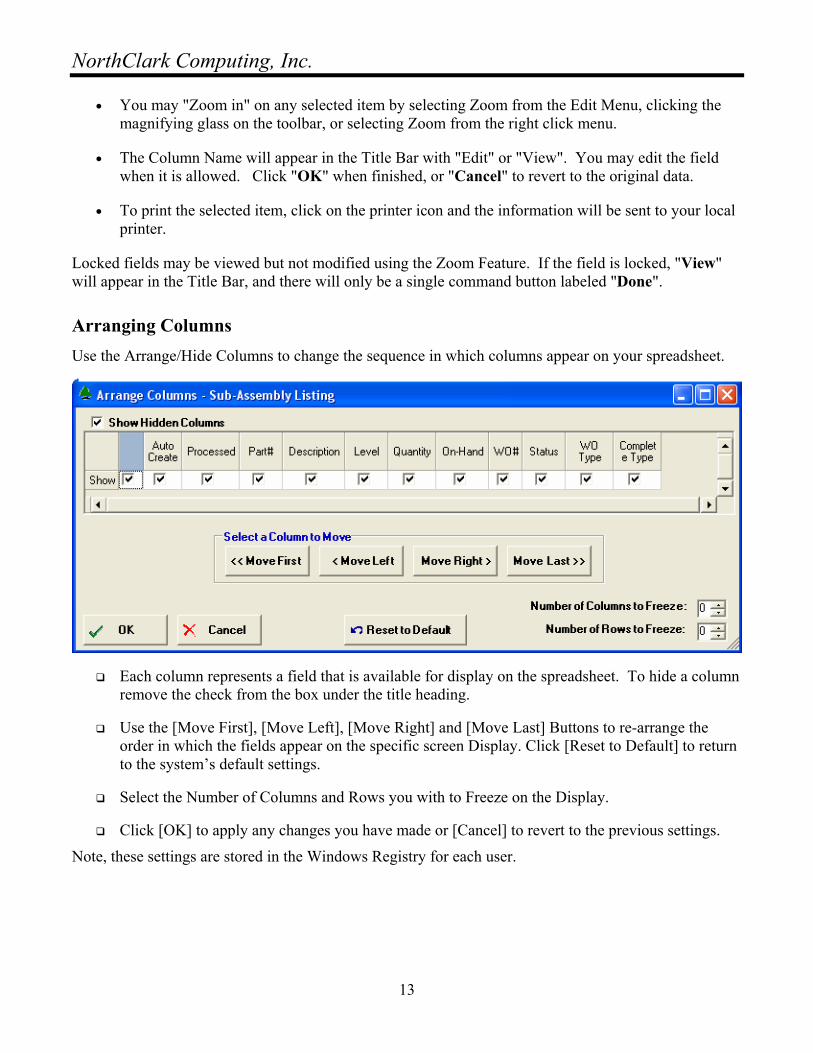
Arranging Columns Use the Arrange/Hide Columns to change the sequence in which columns appear on your spreadsheet.
Each column represents a field that is available for display on the spreadsheet. To hide a column remove the check from the box under the title heading.
Use the [Move First], [Move Left], [Move Right] and [Move Last] Buttons to re-arrange the order in which the fields appear on the specific screen Display. Click [Reset to Default] to return to the system’s default settings.
Select the Number of Columns and Rows you with to Freeze on the Display.
Click [OK] to apply any changes you have made or [Cancel] to revert to the previous settings.
Note, these settings are stored in the Windows Registry for each user.
13
NorthClark Computing, Inc.
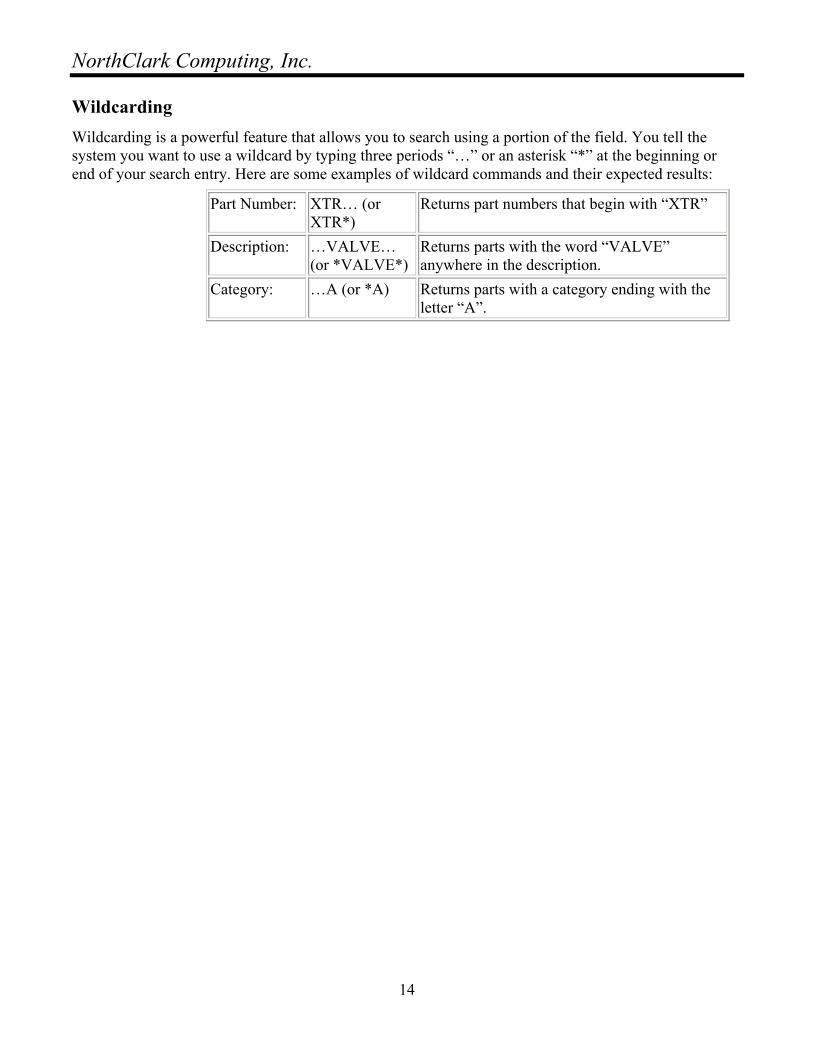
Wildcarding Wildcarding is a powerful feature that allows you to search using a portion of the field. You tell the system you want to use a wildcard by typing three periods “…” or an asterisk “*” at the beginning or end of your search entry. Here are some examples of wildcard commands and their expected results:
Part Number: XTR… (or XTR*)
Returns part numbers that begin with “XTR”
Description: …VALVE… (or *VALVE*)
Returns parts with the word “VALVE” anywhere in the description.
Category: …A (or *A) Returns parts with a category ending with the letter “A”.
14