Embed Size (px)
Citation preview

8/3/2019 Nortel Option 11 Pbx at Home
http://slidepdf.com/reader/full/nortel-option-11-pbx-at-home 1/79
nortel option 11 pbx at home
a few years ago i started getting interested in telephony, andone of my first big projects was to build up my own meridiandigital pbx board by board for hobby use. it has been a lot of
fun and very interesting but there was definitely a learningcurve to it. i decided to put this page together to bothdocument what i have done so that i dont forget, and to provideperhaps a more structured introduction to the meridian for thetelephony hobbyist with no prior experience.
the model range
the nortel meridian range has been around for a while and isfairly comprehensive. meridian systems range from little single
cabinet switches with a few as 20 or 30 lines, all the way up toroom sized switches with thousands of lines. the smallest memberof the meridian range is the option 11 line. it runs on a fewamps of ordinary 120 VAC and weighs less than a hundred poundsfully loaded. these attributes make it perfectly suited forresidential use.
there are a few different vintages of the option 11. theoriginal option 11 systems used an NTAK01 processor card whichseems to have a zilog Z180 processor as the system CPU. it isvery slow and runs fairly old software revisions. the originaloption 11 systems were followed by the option 11e system, whichcame equipped with a refreshed NTBK45 processor card. here, thesystem CPU was updated to a motorola 68020. the performance ofthe option 11e processor is reasonable and these make finesystems for hobby use. the final iteration of the option 11 linewas the option 11c, which again offered a refreshed processorcard, the NTDK20. NTDK20 cards use the motorola 68040 processor.more modern vintages of the NTDK20 remain the processor card fornew option 11 systems shipping from nortel today but the oldervintages of this card are starting to appear on the gray marketat very attractive prices for the hobbyist. pretty mucheverything i will discuss on this site is applicable to all
option 11 processor cards except where otherwise noted.
you could very well get lucky and find a complete option 11system for sale at a fair price, perhaps two or three hundreddollars depending on configuration. the price is especially fairif the seller happens to know what the administrator passwordis. i built my system up from boards, however, and i will spend

8/3/2019 Nortel Option 11 Pbx at Home
http://slidepdf.com/reader/full/nortel-option-11-pbx-at-home 2/79
a lot of time discussing them. i think it was more fun buildingit up piecewise, and there is definitely the potential for costsavings over buying a complete system. perhaps most importantly,you can learn a lot about the internals of the system buildingit up from boards than you might otherwise.
from the ground up, an option 11 system consists of thefollowing components
at least one chassis which will includeo one backplaneo one connector panelo one power supply
a system controller card any number of peripheral cards which may include
o analog and digital station cards
o analog, digital, and e&m trunk cardso serial cards and tone generatorso isdn line cardso meridian mail
the table below sums up the most common and useful parts for theoption 11.
NTAK01 option 11 system controller card
NTBK45 option 11e system controller card
NTDK20 option 11c system controller card
NTAK02 sdi/dch quad serial port card
NTAK03 tds/dtr tone and digit switch card
NTAK09 dti/pri t1 card supported on all releases
NTRB21 tmdi t1 card with integrated ddch supported on rls 24+ only
NT8D02 digital line card
NT8D03 analog line card without message waiting
NT8D09 analog line card with message waiting
NT8D14 universal analog trunk card
NT8D15 e&m trunk card
NTAK04 120 vac power supply
NTAK11 11 slot single shelf chassis

8/3/2019 Nortel Option 11 Pbx at Home
http://slidepdf.com/reader/full/nortel-option-11-pbx-at-home 3/79
NTAK20 clock controller mates to NTAK09
NTAK93 dchi pri d-channel handler mates to NTAK09
NTBK51 ddch improved pri d-channel handler mates to NTAK09
NTAG26 multifrequency receiver card
NTBK48AA 3 port serial breakout cable for system controller card
NTAK19FB 4 port serial breakout cable for NTAK02 card
when buying secondhand gear, you really have to remember thatthe meridian line has been around forever, and that a lot ofstuff from older or larger models is not cross compatible withthe smaller systems. any part numbers starting with QPC are fromolder and larger switches and will not work in the option 11. CPseries call processors with the impressive CPU specs are forlarger switches and will not work in the option 11 context. theyboot from hard disks that we do not have, loaded with softwarethat we probably cannot get. the option 11 systems, in contrast,load their operating system from a ROM cartridge and save dataon flash memory. you will do just fine if you stick to theboards in the table above. stray from that and i make nopromises about it working.
another important thing to keep in mind when buying secondhandoption 11 gear is that the system controllers have criticalancillary parts that must be included for it to work. option 11
and option 11e system controllers must have a software cartridgefitted to run. they will not work without the softwarecartridge. option 11c system controllers must have a RAM SIMM, asoftware daughterboard, and a software security dongle mounted.if the controller is missing any of these items, it will notwork. having a photo of the system controller up front beforebuying is critical to make sure everything you need is stillthere. i would not recommend buying system controllers unseenunless the seller confirms that everything is there.
so in sum, if you want to set up your own option 11 system, all
you need to get is at least one complete NTAK11 chassis orequivalent with power supply and all backplanes installed. add asystem controller card, at least one line card, and at least onetrunk card, and you will be all set. in the case of the straightNTAK01 option 11 processor, there is no tone and digit switchcapability integrated into the processor card so you must havean NTAK03 card installed to provide these services. the NTBK45

8/3/2019 Nortel Option 11 Pbx at Home
http://slidepdf.com/reader/full/nortel-option-11-pbx-at-home 4/79
option 11e processor and the NTDK20 option 11c processor bothhave integrated tone and digit switch, so there is no need toinstall an NTAK03 card unless you need extra capacity. all threeof the processor cards include three serial ports for the systemconsole and any auxiliary functions that may be required such as
a CDR log or maintenance dial up modem.
looking at the system controller, you should see one buttonmarked MAN INT and a block of DIP switches. the button isbasically an interrupt switch, and the switch block sets theconsole baud rate. i leave it set at 9600. as far as the rest ofthe communication parameters go, the nortel defaults to 8N1. ifyou have a NTDK20 processor you will also see a a few PCMCIAslots; these are used in the initial installation of the PBX,and can also be used to provide a secondary backup media for thePBX configuration database. to connect the console terminal,
look to the connector panel under the card cage. you should seetwo 9 pin D shell connectors, sort of lined up vertically underthe system controller card slot. connect your console cable tothe uppermost 9 pin port, closest to the card cage. you mightneed to use a null modem adapter to make it work. pretty muchany terminal emulation will work; the administration interfaceis not screen oriented.
i should probably mention the console serial cable itself sinceit is a little special. as i mention above, the systemcontroller card actually has three serial ports built into it.
all three of them come out on the uppermost 9 pin port under thesystem controller. if you hook up a regular serial cable, youwill just get the console on port 0. this is of course vital andeasy enough to get to with a plain old serial cable, but if youwant to get to the other two serial ports, say to use asmaintenance TTYs or a CDR log, you need a special cable withpart number NTBK48AA. this tends unfortunately to be a ratherexpensive cable. you can find some pinouts for this cable on theinternet but they dont seem to really work. i finally just gaveup and purchased one though i havent bothered to pin it out andcheck it against what the pinout is purported to be.
also, while discussing the connector panel, i do want to mentionexplicitly that each connector on the connector panelcorresponds to the card in the slot immediately above it in thecard cage. you can use the technical reference manual or variouscard specific datasheets to determine the pinouts of the RJ21centronics style connectors when various cards are plugged intothe slots above them. for the system controller they make it

8/3/2019 Nortel Option 11 Pbx at Home
http://slidepdf.com/reader/full/nortel-option-11-pbx-at-home 5/79
nice and easy for us by providing the serial ports alreadypinned to a D shell, but other cards need to be broken out topunchdown blocks.
cabling the meridiancabling up cards in the meridian to a 66 block can be a littleconfusing to the first timer so i want to touch briefly on ithere. basically for each card, you connect the cable via 50 pincentronics to the port under its slot in the meridian. on theother end of the cable is just wires, which you will punch downon a 66 block according to the RJ21 color code standard,described in the table below. you could use a 110 block insteadbut i prefer the 66 block so that will be my focus here.
wire color nortel pin 66 block pin
white+blue stripe 26 1
white+orange stripe 27 3
white+green stripe 28 5
white+brown stripe 29 7
white+gray stripe 30 9
red+blue stripe 31 11
red+orange stripe 32 13
red+green stripe 33 15
red+brown stripe 34 17
red+gray stripe 35 19
black+blue stripe 36 21
black+orange stripe 37 23
black+green stripe 38 25

8/3/2019 Nortel Option 11 Pbx at Home
http://slidepdf.com/reader/full/nortel-option-11-pbx-at-home 6/79
black+brown stripe 39 27
black+gray stripe 40 29
yellow+blue stripe 41 31
yellow+orange stripe 42 33
yellow+green stripe 43 35
yellow+brown stripe 44 37
yellow+gray stripe 45 39
violet+blue stripe 46 41
violet+orange stripe 47 43
violet+green stripe 48 45
violet+brown stripe 49 47
violet+gray stripe 50 49
blue+white stripe 1 2
orange+white stripe 2 4
green+white stripe 3 6
brown+white stripe 4 8
gray+white stripe 5 10
blue+red stripe 6 12
orange+red stripe 7 14
green+red stripe 8 16
brown+red stripe 9 18

8/3/2019 Nortel Option 11 Pbx at Home
http://slidepdf.com/reader/full/nortel-option-11-pbx-at-home 7/79
gray+red stripe 10 20
blue+black stripe 11 22
orange+black stripe 12 24
green+black stripe 13 26
brown+black stripe 14 28
gray+black stripe 15 30
blue+yellow stripe 16 32
orange+yellow stripe 17 34
green+yellow stripe 18 36
brown+yellow stripe 19 38
gray+yellow stripe 20 40
blue+violet stripe 21 42
orange+violet stripe 22 44
green+violet stripe 23 46
brown+violet stripe 24 48
gray+violet stripe 25 50
looking at the 66 block mounted vertically, number the blockstarting at the top with the uppermost row as 1, going down,with the bottom most row being numbered 50. punch down therequisite color of wire at the requisite 66 block position. thenortel pin numbers reference the pin number of the centronicsconnector that is plugged in to the meridian. it is important tonote that when we read a nortel manual that discusses the pinoutof a card, it will give us a pin number that we call the nortelpin number in the above table. when we want to actually cablesomething up, we need to translate from the nortel pin number tothe 66 block number using the table. the 66 block number

8/3/2019 Nortel Option 11 Pbx at Home
http://slidepdf.com/reader/full/nortel-option-11-pbx-at-home 8/79
identifies the pins that we actually need to cable from theblock to the jack or RJ48/RJ45/RJ11 connector end. dont make themistake of taking the pin numbers nortel gives you to be pins onthe 66 block itself or else all your cabling will be off.
there is actually a method to the madness here and it is that,for the simplest cases of an analog or digital line card, youhave the case where nortel pins 1 and 26 are tip and ring ofline 1, nortel pins 2 and 27 are tip and ring of line 2, nortelpins 3 and 28 are tip and ring of line 3, and so forth. thecabling scheme on the 66 block means that nortel pins 1 and 26become 66 block pins 1 and 2, nortel pins 2 and 27 become 66block pins 3 and 4, and so on. thus, each line ends up onadjacent pins on the 66 block.
powering up the system
once everything is cabled up, plug in the switch and hit thenice big circuit breaker style power switch. if all goes well,you should see something like the following, at least on anoption 11 or option 11e switch. the option 11c switch has anunderlying vxworks layer that previous switches do not, and itadds its own startup messages to the output.
HWR000
SYS000 0400 0003 0800 00SYS0089 12 0SYS0089 12 1SYS0089 13 0SYS0089 13 1DATA FROM CARTR.
SYST. CORE EDDCARTR. EDD
SYSLOAD RELEASE 21.35DONEINI000 0000 00 00 00 0000 0000 0003 0800 0000EHM300 01DSET000 DOWN LOAD 37 0 6 0 0 0 0 608INI006 0082 008A
>XMI002 1 XMFRXMI002 2 DTI/PRIXMI002 3 XEMXMI002 4 DTI/PRIXMI002 5 XDLCXMI002 7 XDLC

8/3/2019 Nortel Option 11 Pbx at Home
http://slidepdf.com/reader/full/nortel-option-11-pbx-at-home 9/79
XMI002 9DTA003 2PRI000 2 5DTA003 4PRI000 4 5DTA005 2
DTA005 4DTA007 2DTA007 4DCH2023 10 3MSDL300 10 FROM: SYS DSBL - SELFTESTS PASSED TO: ENBL
TIME: 00:00:32
DCH: 10 EST CONFIRM TIME: 0:00:40 1/04/1993
DCH: 10 EST REMOTE TIME: 0:00:42 1/04/1993
XMI002 6 XMLCXMI002 8 XALC
DCH: 10 RLS CONFIRM TIME: 0:00:56 1/04/1993
DCH: 10 EST REMOTE TIME: 0:00:56 1/04/1993
DCH2034 10 1DCH: 10 EST CONFIRM TIME: 0:00:56 1/04/1993
DROL000 CED LD35 BEGIN 00:01 1/4/1993
DROL001 CED LD35 END 00:04 1/4/1993
DROL000 DTIM LD60 BEGIN 00:04 1/4/1993
PRI TRK LOOP 2 ATLP 0
SLFT OKTRSH CNT:BPV -000SLIPD -000SLIPR -019CRC -000LOSFA -001OS_BPV -000OS_LOSFA-000OS_YEL -001
PRI TRK LOOP 4 ATLP 0SLFT OK
TRSH CNT:BPV -000SLIPD -000SLIPR -019CRC -000LOSFA -001OS_BPV -000OS_LOSFA-000OS_YEL -001

8/3/2019 Nortel Option 11 Pbx at Home
http://slidepdf.com/reader/full/nortel-option-11-pbx-at-home 10/79
DROL001 DTIM LD60 END 00:05 1/4/1993
OVL111 044 BKGD
TTY 00 SCH MTC BUG 0:06
we can split up the startup messages into a few distinctcategories. the first category is just nonsensical spew from theboot loader. that would roughly be everything above the anglebracket. following that we have the system bus probe. we canread this and see what cards the switch is detecting, whichgives a little reassurance that a given card is at leastnominally working. from looking at the output, you can see thati have a multifrequency receiver in slot 1, dti/pri cards inslots 2 and 4, an e&m trunk card in slot 4, digital line cardsin slots 5 and 7, and analog line cards in slots 6 and 8. note
that there are some cards such as the NTAK02 and NTAK03 thatwill not show up in the bus probe. you just have to know thatthey are there. for example, i have a NTAK02 card in slot 10,but you couldnt tell just from looking at the bus probe.
nonetheless, it is good to take note of the XMI002 messages fortwo reasons. one, they give at least nominal assurance that thecard is working and two, you need to know the slot numbers forprogramming the switch so anything that gives you informationabout what card is in which slot is certainly helpful in thisregard.
after the bus probe, the switch runs a startup script (DROL) andperforms other initialization tasks such as bringing up the dchannels for pri trunks. wait a while and let the startup scriptcomplete. hit RETURN on the console and you should be presentedwith the system banner.
OVL111 000 IDLE
TTY 00 SCH MTC BUG 0:10
the OVL111 000 IDLE lets us know that the switch is currentlyidle and ready for us to log in. if we see anything but IDLE,the switch is still in the middle of running the startuproutine, and we must wait before logging in. you should only login when the switch is IDLE.

8/3/2019 Nortel Option 11 Pbx at Home
http://slidepdf.com/reader/full/nortel-option-11-pbx-at-home 11/79
documentation
before we really try to log in to the switch, i want to touch onthe important issue of documentation. you really need to have
some documentation to get anywhere with the meridian. thecommands used to program the switch are not at all obvious, anderror messages returned by the system are just crypticalphanumeric codes with no descriptive text. thus, having theadministration command reference and a cross reference for theerror messages is a must. it used to be difficult to obtaindocumentation for the meridian but since i first startedlearning about the platform, nortel has graciously decided torelease most of their documentation free to the public with noregistration required. just go HERE and look underdocumentation. the table below contains the title andpublication numbers for the manuals which are absolutelycritical to have when working with the meridian.
meridian 1 option 11c technical reference guide (553-3011-100)
meridian 1 software input/output guide, administration (553-3001-311)
meridian 1 software input/output guide, maintenance (553-3001-511)
meridian 1 software input/output guide, system messages (553-3001-411)
the technical reference guide will give you the general clue as
far as the hardware of the meridian goes. it should provide youwith a feel for how the system was designed and how all thevarious component parts work together. practically, it furnishesspecifications, jumper settings, and pinouts for all of thevarious expansion cards that compose a meridian PBX. whendiscussing system controllers it mostly focuses on the newerNTDK20 option 11c card but all of the information regardingexpansion cards is still completely relevant if you are runningan older processor.
the administration guide is the main command reference for themeridian system. this guide is critical to working with theswitch. the companion text to this is the equally criticalsystem messages guide. this is just a giant index of all thepossible cryptic alphanumeric error codes along withdescriptions of what the error actually is in plain english soyou can actually troubleshoot the problem. the maintenance guideis also very important to have it you are doing anything outsideof simple moves, adds, or changes on the switch. it is basically

8/3/2019 Nortel Option 11 Pbx at Home
http://slidepdf.com/reader/full/nortel-option-11-pbx-at-home 12/79
an addendum to the administration guide that describesmaintenance and diagnostic commands. you really need at leastthese four manuals to get anywhere with the meridian.
logging inread the documentation over a little bit before you log in tothe switch just to get a feel for the system. when it starts tomake sense, go back to your console and hit RETURN again. youshould see the system banner again. type the command LOGI andhit RETURN.
OVL111 000 IDLE
TTY 00 SCH MTC BUG 0:10LOGI
PASS?
to be safe, be sure to type it in all caps. older revisions ofthe software prior to release 22 will not respond to lower caseinput and instead throw an error message. the system will promptyou for a password, which motivates the following discussion ofthe authentication model at work on the meridian.
in the most simple case, the meridian switch has two levels ofprivilege. that is to say, you can consider the meridian ashaving two accounts. each account is distinguished by a
different password. the two accounts are similar in the sensethat they can both change almost all aspects of the switchconfiguration. the only difference is that one account can beused to set system passwords and view various tables pertainingto passwords and auth codes, while the other cannot. i may referto the lesser privileged level of access as PWD1, and the moreprivileged as PWD2.
you can use either password to log in to the switch. if you dosomething that requires the PWD2 level of access, you will beprompted for the PWD2 password, regardless of whether you used
PWD1 or PWD2 to log into the system initially. you really needto know PWD2 or else you will not be able to really take fullcontrol of the switch. ideally you got one or both of them fromthe vendor of your system controller card, but oftentimes we arenot so lucky.
for a little background on passwords, consider the meridiansystem security guide. it states that as of release 25,

8/3/2019 Nortel Option 11 Pbx at Home
http://slidepdf.com/reader/full/nortel-option-11-pbx-at-home 13/79
passwords on the meridian can be from 4 to 16 characters inlength. the password can include numeric as well as uppercaseand lowercase alphabetic characters. the switch also has theoption to enable the use of usernames for accounts, instead ofjust using a password for access. when this option is enabled,
the system automatically creates two users with names ADMIN1 andADMIN2 that take the PWD1 and PWD2 passwords, respectively.additional user accounts can be created with access to a limitedset of overlay programs (LAPW). the usernames themselves can beup to 11 mixed case alphanumeric characters. note that even onolder releases where command input must be furnished only inuppercase, the system is still sensitive to mixed case inusernames and passwords.
in addition to all this, the meridian can be configured to justflat out reject all login attempts after a certain number of
failed login attempts regardless of whether the password iscorrect or not until a certain amount of time passes. all ofthese security measures taken together mean that if you buy someused equipment and the previous admin was paranoid, bruteforcing the switch could potentially be somewhat tricky, evengiven some kind of automated solution such as an expect script.on the other hand, the default PWD2 is more common than youmight think, so it is not altogether hopeless.
the real problem here and the reason that i spend so much timehere discussing passwords and usernames is that there is not
really an easy way to just clear out the existing configurationon the switch like there is on say a cisco router, even givenphysical access to the switch and console. ultimately the moralof the story here is that unless you have a friend who is anortel certified tech, you either need to be able to guess thePWD2 password, buy system controllers on a trial and error basisuntil you find one with the default PWD2 of 0000, or have anexisting configuration database where the passwords are knownthat you can restore on a locked out controller. i have maybesix or eight controller cards across all option 11 types and atleast two of them were defaulted when i got them. so the odds
are not terrible. sometimes folks just left the default passwordset, or you find new old stock spares with defaults.
so let me repeat that a common default password to try on theswitch is 0000
when you have the password, type it at the PASS prompt and hitRETURN. upon a successful login you will get a message that you

8/3/2019 Nortel Option 11 Pbx at Home
http://slidepdf.com/reader/full/nortel-option-11-pbx-at-home 14/79
have LOGGED IN before landing at the overlay loader prompt.newer revisions of the system support the printing of anintimidating message after logging in which i think is fun toleave enabled.
TTY 00 SCH MTC BUG 1:17logiPASS?
WARNING: THE PROGRAMS AND DATA STORED ON THIS SYSTEM ARE LICENSED TOOR ARE THE PROPERTY OF NT/BNR AND ARE LAWFULLY AVAILABLE ONLY TOAUTHORIZED USERS FOR APPROVED PURPOSES. UNAUTHORIZED ACCESS TO ANYPROGRAM OR DATA ON SYSTEM IS NOT PERMITTED. THIS SYSTEM MAY BEMONITORED AT ANY TIME FOR OPERATIONAL REASONS. THEREFORE, IF YOUARE NOT AN AUTHORIZED USER, DO NOT ATTEMPT TO LOGIN.
.TTY #00 LOGGED IN 01:18 31/5/2009
>
using the overlay loader
now that you have successfully logged in to the switch, i shouldprobably tell you how to get around a little bit. basically,when you first log in, you end up landing in something calledthe overlay loader. think of the overlay loader as a shell thatonly has one command, which allows you to load an overlay. anoverlay is basically a program that allows you to administer one
aspect of the system. there are a number of different overlays,each of which handles a particular configuration or diagnostictask. you might also hear the overlays referred to as loads.each load is identified by an integer, X, and the command toinvoke the load would be LD X. for example, we invoke a printroutine, load 22, below.
>LD 22PT2000
REQ
the loads are named as such because historically, when youaccessed one from the overlay loader, it would literally loadthe program from the floppy or tape drive on the switch and itwas very, very slow. these days it all comes out of flash or ROMso we dont have to wait around much. but its funny to read olddocumentation which implies that a load could take thirtyseconds or a minute to actually come up after being invoked.

8/3/2019 Nortel Option 11 Pbx at Home
http://slidepdf.com/reader/full/nortel-option-11-pbx-at-home 15/79
when you invoke a load, it usually prints some sort of bannerand prompts you for your REQuest. the responses available to youare given in the system administration guide for each particularload. in general, some common responses are NEW, CHG, OUT, andPRT. sometimes a lot of functionality is crammed into one load
that will allow you to define NEW configuration, CHanGe anexisting configuration, take something OUT of currentconfiguration, or PRinT the current configuration. other times,a load is very simple and will only PRinT configuration, like LD22.
while navigating loads, you will always want to remember thatentering four asterisks **** in response to any prompt will takeyou back to the overlay loader and cancel the current change inprogress. also remember that if you make a mistake in responseto a prompt, you can type a single asterisk * and hit RETURN.
you will then be prompted to enter the value again.
the general procedure here is that you log in, enter an overlayfrom the overlay loader, do something, return to the overlayloader, enter another overlay, and so on, until you are alldone, at which point you will want to save your changes then logout.
cards and units
another thing that is critical to be familiar with when workingwith the meridian is how the system addresses option cards.basically, everything in the system has an address, which iscalled a TN, or terminal number. when configuring the switch,you will often be prompted for a TN. the documentation fromnortel is a little sparse on what a TN actually is so i willtell you quite explicitly. if you look in the administrationguide, it will tell you something about the valid response to aTN prompt being of the format L S C U, or loop, slot, card,unit.
really you should ignore this. you only specify TNs in thisformat on the larger meridian systems. usually right under thisstuff about L S C U in the documentation, you will see a notethat for small systems, the format is C U or card, unit. bysmall systems, they mean the option 11 line. this is fortunatebecause it makes life a lot easier for us. you determine the TNthus by noting the slot number in which the card is inserted,which will be the card number, as well as the unit number. the

8/3/2019 Nortel Option 11 Pbx at Home
http://slidepdf.com/reader/full/nortel-option-11-pbx-at-home 16/79
unit number starts at zero and what it represents varies fromcard to card. a unit is most typically a line. for a stationcard or trunk card, the first line is unit 0, the second line isunit 1, and so forth. a unit might be a serial port or a tonegenerator. some cards might only have a single unit. if you are
unsure of the card number, refer to the bus probe messagesgenerated by the system at boot time, or look at the legendunder the card cage.
logging out
in the most simple single user sense, the overlay loader has notjust one but really two commands, one to load overlays and theother to log you out. when you are finished with yourconfiguration changes, use the LOGO command at the overlayloader prompt to end your session.
OVL000>LOGO>OVL111 044 BKGD
TTY 00 SCH MTC BUG 1:26
reclaiming gray market option 11c processors
as i mention earlier on this page, it is not entirely clear howone might just flat out reset or recover the PWD1 and PWD2passwords on a processor card without already knowing them, andthere is no way to just clear out the configuration and returnthe system back to a factory default state without a softwareinstallation card and a bunch of keycodes. however, so long asyou or a friend has access to a meridian where the PWD1 and PWD2passwords are known, you can make a copy of that configurationdatabase to a host computer and then load it on to any arbitrarysystem controller you may later acquire. thus, there is no needto recover or reset to default any existing passwords, when youcan just replace them with your own. no password controlledaccess of any sort is required to the recipient processor cardin order to perform this procedure so long as you can get to thesystem console TTY 0.
basically, all you need is a recipient option 11c systemcontroller card and a donor CCBR file from a meridian that you

8/3/2019 Nortel Option 11 Pbx at Home
http://slidepdf.com/reader/full/nortel-option-11-pbx-at-home 17/79
already have PWD2 access on, obtained with the XBK command fromLD 43 or LD 143 on the donor PBX. the recipient systemcontroller card must have a security dongle installed and afully functional software load, with the only issue being thatyou do not have the passwords to log in. this is usually the
case for most system controllers that you will find and it ismostly just a case of being careful to avoid the odd one wherethe security dongle is missing or the software daughterboard hasbeen wiped.
we are taking advantage of the fact that there is an excellentpre boot utility menu available on the option 11c processor thatallows the restoration of any configuration database to thecontroller without needing to log in to the controller firstwith any existing passwords that it may have. we are alsogreatly facilitated by the fact that the CCBR database backup
files are not specific to the system on which they wereinitially generated, and the ISM software licensing parametersfollow the software daughterboard, not the configurationdatabase, so there are no worries about database compatibility,or not being able to take advantage of the full feature setsavailable on the various processor cards which you may acquire.
step 1: get a donor CCBR database backup file from a meridiansystem where you already have full PWD2 access. if you arepreparing this yourself rather than getting it from a friend,basically what you do is just go to either LD 43 or LD 143
depending on release on the donor PBX and use the XBK command toback up your database to a host computer using xmodem. afterinvoking the XBK command, you will be prompted to enter adescription for the backup. when done entering the description,hit RETURN twice. you should then receive a prompt R> at whichpoint you will want to set up your host computer to receive datavia xmodem crc protocol. hyperterminal will work fine for this.you should end up with a CCBR file on your computer when thetransfer is complete.
step 2: install your recipient option 11c system controler card
and power it up. hit ctrl-I when prompted to enter the installand upgrade menu, even though we arent really going to installor upgrade the system software. when you get to the menu, select3 to go to Utilities. at the next menu, select 1 to go toRestore Backed Up Database. finally, select 4 to select Option11/11e CCBR file. just say "y" when reminded that you willactually need to have a CCBR file on hand to proceed. at thispoint, the system should say Ready to receive... at which point

8/3/2019 Nortel Option 11 Pbx at Home
http://slidepdf.com/reader/full/nortel-option-11-pbx-at-home 18/79
you will want to initiate the xmodem transfer of the backupdatabase file from the host computer. again, hyperterminal seemsto work fine for this.
step 3: when the transfer is complete, you will see some
transfer statistics and hopefully a message similar to thefollowing
REMOTE BACKUP file found..
Files successfully transferred into source directory.Database restore and upgrade complete
when you return to the menu, type "q" to exit and say "y" whenprompted. the system will the continue the boot procedure. whatwe have basically just done here is to copy our existing
configuration database with known passwords to the recipientsystem controller card, overwriting any previous configurationdatabase and of course passwords that it may have initially had.
step 4: the first time that the system boots after restoring theCCBR backup file, you may see a DATA CONVERSION occur if thedonor and recipient versions differ. this is a normal anddesired thing to have happen. when the system finishes booting,you should be able to log in with the passwords that you hadused in the configuration stored in the CCBR backup file.
step 5: after logging in successfully, you should pop in to LD43 and do an EDD. this will ensure our new configuration getssaved to the flash on the system controller. when you attempt toperform an EDD, you may end up with failures such as EDD016 NOGO BAD DATA. if this occurs, you can try to use the EDD CLRcommand instead of EDD; this will override the write inhibitflag on the configuration database and force an EDD. if thisoccurs, there is no need for despair as it rarely tanks thewhole thing. rather, you may just see sporadic data corruptionin various aspects of your configuration. you just need to lookaround and test everything out after bringing the switch up withthe newly restored configuration. when you find something that
doesnt work, just OUT and recreate it and it will work fineagain. this corruption seems to occur mostly when you make majorversion jumps e.g. release 21 to release 24. if you try to keepthe major version close between both the donor and recipient e.grelease 21 to release 22 this is very unlikely to occur.
thats all there is to unlocking basically any locked out option

8/3/2019 Nortel Option 11 Pbx at Home
http://slidepdf.com/reader/full/nortel-option-11-pbx-at-home 19/79
11c system controller so long as the existing configurationdatabase doesnt matter and you have a donor database available.please do note however that this procedure is only applicable tooption 11c processors as the recipient since they are unique inoffering the ctrl-I preboot utility menu.
pdt
you may occasionally see mention in internet forums or mailinglists of a sort of debugger or rom monitor called PDT. you canaccess this by hitting ctrl-PDT on an option 11c processor atpretty much any time while it is running. you dont have to doanything special with the front panel dip switches. just hit thecontrol key sequence. upon successful use of the key sequence,you will be prompted to log in to PDT. as with the regular
administrative layer of the PBX, there is both a level 1 and alevel 2 password to access PDT. the default level 1 PDT passwordseems to be "thorsgr8". you can look around in there; it isbasically a vxworks shell. i think it might be possible to usePDT to fish out the passwords from an existing configurationdatabase, or to reset the passwords when they are not known buti do not know how this is done and whether or not it requireslevel 2 PDT access. as far as i can tell, PDT is not availableon the option 11 or option 11e processor modules since they seemto run the meridian operating system on a standalone basis,rather than as a task under vxworks.
hidden debug menu on option 11c system controllers
it is possible to access an undocumented debug mode on theoption 11c system controller. looking at the front panel of theprocessor, set the 150 baud dip switch to on, in addition to thedip switch that you have already set for the baud rate of theconsole. two dip switches will be set in total. then power onthe system. when prompted to hit ctrl-I to enter the prebootutility menu, instead hit ctrl-B. this will take you to ahardware debug menu. you can read and write random values tomemory here, and run a fairly comprehensive self test on thesystem controller itself. it is also possible to use this debugmode to erase the software daughterboard, although i would notrecommend doing this unless you have a software PCMCIA card andkeycodes available for the reinstallation.
8/3/2019 Nortel Option 11 Pbx at Home
http://slidepdf.com/reader/full/nortel-option-11-pbx-at-home 20/79
clearing out old switch configuration
when we acquire a new meridian option 11 switch, we willgenerally have to initialize the system so as to get rid of the
old configuration and replace it with our own. unfortunately, asi mention earlier, there is no way to just clear out theconfiguration in one fell swoop like there is on something likea cisco router. if you dont already have your own configurationdatabase handy and ready to load, basically what you will needto do is go manually into each load and clean things out usingREQ OUT. once you have cleaned out the old switch configuration,you can start to add your own. to do this, i basically work fromLD 10 down and and OUT everything that i can. you will want tobe sure to check out at least the following loads.
ld 10 and ld 11 - ananlog and digital phone sets
ld 12 - operator console phone sets ld 14 - trunks ld 16 - routes ld 17 - ttys, d channels,common equipment ld 23 - automatic call distribution ld 49 - nfcr and fcr ld 50 - call park ld 57 - ffc ld 60 - digital trunk interfaces ld 73 - digital data block ld 86, ld 87, and ld 90 - automatic routing ld 88 - auth codes ld 96 - pri d channels
ideally we want to OUT everything such that we can delete CDB 0which is the default CDB, along with any other CDB records thatmay exist on the system. then we just recreate CDB 0 as defaultwhich is as close to a fresh configuration as we will ever get.start adding your own configuration from there.
LD
150000000000000000000000000000000000000000000000000000000000000000000000000000000000000000000000000000000000000000000000000000000000000000000000000000000000000000000000000000000000000000000000000000000000000000000000000000000000000000000000000000000000000000000000000000000000000000000000000000000000000000000000000000000000000000000000000000000000000000000000000000000000000000000000000000000000000000000000000000000000000000000000000000000000000000000000000000000000000000000000000000000000000000000000000000000000000000000000000000000000000000000000000000000000000000000000000000000000000000000000000000000000000000000000000000000000000000000000000000000000000000000000000000000000000000000

8/3/2019 Nortel Option 11 Pbx at Home
http://slidepdf.com/reader/full/nortel-option-11-pbx-at-home 21/79
000000000000000000000000000000000000000000000000000000000000000000000000000000000000000000000000000000000000000000000000000000000000000000000000000000000000000000000000000000000000000000000000000000000000000000000000000000000000000000000000000000000000000000000000000000000000000000000000000000000000000000000000000000000000000000000000000000000000000000000000000000000000000000000000000000000000000000000000000000000000000000000000000000000000000000000000000000
000000000000000000000000000000000000000000000000000000000000000000000000000000000000000000000REQ OUTTYPE CDBCUST 0
LD 15REQ NEWTYPE DEFAULTCUST 0ANI_DATAANAT 0000ANLD 000
i am not sure exactly ANAT and ANLD do but you seem to be forcedto specify one. it set it as above and i have never had anyproblems with anything.
every time you attempt to out CDB 0, it will either just do it,or give you an error which basically tells you what you stillneed to clear out in order to delete CDB 0. just keep clearingstuff out and trying to OUT CDB 0 until successful. the errormessages reference guide is a must for this task.
do note that there is a particular workflow to the process ofremoving the configuration for digital trunks.
1. disable clock controller (LD 60) 2. out the trunk data blocks for the card (LD 14) 3. out the route data block for the card (LD 16) 4. shut down the dchi submodule on the card (LD 96) 5. shut down the dti/pri cards themselves (LD 60) 6. out the ADAN for the d-channel (LD 17) 7. out the clock controller (LD 73) 8. remove digital loops (LD 17)
9. remove the digital data block (LD 73)
clearing out SPWD - the secure data password
when you try to OUT the ESN or auth code data, you may be

8/3/2019 Nortel Option 11 Pbx at Home
http://slidepdf.com/reader/full/nortel-option-11-pbx-at-home 22/79
prompted for SPWD - the secure data password. we can reset theSPWD to something that we know as long as we know the PWD2password. in this example we will reset the SPWD to 0000.
LD 15
REQ CHGTYPE PWD_DATACUST 0SPWD 0000PWD2 (whatever it is)ATAC 0000PWD2 (again)
saving the switch configuration
we will usually want to explicitly save our configuration aftermaking changes. the meridian does by default run a configurationdump as a part of the periodic background routine, but i alwayslike to save my configuration explicitly as well. just use theEDD command from within LD 43.
>LD 43EDD000.EDD
EDD TO SYST. CORE%%%%%%%%%%%%%%%%%%
DIRECTORY
CONFIGPATCH 01PHYSICAL MAPBCS TEMPLATEPBX TEMPLATECUSTACUSTROUTELTN TNLTN LNKTNSCLDIGITALDTI
ASNCHTRSHBG-TIMEBG-CATPRIARIESSYSPXPECXTDT

8/3/2019 Nortel Option 11 Pbx at Home
http://slidepdf.com/reader/full/nortel-option-11-pbx-at-home 23/79
FTCMCADFCADFDCTLAPWSEER
TIMECHECKING
RECORD COUNT = 0023
EDD TO CARTR.%%%%%%%%
DATABASE BACKUP COMPLETE
.EDD000.**
.EDD000
.**>
be sure that power to the switch is not disturbed while theconfiguration is being saved. also note that you can back upyour configuration to a computer using the XBK command fromwithin either LD 43 on older option 11 and option 11econtrollers, or LD 143 on the newer option 11c controllers. theXBK command copies the configuration database on the switch tothe host computer using the xmodem crc protocol.
set the date and time
the system time is set with the STAD command in LD 2. the formatis DD MM YYYY HH MM SS.
>LD 2TFC000.STAD 19 10 2008 23 54 00.****.>
configure a T100 test line
the meridian supports a combination milliwatt and silenttermination test line. it is not enabled by default and must beconfigured in the customer data block LD 15. the example below

8/3/2019 Nortel Option 11 Pbx at Home
http://slidepdf.com/reader/full/nortel-option-11-pbx-at-home 24/79
shows a T100 line configured at DN 5000. note that this cannotbe dialled locally from a phone on the meridian; it will justget reorder. the call has to come in on a trunk in order for itto go through.
>LD 15CDB000UDATA: 156335 0 PDATA: 229373 2DISK RECS AVAIL: 512
REQ: CHGTYPE: TST_DATACUST 0T100 5000REF0TST0REF1TST1
REF2TST2REF3TST3
UDATA: 156335 0 PDATA: 229347 2DISK RECS AVAIL: 512
REQ: ****
>
print currently configured analog sets
to generate this report, go to LD 20 and issue a PRT request,with TYPE specified as 500. the example below shows a switchwith four analog sets configured on DNs 8000 to 8003.
>LD 20
PT0000REQ: PRTTYPE: 500TNCDEN
CUSTTENDATEPAGEDES
DES MACHRMTN 006 0 00 00TYPE 500

8/3/2019 Nortel Option 11 Pbx at Home
http://slidepdf.com/reader/full/nortel-option-11-pbx-at-home 25/79
CDEN 4DCUST 0WRLS NODN 8000 MARPAST NOIAPG 0
HUNTTGAR 0LDN NONCOS 0SGRP 0RNPG 0XLSTSCI 0CLS UNR DTN FBD XFD WTA THFD FND HTD ONS
LPR XRD CWD SWD MWD LPD XHD CCSD LND TVDCFTD SFD MRD C6D PDN CNID CLBD AUTUICDD CDMD LLCN EHTD MCTDGPUD DPUD CFXD ARHD OVDD AGTD CLTD LDTD ASCD
MBXD CPFA CPTA DDGA NAMAMCRD SHL ABDD CFHDCWND USMD USRD BNRD
PLEV 02MLWU_LANG 0DATE 1 APR 1993
DES LVNGRMTN 006 0 00 01TYPE 500CDEN 4DCUST 0WRLS NODN 8001 MARP
AST NOIAPG 0HUNTTGAR 0LDN NONCOS 0SGRP 0RNPG 0XLSTSCI 0CLS UNR DTN FBD XFD WTA THFD FND HTD ONS
LPR XRD CWD SWD MWD LPD XHD CCSD LND TVDCFTD SFD MRD C6D PDN CNID CLBD AUTU
ICDD CDMD LLCN EHTD MCTDGPUD DPUD CFXD ARHD OVDD AGTD CLTD LDTD ASCDMBXD CPFA CPTA DDGA NAMAMCRD SHL ABDD CFHDCWND USMD USRD BNRD
PLEV 02MLWU_LANG 0DATE 1 APR 1993

8/3/2019 Nortel Option 11 Pbx at Home
http://slidepdf.com/reader/full/nortel-option-11-pbx-at-home 26/79
DES ANLG02TN 006 0 00 02TYPE 500CDEN 4DCUST 0WRLS NO
DN 8002 MARPAST NOIAPG 0HUNTTGAR 0LDN NONCOS 0SGRP 0RNPG 0XLSTSCI 0CLS UNR DTN FBD XFD WTA THFD FND HTD ONS
LPR XRD CWD SWD MWD LPD XHD CCSD LND TVD
CFTD SFD MRD C6D PDN CNID CLBD AUTUICDD CDMD LLCN EHTD MCTDGPUD DPUD CFXD ARHD OVDD AGTD CLTD LDTD ASCDMBXD CPFA CPTA DDGA NAMAMCRD SHL ABDD CFHDCWND USMD USRD BNRD
PLEV 02MLWU_LANG 0DATE 1 APR 1993
DES ANLG03TN 006 0 00 03TYPE 500CDEN 4D
CUST 0WRLS NODN 8003 MARPAST NOIAPG 0HUNTTGAR 0LDN NONCOS 0SGRP 0RNPG 0XLSTSCI 0
CLS UNR DTN FBD XFD WTA THFD FND HTD ONSLPR XRD CWD SWD MWD LPD XHD CCSD LND TVDCFTD SFD MRD C6D PDN CNID CLBD AUTUICDD CDMD LLCN EHTD MCTDGPUD DPUD CFXD ARHD OVDD AGTD CLTD LDTD ASCDMBXD CPFA CPTA DDGA NAMAMCRD SHL ABDD CFHDCWND USMD USRD BNRD
PLEV 02
8/3/2019 Nortel Option 11 Pbx at Home
http://slidepdf.com/reader/full/nortel-option-11-pbx-at-home 27/79
MLWU_LANG 0DATE 1 APR 1993
NACTREQ: ****
>OVL000>
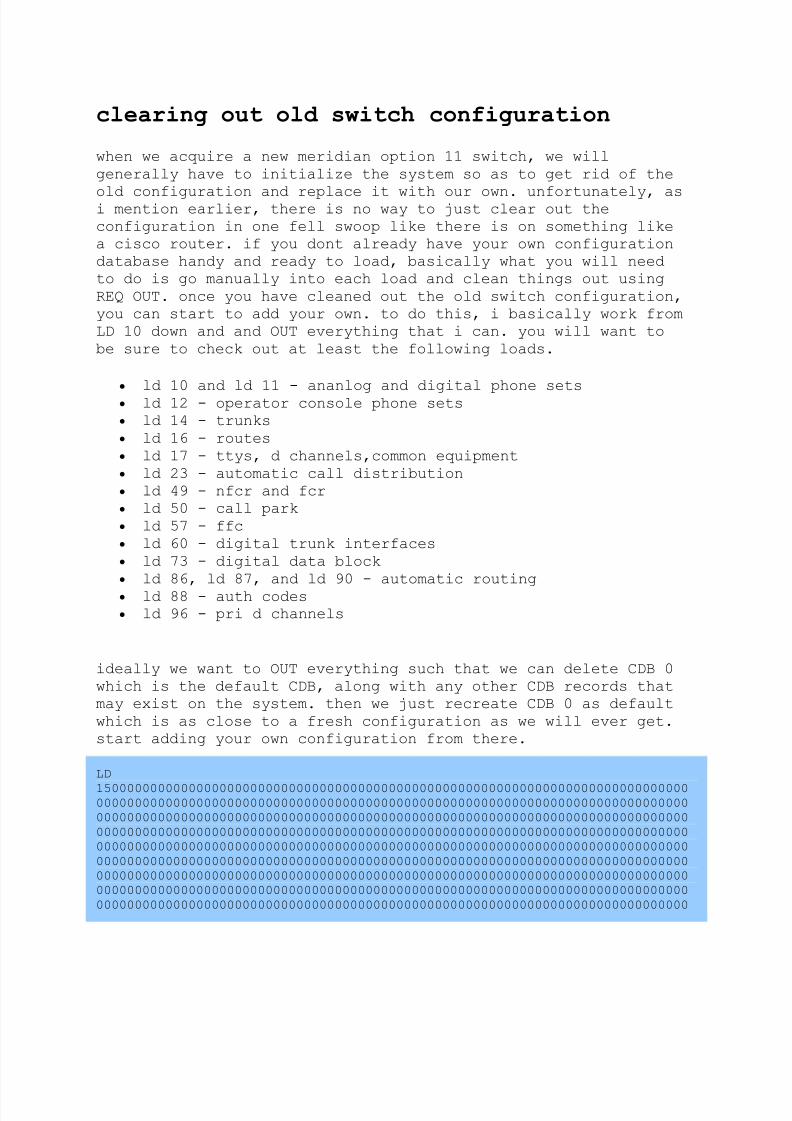
print currently configured model 2008digital sets
to generate this report, return to LD 20 and issue a PRTrequest, but this time the TYPE will be 2008. the example belowshows a switch with four digital sets configured on DNs 7000 to
7003. note how a phone number is assigned to a key on a digitalset. since the digital sets have many keys, we cannot justassign a single phone number to a set itself. instead, we canassign a phone number to each key on the digital set. also notethat there are many different types of digital set; you only getthe specific TYPE that you specify.
>LD 20
PT0000REQ: PRTTYPE: 2008TNCUSTTENDATEPAGEDES
DES LVNGRMTN 005 0 00 00TYPE 2008CDEN 8DCUST 0FDNTGAR 0
LDN NONCOS 0SGRP 0RNPG 0SCI 0SSULNRS 16XLSTCLS UNR FBD WTA LPR MTD FND HTD ADD

8/3/2019 Nortel Option 11 Pbx at Home
http://slidepdf.com/reader/full/nortel-option-11-pbx-at-home 28/79
MWD AAD IMD XHD IRD NID OLD VCE DRG3POD DSX VMD CMSD CCSD SWD LNA CNDDCFTD SFD MRD PDN DDV CNIDICDD CDMD LLCN MCTD CLBD AUTUGPUD DPUD DNDD CFXD ARHD CLTD ASCDCPFA CPTA ABDD CFHD FICD NAID
DDGA NAMAUSMD USRD ULAD
CPND_LANG ENGHUNTPLEV 02ASTIAPG 0ITNA NODGRPMLWU_LANG 0DNDR 0KEY 00 SCR 7000 MARP
01 AO6
02 LNK 1603 MSB04 PRK05 TRN0607
DATE 4 APR 1993
DES DGTL01TN 005 0 00 01TYPE 2008CDEN 8DCUST 0FDN
TGAR 0LDN NONCOS 0SGRP 0RNPG 0SCI 0SSUXLSTCLS UNR FBD WTA LPR MTD FND HTD ADD
MWD AAD IMD XHD IRD NID OLD VCE DRG1POD DSX VMD CMSD CCSD SWD LND CNDDCFTD SFD MRD PDN DDV CNIDICDD CDMD LLCN MCTD CLBD AUTU
GPUD DPUD DNDD CFXD ARHD CLTD ASCDCPFA CPTA ABDD CFHD FICD NAIDDDGA NAMAUSMD USRD ULAD
CPND_LANG ENGHUNTPLEV 02ASTIAPG 0

8/3/2019 Nortel Option 11 Pbx at Home
http://slidepdf.com/reader/full/nortel-option-11-pbx-at-home 29/79
ITNA NODGRPMLWU_LANG 0DNDR 0KEY 00 SCR 7001 MARP
01
020304050607
DATE 1 APR 1993
DES DGTL02TN 005 0 00 02TYPE 2008CDEN 8DCUST 0
FDNTGAR 0LDN NONCOS 0SGRP 0RNPG 0SCI 0SSUXLSTCLS UNR FBD WTA LPR MTD FND HTD ADD
MWD AAD IMD XHD IRD NID OLD VCE DRG1POD DSX VMD CMSD CCSD SWD LND CNDDCFTD SFD MRD PDN DDV CNIDICDD CDMD LLCN MCTD CLBD AUTU
GPUD DPUD DNDD CFXD ARHD CLTD ASCDCPFA CPTA ABDD CFHD FICD NAIDDDGA NAMAUSMD USRD ULAD
CPND_LANG ENGHUNTPLEV 02ASTIAPG 0ITNA NODGRPMLWU_LANG 0DNDR 0
KEY 00 SCR 7002 MARP01020304050607
DATE 1 APR 1993

8/3/2019 Nortel Option 11 Pbx at Home
http://slidepdf.com/reader/full/nortel-option-11-pbx-at-home 30/79
DES DGTL03TN 005 0 00 03TYPE 2008CDEN 8DCUST 0
FDNTGAR 0LDN NONCOS 0SGRP 0RNPG 0SCI 0SSUXLSTCLS UNR FBD WTA LPR MTD FND HTD ADD
MWD AAD IMD XHD IRD NID OLD VCE DRG1POD DSX VMD CMSD CCSD SWD LND CNDDCFTD SFD MRD PDN DDV CNID
ICDD CDMD LLCN MCTD CLBD AUTUGPUD DPUD DNDD CFXD ARHD CLTD ASCDCPFA CPTA ABDD CFHD FICD NAIDDDGA NAMAUSMD USRD ULAD
CPND_LANG ENGHUNTPLEV 02ASTIAPG 0ITNA NODGRPMLWU_LANG 0DNDR 0
KEY 00 SCR 7003 MARP01020304050607
DATE 1 APR 1993
NACTREQ: ****
>
add interesting features to digital sets
if you want to enable the call park feature on a digital set,first go to LD 15 and ensure that call park is allowed in thecustomer record, then go to LD 11 and add it to a key on each

8/3/2019 Nortel Option 11 Pbx at Home
http://slidepdf.com/reader/full/nortel-option-11-pbx-at-home 31/79
digital set where the feature is desired.
LD 15REQ: CHGTYPE: FTR_DATA
CUST 0OPT CPA
LD 11REQ: CHGTYPE: 2008TN 5 0ECHG YESITEM KEY 04 PRK
if you want to enable the last number redial feature on adigital set, again first go to LD 15 and ensure that last numberredial is allowed in the customer record, then go to LD 11 and
add it to a key on each digital set where the feature isdesired.
LD 15REQ: CHGTYPE: FTR_DATACUST 0OPT LRA
LD 11REQ: CHGTYPE: 2008TN 5 0
ECHG YESITEM CLS LNAITEM KEY 02 LNK
to enable call transfer, just assign it to a key on each setwhere the feature is desired in LD 11. there is nothing toconfigure in the customer record for this one.
LD 11REQ: CHGTYPE: 2008TN 5 0
ECHG YESITEM KEY 05 TRN
print most configured terminal numbers
this is a very helpful report that you can run from LD 20 byissuing a PRT request for TYPE TNB. this prints most configured

8/3/2019 Nortel Option 11 Pbx at Home
http://slidepdf.com/reader/full/nortel-option-11-pbx-at-home 32/79
terminal numbers on the system including digitone receivers,analog sets, digital sets, and trunks. this is most useful whenin the process of cleaning up an old configuration as it willtell you a majority of the stuff that you will need to remove.it is also a nice report to run because you can use it to get a
list of digital sets of all TYPEs concurrently. i dont furnishan example printout below because it is just too long.
>LD 20
PT0000REQ: PRTTYPE: TNB
print configuration record
you can print out the configuration record for the system commoncontrol by issuing a PRT request for TYPE CFN in LD 22. thisreport includes ADAN parameters for serial devices, CEQUparameters for low level tuning of system settings, and OVLYscripts that run on startup or on a periodic basis.configuration of digital trunks and conference loops alsoresides in the common equipment settings. note that you canprint several parts of this report such as ADAN or CEQUseperately but i just decided to lump them all together here forconvenience.
>LD 22PT2000
REQ PRTTYPE CFN
ADAN HISTSIZE 5000USER MTC BUG
ADAN TTY 0CARD 00PORT 0DES CONSOLEUSER MTC SCH BUG
XSM NOADAN TTY 1
CARD 00PORT 1DES LOGBPS 9600BITL 8STOP 1PARY NONE

8/3/2019 Nortel Option 11 Pbx at Home
http://slidepdf.com/reader/full/nortel-option-11-pbx-at-home 33/79
FLOW NOUSER SCH CTYXSM NO
ADAN TTY 2CARD 00PORT 2
DES AUXBPS 9600BITL 8STOP 1PARY NONEFLOW NOUSER MTC SCH BUGXSM NO
ADAN TTY 3CARD 10PORT 0DES AUX2BPS 9600
BITL 8STOP 1PARY NONEFLOW NOUSER MTC SCH BUGXSM NO
ADAN TTY 4CARD 10PORT 2DES AUX3BPS 9600BITL 8STOP 1PARY NONE
FLOW NOUSER MTC SCH BUGXSM NO
ADAN DCH 10CTYP MSDLCARD 04PORT 1DES MC3810DCHUSR PRIDCHL 4
PAGE 001
OTBF 32PARM RS422 DTEDRAT 64KCCLOK EXTNASA NOIFC NI2CO_TYPE STD

8/3/2019 Nortel Option 11 Pbx at Home
http://slidepdf.com/reader/full/nortel-option-11-pbx-at-home 34/79
SIDE USRCNEG 1RLS ID **RCAPMBGA NOT310 10
T200 3T203 10N200 3N201 260K 7
PARMLPIB 500HPIB 100500B 100NCR 386MGCR NULLNCPU 1CFWS NO
PCML MUALRM YESERRM ERR BUG AUDDTRB 100TMRK 128FCDR OLDPCDR NOTPO YESTSO YESCLID YESDUR5 NOMLDN YESMARP YESFRPT NEFR
DCUS 1MSCL 75PMSIMANU PMS1PMCR 30PORT NONE
NDIS 20OCAC YESMTRO MRSBA_ADM_INS 001SBA_USER 010
CEQUMPED 8D
SUPL 000 004 008 012016 032 036 040048 P080
XCT 000CONF 029 030 031
DLOP NUM DCH FRM LCMT YALM TRSHPRI 002 24 ESF B8S FDL 00

8/3/2019 Nortel Option 11 Pbx at Home
http://slidepdf.com/reader/full/nortel-option-11-pbx-at-home 35/79
PAGE 002
004 23 ESF B8S FDL 00MISP
MTYP 512KOVLY
SID 0BKGD 044PBXH 01TODR 01DROL 035 060
ATRNCODE 0SOLR 12ROLR +45.00TOLR -45.00AGCD NO
VOLR NOHRLR +42.00HTLR -44.00
ALARMFMT_OUTPUT : OFFAF_STATUS : OFF
FILTER ENTRIES SUMMARYTRIGGER SEVERITY SUPPRESS ESCALATE
NO ENTRIES.
EXCEPTION ENTRIES SUMMARY
TRIGGER
NO ENTRIES.
REQ ****>
print software version
you can print the version and release of the switch softwareload by performing an ISS request within LD 22. the incrementalsoftware management tends to get a lot more granular as theversion number increases.
>LD 22PT2000
REQ ISS
8/3/2019 Nortel Option 11 Pbx at Home
http://slidepdf.com/reader/full/nortel-option-11-pbx-at-home 36/79
VERSION 1411RELEASE 21ISSUE 35 +
REQ
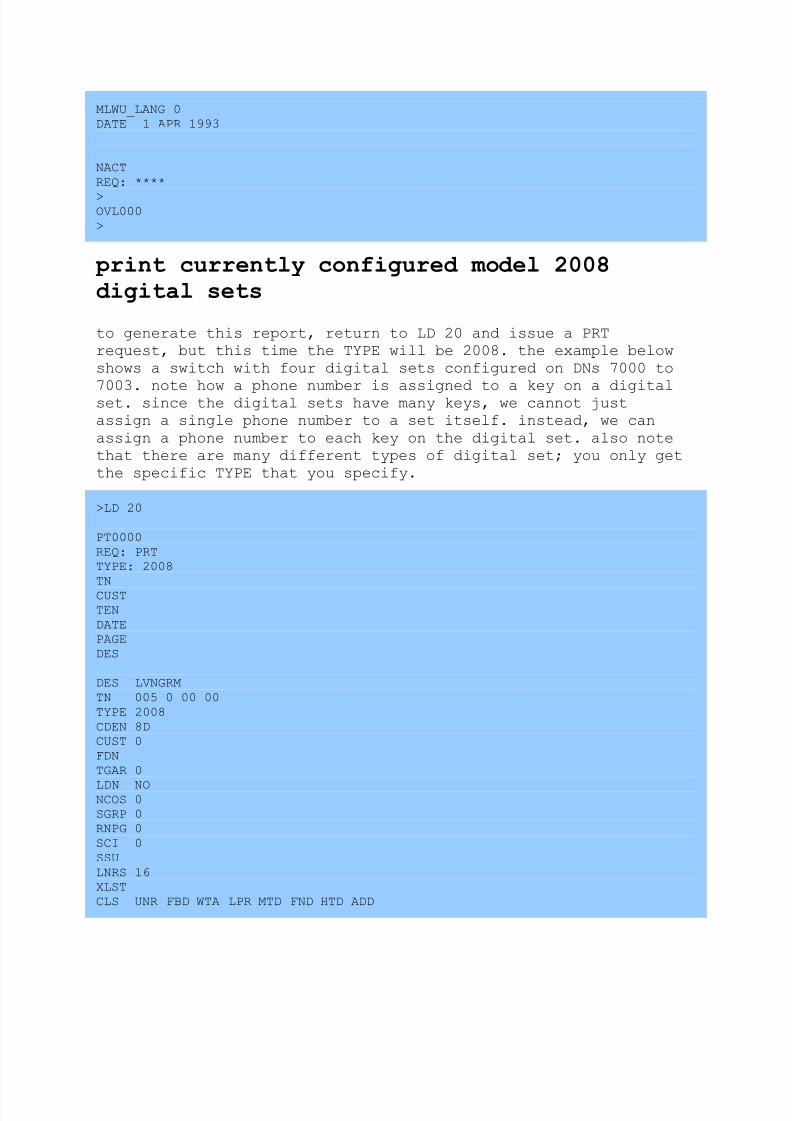
print authentication database
you can print the authentication database of the switch byissuing a PRT request for type PWD from within LD 22. this willtell you what the PWD1 and PWD2 passworsd are. of course, thereis a catch: you must know the PWD2 password before the load willrun. for the purposes of this example, you can see that bothpasswords are set to 1234. we can also see where the failedlogin lockout threshold is set. in this case, the failed login
threshold is three failed attempts, after which the TTY will belocked out for an interval of 30 minutes.
>LD 22PT2000
REQ PRTTYPE PWDPWD2
PWDFLTH 3LOCK 30
AUDT NOINIT NOPWD1 1234PWD2 1234
REQ ****>
configuring call detail recording
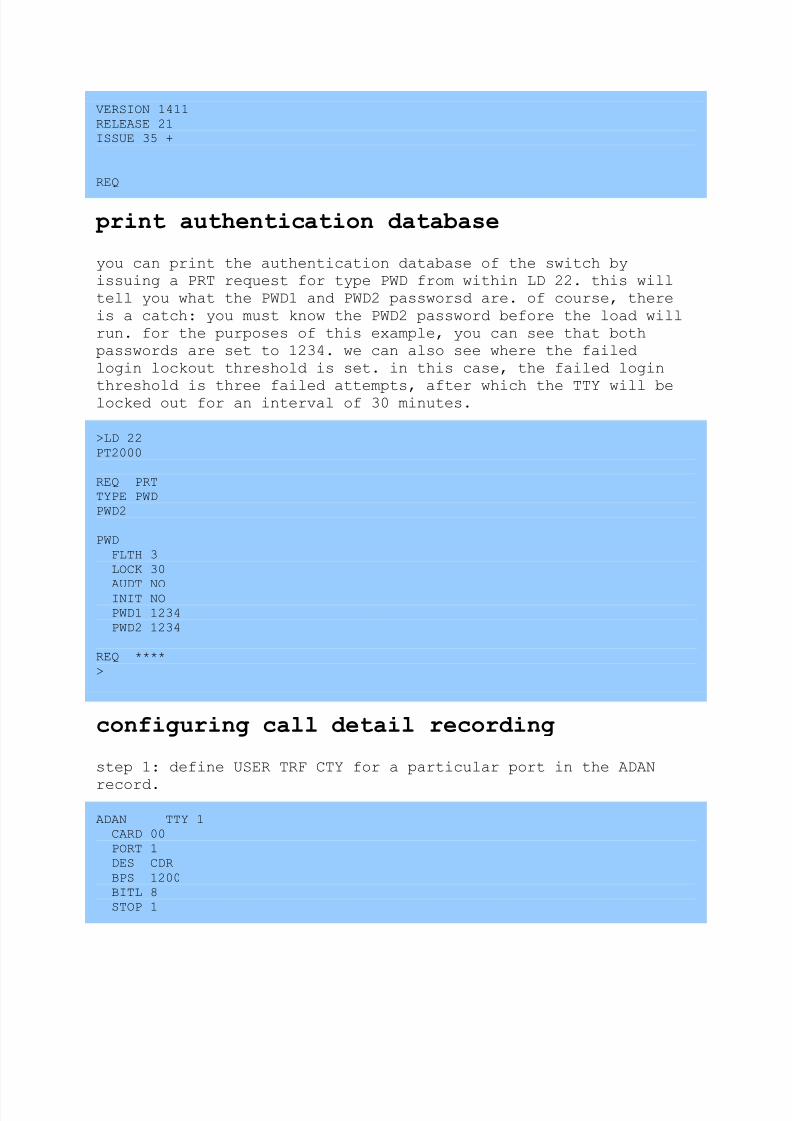
step 1: define USER TRF CTY for a particular port in the ADAN
record.
ADAN TTY 1CARD 00PORT 1DES CDRBPS 1200BITL 8STOP 1

8/3/2019 Nortel Option 11 Pbx at Home
http://slidepdf.com/reader/full/nortel-option-11-pbx-at-home 37/79
PARY NONEFLOW NOUSER TRF CTYXSM NO
step 2: specify CDR YES for each route for which we want calldetail recording.
>LD 16RDB000UDATA: 29817 3 PDATA: 099817 11DISK RECS AVAIL: 512
REQ CHGTYPEDTC105 RDBCUST 0DMOD
ROUT 20TKTPM911_ANISATRCLSDTRK YESDGTP DTIDSELPTYPAUTODNISIANIICOGRANX
SRCHTRMBSTEPACODCPPTARGBILNSGRPOABSINSTCNTLDRNGCDR YES
INC YESLAST YESQREC YESOAL YESAIA YESOAN NOOPD YESSCH2017NATL

8/3/2019 Nortel Option 11 Pbx at Home
http://slidepdf.com/reader/full/nortel-option-11-pbx-at-home 38/79
MUSMREQAROHQOHQTTTBL
OHTDPLEVMCTSALRM
UDATA: 29817 3 PDATA: 099817 11DISK RECS AVAIL: 512
REQ ****
>
step 3: define cdr data block in the customer record
>LD 15CDB000UDATA: 29817 3 PDATA: 099817 11DISK RECS AVAIL: 512
REQ: CHGTYPE: CDR
TYPE CDR_DATACUST 0CDR YES
AXID NO
TRCR NOCDPR NOECDR NOPORT 1 ( this corresponds to tty numbers where USER TRF CTY is
set )PORT
CHLN 0FCAF NO
UDATA: 29817 3 PDATA: 099817 11DISK RECS AVAIL: 512
REQ: ****
>
configuring the option 11c ethernetinterface
step 1: go to LD 117 and add a host entry for the meridian

8/3/2019 Nortel Option 11 Pbx at Home
http://slidepdf.com/reader/full/nortel-option-11-pbx-at-home 39/79
itself using the NEW HOST command.
>ld 117OAM000
=> prt hostsSCH0099 HOSTS?
=> prt hostID Hostname IP Address1 SECONDARY_ENET 137.135.128.2542 LOCAL_PPP_IF 137.135.192.43 REMOTE_PPP_IF 100.1.1.14 N39503 47.1.1.10
OK
=> NEW HOST PRIMARY_ENET 172.16.1.81INET Data Added
step 2: add a host entry for the network gateway using the NEWHOST command.
=> NEW HOST GATEWAY_ENET 172.16.1.1INET Data Added
step 3: assign the host entry that we created for the meridianitself to be the primary IP address for the PBX.
=> CHG ELNK ACTIVE PRIMARY_ENETINET Database updated
step 4: configure the netmask
=> CHG MASK 255.255.255.0INET Data Changed
step 5: configure the default route
=> NEW ROUTE 0.0.0.0 172.16.1.1INET Data Added
step 6: disable and then reenable the ethernet interface in LD137 to apply the IP address change. after doing this, themeridian should be up on the network and reachable at theassigned address.
>ld 137CIOD000.stat elnk

8/3/2019 Nortel Option 11 Pbx at Home
http://slidepdf.com/reader/full/nortel-option-11-pbx-at-home 40/79
ELNK ENABLEDEthernet (qu unit number 0):Host: N39503Internet address: 47.1.1.10Ethernet address: 00:00:75:45:85:99Netmask: 0xff000000; Subnetmask: 0xffff0000
7784 packets received; 9 packets sent0 input errors; 0 output errors0 collisions.dis elnk
OK.****>ld 117OAM000
=> prt elnkACTIVE ETHERNET: "PRIMARY_ENET" "172.16.1.81"INACTIVE ETHERNET: "SECONDARY_ENET" "137.135.128.254"
OK
=> ****>OVL000>ld 137CIOD000.enl elnkInitialize Network Interface.Network Interface is up.Host : PRIMARY_ENETIP Address : 172.16.1.81Sub-netmask : 255.255.255.0
OK.****>
step 7: configure a PTY in LD 17 for remote administration.strangely, you will have to use rlogin. telnet is not supported.it is not required that the DES field say RLOGIN; i justconfigured that as a reminder.
>ld 17CFN000
MEM AVAIL: (U/P): 1316613 USED U P: 131886 26060 TOT: 1474559DISK RECS AVAIL: 484TMDI D-CHANNELS AVAIL: 2 USED: 0 TOT: 2DCH AVAIL: 62 USED: 2 TOT: 64AML AVAIL: 16 USED: 0 TOT: 16REQ chgTYPE adanADAN new tty 15TTY_TYPE PTY

8/3/2019 Nortel Option 11 Pbx at Home
http://slidepdf.com/reader/full/nortel-option-11-pbx-at-home 41/79
PORT 0DES RLOGINFLOWUSER SCH MTC BUGTTYLOG 0BANR YES
MEM AVAIL: (U/P): 1316522 USED U P: 131938 26099 TOT: 1474559DISK RECS AVAIL: 484TMDI D-CHANNELS AVAIL: 2 USED: 0 TOT: 2DCH AVAIL: 62 USED: 2 TOT: 64AML AVAIL: 16 USED: 0 TOT: 16
ADAN DATA SAVEDADAN
REQ ****
>
that is all you will need to do on the meridian to get it up onthe network and ready to accept a connection from a remote host.to access the meridian, use rlogin to connect with a username ofCPSID1110. this should drop you at the usual X11 login prompt.
wildflower.diablonet.net> rlogin -l CPSID1110 172.16.1.81Done!
OVL111 000 TTY 00
TTY 15 SCH MTC BUG 17:16
when you are done, hit ctrl-PDT to jump to PDT. log in with thedefault password of "thorsgr8" and then type "exit" todisconnect from the meridian.
if you try to rlogin to the meridian without specifying ausername, you will land at the PDT login prompt, just as if youhad typed ctrl-PDT on any TTY connected to the PBX. you canstill access the X11 interface by logging in with the PDTpassword "thorsgr8" and then using the "sl1input" command.
also note that by default that the meridian only allows one userto be logged in to the system at any given time. when one userlogs in to the system, any other user who may have been using itwill be logged out. if the system is equipped with theMULTI_USER package, multi user support can be enabled in LD 17OVLY. you may find it more effective to enable multi user

8/3/2019 Nortel Option 11 Pbx at Home
http://slidepdf.com/reader/full/nortel-option-11-pbx-at-home 42/79
support when using network based remote administration, so youcan be logged in both over the network and at a TTYsimultaneously.
configuring a NTAK03 tds/dtr card consider that an NTAK03 tone and digit switch card has beeninstalled in slot 1 of our option 11. we configure it accordingto the procedure below. first add the TDS card in the commonequipment settings using LD 17, then enable the card in LD 34.finally, configure each discrete unit of tone and digit switchon the card with LD 13. there are also a few TTYs available onthe NTAK03 card for general use. they are not included below butyou can enable them by creating ADAN records in LD 17.
LD 17REQ CHGTYPE CEQUTDS 1
LD 34ENLX 1
LD 13REQ NEWTYPE DTRTN 001 00REQ NEWTYPE DTR
TN 001 01REQ NEWTYPE DTRTN 001 02REQ NEWTYPE DTRTN 001 03REQ NEWTYPE DTRTN 001 04REQ NEWTYPE DTRTN 001 05
REQ NEWTYPE DTRTN 001 06REQ NEWTYPE DTRTN 001 07
configuring a NTAK02 sdi/dch card

8/3/2019 Nortel Option 11 Pbx at Home
http://slidepdf.com/reader/full/nortel-option-11-pbx-at-home 43/79
consider an NTAK02 SDI/DCH card installed in slot 9 of ouroption 11 with all jumpers set as default. all we must do toenable it is create the requisite ADAN records in LD 17. theexample below shows how two of the four ports on the card may beconfigured.
LD 17REQ CHGTYPE ADANADAN NEW TTY 5CDNO 9PORT 0DES SDIDCH_TTY_0BPS 9600BITL 8STOP 1PARY NONEENL
USR MTC SCH BUG
ADAN NEW TTY 6CDNO 9PORT 2DES SDIDCH_TTY_1BPS 9600BITL 8STOP 1PARY NONEENLUSR MTC SCH BUG
configuring a station on NT8D09 analog linecard
consider that we have an NT8D09 analog line card in slot 6. LD10 is used to administer analog sets. in the following example,unit 0 is configured on this card with DN 8000. we specify REQNEW with a TYPE of 500.
LD 10REQ NEWTYPE 500
TN 6 0CDENDES ANLG00CUST 0WRLSDN 8000MARPCPNDVMB

8/3/2019 Nortel Option 11 Pbx at Home
http://slidepdf.com/reader/full/nortel-option-11-pbx-at-home 44/79
ASTIAPG 0HUNTTGAR 0LDN NONCOS 0
RNPG 0SGRP 0CLSSCI 0MLWU_LANGPLEV 02FTR
configuring a station on NT8D02 digitalline card
consider that we have an NT8D02 digital line card in slot 5. LD11 is used to administer digital sets. in the following example,a M2008 set on unit 0 has DN 7000 configured on KEY 0. wespecify REQ NEW with a TYPE of 2008. notice that since the phonehas multiple keys, you assign a DN to a key rather than to anentire phone as is the case for an analog set.
LD 11REQ NEWTYPE 2008TN 5 0DES DGTL00
CUST 0FDNTGAR 0LDN NONCOS 0RNPG 0SSUSGRP 0CLSHUNTSCI 0PLEV 02ASTIAPG 0MLWU_LANGDNDR 0KEY 00 SCR 7000MARPCPNDVMB

8/3/2019 Nortel Option 11 Pbx at Home
http://slidepdf.com/reader/full/nortel-option-11-pbx-at-home 45/79
setting up trunks to cisco mc 3810: t1 cas
once we get the meridian set up with some local analog anddigital sets, of course the next thing is to configure some
trunks. a nick easy way to get a t1 trunk up quickly is to usecas signaling. i dont really use cas any longer on my networkbut it is definitely as easy as it gets as far as setting updigital trunks. the scenario is as follows.
cisco mc 3810 with avm and mft t1 card. mft t1 card is connectedto nortel 1.5 mb dti/pri card in slot 2 of the meridian usingcas. the meridian will be providing network clock for the t1span.
when this is all said and done, a user on the nortel can dial anextension on the cisco by dialing 9, then the 4 digit extensionnumber of a phone on the cisco side (e.g. 9000). on the ciscoside, a user can dial an extension on the nortel by dialing the4 digit extension number of a phone on the nortel side (e.g.7000 or 8000).
before we even talk about software we first have to considercabling between the cisco and the switch. refer to the tablebelow; this will give us a crossover cable. RJ45 pins arecounted by pointing RJ45 jack, pins end away from you, clasp
facing bottom. pin 1 will be the pin furthest to your left, pin8 will be the pin furthest to your right. cable from 66 blockpin to RJ45 pin; the nortel pin numbers and signal identifiersare just given for reference.
nortel pin 66 block pin RJ45 pin signal

8/3/2019 Nortel Option 11 Pbx at Home
http://slidepdf.com/reader/full/nortel-option-11-pbx-at-home 46/79
23 46 1 R
24 48 4 R1
48 45 2 T
49 47 5 T1
assume we start out with a clean configuration: no digital datablock, digital loops, d channels, etc. defined. use theprocedure above to clear out the switch if in question. for thepurpose of this example there is a dti/pri card with a clock andcontroller and dchi daughterboard (unused here) installed inslot 2 of the meridian.
step 1: create digital data block. we only need to do this onceon a system. basically it is just used to establish a TRSHtable, which is just a table full of threshold settings mostlyfor error counters. this is also where you define your clockcontroller later. here we just use all default values for thethreshold set (just hit return).
>LD 73DDB000UDATA: 31988 1 PDATA: 101492 5DISK RECS AVAIL: 512
REQ NEWTYPE DDBTRSH 0RALMBIPCLFACBIPVSRTKSRNTLFALSRIMSRMMTRSH
UDATA: 31988 1 PDATA: 101460 5DISK RECS AVAIL: 512
REQ ****
>OVL000>

8/3/2019 Nortel Option 11 Pbx at Home
http://slidepdf.com/reader/full/nortel-option-11-pbx-at-home 47/79
step 2: define the dti/pri card in slot 2 of the meridian byconfiguring a digital loop for it in the common equipmentsettings (LD 17)
>LD 17
CFN000UDATA: 32244 1 PDATA: 101105 15DISK RECS AVAIL: 512
DCH AVAIL: 64 USED: 0 TOT: 64AML AVAIL: 16 USED: 0 TOT: 16REQ CHGTYPE CEQUTDSCONFDLOP 2 24 ESF (note we are using all 24 channels for voice)MODE PRI (even though this says PRI, just trust that it will workin CAS mode)LCMT B8SYALM FDLTRSH 0DLOPMTYP
UDATA: 32116 1 PDATA: 101020 15DISK RECS AVAIL: 512
DCH AVAIL: 64 USED: 0 TOT: 64AML AVAIL: 16 USED: 0 TOT: 16REQ ****
>
OVL000>
step 3: define the clock controller on our dti/pri card in slot2 in the digital data block.
>LD 73DDB000UDATA: 32116 1 PDATA: 101020 15DISK RECS AVAIL: 512
REQ CHG
TYPE DDBCLKN 2PREF (just hit return, nortel defaults to free run, it will beclock master for the span)SREFTRSH 0RALMBIPCLFAC

8/3/2019 Nortel Option 11 Pbx at Home
http://slidepdf.com/reader/full/nortel-option-11-pbx-at-home 48/79
BIPVSRTKSRNTLFALSRIMSRMM
TRSH
UDATA: 32116 1 PDATA: 101020 15DISK RECS AVAIL: 512
REQ ****
>OVL000>
step 4: enable the dti/pri card in slot 2 of the meridian
>LD 60DTI000.ENLL 2
PRI000 2 5PRI000 2 5DTA021 2DTI030 2.****>OVL000>
step 5: create a route for the dti/pri card. it will be a directinward dial (did) trunk which makes this easy to set up becausebasically how it works is the user dials an access code, gets ona trunk, and the PBX just forwards out what digits the userdials to the trunk. conversely when the cisco gets a call thatit needs to send on to the pbx, it just sends out the digits itgets over the trunk to the PBX subject to any stripping rules weset up.
>LD 16RDB000
UDATA: 32116 2 PDATA: 101012 15DISK RECS AVAIL: 512
REQ NEWTYPE RDBCUST 0DMODROUT 20TKTP DID (as above this makes the dial plan easy just matches incoming

8/3/2019 Nortel Option 11 Pbx at Home
http://slidepdf.com/reader/full/nortel-option-11-pbx-at-home 49/79
digits)M911_ANISAT NORCLS EXTDTRK YESDGTP DTI
DSEL VCEPTYP (hit return default is PRI, it works for us)AUTO NODNIS NOIANIICOG IAO (in and out)RANXSRCH LINTRMB YESSTEPACOD 9 (dial 9 to get on a trunk in this route)CPPTARG 0 (no restriction on this trunk)
BILN NOSGRPOABSINSTCNTL YESTIMR ICF 512
512TIMR OGF 512
512TIMR EOD 13952
13952TIMR DSI 34944
34944TIMR NRD 10112
10112TIMR DDL 70
70TIMR ODT 4096
4096TIMR RGV 640
640TIMR GRD 896
896TIMR SFB 3
3TIMRSST 5 0
NEDC ORGFEDC ORGCPDC NODLTN NOHOLD 02 02 40SEIZ 02 02SVFL 02 02DRNG NOCDR NO

8/3/2019 Nortel Option 11 Pbx at Home
http://slidepdf.com/reader/full/nortel-option-11-pbx-at-home 50/79
MUS NOMR NOEQAR NOOHQ NOOHQT 00TTBL 0
OHTD NOPLEV 2MCTSALRM NO
UDATA: 32116 2 PDATA: 100880 15DISK RECS AVAIL: 512
REQSCH0101REQ ****
>
step 6: add a trunk to the route. we create a single DID trunkconsisting of the first channel of the t1 span.
>LD 14TRK000UDATA: 32116 2 PDATA: 100880 15DISK RECS AVAIL: 512
TNS AVAIL: 172 USED: 28 TOT: 200REQ NEWTYPE DID (DID to match the route we just created)TN 2 1
CUST 0NCOS 0RTMB 20 1 (first member of route 20 trunk group, matches route number fromstep 5)NITESIGL EM4 (4 wire e&m signalling matches cisco)STRI WNK (e&m wink start signalling matches on cisco)STRO WNKSUPN YESCLS DTN ECD WTA LPR APN THFD P10 VNLTKID
NEW TRK TN 002 01 RT 20 MB 1
UDATA: 31948 2 PDATA: 100842 15DISK RECS AVAIL: 512
TNS AVAIL: 171 USED: 29 TOT: 200REQ ****
>OVL000

8/3/2019 Nortel Option 11 Pbx at Home
http://slidepdf.com/reader/full/nortel-option-11-pbx-at-home 51/79
>
step 7: add the rest of the trunks to the route (big datafill!)just repeat what we did in step (6) 23 more times..
>LD 14TRK000UDATA: 31932 1 PDATA: 100842 2DISK RECS AVAIL: 512
TNS AVAIL: 171 USED: 29 TOT: 200REQ NEWTYPE DIDTN 2 2CUST 0NCOS 0RTMB 20 2NITE
SIGL EM4STRI WNKSTRO WNKSUPN YESCLS DTN ECD WTA LPR APN THFD P10 VNLTKID
NEW TRK TN 002 02 RT 20 MB 2
UDATA: 31840 1 PDATA: 100797 4DISK RECS AVAIL: 512
TNS AVAIL: 170 USED: 30 TOT: 200REQ NEW
TYPE DIDTN 2 3CUST 0NCOS 0RTMB 20 3NITESIGL EM4STRI WNKSTRO WNKSUPN YESCLS DTN ECD WTA LPR APN THFD P10 VNLTKID
NEW TRK TN 002 03 RT 20 MB 3
UDATA: 31748 1 PDATA: 100752 6DISK RECS AVAIL: 512
TNS AVAIL: 169 USED: 31 TOT: 200REQ NEWTYPE DIDTN 2 4

8/3/2019 Nortel Option 11 Pbx at Home
http://slidepdf.com/reader/full/nortel-option-11-pbx-at-home 52/79
CUST 0NCOS 0RTMB 20 4NITESIGL EM4STRI WNK
STRO WNKSUPN YESCLS DTN ECD WTA LPR APN THFD P10 VNLTKID
NEW TRK TN 002 04 RT 20 MB 4
UDATA: 31656 1 PDATA: 100707 8DISK RECS AVAIL: 512TNS AVAIL: 168 USED: 32 TOT: 200REQ NEWTYPE DIDTN 2 5
CUST 0NCOS 0RTMB 20 5NITESIGL EM4STRI WNKSTRO WNKSUPN YESCLS DTN ECD WTA LPR APN THFD P10 VNLTKID
NEW TRK TN 002 05 RT 20 MB 5
UDATA: 31564 1 PDATA: 100662 8
DISK RECS AVAIL: 512
TNS AVAIL: 167 USED: 33 TOT: 200REQ NEWTYPE DIDTN 2 6CUST 0NCOS 0RTMB 20 6NITESIGL EM4STRI WNKSTRO WNK
SUPN YESCLS DTN ECD WTA LPR APN THFD P10 VNLTKID
NEW TRK TN 002 06 RT 20 MB 6
UDATA: 31472 1 PDATA: 100617 8DISK RECS AVAIL: 512

8/3/2019 Nortel Option 11 Pbx at Home
http://slidepdf.com/reader/full/nortel-option-11-pbx-at-home 53/79
TNS AVAIL: 166 USED: 34 TOT: 200REQ NEWTYPE DIDTN 2 7CUST 0NCOS 0
RTMB 20 7NITESIGL EM4STRI WNKSTRO WNKSUPN YESCLS DTN ECD WTA LPR APN THFD P10 VNLTKID
NEW TRK TN 002 07 RT 20 MB 7
UDATA: 31380 1 PDATA: 100572 8DISK RECS AVAIL: 512
TNS AVAIL: 165 USED: 35 TOT: 200REQ NEWTYPE DIDTN 2 8CUST 0NCOS 0RTMB 20 7
SCH0224RTMB 20 8NITESIGL EM4STRI WNK
STRO WNKSUPN YESCLS DTN ECD WTA LPR APN THFD P10 VNLTKID
NEW TRK TN 002 08 RT 20 MB 8
UDATA: 31288 1 PDATA: 100527 8DISK RECS AVAIL: 512
TNS AVAIL: 164 USED: 36 TOT: 200REQ NEWTYPE DID
TN 2 9CUST 0NCOS 0RTMB 20 8
SCH0224RTMB 20 9NITESIGL EM4

8/3/2019 Nortel Option 11 Pbx at Home
http://slidepdf.com/reader/full/nortel-option-11-pbx-at-home 54/79
STRI WNKSTRO WNKSUPN YESCLS DTN ECD WTA LPR APN THFD P10 VNLTKID
NEW TRK TN 002 09 RT 20 MB 9
UDATA: 31196 1 PDATA: 100482 8DISK RECS AVAIL: 512
TNS AVAIL: 163 USED: 37 TOT: 200REQ NEWTYPE DIDTN 2 10CUST 0NCOS 0RTMB 20 10NITE
SIGL EM4STRI WNKSTRO WNKSUPN YESCLS DTN ECD WTA LPR APN THFD P10 VNLTKID
NEW TRK TN 002 10 RT 20 MB 10
UDATA: 31104 1 PDATA: 100437 9DISK RECS AVAIL: 512
TNS AVAIL: 162 USED: 38 TOT: 200REQ NEW
TYPE DIDTN 2 11CUST 0NCOS 0RTMB 20 11NITESIGL EM4STRI WNKSTRO WNKSUPN YESCLS DTN ECD WTA LPR APN THFD P10 VNLTKID
NEW TRK TN 002 11 RT 20 MB 11
UDATA: 31012 1 PDATA: 100392 11DISK RECS AVAIL: 512
TNS AVAIL: 161 USED: 39 TOT: 200REQ NEWTYPE DIDTN 2 12
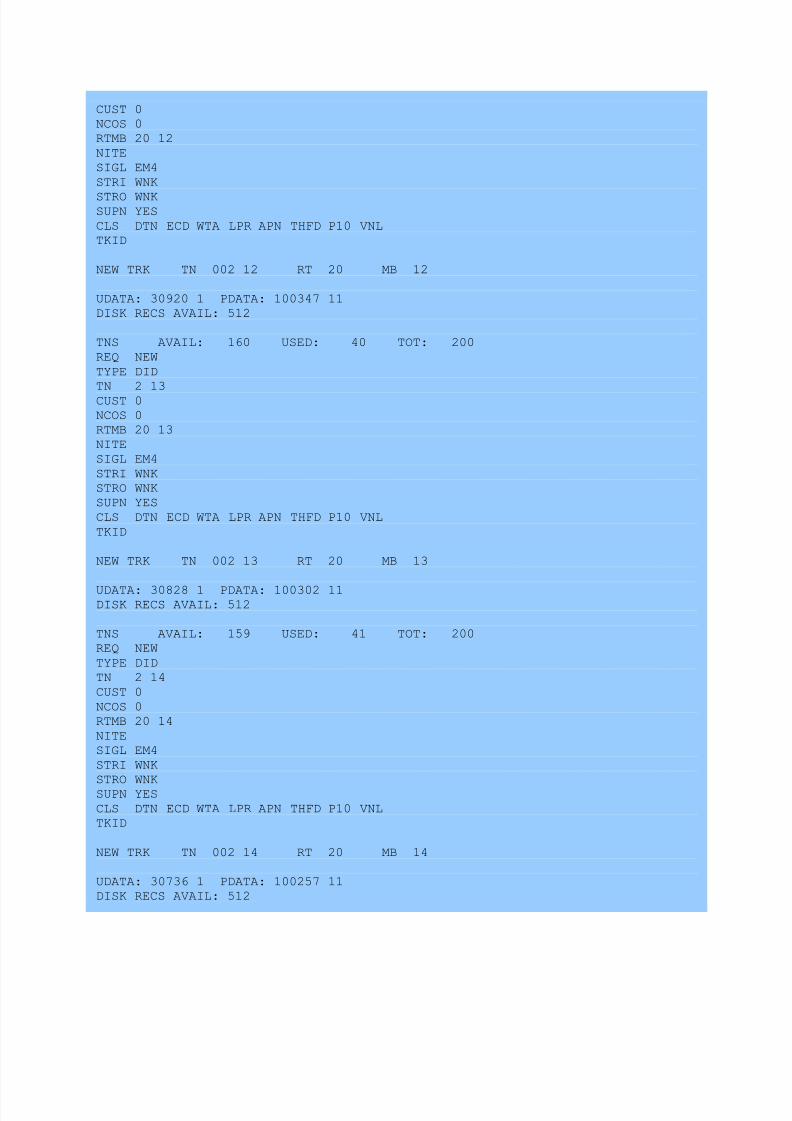
8/3/2019 Nortel Option 11 Pbx at Home
http://slidepdf.com/reader/full/nortel-option-11-pbx-at-home 55/79
CUST 0NCOS 0RTMB 20 12NITESIGL EM4STRI WNK
STRO WNKSUPN YESCLS DTN ECD WTA LPR APN THFD P10 VNLTKID
NEW TRK TN 002 12 RT 20 MB 12
UDATA: 30920 1 PDATA: 100347 11DISK RECS AVAIL: 512
TNS AVAIL: 160 USED: 40 TOT: 200REQ NEWTYPE DID
TN 2 13CUST 0NCOS 0RTMB 20 13NITESIGL EM4STRI WNKSTRO WNKSUPN YESCLS DTN ECD WTA LPR APN THFD P10 VNLTKID
NEW TRK TN 002 13 RT 20 MB 13
UDATA: 30828 1 PDATA: 100302 11DISK RECS AVAIL: 512
TNS AVAIL: 159 USED: 41 TOT: 200REQ NEWTYPE DIDTN 2 14CUST 0NCOS 0RTMB 20 14NITESIGL EM4STRI WNK
STRO WNKSUPN YESCLS DTN ECD WTA LPR APN THFD P10 VNLTKID
NEW TRK TN 002 14 RT 20 MB 14
UDATA: 30736 1 PDATA: 100257 11DISK RECS AVAIL: 512

8/3/2019 Nortel Option 11 Pbx at Home
http://slidepdf.com/reader/full/nortel-option-11-pbx-at-home 56/79
TNS AVAIL: 158 USED: 42 TOT: 200REQ NEWTYPE DIDTN 2 15CUST 0
NCOS 0RTMB 20 15NITESIGL EM4STRI WNKSTRO WNKSUPN YESCLS DTN ECD WTA LPR APN THFD P10 VNLTKID
NEW TRK TN 002 15 RT 20 MB 15
UDATA: 30644 1 PDATA: 100212 11
DISK RECS AVAIL: 512
TNS AVAIL: 157 USED: 43 TOT: 200REQ NEWTYPE DIDTN 2 16CUST 0NCOS 0RTMB 20 16NITESIGL EM4STRI WNKSTRO WNKSUPN YES
CLS DTN ECD WTA LPR APN THFD P10 VNLTKID
NEW TRK TN 002 16 RT 20 MB 16
UDATA: 30551 1 PDATA: 100167 11DISK RECS AVAIL: 512
TNS AVAIL: 156 USED: 44 TOT: 200REQ NEWTYPE DIDTN 2 17CUST 0
NCOS 0RTMB 20 17NITESIGL EM4STRI WNKSTRO WNKSUPN YESCLS DTN ECD WTA LPR APN THFD P10 VNLTKID

8/3/2019 Nortel Option 11 Pbx at Home
http://slidepdf.com/reader/full/nortel-option-11-pbx-at-home 57/79
NEW TRK TN 002 17 RT 20 MB 17
UDATA: 30459 1 PDATA: 100122 11DISK RECS AVAIL: 512
TNS AVAIL: 155 USED: 45 TOT: 200REQ NEWTYPE DIDTN 2 18CUST 0NCOS 0RTMB 20 18NITESIGL EM4STRI WNKSTRO WNKSUPN YESCLS DTN ECD WTA LPR APN THFD P10 VNL
TKID
NEW TRK TN 002 18 RT 20 MB 18
UDATA: 30367 1 PDATA: 100077 11DISK RECS AVAIL: 512
TNS AVAIL: 154 USED: 46 TOT: 200REQ NEWTYPE DIDTN 2 19CUST 0NCOS 0RTMB 20 19
NITESIGL EM4STRI WNKSTRO WNKSUPN YESCLS DTN ECD WTA LPR APN THFD P10 VNLTKID
NEW TRK TN 002 19 RT 20 MB 19
UDATA: 30275 1 PDATA: 100032 11DISK RECS AVAIL: 512
TNS AVAIL: 153 USED: 47 TOT: 200REQ NEWTYPE DIDTN 2 20CUST 0NCOS 0RTMB 20 20NITESIGL EM4

8/3/2019 Nortel Option 11 Pbx at Home
http://slidepdf.com/reader/full/nortel-option-11-pbx-at-home 58/79
STRI WNKSTRO WNKSUPN YESCLS DTN ECD WTA LPR APN THFD P10 VNLTKID
NEW TRK TN 002 20 RT 20 MB 20
UDATA: 30183 1 PDATA: 099987 12DISK RECS AVAIL: 512
TNS AVAIL: 152 USED: 48 TOT: 200REQ NEWTYPE DIDTN 2 21CUST 0NCOS 0RTMB 20 21NITE
SIGL EM4STRI WNKSTRO WNKSUPN YESCLS DTN ECD WTA LPR APN THFD P10 VNLTKID
NEW TRK TN 002 21 RT 20 MB 21
UDATA: 30091 1 PDATA: 099942 12DISK RECS AVAIL: 512
TNS AVAIL: 151 USED: 49 TOT: 200REQ NEW
TYPE DIDTN 2 22CUST 0NCOS 0RTMB 20 22NITESIGL EM4STRI WNKSTRO WNKSUPN YESCLS DTN ECD WTA LPR APN THFD P10 VNLTKID
NEW TRK TN 002 22 RT 20 MB 22
UDATA: 29999 1 PDATA: 099897 14DISK RECS AVAIL: 512
TNS AVAIL: 150 USED: 50 TOT: 200REQ NEWTYPE DIDTN 2 23

8/3/2019 Nortel Option 11 Pbx at Home
http://slidepdf.com/reader/full/nortel-option-11-pbx-at-home 59/79
CUST 0NCOS 0RTMB 20 23NITESIGL EM4STRI WNK
STRO WNKSUPN YESCLS DTN ECD WTA LPR APN THFD P10 VNLTKID
NEW TRK TN 002 23 RT 20 MB 23
UDATA: 29907 1 PDATA: 099852 14DISK RECS AVAIL: 512
TNS AVAIL: 149 USED: 51 TOT: 200REQ NEWTYPE DID
TN 2 24CUST 0NCOS 0RTMB 20 24NITESIGL EM4STRI WNKSTRO WNKSUPN YESCLS DTN ECD WTA LPR APN THFD P10 VNLTKID
NEW TRK TN 002 24 RT 20 MB 24
UDATA: 29815 1 PDATA: 099807 14DISK RECS AVAIL: 512
TNS AVAIL: 148 USED: 52 TOT: 200REQ ****
>
that should basically do it for the nortel, we might have tokick the trunk card with DISL 2/ENLL 2 in LD 60 on the nortel,or a shut/no shut on controller t1 0 on the cisco, or powercycle one device or the other, but the t1 link should come up
and work great with this config.
so now the cisco configuration. i will just post the pertinentparts of the configuration as relating to the t1 part of things.it is really fairly simple. we configure our t1 controller incas mode and create a ds0-group that contains all of thetimeslots. the cisco generates a voice-port 0:1 to represent thet1. we route calls to the pbx using dial-peers with various

8/3/2019 Nortel Option 11 Pbx at Home
http://slidepdf.com/reader/full/nortel-option-11-pbx-at-home 60/79
patterns consisting of a trunk access code and an extension ofthe pbx.
voice-ports 1/5 and 1/6 are just fxs ports on the avm in thecisco. i have a test phone hooked up to the fxs port 1/6 at
extension 9000.
note that the cisco is taking network clock from the nortel onthe t1 span. also note that we use forward-digits 4 in the dialpeer to forward the full four digit extension that was dialed tothe meridian.
! the network-clock base-rate parameter can be excluded and it will stillworknetwork-clock base-rate 56k!voice service voip
sipsession transport tcp
!no voice confirmation-tone!!controller T1 0mode casframing esflinecode b8zsds0-group 1 timeslots 1-24 type e&m-wink-startdescription t1 to meridian!
!voice-port 0:1!voice-port 1/5!voice-port 1/6description test phone on fxs port!!!dial-peer voice 9000 potsdestination-pattern 9000port 1/6!
dial-peer voice 7000 potsdestination-pattern 7...supplementary-service pass-throughport 0:1forward-digits 4!dial-peer voice 8000 potsdestination-pattern 8...supplementary-service pass-through

8/3/2019 Nortel Option 11 Pbx at Home
http://slidepdf.com/reader/full/nortel-option-11-pbx-at-home 61/79
port 0:1forward-digits 4!sip-uaretry invite 3retry response 3
retry bye 3retry cancel 3timers trying 1000timers notify 1000timers info 1000!!gatekeepershutdown
setting up trunks to cisco mc 3810: e&m tielines
now i will discuss a more hypothetical configuration of some e&mtrunks between the nortel and the cisco. i have had this wiredup at various points in time but never got it quite working. ithink it is mostly correct save for a few tweaks. the scenariolooks as follows
cisco mc 3810 with avm and mft t1 card. mft t1 card is unused inthis case. 4 e&m trunks are used to connect the avm on the ciscoand an e&m trunk card in slot 3 of the meridian.
we will begin with the configuration that needs to be added tothe nortel meridian for e&m and then move on to the ciscoconfiguration. but again before even getting to programminganything we first must cable things up according to the tablebelow. this should in theory give us a six wire e&m cable withsignalling wires crossed over for back to back use. again cable

8/3/2019 Nortel Option 11 Pbx at Home
http://slidepdf.com/reader/full/nortel-option-11-pbx-at-home 62/79
from 66 block pin to RJ45 pin; the nortel pin numbers are justgiven for reference. RJ45 pin numbers are given relative to pinside facing away from you, clasp facing down, pin 1 will then bethat which is leftmost.
nortel signal nortel pin 66 block pin RJ45 pin cisco signal
M 3 6 7 E
T1 1 2 5 T1
R1 2 4 4 R1
R 27 3 3 R
T 26 1 6 T
E 28 5 2 M
you can cable up the other 3 units of e&m on this card using thesame pattern. each unit takes up 8 positions on the 66 block; weskip pins 7 and 8 in this particular wiring arrangement. so thesecond unit will run from pin 9-16 on the 66 block, the thirdunit will run from 17-24 on the 66 block, and the fourth unitwill run from 25-32 on the 66 block.
step 1: create another route data block for the e&m lines. wehave to do it as a tie line; the e&m trunks do not supportdirect inward dial.
>LD 16RDB000UDATA: 32040 1 PDATA: 101597 1SCH5066
REQ NEWTYPE RDB
CUST 0DMODROUT 10TKTP TIEESN NOCNVT NOSAT NORCLS EXTDTRK NO

8/3/2019 Nortel Option 11 Pbx at Home
http://slidepdf.com/reader/full/nortel-option-11-pbx-at-home 63/79
PTYP ATTAUTO NODNISIANIICOG IAOSRCH LIN
TRMB YESSTEPACOD 9 (dial 9 to access this trunk)TARG 0BILNSGRPOABSINSTANTKSIGO STDSTYP SDATCNTL YESTIMR ICF 512
512TIMR OGF 512512
TIMR EOD 1395213952
TIMR DSI 3494434944
TIMR NRD 1011210112
TIMR DDL 00
TIMR ODT 40964096
TIMR RGV 640
640TIMR SFB 3
3TIMR TFD 0
0TIMRSST 5 7NEDC ETHFEDC ETHCPDC NODLTN YESHOLD 02 02 40SEIZ 02 02
SVFL 02 02DRNG NOCDR NOMUS NOMANO NOEQAR NOOHQOHQTCBQ

8/3/2019 Nortel Option 11 Pbx at Home
http://slidepdf.com/reader/full/nortel-option-11-pbx-at-home 64/79
AUTHTTBL 0OHTD NOPLEV 2ALRM NO
UDATA: 32040 1 PDATA: 101312 1SCH5066
REQ ****
>
step 2: add a single e&m trunk line to the route we justcreated. we use 4 wire e&m which matches what is set on thecisco. we set e&m type 1 on the nortel which according to ciscomatches type V on their equipment, which is what we will use on
the mc3810. wink start signalling is used for this link and isconfigured to match on both devices.
>LD 14TRK000UDATA: 32040 1 PDATA: 101312 1SCH5066
TNS AVAIL: 178 USED: 22 TOT: 200REQ NEWTYPE TIETN 3 0
XTRK XEMCUST 0NCOS 0RTMB 10 1MNDNTGAR 0SIGL EM4EMTY TY1CPAD COUTSTRI WNKSTRO WNKSUPN YESCLS UNR DTN ECD WTA LPR APN THFD P10 VNL MIDTKID
NEW TRK TN 003 0 00 01 RT 10 MB 1
UDATA: 31881 1 PDATA: 101274 1SCH5066
TNS AVAIL: 177 USED: 23 TOT: 200REQ ****

8/3/2019 Nortel Option 11 Pbx at Home
http://slidepdf.com/reader/full/nortel-option-11-pbx-at-home 65/79
>
step 3: stat the trunk then kick it with DISC 3/ENLC 3 toreinitialize things. then stat the trunk again to make sure that
it is up.
>LD 32NPR000.STAT 300 = UNIT 00 = IDLE (TRK)(TIE EM4W WNK /WNK )01 = UNIT 01 = UNEQ02 = UNIT 02 = UNEQ03 = UNIT 03 = UNEQ.DISC 3
.ENLC 3
XMI001 3 XEMXMI002 3 XEM.STAT 300 = UNIT 00 = IDLE (TRK)(TIE EM4W WNK /WNK )01 = UNIT 01 = UNEQ02 = UNIT 02 = UNEQ03 = UNIT 03 = UNEQ.****.>OVL000>
step 4: add the other 3 units of e&m trunk on the nt8d15 card.exact same procedure as we followed for the first trunk unit,just increment the route member number each time.
> LD 14TRK000UDATA: 31809 1 PDATA: 101210 1SCH5066
TNS AVAIL: 177 USED: 23 TOT: 200REQ NEWTYPE TIE
TN 3 1XTRK XEMCUST 0NCOS 0RTMB 10 2MNDNTGAR 0SIGL EM4EMTY TY1
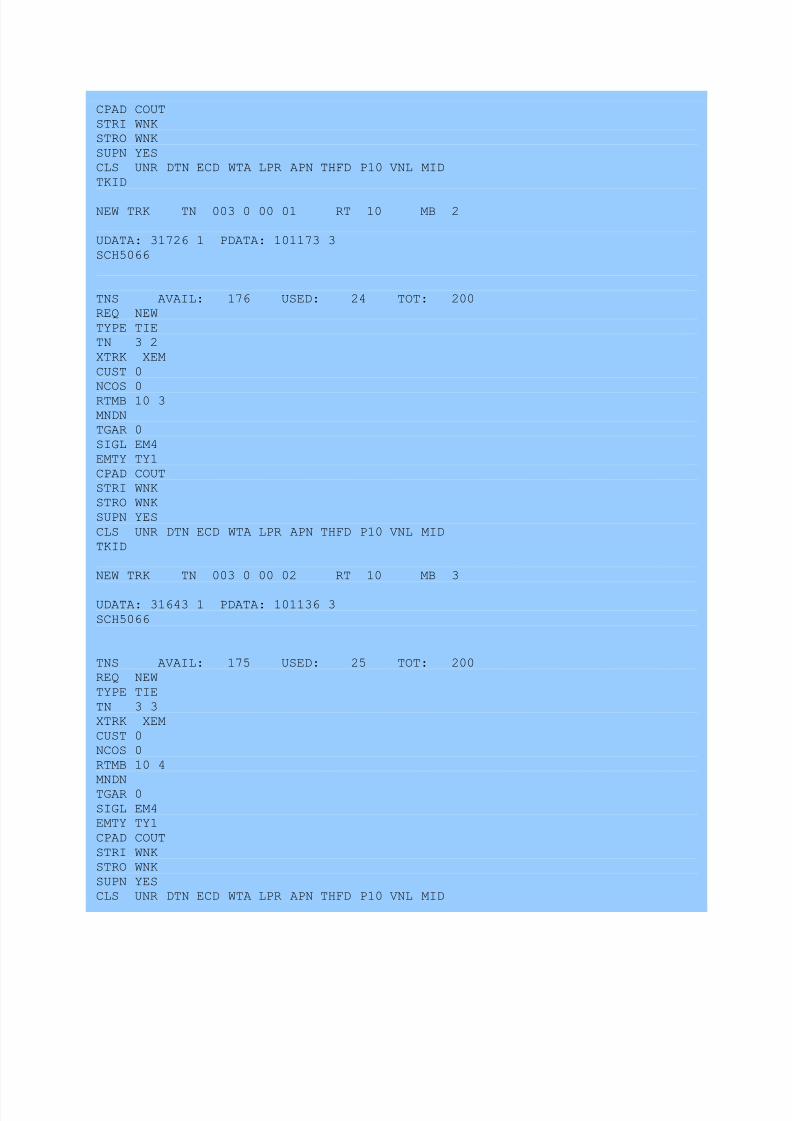
8/3/2019 Nortel Option 11 Pbx at Home
http://slidepdf.com/reader/full/nortel-option-11-pbx-at-home 66/79
CPAD COUTSTRI WNKSTRO WNKSUPN YESCLS UNR DTN ECD WTA LPR APN THFD P10 VNL MIDTKID
NEW TRK TN 003 0 00 01 RT 10 MB 2
UDATA: 31726 1 PDATA: 101173 3SCH5066
TNS AVAIL: 176 USED: 24 TOT: 200REQ NEWTYPE TIETN 3 2XTRK XEMCUST 0
NCOS 0RTMB 10 3MNDNTGAR 0SIGL EM4EMTY TY1CPAD COUTSTRI WNKSTRO WNKSUPN YESCLS UNR DTN ECD WTA LPR APN THFD P10 VNL MIDTKID
NEW TRK TN 003 0 00 02 RT 10 MB 3
UDATA: 31643 1 PDATA: 101136 3SCH5066
TNS AVAIL: 175 USED: 25 TOT: 200REQ NEWTYPE TIETN 3 3XTRK XEMCUST 0NCOS 0RTMB 10 4
MNDNTGAR 0SIGL EM4EMTY TY1CPAD COUTSTRI WNKSTRO WNKSUPN YESCLS UNR DTN ECD WTA LPR APN THFD P10 VNL MID
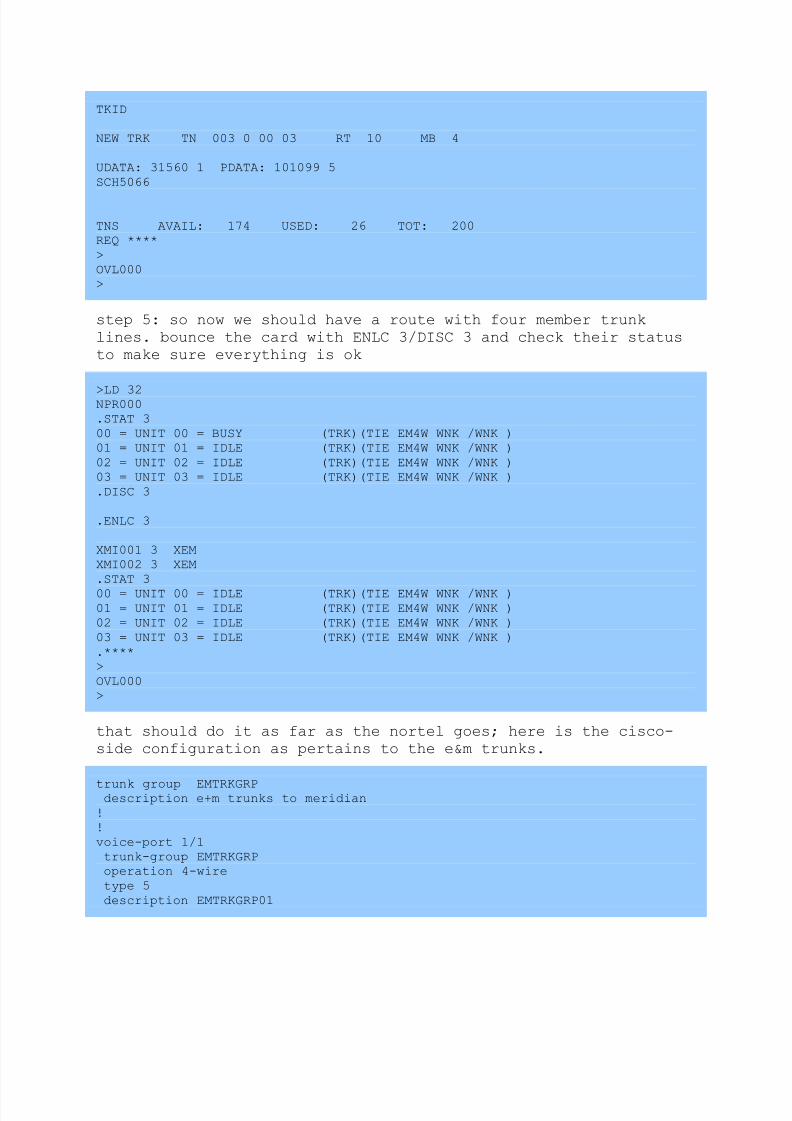
8/3/2019 Nortel Option 11 Pbx at Home
http://slidepdf.com/reader/full/nortel-option-11-pbx-at-home 67/79
TKID
NEW TRK TN 003 0 00 03 RT 10 MB 4
UDATA: 31560 1 PDATA: 101099 5SCH5066
TNS AVAIL: 174 USED: 26 TOT: 200REQ ****>OVL000>
step 5: so now we should have a route with four member trunklines. bounce the card with ENLC 3/DISC 3 and check their statusto make sure everything is ok
>LD 32NPR000.STAT 300 = UNIT 00 = BUSY (TRK)(TIE EM4W WNK /WNK )01 = UNIT 01 = IDLE (TRK)(TIE EM4W WNK /WNK )02 = UNIT 02 = IDLE (TRK)(TIE EM4W WNK /WNK )03 = UNIT 03 = IDLE (TRK)(TIE EM4W WNK /WNK ).DISC 3
.ENLC 3
XMI001 3 XEMXMI002 3 XEM.STAT 300 = UNIT 00 = IDLE (TRK)(TIE EM4W WNK /WNK )01 = UNIT 01 = IDLE (TRK)(TIE EM4W WNK /WNK )02 = UNIT 02 = IDLE (TRK)(TIE EM4W WNK /WNK )03 = UNIT 03 = IDLE (TRK)(TIE EM4W WNK /WNK ).****>OVL000>
that should do it as far as the nortel goes; here is the cisco-side configuration as pertains to the e&m trunks.
trunk group EMTRKGRPdescription e+m trunks to meridian!!voice-port 1/1trunk-group EMTRKGRPoperation 4-wiretype 5description EMTRKGRP01

8/3/2019 Nortel Option 11 Pbx at Home
http://slidepdf.com/reader/full/nortel-option-11-pbx-at-home 68/79
!voice-port 1/2trunk-group EMTRKGRPoperation 4-wiretype 5description EMTRKGRP02
!voice-port 1/3trunk-group EMTRKGRPoperation 4-wiretype 5description EMTRKGRP03!voice-port 1/4trunk-group EMTRKGRPoperation 4-wiretype 5description EMTRKGRP04!
voice-port 1/5!voice-port 1/6description test phone on fxs port!!dial-peer voice 9000 potsdestination-pattern 9000port 1/6!dial-peer voice 7000 potstrunkgroup EMTRKGRPdestination-pattern 7...no digit-strip
forward-digits 4!dial-peer voice 8000 potstrunkgroup EMTRKGRPdestination-pattern 8...no digit-stripforward-digits 4!
setting up trunks to cisco mc 3810: t1 pri
this configuration works great and i have migrated all my t1
trunks on my meridian to isdn pri. there are definitely someadded complexities in configuring t1 pri versus t1 cas and iwill discuss them in detail below. assume again that we arestarting with basically a clean slate with no previously defineddigital loops, d channels, trunks, routes, clock controllers,and so forth. the scenario appears as follows.

8/3/2019 Nortel Option 11 Pbx at Home
http://slidepdf.com/reader/full/nortel-option-11-pbx-at-home 69/79
the isdn switch-type will be NI-2. the cisco will act as thenetwork side and the nortel will act as the user side. thenortel will provide clock for the network link. for simplicity,we are configuring the trunk as a direct inward dial trunkrather than a tie trunk.
i do want to state explicitly that the t1 card in this case ispinned out exactly the same as in the t1 cas case above so justfollow that wiring plan if the card hasnt been wired up yet.
before we proceed i do want to note that the nortel is equippedwith a ddch card in this scenario. i also tried various t1 priconfigurations between the cisco and the nortel when the nortelwas equipped with a dchi card instead of a ddch card and wasnever able to make it work. once i swapped in the ddch card, itstarted working pretty quickly. i got lucky and got my ddch cardfor really cheap but since dchi cards are so much cheaper to geti would be really curious to hear if any other folks out therehave been able to get it working with a dchi card. it should intheory be possible to do.
we will start out configuring the meridian, and then move alongto the cisco.
step 1: create digital data block. we do it the very same way aswe do for the t1 cas configuration. if you already have a DDB 0created then you can skip this step.

8/3/2019 Nortel Option 11 Pbx at Home
http://slidepdf.com/reader/full/nortel-option-11-pbx-at-home 70/79
>LD 73DDB000UDATA: 31988 1 PDATA: 101492 5DISK RECS AVAIL: 512
REQ NEW
TYPE DDBTRSH 0RALMBIPCLFACBIPVSRTKSRNTLFALSRIMSRMMTRSH
UDATA: 31988 1 PDATA: 101460 5DISK RECS AVAIL: 512
REQ ****
>OVL000>
step 2: define digital loops
>LD 17CFN000
UDATA: 31908 1 PDATA: 101436 7DISK RECS AVAIL: 512
DCH AVAIL: 64 USED: 0 TOT: 64AML AVAIL: 16 USED: 0 TOT: 16REQ CHGTYPE CEQUTDSCONFDLOP 02 23 ESF (note only 23 channels; channel 24 is the d-channel)MODE PRILCMT B8SYALM FDLTRSH 0DLOPMTYP
UDATA: 31652 1 PDATA: 101266 7DISK RECS AVAIL: 512
DCH AVAIL: 64 USED: 0 TOT: 64AML AVAIL: 16 USED: 0 TOT: 16REQ

8/3/2019 Nortel Option 11 Pbx at Home
http://slidepdf.com/reader/full/nortel-option-11-pbx-at-home 71/79
REQ ****
>OVL000>
step 3: define clock controller. we can skip this step if wealready have at least one dti/pri card installed with an activeclock controller already.
>LD 73DDB000UDATA: 31732 1 PDATA: 101266 5DISK RECS AVAIL: 512
REQ CHGTYPE DDBCLKN 2
PREF (default is nortel acts as clock master for the span)SREFTRSH 0RALMBIPCLFACBIPVSRTKSRNTLFALSRIMSRMMTRSH
UDATA: 31732 1 PDATA: 101266 5DISK RECS AVAIL: 512
DTC014REQ ****
>OVL000>
step 4: create an adan record for the d-channel
>LD 17CFN000 UDATA: 31732 1 PDATA: 101266 5DISK RECS AVAIL: 512
DCH AVAIL: 64 USED: 0 TOT: 64AML AVAIL: 16 USED: 0 TOT: 16REQ CHGTYPE ADANADAN NEW DCH 10

8/3/2019 Nortel Option 11 Pbx at Home
http://slidepdf.com/reader/full/nortel-option-11-pbx-at-home 72/79
CTYP MSDLCDNO 2
PORT 1DES MC3810PRIUSR PRIIFC NI2
CO TYPEDCHL 2PRIOTBF 32DRAT 64KCSIDECNEGRLSRCAPMBGA NONASATIMR YEST310 10
LAPD YEST23T200 3T203 10N200 3N201 260K 7
UDATA: 30658 1 PDATA: 101125 5DISK RECS AVAIL: 512
DCH AVAIL: 63 USED: 1 TOT: 64AML AVAIL: 16 USED: 0 TOT: 16
ADAN DATA SAVEDADAN
REQ ****
>OVL000>
step 5: enable dti/pri cards.
>LD 60DTI000.ENL *.ENLL 2
PRI000 2 5PRI000 2 5DTA023 2OK.****

8/3/2019 Nortel Option 11 Pbx at Home
http://slidepdf.com/reader/full/nortel-option-11-pbx-at-home 73/79
>
step 6: bring up the d channel. first we may have to enable theddch card and download the pri code to the ddch board (if thishas not already happened before). then we can enable the d
channel itself.
>LD 96DCH000.ENL MSDL 10
DOWNLOADING PRIEREASON: NONE ON CARD
OVL021 IDLESDL100 BUSYOVL021 BKGD
SDL100 BUSY...................................................................
SDL000 PRIE ( MSDL 10), VERSION 46, MAINT MODE.DOWNLOADING NI2 DATAREASON: NONE ON CARD...SDL000 NI02 ( MSDL 10), VERSION 6, MAINT MODE.OK.ENL DCH 10.DCH: 10 EST CONFIRM TIME: 20:00:58 1/04/1993
DCH: 10 EST REMOTE TIME: 20:00:58 1/04/1993
DCH000.****>
step 7: enable isdn in the customer record. if it is not, addingthe route in the next step will fail. note that we leave HNPAand HNXX blank. this makes the meridian just send a 4-digitoutbound CLID for the calling party. if HNPA and HNXX arespecified, you get 10-digit outbound CLID for the calling partythat will look like HNPA-HNXX-EXTN. the important thing is
mostly that whatever you choose here lines up with the dialpeers that get created later on the cisco.
if an ISDN data block already exists with HNPA and HNXX defined,they can be removed by doing a CHG on the NET_DATA andspecifying "X" for HNPA and HNXX when prompted. unlike othercases on the meridian where to remove a numeric value youspecify the numeric value prefixed by "X" when prompted, here

8/3/2019 Nortel Option 11 Pbx at Home
http://slidepdf.com/reader/full/nortel-option-11-pbx-at-home 74/79
you just specify the X alone.
>LD 15CDB000UDATA: 30530 1 PDATA: 100923 1
SCH5066
REQ: CHGTYPE: NET
TYPE NET_DATACUST 0OPTAC2ISDN YESSCH4779
PNIPINX_DN
MBGBSGCHNPA ( this would show up as your area code in the sent CLID )HNXX ( this would show up as your NPA in the sent CLID )HLOCLSCCNTPRCNTPSTNTNDMPCMCSATD
VNR
NITFOPT
UDATA: 30530 1 PDATA: 100923 1SCH5066
REQ:
step 8: define a LDN0 in the customer record with lengthequivalent to the number of digits you expect to come in overthe trunk for inbound calls. you can just make up some DN to puthere so long as the length is good. apparently you have to have
an LDN0 defined for ISDN PRI DID to work.
>LD 15CDB000UDATA: 156335 0 PDATA: 229411 0DISK RECS AVAIL: 512
REQ: CHG

8/3/2019 Nortel Option 11 Pbx at Home
http://slidepdf.com/reader/full/nortel-option-11-pbx-at-home 75/79
TYPE: LDN_DATACUST 0OPTDLDNLDN0 5555LDN1
ICI
UDATA: 156335 0 PDATA: 229373 2DISK RECS AVAIL: 512
REQ: ****
>OVL000>
step 9: add route data block
>LD 16RDB000UDATA: 30658 1 PDATA: 101125 5DISK RECS AVAIL: 512
REQ NEWTYPE RDBCUST 0DMODROUT 20TKTP DIDM911_ANISAT NO
RCLS EXTDTRK YESDGTP PRIISDN YESMODE PRAIFC NI2PNI 00000NCNA YESNCRD NOCHTY BCHISAR NODSEL VODPTYP PRIAUTO NODNIS NODCDR NOIANIICOG IAORANX NOSRCH LINTRMB YESSTEPACOD 9 (dial 9 to access this trunk)

8/3/2019 Nortel Option 11 Pbx at Home
http://slidepdf.com/reader/full/nortel-option-11-pbx-at-home 76/79
TCPP NOTARG 0BILN NOSGRP 0OABSINST
CNTL YESTIMRDRNG NOCDR NONATLMUS NOEQAR NOOHQ NOOHQT 00TTBL 0PLEV 2MCTS NOALRM NO
UDATA: 30658 1 PDATA: 100969 6DISK RECS AVAIL: 512
REQSCH0101REQ ****
>OVL000>
step 10: add trunk data block. basically repeat this command for
unit 1 to 23 on the dti/pri card, incrementing the route membernumber each time. i will spare you the full text of two lengthydatafills of this nature on this page since you have basicallyseen it before in the t1 cas section above.
>LD 14TRK000UDATA: 30582 1 PDATA: 100961 9DISK RECS AVAIL: 512
TNS AVAIL: 178 USED: 22 TOT: 200REQ NEWTYPE DID
TN 2 1CUST 0NCOS 0RTMB 20 1
B-CHANNEL SIGNALINGNITECLSTKID

8/3/2019 Nortel Option 11 Pbx at Home
http://slidepdf.com/reader/full/nortel-option-11-pbx-at-home 77/79
NEW TRK TN 002 01 RT 20 MB 1
UDATA: 30490 1 PDATA: 100923 10DISK RECS AVAIL: 512
TNS AVAIL: 177 USED: 23 TOT: 200REQ
SCH0101REQ ****
>
that should do it as far as the meridian side of things goes.here is the corresponding cisco configuration.
!
isdn switch-type primary-qsigisdn gateway-max-interworking!!!voice service voipsipsession transport tcp
!!no voice confirmation-tone!!controller T1 0
framing esflinecode b8zsclock source internalds0-group timeslots 1-24 fxs-loop-startdescription t1 to channel bank!controller T1 1framing esflinecode b8zspri-group timeslots 1-24description t1 to meridian!! the following is the configuration for the d-channel
!! set the guard timer to be as long as possible and make! sure the T310 counter (in seconds) matches the value set! on the meridian in the ADAN record for the DCH. note that! the cisco and meridian use different units of time for! specifying the T310 value.!interface Serial1:23no ip address

8/3/2019 Nortel Option 11 Pbx at Home
http://slidepdf.com/reader/full/nortel-option-11-pbx-at-home 78/79
no logging event link-statuslogging event nfas-statuslogging event subif-link-statusisdn switch-type primary-niisdn protocol-emulate networkisdn incoming-voice voice
isdn guard-timer 20000isdn T310 10000isdn send-alertingno cdp enable!!voice-port 0:1!! meridian defaults to bearer capacity speech so we use that.!voice-port 1:23bearer-cap Speech!
!! a note on the dial peers below. they serve two purposes. the first! of course is to route incoming calls to the meridian. simple enough.! but the second is more nuanced. basically, per cisco documentation! on one stage and two stage dialing over isdn pri, these destination! patterns are also used to tag incoming calls from meridian 7XXX and! 8XXX extensions such that the cisco will treat them as DIDs.!! the cisco basically looks at the incoming CLID and wants to see it! matching a pots dial-peer with the direct-inward-dial keyword. since! we did not define a HNPA and HNXX in LD 15 NET_DATA when configuring! the nortel, both devices are using 4-digit CLIDs throughout and the! dial peers given below work as intended (one stage dialing).!
! now, if we had configured a HNPA and HNXX on the nortel, it would be! sending a 10-digit calling party CLID of NPA-NXX-EXTN. the four! digit dial peers on the cisco will nominally work for inbound calls! to the nortel because of our digit stripping rules, but they do not! result in proper DID treatment for calls outbound from the meridian! to the cisco.!! the resulting improper treatment is that it will work, but there is! a quirk for the user. they basically dial the access code plus their! number on the nortel, and they will land on a second dial tone from! the cisco. it just throws away any digits they dialed subsequent to! the trunk access code. at this point they will have to dial their! number again at this dial tone to actually have their call go through
! (two stage dialing).!! in that case, we would have had to define 10-digit destination patterns! in our dial peers e.g. destination-pattern NPANXX7... or NPANXX8... such! that the proper treatment for calls outbound from the meridian to the! cisco would occur.!! you can use the debug isdn q931 command on the cisco or ENL MSGI and ENL! MSGO in LD 96 on the nortel to see what both sides think the calling and

8/3/2019 Nortel Option 11 Pbx at Home
http://slidepdf.com/reader/full/nortel-option-11-pbx-at-home 79/79
! called party numbers are.!dial-peer voice 7000 potsdestination-pattern 7...supplementary-service pass-throughdirect-inward-dial
port 1:23forward-digits 4!dial-peer voice 8000 potsdestination-pattern 8...supplementary-service pass-throughdirect-inward-dialport 1:23forward-digits 4!dial-peer voice 9000 potsdestination-pattern 9000port 0:1
!sip-uaretry invite 3retry response 3retry bye 3retry cancel 3timers trying 1000timers notify 1000timers info 1000!!gatekeepershutdown!
home