Embed Size (px)
Citation preview
nodefabric-guide DocumentationRelease 0.4.3
Andres Toomsalu
May 18, 2017

Contents
1 User Guide 3
2 License 35
i

ii
nodefabric-guide Documentation, Release 0.4.3
NodeFabric Host Image is a modular VM (or bare-metal) image that delivers hyperconverged MariaDB-Galeradatabase and Ceph storage solution for highly available, self-healing and load-balanced cloud services.
Based on stable and supported RedHat Enterprise Linux or CentOS operating system - it provides highly availabledata backend layer for self-healing and load-balanced cloud services.
Docker, Consul and HAProxy are used internally for coordinating and maintaining included data storage services.NodeFabric Host Image can run on any virtual or physical infrastructure: Amazon EC2 cloud, Openstack and VMwareprivate clouds or directly on bare metal.
Features include:
• prebuilt NodeFabric Host Image and optional remote cluster auto-join service
• zero-configuration data backend fabric deployment - just “Boot–and-Go”
• self-contained and runs everywhere - AWS, Openstack, VMWare, KVM, bare-metal etc.
• very low infrastructure capabilities requirements for clustering – it does not require multicast networking ornode fencing
• clustered by design
• built-in service discovery and health monitoring
Example use cases:
• hyperconverged solution stack (Docker + database + shared FS + load-balancer)
• highly available turnkey database cluster
• virtual SAN with distributed filesystem support
More information about supported NodeFabric product can be found here: http://opennodecloud.com/products/nodefabric.html
Contents 1
nodefabric-guide Documentation, Release 0.4.3
2 Contents
CHAPTER 1
User Guide
CHANGELOG
0.4.3 (Oct 22, 2015)
• FEATURE: Added support for MariaDB configuration files data volume
• FEATURE: Added nodefabric-update utility for system update
• IMPROVEMENT: Switched to non-blocking XtraBackup SST method for MariaDB-Galera (was rsync)
• IMPROVEMENT: Changed internal load-balanced MariaDB-Galera service endpoint to active-backup mode(in order to avoid potential multi-master deadlock problems with co-located apps using internal mysql serviceendpoint)
• IMPROVEMENT: nf-galera-ctl database management subcommands supporting root password input (whenrequired)
• IMPROVEMENT: Better nf-galera service check script - in order to prevent node status flapping
• BUGFIX: Fixed nf-galera-ctl password change/update replication issue
• EXPERIMENTAL: Implemented initial support for (fixed) 5-node clusters
0.4.2 (Sep 29, 2015)
• FEATURE: Added database management subcommands to nf-galera-ctl utility
• IMPROVEMENT: Database root account is now initialized with empty password and access is limited to local-host
• IMPROVEMENT: Ensuring that Ceph RBD and CephFS modules get autoloaded on boot
• IMPROVEMENT: Removing nf-galera service wait time
3
nodefabric-guide Documentation, Release 0.4.3
0.4.1 (Aug 21, 2015)
• Initial release
Overview
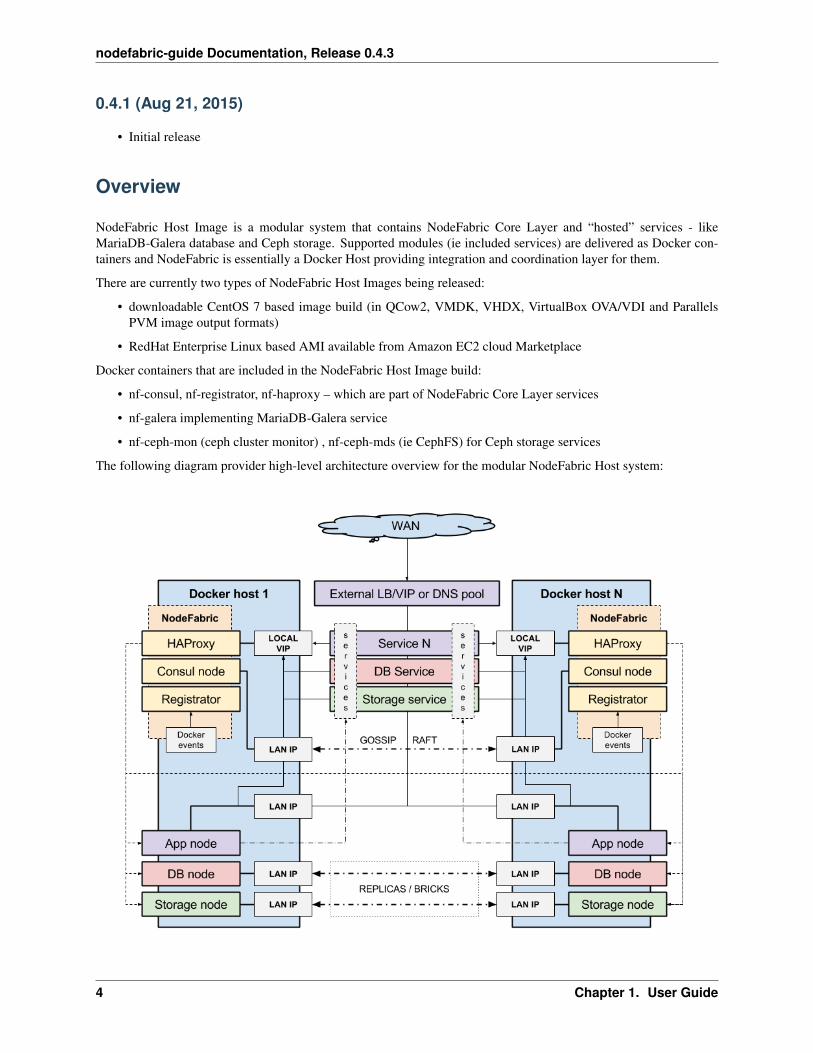
NodeFabric Host Image is a modular system that contains NodeFabric Core Layer and “hosted” services - likeMariaDB-Galera database and Ceph storage. Supported modules (ie included services) are delivered as Docker con-tainers and NodeFabric is essentially a Docker Host providing integration and coordination layer for them.
There are currently two types of NodeFabric Host Images being released:
• downloadable CentOS 7 based image build (in QCow2, VMDK, VHDX, VirtualBox OVA/VDI and ParallelsPVM image output formats)
• RedHat Enterprise Linux based AMI available from Amazon EC2 cloud Marketplace
Docker containers that are included in the NodeFabric Host Image build:
• nf-consul, nf-registrator, nf-haproxy – which are part of NodeFabric Core Layer services
• nf-galera implementing MariaDB-Galera service
• nf-ceph-mon (ceph cluster monitor) , nf-ceph-mds (ie CephFS) for Ceph storage services
The following diagram provider high-level architecture overview for the modular NodeFabric Host system:
4 Chapter 1. User Guide

nodefabric-guide Documentation, Release 0.4.3
NodeFabric Core Layer
This is the highly available integration and coordination layer – based on Consul, Registrator and HAProxy. It im-plements distributed cluster state database and manages internal service endpoints - driven by service discovery andbuilt-in health checks. Inter-service communication can happen over these fault tolerant and load balanced localhost-like service endpoints.
More about the Core Layer modules/containers and their roles:
• nf-consul: provides service discovery, health monitoring and distributed state database based on Consul (https://www.consul.io)
• nf-registrator: implements Consul compatible service registry bridge for Docker (http://gliderlabs.com/registrator)
• nf-haproxy: enables internal service endpoints, utilizing well-known HAProxy load-balancer (http://www.haproxy.com)
About MariaDB-Galera service
MariaDB-Galera Cluster is a synchronous multi-master database cluster - an enhanced, drop-in replacement forMySQL available under GPL v2 license. It’s developed by the MariaDB community with the MariaDB Foundation asits main steward.
MariaDB is a community-developed fork of the MySQL relational database management system and it is kept up todate with the latest MySQL release from the same branch and in most respects MariaDB will work exactly as MySQL.Being a fork of a leading open source software system, it is notable for being led by the original developers of MySQL,who forked it due to concerns over its acquisition by Oracle. All commands, interfaces, libraries and APIs that existin MySQL also exist in MariaDB. There is no need to convert databases to switch to MariaDB.
More info about MariaDB-Galera can be found here: https://mariadb.com/kb/en/mariadb/what-is-mariadb-galera-cluster/
About Ceph storage services
Ceph is a distributed object store and file system designed to provide excellent performance, reliability and scalability.Ceph aims primarily to be completely distributed without a single point of failure, scalable to the exabyte level. Cephreplicates data and makes it fault-tolerant, using commodity hardware and requiring no specific hardware support. Asa result of its design, the system is both self-healing and self-managing, aiming to minimize administration time andother costs.
More info about Ceph can be found here:
• about CephFS: http://ceph.com/ceph-storage/file-system/
• about block storage (RBD): https://ceph.com/ceph-storage/block-storage/
Currently its block-level (RDB) and file-level (CephFS) interfaces are supported and available in NodeFabric. AlthouCeph monitors and metadata daemons are run within Docker containers, OSDs (Object Storage Daemons) are not.These are run directly in the host OS context - one OSD per each underlying Ceph data disk device. You need toprovide and attach dedicated block devices to NodeFabric VM/host nodes that will be initialized as Ceph data disks atlater stage. However you can decide on exact block devices attachment distribution (which disks to which hosts) andyou can have multiple disks (and OSDs) on each and every NodeFabric node.
1.2. Overview 5
nodefabric-guide Documentation, Release 0.4.3
About Docker, CentOS and RHEL
NodeFabric Host Images utilize Docker linux containers technology for achieving modular and expandable archi-tecture. User defined or third-party services can be loaded as additional docker containers and integrated with theNodeFabric Core Layer.
CentOS is a stable Docker Host platform derived from the sources of Red Hat Enterprise Linux (RHEL). NodeFabricHost Image itself is a slightly customized CentOS Docker Host build – adding NodeFabric docker containers and CoreLayer rpm packages – while NodeFabric AMI is based on original RedHat Enterprise Linux distribution.
References:
• https://www.docker.com/
• https://www.centos.org/
• http://www.redhat.com/en/technologies/linux-platforms/enterprise-linux
Deploy
NodeFabric is distributed as a prebuilt VM (or bare-metal) host image – which is used to deploy NodeFabric clusternodes. As we are using quorum based clustering approach - total of 3 or 5 nodes are required to be deployed forsuccessful operation. Exact cluster node count is depending on desired fault-tolerance factor - which can be 1 or 2respectively.
There are two different NodeFabric Host Image builds released:
• RHEL 7 based AMI which is available from AWS Marketplace: https://aws.amazon.com/marketplace/pp/B015WKQZOM
• CentOS 7 based image - available in qcow2, Parallels Desktop pvm, VirtualBox ova (and vdi), Hyper-V vhdxand VMWare vmdk formats – and downloadable from here: https://sourceforge.net/projects/opennode/files/NodeFabric/
Current deployment targets supported are: Amazon EC2, Openstack, VMWare, KVM, Parallels Desktop, VirtualBox,Hyper-V and bare-metal.
In order to bootstrap NodeFabric cluster there are two options to choose from:
• zero-configuration “Boot-and-Go” mode (which requires cloud user-data)
• manual bootstrap procedure (ie supplying cluster hostmap and minimal config options)
Requirements and recommendations
General requirements:
• 3 or 5 cluster nodes - either VMs or bare-metal hosts
• at least 1GB of RAM per node
• at least 10GB dedicated disk device per node for OS root
• at least 64GB dedicated disk device per node for Ceph OSD data
• at least 1x1Gbit network interface
Recommended cluster setup:
• 3 cluster nodes (for single node fault tolerance)
6 Chapter 1. User Guide
nodefabric-guide Documentation, Release 0.4.3
• 4GB or more RAM per node
• 32GB OS root disk
• 1x146GB or more Ceph data disks per each node (more and larger disks are always better, SSDs highly recom-mended for improved perfomance)
• 10Gbit or Infiniband network fabric recommended for better perfomance (especially beneficial for Ceph)
• external load-balancer for services that need to be published for remote consumers
Note: Depending on your deployment target you could use external load-balancers available in AWS, Openstack orin VMWare vSphere
Note: If you need higher fault tolerance factor than 1 – then you need to deploy 5-node cluster (for FT=2 andsacrificing MariaDB-Galera write speed)
Note: 5-node clusters are EXPERIMENTAL at the moment!
User-data
Note: cloud-init is only valid for AWS AMI and nf-centos7-cloud.qcow2 images! Other (ie hypervisor) images doinclude default user account: “centos:changeme”.
NodeFabric Host Images targeted for cloud deployments can take advantage of config metadata (ie user-data) – in thecloud environments where it is available and supplied at boot time. It uses standard cloud-init package (for settinglogin ssh key / password, etc) together with custom nodefabric-cloudinit script (for NF specific options). User-data isused mainly for 2 things:
• activating instances ssh login credentials
• enabling “Boot-and-Go” mode for zero-configuration Core Layer bootstrap
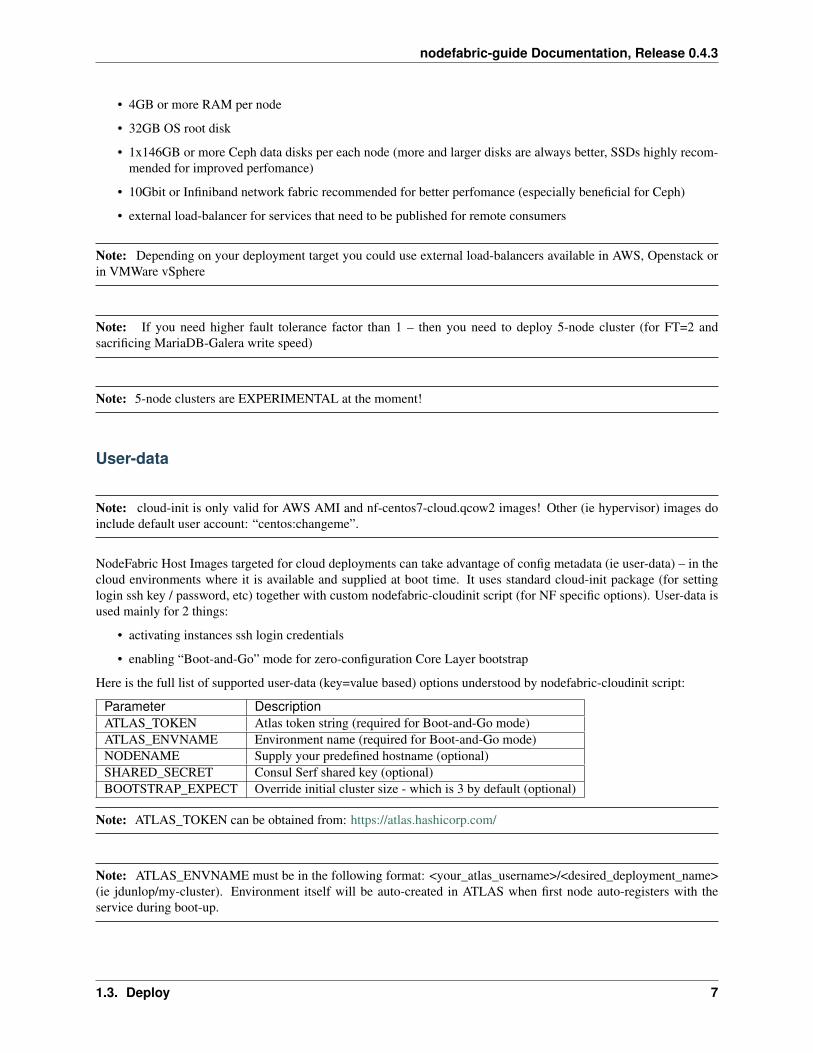
Here is the full list of supported user-data (key=value based) options understood by nodefabric-cloudinit script:
Parameter DescriptionATLAS_TOKEN Atlas token string (required for Boot-and-Go mode)ATLAS_ENVNAME Environment name (required for Boot-and-Go mode)NODENAME Supply your predefined hostname (optional)SHARED_SECRET Consul Serf shared key (optional)BOOTSTRAP_EXPECT Override initial cluster size - which is 3 by default (optional)
Note: ATLAS_TOKEN can be obtained from: https://atlas.hashicorp.com/
Note: ATLAS_ENVNAME must be in the following format: <your_atlas_username>/<desired_deployment_name>(ie jdunlop/my-cluster). Environment itself will be auto-created in ATLAS when first node auto-registers with theservice during boot-up.
1.3. Deploy 7
nodefabric-guide Documentation, Release 0.4.3
Note: SHARED_SECRET can be generated as: ‘openssl rand -base64 16’
Note: Set BOOTSTRAP_EXPECT=5 when bootstrapping 5-node clusters
Note: Current version of nodefabric-cloudinit script parses supported options from: http://169.254.169.254/latest/user-data
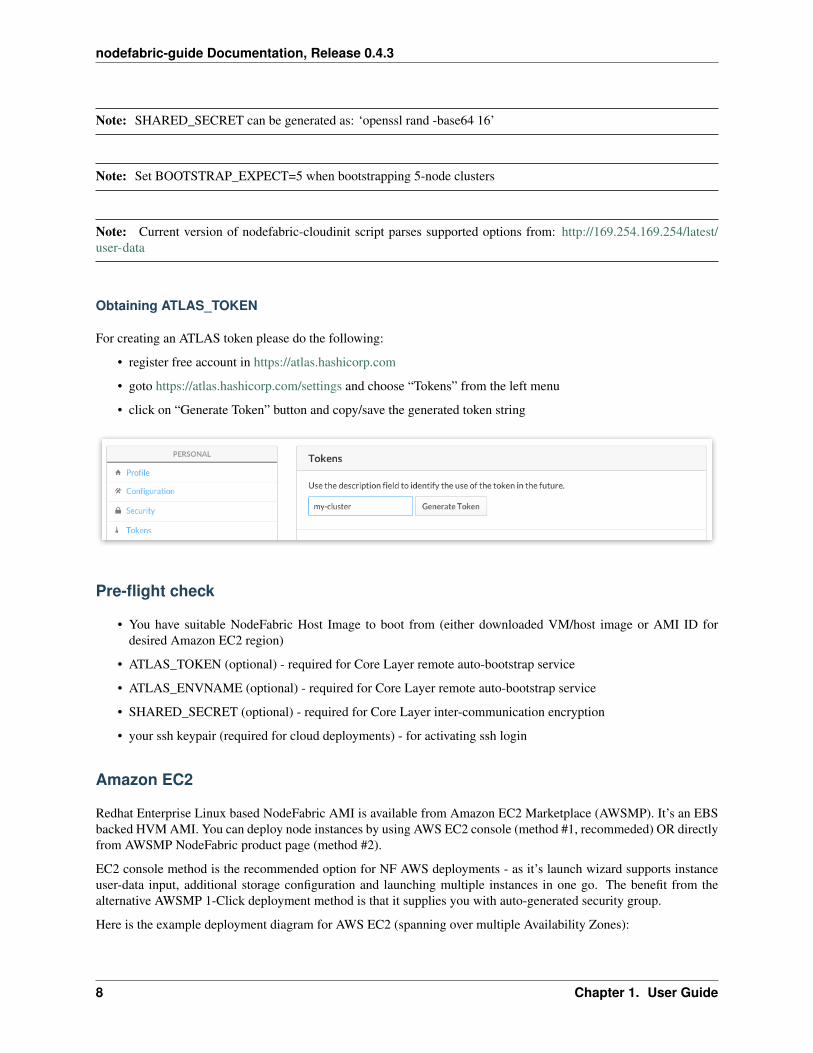
Obtaining ATLAS_TOKEN
For creating an ATLAS token please do the following:
• register free account in https://atlas.hashicorp.com
• goto https://atlas.hashicorp.com/settings and choose “Tokens” from the left menu
• click on “Generate Token” button and copy/save the generated token string
Pre-flight check
• You have suitable NodeFabric Host Image to boot from (either downloaded VM/host image or AMI ID fordesired Amazon EC2 region)
• ATLAS_TOKEN (optional) - required for Core Layer remote auto-bootstrap service
• ATLAS_ENVNAME (optional) - required for Core Layer remote auto-bootstrap service
• SHARED_SECRET (optional) - required for Core Layer inter-communication encryption
• your ssh keypair (required for cloud deployments) - for activating ssh login
Amazon EC2
Redhat Enterprise Linux based NodeFabric AMI is available from Amazon EC2 Marketplace (AWSMP). It’s an EBSbacked HVM AMI. You can deploy node instances by using AWS EC2 console (method #1, recommeded) OR directlyfrom AWSMP NodeFabric product page (method #2).
EC2 console method is the recommended option for NF AWS deployments - as it’s launch wizard supports instanceuser-data input, additional storage configuration and launching multiple instances in one go. The benefit from thealternative AWSMP 1-Click deployment method is that it supplies you with auto-generated security group.
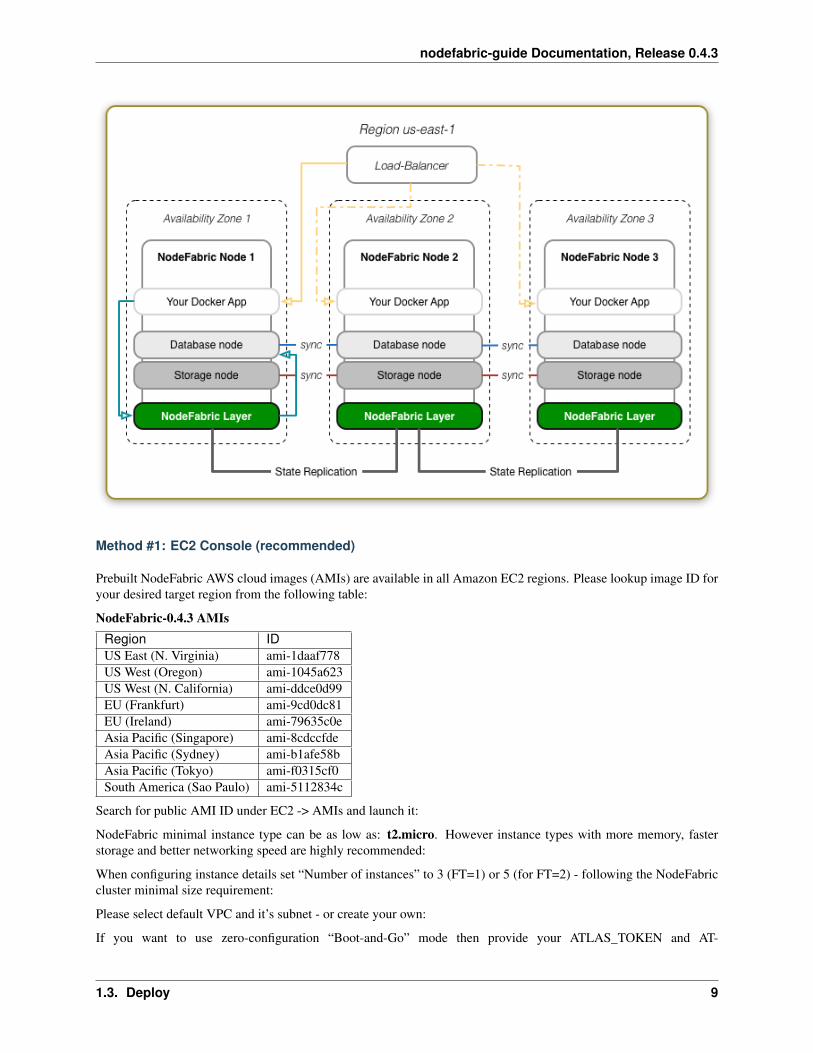
Here is the example deployment diagram for AWS EC2 (spanning over multiple Availability Zones):
8 Chapter 1. User Guide
nodefabric-guide Documentation, Release 0.4.3
Method #1: EC2 Console (recommended)
Prebuilt NodeFabric AWS cloud images (AMIs) are available in all Amazon EC2 regions. Please lookup image ID foryour desired target region from the following table:
NodeFabric-0.4.3 AMIsRegion IDUS East (N. Virginia) ami-1daaf778US West (Oregon) ami-1045a623US West (N. California) ami-ddce0d99EU (Frankfurt) ami-9cd0dc81EU (Ireland) ami-79635c0eAsia Pacific (Singapore) ami-8cdccfdeAsia Pacific (Sydney) ami-b1afe58bAsia Pacific (Tokyo) ami-f0315cf0South America (Sao Paulo) ami-5112834c
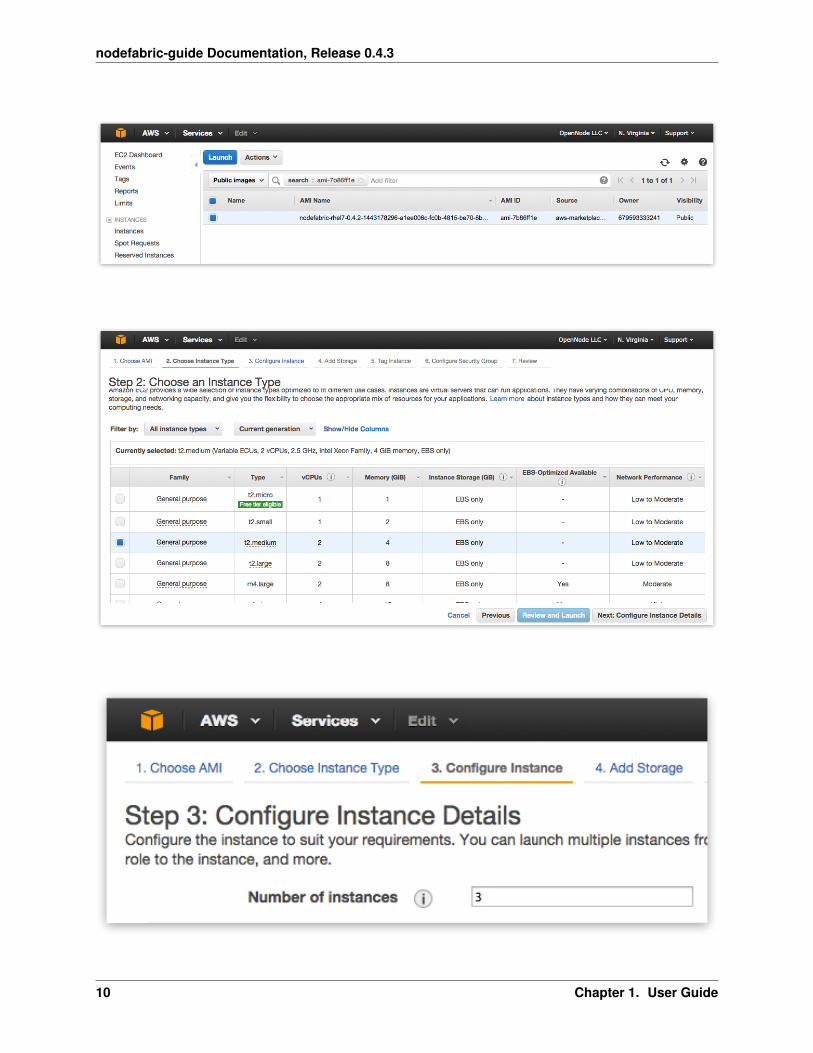
Search for public AMI ID under EC2 -> AMIs and launch it:
NodeFabric minimal instance type can be as low as: t2.micro. However instance types with more memory, fasterstorage and better networking speed are highly recommended:
When configuring instance details set “Number of instances” to 3 (FT=1) or 5 (for FT=2) - following the NodeFabriccluster minimal size requirement:
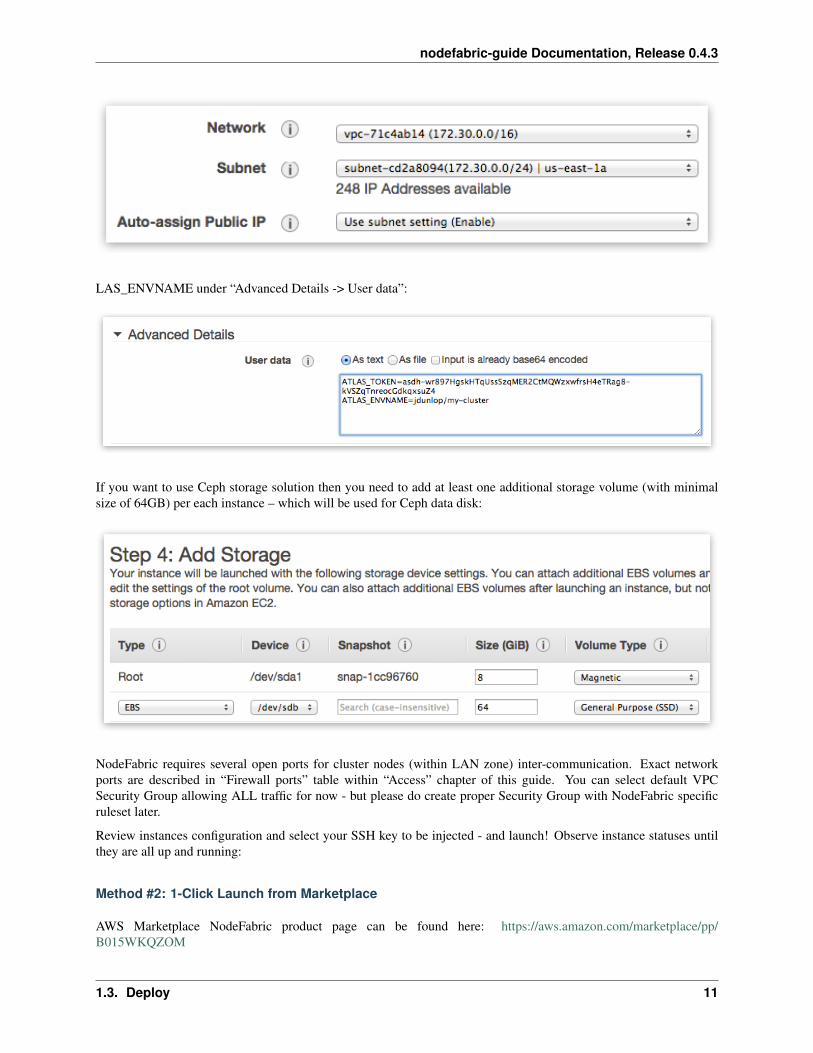
Please select default VPC and it’s subnet - or create your own:
If you want to use zero-configuration “Boot-and-Go” mode then provide your ATLAS_TOKEN and AT-
1.3. Deploy 9
nodefabric-guide Documentation, Release 0.4.3
10 Chapter 1. User Guide
nodefabric-guide Documentation, Release 0.4.3
LAS_ENVNAME under “Advanced Details -> User data”:
If you want to use Ceph storage solution then you need to add at least one additional storage volume (with minimalsize of 64GB) per each instance – which will be used for Ceph data disk:
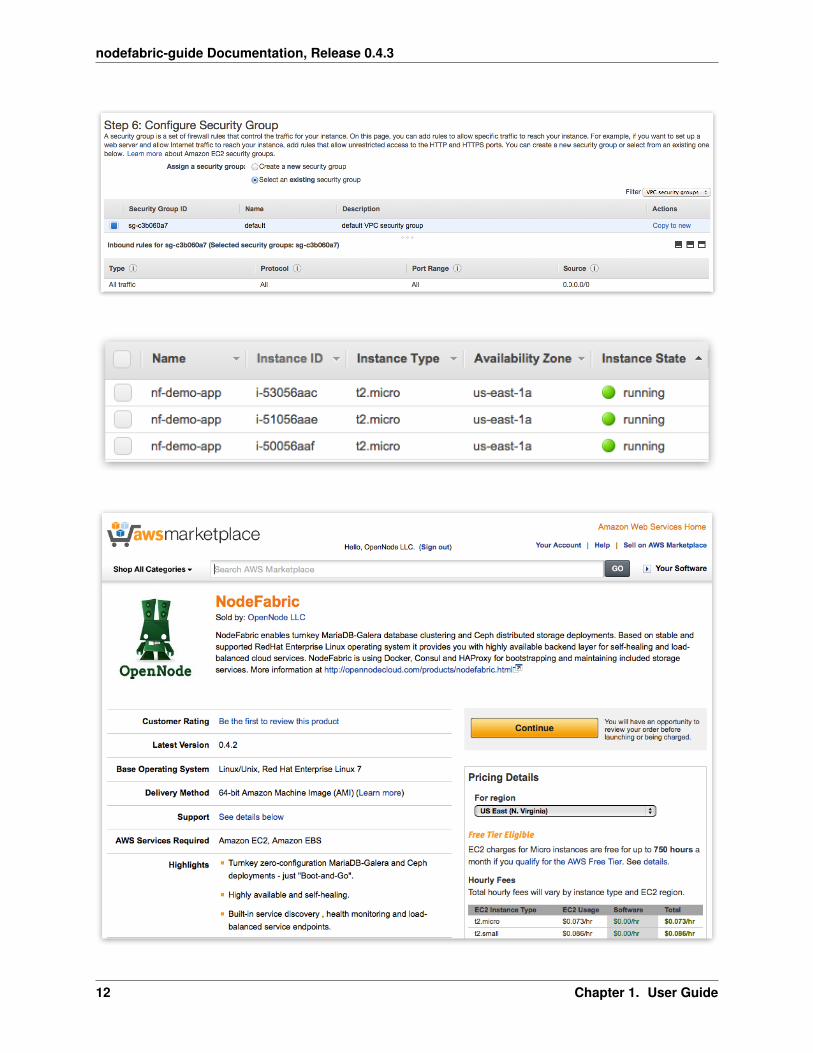
NodeFabric requires several open ports for cluster nodes (within LAN zone) inter-communication. Exact networkports are described in “Firewall ports” table within “Access” chapter of this guide. You can select default VPCSecurity Group allowing ALL traffic for now - but please do create proper Security Group with NodeFabric specificruleset later.
Review instances configuration and select your SSH key to be injected - and launch! Observe instance statuses untilthey are all up and running:
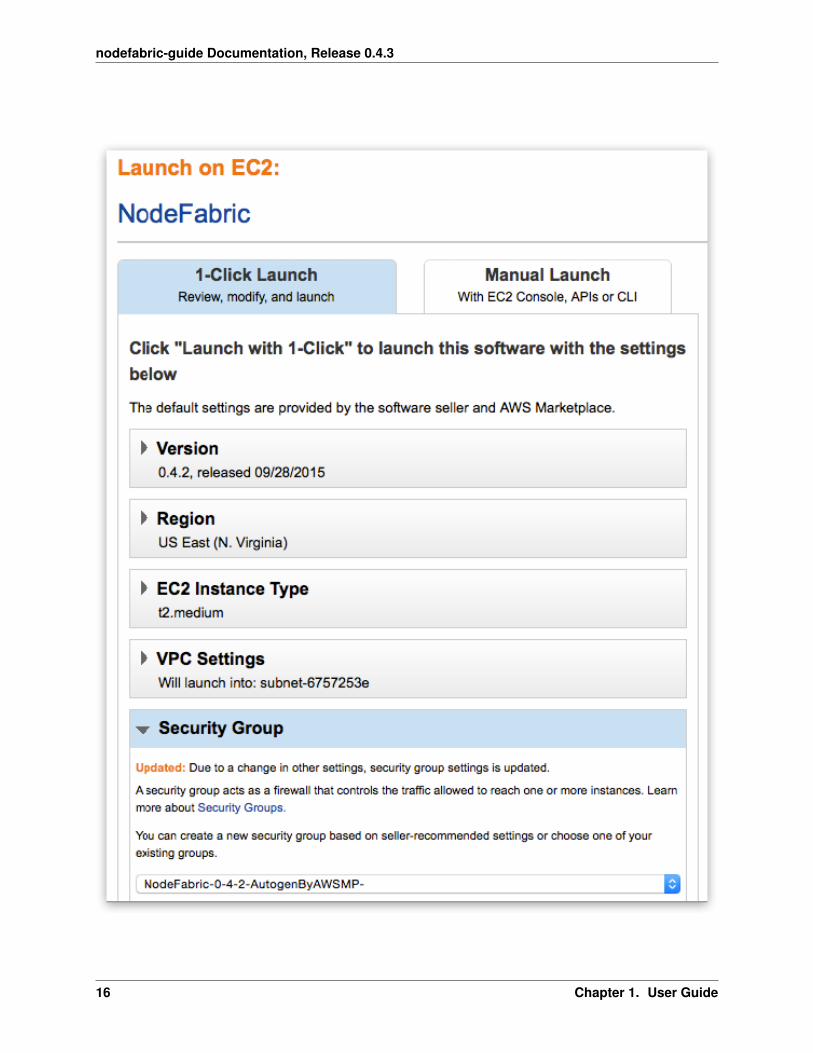
Method #2: 1-Click Launch from Marketplace
AWS Marketplace NodeFabric product page can be found here: https://aws.amazon.com/marketplace/pp/B015WKQZOM
1.3. Deploy 11
nodefabric-guide Documentation, Release 0.4.3
12 Chapter 1. User Guide
nodefabric-guide Documentation, Release 0.4.3
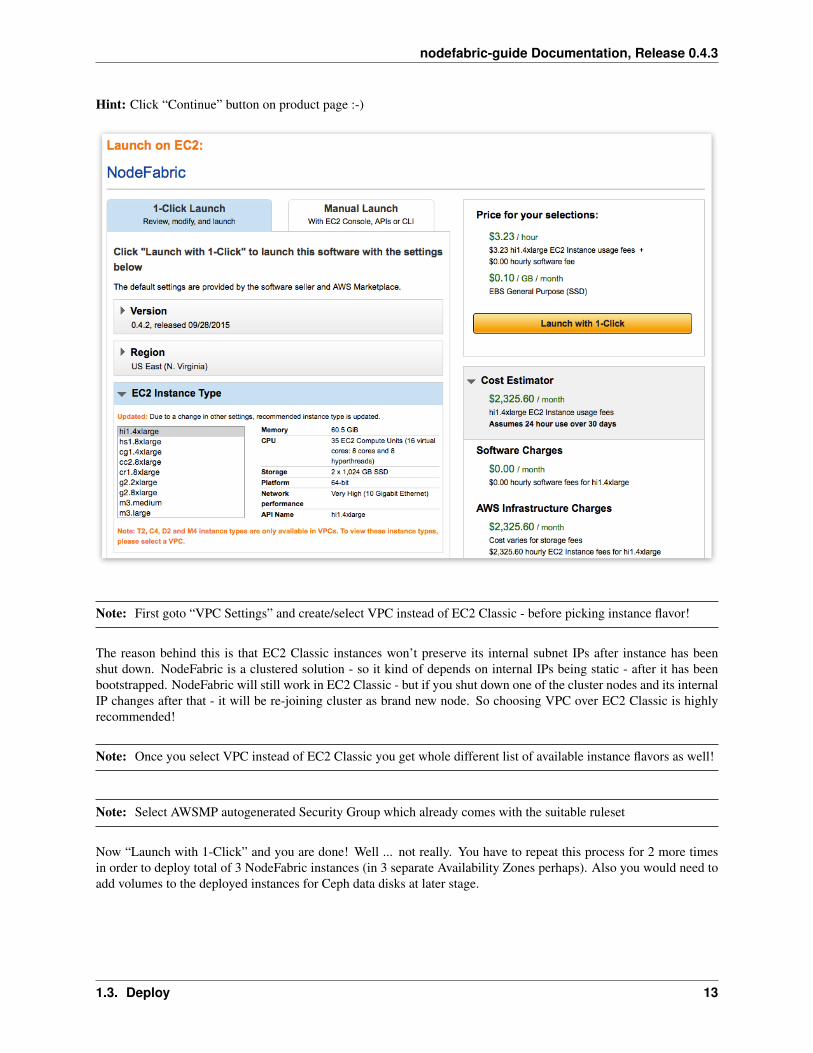
Hint: Click “Continue” button on product page :-)
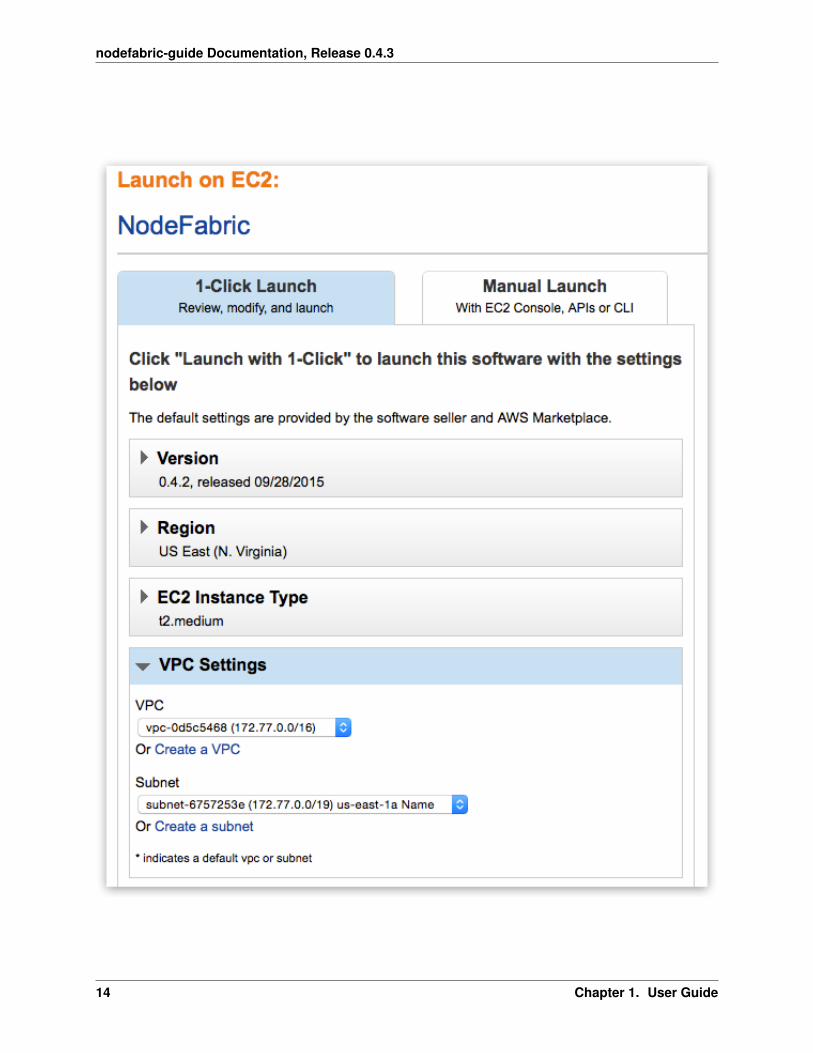
Note: First goto “VPC Settings” and create/select VPC instead of EC2 Classic - before picking instance flavor!
The reason behind this is that EC2 Classic instances won’t preserve its internal subnet IPs after instance has beenshut down. NodeFabric is a clustered solution - so it kind of depends on internal IPs being static - after it has beenbootstrapped. NodeFabric will still work in EC2 Classic - but if you shut down one of the cluster nodes and its internalIP changes after that - it will be re-joining cluster as brand new node. So choosing VPC over EC2 Classic is highlyrecommended!
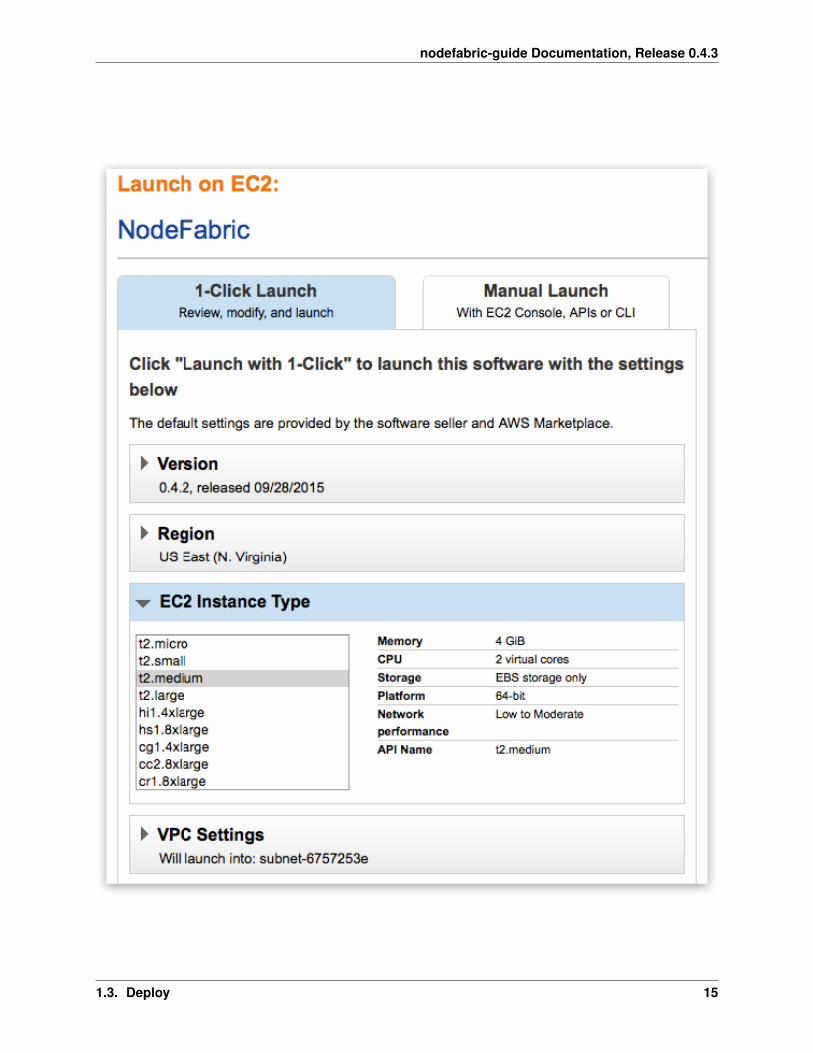
Note: Once you select VPC instead of EC2 Classic you get whole different list of available instance flavors as well!
Note: Select AWSMP autogenerated Security Group which already comes with the suitable ruleset
Now “Launch with 1-Click” and you are done! Well ... not really. You have to repeat this process for 2 more timesin order to deploy total of 3 NodeFabric instances (in 3 separate Availability Zones perhaps). Also you would need toadd volumes to the deployed instances for Ceph data disks at later stage.
1.3. Deploy 13
nodefabric-guide Documentation, Release 0.4.3
14 Chapter 1. User Guide
nodefabric-guide Documentation, Release 0.4.3
1.3. Deploy 15
nodefabric-guide Documentation, Release 0.4.3
16 Chapter 1. User Guide
nodefabric-guide Documentation, Release 0.4.3
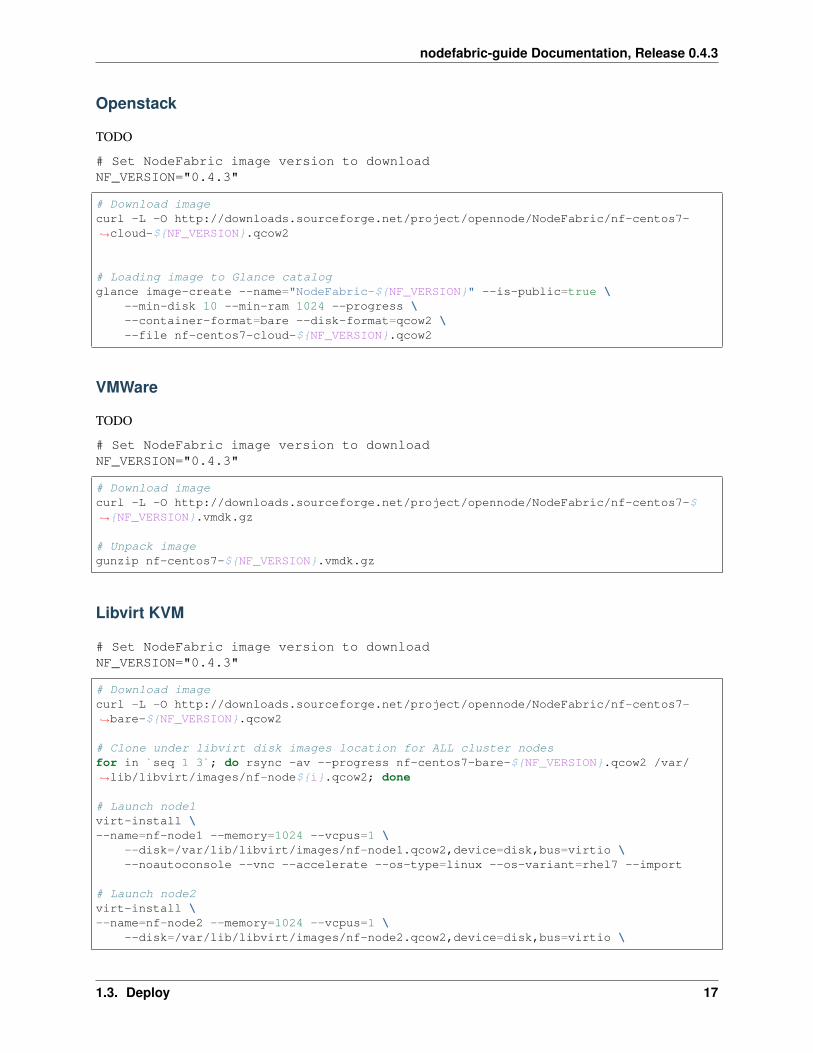
Openstack
TODO
# Set NodeFabric image version to downloadNF_VERSION="0.4.3"
# Download imagecurl -L -O http://downloads.sourceforge.net/project/opennode/NodeFabric/nf-centos7-→˓cloud-${NF_VERSION}.qcow2
# Loading image to Glance catalogglance image-create --name="NodeFabric-${NF_VERSION}" --is-public=true \
--min-disk 10 --min-ram 1024 --progress \--container-format=bare --disk-format=qcow2 \--file nf-centos7-cloud-${NF_VERSION}.qcow2
VMWare
TODO
# Set NodeFabric image version to downloadNF_VERSION="0.4.3"
# Download imagecurl -L -O http://downloads.sourceforge.net/project/opennode/NodeFabric/nf-centos7-$→˓{NF_VERSION}.vmdk.gz
# Unpack imagegunzip nf-centos7-${NF_VERSION}.vmdk.gz
Libvirt KVM
# Set NodeFabric image version to downloadNF_VERSION="0.4.3"
# Download imagecurl -L -O http://downloads.sourceforge.net/project/opennode/NodeFabric/nf-centos7-→˓bare-${NF_VERSION}.qcow2
# Clone under libvirt disk images location for ALL cluster nodesfor in `seq 1 3`; do rsync -av --progress nf-centos7-bare-${NF_VERSION}.qcow2 /var/→˓lib/libvirt/images/nf-node${i}.qcow2; done
# Launch node1virt-install \--name=nf-node1 --memory=1024 --vcpus=1 \
--disk=/var/lib/libvirt/images/nf-node1.qcow2,device=disk,bus=virtio \--noautoconsole --vnc --accelerate --os-type=linux --os-variant=rhel7 --import
# Launch node2virt-install \--name=nf-node2 --memory=1024 --vcpus=1 \
--disk=/var/lib/libvirt/images/nf-node2.qcow2,device=disk,bus=virtio \
1.3. Deploy 17

nodefabric-guide Documentation, Release 0.4.3
--noautoconsole --vnc --accelerate --os-type=linux --os-variant=rhel7 --import
# Launch node3virt-install \--name=nf-node3 --memory=1024 --vcpus=1 \
--disk=/var/lib/libvirt/images/nf-node3.qcow2,device=disk,bus=virtio \--noautoconsole --vnc --accelerate --os-type=linux --os-variant=rhel7 --import
Parallels Desktop
TODO
# Set NodeFabric image version to downloadNF_VERSION="0.4.3"
# Download imagecurl -L -O http://downloads.sourceforge.net/project/opennode/NodeFabric/nf-centos7-$→˓{NF_VERSION}.pvm.tgz
# Unpack imagegunzip nf-centos7-${NF_VERSION}.pvm.tgz
VirtualBox
TODO
# Set NodeFabric image version to downloadNF_VERSION="0.4.3"
# Download imagecurl -L -O http://downloads.sourceforge.net/project/opennode/NodeFabric/nf-centos7-$→˓{NF_VERSION}.ova
Bare metal
TODO
# Set NodeFabric image version to downloadNF_VERSION="0.4.3"
# Set target disk deviceBLKDEV="/dev/sdb"
# Download imagecurl -L -O http://downloads.sourceforge.net/project/opennode/NodeFabric/nf-centos7-→˓bare-${NF_VERSION}.qcow2
# Write image to physical disk deviceqemu-img convert nf-centos7-bare-${NF_VERSION}.qcow2 -O raw $BLKDEV
18 Chapter 1. User Guide
nodefabric-guide Documentation, Release 0.4.3
Access
NodeFabric nodes/instances should be accessed over SSH connection for management, configuration and manualbootstrapping purposes. There are also local and remote web-based status dashboards available - more details aboutthese are presented in the “Management” chapter.
SSH login
Note: Hypervisor images have built-in “centos:changeme” account
Note: Cloud images utilize cloud-init (ie user-data) mechanism for enabling ssh login keys under centos (or ec2-userfor AMI) username
Node/instance default SSH login is “centos:changeme” – but for cloud images (ie for AWS and Openstack) ssh loginkeys are activated through cloud-init method.
Exact details how you need to supply your SSH public key differ between target cloud environments:
• in case of AWS EC2 you have to create your ssh keypair in EC2 console
• in case of Openstack you have to setup your ssh keypair through Horizon UI or nova cli
The following shell commands might be helpful in order to connect to deployed NodeFabric instances:
# Set node IP to connect toNODE_IP="10.211.55.100" # replace this example IP with yours
# Set login usernameNODE_USER="centos" # OR ec2-user for AWS
# Set to your login private key pathKEY_PATH="~/.ssh/id_rsa"
# Connect with your keyssh -i ${KEY_PATH} ${NODE_USER}@${NODE_IP}
Note: You can set root user password and switch to root user priviledged environment by running the followingcommands:
# setting root passwordsudo passwd
# switching to root user environmentsu - root
Firewall ports
NodeFabric open network ports can be divided into 3 separate access zones: localhost only, LAN only andWAN/remote access. Enabling ICMP (ie ping) within LAN zone is highly recommended for diagnostic purposes.
1.4. Access 19
nodefabric-guide Documentation, Release 0.4.3
Management and internal dashboards access should be done over SSH connection (using port forwarding where nec-essary). Outgoing public internet connection is required for optional ATLAS cluster auto-join and remote dashboardservices.
Zone: localhostService port(s) proto commentsConsul CLI RPC 8400 tcpConsul HTTP API & UI 8500 tcp Access UI through ssh pfConsul DNS 8600 tcp/udpHAProxy UI 48080 tcp Access through ssh pf
Zone: LANService port(s) proto commentsConsul RPC 8300 tcpConsul SERF 8301 tcp/udpMariaDB SQL 3306 tcpGalera SST 4444 tcpGalera WSREP 4567 tcp/udpGalera IST 4568 tcpCeph MON 6789 tcpCeph OSDs & MDS 6800:7300 tcp
Zone: WAN/remote accessService port(s) proto commentsSSH 22 tcp Could be limited to LAN onlyConsul WAN gossip 8302 tcp/udp IF remote DCs are enabled
Bootstrap
Each service that NodeFabric provides (ie Core Layer, MariaDB-Galera and Ceph currently) has to be initializedat first - which is a one-time operation. However all services are later capable of repeatable (and non-destructive)automated bootstrapping – even if they loose quorum (ie in case of full cluster/service nodes shutdown/reboot).
Service auto-init (one-time) auto-bootstrap (repeatable)NF Core Layer yes (with ATLAS) yesMariaDB-Galera no yesCeph MON no yesCeph MDS no yes
NF Core Layer
Note: Each node must have its unique FQDN hostname set - otherwise nf-consul service container will refuse tostart!
When NodeFabric nodes boot-up first time - they need to join and form the Consul cluster. For joining the clustertogether each node must have it’s own FQDN hostname set and it needs to know about the other nodes participating- ie how to connect with other nodes (ie having cluster hostmap). There are two supported methods for initializingcluster hostmap:
• by using remote auto-join mode with Hashicorp ATLAS public service (strictly optional but very convinient -hence recommended)
20 Chapter 1. User Guide
nodefabric-guide Documentation, Release 0.4.3
• by editing /etc/nodefabric/nodefabric.hostmap config file manually (on ALL nodes)
Setup node FQDN hostname (IMPORTANT)
Depending on target environment there are three different cases:
• in case of AWS node hostnames will be set by default already (using VPC LAN ip as a hostname) - optionallyit is possible to supply custom hostname through user-data (ie NODENAME=node1.example.com)
• in case of Openstack please set VM hostname by supplying NODENAME=node1.example.com as part of user-data during VM launch
• in case of non-cloud deployments please login to node shell and set hostname manually - by following thisrecipe:
# NB! You must update also HOSTNAME environment variable - as it is used in scripts!export HOSTNAME=node1.nf.inthostnamectl set-hostname $HOSTNAME
# verifyecho $HOSTNAME && hostnamectl
Activating remote auto-join mode
Hashicorp ATLAS service can be used for NF Core Layer remote auto-join. Main benefit here is that you don’t needto know about node internal IPs for constructing the initial nodefabric hostmap - as this data will be collected andspread automagically by ATLAS remote service. ATLAS also adds remote web-based status dashboard as a bonus.Hashicorp does offer free-tier ATLAS service plans in order to get started.
For activating this remote auto-join mode within NodeFabric Host Image you have 2 possible options:
• either by supplying ATLAS_TOKEN and ATLAS_ENVNAME key-value pairs through cloud user-data at boottime (for each node)
• or by manually editing /etc/nodefabric/conf.d/nf-consul.conf file directly (after node has booted up) – and pro-viding ATLAS_TOKEN together with desired ATLAS_ENVNAME there (on ALL nodes)
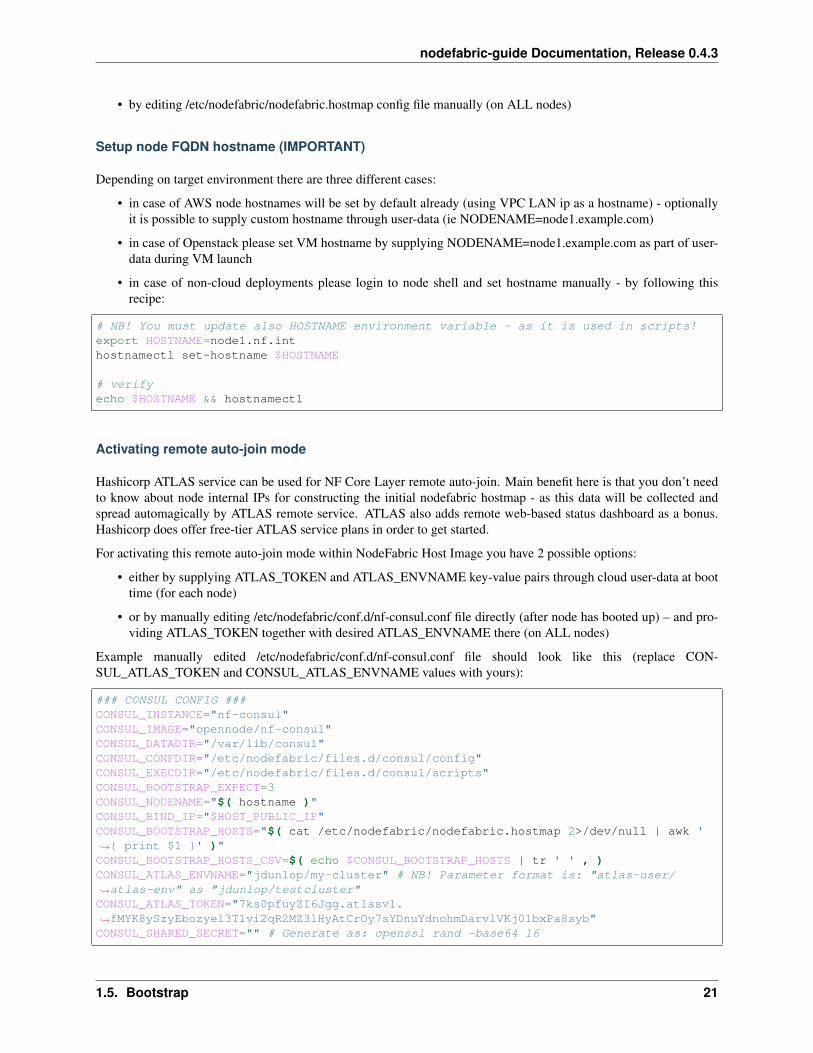
Example manually edited /etc/nodefabric/conf.d/nf-consul.conf file should look like this (replace CON-SUL_ATLAS_TOKEN and CONSUL_ATLAS_ENVNAME values with yours):
### CONSUL CONFIG ###CONSUL_INSTANCE="nf-consul"CONSUL_IMAGE="opennode/nf-consul"CONSUL_DATADIR="/var/lib/consul"CONSUL_CONFDIR="/etc/nodefabric/files.d/consul/config"CONSUL_EXECDIR="/etc/nodefabric/files.d/consul/scripts"CONSUL_BOOTSTRAP_EXPECT=3CONSUL_NODENAME="$( hostname )"CONSUL_BIND_IP="$HOST_PUBLIC_IP"CONSUL_BOOTSTRAP_HOSTS="$( cat /etc/nodefabric/nodefabric.hostmap 2>/dev/null | awk '→˓{ print $1 }' )"CONSUL_BOOTSTRAP_HOSTS_CSV=$( echo $CONSUL_BOOTSTRAP_HOSTS | tr ' ' , )CONSUL_ATLAS_ENVNAME="jdunlop/my-cluster" # NB! Parameter format is: "atlas-user/→˓atlas-env" as "jdunlop/testcluster"CONSUL_ATLAS_TOKEN="7ks0pfuyZI6Jgg.atlasv1.→˓fMYK8ySzyEbozyel3T1vi2qR2MZ3lHyAtCrOy7sYDnuYdnohmDarvlVKj01bxPa8syb"CONSUL_SHARED_SECRET="" # Generate as: openssl rand -base64 16
1.5. Bootstrap 21
nodefabric-guide Documentation, Release 0.4.3
Note: You need to execute ‘systemctl restart nf-consul’ after manually editing nf-consul.conf for ATLAS token andenvironment name!
Manual bootstrap procedure
If you don’t want to use remote auto-join mode then you can simply supply initial cluster hostmap manually - byediting /etc/nodefabric/nodefabric.hostmap config file and providing LAN IP address and hostname for each node instandard hostsfile format (ie ipaddr fqdn shortname in every line).
Example nodefabric.hostmap file would look like this:
192.168.40.101 node01.nf.int node01192.168.40.102 node02.nf.int node02192.168.40.103 node03.nf.int node03
Note: You need to execute ‘systemctl restart nf-consul’ after manually editing /etc/nodefabric/nodefabric.hostmapconfig file!
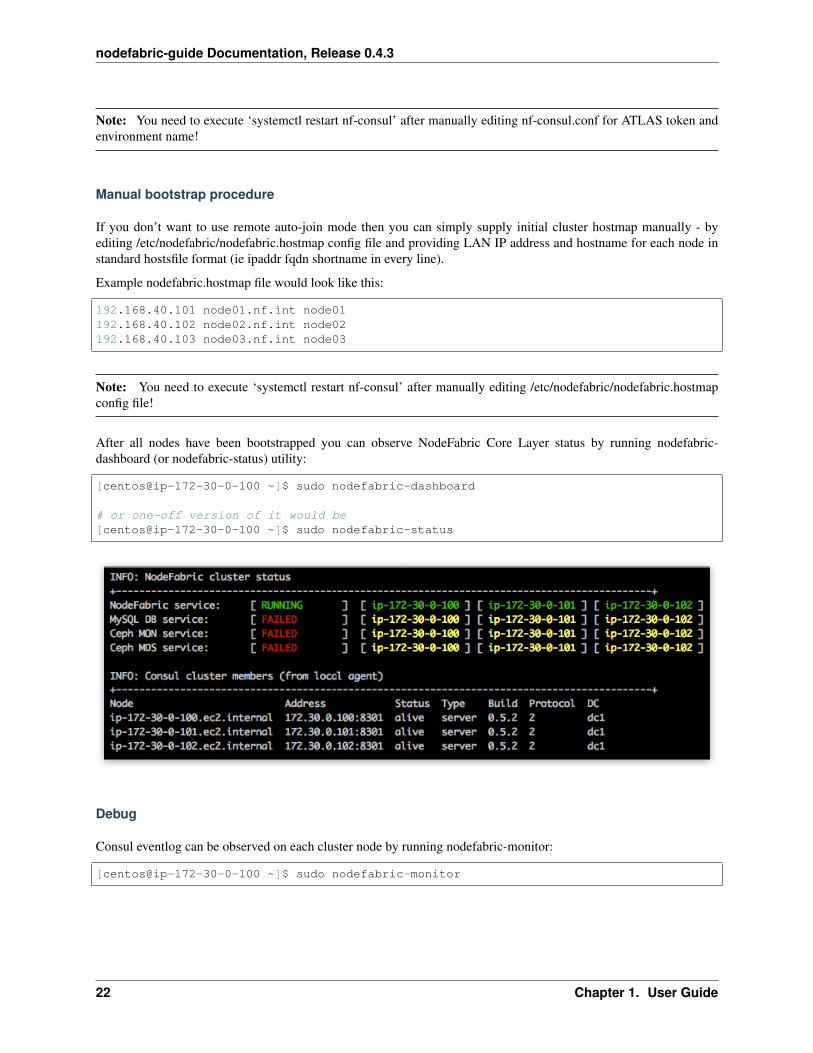
After all nodes have been bootstrapped you can observe NodeFabric Core Layer status by running nodefabric-dashboard (or nodefabric-status) utility:
[centos@ip-172-30-0-100 ~]$ sudo nodefabric-dashboard
# or one-off version of it would be[centos@ip-172-30-0-100 ~]$ sudo nodefabric-status
Debug
Consul eventlog can be observed on each cluster node by running nodefabric-monitor:
[centos@ip-172-30-0-100 ~]$ sudo nodefabric-monitor
22 Chapter 1. User Guide
nodefabric-guide Documentation, Release 0.4.3
Enabling MariaDB-Galera service
MariaDB-Galera database cluster is packaged and delivered as nf-galera docker containers - which are already includedinto NodeFabric Host Image. It’s service management commands are provided by nf-galera-ctl utility:
[root@nf-dev1 ~]# nf-galera-ctl help
Enable DB nodes
For MariaDB-Galera database service initialization you need to enable and start nf-galera containers across all clusternodes. Do this by executing ‘nf-galera-ctl enable’ on a single cluster node:
Note: ‘nf-galera-ctl enable’ command is broadcasted across ALL cluster nodes (ie run it on single node only)
[centos@ip-172-30-0-100 ~]$ sudo nf-galera-ctl enable
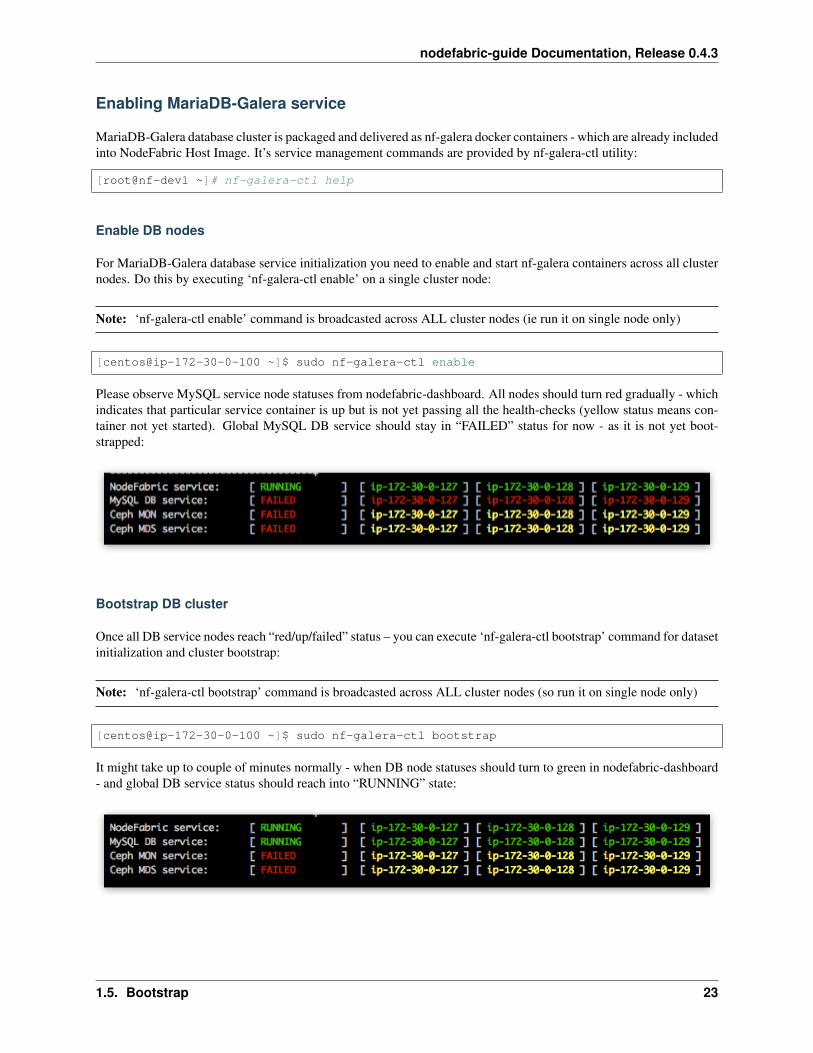
Please observe MySQL service node statuses from nodefabric-dashboard. All nodes should turn red gradually - whichindicates that particular service container is up but is not yet passing all the health-checks (yellow status means con-tainer not yet started). Global MySQL DB service should stay in “FAILED” status for now - as it is not yet boot-strapped:
Bootstrap DB cluster
Once all DB service nodes reach “red/up/failed” status – you can execute ‘nf-galera-ctl bootstrap’ command for datasetinitialization and cluster bootstrap:
Note: ‘nf-galera-ctl bootstrap’ command is broadcasted across ALL cluster nodes (so run it on single node only)
[centos@ip-172-30-0-100 ~]$ sudo nf-galera-ctl bootstrap
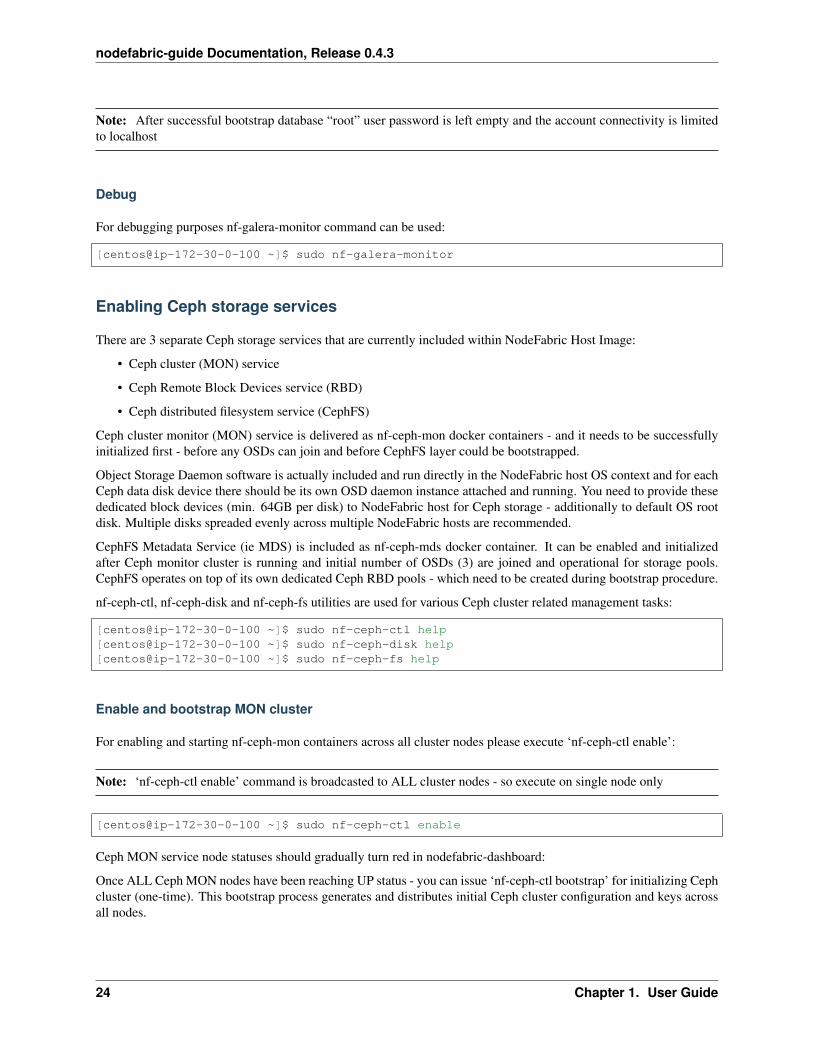
It might take up to couple of minutes normally - when DB node statuses should turn to green in nodefabric-dashboard- and global DB service status should reach into “RUNNING” state:
1.5. Bootstrap 23
nodefabric-guide Documentation, Release 0.4.3
Note: After successful bootstrap database “root” user password is left empty and the account connectivity is limitedto localhost
Debug
For debugging purposes nf-galera-monitor command can be used:
[centos@ip-172-30-0-100 ~]$ sudo nf-galera-monitor
Enabling Ceph storage services
There are 3 separate Ceph storage services that are currently included within NodeFabric Host Image:
• Ceph cluster (MON) service
• Ceph Remote Block Devices service (RBD)
• Ceph distributed filesystem service (CephFS)
Ceph cluster monitor (MON) service is delivered as nf-ceph-mon docker containers - and it needs to be successfullyinitialized first - before any OSDs can join and before CephFS layer could be bootstrapped.
Object Storage Daemon software is actually included and run directly in the NodeFabric host OS context and for eachCeph data disk device there should be its own OSD daemon instance attached and running. You need to provide thesededicated block devices (min. 64GB per disk) to NodeFabric host for Ceph storage - additionally to default OS rootdisk. Multiple disks spreaded evenly across multiple NodeFabric hosts are recommended.
CephFS Metadata Service (ie MDS) is included as nf-ceph-mds docker container. It can be enabled and initializedafter Ceph monitor cluster is running and initial number of OSDs (3) are joined and operational for storage pools.CephFS operates on top of its own dedicated Ceph RBD pools - which need to be created during bootstrap procedure.
nf-ceph-ctl, nf-ceph-disk and nf-ceph-fs utilities are used for various Ceph cluster related management tasks:
[centos@ip-172-30-0-100 ~]$ sudo nf-ceph-ctl help[centos@ip-172-30-0-100 ~]$ sudo nf-ceph-disk help[centos@ip-172-30-0-100 ~]$ sudo nf-ceph-fs help
Enable and bootstrap MON cluster
For enabling and starting nf-ceph-mon containers across all cluster nodes please execute ‘nf-ceph-ctl enable’:
Note: ‘nf-ceph-ctl enable’ command is broadcasted to ALL cluster nodes - so execute on single node only
[centos@ip-172-30-0-100 ~]$ sudo nf-ceph-ctl enable
Ceph MON service node statuses should gradually turn red in nodefabric-dashboard:
Once ALL Ceph MON nodes have been reaching UP status - you can issue ‘nf-ceph-ctl bootstrap’ for initializing Cephcluster (one-time). This bootstrap process generates and distributes initial Ceph cluster configuration and keys acrossall nodes.
24 Chapter 1. User Guide
nodefabric-guide Documentation, Release 0.4.3
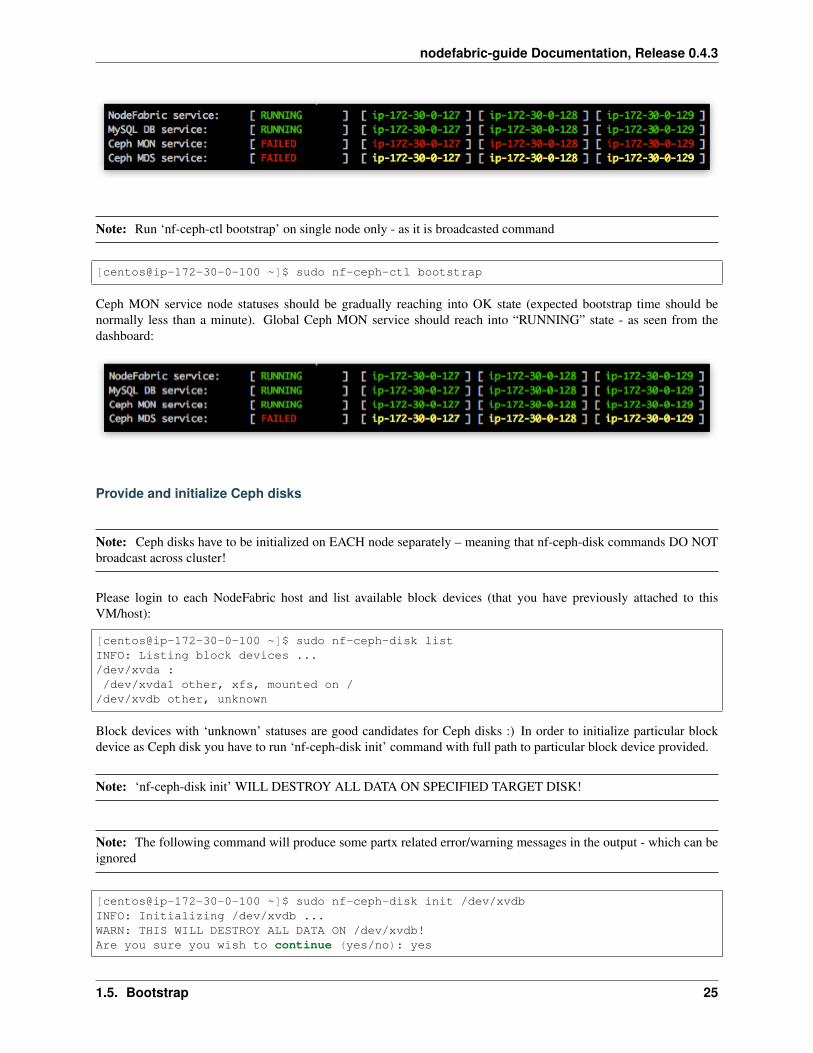
Note: Run ‘nf-ceph-ctl bootstrap’ on single node only - as it is broadcasted command
[centos@ip-172-30-0-100 ~]$ sudo nf-ceph-ctl bootstrap
Ceph MON service node statuses should be gradually reaching into OK state (expected bootstrap time should benormally less than a minute). Global Ceph MON service should reach into “RUNNING” state - as seen from thedashboard:
Provide and initialize Ceph disks
Note: Ceph disks have to be initialized on EACH node separately – meaning that nf-ceph-disk commands DO NOTbroadcast across cluster!
Please login to each NodeFabric host and list available block devices (that you have previously attached to thisVM/host):
[centos@ip-172-30-0-100 ~]$ sudo nf-ceph-disk listINFO: Listing block devices .../dev/xvda :/dev/xvda1 other, xfs, mounted on /
/dev/xvdb other, unknown
Block devices with ‘unknown’ statuses are good candidates for Ceph disks :) In order to initialize particular blockdevice as Ceph disk you have to run ‘nf-ceph-disk init’ command with full path to particular block device provided.
Note: ‘nf-ceph-disk init’ WILL DESTROY ALL DATA ON SPECIFIED TARGET DISK!
Note: The following command will produce some partx related error/warning messages in the output - which can beignored
[centos@ip-172-30-0-100 ~]$ sudo nf-ceph-disk init /dev/xvdbINFO: Initializing /dev/xvdb ...WARN: THIS WILL DESTROY ALL DATA ON /dev/xvdb!Are you sure you wish to continue (yes/no): yes
1.5. Bootstrap 25
nodefabric-guide Documentation, Release 0.4.3
Creating new GPT entries.GPT data structures destroyed! You may now partition the disk using fdisk orother utilities.The operation has completed successfully.partx: specified range <1:0> does not make senseThe operation has completed successfully.partx: /dev/xvdb: error adding partition 2The operation has completed successfully.partx: /dev/xvdb: error adding partitions 1-2meta-data=/dev/xvdb1 isize=2048 agcount=4, agsize=720831 blks
= sectsz=512 attr=2, projid32bit=1= crc=0 finobt=0
data = bsize=4096 blocks=2883323, imaxpct=25= sunit=0 swidth=0 blks
naming =version 2 bsize=4096 ascii-ci=0 ftype=0log =internal log bsize=4096 blocks=2560, version=2
= sectsz=512 sunit=0 blks, lazy-count=1realtime =none extsz=4096 blocks=0, rtextents=0The operation has completed successfully.partx: /dev/xvdb: error adding partitions 1-2INFO: /dev/xvdb initialized!
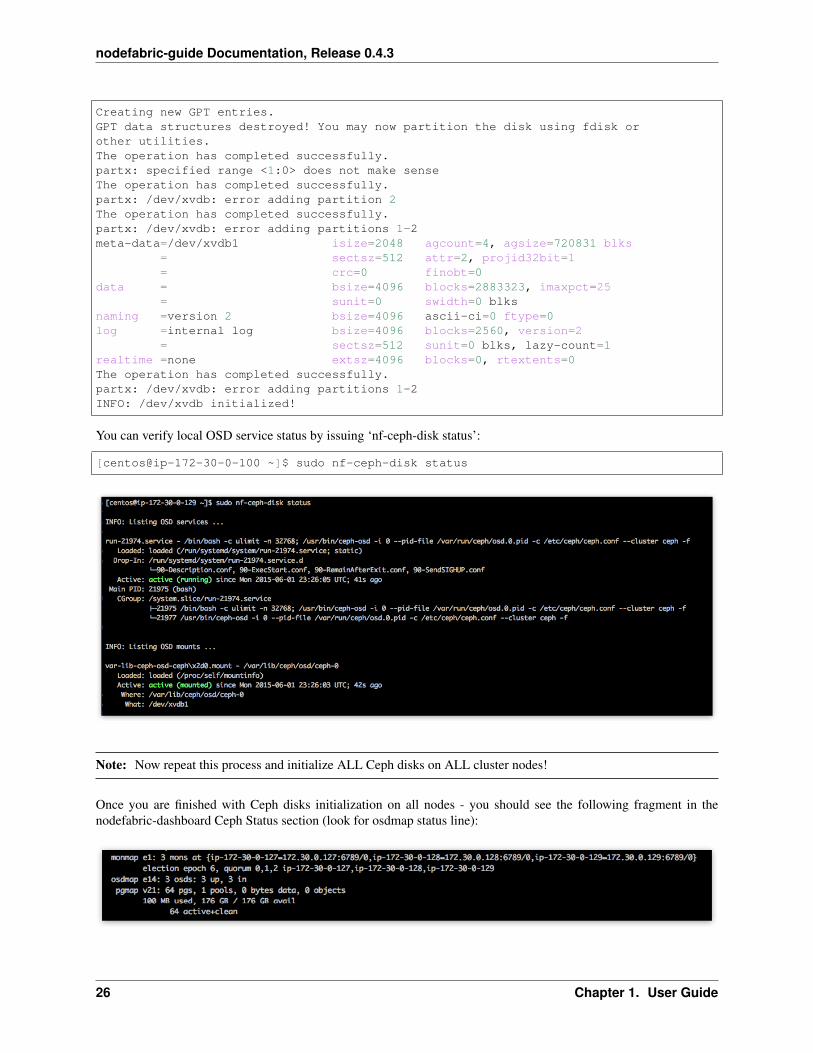
You can verify local OSD service status by issuing ‘nf-ceph-disk status’:
[centos@ip-172-30-0-100 ~]$ sudo nf-ceph-disk status
Note: Now repeat this process and initialize ALL Ceph disks on ALL cluster nodes!
Once you are finished with Ceph disks initialization on all nodes - you should see the following fragment in thenodefabric-dashboard Ceph Status section (look for osdmap status line):
26 Chapter 1. User Guide

nodefabric-guide Documentation, Release 0.4.3
Enable and bootstrap CephFS
For enabling CephFS layer - a POSIX compliant distributed filesystem - you need to start Ceph Metadata Daemoncontainers first (command is broadcasted across cluster nodes):
[centos@ip-172-30-0-100 ~]$ sudo nf-ceph-fs enable
Observe global Ceph MDS Service reaching into “RUNNING” state in nodefabric-dashboard - before proceeding withCephFS bootstrap:
Once Ceph MDS service is running you can issue CephFS bootstrap command (execute on single node):
[centos@ip-172-30-0-100 ~]$ sudo nf-ceph-fs bootstrap
After that you should see mdsmap line in Ceph status section in nodefabric-dashboard:
Note: Currently Ceph MDS service is run in active-passive mode - as suggested by Ceph authors for the sake of thestability
Now you can proceed and mount CephFS on each cluster node - if you desire to do so:
Note: This command is not broadcasted and enables only local /srv/cephfs mountpoint
[centos@ip-172-30-0-100 ~]$ sudo nf-ceph-fs mount
For checking global Ceph Metadata service status and local mountpoint on current node please run:
[centos@ip-172-30-0-100 ~]$ sudo nf-ceph-fs status
1.5. Bootstrap 27
nodefabric-guide Documentation, Release 0.4.3
Manage
Dashboards
There are several status dashboards available with NodeFabric:
• nodefabric-dashboard from SSH console
• local Consul web UI at: http://localhost:8500/ui/
• remote ATLAS dashboard at: https://atlas.hashicorp.com/<user>/environments/<envname>
• HAProxy web UI at: http://localhost:48080/
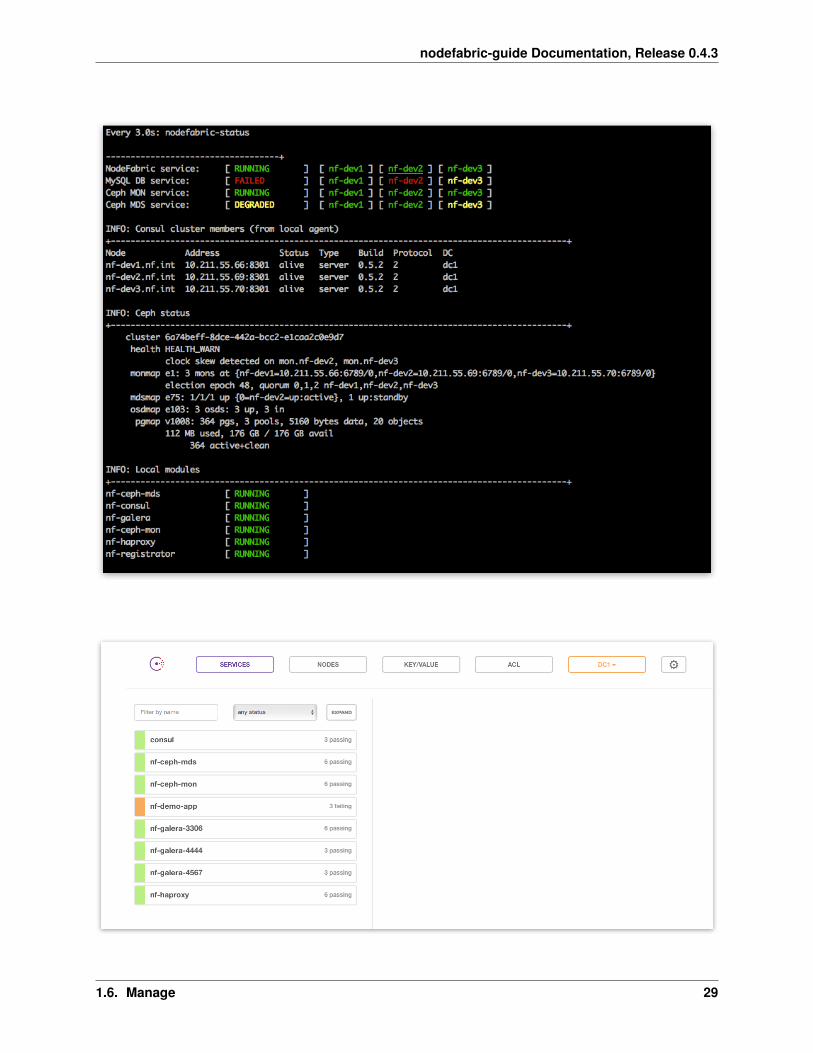
nodefabric-dashboard
This default console based dashboard provides cluster-wide status overview across different NodeFabric service layerstogether with more detailed Consul membership and Ceph status boards.
# Run from arbitrary node consolenodefabric-dashboard
Global services statuses are presented as RUNNING, DEGRADED or FAILED:
• RUNNING means that all nodes participating in service are OK
• DEGRADED means that service has quorum and is operational - yet one or more nodes participating are failing
• FAILED means that service has lost quorum and is not available
Service statuses on each node participating in a global service offering are colored as follows:
• GREEN means service is OK (ie passing health checks)
• YELLOW means that service module is not started
• RED means that service module is started but not passing health checks (ie failing)
Note: Underlined node represents current Consul master
Consul web UI
This local web UI provides cluster-wide status overview about internal services (as they get registered in consul) andabout their built-in health checks. Editing support for Consul highly available Key-Value store is also included.
Note: Consul UI is only available from localhost (use ssh port forwarding for remote access)
# Setup local port forwarding over SSH connection to Consul UI portNODE_IP="10.211.55.100"NODE_USER="centos"KEY_PATH="~/.ssh/id_rsa"ssh -L 8500:localhost:8500 -i ${KEY_PATH} ${NODE_USER}@${NODE_IP}
# Load Consul UI in your web browserhttp://localhost:8500/ui/
28 Chapter 1. User Guide
nodefabric-guide Documentation, Release 0.4.3
1.6. Manage 29
nodefabric-guide Documentation, Release 0.4.3
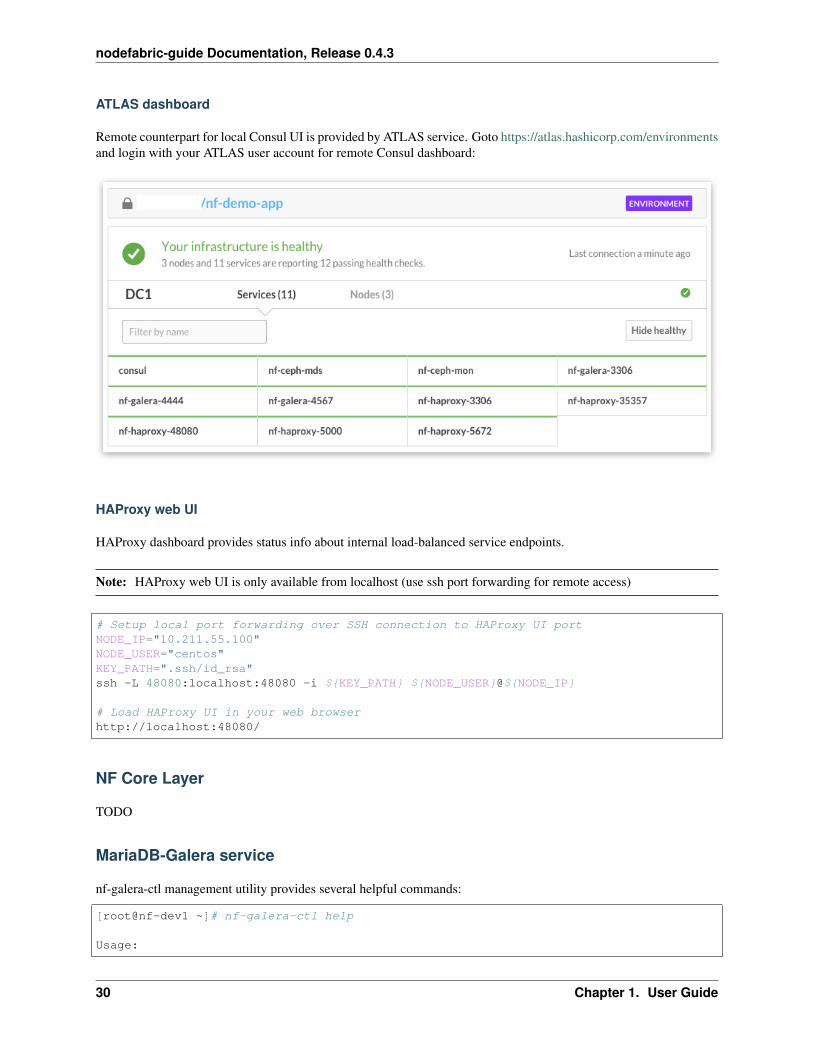
ATLAS dashboard
Remote counterpart for local Consul UI is provided by ATLAS service. Goto https://atlas.hashicorp.com/environmentsand login with your ATLAS user account for remote Consul dashboard:
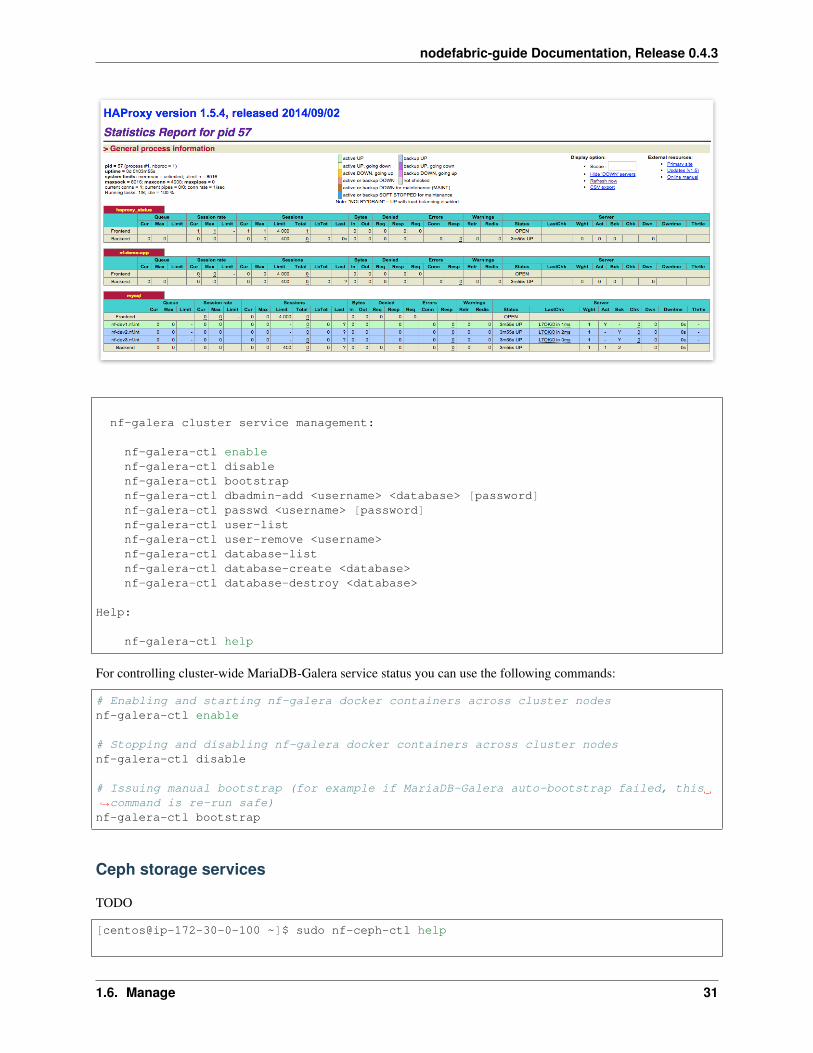
HAProxy web UI
HAProxy dashboard provides status info about internal load-balanced service endpoints.
Note: HAProxy web UI is only available from localhost (use ssh port forwarding for remote access)
# Setup local port forwarding over SSH connection to HAProxy UI portNODE_IP="10.211.55.100"NODE_USER="centos"KEY_PATH=".ssh/id_rsa"ssh -L 48080:localhost:48080 -i ${KEY_PATH} ${NODE_USER}@${NODE_IP}
# Load HAProxy UI in your web browserhttp://localhost:48080/
NF Core Layer
TODO
MariaDB-Galera service
nf-galera-ctl management utility provides several helpful commands:
[root@nf-dev1 ~]# nf-galera-ctl help
Usage:
30 Chapter 1. User Guide
nodefabric-guide Documentation, Release 0.4.3
nf-galera cluster service management:
nf-galera-ctl enablenf-galera-ctl disablenf-galera-ctl bootstrapnf-galera-ctl dbadmin-add <username> <database> [password]nf-galera-ctl passwd <username> [password]nf-galera-ctl user-listnf-galera-ctl user-remove <username>nf-galera-ctl database-listnf-galera-ctl database-create <database>nf-galera-ctl database-destroy <database>
Help:
nf-galera-ctl help
For controlling cluster-wide MariaDB-Galera service status you can use the following commands:
# Enabling and starting nf-galera docker containers across cluster nodesnf-galera-ctl enable
# Stopping and disabling nf-galera docker containers across cluster nodesnf-galera-ctl disable
# Issuing manual bootstrap (for example if MariaDB-Galera auto-bootstrap failed, this→˓command is re-run safe)nf-galera-ctl bootstrap
Ceph storage services
TODO
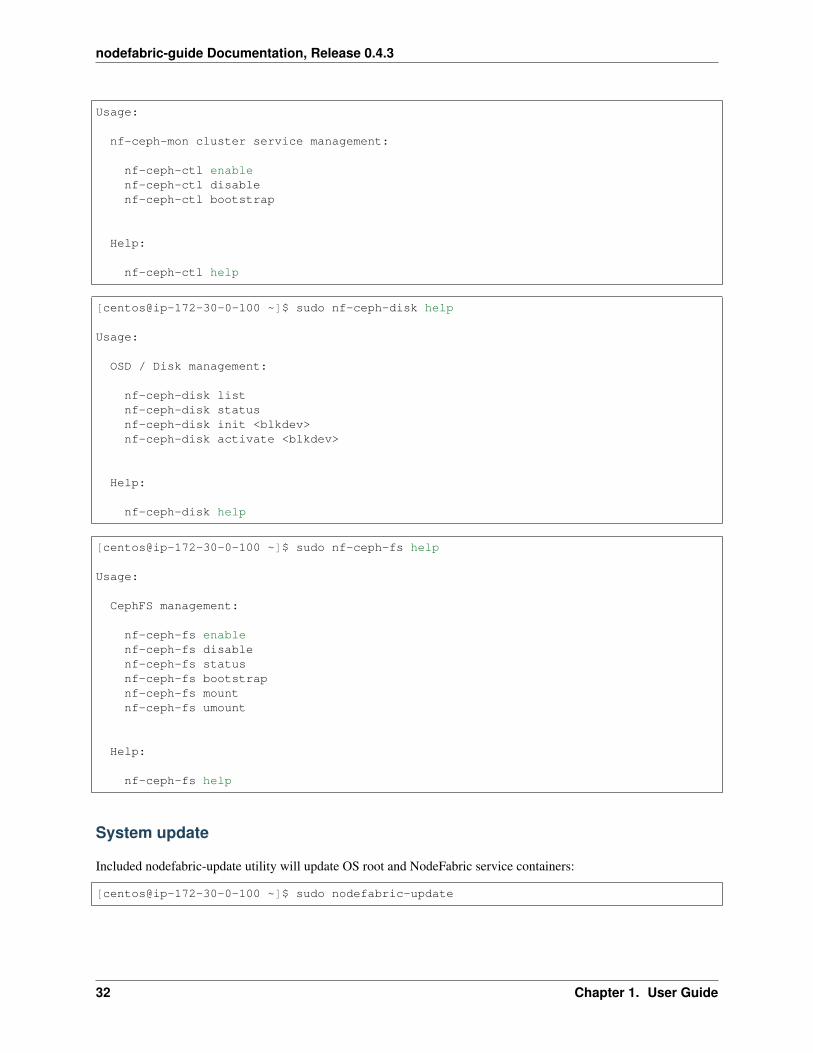
[centos@ip-172-30-0-100 ~]$ sudo nf-ceph-ctl help
1.6. Manage 31
nodefabric-guide Documentation, Release 0.4.3
Usage:
nf-ceph-mon cluster service management:
nf-ceph-ctl enablenf-ceph-ctl disablenf-ceph-ctl bootstrap
Help:
nf-ceph-ctl help
[centos@ip-172-30-0-100 ~]$ sudo nf-ceph-disk help
Usage:
OSD / Disk management:
nf-ceph-disk listnf-ceph-disk statusnf-ceph-disk init <blkdev>nf-ceph-disk activate <blkdev>
Help:
nf-ceph-disk help
[centos@ip-172-30-0-100 ~]$ sudo nf-ceph-fs help
Usage:
CephFS management:
nf-ceph-fs enablenf-ceph-fs disablenf-ceph-fs statusnf-ceph-fs bootstrapnf-ceph-fs mountnf-ceph-fs umount
Help:
nf-ceph-fs help
System update
Included nodefabric-update utility will update OS root and NodeFabric service containers:
[centos@ip-172-30-0-100 ~]$ sudo nodefabric-update
32 Chapter 1. User Guide
nodefabric-guide Documentation, Release 0.4.3
Troubleshoot
Database cluster not auto-bootstrapping after full shutdown
In case of database cluster bootstrap problems you can re-run ‘nf-galera-ctl bootstrap’ - as it is designed to be re-runsafe. It does not re-initialize dataset once it already exists – it only recovers last GTID and transforms node with thelatest dataset as primary node.
sudo nf-galera-ctl bootstrapsudo nf-galera-monitor
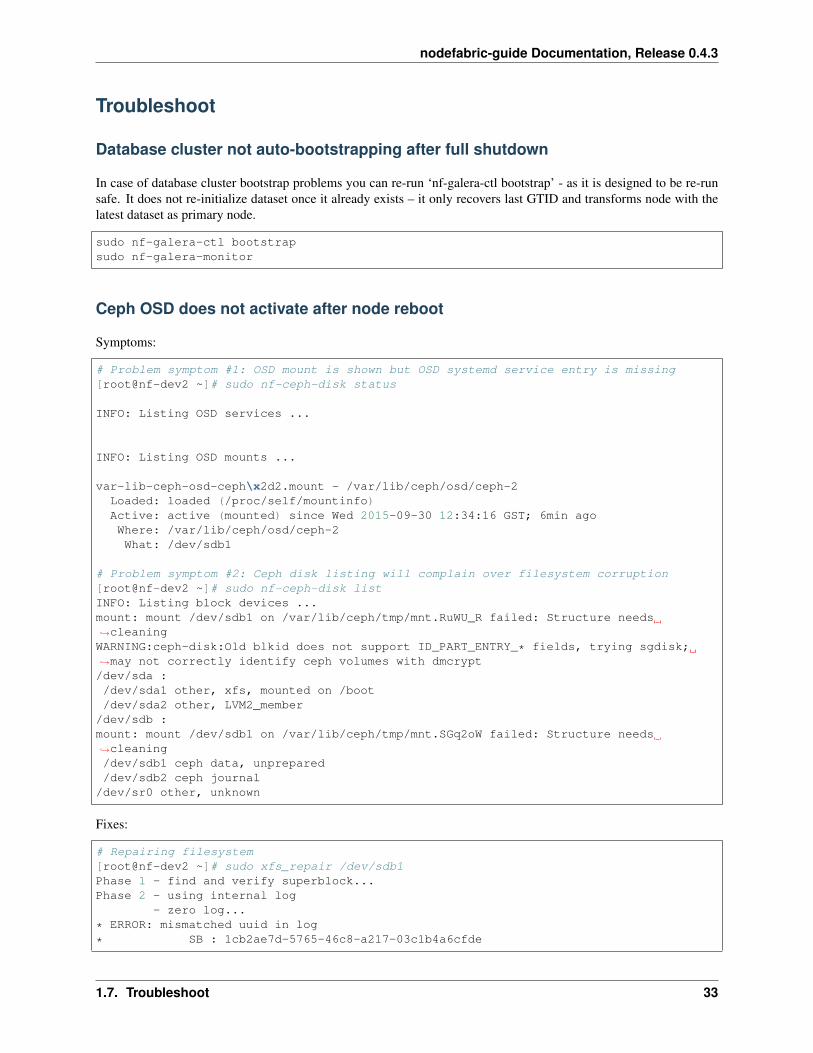
Ceph OSD does not activate after node reboot
Symptoms:
# Problem symptom #1: OSD mount is shown but OSD systemd service entry is missing[root@nf-dev2 ~]# sudo nf-ceph-disk status
INFO: Listing OSD services ...
INFO: Listing OSD mounts ...
var-lib-ceph-osd-ceph\x2d2.mount - /var/lib/ceph/osd/ceph-2Loaded: loaded (/proc/self/mountinfo)Active: active (mounted) since Wed 2015-09-30 12:34:16 GST; 6min agoWhere: /var/lib/ceph/osd/ceph-2What: /dev/sdb1
# Problem symptom #2: Ceph disk listing will complain over filesystem corruption[root@nf-dev2 ~]# sudo nf-ceph-disk listINFO: Listing block devices ...mount: mount /dev/sdb1 on /var/lib/ceph/tmp/mnt.RuWU_R failed: Structure needs→˓cleaningWARNING:ceph-disk:Old blkid does not support ID_PART_ENTRY_* fields, trying sgdisk;→˓may not correctly identify ceph volumes with dmcrypt/dev/sda :/dev/sda1 other, xfs, mounted on /boot/dev/sda2 other, LVM2_member
/dev/sdb :mount: mount /dev/sdb1 on /var/lib/ceph/tmp/mnt.SGq2oW failed: Structure needs→˓cleaning/dev/sdb1 ceph data, unprepared/dev/sdb2 ceph journal
/dev/sr0 other, unknown
Fixes:
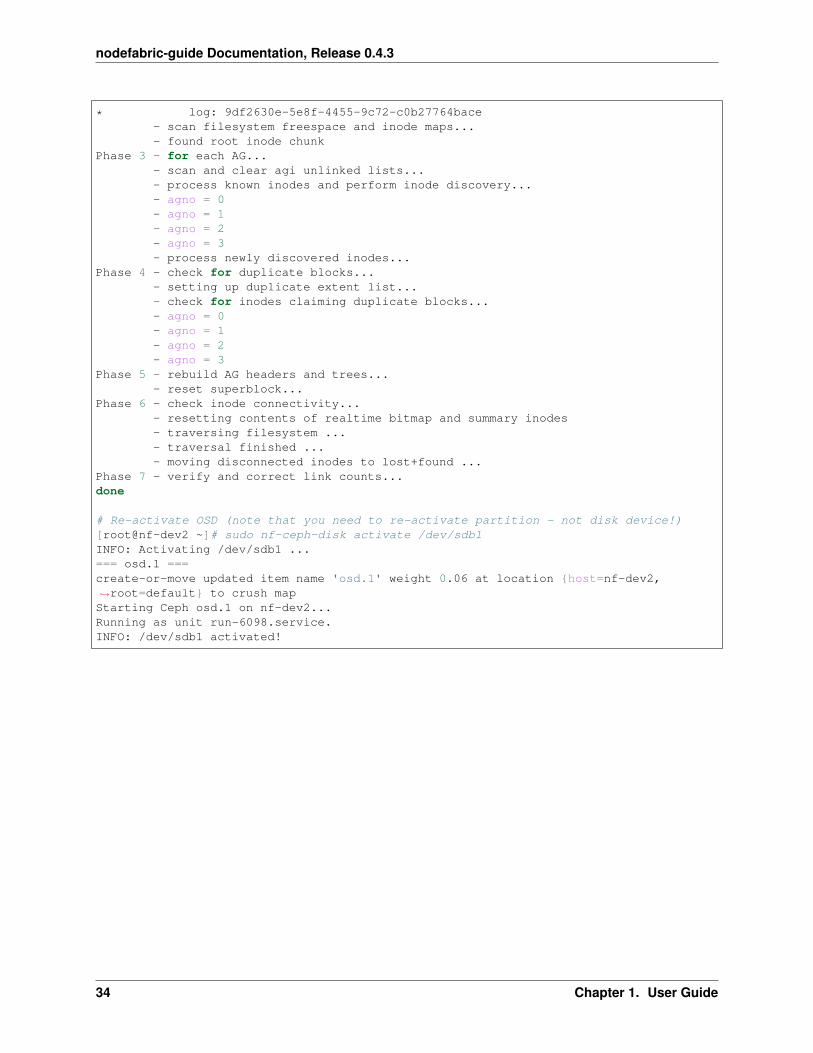
# Repairing filesystem[root@nf-dev2 ~]# sudo xfs_repair /dev/sdb1Phase 1 - find and verify superblock...Phase 2 - using internal log
- zero log...
* ERROR: mismatched uuid in log
* SB : 1cb2ae7d-5765-46c8-a217-03c1b4a6cfde
1.7. Troubleshoot 33
nodefabric-guide Documentation, Release 0.4.3
* log: 9df2630e-5e8f-4455-9c72-c0b27764bace- scan filesystem freespace and inode maps...- found root inode chunk
Phase 3 - for each AG...- scan and clear agi unlinked lists...- process known inodes and perform inode discovery...- agno = 0- agno = 1- agno = 2- agno = 3- process newly discovered inodes...
Phase 4 - check for duplicate blocks...- setting up duplicate extent list...- check for inodes claiming duplicate blocks...- agno = 0- agno = 1- agno = 2- agno = 3
Phase 5 - rebuild AG headers and trees...- reset superblock...
Phase 6 - check inode connectivity...- resetting contents of realtime bitmap and summary inodes- traversing filesystem ...- traversal finished ...- moving disconnected inodes to lost+found ...
Phase 7 - verify and correct link counts...done
# Re-activate OSD (note that you need to re-activate partition - not disk device!)[root@nf-dev2 ~]# sudo nf-ceph-disk activate /dev/sdb1INFO: Activating /dev/sdb1 ...=== osd.1 ===create-or-move updated item name 'osd.1' weight 0.06 at location {host=nf-dev2,→˓root=default} to crush mapStarting Ceph osd.1 on nf-dev2...Running as unit run-6098.service.INFO: /dev/sdb1 activated!
34 Chapter 1. User Guide
CHAPTER 2
License
NodeFabric is released under open-source Apache v2 license.
35