Embed Size (px)
Citation preview
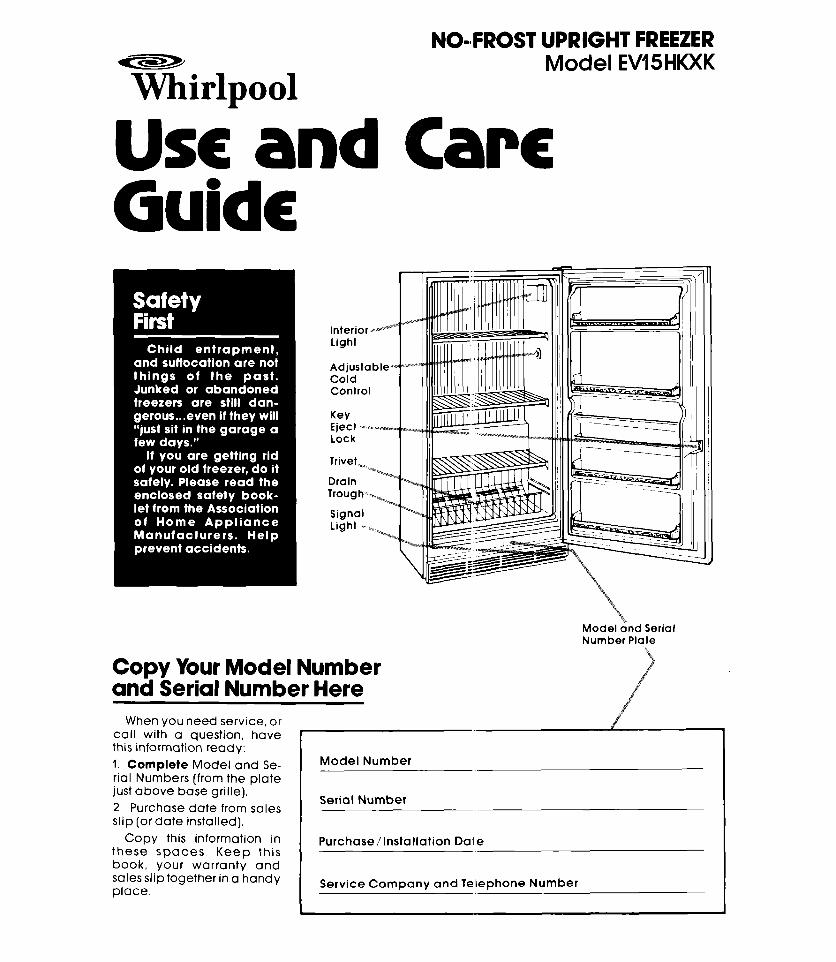
NO-#FROST UPRIGHT FREEZER Model EVISHKXK
Whirlpool
USC and Care Guide
\* Model and Serial Number Plate
Copy Your Model Number and Serial Number Here
When you need service, or
/
call with a question, have - this information ready:
,./
1. Complete Model and Se- rial Numbers (from the plate just above base grille). 2 Purchase date from sales slip [or date installed).
Copy this information in these spaces. Keep this book, vour warrantv and
Model Number
Serial Number
Purchase/Installation Dale
SQleS slib together in a handy place.
I
Service Company and Telephone Number
Before you plug it in
Before using your freezer, you are personally responsible for making sure that it... l is installed and leveled on a floor that will
hold the weight, and in an area suitable for its size and use.
l is connected only to the right kind of outlet, with the right electrical supply and grounding.
l is used only for jobs expected of home freezers.
l is not near an oven, radiator or other heat source.
l is prc perly maintained.
l is in cd dry sheltered place. l is use83 in an area where the room tempera-
ture vill not exceed 110°F (433°C). l is not run where there are explosive fumes.
l is not Ilsed by children or others who may not understand how it should be used.
l is not loaded with food before it has time to get properly cold.
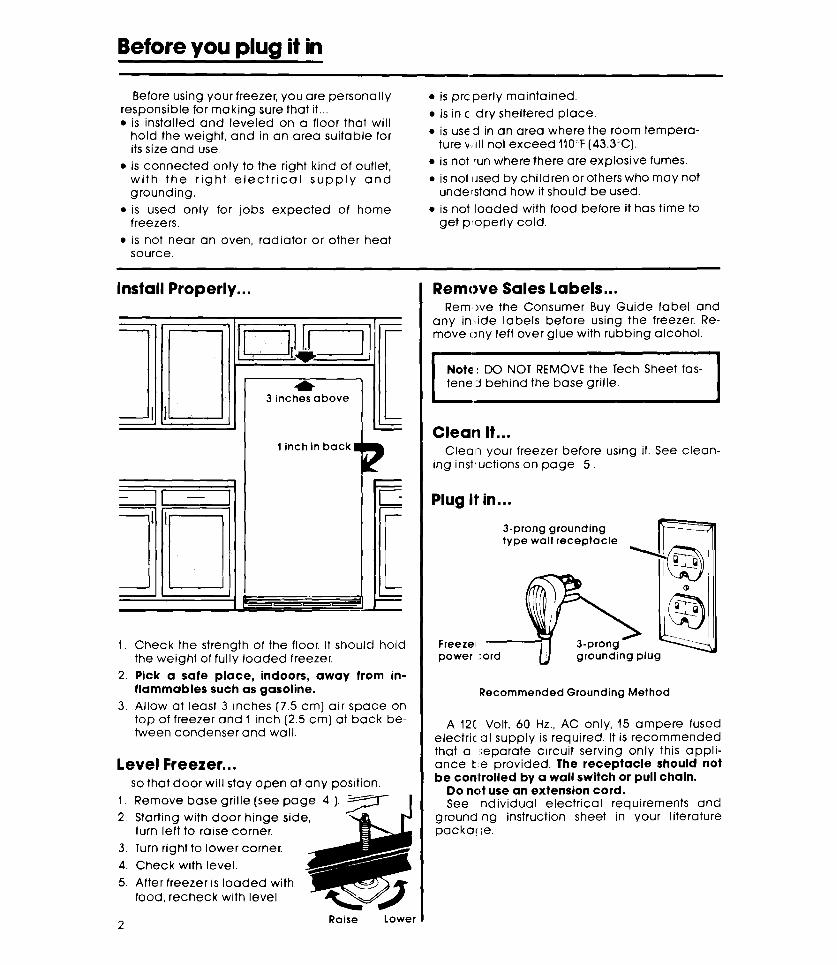
Install Properly.. .
1 inch in back1
1. Check the strength of the floor It should hold the weight of fully loaded freezer.
2. Pick a sate place, indoors, away from in- flammables such as gasoline.
3. Allow at least 3 inches (7.5 cm] air space on top of freezer and 1 tnch (2.5 cm] at back be- tween condenser and wall.
level Freezer.. . so that door will stay open at any position.
1. Remove base grille (see page 4 1. 7 1
2. Starting with door hinge sid turn left to raise corner.
3. Turn right to lower corner
4. Check with level
5. After freezer is loaded with food, recheck with level.
2 Raise Lower
Remove Sales labels... Rem’)ve the Consumer Buy Guide label and
any inm#ide labels before using the freezer. Re- move crny left over glue with rubbing alcohol.
I Notcr: DC NOT REMOVE the Tech Sheet fas- tene.1 behind the base grille.
I
Cleaii It... Clean your freezer before using it. See clean-
ing instructions on page 5,
Plug it in...
3-prong grounding type wall receptacle
Freeze1 power .:ord
Recommended Grounding Method
A 12L Volt, 60 Hz., AC only, 15 ampere fused electric al supply is required. It is recommended that a separate circuit serving only this appli- ance t e provided. The receptacle should not be conlrolled by a wall switch or pull chain.
Do not use an extension cord. See ndividual electrical requirements and
grounding instruction sheet in your literature packa! re.
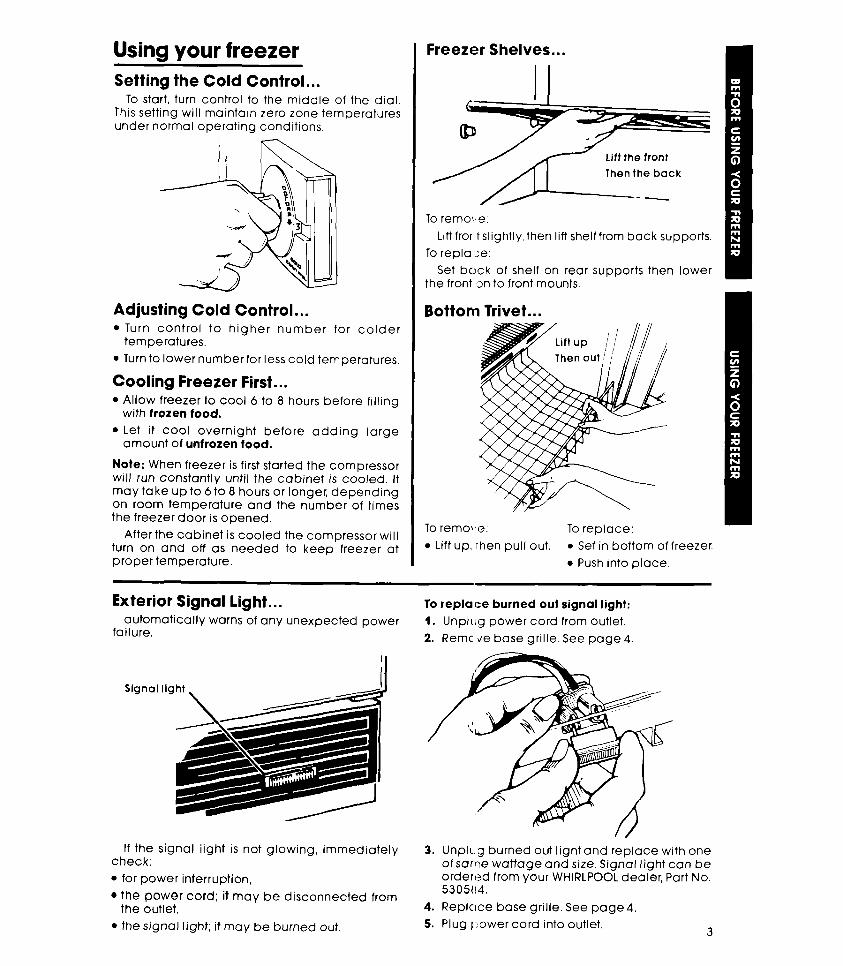
Using your freezer Setting the Cold Control...
To start, turn control to the middle of the dial. This setting will maintain zero zone temperatures under normal operating conditions.
Adjusting Cold Control. . . Bottom Trivet... l Turn control to higher number for colder
temperatures.
l Turn to lower number for less cold temperatures.
Cooling Freezer First.. . l Allow freezer to cool 6 to 8 hours before filling
with frozen food. l Let it cool overnight before adding large
amount of unfrozen food.
Note: When freezer is first started the compressor will run constantly until the cabinet is cooled. It may take up to 6 to 8 hours or longer, depending on room temperature and the number of times the freezer door is opened.
After the cabinet is cooled the compressor will turn on and off as needed to keep freezer at proper temperature.
lo remo\:e: Toreplace: l Lift up, ihen pull out. l Set in bottom of freezer.
l Push into place.
Freezer Shelves...
j-j
/A-- To remo>)e:
Lif frorlt slightly, then lift shelf from back supports.
To repla ::e:
Set bock of shelf on rear supports then lower the front 3n to front mounts.
Exterior Signal light... automatically warns of any unexpected power
failure.
If the signal iight is not glowing, immediately check: 0 for power interruption,
l the power cord: it may be disconnected from the outlet,
l the signal light; it moy be burned out.
To replace burned out signal light: 1. Unplbrg power cord from outlet.
2. Remc tie base grille. See page 4.
3. Unpll.3 burned out light and replace with one of same wattage and size. Signal light can be ordered from your WHIRLPOOL dealer, Part No. 530504.
4. Replclce base grille. See page4. 5. Plug I)ower cord into outlet.
3

The Key Eject lock... Changing Light Bulb... can help reduce the hazard of child
entrapment. I. Unpli rg power cord. 2. Rem )ve light shield by pulling away from the
side vail.
To lock or unlock the freezer you must hold the key in the lock while turning. The lock is spring
/’ Pull out
loaded so the key cannot be left in the lock. If the key is lost, contact your WHIRLPOOL dealer
for a replacement. Always give the complete 3. Repl ice bulb with 40 watt appliance bulb.
model and serial number of your freezer when 4. To reiolace shield, insert tabs into slots in Wall requesting a replacement key. and xess.
Removing the Base Grille... l Open the door. l Lift up on two tabs showing through grille.
Lift up the grille-holding tabs
l Swing the top of the grille forward.
l Lift gri le off bottom supports.
Swing out; lift up
l Replc ce in reverse order. l Do nc t remove Tech Sheet fastened behind
the g Ile.
Optional Ice Maker... The automatic ice maker can be added to
your freezer as an optional accessory. See your dealer to order Part No. ECKMF-6
To start: l Push signal arm down.
OFF/ON: Signal Arm
8 After freezer has cooled several hours, the ice maker will begin automatically making ice cubes until the bin is full. Then it turns off.
l As ice cubes are removed from the bin, the ice maker will replace them automatically.
4
To stop: l Raise ;ignal arm until it locks in up position.
l If bin i removed from freezer, place signal arm in OFF position. When ::)in is replaced, push it all the way in and lower :irm to ON position.
-. TIPS: l ShaIce the bin occasionally to keep cubes
sep Irate. It’s normal for cubes to freeze, in a g oup. they break apart easily.
l You will hear sounds as the water fills the mol :ts and ice falls into the bin. This is nor1 7al
l Bet ause of new plumbing connections, the irst few cubes may be discolored or hav :? an off-flavor. Throw these away.
l If c ;bes are not used for a number of wet <s they will become smaller and de- velc p an off-flavor. The circulating air in the reezer starts a slow evaporation of the cut es. The longer they are stored, the mol t? noticeable is the evaporation. Dis- car i these cubes.
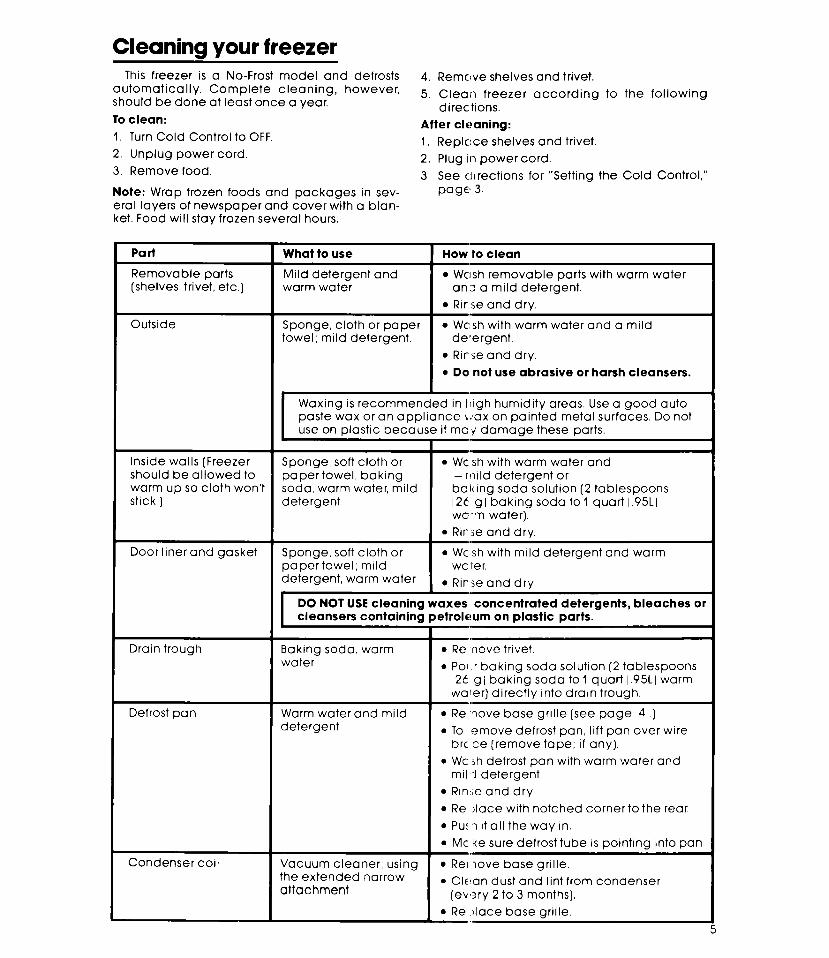
Cleaning your freezer This freezer is a No-Frost model and defrosts 4. Remove shelves and trivet.
automatically. Complete cleaning, however, should be done at least once a year.
5. Cleal~ freezer according to the following directions.
To clean: After cleaning: I. Turn Cold Control to OFF. I. Repl(:ce shelves and trivet. 2. Unplug power cord. 2. Plug III power cord. 3. Remove food. 3. See (:Iirections for “Setting the Cold Control,”
Note: Wrap frozen foods and packages in sev- page, 3
eral layers of newspaper and cover with a blan- ket. food will stay frozen several hours.
Part What to use
Removable parts Mild detergent and (shelves, trivet, etc.] warm water
How to clean
l Welsh removable parts with warm water an:l a mild detergent.
l Rir #se and dry.
Outside Sponge, cloth or paper l Welsh with warm water and a mild towel; mild detergent. detergent.
l Rir se and dry.
l Dal not use abrasive or harsh cleansers.
Waxing is recommended in lllgh humidity areas. Use a good auto paste wax or an appliance \!‘ax on painted metal surfaces. Do not use on plastic because it mc { damage these parts.
,., Inside walls [Freezer Sponge, soft cloth or l WC sh with warm water and should be allowed to paper towel, baking -rntld detergent or warm up so cloth won’t soda, warm water, mild balting soda solution (2 tablespoons stick.) detergent 126 gl baking soda to 1 quart 1.9%
wc ‘rn water). l Rir ;e and dry.
,a, Door liner and gasket Sponge, soft cloth or l WC sh with mild detergent and warm
papertowel; mild wc Ier. detergent, warm water l Rir ;e and dry.
DO NOT USE cleaning waxes concentrated detergents, bleaches OI cleansers containing petrokum on plastic parts.
Drain trough
Defrost pan
Baking soda, warm water
Warm water and mild detergent
l Re .riove trivet.
l POI r baking soda solution (2 tablespoons ;2C gl baking soda to 1 quart 1.95LI warm waler) directly into drain trough.
,a, l Re ‘love base grille (see page 4 .] l To :?move defrost pan, lift pan over wire
brc’ce (remove tape; if any). l WC r,h defrost pan with warm water and
mil :I detergent. l Rin:,e and dry.
l Re Aace with notched corner to the rear.
l Pu! .I it all the way in.
Condenser coil
l MC ke sure defrost tube is pointing into pan
Vacuum cleaner; using l Rel .Iove base grille. the extended narrow attachment
l Clcaan dust and lint from condenser (evft?ry 2 to 3 months).
l Re Ilace base grille.
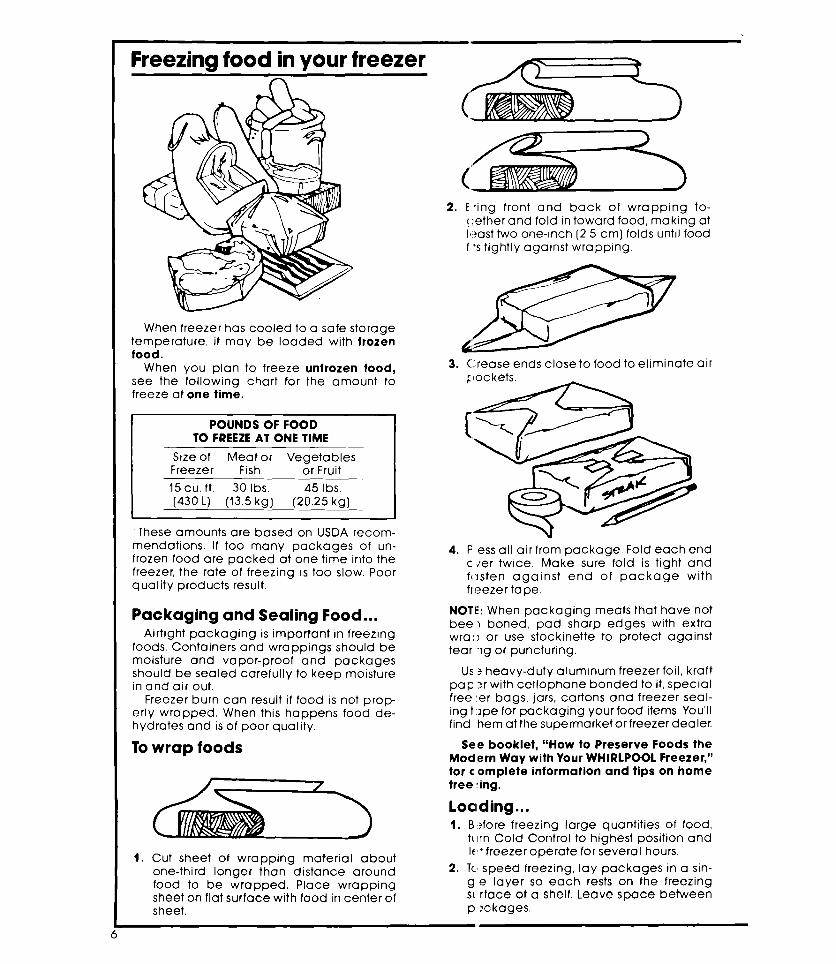
Freezing food in your freezer
When freezer has cooled to a safe storage temperature, it may be loaded with frozen food.
When you plan to freeze unfrozen food, see the following chart for the amount to freeze at one time.
POUNDS OF FOOD TO FREEZE AT ONE TIME
Size of Meat or Vegetables Freezer Fish or Fruit
15 cu. ft. 30 Ibs. 45 Ibs (430 L) (13.5 kg] (20.25 kg]
.These amounts are based on USDA recom- mendations. If too many packages of un- frozen food are packed at one time into the freezer, the rate of freezing is too slow. Poor quality products result.
Packaging and Sealing Food... Airtight packaging is important in freezing
foods. Containers and wrappings should be moisture and vapor-proof and packages should be sealed carefully to keep moisture in and air out.
Freezer burn can result if food is not prop- erly wrapped. When this happens food de- hydrates and is of poor quality.
To wrap foods
1. Cut sheet of wrapping material about one-third longer than distance around food to be wrapped. Place wrapping sheet on flat surface with food in center of sheet.
2. Ering front and back of wrapping to- (yether and fold in toward food, making at I~tast two one-inch (2.5 cm) folds until food f ts tightly against wrapping.
3. ( lease ends close to food to eliminate air
4. Press all air from package. Fold each end c der twice. Make sure fold is tight and fcjsten against end of package with fl,?ezer tape.
NOTE: When packaging meats that have not bee’> boned, pad sharp edges with extra wra:) or use stockinette to protect against tearlmig or puncturing.
Us’? heavy-duty alumtnum freezer foil, kraft papl?r with cellophane bonded to it, special free,‘er bags, jars, cartons ana freezer seal- ing t lpe for packaging your food items. You’ll find hem at the supermarket or freezer dealer.
See booklet, “HOW to Preserve Foods the Modern Way with Your WHIRLPOOL Freezer,” for c:omplete information and tips on home free;l!ing.
Loaiding... I. B ?fore freezing large quantities of food,
t\lrn Cold Control to highest position and If~t freezer operate for several hours.
2. Tcm speed freezing, lay packages in a sin- g e layer so each rests on the freezing s(irface of a shelf. Leave space between p ickages.
3. Add more unfrozen food after first load is frozen (approximately 18 to 24 hours].
4. After all food is frozen, return Cold Control to the usual setting.
Storing frozen food... After food is frozen, stack packages any-
where in the freezer. Packages should not extend beyond the shelf edge or they may keep the door from closing and sealing properly.
Trivet- Store heavy and bulky packages here. Trivet should be in place at all times for proper air circulation.
Door storage -Store packages on the door shelves behind the retaining bar.
Juice can shelves -Store juice cans on door as shown.
Energy Saving Tips... l Check door gasket and level freezer to
assure a good door seal. l Keep door openings to a minlmum.
Remove several items at one time. Keep contents organized to eliminate searching.
l Fill to capacity. Follow recommended procedures for freezing foods.
l Set Cold Control to provide temperatures around 0°F (-22‘C). There is no need to store foods below O’F.
l Keep door locked to insure door closure. l Clean condenser coils frequently.
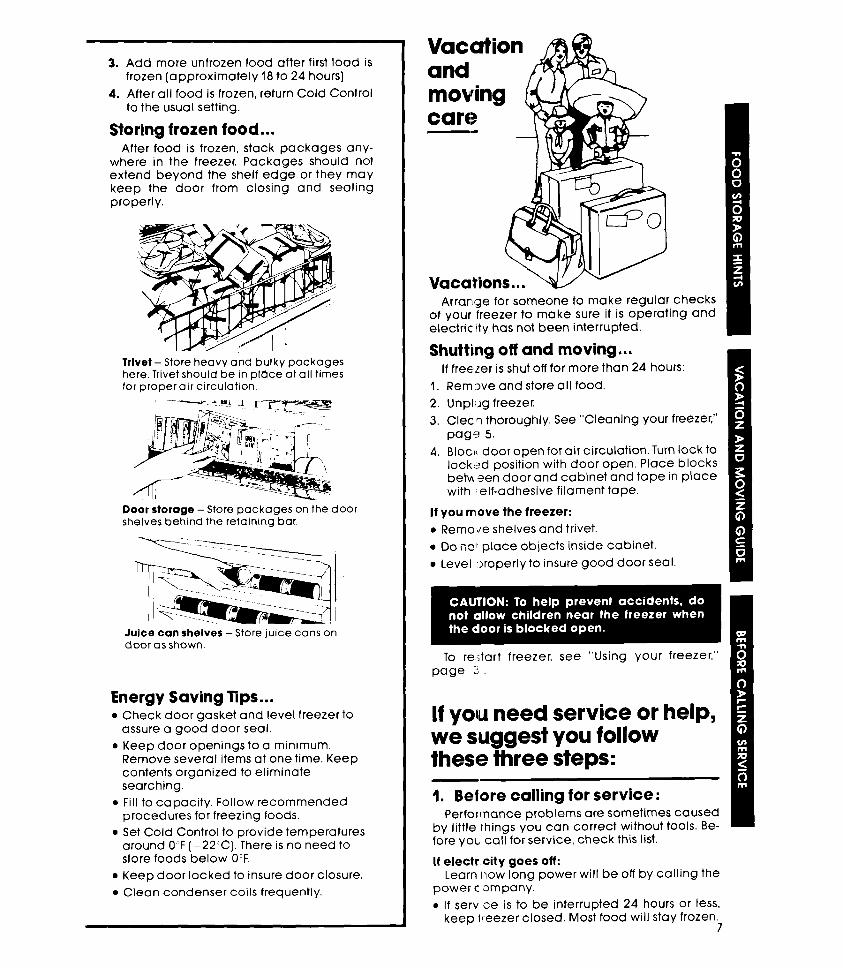
Vacation and moving care --
Arrange for someone to make regular checks of your freezer to make sure it is operating and electric.Ity has not been interrupted.
Shutting off and moving... If freezer is shut off for more than 24 hours:
1. Rem:)ve and store all food.
2. Unplug freezer. 3. Cleun thoroughly. See “Cleaning your freezer,”
pag,! 5.
4. BlocIf door open for air circulation. Turn lock to lock:i:d position with door open. Place blocks beti een door and cabinet and tape in place with iself-adhesive filament tape.
If you move the freezer:
l Remoife shelves and trivet. l Do hoI place objects inside cabinet.
l Level :)roperly to insure good door seal
To re::;tart freezer, see “Using your freezer,” El page ;!
If yore need service or help, we suggest you follow these three steps:
1. Beiore calling for service: Performance problems are sometimes caused
by little rhings you can correct without tools. Be- fore you, call for service, check this list.
If electr!lcity goes off: Learn now long power will be off by calling the
power c 3mpany. l If serv ce is to be interrupted 24 hours or less,
keep lleezer closed. Most food will stay frozen. 7
l If service is to be interrupted longer than 24 hours, do this:
1. Remove all frozen food and store in a frozen food locker. Or...
2. Place dry ice on top of food, using as large pieces as possible. Protec? your hands with gloves when using dry ice.
3. If neither food locker storage or dry ice is available, use or can perishable food at once.
l The length of time food will stay frozen depends on several factors. For instance: a full freezer will remain cold longer than a freezer only par- tially filled. And a freezer full of meat will stay cold longer than a freezer filled with baked goods. Also, if the food still contains ice crystals, it may be safely refrozen, although the quality and flavor may be affected. Use this food as soon as convenient. If the condition of the food is poor or is in any way questionable, it is wise to dispose of it.
If freezer stops running:
l Check to see if power cord is plugged into the outlet.
l Check fuse box or circuit breaker.
l Check electric company for a power failure.
l Be sure COLD CONTROL is turned on.
If compressor seems to run too long:
l Check to see that condenser, located on back of freezer, is free of dust and lint.
l On hot summer days or if room is hot, compres- sor will run longer to provide correct amount of cooling.
l If large amounts of unfrozen food have been put into the freezer, compressor will run longer.
l Check to see that there is enough air circula- tion space above and in back of freezer.
2. If you need service*:
SYMBOL 0~ QUACITY
SERVICE
If your WHIRLPOOL” appliance ever needs service any- where in the United States, help is just a phone call away
.to your nearest Whirlpool franchised TECH-CARE ’ service representative.
Whirlpool main- tains a nationwide network of franchised TECH-CARE service companies to fulfill your war- ranty and provide after-warranty service and maintenance to keep your WHIRLPOOL appli- ance in peak condition.
You’ll find your nearest TECH-CARE service cornpony listed in your local telephone book Yellow gages under APPLIANCES - HOUSEHOLD - MA,JOF; - SERVICE & REPAIR. Should you not find a listing, dial the Whirlpool COOL-LINE ’ service assistance toll-free telephone number:
Contiliental U.S. . . . . . . . . Dial (800) 253-1301 In Michigan . . . . . . . . . . . . . Dial (800) 632-2243 Alaska and Hawaii . . . . . Dial (800) 253-l 121
If you rnove...To make sure that your appliance is corrc:ctly installed and to insure its continued satisfac:tory operation, please telephone your nearest TECH-CARE * service company for instal- lation or to get the name of a qualified installer. [lnstall(:ltion cost will, of course, be paid by you.)
Helpful hints...You can help your TECH-CARE ser- vice re,:)resentative give you faster service if you include, the model and serial number of your appliarlce when requesting service. Also, retain your scles slip and warranty to verify your war- ranty sl:ltus.
Remember...Your TECH-CARE service represen- tative i: specially trained in the expert repairing and se/dicing of your WHIRLPOOL appliances. He can he p you maintain the quality originally built iqto yoljr WHIRLPOOL appliance. So why not take the tirn,!:!, now, to look up his telephone number and j,ol it down in the space provided on the cover
3. If you have a problem*:: Call Whirlpool Corporation in Benton Harbor at
the CC:OL-LINE service assistance telephone number [see Step 2) or write:
Mr. G#..ly Turner, Vice President Whirl,::,001 Corporation Administrative Center 2000 1J.S. 33 North Bentcl’i Harbor, Michigan 49022
-If yolk must call or write, please provide: your name, address, telephone number, type of appli- ance, tjrand, model, serial number, date of pur- chase, the dealer’s name, and a COmplete descric:tion of the problem. This information is needec.: in orderto better respond to your request for assi::,tance.
FSP quality parts. look for this symbol of quality whenever
_\ you need a replacement part R; for your Whirlpool appliance.
FSP replacement parts will fit rrght and work right, because they are mode to the same exacting specifications used to build every new Whirlpool appliance
0 FSP is a registered trademark of Whirlpool Corporation for
TKirlpool Home Appliances
Bentlrn Harbor, Michigan. Aulomatic Washers, Clothes Dryers. Freezers, Refrigerator-Freezers. Ice Makers, Dishwashers, Built in Ovens and Surlace Units, Ranges, Microwave Ovens, Comuaclors, Room Air Conditioners, Dehumidiliers, Cenlral tteat,ng and Air Gondilioning Syslems.
Part No. 942640 Quality. Our way of life Printed in U.S.A.