Embed Size (px)
Citation preview
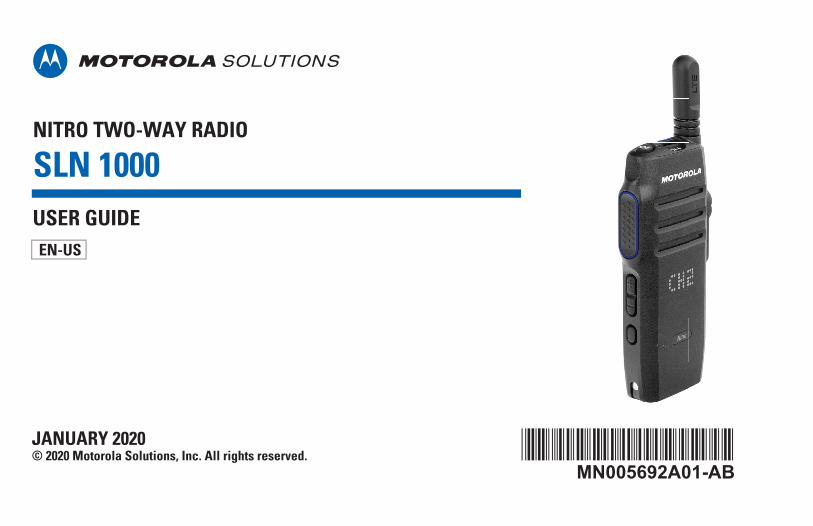
NITRO TWO-WAY RADIO
SLN 1000USER GUIDE
JANUARY 2020© 2020 Motorola Solutions, Inc. All rights reserved.
MN005692A01-AB*MN005692A01*
EN-US
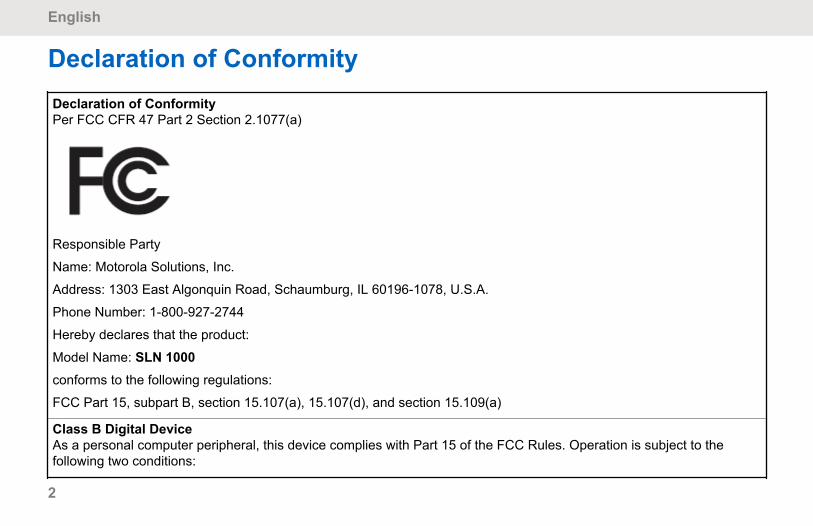
Declaration of ConformityDeclaration of ConformityPer FCC CFR 47 Part 2 Section 2.1077(a)
Responsible Party
Name: Motorola Solutions, Inc.
Address: 1303 East Algonquin Road, Schaumburg, IL 60196-1078, U.S.A.
Phone Number: 1-800-927-2744
Hereby declares that the product:
Model Name: SLN 1000conforms to the following regulations:
FCC Part 15, subpart B, section 15.107(a), 15.107(d), and section 15.109(a)
Class B Digital DeviceAs a personal computer peripheral, this device complies with Part 15 of the FCC Rules. Operation is subject to thefollowing two conditions:
English
2
1 This device may not cause harmful interference, and
2 This device must accept any interference received, including interference that may cause undesired operation.
NOTICE:This equipment has been tested and found to comply with the limits for a Class B digital device, pursuant topart 15 of the FCC Rules. These limits are designed to provide reasonable protection against harmful inter-ference in a residential installation. This equipment generates, uses and can radiate radio frequency energyand, if not installed and used in accordance with the instructions, may cause harmful interference to radiocommunications. However, there is no guarantee that interference will not occur in a particular installation.
If this equipment does cause harmful interference to radio or television reception, which can be determinedby turning the equipment off and on, the user is encouraged to try to correct the interference by one or moreof the following measures:
• Reorient or relocate the receiving antenna.
• Increase the separation between the equipment and receiver.
• Connect the equipment into an outlet on a circuit different from that to which the receiver is connected.
• Consult the dealer or an experienced radio or TV technician for help.
For country code selection usage (WLAN devices)
NOTICE:The country code selection is for non-US model only and is not available to all US models. Per FCC regula-tion, all Wi-Fi products marketed in the US must be fixed to US operation channels only.
Wireless Device Country Approvals Regulatory markings, subject to certification, are applied to the device signifyingthat the radio(s) is/are approved for use in the US. Operation of the device without regulatory approval is illegal.
English
3
ContentsDeclaration of Conformity...............................................2Important Safety Information.......................................... 7Notice to Users...............................................................8Radio Care..................................................................... 9Software Version.......................................................... 10Copyrights and Trademarks......................................... 11Disclaimer.....................................................................12Read Me First...............................................................13Chapter 1: Radio Controls............................................14
Programmable Buttons......................................15Assignable Radio Functions................... 15
Chapter 2: Getting Started........................................... 17Inserting a SIM Card..........................................17Attaching the Battery......................................... 17Charging the Battery..........................................19Attaching and Removing the Antenna............... 19Turning the Radio On or Off.............................. 20Adjusting the Volume.........................................20
Chapter 3: Status Indicators.........................................21
Icons.................................................................. 21Battery Capacity................................................ 23LED Indicators................................................... 24
Chapter 4: Fast Scroll Talkgroup List........................... 26Chapter 5: Contact List.................................................27
Accessing Contact List...................................... 27Chapter 6: Radio Calls ................................................ 28
Group Calls........................................................28Making Group Calls................................ 28Responding to Group Calls.....................28
Private Calls...................................................... 29Making Private Calls............................... 29Responding to Private Calls................... 29
Broadcast Calls................................................. 30Making Broadcast Calls.......................... 30Receiving Broadcast Calls......................31
Chapter 7: Supervisory Override..................................32Chapter 8: Checking Radio Information....................... 33Chapter 9: Checking Battery Strength..........................34Chapter 10: Cellular and Wi-Fi Values......................... 35
Checking Cellular or Wi-Fi Signal Strength....... 35
English
4

Checking Wi-Fi Hotspot Status..........................35Chapter 11: Menu.........................................................36
Do Not Disturb................................................... 37Turning DND On or Off........................... 37
Turning Voice Announcement On or Off........... 37Turning Radio Alert Tones On or Off.................38Adjusting the Display Brightness....................... 39Turning Location On or Off................................ 39Turning Wi-Fi On or Off..................................... 40Turning Radio Cellular On or Off....................... 40Turning Wi-Fi Hotspot On or Off........................41Bluetooth........................................................... 41
Turning Bluetooth On or Off....................42Searching for Bluetooth Devices............ 42Connecting to Bluetooth Devices............42Disconnecting from Bluetooth Devices... 43Clearing Bluetooth Pairing...................... 43
Scan.................................................................. 43Turning Scan On or Off...........................44
Chapter 12: Instant Personal Alert............................... 45Sending IPA.......................................................45
Receiving IPAs.................................................. 45Viewing IPA List.................................................45Clearing IPA Status List.....................................46
Chapter 13: Emergency Operations.............................47Declaring Emergency........................................ 47Cancelling Emergency.......................................47Receiving Emergency Alerts............................. 48Responding to Emergency Alerts...................... 48Receiving Emergency Calls...............................48Clearing Emergency Alert List........................... 49
Chapter 14: Area Talkgroup......................................... 50Chapter 15: Radio Stun................................................51Chapter 16: User Disabled or Suspended....................52Chapter 17: Radio Kill.................................................. 53Chapter 18: Ambient Listening..................................... 54Chapter 19: Authorized Accessories List..................... 55Batteries and Chargers Warranty.................................57
The Workmanship Warranty..............................57The Capacity Warranty......................................57
Limited Warranty.......................................................... 58MOTOROLA SOLUTIONSCOMMUNICATION PRODUCTS...................... 58
English
5
I. WHAT THIS WARRANTY COVERS ANDFOR HOW LONG:............................................. 58II. GENERAL PROVISIONS.............................. 59III. STATE LAW RIGHTS:..................................59IV. HOW TO GET WARRANTY SERVICE........59V. WHAT THIS WARRANTY DOES NOTCOVER..............................................................59VI. PATENT AND SOFTWARE PROVISIONS..60VII. GOVERNING LAW..................................... 61
English
6
Important Safety InformationATTENTION!This radio is designed to meet General Populationusage. Before using the radio, read the RF EnergyExposure and Product Safety Guide for Portable Two-WayRadios which contains important operating instructions forsafe usage and RF energy awareness and control forCompliance with applicable standards and Regulations.
For a list of Motorola Solutions-approved antennas andother accessories, visit the following website:
http://www.motorolasolutions.com
Any modification to this device, not expressly authorized byMotorola Solutions, may void the user's authority to operatethis device.
English
7
Notice to UsersThis device complies with Part 15 of the FCC rules per thefollowing conditions:
• This device may not cause harmful interference.
• This device must accept any interference received,including interference that may cause undesiredoperation.
CAUTION:Changes or modifications made to this device, notexpressly approved by Motorola Solutions, couldvoid the authority of the user to operate thisequipment.
English
8
Radio CareThis section describes the basic handling precaution of theradio.
• Keep your radio clean and exposure to water should beavoided to help ensure proper functionality andperformance.
• To clean the exterior surfaces of the radio, use a dilutedsolution of mild dishwashing detergent and fresh water(for example, one teaspoon of detergent to one gallon ofwater).
• These surfaces should be cleaned whenever a periodicvisual inspection reveals the presence of smudges,grease, and/or grime.
CAUTION:The effects of certain chemicals and their vaporscan have harmful results on certain plastics.Avoid using aerosol sprays, tuner cleaners, andother chemicals.
English
9
Software VersionAll the features described in the following sections aresupported by the software version R03.00.00 or later.
Contact your dealer for more information.
English
10
Copyrights and Trademarks© 2020 Motorola Solutions, Inc. All Rights Reserved
The Motorola Solutions products described in thisdocument may include copyrighted Motorola Solutionscomputer programs. Laws in the United States and othercountries preserve for Motorola Solutions certain exclusiverights for copyrighted computer programs. Accordingly, anycopyrighted Motorola Solutions computer programscontained in the Motorola Solutions products described inthis document may not be copied or reproduced in anymanner without the express written permission of MotorolaSolutions.
No part of this document may be reproduced, transmitted,stored in a retrieval system, or translated into any languageor computer language, in any form or by any means,without the prior written permission of Motorola Solutions,Inc.
Furthermore, the purchase of Motorola Solutions productsshall not be deemed to grant either directly or byimplication, estoppel or otherwise, any license under thecopyrights, patents or patent applications of MotorolaSolutions, except for the normal non-exclusive, royalty-freelicense to use that arises by operation of law in the sale ofa product.
TrademarksMOTOROLA, MOTO, MOTOROLA SOLUTIONS, and theStylized M Logo are trademarks or registered trademarks ofMotorola Trademark Holdings, LLC and are used underlicense. All other trademarks are the property of theirrespective owners.
Open Source SoftwareThis Motorola Solutions product described in this documentmay contain Open Source Software. For informationregarding the Open Source Software copyrights,attributions, licensing, and usage terms refer to:
https://learning.motorolasolutions.com
English
11

DisclaimerPlease note that certain features, facilities, and capabilitiesdescribed in this document may not be applicable to orlicensed for use on a specific system, or may be dependentupon the characteristics of a specific subscriber unit orconfiguration of certain parameters. Please refer to yourMotorola Solutions contact for further information.
English
12
Read Me FirstThe user guide covers the basic operation of the two-wayradio.
NOTICE:Not all features in the manual are available in yourradio. Contact your dealer for more information.
You can consult your dealer about the following:
• What are the functions of each button?
• Which optional accessories may suit your needs?
• What are the best radio usage practices for effectivecommunication?
• What maintenance procedures promote longer radiolife?
English
13
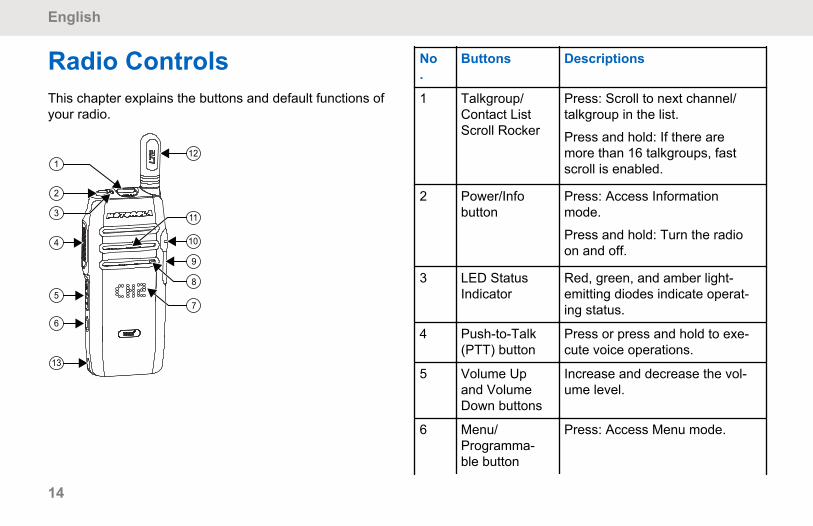
Radio ControlsThis chapter explains the buttons and default functions ofyour radio.
2
4
5
6
13
8
7
9
10
12
113
1
No.
Buttons Descriptions
1 Talkgroup/Contact ListScroll Rocker
Press: Scroll to next channel/talkgroup in the list.
Press and hold: If there aremore than 16 talkgroups, fastscroll is enabled.
2 Power/Infobutton
Press: Access Informationmode.
Press and hold: Turn the radioon and off.
3 LED StatusIndicator
Red, green, and amber light-emitting diodes indicate operat-ing status.
4 Push-to-Talk(PTT) button
Press or press and hold to exe-cute voice operations.
5 Volume Upand VolumeDown buttons
Increase and decrease the vol-ume level.
6 Menu/Programma-ble button
Press: Access Menu mode.
English
14
No.
Buttons Descriptions
Press and hold: Access Pro-grammable Function. The de-fault programmable function isContact List.
7 LED Display Provides visual information.
8 Microphone Allow voice to be sent duringvoice operations.
9 USB Port For charging purposes.
10 Audio Acces-sory Port
A port to attached accessorydevices.
11 High-OutputSpeaker
Outputs all tone and audiogenerated by the radio.
12 LTE Antenna Provide the needed Radio Fre-quency (RF) amplificationwhen transmitting and receiv-ing.
13 ChargingContacts
For charging purposes.
Programmable ButtonsYou can program the programmable buttons as shortcutsto specific radio functions through Wave OnCloud (WoC)portal.
Depending on the duration of a button press, theprogrammable buttons function differently.
Assignable Radio FunctionsThe following radio functions can be assigned to theprogrammable buttons by your dealer. Press or press andhold on the Menu/Programmable button to launch thefollowing features.
Alert TonesAllows you to toggle the Alert Tones on and off.
BluetoothAllows you to toggle the Bluetooth on and off.
CellularAllows you to toggle the Cellular on and off.
Contact ListAllows you to directly access the Contact List.
Do Not Disturb (DND)Allows you to toggle between on and off.
English
15
EmergencyAllows you to initiate or cancel an emergency.
LocationAllows you to toggle the Location on and off.
MenuAllows you to access the menu features.
ScanAllows you to toggle the Scan on and off.
Voice AnnouncementAllows you to toggle Voice Announcement on and off.
Wi-FiAllows you to toggle the Wi-Fi on and off.
English
16
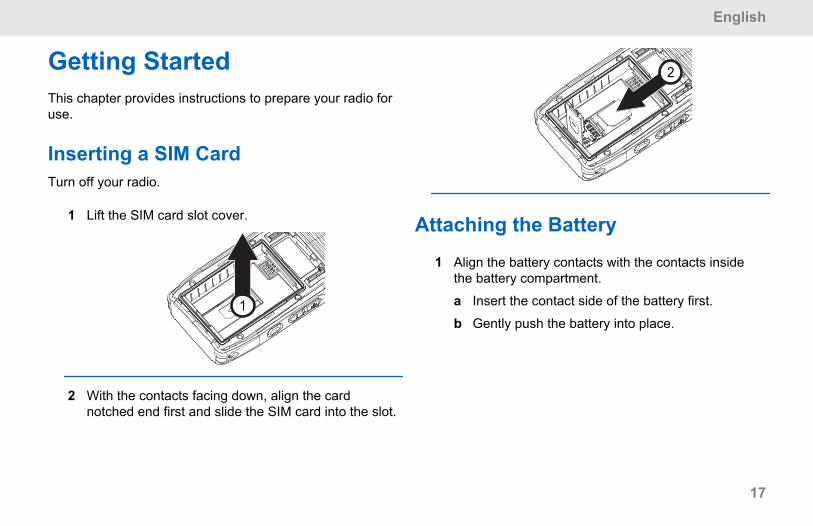
Getting StartedThis chapter provides instructions to prepare your radio foruse.
Inserting a SIM CardTurn off your radio.
1 Lift the SIM card slot cover.
1
2 With the contacts facing down, align the cardnotched end first and slide the SIM card into the slot.
2
Attaching the Battery
1 Align the battery contacts with the contacts insidethe battery compartment.
a Insert the contact side of the battery first.
b Gently push the battery into place.
English
17

1
2 Attach the battery cover by aligning it in place andslide the battery latch until it snaps into place.
2
3 Slide the battery latch into lock position.
English
18
3
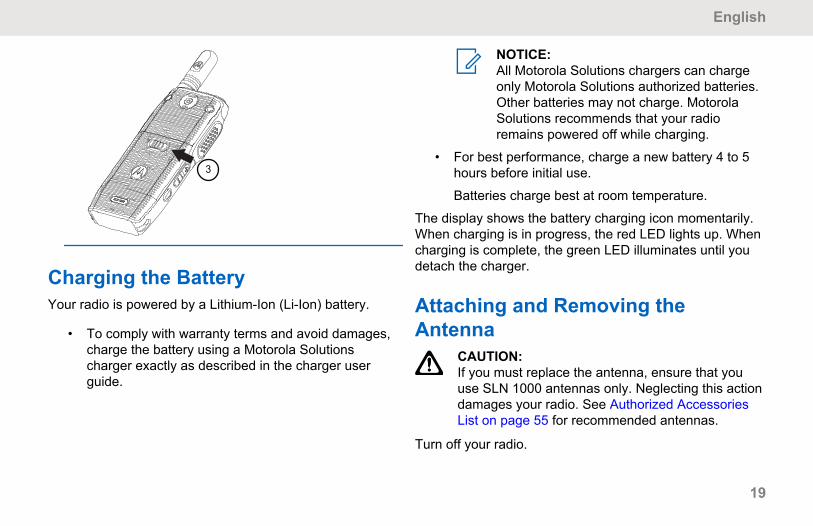
Charging the BatteryYour radio is powered by a Lithium-Ion (Li-Ion) battery.
• To comply with warranty terms and avoid damages,charge the battery using a Motorola Solutionscharger exactly as described in the charger userguide.
NOTICE:All Motorola Solutions chargers can chargeonly Motorola Solutions authorized batteries.Other batteries may not charge. MotorolaSolutions recommends that your radioremains powered off while charging.
• For best performance, charge a new battery 4 to 5hours before initial use.
Batteries charge best at room temperature.
The display shows the battery charging icon momentarily.When charging is in progress, the red LED lights up. Whencharging is complete, the green LED illuminates until youdetach the charger.
Attaching and Removing theAntenna
CAUTION:If you must replace the antenna, ensure that youuse SLN 1000 antennas only. Neglecting this actiondamages your radio. See Authorized AccessoriesList on page 55 for recommended antennas.
Turn off your radio.
English
19
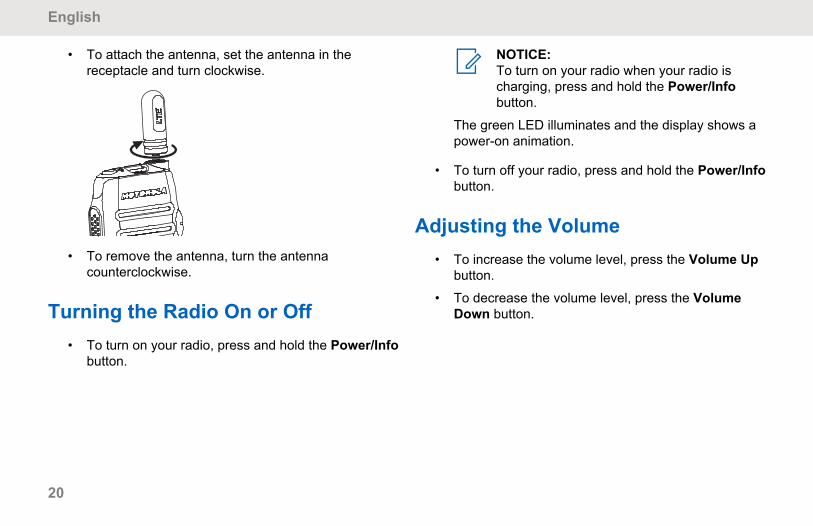
• To attach the antenna, set the antenna in thereceptacle and turn clockwise.
• To remove the antenna, turn the antennacounterclockwise.
Turning the Radio On or Off• To turn on your radio, press and hold the Power/Info
button.
NOTICE:To turn on your radio when your radio ischarging, press and hold the Power/Infobutton.
The green LED illuminates and the display shows apower-on animation.
• To turn off your radio, press and hold the Power/Infobutton.
Adjusting the Volume• To increase the volume level, press the Volume Up
button.
• To decrease the volume level, press the VolumeDown button.
English
20
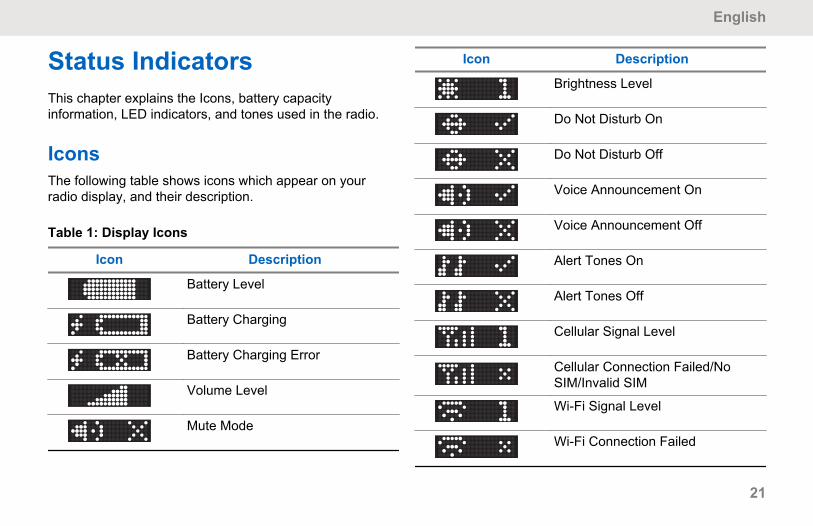
Status IndicatorsThis chapter explains the Icons, battery capacityinformation, LED indicators, and tones used in the radio.
IconsThe following table shows icons which appear on yourradio display, and their description.
Table 1: Display Icons
Icon Description
Battery Level
Battery Charging
Battery Charging Error
Volume Level
Mute Mode
Icon Description
Brightness Level
Do Not Disturb On
Do Not Disturb Off
Voice Announcement On
Voice Announcement Off
Alert Tones On
Alert Tones Off
Cellular Signal Level
Cellular Connection Failed/NoSIM/Invalid SIM
Wi-Fi Signal Level
Wi-Fi Connection Failed
English
21
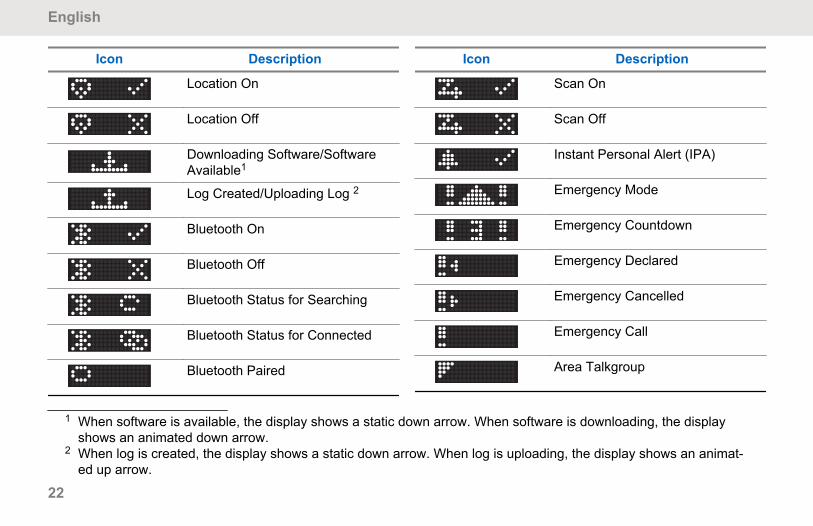
Icon Description
Location On
Location Off
Downloading Software/SoftwareAvailable1
Log Created/Uploading Log 2
Bluetooth On
Bluetooth Off
Bluetooth Status for Searching
Bluetooth Status for Connected
Bluetooth Paired
Icon Description
Scan On
Scan Off
Instant Personal Alert (IPA)
Emergency Mode
Emergency Countdown
Emergency Declared
Emergency Cancelled
Emergency Call
Area Talkgroup
1 When software is available, the display shows a static down arrow. When software is downloading, the displayshows an animated down arrow.
2 When log is created, the display shows a static down arrow. When log is uploading, the display shows an animat-ed up arrow.
English
22
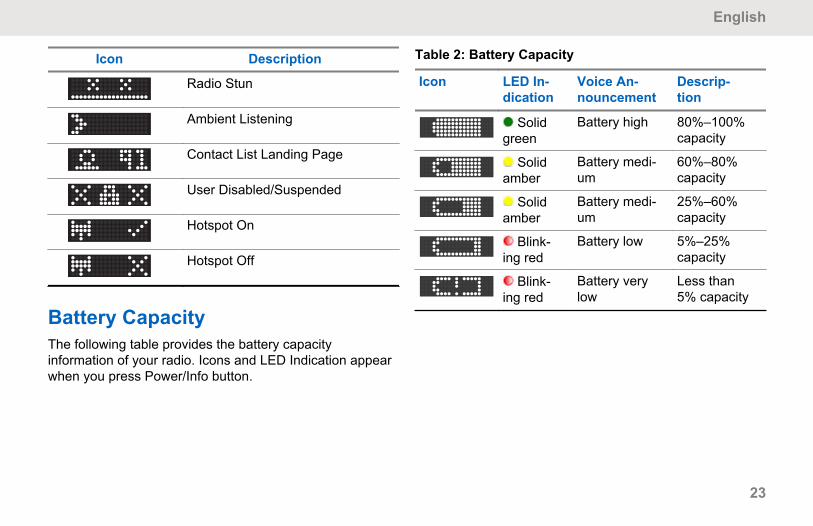
Icon Description
Radio Stun
Ambient Listening
Contact List Landing Page
User Disabled/Suspended
Hotspot On
Hotspot Off
Battery CapacityThe following table provides the battery capacityinformation of your radio. Icons and LED Indication appearwhen you press Power/Info button.
Table 2: Battery Capacity
Icon LED In-dication
Voice An-nouncement
Descrip-tion
Solidgreen
Battery high 80%–100%capacity
Solidamber
Battery medi-um
60%–80%capacity
Solidamber
Battery medi-um
25%–60%capacity
Blink-ing red
Battery low 5%–25%capacity
Blink-ing red
Battery verylow
Less than5% capacity
English
23
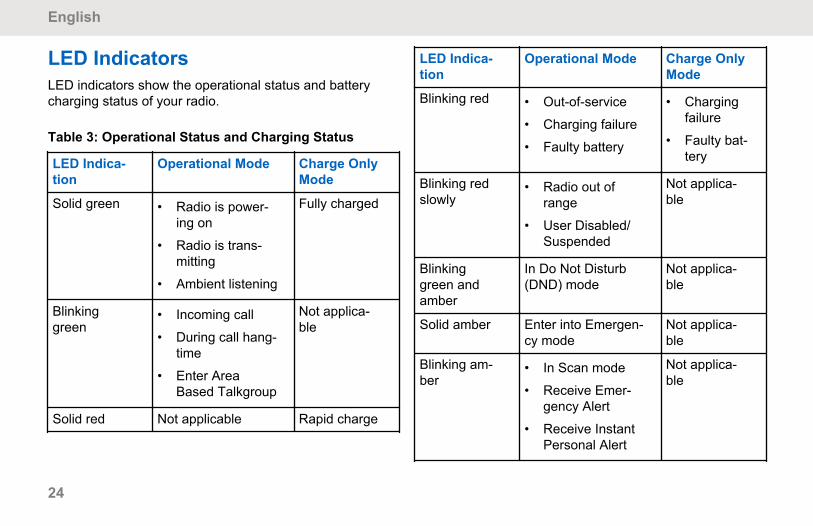
LED IndicatorsLED indicators show the operational status and batterycharging status of your radio.
Table 3: Operational Status and Charging Status
LED Indica-tion
Operational Mode Charge OnlyMode
Solid green • Radio is power-ing on
• Radio is trans-mitting
• Ambient listening
Fully charged
Blinkinggreen
• Incoming call
• During call hang-time
• Enter AreaBased Talkgroup
Not applica-ble
Solid red Not applicable Rapid charge
LED Indica-tion
Operational Mode Charge OnlyMode
Blinking red • Out-of-service
• Charging failure
• Faulty battery
• Chargingfailure
• Faulty bat-tery
Blinking redslowly
• Radio out ofrange
• User Disabled/Suspended
Not applica-ble
Blinkinggreen andamber
In Do Not Disturb(DND) mode
Not applica-ble
Solid amber Enter into Emergen-cy mode
Not applica-ble
Blinking am-ber
• In Scan mode
• Receive Emer-gency Alert
• Receive InstantPersonal Alert
Not applica-ble
English
24
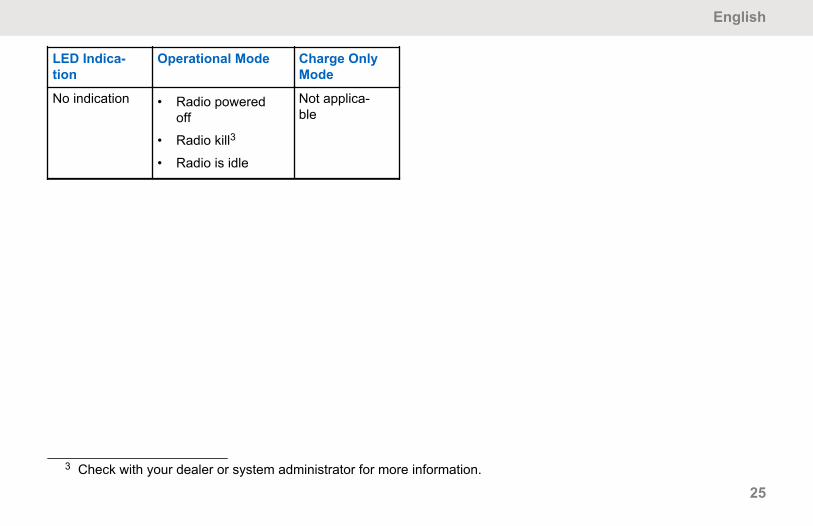
LED Indica-tion
Operational Mode Charge OnlyMode
No indication • Radio poweredoff
• Radio kill3
• Radio is idle
Not applica-ble
3 Check with your dealer or system administrator for more information.
English
25
Fast Scroll Talkgroup ListA talkgroup list has a maximum of 96 channels.
The order of the channels are in numerical order. You canpress and hold on the Talkgroup/Contact List ScrollRocker to perform the fast scroll. After the second channel,you can fast scroll the channels with an increment of 10.
For example, if your radio has 93 channels, theincrement channel change is CH 80 → CH 90 →CH 93 → CH 1 → CH 10 → Ch 20.
English
26
Contact ListBy default, the contact list is accessible through press andhold on the programmable button. Contact your dealer formore information on the configuration.
The contact list only supports user that are available andset to Do Not Disturb (DND). If the contact is offline, it willbe hidden from the list.
A contact name is no more than 30 alphanumbericcharacters and the contact list is displayed in analphabertical order.
This feature supports fast scrolling by pressing and holdingthe Talkgroup/Contact List Scroll Rocker or Volume Upand Volume Down buttons when in contact list.
Accessing Contact ListNOTICE:Depending on the configuration of your radio, pressor press and hold the Menu/Programmable buttonto directly access the feature. Else, manually enterthe feature with the following procedure.
1 Press the Menu/Programmable button.
2 Locate the Contact List icon.
3 To view the contact list, press the Volume Up andVolume Down button.
English
27
Radio CallsThis chapter explains the operations to receive, respond to,make, and stop calls. Calls supported are Group, Private,and Broadcast calls.
Group CallsYour radio must be configured as part of a group to receivea call from or make a call to the group of users.
Making Group Calls
1 Select a channel with the active talkgroup.
2 Press and hold the PTT button to make the call.
The green LED lights up. The display shows thetalkgroup alias.
3 Wait for the Talk Permit Tone to end and speakclearly into the microphone.
4 Release the PTT button to listen.
The green LED blinks when the target radioresponds. The display shows the talkgroup alias.
NOTICE:The call ends when there is no voice activityfor a predetermined period. The radio returnsto the screen you were on before initiating thecall.
Responding to Group CallsWhen you receive a Group Call:
• The green LED blinks.
• Your radio generates a momentary incoming call alerttone before unmuting to the caller's audio.
1 To respond to the call, press PTT button.
The green LED lights up.
2 Wait for the Talk Permit Tone to end and speakclearly into the microphone.
English
28
3 Release the PTT button to listen.
NOTICE:The call ends when there is no voice activityfor a predetermined period.
Private CallsA Private Call is a call from an individual radio to anotherindividual radio.
Making Private CallsNOTICE:Depending on the configuration of your radio, pressor press and hold the Menu/Programmable buttonto directly access the feature. Else, manually enterthe feature with the following procedure.
1 Press the Menu/Programmable button.
2 To select contact, scroll contact list usingTalkgroup/Contact List Scroll Rocker or VolumeUp and Volume Down buttons until the right contactis displayed.
NOTICE:If "X" precedes the contact, the contact is inDo Not Disturb (DND) mode and a reject tonesounds when PTT button is pressed.
3 Press and hold the PTT button to make the call.
The green LED lights up.The display shows thecaller alias.
4 Wait for the Talk Permit Tone to end and speakclearly into the microphone.
5 Release the PTT button to listen.
Responding to Private CallsWhen you receive a Private Call:
• The green LED blinks.
• Your radio generates an inbound call alert tone beforethe inbound audio call.
English
29
• You hear a short alert tone the moment the transmittingradio releases the PTT button, indicating the channel isfree for you to respond.
1 To respond to the call, press PTT button.
The green LED lights up.
2 Wait for the Talk Permit Tone to end and speakclearly into the microphone.
3 Release the PTT button to listen.
NOTICE:The call ends when there is no voice activityfor a predetermined period.
Broadcast CallsA Broadcast Call is a call from an individual radio to everyradio on the channel.
Broadcast Calls are used to make importantannouncements, that require your full attention. You cannotrespond to Broadcast Calls.
If you switch to a different channel while receiving the call,your radio stops receiving the Broadcast Call. You cannotuse any side button functions until the call ends.
To receive calls from or make calls to the group of usersusing broadcast call, your radio must be configured to thebroadcast call talkgroup by your dealer.
Making Broadcast Calls
1 Press the programmed Talkgroup/Contact ListScroll Rocker.
2 Press and hold the PTT button to make the call.
The display shows a countdown from 3, 2, and 1.
3 Wait for the Talk Permit Tone or PTT Side Tone toend and speak clearly into the microphone ifenabled.
The green LED lights up. The display shows the callalias.
English
30
NOTICE:The call ends when there is no voice activityfor a predetermined period. The radio returnsto the screen you were on before initiating thecall.
Receiving Broadcast CallsWhen you receive a Broadcast Call:
• The green LED blinks.
• Your radio generates a receive broadcast alert tonebefore the broadcast audio.
NOTICE:The Broadcast call has a higher priority compare toGroup Call and Private Call, but a lower prioritycompare to Emergency Call.
Your radio is able to receive Broadcast Calls evenwhen "Do not Disturb" (DND) mode is enabled.
English
31
Supervisory OverrideSupervisory Override allows a supervisor to interrupt duringan ongoing Group or Private Call and immediately start asupervisory call.
If the user is receiving or transmitting a Group Call orPrivate Call and the server is interrupted by a supervisorycall, your radio unmutes to the supervisory call and displaythe alias of the supervisor.
NOTICE:Contact your dealer for more information on theconfiguration.
English
32
Checking Radio InformationPress the Power/Info button repeatedly.
The radio displays one of the following depending onthe mode/state.
1 Emergency Alert List4
2 Instant Personal Alert (IPA) List4
3 Radio Stun/Maintenance Mode4
4 Battery/Charging Status
5 Cell Status
6 Wi-Fi Status/Wi-Fi Hotspot Status5
7 Location Status
8 Bluetooth Status
9 Diagnostic Upload Status
10 FOTA Status
11 Radio Name
4 If this feature is disabled, you will not see it on your radio.5 If Wi-Fi Hotspot Status is enabled, Wi-Fi Status will be disabled.
English
33
Checking Battery StrengthFollow the procedure to check the battery level of yourradio.
Press the Power/Info button.
One of the following occurs:
• The LED lights up solid green indicating high batterycapacity.
• The LED lights up solid yellow indicating mediumbattery capacity.
• The LED blinks red indicating low battery capacity.
English
34
Cellular and Wi-Fi ValuesYou are allowed to check your cellular and Wi-Fi signalstrength in your radio.
Your radio provides the following types of signal strengthindication beside the icon:
• 0 = No signal
• 1 = Poor signal
• 2 = Fair signal
• 3–4 = Good signal
• 5 = Excellent signal
• X = Connection fails
Checking Cellular or Wi-Fi SignalStrength
• Press the Power/Info button until you see theCellular Strength or Wi-Fi Strength icon.
The radio displays the Cellular Strength icon and Wi-FiStrength icon and shows the current values.
Checking Wi-Fi Hotspot Status• Press the Power/Info button until you see the Wi-Fi
Hotspot Status icon.
When the Wi-Fi Hotspot is enabled and is not connected,your radio shows Hotspot Available and sounds VoiceAnnouncement.
When the Wi-Fi Hotspot is connected, your radio showsHotspot Connected and sounds Voice Announcement.
When the Wi-Fi Hotspot is connected to two devices, yourradio shows Hotspot connected to two devices andsounds Voice Announcement.
English
35
MenuYou are able to access the menu through the Menu/Programmable button.
The following are the available features in the Menu.
Table 4: List of Features
Feature Description
All Alert Tone Allows you to enable anddisable All Alert Tone.
Display Brightness Allows you to adjust thedisplay brightness onyour radio.
Voice Announcement Allows you to enable anddisable the Voice An-nouncement.
Do Not Disturb (DND) Allows you to change themode of your radio fromavailable to "do not dis-turb".
Feature Description
NOTICE:When DND isenabled, youwill not be ableto receive anyprivate call.
Scan Allows you to enable anddisable the Scan feature.
Location Allows you to enable anddisable the Global Posi-tioning System (GPS)feature.
Wi-Fi Allows you to enable anddisable the Wi-Fi mo-dems.
Cellular Allows you to enable anddisable the Cellular mo-dems.
Bluetooth Allows you to enable anddisable the Bluetooth.
English
36
Do Not DisturbDo Not Disturb (DND) allows you to change the status ofthe radio from available to unavailable.
When DND is enabled, an LED blinks and you will not beable to receive any private call. A negative tone soundswhen a call is initiatited to indicate that the call cannot beconnected.
Turning DND On or OffNOTICE:Depending on the configuration of your radio, pressor press and hold the Menu/Programmable buttonto directly access the feature. Else, manually enterthe feature with the following procedure.
1 Press the Menu/Programmable button.
2 Locate the Do Not Disturb (DND) icon.
3 To turn on DND, press the Volume Up button. Toturn off, press the Volume Down button.
If DND is on, the following occurs:
• Voice Announcement sounds Do Not Disturb On.
• The display shows a check mark beside the DND icon.
• The LED displays a blinking green light and amber lightperiodically.
If DND is off, the following occurs:
• Voice Announcement sounds Do Not Disturb Off.
• The display shows an "X" mark beside the DND icon.
Turning Voice Announcement On orOff
NOTICE:Depending on the configuration of your radio, pressor press and hold the Menu/Programmable buttonto directly access the feature. Else, manually enterthe feature with the following procedure.
1 Press the Menu/Programmable button.
2 Locate the Voice Announcement icon.
English
37
3 To turn on Voice Announcement, press the VolumeUp button. To turn off, press the Volume Downbutton.
If Voice Announcement is on, the following occurs:
• Voice Announcement sounds Voice Announcement On.
• The display shows a check mark beside the VoiceAnnouncement icon.
• All Voice Announcement tones are turned on.
If Voice Announcement is off, the following occurs:
• Voice Announcement sounds Voice Announcement Off.
• The display shows an "X" mark beside the VoiceAnnouncement icon.
• All Voice Announcement tones are turned off.
Turning Radio Alert Tones On or OffNOTICE:Depending on the configuration of your radio, pressor press and hold the Menu/Programmable buttonto directly access the feature. Else, manually enterthe feature with the following procedure.
1 Press the Menu/Programmable button.
2 Locate the Alert Tones icon.
3 To turn on Alert Tones, press the Volume Up button.To turn off, press the Volume Down button.
If Alert Tones is on, the following occurs:
• Voice announcement sounds All Alert Tones On.
• The display shows a check mark beside the Alert Tonesicon.
• All tones and alerts are turned on.
If Alert Tones is off, the following occurs:
• Voice announcement sounds All Alert Tones Off.
• The display shows an "X" mark beside the Alert Tonesicon.
English
38
• All tones and alerts are turned off.
Adjusting the Display Brightness
1 Press the Menu/Programmable button.
2 Locate the Display Brightness icon.
3 To select the brightness level, toggle the Volumebuttons.
The lowest brightness level is 1 and the highest is 4.
• Voice Announcement sounds the selected brightnesslevel.
• The screen shows the selected display brightness.
Turning Location On or OffNOTICE:Depending on the configuration of your radio, pressor press and hold the Menu/Programmable buttonto directly access the feature. Else, manually enterthe feature with the following procedure.
Location can only be accessed when enabled.Check with your dealer or system administrator formore information.
1 Press the Menu/Programmable button.
2 Locate the Location icon.
3 To turn on Location, press the Volume Up button.To turn off, press the Volume Down button.
If Location is on, the following occurs:
• Voice Announcement sounds Location Service On.
• The display shows a check mark beside the Locationicon.
If Location is off, the following occurs:
• Voice Announcement sounds Location Service Off.
English
39
• The display shows an "X" mark beside the Locationicon.
Turning Wi-Fi On or OffNOTICE:Depending on the configuration of your radio, pressor press and hold the Menu/Programmable buttonto directly access the feature. Else, manually enterthe feature with the following procedure.
1 Press the Menu/Programmable button.
2 Locate the Wi-Fi icon.
3 To turn on Wi-Fi, press the Volume Up button. Toturn off, press the Volume Down button.
If Wi-Fi is on, the following occurs:
• Voice Announcement sounds Wi-Fi On.
• The display shows a check mark beside the Wi-Fi icon.
If Wi-Fi is off, the following occurs:
• Voice Announcement sounds Wi-Fi Off.
• The display shows an "X" mark beside the Wi-Fi icon.
Turning Radio Cellular On or OffNOTICE:Depending on the configuration of your radio, pressor press and hold the Menu/Programmable buttonto directly access the feature. Else, manually enterthe feature with the following procedure.
1 Press the Menu/Programmable button.
2 Locate the Cellular icon.
3 To turn on Cellular, press the Volume Up button. Toturn off, press the Volume Down button.
If Cellular is on, the following occurs:
• Voice Announcement sounds Cellular On.
• The display shows a check mark beside the Cellularicon.
If Cellular is off, the following occurs:
• Voice Announcement sounds Cellular Off.
• The display shows an "X" mark beside the Cellular icon.
English
40
Turning Wi-Fi Hotspot On or OffNOTICE:Depending on the configuration of your radio, pressor press and hold the Menu/Programmable buttonto directly access the feature. Else, manually enterthe feature with the following procedure.
1 Press the Menu/Programmable button.
2 Locate the Wi-Fi Hotspot icon.
3 To turn on Wi-Fi Hotspot, press the Volume Upbutton. To turn off, press the Volume Down button.
If Wi-Fi Hotspot is on, the following occurs:
• Voice Announcement sounds Wi-Fi Hotspot On.
• The display shows a check mark beside the Wi-FiHotspot icon.
If Wi-Fi Hotspot is off, the following occurs:
• Voice Announcement sounds Wi-Fi Hotspot Off.
• The display shows an "X" mark beside the Wi-FiHotspot icon.
BluetoothThis feature allows you to use your radio with a Bluetooth-enabled device (accessory) through a Bluetoothconnection. Your radio supports both Motorola Solutionsand Commercially available Off-The-Shelf (COTS)Bluetooth-enabled devices.
Bluetooth operates within a range of 10 m (32 ft) line ofsight. This is an unobstructed path between your radio andyour Bluetooth-enabled device. For high degree ofreliability, Motorola Solutions recommends to not separatethe radio and the accessory.
At the fringe areas of reception, both voice and tone qualitystart to sound "garbled" or "broken". To correct thisproblem, position your radio and Bluetooth-enabled devicecloser to each other (within the 10 m defined range) to re-establish clear audio reception. The Bluetooth function ofyour radio has maximum power of 2.5 mW (4 dBm) at the10 m range.
Your radio can support up to three simultaneous Bluetoothconnections with Bluetooth-enabled devices of uniquetypes. For example, a headset, a scanner, and a PTT-OnlyDevice (POD). Multiple connections with Bluetooth-enableddevices of the same type are not supported.
English
41
Refer to the user manual of your respective Bluetooth-enabled device for more details on the full capabilities ofyour Bluetooth-enabled device.
Turning Bluetooth On or OffNOTICE:Depending on the configuration of your radio, pressor press and hold the Menu/Programmable buttonto directly access the feature. Else, manually enterthe feature with the following procedure.
1 Press the Menu/Programmable button.
2 Locate the Bluetooth icon.
3 To turn on Bluetooth, press the Volume Up button.To turn off, press the Volume Down button.
If Bluetooth is on, the following occurs:
• Voice Announcement sounds Bluetooth On.
• The display shows a check mark beside the Bluetoothicon.
If Bluetooth is off, the following occurs:
• Voice Announcement sounds Bluetooth Off.
• The display shows an "X" mark beside the Bluetoothicon.
Searching for Bluetooth Devices
To search for other Bluetooth devices, press thePower/Info button until you see the Bluetooth icon.
The radio displays Bluetooth Searching icon andVoice Announcement sounds Bluetooth Searching.
Connecting to Bluetooth Devices
1 While searching, the radio search for the lastconnected Bluetooth accessory.
Once connected, an indication tone sounds from theconnected Bluetooth accessory.
2 To view Bluetooth's status information, press thePower/Info button.
The radio displays Bluetooth Connected icon andVoice Announcement sounds Bluetooth Connected.
English
42
Disconnecting from Bluetooth Devices
1 When the Bluetooth accessory goes out of range orturn off, it will be disconnected from the radioautomatically.
The radio sounds an indication tone afterdisconnected from the Bluetooth accessory.
2 The radio attempts to reconnect to the sameBluetooth accessory within a reconnect timer.
Clearing Bluetooth Pairing
1 Press the Power/Info button until you see theBluetooth icon.
2 Scroll through the bluetooth list using Talkgroup/Contact List Scroll Rocker or Volume Up andVolume Down buttons until the right bluetooth isdisplayed.
3 On the device "friendly" name, press and hold theMenu/Programmable button to clear the pairing.
If clearing the bluetooth pairing successfully, a positive tonesounds.
If clearing an unpaired device, a negative tone sounds.
ScanThis feature allows your radio to cycle through theprogrammed scan list for the current channel looking forvoice activity.
When in the scan mode, the system preempts an ongoinglow-priority talkgroup call. Your radio unmutes to the high-priority talkgroup call. You respond to the active talkgroupwhen you press the PTT button during the programmedperiod (hang time) of an ongoing call from your scan list.
Pressing the PTT button when the radio is not in a call,causes the radio to start a call on the last selectedtalkgroup.
NOTICE:If the DND mode is enabled during the scan mode,your radio prioritizes the DND mode.
English
43
Turning Scan On or OffNOTICE:Depending on the configuration of your radio, pressor press and hold the Menu/Programmable buttonto directly access the feature. Else, manually enterthe feature with the following procedure.
1 Press the Menu/Programmable button.
2 Locate the Scan icon.
3 To turn on Scan, press the Volume Up button. Toturn off, press the Volume Down button.
If Scan is on, the following occurs:
• Voice Announcement sounds Scan On.
• The display shows a check mark beside the Scan icon.
• The amber LED blinks.
If Scan is off, the following occurs:
• Voice Announcement sounds Scan Off.
• The display shows an "X" mark beside the Scan icon.
English
44
Instant Personal AlertInstant Personal Alert (IPA) is a callback requestnotification that you can only be sent or receive in yourcontact list.
The IPA are stored in the IPA Status List to allow you toview and to reply in a later time. When multiple IPAs arereceived, the latest IPA will appear at the top of the list. TheIPA Status List can store up to nine alerts.
Sending IPA
1 Press the Menu/Programmable button.
2 Locate the Contact icon.
3 Select the <required alias> that you would liketo send the IPA to.
4 Press and hold the Menu/Programmable button tosend IPA.
Your display blink twice after your IPA is sent and apositive tone sounds.
Receiving IPAsWhen you receive IPA during idle mode, your radio showsthe following indications:
• The IPA is added to the IPA Status List.
• A tone sounds.
• The amber LED blinks until IPA is cleared.
• The display shows the IPA icon and alias.
When you receive IPA while in a call, your radio shows thefollowing indications:
• The IPA is added to the IPA Status List.
• The display does not show the IPA alias.
• The amber LED blinks after the call is ended.
• The display shows the IPA icon after the call is ended.
Viewing IPA List
1 Press the Power/Info button until you see the IPAList icon.
English
45

2 Scroll through the IPA list using Talkgroup/ContactList Scroll Rocker or Volume Up and VolumeDown buttons to view the list.
The list shows nine IPA entries. When the list is reachingthe end or the beginning, a tone sounds.
Clearing IPA Status List• Perform one of the following actions:
- From the contact list or IPA list, press and holdthe PTT button on the contact that you want toclear.
- In the IPA Status List, press and hold the Menu/Programmable button on the contact that youwant to clear.
- Power cycle your radio to clear all the IPAs.
English
46
Emergency OperationsThere are two ways in declaring or canceling anEmergency.
You can declare or cancel an Emergency locally bypressing the programmable button (Emergency button) orthe Emergency button on your Bluetooth accessory.
You can also declare or cancel an Emergency remotely byan authorized user through WAVE APP or a dispatcher.
When Emergency is declared and radio enters intoEmergency mode successfully, the display flashes with theEmergency icon. When the display flashes the Emergencyicon, you are only allowed to view the battery status,volume control, make an emergency call and exit theemergency mode.
During the Emergency mode, any call launched is declaredas Emergency Call.
Declaring EmergencyAttached the Bluetooth (BT) accessory device to yourradio.
• Press the Emergency button on your BT accessorydevice.
The display shows a countdown from !! 3 !!, !! 2 !!,and !! 1 !! with increasing tone.
If Emergency is declared by mistake, during thecountdown, release the Emergency button on your BTaccessory device to cancel declaring Emergency.
If Emergency is declared successfully, your radio showsthe following indications:
• The Emergency tone sounds.
• The amber LED lights up.
• The display shows Emergency icon.
If Emergency is failed to declare, your radio returns to thepreviously selected channel.
Cancelling EmergencyAttached the Bluetooth (BT) accessory device to yourradio.
English
47
• Press the Emergency button on your BT accessorydevice.
The display shows a countdown from !! 3 !!, !! 2 !!,and !! 1 !! with increasing tone.
If Emergency is declared by mistake, during thecountdown, release the Emergency button on your BTaccessory device to cancel declaring Emergency.
If Emergency is cancelled successfully, the display returnsto previously selected channel.
Receiving Emergency AlertsWhen you receive a Declared-Emergency Alert, your radioshows the following indications:
• The Emergency tone sounds.
• The amber LED blinks for 2 seconds.
• The display shows the Declared-Emergency Alert iconand the initiator's alias.
• The alert has a higher priority compare to making orreceiving call.
When you receive a Cancelled-Emergency Alert, your radioshows the following indications:
• The Emergency tone sounds.
• The amber LED blinks until all Emergency Alerts arecleared from the Emergency Alert List.
• The display shows the Cancelled-Emergency Alert iconand the initiator's alias.
• The alert has a higher priority compare to making orreceiving call.
Responding to Emergency Alerts
1 Press the Power/Info button.
2 Locate Emergency Alert List icon.
3 To select the required Emergency Alert alias, pressthe Volume Up and Volume Down button.
4 Press PTT button to initiate a call.
Receiving Emergency CallsWhen you receive a Emergency Call, your radio shows thefollowing indications:
English
48
• The Emergency tone sounds.
• The green LED lights up.
• For Group Call, the display shows the EmergencyGroup Call icon, Talkgroup Channel alias for 2 seconds,and then scroll to Caller Alias.
• For Private Call, the display shows the EmergencyPrivate Call icon and the initiator's alias.
Clearing Emergency Alert ListAn Emergency Alert in the Emergency Alert List is clearedwhen a corresponding Cancelled-Emergency Alert isreceived. Else, manually clear the list with the followingactions.
• Perform one of the following actions:
- In the Emergency Alert List, press and hold theEmergency button on the Emergency Alert Aliasthat you want to clear.
- Power cycle your radio to clear all the EmergencyAlerts.
When all Emergency Alerts are cleared, the EmergencyAlert List icon disappears from the Power/Info buttonoption and the amber LED dissolves.
English
49
Area TalkgroupWhen you enter a georgraphic area, you are able to viewand hear the notifications for the talkgroup area in thatgeofence.
The Area Talkgroup is added to the Area Talkgroup List inalpabertical order. Once you are added to the AreaTalkgroup list, you can receive group call even if yourtalkgroup scanning is off.
When you are in the Area Talkgroup, your radio sounds theVoice Announcement, the green LED blinks, and thedisplay shows the talkgroup alias.
When you exit the Area Talkgroup, your radio sounds theVoice Announcement and the display shows the talkgroupalias as well. If you are in a call when you exit the AreaTalkgroup, your call will not drop automatically.
If the Area Talkgroup is removed, you will go back to yourprevious channel.
English
50
Radio StunRadio Stun indicates that the radio is disabled.
When your radio is in Radio Stun mode, all the buttonsexcept for Power/Info and Volume Up and Volume Downbuttons are disbled. All voice activity and LED indicationsare disabled as well.
In powered on state, pressing the Power/Info buttondisplays the Radio Stun screen.
English
51
User Disabled or SuspendedUser Disabled or Suspended indicates that your account isdisabled or suspended. When your account is disabled orsuspended, you are not able to login to the PTT server.
Your radio sounds a tone, red LED blinks, and flashes theUser Disable/suspended icon.
The Power/Info, Menu/Programmble, Volume Up andDown buttons still works normally.
When you presses the PTT button, your radio tries to loginto the PTT server. If your radio able to connect to the PTTserver, it will bring you to the normal login screen, else theUser Disable/suspended icon flashes.
English
52
Radio KillRadio Kill indicates that your radio is permanently disabled.
In a normal Operation mode, when your radio receive a killcommand, your radio will turn off.
While in Kill mode, there are no User Interface (UI) on yourradio and you are not able to turn on your radio. Your radiocan only be re-activated by Motorola Solutions.
Contact your dealer for more information.
English
53
Ambient ListeningThis feature allows the authorized user to listen to theambient audio of a specific radio during idle mode.
When an authorized user starts ambient listening on aspecific radio, the radio plays a tone, displays the ambientlistening icon and the alias of the authorized user. Ambientlistening stops when a different type of call is initiated orreceived.
English
54
Authorized Accessories ListMotorola Solutions provides a list of accessories to improvethe productivity of your radio.
Antenna• Gray Antenna ID Band (pack of 10) (32012144001)
• Yellow Antenna ID Band (pack of 10) (32012144002)
• Green Antenna ID Band (pack of 10) (32012144003)
• Blue Antenna ID Band (pack of 10) (32012144004)
• Purple Antenna ID Band (pack of 10) (32012144005)
• LTE Antenna (HKAN4004_)
Battery• Li-Ion 2500 mAh Battery (PMNN4578_)
Carry Devices• Nylon Wrist Strap (PMLN6074_)
• Heavy-Duty Swivel Belt Clip (PMLN7128_)
• Swivel Carry Holster (PMLN7932_)
Chargers• Multi-Unit Charger Kit, US/NA Plug (PMLN7101_)
• Single Unit Charger Kit (PMLN7109_)
• 1.5 A Power Supply, Micro USB, US Plug(PS000150A11)
Earbuds and Earpieces• Earbud with In-line Mic/Push-To-Talk (PTT), MagOne
(PMLN7156_)
• 2-Wire with Transparent Tube, Black (PMLN7157_)
• 1-Wire Surveillance Earpiece, In-Line Mic and PTT(PMLN7158_)
• Adjustable D-Style with In-Line Mic and PTT(PMLN7159_)
• Swivel Earpiece, In-line Mic and PTT (PMLN7189_)
Miscellaneous Accessories• Battery Door (HKLN4685_)
• AINA PTT Voice Responder (PMMN4126_)
English
55
Remote Speaker Microphone• RM250 Remote Speaker Microphone (PMMN4125_)
English
56
Batteries and ChargersWarrantyThe Workmanship WarrantyThe workmanship warranty guarantees against defects inworkmanship under normal use and service.
SLN 1000 Batteries 12 Months
The Capacity WarrantyThe capacity warranty guarantees 80% of the ratedcapacity for the warranty duration.
Lithium-Ion (Li-lon) Batter-ies
12 Months
English
57
Limited WarrantyMOTOROLA SOLUTIONSCOMMUNICATION PRODUCTS
I. WHAT THIS WARRANTY COVERSAND FOR HOW LONG:Motorola Solutions, Inc. ("Motorola Solutions") warrants theMotorola Solutions manufactured Communication Productslisted below ("Product") against defects in material andworkmanship under normal use and service for a period oftime from the date of purchase as scheduled below:
Portable Radio 12 Months
Product Accessories 12 Months
Motorola Solutions, at its option, will at no charge eitherrepair the Product (with new or reconditioned parts),replace it (with a new or reconditioned Product), or refundthe purchase price of the Product during the warrantyperiod provided it is returned in accordance with the termsof this warranty. Replaced parts or boards are warranted
for the balance of the original applicable warranty period.All replaced parts of Product shall become the property ofMotorola Solutions.
This express limited warranty is extended by MotorolaSolutions to the original end user purchaser only and is notassignable or transferable to any other party. This is thecomplete warranty for the Product manufactured byMotorola Solutions. Motorola Solutions assumes noobligations or liability for additions or modifications to thiswarranty unless made in writing and signed by an officer ofMotorola Solutions.
Unless made in a separate agreement between MotorolaSolutions and the original end user purchaser, MotorolaSolutions does not warrant the installation, maintenance orservice of the Product.
Motorola Solutions cannot be responsible in any way forany ancillary equipment not furnished by MotorolaSolutions which is attached to or used in connection withthe Product, or for operation of the Product with anyancillary equipment, and all such equipment is expresslyexcluded from this warranty. Because each system whichmay use the Product is unique, Motorola Solutionsdisclaims liability for range, coverage, or operation of thesystem as a whole under this warranty.
English
58
II. GENERAL PROVISIONSThis warranty sets forth the full extent of Motorola Solutionsresponsibilities regarding the Product. Repair, replacementor refund of the purchase price, at Motorola Solutionsoption, is the exclusive remedy. THIS WARRANTY ISGIVEN IN LIEU OF ALL OTHER EXPRESSWARRANTIES. IMPLIED WARRANTIES, INCLUDINGWITHOUT LIMITATION, IMPLIED WARRANTIES OFMERCHANTABILITY AND FITNESS FOR A PARTICULARPURPOSE, ARE LIMITED TO THE DURATION OF THISLIMITED WARRANTY. IN NO EVENT SHALL MOTOROLASOLUTIONS BE LIABLE FOR DAMAGES IN EXCESS OFTHE PURCHASE PRICE OF THE PRODUCT, FOR ANYLOSS OF USE, LOSS OF TIME, INCONVENIENCE,COMMERCIAL LOSS, LOST PROFITS OR SAVINGS OROTHER INCIDENTAL, SPECIAL OR CONSEQUENTIALDAMAGES ARISING OUT OF THE USE OR INABILITYTO USE SUCH PRODUCT, TO THE FULL EXTENT SUCHMAY BE DISCLAIMED BY LAW.
III. STATE LAW RIGHTS:SOME STATES DO NOT ALLOW THE EXCLUSION ORLIMITATION OF INCIDENTAL OR CONSEQUENTIALDAMAGES OR LIMITATION ON HOW LONG AN IMPLIED
WARRANTY LASTS, SO THE ABOVE LIMITATION OREXCLUSIONS MAY NOT APPLY.
This warranty gives specific legal rights, and there may beother rights which may vary from state to state.
IV. HOW TO GET WARRANTYSERVICEYou must provide proof of purchase (bearing the date ofpurchase and Product item serial number) in order toreceive warranty service and, also, deliver or send theProduct item, transportation and insurance prepaid, to anauthorized warranty service location. Warranty service willbe provided by Motorola Solutions through one of itsauthorized warranty service locations. If you first contactthe company which sold you the Product (for example,dealer or communication service provider), it can facilitateyour obtaining warranty service. You can also call MotorolaSolutions at 1-800-927-2744.
V. WHAT THIS WARRANTY DOESNOT COVER1 Defects or damage resulting from use of the Product in
other than its normal and customary manner.
English
59
2 Defects or damage from misuse, accident, water, orneglect.
3 Defects or damage from improper testing, operation,maintenance, installation, alteration, modification, oradjustment.
4 Breakage or damage to antennas unless caused directlyby defects in material workmanship.
5 A Product subjected to unauthorized Productmodifications, disassembles or repairs (including,without limitation, the addition to the Product of non-Motorola Solutions supplied equipment) which adverselyaffect performance of the Product or interfere withMotorola Solutions normal warranty inspection andtesting of the Product to verify any warranty claim.
6 Product which has had the serial number removed ormade illegible.
7 Rechargeable batteries if:
• any of the seals on the battery enclosure of cells arebroken or show evidence of tampering.
• the damage or defect is caused by charging or usingthe battery in equipment or service other than theProduct for which it is specified.
8 Freight costs to the repair depot.
9 A Product which, due to illegal or unauthorizedalteration of the software/firmware in the Product, doesnot function in accordance with Motorola Solutionspublished specifications or the FCC certification labelingin effect for the Product at the time the Product wasinitially distributed from Motorola Solutions.
10 Scratches or other cosmetic damage to Productsurfaces that does not affect the operation of theProduct.
11 Normal and customary wear and tear.
VI. PATENT AND SOFTWAREPROVISIONSMotorola Solutions will defend, at its own expense, any suitbrought against the end user purchaser to the extent that itis based on a claim that the Product or parts infringe aUnited States patent, and Motorola Solutions will pay thosecosts and damages finally awarded against the end userpurchaser in any such suit which are attributable to anysuch claim, but such defense and payments areconditioned on the following:
1 Motorola Solutions will be notified promptly in writing bysuch purchaser of any notice of such claim,
English
60
2 Motorola Solutions will have sole control of the defenseof such suit and all negotiations for its settlement orcompromise, and
3 Should the Product or parts become, or in MotorolaSolutions opinion be likely to become, the subject of aclaim of infringement of a United States patent, thatsuch purchaser will permit Motorola Solutions, at itsoption and expense, either to procure for suchpurchaser the right to continue using the Product orparts or to replace or modify the same so that itbecomes non-infringing or to grant such purchaser acredit for the Product or parts as depreciated and acceptits return. The depreciation will be an equal amount peryear over the lifetime of the Product or parts asestablished by Motorola Solutions.
Motorola Solutions will have no liability with respect to anyclaim of patent infringement which is based upon thecombination of the Product or parts furnished hereunderwith software, apparatus or devices not furnished byMotorola Solutions, nor will Motorola Solutions have anyliability for the use of ancillary equipment or software notfurnished by Motorola Solutions which is attached to orused in connection with the Product. The foregoing statesthe entire liability of Motorola Solutions with respect toinfringement of patents by the Product or any parts thereof.
Laws in the United States and other countries preserve forMotorola Solutions certain exclusive rights for copyrightedMotorola Solutions software such as the exclusive rights toreproduce in copies and distribute copies of such MotorolaSolutions software. Motorola Solutions software may beused in only the Product in which the software wasoriginally embodied and such software in such Product maynot be replaced, copied, distributed, modified in any way, orused to produce any derivative thereof. No other useincluding, without limitation, alteration, modification,reproduction, distribution, or reverse engineering of suchMotorola Solutions software or exercise of rights in suchMotorola Solutions software is permitted. No license isgranted by implication, estoppel or otherwise underMotorola Solutions patent rights or copyrights.
VII. GOVERNING LAWThis Warranty is governed by the laws of the State ofIllinois, U.S.A.
English
61
MOTOROLA, MOTO, MOTOROLA SOLUTIONS and the Stylized M Logo are trademarks or registered trademarks of Motorola Trademark Holdings, LLC and are used under license. All other trademarks are the property of their respective owners. © 2020 Motorola Solutions, Inc. All rights reserved.
Motorola Solutions, Inc.500 W Monroe StreetChicago, IL 606611 U.S.A.