Embed Size (px)
Citation preview

NIOX® Panel User Manual US000200-02 (EPM-000194)
NIOX® Panel PC application for NIOX MINO®
User Manual

Table of contents
1
1 Important information ..................................................................2
1.1 Before using NIOX® Panel.......................................................... 21.2 About this manual ..................................................................... 21.3 Responsible manufacturer and contacts .................................... 21.4 Warnings................................................................................... 21.5 Intended use ............................................................................. 31.6 Training requirements................................................................ 3
2 Installation and setup....................................................................3
2.1 Installation................................................................................. 32.2 Setup......................................................................................... 5
3 Navigation ....................................................................................8
3.1 Interface.................................................................................... 83.2 Main view ................................................................................. 8
4 Using NIOX® Panel.....................................................................10
4.1 Register patient ID (optional) .................................................. 104.2 Measure FeNO........................................................................ 104.3 Demonstration mode .............................................................. 124.4 Measure ambient NO.............................................................. 134.5 Change settings ....................................................................... 134.6 External Quality Control (QC) procedure ................................ 164.7 Turn off NIOX® Panel ............................................................... 20
5 Troubleshooting..........................................................................20
5.1 Alert codes and actions ........................................................... 20
6 Preventive inspections ................................................................22
7 Safety information ......................................................................22
7.1 Cautions ................................................................................. 22
8 Buttons and descriptions ............................................................ 23

Chapter 1 Important information
NIOX® Panel User Manual US2 000200-02
1 Important informationNIOX® Panel is a visual aid for operating NIOX® MINO Airway Inflamma-tion Monitor by allowing the user to operate the NIOX MINO from theirPC.
1.1 Before using NIOX® PanelNIOX® Panel PC application (NIOX® Panel) shall only be operated as di-rected in this manual by trained healthcare professionals. Trained status isachieved only after careful reading of this manual. Read the entire instruc-tions for use and make certain that you fully understand the safety informa-tion. The NIOX MINO User Manual describes how to use the device.
1.2 About this manualNIOX® Panel User Manual - US 000200 (EPM-000194), version 02, May 2015, for application with version number 1.0.X.X and instrumentswith software version 23XX. To view version number for your instrument,refer to NIOX MINO User Manual. For instruction on how to update firm-ware see page 6.
Information in this document is subject to change. Amendments will bemade by Aerocrine AB as they occur.
• Aerocrine, NIOX and NIOX MINO are registered trademarks of Aerocrine AB.
1.3 Responsible manufacturer and contacts
Mailing address:Aerocrine ABP.O. Box 1024 SE-171 21 Solna, Sweden
Visiting address:Råsundavägen 18 SE-169 67 Solna, Sweden
www.aerocrine.com www.niox.com
1.4 Warnings• NIOX® Panel shall only be operated by healthcare professionals.
• Operate NIOX® Panel as stated in this manual. Aerocrine accepts no responsibility for damaged equipment or faulty results, if the equipment is not handled according to this manual.
• When selecting an accessory for your NIOX® Panel product keep in mind that an accessory not recommended by Aerocrine may result in loss of performance, damage to your NIOX Panel product, fire, electric shock, injury or damage to other property. The product warranty does not cover product failure or damage resulting from use with non approved accessories. Aerocrine takes no responsibility for
Symbol Description
WARNING! Indicates a potentially hazardous situation that, if not avoided, can result in bodily harm or injury.
CAUTION! Indicates a potentially hazardous situation that, if not avoided, can damage a product or system, cause loss of data or harm to business.
Note Alerts the reader to important information on the proper use of the product, user expectations, error situations, and actions related to these.

Chapter 2 Installation and setup
3
health and safety problems or other problems caused by the use of accessories not approved by Aerocrine.
• Modification of NIOX® Panel application is not allowed.
• Do not use damaged components.
• Do not disconnect the instrument during firmware loading.
• The patient filter is for single use only.
• All warnings in the NIOX MINO User Manual are also applicable.
1.5 Intended useNIOX® Panel is an optional software accessory allowing an additional dis-play for the NIOX MINO® Airway Inflammation Monitor
Refer to the NIOX MINO® User Manual for NIOX MINO® intended use.
1.6 Training requirementsNIOX® Panel shall only be used as directed in this manual by trainedhealthcare professionals. Trained status is achieved only after careful read-ing of this manual.
The User Manual provides instructions on how to operate NIOX® Panel. Itcontains numbered step-by-step instructions with screens and illustrations.Choices within steps are displayed with bullet points.
2 Installation and setup
2.1 Installation
Note: If the computer does not fulfill the system requirements, see note on page 10.
The NIOX® Panel software is supplied on a USB storage device.
1. Insert the USB storage device in the computer’s USB port.
2. In the folder NIOX Panel 1.0.X.X select the file named setup.exe
3. If .NET Framework 4.0, VC++ 2010,XNA or SQL Server Compact is not installed, an installation wizard for each of the programs opens, one at the time.
4. Select Yes.
5. Select Accept license agreement.
NIOX Panel System requirements• Windows® XP*(32 bit), Windows® Vista(32 bit),
Windows® 7 or Windows® 8.0/8.1 Pro (RT versions excluded)
• .NET Framework 4.0 • 1 GHz or faster processor• 256 MB RAM (512 MB RAM recommended)• 250 MB of video graphics RAM• 250 MB of available hard-disc space• 1024x768 screen resolution
* Windows XP with Service Pack 3

Chapter 2 Installation and setup
NIOX® Panel User Manual US4 000200-02
6. Wait until the programs are installed.
7. The Installation wizard for NIOX® Panel opens. Click Next.
8. Select Accept license agreement.
Chapter 2 Installation and setup
5
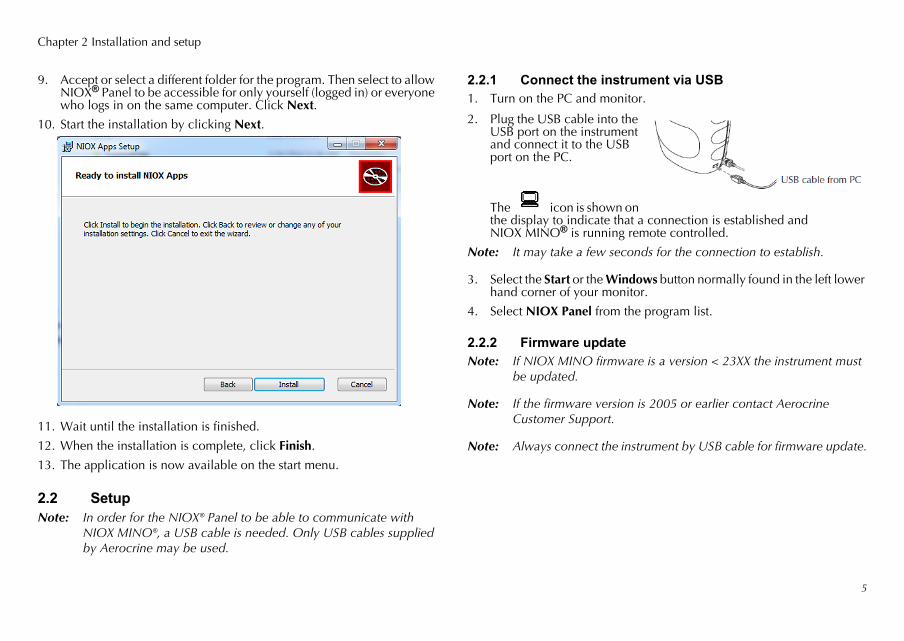
9. Accept or select a different folder for the program. Then select to allow NIOX® Panel to be accessible for only yourself (logged in) or everyone who logs in on the same computer. Click Next.
10. Start the installation by clicking Next.
11. Wait until the installation is finished.
12. When the installation is complete, click Finish.
13. The application is now available on the start menu.
2.2 SetupNote: In order for the NIOX® Panel to be able to communicate with
NIOX MINO®, a USB cable is needed. Only USB cables supplied by Aerocrine may be used.
2.2.1 Connect the instrument via USB1. Turn on the PC and monitor.
2. Plug the USB cable into the USB port on the instrument and connect it to the USB port on the PC.
The icon is shown on the display to indicate that a connection is established and NIOX MINO® is running remote controlled.
Note: It may take a few seconds for the connection to establish.
3. Select the Start or the Windows button normally found in the left lower hand corner of your monitor.
4. Select NIOX Panel from the program list.
2.2.2 Firmware updateNote: If NIOX MINO firmware is a version < 23XX the instrument must
be updated.
Note: If the firmware version is 2005 or earlier contact Aerocrine Customer Support.
Note: Always connect the instrument by USB cable for firmware update.

Chapter 2 Installation and setup
NIOX® Panel User Manual US6 000200-02
1. A view for automatic update is opened.
2. Press OK and wait for the upload to finish.
CAUTION! Do not disconnect the instrument during load of firmware.
3. When the firmware has been uploaded the instrument will disconnect and perform an internal update, after completion the instrument will reconnect automatically.
4. The NIOX Panel opens.
Note: When starting NIOX Panel for the first time the connectivity details dialog box opens
2.2.3 NIOX Panel connectivity moduleThe connectivity module in NIOX Panel utilizes Microsoft’s secure cloudservice, Microsoft Azure, to automatically transmit technical data from thedevice via the internet to Aerocrine.
Technical data such as time stamp, alert codes and number of remainingmeasurements on the device and sensor are received. This informationwill ensure better service and support.
Chapter 2 Installation and setup
7
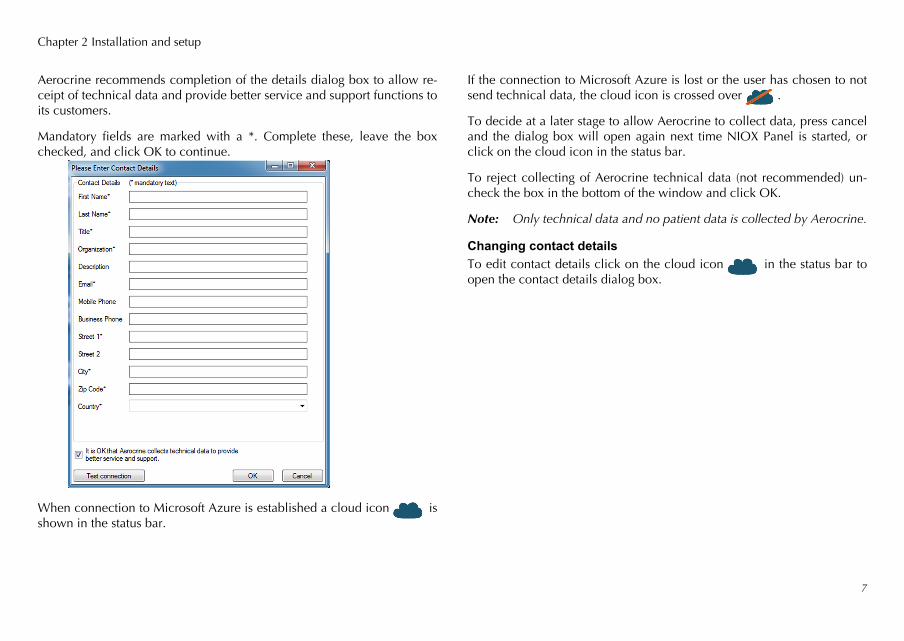
Aerocrine recommends completion of the details dialog box to allow re-ceipt of technical data and provide better service and support functions toits customers.
Mandatory fields are marked with a *. Complete these, leave the boxchecked, and click OK to continue.
When connection to Microsoft Azure is established a cloud icon isshown in the status bar.
If the connection to Microsoft Azure is lost or the user has chosen to notsend technical data, the cloud icon is crossed over .
To decide at a later stage to allow Aerocrine to collect data, press canceland the dialog box will open again next time NIOX Panel is started, orclick on the cloud icon in the status bar.
To reject collecting of Aerocrine technical data (not recommended) un-check the box in the bottom of the window and click OK.
Note: Only technical data and no patient data is collected by Aerocrine.
Changing contact details
To edit contact details click on the cloud icon in the status bar toopen the contact details dialog box.
Chapter 3 Navigation
NIOX® Panel User Manual US8 000200-02
3 Navigation
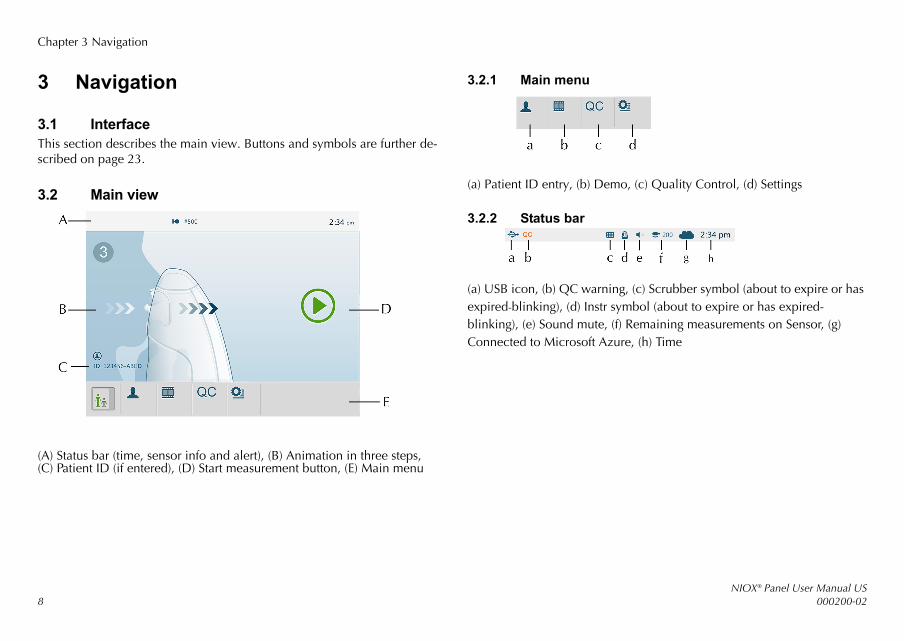
3.1 InterfaceThis section describes the main view. Buttons and symbols are further de-scribed on page 23.
3.2 Main view
(A) Status bar (time, sensor info and alert), (B) Animation in three steps, (C) Patient ID (if entered), (D) Start measurement button, (E) Main menu
3.2.1 Main menu
(a) Patient ID entry, (b) Demo, (c) Quality Control, (d) Settings
3.2.2 Status bar
(a) USB icon, (b) QC warning, (c) Scrubber symbol (about to expire or has expired-blinking), (d) Instr symbol (about to expire or has expired-blinking), (e) Sound mute, (f) Remaining measurements on Sensor, (g) Connected to Microsoft Azure, (h) Time

Chapter 3 Navigation
9
3.2.3 Settings view
(A) User Settings, (B) Device info (see page 14), (C) Volume (see page 13),(D) Scrubber info (see page 15), (E) Ambient measurement (see page 13),(F) Patient log (see page 15), (G) QC log (see page 19), (H) QC info (seepage 19), (I) Return to main view
3.2.4 Measurement view
(a) Measurement sequence number, (b) FeNO value in ppb (parts per billion), (c) Measurement mode 10 seconds exhalation time, (d) QC alert (if not performed the current day), (e) OK - returns to main view

Chapter 4 Using NIOX® Panel
NIOX® Panel User Manual US10 000200-02
4 Using NIOX® Panel
4.1 Register patient ID (optional)Note: If Patient ID is used, it has to be entered before each measurement,
even if it is the same patient. Local Regulations on Patient information privacy must be considered when using unique patient identifiers.
1. Select the Patient ID button from the main menu.
2. Enter up to 12 characters (alpha or numeric).
4.2 Measure FeNOVerify proper operating conditions before performing a measurement withNIOX MINO®. A basic preventive inspection is recommended before eachuse (see page 22). Make sure a successful daily QC is performed, seepage 17. Refer to NIOX MINO User manual for more detailed directions.
4.2.1 Perform FeNO measurementWARNING! The patient filter is for single use only.
1. Attach a new patient filter.
2. Turn the PC-monitor facing the patient.
3. Select Start measurement button on the display.
Note: If the computer does not fulfill the system requirements it may still be possible to run NIOX Panel. To start a measurement select the Win XP animation. It is recommended to press the “start measurement” button to initiate the measurement.
4. Instruct the patient to perform steps 5-8.
5. Empty lungs.
6. Close the lips around the NIOX MINO® patient filter so that no air leakage occurs.
7. Inhale deeply through the filter. The screen shows an animation where the sun rises.
Note: There are three optional animations (Cloud, Balloon or Meter). For instructions on how to change animation see page 12.
8. Exhale slowly through the filter while keeping the balloon within the limits as indicated on the screen (the white lines).

Chapter 4 Using NIOX® Panel
11
9. The visual incentive, instruments- audio signals and top light guide the user to the correct exhalation pressure.
A continuous sound indicates correct pressure with a frequency proportional to the pressure.• An intermittent high frequency sound - too strong pressure
• An intermittent low frequency sound - too weak pressure
Exhalation with:Correct pressure Pressure too strong Pressure too weak
10. Exhale until the balloon has reached the end of the screen.
The instrument will analyze the sample and generate a result in approxi-mately one and a half minutes.
CAUTION! Do not disconnect the instrument from the PC during mea-surement and analyzing process.
(A) Patient ID - if applicable, (B) Measurement mode, (C) FeNO value inppb (parts per billion), (D) Measurement sequence number, (E) OK - re-turns to main view
11. Remove the patient filter.
Chapter 4 Using NIOX® Panel
NIOX® Panel User Manual US12 000200-02
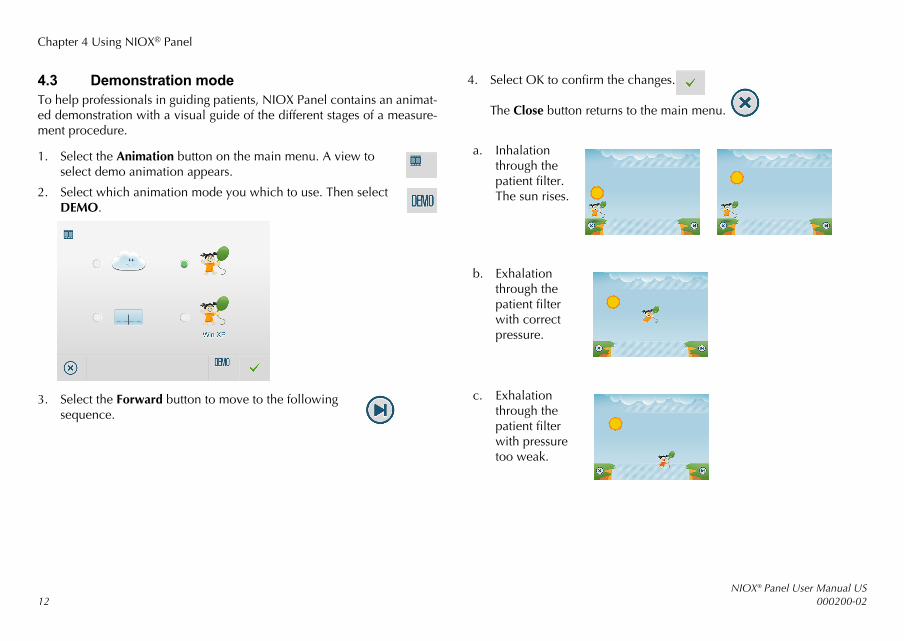
4.3 Demonstration modeTo help professionals in guiding patients, NIOX Panel contains an animat-ed demonstration with a visual guide of the different stages of a measure-ment procedure.
1. Select the Animation button on the main menu. A view to select demo animation appears.
2. Select which animation mode you which to use. Then select DEMO.
3. Select the Forward button to move to the following sequence.
4. Select OK to confirm the changes.
The Close button returns to the main menu.
a. Inhalation through the patient filter.The sun rises.
b. Exhalation through the patient filter with correct pressure.
c. Exhalation through the patient filter with pressure too weak.

Chapter 4 Using NIOX® Panel
13
4.4 Measure ambient NONote: An ambient measurement is counted as one measurement on
NIOX MINO® Sensor and the instrument.
1. Attach a patient filter.
2. Select the Settings button on the main menu.
3. Select Ambient Measurement button.
4. Select the Start Ambient measurement button.
5. The analyzing view is visible until the measurement is finished and the result is displayed.
(A) Ambient measurement value (in ppb), (B) Measurement mode, (C) Measurement sequence number, (D) OK - returns to main view
4.5 Change settings
4.5.1 Change volume1. Select the Settings button on the main menu.
2. Select the Volume button.
d. Exhalation through the patient filter with pressure too strong.
Chapter 4 Using NIOX® Panel
NIOX® Panel User Manual US14 000200-02
3. Select the decrease/increase to adjust volume.
4. Select the Return button to confirm changes and return to settings.
Note: The status bar indicates mute status when the sound volume is set to zero.
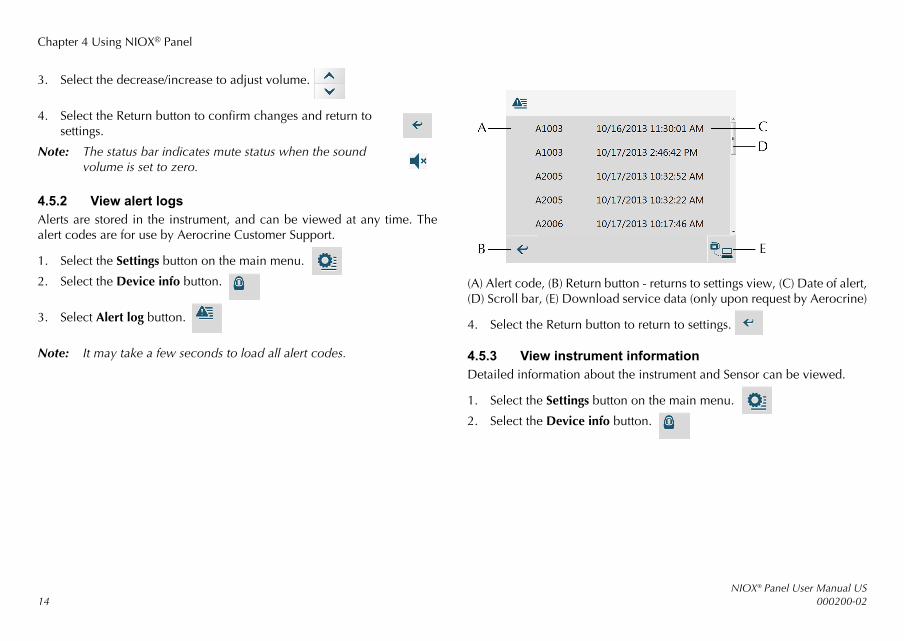
4.5.2 View alert logsAlerts are stored in the instrument, and can be viewed at any time. Thealert codes are for use by Aerocrine Customer Support.
1. Select the Settings button on the main menu.
2. Select the Device info button.
3. Select Alert log button.
Note: It may take a few seconds to load all alert codes.
(A) Alert code, (B) Return button - returns to settings view, (C) Date of alert,(D) Scroll bar, (E) Download service data (only upon request by Aerocrine)
4. Select the Return button to return to settings.
4.5.3 View instrument informationDetailed information about the instrument and Sensor can be viewed.
1. Select the Settings button on the main menu.
2. Select the Device info button.

Chapter 4 Using NIOX® Panel
15
3. This opens the Instrument information view displaying the following:
(A) Numbers of remaining measurements on the instrument,(B) Instrument serial number, (C) Instrument software version, (D) Instrument expiration date, (E) Return to settings, (F) Numbers ofremaining measurements on the Sensor, (G) Sensor serial number, (H) Sensor expiration date, (I) Alert log button
4.5.4 View patient measurement logsAll measurement results are stored in the instrument and can be viewed atany time.
1. Select the Settings button on the main menu.
2. Select Patient log button.
3. This opens the Record view.The log will display the following:
(A) Measurement sequence number, (B) Patient ID - if entered, (C) Measurement mode, (D) Return to settings, (E) FeNO value, (F) Measurement date and time, (G) QC Alert, (H) Forward, Backward
4. Browse through the measurement logs using the forward and backward buttons. Select the Return button to return to settings.
4.5.5 View scrubber information1. Select the Settings button on the main menu.
2. Select the Scrubber button.
Chapter 4 Using NIOX® Panel
NIOX® Panel User Manual US16 000200-02
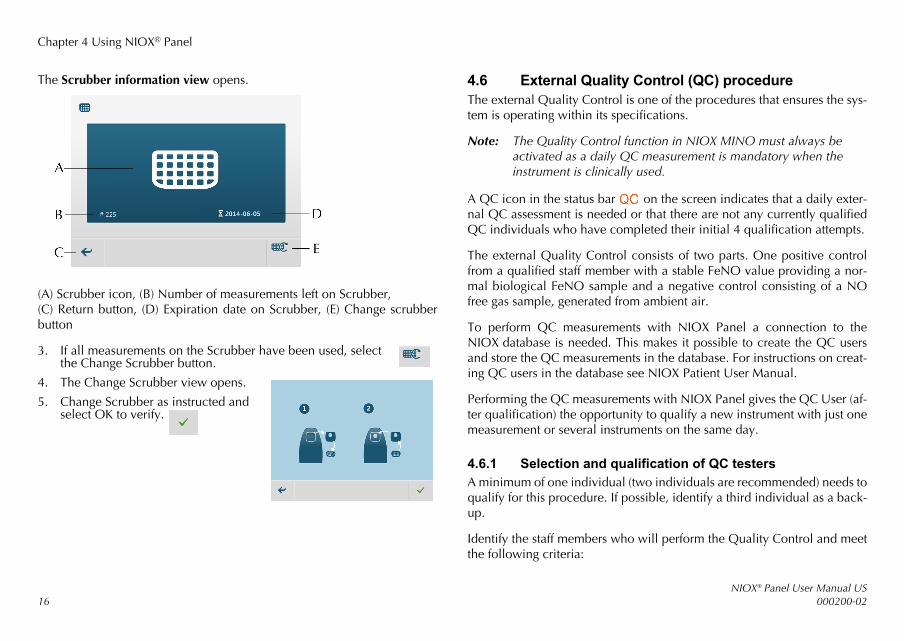
The Scrubber information view opens.
(A) Scrubber icon, (B) Number of measurements left on Scrubber, (C) Return button, (D) Expiration date on Scrubber, (E) Change scrubberbutton
3. If all measurements on the Scrubber have been used, select the Change Scrubber button.
4. The Change Scrubber view opens.
5. Change Scrubber as instructed and select OK to verify.
4.6 External Quality Control (QC) procedureThe external Quality Control is one of the procedures that ensures the sys-tem is operating within its specifications.
Note: The Quality Control function in NIOX MINO must always be activated as a daily QC measurement is mandatory when the instrument is clinically used.
A QC icon in the status bar on the screen indicates that a daily exter-nal QC assessment is needed or that there are not any currently qualifiedQC individuals who have completed their initial 4 qualification attempts.
The external Quality Control consists of two parts. One positive controlfrom a qualified staff member with a stable FeNO value providing a nor-mal biological FeNO sample and a negative control consisting of a NOfree gas sample, generated from ambient air.
To perform QC measurements with NIOX Panel a connection to theNIOX database is needed. This makes it possible to create the QC usersand store the QC measurements in the database. For instructions on creat-ing QC users in the database see NIOX Patient User Manual.
Performing the QC measurements with NIOX Panel gives the QC User (af-ter qualification) the opportunity to qualify a new instrument with just onemeasurement or several instruments on the same day.
4.6.1 Selection and qualification of QC testersA minimum of one individual (two individuals are recommended) needs toqualify for this procedure. If possible, identify a third individual as a back-up.
Identify the staff members who will perform the Quality Control and meetthe following criteria:

Chapter 4 Using NIOX® Panel
17
• Over 18 years of age.
• No ongoing cold or known airway disease.
• Non-smoker.
• Expected stable FeNO values between 5 and 40 ppb.
• Preferably no allergies (except seasonal, see below) or asthma.
A QC tester will be qualified over the course of four days within a sevenday period.
Note: After a QC tester has been qualified, if the most recent QC measurement is older than 30 days, then the qualification is suspended and the QC tester needs to re-qualify according to the qualification procedure. Perform four QC measurements, one per day within seven days, according to the QC measurement section, in order to qualify a QC tester.
A mean value is calculated from the three qualifying measurements thatmust be between 5-40 ppb for the QC tester to be qualified. The QC mea-surement on the fourth day (daily QC) must be within ± 10 ppb from themean value and the negative control approved. If this has been met theQuality Control has passed for that staff member and the instrument isready for clinical use. The moving mean value is recalculated when theQC tester performs a QC measurement after seven days.
4.6.2 QC measurementThis procedure applies for qualification and daily QC measurements. Theinstrument will prompt for a daily QC procedure by showing in thestatus bar. Always consider the following in order to obtain reliable results.
Before any measurement:
• Avoid nitrate rich food within 3 hrs before the measurement.
• Avoid strenuous exercise at least 1 hour before the measurement.
• Preferably do not perform a measurement in case of:
• Ongoing cold.• Acute seasonal allergy.
• Always attach a new patient filter for each new QC tester.
1. Select QC.
2. Select the correct QC User.
3. Empty lungs.
4. Close the lips around the NIOX MINO® patient filter so that no air leakage occurs.
5. Inhale deeply through the filter. The screen shows an animation where the sun rises.
Chapter 4 Using NIOX® Panel
NIOX® Panel User Manual US18 000200-02
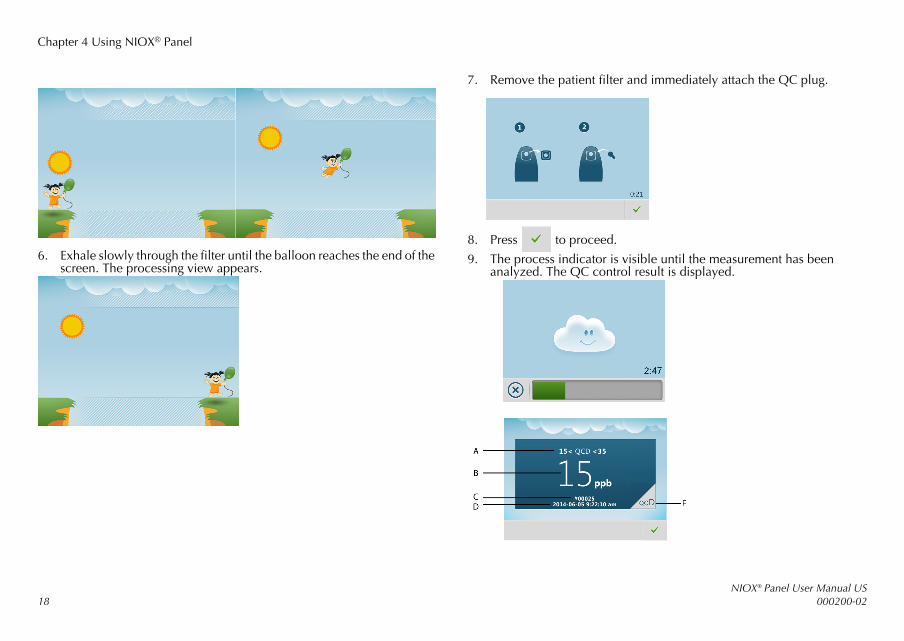
6. Exhale slowly through the filter until the balloon reaches the end of the screen. The processing view appears.
7. Remove the patient filter and immediately attach the QC plug.
8. Press to proceed.
9. The process indicator is visible until the measurement has been analyzed. The QC control result is displayed.
Chapter 4 Using NIOX® Panel
19
(A) QC user limits (mean value +/- 10 ppb), (B) Control result in ppb, (C) QC measurement sequence number, (D) QC measurement date andtime, (E) QC user (database user)
10. Remove the QC plug.
Note: Press to return to main menu.
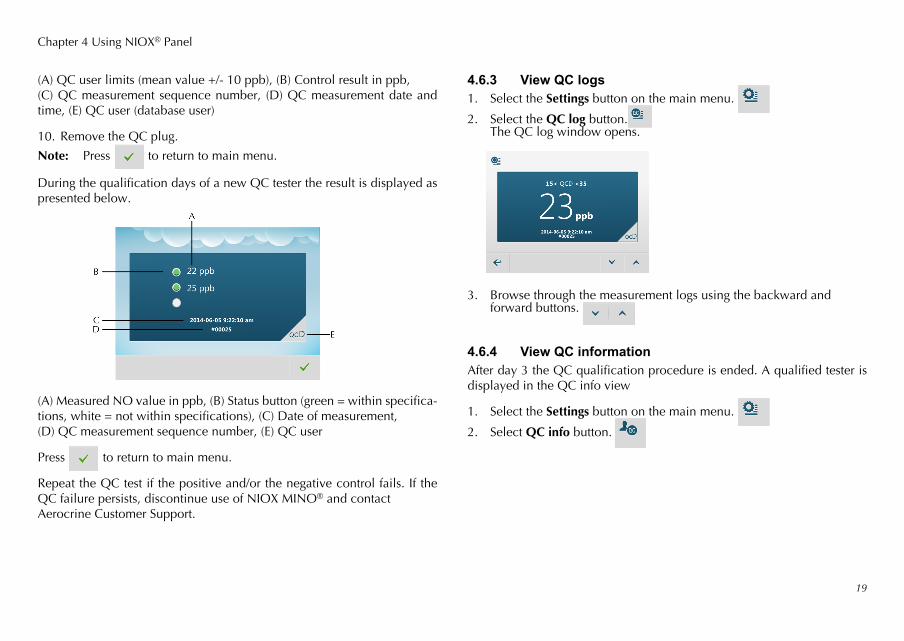
During the qualification days of a new QC tester the result is displayed aspresented below.
(A) Measured NO value in ppb, (B) Status button (green = within specifica-tions, white = not within specifications), (C) Date of measurement, (D) QC measurement sequence number, (E) QC user
Press to return to main menu.
Repeat the QC test if the positive and/or the negative control fails. If theQC failure persists, discontinue use of NIOX MINO® and contact Aerocrine Customer Support.
4.6.3 View QC logs1. Select the Settings button on the main menu.
2. Select the QC log button.The QC log window opens.
3. Browse through the measurement logs using the backward and forward buttons.
4.6.4 View QC informationAfter day 3 the QC qualification procedure is ended. A qualified tester isdisplayed in the QC info view
1. Select the Settings button on the main menu.
2. Select QC info button.

Chapter 5 Troubleshooting
NIOX® Panel User Manual US20 000200-02
3. The QC qualifying results are displayed as follows.
(A) QC User name, (B) Date for latest moving mean calculation, (C) Mean value in ppb, (D) Return button
Select the Return button to return to settings.
4.7 Turn off NIOX® PanelTo turn off NIOX Panel, select the Exit button in the top right corner.
5 Troubleshooting
5.1 Alert codes and actionsAlert messages and other information are shown as a code on the instru-ment display. The tables below provide the alert codes and recommendedactions to be taken for an alert code. If the alert persists, contact your localAerocrine representative or Aerocrine Customer Support.
User alerts Action
A10 Exhalation too strong. Repeat the measurement with less strength.
A11 Exhalation too weak. Repeat the measurement with greater exhalation force.
A12 No exhalation detected. Repeat the measurement and exhale into the instrument directly after inhalation.
A13 Analysis interrupted.Repeat the measurement and do not breathe through the patient filter during analysis.
QC alerts Action
A50 The mean value of the three qualification results does not fall between 5-40 ppb. Restart the QC tester qualification from qualification day 1.
Chapter 5 Troubleshooting
21
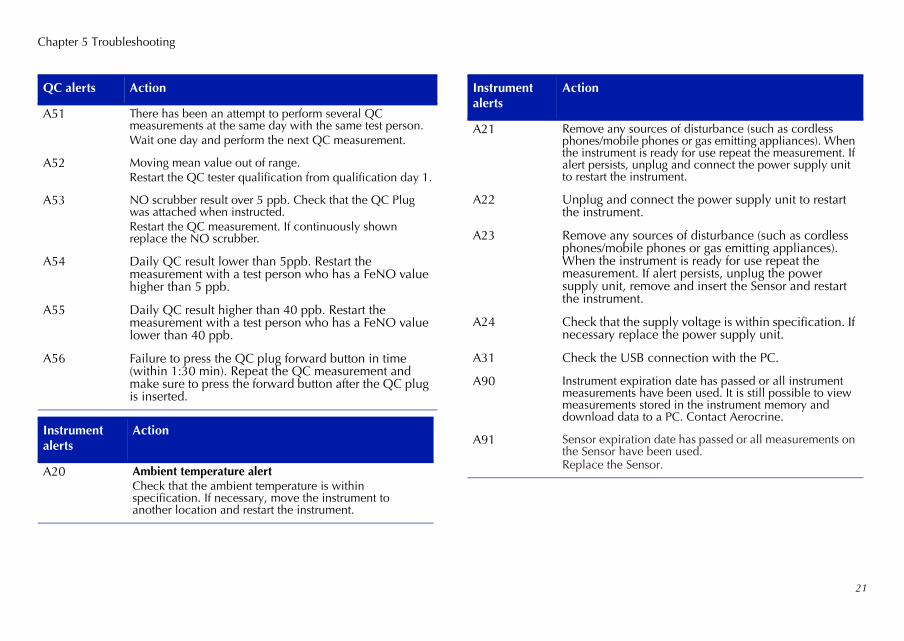
A51 There has been an attempt to perform several QC measurements at the same day with the same test person. Wait one day and perform the next QC measurement.
A52 Moving mean value out of range. Restart the QC tester qualification from qualification day 1.
A53 NO scrubber result over 5 ppb. Check that the QC Plug was attached when instructed.Restart the QC measurement. If continuously shown replace the NO scrubber.
A54 Daily QC result lower than 5ppb. Restart the measurement with a test person who has a FeNO value higher than 5 ppb.
A55 Daily QC result higher than 40 ppb. Restart the measurement with a test person who has a FeNO value lower than 40 ppb.
A56 Failure to press the QC plug forward button in time (within 1:30 min). Repeat the QC measurement and make sure to press the forward button after the QC plug is inserted.
Instrument alerts
Action
A20 Ambient temperature alertCheck that the ambient temperature is within specification. If necessary, move the instrument to another location and restart the instrument.
QC alerts Action
A21 Remove any sources of disturbance (such as cordless phones/mobile phones or gas emitting appliances). When the instrument is ready for use repeat the measurement. If alert persists, unplug and connect the power supply unit to restart the instrument.
A22 Unplug and connect the power supply unit to restart the instrument.
A23 Remove any sources of disturbance (such as cordless phones/mobile phones or gas emitting appliances). When the instrument is ready for use repeat the measurement. If alert persists, unplug the power supply unit, remove and insert the Sensor and restart the instrument.
A24 Check that the supply voltage is within specification. If necessary replace the power supply unit.
A31 Check the USB connection with the PC.
A90 Instrument expiration date has passed or all instrument measurements have been used. It is still possible to view measurements stored in the instrument memory and download data to a PC. Contact Aerocrine.
A91 Sensor expiration date has passed or all measurements on the Sensor have been used. Replace the Sensor.
Instrument alerts
Action

Chapter 6 Preventive inspections
NIOX® Panel User Manual US22 000200-02
6 Preventive inspectionsRefer to the NIOX MINO® user manual for details on how to perform pre-ventive inspections.
If the application is not working properly contact your local Aerocrine rep-resentative or Aerocrine Customer Support.
7 Safety information
7.1 Cautions• Make sure that you use the correct measurement mode, otherwise
incorrect exhaled FeNO results might be obtained.
• Do not disconnect the instrument during measurement and analyzing process.
7.1.1 Limited warrantyAerocrine provides a Limited Warranty for this application. Conditions aredefined when the items are purchased.
Do NOT try to repair the application. Any attempt will make the warrantyinvalid and performance according to the specifications cannot be guaran-teed.
7.1.2 SupportContact Aerocrine Customer Support if you encounter problems, whichyou cannot solve with the information in this manual.
For contact details, see back cover, and provide the following information:
• Your name, address and telephone number.
• Serial number for both the application, instrument and Sensor.
• Problem description (as thorough as possible).
• Alert codes or lists.

Chapter 8 Buttons and descriptions
23
8 Buttons and descriptions
8.0.1 Control buttons
8.0.2 Main menu buttons
8.0.3 Settings view buttons
8.0.4 Status bar
8.0.5 Display
OK - accept changes/verify result
Reset scrubber
Undo - closes view without saving changes
Start 10s measurement
Return Start ambient measurement
Forward-move to the following sequence
Demo
Decrease/step backward Radio buttons - not performed/performed
Increase/step forward Download service data
Check box (not active) Alert log
Check box (active)
Animation Patient ID
QC Settings
User settings Patient log
Volume Ambient measurement
Device info Scrubber info
QC info QC log
Time Sensor status - followed by number of measurements remaining. About to expire or has expired (blinking)
Instrument connected via USB
Instrument- about to expire or has expired (blinking)
Scrubber - about to expire or has expired (blinking)
Audio - mute
Indicates that no QC measurement is performed the current day
Connected to Microsoft Azure
Not connected to Microsoft Azure
Result screens - 10 s mode

Information in this document is subject to change.
Amendments will be made available by Aerocrine AB as they occur.
Copyright© 2015 Aerocrine AB, Solna, Sweden.
Based on the company’s intellectual property, Aerocrine develops and commercializes products for the monitoring of nitric oxide (NO) as a marker of inflammation,
to improve the management and care of patients with inflammatory disease in the airways.
Patents:
For information about patents relating to Aerocrine products see www.aerocrine.com
An ISO 13485 certified company
Aerocrine Inc, 5151 McCrimmon Parkway, Morrisville, Suite 260, NC 27560, USA
Phone: +1 (866) 275-6469, Fax: +1 (866) 329-6469, E-mail: [email protected]
www.aerocrine.comCopyright© 2015 Aerocrine AB, Solna, Sweden.
Aerocrine, NIOX® NIOX MINO® and NIOX VERO® are registered trademarks of Aerocrine AB.