Embed Size (px)
Citation preview
© 2012
NINE GOLDEN RULES OF INSTRUMENT FLYING
By King Povenmire, DPE
Every so often, during the past forty years as an instrument flight instructor I have had a few dramatic moments of insight. Most of these came while watching students fight with some of the same problems I had faced early in my training. I have used them in my own flying and have passed them on to my students. The time has come to formalize them and pass them on to others. An insight is defined as the grouping together of seemingly separate perceptions into a meaningful whole. An ancient Siamese philosopher developed a mantra that is proven very effective in providing an insight. If you face the east as the sun rises and, while on your knees, bow in rhythm with the sounds as you say “Owa Tagoo Siam” repeated as often as necessary, you will be rewarded by a surprising insight. This is more effective if done in a group. Each participant may stop when they have achieved the insight. The group should wait silently until the last participant has been enlightened. At that point the group usually breaks out in universal rejoicing. Over the years I have identified Nine Golden Insights that help me fly smoother and more efficiently. So here they are.
© 2012
1. THE ATTITUDE INDICATOR IS PRIMARY FOR ALL TRANSITIONS AND CORRECTIONS IN PITCH OR BANK
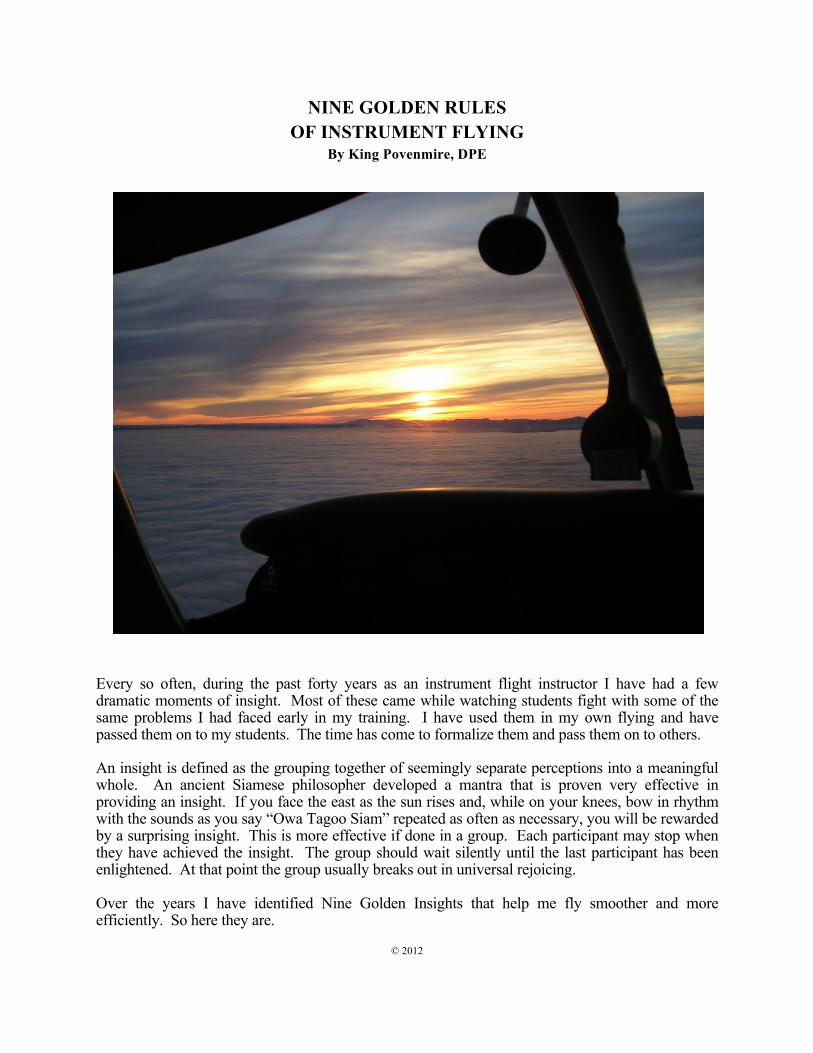
To begin with, we have to agree on what-controls-what. We control heading with coordinated bank. This works even for small corrections of one or two-degrees. Some pilots use rudder alone for small changes. This causes barely perceptible yawing. We control vertical flight profile with pitch. This includes altitude, vertical speed and airspeed climbs or descents. In all but “airspeed climbs” we control airspeed with power. If power is fixed (as in zero) we control airspeed with pitch and live with the resulting vertical profile. The ultimate pitch /power control interaction is when flying the glideslope. We control the glideslope with vertical speed using pitch. We control airspeed with power. The theory of instrument flying began with the old airmail pilots’ lifesaving technique of spinning down through the clouds. A spin is a stable maneuver that could be recovered to level flight after breaking out of the clouds (if the ground didn’t intervene). Then came the “needle, ball and airspeed” technique which allowed extended instrument flight. Today we learn ATTITUDE INSTRUMENT flying. Attitude Instrument Flying is based on the stability of the attitude gyro to provide a horizon and the heading gyro to provide the geographic references around the horizon for heading control. We still use “needle, ball and airspeed” for partial panel emergencies. There are two basic methods of Attitude Instrument Flying. For years we argued about which concept is best: Performance and Control – where each instrument is given either a performance or control responsibility for each axis for each maneuver, or Primary and Supporting - where a “primary” instrument usually remains constant and gives the most pertinent information as to how well we were doing in either pitch, bank or power. Both systems do basically the same thing. When I was learning, my instructor insisted on the Primary and Supporting instrument concept. I was required to memorize the primary and supporting instruments for each axis for each of the fifteen instrument maneuvers listed in Table 1-1. I kept a copy of this table beside my bed until I memorized it.
Table 1-1, Primary Instruments

© 2012
Primary instruments give the most pertinent information for following our clearance. They usually remain constant whereby we can tell if they we have deviated from our clearance. Supporting instruments give additional information for each axis and can verify the credibility of the others. For example, the altimeter is primary for pitch in straight and level flight, but the VSI and airspeed indicators also give pitch information. I have added a secondary instrument to my pitch and bank primaries. When I look at my altimeter my peripheral vision takes in the VSI, and when I look at my heading I see the turn coordinator in the periphery. I learned to simplify the primary instruments for each maneuver when I realized:
• The gyroscopic heading indicator (GHI) is primary for bank for all straight flight. • The altimeter (ALT) is primary for pitch for all level flight. • The turn coordinator is primary for bank for (almost) all turning flight. • The gyroscopic attitude indicator (GAI) is primary for all transitions.
Finally this golden insight occurred to me. EACH CORRECTION IS A TRANSITION!
The attitude indicator is primary for every CORRECTION in pitch or bank!
Instead of correcting by feel and watching the altimeter move back to where I want it I can pitch up or down a specific amount and hold it until the altimeter gets close, then transition back to level. The Performance and Control concept is similar in that Performance instruments are usually Primary. The attitude indicator is still the control instrument for corrections in pitch or bank. The second golden rule comes from realizing just exactly how much pitch causes a given change.
2. ONE DEGREE OF PITCH EQUALS 100-FEET PER MINUTE Every student struggles with pitch corrections. In the beginning we pull up and watch the altimeter until it gets to where we want it. By this time we have pitched up until our vertical speed is out of sight - resulting in an overshoot. It works much better if we quantify our correction. For example, we look at our altimeter and notice an error of 20-30 feet. We see that our VSI shows 100 fpm down. We should raise the attitude indicator one-degree to stop the descent and another to climb at 100 fpm. When we reach our target we can lower the nose one-degree to stay there.
© 2012
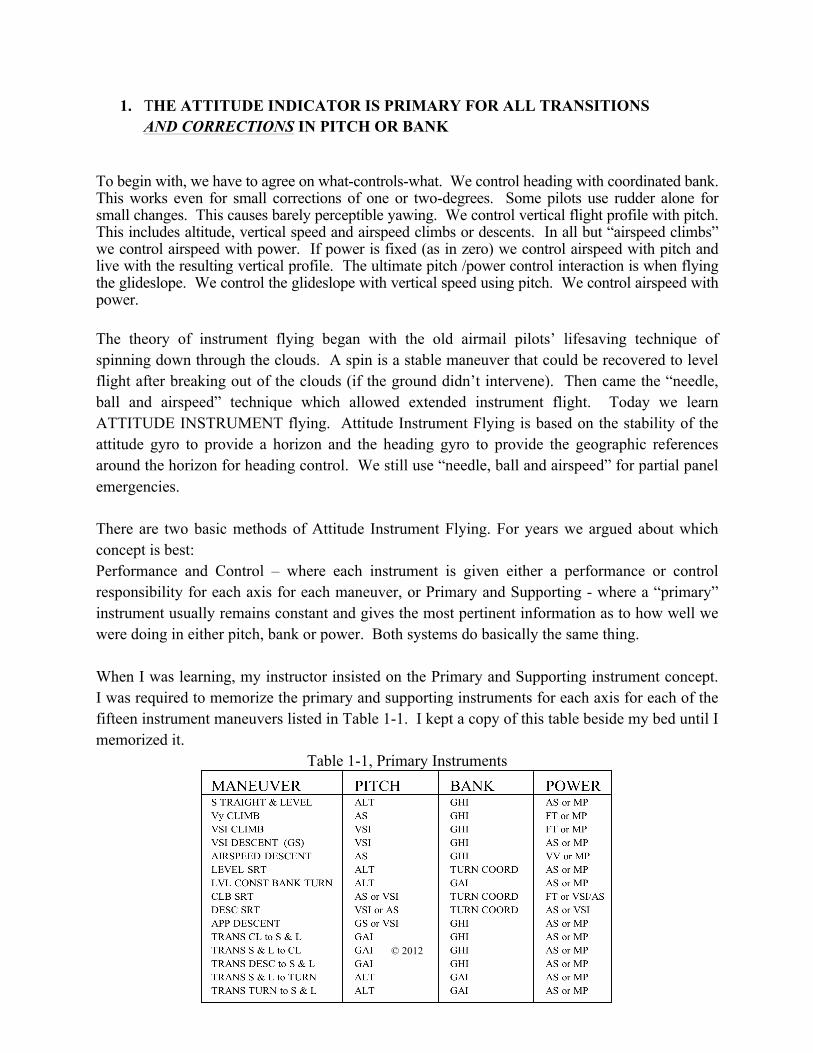
OK, then, how can I tell when I have pitched up two-degrees? Using the 60:1 rule, one-degree is one-inch wide at 60-inches. If you hold your hand out at arms-length and spread your fingers, one-degree is approximately ¼ inch wide as shown in Figure 2-1.
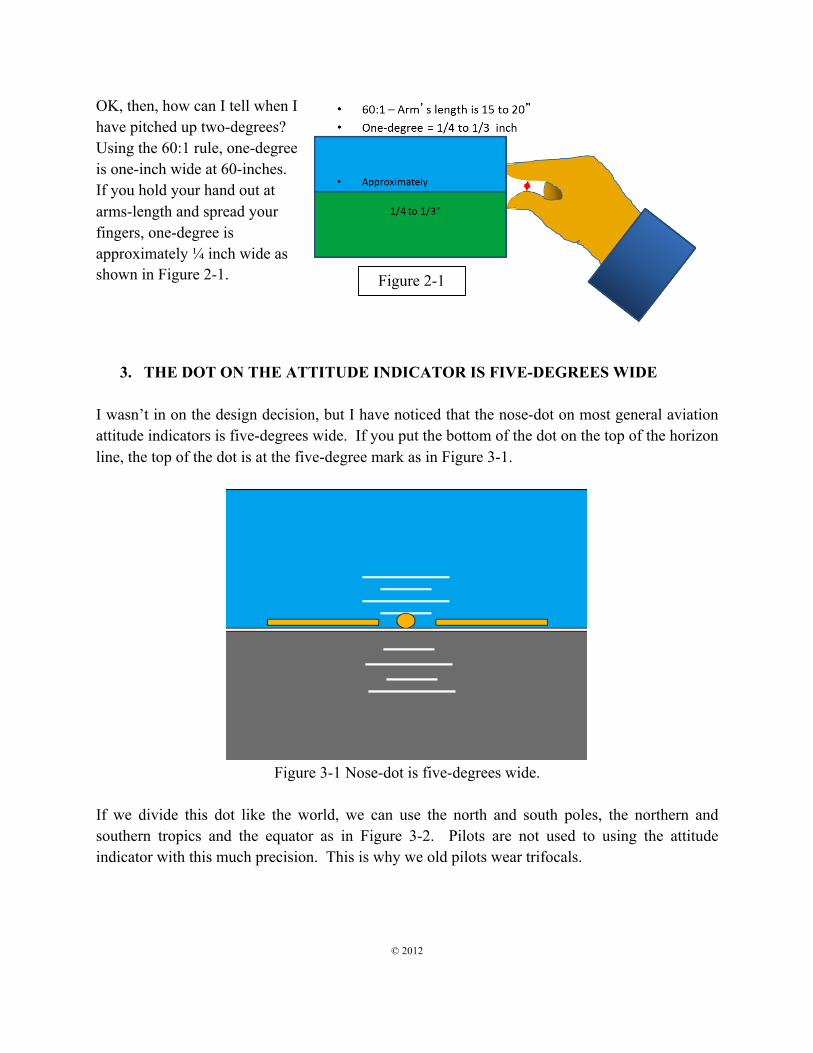
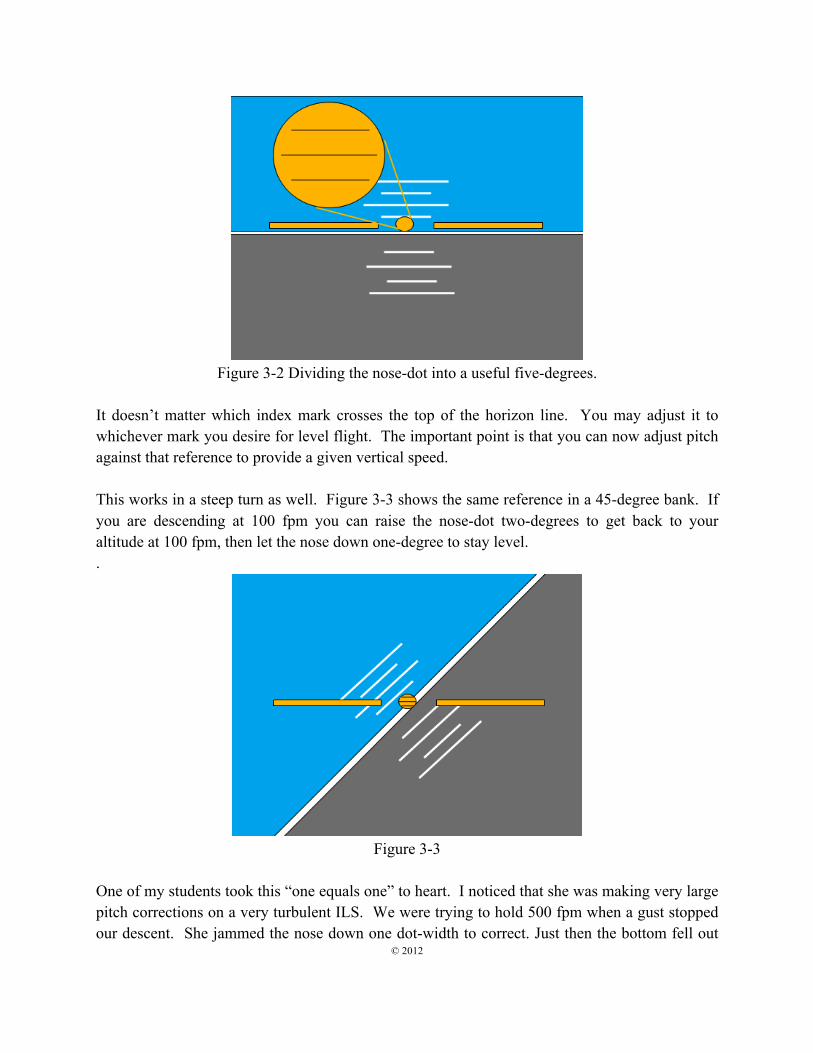
3. THE DOT ON THE ATTITUDE INDICATOR IS FIVE-DEGREES WIDE I wasn’t in on the design decision, but I have noticed that the nose-dot on most general aviation attitude indicators is five-degrees wide. If you put the bottom of the dot on the top of the horizon line, the top of the dot is at the five-degree mark as in Figure 3-1.
Figure 3-1 Nose-dot is five-degrees wide.
If we divide this dot like the world, we can use the north and south poles, the northern and southern tropics and the equator as in Figure 3-2. Pilots are not used to using the attitude indicator with this much precision. This is why we old pilots wear trifocals.
Figure 2-1
© 2012
Figure 3-2 Dividing the nose-dot into a useful five-degrees.
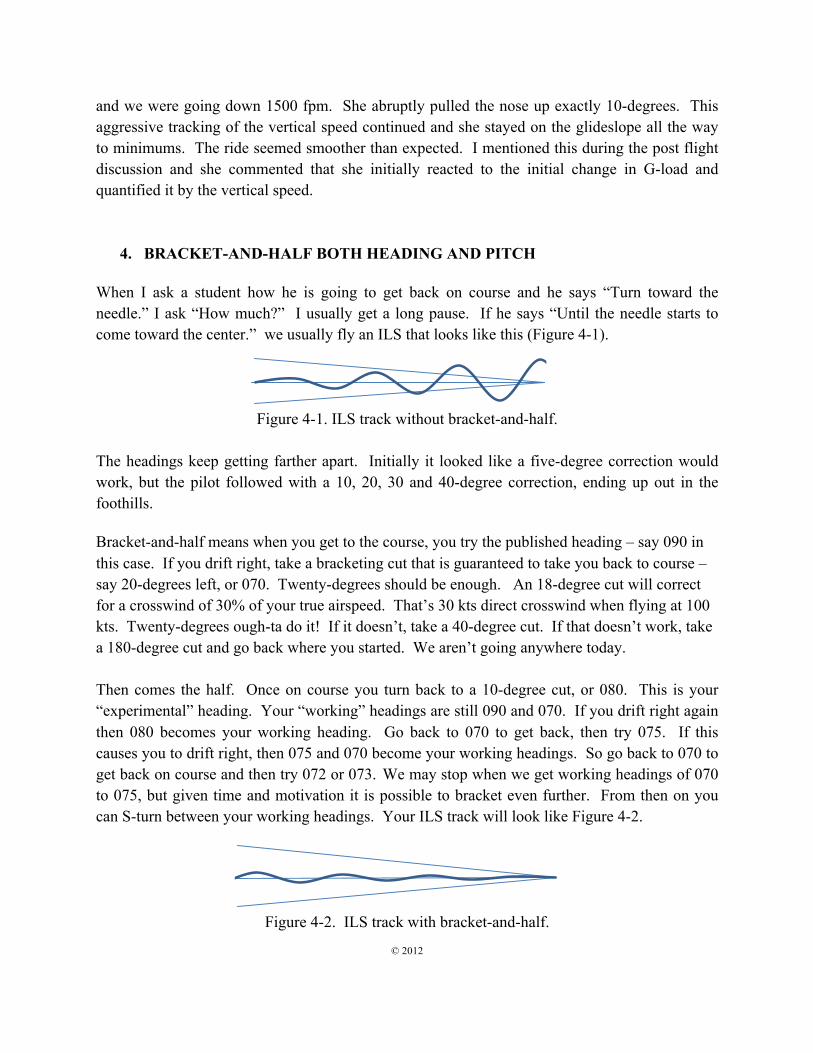
It doesn’t matter which index mark crosses the top of the horizon line. You may adjust it to whichever mark you desire for level flight. The important point is that you can now adjust pitch against that reference to provide a given vertical speed. This works in a steep turn as well. Figure 3-3 shows the same reference in a 45-degree bank. If you are descending at 100 fpm you can raise the nose-dot two-degrees to get back to your altitude at 100 fpm, then let the nose down one-degree to stay level. .
Figure 3-3
One of my students took this “one equals one” to heart. I noticed that she was making very large pitch corrections on a very turbulent ILS. We were trying to hold 500 fpm when a gust stopped our descent. She jammed the nose down one dot-width to correct. Just then the bottom fell out
© 2012
and we were going down 1500 fpm. She abruptly pulled the nose up exactly 10-degrees. This aggressive tracking of the vertical speed continued and she stayed on the glideslope all the way to minimums. The ride seemed smoother than expected. I mentioned this during the post flight discussion and she commented that she initially reacted to the initial change in G-load and quantified it by the vertical speed.
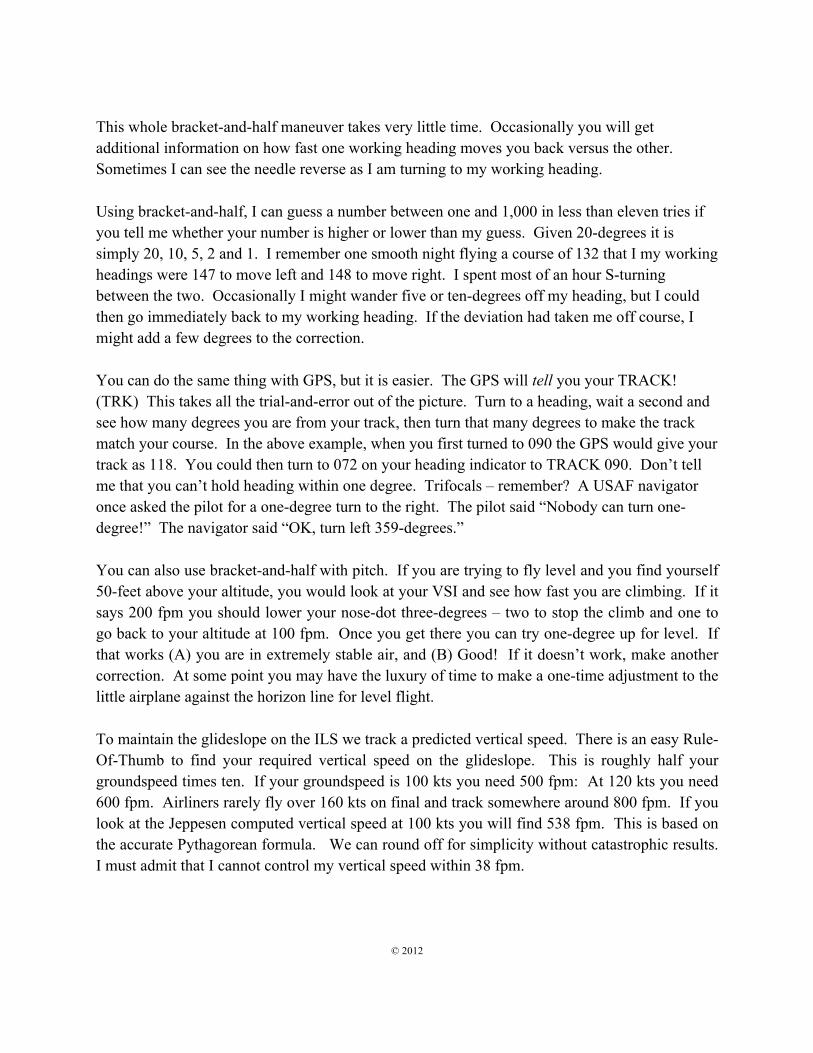
4. BRACKET-AND-HALF BOTH HEADING AND PITCH When I ask a student how he is going to get back on course and he says “Turn toward the needle.” I ask “How much?” I usually get a long pause. If he says “Until the needle starts to come toward the center.” we usually fly an ILS that looks like this (Figure 4-1).
Figure 4-1. ILS track without bracket-and-half. The headings keep getting farther apart. Initially it looked like a five-degree correction would work, but the pilot followed with a 10, 20, 30 and 40-degree correction, ending up out in the foothills. Bracket-and-half means when you get to the course, you try the published heading – say 090 in this case. If you drift right, take a bracketing cut that is guaranteed to take you back to course – say 20-degrees left, or 070. Twenty-degrees should be enough. An 18-degree cut will correct for a crosswind of 30% of your true airspeed. That’s 30 kts direct crosswind when flying at 100 kts. Twenty-degrees ough-ta do it! If it doesn’t, take a 40-degree cut. If that doesn’t work, take a 180-degree cut and go back where you started. We aren’t going anywhere today. Then comes the half. Once on course you turn back to a 10-degree cut, or 080. This is your “experimental” heading. Your “working” headings are still 090 and 070. If you drift right again then 080 becomes your working heading. Go back to 070 to get back, then try 075. If this causes you to drift right, then 075 and 070 become your working headings. So go back to 070 to get back on course and then try 072 or 073. We may stop when we get working headings of 070 to 075, but given time and motivation it is possible to bracket even further. From then on you can S-turn between your working headings. Your ILS track will look like Figure 4-2.
Figure 4-2. ILS track with bracket-and-half.
© 2012
This whole bracket-and-half maneuver takes very little time. Occasionally you will get additional information on how fast one working heading moves you back versus the other. Sometimes I can see the needle reverse as I am turning to my working heading. Using bracket-and-half, I can guess a number between one and 1,000 in less than eleven tries if you tell me whether your number is higher or lower than my guess. Given 20-degrees it is simply 20, 10, 5, 2 and 1. I remember one smooth night flying a course of 132 that I my working headings were 147 to move left and 148 to move right. I spent most of an hour S-turning between the two. Occasionally I might wander five or ten-degrees off my heading, but I could then go immediately back to my working heading. If the deviation had taken me off course, I might add a few degrees to the correction. You can do the same thing with GPS, but it is easier. The GPS will tell you your TRACK! (TRK) This takes all the trial-and-error out of the picture. Turn to a heading, wait a second and see how many degrees you are from your track, then turn that many degrees to make the track match your course. In the above example, when you first turned to 090 the GPS would give your track as 118. You could then turn to 072 on your heading indicator to TRACK 090. Don’t tell me that you can’t hold heading within one degree. Trifocals – remember? A USAF navigator once asked the pilot for a one-degree turn to the right. The pilot said “Nobody can turn one-degree!” The navigator said “OK, turn left 359-degrees.” You can also use bracket-and-half with pitch. If you are trying to fly level and you find yourself 50-feet above your altitude, you would look at your VSI and see how fast you are climbing. If it says 200 fpm you should lower your nose-dot three-degrees – two to stop the climb and one to go back to your altitude at 100 fpm. Once you get there you can try one-degree up for level. If that works (A) you are in extremely stable air, and (B) Good! If it doesn’t work, make another correction. At some point you may have the luxury of time to make a one-time adjustment to the little airplane against the horizon line for level flight. To maintain the glideslope on the ILS we track a predicted vertical speed. There is an easy Rule-Of-Thumb to find your required vertical speed on the glideslope. This is roughly half your groundspeed times ten. If your groundspeed is 100 kts you need 500 fpm: At 120 kts you need 600 fpm. Airliners rarely fly over 160 kts on final and track somewhere around 800 fpm. If you look at the Jeppesen computed vertical speed at 100 kts you will find 538 fpm. This is based on the accurate Pythagorean formula. We can round off for simplicity without catastrophic results. I must admit that I cannot control my vertical speed within 38 fpm.
© 2012
5. BUCKTOOTH SMALL HEADING CHANGES
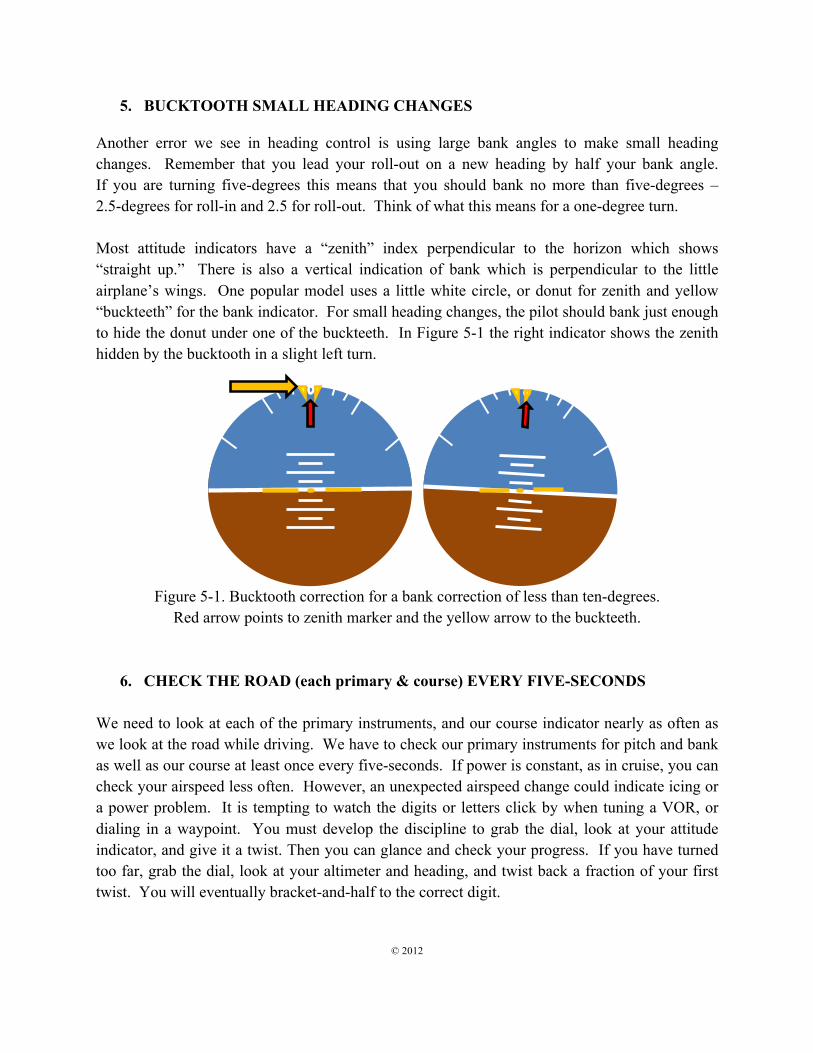
Another error we see in heading control is using large bank angles to make small heading changes. Remember that you lead your roll-out on a new heading by half your bank angle. If you are turning five-degrees this means that you should bank no more than five-degrees – 2.5-degrees for roll-in and 2.5 for roll-out. Think of what this means for a one-degree turn. Most attitude indicators have a “zenith” index perpendicular to the horizon which shows “straight up.” There is also a vertical indication of bank which is perpendicular to the little airplane’s wings. One popular model uses a little white circle, or donut for zenith and yellow “buckteeth” for the bank indicator. For small heading changes, the pilot should bank just enough to hide the donut under one of the buckteeth. In Figure 5-1 the right indicator shows the zenith hidden by the bucktooth in a slight left turn.
Figure 5-1. Bucktooth correction for a bank correction of less than ten-degrees. Red arrow points to zenith marker and the yellow arrow to the buckteeth.
6. CHECK THE ROAD (each primary & course) EVERY FIVE-SECONDS We need to look at each of the primary instruments, and our course indicator nearly as often as we look at the road while driving. We have to check our primary instruments for pitch and bank as well as our course at least once every five-seconds. If power is constant, as in cruise, you can check your airspeed less often. However, an unexpected airspeed change could indicate icing or a power problem. It is tempting to watch the digits or letters click by when tuning a VOR, or dialing in a waypoint. You must develop the discipline to grab the dial, look at your attitude indicator, and give it a twist. Then you can glance and check your progress. If you have turned too far, grab the dial, look at your altimeter and heading, and twist back a fraction of your first twist. You will eventually bracket-and-half to the correct digit.
© 2012
If you have to move in your seat or turn your head to check for traffic, ice or outside references you should watch the attitude indicator while you move – then look. You may remember some time in your career when you looked down at your chart with your left hand on the yoke and found yourself in the “navigator’s left turn.” When your head bends forward, your shoulder and arm move slightly - causing a slow bank to the left. If you look too long your bank will continue to get steeper. This “Thousand-Five” technique along with the next golden rule will keep you from going from A to B in a series of unusual attitude recoveries.
7. TEN-FEET OFF ALTITUDE, OR ONE-DEGREE OFF HEADING IS AN ERROR. The practical test for your instrument rating requires you to stay within 100-feet of your altitude and 10-degrees of your heading. If you notice your altitude 10-feet high it is time to check the VSI and make a correction. If your heading is off one-degree, check your bank angle and make a correction. You won’t always see the error until it gets larger. If you see yourself 150-feet high, you still make the same correction. If on the other hand you look down to see that you are 80-feet high and conclude that you don’t need a correction yet, you are flying in a sloppy manner. It indicates that you are satisfied with your performance using the “close enough for jazz” mind-set. When ATC asks you to “say your altitude” and you respond “Oh about seventy-three-hundred or so” they will probably ask you to call them when you land. There is a corollary to this rule. Make sure you are at your target altitude, airspeed and trim before performing a maneuver for your practical test. For example, the examiner asks for a steep turn as you are flying at 3,500 feet. As you set up for a steep turn, your airplane arrives at 3,680 feet and you say “We will start at 3,700.” This is sloppy flying. You are going where the airplane wants to go rather than where you want to go. Go back to 3,500 before starting your maneuver.
8. BE SNEAKY I remember an article that appeared in Flying Magazine way back in my youth, where a pilot wrote about overcorrecting while working on his instrument rating. This resulted in a rough ride. His instructor finally told him “Be sneaky. Don’t tell everyone in the airplane that you are off your altitude by shoving the yoke forward and lifting them out of their seat. Don’t tell me, don’t tell your passengers, and above all don’t tell the examiner on your check ride.”
© 2012
If you look up from your charts to see that you are in a slow descending turn and have lost 30-degrees of heading and 150 feet of altitude, you should say to yourself “How can I get back so nobody will notice?” You can smoothly ease in the control inputs to get the nose up and the wings banked the other way. As an Instrument Pilot Examiner I spend a lot of time looking out the windows for traffic. If I feel a big G-load change, it tells me that the applicant has made an urgent correction. This causes me to look quickly at the instruments. If you make a sneaky correction you may get rid of several incriminating feet before I notice. This has another more important effect. It makes you a smoother pilot. One of my mentors told me that our goal is to fly so that the passengers do not notice a pitch or bank change.
9. “ARE YOU SURE YOU KNOW WHERE YOU ARE?” When I was about six years old my parents read me a colorfully illustrated book by Roald Dahl, author of “James and the Giant Peach” and “Charlie and the Chocolate Factory” – who among other things was a Flight lieutenant in the RAF during WWII. The book called “The Gremlins” was based on a collaboration with Walt Disney to make a movie and children’s book in support of the war effort. The movie dropped out of the picture, but in 1943, Random House published Dahl’s first book. In this incarnation, Gremlins are little men six-inches tall that can only be seen by men who fly. They initially caused mischief by drilling holes in the wings of RAF Hurricanes and Spitfires while they tangled with German fighters. The Gremlins were dressed in little flight suits and helmets with suction boots to keep them from blowing off the wing at 300 kts. On one dark night Gus, the leading pilot character, was milling about over his sector when Gremlin Gus popped into the cockpit, sat down on top of his glare shield and said “Good evening. Do you know where you are?” Where upon Gus said “Of course I know where I am. Go away at once!” The Gremlin hopped down to the top of the stick and said “I suppose you are absolutely certain you know where you are?” The pilot told him to go away because he was trying to concentrate. At this, Gremlin Gus looked him sternly in the eye and said “Confidentially I don’t think you have the slightest idea where you are.” The pilot then looked around and realized that he hadn’t. He had lost his Situational Awareness (SA). When we fly around in the clouds we have to rely on navaids to tell us where we are. Imagine being cleared to “HOLD NORTH OF THE DUCKS INTERSECTION” with only one VOR in a strong crosswind. After four turns you can’t remember if you are going inbound or outbound. This is a severe test to your SA, and you must resolve it with what you have.
© 2012
One of my friends told of intercepting the glideslope on an ILS. He followed it down until he was about 500-feet above DH. He then passed over final approach fix at the outer marker! He didn’t realize that his glideslope had lost the signal and was showing a flag. As the marker sounded, his SA was challenged. His first thought was that there must be an anomaly. He had been perfectly confident of his situation up to that point. The adrenalin did its job and he jammed in the throttle and climbed back into the clouds to start a missed approach. An airline crew was cruising at FL370 or so and over flew their destination by 100-miles. They had switched to the wrong communication frequency and didn’t hear their subsequent clearances. They were involved in an intense discussion about some new company policy when the company finally got in touch with them on the company frequency. They finally saw the FROM on the VOR and saw the DME increasing passed 100 nm. They suffered a moment of disbelief as their SA was challenged. Sometimes ATC can cause the problem. I am aware of at least two aircraft that were cleared into a mountain. One was a flown by a good friend - a highly experienced pilot in a professional two-pilot crew. While they were flying in an off-shore area without ground-based navaids they were vectored into an island while the controller was distracted by other duties. In another, the controller cleared the number-two target to descend while looking at the number one – which was past the mountain. Just as Number One asked when he could start down, Number Two went off the screen. Here is a scenario that caused a fatal crash where ATC inadvertently provided the wrong information. One dark and stormy night the pilot was overflying XYZ airport when he realized his destination weather had deteriorated. He asked for and was given clearance to the nearby XYZ airport ILS-14 via vectors. A few minutes later he said “I can’t find the chart for ILS-14 to XYZ. Can you tell me the ILS frequency and course?” The controller said “Frequency 109.5 and the course is 140.” The pilot responded “Right and the MDA is 760.” The controller then said “Negative, the MDA is 480.” There was no further contact as the airplane subsequently entered a steep left bank and disappeared from the radar screen. There is no useful evidence to support this, but one possible cause was this. Perhaps the pilot found the correct chart at the instant the controller passed him the numbers and was trying to verify that he had the right chart by reading the MDA off the chart he had found. The DH for this approach is 480 and the MDA 760. The controller should have said “the DH is 480.” Where else could the pilot have come up with 760. When told that 760 was wrong, his SA was challenged, and he said to himself “Wait a minute, this is the XYZ ILS-14,” and tried to resolve this paradox. During this time he did the “navigator’s left turn” and crashed.
© 2012
It is paramount to keep track of your situation. When it is challenged – as in these cases – you must recognize it and get it back quickly and efficiently. The phrase “wait a minute” does not happen at 100 kts. The airplane is still going in some direction – toward something. Think of the SR-71 pilot who said “You’ve never been lost until you’ve been lost at Mach-3.” The worst case is that you run into the ground. First make sure you are at a safe altitude. Start a climb. Captain Sullenberger admitted to a moment of disbelief when he lost both engines in his jet/glider/seaplane. He quickly realized that they were no longer going to North Carolina. He made an astonishingly quick decision to attempt something that had not been successfully done before in a jet. “We’re going to be in the Hudson.” Again – there’s no time for “Wait a minute . . .”
© 2012
SUMMARY Looking back on several thousand hours of instructing instrument pilots at one stage or another, I have passed one or more of these concepts to students to correct some control problem they were having. Here they are in a usable (kneeboard) format. Keep the shiny side up.
1. The attitude indicator is primary for all corrections 2. One-degree of pitch = 100 fpm 3. The dot on the attitude indicator is 5° wide 4. Bracket and half (both heading and pitch) 5. “Bucktooth” small heading changes 6. Check the road every five-seconds 7. 10 ft off altitude or 1° off heading is an error 8. Be sneaky 9. Are you sure you know where you are?
Oh, and by the way – if any of you are still facing east reciting the mantra, try this: Oh, what a goose I am.