Embed Size (px)
Citation preview
- 1
User’s Manual
Scanner Control Software
Nikon Control Windows
Contents1. Overview2. Before You Begin
2.1 System Requirements2.2 Software Installation
3. Getting Started3.1 Launching and Quitting3.2 Control Menu3.3 File Menu3.4 Image Menu3.5 Window Menu3.6 Control Palette3.7 Scanning Basics
4. Preferences4.1 TWAIN source4.2 Naming Files4.3 Export Plug-in4.4 Image Window Handling after Exporting4.5 Gamma Values4.6 Control Palette Size
5. Image Acquisition6. Image Window Operations
6.1 Zoom in/Zoom out6.2 Rotating the Image6.3 Scrolling the Image6.4 Flipping the Image Horizontally6.5 Flipping the Image Vertically
-
7. Saving Images7.1 Save As Window7.2 Quality Window7.3 Exporting Images
8. Loading Images9. Sequential Image Acquisition
9.1 Sequential Save Window9.2 Scanning Log
10. About Window
Appendix A: Differences betweenWindows 3.1 and Windows 95VersionsA.1 System RequirementsA.2 Software InstallationA.3 Control PaletteA.4 Control MenuA.5 File MenuA.6 View MenuA.7 Image MenuA.8 Window MenuA.9 Preferences WindowA.10 Sequential Save WindowA.11 Quality WindowA.12 Log Window
Index
- 2
Cautions• The reproduction of all or part of this manual without our
permission is prohibited.
• The information contained in this manual is subject to changewithout notice.
• We have made every effort to produce a perfect manual,but should you find any mistakes, we would be grateful if youwould kindly let us know.
• We shall take no responsibility for consequences resultingfrom the operation of this product, despite the termsmentioned above.
Trademark InformationIBM and IBM PC/AT are registered trademarks of International BusinessMachines Corporation
MS-DOS and MS-Windows are trademarks of Microsoft Corporation.
Adobe and Adobe Photoshop are trademarks of Adobe SystemsIncorporated.
All other brand or product names mentioned in this manual are thetrademarks or registered trademarks of their respective holders.
-
Notice concerning prohibition of copying orreproductionNote that simply being in possession of material which has beencopied or reproduced by means of a scanner may bepunishable by law.
• Items prohibited by law from being copied or reproduced
Do not copy or reproduce paper money, coins, securities,government bonds, or local government bonds, even if suchcopies or reproductions are stamped “Sample”.
The copying or reproduction of paper money, coins, orsecurities which are circulated in a foreign country isprohibited.
The copying or reproduction of unused postage stamps orpost cards issued by the government without obtainingapproval from the government is prohibited.
The copying or reproduction of stamps issued by thegovernment and certified documents stipulated by law isprohibited.
- 3
• Cautions on certain copies and reproductions
The government has issued cautions on copies orreproductions of securities issued by private companies(shares, bills, checks, gift certificates, etc.), commuter passes,or coupon tickets, except when a minimum of necessarycopies are to be provided for business use by acompany. Also, do not copy or reproduce passports issuedby the government, licenses issued by public agencies andprivate groups, ID cards, and tickets, such as passes and mealcoupons.
• Comply with copyright notices
The copying or reproduction of works such as books, music,paintings, woodcut prints, maps, drawings, movies, andphotographs which are copyrighted creative works isprohibited except when it is done for personal use at homeor for similar restricted and non-commercial use.
-
1. OverviewThank you for purchasing your Nikon scanner. This manualexplains how to use Nikon scanners with the Nikon ControlWindows application. Please read the documentationthoroughly to ensure proper operation and the best resultsfrom your scanner.
Nikon Control Windows is an application that runs on an IBMPC/AT or compatible computer, and supports scanning andsaving image files with Nikon scanners.
Note for Windows 95 users: The instructions in this manual arebased on the Nikon Control Windows 3.1 version. The dialog boxesand operation of the Windows 95 version are different from thoseof the Windows 3.1 version. If you are going to use this product inthe Windows 95 environment, please refer to Appendix A of thismanual, which describes differences between the Windows 3.1 andWindows 95 versions.
- 4
Nikon Control is extremely easy to operate, and offers thefollowing functions.
• Image scanning and display using a TWAIN driver such asNikon Scan Windows
• Opening and display of image files stored on disk
• Saving of the displayed image to disk
• Rotation, zoom in/zoom out, scrolling, and vertical orhorizontal re-orientation of the displayed image
• Automated sequential scanning of a number of images usingthe optional Nikon SF-100 Auto Slide Feeder mounted onthe LS-1000 or the optional AF-10 Auto Document Feedermounted on the AX-110 or AX-210
Important !
Image sizes that can be handled are shown below.
Color images:Horizontal pixels × vertical pixels < 5.3 M
Grayscale images:The limits of the image size depend on your monitor setting.16.7 M colors: (Horizontal pixels × vertical pixels) < 5.3 M64K colors: (Horizontal pixels × vertical pixels) < 7.9M32K colors: (Horizontal pixels × vertical pixels) < 8.5 M256 colors: (Horizontal pixels × vertical pixels) < 15.9M
The aspect ratio of images must be less than 256:1 (width :height).
-
2. Before You Begin
2.1 System RequirementsTo run Nikon Control Windows, the following minimumhardware and software is required:
• IBM PC/AT or compatible with i386SX or better
• MS-DOS 5.0 or later
• MS-Windows 3.1 or later
• 8MB or more of RAM (more than 12MB is recommended)(When launching this software as an application’s TWAINdriver, you must take account of the amount of memoryused by the application.)
• 1MB or more of hard disk capacity (a 300MB or larger harddisk is recommended)
• VGA (640 x 480 pixel) monitor or better
• Monitor with 16.7M colors, 64K colors, 32K colors, 256colors, 256 grayscale, 16 grayscale (16.7M colorsrecommended for color scanning)
- 5
2.2 Software InstallationThe Install disk provided with this product contains the NikonScan Windows TWAIN driver and the Nikon Controlapplication.
Check the following before starting installation.
• Make sure that you have enough free space on the disk onwhich you are going to install the software.
• Write-protect (lock) the Install disk.
• Turn off any applications before starting installation.
After checking the above points, begin installation as describedbelow.
Step 1
After turning on your computer, launch Windows 3.1 and insertthe Install disk into the floppy disk drive.
Step 2
Open the Program Manager window.
-
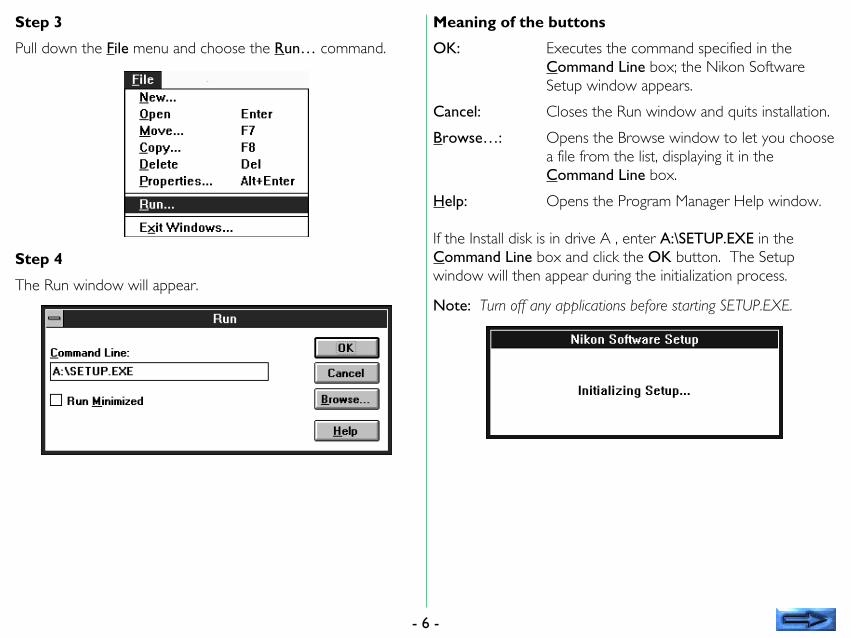
Step 3
Pull down the File menu and choose the Run… command.
Step 4
The Run window will appear.
- 6
Meaning of the buttons
OK: Executes the command specified in theCommand Line box; the Nikon SoftwareSetup window appears.
Cancel: Closes the Run window and quits installation.
Browse…: Opens the Browse window to let you choosea file from the list, displaying it in theCommand Line box.
Help: Opens the Program Manager Help window.
If the Install disk is in drive A , enter A:\SETUP.EXE in theCommand Line box and click the OK button. The Setupwindow will then appear during the initialization process.
Note: Turn off any applications before starting SETUP.EXE.
-
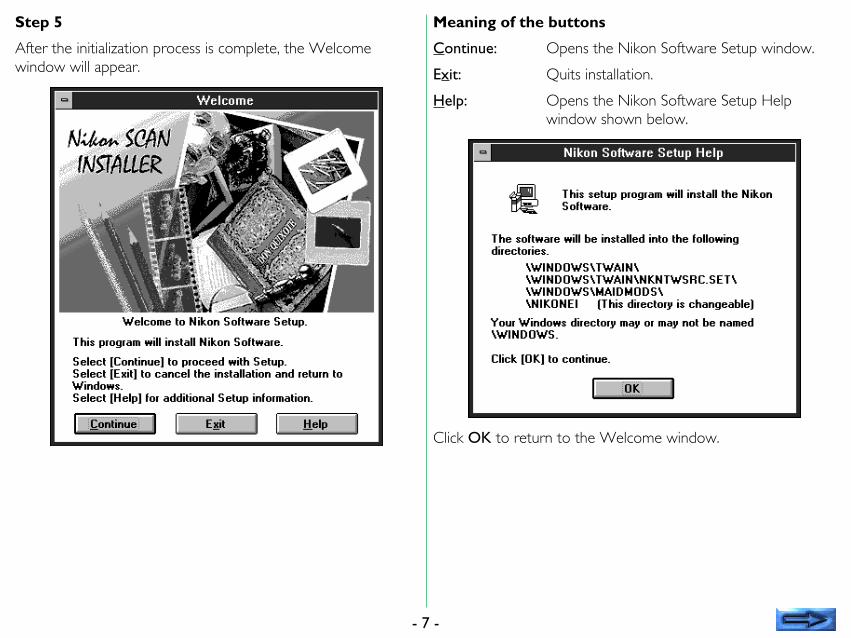
Step 5
After the initialization process is complete, the Welcomewindow will appear.
- 7
Meaning of the buttons
Continue: Opens the Nikon Software Setup window.
Exit: Quits installation.
Help: Opens the Nikon Software Setup Helpwindow shown below.
Click OK to return to the Welcome window.
-
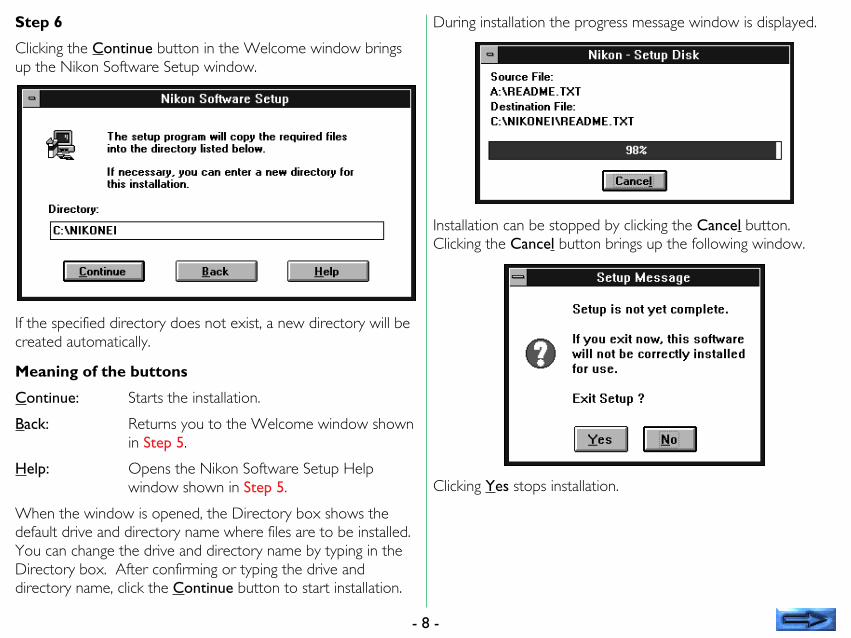
Step 6
Clicking the Continue button in the Welcome window bringsup the Nikon Software Setup window.
If the specified directory does not exist, a new directory will becreated automatically.
Meaning of the buttons
Continue: Starts the installation.
Back: Returns you to the Welcome window shownin Step 5.
Help: Opens the Nikon Software Setup Helpwindow shown in Step 5.
When the window is opened, the Directory box shows thedefault drive and directory name where files are to be installed.You can change the drive and directory name by typing in theDirectory box. After confirming or typing the drive anddirectory name, click the Continue button to start installation.
- 8
During installation the progress message window is displayed.
Installation can be stopped by clicking the Cancel button.Clicking the Cancel button brings up the following window.
Clicking Yes stops installation.
-
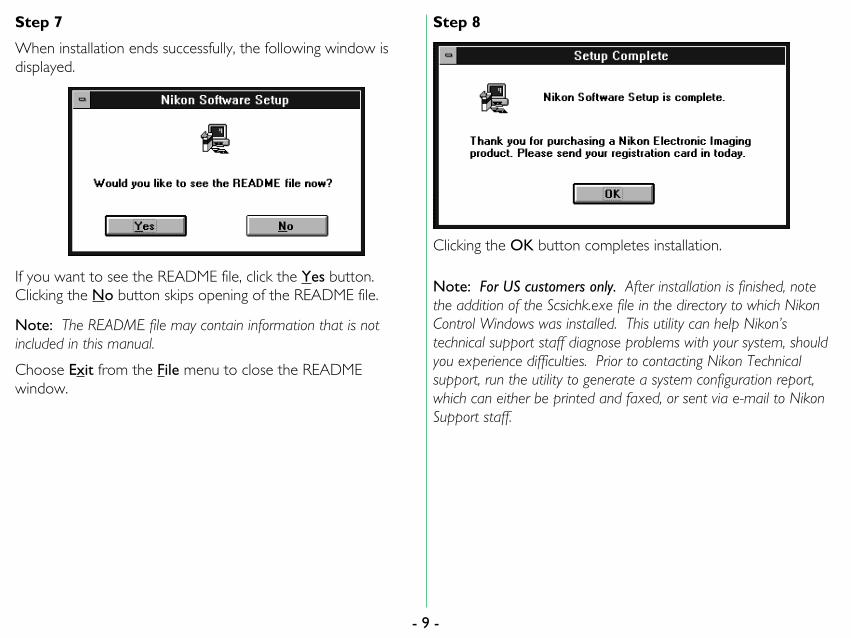
Step 7
When installation ends successfully, the following window isdisplayed.
If you want to see the README file, click the Yes button.Clicking the No button skips opening of the README file.
Note: The README file may contain information that is notincluded in this manual.
Choose Exit from the File menu to close the READMEwindow.
- 9
Step 8
Clicking the OK button completes installation.
Note: For US customers only. After installation is finished, notethe addition of the Scsichk.exe file in the directory to which NikonControl Windows was installed. This utility can help Nikon’stechnical support staff diagnose problems with your system, shouldyou experience difficulties. Prior to contacting Nikon Technicalsupport, run the utility to generate a system configuration report,which can either be printed and faxed, or sent via e-mail to NikonSupport staff.
-
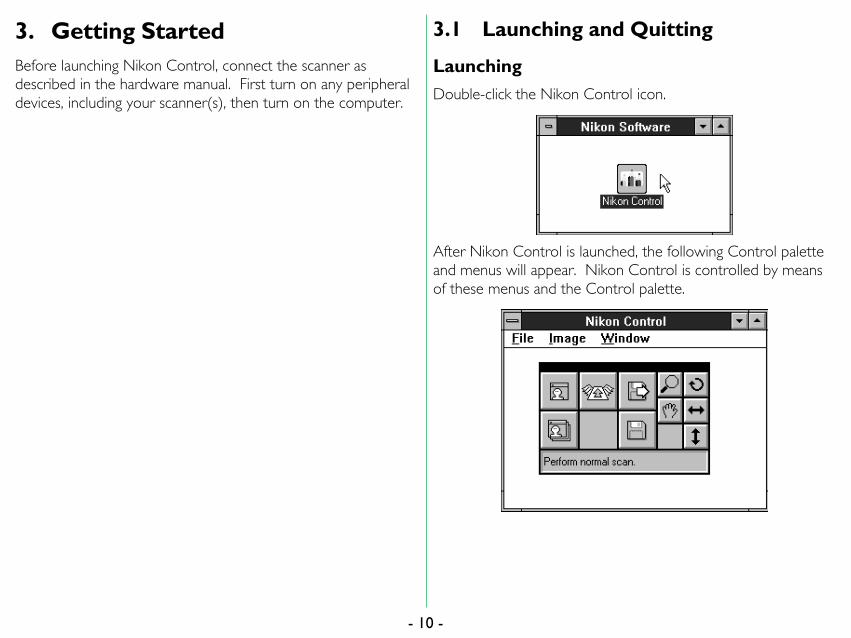
3. Getting StartedBefore launching Nikon Control, connect the scanner asdescribed in the hardware manual. First turn on any peripheraldevices, including your scanner(s), then turn on the computer.
- 10
3.1 Launching and Quitting
LaunchingDouble-click the Nikon Control icon.
After Nikon Control is launched, the following Control paletteand menus will appear. Nikon Control is controlled by meansof these menus and the Control palette.
-
QuittingTo quit Nikon Control, choose Exit from the File menu.
- 11
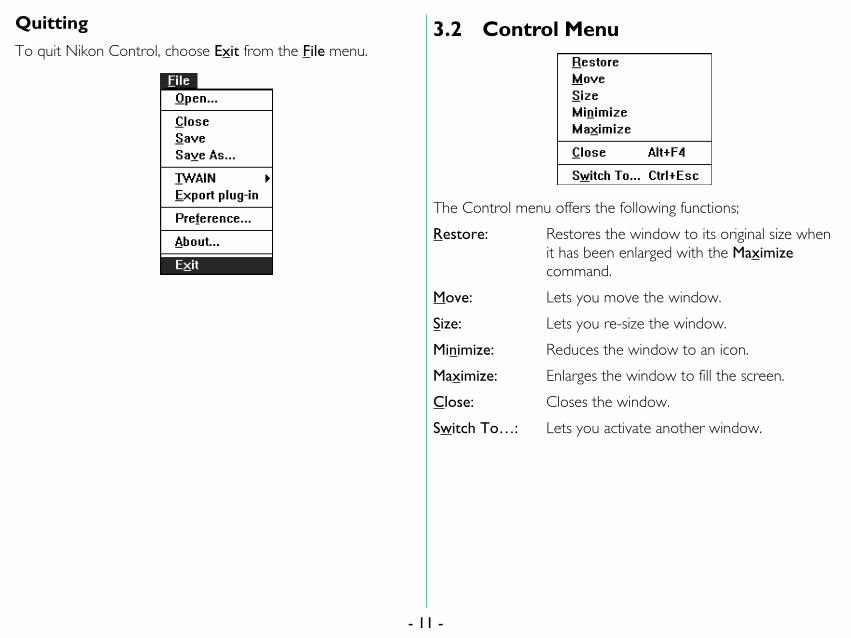
3.2 Control Menu
The Control menu offers the following functions;
Restore: Restores the window to its original size whenit has been enlarged with the Maximizecommand.
Move: Lets you move the window.
Size: Lets you re-size the window.
Minimize: Reduces the window to an icon.
Maximize: Enlarges the window to fill the screen.
Close: Closes the window.
Switch To…: Lets you activate another window.
-
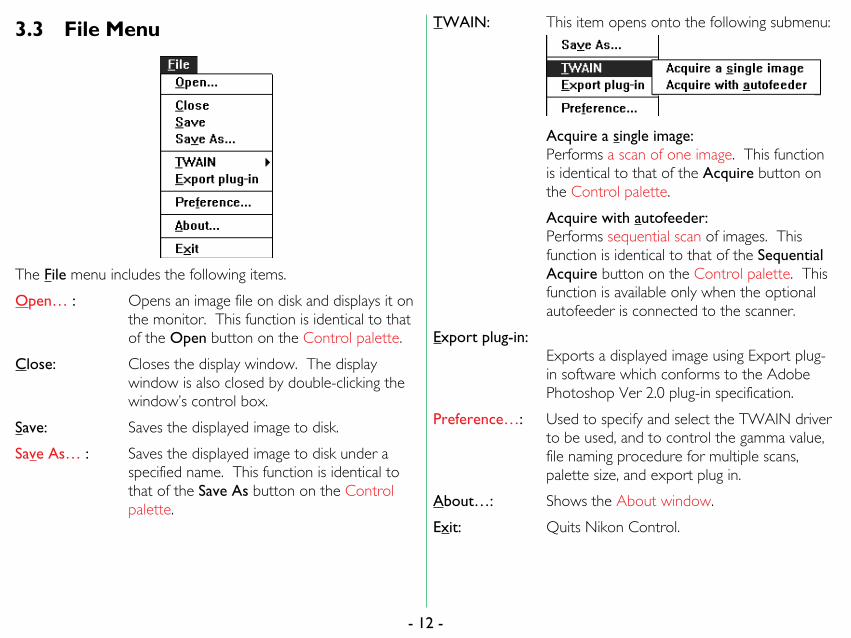
3.3 File Menu
The File menu includes the following items.
Open… : Opens an image file on disk and displays it onthe monitor. This function is identical to thatof the Open button on the Control palette.
Close: Closes the display window. The displaywindow is also closed by double-clicking thewindow’s control box.
Save: Saves the displayed image to disk.
Save As… : Saves the displayed image to disk under aspecified name. This function is identical tothat of the Save As button on the Controlpalette.
- 12
TWAIN: This item opens onto the following submenu:
Acquire a single image:Performs a scan of one image. This functionis identical to that of the Acquire button onthe Control palette.
Acquire with autofeeder:Performs sequential scan of images. Thisfunction is identical to that of the SequentialAcquire button on the Control palette. Thisfunction is available only when the optionalautofeeder is connected to the scanner.
Export plug-in:Exports a displayed image using Export plug-in software which conforms to the AdobePhotoshop Ver 2.0 plug-in specification.
Preference…: Used to specify and select the TWAIN driverto be used, and to control the gamma value,file naming procedure for multiple scans,palette size, and export plug in.
About…: Shows the About window.
Exit: Quits Nikon Control.
-
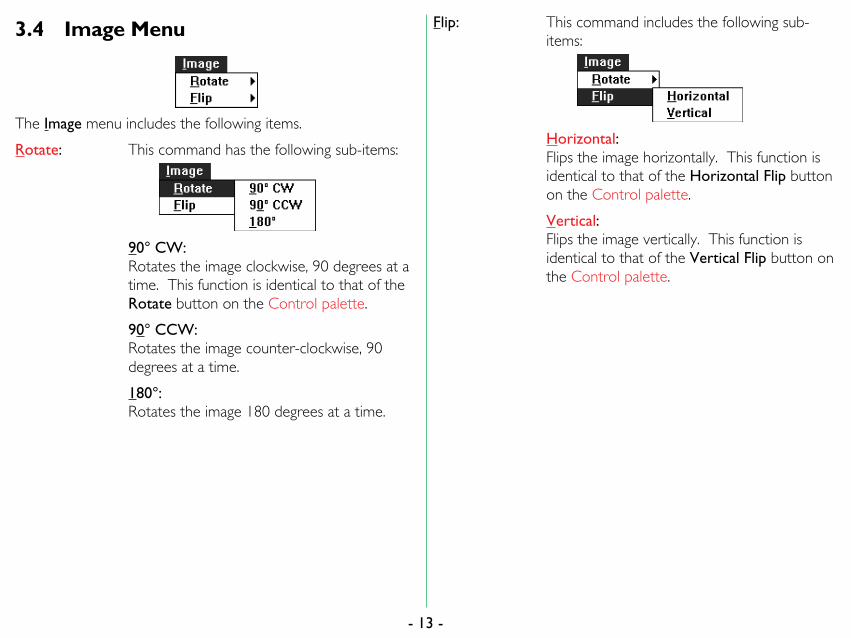
3.4 Image Menu
The Image menu includes the following items.
Rotate: This command has the following sub-items:
90° CW:Rotates the image clockwise, 90 degrees at atime. This function is identical to that of theRotate button on the Control palette.
90° CCW:Rotates the image counter-clockwise, 90degrees at a time.
180°:Rotates the image 180 degrees at a time.
- 13
Flip: This command includes the following sub-items:
Horizontal:Flips the image horizontally. This function isidentical to that of the Horizontal Flip buttonon the Control palette.
Vertical:Flips the image vertically. This function isidentical to that of the Vertical Flip button onthe Control palette.
-
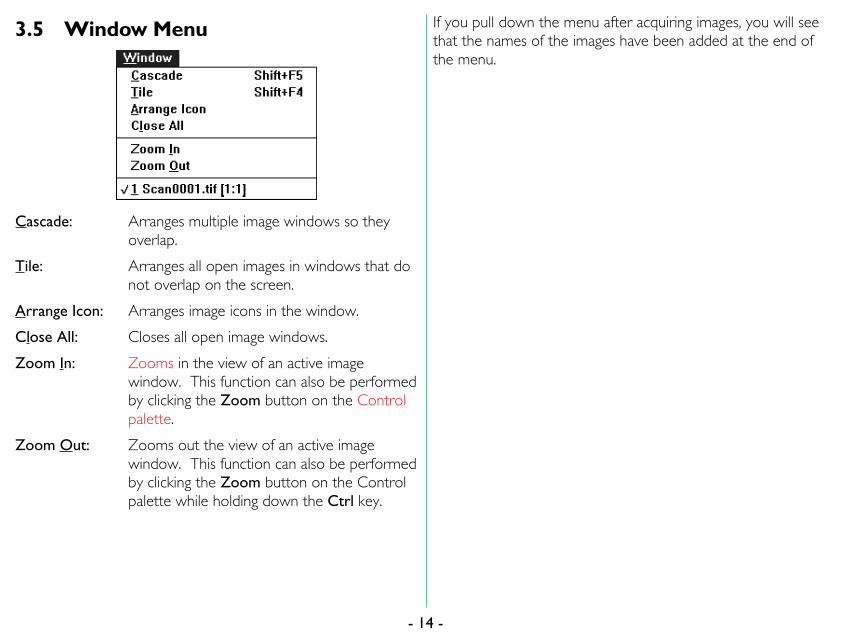
3.5 Window Menu
Cascade: Arranges multiple image windows so theyoverlap.
Tile: Arranges all open images in windows that donot overlap on the screen.
Arrange Icon: Arranges image icons in the window.
Close All: Closes all open image windows.
Zoom In: Zooms in the view of an active imagewindow. This function can also be performedby clicking the Zoom button on the Controlpalette.
Zoom Out: Zooms out the view of an active imagewindow. This function can also be performedby clicking the Zoom button on the Controlpalette while holding down the Ctrl key.
- 14
If you pull down the menu after acquiring images, you will seethat the names of the images have been added at the end ofthe menu.
-
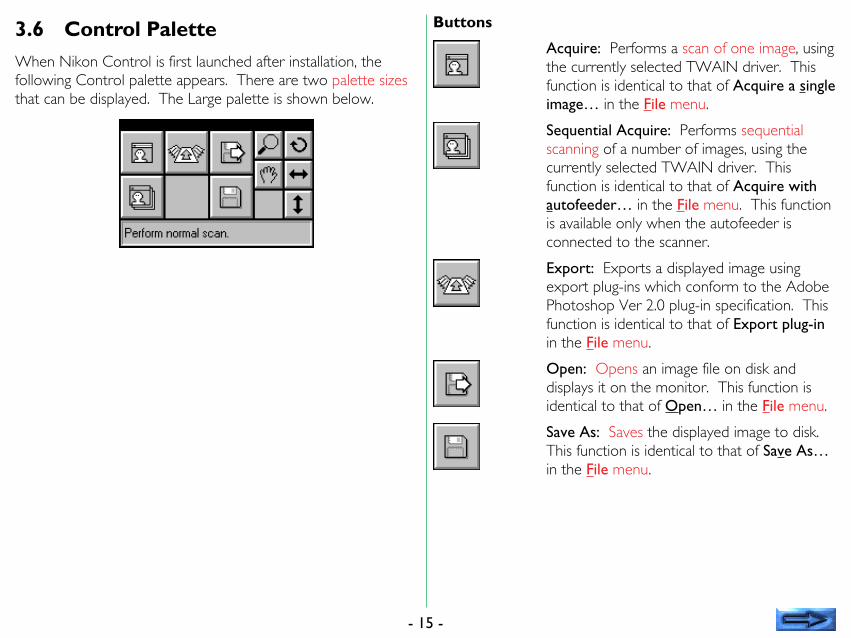
3.6 Control PaletteWhen Nikon Control is first launched after installation, thefollowing Control palette appears. There are two palette sizesthat can be displayed. The Large palette is shown below.
- 15
Buttons
Acquire: Performs a scan of one image, usingthe currently selected TWAIN driver. Thisfunction is identical to that of Acquire a singleimage… in the File menu.
Sequential Acquire: Performs sequentialscanning of a number of images, using thecurrently selected TWAIN driver. Thisfunction is identical to that of Acquire withautofeeder… in the File menu. This functionis available only when the autofeeder isconnected to the scanner.
Export: Exports a displayed image usingexport plug-ins which conform to the AdobePhotoshop Ver 2.0 plug-in specification. Thisfunction is identical to that of Export plug-inin the File menu.
Open: Opens an image file on disk anddisplays it on the monitor. This function isidentical to that of Open… in the File menu.
Save As: Saves the displayed image to disk.This function is identical to that of Save As…in the File menu.
-
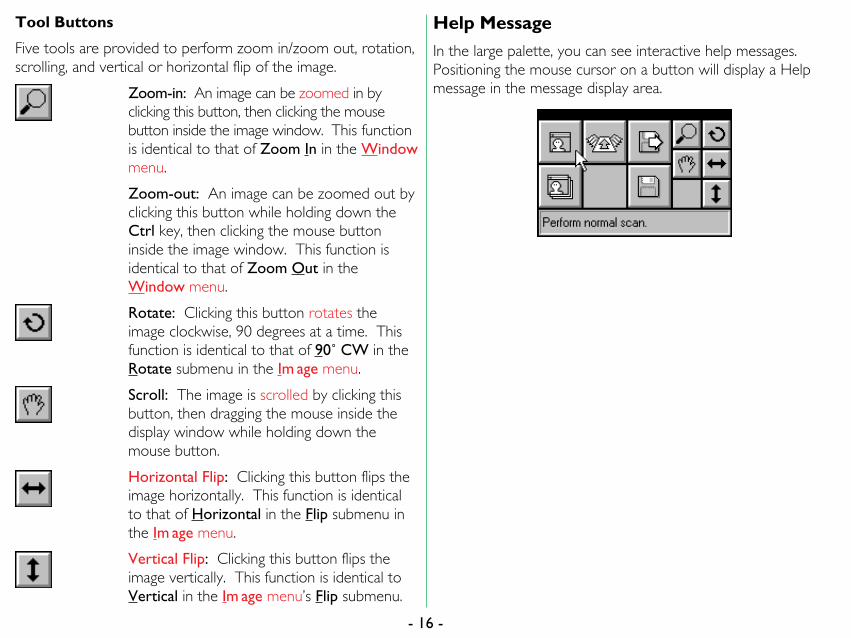
Tool Buttons
Five tools are provided to perform zoom in/zoom out, rotation,scrolling, and vertical or horizontal flip of the image.
Zoom-in: An image can be zoomed in byclicking this button, then clicking the mousebutton inside the image window. This functionis identical to that of Zoom In in the Windowmenu.
Zoom-out: An image can be zoomed out byclicking this button while holding down theCtrl key, then clicking the mouse buttoninside the image window. This function isidentical to that of Zoom Out in theWindow menu.
Rotate: Clicking this button rotates theimage clockwise, 90 degrees at a time. Thisfunction is identical to that of 90˚ CW in theRotate submenu in the Im age menu.
Scroll: The image is scrolled by clicking thisbutton, then dragging the mouse inside thedisplay window while holding down themouse button.
Horizontal Flip: Clicking this button flips theimage horizontally. This function is identicalto that of Horizontal in the Flip submenu inthe Im age menu.
Vertical Flip: Clicking this button flips theimage vertically. This function is identical toVertical in the Im age menu’s Flip submenu.
- 16
Help MessageIn the large palette, you can see interactive help messages.Positioning the mouse cursor on a button will display a Helpmessage in the message display area.
-
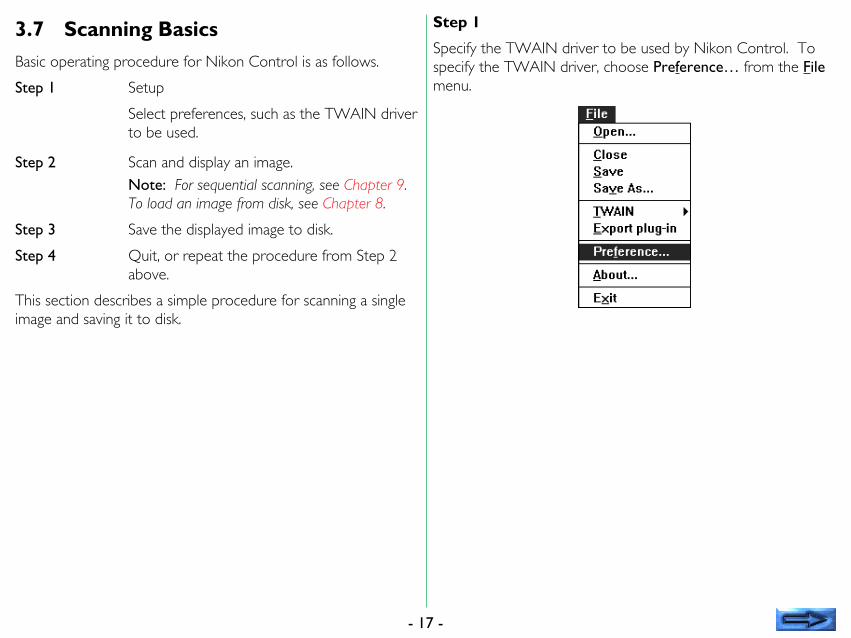
3.7 Scanning BasicsBasic operating procedure for Nikon Control is as follows.
Step 1 Setup
Select preferences, such as the TWAIN driverto be used.
Step 2 Scan and display an image.Note: For sequential scanning, see Chapter 9.To load an image from disk, see Chapter 8.
Step 3 Save the displayed image to disk.
Step 4 Quit, or repeat the procedure from Step 2above.
This section describes a simple procedure for scanning a singleimage and saving it to disk.
- 17
Step 1
Specify the TWAIN driver to be used by Nikon Control. Tospecify the TWAIN driver, choose Preference… from the Filemenu.
-
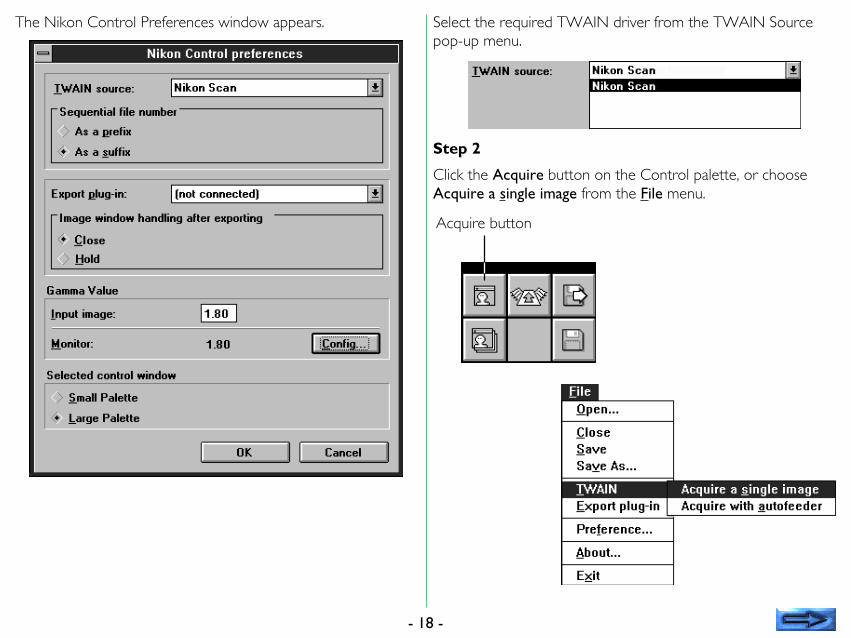
The Nikon Control Preferences window appears.
- 18
Select the required TWAIN driver from the TWAIN Sourcepop-up menu.
Step 2
Click the Acquire button on the Control palette, or chooseAcquire a single image from the File menu.
Acquire button
-
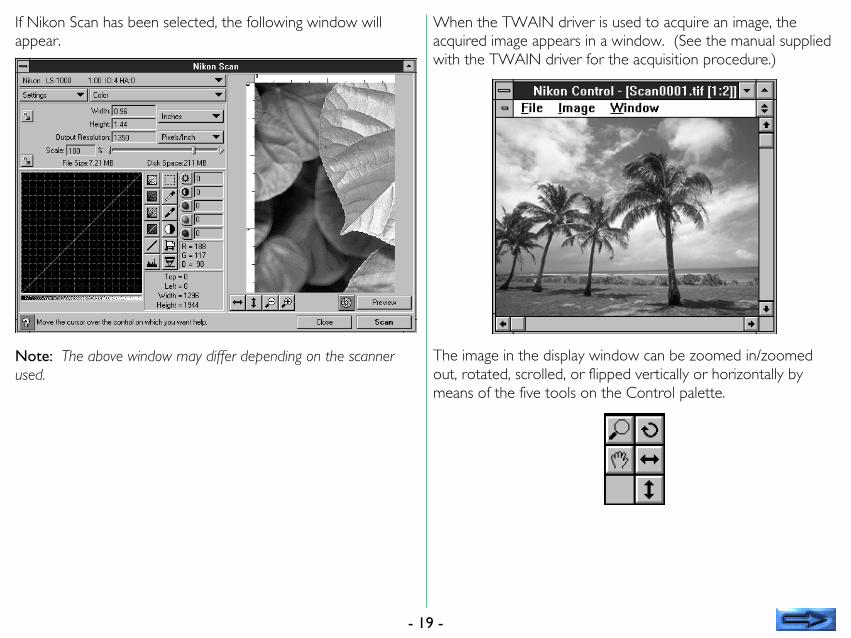
If Nikon Scan has been selected, the following window willappear.
Note: The above window may differ depending on the scannerused.
- 19
When the TWAIN driver is used to acquire an image, theacquired image appears in a window. (See the manual suppliedwith the TWAIN driver for the acquisition procedure.)
The image in the display window can be zoomed in/zoomedout, rotated, scrolled, or flipped vertically or horizontally bymeans of the five tools on the Control palette.
-
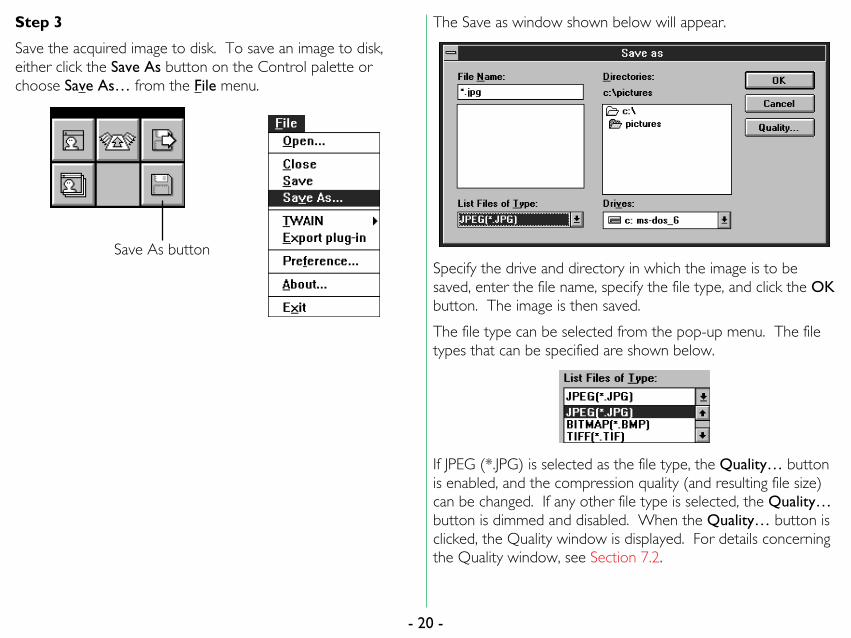
Step 3
Save the acquired image to disk. To save an image to disk,either click the Save As button on the Control palette orchoose Save As… from the File menu.
Save As button
- 20
The Save as window shown below will appear.
Specify the drive and directory in which the image is to besaved, enter the file name, specify the file type, and click the OKbutton. The image is then saved.
The file type can be selected from the pop-up menu. The filetypes that can be specified are shown below.
If JPEG (*.JPG) is selected as the file type, the Quality… buttonis enabled, and the compression quality (and resulting file size)can be changed. If any other file type is selected, the Quality…button is dimmed and disabled. When the Quality… button isclicked, the Quality window is displayed. For details concerningthe Quality window, see Section 7.2.
-
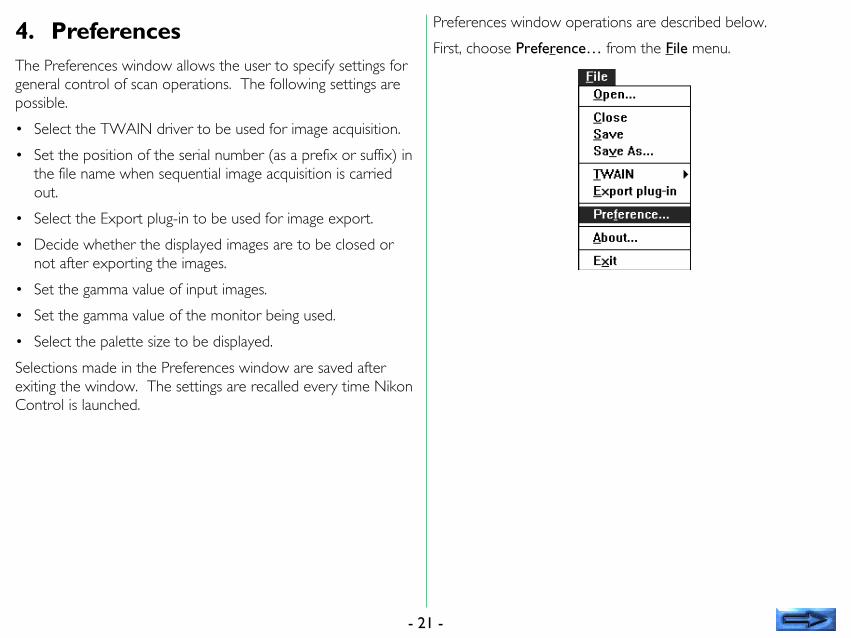
4. PreferencesThe Preferences window allows the user to specify settings forgeneral control of scan operations. The following settings arepossible.
• Select the TWAIN driver to be used for image acquisition.
• Set the position of the serial number (as a prefix or suffix) inthe file name when sequential image acquisition is carriedout.
• Select the Export plug-in to be used for image export.
• Decide whether the displayed images are to be closed ornot after exporting the images.
• Set the gamma value of input images.
• Set the gamma value of the monitor being used.
• Select the palette size to be displayed.
Selections made in the Preferences window are saved afterexiting the window. The settings are recalled every time NikonControl is launched.
- 21
Preferences window operations are described below.
First, choose Preference… from the File menu.
-
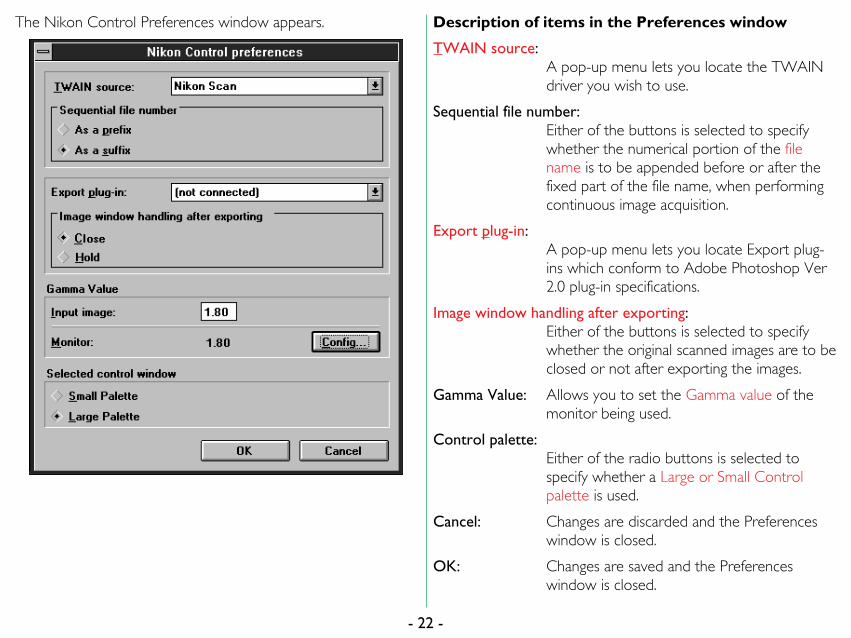
The Nikon Control Preferences window appears.
- 22
Description of items in the Preferences window
TWAIN source:A pop-up menu lets you locate the TWAINdriver you wish to use.
Sequential file number:Either of the buttons is selected to specifywhether the numerical portion of the filename is to be appended before or after thefixed part of the file name, when performingcontinuous image acquisition.
Export plug-in:A pop-up menu lets you locate Export plug-ins which conform to Adobe Photoshop Ver2.0 plug-in specifications.
Image window handling after exporting:Either of the buttons is selected to specifywhether the original scanned images are to beclosed or not after exporting the images.
Gamma Value: Allows you to set the Gamma value of themonitor being used.
Control palette:Either of the radio buttons is selected tospecify whether a Large or Small Controlpalette is used.
Cancel: Changes are discarded and the Preferenceswindow is closed.
OK: Changes are saved and the Preferenceswindow is closed.
-

4.1 TWAIN sourceIf you want to change to another TWAIN driver, pull down theTWAIN source menu and choose the required TWAIN driverfrom the menu. The TWAIN driver is then selected and thenewly selected TWAIN driver is displayed in the box.
- 23
4.2 Naming FilesThe names of individual files saved by means of sequentialimage scanning consist of a fixed part and a serial number. Thissetting specifies whether the number is to be placed before orafter the fixed part. The fixed part of the file name is specifiedin the Sequential save window as a “Prefix name” or “Suffixname” when the image files are saved.
For example, if the As a suffix button is selected here, and thefixed part “Image” is specified in the Sequential save window,the file names, in the order saved, will be “Image001”,“Image002”, “Image003” and so on.
Naming Procedure Choices
As a prefix: The serial number precedes the fixed part.
As a suffix: The serial number follows the fixed part.
-
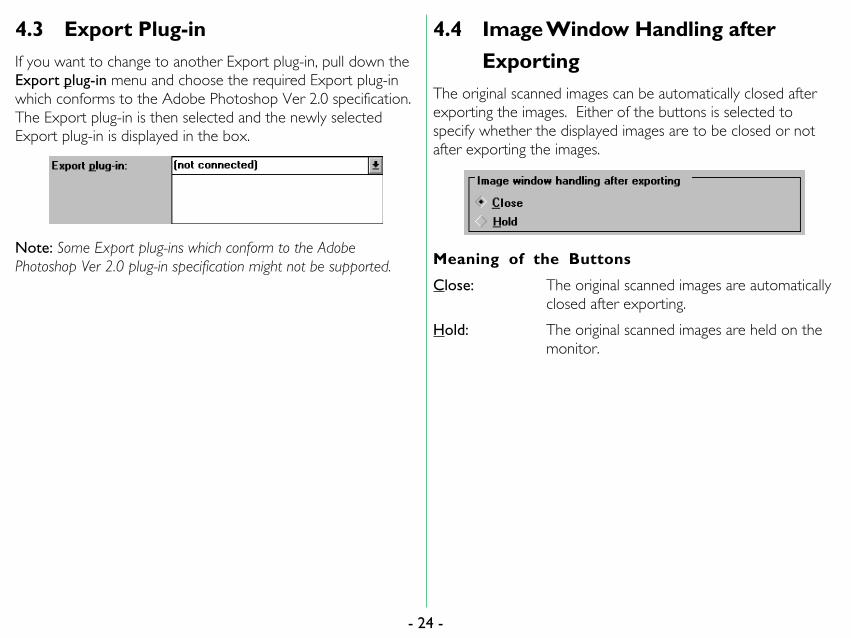
4.3 Export Plug-inIf you want to change to another Export plug-in, pull down theExport plug-in menu and choose the required Export plug-inwhich conforms to the Adobe Photoshop Ver 2.0 specification.The Export plug-in is then selected and the newly selectedExport plug-in is displayed in the box.
Note: Some Export plug-ins which conform to the AdobePhotoshop Ver 2.0 plug-in specification might not be supported.
- 24
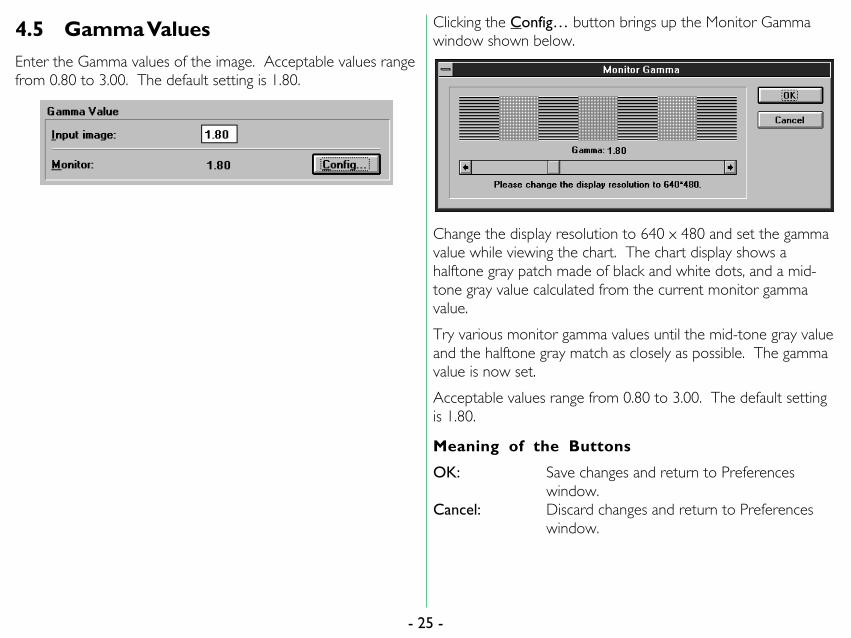
4.4 Image Window Handling after
ExportingThe original scanned images can be automatically closed afterexporting the images. Either of the buttons is selected tospecify whether the displayed images are to be closed or notafter exporting the images.
Meaning of the Buttons
Close: The original scanned images are automaticallyclosed after exporting.
Hold: The original scanned images are held on themonitor.
-
4.5 Gamma ValuesEnter the Gamma values of the image. Acceptable values rangefrom 0.80 to 3.00. The default setting is 1.80.
- 25
Clicking the Config… button brings up the Monitor Gammawindow shown below.
Change the display resolution to 640 x 480 and set the gammavalue while viewing the chart. The chart display shows ahalftone gray patch made of black and white dots, and a mid-tone gray value calculated from the current monitor gammavalue.
Try various monitor gamma values until the mid-tone gray valueand the halftone gray match as closely as possible. The gammavalue is now set.
Acceptable values range from 0.80 to 3.00. The default settingis 1.80.
Meaning of the Buttons
OK: Save changes and return to Preferenceswindow.
Cancel: Discard changes and return to Preferenceswindow.
-
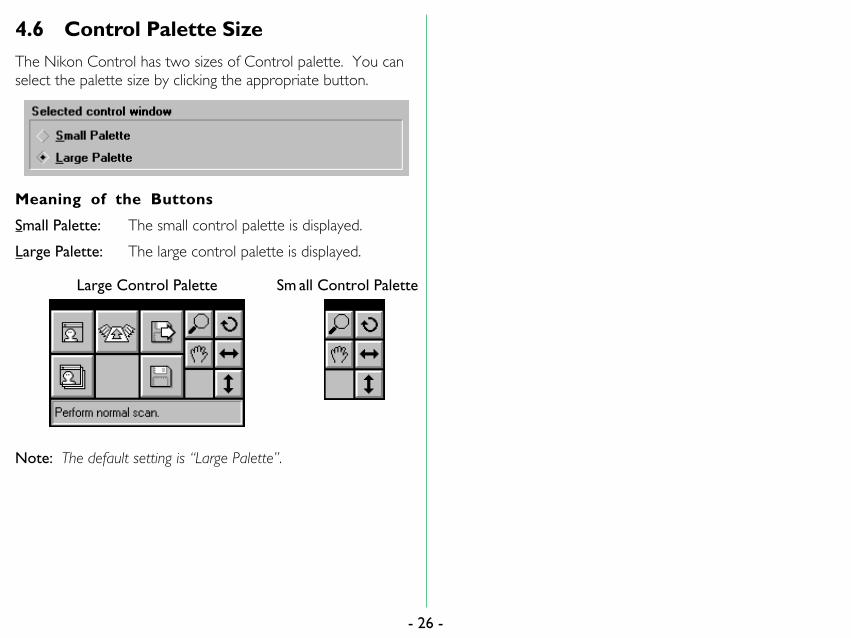
4.6 Control Palette SizeThe Nikon Control has two sizes of Control palette. You canselect the palette size by clicking the appropriate button.
Meaning of the Buttons
Small Palette: The small control palette is displayed.
Large Palette: The large control palette is displayed.
Large Control Palette Sm all Control Palette
Note: The default setting is “Large Palette”.
- 26 -
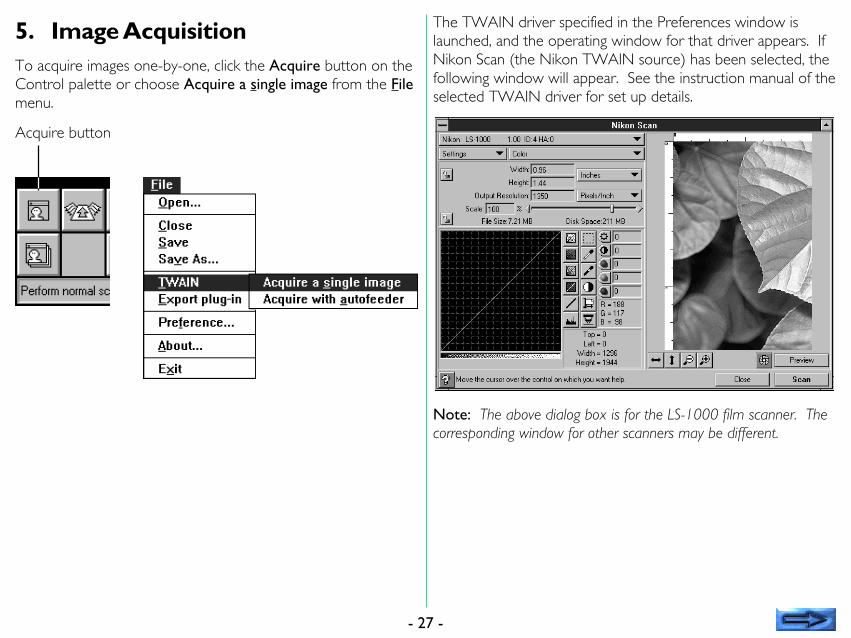
5. Image AcquisitionTo acquire images one-by-one, click the Acquire button on theControl palette or choose Acquire a single image from the Filemenu.
Acquire button
- 27
The TWAIN driver specified in the Preferences window islaunched, and the operating window for that driver appears. IfNikon Scan (the Nikon TWAIN source) has been selected, thefollowing window will appear. See the instruction manual of theselected TWAIN driver for set up details.
Note: The above dialog box is for the LS-1000 film scanner. Thecorresponding window for other scanners may be different.
-
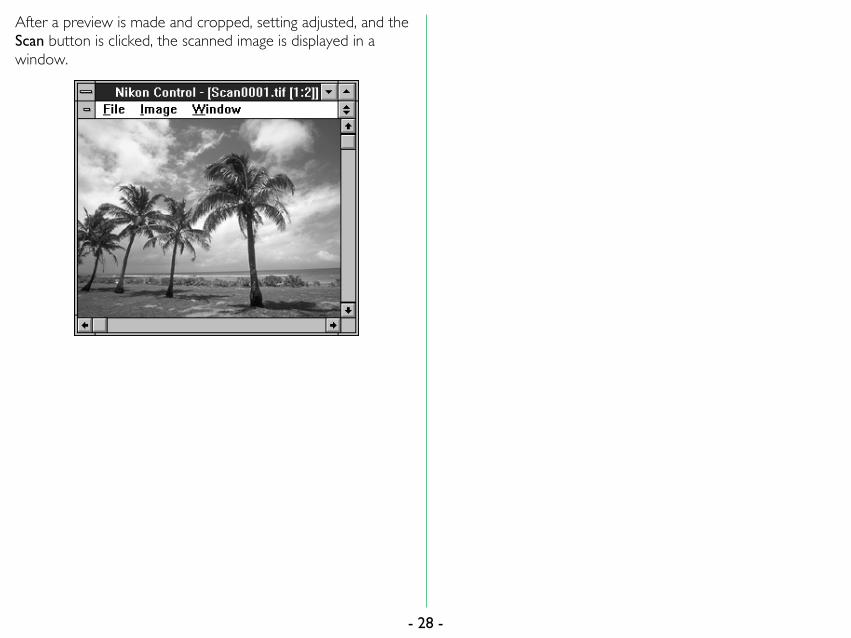
After a preview is made and cropped, setting adjusted, and theScan button is clicked, the scanned image is displayed in awindow.
- 28 -
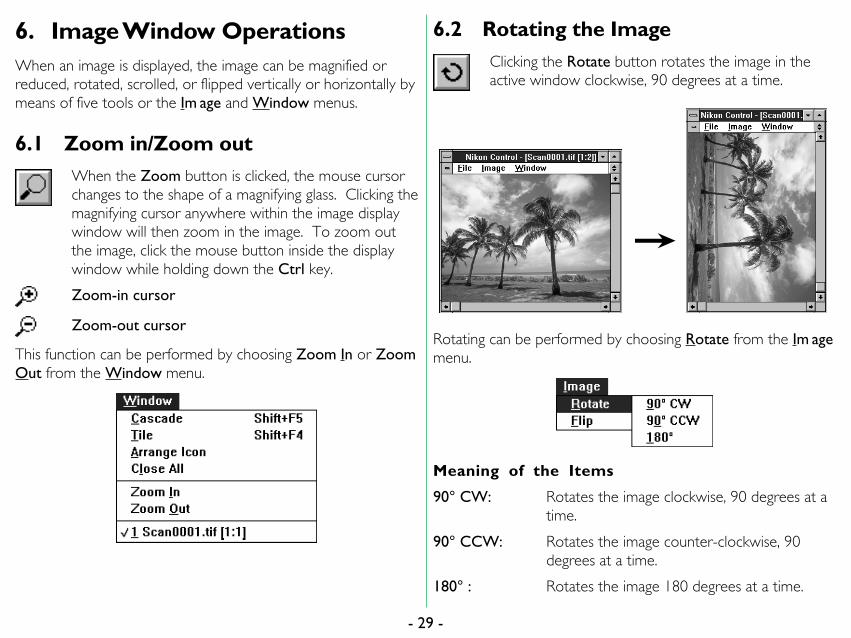
6. Image Window OperationsWhen an image is displayed, the image can be magnified orreduced, rotated, scrolled, or flipped vertically or horizontally bymeans of five tools or the Im age and Window menus.
6.1 Zoom in/Zoom outWhen the Zoom button is clicked, the mouse cursorchanges to the shape of a magnifying glass. Clicking themagnifying cursor anywhere within the image displaywindow will then zoom in the image. To zoom outthe image, click the mouse button inside the displaywindow while holding down the Ctrl key.
Zoom-in cursor
Zoom-out cursor
This function can be performed by choosing Zoom In or ZoomOut from the Window menu.
- 29
6.2 Rotating the ImageClicking the Rotate button rotates the image in theactive window clockwise, 90 degrees at a time.
Rotating can be performed by choosing Rotate from the Im agemenu.
Meaning of the Items
90° CW: Rotates the image clockwise, 90 degrees at atime.
90° CCW: Rotates the image counter-clockwise, 90degrees at a time.
180° : Rotates the image 180 degrees at a time.
-
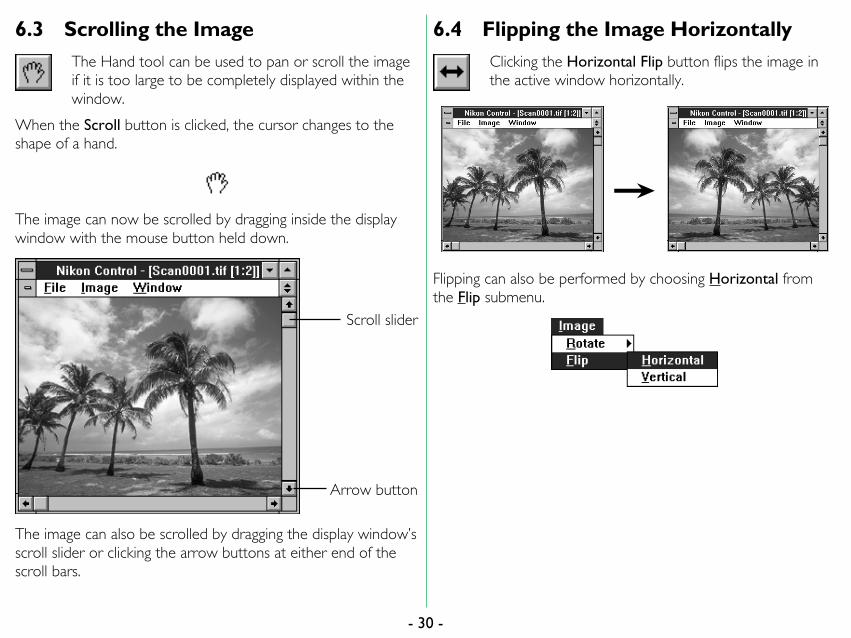
6.3 Scrolling the ImageThe Hand tool can be used to pan or scroll the imageif it is too large to be completely displayed within thewindow.
When the Scroll button is clicked, the cursor changes to theshape of a hand.
The image can now be scrolled by dragging inside the displaywindow with the mouse button held down.
The image can also be scrolled by dragging the display window’sscroll slider or clicking the arrow buttons at either end of thescroll bars.
Scroll slider
Arrow button
- 30
6.4 Flipping the Image HorizontallyClicking the Horizontal Flip button flips the image inthe active window horizontally.
Flipping can also be performed by choosing Horizontal fromthe Flip submenu.
-
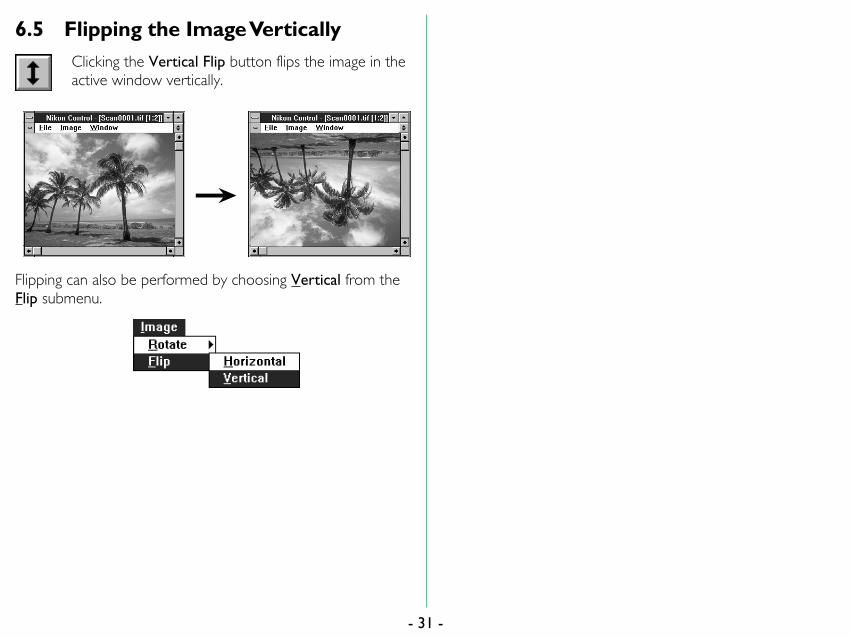
6.5 Flipping the Image VerticallyClicking the Vertical Flip button flips the image in theactive window vertically.
Flipping can also be performed by choosing Vertical from theFlip submenu.
- 31 -
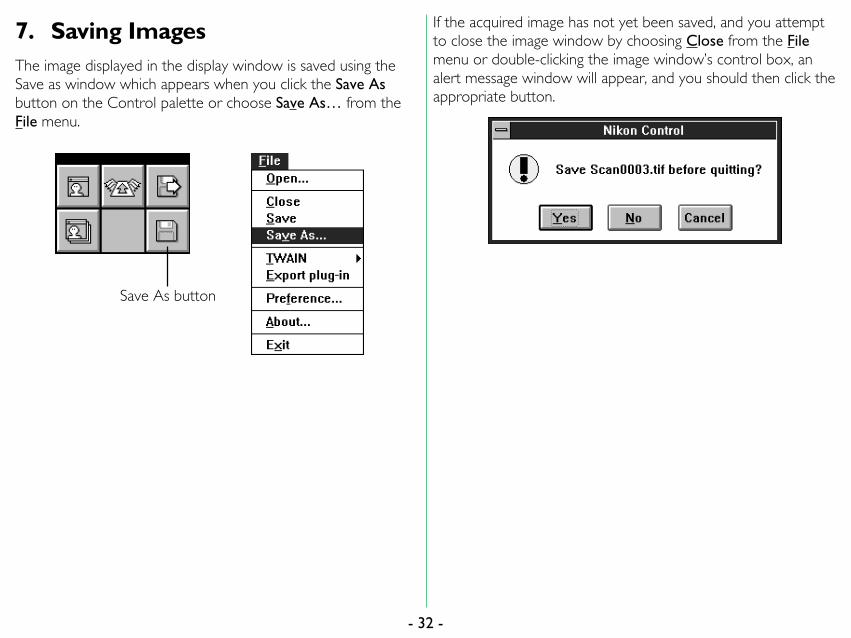
7. Saving ImagesThe image displayed in the display window is saved using theSave as window which appears when you click the Save Asbutton on the Control palette or choose Save As… from theFile menu.
Save As button
- 32
If the acquired image has not yet been saved, and you attemptto close the image window by choosing Close from the Filemenu or double-clicking the image window’s control box, analert message window will appear, and you should then click theappropriate button.
-
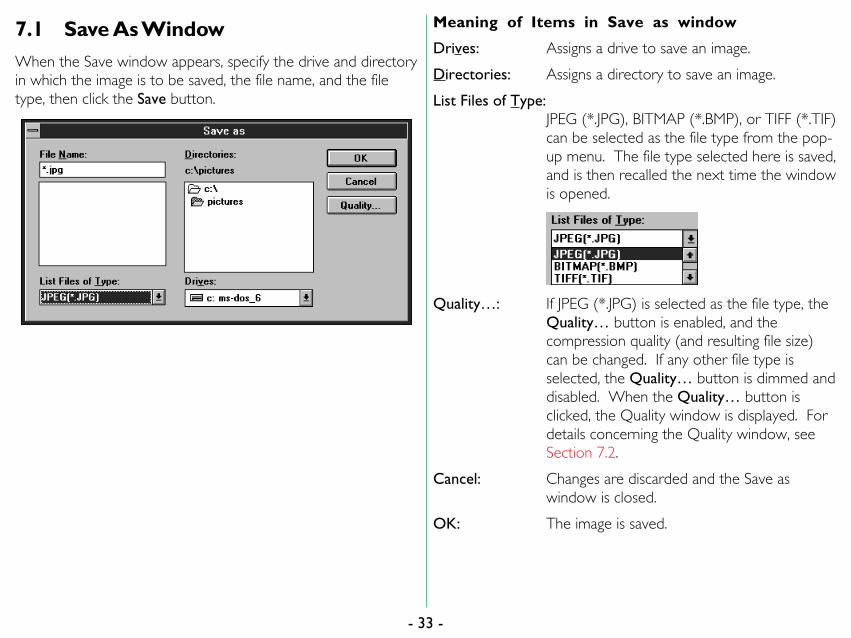
7.1 Save As WindowWhen the Save window appears, specify the drive and directoryin which the image is to be saved, the file name, and the filetype, then click the Save button.
- 33
Meaning of Items in Save as window
Drives: Assigns a drive to save an image.
Directories: Assigns a directory to save an image.
List Files of Type:JPEG (*.JPG), BITMAP (*.BMP), or TIFF (*.TIF)can be selected as the file type from the pop-up menu. The file type selected here is saved,and is then recalled the next time the windowis opened.
Quality…: If JPEG (*.JPG) is selected as the file type, theQuality… button is enabled, and thecompression quality (and resulting file size)can be changed. If any other file type isselected, the Quality… button is dimmed anddisabled. When the Quality… button isclicked, the Quality window is displayed. Fordetails concerning the Quality window, seeSection 7.2.
Cancel: Changes are discarded and the Save aswindow is closed.
OK: The image is saved.
-
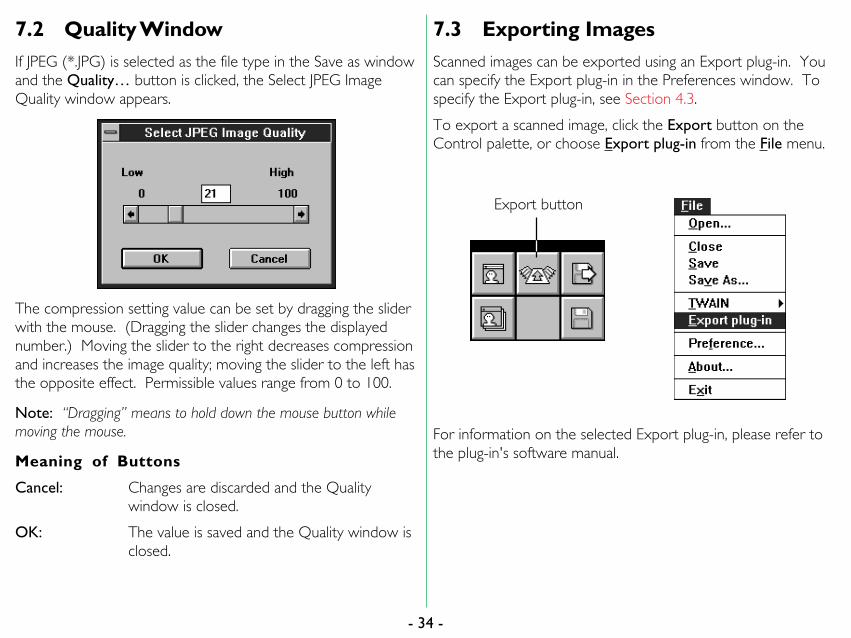
7.2 Quality WindowIf JPEG (*.JPG) is selected as the file type in the Save as windowand the Quality… button is clicked, the Select JPEG ImageQuality window appears.
The compression setting value can be set by dragging the sliderwith the mouse. (Dragging the slider changes the displayednumber.) Moving the slider to the right decreases compressionand increases the image quality; moving the slider to the left hasthe opposite effect. Permissible values range from 0 to 100.
Note: “Dragging” means to hold down the mouse button whilemoving the mouse.
Meaning of Buttons
Cancel: Changes are discarded and the Qualitywindow is closed.
OK: The value is saved and the Quality window isclosed.
- 34
7.3 Exporting ImagesScanned images can be exported using an Export plug-in. Youcan specify the Export plug-in in the Preferences window. Tospecify the Export plug-in, see Section 4.3.
To export a scanned image, click the Export button on theControl palette, or choose Export plug-in from the File menu.
Export button
For information on the selected Export plug-in, please refer tothe plug-in's software manual.
-
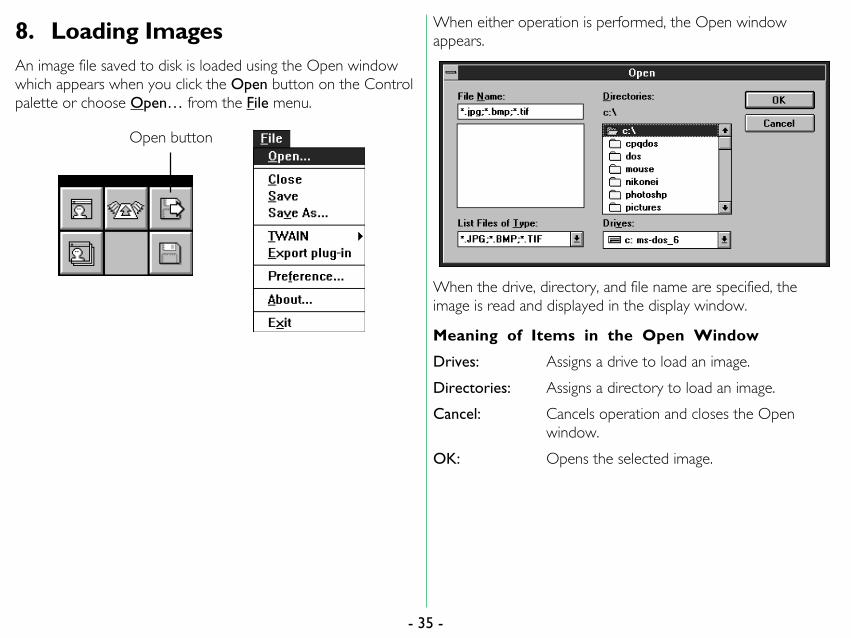
8. Loading ImagesAn image file saved to disk is loaded using the Open windowwhich appears when you click the Open button on the Controlpalette or choose Open… from the File menu.
Open button
- 35
When either operation is performed, the Open windowappears.
When the drive, directory, and file name are specified, theimage is read and displayed in the display window.
Meaning of Items in the Open Window
Drives: Assigns a drive to load an image.
Directories: Assigns a directory to load an image.
Cancel: Cancels operation and closes the Openwindow.
OK: Opens the selected image.
-
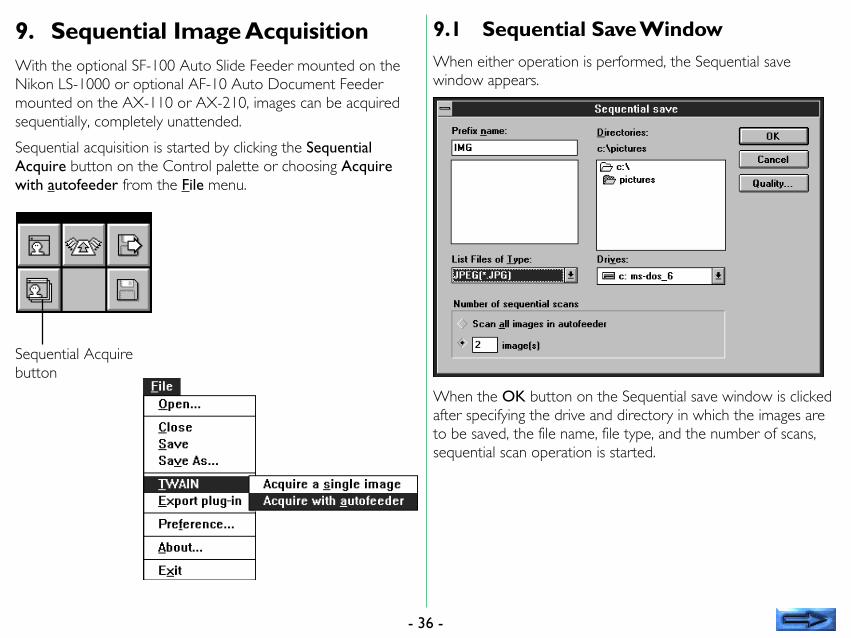
9. Sequential Image AcquisitionWith the optional SF-100 Auto Slide Feeder mounted on theNikon LS-1000 or optional AF-10 Auto Document Feedermounted on the AX-110 or AX-210, images can be acquiredsequentially, completely unattended.
Sequential acquisition is started by clicking the SequentialAcquire button on the Control palette or choosing Acquirewith autofeeder from the File menu.
Sequential Acquirebutton
- 36
9.1 Sequential Save WindowWhen either operation is performed, the Sequential savewindow appears.
When the OK button on the Sequential save window is clickedafter specifying the drive and directory in which the images areto be saved, the file name, file type, and the number of scans,sequential scan operation is started.
-
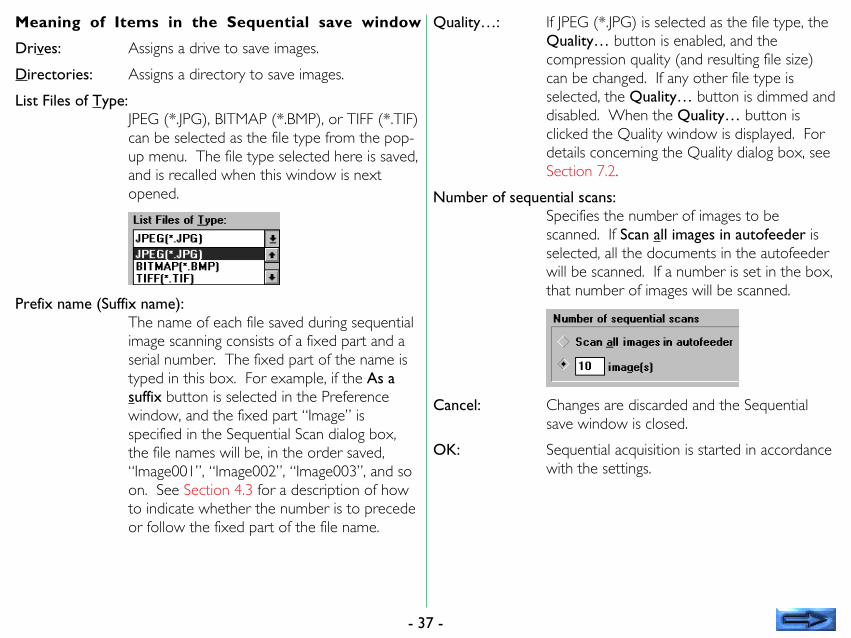
Meaning of Items in the Sequential save window
Drives: Assigns a drive to save images.
Directories: Assigns a directory to save images.
List Files of Type:JPEG (*.JPG), BITMAP (*.BMP), or TIFF (*.TIF)can be selected as the file type from the pop-up menu. The file type selected here is saved,and is recalled when this window is nextopened.
Prefix name (Suffix name):The name of each file saved during sequentialimage scanning consists of a fixed part and aserial number. The fixed part of the name istyped in this box. For example, if the As asuffix button is selected in the Preferencewindow, and the fixed part “Image” isspecified in the Sequential Scan dialog box,the file names will be, in the order saved,“Image001”, “Image002”, “Image003”, and soon. See Section 4.3 for a description of howto indicate whether the number is to precedeor follow the fixed part of the file name.
- 37
Quality…: If JPEG (*.JPG) is selected as the file type, theQuality… button is enabled, and thecompression quality (and resulting file size)can be changed. If any other file type isselected, the Quality… button is dimmed anddisabled. When the Quality… button isclicked the Quality window is displayed. Fordetails concerning the Quality dialog box, seeSection 7.2.
Number of sequential scans:Specifies the number of images to bescanned. If Scan all images in autofeeder isselected, all the documents in the autofeederwill be scanned. If a number is set in the box,that number of images will be scanned.
Cancel: Changes are discarded and the Sequentialsave window is closed.
OK: Sequential acquisition is started in accordancewith the settings.
-
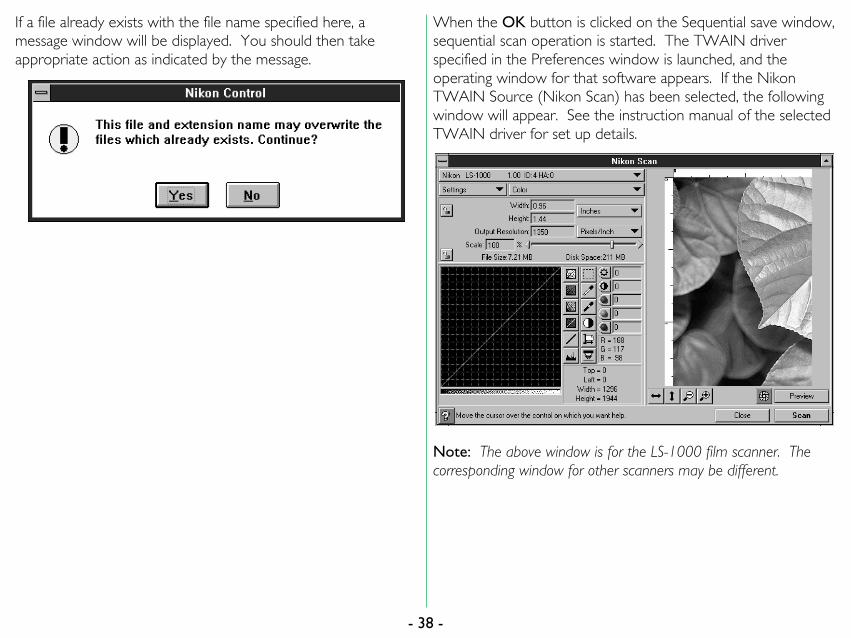
If a file already exists with the file name specified here, amessage window will be displayed. You should then takeappropriate action as indicated by the message.
- 38
When the OK button is clicked on the Sequential save window,sequential scan operation is started. The TWAIN driverspecified in the Preferences window is launched, and theoperating window for that software appears. If the NikonTWAIN Source (Nikon Scan) has been selected, the followingwindow will appear. See the instruction manual of the selectedTWAIN driver for set up details.
Note: The above window is for the LS-1000 film scanner. Thecorresponding window for other scanners may be different.
-
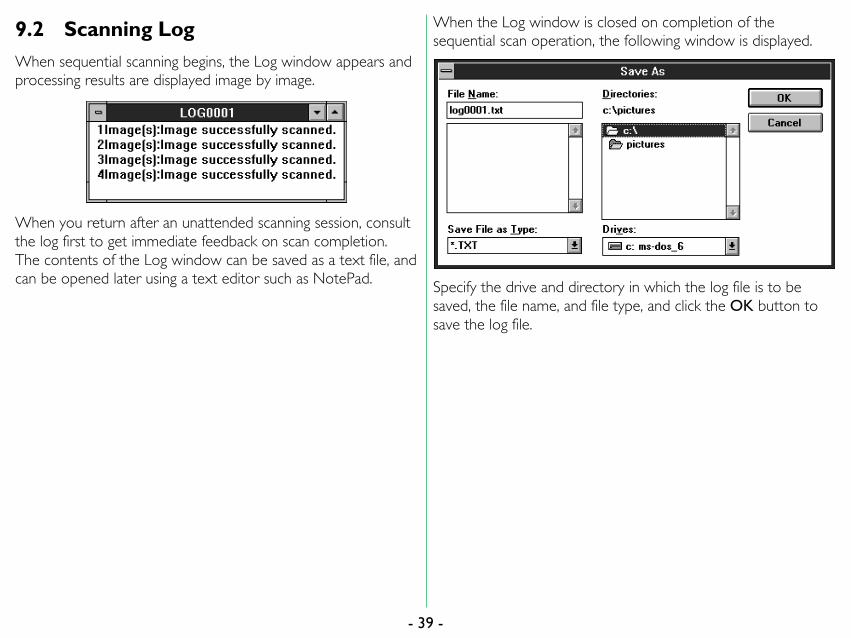
9.2 Scanning LogWhen sequential scanning begins, the Log window appears andprocessing results are displayed image by image.
When you return after an unattended scanning session, consultthe log first to get immediate feedback on scan completion.The contents of the Log window can be saved as a text file, andcan be opened later using a text editor such as NotePad.
- 39
When the Log window is closed on completion of thesequential scan operation, the following window is displayed.
Specify the drive and directory in which the log file is to besaved, the file name, and file type, and click the OK button tosave the log file.
-
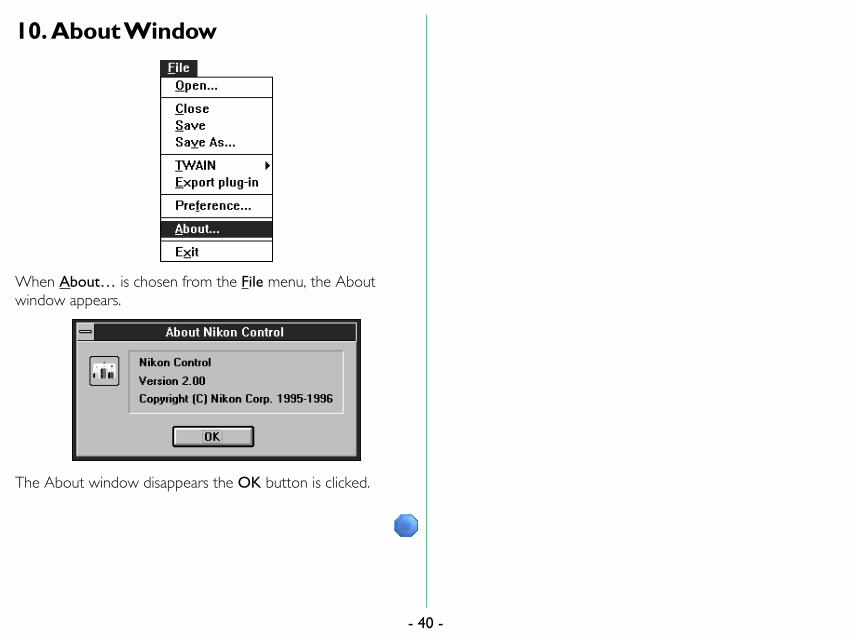
10. About Window
When About… is chosen from the File menu, the Aboutwindow appears.
The About window disappears the OK button is clicked.
- 40 -
Appendix A: Differences between
Windows 3.1 and Windows 95
Versions
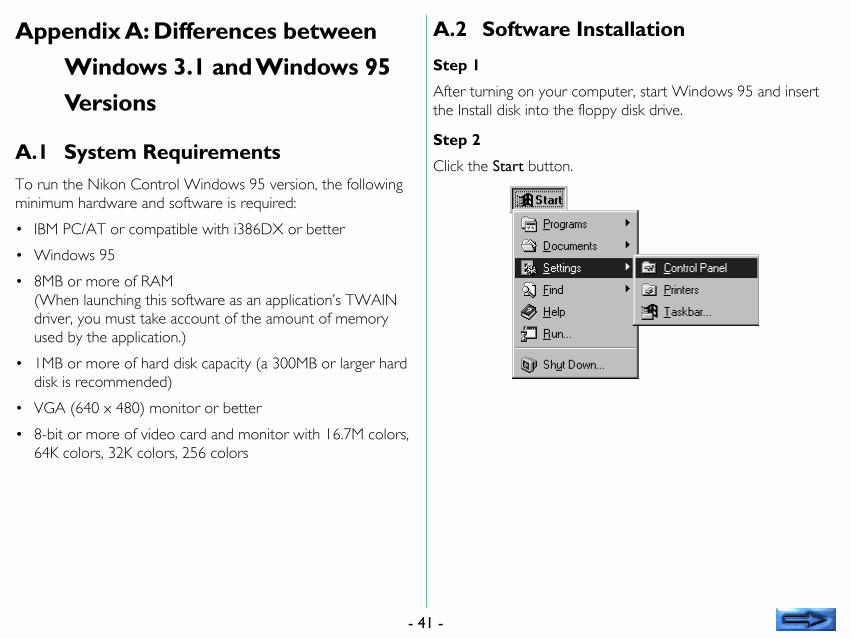
A.1 System RequirementsTo run the Nikon Control Windows 95 version, the followingminimum hardware and software is required:
• IBM PC/AT or compatible with i386DX or better
• Windows 95
• 8MB or more of RAM(When launching this software as an application’s TWAINdriver, you must take account of the amount of memoryused by the application.)
• 1MB or more of hard disk capacity (a 300MB or larger harddisk is recommended)
• VGA (640 x 480) monitor or better
• 8-bit or more of video card and monitor with 16.7M colors,64K colors, 32K colors, 256 colors
- 41
A.2 Software Installation
Step 1
After turning on your computer, start Windows 95 and insertthe Install disk into the floppy disk drive.
Step 2
Click the Start button.
-
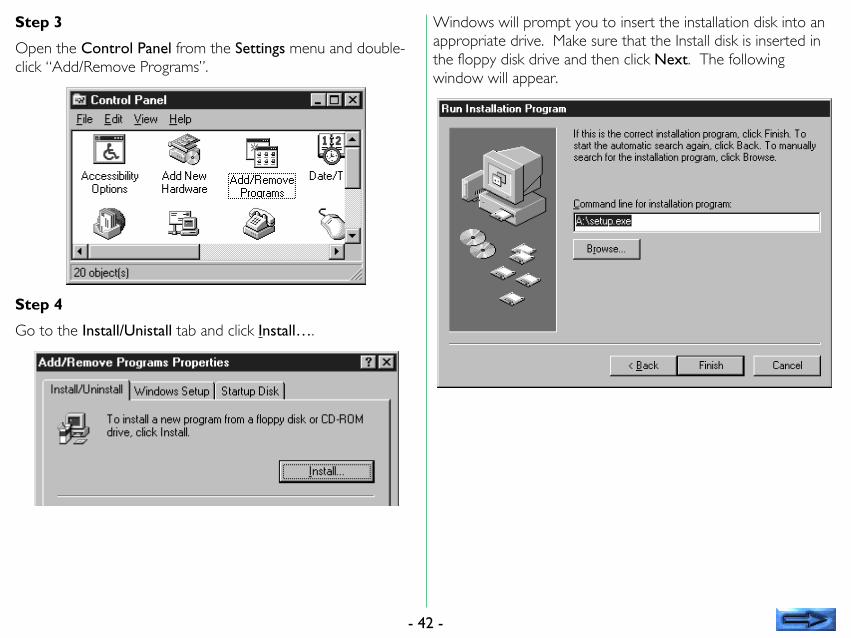
Step 3
Open the Control Panel from the Settings menu and double-click “Add/Remove Programs”.
Step 4
Go to the Install/Unistall tab and click Install….
- 42
Windows will prompt you to insert the installation disk into anappropriate drive. Make sure that the Install disk is inserted inthe floppy disk drive and then click Next. The followingwindow will appear.
-
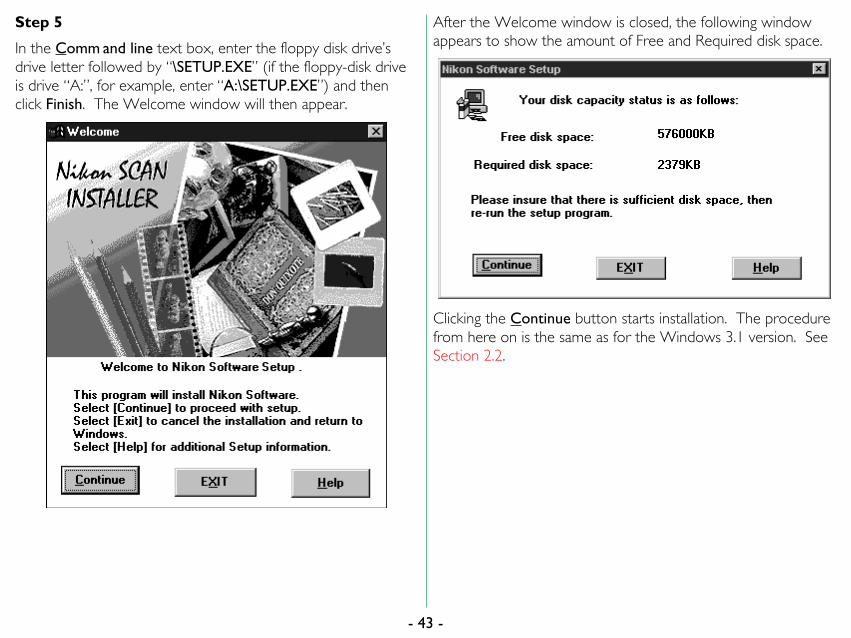
Step 5
In the Comm and line text box, enter the floppy disk drive’sdrive letter followed by “\SETUP.EXE” (if the floppy-disk driveis drive “A:”, for example, enter “A:\SETUP.EXE”) and thenclick Finish. The Welcome window will then appear.
- 43
After the Welcome window is closed, the following windowappears to show the amount of Free and Required disk space.
Clicking the Continue button starts installation. The procedurefrom here on is the same as for the Windows 3.1 version. SeeSection 2.2.
-
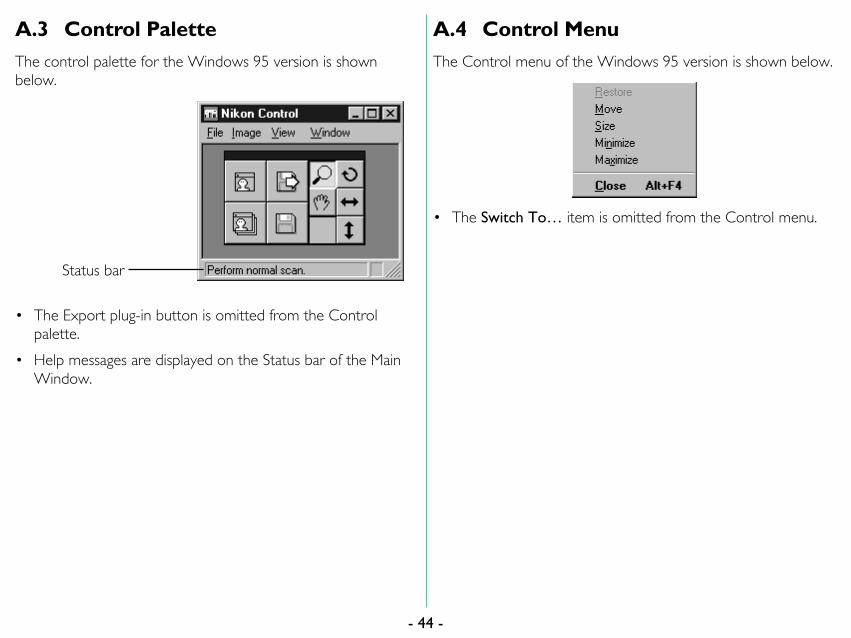
A.3 Control PaletteThe control palette for the Windows 95 version is shownbelow.
• The Export plug-in button is omitted from the Controlpalette.
• Help messages are displayed on the Status bar of the MainWindow.
Status bar
- 44
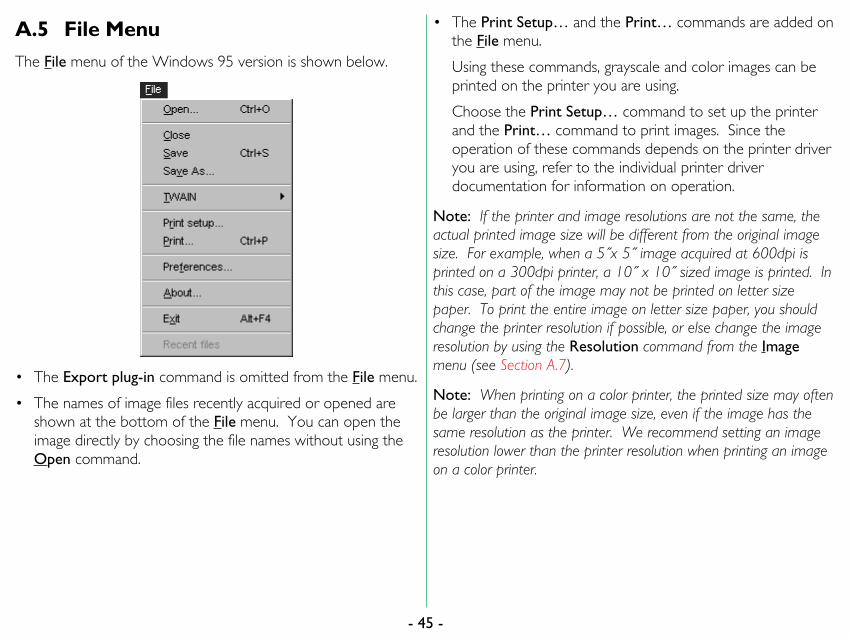
A.4 Control MenuThe Control menu of the Windows 95 version is shown below.
• The Switch To… item is omitted from the Control menu.
-
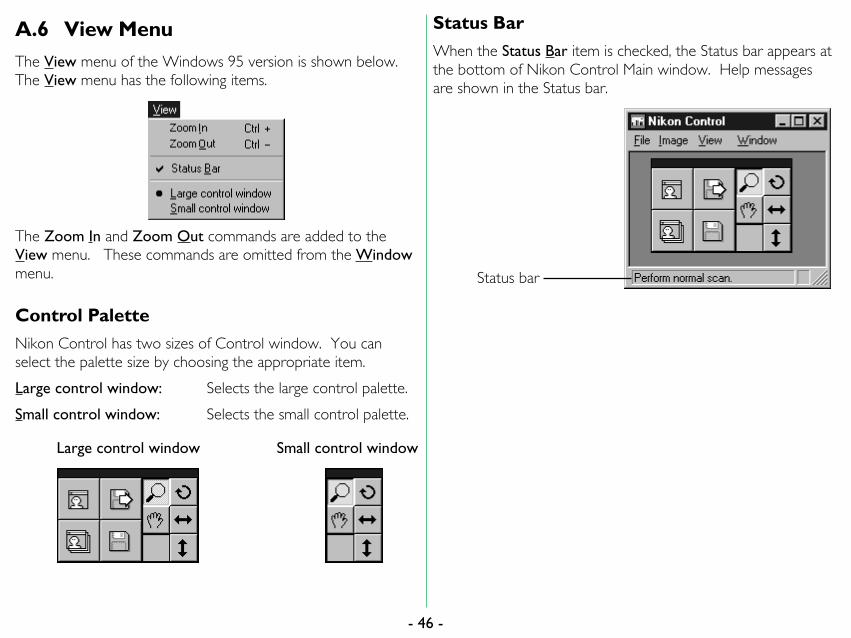
A.5 File MenuThe File menu of the Windows 95 version is shown below.
• The Export plug-in command is omitted from the File menu.
• The names of image files recently acquired or opened areshown at the bottom of the File menu. You can open theimage directly by choosing the file names without using theOpen command.
- 45
• The Print Setup… and the Print… commands are added onthe File menu.
Using these commands, grayscale and color images can beprinted on the printer you are using.
Choose the Print Setup… command to set up the printerand the Print… command to print images. Since theoperation of these commands depends on the printer driveryou are using, refer to the individual printer driverdocumentation for information on operation.
Note: If the printer and image resolutions are not the same, theactual printed image size will be different from the original imagesize. For example, when a 5˝x 5˝ image acquired at 600dpi isprinted on a 300dpi printer, a 10˝ x 10˝ sized image is printed. Inthis case, part of the image may not be printed on letter sizepaper. To print the entire image on letter size paper, you shouldchange the printer resolution if possible, or else change the imageresolution by using the Resolution command from the Imagemenu (see Section A.7).
Note: When printing on a color printer, the printed size may oftenbe larger than the original image size, even if the image has thesame resolution as the printer. We recommend setting an imageresolution lower than the printer resolution when printing an imageon a color printer.
-
A.6 View MenuThe View menu of the Windows 95 version is shown below.The View menu has the following items.
The Zoom In and Zoom Out commands are added to theView menu. These commands are omitted from the Windowmenu.
Control PaletteNikon Control has two sizes of Control window. You canselect the palette size by choosing the appropriate item.
Large control window: Selects the large control palette.
Small control window: Selects the small control palette.
Large control window Small control window
- 46
Status BarWhen the Status Bar item is checked, the Status bar appears atthe bottom of Nikon Control Main window. Help messagesare shown in the Status bar.
Status bar
-
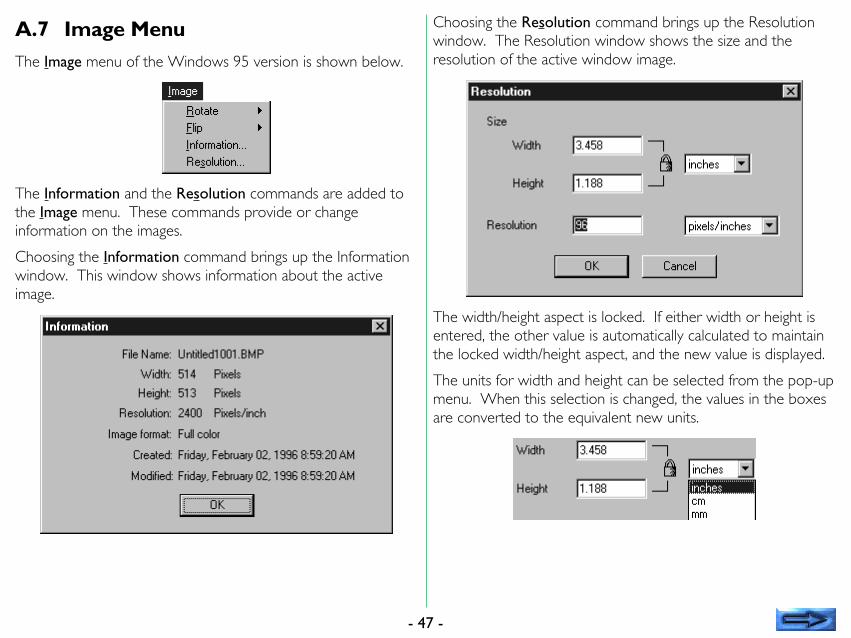
A.7 Image MenuThe Image menu of the Windows 95 version is shown below.
The Information and the Resolution commands are added tothe Image menu. These commands provide or changeinformation on the images.
Choosing the Information command brings up the Informationwindow. This window shows information about the activeimage.
- 47
Choosing the Resolution command brings up the Resolutionwindow. The Resolution window shows the size and theresolution of the active window image.
The width/height aspect is locked. If either width or height isentered, the other value is automatically calculated to maintainthe locked width/height aspect, and the new value is displayed.
The units for width and height can be selected from the pop-upmenu. When this selection is changed, the values in the boxesare converted to the equivalent new units.
-
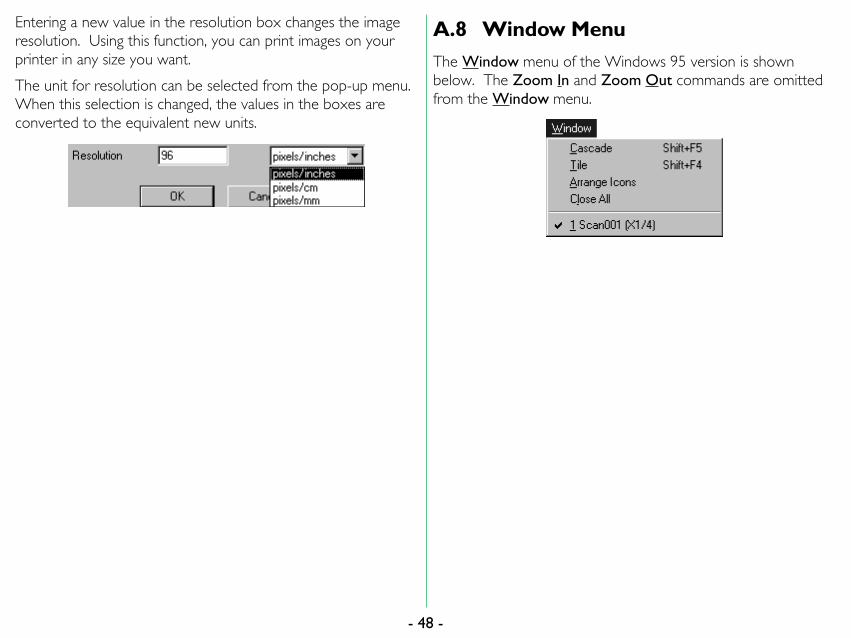
Entering a new value in the resolution box changes the imageresolution. Using this function, you can print images on yourprinter in any size you want.
The unit for resolution can be selected from the pop-up menu.When this selection is changed, the values in the boxes areconverted to the equivalent new units.
- 48
A.8 Window MenuThe Window menu of the Windows 95 version is shownbelow. The Zoom In and Zoom Out commands are omittedfrom the Window menu.
-
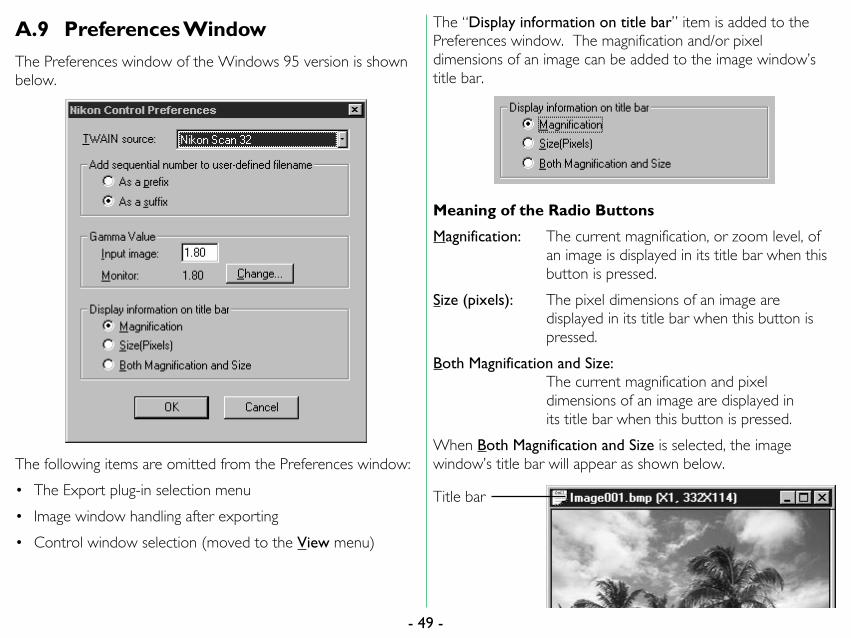
A.9 Preferences WindowThe Preferences window of the Windows 95 version is shownbelow.
The following items are omitted from the Preferences window:
• The Export plug-in selection menu
• Image window handling after exporting
• Control window selection (moved to the View menu)
- 49
The “Display information on title bar” item is added to thePreferences window. The magnification and/or pixeldimensions of an image can be added to the image window’stitle bar.
Meaning of the Radio Buttons
Magnification: The current magnification, or zoom level, ofan image is displayed in its title bar when thisbutton is pressed.
Size (pixels): The pixel dimensions of an image aredisplayed in its title bar when this button ispressed.
Both Magnification and Size:The current magnification and pixeldimensions of an image are displayed inits title bar when this button is pressed.
When Both Magnification and Size is selected, the imagewindow’s title bar will appear as shown below.
Title bar
-
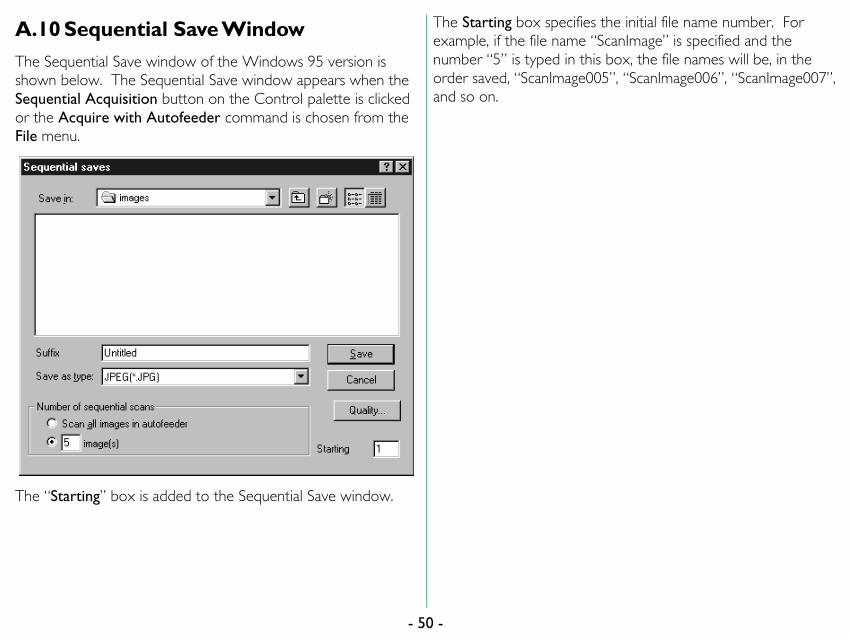
A.10 Sequential Save WindowThe Sequential Save window of the Windows 95 version isshown below. The Sequential Save window appears when theSequential Acquisition button on the Control palette is clickedor the Acquire with Autofeeder command is chosen from theFile menu.
The “Starting” box is added to the Sequential Save window.
- 50
The Starting box specifies the initial file name number. Forexample, if the file name “ScanImage” is specified and thenumber “5” is typed in this box, the file names will be, in theorder saved, “ScanImage005”, “ScanImage006”, “ScanImage007”,and so on.
-
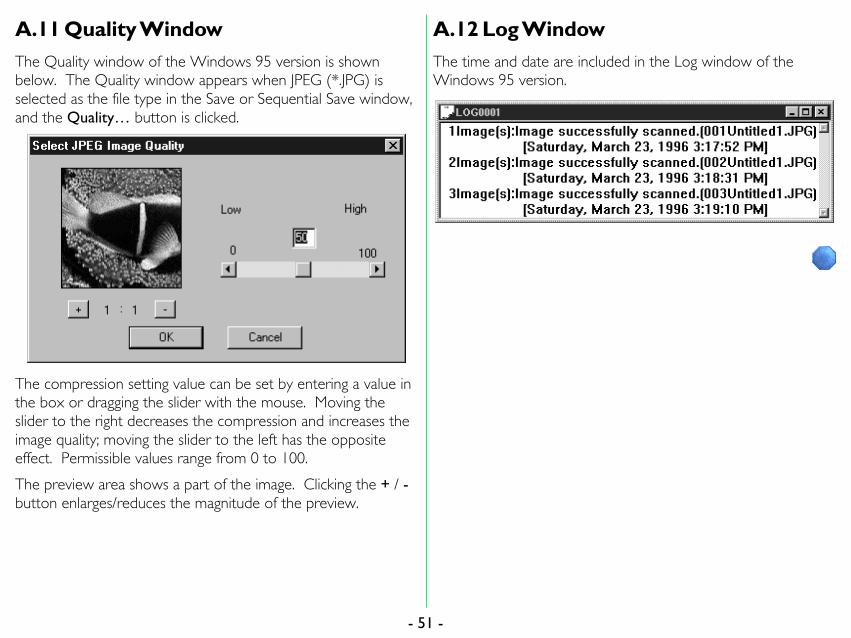
A.11 Quality WindowThe Quality window of the Windows 95 version is shownbelow. The Quality window appears when JPEG (*.JPG) isselected as the file type in the Save or Sequential Save window,and the Quality… button is clicked.
The compression setting value can be set by entering a value inthe box or dragging the slider with the mouse. Moving theslider to the right decreases the compression and increases theimage quality; moving the slider to the left has the oppositeeffect. Permissible values range from 0 to 100.
The preview area shows a part of the image. Clicking the + / -button enlarges/reduces the magnitude of the preview.
- 51
A.12 Log WindowThe time and date are included in the Log window of theWindows 95 version.
-
IndexAAbout command 12, 40About window 40Acquire a Single Image
command 12, 18, 27Acquire button 15, 18, 27Acquire with Autofeeder
command 12, 36AF-10 auto document feeder
4, 36Arrange Icon command 14As a prefix 23As a suffix 23Auto slide feeder 4, 36AX-110 4, 36AX-210 4, 36
CCascade command 14Close All command 14Close command 12, 32Config… button 25Control menu 11
Windows 95 44Control palette 15
large 26, 46setting size of 26
Windows 95 46small 26, 46Windows 95 44
EEnlarging and reducing
images 29Exit command 12Export button 15, 34Export plug-in 22, 24Export plug-in command
12, 34Exporting images 34
FFile menu 12
Windows 95 45Flip
horizontal 30vertical 31
Flip command 13
GGamma value 22, 25
HHelp 16Horizontal command 13, 30Horizontal Flip button 16, 30
IImage acquisition 27Image menu 13
Windows 95 47–48Image window handling after
exporting 22, 24Image window operations 29Installation 5
Windows 95 41
- 52
LLaunching 10List Files of Type text box
33, 37Loading images 35LS-1000 4, 36
NNaming files 23Nikon Control icon 10Number of sequential scans
37
OOpen button 15, 35Open command 12, 35
PPreference… command
12, 17, 21Preferences 21Preferences window 18, 22
Windows 95 49Prefix name 37
QQuality window 34
Windows 95 51Quality… button 33Quitting 11
-
RREADME file 9Resolution 47Rotate button 16, 29Rotate command 13, 29Rotating images 29
SSave As button 15, 20, 32Save As command
12, 20, 32Save As window 33Save command 12Saving images 32Scanning basics 17Scanning log 39Scroll button 16, 30Scrolling images 30Scsichk.exe file 9Sequential Acquire button
15, 36Sequential file number 22Sequential image acquisition
36Sequential save window 36
Windows 95 50SF-100. See Auto slide feederStatus bar 46Suffix name 37System requirements 5
Windows 95 41
TTile command 14Tool buttons 16TWAIN command 12TWAIN source 22, 23TWAIN source pop-up menu
18, 23
VVertical command 31Vertical Flip button 16, 31
WWindow menu 14
Windows 95 48Windows 95 4, 41–51
ZZoom button 16Zoom cursors 29Zoom In command 14, 29Zoom Out command 14, 29
- 53 -