Embed Size (px)
Citation preview

NI VisionNI PCI-1426 User ManualBase Configuration Camera Link Image Acquisition Device
NI PCI-1426 User Manual
February 2007374040C-01

Support
Worldwide Technical Support and Product Information
ni.com
National Instruments Corporate Headquarters
11500 North Mopac Expressway Austin, Texas 78759-3504 USA Tel: 512 683 0100
Worldwide Offices
Australia 1800 300 800, Austria 43 662 457990-0, Belgium 32 (0) 2 757 0020, Brazil 55 11 3262 3599, Canada 800 433 3488, China 86 21 6555 7838, Czech Republic 420 224 235 774, Denmark 45 45 76 26 00, Finland 385 (0) 9 725 72511, France 33 (0) 1 48 14 24 24, Germany 49 89 7413130, India 91 80 41190000, Israel 972 3 6393737, Italy 39 02 413091, Japan 81 3 5472 2970, Korea 82 02 3451 3400, Lebanon 961 (0) 1 33 28 28, Malaysia 1800 887710, Mexico 01 800 010 0793, Netherlands 31 (0) 348 433 466, New Zealand 0800 553 322, Norway 47 (0) 66 90 76 60, Poland 48 22 3390150, Portugal 351 210 311 210, Russia 7 495 783 6851, Singapore 1800 226 5886, Slovenia 386 3 425 42 00, South Africa 27 0 11 805 8197, Spain 34 91 640 0085, Sweden 46 (0) 8 587 895 00, Switzerland 41 56 2005151, Taiwan 886 02 2377 2222, Thailand 662 278 6777, Turkey 90 212 279 3031, United Kingdom 44 (0) 1635 523545
For further support information, refer to the Technical Support and Professional Services appendix. To comment on National Instruments documentation, refer to the National Instruments Web site at ni.com/info and enter the info code feedback.
© 2004–2007 National Instruments Corporation. All rights reserved.

Important Information
WarrantyThe NI PCI-1426 is warranted against defects in materials and workmanship for a period of one year from the date of shipment, as evidenced by receipts or other documentation. National Instruments will, at its option, repair or replace equipment that proves to be defective during the warranty period. This warranty includes parts and labor.
The media on which you receive National Instruments software are warranted not to fail to execute programming instructions, due to defects in materials and workmanship, for a period of 90 days from date of shipment, as evidenced by receipts or other documentation. National Instruments will, at its option, repair or replace software media that do not execute programming instructions if National Instruments receives notice of such defects during the warranty period. National Instruments does not warrant that the operation of the software shall be uninterrupted or error free.
A Return Material Authorization (RMA) number must be obtained from the factory and clearly marked on the outside of the package before any equipment will be accepted for warranty work. National Instruments will pay the shipping costs of returning to the owner parts which are covered by warranty.
National Instruments believes that the information in this document is accurate. The document has been carefully reviewed for technical accuracy. In the event that technical or typographical errors exist, National Instruments reserves the right to make changes to subsequent editions of this document without prior notice to holders of this edition. The reader should consult National Instruments if errors are suspected. In no event shall National Instruments be liable for any damages arising out of or related to this document or the information contained in it.
EXCEPT AS SPECIFIED HEREIN, NATIONAL INSTRUMENTS MAKES NO WARRANTIES, EXPRESS OR IMPLIED, AND SPECIFICALLY DISCLAIMS ANY WARRANTY OF MERCHANTABILITY OR FITNESS FOR A PARTICULAR PURPOSE. CUSTOMER’S RIGHT TO RECOVER DAMAGES CAUSED BY FAULT OR NEGLIGENCE ON THE PART OF NATIONAL INSTRUMENTS SHALL BE LIMITED TO THE AMOUNT THERETOFORE PAID BY THE CUSTOMER. NATIONAL INSTRUMENTS WILL NOT BE LIABLE FOR DAMAGES RESULTING FROM LOSS OF DATA, PROFITS, USE OF PRODUCTS, OR INCIDENTAL OR CONSEQUENTIAL DAMAGES, EVEN IF ADVISED OF THE POSSIBILITY THEREOF. This limitation of the liability of National Instruments will apply regardless of the form of action, whether in contract or tort, including negligence. Any action against National Instruments must be brought within one year after the cause of action accrues. National Instruments shall not be liable for any delay in performance due to causes beyond its reasonable control. The warranty provided herein does not cover damages, defects, malfunctions, or service failures caused by owner’s failure to follow the National Instruments installation, operation, or maintenance instructions; owner’s modification of the product; owner’s abuse, misuse, or negligent acts; and power failure or surges, fire, flood, accident, actions of third parties, or other events outside reasonable control.
CopyrightUnder the copyright laws, this publication may not be reproduced or transmitted in any form, electronic or mechanical, including photocopying, recording, storing in an information retrieval system, or translating, in whole or in part, without the prior written consent of National Instruments Corporation.
National Instruments respects the intellectual property of others, and we ask our users to do the same. NI software is protected by copyright and other intellectual property laws. Where NI software may be used to reproduce software or other materials belonging to others, you may use NI software only to reproduce materials that you may reproduce in accordance with the terms of any applicable license or other legal restriction.
TrademarksNational Instruments, NI, ni.com, and LabVIEW are trademarks of National Instruments Corporation. Refer to the Terms of Use section on ni.com/legal for more information about National Instruments trademarks.
Members of the National Instruments Alliance Partner Program are business entities independent from National Instruments and have no agency, partnership, or joint-venture relationship with National Instruments.
PatentsFor patents covering National Instruments products, refer to the appropriate location: Help»Patents in your software, the patents.txt file on your CD, or ni.com/patents.
WARNING REGARDING USE OF NATIONAL INSTRUMENTS PRODUCTS(1) NATIONAL INSTRUMENTS PRODUCTS ARE NOT DESIGNED WITH COMPONENTS AND TESTING FOR A LEVEL OF RELIABILITY SUITABLE FOR USE IN OR IN CONNECTION WITH SURGICAL IMPLANTS OR AS CRITICAL COMPONENTS IN ANY LIFE SUPPORT SYSTEMS WHOSE FAILURE TO PERFORM CAN REASONABLY BE EXPECTED TO CAUSE SIGNIFICANT INJURY TO A HUMAN.
(2) IN ANY APPLICATION, INCLUDING THE ABOVE, RELIABILITY OF OPERATION OF THE SOFTWARE PRODUCTS CAN BE IMPAIRED BY ADVERSE FACTORS, INCLUDING BUT NOT LIMITED TO FLUCTUATIONS IN ELECTRICAL POWER SUPPLY, COMPUTER HARDWARE MALFUNCTIONS, COMPUTER OPERATING SYSTEM SOFTWARE FITNESS, FITNESS OF COMPILERS AND DEVELOPMENT SOFTWARE USED TO DEVELOP AN APPLICATION, INSTALLATION ERRORS, SOFTWARE AND HARDWARE COMPATIBILITY PROBLEMS, MALFUNCTIONS OR FAILURES OF ELECTRONIC MONITORING OR CONTROL DEVICES, TRANSIENT FAILURES OF ELECTRONIC SYSTEMS (HARDWARE AND/OR SOFTWARE), UNANTICIPATED USES OR MISUSES, OR ERRORS ON THE PART OF THE USER OR APPLICATIONS DESIGNER (ADVERSE FACTORS SUCH AS THESE ARE HEREAFTER COLLECTIVELY TERMED “SYSTEM FAILURES”). ANY APPLICATION WHERE A SYSTEM FAILURE WOULD CREATE A RISK OF HARM TO PROPERTY OR PERSONS (INCLUDING THE RISK OF BODILY INJURY AND DEATH) SHOULD NOT BE RELIANT SOLELY UPON ONE FORM OF ELECTRONIC SYSTEM DUE TO THE RISK OF SYSTEM FAILURE. TO AVOID DAMAGE, INJURY, OR DEATH, THE USER OR APPLICATION DESIGNER MUST TAKE REASONABLY PRUDENT STEPS TO PROTECT AGAINST SYSTEM FAILURES, INCLUDING BUT NOT LIMITED TO BACK-UP OR SHUT DOWN MECHANISMS. BECAUSE EACH END-USER SYSTEM IS CUSTOMIZED AND DIFFERS FROM NATIONAL INSTRUMENTS' TESTING PLATFORMS AND BECAUSE A USER OR APPLICATION DESIGNER MAY USE NATIONAL INSTRUMENTS PRODUCTS IN COMBINATION WITH OTHER PRODUCTS IN A MANNER NOT EVALUATED OR CONTEMPLATED BY NATIONAL INSTRUMENTS, THE USER OR APPLICATION DESIGNER IS ULTIMATELY RESPONSIBLE FOR VERIFYING AND VALIDATING THE SUITABILITY OF NATIONAL INSTRUMENTS PRODUCTS WHENEVER NATIONAL INSTRUMENTS PRODUCTS ARE INCORPORATED IN A SYSTEM OR APPLICATION, INCLUDING, WITHOUT LIMITATION, THE APPROPRIATE DESIGN, PROCESS AND SAFETY LEVEL OF SUCH SYSTEM OR APPLICATION.

Compliance
Compliance with FCC/Canada Radio Frequency Interference Regulations
Determining FCC ClassThe Federal Communications Commission (FCC) has rules to protect wireless communications from interference. The FCC places digital electronics into two classes. These classes are known as Class A (for use in industrial-commercial locations only) or Class B (for use in residential or commercial locations). All National Instruments (NI) products are FCC Class A products.Depending on where it is operated, this Class A product could be subject to restrictions in the FCC rules. (In Canada, the Department of Communications (DOC), of Industry Canada, regulates wireless interference in much the same way.) Digital electronics emit weak signals during normal operation that can affect radio, television, or other wireless products.All Class A products display a simple warning statement of one paragraph in length regarding interference and undesired operation. The FCC rules have restrictions regarding the locations where FCC Class A products can be operated.Consult the FCC Web site at www.fcc.gov for more information.
FCC/DOC WarningsThis equipment generates and uses radio frequency energy and, if not installed and used in strict accordance with the instructions in this manual and the CE marking Declaration of Conformity*, may cause interference to radio and television reception. Classification requirements are the same for the Federal Communications Commission (FCC) and the Canadian Department of Communications (DOC). Changes or modifications not expressly approved by NI could void the user’s authority to operate the equipment under the FCC Rules.
Class AFederal Communications CommissionThis equipment has been tested and found to comply with the limits for a Class A digital device, pursuant to part 15 of the FCC Rules. These limits are designed to provide reasonable protection against harmful interference when the equipment is operated in a commercial environment. This equipment generates, uses, and can radiate radio frequency energy and, if not installed and used in accordance with the instruction manual, may cause harmful interference to radio communications. Operation of this equipment in a residential area is likely to cause harmful interference in which case the user is required to correct the interference at their own expense.
Canadian Department of CommunicationsThis Class A digital apparatus meets all requirements of the Canadian Interference-Causing Equipment Regulations.Cet appareil numérique de la classe A respecte toutes les exigences du Règlement sur le matériel brouilleur du Canada.
Compliance with EU DirectivesUsers in the European Union (EU) should refer to the Declaration of Conformity (DoC) for information* pertaining to the CE marking. Refer to the Declaration of Conformity (DoC) for this product for any additional regulatory compliance information. To obtain the DoC for this product, visit ni.com/certification, search by model number or product line, and click the appropriate link in the Certification column.
* The CE marking Declaration of Conformity contains important supplementary information and instructions for the user or installer.

Conventions
The following conventions are used in this manual:
<> Angle brackets that contain numbers separated by an ellipsis represent a range of values associated with a bit or signal name—for example, AO <3..0>.
This icon denotes a note, which alerts you to important information.
bold Bold text denotes items that you must select or click in the software, such as menu items and dialog box options. Bold text also denotes parameter names.
italic Italic text denotes variables, emphasis, a cross-reference, or an introduction to a key concept. Italic text also denotes text that is a placeholder for a word or value that you must supply.
monospace Text in this font denotes text or characters that you should enter from the keyboard, sections of code, programming examples, and syntax examples. This font is also used for the proper names of disk drives, paths, directories, programs, subprograms, subroutines, device names, functions, operations, variables, filenames, and extensions.
NI 1426 NI 1426 refers to the NI PCI-1426 image acquisition device.

© National Instruments Corporation vii NI PCI-1426 User Manual
Contents
Chapter 1Introduction
Software Overview ........................................................................................................1-2NI-IMAQ Driver Software ..............................................................................1-2National Instruments Application Software ....................................................1-2
Vision Builder for Automated Inspection.........................................1-3Vision Development Module ............................................................1-3
Integration with DAQ and Motion ..................................................................1-4Camera Link ..................................................................................................................1-4
Overview .........................................................................................................1-4
Chapter 2Hardware Overview
Functional Overview......................................................................................................2-1Camera Link and the NI 1426 .........................................................................2-2
Base Configuration ...........................................................................2-2Data Transmission ...........................................................................................2-2Hardware Binarization.....................................................................................2-3Multiple-Tap Data Formatter ..........................................................................2-4SDRAM...........................................................................................................2-4Trigger Control and Mapping Circuitry ..........................................................2-4Wiring an Isolated Input to Output Devices....................................................2-5Connecting to a Quadrature Encoder ..............................................................2-6High-Speed Timing .........................................................................................2-7Acquisition and Region of Interest (ROI) .......................................................2-7Scatter-Gather DMA Controllers ....................................................................2-8Bus Master PCI Interface ................................................................................2-8Start Conditions ...............................................................................................2-8Serial Interface.................................................................................................2-9
Chapter 3Signal Connections
Connectors .....................................................................................................................3-2MDR 26-Pin Connector...................................................................................3-215-pin D-SUB Connector ................................................................................3-3Connector Signal Connection Descriptions.....................................................3-4

Contents
NI PCI-1426 User Manual viii ni.com
Appendix ACabling
Appendix BTechnical Support and Professional Services
Glossary
Index
© National Instruments Corporation 1-1 NI PCI-1426 User Manual
1Introduction
The NI 1426 is an interface device that supports a diverse range of Camera Link-compatible cameras. The NI 1426 acquires digital images in real time and stores the images in onboard frame memory or transfers them directly to system memory. Featuring a high-speed data flow path, the NI 1426 is ideal for both industrial and scientific environments.
The NI 1426 is easy to install and configure. It ships with NI-IMAQ, the National Instruments complete Vision driver software you can use to directly control the NI 1426 and other National Instruments Vision hardware products. With NI-IMAQ, you can quickly and easily start your applications without having to program the device at the register level.
The NI 1426 supports the Camera Link Base configuration. The MDR 26-pin connector provides access to base configuration cameras. For further configuration information, refer to the Camera Link and the NI 1426 section of Chapter 2, Hardware Overview.
The 15-pin D-SUB connector has four external TTL input/output (I/O) lines you can use as triggers or as high-speed digital I/O lines. Should you choose not to use the TTL I/O lines, the 15-pin D-SUB connector also provides access to two optically isolated inputs and two RS-422 inputs. These inputs can be individually selected in software.
For more advanced digital or analog system triggering or digital I/O lines, you can use the NI 1426 and NI-IMAQ with the National Instruments data acquisition (DAQ) or motion control product lines.
Synchronizing several functions to a common trigger or timing event can be a challenge with image acquisition devices. The NI 1426 uses the Real-Time System Integration (RTSI) bus to solve this problem.
The RTSI bus uses the National Instruments RTSI bus interface and ribbon cable to route additional timing and trigger signals between the NI 1426 and up to four National Instruments DAQ, Motion Control, or image acquisition devices.
For detailed specifications of the NI 1426, refer to the Specifications section of Getting Started with the NI PCI-1426.

Chapter 1 Introduction
NI PCI-1426 User Manual 1-2 ni.com
Software OverviewProgramming the NI 1426 requires the NI-IMAQ driver software for controlling the hardware. National Instruments also offers the following application software packages for analyzing and processing your acquired images.
• Vision Builder for Automated Inspection—Allows you to configure solutions to common inspection tasks.
• Vision Development Module—Provides customized control over hardware and algorithms.
NI-IMAQ Driver SoftwareThe NI-IMAQ driver software ships with the NI 1426. NI-IMAQ has an extensive library of functions—such as routines for video configuration, continuous and single shot image acquisition, memory buffer allocation, trigger control, and device configuration—you can call from the application development environment (ADE). NI-IMAQ handles many of the complex issues between the computer and the image acquisition device, such as programming interrupts and camera control.
NI-IMAQ performs all functions required for acquiring and saving images but does not perform image analysis. Refer to the National Instruments Application Software section for image analysis functionality.
NI-IMAQ is also the interface between the NI 1426 and LabVIEW, LabWindows™/CVI™, or a text-based programming environment. The NI-IMAQ software kit includes a series of libraries for image acquisition for LabVIEW, LabWindows/CVI, and Measurement Studio, which contains libraries for Microsoft Visual Basic.
NI-IMAQ features both high-level and low-level functions. Examples of high-level functions include the sequences to acquire images in multi-buffer, single-shot, or continuous mode. An example of a low-level function is configuring an image sequence, since it requires advanced understanding of the Vision device and image acquisition.
National Instruments Application SoftwareThis section describes the National Instruments application software packages you can use to analyze and process the images you acquire with the NI 1426.
Chapter 1 Introduction
© National Instruments Corporation 1-3 NI PCI-1426 User Manual
Vision Builder for Automated InspectionNI Vision Builder for Automated Inspection (AI) is configurable machine vision software that you can use to prototype, benchmark, and deploy applications. Vision Builder AI does not require programming, but is scalable to powerful programming environments.
Vision Builder AI allows you to easily configure and benchmark a sequence of visual inspection steps, as well as deploy the visual inspection system for automated inspection. With Vision Builder AI, you can perform powerful visual inspection tasks and make decisions based on the results of individual tasks. You also can migrate the configured inspection to LabVIEW, extending the capabilities of the applications if necessary.
Vision Development ModuleNI Vision Development Module, which consists of NI Vision and NI Vision Assistant, is an image acquisition, processing, and analysis library of more than 270 functions for the following common machine vision tasks:
• Pattern matching
• Particle analysis
• Gauging
• Taking measurements
• Grayscale, color, and binary image display
You can use the Vision Development Module functions individually or in combination. With the Vision Development Module, you can acquire, display, and store images, as well as perform image analysis and processing. Using the Vision Development Module, imaging novices and experts can program the most basic or complicated image applications without knowledge of particular algorithm implementations.
As a part of the Vision Development Module, NI Vision Assistant is an interactive prototyping tool for machine vision and scientific imaging developers. With Vision Assistant, you can prototype vision applications quickly and test how various image processing functions work.
Vision Assistant generates a Builder file, which is a text description containing a recipe of the machine vision and image processing functions. This Builder file provides a guide you can use for developing applications in any ADE, such as LabWindows/CVI or Visual Basic, using the Vision Assistant machine vision and image processing libraries. Using the
Chapter 1 Introduction
NI PCI-1426 User Manual 1-4 ni.com
LabVIEW VI creation wizard, Vision Assistant can create LabVIEW VI diagrams that perform the prototype you created in Vision Assistant. You can then use LabVIEW to add functionality to the generated VI.
Integration with DAQ and MotionPlatforms that support NI-IMAQ also support NI-DAQ and a variety of National Instruments DAQ devices. This allows integration between image acquisition devices and National Instruments DAQ devices.
Use National Instruments high-performance stepper and servo motion control products with pattern matching software in inspection and guidance applications, such as locating alignment markers on semiconductor wafers, guiding robotic arms, inspecting the quality of manufactured parts, and locating cells.
Camera LinkThis section provides a brief overview of the Camera Link standard. Refer to the Specifications of the Camera Link Interface Standard for Digital Cameras and Frame Grabbers manual for more detailed information about Camera Link specifications. This manual is available on several Web sites, including the Automated Imaging Association site at www.machinevisiononline.org.
OverviewDeveloped by a consortium of camera and image acquisition device manufacturers, Camera Link is a standard for interfacing digital cameras with image acquisition devices. Camera Link simplifies connectivity between the image acquisition device and the camera by defining a single standard connector for both. This standard ensures physical compatibility of devices bearing the Camera Link logo.
The basis for the Camera Link standard is the National Semiconductor Channel Link chipset, a data transmission method consisting of a general-purpose transmitter/receiver pair. The Channel Link driver takes 28 bits of parallel digital data and a clock and serializes the stream to four LVDS (EIA-644) data streams and an LVDS clock, providing high-speed data transmission across 10 wires and over distances of up to 10 m.

© National Instruments Corporation 2-1 NI PCI-1426 User Manual
2Hardware Overview
This chapter provides an overview of NI 1426 hardware functionality and explains the operations of the NI 1426 functional units.
Functional OverviewThe NI 1426 features a flexible, high-speed data path optimized for receiving and formatting video data from Camera Link cameras.
Figure 2-1 illustrates the key functional components of the NI 1426.
Figure 2-1. NI 1426 Block Diagram
Data
MD
R 2
6-P
in C
onne
ctor Channel
Link Receiver
Enables
PixelClock
CameraControl
UART
PC
I Bus
PCI Interfaceand
Scatter-GatherDMA Controllers
DataSDRAMInterface
Synchronous Dynamic RAM
AdvancedTiming
Acquisition, ROI, and Triggering
External Triggers
Pixel Clock and Camera Enables
RTSI Bus
Data
DifferentialConverter
15-P
in D
-SU
B
Serial
Control
Chapter 2 Hardware Overview
NI PCI-1426 User Manual 2-2 ni.com
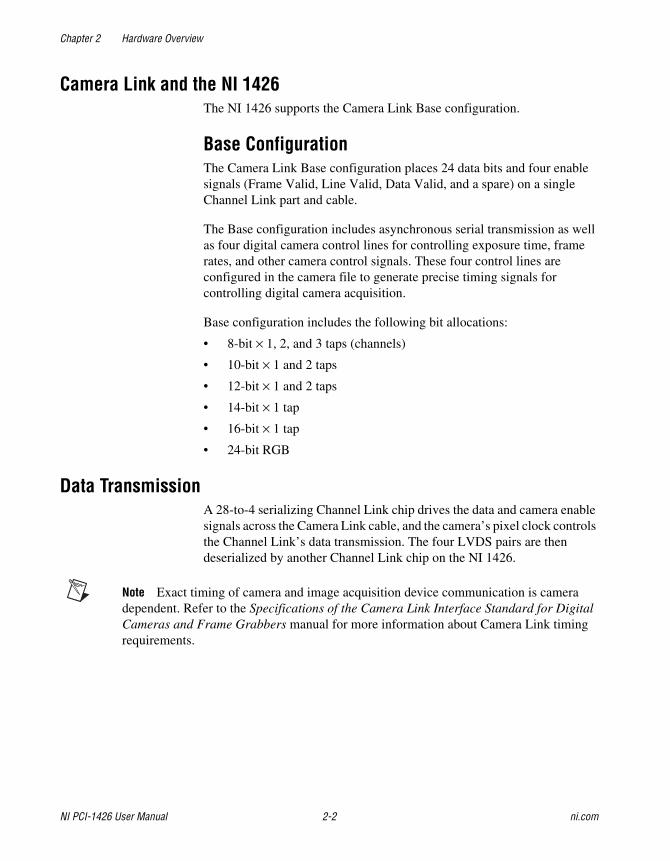
Camera Link and the NI 1426The NI 1426 supports the Camera Link Base configuration.
Base ConfigurationThe Camera Link Base configuration places 24 data bits and four enable signals (Frame Valid, Line Valid, Data Valid, and a spare) on a single Channel Link part and cable.
The Base configuration includes asynchronous serial transmission as well as four digital camera control lines for controlling exposure time, frame rates, and other camera control signals. These four control lines are configured in the camera file to generate precise timing signals for controlling digital camera acquisition.
Base configuration includes the following bit allocations:
• 8-bit × 1, 2, and 3 taps (channels)
• 10-bit × 1 and 2 taps
• 12-bit × 1 and 2 taps
• 14-bit × 1 tap
• 16-bit × 1 tap
• 24-bit RGB
Data TransmissionA 28-to-4 serializing Channel Link chip drives the data and camera enable signals across the Camera Link cable, and the camera’s pixel clock controls the Channel Link’s data transmission. The four LVDS pairs are then deserialized by another Channel Link chip on the NI 1426.
Note Exact timing of camera and image acquisition device communication is camera dependent. Refer to the Specifications of the Camera Link Interface Standard for Digital Cameras and Frame Grabbers manual for more information about Camera Link timing requirements.
Chapter 2 Hardware Overview
© National Instruments Corporation 2-3 NI PCI-1426 User Manual
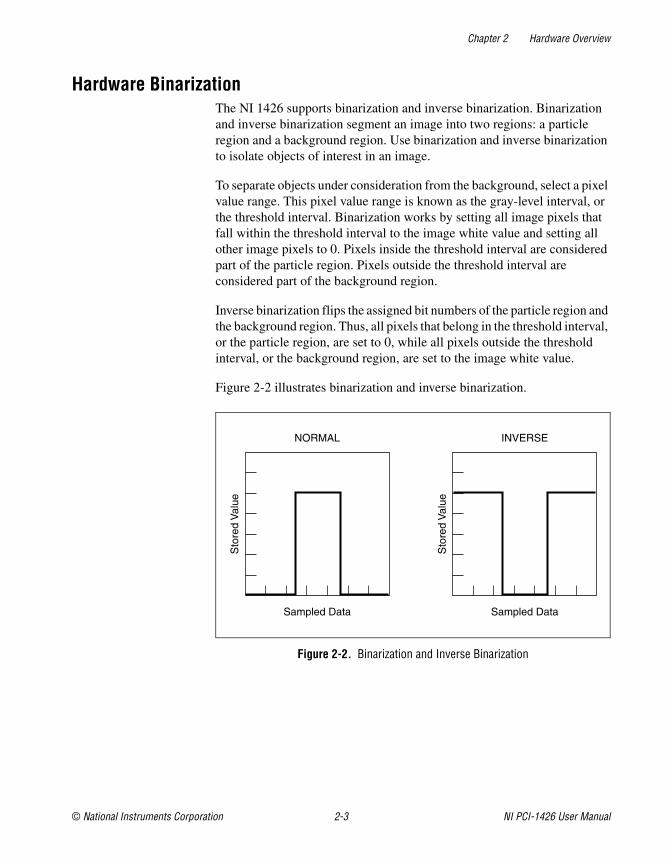
Hardware BinarizationThe NI 1426 supports binarization and inverse binarization. Binarization and inverse binarization segment an image into two regions: a particle region and a background region. Use binarization and inverse binarization to isolate objects of interest in an image.
To separate objects under consideration from the background, select a pixel value range. This pixel value range is known as the gray-level interval, or the threshold interval. Binarization works by setting all image pixels that fall within the threshold interval to the image white value and setting all other image pixels to 0. Pixels inside the threshold interval are considered part of the particle region. Pixels outside the threshold interval are considered part of the background region.
Inverse binarization flips the assigned bit numbers of the particle region and the background region. Thus, all pixels that belong in the threshold interval, or the particle region, are set to 0, while all pixels outside the threshold interval, or the background region, are set to the image white value.
Figure 2-2 illustrates binarization and inverse binarization.
Figure 2-2. Binarization and Inverse Binarization
NORMAL
Sto
red
Val
ue
Sampled Data
INVERSES
tore
d V
alue
Sampled Data
Chapter 2 Hardware Overview
NI PCI-1426 User Manual 2-4 ni.com
Multiple-Tap Data FormatterMany digital cameras transfer multiple taps, or channels, of data simultaneously to increase the frame rate of the camera. However, the data in each tap may not be transferred in the traditional top-left to bottom-right direction. Also, the taps may not transfer data in the same direction.
The multiple-tap data formatting circuitry on the NI 1426 can reorder the data from up to three taps. The data from each tap can be independently scanned either from left-to-right or right-to-left and top-to-bottom or bottom-to-top.
Note For your convenience, data reformatting instructions for these cameras have been preprogrammed into the camera files.
SDRAMDepending on the memory option purchased, the NI 1426 has 16 MB or 32 MB of onboard high-speed synchronous dynamic RAM (SDRAM). The NI 1426 uses the onboard RAM as a FIFO buffer to ensure a complete acquisition. Even when the data rate from the camera exceeds PCI throughput, you can acquire without interruption until the onboard RAM is full.
Trigger Control and Mapping CircuitryThe trigger control and mapping circuitry routes, monitors, and drives the external and RTSI bus trigger lines. You can configure each line to start an acquisition on a rising or falling edge and drive each line asserted or unasserted, much like a digital I/O line. You also can map pulses from the high-speed timing circuitry or many of the NI 1426 status signals to these trigger lines. Four RTSI bus triggers and four external triggers (all of which are programmable for polarity and direction) are available for simultaneous use.
Individually configure the four external triggers in Measurement and Automation Explorer (MAX), the National Instruments Configuration utility, as single-ended I/O lines or, alternatively, as isolated or RS-422 input only lines. You can configure the four external triggers in any combination of single-ended I/O or input only lines. Table 2-1 lists the configuration options available for each trigger source.
Chapter 2 Hardware Overview
© National Instruments Corporation 2-5 NI PCI-1426 User Manual
Note If not configured as single-ended I/O lines, triggers have input only capability.
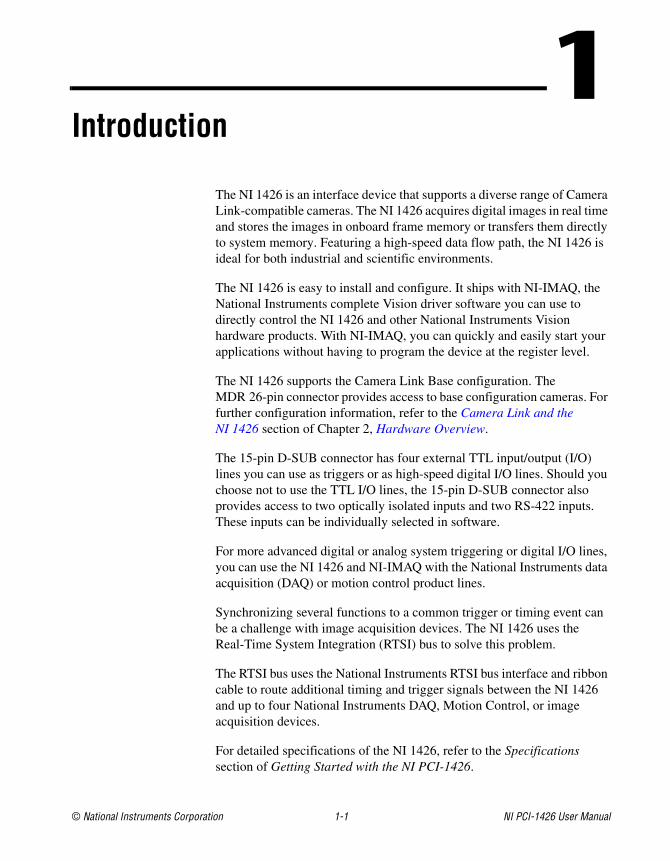
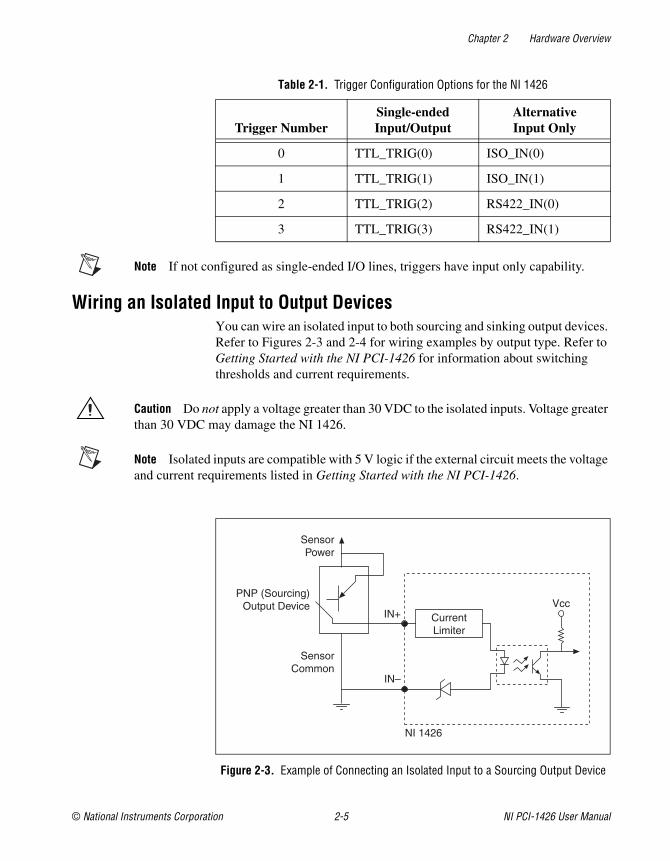
Wiring an Isolated Input to Output DevicesYou can wire an isolated input to both sourcing and sinking output devices. Refer to Figures 2-3 and 2-4 for wiring examples by output type. Refer to Getting Started with the NI PCI-1426 for information about switching thresholds and current requirements.
Caution Do not apply a voltage greater than 30 VDC to the isolated inputs. Voltage greater than 30 VDC may damage the NI 1426.
Note Isolated inputs are compatible with 5 V logic if the external circuit meets the voltage and current requirements listed in Getting Started with the NI PCI-1426.
Figure 2-3. Example of Connecting an Isolated Input to a Sourcing Output Device
Table 2-1. Trigger Configuration Options for the NI 1426
Trigger NumberSingle-ended Input/Output
AlternativeInput Only
0 TTL_TRIG(0) ISO_IN(0)
1 TTL_TRIG(1) ISO_IN(1)
2 TTL_TRIG(2) RS422_IN(0)
3 TTL_TRIG(3) RS422_IN(1)
Vcc
SensorPower
IN+ CurrentLimiter
NI 1426
IN–
PNP (Sourcing)Output Device
SensorCommon

Chapter 2 Hardware Overview
NI PCI-1426 User Manual 2-6 ni.com
Figure 2-4. Example of Connecting an Isolated Input to a Sinking Output Device
Connecting to a Quadrature EncoderThe NI 1426 accepts differential (RS-422) line driver inputs. Shielded encoder cables are recommended for all applications. Unshielded cables are more susceptible to noise and can corrupt the encoder signals. Refer to Figure 2-5 for an example of connecting differential line drivers.
Figure 2-5. Example of Connecting Differential Line Drivers
Vcc
SensorPower
IN+ CurrentLimiter
NI 1426
IN–
NPN (Sinking)Output Device
SensorCommon
26LS32+
–
Phase A+
Phase A–Phase A–
Phase A 7
8
TwistedPair
26LS32+
–
Phase B+
Phase B–Phase B–
Phase B 14
15
TwistedPair
Encoder NI 1426
Chapter 2 Hardware Overview
© National Instruments Corporation 2-7 NI PCI-1426 User Manual
High-Speed TimingBuilt from high-speed counters, the high-speed timing circuitry on the NI 1426 can generate precise real-time control signals for your camera. Map the output of this circuitry to a trigger line to provide accurate pulses and pulse trains. Map these control signals to the camera control lines to control exposure time and frame rate.
Note For your convenience, the external control for cameras that support the NI 1426 has been preprogrammed into the camera file. You can use MAX to specify the frequency and duration of these signals in easy-to-use units.
The NI 1426 also allows you to route the external trigger inputs 0–3 onto the camera control lines 1–4. Use MAX to select the source for the camera control lines. You have the option to choose either the default control signal that is specified in the camera file or the external trigger input as the source for the camera control lines.
Acquisition and Region of Interest (ROI)The acquisition and ROI circuitry monitors incoming video signals and routes the active pixels to the multiple-tap data formatter and SDRAM. The NI 1426 can perform ROI acquisitions on all video lines and frames. In an ROI acquisition, select an area within the acquisition window to transfer across the PCI bus to system memory.
Configure the following parameters on the NI 1426 to control the video acquisition window:
• Acquisition window—The NI 1426 allows the user to specify a particular region of active pixels and active lines within the incoming video data. The active pixel region selects the starting pixel and number of pixels to be acquired relative to the assertion edge of the horizontal (or line) enable signal from the camera. The active line region selects the starting line and number of lines to be acquired relative to the assertion edge of the vertical (or frame) enable signal.
• Region of interest—The NI 1426 uses a second level of active pixel and active line regions for selecting a region of interest. Using the region-of-interest circuitry, the device acquires only a selected subset of the acquisition window.
Note You can use MAX to set the acquisition window on the NI 1426.
Chapter 2 Hardware Overview
NI PCI-1426 User Manual 2-8 ni.com
Scatter-Gather DMA ControllersThe NI 1426 uses three independent onboard direct memory access (DMA) controllers. The DMA controllers transfer data between the onboard SDRAM memory buffers and the PCI bus. Each of these controllers supports scatter-gather DMA, which allows the DMA controller to reconfigure on-the-fly. The NI 1426 can perform continuous image transfers directly to either contiguous or fragmented memory buffers.
Bus Master PCI InterfaceThe NI 1426 implements the PCI interface with a National Instruments custom application-specific integrated circuit (ASIC), the PCI miniMITE. The PCI interface can transfer data at a theoretical maximum rate of 133 MB/s in bus master mode.
Start ConditionsThe NI 1426 can start acquisitions in the following ways:
• Software control—The NI 1426 supports software control of a start acquisition. You can configure the NI 1426 to capture a fixed number of frames. This configuration is useful for capturing a single frame or a sequence of frames.
• Trigger control—You can start an acquisition by enabling external or RTSI bus trigger lines. Each of these inputs can start a video acquisition on a rising or falling edge. You can use all four external triggers and up to four RTSI bus triggers simultaneously.
• Delayed acquisition—Use either software or triggers to start acquisitions instantaneously or after skipping a specific number of frames. You can use delayed acquisition for post-trigger applications.

Chapter 2 Hardware Overview
© National Instruments Corporation 2-9 NI PCI-1426 User Manual
Serial InterfaceThe NI 1426 provides serial connections to and from the camera through two LVDS pairs in the Camera Link cable. All Camera Link serial communication uses one start bit, one stop bit, no parity, and no hardware handshaking.
The NI 1426 supports the following baud rates: 56000, 38400, 19200, 9600, 7200, 4800, 3600, 2400, 2000, 1800, 1200, 600, and 300 bps.
You can use the serial interface interactively with MAX and clsercon.exe, or programmatically with LabVIEW and C.
Interactively:
• MAX—Use MAX with a camera file containing preprogrammed commands. When an acquisition is initiated, the commands are sent to the camera.
• clsercon.exe—Use the National Instruments terminal emulator for Camera Link, clsercon.exe, if a camera file with preprogrammed serial commands does not exist for your camera. With clsercon.exe, you can still communicate serially with your camera. Go to <NI-IMAQ>\bin to access clsercon.exe.
Programmatically:
• LabVIEW—Use the serial interface programmatically, through calls to the NI-IMAQ driver using the IMAQ Serial Write and IMAQ Serial Read VIs. Go to <LabVIEW>\vi.lib\vision\driver\ imaqll.llb to access these files.
• C—Use the serial interface programmatically, through calls to the NI-IMAQ driver using imgSessionSerialWrite and imgSessionSerialRead.
Note IMAQ Serial Read, IMAQ Serial Write, clsercon.exe, imgSessionSerialRead, and imgSessionSerialWrite are used for directly accessing the NI 1426 serial port and are not required for most users.
National Instruments also fully supports the recommended serial API described in the Specifications of the Camera Link Interface Standard for Digital Cameras and Frame Grabbers manual. This manual is available on several websites, including the Automated Image Association Web site at www.machinevisiononline.org.
© National Instruments Corporation 3-1 NI PCI-1426 User Manual
3Signal Connections
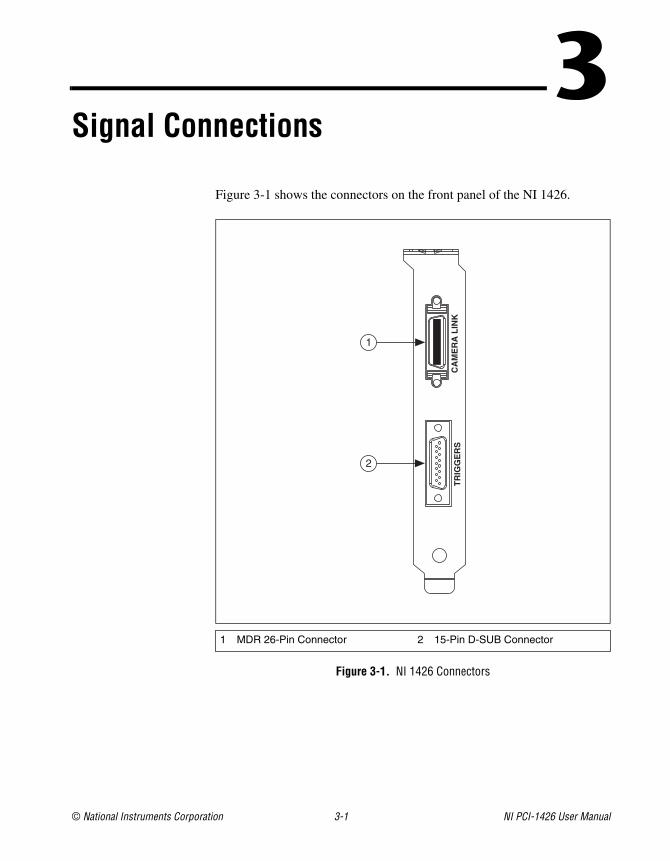
Figure 3-1 shows the connectors on the front panel of the NI 1426.
Figure 3-1. NI 1426 Connectors
1 MDR 26-Pin Connector 2 15-Pin D-SUB Connector
TR
IGG
ER
SC
AM
ER
A L
INK
2
1
Chapter 3 Signal Connections
NI PCI-1426 User Manual 3-2 ni.com
ConnectorsThis section describes the MDR 26-pin connector and the 15-pin D-SUB connector on the NI 1426.
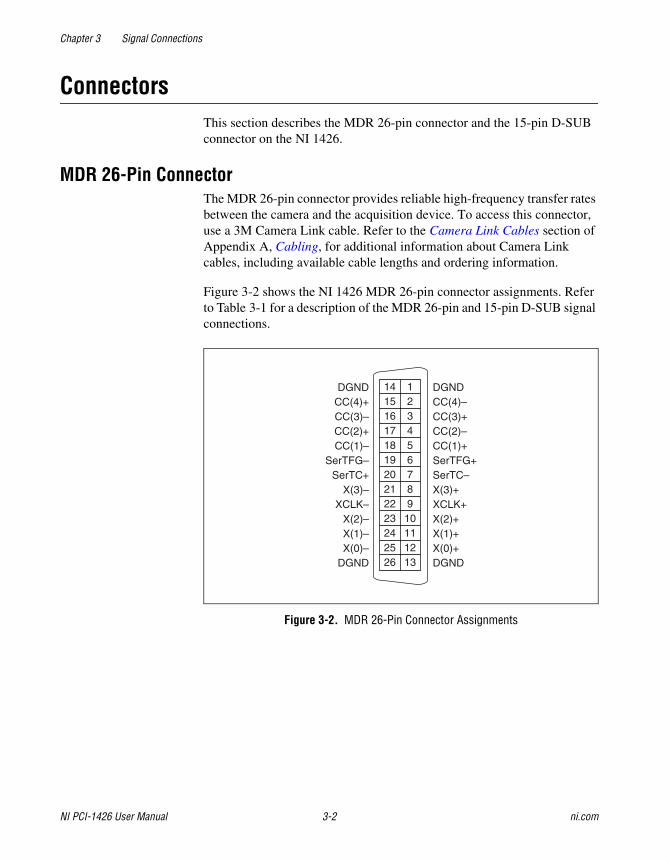
MDR 26-Pin ConnectorThe MDR 26-pin connector provides reliable high-frequency transfer rates between the camera and the acquisition device. To access this connector, use a 3M Camera Link cable. Refer to the Camera Link Cables section of Appendix A, Cabling, for additional information about Camera Link cables, including available cable lengths and ordering information.
Figure 3-2 shows the NI 1426 MDR 26-pin connector assignments. Refer to Table 3-1 for a description of the MDR 26-pin and 15-pin D-SUB signal connections.
Figure 3-2. MDR 26-Pin Connector Assignments
123456789
10111213
14151617181920212223242526
DGNDCC(4)–CC(3)+CC(2)–CC(1)+SerTFG+SerTC–X(3)+XCLK+X(2)+X(1)+X(0)+DGND
DGNDCC(4)+CC(3)–CC(2)+CC(1)–
SerTFG–SerTC+
X(3)–XCLK–
X(2)–X(1)–X(0)–
DGND
Chapter 3 Signal Connections
© National Instruments Corporation 3-3 NI PCI-1426 User Manual
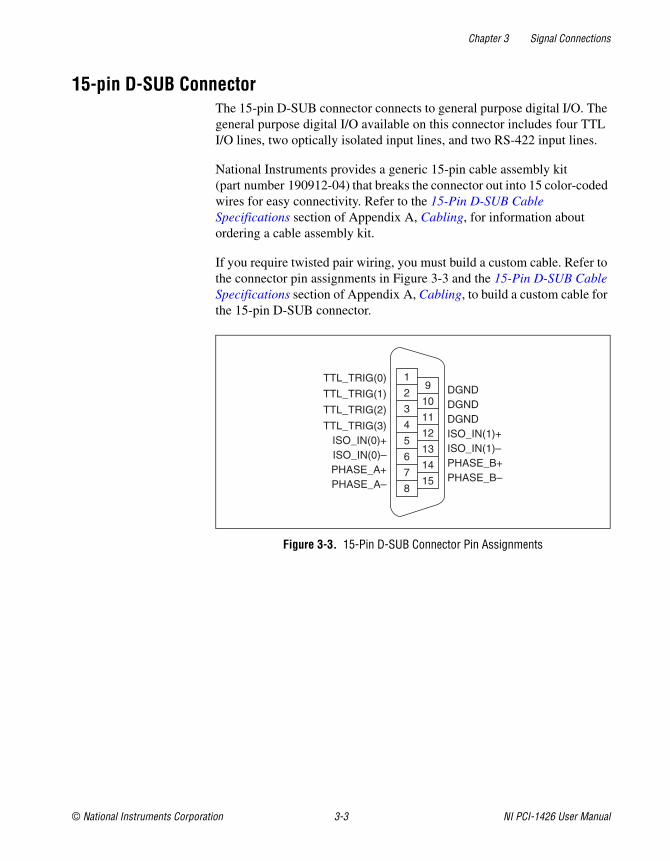
15-pin D-SUB ConnectorThe 15-pin D-SUB connector connects to general purpose digital I/O. The general purpose digital I/O available on this connector includes four TTL I/O lines, two optically isolated input lines, and two RS-422 input lines.
National Instruments provides a generic 15-pin cable assembly kit (part number 190912-04) that breaks the connector out into 15 color-coded wires for easy connectivity. Refer to the 15-Pin D-SUB Cable Specifications section of Appendix A, Cabling, for information about ordering a cable assembly kit.
If you require twisted pair wiring, you must build a custom cable. Refer to the connector pin assignments in Figure 3-3 and the 15-Pin D-SUB Cable Specifications section of Appendix A, Cabling, to build a custom cable for the 15-pin D-SUB connector.
Figure 3-3. 15-Pin D-SUB Connector Pin Assignments
9
10
11
12
13
14
15
1
2
3
4
5
6
7
8
DGNDDGNDDGNDISO_IN(1)+ISO_IN(1)–PHASE_B+PHASE_B–
TTL_TRIG(0)
TTL_TRIG(1)
TTL_TRIG(2)
TTL_TRIG(3)ISO_IN(0)+ISO_IN(0)–PHASE_A+PHASE_A–

Chapter 3 Signal Connections
NI PCI-1426 User Manual 3-4 ni.com
Connector Signal Connection DescriptionsTable 3-1 describes the MDR 26-pin and 15-pin D-SUB signal connections.
Table 3-1. I/O Connector Signals
Signal Name Description
TTL_TRIG<3..0> TTL external triggers/DIO lines (I/O).
DGND Direct connection to digital GND on the NI 1426.
ISO_IN<1..0>± 30 V isolated input only lines.
Use these lines instead of, not in addition to, TTL_TRIG<1..0>.
PHASE_A±
PHASE_B±
The primary use of these signals is for interfacing to a quadrature encoder.
Alternatively, these pairs can be used as independent RS-422 trigger inputs instead of, not in addition to, TTL_TRIG<3..2>.
X<3..0>± LVDS Base configuration data and enable signals from the camera to the acquisition device.
XCLK± Transmission clock on the Base configuration chip for Camera Link communication between the acquisition device and the camera.
SerTC± Serial transmission to the camera from the image acquisition device.
SerTFG± Serial transmission to the frame grabber from the camera.
CC<4..1>± Four LVDS pairs, defined as camera inputs and acquisition device outputs, reserved for camera control.
On some cameras, the camera controls allow the acquisition device to control exposure time and frame rate.
© National Instruments Corporation A-1 NI PCI-1426 User Manual
ACabling
This appendix contains cabling requirements for the NI 1426, including Camera Link cable ordering information.
15-Pin D-SUB Cable SpecificationsNational Instruments provides a generic 15-pin cable assembly kit (part number 190912-04) that breaks the connector out into 15 color-coded wires for easy connectivity. Visit the National Instruments Web site at ni.com/catalog to purchase a cable assembly kit for the NI 1426.
If you decide to build a custom cable, National Instruments recommends that you use twisted pair wiring to help reduce noise pickup from outside sources and crosstalk. TTL I/O lines should be twisted together with a wire connected to DGND. Isolated input and RS-422 input lines should be twisted together in their proper +/– pairs.
Refer to the Connectors section of Chapter 3, Signal Connections, for connector pin assignments.
Camera Link CablesUse a standard Camera Link cable to connect your camera to the MDR 26-pin connector on the NI 1426. Camera Link cables consist of two MDR 26-pin male plugs linked with a twin-axial shielded cable and are available in two shell configurations.
Note National Instruments recommends purchasing a Camera Link cable. Building your own cable is not recommended due to the high-speed signaling on the Camera Link interface.
Refer to the Specifications of the Camera Link Interface Standard for Digital Cameras and Frame Grabbers manual for more information about Camera Link cables.
Appendix A Cabling
NI PCI-1426 User Manual A-2 ni.com
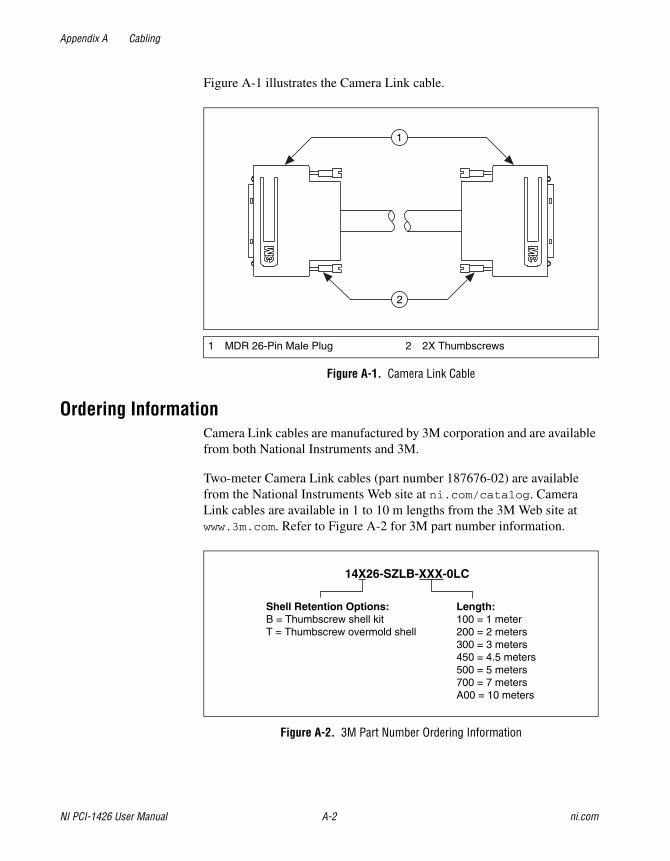
Figure A-1 illustrates the Camera Link cable.
Figure A-1. Camera Link Cable
Ordering InformationCamera Link cables are manufactured by 3M corporation and are available from both National Instruments and 3M.
Two-meter Camera Link cables (part number 187676-02) are available from the National Instruments Web site at ni.com/catalog. Camera Link cables are available in 1 to 10 m lengths from the 3M Web site at www.3m.com. Refer to Figure A-2 for 3M part number information.
Figure A-2. 3M Part Number Ordering Information
1 MDR 26-Pin Male Plug 2 2X Thumbscrews
2
1
14X26-SZLB-XXX-0LC
Length:100 = 1 meter200 = 2 meters300 = 3 meters450 = 4.5 meters500 = 5 meters700 = 7 metersA00 = 10 meters
Shell Retention Options:B = Thumbscrew shell kitT = Thumbscrew overmold shell

© National Instruments Corporation B-1 NI PCI-1426 User Manual
BTechnical Support and Professional Services
Visit the following sections of the National Instruments Web site at ni.com for technical support and professional services:
• Support—Online technical support resources at ni.com/support include the following:
– Self-Help Resources—For answers and solutions, visit the award-winning National Instruments Web site for software drivers and updates, a searchable KnowledgeBase, product manuals, step-by-step troubleshooting wizards, thousands of example programs, tutorials, application notes, instrument drivers, and so on.
– Free Technical Support—All registered users receive free Basic Service, which includes access to hundreds of Application Engineers worldwide in the NI Discussion Forums at ni.com/forums. National Instruments Application Engineers make sure every question receives an answer.
For information about other technical support options in your area, visit ni.com/services or contact your local office at ni.com/contact.
• Training and Certification—Visit ni.com/training for self-paced training, eLearning virtual classrooms, interactive CDs, and Certification program information. You also can register for instructor-led, hands-on courses at locations around the world.
• System Integration—If you have time constraints, limited in-house technical resources, or other project challenges, National Instruments Alliance Partner members can help. To learn more, call your local NI office or visit ni.com/alliance.
• Declaration of Conformity (DoC)—A DoC is our claim of compliance with the Council of the European Communities using the manufacturer’s declaration of conformity. This system affords the user protection for electronic compatibility (EMC) and product safety. You can obtain the DoC for your product by visiting ni.com/certification.

Appendix B Technical Support and Professional Services
NI PCI-1426 User Manual B-2 ni.com
• Calibration Certificate—If your product supports calibration, you can obtain the calibration certificate for your product at ni.com/calibration.
If you searched ni.com and could not find the answers you need, contact your local office or NI corporate headquarters. Phone numbers for our worldwide offices are listed at the front of this manual. You also can visit the Worldwide Offices section of ni.com/niglobal to access the branch office Web sites, which provide up-to-date contact information, support phone numbers, email addresses, and current events.

© National Instruments Corporation G-1 NI PCI-1426 User Manual
Glossary
A
acquisition window The image size specific to a video standard or camera resolution.
active line region The region of lines actively being stored. Defined by a line start (relative to the vertical synchronization signal) and a line count.
active pixel region The region of pixels actively being stored. Defined by a pixel start (relative to the horizontal synchronization signal) and a pixel count.
API Application programming interface.
area A rectangular portion of an acquisition window or frame that is controlled and defined by software.
ASIC Application-Specific Integrated Circuit. A proprietary semiconductor component designed and manufactured to perform a set of specific functions for specific customer needs.
B
buffer Temporary storage for acquired data.
bus A group of conductors that interconnect individual circuitry in a computer, such as the PCI bus; typically the expansion vehicle to which I/O or other devices are connected.
C
Camera Link Interface standard for digital video data and camera control based on the Channel Link chipset.
Channel Link National Semiconductor chipset for high-speed data serialization and deserialization for transmission across cables up to 10 m.

Glossary
NI PCI-1426 User Manual G-2 ni.com
D
DAQ Data acquisition. (1) Collecting and measuring electrical signals from sensors, transducers, and test probes or fixtures and inputting them to a computer for processing. (2) Collecting and measuring the same kinds of electrical signals with A/D or DIO boards plugged into a computer, and possibly generating control signals with D/A and/or DIO boards in the same computer.
DMA Direct memory access. A method by which data can be transferred to and from computer memory from and to a device or memory on the bus while the processor does something else; DMA is the fastest method of transferring data to/from computer memory.
F
FIFO First-in first-out memory buffer. The first data stored is the first data sent to the acceptor; FIFOs are used on Vision devices to temporarily store incoming data until that data can be retrieved.
L
LVDS Low Voltage Differential Signaling (EIA-644).
N
NI-IMAQ Driver software for National Instruments Vision hardware.
P
PCI Peripheral Component Interconnect. A high-performance expansion bus architecture originally developed by Intel to replace ISA and EISA. PCI offers a theoretical maximum transfer rate of 133 Mbytes/s.
pixel Picture element. The smallest division that makes up the video scan line; for display on a computer monitor, a pixel’s optimum dimension is square (aspect ratio of 1:1, or the width equal to the height).
pixel clock Divides the incoming horizontal video line into pixels.

Glossary
© National Instruments Corporation G-3 NI PCI-1426 User Manual
Q
quadrature encoder A device that converts angular rotation into two pulse trains, A and B. The phase difference between A and B transmits information about the direction of rotation and the number of transitions indicates the amount of rotation.
R
real time A property of an event or system in which data is processed as it is acquired instead of being accumulated and processed at a later time.
resolution The smallest signal increment that can be detected by a measurement system. Resolution can be expressed in bits, in proportions, or in percent of full scale. For example, a system has 12-bit resolution, one part in 4,096 resolution, and 0.0244 percent of full scale.
RGB Color encoding scheme using red, green, and blue (RGB) color information where each pixel in the color image is encoded using 32 bits: eight bits for red, eight bits for green, eight bits for blue, and eight bits for the alpha value (unused).
ROI Region of interest. A hardware-programmable rectangular portion of the acquisition window.
RTSI bus Real-Time System Integration Bus. The National Instruments timing bus that connects image acquisition and DAQ devices directly, by means of connectors on the devices, for precise synchronization of functions.
S
scatter-gather DMA A type of DMA that allows the DMA controller to reconfigure on-the-fly.
SDRAM Synchronous dynamic RAM.
Glossary
NI PCI-1426 User Manual G-4 ni.com
T
tap A stream of pixels from a camera. Some cameras send multiple streams, or taps, of data over a cable simultaneously to increase transfer rate.
transfer rate The rate, measured in bytes/s, at which data is moved from source to destination after software initialization and set up operations. The maximum rate at which the hardware can operate.
trigger Any event that causes or starts some form of data capture.
trigger control and mapping circuitry
Circuitry that routes, monitors, and drives external and RTSI bus trigger lines. You can configure each of these lines to start or stop acquisition on a rising or falling edge.
TTL Transistor-transistor logic.
V
VI Virtual Instrument. (1) A combination of hardware and/or software elements, typically used with a PC, that has the functionality of a classic stand-alone instrument. (2) A LabVIEW software module (VI), which consists of a front panel user interface and a block diagram program.

© National Instruments Corporation I-1 NI PCI-1426 User Manual
Index
Numerics15-pin D-SUB connector, 3-3
cable specifications, A-1overview, 3-3pin assignments (figure), 3-3
Aacquisition and region of interest (ROI)
circuitry, 2-7acquisition start conditions, 2-8acquisition window control
active pixel region (acquisitionwindow), 2-7
region of interest, 2-7
BBase configuration, Camera Link, 2-2block diagram of NI 1426 (figure), 2-1bus master PCI interface, 2-8
Ccabling
15-pin D-SUB connector, A-1Camera Link cable (figure), A-2Camera Link cables, A-1
calibration certificate (NI resources), B-2Camera Link
Base configuration, 2-2cabling
description, A-1ordering information, A-2
overview, 1-4CC<4..1>± signal (table), 3-4clock signals, XCLK± signal (table), 3-4
configuration, Camera LinkBase configuration, 2-2
connectors15-pin D-SUB connector, 3-3I/O connector signals (table), 3-4MDR 26-pin connector (figure), 3-2NI 1426 connectors (figure), 3-1signal description (table), 2-5, 3-4
conventions used in manual, v
Ddata formatter, multiple tap, 2-3, 2-4data transmission, 2-2Declaration of Conformity (NI resources), B-1delayed acquisition start conditions, 2-8DGND signal (table), 3-4diagnostic tools (NI resources), B-1DMA controllers, 2-8documentation
conventions used in the manual, vNI resources, B-1
drivers (NI resources), B-1D-SUB connector, 15-pin, 3-3
cable specifications, A-1overview, 3-3pin assignments (figure), 3-3
Eexamples (NI resources), B-1
Hhardware overview, 2-1
acquisition, region of interest (ROI), 2-7binarization, 2-3block diagram (figure), 2-1

Index
NI PCI-1426 User Manual I-2 ni.com
bus master PCI interface, 2-8Camera Link, Base configuration, 2-2data transmission, 2-2high-speed timing, 2-7multiple-tap data formatter, 2-4scatter-gather DMA controllers, 2-8SDRAM, 2-4serial interface, 2-9start conditions, 2-8trigger control and mapping circuitry, 2-4wiring an isolated input to a
sourcing/sinking output device, 2-5wiring an isolated input to output
devices, 2-5help, technical support, B-1high-speed timing circuitry, 2-5, 2-7
II/O connector. See connectorsinstallation, cabling
15-pin D-SUB cable specifications, A-1Camera Link cables, A-1
instrument drivers (NI resources), B-1integration with DAQ and motion control, 1-4ISO_IN± signal (table), 3-4
KKnowledgeBase, B-1
LLabVIEW, Vision Builder AI, 1-3
Mmapping circuitry, 2-4MDR 26-pin connector, 3-2multiple-tap data formatter, 2-3, 2-4
NNational Instruments
application software, 1-2support and services, B-1
NI 1426Camera Link, 1-4software programming choices, 1-2
integration with DAQ, 1-4National Instruments application
software, 1-2NI Vision Builder for Automated
Inspection, 1-3NI Vision Development Module, 1-3NI-IMAQ driver software, 1-2
NI support and services, B-1NI Vision Assistant, 1-3NI-IMAQ driver software, 1-2
PPHASE_A± signal (table), 3-4PHASE_B± signal (table), 3-4programming examples (NI resources), B-1
Qquadrature encoder
connecting to, 2-6signal descriptions, 3-4
RReal-Time System Integration (RTSI) bus, 1-1region of interest (ROI) circuitry, 2-7region of interest, in acquisition window
control, 2-7

Index
© National Instruments Corporation I-3 NI PCI-1426 User Manual
Sscatter-gather DMA controllers, 2-8SDRAM, 2-4serial interface, 2-9SerTC± signal (table), 3-4SerTFG± signal (table), 3-4signal connections
connectors15-pin D-SUB connector, 3-3MDR 26-pin connector, 3-2NI 1426 connectors (figure), 3-1signal descriptions, 3-4
software (NI resources), B-1software controlled start conditions, 2-8software programming choices, 1-2
integration with DAQ, 1-4NI Vision Builder for Automated
Inspection, 1-3NI Vision Development Module, 1-3NI-IMAQ driver software, 1-2
start conditionsdelayed acquisition, 2-8software control, 2-8trigger control, 2-8
support, technical, B-1
Ttechnical support, B-1timing circuitry, high-speed, 2-7training and certification (NI resources), B-1trigger
configuration options (table), 2-5control and mapping circuitry, 2-4controlled start conditions, 2-8
troubleshooting (NI resources), B-1TTL_TRIG signal (table), 3-4
WWeb resources, B-1
XX<3..0>± signal (table), 3-4XCLK± signal (table), 3-4