Embed Size (px)
Citation preview

3000-nex_con-v2.3-000042-A
NexentaConnect View EditionUser Guide
2.3

ii NexentaConnect View Edition User Guide
Copyright © 2014 Nexenta Systems, ALL RIGHTS RESERVED
Notice: No part of this publication may be reproduced or transmitted in any form or by any means, electronic or mechanical, including photocopying and recording, or stored in a database or retrieval system for any purpose, without the express written permission of Nexenta Systems, c. (hereafter referred to as “Nexenta”).
Nexenta reserves the right to make changes to this document at any time without notice and assumes no responsibility for its use. Nexenta products and services only can be ordered under the terms and conditions of Nexenta’ applicable agreements. All of the features described in this document may not be available currently. Refer to the latest product announcement or contact your local Nexenta sales office for information on feature and product availability. This document includes the latest information available at the time of publication.
Nexenta is a registered trademark of Nexenta in the United States and other countries. All other trademarks, service marks, and company names in this document are properties of their respective owners.
This document applies to the following product versions
Product Versions supported
NexentaConnect View EditionTM
2.3
VMware vCenter Server 5.x
VMware vSphere Client 5.x
VMware Horizon View 5.x
Microsoft Windows Active Directory Server
2008 R2
VMware ESXi 5.x

NexentaConnect View Edition User Guide iii
Contents
Preface . . . . . . . . . . . . . . . . . . . . . . . . . . . . . . . . . . . . . . . . . . . . . . . vii
1 NexentaConnect View Edition Introduction . . . . . . . . . . . . . . . . . . . . 1About NexentaConnect View Edition . . . . . . . . . . . . . . . . . . . . . . . . . . . . . 1NexentaConnect GUI Elements . . . . . . . . . . . . . . . . . . . . . . . . . . . . . . . . 3
About NexentaConnect Title Bar . . . . . . . . . . . . . . . . . . . . . . . . . . . . . 4About NexentaConnect Wizards . . . . . . . . . . . . . . . . . . . . . . . . . . . . . 5
2 Starting NexentaConnect View Edition . . . . . . . . . . . . . . . . . . . . . . . . 7Accessing NexentaConnect View Edition . . . . . . . . . . . . . . . . . . . . . . . . . . 7
Filling Out Forms . . . . . . . . . . . . . . . . . . . . . . . . . . . . . . . . . . . . . . . 8Sizing and Scaling . . . . . . . . . . . . . . . . . . . . . . . . . . . . . . . . . . . . . . 9
Viewing the Scheduled Tasks . . . . . . . . . . . . . . . . . . . . . . . . . . . . . . . . . 9
3 Deploying Desktop Pools . . . . . . . . . . . . . . . . . . . . . . . . . . . . . . . . . . 11Overview . . . . . . . . . . . . . . . . . . . . . . . . . . . . . . . . . . . . . . . . . . . . . . 11About NexentaConnect Deployment Options . . . . . . . . . . . . . . . . . . . . . . 12Starting the VDI Deployment Wizard . . . . . . . . . . . . . . . . . . . . . . . . . . . 12Deploying Desktop Pool . . . . . . . . . . . . . . . . . . . . . . . . . . . . . . . . . . . . 12
Selecting the Desktop Pool Type . . . . . . . . . . . . . . . . . . . . . . . . . . . 13About Provisioning Types . . . . . . . . . . . . . . . . . . . . . . . . . . . . . . . . 13Configuring the Virtual Desktop Pool . . . . . . . . . . . . . . . . . . . . . . . . 14Configuring Storage for Desktop Pool . . . . . . . . . . . . . . . . . . . . . . . . 17Selecting and Editing a VDI Profile . . . . . . . . . . . . . . . . . . . . . . . . . . 21Configuring the ZFS volume . . . . . . . . . . . . . . . . . . . . . . . . . . . . . . 23Completing the Deployment Wizard . . . . . . . . . . . . . . . . . . . . . . . . . 25
Deploying Global VSA . . . . . . . . . . . . . . . . . . . . . . . . . . . . . . . . . . . . . . 26Configuring a NexentaStor VSA . . . . . . . . . . . . . . . . . . . . . . . . . . . . 26Configuring the Storage Volume . . . . . . . . . . . . . . . . . . . . . . . . . . . 27
4 Running Performance Benchmark Tests . . . . . . . . . . . . . . . . . . . . . . 29Overview . . . . . . . . . . . . . . . . . . . . . . . . . . . . . . . . . . . . . . . . . . . . . . 30
iv NexentaConnect View Edition User Guide
Running the Benchmark Tests . . . . . . . . . . . . . . . . . . . . . . . . . . . . . . . . 31Running the Single-Step Steady State Benchmark Test . . . . . . . . . . . 31Running the Single Step IOMeter Benchmark Test . . . . . . . . . . . . . . . 32Running the Multi-Step Performance Benchmark Test . . . . . . . . . . . . . 34Running the Boot Storm Benchmark Test . . . . . . . . . . . . . . . . . . . . . 36
Monitoring Benchmark Activity . . . . . . . . . . . . . . . . . . . . . . . . . . . . . . . 37Viewing Task . . . . . . . . . . . . . . . . . . . . . . . . . . . . . . . . . . . . . . . . . . . . 38Monitoring System Health . . . . . . . . . . . . . . . . . . . . . . . . . . . . . . . . . . . 38Viewing Benchmark Test Results . . . . . . . . . . . . . . . . . . . . . . . . . . . . . . 38Sending Benchmark Test Results by Email . . . . . . . . . . . . . . . . . . . . . . . 39Understanding Benchmark Results . . . . . . . . . . . . . . . . . . . . . . . . . . . . . 39
Understanding Steady Benchmark Results . . . . . . . . . . . . . . . . . . . . 40Understanding IOMeter Benchmark Results . . . . . . . . . . . . . . . . . . . . 41Understanding Multi-Step Read/Write Operations Benchmark Test . . . . 43Understanding Multi-Step Read Write MBs Benchmark Results . . . . . . . 45Understanding the Results from the Multi-Step Read Write Latency Bench-mark Test . . . . . . . . . . . . . . . . . . . . . . . . . . . . . . . . . . . . . . . . . . 47
Understanding Results from the Boot Storm Benchmark Test . . . . . . . 49
5 Calibrating Desktop Pools and Resources . . . . . . . . . . . . . . . . . . . . . 51Overview . . . . . . . . . . . . . . . . . . . . . . . . . . . . . . . . . . . . . . . . . . . . . . 51Determining the Maximum Number of Desktops in a Desktop Pool . . . . . . 52Increasing the NexentaStor VSA Resources . . . . . . . . . . . . . . . . . . . . . . 54Reducing the NexentaStor VSA Resources . . . . . . . . . . . . . . . . . . . . . . . 58Viewing the Results of the Calibration Test . . . . . . . . . . . . . . . . . . . . . . . 61Sending the Calibration Report by Email . . . . . . . . . . . . . . . . . . . . . . . . . 62Understanding Results of the Calibration Benchmark Test . . . . . . . . . . . . 63
6 Managing Snapshots and Remote Backups . . . . . . . . . . . . . . . . . . . . 65About Snapshot Service . . . . . . . . . . . . . . . . . . . . . . . . . . . . . . . . . . . . 65About Replication Backups . . . . . . . . . . . . . . . . . . . . . . . . . . . . . . . . . . 66About Types of Snapshots and Remote Backups . . . . . . . . . . . . . . . . . . . 66Creating a Schedule for a Snapshot Service . . . . . . . . . . . . . . . . . . . . . . 67Creating a Schedule for Remote Backup Service . . . . . . . . . . . . . . . . . . . 68Rolling Back a Desktop Pool . . . . . . . . . . . . . . . . . . . . . . . . . . . . . . . . . 70Restoring from Remote Backup . . . . . . . . . . . . . . . . . . . . . . . . . . . . . . . 70
Known Limitations . . . . . . . . . . . . . . . . . . . . . . . . . . . . . . . . . . . . . 71

NexentaConnect View Edition User Guide v
7 Changing Settings . . . . . . . . . . . . . . . . . . . . . . . . . . . . . . . . . . . . . . . 73Overview of Desktop Pool Profiles . . . . . . . . . . . . . . . . . . . . . . . . . . . . . 74Creating and Modifying the Desktop Pool Profiles . . . . . . . . . . . . . . . . . . . 74
Modifying the Desktop Pool Profile in the Desktop Pool Deploy Wizard . 75Creating a New Desktop Pool Profile . . . . . . . . . . . . . . . . . . . . . . . . . 75
Deleting Desktop Pool Profiles . . . . . . . . . . . . . . . . . . . . . . . . . . . . . . . . 75Modifying the Storage Settings for a Desktop Pool Profile . . . . . . . . . . . . . 76Modifying the Desktop Pool Profile Resource Settings . . . . . . . . . . . . . . . . 79Modifying the Desktop Pool Profile Desktop Settings . . . . . . . . . . . . . . . . 81Modifying the Notification System Settings . . . . . . . . . . . . . . . . . . . . . . . 85Modifying the Authentication Settings . . . . . . . . . . . . . . . . . . . . . . . . . . 86
Adding a New User . . . . . . . . . . . . . . . . . . . . . . . . . . . . . . . . . . . . . 87Changing Password . . . . . . . . . . . . . . . . . . . . . . . . . . . . . . . . . . . . 88
Modifying the System Settings . . . . . . . . . . . . . . . . . . . . . . . . . . . . . . . 89Resetting the User Interface Settings . . . . . . . . . . . . . . . . . . . . . . . . . . . 89Changing NexentaConnect View Edition Associated Servers . . . . . . . . . . . 90
Removing a VMware Horizon View Connection Server . . . . . . . . . . . . . 90Adding a new VMware Horizon View Connection Server . . . . . . . . . . . 90Removing a VMware vCenter Server . . . . . . . . . . . . . . . . . . . . . . . . . 91
Adding a VMware vCenter Server . . . . . . . . . . . . . . . . . . . . . . . . . . . . . 91Adding a new ESXi Server to ESXi Cluster . . . . . . . . . . . . . . . . . . . . . 91
Changing Existing Desktop Pool Configuration . . . . . . . . . . . . . . . . . . . . . 92Destroying a Desktop Pool . . . . . . . . . . . . . . . . . . . . . . . . . . . . . . . . . . 95Cleaning Up the ESXi Cluster . . . . . . . . . . . . . . . . . . . . . . . . . . . . . . . . 95Recomposing a Linked-Clones Desktop Pool . . . . . . . . . . . . . . . . . . . . . . 96Reconfiguring a Desktop Pool . . . . . . . . . . . . . . . . . . . . . . . . . . . . . . . . 97Resyncing a Desktop Pool . . . . . . . . . . . . . . . . . . . . . . . . . . . . . . . . . . . 97Retethering an ESXi Cluster . . . . . . . . . . . . . . . . . . . . . . . . . . . . . . . . . 98
8 Managing Replicated High Availability . . . . . . . . . . . . . . . . . . . . . . . 99About Replicated High Availability . . . . . . . . . . . . . . . . . . . . . . . . . . . . . 99Enabling the Replicated High Availability Service . . . . . . . . . . . . . . . . . . 100Performing a Failover from Main Storage to Backup Storage . . . . . . . . . . 101Performing a Failback from Backup Storage to Main Storage . . . . . . . . . . 102Destroying a Replicated HA Service . . . . . . . . . . . . . . . . . . . . . . . . . . . 103
vi NexentaConnect View Edition User Guide
9 Monitoring Utilization and Performance . . . . . . . . . . . . . . . . . . . . . 105Monitoring ESXi Cluster Activity . . . . . . . . . . . . . . . . . . . . . . . . . . . . . . 105Monitoring ESXi Server Activity . . . . . . . . . . . . . . . . . . . . . . . . . . . . . . 106Monitoring Desktop Pool Activity . . . . . . . . . . . . . . . . . . . . . . . . . . . . . 107Monitoring NexentaStor VSA Activity . . . . . . . . . . . . . . . . . . . . . . . . . . 108Chart Parameters . . . . . . . . . . . . . . . . . . . . . . . . . . . . . . . . . . . . . . . 111About AuraGraph . . . . . . . . . . . . . . . . . . . . . . . . . . . . . . . . . . . . . . . . 112Viewing Storage Summary Information . . . . . . . . . . . . . . . . . . . . . . . . 113
10 Managing Resources . . . . . . . . . . . . . . . . . . . . . . . . . . . . . . . . . . . . 115About Disk Fault Management . . . . . . . . . . . . . . . . . . . . . . . . . . . . . . . 115Viewing the State of Disks . . . . . . . . . . . . . . . . . . . . . . . . . . . . . . . . . 116Replacing a Faulted Disk . . . . . . . . . . . . . . . . . . . . . . . . . . . . . . . . . . 116
11 Troubleshooting NexentaConnect View Edition . . . . . . . . . . . . . . . 117Deployment of Desktop Pool Fails because of an Overload on the vCenter Server . . . . . . . . . . . . . . . . . . . . . . . . . . . . . . . . . . . . . . . . . . . . . . 117
Preventing a Desktop Virtual Machine from Remaining in the Provisioning State During the Deployment of a Desktop Pool . . . . . . . . . . . . . . . . . . . . . . 118
Preventing a Desktop Virtual Machine from Remaining in the Customization State . . . . . . . . . . . . . . . . . . . . . . . . . . . . . . . . . . . . . . . . . . . . . . . 118
Creating a Desktop Pool Fails With an Error . . . . . . . . . . . . . . . . . . . . . 119
Glossary . . . . . . . . . . . . . . . . . . . . . . . . . . . . . . . . . . . . . . . . . . . . . . 121

NexentaConnect View Edition User Guide vii
Preface
This documentation presents information specific to Nexenta products. The information is for reference purposes and is subject to change.
Intended Audience
This documentation is tended for VDI Administrators and assumes that you have experience with data storage concepts, such as NAS, SAN, NFS, and ZFS; VMware vSphere, VMware Horizon View; SQL database administration; networking; Microsoft Windows Server Active Directory 2008 R2.
Documentation History
The following table lists the released revisions of this documentation.
Contacting Support
Choose a method for contacting support:
Contacting Support
Choose a method for contacting support:
• Visit the Nexenta customer portal or partner portal. Log in and browse the customers knowledge base.
• Using the NexentaConnect Management Appliance. Click Help > Support Request and complete the request form. Then click Send Request.
• Using the NexentaConnect View Edition Management Appliance, click Help > Support Request > Download as file. Save the files on your system and attach them to support request e-mail.
You may want use this option, if you cannot use the NexentaConnect Management Appliance built-in mail notification system.
Table 1: Documentation Revision History
Revision Date Description
3000-nex_con-v2.3-000042-A April, 2014 GA

viii NexentaConnect View Edition User Guide
Preface
Comments
Your comments and suggestions to improve this documentation are greatly appreciated. Send any feedback to [email protected] and include the documentation title, number, and revision. Refer to specific pages, sections, and paragraphs whenever possible.

NexentaConnect View Edition User Guide 1
1
NexentaConnect View Edition Introduction
This chapter includes the following topics:
• About NexentaConnect View Edition
• NexentaConnect GUI Elements
About NexentaConnect View Edition
Deploying a virtual desktop infrastructure (VDI) environment is typically a complex and lengthy process that includes many discrete system administration tasks. NexentaConnect simplifies VDI deployment tasks, uses advanced Zettabyte File System (ZFS) storage, and optimizes performance.
NexentaConnect View Edition (NexentaConnect) is a software solution that comprises Nexenta’s 3rd generation NAS/SAN storage stack and VDI management appliance — the latter designed to interoperate with VMware vCenters and Horizon View 5.x servers.
The product effectively bundles two virtual machines, or OVF images: NexentaConnect and NexentaStor. Users deploy wizard-driven NexentaConnect designed from ground up to absorb and hide the complexity of deploying and managing virtual desktop datacenters. Ease of use and the capability to run on vendor’s selected hardware are the two primary motivations to use the product.
NexentaConnect supports both local and external storage, whereby the latter can be either Nexenta’s own storage appliance, or a 3rd party NAS. For local storage the product automatically provisions and deploys Nexenta’s storage appliances as VSAs – one Virtual Storage Appliance per VMware ESXi host per pool of virtual desktops.
NexentaConnect is composed of the following components:
• NexentaConnect Management Appliance—Provides the NexentaConnect management functions and user interface.
• NexentaConnect Server Agent—Provides communication between the NexentaConnect and the View Connection Server.

2 NexentaConnect View Edition User Guide
NexentaConnect View Edition Introduction
• NexentaConnect Desktop Agent—Provides communication between NexentaConnect and the desktops.
• NexentaStor VSA—A virtual storage appliance (VSA) that provides storage for the NexentaConnect environment.
• External NexentaStor— Optional component. A physical or virtual NexentaStor appliance, that provides storage. It can also be used for remote backups or Replicated High Availability.
• Nexenta NAS VAAI plugin — Optional component. A plugin that offloads NFS traffic between NexentaStor VSA and ESXi, and provides faster deployment process.
The following diagram describes the NexentaConnect View Edition components.
Figure 1-1: NexentaConnect components
!Note:
When the term NexentaStor VSA is used to refer to the virtual storage appliance, it is referring to a NexentaStor Virtual Storage Appliance (VSA).User access to the NexentaConnect View Edition functionality is through the NexentaConnect Management Appliance. For the purposes of this guide, when we refer to “accessing NexentaConnect View Edition” it implies that you use the NexentaConnect Management Appliance.

NexentaConnect View Edition Introduction
NexentaConnect View Edition User Guide 3
NexentaConnect GUI Elements
There are a few basic areas on the NexentaConnect View Edition Web page. The areas provide specific information and are used for selected actions.
The following table describes the NexentaConnect GUI elements.
3
2
1
4
Table 1-1: NexentaConnect GUI Elements
No Description
1 NexentaConnect title bar. You can start the desktop pool deploy wizard, edit settings, or access the on-line help system from the title bar.
2 Objects List. This area lists all the objects that are associated with NexentaConnect View Edition. You can select objects from this list to view or perform actions.
3 Recent Activity panel displays current and recent activity status. When a wizard processes an action, the transition status messages are displayed in this area.Click Show all to view the Activity report.

4 NexentaConnect View Edition User Guide
NexentaConnect View Edition Introduction
About NexentaConnect Title Bar
From the title bar, click an icon to start a wizard or view status.
4 Working area displays status, reference, selected actions links for the object selected in the related objects list. You can also view pool performance statistics, as well as the AuraGraph chart in this area.
Table 1-1: NexentaConnect GUI Elements (Continued)
No Description
Table 1-2: Task Bar Overview
Task Description
Deploy VDI Starts the VDI Deployment wizard.For more information, see About NexentaConnect Wizards
Settings View, or modify NexentaConnect settings.
Overview Provides the summary information about the VMware ESXi Clusters which you use in deployment.
Profiles Lists the available profiles for a desktop pool and their descriptions. From this tab you can copy a default profile, modify it, and save as a new desktop pool profile.For more information, see Selecting and Editing a VDI Profile.
Scheduled tasks View the list of scheduled tasks. You can delete a scheduled task by selecting the task and clicking Remove.
Graphical Statistic
Provides the graphical representation of ESXi Clusters and ESXi statistics. You can view the following statistics:• Resource usage: CPU, Memory for Cluster and
Individual host, NexentaStor VSA• NexentaStor and VSA internals: ZFS/NFS
statistics, Resource usages, ARC and L2ARC statistics
Settings SMTP and notification settings, authentication settings, user interface settings, system settings

NexentaConnect View Edition Introduction
NexentaConnect View Edition User Guide 5
About NexentaConnect Wizards
NexentaConnect provides wizards to perform desktop pool deployment and calibration.
• Deployment Wizard
Deployment wizard helps you to configure a pool of virtual desktops. In the Deployment wizard you specify the components and settings of the desktop pool, such as an ESXi Cluster, a number of virtual desktops in a desktop pool, a desktop pool template, a type of storage, and a desktop pool profile.
For more information, see Deploying Desktop Pool.
• Calibration Wizard
Calibration wizard helps you to configure and start the calibration test. Calibration test determines the number of desktops, memory, CPU cores, or cache size with a selected performance, and then reconfigures the desktop pool.
For more information, see Calibrating Desktop Pools and Resources.
Help In the Help menu, you can perform the following tasks:• Under Documentation you can select the
following options:• Online-Help — the NexentaConnect View
Edition Online Help.• Installation Guide — download local PDF
version of the document.• Hardware Reference Guide — download
local PDF version of the document.• User Guide — download local PDF version of
the document.• About — information about NexentaConnect
View Edition, such as an appliance signature, product license key, etc.
• Support Request — send a support request to Nexenta Support.
• Free Trial Registration — send a request for a trial license key.
• Product Registration — register NexentaConnect View Edition.
Table 1-2: Task Bar Overview (Continued)
Task Description

NexentaConnect View Edition Introduction
6 NexentaConnect View Edition User Guide
This page intentionally left blank

NexentaConnect View Edition User Guide 7
2
Starting NexentaConnect View Edition
This chapter includes the following topics:
• Accessing NexentaConnect View Edition
• Viewing the Scheduled Tasks
Accessing NexentaConnect View Edition
Access to NexentaConnect View Edition is through the NexentaConnect Management Appliance. You must use a web-browser to access the NexentaConnect Management Appliance and manage all of the NexentaConnect functions.
NexentaConnect View Edition supports:
• Firefox 9 or later
• Google Chrome 12 or later
• Internet Explorer 10 (Limited Support)
To access NexentaConnect:
1. Complete all the instructions in the NexentaConnect View Edition Installation Guide. This includes meeting all the VDI environment requirements.
2. Identify the NexentaConnect Management Appliance.
!Note:
Access and management of all NexentaConnect View Edition functions is through the NexentaConnect Management Appliance. For the purposes of this document, the general product term, NexentaConnect View Edition, is used and implies access through the NexentaConnect Management Appliance.

8 NexentaConnect View Edition User Guide
Starting NexentaConnect View Edition
Log into the VMware hypervisor using the vSphere Client:
a. In the vCenter inventory panel, select the View Connection server or the vCenter server > Datacenter > Cluster > Virtual Machines > NexentaConnect View Edition.
b. Select the NexentaConnect View Edition > Summary > General and locate IP Addresses.
Use this IP address to access NexentaConnect Management Appliance.
VMware Tools must be installed.
3. Log in to NexentaConnect Management Appliance.
a. Open a browser.
The options are:
• Mozilla Firefox v9 or later
• Google Chrome v12x or later
• Internet Explorer 9 or later
b. Enter the NexentaConnect View Edition IP address with the port number.
Example:
http://<nexentaconnect_host_name>:3000
NexentaConnect View Edition uses port 3000, by default.
The first time that you log in to NexentaConnect View Edition, you are guided through the initial Configuration Wizard.
For detailed information, see the NexentaConnect View Edition Installation Guide.
After you complete the initial Wizard, the NexentaConnect View Edition main page appears.
Filling Out Forms
• Click in fields and type text.
• Required fields are identified by red xxx around a field box.
• Click arrows to increase or decrease values. Click down arrows to display field options.
• Complete forms, click the green checked action buttons. These buttons may be labeled Apply, Run, Finish.
• The following message icons are used to quickly convey status:
OK or task completed successfully.

Starting NexentaConnect View Edition
NexentaConnect View Edition User Guide 9
Sizing and Scaling
You can sort and size many of the pages, panels, and tables in the NexentaConnect Management Appliance:
To sort any column:
Click in the column header > arrow > Sort Ascending or Sort Descending.
To add columns to a table:
Click in the column header > arrow > Columns arrow. Then select from the displayed list.
To size pages, panels, or tables:
1. Click the edge of the panel.
2. Use the parallel handles to drag the frame to size.
Viewing the Scheduled Tasks
You can schedule the tasks that you want to execute in NexentaConnect. The list of scheduled tasks provides the following information:
• Type of task
• Schedule
In-process task or tool tip. Hover over this symbol when next to a field to display a tool tip about the field.
Point of concern. Possible meanings include the task failed or status of the related object is in an error state.

10 NexentaConnect View Edition User Guide
Starting NexentaConnect View Edition
• Time of execution
You can schedule:
• Calibration test
• Benchmark test
• Snapshot service
• Remote backup service
To view the scheduled tasks:
1. Log in to NexentaConnect View Edition through the NexentaConnect Management Appliance.
a. Open a browser.
b. Enter the NexentaConnect Management Appliance IP address or host name with a port number.
Example:
http://<nexentaconnect_host_name>:3000
c. Enter the in credentials.
2. From the Objects List panel, select Management infrastructure.
3. In the Working Area, select the Scheduled Tasks tab.
You can Refresh the list of scheduled tasks, or Remove the tasks.
NexentaConnect View Edition User Guide 11
3
Deploying Desktop Pools
This section includes the following topics:
• Overview
• About NexentaConnect Deployment Options
• Starting the VDI Deployment Wizard
• Deploying Desktop Pool
• Completing the Deployment Wizard
• Deploying Global VSA
Overview
The VDI (Virtual Desktop Infrastructure) Deployment wizard provisions a pool of virtual desktops on a specified ESXi cluster. The resulting ready-to-use VDI configuration is based on storage that is provided by NexentaStor VSA and bare metal NexentaStor.
You may deploy as many desktop pools per ESXi cluster, as you need. You can use different gold images for these desktop pools. The number of desktop pools on the ESXi cluster is limited by the following resources: storage, memory, and CPU.
The VDI Deployment Wizard prompts you for a few parameters. Based on the answers that you provide for desktop pool settings and storage creation, the VDI Deployment Wizard deploys your virtual desktop pools.
Complete all of the steps in the NexentaConnect View Edition Installation Guide before you deploy a desktop pool.
To complete the deploy wizard you need the following information:
• The name of the ESXi cluster on which you plan to deploy the desktop pool.
• The provisioning type that you plan to use for this desktop pool.
• The desktop pool virtual machine, and its snapshot for linked clones, or a virtual machine template for full clones.
• The maximum size of the desktop pool.

12 NexentaConnect View Edition User Guide
Deploying Desktop Pools
• The type of storage that you plan to use for the desktop pool.
• (Optional) The users or user groups to whom you want to give access to the desktops in the desktop pool. You can configure user access settings later.
About NexentaConnect Deployment Options
NexentaConnect provides the following deployment options:
• Desktop pool
This option provisions a virtual or bare metal storage solution, as well as virtual desktops. NexentaConnect deploys a separate storage for every desktop pool. You can use it to provision virtual desktops and storage for optimized VDI usage. Use this option to deploy a brand new VDI environment.
• Global VSA
If you select this option, NexentaConnect deploys only storage without provisioning desktop pools. Therefore, configuring the gold image is not required. You can use this option if you have an existing storage pool that you want to provision as a storage for user profiles or provide NFS storage for vSphere.
Starting the VDI Deployment Wizard
You can deploy a pool of virtual desktops using the deployment wizard.
To start the VDI deployment wizard:
1. In a web browser, type the NexentaConnect Management Appliance IP address and port number.
Example:
http://<nexentaconnect_host_name>:3000
2. In the Management Infrastructure panel, select a ESXi Cluster.
3. Select the deployment option:
• Deploy Desktop Pool
Proceed to: Deploying Desktop Pool.
• Deploy Global VSA
Proceed to: Deploying Global VSA.
Deploying Desktop Pool
You must complete the steps described in the following sections to deploy the desktop pool:

Deploying Desktop Pools
NexentaConnect View Edition User Guide 13
• Selecting the Desktop Pool Type
• About Provisioning Types
• Configuring the Virtual Desktop Pool
• Configuring Storage for Desktop Pool
• Selecting and Editing a VDI Profile
• Configuring the ZFS volume
• Completing the Deployment Wizard
Selecting the Desktop Pool Type
Each desktop pool includes one type of desktop — persistent or stateless:
• Stateless — stateless virtual desktops do not include any personal settings or data. When users log in, they are assigned a desktop randomly. The user can create and store data on a network file share or on a VMware Horizon View desktop persistent disk. When you select the stateless desktop pool type, NexentaConnect automatically assigns the Linked-Clone provisioning type.
• Persistent — persistent virtual desktops preserve user settings, customization, and data. When users log in, they retrieve their designated desktops. When you select the Persistent desktop pool type, NexentaConnect automatically assigns the Linked Clone provisioning type.
This topic is a continuation of the VDI Deployment Wizard that follows the Starting the VDI Deployment Wizard steps.
To select the desktop pool type:
1. Select the desktop pool type by clicking Stateless or Persistent.
2. Proceed to About Provisioning Types.
About Provisioning Types
Each desktop pool is created from one type of clone:
• Full Clones Desktop Pool—an independent copy of a virtual machine that doesn’t share anything with the parent’s virtual machine after the cloning operation. NexentaConnect automatically assigns the Full Clones Desktop Pool provisioning type for a Persistent desktop pool.
• Composer Linked-Clone Desktop Pool—a virtual machine that shares a base image with the parent’s virtual machine. NexentaConnect automatically assigns a Composer Linked-Clones Desktop Pool type for a Stateless desktop pool.
You can leave the recommended default settings or change the provisioning type.
This topic is a continuation of the VDI Deployment Wizard that follows the Selecting the Desktop Pool Type steps.

14 NexentaConnect View Edition User Guide
Deploying Desktop Pools
Configuring the Virtual Desktop Pool
You can specify a unique pool name, the maximum number of desktops, the number of desktops to initially deploy, an AD container, and the Windows template or snapshot to create the desktop pool. For your convenience, NexentaConnect automatically selects the latest snapshot or an available template.
This topic is a continuation of the VDI Deployment Wizard that follows the Selecting the Desktop Pool Type steps.
To configure the desktop pool:
1. In the Desktop pool name field, type a name for your desktop pool.
You can type up to 9 characters.
2. Optionally, type the description for the desktop pool.
3. Select the Number of virtual desktops for the desktop pool by clicking the arrows.
This is the number of desktops that this wizard creates.
4. In the Maximum size of the pool field, select the maximum number of virtual desktops that this desktop pool can include.
You can increase the number of the desktops up to the value that you typed in the Maximum size of the pool field any time after deployment. You cannot expand the desktop pool size to a value that is larger than the one that you have previously typed in the Maximum size of the pool field.
5. Depending on the desktop pool type, select a virtual machine template or snapshot.
If you selected to use a Full Clones desktop pool:
a. In the Desktop virtual machine field, select a Microsoft Windows desktop template by clicking the row of the virtual machines.
This is the virtual machine template that you can use to create any new desktops.
Type the text in the search box to search long lists of virtual machine templates.
If you selected to use Linked Clones desktop pool:
a. In the Desktop virtual machine field, select a Microsoft Windows desktop template by clicking the row of the virtual machine.
b. In the Virtual machine snapshot field select a snapshot that you will use as the base for the new virtual desktops by clicking Browse.
Desktops are deployed from snapshots.
c. Select a Domain to authorize guest operating system customization options on the desktops.

Deploying Desktop Pools
NexentaConnect View Edition User Guide 15
6. Proceed to Configuring Advanced Options or Configuring Storage for Desktop Pool.
Configuring Advanced Options
You can change configuration settings of a desktop pool in Advanced Options.
To configure the Advanced Options:
1. Click Advanced Options.
The following table describes Advanced Options that you can set for a desktop pool.
Table 3-1: Advanced Options
Field Description
Display protocol Select one of the available options: • PCoIP• RDP
Desktop naming pattern
You can provide a naming pattern, that NexentaConnect can use to name the desktops in a pool. The default value is test-{n} where n is replaced with a number during the deployment.
AD Container Select Active Directory container.
Size of a temporary disk
You can assign a separate disk for the virtual desktop temporary files. Specify the size of the disk. The minimum and default size is 512MB.
Quest OS customizationUse QuickPrep A desktop personalization tool that you can use for
Linked Clones desktop pool. You cannot use QuickPrep for the customization of a Full Clones desktop pool.The main advantages of using the QuickPrep customization method for Linked-Clones Pool are:• Faster and simpler joins the Active Directory• Creates a computer account on the Active Directory.• Mounts View Composer persistent disk• Redirects temporary and paging files
Path to logoff script
Location of the off script on the desktop template. You can use QuickPrep customization only with Linked Clones
Path to postsync script
Location of the postsync script on the desktop template. You can use QuickPrep customization only with Linked Clones.

16 NexentaConnect View Edition User Guide
Deploying Desktop Pools
2. Proceed to Configuring Entitlements.
Configuring Entitlements
If you want to access any deployed desktop from the desktop pool, you must grant the required permissions to users and/or groups. You need to select the users and groups that are allowed to access the desktops.
This topic is a continuation of the VDI Deployment Wizard that follows the Configuring Advanced Options steps.
To configure the access permissions:
1. Specify a user/group to whom you want to grant a permission to access the deployed desktops.
In the Entitlements list, click Add to locate and select the users and groups who are authorized to use the deployed desktops.
2. Select User or Group.
3. In the Name Includes field, type the partial or full name of the user or group, and click the magnifying glass to list the available users and groups.
4. Select a user or group from the list.
The list of users and groups is collected from the Active Directory (AD) server.
5. Click Apply.
6. Proceed to Configuring Storage for Desktop Pool.
Use a customization specification(Sysprep)
Microsoft SysPrep — a standard customization method, that you can use for both Full Clone Pool and Linked-Clone Pool. Though you can use the Microsoft SysPrep for linked- clone desktop pool customization, Nexenta recommends that you use the QuickPrep customization method.For more information, see the VMware Horizon View documentation.
Customization specification
You can select the customization specification from the list of available customization scripts or create a new one, if you click Add.
Entitlements Add users or group that will be able to access the desktop pool. See Configuring Entitlements.
Table 3-1: Advanced Options (Continued)
Field Description
!Note:
If you do not specify any users or groups, then only the Domain Administrator has access to the deployed desktops.
Deploying Desktop Pools
NexentaConnect View Edition User Guide 17
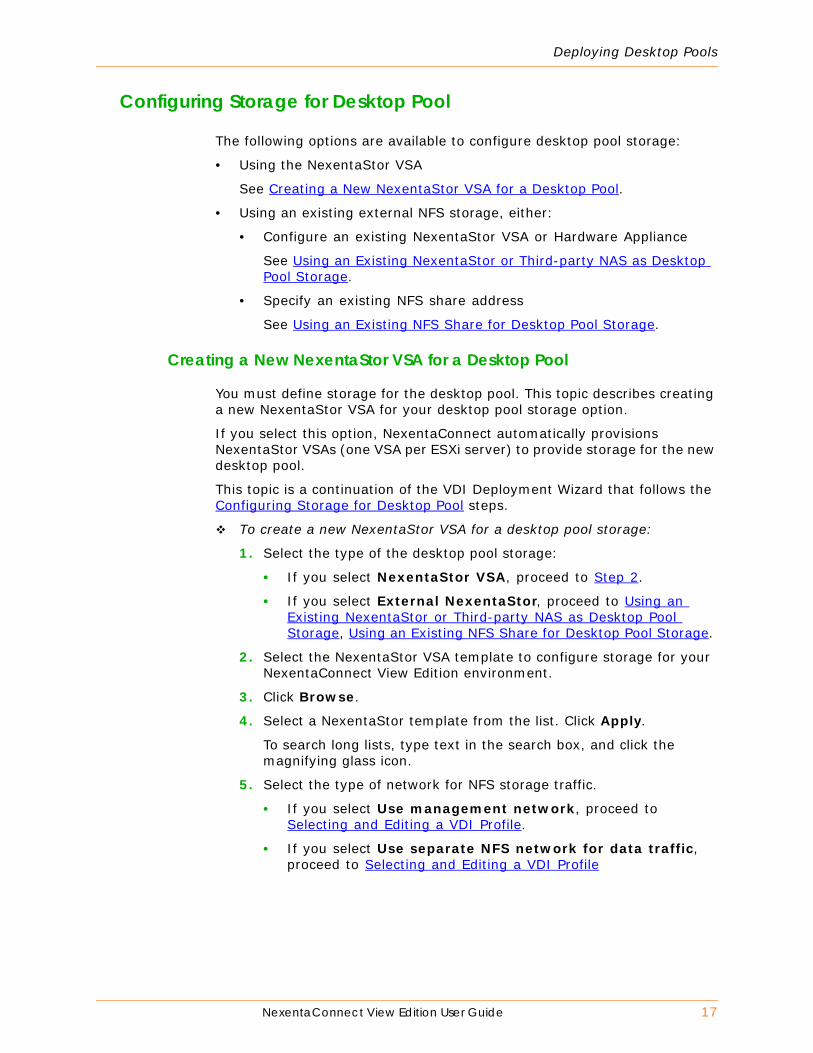
Configuring Storage for Desktop Pool
The following options are available to configure desktop pool storage:
• Using the NexentaStor VSA
See Creating a New NexentaStor VSA for a Desktop Pool.
• Using an existing external NFS storage, either:
• Configure an existing NexentaStor VSA or Hardware Appliance
See Using an Existing NexentaStor or Third-party NAS as Desktop Pool Storage.
• Specify an existing NFS share address
See Using an Existing NFS Share for Desktop Pool Storage.
Creating a New NexentaStor VSA for a Desktop Pool
You must define storage for the desktop pool. This topic describes creating a new NexentaStor VSA for your desktop pool storage option.
If you select this option, NexentaConnect automatically provisions NexentaStor VSAs (one VSA per ESXi server) to provide storage for the new desktop pool.
This topic is a continuation of the VDI Deployment Wizard that follows the Configuring Storage for Desktop Pool steps.
To create a new NexentaStor VSA for a desktop pool storage:
1. Select the type of the desktop pool storage:
• If you select NexentaStor VSA, proceed to Step 2.
• If you select External NexentaStor, proceed to Using an Existing NexentaStor or Third-party NAS as Desktop Pool Storage, Using an Existing NFS Share for Desktop Pool Storage.
2. Select the NexentaStor VSA template to configure storage for your NexentaConnect View Edition environment.
3. Click Browse.
4. Select a NexentaStor template from the list. Click Apply.
To search long lists, type text in the search box, and click the magnifying glass icon.
5. Select the type of network for NFS storage traffic.
• If you select Use management network, proceed to Selecting and Editing a VDI Profile.
• If you select Use separate NFS network for data traffic, proceed to Selecting and Editing a VDI Profile
18 NexentaConnect View Edition User Guide
Deploying Desktop Pools
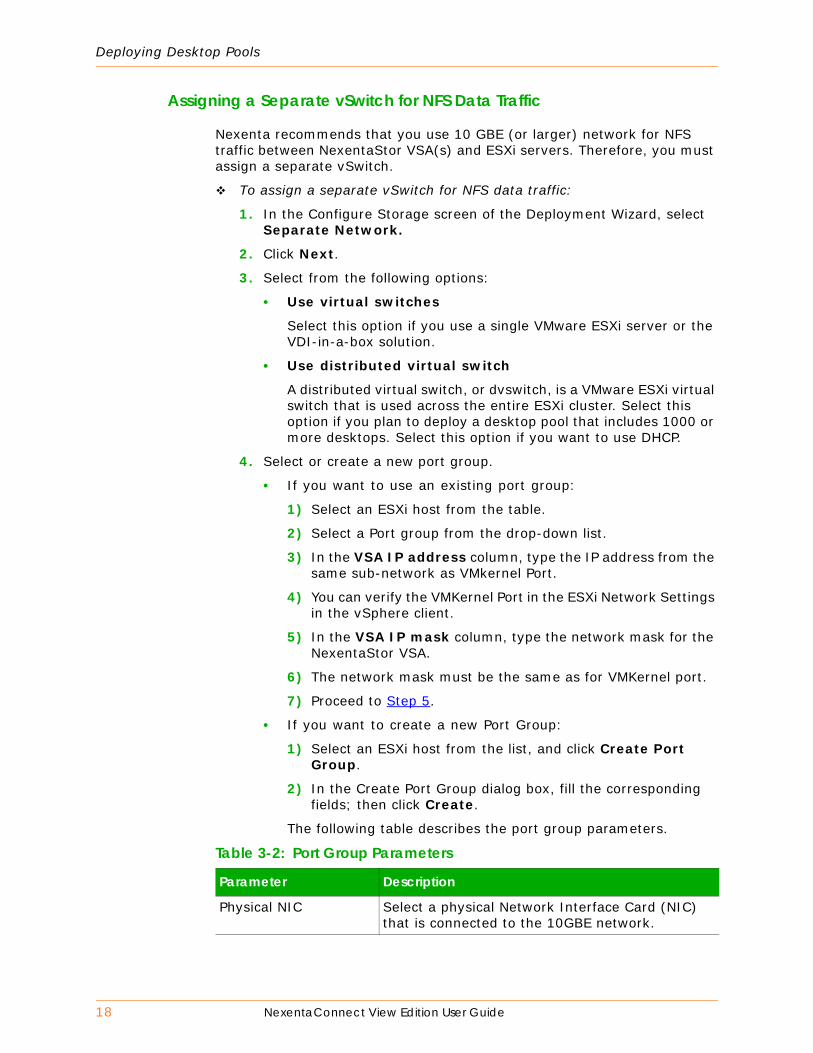
Assigning a Separate vSwitch for NFS Data Traffic
Nexenta recommends that you use 10 GBE (or larger) network for NFS traffic between NexentaStor VSA(s) and ESXi servers. Therefore, you must assign a separate vSwitch.
To assign a separate vSwitch for NFS data traffic:
1. In the Configure Storage screen of the Deployment Wizard, select Separate Network.
2. Click Next.
3. Select from the following options:
• Use virtual switches
Select this option if you use a single VMware ESXi server or the VDI-in-a-box solution.
• Use distributed virtual switch
A distributed virtual switch, or dvswitch, is a VMware ESXi virtual switch that is used across the entire ESXi cluster. Select this option if you plan to deploy a desktop pool that includes 1000 or more desktops. Select this option if you want to use DHCP.
4. Select or create a new port group.
• If you want to use an existing port group:
1) Select an ESXi host from the table.
2) Select a Port group from the drop-down list.
3) In the VSA IP address column, type the IP address from the same sub-network as VMkernel Port.
4) You can verify the VMKernel Port in the ESXi Network Settings in the vSphere client.
5) In the VSA IP mask column, type the network mask for the NexentaStor VSA.
6) The network mask must be the same as for VMKernel port.
7) Proceed to Step 5.
• If you want to create a new Port Group:
1) Select an ESXi host from the list, and click Create Port Group.
2) In the Create Port Group dialog box, fill the corresponding fields; then click Create.
The following table describes the port group parameters.
Table 3-2: Port Group Parameters
Parameter Description
Physical NIC Select a physical Network Interface Card (NIC) that is connected to the 10GBE network.

Deploying Desktop Pools
NexentaConnect View Edition User Guide 19
5. Click Next.
6. Proceed to Selecting and Editing a VDI Profile.
Using an Existing NexentaStor or Third-party NAS as Desktop Pool Storage
You can use an existing NexentaStor VSA for desktop pool storage.
• Selecting the External NexentaStor/ Third-party NFS option uses an existing external physical or virtual NexentaStor.
• Selecting the Existing NFS share option uses an existing NFS storage on external NexentaStor or any other NFS storage.
For instructions, see Using an Existing NFS Share for Desktop Pool Storage
This topic is a continuation of the VDI Deployment Wizard that follows the Configuring Storage for Desktop Pool steps.
To use an existing NexentaStor VSA for desktop pool storage:
1. Click External NexentaStor/ Third-party NFS.
2. Click Next.
3. Add a storage appliance:
a. Click Add.
b. In the Add new storage appliance dialog box, type the NexentaStor connection information:
• Hostname
• Username
• Password.
c. Click Add.
4. Alternatively, select from the list.
5. Proceed to Using an Existing NexentaStor VSA ZFS Folder for Desktop Pool Storage, or Creating NexentaStor VSA ZFS Storage.
Port Group network label
Set a port group name.
VMkernel Port network label
Set a VMkernel port group name.
VMkernel port IP address
Set an IP address that belongs to 10 GBE subnet.
VMkernel port netmask Set a netmask of the 10 GBE subnet.
MTU The maximum size of an IP packet that is transmitted through network.
Table 3-2: Port Group Parameters (Continued)
Parameter Description

20 NexentaConnect View Edition User Guide
Deploying Desktop Pools
Using an Existing NexentaStor VSA ZFS Folder for Desktop Pool Storage
You can use an existing ZFS folder to export it as an NFS share for the desktop pool.
This topic is a continuation of the VDI Deployment Wizard that follows the Using an Existing NexentaStor or Third-party NAS as Desktop Pool Storage steps.
To use an existing NexentaStor VSA ZFS folder for the desktop pool storage:
1. In the NexentaStor appliances page, click Use an existing folder.
2. Select a ZFS folder to use. Click Next.
3. Proceed to Selecting and Editing a VDI Profile.
Creating NexentaStor VSA ZFS Storage
You can create a ZFS volume and a new ZFS folder, and then export this folder as an NFS share for the new desktop pool.
This topic is a continuation of the VDI Deployment Wizard that follows the Using an Existing NexentaStor or Third-party NAS as Desktop Pool Storage steps.
To create ZFS storage for your desktop pool storage:
1. In the NexentaStor appliances page, click Create NFS storage from unused disks.
2. Select NFS disks from the list. Click Next.
3. Proceed to Selecting and Editing a VDI Profile, Selecting and Editing a VDI Profile.
Using an Existing NFS Share for Desktop Pool Storage
You can use an existing NFS share on an external NexentaStor VSA appliance as a storage for desktop pool.
This topic is a continuation of the VDI Deployment Wizard that follows the Configuring Storage for Desktop Pool steps.
To use an existing NexentaStor VSA for your desktop pool storage:
1. Select Existing NFS share.
2. Type the NFS server hostname.
3. Type the NFS share path.
4. Click Update.
5. Optionally, select Check NFS share Availability.
6. Click Next.
7. Proceed to Selecting and Editing a VDI Profile, Selecting and Editing a VDI Profile.

Deploying Desktop Pools
NexentaConnect View Edition User Guide 21
Selecting and Editing a VDI Profile
Default desktop profiles combine settings for storage, resource allocation, and desktop deployment into sets of common configurations. If you use the default profiles, you can significantly simplify the process of deploying virtual desktops.
You can modify a desktop pool profile through the VDI Deployment Wizard or through the Settings button after a desktop pool is deployed.
The profile defines the storage, resource, and desktop settings for the desktops that is deployed in this pool.
Several default profiles are installed with NexentaConnect View Edition. The default profiles define VDI storage (RAID levels, number of drives, L2ARC, write , etc.), hypervisor resource allocations, and desktop settings. You can select from the profiles available for the selected type of desktop pool.
The default profiles are:
• Default-external
This default profile is optimized for use of an external NexentaStor as NFS storage.
• Default-persistent
This default profile is optimized for stateful virtual desktops that use NexentaStor VSA.
• Default-stateless
This default profile is optimized for performance by utilizing the stripe of mirrors RAID10. You can use this profile for stateless deployments. The profile requires at least 4 drives for the storage pool.
• Default-SAN-accelerator
This default profile is optimized for SAN acceleration. NexentaConnect offloads I/O operations from the SAN back end. Therefore, it significantly improves performance during BootStorm, LoginStorm, Steady Workload, etc.
This topic is a continuation of the VDI Deployment Wizard that follows the Creating a New NexentaStor VSA for a Desktop Pool, Using an Existing NexentaStor VSA ZFS Folder for Desktop Pool Storage, Creating NexentaStor VSA ZFS Storage, or Using an Existing NFS Share for Desktop Pool Storage steps.
To select and edit a profile:
1. Select a deployment profile that you plan to use for the desktop pool. Click Browse.
A description of the selected profile is displayed.
2. Optionally, customize an existing profile by clicking Customize profile.

22 NexentaConnect View Edition User Guide
Deploying Desktop Pools
The corresponding groups of parameters can be modified or adjusted for any existing VDI instance. You can, for instance, add or delete virtual desktop pools, reallocate resources, change network or storage settings.
Customizable options are grouped by tab:
• Description
• Storage
• Resource
• Desktop
3. Optionally, rename the profile by clicking the Description tab. Type a new Profile name and add a Profile description.
When you customize the profile, you can rename a profile and/or modify the existing profile.
4. Optionally, modify the storage, resource, and desktop settings for the profile.
5. Accept the profile modifications. Click Apply.
For more information on descriptions of the default profiles and the editable settings, see Changing Settings.
6. Optionally select Planning to deploy another desktop pool on this cluster in the future? checkbox, if you plan to deploy additional desktop pool on this ESXi cluster.
7. If you selected External NexentaStor/ Third party NFS as a storage type, proceed to Configuring the ZFS volume.
8. If you selected NexentaStor VSA as a storage type, select the storage profile redundancy configuration.
The options are:
• RAID-0
• RAID-10
• RAID-Z
• RAID-Z2
9. Optionally, in the Spare drive count field, type the number of spare drives that you want to use for this desktop pool.
10.Optionally, modify Drive Selection Options.
a. Click Advanced Options.
b. Select the Include local HDD models checkbox to add local drives in the lists of read-optimized and write-optimized drives.
c. In the Read-optimized drives field, select a disk drive from the drop-down list.
d. In the Write-optimized drives field, select a disk drive from the drop-down list.
11.Proceed to Configuring the ZFS volume.

Deploying Desktop Pools
NexentaConnect View Edition User Guide 23
Configuring the ZFS volume
You can modify the default settings of the ZFS volume where you store virtual desktops.
This topic is a continuation of the VDI Deployment Wizard that follows the Selecting and Editing a VDI Profile steps.
To configure the ZFS volume:
1. Click the arrow in a field and select the required options.
The following table describes the advanced profile parameters that you can edit in the deployment wizard.
Table 3-3: Advanced Profile Parameters
Parameter Description
VMware VAAINative NFS snapshot Select this parameter if the storage array
that you use for the NexentaConnect deployment supports the vStorage APIs for Array Integration (VAAI). The parameter decreases the time of cloning virtual desktops.
Volume PropertiesStorage overcommit This parameters enables you to provision
more linked-clone desktops on a datastore, than the physical capacity of datastore allows.The options are:• None — storage is not overcommitted• Conservative — 4 times the size of the
datastore. • Moderate — 7 times the size of the
datastore.• Aggressive —15 times the size of the
datastore.
Data deduplication Controls the usage of data deduplication.Default value for linked clones is off. Default value for full clones is on.

24 NexentaConnect View Edition User Guide
Deploying Desktop Pools
Dataset compression Determines the compression algorithm for the desktop pool.The options are:• lz4• on• off• lzjb• gzip• gzip-1 — gzip-9Default value is lz4.
NexentaStor clone location Type of the datastore for the NexentaStor VSA.The options are:• HDD• SSD• VMFS datastore
Data volume drive types Type of drives that you want to use for the data volume. The options are:• HDD• SSD• RDM (Raw Device Mapping). This option
enables you to use LUNs directly connected to a virtual machine in the VMware ESXi Server.
SSD AllocationRead cache (L2ARC) Provision fast storage for ZFS secondary
read cache (L2ARC)The options are:• 1 • 2 • 3 • 4
Write Acceleration Policy of assigning a separate LUN for ZIL or special vdev. You can specify the number of disks.The options are:• 1 • 2 • 4
Table 3-3: Advanced Profile Parameters (Continued)
Parameter Description

Deploying Desktop Pools
NexentaConnect View Edition User Guide 25
Allocating SSDs
You can assign solid state drives (SSDs) for the following purposes:
• Read Cache (L2ARC)
• Write Acceleration
• Linked Clone Replica
To allocate SSDs:
1. In the Disks drop-down list, select the number of drives that you want to assign for the selected option.
2. In the Allow drive sharing column, select or unselect the checkbox.
For better performance, Nexenta recommends that you allocate separate drives for read and write cache devices, as well as for replica. However, if the system has insufficient amount of SSDs, you can share each SSD to few devices.
3. Click Next.
4. Proceed to Completing the Deployment Wizard.
Completing the Deployment Wizard
Before you complete the VDI Deployment wizard, verify the configuration settings.
To complete the VDI deployment wizard:
1. Review the configuration.
2. If needed, click Back to modify the configuration.
3. Optionally, modify the number of desktops in the desktop pool.
4. Optionally, modify the minimum number of desktops that should be created for successful pool deployment.
5. Optionally, click customize, if you need to check any of the profile’s settings.
6. Click Deploy to create the new virtual desktop pool.
Replica Use a different datastore for VMware Horizon View composer replica disks.The options are:• Disabled • 1 • 2
Table 3-3: Advanced Profile Parameters (Continued)
Parameter Description
26 NexentaConnect View Edition User Guide
Deploying Desktop Pools
NexentaConnect View Edition creates the new desktop pool. This process completes in phases. The phases are indicated in the Recent Activity panel. They include:
• Validating hardware
• Cloning virtual NexentaStor
• Waiting for a creation of desktop machines
• Finished
Creating the desktop pool takes some time depending upon the number and types of desktops that are created for the pool.
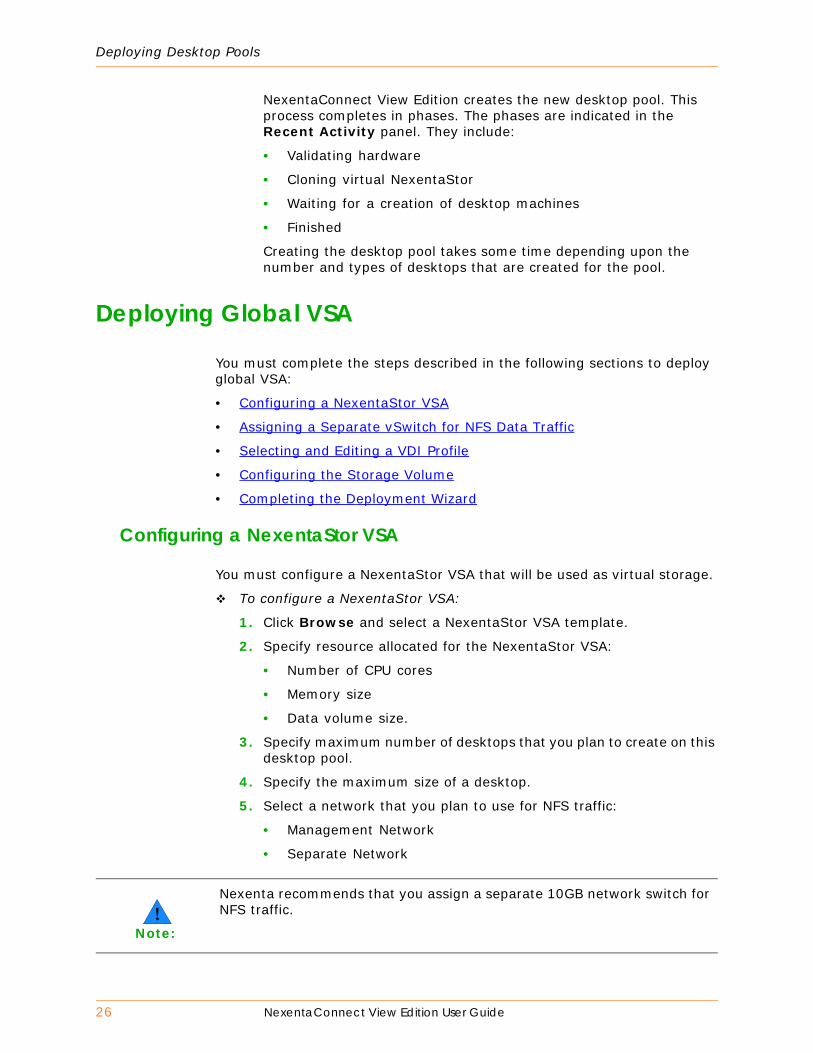
Deploying Global VSA
You must complete the steps described in the following sections to deploy global VSA:
• Configuring a NexentaStor VSA
• Assigning a Separate vSwitch for NFS Data Traffic
• Selecting and Editing a VDI Profile
• Configuring the Storage Volume
• Completing the Deployment Wizard
Configuring a NexentaStor VSA
You must configure a NexentaStor VSA that will be used as virtual storage.
To configure a NexentaStor VSA:
1. Click Browse and select a NexentaStor VSA template.
2. Specify resource allocated for the NexentaStor VSA:
• Number of CPU cores
• Memory size
• Data volume size.
3. Specify maximum number of desktops that you plan to create on this desktop pool.
4. Specify the maximum size of a desktop.
5. Select a network that you plan to use for NFS traffic:
• Management Network
• Separate Network
!Note:
Nexenta recommends that you assign a separate 10GB network switch for NFS traffic.

Deploying Desktop Pools
NexentaConnect View Edition User Guide 27
6. If you selected Management Network, proceed to Assigning a Separate vSwitch for NFS Data Traffic.
7. If you selected Separate Network, proceed to Selecting and Editing a VDI Profile.
Configuring the Storage Volume
You can modify the parameters of the volume that you provision as storage.
To configure the volume:
1. Modify the properties described in the following table:
2. Modify the SSD allocation parameters:
Volume PropertiesNexentaStor clone location
Type of the datastore for the NexentaStor VSA.The options are:• HDD• SSD• VMFS datastore
Data volume drive types
Type of drives that you want to use for the data volume. The options are:• HDD• SSD• RDM (Raw Device Mapping). This option enables you
to use LUNs directly connected to a virtual machine in the VMware ESXi Server.
SSD AllocationRead cache (L2ARC)
Provision fast storage for ZFS secondary read cache (L2ARC)The options are:• 1 • 2 • 3 • 4
Write Acceleration Policy of assigning a separate LUN for ZIL or special vdev. You can specify the number of disks.The options are:• 1 • 2 • 4

Deploying Desktop Pools
28 NexentaConnect View Edition User Guide
This page intentionally left blank

NexentaConnect View Edition User Guide 29
4
Running Performance Benchmark Tests
This chapter includes the following topics:
• Overview
• Running the Benchmark Tests
• Running the Single-Step Steady State Benchmark Test
• Running the Single Step IOMeter Benchmark Test
• Running the Multi-Step Performance Benchmark Test
• Running the Boot Storm Benchmark Test
• Monitoring Benchmark Activity
• Viewing Task
• Viewing Benchmark Test Results
• Sending Benchmark Test Results by Email
• Understanding Benchmark Results
• Understanding Steady Benchmark Results
• Understanding IOMeter Benchmark Results
• Understanding Multi-Step Read/Write Operations Benchmark Test
• Understanding Multi-Step Read Write MBs Benchmark Results
• Understanding the Results from the Multi-Step Read Write Latency Benchmark Test
• Understanding Results from the Boot Storm Benchmark Test

30 NexentaConnect View Edition User Guide
Running Performance Benchmark Tests
Overview
NexentaConnect View Edition provides analytic features that you can use to execute and display the charts of the selected built-in performance benchmarks on all or some of the provisioned desktops.
Benchmark testing supports the following modes:
• Single test mode
NexentaConnect runs the IOMeter tool or Steady benchmark to measure Input/Output per second (IOPS) performance on a selected desktop pool.
NexentaConnect runs the IOMeter tool to measure the IOPS performance on a selected desktop pool.
There are the following performance benchmark tests that measure Input/Output operations per second (IOPS).
The options are:
• IOMeter
The client-server based benchmark monitoring tool that performs asymmetric I/O operations to test the performance of a system.
• Steady
Steady benchmark runs a set of IOMeter tests that simulate the real-world desktop workload.
• Multi-Step
Multi-step benchmarks run a number of single-step performance tests at varying read/write percentage ratios.
• Boot Storm
NexentaConnect performs warm or cold boots on all desktops in the desktop pool.
The options are:
• Cold Boot Storm
NexentaConnect turns off the desktop pool and NexentaStor VSA virtual machines to test the boot time in a desktop pool when the pool starts from a cold state.
• Warm Boot Storm
The process executes in the following phases:
1) NexentaConnect starts one of the desktops in a desktop pool to warm up the cache.
2) NexentaConnect starts the remaining desktops in the pool, and records the boot time.
Running Performance Benchmark Tests
NexentaConnect View Edition User Guide 31
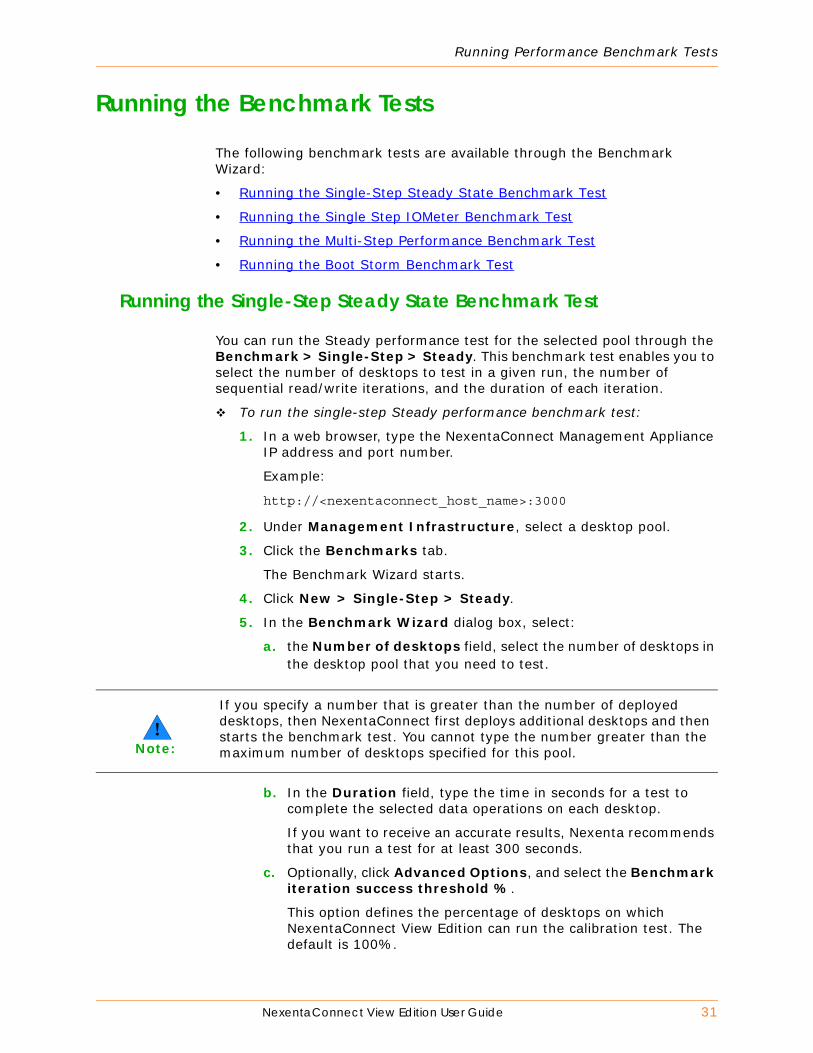
Running the Benchmark Tests
The following benchmark tests are available through the Benchmark Wizard:
• Running the Single-Step Steady State Benchmark Test
• Running the Single Step IOMeter Benchmark Test
• Running the Multi-Step Performance Benchmark Test
• Running the Boot Storm Benchmark Test
Running the Single-Step Steady State Benchmark Test
You can run the Steady performance test for the selected pool through the Benchmark > Single-Step > Steady. This benchmark test enables you to select the number of desktops to test in a given run, the number of sequential read/write iterations, and the duration of each iteration.
To run the single-step Steady performance benchmark test:
1. In a web browser, type the NexentaConnect Management Appliance IP address and port number.
Example:
http://<nexentaconnect_host_name>:3000
2. Under Management Infrastructure, select a desktop pool.
3. Click the Benchmarks tab.
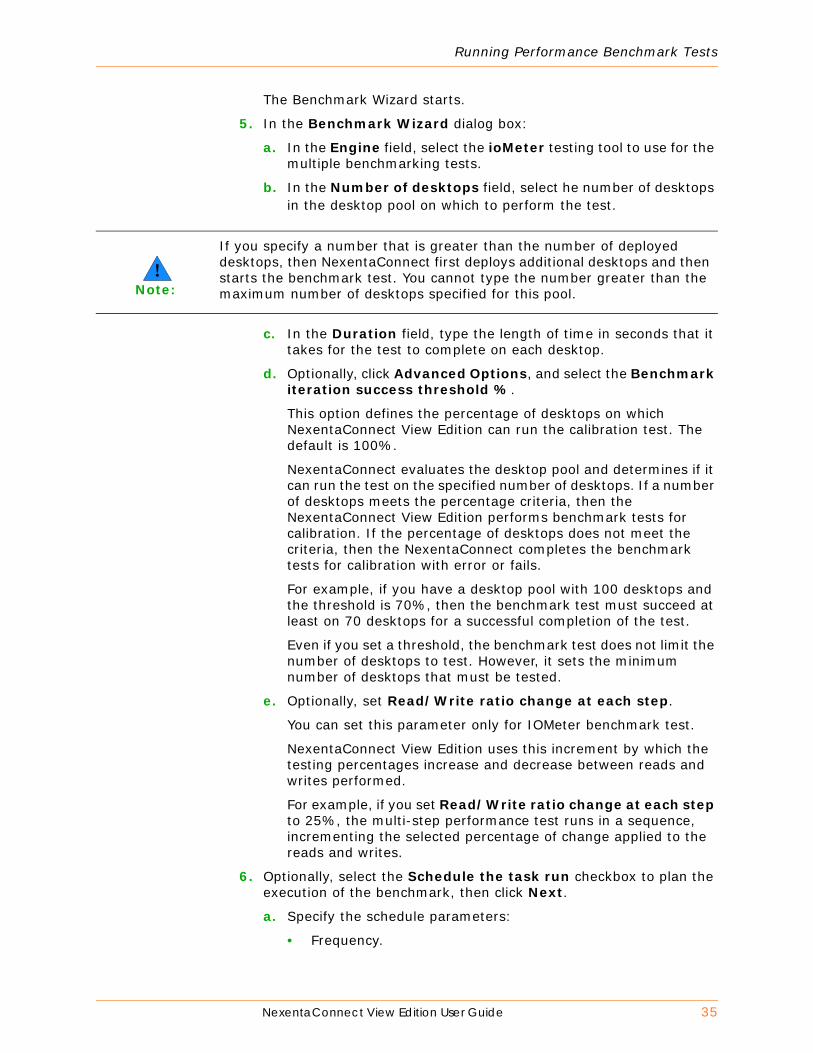
The Benchmark Wizard starts.
4. Click New > Single-Step > Steady.
5. In the Benchmark Wizard dialog box, select:
a. the Number of desktops field, select the number of desktops in the desktop pool that you need to test.
b. In the Duration field, type the time in seconds for a test to complete the selected data operations on each desktop.
If you want to receive an accurate results, Nexenta recommends that you run a test for at least 300 seconds.
c. Optionally, click Advanced Options, and select the Benchmark iteration success threshold %.
This option defines the percentage of desktops on which NexentaConnect View Edition can run the calibration test. The default is 100%.
!Note:
If you specify a number that is greater than the number of deployed desktops, then NexentaConnect first deploys additional desktops and then starts the benchmark test. You cannot type the number greater than the maximum number of desktops specified for this pool.

32 NexentaConnect View Edition User Guide
Running Performance Benchmark Tests
NexentaConnect View Edition evaluates the desktop pool and determines if it can run the test on the specified number of desktops. If a number of desktops meets the percentage criteria, then the NexentaConnect performs benchmark tests for calibration. If the percentage of desktops does not meet the criteria, then NexentaConnect completes the benchmark tests for calibration with error or fails.
For example, if you have a desktop pool with 100 desktops and the threshold is 70%, then the benchmark test must succeed at least on 70 desktops for a successful completion of the test.
Even if you set a threshold, the benchmark test does not limit the number of desktops to test. However, it sets the minimum number of desktops that must be tested.
6. Optionally, select the Schedule the task run checkbox to plan the execution of the benchmark, then click Next.
a. Specify the schedule parameters:
• Frequency.
The options are:
• Once
• Hourly
• Daily
• Weekly
• Monthly
b. Depending on the selected frequency, select the time.
c. Optionally, select Send results to e-mail.
7. Click Run, after you have specified all the parameters.
The performance benchmark test collects and charts the I/O performance and latency data.
8. Proceed to one of the following topics: Monitoring Benchmark Activity, Viewing Task, Viewing Benchmark Test Results, Sending Benchmark Test Results by Email, Understanding Benchmark Results.
Running the Single Step IOMeter Benchmark Test
You can run the IOMeter performance test on the selected desktop pool, if you select Benchmark > Single-Step > IOMeter. However, you must set the number of desktops that you plan to test in a given run and the duration of each iteration.
To run the IOMeter performance benchmark test:
1. In a web browser, type the NexentaConnect Management Appliance IP address and port number.

Running Performance Benchmark Tests
NexentaConnect View Edition User Guide 33
Example:
http://<nexentaconnect_host_name>:3000
2. Under Management infrastructure, select a desktop pool.
3. Click the Benchmarks tab.
4. Click New > Single-Step > IO Meter.
The Benchmark Wizard starts.
5. In the Benchmark Wizard dialog box:
a. In the Read/Write ratio field, select the ratio of read-to-write operations that the test performs.
The options are:
• 100% reads (0% writes)
• 75% reads, 25% writes
• 50% reads, 50% writes
• 25% reads, 75% writes
• (0% reads) 100% writes
b. In the Number of desktops field, select the number of desktops in the desktop pool to test.
c. In the Duration field, type the length of time in seconds to complete the selected data operations on each desktop.
d. Optionally, click Advanced Options, and select the Benchmark iteration success threshold %.
This option defines the percentage of desktops on which NexentaConnect View Edition can run the calibration test. The default is 100%.
NexentaConnect evaluates the desktop pool and determines if it can run the test on the specified number of desktops. If a number of desktops meets the percentage criteria, then the NexentaConnect performs benchmark tests for calibration. If the percentage of desktops does not meet the criteria, then the NexentaConnect completes the benchmark tests for calibration with error or fails.
For example, if you have a desktop pool with 100 desktops and the threshold is 70%, then the benchmark test must succeed at least on 70 desktops for a successful completion of the test.
Even if you set a threshold, the benchmark test does not limit the number of desktops to test. However, it sets the minimum number of desktops that must be tested.
!Note:
If you specify a number that is greater than the number of deployed desktops, then NexentaConnect first deploys additional desktops and then starts the benchmark test. You cannot type the number greater than the maximum number of desktops specified for this pool.

34 NexentaConnect View Edition User Guide
Running Performance Benchmark Tests
6. Optionally, select the Schedule the task run checkbox to plan the execution of the benchmark, then click Next.
a. Specify the schedule parameters:
• Frequency.
The options are:
• Once
• Hourly
• Daily
• Weekly
• Monthly
b. Depending on the selected frequency, select the time.
c. Optionally, select Send results to email.
7. Click Run, after you have specified all the parameters
8. Proceed to one of the following topics: Monitoring Benchmark Activity, Viewing Task, Viewing Benchmark Test Results, Sending Benchmark Test Results by Email, Understanding Benchmark Results.
Running the Multi-Step Performance Benchmark Test
You can run the IOMeter performance tests, if you select Benchmark > Multi-Step. This benchmark test enables you to select the number of desktop tests in a given run, the number of sequential read/write iterations, and the duration of each iteration.
The number of runs in a sequence for IOMeter performance test depends on the selected variations for read/write ratio.
For example: given a single-step at 25%, the multi-step performance test runs in sequence, incrementing the selected percentage of change applied to the read and write operations:
• 100% reads (0% writes)• 75% reads, 25% writes• 50% reads, 50% writes• 25% reads, 75% writes• (0% reads) 100% writes
To run the multi-step performance benchmark test:
1. In a web browser, type the NexentaConnect Management Appliance IP address and port number.
Example:
http://<nexentaconnect_host_name>:3000
2. Under Management infrastructure, select a desktop pool.
3. Click the Benchmarks tab.
4. Click New > Multi-Step.
Running Performance Benchmark Tests
NexentaConnect View Edition User Guide 35
The Benchmark Wizard starts.
5. In the Benchmark Wizard dialog box:
a. In the Engine field, select the ioMeter testing tool to use for the multiple benchmarking tests.
b. In the Number of desktops field, select he number of desktops in the desktop pool on which to perform the test.
c. In the Duration field, type the length of time in seconds that it takes for the test to complete on each desktop.
d. Optionally, click Advanced Options, and select the Benchmark iteration success threshold %.
This option defines the percentage of desktops on which NexentaConnect View Edition can run the calibration test. The default is 100%.
NexentaConnect evaluates the desktop pool and determines if it can run the test on the specified number of desktops. If a number of desktops meets the percentage criteria, then the NexentaConnect View Edition performs benchmark tests for calibration. If the percentage of desktops does not meet the criteria, then the NexentaConnect completes the benchmark tests for calibration with error or fails.
For example, if you have a desktop pool with 100 desktops and the threshold is 70%, then the benchmark test must succeed at least on 70 desktops for a successful completion of the test.
Even if you set a threshold, the benchmark test does not limit the number of desktops to test. However, it sets the minimum number of desktops that must be tested.
e. Optionally, set Read/Write ratio change at each step.
You can set this parameter only for IOMeter benchmark test.
NexentaConnect View Edition uses this increment by which the testing percentages increase and decrease between reads and writes performed.
For example, if you set Read/Write ratio change at each step to 25%, the multi-step performance test runs in a sequence, incrementing the selected percentage of change applied to the reads and writes.
6. Optionally, select the Schedule the task run checkbox to plan the execution of the benchmark, then click Next.
a. Specify the schedule parameters:
• Frequency.
!Note:
If you specify a number that is greater than the number of deployed desktops, then NexentaConnect first deploys additional desktops and then starts the benchmark test. You cannot type the number greater than the maximum number of desktops specified for this pool.

36 NexentaConnect View Edition User Guide
Running Performance Benchmark Tests
The options are:
• Once
• Hourly
• Daily
• Weekly
• Monthly
b. Depending on the selected frequency, select the time.
c. Optionally, select Send results to e-mail.
7. Click Run, after you have specified all the parameters.
Performance benchmark test collects and charts the I/O performance and latency data.
8. Proceed to one of the following topics: Monitoring Benchmark Activity, Viewing Task, Viewing Benchmark Test Results, Sending Benchmark Test Results by Email, Understanding Benchmark Results.
Running the Boot Storm Benchmark Test
You can run either warm or cold boot storm on the storage for a desktop pool, if you select Benchmark > Boot Storm. You must select the number of desktops that you plan to test.
To run the Boot Storm performance benchmark test:
1. In a web browser, type the NexentaConnect Management Appliance IP address and port number.
Example:
http://<nexentaconnect_host_name>:3000
2. Under Management infrastructure, select a desktop pool.
3. Click the Benchmarks tab.
4. Click New > Boot Storm.
The Benchmark Wizard starts.
5. In the Benchmark Wizard dialog box:
6. In the Number of desktops field, select he number of desktops in the desktop pool on which to perform the test.
7. Select the type of boot, Cold vs Warm.
!Note:
If you specify a number that is greater than the number of deployed desktops, then NexentaConnect first deploys additional desktops and then starts the benchmark test. You cannot type the number greater than the maximum number of desktops specified for this pool.
Running Performance Benchmark Tests
NexentaConnect View Edition User Guide 37
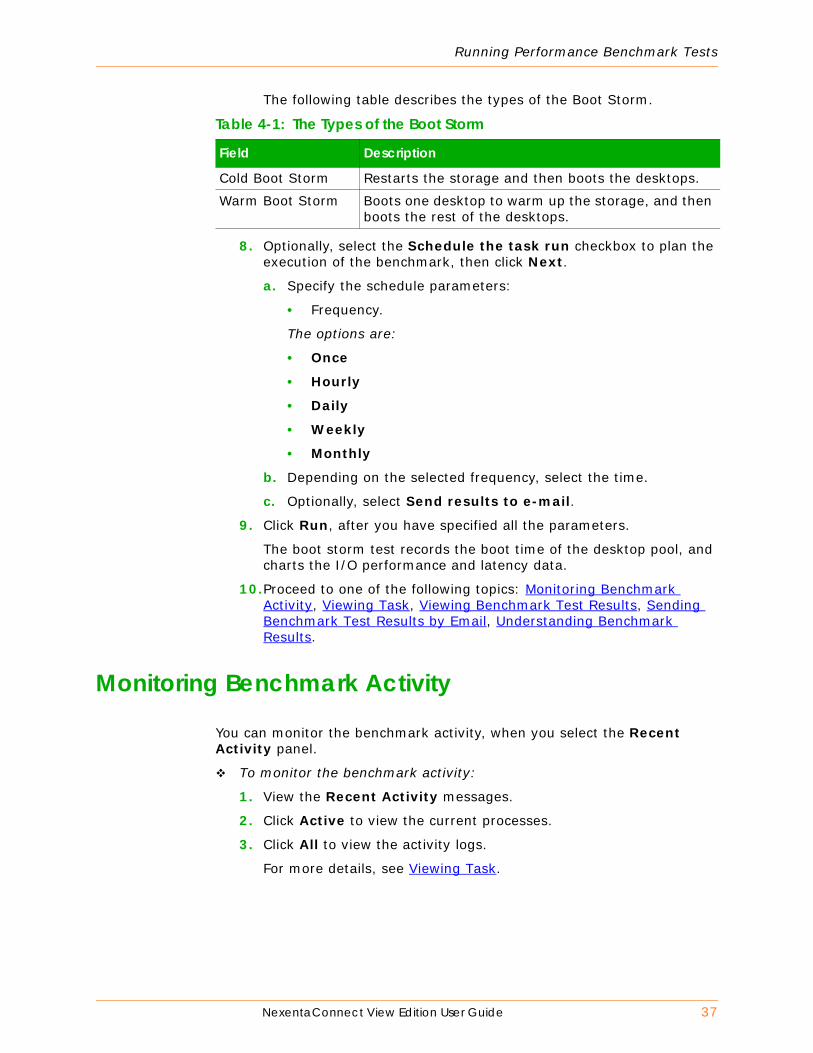
The following table describes the types of the Boot Storm.
8. Optionally, select the Schedule the task run checkbox to plan the execution of the benchmark, then click Next.
a. Specify the schedule parameters:
• Frequency.
The options are:
• Once
• Hourly
• Daily
• Weekly
• Monthly
b. Depending on the selected frequency, select the time.
c. Optionally, select Send results to e-mail.
9. Click Run, after you have specified all the parameters.
The boot storm test records the boot time of the desktop pool, and charts the I/O performance and latency data.
10.Proceed to one of the following topics: Monitoring Benchmark Activity, Viewing Task, Viewing Benchmark Test Results, Sending Benchmark Test Results by Email, Understanding Benchmark Results.
Monitoring Benchmark Activity
You can monitor the benchmark activity, when you select the Recent Activity panel.
To monitor the benchmark activity:
1. View the Recent Activity messages.
2. Click Active to view the current processes.
3. Click All to view the activity logs.
For more details, see Viewing Task.
Table 4-1: The Types of the Boot Storm
Field Description
Cold Boot Storm Restarts the storage and then boots the desktops.
Warm Boot Storm Boots one desktop to warm up the storage, and then boots the rest of the desktops.

38 NexentaConnect View Edition User Guide
Running Performance Benchmark Tests
Viewing Task
NexentaConnect View Edition provides activity monitoring tools that are a part of the activity logs.
To view activity logs:
1. In the bottom of the Object List, click All Tasks.
2. View the list of all completed and running tasks.
3. Select the Period in the right upper corner.
The default period is past day.
4. Optionally, select a task and click Details to view detailed information about the task.
5. Optionally, select a task and click Stop Task to cancel the task.
Monitoring System Health
You can use the System Health tab to quickly analyze NexentaConnect environment problems.
To monitor system health:
1. Click Management Infrastructure > System Health.
2. Select one of the following tabs:
• Alerts
Filter alerts by severity or search for alerts using a keyword.
• Logs
Use the scroll bar to navigate through the logs.
• Errors
Optionally, clear the list of errors.
Viewing Benchmark Test Results
You can view the results of a benchmark test in the Benchmarks tab.
To view benchmark test results:
1. In a web browser, type the NexentaConnect Management Appliance IP address and port number.
Example:
http://<nexentaconnect_host_name>:3000
2. In the Related Objects panel, select a desktop pool.
3. Click the Benchmarks tab.

Running Performance Benchmark Tests
NexentaConnect View Edition User Guide 39
4. Select the benchmark test that you want to view.
The report provides the information about the read/write IOPS, bandwidth, and latency.
For more information, see Understanding Benchmark Results.
5. If you plan to select the multi-step benchmark test, mark the chart checkbox to view.
• Read/Write Operations
• Read/Write MB
• Read/Write Latency
Select only one checkbox at a time to view a chart.
Sending Benchmark Test Results by Email
You can send a copy of the report that includes the results from the benchmark test to the email address for statistics.
For more information, see the NexentaConnect View Edition Installation Guide.
To send the benchmark test result by email:
1. In a web browser, type the NexentaConnect Management Appliance IP address and port number.
Example:
http://<nexentaconnect_host_name>:3000
2. From the Objects List panel, select a desktop pool.
3. Click the Benchmarks tab. Expand the page to view the content.
4. Select the benchmark.
5. Click Report.
6. Click Yes to confirm that you want to send the report by e-mail.
NexentaConnect View Edition sends a copy of the report to the e-mail address that you previously set up in Settings.
Understanding Benchmark Results
The following topics describe the returned results for the following benchmark tests:
• Understanding Steady Benchmark Results
• Understanding IOMeter Benchmark Results
• Understanding Multi-Step Read/Write Operations Benchmark Test
• Understanding Multi-Step Read Write MBs Benchmark Results

40 NexentaConnect View Edition User Guide
Running Performance Benchmark Tests
• Understanding the Results from the Multi-Step Read Write Latency Benchmark Test
• Understanding Results from the Boot Storm Benchmark Test
Understanding Steady Benchmark Results
The snapshot represents a sample benchmark result. Refer to the following table for a description of the charts and fields.
Figure 4-1: Sample Steady Benchmark Results in
The following table describes the Steady benchmark result parameters.
Table 4-2: Steady Benchmark Result Parameters
Field Description
Benchmark Steady: Duration of the benchmark test.
Started Start time of the benchmark test.
Fished Completion time of the benchmark test.
Status message Indicates the success or failure of the benchmark test.
Benchmark Parameters: Parameters that you set in Configuration page of the Benchmark wizard.
Desktop pool Name of the desktop pool that has been tested.
Desktops count Number of desktops that have been tested.
Duration (seconds) Length of time that a test runs on each desktop.

Running Performance Benchmark Tests
NexentaConnect View Edition User Guide 41
Understanding IOMeter Benchmark Results
The snapshot represents a sample benchmark result. Refer to the following table for descriptions of charts and fields
Figure 4-2: Sample IOMeter Benchmark Results
Data operation mode Options are: Read, Write
Benchmark Results: Listing and visual representation of returned of test results.
Write IOPS Number of write operations that have been performed.
Write Bandwidth (MB/s) Network bandwidth that is required for write operations that is measured in MB/second.
Average Write Latency (ms) Average latency that has occurred for any write operation and is measured in milliseconds.
Read IOPS Number of read operations that have been performed.
Read Bandwidth (MB/s) Network bandwidth that is required for read operations that is measured in MB/second.
Average Read Latency Average latency that has occurred for any read operation and is measured in milliseconds.
Table 4-2: Steady Benchmark Result Parameters (Continued)
Field Description

42 NexentaConnect View Edition User Guide
Running Performance Benchmark Tests
The following table describes the IOMeter benchmark result parameters.
Table 4-3: IOMeter Benchmark Result Parameters
Field Description
Benchmark IOMeter: Provides parameters that deal with the duration of the benchmark test.
Started Start time of the benchmark test.
Fished Completion time of the benchmark test.
Status message Indicates the success or failure of the benchmark test.
Benchmark Parameters IOMeter: Parameters that are set in the Configuration page of the Benchmark wizard.
Desktop pool Name of a desktop pool that has been tested.
Desktops count Number of desktops that have been tested.
Duration (seconds) Length of time that the benchmark test run on each desktop.
Reads Percentage of the read operations that have been measured.
Writes Percentage of the write operations that have been measured.
Benchmark Results IOMeter and Charts
Listing and visual representation of returned results of test.
Write IOPS Number of write operations that have been performed.
Write Bandwidth (MB/s) Network bandwidth that is required for the write operations and measured in MB/second.
Average Write Latency (ms) Average latency that has occurred for write operations and is measured in milliseconds.
Read IOPS Number of read operations that have been performed.
Read Bandwidth (MB/s) Network bandwidth that is required for the read operations and measured in MB/second.
Average Read Latency Average latency that has occurred for read operations and is measured in milliseconds.

Running Performance Benchmark Tests
NexentaConnect View Edition User Guide 43
Understanding Multi-Step Read/Write Operations Benchmark Test
The snapshot represents a sample benchmark result. Refer to the following table for a description of the charts and fields.
Figure 4-3: Results from the Sample Multi-Step Read/Write Operations Benchmark Test
The following table describes the Multi-Step Read/Write Operations benchmark test.
Table 4-4: Multi-Step Read/Write Operations Benchmark Test
Field Description
Benchmark Multi-Step: Duration of the benchmark test.
Started Start time of the benchmark test.
Fished Completion time of the benchmark test.
Status message Indicates the success or failure of the benchmark test.
Benchmark Parameters: Parameters set in Configuration page of Benchmark wizard.
Desktop pool Name of the desktop pool that has been tested.
Desktops count Number of desktops that have been tested.
Duration (seconds) Length of time that the benchmark test run on each desktop.
Benchmark mechanism Options are: IOMeter, SQLIO

44 NexentaConnect View Edition User Guide
Running Performance Benchmark Tests
R/W ration step change Percentage of change up or down for reads and writes measured.
Table Table listing of incremental results.
Reads/Writes (%) Ratio percentage of Reads and Writes measured. These vary depending upon the percentage of step change specified in Configure Benchmark.
Write IOPS Number of write operations that have been performed.
Write Bandwidth (MB/s) Network bandwidth that is required for the write operations and measured in MB/second.
Average Write Latency (ms) Average latency that has occurred for write operations and is measured in milliseconds.
Read IOPS Number of reads performed.
Read Bandwidth (MB/s) Network bandwidth that is required for the read operations and measured in MB/second.
Average Read Latency Average latency that has occurred for read operations and is measured in milliseconds.
Charts Visual representation of returned Results.
Read/Write Latency (ms) Average latency that has occurred for write operations and is measured in milliseconds.
read_operations Number of reads performed.
write_operations Number of writes performed.
reads % writes % Ratio percentage of Reads and Writes measured. These vary depending upon the percentage of step change specified in Configure Benchmark.
Table 4-4: Multi-Step Read/Write Operations Benchmark Test (Continued)
Field Description

Running Performance Benchmark Tests
NexentaConnect View Edition User Guide 45
Understanding Multi-Step Read Write MBs Benchmark Results
The snapshot represents a sample benchmark result. Refer to the following table for a description of the charts and fields.
Figure 4-4: Sample Multi-Step Read/Write MBs Benchmark Results
The following table describes the parameters of the Multi-Step Read/Write MBs benchmark test.
Table 4-5: Parameters for the Multi-Step Read/Write MBs Benchmark Test
Field Description
Benchmark Multi-Step: Duration of the benchmark test.
Started Start time of the benchmark test.
Fished Completion time of the benchmark test.
Status message Indicates the success or failure of the benchmark test.
Benchmark Parameters: Parameters set in Configuration page of Benchmark wizard.
Desktop pool Name of the desktop pool that has been tested.
Desktops count Number of desktops that have been tested.
Duration (seconds) Length of time that the benchmark test run on each desktop.
Benchmark mechanism Options are: IOMeter, SQLIO
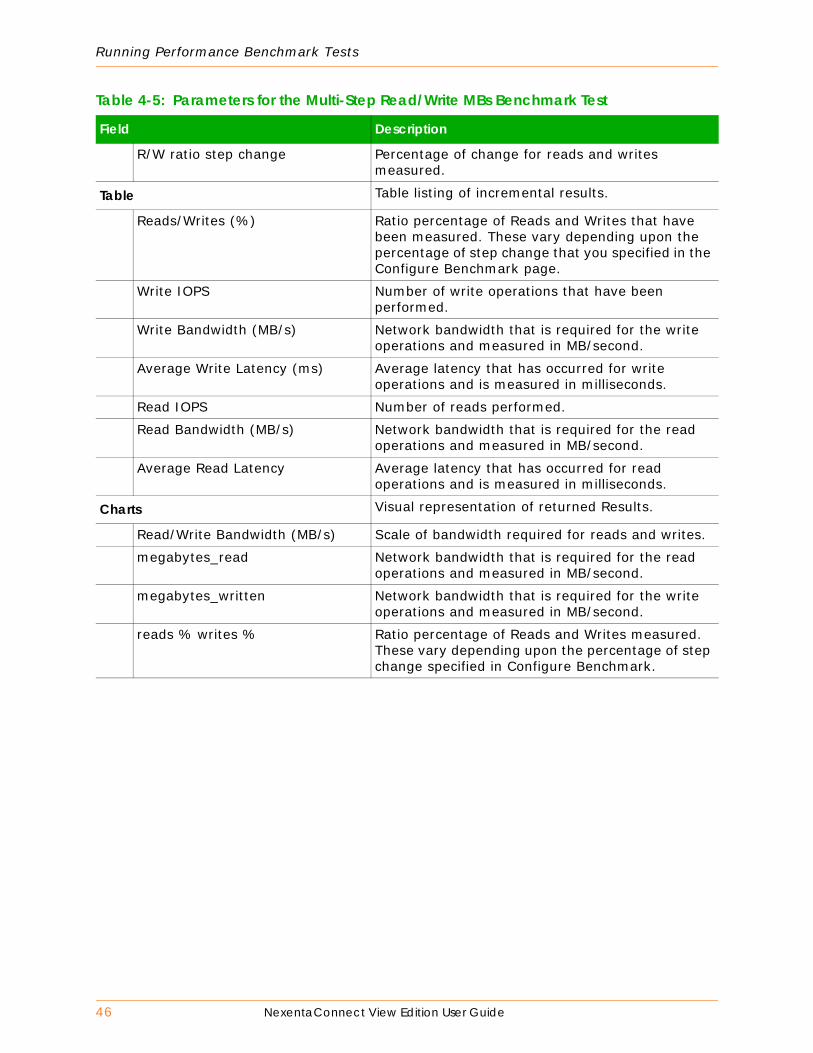
46 NexentaConnect View Edition User Guide
Running Performance Benchmark Tests
R/W ratio step change Percentage of change for reads and writes measured.
Table Table listing of incremental results.
Reads/Writes (%) Ratio percentage of Reads and Writes that have been measured. These vary depending upon the percentage of step change that you specified in the Configure Benchmark page.
Write IOPS Number of write operations that have been performed.
Write Bandwidth (MB/s) Network bandwidth that is required for the write operations and measured in MB/second.
Average Write Latency (ms) Average latency that has occurred for write operations and is measured in milliseconds.
Read IOPS Number of reads performed.
Read Bandwidth (MB/s) Network bandwidth that is required for the read operations and measured in MB/second.
Average Read Latency Average latency that has occurred for read operations and is measured in milliseconds.
Charts Visual representation of returned Results.
Read/Write Bandwidth (MB/s) Scale of bandwidth required for reads and writes.
megabytes_read Network bandwidth that is required for the read operations and measured in MB/second.
megabytes_written Network bandwidth that is required for the write operations and measured in MB/second.
reads % writes % Ratio percentage of Reads and Writes measured. These vary depending upon the percentage of step change specified in Configure Benchmark.
Table 4-5: Parameters for the Multi-Step Read/Write MBs Benchmark Test
Field Description

Running Performance Benchmark Tests
NexentaConnect View Edition User Guide 47
Understanding the Results from the Multi-Step Read Write Latency Benchmark Test
The snapshot represents a sample benchmark result. Refer to the following table for a description of the charts and fields.
Figure 4-5: Results from the Sample Multi-Step Read/Write Latency Benchmark Test
The following table describes the parameters of the Multi-Step Read/Write Latency benchmark test.
Table 4-6: Parameters for the Multi-Step Read/Write Latency Benchmark Test
Field Description
Benchmark Multi-Step: Duration of the benchmark test.
Started Start time of the benchmark test.
Fished Completion time of the benchmark test.
Status message Indicates the success or failure of the benchmark test.
Benchmark Parameters: Parameters set in the Configuration page of the Benchmark wizard.
Desktop pool Name of the desktop pool that has been tested.
Desktops count Number of desktops that have been tested.
Duration (seconds) Length of time that the benchmark test run on each desktop.

48 NexentaConnect View Edition User Guide
Running Performance Benchmark Tests
Benchmark mechanism Options are: IOMeter, SQLIO
R/W ration step change Percentage of change up or down for reads and writes measured.
Table Listing of incremental results.
Reads/Writes (%) Ratio percentage of Reads and Writes measured. These vary depending upon the percentage of step change specified in Configure Benchmark.
Write IOPS Number of write operations that have been performed.
Write Bandwidth (MB/s) Network bandwidth that is required for the write operations and measured in MB/second.
Average Write Latency (ms) Average latency that has occurred for write operations and is measured in milliseconds.
Read IOPS Number of reads performed.
Read Bandwidth (MB/s) Network bandwidth that is required for the read operations and measured in MB/second.
Average Read Latency Average latency that has occurred for read operations and is measured in milliseconds.
Charts Visual representation of returned Results.
Read/Write Latency (ms) Scale of latency values for reads and writes.
read_latency Average latency that has occurred for read operations and is measured in milliseconds.
write_latency Average latency that has occurred for write operations and is measured in milliseconds.
reads % writes % Percentage ratio.
Table 4-6: Parameters for the Multi-Step Read/Write Latency Benchmark Test
Field Description

Running Performance Benchmark Tests
NexentaConnect View Edition User Guide 49
Understanding Results from the Boot Storm Benchmark Test
The snapshot represents a sample benchmark result. Refer to the following table for a description of the charts and fields.
Figure 4-6: Results from the Sample Boot Storm Benchmark Test
The following table describes the Boot Storm benchmark result parameters.
Table 4-7: Parameters for the Boot Storm Test
Field Description
Benchmark Boot Storm: Duration of the benchmark test.
Started Start time of the benchmark test.
Fished Completion time of the benchmark test.
Status message Indicates the success or failure of the benchmark test.
Benchmark Parameters: Parameters set in the Configuration page of the Benchmark wizard.
Desktop pool Name of the desktop pool that has been tested.
Number of desktops to boot Number of desktops in the pool that were tested.
Cold or warm boot Type of boot storm test performed. Options are: cold or warm.
Benchmark Results Listing of incremental results.
Duration of the boot Length of time required to boot the desktop. Measured in seconds.

Running Performance Benchmark Tests
50 NexentaConnect View Edition User Guide
This page intentionally left blank

NexentaConnect View Edition User Guide 51
5
Calibrating Desktop Pools and Resources
This chapter includes the following topics:
• Overview
• Determining the Maximum Number of Desktops in a Desktop Pool
• Increasing the NexentaStor VSA Resources
• Reducing the NexentaStor VSA Resources
• Viewing the Results of the Calibration Test
• Viewing the Results of the Calibration Test
• Sending the Calibration Report by Email
• Understanding Results of the Calibration Benchmark Test
Overview
Using the incremental benchmarks, the Calibration wizard helps you to determine the maximum number of desktops, memory, CPU cores, or cache size that are supported with a selected I/O performance.
There are two calibration use cases. One calibrates the settings to achieve predefined latency. In the second use case a latency level is set and hardware resources are removed to achieve the minimal amount of hardware necessary to achieve the specified latency.
The calibration options are:
• Increase the number of desktops
You can run this calibration to determine the maximum number of desktops you can support in the desktop pool while maintaining a selected I/O performance level.
• Increase NexentaStor VSA resources
You can run this calibration to determine the amount of cache, memory, or CPU cores that you require for the specified I/O performance. You can use this calibration to increase the resources of the NexentaStor VSA.
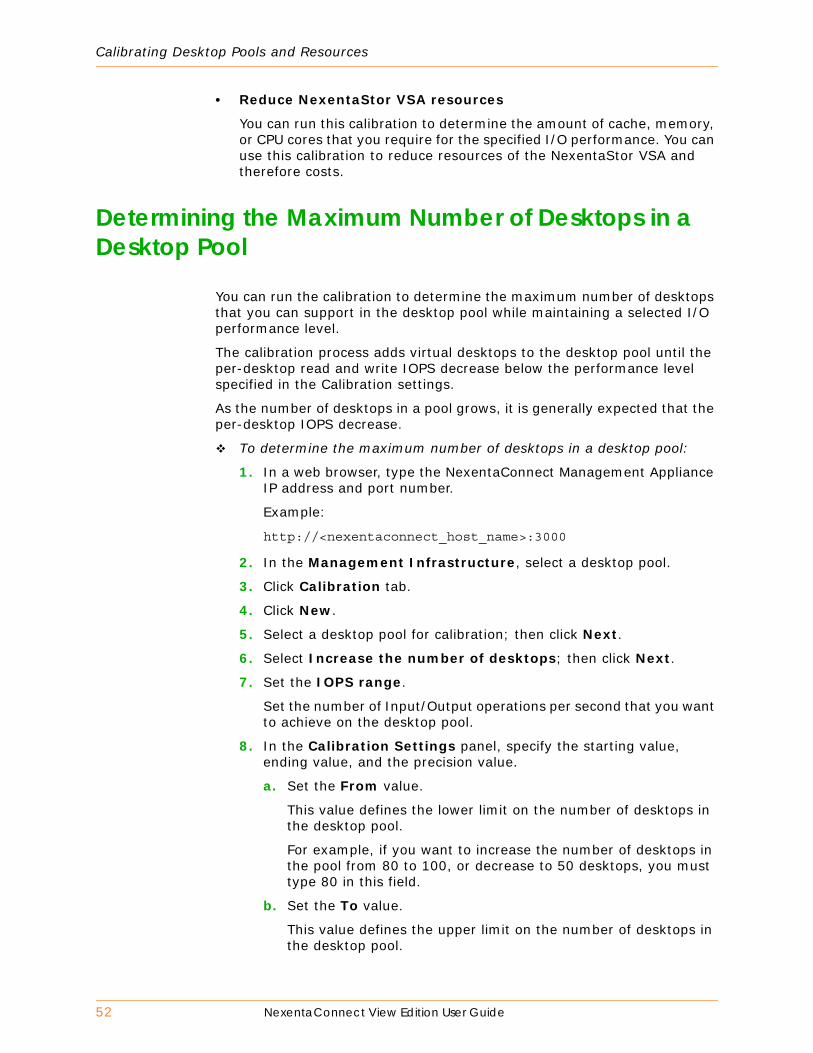
52 NexentaConnect View Edition User Guide
Calibrating Desktop Pools and Resources
• Reduce NexentaStor VSA resources
You can run this calibration to determine the amount of cache, memory, or CPU cores that you require for the specified I/O performance. You can use this calibration to reduce resources of the NexentaStor VSA and therefore costs.
Determining the Maximum Number of Desktops in a Desktop Pool
You can run the calibration to determine the maximum number of desktops that you can support in the desktop pool while maintaining a selected I/O performance level.
The calibration process adds virtual desktops to the desktop pool until the per-desktop read and write IOPS decrease below the performance level specified in the Calibration settings.
As the number of desktops in a pool grows, it is generally expected that the per-desktop IOPS decrease.
To determine the maximum number of desktops in a desktop pool:
1. In a web browser, type the NexentaConnect Management Appliance IP address and port number.
Example:
http://<nexentaconnect_host_name>:3000
2. In the Management Infrastructure, select a desktop pool.
3. Click Calibration tab.
4. Click New.
5. Select a desktop pool for calibration; then click Next.
6. Select Increase the number of desktops; then click Next.
7. Set the IOPS range.
Set the number of Input/Output operations per second that you want to achieve on the desktop pool.
8. In the Calibration Settings panel, specify the starting value, ending value, and the precision value.
a. Set the From value.
This value defines the lower limit on the number of desktops in the desktop pool.
For example, if you want to increase the number of desktops in the pool from 80 to 100, or decrease to 50 desktops, you must type 80 in this field.
b. Set the To value.
This value defines the upper limit on the number of desktops in the desktop pool.
Calibrating Desktop Pools and Resources
NexentaConnect View Edition User Guide 53
For example, if you want to increase the number of desktops in the pool from 80 to 100 desktops, you must type 100 in this field. If you want to decrease the number of desktops from 80 to 50, you must type 50 in this field.
c. Set the Precision value.
This value represents the accuracy of the desktop pool calibration benchmark test in terms of desktops.
For example, if you perform a calibration on a desktop pool of 80 desktops to increase the size of the desktop pool to 100 desktops and set the precision to 5, the result of the calibration has a deviation of 5 desktops. You may expect the desktop pool size to be 100 desktops, if the expected performance achieved on 100 desktops, or 95, 90, 85 desktops depending on the result of the test.
9. In the Benchmark Settings panel, specify the method and parameters for the benchmark tests that you use.
a. Click the arrows to select one of the following Mechanism type.
• IOMeter
• SQLIO
This value defines the type of test that you use to calibrate the optimum number of desktops or resources.
b. Click the arrows to select a Read/Write ratio of the total IOPS that you need to measure.
This option only applies to the IOMeter tests.
This value sets the ratio of read-to-write operations that the benchmark tests perform.
The options are:
• 100% reads (0% writes)• 75% reads, 25% writes• 50% reads, 50% writes• 25% reads, 75% writes• (0% reads) 100% writes
c. Click the arrows to set the Duration, in seconds.
This value defines how long each testing interval lasts.
d. Click the arrows to set the Benchmark success threshold %.
This option defines the percentage of desktops on which NexentaConnect can run the calibration test. The default is 100%.
NexentaConnect evaluates the desktop pool and determines if it can run the test on the specified number of desktops. If a number of desktops meets the percentage criteria, then the NexentaConnect performs benchmark tests for calibration. If the percentage of desktops does not meet the criteria, then the NexentaConnect completes the benchmark tests for calibration with error or fails.

54 NexentaConnect View Edition User Guide
Calibrating Desktop Pools and Resources
For example, if you have a desktop pool with 100 desktops and the threshold is 70%, then the benchmark test must succeed at least on 70 desktops for a successful completion of the test.
Even if you set a threshold, the benchmark test does not limit the number of desktops to test. However, it sets the minimum number of desktops that must be tested.
10.Optionally, select the Schedule the task run checkbox to plan the execution of the benchmark, then click Next.
a. Specify the schedule parameters:
• Frequency.
The options are:
• Once
• Hourly
• Daily
• Weekly
• Monthly
b. Depending on the selected frequency, select the time.
c. Optionally, select Send results to e-mail.
11.Click Calibrate.
The calibration performs the following steps:
a. Runs the selected benchmark test.
b. Ensures that the read/write IOPS meet the selected criteria.
If the criteria is met, NexentaConnect View Edition adds desktops to the pool.
c. Repeat Step a through Step b until one of the following conditions are met:
• Storage performance decrease below the minimum number of read/write IOPS, that you have previously specified.
• The maximum number of desktops for a given pool match the value that you previously specified in the Precision field.
12.Proceed to one of the following topics: Viewing the Results of the Calibration Test, Sending the Calibration Report by Email, Understanding Results of the Calibration Benchmark Test
Increasing the NexentaStor VSA Resources
You can run the Increase Resources calibration to determine and automatically increase the resources of the NexentaStor VSA(s) according to the I/O performance that you specify in the calibration wizard.

Calibrating Desktop Pools and Resources
NexentaConnect View Edition User Guide 55
To increase the NexentaStor VSA resources:
1. In a web browser, type the NexentaConnect Management Appliance IP address and port number.
Example:
http://<nexentaconnect_host_name>:3000
2. In the Management infrastructure, select a desktop pool.
3. Click Calibration tab.
4. Click New.
5. In the Desktop pool calibration screen, select the desktop pool that you want to use to perform the test, and then click Next.
6. In the Select a calibration type screen, select Increase NexentaStor VSA resources.
a. Select one of the following resources that you want to calibrate.
The options are:
• Memory
• Cores
• Cache
b. Click Next.
7. In the IOPS Settings panel, set Total IOPS, Read IOPS, or Write IOPS to a value greater than zero.
The values that appear in the calibration configuration page are based on the results from the previous calibration that you executed on the selected pool.
a. Type the Total IOPS.
This value, as a performance value, represents the minimum number of IOPS that must occur in the test interval for each desktop in the pool.
b. Optionally, set the minimum read/write IOPS manually.
1) Select Manually set the minimum read/write IOPS.
2) Set the Read IOPS.
This value represents the minimum number of read IOPS operations that must occur during each benchmark test interval.
3) Set the Write IOPS.
This value represents the number of write IOPS operations that must occur during each benchmark test interval.
8. In the Calibration Settings panel, select the starting value, ending value, size of the incremental step, and maximum difference between the original desktop pool and the resulting desktop pool.
a. Set the Current value.

56 NexentaConnect View Edition User Guide
Calibrating Desktop Pools and Resources
This value defines the current resource allocation for each desktop pools.
b. Set the Max value.
This value defines the upper limit on the resource allocation to the desktop pools.
c. Set the Step value.
This value determines whether the resources are automatically decreased every time that the test is executed.
The default values are:
• CPU core default is 1 core.
• Memory default is 1 GB.
• Disk cache default is 1 GB.
d. Set the Precision value.
This value represents the accuracy of the desktop pool calibration benchmark test in terms of desktops.
For example, if you perform a calibration on a desktop pool of 80 desktops to increase the size of the desktop pool to 100 desktops and set the precision to 5, the result of the calibration has a deviation of 5 desktops. You may expect the desktop pool size to be 100 desktops, if the expected performance achieved on 100 desktops, or 95, 90, 85 desktops depending on the result of the test.
9. In the Benchmark Settings panel, specify the method and parameters for the benchmark tests that you use.
a. Click the arrow to select on of the following Mechanism type.
• IOMeter
• SQLIO
This value defines the type of test that you use to calibrate the optimum number of desktops or resources.
b. Click the arrows to set the Duration, in seconds.
This value defines how long each testing interval lasts.
c. Click the arrows to select a Read/Write ratio of the total IOPS that you need to measure.
This option only applies to the IOMeter tests.
This value sets the ratio of read-to-write operations that the benchmark tests perform.
The options are:
• 100% reads (0% writes)• 75% reads, 25% writes• 50% reads, 50% writes• 25% reads, 75% writes• (0% reads), 100% writes

Calibrating Desktop Pools and Resources
NexentaConnect View Edition User Guide 57
d. Set the Benchmark success threshold %.
This option defines the percentage of desktops on which NexentaConnect View Edition can run the calibration test. The default is 100%.
NexentaConnect evaluates the desktop pool and determines if it can run the test on the specified number of desktops. If a number of desktops meets the percentage criteria, then the NexentaConnect performs a benchmark tests for calibration. If the percentage of desktops does not meet the criteria, then the NexentaConnect View Edition completes the benchmark tests for calibration with error or fails.
For example, if you have a desktop pool with 100 desktops and the threshold is 70%, then the benchmark test must succeed at least on 70 desktops for a successful completion of the test.
Even if you set a threshold, the benchmark test does not limit the number of desktops to test. However, it sets the minimum number of desktops that must be tested.
10.Optionally, select the Schedule the task run checkbox to plan the execution of the benchmark, then click Next.
a. Specify the schedule parameters:
• Frequency.
The options are:
• Once
• Hourly
• Daily
• Weekly
• Monthly
b. Depending on the selected frequency, select the time.
c. Optionally, select Send results to e-mail.
11.Click Calibrate.
The calibration performs the following steps:
a. Runs the selected benchmark test.
b. Ensures that the read/write IOPS meet the selected criteria.
If the criteria is met, NexentaConnect View Edition adds desktops to the pool.
c. Repeats Step b through Step b until one of the following conditions are met:
• Storage performance decrease below the minimum number of read/write IOPS, that you have previously specified.
• The maximum number of desktops for a given pool match the value that you previously specified in the Precision field.

58 NexentaConnect View Edition User Guide
Calibrating Desktop Pools and Resources
12.Proceed to one of the following topics: Viewing the Results of the Calibration Test, Sending the Calibration Report by Email, Understanding Results of the Calibration Benchmark Test
Reducing the NexentaStor VSA Resources
You can run this calibration test to determine and automatically decrease the resources of the NexentaStor VSA(s) according to the I/O performance that you specify in the calibration wizard.
You should use this calibration test to reduce the allocated resources, and therefore cost.
The calibration process reduces allocation of the selected resource to the NexentaStor VSA until the per-desktop read and write IOPS drop below the performance level specified in the Calibration settings.
As the number of CPU cores, memory size, or cache size allocated to the desktop pool decreases, it is generally expected that the number of per-desktop IOPS also decreases.
To reduce the NexentaStor VSA resources:
1. In a web browser, type the NexentaConnect Management Appliance IP address and port number.
Example:
http://<nexentaconnect_host_name>:3000
2. In the Management infrastructure, select a desktop pool.
3. Click Calibration tab.
4. Click New.
5. In the Desktop Pool calibration Wizard screen, select the desktop pool that you want to use to perform the test, and then click Next.
6. Select Reduce NexentaStor VSA resources, and then click Next.
a. Select the resource to calibrate.
The options are:
• Memory
• Cores
• Cache
b. Click Next.
7. In the IOPS Settings panel, set Total IOPS, Read IOPS, or Write IOPS to a value greater than zero.
The values that appear in the calibration configuration page are based on the results from the previous benchmark tests that you executed on the selected pool.
c. Type the Total IOPS.

Calibrating Desktop Pools and Resources
NexentaConnect View Edition User Guide 59
This value, as a performance value, represents the minimum number of IOPS that must occur in the test interval for each desktop in the pool.
d. Optionally, set the minimum read/write IOPS manually.
1) Select Manually set the minimum read/write IOPS .
2) Set the Read IOPS.
This is the minimum number of read IOPS operations that must occur during each benchmark test interval.
3) Set the Write IOPS.
This is the number of write IOPS operations that must occur during each benchmark test interval.
8. In the Calibration Settings panel, set the starting value, ending value, size of the incremental step, and maximum difference between the original desktop pool and the resulting desktop pool.
a. Set the Current value.
This value defines the current resource allocation to the desktop pool.
b. Set the Min value.
This value defines the lower limit on the resource allocation for a desktop pool.
c. Set the Step value.
This value determines whether the resources are automatically decreased every time that the test is executed. Defaults are:
• CPU core default is 1 core.
• RAM memory default is 1 GB.
• Disk cache default is 1 GB.
d. Set the Precision value. Click the arrows.
This value represents the accuracy of the desktop pool calibration benchmark test in terms of desktops.
For example, if you perform a calibration on a desktop pool of 80 desktops to increase the size of the desktop pool to 100 desktops and set the precision to 5, the result of the calibration has a deviation of 5 desktops. You may expect the desktop pool size to be 100 desktops, if the expected performance achieved on 100 desktops, or 95, 90, 85 desktops depending on the result of the test.
9. In the Benchmark Settings panel, specify the method and parameters for the benchmark tests that you use.
a. Click the arrow to select one of the following Mechanism type.
• IOMeter
• SQLIO

60 NexentaConnect View Edition User Guide
Calibrating Desktop Pools and Resources
This value defines the type of test that you use to calibrate the optimum number of desktops or resources.
b. Click the arrows to set the Duration, in seconds.
This value defines how long each testing interval lasts.
c. Click the arrows to select a Read/Write ratio of the total IOPS that you need to measure.
This option only applies to the IOMeter tests.
This value sets the ratio of read-to-write operations that the benchmark tests perform.
The options are:
• 100% reads, (0% writes)• 75% reads, 25% writes• 50% reads, 50% writes• 25% reads, 75% writes• (0% reads), 100% writes
d. Set the Benchmark success threshold %.
This option defines the percentage of desktops on which NexentaConnect View Edition can run the calibration test. The default is 100%.
NexentaConnect evaluates the desktop pool and determines if it can run the test on the specified number of desktops. If a number of desktops meets the percentage criteria, then the NexentaConnect View Edition performs benchmark tests for calibration. If the percentage of desktops does not meet the criteria, then the NexentaConnect completes the benchmark tests for calibration with error or fails.
For example, if you have a desktop pool with 100 desktops and the threshold is 70%, then the benchmark test must succeed at least on 70 desktops for a successful completion of the test.
Even if you set a threshold, the benchmark test does not limit the number of desktops to test. However, it sets the minimum number of desktops that must be tested.
10.Optionally, select the Schedule the task run checkbox to plan the execution of the benchmark, then click Next.
a. Specify the schedule parameters:
• Frequency.
The options are:
• Once
• Hourly
• Daily
• Weekly
• Monthly
b. Depending on the selected frequency, select the time.

Calibrating Desktop Pools and Resources
NexentaConnect View Edition User Guide 61
c. Optionally, select Send results to e-mail.
11.Click Calibrate.
The calibration performs the following steps:
a. Runs the selected benchmark test.
b. Ensures that the read/write IOPS meet the selected criteria.
If the criteria is met, then NexentaConnect View Edition adds desktops to the pool.
c. Repeat Step a through Step b until one of the following conditions are met:
• Storage performance decrease below the minimum number of read/write IOPS, that you have previously specified.
• The maximum number of desktops for a given pool match the value that you previously specified in the Precision field.
12.Proceed to one of the following topics: , Viewing the Results of the Calibration Test, Sending the Calibration Report by Email, Understanding Results of the Calibration Benchmark Test
Viewing the Results of the Calibration Test
You can view the results of the calibration test in the Calibration tab in the NexentaConnect View Edition working area.
To view the results of the calibration test:
1. In a web browser, type the NexentaConnect Management Appliance IP address and port number.
Example:
http://<nexentaconnect_host_name>:3000
2. From the Objects list panel, select a desktop pool.
3. Click Calibration tab. Expand the page to view the content clearly.
4. Click the calibration report line item that you want to view to display the report on read/write IOPS, bandwidth, and latency.
For more information, see Understanding Results of the Calibration Benchmark Test.
5. If you select a multi-step benchmark, click Chart to view the following options.
• Read/Write Operations
• Read/Write MB
• Read/Write Latency
Select only one checkbox at a time to view a chart.

62 NexentaConnect View Edition User Guide
Calibrating Desktop Pools and Resources
Sending the Calibration Report by Email
You can send the calibration report to the email address that you previously configured when you set up the notifications in NexentaConnect.
For more information on how to configure the notification system in NexentaConnect View Edition, see the NexentaConnect View Edition Installation Guide.
To send the calibration report by e-mail:
1. In a web browser, type the NexentaConnect Management Appliance IP address and port number.
Example:
http://<nexentaconnect_host_name>:3000
2. From the Objects List panel, select a desktop pool.
3. Click the Calibration tab. Expand the page to view the content clearly.
4. Send a calibration report by e-mail by selecting a calibration line item, and click the Report button.
5. To send an individual calibration report by email, select a line item in the Calibration Benchmarks pane and click the Report button.
6. Click Yes to confirm sending the report by e-mail.
A copy of the report is sent to the e-mail address that you specified in Settings > SMTP and Notifications > Statistics e-mails.

Calibrating Desktop Pools and Resources
NexentaConnect View Edition User Guide 63
Understanding Results of the Calibration Benchmark Test
The following topic describes the results from the calibration tests.
Figure 5-1: Sample Results Calibration
The following table describes the report of the calibration results.
Table 5-1: Calibration Results
Field Description
Calibration Desktops Duration of the benchmark test.
Results Number of desktops that have been added.
Started Start time of the calibration test.
Fished Completion time of the calibration test.
Desktop Pool Name of the calibrated desktop pool.
Run Parameters Setting used for calibration.
Property Calibrated object
From Number of starting desktops
To Maximum number of desktops to create.
Step Increment number of desktops added to pool by this value.
Benchmark mechanism Test method that has been used to determine IOPS. The options are:• SQLIO • IOMeter.
Write IOPS Number of write operations that have been measured.
Read IOPS Number of write operations that have been measured.
Calibration Benchmarks List of tests performed for calibration.

64 NexentaConnect View Edition User Guide
Calibrating Desktop Pools and Resources
Type Test method used to determine IOPS. Options are: SQLIO, IOMeter.
Started Start of specific calibration test.
Fished End of specific calibration test.
Benchmark IOMeter Duration of the calibration test.
Started Start time of the calibration test.
Fished Completion time of test.
Status message Indicates success or failure of test.
Benchmark Parameters Parameters set in Configuration page of Calibration wizard.
Desktop pool Name of the desktop pool that has been tested.
Desktops count Number of desktops that have been tested.
Duration (seconds) Length of time that a test runs on each desktop.
Reads Percentage of total IOPS that were measured for read operations
Writes Percentage of total IOPS that were measured for write operations
Benchmark Results and Charts Listing of returned results of test.
Write IOPS Number of write operation that have been performed.
Write Bandwidth (MB/s) Network bandwidth that is required for the write operations and measured in MB/second
Average Write Latency (ms) Average latency that has occurred for write operations and is measured in milliseconds.
Read IOPS Number of read operations that have been performed.
Read Bandwidth (MB/s) Network bandwidth that is required for the read operations and measured in MB/second.
Average Read Latency Average latency that has occurred for read operations and is measured in milliseconds.
Table 5-1: Calibration Results (Continued)
Field Description

NexentaConnect View Edition User Guide 65
6
Managing Snapshots and Remote Backups
This section includes the following topics:
• About Snapshot Service
• About Replication Backups
• About Types of Snapshots and Remote Backups
• Creating a Schedule for a Snapshot Service
• Creating a Schedule for Remote Backup Service
• Rolling Back a Desktop Pool
• Restoring from Remote Backup
• Known Limitations
About Snapshot Service
NexentaConnect View Edition uses built-in ZFS snapshot that enables you to create unlimited number of snapshots of a desktop pool. You can then roll back a desktop pool or a single desktop to any previously taken snapshot.
Snapshot service enables you to:
• Create a read-only copy of a desktop pool
• Revert the state of data in a desktop pool or a single virtual desktop to a previously taken snapshot
• Schedule a snapshot service
• Implement a retention policy
• Take live snapshots
See Also:
• NexentaStor Auto-Sync User Guide
• NexentaStor User Guide
66 NexentaConnect View Edition User Guide
Managing Snapshots and Remote Backups
About Replication Backups
You can use NexentaConnect View Edition to create remote backups of a desktop pool or schedule remote backup services. Remote backup uses built-in ZFS snapshot, as well as ZFS send/receive mechanism to create and transfer the snapshots of a desktop pool from NexentaStor VSA to external NexentaStor by using the NexentaStor Remote Replication Protocol.
Replication backups enable you to:
• Create remote backups of a desktop pool
• Schedule a replication backup service
• Revert the state of data in a desktop pool or a single virtual desktop to a previously taken snapshot
• Implement a retention policy
• Take live snapshots
See Also:
• NexentaStor Auto-Sync User Guide
• NexentaStor User Guide
About Types of Snapshots and Remote Backups
You can create the following types of snapshots and remote backups:
• Live snapshot
When you create a live snapshot, NexentaConnect starts the desktops that were previously stopped. A snapshot service creates a snapshot of every desktop and then stores them with the virtual desktop. All virtual desktops remain accessible. Therefore, some data that users generate during the creation of a snapshot may not be included in the snapshot.
• Live Remote backup
When you create a live remote backup, NexentaConnect starts the desktops that were previously stopped. A remote backup service creates a snapshot of every desktop and sends them to the external NexentaStor appliance that you specify. All virtual desktops remain accessible. Therefore, some data that users generate during the creation of a snapshot may not be included in the remote backup.
!Caution:
When you roll back to a snapshot or restore from a remote backup, NexentaConnect only reverts the virtual machine’s data. It does not restore the desktop pool configuration.

Managing Snapshots and Remote Backups
NexentaConnect View Edition User Guide 67
• Regular snapshot
When you create a regular snapshot, NexentaConnect stops all desktops in a desktop pool. A snapshot service creates a snapshot of every desktop, and then stores them with the virtual desktop. All virtual desktops remain unaccessible. The creation of regular snapshots usually takes more time than the creation of live snapshots.
• Regular remote backup
When you create a regular remote backup, NexentaConnect stops all desktops in a desktop pool. A remote backup service creates a snapshot of every desktop and sends them to the external NexentaStor appliance that you specify. All virtual desktops remain unaccessible. The creation of regular remote backups usually takes more time than the creation of live remote backups.
Creating a Schedule for a Snapshot Service
You can create a snapshot schedule for a desktop pool. If you create a schedule for a snapshot service, then NexentaConnectcreates and saves the snapshots in the same location as the desktops on the NexentaStor VSA at a specified time. After NexentaConnect creates a snapshot, you can roll back the desktop pool or a single desktop to this snapshot.
To create a snapshot schedule:
1. In a web browser, type the NexentaConnect Management Appliance IP address and port number.
Example:
http://<nexentaconnect_host_name>:3000
2. In the Objects List, select the desktop pool.
3. In the Working Area, select Snapshots.
4. In the Snapshots tab, click Take a snapshot.
5. In the Snapshot title, type the name of the snapshot.
6. Depending on the type of a snapshot that you want to create, select, or leave blank the Live check box.
7. Perform one of the following actions:
• If you want to create a single snapshot, click Done.
• If you want to create a snapshot service, select Schedule.
1) Fill the required fields.
The following table describes the fields of the Snapshot service properties.
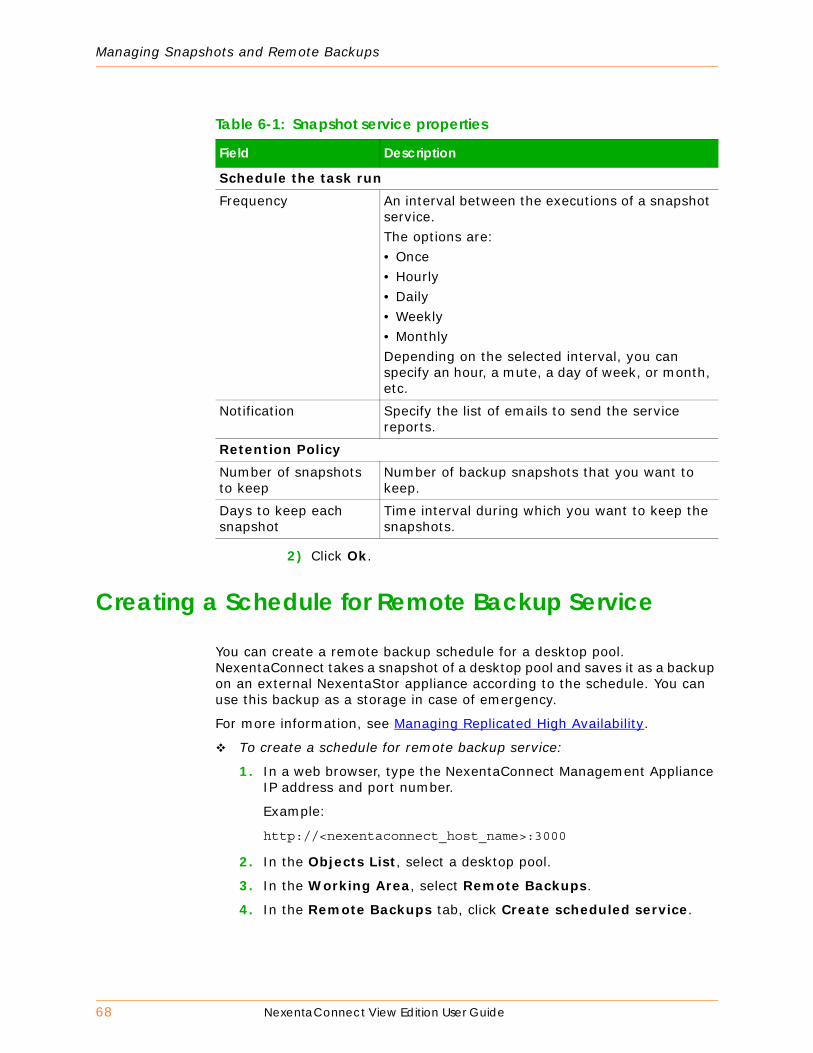
68 NexentaConnect View Edition User Guide
Managing Snapshots and Remote Backups
2) Click Ok.
Creating a Schedule for Remote Backup Service
You can create a remote backup schedule for a desktop pool. NexentaConnect takes a snapshot of a desktop pool and saves it as a backup on an external NexentaStor appliance according to the schedule. You can use this backup as a storage in case of emergency.
For more information, see Managing Replicated High Availability.
To create a schedule for remote backup service:
1. In a web browser, type the NexentaConnect Management Appliance IP address and port number.
Example:
http://<nexentaconnect_host_name>:3000
2. In the Objects List, select a desktop pool.
3. In the Working Area, select Remote Backups.
4. In the Remote Backups tab, click Create scheduled service.
Table 6-1: Snapshot service properties
Field Description
Schedule the task runFrequency An interval between the executions of a snapshot
service.The options are:• Once • Hourly• Daily • Weekly • MonthlyDepending on the selected interval, you can specify an hour, a mute, a day of week, or month, etc.
Notification Specify the list of emails to send the service reports.
Retention PolicyNumber of snapshots to keep
Number of backup snapshots that you want to keep.
Days to keep each snapshot
Time interval during which you want to keep the snapshots.

Managing Snapshots and Remote Backups
NexentaConnect View Edition User Guide 69
5. In the Take a remote backup of a desktop pool dialog box, fill the required fields.
The following table describes the remote backup schedule properties.
Table 6-2: Remote backup schedule properties
Field Description
Live Select this checkbox, if you want to create live snapshots. Leave this checkbox unchecked, if you want to create regular snapshots. For more information, see About Types of Snapshots and Remote Backups.
Schedule the task run
Frequency An interval between the executions of a remote backup service.The options are:• Once • Hourly• Daily • Weekly• MonthlyDepending on the selected interval, you can specify an hour, a minute, a day of week, or month, etc.
Send results by e-mail Select this checkbox, if you want to send a report with the details about the execution of the snapshot service by email.
Retention PolicyNumber of snapshots to keep
A number of a backup snapshots that you want to keep on the destination.
Days to keep each snapshot
A period of time during which you want to keep the snapshots on the destination.
Configure ReplicationReplica type The type of replica. NexentaConnect View Edition
supports the following types of replica: NexentaStor.
External NexentaStor A host name or an IP address of an external NexentaStor appliance, on which you want to store the backups of a desktop pool.You may use the Attach button to create a new ssh-binding with the remote NexentaStor appliance.
Dataset A path to the volume or folder in which you want to store the backups.
70 NexentaConnect View Edition User Guide
Managing Snapshots and Remote Backups
6. Click Ok.
Rolling Back a Desktop Pool
You can roll back a desktop pool or a single desktop to a specified snapshot. If you roll back a desktop pool, all desktops in the desktop pool revert their states. If you roll back a single desktop, only this desktop reverts its state.
To roll back a desktop pool:
1. a web browser, type the NexentaConnect Management Appliance IP address and port number.
Example:
http://<nexentaconnect_host_name>:3000
2. In the Objects List, select a desktop pool.
3. In the Working Area, select Snapshots tab.
4. In the Snapshots tab, select the snapshot to which you want to revert the desktop pool.
5. Click Rollback to snapshot and select on of the following:
• Desktop pool
• Single desktop
If you selected Desktop pool:
a. In the confirmation dialog box, click Yes.
If you selected Single desktop:
a. In the Select desktop dialog box, select the desktop that you want to roll back.
b. Click OK.
c. In the confirmation dialog box, click Yes.
See Also:
• Known Limitations
Restoring from Remote Backup
You can restore the data in a desktop pool, or a single desktop from a remote backup on the external NexentaStor.
!Note:
You cannot use local snapshots for high availability.

Managing Snapshots and Remote Backups
NexentaConnect View Edition User Guide 71
To restore from a remote backup:
1. In a web browser, type the NexentaConnect Management Appliance IP address and port number.
Example:
http://<nexentaconnect_host_name>:3000
2. In the Objects List, select a desktop pool.
3. In the Working Area, select Remote Backups.
4. In the Remote Backups tab, select a remote backup.
5. Click Revert.
Known Limitations
If you roll back a desktop pool to a snapshot or restore a desktop pool from a remote backup, you must consider the following:
• The desktop pool has more or fewer desktops than included to the snapshot or remote backup.
When you roll back a desktop pool to a snapshot or restore a desktop pool from a remote backup, NexentaConnect restores the desktops that existed when you created the snapshot or remote backup and that exist now. NexentaConnect will not restore the desktops that you deleted or added after you created the snapshot or remote backup.
• The desktop must be included in the snapshot.
If you roll back a single desktop to a snapshot or restore it from a remote backup, you must verify that this desktop is included in the snapshot or remote backup. Otherwise, the rollback or restore operation fails.

Managing Snapshots and Remote Backups
72 NexentaConnect View Edition User Guide
This page intentionally left blank

NexentaConnect View Edition User Guide 73
7
Changing Settings
This chapter includes the following topics:
• Overview of Desktop Pool Profiles
• Creating and Modifying the Desktop Pool Profiles
• Modifying the Desktop Pool Profile in the Desktop Pool Deploy Wizard
• Creating a New Desktop Pool Profile
• Deleting Desktop Pool Profiles
• Modifying the Storage Settings for a Desktop Pool Profile
• Modifying the Desktop Pool Profile Resource Settings
• Modifying the Desktop Pool Profile Desktop Settings
• Modifying the Notification System Settings
• Resetting the User Interface Settings
• Changing NexentaConnect View Edition Associated Servers
• Removing a VMware Horizon View Connection Server
• Adding a new VMware Horizon View Connection Server
• Removing a VMware vCenter Server
• Adding a new ESXi Server to ESXi Cluster
• Changing Existing Desktop Pool Configuration
• Destroying a Desktop Pool
• Cleaning Up the ESXi Cluster
• Recomposing a Linked-Clones Desktop Pool
• Reconfiguring a Desktop Pool
• Resyncing a Desktop Pool
• Retethering an ESXi Cluster

74 NexentaConnect View Edition User Guide
Changing Settings
Overview of Desktop Pool Profiles
When you create a desktop pool, you can apply pre-defined profiles to desktop pool types. Profiles provide a collection of storage, resource, and desktop configuration information. The following desktop pool profiles are included with NexentaConnect View Edition.
• Default-external
This default profile is optimized for use with an external NexentaStor as NFS storage.
• Default-persistent
This default profile is optimized for persistent virtual desktops that use NexentaStor VSA.
• Default-stateless
This default profile is optimized for performance by using a RAID10, also called stripe of mirrors. You can apply this profile to stateless deployments. It requires at least 4 drives for the storage pool.
• Default-SAN-accelerator
This default profile is optimized for SAN acceleration. NexentaConnect offloads I/O operations from the SAN back end. Therefore, it significantly improves performance during BootStorm, LoginStorm, Steady Workload, etc.
During the deployment, NexentaConnect View Edition creates a new profile on the base of the profile that you use for deployment, and assigns the name of the desktop pool to this profile. However, you can assign another name to the desktop profile when you apply it to a desktop pool with the VDI Deployment wizard. Later, you can apply the same profile again to create additional desktop pools.
You can modify the following parameters of the profile:
• Storage: ZFS, volume, and Zpool options
• Desktop: (VMware Horizon View) parameters
• Resource: CPU cores and memory settings
You cannot edit any information that appears in the Description field for the built-in desktop pool profiles.
Creating and Modifying the Desktop Pool Profiles
The following options are available to create and modify a desktop pool profile:
• Modifying the desktop pool profile in the Desktop Pool Deploy Wizard.
See Modifying the Desktop Pool Profile in the Desktop Pool Deploy Wizard

Changing Settings
NexentaConnect View Edition User Guide 75
• Copying the default profile, modifying and saving as new profile in Management infrastructure > Profiles
See Creating a New Desktop Pool Profile
Modifying the Desktop Pool Profile in the Desktop Pool Deploy Wizard
You can modify a desktop pool profile, when you deploy a desktop pool. If you edit the profile, NexentaConnect View Edition automatically saves the new profile in the list of desktop profiles with a name of the desktop pool. You cannot edit the name of the profile in the Desktop Pool Deploy Wizard.
For more information, see Creating and Modifying the Desktop Pool Profiles, Modifying the Storage Settings for a Desktop Pool Profile,
Creating a New Desktop Pool Profile
You can copy and modify an existing desktop pool profile, and save it as new.
To create a new desktop pool profile:
1. In a web browser, type the NexentaConnect Management Appliance IP address and port number.
Example:
http://<nexentaconnect_host_name>:3000
2. Click Settings > Profiles.
3. Select the profile and click Copy profile.
4. In the Name field, type the name for the new profile.
5. Optionally, in the Description field, type the description of the new profile.
6. In the Storage, Resource, and Desktop tabs, edit the settings as needed.
For more information, see Modifying the Storage Settings for a Desktop Pool Profile, Modifying the Desktop Pool Profile Resource Settings, Modifying the Desktop Pool Profile Desktop Settings.
7. Click Apply.
Deleting Desktop Pool Profiles
You can delete any desktop pool profile, except the default desktop pool profiles.
To delete a desktop pool profile:
1. In a web browser, type the NexentaConnect Management Appliance IP address and port number.

76 NexentaConnect View Edition User Guide
Changing Settings
Example:
http://<nexentaconnect_host_name>:3000
2. Click Profiles.
3. Select the profile and click Delete.
4. Click Yes to confirm.
Modifying the Storage Settings for a Desktop Pool Profile
You can modify the storage settings in the default or custom profile as needed.
To modify the storage settings for a desktop pool profile:
1. In a web browser, type the NexentaConnect Management Appliance IP address and port number.
Example:
http://<nexentaconnect_host_name>:3000
2. Click Settings > Profiles.
3. Select the profile.
Scroll through the list of Names and click the profile that you want to edit.
The Description tab displays the general information about the profile.
4. Click Storage to edit any of the following settings for the profile that you selected:
• Storage ZFS
• Storage Volume
• Storage Zpool
• Storage Memory
All the fields list the current settings for the profile.
For more information, see Desktop Pool Profile Settings for Storage.
a. Scroll to view all the options that you can modify.
b. Modify all options as needed.
c. Click the arrows to select from a list of field options.
!Note:
If you want to edit the default profile, you must copy it, edit as required, and save as a new profile.
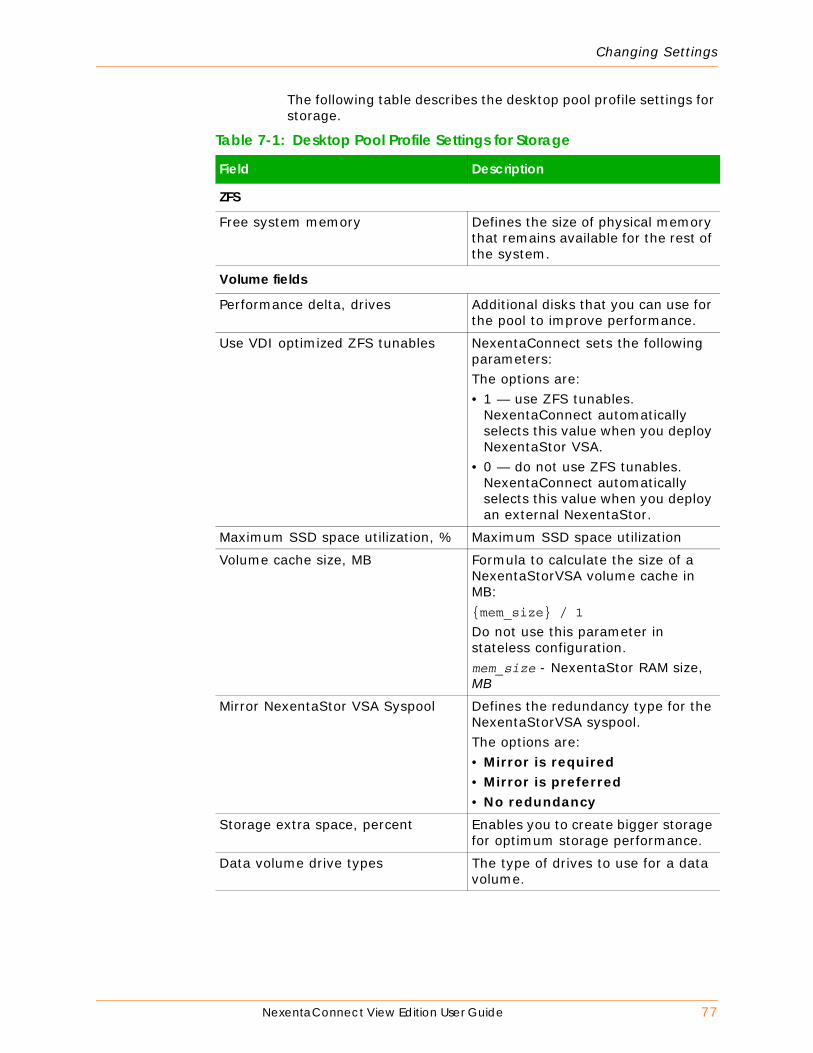
Changing Settings
NexentaConnect View Edition User Guide 77
The following table describes the desktop pool profile settings for storage.
Table 7-1: Desktop Pool Profile Settings for Storage
Field Description
ZFS
Free system memory Defines the size of physical memory that remains available for the rest of the system.
Volume fields
Performance delta, drives Additional disks that you can use for the pool to improve performance.
Use VDI optimized ZFS tunables NexentaConnect sets the following parameters: The options are:• 1 — use ZFS tunables.
NexentaConnect automatically selects this value when you deploy NexentaStor VSA.
• 0 — do not use ZFS tunables. NexentaConnect automatically selects this value when you deploy an external NexentaStor.
Maximum SSD space utilization, % Maximum SSD space utilization
Volume cache size, MB Formula to calculate the size of a NexentaStorVSA volume cache in MB:{mem_size} / 1
Do not use this parameter in stateless configuration.mem_size - NexentaStor RAM size, MB
Mirror NexentaStor VSA Syspool Defines the redundancy type for the NexentaStorVSA syspool.The options are:• Mirror is required • Mirror is preferred • No redundancy
Storage extra space, percent Enables you to create bigger storage for optimum storage performance.
Data volume drive types The type of drives to use for a data volume.

78 NexentaConnect View Edition User Guide
Changing Settings
Volume log size, MB Formula to calculate a NexentaStor volume log size in MB:{mem_size} / 1
mem_size - NexentaStor RAM size.
Data volume RAID configuration The RAID configuration for a data volume.
NexentaStor clone location Type of the datastore where you store the NexentaStor VSA.
Zpool fields
Data deduplication Controls the usage of the deduplication algorithm. The values are on | off | verify | sha256.
Dataset compression Controls the usage of the compression algorithm on new data.
ZIL synchronicity file system’s transaction policy
Determines synchronous behavior of filesystem's transactions.The options are:• standard — synchronous
filesystem transactions, such as fsync, O_DSYNC, O_SYNC, and others, are written to the intent log.
• always — every filesystem transaction is written and flushed to a stable storage that may lead to a significant performance penalty.
• disabled — synchronous requests are disabled.
Table 7-1: Desktop Pool Profile Settings for Storage (Continued)
Field Description

Changing Settings
NexentaConnect View Edition User Guide 79
5. Click Save.
Modifying the Desktop Pool Profile Resource Settings
You can modify the desktop pool profile resource settings as needed.
To modify the desktop pool profile resource settings:
1. In a web browser, type the NexentaConnect Management Appliance IP address and port number.
File system block size Applies a suggested block size to files in a filesystem. This property is designed for use with database workloads. Block sizes are automatically adjusted by ZFS according to the internal algorithms that are optimized for typical access patterns. These algorithms might be suboptimal for databases that use very large files and are accessed in small random chunks.The options are:• 512 • 1K • 2K • 4K • 8K • 16K • 32K • 64K • 128K
Advanced
Write cache type Select the write ZIL type.The options are:• ZIL — use this option if
deduplication is disabled. • Special vdev — use this option if
deduplication is enabled.
Table 7-1: Desktop Pool Profile Settings for Storage (Continued)
Field Description
!Note:
If you want to edit the default profile, you must copy it, edit as required, and save as a new profile.

80 NexentaConnect View Edition User Guide
Changing Settings
Example:
http://<nexentaconnect_host_name>:3000
2. Click Settings >Profiles.
3. Select a profile.
Scroll through the list of Names, and select the profile to edit.
4. Click Resource tab and edit the resources settings.
You can write a formula depending on the required parameters.
For more information, see Desktop Pool Profile Settings for Resources.
5. Edit the Resource fields, as needed.
a. Scroll to see all editable fields.
b. Type the change in the field.
c. Click the arrows to select from a list of field options.
d. Click Save.
The following table describes the desktop pool profile settings for resources.
!Note:
These settings are only for advanced users. Use the predefined profiles, if you perform the deployment for the first time.
Table 7-2: Desktop Pool Profile Settings for Resources
Field Description
Virtual NexentaStor CPU cores number calculation code
Suggested options include:desktops_min_count - Minimum desktop count in the desktop pooldesktops_max_count - Maximum desktop count in the desktop poolhost_cores - Total CPU core number per cluster nodens_count - Total NexentaStor count in the clusteresx_host_count - The number of cluster nodes

Changing Settings
NexentaConnect View Edition User Guide 81
Modifying the Desktop Pool Profile Desktop Settings
You can modify the desktop settings in a new desktop pool profile.
To modify the desktop pool profile desktop settings:
1. In a web browser, type the NexentaConnect Management Appliance IP address and port number.
Example:
http://<nexentaconnect_host_name>:3000
Virtual Desktop CPU MHz calculation code
Suggested options include:desktops_min_count — Minimum desktop count in the desktop pooldesktops_max_count — Maximum desktop count in the desktop pooldesktop_template_cpu_size — Desktop template cpu sizeesx_host_count — Total cluster nodes count
Virtual Desktop Memory (MB) calculation code
Suggested options include:desktops_min_count - Minimum desktop count in the desktop pooldesktops_max_count - Maximum desktop count in the desktop pooldesktop_template_mem_size - Desktop template memory sizeesx_host_count - Total cluster nodes count
Virtual NexentaStor Memory (MB) calculation code
Suggested options include:desktops_min_count - Minimum desktop count in the desktop pooldesktops_max_count - Maximum desktop count in the desktop poolns_memory_size - Maximum NexentaStor memory sizens_count - Total NexentaStor count in the cluster
Max desktops per core Maximum number of desktops per one CPU core.
Table 7-2: Desktop Pool Profile Settings for Resources (Continued)
Field Description
!Note:
If you want to edit the default profile, you must copy it, edit as required, and save as a new profile.

82 NexentaConnect View Edition User Guide
Changing Settings
2. Click Settings > Profiles.
3. Select the profile to edit.
Scroll through the list of Names and click the profile that you want to edit.
4. Click Desktop tab to edit the following desktop settings:
• Pool settings
• Guest resources
• Replica
• Desktop Agent
• Deploy settings
For more information, see Desktop Pool Profile Settings for Desktop.
5. Edit the Desktop fields, as needed.
a. Scroll to see all the editable fields.
b. Type the change in the field.
c. Click the arrows in to select from a list of field options.
d. Click Save.
The following table describes the desktop pool profile settings for desktop.
Table 7-3: Desktop Pool Profile Settings for Desktop
Field Options, Description, and Use
Pool settings
Remote desktop power policy The options are:• AlwaysOn — View Connection Server
actively monitors and starts the desktops as necessary.
• Suspend — the action occurs, when a user logs off or when a pool does not use the desktop as a spare.
• PowerOff — the action takes place, when a user logs off or when a pool does not use the desktop as a spare.
• RemainOn — power state does not change when a user logs off or when a pool no longer uses the desktop as a spare.
Allow multiple sessions per user Enables the execution of multiple sessions for each user.

Changing Settings
NexentaConnect View Edition User Guide 83
HTML access Enables the users to connect to the VMware Horizon View desktops through a web browser using the Blast protocol. Therefore, you don’t need to install the VMware Horizon View Client on client devices. You must install it on all desktops.
Storage overcommit Specifies the storage overcommit level. The higher level you select, the more linked cloned desktops you can store on a datastore. The options are:• None — do not overcommit the
storage.• Conservative — 4 times the size of
the datastore.• Moderate — 7 times the size of the
datastore.• Aggressive — 15 times the size of the
datastore.
Reclaim VM disk space Enables the VMware ESXi host to reclaim the unused disk space on the linked clones.
Initiate reclamation when unused space on VM exceeds
Specifies the minimum threshold of unused disk space, in gigabytes, that must be accumulated on a linked clone disk to enable space reclamation. When a linked clone disk space reaches this threshold, the VMware ESXi initiates the reclaim disk space operation.
Refresh OS disk policy after logoff
The options are:• Always • Never
Delete or refresh desktop on logoff
The options are:• Default • DeleteOnUse • RefreshOnUse Not applicable for persistent (dedicated) pools.
Automatic logoff after session disconnect
The options are:• Never • Immediately
Guest resources
Table 7-3: Desktop Pool Profile Settings for Desktop (Continued)
Field Options, Description, and Use

84 NexentaConnect View Edition User Guide
Changing Settings
CPU reservation per desktop in MHz
CPU reservation formula for a desktop in MHz
Memory reservation per desktop in MB
Memory reservation formula for a desktop in MB
Adobe FlashFlash Throttling Specifies the time interval between
screen updates. The longer the interval, the more bandwidth utilization savings. The options are:• Disabled• Conservative• Moderate • Aggressive
Flash Quality Determines the quality of the Adobe flash animation on the page. The options are:• Do not control• Low• Medium• High
Storage Accelerator
Cache Refresh Interval, days Interval between cache regeneration. During the cache regeneration the VMware Horizon View clears the old hashes and fills it with new recently used data.
Blackout Times Specifies the schedule when cache regeneration is not performed. For example, specify the blackout time on weekday mornings when users start to work. Type the value in the following format:[weekday, Today - 1]:[hour]:[minute]You can specify multiple black out times by separating each time with a comma.
View Storage Accelerator Specifies whether to use the VMware Horizon View Storage Accelerator or not.
Deploy Settings
Headroom count Number of powered on desktops to maintain this pool
Table 7-3: Desktop Pool Profile Settings for Desktop (Continued)
Field Options, Description, and Use

Changing Settings
NexentaConnect View Edition User Guide 85
See Also:
• http://www.vmware.com/files/pdf/techpaper/vmware-view-storage-accelerator-host-caching-content-based-read-cache.pdf
Modifying the Notification System Settings
You can configure the notification system in the NexentaConnect View Edition, if you want to receive notifications, alerts, warnings, reports and other messages from the NexentaConnect Management Appliance.
To modify the notification system settings:
1. In a web browser, type the NexentaConnect Management Appliance IP address and port number.
Example:
http://<nexentaconnect_host_name>:3000
2. Click Settings.
3. In the SMTP Settings pane, modify the fields, as needed.
These fields define the target SMTP server that receives e-mail from the appliance.
For more information, see Notification System Settings: SMTP Settings
Number of desktops created in one iteration
Number of desktops created in one iteration. If you increase the value beyond 20 desktops at a time, you may cause provisioning errors.
Successful operations The percentage of successful operations.
Replica
Replica size multiplier The value of the replica size multiplier varies and ranges from 1.1 to 3. If you set the value below 2, you are unable to recompose the desktop pool. If you plan to recompose the desktop pool, you must set the value 2.1 or higher.
Desktop Agent
Desktop agent port Specify a TCP for Desktop Agent. The default value is 7777.
Table 7-3: Desktop Pool Profile Settings for Desktop (Continued)
Field Options, Description, and Use

86 NexentaConnect View Edition User Guide
Changing Settings
The following table describes the SMTP settings of the notification system.
4. In the Notification Settings pane, modify the fields, as needed.
These fields define the target SMTP server that receives mail from the appliance.
The following table describes notifications settings.
5. Select an action:
• Reset
You can use this action to reset the values to previously saved version.
• Apply
You can use this action to apply the changes to the NexentaConnect View Edition configuration.
Modifying the Authentication Settings
In the NexentaConnect Management Appliance you can create multiple users and assign roles for these users.
You can do the following operations with NexentaConnect users:
Table 7-4: Notification System Settings: SMTP Settings
Field Description
Hostname Type the name of SMTP host used for your mail
Protocol Select your SMTP protocol.
Port Type your SMTP listening port.
Timeout Type the amount of time to wait for response from your SMTP server that indicates a failed sent message. Measured in seconds.
Username Type the user name that is authorized to allow access to your SMTP server.
Password Type the password associated with the username.
Sender Account
An email address from which you will be receiving all NexentaConnect notifications.
Table 7-5: Notifications Settings
Field Description
E-mail Addresses for faults
Type one or more e-mail addresses for NexentaConnect View Edition to send the e-mails with alert and fault messages. You can type any valid e-mail address.
Send test e-mail Click this button to verify your SMTP settings.
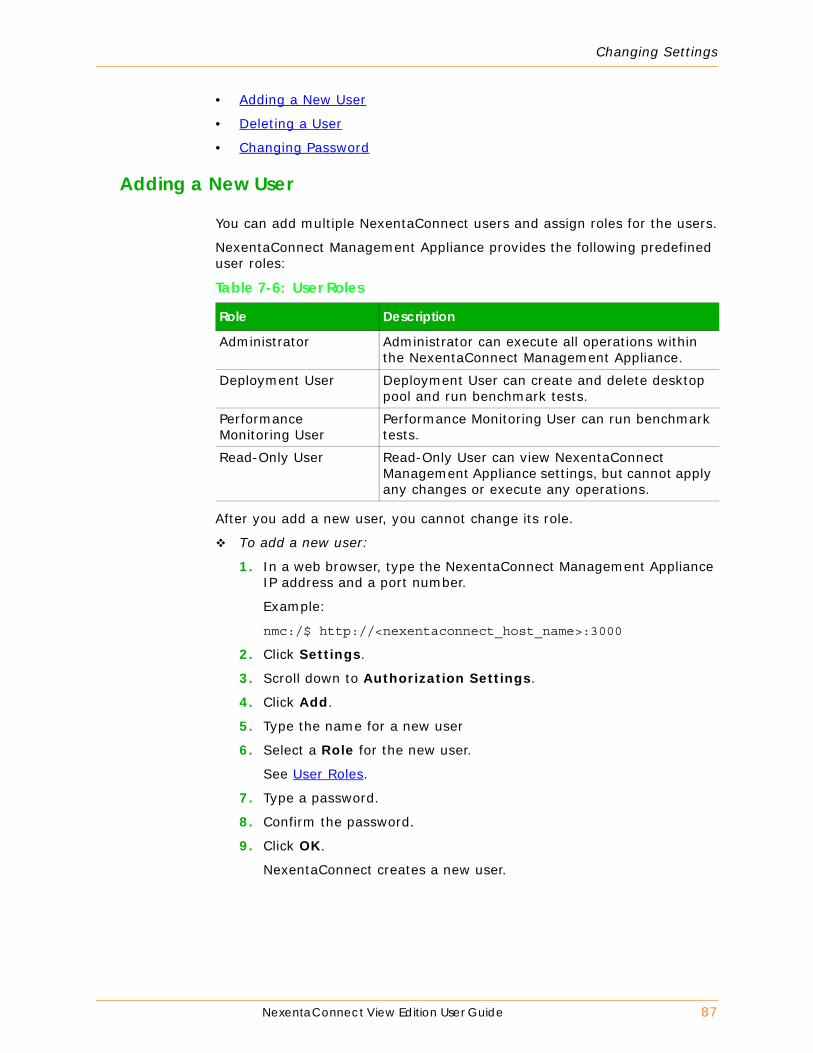
Changing Settings
NexentaConnect View Edition User Guide 87
• Adding a New User
• Deleting a User
• Changing Password
Adding a New User
You can add multiple NexentaConnect users and assign roles for the users.
NexentaConnect Management Appliance provides the following predefined user roles:
After you add a new user, you cannot change its role.
To add a new user:
1. In a web browser, type the NexentaConnect Management Appliance IP address and a port number.
Example:
nmc:/$ http://<nexentaconnect_host_name>:3000
2. Click Settings.
3. Scroll down to Authorization Settings.
4. Click Add.
5. Type the name for a new user
6. Select a Role for the new user.
See User Roles.
7. Type a password.
8. Confirm the password.
9. Click OK.
NexentaConnect creates a new user.
Table 7-6: User Roles
Role Description
Administrator Administrator can execute all operations within the NexentaConnect Management Appliance.
Deployment User Deployment User can create and delete desktop pool and run benchmark tests.
Performance Monitoring User
Performance Monitoring User can run benchmark tests.
Read-Only User Read-Only User can view NexentaConnect Management Appliance settings, but cannot apply any changes or execute any operations.

88 NexentaConnect View Edition User Guide
Changing Settings
Deleting a User
You can delete NexentaConnect users.
To delete a user:
1. In a web browser, type the NexentaConnect Management Appliance IP address and port number.
Example:
nmc:/$ http://<nexentaconnect_host_name>:3000
2. Click Settings > Settings.
3. Scroll down to Authorization Settings.
4. Select a user that you want to delete.
5. Click Remove.
6. Type the password.
7. Click OK.
NexentaConnect deletes the user.
Changing Password
You can change the password of for the existing user.
To change a password:
1. In a web browser, type the NexentaConnect Management Appliance IP address and a port number.
Example:
nmc:/$ http://<nexentaconnect_host_name>:3000
2. Click Settings.
3. Scroll down to Authorization Settings.
4. Select a user.
5. Click Update Password.
6. Type the current password and new password.
7. Confirm the password.
8. Click OK.
NexentaConnect changes the password of the selected user.
!Note:
Do not delete all users. Otherwise, you cannot log in to the NexentaConnect Management Appliance.
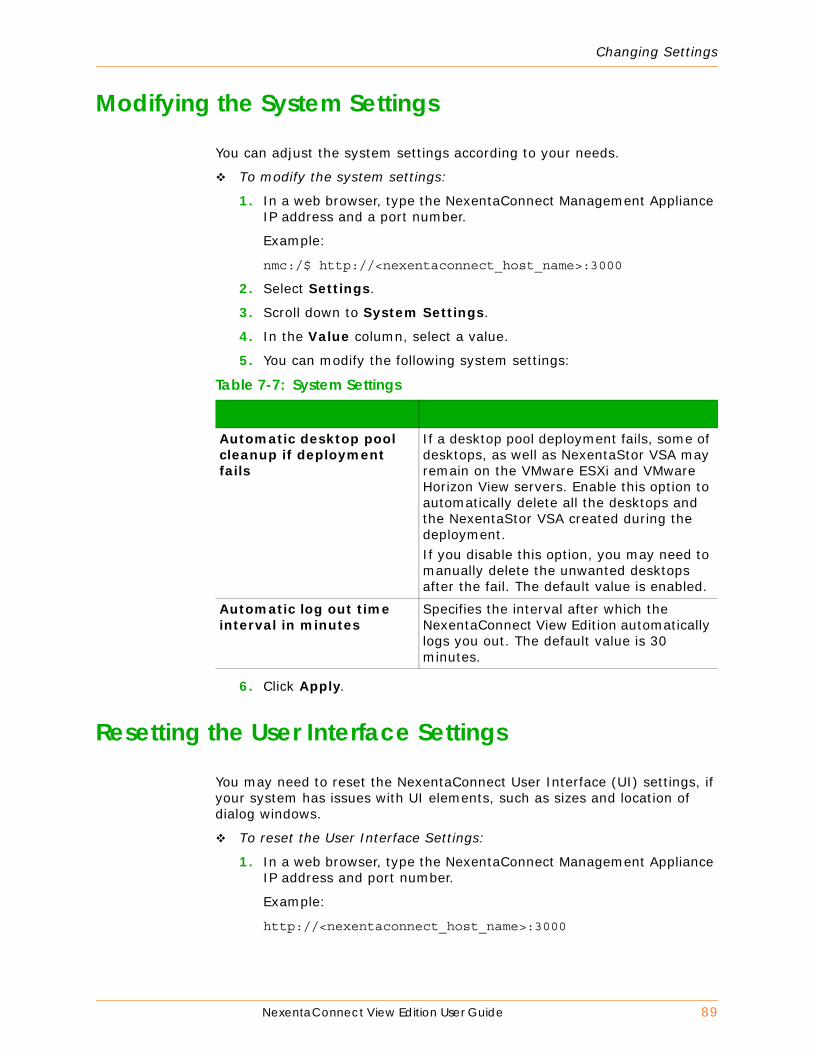
Changing Settings
NexentaConnect View Edition User Guide 89
Modifying the System Settings
You can adjust the system settings according to your needs.
To modify the system settings:
1. In a web browser, type the NexentaConnect Management Appliance IP address and a port number.
Example:
nmc:/$ http://<nexentaconnect_host_name>:3000
2. Select Settings.
3. Scroll down to System Settings.
4. In the Value column, select a value.
5. You can modify the following system settings:
6. Click Apply.
Resetting the User Interface Settings
You may need to reset the NexentaConnect User Interface (UI) settings, if your system has issues with UI elements, such as sizes and location of dialog windows.
To reset the User Interface Settings:
1. In a web browser, type the NexentaConnect Management Appliance IP address and port number.
Example:
http://<nexentaconnect_host_name>:3000
Table 7-7: System Settings
Automatic desktop pool cleanup if deployment fails
If a desktop pool deployment fails, some of desktops, as well as NexentaStor VSA may remain on the VMware ESXi and VMware Horizon View servers. Enable this option to automatically delete all the desktops and the NexentaStor VSA created during the deployment. If you disable this option, you may need to manually delete the unwanted desktops after the fail. The default value is enabled.
Automatic log out time interval in minutes
Specifies the interval after which the NexentaConnect View Edition automatically logs you out. The default value is 30 minutes.

90 NexentaConnect View Edition User Guide
Changing Settings
2. Click Settings.
3. Scroll down to User Interface Settings.
4. Click Restore defaults.
Changing NexentaConnect View Edition Associated Servers
NexentaConnect View Edition requires that you connect the VMware Horizon View Connection Server and vCenter Server to the NexentaConnect Management Appliance. You add these servers to the NexentaConnect configuration when you run the Initial Configuration Wizard. This section describes how to remove, add, or edit parameters for these servers.
You can verify the connected VMware Horizon View Connection Server and VMware vCenter server in the Management Infrastructure panel.
Removing a VMware Horizon View Connection Server
You can remove the connected VMware Horizon View Connection Server from the Objects list in. This operation disconnects it from NexentaConnect View Edition. Alternatively, you can remove the VMware Horizon View Connection Server in the Settings dialog box.
To remove a VMware Horizon View Connection Server:
1. In a web browser, type the NexentaConnect Management Appliance IP address and port number.
Example:
http://<nexentaconnect_host_name>:3000
2. In the Object List, select a VMware View Connection Server.
3. In the Working area, click Remove.
4. Click Yes to confirm.
When you remove a VMware Horizon View Connection Server, the associated vCenter Server also removes.
Adding a new VMware Horizon View Connection Server
You can add a new VMware Horizon View Connection Server to NexentaConnect View Edition any time after you completed the Initial Configuration Wizard.
To add a VMware Horizon View Connection server:
1. In a web browser, type the NexentaConnect Management Appliance IP address and port number.
Example:
http://<nexentaconnect_host_name>:3000

Changing Settings
NexentaConnect View Edition User Guide 91
2. In the Objects list, click Add > VMware View.
3. In the Add VMware Horizon View Connection Server dialog box, type the Hostname, Username, and Password of the VMware Horizon View Connection Server, and then click Add.
The hostname can be a fully qualified domain name, or an IP address.
Removing a VMware vCenter Server
You can remove the connected VMware vCenter Server from the Objects list in the NexentaConnect Management Appliance and disconnect it from NexentaConnect View Edition.
To remove a VMware vCenter Server from the Objects List:
1. In a web browser, type the NexentaConnect Management Appliance IP address and port number.
Example:
http://<nexentaconnect_host_name>:3000
2. From the Objects list panel, select the VMware vCenter Server.
3. In the Working Area, click Remove.
4. Click Yes to confirm.
Adding a VMware vCenter Server
You can add a new VMware vCenter Server, after you added the VMware Horizon View Connection Server.
To register a VMware vCenter server:
1. In a web browser, type the NexentaConnect Management Appliance IP address and port number.
Example:
http://<nexentaconnect_host_name>:3000
2. In the Objects list, click Add > vCenter.
3. In the Register VMware vCenter server dialog box, select the IP addresses of the VMware Horizon View Connection server and VMware vCenter server.
4. Type vCenter server login credentials.
5. Click Add.
Adding a new ESXi Server to ESXi Cluster
You can add a new ESXi server to ESXi Cluster. ESXi server must be configured and available.

92 NexentaConnect View Edition User Guide
Changing Settings
To add a new ESXi server to ESXi cluster:
1. In a web browser, type the NexentaConnect Management Appliance IP address and port number.
Example:
http://<nexentaconnect_host_name>:3000
2. In the Objects list, click Add > ESXi host.
3. In the Attach ESXi host dialog box, fill the required fields:
a. In the Cluster filed, select an ESXi cluster from the drop-down list.
b. In the ESXi hostname field, type the IP address, or host name of the ESXi host that you want to attach to cluster.
c. In the Login and Password fields, type the administrative credentials.
d. Optionally, select Allow insecure SSL connection.
4. Click Register.
Changing Existing Desktop Pool Configuration
You can change the configuration of a desktop pool manually. This option does not use the Calibration feature.
To change a desktop pool configuration:
1. In a web browser, type the NexentaConnect Management Appliance IP address and port number.
Example:
http://<nexentaconnect_host_name>:3000
2. In the Objects List panel, select a desktop pool.
3. Click Reconfigure.
The Reconfigure desktop pool dialog appears.
The information retrieved is based on the last benchmark test run on the desktop pool.
4. Click Resource settings to change memory or resource settings.
!Note:
When you add a new ESXi server to the ESXi Cluster, NexentaConnect View Edition does not allocate its resources automatically. If you want NexentaConnect to use the resources of the new ESXi server for a desktop pool(s), you must retether the ESXi cluster.For more information, see Retethering an ESXi Cluster

Changing Settings
NexentaConnect View Edition User Guide 93
The following table describes the Resource settings for desktop pool configuration.
5. Click Storage Settings to change data storage handling settings.
The following table describes the storage settings for desktop pool configuration
Table 7-8: Resource settings for desktop pool configuration
Field Description
Memory reservation for desktop
The amount of memory in GB or MB, that you want to reserve for each desktop in a desktop pool.
CPU reservation per desktop, MHz
The amount of CPU in MHz, that you want to reserve for each desktop in a desktop pool.
Memory per NexentaStor VSA The amount of memory, that you want to reserve for each NexentaStor VSA in a desktop pool.
Number of cores per NexentaStor VSA
The number of CPU cores, that you want to reserve for each NexentaStor VSA in a desktop pool.
Table 7-9: Storage Settings for Desktop Pool Configuration
Field Description
Data volume cache size The amount of physical disk space, that you want to assign for the data volume cache.
Data volume log size The amount of physical disk space, that you want to assign for the data volume log.
Data deduplication Controls the usage of data deduplication.
Dataset compression Determines the compression algorithm for in the desktop pool
ZIL synchronicity file systems’ transaction policy
Determines synchronous behavior of filesystem's transactions. • standard — synchronous filesystem
transactions, such as fsync, O_DSYNC, O_SYNC, and others, are written to the intent log.
• always — every filesystem transaction is written and flushed to a stable storage that may lead to a significant performance penalty.
• disabled — synchronous requests are disabled.
File system block size The size of the NexentaStor VSA file system block size.
Device I/O queue depth The number of I/O operations that can be run in parallel on a device.

94 NexentaConnect View Edition User Guide
Changing Settings
6. Click Desktop settings to change the desktop pool policies.
The following table describes the desktop settings for desktop pool configuration.
Device cache size ‘Read ahead’
Read ahead cache size for each virtual device in a pool.
Table 7-10: Desktop Settings for Desktop Pool Configuration
Field Description
Number of virtual desktops
The number of desktops, that you want to assign to the desktop pool
Delete or refresh desktop on logoff
Determines whether to delete or refresh a desktop after a user logs off.
Automatic logoff after session disconnect
Determines the log off policy when session terminates.
User assignment mode The options are:• NonPersistent • Persistent
Remote desktop power policy
Determines how a virtual machine behaves when the user logs off from the associated desktop.The options are:• AlwaysOn — View Connection Server
actively monitors and powers on the desktops as necessary.
• Suspend — the action takes place, when a user logs off or when a pool does not use the desktop as a spare.
• PowerOff — he action takes place, when a user logs off or when a pool does not use the desktop as a spare.
• RemainOn — the power state does not changed when a user logs off or when a pool is no longer using a desktop as a spare.
Default display protocol Select the display protocol that you want View Connection Server to use for communication with View clients.The options are:• PCoIP• RDP
Allow multiple sessions per user
Allow a user to connect to multiple desktops in the pool at the same time.
Table 7-9: Storage Settings for Desktop Pool Configuration (Continued)
Field Description

Changing Settings
NexentaConnect View Edition User Guide 95
7. Click Apply.
Destroying a Desktop Pool
You can destroy any existing desktop pool created using NexentaConnect. When you destroy a desktop pool, you delete all the components of the desktop pool from the ESXi Cluster.
To destroy a desktop pool:
1. In a web browser, type the NexentaConnect Management Appliance IP address and port number.
Example:
http://<nexentaconnect_host_name>:3000
2. In the Objects List, select a desktop pool.
3. In the Working Area, click Destroy.
4. In the confirmation dialog box, click Yes.
Cleaning Up the ESXi Cluster
When a desktop pool deploy fails, some components of the desktop pool may not be deleted from the ESXi Cluster. You can only see these components in the vCenter Inventory. When you run the NexentaConnect View Edition Cleanup, you remove all these components from an ESXi cluster.
To cleanup the ESXi cluster:
1. In a web browser, type the NexentaConnect Management Appliance IP address and port number.
Example:
http://<nexentaconnect_host_name>:3000
Refresh OS disk policy after logoff
Determines whether and when to refresh the OS disks for dedicated-assignment, linked-clone desktops.
Customization specification template
Select the type of customization specification.
Table 7-10: Desktop Settings for Desktop Pool Configuration
Field Description
!Note:
If you do not remove the components of the previous attempt to deploy the desktop pool, you may not be able to re-deploy the pool.

96 NexentaConnect View Edition User Guide
Changing Settings
2. In the Objects List, select an ESXi Cluster.
3. Click Cleanup Cluster.
4. In the confirmation dialog box, click Yes.
Recomposing a Linked-Clones Desktop Pool
You can update a desktop virtual snapshot in a Linked-Clones desktop pool, that you use in a desktop pool deployment by using the desktop pool recompose. For example, you installed the new components on the desktop pool virtual machine and need to distribute these changes across all the desktops in the desktop pool. Instead of destroying the pool and creating a new pool on a base of the updated template, you can use recomposing.
To recompose a desktop pool:
1. Install the new components on a desktop pool virtual machine.
2. Create a desktop pool virtual machine snapshot.
a. In the vSphere client, log in to vCenter.
b. In the vCenter Inventory panel, right-click the desktop pool virtual machine and select Snapshot > Take Snapshot.
c. Save the new snapshot.
3. In a web browser, type the NexentaConnect Management Appliance IP address and port number.
Example:
http://<nexentaconnect_host_name>:3000
4. In the Objects List, select a desktop pool.
5. In the Working Area, click Recompose.
6. In the Recompose desktop pool:<desktop_pool_name> dialog box, click Browse.
7. Select a desktop virtual machine.
8. Select a snapshot of a virtual machine from Step 2.
9. Click Apply.
Recomposing the desktop pool takes some time depending upon the number and type of desktops that are created for the pool.
!Note:
You must switch off virtual desktops, before you create a snapshot.

Changing Settings
NexentaConnect View Edition User Guide 97
Reconfiguring a Desktop Pool
You can reconfigure the settings of a desktop pool any time after deployment.
To reconfigure a desktop pool:
1. In a web browser, type the NexentaConnect Management Appliance IP address and port number.
Example:
http://<nexentaconnect_host_name>:3000
2. In the Objects List, select a desktop pool.
3. In the Working Area, click Reconfigure.
NexentaConnect loads the configurable parameters.
4. In the Reconfigure desktop pool: desktop_pool_name wizard, change the required settings:
The options are:
• Resource Settings
• Storage Settings
• Desktop Settings
You can edit only one parameter per reconfigure operation.
For more information, see Resource settings for desktop pool configuration, Storage Settings for Desktop Pool Configuration, Desktop Settings for Desktop Pool Configuration
5. Click Apply.
Reconfiguring the desktop pool takes some time depending upon the number and types of desktops that are created for the pool.
Resyncing a Desktop Pool
If the VMware vCenter loses connection to virtual desktops, the desktops may change their status to inactive. This may occur in case of a network error. Resync your desktop pool to update states of virtual desktops and restore connection to desktops.
To resync a desktop pool:
1. In a web browser, type the NexentaConnect Management Appliance IP address and port number.
Example:
http://<nexentaconnect_host_name>:3000
2. In the Objects List, select an ESXi cluster.
3. In the Working Area, click Resync.

98 NexentaConnect View Edition User Guide
Changing Settings
4. In the confirmation dialog, click Yes.
Retethering an ESXi Cluster
You can adjust the distribution of the desktop pool(s) across the ESXi cluster for better utilization of resources. Retethering ensures that all virtual desktops and the VSA that serves as their storage are located on the same VMware ESXi host. You may want to use this functionality, if you add a new ESXi server to the ESXi cluster.
For more information, see Adding a new ESXi Server to ESXi Cluster.
You can check the distribution of the desktop pool(s) and desktops across the ESXi cluster in VMware vCenter.
To retether an ESXi Cluster:
1. In a web browser, type the NexentaConnect Management Appliance IP address and port number.
Example:
http://<nexentaconnect_host_name>:3000
2. In the Objects List, select an ESXi cluster.
3. In the Working Area, click Retether.
4. Optionally, select Use Storage VMotion checkbox.
5. In the confirmation dialog, click Yes.
!Note:
The ESXi cluster must include at least two ESXi servers.

NexentaConnect View Edition User Guide 99
8
Managing Replicated High Availability
This chapter includes the following topics:
• About Replicated High Availability
• Enabling the Replicated High Availability Service
• Performing a Failover from Main Storage to Backup Storage
• Performing a Failback from Backup Storage to Main Storage
• Destroying a Replicated HA Service
About Replicated High Availability
Replicated High Availability (RHA) is a NexentaConnect service that enables you to schedule periodical backups of the VDI datastore. You can then use this backup storage instead of the main storage. You may want to use this functionality in case of emergency or during the maintenance of the main storage.
When you create a Replicated High Availability service, you also need to schedule a periodic backup service and specify the location for backups on an external NexentaStor appliance. Therefore, you must configure the external NexentaStor appliance before you enable the Replicated HA service.
The Replicated HA service transfers the snapshots of the desktop pool datastore to the external NexentaStor appliance. On each replication, the service sends only the changes that have occurred between the previous and current snapshots.
When the Replication HA service creates an initial backup, you can fail over the ESXi datastore to the backup storage. During the failover all desktops restart and become temporarily unavailable.
!Note:
This functionality is provided as a technical preview.

100 NexentaConnect View Edition User Guide
Managing Replicated High Availability
If you want to switch from backup to the main storage, you must execute a failback operation. During the failback operation all desktops restart and become temporarily unavailable. When you failback to the main storage, all the data that has been generated on backup storage is transferred to main storage.
Replicated HA provides the following functions:
• Emergency backup
• Storage backup during maintenance periods
• Remote backups
• Replication schedule
Enabling the Replicated High Availability Service
You must enable the Replicated HA service before you can fail over from main storage to backup storage.
Before you enable the Replicated HA service, you must configure an external NexentaStor appliance.
To enable Replicated High Availability service:
1. In a web browser, type the NexentaConnect Management Appliance IP address and port number.
Example:
http://<nexentaconnect_host_name>:3000
2. In the Object List, select an ESXi cluster.
3. In the Working Area, select Replicated HA.
4. On the Replicated HA tab, click Enable.
5. In the Replicated High Availability - Configuration Wizard, complete the corresponding fields.
The following table describes the Replicated HA parameters.
Table 8-1: Replicated HA Parameters
Parameter Description
RHA Schedule for ClusterNexentaConnect Current Time/Date
Specifies the time on the NexentaConnect according to the configured time zone.

Managing Replicated High Availability
NexentaConnect View Edition User Guide 101
Performing a Failover from Main Storage to Backup Storage
You can fail over from the main storage to backup storage on an external NexentaStor appliance in case of emergency or maintenance.
You must configure the following components, before you can fail over from main storage to backup storage:
• External NexentaStor appliance
• Enable Replicated HA service
The replicated HA service must create at least initial backup of the main storage on the external NexentaStor appliance.
Frequency of replication Specifies an interval between the execution of a remote backup service.The options are:• Once • Hourly • Daily • Weekly • Monthly Depending on the selected interval, you can specify an hour, a minute, a day of the week, or a month, etc.
Notification Select this check box to enable NexentaConnect send detailed reports about the work of the Replicated HA service.
RHA Mode of OperationReplicated HA type The options are:
• Auto• Manual
Replication Destination — RHA Failover TargetExternal NexentaStor Specifies the host name or IP address of the
external NexentaStor appliance that you want use as backup storage.
ZFS volume/filesystem on the NexentaStor:
Specifies a volume or folder on the external NexentaStor appliance that you want to use as a destination for backup. The destination must have enough space for the backup.
Table 8-1: Replicated HA Parameters (Continued)
Parameter Description

102 NexentaConnect View Edition User Guide
Managing Replicated High Availability
To perform a failover from main storage to backup storage:
1. In a web browser, type the NexentaConnect Management Appliance IP address and port number.
Example:
http://<nexentaconnect_host_name>:3000
2. In the Object List, select an ESXi cluster.
3. In the Working Area, select Replicated HA.
4. On the Replicated HA tab, click Failover.
5. In the RHA Configuration dialog box, select the ESXi Server or ESXi Cluster that you want to fail over:
• If you want to fail over ESXi datastore to all ESXi Servers in the ESXi Cluster, select Failover entire cluster,
• If you want to fail over a single ESXi server in the ESXi Cluster, select Only selected ESXi; then select the ESXi server from the list.
6. Click Apply.
7. Click YES to confirm the operation.
After you start the failover, NexentaConnect turns off all the desktops in every desktop pool on the ESXi server or ESXi cluster. Then NexentaConnect fails over from main storage to backup storage on the external NexentaStor appliance. After failover completes, NexentaConnect turns on all desktops.
Performing a Failback from Backup Storage to Main Storage
You can fail back from the backup storage to main storage.
To perform a failback from backup storage to main storage:
1. In a web browser, type the NexentaConnect Management Appliance IP address and port number.
Example:
http://<nexentaconnect_host_name>:3000
2. In the Object List, select an ESXi cluster.
3. In the Working Area, click Replicated HA.
4. In the Replicated HA tab, click Failback.
5. Confirm the operation, click Yes.

Managing Replicated High Availability
NexentaConnect View Edition User Guide 103
Destroying a Replicated HA Service
You may want to destroy a Replicated HA service, and stop creating new backups on the external NexentaStor appliance. If you destroy a replicated HA service, you are no longer able to fail over from the main storage to backup storage.
To destroy a Replicated HA service:
1. a web browser, type the NexentaConnect Management Appliance IP address and port number.
Example:
http://<nexentaconnect_host_name>:3000
2. the Object List, select the ESXi cluster.
3. the Working Area, select Replicated HA.
4. On the Replicated HA tab, click Destroy.
5. Optionally, in the Destroy RHA Service dialog box, select Keep backup data if you want to keep the backups of the desktop pool(s).
6. Click Destroy.

Managing Replicated High Availability
104 NexentaConnect View Edition User Guide
This page intentionally left blank
NexentaConnect View Edition User Guide 105
9
Monitoring Utilization and Performance
This chapter includes the following topics:
• Monitoring ESXi Cluster Activity
• Monitoring ESXi Server Activity
• Monitoring Desktop Pool Activity
• Monitoring NexentaStor VSA Activity
• Chart Parameters
• About AuraGraph
Monitoring ESXi Cluster Activity
NexentaConnect View Edition provides the charts that are continuously updated to monitor the following statistics of the ESXi cluster:
• CPU usage, %
• Memory usage %
To monitor ESXi server activity:
1. In a web-browser, type the NexentaConnect Management Appliance IP address and port number.
Example:
http://<nexentaconnect_host_name>:3000
2. Click Management infrastructure > Graphical Statistics > Charts > Cluster.
3. Select the chart that you want to view.
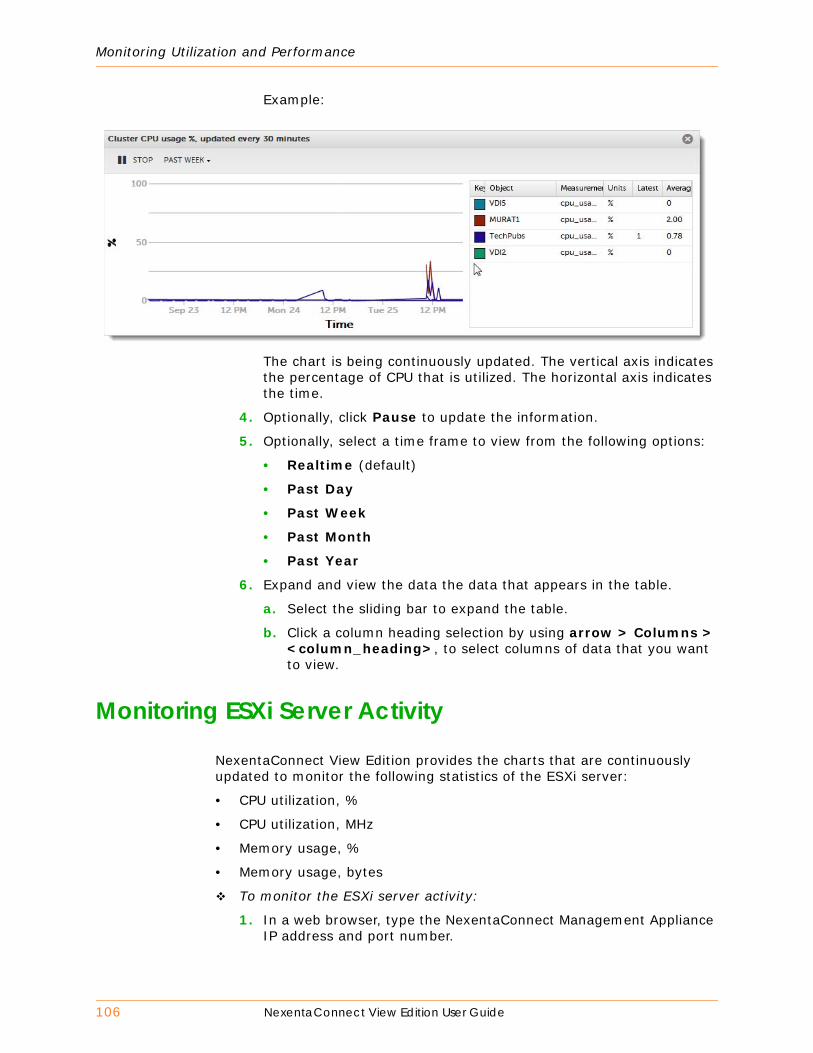
106 NexentaConnect View Edition User Guide
Monitoring Utilization and Performance
Example:
The chart is being continuously updated. The vertical axis indicates the percentage of CPU that is utilized. The horizontal axis indicates the time.
4. Optionally, click Pause to update the information.
5. Optionally, select a time frame to view from the following options:
• Realtime (default)
• Past Day
• Past Week
• Past Month
• Past Year
6. Expand and view the data the data that appears in the table.
a. Select the sliding bar to expand the table.
b. Click a column heading selection by using arrow > Columns > <column_heading>, to select columns of data that you want to view.
Monitoring ESXi Server Activity
NexentaConnect View Edition provides the charts that are continuously updated to monitor the following statistics of the ESXi server:
• CPU utilization, %
• CPU utilization, MHz
• Memory usage, %
• Memory usage, bytes
To monitor the ESXi server activity:
1. In a web browser, type the NexentaConnect Management Appliance IP address and port number.

Monitoring Utilization and Performance
NexentaConnect View Edition User Guide 107
Example:
http://<nexentaconnect_host_name>:3000
2. Click Management infrastructure > Graphical Statistics > Charts > ESXi.
3. Select the chart that you want to view.
Example:
The chart is beg continuously updated. The vertical axis indicates the percentage of CPU that is utilized. The horizontal axis indicates the time.
4. Optionally, click Pause to update the information.
5. Optionally, select a time frame to view from the following options:
• Realtime (default)
• Past Day
• Past Week
• Past Month
• Past Year
6. Expand and view the data that appears in the table.
a. Select the sliding bar to expand the table.
b. Click a column heading selection by using arrow > Columns > <column_heading>, to select columns of data that you want to view.
Monitoring Desktop Pool Activity
NexentaConnect View Edition provides a continuously updated chart to monitor the following desktop pool activity:
• NFS: Read IOPS, Write IOPS, Read Bandwidth, Write Bandwidth
• ZFS: Read IOPS, Write IOPS

108 NexentaConnect View Edition User Guide
Monitoring Utilization and Performance
To monitor desktop pool activity:
1. In a web-browser, type the NexentaConnect Management Appliance IP address and port number.
Example:
http://<nexentaconnect_host_name>:3000
2. Click Management infrastructure > Graphical Statistics > Charts >NexentaStor VSA
3. Select the chart that you want to view.
Example:
The desktop pool activity chart appears. The chart continuously updates. The vertical axis indicates the percentage of CPU utilized. The horizontal axis indicates the time.
4. Optionally, click Pause to update the information.
5. Optionally, select a time frame to view from the following options:
• Realtime (default)
• Past Day
• Past Week
• Past Month
6. Expand and view the data the data that appears in the table.
a. Select the sliding bar to expand the table.
b. Click a column heading selection by using arrow > Columns > <column_heading>, to select columns of data that you want to view.
Monitoring NexentaStor VSA Activity
NexentaConnect View Edition provides a continuously updated chart to monitor the following NexentaStor VSA activity:
• CPU, %

Monitoring Utilization and Performance
NexentaConnect View Edition User Guide 109
• Memory usage, %
• Memory usage, bytes
• ZFS: Read IOPS, Write IOPS
• NFS: Read IOPS, Write IOPS, Read Bandwidth, Write Bandwidth
• ARC: Size, Hits %, Misses %
• L2ARC: Size, Hits %, Misses %
To view NexentaStor VSA activity:
1. In a web-browser, type the NexentaConnect Management Appliance IP address and port number.
Example:
http://<nexentaconnect_host_name>:3000
2. Click Management infrastructure > Graphical Statistics > Charts >NexentaStor VSA
3. Select the chart that you want to view.
Example:
The NexentaStor VSA chart appears. The chart continuously updates. The vertical axis indicates the percentage of CPU utilized. The horizontal axis indicates the time.
4. Optionally, click Pause to update the information.
5. Optionally, select a time frame to view from the following options:
• Realtime (default)
• Past Day
• Past Week
• Past Month
6. Expand and view the data that appears in the table.
a. Select the sliding bar to expand the table.

110 NexentaConnect View Edition User Guide
Monitoring Utilization and Performance
b. Click a column heading selection by using arrow > Columns > <column_heading>, to select columns of data that you want to view.

Monitoring Utilization and Performance
NexentaConnect View Edition User Guide 111
Chart Parameters
The following table describes the parameters of the Graphical Statistic Chart.
Table 9-1: Graphical Statistic Chart Parameters
Key Object Measurement Units Latest Average
Description
The color of the graphic chart for the specified ESXi host or NexentaStor VSA.
The Object of measurement
The unit of measurement which depends on the type of the chart.
The unit of measurement, which depends on the value in field Measurement
The latest obtained value
The average value
ESXi CPU usage
ESXi CPU ESXi CPU %
NexentaStor VSA CPU usage
NexentaStor VSA
The options are:• Virt — Virtual
Machine CPU usage from vSphere
• Real — CPU usage, which is reported internally by NexentaStor VSA
%
NexentaStor ZFS I/O Performance
NexentaStor VSA
The number of read and write operations on filesystem level.
IOPS
NexentaStor NFS I/O Performance
NexentaStor VSA
Total amount of NFS operations on NexentaStor VSA.
IOPS
NexentaStor NFS bandwidth
NexentaStor VSA
The average data transfer rate for the data transferred over NFS.
KB/s
NexentaStor NFS latency
NexentaStor VSA
The average delay in NFS operations in milliseconds.
ms
NexentaStor NFS Alignment
NexentaStor VSA
NexentaStor VSA read/write operations alignment
%

112 NexentaConnect View Edition User Guide
Monitoring Utilization and Performance
About AuraGraph
NexentaConnect View Edition provides AuraGraph chart which is a visual representation of per desktop activity. AuraGraph helps administrators to identify weak points in the NexentaConnect infrastructure and quickly address performance issues.
NexentaConnect gets the performance information from dtrace that runs on the NexentaStor VSA(s) and visualizes the performance results.
For more information, go to www.dtrace.org.
AuraGraph features the following:
• Graphical view of the IOPS and bandwidth statistics per desktop
• Read, write, and total operations statistics per desktop
The following screenshots describes an example of the NexentaConnect View Edition AuraGraph.
Figure 9-1: AuraGraph
!Note:
AuraGraph does not support external NexentaStor.

Monitoring Utilization and Performance
NexentaConnect View Edition User Guide 113
Viewing Storage Summary Information
You can view the status of the VDI storage for a desktop pool using the Storage Summary tab. The tab provides information about the total and used size of the storage, as well as read cache information and storage health statistics.
To view Storage Summary Information:
1. In a web-browser, type the NexentaConnect Management Appliance IP address and port number.
Example:
http://<nexentaconnect_host_name>:3000
2. In the Object List, select a desktop pool.
3. In the Work Area, select the Storage Summary tab.
# Description
1 The green sectors represent virtual desktops. The sector’s dimensions display the following parameters:• IOPS. The higher the height of a sector, the more IOPS the
desktop generates. • Bandwidth. The longer the length of an outer arc, the wider
bandwidth the desktop uses.
2 The orange sector represents the NexentaStor appliance. Depending on a number of NexentaStors in the desktop pool, the AuraGraph displays one or multiple orange sectors.
3 Control panel. You can select the following parameters:
Desktops • First — show first 5, 10, or 20 desktops according to workload that they create.
• Last — show last 5, 10, or 20 desktops according to workload that they create.
IOPS Select the IOPS statistic that you want view. The options are:• Read IOPS • Write IOPS • Bandwidth • Read bytes • Write bytes

Monitoring Utilization and Performance
114 NexentaConnect View Edition User Guide
This page intentionally left blank

NexentaConnect View Edition User Guide 115
10
Managing Resources
This chapter includes the following topics:
• About Disk Fault Management
• Viewing the State of Disks
• Replacing a Faulted Disk
About Disk Fault Management
You can use the NexentaConnect Management Appliance to monitor the state and replace faulted disk drives on the NexentaStor VSA. You can perform this operation on volumes with the following redundancy types:
• Mirror
• RAIDZ-1
• RAIDZ-2
The redundancy type of the storage volumes on the NexentaStor VSA is defined by a desktop pool profile.
When you replace a LUN, NexentaConnect performs the following tasks:
1. Detaches a faulted disk from a volume on the NexentaStor VSA.
2. Deletes the ESXi datastore that was located on the faulted disk.
3. Creates a new ESXi datastore on a new disk.
4. Creates and attaches the new disk to a volume on the NexentaStor VSA.
See Also:
• Changing Settings
!Note:
You can replace faulted disks in pool devices. You cannot restore the faulted disks in cache or log devices.

116 NexentaConnect View Edition User Guide
Managing Resources
Viewing the State of Disks
You can view the state of the NexentaStor VSA disks in the NexentaConnect user interface.
To view the state of disks:
1. In a web browser, type the NexentaConnect Management Appliance IP address and port number.
Example:
http://<nexentaconnect_host_name>:3000
2. In the Objects list, select a desktop pool.
3. In the Working area, click Resources.
4. In the NexentaStor VSA Desktop pool, select the NexentaStor VSA.
5. Click Replace LUN.
You can view information about the disks on the selected NexentaStor VSA.
Replacing a Faulted Disk
You can use the NexentaConnect Management Appliance to replace a faulted disk drive on the NexentaStor VSA.
To replace a faulted disk:
1. In a web-browser, type the NexentaConnect Management Appliance IP address and port number.
Example:
http://<nexentaconnect_host_name>:3000
2. In the Objects list, select a desktop pool.
3. In the Working area, click Resources.
4. In the NexentaStor VSA Desktop pool, select the NexentaStor VSA.
5. Click Replace LUN.
6. In the left side of the Replace LUN dialog box, select the disk that you want to replace.
7. In the right side of the Replace LUN dialog box, select a new disk.
8. Click Done.
!Note:
You cannot replace disks on the external NexentaStor appliance using the NexentaConnect Management Appliance.
NexentaConnect View Edition User Guide 117
11
Troubleshooting NexentaConnect View Edition
This chapter includes the following topics:
• Deployment of Desktop Pool Fails because of an Overload on the vCenter Server
• Preventing a Desktop Virtual Machine from Remaining in the Provisioning State During the Deployment of a Desktop Pool
• Preventing a Desktop Virtual Machine from Remaining in the Customization State
• Creating a Desktop Pool Fails With an Error
Deployment of Desktop Pool Fails because of an Overload on the vCenter Server
The following error message may appear in the Event Database, when you deploy a desktop pool:
Provisioning error occurred on Pool Desktop_ID because of a timeout while customizing.
If this error message appears, you must verify, that the vCenter Server has sufficient resources to create a desktop infrastructure. If it does not, you must add additional vCenter Servers to the environment.
To add an additional vCenter Server:
1. Reduce the provisioning and power operation limits for the vCenter Server.
2. Log in to the View Administrator web interface.
3. Click View Configuration > Servers.
4. Click vCenter Server > Edit > Advanced.
5. Reduce the values in Max concurrent provisioning operations and Max concurrent power operations.
6. Click OK.

118 NexentaConnect View Edition User Guide
Troubleshooting NexentaConnect View Edition
Preventing a Desktop Virtual Machine from Remaining in the Provisioning State During the Deployment of a Desktop Pool
When you deploy a desktop pool, the virtual machine may remain in provisioning state. The following error message appears:
ERROR: Reached deploy/update timeout for desktop pool '$pool_name'
To prevent a virtual machine from remaining in the provisioning state:
1. Run the Desktop Pool Deploy Wizard.
2. In the Configure virtual desktop pool screen, click Advanced Options.
3. In the Advanced Options, decrease the value of the Pool creation success threshold.
For example, you can decrease the value to 90%.
4. After NexentaConnect completes the deployment of a desktop pool, log in to VMware Horizon View Administrator and delete the virtual machines that have failed.
See Also:
• Deploying Desktop Pools
Preventing a Desktop Virtual Machine from Remaining in the Customization State
When you deploy a desktop pool, virtual machines may remain in the customization state because sufficient number of IP addresses that are available in the DHCP pool or desktops that are unable to join the Domain Controller.
To prevent virtual machine stuck in the customization state:
1. Verify that DHCP pool has sufficient number of IP addresses for all the desktops.
2. If the DHCP pool has sufficient number of IP addresses for a desktop pool, increase the DHCP range for this subnet.
Otherwise, remove the old desktops from the pool.

Troubleshooting NexentaConnect View Edition
NexentaConnect View Edition User Guide 119
Creating a Desktop Pool Fails With an Error
When you deploy a desktop pool, the following error message may appear in VMware Horizon View Administrator:
Provisioning error occurred for Machine Machine_Name: Customization failed for Machine
To resolve this issue:
1. Verify that your account permissions have been correctly configured to access the customization specifications and to create a pool.
• If the customization specification no longer exists because it has been renamed or deleted, select a different specification.
2. If you keep receiving this error in VMware Horizon View Administrator:
a. Collect the VMware Horizon View Administrator diagnostic bundle.
For more information, see Collecting diagnostic information for VMware products.
b. File a support request with VMware Support and specify Knowledge Base article ID 1029366 in the problem description.

Troubleshooting NexentaConnect View Edition
120 NexentaConnect View Edition User Guide
This page intentionally left blank

NexentaConnect View Edition User Guide 121
A—IDesktop pool
A group of identically configured virtual machines. When you deploy a desktop pool, you create multiple copies that are based on a specified desktop template.
Desktop pool backupA snapshot of a desktop pool that is stored on the external NexentaStor.
Desktop pool snapshot A read-only copy of a desktop pool at a particular point in time.
Full BackupFull, complete replica of all of datasets in the specified source. Provides for a more secure method for backing up data. In case of a disk failure, the files are easily restored from a single backup set.
Full CloneA full clone is an independent virtual machine, with no need to access the parent. Full clones do not require an ongoing connection to the parent virtual machine. Because a full clone does not share virtual disks with the parent virtual machine, full clones generally perform better than linked clones. However, full clones take longer to create than linked clones. Creating a full clone can take several minutes if the files involved are large.
Gold ImageA Microsoft Windows desktop template that you can use for the desktop pool deployment. Before you create a gold image, you need to install all required software on the virtual machine, as well as the NexentaConnect components.
NexentaConnect supports the following gold images:
• Windows 7 Enterprise and Professional Editions (x86 and x64)
• Windows Vista Business and Enterprise Editions SP 1 and SP2 (x86)
• Windows XP Professional SP3 (x86)
• Windows 8 Consumer Preview (x86 and x64)
Incremental BackupBacks up only the changes since the last backup operation. This is less secure than a full backup. In order to restore a file, all of the incremental backups must be present.
Glossary

122 NexentaConnect View Edition User Guide
Glossary
IO MeterIometer is an industry standard I/O subsystem storage performance measurement and characterization tool implemented in NexentaConnect. It is used to measure storage performance of the individual virtual desktops.
J—QLinked Clone
A linked clone is a snapshot of a replica disk that is accessed by users. This snapshot only consumes the storage resources as it is used. A linked clone is made from a snapshot of the parent. All files available on the parent at the moment of the snapshot creation, continue to remain available to the linked clone. Ongoing changes to the virtual disk of the parent do not affect the linked clone, and changes to the disk of the linked clone do not affect the parent. A linked clone must have access to the parent. Without access to the parent, a linked clone is disabled.
NexentaStorNexenta Systems is a fully featured NAS/SAN open storage appliance, that leverages the advantages of ZFS.
NexentaStor VSAA virtual storage appliance (VSA) that provides storage for the NexentaConnect environment.
Nexenta NAS VAAI plugNexenta NAS VAAI plug- implements VMware API primitives such as full file clone, lazy file clone, reserve space, extended file statistics for NAS device offloads. It speeds up certain operations on virtual hosts images located on NFS share that is mounted on the ESXi host. The plug-in effectively offloads network-intensive NFS operations to clone files.
NexentaConnect View Edition (NexentaConnect)NexentaConnect View Edition is a combined all-in-one VDI automation, storage auto-deployment and storage acceleration solution that provides desktops-as-a-service Wizard-guided provisioning, benchmarking and calibration of desktop pools, built-in multitenancy and scale-out via local storage shared-nothing architecture.
NexentaConnect Desktop AgentProvides benchmarking, calibration capabilities, and communication between NexentaConnect Management Appliance and virtual desktops.
NexentaConnect Management Appliance A virtual appliance that provides the NexentaConnect management functions and user interface.
NexentaConnect Server AgentProvides communication between NexentaConnect and the View Connection Server.
NMCThe Nexenta Management Console (NMC) is a command line interface that enables you to execute all NexentaStor functions.

Glossary
NexentaConnect View Edition User Guide 123
NMSThe Nexenta Management Server is a service that controls all NexentaStor services and runners. It receives and processes requests from NMC and NMV and returns the output.
NMVThe Nexenta Management View (NMV) is a web-based graphical User interface that enables you to perform most of the NexentaStor functions.
R—ZReplicated High Availability (RHA)
An NexentaConnect service that provides the functionality to create backups of a desktop pool on a standalone external NexentaStor appliance. It also enables you to fail over ESXi datastores to a designated backup storage.
Stateful Desktop PoolStateful/Persistent virtual desktops preserve user settings, customization and data. When users log in, they retrieve their designated desktops.
Stateless Desktop PoolStateless virtual desktops do not contain any personal settings or data. When users log in, NexentaConnect assigns desktops randomly. The user data can be created and stored in a NFS folder or on a VMware Horizon View desktop persistent disk.
SQLIOSQLIO is the I/O capacity determination tool provided by Microsoft. It’s implemented to NexentaConnect and used to measure storage performance of the individual virtual desktops.
VAAIvStorage API for Array integration (VAAI) is an application program interface (API) framework from VMware that enables certain storage tasks, such as thin provisioning, to be offloaded from the VMware server virtualization hardware to the storage array.
VBackstoreNexenta VM Datastore, VBackstore, is the storage allocated to a given virtual machine. A Vbackstore can be a shared Zvol or a Folder. VBackstore is the NexentaStor-provided storage.
vCenterVMware virtualization management platform
VDIVirtual desktop infrastructure (VDI) is the practice of hosting a desktop operating system with a virtual machine (VM) running on a centralized server.
vHostNexenta Virtual Factory, VHost, is a generic term for the hypervisor platform (e.g. VMware, Citrix Xen, Microsoft Hyper-V). VHosts may be: ESX Cluster, Xen pool, or Hyper-V cluster.

124 NexentaConnect View Edition User Guide
Glossary
Virtual DesktopStandard desktop operating system that runs on a virtual machine.
vMotionNexenta VM Motion is a generic term for migration of Virtual Machines, regardless of the virtualization environment. Vmotion is a VMware term for Hyper-v/Xen Live Migration.
VMware ESXiAn enterprise class hypervisor that provides software virtualization environment.
VMware ESXi ClusterA collection of two or more ESXi hosts connected through VMware vCenter tools. In the NexentaConnect environment, you use the ESXi cluster for better load balancing and resource utilization.
VMware vCenter Server It is the centralized management tool for the vSphere suite. VMware vCenter Server enables you to manage multiple ESXi servers and virtual machines (VMs) from different ESXi servers through a single console application.
VMware vSphere clientA Microsoft Windows desktop application that enables you to access VMware ESXi and VMware vCenter.
VMware Horizon View AdministratorView Administrator is the Web interface through which you configure View Connection Server and manage any View desktops.
View ComposerVMware Horizon View Composer is a key component of VMware vSphere. It is tightly integrated with VMware Horizon View Manager to provide advanced image management and storage optimization. View composer is required to use Linked-clones, refresh, recompose and retether capabilities.
VMXNET3Type of a supported network driver for virtual machines
VStorageVirtualized Storage. VStorage, refers to the storage managed by NexentaStor. VStorage is virtual disk storage as seen from the perspective of VHost. VHost and its VMs see VDisks stored on VStorage. in ESX terminology VStorage is a "datastore", in XEN it is an "SR" (Storage repository).
ZFSZettabyte File System (ZFS) is 128-bit file system that provides features, such as data integrity verification, disk management, snapshots, transactional operations, and so on.
ZILZFS tent Log is a component of a hybrid storage pool that speeds up write operation. Usually, SSD drives are used as ZIL devices.
Glossary
NexentaConnect View Edition User Guide 125
Zvolinterface layers available in the ZFS

Glossary
126 NexentaConnect View Edition User Guide
This page intentionally left blank

Global Headquarters455 El Camino RealSanta Clara, California 95050
Nexenta EMEA HeadquartersCamerastraat 81322 BC AlmereNetherlands
Nexenta Systems ItalyVia Vespucci 8B26900 LodiItaly
Nexenta Systems ChinaRoom 806, Hanhai Culture Building,Chaoyang District,Beijing, China 100020
Nexenta Systems Korea Chusik Hoesa3001, 30F World Trade Center511 YoungDongDa-RoGangNam-Gu, 135-729Seoul, Korea