Embed Size (px)
Citation preview
New in Media Composer v2019.x
What’s New forAvid® Media Composer® v2019.6
Revision History
Online Videos and Tutorials
Use the following links to access helpful videos and tutorials on using Media Composer:
• What’s New
• Account Activation, Downloading and Support
• A Quick Introduction, Projects and the Source Browser
• Exporting
New in Media Composer v2019.x
The following are new with this release:
• Media Composer | Distributed Processing
• Media Composer | Enterprise
• Updated User Interface
• Change to Digital Audio Scrub
• Workspace Toolbar
• The Inspector Tool
• Multiple Monitor Support
• MXF OP1a Media Creation
• OP1a MXF Mixdown
• OpenEXR Support
• IMF Support
• Support for 32 bit Floating Point Quality
• Timeline - Full Floating point (32 bits) Processing Supportt
• Support for ACES Workflows
• Source Settings Color Encoding Update
Date Description
July 1, 2019 Fixed typo.
June 25, 2019. Added Support for XAVC-I Class 100.
June 24, 2019 Added links to helpful Online Videos and Tutorials.
June 20, 2019 Fixed typo in MXF mixdown procedure.
1

New in Media Composer v2019.x
• Dynamic Relink Across Frame Rates
• Support for XAVC-I Class 100
Media Composer | Distributed Processing
Media Composer Distributed Processing allows Media Composer users to offload foreground tasks such as rendering, consolidating, or transcoding to one or more service workstations on the network.
As these system intensive processes are handled outside of Media Composer, users have more time to focus on the creative editing process. The distributed operations are monitored by services that report to the MediaCentral Platform. Users can access the Job Status app through Avid Media Composer and / or Avid MediaCentral Cloud UX to monitor the status of their jobs, cancel jobs, or perform other actions related to the remote processing tasks. For details on setting up a Distributed Processing environment, see the Avid Media Composer | Distributed Processing Administration Guide. Once the environment is setup, see Chapter 3 of the Avid Media Composer | Distributed Processing Administration Guide for details on the Distributed Processing workflow.
Media Composer | Enterprise
Media Composer Enterprise offers administrative control to customize the Media Composer interface for specific roles within the production organization. Site administrators will be able to define levels of customization of Media Composer features based on user groups. For details on setting up an Media Composer Enterprise environment, see the Avid Media Composer | Enterprise Administration Guide.
Updated User Interface
The following are changes to the User Interface. You must create a new user. Select File > Settings, click the User tab and create a new User Profile.
Project Window Changes
With this release, when you launch Media Composer and choose your project, you will notice that the application opens with a Bin Container at the top left of the window rather than the old Project Window. A number of items that were in the old Project Window are now located in different windows. See the table below for information on where to find items that resided in the Project Window in previous releases.
Item Old Location New Location
Settings list Project Window Settings Tab File > Settings (Shortcut is Ctrl + Shift + =)
Usage Project Window Usage tab Help > About Media Composer Usage tab
Info Project Window Info tab Help > About Media Composer Configuration tab
Hardware Project Window Info tab Hardware button Help > About Media Composer Hardware tab
Format Project Window Format tab File > Settings Format tab
2

New in Media Composer v2019.x
Settings List Changes
You now access the Settings list from the File menu. (Or Ctrl + Shift + =) The new settings list makes it much easier to see which settings are project, user, or site settings. Simply click the Project, User, or Site tab to find the applicable settings.
The Settings window also includes the Format information that was previously selectable in the Project Window.
3

New in Media Composer v2019.x
Usage Tab
To access Usage information, select Help > About Avid Media Composer. Click the Usage tab.
Info Tab
To access the information that used to appear in the Info tab of the Project Window, select Help > About Avid Media Composer. Click the Configuration tab.
4

New in Media Composer v2019.x
Hardware Tab
To access the information that used to appear in the Hardware tab of the Project window, select Help > About Avid Media Composer. Click the Hardware tab.
Format Tab
To access the information that used to appear in the Format tab of the Project window, select File > Settings. Click the Format tab.
5

New in Media Composer v2019.x
Refreshed User Interface
When you first launch the Media Composer and select your project, the application opens with a Bin Container, the Composer Window, and the Timeline. These windows open as connected panels.
Image when you create a new project (on a single monitor): Top left: Bin Container, Middle: Composer Window, Top right: Workspace toolbar, Bottom: Timeline
You will notice that windows include a vertical title bar with a tab indicating the name of the window.
6

New in Media Composer v2019.x
The user interface is customizable. You can arrange the windows to fit your needs. Windows can be arranged and moved in multiple ways. Some windows can be docked or floating. You can also tab docked and floating windows.
• Docked - A window that is docked (connected) within the paneled User Interface.
• Floating - A window that is undocked. You can move a window by simply clicking in the vertical title bar and dragging it to another location on the screen. All windows can be floating.
• Tabbed - A window that can be vertically tabbed to another window that is either docked or floating.
To dock a window:
1. Click in the vertical title bar to select the window that you want to dock in the paneled user interface.
2. Drag to the location where you want to dock the window.
Locations where you can dock the window will appear as green drop zones.
n Use the green areas to choose the possible location to dock the window. The white areas show how the window will appear when dropped.
3. Drop the window by releasing the mouse.
The window now appears docked at the selected location.
7

New in Media Composer v2019.x
To tab windows:
1. Press the Alt key while dragging the vertical title bar of the window you want to tab to another window.
2. Drag the window to the vertical title bar of the window to which you want to tab. You will see the vertical bar display as green.
3. Release the mouse. The windows are now tabbed.
Some windows can be tabbed to the vertical title bar of another window that is paneled. And those windows can also be tabbed to the vertical title bar of a window that is floating.
8

New in Media Composer v2019.x
To dock a window with multiple tabs:
1. In the window that has multiple tabs, click in either the gray space at the bottom of the vertical title bar, or if the window does not have space below the vertical title bar, click the gray box at the top left of the window.
Gray space at bottom of vertical title bar.
Gray box at top of vertical title bar.
2. Drag to the location where you want to dock the tabbed window.
Locations where you can dock the tabbed window will appear green.
3. Drop the window by releasing the mouse.
The tabbed window now appears docked at the selected location.
n If you have a multi-tabbed window and you only want to move one of the windows to a docked panel, simply drag the tab of the window you want to move and move that window. You can then drop that window into a paneled green drop zone..
9

New in Media Composer v2019.x
To float a window that is currently tabbed or paneled:
1. Click the window’s vertical title bar and drag it to another area of the user interface.
2. Release the mouse.
The window appears as a floating window.
To move a floating window:
1. Click the floating window’s top horizontal bar and drag it to another area of the user interface.
2. Release the mouse.
The window appears in the new location.
To float all panels:
t Select Windows > Float All Panels
To float the active panel:
t Select Windows > Float Active Panel.
The Bin Container
The Bin Container consists of the Bin Container Sidebar on the left and the Bin(s) on the right. The Bin Container allows you to organize bins within a single container. The Bin Container can be tabbed or docked with other tools. Bins can only be tabbed or docked with other bins within a Bin Container.
Left: Bin Container Sidebar, Right: Opened bin
The Bin Container Sidebar displays the contents of your project including scripts, bins, volumes, and folders, just like the traditional Project Window. The opened bins, volumes, and scripts are displayed on the right panel of the Bin Container.Keep in mind the following when working with the Bin Container.
To open a bin from the Bin Container Sidebar
t Double click a bin icon in the Bin Container Sidebar.
10

New in Media Composer v2019.x
The bin will open in the right panel.
To open another bin from the Bin Container Sidebar
t Double click another bin icon in the Bin Container Sidebar.
The bin will be tabbed to a bin in the right panel. If you continue to double click bins, they will open, tabbed to bins in the right panel.
To subdivide the bins in the right panel:
t Drag a bin tab into an eligible edge of the Bin Container. (Eligible edges appear as green.)
The bin will appear subdivided in the right panel.
11

New in Media Composer v2019.x
To open in bin into a new Bin Container:
t Drag a bin in the right panel and release the mouse to float the bin.
The bin will appear in a new Bin Container with the Sidebar closed. To make the Sidebar appear in this new Bin Container, right click and select Show Sidebar.
To customize the look of your bins:
t Use the procedures above to open and arrange the bins in the right panel.
You can easily customize how your bins look in the Bin Container. For example, you can add background color to customize the look of your bins. You can arrange the bins in a number of ways. For example, in the image below, the top area of the bin panel displays one bin, the middle area displays multiple tabbed bins, and the bottom displays a script. You can arrange bins horizontally or vertically.
You can place your cursor on the splitter between bins until an arrow appears and move the splitter up and down to resize the bins.
12

New in Media Composer v2019.x
Splitter between bins
Dragging items within the Bin Container Sidebar:
t Simply drag the script, volume, or folder into another folder in the Bin Container Sidebar.
Dragging items from the Bin Container Sidebar to the right panel:
t Press and hold Alt while dragging the bin, script, or volume into the right panel. The item will be tabbed to another bin.
If you release the Alt tab while dragging, all available drop zone targets appear allowing you to drop the item in a new sub panel.
To hide the Bin Container Sidebar:
t Select Hide Sidebar from the Sidebar Fast menu.
To close the Bin Container Sidebar:
t Select Close Bin Container from the File menu.
If a Bin Container is floating, it will be closed when the last bin is closed or dragged to another Bin Container.
To shown only the Sidebar:
t Select Bin > Show Sidebar Only.
You will also notice that the Bin Tools buttons are at the top of the Bin. If the bin size shrinks, the bin Tools collapse responsively to keep the tools presented to you at all times as a pulldown.
From Left to Right: Text, Frame, Script view buttons, Search field, Bin Fast Menu
Timeline Changes
In addition to the user interface refreshed look, you will notice a few changes to the Timeline.
13

New in Media Composer v2019.x
Extract and Lift Buttons
In the Timeline and the Record monitor, you will also notice the return of the original looking Extract and Lift buttons.
Audio Ducking Button
The icon for Audio Ducking has been updated. The following Audio Ducking icon appears in the Timeline tool bar.
Choosing Segment Modes
Changes have been made to the Timeline that change the way you select segment and trim modes. Instead of choosing modes on the Smart Tool, these options have now moved to selectable buttons on the Timeline tool bar.
Segment Mode button, Trim Type button
You can select the Segment mode by right clicking the Segment mode button.
• If you select the red arrow only, the segment mode button is set to Lift/Overwrite which replaces a section of the sequence with the selected source material.
• If you select the yellow arrow only, the segment mode button is set to Extract/Splice-in which inserts the marked source material into the sequence without replacing material already in the sequence.
14

New in Media Composer v2019.x
• If you select both arrows, the segment edit depends on which region of the segment in the Timeline that you activate. For example, if you place your cursor at the top part of the segment in the Timeline, you will be in Lift/Overwrite mode and if you place the cursor at the bottom of the segment in the Timeline you will be in Lift/Overwrite mode.
• You can also Alt click the Segment mode buttons to cycle through the options.
Selecting Trim Types
You can select the Trim mode by right clicking the Trim type button.
• If you select the red roller only, the trim mode is set to Overwrite trim which creates a single-roller trim and adds a black segment to fill the duration of trimmed frames.
• If you select the yellow roller only, the trim mode is set to Ripple trim which creates a single-roller trim with no sync lock and maintains the duration of all other clips.
• If you select both rollers, the trim type depends on which region of the segment in the Timeline that you activate. For example, if you place your cursor at the top part of the segment in the Timeline, you will be in Overwrite trim mode and if you place the cursor at the bottom part of the segment, you will be in Ripple trim mode.
Interface Settings Changes
The following additions have been made to the Interface Settings dialog.
• Interface brightness. You now can choose between a dark or light brightness for the application.
• Highlight colors. You now have two highlight options to choose from. Purple and white. White is the default.
15

New in Media Composer v2019.x
• Bin Container Color and Font options.
• Slider that allows you to brighten or dim the Timeline and Composer icons. (This does not apply to track enable buttons in the Timeline.)
Bin Settings Changes
The following additions have been made to the Bin Settings dialog.
• You can set Favorite Bins to appear at the top or bottom of the Bin Container Sidebar.
• Action for double-clicking a closed bin. You can choose to tab the bin or float the bin.
Timeline Settings Change
The following addition has been made to the Timeline Settings dialog.
• You can choose to set the Timeline clip text to either black or white.
16

New in Media Composer v2019.x
Change to Digital Audio Scrub
There is a new icon in the Play Command Palette that replaces CAPS lock for digital audio scrub. Use the new Digital Audio Scrub button instead of CAPS lock to perform digital audio scrub. Map this button to a key on your keyboard or a button on the Timeline or Composer Windows.
Workspace Toolbar
An easily accessible workspace toolbar is provided on the right side of the user interface. Simply click the workspace you want to access. You can choose to access an Edit, Color Correction, Effects, or an Audio workspace. The workspace bar is presented at full width, allowing you to easily work across workspaces. Traditionally workspaces were only available from the Workspace menu.
You can adjust the width of the workspaces. Simply right-click on a workspace and select an option. You can choose to show both the workspace icon and text, icon only, or to hide the workspaces.
17

New in Media Composer v2019.x
If you choose to hide the workspace bar, the workspace bar closes and a workspace icon appears at the top of the application allowing you to quickly select a workspace from the pulldown menu.
If you choose to hide the workspaces, you can have them reappear by doing one of the following:
• Click the workspace icon at the top right of the window and select Show Workspace Bar.
• Select Windows > Workspaces > Show Workspace Toolbar
If you create a new workspace from the Workspace menu, the new workspace will appear in the Workspace Toolbar.
18

New in Media Composer v2019.x
The Inspector Tool
The Media Composer Inspector displays clip and sequence metadata info. If you select an item in the bin or the Composer Window, the Inspector Tool will display the applicable metadata for that item.
19

New in Media Composer v2019.x
To access the Inspector Tool:
t Select Tool > Inspector Tool.
To select the columns to be displayed in the Inspector:
1. Right-click in the Inspector Tool window.
2. Select Choose Columns.
The Choose Columns dialog opens.
20

New in Media Composer v2019.x
n Use Alt +click to expand or collapse the options in the dialog.
3. Click to select the information you want to see in the Inspector.
4. Click OK. The selected data appears in the Inspector window.
To rearrange the order of the metadata displayed in the Inspector:
1. Simply click a column heading and drag it up or down within the Inspector to change its location.
To save the layout of the Inspector:
1. In the Inspector Tool, make sure to arrange the order of the metadata as desired.
2. Click the Profile pulldown menu and select Save As.
21

New in Media Composer v2019.x
3. Name the setting.
4. Click Save.
When you want to use this layout for future use, simply select it from the Inspector Profile pulldown menu.
To keep the information in the Inspector Tool static:
1. If you want to keep the information in the Inspector Tool set to one particular item, right click in the Inspector Tool and deselect Follow Selection.
This might be helpful if you want to display the metadata for the current sequence you are looking at, but want to continue selecting clips in the bin without changing the information in the Inspector.
n You can change editable fields in the Inspector, for example, you can edit the name of the clip.
n You can panel the Inspector Tool to other windows in the application.
22

New in Media Composer v2019.x
Multiple Monitor Support
If you have multiple monitors, Media Composer will detect how many monitors are connected and populate a new “Host Panels” menu located under the Windows menu. When you select another monitor, the newly added monitor will be populated with a Host background panel where you can drag and dock windows.
With two or more monitors connected to the system, when you launch with a new user setting, Media Composer will display a main host panel on Display 1 (left-most), and a second host panel on Display 2 and populate the monitors with the default two monitor Workspace.
n If you have more than two displays, those additional displays will not have a host panel by default.
MXF OP1a Media Creation
With this release, you can choose to create MXF OP1a media. By selecting the MXF OP1a Video Wrapper Format in the Media Creation dialog, MXF OP1a will be created when capturing, consolidating, transcoding and performing a mixdown.
n Creating MXF OP1a is not supported for Render, Motion Effects, Titles, or Import as alpha mattes.
23

New in Media Composer v2019.x
New media files are written to drive:\Avid MediaFiles\UME folder.
n OP1a Media Creation is not supported in the following project types: 23p NTSC, 24p NTSC, 24p PAL, 25p PAL 1080i50/RGB 709 (YUV is supported), 1080i59.94/RGB 709 (YUV is supported), 1080p100, 1080p119.88, 1080p120. See “Project Formats and Resolutions” in the Help.
OP1a MXF Mixdown
With this release, you can create one master clip in your bin which is a mixdown of audio, video and data.
To perform an OP1a MXF mixdown:
1. Load your sequence in the Timeline.
2. (Optional) Mark and IN and OUT.
3. Do one of the following:
t Right click the sequence in the Timeline and select Mixdown > Op1a-MXF Mixdown.
t Select Timeline > Mixdown > OP1a-MXF Mixdown.
4. Select the video and audio resolution.
5. Click OK.
An MXF master clip is written to the bin. The clip includes the audio, video and data.
OpenEXR Support
Media Composer supports linking OpenEXR files using the Avid UME Link plug-in. OpenEXR is a high-dynamic-range imaging file format created by the Industrial Light & Magic®.
24
New in Media Composer v2019.x
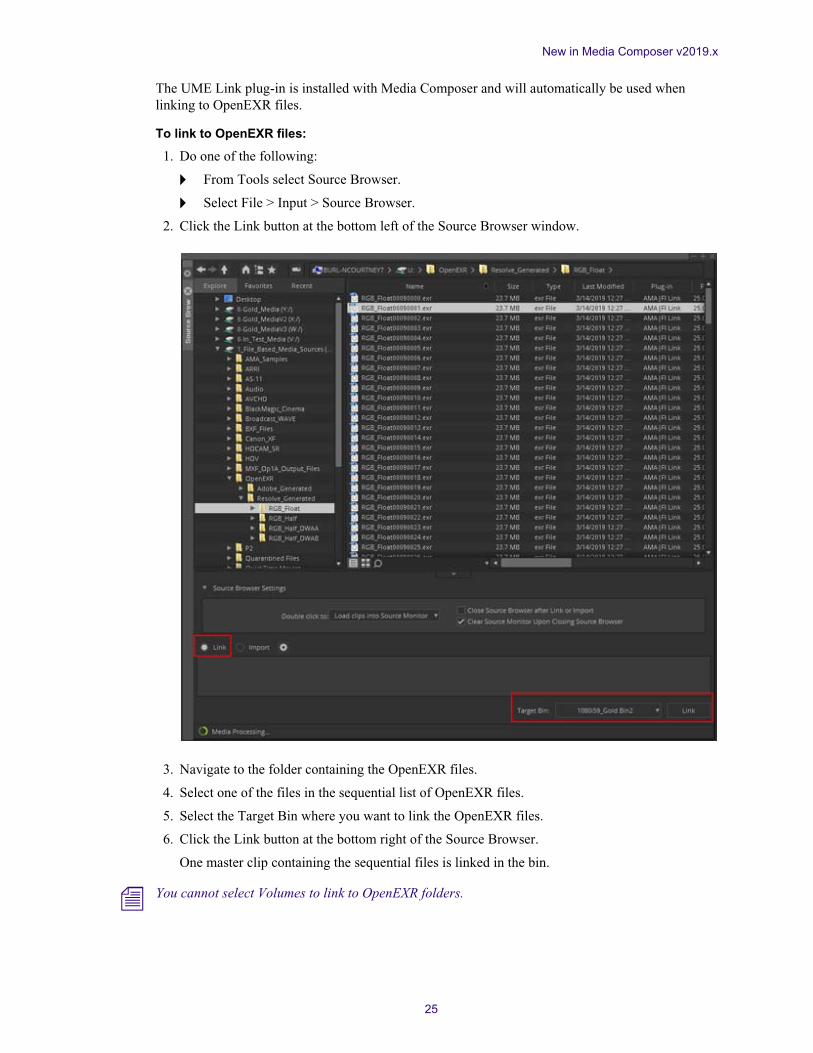
The UME Link plug-in is installed with Media Composer and will automatically be used when linking to OpenEXR files.
To link to OpenEXR files:
1. Do one of the following:
t From Tools select Source Browser.
t Select File > Input > Source Browser.
2. Click the Link button at the bottom left of the Source Browser window.
3. Navigate to the folder containing the OpenEXR files.
4. Select one of the files in the sequential list of OpenEXR files.
5. Select the Target Bin where you want to link the OpenEXR files.
6. Click the Link button at the bottom right of the Source Browser.
One master clip containing the sequential files is linked in the bin.
n You cannot select Volumes to link to OpenEXR folders.
25

New in Media Composer v2019.x
IMF Support
The Interoperable Master Format (IMF) is an international standard for the file-based interchange of multi-version, finished audio-visual works.
n Currently, you can create an IMF package with a sequence with the following progressive frame rates: 23.98, 24, 25, 30, 48, 60
To create an IMF package:
1. Select the sequence you want to export as IMF.
2. Right click and select Output > Export to File.
3. Click Options.
4. In the Export As menu, select IMF.
5. Choose the video compression (J2K) and click Save.
26

New in Media Composer v2019.x
6. Select the location where you want the package saved.
7. Click Save.
An IMF package containing the assets as well as the asset map, packing list and composition playlist will be saved.
Support for 32 bit Floating Point Quality
With the introduction of DNxUncompressed, it is now possible to import, render, transcode and mixdown at uncompressed quality. This allows you to generate media that preserves the full quality of the Timeline.
This release supports DNxUncompressed 32 bit float in HD and greater than HD raster dimensions. The Media Creation options are:
• For YCbCr: DNxUncompressed 4:2:2 32bit float
• For RGB: DNxUncompressed 32bit float
27
New in Media Composer v2019.x
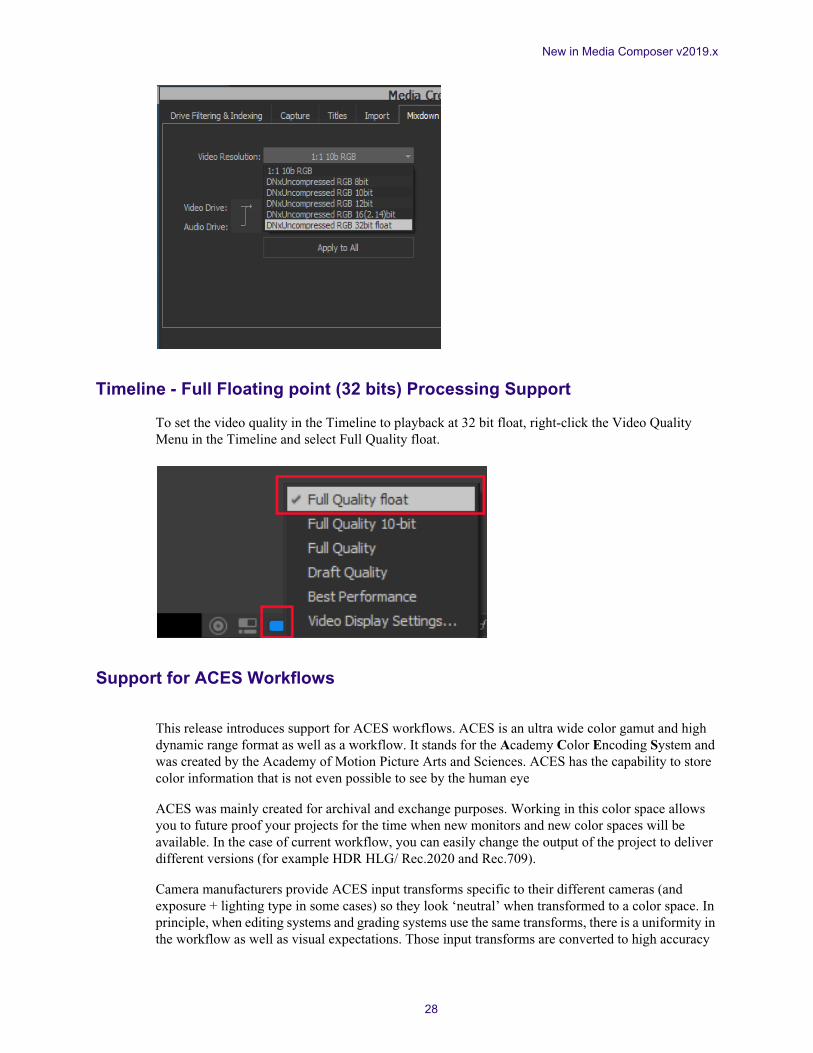
Timeline - Full Floating point (32 bits) Processing Support
To set the video quality in the Timeline to playback at 32 bit float, right-click the Video Quality Menu in the Timeline and select Full Quality float.
Support for ACES Workflows
This release introduces support for ACES workflows. ACES is an ultra wide color gamut and high dynamic range format as well as a workflow. It stands for the Academy Color Encoding System and was created by the Academy of Motion Picture Arts and Sciences. ACES has the capability to store color information that is not even possible to see by the human eye
ACES was mainly created for archival and exchange purposes. Working in this color space allows you to future proof your projects for the time when new monitors and new color spaces will be available. In the case of current workflow, you can easily change the output of the project to deliver different versions (for example HDR HLG/ Rec.2020 and Rec.709).
Camera manufacturers provide ACES input transforms specific to their different cameras (and exposure + lighting type in some cases) so they look ‘neutral’ when transformed to a color space. In principle, when editing systems and grading systems use the same transforms, there is a uniformity in the workflow as well as visual expectations. Those input transforms are converted to high accuracy
28

New in Media Composer v2019.x
3D LUTs to an internal ACES variant color space, this is done so the current controls still feel the same (such as color correction). The 32 bit floating point timeline precision allow us to convert to and from ACES encoding types (ACES2065, ACEScc, ACEScct, ACEScg) without any loss.
Being an ultra wide gamut color space has the advantage of preserving all the colors and luminance values but realistically there needs to be an output delivered for today’s current standards. Those output transforms are also defined by ACES, which means that all compatible systems would produce the same output, which again simplifies the workflow.
You can edit and grade for a dedicated output color space but the Timeline itself is always at ultra high gamut. This transformation is applied at the output and can be dynamically changed.
Creating an ACES Project
Avid recently announced it was joining the ACES logo Program as the first partner for the Editorial Finishing category. Until we add all the necessary features to satisfy the category, we recommend properly testing your workflow prior to delivering ACES projects.
For more information about ACES and the ACES Logo Program, visit www.oscars.org/ACES.
Use the following procedures to create and work with an ACES project.
To create an ACES project:
1. Launch the editing application.
2. In the Select Project dialog box, click New Project.
3. Select a greater than HD format.
4. From the Color Space pulldown menu, select the ACES RGBcolor space.
5. Name your project and click OK.
When you create an ACES project, the Timeline will automatically change to 32 bit floating point precision. (You will notice the blue Video Quality Menu at the bottom of the Timeline.) This ensures that all internal processing is done at full precision without loss of the extra high luminance values and colors even if the output is to a narrower color space such as Rec.709.
To preserve full precision when rendering effects, use DNxUncompressed floating point (in Media Creation settings.)
To view ACES color space in the monitors:
1. With the clip or sequence loaded, right click the monitor.
2. Select Display Color Space and choose the ACES color space.
29

New in Media Composer v2019.x
To work with Source Settings for Color Encoding:
1. Right click the clip and select Source Settings.
2. Select an ACES Color Adapter option. When working in ACES, the transform you select is the one matching the media you have as a source. This is not a destination color space. All transforms take you to a common ACES format (full floating point).
3. For example, if the source is Canon C300 media shot at daylight setting, you would select the following adapter to go to ACES:
30

New in Media Composer v2019.x
4. Select the desired Color Adapter Type and Color Adapter.
5. Click Add to add the color transformation.
n For media not coming from a camera manufacturer (Rec.709 media for example), you should select ACES Generic Color Adapter Type and a Rec 709 to ACES Color Adapter.
Note: Currently in ACES projects, the color adapters do not apply automatically when linking.
To select the Output Color Space:
1. Select File > Settings and click the Format tab.
You will notice the ACES version is v1.1. ACES versions define a set of transformations that need to be supported. This is to maintain compatibility between different products supporting ACES.
2. From the Output Color Space, select the color space you want for your exported sequence. This is a conversion from the ACES Timeline that happens when you export to file so you can deliver a specific format from your ACES project.
To select an ACES Color Space for viewing on an external monitor:
1. Select File > Settings and click the Project tab.
2. Select the applicable ACES color space. Usually both the output color space and video output color space should be the same so you can view on the external monitor exactly what will be exported to file.
31

New in Media Composer v2019.x
Avid is taking part in the ACES Logo Program and will add more ACES related features in subsequent releases, such as common LUT format support (CLF), Open EXR export etc.
Source Settings Color Encoding Update
The Source Settings window has been updated to help simplify choosing Color Adapter Types and Color Adapters. The Color Adapter Types pull down menu will now allow you to narrow down the adapters by first selecting between Generic, User Installed LUTS, and ACES Adapter types. Once you select the Adapter Type, you can then use the Color Adapter pull down menu to select the Color Adapter transformations available for that Adapter Type.
Avid Media Processor Export As Option Name Change
The Avid Media Process Export As option in the AMA File Export dialog has been changed to MXF OP1a. Note, the MXF OP1a (Legacy) option is available when exporting J2K.
32

New in Media Composer v2019.x
Dynamic Relink Across Frame Rates
With this release of Media Composer, if you transcode media to different frame rates, you can use Dynamic Relink to conform a sequence from one rate to another.Use the following procedure to conform a sequence from one rate to another.
To conform a sequence from one rate to another:
1. Load the sequence that you want to conform from one rate to another in the Timeline.
2. Open the Dynamic Relink dialog by performing one of the following:
t In the Settings list in the Project window, double-click Dynamic Relink.
t Right-click the MultiRez button at the bottom of the Timeline and select Dynamic Relink Settings.
The Dynamic Relink dialog opens.
33

New in Media Composer v2019.x
3. Select Enable Dynamic Relink.
4. Select Allow Mixed Frame Rate Media.
5. In the Dynamic Relink dialog, in the Target Settings tab, select the target rate in the Frame Rate pull down menu.
6. Click Apply.
New master clips (and subclips) are created for the different rate media and placed in the same bin as the sequence. The sequence is relinked using the new clips. Existing master clips remain unchanged.
n When dynamically relinking to a different rate, only sequences are changed. Source clips placed in the Source Monitor are not relinked to different rate media
7. Click OK to close the Dynamic Relink dialog.
Support for XAVC-I Class 100
This release supports XAVC HD Intra CBG Class 100 resolution for 1080p 59.94 formats.
34

New in Media Composer v2019.x
Legal NoticesProduct specifications are subject to change without notice and do not represent a commitment on the part of Avid Technology, Inc.
This product is subject to the terms and conditions of a software license agreement provided with the software. The product may only be used in accordance with the license agreement.
This product may be protected by one or more U.S. and non-U.S patents. Details are available at www.avid.com/patents.
This document is protected under copyright law. An authorized licensee of Avid Media Composer may reproduce this publication for the licensee’s own use in learning how to use the software. This document may not be reproduced or distributed, in whole or in part, for commercial purposes, such as selling copies of this document or providing support or educational services to others. This document is supplied as a guide for Avid Media Composer. Reasonable care has been taken in preparing the information it contains. However, this document may contain omissions, technical inaccuracies, or typographical errors. Avid Technology, Inc. does not accept responsibility of any kind for customers’ losses due to the use of this document. Product specifications are subject to change without notice.
Copyright © 2019 Avid Technology, Inc. and its licensors. All rights reserved.
The following disclaimer is required by Apple Computer, Inc.:APPLE COMPUTER, INC. MAKES NO WARRANTIES WHATSOEVER, EITHER EXPRESS OR IMPLIED, REGARDING THIS PRODUCT, INCLUDING WARRANTIES WITH RESPECT TO ITS MERCHANTABILITY OR ITS FITNESS FOR ANY PARTICULAR PURPOSE. THE EXCLUSION OF IMPLIED WARRANTIES IS NOT PERMITTED BY SOME STATES. THE ABOVE EXCLUSION MAY NOT APPLY TO YOU. THIS WARRANTY PROVIDES YOU WITH SPECIFIC LEGAL RIGHTS. THERE MAY BE OTHER RIGHTS THAT YOU MAY HAVE WHICH VARY FROM STATE TO STATE.
The following disclaimer is required by Sam Leffler and Silicon Graphics, Inc. for the use of their TIFF library:Copyright © 1988–1997 Sam Leffler Copyright © 1991–1997 Silicon Graphics, Inc.
Permission to use, copy, modify, distribute, and sell this software [i.e., the TIFF library] and its documentation for any purpose is hereby granted without fee, provided that (i) the above copyright notices and this permission notice appear in all copies of the software and related documentation, and (ii) the names of Sam Leffler and Silicon Graphics may not be used in any advertising or publicity relating to the software without the specific, prior written permission of Sam Leffler and Silicon Graphics.
THE SOFTWARE IS PROVIDED “AS-IS” AND WITHOUT WARRANTY OF ANY KIND, EXPRESS, IMPLIED OR OTHERWISE, INCLUDING WITHOUT LIMITATION, ANY WARRANTY OF MERCHANTABILITY OR FITNESS FOR A PARTICULAR PURPOSE.
IN NO EVENT SHALL SAM LEFFLER OR SILICON GRAPHICS BE LIABLE FOR ANY SPECIAL, INCIDENTAL, INDIRECT OR CONSEQUENTIAL DAMAGES OF ANY KIND, OR ANY DAMAGES WHATSOEVER RESULTING FROM LOSS OF USE, DATA OR PROFITS, WHETHER OR NOT ADVISED OF THE POSSIBILITY OF DAMAGE, AND ON ANY THEORY OF LIABILITY, ARISING OUT OF OR IN CONNECTION WITH THE USE OR PERFORMANCE OF THIS SOFTWARE.
The following disclaimer is required by the Independent JPEG Group:This software is based in part on the work of the Independent JPEG Group.
This Software may contain components licensed under the following conditions:Copyright (c) 1989 The Regents of the University of California. All rights reserved.
Redistribution and use in source and binary forms are permitted provided that the above copyright notice and this paragraph are duplicated in all such forms and that any documentation, advertising materials, and other materials related to such distribution and use acknowledge that the software was developed by the University of California, Berkeley. The name of the University may not be used to endorse or promote products derived from this software without specific prior written permission. THIS SOFTWARE IS PROVIDED ``AS IS'' AND WITHOUT ANY EXPRESS OR IMPLIED WARRANTIES, INCLUDING, WITHOUT LIMITATION, THE IMPLIED WARRANTIES OF MERCHANTABILITY AND FITNESS FOR A PARTICULAR PURPOSE.
Copyright (C) 1989, 1991 by Jef Poskanzer.
Permission to use, copy, modify, and distribute this software and its documentation for any purpose and without fee is hereby granted, provided that the above copyright notice appear in all copies and that both that copyright notice and this permission notice appear in supporting documentation. This software is provided " as is" without express or implied warranty.
Copyright 1995, Trinity College Computing Center. Written by David Chappell.
Permission to use, copy, modify, and distribute this software and its documentation for any purpose and without fee is hereby granted, provided that the above copyright notice appear in all copies and that both that copyright notice and this permission notice appear in supporting documentation. This software is provided " as is" without express or implied warranty.
Copyright 1996 Daniel Dardailler.
Permission to use, copy, modify, distribute, and sell this software for any purpose is hereby granted without fee, provided that the above copyright notice appear in all copies and that both that copyright notice and this permission notice appear in supporting documentation, and that the name of Daniel Dardailler not be used in advertising or publicity pertaining to distribution of the software without specific, written prior permission. Daniel Dardailler makes no representations about the suitability of this software for any purpose. It is provided " as is" without express or implied warranty.
Modifications Copyright 1999 Matt Koss, under the same license as above.
Copyright (c) 1991 by AT&T.
35

New in Media Composer v2019.x
Permission to use, copy, modify, and distribute this software for any purpose without fee is hereby granted, provided that this entire notice is included in all copies of any software which is or includes a copy or modification of this software and in all copies of the supporting documentation for such software.
THIS SOFTWARE IS BEING PROVIDED " AS IS" , WITHOUT ANY EXPRESS OR IMPLIED WARRANTY. IN PARTICULAR, NEITHER THE AUTHOR NOR AT&T MAKES ANY REPRESENTATION OR WARRANTY OF ANY KIND CONCERNING THE MERCHANTABILITY OF THIS SOFTWARE OR ITS FITNESS FOR ANY PARTICULAR PURPOSE.
This product includes software developed by the University of California, Berkeley and its contributors.
The following disclaimer is required by Paradigm Matrix:Portions of this software licensed from Paradigm Matrix.
The following disclaimer is required by Ray Sauers Associates, Inc.:“Install-It” is licensed from Ray Sauers Associates, Inc. End-User is prohibited from taking any action to derive a source code equivalent of “Install-It,” including by reverse assembly or reverse compilation, Ray Sauers Associates, Inc. shall in no event be liable for any damages resulting from reseller’s failure to perform reseller’s obligation; or any damages arising from use or operation of reseller’s products or the software; or any other damages, including but not limited to, incidental, direct, indirect, special or consequential Damages including lost profits, or damages resulting from loss of use or inability to use reseller’s products or the software for any reason including copyright or patent infringement, or lost data, even if Ray Sauers Associates has been advised, knew or should have known of the possibility of such damages.
The following disclaimer is required by Videomedia, Inc.:“Videomedia, Inc. makes no warranties whatsoever, either express or implied, regarding this product, including warranties with respect to its merchantability or its fitness for any particular purpose.”
“This software contains V-LAN ver. 3.0 Command Protocols which communicate with V-LAN ver. 3.0 products developed by Videomedia, Inc. and V-LAN ver. 3.0 compatible products developed by third parties under license from Videomedia, Inc. Use of this software will allow “frame accurate” editing control of applicable videotape recorder decks, videodisc recorders/players and the like.”
The following disclaimer is required by Altura Software, Inc. for the use of its Mac2Win software and Sample Source Code:©1993–1998 Altura Software, Inc.
The following disclaimer is required by Ultimatte Corporation:Certain real-time compositing capabilities are provided under a license of such technology from Ultimatte Corporation and are subject to copyright protection.
The following disclaimer is required by 3Prong.com Inc.:Certain waveform and vector monitoring capabilities are provided under a license from 3Prong.com Inc.
The following disclaimer is required by Interplay Entertainment Corp.:The “Interplay” name is used with the permission of Interplay Entertainment Corp., which bears no responsibility for Avid products.
This product includes portions of the Alloy Look & Feel software from Incors GmbH.
This product includes software developed by the Apache Software Foundation (http://www.apache.org/).
© DevelopMentor
This product may include the JCifs library, for which the following notice applies:JCifs © Copyright 2004, The JCIFS Project, is licensed under LGPL (http://jcifs.samba.org/). See the LGPL.txt file in the Third Party Software directory on the installation CD.
Avid Interplay contains components licensed from LavanTech. These components may only be used as part of and in connection with Avid Interplay.
Attn. Government User(s). Restricted Rights LegendU.S. GOVERNMENT RESTRICTED RIGHTS. This Software and its documentation are “commercial computer software” or “commercial computer software documentation.” In the event that such Software or documentation is acquired by or on behalf of a unit or agency of the U.S. Government, all rights with respect to this Software and documentation are subject to the terms of the License Agreement, pursuant to FAR §12.212(a) and/or DFARS §227.7202-1(a), as applicable.
TrademarksAvid, the Avid Logo, Avid Everywhere, Avid DNXHD, Avid DNXHR, Avid Nexis, AirSpeed, Eleven, EUCON, Interplay, iNEWS, ISIS, Mbox, MediaCentral, Media Composer, NewsCutter, Pro Tools, ProSet and RealSet, Maestro, PlayMaker, Sibelius, Symphony, and all related product names and logos, are registered or unregistered trademarks of Avid Technology, Inc. in the United States and/or other countries. The Interplay name is used with the permission of the Interplay Entertainment Corp. which bears no responsibility for Avid products. All other trademarks are the property of their respective owners. For a full list of Avid trademarks, see: http://www.avid.com/US/about-avid/legal-notices/trademarks.
Adobe and Photoshop are either registered trademarks or trademarks of Adobe Systems Incorporated in the United States and/or other countries. Apple and Macintosh are trademarks of Apple Computer, Inc., registered in the U.S. and other countries. Windows is either a registered trademark or trademark of Microsoft Corporation in the United States and/or other countries. All other trademarks contained herein are the property of their respective owners.
What’s New for Media Composer • Created 7/1/19
36