Embed Size (px)
Citation preview
THE WORLD’S BEST DIY WOOD BURNING CAMP STOVE(WITH COMPANION VIDEOS ON YOUTUBE!)
MOUNTAINRANGERHow To Build a
Step-By-Step PlansFREE!INVENTED BY A VETERAN.TESTED AND PROVEN BY VETERANS.HANDCRAFTED BY VETERANS.
Build It or Buy It?It’s your choice. If you have the time, tools and simple skills, by all means build one. If not, I’ve done the work for you. I built my own custom jigs and fixtures to ensure you get the very same Mountain Ranger you see in my videos. It’s even painted and pre-cured so you can use it right away.
The Stove.The Mountain Ranger is designed for optimum airflow. It is the only DIY wood burner of it’s kind anywhere that incorporates 1 part Primary air to 5 parts Secondary air (1:4.7 actually). That’s the true secret behind the Mountain Ranger. That’s why it works. And now I’ve made it even better.
The Bag.Your new Mountain Ranger comes wrapped in a durable plastic bag to keep it dry. Everything is packed in a handcrafted, triple-stitched, custom-fit, round-bottom stuff sack made from authentic military surplus items - actually issued to a veteran.
I am a veteran and I cater to veterans. We are brothers and sisters in arms and we take care of our own. I have assembled a team of highly motivated, highly skilled veterans who handcraft each and every Mountain Ranger to exacting specifications.
Thank a Veteran.We all swore a solemn oath that never expires. Our “service“ to the People of this country ends only when we die. If you truly want to thank a Veteran, put a Mountain Ranger in your outdoor or emergency preparedness gear. You’ll find out why we ask the question:
What’s In YOUR Backpack?
The Bottom Line.If you can make or buy a better wood burning camp stove - DO IT!Watch the videos. Build a Mountain Ranger. Judge for yourself.
BUILD VIDEO: http://www.youtube.com/watch?v=qMTUfNoJPwsPAINTING VIDEO: http://www.youtube.com/watch?v=_P1dOlV3YZEQuestions, Comments, Purchase Info: [email protected]
*** WARNING ***NEVER try to light the stove with liquid fuels of ANY kind. Doing so will cause an EXPLOSION.Place on Burn-Proof Surface ONLY. The Mountain Ranger stove gets very hot. NEVER place, use or burn your stove in, on or around anything that is flammable. An unintended fire may result. Not suitable for indoor use. Burn in well ventilated area only. Follow all fire regulations for your area.
FILL THE STOVE AND LIGHT IT ON THE TOPThis stove was designed to burn from the top down. Always light your stove on the top. Load your fuel to just below the secondary air holes. This allows an area for firestarters and will help collect the flammable gases produced by the flames.
To get the absolute best performance, keep your fuel consistent (length, diameter and type) from burn to burn. Don’t mix hardwood and softwood. Don’t use wet or very damp wood. Smoke will result.
FUELSSticks, chips and chunks of hardwood work best. Softwood is fine as long as it’s dry. Fuel should be approximately 1/4” diameter by 1” - 2” long. It doesn’t have to be exact. Just make sure your fuel is not too big. Too much space creates too much primary airflow and will cause smoke. Conversly, fuel that is too small can plug the primary air holes and smother your fire - which creates smoke. Practice will help you determine what works best for you and your particular situation.
Wood Pellets: Hardwood pellets work great, and burn longer. Load 1 cup (1/2 load!) on the bottom and sticks on the top. Light as described.
FIRESTARTINGMy preferred method is to use fatwood. It is very dry, very old, pitch-filled pine available just about everywhere. Fatwood is waterproof, lights instantly, and burns for some time. To use, simply put some fatwood chips on the top of your fuel and light it. Replace outer housing, riser and potstand.
Petroleum Jelly Cotton BallRub petroleum jelly into a cotton ball until “sticky”. Stretch to cover top of fuel. Light and place small pieces of tinder on top of fire. Once flame is established, replace outer housing, riser and potstand.
Build a FireUsing tinder and small twigs, build a fire on top of your fuel. Once flames are fully engaged and stable, replace housing, riser and potstand. Take care not to burn yourself - the combustion chamber gets very hot, very quickly.
DISCLAIMERUser/maker voluntarily assumes all risks, known and unknown, of any injury, however caused, even if caused in whole or in part by the action, inaction, or negligence of any party, to the full extent allowed by law. Not responsible for direct, indirect, incidental, or consequential damages resulting from any defect, error, judgement, action or failure to perform. Use at your own risk. Use only in a well-ventilated area. All rights reserved.

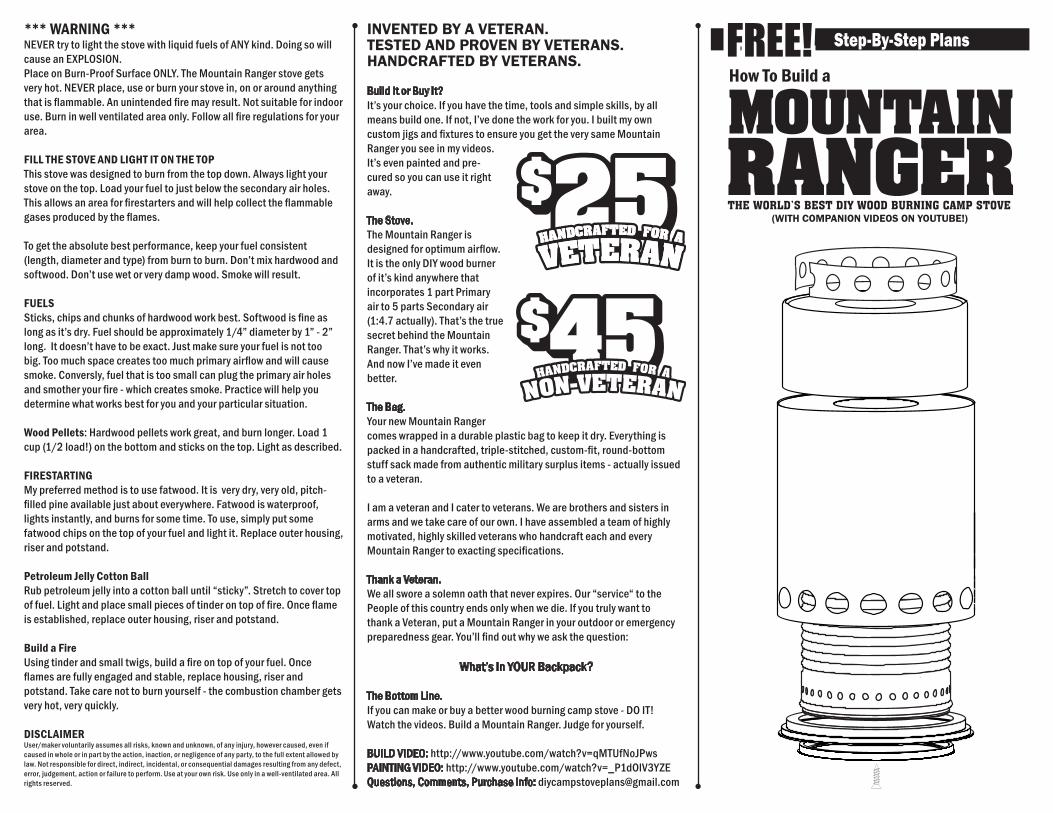
10½” Plumber’s strap
MOUNTAIN RANGERTHE WORLD’S BEST DIY WOOD BURNING CAMP STOVE
BURNER RING/POT STAND
RISER/FLAME PROTECTOR
MAIN STOVE BODY
COMBUSTION CHAMBER
BASE ASSEMBLY
⅜” SHEETMETAL SCREW
12 oz. tuna can or equivalent(Do Not use galvanized can)- 1 ¹¹/16” Concentrator hole (Toilet paper or paper towel tube)
1 qt. paint can- 1 ¹¹/16” Concentrator hole (Toilet paper or paper towel tube)- 16 @ /16” Main air intake holes
“Progresso” style soup can(or equivalent)- 32 @ /32” Primary air intake holes- 16 @ ¼” Secondary air intake holes
Paint can top and lid
1 PREPARATION. Remove lids from soup can and tuna can using side-cutting (safety) can opener. Empty contents. Remove labels.
Remove any burrs with sandpaper or file. Wash and dry cans. Do not remove paint can top at this time.
2 DRAW LAyOUT LINES. Turn paint can upside down on flat surface. Place Sharpie™ on inverted paint can lid. Turn can to
draw line. Place soup can right side up on flat surface. Place Sharpie™ on inverted paint can lid. Turn can to draw line. Turn soup can upside down. Place Sharpie™ on flat surface without paint can lid. Turn can to draw line.
3 MARK HOLE LOCATIONS. Turn paint can upside down and make 4 marks on the rim at 12 o’clock, 3 o’clock, 6 o’clock and
9 o’clock. Mark between each point for 8 marks, repeat for 16. Transfer these marks to the layout line.Turn the soup can upside down and make 16 marks. Transfer these marks to both layout lines. Double the number of marks on the bottom layout line of the soup can to make 32 marks.Center toilet paper or paper towel tube on bottom of paint can. Draw around tube to make a circle for concentrator hole.Repeat on bottom of tuna can for concentrator hole.
4 PRE-DRILL AIR HOLES. Pre-drill all holes you marked with (+) using ⅛” drill bit. You can also pre-drill ⅛” holes around
concentrator circles to make removal easier.After pre-drilling, remove top of paint can with side-cutting (safety) can opener.
5 DRILL AIR HOLES. Drill 16 main air intake holes in paint can to /16”. Drill 32 primary air holes in soup can to /32”. Drill 16
secondary air holes in soup can to ¼”.Remove concentrator holes from paint can and tuna can. A Dremel tool works best. Clean up edges with a file, sandpaper or Dremel.
6 ASSEMBLy. Place soup can upside down on flat surface. Assemble paint can lid and ring, and place firmly on soup can as
shown (it is a snug fit). Install sheetmetal screw in center of assembly. Don’t overtighten.Paint and cure with Rutland High-Temp Stove paint. (refer to painting video and follow all manufacturers instructions.) FINISHED!
BUILD VIDEO: http://www.youtube.com/watch?v=qMTUfNoJPwsPAINTING VIDEO: http://www.youtube.com/watch?v=_P1dOlV3YZEQuestions, Comments and Purchase Info: [email protected]