Embed Size (px)
Citation preview

OPERATIONAL MANUAL
NEVADA GOLD™
PULL TAB DISPENSING MACHINE
for cash accepting & keypad models
Arrow International
Capitol Bingo Equipment Division
Arrow Games (Canada)
Presented By:

NEVADA GOLD2
INTRODUCTION
In This ManualInformation in this document pertains to this release of the Arrow International Inc. Nevada Gold™ Pull Tab Dispenser. Modifications are periodically made to the information: any such changes will be reported in subsequent revisions.
The laws that determine the legality of this product change constantly. It is the responsibility of the buyer to determine which products are legal in any given area.
This device is protected by a published international patent application P.C.T. (Patent Co-Operation Treaty) # PCT/CA97/00618
©Copyright Arrow International, Inc. 1998All trademarks, trade names, and patents are the property of their respective companies.
Arrow Technical Assistance CenterProtecting Your Investments Through Innovative
Solutions and Support
www.arrowinternational.com
Phone Support Hours: 8am to 12am
1-800-277-6214

NEVADA GOLD 3
Your new Capitol Nevada Gold™ Pull Tab Dispenser is designed using state of the art technology. Its rugged all steel construction, modular design, and exceptional user convenience set it apart from the competition. Benefits include: accurate sales recording, complete security, reduced staff requirements, high speed dispensing, and the capability to play a variety of tickets.
The Nevada Gold™ Pull Tab Dispenser features 1000 ticket capacity per column, vends one, three, four, five, or six window tickets.
The bill validator accepts $1.00, $5.00, $10.00, $20.00, $50.00 and $100.00 denominations and holds a maximum of 600 bills. Your Nevada Gold™ Pull Tab Dispenser is capable of tickets that sell for $0.10, $0.25, $0.50, $1.00, $2.00 or $5.00 denominations.
A “Play All” button enables to user to play all existing credits from any one column up to a maximum of 100 tickets.
The Nevada Gold™ Pull Tab Dispenser offers quick front loading of tickets, and individual modular ticket columns that may be easily removed for service without affecting the operation of other columns.
Security features include: separate keys for tickets and money, an alarm to warn of unauthorized access and theft, and on random select models and models with the printer update kit installed automatic date and time tracking of the last 30 door openings.
INTRODUCTION
Introduction To Capitol Nevada Gold
The bill validator accepts $1.00, $5.00, $10.00, $20.00, $50.00 and $100.00 denominations and holds a maximum of 600 bills.

NEVADA GOLD4
INTRODUCTION
Your Capitol Bingo Equipment contains delicate electronic equipment. It is imperative that you thoroughly inspect the contents of the package before accepting product delivery from the carrier.
In case of severe damage, refuse the equipment from the carrier. Contact your local Arrow International Distributor for immediate replacement.
If the product is damaged but acceptable, make a note on the bill of lading before accepting. Take a photo of the damage before and after unpacking as a record of claim against the carrier. Contact the carrier’s agent immediately for inspection. Be sure to obtain a copy of the inspection report for your records.
If these precautions are not taken, we cannot assist you in recovering the amount of the claim against the carrier.
Damage Action Process
Introduction To Capitol Nevada Gold (cont’d)Cash totals and sales totals are stored in both resettable and non-resettable electronic memory, and are backed up by non-resettable electro-mechanical meters. The electronic memory will hold even when power has been disconnected.
Optional printer upgrade kit allows a single printer to generate hard copy receipt of accounting information for any number of dispensers.
The Nevada Gold™ Pull Tab Dispenser offers years of trouble-free service. However, if a problem arise, our service department provides timely responses on repairs, spare parts, and technical support (see page 11)

NEVADA GOLD 5
CONTENTS
OVERVIEW8 What You Should Know9 Important Safety Info10 Unpacking10 Check Your Shipment
INSTALLATION12 Choose Location13 Wall-Mounting a Unit13 Surface-Mounting a Unit14 Opening Cabinet Doors15 Connect the Battery15 Disconnect the Battery15 About the Alarm
PREPARATION16 Turning On the Unit18 Turning Off the Unit19 Loading Tickets20 Removing Tickets20 Displaying Sample Tickets
BASIC OPERATIONS21 Accessing Menus22 Managing PIN Numbers23 Tracking Sales24 Establish Column Ticket Prices25 Testing Dispensing Unit26 Setting Date & Time28 Tracking Door Openings29 Dispenser Serial Number29 Clearing Established Credits29 Resetting Error Messages31 Emptying the Cash33 Keypad Operations
OPTIONAL VIDEO DISPLAY46 Settings48 Images50 Display Configuration
OPTIONAL REPORT PRINTER51 Generating the Report
PLAYER INFORMATION53 Dispensing Tickets
CARE & MAINTENANCE55 Lubricate Chute Door56 Lubricate Accelerator Roller Shafts56 Cleaning Infrared Sensor57 Cleaning Bill Validator59 Clearing Jammed Bills60 Replacing Ticket Column63 Adjusting for Ticket Thickness
OPTIONAL RANDOM TICKET DISPENSE64 Random Ticket Dispense
TROUBLESHOOTING68 Bill Validator Diagnostics
SPECIFICATIONS69 Physical Characteristics
WARRANTY70 Warranty Information
NOTES73 Notes74 Service Log
NEVADA GOLD6
OVERVIEW
Please read the complete

NEVADA GOLD 7
OVERVIEW
Please read the complete manual before you begin. The information provided in this document describes the procedures required for successful operation of this unit.
Throughout this manual, you will see arrows.
Pay particular attention to these sections with the arrows. If you do not follow the instructions correctly, you may adversely affect the operation of your dispenser.
NEVADA GOLD8
OVERVIEW
Before you begin, familiarize yourself with the information in this manual and your model of Nevada Gold™ Pull Tab Dispenser. Note the following important details:
What You Should Know
The keypad located inside the model is used to maintain the unit.
You must have a valid Personal Identification Number (PIN) to be able to maintain the unit.
You should not share your PIN number with others.
Players cannot dispense tickets if the machine door is unlocked.
The Nevada Gold™ Pull Tab Dispenser accepts cash from $1.00 to $100.00 bills, depending upon the model of your machine.
Players cannot enter money when a credit of greater than $100.00 has been established. The green light on the bill collector turns red and no currency is accepted.
When the player presses the PLAY ALL button and then presses a column button, up to 100 tickets dispense at the column price selected and the remaining credits are displayed. If the price per ticket in the column selected is not evenly divisible by the credits entered, a credit displays after the tickets are dispensed. Enter more money to dispense a ticket for a credit that does not equal the cost of tickets in the machine. For example, if a $5.00 credit appears in a machine containing only $2.00 tickets, two $2.00 tickets dispense and a $1.00 credit appears. Another $1.00 is required to dispense the remaining ticket.
Pressing only one column button allows the players to dispense just one ticket at a time.
After ticket is vended, remaining credit amount displays in the LCD.
The bill collector indicator turns green and accepts money once the credits are reduced to $100.00 or less.
If you have any questions, call your Arrow distributor or Arrow International for assistance.

NEVADA GOLD 9
OVERVIEW
Important Safety InformationSome caution must be exercised when using the Nevada Gold™ Pull Tab Dispenser. Read and understand the following important information to ensure safe and prolonged operation of the unit:
Do not install or use the machine near water or moisture. Take care not to spill any liquids on the machine.
Do not use any abrasive materials or solvents to clean the machine.
Do not drop retaining plates in between the ticket columns when removing. A short circuit could result, causing serious damage to the product.
Do not spill oil on the rubber surfaces of the rollers when lubricating.
Turn off power to the ticket dispenser before using a vacuum cleaner to clean the inside of the machine
Do not use a metal crevice tool to vacuum the inside of the unit unless the power is off.
Use a plastic crevice tool to vacuum inside the unit when the machine is plugged in.
Use a soft damp cloth with a drop of liquid fabric softener to clean the glass on the unit.

NEVADA GOLD10
OVERVIEW
To unpack your dispenser, set box upright on a firm level surface. Cut the shipping straps, and lift off the top and remove packaging material. Now dispenser can be moved from the bottom carton to the permanent location.
Take note of the keys and the manual to keep in a safe place.
In order to protect the columns and main door glass during shipping, the adjustable backs of the columns have been taped in place. You should remove the tape before using your dispenser so that you can properly adjust the columns for different ticket lengths. Unlock the main door with the key supplied, and carefully peel off the tape on the side of each column.
Also, remove the cardboard packing from the bill acceptor bill box and remove the cardboard strip from the bill pathway before use.
Whether you wall mount or surface mount the dispenser, keep in mind that a 4-column unit weighs 145 pounds, and an 8-column unit weighs 225 pounds. Use care and get assistance before unpacking and lifting. A minimum of two people are required.
Unpacking
Ensure that your shipment contains the following:
The correct model of the Nevada Gold™ Pull Tab Dispenser
Remote keypad (for Nevada Gold™ keypad model ONLY)
Power supply or power cord (depends on model) for ticket dispenser.
Two keys to open the cabinet doors
Two keys to open the bill acceptor and coin collectors (coin collectors are available on selected models only)
One H-shaped retaining plate per dispensing column
Leveling feet (you receive four leveling feet with a four column dispenser and eight leveling feet with an eight column dispenser)
Check Your Shipment

NEVADA GOLD 11
OVERVIEW
Note:
Arrow Technical Assistance CenterProtecting Your Investments Through Innovative
Solutions and Support
www.arrowinternational.com
Phone Support Hours: 8am to 12am
1-800-277-6214
In order to validate your warranty, you must present proof of purchase to Arrow International. Keep a sales receipt or invoice to protect your investment!
See pages 70 and 71 for more details

NEVADA GOLD12
INSTALLATION
Before using your Nevada Gold™ Pull Tab Dispenser, you must ensure that it is properly installed and ready for use. It is important that you position the unit in a safe and secure location. Make sure that your location:
• Provides accessibility to an electrical outlet to plug in the unit.
• Remains dry.
• User can reach the unit when selecting the wall-mounting option.
• Provides a level surface on which to place the unit when choosing to operate the unit from a table, counter or shelf.
• Provides ample room for both the upper and lower cabinet doors to swing open to the left, to the right, or both.
Choosing a Location
7
8
4
1
3
2
6
5
Main Door
Column Buttons
Console Door
Hopper Door
(Optional) Display
Display
Play All Button
Bill Validator
1
4
2
5
3
6
7
8

NEVADA GOLD 13
INSTALLATION
If you decide to wall-mount the unit, choose a location that allows you to open both the upper and lower cabinet doors after the unit has been mounted. Note that each four-column model weighs approximately 145 pounds before tickets are loaded to keep in mind when deciding where to mount the unit. Also, consider that the height of individual users varies when deciding how high to place the unit.
The unit is designed for wall-mounting based on a 16 inch stud spacing (4 column machine). You require four 5/16 inch diameter lag bolts (or a bolt to fit your wall application) and a socket wrench with extension. Open the cabinet doors. Insert the lag bolts through the mounting eyes in the back of the unit and secure bolts into the wall.
The dispenser is easily installed on a level surface like a table, counter or shelf. If your surface is not completely level, you can adjust the unit using the leveling feet provided. The leveling feet also protect the surface on which you mount the unit.
Secure the unit to its location using lag bolts or nuts and bolts. Each leg contains a hole designed to allow you to secure the unit in place with a 5/16 inch bolt.
Wall-Mounting the Unit
Surface-Mounting the Unit

NEVADA GOLD14
INSTALLATION
The upper cabinet door contains two locks for security. You must unlock the upper door before opening the lower cabinet door. To open the lower cabinet door, release the lever on the latch located just above the lower cabinet door. The unit appears as follows:
Opening the Cabinet Doors
6
3
4
5
7
1
Ticket Display
Wall Mounting Holes
Meters
Keypad
1
4
2
5
3
6
7
2
Printer Port
Console Latch
Columns

NEVADA GOLD 15
INSTALLATION
Column Loaded Indicator
Make Connection to P7
When you first receive your Nevada Gold Pull Tab Dispenser, unlock and open the cabinet doors. Plug the unconnected connector shown in the photo to P7 on the Backplane Board.
You must disconnect the battery if you are shipping the unit or if the AC power will be shut down for more than 96 hours. Disconnect the battery and tape the connectors to insulate the ends and prevent accidental short circuits.
The Nevada Gold™ Pull Tab Dispenser is fully alarmed to prevent unauthorized access to the machine and theft.
The alarm operates on a seven second delay and sounds under the following conditions:
Any door is opened.The AC power is disconnected.
Note that on the initial power up of the dispenser, the alarm may also sound. To clear an alarm, open the cabinet door and enter your four digit pin number.
The Green LED is on by default, it turns off when a ticket is loaded & advanced under the ticket counting sensor of the column. (See page 19 for reference) The display on the console will now read ALARM ACTIVATED ENTER PIN NUMBER.
Connecting the Battery
Disconnecting the Battery
About the AlarmNOTE:If you do not wish to have the alarm sound during a power failure, don’t connect the battery inside the unit. By doing this, however, the alarm will not sound during a theft of the machine, and if a player has credits established when the power fails, the player will not be able to continue playing until power to the dispenser is restored. If you choose to do this, make sure that you tape the battery connectors to insulate the ends and prevent accidental short circuits.
NEVADA GOLD16
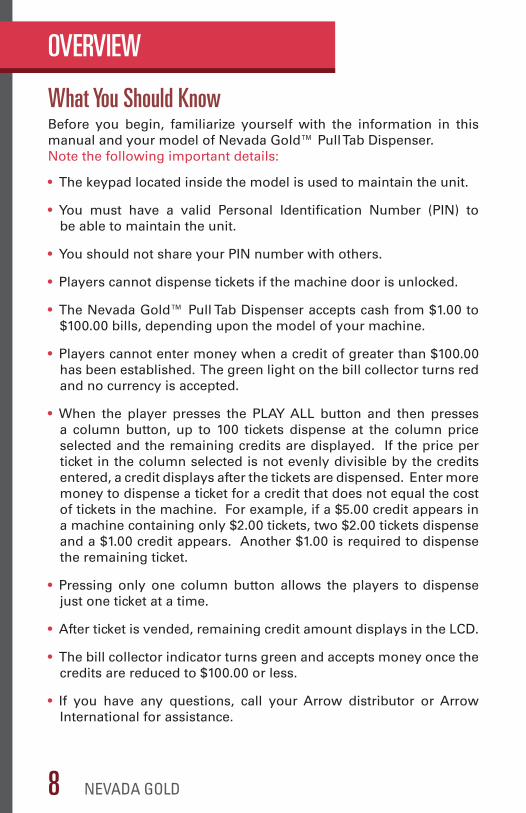
Once the machine is safely secured to a surface and the battery is connected, follow these steps to turn unit on:
Turning on the Unit
1. Attach the power supply connector to the left side of the machine. This connector only fits in one way: do not use force. Plug in the power supply (plug) to a grounded 120V outlet. It is recommended that you plug your dispensing machine into a surge-protected circuit or use a good quality surge-protected power strip.
2. Press the On/Off switch located under the unit on the left-hand side. (The LCD backlighting and the interior cabinet lighting will turn on when the unit is switched on.)
3. Unlock and open the cabinet doors.
4. If this is the first time you are using the dispenser, and the unit either has the optional printer upgrade kit installed or is a random column select dispenser, the LCD will prompt you to enter the date and time. See page 26 for instructions on setting the date and time. The dispenser will also prompt you to enter the date and time after all power is disconnected from the unit and then reconnected.
5. Enter your four digit PIN when the LCD display appears as follows:
ALARM ACTIVATED ENTER PIN NUMBER
PREPARATION
Power Switch Location Power Switch Unit with Window Lights & Marketing Display

NEVADA GOLD 17
PREPARATION
Note that the Nevada Gold™ Pull Tab Dispenser is pre-programmed with PIN number 1000 in position 5.
Turning On the Unit (cont)If this is the first time you are using the dispenser, you must set the column ticket prices before you can dispense tickets. If you lock the cabinet door before establishing ticket prices, the LCD will then display the following:
You must unlock the cabinet door and set the ticket pricing. See page 24 for details.
If the cabinet door is locked and ticket pricing is set, players can purchase tickets.
PRICING NOT SET GO TO SERVICE

NEVADA GOLD18
PREPARATION
Turning Off the Unit
Loading Tickets
Use the On/Off switch located on the bottom left corner of the machine to turn off the unit. Turning off the unit does not affect any of the column price settings, electronic totals or PIN number entries, nor does turning off the unit affect the battery backup. If you are going to store the machine for more than 96 hours, disconnect the battery.(see page 15 for reference)
NOTE: If battery is connected, turning the machine off will cause alarm to sound, which requires you to enter your four digit PIN to turn off.
The Nevada Gold™ Pull Tab Dispensers can be adapted to fit one window, three window, four window, five window, and six window ticket types, where approved by the government. The tickets vary in size. You can adjust each column to the appropriate ticket size and load up to 1000 tickets per column.
For optimum performance it is highly recommended that only tickets manufactured by Arrow International, Inc. be used in this machine.
Arrow International will not warranty problems resulting from the use of non-Arrow tickets.

NEVADA GOLD 19
1. Adjust the dispensing column size, if necessary. Use the tabs located on the back of each column to make the adjustment
2. Load a single ticket. Make sure that both the upper and lower cabinet doors remain open.
Starting at the top of the column, slide a ticket down the chute until it reaches the lowest point. Rotate the large white gear at the bottom right of the column to advance the front edge of the ticket approximately one half to one inch into the feeder. No further adjustments for size are required. The front edge of the ticket remains lower than the back edge. Note the ticket should be sitting at an angle when loaded properly. If the ticket is laying flat the column back is not in the proper slot.
3. Fill the column. First, check to see how the tickets bend. To prevent tickets from jamming and to ensure that tickets vend smoothly, make sure tickets are loaded as illustrated. Reference label on inside
of cabinet door for ticket loading. The opening at the top of each column allows you to enter stacks of tickets. Grasp a manageable stack of tickets. Slide the stack down the chute. Continue to load tickets until the column is full. All tickets in one column must be of the same value.
• Pinch the upper right-hand tab of the column you wish to adjust.
• Pinch bottom left-hand tab of the same column.
PREPARATION
Loading Tickets Steps
Slot 4: 4 5/8 “Slot 3: 3 3/4“Slot 2: 3 5/16“Slot 1: 2 5/8“
Bottom of Dispensing Column
Top of Ticket
NEVADA GOLD20
PREPARATION
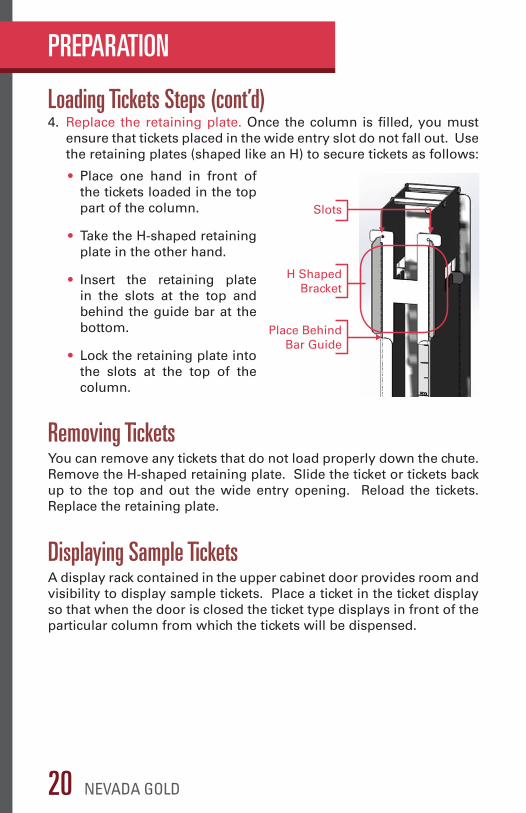
4. Replace the retaining plate. Once the column is filled, you must ensure that tickets placed in the wide entry slot do not fall out. Use the retaining plates (shaped like an H) to secure tickets as follows:
• Place one hand in front of the tickets loaded in the top part of the column.
• Take the H-shaped retaining plate in the other hand.
• Insert the retaining plate in the slots at the top and behind the guide bar at the bottom.
• Lock the retaining plate into the slots at the top of the column.
Loading Tickets Steps (cont’d)
Removing Tickets
Displaying Sample Tickets
You can remove any tickets that do not load properly down the chute. Remove the H-shaped retaining plate. Slide the ticket or tickets back up to the top and out the wide entry opening. Reload the tickets. Replace the retaining plate.
A display rack contained in the upper cabinet door provides room and visibility to display sample tickets. Place a ticket in the ticket display so that when the door is closed the ticket type displays in front of the particular column from which the tickets will be dispensed.
H Shaped Bracket
Place Behind Bar Guide
Slots

NEVADA GOLD 21
If you are using the dispenser for the first time, enter PIN number 1000 and then press #. Otherwise, enter your own PIN number and press #. The Main Menu will then appear:
Pressing # will then bring up the following display:
To set up or make changes, unlock the upper cabinet door and use the keypad located inside the door to program the changes. Once you open the door, the ENTER PIN NUMBER prompt displays.
When doors are locked and machine is ready to dispense tickets, LCD message appears as follows on models that accept only bills:
BASIC OPERATION (CASH)
Accessing MenusThe LCD (liquid crystal display) located on the outside of the upper right cabinet (as looking at the machine) provides the menu information for maintaining your Nevada Gold™ Pull Tab Dispenser.
The following pages explain the basic operation for the Nevada Gold™cash accepting models. For instructions on Nevada Gold™ keypad models, please turn to page 32.
PINS-‐1 TOTALS-‐2 PRICE-‐3 MORE-‐#
TEST-‐4 CLOCK-‐5 DOOR-‐6 PRINT-‐7
INSERT BILL NO CHANGE GIVEN

NEVADA GOLD22
BASIC OPERATION (CASH)
Pressing * will return you to the previous screen.
• Enter 0 to clear credits that have not been played
• Enter 1 to add, change or delete PIN numbers. See below.
• Enter 2 to view the total number of tickets dispensed for each column and an accumulated total, as well as the total currency collected. See page # 23.
• Enter 3 to set ticket prices for each column. See page # 24.
• Enter 4 to dispense tickets in a test mode. See page # 25.
• Enter 5 to set the date and time. See page # 26.
• Enter 6 to display the last 30 door openings in reverse chronological order. See page # 28.
• Enter 7 to print out an accounting report. See page # 51.
• Enter 8 to view units serial number. See page # 29.
TEST-‐4 CLOCK-‐5 DOOR-‐6 PRINT-‐7
Managing PIN NumberYou can add, change or delete up to five different PIN numbers. You cannot access menu functions unless at least one PIN position contains a valid PIN number. 0000 is not a valid PIN number. Press 1 to select the PIN function. The PIN Menu displays.
To add or change a PIN number press *. NEW PIN displays. Enter the new PIN number or enter 0000 to delete a PIN number for that position. Press the # key to advance to the next position. After you modify the PIN number, press the # key. When you reach the last PIN position, the display returns to the Main Menu.
Accessing Menus (cont’d)

NEVADA GOLD 23
BASIC OPERATION (CASH)
When you press # again, the resettable total appears. Pressing * will reset the total. Press # to advance to the next non-resettable column total. Pressing # again will advance you to the next resettable total. Once all columns are displayed, press # to display the non-resettable TOTAL ALL COLUMN amount. Press # again to display the resettable TOTAL ALL COLUMN amount. Pressing * resets to zero.
The Nevada Gold™ Pull Tab Dispenser records the total number of tickets dispensed from each column and gives a sum total of all tickets dispensed. The dispenser accumulates a total of all currency accepted. To review the Totals Menu, press 2 from the Main Menu.
Tracking Sales
To display the total ticket sales, press 1, TOTAL FOR COLS. The total for the first column displays, where xx is the column number and 0000000 displays the actual number of tickets dispensed from that column. This amount is not erasable or resettable.
To track the total value of currency accepted, press 2, TOT FOR CASH, from the Totals Menu. The screen displays, where $0000000.00 is the actual currency total:
Note that the Nevada Gold™ Pull Tab Dispenser is also equipped with two meters located inside the main cabinet door. The TOTAL ALL COLUMN amount equals the amount displayed on the bottom meter.
TOTAL CASH $0000000.00
Press # to proceed to RESETTABLE TOTAL CASH. Pressing * resets the cash total to zero, while pressing # returns you to the main menu.
Note the top meter located inside the main cabinet door matches the TOTAL CASH amount. If your machine accepts 25¢ coins, the top meter amount will be accurate within 75¢. For example, $475.75 appears as $475.00.
TOTAL FOR COL 1 0000000
RESETTABLE COL 1 0000000

NEVADA GOLD24
BASIC OPERATION (CASH)
The Nevada Gold™ Pull Tab Dispenser is shipped with six preset ticket values: ten cents, twenty-five cents, fifty cents, one dollar, two dollars or five dollars. Players select amounts to match the ticket value. You must set the column amounts to equal the value of the tickets placed in the column.
From the Main Menu, Press 3. The Pricing Menu appears:
Press the * key to select a preset value. When the proper amount displays, press the # key to advance to the next column. Repeat this step until all of the columns are priced. When you have finished entering the ticket prices, press the # key to return to the Main Menu. All columns must have pricing set in order for the dispenser to enter vend mode.
Note that on random select models, a minimum of two columns must be set to the same price before the unit can dispense tickets.
Establishing Column Ticket Pricing
• Columns are numbered from left to right, beginning with column 1 on the far left.
• A column must display a value greater than $0.00 to dispense tickets.
• A column must contain all tickets of the same value; for example, all tickets in column one must cost $0.50.
• Set the price for the tickets one column at a time.
• If the price set for the column does not match the price of the ticket, sales will not correctly represent the price of the ticket.
NEVADA GOLD 25
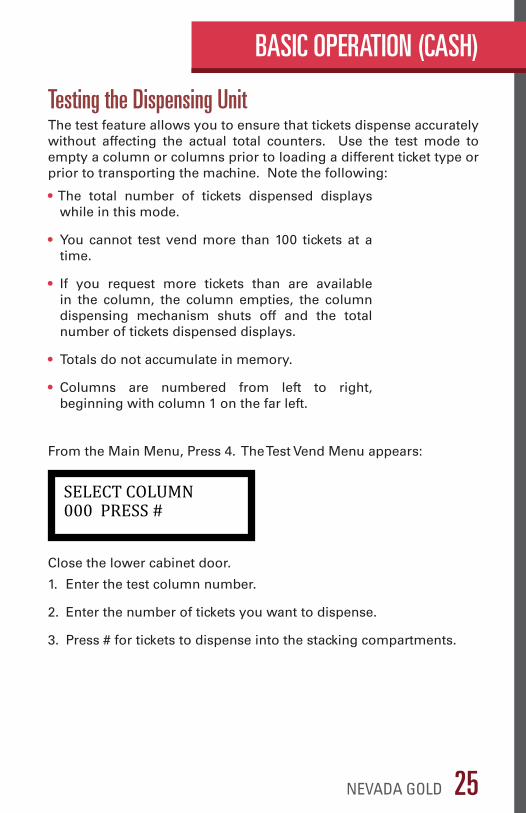
From the Main Menu, Press 4. The Test Vend Menu appears:
Close the lower cabinet door.
BASIC OPERATION (CASH)
The test feature allows you to ensure that tickets dispense accurately without affecting the actual total counters. Use the test mode to empty a column or columns prior to loading a different ticket type or prior to transporting the machine. Note the following:
Testing the Dispensing Unit
• The total number of tickets dispensed displays while in this mode.
• You cannot test vend more than 100 tickets at a time.
• If you request more tickets than are available in the column, the column empties, the column dispensing mechanism shuts off and the total number of tickets dispensed displays.
• Totals do not accumulate in memory.
• Columns are numbered from left to right, beginning with column 1 on the far left.
SELECT COLUMN 000 PRESS #
1. Enter the test column number.
2. Enter the number of tickets you want to dispense.
3. Press # for tickets to dispense into the stacking compartments.

NEVADA GOLD26
BASIC OPERATION (CASH)
(Random Column Select or Printer Upgrade Installed Only)NOTE: Requires battery to be connected to retain date & time(see page 15)
From the main menu, press 5. If your dispenser is not a random column select or doesn’t have the optional printer upgrade kit installed, the following appears:
After a delay, the LCD will automatically return to the main menu. (Contact your local Arrow Distributor if you would like this option.)
Otherwise, the date and time currently in the unit will display:
Pressing # will return you to the main menu whereas pressing * will allow you to set a new date and time.
Press *, and the following screen will appear: You can now enter the applicable month in numerals (e.g.: Jan - 01, Feb - 02, etc.)
Press #, and the following screen appears:
You can now enter the correct date of the month(1-31) and press # when you are finished.
Setting the Date & Time
CLOCK OPTION REQUIRED
FRI APR 17 2003 00:00:00 PRESS #
YEAR: PRESS #
MONTH: PRESS #
DATES: PRESS #

NEVADA GOLD 27
BASIC OPERATION (CASH)
Setting the Date & Time (cont’d)
YEAR: PRESS #
After setting the date of the month and pressing # you will see that the following screen appears:
Enter the correct year (i.e.: 2015) and press #.
After pressing # the following screen appears:
Enter the correct hour in 24-hour format (i.e.: 0-23) and press #.
After pressing # the following screen appears:
Enter the correct minutes (0-59) and then press #.
The following screen will show the changes you have made:
From the main menu press 5 to re-check the date and time settings.
The date and time will re-display. If they are correct, press # to return to the main menu, otherwise press * to enter the correct date & time.
ENTER HOURS: PRESS #
MINUTES: PRESS #
FRI APR 17 2003 11:46:45 PRESS #

NEVADA GOLD28
BASIC OPERATION (CASH)
On units that are either random column select or have optional printer upgrade kit installed, the dispenser automatically tracks the date & time of the last 30 door openings in reverse chronological order.
From the main menu press 6. If your dispenser is not a random column select unit or does not have the optional printer upgrade kit installed, the following will appear:
After a delay, the LCD will return to the main menu. (Contact your local Arrow Distributor if you would like this option.)
Otherwise, the following screen will appear:
This shows the date and time of the last door opening by the person with a valid pin number in position # 1 (See page 22 for more details on PIN numbers and Positions).
Press # to show you the second last door opening. Press # again to show you the third last door opening, and so on. At any time while viewing door openings, pressing * will return you to the main menu.
If an invalid PIN number is entered upon opening the door, the display will show the date and time. Note that a valid POS # was not entered.
Tracking Door Openings
CLOCK OPTION REQUIRED
FRI APR 17 2003 00:00:00 POS# 01
FRI APR 17 2003 00:00:00 POS# 00

NEVADA GOLD 29
If you wish to clear any credits established in the dispenser without dispensing tickets, from the main menu press 0, and the following will then appear on the LCD:
Press 1 to clear the established credits or 2 if you do not want to.
Error messages appear for two reasons: a empty ticket column or a malfunction in a column has occurred. This section describes how to correct the problem in these situations. The first time the problem is detected, the LCD displays the total number of credits remaining:
If the player selects again from the same column, the LCD will then displays the following prompt:
When the message appears because an empty column has been selected, another column must be chosen to continue.
BASIC OPERATION (CASH)
From the main menu, press 8. The machines serial number will appear on the LCD which will match the serial number on the identification tag on the lower left hand side of your unit. Pressing # will take you back to the main menu.
Reading The Dispenser’s Serial Number
Clearing Established Credits
Resetting Error Messages
CLEAR CREDITS 1 – YES 2 – NO
$0.00 CREDIT
COLUMN EMPTY OR MALFUNCTION

NEVADA GOLD30
BASIC OPERATION (CASH)
Reset the column empty message before resuming play:1. Unlock and open the upper cabinet door.
2. Enter your PIN number.
3. Load tickets. (See page 19 for details.)
4. Close and lock cabinet door.
5. Resume play (Note that when you reload the column with tickets, the player does not lose any credits.)
Resetting Error Messages (cont’d)
If the message appears for a reason other than an empty ticket column, you must first determine the reason for the malfunction. Tickets will not dispense for one of three reasons: a ticket jam, a misaligned sensor, or a dirty sensor.
Refer to pages 41-42 for instructions on resetting error messages for ticket jams and misalignment of a sensor.
Note that the Nevada Gold™ Pull Tab Dispenser is pre-programmed with PIN number 1000 in position #5.
NEVADA GOLD 31
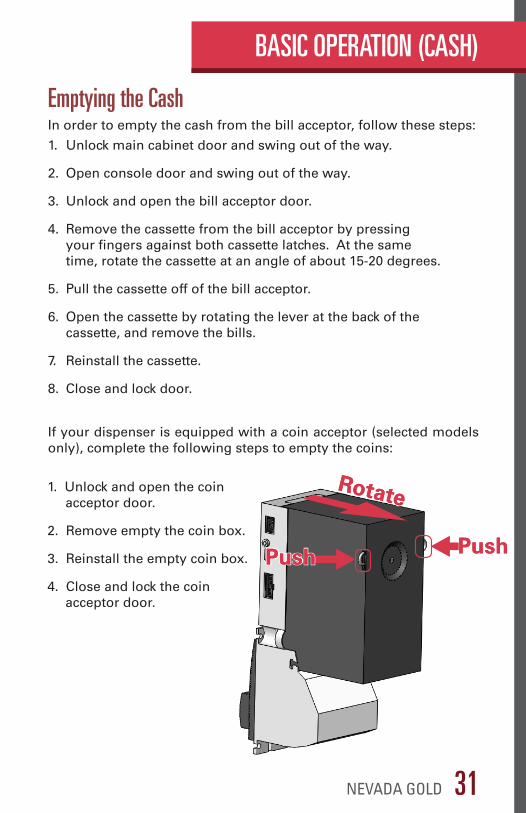
1. Unlock and open the coin acceptor door.
2. Remove empty the coin box.
3. Reinstall the empty coin box.
4. Close and lock the coin acceptor door.
BASIC OPERATION (CASH)
Emptying the CashIn order to empty the cash from the bill acceptor, follow these steps:
If your dispenser is equipped with a coin acceptor (selected models only), complete the following steps to empty the coins:
1. Unlock main cabinet door and swing out of the way.
2. Open console door and swing out of the way.
3. Unlock and open the bill acceptor door.
4. Remove the cassette from the bill acceptor by pressing your fingers against both cassette latches. At the same time, rotate the cassette at an angle of about 15-20 degrees.
5. Pull the cassette off of the bill acceptor.
6. Open the cassette by rotating the lever at the back of the cassette, and remove the bills.
7. Reinstall the cassette.
8. Close and lock door.
Note that the Nevada Gold™ Pull Tab Dispenser is pre-programmed with PIN number 1000 in position #5.
PushPush
RotateRotate
PushPush

NEVADA GOLD32
BASIC OPERATION (KEYPAD)
On the following pages, directions are included for the Nevada Gold™Pull Tab Dispenser with keypad. Although many of the components are similar in
cash accepting machines and keypad models, there are some differences that apply to one machine type or the other. Please keep this in mind as you begin to operate your machine.
Keypad Operation

NEVADA GOLD 33
BASIC OPERATION (KEYPAD)
With the Nevada Gold™ Pull Tab Dispenser with the keypad you can:
• Add, change or delete Personal Identification Numbers (PIN)
• Assign a security level to each active PIN number
• Track the total number of tickets dispensed from each column
• Adjust the timeout setting
• Adjust ticket pricing for each dispensing column
• Test ticket dispenser for accuracy without affecting actual ticket count
The LCD (liquid crystal display) located on the keypad provides the menu information for maintaining your Nevada Gold™ Pull Tab Dispenser. To program the unit, you must unlock the main console door and make the necessary changes using the keypad. Before opening the door, make sure that the ENTER PIN NUMBER screen displays. The screen displays when the timeout period expires or when you press the # key. The display appears as follows:
If you are using the dispenser for the first time, enter PIN number 1000 and then press #. Otherwise, enter your own PIN number and press #. The Main Menu will then appear:
Press 1- add, change, delete PINPress 2- view total # of tickets dispensedPress 3- adjust timeout settingPress 4- display additional menu items

NEVADA GOLD34
The Position automatically displays. The PIN number and Security levels display zeros, when the position is available. Otherwise, the PIN number and
SEC level number assigned to the position appear.
BASIC OPERATION (KEYPAD)
Assigning PIN & Security LevelsYou can assign up to 25 different PIN numbers and with options of three different security levels to choose from.
• The first PIN number and security code are pre-assigned. Use PIN 1000 the first time you program the unit.
• You cannot access menu functions unless at least one PIN position contains a valid PIN number with a level 2 security.
• 0000 is not a valid PIN number.
• The security levels are:
• Most users are assigned level 1 security.
• Assign a security level of 0 (no access) to any invalid PIN number.
0 - No access (this is the default)1 - Access to vending functions only2 - Access to vending, accounting and programming functions
To access the Main Menu, use PIN number 1000 the first time you program the unit. Otherwise, enter your PIN. Press 1 to select the PIN function. The PIN menu displays. POS is the Position number from 1 to 25; PIN is the four digit Personal Identification Number; and SEC is a Security level of 0, 1 or 2:
To add, change or delete a PIN press *. The NEW PIN screen displays:
Enter the new PIN number or enter 0000 to delete an existing PIN number.

NEVADA GOLD 35
BASIC OPERATION (KEYPAD)
Tracking Ticket SalesThe Nevada Gold™ Pull Tab Dispenser records the total number of tickets dispensed for each PIN and tracks the total number of tickets dispensed from each column. It is recommended that you use a Daily Control Sheet to record the ticket count and reconcile your sales (check with your State Agencies for requirements). To review or reset the totals, press 2 from the Main Menu. The Totals Menu appears:
Press the # key to advance to the Security level screen:
Enter the level of security (0, 1 or 2) assigned to the PIN number. Press #.
Press 1 to display the total ticket sales for each PIN position.
Press 2 when the Totals Menu appears to display the total ticket sales for each column.
Press the * key to make changes to the current screen. Press the # key to advance to the next position. You must scroll through all 25 positions even if you do not need to enter PIN and security information in each position. The Main Menu appears after position 25 appears.
Displaying Ticket Sales by PIN Position## is the PIN position number from one through 25, and 00000.00 displays the actual dollar amount:
Press the # key to advance to the next PIN position. Continue to press the # key until you scroll through all 25 PIN positions. The Main Menu appears.

NEVADA GOLD36
BASIC OPERATION (KEYPAD)
Tracking Ticket Sales (cont’d)Displaying Ticket Sales by Column NumberPress 2 when the Totals Menu appears to display the total ticket sales for each column. ## is the COLUMN number and 0000000 displays the total number of tickets dispensed from the particular column:
Press the # key to review each column total. After each column total displays, the TOTAL ALL COLUMN appears. When you press # again, the re-settable total appears. Press * to reset
total. Press # again to return to Main Menu. The TOTAL ALL COLUMN display provides a non resettable sum of the totals of each column.
Adjusting the Timeout SectionThe Nevada Gold™ Pull Tab Dispenser allows you to select the length of time from when you complete a ticket sale to the time when the ENTER PIN prompt automatically appears. Consider the following:
• The Pull Tab Ticket Dispenser is initially set with a 45 second timeout period.
• No timeout or a timeout setting of 000 provides unlimited access until the operator logs off by pressing the # key following the completion of a transaction. This is not a secure means of vending. Use a short setting in situations where several operators have continuous access to the machine.
• Use a longer setting if only one person is responsible for vending or constant supervision of the Pull Tab Ticket Dispenser is provided.
• The minimum timeout setting is 003 seconds.
• The maximum timeout setting is 255 seconds.

NEVADA GOLD 37
BASIC OPERATION (KEYPAD)
Establishing Ticket PricingThe Nevada Gold™ Pull Tab Dispenser is preset with four values: ten twenty-five cents, fifty cents, one dollar or two dollars. Players select amounts to match the ticket value. Remember:
Adjusting the Timeout Section (cont’d)
Selecting More Options
If you want to adjust the timeout, press 3 from the Main Menu. The Timeout Menu will then appear as seen below:
Selecting # from the Main Menu allows you to perform two more programming functions. Adjusting the Ticket Pricing and Testing the Dispensing Unit. The menu appears as follows:
• Columns are numbered from left to right, beginning with column 1 on the far left.
• Column must display a value greater than $0.00 to dispense tickets.
• A column must contain all tickets of the same value; for example, all tickets in column one must cost $0.50.
• Set the price for the tickets one column at a time.
Enter the desired number of seconds. Press the # key to return to the Main Menu.

NEVADA GOLD38
BASIC OPERATION (KEYPAD)
Selecting More Options (cont’d)From the More Menu, Press 4. The Pricing Menu appears:
Press the * key to select a preset value. When the proper amount displays, press the # key to advance to the next column. Repeat this step until all of the columns are priced. When you’ve
finished entering the ticket prices, press the # key to return to the Main Menu.
Testing the Dispensing UnitThe test feature allows you to ensure that tickets dispense accurately without affecting the actual total counters. Use the test mode to empty the machine prior to loading a different ticket type or prior to transporting the machine. Note the following:
• The total number of tickets dispensed displays while in this mode.
• You cannot test vend more than 100 tickets each time you dispense.
• The unit allows you to empty the column.
• If you request more tickets than are available in the column, the column empties, the column dispensing mechanism shuts off and the total number of tickets dispensed displays.
• Totals do not accumulate in this mode.
• Columns are numbered from left to right, beginning with column 1 on the far left.
From the More Menu, press 5. The Test Vend Menu appears.
Close the lower ticket console door. Enter the test column number followed by the number of tickets you want to dispense and press #. The tickets dispense into the stacking compartments.
NEVADA GOLD 39
BASIC OPERATION (KEYPAD)
Dispensing TicketsYou can begin to dispense tickets once you turn on the Pull Tab Ticket Dispenser and lock the cabinet doors. If you have not set the ticket pricing, the message PRICING NOT SET GO TO SERVICE appears.
You must enter your four digit PIN number to dispense tickets. After you enter your four digit PIN number, the message ENTER IN NUMBER **** will appear.
Each time you enter a PIN number, **** displays instead of the actual number. Press # to advance to the next display.
Selecting the Dispensing Column
Entering a Value
After you enter your valid PIN number, you must select the column from which to dispense tickets. The display on the screen says SELECT COLUMN $00.00 PRESS #.
Enter the number of the column from which the tickets are to dispense. Columns are numbered from left to right, beginning with column 1 on the far left. If you select the wrong column, press * to return to the column display. Otherwise, the column number selected displays and you can enter the dollar value of the tickets for dispensing.
Once you have entered a valid PIN number and selected a column from which to dispense tickets, you must enter the value of the tickets for vending. Note the following:
• You must enter a value that is divisible by the ticket price for the column. For example, if column 1 is priced for $0.50 tickets and you enter $4.75, the value remains at $00.00 until a valid amount is entered. In this case, you must enter value in fifty cent increments for the tickets to dispense.
• The maximum number of tickets dispensed per transaction is 100; for example you can vend up to $50.00 worth of $0.50 tickets.
NEVADA GOLD40
BASIC OPERATION (KEYPAD)
Dispensing Tickets (cont’d)
Once you successfully dispense the tickets, you have three choices:Entering a Value
Display Total SalesThe Pull Tab Ticket Dispenser also allows you to view the total value of all of the tickets dispensed using your PIN. At the ENTER PIN display, enter your PIN and then press *. The screen appears with the message YOUR TOTAL IS $00000.00 (with the actual total value displayed).
Resetting Error MessagesError messages appear for two reasons: low ticket inventory or a malfunction in a column has occurred. This section describes how to correct the problem in each of these situations.
When an error occurs, the seller is alerted by an audible alarm. The display shows the message COLUMN FAULT PRESS ANY KEY.
Pressing any key will cancel the alarm and take you to the next screen that shows you what the value was actually dispensed. You then press any key and will be returned to the column selection screen that reads SELECT COLUMN $00.00 PRESS #.
That particular column may not be used unit the cabinet door has been opened and closed. You must determine the cause of the fault.
1. Select another column number from which to vend and then enter the value of the tickets for dispensing.
2. Allow the machine to return to the ENTER PIN NUMBER screen after a timeout occurs.
3. Press the # key to return to the ENTER PIN screen immediately.
NEVADA GOLD 41
BASIC OPERATION (CASH & KEY)
If the error message appears for a reason other than an empty ticket column, you must first determine the reason for the malfunction. Tickets will not dispense for one of three reasons: a ticket jam, a misaligned sensor, or a dirty sensor.
Resetting Error Messages (cont’d)
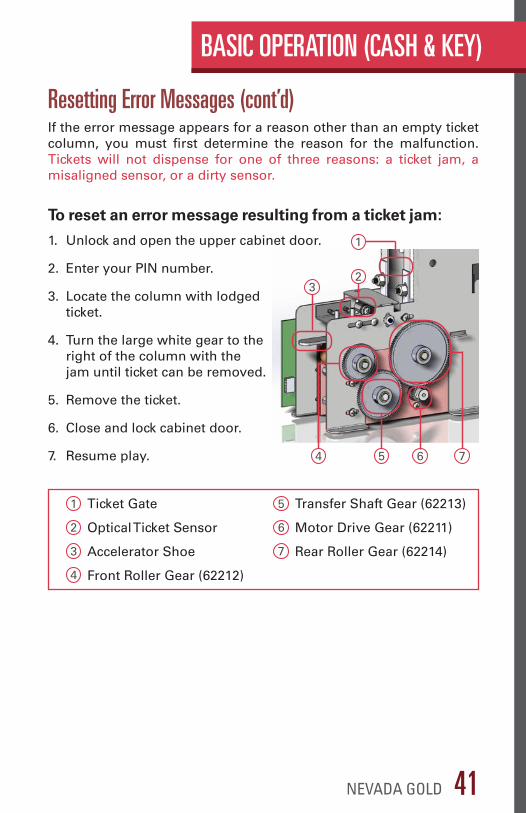
To reset an error message resulting from a ticket jam:
Ticket Gate
Optical Ticket Sensor
Accelerator Shoe
Front Roller Gear (62212)
1
1
2
4 5 6 7
3
4
2
5
3
6
7
Transfer Shaft Gear (62213)
Motor Drive Gear (62211)
Rear Roller Gear (62214)
1. Unlock and open the upper cabinet door.
2. Enter your PIN number.
3. Locate the column with lodged ticket.
4. Turn the large white gear to the right of the column with the jam until ticket can be removed.
5. Remove the ticket.
6. Close and lock cabinet door.
7. Resume play.
NEVADA GOLD42
BASIC OPERATION (CASH & KEY)
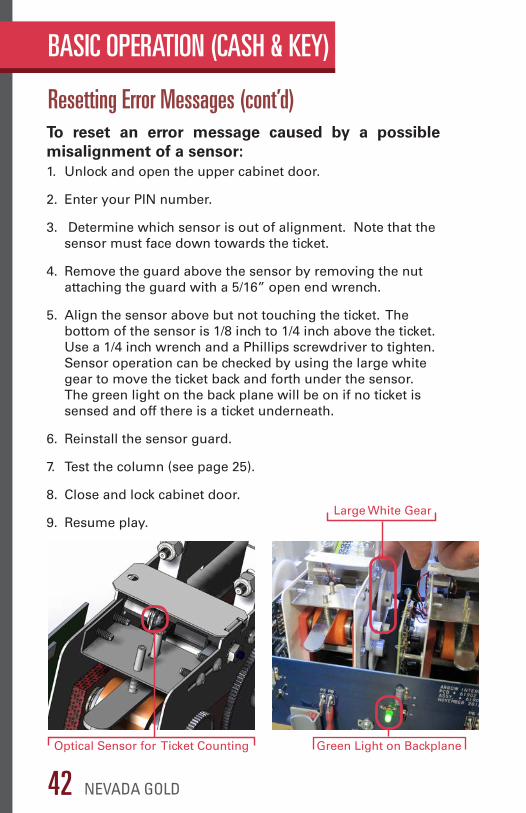
To reset an error message caused by a possible misalignment of a sensor:1. Unlock and open the upper cabinet door.
2. Enter your PIN number.
3. Determine which sensor is out of alignment. Note that the sensor must face down towards the ticket.
4. Remove the guard above the sensor by removing the nut attaching the guard with a 5/16” open end wrench.
5. Align the sensor above but not touching the ticket. The bottom of the sensor is 1/8 inch to 1/4 inch above the ticket. Use a 1/4 inch wrench and a Phillips screwdriver to tighten. Sensor operation can be checked by using the large white gear to move the ticket back and forth under the sensor. The green light on the back plane will be on if no ticket is sensed and off there is a ticket underneath.
6. Reinstall the sensor guard.
7. Test the column (see page 25).
8. Close and lock cabinet door.
9. Resume play.
Resetting Error Messages (cont’d)
Optical Sensor for Ticket Counting Green Light on Backplane
Large White Gear

NEVADA GOLD 43
OPTIONAL FEATURES
On the following pages, directions are included for the optional features not standard with Nevada Gold machines. These features include the optional Video Display and the optional Printer Report.
For more information regarding these features, contact your local Arrow distributor.
Optional Features Available

NEVADA GOLD44
OPTIONAL VIDEO DISPLAY
Optional Video DisplayIf your dispenser has the optional video display installed, the unit is capable of presenting fixed images in JPG format and video with sound in DIVX AVI format.
Specifications
Button Definition
• LCD resolution: 800x480, contrast and brightness adjustable
• Working temperature: -10ºC -+ 40ºC
• Humidity: 10% - 80%
• Storage temperature: -20ºC - 70ºC
• Voltage: Adapter: AC 90V-240V~50/60HZ; Player: DC12V
• Current: 360mA-600mA; Sleep: 210mA; Standby: 15mA
Button definition as follows (from left to right)
• UP
• DOWN
• LEFT
• RIGHT
• ENTER/PLAY/PAUSE
• MENU
• SETUP

NEVADA GOLD 45
OPTIONAL VIDEO DISPLAY
The main menu can be accessed by pressing the MENU button and displays icons for all the preferences and options. Rotate between the icons by pressing the or buttons and press ENTER to edit or view information for that setting.
Display starts after unit power is turned on.
Main Menu
Power on/off Operation
Menu Icons
• Photo
• Music
• Photo + Music
• Movie
• Setup
• Calendar
• Clock
• Auto Power
• Edit
• Favorite

NEVADA GOLD46
OPTIONAL VIDEO DISPLAY
SettingsTime Settings
Date Settings
Auto Power
In the main menu, press or , move the cursor to the icon
CLOCK and press ENTER to select clock function.
Press or , move the cursor to SET TIME, then press ENTER to select the function to set time.
Press or to select HH/MM/SS then press or to adjust the selected item. If it is ok, press , then press ENTER to save the setting.
Select the item SET DATE from the menu and then use the same steps as above to adjust the date. After you are done with setting the date, you can then press ENTER to save it.
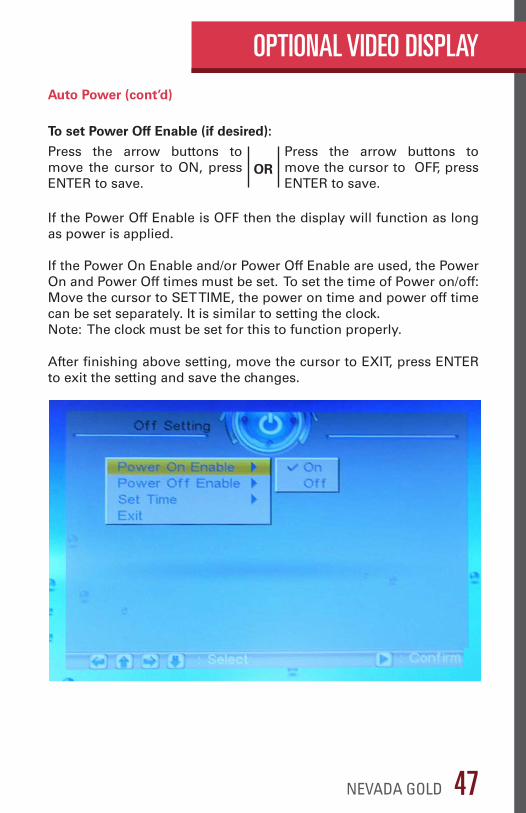
Power On Enable and Power Off Enable will turn the display on or off at a predetermined time. Leave them both Off to allow the display to run continuously. Press or to select AUTO POWER ON/OFF, to set the function of power on/off.
To set Power On Enable (if desired):
Press the arrow buttons to move the cursor to ON, press ENTER to save it.
Press the arrow buttons to move the cursor to OFF, press ENTER to save it.
OR
NEVADA GOLD 47
OPTIONAL VIDEO DISPLAYAuto Power (cont’d)
To set Power Off Enable (if desired):
Press the arrow buttons to move the cursor to ON, press ENTER to save.
Press the arrow buttons to move the cursor to OFF, press ENTER to save.
OR
If the Power Off Enable is OFF then the display will function as long as power is applied.
If the Power On Enable and/or Power Off Enable are used, the Power On and Power Off times must be set. To set the time of Power on/off: Move the cursor to SET TIME, the power on time and power off time can be set separately. It is similar to setting the clock. Note: The clock must be set for this to function properly.
After finishing above setting, move the cursor to EXIT, press ENTER to exit the setting and save the changes.

NEVADA GOLD48
OPTIONAL VIDEO DISPLAY
Images
The videos (AVI) can not be rotated or mirrored. The volume can be changed as follows only while the video is playing.
Press or to change the volume.
Images and videos must be stored on a Secure Digital (SD) memory card. A 1G card is recommended. Place the image (JPG) and the video (AVI) files directly onto the SD card. The Display will automatically play the images and videos on the card on rotation.
The images (JPG) can be rotated by pressing the buttons as follows while it is playing. Each image must be set individually.
NOTE: The orientation will return to the original position when power is removed. It is recommended that the actual JPG or AVI image be rotated to the desired orientation prior to placing the file on the SD card. This can be done in the readily available graphics programs.
• Mirrors image left to right
• Mirrors image top to bottom
• Rotates image clockwise
• Rotates image counter clockwise

NEVADA GOLD 49
OPTIONAL VIDEO DISPLAY
System SetupPress SETUP button located next to MENU button for access to clock settings (contains clock setting, set date, auto power and sensor), custom setup (contains language and display setup) and the option to return to default settings.
Clock Settings
Sensor
Set Date
Auto Power
Set time with arrow buttons and press OK on the screen.
Set time of sensor setting or turn off and press ENTER to set.
Set date with arrow buttons and press OK on the screen.
Set auto power timing on and off with arrow buttons in the same way as explained on pages 46 and 47.

NEVADA GOLD50
OPTIONAL VIDEO DISPLAY
System Setup (cont’d)
Press the arrow buttons to select DISPLAY SETUP and select the brightness that you need from the options. Press ENTER to save your selection.
Press the arrow buttons to select OSD LANGUAGE there are English/French/German/Italian/Spanish/etc for selection, press ENTER to save after certain language is selected.
Press or to select DEFAULT to restore the configuration to the original default settings.
Press SETUP button located next to MENU button for access to custom setup (language and display setup) and default option.
NEVADA GOLD 51
OPTIONAL REPORT PRINTER
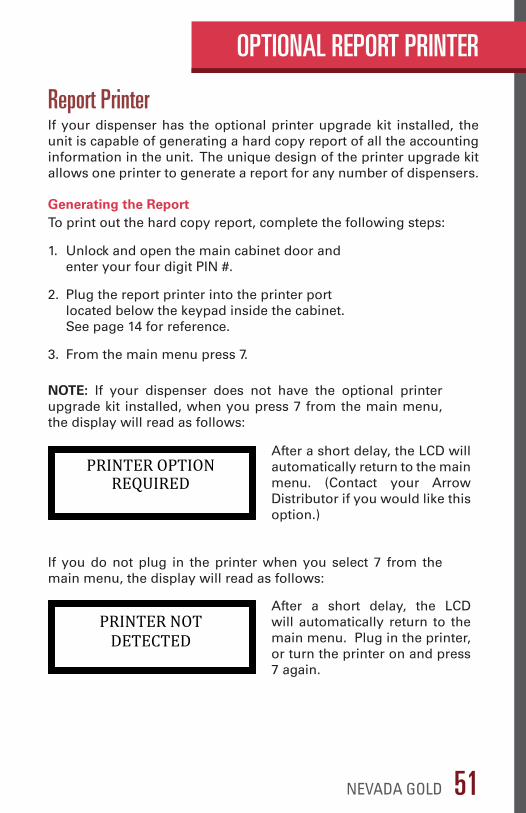
Report PrinterIf your dispenser has the optional printer upgrade kit installed, the unit is capable of generating a hard copy report of all the accounting information in the unit. The unique design of the printer upgrade kit allows one printer to generate a report for any number of dispensers.
NOTE: If your dispenser does not have the optional printer upgrade kit installed, when you press 7 from the main menu, the display will read as follows:
Generating the ReportTo print out the hard copy report, complete the following steps:
1. Unlock and open the main cabinet door and enter your four digit PIN #.
2. Plug the report printer into the printer port located below the keypad inside the cabinet. See page 14 for reference.
3. From the main menu press 7.
PRINTER OPTION REQUIRED
After a short delay, the LCD will automatically return to the main menu. (Contact your Arrow Distributor if you would like this option.)
After a short delay, the LCD will automatically return to the main menu. Plug in the printer, or turn the printer on and press 7 again.
If you do not plug in the printer when you select 7 from the main menu, the display will read as follows:
PRINTER NOT DETECTED

NEVADA GOLD52
OPTIONAL REPORT PRINTER
NEVADA GOLD REPORT
MON OCT 19 199810:52:56
SERIAL NUMBER:0000000
PIN POSITION #5
COLUMN #1PRICE: $0.00TOTAL TICKETS DISPENSED: 0RESETTABLE TOTAL: 0
COLUMN #2PRICE: $0.00TOTAL TICKETS DISPENSED: 0RESETTABLE TOTAL: 0
COLUMN #3PRICE: $0.00TOTAL TICKETS DISPENSED: 0RESETTABLE TOTAL: 0
COLUMN #4PRICE: $0.00TOTAL TICKETS DISPENSED: 0RESETTABLE TOTAL: 0
TOTAL OF ALL COLUMNS: 0RESETTABLE TOTAL: 0
TOTAL CASH ACCEPTED: $0.00
RESETTABLE CASH TOTAL: $0.00
------ END OF REPORT -------
Printer Report (cont’d)The printer will print a report similar to image on the left. This report details all the accounting information present in the dispenser, including:
• The date and time the report was generated,
• The serial number of the dispenser,
• The PIN position # of the person generating the report,
• The price, total tickets dispensed and resettable total tickets dispensed by column,
• The total number of tickets dispensed in all columns,
• The resettable total number of tickets dispensed in all columns,
• The total amount of cash accepted and,
• The resettable total amount of cash that is accepted.

NEVADA GOLD 53
PLAYER INFORMATION
Information for PlayerPlayer instructions are located on the LCD on the front of the dispenser underneath the bill acceptor.
Dispensing TicketsPlayers must check the LCD display for ticket dispensing instructions. The unit only accepts currency when the doors are locked and the bill validator light appears green.
When the doors are locked and no credits appear, the LCD display appears as follows on models that accepts only bills:
$00.00 CREDIT
Once you insert money into the machine, you see:
Note: $00.00 represents the amount of the credit available. Selecting the PLAYALL Button. Use the PLAYALL feature to dispense 100 tickets maximum from a single column (or 100 tickets randomly from all columns set at the same price on random models). If all credits are not used up, the remaining credits will be displayed when vending is completed. When you select the PLAY ALL button, the following screen will appear:
$00.00 CREDIT PLAYALL
INSERT BILL NO CHANGE GIVEN

NEVADA GOLD54
PLAYER INFORMATION
Selecting a Column ButtonYou can dispense tickets one at a time by selecting a particular column. When you select a column, the following display appears on the LCD:
Note: the column number selected appears, not x.On random models, a single ticket will be dispensed randomly from any column set at the chosen price.
$00.00 CREDIT COLUMN x

NEVADA GOLD 55
CARE & MAINTENANCE
Basic Care
Lubricating Chute Door
Your model of the Nevada Gold™ Pull Tab Dispenser has been manufactured to exceed mechanical and electronic standards. The following information will assist you in the care and maintenance of your unit.
When dust from the tickets accumulates, the chute door can stick or become difficult to open or close. To prevent this from happening, lubricate the four pins on the chute door every three to six months. Using an aerosol lubricant with a straw attachment, spray each of the four pins carefully.
• Keep the unit dry. If it gets wet, immediately turn off power and unplug unit followed by wiping it dry. Liquids can damage the electronic circuits of the unit.
• Wipe the unit with a damp cloth and a drop of liquid fabric softener to keep it looking new. Do not use any abrasive cleaning materials or solvents to clean your model.
• Handle any removed parts gently and carefully. Dropping or mishandling parts can damage electronic components.
• Use plastic cleaning implements or a soft cloth to remove dust from inside the unit. Metal tools can damage electronic parts.
• Use light lubricants and precision oiling implements to lubricate the rollers, shafts and the chute door.
CLEAN EVERY
MONTHS3-6
Lubricate chute door at 4 guide pins

NEVADA GOLD56
CARE & MAINTENANCE
Lubricating the Column Roller Shafts
Cleaning The Column Ticket Counting Sensor
Occasionally, the accelerator rollers can grind or squeal. To prevent this from happening, you should lubricate the rollers and the transfer shaft every three to six months. We recommend applying all lubricants from the outside ONLY!! “between red block & gears” to avoid getting oil on the rollers surface.
About every 100,000 tickets or three months, you should remove any dust build-up from the ticket counter infrared sensor. Failure to do this could result in miscounting of tickets. To clean the sensor:
1. Looking from the front of the dispenser, insert a Q-Tip, underneath the sensor.
2. Gently rub the bottom of the sensor to remove the paper dust, or
3. Use a can of compressed air to blow out the dust.
CLEAN EVERY
3 MONTHS
100,000 TICKETSOR
CLEAN EVERY
MONTHS3-6
1 1 2Use Light Precision Oil
Use Bearing Grease
1
2
1. Apply one drop of light oil with precision oiler on each side of the accelerator roller and the transfer shaft.
2. Press light weight bearing grease into the bearings using a tongue depressor.
NEVADA GOLD 57
CARE & MAINTENANCE
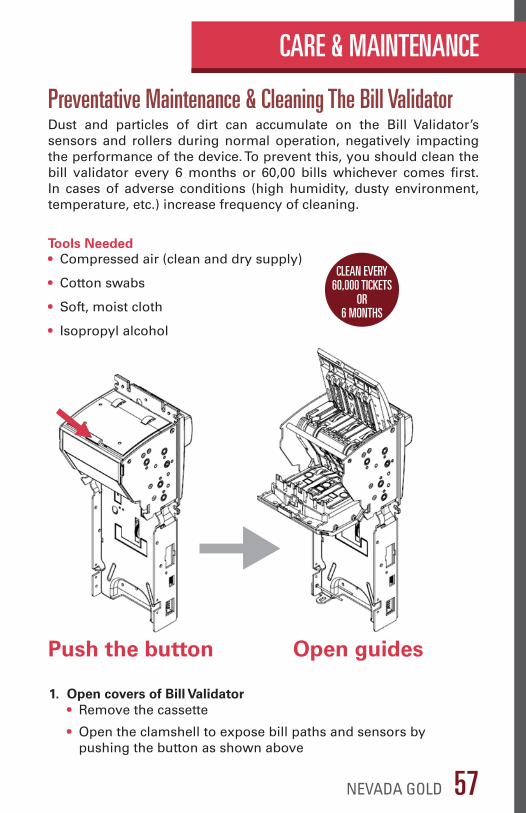
Preventative Maintenance & Cleaning The Bill ValidatorDust and particles of dirt can accumulate on the Bill Validator’s sensors and rollers during normal operation, negatively impacting the performance of the device. To prevent this, you should clean the bill validator every 6 months or 60,00 bills whichever comes first. In cases of adverse conditions (high humidity, dusty environment, temperature, etc.) increase frequency of cleaning.
1. Open covers of Bill Validator• Remove the cassette
• Open the clamshell to expose bill paths and sensors by pushing the button as shown above
CLEAN EVERY
6 MONTHS
60,000 TICKETSOR
Tools Needed• Compressed air (clean and dry supply)
• Cotton swabs
• Soft, moist cloth
• Isopropyl alcohol
Push the button Open guides

NEVADA GOLD58
CARE & MAINTENANCE
Preventative Maintenance & Cleaning Bill Validator (cont’d)2. Sensor Cleaning
• Use compressed air, removing all fine dust and loose particles
• Clean sensors using the soft moist cloth (moisten cloth with clean water ONLY)
• Be sure there is no dust accumulation, scratches or other mechanical damage as performance will be greatly impacted.
3. Transport Drive Mechanism• First blow with compressed air the entire bill path, giving
special attention to the wheels and rollers
• Use the soft moist cloth to remove contaminants still remaining
• In the case of extremely contaminated rollers and rubber o-rings, use the cloth with isopropyl alcohol
Rubber O-Rings
Rollers

NEVADA GOLD 59
CARE & MAINTENANCE
Clearing Jammed BillsIf a severely damaged bill is inserted into the bill acceptor, there is a possibility that the bill may jam when it goes into the stacking cassette. To remove a jammed bill:
1. Remove the cassette carefully, trying not to damage the jammed bill (See page 31.)
2. Open the two covers of the banknote pathway by pressing the button labeled “PUSH”.
3. Remove the jammed bill.
Rubber O-Rings
SEE PAGE 68 FOR MORE ON BILL VALIDATOR DIAGNOSTICS

NEVADA GOLD60
CARE & MAINTENANCE
Replacing a Ticket ColumnIf a ticket column requires replacement, complete the following steps:
1. Unplug the dispenser.
2. Disconnect the battery wire. (See Page 15)
3. Loosen the column retaining plate that is located beside the wide opening between every second column. Use a 3/8 inch socket wrench to loosen the nut and rotate the plate from horizontal to a vertical position.
4. Disconnect the 14 Conductor Ribbon Cable located on back plane and remove the five Philips screws from back plane (see page 61 photo).
5. Pull the backplane circuit board straight out to disconnect the pins from the columns.
6. Place the circuit board, with the pin connectors facing up, on a level surface to avoid damaging the pins.
7. Place one hand on the top of the column, one hand on the bottom of the column and slide the column out of the unit.
8. Slide the new column in, making sure that the column fits in properly.
Loosen Screw
thenRotate
Plate
NEVADA GOLD 61
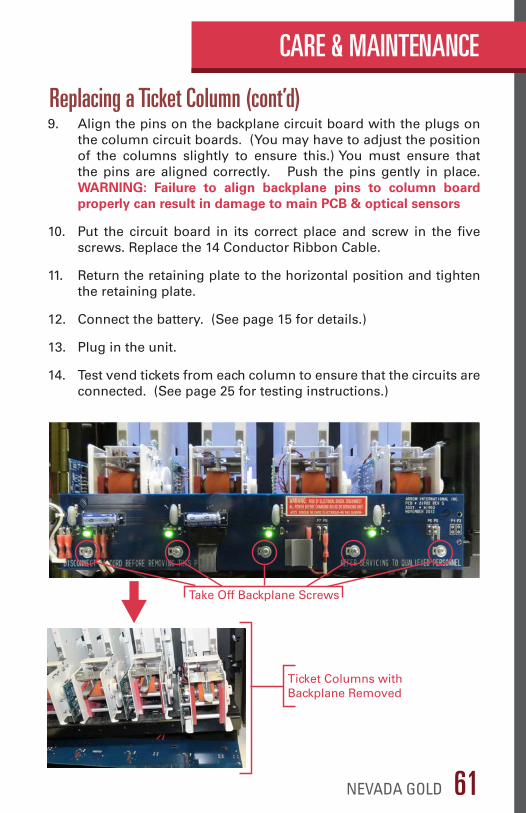
Take Off Backplane Screws
CARE & MAINTENANCE
Replacing a Ticket Column (cont’d)9. Align the pins on the backplane circuit board with the plugs on
the column circuit boards. (You may have to adjust the position of the columns slightly to ensure this.) You must ensure that the pins are aligned correctly. Push the pins gently in place. WARNING: Failure to align backplane pins to column board properly can result in damage to main PCB & optical sensors
10. Put the circuit board in its correct place and screw in the five screws. Replace the 14 Conductor Ribbon Cable.
11. Return the retaining plate to the horizontal position and tighten the retaining plate.
12. Connect the battery. (See page 15 for details.)
13. Plug in the unit.
14. Test vend tickets from each column to ensure that the circuits are connected. (See page 25 for testing instructions.)
Ticket Columns with Backplane Removed
NEVADA GOLD62
CARE & MAINTENANCE
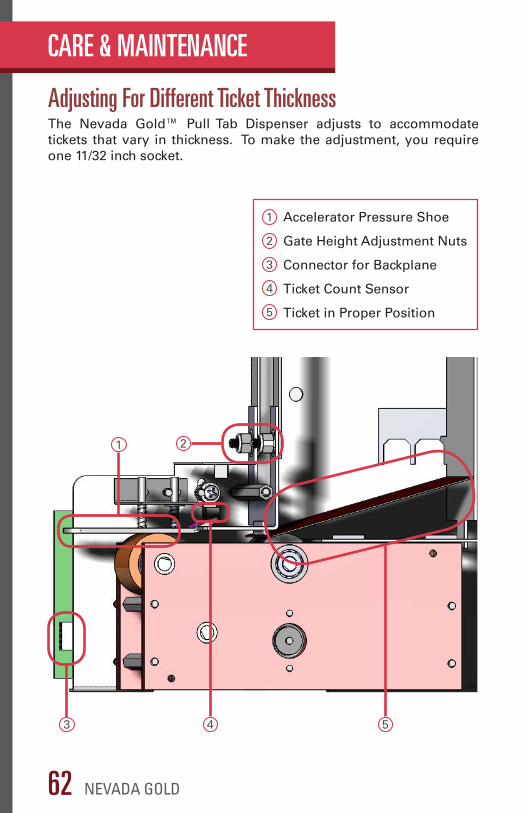
Adjusting For Different Ticket ThicknessThe Nevada Gold™ Pull Tab Dispenser adjusts to accommodate tickets that vary in thickness. To make the adjustment, you require one 11/32 inch socket.
Accelerator Pressure Shoe
Gate Height Adjustment Nuts
Connector for Backplane
Ticket Count Sensor
Ticket in Proper Position
1
2
4
3
2
4
5
5
3
1

NEVADA GOLD 63
CARE & MAINTENANCE
Adjusting For Different Ticket Thickness (cont’d)
4. Tighten the nuts gradually, alternating from side to side to ensure that the edge of the gate stays parallel with the ticket. Do not over tighten.
5. Test vend tickets from each of the column to ensure that the correct number of tickets dispense. (See page 25 for testing instructions.)
Note: The dispensing columns are factory preset to accept tickets .024 inches thick. You do not have to adjust the columns unless you are using a ticket that has a different thickness.
Ticket thicknesses can vary due to storage conditions. Humidity, heat, or cold can sometimes vary ticket thickness or severely warp the ticket. To insure proper operation store your tickets in a dry place with humidity between 30-45% and avoid direct sunlight.
• If the ticket slides through the feeder, the gap is too wide for the ticket. Adjust downwards.
• If ticket does not feed through feeder when large white gear is turned, gap is too narrow for ticket so adjust upwards.
• If the ticket stops at the front edge of the stainless steel gate and moves forward when the large white gear is turned, the adjustment is complete. (See diagram, on page 62.) Notice that the ticket is sitting in the column at an angle.
• Slide a single ticket down the ticket chute.
1. Loosen gate height adjustment nuts on side of the ticket feeder.
2. Adjust upwards for thicker tickets and down for thinner tickets.
3. Test adjustment.

NEVADA GOLD64
OPTIONAL RANDOM TICKET DISPENSE
Random Ticket Dispense When in random dispense mode, ‘Play All’ switch will randomly select up to 100 tickets from columns until credits are depleted. Only columns that are of the same price will dispense tickets.
If you would like this function installed, contact your local Arrow distributor for more information.
You will need to set pricing on at least 2 columns to be able to use the ‘Play All’ function when in random dispense.

NEVADA GOLD 65
TROUBLESHOOTING
An incorrect number of tickets continue to dispense from a column.
Credits display but no tickets dispense.
Remaining credits do not dispense after the AC power is disconnected.
LCD displays text but the back lighting is not on and the bill acceptor light is red.
PROBLEM:
PROBLEM:
PROBLEM:
PROBLEM:
EXPLANATION:
EXPLANATION:
EXPLANATION:
EXPLANATION:
1. Check ticket pricing for the column. Make sure that the price of the ticket matches the price set for the column; or
2. Clean the optical sensor, see page 56.
3. Check the optical sensor. Make sure the sensor is aligned. If the sensor is out of place, see page 42 for details on aligning the sensor.
Check the value of the tickets in the dispenser. If the remaining tickets in the dispenser are not divisible by the credit amount; for example, a $1.00 credit displays, but the machine has only $2.00 tickets.
2. Enter more money.
3. Fill an empty column with a ticket of a different value. See Loading an Empty Column on page 19 for details and reference.
Connect the back-up battery. See page 15 for details.
No AC power to unit. Make sure AC power supply is plugged in and the ON/OFF switch is ON.

NEVADA GOLD66
TROUBLESHOOTINGBill acceptor does not accept currency and the indicator light remains red.
PROBLEM:
EXPLANATION: 1. Check the amount of credit already established. If more than $100.00 worth of credit appears, tickets must be dispensed until a credit value of $100.00 or less appears; or
2. Check to ensure that the cabinet door is locked. No cash is accepted when the cabinet door is open; or
3. Check to see if the bill acceptor is full. No cash is accepted when the bill acceptor is full. See page 31 for instructions on emptying the bill acceptor
4. Check bill validator diagnostics, page 68.
Tickets do not dispense.
Tickets do not dispense from column selected.
Column makes grinding or squealing noise when tickets are dispensing.
PROBLEM:
PROBLEM:
PROBLEM:
EXPLANATION:
EXPLANATION:
EXPLANATION:
Check the chute door. Tickets do not dispense when the chute door is not completely closed. Lubricate the chute door if necessary, see page 55.
Is your dispenser a random select model? Tickets will randomly dispense from all columns set to the same price as the column selected.
Make sure that the unit has been properly maintained. Refer to page 56 on how to lubricate the roller shafts.

NEVADA GOLD 67
TROUBLESHOOTING“COLUMN EMPTY OR MALFUNCTION” appears on the LCD.
Alarm activated.
PROBLEM:
PROBLEM:
EXPLANATION:
EXPLANATION:
1. The column selected does not have any tickets loaded. Load more tickets into the column. See page 19.
2. On random select models, at least two columns must be set to the same price AND have tickets loaded. See page 19 for loading tickets and page 24 for setting ticket pricing.
3. A ticket could be jammed in the column. See page 41 to clear the jam.
1. Make sure that the cabinet doors are closed and locked. The alarm will sound if any one of the cabinet doors is open and the ticket pricing has already been set; or
2. Make sure that the unit is plugged in. The alarm sounds if the unit is unplugged for more than seven seconds; or
3. A power failure lasting more than seven seconds causes the alarm to sound. To reset alarm:
CLOCK OPTION REQUIRED or PRINTER OPTION REQUIRED appears on the LCD
PROBLEM
EXPLANATION: Dispenser is not equipped with the optional printer upgrade kit. The option on the main menu which was selected is not available until printer upgrade kit is installed. Contact your Arrow distributor for information on obtaining this kit.
• Open door.
• Enter PIN number.
• Close and lock door.
• Plug in, if unplugged, or wait for power to be restored.

NEVADA GOLD68
TROUBLESHOOTING
Bill Validator DiagnosticsIf the red light on the front of the bill validator is ON when the doors are locked and no credit appears, insert a bill and remove it. After the red light goes OFF, count the number of times the light flashes.
No faults - Validator is working properly
Mechanical jam in cassette. See page 59 to clear jam.
Optical sensors failure. Clean sensors.
The bill pathway security latch is open. Close latch.
Magnetic sensors failure. Clean sensors.
The cassette is removed from the bill validator. Install the cassette. See page 31 for information on cassette.
The stacking motor does not rotate. Possible jammed bill. See page 41 to clear the jam.
The cassette is full. Empty the cassette (see page 31 for information on emptying the cassette).
There is a stacking motor electrical overload. Contact your Arrow distributor.
Transporting motor does not rotate. Clean the bill pathway (see page 57) or clear jammed bill (page 59).
The speed of the transporting motor is too fast. Contact your Arrow distributor.
There is a transporting motor electrical overload. Contact your Arrow distributor.
Banknote is in the entry slot of the cassette and credits were not issued. Contact your Arrow distributor.
0
4
6
11
7
1
2
3
5
8
9
10
12
# OF FLASHES EXPLANATION
SEE PAGE
ON CLEANING JAMMED BILL
59

NEVADA GOLD 69
SPECIFICATIONS
Physical CharacteristicsPower Supply Input110/120V AC
Power Supply Output16V AC
Operating Temperature40ºF to 95ºF (5ºC to 35ºC)
Power Consumption40VA Max.
Dimensions 4 column24 ½ inches36 5/8 inches15 ¼ inches145 lbs
8 column42 5/8 inches36 5/8 inches15 ¼ inches225 lbs
widthheightdepthweight (empty)

NEVADA GOLD70
WARRANTY
Capitol Bingo Equipment Limited WarrantySet out below are the terms of the Limited Warranty made by Arrow International, Inc. (“Arrow’) in connection with the sale of the Capitol Bingo Equipment (the “Equipment”).
1. Limited WarrantyArrow warrants to the original purchaser (“Purchaser”) that the Equipment will, for a period of ONE (1) YEAR from the date of original purchase of any equipment in the product line from an authorized Arrow dealer, be free from manufacturing defects in material and workmanship. Purchaser represents to Arrow that no employee, agent, or representative of Arrow (or of an Arrow dealer) has made any representation or warranty regarding the Equipment except as set out herein.
This Limited Warranty applies to normal commercial use and does not cover failures or damage which (a) occur in shipment; (b) is caused by products not supplied by Arrow; or (c) result from accident, misuse, abuse, neglect, mishandling, misapplication, alteration, set-up adjustments or modifications. This Limited Warranty also does not cover (i) any damage to the Equipment resulting from failure to install in strict conformity with both local fire and building codes and regulations, (ii) if installation does not comply with the installation instructions provided by Arrow, or (iii) consumable items such as filters or bulbs.
2. Disclaimer of WarrantiesARROW MAKES NO WARRANTIES, EXPRESS OR IMPLIED (INCLUDING, WITHOUT LIMITATION, MERCHANTABILITY, FITNESS FOR A PARTICULAR PURPOSE, OR AGAINST INFRINGEMENT OF ANY PATENT), EXCEPT AS EXPRESSLY PROVIDED HEREIN. THE EXPRESS WARRANTIES PROVIDED HEREIN ARE IN LIEU OF AND EXCLUDE ALL OTHER WARRANTIES, GUARANTEES OR REPRESENTATIONS, EXPRESS OR IMPLIED, WHETHER ARISING BY OPERATION OF LAW OR OTHERWISE.
3. Limitation of RemediesIf the Equipment supplied does not conform to the Limited Warranty set out above, Arrow will, at its option, (a) repair or replace the Equipment, or part thereof, which is defective or (b) refund so much of the purchase price as Purchaser has paid for the defective Equipment, less 1/3rd of the purchase price for each month between the date of the purchase from an authorized Arrow dealer and the date of the discovery of the defect, provided that written notice of the defect and its nature is given to Arrow as soon as practical after discovery of the defect, but in no event later than 15 days from the date of the discovery of the defect.
4. Limitation of Liability The remedy of repair, replacement, or refund of the purchase price is Purchaser’s sole and exclusive remedy and will satisfy all of Arrow’s liabilities, whether based on contract, negligence, tort, product liability, strict liability, or otherwise. IN NO EVENT WILL ARROW BE LIABLE FOR INCIDENTAL OR CONSEQUENTIAL DAMAGES, NOR WILL ITS INABILITY IN CONNECTION WITH ANY EQUIPMENT OR SERVICE SOLD (INCLUDING NONDELIVERY OR LATE DELIVERY THEREOF) EXCEED THE SALES PRICE OF SUCH EQUIPMENT OR SERVICE.

NEVADA GOLD 71
WARRANTY5. Warranty Voided Any obligations of Arrow under this Limited Warranty will be deemed to have been satisfied if anyone other than an authorized Capitol Bingo Equipment Dealer services the Equipment.
6. Transfer Of Limited Warranty Purchaser may transfer its rights under this Limited Warranty subject to the terms and conditions hereof, to a buyer (“Buyer”) from Purchaser of the Equipment. Thereafter, the rights under this Limited Warranty are not transferable. For the transfer by Purchaser of the Limited Warranty to be effective, the following conditions must have occurred no later than the 30th day following the date of resale to Buyer:
A. Purchaser must have compiled with all requirements to make the Limited Warranty effective as to Purchaser; and
B. The Equipment (as an entire unit and as purchased by Purchaser) must be transferred to Buyer.
A. Refer to your Operator’s Manual and follow the Troubleshooting Table within the “Care and Maintenance” section.
B. Contact the authorized Capitol Bingo Equipment Distributor from whom you purchased the Equipment.
C. Contact the Capitol Bingo Equipment Service Manager at 1-800-277-6214
7. Inspection With respect to any claim that the Equipment is defective, Arrow will be allowed a reasonable time to inspect the Equipment, in place. If the Equipment is altered or removed before Arrow has made such inspection or waived its right to do so, the obligations of Arrow under this Limited Warranty will be deemed to have been satisfied.
8. Proof of PurchaseNotwithstanding anything to the contrary in this Limited Warranty, Purchaser must, upon Arrow’s request, submit proof of original purchase (satisfactory to Arrow) of the Equipment. The Limited Warranty set out above shall not apply to, nor cover, any Equipment for which Purchaser is unable, upon Arrow’s request, to supply such proof of purchase.
9. Limitation of Actions Any legal action against Arrow for a default of its obligations under this Limited Warranty must be commenced within two years from the date the Equipment was sold by an authorized dealer of the Equipment.
10. How to Obtain Service If a Problem with this Equipment develops during or after the warranty period, proceed as follows:

NEVADA GOLD72
WARRANTY
Capitol Bingo Equipment Limited Warranty (cont’d)SERVICE CALLS WHICH DO NOT INVOLVE DEFECTIVE MATERIALS OR WORKMANSHIP AS DETERMINED BY ARROW IN ITS SOLE DISCRETION, ARE NOT COVERED. COST OF SUCH SERVICE CALLS ARE THE RESPONSIBILITY OF THE PURCHASER.
Arrow wants you to remain a satisfied customer. If a problem occurs that cannot be resolved to your satisfaction, please contact us immediately, Phone one of the numbers listed on the previous page or write to:
Please be sure to include the name, model number, serial number, date of original purchase, and the distributor from whom you purchased the Equipment, as well as any actions taken to correct the problem.
Capitol Bingo Equipment Divisionc/o National Service Manager9900 Clinton RoadCleveland, Ohio 44144
Arrow Games (Canada) Inc.1245 Lorimar DriveMississauga, OntarioL5S 1R2
WARNINGYou must keep your receipt or invoice for proof of purchase in order to insure proper warranty coverage.
Arrow Technical Assistance CenterProtecting Your Investments Through Innovative
Solutions and Support
www.arrowinternational.com
Phone Support Hours: 8am to 12am
1-800-277-6214

NEVADA GOLD 73
NOTES

74NEV
ADA
GOLD
SERV
ICE LO
GUN
IT S
ERIA
L N
UMBE
R:UN
IT P
ART
NUM
BER:
INST
ALLA
TION
DATE
:
SERV
ICE D
ATE
TECH
NICIA
N NA
ME
COM
PANY
NAM
ESE
RVICE
PER
FORM
EDSE
RIAL #
Ref
er t
o t
he
Nev
ada
Go
ld M
anu
al f
or
reco
mm
end
ed m
ain
ten
ance
. R
olle
r C
lean
ing
an
d m
ain
ten
ance
can
be
fou
nd
at A
rro
win
tern
atio
nal
.co
m
If a
ny c
ircu
it b
oar
d
is c
han
ged
en
ter
the
seri
al n
um
ber
bel
ow

SERV
ICE D
ATE
TECH
NICIA
N NA
ME
COM
PANY
NAM
ESE
RVICE
PER
FORM
EDSE
RIAL #
Ref
er t
o t
he
Nev
ada
Go
ld M
anu
al f
or
reco
mm
end
ed m
ain
ten
ance
. R
olle
r C
lean
ing
an
d m
ain
ten
ance
can
be
fou
nd
at A
rro
win
tern
atio
nal
.co
m

PULL TAB DISPENSING MACHINE
ARROW INTERNATIONAL, INC.ARROW GAMES (CANADA) INC.
www.arrowinternational.comwww.arrowgames.com
Technical Support Hours: 8am to 12 am1-800-277-6214
Revision May 5, 2015
WARNING: You must keep your receipt or invoice for proof of purchase in order to insure proper warranty coverage.
NEVADA GOLD™
PULL TAB DISPENSING MACHINE