Embed Size (px)
Citation preview
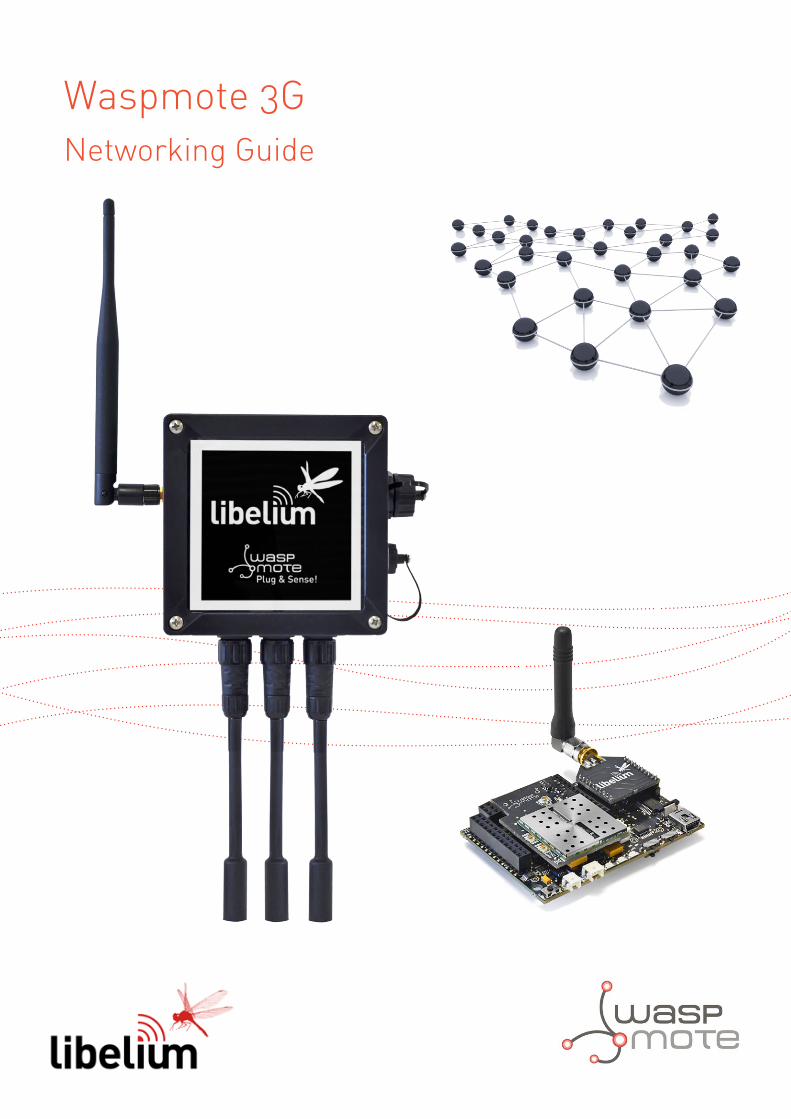
Waspmote 3GNetworking Guide
-2- v7.0
Index
Document Version: v7.0 - 02/2017© Libelium Comunicaciones Distribuidas S.L.
INDEX
1. Introduction ......................................................................................................................................... 6
2. General Considerations ...................................................................................................................... 72.1. Introduction ...................................................................................................................................................................................72.2. 3G vs 3G+GPS vs GPRS vs GPRS+GPS ...................................................................................................................................82.3. Hardware .........................................................................................................................................................................................92.4. Waspmote Libraries ..................................................................................................................................................................11
2.4.1. Waspmote 3G files .....................................................................................................................................................112.4.2. Constructor ...................................................................................................................................................................112.4.3. Working modes ..........................................................................................................................................................112.4.4. Library fuses .................................................................................................................................................................122.4.5. Debug modes ..............................................................................................................................................................122.4.6. Special errors ...............................................................................................................................................................12
3. Initialization ....................................................................................................................................... 133.1. Initializing the 3G/GPRS module .........................................................................................................................................133.2. 3G power modes .......................................................................................................................................................................133.3. Closing communications with the 3G/GPRS module .................................................................................................133.4. Switching 3G off ........................................................................................................................................................................143.5. Checking the GSM connection ............................................................................................................................................143.6. Setting time and date from RTC ..........................................................................................................................................143.7. Setting operator parameters ................................................................................................................................................15
4. SIM related functions ........................................................................................................................ 164.1. Setting the PIN ...........................................................................................................................................................................164.2. Changing PIN number.............................................................................................................................................................164.3. Getting IMSI ...............................................................................................................................................................................164.4. Getting IMEI ...............................................................................................................................................................................17
5. GSM related functions ....................................................................................................................... 185.1. Setting information returned when receiving a call ....................................................................................................185.2. Making calls ................................................................................................................................................................................185.3. Making lost calls .......................................................................................................................................................................185.4. Hanging up calls ........................................................................................................................................................................195.5. Setting CLI presentation in incoming calls ......................................................................................................................195.6. Setting CLI restriction in outcoming calls ........................................................................................................................195.7. Gets the phone activity status ..............................................................................................................................................205.8. Autoanswer .................................................................................................................................................................................205.9. Answer a call ...............................................................................................................................................................................20
-3- v7.0
Index
5.10. Generating DTMF tones .......................................................................................................................................................215.11. Ringer level ...............................................................................................................................................................................225.12. Setting Information returned when receiving an SMS .............................................................................................225.13. Setting Mode for SMS ...........................................................................................................................................................225.14. Sending SMS ............................................................................................................................................................................235.15. Getting the number of SMS stored in SIM card ...........................................................................................................235.16. Deleting SMS ............................................................................................................................................................................23
6. File system related functions ............................................................................................................ 246.1. Description ..................................................................................................................................................................................246.2. Go to the root directory of desired unit ............................................................................................................................246.3. Changing directory ..................................................................................................................................................................246.4. Getting file size ..........................................................................................................................................................................256.5. Deleting files ...............................................................................................................................................................................256.6. MicroSD is present ....................................................................................................................................................................256.7. List subdirectories/files in current directory ...................................................................................................................266.8. Getting files from 3G/GPRS to Waspmote ........................................................................................................................26
7. Camera related functions .................................................................................................................. 277.1. Connecting the camera ..........................................................................................................................................................277.2. Starting the camera ..................................................................................................................................................................277.3. Stopping the camera ...............................................................................................................................................................287.4. Configuration of the camera .................................................................................................................................................28
7.4.1. Resolution .....................................................................................................................................................................287.4.2. Brightness .....................................................................................................................................................................297.4.3. Rotation .........................................................................................................................................................................297.4.4. FPS ...................................................................................................................................................................................307.4.5. Picture name ................................................................................................................................................................307.4.6. Adding time stamp on pictures ............................................................................................................................30
7.5. Taking pictures ...........................................................................................................................................................................317.6. Recording videos ......................................................................................................................................................................317.7. Making videocalls .....................................................................................................................................................................327.8. Setting the video quality ........................................................................................................................................................337.9. Sending DMTF tones ...............................................................................................................................................................33
8. FTP and FTPS ...................................................................................................................................... 348.1. Creating your own FTP server ..............................................................................................................................................348.2. FTP related functions ...............................................................................................................................................................35
8.2.1. Setting FTP parameters ............................................................................................................................................358.2.2. Uploading files from Waspmote ...........................................................................................................................368.2.3. Uploading files from 3G/GPRS module ..............................................................................................................368.2.4. Downloading files to Waspmote ..........................................................................................................................378.2.5. Downloading files to 3G/GPRS module .............................................................................................................37
8.3. FTPS related functions ............................................................................................................................................................388.3.1. Log into FTPS server ..................................................................................................................................................38
-4- v7.0
8.3.2. Uploading files from Waspmote ...........................................................................................................................388.3.3. Uploading files from 3G/GPRS module ..............................................................................................................398.3.4. Downloading files to Waspmote ..........................................................................................................................398.3.5. Downloading files to 3G/GPRS module .............................................................................................................408.3.6. Log out the FTPS server ...........................................................................................................................................40
9. SMTP and POP3 related functions.................................................................................................... 419.1. Sending email with SMTP ......................................................................................................................................................41
9.1.1. Setting the SMTP server ...........................................................................................................................................419.1.2. Setting the sender address and name ................................................................................................................419.1.3. Setting the recipient address and name ............................................................................................................419.1.4. Setting the subject and the body.........................................................................................................................429.1.5. Attaching files ..............................................................................................................................................................429.1.6. Sending the email ......................................................................................................................................................42
9.2. Receiving emails with POP3 ..................................................................................................................................................439.2.1. Setting the POP3 server parameters ...................................................................................................................439.2.2. Getting a list of emails ..............................................................................................................................................439.2.3. Getting the header of an email .............................................................................................................................439.2.4. Getting an email .........................................................................................................................................................449.2.5. Deleting an email .......................................................................................................................................................44
10. HTTP and HTTPS .............................................................................................................................. 4510.1. HTTP connections ..................................................................................................................................................................45
10.1.1. GET method ...............................................................................................................................................................4510.1.2. POST method ............................................................................................................................................................4510.1.3. Server response ........................................................................................................................................................46
10.2. Reading an URL .......................................................................................................................................................................4610.3. Sending a frame to Meshlium ............................................................................................................................................4710.4. HTTPS connections ................................................................................................................................................................48
10.4.1. HTTPS function .........................................................................................................................................................49
11. TCP and UDP connections ............................................................................................................... 5011.1. Configuration of the 3G/GPRS module for TCP and UDP .........................................................................................5011.2. Getting the IP assigned to the module ...........................................................................................................................5111.3. Query a IP address from a domain name .......................................................................................................................5111.4. Query a domain name from a IP address .......................................................................................................................5211.5. Working in single client mode ...........................................................................................................................................52
11.5.1. Creating a socket .....................................................................................................................................................5211.5.2. Sending and receiving data .................................................................................................................................5311.5.3. Closing the socket ...................................................................................................................................................53
11.6. Working in multi client mode.............................................................................................................................................5311.6.1. Enable the multi client mode ..............................................................................................................................5411.6.2. Creating sockets .......................................................................................................................................................5411.6.3. Sending and receiving data .................................................................................................................................5411.6.4. Closing the socket ...................................................................................................................................................55
Index
-5- v7.0
11.7. Working in TCP server mode ..............................................................................................................................................5511.7.1. Creating the server ..................................................................................................................................................5511.7.2. Listing the clients .....................................................................................................................................................5611.7.3. Activate a client ........................................................................................................................................................5611.7.4. Sending and receiving data .................................................................................................................................5611.7.5. Disconnecting a client ...........................................................................................................................................5711.7.6. Closing the server ....................................................................................................................................................57
12. Miscellaneous functions ................................................................................................................. 5812.1. Managing incoming data ....................................................................................................................................................5812.2. Getting RSSI level ....................................................................................................................................................................5812.3. Getting cell system information ........................................................................................................................................5812.4. Getting cell channel information .....................................................................................................................................5912.5. Getting serving cell radio parameters ............................................................................................................................6012.6. Setting preferred service domain .....................................................................................................................................6012.7. Scanning the network band channels ............................................................................................................................6112.8. Getting UE system information .........................................................................................................................................6212.9. Show network system mode ..............................................................................................................................................6312.10. Shows system information in WCDMA .........................................................................................................................6312.11. Setting network system mode preference .................................................................................................................6412.12. Setting the preferences for order of acquisitions .....................................................................................................6412.13. Choosing the storage location ........................................................................................................................................6512.14. Changing the baudrate ......................................................................................................................................................6512.15. Sending AT commands to the 3G/GPRS module .....................................................................................................6512.16. Choosing audio output ......................................................................................................................................................6612.17. Setting the gain level of the microphone ...................................................................................................................6612.18. Setting the loudspeaker volume ....................................................................................................................................6612.19. Getting module information ...........................................................................................................................................67
13. Certifications .................................................................................................................................... 68
14. API changelog .................................................................................................................................. 69
15. Apendix A. CME error codes ........................................................................................................... 70
Apendix B. CMS error codes .................................................................................................................. 71
Index

-6- v7.0
Introduction
1. IntroductionThis guide explains the 3G features and functions. There are no great variations in this library for our new product lines Waspmote v15 and Plug & Sense! v15, released on October 2016.
Anyway, if you are using previous versions of our products, please use the corresponding guides, available on our Development website.
You can get more information about the generation change on the document “New generation of Libelium product lines”.

-7- v7.0
General Considerations
2. General Considerations
2.1. IntroductionImportant:
Since March 2016, the SIM5218 chipset is retired because the provider, SIMCom, implemented the End Of Life process. Libelium has migrated from that chipset to the SIM5215. This chipset is equivalent in terms of hardware specifications and software handling, but has some important changes, please see the table in the next section.
This guide explains about the new 3G module (with the SIM5215). Previous versions of this guide explained about the retired 3G+GPS module (with the SIM5218).
The 3G/GPRS module for Waspmote allows sensor networks and M2M devices to connect to the Cloud by using high speed WCDMA cellular networks in the same way as Smartphones do. This makes possible sensor nodes send not only discrete sensor information such as temperature or humidity (which can be encoded using just a single number) but also complex streams of information such as photos and videos. This feature allows developers the creation of new Smart Security applications.
The 3G/GPRS module for the Waspmote sensor platform offers speed rates of 384 kbps in download mode and also 384 kbps when uploading information to the Cloud.
Each Waspmote sensor node may integrate at the same time a medium range radio such as 802.15.4/ZigBee/Bluetooth/WiFi and one long range 3G radio. This way we can minimize costs by using the mobile network just when really needed.
The 3G communicating module is specially oriented to work with Internet servers implementing internally several application layer protocols which make easier to send the information to the cloud. We can make HTTP and HTTPS (secure mode) navigation, downloading and uploading content to a web server. In the same way FTP and FTPS (secure mode) protocols are also available, which is really useful when your application requires handling files. You can even send and receive mails directly from Waspmote using the SMTP and POP3 clients implemented internally.
Coinciding with the release of the 3G/GPRS module and in order to take part of all the the capabilities Libelium launched the Video Camera Sensor board, which allows to each of the nodes of the sensor network to take photos (640x480), record videos (320x240) and upload them in real time to the Cloud. The Video Camera Sensor board includes 22 high power IR LED’s to implement a night vision mode.
The 3G/GPRS module comes with an internal SD Card of 2GB (extended up to 32GB) which is used to store the photos and videos taken by the Video Camera Sensor Board without the need of being handled by the MCU. This ensures we get real speed ranges as the communication is direct between the SD and the 3G/GPRS module.
-8- v7.0
General Considerations
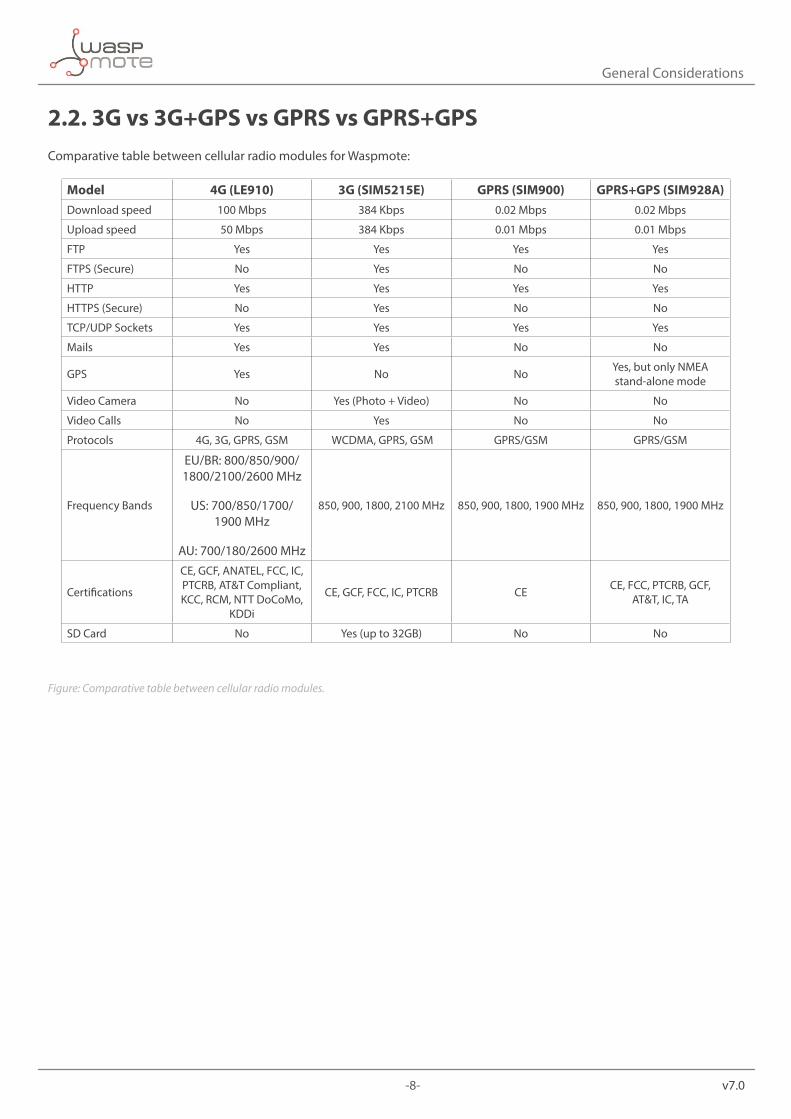
2.2. 3G vs 3G+GPS vs GPRS vs GPRS+GPSComparative table between cellular radio modules for Waspmote:
Model 4G (LE910) 3G (SIM5215E) GPRS (SIM900) GPRS+GPS (SIM928A)Download speed 100 Mbps 384 Kbps 0.02 Mbps 0.02 Mbps
Upload speed 50 Mbps 384 Kbps 0.01 Mbps 0.01 Mbps
FTP Yes Yes Yes Yes
FTPS (Secure) No Yes No No
HTTP Yes Yes Yes Yes
HTTPS (Secure) No Yes No No
TCP/UDP Sockets Yes Yes Yes Yes
Mails Yes Yes No No
GPS Yes No No Yes, but only NMEA stand-alone mode
Video Camera No Yes (Photo + Video) No No
Video Calls No Yes No No
Protocols 4G, 3G, GPRS, GSM WCDMA, GPRS, GSM GPRS/GSM GPRS/GSM
Frequency Bands
EU/BR: 800/850/900/ 1800/2100/2600 MHz
US: 700/850/1700/ 1900 MHz
AU: 700/180/2600 MHz
850, 900, 1800, 2100 MHz 850, 900, 1800, 1900 MHz 850, 900, 1800, 1900 MHz
Certifications
CE, GCF, ANATEL, FCC, IC, PTCRB, AT&T Compliant, KCC, RCM, NTT DoCoMo,
KDDi
CE, GCF, FCC, IC, PTCRB CE CE, FCC, PTCRB, GCF, AT&T, IC, TA
SD Card No Yes (up to 32GB) No No
Figure: Comparative table between cellular radio modules.
-9- v7.0
General Considerations
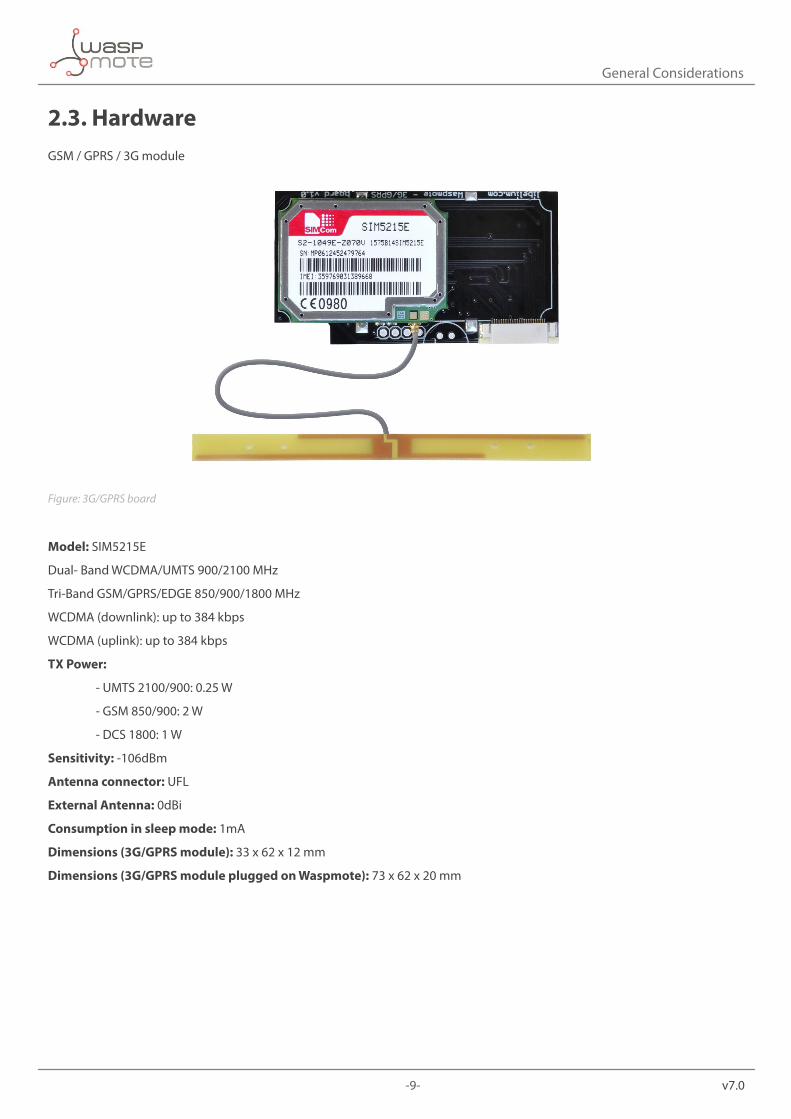
2.3. HardwareGSM / GPRS / 3G module
Figure: 3G/GPRS board
Model: SIM5215E
Dual- Band WCDMA/UMTS 900/2100 MHz
Tri-Band GSM/GPRS/EDGE 850/900/1800 MHz
WCDMA (downlink): up to 384 kbps
WCDMA (uplink): up to 384 kbps
TX Power:
- UMTS 2100/900: 0.25 W
- GSM 850/900: 2 W
- DCS 1800: 1 W
Sensitivity: -106dBm
Antenna connector: UFL
External Antenna: 0dBi
Consumption in sleep mode: 1mA
Dimensions (3G/GPRS module): 33 x 62 x 12 mm
Dimensions (3G/GPRS module plugged on Waspmote): 73 x 62 x 20 mm

-10- v7.0
General Considerations
Actions:
• Videocall, record video and take pictures available with Video Camera Sensor Board • Support microSD card up to 32GB • 64MB of internal storage space • Making/Receiving calls • Making ‘x’ tone missed calls • Sending/Receiving SMS • Single connection and multiple connections TCP/IP and UDP/IP clients • TCP/IP server. • HTTP and HTTPS service • FTP and FTPS Service (downloading and uploading files) • Sending/receiving email (SMTP and POP3) • OTA feature can be performed now by Waspmote’s 3G/GPRS module. Refer to the Over the Air Programming Guide for
more information: http://www.libelium.com/development/waspmote/documentation/over-the-air-programming-guide-otap/
Figure: 3G/GPRS board in Waspmote
Figure: 3G/GPRS board top
-11- v7.0
General Considerations
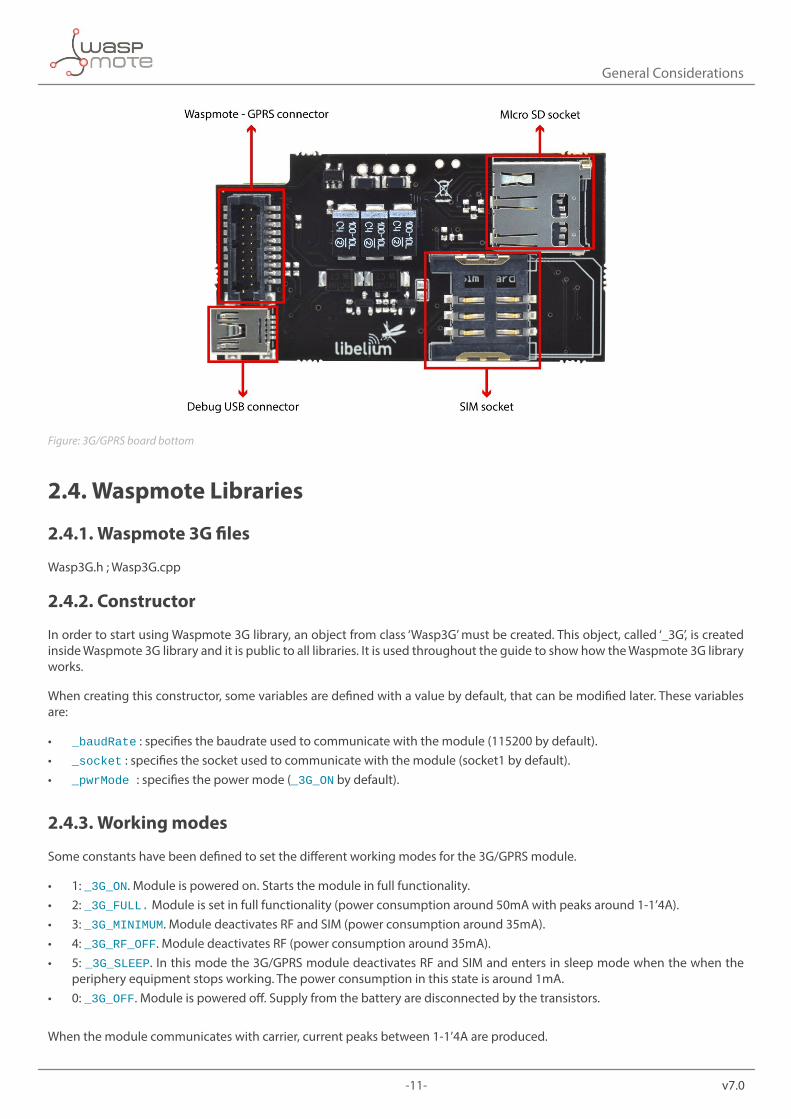
Figure: 3G/GPRS board bottom
2.4. Waspmote Libraries
2.4.1. Waspmote 3G files
Wasp3G.h ; Wasp3G.cpp
2.4.2. Constructor
In order to start using Waspmote 3G library, an object from class ‘Wasp3G’ must be created. This object, called ‘_3G’, is created inside Waspmote 3G library and it is public to all libraries. It is used throughout the guide to show how the Waspmote 3G library works.
When creating this constructor, some variables are defined with a value by default, that can be modified later. These variables are:
• _baudRate : specifies the baudrate used to communicate with the module (115200 by default). • _socket : specifies the socket used to communicate with the module (socket1 by default). • _pwrMode : specifies the power mode (_3G_ON by default).
2.4.3. Working modes
Some constants have been defined to set the different working modes for the 3G/GPRS module.
• 1: _3G_ON. Module is powered on. Starts the module in full functionality. • 2: _3G_FULL. Module is set in full functionality (power consumption around 50mA with peaks around 1-1’4A). • 3: _3G_MINIMUM. Module deactivates RF and SIM (power consumption around 35mA). • 4: _3G_RF_OFF. Module deactivates RF (power consumption around 35mA). • 5: _3G_SLEEP. In this mode the 3G/GPRS module deactivates RF and SIM and enters in sleep mode when the when the
periphery equipment stops working. The power consumption in this state is around 1mA. • 0: _3G_OFF. Module is powered off. Supply from the battery are disconnected by the transistors.
When the module communicates with carrier, current peaks between 1-1’4A are produced.
-12- v7.0
General Considerations
2.4.4. Library fuses
The library for this module is divided in 9 sections and other section with functions and constants that always are active. Each section is activated/deactivated by a fuse. This fuses are located in Wasp3G.h. By default this fuses have a ‘1’ allowing to use the functions. The Wasp3G.h have this fuses:
• GSM_FUSE: Call and SMS related funtions and constants • CAMERA_FUSE: Camera related funtions and constants • FTP_FUSE: FTP related funtions and constants • MAIL_FUSE: SMTP and POP3 related funtions and constants • HTTP_FUSE: HTTP and HTTPS related funtions and constants • GPS_FUSE: GPS related funtions and constants • IP_FUSE: TCP and UDP related funtions and constants • TRANSMISION_FUSE: File transmission related funtions and constants • OTA_FUSE: OTA related funtions and constants (FTP_FUSE must be ‘1’ too)
For deactivate a section change the ‘1’ in the related fuse by ‘0’.
Note: GPS_FUSE is only for use with 3G+GPS module (retired)
Note: If you use a function with the related fused with a value of ‘0’, the compiler will give you an error. Please, be carefully when you use the fuses.
Note: If you do not use the Videocamera Board, switch the Videocamera fuse to 0.
2.4.5. Debug modes
The library have two debug modes implemented that allows to the experimented user show the data transmitted and received between the Waspmote and the 3G/GPRS module. The value of the _3G_debug_mode constant selects the debug mode:
• ‘0’ Disables all debug messages • ‘1’ Shows only the commands sent to the 3G/GPRS module and some extra messages • ‘2’ Shows commands sent to the 3G/GPRS module, the data answered by the module and some extra messages
The constant _3G_debug_mode is located in Wasp3G.h file.
2.4.6. Special errors
Some functions can give an extra error code (CME or CMS error codes). This code is stored on _3G.CME_CMS_code. To know the description of the code see the appendix.
-13- v7.0
Initialization
3. Initialization
3.1. Initializing the 3G/GPRS moduleThe 3G/GPRS module is connected to a multiplexer, since it is connected to the same microcontroller UART. To start using the 3G/GPRS module, this multiplexer must be switched on and choose the correct combination for the 3G to be selected. This selection is (1,1).
To open the UART and set the multiplexer to the correct combination, a function has been developed. This function powers on (_3G.setMode(_3G_ON)) the module too, but doesn’t configure the UART.
Example of use:
{ // Configures the Waspmote to work with 3G module and starts it: _3G.ON();}
3.2. 3G power modesThe 3G/GPRS module has five different power modes: _3G_ON, _3G_FULL, _3G_MINIMUM, _3G_OFFLINE, _3G_SLEEP and _3G_OFF.
The function setMode will set up the ‘pwrMode’ variable to one of the five values, but also configures the Waspmote’s pins and sends the serial command to the 3G/GPRS module. It returns ‘1’ on success, ‘0’ and ‘-2’ if error and ‘-3’ when the module starts succesfully with low battery (in which case the user should expect future failures due to not enough power).
The function getMode() gets the power mode of the module.
Example of use:
{ uint8_t powerMode=0; // Sets the 3G in full functionality: _3G.setMode(_3G_FULL); // Get _3G power mode: powerMode=_3G.getMode ();}
Related variables _3G.pwrMode → stores 3G power mode
3.3. Closing communications with the 3G/GPRS module It closes the UART to which the 3G/GPRS module is connected. It means disconnecting the internal UART drivers inside the ATMEGA1281 processor, but the power mode of the 3G/GPRS module don’t change.
Example of use:
{ // Closes UART: _3G.close(); }
-14- v7.0
Initialization
3.4. Switching 3G offIt closes the UART to which the 3G/GPRS module is connected to and turns it off.
Example of use:
{ // Closes UART and turns it off: _3G.OFF();}
3.5. Checking the GSM connectionIt checks if the module is connected to the network for a time desired by the input parameter.
If the 3G/GPRS module does not connect within these attempts, function exits with ‘0’.
Example of use:
{ // Waits 60 seconds for connection: _3G.check(60);}
This function returns:
• ‘1’ if the module is connected to the carrier • ‘0’ if not connected
According to Libelium experience, 60 seconds is the recommended timeout for connecting the 3G/GPRS network. The timeout may vary depending on the network range and quality of service. If the user detects this timeout does not allow his 3G/GPRS to connect, he can experiment with higher values. 120 seconds would be the maximum advised timeout: if the 3G/GPRS module cannot connect in 2 minutes, it is better to stop trying and check again in the next loop.
Note for USA users: We have tested the new 3G shield with the AT&T network which supports nativelly the GSM and 3G protocols. With other carriers may also work although we haven’t tried and thus we can not ensure it. For this reason we recommend to use AT&T SIM cards.
3.6. Setting time and date from RTCThis function updates the time and the date of the 3G/GPRS module from the RTC.
Example of use:
{ // Updates time and date: _3G.setTime(); }
This function returns:
• ‘1’ on success • ‘0’ if error • ‘-2’ if error with CME error response
-15- v7.0
Initialization
3.7. Setting operator parametersWhen the 3G module uses some services like IP connections (TCP/UDP), HTTP services, SMTP/POP3 or FTP transfers, it’s mandatory to configure operator parameters like APN, login and password.
There are two ways to configure these settings. The first one is to use the definitions into the file Wasp3G.h.
#define _3G_APN “apn” #define _3G_LOGIN “login” #define _3G_PASSW “password”
The second one is to use the function set_APN().
Example of use:
{ // If only APN is necessary _3G.set_APN(“provider_APN”); // If APN, login and password are necessary _3G.set_APN(“provider_APN”, “login”, “password”);}
-16- v7.0
SIM related functions
4. SIM related functionsSome functions have been developed to configure some settings related with GSM, specifically with managing calls and SMS.
4.1. Setting the PINIt sets the PIN to the SIM card.
Example of use:
{ // Sets PIN=1234 to the SIM: _3G.setPIN(“1234”); }
This function returns:
• ‘1’ on success • ‘0’ if error
4.2. Changing PIN numberIt changes PIN number of SIM card.
Example of use:
{ // Changes the PIN number from “1234” to “4321”: _3G.changePIN(“1234”, “4321”); }
This function returns:
• ‘1’ on success • ‘0’ if error • ‘-1’ if CME code are available
4.3. Getting IMSI It gets the IMSI from the SIM card and it stores the IMSI into buffer_3G variable.
Example of use:
{ _3G.getIMSI();}
This function returns:
• ‘1’ on success • ‘0’ if error

-17- v7.0
SIM related functions
4.4. Getting IMEIIt gets the IMEI from the SIM card and it stores the IMEI into buffer_3G variable.
Example of use:
{ _3G.getIMEI();}
This function returns:
• ‘1’ on success • ‘0’ if error
-18- v7.0
GSM related functions
5. GSM related functionsThe fuse GSM_FUSE is used to activate or deactivate the functions of this section. If you use a function of this section the fuse must be at ‘1’.
5.1. Setting information returned when receiving a callThis function configures the information returned by the module when a call is received. It is useful to generate interruptions or to store data from the incoming call.
Example of use:
{ // Sets information returned by the module when incoming call: _3G.setInfoIncomingCall(); }
This function returns:
• ‘1’ on success • ‘0’ if error • ‘-2’ if error with CME error code available
5.2. Making callsIt makes a call to the given telephone number.
Note: the number can be using the country code or only the phone number.
Example of use:
{ // Makes a call to the desired number: _3G.makeCall(“*********”); }
This function returns:
• ‘1’ on success • ‘0’ if error • ‘-2’ if no carrier
5.3. Making lost calls It makes a specified duration lost call to the given telephone number.
Note 1: the calling time includes the time to send the request to the carrier, so the receiving call time is a bit shorter than the input parameter.
Note 2: the number can be using the country code or only the phone number.
Example of use:
{ // Makes a lost call of 10 seconds to the desired number: _3G.makeLostCall(“*********”,10); }
-19- v7.0
GSM related functions
This function returns:
• ‘1’ on success • ‘0’ if error • ‘-2’ if no carrier
5.4. Hanging up callsIt hangs up all the active calls.
Example of use:
{ // Hangs all the active calls up: _3G.hangUp(); }
This function returns:
• ‘1’ on success • ‘0’ if error
5.5. Setting CLI presentation in incoming callsThis function enables or disables the presentation of the incoming call.
Example of use:
{ _3G.setCLIPresentation(ENABLE); }
This function returns:
• ‘1’ on success • ‘0’ if error • ‘-2’ if error with CME error code available
5.6. Setting CLI restriction in outcoming callsThis function restricts or enables the presentation of the CLI to the called party when originating a call. Allowed modes DEFAULT_CLIR, INVOKE_CLIR or SUPPRESS_CLIR.
Example of use:
{ // Restricts the CLI for called party: _3G.setCLIRestriction(SUPPRESS_CLIR);}
This function returns:
• ‘1’ on success • ‘0’ if error • ‘-2’ if error with CME error code available
-20- v7.0
GSM related functions
5.7. Gets the phone activity status This function gets the phone activity status.
Example of use:
{ uint8_t status=0; // Stores in ‘status’ the state of the phone: status=_3G.getPhoneActStatus(); }
This function returns:
• ‘0’ for error • ‘1’= Ready • ‘2’= Unknown • ‘3’= Ringing • ‘4’= Call in progress
5.8. AutoanswerThis function enables or disables the auto-answer function of the 3G/GPRS module. The function wait a number of “rings” and the answer the call. If the number of rings is 0, disables the autoanswer.
Example of use:
{ // Enables autoanswer for wait 2 rings: _3G.autoAnswer(2);}
This function returns:
• ‘1’ on success • ‘0’ if error
5.9. Answer a callThis function answers an incoming call.
Example of use:
{ // Answers an incomming call: _3G.answerCall();}
This function returns:
• ‘1’ on success • ‘0’ if error • ‘-2’ if there isn’t an incoming call

-21- v7.0
GSM related functions
5.10. Generating DTMF tonesThis function generate a DTMF tone according the code listed below:
• ‘0’ - Stop the sound tone • ‘1’ - DTMF tone for 1 key, duration 100ms • ‘2’ - DTMF tone for 2 key, duration 100ms • ‘3’ - DTMF tone for 3 key, duration 100ms • ‘4’ - DTMF tone for 4 key, duration 100ms • ‘5’ - DTMF tone for 5 key, duration 100ms • ‘6’ - DTMF tone for 6 key, duration 100ms • ‘7’ - DTMF tone for 7 key, duration 100ms • ‘8’ - DTMF tone for 8 key, duration 100ms • ‘9’ - DTMF tone for 9 key, duration 100ms • ‘10’ - DTMF tone for 0 key, duration 100ms • ‘11’ - DTMF tone for A key, duration 100ms • ‘12’ - DTMF tone for B key, duration 100ms • ‘13’ - DTMF tone for C key, duration 100ms • ‘14’ - DTMF tone for D key, duration 100ms • ‘15’ - DTMF tone for # key, duration 100ms • ‘16’ - DTMF tone for * key, duration 100ms • ‘17’ - Subscriber busy sound, duration always • ‘18’ - Congestion sound, duration always • ‘19’ - Error information sound, duration 1330*3ms • ‘20’ - Number unobtainable sound, duration 1330*3ms • ‘21’ - Authentication failure sound, duration 1330*3ms • ‘22’ - Radio path acknowledgement sound, duration 700*1ms • ‘23’ - Radio path not available sound, duration 400*4ms • ‘24’ - CEPT call waiting sound, duration 4000*2ms • ‘25’ - CEPT ringing sound, duration always • ‘26’ - CEPT dial tone, duration always
Example of use:
{ // Generate subscriber busy sound: _3G.generateTone(17); delay(5000); // Stops the sound: _3G.generateTone(0);}
This function returns:
• ‘1’ on success • ‘0’ if error
-22- v7.0
GSM related functions
5.11. Ringer levelThis function controls the ringer level of the loudspeaker for incoming call alert. Allowed values: ‘0’ for mute and ‘1’ to ‘5’ for volume level.
Example of use:
{ // Answers an incomming call: _3G.ringerLevel(4);}
This function returns:
• ‘1’ on success • ‘0’ if error
5.12. Setting Information returned when receiving an SMSThis function configures the information returned by the module when an SMS is received. It is useful to generate interruptions or to store data from the incoming SMS.
Example of use:
{ //Sets information returned by the module when incoming SMS _3G.setInfoIncomingSMS(); }
This function returns:
• ‘1’ on success • ‘0’ if error • ‘-2’ if error with CMS error code available • ‘-3’ if error setting the memory • ‘-4’ if error setting the memory with CMS error code available
5.13. Setting Mode for SMSIt sets the text mode for the SMS.
Example of use:
{ //Sets text mode for sms: _3G.setTextModeSMS(); }
This function returns:
• ‘1’ on success • ‘0’ if error
-23- v7.0
GSM related functions
5.14. Sending SMSIt sends an SMS to the specified number.
Note: the maximum length is 160 Bytes (160 characters).
Example of use:
{ // Sends this text in a SMS to the desired number _3G.sendSMS(“Hello World!”,“6********”);}
This function returns:
• ‘1’ on success • ‘0’ if error • ‘-2’ if error with CMS error code available
5.15. Getting the number of SMS stored in SIM cardThis function gets the number of total SMS stored in the SIM card.
Example of use:
{ uint8_t total_SMS=0; // Gets the total SMS in SIM card: total_SMS=_3G.getTotalSMS();}
This function returns:
• ‘1’ on success • ‘0’ if error • ‘-2’ if error with CMS error code available
5.16. Deleting SMSThis function deletes an SMS stored in the SIM card. It’s advisable use first the function getTotalSMS() in order to know the number of SMS.
Example of use:
{ // Deletes the SMS in the 2 index: total_SMS=_3G.getTotalSMS();}
This function returns:
• ‘1’ on success • ‘0’ if error • ‘-2’ if error with CMS error code available
-24- v7.0
File system related functions
6. File system related functions
6.1. DescriptionThe file system is used to store files in a hierarchical (tree) structure, and there are some definitions and conventions to use the Module.
Local storage space is mapped to “C:”, and storage space of present storage card is mapped to “D:”. In both “C:” and “D:” directories, module creates four directories named “Picture”, “Audio”, “Video” and “VideoCall” automatically; “Picture” is used to store static image when taking picture by camera, “Audio” is used to store audio file, “Video” is used to store video file when recording by camera, and “VideoCall” is used to store media file which is recorded during a video call.
The size of the C: unit is 64MB. The microSD card store up to 32GB of information.
Some functions have been developed to work with this file system.
6.2. Go to the root directory of desired unitThe function goRoot(unit) selects the ‘unit’ to work (‘0’ for C: unit and ‘1’ for D:), not for save the files created by the module, and goes to the root directory (C: or D:).
Example of use:
{ // changes to microSD card and goes to the root _3G.goRoot(1);}
This function returns:
• ‘1’ on success • ‘0’ if error
6.3. Changing directoryIt changes the directory in the working unit to the directory given as a parameter.
Example of use:
{ // changes to “Picture” directory _3G.cd(“Picture”);}
This function returns:
• ‘1’ on success • ‘0’ if error

-25- v7.0
File system related functions
6.4. Getting file sizeIt gets the size of a file given as a parameter in the current directory.
Example of use:
{ int32_t sizeFile; // gets the size of “file.txt” sizeFile= _3G.getFileSize(“file.txt”);}
This function returns:
• The size of the file • ‘-2’ if error
6.5. Deleting filesIt deletes a file in the current directory.
Example of use:
{ // deletes “file.txt” _3G.del(“file.txt”);}
This function returns:
• ‘1’ on success • ‘0’ if error
6.6. MicroSD is presentIt checks if the microSD card is present.
Example of use:
{ uint8_t present; // checks if microSD is present present=SD.isSD() ;}
This function returns:
• ‘1’ if is present • ‘’0’ if not present
-26- v7.0
File system related functions
6.7. List subdirectories/files in current directoryls(type_of_ls) stores in buffer_3G a list of the files and/or subdirectories in the current directory. The function needs a number as input parameter that indicates the kind of the list to do. ‘0’ for list the directories and the files, ‘1’ for list only subdirectories and ‘2’ for list only files.
Example of use:
{ // lists the files in the current directory: _3G.ls(2);}
This function returns:
• ‘1’ on success • ‘0’ if error • ‘2’ if no data
6.8. Getting files from 3G/GPRS to WaspmoteThe function getXModemFile(‘origin_file’, ‘destiny_path’) allows to get files from the current directory of the 3G/GPRS Board and saves it in Waspmote’s microSD card. ‘origin_file’ is the name of the file to get. destiny_path is the path with the name to store the file in Waspmote’s microSD card.
Example of use:
{ // Gets the test1.txt from 3G/GPRS board and stores it in /dir1/t001.txt: _3G.getXModemFile(“test.txt”, “/dir1/t001.txt”);}
This function returns:
• ‘1’ if success • ‘0’ if error • ‘-2’ if error going to root directory in Waspmote’s SD • ‘-3’ if error creating the file in Waspmote • ‘-4’ if error if file not exist in 3G/GPRS module • ‘-5’ if error getting the file
-27- v7.0
Camera related functions
7. Camera related functionsWaspmote 3G/GPRS module is capable to take pictures and videos and store in the memory of the module or in its external microSD card. To use camera functions the Videocamera Sensor Board is required. This board, the 3G/GPRS Board, allows to Waspmote take pictures in jpg format with a resolution up to VGA quality (640 x 480) and record video in mp4 format with a resolution up to QVGA quality (320 x 240).
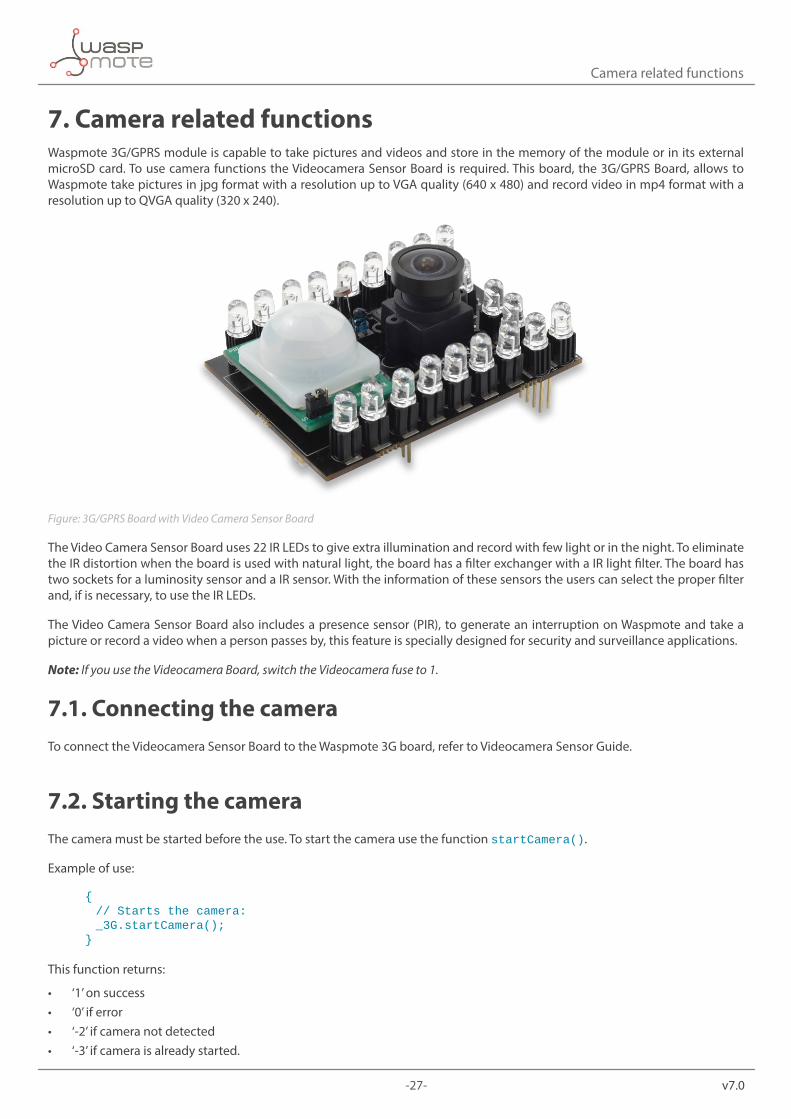
Figure: 3G/GPRS Board with Video Camera Sensor Board
The Video Camera Sensor Board uses 22 IR LEDs to give extra illumination and record with few light or in the night. To eliminate the IR distortion when the board is used with natural light, the board has a filter exchanger with a IR light filter. The board has two sockets for a luminosity sensor and a IR sensor. With the information of these sensors the users can select the proper filter and, if is necessary, to use the IR LEDs.
The Video Camera Sensor Board also includes a presence sensor (PIR), to generate an interruption on Waspmote and take a picture or record a video when a person passes by, this feature is specially designed for security and surveillance applications.
Note: If you use the Videocamera Board, switch the Videocamera fuse to 1.
7.1. Connecting the cameraTo connect the Videocamera Sensor Board to the Waspmote 3G board, refer to Videocamera Sensor Guide.
7.2. Starting the cameraThe camera must be started before the use. To start the camera use the function startCamera().
Example of use:
{ // Starts the camera: _3G.startCamera();}
This function returns:
• ‘1’ on success • ‘0’ if error • ‘-2’ if camera not detected • ‘-3’ if camera is already started.
-28- v7.0
Camera related functions
7.3. Stopping the cameraWhen do not use the camera, the function stopCamera() stops and turns off the camera reducing the power consumption.
Example of use:
{ // Stops the camera: _3G.stopCamera();}
This function returns:
• ‘1’ on success • ‘0’ if error • ‘-2’ if camera not started
7.4. Configuration of the cameraThe camera can be configured in some parameters. Each one have its own function.
Note: the camera must be started to start the configuration.
7.4.1. Resolution
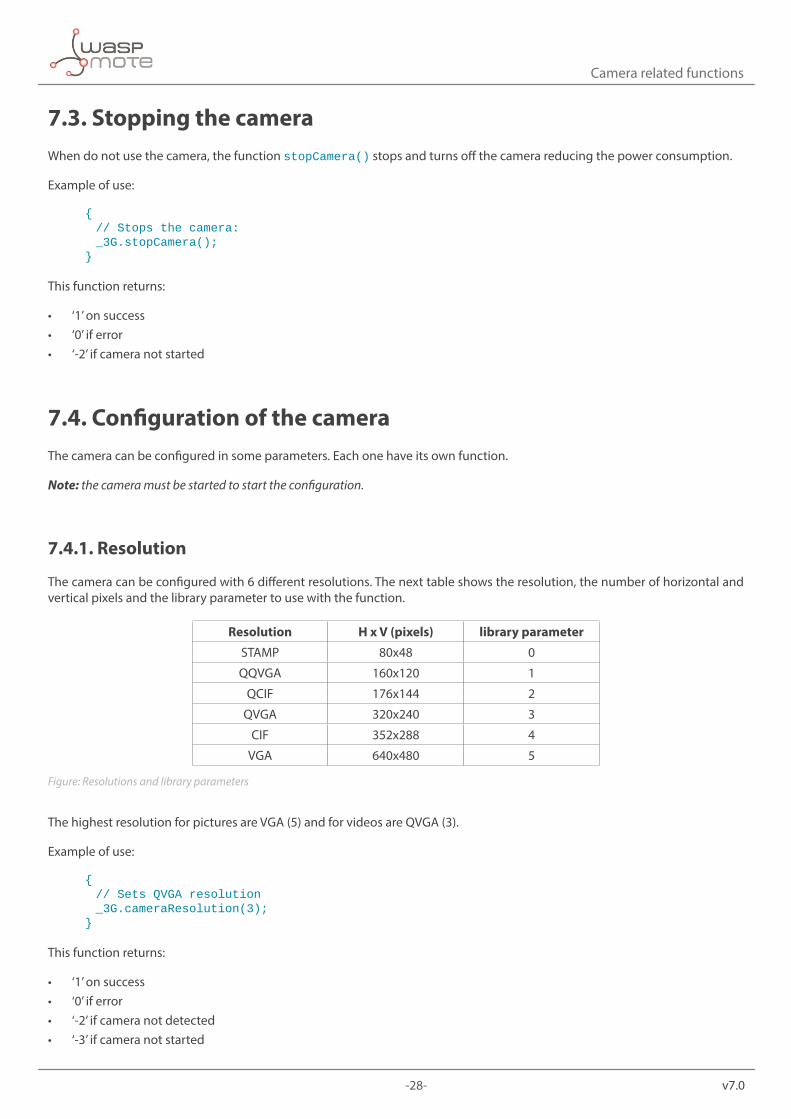
The camera can be configured with 6 different resolutions. The next table shows the resolution, the number of horizontal and vertical pixels and the library parameter to use with the function.
Resolution H x V (pixels) library parameter
STAMP 80x48 0
QQVGA 160x120 1
QCIF 176x144 2
QVGA 320x240 3
CIF 352x288 4
VGA 640x480 5
Figure: Resolutions and library parameters
The highest resolution for pictures are VGA (5) and for videos are QVGA (3).
Example of use:
{ // Sets QVGA resolution _3G.cameraResolution(3);}
This function returns:
• ‘1’ on success • ‘0’ if error • ‘-2’ if camera not detected • ‘-3’ if camera not started
-29- v7.0
Camera related functions
7.4.2. Brightness
The camera have seven levels of brightness, from 0 to 6 (0 is the lowest, 6 is the highest).
Example of use:
{ // Sets highest brightness _3G.cameraBrightness(6);}
This function returns:
• ‘1’ on success • ‘0’ if error • ‘-2’ if camera not started • ‘-3’ if camera is in invalid state
7.4.3. Rotation
The image of the camera can be rotated in steps of 90 degrees: 0, 90, 180 and 270.
Example of use:
{ // Rotates the camera 90 degrees _3G.cameraRotation(“90”);}
This function returns:
• ‘1’ on success • ‘0’ if error • ‘-2’ if camera not started • ‘-3’ if camera is in invalid state
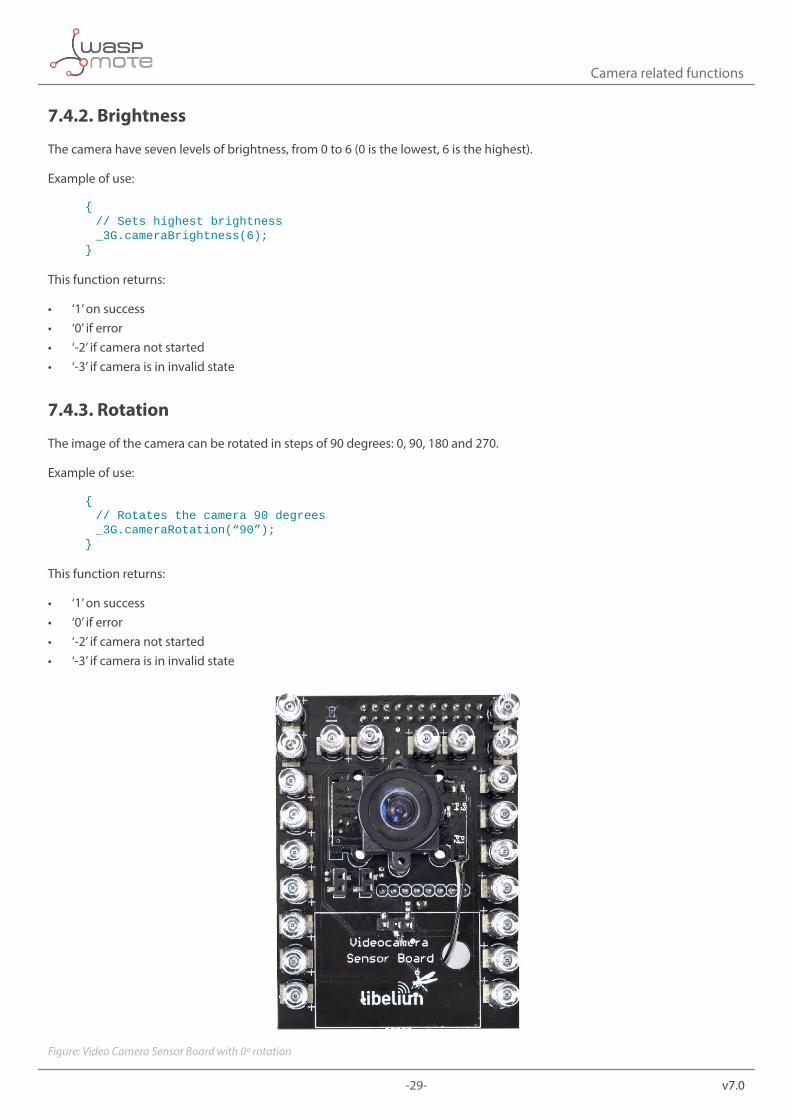
Figure: Video Camera Sensor Board with 0º rotation
-30- v7.0
Camera related functions
7.4.4. FPS
For record a video 3 different FPS can be selected. The parameters are ‘0’ for 7.5 FPS, ‘1’ for 10 FPS and ‘2’ for 15 FPS
Example of use:
{ // Selects 15 fps _3G.cameraFPS(2);}
This function returns:
• ‘1’ on success • ‘0’ if error • ‘-2’ if camera not started • ‘-3’ if camera is in invalid state
7.4.5. Picture name
The name of the pictures can be customized by the user. The name can have up to 20 characters. The name is only a part of the whole name; the whole name is namexxxx.jpg where xxxx is an index of the picture after user defined name.
Example of use:
{ // Sets the name of the pictures // The final name is → Test_name_xxxx.jpg _3G.pictureName(“Test_name_”);}
This function returns:
• ‘1’ on success • ‘0’ if error
7.4.6. Adding time stamp on pictures
The function pictureTimeStamp() allows to add a time stamp with the date and time of the 3G/GPRS module.
Example of use:
{ // Adds time stamp _3G.pictureTimeStamp(1);
// Don’t add time stamp _3G.pictureTimeStamp(0);}
This function returns:
• ‘1’ on success • ‘0’ if error
-31- v7.0
Camera related functions
7.5. Taking picturesThe function takePicture() takes a picture and stores it in the folder “Picture”. To select if store in the module memory or the external microSD card use the function selectStorage().
Example of use:
{ // Takes a picture: _3G.takePicture ();}
This function returns:
• ‘1’ on success • ‘0’ if error • ‘-2’ if camera not started • ‘-3’ if camera is in invalid state • ‘-4’ if there isn’t memory enough
7.6. Recording videosThere are 4 functions related with recording a video:
• startVideo(). Starts the recording of the video • pauseVideo(). Pauses the recording of the video • resumeVideo(). Resumes the recording of the video • stopVideo(). Stops the recording of the video
Example of use:
{ // Starts the recording: _3G.startVideo(); // Records 15 seconds and pauses: delay(15000); _3G.pauseVideo(); // Waits 5 seconds and resumes the record: delay(5000); _3G.resumeVideo(); // Records 15 seconds and stops: delay(15000); _3G.stopVideo(); }
The function startVideo() returns:
• ‘1’ on success • ‘0’ if error • ‘-2’ if camera not started • ‘-3’ if camera is in invalid state • ‘-4’ if there isn’t memory enough
-32- v7.0
Camera related functions
The functions pauseVideo(), resumeVideo() and stopVideo() return:
• ‘1’ on success • ‘0’ if error • ‘-2’ if camera not started • ‘-3’ if camera is in invalid state
7.7. Making videocallsIt makes a videocall to the given telephone number. To do this you can use the function makeVideoCall(phone_number, record). The input parameter record allow to record the videocall. ‘0’ not record video, ‘1’ only record far-end video, ‘2’ only record near-end video and ‘3’ record both far-end and near-end, The video files have been saved in the folder VideoCall/
Example of use:
{ // Makes a videocall and record both far-end and near-end: _3G.makeVideoCall(“*********”, 3);}
This function returns:
• ‘1’ if success • ‘0’ if error • ‘-1’ if error connecting to the other party, • ‘-2’ if error with setup or the other party hangs the call • ‘-3’ if error connecting the videocall • ‘-4’ if error recording the call (videocall is active)
To hang a videocall use the function hangVideoCall().
Example of use:
{ // Hangs the active videocall: _3G.hangVideoCall();}
This function returns:
• ‘1’ if success • ‘0’ if error
-33- v7.0
Camera related functions
7.8. Setting the video qualityThe video quality can be selected with the function VideoCallQuality(VideoQuality). The parameter VideoQuality can be between 5 for 5 for high quality image or 15 for high motion profile.
Note: This function can be used only when videocall is in idle state, and the setting is available until power off.
Example of use:
{ // Sets high quality image: _3G.VideoCallQuality(5);}
This function returns:
• ‘1’ if success • ‘0’ if error
7.9. Sending DMTF tonesDMTF tones can be sent during a videocall. Allowed tones are 0–9, * and #.
Example of use:
{ // Sends an example string: _3G.VideoCallDMTF(“0123456789*#);}
This function returns:
• ‘1’ if success • ‘0’ if error
-34- v7.0
FTP and FTPS
8. FTP and FTPS
8.1. Creating your own FTP serverFirst, you should get a server. This server will receive your frames and store them. There is no need to purchase a physical server since there a companies that offer remote servers.
Note: The server used by Libelium to realize the upload and download tests is a Pure-FTPD server (www.pureftpd.org) and it is hosted into a OVH server (www.ovh.com). The Pure-FTPD server has the settings by default:
• TLS encryption support: Optional • TLS cipher suite: High-Medium + TLSv1 • Allow anonymous logins: No • Allow anonymous uploads: No • Maximum load for anonymous downloads: 4 • Maximum idle time (minutes): 15 • Maximum connections: 50 • Maximum connections per IP address: 8 • Allow logins with root password: Yes • Broken clients compatibility: No
From Libelium, we recommend the use of this server hosting provider to obtain good results to upload and download files, but we can’t guarantee the perfect performance of the FTP server.
Also, Libelium has tested with Guebs hosting (www.guebs.com) with good results.
Follow the next steps to create your own FTP server using the terminal:
1 - Install the pure-ftpd server: sudo apt-get install pure-ftpd
2 - Stop the server: sudo /etc/init.d/pure-ftpd stop
3 - Before creating the user, it is necessary create a directory to stored the received data: sudo mkdir /home/ftp and inclide a false shell. To check if the shell exist: sudo more /etc/shells
4 - If it isn’t the line /bin/false, edit the file, for example with vim, and include it: sudo vim /etc/shells
5 - After creating a new folder to store data, you have to create a group and a user with false shell, because this type of user don’t need a valid shell (more secure), therefore select /bin/false shell for user and /dev/null as directory: sudo groupadd ftpgroup sudo useradd -g ftpgroup -d /dev/null -s /bin/false user1
-35- v7.0
FTP and FTPS
6 - Modify folder permissions: sudo chown -R user1 /home/ftp sudo chmod -R 755 /home/ftp
7 - Add the new user to the pure-ftpd database: sudo pure-pw useradd username -u ftpuser -g ftpgroup -d /home/ftp
Set the user password when it request.
8 - Update the pure-ftpd database: sudo pure-pw mkdb
9 - When the users are include in the ftp, start the server: sudo /etc/init.d/pure-ftpd start
Remeber to open the ports in your router. After this, you will be able to receive FTP transmissions on your server. We advise to use FileZilla to visualize and manage your FTP server.
8.2. FTP related functions
8.2.1. Setting FTP parameters
Before to upload and download files from a FTP server, you need to configure the parameters of the FTP server. The parameters in order are: server address (can be an IP address or a domain name), port, user name, password, mode (1 for passive and 0 for proactive) and type (A for ASCII or I for binary).
Example of use:
{ // Setting FTP parameters _3G.configureFTP(“ftp_address”, “ftp_port”, “user_name”, “password”, 1, “I”);}
This function returns:
• ‘1’ on success • ‘-2’ if error setting the connection parameters (APN) • ‘-3’ if error setting the FTP server • ‘-4’ if error setting the FTP port • ‘-5’ if error setting the FTP mode • ‘-6’ if error setting the FTP type • ‘-7’ if error setting the user name • ‘-8’ if error setting the FTP password • ‘-13’ if error setting the FTP server with if CME error available • ‘-14’ if error setting the FTP port with CME error available • ‘-15’ if error setting the FTP mode with CME error available • ‘-16’ if error setting the FTP type with CME error available • ‘-17’ if error setting the user name with CME error available • ‘-18’ if error setting the FTP password with CME error available
-36- v7.0
FTP and FTPS
8.2.2. Uploading files from Waspmote
To upload a file from Waspmote’s SD card you can use the function uploadData(SD_origin, FTP_destination). SD_origin and FTP_destination are strings that contains the complete path with the file name. The strings must be start with the character ‘/’, for example “/filename” or “/directory/filename”.
Example of use:
{ // Uploading a file from Waspmote _3G.uploadData(“/SD_path/SD_file_name”, “/FTP_path/FTP_file_name”);}
This function returns:
• ‘1’ on success • ‘0’ if error • ‘-2’ if error with CME code (FTP error) • ‘-3’ if error getting file size from SD
8.2.3. Uploading files from 3G/GPRS module
To upload a file from the SD card of the 3G/GPRS module you can use the function uploadFile(3G_folder, FTP_destination_path). 3G_folder is a number that indicates the folder that contains the file to upload. Allowed values for 3G_folder:
• 0 – current directory • 1 – “C:/Picture” directory • 2 – “C:/Video” directory • 3 – “C:/VideoCall” directory • 4 – “D:/Picture” directory • 5 – “D:/Video” directory • 6 – “D:/VideoCall” directory • 7 – “C:/Audio” directory • 8 – “D:/Audio” directory
FTP_desitanion is a string that contains the complete path with the file name. The string must be start with the character ‘/’, for example “/filename” or “/directory/filename”.
Example of use:
{ // Uploading a file from Video directory in the 3G microSD card _3G. uploadFile(5, “/FTP_path/FTP_file_name”);}
This function returns:
• ‘1’ on success • ‘0’ if error • ‘-2’ if error with CME code (FTP error) • ‘-3’ if error getting the file of the size to upload
-37- v7.0
FTP and FTPS
8.2.4. Downloading files to Waspmote
To download a file to Waspmote’s SD card you can use the function downloadData(FTP_origin, SD_destination, max_time). FTP_origin and SD_desitanion are strings that contains the complete path with the file name. The strings must be start with the character ‘/’, for example “/filename” or “/directory/filename”. max_time is the total time in seconds to download the file from the server.
Example of use:
{ // Downloading a file from Waspmote _3G.downloadData(“/FTP_path/FTP_file_name”, “/FTP_path/FTP_file_name”, 180);}
This function returns:
• ‘1’ on success • ‘0’ if error • ‘-2’ if error with CME code (FTP error) • ‘-3’ if error sending the file from 3G/GPRS module to Waspmote SD
8.2.5. Downloading files to 3G/GPRS module
To download a file to the SD card of the 3G/GPRS module you can use the function downloadFile(FTP_path, SD_destination_folder, max_time). SD_destination_folder is a number that indicates the destiny folder to the downloaded file. Allowed values for SD_destination_folder:
• 0 – current directory • 1 – “C:/Picture” directory • 2 – “C:/Video” directory • 3 – “C:/VideoCall” directory • 4 – “D:/Picture” directory • 5 – “D:/Video” directory • 6 – “D:/VideoCall” directory • 7 – “C:/Audio” directory • 8 – “D:/Audio” directory
FTP_desitanion is a string that contains the complete path with the file name. The string must be start with the character ‘/’, for example “/filename” or “/directory/filename”. max_time is the total time in seconds to download the file from the server.
Example of use:
{ // Downloading a file from FTP to Video directory _3G. downloadFile(“/FTP_path/FTP_file_name”, 5, 180 );}
This function returns:
• ‘1’ on success • ‘0’ if error • ‘-2’ if error with CME code (FTP error)
-38- v7.0
FTP and FTPS
8.3. FTPS related functionsNote: the 3G/GPRS module doesn’t support FTPS server with certificate authentication. An explicit FTPS server without certificate authentication must be used with these functions.
8.3.1. Log into FTPS server
Before to upload or download files from a FTPS server, you need to log into the FTPS server. The parameters needed to log into the server in order are: server address (can be an IP address or a domain name), port, user name and password.
Example of use:
{ // Setting FTPS parameters _3G.loginFPTS(“ftp_address”, “ftps_port”, “user_name”, “password”);}
This function returns:
• ‘1’ on success • ‘-2’ if error setting the connection parameters (APN) • ‘-3’ if error acquiring the SSL stack • ‘-4’ error login into the server • ‘-5’ if timeout when logs in
8.3.2. Uploading files from Waspmote
To upload a file from Waspmote’s SD card you can use the function uploadDataSecure(SD_origin, FTPS_destination). SD_origin and FTPS_destination are strings that contains the complete path with the file name. The strings must be start with the character ‘/’, for example “/filename” or “/directory/filename”.
Example of use:
{ // Uploading a file from Waspmote _3G.uploadDataSecure(“/SD_path/SD_file_name”, “/FTPS_path/FTPS_file_name”);}
This function returns:
• ‘1’ on success • ‘0’ if error • ‘-2’ if error with CME code (FTP error) • ‘-3’ if error getting file size from SD

-39- v7.0
FTP and FTPS
8.3.3. Uploading files from 3G/GPRS module
To upload a file from the SD card of the 3G/GPRS module you can use the function uploadFileSecure(3G_folder, FTPS_destination_path). 3G_folder is a number that indicates the folder that contains the file to upload. Allowed values for 3G_folder:
• 0 – current directory • 1 – “C:/Picture” directory • 2 – “C:/Video” directory • 3 – “C:/VideoCall” directory • 4 – “D:/Picture” directory • 5 – “D:/Video” directory • 6 – “D:/VideoCall” directory • 7 – “C:/Audio” directory • 8 – “D:/Audio” directory
FTPS_desitanion is a string that contains the complete path with the file name. The string must be start with the character ‘/’, for example “/filename” or “/directory/filename”.
Example of use:
{ // Uploading a file from Video directory in the 3G microSD card _3G. uploadFileSecure(5, “/FTPS_path/FTPS_file_name”);}
This function returns:
• ‘1’ on success • ‘0’ if error • ‘-2’ if error with CME code (FTP error) • ‘-3’ if error getting the file of the size to upload
8.3.4. Downloading files to Waspmote
To download a file to Waspmote’s SD card you can use the function downloadDataSecure(FTPS_origin, SD_destination). FTPS_origin and SD_desitanion are strings that contains the complete path with the file name. The strings must be start with the character ‘/’, for example “/filename” or “/directory/filename”.
Example of use:
{ // Downloading a file from Waspmote _3G.downloadDataSecure(“/FTPS_path/FTPS_file_name”, “/FTPS_path/FTPS_file_name”);}
This function returns:
• ‘1’ on success • ‘0’ if error • ‘-2’ if error with CME code (FTP error) • ‘-3’ if error sending the file from 3G/GPRS module to Waspmote SD
-40- v7.0
FTP and FTPS
8.3.5. Downloading files to 3G/GPRS module
To download a file to the SD card of the 3G/GPRS module you can use the function downloadFileSecure(FTPS_path, SD_destination_folder, max_time). SD_destination_folder is a number that indicates the destiny folder to the downloaded file. Allowed values for SD_destination_folder:
• 0 – current directory • 1 – “C:/Picture” directory • 2 – “C:/Video” directory • 3 – “C:/VideoCall” directory • 4 – “D:/Picture” directory • 5 – “D:/Video” directory • 6 – “D:/VideoCall” directory • 7 – “C:/Audio” directory • 8 – “D:/Audio” directory
FTPS_desitanion is a string that contains the complete path with the file name. The string must be start with the character ‘/’, for example “/filename” or “/directory/filename”. max_time is the total time in seconds to download the file from the server.
Example of use:
{ // Downloading a file from FTPS to Video directory _3G. downloadFileSecure(“/FTPS_path/FTPS_file_name”, 5, 180 );}
This function returns:
• ‘1’ on success • ‘0’ if error • ‘-2’ if error with CME code (FTP error)
8.3.6. Log out the FTPS server
Once the uploads or downloads have been completed use the function
Example of use:
{ // Setting FTP parameters _3G.logoutFPTS();}
This function returns:
• ‘1’ on success • ‘-2’ if error logging out of the server • ‘-3’ if error releasing the SSL stack
-41- v7.0
SMTP and POP3 related functions
9. SMTP and POP3 related functionsNote: to use these features the email servers must work without SSL function.
9.1. Sending email with SMTP
9.1.1. Setting the SMTP server
This function set SMTP server address and server’s port number. SMTP client will initiate TCP session with the specified server to send an e-mail. If SMTP server requires authentication the function must have the user_name and the password. If the process of sending an e-mail is ongoing, the function returns -1 directly.
Example of use:
{ // Sets the SMTP server without authentication : setSMTPserver(“smtp.server.com”, 110,); // Sets the SMTP server with authentication : setSMTPserver(“smtp.server.com”, 110, “user_name”, “password”);}
This function returns:
• ‘1’ if success • ‘0’ if error setting username and password • ‘-1’ if error setting server and port
9.1.2. Setting the sender address and name
This function sets the sender mail address and name.
{ // Sets the sender mail address and the name: setSMTPfrom(“[email protected]”, “sender”);}
This function returns:
• ‘1’ if success • ‘0’ if error
9.1.3. Setting the recipient address and name
The function setSMTPrecipient(kind, index, mail_address, name) sets the recipient mail address and name. For set a normal recipient kind parameter must be 0, 1 for Carbon Copy recipient and 2 for Blind Carbon Copy recipient. The 3G/GPRS module allows five recipients of each kind (index from 0 to 4).
{ // Sets a normal recipient: setSMTPrecipient(0, 0, [email protected], normal_recicpient); // Sets a Carbon Copy recipient: setSMTPrecipient(1, 2, [email protected], Carcon_Copy_recicpient); // Sets a normal recipient: setSMTPrecipient(2, 4, [email protected], Blind_Carbon_Copy_recicpient);}
This function returns:
• ‘1’ if success • ‘0’ if error
-42- v7.0
SMTP and POP3 related functions
9.1.4. Setting the subject and the body
These functions sets the subject of the email and the body. After an e-mail is sent successfully, the subject and the body will be cleared, if unsuccessfully, they won’t be cleared. Subject and email body are printable ASCII text up to 512 characters each one.
If the process of sending an e-mail is ongoing, these functions will return ‘0’ directly.
{ // Sets the subject: setSMTPsubject(“Subject of the email”); // Sets the body: setSMTPbody(“This is the body of the email”);}
These functions returns:
• ‘1’ if success • ‘0’ if error
9.1.5. Attaching files
The 3G/GPRS module can attach up to 10 files (0 to 9) to the email. The total size of all attachments can’t exceed 10MB. To attach a file to the email the file must be in the current directory. Please, refer to the File system related functions chapter to know how to go to the correct folder.
If the process of sending an e-mail is ongoing, these functions will return ‘0’ directly.
Example of use:
{ // Attach a picture: setSMTPattach( 1, “picture.jpg”);}
This function returns:
• ‘1’ if success • ‘0’ if error
9.1.6. Sending the email
This functions sends the email.
Example of use:
{ // Sends the email: setSMTPsend();}
This function returns:
• ‘1’ on success • ‘0’ if error setting the APN • ‘-2’ error sending the email • ‘-3’ if error setting the APN with CME error code available
-43- v7.0
SMTP and POP3 related functions
9.2. Receiving emails with POP3
9.2.1. Setting the POP3 server parameters
This function sets the parameters for the POP3 server.
Example of use:
{ // Configures the SMTP server: setPOP3server(“pop.server.com”, 110, “username”, ”password”);}
This function returns:
• ‘1’ on success • ‘0’ if error setting the APN • ‘-2’ error sending the email • ‘-3’ if error setting the APN with CME error code available
9.2.2. Getting a list of emails
This function get a list with the total number of emails.
Example of use:
{ // Configures the SMTP server: total_email = getPOP3list();}
This function returns:
• the total number of emails • ‘-2’ if error logging in the POP3 server • ‘-3’ getting the e-mail number and total size
9.2.3. Getting the header of an email
This function gets the header of the email specified in index and stores it in buffer_3G.
Example of use:
{ // Configures the SMTP server: getPOP3header(6);}
This function returns:
• ‘1’ on success • ‘-1’ if error logging in the POP3 server • ‘-2’ if error getting the header of the e-mail
-44- v7.0
SMTP and POP3 related functions
9.2.4. Getting an email
This function gets the e-mail specified in index and stores it in the location selected with selectStorage(). After retrieving an e-mail successfully, POP3 client will create a directory and save the email’s header and body into file system as file “EmailYYMMDDHHMMSSXYZ.TXT”, and save each attachment as a file under the same directory.
Example of use:
{ // Configures the SMTP server: getPOP3mail(6);}
This function returns:
• ‘1’ on success • ‘-1’ if error logging in the POP3 server • ‘-2’ if error getting the e-mail
9.2.5. Deleting an email
This function deletes the e-mail specified in index. The function only marks an email on the server to delete it, and after POP3 client logs out POP3 server and closes the session normally, the marked email is deleted on the server.
Example of use:
{ // Configures the SMTP server: deletePOP3mail(2);}
This function returns:
• ‘1’ on success • ‘-1’ if error logging in the POP3 server • ‘-2’ if error deleting the e-mail
-45- v7.0
HTTP and HTTPS
10. HTTP and HTTPS
10.1. HTTP connectionsHTTP is a great protocol because it is a standard, simple and light way to send information to web servers.
Libelium has created a little web service in order to allow GPRS, WiFi or 3G modules users to test the HTTP mode. This web service is a little code, written in PHP, which is continuously listening to the HTTP port (port number 80) of our test server “pruebas.libelium.com”. This is a kind of RESTful service. GPRS, WiFi or 3G modules can send HTTP instances to our web service.
HTTP instances should have the following structures so that our web service can understand.
10.1.1. GET method
In GET method the data are sent to the server append to the main URL with the ‘?’ character. The base sentence to perform GET method is shown below:
pruebas.libelium.com/getpost_frame_parser.php?<variable1=value1>&<variable2=value2>&<...>&view=html
Where:
• getpost_frame_parser.php? : It is the main URL, where the web service is running. • <variable1=value1> : It is a couple with the variable name and value which we want the web service to parse. • view=html : It is an optional argument. It shows a “pretty” response (HTML formatted)
All arguments must be separated by “&”. The variable name and value must be separated by “=”. Some examples:
pruebas.libelium.com/getpost_frame_parser.php?var1=3.1415pruebas.libelium.com/getpost_frame_parser.php?var1=3.1415&view=html
pruebas.libelium.com/getpost_frame_parser.php?var1=3.1415&var2=123456&var3=hello&view=html
10.1.2. POST method
Unlike GET method, with POST method the data are sent to the server into an extra data field. The URL only includes the site name and the PHP direction:
pruebas.libelium.com/getpost_frame_parser.php
The data field is very similar as the used in GET method:
<variable1=value1>&<variable2=value2>&<...>&view=html
Where:
• <variable1=value1> : It is a couple with the variable name and value which we want the web service to parse. All arguments must be separated by “&”. The variable name and value must be separated by “=”.
Some examples of data field:
pruebas.libelium.com/getpost_frame_parser.php?variable1=3.141592 pruebas.libelium.com/getpost_frame_parser.php?var1=3.1415&var2=123456&var3=hello
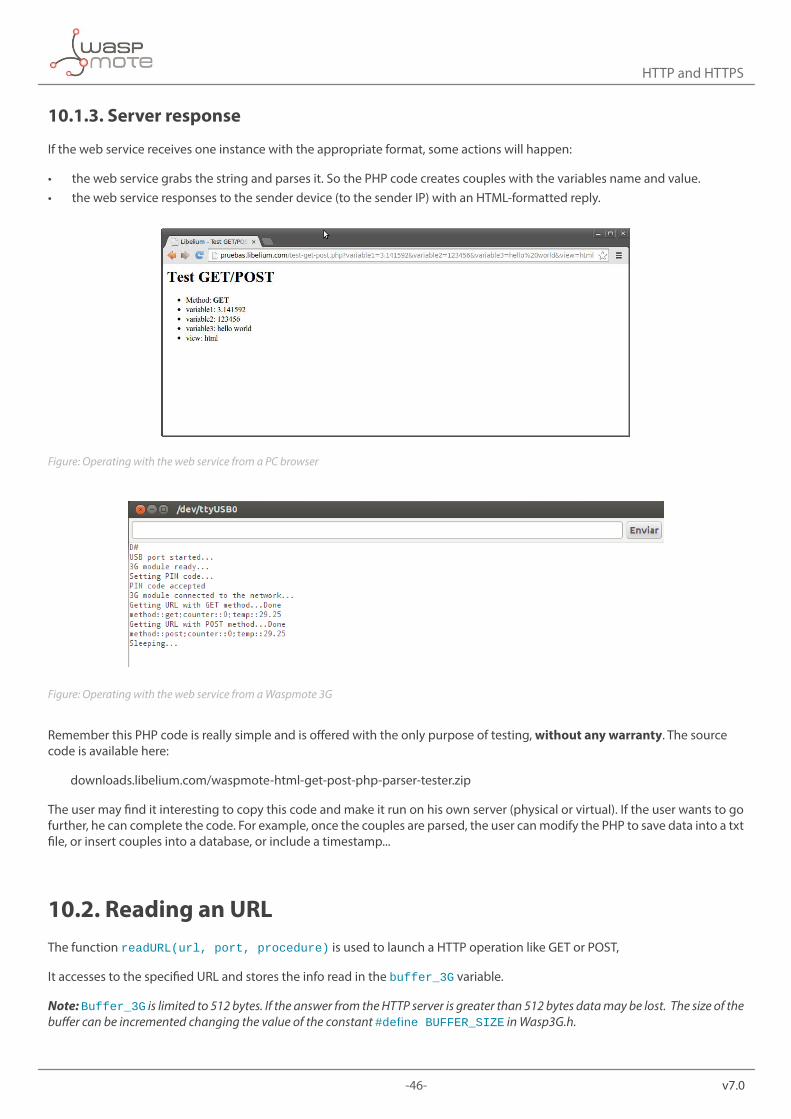
-46- v7.0
HTTP and HTTPS
10.1.3. Server response
If the web service receives one instance with the appropriate format, some actions will happen:
• the web service grabs the string and parses it. So the PHP code creates couples with the variables name and value. • the web service responses to the sender device (to the sender IP) with an HTML-formatted reply.
Figure: Operating with the web service from a PC browser
Figure: Operating with the web service from a Waspmote 3G
Remember this PHP code is really simple and is offered with the only purpose of testing, without any warranty. The source code is available here:
downloads.libelium.com/waspmote-html-get-post-php-parser-tester.zip
The user may find it interesting to copy this code and make it run on his own server (physical or virtual). If the user wants to go further, he can complete the code. For example, once the couples are parsed, the user can modify the PHP to save data into a txt file, or insert couples into a database, or include a timestamp...
10.2. Reading an URLThe function readURL(url, port, procedure) is used to launch a HTTP operation like GET or POST,
It accesses to the specified URL and stores the info read in the buffer_3G variable.
Note: Buffer_3G is limited to 512 bytes. If the answer from the HTTP server is greater than 512 bytes data may be lost. The size of the buffer can be incremented changing the value of the constant #define BUFFER_SIZE in Wasp3G.h.
-47- v7.0
HTTP and HTTPS
Example of use:
{ // Sends a GET procedure to www.url.com _3G.readURL(“www.url.com”, 80, “GET /index HTTP/1.1\r\nHost: www.url.com\r\nUser-Agent: Waspmote\r\nContent-Length: 0\r\n\r\n”);
// Shows the answer from www.url.com USB.println(_3G.buffer_3G);}
This function returns: • ‘1’ on success • ‘-1’ if error setting APN, username and password • ‘-2’ if error opening a HTTP session • ‘-3’ if error receiving data or timeout waiting data • ‘-4’ if error changing the baudrate (data received is OK) • ‘-5’ if unknown error for HTTP • ‘-6’ if HTTP task is busy • ‘-7’ if fail to resolve server address • ‘-8’ if HTTP timeout • ‘-9’ if fail to transfer data • ‘-10’ if memory error • ‘-11’ if invalid parameter • ‘-12’ if network error • ‘-15’ if error setting APN, username and password with CME_error code available • ‘-16’ if error opening a HTTP session with CME_error code available
Reading an URL using GET and POST methods example:
http://www.libelium.com/development/waspmote/examples/3g-15-getting-url/
10.3. Sending a frame to MeshliumThe function sendHTTPframe( url, port, data, length, method) has been developed to send a frame from Waspmote to Meshlium. Meshlium will parse the frame and will store in the internal database. This function requires the next parameters:
• url: IP address from Meshlium • port: HTTP port from Meshlium • data: variable frame.buffer from the frame generated • length: variable frame.length from the frame generated • method: GET or POST
The response from Meshlium will be stored in buffer_3G variable.
Note: Buffer_3G is limited to 512 bytes. If the answer from the HTTP server is greater than 512 bytes data may be lost. The size of the buffer can be incrmented changing the value of the constant #define BUFFER_SIZE in Wasp3G.h.
-48- v7.0
HTTP and HTTPS
Example of use:
{ // Sends a frame with GET procedure _3G.sendHTTPframe(“www.url.com”, 80, frame.buffer, frame.length, GET);
// Shows the answer from www.url.com USB.println(_3G.buffer_3G);}
This function returns:
• ‘1’ on success • ‘-1’ if error setting APN, username and password • ‘-2’ if error opening a HTTP session • ‘-3’ if error receiving data or timeout waiting data • ‘-4’ if error changing the baudrate (data received is OK) • ‘-5’ if unknown error for HTTP • ‘-6’ if HTTP task is busy • ‘-7’ if fail to resolve server address • ‘-8’ if HTTP timeout • ‘-9’ if fail to transfer data • ‘-10’ if memory error • ‘-11’ if invalid parameter • ‘-12’ if network error • ‘-15’ if error setting APN, username and password with CME_error code available • ‘-16’ if error opening a HTTP session with CME_error code available • ‘-17’ if url response its not OK (HTTP code 200) • ‘-18’ if content-length field not found • ‘-19’ if data field not found
Sending a frame to Meshlium using GET and POST methods example:http://www.libelium.com/development/waspmote/examples/3g-15b-sending-a-frame-to-meshlium/
10.4. HTTPS connectionsHypertext Transfer Protocol Secure (HTTPS) is a combination of the Hypertext Transfer Protocol (HTTP) with SSL/TLS protocol to provide encrypted communication and secure identification of a network web server. HTTPS is the result of simply layering the Hypertext Transfer Protocol (HTTP) on top of the SSL/TLS protocol, thus adding the security capabilities of SSL/TLS to standard HTTP communications. The figure is:
SSL/TLS allows an SSL-enabled server to authenticate itself to an SSL-enabled client, and if necessary, allows the client to authenticate itself to the server. After the authentication and cryptology parameter negotiation, a secure channel is established so that the client and server can exchange information in a secure way.
SSL/TLS Features
• Support SSL 3.0 and TLS 1.0 • Support SSL client only • Support 512 bits and 1024 bits exportable and non-exportable cipher suits • Support RSA and Ephemeral Diffie-Hellman key exchange method • Support RSA (with MD5, SHA1 or MD2) and DSS signature algorithm

-49- v7.0
HTTP and HTTPS
• Support Mutual authentication • Support SSL re-handshake • Support DES, 3DES, AES, RC2, and ARCFOUR (compatible with RC4) algorithms. • Support resumed handshake. • Support user interaction in certificate processing.
10.4.1. HTTPS function
The function readURL(url, port, procedure) is used to launch a HTTPS operation like GET or POST.
It accesses to the specified URL and stores the info read in the buffer_3G variable.
Note: Buffer_3G is limited to 512 bytes. If the answer from the HTTPs server is greater than 512 bytes data may be lost. The size of the buffer can be incremented changing the value of the constant #define BUFFER_SIZE in Wasp3G.h.
Example of use:
{ // Sends a GET procedure to www.urls.com _3G.readURLS(“www.urls.com”, 80, “GET /index HTTP/1.1\r\nHost: www.urls.com\r\nUser-Agent: Waspmote\r\nContent-Length: 0\r\n\r\n”);
// Shows the answer from www.urls.com USB.println(_3G.buffer_3G);}
This function returns:
• ‘1’ on success • ‘-1’ if unknown error • ‘-2’ if 3G module is busy • ‘-3’ if server closed • ‘-4’ if timeout • ‘-5’ if transfer failed • ‘-6’ if memory error • ‘-7’ if invalid parameter • ‘-8’ if network error • ‘-10’ if error setting APN, username and password • ‘-11’ if error acquiring HTTPS protocol stack • ‘-12’ if error opening a HTTPS session • ‘-13’ if error changing baudrate • ‘-14’ if error storing HTTPS request in the output buffer • ‘-15’ if error sending the HTTPS request to the url • ‘-16’ if error with the receive command • ‘-17’ if error closing the session (data received is OK) • ‘-18’ if error releasing the SSL stack (data received is OK) • ‘-19’ if error changing the baudrate (data received is OK) • ‘-20’ if error receiving data or timeout waiting data and • ‘-25’ if error setting username and password with CME_error code available
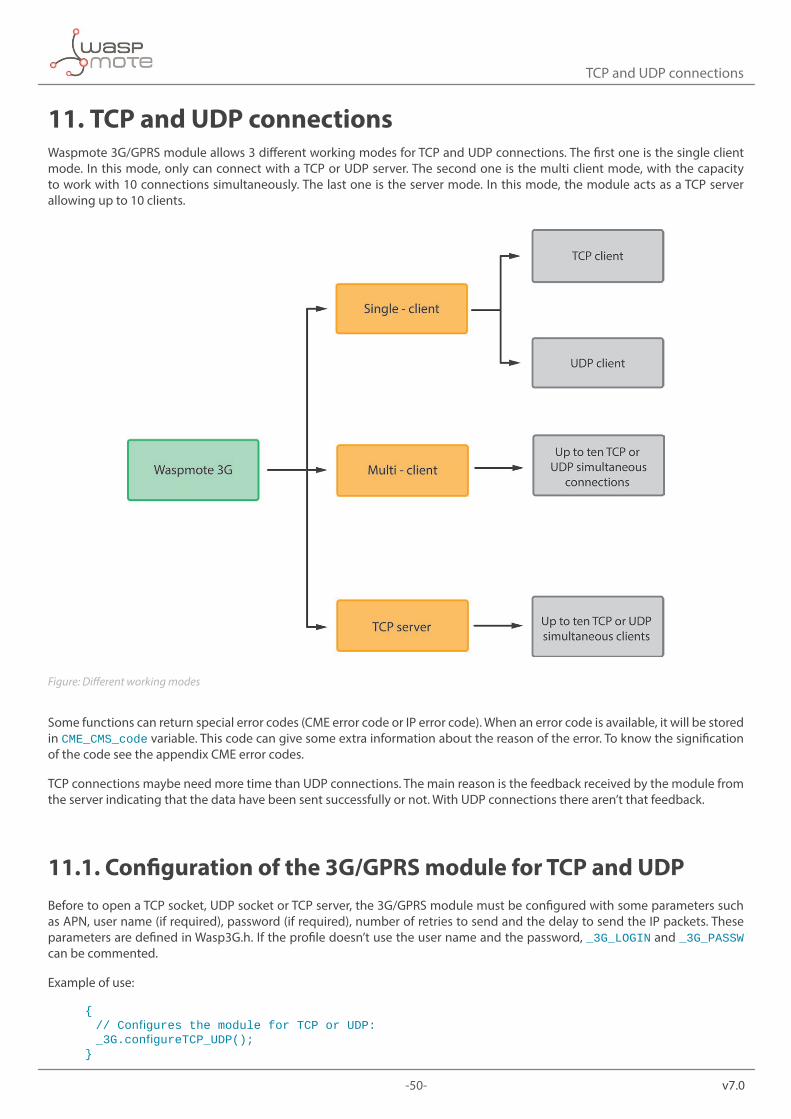
-50- v7.0
TCP and UDP connections
11. TCP and UDP connectionsWaspmote 3G/GPRS module allows 3 different working modes for TCP and UDP connections. The first one is the single client mode. In this mode, only can connect with a TCP or UDP server. The second one is the multi client mode, with the capacity to work with 10 connections simultaneously. The last one is the server mode. In this mode, the module acts as a TCP server allowing up to 10 clients.
Figure: Different working modes
Some functions can return special error codes (CME error code or IP error code). When an error code is available, it will be stored in CME_CMS_code variable. This code can give some extra information about the reason of the error. To know the signification of the code see the appendix CME error codes.
TCP connections maybe need more time than UDP connections. The main reason is the feedback received by the module from the server indicating that the data have been sent successfully or not. With UDP connections there aren’t that feedback.
11.1. Configuration of the 3G/GPRS module for TCP and UDPBefore to open a TCP socket, UDP socket or TCP server, the 3G/GPRS module must be configured with some parameters such as APN, user name (if required), password (if required), number of retries to send and the delay to send the IP packets. These parameters are defined in Wasp3G.h. If the profile doesn’t use the user name and the password, _3G_LOGIN and _3G_PASSW can be commented.
Example of use:
{ // Configures the module for TCP or UDP: _3G.configureTCP_UDP(); }
-51- v7.0
TCP and UDP connections
Related constants of Wasp3G.h
#define _3G_APN “myapn” #define _3G_LOGIN “user_name”#define _3G_PASSW “password”#define RETRIES “10” #define DELAY_SEND “0”
This function returns:
• ‘1’ on success • ‘0’ if error • ‘-2’ if error with CME code is available • ‘-3’ if error configuring IP parameters.
11.2. Getting the IP assigned to the moduleThe function getIP() gets the IP assigned to the module by the network provider. The IP address is stored in buffer_3G.
Example of use:
{ // Gets the IP assigned: _3G.getIP();}
This function returns:
• ‘1’ on success • ‘0’ if error • ‘-2’ if error with IP error code available
11.3. Query a IP address from a domain nameThis function obtains the IP address from a given domain name. The IP address is stored in buffer_3G.
Example of use:
{ // Query the IP address from a domain name _3G.QueryIPfromDomain(“www.libelium.com”);}
This function returns:
• ‘1’ on success • ‘0’ if error
-52- v7.0
TCP and UDP connections
11.4. Query a domain name from a IP addressThis function obtains the IP address from a given domain name. The IP address is stored in buffer_3G.
Example of use:
{ // Query the domain from the give IP _3G.QueryIPfromDomain(“80.58.0.33”);}
This function returns:
• ‘1’ on success • ‘0’ if error
11.5. Working in single client modeIn the single client mode, only one connection can be established with a server. This connection can be TCP or UDP.
The steps to work in this mode are the next:
• 1. Create a TCP or UDP socket • 2. Send and receive data • 3. Close the socket
11.5.1. Creating a socket
A socket can be created with the function createSocket(). The parameters needed for create a TCP or UDP socket are different. For a TCP socket you need to specify: working mode (TCP_CLIENT), IP address of the server and port of the server. For an UDP socket only need to specify the working mode.
Example of use:
{ // Creating a TCP socket: _3G.createSocket(TCP_CLIENT, “90.12.54.132”, 5566); // Creating a UDP socket: _3G.createSocket(UDP_CLIENT);}
This function returns:
• ‘1’ on success • ‘-2’ if error opening the network • ‘-3’ if error opening the network with CME error code available • ‘-4’ if error opening the network with IP error code available • ‘-5’ if error opening the TCP connection or starting the TCP server • ‘-6’ if error opening the TCP connection or starting the TCP server with IP error code available.
-53- v7.0
TCP and UDP connections
11.5.2. Sending and receiving data
sendData() is the function for send data to an opened socket. For send data to a TCP socket you only needs the string of data to send. For send data to a UDP socket, you need the string of data to send, the IP address and the port.
Example of use:
{ // Sending data to a TCP socket: _3G.sendData(“TCP test string”);
// Sending data to a UDP socket: _3G.sendData(“UDP test string”, “90.12.54.132”, 5566);}
This function returns:
• ‘1’ on success • ‘0’ if error • ‘-2’ if error with IP error code available
For receive data Waspmote must execute the function manageIncomingData(). This function executes the proper functions and returns a number with the type of data. For IP data this function returns ‘3’. The IP address of the sender is stored in IP_dir and the data in buffer_3G. For more information about the function manageIncomingData(), see the description of the function at this guide.
11.5.3. Closing the socket
To close an opened socket the function closeSocket() must be used. This function doesn’t need parameters.
Example of use:
{ // Closes the socket: _3G.closeSocket();}
This function returns:
• ‘1’ on success • ‘0’ if error • ‘-2’ if error with IP error code available
11.6. Working in multi client modeIn the multi client mode, the 3G/GPRS module can establish up to 10 connections with different servers. These connections can be TCP or UDP.
The steps to work in this mode are the next:
• 1. Enable the multi client mode • 2. Create a socket • 3. Send and receive data • 4. Close the socket
-54- v7.0
TCP and UDP connections
11.6.1. Enable the multi client mode
The function createSocket() with the parameter MULTI_CONNECTION must be used to enable the multi client mode.
Example of use:
{ // Enables the multi client mode: _3G.createSocket(MULTI_CONNECTION);}
This function returns:
• ‘1’ on success • ‘-2’ if error opening the network • ‘-3’ if error opening the network with CME error code available • ‘-4’ if error opening the network with IP error code available
11.6.2. Creating sockets
To open a socket in multi client mode the function createMultiSocket(), must be used. To open a TCP socket the next parameters must be specified: number of the link, IP address of the server and port of the server. To open a UDP socket only need the number of the link and the listen port.
Example of use:
{ // Creates a TCP connection in multi client mode: _3G.createMultiSocket(2, “90.12.54.132”, 5566); // Creates a UDP connection in multi client mode: _3G.createMultiSocket(1, 156);}
This function returns:
• ‘1’ on success • ‘0’ if error • ‘-2’ if not configured in multi client mode • ‘-3’ if network is closed • ‘-4’ error opening the connection with CME error code available • ‘-5’ error opening the connection with IP error code available
11.6.3. Sending and receiving data
To send data to a TCP connection the parameters needed are the number of the connection and the string of data. For send data to a UDP connection the parameters are the number of the connection, the string of data, the IP address of the server and the port of the server.
Example of use:
{ // Sending data to a TCP socket: _3G.sendData(2, “TCP test string”);
// Sending data to a UDP socket: _3G.sendData(1, “UDP test string”, “90.12.54.136”, 5577);}
-55- v7.0
TCP and UDP connections
This function returns:
• ‘1’ on success • ‘0’ if error • ‘-2’ if error with IP error code available
For receive data Waspmote must execute the function manageIncomingData(). This function executes the proper functions and returns a number with the type of data. For IP data this function returns ‘3’. The IP address of the sender is stored in IP_dir and the data in buffer_3G. For more information about the function manageIncomingData(), see the description of the function at this guide.
11.6.4. Closing the socket
To close an opened connection the function closeMultiSocket() must be used. This function needs number of the connection to close.
Example of use:
{ // Closes the specify socket: _3G.closeMultiSocket(2);}
This function returns:
• ‘1’ on success • ‘0’ if error • ‘-2’ if error with IP error code available
11.7. Working in TCP server modeThe 3G/GPRS module can be used as a TCP server. In this working mode, the 3G/GPRS module can accept up to 10 TCP clients.
11.7.1. Creating the server
A TCP server can be created with the function createSocket(). The parameters needed are the working mode TCP_SERVER and the port of the server.
Example of use:
{ // Creates a TCP server: _3G.createSocket(TCP_SERVER, 80);}
This function returns:
• ‘1’ on success • ‘-2’ if error opening the network • ‘-3’ if error opening the network with CME error code available • ‘-4’ if error opening the network with IP error code available • ‘-5’ if error opening the TCP connection or starting the TCP server • ‘-6’ if error opening the TCP connection or starting the TCP server with IP error code available

-56- v7.0
TCP and UDP connections
11.7.2. Listing the clients
The function listClients() creates in buffer_3G a list of the clients connected to the TCP server. Each line shows: the number of the client, the IP address of the client and the port of the client.
Example of use:
{ // Lists the clients: _3G.listClients();}
Example of data stored in buffer_3G:
{ 0, 80.58.0.32, 620 1, 194.40.125.10, 800}
This function returns:
• ‘1’ on success • ‘0’ if error • ‘-2’ if error with IP error code available
11.7.3. Activate a client
To send and receive data from a client, first must activated. The number of client starts in 0.
Example of use:
{ // Opens the client number 2: _3G.openClient(2);}
This function returns:
• ‘1’ on success • ‘0’ if error • ‘-2’ if error with IP error code available
11.7.4. Sending and receiving data
To send data to an active client use the function sendData().
Example of use:
{ // Sending data to an active client: _3G.sendData(“Test string”);}
This function returns:
• ‘1’ on success • ‘0’ if error • ‘-2’ if error with IP error code available
-57- v7.0
TCP and UDP connections
For receive data Waspmote must execute the function manageIncomingData(). This function executes the proper functions and returns a number with the type of data. For IP data this function returns ‘3’. The IP address of the sender is stored in IP_dir and the data in buffer_3G. For more information about the function manageIncomingData(), see the description of the function at this guide.
11.7.5. Disconnecting a client
The function closeClient() closes an active client.
Example of use:
{ // Opens the client number 2: _3G.closeClient(2);}
This function returns:
• ‘1’ on success • ‘0’ if error • ‘-2’ if error with IP error code available
11.7.6. Closing the server
To close the TCP server the function closeSocket() must be used. This function doesn’t need parameters.
Example of use:
{ // Closes the TCP server: _3G.closeSocket();}
This function returns:
• ‘1’ on success • ‘0’ if error • ‘-2’ if error with IP error code available

-58- v7.0
Miscellaneous functions
12. Miscellaneous functions
12.1. Managing incoming dataIt waits for incoming calls, SMSs or TCP/UDP data up to 20 seconds. It executes the function readCall() if a call is received, readSMS() if an SMS is received and readIPData().
Example of use:
{ // Stores in answer the kind of data received answer = _3G.manageIncomingData(); // Manages incoming data }
This function returns:
• ‘1’ for call, Stores the phone number in buffer_3G • ‘2’ for SMS. Stores tlfNumber and buffer_3G variables the tlf number and text of the incoming SMS • ‘3’ for IP data. Stores the IP address from the sender in IP_dir and the data in buffer_3G • ‘0’ for error or not data
Note 1: the phone number has a maximum length of 15 characters, including country code.
Note 2: the SMS text and the TCP/UDP data string has a maximum size of buffer_3G length.
12.2. Getting RSSI levelThis function gets the RSSI level from the network and stores it in buffer_3G in dBm.
Example of use:
{ // Getting RSSI level: USB.println(_3G.getRSSI(), DEC);}
This function returns:
• the value in -dBm • ‘0’ if error
12.3. Getting cell system informationThis function inquires serving cell and neighbours cell system information in GSM.
Example of use:
{ // Gets the cell system information: _3G.getCellsysInfo(); // Shows the information: USB.println(_3G.buffer_3G);}
-59- v7.0
Miscellaneous functions
This function returns:
• ‘1’ on success • ‘0’ if error • ‘-1’ if timeout • ‘-2’ if error restoring the baudrate (data are valid)
Information is stored in buffer_3G with this format:
[SCELL],ARFCN:9,MCC:214,MNC:07,LAC:5002,ID:2432,BSIC:63,RXLev:-95dbm,C1:8,C2:8,TA:0,TXPWR:0 [NCell1],ARFCN:60,MCC:214,MNC:07,LAC:5002,ID:4433,BSIC:37,RXLev:-97dbm,C1:5,C2:5
• [SCELL]: indicate serving cell • [NCELLn]: available neighbour cell index • ARFCN: assigned radio channel • MCC: mobile country code • MNC: mobile network code • LAC: localization area code • ID: cell identifier • BSIC: base station identification code • RXLev: received signal strength in dBm • TA: timing advance • C1: Coefficient for base station selection • C2: Coefficient for Cell re-selection • TXPWR: UE TX power in dBm. If no TX, the value is 0.
When the 3G/GPRS module is in dedicated mode (for example in a call is in progress) the parameters MCC, MNC, LAC, ID, C1 and C2 for the neighbour cells are not showed.
12.4. Getting cell channel information This function inquires serving cell channel information in GSM when a call is in progress.
Example of use:
{ // Gets the cell channel information: _3G.getCellchannel(); // Shows the information: USB.println(_3G.buffer_3G);}
This function returns:
• ‘1’ on success • ‘0’ if error
Information is stored in buffer_3G with this format:
ARFCN:11,BISC: 4,HSN: 1,MAIO: 1,TN: 2,HF: 1,TSC: 4,TCH: 3
-60- v7.0
Miscellaneous functions
• ARFCN: assigned radio channel • BSIC: base station identification code • HSN: hopping sequence number • MAIO: mobile allocation index offset • TN: timeslot number • HF: hopping flag • TSC: training sequence code • TCH: channel type
12.5. Getting serving cell radio parametersThis function inquires serving cell radio parameter in GSM when a call is in progress.
Example of use:
{ // Gets serving cell radio parameters: _3G.getCellradioparam(); // Shows the information: USB.println(_3G.buffer_3G);}
This function returns:
• ‘1’ on success • ‘0’ if error
Information is stored in buffer_3G with this format:
ARFCN:9,RXLevFull: -96dbm,RXLevSub: -96dbm,RXQualFull: 4,RXQualSub: 3,PWRC:1,DTX: 1,RLT: 32
• ARFCN: assigned radio channel • RXLevFull: received full signal strength in dBm • RXLevSub: received sub signal strength in dBm • RXQualFull: full quality of reception • RXQualSub: sub quality of reception • PWRC: power control • DTX: DTX indicator • RLT: radio link timeout
12.6. Setting preferred service domainThis function sets the preferred service domain. Allowed values are ‘0’ for CS (Circuit Switched), ‘1’ for PS (Packet Switched) and ‘2’ for CS+PS.
Example of use:
{ // Selects CS+PS: _3G.setPreferedServiceDomain(2);}
This function returns:
• ‘1’ on success • ‘0’ if error
-61- v7.0
Miscellaneous functions
12.7. Scanning the network band channelsThis function scans the network band channels and stores in buffer_3G the data from the channels. You must to specify a start channel and an end channel. The parameter mode selects if the output will be a verbose output (0) or only numeric data (1).
Example of use:
{ // Scans channels from 23 to 33 with verbose output: _3G.scanNetworkchannels(11, 20, 0); // Shows the information: USB.println(_3G.buffer_3G);}
This function returns:
• ‘1’ on success • ‘0’ if error
Information is stored in buffer_3G with this format when verbose output is selected:
For BCCH-Carrier:
arfcn:<arfcn_value>,bsic:<bsic_value>,dBm:<dBm_value>,mcc: <mcc_value>,mnc:<mnc_value>,lac:<lac_value>,cellId:<cellId>,cellStatus: <cellStasus>,numArfcn:<num_afrcn>,arfcn:<list of arfcns>,numChannels: <num_channel>,array:<list of channels>
For non BCCH-Carrier:
arfch:<arfcn_value>,dBm:<dBm_value>
Information is stored in buffer_3G with this format when numeric output is selected:
For BCCH-Carrier:
<arfcn_value>,<bsic_value>,<dBm_value>,<mcc_value>,<mnc_value>,<lac_value>,<cellId>,<cellStasus>,<num_afrcn>,<list of arfcns>,<num_channel>,<list of channels>
For non BCCH-Carrier:
<arfcn_value>,<dBm_value>
• <arfcn_value> : carrier assigned radio channel (BCCH – Broadcast Control Channel) • <bsic_value> : base station identification code • <dBm_value> : the value of dBm • <mcc_value>: mobile country code • <mnc_value> : mobile network code • <lac_value> : localization area code • <cellId> : cell identifier • <cellStatus> : cell status, this parameter indicates the following statuses:
- CELL_SUITABLE indicates the C0 is a suitable cell - CELL_LOW_PRIORITY indicates the cell is low priority based on the system information received - CELL_FORBIDDEN indicates the cell is forbidden - CELL_BARRED indicates the cell is barred based on the system information received - CELL_LOW_LEVEL indicates the cell RXLEV is low - CELL_OTHER indicates none of the above, e.g. exelusion timer running, no BCCH available , etc.
• <num_arfcn> : number of valid channels
-62- v7.0
Miscellaneous functions
• <list of arfcns> : list arfcns BCCH allocation, and the total number is <num_arfcn> • <num_channel> : number of valid channels • <list of channels> : list channels, and the total number is <num_channels> • <arfcn_index> : the index of arfcn, and the minimum value is zero
12.8. Getting UE system informationThis function inquires the UE system information. The information returned in ‘buffer_3G’ is different from 2G network and 3G network.
Example of use:
{ // Gets UE system information: _3G.getUEsysInfo(); // Shows the information: USB.println(_3G.buffer_3G);}
This function returns:
• ‘1’ on success • ‘0’ if error
Information is stored in buffer_3G with this format:
For a 2G cell:
<System Mode>,<Operation Mode>,<MCC><MNC> ,<LAC>,<Cell ID>,<Absolute RF Ch Num>, < RxLev >, <Track LO Adjust>,<C1-C2>
For a 3G cell:
<System Mode>,<Operation Mode>,<MCC>,<MNC>,<LAC>,<Cell ID>,<Frequency Band>,<PSC>,<Freq>, <SSC>,<EC/IO>,<RSCP >,<Qual>,<RxLev>,<TXPWR>
• <System Mode> : System mode, values: “NO SERVICE”, “GSM” or “WCDMA”. • <Operation Mode> : UE operation mode, values: “Online”,“Offline”,“Factory Test Mode”,“Reset”, “Low Power Mode”. • <MCC> : Mobile Country Code (first part of the PLMN code) • <MNC> : Mobile Network Code (second part of the PLMN code) • <LAC> : Location Area Code (hexadecimal digits) • <Cell ID> : Service-cell ID. • <Absolute RF Ch Num> : AFRCN for service-cell. • <Track LO Adjust> : Track LO Adjust • <C1> : Coefficient for base station selection • <C2> : Coefficient for Cell re-selection • <Frequency Band> : Frequency Band of active set • <PSC> : Primary synchronization code of active set. • <Freq> : Downlink frequency of active set. • <SSC> : Secondary synchronization code of active set • <EC/IO> : Ec/Io value • <RSCP> : Received Signal Code Power • <Qual> : Quality value for base station selection • <RxLev> : RX level value for base station selection • <TXPWR> : UE TX power in dBm. If no TX, the value is 500.
-63- v7.0
Miscellaneous functions
12.9. Show network system modeThis function shows network system mode.
Example of use:
{ // Shows network mode: USB.println(_3G.showsNetworkMode(), DEC);}
This function returns:
• ‘1’ for no service • ‘2’ for GSM • ‘3’ for GPRS • ‘4’ for EGPRS (EDGE) • ‘5’ for WCDMA • ‘6’ for HSDPA only • ‘7’ for HSUPA only • ‘8’ for HSPA (HSDPA and HSUPA) • ‘0’ if error • ‘-1’ if error with CME error code available
Values 6, 7 and 8 are included only for compatibility with the former 3G+GPS module.
12.10. Shows system information in WCDMAThis function shows the mobile phone system information in WCDMA mode. The information are stored in buffer_3G.
Example of use:
{ // Gets WCDMA system information: _3G.WCDMAsysInfo(); // Shows the information: USB.println(_3G.buffer_3G);}
This function returns:
• ‘1’ on success • ‘0’ if error
Information is stored in buffer_3G with this format:
Active SET,<ActiveSET Cells Num>,<ActiveSET Cell1 PSC>,<ActiveSET Cell1 Freq>,<ActiveSET Cell1 SSC>, <ActiveSET Cell1 Sttd>,<ActiveSET Cell1 TotEcio>,<ActiveSET Cell1 Ecio>,<ActiveSET Cell1 Rscp>,<UTMS_SETS Cell TPC>,<UTMS_SETS Cell SecCpichOvsf>, <ActiveSET Cell1 WinSize> ,... more active cells.
Sync Neighbor SET,<SyncSET Cells Num>,<SyncSET Cell1 PSC>,<SyncSET Cell1 Freq>,<SyncSET Cell1 SSC>,< SyncSET Cell1 Sttd>,< SyncSET Cell1 TotEcio>,< SyncSET Cell1 Ecio>,< SyncSET Cell1 Rscp>,< SyncSET Cell1 WinSize> ,... more sync neighbor cells.
Async Neighbor SET,<AsyncSET Cells Num>,< AsyncSET Cell1 PSC>,< AsyncSET Cell1 Freq>,< AsyncSET Cell1 SSC>,< AsyncSET Cell1 Sttd>,< AsyncSET Cell1 TotEcio>,< AsyncSET Cell1 Ecio>,< AsyncSET Cell1 Rscp>,< AsyncSET Cell1 WinSize> ,... more async neighbor cells.

-64- v7.0
Miscellaneous functions
• <UTMS_SETS Cells Num> : cells number • <UTMS_SETS Cell 1-n PSC> : primary synchronization code of the cell • <UTMS_SETS Cell 1-n Freq> : downlink frequency of the cell • <UTMS_SETS Cell 1-n SSC> : secondary synchronization code • <UTMS_SETS Cell 1-n Sttd> : if the CPICH of this cell uses STTD • <UTMS_SETS Cell 1-n TotEcio> : the total Ec/Io in the best paths found in a sweep • <UTMS_SETS Cell 1-n 1 Ecio> : Ec/Io • <UTMS_SETS Cell 1-n Rscp> : CPICH RSCP • <UTMS_SETS Cell 1-n TPC> : Forward power control combination • <UTMS_SETS Cell 1-n SecCpichOvsf>: OVSF code of the secondary CPICH • <UTMS_SETS Cell 1-n WinSize>: search window size for this cell
UTMS_SETS contains:
• ActiveSET : active set • SyncSET: neighbour (monitored) set for neighbours whose timing is known • AsyncSET: neighbour (monitored) set for neighbours whose timing is unknown
12.11. Setting network system mode preferenceThis function sets network system mode preference. The values for the input parameter are: ‘0’ for automatic, ‘13’ for GSM only and ‘14’ for WCDMA only.
Example of use:
{ // Sets network system mode for WCDMA only: _3G.setNetworkMode(14);}
This function returns:
• ‘1’ on success • ‘0’ if error
12.12. Setting the preferences for order of acquisitionsThis function sets the preferences for order acquisitions mode. The input parameter specifies the order: ‘0’ for automatic, ‘1’ GSM,WCDMA and ‘2’ for WCDMA,GSM.
Example of use:
{ // Sets the order to work first with WCDMA: _3G.modeAcquisitionsOrder(2);}
This function returns:
• ‘1’ on success • ‘0’ if error
-65- v7.0
Miscellaneous functions
12.13. Choosing the storage locationThis function selects the location (local storage or SD card storage) of store the data captured by the 3G/GPRS module as pictures, video or emails. The values for input parameter can be: ‘0’ for local storage and ‘1’ for SD card storage.
Example of use:
{ // Selects microSD card to store data: _3G.selectStorage(1);}
This function returns:
• ‘1’ on success • ‘0’ or ‘-2’ if error
12.14. Changing the baudrateThis function changes the baudrate between Waspmote and 3G/GPRS module. This function also changes the UART’s baudrate in Waspmote. The allowed baudrates are: 300, 600, 1200, 2400, 4800, 9600, 19200, 38400, 57600, 115200. Higher values don’t work properly in Waspmote.
Example of use:
{ // Sets baudrate to 38400 bauds: _3G.changeBaudrate(38400);}
This function returns:
• ‘1’ on success • ‘0’ or ‘-2’ if error
12.15. Sending AT commands to the 3G/GPRS moduleThis function allows to the user to send AT commands to the 3G/GPRS module and read the answer from it. The command must a string without the “AT”. The answer is stored in buffer_3G with this format.
Example of use:
{ // Sends “AT+CREG”: _3G.sendATCommand(“+CREG?”); // Shows the answer: USB.println(_3G.buffer_3G);}
This function returns:
• ‘1’ on success • ‘0’ if error
-66- v7.0
Miscellaneous functions
12.16. Choosing audio output This functions selects the output for the audio. Allowed values are ‘0’ for speaker and ‘1’ for loudspeaker.
Example of use:
{ // Selects the loudspeaker for audio: _3G.selectAudioOutput(1);}
This function returns:
• ‘1’ on success • ‘0’ if error
12.17. Setting the gain level of the microphoneThis function sets the gain level of the microphone. The input values are:’ 0’ for mute and ‘1’ to ‘16’ for gain level. Mute only can be used into a call.
Example of use:
{ // Sets max gain for the microphne amplifier: _3G.micGain(16);}
This function returns:
• ‘1’ on success • ‘0’ if error
12.18. Setting the loudspeaker volume This function sets the level of the loudspeaker. The input values are:’ 0’ for mute and ‘1’ to ‘5’ for volume level.
Example of use:
{ // Sets mmute for the loudspeaker: _3G.loudspeakerLevel(0);}
This function returns:
• ‘1’ on success • ‘0’ if error
-67- v7.0
Miscellaneous functions
12.19. Getting module information The function whoamI() get the model of the module and saves it in buffer_GPRS. The function firmware_version() get the firmware of the module and saves it in buffer_GPRS.
These functions return ‘1’ on success, ‘0’ if error.
Example of use:
{ USB.print(F(“WhoamI: “)); GPRS_Pro.whoamI(); USB.println(GPRS_Pro.buffer_GPRS); USB.print(F(“Firmware version: “)); GPRS_Pro.firmware_version(); USB.println(GPRS_Pro.buffer_GPRS); }
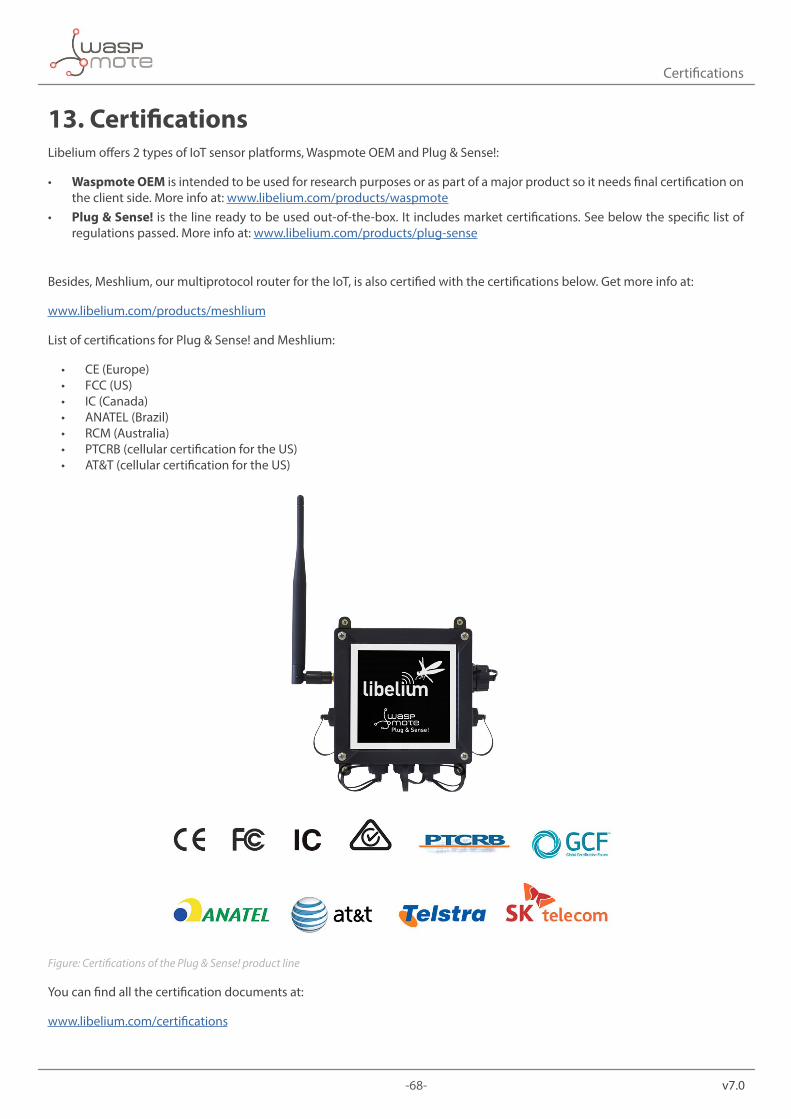
-68- v7.0
Certifications
13. CertificationsLibelium offers 2 types of IoT sensor platforms, Waspmote OEM and Plug & Sense!:
• Waspmote OEM is intended to be used for research purposes or as part of a major product so it needs final certification on the client side. More info at: www.libelium.com/products/waspmote
• Plug & Sense! is the line ready to be used out-of-the-box. It includes market certifications. See below the specific list of regulations passed. More info at: www.libelium.com/products/plug-sense
Besides, Meshlium, our multiprotocol router for the IoT, is also certified with the certifications below. Get more info at:
www.libelium.com/products/meshlium
List of certifications for Plug & Sense! and Meshlium:
• CE (Europe) • FCC (US) • IC (Canada) • ANATEL (Brazil) • RCM (Australia) • PTCRB (cellular certification for the US) • AT&T (cellular certification for the US)
Figure: Certifications of the Plug & Sense! product line
You can find all the certification documents at:
www.libelium.com/certifications

-69- v7.0
API changelog
14. API changelog
Keep track of the software changes on this link:
www.libelium.com/development/waspmote/documentation/changelog/#3G

-70- v7.0
Apendix A. CME error codes
15. Apendix A. CME error codesCME error code Description CME error code Description
0 phone failure 112 Location area not allowed
1 no connection to phone 113 Roaming not allowed in this location area
2 phone adaptor link reserved 132 service option not supported
3 operation not allowed 133 requested service option not subscribed
4 operation not supported 134 service option temporarily out of order
5 PH-SIM PIN required 148 unspecified GPRS error
6 PH-FSIM PIN required 149 PDP authentication failure
7 PH-FSIM PUK required 150 invalid mobile class
10 SIM not inserted 257 network rejected request
11 SIM PIN required 258 retry operation
12 SIM PUK required 259 invalid deflected to number
13 SIM failure 260 deflected to own number
14 SIM busy 261 unknown subscriber
15 SIM wrong 262 service not available
16 incorrect password 263 unknown class specified
17 SIM PIN2 required 264 unknown network message
18 SIM PUK2 required 273 minimum TFTS per PDP address violated
20 memory full 274 TFT precedence index not unique
21 invalid index 275 invalid parameter combination
22 not found 201 Unknown error for FTP
23 memory failure 202 FTP task is busy
24 text string too long 203 Failed to resolve server address
25 invalid characters in text string 204 FTP timeout
26 dial string too long 205 Failed to read file
27 invalid characters in dial string 206 Failed to write file
30 no network service 207 It’s not allowed in current state
31 network timeout 208 Failed to login
32 network not allowed - emergency calls only 209 Failed to logout
40 network personalization PIN required 210 Failed to transfer data
41 network personalization PUK required 211 FTP command rejected by server
42 network subset personalization PIN required 212 Memory error
43 network subset personalization PUK required 213 Invalid parameter
44 service provider personalization PIN required 214 Network error
45 service provider personalization PUK required 220 Unknown error fot HTTP
46 corporate personalization PIN required 221 HTTP task is busy
47 corporate personalization PUK required 222 Failed to resolve server address
100 Unknown 223 HTTP timeout
103 Illegal MESSAGE 224 Failed to transfer data
106 Illegal ME 225 Memory error
107 GPRS services not allowed 226 Invalid parameter
111 PLMN not allowed 227 Network error
-71- v7.0
Apendix A. CME error codes
Apendix B. CMS error codesCME error code Description CME error code Description
300 ME failure 316 SIM PUK required
301 SMS service of ME reserved 317 SIM PIN2 required
302 Operation not allowed 318 SIM PUK2 required
303 Operation not supported 320 Memory failure
304 Invalid PDU mode parameter 321 Invalid memory index
305 Invalid text mode parameter 322 Memory full
310 SIM not inserted 330 SMSC address unknown
311 SIM PIN required 331 no network service
312 PH-SIM PIN required 332 Network timeout
313 SIM failure 340 NO +CNMA ACK EXPECTED
314 SIM busy 342 SMS size more than expected
315 SIM wrong 500 unknown error