Embed Size (px)
Citation preview

NETWORK USER’S GUIDE
Internet Fax and Fax to Server features
MFC-9460CDNMFC-9465CDNMFC-9560CDW
To find basic information about network and advanced network features of your Brother machine, see the Network User's Guide and Network Glossary.
To download the latest manual, please visit the Brother Solutions Center at (http://solutions.brother.com/). You can also download the latest drivers and utilities for your machine, read FAQs and troubleshooting tips or learn about special printing solutions from the Brother Solutions Center.
Not all models are available in all countries.
Version 0
ENG
i
Definitions of notes
We use the following icons throughout this User’s Guide:
IMPORTANT NOTE
This product is approved for use in the country of purchase only. Do not use this product outside the country of purchase as it may violate the wireless telecommunication and power regulations of that country.
Windows® XP in this document represents Windows® XP Professional, Windows® XP Professional x64
Edition and Windows® XP Home Edition.
Windows Server® 2003 in this document represents Windows Server® 2003 and Windows Server® 2003 x64 Edition.
Windows Server® 2008 in this document represents Windows Server® 2008 and Windows Server® 2008 R2.
Windows Vista® in this document represents all editions of Windows Vista®.
Windows® 7 in this document represents all editions of Windows® 7.
Please go to the Brother Solutions Center at http://solutions.brother.com/ and click Manuals on your model page to download the other manuals.
Notes tell you how you should respond to a situation that may arise or give tips about how the operation works with other features.Note

ii
1 Internet fax 1
Internet fax Overview.................................................................................................................................1Important information on Internet fax...................................................................................................2
How to Internet fax.....................................................................................................................................3Sending an Internet fax .......................................................................................................................3Receiving E-mail or Internet fax ..........................................................................................................4
Additional Internet Fax options ..................................................................................................................6Forwarding received E-mail and fax messages...................................................................................6Relay broadcasting..............................................................................................................................6TX Verification Mail..............................................................................................................................9Error mail ...........................................................................................................................................10
2 Storing numbers and E-mail addresses 11
Using One Touch or Speed Dial ..............................................................................................................11One Touch and Speed Dial Storage Options ....................................................................................12Storing One Touch Dial numbers ......................................................................................................13Storing Speed Dial numbers..............................................................................................................16Changing or Deleting One Touch and Speed Dial numbers .............................................................19
Additional ways to store numbers............................................................................................................21Setting up Groups for Broadcasting ..................................................................................................21Broadcasting (black & white only) .....................................................................................................24
3 Control panel setup 25
E-mail/IFAX menu....................................................................................................................................25E-mail / IFAX .....................................................................................................................................25Scan to E-mail (E-mail Server) ..........................................................................................................29How to set a new default for the file size
(For Scan to E-mail (E-mail server))..............................................................................................31How to set a new default for the Duplex Scan mode
(For Scan to E-mail (E-mail server)) (For MFC-9465CDN and MFC-9560CDW)..........................31Fax to Server .....................................................................................................................................32
Function table and default factory settings ..............................................................................................34
A Index 40
Table of Contents
1
11Internet fax Overview 1
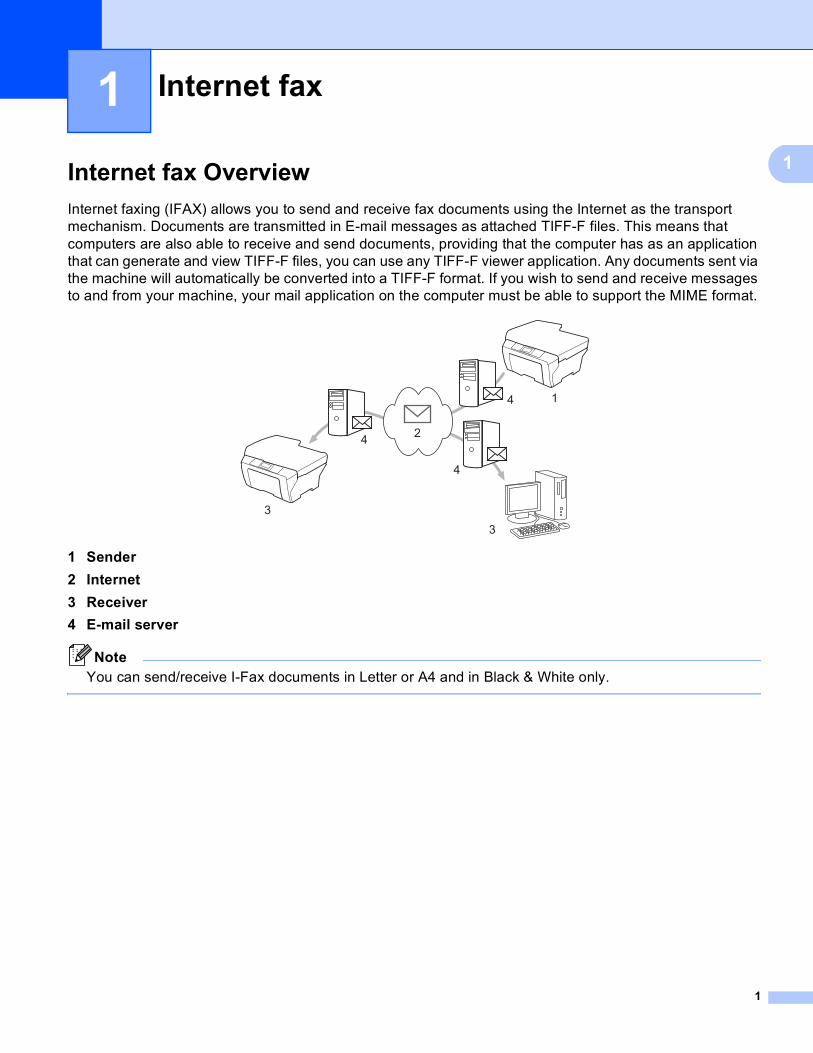
Internet faxing (IFAX) allows you to send and receive fax documents using the Internet as the transport mechanism. Documents are transmitted in E-mail messages as attached TIFF-F files. This means that computers are also able to receive and send documents, providing that the computer has as an application that can generate and view TIFF-F files, you can use any TIFF-F viewer application. Any documents sent via the machine will automatically be converted into a TIFF-F format. If you wish to send and receive messages to and from your machine, your mail application on the computer must be able to support the MIME format.
1 Sender
2 Internet
3 Receiver
4 E-mail server
NoteYou can send/receive I-Fax documents in Letter or A4 and in Black & White only.
Internet fax 1
24
4
4
33
1
Internet fax
2
1
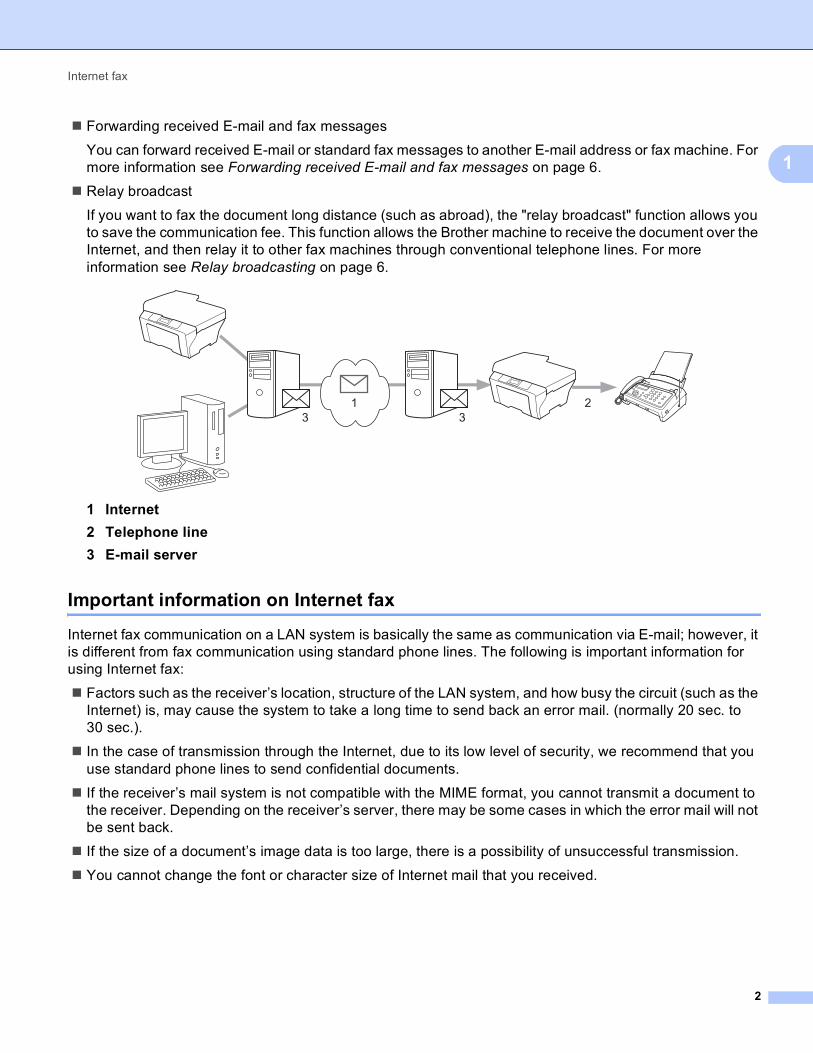
Forwarding received E-mail and fax messages
You can forward received E-mail or standard fax messages to another E-mail address or fax machine. For more information see Forwarding received E-mail and fax messages on page 6.
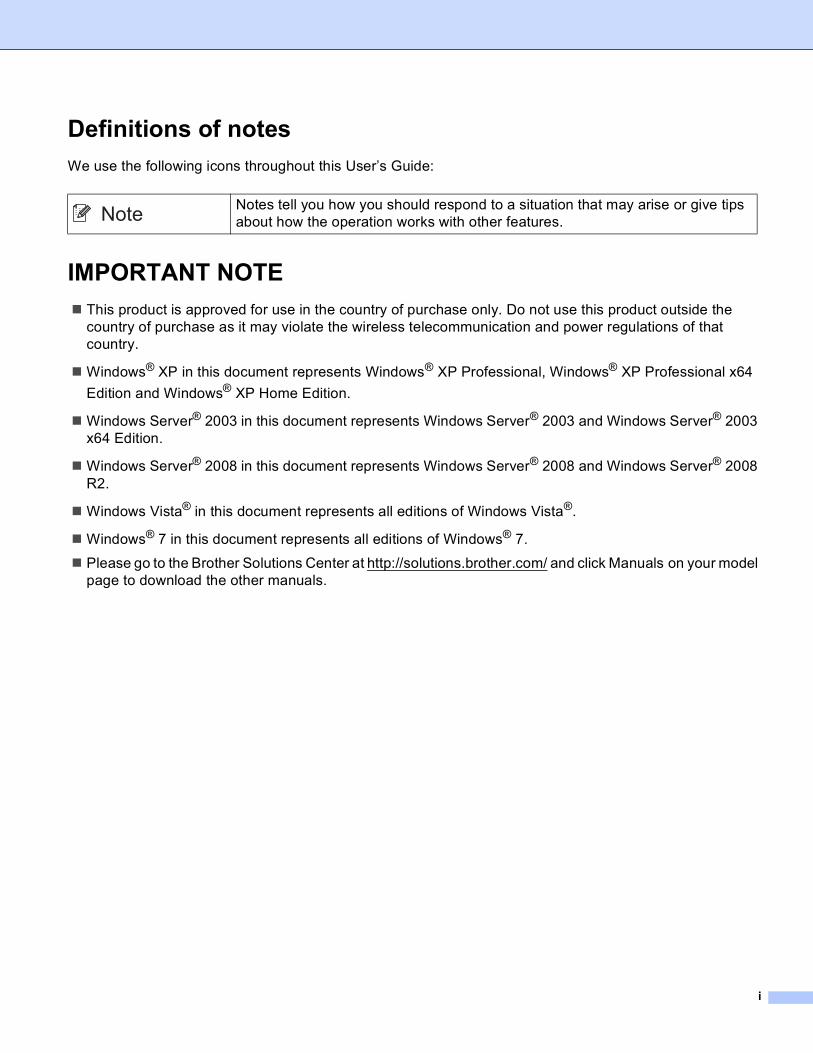
Relay broadcast
If you want to fax the document long distance (such as abroad), the "relay broadcast" function allows you to save the communication fee. This function allows the Brother machine to receive the document over the Internet, and then relay it to other fax machines through conventional telephone lines. For more information see Relay broadcasting on page 6.
1 Internet
2 Telephone line
3 E-mail server
Important information on Internet fax 1
Internet fax communication on a LAN system is basically the same as communication via E-mail; however, it is different from fax communication using standard phone lines. The following is important information for using Internet fax:
Factors such as the receiver’s location, structure of the LAN system, and how busy the circuit (such as the Internet) is, may cause the system to take a long time to send back an error mail. (normally 20 sec. to 30 sec.).
In the case of transmission through the Internet, due to its low level of security, we recommend that you use standard phone lines to send confidential documents.
If the receiver’s mail system is not compatible with the MIME format, you cannot transmit a document to the receiver. Depending on the receiver’s server, there may be some cases in which the error mail will not be sent back.
If the size of a document’s image data is too large, there is a possibility of unsuccessful transmission.
You cannot change the font or character size of Internet mail that you received.
233
1
Internet fax
3
1
How to Internet fax 1
Before using Internet fax you must configure your Brother machine to communicate with your network and mail server. You must ensure the following items are configured on your machine. You can configure these items from the control panel, Web Based Management, Remote Setup or BRAdmin Professional 3. If you are unsure of any of these items, please contact your systems administrator.
IP address (If you are already using your machine with your network, the machine’s IP address has been configured correctly.)
E-mail address
SMTP, POP3 server address/port /Authentication method
mailbox name and password
Sending an Internet fax 1
Before sending an Internet fax 1
To send an Internet fax, you can configure the following items from the control panel, Web Based Management or Remote Setup.
Sender Subject (if needed)
Size Limit (if needed)
Notification (if needed) (For more information, see TX Verification Mail on page 9.)
How to send an Internet fax 1
Sending an Internet fax is the same as sending a normal fax (For more information, see Sending a fax in the Basic User's Guide). If you have already programmed the addresses of the destination Internet fax machines as One Touch or Speed-Dial locations, you can send the Internet fax by loading the document into the machine. If you want to change the resolution, use the Fax Resolution key to set the preferred resolution, choose a Speed Dial or One Touch number (For more information, see Storing numbers and E-mail addresses on page 11.), press Black Start/Mono Start (S.Fine is not supported for Internet fax).
Note
• If you wish to manually enter the Internet fax address, load the document into the machine and press Shift and 1 simultaneously to change into the “alphabet” dialing mode. Enter the address and then press Black Start/Mono Start.
For more information how to enter text, see the Basic User's Guide.
• You can register the E-mail address information from Web Based Management or Remote Setup.
Internet fax
4
1
After the document is scanned, it is transmitted to the recipient Internet fax machine automatically via your SMTP server. You can cancel the send operation by pressing the Stop/Exit key during scanning. After the transmission is finished, the machine will return to standby mode.
NoteSome E-mail servers do not allow you to send large E-mail documents (the System Administrator will often place a limit on the maximum E-mail size). With this function enabled, the machine will display Out of Memory when trying to send E-mail documents over 1 Mbyte in size. The document will not be sent and an error report will be printed. The document you are sending should be separated into smaller documents that will be accepted by the mail server. (For your information, a 42 page document based on the ITU-T Test Chart #1 test chart is approximately 1 Mbyte in size.)
Receiving E-mail or Internet fax 1
Before receiving an Internet fax 1
To receive an Internet fax, you should configure the following items from the control panel, Web Based Management or Remote Setup:
Auto Polling (if needed)
Poll Frequency (if needed)
Header (if needed)
Delete Error Mail (if needed)
Notification (if needed) (For more information, see TX Verification Mail on page 9.)
How to receive an Internet fax 1
There are 2 ways you can receive E-mail messages:
POP3 receiving at regular intervals
POP3 receiving (manually initiated)
Using POP3 receiving the machine must poll the E-mail server to receive the data. This polling can occur at set intervals (for example, you can configure the machine to poll the E-mail server at 10 minute intervals) or you can manually poll the server by pressing the Shift + Black Start/Mono Start or Color Start/Colour Start keys.
If your machine starts to receive E-mail data, the LCD panel will reflect this activity. For example, you will see Receiving on the LCD panel followed by xxE-mail(s). If you press the Shift + Black Start/Mono Start or Color Start/Colour Start keys to manually poll the E-mail server for E-mail data and there are no mail documents waiting to be printed, the machine will display No Mail on the LCD panel for two seconds.
Internet fax
5
1
Note• If your machine is out of paper when receiving data, the received data will be held in the machine’s
memory. This data will be printed automatically after paper is re-inserted into the machine.
• If the received mail is not in a plain text format or an attached file is not in the TIFF-F format, the following error message will be printed: “ATTACHED FILE FORMAT NOT SUPPORTED. FILE NAME:XXXXXX.doc” If the received mail is too large, the following error message will be printed: "E-MAIL FILE TOO LARGE.". If Delete POP Receive Error Mail is ON (default) then the error mail is automatically deleted from the E-mail server.
Receiving an Internet fax to your computer 1
When a computer receives an Internet fax document, the document is attached to a mail message that informs the computer that it has received a document from an Internet fax. This is notified in the subject field of the received mail message.
Note
If the computer to which you wish to send a document is not running Windows® 2000/XP, Windows
Server® 2003/2008, Windows Vista® or Windows® 7 operating system, please inform the computer’s owner that they must install some software that can view TIFF-F files.
Internet fax
6
1
Additional Internet Fax options 1
Forwarding received E-mail and fax messages 1
You can forward received E-mail or standard fax messages to another E-mail address or fax machine. Received messages can be forwarded via E-mail to a computer or Internet fax. They can also be forwarded via standard phone lines to another machine.
The setting can be enabled using a web browser or through the control panel of the machine. The steps for configuring fax forward can be found in the Advanced User's Guide.
Please see the Advanced User's Guide to check that this feature is supported.
Relay broadcasting 1
This function allows the Brother machine to receive a document over the Internet, and then relay it to other fax machines through conventional telephone lines.
Before relaying broadcast 1
To relay broadcast, you must configure the following items from the control panel, Web Based Management or Remote Setup:
Relay Broadcast
You must enable the relay broadcast.
Relay Domain
You must configure your machine’s domain name on the machine that will broadcast the document to the conventional fax machine. If you wish to use your machine as a relay broadcast device, you must specify the domain name that you trust at the machine, in other words, the portion of the name after the “@” sign. Use care in selecting a trusted domain since any user on a trusted domain will be able to send a relay broadcast.
You can register up to 10 domain names.
Relay Report
Internet fax
7
1
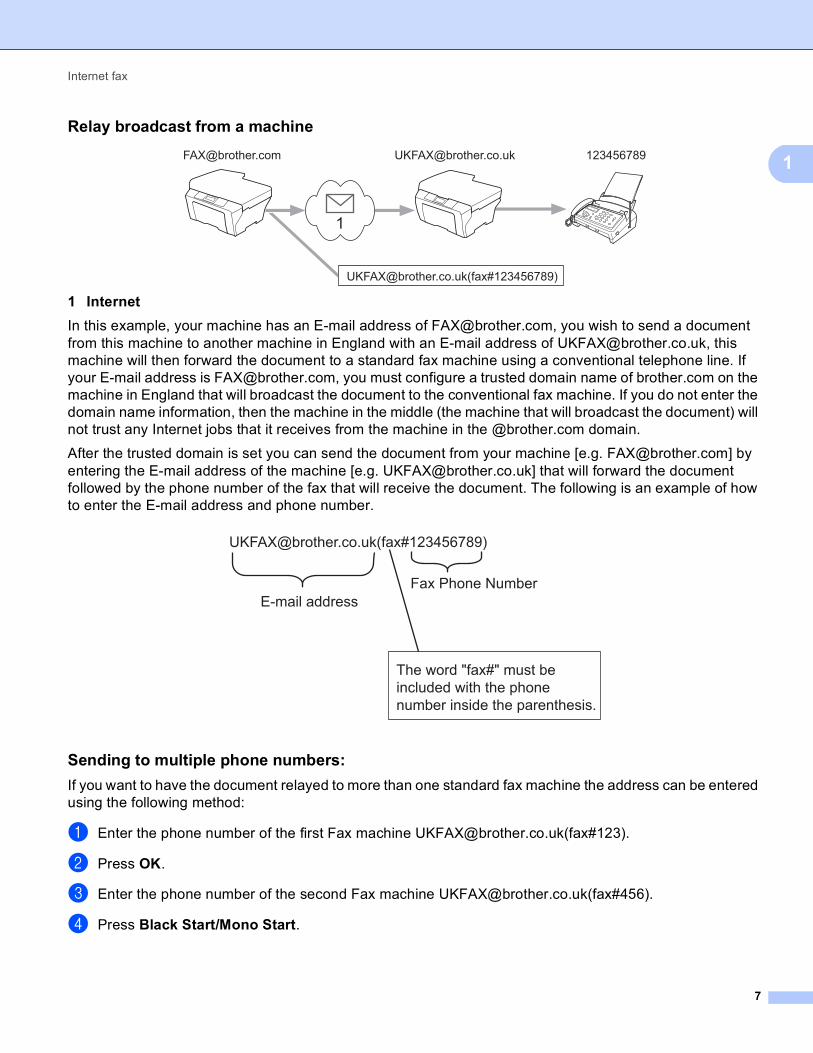
Relay broadcast from a machine 1
1 Internet
In this example, your machine has an E-mail address of [email protected], you wish to send a document from this machine to another machine in England with an E-mail address of [email protected], this machine will then forward the document to a standard fax machine using a conventional telephone line. If your E-mail address is [email protected], you must configure a trusted domain name of brother.com on the machine in England that will broadcast the document to the conventional fax machine. If you do not enter the domain name information, then the machine in the middle (the machine that will broadcast the document) will not trust any Internet jobs that it receives from the machine in the @brother.com domain.
After the trusted domain is set you can send the document from your machine [e.g. [email protected]] by entering the E-mail address of the machine [e.g. [email protected]] that will forward the document followed by the phone number of the fax that will receive the document. The following is an example of how to enter the E-mail address and phone number.
Sending to multiple phone numbers: 1
If you want to have the document relayed to more than one standard fax machine the address can be entered using the following method:
a Enter the phone number of the first Fax machine [email protected](fax#123).
b Press OK.
c Enter the phone number of the second Fax machine [email protected](fax#456).
d Press Black Start/Mono Start.
[email protected] [email protected] 123456789
[email protected](fax#123456789)
1
[email protected](fax#123456789)
E-mail addressFax Phone Number
The word "fax#" must beincluded with the phone number inside the parenthesis.
Internet fax
8
1
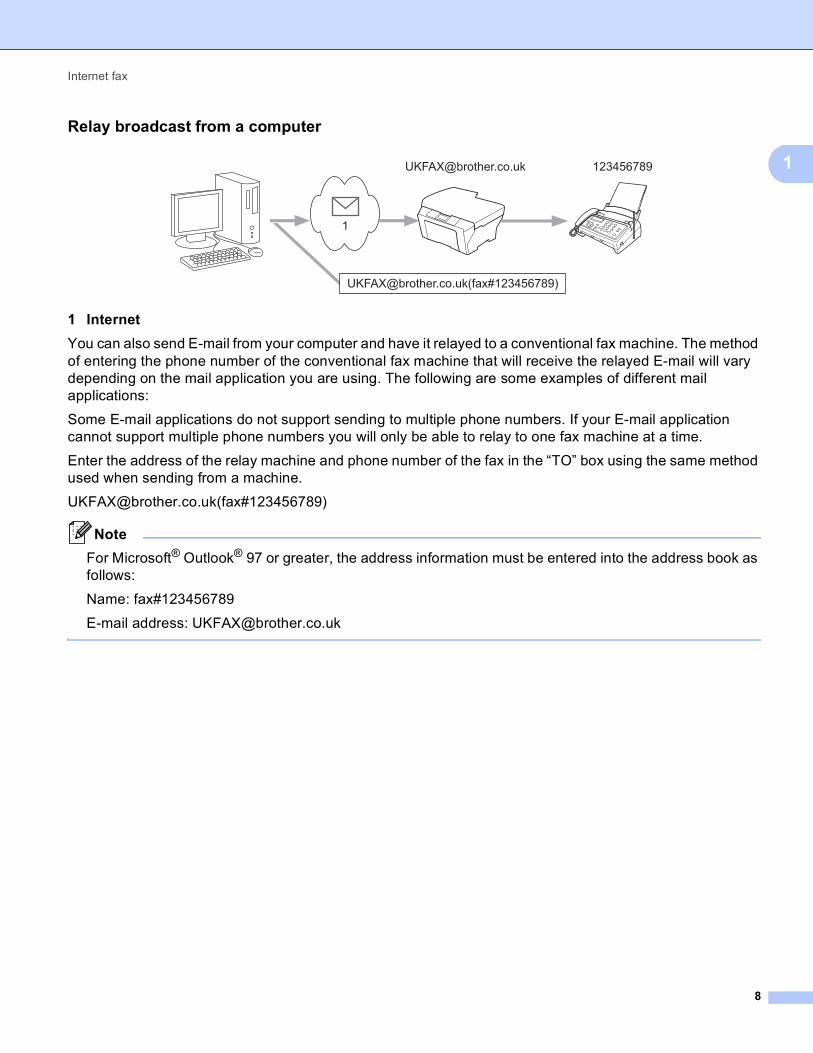
Relay broadcast from a computer 1
1 Internet
You can also send E-mail from your computer and have it relayed to a conventional fax machine. The method of entering the phone number of the conventional fax machine that will receive the relayed E-mail will vary depending on the mail application you are using. The following are some examples of different mail applications:
Some E-mail applications do not support sending to multiple phone numbers. If your E-mail application cannot support multiple phone numbers you will only be able to relay to one fax machine at a time.
Enter the address of the relay machine and phone number of the fax in the “TO” box using the same method used when sending from a machine.
[email protected](fax#123456789)
Note
For Microsoft® Outlook® 97 or greater, the address information must be entered into the address book as follows:
Name: fax#123456789
E-mail address: [email protected]
1
[email protected] 123456789
[email protected](fax#123456789)
Internet fax
9
1
TX Verification Mail 1
Transmission Verification Mail supports two separate functions. Verification Mail for sending allows you to request notification from the receiving station that the Internet Fax or E-mail was received and processed. Verification Mail for receiving allows you to transmit a default report back to the sending station after successfully receiving and processing an Internet Fax or E-mail.
To use this feature you must set the Notification option within the Setup Mail RX and Setup Mail TX options.
Setup Mail TX 1
You can set the Notification option in the Setup Mail TX option to either On or Off. When switched to On an additional field of information is sent with the image data. This field is named “MDN”.
MDN (Message Disposition Notification): This field requests the status of the Internet Fax/E-mail message after delivery through the SMTP (Send Mail Transfer Protocol) transport system. Once the message has arrived at the receiver this data is used when the machine or user reads or prints the received Internet Fax or E-mail. For example, if the message is opened for reading or is printed the receiver sends back a notification to the original sending machine or user.
The receiver must support the MDN field in order to be able to send a notification report, otherwise the request will be ignored.
Setup Mail RX 1
There are three possible settings for this option On, MDN or Off.
Receive Notification “On”
When switched to “On” a fixed message is sent back to the sender to indicate successful reception and processing of the message. These fixed messages depend on the operation requested by the sender.
Report messages consist of:
SUCCESS: Received From <mail address>
Receive Notification “MDN”
When switched to “MDN” a report as described above is sent back to the sender if the originating station sent the “MDN” field to request confirmation.
Receive Notification “Off”
Off switches all forms of receive notification Off, no message is sent back to the sender regardless of the request.
Note
To receive the TX verification mail properly, you must configure the following settings.
• Sender
• Switch Notification in the Setup Mail TX to on.
• Switch Header in the Setup Mail RX to All or Subject+From+To.
• Receiver
• Switch Notification in the Setup Mail RX to on.
Internet fax
10
1
Error mail 1
If there is a mail delivery error while sending an Internet fax, the mail server will send an error message back to the machine and the error message will be printed. If there is an error while receiving mail, an error message will be printed (Example: “The message being sent to the machine was not in a TIFF-F format.”).
To receive the error mail properly, you must switch Header in the Setup Mail RX to All or Subject+From+To.

11
2
2
You can follow instructions in the Basic User's Guide and Advanced User's Guide for how to use your machine as a fax after installing the internet fax software. This chapter explains some operations which are unique for the internet fax capable machine.
Using One Touch or Speed Dial 2
You can set up your machine to do the following types of easy dialing: One Touch, Speed Dial and Groups for Broadcasting faxes and I-faxes. You can also specify the default resolution for each One Touch and Speed Dial number. When you dial a quick dial number, the LCD shows the name, if you stored it, or the number. A scan profile can also be stored along with the fax number or E-mail address.
If you lose electrical power, the quick dial numbers stored in the memory will not be lost.
A scan profile is the resolution and other scan settings that you choose when you store a number.
Storing numbers and E-mail addresses 2
Storing numbers and E-mail addresses
12
2
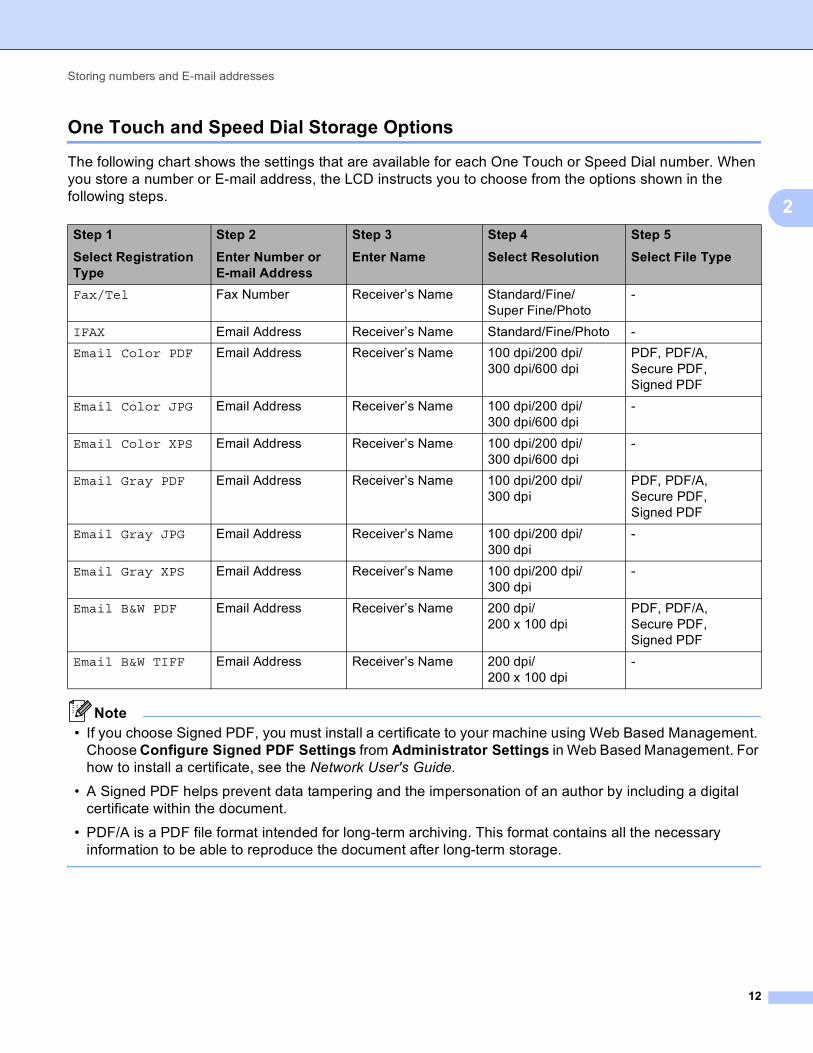
One Touch and Speed Dial Storage Options 2
The following chart shows the settings that are available for each One Touch or Speed Dial number. When you store a number or E-mail address, the LCD instructs you to choose from the options shown in the following steps.
Note• If you choose Signed PDF, you must install a certificate to your machine using Web Based Management.
Choose Configure Signed PDF Settings from Administrator Settings in Web Based Management. For how to install a certificate, see the Network User's Guide.
• A Signed PDF helps prevent data tampering and the impersonation of an author by including a digital certificate within the document.
• PDF/A is a PDF file format intended for long-term archiving. This format contains all the necessary information to be able to reproduce the document after long-term storage.
Step 1
Select Registration Type
Step 2
Enter Number or E-mail Address
Step 3
Enter Name
Step 4
Select Resolution
Step 5
Select File Type
Fax/Tel Fax Number Receiver’s Name Standard/Fine/Super Fine/Photo
-
IFAX Email Address Receiver’s Name Standard/Fine/Photo -
Email Color PDF Email Address Receiver’s Name 100 dpi/200 dpi/300 dpi/600 dpi
PDF, PDF/A, Secure PDF, Signed PDF
Email Color JPG Email Address Receiver’s Name 100 dpi/200 dpi/300 dpi/600 dpi
-
Email Color XPS Email Address Receiver’s Name 100 dpi/200 dpi/300 dpi/600 dpi
-
Email Gray PDF Email Address Receiver’s Name 100 dpi/200 dpi/300 dpi
PDF, PDF/A, Secure PDF, Signed PDF
Email Gray JPG Email Address Receiver’s Name 100 dpi/200 dpi/300 dpi
-
Email Gray XPS Email Address Receiver’s Name 100 dpi/200 dpi/300 dpi
-
Email B&W PDF Email Address Receiver’s Name 200 dpi/200 x 100 dpi
PDF, PDF/A, Secure PDF, Signed PDF
Email B&W TIFF Email Address Receiver’s Name 200 dpi/200 x 100 dpi
-
Storing numbers and E-mail addresses
13
2
Storing One Touch Dial numbers 2
Your machine has 8 One Touch keys where you can store 16 fax/telephone numbers or E-mail addresses for automatic dialing. To access numbers 9 to 16, hold down Shift as you press the One Touch key.
a Press the One Touch key where you want to store the number or E-mail address.If a number or E-mail address is not stored there, the LCD shows Register Now?.Press 1 to choose Yes.
b Press a or b to select Fax/Tel, IFAX, Email Color PDF, Email Color JPG, Email Color XPS, Email Gray PDF, Email Gray JPG, Email Gray XPS, Email B&W PDF or Email B&W TIFF.Press OK.
c Enter the telephone or fax number (up to 20 characters) or E-mail address (up to 60 characters each).Press OK.
NoteIf you selected an E-mail Registration Type in step b and save the E-mail address, you can only use the E-mail address when you are in Scan mode. If you selected the IFAX Registration Type in step b and save the E-mail address, you can only use the E-mail address when you are in Fax mode.
d Do one of the following:
Enter the name using the dial pad (up to 15 characters).
Press OK.
Press OK to store the number or E-mail address without a name.
Storing numbers and E-mail addresses
14
2
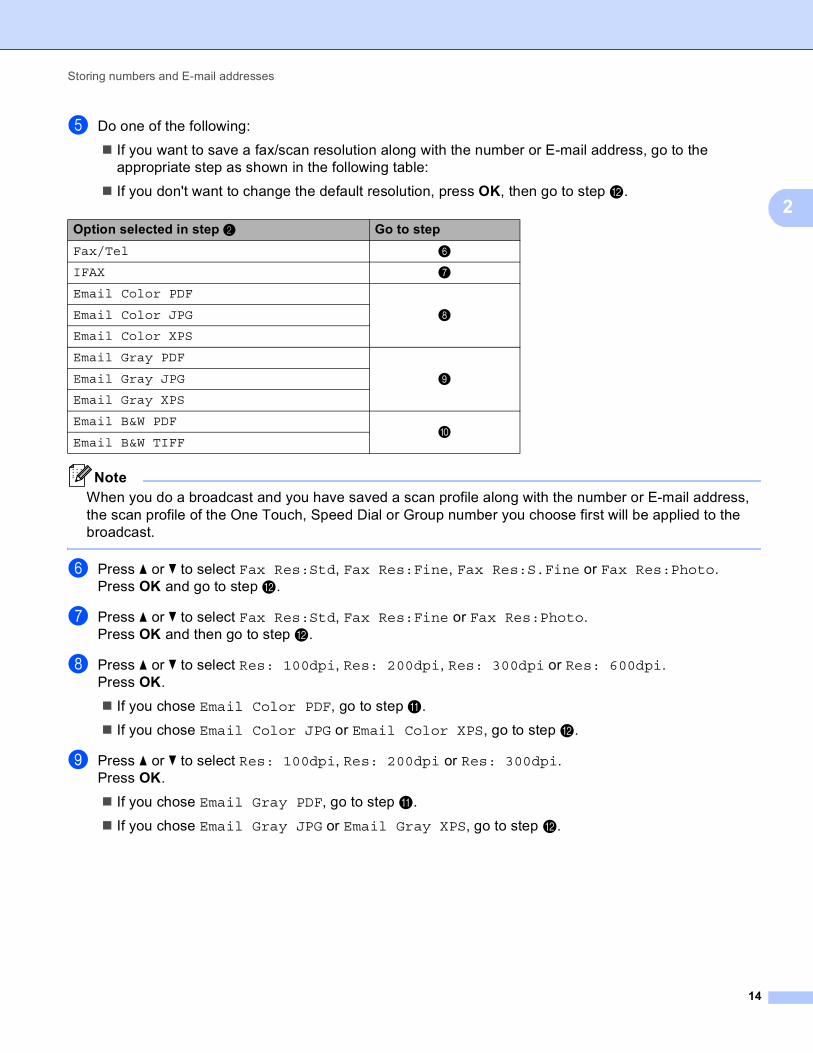
e Do one of the following:
If you want to save a fax/scan resolution along with the number or E-mail address, go to the appropriate step as shown in the following table:
If you don't want to change the default resolution, press OK, then go to step l.
NoteWhen you do a broadcast and you have saved a scan profile along with the number or E-mail address, the scan profile of the One Touch, Speed Dial or Group number you choose first will be applied to the broadcast.
f Press a or b to select Fax Res:Std, Fax Res:Fine, Fax Res:S.Fine or Fax Res:Photo.Press OK and go to step l.
g Press a or b to select Fax Res:Std, Fax Res:Fine or Fax Res:Photo.Press OK and then go to step l.
h Press a or b to select Res: 100dpi, Res: 200dpi, Res: 300dpi or Res: 600dpi.Press OK.
If you chose Email Color PDF, go to step k.
If you chose Email Color JPG or Email Color XPS, go to step l.
i Press a or b to select Res: 100dpi, Res: 200dpi or Res: 300dpi.Press OK.
If you chose Email Gray PDF, go to step k.
If you chose Email Gray JPG or Email Gray XPS, go to step l.
Option selected in step b Go to step
Fax/Tel f
IFAX g
Email Color PDF
hEmail Color JPG
Email Color XPS
Email Gray PDF
iEmail Gray JPG
Email Gray XPS
Email B&W PDFj
Email B&W TIFF

Storing numbers and E-mail addresses
15
2
j Press a or b to select Res: 200dpi or Res: 200x100dpi.Press OK.
If you chose Email B&W PDF, go to step k.
If you chose Email B&W TIFF, go to step l.
k Press a or b to select PDF TYPE: PDF, PDF TYPE: PDF/A, PDF TYPE: SPDF or PDF TYPE: SiPDF.Press OK and then go to step l.
NoteIf you choose Secure PDF (PDF TYPE: SPDF), the machine will ask you to enter a 4 digit password using numbers 0-9 before it starts scanning.
l Press Stop/Exit.
Storing numbers and E-mail addresses
16
2
Storing Speed Dial numbers 2
You can store your frequently used numbers and E-mail addresses as Speed Dial numbers, so that when you dial you will only have to press a few keys (a Speed Dial, the three-digit number and Black Start/Mono Start or Color Start/Colour Start). The machine can store 300 Speed Dial numbers (001-300).
a Press a Speed Dial and enter a three-digit Speed Dial location number (001-300).If a number or E-mail address is not stored there, the LCD shows Register Now?Press 1 to choose Yes.
b Press a or b to select Fax/Tel, IFAX, Email Color PDF, Email Color JPG, Email Color XPS, Email Gray PDF, Email Gray JPG, Email Gray XPS, Email B&W PDF or Email B&W TIFF.Press OK.
c Enter the telephone or fax number (up to 20 characters) or E-mail address (up to 60 characters each).Press OK.
NoteIf you selected an E-mail Registration Type in step b and save the E-mail address, you can only use the E-mail address when you are in Scan mode. If you selected the IFAX Registration Type in step b and save the E-mail address, you can only use the E-mail address when you are in Fax mode.
d Do one of the following:
Enter the name using the dial pad (up to 15 characters).
Press OK.
Press OK to store the number or E-mail address without a name.
Storing numbers and E-mail addresses
17
2
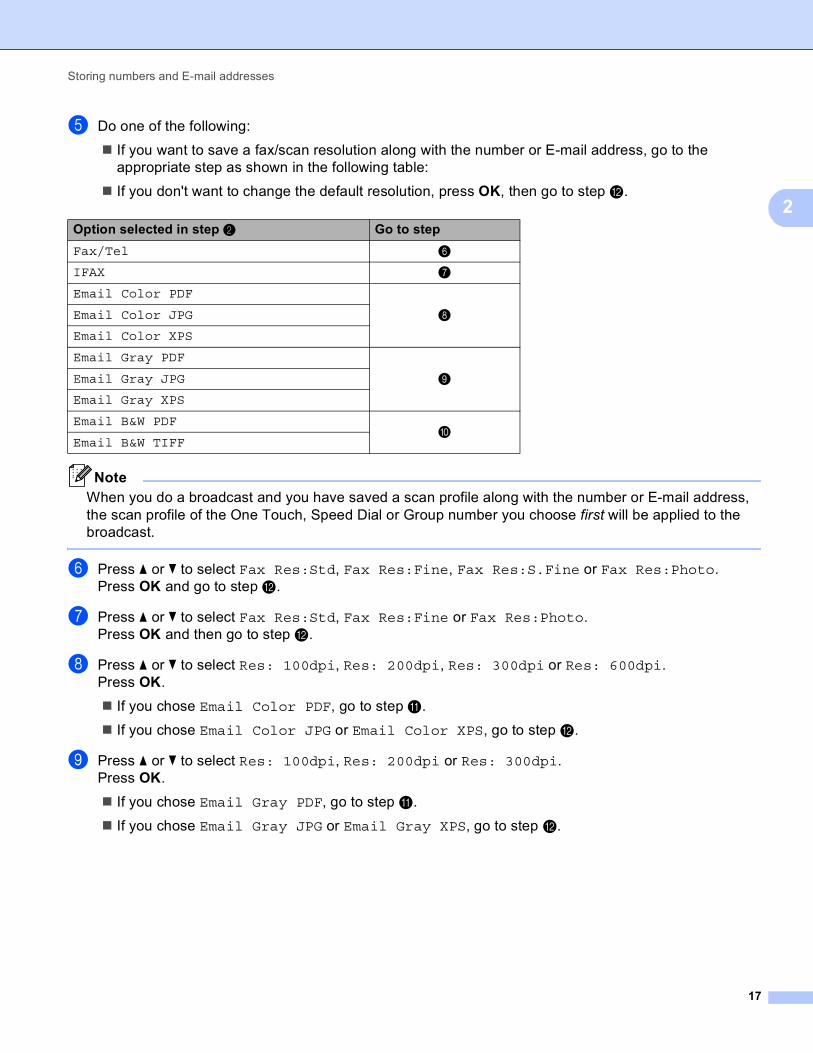
e Do one of the following:
If you want to save a fax/scan resolution along with the number or E-mail address, go to the appropriate step as shown in the following table:
If you don't want to change the default resolution, press OK, then go to step l.
NoteWhen you do a broadcast and you have saved a scan profile along with the number or E-mail address, the scan profile of the One Touch, Speed Dial or Group number you choose first will be applied to the broadcast.
f Press a or b to select Fax Res:Std, Fax Res:Fine, Fax Res:S.Fine or Fax Res:Photo.Press OK and go to step l.
g Press a or b to select Fax Res:Std, Fax Res:Fine or Fax Res:Photo.Press OK and then go to step l.
h Press a or b to select Res: 100dpi, Res: 200dpi, Res: 300dpi or Res: 600dpi.Press OK.
If you chose Email Color PDF, go to step k.
If you chose Email Color JPG or Email Color XPS, go to step l.
i Press a or b to select Res: 100dpi, Res: 200dpi or Res: 300dpi.Press OK.
If you chose Email Gray PDF, go to step k.
If you chose Email Gray JPG or Email Gray XPS, go to step l.
Option selected in step b Go to step
Fax/Tel f
IFAX g
Email Color PDF
hEmail Color JPG
Email Color XPS
Email Gray PDF
iEmail Gray JPG
Email Gray XPS
Email B&W PDFj
Email B&W TIFF
Storing numbers and E-mail addresses
18
2
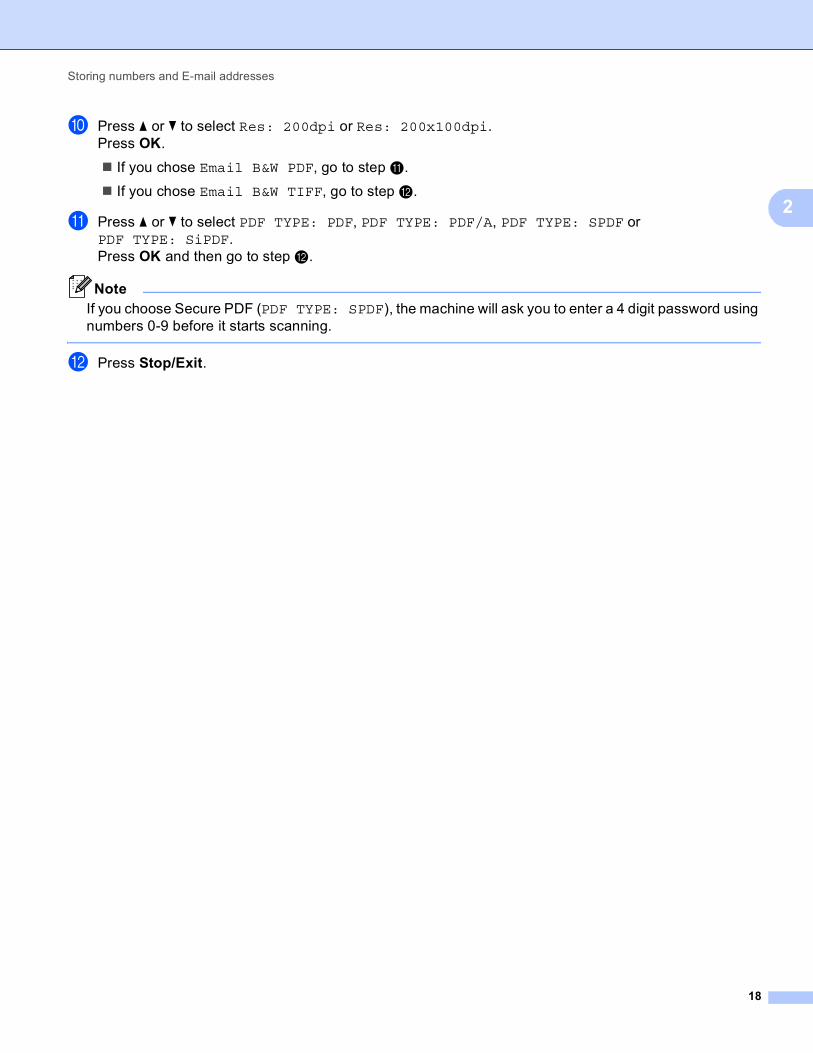
j Press a or b to select Res: 200dpi or Res: 200x100dpi.Press OK.
If you chose Email B&W PDF, go to step k.
If you chose Email B&W TIFF, go to step l.
k Press a or b to select PDF TYPE: PDF, PDF TYPE: PDF/A, PDF TYPE: SPDF or PDF TYPE: SiPDF.Press OK and then go to step l.
NoteIf you choose Secure PDF (PDF TYPE: SPDF), the machine will ask you to enter a 4 digit password using numbers 0-9 before it starts scanning.
l Press Stop/Exit.
Storing numbers and E-mail addresses
19
2
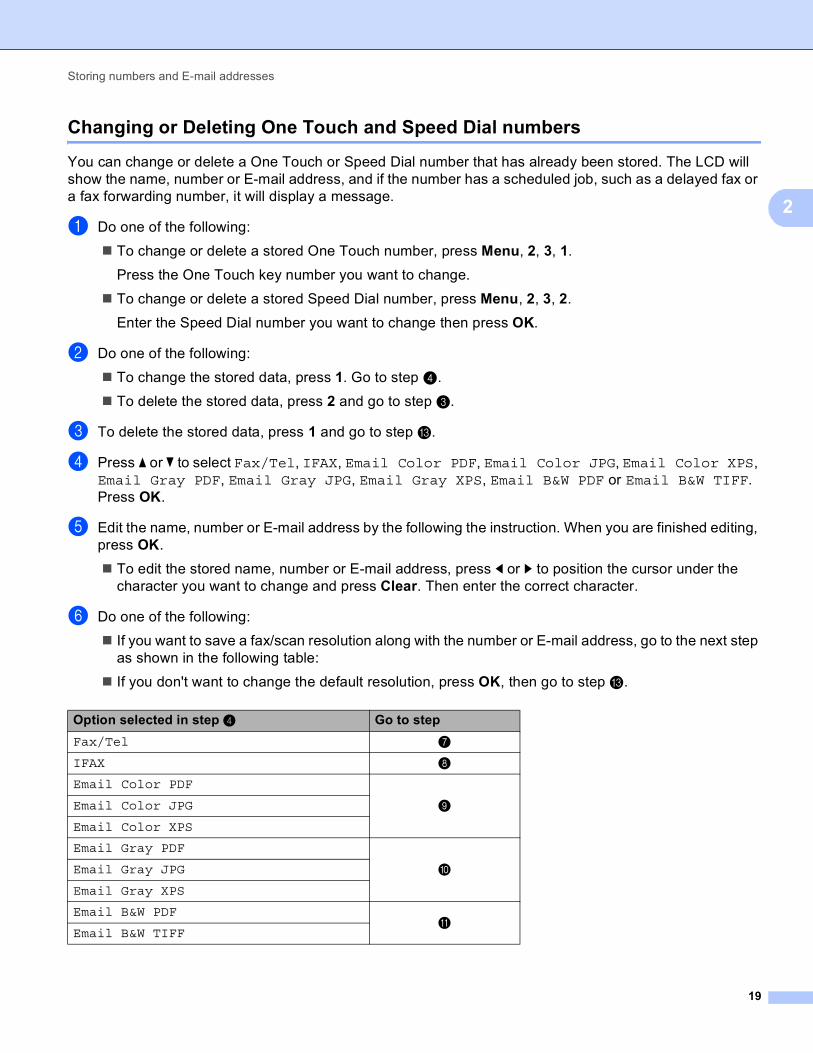
Changing or Deleting One Touch and Speed Dial numbers 2
You can change or delete a One Touch or Speed Dial number that has already been stored. The LCD will show the name, number or E-mail address, and if the number has a scheduled job, such as a delayed fax or a fax forwarding number, it will display a message.
a Do one of the following:
To change or delete a stored One Touch number, press Menu, 2, 3, 1.
Press the One Touch key number you want to change.
To change or delete a stored Speed Dial number, press Menu, 2, 3, 2.
Enter the Speed Dial number you want to change then press OK.
b Do one of the following:
To change the stored data, press 1. Go to step d.
To delete the stored data, press 2 and go to step c.
c To delete the stored data, press 1 and go to step m.
d Press a or b to select Fax/Tel, IFAX, Email Color PDF, Email Color JPG, Email Color XPS, Email Gray PDF, Email Gray JPG, Email Gray XPS, Email B&W PDF or Email B&W TIFF.Press OK.
e Edit the name, number or E-mail address by the following the instruction. When you are finished editing, press OK.
To edit the stored name, number or E-mail address, press d or c to position the cursor under the character you want to change and press Clear. Then enter the correct character.
f Do one of the following:
If you want to save a fax/scan resolution along with the number or E-mail address, go to the next step as shown in the following table:
If you don't want to change the default resolution, press OK, then go to step m.
Option selected in step d Go to step
Fax/Tel g
IFAX h
Email Color PDF
iEmail Color JPG
Email Color XPS
Email Gray PDF
jEmail Gray JPG
Email Gray XPS
Email B&W PDFk
Email B&W TIFF

Storing numbers and E-mail addresses
20
2
g Press a or b to select Fax Res:Std, Fax Res:Fine, Fax Res:S.Fine or Fax Res:Photo.Press OK and go to step m.
h Press a or b to select Fax Res:Std, Fax Res:Fine or Fax Res:Photo.Press OK and then go to step m.
i Press a or b to select Res: 100dpi, Res: 200dpi, Res: 300dpi or Res: 600dpi.Press OK.
If you chose Email Color PDF, go to step l.
If you chose Email Color JPG or Email Color XPS, go to step m.
j Press a or b to select Res: 100dpi, Res: 200dpi or Res: 300dpi.Press OK.
If you chose Email Gray PDF, go to step l.
If you chose Email Gray JPG or Email Gray XPS, go to step m.
k Press a or b to select Res: 200dpi or Res: 200x100dpi.Press OK.
If you chose Email B&W PDF, go to step l.
If you chose Email B&W TIFF, go to step m.
l Press a or b to select PDF TYPE: PDF, PDF TYPE: PDF/A, PDF TYPE: SPDF or PDF TYPE: SiPDF.Press OK and then go to step m.
NoteIf you choose Secure PDF (PDF TYPE: SPDF), the machine will ask you to enter a 4 digit password using numbers 0-9 before it starts scanning.
m Press Stop/Exit.
Storing numbers and E-mail addresses
21
2
Additional ways to store numbers 2
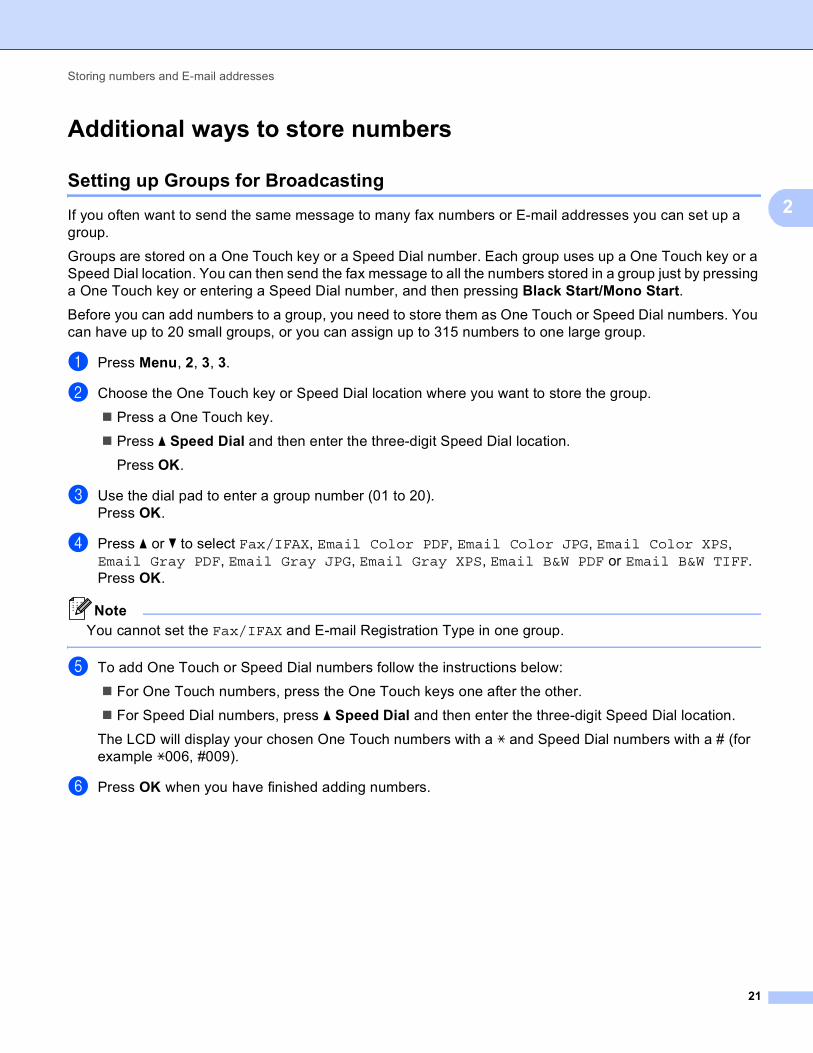
Setting up Groups for Broadcasting 2
If you often want to send the same message to many fax numbers or E-mail addresses you can set up a group.
Groups are stored on a One Touch key or a Speed Dial number. Each group uses up a One Touch key or a Speed Dial location. You can then send the fax message to all the numbers stored in a group just by pressing a One Touch key or entering a Speed Dial number, and then pressing Black Start/Mono Start.
Before you can add numbers to a group, you need to store them as One Touch or Speed Dial numbers. You can have up to 20 small groups, or you can assign up to 315 numbers to one large group.
a Press Menu, 2, 3, 3.
b Choose the One Touch key or Speed Dial location where you want to store the group.
Press a One Touch key.
Press a Speed Dial and then enter the three-digit Speed Dial location.
Press OK.
c Use the dial pad to enter a group number (01 to 20).Press OK.
d Press a or b to select Fax/IFAX, Email Color PDF, Email Color JPG, Email Color XPS, Email Gray PDF, Email Gray JPG, Email Gray XPS, Email B&W PDF or Email B&W TIFF.Press OK.
NoteYou cannot set the Fax/IFAX and E-mail Registration Type in one group.
e To add One Touch or Speed Dial numbers follow the instructions below:
For One Touch numbers, press the One Touch keys one after the other.
For Speed Dial numbers, press a Speed Dial and then enter the three-digit Speed Dial location.
The LCD will display your chosen One Touch numbers with a l and Speed Dial numbers with a # (for example l006, #009).
f Press OK when you have finished adding numbers.
Storing numbers and E-mail addresses
22
2
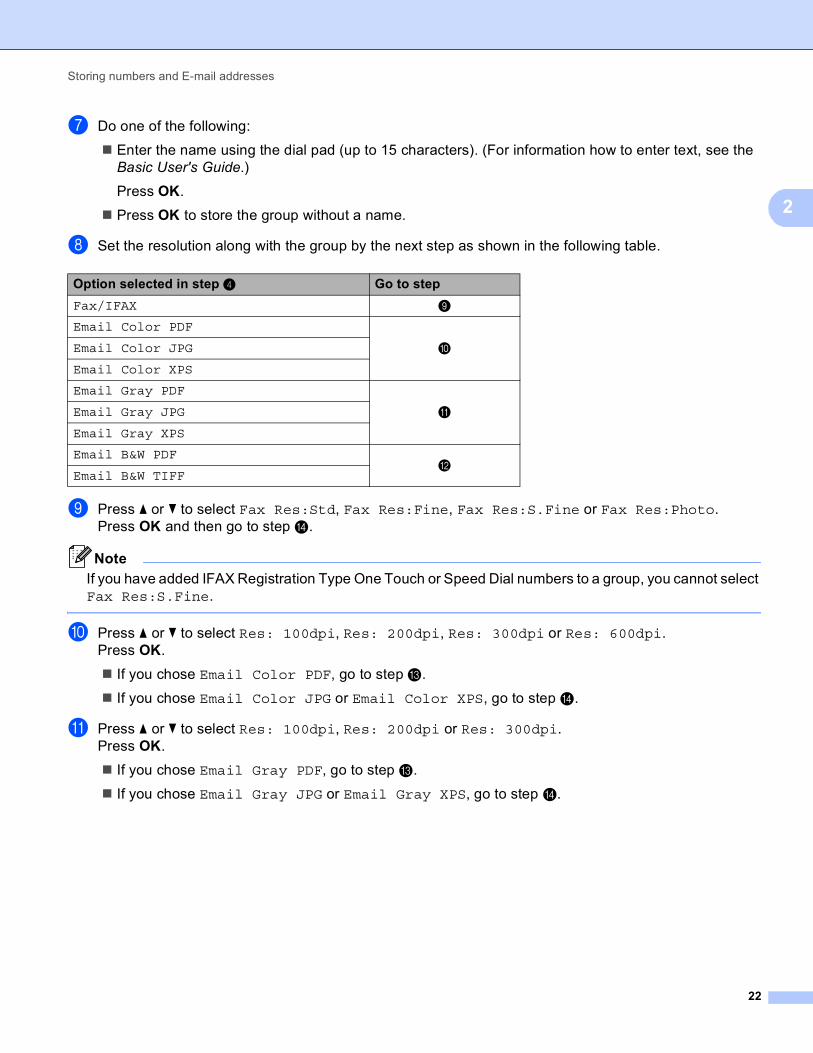
g Do one of the following:
Enter the name using the dial pad (up to 15 characters). (For information how to enter text, see the Basic User's Guide.)
Press OK.
Press OK to store the group without a name.
h Set the resolution along with the group by the next step as shown in the following table.
i Press a or b to select Fax Res:Std, Fax Res:Fine, Fax Res:S.Fine or Fax Res:Photo.Press OK and then go to step n.
Note
If you have added IFAX Registration Type One Touch or Speed Dial numbers to a group, you cannot select Fax Res:S.Fine.
j Press a or b to select Res: 100dpi, Res: 200dpi, Res: 300dpi or Res: 600dpi.Press OK.
If you chose Email Color PDF, go to step m.
If you chose Email Color JPG or Email Color XPS, go to step n.
k Press a or b to select Res: 100dpi, Res: 200dpi or Res: 300dpi.Press OK.
If you chose Email Gray PDF, go to step m.
If you chose Email Gray JPG or Email Gray XPS, go to step n.
Option selected in step d Go to step
Fax/IFAX i
Email Color PDF
jEmail Color JPG
Email Color XPS
Email Gray PDF
kEmail Gray JPG
Email Gray XPS
Email B&W PDFl
Email B&W TIFF
Storing numbers and E-mail addresses
23
2
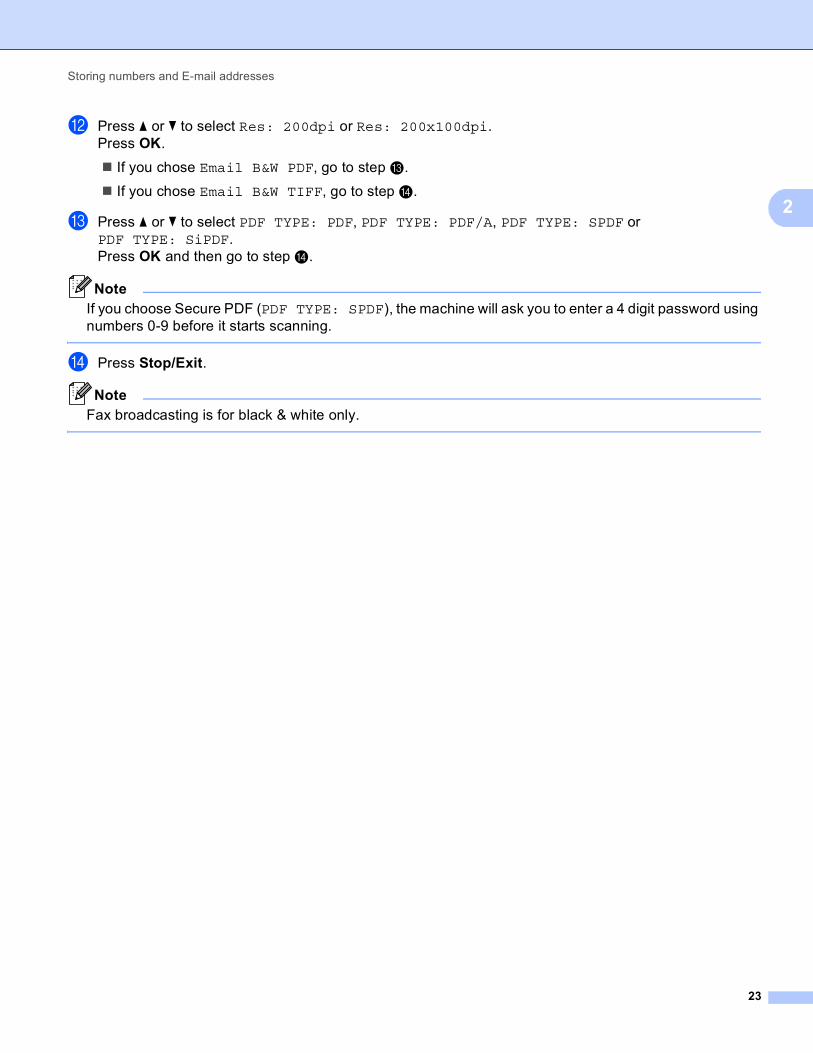
l Press a or b to select Res: 200dpi or Res: 200x100dpi.Press OK.
If you chose Email B&W PDF, go to step m.
If you chose Email B&W TIFF, go to step n.
m Press a or b to select PDF TYPE: PDF, PDF TYPE: PDF/A, PDF TYPE: SPDF or PDF TYPE: SiPDF.Press OK and then go to step n.
NoteIf you choose Secure PDF (PDF TYPE: SPDF), the machine will ask you to enter a 4 digit password using numbers 0-9 before it starts scanning.
n Press Stop/Exit.
NoteFax broadcasting is for black & white only.
Storing numbers and E-mail addresses
24
2
Broadcasting (black & white only) 2
Broadcasting lets you send the same message to more than one fax number or E-mail address. You can include Groups, One Touch, Speed Dial numbers and up to 50 manually dialed numbers in the same broadcast.
You can broadcast up to 366 different numbers or E-mail addresses. This will depend on how many groups, access codes or credit card numbers you have stored, and on how many delayed or stored faxes in memory.
Before you begin the broadcast 2
One Touch and Speed Dial numbers must be stored in the machine's memory before they can be used in a broadcast.
Group numbers must also be stored in the machine's memory before they can be used in a broadcast. Group numbers include many stored One Touch Dial and Speed Dial numbers for easier dialing.
How to broadcast a fax 2
NoteUse b Search to help you choose numbers easily.
a Make sure you are in Fax mode .
b Load your document.
c Enter a number.Press OK.You can use either a One Touch, Speed Dial, a Group number, or a number manually entered using the dial pad. (For information how to enter text, see the Basic User's Guide.)
d Repeat step c until you have entered all the numbers or E-mail addresses you want to broadcast to.
e Press Black Start/Mono Start.
After the broadcast is finished the machine will print a broadcast report to let you know the results.
Note
The scan profile of the One Touch, Speed Dial or Group number you chose first will be applied to the broadcast.
25
3
3
E-mail/IFAX menu 3
The E-mail/IFAX menu selections of the control panel allow you to set up the Brother machine for your network configuration. (For more information on how to use the control panel, see the Basic User's Guide.) Press Menu then press a or b to choose Network. Press a or b to choose E-mail/IFAX. Proceed to the menu selection you wish to configure. (For additional information on the menu, see Function table and default factory settings on page 34.)
Before sending or receiving an Internet fax, you must configure your Brother machine to communicate with your network and mail server. You must ensure the following: a correctly configured IP address for your machine, an E-mail address for your machine, the mail server(s) IP address, mailbox name and password for your Brother machine. If you are unsure of any of these items, contact your system Administrator.
For details of how to configure your machine's IP address, see the Network User's Guide.
If you have already configured your machine to communicate with your network, configure E-mail/IFAX menu selections.
E-mail / IFAX 3
This menu has five selections: Mail Address, Setup Server, Setup Mail RX, Setup Mail TX and Setup Relay. As this section requires you to enter a lot of text characters, you may find that it is more convenient to use Web Based Management and your favorite web browser to configure these settings. These settings must be configured for the IFAX feature to work. (For more details about Internet fax, see Internet fax on page 1.)
You can also access the character you want by repeatedly pressing the appropriate number key using the machine’s control panel. (For entering text, see the Basic User's Guide.)
Mail Address 3
You can set your machine’s E-mail address.
Setup Server 3
SMTP
SMTP Server
This field displays the node name or IP address of an SMTP mail server (outgoing E-mail server) on your network.
(Ex, “mailhost.brothermail.net” or “192.000.000.001”)
SMTP Port
This field displays the SMTP port number (for outgoing E-mails) on your network.
Auth. for SMTP
You can specify the security method for E-mail notification. (For details on the security methods for E-mail notification, see the Network User's Guide.)
Control panel setup 3
Control panel setup
26
3
SMTP SSL/TLS
You can choose the encryption method between the machine and the SMTP server.
Verify Cert.
You can enable or disable to use the security certificate between the machine and the SMTP server.
NoteFor more information on the security certificate, see Security Features in the Network User's Guide.
3
POP3
POP3 Server
This field displays the node name or IP address of the POP3 server (incoming E-mail server) used by the Brother machine. This address is necessary for the Internet fax features to function correctly.
(Ex, “mailhost.brothermail.net” or “192.000.000.001”)
POP3 Port
This field displays the POP3 port number (for incoming E-mails) used by the Brother machine.
Mailbox Name
You can specify a mailbox name on the POP3 server where the Internet print jobs are to be retrieved.
Mailbox Pwd
You can specify the password for the POP3 server account where the Internet print jobs are to be retrieved.
NoteTo set for no password, enter a single space.
POP3 SSL/TLS
You can choose the encryption method between the machine and the POP3 server.
Verify Cert.
You can enable or disable to use the security certificate between the machine and the POP3 server.
NoteFor more information on the security certificate, see Security Features in the Network User's Guide.
APOP
You can enable or disable the APOP (Authenticated Post Office Protocol).
Setup Mail RX 3
Auto Polling
When set to On, the machine automatically checks the POP3 server for new messages.
Control panel setup
27
3
3
Poll Frequency
Sets the interval for checking for new messages on the POP3 server (default is 10Min).
3
Header
This selection allows the contents of the mail header to be printed when the received message is printed.
3
Del Error Mail
When set to On, the machine automatically deletes error mails that the machine cannot receive from the POP3 server.
3
Notification
The notification feature allows a confirmation of receipt message to be transmitted to the sending station when the Internet Fax has been received.
This feature only works on Internet Fax machines that support the “MDN” specification.
Setup Mail TX 3
Sender Subject
This field displays the subject that is attached to the Internet fax data being sent from the Brother machine to a computer (default is “Internet Fax Job”).
3
Size Limit
Some E-mail servers do not allow you to send large E-mail documents (the System Administrator will often place a limit on the maximum E-mail size). With this function enabled, the machine will display Out of Memory when trying to send E-mail documents over 1 Mbyte in size. The document will not be sent and an error report will be printed. The document you are sending should be separated into smaller documents that will be accepted by the mail server. (For your information, a 42 page document based on the ITU-T Test Chart #1 test chart is approximately 1 Mbyte in size.)
3
Notification
The notification feature allows a confirmation of receipt message to be transmitted to the sending station when the Internet Fax has been received.
This feature only works on Internet Fax machines that support the “MDN” specification.
Control panel setup
28
3
Setup Relay 3
Relay Broadcast
This function allows the machine to receive a document over the Internet, and then relay it to other fax machines through conventional analog landlines.
3
Relay Domain
You can register the Domain Names (Max. 10) that are allowed to request a Relay Broadcast.
3
Relay Report
A Relay Broadcast Report can be printed at the machine that will act as a Relay Station for all Relay Broadcasts.
Its primary function is to print reports of any relayed broadcasts that have been sent through the machine. Please note: In order to use this function, you must assign the relay domain in the “Trusted Domains” section of the Relay function settings.
NoteFor more information on Relay Broadcast, see Relay broadcasting on page 6.
Control panel setup
29
3
Scan to E-mail (E-mail Server) 3
When you choose Scan to E-mail (E-mail Server) you can scan a black and white or color document and send it directly to an E-mail address from the machine. You can choose PDF, PDF/A, Secure PDF, Signed PDF or TIFF for Black and White and PDF, PDF/A, Secure PDF, Signed PDF, XPS or JPEG for color or gray.
NoteScan to E-mail (E-mail Server) requires SMTP/POP3 mail server support.
a Load your document.
b Press (SCAN).
c Press a or b to choose Scan to E-mail.Press OK.(MFC-9460CDN) Go to step e.(MFC-9465CDN and MFC-9560CDW) Go to step d.
d Press a or b to choose 1sided, 2sided (L)edge or 2sided (S)edge.Press OK.
e Press a or b to choose Change Setting.Press OK.If you don’t have to change the quality, press a or b to choose Enter Address.Press OK and then go to step i.
f Press a or b to choose Color 100 dpi, Color 200 dpi, Color 300 dpi, Color 600 dpi, Gray 100 dpi, Gray 200 dpi, Gray 300 dpi, B&W 200 dpi or B&W 200x100 dpi.Press OK.If you choose Color 100 dpi, Color 200 dpi, Color 300 dpi, Color 600 dpi, Gray 100 dpi, Gray 200 dpi or Gray 300 dpi, go to step g.If you choose B&W 200 dpi or B&W 200x100 dpi, go to step h.
g Press a or b to choose PDF, PDF/A, Secure PDF, Signed PDF, JPEG or XPS.Press OK and go to step i.
h Press a or b to choose PDF, PDF/A, Secure PDF, Signed PDF or TIFF.Press OK and go to step i.
Control panel setup
30
3
Note• PDF/A is a PDF file format intended for long-term archiving. This format contains all the necessary
information to be able to reproduce the document after long-term storage.
• If you choose Secure PDF, the machine will ask you to enter a 4 digit password using numbers 0-9 before it starts scanning.
• If you choose Signed PDF, you must install a certificate to your machine using Web Based Management.
Choose Configure Signed PDF Settings from Administrator Settings in Web Based Management. For how to install a certificate, see the Network User's Guide.
• A Signed PDF helps prevent data tampering and the impersonation of an author by including a digital certificate within the document.
i The LCD prompts you to enter an address. Enter the destination E-mail address from the dial pad or use the One Touch key or Speed Dial number.Press Black Start/Mono Start or Color Start/Colour Start.The machine will start the scanning process.
NoteYou can store the scan resolution (Scan Profile) for each stored E-mail address in a One Touch or Speed Dial number. (See Using One Touch or Speed Dial on page 11.)
Using One Touch or Speed Dial number 3
You can also scan a document directly to an address you registered in a One Touch or Speed Dial number. When you scan the document, the settings you registered with the One Touch or Speed Dial will be used for the quality and the file type. Only One Touch or Speed Dials with an E-mail address registered can be used when you scan data using One Touch or Speed Dial. (I-Fax addresses are not available for use.)
a Load your document.
b Press (SCAN).
c Choose One Touch or Speed Dial number.If your machine supports Duplex Scan and you want to scan both sides of your document, press Duplex.
d Press Black Start/Mono Start or Color Start/Colour Start. The machine starts the scanning process.
NoteYou can store the scan resolution (Scan Profile) for each stored E-mail address in a One Touch or Speed Dial number. (See Using One Touch or Speed Dial on page 11.)
Control panel setup
31
3
How to set a new default for the file size (For Scan to E-mail (E-mail server)) 3
You can set your own default setting for the file size. For a higher quality scan, choose the large file size. For a smaller file size, choose the small file size.
a Press Menu, 1.
b Press a or b to choose Document Scan. Press OK.
c Press a or b to choose File Size. Press OK.
d Press a or b to choose 1.Color or 2.Gray. Press OK.
e Press a or b to choose Small, Middle or Large. Press OK.
f Press Stop/Exit.
Note
You cannot choose the file size when you scan a document in black and white. Black and white documents will be stored in the TIFF file format and the data will not be compressed.
How to set a new default for the Duplex Scan mode (For Scan to E-mail (E-mail server)) (For MFC-9465CDN and MFC-9560CDW) 3
You can set your own default setting for the Duplex Scan mode. You can choose from two types of layout, long edge or short edge.
a Press Menu, 1.
b Press a or b to choose Document Scan. Press OK.
c Press a or b to choose Duplex Scan. Press OK.
d Press a or b to choose Long edge or Short edge. Press OK.
e Press Stop/Exit.
Control panel setup
32
3
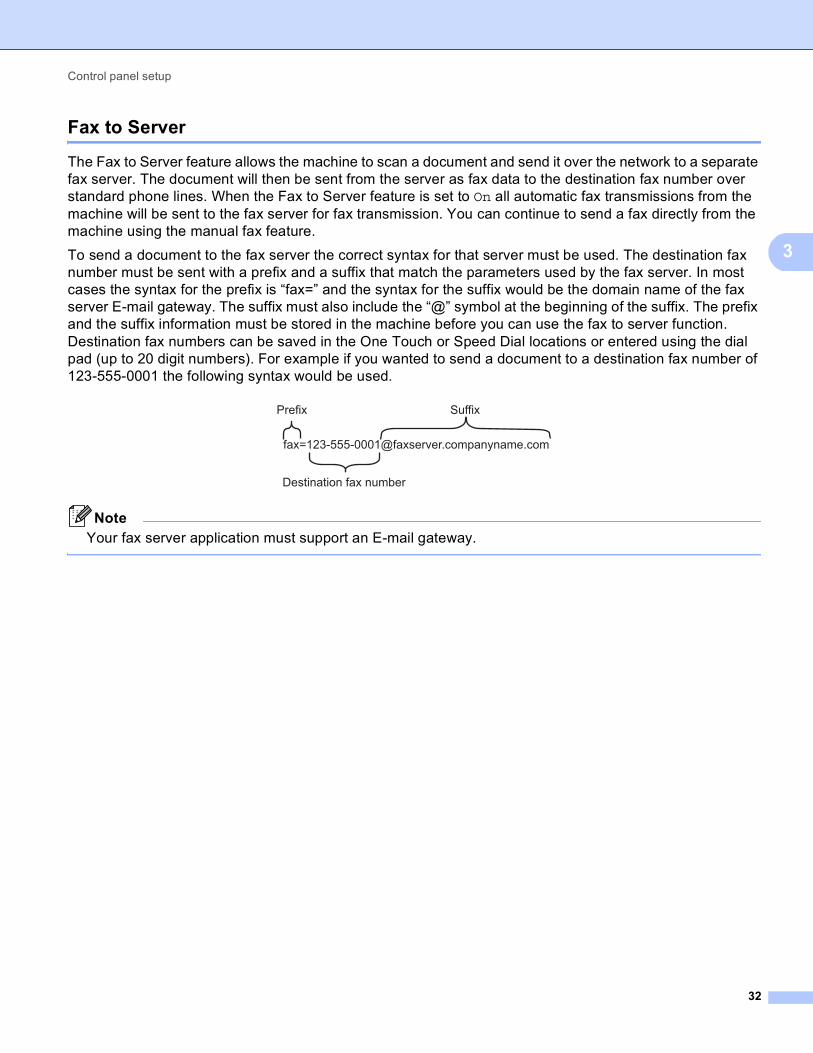
Fax to Server 3
The Fax to Server feature allows the machine to scan a document and send it over the network to a separate fax server. The document will then be sent from the server as fax data to the destination fax number over standard phone lines. When the Fax to Server feature is set to On all automatic fax transmissions from the machine will be sent to the fax server for fax transmission. You can continue to send a fax directly from the machine using the manual fax feature.
To send a document to the fax server the correct syntax for that server must be used. The destination fax number must be sent with a prefix and a suffix that match the parameters used by the fax server. In most cases the syntax for the prefix is “fax=” and the syntax for the suffix would be the domain name of the fax server E-mail gateway. The suffix must also include the “@” symbol at the beginning of the suffix. The prefix and the suffix information must be stored in the machine before you can use the fax to server function. Destination fax numbers can be saved in the One Touch or Speed Dial locations or entered using the dial pad (up to 20 digit numbers). For example if you wanted to send a document to a destination fax number of 123-555-0001 the following syntax would be used.
NoteYour fax server application must support an E-mail gateway.
Control panel setup
33
3
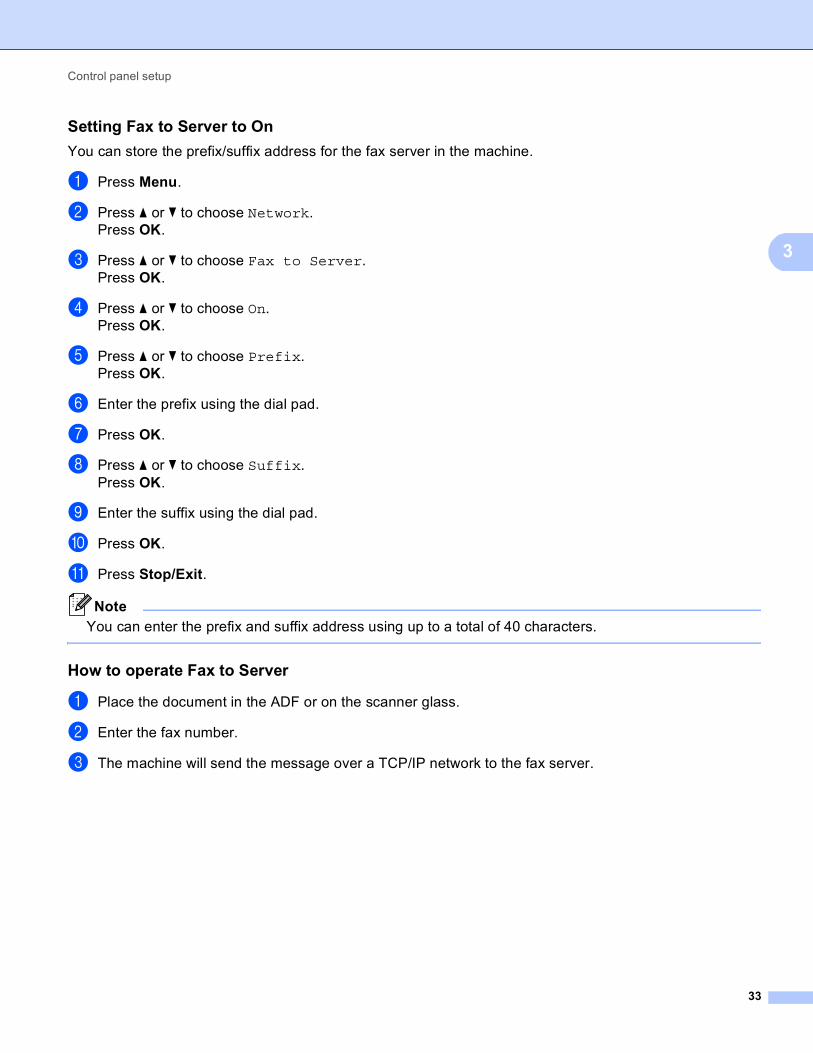
Setting Fax to Server to On 3
You can store the prefix/suffix address for the fax server in the machine.
a Press Menu.
b Press a or b to choose Network.Press OK.
c Press a or b to choose Fax to Server.Press OK.
d Press a or b to choose On.Press OK.
e Press a or b to choose Prefix.Press OK.
f Enter the prefix using the dial pad.
g Press OK.
h Press a or b to choose Suffix.Press OK.
i Enter the suffix using the dial pad.
j Press OK.
k Press Stop/Exit.
Note
You can enter the prefix and suffix address using up to a total of 40 characters.
How to operate Fax to Server 3
a Place the document in the ADF or on the scanner glass.
b Enter the fax number.
c The machine will send the message over a TCP/IP network to the fax server.
Control panel setup
34
3
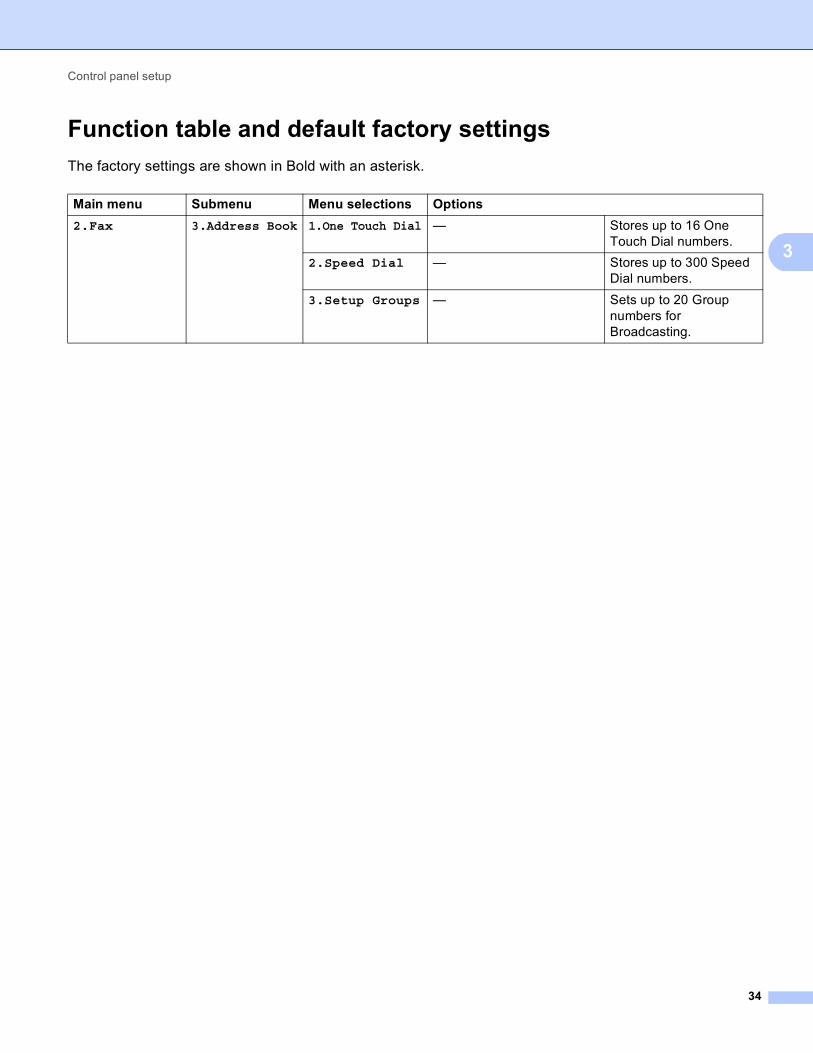
Function table and default factory settings 3
The factory settings are shown in Bold with an asterisk.
Main menu Submenu Menu selections Options
2.Fax 3.Address Book 1.One Touch Dial — Stores up to 16 One Touch Dial numbers.
2.Speed Dial — Stores up to 300 Speed Dial numbers.
3.Setup Groups — Sets up to 20 Group numbers for Broadcasting.
Control panel setup
35
3
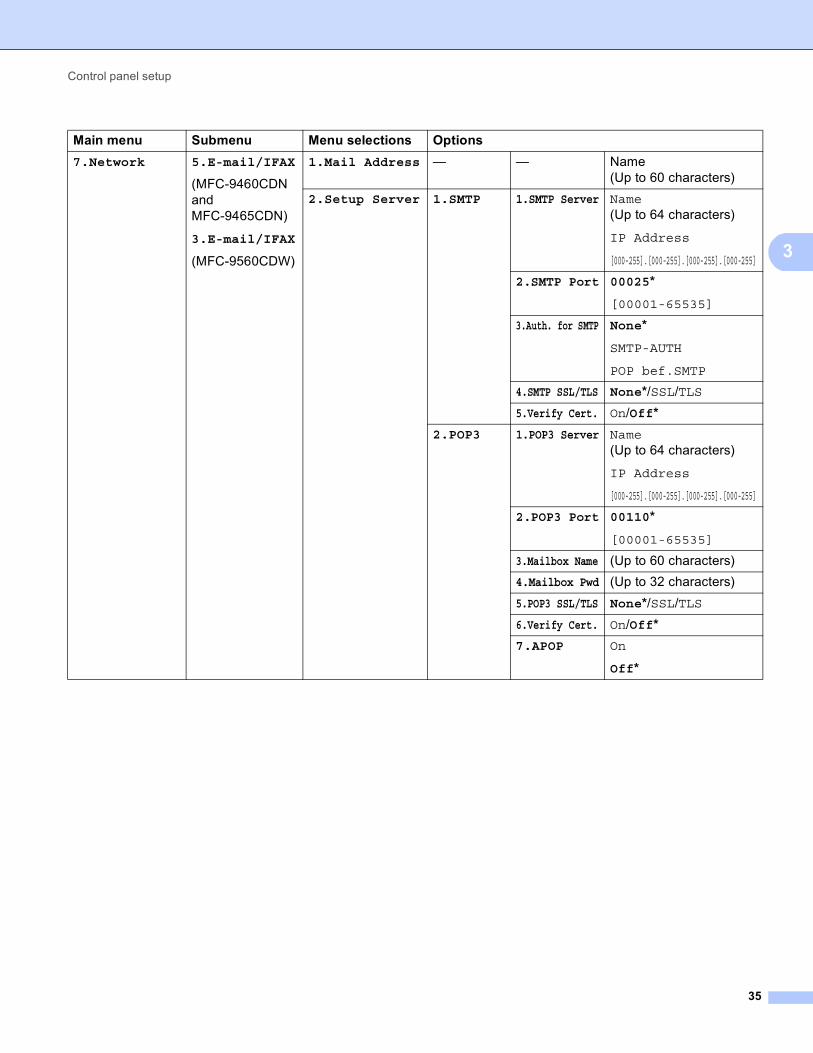
Main menu Submenu Menu selections Options
7.Network 5.E-mail/IFAX
(MFC-9460CDN and MFC-9465CDN)
3.E-mail/IFAX
(MFC-9560CDW)
1.Mail Address — — Name(Up to 60 characters)
2.Setup Server 1.SMTP 1.SMTP Server Name(Up to 64 characters)
IP Address
[000-255].[000-255].[000-255].[000-255]
2.SMTP Port 00025*
[00001-65535]
3.Auth. for SMTP None*
SMTP-AUTH
POP bef.SMTP
4.SMTP SSL/TLS None*/SSL/TLS
5.Verify Cert. On/Off*
2.POP3 1.POP3 Server Name(Up to 64 characters)
IP Address
[000-255].[000-255].[000-255].[000-255]
2.POP3 Port 00110*
[00001-65535]
3.Mailbox Name (Up to 60 characters)
4.Mailbox Pwd (Up to 32 characters)
5.POP3 SSL/TLS None*/SSL/TLS
6.Verify Cert. On/Off*
7.APOP On
Off*
Control panel setup
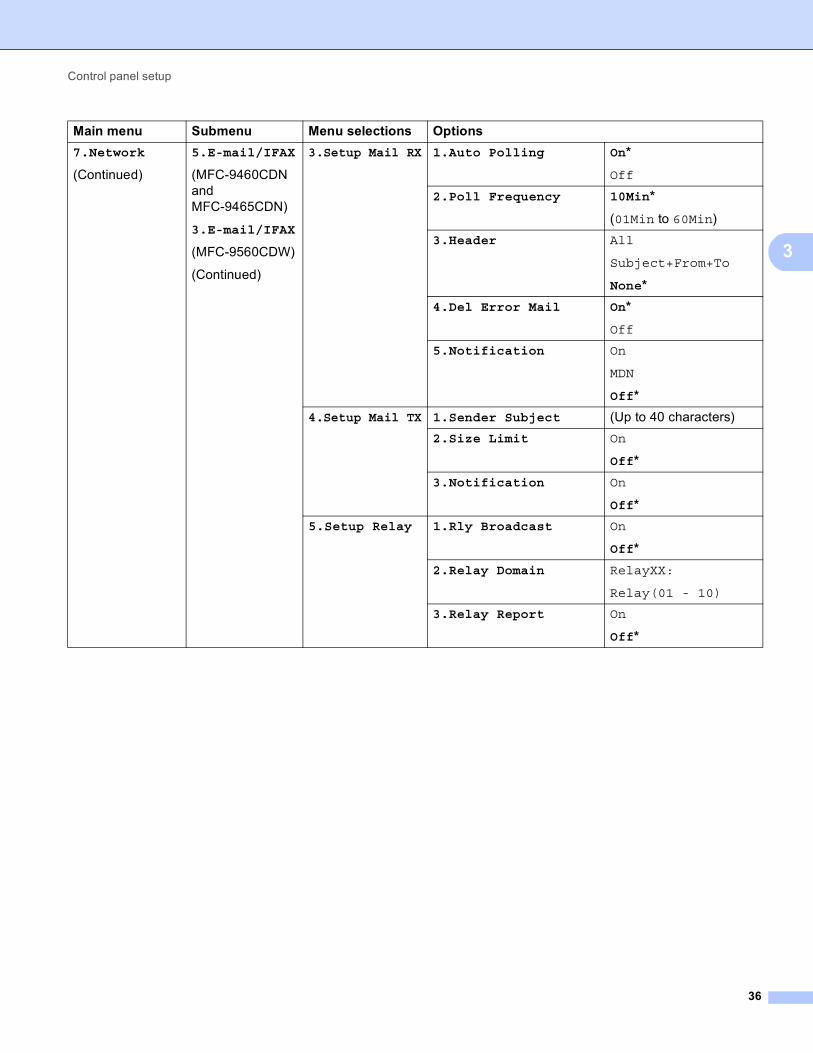
36
3
7.Network
(Continued)
5.E-mail/IFAX
(MFC-9460CDN and MFC-9465CDN)
3.E-mail/IFAX
(MFC-9560CDW)
(Continued)
3.Setup Mail RX 1.Auto Polling On*
Off
2.Poll Frequency 10Min*
(01Min to 60Min)
3.Header All
Subject+From+To
None*
4.Del Error Mail On*
Off
5.Notification On
MDN
Off*
4.Setup Mail TX 1.Sender Subject (Up to 40 characters)
2.Size Limit On
Off*
3.Notification On
Off*
5.Setup Relay 1.Rly Broadcast On
Off*
2.Relay Domain RelayXX:
Relay(01 - 10)
3.Relay Report On
Off*
Main menu Submenu Menu selections Options
Control panel setup
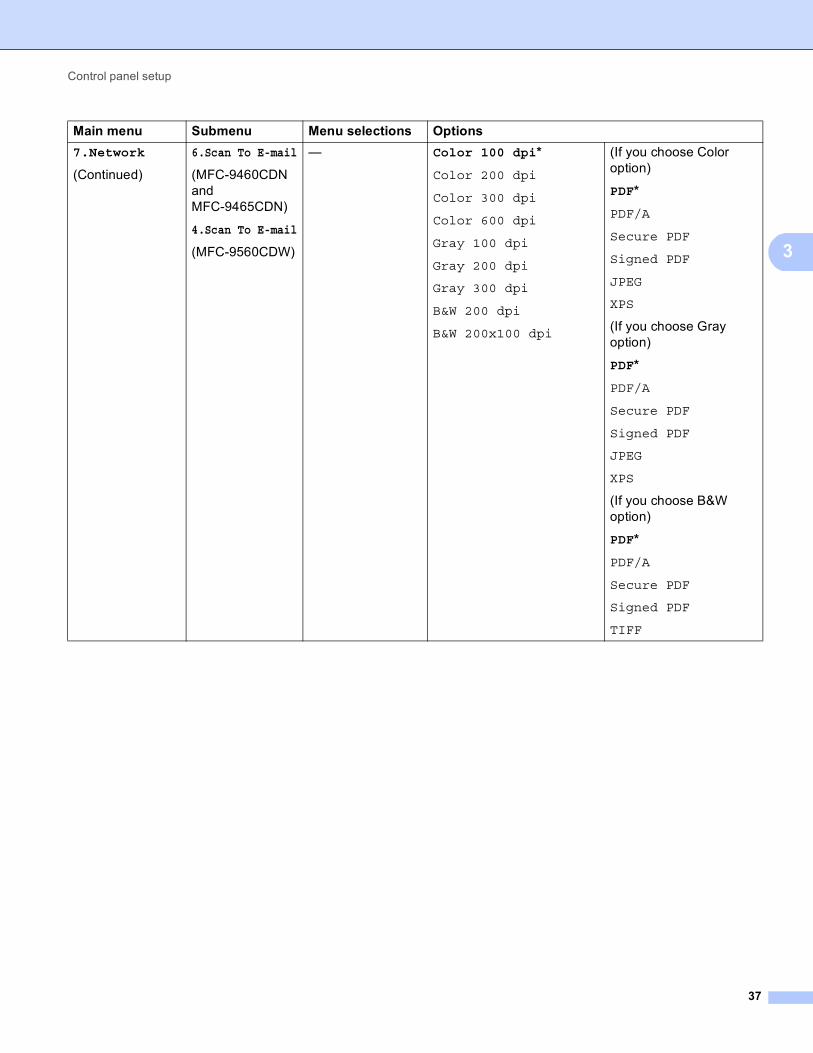
37
3
7.Network
(Continued)
6.Scan To E-mail
(MFC-9460CDN and MFC-9465CDN)
4.Scan To E-mail
(MFC-9560CDW)
— Color 100 dpi*
Color 200 dpi
Color 300 dpi
Color 600 dpi
Gray 100 dpi
Gray 200 dpi
Gray 300 dpi
B&W 200 dpi
B&W 200x100 dpi
(If you choose Color option)
PDF*
PDF/A
Secure PDF
Signed PDF
JPEG
XPS
(If you choose Gray option)
PDF*
PDF/A
Secure PDF
Signed PDF
JPEG
XPS
(If you choose B&W option)
PDF*
PDF/A
Secure PDF
Signed PDF
TIFF
Main menu Submenu Menu selections Options

Control panel setup
38
3
7.Network
(Continued)
7.Scan To FTP
(MFC-9460CDN and MFC-9465CDN)
5.Scan To FTP
(MFC-9560CDW)
— Color 100 dpi*
Color 200 dpi
Color 300 dpi
Color 600 dpi
Gray 100 dpi
Gray 200 dpi
Gray 300 dpi
B&W 200 dpi
B&W 200x100 dpi
(If you choose Color option)
PDF*
PDF/A
Secure PDF
Signed PDF
JPEG
XPS
(If you choose Gray option)
PDF*
PDF/A
Secure PDF
Signed PDF
JPEG
XPS
(If you choose B&W option)
PDF*
PDF/A
Secure PDF
Signed PDF
TIFF
Main menu Submenu Menu selections Options
Control panel setup
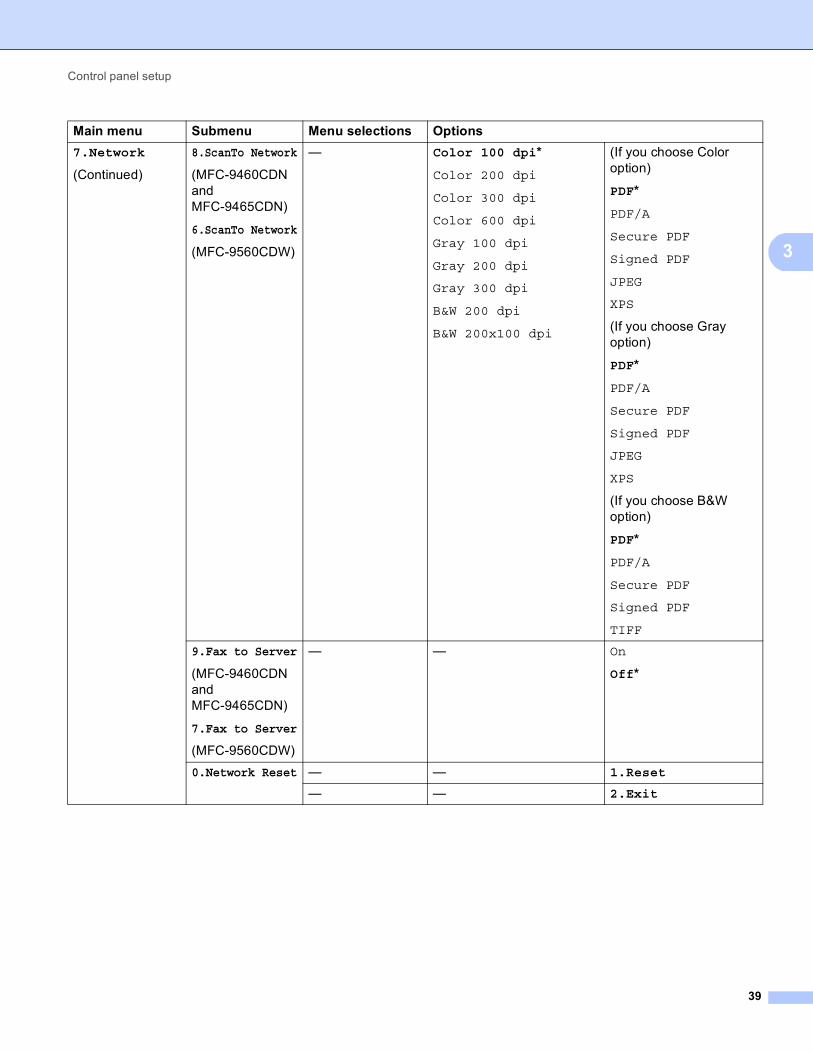
39
3
7.Network
(Continued)
8.ScanTo Network
(MFC-9460CDN and MFC-9465CDN)
6.ScanTo Network
(MFC-9560CDW)
— Color 100 dpi*
Color 200 dpi
Color 300 dpi
Color 600 dpi
Gray 100 dpi
Gray 200 dpi
Gray 300 dpi
B&W 200 dpi
B&W 200x100 dpi
(If you choose Color option)
PDF*
PDF/A
Secure PDF
Signed PDF
JPEG
XPS
(If you choose Gray option)
PDF*
PDF/A
Secure PDF
Signed PDF
JPEG
XPS
(If you choose B&W option)
PDF*
PDF/A
Secure PDF
Signed PDF
TIFF
9.Fax to Server
(MFC-9460CDN and MFC-9465CDN)
7.Fax to Server
(MFC-9560CDW)
— — On
Off*
0.Network Reset — — 1.Reset
— — 2.Exit
Main menu Submenu Menu selections Options
40
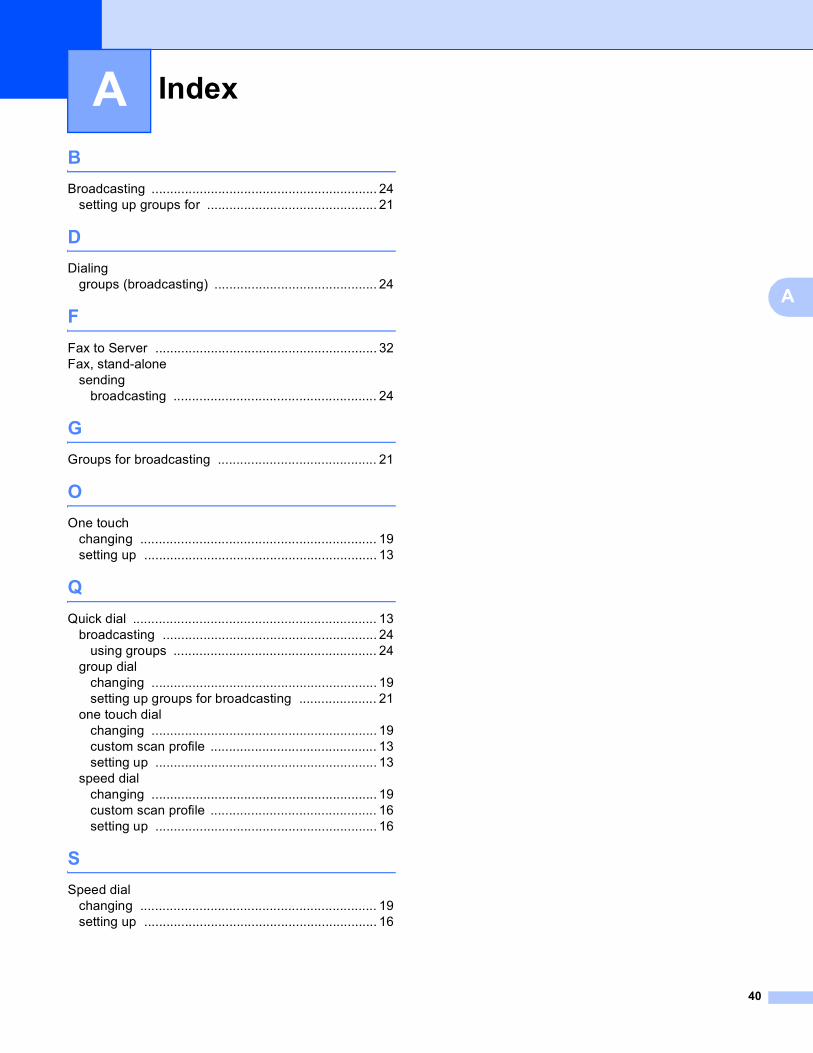
A
A
B
Broadcasting ............................................................. 24setting up groups for .............................................. 21
D
Dialinggroups (broadcasting) ............................................ 24
F
Fax to Server ............................................................ 32Fax, stand-alone
sendingbroadcasting ....................................................... 24
G
Groups for broadcasting ........................................... 21
O
One touchchanging ................................................................ 19setting up ............................................................... 13
Q
Quick dial .................................................................. 13broadcasting .......................................................... 24
using groups ....................................................... 24group dial
changing ............................................................. 19setting up groups for broadcasting ..................... 21
one touch dialchanging ............................................................. 19custom scan profile ............................................. 13setting up ............................................................ 13
speed dialchanging ............................................................. 19custom scan profile ............................................. 16setting up ............................................................ 16
S
Speed dialchanging ................................................................ 19setting up ............................................................... 16
Index