Embed Size (px)
Citation preview
Netra Server X5-2 Operating SystemInstallation Guide
Part No: E53599-03October 2016


Netra Server X5-2 Operating System Installation Guide
Part No: E53599-03
Copyright © 2015, 2016, Oracle and/or its affiliates. All rights reserved.
This software and related documentation are provided under a license agreement containing restrictions on use and disclosure and are protected by intellectual property laws. Exceptas expressly permitted in your license agreement or allowed by law, you may not use, copy, reproduce, translate, broadcast, modify, license, transmit, distribute, exhibit, perform,publish, or display any part, in any form, or by any means. Reverse engineering, disassembly, or decompilation of this software, unless required by law for interoperability, isprohibited.
The information contained herein is subject to change without notice and is not warranted to be error-free. If you find any errors, please report them to us in writing.
If this is software or related documentation that is delivered to the U.S. Government or anyone licensing it on behalf of the U.S. Government, then the following notice is applicable:
U.S. GOVERNMENT END USERS. Oracle programs, including any operating system, integrated software, any programs installed on the hardware, and/or documentation, deliveredto U.S. Government end users are "commercial computer software" pursuant to the applicable Federal Acquisition Regulation and agency-specific supplemental regulations. Assuch, use, duplication, disclosure, modification, and adaptation of the programs, including any operating system, integrated software, any programs installed on the hardware, and/ordocumentation, shall be subject to license terms and license restrictions applicable to the programs. No other rights are granted to the U.S. Government.
This software or hardware is developed for general use in a variety of information management applications. It is not developed or intended for use in any inherently dangerousapplications, including applications that may create a risk of personal injury. If you use this software or hardware in dangerous applications, then you shall be responsible to take allappropriate fail-safe, backup, redundancy, and other measures to ensure its safe use. Oracle Corporation and its affiliates disclaim any liability for any damages caused by use of thissoftware or hardware in dangerous applications.
Oracle and Java are registered trademarks of Oracle and/or its affiliates. Other names may be trademarks of their respective owners.
Intel and Intel Xeon are trademarks or registered trademarks of Intel Corporation. All SPARC trademarks are used under license and are trademarks or registered trademarks ofSPARC International, Inc. AMD, Opteron, the AMD logo, and the AMD Opteron logo are trademarks or registered trademarks of Advanced Micro Devices. UNIX is a registeredtrademark of The Open Group.
This software or hardware and documentation may provide access to or information about content, products, and services from third parties. Oracle Corporation and its affiliates arenot responsible for and expressly disclaim all warranties of any kind with respect to third-party content, products, and services unless otherwise set forth in an applicable agreementbetween you and Oracle. Oracle Corporation and its affiliates will not be responsible for any loss, costs, or damages incurred due to your access to or use of third-party content,products, or services, except as set forth in an applicable agreement between you and Oracle.
Documentation Accessibility
For information about Oracle's commitment to accessibility, visit the Oracle Accessibility Program website at http://www.oracle.com/pls/topic/lookup?ctx=acc&id=docacc.
Access to Oracle Support
Oracle customers that have purchased support have access to electronic support through My Oracle Support. For information, visit http://www.oracle.com/pls/topic/lookup?ctx=acc&id=info or visit http://www.oracle.com/pls/topic/lookup?ctx=acc&id=trs if you are hearing impaired.

Référence: E53599-03
Copyright © 2015, 2016, Oracle et/ou ses affiliés. Tous droits réservés.
Ce logiciel et la documentation qui l’accompagne sont protégés par les lois sur la propriété intellectuelle. Ils sont concédés sous licence et soumis à des restrictions d’utilisation etde divulgation. Sauf stipulation expresse de votre contrat de licence ou de la loi, vous ne pouvez pas copier, reproduire, traduire, diffuser, modifier, accorder de licence, transmettre,distribuer, exposer, exécuter, publier ou afficher le logiciel, même partiellement, sous quelque forme et par quelque procédé que ce soit. Par ailleurs, il est interdit de procéder à touteingénierie inverse du logiciel, de le désassembler ou de le décompiler, excepté à des fins d’interopérabilité avec des logiciels tiers ou tel que prescrit par la loi.
Les informations fournies dans ce document sont susceptibles de modification sans préavis. Par ailleurs, Oracle Corporation ne garantit pas qu’elles soient exemptes d’erreurs et vousinvite, le cas échéant, à lui en faire part par écrit.
Si ce logiciel, ou la documentation qui l’accompagne, est livré sous licence au Gouvernement des Etats-Unis, ou à quiconque qui aurait souscrit la licence de ce logiciel pour lecompte du Gouvernement des Etats-Unis, la notice suivante s’applique:
U.S. GOVERNMENT END USERS. Oracle programs, including any operating system, integrated software, any programs installed on the hardware, and/or documentation, deliveredto U.S. Government end users are "commercial computer software" pursuant to the applicable Federal Acquisition Regulation and agency-specific supplemental regulations. Assuch, use, duplication, disclosure, modification, and adaptation of the programs, including any operating system, integrated software, any programs installed on the hardware, and/ordocumentation, shall be subject to license terms and license restrictions applicable to the programs. No other rights are granted to the U.S. Government.
Ce logiciel ou matériel a été développé pour un usage général dans le cadre d’applications de gestion des informations. Ce logiciel ou matériel n’est pas conçu ni n’est destinéà être utilisé dans des applications à risque, notamment dans des applications pouvant causer des dommages corporels. Si vous utilisez ce logiciel ou matériel dans le cadre d’applications dangereuses, il est de votre responsabilité de prendre toutes les mesures de secours, de sauvegarde, de redondance et autres mesures nécessaires à son utilisation dans desconditions optimales de sécurité. Oracle Corporation et ses affiliés déclinent toute responsabilité quant aux dommages causés par l’utilisation de ce logiciel ou matériel pour ce typed’applications.
Oracle et Java sont des marques déposées d’Oracle Corporation et/ou de ses affiliés. Tout autre nom mentionné peut correspondre à des marques appartenant à d’autres propriétairesqu’Oracle.
Intel et Intel Xeon sont des marques ou des marques déposées d’Intel Corporation. Toutes les marques SPARC sont utilisées sous licence et sont des marques ou des marquesdéposées de SPARC International, Inc. AMD, Opteron, le logo AMD et le logo AMD Opteron sont des marques ou des marques déposées d’Advanced Micro Devices. UNIX est unemarque déposée d’The Open Group.
Ce logiciel ou matériel et la documentation qui l’accompagne peuvent fournir des informations ou des liens donnant accès à des contenus, des produits et des services émanant detiers. Oracle Corporation et ses affiliés déclinent toute responsabilité ou garantie expresse quant aux contenus, produits ou services émanant de tiers, sauf mention contraire stipuléedans un contrat entre vous et Oracle. En aucun cas, Oracle Corporation et ses affiliés ne sauraient être tenus pour responsables des pertes subies, des coûts occasionnés ou desdommages causés par l’accès à des contenus, produits ou services tiers, ou à leur utilisation, sauf mention contraire stipulée dans un contrat entre vous et Oracle.
Accessibilité de la documentation
Pour plus d’informations sur l’engagement d’Oracle pour l’accessibilité à la documentation, visitez le site Web Oracle Accessibility Program, à l’adresse http://www.oracle.com/pls/topic/lookup?ctx=acc&id=docacc.
Accès aux services de support Oracle
Les clients Oracle qui ont souscrit un contrat de support ont accès au support électronique via My Oracle Support. Pour plus d’informations, visitez le site http://www.oracle.com/pls/topic/lookup?ctx=acc&id=info ou le site http://www.oracle.com/pls/topic/lookup?ctx=acc&id=trs si vous êtes malentendant.

Contents
Using This Documentation ................................................................................. 9
Choosing an OS Installation Method ................................................................ 11OS Installation Task Map (Oracle Solaris) ......................................................... 12OS Installation Task Map (Oracle VM) ............................................................. 12OS Installation Task Map (Linux) .................................................................... 13OS Installation Task Map (VMware ESXi) ........................................................ 14OS Installation Task Map (Windows) ................................................................ 15Supported OS Versions and Documentation ....................................................... 15Oracle Linux Support Kernel ........................................................................... 16Understanding Installation Methods .................................................................. 17
OSA for Guided OS Installations ............................................................. 17OS Media for Manual Installations ........................................................... 18PXE for Network Installations ................................................................. 19
Configuring the Preinstalled Oracle Solaris OS ................................................ 21Preinstalled OS RAID Limitations .................................................................... 21Configuration Worksheet (Oracle Solaris) .......................................................... 22▼ Configure the Preinstalled Oracle Solaris OS ................................................. 24
Configuring the Preinstalled Oracle VM 3. 3 Software ...................................... 27Configuration Worksheet (Oracle VM Server) .................................................... 27▼ Configure the Preinstalled Oracle VM 3.3 OS ............................................... 28Oracle VM 3.3 Overview ............................................................................... 30
Preparing to Install an OS ................................................................................ 31Selecting the Console Display ......................................................................... 31
Console Display Options ........................................................................ 32Related Information ............................................................................... 32▼ Set Up a Serial Console CLI Connection .............................................. 32
5
Contents
▼ Set Up a KVM Console Connection .................................................... 33▼ Set Up an SSH Client Network Console Connection ............................... 33▼ Set Up a Web-Based Client Console Connection .................................... 34
Selecting the Boot Media ................................................................................ 35▼ Set Up Local Boot Media .................................................................. 36▼ Set Up Remote Boot Media ............................................................... 36
Preparing Your PXE Environment .................................................................... 37▼ Prepare PXE (Oracle Solaris) ............................................................. 37▼ Prepare PXE (Linux) ........................................................................ 38▼ Prepare PXE (Windows) .................................................................... 40
Accessing Installation Utilities ......................................................................... 41▼ Initiate a BIOS Operation .................................................................. 41▼ Start OSA ....................................................................................... 43
Setting Up BIOS ........................................................................................... 44BIOS Overview (OS Installation) ............................................................. 44▼ Set BIOS Settings to Default Values .................................................... 45▼ Switch Between Legacy BIOS and UEFI BIOS Modes ............................ 47
Configuring RAID .............................................................................................. 49HBA and RAID Support ................................................................................ 49RAID Configuration Requirements ................................................................... 50Post-Installation RAID Volume Creation ........................................................... 51▼ Configure RAID (OSA) ............................................................................ 52Configuring RAID Volumes (LSI BIOS Utilities) ................................................ 56
▼ Create a RAID Volume ..................................................................... 56Making Virtual Drives Bootable ....................................................................... 57
Related Information ............................................................................... 57▼ Make a Virtual Drive Bootable (WebBIOS utility) .................................. 57▼ Make a Virtual Drive Bootable (MegaRAID utility) ................................ 60
Installing a Supported OS ................................................................................. 65▼ Install an OS (OSA) ................................................................................. 65Installing an OS (Media) ................................................................................ 71
▼ Install an OS (Media) ....................................................................... 71▼ Install HBA Drivers (Windows) .......................................................... 75
▼ Install an OS (PXE) ................................................................................. 80
Performing Post-Installation Tasks ................................................................... 85▼ (Optional) Assign Boot Drive Priorities ........................................................ 85
6 Netra Server X5-2 Operating System Installation Guide • October 2016
Contents
▼ Install the VM Manager ............................................................................ 87Performing Linux Post-Installation Tasks ........................................................... 87
▼ (Optional) Choose an Oracle Linux Kernel ........................................... 87▼ (Optional) Install the Oracle Linux Support Kernel ................................. 89
Performing VMware ESXi Post-Installation Tasks ............................................... 90▼ Configure Network Adapter Settings (VMware ESXi) ............................. 90▼ Determine the MAC Address of a Connected Server Network Port(VMware ESXi) .................................................................................... 92
Performing Windows Post-Installation Tasks ...................................................... 93Supplemental Software Component Options (Windows) ............................... 94▼ Install Server-Specific Device Drivers and Supplemental Software(Windows) ........................................................................................... 95▼ (Optional) Configure TPM Support (Windows) ...................................... 96
Glossary ............................................................................................................ 99
Index ................................................................................................................ 105
7

8 Netra Server X5-2 Operating System Installation Guide • October 2016
Using This Documentation
■ Overview – Provides information about how to install the supported operating systems onthe Netra Server X5-2 from Oracle.
■ Audience – Technicians, system administrators, authorized service providers, andexperienced users.
■ Required knowledge – Advanced experience with installing operating systems.
Product Documentation Library
Documentation and resources for this product and related products are available at http://www.oracle.com/goto/netra-x5-2/docs.
Feedback
Provide feedback about this documentation at http://www.oracle.com/goto/docfeedback.
Using This Documentation 9

10 Netra Server X5-2 Operating System Installation Guide • October 2016

Choosing an OS Installation Method
The server supports several different operating systems. A subset of the supported OSes areavailable preinstalled, depending on what was selected when the server was ordered. You canuse the preinstalled OS, or install a fresh version of any of the supported OSes.
The OS installation process varies based on the OS and whether you want to use a preinstalledversion or install a fresh version.
Description Links
Configure the preinstalled Oracle Solaris OSor install a fresh version.
“Configuring the Preinstalled Oracle Solaris OS” on page 21
“OS Installation Task Map (Oracle Solaris)” on page 12
“Supported OS Versions and Documentation” on page 15
Configure the preinstalled Oracle VMsoftware or install a fresh version.
“Configuring the Preinstalled Oracle VM 3. 3Software” on page 27
“OS Installation Task Map (Oracle VM)” on page 12
“Supported OS Versions and Documentation” on page 15
Install a supported version of Linux. “OS Installation Task Map (Linux)” on page 13
“Oracle Linux Support Kernel” on page 16
“Supported OS Versions and Documentation” on page 15
Install a supported version of VMware ESXi. “OS Installation Task Map (VMware ESXi)” on page 14
“Supported OS Versions and Documentation” on page 15
Install a supported version of Windows OS. “OS Installation Task Map (Windows)” on page 15
“Supported OS Versions and Documentation” on page 15
Choose an installation method. “Understanding Installation Methods” on page 17
Related Information
■ “Configuring the Preinstalled Oracle Solaris OS” on page 21■ “Configuring the Preinstalled Oracle VM 3. 3 Software” on page 27■ “Preparing to Install an OS” on page 31■ “Configuring RAID” on page 49
Choosing an OS Installation Method 11
OS Installation Task Map (Oracle Solaris)
■ “Installing a Supported OS” on page 65■ “Performing Post-Installation Tasks” on page 85
OS Installation Task Map (Oracle Solaris)
This table lists the tasks you perform for a new installation of the Oracle Solaris OS. Ifinstead you plan to use a preinstalled version, see “Configuring the Preinstalled Oracle SolarisOS” on page 21.
Step Description Links
1. Install the server hardware and configure the Oracle ILOM serviceprocessor.
Server Installation
2. Determine which Oracle Solaris version to install. “Supported OS Versions andDocumentation” on page 15
3. Choose an installation method. “Understanding Installation Methods” on page 17
4. Download or order the Oracle Solaris installation media. For Oracle Solaris 11: http://www.oracle.com/technetwork/server-storage/solaris11/
downloads/index.html
5. Review the product notes. Netra Server X5-2 Product Notes
6. Prepare for the installation by configuring various installation options. “Preparing to Install an OS” on page 31
7. (Optional) Configure RAID. “Configuring RAID” on page 49
8. Install the Oracle Solaris OS. “Installing a Supported OS” on page 65
9. Perform post-installation tasks, if applicable. “Performing Post-Installation Tasks” on page 85
Related Information
■ “Configuring the Preinstalled Oracle Solaris OS” on page 21■ “Preparing to Install an OS” on page 31■ “Configuring RAID” on page 49■ “Installing a Supported OS” on page 65■ “Performing Post-Installation Tasks” on page 85
OS Installation Task Map (Oracle VM)
This table lists the tasks you perform for a new installation of the Oracle VM OS. If insteadyou plan to use a preinstalled version, see “Configuring the Preinstalled Oracle VM 3. 3Software” on page 27.
12 Netra Server X5-2 Operating System Installation Guide • October 2016
OS Installation Task Map (Linux)
Step Description Links
1. Install your server hardware and configure the Oracle ILOM serviceprocessor.
Server Installation
2. Determine which Oracle VM version to install. “Supported OS Versions andDocumentation” on page 15
3. Choose an installation method. “Understanding Installation Methods” on page 17
4. Set up a second system with a static IP address on which you can installthe Oracle VM Manager. This system must have one of these operatingsystems installed:
■ Oracle Linux 5.5, 64-bit and subsequent releases■ Red Hat Enterprise Linux Release 6.6, 64-bit and subsequent releases
Oracle VM Server Release Notes and the Oracle VMManager Release Notes at: http://docs.oracle.com/cd/E50245_01/index.html
5. Obtain the Oracle VM installation media (optional) and the Oracle VMdocumentation. Use the Oracle VM documentation in conjunction withthe installation procedures.Note - You do not need to download the image if you use OSA to installthis OS.
■ ISO image of the Oracle VM installation program:https://www.oracle.com/virtualization/
index.html
■ Oracle VM documentation: http://docs.oracle.com/cd/E50245_01/index.html
6. Review the product notes. Netra Server X5-2 Product Notes
7. Prepare for the installation by configuring various installation options. “Preparing to Install an OS” on page 31
8. Install the Oracle VM Server and, if necessary, Oracle VM Manager. “Installing a Supported OS” on page 65
9. Perform post-installation tasks. “Performing Post-Installation Tasks” on page 85
Related Information
■ “Configuring the Preinstalled Oracle VM 3. 3 Software” on page 27■ “Preparing to Install an OS” on page 31■ “Installing a Supported OS” on page 65■ “Performing Post-Installation Tasks” on page 85
OS Installation Task Map (Linux)
Step Description Links
1. Install your server hardware and configure the Oracle ILOM serviceprocessor.
Server Installation
2. Determine which Linux version to install and access the documentation. “Supported OS Versions andDocumentation” on page 15
3. Choose an installation method. “Understanding Installation Methods” on page 17
4. Obtain the Linux installation media. Use the documentation inconjunction with the installation procedures.
https://www.oracle.com/linux/index.html
5. Review the product notes. Netra Server X5-2 Product Notes
6. Prepare for the installation by configuring various installation options. “Preparing to Install an OS” on page 31
Choosing an OS Installation Method 13
OS Installation Task Map (VMware ESXi)
Step Description Links
7. (Optional) Configure RAID. “Configuring RAID” on page 49
8. Install the Linux OS. “Installing a Supported OS” on page 65
9. Perform post-installation tasks. “Performing Post-Installation Tasks” on page 85
Related Information
■ “Preparing to Install an OS” on page 31■ “Configuring RAID” on page 49■ “Installing a Supported OS” on page 65■ “Performing Post-Installation Tasks” on page 85
OS Installation Task Map (VMware ESXi)
Step Description Links
1. Install your server hardware and configure the Oracle ILOM serviceprocessor.
Server Installation
2. Determine which versions are supported. “Supported OS Versions andDocumentation” on page 15
3. Choose an installation method. “Understanding Installation Methods” on page 17
4. Obtain the VMware ESXi installation media and documentation. ISO image of the VMware ESXi installation program:http://www.vmware.com/download
5. Review the product notes. Netra Server X5-2 Product Notes
6. Prepare for the installation by configuring various installation options. “Preparing to Install an OS” on page 31
7. Install the VMware ESXi software. “Installing a Supported OS” on page 65
8. Perform post-installation tasks. “Performing Post-Installation Tasks” on page 85
Related Information
■ “Preparing to Install an OS” on page 31■ “Configuring RAID” on page 49■ “Installing a Supported OS” on page 65■ “Performing Post-Installation Tasks” on page 85
14 Netra Server X5-2 Operating System Installation Guide • October 2016

OS Installation Task Map (Windows)
OS Installation Task Map (Windows)
Step Description Links
1. Install your server hardware and configure the Oracle ILOM serviceprocessor.
Server Installation
2. Determine which version of Windows to install. “Supported OS Versions andDocumentation” on page 15
3. Choose an installation method. “Understanding Installation Methods” on page 17
4. Obtain the Windows installation media.
5. Review the product notes. Netra Server X5-2 Product Notes
6. Prepare for the installation by configuring various installation options. “Preparing to Install an OS” on page 31
7. Install the Windows OS. “Installing a Supported OS” on page 65
8. Perform post-installation tasks. “Performing Post-Installation Tasks” on page 85
Related Information
■ “Preparing to Install an OS” on page 31■ “Configuring RAID” on page 49■ “Installing a Supported OS” on page 65■ “Performing Post-Installation Tasks” on page 85
Supported OS Versions and Documentation
Note - For the latest information about supported OS versions refer to the Netra Server X5-2Product Notes.
OS Versions Links to Documentation
Oracle Solaris 11 Release 11.2 http://www.oracle.com/goto/solaris11/docs
Oracle VM Release 3.3 http://www.oracle.com/technetwork/documentation/vm-
096300.html
Oracle Linux Oracle Linux 6.6 for x86 (64-bit) with theOracle Linux Support kernel or the Red HatCompatible Kernel. See “Oracle Linux SupportKernel” on page 16 .
http://www.oracle.com/technetwork/documentation/ol-
1-1861776.html
Red Hat Linux RHEL 6.6 and 7.x for x86 (64-bit) http://www.redhat.com/en
Choosing an OS Installation Method 15
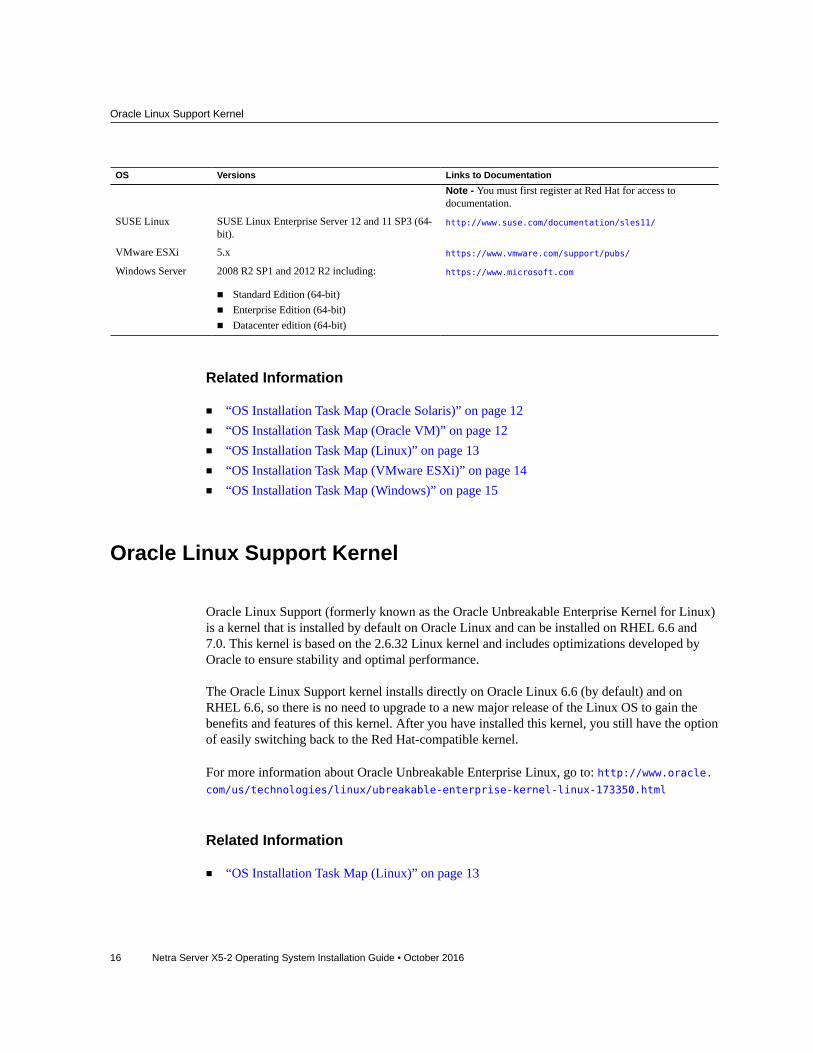
Oracle Linux Support Kernel
OS Versions Links to DocumentationNote - You must first register at Red Hat for access todocumentation.
SUSE Linux SUSE Linux Enterprise Server 12 and 11 SP3 (64-bit).
http://www.suse.com/documentation/sles11/
VMware ESXi 5.x https://www.vmware.com/support/pubs/
Windows Server 2008 R2 SP1 and 2012 R2 including:
■ Standard Edition (64-bit)■ Enterprise Edition (64-bit)■ Datacenter edition (64-bit)
https://www.microsoft.com
Related Information
■ “OS Installation Task Map (Oracle Solaris)” on page 12■ “OS Installation Task Map (Oracle VM)” on page 12■ “OS Installation Task Map (Linux)” on page 13■ “OS Installation Task Map (VMware ESXi)” on page 14■ “OS Installation Task Map (Windows)” on page 15
Oracle Linux Support Kernel
Oracle Linux Support (formerly known as the Oracle Unbreakable Enterprise Kernel for Linux)is a kernel that is installed by default on Oracle Linux and can be installed on RHEL 6.6 and7.0. This kernel is based on the 2.6.32 Linux kernel and includes optimizations developed byOracle to ensure stability and optimal performance.
The Oracle Linux Support kernel installs directly on Oracle Linux 6.6 (by default) and onRHEL 6.6, so there is no need to upgrade to a new major release of the Linux OS to gain thebenefits and features of this kernel. After you have installed this kernel, you still have the optionof easily switching back to the Red Hat-compatible kernel.
For more information about Oracle Unbreakable Enterprise Linux, go to: http://www.oracle.com/us/technologies/linux/ubreakable-enterprise-kernel-linux-173350.html
Related Information
■ “OS Installation Task Map (Linux)” on page 13
16 Netra Server X5-2 Operating System Installation Guide • October 2016

Understanding Installation Methods
Understanding Installation Methods
These topics describe the installation methods available for the supported OSes.
Note - These installation methods describe how to install the OS on a single server. You canalso install an OS on multiple servers using Oracle Enterprise Manager Ops Center. For details,refer to information at: http://www.oracle.com/technetwork/oem/ops-center/index.html
Description Links
Use OSA to install these OSes:
■ Oracle VM■ Supported Linux■ Windows
“OSA for Guided OS Installations” on page 17
Use the OS media to locally or remotely install the OSon any of the supported OSes.
“OS Media for Manual Installations” on page 18
Use your PXE environment to install these OSes:
■ Oracle Solaris■ Supported Linux■ Windows
“PXE for Network Installations” on page 19
Related Information■ “OS Installation Task Map (Oracle Solaris)” on page 12■ “OS Installation Task Map (Oracle VM)” on page 12■ “OS Installation Task Map (Linux)” on page 13■ “OS Installation Task Map (VMware ESXi)” on page 14■ “OS Installation Task Map (Windows)” on page 15■ “Supported OS Versions and Documentation” on page 15
OSA for Guided OS Installations
You can use OSA to perform a guided installation of these OSes:
■ Oracle VM■ Linux■ Windows
You supply the OS installation media, and OSA guides you through the installation process.OSA then fetches the appropriate drivers based on your server hardware configuration.
Choosing an OS Installation Method 17
Understanding Installation Methods
Note - The OSA Installation OS option is not available for all supported operating systems.
During the OS installation you can use OSA to update the OS drivers and other firmwarecomponents (such as BIOS, Oracle ILOM, HBAs, and expanders, if applicable).
You can access OSA locally, using a local console connection, or remotely, using the OracleILOM Remote Console.
Alternatively, you can install an OS manually using the media. See “OS Media for ManualInstallations” on page 18.
Once the OS is installed, you can use OSA to perform a number of administrative tasks, evenfor OSes that OSA does not install. Some of these tasks include:
■ Get the latest available system BIOS, Oracle ILOM, firmware, and drivers from Oracle (anInternet connection is required).
■ Update system Oracle-certified device drivers for optional accessory cards and other systemhardware.
■ Configure RAID 0 or RAID 1 for servers that contain a supported LSI disk controller.■ Configure the SP, including modifying identification information; configuring network
settings (IPv4 and IPv6) and DNS; adding, deleting, or modifying users; and setting theservice processor clock.
■ Display system overview and hardware inventory information.■ Set the keyboard language.■ Access a Linux shell terminal window allowing use of the runtime environment.■ Access Oracle HMP (using the Linux shell).
For more information about OSA refer to Server Administration.
Related Information
■ “OS Installation Task Map (Oracle VM)” on page 12■ “OS Installation Task Map (Linux)” on page 13■ “OS Installation Task Map (Windows)” on page 15■ “Supported OS Versions and Documentation” on page 15
OS Media for Manual Installations
You provide the OS distribution media on either a local or remote CD/DVD, USB device, orCD/DVD image and perform the installation manually using the OS installation wizard.
You can use this method for every supported OS.
18 Netra Server X5-2 Operating System Installation Guide • October 2016
Understanding Installation Methods
In some cases, you must install additional drivers. The drivers for your server are available onthe server's internal OSA USB drive and from the My Oracle Support web site.
Related Information
■ “OS Installation Task Map (Oracle Solaris)” on page 12■ “OS Installation Task Map (Oracle VM)” on page 12■ “OS Installation Task Map (Linux)” on page 13■ “OS Installation Task Map (VMware ESXi)” on page 14■ “OS Installation Task Map (Windows)” on page 15■ “Supported OS Versions and Documentation” on page 15
PXE for Network Installations
The server supports PXE OS installations for these OSes:
■ Oracle Solaris■ Supported Linux■ Windows
Performing OS installations using PXE enables you to install certain OSes by booting the serverover an established PXE-based network.
Your network environment must be configured to support PXE. This guide does not cover PXEconfiguration, however, this guide does provide instructions for initiating a OS installation in aPXE environment.
Related Information
■ “OS Installation Task Map (Oracle Solaris)” on page 12■ “OS Installation Task Map (Linux)” on page 13■ “OS Installation Task Map (Windows)” on page 15■ “Supported OS Versions and Documentation” on page 15
Choosing an OS Installation Method 19

20 Netra Server X5-2 Operating System Installation Guide • October 2016

Configuring the Preinstalled Oracle Solaris OS
These topics describe how to configure the Oracle Solaris OS that is preinstalled (if ordered) onyour server. The preinstalled OS image contains all of the necessary drivers for your server.
Step Description Links
1. Review RAID limitations on the preinstalled OS. “Preinstalled OS RAID Limitations” on page 21
2. Gather the information you need during the configurationprocess.
“Configuration Worksheet (Oracle Solaris)” on page 22
3. Configure the preinstalled Oracle Solaris OS. “Configure the Preinstalled Oracle Solaris OS” on page 24
Related Information
■ “Choosing an OS Installation Method” on page 11■ “Configuring the Preinstalled Oracle VM 3. 3 Software” on page 27■ “Preparing to Install an OS” on page 31■ “Configuring RAID” on page 49■ “Installing a Supported OS” on page 65■ “Performing Post-Installation Tasks” on page 85
Preinstalled OS RAID Limitations
Configuring RAID for the server is optional. However, the Oracle Solaris preinstalled imagecan only be configured in a non-RAID configuration. If a RAID configuration is required, youmust configure RAID on the server and then perform a fresh installation of the Oracle SolarisOS (or other OS) in the desired RAID configuration.
Related Information
■ “Configuration Worksheet (Oracle Solaris)” on page 22■ “Configure the Preinstalled Oracle Solaris OS” on page 24
Configuring the Preinstalled Oracle Solaris OS 21

Configuration Worksheet (Oracle Solaris)
Configuration Worksheet (Oracle Solaris)
Use this configuration worksheet to gather the information you need to configure the OracleSolaris OS. You need to collect only the information that applies to your application of thesystem.
Information for Installation Description or Example Your Values (* Denotes the defaultvalue)
Language Select from the list of available languages for the OS. English*
Locale Select your geographic region from the list ofavailable locales.
Terminal Select the type of terminal that you are using from thelist of available terminal types.
Network connection Is the system connected to a network? ■ Networked■ Nonnetworked*
DHCP Can the system use Dynamic Host ConfigurationProtocol (DHCP) to configure its network interfaces?
■ Yes■ No*
IP address Supply the IP address for the system.
Example: 192.168.100.1
Subnet Is the system part of a subnet?
If yes, what is the netmask of the subnet?
Example: 255.255.255.0
255.255.0.0*
If you are not usingDHCP, note thenetwork address:
IPv6 Do you want to enable IPv6 on this machine? ■ Yes■ No*
Host name Choose a host name for the system.
Kerberos Do you want to configure Kerberos security on thismachine?
If yes, gather this information:
■ Default realm:■ Administration server:■ First KDC:■ (Optional) Additional KDCs:
■ Yes■ No*
Name service If applicable, which name service will this systemuse?
■ NIS+■ NIS■ DNS■ LDAP■ None*
Domain name Provide the name of the domain in which the systemresides.
DNS or NIS
Name service
NIS+ and NIS If you chose NIS+ or NIS, do you want to specify aname server, or let the installation program find one?
■ Specify One■ Find One*
22 Netra Server X5-2 Operating System Installation Guide • October 2016
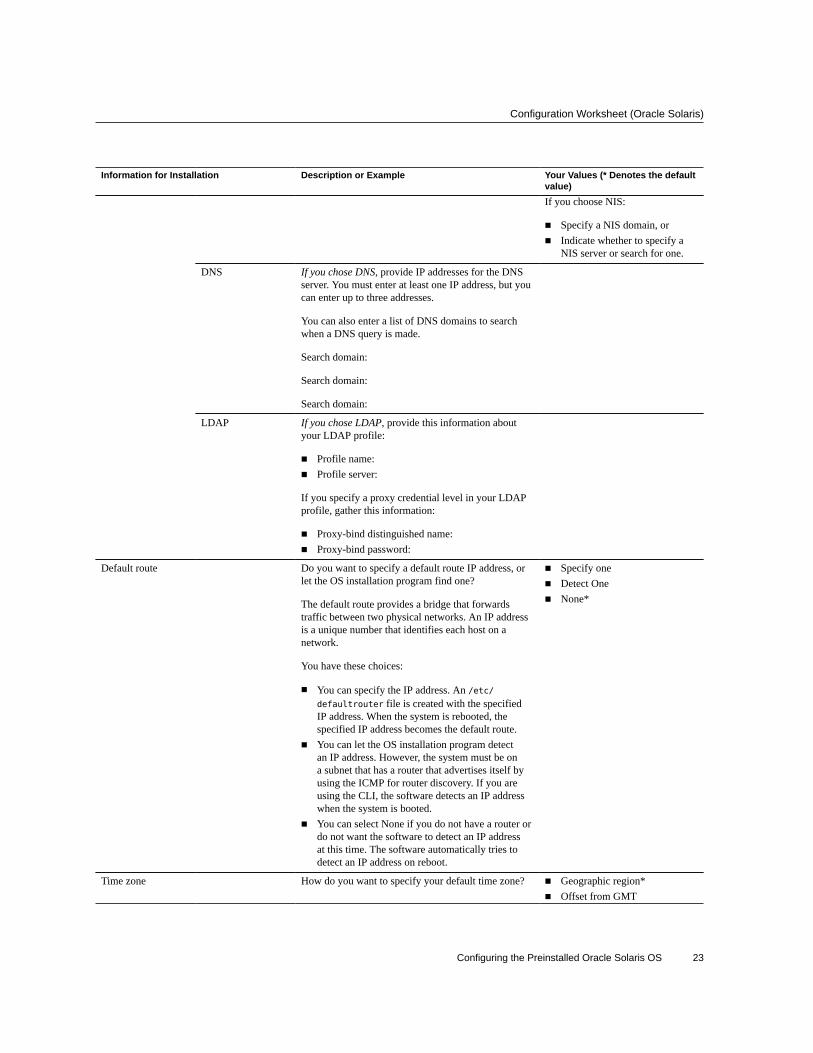
Configuration Worksheet (Oracle Solaris)
Information for Installation Description or Example Your Values (* Denotes the defaultvalue)If you choose NIS:
■ Specify a NIS domain, or■ Indicate whether to specify a
NIS server or search for one.
DNS If you chose DNS, provide IP addresses for the DNSserver. You must enter at least one IP address, but youcan enter up to three addresses.
You can also enter a list of DNS domains to searchwhen a DNS query is made.
Search domain:
Search domain:
Search domain:
LDAP If you chose LDAP, provide this information aboutyour LDAP profile:
■ Profile name:■ Profile server:
If you specify a proxy credential level in your LDAPprofile, gather this information:
■ Proxy-bind distinguished name:■ Proxy-bind password:
Default route Do you want to specify a default route IP address, orlet the OS installation program find one?
The default route provides a bridge that forwardstraffic between two physical networks. An IP addressis a unique number that identifies each host on anetwork.
You have these choices:
■ You can specify the IP address. An /etc/defaultrouter file is created with the specifiedIP address. When the system is rebooted, thespecified IP address becomes the default route.
■ You can let the OS installation program detectan IP address. However, the system must be ona subnet that has a router that advertises itself byusing the ICMP for router discovery. If you areusing the CLI, the software detects an IP addresswhen the system is booted.
■ You can select None if you do not have a router ordo not want the software to detect an IP addressat this time. The software automatically tries todetect an IP address on reboot.
■ Specify one■ Detect One■ None*
Time zone How do you want to specify your default time zone? ■ Geographic region*■ Offset from GMT
Configuring the Preinstalled Oracle Solaris OS 23
Configure the Preinstalled Oracle Solaris OS
Information for Installation Description or Example Your Values (* Denotes the defaultvalue)■ Time zone file
Root password Choose a root password for the system.
Related Information■ “Preinstalled OS RAID Limitations” on page 21■ “Configure the Preinstalled Oracle Solaris OS” on page 24
Configure the Preinstalled Oracle Solaris OS
When the server is started for the first time, you are prompted to configure the preinstalledOracle Solaris OS.
Note - You can only perform this procedure if the server was ordered with the Oracle SolarisOS preinstalled.
1. If you are not already logged in to Oracle ILOM, log in either through the serialmanagement port or from the network management port.Refer to Server Administration, accessing Oracle ILOM.
2. If main power has not yet been applied to the server, power on or restart theserver in one of these ways.
■ Power on the server – Use one of these methods:■ From the Oracle ILOM web interface System Information page, click Power State →
Turn On.■ From the Oracle ILOM CLI, type:
-> start /System
■ Restart the server – Use one of these methods:■ From the Oracle ILOM web interface, click Host Management → Power Control and
select Reset from the Select Action list box. Then click Save and OK.■ From the Oracle ILOM CLI, type:
-> reset /System
The server starts the boot process.
3. From Oracle ILOM, start the remote console using one of these methods.
■ From the Oracle ILOM web interface
24 Netra Server X5-2 Operating System Installation Guide • October 2016
Configure the Preinstalled Oracle Solaris OS
Navigate to the System Information → Summary page, click Launch for Remote Console inthe Actions panel. Then click Turn On for the Power State.
■ From the Oracle ILOM CLIType:
-> start /HOST/console
Are you sure you want to start /HOST/console (y/n)? y
Serial console started.
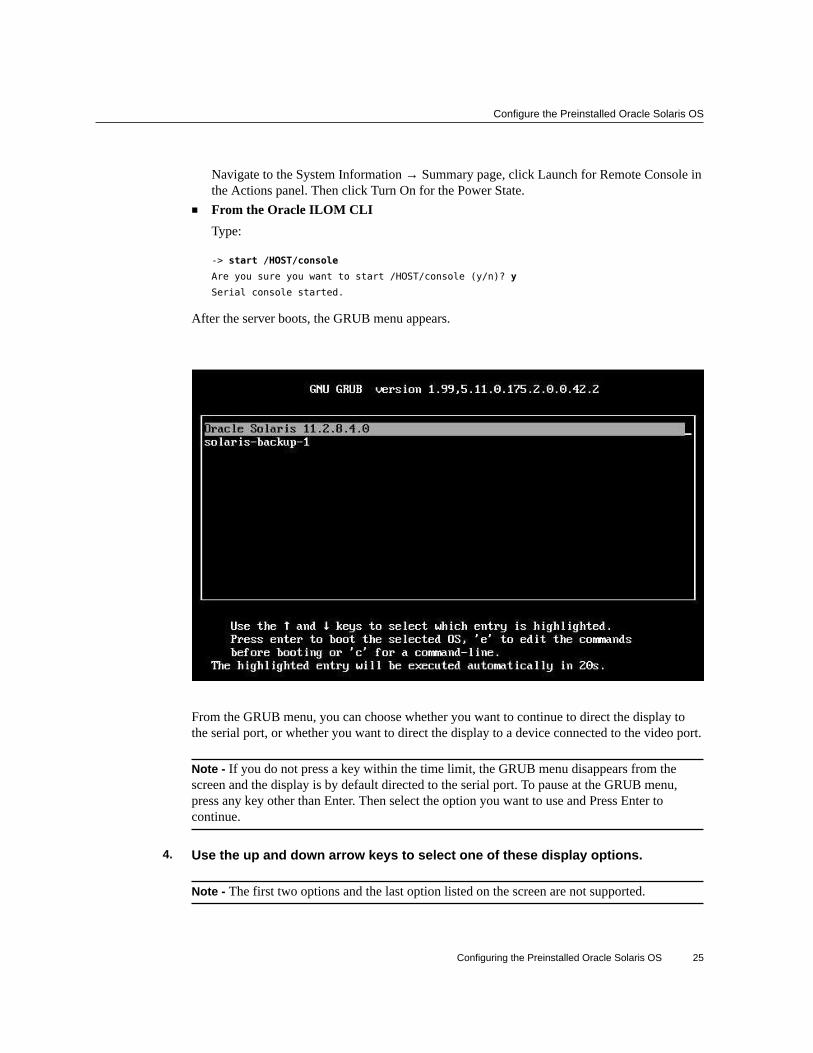
After the server boots, the GRUB menu appears.
From the GRUB menu, you can choose whether you want to continue to direct the display tothe serial port, or whether you want to direct the display to a device connected to the video port.
Note - If you do not press a key within the time limit, the GRUB menu disappears from thescreen and the display is by default directed to the serial port. To pause at the GRUB menu,press any key other than Enter. Then select the option you want to use and Press Enter tocontinue.
4. Use the up and down arrow keys to select one of these display options.
Note - The first two options and the last option listed on the screen are not supported.
Configuring the Preinstalled Oracle Solaris OS 25
Configure the Preinstalled Oracle Solaris OS
■ Display output to the serial port – Select the appropriate option in the GRUBmenu and press Enter.This is the default option. If you do not select an option on the GRUB menu, after fiveseconds, the GRUB menu is no longer available and the system continues with the outputdirected to the serial port.
■ Display output to the video port – Select the appropriate option in the GRUBmenu and press Enter.If you choose this option, you must connect a device to the VGA connector on the serverand an input device (USB keyboard or mouse).
5. Follow the Oracle Solaris 11 installer on-screen prompts to configure thesoftware.Use the information gathered in “Configuration Worksheet (Oracle Solaris)” on page 22 tohelp you enter the system and network information as you are prompted.
The screens that are displayed will vary, depending on the configuration option you select (forexample, DHCP or static IP address).
After you enter the system configuration information, the server completes the boot process anddisplays the Oracle Solaris login prompt.
For detailed information about using the Oracle Solaris OS, access the documentation listed inhttp://www.oracle.com/goto/solaris11/docs.
Related Information
■ “Preinstalled OS RAID Limitations” on page 21■ “Configuration Worksheet (Oracle Solaris)” on page 22
26 Netra Server X5-2 Operating System Installation Guide • October 2016
Configuring the Preinstalled Oracle VM 3. 3Software
These topics describe how to configure the Oracle VM 3.3 software that is preinstalled (ifordered) on the server. The preinstalled image contains all of the necessary drivers for theserver.
Step Description Links
1. Gather necessary configuration information. “Configuration Worksheet (Oracle VMServer)” on page 27
2. Configure the preinstalled Oracle VMsoftware.
“Configure the Preinstalled Oracle VM 3.3OS” on page 28
3. Get started using Oracle VM. “Oracle VM 3.3 Overview” on page 30
Related Information■ “Choosing an OS Installation Method” on page 11■ “Configuring the Preinstalled Oracle Solaris OS” on page 21■ “Preparing to Install an OS” on page 31■ “Configuring RAID” on page 49■ “Installing a Supported OS” on page 65■ “Performing Post-Installation Tasks” on page 85
Configuration Worksheet (Oracle VM Server)
Use this configuration worksheet to gather the information you need to configure the OracleVM Server.
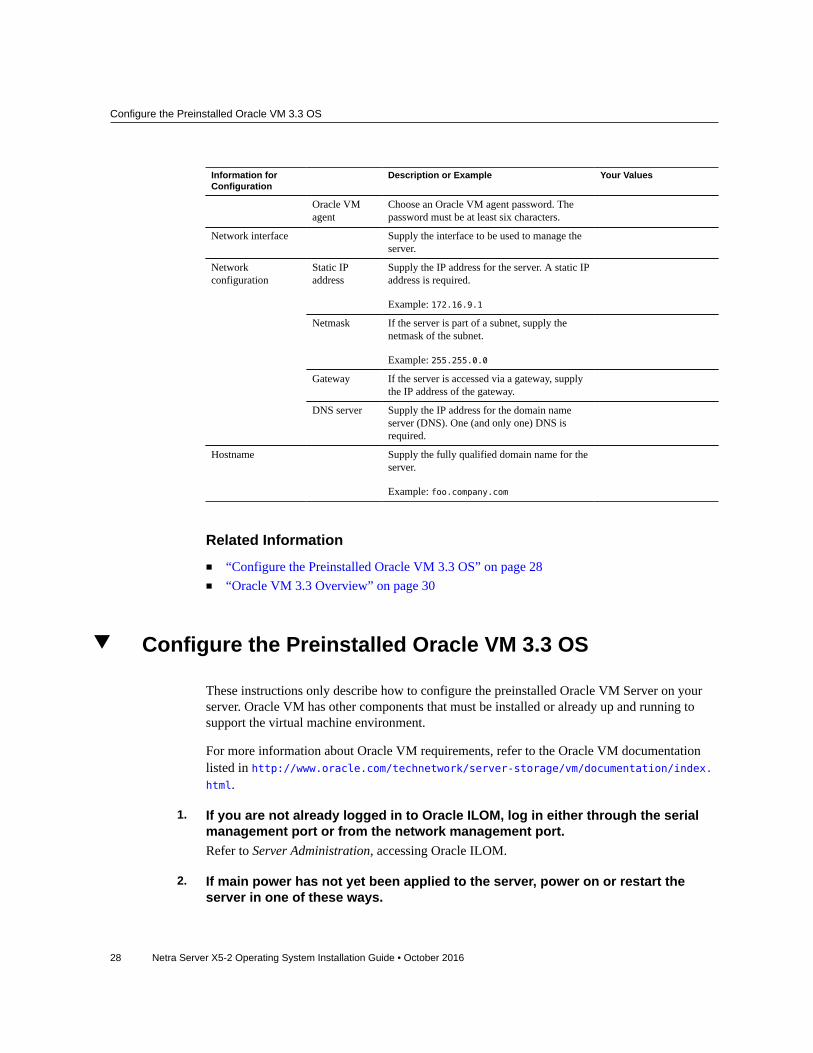
Information forConfiguration
Description or Example Your Values
Oracle VM Serverpasswords
Root Choose a root password. There are norestrictions on the characters or length.
Configuring the Preinstalled Oracle VM 3. 3 Software 27
Configure the Preinstalled Oracle VM 3.3 OS
Information forConfiguration
Description or Example Your Values
Oracle VMagent
Choose an Oracle VM agent password. Thepassword must be at least six characters.
Network interface Supply the interface to be used to manage theserver.
Static IPaddress
Supply the IP address for the server. A static IPaddress is required.
Example: 172.16.9.1
Netmask If the server is part of a subnet, supply thenetmask of the subnet.
Example: 255.255.0.0
Gateway If the server is accessed via a gateway, supplythe IP address of the gateway.
Networkconfiguration
DNS server Supply the IP address for the domain nameserver (DNS). One (and only one) DNS isrequired.
Hostname Supply the fully qualified domain name for theserver.
Example: foo.company.com
Related Information
■ “Configure the Preinstalled Oracle VM 3.3 OS” on page 28■ “Oracle VM 3.3 Overview” on page 30
Configure the Preinstalled Oracle VM 3.3 OS
These instructions only describe how to configure the preinstalled Oracle VM Server on yourserver. Oracle VM has other components that must be installed or already up and running tosupport the virtual machine environment.
For more information about Oracle VM requirements, refer to the Oracle VM documentationlisted in http://www.oracle.com/technetwork/server-storage/vm/documentation/index.html.
1. If you are not already logged in to Oracle ILOM, log in either through the serialmanagement port or from the network management port.Refer to Server Administration, accessing Oracle ILOM.
2. If main power has not yet been applied to the server, power on or restart theserver in one of these ways.
28 Netra Server X5-2 Operating System Installation Guide • October 2016

Configure the Preinstalled Oracle VM 3.3 OS
■ Power on the server – Use one of these methods:■ From the Oracle ILOM web interface Summary Information page, click Turn On for the
Power State in the Actions panel.■ From the Oracle ILOM CLI, type:
-> start /System
■ Restart the server – Use one of these methods:■ From the Oracle ILOM web interface, navigate to Host Management → Power Control
and select Reset from the Select Action drop-down menu. Then click Save and OK.■ From the Oracle ILOM CLI, type:
-> reset /System
The server starts the boot process.
3. From Oracle ILOM, start the remote console using one of these methods.
■ From the Oracle ILOM web interfaceNavigate to the System Information → Summary page, click Launch for Remote Console inthe Actions panel. Then click Turn On for the Power State.
■ From the Oracle ILOM CLIType:
-> start /HOST/console
Are you sure you want to start /HOST/console (y/n)? y
Serial console started.
From the GRUB menu, you can choose whether you want to continue to direct the display tothe serial port, or whether you want to direct the display to a device connected to the video port.
Note - If you do not press a key within five seconds, the GRUB menu disappears from thescreen and the display is by default directed to the serial port. To pause at the GRUB menu,press any key other than Enter. Then select the option you want to use and Press Enter tocontinue.
4. Use the up and down arrow keys to select one of these display options.
Note - The first two options and the last option listed on the screen are not supported.
■ Display output to the serial port – Select the appropriate option in the GRUBmenu and press Enter.
Configuring the Preinstalled Oracle VM 3. 3 Software 29
Oracle VM 3.3 Overview
This is the default option. If you do not select an option on the GRUB menu, after fiveseconds, the GRUB menu is no longer available and the system continues with the outputdirected to the serial port.
■ Display output to the video port – Select the appropriate option in the GRUBmenu and press Enter.If you choose this option, you must connect a device to the VGA connector on the serverand an input device (USB keyboard or mouse).
5. Follow the Oracle VM installer on-screen prompts to configure the Oracle VMServer portion of the software.After you have responded to all the prompts for system information, the server completes theboot process and displays the Oracle VM login prompt.
Related Information
■ “Configuration Worksheet (Oracle VM Server)” on page 27■ “Oracle VM 3.3 Overview” on page 30
Oracle VM 3.3 Overview
Use this information to get started using Oracle VM:
■ The default root password for the Oracle Linux VM is ovsroot.■ The default console password for the VMs is oracle.■ You configure the root password for the Oracle Solaris VM during the Oracle Solaris
installation procedure. Refer to the Oracle Solaris OS documentation.
For complete information about using Oracle VM 3.3, refer to the Oracle VM 3.3documentation listed in http://www.oracle.com/goto/solaris11/docs.
Related Information
■ http://www.oracle.com/technetwork/documentation/index.html#virtualization.■ “Configuration Worksheet (Oracle VM Server)” on page 27■ “Configure the Preinstalled Oracle VM 3.3 OS” on page 28
30 Netra Server X5-2 Operating System Installation Guide • October 2016

Preparing to Install an OS
These topics describe how to prepare for a new installation of a supported OS.
Step Description Links
1. Learn about console display options and setthem up.
“Selecting the Console Display” on page 31
2. Learn about boot media options and set themup.
“Selecting the Boot Media” on page 35
3. Verify and configure server BIOS settings. “Setting Up BIOS” on page 44
4. Access installation utilities. “Accessing Installation Utilities” on page 41
5. Configure BIOS. “Setting Up BIOS” on page 44
Related Information
■ “Choosing an OS Installation Method” on page 11■ “Configuring RAID” on page 49■ “Installing a Supported OS” on page 65■ “Performing Post-Installation Tasks” on page 85
Selecting the Console Display
To use any of the OS installation methods, you must have access to the server.
These topics describe the options for connecting a console from which you perform theinstallation.
■ “Console Display Options” on page 32■ “Set Up a Serial Console CLI Connection” on page 32■ “Set Up a KVM Console Connection” on page 33■ “Set Up an SSH Client Network Console Connection” on page 33■ “Set Up a Web-Based Client Console Connection” on page 34
Preparing to Install an OS 31
Set Up a Serial Console CLI Connection
Related Information■ “Selecting the Boot Media” on page 35■ “Preparing Your PXE Environment” on page 37■ “Accessing Installation Utilities” on page 41■ “Setting Up BIOS” on page 44
Console Display Options
You can install the OS and administer the server through 4 types of consoles:
■ Serial console CLI connection■ Keyboard, Video, Mouse (KVM) console connection■ Web-based client connection using the Oracle ILOM Remote Console application■ SSH client network CLI connection
Related Information■ Oracle ILOM 3.2 documentation at: http://www.oracle.com/goto/ILOM/docs■ “Set Up a Serial Console CLI Connection” on page 32■ “Set Up a KVM Console Connection” on page 33■ “Set Up an SSH Client Network Console Connection” on page 33■ “Set Up a Web-Based Client Console Connection” on page 34
Set Up a Serial Console CLI Connection
1. Attach a terminal device to the server SER MGT port.For details, refer to Server Installation, connecting cables.
2. Press the Enter key.The Oracle ILOM prompt appears.
3. Log in to Oracle ILOM.This is the factory default login account:
■ User name – root■ Password – changeme
4. Establish a connection to the host console.
32 Netra Server X5-2 Operating System Installation Guide • October 2016
Set Up a KVM Console Connection
-> start /HOST/console
The serial output is automatically routed to the local console.
Related Information
■ Oracle ILOM 3.2 documentation at: http://www.oracle.com/goto/ILOM/docs■ “Console Display Options” on page 32■ “Set Up a KVM Console Connection” on page 33■ “Set Up an SSH Client Network Console Connection” on page 33■ “Set Up a Web-Based Client Console Connection” on page 34
Set Up a KVM Console Connection
1. Attach a VGA monitor, keyboard, and mouse to the server.For details, refer to Server Installation, connecting cables.
2. Press the Enter Key.The Oracle ILOM prompt appears.
3. Log in to Oracle ILOM.This is the factory default login account:
■ User name – root■ Password – changeme
Related Information
■ Oracle ILOM 3.2 documentation at: http://www.oracle.com/goto/ILOM/docs■ “Console Display Options” on page 32■ “Set Up a Serial Console CLI Connection” on page 32■ “Set Up an SSH Client Network Console Connection” on page 33■ “Set Up a Web-Based Client Console Connection” on page 34
Set Up an SSH Client Network ConsoleConnection
This procedure uses the Oracle ILOM CLI to remotely access the server console.
Preparing to Install an OS 33
Set Up a Web-Based Client Console Connection
1. Establish an IP address for the server SP.Refer to Server Administration, configuring the NET MGT port.
2. From a network console, establish an SSH connection to the server SP and login to Oracle ILOM.
ssh root@hostname_or_IP_addressPassword: changme->
The Oracle ILOM CLI prompt is displayed..
3. Establish a connection to the host console.
-> start /HOST/console
Related Information
■ Oracle ILOM 3.2 documentation at: http://www.oracle.com/goto/ILOM/docs■ “Console Display Options” on page 32■ “Set Up a Serial Console CLI Connection” on page 32■ “Set Up a KVM Console Connection” on page 33■ “Set Up a Web-Based Client Console Connection” on page 34
Set Up a Web-Based Client Console Connection
This procedure uses the Oracle ILOM web browser to remotely access the server console.
1. Establish an IP address for the server SP.Refer to Server Administration, configuring the NET MGT port.
2. In a web browser, type the IP address for the server SP.The Oracle ILOM Please Log In page is displayed.
3. Log in to Oracle ILOM.This is the factory default login account:
■ User name – root■ Password – changeme
4. Navigate to the Remote Control → Redirection page.The Redirection page is displayed.
34 Netra Server X5-2 Operating System Installation Guide • October 2016
Selecting the Boot Media
5. Select either video or serial redirection.
6. Click Launch Remote Console.A separate window is displayed. The information displayed in the Remote Console differsbased on the state of the host.
■ Host is powered off – Blank screen.■ Host is booting – BIOS initialization windows are displayed. During this activity, you
can enter various BIOS keys to enter the BIOS Setup utility or start OSA. See “Setting UpBIOS” on page 44.
■ Host OS is booted – A message appears prompting you to specify user credentials for theinstalled OS.
Related Information
■ Oracle ILOM 3.2 documentation at: http://www.oracle.com/goto/ILOM/docs■ “Console Display Options” on page 32■ “Set Up a Serial Console CLI Connection” on page 32■ “Set Up a KVM Console Connection” on page 33■ “Set Up an SSH Client Network Console Connection” on page 33■ “Set Up a Web-Based Client Console Connection” on page 34
Selecting the Boot Media
Use one of these procedures to start the OS installation by booting from a local or remoteinstallation media source.
Description Links
Start the installation using a local CD/DVD-ROMdevice.
“Set Up Local Boot Media” on page 36
Start the installation using a remote CD/DVD-ROMdevice or ISO installation image.
“Set Up Remote Boot Media” on page 36
Related Information
■ “Selecting the Console Display” on page 31■ “Preparing Your PXE Environment” on page 37■ “Accessing Installation Utilities” on page 41■ “Setting Up BIOS” on page 44
Preparing to Install an OS 35
Set Up Local Boot Media
Set Up Local Boot Media
Local boot media requires that the server have a built-in or an externally attached CD/DVD-ROM device.
If your server does not contain a built-in CD/DVD-ROM device, attach theappropriate device to the server.For more information about how to attach devices to the server refer to Server Service.
Related Information■ “Set Up Remote Boot Media” on page 36
Set Up Remote Boot Media
You can start the network installation from a redirected boot device such as a CD/DVD or ISOimage. You must provide the installation media.
Note - Alternatively, you can start the network installation from a networked system thatexports the installation over the network using a PXE environment. See “Preparing Your PXEEnvironment” on page 37.
1. Insert the boot media into the device.
■ For a CD/DVD-ROM – Insert media into the built-in or external CD/DVD drive.
■ For a CD/DVD-ROM ISO image – Ensure that ISO images are readily availableon a network shared location.
2. Establish a web-based remote console connection.See “Set Up a Web-Based Client Console Connection” on page 34.
3. In the KVMS menu of the Oracle ILOM Remote Console, click Storage...The Storage Devices window opens.
4. Click Add...The Add Storage Device window opens.
5. Locate the bootable image, and click Select.The Storage Devices window is updated with the Path and Device Type.
6. Click Connect.
36 Netra Server X5-2 Operating System Installation Guide • October 2016
Preparing Your PXE Environment
The image is mounted and available to the Oracle ILOM Remote Console.
Related Information■ “Set Up Local Boot Media” on page 36
Preparing Your PXE Environment
These topics describe how to set up your environment to support PXE OS installation ofsupported OSes. The server supports PXE-based installations for these OSes:
■ Oracle Solaris■ Oracle Linux■ Red Hat Linux■ SUSE Linux■ Windows OS
Note - You only need to perform these setup tasks if you plan to perform an OS installationusing PXE.
■ “Prepare PXE (Oracle Solaris)” on page 37■ “Prepare PXE (Linux)” on page 38■ “Prepare PXE (Windows)” on page 40
Related Information■ “Selecting the Console Display” on page 31■ “Selecting the Boot Media” on page 35■ “Accessing Installation Utilities” on page 41■ “Setting Up BIOS” on page 44
Prepare PXE (Oracle Solaris)
This procedure describes how to prepare your environment so you can install the Oracle SolarisOS using PXE.
Note - JumpStart eliminates most of the manual tasks of setting up the Oracle Solaris OS for thefirst time on multiple servers. For more information about using a JumpStart image, refer to theOracle Solaris installation documentation.
Preparing to Install an OS 37
Prepare PXE (Linux)
1. Ensure that the PXE boot JumpStart installation server is properly set up andaccessible to your server on the network.
Note - The PXE network boot does not work properly over subnets that include multiple DHCPservers. Therefore, set up only one DHCP server on the subnet that includes the client systemthat you want to install.
2. Ensure that the Oracle Solaris installation media is available for PXE boot.
3. Ensure that the JumpStart installation server has your server's MAC address ofthe network interface from which the server will boot.As an example, if you want to PXE boot from NET0, you can obtain the server's MAC addressby logging in to the SP as root, and typing:
-> show /SYS/MB/NET0 fru_macaddress
/SYS/MB/NET0
Properties:
fru_macaddress = 00:21:28:e7:77:24
4. Install the OS.See “Install an OS (PXE)” on page 80.
Related Information
■ “Prepare PXE (Linux)” on page 38■ “Prepare PXE (Windows)” on page 40
Prepare PXE (Linux)
This procedure describes the high-level steps that you perform to set up your PXE environmentto support PXE booting for supported Linux OSes. For setup details, refer to the installationdocumentation for your OS.
1. Follow the PXE network installation instructions from one of these resources:
■ Oracle Linux and Red Hat Linux – Follow the PXE network installationinstructions in the Red Hat Enterprise Linux: System Administration Guideat:http://www.redhat.com/en
Note - You must first register at Red Hat for access to documentation.
38 Netra Server X5-2 Operating System Installation Guide • October 2016
Prepare PXE (Linux)
■ SLES 11 SP3 – Go to:http://www.suse.com/documentation/sles11/
2. Configure the network (NFS, FTP, HTTP) server to export the installation tree.You can configure your network to provide the ISO DVD image or use a KickStart image(network repository).
Note - KickStart is an automated installation tool. KickStart enables you to create a singleimage containing the settings for some or all installation and configuration parameters that arenormally provided during a typical Oracle Linux installation. Typically, a KickStart image isplaced on a single network server and read by multiple systems for installation.
3. Ensure that these items are configured.
a. Configure the files on the TFTP server necessary for PXE booting.
b. Configure your server's MAC network port address to boot from the PXEconfiguration.As an example, if you want to PXE boot from NET0, you can obtain the server's MACaddress by logging in to the SP as root, and typing:
-> show /SYS/MB/NET0 fru_macaddress
/SYS/MB/NET0
Properties:
fru_macaddress = 00:21:28:e7:77:24
c. Configure DHCP.
4. If you are using a KickStart image to perform the installation, ensure that theseitems are configured.
a. Create a KickStart file.
b. Create the boot media with the KickStart file or make the KickStart fileavailable on the network.
5. Install the OS.See “Install an OS (PXE)” on page 80.
Related Information
■ “Prepare PXE (Oracle Solaris)” on page 37■ “Prepare PXE (Windows)” on page 40
Preparing to Install an OS 39
Prepare PXE (Windows)
Prepare PXE (Windows)
This procedure describes the high-level steps that you perform to set up your PXE environmentto support PXE booting for supported Windows OSes using WDS. For setup details, refer toMicrosoft's WDS documentation.
1. Ensure that these items are configured.
a. Configure the network (NFS, FTP, HTTP) server to export the installationtree.
b. Configure the files on the TFTP server necessary for PXE booting.
c. Configure your server's MAC network port address to boot from the PXEconfiguration.As an example, if you want to PXE boot from NET0, you can obtain the server's MACaddress by logging in to the SP as root, and typing:
-> show /SYS/MB/NET0 fru_macaddress
/SYS/MB/NET0
Properties:
fru_macaddress = 00:21:28:e7:77:24
d. Configure DHCP.
2. If you are using WDS to perform the installation, ensure that these items areconfigured.
a. Add the required system device drivers to the install.wim image and, ifnecessary, the boot.wim image.For instructions for adding drivers to the WIM installation images, refer to the MicrosoftWDS documentation.
b. Obtain the WIM Administrator password.
3. Install the OS.See “Install an OS (PXE)” on page 80.
Related Information
■ “Prepare PXE (Oracle Solaris)” on page 37■ “Prepare PXE (Linux)” on page 38
40 Netra Server X5-2 Operating System Installation Guide • October 2016
Accessing Installation Utilities
Accessing Installation Utilities
Use these topics to initiate various installation tasks:
■ “Initiate a BIOS Operation” on page 41■ “Start OSA” on page 43
Related Information
■ “Selecting the Console Display” on page 31■ “Selecting the Boot Media” on page 35■ “Preparing Your PXE Environment” on page 37■ “Setting Up BIOS” on page 44
Initiate a BIOS Operation
This procedure resets the server.
1. Perform one of the following actions.
Note - During the reset or power on, pay close attention to the screen so that you can interruptthe boot process at the correct time.
■ From the local server – Press the Power button on the front panel of theserver to power off the server, then press the Power button again to poweron the server.
■ From the Oracle ILOM web interface – Click Host Management → PowerControl and select Reset from the Select Action list box.
■ From the Oracle ILOM CLI – Type.
-> reset /System
Preparing to Install an OS 41

Initiate a BIOS Operation
The BIOS startup screen is displayed.
2. Depending on your OS installation method, interrupt the boot process andcontinue to the appropriate procedure.Use one of these keys:
FunctionKey
Control KeySequence
Description Installation Procedure
F1 Ctrl+Q Access BIOS Setup help. n/a
F2 Ctrl+E Access the BIOS Setup utility during BIOS POST. “Setting Up BIOS” on page 44
F7 Ctrl+D Discard changes. n/a
F8 Ctrl+P Access the BIOS boot menu during BIOS POST. “Installing a Supported OS” on page 65
F9 Ctrl+O Start OSA during BIOS POST. (BIOS boots to OSA,bypassing the current Boot Priority List for this one-timeboot.)
“Install an OS (OSA)” on page 65
F10 Ctrl+S Save BIOS changes and exit. n/a
F12 Ctrl+N Activate a network boot during BIOS POST.
Related Information
■ “Start OSA” on page 43
42 Netra Server X5-2 Operating System Installation Guide • October 2016
Start OSA
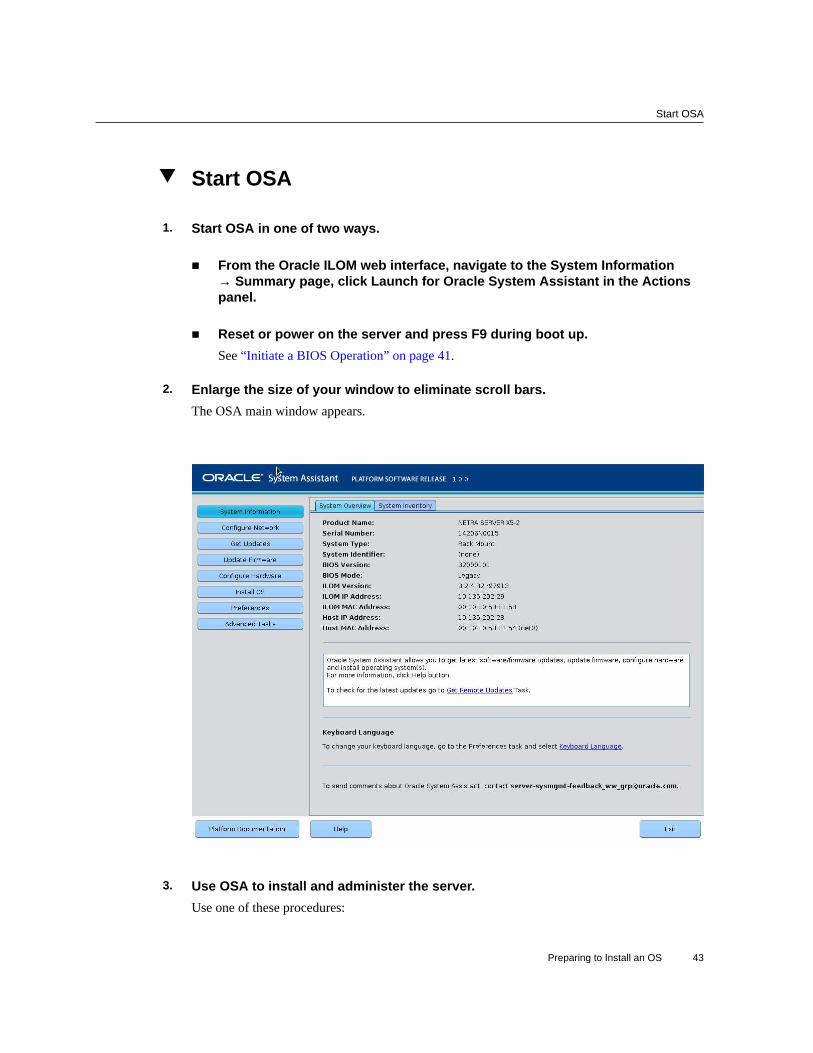
Start OSA
1. Start OSA in one of two ways.
■ From the Oracle ILOM web interface, navigate to the System Information→ Summary page, click Launch for Oracle System Assistant in the Actionspanel.
■ Reset or power on the server and press F9 during boot up.See “Initiate a BIOS Operation” on page 41.
2. Enlarge the size of your window to eliminate scroll bars.The OSA main window appears.
3. Use OSA to install and administer the server.Use one of these procedures:
Preparing to Install an OS 43
Setting Up BIOS
■ “Configure RAID (OSA)” on page 52■ “Install an OS (OSA)” on page 65
Related Information
■ “Initiate a BIOS Operation” on page 41
Setting Up BIOS
If the server is newly installed and this is the first time that an OS is installed, then the BIOS isset to default values that are optimized for the server.
You only need to change the BIOS if you want to perform these tasks.
Description Links
Learn about BIOS. “BIOS Overview (OS Installation)” on page 44
Server Administration, BIOS overview
Ensure that the BIOS settings are set to default values. “Set BIOS Settings to Default Values” on page 45
Configure the server to use either Legacy BIOS modeor UEFI boot mode.
“Switch Between Legacy BIOS and UEFI BIOSModes” on page 47
Related Information
■ Server Administration, understanding administration resources and accessing administrationtools
BIOS Overview (OS Installation)
BIOS firmware is built in to the server and provides the server with configuration informationand programs that enable the server to boot.
The server's BIOS can be configured to operate in one of these two modes:
■ Legacy BIOS (default) – Works with all of the supported OSes, but does not offer the latestBIOS features.
■ UEFI BIOS – Provides the latest BIOS features, but only supports these OSes:■ Oracle Enterprise Linux■ Oracle Solaris
44 Netra Server X5-2 Operating System Installation Guide • October 2016
Set BIOS Settings to Default Values
■ Oracle VM■ SUSE Linux Enterprise Server■ RHEL■ Microsoft Windows
Some devices do not yet support UEFI-based BIOS and can only boot from Legacy BIOS.Depending on your situation, you might need to configure the server's BIOS for Legacy BIOSMode or UEFI Boot Mode.
Once you choose a mode and install an OS, the server can only boot using the same mode thatwas used for the installation.
Ensure that the server's BIOS is configured for your desired mode before you install an OS.
Note - When switching between Legacy BIOS Mode and UEFI Boot Mode (either direction),the BIOS configuration settings for a given mode do not persist.
You can use these tools to view, configure, and reset default BIOS values:
■ BIOS Setup utility■ OSA
Any changes you make in the BIOS Setup utility are permanent until you change them.
In addition to using F2 to view or edit the system's BIOS settings, you can use F8 during theBIOS start-up to specify a temporary boot device. If you use F8 to set a temporary boot device,this change is only in effect for the current system boot. The permanent boot device specifiedthrough F2 takes effect after booting from the temporary boot device.
Note - You can set the BIOS mode using OSA during the installation process. See “Install anOS (OSA)” on page 65.
Related Information
■ “Set BIOS Settings to Default Values” on page 45■ “Switch Between Legacy BIOS and UEFI BIOS Modes” on page 47
Set BIOS Settings to Default Values
Note - If the server is newly installed and this is the first time that an OS is installed, then theBIOS is configured to its default settings. You do not have to perform this task.
Preparing to Install an OS 45

Set BIOS Settings to Default Values
1. Ensure that these requirements are met:
■ A drive is properly installed in the server. Refer to Server Service.■ A console connection is established to the server. For details, see “Selecting the Console
Display” on page 31 .
2. Access the BIOS Setup utility.See “Initiate a BIOS Operation” on page 41.
3. Press F9 to automatically load the optimized default settings.A message appears prompting you to continue this operation by selecting OK or to cancel thisoperation by selecting CANCEL.
4. In the message, highlight OK then press Enter.The BIOS Setup utility screen appears with the cursor highlighting the first value in the SystemTime field.
5. In the BIOS Setup utility, edit the values associated with the system time anddate.
a. Highlight the values you want to change.Use up or down arrow keys to change between the system time and date selection.
b. Change the values in the highlighted fields using these keys:
■ + (plus) increments the current value shown.■ - (minus) decrements the current value shown.■ Enter moves the cursor to the next value field.
6. Press F10 to save changes and exit the BIOS Setup utility.
Note - When using the Oracle ILOM remote console, F10 is trapped by the local OS. You mustuse the F10 option listed in the Keyboard drop-down menu that is available at the top of theRemote Console application.
Related Information
■ “BIOS Overview (OS Installation)” on page 44■ “Switch Between Legacy BIOS and UEFI BIOS Modes” on page 47
46 Netra Server X5-2 Operating System Installation Guide • October 2016

Switch Between Legacy BIOS and UEFI BIOS Modes
Switch Between Legacy BIOS and UEFI BIOSModes
The BIOS firmware supports both Legacy BIOS (the default) and UEFI. Because some OSessupport both Legacy BIOS and UEFI BIOS and some only support Legacy BIOS, you havethese options:
■ If the OS being installed supports Legacy BIOS only, ensure that BIOS is set to Legacymode before you install the OS.
■ If the OS being installed supports both Legacy BIOS and UEFI BIOS, you can set the BIOSto either Legacy mode or UEFI mode. Set the BIOS mode before you install the OS.
Note - The Windows Server 2008 OSes support both Legacy and UEFI BIOS modes. Youcan choose which mode to use for the OS installation.
1. Access the BIOS Setup utility.See “Initiate a BIOS Operation” on page 41.
2. Use the left and right arrow keys to display the Boot menu.
Preparing to Install an OS 47
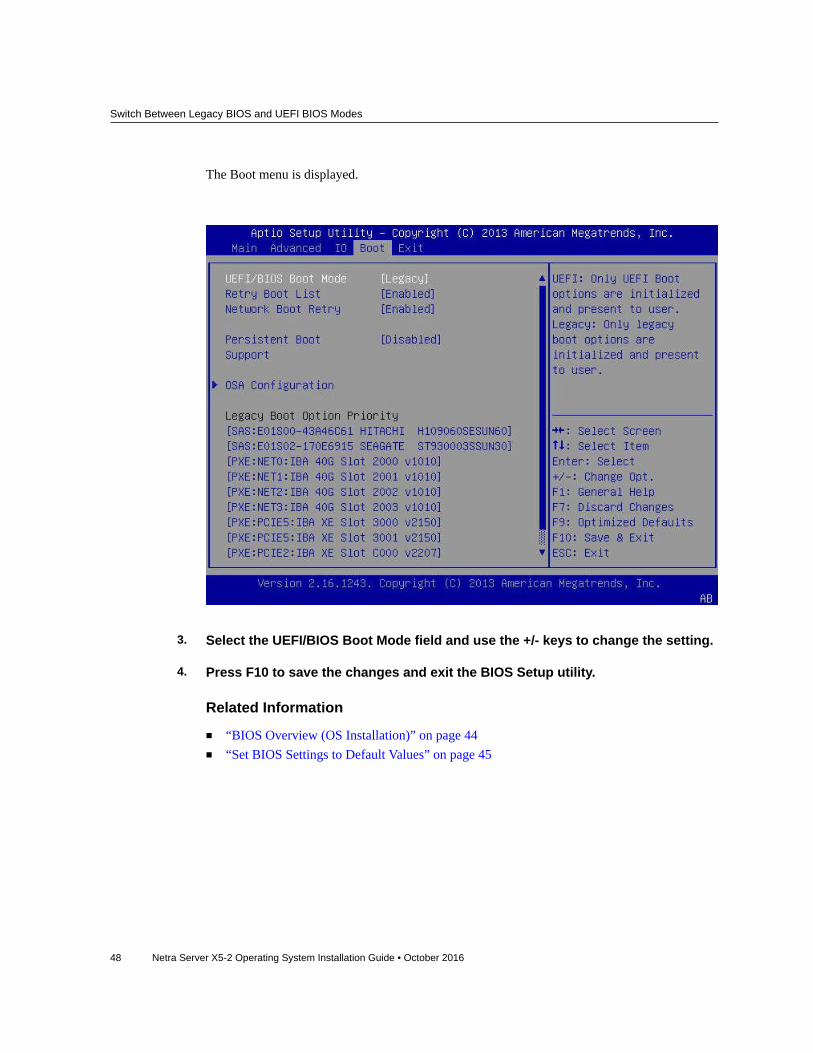
Switch Between Legacy BIOS and UEFI BIOS Modes
The Boot menu is displayed.
3. Select the UEFI/BIOS Boot Mode field and use the +/- keys to change the setting.
4. Press F10 to save the changes and exit the BIOS Setup utility.
Related Information
■ “BIOS Overview (OS Installation)” on page 44■ “Set BIOS Settings to Default Values” on page 45
48 Netra Server X5-2 Operating System Installation Guide • October 2016
Configuring RAID
These topics provide information on configuring the server drives into hardware RAIDvolumes.
Step Description Links
1. Learn about RAID configuration options. “HBA and RAID Support” on page 49
“RAID Configuration Requirements” on page 50
“Post-Installation RAID VolumeCreation” on page 51
2. Configure server drives into RAID volumes usingOSA or using the LSI MegaRAID BIOS utilities.
“Configure RAID (OSA)” on page 52
“Configuring RAID Volumes (LSI BIOSUtilities)” on page 56
Related Information
■ “Choosing an OS Installation Method” on page 11■ “Configuring the Preinstalled Oracle Solaris OS” on page 21■ “Configuring the Preinstalled Oracle VM 3. 3 Software” on page 27■ “Preparing to Install an OS” on page 31■ “Installing a Supported OS” on page 65■ “Performing Post-Installation Tasks” on page 85
HBA and RAID Support
Disk Controller RAID Support
Sun 12Gb/s LSI SAS3008 SAS-3 On Board Controller No RAID support
Sun Storage 12Gb/s SAS PCIe HBA, external 8 port No RAID support
Sun Storage 12Gb/s SAS PCIe RAID HBA,internal 8port 1 GB memory
Hardware 0, 1, 5, 6, 10, 50, or 60
Configuring RAID 49

RAID Configuration Requirements
Note - If you are using OSA to configure RAID, you can only configure RAID levels 0 or 1. Toconfigure other RAID levels, you must use the BIOS Setup utility.
Related Information
■ “RAID Configuration Requirements” on page 50■ “Post-Installation RAID Volume Creation” on page 51■ “Configuring RAID Volumes (LSI BIOS Utilities)” on page 56
RAID Configuration Requirements
Configuring drives into RAID volumes is an optional task.
You have these options:
■ Option 1 – If you intend to use the preinstalled version of Oracle Solaris OS, you cannotconfigure the server's drives into RAID volumes because the preinstalled OS does notsupport RAID configurations.For this option, skip this section and proceed to “Configuring the Preinstalled Oracle SolarisOS” on page 21.
■ Option 2 – If you are going to perform a fresh OS installation and you want to configurethe multiple drives into one or more RAID volumes, you must configure the server's drivesinto RAID volumes before you install the OS.■ If your server is equipped with OSA, proceed to “Configure RAID
(OSA)” on page 52.■ If your server is not equipped with OSA, proceed to “Configuring RAID Volumes (LSI
BIOS Utilities)” on page 56.■ Option 3 – If your server has the Oracle Storage 12 Gb SAS PCIe RAID HBA (see “HBA
and RAID Support” on page 49) installed and you are going to perform a fresh OSinstall, but you do not want to configure multiple drives into RAID volumes, use thisoption.
Caution - If you choose option 3, you must configure a single drive on a RAID volume andmake that volume bootable. Otherwise, the internal HBA will not be able to identify the drivefor the installation.
■ If your server is equipped with OSA, proceed to “Configure RAID(OSA)” on page 52 and configure RAID on a single drive.
50 Netra Server X5-2 Operating System Installation Guide • October 2016
Post-Installation RAID Volume Creation
■ If your server is not equipped with OSA, proceed to “Configuring RAID Volumes (LSIBIOS Utilities)” on page 56 and configure RAID on a single drive.
■ If your server has the Oracle Storage 12 Gb SAS PCIe RAID HBA (see “HBA andRAID Support” on page 49) installed and you want to create a RAID volumelevel 5, 6, 10, 50, or 60 using the drive on which you plan to install the OS, proceed to“Configuring RAID Volumes (LSI BIOS Utilities)” on page 56 and configure RAIDon a single drive.
Note - OSA only supports RAID 0 or 1 for the Oracle Storage 12 Gb SAS PCIe RAIDHBA.
■ Option 4 – If your server has the Oracle Storage 12 Gb SAS PCIe RAID HBA (see“HBA and RAID Support” on page 49) installed and you want to perform a fresh OSinstallation, but you do not want to configure the server's drives into RAID volumes, usethis option.Proceed to install the OS. See “Installing a Supported OS” on page 65.
Related Information■ “HBA and RAID Support” on page 49■ “Configure RAID (OSA)” on page 52■ “Post-Installation RAID Volume Creation” on page 51■ “Configuring RAID Volumes (LSI BIOS Utilities)” on page 56■ “Installing a Supported OS” on page 65
Post-Installation RAID Volume Creation
RAID configuration is usually completed before installing an operating system. However, it ispossible to create a RAID volume on nonboot disks after installing an operating system.
Use these resources for creating and managing the RAID resources in your server:
■ OSA – You can use OSA to create RAID 0 or 1 level volumes and prepare drives for OSinstallation. See “Configure RAID (OSA)” on page 52.
■ Oracle HMP 2.2 – You can use the raidconfig commands contained in this software'sOracle Server CLI Tools component to create and manage RAID volumes on your server.Refer to the Oracle HMP documentation at http://www.oracle.com/pls/topic/lookup?ctx=ohmp.
■ (SGX-SAS6-INT-Z HBA only) LSI SAS2 Integration RAID Configuration Utility– You can use the sas2ircu commands contained in the LSI SAS2 Integrated RAIDConfiguration Utility to configure and manage RAID volumes on your server.
Configuring RAID 51

Configure RAID (OSA)
You can download the SAS2IRCU software from the following location: http://www.avagotech.com/
■ (Oracle Storage 12 Gb SAS PCIe RAID HBA) LSI MegaCLI or MegaRAID StorageManager – You can use the LSI MegaCLI command-line tool or the MegaRAID StorageManager graphical interface to configure and manage RAID volumes for Oracle Storage 12Gb SAS PCIe RAID HBA.
Related Information
■ “Configure RAID (OSA)” on page 52
Configure RAID (OSA)
OSA is the easiest way to configure RAID on the server.
Note - If you are using OSA to configure RAID, you can only configure RAID volumes to level0 or 1. To configure other RAID levels, you must use the LSI utilities.
1. Start OSA.See “Start OSA” on page 43.
The OSA main window appears.
2. Click Configure Hardware.The Hardware Configuration window appears.
3. Click the RAID Configuration tab.The RAID Configuration window appears.
52 Netra Server X5-2 Operating System Installation Guide • October 2016

Configure RAID (OSA)
Note - Your screen might appear slightly different based on the type of HBA installed in yourserver.
4. From the HBA drop-down menu, select the HBA.Select one of these:
■ SGXSAS6INTZ
Configuring RAID 53
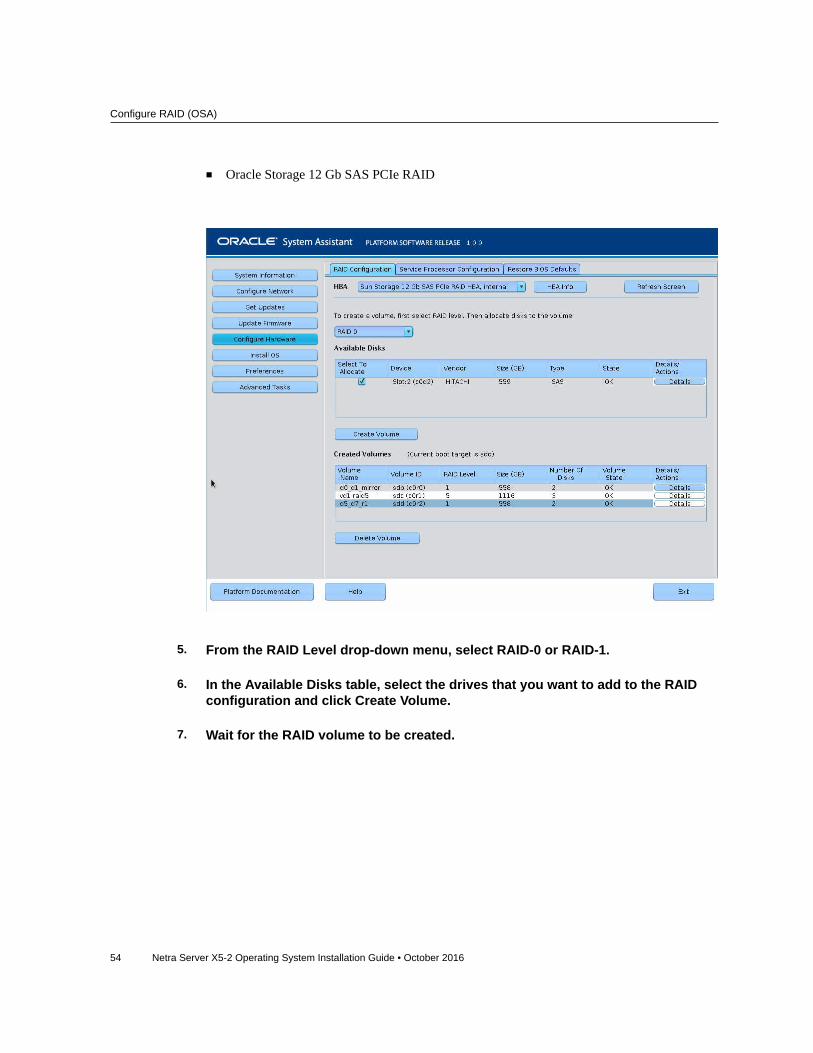
Configure RAID (OSA)
■ Oracle Storage 12 Gb SAS PCIe RAID
5. From the RAID Level drop-down menu, select RAID-0 or RAID-1.
6. In the Available Disks table, select the drives that you want to add to the RAIDconfiguration and click Create Volume.
7. Wait for the RAID volume to be created.
54 Netra Server X5-2 Operating System Installation Guide • October 2016
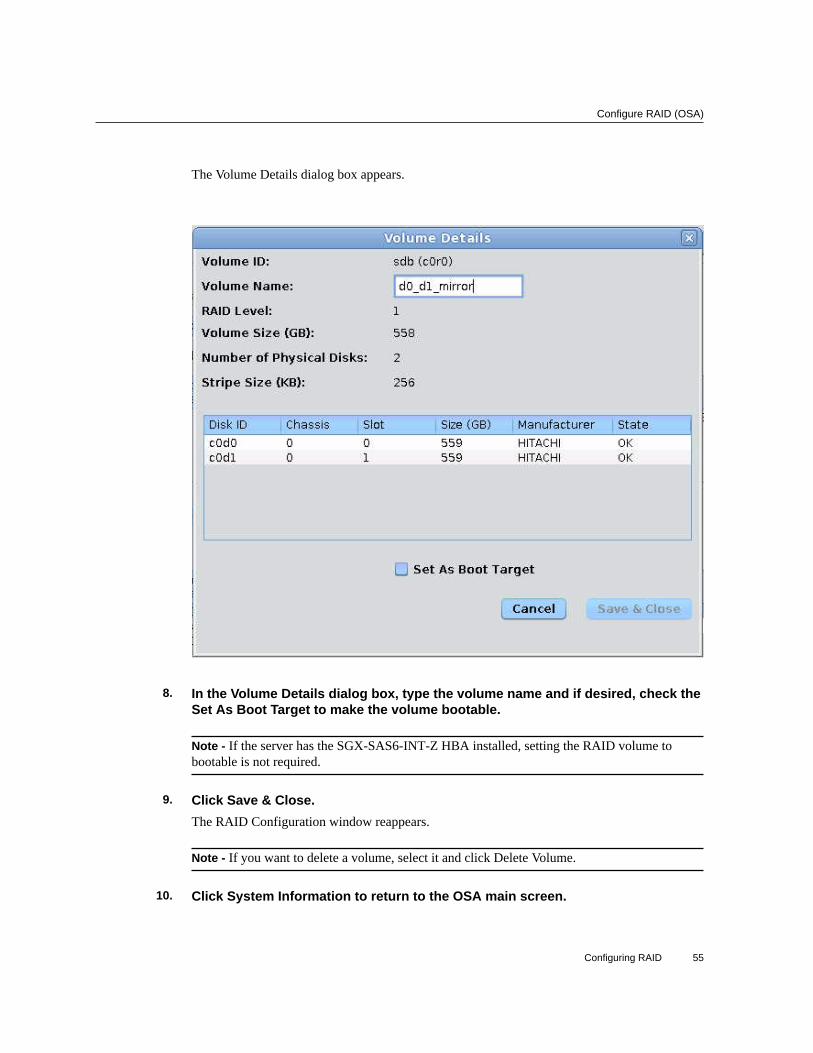
Configure RAID (OSA)
The Volume Details dialog box appears.
8. In the Volume Details dialog box, type the volume name and if desired, check theSet As Boot Target to make the volume bootable.
Note - If the server has the SGX-SAS6-INT-Z HBA installed, setting the RAID volume tobootable is not required.
9. Click Save & Close.The RAID Configuration window reappears.
Note - If you want to delete a volume, select it and click Delete Volume.
10. Click System Information to return to the OSA main screen.
Configuring RAID 55
Configuring RAID Volumes (LSI BIOS Utilities)
This completes the RAID configuration task.
Related Information■ “HBA and RAID Support” on page 49■ “RAID Configuration Requirements” on page 50■ “Post-Installation RAID Volume Creation” on page 51■ “Installing a Supported OS” on page 65
Configuring RAID Volumes (LSI BIOS Utilities)
You can use LSI's MegaRAID BIOS utilities that reside in the HBA firmware as described inthese topics:
■ “Create a RAID Volume” on page 56■ “Make a Virtual Drive Bootable (WebBIOS utility)” on page 57
Related Information■ “RAID Configuration Requirements” on page 50■ “Configure RAID (OSA)” on page 52
Create a RAID Volume
The LSI SAS2 BIOS Configuration Utility resides in the HBA firmware. Use this procedureunder either of these conditions:
■ You want to configure RAID on the intended OS installation drive, regardless of theinstalled HBA, and the server does not have OSA or you do not want to use it.
■ If your server has the Oracle Storage 12 Gb SAS PCIe RAID HBA internal 8 port 1 GBmemory installed and you want to create a RAID volume level 5, 6, 10, 50, or 60 using thedrive on which you plan to install the OS.
Note - OSA only supports RAID 0 or 1 for the Oracle Storage 12 Gb SAS PCIe RAIDHBA.
■ You do not want to create a RAID volume, but the intended OS installation drive hasnot been initialized and the server has the Oracle Storage 12 Gb SAS PCIe RAID HBAinstalled.
56 Netra Server X5-2 Operating System Installation Guide • October 2016
Making Virtual Drives Bootable
1. Create one or more RAID volumes (virtual drives).Refer to the instructions in LSI's MegaRAID SAS Software User's Guide.
2. If you created m one virtual drive, make one virtual drive bootable.For instructions, see “Make a Virtual Drive Bootable (WebBIOS utility)” on page 57.
Note - The MegaRAID SAS Software User's Guide does not include instructions for making adrive bootable.
Related Information
■ “Make a Virtual Drive Bootable (WebBIOS utility)” on page 57
Making Virtual Drives Bootable
These topics describe how to make a virtual drive bootable from the installed HBA firmware.
■ “Make a Virtual Drive Bootable (WebBIOS utility)” on page 57■ “Make a Virtual Drive Bootable (MegaRAID utility)” on page 60
Related Information
■ “Create a RAID Volume” on page 56■ “Installing a Supported OS” on page 65
Make a Virtual Drive Bootable (WebBIOS utility)
Perform this procedure to make a virtual drive bootable if you created more than one virtualdrive, or RAID volume, using the LSI BIOS Configuration Utility on a server that has theOracle Storage 12 Gb SAS PCIe RAID HBA installed.
You do not need to perform this procedure if any of these conditions are true:
■ You used OSA to create a volume and to make the volume bootable.■ The SGX-SAS6-INT-Z HBA is installed on your server.■ You only created one virtual drive using the LSI SAS2 BIOS Configuration Utility.
Configuring RAID 57

Make a Virtual Drive Bootable (WebBIOS utility)
Before you begin, create at least one virtual drive, or RAID volume, on the Oracle Storage12 Gb SAS PCIe RAID HBA using the LSI BIOS Configuration Utility. See “Create a RAIDVolume” on page 56.
1. Reset or power on the server.See “Initiate a BIOS Operation” on page 41.
2. To access the LSI WebBIOS utility, press the Ctrl+H keys during the serverpower-on sequence.The Adapter Selection screen appears.
3. In the Adapter Selection window, click Start.
58 Netra Server X5-2 Operating System Installation Guide • October 2016

Make a Virtual Drive Bootable (WebBIOS utility)
The LSI MegaRAID BIOS Config 1 Utility Virtual Configuration window appears.
4. Click Virtual Drives.
Configuring RAID 59
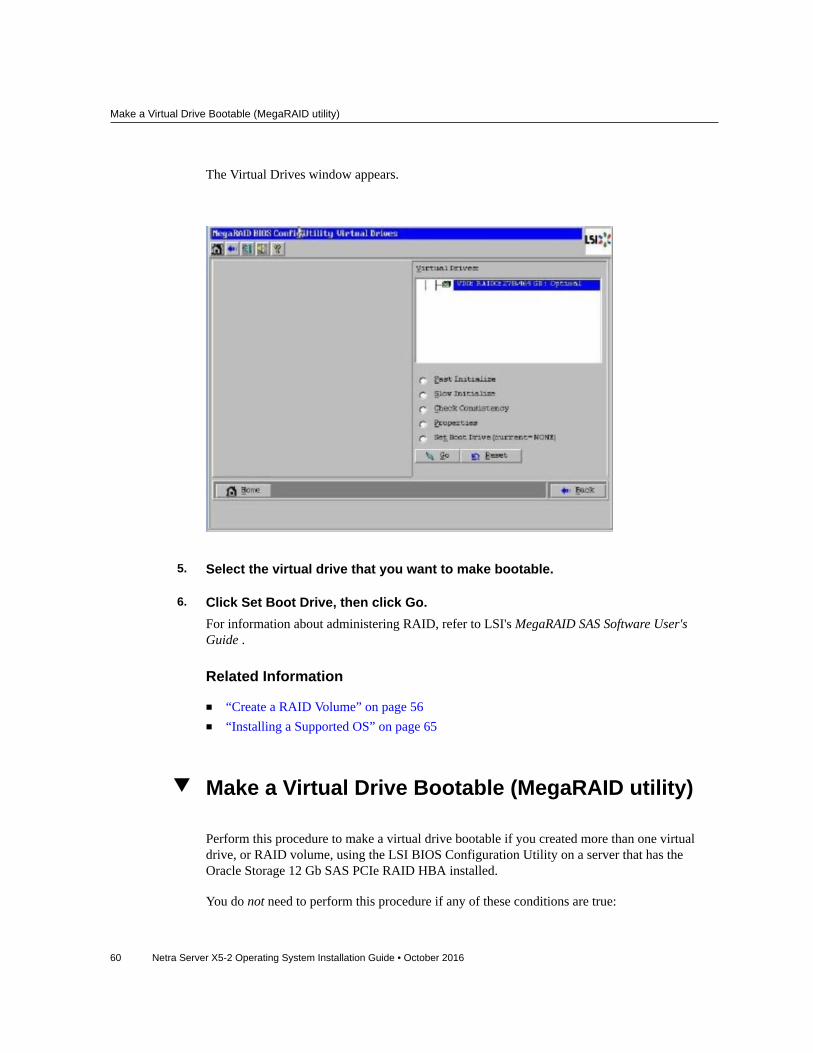
Make a Virtual Drive Bootable (MegaRAID utility)
The Virtual Drives window appears.
5. Select the virtual drive that you want to make bootable.
6. Click Set Boot Drive, then click Go.For information about administering RAID, refer to LSI's MegaRAID SAS Software User'sGuide .
Related Information
■ “Create a RAID Volume” on page 56■ “Installing a Supported OS” on page 65
Make a Virtual Drive Bootable (MegaRAID utility)
Perform this procedure to make a virtual drive bootable if you created more than one virtualdrive, or RAID volume, using the LSI BIOS Configuration Utility on a server that has theOracle Storage 12 Gb SAS PCIe RAID HBA installed.
You do not need to perform this procedure if any of these conditions are true:
60 Netra Server X5-2 Operating System Installation Guide • October 2016

Make a Virtual Drive Bootable (MegaRAID utility)
■ You used OSA to create a volume and to make the volume bootable.■ The SGX-SAS6-INT-Z HBA is installed on your server.■ You only created one virtual drive using the LSI SAS2 BIOS Configuration Utility.
Before you begin, create at least one virtual drive, or RAID volume, on the Oracle Storage12 Gb SAS PCIe RAID HBA using the LSI BIOS Configuration Utility. See “Create a RAIDVolume” on page 56.
1. Reset or power on the server.See “Initiate a BIOS Operation” on page 41.
2. To access the LSI WebBIOS utility, press the Ctrl+R keys when prompted duringthe server power-on sequence.The MegaRAID utility VD Mgmt menu is displayed.
3. In the drive tree, identify the virtual drive to be made bootable.Record the ID: x, where x is the number of the virtual drive.
4. Press the Ctrl+N keys and then the Ctrl+N keys again to select the Ctrl Mgmt tab.
Configuring RAID 61
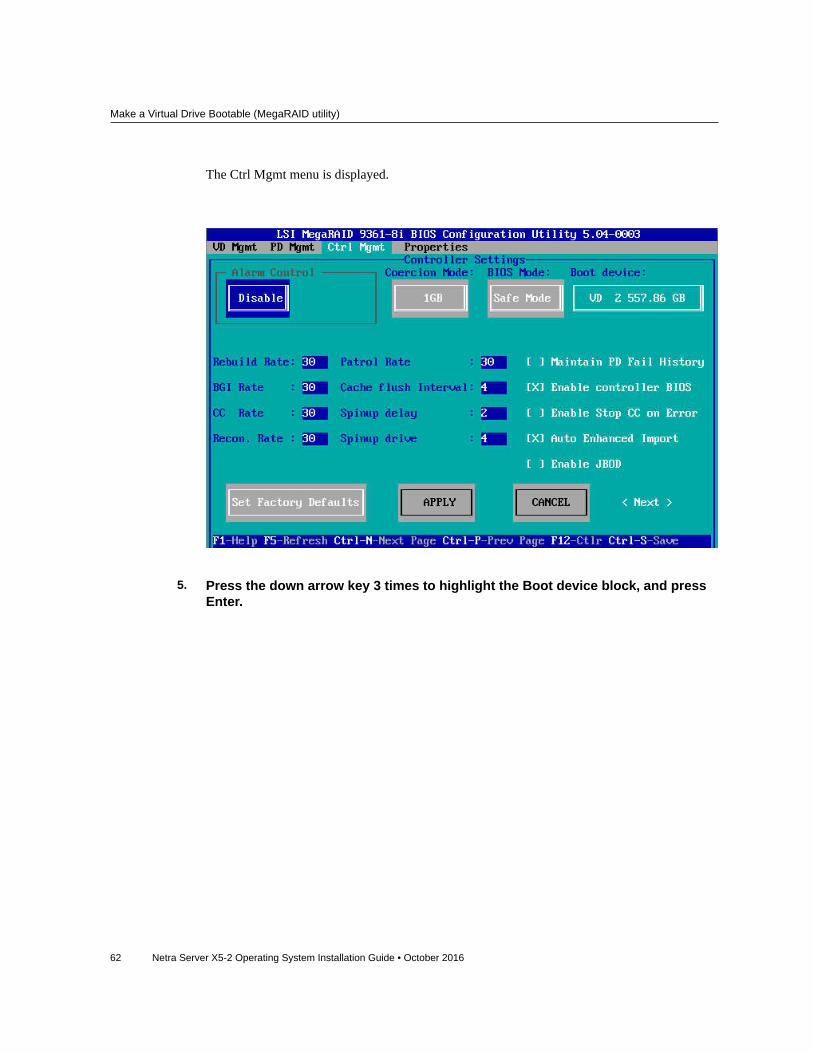
Make a Virtual Drive Bootable (MegaRAID utility)
The Ctrl Mgmt menu is displayed.
5. Press the down arrow key 3 times to highlight the Boot device block, and pressEnter.
62 Netra Server X5-2 Operating System Installation Guide • October 2016
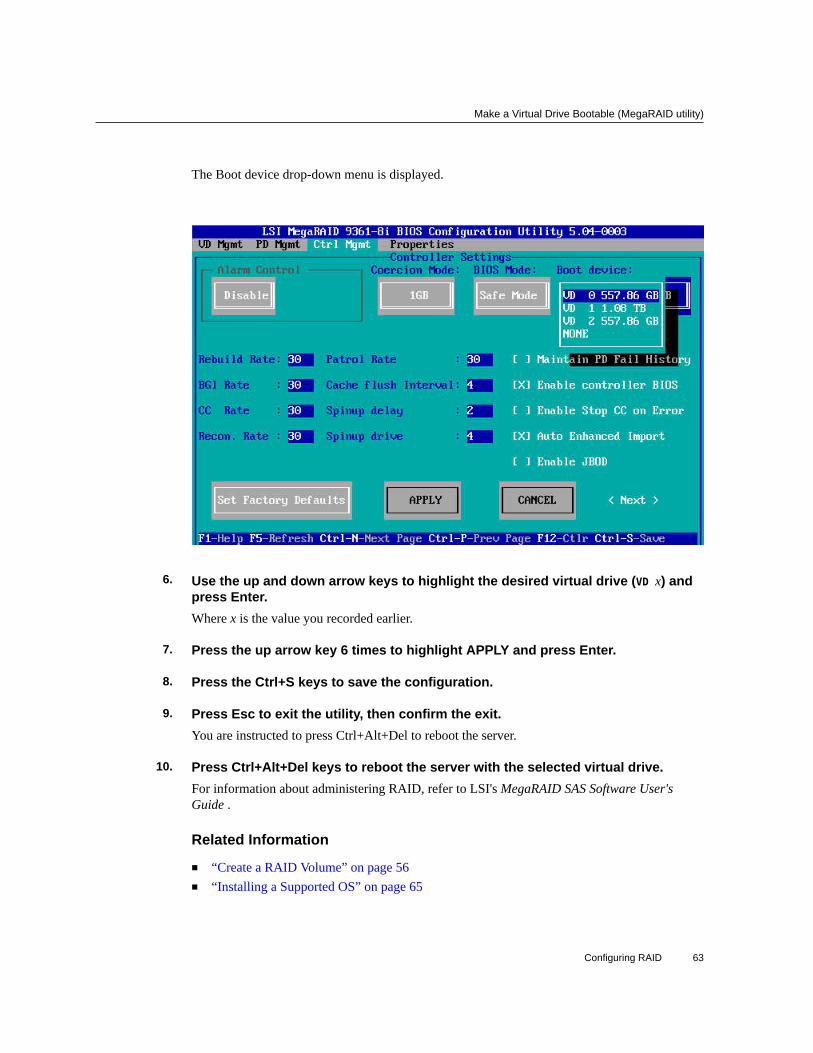
Make a Virtual Drive Bootable (MegaRAID utility)
The Boot device drop-down menu is displayed.
6. Use the up and down arrow keys to highlight the desired virtual drive (VD x) andpress Enter.Where x is the value you recorded earlier.
7. Press the up arrow key 6 times to highlight APPLY and press Enter.
8. Press the Ctrl+S keys to save the configuration.
9. Press Esc to exit the utility, then confirm the exit.You are instructed to press Ctrl+Alt+Del to reboot the server.
10. Press Ctrl+Alt+Del keys to reboot the server with the selected virtual drive.For information about administering RAID, refer to LSI's MegaRAID SAS Software User'sGuide .
Related Information
■ “Create a RAID Volume” on page 56■ “Installing a Supported OS” on page 65
Configuring RAID 63

64 Netra Server X5-2 Operating System Installation Guide • October 2016

Installing a Supported OS
These topics describe how to initiate OS installation to get you to the point where you use theOS documentation to complete the installation.
Description Links
Install the Oracle Solaris OS using media or PXE. “Installing an OS (Media)” on page 71
“Install an OS (PXE)” on page 80
Install Oracle VM using OSA or media. “Install an OS (OSA)” on page 65
“Installing an OS (Media)” on page 71
Install a supported Linux OS using OSA, or media, orPXE.
“Install an OS (OSA)” on page 65
“Installing an OS (Media)” on page 71
“Install an OS (PXE)” on page 80
Install VMware ESXi using media or PXE. “Installing an OS (Media)” on page 71
“Install an OS (PXE)” on page 80
Install a Windows OS using OSA, media, or PXE. “Install an OS (OSA)” on page 65
“Installing an OS (Media)” on page 71
“Install an OS (PXE)” on page 80
Related Information■ “Choosing an OS Installation Method” on page 11■ “Configuring the Preinstalled Oracle Solaris OS” on page 21■ “Configuring the Preinstalled Oracle VM 3. 3 Software” on page 27■ “Preparing to Install an OS” on page 31■ “Configuring RAID” on page 49■ “Performing Post-Installation Tasks” on page 85
Install an OS (OSA)
Use this procedure to install one of these OSes using OSA:
Installing a Supported OS 65
Install an OS (OSA)
■ Oracle VM■ A supported Linux OS■ Windows
See “Supported OS Versions and Documentation” on page 15.
Caution - Loss of data. The OS installation overwrites the contents of the drives on which theOS is installed.
1. Access the documentation for the OS you plan to install.See “Supported OS Versions and Documentation” on page 15.
2. Ensure that you have established a console connection.See “Selecting the Console Display” on page 31.
3. Ensure that the installation media is available.
■ For the distribution CD/DVD, insert the installation media into the local orremote CD/DVD-ROM drive.
■ For ISO images, ensure that the ISO images are available and that the OracleILOM Remote Console application is aware of the first ISO image location.
For additional information about how to set up the installation media, see “Selecting the BootMedia” on page 35.
4. (Optional) Configure RAID.If you want to configure the boot drive as a RAID volume, you must do so before you install anOS. See “Configuring RAID” on page 49.
5. Start OSA using one of these methods.
■ From the Oracle ILOM web interface, navigate to the System Information→ Summary page, click Launch for Oracle System Assistant in the Actionspanel.
■ Reset or power on the server and press F9 during boot up.See “Initiate a BIOS Operation” on page 41.
66 Netra Server X5-2 Operating System Installation Guide • October 2016
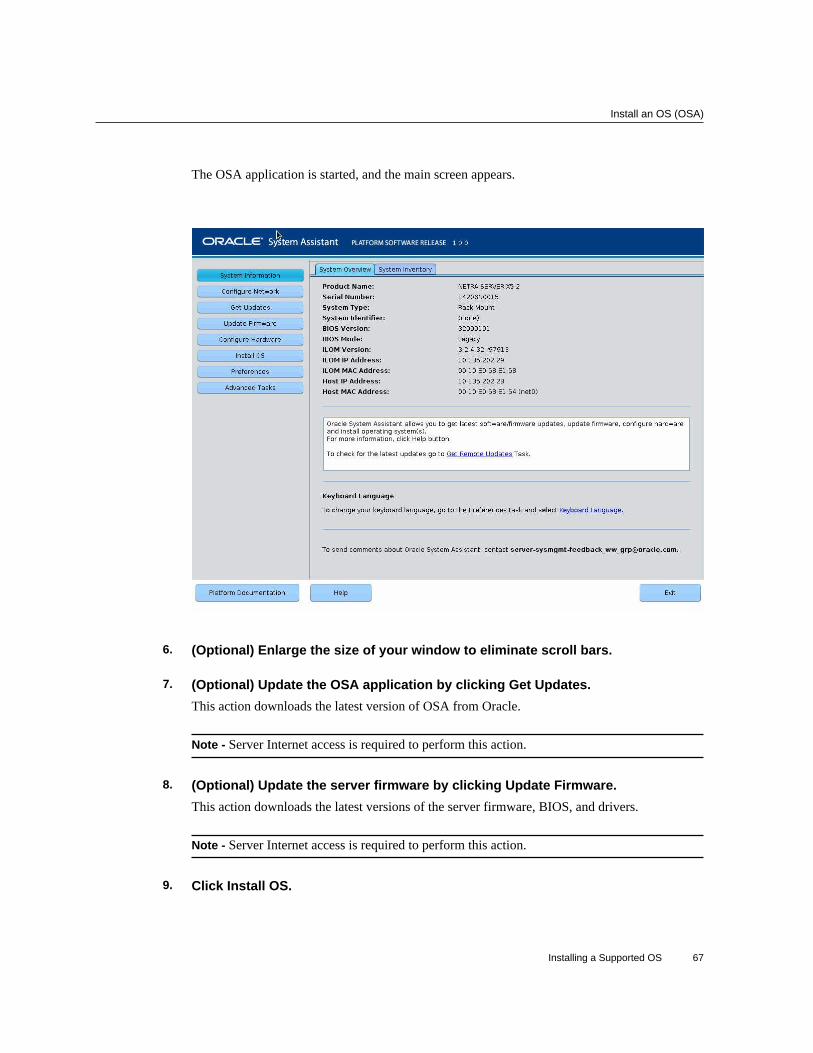
Install an OS (OSA)
The OSA application is started, and the main screen appears.
6. (Optional) Enlarge the size of your window to eliminate scroll bars.
7. (Optional) Update the OSA application by clicking Get Updates.This action downloads the latest version of OSA from Oracle.
Note - Server Internet access is required to perform this action.
8. (Optional) Update the server firmware by clicking Update Firmware.This action downloads the latest versions of the server firmware, BIOS, and drivers.
Note - Server Internet access is required to perform this action.
9. Click Install OS.
Installing a Supported OS 67

Install an OS (OSA)
The OS Installation window is displayed.
10. Select an OS from the drop-down menu.
68 Netra Server X5-2 Operating System Installation Guide • October 2016
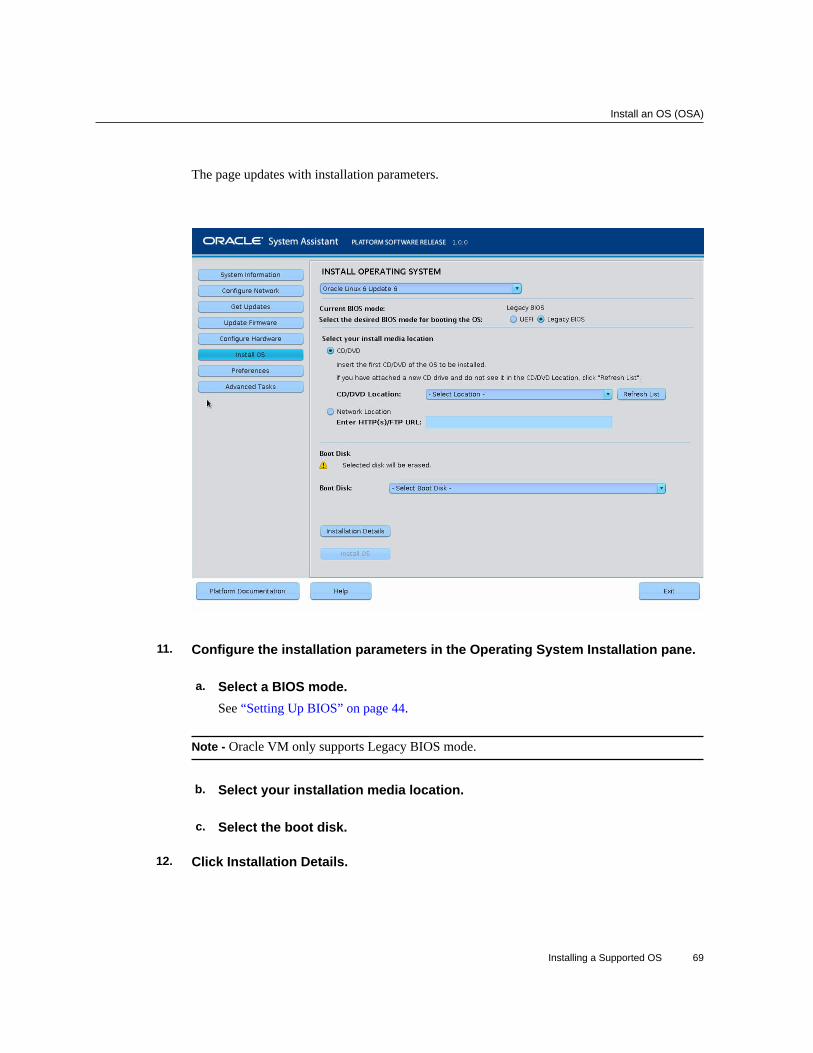
Install an OS (OSA)
The page updates with installation parameters.
11. Configure the installation parameters in the Operating System Installation pane.
a. Select a BIOS mode.See “Setting Up BIOS” on page 44.
Note - Oracle VM only supports Legacy BIOS mode.
b. Select your installation media location.
c. Select the boot disk.
12. Click Installation Details.
Installing a Supported OS 69
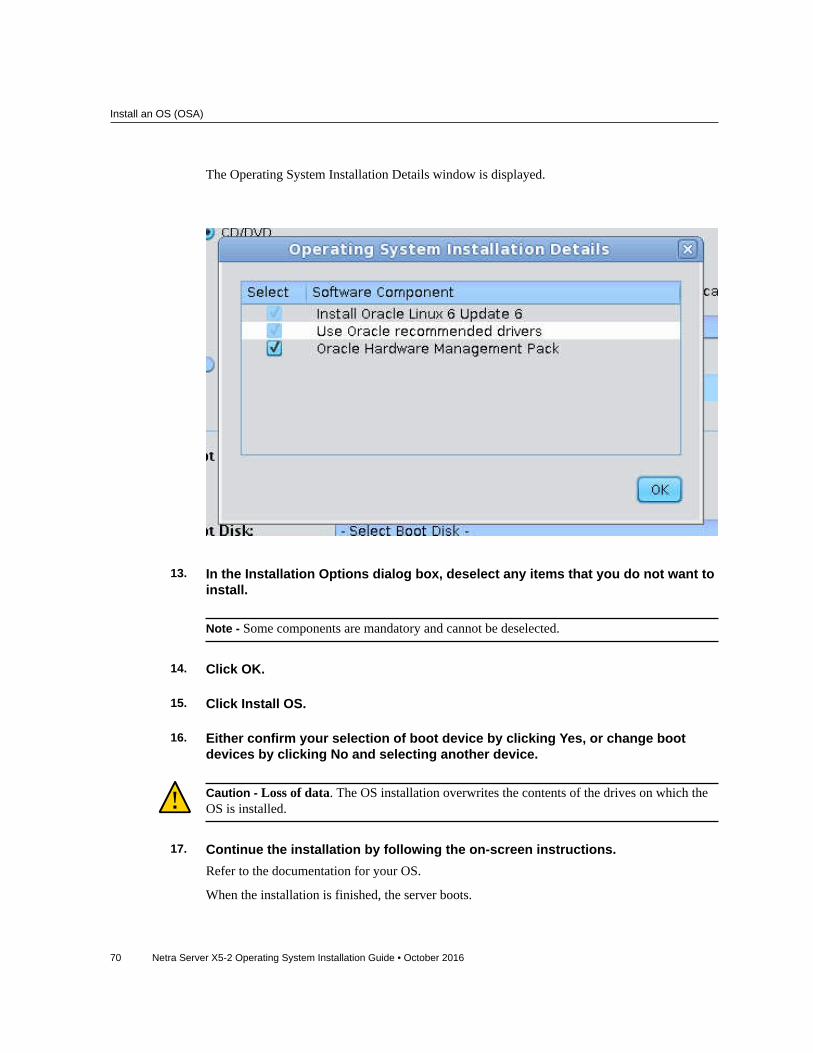
Install an OS (OSA)
The Operating System Installation Details window is displayed.
13. In the Installation Options dialog box, deselect any items that you do not want toinstall.
Note - Some components are mandatory and cannot be deselected.
14. Click OK.
15. Click Install OS.
16. Either confirm your selection of boot device by clicking Yes, or change bootdevices by clicking No and selecting another device.
Caution - Loss of data. The OS installation overwrites the contents of the drives on which theOS is installed.
17. Continue the installation by following the on-screen instructions.Refer to the documentation for your OS.
When the installation is finished, the server boots.
70 Netra Server X5-2 Operating System Installation Guide • October 2016
Installing an OS (Media)
Related Information
■ “Supported OS Versions and Documentation” on page 15■ “OS Installation Task Map (Oracle VM)” on page 12■ “OS Installation Task Map (Linux)” on page 13“OS Installation Task Map
(Windows)” on page 15■ “Installing an OS (Media)” on page 71■ “Install an OS (PXE)” on page 80
Installing an OS (Media)
You can install any of the supported OSes using the OS media and these topics:
Step Description Links
1. Install a supported OS using local or remotemedia.
“Installing an OS (Media)” on page 71
2. (Windows only) Install HBA drivers duringthe OS installation.
“Install HBA Drivers (Windows)” on page 75
Related Information
■ “Supported OS Versions and Documentation” on page 15■ “Install an OS (OSA)” on page 65■ “Install an OS (PXE)” on page 80■ “OS Installation Task Map (Oracle Solaris)” on page 12■ “OS Installation Task Map (Oracle VM)” on page 12■ “OS Installation Task Map (Linux)” on page 13■ “OS Installation Task Map (VMware ESXi)” on page 14■ “OS Installation Task Map (Windows)” on page 15
Install an OS (Media)
This procedure describes how to install an OS from local or remote media. You can install anyof the supported OSes using this method.
1. Access the documentation for the OS you plan to install.
Installing a Supported OS 71
Install an OS (Media)
See “Supported OS Versions and Documentation” on page 15.
2. Ensure that you have established a console connection.See “Selecting the Console Display” on page 31.
3. Ensure that the installation media is available.
■ For the distribution CD/DVD, insert the installation media into the local orremote CD/DVD-ROM drive.
■ For ISO images, ensure that the ISO images are available and that the OracleILOM Remote Console application is aware of the first ISO image location.Ensure that you have selected CD-ROM Image from the Oracle ILOM RemoteConsole KVMS → Storage... menu.
For additional information about how to set up the installation media, see “Selecting the BootMedia” on page 35.
4. (Optional) Configure BIOS.By default the server uses Legacy BIOS mode. For some OSes, you can change the BIOS toUEFI mode. If you want to change the BIOS mode, do so before installing the OS. See “SettingUp BIOS” on page 44.
5. (Optional) Configure RAID.If you want to configure the boot drive as a RAID volume, you must do so before you install anOS. See “Configuring RAID” on page 49.
6. Reset or power on the server and press F8 during boot up.See “Initiate a BIOS Operation” on page 41.
The Please Select Boot Device menu appears.
72 Netra Server X5-2 Operating System Installation Guide • October 2016
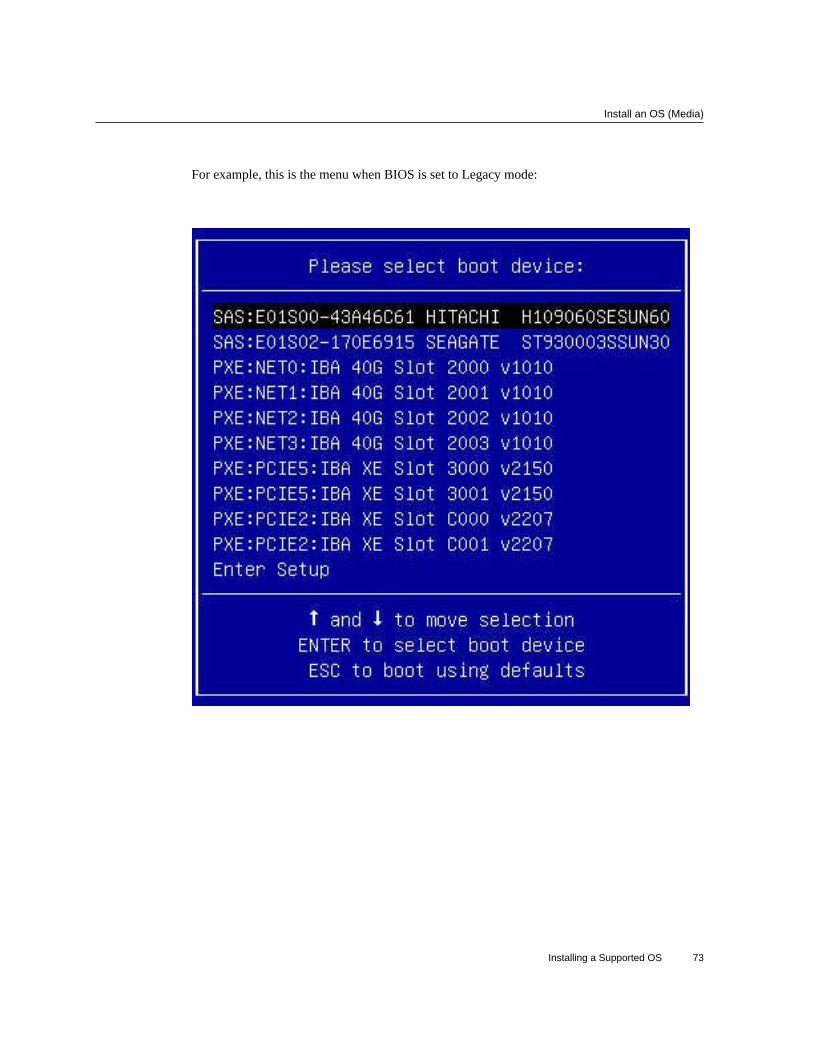
Install an OS (Media)
For example, this is the menu when BIOS is set to Legacy mode:
Installing a Supported OS 73
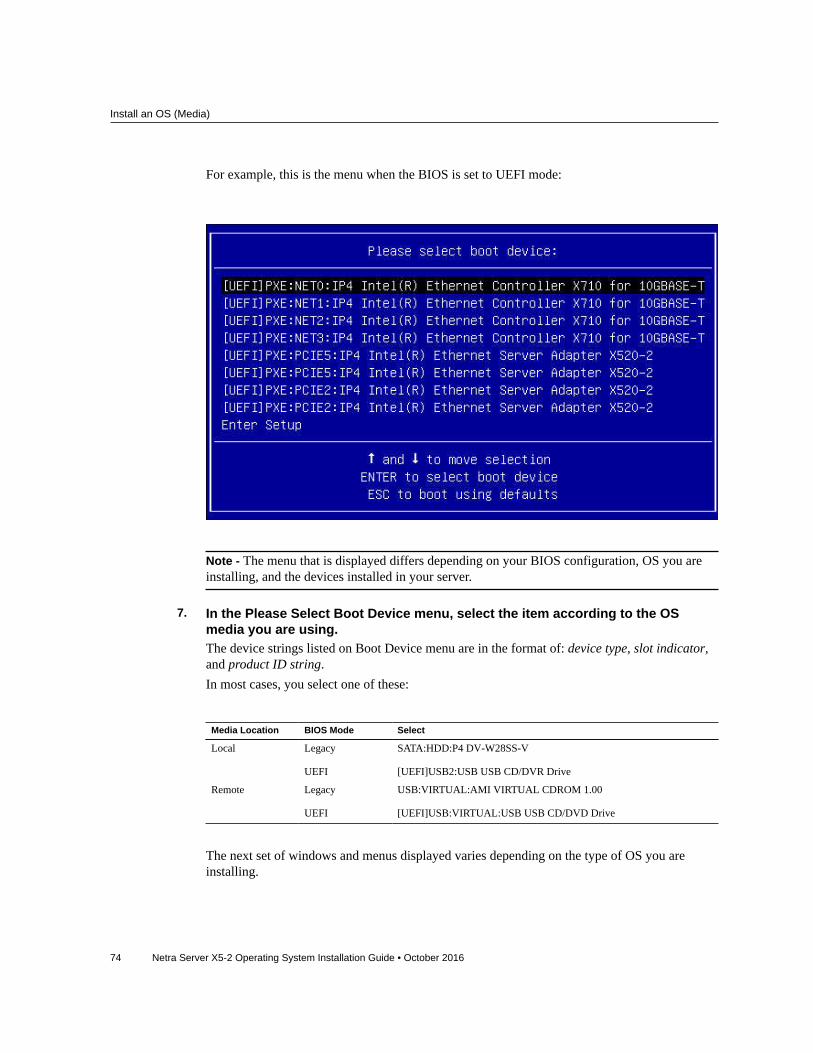
Install an OS (Media)
For example, this is the menu when the BIOS is set to UEFI mode:
Note - The menu that is displayed differs depending on your BIOS configuration, OS you areinstalling, and the devices installed in your server.
7. In the Please Select Boot Device menu, select the item according to the OSmedia you are using.The device strings listed on Boot Device menu are in the format of: device type, slot indicator,and product ID string.In most cases, you select one of these:
Media Location BIOS Mode Select
Local Legacy
UEFI
SATA:HDD:P4 DV-W28SS-V
[UEFI]USB2:USB USB CD/DVR Drive
Remote Legacy
UEFI
USB:VIRTUAL:AMI VIRTUAL CDROM 1.00
[UEFI]USB:VIRTUAL:USB USB CD/DVD Drive
The next set of windows and menus displayed varies depending on the type of OS you areinstalling.
74 Netra Server X5-2 Operating System Installation Guide • October 2016
Install HBA Drivers (Windows)
8. When prompted, press any key to boot from CD/DVD.
9. Continue the installation by following the on-screen instructions.Refer to the documentation for your OS.
10. (Optional) If you are installing Windows, install the HBA drivers.See “Install HBA Drivers (Windows)” on page 75.
11. Determine if you need to perform post-installation tasks.See “Performing Post-Installation Tasks” on page 85.
Related Information
■ “Install HBA Drivers (Windows)” on page 75■ “OS Installation Task Map (Oracle Solaris)” on page 12■ “OS Installation Task Map (Oracle VM)” on page 12■ “OS Installation Task Map (Linux)” on page 13■ “OS Installation Task Map (VMware ESXi)” on page 14■ “OS Installation Task Map (Windows)” on page 15
Install HBA Drivers (Windows)
Perform these steps during the actual Windows OS installation, to ensure that the drivers foryour HBA are installed.
Note - If you used OSA to install the Windows OS, you do not need to perform this procedurebecause OSA installs the required HBA drivers.
1. In the Installation Type window, click Custom (Advanced).
Installing a Supported OS 75
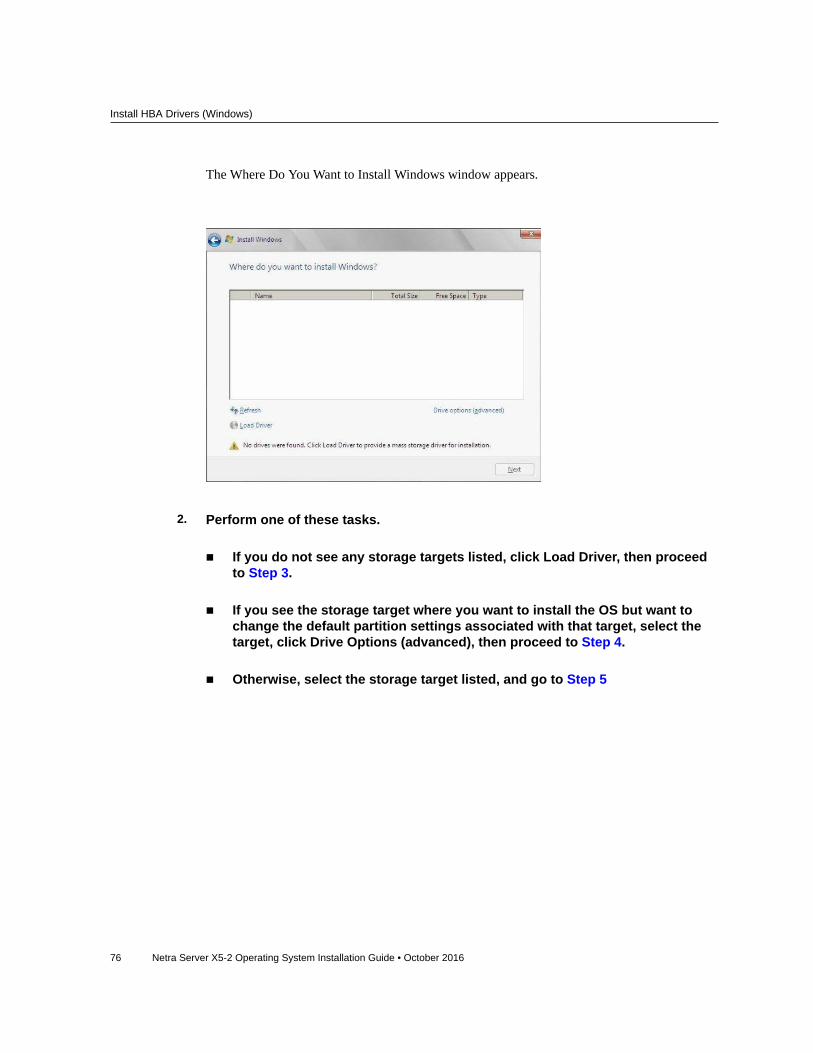
Install HBA Drivers (Windows)
The Where Do You Want to Install Windows window appears.
2. Perform one of these tasks.
■ If you do not see any storage targets listed, click Load Driver, then proceedto Step 3.
■ If you see the storage target where you want to install the OS but want tochange the default partition settings associated with that target, select thetarget, click Drive Options (advanced), then proceed to Step 4.
■ Otherwise, select the storage target listed, and go to Step 5
76 Netra Server X5-2 Operating System Installation Guide • October 2016
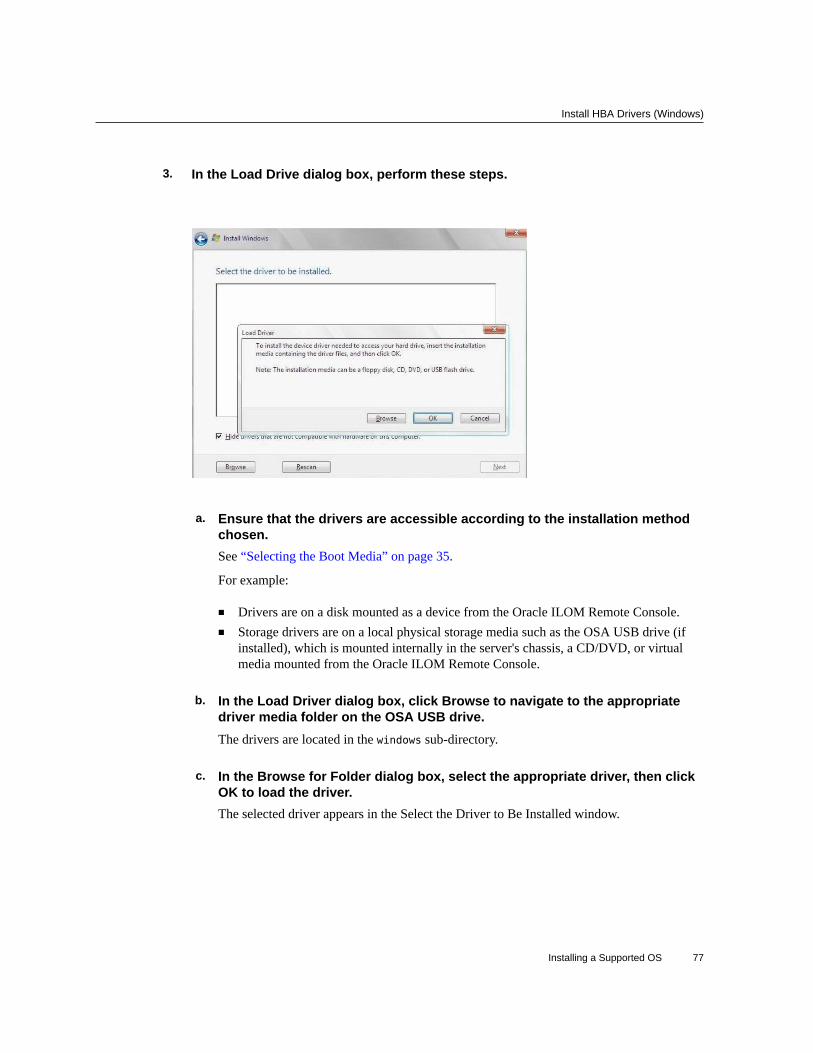
Install HBA Drivers (Windows)
3. In the Load Drive dialog box, perform these steps.
a. Ensure that the drivers are accessible according to the installation methodchosen.See “Selecting the Boot Media” on page 35.
For example:
■ Drivers are on a disk mounted as a device from the Oracle ILOM Remote Console.■ Storage drivers are on a local physical storage media such as the OSA USB drive (if
installed), which is mounted internally in the server's chassis, a CD/DVD, or virtualmedia mounted from the Oracle ILOM Remote Console.
b. In the Load Driver dialog box, click Browse to navigate to the appropriatedriver media folder on the OSA USB drive.The drivers are located in the windows sub-directory.
c. In the Browse for Folder dialog box, select the appropriate driver, then clickOK to load the driver.The selected driver appears in the Select the Driver to Be Installed window.
Installing a Supported OS 77
Install HBA Drivers (Windows)
For example:
d. In the Select the Driver to Be Installed window, click Next to install the driver.The Where Do You Want to Install Windows window appears.
78 Netra Server X5-2 Operating System Installation Guide • October 2016
Install HBA Drivers (Windows)
Note - If you previously removed or unmounted the Windows OS installation media to loadthe drivers from the internal OSA USB drive, you might see this message: “Windows Cannotbe installed to this disk.” If this message appears, insert or re-mount the Windows installationmedia, then click Refresh.
e. In the Where Do You Want to Install Windows window, perform one of theseactions:
■ If you see the storage target where you want to install the OS but wantto change the default partition settings associated with that target,select the target, click Drive Options (advanced), then proceed to Step 4.
■ Otherwise, go to Step 5.
4. In the lower portion of the Where Do You Want to Install Windows window,perform these steps.
a. Click Delete to delete the selected storage target existing partitionconfiguration.A confirmation window appears.
b. Click OK to confirm the partition deletion.
c. If any additional partitions exist on the target drive, repeat Step a and Step b.
Installing a Supported OS 79
Install an OS (PXE)
d. Go to Step 5.
5. Click Next to install the OS to the selected storage target.The Windows installation program begins and will reboot the server multiple times during theinstallation process.
6. Change the user password when prompted.When the installation is complete, Windows starts and prompts you to change the userpassword.
7. In the User Password dialog box, click OK and set up the initial user loginaccount.After the initial user account is created, the Windows OS desktop appears.
8. Perform post-installation tasks.See “Performing Post-Installation Tasks” on page 85.
Related Information
■ “Installing an OS (Media)” on page 71■ “OS Installation Task Map (Windows)” on page 15
Install an OS (PXE)
This procedure describes how to install a supported OS using a PXE network environment.
The server supports a PXE installations for these OSes:
■ Oracle Solaris■ Linux■ Windows
See “Supported OS Versions and Documentation” on page 15.
Note - Once you reset the server, events occur very quickly. Pay close attention to the screen sothat you can interrupt the boot process at the correct time.
1. Access the documentation for the OS you plan to install.See “Supported OS Versions and Documentation” on page 15.
80 Netra Server X5-2 Operating System Installation Guide • October 2016
Install an OS (PXE)
2. Ensure that the PXE network environment is set up.See “Preparing Your PXE Environment” on page 37.
3. Ensure that you have established a console connection.See “Selecting the Console Display” on page 31.
4. Access the BIOS Setup utility.See “Initiate a BIOS Operation” on page 41.
5. (Optional) If you are installing Oracle Solaris, enable the Launch PXE OpROMBIOS option.
a. Use the left and right arrow keys to display the Advanced menu.
b. Set the Launch PXE OpROM setting to Enabled.
c. Press F10 to save the changes and exit the BIOS Setup utility.
This action causes the server to reset. After resetting, the BIOS window displays again.
Installing a Supported OS 81
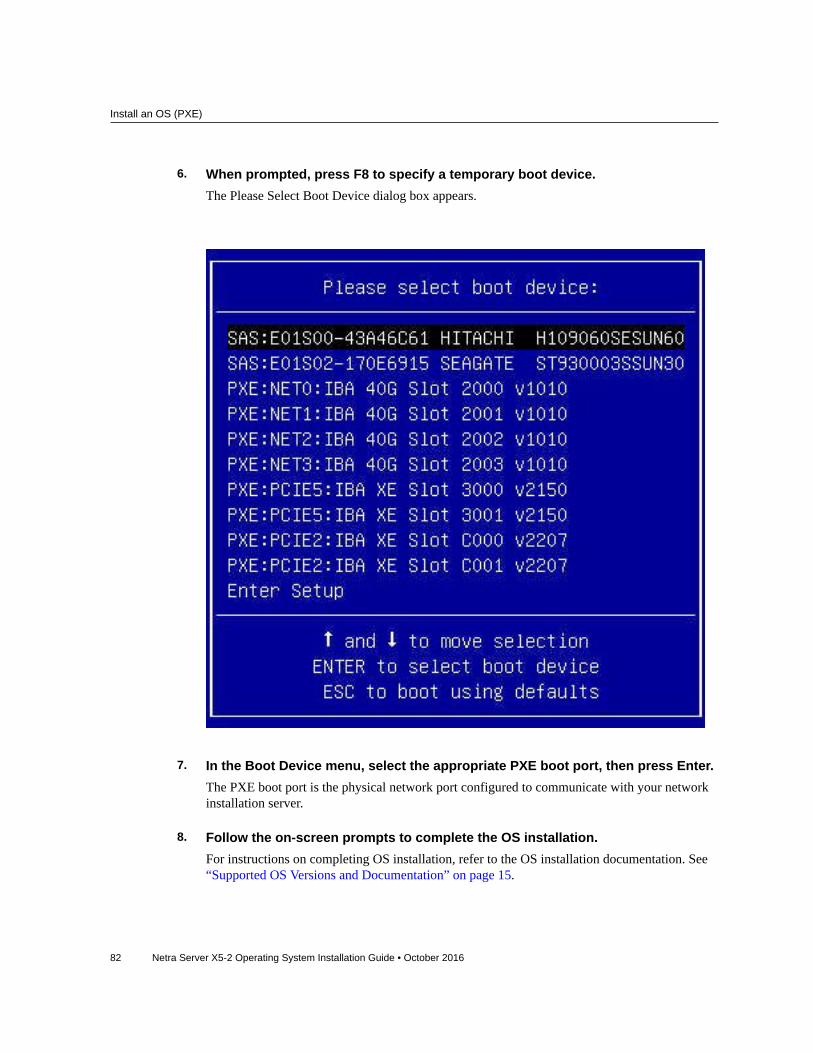
Install an OS (PXE)
6. When prompted, press F8 to specify a temporary boot device.The Please Select Boot Device dialog box appears.
7. In the Boot Device menu, select the appropriate PXE boot port, then press Enter.The PXE boot port is the physical network port configured to communicate with your networkinstallation server.
8. Follow the on-screen prompts to complete the OS installation.For instructions on completing OS installation, refer to the OS installation documentation. See“Supported OS Versions and Documentation” on page 15.
82 Netra Server X5-2 Operating System Installation Guide • October 2016
Install an OS (PXE)
Note - For Windows OS installations, you might need to ensure that the HBA drivers areinstalled during the installation. See “Install HBA Drivers (Windows)” on page 75.
9. Determine if you need to perform post-installation tasks.See “Performing Post-Installation Tasks” on page 85.
Related Information
■ “Supported OS Versions and Documentation” on page 15■ “OS Installation Task Map (Oracle Solaris)” on page 12■ “OS Installation Task Map (Linux)” on page 13■ “OS Installation Task Map (Windows)” on page 15
Installing a Supported OS 83

84 Netra Server X5-2 Operating System Installation Guide • October 2016
Performing Post-Installation Tasks
After completing the OS installation, review these post-installation topics to see if any apply toyour installation.
Description Links
For all supported OSes,optionally assign the server'sboot drive priorities.
“(Optional) Assign Boot Drive Priorities” on page 85
For Oracle VM installations,access information to install anduse an Oracle VM server.
“Install the VM Manager” on page 87
For Oracle Linux installations,configure Linux to use aparticular kernel.
“(Optional) Choose an Oracle Linux Kernel” on page 87
For Red Hat Linux, install theOracle Linux Support kernel.
“(Optional) Install the Oracle Linux Support Kernel” on page 89
Perform VMware ESXi post-installation tasks.
“Performing VMware ESXi Post-Installation Tasks” on page 90
Perform Windows OS post-installation tasks.
“Performing Windows Post-Installation Tasks” on page 93
Related Information
■ “Choosing an OS Installation Method” on page 11■ “Configuring the Preinstalled Oracle Solaris OS” on page 21■ “Configuring the Preinstalled Oracle VM 3. 3 Software” on page 27■ “Preparing to Install an OS” on page 31■ “Configuring RAID” on page 49■ “Installing a Supported OS” on page 65
(Optional) Assign Boot Drive Priorities
Use this procedure if you want to assign the server's boot priorities.
Performing Post-Installation Tasks 85
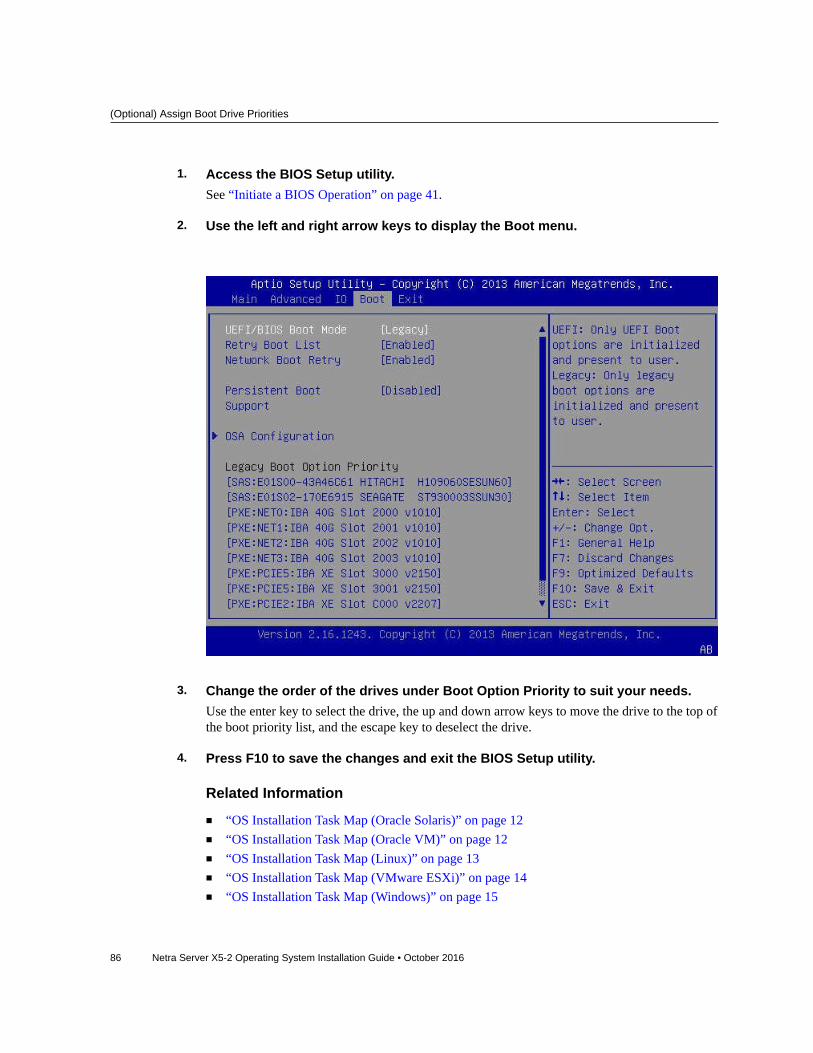
(Optional) Assign Boot Drive Priorities
1. Access the BIOS Setup utility.See “Initiate a BIOS Operation” on page 41.
2. Use the left and right arrow keys to display the Boot menu.
3. Change the order of the drives under Boot Option Priority to suit your needs.Use the enter key to select the drive, the up and down arrow keys to move the drive to the top ofthe boot priority list, and the escape key to deselect the drive.
4. Press F10 to save the changes and exit the BIOS Setup utility.
Related Information
■ “OS Installation Task Map (Oracle Solaris)” on page 12■ “OS Installation Task Map (Oracle VM)” on page 12■ “OS Installation Task Map (Linux)” on page 13■ “OS Installation Task Map (VMware ESXi)” on page 14■ “OS Installation Task Map (Windows)” on page 15
86 Netra Server X5-2 Operating System Installation Guide • October 2016
Install the VM Manager
■ “Install an OS (OSA)” on page 65■ “Installing an OS (Media)” on page 71■ “Install an OS (PXE)” on page 80
Install the VM ManagerIf you do not have an Oracle VM Manager configured to manage the Oracle VMServer, you must install the Oracle VM Manager.Refer to the Oracle VM Manager Installation Guide at: http://download.oracle.com/docs/cd/E20065_01/index.htm
Related Information
■ “OS Installation Task Map (Oracle VM)” on page 12
Performing Linux Post-Installation Tasks
Use these topics to perform post-installation tasks:
■ “(Optional) Choose an Oracle Linux Kernel” on page 87■ “(Optional) Install the Oracle Linux Support Kernel” on page 89
Related Information
■ “OS Installation Task Map (Linux)” on page 13
(Optional) Choose an Oracle Linux Kernel
Oracle Linux supports two kernels:
■ Oracle Linux Support, also known as the Unbreakable Enterprise Kernel (default)■ Red Hat Compatible Kernel
If you want to switch to the Red Hat Compatible Kernel or back to the Oracle Linux Supportkernel, perform these steps.
1. Reboot the server.
Performing Post-Installation Tasks 87
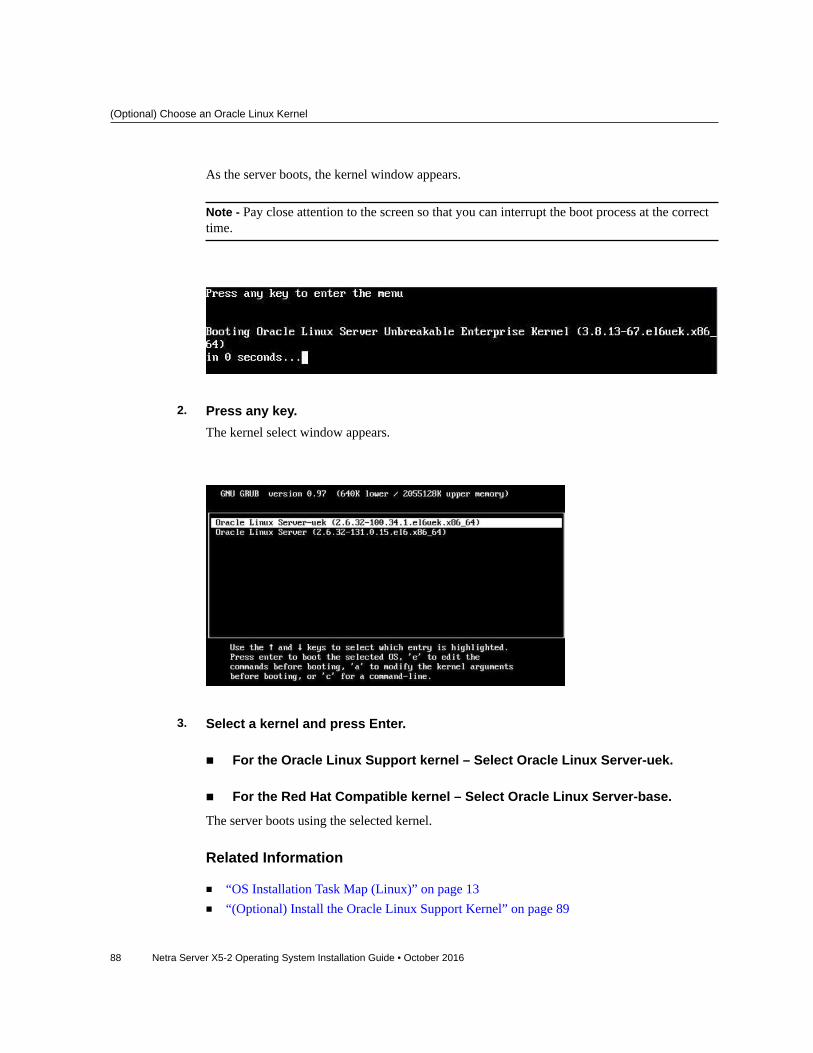
(Optional) Choose an Oracle Linux Kernel
As the server boots, the kernel window appears.
Note - Pay close attention to the screen so that you can interrupt the boot process at the correcttime.
2. Press any key.The kernel select window appears.
3. Select a kernel and press Enter.
■ For the Oracle Linux Support kernel – Select Oracle Linux Server-uek.
■ For the Red Hat Compatible kernel – Select Oracle Linux Server-base.
The server boots using the selected kernel.
Related Information
■ “OS Installation Task Map (Linux)” on page 13■ “(Optional) Install the Oracle Linux Support Kernel” on page 89
88 Netra Server X5-2 Operating System Installation Guide • October 2016
(Optional) Install the Oracle Linux Support Kernel
(Optional) Install the Oracle Linux Support Kernel
After you have installed the RHEL OS, you have the option of installing and using the OracleLinux Support kernel (formerly known as the Oracle Unbreakable Enterprise Kernel for Linux).See “Oracle Linux Support Kernel” on page 16.
1. Ensure that your system is running before installing the Oracle Linux Supportkernel.
2. As the root user, perform these steps to download and edit the Oracle Linux 6Yum repository file:
a. Type.
# cd /etc/yum.repos.d
# wget http://public-yum.oracle.com/public-yum-el6.repo
b. Open the /etc/yum.repos.d/public-yum-el6.repo file in an editor.
c. Edit the [public_ol6_u5_base] stanza and change enabled=0 to enabled=1.
[public_ol6_u5_base]
name=Oracle Linux $releasever Update 5 installation media copy ($basearch)
baseurl=http://public-yum.oracle.com/repo/OracleLinux/OL6/5/base/$basearch/
gpgkey=file:///etc/pki/rpm-gpg/RPM-GPG-KEY-oracle
gpgcheck=1
enable=1
3. Update the system kernel using one of these methods.
■ Update the kernel.
# yum install kernel
■ Update the kernel and upgrade all the recommended packages associatedwith it.
# yum install oracle-linux
4. Reboot the server.
Note - For more information on the Oracle Linux Support kernel, refer to the release notes at:http://www.oracle.com/technetwork/server-storage/linux/documentation/index.html.
Performing Post-Installation Tasks 89
Performing VMware ESXi Post-Installation Tasks
Related Information
■ “OS Installation Task Map (Linux)” on page 13
Performing VMware ESXi Post-Installation Tasks
After completing the VMware ESXi installation, perform these tasks:
■ “Configure Network Adapter Settings (VMware ESXi)” on page 90■ “Determine the MAC Address of a Connected Server Network Port (VMware
ESXi)” on page 92
Related Information
■ “OS Installation Task Map (VMware ESXi)” on page 14
Configure Network Adapter Settings (VMwareESXi)
Note - This task is necessary only if you installed VMware ESXI and you are using static IPaddressing. If you are using DHCP, this task is not necessary.
For VMware ESXi installations, you must determine the network management interface thatyou will use for the VM service console.
The VM service console and management interface require a network interface. The serviceconsole does not automatically use the first interface with a live connection. Therefore, youmust select a network interface for the service console during installation because the networkinterface defaults to vmnic0.
This procedure describes how to configure the VMware ESXi settings for the network adaptersinstalled on your server.
1. After completing the VMware ESXi software installation wait for the server toreboot.
90 Netra Server X5-2 Operating System Installation Guide • October 2016

Configure Network Adapter Settings (VMware ESXi)
This window appears:
2. Press F2 to select Customize System/View Logs.
3. Log in to the VMware ESXi server.
Performing Post-Installation Tasks 91

Determine the MAC Address of a Connected Server Network Port (VMware ESXi)
4. Access the System Customization dialog and select Configure ManagementNetwork.
To complete this task, refer to the VMware documentation.
5. Determine the MAC address of connected ports.See “Determine the MAC Address of a Connected Server Network Port (VMwareESXi)” on page 92.
Related Information
■ “Determine the MAC Address of a Connected Server Network Port (VMwareESXi)” on page 92
Determine the MAC Address of a ConnectedServer Network Port (VMware ESXi)
The server has four network ports, NET0, NET1, NET2, and NET3. When any of these portsare connected to the network, VMware ESXi assigns a MAC address to each port.
Use this procedure to determine the MAC address for each server network port.
92 Netra Server X5-2 Operating System Installation Guide • October 2016
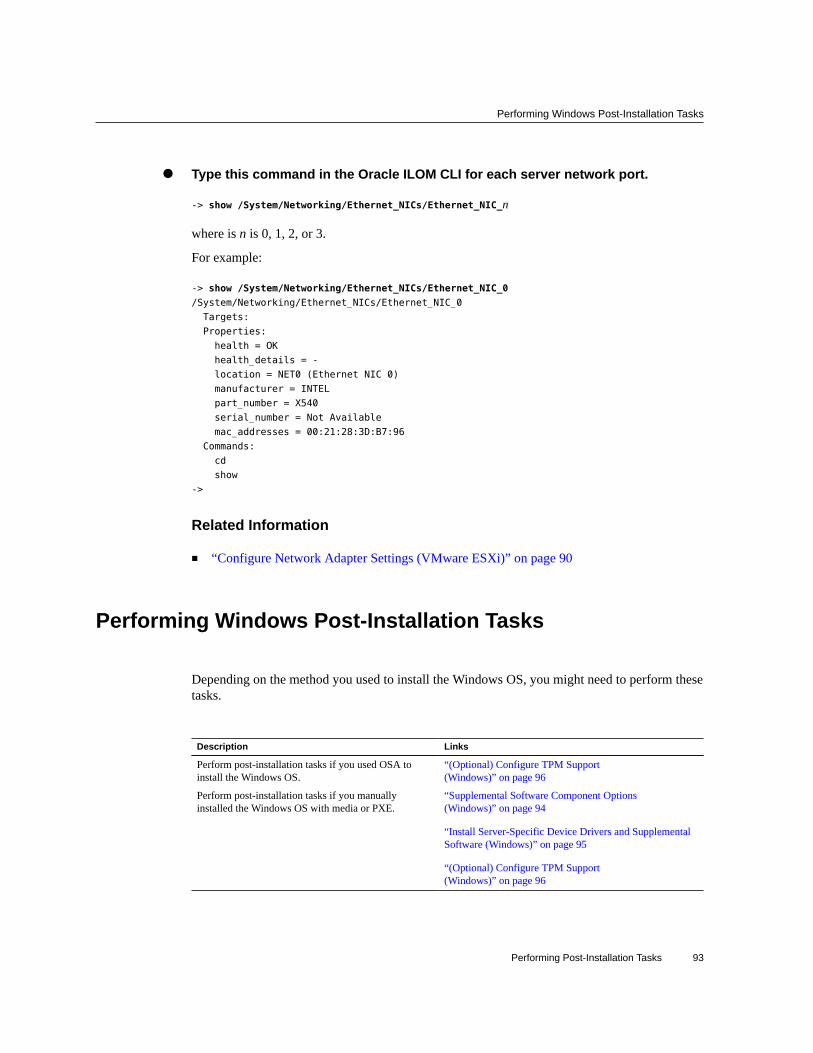
Performing Windows Post-Installation Tasks
Type this command in the Oracle ILOM CLI for each server network port.
-> show /System/Networking/Ethernet_NICs/Ethernet_NIC_n
where is n is 0, 1, 2, or 3.
For example:
-> show /System/Networking/Ethernet_NICs/Ethernet_NIC_0
/System/Networking/Ethernet_NICs/Ethernet_NIC_0
Targets:
Properties:
health = OK
health_details = -
location = NET0 (Ethernet NIC 0)
manufacturer = INTEL
part_number = X540
serial_number = Not Available
mac_addresses = 00:21:28:3D:B7:96
Commands:
cd
show
->
Related Information
■ “Configure Network Adapter Settings (VMware ESXi)” on page 90
Performing Windows Post-Installation Tasks
Depending on the method you used to install the Windows OS, you might need to perform thesetasks.
Description Links
Perform post-installation tasks if you used OSA toinstall the Windows OS.
“(Optional) Configure TPM Support(Windows)” on page 96
Perform post-installation tasks if you manuallyinstalled the Windows OS with media or PXE.
“Supplemental Software Component Options(Windows)” on page 94
“Install Server-Specific Device Drivers and SupplementalSoftware (Windows)” on page 95
“(Optional) Configure TPM Support(Windows)” on page 96
Performing Post-Installation Tasks 93
Performing Windows Post-Installation Tasks
Related Information
■ “OS Installation Task Map (Windows)” on page 15
Supplemental Software Component Options(Windows)
OSA makes several supplemental software components available for the server.
If you used OSA to install the Windows OS, the supplemental software was automaticallyinstalled.
If you manually installed the Windows OS, you can install the supplementalsoftware. See “Install Server-Specific Device Drivers and Supplemental Software(Windows)” on page 95.
You have two options:
■ Typical – Installs all supplemental software applicable for your server.■ Custom – Installs only selected supplemental software.
OSA makes these optional supplemental software components available for your server.
■ LSI MegaRAID Storage Manager – Enables you to configure, monitor, and maintainRAID on the SAS internal RAID HBA.
■ HMP – provides tools to help you manage and configure your server enabling you to dothese things:■ Use a management agent at the OS level to enable in-band monitoring of your server
hardware over SNMP. You can use this information to integrate your server into yourdata center management infrastructure.
■ Use a management agent to enable in-band monitoring of your server's storage devices,including RAID arrays. You can view this information from the Oracle ILOM webinterface or CLI.
■ Use a BIOS configuration tool, which runs on the host OS and configures the host BIOSCMOS settings, host boot order, and some SP settings.
■ Use IPMItool to access the servers service processor using the IPMI protocol andperform management tasks.
■ Intel NIC Teaming – Enables the network interfaces on a server to be grouped together intoa team of physical ports called a link aggregated group.For more information on setting up Intel NIC teaming for your environment, refer to theIntel Connectivity web page on Advanced Networking Services Teaming at:
http://support.intel.com/support/network/sb/CS-009747.htm
94 Netra Server X5-2 Operating System Installation Guide • October 2016
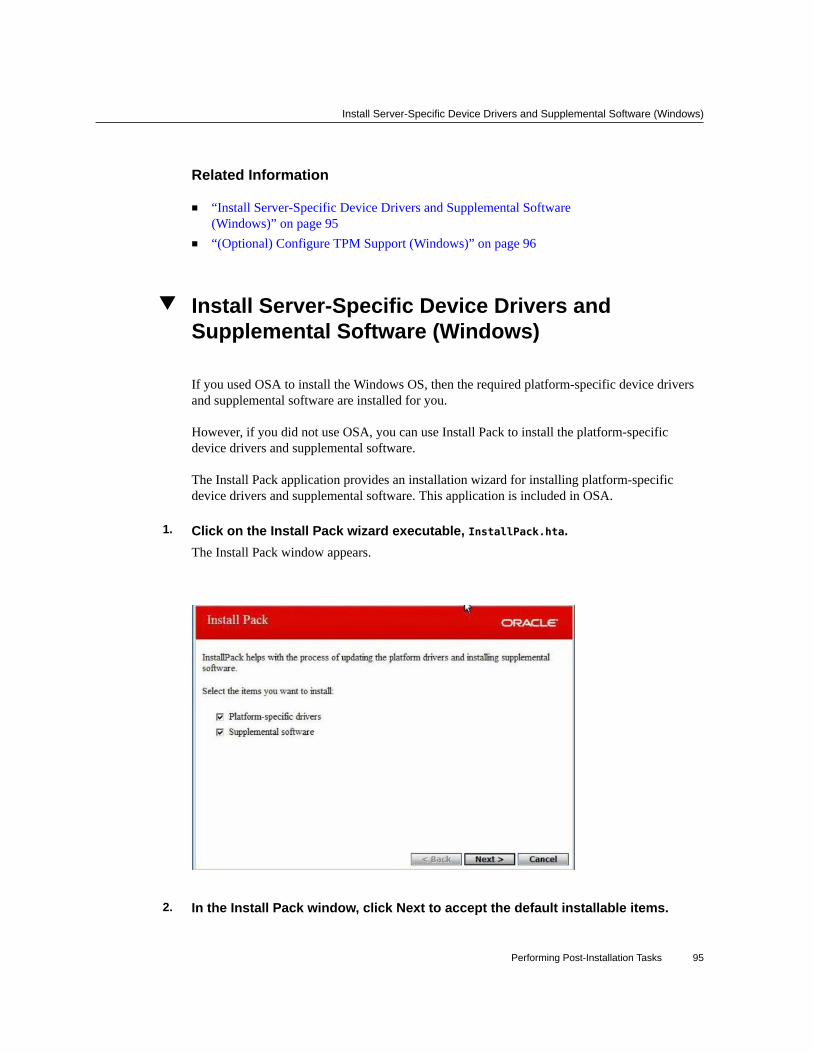
Install Server-Specific Device Drivers and Supplemental Software (Windows)
Related Information
■ “Install Server-Specific Device Drivers and Supplemental Software(Windows)” on page 95
■ “(Optional) Configure TPM Support (Windows)” on page 96
Install Server-Specific Device Drivers andSupplemental Software (Windows)
If you used OSA to install the Windows OS, then the required platform-specific device driversand supplemental software are installed for you.
However, if you did not use OSA, you can use Install Pack to install the platform-specificdevice drivers and supplemental software.
The Install Pack application provides an installation wizard for installing platform-specificdevice drivers and supplemental software. This application is included in OSA.
1. Click on the Install Pack wizard executable, InstallPack.hta.The Install Pack window appears.
2. In the Install Pack window, click Next to accept the default installable items.
Performing Post-Installation Tasks 95
(Optional) Configure TPM Support (Windows)
Note - Always accept the default installable items to ensure that the most recent versions of thedrivers are installed.
The Install Pack notice dialog box appears.
3. Follow the prompts to complete the installation of the device drivers andsupplemental software.
Related Information
■ “Supplemental Software Component Options (Windows)” on page 94■ “(Optional) Configure TPM Support (Windows)” on page 96
(Optional) Configure TPM Support (Windows)
If you intend to use the Windows 2008 TPM feature set on Oracle's Netra Server X5-2, youmust configure the server to support this feature.
Note - TPM enables you to administer the TPM security hardware in your server. For additionalinformation about implementing this feature, refer to the Windows TPM Managementdocumentation provided by Microsoft.
1. Access the BIOS Setup utility.See “Initiate a BIOS Operation” on page 41.
2. Use the left and right arrow keys to display the Advanced menu.
3. Use the up and down arrow keys to select Trusted Computing and press Enter.
96 Netra Server X5-2 Operating System Installation Guide • October 2016

(Optional) Configure TPM Support (Windows)
The TPM Configuration menu is displayed.
4. Select TPM Support and press Enter.The TPM Support dialog box is displayed.
5. In the dialog box, set TPM Support to Enable and press Enter.
Performing Post-Installation Tasks 97
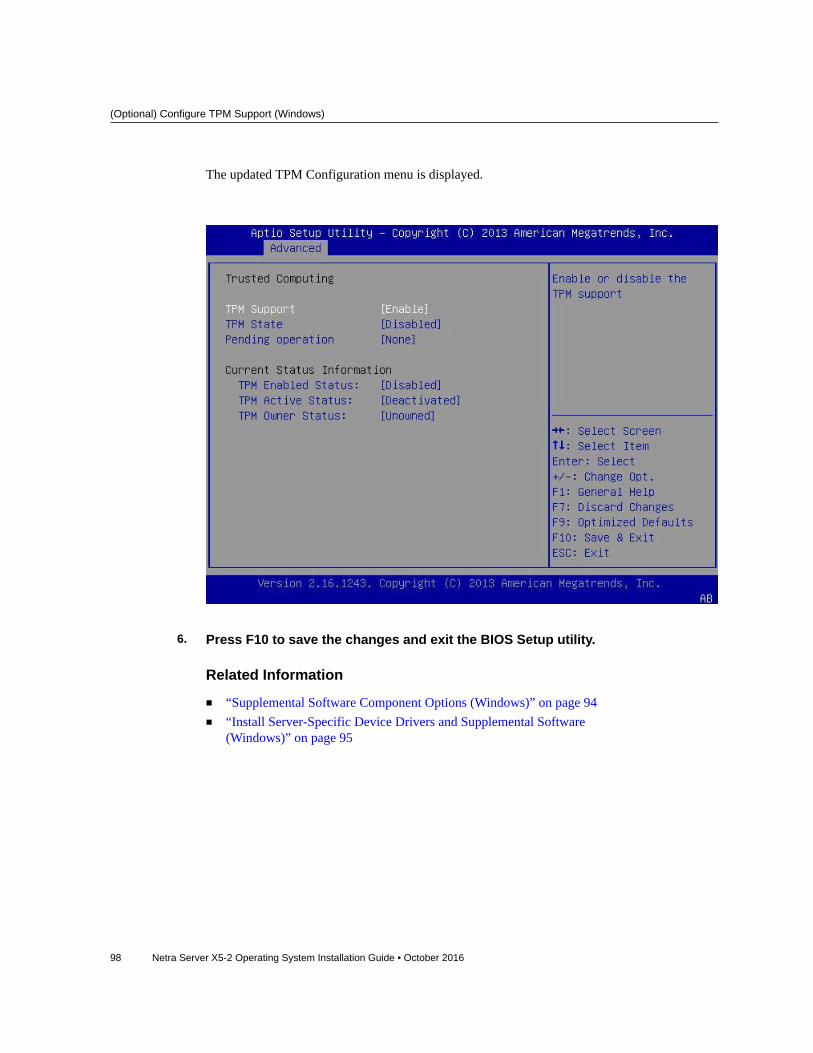
(Optional) Configure TPM Support (Windows)
The updated TPM Configuration menu is displayed.
6. Press F10 to save the changes and exit the BIOS Setup utility.
Related Information
■ “Supplemental Software Component Options (Windows)” on page 94■ “Install Server-Specific Device Drivers and Supplemental Software
(Windows)” on page 95
98 Netra Server X5-2 Operating System Installation Guide • October 2016

Glossary
A
ACPI Advanced Configuration and Power Interface.
ANSI SIS American National Standards Institute Status Indicator Standard.
ASF Alert standard format.
ASR Automatic system recovery.
AWG American wire gauge.
B
BAT basic assurance test.
BIOS Basic Input Output System.
BMC Baseboard management controller.
BOB Memory buffer on board.
C
chassis Refers to the server enclosure. For server modules, refers to the modular system enclosure.
CMA Cable management arm.
D
DHCP Dynamic Host Configuration Protocol.
Glossary 99

DTE
DTE Data terminal equipment.
E
ECC Error-correcting code.
EIA Electronics Industries Alliance.
ESD Electrostatic discharge.
F
FRU Field-replaceable unit.
G
GPT GUID partition table.
GRUB GRand Unified Bootloader. A GNU implementation that supports booting multiple OSs on acomputer.
H
HBA Host bus adapter.
HMP Hardware Management Pack.
host The part of the server with the CPU and other hardware that runs the Oracle Solaris OS andother applications. The term host is used to distinguish the primary computer from the SP. SeeSP.
I
ICMP Internet Control Message Protocol.
ID PROM Chip that contains system information for the server or server module.
IDE Integrated Development Environment.
IP Internet Protocol.
100 Netra Server X5-2 Operating System Installation Guide • October 2016
Oracle ILOM
K
KVM Keyboard, video, mouse. Refers to using a switch to enable sharing of one keyboard, onedisplay, and one mouse with more than one computer.
L
LRDIMM Load Reduced DIMM.
LwA Sound power level.
M
MAC Machine access code.
MAC address Media access controller address.
MBR Master boot record.
MSGID Message identifier.
N
NEBS Network Equipment-Building.
NET MGT Network management port. An Ethernet port on the server SP.
NIC Network interface card or controller.
NMI Nonmaskable interrupt.
NVMe A specification for accessing solid-state drives (SSDs) attached through the PCI Express (PCIe)bus. "NVM" is an acronym for non-volatile memory, which is used in SSDs.
O
OBP OpenBoot PROM.
Oracle ILOM Oracle Integrated Lights Out Manager. Oracle ILOM firmware is preinstalled on a variety ofOracle systems. Oracle ILOM enables you to remotely manage your Oracle servers regardlessof the state of the host system.
Glossary 101

Oracle Solaris OS
Oracle SolarisOS
Oracle Solaris operating system.
OS Operating system.
OSA Oracle System Assistant.
P
PCI Peripheral component interconnect.
PDB Power distribution board.
PMR Physical media request.
POST Power-on self-test.
PROM Programmable read-only memory.
PSH Predictive self healing.
PXE Preboot eXecution environment.
Q
QSFP Quad small form-factor pluggable.
R
RDIMM Registered DIMM.
REM RAID expansion module. Sometimes referred to as an HBA See HBA. Supports the creation ofRAID volumes on drives.
RHEL Red Hat Enterprise Linux.
S
SAN Storage area network.
SAS Serial attached SCSI.
102 Netra Server X5-2 Operating System Installation Guide • October 2016

UUID
SATA Serial advanced technology attachment.
SCC System configuration chip.
SER MGT Serial management port. A serial port on the server SP, the server module SP, and the CMM.
SLES SUSE Linux Enterprise Server.
SMART Self-Monitoring, Analysis, and Reporting Technology.
SNMP Simple Network Management Protocol.
SP Service processor. In the server or server module, the SP is a card with its own OS. The SPprocesses Oracle ILOM commands providing lights out management control of the host. Seehost.
SRU Support Repository Update. Used to updated the Oracle Solaris OS.
SSD Solid-state drive.
SSH Secure shell.
T
TIA Telecommunications Industry Association (Netra products only).
Tma Maximum ambient temperature.
TPM Trusted Platform Module.
U
U.S. NEC United States National Electrical Code.
UCP Universal connector port.
UEFI Unified Extensible Firmware Interface.
UI User interface.
UL Underwriters Laboratory Inc.
UTC Coordinated Universal Time.
UUID Universal unique identifier.
Glossary 103
VM
V
VM Virtual machine.
W
WDS Windows Deployment Services.
WIM Windows Imaging Format.
WWN World wide name. A unique number that identifies a SAS target.
104 Netra Server X5-2 Operating System Installation Guide • October 2016
Index
Aassigning boot priority, 85
BBIOS
boot drive priority, 85modes, 47overview, 44setting default values, 45setting up, 44switching Legacy and UEFI modes, 47
boot mediaselecting, 35setting up
local, 36remote, 36
boot priority, 85booting
RAID, 57
Cchoosing installation method, 11configuration worksheet
Oracle Solaris, 22Oracle VM, 27
configuringnetwork adapter, 90Oracle Solaris, 21, 24Oracle VM, 27, 28RAID, 49
LSI BIOS, 56OSA, 52
TPM support, 96console display
options, 32selecting, 31setting up
KVM, 33SER MGT, 32SSH, 33web, 34
creating RAID volume, 56
Ddetermining
MAC address, 92
GGRUB, 87guided OS installations, 17
HHBA and RAID support, 49
Iinstallation
by media, 18by network, 19by OSA, 17Linux task map, 13method
choosing, 11understanding, 17
Oracle Solaris task map, 12Oracle VM task map, 12
105

Index
OS, 65media, 71
overviewLinux, 13Oracle Solaris, 12Oracle VM, 12VMware ESXi, 14Windows, 15
preparation, 31utilities, 41VMware ESXi task map, 14Windows task map, 15
installingOS, 65
media, 71OSA, 65PXE, 80
support kernel, 89Windows
device drivers, 95HBA drivers, 75
LLinux
installation task map, 13post-installation tasks, 87preparing PXE, 38
Mmaking a virtual drive bootable
MegaRAID, 60WebBIOS, 57
manual OS installations, 18
Nnetwork installations, 19
OOracle Linux
choosing kernel, 87
installing support kernel, 89support kernel, 16
Oracle Solarisconfiguration worksheet, 22configuring, 21, 24installation task map, 12preparing PXE, 37RAID limitations, 21
Oracle VMconfiguration worksheet, 27configuring, 27, 28installation task map, 12overview, 30
OSdocumentation links, 15installing, 65
from media, 71from OSA, 65from PXE, 80
media, 18preparing to install, 31supported versions, 15
OSAconfiguring RAID, 52installations, 17starting, 43
overviewBIOS, 44Oracle VM, 30
Ppost-installation tasks, 85
Linux, 87VMware ESXi, 90Windows, 93
preparingfor installation
OS, 31PXE, 37
Linux, 38Oracle Solaris, 37Windows, 40
PXEpreparation, 37
Linux, 38
106 Netra Server X5-2 Operating System Installation Guide • October 2016
Index
Oracle Solaris, 37Windows, 40
support, 19
RRAID
boot virtual drive, 60booting, 57booting a virtual drive, 57configuration requirements, 50configuring, 49
LSI BIOS, 56OSA, 52
creating a volume, 51, 56HBA support, 49limitations in Oracle Solaris, 21post-installation, 51
resettingserver, 41
Sselecting
boot media, 35console display, 31
serverresetting, 41
settingBIOS default values, 45console display
KVM, 33SER MGT, 32SSH, 33web, 34
setting upBIOS, 44local
boot media, 36KVM console, 33SER MGT console, 32
remoteboot media, 36SSH console, 33web console, 34
starting OSA, 43supplemental software, 94supported
OS versions, 15
Uunderstanding
OS installation method, 17
VVMware ESXi
configuring network adapter, 90determining MAC address, 92installation task map, 14post-installation tasks, 90
WWindows
installation overview, 15installing
device drivers, 95HBA drivers, 75
post-installation tasks, 93preparing PXE, 40supplemental software, 94TPM support, 96
107

108 Netra Server X5-2 Operating System Installation Guide • October 2016