Embed Size (px)
Citation preview
NetBak Replicator
Applies to version 4.5.0
Contents
1 Notice ............................................................................................................ 1
2 Install NetBak Replicator ....................................................................................... 2
2.1 System Requirements ................................................................................... 2
2.2 Software Installation .................................................................................... 2
2.3 Silent installation by command line .................................................................... 8
3 Using NetBak Replicator ........................................................................................ 9
3.1 First Time wizard: ....................................................................................... 9
3.2 Simple Mode ............................................................................................ 9
3.3 Instant Backup......................................................................................... 11
3.4 Instant Restore......................................................................................... 16
3.5 Advanced Mode ....................................................................................... 17
3.5.1 Auto-Backup ................................................................................. 18
3.5.2 Schedule Backup ............................................................................. 20
3.5.3 Instant Backup ............................................................................... 21
3.5.4 Instant Restore ............................................................................... 22
3.6 Options ................................................................................................ 22
3.7 Tray Icon Management ............................................................................... 25
3.8 Exit NetBak Replicator ............................................................................... 25
4 Technical Support ............................................................................................. 26
1 Notice
Thank you for choosing QNAP products! This user manual provides detailed instructions of
using NetBak Replicator. Please read carefully and start to enjoy the powerful functions of
NetBak Replicator!
Legal Notices
©Copyright 2015. QNAP Systems, Inc. All Rights Reserved.

All the features, functionality, and other product specifications are subject to change
without prior notice or obligation. Information contained herein is subject to change
without notice.
QNAP and the QNAP logo are trademarks of QNAP Systems, Inc. All other brands and
product names referred to are trademarks of their respective holders.
Further, the ® or ™ symbols are not used in the text.
DISCLAIMER
In no event shall the liability of QNAP Systems, Inc. (QNAP) exceed the price paid for the
product from direct, indirect, special, incidental, or consequential software, or its
documentation. QNAP makes no warranty or representation, expressed, implied, or
statutory, with respect to its products or the contents or use of this documentation and all
accompanying software, and specifically disclaims its quality, performance,
merchantability, or fitness for any particular purpose. QNAP reserves the right to revise or
update its products, software, or documentation without obligation to notify any individual
or entity.
Back up your system periodically to avoid any potential data loss. QNAP disclaims any
responsibility of all sorts of data loss or recovery.
Should you return any components of the NAS package for refund or maintenance, make
sure they are carefully packed for shipping. Any form of damages due to improper
packaging will not be compensated.
2 Install NetBak Replicator
2.1 System Requirements
� Windows 10, 8.1, Windows 8, Windows 7, Vista, XP (SP3)
� Windows Server 2012 R2, Windows Server 2012, Windows Server 2008 R2
� 1 GHz or faster processor (x86 32-bit or x86 64-bit)
� 1 GB RAM (32-bit) or 2 GB RAM (64-bit)
2.2 Software Installation

Follow these steps to install NetBak Replicator.
1. You can download and install NetBak Replicator from the QNAP website
(http://www.qnap.com), or install it from the product CD-ROM (if applicable).
2. Select a language and click “OK”.
3. When the NetBak Replicator Setup Wizard is shown, click “Next”.
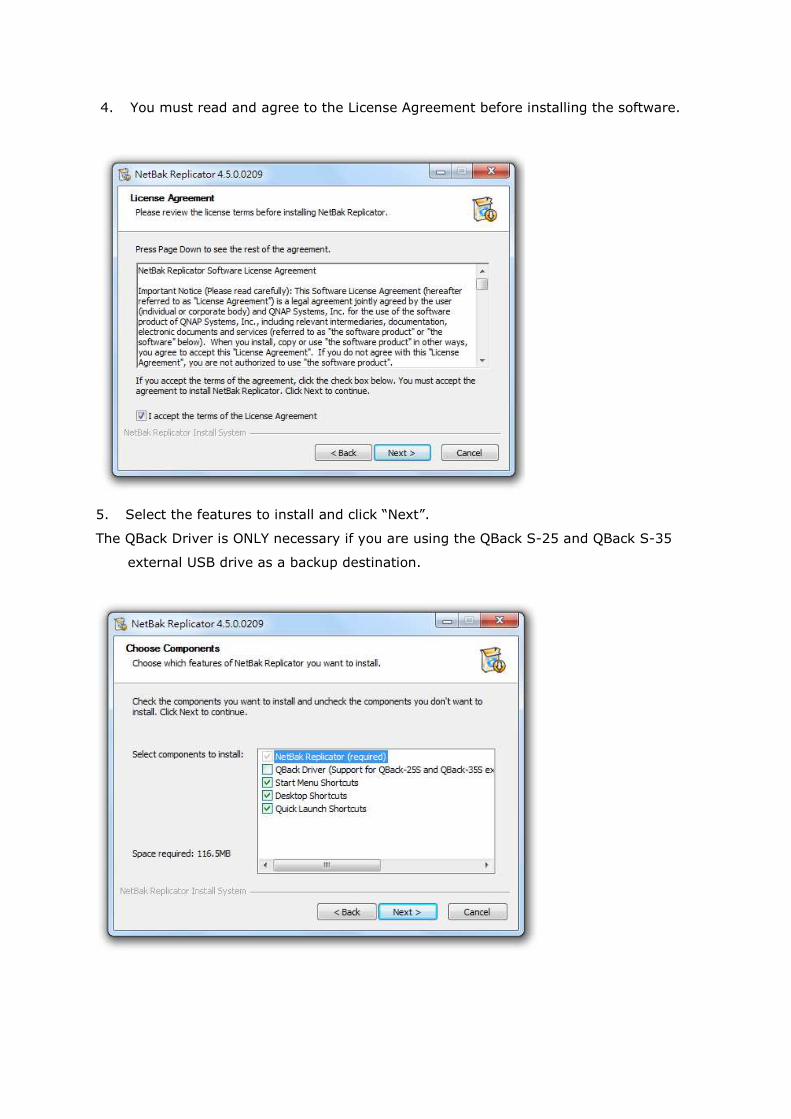
4. You must read and agree to the License Agreement before installing the software.
5. Select the features to install and click “Next”.
The QBack Driver is ONLY necessary if you are using the QBack S-25 and QBack S-35
external USB drive as a backup destination.

6. Select the install location and click “Install”. Please note that NetBak Replicator must
be installed in a local drive of your computer.
7. Select additional Options:
- Allow non-administrator users to perform scheduled backup tasks
- Always run NetBak Replicator as administrator.
Both options are checked by default and will fit most of cases (described below).

- Allow non-administrator users to perform scheduled backup tasks
(If unchecked non-administrator users cannot run schedule backup but can run instant
backup)
This option allows non-administrator users to perform scheduled backup tasks by using
Windows Task Scheduler. Windows security does not allow non-administrator users to
perform scheduled tasks by default. If this option is checked, NetBak will change the
setting automatically for local users only.
This setting can be change manually in Windows from the Local Policies setting or by GPO
and granting the users the right to “logon as batch job”. Reference:
http://technet.microsoft.com/en-us/library/cc957131.aspx
For Active Directory, the administrator has to grant users this permission in the GPO to
allow non-administrator domain users the right to perform schedule backup.
- Always run NetBak Replicator as administrator.
(If unchecked non-administrator users cannot launch NetBak Replicator)
By default, Netbak will run as administrator to allow users to backup system files or files
that requires administrator privilege. This is mostly necessary for server backup.
However, it can be disabled if NetBak Replication will be used by users without
administrator privileges.
Note: When both options are checked, the second option has higher priority and will set
NetBak Replicator to run as administrator
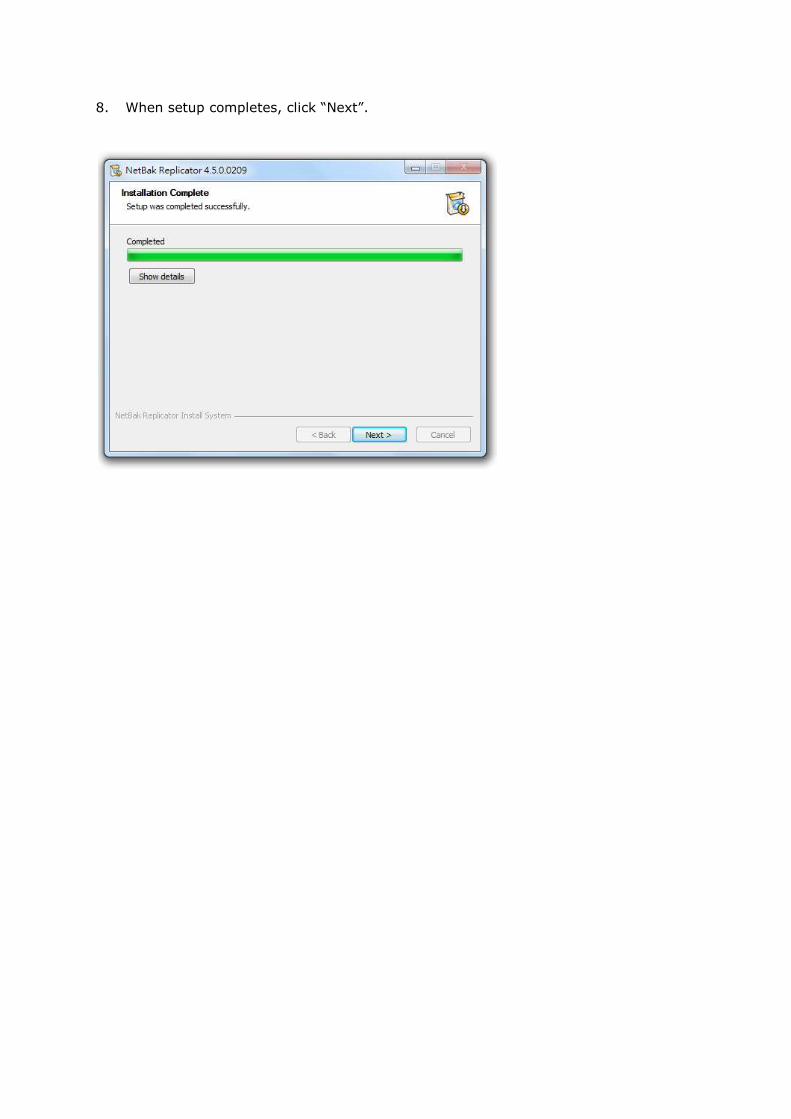
8. When setup completes, click “Next”.

9.
It may be necessary to reboot if you installed the QBack Driver. Select whether to reboot
your computer immediately or to reboot it later.
Then click “Finish” to complete the installation.
2.3 Silent installation by command line
NetBak Replicator can also be installed by command line.
It can be used to deploy it by script or by GPO with Active Directory.
QNAPNetBakWindows-4.3.0.exe [/S] [/R=NO] [/A=NO] [/ D=instdir]
/S Enables silent install
/D=instdir Specifies the install directory
/R=NO Run as administrator is disabled (default i s enabled) – Non-administrator
user cannot run NetBak Replicator
/G=NO Grant “Log on as a batch job” is disabled (d efault is enabled) –
Non-administrator user cannot run schedule backup
The switches must be in uppercase letters.
The switch /D must be put in the last position without using double quotes, even if the path
contains space characters.
Example:
QNAPNetBakWindows-4.3.0.exe /S /D=C:\Program Files\ NetBak

Install NetBak Replicator to the directory C:
(uses the default settings.)
QNAPNetBakWindows- 4.3.0.exe /S
Install NetBak to the default install directory and don’t show dialog.
Also disable “Run as administrator” to allow non
replicator. (/G=NO)
Also allow non-administrator users to
3 Using NetBak Replicator
3.1 First Time wizard:
The First Time Wizard allows
- Select the NAS
- Select the shared folder
As NetBak Replicator can remember the most common
convenient to backup your data to multiple destination if wanted.
Click Start and follow the wizard.
3.2 Simple Mode
to the directory C:\Program Files\NetBak and don’t show dialog
4.3.0.exe /S /G=NO
Bak to the default install directory and don’t show dialog. (/S)
Also disable “Run as administrator” to allow non-administrator users to start netback
administrator users to be able to perform scheduled backup. (default)
NetBak Replicator
The First Time Wizard allows setting the first backup destination with a few easy s
Select the shared folder
As NetBak Replicator can remember the most commonly used destination, it will be
data to multiple destination if wanted.
Click Start and follow the wizard.
NetBak and don’t show dialog
(/S)
to start netback
backup. (default)
with a few easy steps:
used destination, it will be

NetBak Replicator supports “Simple Mode” and “Advanced Mode” for data backup and
restore. For simple configuration, you can select “Instant Backup” and “Instant
Restore”. To use advanced options such as auto
settings, select “Advanced Mode” or “Options”.
cator supports “Simple Mode” and “Advanced Mode” for data backup and
For simple configuration, you can select “Instant Backup” and “Instant
To use advanced options such as auto-backup, schedule backup and filter
ced Mode” or “Options”.
cator supports “Simple Mode” and “Advanced Mode” for data backup and
For simple configuration, you can select “Instant Backup” and “Instant
backup, schedule backup and filter

Function
Instant Backup
Instant Restore
Advanced Mode
3.3 Instant Backup
To use instant backup, click
Backup Source:
NetBak Replicator supports data backup of computer drives, mail data (Outlook*, O
Express, Windows Mail), Documents, Desktop, Favorites, and Fonts.
files to be backed up and then click Next.
*NetBak Replicator can back up all active personal folder files (PST files) only from
Microsoft Outlook located in
Description
Back up data to the destination instantly.
Restore data from the backup instantly.
Advanced function of NetBak Replicator, such as
auto-backup, schedule backup and NetBak Replicator
management.
(Instant Backup).
NetBak Replicator supports data backup of computer drives, mail data (Outlook*, O
Express, Windows Mail), Documents, Desktop, Favorites, and Fonts. Select the folders and
hen click Next.
*NetBak Replicator can back up all active personal folder files (PST files) only from
your computer drives or any network drives.
Back up data to the destination instantly.
instantly.
Replicator, such as
backup, schedule backup and NetBak Replicator
NetBak Replicator supports data backup of computer drives, mail data (Outlook*, Outlook
Select the folders and
*NetBak Replicator can back up all active personal folder files (PST files) only from
your computer drives or any network drives.

Backup destination
The destination can be an internal or external disk drive or a network share. Note that the
latest selected location will be displayed.
- Local drives
- Network Location Wizard
- Network Location
- Other Location
- Remove Location
a. Local drive
Select a local drive or an external drive letter as the destination.
b. Network Location Wizard
Start the wizard to add a new backup destination. (Same as First Time Wizard)
c. Network location
Select “Network Location” to specify a shared folder of QNAP NAS from Microsoft
Networking section, a WebDAV folder or an FTP folder as the destination. Make sure your
computer is connected to the network when you use this feature.

Function Description
NAS Server(s) on the
Network
All the available NAS servers on the local network will be
shown.
data will be backed up to.
NAS IP
To specify the destination by NAS IP, select this option and enter
the IP
folders on the NAS.
NAS domain name
To specify the destination by NAS domain name (DNS), select
this option and enter the address of the NAS (example:
mynas.mydomain.local).
folders on the NAS.
WebDAV URL
Specify a WebDAV folder as the destination.
directory and click “OK”.
to the folder.
enter the us
“Advanced” to configure the proxy settings.
FTP URL
You can specify an FTP folder as the destination.
directory and click “OK”.
to the folder.
Passive Mode Check this option to enable FTP passive mode. Try this option if
you have FTP connection problems.
Protocol To use SSL or SSH tunnel for FTP.
mode
> Click “
Refresh If your NAS cannot be found, click “Refresh” to try again.
d. Other location
You can select “Other Location” and specify the location of a shared folder.
e. Remove Location
As NetBak Replicator remember
them from the list.
Click “Start” to back up the data.
Description
All the available NAS servers on the local network will be
shown. Select the NAS server and the shared folder where the
data will be backed up to.
To specify the destination by NAS IP, select this option and enter
the IP address of the NAS. Then click “>” to display the shared
folders on the NAS.
To specify the destination by NAS domain name (DNS), select
this option and enter the address of the NAS (example:
mynas.mydomain.local). Then click “>” to disp
folders on the NAS.
Specify a WebDAV folder as the destination. Enter the folder
directory and click “OK”. Make sure you have proper access right
to the folder. After clicking “OK”, a dialog will pop up for you to
enter the username and password. You can also click
“Advanced” to configure the proxy settings.
You can specify an FTP folder as the destination.
directory and click “OK”. Make sure you have proper access right
to the folder.
Check this option to enable FTP passive mode. Try this option if
you have FTP connection problems.
use SSL or SSH tunnel for FTP. If SSH is selected, Passive
mode will be disabled.
Click “>” to view the network shares of the selected NAS.
If your NAS cannot be found, click “Refresh” to try again.
You can select “Other Location” and specify the location of a shared folder.
As NetBak Replicator remembers previous backup destination, it is possible
Click “Start” to back up the data.
All the available NAS servers on the local network will be
Select the NAS server and the shared folder where the
To specify the destination by NAS IP, select this option and enter
” to display the shared
To specify the destination by NAS domain name (DNS), select
this option and enter the address of the NAS (example:
Then click “>” to display the shared
Enter the folder
Make sure you have proper access right
After clicking “OK”, a dialog will pop up for you to
You can also click
You can specify an FTP folder as the destination. Enter the folder
Make sure you have proper access right
Check this option to enable FTP passive mode. Try this option if
If SSH is selected, Passive
” to view the network shares of the selected NAS.
If your NAS cannot be found, click “Refresh” to try again.
You can select “Other Location” and specify the location of a shared folder.
previous backup destination, it is possible to remove


When backup is in process, the progress will be shown.
Function Description
When backup is
finished, turn off this
computer
Select this option to turn off the computer
backup completes.
Action when an error
occurs
If an error occurs during backup, you
functions
1.
2.
3.
Details View
view the details.
Pause Pause the backup action.
Finish Click Finish to exit.
When backup has completed, a summary will be shown.
exit.
When backup is in process, the progress will be shown.
Description
Select this option to turn off the computer automatically after
backup completes.
an error occurs during backup, you can choose
functions:
Display a warning dialog.
Ignore the error and continue.
Stop the action.
View the backup information. You can mouse over the logs to
view the details.
Pause the backup action.
Click Finish to exit.
When backup has completed, a summary will be shown. Click “OK” and click “Finish” to
automatically after
choose one of these
You can mouse over the logs to
Click “OK” and click “Finish” to

3.4 Instant Restore
1. To restore data with NetBak Replicator, click
2. Select the data source, the user and computer, and specify the files or folders to
restore. Then click “Next”.
make sure it is available.
3. Select the restore location and the action to take
original file. Click “Start” to begin restore.
4. When the restore completes, a summary will be shown.
5. Click “Details” to view the restore information, or click “Finish” to exit.
NetBak Replicator, click (Instant Restore).
Select the data source, the user and computer, and specify the files or folders to
Then click “Next”. If the data source is a network share or an external drive,
it is available.
Select the restore location and the action to take if a restore file is different from the
Click “Start” to begin restore.
restore completes, a summary will be shown. Click “OK” to continue.
Click “Details” to view the restore information, or click “Finish” to exit.
(Instant Restore).
Select the data source, the user and computer, and specify the files or folders to
If the data source is a network share or an external drive,
a restore file is different from the
Click “OK” to continue.
Click “Details” to view the restore information, or click “Finish” to exit.

3.5 Advanced Mode
NetBak Replicator provides advanced functions such as automatic backup, scheduled
backup, filter settings, and backup settings for opened files. To use the advanced mode,
run NetBak Replicator and select (Advanced Mode).
Function Description
Auto-Backup Execute automatic data backup to the destination.
Schedule Backup Set backup schedules.
Instant Backup Back up data to the destination Instantly.
Instant Restore Restore data from the backup Instantly.
Options Configure advanced backup settings.
Additionally, scheduled backups can be started by command line:
C:\Program Files\QNAP\NetBak\Netbak.exe /backupjob: 2

3.5.1 Auto-Backup
NetBak Replicator supports automatic backup for computer drives, My Documents,
Desktop, and Favorites to QNAP QBack devices, local or external disk drives, or network
shares. When source files are added, modified or deleted, the changes will be
synchronized with the destination automatically. (Opened file option (VSS) is not
supported with Auto-Backup)
Note: Incremental backup is used for this feature. After the first time data backup, NetBak
Replicator only copies files that have been added or changed since the last backup.
1 is the Source
2 is the destination
1 2

Function Description
Source Select the files and folders for automatic backup.
Destination
Select the destination drive to back up the data to. The
destination can be a QNAP QBack device, a local or an
external disk drive, or a network share.
Do not delete file at the
backup destination.
Select this function and NetBak will not delete files at the
backup destination even if the files are deleted locally.
Clear Logs Mouse over the log to view the details. To clear the logs,
click “Clear Logs”.
Options Click “Options” and select to view all event logs or view
warning and error logs only.
Save As To save the backup information, click “Save As” to save
the logs as *.log file.
Start Auto-Backup/Stop
To execute automatic backup, click “Start
Auto-Backup”. If the files have never been backed up
before, the backup will start automatically. The backup
logs and the status will be displayed.
Click “Stop” to disable the auto-backup.
Simple Mode Return to Simple Mode.
Load Logs To view the previously saved logs, click “Load Log” and
select the log file.
Close Close NetBak Replicator.

3.5.2 Schedule Backup
NetBak Replicator supports scheduled backup to back up specified files and folders from
your computer to a QNAP NAS, local or external disk drives, or network shares on a daily,
weekly or monthly basis.
1 – Source
2 – Destination
3 – Start time and frequency
4 – Job List
Function Description
Source Select the folders and files for scheduled backup.
Destination
Select the destination drive to back up the data to. The
destination can be a QNAP QBack device, a local or
external disk drive, or a network share.
Create a folder for each
backup.
If enabled, please enter the folder name and the backup
job will create this folder at the destination. The name of
that folder will use the backup name field and the backup
date.
For example:
1
4
2
3

NetBakData\MyBackup\YYYY-MM-DD-HH-MM-SS \
All of the selected files will be copied to this new folder at
the destination.
The files copied to that folder will not be available from the
restore function, as only a file copy is performed for
archiving or keeping a version as a purpose. To restore
some files, open the backup destination folder in the
NetBakData folder.
Start time and Frequency
Setting
Specify the start date and time of the backup
schedule. Click “Frequency Settings” to set the schedule
settings.
Select “Repeat on selected day” and specify the backup
schedule. If the option is disabled, the backup schedule
will execute once only.
Backup Schedule The backup schedules are shown on this list. You can
create a maximum of 16 backup schedules.
Add After choosing a source, destination and set duration,
click “ADD” and the action will be added to the job list
Remove Choose the job from the job list and click “Remove” to
delete the selected job.
Save
To change a backup schedule, select a schedule on the list
and click Frequency Settings. After changing the settings,
click “Save”. Click “OK” to confirm the changes or “No” to
cancel.
Logs View the backup logs.
Start Schedule/Stop
Choose a backup schedule and click “Start Schedule” to
enable the schedule.
To stop a backup schedule, click “Stop”.
Simple Mode Return to Simple Mode
Load Logs To view previously saved logs, click “Load Logs” and select
the log file.
Close Close NetBak Replicator.
Note: For non-admin user,
3.5.3 Instant Backup
To use backup in Advanced Mode, click the Instant Backup tab. This feature is the same as
Instant Backup in Simple Mode. Please see 3.3 Instant Backup for the details.

The option “Create a folder for each backup” is the same as for scheduled backup. Please
refer to 3.5.2 Schedule Backup for more details.
3.5.4 Instant Restore
To use restore in Advanced Mode, click the Instant Restore tab. This feature is the same as
Instant Restore in Simple Mode. Please refer to 3.4 Instant Restore for more details.
3.6 Options
To use the advanced options such as filter settings, one touch action settings, secure disk
management, and drive initialization, click “Options” in Simple Mode or go to “Options” in
Advanced Mode.

Function Description
Activity History This section records all the event logs of NetBak Replicator. You can
view, save and clear the logs in this section.
Filter Settings
You can specify the file size or types to be excluded from backup and
restore tasks. Click the icon to configure the settings.
To configure file size, enter the value at the Minimum and Maximum file
size options and select the value’s unit (KB, MB, GB) from the drop
down menu.
To configure file types, click the boxes in Include or Exclude file types.
There are several file types can be selected including Documents,
Picture, Video, Application, Music, Temporary File. Move the cursor on
each file type to check what filename extensions are contained in that file
type.
You can also customize specific filename extensions by entering them in the Other with * .extension type1 *, *.extension type2 *, formation. For example:
Please note that Exclude has priority over Include in this
function.
Advanced Settings
Advanced Settings includes Startup Settings, Backup Settings for
Opened Files and E-Mail Notification.
Startup Settings
This option allows you to enable and disable launching NetBak
Replicator at system startup
Backup Settings for Opened Files
NetBak Replicator allows you to back up opened files and Microsoft
VSS-aware applications. This option is enabled by default and is only
supported by Schedule Backup and Instant Backup.
Enable VSS: This option allows you to back up opened files.
Enable VSS Writer (Application Consistency Support): This option
allows you to back up VSS-aware applications (such as MS SQL and
Hyper-V) to ensure application data consistency.
Select “Do not prompt for VSS files inclusion/exclusion during
scheduled backup” to back up all VSS files without prompting the
user.
E-Mail Notification
User can enable and disable e-mail notification when Schedule Backup
job or Instant Backup job finishes. SMTP server ip or domain name
address and SMTP service port have to be specified here. User can also
choose to enable SMTP Authentication or SSL/TLS encryption. User
can configure up to 2 e-mail addresses to receive notification.
One Touch Action Settings
Select the action to take when pressing the one touch button on the
QNAP QBack S-25 and QBack S-35 devices. NetBak Replicator will
execute instant backup immediately according to your previous
settings when you press the button. To disable one touch button,

select “Do nothing”.
This option requires QBack Driver installed.
Manage Secure Disk
You can change the password of the secure disk, open or close the
secure disk in this section.
Change Password: Select the secure volume of the external device and
enter the old and new password. Select a security question from the
drop-down menu or enter a password reminder.
*If you have selected to remember the password of the secure disk and
want to cancel this option, you can change the password and uncheck
the option “Remember the password of Secure Disk”. Then restart
NetBak Replicator.
Open Secure Disk:
Select the secure disk volume of the external device and enter the
password. Click “OK”.
If you forgot the password, click “Password Prompt” to view the hint
question and answer. This will help you recall the password.
Close Secure Disk: Select the secure volume and click “OK”.
Initialize an External Device
To initialize an external device with NetBak Replicator, follow these
steps:
Note: NetBak Replicator can only format an external device as an
NTFS file system. All the disk data will be cleared after initialization.
1. Make sure the device is properly connected to your PC. Click the
icon .
2. Select the drive corresponding to the external device. Click
“Next”.
3. You can create a public disk and a secure disk on the external
device. Enter the size of the public disk or use the slide bar to
adjust the space of the public and secure disks. Click “Next”.
4. Enter a password to enable the secure disk. The password should
contain 8-64 alphanumeric characters. Select the security
question from the drop-down menu or enter your own password
reminder. Click “Next”.
5. Check the disk settings and click “Next” to start
initialization. Select “Remember the password of Secure Disk” to
open the secure disk and start auto-backup or schedule backup (if
configured) automatically when you plug in the device to the same
PC next time.
6. Click “OK”.
7. Wait patiently until the initialization completes. Click
“Finish”. The public and secure disks will be mounted to your
computer automatically.

3.7 Tray Icon Management
When you run NetBak Replicator, an icon
the icon and you can select Open NetBak Replicator, Instant Backup, Instant Restore,
Advanced Mode, Manage Secure Disk,
3.8 Exit NetBak Replicator
To exit NetBak Replicator, right click the tray icon
Tray Icon Management
When you run NetBak Replicator, an icon will be shown in the system tray.
you can select Open NetBak Replicator, Instant Backup, Instant Restore,
Advanced Mode, Manage Secure Disk, Check for Updates or Exit.
Exit NetBak Replicator
To exit NetBak Replicator, right click the tray icon and select Exit.
the system tray. Right click
you can select Open NetBak Replicator, Instant Backup, Instant Restore,

4 Technical Support
QNAP provides dedicated online support and customer service via instant messenger.
You can find the best way for you to contact us on our website:
http://www.qnap.com/support


![Untitled-1 [escanav.ir]escanav.ir/userfiles/manualpdf/200.pdf · 2013-02-01 · 01±1 Cyberoam : Endpoint Data Protection (EPDP) Kaspersky ESET(NOD32) Accunetix (Penetration Test)](https://img.pdfslide.us/doc/110x75/5b7ba41a7f8b9adb4c8d0cc7/untitled-1-2013-02-01-011-cyberoam-endpoint-data-protection-epdp.jpg)