Embed Size (px)
Citation preview

Net mending and patching P.D. Lorimer
500
(F!
Contents Page Arranging net for mending 2 The knots 3 The starting knot 3 Net making knots 3 Right side knots 5 Left side knot 6 Pick-up knots 7 Finishing knot 8 Cutting and mending 9 Cutting out 9 Mending 11 Larger holes 13 Patching 14 Lacing 15
FISHING nets have been used for thousands of years by those who seek food from the sea or make their living by catching fish.
In the early days suitable knots had to be devised before a net could be made. Its size was determined by the availability of suitable materials and by the time available to make by hand the twine and then braid the net.
The introduction of net making machines about 100 years ago speeded up operations considerably and meant much bigger nets could be manufactured. However, many hours still had to be spent by fishermen washing the natural fibres, preserving them with tar or tannin and mending them to extend their useful life.
When synthetic fibres were introduced in the 1950's nets of greater strength and longer life became available to fishermen, but despite these advantages modern nets still get damaged and have to be repaired by hand.
This paper is not meant to be a complete do-it-yourself course foi beginners from filling the needle onwards. Rather it is intended for practical fishermen starting off in a net fishery and is essentially a guide to mending and patching nets aboard Australian fishing boats.
SG 83 • September 1989
P.D. Lorimer, technical adviser, Fisheries Division, Department of Primary Industry, Canberra, Australia. This pubUcation, formerly PS 9, is reprinted by permission from a supplement to the June 1970 issue of Australian Fisheries; it is published for the Pacific Sea Grant College Program by Oregon State University Extension Service.
ORGGON STATG UNIVGR5ITY GXTGNSION SGRVICG
Arranging the net for mending
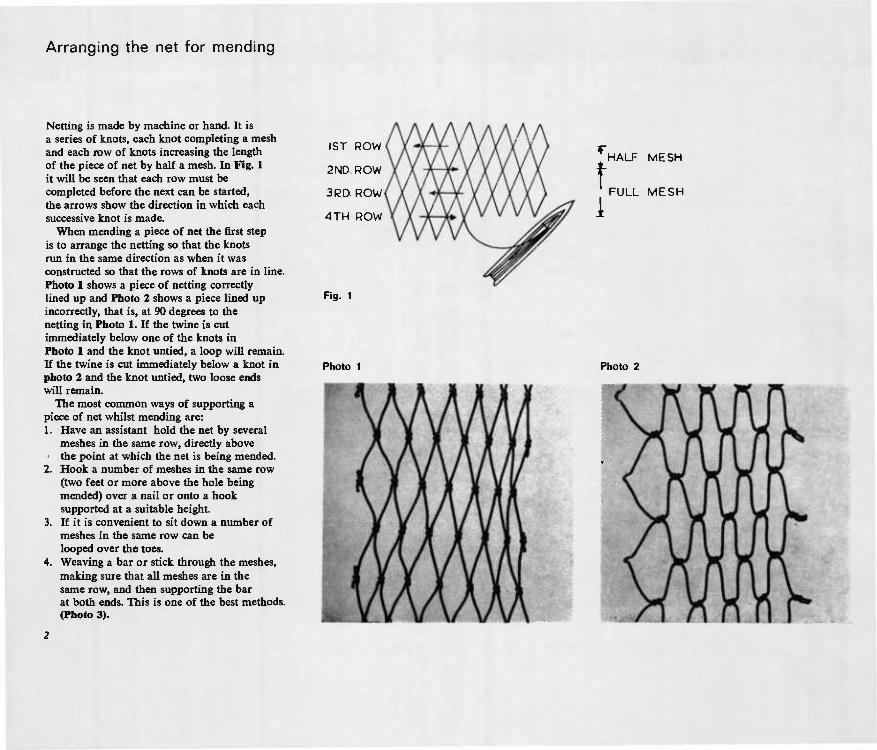
Netting is made by machine or hand. It is a series of knots, each knot completing a mesh and each row of knots increasing the length of the piece of net by half a mesh. In Fig. 1 it will be seen that each row must be completed before the next can be started, the arrows show the direction in which each successive knot is made.
When mending a piece of net the first step is to arrange the netting so that the knots run in the same direction as when it was constructed so that the rows of knots are in line. Photo 1 shows a piece of netting correctly lined up and Photo 2 shows a piece lined up incorrectly, that is, at 90 degrees to the netting in Photo 1. If the twine is cut immediately below one of the knots in Photo 1 and the knot untied, a loop will remain. If the twine is cut immediately below a knot in photo 2 and the knot untied, two loose ends will remain.
The most common ways of supporting a piece of net whilst mending are: 1. Have an assistant hold the net by several
meshes in the same row, directly above ' the point at which the net is being mended.
Hook a number of meshes in the same row (two feet or more above the hole being mended) over a nail or onto a hook supported at a suitable height. If it is convenient to sit down a number of meshes in the same row can be looped over the toes.
4. Weaving a bar or stick through the meshes, making sure that all meshes are in the same row, and then supporting the bar at both ends. This is one of the best methods. (Photo 3).
2.
3.
1ST ROW
2ND ROW
3RD. ROW
4TH ROW
t 1
HALF MESH
FULL MESH
Fig. 1
Photo 1 Photo 2

S. Providing the knots in a prawn or fish trawl net run in the right direction the net can be fleeted up to the boom and large areas can be inspected easily for holes and mended.
It is stressed that to mend a net quickly and efficiently the rows of knots must be lined up in the right direction and the netting properly supported.
The knots Knots described are those commonly
used in net mending and patching. There are several variations of the starting and finishing knots but only the best known ones are shown. There are also double left and right hand side knots but they are seldom used, because they are slower to execute, and have tittle advantage over the simple side knots illustrated, and have not been included.
The starting knot Pass the needle up through the mesh until a short tail of twine remains below the knot (Fig. 2). Using the fingers twist the tail of the twine around the two bars of the mesh above the twine leading to the needle (Fig. 3). Throwing the loop of twine to the left form a sheet bend (Fig. 4) and pull tight (Fig. 5).
Net making knots These are also known as half mesh knots. When working from left to right across the net the needle is brought up through the mesh (Fig. 6), Continued page 4
Fig. 5 Fig. 2
Fig. 3
Fig. 4

Fig. 7
Photo 4
Photo 5
Fig. 8
Fig. 9
From page 3 The size of the loop formed is
measured against the preceeding half mesh using the fingers as illustrated (Photo 4). This leaves the thumb and index finger to clamp the twine at the centre point of the half mesh on which the knot is being tied. (Photo 5). A sheet bend is then formed by throwing the loop of twine to the left and passing the needle under the half mesh and over the loop (Fig. 7). The knot is then pulled tight by moving the needle to the right (Fig 8).
Fig. 10
Fig. 11

When working from right to left the needle is passed down through the mesh (Fig. 9) and the size of the loop is measured against the preceding half mesh using the fingers as illustrated. (Photo 6.) This time the palm of the hand not the back of the hand is towards the net mender. The back of the hand is towards the mender when working from left to right. The twine is clamped in the half mesh by the index finger and thumb and a sheet bend is formed in the same manner as before (Fig. 10) and tightened by moving the needle to the left (Fig. 11).
Right side knots Lay the twine to the right of the knot of the side mesh (Fig. 12) with the index finger behind the knot. Measure the length of the bar of the mesh being formed by lining up the two knots above the one being made (Photo 7). Clamp the twine with index finger and thumb just below the knot in the side mesh. Throwing the loop in the twine to the left form an overhand knot around the knot in the side mesh (Fig. 13) and pull tight by moving the needle to the left (Fig. 14).
Fig. 12
Fig. 13
Pholo 6
Photo 7
Fig. 14
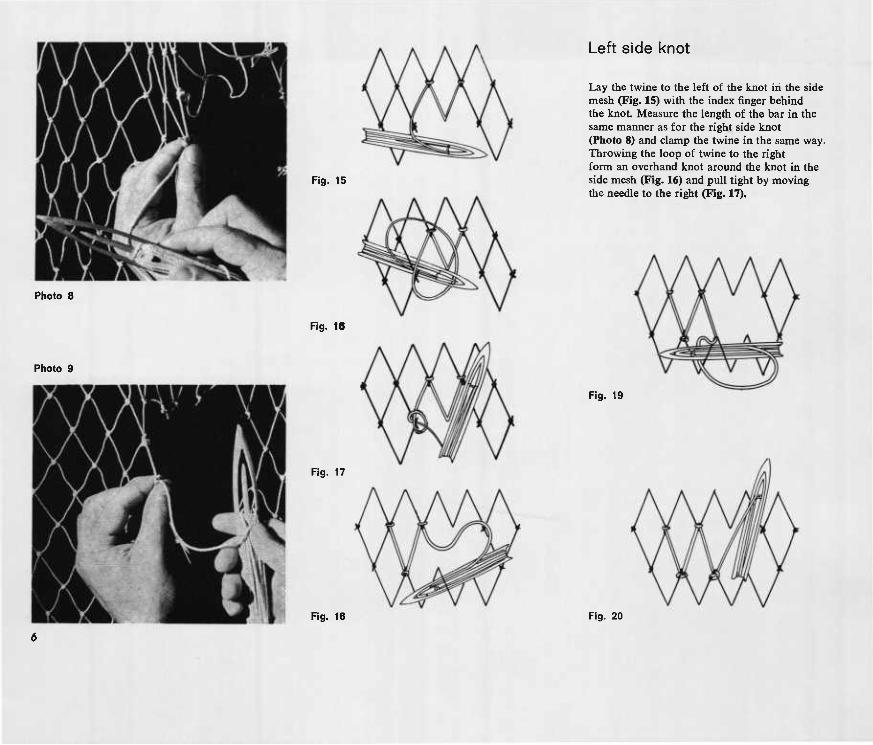
Fig. 15
Photo 8
Photo 9
Left side knot
Lay the twine to the left of the knot in the side mesh (Fig. 15) with the index finger behind the knot Measure the length of the bar in the same manner as for the right side knot (Photo 8) and clamp the twine in the same way. Throwing the loop of twine to the right form an overhand knot around the knot in the side mesh (Fig. 16) and pull tight by moving the needle to the right (Fig. 17).
Fig. 16
Fig. 17
Fig. 19
Fig. 18 Fig. 20

Pick-up knots
When working from left to right across the net the needle is passed up through the mesh (Fig. 18). The length of the bar of the mesh being formed is measured by lining up the knot being formed with the adjacent knot on the left (Photo 9). Clamp the twine with the index finger and thumb. A sheet bend is then formed by throwing the loop of twine to the left and passing the needle under the half mesh being picked up and over the loop (Fig. 19). The knot is then pulled tight by moving the needle to the right (Fig. 20).
When working from right to left the needle is passed down through the mesh being picked up (Fig. 21) and the length of the bar of the mesh being formed is measured by lining up the knot being formed with the adjacent knot on the right (Photo 10). The twine is clamped between forefinger and thumb (Photo 11) and a sheet bend formed, throwing the loop in the twine to the left (Photo 12) (Fig. 22) and tightening by moving the needle to the left (Fig. 23).
Fig. 21
Fig. 22
Fig. 23
Photo 10
Photo 11
Photo 12

Finishing knot
To finish ofi a mend a sheet bend is formed in the same manner as the pick up knot (Figs. 24 and 25) and a half hitch is then tied around the bar opposite the last bar formed (Fig. 26) and pulled tight (Fig. 27).
Fig. 24 Fig. 26
Fig. 25 Fig. 27

Cutting and mending
Cutting out
In a piece of netting each knot always has four bars leading to it, never three or two unless it is on the edge of the netting, and never five under any circumstances. When the starting knot is tied the twine on the needle forms the fourth bar to the knot. On half mesh, pick up and side knots, the twine on the needle forms one bar as it is brought to the knot and another as it leaves after the knot is tied. In the finishing knot the twine on the needle forms one bar as it is brought to the knot and tied.
Therefore, when cutting out a hole, preparatory to mending it, the knot to which the starting knot is to be tied must have three bars leading to it, only one of the normal four bars being cut away (Fig. 28). All the other knots tied in mending the hole, except the finishing knot, must be tied to a knot with only two bars leading to it, requiring two bars to be cut away. The finishing knot is tied to a knot with three bars leading to it, so only one bar is cut away.
Fig. 28
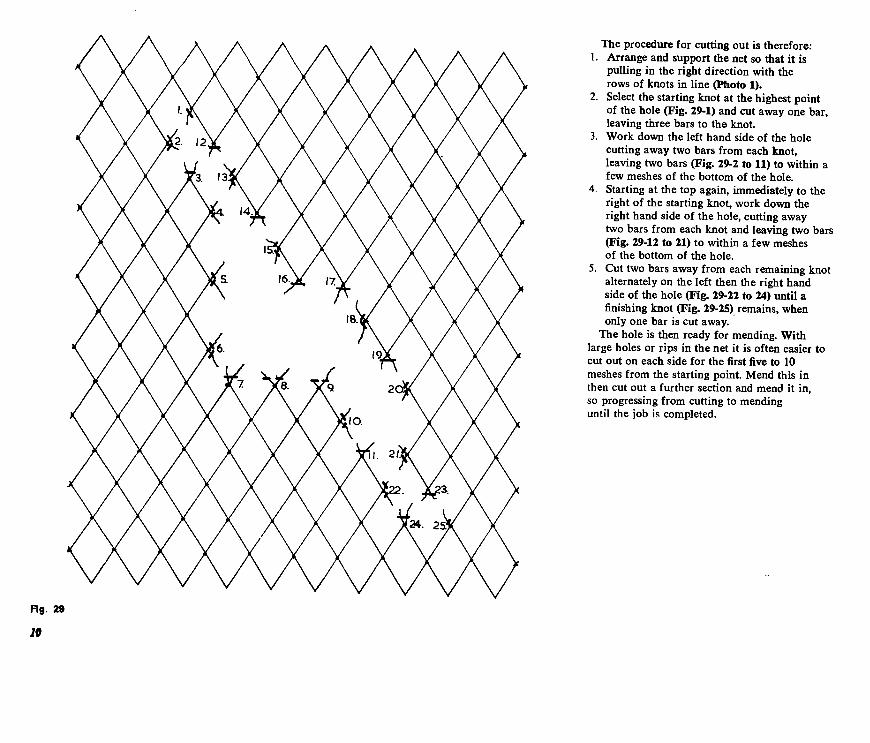
The procedure for cutting out is therefore: 1. Arrange and support the net so that it is
pulling in the right direction with the rows of knots in line (Photo 1).
2. Select the starting knot at the highest point of the hole (Fig. 29-1) and cut away one bar, leaving three bars to the knot
3. Work down the left hand side of the hole cutting away two bars from each knot, leaving two bars (Fig. 29-2 to 11) to within a few meshes of the bottom of the hole.
4. Starting at the top again, immediately to the right of the starting knot, work down the right hand side of the hole, cutting away two bars from each knot and leaving two bars (Fig. 29-12 to 21) to within a few meshes of the bottom of the hole.
5. Cut two bars away from each remaining knot alternately on the left then the right hand side of the hole (Fig. 29-22 to 24) until a finishing knot (Fig. 29-25) remains, when only one bar is cut away.
The hole is then ready for mending. With large holes or rips in the net it is often easier to cut out on each side for the first five to 10 meshes from the starting point. Mend this in then cut out a further section and mend it in, so progressing from cutting to mending until the job is completed.

Mending
Mending is a straight forward procedure once the hole has been prepared by cutting out. However, there are five simple rules to follow and it is essential that the mender does not deviate from them. 1. With the exception of the starting and
finishing knot, every knot formed must complete a mesh with four equal sides. (Fig. 30 and 31, half mesh knot; Fig. 32 side knot; Fig. 33 pick up knot.) When the starting knot is made no mesh is formed; when the finishing knot is made two meshes are formed.
2. Each half mesh row, whether moving from right to left or left to right across the hole, must be completed before the next is started.
3. Each change of direction across the hole, at the end of each row, is made by progressing to a side knot.
4. With one exception, after making a side knot the next knot will be a half mesh knot (Fig. 34), a pick up knot followed by a half mesh knot, (Fig. 35) or a finishing knot
5. A side knot cannot follow a side knot on the same side of the hole (Fig. 36). This would entail progressing down the hole by a full mesh (two rows) instead of the specified half mesh (one row).
Fig. 34
The exception to rule 4 is when only one bar of a mesh is needed to join the two edges of the hole. Side knot then follows side knot but each successive knot is on the opposite side of the hole and each involves a change of direction (Fig. 37).
Fig. 30
Fig. 35 -ULF MESH
COBHECt
Fig. 31
Fig. 36
Fig. 32
Fig. 33 Fig. 37 HALF MESH
COPRECT
//
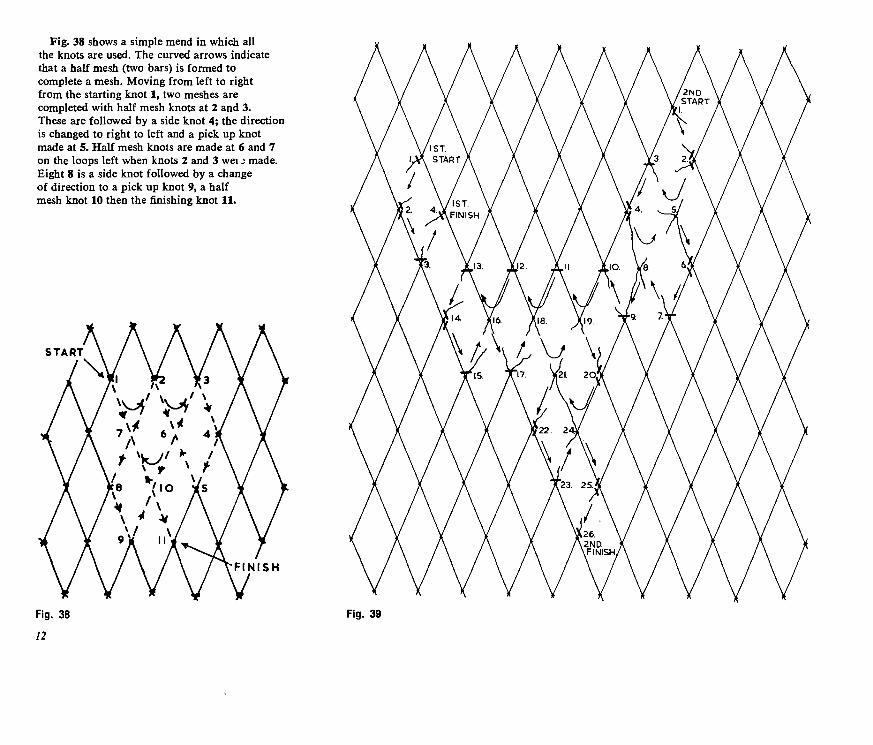
Fig. 38 shows a simple mend in which all the knots are used. The curved arrows indicate that a half mesh (two bars) is formed to complete a mesh. Moving from left to right from the starting knot 1, two meshes are completed with half mesh knots at 2 and 3. These are followed by a side knot 4; the direction is changed to right to left and a pick up knot made at 5. Half mesh knots are made at 6 and 7 on the loops left when knots 2 and 3 wei J made. Eight 8 is a side knot followed by a change of direction to a pick up knot 9, a half mesh knot 10 then the finishing knot 11.
START
Fig. 39

Larger holes
Unfortunately all holes are not as simple and straightforward to mend as that shown in Fig. 38. When a damaged net is examined it will often be found that two or more tears run down the net, meeting at the point of most damage, and leaving a tongue or tongues of net hanging down between the tears. In Fig. 39 there are two tears running down the net and meeting in the centre with a single tear running on down from there.
As all mends must progress down the net half a mesh at a time, to repair this hole it is necessary to make two separate mends. The first small mend (1st start, 1 to 4) closes the left hand tear. It is then possible to complete the repair work, starting at the top of the right hand tear and progressing down the net. (2nd start, 1 to 26).
If more than two tears lead from the top down, all but one must be repaired separately before the hole can be closed. If two or more tears run off from the bottom of a hole the netting can be end for ended so that the bottom becomes the top and the same procedures used.
When mending to the edge of a piece of netting a selvedge mesh must be formed (Fig. 40). A selvedge mesh is formed after
the last half mesh knot of a row is completed. Three bars of the four bars for the mesh are formed when the first half mesh knot of the next row is made.
Great care must be exercised when mending a hole which cuts across a section of net where tapered edges have been joined. It is essential to know the taper and the direction in which it is decreasing. The easiest approach to this situation for a beginner may be to undo the tapered edges for a few meshes above and below the hole, mend each side of the taper as separate holes to a straight edge, then cut the appropriate taper on the edges and rejoin.
With practice it will soon be possible to make an even mend with the bars of the meshes the same length as those of the original netting. However, during the learning stages it is better to make the bars a little larger than the original rather than too small. When mending wet netting of natural fibre with dry twine allow for shrinkage of the mending twine when it is also wet.
Do not try for speed in mending right from the start. Concentrate on tying the knots smoothly and efficiently without any fumbling. Speed will then follow naturally with practice.
;i V/ \U' V * Is
w y/ y V * /
<
Fig. 40
13

Patching
When damage to a net is extensive and part of the netting is missing, rather than just torn, it is quicker to put in a patch than to attempt to mend the hole in the normal way. To put in a rectangular patch cut out the hole as shown in Fig. 41. The patch is cut one mesh smaller in depth and width than the hole to allow for the half mesh formed on each side when sewing it into the hole. Starting in the top right hand corner at 1 and 2 work around
the patch to finish at 1 and 2 in the bottom left hand corner.. If two men are available one can work in each direction and so save time.
When putting in a patch it is not essential to cut out a square or rectangular hole and then a patch to fit it. The most commonly used method of patching is to cut out part of the hole and then part of the,patch to fit. Join this in, then cut out a further section of the hole and a corresponding section of patch to sew to it.
Continue cutting the hole, cutting the patch and joining until the job is completed. The completed patch can be any shape so long as each corner turned during cutting out the damaged netting is a right angle (Fig. 42).
Figure 42 also shows a different method of starting and finishing. As there are two starting knots being tied at (1) in the top left hand corner and two finishing knots being tied at (2), bottom right, the hole and the patch can
Fig. 41 Fig. 42
14
be cut out with two bars to each knot all the way round.
Before starting to cut out for a patch it is advisable to make a quick mesh count of the width and depth of the damaged area so that a piece of netting of sufficient size can be chosen for the patch.
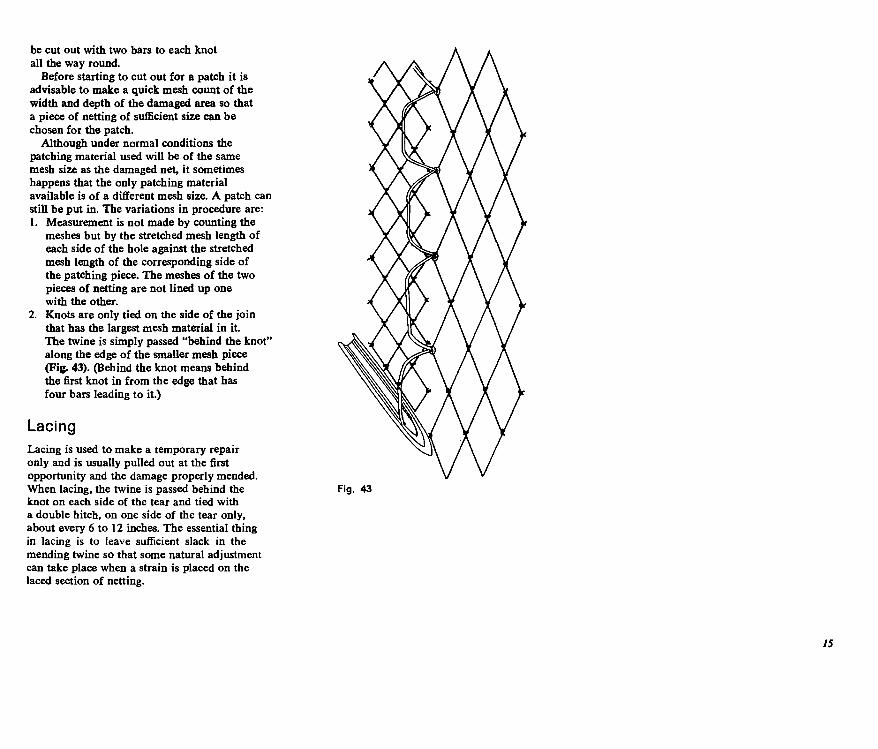
Although under normal conditions the patching material used will be of the same mesh size as the damaged net, it sometimes happens that the only patching material available is of a different mesh size. A patch can still be put in. The variations in procedure are: 1. Measurement is not made by counting the
meshes but by the stretched mesh length of each side of the hole against the stretched mesh length of the corresponding side of the patching piece. The meshes of the two pieces of netting are not lined up one with the other.
2. Knots are only tied on the side of the join that has the largest mesh material in it. The twine is simply passed "behind the knot" along the edge of the smaller mesh piece (Fig. 43). (Behind the knot means behind the first knot in from the edge that has four bars leading to it.)
Lacing Lacing is used to make a temporary repair only and is usually pulled out at the first opportunity and the damage properly mended. When lacing, the twine is passed behind the knot on each side of the tear and tied with a double hitch, on one side of the tear only, about every 6 to 12 inches. The essential thing in lacing is to leave sufficient slack in the mending twine so that some natural adjustment can take place when a strain is placed on the laced section of netting.
Fig. 43
15

Extension Service, Oregon State University, CorvaUis, O.E. Smith, director. This publication was produced and distributed in furtherance of the Acts of Congress of May 8 and June 30, 1914. Extension work is a cooperative program of Oregon State University, the U.S. Department of Agriculture, and Oregon counties.
The Extension/Sea Grant Program is supported in part by the National Oceanic and Atmospheric Administration, U.S. Department of Commerce.
Oregon State University Extension Service offers educational programs, activities, and materials—without regard to race, color, national origin, sex, age, or disability—as required by Title VI of the Civil Rights Act of 1954, Title IX of the Education Amendments of 1972, and Section 504 of the Rehabilita- tion Act of 1973. Oregon State University Extension Service is an Equal Opportunity Employer.