Embed Size (px)
Citation preview

Net Booting/Installing Vintage Computersfrom a Raspberry Pi
Stephen A. Edwards
VCF East, May 3, 2019
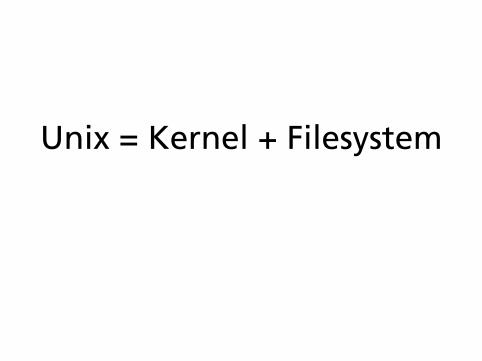
Unix = Kernel + Filesystem
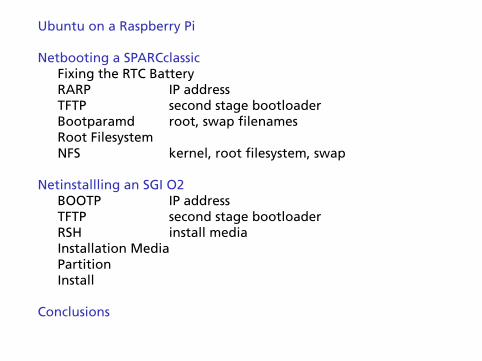
Ubuntu on a Raspberry Pi
Netbooting a SPARCclassicFixing the RTC BatteryRARP IP addressTFTP second stage bootloaderBootparamd root, swap filenamesRoot FilesystemNFS kernel, root filesystem, swap
Netinstallling an SGI O2BOOTP IP addressTFTP second stage bootloaderRSH install mediaInstallation MediaPartitionInstall
Conclusions
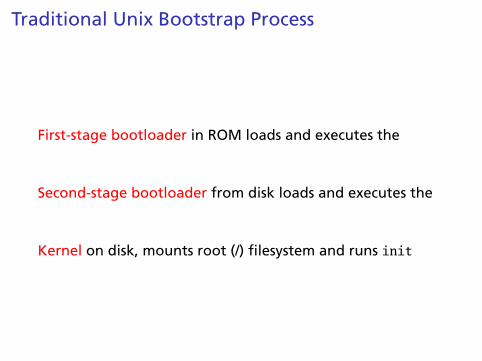
Traditional Unix Bootstrap Process
First-stage bootloader in ROM loads and executes the
Second-stage bootloader from disk loads and executes the
Kernel on disk, mounts root (/) filesystem and runs init
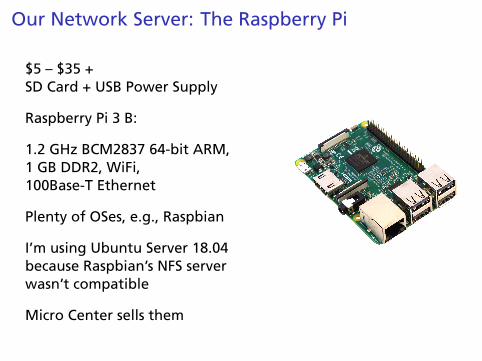
Our Network Server: The Raspberry Pi
$5 – $35 +SD Card + USB Power Supply
Raspberry Pi 3 B:
1.2 GHz BCM2837 64-bit ARM,1 GB DDR2, WiFi,100Base-T Ethernet
Plenty of OSes, e.g., Raspbian
I’m using Ubuntu Server 18.04because Raspbian’s NFS serverwasn’t compatible
Micro Center sells them
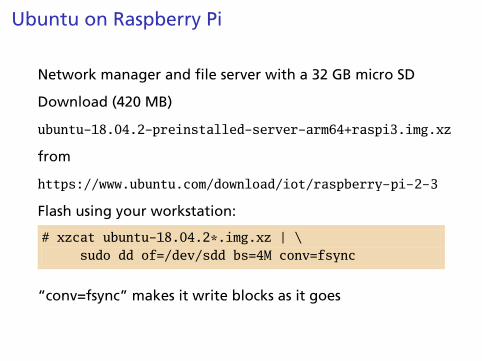
Ubuntu on Raspberry Pi
Network manager and file server with a 32 GB micro SD
Download (420 MB)
ubuntu-18.04.2-preinstalled-server-arm64+raspi3.img.xz
from
https://www.ubuntu.com/download/iot/raspberry-pi-2-3
Flash using your workstation:
# xzcat ubuntu-18.04.2*.img.xz | \sudo dd of=/dev/sdd bs=4M conv=fsync
“conv=fsync” makes it write blocks as it goes
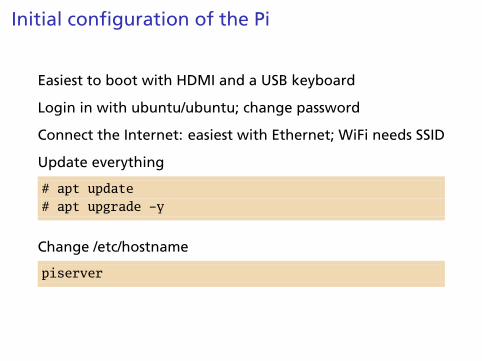
Initial configuration of the Pi
Easiest to boot with HDMI and a USB keyboard
Login in with ubuntu/ubuntu; change password
Connect the Internet: easiest with Ethernet; WiFi needs SSID
Update everything
# apt update# apt upgrade -y
Change /etc/hostname
piserver
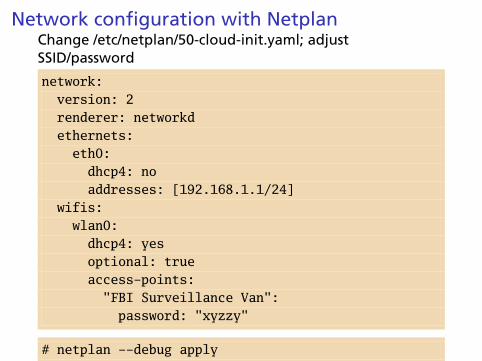
Network configuration with NetplanChange /etc/netplan/50-cloud-init.yaml; adjustSSID/password
network:version: 2renderer: networkdethernets:
eth0:dhcp4: noaddresses: [192.168.1.1/24]
wifis:wlan0:
dhcp4: yesoptional: trueaccess-points:"FBI Surveillance Van":password: "xyzzy"
# netplan --debug apply
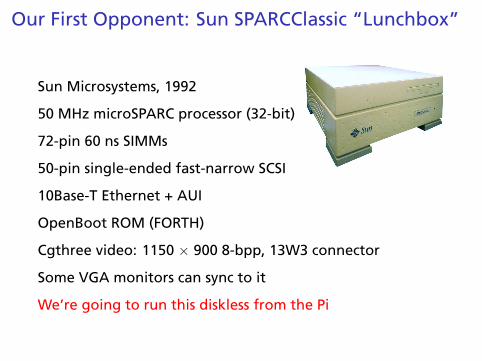
Our First Opponent: Sun SPARCClassic “Lunchbox”
Sun Microsystems, 1992
50 MHz microSPARC processor (32-bit)
72-pin 60 ns SIMMs
50-pin single-ended fast-narrow SCSI
10Base-T Ethernet + AUI
OpenBoot ROM (FORTH)
Cgthree video: 1150 × 900 8-bpp, 13W3 connector
Some VGA monitors can sync to it
We’re going to run this diskless from the Pi

Repairing the M48T59Y
Every old Sun has this problem:
ST M48T59Y-70PC1U “Timekeeper SRAM”
Internal lithium battery dies after 20 years (but doesn’t leak)
Dremel + CR2032 socket + soldering-iron
Before After
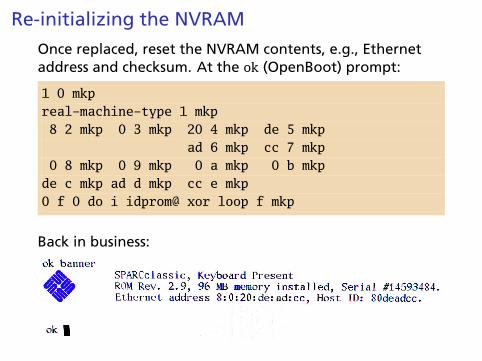
Re-initializing the NVRAM
Once replaced, reset the NVRAM contents, e.g., Ethernetaddress and checksum. At the ok (OpenBoot) prompt:
1 0 mkpreal-machine-type 1 mkp8 2 mkp 0 3 mkp 20 4 mkp de 5 mkp
ad 6 mkp cc 7 mkp0 8 mkp 0 9 mkp 0 a mkp 0 b mkp
de c mkp ad d mkp cc e mkp0 f 0 do i idprom@ xor loop f mkp
Back in business:
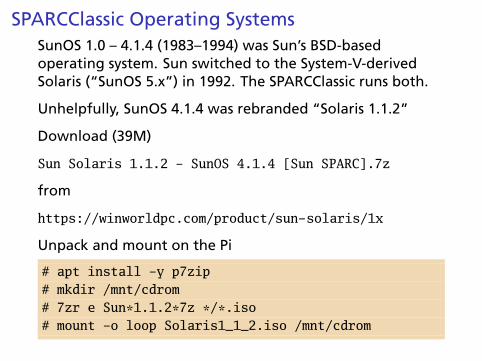
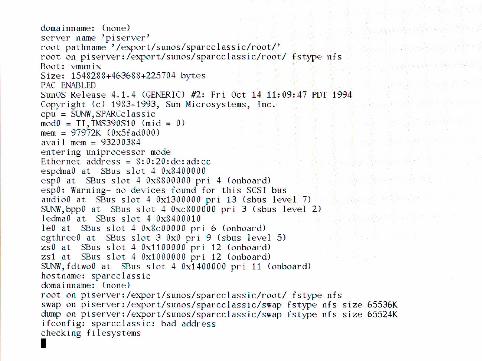
SPARCClassic Operating SystemsSunOS 1.0 – 4.1.4 (1983–1994) was Sun’s BSD-basedoperating system. Sun switched to the System-V-derivedSolaris (“SunOS 5.x”) in 1992. The SPARCClassic runs both.
Unhelpfully, SunOS 4.1.4 was rebranded “Solaris 1.1.2”
Download (39M)
Sun Solaris 1.1.2 - SunOS 4.1.4 [Sun SPARC].7z
from
https://winworldpc.com/product/sun-solaris/1x
Unpack and mount on the Pi
# apt install -y p7zip# mkdir /mnt/cdrom# 7zr e Sun*1.1.2*7z */*.iso# mount -o loop Solaris1_1_2.iso /mnt/cdrom
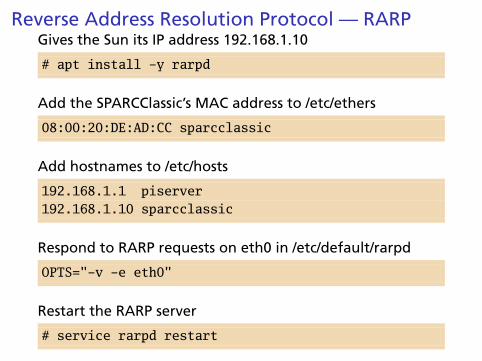
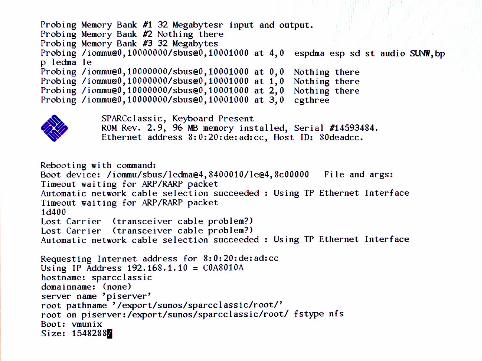
Reverse Address Resolution Protocol — RARPGives the Sun its IP address 192.168.1.10
# apt install -y rarpd
Add the SPARCClassic’s MAC address to /etc/ethers
08:00:20:DE:AD:CC sparcclassic
Add hostnames to /etc/hosts
192.168.1.1 piserver192.168.1.10 sparcclassic
Respond to RARP requests on eth0 in /etc/default/rarpd
OPTS="-v -e eth0"
Restart the RARP server
# service rarpd restart
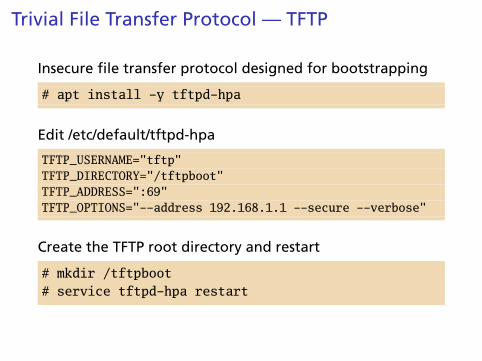
Trivial File Transfer Protocol — TFTP
Insecure file transfer protocol designed for bootstrapping
# apt install -y tftpd-hpa
Edit /etc/default/tftpd-hpa
TFTP_USERNAME="tftp"TFTP_DIRECTORY="/tftpboot"TFTP_ADDRESS=":69"TFTP_OPTIONS="--address 192.168.1.1 --secure --verbose"
Create the TFTP root directory and restart
# mkdir /tftpboot# service tftpd-hpa restart
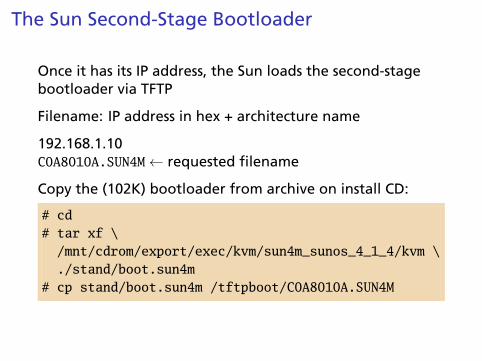
The Sun Second-Stage Bootloader
Once it has its IP address, the Sun loads the second-stagebootloader via TFTP
Filename: IP address in hex + architecture name
192.168.1.10C0A8010A.SUN4M← requested filename
Copy the (102K) bootloader from archive on install CD:
# cd# tar xf \/mnt/cdrom/export/exec/kvm/sun4m_sunos_4_1_4/kvm \./stand/boot.sun4m
# cp stand/boot.sun4m /tftpboot/C0A8010A.SUN4M
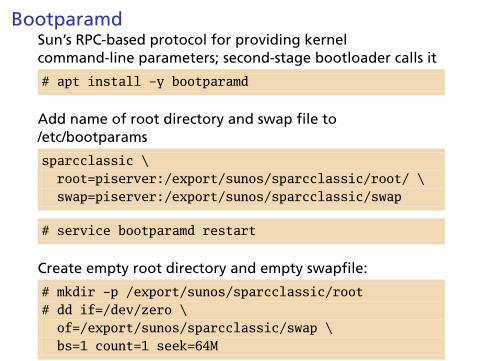
BootparamdSun’s RPC-based protocol for providing kernelcommand-line parameters; second-stage bootloader calls it
# apt install -y bootparamd
Add name of root directory and swap file to/etc/bootparams
sparcclassic \root=piserver:/export/sunos/sparcclassic/root/ \swap=piserver:/export/sunos/sparcclassic/swap
# service bootparamd restart
Create empty root directory and empty swapfile:
# mkdir -p /export/sunos/sparcclassic/root# dd if=/dev/zero \of=/export/sunos/sparcclassic/swap \bs=1 count=1 seek=64M
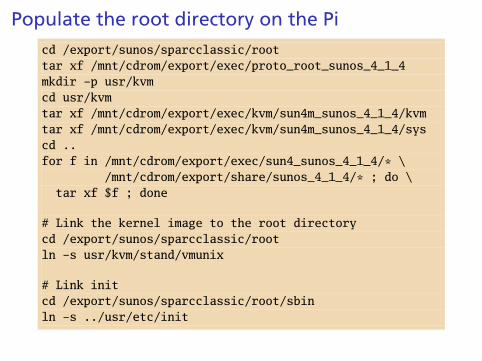
Populate the root directory on the Picd /export/sunos/sparcclassic/roottar xf /mnt/cdrom/export/exec/proto_root_sunos_4_1_4mkdir -p usr/kvmcd usr/kvmtar xf /mnt/cdrom/export/exec/kvm/sun4m_sunos_4_1_4/kvmtar xf /mnt/cdrom/export/exec/kvm/sun4m_sunos_4_1_4/syscd ..for f in /mnt/cdrom/export/exec/sun4_sunos_4_1_4/* \
/mnt/cdrom/export/share/sunos_4_1_4/* ; do \tar xf $f ; done
# Link the kernel image to the root directorycd /export/sunos/sparcclassic/rootln -s usr/kvm/stand/vmunix
# Link initcd /export/sunos/sparcclassic/root/sbinln -s ../usr/etc/init
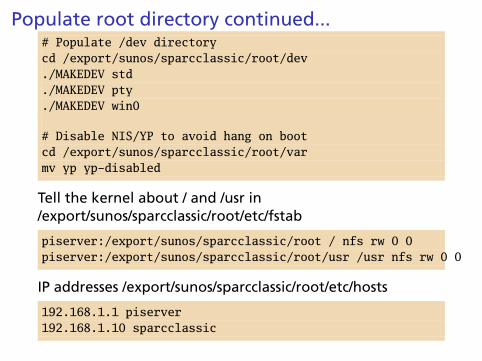
Populate root directory continued...# Populate /dev directorycd /export/sunos/sparcclassic/root/dev./MAKEDEV std./MAKEDEV pty./MAKEDEV win0
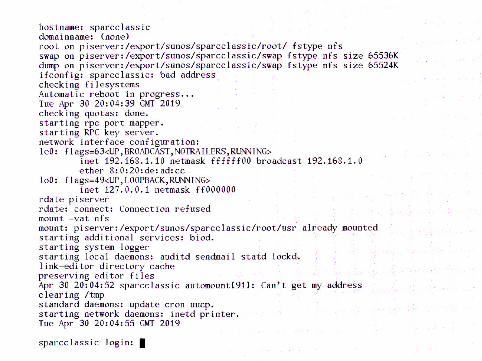
# Disable NIS/YP to avoid hang on bootcd /export/sunos/sparcclassic/root/varmv yp yp-disabled
Tell the kernel about / and /usr in/export/sunos/sparcclassic/root/etc/fstab
piserver:/export/sunos/sparcclassic/root / nfs rw 0 0piserver:/export/sunos/sparcclassic/root/usr /usr nfs rw 0 0
IP addresses /export/sunos/sparcclassic/root/etc/hosts
192.168.1.1 piserver192.168.1.10 sparcclassic

Network File System – NFS
Sun’s still-relevant protocol for mounting remotefilesystems. Cf. Microsoft’s SMB
# apt install -y nfs-kernel-server
Place names of directories to serve in /etc/exports
/export/sunos \sparcclassic(rw,no_root_squash,no_subtree_check)
Enable the archaic NFS v2 in /etc/default/nfs-kernel-server
RPCNFSDOPTS="--nfs-version 2,3,4 --debug --syslog"
# service nfs-kernel-server restart
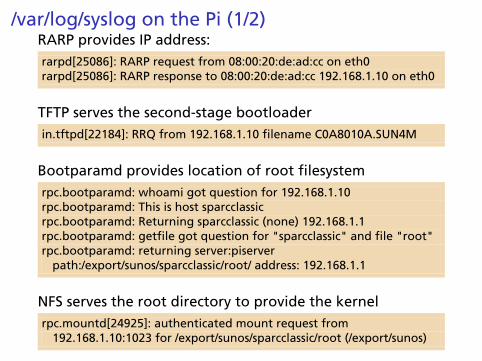
/var/log/syslog on the Pi (1/2)RARP provides IP address:rarpd[25086]: RARP request from 08:00:20:de:ad:cc on eth0rarpd[25086]: RARP response to 08:00:20:de:ad:cc 192.168.1.10 on eth0
TFTP serves the second-stage bootloaderin.tftpd[22184]: RRQ from 192.168.1.10 filename C0A8010A.SUN4M
Bootparamd provides location of root filesystemrpc.bootparamd: whoami got question for 192.168.1.10rpc.bootparamd: This is host sparcclassicrpc.bootparamd: Returning sparcclassic (none) 192.168.1.1rpc.bootparamd: getfile got question for "sparcclassic" and file "root"rpc.bootparamd: returning server:piserver
path:/export/sunos/sparcclassic/root/ address: 192.168.1.1
NFS serves the root directory to provide the kernelrpc.mountd[24925]: authenticated mount request from
192.168.1.10:1023 for /export/sunos/sparcclassic/root (/export/sunos)

/var/log/syslog on the Pi (2/2)
Bootparamd reports swap (not dump); NFS serves swap
rpc.bootparamd: getfile got question for "sparcclassic" and file "swap"rpc.bootparamd: returning server:piserver
path:/export/sunos/sparcclassic/swap address: 192.168.1.1
rpc.mountd[24925]: authenticated mount request from192.168.1.10:1021 for /export/sunos/sparcclassic/swap (/export/sunos)
rpc.bootparamd: getfile got question for "sparcclassic" and file "dump"rpc.bootparamd: returning server: path: address: 0.0.0.0
Init runs and re-mounts / and /usr
rpc.mountd[24925]: authenticated mount request from 192.168.1.10:620for /export/sunos/sparcclassic/root/usr (/export/sunos)
rpc.mountd[24925]: authenticated mount request from 192.168.1.10:624for /export/sunos/sparcclassic/root (/export/sunos)
rpc.mountd[24925]: authenticated mount request from 192.168.1.10:625for /export/sunos/sparcclassic/root/usr (/export/sunos)
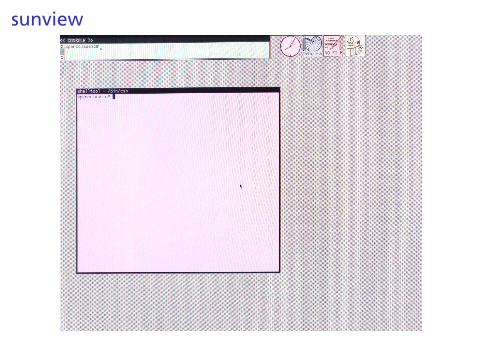
sunview

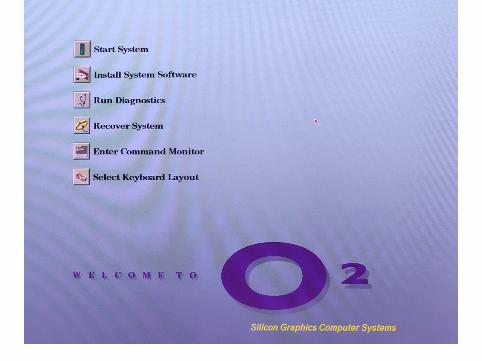
Our Second Opponent: SGI O2 “Toaster”
Silicon Graphics, 1996
180 MHz MIPS R5000 processor (32-bit)
Proprietary 239-pin DIMMs
UltraWide SCSI drives
100Base-T Ethernet
1280 × 1024 VGA video
SGI’s Imaging and Compression Engine
PS/2 Keyboard and Mouse
ESC on boot brings up service menu
No keyboard boots into serial console
We’re going to install IRIX 6.5.22 over the network
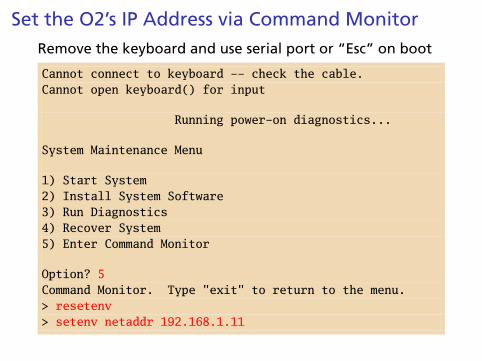
Set the O2’s IP Address via Command MonitorRemove the keyboard and use serial port or “Esc” on boot
Cannot connect to keyboard -- check the cable.Cannot open keyboard() for input
Running power-on diagnostics...
System Maintenance Menu
1) Start System2) Install System Software3) Run Diagnostics4) Recover System5) Enter Command Monitor
Option? 5Command Monitor. Type "exit" to return to the menu.> resetenv> setenv netaddr 192.168.1.11
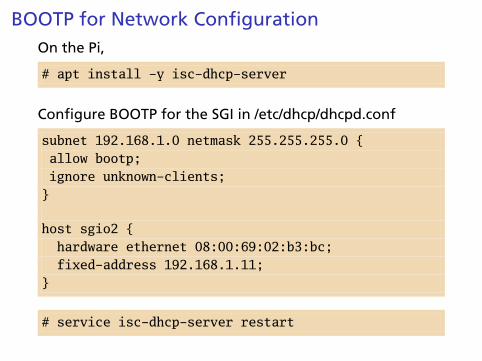
BOOTP for Network ConfigurationOn the Pi,
# apt install -y isc-dhcp-server
Configure BOOTP for the SGI in /etc/dhcp/dhcpd.conf
subnet 192.168.1.0 netmask 255.255.255.0 {allow bootp;ignore unknown-clients;
}
host sgio2 {hardware ethernet 08:00:69:02:b3:bc;fixed-address 192.168.1.11;
}
# service isc-dhcp-server restart
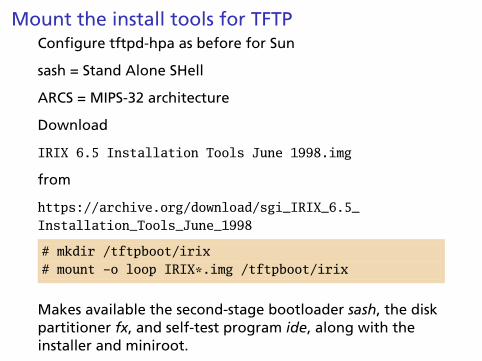
Mount the install tools for TFTPConfigure tftpd-hpa as before for Sun
sash = Stand Alone SHell
ARCS = MIPS-32 architecture
Download
IRIX 6.5 Installation Tools June 1998.img
from
https://archive.org/download/sgi_IRIX_6.5_Installation_Tools_June_1998
# mkdir /tftpboot/irix# mount -o loop IRIX*.img /tftpboot/irix
Makes available the second-stage bootloader sash, the diskpartitioner fx, and self-test program ide, along with theinstaller and miniroot.
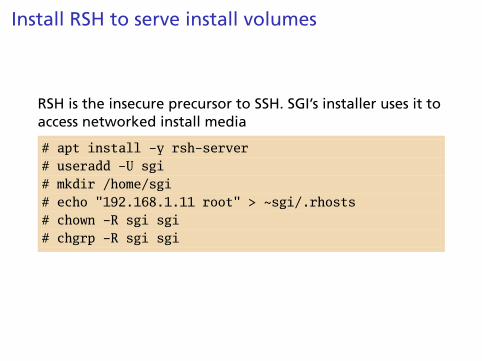
Install RSH to serve install volumes
RSH is the insecure precursor to SSH. SGI’s installer uses it toaccess networked install media
# apt install -y rsh-server# useradd -U sgi# mkdir /home/sgi# echo "192.168.1.11 root" > ~sgi/.rhosts# chown -R sgi sgi# chgrp -R sgi sgi
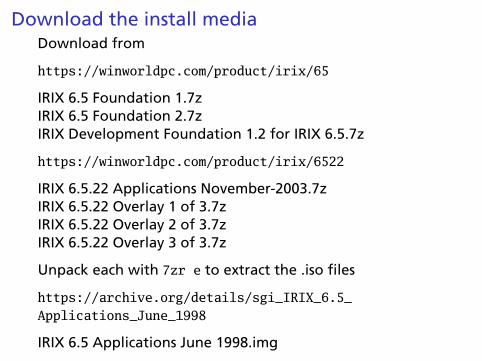
Download the install mediaDownload from
https://winworldpc.com/product/irix/65
IRIX 6.5 Foundation 1.7zIRIX 6.5 Foundation 2.7zIRIX Development Foundation 1.2 for IRIX 6.5.7z
https://winworldpc.com/product/irix/6522
IRIX 6.5.22 Applications November-2003.7zIRIX 6.5.22 Overlay 1 of 3.7zIRIX 6.5.22 Overlay 2 of 3.7zIRIX 6.5.22 Overlay 3 of 3.7z
Unpack each with 7zr e to extract the .iso files
https://archive.org/details/sgi_IRIX_6.5_Applications_June_1998
IRIX 6.5 Applications June 1998.img
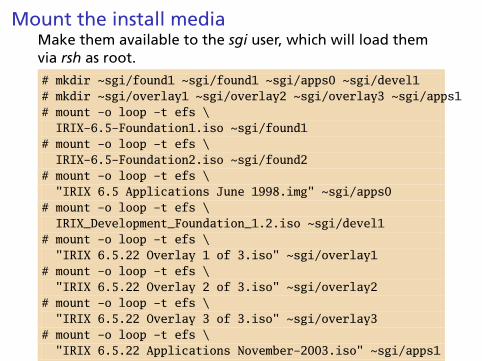
Mount the install mediaMake them available to the sgi user, which will load themvia rsh as root.
# mkdir ~sgi/found1 ~sgi/found1 ~sgi/apps0 ~sgi/devel1# mkdir ~sgi/overlay1 ~sgi/overlay2 ~sgi/overlay3 ~sgi/apps1# mount -o loop -t efs \IRIX-6.5-Foundation1.iso ~sgi/found1
# mount -o loop -t efs \IRIX-6.5-Foundation2.iso ~sgi/found2
# mount -o loop -t efs \"IRIX 6.5 Applications June 1998.img" ~sgi/apps0
# mount -o loop -t efs \IRIX_Development_Foundation_1.2.iso ~sgi/devel1
# mount -o loop -t efs \"IRIX 6.5.22 Overlay 1 of 3.iso" ~sgi/overlay1
# mount -o loop -t efs \"IRIX 6.5.22 Overlay 2 of 3.iso" ~sgi/overlay2
# mount -o loop -t efs \"IRIX 6.5.22 Overlay 3 of 3.iso" ~sgi/overlay3
# mount -o loop -t efs \"IRIX 6.5.22 Applications November-2003.iso" ~sgi/apps1
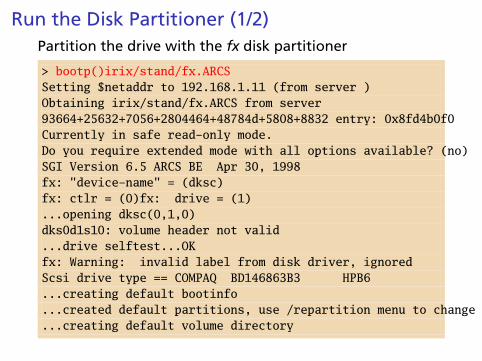
Run the Disk Partitioner (1/2)Partition the drive with the fx disk partitioner
> bootp()irix/stand/fx.ARCSSetting $netaddr to 192.168.1.11 (from server )Obtaining irix/stand/fx.ARCS from server93664+25632+7056+2804464+48784d+5808+8832 entry: 0x8fd4b0f0Currently in safe read-only mode.Do you require extended mode with all options available? (no)SGI Version 6.5 ARCS BE Apr 30, 1998fx: "device-name" = (dksc)fx: ctlr = (0)fx: drive = (1)...opening dksc(0,1,0)dks0d1s10: volume header not valid...drive selftest...OKfx: Warning: invalid label from disk driver, ignoredScsi drive type == COMPAQ BD146863B3 HPB6...creating default bootinfo...created default partitions, use /repartition menu to change...creating default volume directory
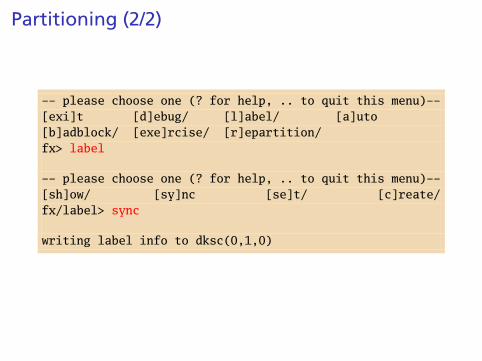
Partitioning (2/2)
-- please choose one (? for help, .. to quit this menu)--[exi]t [d]ebug/ [l]abel/ [a]uto[b]adblock/ [exe]rcise/ [r]epartition/fx> label
-- please choose one (? for help, .. to quit this menu)--[sh]ow/ [sy]nc [se]t/ [c]reate/fx/label> sync
writing label info to dksc(0,1,0)
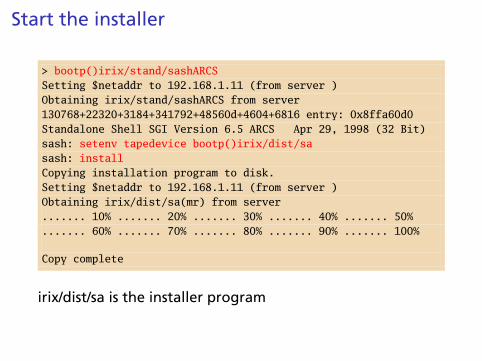
Start the installer
> bootp()irix/stand/sashARCSSetting $netaddr to 192.168.1.11 (from server )Obtaining irix/stand/sashARCS from server130768+22320+3184+341792+48560d+4604+6816 entry: 0x8ffa60d0Standalone Shell SGI Version 6.5 ARCS Apr 29, 1998 (32 Bit)sash: setenv tapedevice bootp()irix/dist/sasash: installCopying installation program to disk.Setting $netaddr to 192.168.1.11 (from server )Obtaining irix/dist/sa(mr) from server....... 10% ....... 20% ....... 30% ....... 40% ....... 50%....... 60% ....... 70% ....... 80% ....... 90% ....... 100%
Copy complete
irix/dist/sa is the installer program
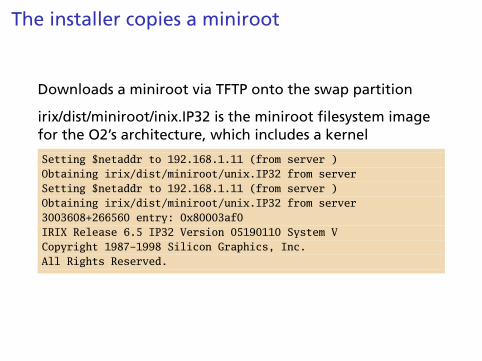
The installer copies a miniroot
Downloads a miniroot via TFTP onto the swap partition
irix/dist/miniroot/inix.IP32 is the miniroot filesystem imagefor the O2’s architecture, which includes a kernel
Setting $netaddr to 192.168.1.11 (from server )Obtaining irix/dist/miniroot/unix.IP32 from serverSetting $netaddr to 192.168.1.11 (from server )Obtaining irix/dist/miniroot/unix.IP32 from server3003608+266560 entry: 0x80003af0IRIX Release 6.5 IP32 Version 05190110 System VCopyright 1987-1998 Silicon Graphics, Inc.All Rights Reserved.
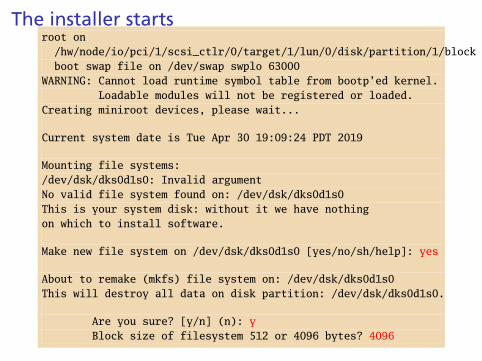
The installer startsroot on
/hw/node/io/pci/1/scsi_ctlr/0/target/1/lun/0/disk/partition/1/block ;boot swap file on /dev/swap swplo 63000
WARNING: Cannot load runtime symbol table from bootp’ed kernel.Loadable modules will not be registered or loaded.
Creating miniroot devices, please wait...
Current system date is Tue Apr 30 19:09:24 PDT 2019
Mounting file systems:/dev/dsk/dks0d1s0: Invalid argumentNo valid file system found on: /dev/dsk/dks0d1s0This is your system disk: without it we have nothingon which to install software.
Make new file system on /dev/dsk/dks0d1s0 [yes/no/sh/help]: yes
About to remake (mkfs) file system on: /dev/dsk/dks0d1s0This will destroy all data on disk partition: /dev/dsk/dks0d1s0.
Are you sure? [y/n] (n): yBlock size of filesystem 512 or 4096 bytes? 4096
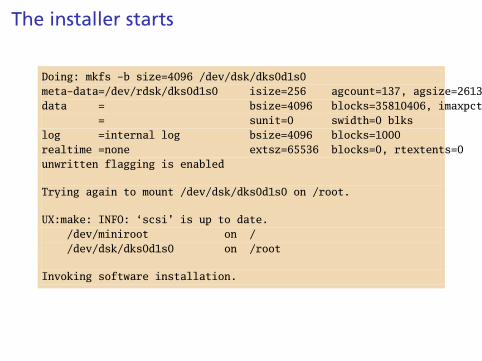
The installer starts
Doing: mkfs -b size=4096 /dev/dsk/dks0d1s0meta-data=/dev/rdsk/dks0d1s0 isize=256 agcount=137, agsize=261390 blksdata = bsize=4096 blocks=35810406, imaxpct=25
= sunit=0 swidth=0 blkslog =internal log bsize=4096 blocks=1000realtime =none extsz=65536 blocks=0, rtextents=0unwritten flagging is enabled
Trying again to mount /dev/dsk/dks0d1s0 on /root.
UX:make: INFO: ‘scsi’ is up to date./dev/miniroot on //dev/dsk/dks0d1s0 on /root
Invoking software installation.
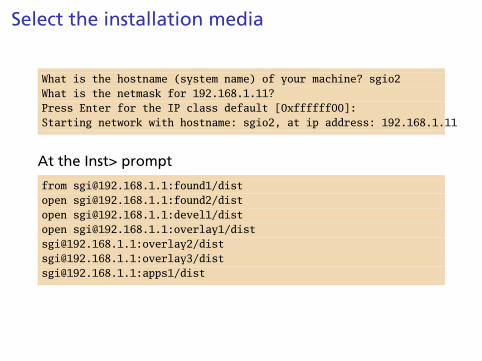
Select the installation media
What is the hostname (system name) of your machine? sgio2What is the netmask for 192.168.1.11?Press Enter for the IP class default [0xffffff00]:Starting network with hostname: sgio2, at ip address: 192.168.1.11
At the Inst> prompt
from [email protected]:found1/distopen [email protected]:found2/distopen [email protected]:devel1/distopen [email protected]:overlay1/[email protected]:overlay2/[email protected]:overlay3/[email protected]:apps1/dist
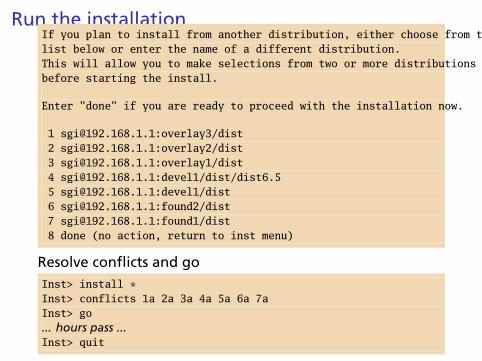
Run the installationIf you plan to install from another distribution, either choose from thelist below or enter the name of a different distribution.This will allow you to make selections from two or more distributionsbefore starting the install.
Enter "done" if you are ready to proceed with the installation now.
1 [email protected]:overlay3/dist2 [email protected]:overlay2/dist3 [email protected]:overlay1/dist4 [email protected]:devel1/dist/dist6.55 [email protected]:devel1/dist6 [email protected]:found2/dist7 [email protected]:found1/dist8 done (no action, return to inst menu)
Resolve conflicts and goInst> install *Inst> conflicts 1a 2a 3a 4a 5a 6a 7aInst> go... hours pass ...Inst> quit
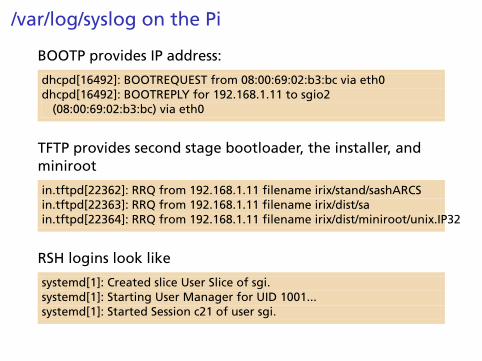
/var/log/syslog on the Pi
BOOTP provides IP address:
dhcpd[16492]: BOOTREQUEST from 08:00:69:02:b3:bc via eth0dhcpd[16492]: BOOTREPLY for 192.168.1.11 to sgio2
(08:00:69:02:b3:bc) via eth0
TFTP provides second stage bootloader, the installer, andminiroot
in.tftpd[22362]: RRQ from 192.168.1.11 filename irix/stand/sashARCSin.tftpd[22363]: RRQ from 192.168.1.11 filename irix/dist/sain.tftpd[22364]: RRQ from 192.168.1.11 filename irix/dist/miniroot/unix.IP32
RSH logins look like
systemd[1]: Created slice User Slice of sgi.systemd[1]: Starting User Manager for UID 1001...systemd[1]: Started Session c21 of user sgi.
Conclusions
Every config. file line represents an hour of frustration
Tried Solaris 2.3, but building root filesystem from installmedia not obvious. Could netinstall using similar recipe.
Wanted to do all this with a wireless router hacked to runOpenWRT, but OpenWRT doesn’t support RARP, Bootparam
But I highly recommend OpenWRT. Could be used to PXEboot more modern machines
Acknowledgements/References
Sun network booting and install
http://sites.inka.de/pcde/site/documentation_files/sunos_network_boot.htmlhttps://github.com/halfmanhalftaco/sunboot
SGI network installation
http://techpubs.spinlocksolutions.com/irix/remote-irix-6.5-installation-from-linux.htmlhttps://github.com/halfmanhalftaco/irixboothttps://github.com/unxmaal/booterizer


![file · Web viewUpgrading Oracle database from 11.2.0.3 to oracle database 12c [oracle@db11gr2 u03]$ mkdir setup12c [oracle@db11gr2 u03]$ mkdir -p app/oracle/product/12.0.1/db01](https://img.pdfslide.us/doc/110x75/5a754c317f8b9aa3618c531d/doc-file-web-viewupgrading-oracle-database-from-11203-to-oracle-database.jpg)