Embed Size (px)
Citation preview

Nestlé Waters New Customer Setup Application
User Guide
V6.3
User Guide 2
Table of Contents
1. Introduction ..................................................................................................................................................... 4
1.1 About the NW New Customer Setup Application ............................................................................................................ 4
1.2 Intended Audience ......................................................................................................................................................... 4
1.1 About the User Manual ................................................................................................................................................... 4
1.2 Common Tasks .............................................................................................................................................................. 5
2. Getting Started ................................................................................................................................................ 6
2.1 Accessing the NW New Customer Setup Application ..................................................................................................... 6
2.2 Forgot Password ............................................................................................................................................................ 7
2.3 Change the Password .................................................................................................................................................... 9
2.4 Password Alert ............................................................................................................................................................. 10
2.5 Log Out ........................................................................................................................................................................ 11
3. Create a Prospect ......................................................................................................................................... 12
3.1 Commercial Prospect ................................................................................................................................................... 12
3.2 Residential Prospect .................................................................................................................................................... 14
3.3 Add a Product .............................................................................................................................................................. 18
3.4 View Selected Prospect ................................................................................................................................................ 21
3.5 View Order Summary ................................................................................................................................................... 23
3.6 Schedule a Follow-Up .................................................................................................................................................. 24
3.7 Electronic Service Agreement ...................................................................................................................................... 28
4. Search for a Prospect ................................................................................................................................... 34
4.1 Update Prospect Details ............................................................................................................................................... 35
5. Search for a Customer .................................................................................................................................. 37
5.1 View Customer Details ................................................................................................................................................. 38
6. Map Customers / Prospects ......................................................................................................................... 40
7. Send Marketing Material ............................................................................................................................... 41
8. Reports .......................................................................................................................................................... 43
9. Frequently Asked Questions ....................................................................................................................... 44
10. Glossary ......................................................................................................................................................... 45
11. Index............................................................................................................................................................... 46
User Guide 3
Table of Figures
Figure 2-1 Logon ............................................................................................................................................................................... 7 Figure 2-2 Forgot password ............................................................................................................................................................... 8 Figure 2-3 Forgot password email reset link...................................................................................................................................... 8 Figure 2-3 Change password link ...................................................................................................................................................... 9 Figure 2-4 Change password ........................................................................................................................................................... 10 Figure 2-5 Password alert ................................................................................................................................................................ 10 Figure 2-6 Logout ............................................................................................................................................................................ 11 Figure 3-1 Create a commercial prospect ........................................................................................................................................ 12 Figure 3-2 Select the prospect’s address ......................................................................................................................................... 13 Figure 3-3 Create a BOP residential prospect .................................................................................................................................. 15 Figure 3-4 Select the residential address of the BOP ....................................................................................................................... 15 Figure 3-5 create a Non-BOP residential prospect ........................................................................................................................... 16 Figure 3-6 Select the residential address of the Non-bop prospect .................................................................................................. 17 Figure 3-7 Select the price schedule ................................................................................................................................................ 18 Figure 3-8 Select a product .............................................................................................................................................................. 19 Figure 3-9 Update the cart ............................................................................................................................................................... 20 Figure 3-10 Update the Selected Prospect Form ............................................................................................................................. 22 Figure 3-11 View Order Summary ................................................................................................................................................... 23 Figure 3-12 Schedule a follow-up .................................................................................................................................................... 25 Figure 3-13 Credit card information.................................................................................................................................................. 26 Figure 3-15 Monthly bill information ................................................................................................................................................. 28 Figure 3-16 Setup Confirmation Page .............................................................................................................................................. 28 Figure 3-17 Generate PDF button .................................................................................................................................................... 29 Figure 4-1 Search Prospect ............................................................................................................................................................. 34 Figure 5-1 Search Customer ............................................................................................................................................................ 37
User Guide 4
Nestlé Waters New Customer Setup Application
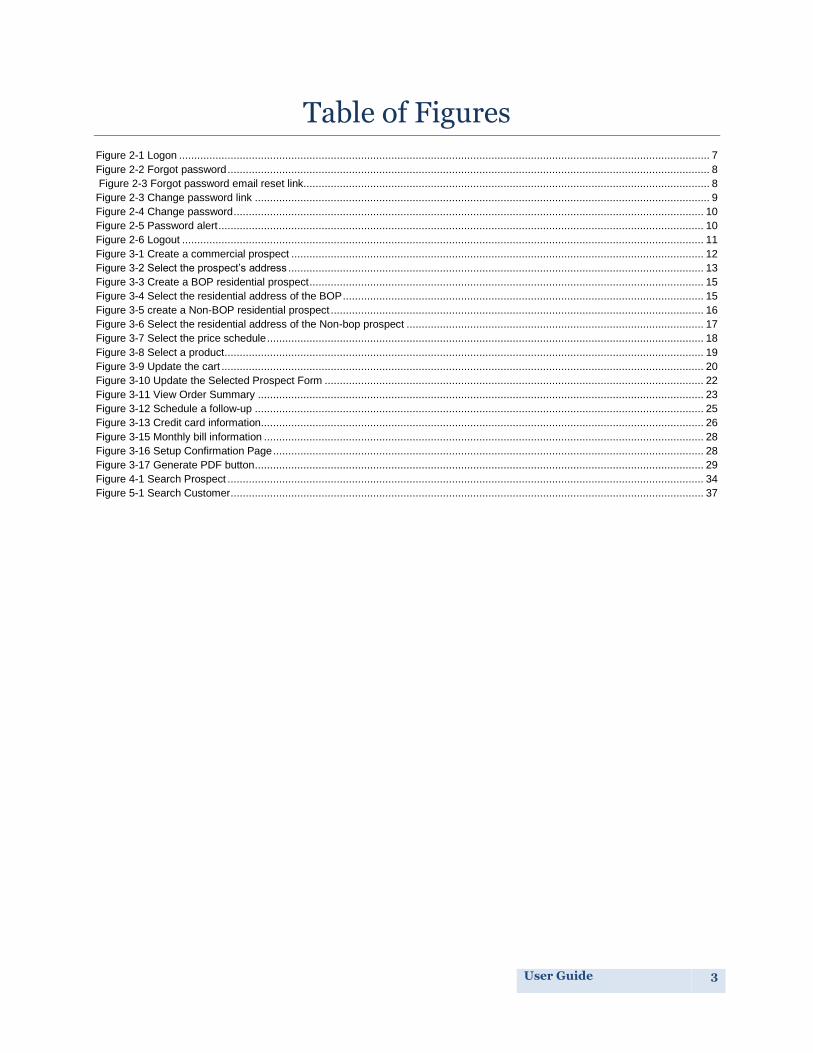
1. Introduction
1.1 About the NW New Customer Setup Application
The Nestlé Waters (NW) New Customer Setup Application is a Web-based application
that enables the employees of Nestlé Waters to add a new customer. Employees can
use the application to add the names of commercial and residential customers, store
customer details, and create a new customer.
1.2 Intended Audience
This manual is intended for all users of the NW New Customer Setup application,
whether on a tablet or on a desktop.
1.1 About the User Manual
1.1.1 Conventions Followed
The following table describes the styling conventions followed in the user manual:
Document Conventions
Description
Bold Bold typeface is used to present references to menu options, field names, procedure leads, screen names, and tab names.
Bulleted List
Bulleted lists are used for unordered series of concepts, items, or options, rather than a sequence of processes, events, or steps.
1. Numbered List
Numbered lists indicate the sequence of processes, events, or steps
Italic Italic typeface is used to present information that provides emphasis to content.
This symbol indicates a note of additional information
This symbol indicates the good-to-know information about a page or screen element.
User Guide 5
Nestlé Waters New Customer Setup Application
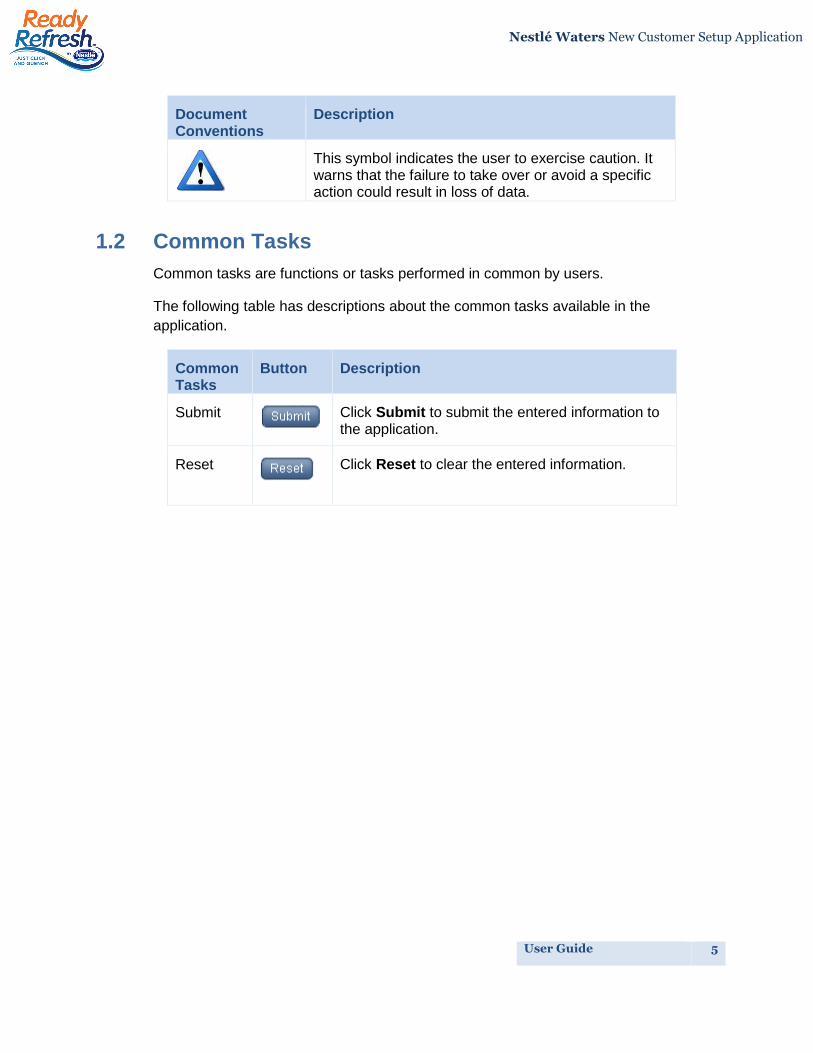
Document Conventions
Description
This symbol indicates the user to exercise caution. It warns that the failure to take over or avoid a specific action could result in loss of data.
1.2 Common Tasks
Common tasks are functions or tasks performed in common by users.
The following table has descriptions about the common tasks available in the
application.
Common Tasks
Button Description
Submit
Click Submit to submit the entered information to the application.
Reset
Click Reset to clear the entered information.

User Guide 6
Nestlé Waters New Customer Setup Application
2. Getting Started
The Getting Started section of the manual explains how to access the NW New
Customer Setup application, logon to the application, retrieve forgotten password,
change the user password, and log off after you complete the required tasks.
2.1 Accessing the NW New Customer Setup Application
This section explains how to log on to the NW New Customer Setup application. The
first time users can logon to the application by using their email address and the default
password: NWNA1234
To log on to the NW New Customer Setup application:
On a PC or tablet, open the browser window
During training, type the URL https://pre.custset.nestle-watersna.com
This link will allow you to complete the entire training process without actually
creating real customers
If you are logging on for the first time with the valid username and default
password, the ‘Update Password’ page is displayed. For more information, go to
Update Password.
Due to security rules, you only get 5 attempts with your password before your
account is locked. For more information, go to Forgot Password.
You need to change your password every 90 days.
User Guide 7
Nestlé Waters New Customer Setup Application
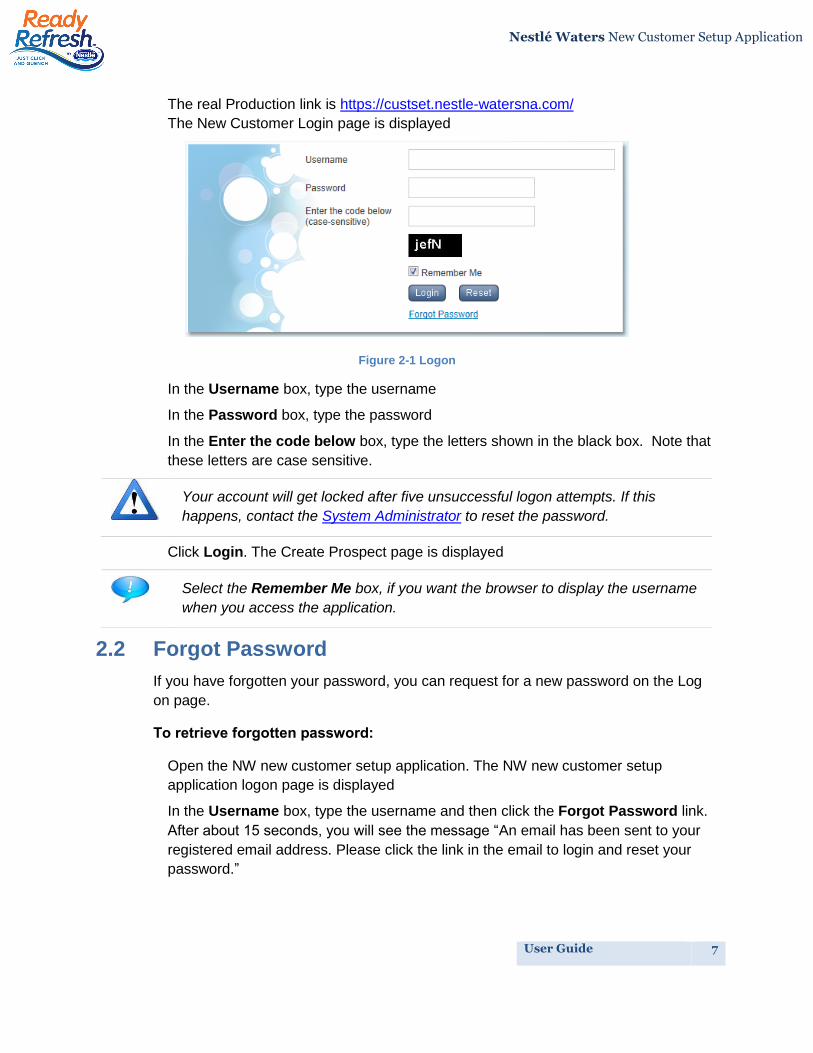
The real Production link is https://custset.nestle-watersna.com/
The New Customer Login page is displayed
Figure 2-1 Logon
In the Username box, type the username
In the Password box, type the password
In the Enter the code below box, type the letters shown in the black box. Note that
these letters are case sensitive.
Click Login. The Create Prospect page is displayed
2.2 Forgot Password
If you have forgotten your password, you can request for a new password on the Log
on page.
To retrieve forgotten password:
Open the NW new customer setup application. The NW new customer setup
application logon page is displayed
In the Username box, type the username and then click the Forgot Password link.
After about 15 seconds, you will see the message “An email has been sent to your
registered email address. Please click the link in the email to login and reset your
password.”
Your account will get locked after five unsuccessful logon attempts. If this
happens, contact the System Administrator to reset the password.
Select the Remember Me box, if you want the browser to display the username
when you access the application.
User Guide 8
Nestlé Waters New Customer Setup Application
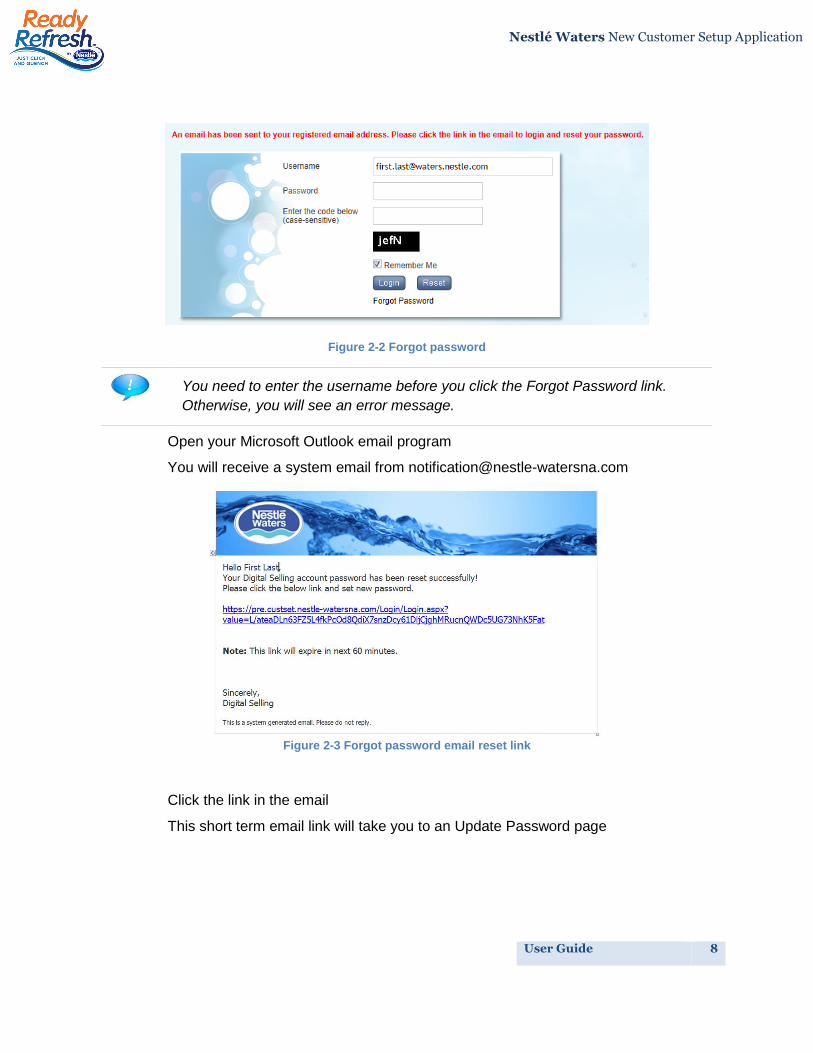
Figure 2-2 Forgot password
Open your Microsoft Outlook email program
You will receive a system email from [email protected]
Figure 2-3 Forgot password email reset link
Click the link in the email
This short term email link will take you to an Update Password page
You need to enter the username before you click the Forgot Password link.
Otherwise, you will see an error message.
User Guide 9
Nestlé Waters New Customer Setup Application
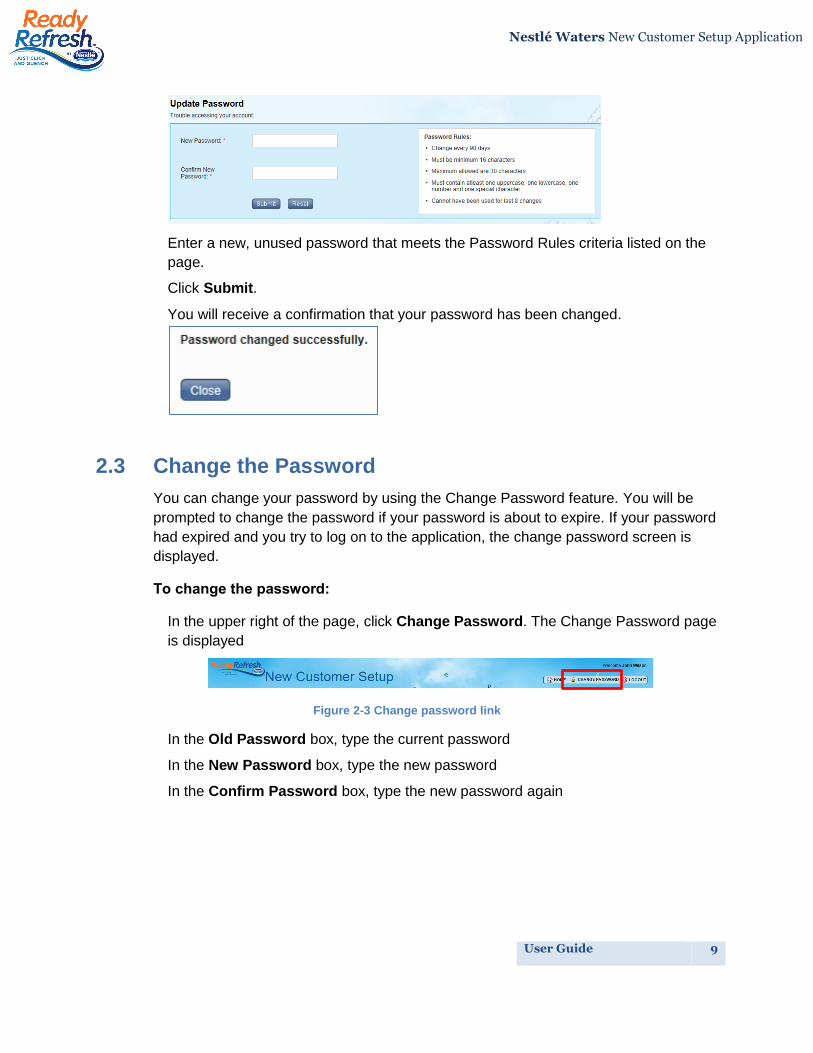
Enter a new, unused password that meets the Password Rules criteria listed on the
page.
Click Submit.
You will receive a confirmation that your password has been changed.
2.3 Change the Password
You can change your password by using the Change Password feature. You will be
prompted to change the password if your password is about to expire. If your password
had expired and you try to log on to the application, the change password screen is
displayed.
To change the password:
In the upper right of the page, click Change Password. The Change Password page
is displayed
Figure 2-3 Change password link
In the Old Password box, type the current password
In the New Password box, type the new password
In the Confirm Password box, type the new password again
User Guide 10
Nestlé Waters New Customer Setup Application
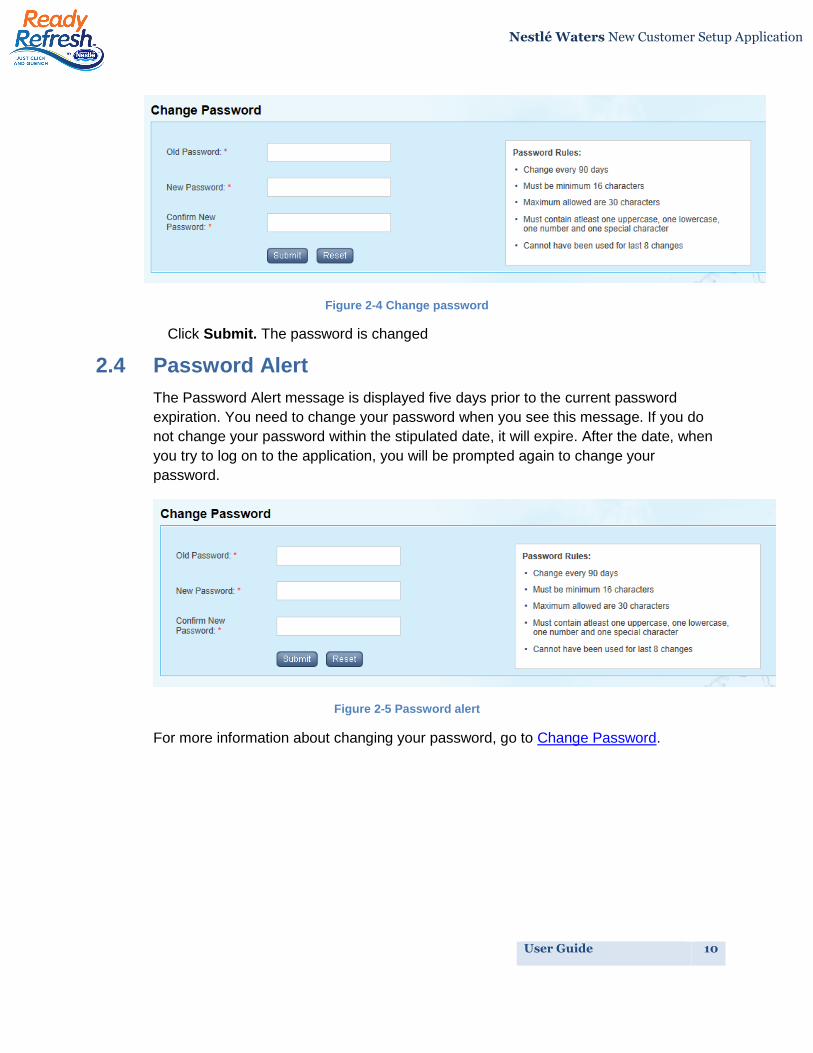
Figure 2-4 Change password
Click Submit. The password is changed
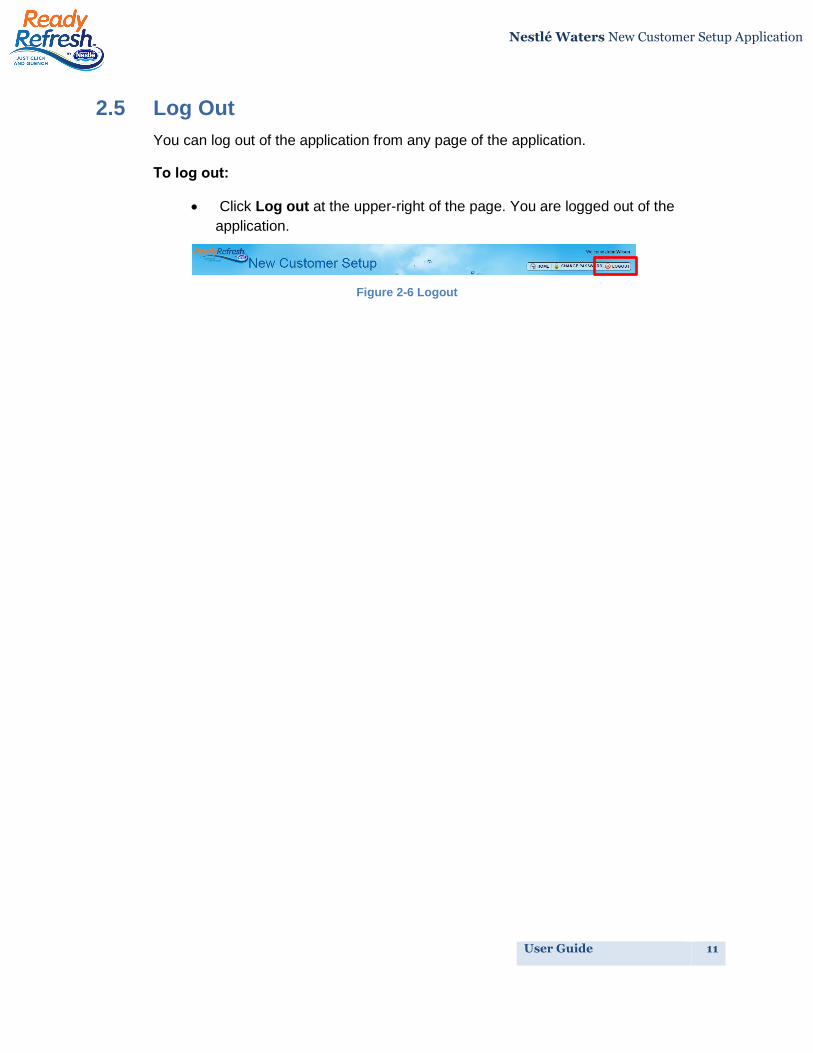
2.4 Password Alert
The Password Alert message is displayed five days prior to the current password
expiration. You need to change your password when you see this message. If you do
not change your password within the stipulated date, it will expire. After the date, when
you try to log on to the application, you will be prompted again to change your
password.
Figure 2-5 Password alert
For more information about changing your password, go to Change Password.
User Guide 11
Nestlé Waters New Customer Setup Application
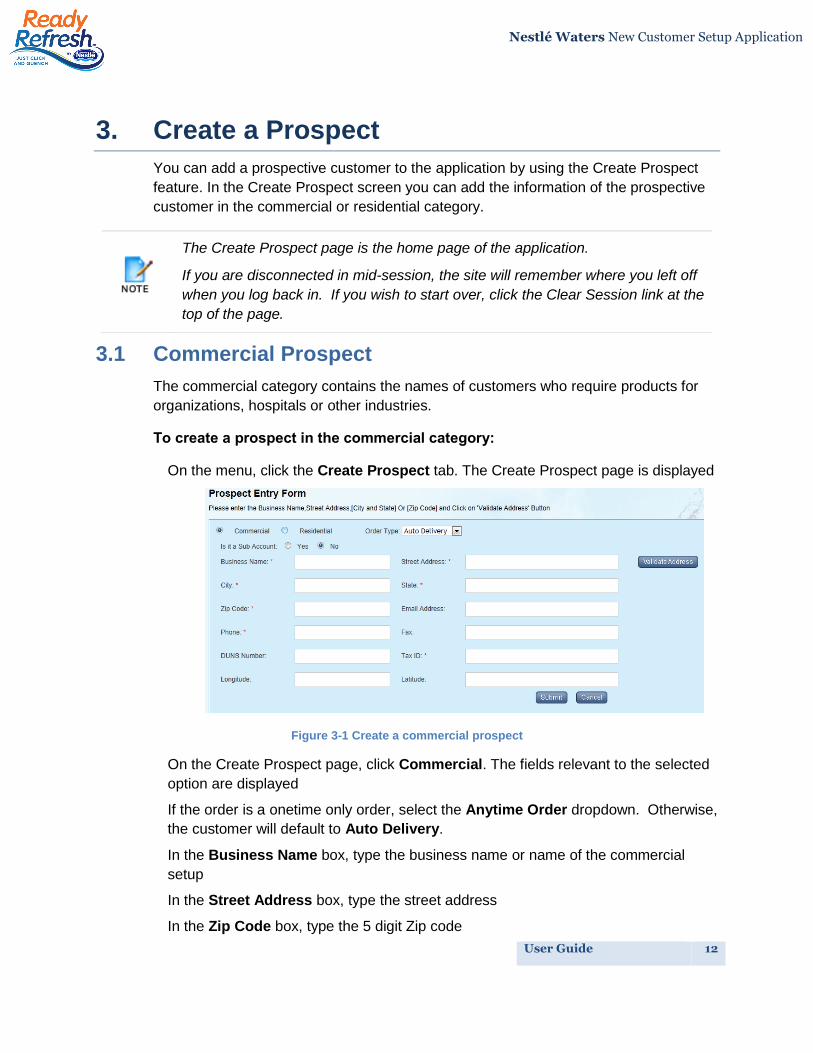
2.5 Log Out
You can log out of the application from any page of the application.
To log out:
Click Log out at the upper-right of the page. You are logged out of the
application.
Figure 2-6 Logout
User Guide 12
Nestlé Waters New Customer Setup Application
3. Create a Prospect
You can add a prospective customer to the application by using the Create Prospect
feature. In the Create Prospect screen you can add the information of the prospective
customer in the commercial or residential category.
3.1 Commercial Prospect
The commercial category contains the names of customers who require products for
organizations, hospitals or other industries.
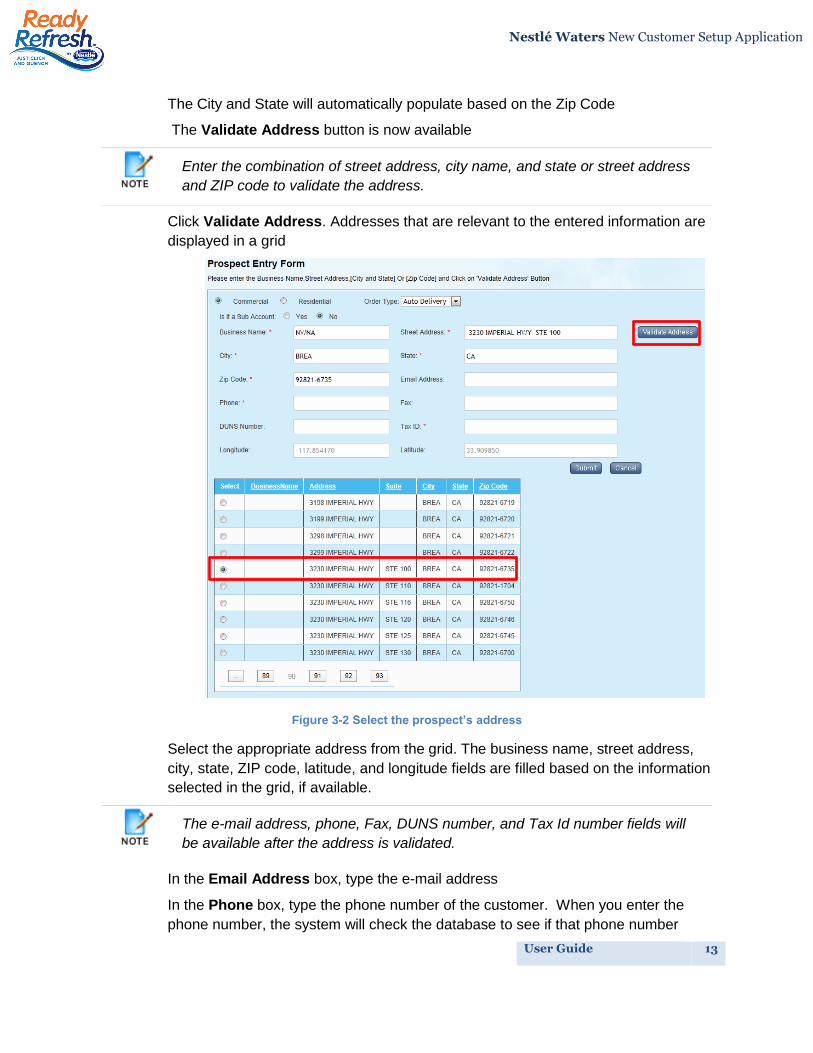
To create a prospect in the commercial category:
On the menu, click the Create Prospect tab. The Create Prospect page is displayed
Figure 3-1 Create a commercial prospect
On the Create Prospect page, click Commercial. The fields relevant to the selected
option are displayed
If the order is a onetime only order, select the Anytime Order dropdown. Otherwise,
the customer will default to Auto Delivery.
In the Business Name box, type the business name or name of the commercial
setup
In the Street Address box, type the street address
In the Zip Code box, type the 5 digit Zip code
The Create Prospect page is the home page of the application.
If you are disconnected in mid-session, the site will remember where you left off
when you log back in. If you wish to start over, click the Clear Session link at the
top of the page.
User Guide 13
Nestlé Waters New Customer Setup Application
The City and State will automatically populate based on the Zip Code
The Validate Address button is now available
Click Validate Address. Addresses that are relevant to the entered information are
displayed in a grid
Figure 3-2 Select the prospect’s address
Select the appropriate address from the grid. The business name, street address,
city, state, ZIP code, latitude, and longitude fields are filled based on the information
selected in the grid, if available.
In the Email Address box, type the e-mail address
In the Phone box, type the phone number of the customer. When you enter the
phone number, the system will check the database to see if that phone number
Enter the combination of street address, city name, and state or street address
and ZIP code to validate the address.
The e-mail address, phone, Fax, DUNS number, and Tax Id number fields will
be available after the address is validated.
User Guide 14
Nestlé Waters New Customer Setup Application
already exists. This reduces your data entry if we have already loaded the prospect
information or if you have already visited that location, but didn't complete the sale.
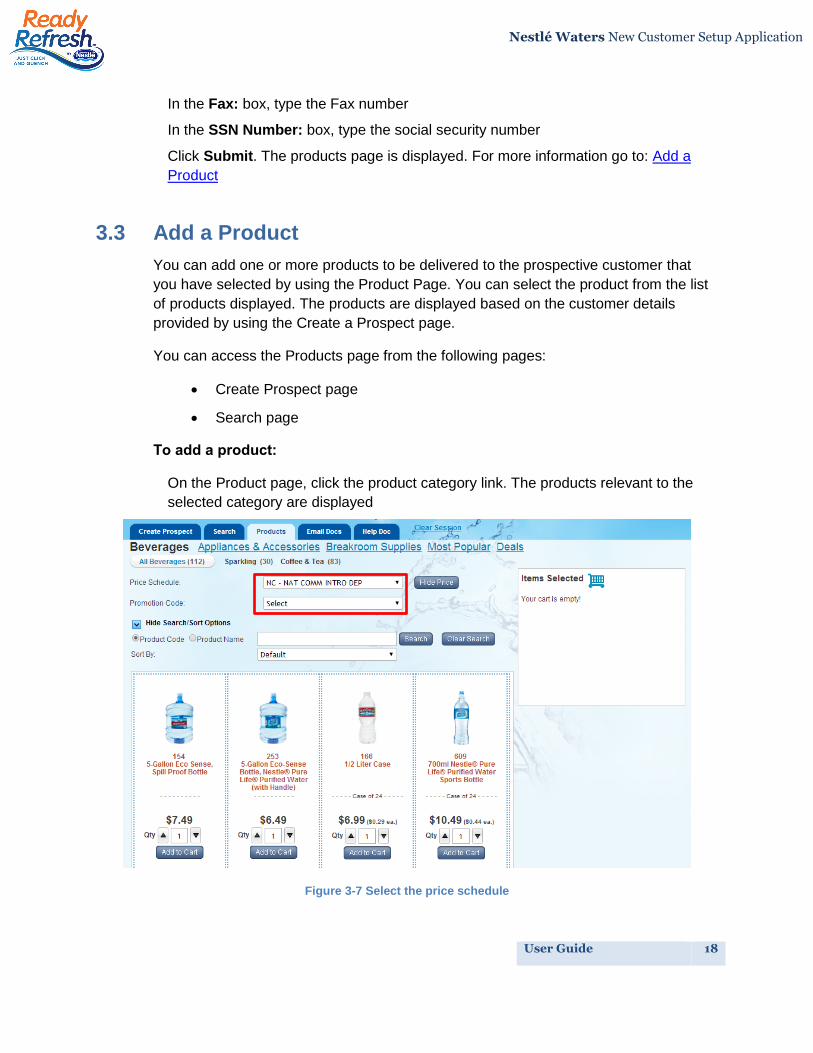
In the Fax box, type the Fax number
In the DUNS Number box, type the DUNS number of the organization
In the Tax Id Number box, type the EIN Number of the organization
Click Submit. The Products page is displayed
3.2 Residential Prospect
The residential category contains the names of customers who require products for use
at home. There are two types of residential customers: business owner prospects
(BOP) and regular residential (eg. employees).
3.2.1 Residential BOP
The business owner prospects (BOP) are privileged prospects. The organization with
which they are associated processes the payments. The products purchased by them
are billed to the business address and not to their residential address.
To create a BOP in the residential category:
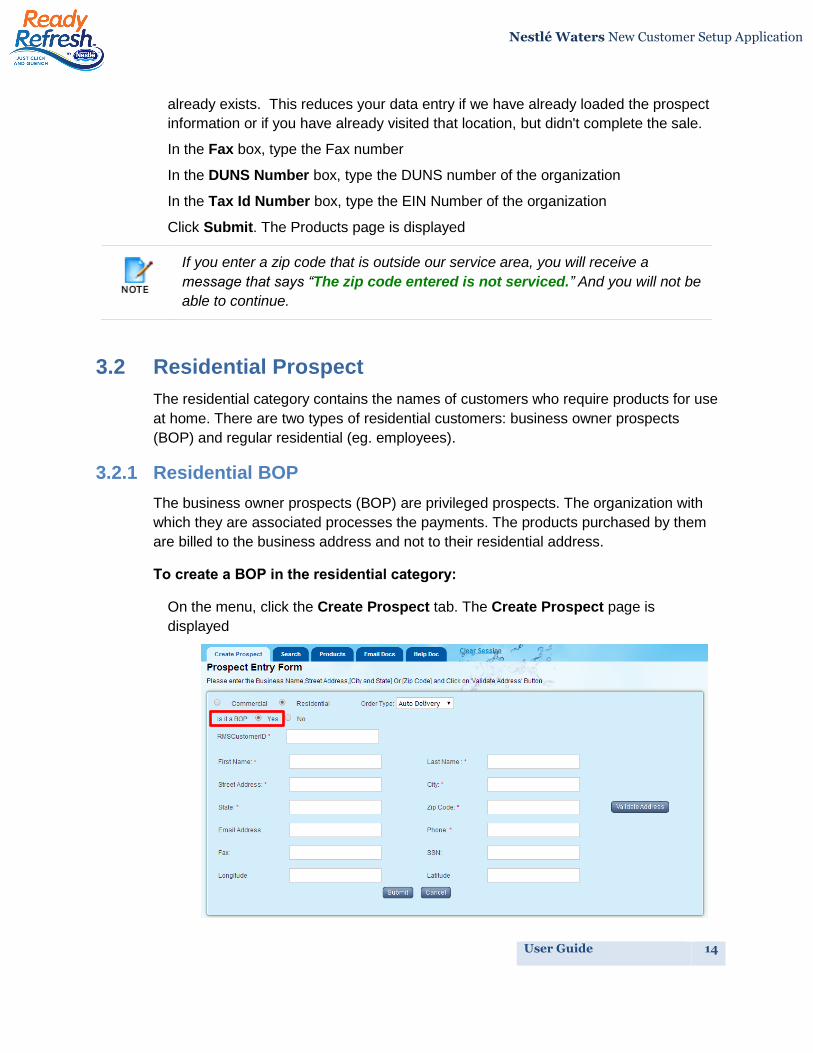
On the menu, click the Create Prospect tab. The Create Prospect page is
displayed
If you enter a zip code that is outside our service area, you will receive a
message that says “The zip code entered is not serviced.” And you will not be
able to continue.
User Guide 15
Nestlé Waters New Customer Setup Application
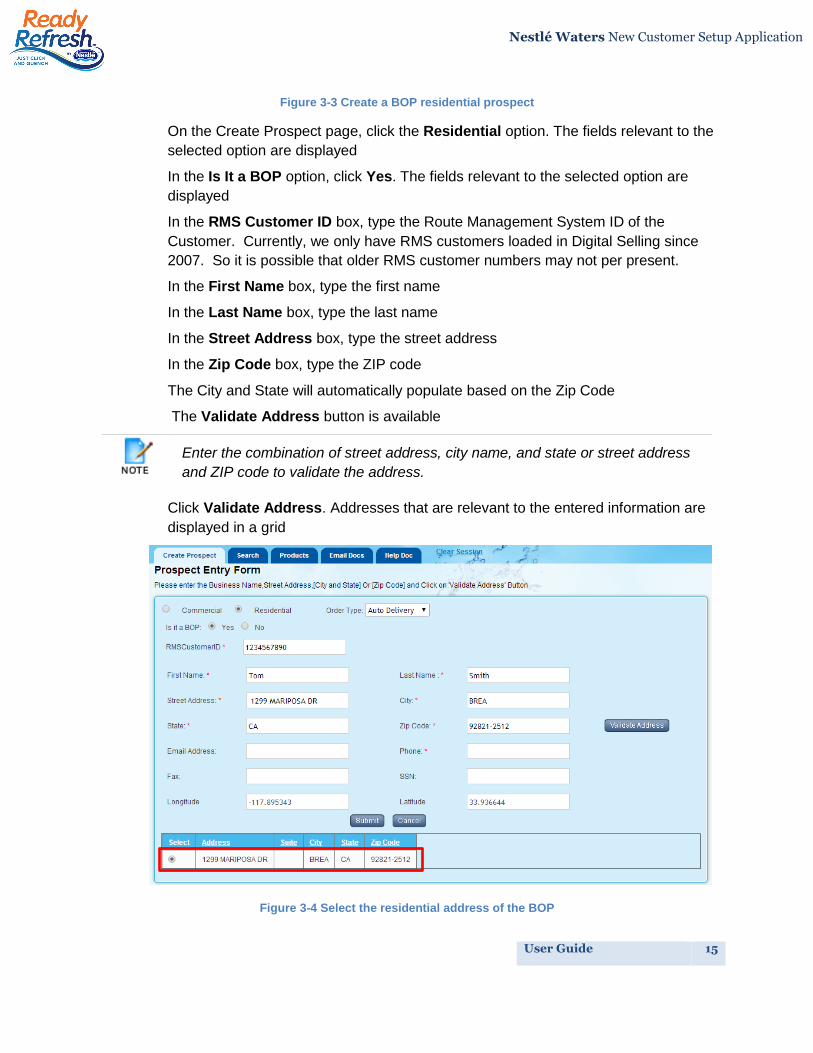
Figure 3-3 Create a BOP residential prospect
On the Create Prospect page, click the Residential option. The fields relevant to the
selected option are displayed
In the Is It a BOP option, click Yes. The fields relevant to the selected option are
displayed
In the RMS Customer ID box, type the Route Management System ID of the
Customer. Currently, we only have RMS customers loaded in Digital Selling since
2007. So it is possible that older RMS customer numbers may not per present.
In the First Name box, type the first name
In the Last Name box, type the last name
In the Street Address box, type the street address
In the Zip Code box, type the ZIP code
The City and State will automatically populate based on the Zip Code
The Validate Address button is available
Click Validate Address. Addresses that are relevant to the entered information are
displayed in a grid
Figure 3-4 Select the residential address of the BOP
Enter the combination of street address, city name, and state or street address
and ZIP code to validate the address.
User Guide 16
Nestlé Waters New Customer Setup Application
Select the appropriate address in the grid. The street address, city, state, ZIP code,
latitude, and longitude fields are filled based on the information that you selected in
the grid.
In the Email Address box, type the e-mail address
In the Phone box, type the phone number of the customer
In the Fax box, type the Fax number
In the SSN Number box, type the social security number
Click Submit. The Products page is displayed. For more information go to: Add a
Product
3.2.2 Residential Non-BOP
Non-BOP users are regular prospects who buy products for use in their homes. The
products they purchase are billed to their residential address.
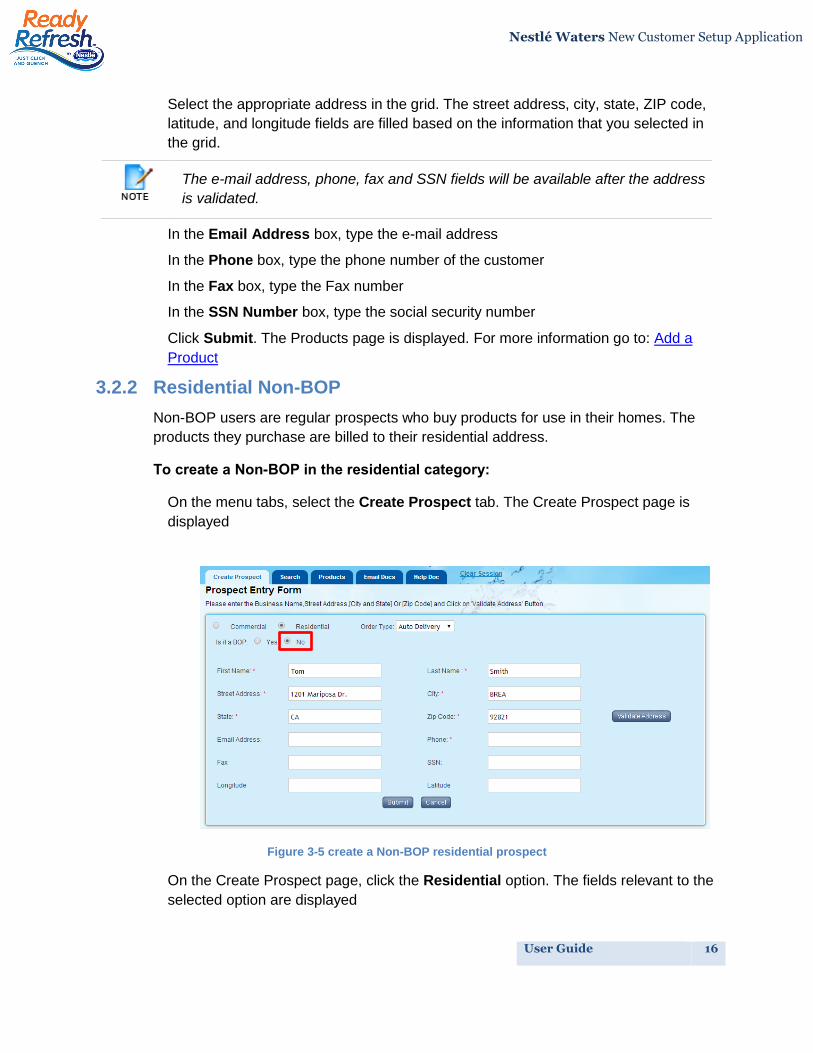
To create a Non-BOP in the residential category:
On the menu tabs, select the Create Prospect tab. The Create Prospect page is
displayed
Figure 3-5 create a Non-BOP residential prospect
On the Create Prospect page, click the Residential option. The fields relevant to the
selected option are displayed
The e-mail address, phone, fax and SSN fields will be available after the address
is validated.
User Guide 17
Nestlé Waters New Customer Setup Application
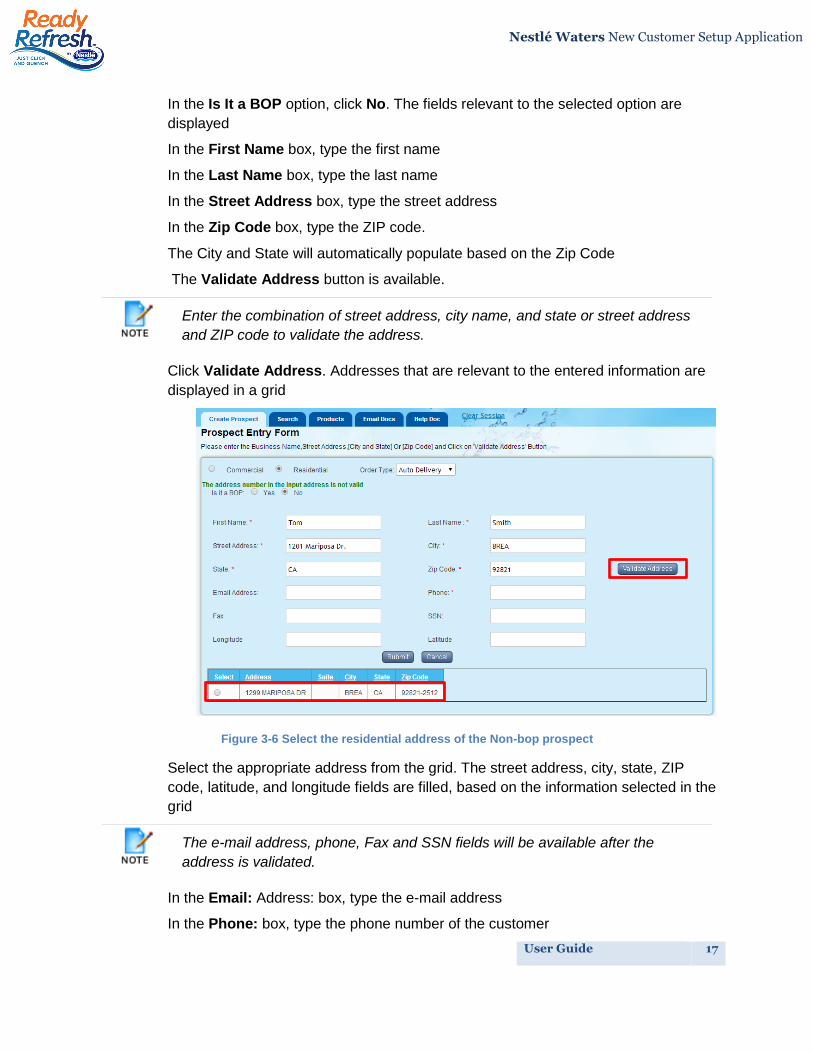
In the Is It a BOP option, click No. The fields relevant to the selected option are
displayed
In the First Name box, type the first name
In the Last Name box, type the last name
In the Street Address box, type the street address
In the Zip Code box, type the ZIP code.
The City and State will automatically populate based on the Zip Code
The Validate Address button is available.
Click Validate Address. Addresses that are relevant to the entered information are
displayed in a grid
Figure 3-6 Select the residential address of the Non-bop prospect
Select the appropriate address from the grid. The street address, city, state, ZIP
code, latitude, and longitude fields are filled, based on the information selected in the
grid
In the Email: Address: box, type the e-mail address
In the Phone: box, type the phone number of the customer
Enter the combination of street address, city name, and state or street address
and ZIP code to validate the address.
The e-mail address, phone, Fax and SSN fields will be available after the
address is validated.
User Guide 18
Nestlé Waters New Customer Setup Application
In the Fax: box, type the Fax number
In the SSN Number: box, type the social security number
Click Submit. The products page is displayed. For more information go to: Add a
Product
3.3 Add a Product
You can add one or more products to be delivered to the prospective customer that
you have selected by using the Product Page. You can select the product from the list
of products displayed. The products are displayed based on the customer details
provided by using the Create a Prospect page.
You can access the Products page from the following pages:
Create Prospect page
Search page
To add a product:
On the Product page, click the product category link. The products relevant to the
selected category are displayed
Figure 3-7 Select the price schedule
User Guide 19
Nestlé Waters New Customer Setup Application
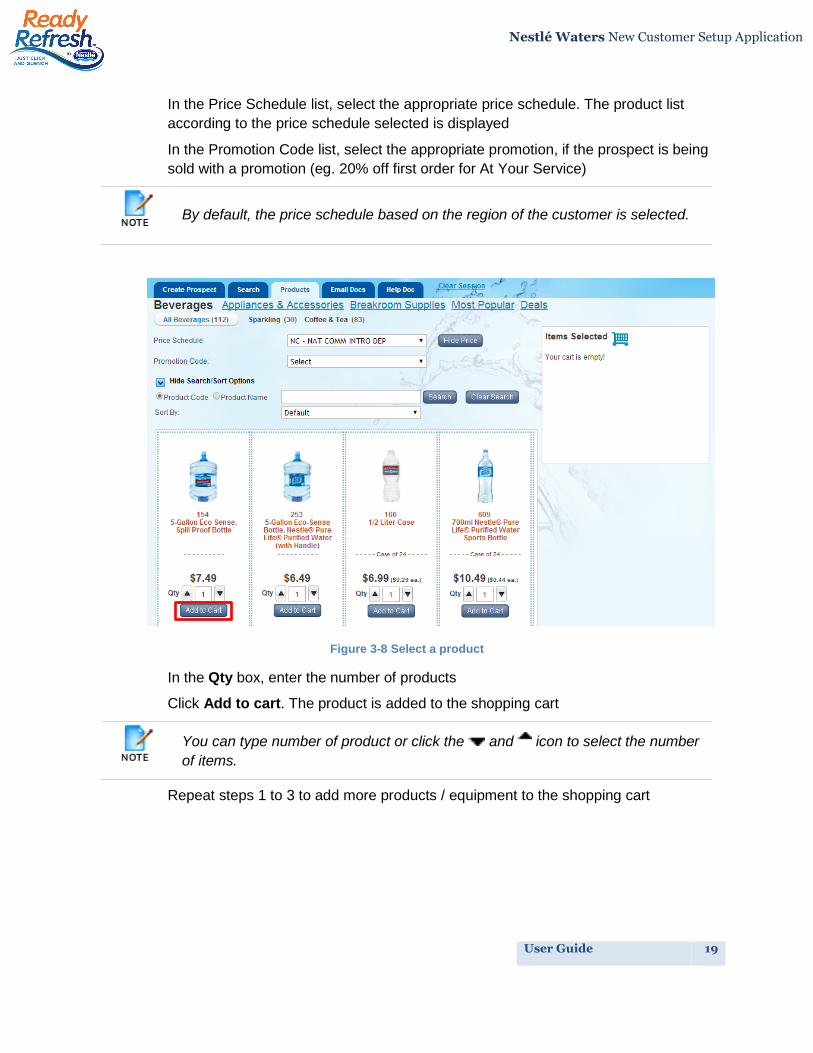
In the Price Schedule list, select the appropriate price schedule. The product list
according to the price schedule selected is displayed
In the Promotion Code list, select the appropriate promotion, if the prospect is being
sold with a promotion (eg. 20% off first order for At Your Service)
Figure 3-8 Select a product
In the Qty box, enter the number of products
Click Add to cart. The product is added to the shopping cart
Repeat steps 1 to 3 to add more products / equipment to the shopping cart
By default, the price schedule based on the region of the customer is selected.
You can type number of product or click the and icon to select the number
of items.
User Guide 20
Nestlé Waters New Customer Setup Application
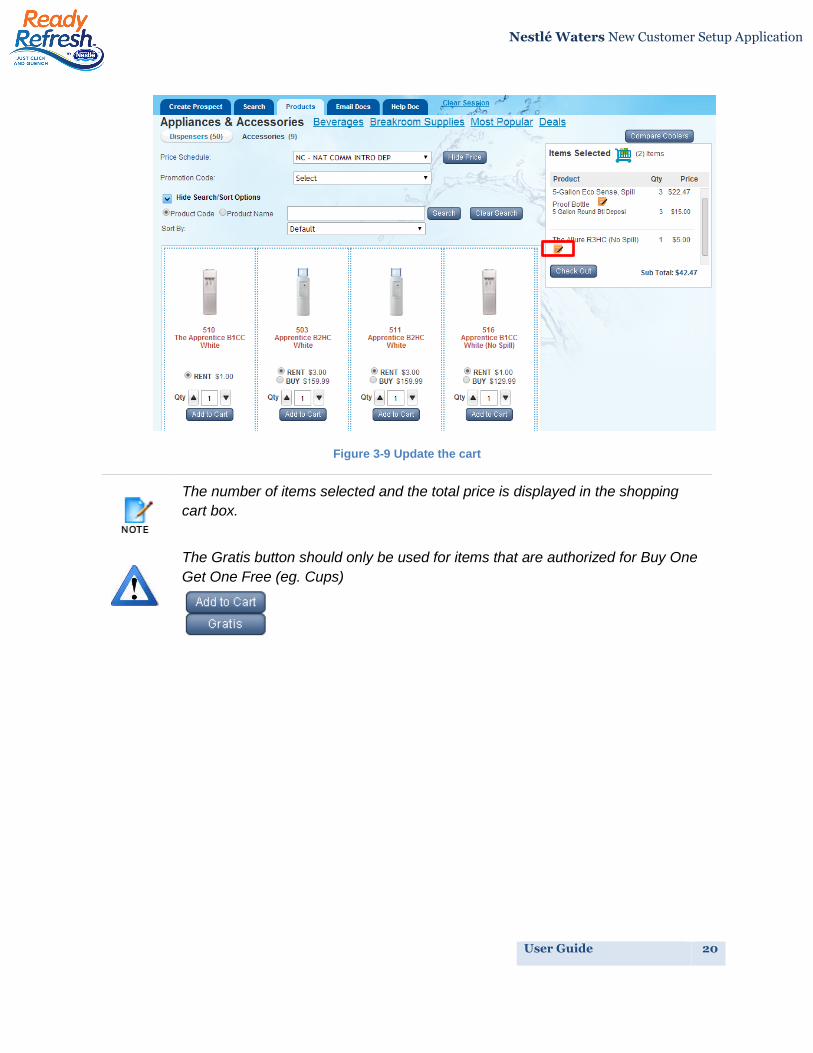
Figure 3-9 Update the cart
The number of items selected and the total price is displayed in the shopping
cart box.
The Gratis button should only be used for items that are authorized for Buy One
Get One Free (eg. Cups)
User Guide 21
Nestlé Waters New Customer Setup Application
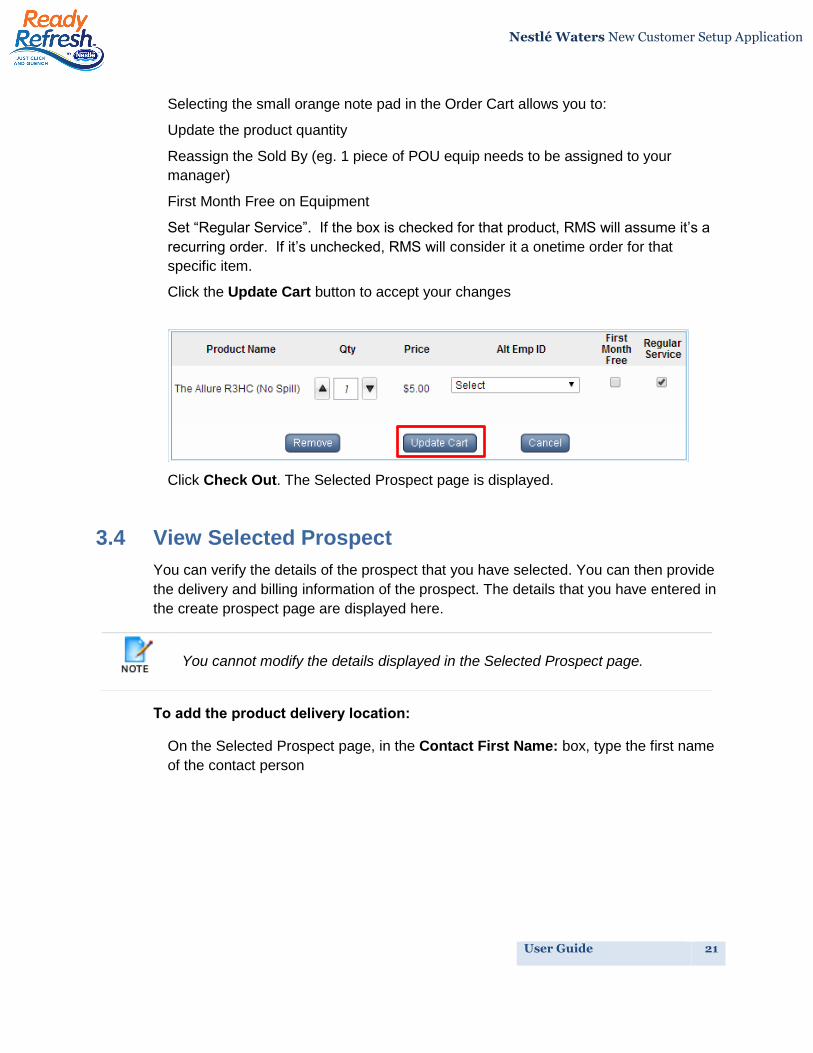
Selecting the small orange note pad in the Order Cart allows you to:
Update the product quantity
Reassign the Sold By (eg. 1 piece of POU equip needs to be assigned to your
manager)
First Month Free on Equipment
Set “Regular Service”. If the box is checked for that product, RMS will assume it’s a
recurring order. If it’s unchecked, RMS will consider it a onetime order for that
specific item.
Click the Update Cart button to accept your changes
Click Check Out. The Selected Prospect page is displayed.
3.4 View Selected Prospect
You can verify the details of the prospect that you have selected. You can then provide
the delivery and billing information of the prospect. The details that you have entered in
the create prospect page are displayed here.
To add the product delivery location:
On the Selected Prospect page, in the Contact First Name: box, type the first name
of the contact person
You cannot modify the details displayed in the Selected Prospect page.
User Guide 22
Nestlé Waters New Customer Setup Application
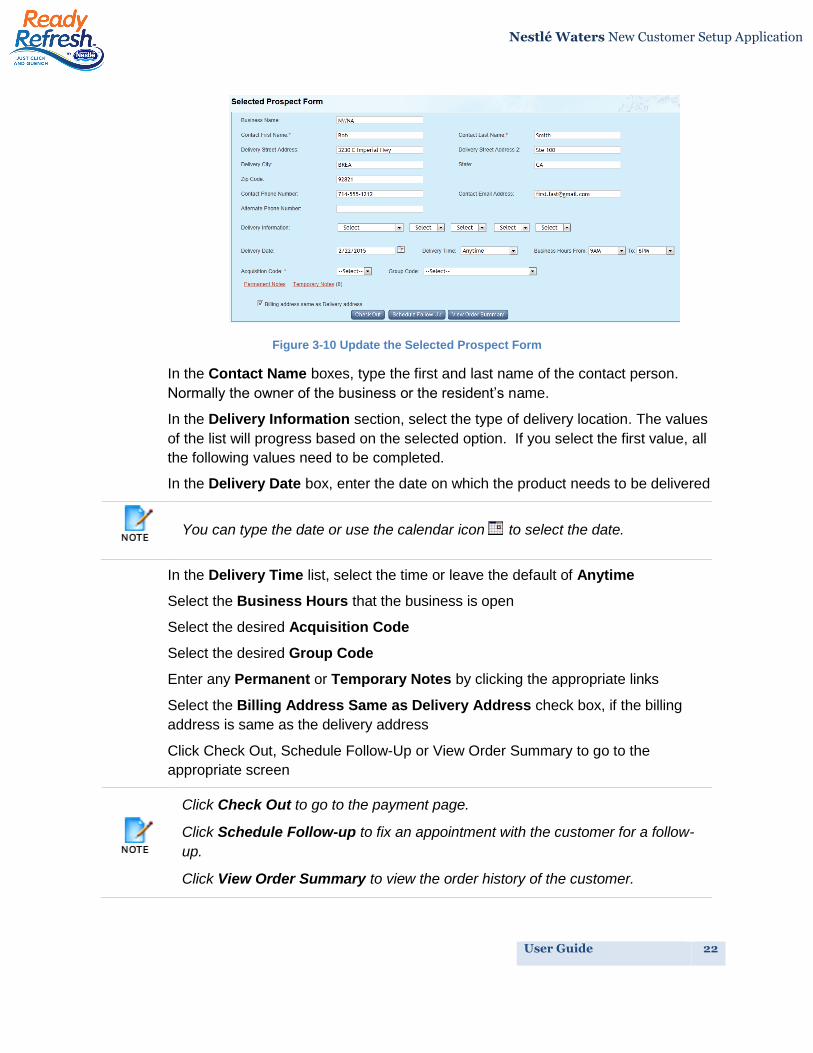
Figure 3-10 Update the Selected Prospect Form
In the Contact Name boxes, type the first and last name of the contact person.
Normally the owner of the business or the resident’s name.
In the Delivery Information section, select the type of delivery location. The values
of the list will progress based on the selected option. If you select the first value, all
the following values need to be completed.
In the Delivery Date box, enter the date on which the product needs to be delivered
In the Delivery Time list, select the time or leave the default of Anytime
Select the Business Hours that the business is open
Select the desired Acquisition Code
Select the desired Group Code
Enter any Permanent or Temporary Notes by clicking the appropriate links
Select the Billing Address Same as Delivery Address check box, if the billing
address is same as the delivery address
Click Check Out, Schedule Follow-Up or View Order Summary to go to the
appropriate screen
You can type the date or use the calendar icon to select the date.
Click Check Out to go to the payment page.
Click Schedule Follow-up to fix an appointment with the customer for a follow-
up.
Click View Order Summary to view the order history of the customer.
User Guide 23
Nestlé Waters New Customer Setup Application
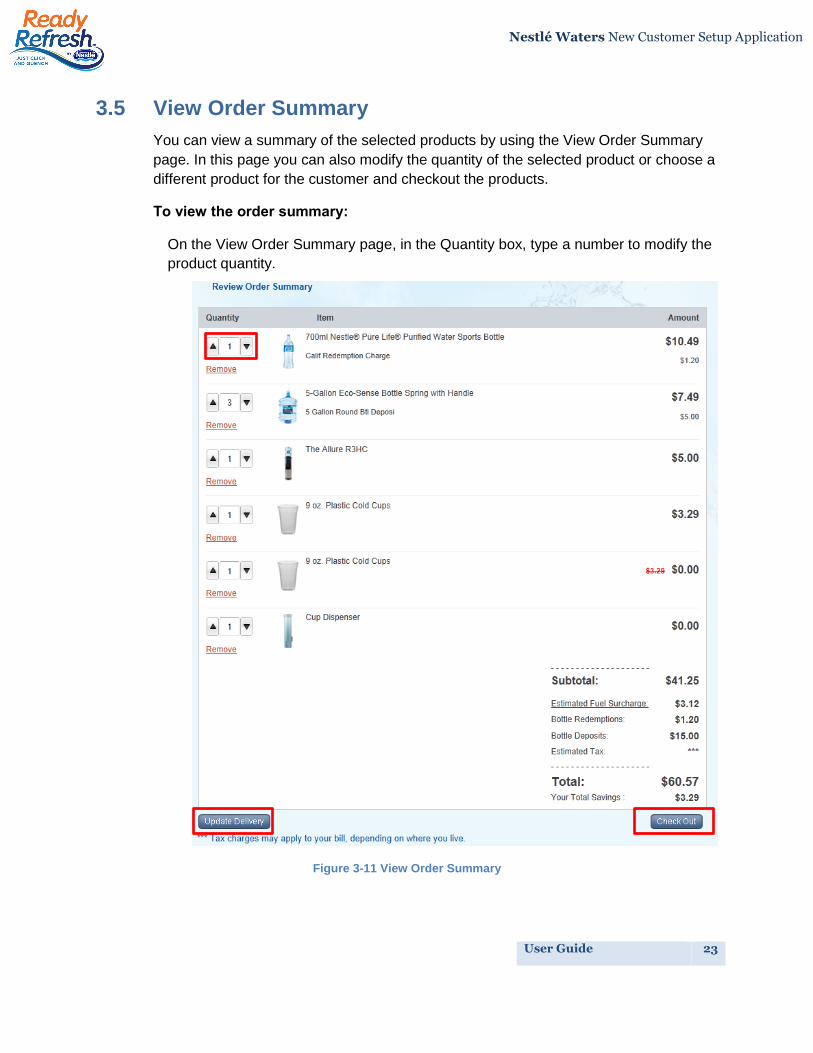
3.5 View Order Summary
You can view a summary of the selected products by using the View Order Summary
page. In this page you can also modify the quantity of the selected product or choose a
different product for the customer and checkout the products.
To view the order summary:
On the View Order Summary page, in the Quantity box, type a number to modify the
product quantity.
Figure 3-11 View Order Summary
User Guide 24
Nestlé Waters New Customer Setup Application
Click Update Delivery. The updated summary of the product that you selected is
displayed
Click Checkout. The Payment Checking page is displayed.
3.6 Schedule a Follow-Up
You can schedule an appointment with the customer by using the Schedule Follow-up
page. You can create an appointment and send an e-mail message to the customer
indicating the scheduled date of follow-up.
To schedule a follow-up:
On the Schedule Follow Up page, in the Follow-Up Date box, enter the date
In the Time list, select the time
You can type number of product or click the and icon to select the number
of items.
You can add more products by clicking the Browse Other Products link.
The details provided at the time of creating the prospect are displayed in this
page. The employee email address, prospect name, contact address, and
prospect phone number appear unavailable.
You can type the date or use the calendar icon to select the date.
User Guide 25
Nestlé Waters New Customer Setup Application
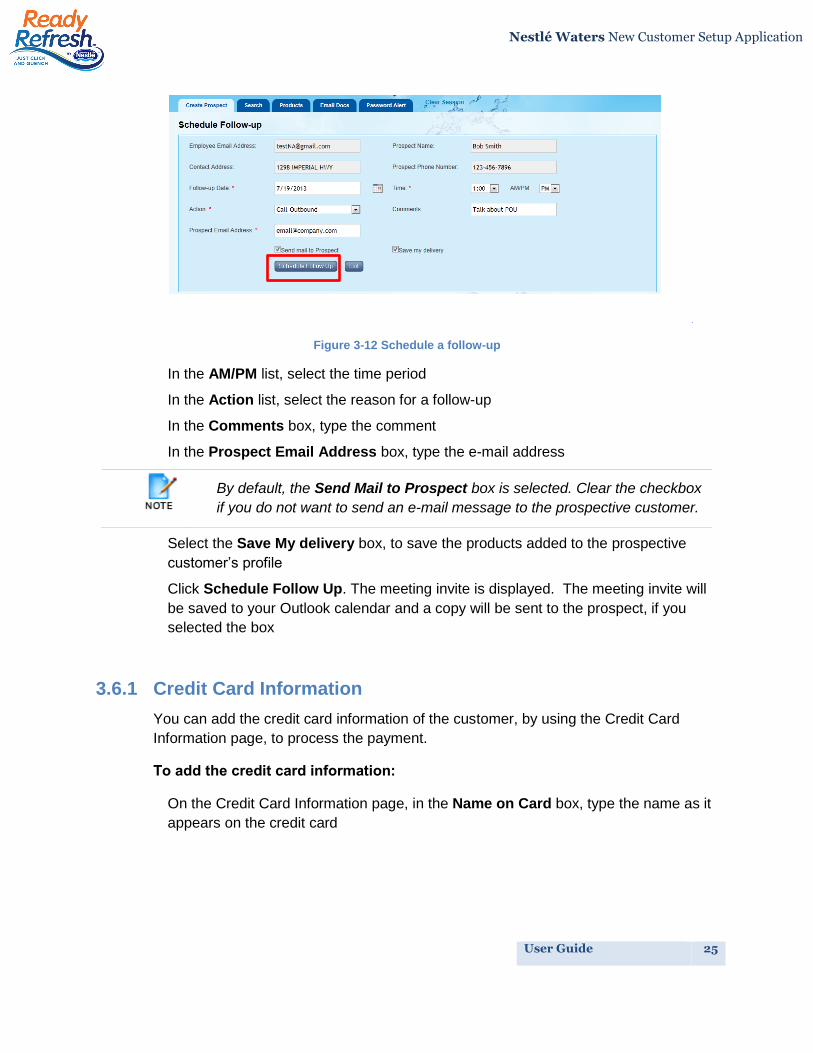
Figure 3-12 Schedule a follow-up
In the AM/PM list, select the time period
In the Action list, select the reason for a follow-up
In the Comments box, type the comment
In the Prospect Email Address box, type the e-mail address
Select the Save My delivery box, to save the products added to the prospective
customer’s profile
Click Schedule Follow Up. The meeting invite is displayed. The meeting invite will
be saved to your Outlook calendar and a copy will be sent to the prospect, if you
selected the box
3.6.1 Credit Card Information
You can add the credit card information of the customer, by using the Credit Card
Information page, to process the payment.
To add the credit card information:
On the Credit Card Information page, in the Name on Card box, type the name as it
appears on the credit card
By default, the Send Mail to Prospect box is selected. Clear the checkbox
if you do not want to send an e-mail message to the prospective customer.
User Guide 26
Nestlé Waters New Customer Setup Application
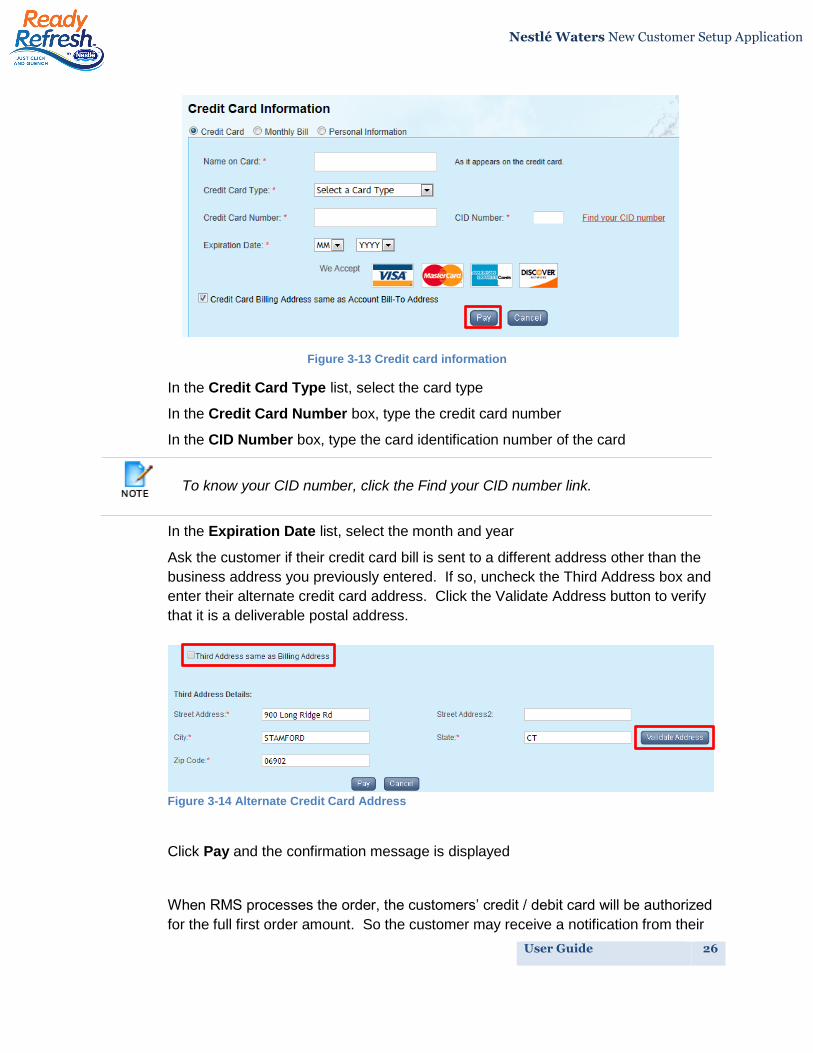
Figure 3-13 Credit card information
In the Credit Card Type list, select the card type
In the Credit Card Number box, type the credit card number
In the CID Number box, type the card identification number of the card
In the Expiration Date list, select the month and year
Ask the customer if their credit card bill is sent to a different address other than the
business address you previously entered. If so, uncheck the Third Address box and
enter their alternate credit card address. Click the Validate Address button to verify
that it is a deliverable postal address.
Figure 3-14 Alternate Credit Card Address
Click Pay and the confirmation message is displayed
When RMS processes the order, the customers’ credit / debit card will be authorized
for the full first order amount. So the customer may receive a notification from their
To know your CID number, click the Find your CID number link.
User Guide 27
Nestlé Waters New Customer Setup Application
bank or credit card company that an authorization was performed on their account.
The customer is not actually charged, just authorized. Banks have various time
frames to release the authorization, if the charge is not processed. If the order is an
Anytime Order, the full amount of the order will be charged immediately.
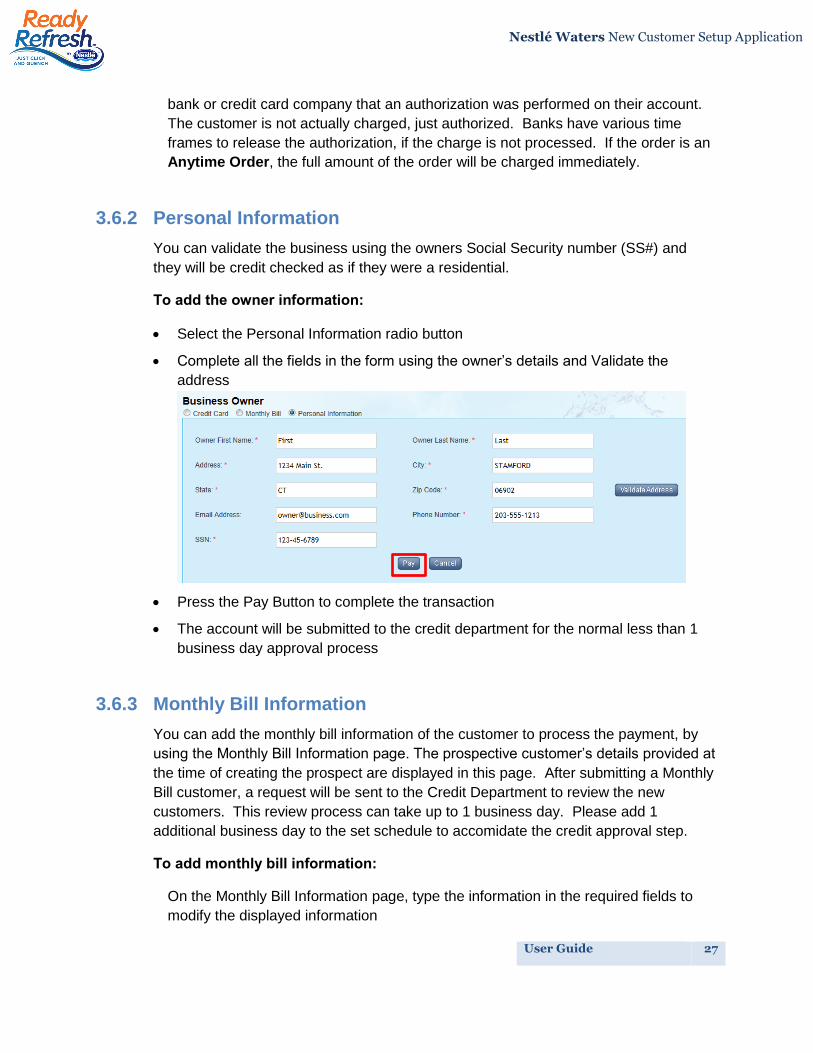
3.6.2 Personal Information
You can validate the business using the owners Social Security number (SS#) and
they will be credit checked as if they were a residential.
To add the owner information:
Select the Personal Information radio button
Complete all the fields in the form using the owner’s details and Validate the
address
Press the Pay Button to complete the transaction
The account will be submitted to the credit department for the normal less than 1
business day approval process
3.6.3 Monthly Bill Information
You can add the monthly bill information of the customer to process the payment, by
using the Monthly Bill Information page. The prospective customer’s details provided at
the time of creating the prospect are displayed in this page. After submitting a Monthly
Bill customer, a request will be sent to the Credit Department to review the new
customers. This review process can take up to 1 business day. Please add 1
additional business day to the set schedule to accomidate the credit approval step.
To add monthly bill information:
On the Monthly Bill Information page, type the information in the required fields to
modify the displayed information
User Guide 28
Nestlé Waters New Customer Setup Application
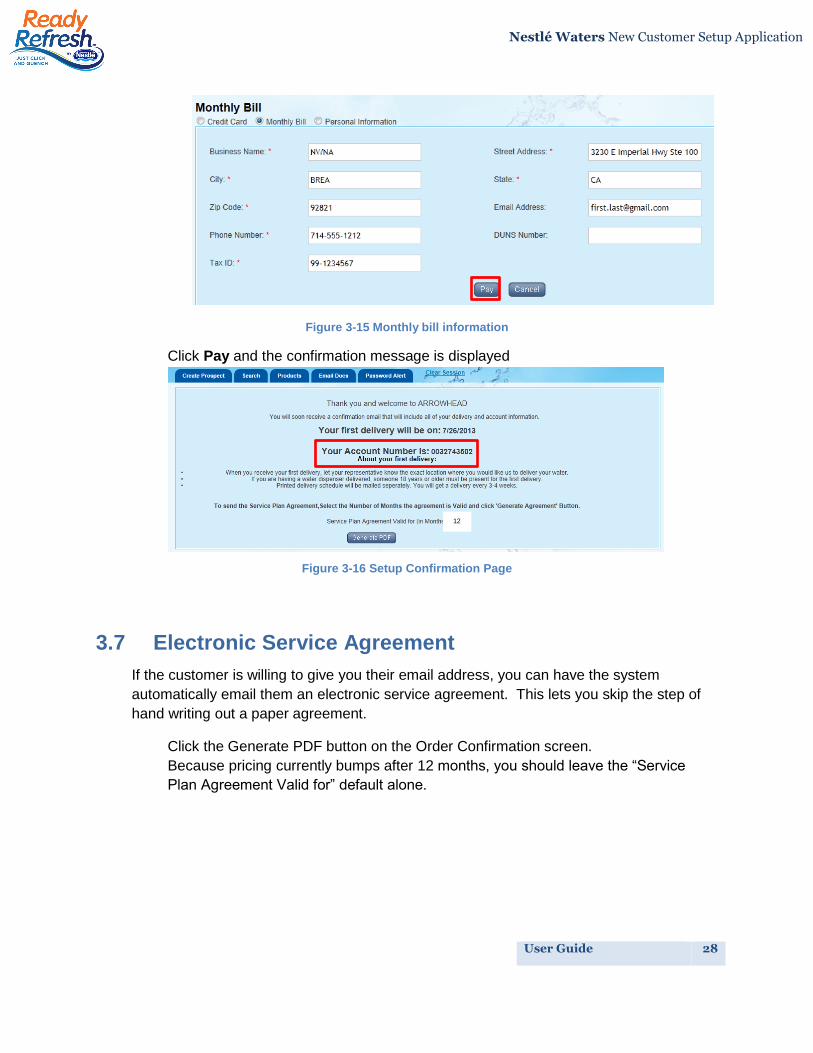
Figure 3-15 Monthly bill information
Click Pay and the confirmation message is displayed
Figure 3-16 Setup Confirmation Page
3.7 Electronic Service Agreement
If the customer is willing to give you their email address, you can have the system
automatically email them an electronic service agreement. This lets you skip the step of
hand writing out a paper agreement.
Click the Generate PDF button on the Order Confirmation screen.
Because pricing currently bumps after 12 months, you should leave the “Service
Plan Agreement Valid for” default alone.
12
User Guide 29
Nestlé Waters New Customer Setup Application
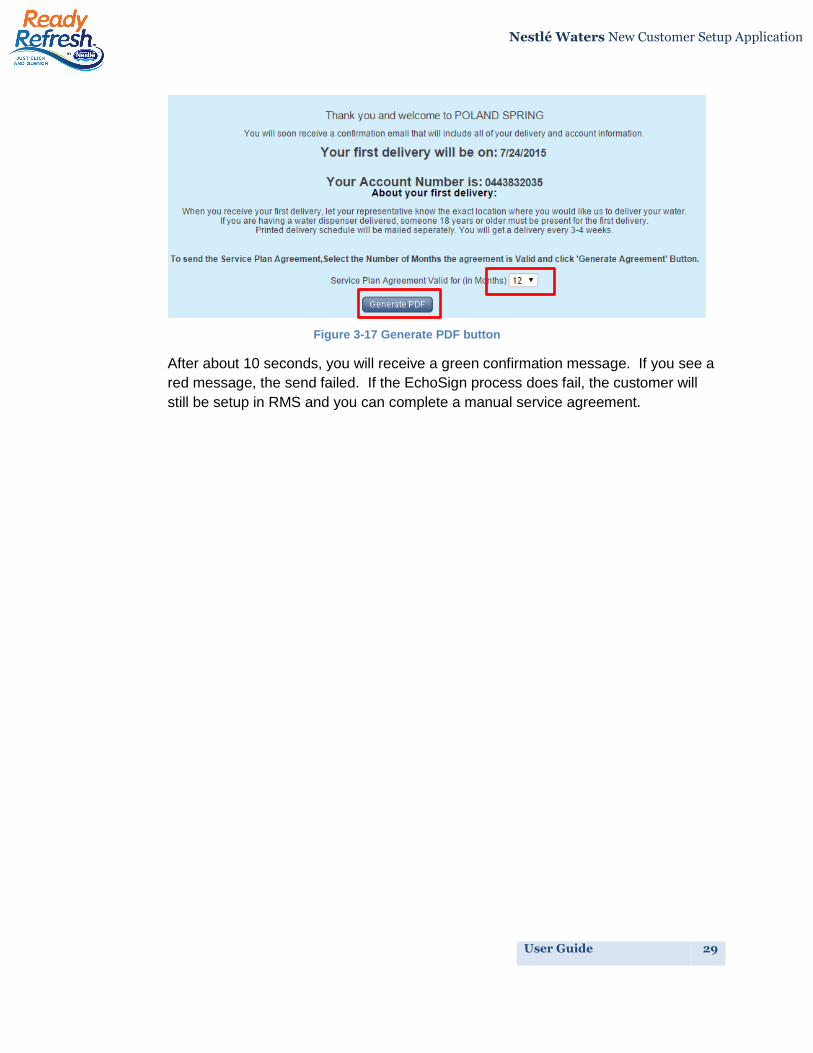
Figure 3-17 Generate PDF button
After about 10 seconds, you will receive a green confirmation message. If you see a
red message, the send failed. If the EchoSign process does fail, the customer will
still be setup in RMS and you can complete a manual service agreement.
User Guide 30
Nestlé Waters New Customer Setup Application
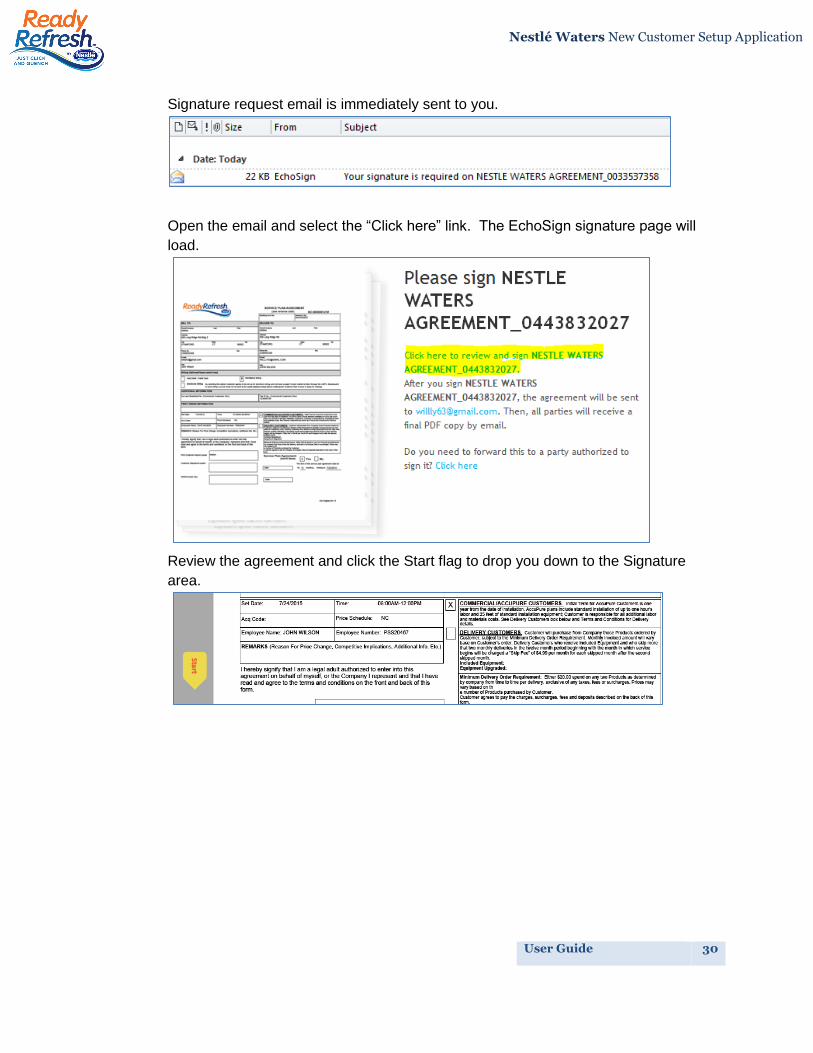
Signature request email is immediately sent to you.
Open the email and select the “Click here” link. The EchoSign signature page will
load.
Review the agreement and click the Start flag to drop you down to the Signature
area.
User Guide 31
Nestlé Waters New Customer Setup Application
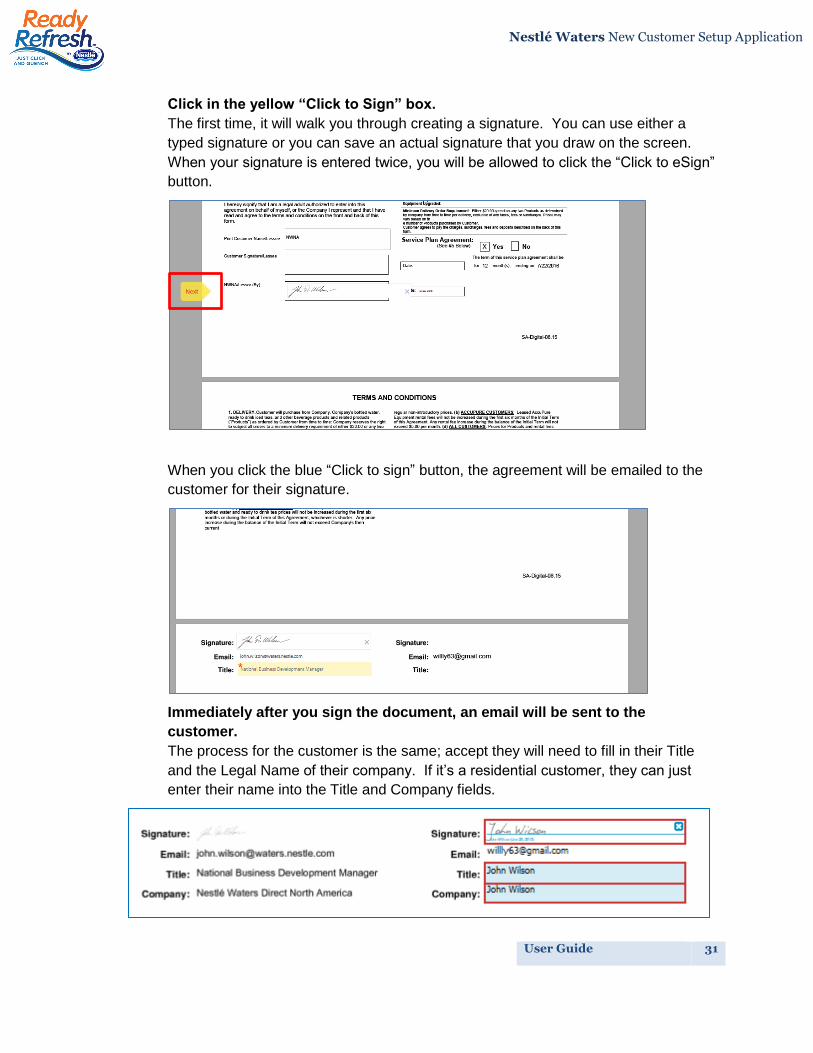
Click in the yellow “Click to Sign” box.
The first time, it will walk you through creating a signature. You can use either a
typed signature or you can save an actual signature that you draw on the screen.
When your signature is entered twice, you will be allowed to click the “Click to eSign”
button.
When you click the blue “Click to sign” button, the agreement will be emailed to the
customer for their signature.
Immediately after you sign the document, an email will be sent to the
customer.
The process for the customer is the same; accept they will need to fill in their Title
and the Legal Name of their company. If it’s a residential customer, they can just
enter their name into the Title and Company fields.
User Guide 32
Nestlé Waters New Customer Setup Application
After the customer signs the agreement, you and the customer will immediately
receive an email confirming that they completed the agreement.
An attachment of the completed PDF is also included. If the customer forgets to sign
the agreement immediately, they will be reminded weekly that they need to sign.
User Guide 33
Nestlé Waters New Customer Setup Application
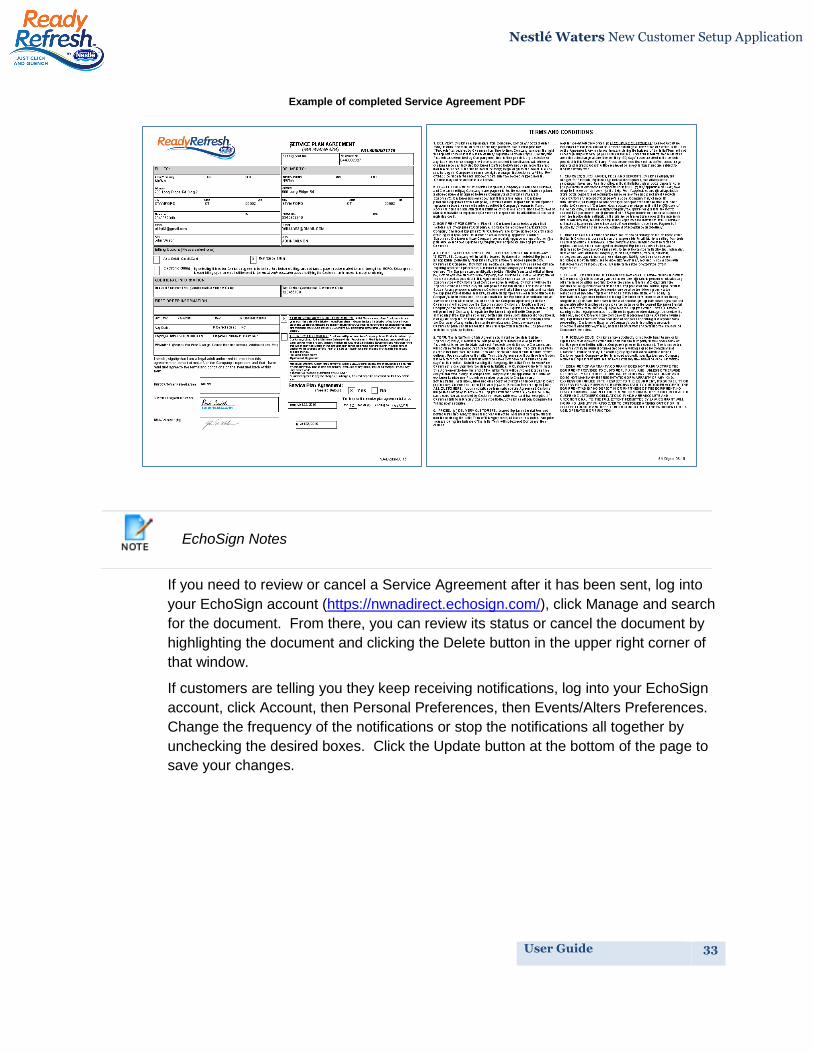
Example of completed Service Agreement PDF
If you need to review or cancel a Service Agreement after it has been sent, log into
your EchoSign account (https://nwnadirect.echosign.com/), click Manage and search
for the document. From there, you can review its status or cancel the document by
highlighting the document and clicking the Delete button in the upper right corner of
that window.
If customers are telling you they keep receiving notifications, log into your EchoSign
account, click Account, then Personal Preferences, then Events/Alters Preferences.
Change the frequency of the notifications or stop the notifications all together by
unchecking the desired boxes. Click the Update button at the bottom of the page to
save your changes.
EchoSign Notes
User Guide 34
Nestlé Waters New Customer Setup Application
4. Search for a Prospect
You can search for a prospect in the NW New Customer Application by using the
Search page. You can search for both commercial and residential prospects on this
page. You can also update the details of the prospect by using this page. The search
results display the list of names of prospective customers added to the application. You
can also broaden the search by including the names of past quit customers and current
customers.
To search for a prospect:
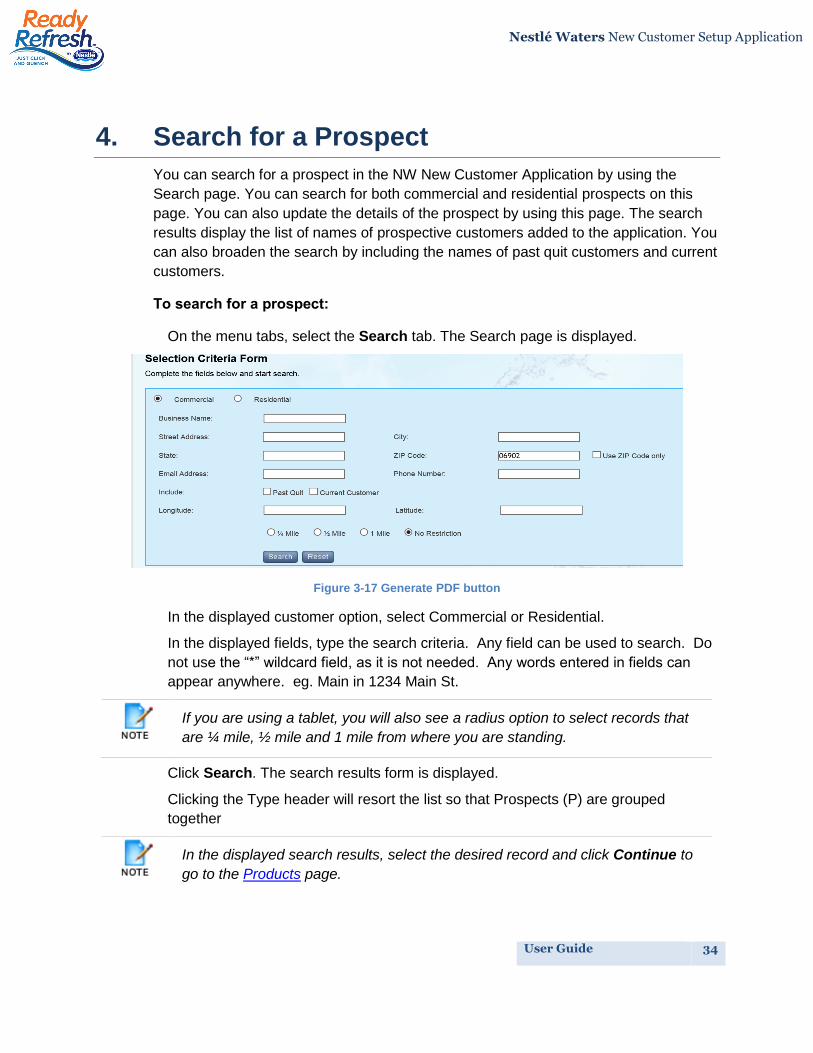
On the menu tabs, select the Search tab. The Search page is displayed.
Figure 3-17 Generate PDF button
In the displayed customer option, select Commercial or Residential.
In the displayed fields, type the search criteria. Any field can be used to search. Do
not use the “*” wildcard field, as it is not needed. Any words entered in fields can
appear anywhere. eg. Main in 1234 Main St.
Click Search. The search results form is displayed.
Clicking the Type header will resort the list so that Prospects (P) are grouped
together
If you are using a tablet, you will also see a radius option to select records that
are ¼ mile, ½ mile and 1 mile from where you are standing.
In the displayed search results, select the desired record and click Continue to
go to the Products page.
User Guide 35
Nestlé Waters New Customer Setup Application
4.1 Update Prospect Details
You can update the details of the existing prospect by using the update prospect page.
You can update both the commercial and residential prospects by using the Update
Prospects page.
To update the prospect details:
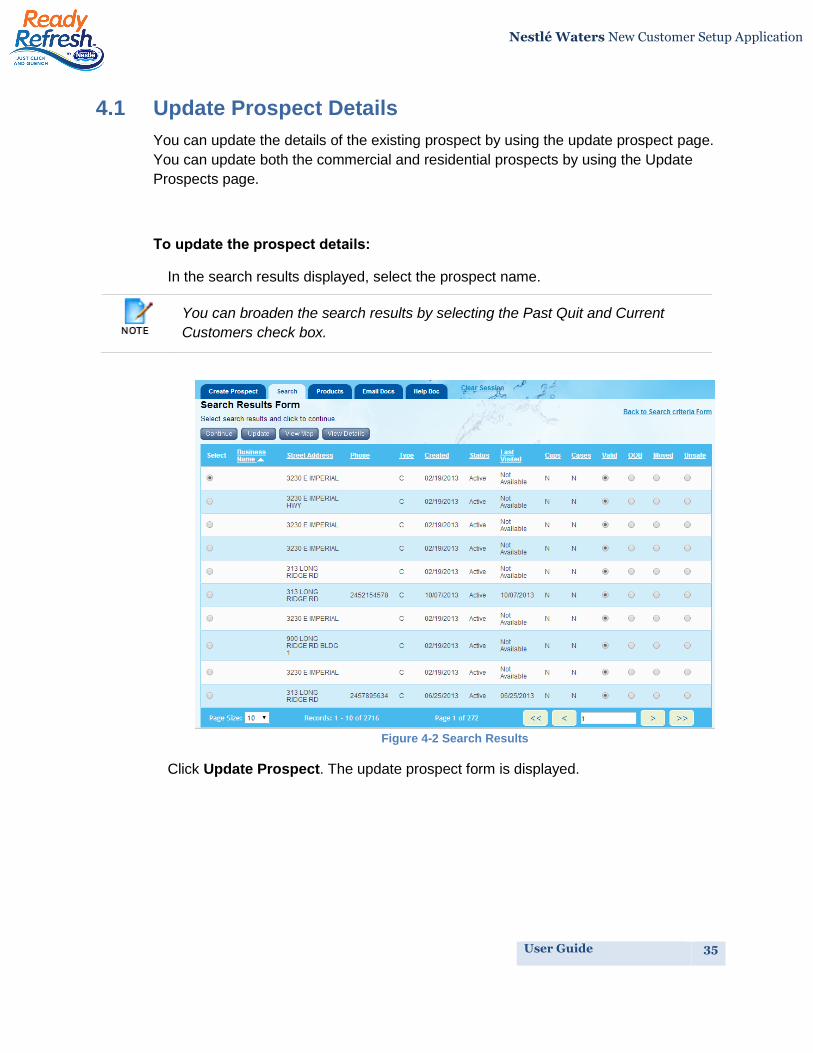
In the search results displayed, select the prospect name.
Figure 4-2 Search Results
Click Update Prospect. The update prospect form is displayed.
You can broaden the search results by selecting the Past Quit and Current
Customers check box.
User Guide 36
Nestlé Waters New Customer Setup Application
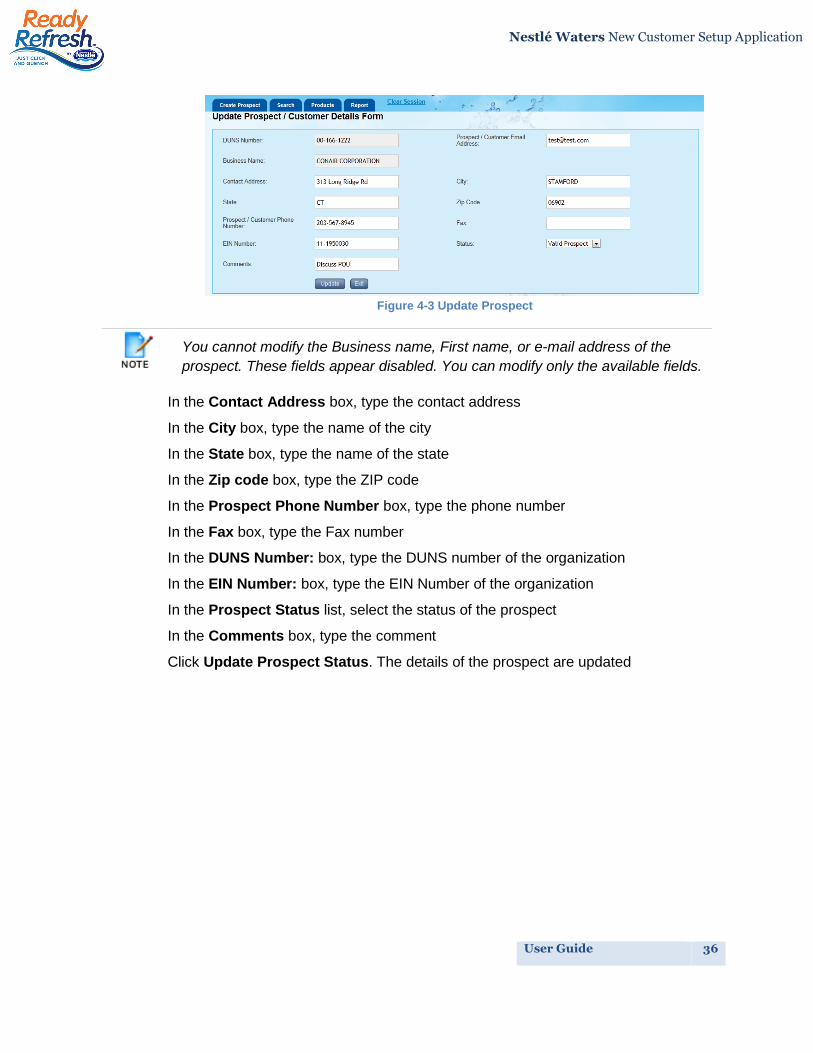
Figure 4-3 Update Prospect
In the Contact Address box, type the contact address
In the City box, type the name of the city
In the State box, type the name of the state
In the Zip code box, type the ZIP code
In the Prospect Phone Number box, type the phone number
In the Fax box, type the Fax number
In the DUNS Number: box, type the DUNS number of the organization
In the EIN Number: box, type the EIN Number of the organization
In the Prospect Status list, select the status of the prospect
In the Comments box, type the comment
Click Update Prospect Status. The details of the prospect are updated
You cannot modify the Business name, First name, or e-mail address of the
prospect. These fields appear disabled. You can modify only the available fields.
User Guide 37
Nestlé Waters New Customer Setup Application
5. Search for a Customer
You can search for a customer in the NW New Customer Application by using the
Search page. You can search for both commercial and residential customers on this
page. You can also view the details of the customer by using this page. The search
results display the list of names of customers added to the application.
To search for a customer:
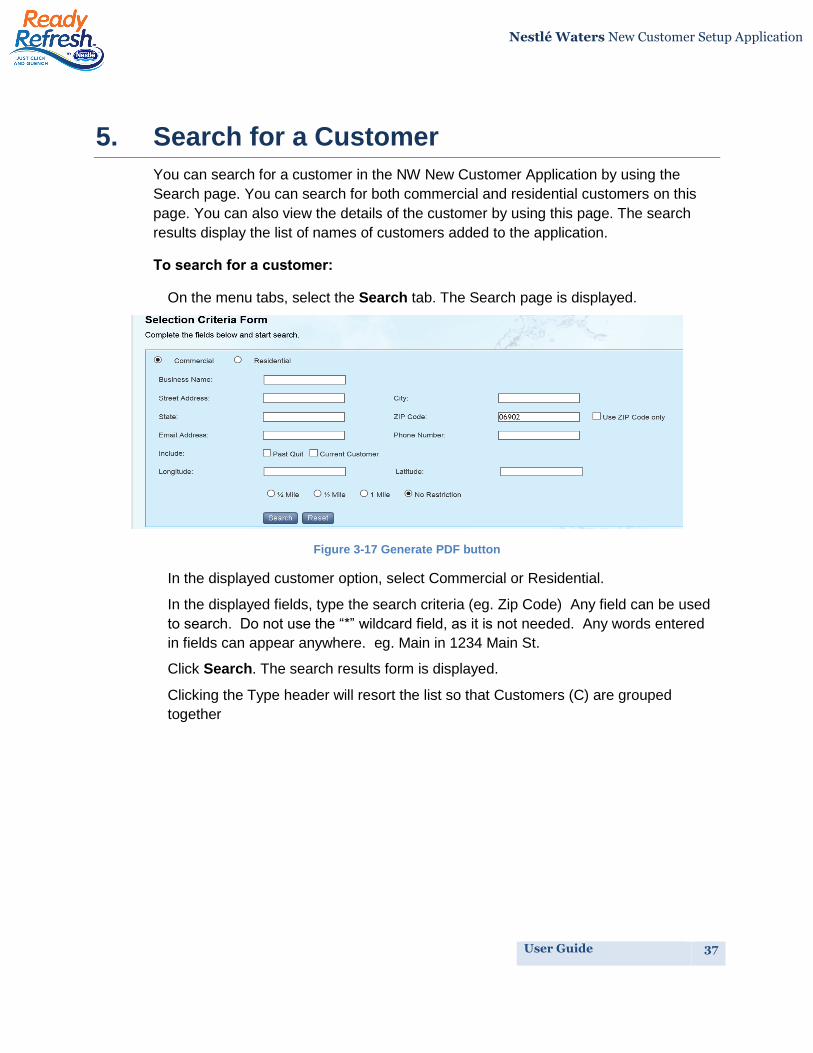
On the menu tabs, select the Search tab. The Search page is displayed.
Figure 3-17 Generate PDF button
In the displayed customer option, select Commercial or Residential.
In the displayed fields, type the search criteria (eg. Zip Code) Any field can be used
to search. Do not use the “*” wildcard field, as it is not needed. Any words entered
in fields can appear anywhere. eg. Main in 1234 Main St.
Click Search. The search results form is displayed.
Clicking the Type header will resort the list so that Customers (C) are grouped
together
User Guide 38
Nestlé Waters New Customer Setup Application
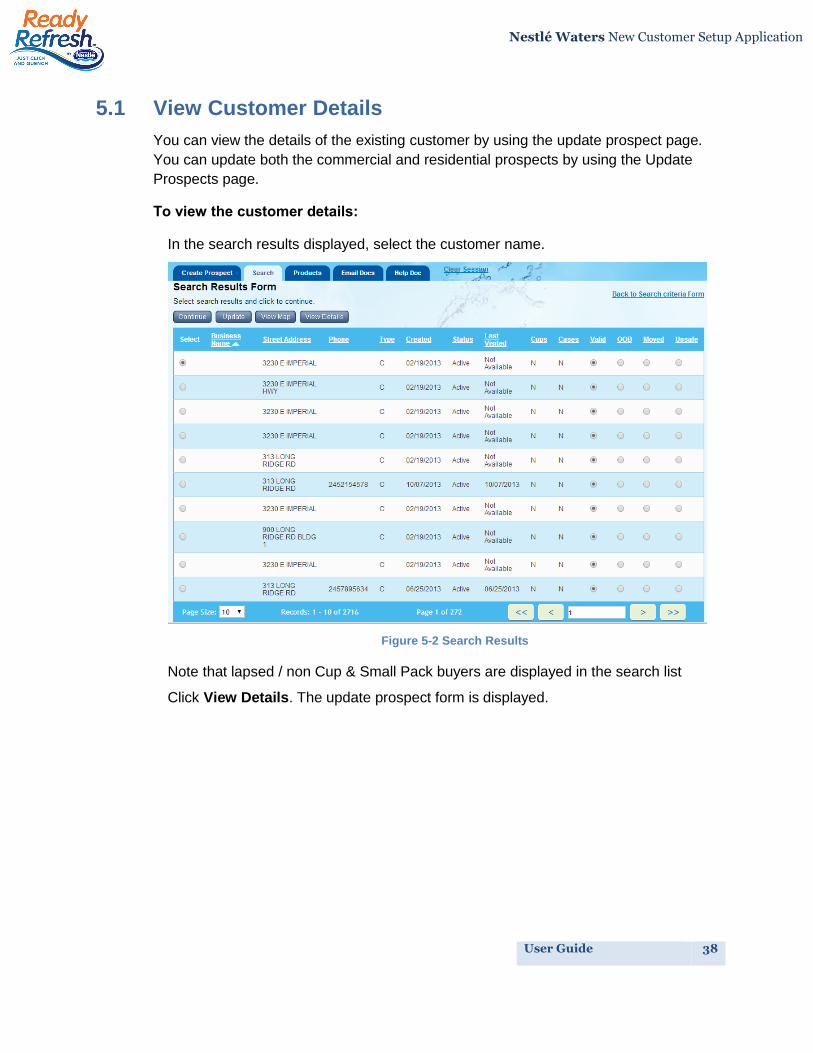
5.1 View Customer Details
You can view the details of the existing customer by using the update prospect page.
You can update both the commercial and residential prospects by using the Update
Prospects page.
To view the customer details:
In the search results displayed, select the customer name.
Figure 5-2 Search Results
Note that lapsed / non Cup & Small Pack buyers are displayed in the search list
Click View Details. The update prospect form is displayed.
User Guide 39
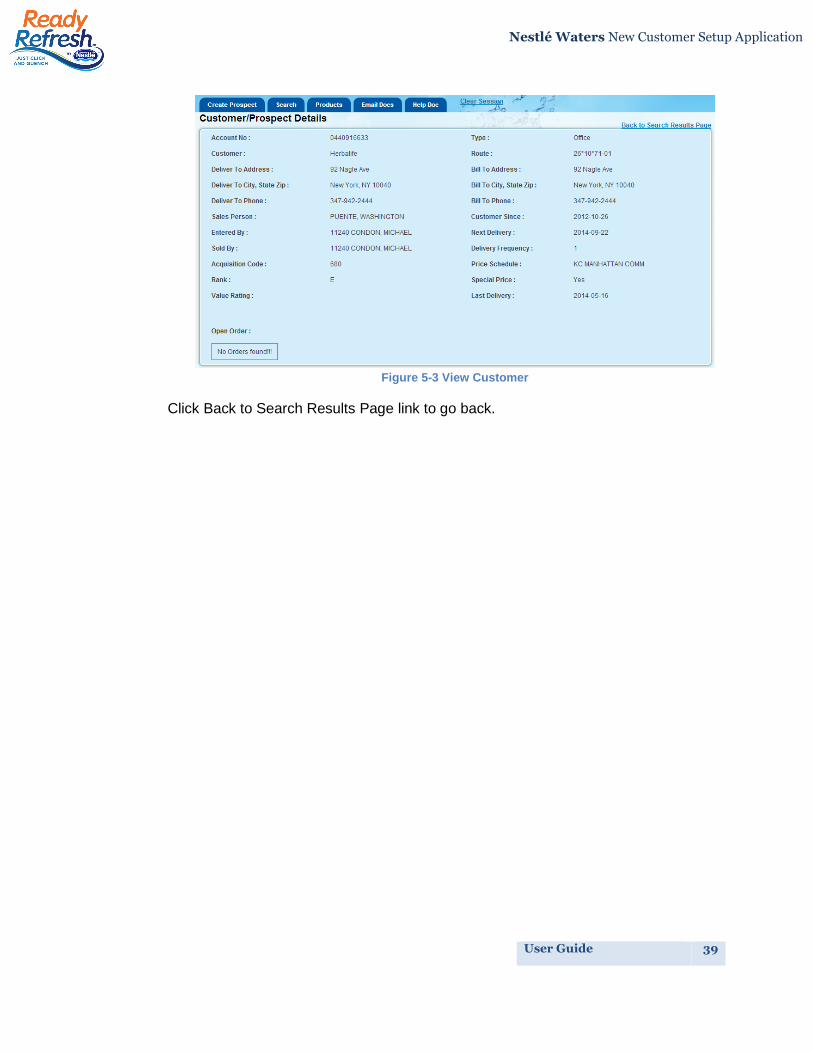
Nestlé Waters New Customer Setup Application
Figure 5-3 View Customer
Click Back to Search Results Page link to go back.
User Guide 40
Nestlé Waters New Customer Setup Application
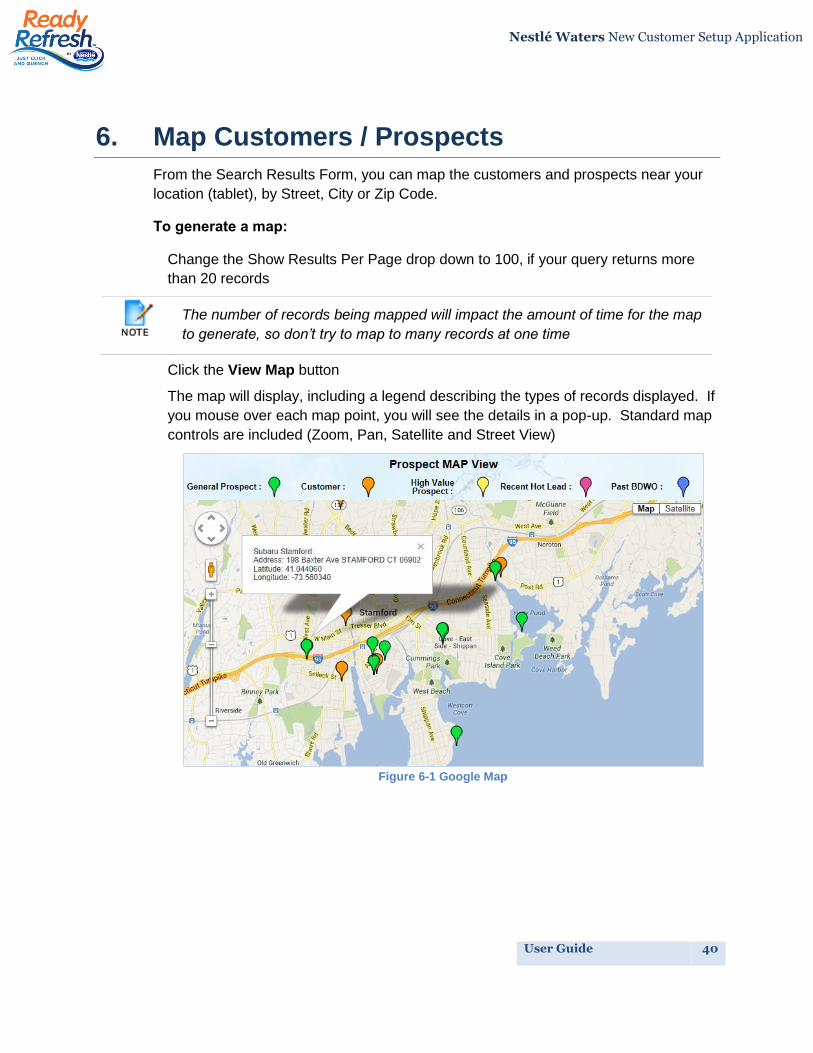
6. Map Customers / Prospects
From the Search Results Form, you can map the customers and prospects near your
location (tablet), by Street, City or Zip Code.
To generate a map:
Change the Show Results Per Page drop down to 100, if your query returns more
than 20 records
Click the View Map button
The map will display, including a legend describing the types of records displayed. If
you mouse over each map point, you will see the details in a pop-up. Standard map
controls are included (Zoom, Pan, Satellite and Street View)
Figure 6-1 Google Map
The number of records being mapped will impact the amount of time for the map
to generate, so don’t try to map to many records at one time
User Guide 41
Nestlé Waters New Customer Setup Application
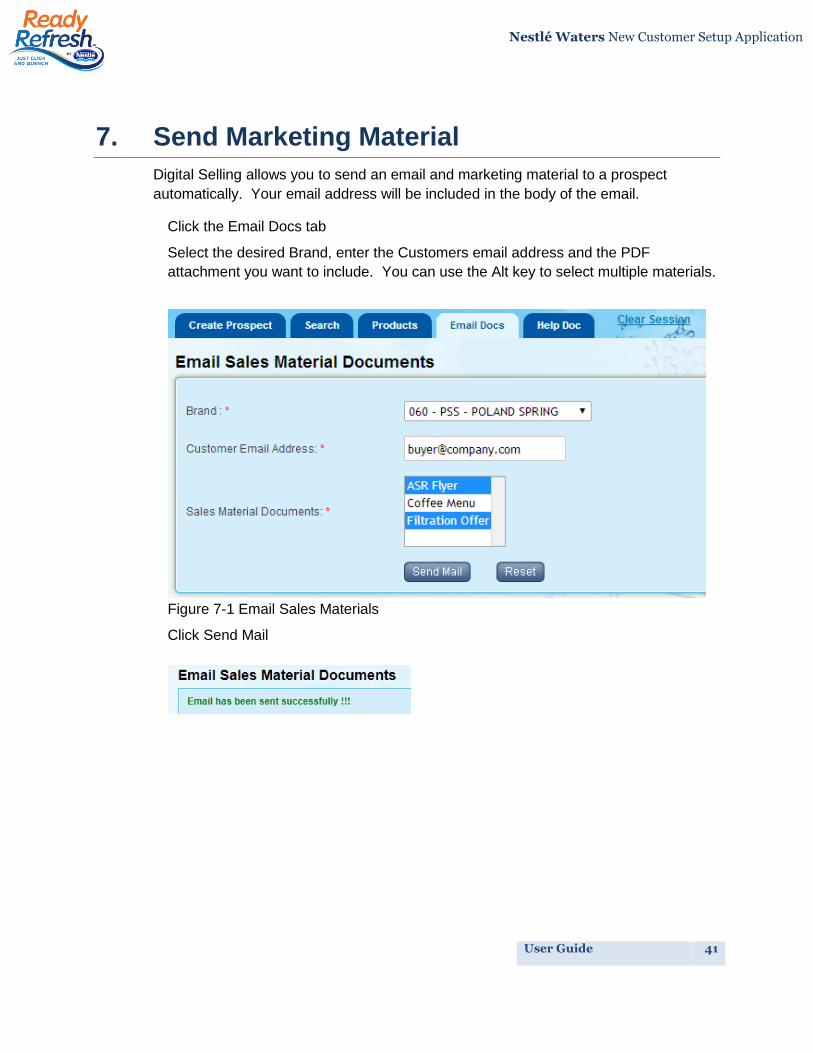
7. Send Marketing Material
Digital Selling allows you to send an email and marketing material to a prospect
automatically. Your email address will be included in the body of the email.
Click the Email Docs tab
Select the desired Brand, enter the Customers email address and the PDF
attachment you want to include. You can use the Alt key to select multiple materials.
Figure 7-1 Email Sales Materials
Click Send Mail
User Guide 42
Nestlé Waters New Customer Setup Application
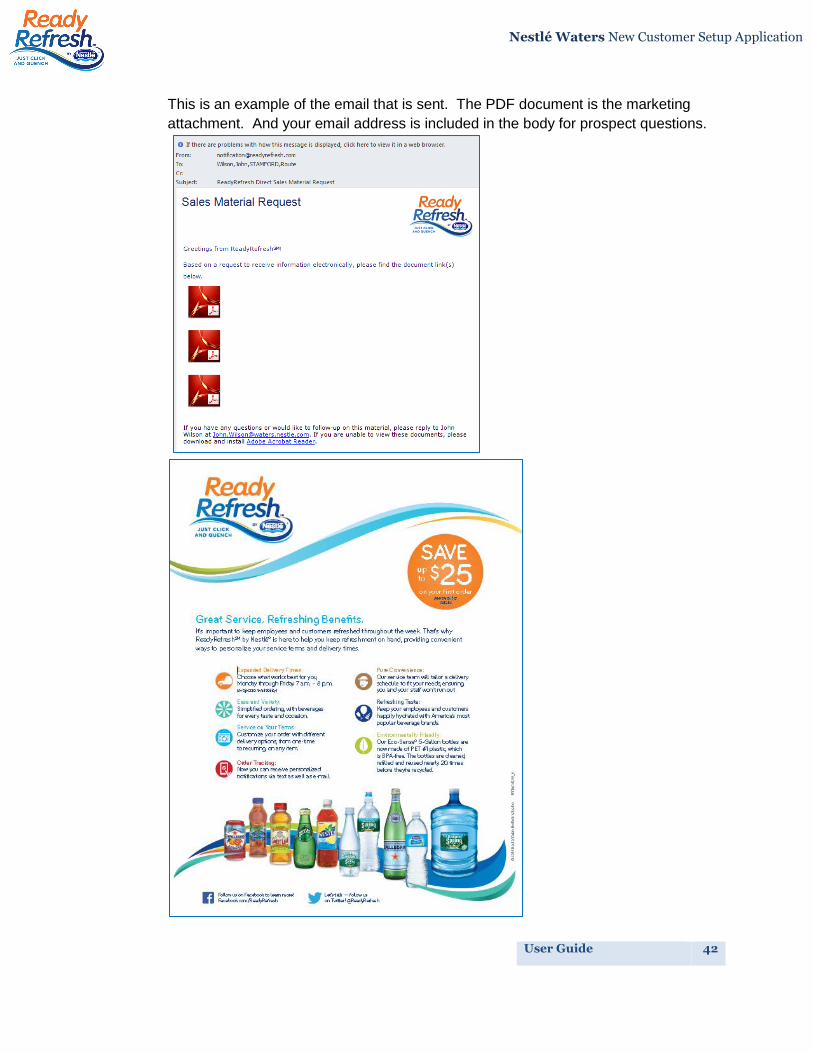
This is an example of the email that is sent. The PDF document is the marketing
attachment. And your email address is included in the body for prospect questions.
User Guide 43
Nestlé Waters New Customer Setup Application
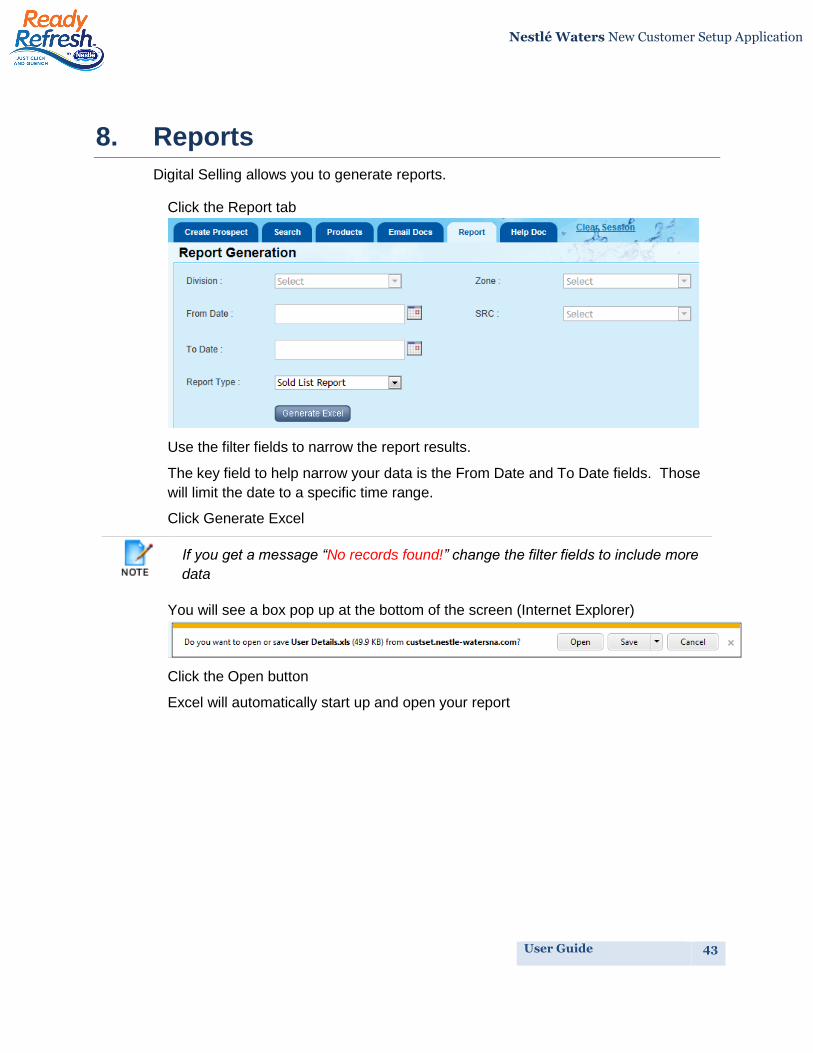
8. Reports
Digital Selling allows you to generate reports.
Click the Report tab
Use the filter fields to narrow the report results.
The key field to help narrow your data is the From Date and To Date fields. Those
will limit the date to a specific time range.
Click Generate Excel
You will see a box pop up at the bottom of the screen (Internet Explorer)
Click the Open button
Excel will automatically start up and open your report
If you get a message “No records found!” change the filter fields to include more
data

User Guide 44
Nestlé Waters New Customer Setup Application
9. Frequently Asked Questions
I am on a tablet and I lost my wireless connection in the middle of setting up a
customer, what do I do?
a) The system will remember where you left off, and when you log back in, it will
return to that screen.
b) If you do want to start over, click the Clear Session link in the header
The send Service Agreement (Generate PDF button) is failing, what do I do?
a) The customer’s email address must be valid and you cannot send the agreement
to yourself
b) If you are still getting an error, contact the system administrator
The customer is getting EchoSign notifications too often. How do I change the
frequency?
a) Log into your EchoSign account https://nwnadirect.echosign.com
b) In the header, click Account > Personal Preferences > Events/Alerts Preferences
c) Change the bottom section Email notifications to a longer time frame (eg. 1
week)
d) Click the Update button to save your changes
The customer doesn’t want to sign the electronic service agreement and I need to
cancel it. How do I do that?
a) The first option is the customer has a link in their reminder email that says “Click
here if you wish to stop receiving reminders about this agreement.” This option
will just stop the notifications, not cancel the agreement.
b) To cancel the agreement, log into your EchoSign account
c) In the header, click Manage
d) In the Search Documents field, enter the document code from the notification
(eg. 0441532652)
e) Highlight the agreement and click Cancel in the upper right corner of the search
box. This will permantly cancel the agreement and stop the notifications.
User Guide 45
Nestlé Waters New Customer Setup Application
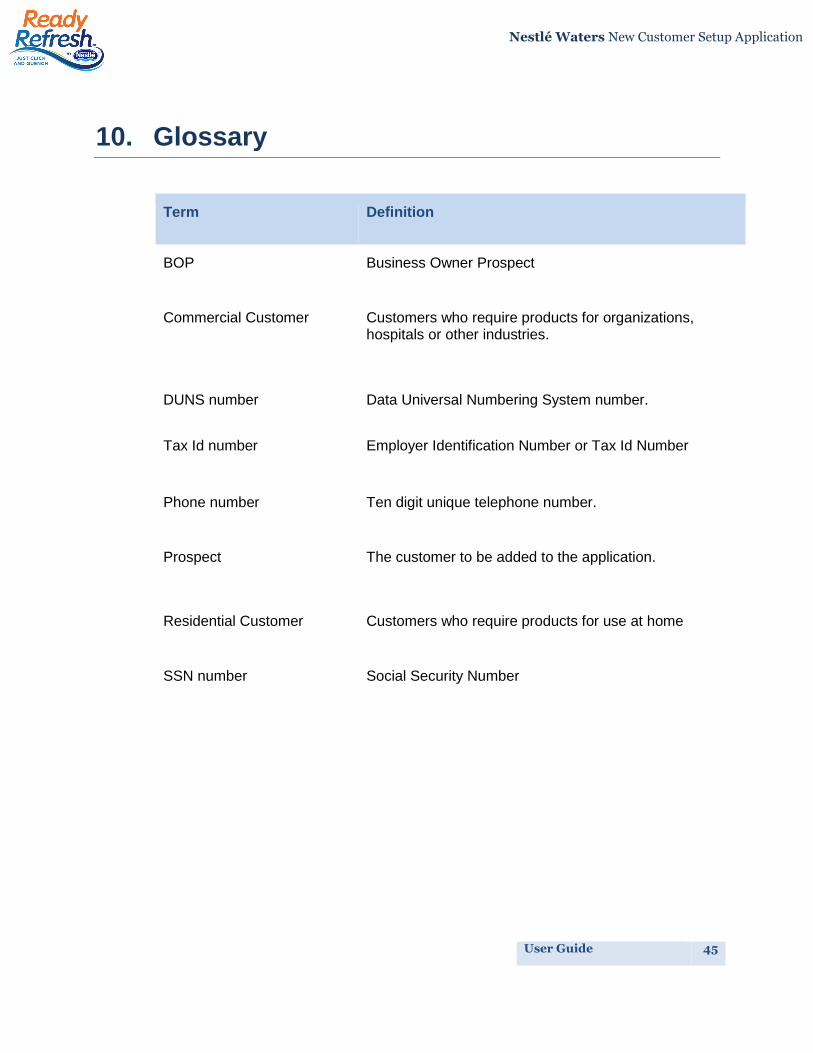
10. Glossary
Term Definition
BOP Business Owner Prospect
Commercial Customer Customers who require products for organizations, hospitals or other industries.
DUNS number Data Universal Numbering System number.
Tax Id number Employer Identification Number or Tax Id Number
Phone number Ten digit unique telephone number.
Prospect The customer to be added to the application.
Residential Customer Customers who require products for use at home
SSN number Social Security Number

User Guide 46
Nestlé Waters New Customer Setup Application
11. Index
A
Add
Add a Prospect, 12
Product, 18
P
Password
Change the Password, 9
Forgot Password, 7
Password Alert, 10
Payment
Credit Card, 25, 27
Monthly Bill, 27
Prospect
Commercial, 12
Create a Prospect, 12
Residential BOP, 14
Residential Non-BOP, 16
Search, 35, 38, 42, 44, 45
Update, 36, 39, 41
View Selected Prospect, 21
V
View
Order Summary, 23
Selected Prospect, 21