Embed Size (px)
Citation preview

NEHRIM http://www.nehrim.de/dataEV.html
My unofficial ―starter‖ walkthrough, for the English version of Nehrim: At Fate’s Edge.
Version 1.0, September 2010.
http://perfectworlds.wordpress.com/
http://morrowind2009.wordpress.com/
PRELIMINARIES: Install and troubleshooting guide.
1. Install a retail copy of the videogame Oblivion, ideally the PC DVD
version. (If you have the Steam version, find the Nehrim readme.txt
online, before you install from the Nehrim .exe file).
2. Ensure Oblivion is patched to the latest patch version 1.2.0416
(Oblivion_v1.2.0416English.exe). Nehrim cannot install/run unless you
have the lasted patched version of Oblivion installed.
3. Download the English version of the full Nehrim installer (currently:
NehrimInstall_1.0.7.5_EN.exe).
4. You may also wish to download:
* Qarl’s Texture Pack 3 – Redimized for speed-optimised hi-res
textures. Although you may already have this if you manually copy over
the Oblivion textures folder (see point 10, below).
* Nehrim Minor texts translation mod at:
http://www.tesnexus.com/downloads/file.php?id=34692
5. The Nehrim installer will auto-detect your original Oblivion install
directory, and offer to make a Nehrim-based duplicate of it, and a
desktop shortcut to play Nehrim. Make sure you have 6Gb of empty
space on your main hard-drive for the new Nehrim directory (ideally
10Gb+, if you later have to manually bring over the original Oblivion
textures folder). By default Nehrim installs to C:\Program
Files\SureAI\Nehrim\Data. I suggest installing to: C:\Nehrim instead,
because otherwise the launcher probably won’t be able to save the data it
needs to launch the game.
Note that the readme.txt suggests that Nehrim should not be installed to
C:\Program Files due to Windows security checks. If you did end up with
it here (it’s easily done, since you only get to read it after you install —
durh), you will need to uninstall, delete any remaining bits of the Sure AI
directory, and start all over again.
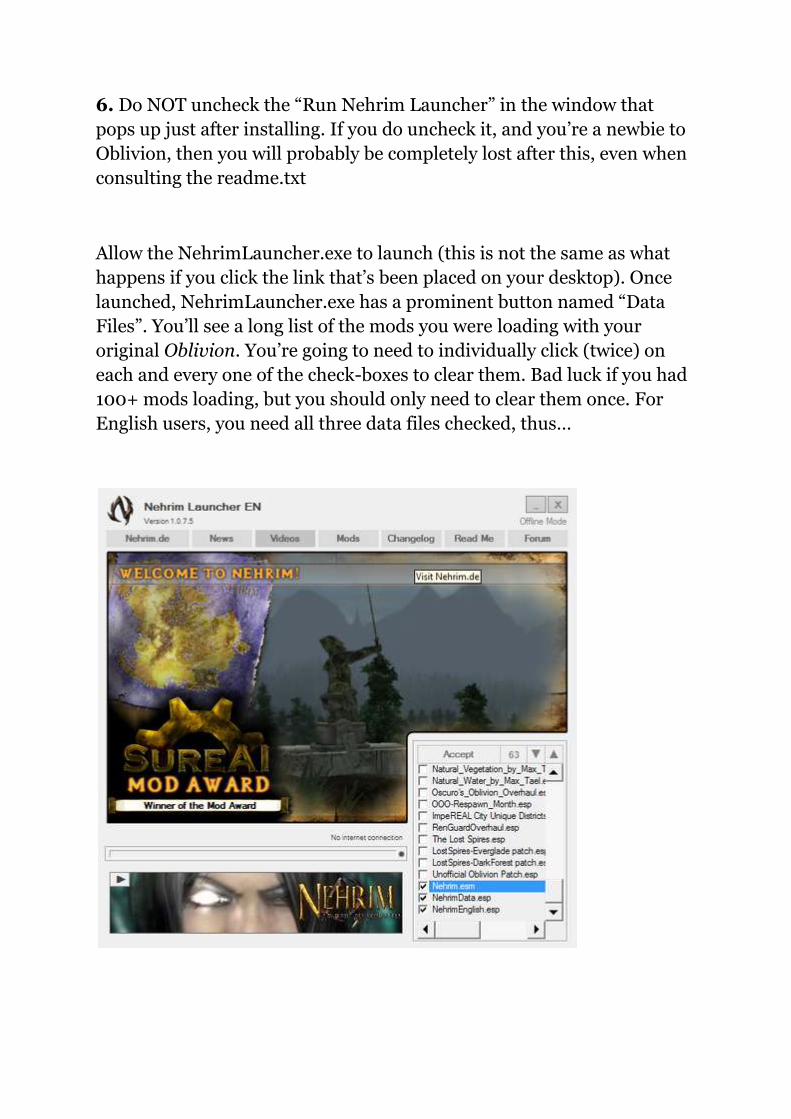
6. Do NOT uncheck the ―Run Nehrim Launcher‖ in the window that
pops up just after installing. If you do uncheck it, and you’re a newbie to
Oblivion, then you will probably be completely lost after this, even when
consulting the readme.txt
Allow the NehrimLauncher.exe to launch (this is not the same as what
happens if you click the link that’s been placed on your desktop). Once
launched, NehrimLauncher.exe has a prominent button named ―Data
Files‖. You’ll see a long list of the mods you were loading with your
original Oblivion. You’re going to need to individually click (twice) on
each and every one of the check-boxes to clear them. Bad luck if you had
100+ mods loading, but you should only need to clear them once. For
English users, you need all three data files checked, thus…

7. Then, click the cunningly bland ACCEPT button (which doesn’t even
look like a button), rather than the enticing X in the top right of the
NehrimLauncher.exe window. Clicking ―Accept‖ should save your data
files preferences. If NehrimLauncher.exe was sitting in C:\Program
Files\ then Windows security probably wouldn’t let it save this vital
information.
8. You can now use the desktop shortcut to Nehrim to launch and play
the game. Start a new game.
9. After the intro video (make sure you’re getting the English subtitles)
you will find yourself at the bottom of a large mine. And after selecting
your character name and other attributes you will meet a lad called
Celebro and pick up a basic weapon from a slain enemy.
10. At this time you may notice missing textures and that the cave is far
too dark (even if you lift the gamma in the video options). If this is so,
it’ll be the fault of the textures. Copy the Textures folder from your
original Oblivion install, and then merge the lot with
C:\Nehrim\Data\Textures. If there are any filename clashes (I had about
120 of them), then do not allow overwrites. In my case doing this took
my final Nehrim install up to a chunky 10Gb.
Now you can finally see what you’re doing in the caves, and you can play!
Note that you’ll need the original Oblivion DVD in the disc-tray to launch
Nehrim.
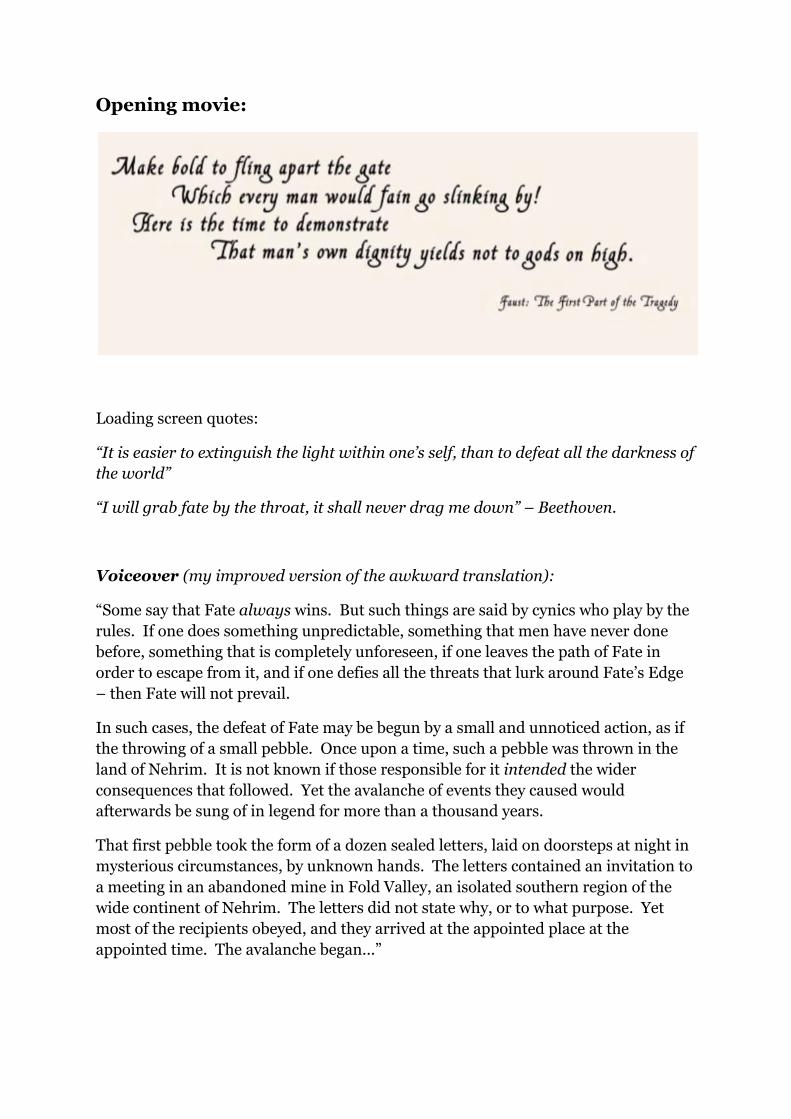
Opening movie:
Loading screen quotes:
“It is easier to extinguish the light within one’s self, than to defeat all the darkness of
the world”
“I will grab fate by the throat, it shall never drag me down” – Beethoven.
Voiceover (my improved version of the awkward translation):
―Some say that Fate always wins. But such things are said by cynics who play by the
rules. If one does something unpredictable, something that men have never done
before, something that is completely unforeseen, if one leaves the path of Fate in
order to escape from it, and if one defies all the threats that lurk around Fate’s Edge
– then Fate will not prevail.
In such cases, the defeat of Fate may be begun by a small and unnoticed action, as if
the throwing of a small pebble. Once upon a time, such a pebble was thrown in the
land of Nehrim. It is not known if those responsible for it intended the wider
consequences that followed. Yet the avalanche of events they caused would
afterwards be sung of in legend for more than a thousand years.
That first pebble took the form of a dozen sealed letters, laid on doorsteps at night in
mysterious circumstances, by unknown hands. The letters contained an invitation to
a meeting in an abandoned mine in Fold Valley, an isolated southern region of the
wide continent of Nehrim. The letters did not state why, or to what purpose. Yet
most of the recipients obeyed, and they arrived at the appointed place at the
appointed time. The avalanche began...‖
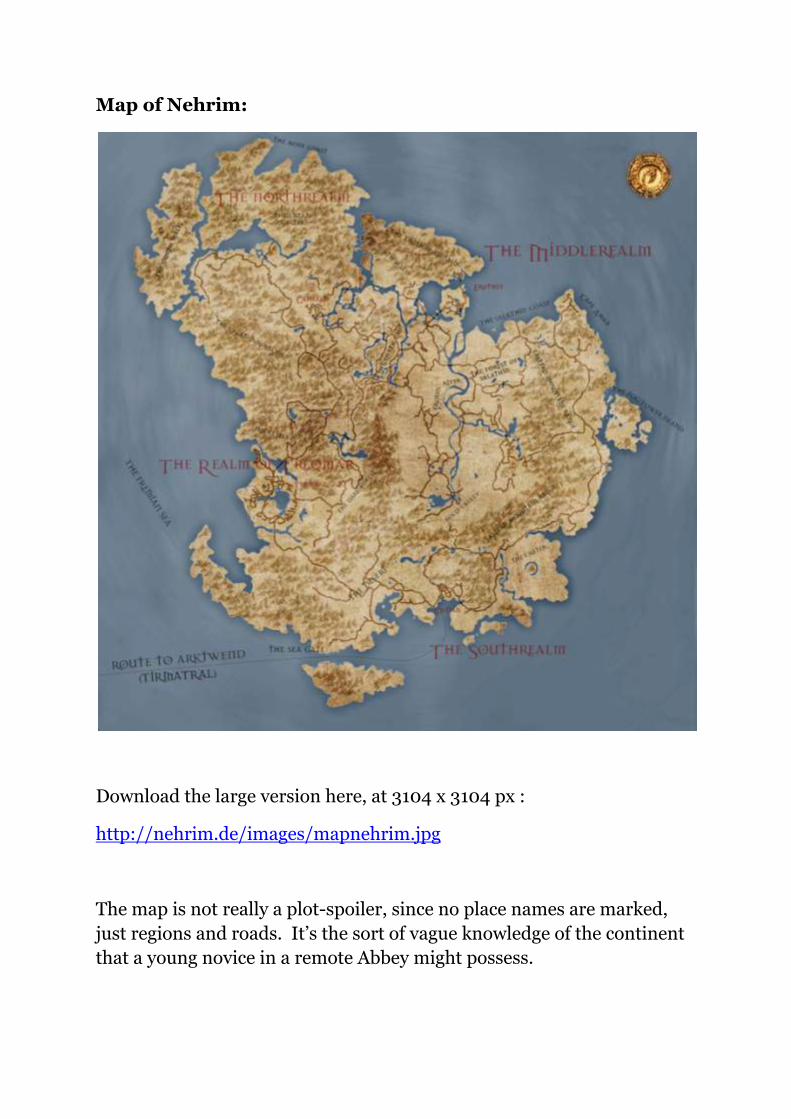
Map of Nehrim:
Download the large version here, at 3104 x 3104 px :
http://nehrim.de/images/mapnehrim.jpg
The map is not really a plot-spoiler, since no place names are marked,
just regions and roads. It’s the sort of vague knowledge of the continent
that a young novice in a remote Abbey might possess.
Prologue: Shadows and Light
ou are a young novice monk of a remote Abbey, and you have
received one of the mysterious letters spoken of in the opening
voiceover. After a short journey you arrive, as arranged, at the
abandoned Shadow Song Mine. Walking across rotten planking inside
the mine, you suddenly fall down an abandoned mine shaft and find
yourself at the very bottom of the mine.
At this point you choose your name, racial characteristics, hairstyle, etc.
You see a lad called Celebro fighting an ape-monster. He kills it, and
comes over to talk to you. It seems that he, also, had been called to this
mysterious gathering. He suggests that together you and he can find a
way back to the surface.
To your right is your first weapon. There is also a handy sharpened
pickaxe nearby, and other useful items. Light your torch [ or increase
Gamma in video settings ] , go up the ramp, admire the view, and then
switch back right, and walk down a narrow level shaft.
Celebro will follow. You will soon encounter some of the mine apes.
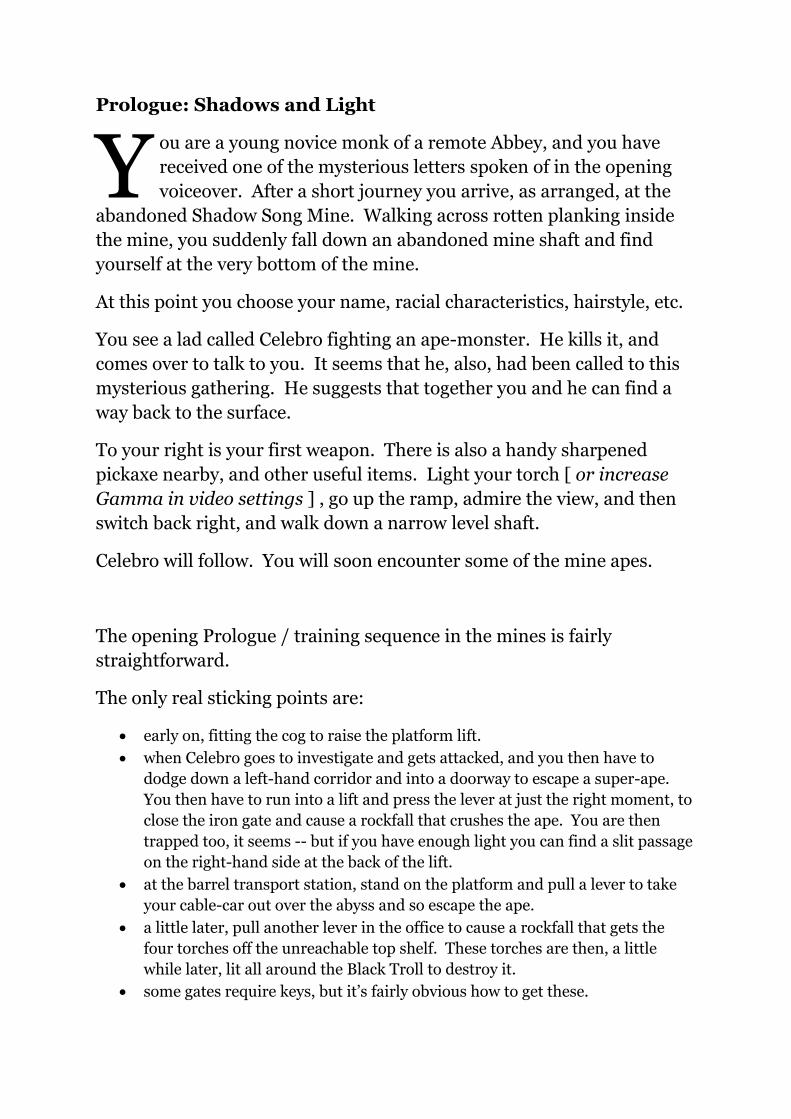
The opening Prologue / training sequence in the mines is fairly
straightforward.
The only real sticking points are:
early on, fitting the cog to raise the platform lift.
when Celebro goes to investigate and gets attacked, and you then have to
dodge down a left-hand corridor and into a doorway to escape a super-ape.
You then have to run into a lift and press the lever at just the right moment, to
close the iron gate and cause a rockfall that crushes the ape. You are then
trapped too, it seems -- but if you have enough light you can find a slit passage
on the right-hand side at the back of the lift.
at the barrel transport station, stand on the platform and pull a lever to take
your cable-car out over the abyss and so escape the ape.
a little later, pull another lever in the office to cause a rockfall that gets the
four torches off the unreachable top shelf. These torches are then, a little
while later, lit all around the Black Troll to destroy it.
some gates require keys, but it’s fairly obvious how to get these.
Y
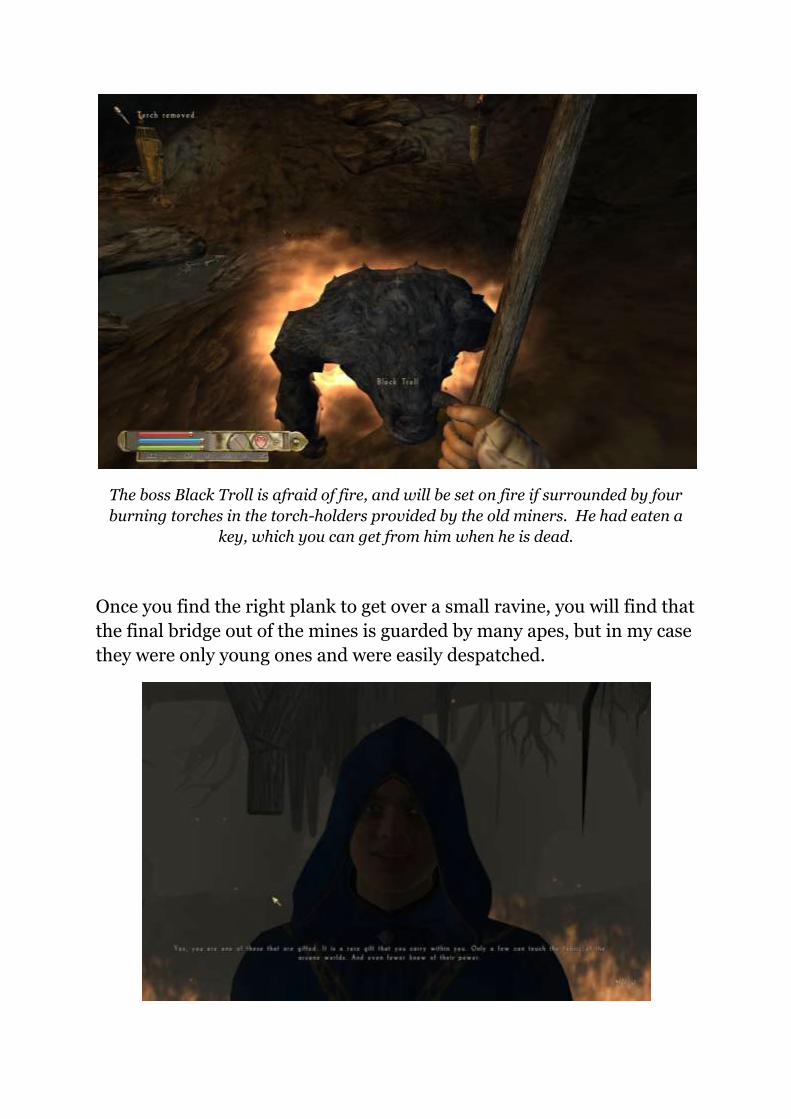
The boss Black Troll is afraid of fire, and will be set on fire if surrounded by four
burning torches in the torch-holders provided by the old miners. He had eaten a
key, which you can get from him when he is dead.
Once you find the right plank to get over a small ravine, you will find that
the final bridge out of the mines is guarded by many apes, but in my case
they were only young ones and were easily despatched.
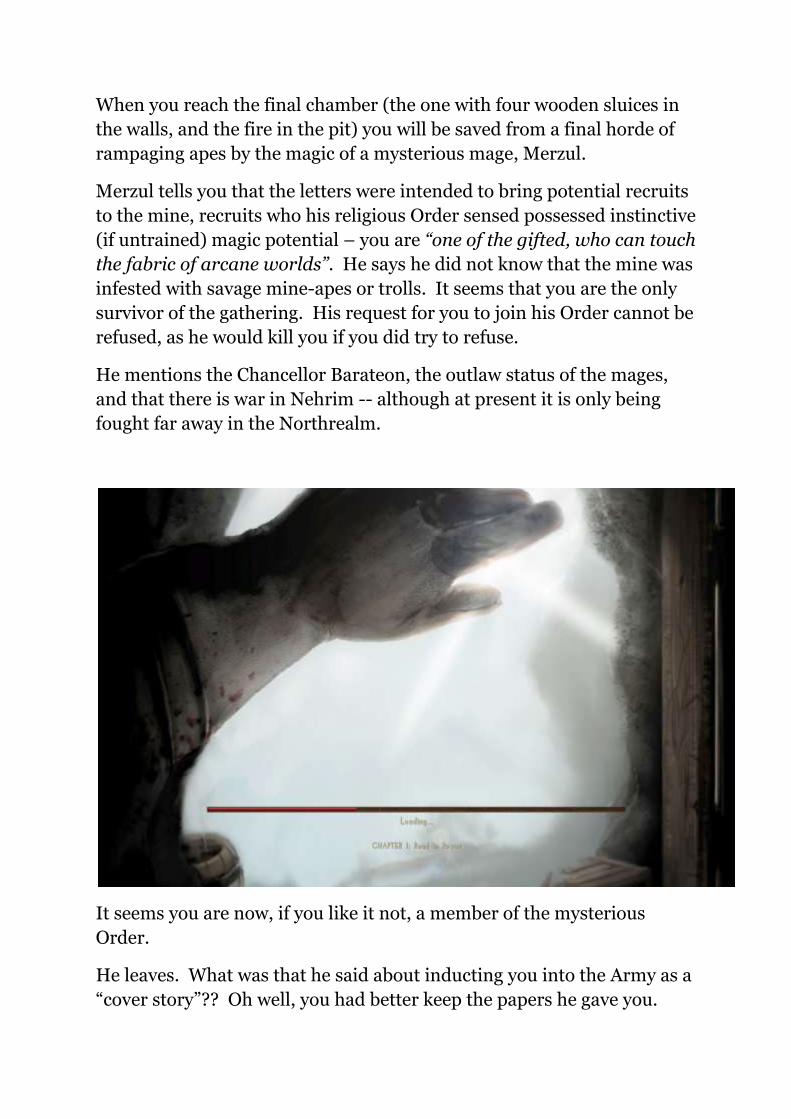
When you reach the final chamber (the one with four wooden sluices in
the walls, and the fire in the pit) you will be saved from a final horde of
rampaging apes by the magic of a mysterious mage, Merzul.
Merzul tells you that the letters were intended to bring potential recruits
to the mine, recruits who his religious Order sensed possessed instinctive
(if untrained) magic potential – you are “one of the gifted, who can touch
the fabric of arcane worlds”. He says he did not know that the mine was
infested with savage mine-apes or trolls. It seems that you are the only
survivor of the gathering. His request for you to join his Order cannot be
refused, as he would kill you if you did try to refuse.
He mentions the Chancellor Barateon, the outlaw status of the mages,
and that there is war in Nehrim -- although at present it is only being
fought far away in the Northrealm.
It seems you are now, if you like it not, a member of the mysterious
Order.
He leaves. What was that he said about inducting you into the Army as a
―cover story‖?? Oh well, you had better keep the papers he gave you.
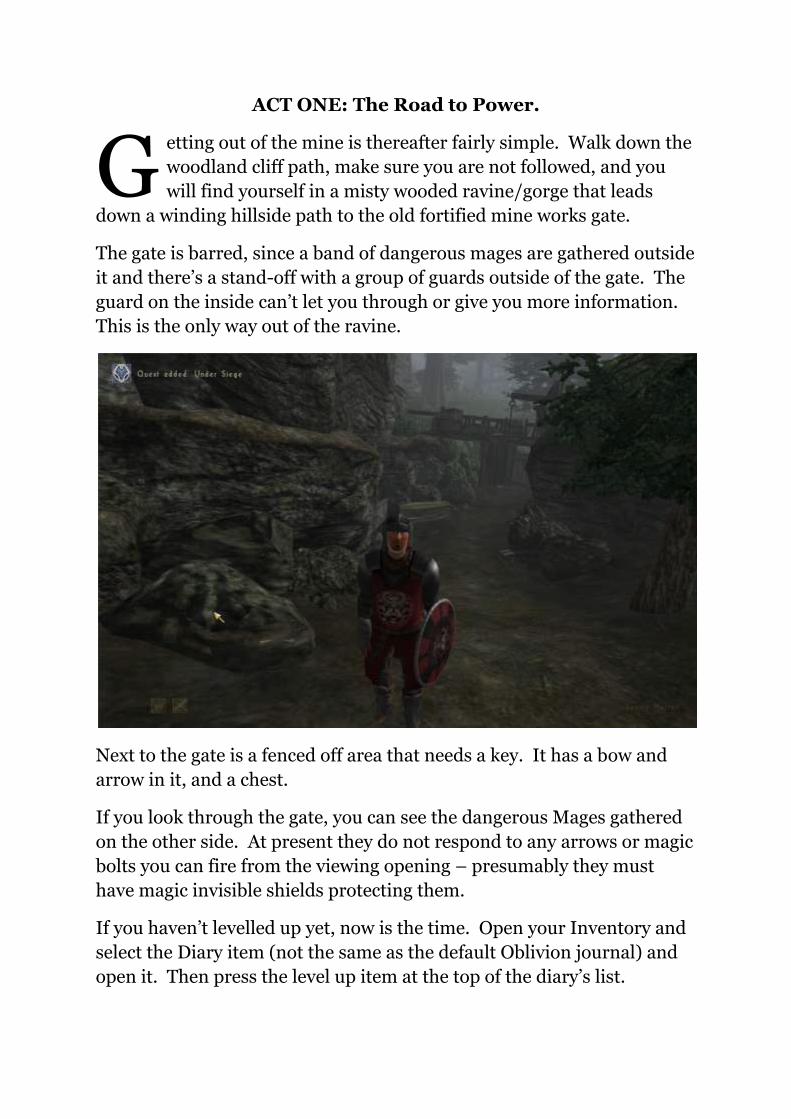
ACT ONE: The Road to Power.
etting out of the mine is thereafter fairly simple. Walk down the
woodland cliff path, make sure you are not followed, and you
will find yourself in a misty wooded ravine/gorge that leads
down a winding hillside path to the old fortified mine works gate.
The gate is barred, since a band of dangerous mages are gathered outside
it and there’s a stand-off with a group of guards outside of the gate. The
guard on the inside can’t let you through or give you more information.
This is the only way out of the ravine.
Next to the gate is a fenced off area that needs a key. It has a bow and
arrow in it, and a chest.
If you look through the gate, you can see the dangerous Mages gathered
on the other side. At present they do not respond to any arrows or magic
bolts you can fire from the viewing opening – presumably they must
have magic invisible shields protecting them.
If you haven’t levelled up yet, now is the time. Open your Inventory and
select the Diary item (not the same as the default Oblivion journal) and
open it. Then press the level up item at the top of the diary’s list.
G
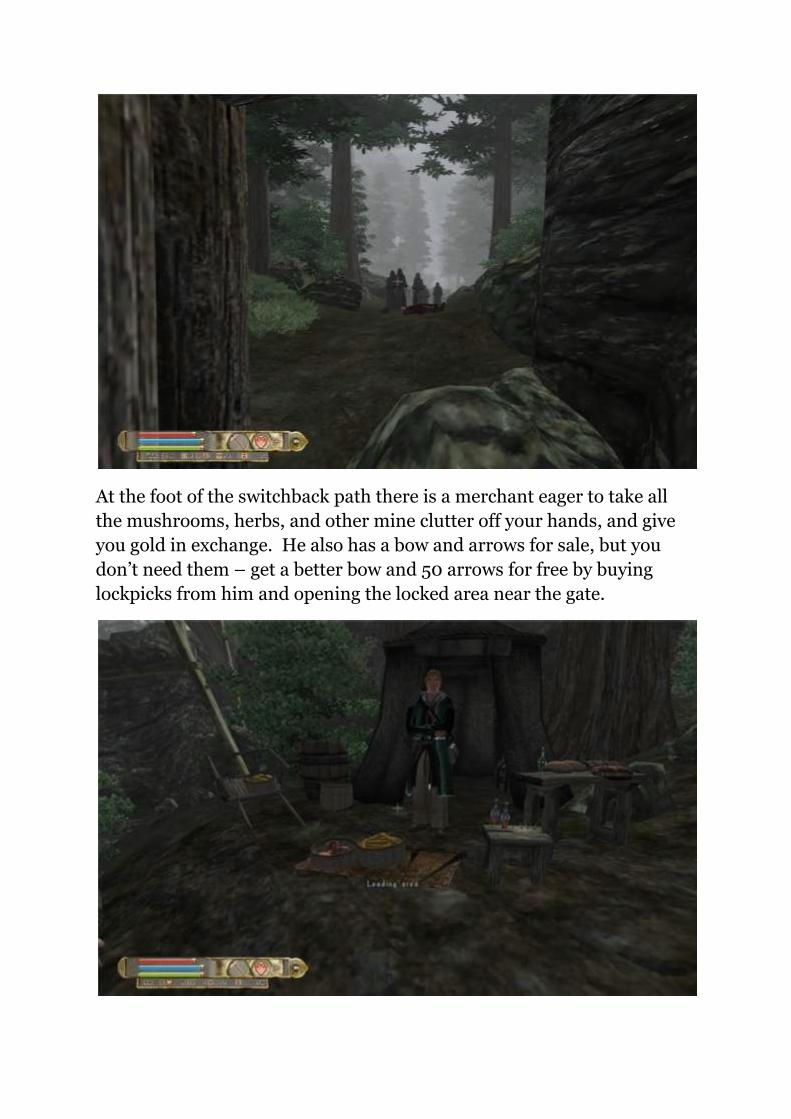
At the foot of the switchback path there is a merchant eager to take all
the mushrooms, herbs, and other mine clutter off your hands, and give
you gold in exchange. He also has a bow and arrows for sale, but you
don’t need them – get a better bow and 50 arrows for free by buying
lockpicks from him and opening the locked area near the gate.

The Merchant will also buy all the herbs and mushrooms you can pick in
and around the gorge.
You will also be intercepted by a likeable young lad called Porim, who
invites you to do a little work for his uncle Merre. After all, if you’re
stuck here you might was well earn some money? This is not an optional
side-quest. His uncle Merre is a miner working up in the top mine
works, which is the only remaining active part of the mine. As you go up
the hill, notice and take a repair hammer on one of the wooden
structures.
Swarms of rats have taken over the back storage area of the caves, and
Merre asks you to kill them. But to do this you need to stop up their
holes with the correct type of bricks. First look at each hole and note
what type of brick it needs. Then find the correct brick and ―hold Z‖ to
drag the brick over to the hole. Dangle the brick long enough and it will
automatically fit into the hole. Stuff the correct type of brick in each
hole, and the rats will stop spawning. It’s no good just stuffing bricks in
any old hole – some will be accepted and then you won’t be able to get
them back out, and you’ll have one odd brink left -- so you’ll then need to
go back to an old savegame and start over.
Once you’ve finished with the rats, go back to Porim and Merre and
claim your small but useful reward.
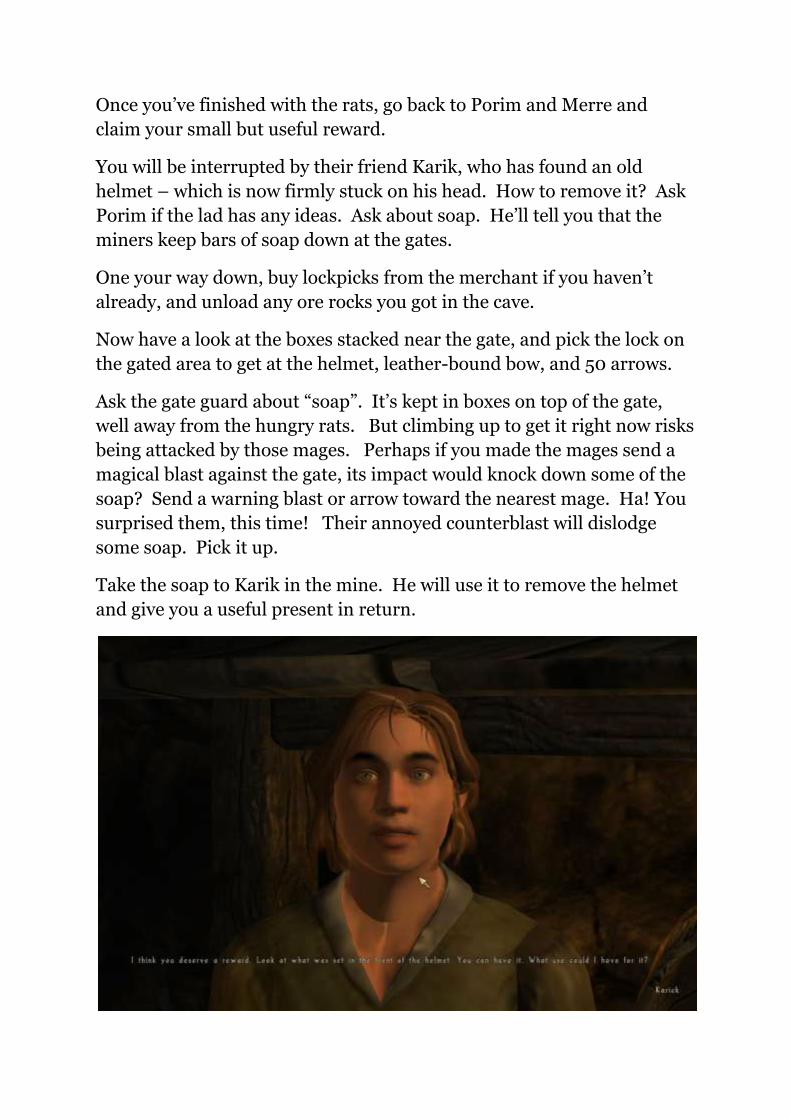
You will be interrupted by their friend Karik, who has found an old
helmet – which is now firmly stuck on his head. How to remove it? Ask
Porim if the lad has any ideas. Ask about soap. He’ll tell you that the
miners keep bars of soap down at the gates.
One your way down, buy lockpicks from the merchant if you haven’t
already, and unload any ore rocks you got in the cave.
Now have a look at the boxes stacked near the gate, and pick the lock on
the gated area to get at the helmet, leather-bound bow, and 50 arrows.
Ask the gate guard about ―soap‖. It’s kept in boxes on top of the gate,
well away from the hungry rats. But climbing up to get it right now risks
being attacked by those mages. Perhaps if you made the mages send a
magical blast against the gate, its impact would knock down some of the
soap? Send a warning blast or arrow toward the nearest mage. Ha! You
surprised them, this time! Their annoyed counterblast will dislodge
some soap. Pick it up.
Take the soap to Karik in the mine. He will use it to remove the helmet
and give you a useful present in return.
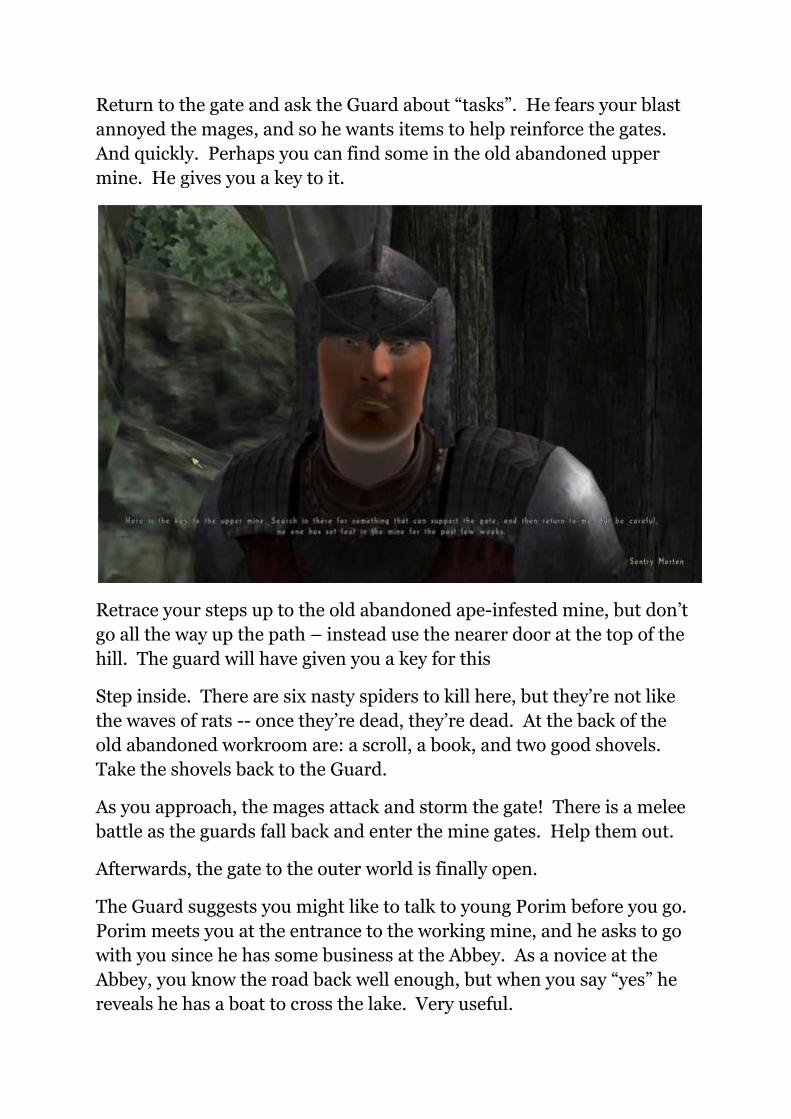
Return to the gate and ask the Guard about ―tasks‖. He fears your blast
annoyed the mages, and so he wants items to help reinforce the gates.
And quickly. Perhaps you can find some in the old abandoned upper
mine. He gives you a key to it.
Retrace your steps up to the old abandoned ape-infested mine, but don’t
go all the way up the path – instead use the nearer door at the top of the
hill. The guard will have given you a key for this
Step inside. There are six nasty spiders to kill here, but they’re not like
the waves of rats -- once they’re dead, they’re dead. At the back of the
old abandoned workroom are: a scroll, a book, and two good shovels.
Take the shovels back to the Guard.
As you approach, the mages attack and storm the gate! There is a melee
battle as the guards fall back and enter the mine gates. Help them out.
Afterwards, the gate to the outer world is finally open.
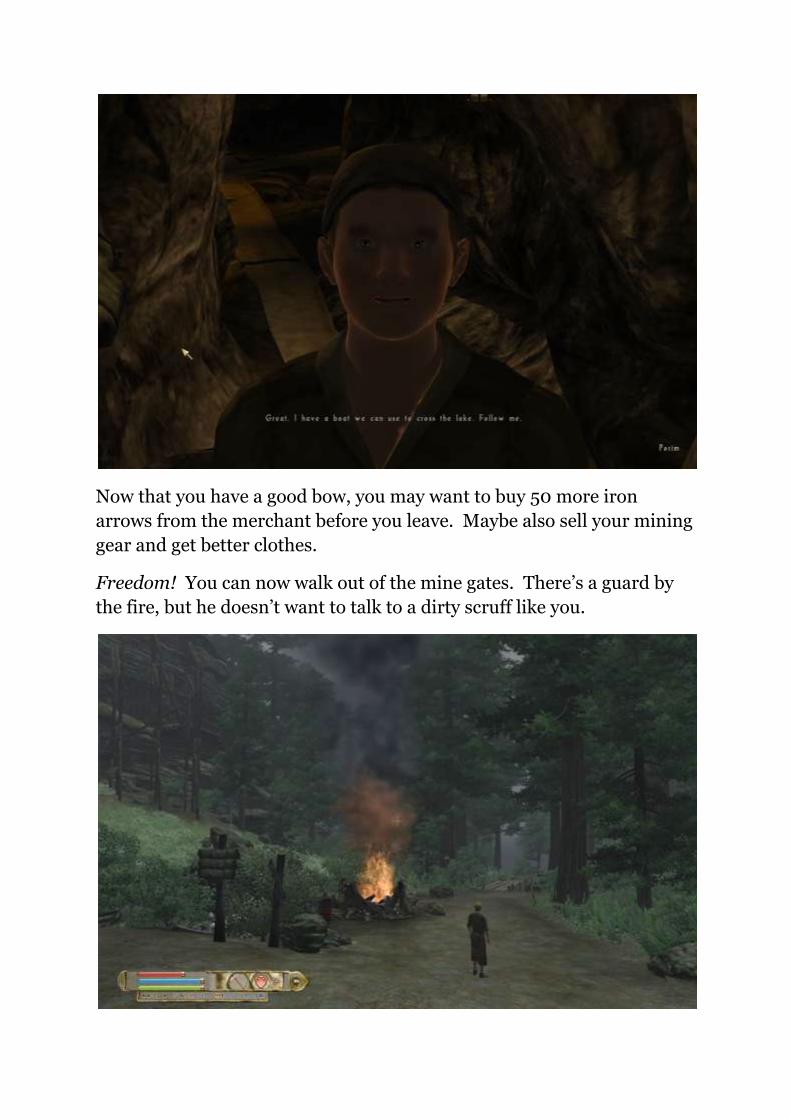
The Guard suggests you might like to talk to young Porim before you go.
Porim meets you at the entrance to the working mine, and he asks to go
with you since he has some business at the Abbey. As a novice at the
Abbey, you know the road back well enough, but when you say ―yes‖ he
reveals he has a boat to cross the lake. Very useful.
Now that you have a good bow, you may want to buy 50 more iron
arrows from the merchant before you leave. Maybe also sell your mining
gear and get better clothes.
Freedom! You can now walk out of the mine gates. There’s a guard by
the fire, but he doesn’t want to talk to a dirty scruff like you.
Your instructions in the letter from the mysterious Mage are to go to the
village of Giliad / Gilead, take the eastern road out of Giliad, then find
the Sanctum from there, where you are to talk to Vanmiria. Should you
follow the signpost and leave Porim, or follow him and return to the
comfort of your dear old Abbey home? It’s not much of a choice. After
all, it seems Mages are outlaws in the land, and you’re a law abiding
young monk.
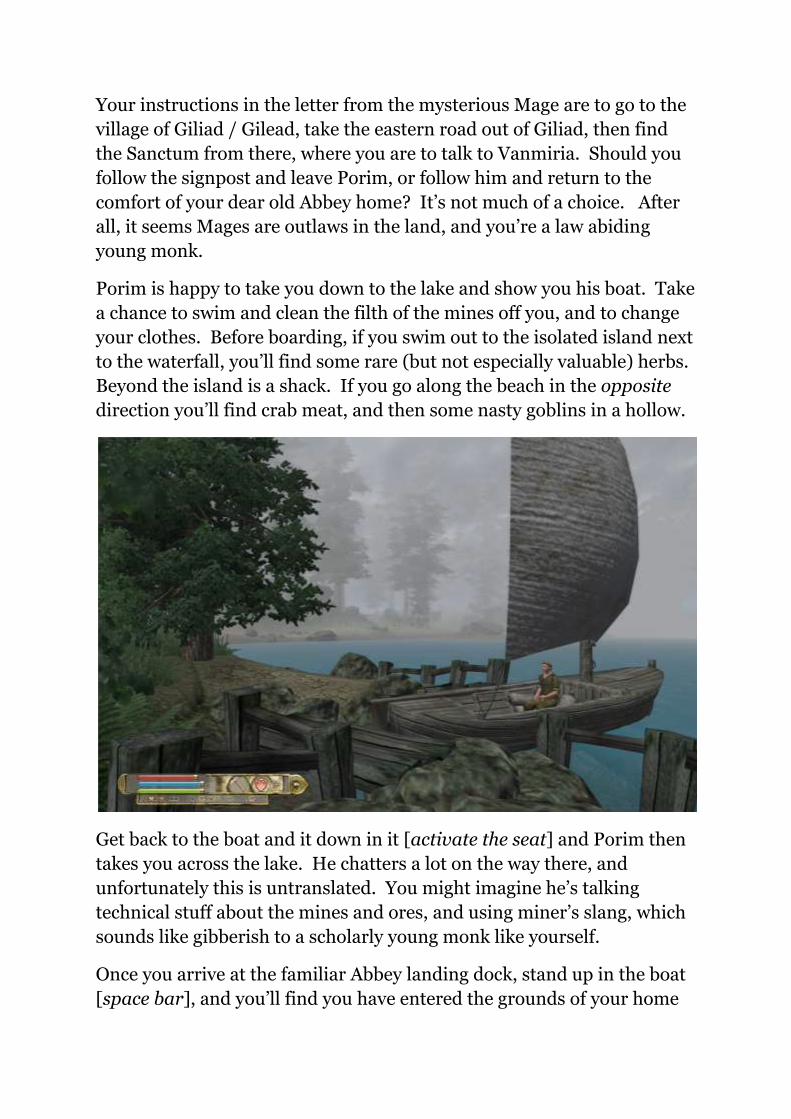
Porim is happy to take you down to the lake and show you his boat. Take
a chance to swim and clean the filth of the mines off you, and to change
your clothes. Before boarding, if you swim out to the isolated island next
to the waterfall, you’ll find some rare (but not especially valuable) herbs.
Beyond the island is a shack. If you go along the beach in the opposite
direction you’ll find crab meat, and then some nasty goblins in a hollow.
Get back to the boat and it down in it [activate the seat] and Porim then
takes you across the lake. He chatters a lot on the way there, and
unfortunately this is untranslated. You might imagine he’s talking
technical stuff about the mines and ores, and using miner’s slang, which
sounds like gibberish to a scholarly young monk like yourself.
Once you arrive at the familiar Abbey landing dock, stand up in the boat
[space bar], and you’ll find you have entered the grounds of your home
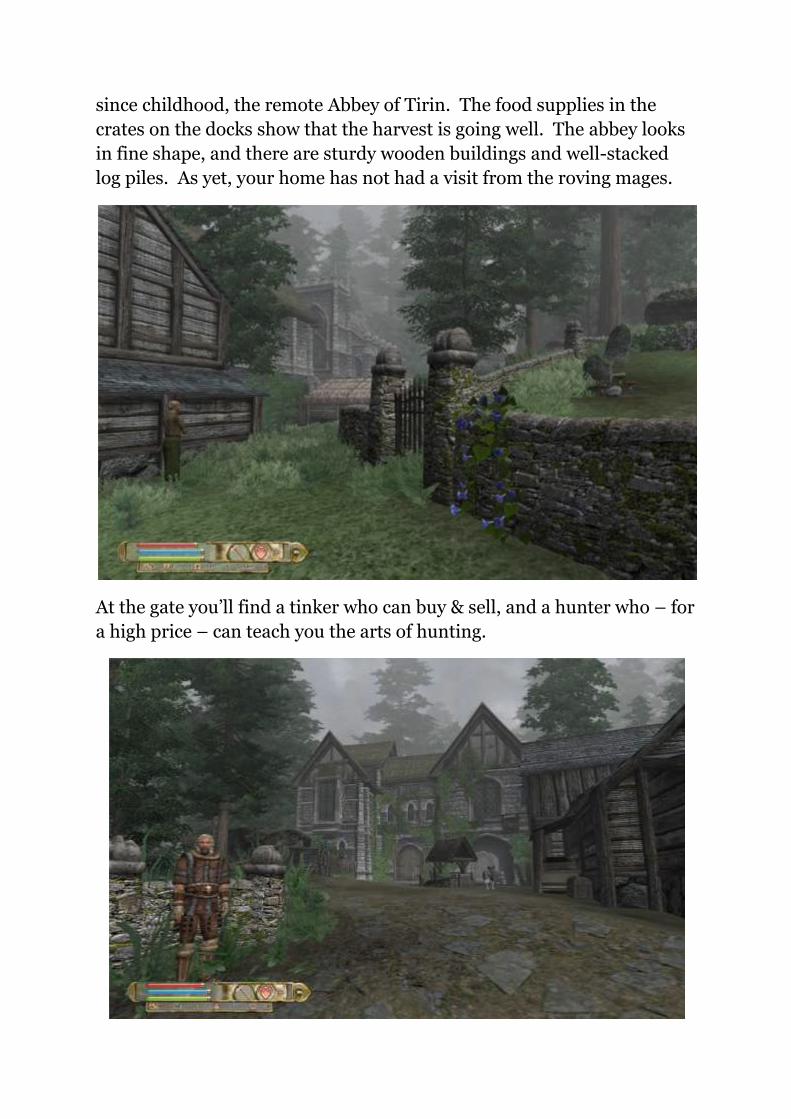
since childhood, the remote Abbey of Tirin. The food supplies in the
crates on the docks show that the harvest is going well. The abbey looks
in fine shape, and there are sturdy wooden buildings and well-stacked
log piles. As yet, your home has not had a visit from the roving mages.
At the gate you’ll find a tinker who can buy & sell, and a hunter who – for
a high price – can teach you the arts of hunting.
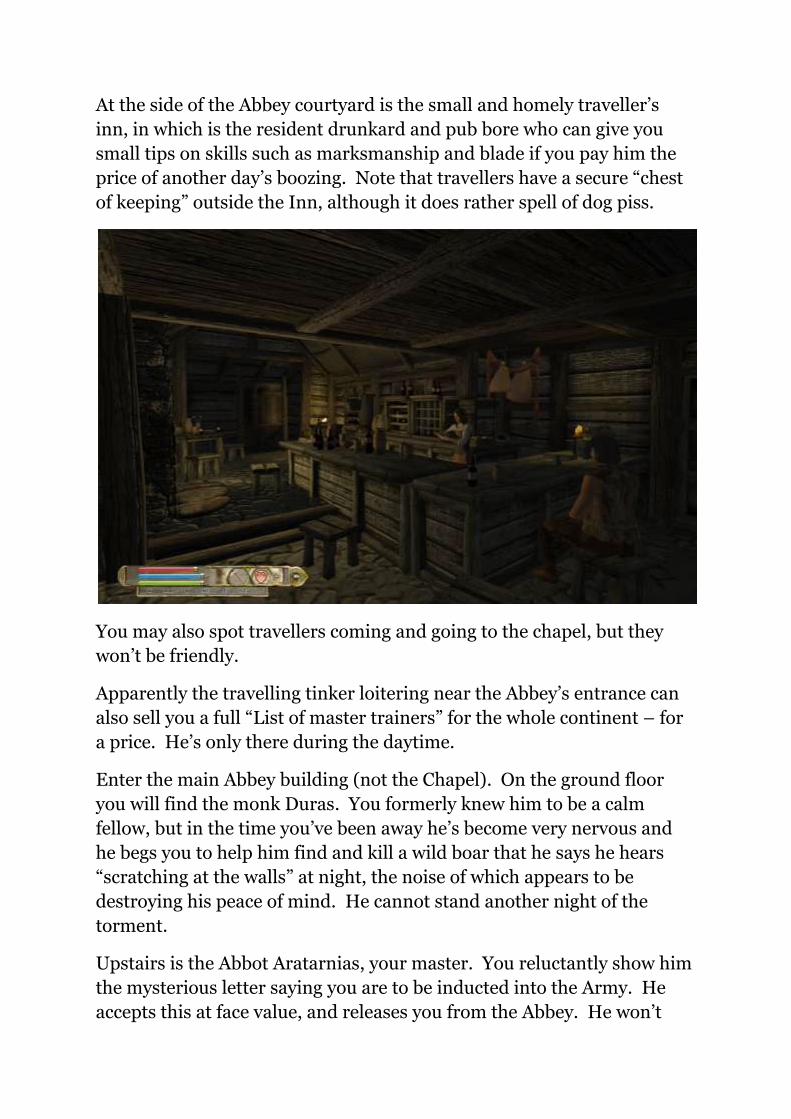
At the side of the Abbey courtyard is the small and homely traveller’s
inn, in which is the resident drunkard and pub bore who can give you
small tips on skills such as marksmanship and blade if you pay him the
price of another day’s boozing. Note that travellers have a secure ―chest
of keeping‖ outside the Inn, although it does rather spell of dog piss.
You may also spot travellers coming and going to the chapel, but they
won’t be friendly.
Apparently the travelling tinker loitering near the Abbey’s entrance can
also sell you a full ―List of master trainers‖ for the whole continent – for
a price. He’s only there during the daytime.
Enter the main Abbey building (not the Chapel). On the ground floor
you will find the monk Duras. You formerly knew him to be a calm
fellow, but in the time you’ve been away he’s become very nervous and
he begs you to help him find and kill a wild boar that he says he hears
―scratching at the walls‖ at night, the noise of which appears to be
destroying his peace of mind. He cannot stand another night of the
torment.
Upstairs is the Abbot Aratarnias, your master. You reluctantly show him
the mysterious letter saying you are to be inducted into the Army. He
accepts this at face value, and releases you from the Abbey. He won’t
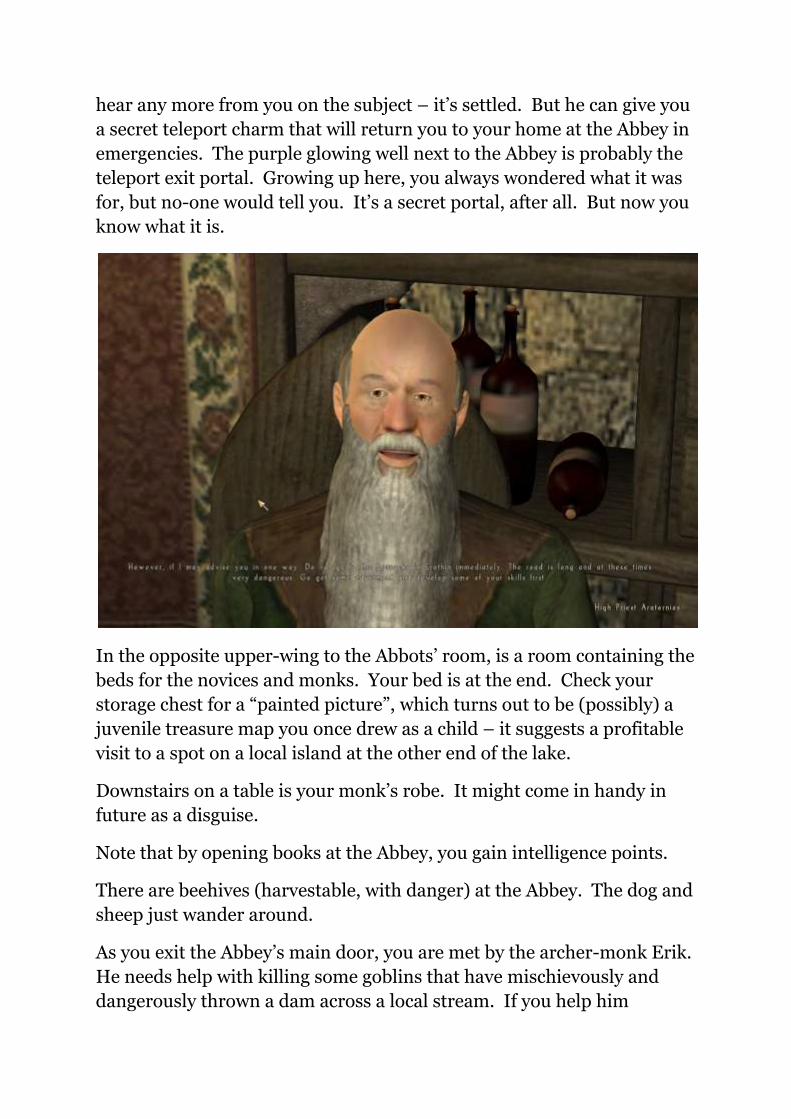
hear any more from you on the subject – it’s settled. But he can give you
a secret teleport charm that will return you to your home at the Abbey in
emergencies. The purple glowing well next to the Abbey is probably the
teleport exit portal. Growing up here, you always wondered what it was
for, but no-one would tell you. It’s a secret portal, after all. But now you
know what it is.
In the opposite upper-wing to the Abbots’ room, is a room containing the
beds for the novices and monks. Your bed is at the end. Check your
storage chest for a ―painted picture‖, which turns out to be (possibly) a
juvenile treasure map you once drew as a child – it suggests a profitable
visit to a spot on a local island at the other end of the lake.
Downstairs on a table is your monk’s robe. It might come in handy in
future as a disguise.
Note that by opening books at the Abbey, you gain intelligence points.
There are beehives (harvestable, with danger) at the Abbey. The dog and
sheep just wander around.
As you exit the Abbey’s main door, you are met by the archer-monk Erik.
He needs help with killing some goblins that have mischievously and
dangerously thrown a dam across a local stream. If you help him

undertake his plan to trap them in their cave, then he will teach you
archery skills and show you some tactics.
Erik suggests that the monk Duras is deranged, and that you should only
help Duras hunt his ―imaginary‖ wild boar if you want to learn heavy
armoured combat. If you want to learn archery, go with Erik. You have
to choose at this point, one or the other. If you don’t have a bow, there is
an old one on Erik’s bed, upstairs at the Abbey. And arrows in one of the
storage chests.
So off you go with Erik to investigate the dam in the stream. The
entrance to Clatter Cave is right next to the dam, and is easily overlooked
if you go haring off over the other side of the stream.
Clatter Cave is fairly straightforward. Work your way around until
you’re looking at the back of the locked door. Stick an arrow in the
goblin that you can just see in the entrance of the corridor on your far-
right, he will freak out and try to get to you – and will conveniently end
up standing in front of the door you want to open. Use the goblin as
target practice, and by the time he falls you should have your distance-
aim and arrow-fall spot-on, enough to be able to hit the door lock with
one arrow.
Run back to the front of the door, and you’ll find it now no longer
requires a key. Continue to the point when you are alerted that you need
to plant the gunpowder & resin block. Activate it, then run back toward
the large room (the way you came in). Once the block has detonated and
caused the rockfall, go back in and clear out any stray goblins in the
further chamber – this side quest cannot be completed unless all the
goblins are either trapped or dead.
There’s not much loot in Clatter Cave. Lockpicks, health potions, a scroll
or two. Much more useful is the raising of your marksman abilities,
when Erik gives you some useful tips at the end of the quest.
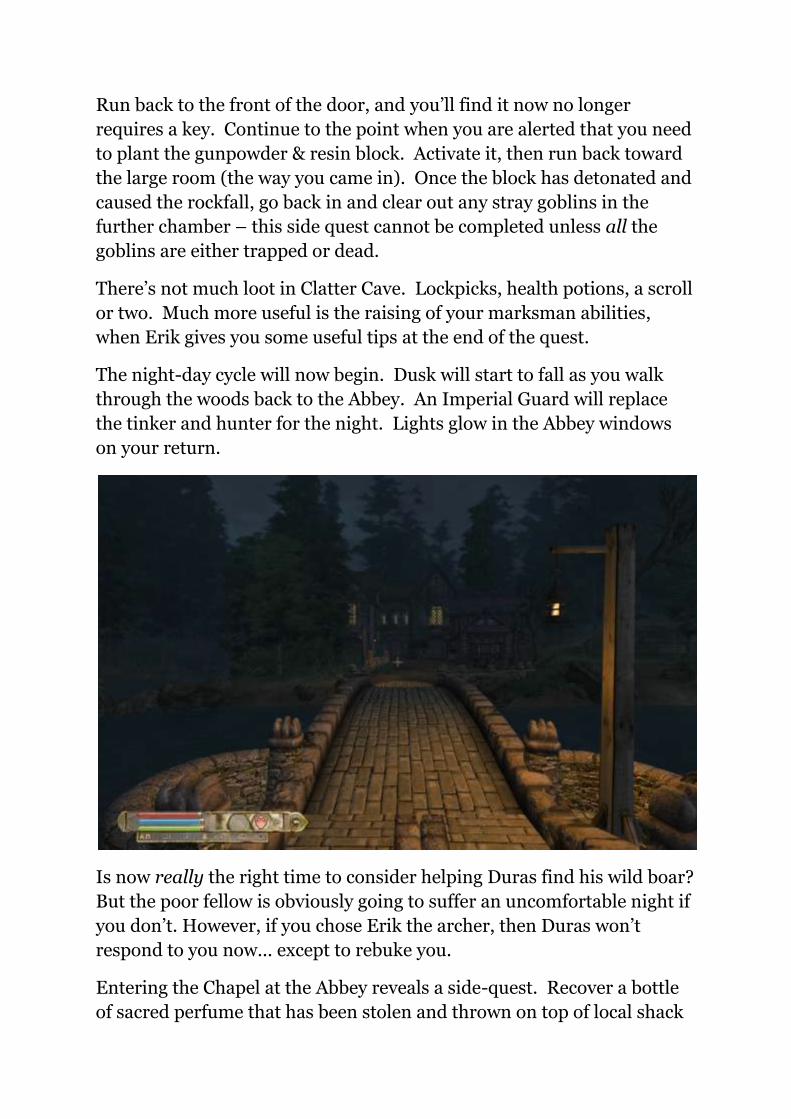
The night-day cycle will now begin. Dusk will start to fall as you walk
through the woods back to the Abbey. An Imperial Guard will replace
the tinker and hunter for the night. Lights glow in the Abbey windows
on your return.
Is now really the right time to consider helping Duras find his wild boar?
But the poor fellow is obviously going to suffer an uncomfortable night if
you don’t. However, if you chose Erik the archer, then Duras won’t
respond to you now... except to rebuke you.
Entering the Chapel at the Abbey reveals a side-quest. Recover a bottle
of sacred perfume that has been stolen and thrown on top of local shack
by a disgruntled pilgrim. The bottle can only be brought down by a
precise arrow hit. Take it back to the Chapel for a permanent Personality
boost. Possibly there is a similar Chapel side-quest for those who chose
the Boar quest and heavy/close combat skills?
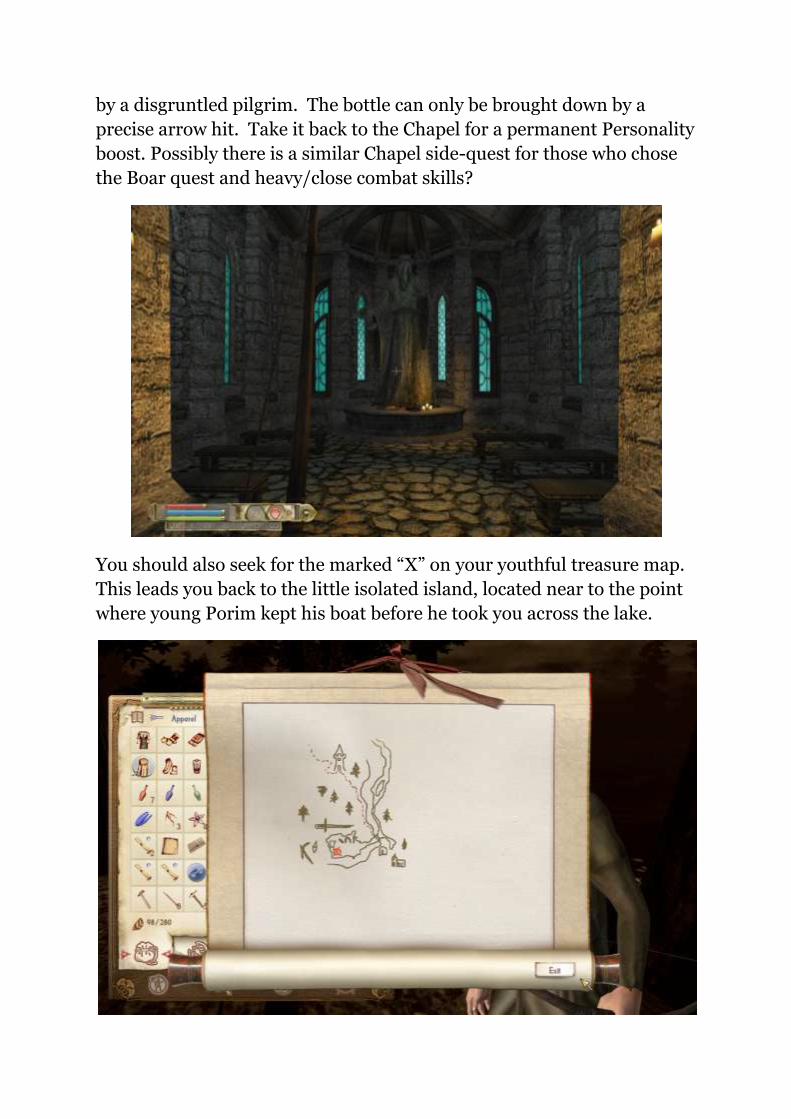
You should also seek for the marked ―X‖ on your youthful treasure map.
This leads you back to the little isolated island, located near to the point
where young Porim kept his boat before he took you across the lake.

On this tranquil island, which you may have visited before for its rare
herbs, you will find a hollow tree truck. Inside it is an old broken blade,
obviously a princely one, inscribed:
“Matlin, Royal Smith, Stonefield.”
Perhaps you should go to Stonefield and talk to this smith, if he is still
alive. The ―Search for My Roots‖ quest will mark the location on your
map.
~
So – having completed the opening prologue and introductory quests,
your character now has three clear choices of destination. These are all
spread out at roughly at the same distance away, located to the north or
north-east of the Abbey...
1) Giliad, and then on to Erothin - to join the Army immediately.
2) Giliad, and then the Arcane Sanctum of the mysterious ―Order‖.
3) To Stonefield, to seek information about your roots.

Possibly these three possible destinations map onto three character type
choices: 1) Heavy Melee fighter, 2) Mage, and 3) Marksman/Athletics ?
Remember the Abbot suggested you should not join the Army
immediately, but instead seek to raise your combat skills first.
Remember also that the Mage who inducted you into his Order
mentioned he’d kill you if you refused? Not something that’s exactly
going to entice you to seek out the old crank and his associates again.
So -- it looks like the ―Search for Your Roots‖ quest is the one to follow
for now. Sleep until daylight, stock up on health potions and arrows
(arrows can’t always be recovered, even if you can see them stuck in a
goblin), walk across the bridge and take the road north.
Watch out for the runaway donkeys!
Note that you can expand the in-game map and have it display differently via various
options buttons.
Good Luck!

Do you enjoy reading adventure stories?
Then my most recent book might appeal to you...
A faithful and direct sequel to H.G. Wells’s famous time-travel book!
You can buy it as a paperback book from Lulu:
http://www.lulu.com/ Search Lulu for : Time Machine Sequel
Also available for the Amazon Kindle ebook reader in the USA!
USA: http://www.amazon.com/dp/B0047T7OVI