Embed Size (px)
Citation preview
1
INSTRUCTION MANUAL NEBNext® Single Cell/Low Input RNA Library Prep Kit for Illumina® NEB #E6420S/L 24/96 reactions Version 5.0_5/20 Table of Contents
Required Materials not Included ......................................................................................................................................................... 2
Overview ............................................................................................................................................................................................. 3
Workflow: Illumina Library Generation ............................................................................................................................................. 3
Section 1 Protocol for Cells: cDNA Synthesis, Amplification and Library Generation ..................................................................................... 4
Section 2 Protocol for Low Input RNA: cDNA Synthesis, Amplification and Library Generation ................................................................. 14
Oligo Sequences ................................................................................................................................................................................ 22
Kit Components ................................................................................................................................................................................. 22
Checklist ............................................................................................................................................................................................ 23
Revision History ................................................................................................................................................................................ 30
The NEBNext Single Cell/Low Input RNA Library Prep Kit Includes The volumes provided are sufficient for preparation of up to 24 reactions (NEB #E6420S) and 96 reactions (NEB #6420L). All reagents should be stored at –20°C. Colored bullets indicate the cap color of the reagent to be added to a reaction.
(white) Murine RNase Inhibitor
(white) NEBNext Cell Lysis Buffer
(lilac) NEBNext Single Cell RT Primer Mix
(lilac) NEBNext Single Cell RT Buffer
(lilac) NEBNext Template Switching Oligo
(lilac) NEBNext Single Cell RT Enzyme Mix
(orange) NEBNext Single Cell cDNA PCR Master Mix
(orange) NEBNext Single Cell cDNA PCR Primer
(yellow) NEBNext Ultra II FS Enzyme Mix
(yellow) NEBNext Ultra II FS Reaction Buffer
(red) NEBNext Ultra II Ligation Master Mix
(red) NEBNext Ligation Enhancer
(blue) NEBNext Ultra II Q5® Master Mix (white) NEBNext Bead Reconstitution Buffer
(white) NEBNext Adaptor Dilution Buffer
(white) TE Buffer
(white) Nuclease-free Buffer
2
Required Materials Not Included • 80% Ethanol (freshly prepared)
• Nuclease-free Water
• DNA LoBind Tubes (Eppendorf® #022431021)
• NEBNext Oligos
• Magnetic rack/stand (NEB #S1515, Alpaqua®, cat. #A001322 or equivalent) • Thermal cycler
• Vortex Mixer
• Microcentrifuge
• SPRIselect® Reagent (Beckman Coulter®, Inc. #B23317) or AMPure® XP Beads (Beckman Coulter, Inc. #A63881)
• Agilent® Bioanalyzer® or similar fragment analyzer and associated consumables
• DNase RNase free PCR strip tubes (USA Scientific 1402-1708)
3
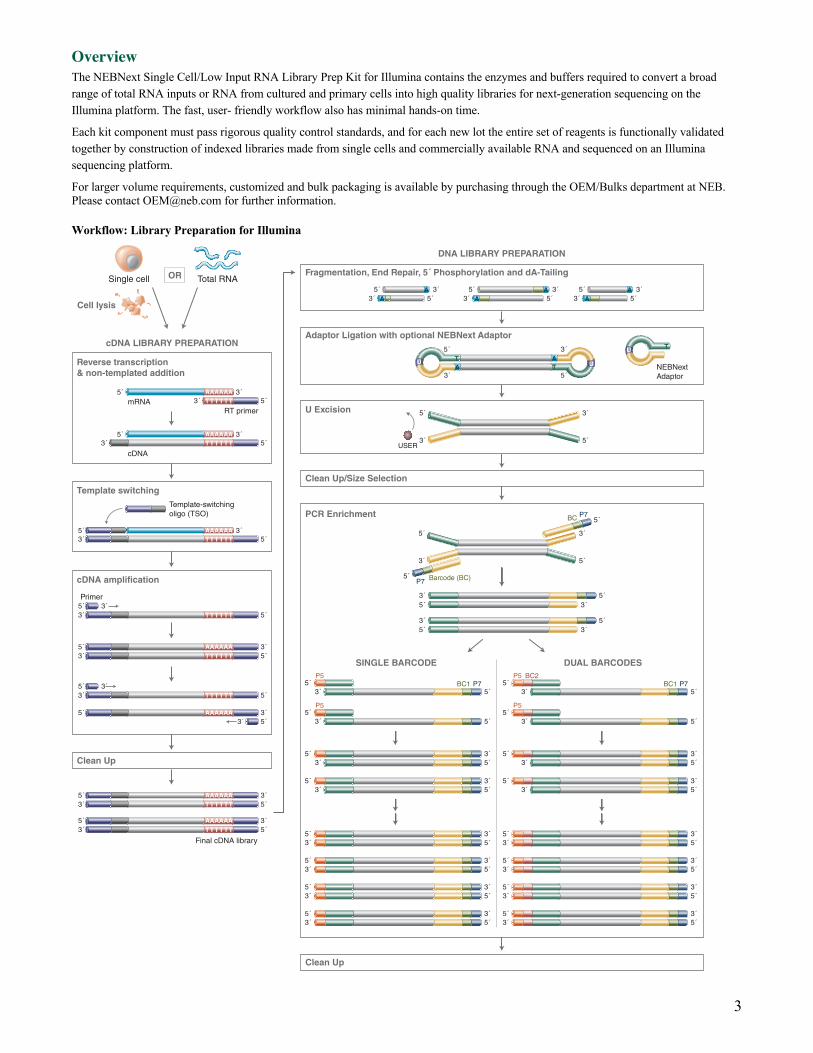
Overview The NEBNext Single Cell/Low Input RNA Library Prep Kit for Illumina contains the enzymes and buffers required to convert a broad range of total RNA inputs or RNA from cultured and primary cells into high quality libraries for next-generation sequencing on the Illumina platform. The fast, user- friendly workflow also has minimal hands-on time.
Each kit component must pass rigorous quality control standards, and for each new lot the entire set of reagents is functionally validated together by construction of indexed libraries made from single cells and commercially available RNA and sequenced on an Illumina sequencing platform.
For larger volume requirements, customized and bulk packaging is available by purchasing through the OEM/Bulks department at NEB. Please contact [email protected] for further information.
Workflow: Library Preparation for Illumina
Final cDNA library
Single cell Total RNA
Cell lysis
Template switching
mRNA
cDNA
Primer
RT primer
5´ 3´5´3´
AAAAAATTTTTT
5´ 3´5´3´
AAAAAATTTTTT
5´ 3´5´3´
AAAAAATTTTTT
Template-switchingoligo (TSO)
5´ 3´5´3´ TTTTTT
5´ 3´5´3´ TTTTTT
5´ 3´5´3´ TTTTTT
AAAAAA
5´ 3´5´3´ TTTTTT
AAAAAA
5´ 3´5´3´ TTTTTT
AAAAAA
3´ 5´5´ 3´AAAAAA
OR
NEBNextAdaptor
cDNA LIBRARY PREPARATION
Reverse transcription& non-templated addition
cDNA ampli!cation
Clean Up
Clean Up/Size Selection
USER
Adaptor Ligation with optional NEBNext Adaptor
PCR Enrichment
Clean Up
U Excision
Fragmentation, End Repair, 5´ Phosphorylation and dA-Tailing
DNA LIBRARY PREPARATION
DUAL BARCODESSINGLE BARCODE
P7
Barcode (BC)
5´ 3´5´3´
AA
5´ 3´5´3´
AA
5´ 3´5´3´
AA
5´ 3´
5´3´TA
UUAT
5´ 3´
5´3´
5´
5´
3´
5´
5´
3´
5´
5´3´
3´3´
3´5´
5´
3´ 5´5´
3´ 5´5´
P7BC
P7
P5
P5
3´ 5´5´
3´ 5´5´
3´
3´
3´ 5´5´ 3´
3´ 5´5´ 3´
3´ 5´5´ 3´
3´ 5´5´ 3´
P7BC1BC13´ 5´
5´
3´ 5´5´
P5 BC2
P5
3´ 5´5´
3´ 5´5´
3´
3´
3´ 5´5´ 3´
3´ 5´5´ 3´
3´ 5´5´ 3´
3´ 5´5´ 3´
U T
4
Section 1 Protocol for Cells: cDNA Synthesis, Amplification and Library Generation Symbols
This is a point where you can safely stop the protocol and store the samples prior to proceeding to the next step in the protocol.
This caution sign signifies a step in the protocol that has two paths leading to the same end point but is dependent on a user variable, like the type of RNA input.
Colored bullets indicate the cap color of the reagent to be added.
Sample Recommendations This protocol is intended for isolated cultured or primary cells, but is not compatible with fixed cells.
Cells should be intact and sorted in cell lysis buffer provided in the kit. See Section 1.2 for cell lysis buffer dilution and recommended volumes before use. Cells should be washed and resuspended in PBS prior to isolation/sorting. Carryover of media may affect the cDNA synthesis efficiency.
Starting Material Isolated single, tens or hundred cells.
Typical Yield of cDNA from a Reaction Actual yields will depend on the quality and quantity of the cell and the mRNA content of the sample. Typical cDNA yields range between 5–15 ng based on the PCR cycle recommendations provided in Section 1.5.
Typical Yield of Illumina Library from a Reaction Actual yields will depend on the quality and quantity of the input cDNA. Typical library yields range between 100 ng–1 µg based on the PCR cycle recommendations provided in Section 1.11.
Notes Keep all buffers and enzymes on ice, unless otherwise indicated.
1.1. Sample and Reagents Preparation 1.1.1. Briefly centrifuge the tubes containing NEBNext Single Cell RT Enzyme Mix and Murine RNase Inhibitor to collect solutions to
the bottom of the tubes, then place on ice.
1.1.2. Thaw all other frozen components at room temperature (if the 10X NEBNext Cell Lysis Buffer appears cloudy after thawing, incubate briefly at 37°C to clear up the solution).
1.1.3. Mix each component thoroughly, centrifuge briefly to collect solutions to the bottom of the tube, and then place on ice. Leave the 10X NEBNext Cell Lysis Buffer at room temperature.
1.2. Cell Collection and Lysis
1.2.1. If the carryover volume from cell isolation/sorting is < 1 μl, cells can be dispensed directly into 1X NEBNext Cell Lysis Buffer (without accounting for added volume). If carryover volume from cell isolation/sorting is ≥ 1 µl, skip to Step 1.2.5.
Prepare 1X NEBNext Cell Lysis Buffer in an RNase-free tube as follows:
COMPONENTVOLUME (µl)
PER REACTION
(white) NEBNext Cell Lysis Buffer (10X) 0.5 µl
(white) Murine RNase Inhibitor 0.25 µl
Nuclease-free Water 4.25 µl
Total Volume 5 µl
1.2.2. Mix solution thoroughly by pipetting, avoiding bubbles. Centrifuge briefly to collect solution to the bottom of the tube.
5
1.2.3. Dispense cells directly into 5 μl 1X Cell Lysis Buffer. After dispensing, cells can be flash-frozen and stored at -80°C for future use, or lysed as outlined in Step 1.2.4.
1.2.4. Incubate at room temperature for 5 minutes and then proceed immediately to Section 1.3
1.2.5. If the carryover volume from cell isolation/sorting is ≥ 1 μl or the cells have already been collected in a solution with a volume ≥ 1 μl, prepare a Cell Lysis Buffer according to the table below, accounting for the carryover cell volume. Cells can be flash frozen and stored at -80°C for future use or lysed as outlined in Step 1.2.6.
COMPONENTVOLUME (µl)
PER REACTION
Carryover Cell Volume 1-5 µl
(white) NEBNext Cell Lysis Buffer (10X) 0.8 µl
(white) Murine RNase Inhibitor 0.4 µl
Nuclease-free Water Variable
(based on carryover cell volume)
Total Volume 8 µl
1.2.6. Incubate at room temperature for 5 minutes and then proceed immediately to Section 1.3.
1.3. Primer Annealing for First Strand Synthesis
Follow Step 1.3.1A for carryover volumes < 1 µl. Follow Step 1.3.1B for carryover volumes ≥ 1 µl.
1.3.1. To anneal cDNA Primer with RNA templates in the sample, prepare the reaction as follows (on ice):
1.3.1A. Carryover Volume < 1 µl
COMPONENTVOLUME (µl)
PER REACTION
Lysed Cell (Step 1.2.4) 5 µl
(lilac) NEBNext Single Cell RT Primer Mix 1 µl
Nuclease-free Water 3 µl
Total Volume 9 µl
Continue to Step 1.3.2.
1.3.1B. Carryover Volume ≥ 1 µl
COMPONENTVOLUME (µl)
PER REACTION
Lysed Cell (Step 1.2.6) 8 µl
(lilac) NEBNext Single Cell RT Primer Mix 1 µl
Total Volume 9 µl
1.3.2. Mix well by pipetting up and down gently at least 10 times, then centrifuge briefly to collect solution to the bottom of the tube.
1.3.3. Incubate for 5 minutes at 70°C in a thermal cycler with the heated lid set to 105°C, then hold at 4ºC until next step.
During the above annealing step, prepare the components for the following step.
6
1.4. Reverse Transcription (RT) and Template Switching 1.4.1. Vortex the NEBNext Single Cell RT Buffer, then prepare the RT mix in a separate tube as follows (adding NEBNext Single Cell
RT Enzyme Mix last) on ice.
Note: It is important to vortex the buffer prior to use for optimal performance.
COMPONENTVOLUME (µl)
PER REACTION
(lilac) NEBNext Single Cell RT Buffer 5 µl
(lilac) NEBNext Template Switching Oligo 1 µl
(lilac) NEBNext Single Cell RT Enzyme Mix 2 µl
Nuclease-free Water 3 µl
Total Volume 11 µl
1.4.2. Mix thoroughly by pipetting up and down several times, then centrifuge briefly to collect solutions to the bottom of tubes.
1.4.3. Combine 11 μl of the RT mix (above) with 9 μl of the annealed sample (Step 1.3.3). Mix well by pipetting up and down at least 10 times, and centrifuge briefly.
1.4.4. Incubate the reaction in a thermal cycler with the following steps and the heated lid set to 105°C: 90 minutes at 42°C 10 minutes at 70°C Hold at 4°C
Safe Stopping Point: Samples can be safely stored overnight at 4°C or –20°C.
1.5. cDNA Amplification by PCR 1.5.1. Prepare cDNA amplification mix as follows:
COMPONENTVOLUME (µl)
PER REACTION
(orange) NEBNext Single Cell cDNA PCR Master Mix 50 µl
(orange) NEBNext Single Cell cDNA PCR Primer 2 µl
Nuclease-free Water 28 µl
Total Volume 80 µl
1.5.2. Add 80 µl cDNA amplification mix to 20 µl of the sample from Step 1.4.4. Mix by pipetting up and down at least 10 times.
1.5.3. Incubate the reaction in a thermal cycler with the following PCR cycling conditions and the heated lid set to 105°C:
CYCLE STEP TEMP TIME CYCLES Initial Denaturation 98°C 45 seconds 1
Denaturation 98°C 10 seconds 11-21*
(see table next page) Annealing 62°C 15 seconds Extension 72°C 3 minutes Final Extension 72°C 5 minutes 1 Hold 4°C ∞
7
Recommended Number of PCR Cycles
RNA CONTENT OF CELL OR CELL TYPE
RECOMMENDED NUMBER OF PCR
CYCLES*
Hek293 Single Cell 18
HeLa Single Cell 17
Jurkat Single Cell 20
Mouse M1 Cells 20
10 cells 14–17
100 cells 11–14
2 pg 20–21
10 pg 17–18
100 pg 14–15
*Note: The amount of RNA in your sample should be used to determine the appropriate number of PCR cycles. If you are starting with single cells not listed above, a PCR cycle titration can be done to determine the appropriate number of PCR cycles for your sample.
For the various inputs listed above, the recommended PCR cycles will typically result in cDNA yields between 1–20 ng (in most cases 5-15 ng). We recommend quantifying the cDNA after the cleanup (Section 1.6) before proceeding to the library preparation (Sections 1.8–1.13). The total RNA used for the above recommendations is Universal Human Reference (UHR) RNA. When using other sources of starting material or a different cell type, some optimization may be necessary due to variations in mRNA amounts.
Safe Stopping Point: Samples can be safely stored overnight at 4°C or –20°C.
1.6. Cleanup of Amplified cDNA 1.6.1. Allow the NEBNext Bead Reconstitution Buffer and the SPRI® beads (if stored at 4°C) to warm to room temperature for at least
30 minutes before use. Vortex SPRI Beads to resuspend well and prepare fresh 80% ethanol.
1.6.2. Add 60 μl (0.6X of sample volume) resuspended beads to the PCR reaction. Mix well by pipetting up and down at least 10 times. Be careful to expel all of the liquid out of the tip during the last mix. Alternatively, samples can be mixed by vortexing for 3–5 seconds on high. If centrifuging samples after mixing, be sure to stop the centrifugation before the beads start to settle out.
1.6.3. Incubate samples on the bench top for at least 5 minutes at room temperature.
1.6.4. Place the tube/plate on an appropriate magnetic stand to separate the beads from the supernatant. If necessary, quickly spin the sample to collect the liquid from the sides of the tube or plate wells before placing on the magnetic stand.
1.6.5. After 5 minutes (or when the solution is clear), carefully remove and discard the supernatant. Be careful not to disturb the beads that contain cDNA (Caution: do not discard the beads).
1.6.6. Add 200 μl of 80% freshly prepared ethanol to the tube/plate while in the magnetic stand. Incubate at room temperature for 30 seconds, and then carefully remove and discard the supernatant. Be careful not to disturb the beads that contain cDNA.
1.6.7. Repeat Step 1.6.6 once for a total of two washes. Be sure to remove all visible liquid after the second wash. If necessary, briefly spin the tube/plate, place back on the magnet and remove traces of ethanol.
1.6.8. Air dry the beads for up to 5 minutes while the tube/plate is on the magnetic stand with the lid open.
Caution: Do not over-dry the beads. This may result in lower recovery of cDNA. Elute the samples when the beads are still dark brown and glossy looking, but when all visible liquid has evaporated. When the beads turn lighter brown and start to crack they are too dry.
1.6.9. Remove the tube/plate from the magnetic stand. Elute the cDNA from the beads by adding 50 μl of 0.1X TE (dilute 1X TE Buffer 1:10 in water).
1.6.10. Mix well by pipetting up and down 10 times, or on a vortex mixer. Incubate for at least 2 minutes at room temperature. If necessary, quickly spin the sample to collect the liquid from the sides of the tube or plate wells.
8
1.6.11. Add 45 μl of (room temperature) NEBNext Bead Reconstitution Buffer to the eluted cDNA + bead mixture from Step 1.6.10 for a second sample clean up. Mix well by pipetting up and down at least 10 times (Caution: Skipping this additional cleanup step may reduce overall cDNA purity).
1.6.12. Incubate samples on the bench top for at least 5 minutes at room temperature.
1.6.13. Place the tube/plate on an appropriate magnetic stand to separate the beads from the supernatant. If necessary, quickly spin the sample to collect the liquid from the sides of the tube or plate wells before placing on the magnetic stand.
1.6.14. After 5 minutes (or when the solution is clear), carefully remove and discard the supernatant. Be careful not to disturb the beads that contain cDNA (Caution: do not discard the beads).
1.6.15. Add 200 μl of 80% freshly prepared ethanol to the tube/plate while in the magnetic stand. Incubate at room temperature for 30 seconds, and then carefully remove and discard the supernatant. Be careful not to disturb the beads that contain cDNA.
1.6.16. Repeat Step 1.6.15 once for a total of two washes. Be sure to remove all visible liquid after the second wash. If necessary, briefly spin the tube/plate, place back on the magnet and remove traces of ethanol.
1.6.17. Air dry the beads for up to 5 minutes while the tube/plate is on the magnetic stand with the lid open.
Caution: Do not over-dry the beads. This may result in lower recovery of cDNA. Elute the samples when the beads are still dark brown and glossy looking, but when all visible liquid has evaporated. When the beads turn lighter brown and start to crack they are too dry.
1.6.18. Remove the tube/plate from the magnetic stand. Elute the cDNA from the beads by adding 33 μl of 1X TE (provided in kit).
1.6.19. Mix well by pipetting up and down 10 times, or on a vortex mixer. Incubate for at least 2 minutes at room temperature. If necessary, quickly spin the sample to collect the liquid from the sides of the tube or plate wells before placing back on the magnetic stand.
1.6.20. Place the tube/plate on the magnetic stand. After 5 minutes (or when the solution is clear), transfer 30 μl to a new PCR tube.
Safe Stopping Point: Samples can be safely stored overnight at 4°C or –20°C.
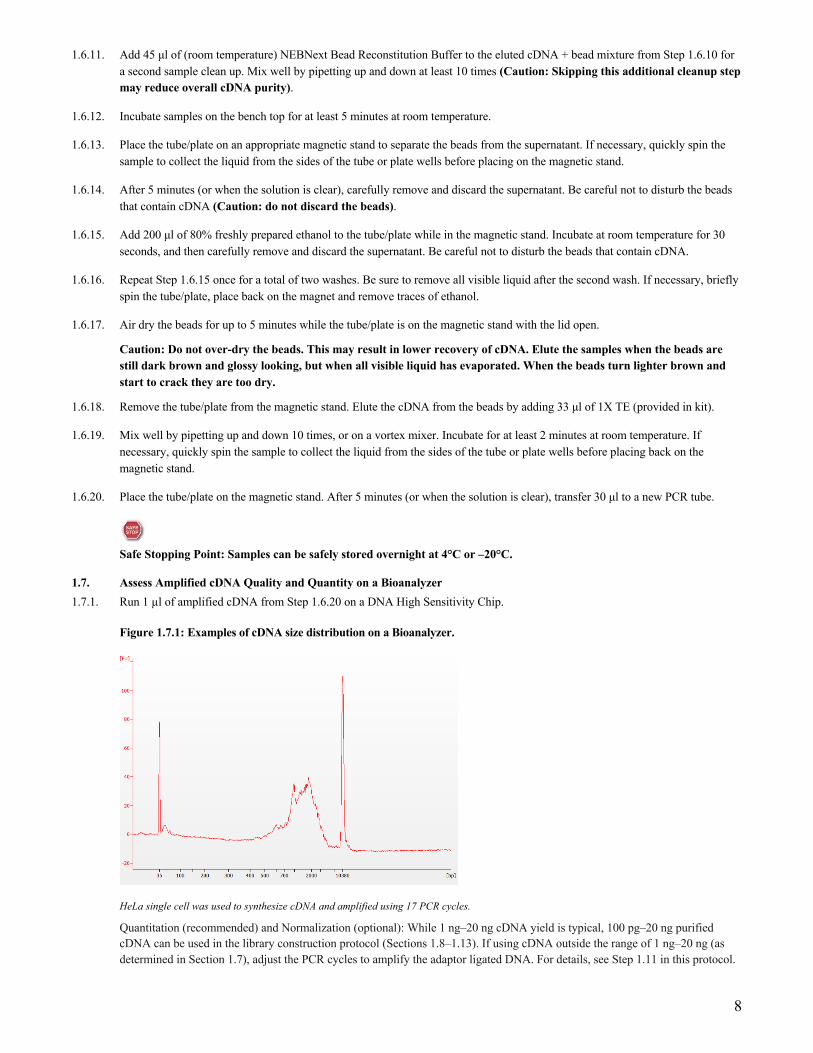
1.7. Assess Amplified cDNA Quality and Quantity on a Bioanalyzer 1.7.1. Run 1 µl of amplified cDNA from Step 1.6.20 on a DNA High Sensitivity Chip.
Figure 1.7.1: Examples of cDNA size distribution on a Bioanalyzer.
HeLa single cell was used to synthesize cDNA and amplified using 17 PCR cycles.
Quantitation (recommended) and Normalization (optional): While 1 ng–20 ng cDNA yield is typical, 100 pg–20 ng purified cDNA can be used in the library construction protocol (Sections 1.8–1.13). If using cDNA outside the range of 1 ng–20 ng (as determined in Section 1.7), adjust the PCR cycles to amplify the adaptor ligated DNA. For details, see Step 1.11 in this protocol.

9
If the cDNA yield is variable, the samples can be normalized to the same concentration prior to Step 1.8 in order to treat all of the samples with the same number of PCR cycles.
Recommended cDNA PCR Yield
cDNA PCR YIELDRECOMMENDATION
FOR STEP 1.8–1.13
100 pg–1 ng
Use all of the cDNA and adjust PCR cycles (see table in Step 1.11)
1 ng–20 ng
Typical cDNA yield. Use 8 cycles for the library enrichment PCR. cDNA input into library prep can be normalized.
20 ng–100 ng
cDNA input into library prep can be normalized. Adjust PCR cycles per table in Step 1.11.
> 100 ng
Normalize cDNA so that at least 3 PCR cycles will be used in the library enrichment PCR (Step 1.11)
1.8. Fragmentation/End Prep 1.8.1. Ensure that the NEBNext Ultra II FS Reaction Buffer is completely thawed. If a precipitate is seen in the buffer, pipette up and
down several times to break it up, and quickly vortex to mix. Place on ice until use.
1.8.2. Vortex the NEBNext Ultra II FS Enzyme Mix 5–8 seconds prior to use and place on ice.
Note: It is important to vortex the enzyme mix prior to use for optimal performance.
1.8.3. Add the following components to a 0.2 ml thin wall PCR tube on ice:
COMPONENTVOLUME (µl)
PER REACTION
cDNA (Step 1.6.20) 26 µl
(yellow) NEBNext Ultra II FS Reaction Buffer 7 µl
(yellow) NEBNext Ultra II FS Enzyme Mix 2 µl
Total Volume 35 µl
1.8.4. Vortex the reaction for 5 seconds and briefly spin in a microcentrifuge.
1.8.5. In a thermal cycler, with the heated lid set to 75°C, run the following program: 25 minutes at 37°C 30 minutes at 65°C Hold at 4°C
Safe Stopping Point: If necessary, samples can be stored at –20°C; however, a slight loss in yield (~20%) may be observed. We recommend continuing with adaptor ligation before stopping.
1.9. Adaptor Ligation
1.9.1. Dilute (red) NEBNext Adaptor for Illumina by 25-fold (0.6 µM) in the NEBNext Adaptor Dilution Buffer (provided).
1.9.2. Mix the NEBNext Ultra II Ligation Master Mix by pipetting up and down several times.
1.9.3. Add the following components directly to the FS Reaction Mixture on ice:
10
COMPONENTVOLUME (µl)
PER REACTION
FS Reaction Mixture (Step 1.8.5) 35 µl
(red) NEBNext Ultra II Ligation Master Mix 30 µl
(red) NEBNext Ligation Enhancer 1 µl
(red) NEBNext Adaptor for Illumina* (diluted 1:25) 2.5 µl
Total Volume 68.5 µl
*The NEBNext adaptor is provided in the NEBNext Oligo kit. NEB has several Oligo kit options, which are supplied separately from the library prep kit.
Note: The ligation master mix and ligation enhancer can be mixed ahead of time and the mixture is stable for at least 8 hours @ 4°C. We do not recommend adding adaptor to a premix in the Adaptor Ligation Step.
1.9.4. Set a 100 μl or 200 μl pipette to 50 μl and then pipette the entire volume up and down at least 10 times to mix thoroughly. Perform a quick spin to collect all liquid from the sides of the tube. (Caution: The NEBNext Ultra II Ligation Master Mix is very viscous. Care should be taken to ensure adequate mixing of the ligation reaction, as incomplete mixing will result in reduced ligation efficiency. The presence of a small amount of bubbles will not interfere with performance).
1.9.5. Incubate at 20°C for 15 minutes in a thermal cycler with the heated lid off.
1.9.6. Add 3 μl of (red) USER® Enzyme to the ligation mixture from Step 1.9.5.
Note: Steps 1.9.6 and 1.9.7 are only required for use with NEBNext Adaptors. USER enzyme can be found in the NEBNext oligo kits.
1.9.7. Mix well and incubate at 37°C for 15 minutes with the heated lid set to ≥ 47°C.
Safe Stopping Point: Samples can be safely stored overnight at –20°C.
1.10. Cleanup of Adaptor-ligated DNA Note: The following bead volumes may not work properly for a cleanup at a different step in the workflow, or if this is a
second cleanup at this step. For cleanups of samples contained in different buffer conditions, the volumes may need to be experimentally determined.
1.10.1. If stored at 4°C allow the SPRI beads to warm to room temperature for at least 30 minutes before use. Vortex SPRI beads to resuspend well and prepare fresh 80% ethanol.
1.10.2. Add 57 μl (0.8X of sample volume) resuspended beads to the PCR reaction. Mix well by pipetting up and down at least 10 times. Be careful to expel all of the liquid out of the tip during the last mix. Alternatively, samples can be mixed by vortexing for 3–5 seconds on high. If centrifuging samples after mixing, be sure to stop the centrifugation before the beads start to settle out.
1.10.3. Incubate samples on the bench top for at least 5 minutes at room temperature.
1.10.4. Place the tube/plate on an appropriate magnetic stand to separate the beads from the supernatant. If necessary, quickly spin the sample to collect the liquid from the sides of the tube or plate wells before placing on the magnetic stand.
1.10.5. After 5 minutes (or when the solution is clear), carefully remove and discard the supernatant. Be careful not to disturb the beads that contain DNA targets (Caution: do not discard the beads).
1.10.6. Add 200 μl of 80% freshly prepared ethanol to the tube/ plate while in the magnetic stand. Incubate at room temperature for 30 seconds, and then carefully remove and discard the supernatant. Be careful not to disturb the beads that contain DNA targets.
1.10.7. Repeat Step 1.10.6 once for a total of two washes. Be sure to remove all visible liquid after the second wash. If necessary, briefly spin the tube/plate, place back on the magnet and remove traces of ethanol.
1.10.8. Air dry the beads for up to 5 minutes while the tube/plate is on the magnetic stand with the lid open. Caution: Do not over-dry the beads. This may result in lower recovery of DNA. Elute the samples when the beads are still
dark brown and glossy looking, but when all visible liquid has evaporated. When the beads turn lighter brown and start to crack they are too dry.
11
1.10.9. Remove the tube/plate from the magnetic stand. Elute the DNA target from the beads by adding 17 μl of 0.1X TE (dilute 1X TE Buffer 1:10 in water).
1.10.10. Mix well by pipetting up and down 10 times, or on a vortex mixer. Incubate for at least 2 minutes at room temperature. If necessary, quickly spin the sample to collect the liquid from the sides of the tube or plate wells before placing back on the magnetic stand.
1.10.11. Place the tube/plate on the magnetic stand. After 5 minutes (or when the solution is clear), transfer 15 μl to a new PCR tube.
1.10.12. Proceed to PCR Enrichment of Adaptor-ligated DNA in Section 1.11.
Safe Stopping Point: Samples can be safely stored overnight at 4°C or –20°C.
1.11. PCR Enrichment of Adaptor-ligated DNA
Use Option A for any NEBNext oligo kit where index primers are supplied in tubes. These kits have the forward and reverse primers supplied in separate tubes.
Use Option B for any NEBNext oligo kit where index primers are supplied in a 96-well plate format. These kits have the forward and reverse (i7 and i5) primers combined.
1.11.1. Combine the following components in a sterile tube:
1.11.1A. Forward and Reverse Primers Supplied Separately
COMPONENTVOLUME (µl)
PER REACTION
Adaptor Ligated DNA Fragments (Step 1.9.11) 15 µl
(blue) NEBNext Ultra II Q5 Master Mix 25 µl
(blue) Index Primer/i7 Primer*,** 5 µl
(blue) Universal PCR Primer/i5 Primer*, ** 5 µl
Total Volume 50 µl
*NEBNext Oligos must be purchased separately from the library prep kit. Refer to the corresponding NEBNext Oligo kit manual for determining valid barcode combinations.
**Use only one i7 primer/ index primer per sample. Use only one i5 primer (or the universal primer for single index kits) per sample.
Proceed to Step 1.11.2.
1.11.1B. Forward and Reverse Primers Already Combined
COMPONENTVOLUME (µl)
PER REACTION
Adaptor Ligated DNA Fragments (Step 1.9.11) 15 µl
(blue) NEBNext Ultra II Q5 Master Mix 25 µl
Index Primer Mix * 10 µl
Total Volume 50 µl
*NEBNext Oligos must be purchased separately from the library prep kit. Refer to the corresponding NEBNext Oligo kit manual for determining valid barcode combinations.
1.11.2. Set a 100 µl or 200 μl pipette to 40 μl and then pipette the entire volume up and down at least 10 times to mix thoroughly. Perform a quick spin to collect all liquid from the sides of the tube.
12
1.11.3. Place the tube on a thermal cycler and perform PCR amplification using the following PCR cycling conditions:
CYCLE STEP TEMP TIME CYCLES Initial Denaturation 98°C 30 seconds 1
Denaturation 98°C 10 seconds 8*
Annealing 65°C 75 seconds Final Extension 65°C 5 minutes 1 Hold 4°C ∞
* If your cDNA input is outside the input range of 1 ng–20 ng, adjust the PCR cycle numbers accordingly. We recommend a minimum of 3 PCR cycles for all of the original molecules to make it into the final library. For cDNA input of 1 ng–20 ng, the typical Illumina library yield, using 8 PCR cycles, is 100 ng–1 μg.
INPUT IN THE FRAGMENTATION/ END PREP REACTION* # CYCLES REQUIRED
100 pg–1 ng 9–12
1 ng–20 ng 6–9
20 ng–100 ng 3–6
* It is possible to normalize the cDNA input into the Fragmentation/ End Prep Reaction so that all libraries start out with a similar amount of cDNA
1.12. Cleanup of PCR Reaction
1.12.1. If stored at 4°C allow the SPRI beads to warm to room temperature for at least 30 minutes before use. Vortex SPRI beads to resuspend well and prepare fresh 80% ethanol.
1.12.2. Add 45 μl (0.9X of sample volume) resuspended beads to the PCR reaction. Mix well by pipetting up and down at least 10 times. Be careful to expel all of the liquid out of the tip during the last mix. Vortexing for 3–5 seconds on high can also be used. If centrifuging samples after mixing, be sure to stop the centrifugation before the beads start to settle out.
1.12.3. Incubate samples on bench top for at least 5 minutes at room temperature.
1.12.4. Place the tube/plate on an appropriate magnetic stand to separate the beads from the supernatant. If necessary, quickly spin the sample to collect the liquid from the sides of the tube or plate wells before placing on the magnetic stand.
1.12.5. After 5 minutes (or when the solution is clear), carefully remove and discard the supernatant. Be careful not to disturb the beads that contain DNA targets (Caution: do not discard the beads).
1.12.6. Add 200 μl of 80% freshly prepared ethanol to the tube/ plate while in the magnetic stand. Incubate at room temperature for 30 seconds, and then carefully remove and discard the supernatant. Be careful not to disturb the beads that contain DNA targets.
1.12.7. Repeat Step 1.12.6 once for a total of two washes. Be sure to remove all visible liquid after the second wash. If necessary, briefly spin the tube/plate, place back on the magnet and remove traces of ethanol.
1.12.8. Air dry the beads for up to 5 minutes while the tube/plate is on the magnetic stand with the lid open.
Caution: Do not over-dry the beads. This may result in lower recovery of DNA. Elute the samples when the beads are still dark brown and glossy looking, but when all visible liquid has evaporated. When the beads turn lighter brown and start to crack they are too dry.
1.12.9. Remove the tube/plate from the magnetic stand. Elute the DNA target from the beads by adding 33 μl of 0.1X TE (dilute 1X TE Buffer 1:10 in water).
1.12.10. Mix well by pipetting up and down 10 times, or on a vortex mixer. Incubate for at least 2 minutes at room temperature. If necessary, quickly spin the sample to collect the liquid from the sides of the tube or plate wells before placing back on the magnetic stand.
1.12.11. Place the tube/plate on the magnetic stand. After 5 minutes (or when the solution is clear), transfer 30 μl to a new PCR tube. Libraries can be stored at -20°C.
13
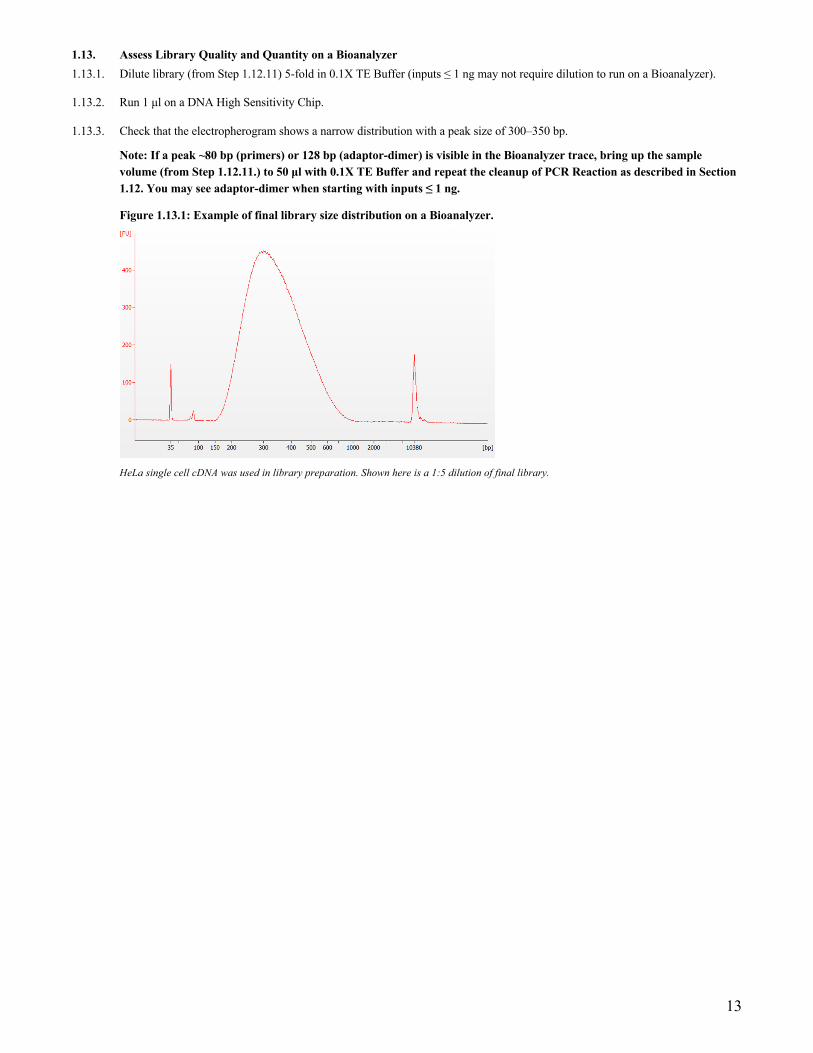
1.13. Assess Library Quality and Quantity on a Bioanalyzer 1.13.1. Dilute library (from Step 1.12.11) 5-fold in 0.1X TE Buffer (inputs ≤ 1 ng may not require dilution to run on a Bioanalyzer).
1.13.2. Run 1 μl on a DNA High Sensitivity Chip.
1.13.3. Check that the electropherogram shows a narrow distribution with a peak size of 300–350 bp.
Note: If a peak ~80 bp (primers) or 128 bp (adaptor-dimer) is visible in the Bioanalyzer trace, bring up the sample volume (from Step 1.12.11.) to 50 μl with 0.1X TE Buffer and repeat the cleanup of PCR Reaction as described in Section 1.12. You may see adaptor-dimer when starting with inputs ≤ 1 ng.
Figure 1.13.1: Example of final library size distribution on a Bioanalyzer.
HeLa single cell cDNA was used in library preparation. Shown here is a 1:5 dilution of final library.

14
Section 2 Protocol for Low Input RNA: cDNA Synthesis, Amplification and Library Generation Symbols
This is a point where you can safely stop the protocol and store the samples prior to proceeding to the next step in the protocol.
This caution sign signifies a step in the protocol that has two paths leading to the same end point but is dependent on a user variable, like the type of RNA input.
Colored bullets indicate the cap color of the reagent to be added.
Sample Recommendations This protocol is to be used for total RNA.
The RNA sample should be free of salts (e.g., Mg2+, or guanidinium salts), divalent cation chelating agents (e.g. EDTA, EGTA, citrate), or organics (e.g., phenol and ethanol). If an excess amount of genomic DNA is present in RNA samples, an optional DNase I treatment could be peformed. Inactivate/remove DNase I after treatment.
Assess quality of the input RNA by running input RNA on an Agilent Bioanalyzer to determine the RNA Integrity Number (RIN).
Starting Material 2 pg–200 ng poly(A) tail-containing total RNA (DNA free), RIN score ≥ 8.0.
Typical Yield of cDNA from a Reaction Actual yields will depend on the quality and quantity of the input RNA, the mRNA content of the sample, and the method used to purify the RNA. Typical cDNA yields range between 5–15 ng (for the lower RNA inputs) based on the PCR cycle recommendations provided in Section 2.4.
Typical Yield of Illumina Library from a Reaction Actual yields will depend on the quality and quantity of the input cDNA. Typical library yields range between 100 ng–1 µg based on the PCR cycle recommendations provided in Section 2.10.
Notes Keep all buffers and enzymes on ice, unless otherwise indicated.
2.1. Sample and Reagents Preparation 2.1.1. Briefly centrifuge the tubes containing NEBNext Single Cell RT Enzyme Mix and Murine RNase Inhibitor to collect solutions to
the bottom of the tubes, then place on ice.
2.1.2. Thaw all other frozen components at room temperature (if the 10X NEBNext Cell Lysis Buffer appears cloudy after thawing, incubate briefly at 37°C to clear up the solution).
2.1.3. Mix each component thoroughly, centrifuge briefly to collect solutions to the bottom of the tube, and then place on ice. Leave the 10X NEBNext Cell Lysis Buffer at room temperature.
2.1.4. Thaw total RNA on ice prior to starting the protocol.

15
2.2. Primer Annealing for First Strand Synthesis
2.2.1. To anneal cDNA Primer with total RNA samples, prepare the reaction as follows (on ice):
COMPONENT
< 5 ng RNA VOLUME (µl)
PER RXN
≥ 5 ng RNA VOLUME (µl)
PER RXN
Total RNA Up to 8 µl Up to 7 µl
(lilac) NEBNext Single Cell RT Primer Mix 1 µl 2 µl
Nuclease-free Water Variable Variable
Total Volume 9 µl 9 µl
2.2.2. Mix well by pipetting up and down gently at least 10 times, then centrifuge briefly to collect solution to the bottom of the tubes. 2.2.3. Incubate for 5 minutes at 70°C in a thermal cycler with the heated lid set to 105°C, then hold at 4ºC until next step.
During the above annealing step, prepare the components for the following step.
2.3. Reverse Transcription (RT) and Template Switching 2.3.1. Vortex the NEBNext Single Cell RT Buffer briefly, then prepare the RT mix in a separate tube as follows (adding NEBNext
Single Cell RT Enzyme Mix last).
Note: It is important to vortex the buffer prior to use for optimal performance.
COMPONENTVOLUME (µl)
PER REACTION
(lilac) NEBNext Single Cell RT Buffer 5 µl
(lilac) NEBNext Template Switching Oligo 1 µl
(lilac) NEBNext Single Cell RT Enzyme Mix 2 µl
Nuclease-free Water 3 µl
Total Volume 11 µl
2.3.2. Mix thoroughly by pipetting up and down several times, then centrifuge briefly to collect solutions to the bottom of tubes.
2.3.3. Combine 11 μl of the RT mix (above) with 9 μl of the annealed sample (Step 2.2.3). Mix well by pipetting up and down at least 10 times, and centrifuge briefly.
2.3.4. Incubate the reaction mix in a thermal cycler with the following steps and the heated lid set to 105°C: 90 minutes at 42°C 10 minutes at 70°C Hold at 4°C
Safe Stopping Point: Samples can be safely stored overnight at 4°C or –20°C.
2.4. cDNA Amplification by PCR 2.4.1. Prepare cDNA amplification mix as follows:
COMPONENTVOLUME (µl)
PER REACTION
(orange) NEBNext Single Cell cDNA PCR Master Mix 50 µl
(orange) NEBNext Single Cell cDNA PCR Primer 2 µl
(white) NEBNext Cell Lysis Buffer (10X) 0.5 µl
Nuclease-free Water 27.5 µl
Total Volume 80 µl
2.4.2. Add 80 µl cDNA amplification mix to 20 µl of the sample from Step 2.3.4. Mix by pipetting up and down at least 10 times.

16
2.4.3. Incubate the reaction in a thermal cycler with the following PCR cycling conditions and the heated lid set to 105°C:
CYCLE STEP TEMP TIME CYCLES Initial Denaturation 98°C 45 seconds 1
Denaturation 98°C 10 seconds 7-21*
(see table below) Annealing 62°C 15 seconds Extension 72°C 3 minutes Final Extension 72°C 5 minutes 1 Hold 4°C ∞
Recommended Number of PCR Cycles
TOTAL RNA
RECOMMENDED NUMBER OF PCR
CYCLES*
2 pg 20-21
10 pg 17-18
100 pg 14-15
1 ng 10-11
10 ng 8-9
100 ng/200 ng 7-8
*Note: The amount of RNA in your sample should be used to determine the appropriate number of PCR cycles.
For the various inputs listed above, the recommended PCR cycles will typically result in cDNA yields between 1-20 ng (in most cases 5-15 ng). We recommend quantifying cDNA after the cleanup (Step 2.5) before proceeding to the library preparation (Sections 2.7 - 2.12). The higher RNA input (> 100 ng) may yield > 15 ng cDNA. The total RNA used for the above recommendations is Universal Human Reference (UHR) RNA.
Safe Stopping Point: Samples can be safely stored overnight at 4°C or –20°C.
2.5. Cleanup of Amplified cDNA 2.5.1. Allow the NEBNext Bead Reconstitution Buffer and the SPRI® beads (if stored at 4°C) to warm to room temperature for at least
30 minutes before use. Vortex SPRI Beads to resuspend well and prepare fresh 80% ethanol.
2.5.2. Add 60 μl (0.6X of sample volume) resuspended beads to the PCR reaction. Mix well by pipetting up and down at least 10 times. Be careful to expel all of the liquid out of the tip during the last mix. Alternatively, samples can be mixed by vortexing for 3–5 seconds on high. If centrifuging samples after mixing, be sure to stop the centrifugation before the beads start to settle out.
2.5.3. Incubate samples on the bench top for at least 5 minutes at room temperature.
2.5.4. Place the tube/plate on an appropriate magnetic stand to separate the beads from the supernatant. If necessary, quickly spin the sample to collect the liquid from the sides of the tube or plate wells before placing on the magnetic stand.
2.5.5. After 5 minutes (or when the solution is clear), carefully remove and discard the supernatant. Be careful not to disturb the beads that contain cDNA (Caution: do not discard the beads).
2.5.6. Add 200 μl of 80% freshly prepared ethanol to the tube/plate while in the magnetic stand. Incubate at room temperature for 30 seconds, and then carefully remove and discard the supernatant. Be careful not to disturb the beads that contain cDNA.
2.5.7. Repeat Step 2.5.6 once for a total of two washes. Be sure to remove all visible liquid after the second wash. If necessary, briefly spin the tube/plate, place back on the magnet and remove traces of ethanol.
2.5.8. Air dry the beads for up to 5 minutes while the tube/plate is on the magnetic stand with the lid open.
17
Caution: Do not over-dry the beads. This may result in lower recovery of cDNA. Elute the samples when the beads are still dark brown and glossy looking, but when all visible liquid has evaporated. When the beads turn lighter brown and start to crack they are too dry.
2.5.9. Remove the tube/plate from the magnetic stand. Elute the cDNA from the beads by adding 50 μl of 0.1X TE (dilute 1X TE Buffer 1:10 in water).
2.5.10. Mix well by pipetting up and down 10 times, or on a vortex mixer. Incubate for at least 2 minutes at room temperature. If necessary, quickly spin the sample to collect the liquid from the sides of the tube or plate wells.
2.5.11. Add 45 μl of (room temperature) NEBNext Bead Reconstitution Buffer to the eluted cDNA + bead mixture from Step 2.5.10 for a second sample clean up. Mix well by pipetting up and down at least 10 times (Caution: Skipping this additional cleanup step may reduce overall cDNA purity).
2.5.12. Incubate samples on the bench top for at least 5 minutes at room temperature.
2.5.13. Place the tube/plate on an appropriate magnetic stand to separate the beads from the supernatant. If necessary, quickly spin the sample to collect the liquid from the sides of the tube or plate wells before placing on the magnetic stand.
2.5.14. After 5 minutes (or when the solution is clear), carefully remove and discard the supernatant. Be careful not to disturb the beads that contain cDNA (Caution: do not discard the beads).
2.5.15. Add 200 μl of 80% freshly prepared ethanol to the tube/plate while in the magnetic stand. Incubate at room temperature for 30 seconds, and then carefully remove and discard the supernatant. Be careful not to disturb the beads that contain cDNA.
2.5.16. Repeat Step 2.5.15 once for a total of two washes. Be sure to remove all visible liquid after the second wash. If necessary, briefly spin the tube/plate, place back on the magnet and remove traces of ethanol.
2.5.17. Air dry the beads for up to 5 minutes while the tube/plate is on the magnetic stand with the lid open. Caution: Do not over-dry the beads. This may result in lower recovery of cDNA. Elute the samples when the beads are
still dark brown and glossy looking, but when all visible liquid has evaporated. When the beads turn lighter brown and start to crack they are too dry.
2.5.18. Remove the tube/plate from the magnetic stand. Elute the cDNA from the beads by adding 33 μl of 1X TE (provided in kit).
2.5.19. Mix well by pipetting up and down 10 times, or on a vortex mixer. Incubate for at least 2 minutes at room temperature. If necessary, quickly spin the sample to collect the liquid from the sides of the tube or plate wells before placing back on the magnetic stand.
2.5.20. Place the tube/plate on the magnetic stand. After 5 minutes (or when the solution is clear), transfer 30 μl to a new PCR tube.
Safe Stopping Point: Samples can be safely stored overnight at 4°C or –20°C.
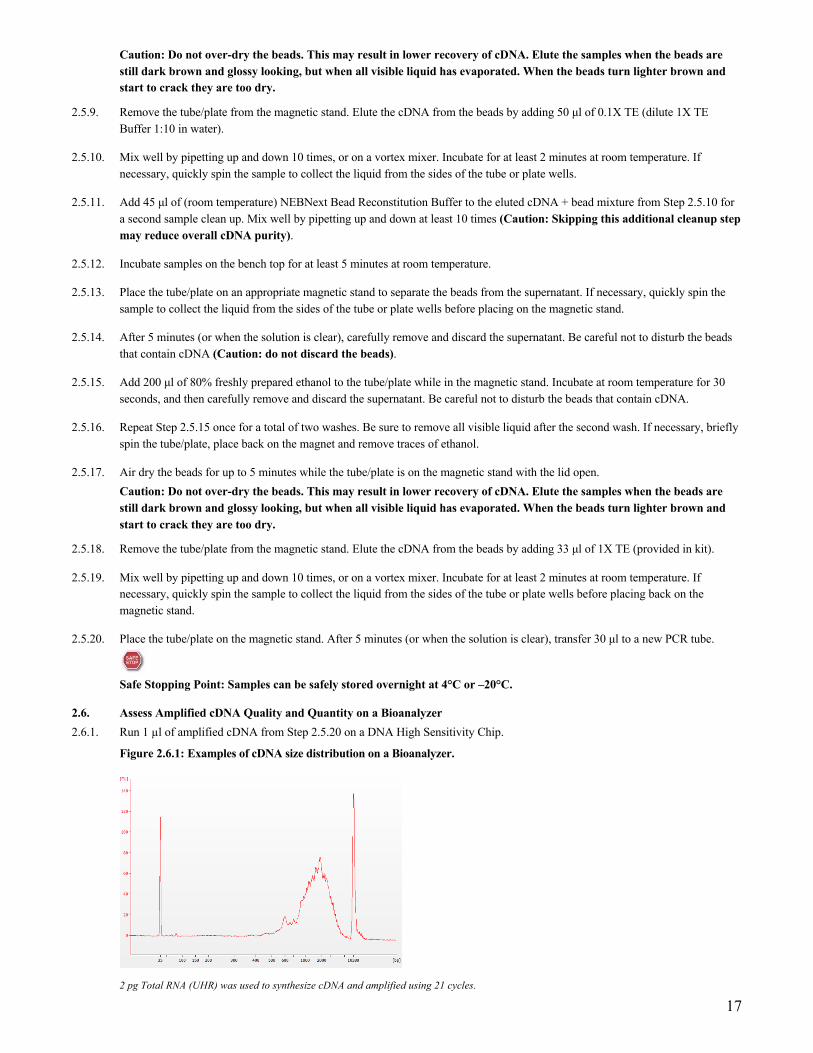
2.6. Assess Amplified cDNA Quality and Quantity on a Bioanalyzer 2.6.1. Run 1 µl of amplified cDNA from Step 2.5.20 on a DNA High Sensitivity Chip.
Figure 2.6.1: Examples of cDNA size distribution on a Bioanalyzer.
2 pg Total RNA (UHR) was used to synthesize cDNA and amplified using 21 cycles.
18
Quantitation (recommended) and Normalization (optional) While 1 ng–20 ng cDNA yield is typical, 100 pg–20 ng purified cDNA can be used in the library construction protocol (Sections
2.7–2.12). If using cDNA outside the range of 1 ng–20 ng (as determined in Step 2.6), adjust the PCR cycles to amplify the adaptor ligated DNA. For details, see Step 2.10 in this protocol. If the cDNA yield is variable, the samples can be normalized to the same concentration prior to Step 2.7 in order to treat all of the samples with the same number of PCR cycles.
Recommended cDNA PCR Yield
cDNA PCR YIELDRECOMMENDATION
FOR STEP 2.7–2.12
100 pg–1 ng Use all of the cDNA and adjust PCR cycles (see table in Step 2.10)
1 ng–20 ng
Typical cDNA yield. Use 8 cycles for the library enrichment PCR. cDNA input into library prep (Step 2.7–2.12) can be normalized.
20 ng–100 ng
cDNA input into library prep can be normalized. Adjust PCR cycles per table in Step 2.10.
> 100 ng
Normalize cDNA so that at least 4 PCR cycles will be used in the library enrichment PCR (Step 2.10)
2.7. Fragmentation/End Prep 2.7.1. Ensure that the NEBNext Ultra II FS Reaction Buffer is completely thawed. If a precipitate is seen in the buffer, pipette up and
down several times to break it up, and quickly vortex to mix. Place on ice until use.
2.7.2. Vortex the NEBNext Ultra II FS Enzyme Mix 5–8 seconds prior to use and place on ice.
Note: It is important to vortex the enzyme mix prior to use for optimal performance.
2.7.3. Add the following components to a 0.2 ml thin wall PCR tube on ice:
COMPONENTVOLUME (µl)
PER REACTION
cDNA (Step 2.5.20) 26 µl
(yellow) NEBNext Ultra II FS Reaction Buffer 7 µl
(yellow) NEBNext Ultra II FS Enzyme Mix 2 µl
Total Volume 35 µl
2.7.4. Vortex the reaction for 5 seconds and briefly spin in a microcentrifuge.
2.7.5. In a thermal cycler, with the heated lid set to 75°C, run the following program: 25 minutes at 37°C 30 minutes at 65°C Hold at 4°C
Safe Stopping Point: If necessary, samples can be stored at –20°C; however, a slight loss in yield (~20%) may be observed. We recommend continuing with adaptor ligation before stopping.
2.8. Adaptor Ligation
2.8.1. Dilute • (red) NEBNext Adaptor for Illumina by 25-fold (0.6 µM) in the NEBNext Adaptor Dilution Buffer (provided).
2.8.2. Mix the NEBNext Ultra II Ligation Master Mix by pipetting up and down several times.
2.8.3. Add the following components directly to the FS Reaction Mixture on ice:
19
COMPONENTVOLUME (µl)
PER REACTION
FS Reaction Mixture (Step 2.7.5) 35 µl
• (red) NEBNext Ultra II Ligation Master Mix 30 µl
• (red) NEBNext Ligation Enhancer 1 µl
• (red) NEBNext Adaptor for Illumina* (diluted 1:25) 2.5 µl
Total Volume 68.5 µl
*The NEBNext adaptor is provided in the NEBNext Oligo kit. NEB has several Oligo kit options, which are supplied separately from the library prep kit.
Note: The ligation master mix and ligation enhancer can be mixed ahead of time and the mixture is stable for at least 8 hours @ 4°C. We do not recommend adding adaptor to a premix in the Adaptor Ligation Step.
2.8.4. Set a 100 μl or 200 μl pipette to 50 μl and then pipette the entire volume up and down at least 10 times to mix thoroughly. Perform a quick spin to collect all liquid from the sides of the tube. (Caution: The NEBNext Ultra II Ligation Master Mix is very viscous. Care should be taken to ensure adequate mixing of the ligation reaction, as incomplete mixing will result in reduced ligation efficiency. The presence of a small amount of bubbles will not interfere with performance).
2.8.5. Incubate at 20°C for 15 minutes in a thermal cycler with the heated lid off.
2.8.6. Add 3 μl of • (red) USER® Enzyme to the ligation mixture from Step 2.8.5. Note: Steps 2.8.6 and 2.8.7 are only required for use with NEBNext Adaptors. USER enzyme can be found in the
NEBNext oligo kits.
2.8.7. Mix well and incubate at 37°C for 15 minutes with the heated lid set to ≥ 47°C.
Safe Stopping Point: Samples can be safely stored overnight at 4°C or –20°C.
2.9. Cleanup of Adaptor-ligated DNA Note: The following bead volumes may not work properly for a cleanup at a different step in the workflow, or if this is a
second cleanup at this step. For cleanups of samples contained in different buffer conditions, the volumes may need to be experimentally determined.
2.9.1. If stored at 4°C allow the SPRI beads to warm to room temperature for at least 30 minutes before use. Vortex SPRI beads to resuspend well and prepare fresh 80% ethanol.
2.9.2. Add 57 μl (0.8X of sample volume) resuspended beads to the PCR reaction. Mix well by pipetting up and down at least 10 times. Be careful to expel all of the liquid out of the tip during the last mix. Alternatively, samples can be mixed by vortexing for 3–5 seconds on high. If centrifuging samples after mixing, be sure to stop the centrifugation before the beads start to settle out.
2.9.3. Incubate samples on the bench top for at least 5 minutes at room temperature.
2.9.4. Place the tube/plate on an appropriate magnetic stand to separate the beads from the supernatant. If necessary, quickly spin the sample to collect the liquid from the sides of the tube or plate wells before placing on the magnetic stand.
2.9.5. After 5 minutes (or when the solution is clear), carefully remove and discard the supernatant. Be careful not to disturb the beads that contain DNA targets (Caution: do not discard the beads).
2.9.6. Add 200 μl of 80% freshly prepared ethanol to the tube/ plate while in the magnetic stand. Incubate at room temperature for 30 seconds, and then carefully remove and discard the supernatant. Be careful not to disturb the beads that contain DNA targets.
2.9.7. Repeat Step 2.9.6 once for a total of two washes. Be sure to remove all visible liquid after the second wash. If necessary, briefly spin the tube/plate, place back on the magnet and remove traces of ethanol.
2.9.8. Air dry the beads for up to 5 minutes while the tube/plate is on the magnetic stand with the lid open. Caution: Do not over-dry the beads. This may result in lower recovery of DNA. Elute the samples when the beads are still
dark brown and glossy looking, but when all visible liquid has evaporated. When the beads turn lighter brown and start to crack they are too dry.

20
2.9.9. Remove the tube/plate from the magnetic stand. Elute the DNA target from the beads by adding 17 μl of 0.1X TE (dilute 1X TE Buffer 1:10 in water).
2.9.10. Mix well by pipetting up and down 10 times, or on a vortex mixer. Incubate for at least 2 minutes at room temperature. If necessary, quickly spin the sample to collect the liquid from the sides of the tube or plate wells before placing back on the magnetic stand.
2.9.11. Place the tube/plate on the magnetic stand. After 5 minutes (or when the solution is clear), transfer 15 μl to a new PCR tube.
2.9.12. Proceed to PCR Enrichment of Adaptor-ligated DNA in Section 2.10.
Safe Stopping Point: Samples can be safely stored overnight at 4°C or –20°C.
2.10. PCR Enrichment of Adaptor-ligated DNA
Use Option A for any NEBNext oligo kit where index primers are supplied in tubes. These kits have the forward and reverse primers supplied in separate tubes.
Use Option B for any NEBNext oligo kit where index primers are supplied in a 96-well plate format. These kits have the forward and reverse (i7 and i5) primers combined.
2.10.1. Combine the following components in a sterile tube:
2.10.1A. Forward and Reverse Primers Supplied Separately
COMPONENTVOLUME (µl)
PER REACTION
Adaptor Ligated DNA Fragments (Step 2.9.11) 15 µl
(blue) NEBNext Ultra II Q5 Master Mix 25 µl
(blue) Index Primer/i7 Primer*,** 5 µl
(blue) Universal PCR Primer/i5 Primer*, ** 5 µl
Total Volume 50 µl
*NEBNext Oligos must be purchased separately from the library prep kit. Refer to the corresponding NEBNext Oligo kit manual for determining valid barcode combinations.
**Use only one i7 primer/ index primer per sample. Use only one i5 primer (or the universal primer for single index kits) per sample.
Proceed to Step 2.10.2.
2.10.1B. Forward and Reverse Primers Already Combined
COMPONENTVOLUME (µl)
PER REACTION
Adaptor Ligated DNA Fragments (Step 2.9.11) 15 µl
(blue) NEBNext Ultra II Q5 Master Mix 25 µl
Index Primer/Universal Primer* 10 µl
Total Volume 50 µl
*NEBNext Oligos must be purchased separately from the library prep kit. Refer to the corresponding NEBNext Oligo kit manual for determining valid barcode combinations.
2.10.2. Set a 100 µl or 200 μl pipette to 40 μl and then pipette the entire volume up and down at least 10 times to mix thoroughly. Perform a quick spin to collect all liquid from the sides of the tube.
21
2.10.3. Place the tube on a thermal cycler and perform PCR amplification using the following PCR cycling conditions:
CYCLE STEP TEMP TIME CYCLES Initial Denaturation 98°C 30 seconds 1
Denaturation 98°C 10 seconds 8*
Annealing/Extension 65°C 75 seconds Final Extension 65°C 5 minutes 1 Hold 4°C ∞
* If your cDNA input is outside the input range of 1 ng–20 ng, adjust the PCR cycle numbers accordingly. We recommend a minimum of 3 PCR cycles for all of the original molecules to make it into the final library. For cDNA yield of 100 pg we recommend testing 12 PCR cycles. For cDNA input of 1 ng–20 ng, the typical Illumina library yield, using 8 PCR cycles, is 100 ng–1 μg.
INPUT IN THE FRAGMENTATION/ END PREP REACTION* # CYCLES REQUIRED
100 pg–1 ng 9–12
1 ng–20 ng 6–9
20 ng–100 ng 3–6
* It Is possible to normalize the cDNA input into the Fragmentation/ End Prep Reaction so that all libraries start out with a similar amount of cDNA.
2.11. Cleanup of PCR Reaction
2.11.1. If stored at 4°C allow the SPRI beads to warm to room temperature for at least 30 minutes before use. Vortex SPRI beads to resuspend well and prepare fresh 80% ethanol.
2.11.2. Add 45 μl (0.9X of sample volume) resuspended beads to the PCR reaction. Mix well by pipetting up and down at least 10 times. Be careful to expel all of the liquid out of the tip during the last mix. Vortexing for 3–5 seconds on high can also be used. If centrifuging samples after mixing, be sure to stop the centrifugation before the beads start to settle out.
2.11.3. Incubate samples on bench top for at least 5 minutes at room temperature.
2.11.4. Place the tube/plate on an appropriate magnetic stand to separate the beads from the supernatant. If necessary, quickly spin the sample to collect the liquid from the sides of the tube or plate wells before placing on the magnetic stand.
2.11.5. After 5 minutes (or when the solution is clear), carefully remove and discard the supernatant. Be careful not to disturb the beads that contain DNA targets (Caution: do not discard the beads).
2.11.6. Add 200 μl of 80% freshly prepared ethanol to the tube/ plate while in the magnetic stand. Incubate at room temperature for 30 seconds, and then carefully remove and discard the supernatant. Be careful not to disturb the beads that contain DNA targets.
2.11.7. Repeat Step 2.11.6 once for a total of two washes. Be sure to remove all visible liquid after the second wash. If necessary, briefly spin the tube/plate, place back on the magnet and remove traces of ethanol.
2.11.8. Air dry the beads for up to 5 minutes while the tube/plate is on the magnetic stand with the lid open.
Caution: Do not over-dry the beads. This may result in lower recovery of DNA. Elute the samples when the beads are still dark brown and glossy looking, but when all visible liquid has evaporated. When the beads turn lighter brown and start to crack they are too dry.
2.11.9. Remove the tube/plate from the magnetic stand. Elute the DNA target from the beads by adding 33 μl of 0.1X TE (dilute 1X TE Buffer 1:10 in water).
2.11.10. Mix well by pipetting up and down 10 times, or on a vortex mixer. Incubate for at least 2 minutes at room temperature. If necessary, quickly spin the sample to collect the liquid from the sides of the tube or plate wells before placing back on the magnetic stand.
2.11.11. Place the tube/plate on the magnetic stand. After 5 minutes (or when the solution is clear), transfer 30 μl to a new PCR tube. Libraries can be stored at -20°C.
22
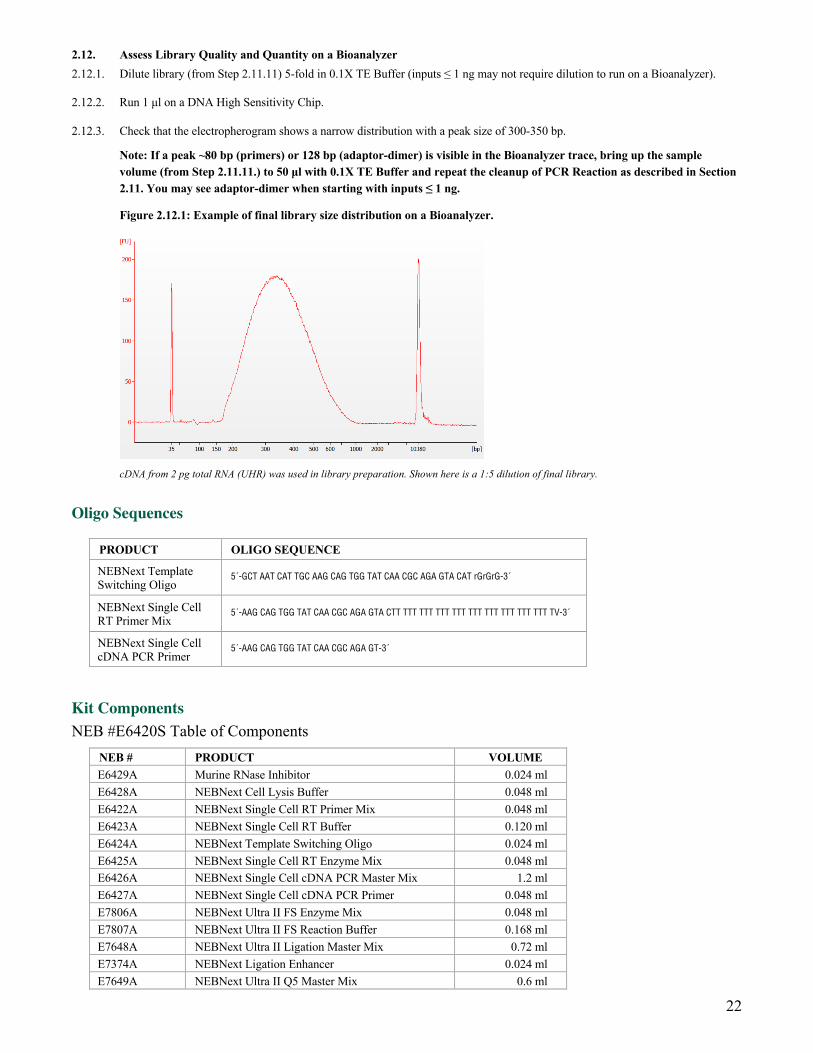
2.12. Assess Library Quality and Quantity on a Bioanalyzer 2.12.1. Dilute library (from Step 2.11.11) 5-fold in 0.1X TE Buffer (inputs ≤ 1 ng may not require dilution to run on a Bioanalyzer).
2.12.2. Run 1 μl on a DNA High Sensitivity Chip.
2.12.3. Check that the electropherogram shows a narrow distribution with a peak size of 300-350 bp.
Note: If a peak ~80 bp (primers) or 128 bp (adaptor-dimer) is visible in the Bioanalyzer trace, bring up the sample volume (from Step 2.11.11.) to 50 μl with 0.1X TE Buffer and repeat the cleanup of PCR Reaction as described in Section 2.11. You may see adaptor-dimer when starting with inputs ≤ 1 ng.
Figure 2.12.1: Example of final library size distribution on a Bioanalyzer.
cDNA from 2 pg total RNA (UHR) was used in library preparation. Shown here is a 1:5 dilution of final library.
Oligo Sequences
PRODUCT OLIGO SEQUENCE
NEBNext Template Switching Oligo
5´-GCT AAT CAT TGC AAG CAG TGG TAT CAA CGC AGA GTA CAT rGrGrG-3´
NEBNext Single Cell RT Primer Mix
5´-AAG CAG TGG TAT CAA CGC AGA GTA CTT TTT TTT TTT TTT TTT TTT TTT TTT TTT TV-3´
NEBNext Single Cell cDNA PCR Primer
5´-AAG CAG TGG TAT CAA CGC AGA GT-3´
Kit Components NEB #E6420S Table of Components
NEB # PRODUCT VOLUME E6429A Murine RNase Inhibitor 0.024 ml E6428A NEBNext Cell Lysis Buffer 0.048 ml E6422A NEBNext Single Cell RT Primer Mix 0.048 ml E6423A NEBNext Single Cell RT Buffer 0.120 ml E6424A NEBNext Template Switching Oligo 0.024 ml E6425A NEBNext Single Cell RT Enzyme Mix 0.048 ml E6426A NEBNext Single Cell cDNA PCR Master Mix 1.2 ml E6427A NEBNext Single Cell cDNA PCR Primer 0.048 ml E7806A NEBNext Ultra II FS Enzyme Mix 0.048 ml E7807A NEBNext Ultra II FS Reaction Buffer 0.168 ml E7648A NEBNext Ultra II Ligation Master Mix 0.72 ml E7374A NEBNext Ligation Enhancer 0.024 ml E7649A NEBNext Ultra II Q5 Master Mix 0.6 ml

23
E6430A NEBNext Bead Reconstitution Buffer 1.08 ml E6431A NEBNext Adaptor Dilution Buffer 0.576 ml E6432A TE Buffer 1.2 ml E6433A Nuclease-free Water 1.44 ml
NEB #E6420L Table of Components NEB # PRODUCT VOLUME E6429AA Murine RNase Inhibitor 0.096 ml E6428AA NEBNext Cell Lysis Buffer 0.192 ml E6422AA NEBNext Single Cell RT Primer Mix 0.192 ml E6423AA NEBNext Single Cell RT Buffer 0.48 ml E6424AA NEBNext Template Switching Oligo 0.096 ml E6425AA NEBNext Single Cell RT Enzyme Mix 0.192 ml E6426AA NEBNext Single Cell cDNA PCR Master Mix 4.8 ml E6427AA NEBNext Single Cell cDNA PCR Primer 0.192 ml E7806AA NEBNext Ultra II FS Enzyme Mix 0.192 ml E7807AA NEBNext Ultra II FS Reaction Buffer 0.672 ml E7648AA NEBNext Ultra II Ligation Master Mix 0.96 ml E7374AA NEBNext Ligation Enhancer 0.096 ml E7649AA NEBNext Ultra II Q5 Master Mix 1.2 ml E6430AA NEBNext Bead Reconstitution Buffer 4.32 ml E6431AA NEBNext Adaptor Dilution Buffer 2.304 ml E6432AA TE Buffer 4.8 ml E6433AA Nuclease-free Water 5.76 ml
CheckList
Section 1: Protocol for Cells
1.1 Sample Reagents Preparation
[ _ ] 1.1.1. Spin NEBNext Single cell RT enzyme mix and Murine RNase inhibitor.
[ _ ] 1.1.2. Thaw, mix and spin other reagents.
[ _ ] 1.1.3. Place all reagents on ice until use, leave NEBNext Cell lysis buffer at room temperature.
[ _ ] 1.1.4. Prepare cells for isolation or remove cells from storage.
1.2. Cell Collection and Lysis:
[ _ ] 1.2.1A. If carryover volume from cell isolation is < 1 µl:
[ _ ] 1.2.1A.1. Prepare 1X Cell Lysis Buffer: (0.5 µl NEBNext 10X Cell Lysis Buffer, 0.25 µl Murine RNase Inhibitor, 4.25 µl Nuclease free water).
[ _ ] 1.2.1A.2. Mix by pipetting 10 times.
[ _ ] 1.2.1A.3. Dispense cells into 5 µl of 1X Cell Lysis Buffer from Step 1.2.1A.2. (Cells dispensed in the lysis buffer can be flash frozen and stored at -80°C for future use).
[ _ ] 1.2.1A.4. Incubate for 5 minutes at room temperature.
[ _ ] 1.2.1B. If carryover volume from cell isolation is ≥ 1 µl:
[ _ ] 1.2.1B.1. Dilute Cell Lysis Buffer: (0.8 µl NEBNext 10X Cell Lysis Buffer, 0.4 µl Murine RNase Inhibitor, variable amount of Nuclease free water, to 8 µl accounting for the carryover volume from cell isolation).
[ _ ] 1.2.1B.2. Mix by pipetting 10 times.
24
[ _ ] 1.2.1B.3. Dispense cells into diluted Cell Lysis Buffer from Step 1.2.1B.2. (Cells dispensed in the lysis buffer can be flash frozen and stored at -80°C for future use).
[ _ ] 1.2.1B.4. Incubate for 5 minutes at room temperature.
1.3. Primer Annealing for First Strand Synthesis
[ _ ] 1.3.1A. If carryover volume from cell isolation is < 1 µl:
[ _ ] 1.3.1A.1. To lysed cells (5 µl from Step 1.2.1A.4), add 1 µl Single Cell RT Primer Mix, 3 µl Nuclease-free water, to 9 µl. Mix by pipetting 10 times.
[ _ ] 1.3.1B. If carryover volume from cell isolation is ≥ 1 µl:
[ _ ] 1.3.1A.1. To lysed cells (8 µl from Step 1.2.1B.4), add 1 µl Single Cell RT Primer Mix to 9 µl. Mix by pipetting 10 times.
[ _ ] 1.3.2. Incubate for 5 minutes in thermal cycler at 70°C with heated lid at 105°C, then hold at 4°C.
[ _ ] 1.3.3. During the annealing step, prepare the components for the following step (below).
1.4. Reverse Transcription and Template Switching
[ _ ] 1.4.1. Prepare RT Reaction Mix (5 µl NEBNext Single Cell RT Buffer, 1 µl NEBNext Template Switching Oligo, 3 µl Nuclease-free water, 2 µl NEBNext Single Cell RT Enzyme Mix, to 11 µl).
[ _ ] 1.4.2. Mix by pipetting 10 times.
[ _ ] 1.4.3. Combine reaction mix (above) with the annealed sample (9 µl from 1.3.2.) by pipetting 10 times.
[ _ ] 1.4.4. Place tubes in thermal cycler with heated lid at 105°C, incubate for 90 minutes at 42°C, 10 minutes at 70°C, hold at 4°C.
1.5. cDNA Amplification by PCR
[ _ ] 1.5.1. To the first strand cDNA (20 µl from 1.4.4), add 50 µl NEBNext Single Cell cDNA PCR Master Mix, 2 µl NEBNext Single Cell cDNA PCR Primer, 28 µl Nuclease-free water.
[ _ ] 1.5.2. Mix by pipetting 10 times.
[ _ ] 1.5.3. In thermal cycler with heated lid at 105°C, cycle with the following condition: Initial Duration 98°C for 45 seconds, 1 cycle; Denaturation 98°C for 10 seconds, Annealing 62°C for 15 seconds, Extension 72°C for 3 minutes, 11–21 cycles; Final extension 72°C for 5 minutes; hold 4°C.
1.6. Cleanup of Amplified cDNA
[ _ ] 1.6.1. Allow the NEBNext Bead Reconstitution Buffer and SPRI Beads (if stored at 4°C) to warm to room temperature for at least 30 minutes. Vortex beads to resuspend well and prepare fresh 80% ethanol.
[ _ ] 1.6.2. Add 60 µl (0.6X of sample volume) of beads to amplified cDNA mixture and mix by pipetting 10 times.
[ _ ] 1.6.3. Incubate for 5 minutes at room temperature.
[ _ ] 1.6.4. Place tubes on magnetic stand.
[ _ ] 1.6.5 Wait 5 minutes and remove supernatant (keep the beads).
[ _ ] 1.6.6. On magnetic stand, add 200 µl 80% ethanol, wait 30 seconds and remove.
[ _ ] 1.6.7. Repeat Step 1.6.6. once.
[ _ ] 1.6.8. Air dry the beads for 5 minutes, do not overdry.
[ _ ] 1.6.9. Remove from magnet. Add 50 µl of 0.1X TE.
[ _ ] 1.6.10. Mix by pipetting 10 times and incubate for 2 minutes.
[ _ ] 1.6.11. Add 45 µl NEBNext Bead Reconstitution Buffer (warmed to room temperature) to cDNA and bead mixture and mix by pipetting 10 times (skipping may reduce cDNA purity).
25
[ _ ] 1.6.12. Incubate for 5 minutes at room temperature.
[ _ ] 1.6.13. Place tubes on magnetic stand.
[ _ ] 1.6.14. Wait 5 minutes and remove supernatant (keep the beads).
[ _ ] 1.6.15. On magnetic stand, add 200 µl 80% ethanol, wait 30 seconds and remove.
[ _ ] 1.6.16. Repeat Step 1.6.15 once.
[ _ ] 1.6.17. Air dry the beads for 5 minutes, do not overdry.
[ _ ] 1.6.18. Remove tube from magnet and add 33 µl of 1X TE and incubate for 2 minutes.
[ _ ] 1.6.19. Mix by pipetting and briefly spin.
[ _ ] 1.6.20. Place tubes on magnetic stand. Wait 5 minutes and transfer 30 µl to fresh tube by pipetting, avoiding beads.
1.7. Run cDNA on Agilent Bioanalyzer for quantity and quality assessment
1.8. Fragmentation/End Prep
[ _ ] 1.8.1. Thaw, mix and spin NEBNext Ultra II FS Reaction Buffer.
[ _ ] 1.8.2. Gently vortex enzyme mix for 5–8 seconds and place on ice.
[ _ ] 1.8.3. To amplified cDNA (26 µl from Step 1.6.15), add 7 µl NEBNext Ultra II FS Reaction Buffer, 2 µl NEBNext Ultra II FS Enzyme Mix, to 35 µl.
[ _ ] 1.8.4. Vortex 5 seconds then briefly spin.
[ _ ] 1.8.5. Incubate in thermal cycler with heated lid at ≥ 75°C for 25 minutes at 37°C, followed by 30 minutes at 65°C, hold at 4°C.
1.9. Adaptor Ligation
[ _ ] 1.9.1. Dilute adaptor for Illumina by 25-fold with NEBNext Adaptor Dilution Buffer
[ _ ] 1.9.2. Mix Ultra II Ligation Master Mix
[ _ ] 1.9.3. To FS Reaction Mixture (35 µl from Step 1.8.5), add 30 µl NEBNext Ultra II Ligation Master Mix, 1 µl Ligation Enhancer, 2.5 µl Adaptor for Illumina (diluted 1:25), to 68.5 µl. The adaptor should be added separately to each sample, do not premix with Ligation Master Mix and Ligation Enhancer.
[ _ ] 1.9.4. Mix by pipetting 10 times.
[ _ ] 1.9.5. Incubate for 15 minutes at 20°C (heated lid off).
[ _ ] 1.9.6. Add 3 µl USER Enzyme.
[ _ ] 1.9.7. Mix well and incubate for 15 minutes at 37°C (heated lid ≥ 47°C).
1.10. Cleanup of Adaptor-ligated DNA
[ _ ] 1.10.1. If beads are stored at 4°C, allow the beads to warm to room temperature for at least 30 minutes. Vortex beads to resuspend well and prepare fresh 80% ethanol.
[ _ ] 1.10.2. Add 57 µl (0.8X of sample volume) of beads to sample and mix by pipetting 10 times.
[ _ ] 1.10.3. Incubate for 5 minutes at room temperature.
[ _ ] 1.10.4. Place tube on magnetic stand.
[ _ ] 1.10.5. Wait for 5 minutes and remove supernatant (keep the beads).
[ _ ] 1.10.6. On magnet, add 200 µl 80% ethanol, wait 30 seconds and remove.
[ _ ] 1.10.7. Repeat Step 1.10.6. once.
[ _ ] 1.10.8. Air dry beads for 5 minutes, do not overdry.
[ _ ] 1.10.9. Remove from magnet and add 17 µl 0.1X TE.

26
[ _ ] 1.10.10. Mix by pipetting 10 times. Incubate for 2 minutes at room temperature.
[ _ ] 1.10.11. Place tubes on magnet. Wait 5 minutes and transfer 15 µl to a new tube.
[ _ ] 1.10.12. Proceed to 1.11.
1.11. PCR Enrichment of Adaptor-ligated DNA
[ _ ] 1.11.1. Add to Adaptor Ligated DNA Fragments (15 µl from Step 1.10.11.), (Choose A for any NEBNext oligo kit where index primers are supplied in tubes OR Choose B if primers are supplied premixed in 96-well format).
[ _ ] 1.11.1A. Primers Not Combined:
[ _ ] 1.10.1A.1. 25 µl NEBNext Ultra II Q5 Master Mix, 5 µl Index Primer/i7 Primer, 5 µl Universal PCR Primer/i5 Primer, to 15 µl Adaptor Ligated DNA Fragments.
[ _ ] 1.11.1B. Primers Already Combined:
[ _ ] 1.10.1B.1. 25 µl NEBNext Ultra II Q5 Master Mix, 10 µl Index/Universal Primer, to 15 µl Adaptor Ligated DNA Fragments.
[ _ ] 1.11.2. Mix by pipetting 10 times, quick spin.
[ _ ] 1.11.3. In thermal cycler with heated lid at 105°C, cycle with the following condition: Initial Duration: 98°C for 30 seconds for 1 cycle, Denaturation 98°C for 10 seconds and Annealing/Extension 65°C for 75 seconds for 8 cycles, Final extension 65°C for 5 minutes for 1 cycle, hold at 4°C.
1.12. Cleanup of PCR Reaction
[ _ ] 1.12.1. If beads are stored at 4°C, allow the beads to warm to room temperature for at least 30 minutes. Vortex beads to resuspend well and prepare fresh 80% ethanol.
[ _ ] 1.12.2. Add 45 µl (0.9X of sample volume) of beads to sample and mix by pipetting 10 times.
[ _ ] 1.12.3. Incubate for 5 minutes at room temperature.
[ _ ] 1.12.4. Place tubes on magnetic stand.
[ _ ] 1.12.5. Wait for 5 minutes and remove supernatant (keep the beads).
[ _ ] 1.12.6. On magnetic stand, add 200 µl 80% ethanol, wait 30 seconds and remove.
[ _ ] 1.12.7. Repeat Step 1.12.6. once.
[ _ ] 1.12.8. Air dry beads for 5 minutes, do not overdry.
[ _ ] 1.12.9. Remove from magnetic stand and add 33 µl of 0.1X TE.
[ _ ] 1.12.10. Mix by pipetting 10 times and incubate for 2 minutes.
[ _ ] 1.12.11. Place tubes on magnetic stand. Wait for 5 minutes and transfer 30 µl to new tube.
1.13. Assess Library Quality on a Bioanalyzer
[ _ ] 1.13.1. Dilute library 1-5 fold.
[ _ ] 1.13.2. Run 1 µl on DNA High Sensitivity Chip.
[ _ ] 1.13.3. Check electropherogram for library quality and quantity.
27
CheckList
Section 2: Protocol for Low Input RNA
2.1. Sample Reagents Preparation
[ _ ] 2.1.1. Spin NEBNext Single Cell RT Enzyme Mix.
[ _ ] 2.1.2. Thaw, mix and spin other reagents.
[ _ ] 2.1.3. Place all reagents on ice until use, leave NEBNext Cell Lysis Buffer at room temperature.
[ _ ] 2.1.4. Thaw total RNA on ice.
2.2. Primer Annealing for First Strand Synthesis:
[ _ ] 2.2.1. Prepare annealing Mix on ice then mix by pipetting 10 times.
[ _ ] 2.2.1A. If RNA input is < 5 ng:
[ _ ] 2.2.1A.1. To 8 µl total RNA add, 1 µl Single Cell RT Primer Mix, Nuclease-free water (variable), to 9 µl.
[ _ ] 2.2.1B. If RNA input is ≥ 5 ng:
[ _ ] 2.2.1B.1. To 7 µl total RNA add, 2 µl Single Cell RT Primer Mix, Nuclease-free water (variable), to 9 µl.
[ _ ] 2.2.2. Mix by pipetting 10 times
[ _ ] 2.2.3. Incubate for 5 minutes in thermal cycler at 70°C with heated lid at 105°C, then hold at 4°C.
2.3. Reverse Transcription and Template Switching
[ _ ] 2.3.1. Prepare RT reaction mix (5 µl NEBNext Single Cell RT Buffer, 1 µl NEBNext Template Switching Oligo, 3 µl Nuclease-free water, 2 µl NEBNext Single Cell RT Enzyme Mix, to 11 µl).
[ _ ] 2.3.2. Mix by pipetting.
[ _ ] 2.3.3. Combine reaction mix (above) with the annealed sample (9 µl from Step 2.2.3) by pipetting 10 times.
[ _ ] 2.3.4. Place tubes in thermal cycler with heated lid at 105°C, incubate for 90 minutes at 42°C, 10 minutes at 70°C, hold at 4°C.
2.4. cDNA Amplification by PCR
[ _ ] 2.4.1. To the first strand cDNA (20 µl from 2.3.4), add 0.5 µl NEBNext Cell Lysis Buffer (10X), 50 µl NEBNext Single Cell cDNA PCR Master Mix, 2 µl NEBNext Single Cell cDNA PCR Primer, 27.5 µl Nuclease-free water.
[ _ ] 2.4.2. Mix by pipetting 10 times.
[ _ ] 2.4.3. In thermal cycler with heated lid at 105°C, cycle with the following condition: Initial Duration 98°C for 45 seconds, 1 cycle; Denaturation 98°C for 10 seconds, Annealing 62°C for 15 seconds, Extension 72°C for 3 minutes, 7–21 cycles; Final extension 72°C for 5 minutes; hold 4°C.
2.5. Cleanup of Amplified cDNA
[ _ ] 2.5.1. Allow the NEBNext Bead Reconstitution Buffer and SPRI Beads (if stored at 4°C) to warm to room temperature for at least 30 minutes. Vortex beads to resuspend well and prepare fresh 80% ethanol.
[ _ ] 2.5.2. Add 60 µl (0.6X of sample volume) of beads to cDNA mixture and mix 10 times by pipetting.
[ _ ] 2.5.3. Incubate for 5 minutes at room temperature.
[ _ ] 2.5.4. Place tubes on magnetic stand.
[ _ ] 2.5.5. Wait for 5 minutes and remove supernatant (keep the beads).
[ _ ] 2.5.6. On magnetic stand, add 200 µl 80% ethanol, wait 30 seconds and remove.
[ _ ] 2.5.7. Repeat 2.5.6 once.
[ _ ] 2.5.8. Air dry the beads for 5 minutes, do not overdry.
28
[ _ ] 2.5.9. Remove from magnet. Add 50 µl of 0.1X TE.
[ _ ] 2.5.10. Mix by pipetting 10 times and incubate for 2 minutes.
[ _ ] 2.5.11. Add 45 µl NEBNext Bead Reconstitution Buffer (warmed to room temperature) to cDNA and bead mixture (skipping may reduce cDNA purity).
[ _ ] 2.5.12. Incubate for 5 minutes at room temperature.
[ _ ] 2.5.13. Place tubes on magnetic stand.
[ _ ] 2.5.14. Wait 5 minutes and remove supernatant (keep the beads).
[ _ ] 2.5.15. On the magnetic stand, add 200 µl 80% ethanol, wait 30 seconds and remove.
[ _ ] 2.5.16. Repeat Step 2.5.15. once.
[ _ ] 2.5.17. Air dry the beads for 5 minutes, do not overdry.
[ _ ] 2.5.18. Remove tube from magnet and add 33 µl of 1X TE and incubate for 2 minutes.
[ _ ] 2.5.19. Mix by pipetting 10 times and briefly spin.
[ _ ] 2.5.20. Place tubes on magnetic stand. Wait 5 minutes and transfer 30 µl to fresh tube by pipetting, avoiding the beads.
2.6. Run cDNA on Agilent Bioanalyzer for quantity and quality assessment.
2.7. Fragmentation/End Prep
[ _ ] 2.7.1. Thaw, mix and spin NEBNext Ultra II FS Reaction Buffer.
[ _ ] 2.7.2. Gently vortex enzyme mix 5-8 seconds and place on ice.
[ _ ] 2.7.3. To amplified cDNA (26 µl from Step 2.5.15), add 7 µl NEBNext Ultra II FS Reaction Buffer, 2 µl NEBNext Ultra II FS Enzyme Mix, to 35 µl.
[ _ ] 2.7.4. Vortex 5 seconds then briefly spin.
[ _ ] 2.7.5. Incubate in thermal cycler with heated lid at ≥ 75°C for 25 minutes at 37°C, followed by 30 minutes at 65°C, hold at 4°C.
2.8. Adaptor Ligation
[ _ ] 2.8.1. Dilute adaptor for Illumina by 25-fold with NEBNext Adaptor Dilution Buffer.
[ _ ] 2.8.2. Mix Ultra II Ligation Master Mix.
[ _ ] 2.8.3. To FS Reaction Mixture (35 µl from Step 2.7.5), add 30 µl NEBNext Ultra II Ligation Master Mix, 1 µl Ligation Enhancer, 2.5 µl Adaptor for Illumina (diluted 1:25), to 68.5 µl. The adaptor should be added separately to each sample, do not premix with Ligation Master Mix and Ligation Enhancer.
[ _ ] 2.8.4. Mix by pipetting 10 times.
[ _ ] 2.8.5. Incubate for 15 minutes at 20°C (heated lid off).
[ _ ] 2.8.6. Add 3 µl USER Enzyme.
[ _ ] 2.8.7. Mix well and incubate for 15 minutes at 37°C (heated lid ≥ 47°C).
2.9. Cleanup of Adaptor-ligated DNA
[ _ ] 2.9.1. If beads are stored at 4°C, allow the beads to warm to room temperature for atleast 30 minutes. Vortex beads to resuspend well and prepare fresh 80% ethanol.
[ _ ] 2.9.2. Add 57 µl (0.8X of sample volume) of beads to sample and mix by pipetting 10 times.
[ _ ] 2.9.3. Incubate for 5 minutes at room temperature.
[ _ ] 2.9.4. Place tube on magnetic stand.
[ _ ] 2.9.5. Wait for 5 minutes and remove supernatant (keep the beads).
29
[ _ ] 2.9.6. On magnet, add 200 µl 80% ethanol, wait 30 seconds and remove.
[ _ ] 2.9.7. Repeat Step 2.9.6 once.
[ _ ] 2.9.8. Air dry beads for 5 minutes, do not overdry.
[ _ ] 2.9.9. Remove from magnet and add 17 µl 0.1X TE.
[ _ ] 2.9.10. Mix by pipetting 10 times. Incubate 2 minutes at room temperature.
[ _ ] 2.9.11. Place tubes on magnet. Wait 5 minutes and transfer 15 µl to a new tube.
[ _ ] 2.9.12. Proceed to 2.10.
2.10. PCR Enrichment of Adaptor-ligated DNA
[ _ ] 2.10.1. Add to Adaptor Ligated DNA Fragments (15 µl from Step 2.9.11.), (Choose A for any NEBNext oligo kit where index primers are supplied in tubes OR Choose B if primers are supplied premixed in 96-well format).
[ _ ] 2.10.1A. Primers Not Combined:
[ _ ] 2.10.1A.1. 25 µl Ultra II Q5 Master Mix, 5 µl Index Primer/i7 Primer, 5 µl Universal PCR Primer/i5 Primer, 15 µl Adaptor Ligated DNA Fragments.
[ _ ] 2.10.1B. Primers Already Combined:
[ _ ] 2.10.1B.1. 25 µl Ultra II Q5 Master Mix, 10 µl Index/Universal Primer, 15 µl Adaptor Ligated DNA Fragments.
[ _ ] 2.10.2. Mix by pipetting 10 times, quick spin.
[ _ ] 2.10.3. In thermal cycler with heated lid at 105°C, cycle with the following condition: Initial Duration: 98°C for 30 seconds for 1 cycle, Denaturation 98°C for 10 seconds and Annealing/Extension 65°C for 75 seconds for 8 cycles, Final extension 65°C for 5 minutes for 1 cycle, hold at 4°C.
2.11. Cleanup of PCR Reaction
[ _ ] 2.11.1. If beads are stored at 4°C, allow the beads to warm to room temperature for atleast 30 minutes. Vortex beads to resuspend well and prepare fresh 80% ethanol.
[ _ ] 2.11.2. Add 45 µl (0.9X of sample volume) of beads to sample and mix by pipetting 10 times.
[ _ ] 2.11.3. Incubate for 5 minutes at room temperature.
[ _ ] 2.11.4. Place tubes on magnetic stand.
[ _ ] 2.11.5. Wait 5 minutes and remove supernatant (keep the beads).
[ _ ] 2.11.6. On magnetic stand, add 200 µl 80% ethanol, wait 30 seconds and remove.
[ _ ] 2.11.7. Repeat Step 2.11.6 once.
[ _ ] 2.11.8. Air dry beads for 5 minutes, do not overdry.
[ _ ] 2.11.9. Remove from magnetic stand and add 33 µl of 0.1X TE.
[ _ ] 2.11.10. Mix by pipetting 10 times and incubate 2 minutes.
[ _ ] 2.11.11. Place tubes on magnetic stand. Wait 5 minutes and transfer 30 µl to new tube.
2.12. Assess Library Quality on a Bioanalyzer
[ _ ] 2.12.1. Dilute library 1–5 fold.
[ _ ] 2.12.2. Run 1 µl on DNA High Sensitivity Chip.
[ _ ] 2.12.3. Check electropherogram for library quality and quantity.
30
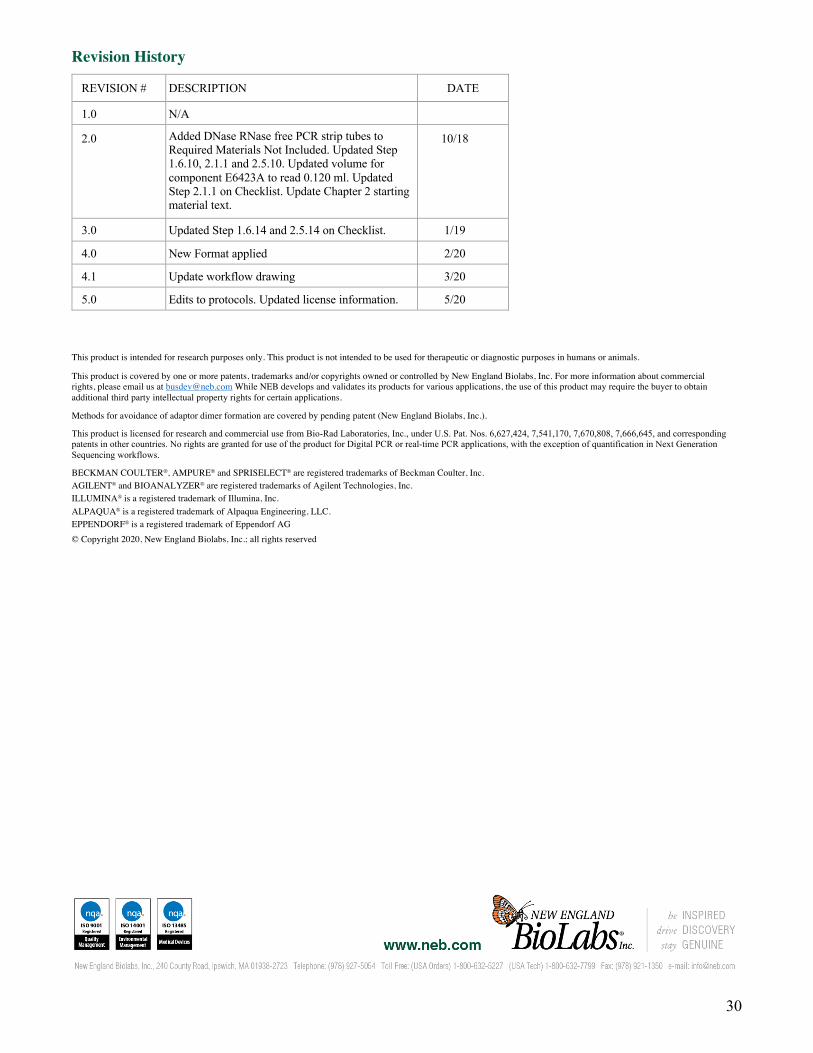
Revision History
REVISION # DESCRIPTION DATE
1.0 N/A
2.0
Added DNase RNase free PCR strip tubes to Required Materials Not Included. Updated Step 1.6.10, 2.1.1 and 2.5.10. Updated volume for component E6423A to read 0.120 ml. Updated Step 2.1.1 on Checklist. Update Chapter 2 starting material text.
10/18
3.0 Updated Step 1.6.14 and 2.5.14 on Checklist. 1/19
4.0 New Format applied 2/20
4.1 Update workflow drawing 3/20
5.0 Edits to protocols. Updated license information. 5/20 This product is intended for research purposes only. This product is not intended to be used for therapeutic or diagnostic purposes in humans or animals.
This product is covered by one or more patents, trademarks and/or copyrights owned or controlled by New England Biolabs, Inc. For more information about commercial rights, please email us at [email protected] While NEB develops and validates its products for various applications, the use of this product may require the buyer to obtain additional third party intellectual property rights for certain applications.
Methods for avoidance of adaptor dimer formation are covered by pending patent (New England Biolabs, Inc.).
This product is licensed for research and commercial use from Bio-Rad Laboratories, Inc., under U.S. Pat. Nos. 6,627,424, 7,541,170, 7,670,808, 7,666,645, and corresponding patents in other countries. No rights are granted for use of the product for Digital PCR or real-time PCR applications, with the exception of quantification in Next Generation Sequencing workflows.
BECKMAN COULTER®, AMPURE® and SPRISELECT® are registered trademarks of Beckman Coulter, Inc. AGILENT® and BIOANALYZER® are registered trademarks of Agilent Technologies, Inc. ILLUMINA® is a registered trademark of Illumina, Inc. ALPAQUA® is a registered trademark of Alpaqua Engineering, LLC. EPPENDORF® is a registered trademark of Eppendorf AG © Copyright 2020, New England Biolabs, Inc.; all rights reserved