Embed Size (px)
Citation preview

Module 1 (ICT) is a theory module and is broken up into six sections, as represented by the six buttons on the welcome
screen of the interactive retention exercises. (See the illustration of this welcome screen on the bottom of page 5.)
This electronic welcome screen will open automatically when you insert your CD into the CD drive of your computer
or when you double-click the gm.exe file on the CD.
2. The first questions appear, and you are asked to click
the appropriate True or False button for each of the
four statements in this screen.
Other Module 1 Retention Exercises
Complete each of the other electronic retention exercises
after completing the appropriate section in this module.
8. Click the Next button to navigate from question screen
to question screen in order to see how each of your
answers was marked.
9. Close the exercise screen by clicking the X (Close button)
in the top right corner of the Web page window.
ELECTRONIC RETENTION EXERCISES
1. See the bottom of page 5 for getting started on these
interactive theory exercises. As ‘Hardware’ is discussed
in the first section of Module 1 of ECDL Syllabus 5,
click the Hardware button.
Navigating through the ‘Hardware’ Electronic Retention Exercise
3. You can do the following by using the buttons in the
bottom right of the screen:
If you want to preview the correct answers, you can
cheat by clicking the Cheat button.
If you want to see how you have answered each
screen of questions, you can mark your answers as
you proceed by clicking the Mark button.
If you do not wish to use the Cheat or Mark buttons,
you can navigate from screen to screen by continuing
to click the Next button until you have completed
the ‘Hardware’ section.
When you have completed the exercise, all your answers
will be marked, and you will be able to navigate through
all the answers in order to determine which questions you
answered correctly and incorrectly.
4. To the only other type of question in these
electronic exercises you will need to click
a specified number of Select buttons.
5. Continue clicking the Next button until
you have answered all the questions.
6. When you have answered all the questions,
click the Yes. Finished button.
7. A results window appears.
The purpose of these exercises is to help the candidate
retain the information already presented in this book
relating to Module 1 of ECDL Syllabus 5.
These exercises are not ECDL Certification tests.
See Exercise Disclaimer on page 7.
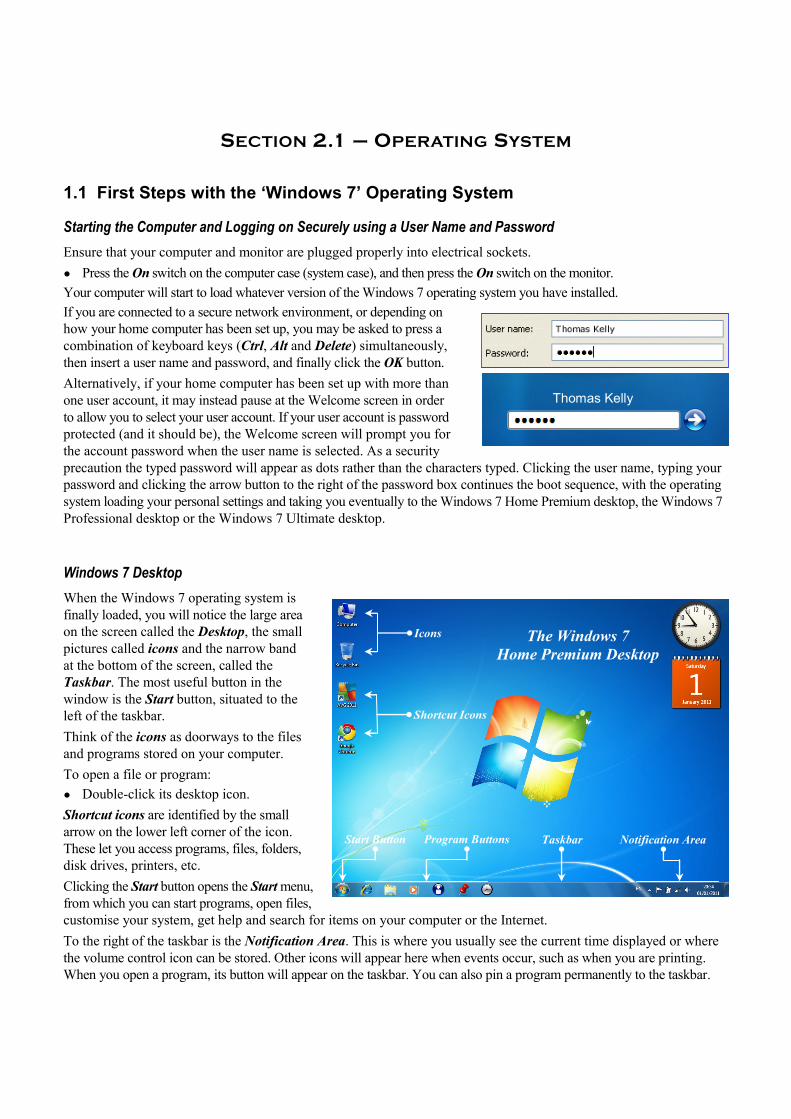
Windows 7 Desktop
When the Windows 7 operating system is
finally loaded, you will notice the large area
on the screen called the Desktop, the small
pictures called icons and the narrow band
at the bottom of the screen, called the
Taskbar. The most useful button in the
window is the Start button, situated to the
left of the taskbar.
Think of the icons as doorways to the files
and programs stored on your computer.
To open a file or program:
● Double-click its desktop icon.
Shortcut icons are identified by the small
arrow on the lower left corner of the icon.
These let you access programs, files, folders,
disk drives, printers, etc.
Clicking the Start button opens the Start menu,
from which you can start programs, open files,
customise your system, get help and search for items on your computer or the Internet.
To the right of the taskbar is the Notification Area. This is where you usually see the current time displayed or where
the volume control icon can be stored. Other icons will appear here when events occur, such as when you are printing.
When you open a program, its button will appear on the taskbar. You can also pin a program permanently to the taskbar.
SECTION 2.1 – OPERATING SYSTEM
The Windows 7
Home Premium Desktop
Shortcut Icons
Taskbar Start Button
Icons
Program Buttons Notification Area
1.1 First Steps with the ‘Windows 7’ Operating System
Starting the Computer and Logging on Securely using a User Name and Password
Ensure that your computer and monitor are plugged properly into electrical sockets.
● Press the On switch on the computer case (system case), and then press the On switch on the monitor.
Your computer will start to load whatever version of the Windows 7 operating system you have installed.
If you are connected to a secure network environment, or depending on
how your home computer has been set up, you may be asked to press a
combination of keyboard keys (Ctrl, Alt and Delete) simultaneously,
then insert a user name and password, and finally click the OK button.
Alternatively, if your home computer has been set up with more than
one user account, it may instead pause at the Welcome screen in order
to allow you to select your user account. If your user account is password
protected (and it should be), the Welcome screen will prompt you for
the account password when the user name is selected. As a security
precaution the typed password will appear as dots rather than the characters typed. Clicking the user name, typing your
password and clicking the arrow button to the right of the password box continues the boot sequence, with the operating
system loading your personal settings and taking you eventually to the Windows 7 Home Premium desktop, the Windows 7
Professional desktop or the Windows 7 Ultimate desktop.
Thomas Kelly
SECTION 3.1 – USING THE APPLICATION
1.1 Working with Documents
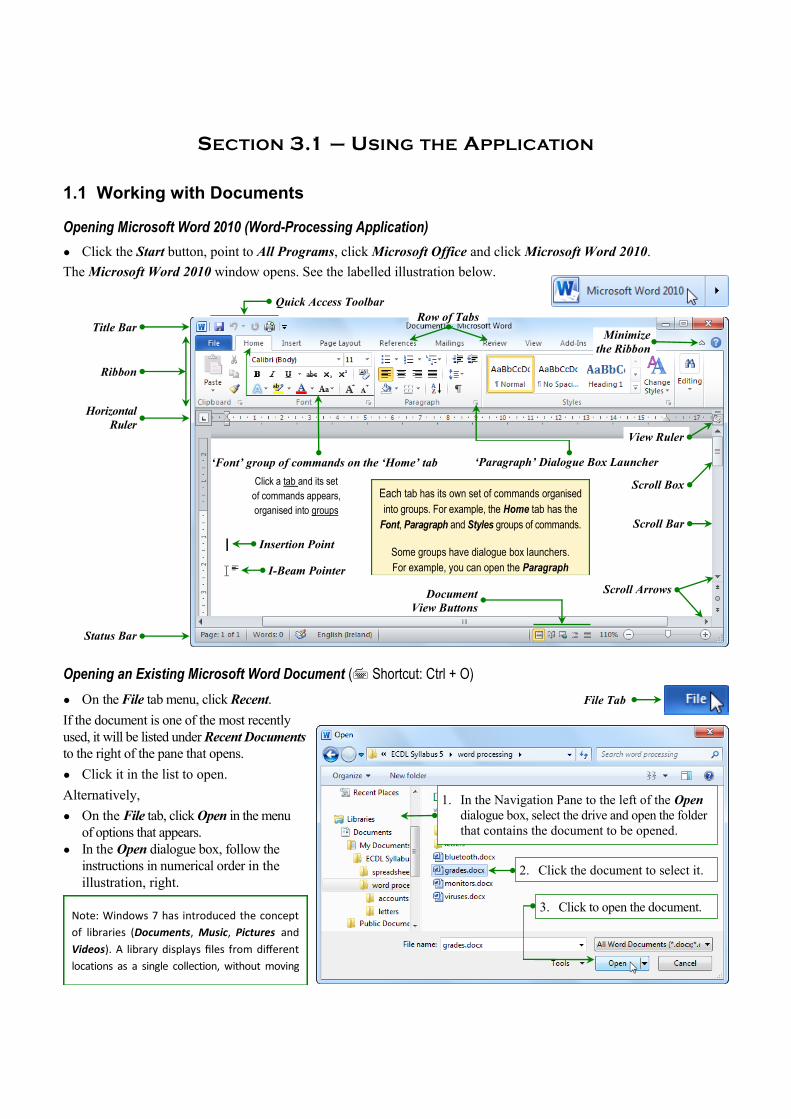
Opening Microsoft Word 2010 (Word-Processing Application)
● Click the Start button, point to All Programs, click Microsoft Office and click Microsoft Word 2010.
The Microsoft Word 2010 window opens. See the labelled illustration below.
Opening an Existing Microsoft Word Document ( Shortcut: Ctrl + O)
● On the File tab menu, click Recent.
If the document is one of the most recently
used, it will be listed under Recent Documents
to the right of the pane that opens.
● Click it in the list to open.
Alternatively,
● On the File tab, click Open in the menu
of options that appears.
● In the Open dialogue box, follow the
instructions in numerical order in the
illustration, right.
Note: Windows 7 has introduced the concept
of libraries (Documents, Music, Pictures and
Videos). A library displays files from different
locations as a single collection, without moving
1. In the Navigation Pane to the left of the Open
dialogue box, select the drive and open the folder
that contains the document to be opened.
2. Click the document to select it.
3. Click to open the document.
File Tab
Horizontal
Ruler
Status Bar
Document
View Buttons
Insertion Point
I-Beam Pointer
Scroll Bar
Scroll Box
Scroll Arrows
Ribbon
Each tab has its own set of commands organised
into groups. For example, the Home tab has the
Font, Paragraph and Styles groups of commands.
Some groups have dialogue box launchers.
For example, you can open the Paragraph
Click a tab and its set
of commands appears,
organised into groups
‘Paragraph’ Dialogue Box Launcher
Title Bar
Quick Access Toolbar
‘Font’ group of commands on the ‘Home’ tab
Minimize
the Ribbon
View Ruler
Row of Tabs
Exercise 1A
1. Open Microsoft Word.
2. Locate the bluetooth.docx and infrared.docx document files on your disk and open them.
3. Practise using the taskbar and the Word Window to switch between the open documents.
4. Close the open documents and close Microsoft Word.
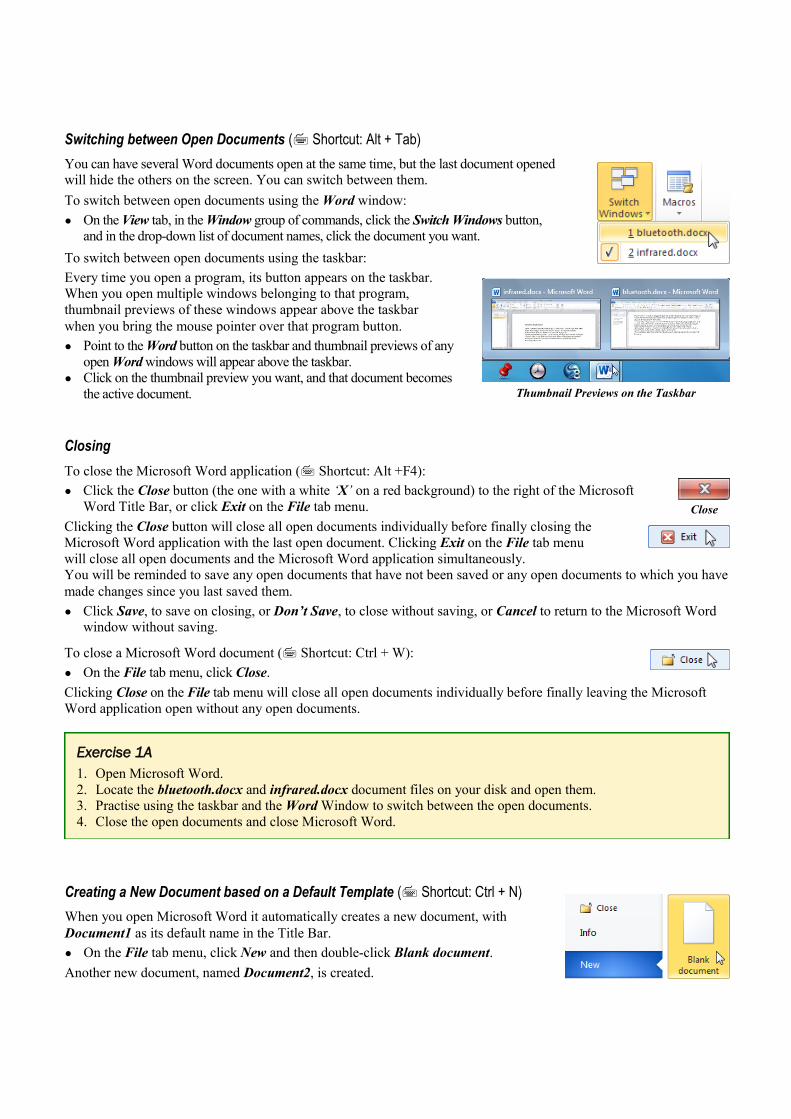
Switching between Open Documents ( Shortcut: Alt + Tab)
You can have several Word documents open at the same time, but the last document opened
will hide the others on the screen. You can switch between them.
To switch between open documents using the Word window:
● On the View tab, in the Window group of commands, click the Switch Windows button,
and in the drop-down list of document names, click the document you want.
To switch between open documents using the taskbar:
Every time you open a program, its button appears on the taskbar.
When you open multiple windows belonging to that program,
thumbnail previews of these windows appear above the taskbar
when you bring the mouse pointer over that program button.
● Point to the Word button on the taskbar and thumbnail previews of any
open Word windows will appear above the taskbar.
● Click on the thumbnail preview you want, and that document becomes
the active document. Thumbnail Previews on the Taskbar
Closing
To close the Microsoft Word application ( Shortcut: Alt +F4):
● Click the Close button (the one with a white ‘X’ on a red background) to the right of the Microsoft
Word Title Bar, or click Exit on the File tab menu.
Clicking the Close button will close all open documents individually before finally closing the
Microsoft Word application with the last open document. Clicking Exit on the File tab menu
will close all open documents and the Microsoft Word application simultaneously.
You will be reminded to save any open documents that have not been saved or any open documents to which you have
made changes since you last saved them.
● Click Save, to save on closing, or Don’t Save, to close without saving, or Cancel to return to the Microsoft Word
window without saving.
To close a Microsoft Word document ( Shortcut: Ctrl + W):
● On the File tab menu, click Close.
Clicking Close on the File tab menu will close all open documents individually before finally leaving the Microsoft
Word application open without any open documents.
Close
Creating a New Document based on a Default Template ( Shortcut: Ctrl + N)
When you open Microsoft Word it automatically creates a new document, with
Document1 as its default name in the Title Bar.
● On the File tab menu, click New and then double-click Blank document.
Another new document, named Document2, is created.
SECTION 3.2 – DOCUMENT CREATION
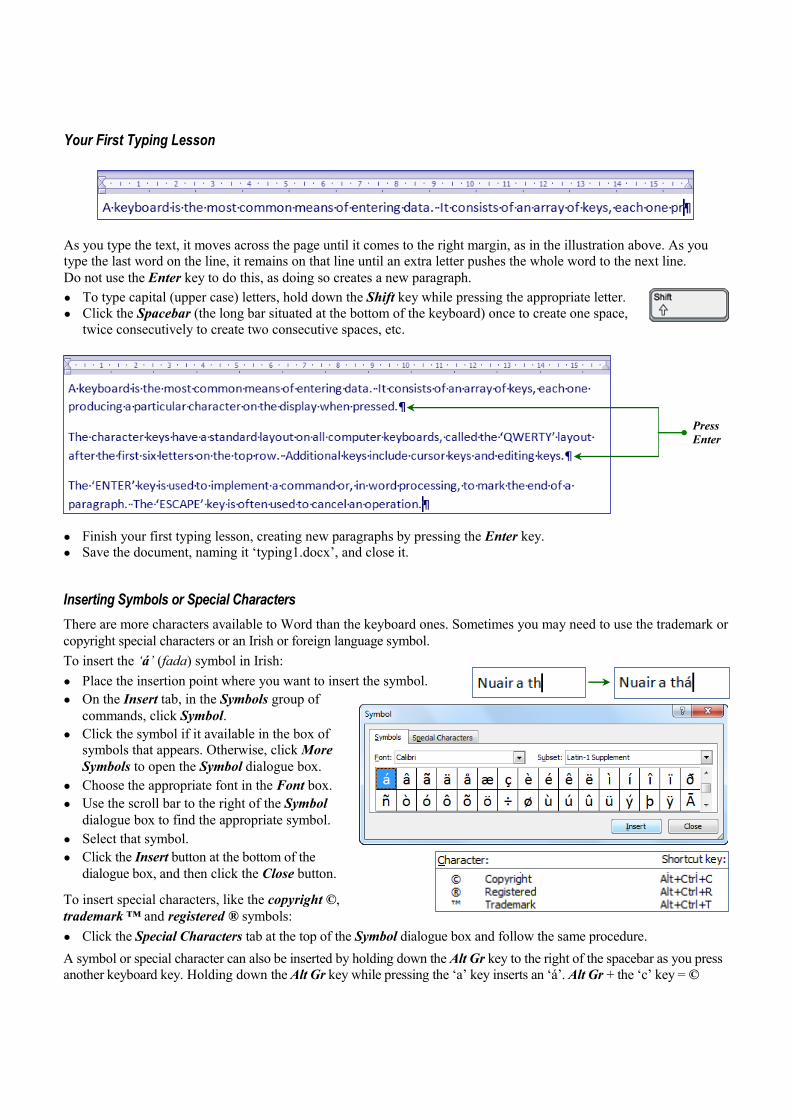
Entering Text into a Document
● Open Microsoft Word.
When you open Microsoft Word a new document is created, in which you can start inserting text. The insertion point
is blinking in the top left corner of the page, inviting you to start typing.
You will notice a space between the insertion point and the left edge of the page. This space is the left margin. Microsoft
Word opens with its own default left, right, top and bottom margins.
The illustration above shows the top of a blank document in Print Layout View. The white section of the ruler shows
the horizontal text area. The darker sections of the ruler show the left and right margins.
Horizontal Text Area
Right Margin Left Margin Insertion Point
2.1 Entering Text
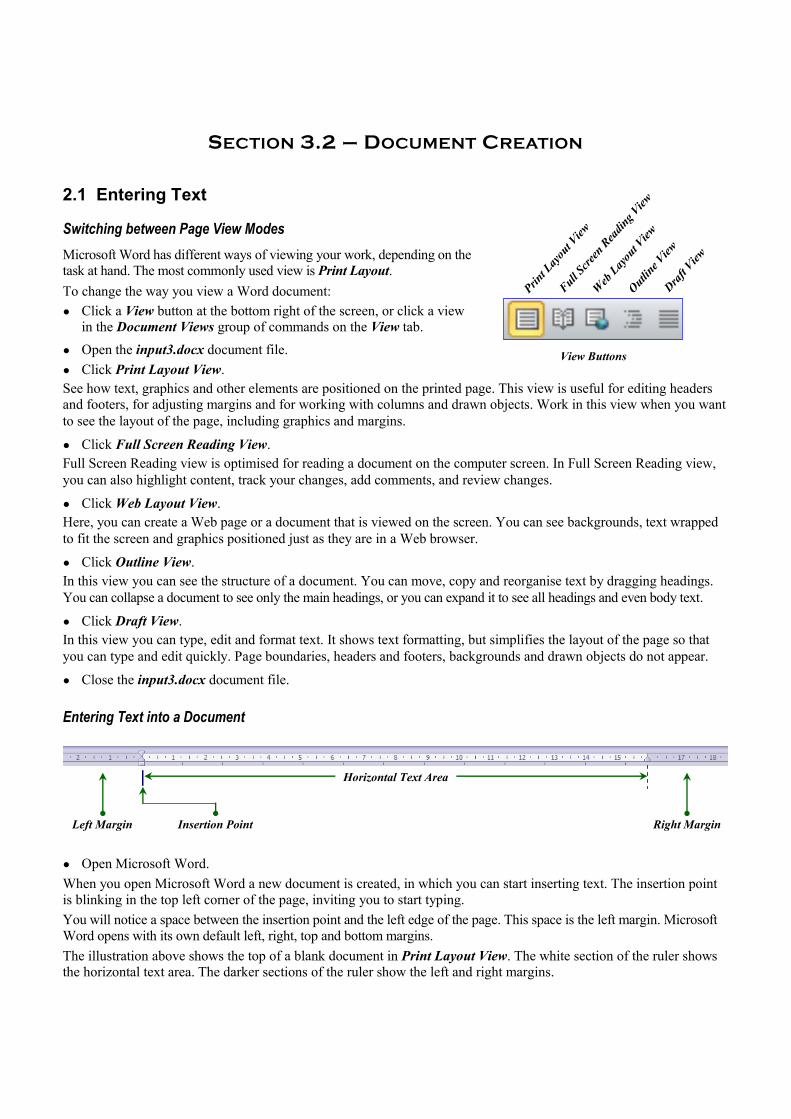
Switching between Page View Modes
Microsoft Word has different ways of viewing your work, depending on the
task at hand. The most commonly used view is Print Layout.
To change the way you view a Word document:
● Click a View button at the bottom right of the screen, or click a view
in the Document Views group of commands on the View tab.
● Open the input3.docx document file.
● Click Print Layout View.
See how text, graphics and other elements are positioned on the printed page. This view is useful for editing headers
and footers, for adjusting margins and for working with columns and drawn objects. Work in this view when you want
to see the layout of the page, including graphics and margins.
● Click Full Screen Reading View.
Full Screen Reading view is optimised for reading a document on the computer screen. In Full Screen Reading view,
you can also highlight content, track your changes, add comments, and review changes.
● Click Web Layout View.
Here, you can create a Web page or a document that is viewed on the screen. You can see backgrounds, text wrapped
to fit the screen and graphics positioned just as they are in a Web browser.
● Click Outline View.
In this view you can see the structure of a document. You can move, copy and reorganise text by dragging headings.
You can collapse a document to see only the main headings, or you can expand it to see all headings and even body text.
● Click Draft View.
In this view you can type, edit and format text. It shows text formatting, but simplifies the layout of the page so that
you can type and edit quickly. Page boundaries, headers and footers, backgrounds and drawn objects do not appear.
● Close the input3.docx document file.
Web
Lay
out V
iew
Print L
ayou
t Vie
w
Full
Scree
n Rea
ding
Vie
w
Outli
ne Vie
w
View Buttons
Dra
ft V
iew
Inserting Symbols or Special Characters
There are more characters available to Word than the keyboard ones. Sometimes you may need to use the trademark or
copyright special characters or an Irish or foreign language symbol.
To insert the ‘á’ (fada) symbol in Irish:
● Place the insertion point where you want to insert the symbol.
● On the Insert tab, in the Symbols group of
commands, click Symbol.
● Click the symbol if it available in the box of
symbols that appears. Otherwise, click More
Symbols to open the Symbol dialogue box.
● Choose the appropriate font in the Font box.
● Use the scroll bar to the right of the Symbol
dialogue box to find the appropriate symbol.
● Select that symbol.
● Click the Insert button at the bottom of the
dialogue box, and then click the Close button.
To insert special characters, like the copyright ©,
trademark ™ and registered ® symbols:
● Click the Special Characters tab at the top of the Symbol dialogue box and follow the same procedure.
A symbol or special character can also be inserted by holding down the Alt Gr key to the right of the spacebar as you press
another keyboard key. Holding down the Alt Gr key while pressing the ‘a’ key inserts an ‘á’. Alt Gr + the ‘c’ key = ©
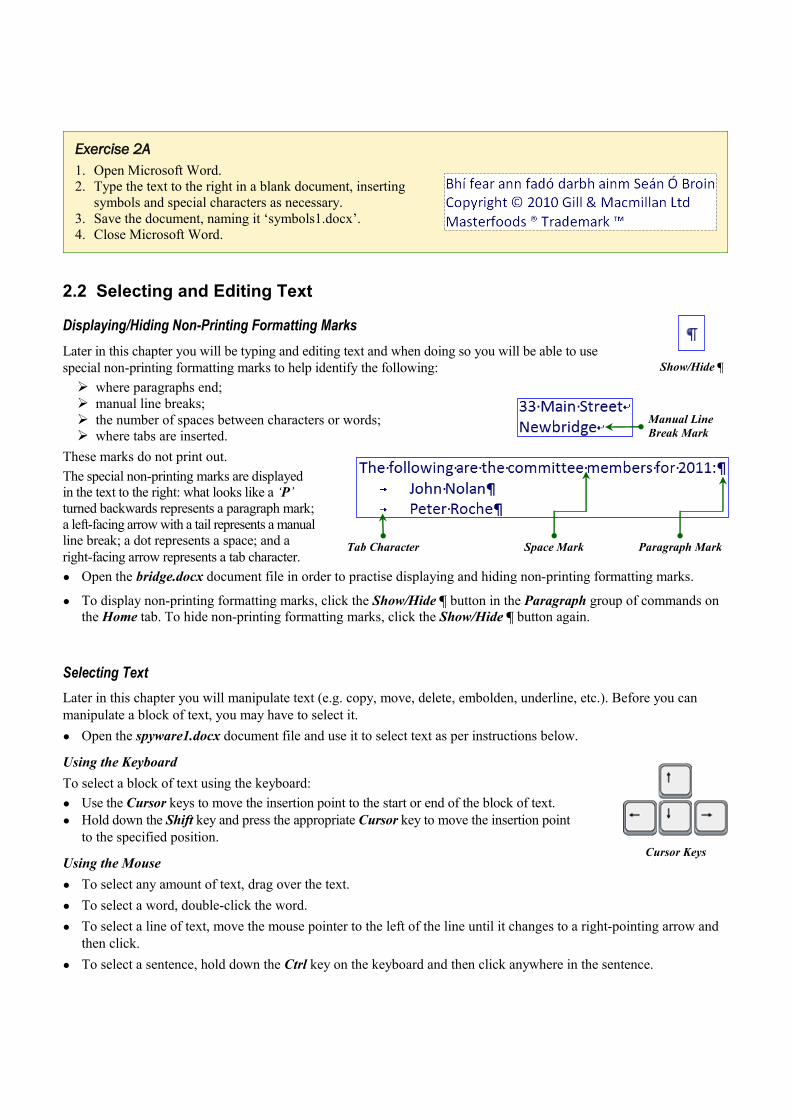
Your First Typing Lesson
As you type the text, it moves across the page until it comes to the right margin, as in the illustration above. As you
type the last word on the line, it remains on that line until an extra letter pushes the whole word to the next line.
Do not use the Enter key to do this, as doing so creates a new paragraph.
● To type capital (upper case) letters, hold down the Shift key while pressing the appropriate letter.
● Click the Spacebar (the long bar situated at the bottom of the keyboard) once to create one space,
twice consecutively to create two consecutive spaces, etc.
● Finish your first typing lesson, creating new paragraphs by pressing the Enter key.
● Save the document, naming it ‘typing1.docx’, and close it.
Press
Enter
Exercise 2A
1. Open Microsoft Word.
2. Type the text to the right in a blank document, inserting
symbols and special characters as necessary.
3. Save the document, naming it ‘symbols1.docx’.
4. Close Microsoft Word.
2.2 Selecting and Editing Text
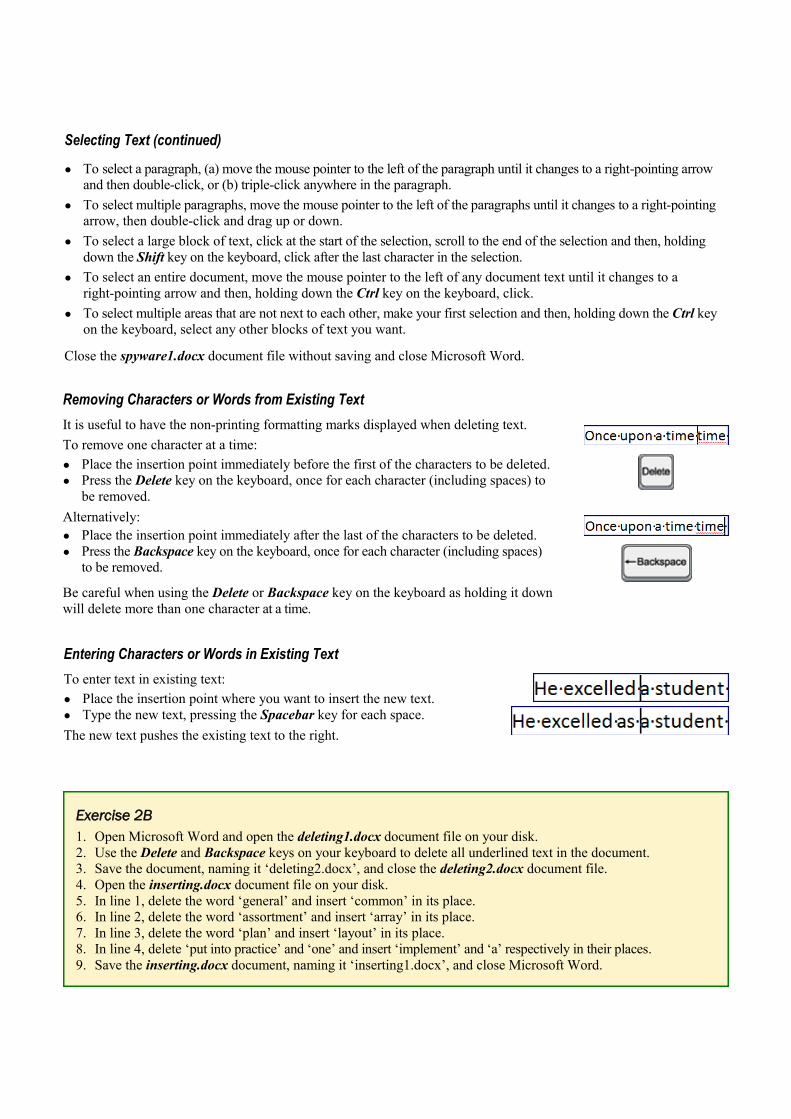
Displaying/Hiding Non-Printing Formatting Marks
Later in this chapter you will be typing and editing text and when doing so you will be able to use
special non-printing formatting marks to help identify the following:
where paragraphs end;
manual line breaks;
the number of spaces between characters or words;
where tabs are inserted.
These marks do not print out.
The special non-printing marks are displayed
in the text to the right: what looks like a ‘P’
turned backwards represents a paragraph mark;
a left-facing arrow with a tail represents a manual
line break; a dot represents a space; and a
right-facing arrow represents a tab character.
● Open the bridge.docx document file in order to practise displaying and hiding non-printing formatting marks.
● To display non-printing formatting marks, click the Show/Hide ¶ button in the Paragraph group of commands on
the Home tab. To hide non-printing formatting marks, click the Show/Hide ¶ button again.
Show/Hide 
Tab Character Space Mark Paragraph Mark
Manual Line
Break Mark
Selecting Text
Later in this chapter you will manipulate text (e.g. copy, move, delete, embolden, underline, etc.). Before you can
manipulate a block of text, you may have to select it.
● Open the spyware1.docx document file and use it to select text as per instructions below.
Using the Keyboard
To select a block of text using the keyboard:
● Use the Cursor keys to move the insertion point to the start or end of the block of text.
● Hold down the Shift key and press the appropriate Cursor key to move the insertion point
to the specified position.
Using the Mouse
● To select any amount of text, drag over the text.
● To select a word, double-click the word.
● To select a line of text, move the mouse pointer to the left of the line until it changes to a right-pointing arrow and
then click.
● To select a sentence, hold down the Ctrl key on the keyboard and then click anywhere in the sentence.
Cursor Keys
Exercise 2B
1. Open Microsoft Word and open the deleting1.docx document file on your disk.
2. Use the Delete and Backspace keys on your keyboard to delete all underlined text in the document.
3. Save the document, naming it ‘deleting2.docx’, and close the deleting2.docx document file.
4. Open the inserting.docx document file on your disk.
5. In line 1, delete the word ‘general’ and insert ‘common’ in its place.
6. In line 2, delete the word ‘assortment’ and insert ‘array’ in its place.
7. In line 3, delete the word ‘plan’ and insert ‘layout’ in its place.
8. In line 4, delete ‘put into practice’ and ‘one’ and insert ‘implement’ and ‘a’ respectively in their places.
9. Save the inserting.docx document, naming it ‘inserting1.docx’, and close Microsoft Word.
Selecting Text (continued)
● To select a paragraph, (a) move the mouse pointer to the left of the paragraph until it changes to a right-pointing arrow
and then double-click, or (b) triple-click anywhere in the paragraph.
● To select multiple paragraphs, move the mouse pointer to the left of the paragraphs until it changes to a right-pointing
arrow, then double-click and drag up or down.
● To select a large block of text, click at the start of the selection, scroll to the end of the selection and then, holding
down the Shift key on the keyboard, click after the last character in the selection.
● To select an entire document, move the mouse pointer to the left of any document text until it changes to a
right-pointing arrow and then, holding down the Ctrl key on the keyboard, click.
● To select multiple areas that are not next to each other, make your first selection and then, holding down the Ctrl key
on the keyboard, select any other blocks of text you want.
Close the spyware1.docx document file without saving and close Microsoft Word.
Entering Characters or Words in Existing Text
To enter text in existing text:
● Place the insertion point where you want to insert the new text.
● Type the new text, pressing the Spacebar key for each space.
The new text pushes the existing text to the right.
Removing Characters or Words from Existing Text
It is useful to have the non-printing formatting marks displayed when deleting text.
To remove one character at a time:
● Place the insertion point immediately before the first of the characters to be deleted.
● Press the Delete key on the keyboard, once for each character (including spaces) to
be removed.
Alternatively:
● Place the insertion point immediately after the last of the characters to be deleted.
● Press the Backspace key on the keyboard, once for each character (including spaces)
to be removed.
Be careful when using the Delete or Backspace key on the keyboard as holding it down
will delete more than one character at a time.
Exercise 2C
1. Open Microsoft Word.
2. Open the overwriting.docx document file on your disk and turn on overtype mode in Microsoft Word.
3. In line 1, insert the word ‘common’ instead of ‘general’.
4. In line 2, insert the word ‘array’ instead of ‘assortment’.
5. In line 3, insert the word ‘layout’ instead of ‘plan’.
6. In line 4, insert the words ‘implement’ and ‘a’ instead of ‘put into practice’ and ‘one’ respectively.
7. When you have completed question 6 above, ensure overtype mode is turned off in Microsoft Word.
8. Practise using the Undo and Redo buttons on the Quick Access toolbar.
9. Save the document, naming it ‘overwriting1.docx’, and close Microsoft Word.
Over-Typing to Replace Existing Text
In order to overtype existing text, you must turn on overtype mode. To do that, click Options on the File tab. In the left
panel of the Word Options dialogue box, click the Advanced button. Select the Use overtype mode check box and click
the OK button. To overtype text in overtype mode:
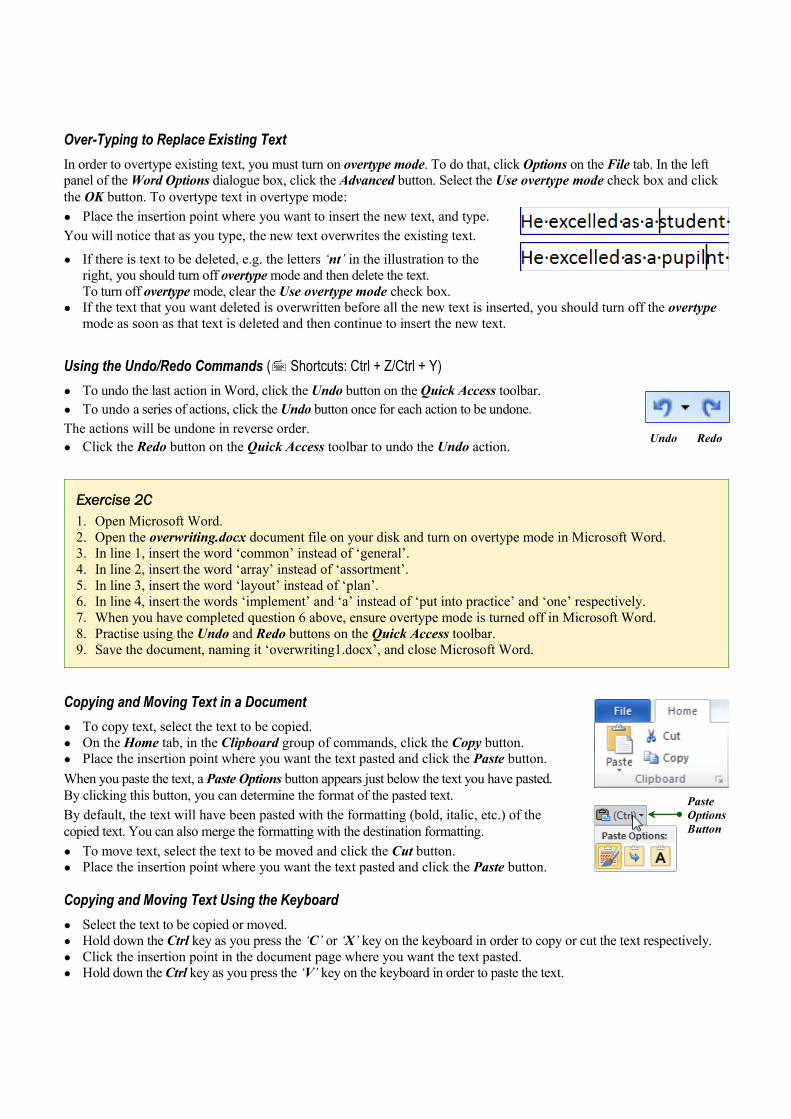
● Place the insertion point where you want to insert the new text, and type.
You will notice that as you type, the new text overwrites the existing text.
● If there is text to be deleted, e.g. the letters ‘nt’ in the illustration to the
right, you should turn off overtype mode and then delete the text.
To turn off overtype mode, clear the Use overtype mode check box.
● If the text that you want deleted is overwritten before all the new text is inserted, you should turn off the overtype
mode as soon as that text is deleted and then continue to insert the new text.
Using the Undo/Redo Commands ( Shortcuts: Ctrl + Z/Ctrl + Y)
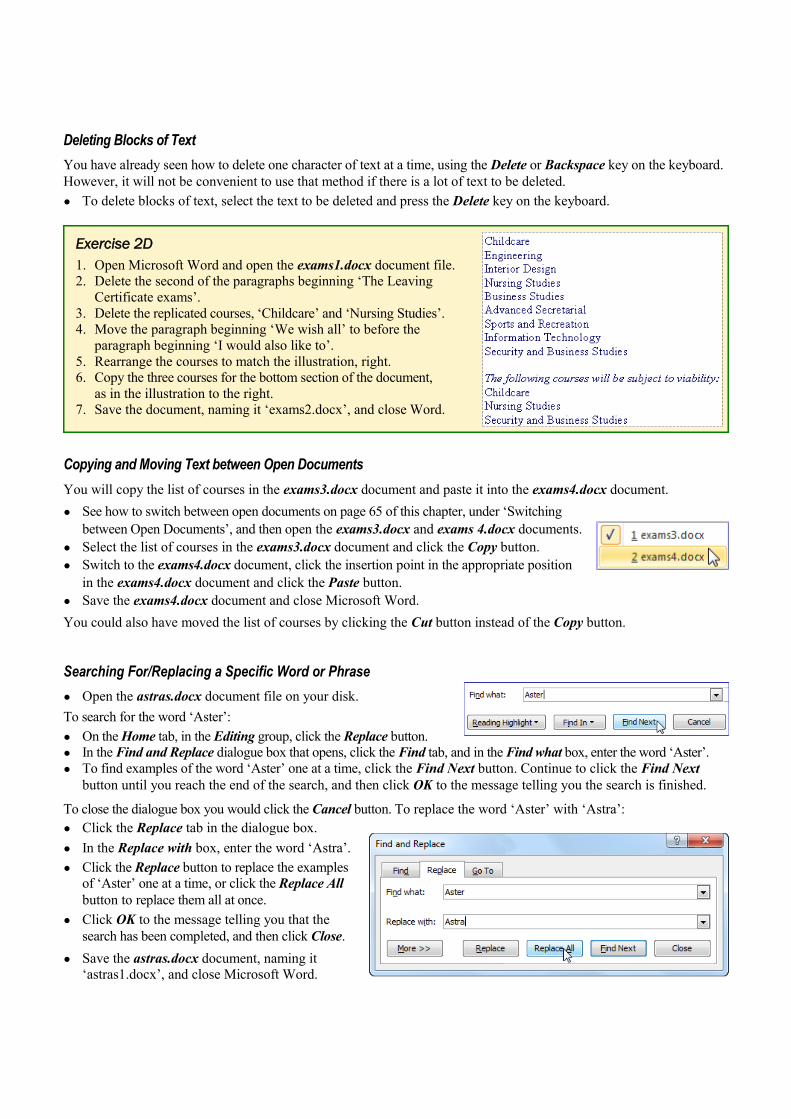
● To undo the last action in Word, click the Undo button on the Quick Access toolbar.
● To undo a series of actions, click the Undo button once for each action to be undone.
The actions will be undone in reverse order.
● Click the Redo button on the Quick Access toolbar to undo the Undo action. Undo Redo
Copying and Moving Text Using the Keyboard
● Select the text to be copied or moved.
● Hold down the Ctrl key as you press the ‘C’ or ‘X’ key on the keyboard in order to copy or cut the text respectively.
● Click the insertion point in the document page where you want the text pasted.
● Hold down the Ctrl key as you press the ‘V’ key on the keyboard in order to paste the text.
Copying and Moving Text in a Document
● To copy text, select the text to be copied.
● On the Home tab, in the Clipboard group of commands, click the Copy button.
● Place the insertion point where you want the text pasted and click the Paste button.
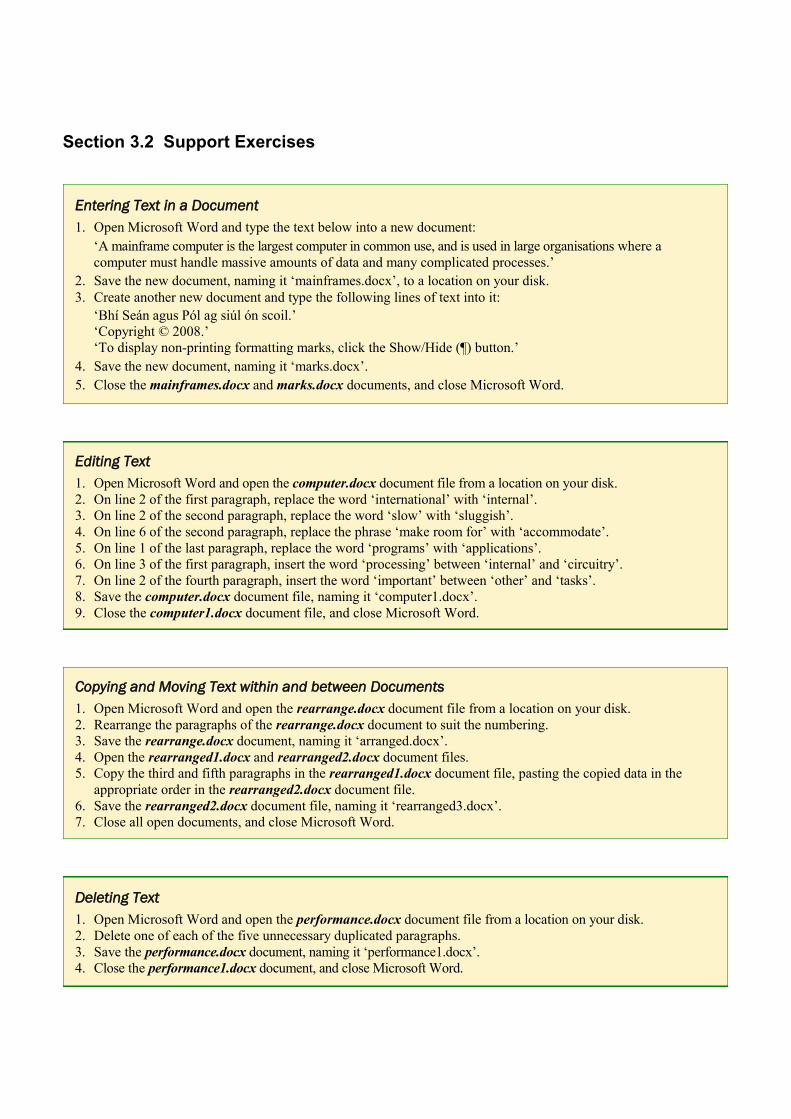
When you paste the text, a Paste Options button appears just below the text you have pasted.
By clicking this button, you can determine the format of the pasted text.
By default, the text will have been pasted with the formatting (bold, italic, etc.) of the
copied text. You can also merge the formatting with the destination formatting.
● To move text, select the text to be moved and click the Cut button.
● Place the insertion point where you want the text pasted and click the Paste button.
Paste
Options
Button
Deleting Blocks of Text
You have already seen how to delete one character of text at a time, using the Delete or Backspace key on the keyboard.
However, it will not be convenient to use that method if there is a lot of text to be deleted.
● To delete blocks of text, select the text to be deleted and press the Delete key on the keyboard.
Exercise 2D
1. Open Microsoft Word and open the exams1.docx document file.
2. Delete the second of the paragraphs beginning ‘The Leaving
Certificate exams’.
3. Delete the replicated courses, ‘Childcare’ and ‘Nursing Studies’.
4. Move the paragraph beginning ‘We wish all’ to before the
paragraph beginning ‘I would also like to’.
5. Rearrange the courses to match the illustration, right.
6. Copy the three courses for the bottom section of the document,
as in the illustration to the right.
7. Save the document, naming it ‘exams2.docx’, and close Word.
Copying and Moving Text between Open Documents
You will copy the list of courses in the exams3.docx document and paste it into the exams4.docx document.
● See how to switch between open documents on page 65 of this chapter, under ‘Switching
between Open Documents’, and then open the exams3.docx and exams 4.docx documents.
● Select the list of courses in the exams3.docx document and click the Copy button.
● Switch to the exams4.docx document, click the insertion point in the appropriate position
in the exams4.docx document and click the Paste button.
● Save the exams4.docx document and close Microsoft Word.
You could also have moved the list of courses by clicking the Cut button instead of the Copy button.
Searching For/Replacing a Specific Word or Phrase
● Open the astras.docx document file on your disk.
To search for the word ‘Aster’:
● On the Home tab, in the Editing group, click the Replace button.
● In the Find and Replace dialogue box that opens, click the Find tab, and in the Find what box, enter the word ‘Aster’.
● To find examples of the word ‘Aster’ one at a time, click the Find Next button. Continue to click the Find Next
button until you reach the end of the search, and then click OK to the message telling you the search is finished.
To close the dialogue box you would click the Cancel button. To replace the word ‘Aster’ with ‘Astra’:
● Click the Replace tab in the dialogue box.
● In the Replace with box, enter the word ‘Astra’.
● Click the Replace button to replace the examples
of ‘Aster’ one at a time, or click the Replace All
button to replace them all at once.
● Click OK to the message telling you that the
search has been completed, and then click Close.
● Save the astras.docx document, naming it
‘astras1.docx’, and close Microsoft Word.
Section 3.2 Support Exercises
Editing Text
1. Open Microsoft Word and open the computer.docx document file from a location on your disk.
2. On line 2 of the first paragraph, replace the word ‘international’ with ‘internal’.
3. On line 2 of the second paragraph, replace the word ‘slow’ with ‘sluggish’.
4. On line 6 of the second paragraph, replace the phrase ‘make room for’ with ‘accommodate’.
5. On line 1 of the last paragraph, replace the word ‘programs’ with ‘applications’.
6. On line 3 of the first paragraph, insert the word ‘processing’ between ‘internal’ and ‘circuitry’.
7. On line 2 of the fourth paragraph, insert the word ‘important’ between ‘other’ and ‘tasks’.
8. Save the computer.docx document file, naming it ‘computer1.docx’.
9. Close the computer1.docx document file, and close Microsoft Word.
Copying and Moving Text within and between Documents
1. Open Microsoft Word and open the rearrange.docx document file from a location on your disk.
2. Rearrange the paragraphs of the rearrange.docx document to suit the numbering.
3. Save the rearrange.docx document, naming it ‘arranged.docx’.
4. Open the rearranged1.docx and rearranged2.docx document files.
5. Copy the third and fifth paragraphs in the rearranged1.docx document file, pasting the copied data in the
appropriate order in the rearranged2.docx document file.
6. Save the rearranged2.docx document file, naming it ‘rearranged3.docx’.
7. Close all open documents, and close Microsoft Word.
Entering Text in a Document
1. Open Microsoft Word and type the text below into a new document:
‘A mainframe computer is the largest computer in common use, and is used in large organisations where a
computer must handle massive amounts of data and many complicated processes.’
2. Save the new document, naming it ‘mainframes.docx’, to a location on your disk.
3. Create another new document and type the following lines of text into it:
‘Bhí Seán agus Pól ag siúl ón scoil.’
‘Copyright © 2008.’
‘To display non-printing formatting marks, click the Show/Hide (¶) button.’
4. Save the new document, naming it ‘marks.docx’.
5. Close the mainframes.docx and marks.docx documents, and close Microsoft Word.
Deleting Text
1. Open Microsoft Word and open the performance.docx document file from a location on your disk.
2. Delete one of each of the five unnecessary duplicated paragraphs.
3. Save the performance.docx document, naming it ‘performance1.docx’.
4. Close the performance1.docx document, and close Microsoft Word.
SECTION 3.7 – RETENTION EXERCISES
Exercise 1
1. Open the word-processing application and open the gaa.docx document file from your disk.
2. Change the left and right margins to 3.2 cm, and the top margin to 3 cm.
3. Increase the font size for all the text, except the top two lines, to 12 pt.
4. Centre align the top two lines of text in the document and apply bold formatting to them.
5. Change the font colour of the top two lines of text to blue and change the font size to 14 pt.
6. Move the line of text beginning ‘To all the members of’ to a separate line, before the text ‘I wish to inform
you that’.
7. Right align the date near the top of the page and centre align the line of text beginning ‘The following items’.
8. Apply bold and italic formatting to the line of text beginning ‘The following items’.
9. Add bullets to the last seven lines of the document, from the line beginning ‘Election of the’.
10. Increase to 1.5 lines the line spacing of all the lines of text from the line beginning ‘The following items’
to the end of the document.
11. Change the font of all the text in the document to Arial.
12. Create a new paragraph after the last line of text and enter the following text: ‘Martin Casey (secretary)’.
Delete the bullet and indent, if they appear.
13. Apply a left tab of 2 cm to the line of text ‘Martin Casey (secretary)’.
14. Save the gaa.docx document file, naming it ‘gaameeting.docx’ and close Microsoft Word.
Exercise 2
1. Open Microsoft Word and open the gaaclub.docx document file from your disk.
2. Insert your name and the words ‘Emergency Meeting’ on separate lines as a header to your document.
3. Centre align the header, increase the font size to 14 pt and apply bold formatting to it.
4. Insert page numbers as a footer to your document and centre align them.
5. Spell check your document, correcting any spelling errors or consecutive repetition of words.
6. Insert the meeting.gif image from a location on your disk and position it at the bottom of the page below
the last line of text.
7. Resize the meeting.gif image so that its height is 3.5 cm and then save the gaaclub.docx document.
8. Mail merge: use the gaaclub.docx document as your main document.
9. Select the addresslist.docx document file as your data file. It contains an address list that will be merged
with the gaaclub.docx main document.
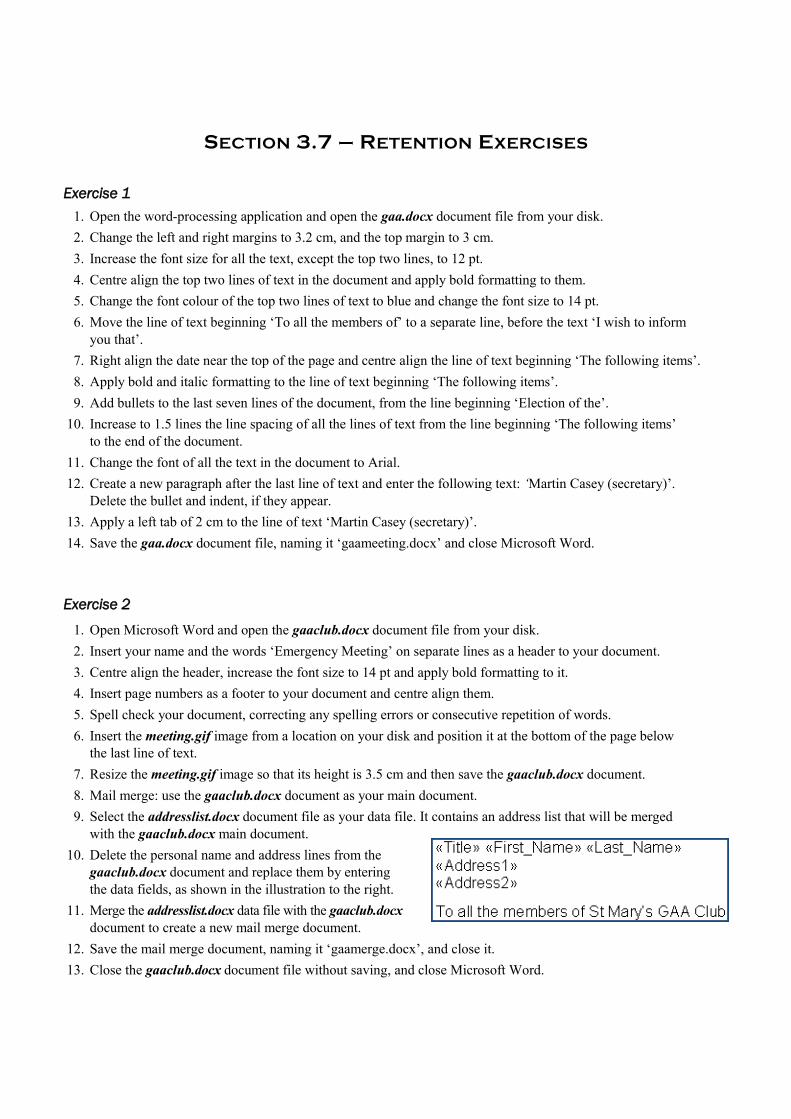
10. Delete the personal name and address lines from the
gaaclub.docx document and replace them by entering
the data fields, as shown in the illustration to the right.
11. Merge the addresslist.docx data file with the gaaclub.docx
document to create a new mail merge document.
12. Save the mail merge document, naming it ‘gaamerge.docx’, and close it.
13. Close the gaaclub.docx document file without saving, and close Microsoft Word.
SECTION 4.1 – USING THE APPLICATION
1.1 Working with Spreadsheets
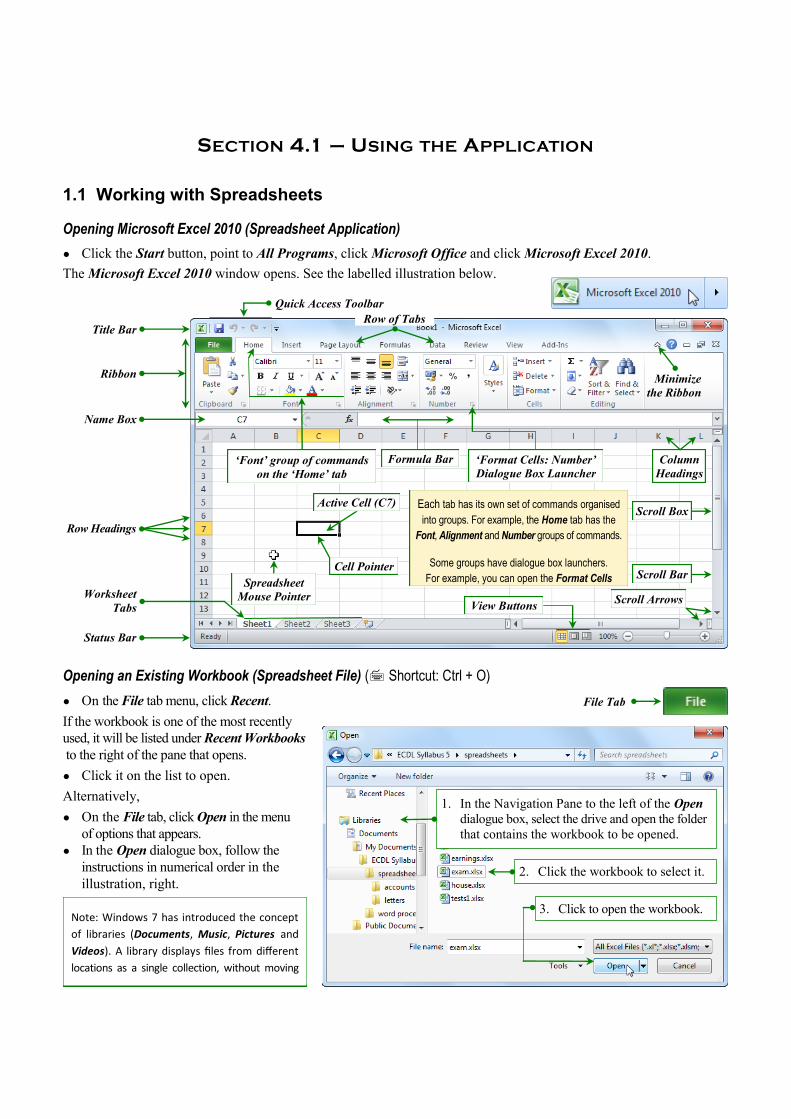
Opening Microsoft Excel 2010 (Spreadsheet Application)
● Click the Start button, point to All Programs, click Microsoft Office and click Microsoft Excel 2010.
The Microsoft Excel 2010 window opens. See the labelled illustration below.
Opening an Existing Workbook (Spreadsheet File) ( Shortcut: Ctrl + O)
● On the File tab menu, click Recent.
If the workbook is one of the most recently
used, it will be listed under Recent Workbooks
to the right of the pane that opens.
● Click it on the list to open.
Alternatively,
● On the File tab, click Open in the menu
of options that appears.
● In the Open dialogue box, follow the
instructions in numerical order in the
illustration, right.
Note: Windows 7 has introduced the concept
of libraries (Documents, Music, Pictures and
Videos). A library displays files from different
locations as a single collection, without moving
1. In the Navigation Pane to the left of the Open
dialogue box, select the drive and open the folder
that contains the workbook to be opened.
2. Click the workbook to select it.
3. Click to open the workbook.
File Tab
Row Headings
Status Bar
Scroll Box
Scroll Arrows
Ribbon
Title Bar
Quick Access Toolbar
Minimize
the Ribbon
‘Font’ group of commands
on the ‘Home’ tab
Name Box
Formula Bar ‘Format Cells: Number’
Dialogue Box Launcher
Column
Headings
Scroll Bar
Worksheet
Tabs View Buttons
Cell Pointer
Active Cell (C7)
Spreadsheet
Mouse Pointer
Each tab has its own set of commands organised
into groups. For example, the Home tab has the
Font, Alignment and Number groups of commands.
Some groups have dialogue box launchers.
For example, you can open the Format Cells
Row of Tabs
Exercise 4A
1. Open Microsoft Excel and open the operators.xlsx workbook from a location on your disk.
2. Using the cell references of the cells that contain values, create arithmetic formulas in the appropriate cells
in Column D to perform the calculations.
3. Save the operators.xlsx workbook, naming it ‘operators1.xlsx’, and close Microsoft Excel.
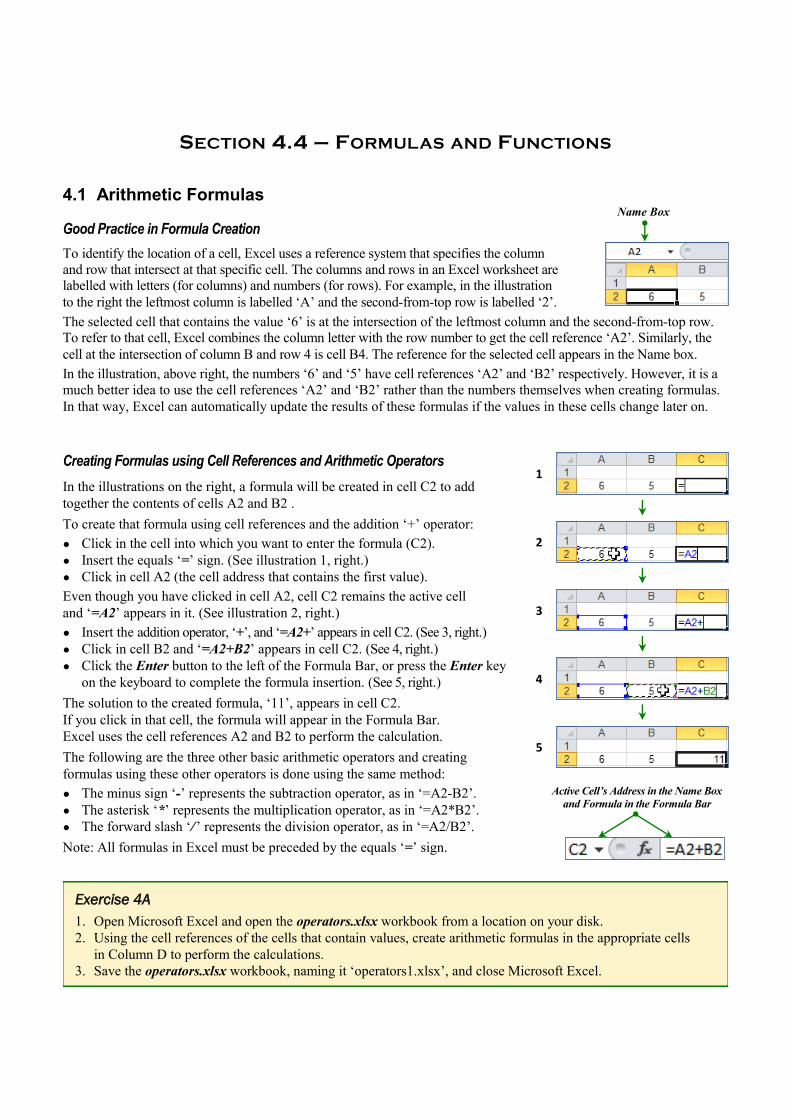
Creating Formulas using Cell References and Arithmetic Operators
In the illustrations on the right, a formula will be created in cell C2 to add
together the contents of cells A2 and B2 .
To create that formula using cell references and the addition ‘+’ operator:
● Click in the cell into which you want to enter the formula (C2).
● Insert the equals ‘=’ sign. (See illustration 1, right.)
● Click in cell A2 (the cell address that contains the first value).
Even though you have clicked in cell A2, cell C2 remains the active cell
and ‘=A2’ appears in it. (See illustration 2, right.)
● Insert the addition operator, ‘+’, and ‘=A2+’ appears in cell C2. (See 3, right.)
● Click in cell B2 and ‘=A2+B2’ appears in cell C2. (See 4, right.)
● Click the Enter button to the left of the Formula Bar, or press the Enter key
on the keyboard to complete the formula insertion. (See 5, right.)
The solution to the created formula, ‘11’, appears in cell C2.
If you click in that cell, the formula will appear in the Formula Bar.
Excel uses the cell references A2 and B2 to perform the calculation.
The following are the three other basic arithmetic operators and creating
formulas using these other operators is done using the same method:
● The minus sign ‘-’ represents the subtraction operator, as in ‘=A2-B2’.
● The asterisk ‘*’ represents the multiplication operator, as in ‘=A2*B2’.
● The forward slash ‘/’ represents the division operator, as in ‘=A2/B2’.
Note: All formulas in Excel must be preceded by the equals ‘=’ sign.
Active Cell’s Address in the Name Box
and Formula in the Formula Bar
1
3
2
5
4
SECTION 4.4 – FORMULAS AND FUNCTIONS
4.1 Arithmetic Formulas
Good Practice in Formula Creation
To identify the location of a cell, Excel uses a reference system that specifies the column
and row that intersect at that specific cell. The columns and rows in an Excel worksheet are
labelled with letters (for columns) and numbers (for rows). For example, in the illustration
to the right the leftmost column is labelled ‘A’ and the second-from-top row is labelled ‘2’.
The selected cell that contains the value ‘6’ is at the intersection of the leftmost column and the second-from-top row.
To refer to that cell, Excel combines the column letter with the row number to get the cell reference ‘A2’. Similarly, the
cell at the intersection of column B and row 4 is cell B4. The reference for the selected cell appears in the Name box.
In the illustration, above right, the numbers ‘6’ and ‘5’ have cell references ‘A2’ and ‘B2’ respectively. However, it is a
much better idea to use the cell references ‘A2’ and ‘B2’ rather than the numbers themselves when creating formulas.
In that way, Excel can automatically update the results of these formulas if the values in these cells change later on.
Name Box

There are three types of cell referencing in formulas: (a) relative; (b) absolute; and (c) mixed. This syllabus requires us
to deal with relative cell referencing and absolute cell referencing only.
Relative Cell Referencing
● Open the relative.xlsx workbook, click in cell C2 and look at the formula in the Formula Bar.
(See the illustration, right.)
Relative cell references in this formula are based on the relative position of cell C2 (the cell that
contains the formula) and cells A2 and B2 (the cells to which the references refer).
● Use the fill handle to copy the formula from cell C2 to cell C4, as in the
illustration, right.
● Click in cell C3 and check the formula in the Formula Bar.
The position of the cell that contains the formula changes from cell C2 to C3,
and the references change accordingly from A2, B2 to A3, B3.
● Click in cell C4 and check the formula.
If you copy the formula across rows or down columns, the relative cell
references adjust automatically.
See the lower of the two illustrations, where the formulas, rather than
the results of the formulas, are displayed.
● In the relative.xlsx workbook, copy the created formula for each of the other three operators down the next two
cells in column C. Click in the formula cells to display the formulas in the Formula Bar.
● Save the relative.xlsx workbook, naming it ‘relative1.xlsx’, and close Microsoft Excel.
Absolute Cell Referencing
An absolute cell reference in a formula always refers to a cell in a specific location. If the position of the cell that contains
the formula changes, the absolute reference remains the same. If you copy the formula across rows or down columns,
the absolute reference does not adjust.
By default, new formulas use relative references, and you need to change them to absolute references.
● Open the absolute.xlsx workbook.
You will create a formula in cell D3 to calculate the total sales for
the Caramel flavour. This is done by multiplying the cones sold (B3)
by the cost of each cone (C2). You will apply absolute referencing to
cell C2, so that it does not change to C3, C4, etc., as you copy the
formula in cell D3 down its adjoining cells.
● Click in cell D3 and insert the equals ‘=’ sign.
● Click in cell B3 (the cell address that contains the first value).
● Insert the multiplication operator, ‘*’, and ‘=B3*’ appears in cell D3.
● Click in cell C2 and ‘=B3*C2’ appears in cell D3.
To apply absolute cell referencing to cell C2:
● While cell C2 is selected, press the F4 function key on the keyboard.
A dollar sign appears before each part of the cell reference. It appears before the ‘C’ and before the ‘2’.
This ensures that the reference cannot change either across columns or down rows. It is absolute.
● Press the Enter key on the keyboard to complete the insertion of the formula.
● Copy the formula from cell D3 to cell D9 and click in each of the Total Sales cells to check its formula.
Notice that in each formula the cell reference B3 changes to B4, B5, etc., but the cell reference C2 does not.
● Save the absolute.xlsx workbook, naming it ‘absolute1.xlsx’, and close Microsoft Excel.
Relative
Referencing
Absolute
Referencing
Sections 4.3 and 4.4 Support Exercises
Worksheets
1. Open Microsoft Excel and open the calculations.xlsx workbook from a location on your disk.
2. Insert a new worksheet between the House Expenses and the Awards worksheets.
3. Rename the new worksheet ‘Food’.
4. Copy the contents of the cell range A4:D5 in the House Expenses worksheet into the Food worksheet,
starting in cell A3.
5. Move the Awards worksheet to before the House Expenses worksheet.
6. Save the calculations.xlsx workbook, naming it ‘mycalculations.xlsx’, and close it.
7. Open the calculations1.xlsx and calculations2.xlsx workbooks and copy the Awards worksheet in the
calculations1.xlsx workbook into the calculations2.xlsx workbook. Position the Awards workbook between
the House Expenses and Expenditure worksheets in the calculations2.xlsx workbook.
8. Save the calculations2.xlsx workbook, naming it ‘mycalculations2.xlsx’.
9. Close the open workbooks, and close Microsoft Excel.
Arithmetic Formulas and Functions
1. Open Microsoft Excel and open the house.xlsx workbook from a location on your disk.
2. In the House Expenses worksheet use the SUM function to insert a formula in cell F8 to calculate the
sum of the B8:E8 cell range.
3. Replicate (copy) the contents of cell F8 down the cell range F9:F15.
4. Insert a formula in cell B17 to calculate the sum of the B8:B15 cell range.
5. Replicate (copy) the contents of cell B17 across the cell range C17:E17.
6. Insert a formula in cell B19 to subtract cell B17 from cell B5.
7. Replicate (copy) the contents of cell B19 across the cell range C19:E19.
8. Open the Salary worksheet and insert a formula in cell C7 that will multiply cell B7 by cell B3.
Be careful to apply absolute cell referencing to cell B3.
9. Replicate (copy) the contents of cell C7 down the cell range C8:C12.
10. Save the house.xlsx workbook, naming it ‘myhouse.xlsx’, and close Microsoft Excel.
Functions
1. Open Microsoft Excel and open the house1.xlsx workbook from a location on your disk.
2. In the House Expenses worksheet use the SUM function to insert a formula in cell G8 to calculate the
sum of the B8:F8 cell range.
3. Replicate (copy) the contents of cell G8 down the cell range G9:G15.
4. Use the AVERAGE function to insert a formula in cell H8 to calculate the average of the B8:F8 cell range.
5. Replicate (copy) the contents of cell H8 down the cell range H9:H15.
6. Use the COUNT function to insert a formula in cell I8 to count the cells that contain numbers in the
B8:F8 cell range.
7. Replicate (copy) the contents of cell I8 down the cell range I9:I15.
8. Use the MAX function to insert a formula in cell J8 to return the largest number in the B8:F8 cell range.
9. Replicate (copy) the contents of cell J8 down the cell range J9:J15.
10. Use the MIN function to insert a formula in cell K8 to return the smallest number in the B8:F8 cell range.
11. Replicate (copy) the contents of cell K8 down the cell range K9:K15.
12. Save the house1.xlsx workbook, naming it ‘myhouse1.xlsx’, and close Excel.
Exercise 1
1. Open the housekeeping.xlsx workbook from a location on your disk and open its Budget worksheet.
2. Fill the contents of cell B2 across the C2:E2 cell range to read ‘Qtr2’, ‘Qtr3’ and ‘Qtr4’.
3. Apply bold italic formatting to the cell ranges A2:G2, A13:E13, A15:E15 and A17:E17.
4. Apply a red colour to the contents of the cell range A2:G2, and a blue colour to the contents of each of the
cell ranges A13:E13, A15:E15 and A17:E17.
5. Apply a border around each cell in the cell range A4:G11 in the Budget worksheet.
6. Centre align (horizontally) the contents of the cell range B2:G17 in the Budget worksheet.
7. Insert your own name as a left-aligned header and the worksheet name as a right-aligned header in the Budget
worksheet.
8. Change the orientation of the Budget worksheet to landscape.
9. Print one copy of the Budget worksheet to an output printer.
10. Open the House Expenses worksheet and adjust the column widths to accommodate the widest data.
11. Change the values in cells C14 and D11 to 789 and 579 respectively.
12. Insert a formula in cell E7 that will calculate the sum of the cell range B7:D7. Copy the formula in cell E7 to
the cell range E8:E14.
13. Insert a formula in cell B16 that will calculate the sum of the cell range B7:B14. Copy the formula in cell B16
to the cell range C16:E16.
14. Insert a formula in cell B18 that will subtract cell B16 from cell B4. Copy the formula in cell B18 to the cell
range C18:E18.
15. Save the housekeeping.xlsx workbook, naming it ‘housekeeping1.xlsx’ and close Microsoft Excel.
SECTION 4.8 – RETENTION EXERCISES
Exercise 2
1. Open the housekeeping2.xlsx workbook from a location on your disk and open its House Expenses worksheet.
2. Insert a formula in cell B19 that will calculate the average of the cell range B7:B14. Copy the formula in cell B19
to the cell range C19:E19.
3. Format the contents of the cell range B19:E19 to show only one decimal point.
4. Insert a formula in cell B20 that will find the maximum expenditure for an item in the cell range B7:B14.
Copy the formula in cell B20 to the cell range C20:E20.
5. Insert a formula in cell B21 that will find the minimum expenditure for an item in the cell range B7:B14.
Copy the formula in cell B21 to the cell range C21:E21.
6. Insert a formula in cell B22 that will count the number of expenditure values in the cell range B7:B14.
Copy the formula in cell B22 to the cell range C22:E22.
7. Insert a formula in cell B24 that will the display the text ‘Good’ if the value in cell B18 is greater than 700,
or else will display the text ‘Bad’. Copy the formula in cell B24 to the cell range C24:D24.
8. Format the cell range B4:E21 to display the ‘€’ currency symbol with no decimal places. If you need to adjust
column widths to accommodate the ‘€’ sign, adjust them.
SECTION 5.2 – USING THE APPLICATION
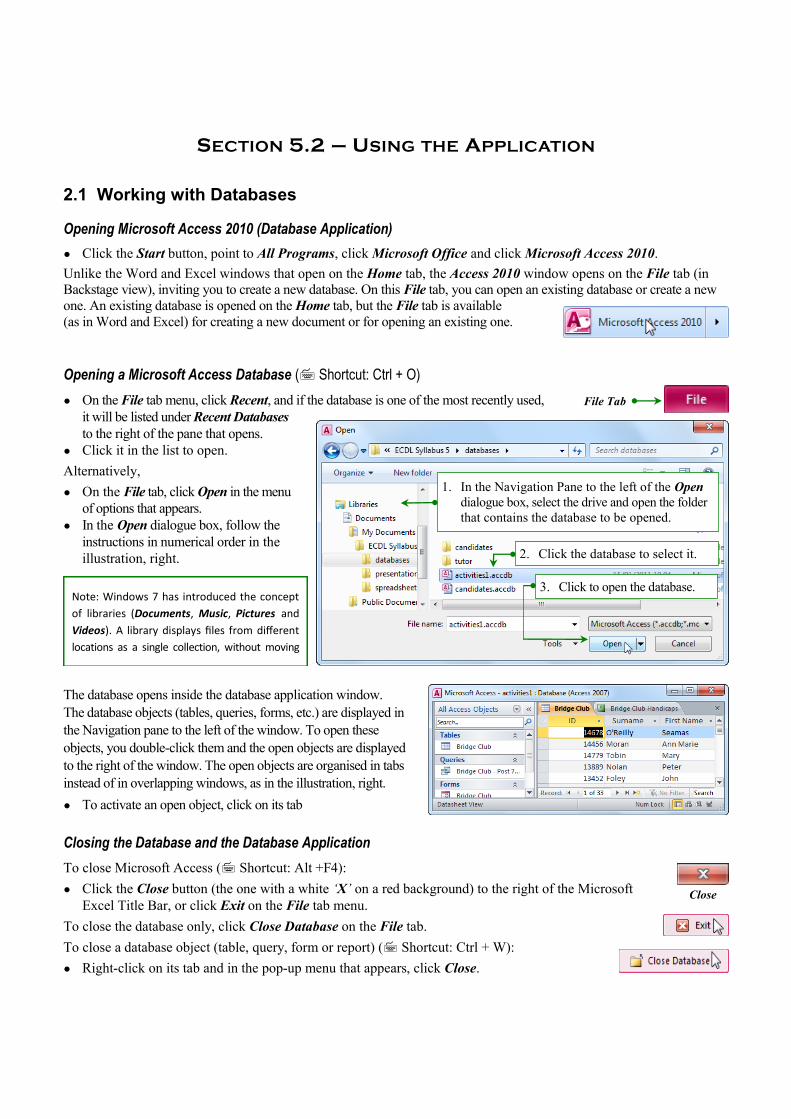
Opening a Microsoft Access Database ( Shortcut: Ctrl + O)
● On the File tab menu, click Recent, and if the database is one of the most recently used,
it will be listed under Recent Databases
to the right of the pane that opens.
● Click it in the list to open.
Alternatively,
● On the File tab, click Open in the menu
of options that appears.
● In the Open dialogue box, follow the
instructions in numerical order in the
illustration, right.
Note: Windows 7 has introduced the concept
of libraries (Documents, Music, Pictures and
Videos). A library displays files from different
locations as a single collection, without moving
File Tab
1. In the Navigation Pane to the left of the Open
dialogue box, select the drive and open the folder
that contains the database to be opened.
3. Click to open the database.
2. Click the database to select it.
2.1 Working with Databases
Opening Microsoft Access 2010 (Database Application)
● Click the Start button, point to All Programs, click Microsoft Office and click Microsoft Access 2010.
Unlike the Word and Excel windows that open on the Home tab, the Access 2010 window opens on the File tab (in
Backstage view), inviting you to create a new database. On this File tab, you can open an existing database or create a new
one. An existing database is opened on the Home tab, but the File tab is available
(as in Word and Excel) for creating a new document or for opening an existing one.
The database opens inside the database application window.
The database objects (tables, queries, forms, etc.) are displayed in
the Navigation pane to the left of the window. To open these
objects, you double-click them and the open objects are displayed
to the right of the window. The open objects are organised in tabs
instead of in overlapping windows, as in the illustration, right.
● To activate an open object, click on its tab
Closing the Database and the Database Application
To close Microsoft Access ( Shortcut: Alt +F4):
● Click the Close button (the one with a white ‘X’ on a red background) to the right of the Microsoft
Excel Title Bar, or click Exit on the File tab menu.
To close the database only, click Close Database on the File tab.
To close a database object (table, query, form or report) ( Shortcut: Ctrl + W):
● Right-click on its tab and in the pop-up menu that appears, click Close.
Close
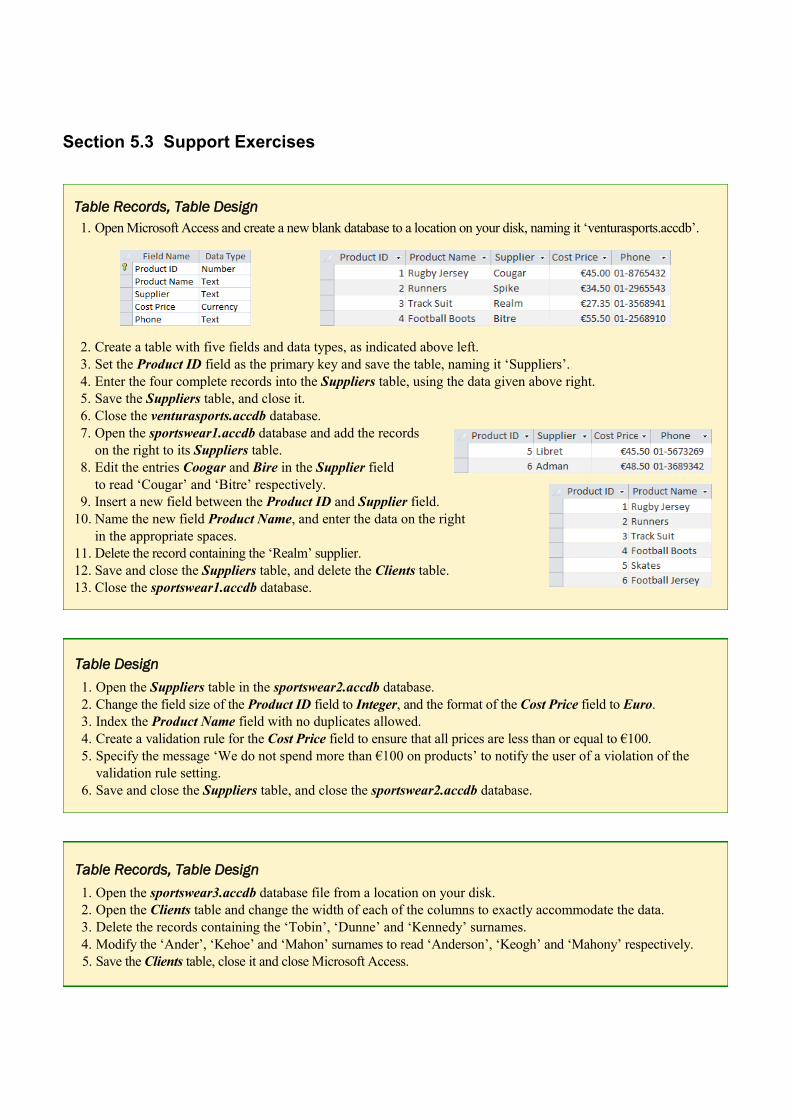
Section 5.3 Support Exercises
Table Design
1. Open the Suppliers table in the sportswear2.accdb database.
2. Change the field size of the Product ID field to Integer, and the format of the Cost Price field to Euro.
3. Index the Product Name field with no duplicates allowed.
4. Create a validation rule for the Cost Price field to ensure that all prices are less than or equal to €100.
5. Specify the message ‘We do not spend more than €100 on products’ to notify the user of a violation of the
validation rule setting.
6. Save and close the Suppliers table, and close the sportswear2.accdb database.
Table Records, Table Design
1. Open the sportswear3.accdb database file from a location on your disk.
2. Open the Clients table and change the width of each of the columns to exactly accommodate the data.
3. Delete the records containing the ‘Tobin’, ‘Dunne’ and ‘Kennedy’ surnames.
4. Modify the ‘Ander’, ‘Kehoe’ and ‘Mahon’ surnames to read ‘Anderson’, ‘Keogh’ and ‘Mahony’ respectively.
5. Save the Clients table, close it and close Microsoft Access.
Table Records, Table Design
1. Open Microsoft Access and create a new blank database to a location on your disk, naming it ‘venturasports.accdb’.
2. Create a table with five fields and data types, as indicated above left.
3. Set the Product ID field as the primary key and save the table, naming it ‘Suppliers’.
4. Enter the four complete records into the Suppliers table, using the data given above right.
5. Save the Suppliers table, and close it.
6. Close the venturasports.accdb database.
7. Open the sportswear1.accdb database and add the records
on the right to its Suppliers table.
8. Edit the entries Coogar and Bire in the Supplier field
to read ‘Cougar’ and ‘Bitre’ respectively.
9. Insert a new field between the Product ID and Supplier field.
10. Name the new field Product Name, and enter the data on the right
in the appropriate spaces.
11. Delete the record containing the ‘Realm’ supplier.
12. Save and close the Suppliers table, and delete the Clients table.
13. Close the sportswear1.accdb database.
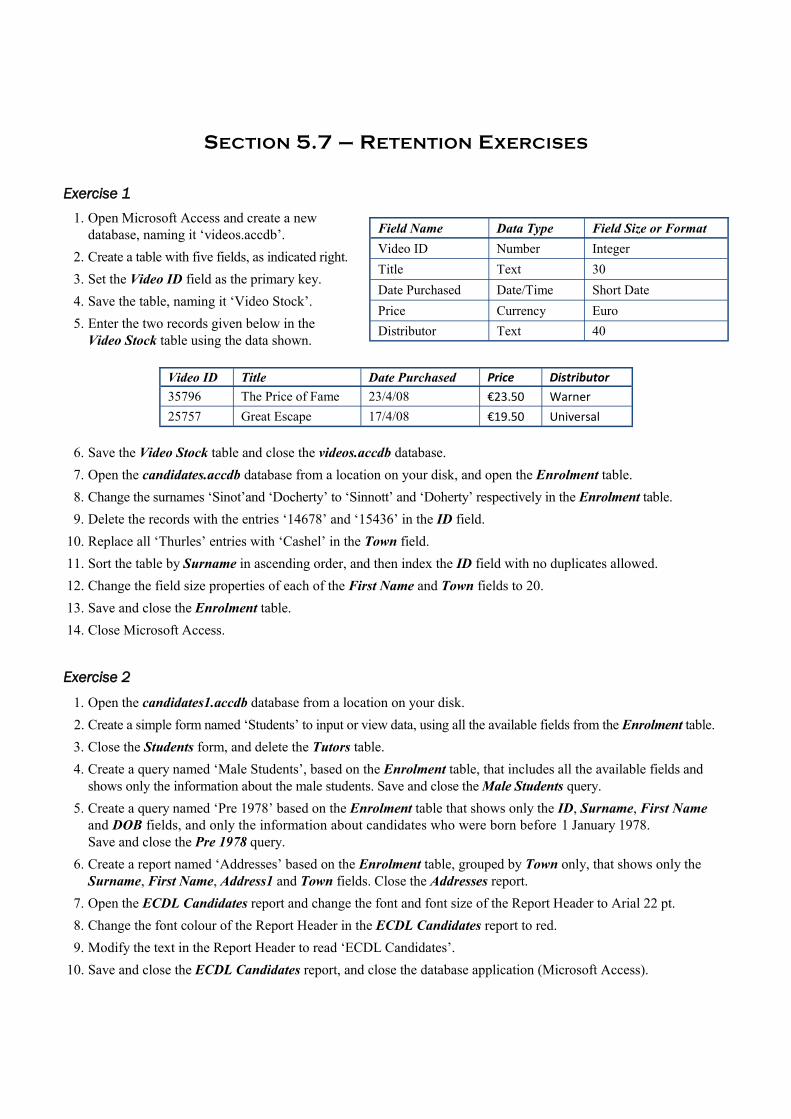
Exercise 1
1. Open Microsoft Access and create a new
database, naming it ‘videos.accdb’.
2. Create a table with five fields, as indicated right.
3. Set the Video ID field as the primary key.
4. Save the table, naming it ‘Video Stock’.
5. Enter the two records given below in the
Video Stock table using the data shown.
Field Name Data Type Field Size or Format
Video ID Number Integer
Title Text 30
Date Purchased Date/Time Short Date
Price Currency Euro
Distributor Text 40
Video ID Title Date Purchased Price Distributor
35796 The Price of Fame 23/4/08 €23.50 Warner
25757 Great Escape 17/4/08 €19.50 Universal
6. Save the Video Stock table and close the videos.accdb database.
7. Open the candidates.accdb database from a location on your disk, and open the Enrolment table.
8. Change the surnames ‘Sinot’and ‘Docherty’ to ‘Sinnott’ and ‘Doherty’ respectively in the Enrolment table.
9. Delete the records with the entries ‘14678’ and ‘15436’ in the ID field.
10. Replace all ‘Thurles’ entries with ‘Cashel’ in the Town field.
11. Sort the table by Surname in ascending order, and then index the ID field with no duplicates allowed.
12. Change the field size properties of each of the First Name and Town fields to 20.
13. Save and close the Enrolment table.
14. Close Microsoft Access.
SECTION 5.7 – RETENTION EXERCISES
Exercise 2
1. Open the candidates1.accdb database from a location on your disk.
2. Create a simple form named ‘Students’ to input or view data, using all the available fields from the Enrolment table.
3. Close the Students form, and delete the Tutors table.
4. Create a query named ‘Male Students’, based on the Enrolment table, that includes all the available fields and
shows only the information about the male students. Save and close the Male Students query.
5. Create a query named ‘Pre 1978’ based on the Enrolment table that shows only the ID, Surname, First Name
and DOB fields, and only the information about candidates who were born before 1 January 1978.
Save and close the Pre 1978 query.
6. Create a report named ‘Addresses’ based on the Enrolment table, grouped by Town only, that shows only the
Surname, First Name, Address1 and Town fields. Close the Addresses report.
7. Open the ECDL Candidates report and change the font and font size of the Report Header to Arial 22 pt.
8. Change the font colour of the Report Header in the ECDL Candidates report to red.
9. Modify the text in the Report Header to read ‘ECDL Candidates’.
10. Save and close the ECDL Candidates report, and close the database application (Microsoft Access).

SECTION 6.1 – USING THE APPLICATION
1.1 Working with Presentations
Opening Microsoft PowerPoint 2010 (Presentation Application)
● Click the Start button, point to All Programs, click Microsoft Office and click Microsoft PowerPoint 2010.
The Microsoft PowerPoint 2010 window opens. See the labelled illustration below.
Opening an Existing Microsoft PowerPoint Presentation ( Shortcut: Ctrl + O)
● On the File tab menu, click Recent.
If the presentation is one of the most recently used,
it will be listed under Recent Presentations
to the right of the pane that opens.
● Click it on the list to open.
Alternatively,
● Click the File tab and click Open in the
menu of options that appears.
● In the Open dialogue box, follow the
instructions in numerical order as in
the illustration, right.
Note: Windows 7 has introduced the concept
of libraries (Documents, Music, Pictures and
Videos). A library displays files from different
locations as a single collection, without moving
1. In the Navigation Pane to the left of the Open
dialogue box, select the drive and open the folder
that contains the presentation to be opened.
2. Click the presentation to select it.
3. Click to open the presentation.
File Tab
Text Placeholders
Slide Pane
Outline Pane, or
Thumbnail Pane Each tab has its own set of commands
organised into groups. For example,
the Home tab has the Slides, Font
Normal View
Tabs
Status Bar
Ribbon
‘Paragraph’ Dialogue
Box Launcher
Title Bar
Quick Access Toolbar
‘Font’ Group of Commands
on the ‘Home’ Tab
Minimize
the Ribbon
Scroll Arrow
Scroll Box
Previous Slide
Next Slide
Scroll Bar
View Buttons Notes Pane
Row of Tabs
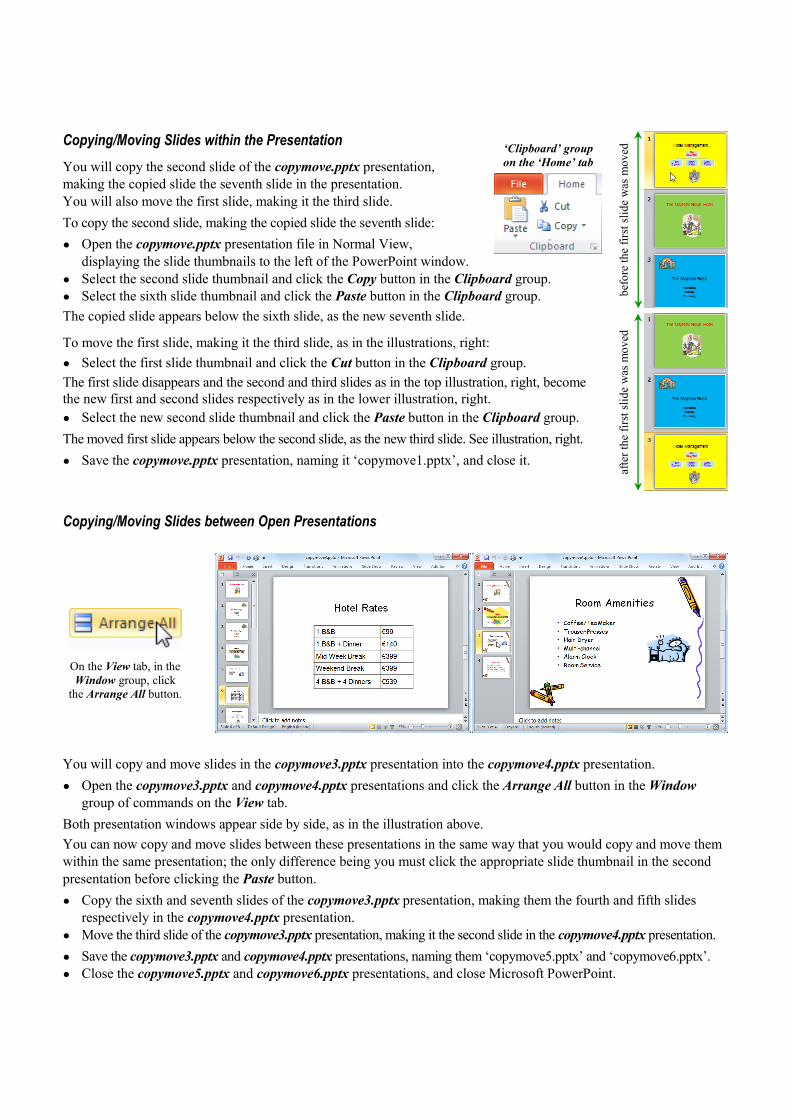
You will copy and move slides in the copymove3.pptx presentation into the copymove4.pptx presentation.
● Open the copymove3.pptx and copymove4.pptx presentations and click the Arrange All button in the Window
group of commands on the View tab.
Both presentation windows appear side by side, as in the illustration above.
You can now copy and move slides between these presentations in the same way that you would copy and move them
within the same presentation; the only difference being you must click the appropriate slide thumbnail in the second
presentation before clicking the Paste button.
● Copy the sixth and seventh slides of the copymove3.pptx presentation, making them the fourth and fifth slides
respectively in the copymove4.pptx presentation.
● Move the third slide of the copymove3.pptx presentation, making it the second slide in the copymove4.pptx presentation.
● Save the copymove3.pptx and copymove4.pptx presentations, naming them ‘copymove5.pptx’ and ‘copymove6.pptx’.
● Close the copymove5.pptx and copymove6.pptx presentations, and close Microsoft PowerPoint.
Copying/Moving Slides between Open Presentations
Copying/Moving Slides within the Presentation
You will copy the second slide of the copymove.pptx presentation,
making the copied slide the seventh slide in the presentation.
You will also move the first slide, making it the third slide.
To copy the second slide, making the copied slide the seventh slide:
● Open the copymove.pptx presentation file in Normal View,
displaying the slide thumbnails to the left of the PowerPoint window.
● Select the second slide thumbnail and click the Copy button in the Clipboard group.
● Select the sixth slide thumbnail and click the Paste button in the Clipboard group.
The copied slide appears below the sixth slide, as the new seventh slide.
To move the first slide, making it the third slide, as in the illustrations, right:
● Select the first slide thumbnail and click the Cut button in the Clipboard group.
The first slide disappears and the second and third slides as in the top illustration, right, become
the new first and second slides respectively as in the lower illustration, right.
● Select the new second slide thumbnail and click the Paste button in the Clipboard group.
The moved first slide appears below the second slide, as the new third slide. See illustration, right.
● Save the copymove.pptx presentation, naming it ‘copymove1.pptx’, and close it.
bef
ore
th
e fi
rst
slid
e w
as m
ov
ed
afte
r th
e fi
rst
slid
e w
as m
ov
ed
‘Clipboard’ group
on the ‘Home’ tab
On the View tab, in the
Window group, click
the Arrange All button.
Sections 6.1–6.3 Support Exercises
Developing the Presentation, Text
1. Open Microsoft PowerPoint and open the computer3.pptx presentation file from a location on your disk.
2. Save the computer3.pptx presentation as a design template, naming it ‘computer4.potx’.
3. Close the computer4.potx presentation template.
4. Create a new two-slide presentation file, choosing the Title Slide layout for the first slide.
5. Insert the text ‘Computer World’ and ‘Main Street, Bray, Co. Wicklow’ in the Click to add title and
Click to add subtitle placeholders respectively in the first slide.
6. Insert a second slide, and choose the Title and Content layout.
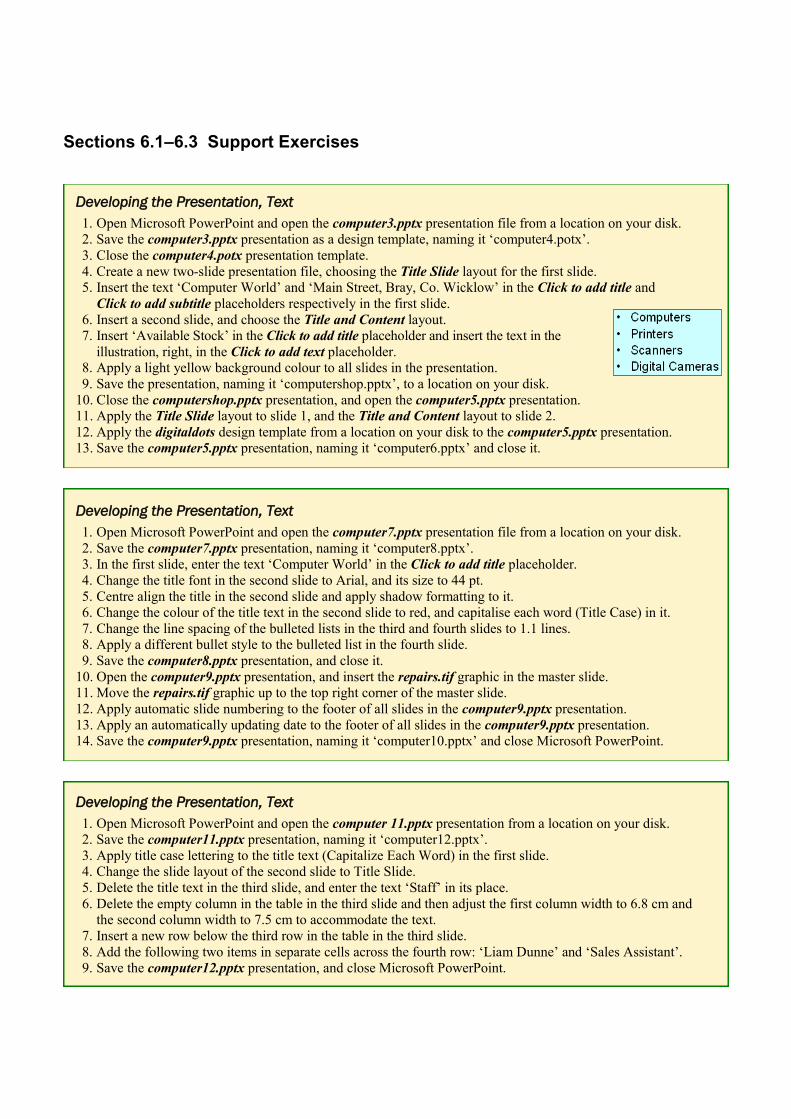
7. Insert ‘Available Stock’ in the Click to add title placeholder and insert the text in the
illustration, right, in the Click to add text placeholder.
8. Apply a light yellow background colour to all slides in the presentation.
9. Save the presentation, naming it ‘computershop.pptx’, to a location on your disk.
10. Close the computershop.pptx presentation, and open the computer5.pptx presentation.
11. Apply the Title Slide layout to slide 1, and the Title and Content layout to slide 2.
12. Apply the digitaldots design template from a location on your disk to the computer5.pptx presentation.
13. Save the computer5.pptx presentation, naming it ‘computer6.pptx’ and close it.
Developing the Presentation, Text
1. Open Microsoft PowerPoint and open the computer7.pptx presentation file from a location on your disk.
2. Save the computer7.pptx presentation, naming it ‘computer8.pptx’.
3. In the first slide, enter the text ‘Computer World’ in the Click to add title placeholder.
4. Change the title font in the second slide to Arial, and its size to 44 pt.
5. Centre align the title in the second slide and apply shadow formatting to it.
6. Change the colour of the title text in the second slide to red, and capitalise each word (Title Case) in it.
7. Change the line spacing of the bulleted lists in the third and fourth slides to 1.1 lines.
8. Apply a different bullet style to the bulleted list in the fourth slide.
9. Save the computer8.pptx presentation, and close it.
10. Open the computer9.pptx presentation, and insert the repairs.tif graphic in the master slide.
11. Move the repairs.tif graphic up to the top right corner of the master slide.
12. Apply automatic slide numbering to the footer of all slides in the computer9.pptx presentation.
13. Apply an automatically updating date to the footer of all slides in the computer9.pptx presentation.
14. Save the computer9.pptx presentation, naming it ‘computer10.pptx’ and close Microsoft PowerPoint.
Developing the Presentation, Text
1. Open Microsoft PowerPoint and open the computer 11.pptx presentation from a location on your disk.
2. Save the computer11.pptx presentation, naming it ‘computer12.pptx’.
3. Apply title case lettering to the title text (Capitalize Each Word) in the first slide.
4. Change the slide layout of the second slide to Title Slide.
5. Delete the title text in the third slide, and enter the text ‘Staff’ in its place.
6. Delete the empty column in the table in the third slide and then adjust the first column width to 6.8 cm and
the second column width to 7.5 cm to accommodate the text.
7. Insert a new row below the third row in the table in the third slide.
8. Add the following two items in separate cells across the fourth row: ‘Liam Dunne’ and ‘Sales Assistant’.
9. Save the computer12.pptx presentation, and close Microsoft PowerPoint.
SECTION 6.7 – RETENTION EXERCISES
Exercise 1
1. Open Microsoft PowerPoint and open the sports1.pptx presentation from a location on your disk.
2. Save the sports1.pptx presentation to your disk, naming it ‘belair1.pptx’.
3. Apply a light yellow background colour to all slides in the belair1.pptx presentation.
4. Insert the ball.tif image file from your disk into the belair1.pptx presentation, so that it will appear on all the slides.
Resize the ball.tif image so that its height is 2.5 cm and align it to the top right of each slide in the presentation.
5. Change the layout of slide 1 to a Title Slide, and type the following address in the subtitle placeholder:
Dublin Road
Athlone
Co. Westmeath
6. Apply bold italic formatting to the title text in slide 1, and increase its font size to 44 pt.
7. On slide 2 change the column chart to a bar chart.
8. On slide 3 delete the subordinate Mai O’Toole from the organisation chart.
9. On slide 3 change Tom Kehoe from being a subordinate of Niall Hogan (Golf Manager) to being a
subordinate of Mary Tobin (Bridge Manager).
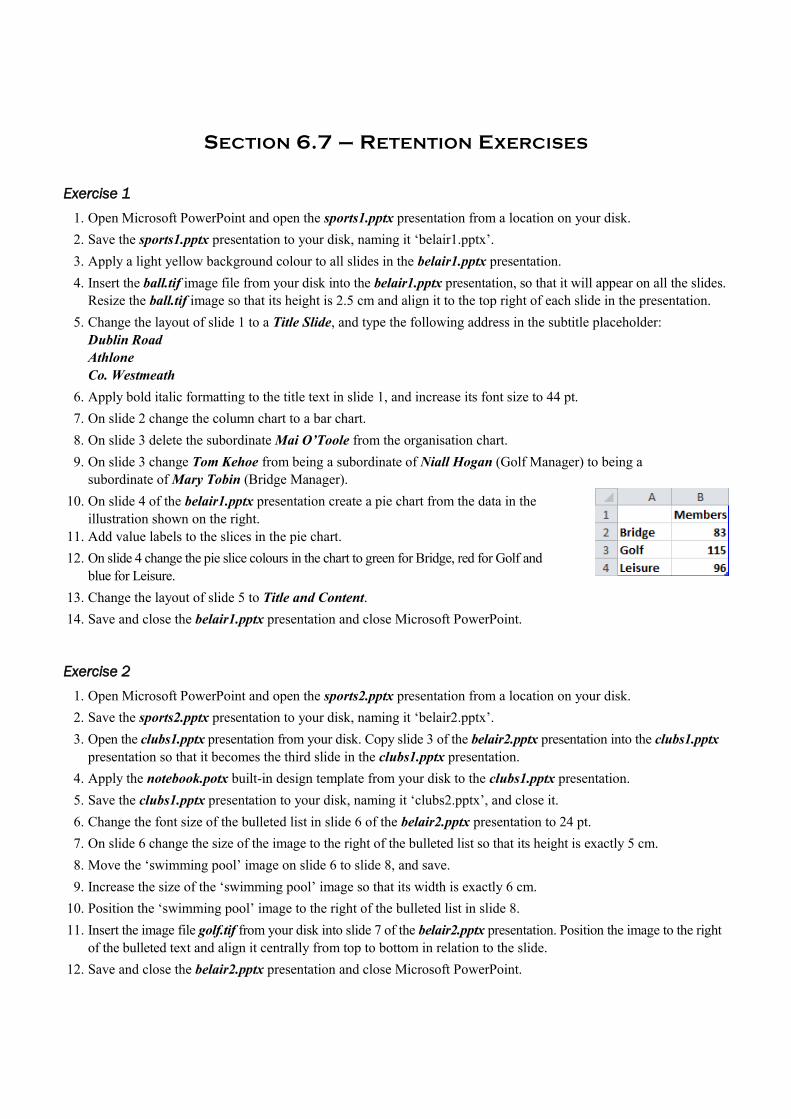
10. On slide 4 of the belair1.pptx presentation create a pie chart from the data in the
illustration shown on the right.
11. Add value labels to the slices in the pie chart.
12. On slide 4 change the pie slice colours in the chart to green for Bridge, red for Golf and
blue for Leisure.
13. Change the layout of slide 5 to Title and Content.
14. Save and close the belair1.pptx presentation and close Microsoft PowerPoint.
Exercise 2
1. Open Microsoft PowerPoint and open the sports2.pptx presentation from a location on your disk.
2. Save the sports2.pptx presentation to your disk, naming it ‘belair2.pptx’.
3. Open the clubs1.pptx presentation from your disk. Copy slide 3 of the belair2.pptx presentation into the clubs1.pptx
presentation so that it becomes the third slide in the clubs1.pptx presentation.
4. Apply the notebook.potx built-in design template from your disk to the clubs1.pptx presentation.
5. Save the clubs1.pptx presentation to your disk, naming it ‘clubs2.pptx’, and close it.
6. Change the font size of the bulleted list in slide 6 of the belair2.pptx presentation to 24 pt.
7. On slide 6 change the size of the image to the right of the bulleted list so that its height is exactly 5 cm.
8. Move the ‘swimming pool’ image on slide 6 to slide 8, and save.
9. Increase the size of the ‘swimming pool’ image so that its width is exactly 6 cm.
10. Position the ‘swimming pool’ image to the right of the bulleted list in slide 8.
11. Insert the image file golf.tif from your disk into slide 7 of the belair2.pptx presentation. Position the image to the right
of the bulleted text and align it centrally from top to bottom in relation to the slide.
12. Save and close the belair2.pptx presentation and close Microsoft PowerPoint.
SECTION 7.2 – USING THE BROWSER
2.1 Basic Browsing
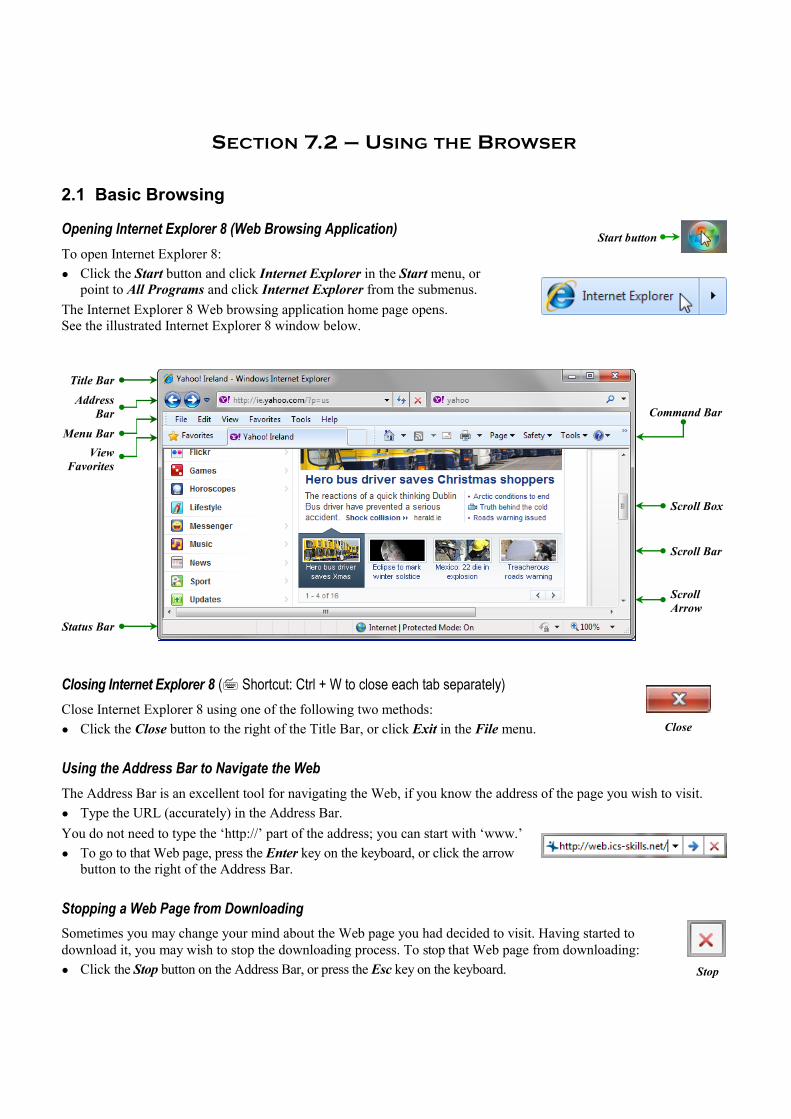
Opening Internet Explorer 8 (Web Browsing Application)
To open Internet Explorer 8:
● Click the Start button and click Internet Explorer in the Start menu, or
point to All Programs and click Internet Explorer from the submenus.
The Internet Explorer 8 Web browsing application home page opens.
See the illustrated Internet Explorer 8 window below.
Start button
Stopping a Web Page from Downloading
Sometimes you may change your mind about the Web page you had decided to visit. Having started to
download it, you may wish to stop the downloading process. To stop that Web page from downloading:
● Click the Stop button on the Address Bar, or press the Esc key on the keyboard. Stop
Closing Internet Explorer 8 ( Shortcut: Ctrl + W to close each tab separately)
Close Internet Explorer 8 using one of the following two methods:
● Click the Close button to the right of the Title Bar, or click Exit in the File menu. Close
Using the Address Bar to Navigate the Web
The Address Bar is an excellent tool for navigating the Web, if you know the address of the page you wish to visit.
● Type the URL (accurately) in the Address Bar.
You do not need to type the ‘http://’ part of the address; you can start with ‘www.’
● To go to that Web page, press the Enter key on the keyboard, or click the arrow
button to the right of the Address Bar.
Scroll Box
Scroll Bar
Scroll
Arrow
Status Bar
Title Bar
Menu Bar
Address
Bar Command Bar
View
Favorites
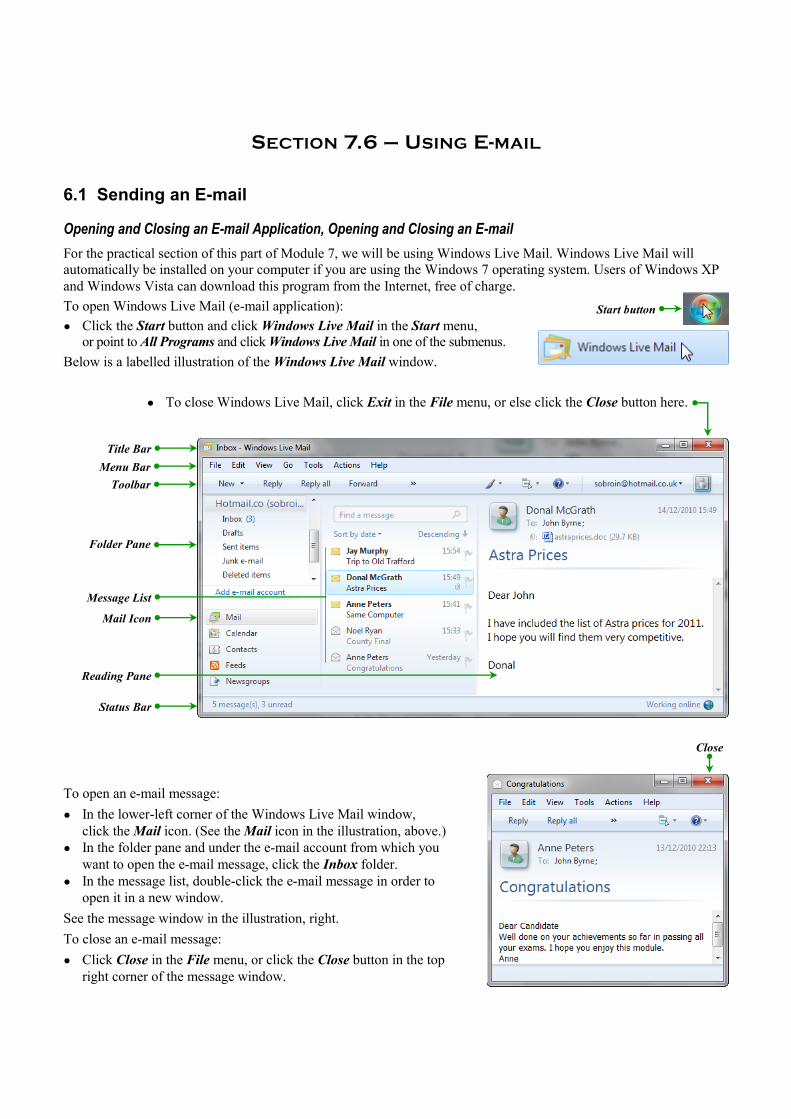
SECTION 7.6 – USING E-MAIL
To open an e-mail message:
● In the lower-left corner of the Windows Live Mail window,
click the Mail icon. (See the Mail icon in the illustration, above.)
● In the folder pane and under the e-mail account from which you
want to open the e-mail message, click the Inbox folder.
● In the message list, double-click the e-mail message in order to
open it in a new window.
See the message window in the illustration, right.
To close an e-mail message:
● Click Close in the File menu, or click the Close button in the top
right corner of the message window.
Close
● To close Windows Live Mail, click Exit in the File menu, or else click the Close button here.
Title Bar
Menu Bar
Toolbar
Folder Pane
Status Bar
Message List
Mail Icon
Reading Pane
6.1 Sending an E-mail
Opening and Closing an E-mail Application, Opening and Closing an E-mail
For the practical section of this part of Module 7, we will be using Windows Live Mail. Windows Live Mail will
automatically be installed on your computer if you are using the Windows 7 operating system. Users of Windows XP
and Windows Vista can download this program from the Internet, free of charge.
To open Windows Live Mail (e-mail application):
● Click the Start button and click Windows Live Mail in the Start menu,
or point to All Programs and click Windows Live Mail in one of the submenus.
Below is a labelled illustration of the Windows Live Mail window.
Start button
SECTION 7.8 – RETENTION EXERCISES
Web Browsing Exercise
1. Open the exercise1.docx file on your computer and enter your name in the appropriate place.
2. What is a Web browser? (a) A program that searches Web pages for viruses; (b) a program that refreshes Web
pages; (c) a program that enables you to navigate the World Wide Web. Insert your answer in the Q.2 space.
3. What is a cookie? (a) A computer virus; (b) a file created on your computer by a website; (c) a URL. Insert your
answer in the Q.3 space.
4. What is a digital certificate? (a) A certificate that enables the user to confirm that a Web page originated from the
organisation or individual it claims to come from; (b) a certificate awarded for excellence in computer skills;
(c) a certificate awarded for excellence in editing digital images. Insert your answer in the Q.4 space.
5. What is a Web browser home page? (a) A secure Web page; (b) the most interesting Web page that you have
accessed; (c) the Web page that appears every time you open the Web browser. Insert your answer in the Q.5 space.
6. What is encryption? (a) Encoding data so that only an authorised recipient can decode it; (b) hiding data so that
it cannot be seen; (c) decoding encoded data. Insert your answer in the Q.6 space.
7. In the term ‘RSS feeds’, what do the letters ‘RSS’ stand for? (a) Regular System Software; (b) Really Simple
Software; (c) Really Simple Syndication; (d) Really Simple Stories. Insert your answer in the Q.7 space.
8. Which of the following is not a security threat? (a) Spyware; (b) virus; (c) podcast; (d) worm; (e) Trojan horse.
Insert your answer in the Q.8 space.
9. What is a firewall? (a) A device to stop your computer overheating; (b) a device that speeds up your Internet
access; (c) a software or hardware system that blocks unauthorised access to your computer. Insert your answer in
the Q.9 space.
10. Open Internet Explorer and using the Address Bar, open a Web page of your tutor’s choosing.
11. Copy an image of your tutor’s choosing from that Web page, pasting it in the Q.11 space.
12. Use a search engine to find out information about ‘Tourism in Germany’.
13. From the list of search results, access one of these sites and copy its URL into the Q.13 space.
14. Change the orientation of the Web page from portrait to landscape, and print one copy of it.
15. Save the Web page to a location on your disk, close Internet Explorer and close the exercise1.docx file on saving.
Note for the Tutor!
For the Communication exercise on page 273, create three e-mail addresses so that the candidates can correspond
with you. For the purposes of the exercise on page 273, they will be called ‘tutor e-mail addresses 1, 2 and 3’.
For the Web Browsing exercise below, select a Web page in order that questions 10 and 11 can be answered.
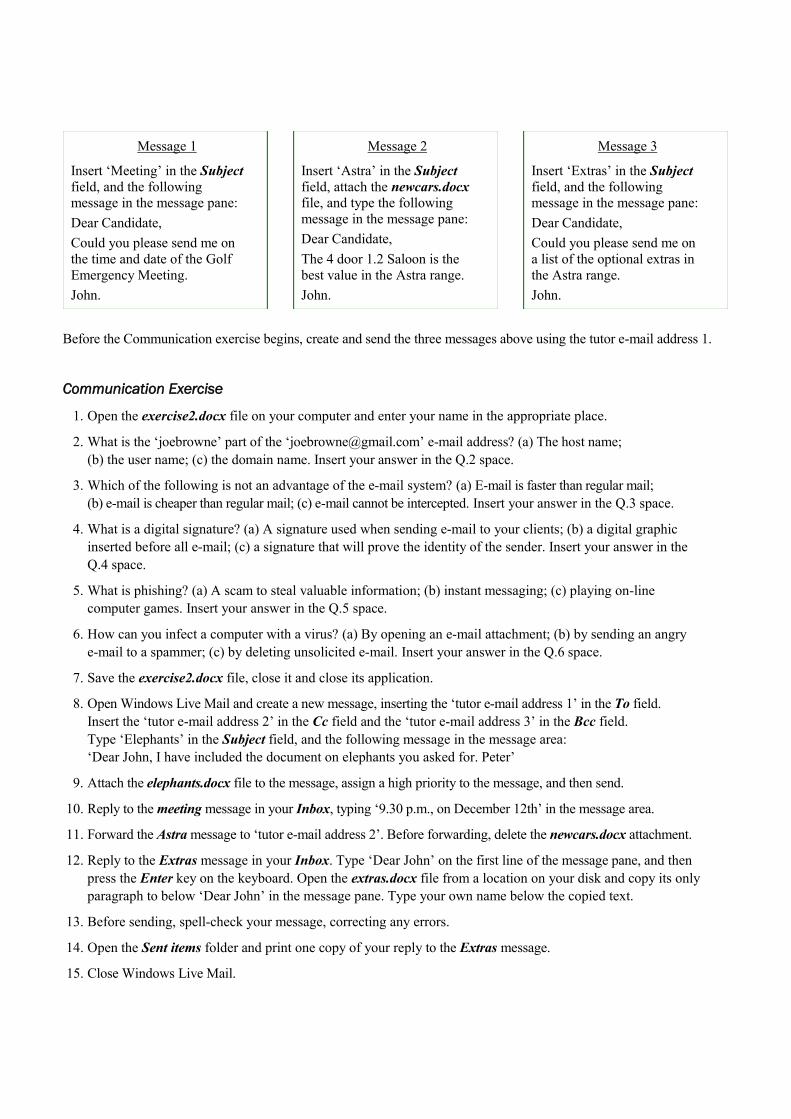
Message 2
Insert ‘Astra’ in the Subject
field, attach the newcars.docx
file, and type the following
message in the message pane:
Dear Candidate,
The 4 door 1.2 Saloon is the
best value in the Astra range.
John.
Message 1
Insert ‘Meeting’ in the Subject
field, and the following
message in the message pane:
Dear Candidate,
Could you please send me on
the time and date of the Golf
Emergency Meeting.
John.
Message 3
Insert ‘Extras’ in the Subject
field, and the following
message in the message pane:
Dear Candidate,
Could you please send me on
a list of the optional extras in
the Astra range.
John.
Communication Exercise
1. Open the exercise2.docx file on your computer and enter your name in the appropriate place.
2. What is the ‘joebrowne’ part of the ‘[email protected]’ e-mail address? (a) The host name;
(b) the user name; (c) the domain name. Insert your answer in the Q.2 space.
3. Which of the following is not an advantage of the e-mail system? (a) E-mail is faster than regular mail;
(b) e-mail is cheaper than regular mail; (c) e-mail cannot be intercepted. Insert your answer in the Q.3 space.
4. What is a digital signature? (a) A signature used when sending e-mail to your clients; (b) a digital graphic
inserted before all e-mail; (c) a signature that will prove the identity of the sender. Insert your answer in the
Q.4 space.
5. What is phishing? (a) A scam to steal valuable information; (b) instant messaging; (c) playing on-line
computer games. Insert your answer in the Q.5 space.
6. How can you infect a computer with a virus? (a) By opening an e-mail attachment; (b) by sending an angry
e-mail to a spammer; (c) by deleting unsolicited e-mail. Insert your answer in the Q.6 space.
7. Save the exercise2.docx file, close it and close its application.
8. Open Windows Live Mail and create a new message, inserting the ‘tutor e-mail address 1’ in the To field.
Insert the ‘tutor e-mail address 2’ in the Cc field and the ‘tutor e-mail address 3’ in the Bcc field.
Type ‘Elephants’ in the Subject field, and the following message in the message area:
‘Dear John, I have included the document on elephants you asked for. Peter’
9. Attach the elephants.docx file to the message, assign a high priority to the message, and then send.
10. Reply to the meeting message in your Inbox, typing ‘9.30 p.m., on December 12th’ in the message area.
11. Forward the Astra message to ‘tutor e-mail address 2’. Before forwarding, delete the newcars.docx attachment.
12. Reply to the Extras message in your Inbox. Type ‘Dear John’ on the first line of the message pane, and then
press the Enter key on the keyboard. Open the extras.docx file from a location on your disk and copy its only
paragraph to below ‘Dear John’ in the message pane. Type your own name below the copied text.
13. Before sending, spell-check your message, correcting any errors.
14. Open the Sent items folder and print one copy of your reply to the Extras message.
15. Close Windows Live Mail.
Before the Communication exercise begins, create and send the three messages above using the tutor e-mail address 1.