Embed Size (px)
Citation preview
©Center for Microbial Oceanography: Research and Education (C‐MORE). Materials may be duplicated and distributed for educational, non‐commercial purposes only.
NAUTICAL KNOTS & MARITIME CAREERS
Grade Level: This kit is appropriate for students in grades 3–8.
Overview: This kit introduces students to one of the key skills needed by anyone considering a maritime career: knot‐ tying. Step‐by‐step instructions with color photos are provided, along with pre‐made reference knots. Each knot is associated with a practical application, and with a professional who uses this knot in his or her job. Students learn about a variety of marine science careers and their education requirements. This lesson can be completed in one hour.
Suggestions for Curriculum Placement: This kit is designed to be a fun activity to begin or conclude an oceanography or marine science unit. It can also serve as a stand‐alone activity to introduce students to maritime careers.
Materials Included in this Science Kit: (Materials contained in binder are shown in BOLD CAPS) Materials are provided for up to 30 students working in teams.
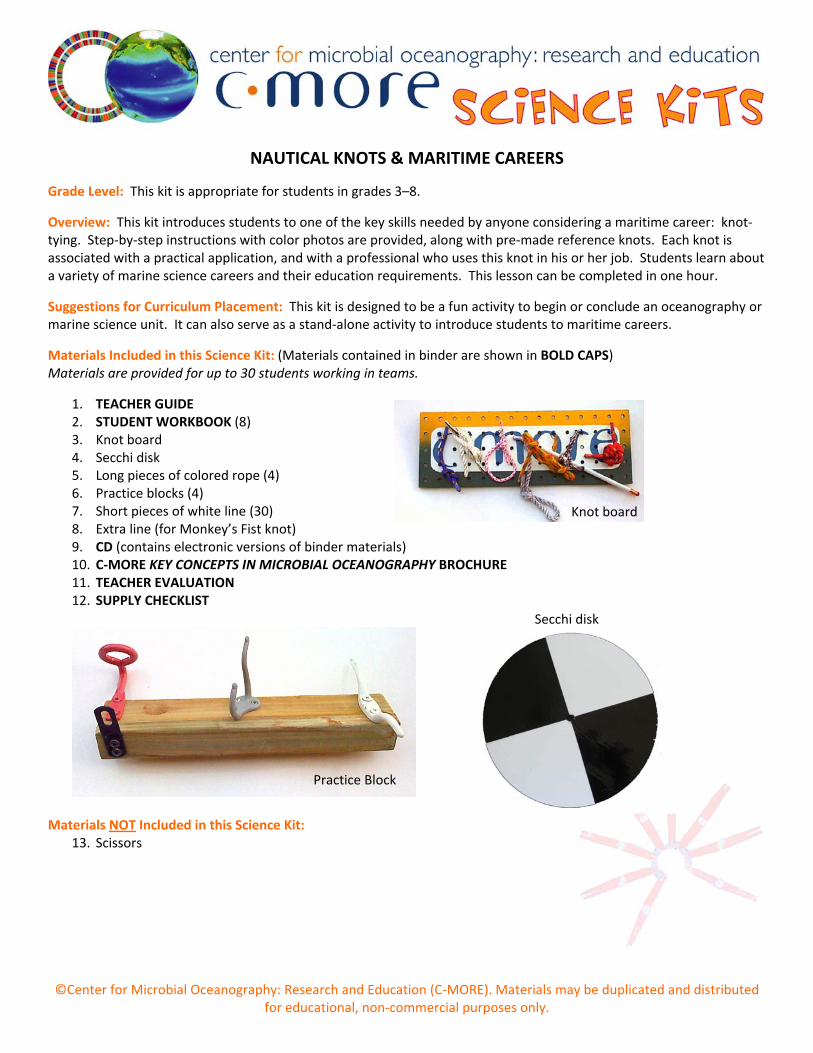
1. TEACHER GUIDE 2. STUDENT WORKBOOK (8) 3. Knot board 4. Secchi disk 5. Long pieces of colored rope (4) 6. Practice blocks (4) 7. Short pieces of white line (30) 8. Extra line (for Monkey’s Fist knot) 9. CD (contains electronic versions of binder materials) 10. C‐MORE KEY CONCEPTS IN MICROBIAL OCEANOGRAPHY BROCHURE 11. TEACHER EVALUATION 12. SUPPLY CHECKLIST
Materials NOT Included in this Science Kit:
13. Scissors
Knot board
lock
Practice Block
Secchi disk
Knot board

Hawaii Content & Performance Standards (HCPS III): The following standards and benchmarks can be addressed through these lessons:
Career and Technical Education Standard 2: CAREER PLANNING: Explore and understand educational and career options in order to develop and implement personal, educational, and career goals.
Grades 3‐8 Benchmarks for Career and Technical Education: CTE.3.2.1 Describe how different careers may require different skills, knowledge, and attitudes. CTE.4.2.1 Analyze how doing well in school affects future career opportunities. CTE.4.2.2 Identify ways that hobbies, personal interests, and strengths may lead to a career interest. CTE.6.2.1 Establish personal and learning goals related to career and life interests. CTE.7‐8.2.3 Analyze the relationship between personal characteristics, interests, abilities, and skills in achieving
personal and career goals. CTE.7‐8.2.4 Analyze career options that match personal interests, abilities, and skills. Ocean Literacy Principles: The following ocean literacy principles can be addressed through these lessons:
Ocean Literacy Principle 6: The ocean and humans are inextricably interconnected.
c. The ocean is a source of inspiration, recreation, rejuvenation and discovery. It is also an important element in the heritage of many cultures.
TEACHER GUIDE
Nautical Knots & Maritime Careers
Time required: 60 minutes. Advance preparation time will vary between 20 and 60 minutes, depending on the amount
of knot‐tying practice required. Structure: This activity is intended to be run as a student‐teamed activity. Alternatively, it can be run as a teacher‐led
activity. Advance Preparation:
1. Read the STUDENT WORKBOOK, practice the knots, and familiarize yourself with the kit materials. 2. Photocopy the TEACHER EVALUATION and the SUPPLY CHECKLIST.
Materials: Teacher Demonstration & Student Activity:
1. STUDENT WORKBOOK (8) 2. Knot board 3. Secchi disk 4. Practice blocks (4) 5. Long pieces of colored rope (4) 6. Short pieces of white line (30) 7. Extra line (for Monkey’s Fist knot)
Other Materials:
8. CD (contains electronic versions of binder materials) 9. C‐MORE KEY CONCEPTS IN MICROBIAL OCEANOGRAPHY BROCHURE 10. TEACHER EVALUATION 11. SUPPLY CHECKLIST
Instructional Procedures: Introduction/Demonstration
1. Divide the class into four groups, and pass out two STUDENT WORKBOOKS to each group. 2. Have students read through the career profiles found in the STUDENT WORKBOOK. At this time, they do not
need to read the directions for tying each knot. 3. To help students link these knots to their maritime uses, use the secchi disk and a piece of colored rope to
demonstrate the Figure 8 knot. Refer to pages 4‐5 of the STUDENT WORKBOOK for instructions on tying the Figure 8 knot and for Secchi disk information.
4. Explain to the students that they will be tying knots with white line onto the practice block, using the knot board for reference. Explain that the knots on the knot board are identical to those in the STUDENT WORKBOOK. They are color coordinated to match the hardware on the practice block (e.g., the Figure 8 knot is tied with purple rope on the knot board, and should be tied to the purple piece of hardware on the practice block).
5. Using a short piece of white line and the practice block, briefly demonstrate how to tie the Figure 8 knot onto the practice block. Demonstrate other knots, if desired.

Student Activity 1. Distribute a practice block and a long piece of colored rope to each group. Each group already has 2 student
workbooks. 2. Distribute a short piece of white line to each student. 3. Have each student select a knot from the STUDENT WORKBOOK to complete. Not all knots will require the use
of the practice block. a. The Clove Hitch requires a post such as a chair leg. b. Students can start tying the Monkey’s Fist with their short piece of white line, but (1) the line isn’t long
enough to complete the knot; and (2) it should not be tightened, as this is a permanent knot. If students wish to make a Monkey’s Fist to take home, have them cut a 4 feet piece from the extra line included.
4. Students can also try tying a bowline knot around their waists using the long piece of colored rope. This is often done on ships as a safety measure in case a sailor falls overboard.
5. If time permits, allow students to practice their Figure 8 knot using the secchi disk. Assessment & Clean‐up
1. Collect all supplies and re‐pack the kit for return to C‐MORE. Please double‐check that all the items are included by completing the SUPPLY CHECKLIST. Please make a note of missing, broken, or damaged items so that they can be replaced. Please pack the kit so that the materials are stored as they were when you received them.
2. If you have time, we would be grateful if you would complete the TEACHER EVALUATION in this kit. All comments, corrections, and suggestions are very welcome.
Mahalo!

TEACHER EVALUATION
Nautical Knots & Maritime Careers
1. Was this C‐MORE Science Kit easy to use? 2. What do you think are the appropriate grade levels for this Science Kit? 3. Did your students enjoy using this Science Kit? 4. Would you borrow this Science Kit in the future? Would you recommend it to other teachers?

5. Please suggest two things that could be improved.
6. Any other comments? 7. Please tell us about your students. As we are committed to serving underrepresented populations, please estimate
the number of your students in the following categories: ___ Total number of students ___ African American ___ Eligible for free or reduced lunch ___ Native American ___ Native Hawaiian or Pacific Islander ___ Physically disabled ___ Filipino ___ Learning disabled ___ Hispanic ___ Neither parent attended college
Thank you for your feedback.
SUPPLY CHECKLIST
Nautical Knots & Maritime Careers
Use the boxes to check off each item as you reassemble this kit.
Contents of Binder:
1. Front pocket CD (contains electronic versions of binder materials) C‐MORE KEY CONCEPTS IN MICROBIAL OCEANOGRAPHY brochure
2. Front Material NAUTICAL KNOTS & MARITIME CAREERS (provides a general overview & standards addressed)
3. Teacher Guide Tab TEACHER GUIDE
4. Student Workbook Tab STUDENT WORKBOOK (8 copies)
5. Teacher Evaluation Tab TEACHER EVALUATION
6. Supply Checklist Tab SUPPLY CHECKLIST
Other Supplies:
Knot board Secchi disk Practice blocks (4) Long pieces of colored rope (4) Short pieces of white line (30) Extra line (for Monkey’s Fist knot)
10

STUDENT WORKBOOKNautical Knots & Maritime Careers
STUDENT WORKBOOKNautical Knots & Maritime Careers
Figure 8 Cleat Hitch Bowline Slippery Hitch
Sheep Shank Clove Hitch Monkey’s Fist
1
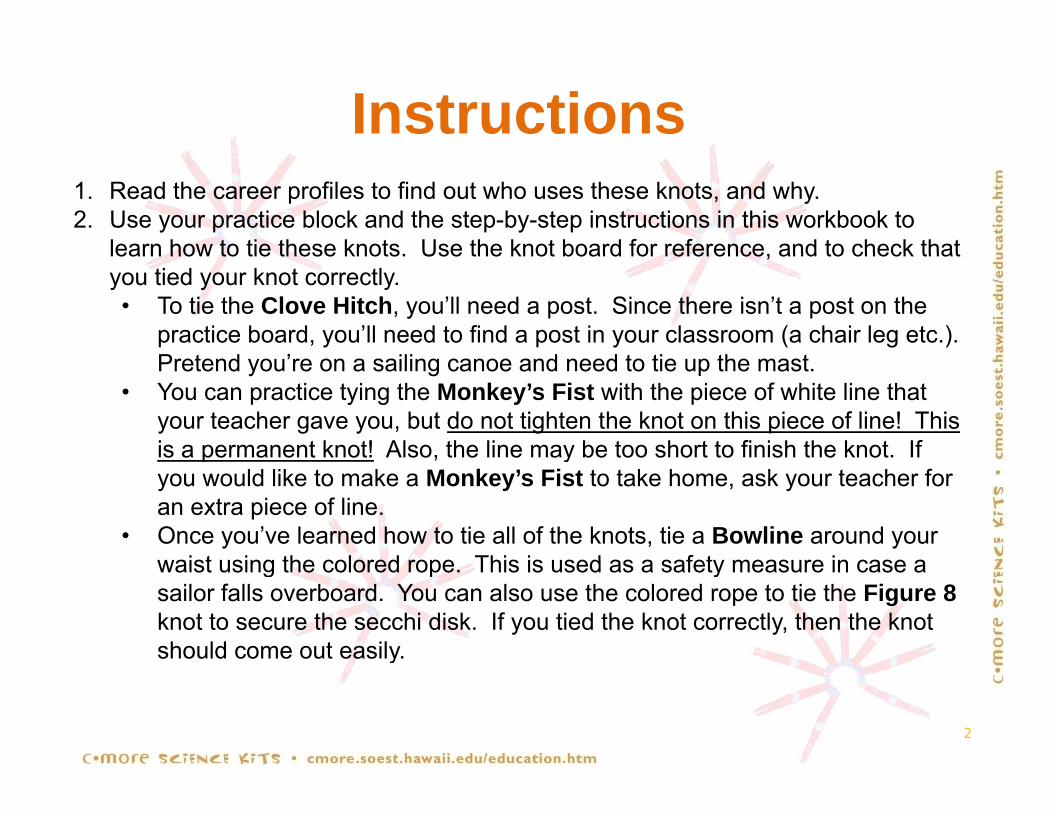
Instructions1. Read the career profiles to find out who uses these knots, and why.2. Use your practice block and the step-by-step instructions in this workbook to
learn how to tie these knots Use the knot board for reference and to check thatlearn how to tie these knots. Use the knot board for reference, and to check that you tied your knot correctly. • To tie the Clove Hitch, you’ll need a post. Since there isn’t a post on the
practice board, you’ll need to find a post in your classroom (a chair leg etc.). P t d ’ ili d d t ti th tPretend you’re on a sailing canoe and need to tie up the mast.
• You can practice tying the Monkey’s Fist with the piece of white line that your teacher gave you, but do not tighten the knot on this piece of line! This is a permanent knot! Also, the line may be too short to finish the knot. If p , yyou would like to make a Monkey’s Fist to take home, ask your teacher for an extra piece of line.
• Once you’ve learned how to tie all of the knots, tie a Bowline around your waist using the colored rope This is used as a safety measure in case awaist using the colored rope. This is used as a safety measure in case a sailor falls overboard. You can also use the colored rope to tie the Figure 8knot to secure the secchi disk. If you tied the knot correctly, then the knot should come out easily.
2
y

Index of Knots
Cleat Hitch
Figure 8
Easy
Hitch
Bowline
Slippery Hitch
Average
Clove Hitch
Monkey’s Hard
Sheep Shank
3
yFist Hard
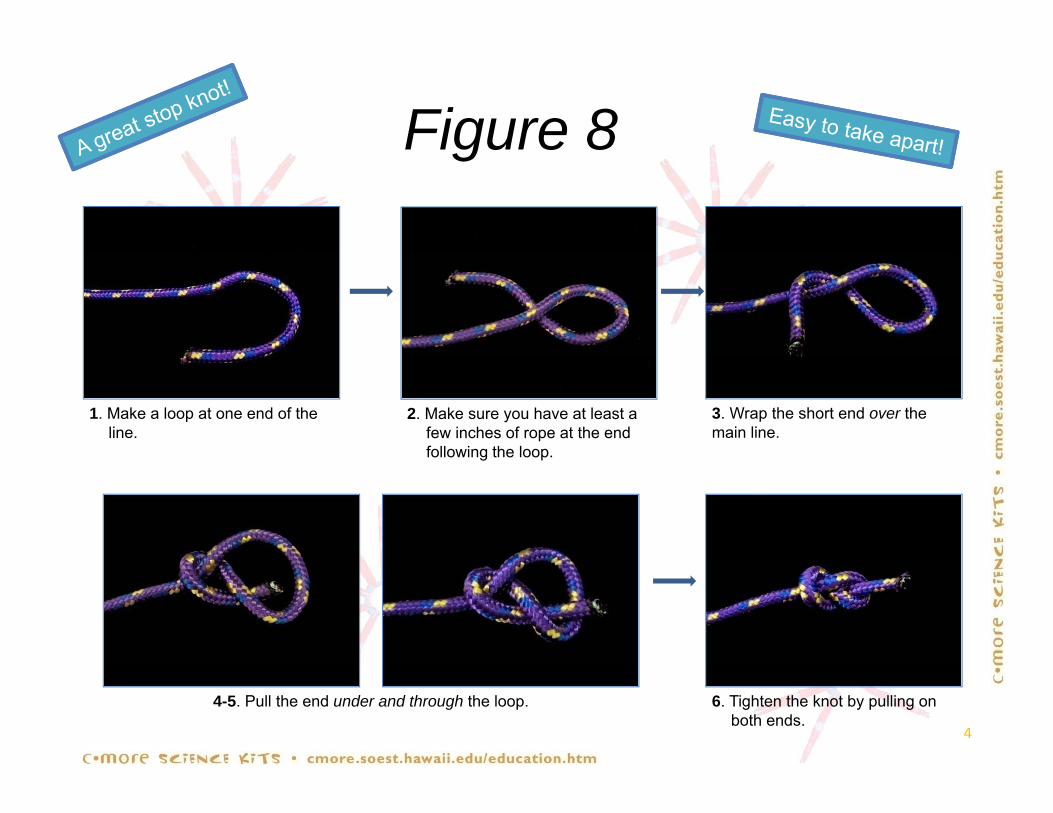
Figure 8g
1. Make a loop at one end of the line.
2. Make sure you have at least a few inches of rope at the end following the loop.
3. Wrap the short end over the main line.
g p
6. Tighten the knot by pulling on both ends.
4
4-5. Pull the end under and through the loop.
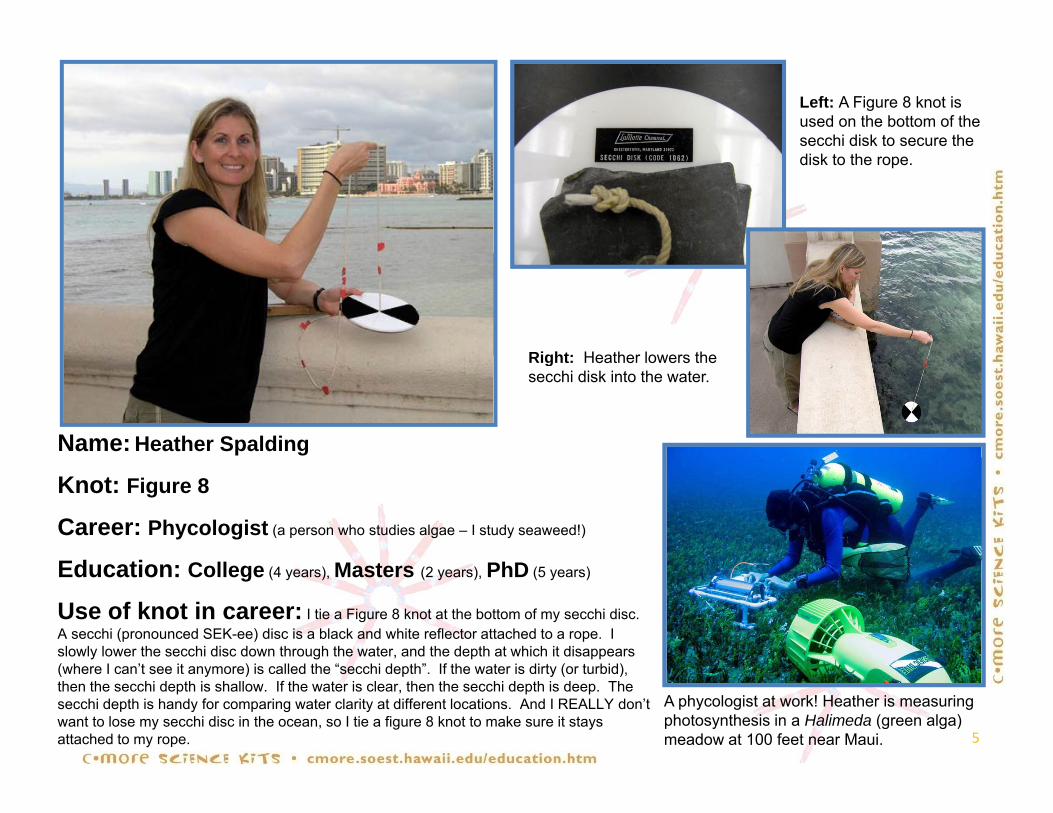
Left: A Figure 8 knot is used on the bottom of the secchi disk to secure the disk to the rope.
Right: Heather lowers the
Name: Heather Spalding
Right: Heather lowers the secchi disk into the water.
Knot: Figure 8
Career: Phycologist (a person who studies algae – I study seaweed!)
Ed tiEducation: College (4 years), Masters (2 years), PhD (5 years)
Use of knot in career: I tie a Figure 8 knot at the bottom of my secchi disc. A secchi (pronounced SEK-ee) disc is a black and white reflector attached to a rope. I slowly lower the secchi disc down through the water, and the depth at which it disappears
5
(where I can’t see it anymore) is called the “secchi depth”. If the water is dirty (or turbid), then the secchi depth is shallow. If the water is clear, then the secchi depth is deep. The secchi depth is handy for comparing water clarity at different locations. And I REALLY don’t want to lose my secchi disc in the ocean, so I tie a figure 8 knot to make sure it stays attached to my rope.
A phycologist at work! Heather is measuring photosynthesis in a Halimeda (green alga) meadow at 100 feet near Maui.
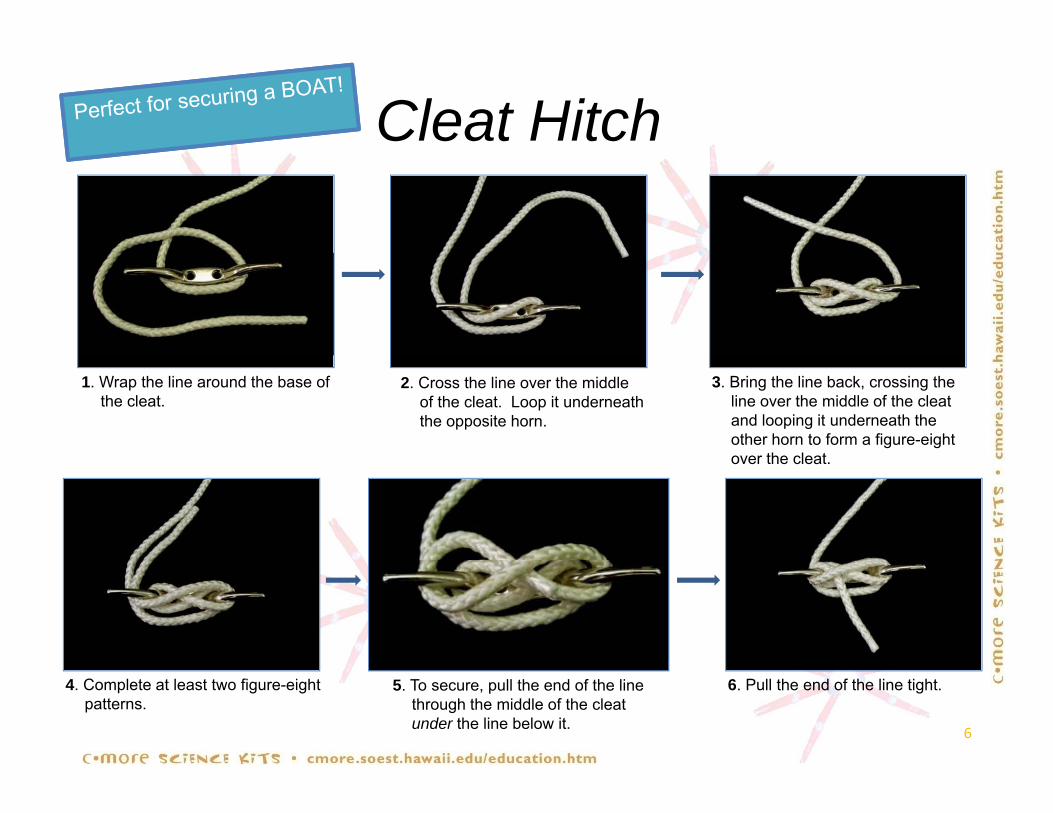
Cleat Hitch
1. Wrap the line around the base of the cleat.
3. Bring the line back, crossing the line over the middle of the cleat and looping it underneath the other horn to form a figure-eight over the cleat
2. Cross the line over the middle of the cleat. Loop it underneath the opposite horn.
over the cleat.
6
4. Complete at least two figure-eight patterns.
5. To secure, pull the end of the line through the middle of the cleat under the line below it.
6. Pull the end of the line tight.

Right: Blossom with fellow crew members of the Alingano Maisu and the Hokule‘aMaisu and the Hokule a performing a dance upon safely arriving in the Marshall Islands after using polynesian navigational techniques to sail 2,200 miles from Hawai‘i.
Photo courtesy of Gary Kubota & Honolulu Star-Bulletin
Name: Blossom Pualani Lincoln
Knot: Cleat Hitch
Career: Polynesian Voyager and Teacher
Education: College (4 ) Masters (2 )Education: College (4 years), Masters (2 years)
Use of knot in career: I am a crewmember of the Makali‘i, which is a 54 foot double-hulled Polynesian voyaging canoe, as well as a teacher of Hawaiian Studies at the University of Hawai‘i at Mānoa. I incorporate ancient Hawaiian traditions and navigational techniques into ocean voyaging to
7
Hawaiian traditions and navigational techniques into ocean voyaging to educate future generations and the community about our Polynesian ancestors. The use of knots in sailing is extremely important. I use the cleat hitch to secure lines on the mast of our canoes, but it is also used to tie up a boat at a dock.
Launching of the canoe! This is a traditional style voyaging canoe that students in her Ho‘okele Hawaiian Studies class at UH helped build during Spring 2009.

Bowline
1. Make a loop toward the end of the rope.
2. Pull the end through the loop from underneath.
8
2. Pull the rope under the main line. 3. Pull the end through the small loop from above the main line.
4. Tighten the knot while making the loop the size you need.

Left: Bringing a CTD water sampler back on deck
Right: Karin processes samples in the
deck.
pshipboard laboratory.
Name: Karin Björkman
Knot: Bowline
Career: Microbial Oceanographer (a person who studies microbes!)
Education: College (4 years), Masters (2 years), PhD (5 years)
Use of knot in career: OUse of knot in career: I am scientist with the Hawai‘i Ocean Time-series, and I study microorganisms in the open ocean. I go on research cruises to collect my samples. The bowline is one of the most functional knots – I use this knot everyday when I am at sea. I use it to safely secure my sampling equipment, such as a CTD (Conductivity, Temperature, Depth recorder), to the ship. There are bottles mounted on the CTD that allow me to collect water samples at any depth in the ocean. To study the microbial biomass at each depth, I measure
Safety first! Karin and a fellow scientist try on their survival suits during a safety drill at sea. 9
p y p y p ,the amount of adenosine triphosphate (ATP) in each water sample. This method works well because all living organisms contain ATP, which is used to transport chemical energy within cells. From my research, I have found that most living microbial organisms can be found in the upper 200 meters (660 feet) of the ocean.

Slippery HitchThis knot can be tied quickly and released easily.
1. Make a loop at one end. 2. Pinch some of the line to the left of the loop.
3. Pull this line under and throughyour loop.
10
4. Tighten the knot by pulling both the shorter end and the loop. Done!
5. To quickly undo the knot, pull on the two ends of the line.

Name: Skippy Hau
Knot: Slippery Hitch
Career: Aquatic Biologist (24 years with the Dept of Aquatic Resources)Career: Aquatic Biologist (24 years with the Dept. of Aquatic Resources)
Education: College (4.5 years)
Use of knot in career: I use the slippery hitch for tying down supplies and gear in back of the truck or on the boat I used to try using it for a bow or stern line
11
and gear in back of the truck or on the boat. I used to try using it for a bow or stern line, but for some strange reason, it takes longer because some people try to untie the knot instead of pulling the two ends of the line. It helps when people are experienced with basic knots to make things run smoother.
Skippy monitors coral reefs in the Hawaiian islands. In these photos, he is studying a Hawaiian sea urchin.
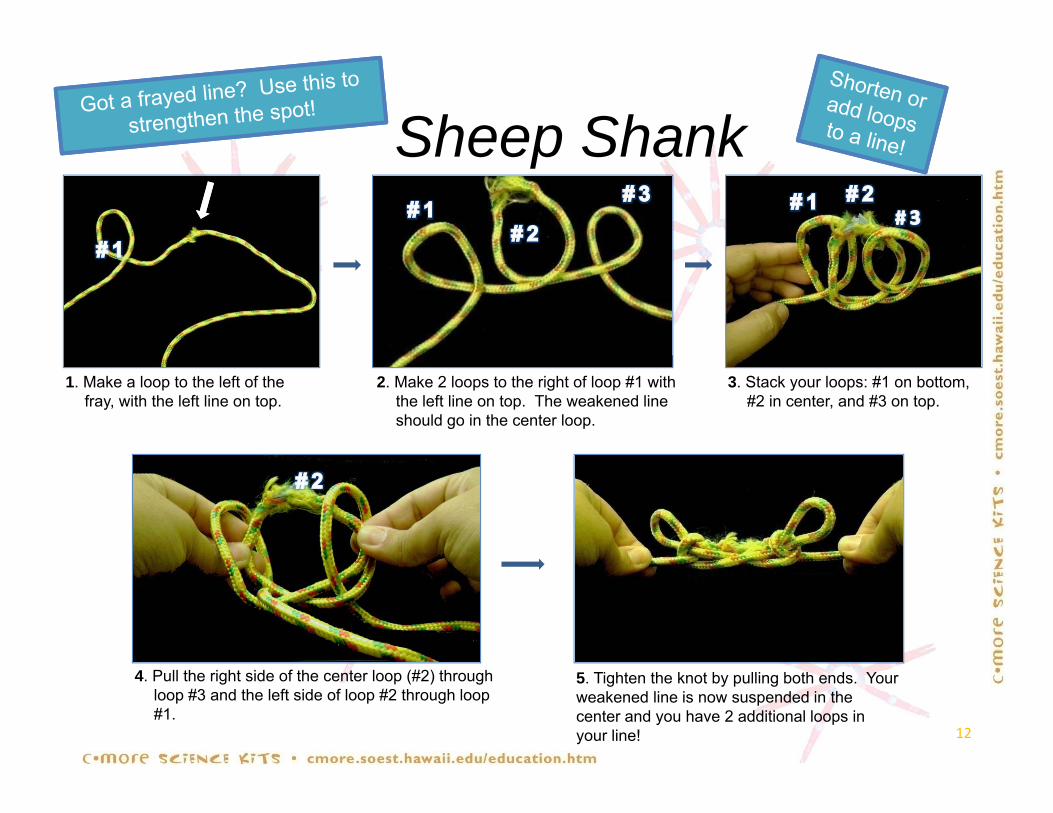
Sheep ShankSheep Shank
1. Make a loop to the left of the fray, with the left line on top.
2. Make 2 loops to the right of loop #1 with the left line on top. The weakened line should go in the center loop.
3. Stack your loops: #1 on bottom, #2 in center, and #3 on top.
12
5. Tighten the knot by pulling both ends. Your weakened line is now suspended in the center and you have 2 additional loops in your line!
4. Pull the right side of the center loop (#2) through loop #3 and the left side of loop #2 through loop #1.

Above: Colin fixing i t th bequipment on the sub.
Right: Preparing the sub for recovery onto the support ship.
Name: Colin Wollerman
Knot: Sheep ShankKnot: Sheep Shank
Career: Submersible Support Technician (SST)
Education: Electrician Apprenticeship (3 years)
& T h i l T i i& Technical Training
Use of knot in career: I maintain and repair deep diving Human Occupied Vehicles (HOVs). When we recover items lost on the bottom of the seafloor, it involves a lot of “rigging”. The submersible (“sub”) locates the item and brings it to the surface If the item is too large for the sub to hold during recovery of the sub onto
Scientists with the Hawai‘i Underwater Research Lab (HURL) can dive to 2000 meters in this sub. The sub takes 3 people and can stay down for 6-10 hours!
13
the surface. If the item is too large for the sub to hold during recovery of the sub onto the support ship, the SST will go onto the sub while it is at the surface and “rig” the item to a buoy with a lifting point that the ship can lift with a crane. The sheep shank is used to adjust the length of the rigging line so items can be lifted out of the water quickly and safely. Longer lines could tangle and create a dangerous situation.

Clove Hitch
1. Wrap the rope around the post with the left side on the bottom.
2. Make a second turn around the post .
14
3. Bring the second turn around and pull the end underneath the top turn.
4. Pull on both ends of the rope to tighten.
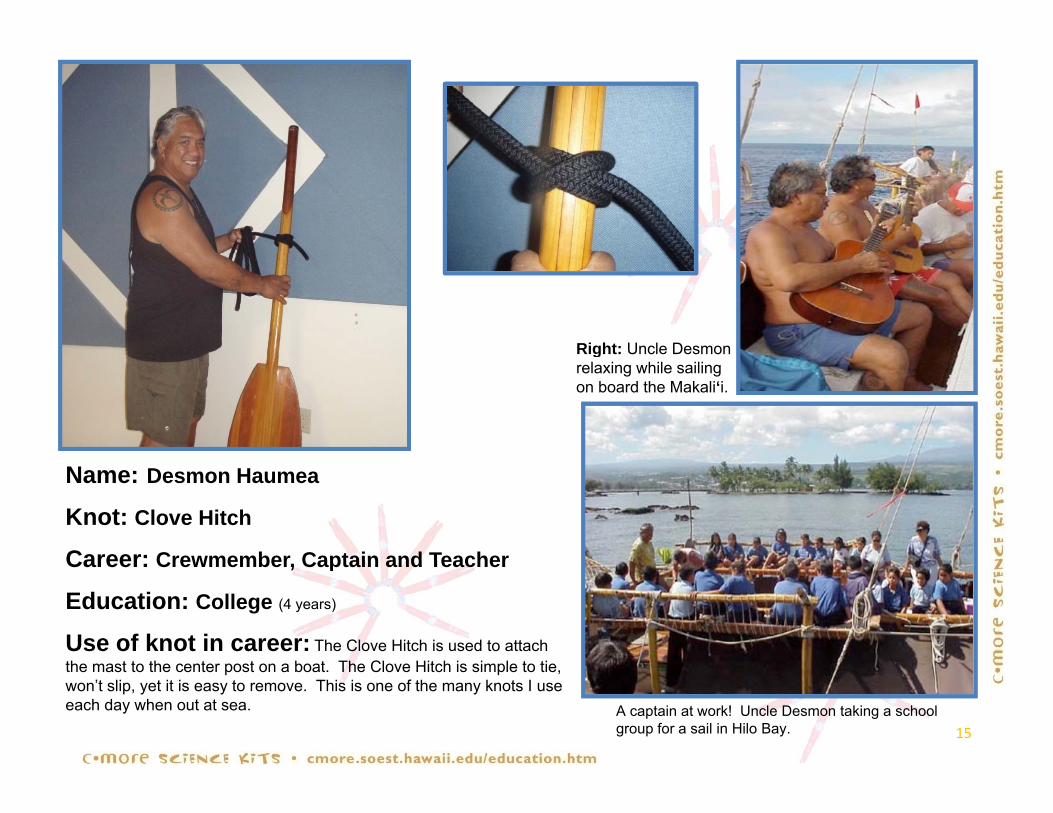
Right: Uncle Desmon grelaxing while sailing on board the Makali‘i.
Name: Desmon Haumea
Knot: Clove Hitch
Career: Crewmember Captain and TeacherCareer: Crewmember, Captain and Teacher
Education: College (4 years)
Use of knot in career: The Clove Hitch is used to attach th t t th t t b t Th Cl Hit h i i l t ti
15
the mast to the center post on a boat. The Clove Hitch is simple to tie, won’t slip, yet it is easy to remove. This is one of the many knots I use each day when out at sea. A captain at work! Uncle Desmon taking a school
group for a sail in Hilo Bay.

Monkey’s FistAsk your teacher for extra line to make this knot.
1. Wrap the rope from front to back 3 times around
2. Curve the tail of your final turn to the right side, around the back of the rope, through your fingers and to the front
3. Wrap the rope 3 times in this “right to left”
your fingers.front.
direction.
CLoose Tight
6. Tighten each turn of the line in the order it was made until the entire knot is tight. This part can take awhile, so be patient and stick with it! 16
4. Pull the end back through the top of the wraps and go through the bottom gap in a “top to bottom” direction.
5. Complete 3 spirals in this direction. There should be 3 pieces of line visible from all sides.
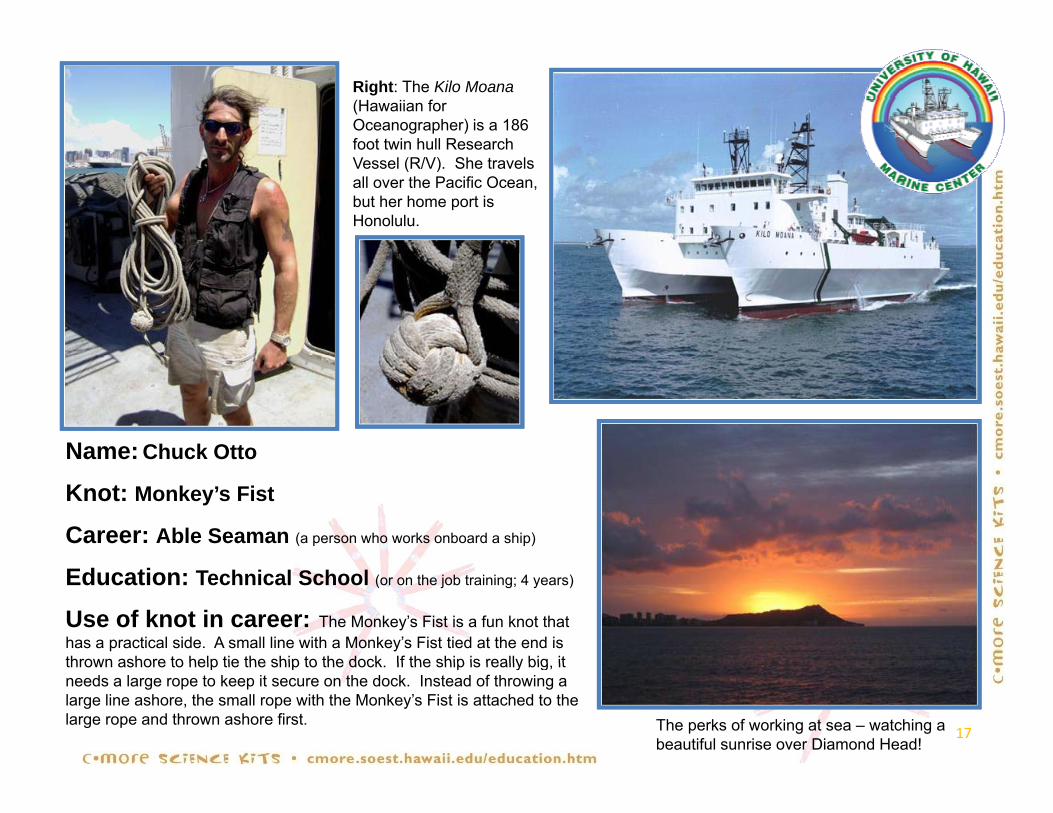
Right: The Kilo Moana (Hawaiian for Oceanographer) is a 186 foot twin hull Research Vessel (R/V). She travels all over the Pacific Ocean, but her home port is Honolulu.
Name: Chuck OttoName: Chuck Otto
Knot: Monkey’s Fist
Career: Able Seaman (a person who works onboard a ship)
Education: Technical School (or on the job training; 4 years)
Use of knot in career: The Monkey’s Fist is a fun knot that has a practical side. A small line with a Monkey’s Fist tied at the end is thrown ashore to help tie the ship to the dock If the ship is really big it
17
thrown ashore to help tie the ship to the dock. If the ship is really big, it needs a large rope to keep it secure on the dock. Instead of throwing a large line ashore, the small rope with the Monkey’s Fist is attached to the large rope and thrown ashore first. The perks of working at sea – watching a
beautiful sunrise over Diamond Head!