Embed Size (px)
Citation preview

118 Greys Road, Henley-on-Thames, Oxon RG9 1QW. Tel: +44(0)1491 579727
e-mail [email protected] www.makoweruk.com
NauticalDesigned by Lynne Goldsworthy of lilysquilts.blogspot.com,
pattern drawn up in EQ by Jane Davidson. Finished size 1,49 x 1,97m (58½" x 77½")
Featuring the Nautical collection from makoweruk

FABRIC1147 B Stripe ¼ m / ¼ yd1234 B Beach Huts ¼ m / ¼ yd1234 Q Beach Huts ½ m / ½ yd1235 B Boats ¼ m / ¼ yd1236 B Seagulls ¼ m / ¼ yd1236 T Seagulls ¼ m / ¼ yd1237 B Anchors ½ m / ½ yd1237 Q Anchors ½ m / ½ yd1238 B Fish ¼ m / ¼ yd1238 T Fish ½ m / ½ yd1239 B Flags ¼ m / ¼ yd1239 R Flags ½ m / ½ yd1240 B Waves ¼ m / ¼ yd1240 T Waves ¼ m / ¼ yd2000 Q01 Spectrum 2m / 2ydBacking 1234 Q 4½ m / 5ydsBinding 1147/B ½ m / ½ yd
Cutting instructions:
Cutting instructions are shown for each block below but the cream solid (2000Q01) should be cut as follows:1. Cut three 5 ½” WOF (width of fabric) strips and sub cut into four 10 ½” lengths to make a total of twelve. Then cut those rectangles in half along the diagonal. If you are using a solid which has no right and wrong side, they can all be cut on the same diagonal but, if the fabric has a right and a wrong side, make sure half the triangles are cut top left to bottom right and half top right to bottom left. These rectangles can be used to foundation paper piece the background to the triangle blocks. 2. Cut twenty-four 2” WOF strips. Sub cut eight into five 8 ½” lengths to make a total of forty. Sew the remaining sixeen strips end to end and sub-cut into nine 56” lengths and two 78” lengths
Block Instructions:
A block – wigwam - make 2
1. Print / photocopy templates A1 and A2 (one set for each block) and tape together where indicated with the red arrows to make an 8 ½” template 2. NB the black line down the centre of the template where A1 and A2 join should be ignored when piecing this block3. Foundation paper piece three A blocks using the 5 ½” x 10 ½” half-rectangle triangles of cream solid for the background area of the block4. Trim to dashed line and remove papers
1.1234B, 1239R and 2000Q01 2. 1240T, 1236T and 2000Q01)
Nautical by Lynne Goldsworthy lilysquilts.blogspot.comPattern drawn up in EQ by Jane DavidsonFinished size 1,49 x 1,97m (58½” x 77½”)

B block – circle - make 5
1. Print /photocopy template B (only one template needed for all 5 blocks)2. Cut one 6” square for the circle3. Cut one 8 ½” square for the background for each B block4. Trace five circles onto the back of fusible web and cut out roughly5. Fuse to the back of the 6” squares of fabric following manufacturer’s instructions6. Cut out the circles7. Fuse to the 8 ½” squares8. Sew round the edge of the circles using zigzag, blanket or another stitch of your choice. 9. If you prefer you could use the template to appliqué the circles using needle turn or similar.
C block – framed square – make 4
1. Cut one 4 ½" square for the centre2. Cut two 2 ½" x 4 ½" strips and two 2 ½"x 8 ½" strips for the frame. Sash the centre square using first the shorter frame strips and then the longer frame strips.
D block – horizontal 3 stripe triangle - make 3
1. Print / photocopy templates D1 and D2 (one set for each block) and tape together where indi-cated with the red arrows to make an 8 ½” template2. NB the black line down the centre of the template where D1 and D2 join should be ignored when piecing this block3. Foundation paper piece four D blocks using the 5 ½” x 10 ½” half-rectangle triangles of cream solid for the background area of the block4. Trim to dashed line and remove papers
1. 1234Q and 1237B2. 1234Q and 1240T3. 1239B and 1234Q4. 1234B and 1235B5. 1239R and 1236T
1. 1240B and 1236B2. 1234Q and 1240T3. 1238T and 1239B4. 1237Q and 1235B
1. 1234Q, 1239R and 2000Q012. 1239R, 1237Q and 2000Q013. 1240B, 1235B and 2000Q01

E block – quarter square triangle - make 4
1. Cut four 9 ½ ” squares (this will make four of these blocks)2. Cut in half on the diagonal and then in half again on the opposite diagonal to make four triangles per square3. Sew together to make the E blocks4. Trim to 8 ½ “ square
F block – the letter X - make 3
1. Cut one 7 ½” square for the background2. Cut two 2” x 12” strips for the X. 3. Cut the square in half along the diagonal and sew back together using one of the sashing strips to join the two halves together4. Cut in half along the other diagonal then once again sew back together using the other sashing strip to join the two halves together
G block – 4-patch – make 4
1. Cut two 4 ½ in squares of each colour2. Sew into pairs then sew the two rows together to make a 4 patch.
1. 1237B and 1238T2. 1239R and 1147B3. 1238T and 1239R4. 1237B and 1147B
1. 1147B and 1240B2. 1237B and 1238T3. 1237Q and 1239R
1. 1234B and 1237Q2. 1235B and 1237Q3. 1239B and 1236T4. 1237B and 1238T

H block – 3 stripe square - make 4
1. Cut one 3 ½” x 8 ½” strip for the centre stripe 2. Cut two 3” x 8 ½” strips for the top and bottom stripes 3. Sew together
I block – square in square - make 3
1. Cut one 6’ square for the centre of the block2. Cut two 5 ¼” squares for the background3. Cut the 5 ¼” squares in half along the diagonal to make four triangles4. Sew two of the triangles to opposite sides of the square and press open5. Sew the remaining two triangles to the other sides of the square and press open6. Trim to 8 ½’ square
J block – half and half – make 3
1. Cut two 4 ½ in x 8 ½ in rectangles 2. Sew together
K block – vertical 3 stripe triangle – make 3
1. Print / photocopy templates K1 and K2 (one set for each block) and tape together where indi-cated with the red arrows to make a 8 ½” template2. NB the black line down the centre of the template where K1 and K2 join should be ignored when piecing this block3. Foundation paper piece three K blocks using the 5 ½” x 10 ½” half-rectangle triangles of cream solid for the background area of the block4. Trim to dashed line and remove papers
1. 1237B and 1147B2. 1147B and 1237B3. 1236T and 1240T4. 1234B and 1238B
1. 1235B and 1237Q2. 1236T and 1237B3. 1238T and1240B
1. 1234Q and 1147B2. 1239R and 1238T3. 1234B and 1238B
1. 1234Q, 1236B and 2000Q012. 1237Q, 1239B and 2000Q013. 1239B, 1237Q and 2000Q01

L block – half square triangle – make 3
1. Cut three 9 in squares (to make the three blocks)2. Cut in half on the diagonal to make six triangles3. Sew two of these triangles together for each block4. Trim to 8 ½”
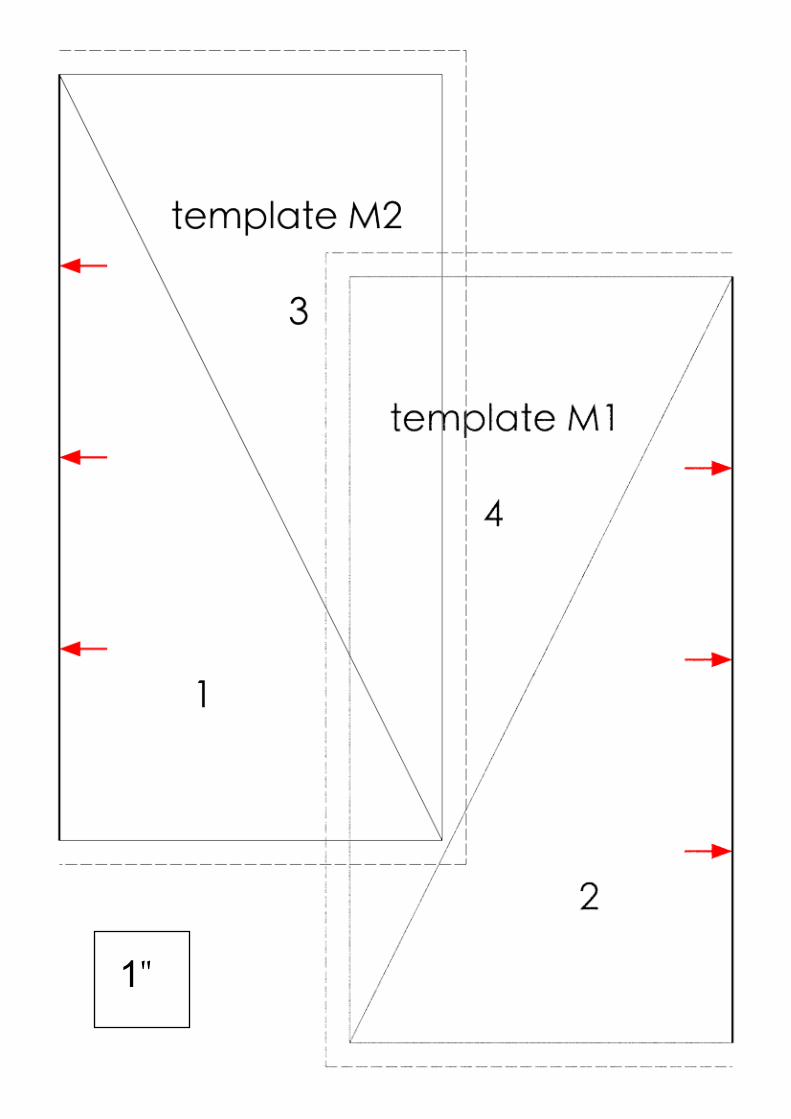
M block – half triangles – make 4
1. Print / photocopy templates M1 and M2 (one set for each block) and tape together where indi-cated with the red arrows to make a 8 ½” template2. NB the black line down the centre of the template where M1 and M2 join is one of the piecing lines in the case of this block – unlike A, D and K3. Foundation paper piece three M blocks using the 5 ½” x 10 ½” half-rectangle triangles of cream solid for the background area of the block4. Trim to dashed line and remove papers
N block – plus ( + ) sign – make 3
1. Cut four 3 ¾” squares for the background2. Cut two 2” x 3 ¾” strips and one 2” x 8 ½” strip for the cross3. Sash two of the squares together using the shorter sashing strips and press4. Sash the two halves of the block together using the longer sashing strip
1. 1238T and 1239R2. 1234Q and 1238T3. 1239R and 1234Q
1. 1239R, 1147B and 2000Q012. 1234Q, 1147B and 2000Q013. 1234Q, 1240B and 2000Q014. 1239R, 1240B and 2000Q01
1. 1237 Q and 1238 T2. 1147 B and 1238 B3. 1240 B and 1234 Q

Assembling the quilt top
1. Lay out the blocks following the layout in the quilt photograph or the layout of your choice. 2. Cut the remaining cream solid background fabric into twenty-five 2” WOF strips. 3. Cut eight of those strips into five strips of 8 ½” to make 40 strips.4. Sew the remaining seventeen strips end to end and sub-cut into nine strips 56” long and two strips 78” long. 5. Sash each of the eight rows of six blocks together using five 8 ½” strips of cream background fabric in between the blocks. Press seams as desired. 6. Sash the rows together using seven of the 56” cream background sashing strips. Add two more of those strips to the top and bottom of the quilt top. Press seams as desired. 7. Sew the remaining two (78”) sashing strips to the sides of the quilt and press to finish the quilt top.
Finishing the Quilt
1. Cut the backing fabric into two equal lengths, remove selvedges and sew together along the long edges using a ½” seam to make the quilt back. 2. Make and baste a quilt sandwich using the backing, wadding and quilt top and quilt as desired. 3. Trim away excess backing fabric and wadding, squaring up the quilt top. 4. Cut seven 2 ½” WOF strips of binding fabric. Sew end to end and press in half wrong sides together to make a double fold binding. Bind to finish, taking care to mitre corners.
1"

1"

1"

1"

1234/Q BEACH HUTS
1237/Q ANCHORS 1237/B ANCHORS1238/B FISH
Nautical by Lynne Goldsworthy Finished size 1,49 x 1,97m (58½” x 77½”)
FREE pattern available to download from www.makoweruk.com
All fabrics used in quilt. Also requires 2000 Q01
1234/B BEACH HUTS
1238/T FISH
ALL DESIGNS 50% OF ACTUAL SIZE
1240/T WAVES 1240/B WAVES1236/B SEAGULLS1236/T SEAGULLS
1239/R FLAGS
1147/B STRIPE
1239/B FLAGS
1235/B YACHTS
Nautical by The Henley Studio from makoweruk +44(0)1491 579727 www.makoweruk.comhttps://www.facebook.com/pages/Makower-UK/127827177412975