Embed Size (px)
Citation preview
PXT-Live Plus User Manual 1
nativeKONTROL PXT-Live Plus
User Manual
Version 1.0.8
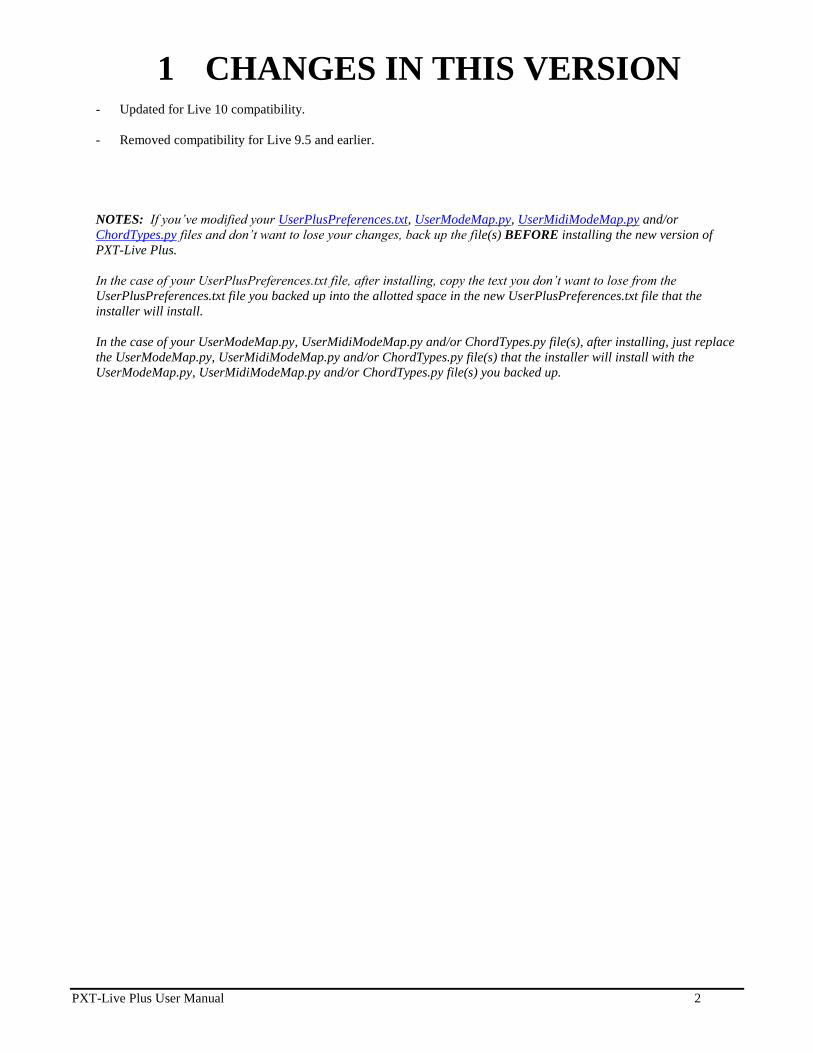
1 CHANGES IN THIS VERSION
2 GENERAL OVERVIEW
3 SETUP
3.1 Live Settings 3.2 UserPlusPreferences
4 GLOBAL CONTROLS
4.1 Touch Strip
5 PLUS MATRIX MODES
5.1 Functionality Common to Plus Matrix Modes 5.2 Drum Mode 5.3 Capture Mode 5.4 Chord Mode 5.5 STC Mode 5.6 User Mode 5.7 Meters Mode
6 ACCESSORY MODE MODIFICATION
7 ENCODER MODES
7.1 MIDI Mode (Volume and Pan & Send Buttons)
8 TROUBLESHOOTING
8.1 General Troubleshooting 8.2 Windows Troubleshooting 8.3 OS X Troubleshooting
9 SUPPORT
PXT-Live Plus User Manual 2
1 CHANGES IN THIS VERSION
- Updated for Live 10 compatibility.
- Removed compatibility for Live 9.5 and earlier.
NOTES: If you’ve modified your UserPlusPreferences.txt, UserModeMap.py, UserMidiModeMap.py and/or
ChordTypes.py files and don’t want to lose your changes, back up the file(s) BEFORE installing the new version of
PXT-Live Plus.
In the case of your UserPlusPreferences.txt file, after installing, copy the text you don’t want to lose from the
UserPlusPreferences.txt file you backed up into the allotted space in the new UserPlusPreferences.txt file that the
installer will install.
In the case of your UserModeMap.py, UserMidiModeMap.py and/or ChordTypes.py file(s), after installing, just replace
the UserModeMap.py, UserMidiModeMap.py and/or ChordTypes.py file(s) that the installer will install with the
UserModeMap.py, UserMidiModeMap.py and/or ChordTypes.py file(s) you backed up.
PXT-Live Plus User Manual 3
2 GENERAL OVERVIEW PXT-Live Plus is an extended version of PXT-Live that utilizes a MIDI Remote Script as well as an MT Player preset, which
covers bases that a MIDI Remote Script alone would not allow. As with PXT-Live, PXT-Live Plus does not affect the
functionality of Push’s Live (default) Mode and it also maintains all of the functionality of PXT-Live.
Note that the functionality of PXT-Live is covered in the documentation provided with PXT-Live. All of the information in
this documentation applies when using PXT-Live Plus except for the Live Settings listed for PXT-Live. When using PXT-
Live Plus, you should use the Live Settings described below.
In addition to this manual, a control reference (PXT-Live Plus Control Reference.pdf) and Live Lesson are also provided.
After installing PXT-Live Plus, you can access the Live Lesson by using the following steps:
1. Show Help View by selecting Help View from Live’s Help menu.
2. Click the home button (rightmost button at the top of Help View) to return to the front page of Help View.
3. Scroll down to the bottom of Help View and click the Show all built-in lessons link to show the Table of Contents.
4. Scroll down to the bottom of the Table of Contents where you’ll find the PXT-Live Plus Lesson section.
3 SETUP The initial installation and setup for PXT-Live Plus is covered in the provided PXT-Live Plus Install Info documents. Please
refer to these documents for information on initial installation and setup. This section covers the settings you will need to
make in Live in order to use PXT-Live Plus and also provides information on optional settings. Please take your time when
completing these steps. If you should run into trouble when performing any of these steps, please refer to the
Troubleshooting section.
NOTE: In order to use PXT-Live Plus, you need to have MT Player running and the PXT-Live Plus preset selected.
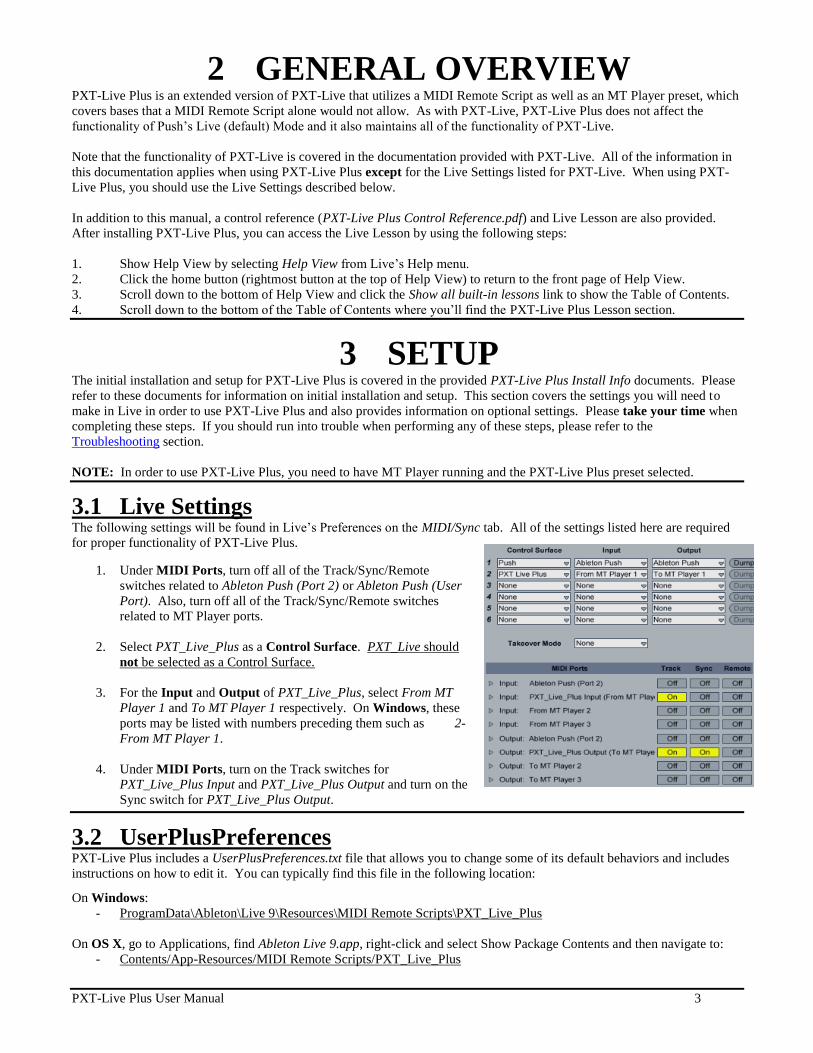
3.1 Live Settings The following settings will be found in Live’s Preferences on the MIDI/Sync tab. All of the settings listed here are required
for proper functionality of PXT-Live Plus.
1. Under MIDI Ports, turn off all of the Track/Sync/Remote
switches related to Ableton Push (Port 2) or Ableton Push (User
Port). Also, turn off all of the Track/Sync/Remote switches
related to MT Player ports.
2. Select PXT_Live_Plus as a Control Surface. PXT_Live should
not be selected as a Control Surface.
3. For the Input and Output of PXT_Live_Plus, select From MT
Player 1 and To MT Player 1 respectively. On Windows, these
ports may be listed with numbers preceding them such as 2-
From MT Player 1.
4. Under MIDI Ports, turn on the Track switches for
PXT_Live_Plus Input and PXT_Live_Plus Output and turn on the
Sync switch for PXT_Live_Plus Output.
3.2 UserPlusPreferences PXT-Live Plus includes a UserPlusPreferences.txt file that allows you to change some of its default behaviors and includes
instructions on how to edit it. You can typically find this file in the following location:
On Windows:
- ProgramData\Ableton\Live 9\Resources\MIDI Remote Scripts\PXT_Live_Plus
On OS X, go to Applications, find Ableton Live 9.app, right-click and select Show Package Contents and then navigate to:
- Contents/App-Resources/MIDI Remote Scripts/PXT_Live_Plus
PXT-Live Plus User Manual 4
4 GLOBAL CONTROLS The Global Controls accessible in PXT-Live Plus are identical to those in PXT-Live with the following exceptions.
4.1 Touch Strip By default, the Touch Strip will function exactly as it does PXT-Live. However, its function can also be changed by
holding down the Select button and using the Touch Strip. The currently selected function will be shown in the
Display. The available functions are:
SelectedParameter – The default function of the Touch Strip, which works exactly as it does in PXT-Live.
Crossfader – Sets up the Touch Strip to control the Crossfader.
Tempo Nudge – Sets up the Touch Strip to nudge the Tempo up (if the upper half of the Touch Strip is touched)
or down (if the lower half of the Touch Strip is touched).
Pitch Bend – Sets up the Touch Strip as a Pitch Bend strip.
Mod Wheel – Sets up the Touch Strip as a Mod Wheel strip.
Sprung Mod Wheel – Sets up the Touch Strip to function as a spring-loaded Mod Wheel so that releasing the
Touch Strip will reset the Mod Wheel value back to 0.
PXT-Live Plus User Manual 5
5 PLUS MATRIX MODES PXT-Live Plus provides all of the Matrix Modes accessible in PXT-Live and provides an additional set of six Matrix Modes
(referred to as the Plus Matrix Modes); Drum, Capture, Chord, STC, User and Meters. The Plus Matrix Modes can be
accessed by first entering PXT-Live via the User button, then holding down the Session button and pressing the Note
button. You can switch between the Plus Matrix Modes by holding down the Select button, selecting the desired Mode
with the Track Selection buttons and releasing the Select button.
As with the Matrix Modes in PXT-Live, each Plus Matrix Mode dictates the functionality of the Matrix, Track Selection, Track State, Resolution, Stop, Mute, Solo, Scales, Repeat, Accent, Octave Down/Up,
Add Effect and Add Track buttons. However, the Plus Matrix Modes do not use the Add Effect or Add Track
buttons. These buttons will be dark when Plus Matrix Modes are selected. Each Plus Matrix Mode also utilizes the lower
two lines of the Display. Also, as with PXT-Live, Matrix Pads set up for playing Notes will provide feedback (turn
Green) on Notes coming through the selected MIDI Track unless the MIDI Track has a Drum Rack on it. Drum Mode is an
exception to this rule however.
PXT-Live Plus also slightly modifies the functionality of PXT-Live’s Accessory Mode.
5.1 Functionality Common to Plus Matrix Modes The Plus Matrix Modes share some of the same functionality. First of all, all of the Plus Matrix Modes (aside from Meters)
operate on the selected Track and selected Clip. Also, in order to play instruments/record data into MIDI Clips via any of the
Plus Matrix Modes, the Track(s) containing the instrument(s) should be armed, which can be accomplished via the Track
Arm function covered below.
Clip Play Toggle – If the selected Clip is playing, triggered or recording, this will stop the Clip. If the Shift button is
pressed, this will immediately stop the Clip (without quantization). If the Clip is not playing or is triggered to stop, this will
launch the Clip. If the Shift button is pressed, this will immediately launch the Clip (without quantization) with legato.
Repeat Velocity Toggle – When on and Repeat is on, applying pressure to the Pads will control the velocity of repeated
notes. When off, applying pressure to the Pads will have no effect on the velocity of repeated notes.
Track Arm – Toggles the Arm state of the selected Track. By default, this will obey your settings in Preferences for
exclusive Arm. When the Shift button is held down, this will do the opposite of your Preference setting.
Sustain – When on, the last Note/Chord played from the Pads will sustain until a new Note/Chord is played or until Sustain
is turned off. Sustain is incompatible with Note Repeat and so turning Sustain on will turn Note Repeat off and vice versa.
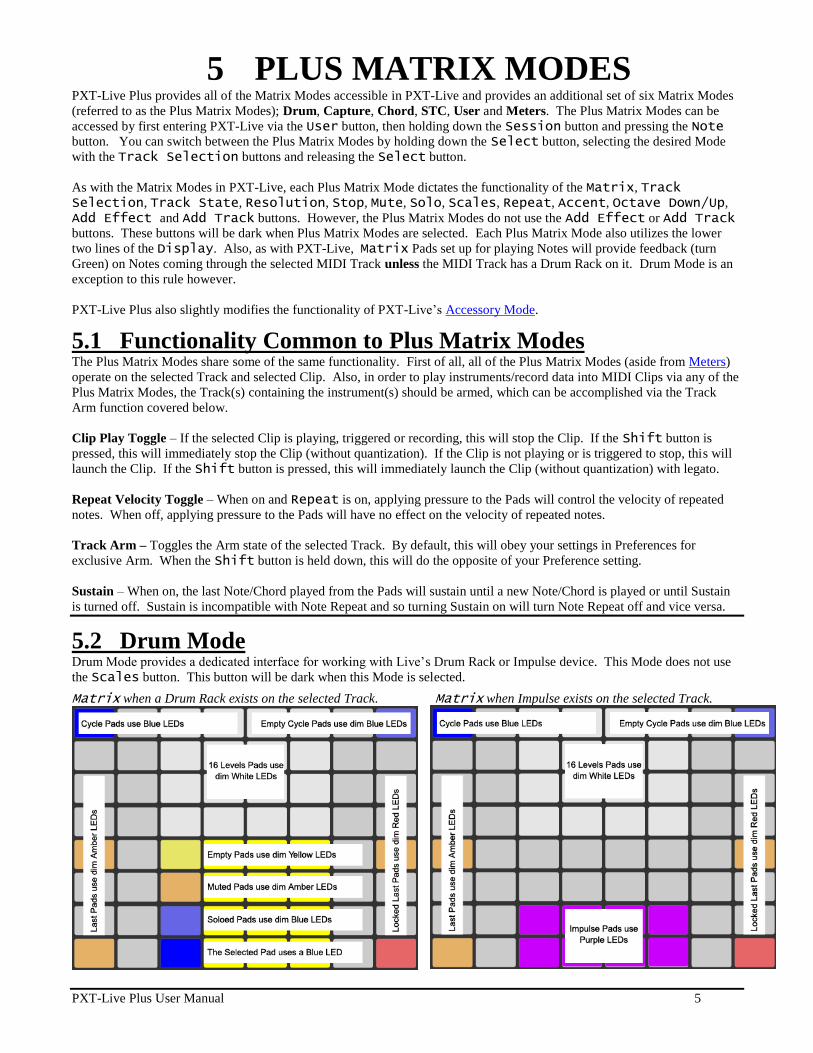
5.2 Drum Mode Drum Mode provides a dedicated interface for working with Live’s Drum Rack or Impulse device. This Mode does not use
the Scales button. This button will be dark when this Mode is selected.
Matrix when a Drum Rack exists on the selected Track. Matrix when Impulse exists on the selected Track.

PXT-Live Plus User Manual 6
NOTE: You can specify the LED colors to use in this Mode as well as associate LED colors with Drum Rack pads
containing user-definable words in UserPlusPreferences. Matrix – The Matrix is split up into several sections that perform different tasks.
- By default, the Drum Pads (Pads in the lower half center) play either the visible pads in the Drum Rack or the
pads in Impulse. Holding down the Delete button and pressing a Pad will delete the Notes associated with the
Pad (if the Clip is not playing) or erase the portion of Notes that the playhead is currently passing over (if the Clip is
playing). Holding down the Quantize button and pressing a Pad will quantize the Notes associated with the Pad.
In the case of the Drum Rack, holding down the Select button and pressing a Pad will select the associated Drum
Rack pad. The Drum Pads can also perform other functions depending on which other buttons are pressed.
- The Last Pads (Pads in the lower half corners) will play the pad that was triggered last. These can also be
individually locked to the current pad by holding the Shift button and pressing one of the Last Pads. The
Drum Rack and Impulse each have their own set of Last Pads.
- The 16 Level Pads (Pads in the upper half center) will all play the pad that was triggered last. Each 16 Level Pad will, by default, play the pad with a different velocity (the velocities ascend from bottom to top).
- The Cycle Pads (Pads in the upper corners of the upper half) can manually play back sequences of up to 8 notes
each. Holding down the Shift button and pressing one of the Cycle Pads will enable recording for the Cycle Pad (the Display will indicate this). You can then use the Drum Pads to record a sequence. When you’re
done recording, press the Cycle Pad again to stop recording and start playing back. The Drum Rack and Impulse
each have their own set of Cycle Pads.
Track Selection – The Track Selection buttons provide access to 8 options/functions. These options/functions
are shown in the Display. LvlVelo toggles velocity on/off for the 16 Levels Pads. LvlPitch (only accessible for
Drum Racks) toggles Pitch Bend on/off for the 16 Levels Pads. RptVelo performs the Repeat Velocity Toggle
function. Arm performs the Track Arm function.
When Repeat is on, applying pressure to the Drum Pads can control a parameter within Drum Racks or Impulse (if the
selected parameter is not assigned to a Macro). The parameter to control is selected via the 7th Track Selection button
(shown as Pitch in the image below). The available parameters are Pitch (Transpose), Freq (Filter Frequency), Res (Filter
Resonance), Decay (Amp Decay) and Pan (Panning).
<Rpt2> will cause pressure to control the entire range of the parameter. <Rpt2 will cause pressure to control the parameter
with a range from its minimum value to its current value. Rpt2> will cause pressure to control the parameter with a range
from its current value to its maximum value. When all 3 of these are turned off, the selected parameter will not be affected
by pressure and it will be restored to its previous value. Also, turning Repeat off will restore the previous value of the
parameter.
Track Selection buttons and Display in Drum Mode.
Track State – Displays a visual metronome.
Resolution – Selects the Note Repeat Rate when Repeat is on.
Stop – Performs the Clip Play Toggle function.
Mute – Only accessible to Drum Racks. When held down, the Drum Pads can be used for toggling the Mute state of
Drum Rack pads. Holding down the Shift button and pressing Mute will unmute all Drum Rack pads.
Solo – Only accessible to Drum Racks. When held down, the Drum Pads can be used for toggling the Solo state of Drum
Rack pads. Holding down the Shift button and pressing Solo will unsolo all Drum Rack pads.
PXT-Live Plus User Manual 7
Repeat – Toggle (if pressed quickly) or momentarily (if held down) activate Note Repeat. Accent – Toggle (if pressed quickly) or momentarily (if held down) activate Full Velocity for the Drum Pads, Last Pads and Cycle Pads.
Octave Down/Up – Only accessible to Drum Racks. Scroll the Drum Rack’s selector down/up by 4 or by 1 if the Shift
button is held down.
Select – Holding down the Delete button and pressing the Select button will delete the Clip. Holding down the
Quantize button and pressing the Select button will quantize the Clip.
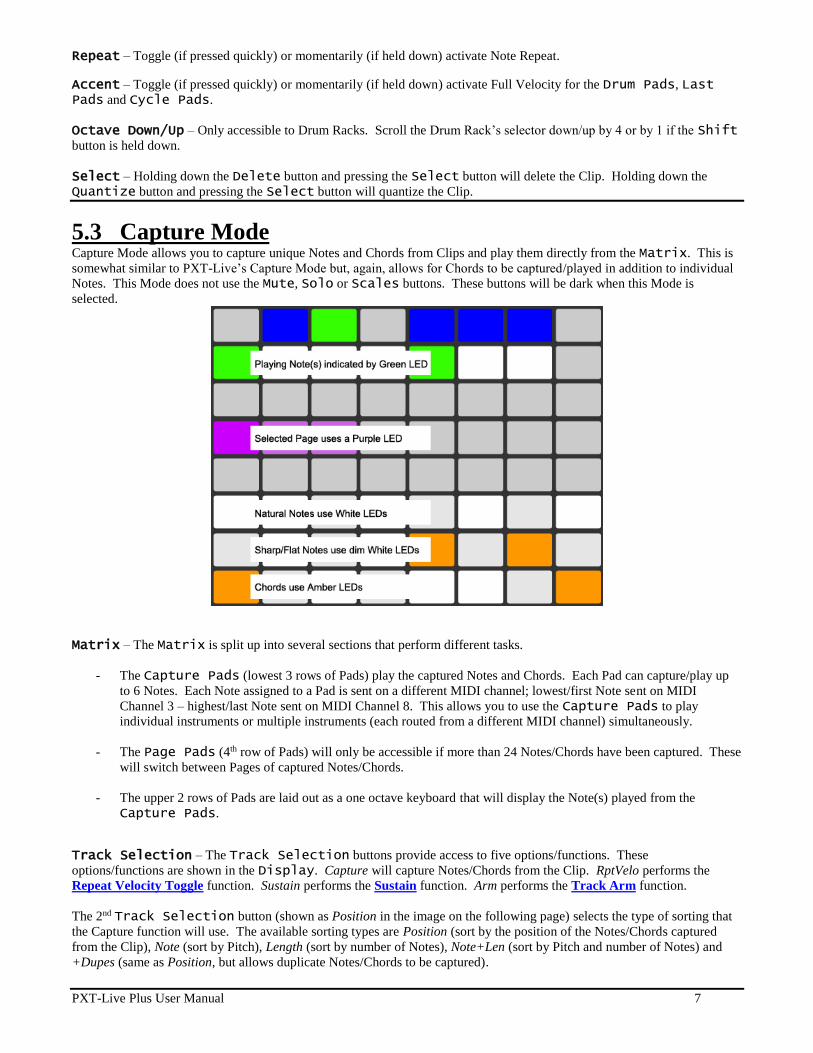
5.3 Capture Mode Capture Mode allows you to capture unique Notes and Chords from Clips and play them directly from the Matrix. This is
somewhat similar to PXT-Live’s Capture Mode but, again, allows for Chords to be captured/played in addition to individual
Notes. This Mode does not use the Mute, Solo or Scales buttons. These buttons will be dark when this Mode is
selected.
Matrix – The Matrix is split up into several sections that perform different tasks.
- The Capture Pads (lowest 3 rows of Pads) play the captured Notes and Chords. Each Pad can capture/play up
to 6 Notes. Each Note assigned to a Pad is sent on a different MIDI channel; lowest/first Note sent on MIDI
Channel 3 – highest/last Note sent on MIDI Channel 8. This allows you to use the Capture Pads to play
individual instruments or multiple instruments (each routed from a different MIDI channel) simultaneously.
- The Page Pads (4th row of Pads) will only be accessible if more than 24 Notes/Chords have been captured. These
will switch between Pages of captured Notes/Chords.
- The upper 2 rows of Pads are laid out as a one octave keyboard that will display the Note(s) played from the
Capture Pads. Track Selection – The Track Selection buttons provide access to five options/functions. These
options/functions are shown in the Display. Capture will capture Notes/Chords from the Clip. RptVelo performs the
Repeat Velocity Toggle function. Sustain performs the Sustain function. Arm performs the Track Arm function.
The 2nd Track Selection button (shown as Position in the image on the following page) selects the type of sorting that
the Capture function will use. The available sorting types are Position (sort by the position of the Notes/Chords captured
from the Clip), Note (sort by Pitch), Length (sort by number of Notes), Note+Len (sort by Pitch and number of Notes) and
+Dupes (same as Position, but allows duplicate Notes/Chords to be captured).
PXT-Live Plus User Manual 8
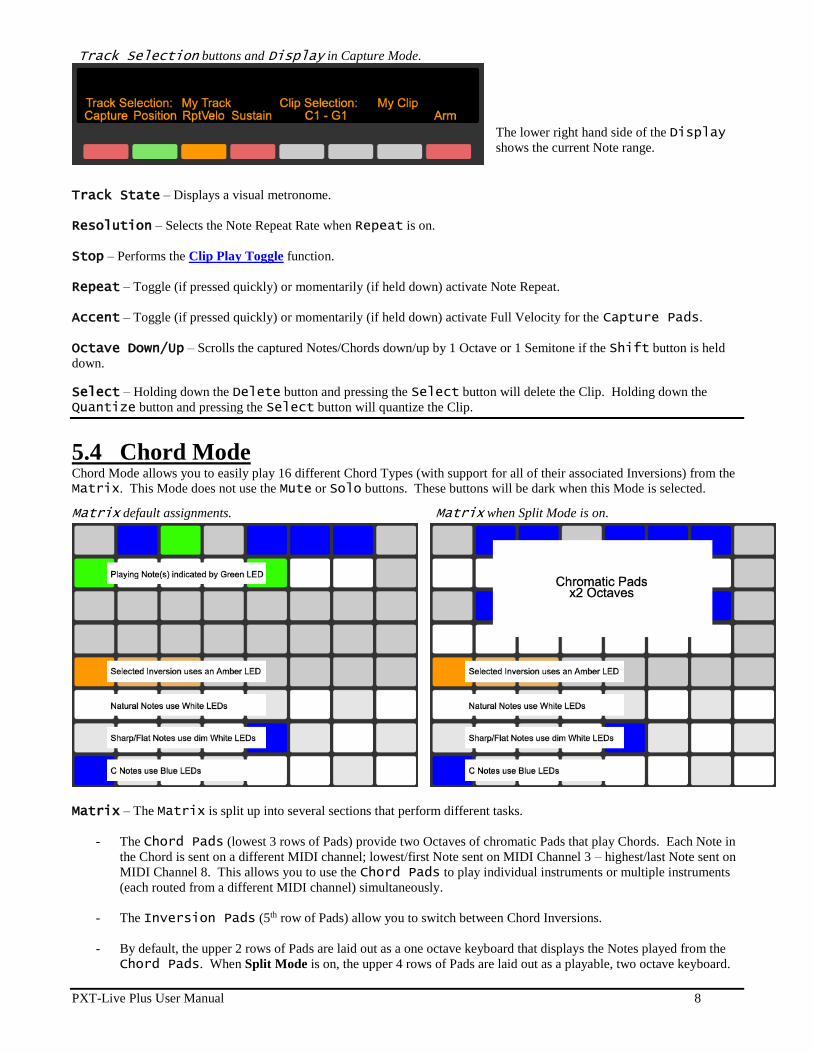
Track Selection buttons and Display in Capture Mode.
The lower right hand side of the Display
shows the current Note range.
Track State – Displays a visual metronome.
Resolution – Selects the Note Repeat Rate when Repeat is on.
Stop – Performs the Clip Play Toggle function.
Repeat – Toggle (if pressed quickly) or momentarily (if held down) activate Note Repeat.
Accent – Toggle (if pressed quickly) or momentarily (if held down) activate Full Velocity for the Capture Pads.
Octave Down/Up – Scrolls the captured Notes/Chords down/up by 1 Octave or 1 Semitone if the Shift button is held
down. Select – Holding down the Delete button and pressing the Select button will delete the Clip. Holding down the
Quantize button and pressing the Select button will quantize the Clip.
5.4 Chord Mode Chord Mode allows you to easily play 16 different Chord Types (with support for all of their associated Inversions) from the
Matrix. This Mode does not use the Mute or Solo buttons. These buttons will be dark when this Mode is selected.
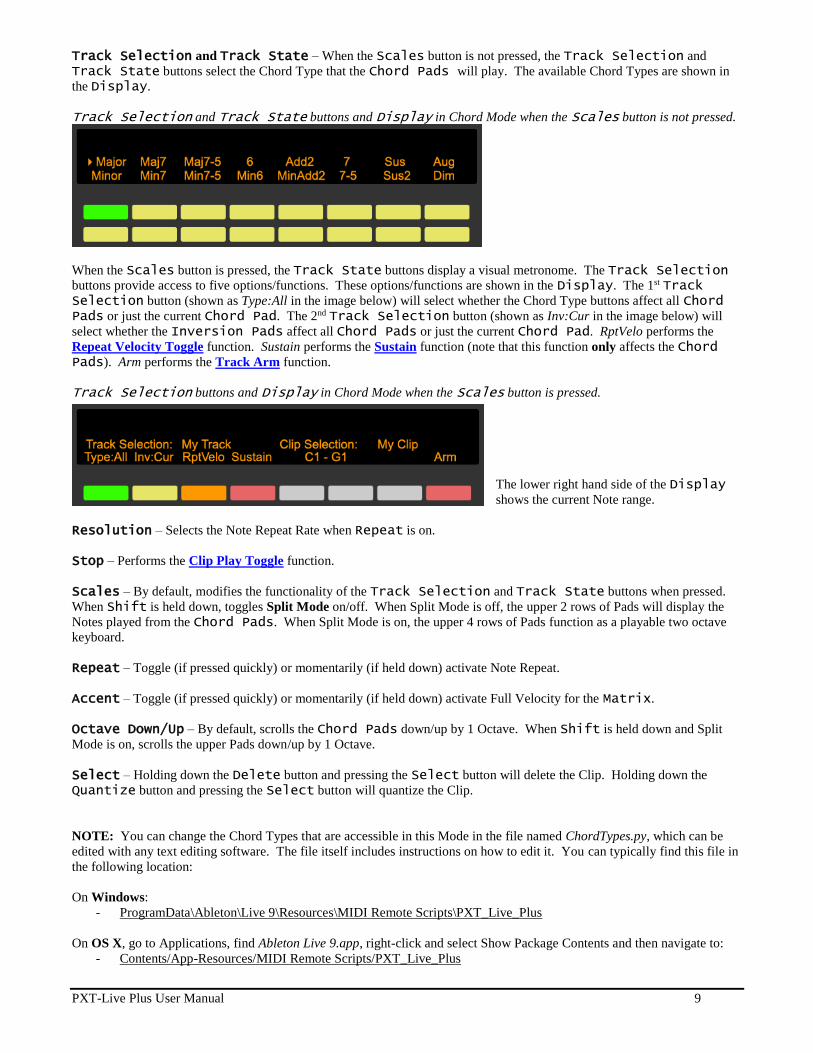
Matrix default assignments. Matrix when Split Mode is on.
Matrix – The Matrix is split up into several sections that perform different tasks.
- The Chord Pads (lowest 3 rows of Pads) provide two Octaves of chromatic Pads that play Chords. Each Note in
the Chord is sent on a different MIDI channel; lowest/first Note sent on MIDI Channel 3 – highest/last Note sent on
MIDI Channel 8. This allows you to use the Chord Pads to play individual instruments or multiple instruments
(each routed from a different MIDI channel) simultaneously.
- The Inversion Pads (5th row of Pads) allow you to switch between Chord Inversions.
- By default, the upper 2 rows of Pads are laid out as a one octave keyboard that displays the Notes played from the
Chord Pads. When Split Mode is on, the upper 4 rows of Pads are laid out as a playable, two octave keyboard.
PXT-Live Plus User Manual 9
Track Selection and Track State – When the Scales button is not pressed, the Track Selection and
Track State buttons select the Chord Type that the Chord Pads will play. The available Chord Types are shown in
the Display.
Track Selection and Track State buttons and Display in Chord Mode when the Scales button is not pressed.
When the Scales button is pressed, the Track State buttons display a visual metronome. The Track Selection
buttons provide access to five options/functions. These options/functions are shown in the Display. The 1st Track Selection button (shown as Type:All in the image below) will select whether the Chord Type buttons affect all Chord Pads or just the current Chord Pad. The 2nd Track Selection button (shown as Inv:Cur in the image below) will
select whether the Inversion Pads affect all Chord Pads or just the current Chord Pad. RptVelo performs the
Repeat Velocity Toggle function. Sustain performs the Sustain function (note that this function only affects the Chord Pads). Arm performs the Track Arm function.
Track Selection buttons and Display in Chord Mode when the Scales button is pressed.
The lower right hand side of the Display
shows the current Note range.
Resolution – Selects the Note Repeat Rate when Repeat is on.
Stop – Performs the Clip Play Toggle function.
Scales – By default, modifies the functionality of the Track Selection and Track State buttons when pressed.
When Shift is held down, toggles Split Mode on/off. When Split Mode is off, the upper 2 rows of Pads will display the
Notes played from the Chord Pads. When Split Mode is on, the upper 4 rows of Pads function as a playable two octave
keyboard.
Repeat – Toggle (if pressed quickly) or momentarily (if held down) activate Note Repeat.
Accent – Toggle (if pressed quickly) or momentarily (if held down) activate Full Velocity for the Matrix.
Octave Down/Up – By default, scrolls the Chord Pads down/up by 1 Octave. When Shift is held down and Split
Mode is on, scrolls the upper Pads down/up by 1 Octave.
Select – Holding down the Delete button and pressing the Select button will delete the Clip. Holding down the
Quantize button and pressing the Select button will quantize the Clip.
NOTE: You can change the Chord Types that are accessible in this Mode in the file named ChordTypes.py, which can be
edited with any text editing software. The file itself includes instructions on how to edit it. You can typically find this file in
the following location:
On Windows:
- ProgramData\Ableton\Live 9\Resources\MIDI Remote Scripts\PXT_Live_Plus
On OS X, go to Applications, find Ableton Live 9.app, right-click and select Show Package Contents and then navigate to:
- Contents/App-Resources/MIDI Remote Scripts/PXT_Live_Plus
PXT-Live Plus User Manual 10
5.5 STC Mode STC (or Scale Tone Chord) Mode allows you to easily play the 7 Chords (triads and/or 7ths with support for all of their
associated Inversions) associated with Major and Minor Scales from the Matrix. This Mode does not use the Mute or
Solo buttons. These buttons will be dark when this Mode is selected.
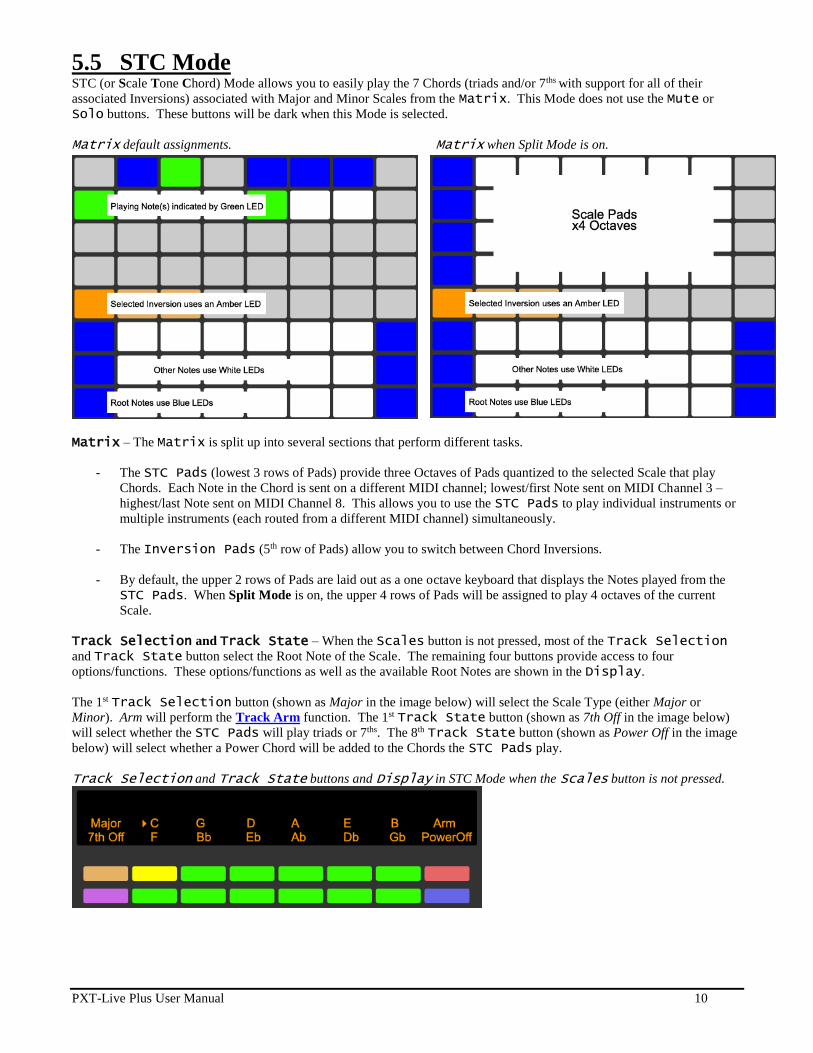
Matrix default assignments. Matrix when Split Mode is on.
Matrix – The Matrix is split up into several sections that perform different tasks.
- The STC Pads (lowest 3 rows of Pads) provide three Octaves of Pads quantized to the selected Scale that play
Chords. Each Note in the Chord is sent on a different MIDI channel; lowest/first Note sent on MIDI Channel 3 –
highest/last Note sent on MIDI Channel 8. This allows you to use the STC Pads to play individual instruments or
multiple instruments (each routed from a different MIDI channel) simultaneously.
- The Inversion Pads (5th row of Pads) allow you to switch between Chord Inversions.
- By default, the upper 2 rows of Pads are laid out as a one octave keyboard that displays the Notes played from the
STC Pads. When Split Mode is on, the upper 4 rows of Pads will be assigned to play 4 octaves of the current
Scale.
Track Selection and Track State – When the Scales button is not pressed, most of the Track Selection
and Track State button select the Root Note of the Scale. The remaining four buttons provide access to four
options/functions. These options/functions as well as the available Root Notes are shown in the Display.
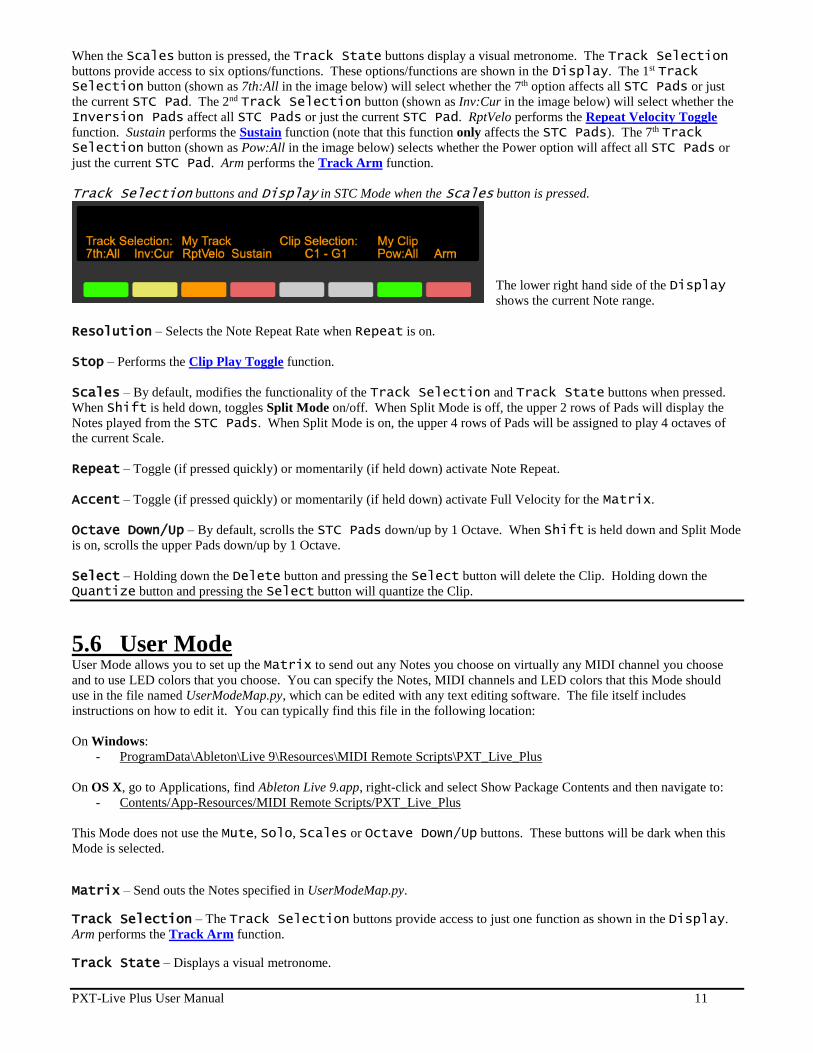
The 1st Track Selection button (shown as Major in the image below) will select the Scale Type (either Major or
Minor). Arm will perform the Track Arm function. The 1st Track State button (shown as 7th Off in the image below)
will select whether the STC Pads will play triads or 7ths. The 8th Track State button (shown as Power Off in the image
below) will select whether a Power Chord will be added to the Chords the STC Pads play.
Track Selection and Track State buttons and Display in STC Mode when the Scales button is not pressed.
PXT-Live Plus User Manual 11
When the Scales button is pressed, the Track State buttons display a visual metronome. The Track Selection
buttons provide access to six options/functions. These options/functions are shown in the Display. The 1st Track Selection button (shown as 7th:All in the image below) will select whether the 7th option affects all STC Pads or just
the current STC Pad. The 2nd Track Selection button (shown as Inv:Cur in the image below) will select whether the
Inversion Pads affect all STC Pads or just the current STC Pad. RptVelo performs the Repeat Velocity Toggle
function. Sustain performs the Sustain function (note that this function only affects the STC Pads). The 7th Track Selection button (shown as Pow:All in the image below) selects whether the Power option will affect all STC Pads or
just the current STC Pad. Arm performs the Track Arm function.
Track Selection buttons and Display in STC Mode when the Scales button is pressed.
The lower right hand side of the Display
shows the current Note range.
Resolution – Selects the Note Repeat Rate when Repeat is on.
Stop – Performs the Clip Play Toggle function.
Scales – By default, modifies the functionality of the Track Selection and Track State buttons when pressed.
When Shift is held down, toggles Split Mode on/off. When Split Mode is off, the upper 2 rows of Pads will display the
Notes played from the STC Pads. When Split Mode is on, the upper 4 rows of Pads will be assigned to play 4 octaves of
the current Scale.
Repeat – Toggle (if pressed quickly) or momentarily (if held down) activate Note Repeat.
Accent – Toggle (if pressed quickly) or momentarily (if held down) activate Full Velocity for the Matrix.
Octave Down/Up – By default, scrolls the STC Pads down/up by 1 Octave. When Shift is held down and Split Mode
is on, scrolls the upper Pads down/up by 1 Octave.
Select – Holding down the Delete button and pressing the Select button will delete the Clip. Holding down the
Quantize button and pressing the Select button will quantize the Clip.
5.6 User Mode User Mode allows you to set up the Matrix to send out any Notes you choose on virtually any MIDI channel you choose
and to use LED colors that you choose. You can specify the Notes, MIDI channels and LED colors that this Mode should
use in the file named UserModeMap.py, which can be edited with any text editing software. The file itself includes
instructions on how to edit it. You can typically find this file in the following location:
On Windows:
- ProgramData\Ableton\Live 9\Resources\MIDI Remote Scripts\PXT_Live_Plus
On OS X, go to Applications, find Ableton Live 9.app, right-click and select Show Package Contents and then navigate to:
- Contents/App-Resources/MIDI Remote Scripts/PXT_Live_Plus
This Mode does not use the Mute, Solo, Scales or Octave Down/Up buttons. These buttons will be dark when this
Mode is selected. Matrix – Send outs the Notes specified in UserModeMap.py. Track Selection – The Track Selection buttons provide access to just one function as shown in the Display.
Arm performs the Track Arm function. Track State – Displays a visual metronome.
PXT-Live Plus User Manual 12
Resolution – Selects the Note Repeat Rate when Repeat is on.
Stop – Performs the Clip Play Toggle function.
Repeat – Toggle (if pressed quickly) or momentarily (if held down) activate Note Repeat.
Accent – Toggle (if pressed quickly) or momentarily (if held down) activate Full Velocity for the Matrix.
Select – Holding down the Delete button and pressing the Select button will delete the Clip. Holding down the
Quantize button and pressing the Select button will quantize the Clip.
5.7 Meters Mode Meters Mode sets up the Matrix and Track State buttons to function as Output Meters and Volume controls for the 8
Tracks that are currently outlined in Live as well as the Master Track. This Mode does not use the Resolution, Stop,
Scales, Repeat, Accent or Octave Down/Up buttons. These buttons will be dark when this Mode is selected.
Matrix – By default, each column of Pads in the Matrix displays an Output Meter for the associated outlined Track.
When the Shift button is held down, each column of Pads in the Matrix functions as a Volume control for the associated
outlined Track.
Track Selection – Pressing a Track Selection button quickly will select the corresponding Track or toggle the
Arm state of the Track if the Track is already selected. Holding down a Track Selection button will fold or unfold the
corresponding Track (if it is a group Track). Holding down the Shift button and pressing a Track Selection button
will select the corresponding Track as well as the Clip playing on the Track.
Track State – By default, displays an Output Meter for the Master Track. When the Shift button is held down,
functions as a Volume control for the Master Track. The Track State buttons can also perform other functions
depending on which other buttons are pressed.
Mute – Toggle (if pressed quickly) or momentarily (if held down) switch the Track State buttons to Mute Mode. In
Mute Mode, pressing a Track State button quickly will toggle the Mute state of the corresponding Track. Holding down
a Track State button will momentarily toggle the Mute state of the corresponding Track.
When the Shift button is held down, pressing the Mute button will toggle between dimming the Master Track (settings its
volume to half of its current setting) and undimming the Master Track (restoring its volume back to its setting before
dimming).
Solo – Toggle (if pressed quickly) or momentarily (if held down) switch the Track State buttons to Solo Mode. In
Solo Mode, pressing a Track State button quickly will toggle the Solo state of the corresponding Track. Holding down a
Track State button will momentarily toggle the Solo state of the corresponding Track. By default, Solo Mode will obey
your settings in Preferences for exclusive Solo. Holding down the Shift button and pressing a Track State button will
do the opposite of your Preference setting.
PXT-Live Plus User Manual 13
6 ACCESSORY MODE
MODIFICATION Accessory Mode in PXT-Live Plus functions exactly as it does in PXT-Live, but includes an additional set of functions.
When Accessory Mode is locked (via User + Shift) and the Shift button is held down, the Track Selection and
Track State buttons can send keystrokes. The keystrokes to send can be assigned in your UserPlusPreferences file.
7 ENCODER MODES PXT-Live Plus provides all of the Encoder Modes accessible in PXT-Live and provides an additional Encoder Mode; MIDI,
which you can access by holding down the Volume button and pressing the Pan & Send button. As with the Encoder
Modes in PXT-Live, this Mode dictates the functionality of the Encoders over the Display as well as the In and Out
buttons and utilizes the upper two lines of the Display.
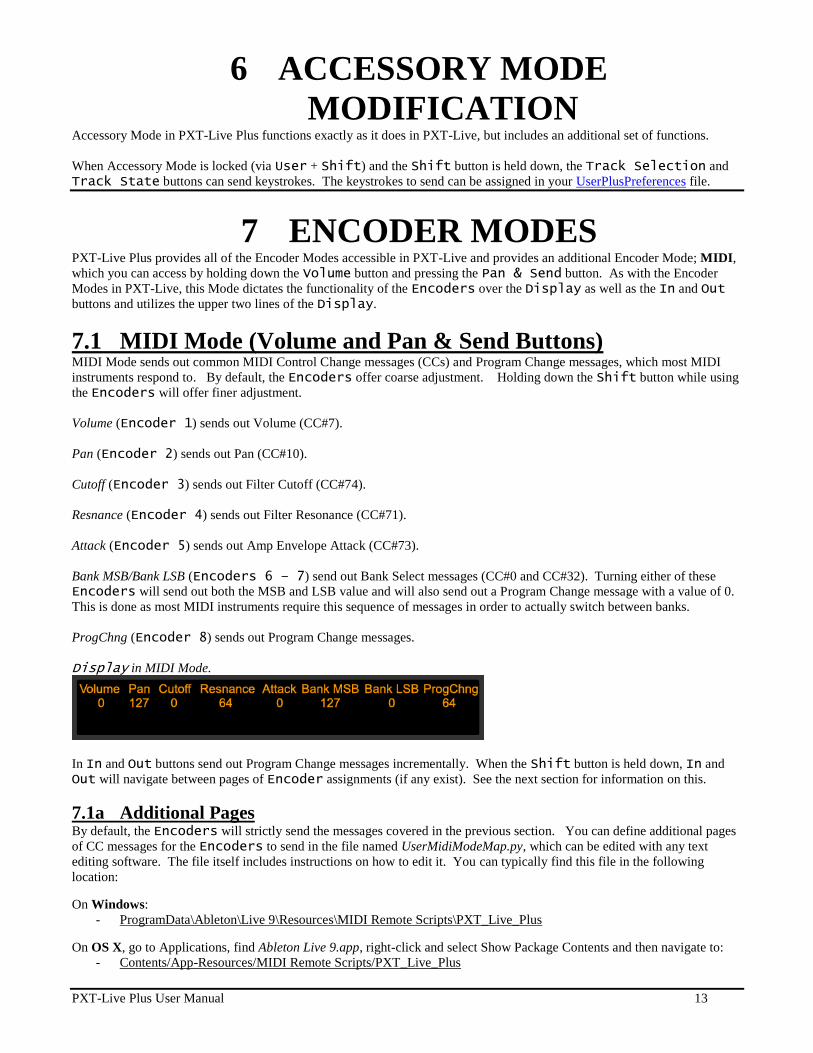
7.1 MIDI Mode (Volume and Pan & Send Buttons) MIDI Mode sends out common MIDI Control Change messages (CCs) and Program Change messages, which most MIDI
instruments respond to. By default, the Encoders offer coarse adjustment. Holding down the Shift button while using
the Encoders will offer finer adjustment.
Volume (Encoder 1) sends out Volume (CC#7).
Pan (Encoder 2) sends out Pan (CC#10).
Cutoff (Encoder 3) sends out Filter Cutoff (CC#74).
Resnance (Encoder 4) sends out Filter Resonance (CC#71).
Attack (Encoder 5) sends out Amp Envelope Attack (CC#73).
Bank MSB/Bank LSB (Encoders 6 – 7) send out Bank Select messages (CC#0 and CC#32). Turning either of these
Encoders will send out both the MSB and LSB value and will also send out a Program Change message with a value of 0.
This is done as most MIDI instruments require this sequence of messages in order to actually switch between banks.
ProgChng (Encoder 8) sends out Program Change messages.
Display in MIDI Mode.
In In and Out buttons send out Program Change messages incrementally. When the Shift button is held down, In and
Out will navigate between pages of Encoder assignments (if any exist). See the next section for information on this.
7.1a Additional Pages By default, the Encoders will strictly send the messages covered in the previous section. You can define additional pages
of CC messages for the Encoders to send in the file named UserMidiModeMap.py, which can be edited with any text
editing software. The file itself includes instructions on how to edit it. You can typically find this file in the following
location:
On Windows:
- ProgramData\Ableton\Live 9\Resources\MIDI Remote Scripts\PXT_Live_Plus
On OS X, go to Applications, find Ableton Live 9.app, right-click and select Show Package Contents and then navigate to:
- Contents/App-Resources/MIDI Remote Scripts/PXT_Live_Plus
PXT-Live Plus User Manual 14
8 TROUBLESHOOTING This section provides resolutions to common problems that you may run into when setting up or using PXT-Live Plus. If you
do not find a resolution to your problem here, please contact Support.
8.1 General Troubleshooting
I’m sure that my Live settings are correct, but PXT-Live Plus does not work.
First, please double-check your Live settings against those provided. If you’re sure that these are correct, then it’s likely
you’ve made some incorrect settings in MT Player. To resolve this, you can reset MT Player. Please note, however, that this
will clear out any settings you’ve made in MT Player. To reset MT Player:
1. Close MT Player.
2. Go to:
o My Documents\Bome’s Midi Translator\Player (Windows)
o (your name)/Bome’s Midi Translator/Player (OS X)
3. Launch the app named MT Control Panel and click RESET.
4. Relaunch MT Player.
5. Upon relaunching MT Player, select the PXT-Live Plus Preset if it isn’t already selected.
6. You may be prompted to select MIDI ports to use. If so, you should select Push’s User Ports at these prompts.
In Chord and/or STC Mode, when Split Mode is on, the upper 2 rows of Pads sometimes do not display the Notes I
played/recorded.
The upper 2 rows of Pads can only display feedback on the currently selected Track and only if the Track does not contain a
Drum Rack. If you’re using Chord and/or STC Mode to control instruments across multiple Tracks, you will only receive
feedback on whichever Track is currently selected providing that is doesn’t contain a Drum Rack.
8.2 Windows Troubleshooting
I’ve ran the provided Setup executable, but don’t find PXT_Live_Plus listed under Control Surfaces.
If Live was running at the time you ran the Setup executable, you will need to restart Live. If this doesn’t resolve the
problem, then it’s likely that you’ve installed Live in a protected location (such as Program Files). In this case, you will need
to elevate the permissions on your Live installation directory so that you can write to it. Once this is done, re-run the Setup
executable.
Upon launching MT Player I receive an error message regarding Push’s User Ports.
Please close Live, MT Player and any other MIDI applications. Then re-launch MT Player.
Keystrokes are not being sent to Live correctly.
If you are running Live as an administrator, you will also need to run MT Player as an administrator.
8.3 OS X Troubleshooting
I’ve ran the provided Setup package, but don’t find PXT_Live_Plus listed under Control Surfaces.
If Live was running at the time you ran the Setup application, you will need to restart Live.
PXT-Live Plus User Manual 15
9 SUPPORT Email: [email protected]
Forum: Beatwise Network
Copyright 2013-2018 nativeKONTROL. All rights reserved.
This document, as well as the software described in it, is provided under license and may be used or copied only in accordance with the terms of this license. The content of this document is furnished for informational use only, is subject to change without notice,
and should not be construed as a commitment by nativeKONTROL. Every effort has been made to ensure that the information in this
document is accurate. nativeKONTROL assumes no responsibility or liability for any errors or inaccuracies that may appear in this document.
All product and company names mentioned in this document, as well as the software it describes, are trademarks or registered trademarks of their respective
owners. This software is solely endorsed and supported by nativeKONTROL.
The Ableton Live MIDI Remote Scripts that are supplied with the software are released under the GNU Lesser General Public License. The source code for
these scripts is available upon request.


![Pxt brochure[1]](https://img.pdfslide.us/doc/110x75/5454f326b1af9fcf338b45fd/pxt-brochure1.jpg)