Embed Size (px)
Citation preview
1
NATIONAL HEDGEHOG SURVEY
VOLUNTEER HANDBOOK
© Alan Nolan-Davies
2
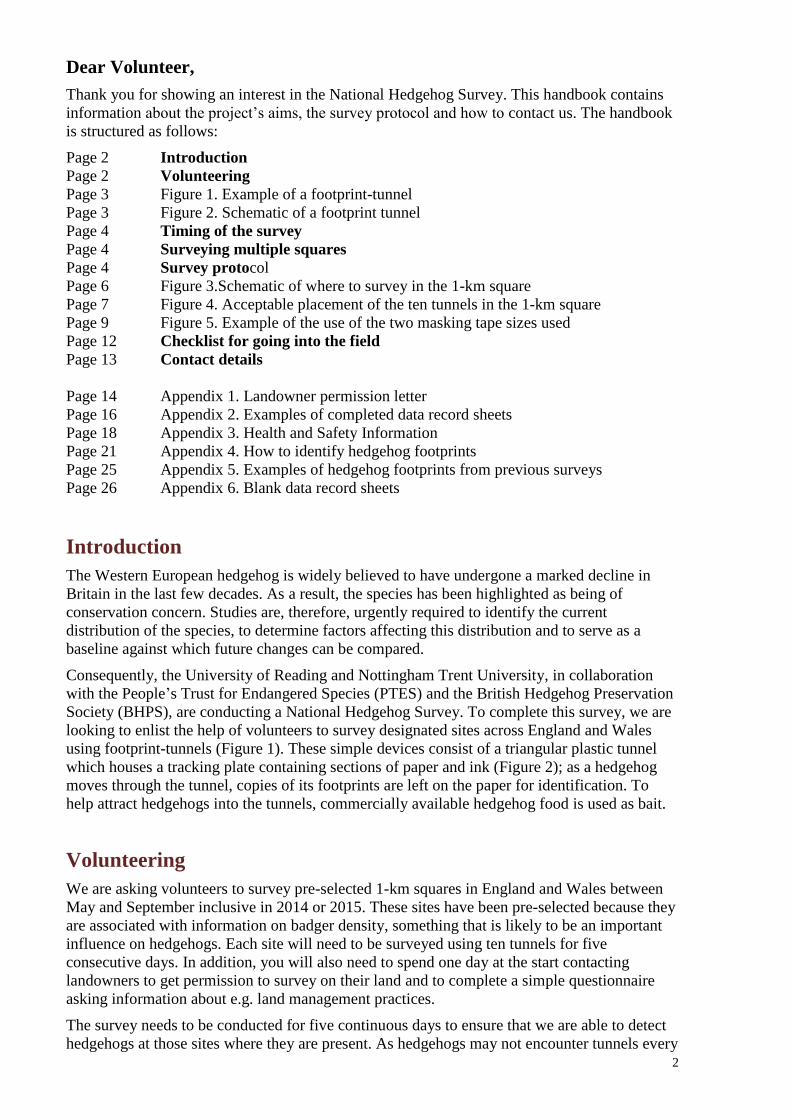
Dear Volunteer,
Thank you for showing an interest in the National Hedgehog Survey. This handbook contains
information about the project’s aims, the survey protocol and how to contact us. The handbook
is structured as follows:
Page 2 Introduction
Page 2 Volunteering
Page 3 Figure 1. Example of a footprint-tunnel
Page 3 Figure 2. Schematic of a footprint tunnel
Page 4 Timing of the survey
Page 4 Surveying multiple squares
Page 4 Survey protocol
Page 6 Figure 3.Schematic of where to survey in the 1-km square
Page 7 Figure 4. Acceptable placement of the ten tunnels in the 1-km square
Page 9 Figure 5. Example of the use of the two masking tape sizes used
Page 12 Checklist for going into the field
Page 13 Contact details
Page 14 Appendix 1. Landowner permission letter
Page 16 Appendix 2. Examples of completed data record sheets
Page 18 Appendix 3. Health and Safety Information
Page 21 Appendix 4. How to identify hedgehog footprints
Page 25 Appendix 5. Examples of hedgehog footprints from previous surveys
Page 26 Appendix 6. Blank data record sheets
Introduction
The Western European hedgehog is widely believed to have undergone a marked decline in
Britain in the last few decades. As a result, the species has been highlighted as being of
conservation concern. Studies are, therefore, urgently required to identify the current
distribution of the species, to determine factors affecting this distribution and to serve as a
baseline against which future changes can be compared.
Consequently, the University of Reading and Nottingham Trent University, in collaboration
with the People’s Trust for Endangered Species (PTES) and the British Hedgehog Preservation
Society (BHPS), are conducting a National Hedgehog Survey. To complete this survey, we are
looking to enlist the help of volunteers to survey designated sites across England and Wales
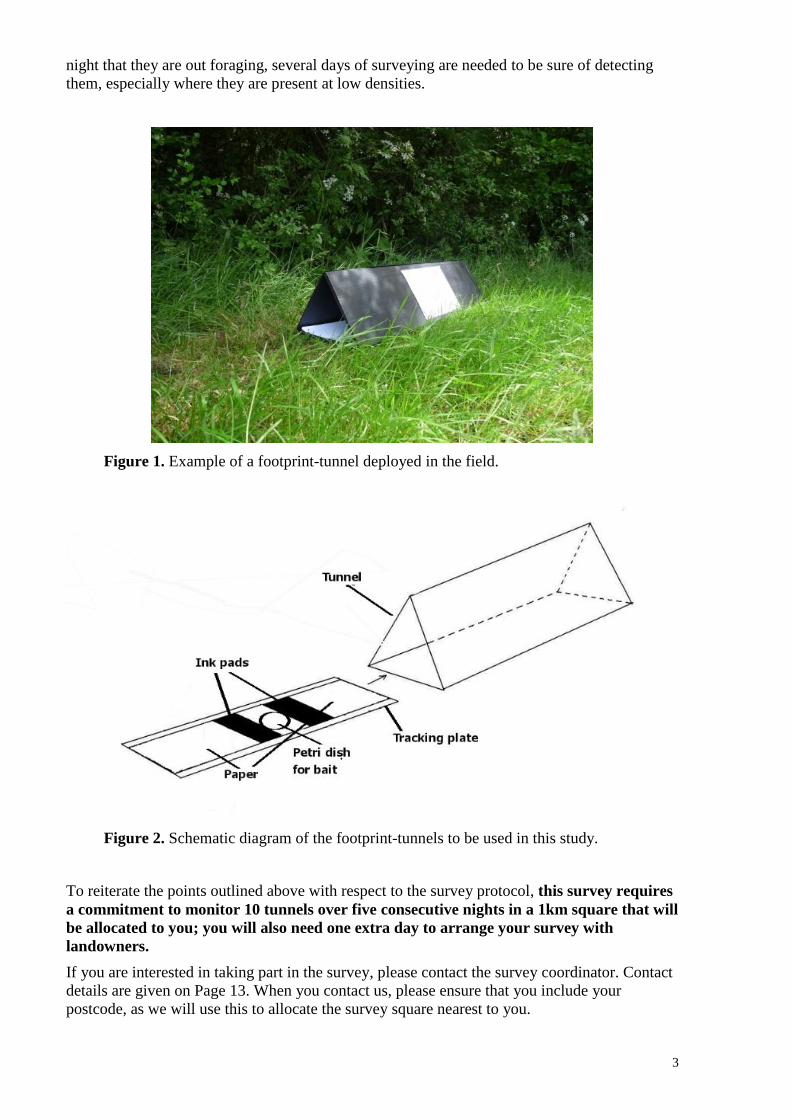
using footprint-tunnels (Figure 1). These simple devices consist of a triangular plastic tunnel
which houses a tracking plate containing sections of paper and ink (Figure 2); as a hedgehog
moves through the tunnel, copies of its footprints are left on the paper for identification. To
help attract hedgehogs into the tunnels, commercially available hedgehog food is used as bait.
Volunteering
We are asking volunteers to survey pre-selected 1-km squares in England and Wales between
May and September inclusive in 2014 or 2015. These sites have been pre-selected because they
are associated with information on badger density, something that is likely to be an important
influence on hedgehogs. Each site will need to be surveyed using ten tunnels for five
consecutive days. In addition, you will also need to spend one day at the start contacting
landowners to get permission to survey on their land and to complete a simple questionnaire
asking information about e.g. land management practices.
The survey needs to be conducted for five continuous days to ensure that we are able to detect
hedgehogs at those sites where they are present. As hedgehogs may not encounter tunnels every
3
night that they are out foraging, several days of surveying are needed to be sure of detecting
them, especially where they are present at low densities.
Figure 1. Example of a footprint-tunnel deployed in the field.
Figure 2. Schematic diagram of the footprint-tunnels to be used in this study.
To reiterate the points outlined above with respect to the survey protocol, this survey requires
a commitment to monitor 10 tunnels over five consecutive nights in a 1km square that will
be allocated to you; you will also need one extra day to arrange your survey with
landowners.
If you are interested in taking part in the survey, please contact the survey coordinator. Contact
details are given on Page 13. When you contact us, please ensure that you include your
postcode, as we will use this to allocate the survey square nearest to you.
4
TIMING OF THE SURVEY
The survey can be undertaken any time between May and September inclusive in 2014 or 2015.
Within these dates, you will need to find a one-week period where you can complete your
survey.
SURVEYING MULTIPLE SQUARES
Because the total survey period is quite extensive, you may wish to survey more than one
square during the course of the project. In our experience, unless you have no other
commitments, it is unrealistic to survey more than two squares at the same time because of the
time taken to travel to and between squares. But you can survey different squares in the same
year or different squares in different years. In addition, we will be surveying some squares in
both years.
SURVEY PROTOCOL
In this section we have outlined the standardised methodology that will be used to monitor
hedgehog presence/absence. Please make sure that you read ALL THE INFORMATION
before embarking on your survey.
1. Volunteers are requested to complete at least one survey in a designated survey square
allocated to them. Once you have expressed an interest in taking part in the survey, the
survey coordinator will send you maps of the survey square alloccated to you and put
you in touch with your regional coordinator.
You will be given three maps of each survey square to record different pieces of
information:
Map 1: a small-scale map illustrating the position of your square in the wider
countryside. This is to help you poinpoint the square’s position. The Ordnance
Survey grid reference of your square will be listed on this map
Map 2: a large-scale map illustrating the position of fields, woods etc. This map
is for you to take into the field at the start of the survey. Initially it will be used
to mark the position of all the property owned by the landowner whose land you
will be surveying and the position of the tunnels. This information will later be
transferred to Map 3
Map 3: a large-scale map onto which you will need to mark (a) the position of
each of the ten tunnels and (b) an outline of the total area owned by the
landowner withn the 1-km square. This “neat version” will be returned to us at
the end of the survey
2. Volunteers will contact the regional coordinator to arrange a time to collect the ten
footprint-tunnels and other necessary equipment (charcoal powder for making the ink,
hedgehog food, paintbrush, masking tape). In addition, you will need an old jam jar and
some vegetable oil for making and transporting the ink. Information for making the ink
is given in Section 11 (Page 10) below.
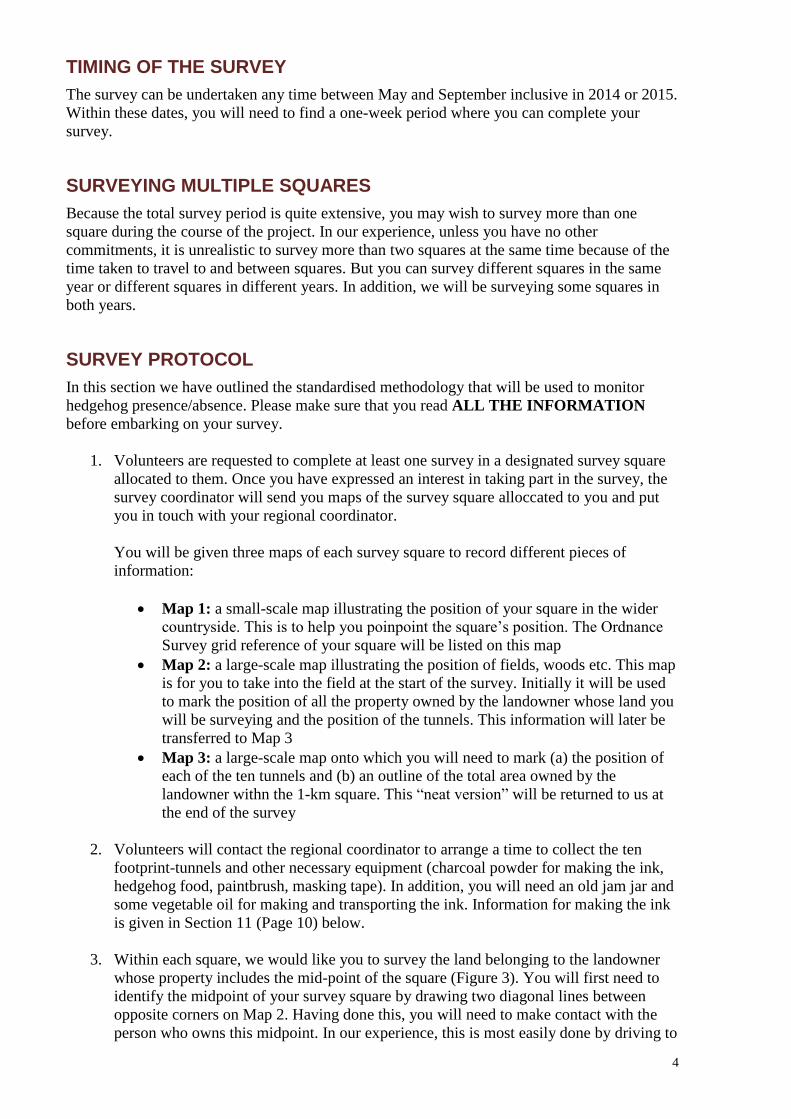
3. Within each square, we would like you to survey the land belonging to the landowner
whose property includes the mid-point of the square (Figure 3). You will first need to
identify the midpoint of your survey square by drawing two diagonal lines between
opposite corners on Map 2. Having done this, you will need to make contact with the
person who owns this midpoint. In our experience, this is most easily done by driving to
5
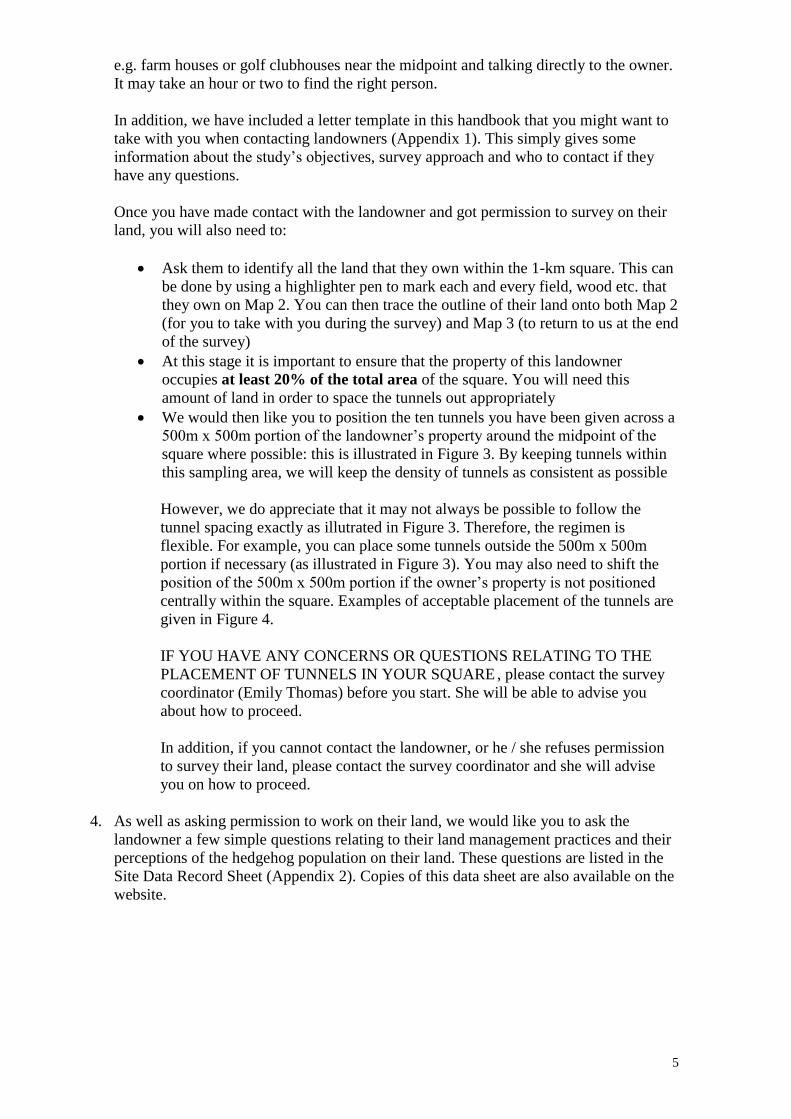
e.g. farm houses or golf clubhouses near the midpoint and talking directly to the owner.
It may take an hour or two to find the right person.
In addition, we have included a letter template in this handbook that you might want to
take with you when contacting landowners (Appendix 1). This simply gives some
information about the study’s objectives, survey approach and who to contact if they
have any questions.
Once you have made contact with the landowner and got permission to survey on their
land, you will also need to:
Ask them to identify all the land that they own within the 1-km square. This can
be done by using a highlighter pen to mark each and every field, wood etc. that
they own on Map 2. You can then trace the outline of their land onto both Map 2
(for you to take with you during the survey) and Map 3 (to return to us at the end
of the survey)
At this stage it is important to ensure that the property of this landowner
occupies at least 20% of the total area of the square. You will need this
amount of land in order to space the tunnels out appropriately
We would then like you to position the ten tunnels you have been given across a
500m x 500m portion of the landowner’s property around the midpoint of the
square where possible: this is illustrated in Figure 3. By keeping tunnels within
this sampling area, we will keep the density of tunnels as consistent as possible
However, we do appreciate that it may not always be possible to follow the
tunnel spacing exactly as illutrated in Figure 3. Therefore, the regimen is
flexible. For example, you can place some tunnels outside the 500m x 500m
portion if necessary (as illustrated in Figure 3). You may also need to shift the
position of the 500m x 500m portion if the owner’s property is not positioned
centrally within the square. Examples of acceptable placement of the tunnels are
given in Figure 4.
IF YOU HAVE ANY CONCERNS OR QUESTIONS RELATING TO THE
PLACEMENT OF TUNNELS IN YOUR SQUARE , please contact the survey
coordinator (Emily Thomas) before you start. She will be able to advise you
about how to proceed.
In addition, if you cannot contact the landowner, or he / she refuses permission
to survey their land, please contact the survey coordinator and she will advise
you on how to proceed.
4. As well as asking permission to work on their land, we would like you to ask the
landowner a few simple questions relating to their land management practices and their
perceptions of the hedgehog population on their land. These questions are listed in the
Site Data Record Sheet (Appendix 2). Copies of this data sheet are also available on the
website.
6
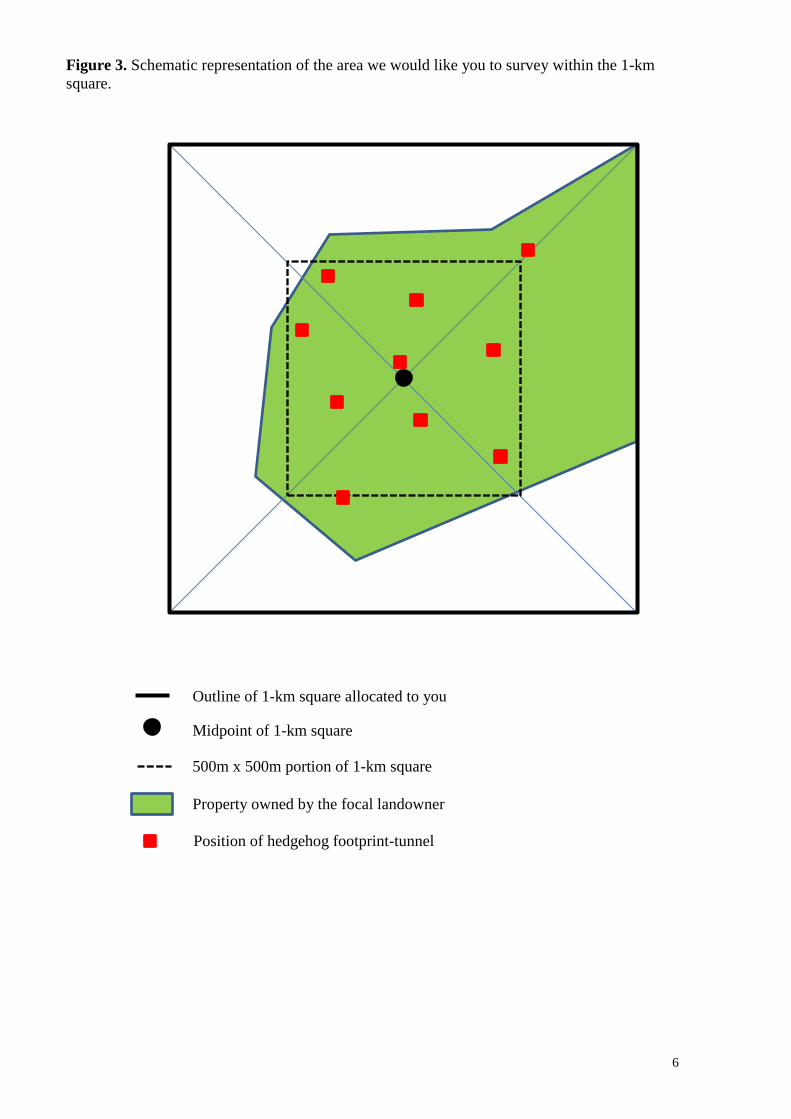
Figure 3. Schematic representation of the area we would like you to survey within the 1-km
square.
Outline of 1-km square allocated to you
Midpoint of 1-km square
500m x 500m portion of 1-km square
Property owned by the focal landowner
Position of hedgehog footprint-tunnel
7
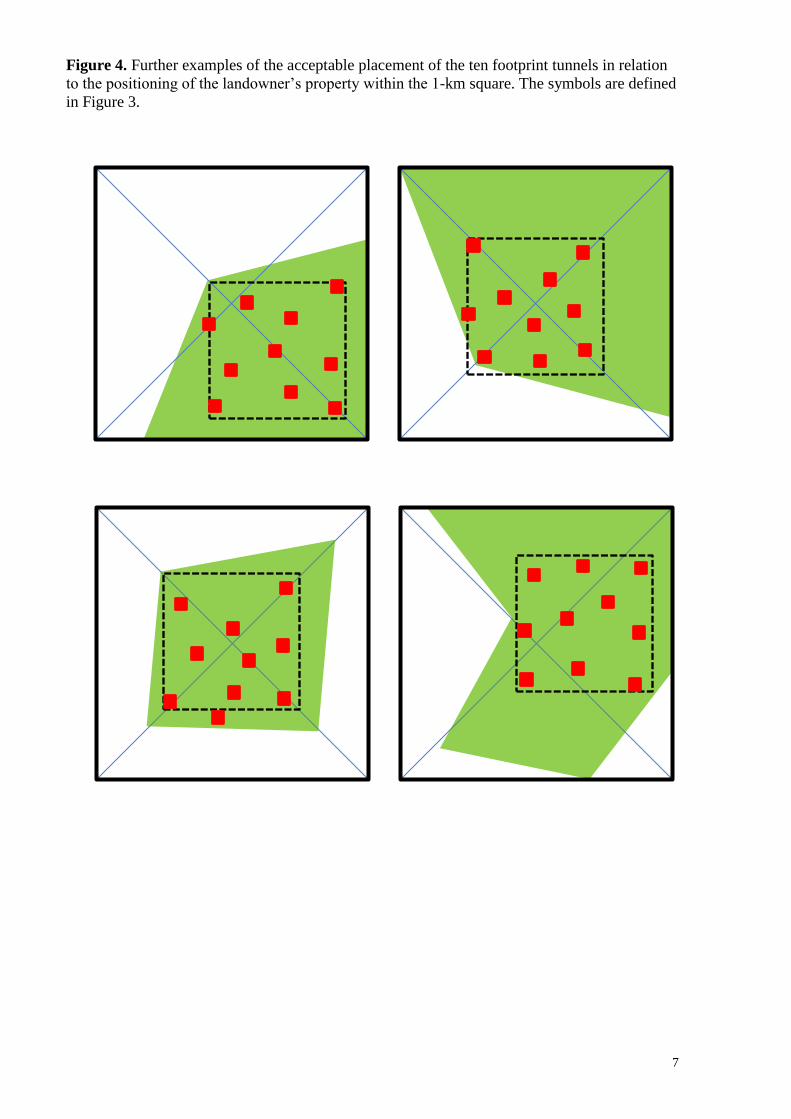
Figure 4. Further examples of the acceptable placement of the ten footprint tunnels in relation
to the positioning of the landowner’s property within the 1-km square. The symbols are defined
in Figure 3.
8
5. Once permission has been granted, walk the site recording suitable locations for placing
the tunnels. It is best to place the tunnels in a “loop” through the landscape, so that you
start and end up at the same place.
There are a number of very minor hazards associated with conducting this survey. A
Health and Safety risk assessment associated with the project is listed in Appendix 3.
Please make sure that you read this before conducting your survey.
6. EACH SITE MUST BE SURVEYED USING TEN FOOTPRINT-TUNNELS.
7. When placing the tunnels, you need to consider (a) the habitat in which the tunnel is
placed and (b) the linear feature along which the tunnel is placed. It is also imperative
that you (c) do not place tunnels too close to one another.
(a) It is recommended that you place tunnels in those habitats most likely to be used by
hedgehogs. These are typically areas of short grassland such as pasture fields and
amenity grasslands (e.g. golf courses, parks). However, it is permitted to place tunnels
in other habitats provided that they are associated with a clear edge habitat. For
example, arable fields may be bordered by a strip of land next to a hedgerow or the land
may border the fences of houses.
(b) Tunnels must be placed along linear features / edge habitats (e.g. hedgerows,
fences, woodland edges etc.) as these are the habitats that hedgehogs tend to use when
travelling through the landscape. Tunnels should be placed in a position that is practical
to the landowner and where the risk of it being disturbed is minimal (i.e. not next to
public footpaths, or in fields with livestock). A “Do not disturb” sign is available on the
website and can be attached to each tunnel if you think it is appropriate
(c) Tunnels must be AT LEAST 100m FROM ONE ANOTHER, and there must be
NO MORE THAN TWO TUNNELS IN THE SAME FIELD (e.g. in large fields,
opposite sides of the field may be more than 100m apart). You can use the map to
ensure that the tunnels are not too close to one another.
Tunnels should be placed throughout the 500m x 500m portion of the 1-km square
to ensure that as much of the area as possible is surveyed.
Whenever you are carrying out any work, please make sure that you follow the
Countryside Code (i.e. leave gates as you find them, don’t disturb livestock etc.). The
Countryside Code can be downloaded here:
http://www.naturalengland.org.uk/ourwork/enjoying/countrysidecode/
8. As you put out your tunnels, please assign each one a number from 1-10: these
identification numbers will be used to collate information during the course of the
project. You need to mark the position of each of tunnel, along with their identification
numbers, on Map 2 and then later transfer this information to Map 3.
9. Each time you put a tunnel in position you need to record: (i) the habitat in which the
tunnel is placed (this is termed the “near” habitat); (ii) the type of linear feature along
which the tunnel has been placed; and (iii) the habitat on the other side of the linear
feature against which the tunnel has been placed (this is termed the “far” habitat).
Please record this information in your site data record sheet. An example of a completed
Site Data Record Sheet is given in Appendix 2.
9
10. The tunnels you have collected from your regional coordinator may have been stored
flat. They should fold easily into the trinagular shape and locked into position using the
velcro on the two surfaces that form the bottom of the tunnel (NB: if you are the first
person to have received a freshly made tunnel, you will first need to remove some of the
backing-paper on the velcro strips before folding the tunnel into position and pressing
the velcro firmly together). After the tunnel has been folded into its triangular shape,
you will also need to fix the petri dish which stores the food onto the centre square of
velcro on the removable insert (see Figure 2).
11. Tunnels should be placed flush with the ground to avoid hedgehogs having to climb up
into the tunnel. Each tunnel should contain the following (see Figures 1 and 2):
One piece of A4 paper at each end of the removable tracking plate; these can be
fixed to the removable plate with butterfly fasteners
At the end of each piece the A4 paper, there should be a strip of masking tape to
apply the ink (Figure 2). Masking tape typically comes in two sizes: 25mm wide
or 50mm wide. If you are using 25mm tape, you will need three strips of tape,
slightly overlapping, at each point; if you are using 50mm tape, you will need
two strips at each point (Figure 5). These strips are wide enough to ensure that
they coat the hedgehog’s feet with ink when they are in the tunnel
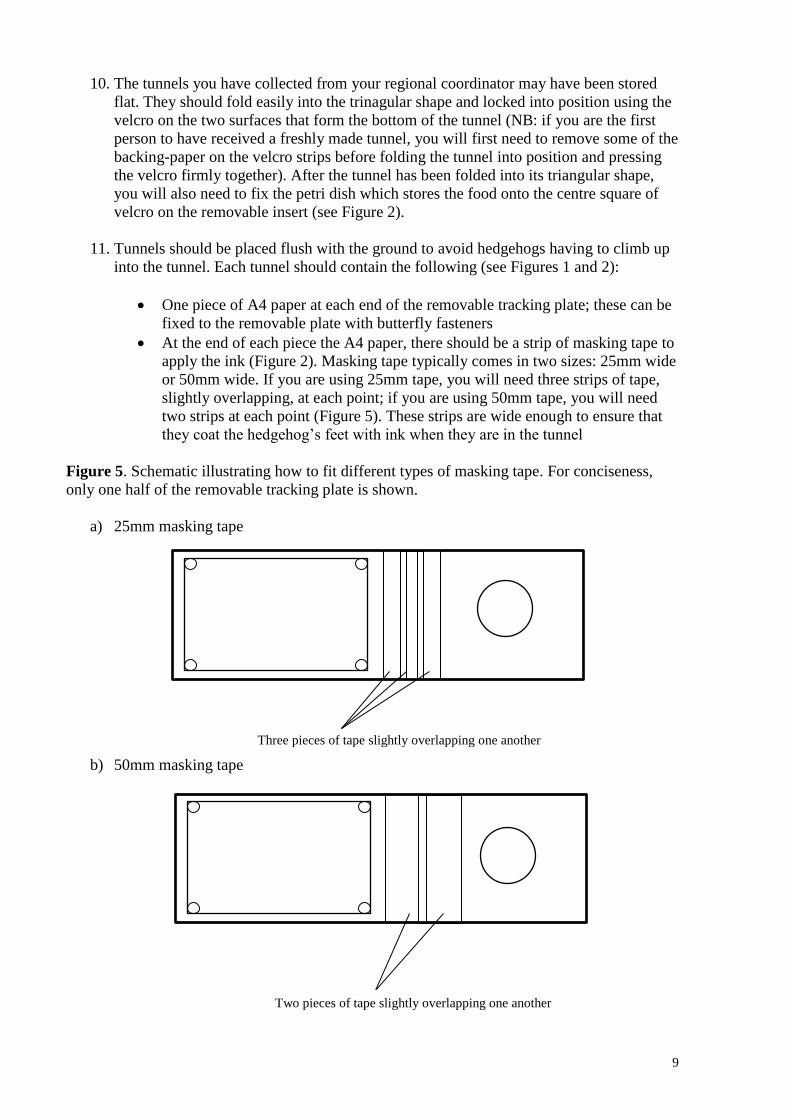
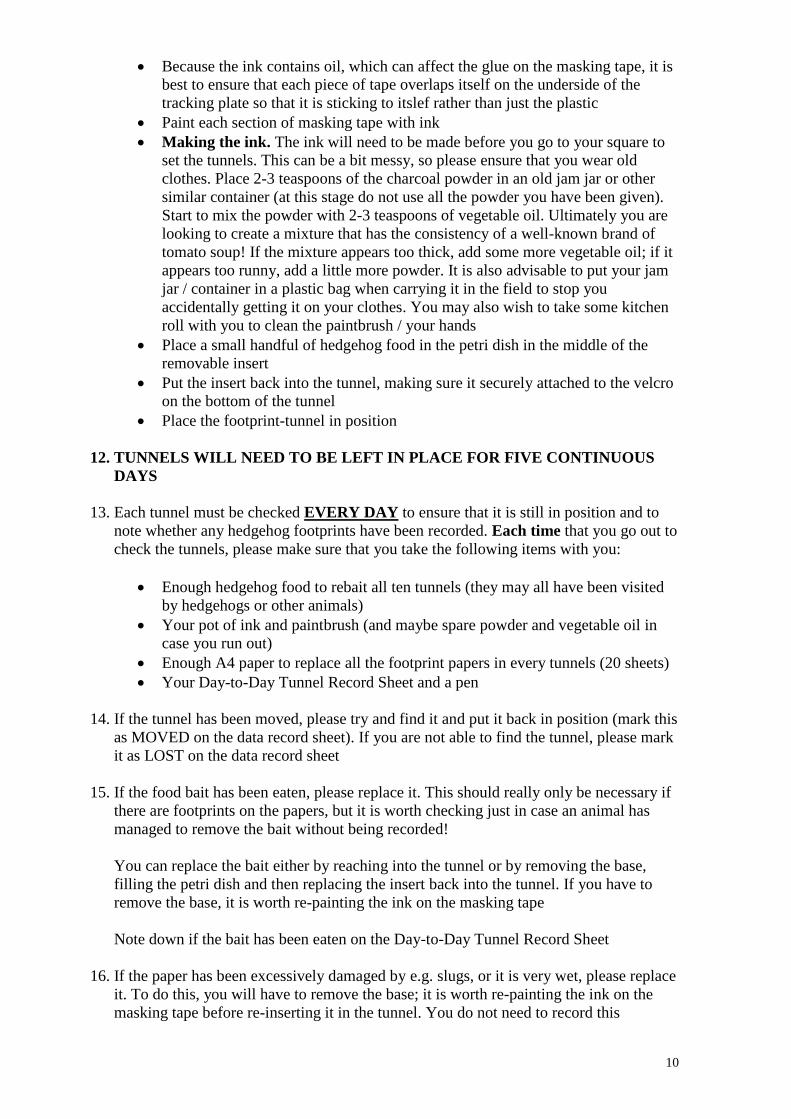
Figure 5. Schematic illustrating how to fit different types of masking tape. For conciseness,
only one half of the removable tracking plate is shown.
a) 25mm masking tape
b) 50mm masking tape
Three pieces of tape slightly overlapping one another
Two pieces of tape slightly overlapping one another
10
Because the ink contains oil, which can affect the glue on the masking tape, it is
best to ensure that each piece of tape overlaps itself on the underside of the
tracking plate so that it is sticking to itslef rather than just the plastic
Paint each section of masking tape with ink
Making the ink. The ink will need to be made before you go to your square to
set the tunnels. This can be a bit messy, so please ensure that you wear old
clothes. Place 2-3 teaspoons of the charcoal powder in an old jam jar or other
similar container (at this stage do not use all the powder you have been given).
Start to mix the powder with 2-3 teaspoons of vegetable oil. Ultimately you are
looking to create a mixture that has the consistency of a well-known brand of
tomato soup! If the mixture appears too thick, add some more vegetable oil; if it
appears too runny, add a little more powder. It is also advisable to put your jam
jar / container in a plastic bag when carrying it in the field to stop you
accidentally getting it on your clothes. You may also wish to take some kitchen
roll with you to clean the paintbrush / your hands
Place a small handful of hedgehog food in the petri dish in the middle of the
removable insert
Put the insert back into the tunnel, making sure it securely attached to the velcro
on the bottom of the tunnel
Place the footprint-tunnel in position
12. TUNNELS WILL NEED TO BE LEFT IN PLACE FOR FIVE CONTINUOUS
DAYS
13. Each tunnel must be checked EVERY DAY to ensure that it is still in position and to
note whether any hedgehog footprints have been recorded. Each time that you go out to
check the tunnels, please make sure that you take the following items with you:
Enough hedgehog food to rebait all ten tunnels (they may all have been visited
by hedgehogs or other animals)
Your pot of ink and paintbrush (and maybe spare powder and vegetable oil in
case you run out)
Enough A4 paper to replace all the footprint papers in every tunnels (20 sheets)
Your Day-to-Day Tunnel Record Sheet and a pen
14. If the tunnel has been moved, please try and find it and put it back in position (mark this
as MOVED on the data record sheet). If you are not able to find the tunnel, please mark
it as LOST on the data record sheet
15. If the food bait has been eaten, please replace it. This should really only be necessary if
there are footprints on the papers, but it is worth checking just in case an animal has
managed to remove the bait without being recorded!
You can replace the bait either by reaching into the tunnel or by removing the base,
filling the petri dish and then replacing the insert back into the tunnel. If you have to
remove the base, it is worth re-painting the ink on the masking tape
Note down if the bait has been eaten on the Day-to-Day Tunnel Record Sheet
16. If the paper has been excessively damaged by e.g. slugs, or it is very wet, please replace
it. To do this, you will have to remove the base; it is worth re-painting the ink on the
masking tape before re-inserting it in the tunnel. You do not need to record this
11
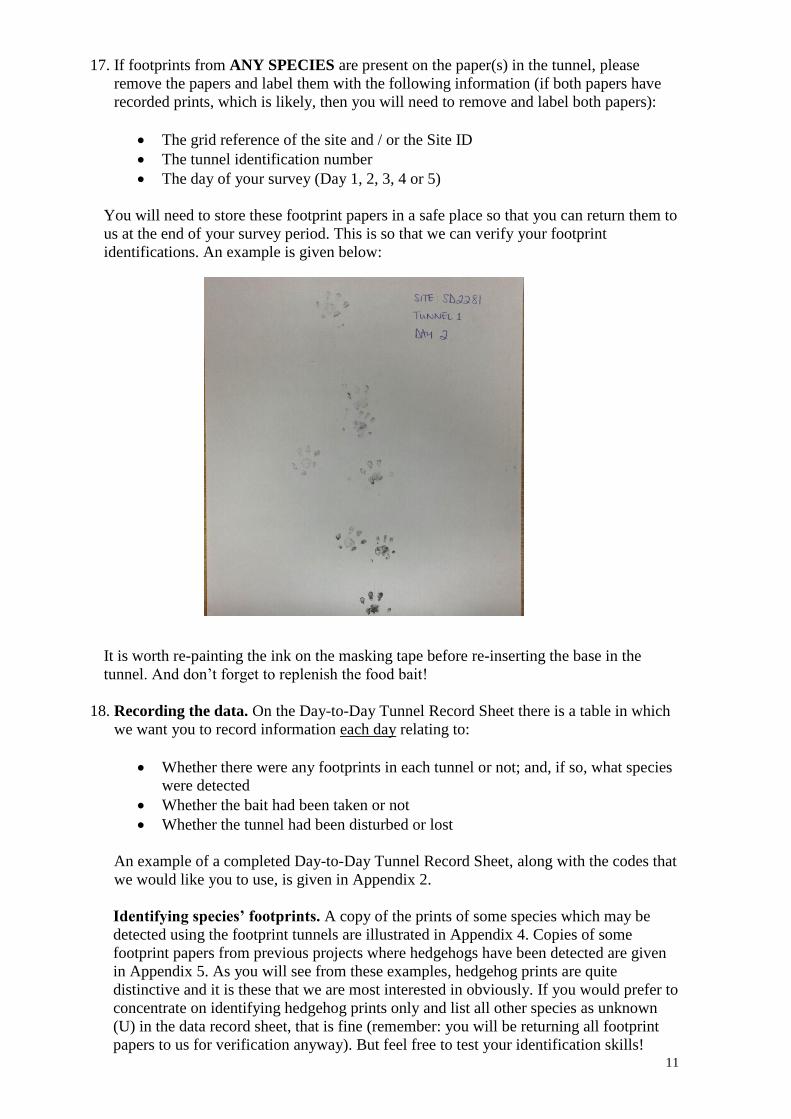
17. If footprints from ANY SPECIES are present on the paper(s) in the tunnel, please
remove the papers and label them with the following information (if both papers have
recorded prints, which is likely, then you will need to remove and label both papers):
The grid reference of the site and / or the Site ID
The tunnel identification number
The day of your survey (Day 1, 2, 3, 4 or 5)
You will need to store these footprint papers in a safe place so that you can return them to
us at the end of your survey period. This is so that we can verify your footprint
identifications. An example is given below:
It is worth re-painting the ink on the masking tape before re-inserting the base in the
tunnel. And don’t forget to replenish the food bait!
18. Recording the data. On the Day-to-Day Tunnel Record Sheet there is a table in which
we want you to record information each day relating to:
Whether there were any footprints in each tunnel or not; and, if so, what species
were detected
Whether the bait had been taken or not
Whether the tunnel had been disturbed or lost
An example of a completed Day-to-Day Tunnel Record Sheet, along with the codes that
we would like you to use, is given in Appendix 2.
Identifying species’ footprints. A copy of the prints of some species which may be
detected using the footprint tunnels are illustrated in Appendix 4. Copies of some
footprint papers from previous projects where hedgehogs have been detected are given
in Appendix 5. As you will see from these examples, hedgehog prints are quite
distinctive and it is these that we are most interested in obviously. If you would prefer to
concentrate on identifying hedgehog prints only and list all other species as unknown
(U) in the data record sheet, that is fine (remember: you will be returning all footprint
papers to us for verification anyway). But feel free to test your identification skills!
12
19. Once you have checked your tunnels on Day 5, please collect them all in.
At this stage, we would very much appreciate it if you could set the tunnels ready to
go for the next volunteer (we hope you will have received them ready to go). This
means ensuring that there is: (a) fresh paper at each end of the removable plate; and (b)
clean masking tape, without any ink on, next to each piece of paper. You may also want
to remove the petri dish from each tunnel, as this means that they can be folded flat which
makes transporting them a little easier.
Please note: if the ink has spilt onto the plastic of the removable insert, this will need to
be cleaned off before you try putting new tape on (the oil in the ink means the tape might
not stick). Removing the ink will require a bit of elbow grease; a little bit of washing up
liquid also helps – and make sure the plastic is dry before putting the new tape on
20. You will then need to contact your regional coordinator to arrange returning the tunnels
and all associated equipment for the next volunteer
21. Please return your data record sheets, your completed Map 3 with the position of tunnels
and landowner property marked on it and any footprint papers (labelled with all the
necessary information) to the survey coordinator. Contact details are on Page 13.
Checklist for going into the field
Because there is nothing more infuriating than going to complete some fieldwork and only
realising that you have forgotten something crucial when you are miles from home, we have
put together the following checklists of things that you must take with you at the start of the
survey when you are putting the tunnels out for the first time (Day 0) and when you are
checking the tunnels for the next five days (Days 1-5):
Day 0: contacting landowners / setting the tunnels
Maps 1 and 2 of your survey square
A copy of the letter to landowners
A copy of the Site Data Record Sheet (Appendix 6) and something to write with
Ten hedgehog tunnels (set with paper and masking tape ready to go)
Ten petri dishes
Enough hedgehog food for ten tunnels
Your pot of ink and paintbrush
Days 1-5: checking the tunnels
Enough hedgehog food for ten tunnels
Your pot of ink and paintbrush
Enough pieces of A4 paper for ten tunnels (20 sheets)
A copy of the Day-to-Day Tunnel Record Sheet (Appendix 6) and a pen
Some spare masking tape
Some spare butterfly fasteners
You might also want to include a roll of duct tape in case you need to make any
impromptu repairs to the tunnel
A folder to store any footprint papers in
13
Contact details
To register as a volunteer and / or to ask any questions regarding the survey, please contact the
survey coordinator, Emily Thomas by email ([email protected]).When contacting us,
please ensure that you include your postcode as this will be used to identify the survey square
closest to you.
When returning your data record sheets, your map with the position of tunnels marked on it and
any footprint papers (labelled with all the necessary information), you can either email them to
the address above if you can scan the documents or you can post them to:
Emily Thomas
Key Species Monitoring Officer
People's Trust for Endangered Species
15 Cloisters House
8 Battersea Park Road
London
SW8 4BG
We would again like to take this opportunity to say a huge thank you for helping
with our hedgehog survey.
Happy hedgehoging!

14
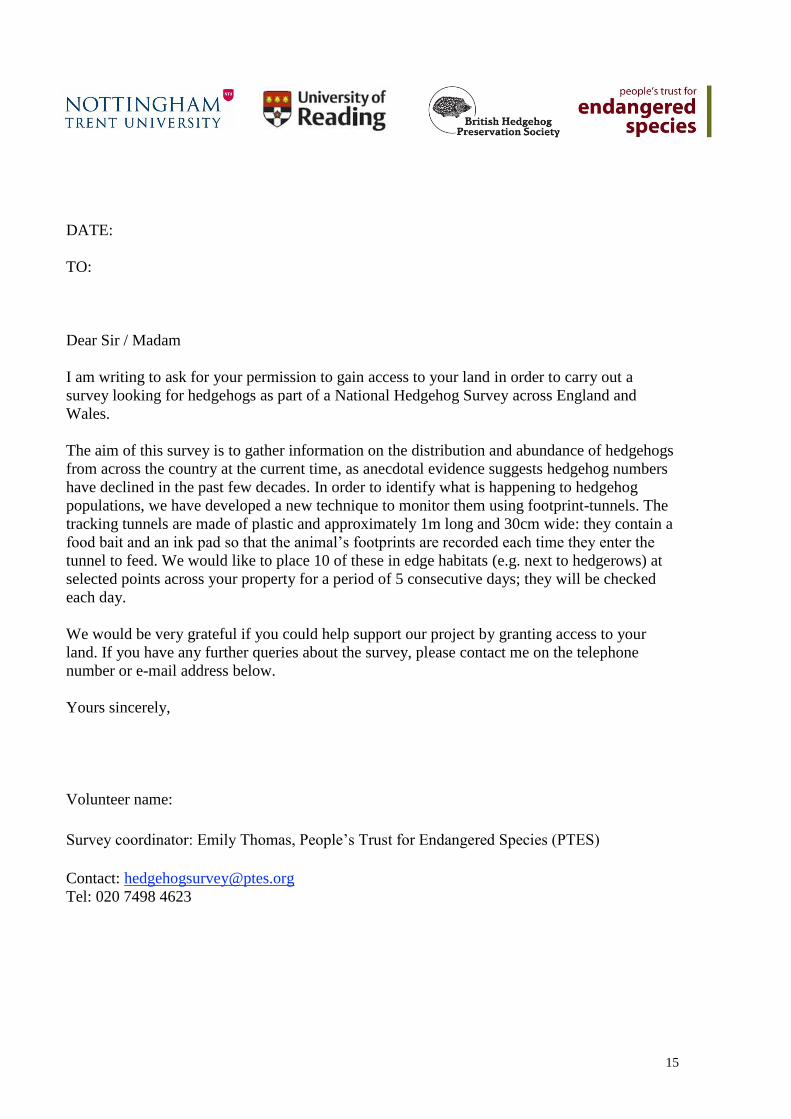
APPENDIX 1. Landowner permission request letter
On the following page is a template letter that you may wish to take with you when contacting
landowners to obtain permission to carry out the hedgehog survey on their land.
15
DATE:
TO:
Dear Sir / Madam
I am writing to ask for your permission to gain access to your land in order to carry out a
survey looking for hedgehogs as part of a National Hedgehog Survey across England and
Wales.
The aim of this survey is to gather information on the distribution and abundance of hedgehogs
from across the country at the current time, as anecdotal evidence suggests hedgehog numbers
have declined in the past few decades. In order to identify what is happening to hedgehog
populations, we have developed a new technique to monitor them using footprint-tunnels. The
tracking tunnels are made of plastic and approximately 1m long and 30cm wide: they contain a
food bait and an ink pad so that the animal’s footprints are recorded each time they enter the
tunnel to feed. We would like to place 10 of these in edge habitats (e.g. next to hedgerows) at
selected points across your property for a period of 5 consecutive days; they will be checked
each day.
We would be very grateful if you could help support our project by granting access to your
land. If you have any further queries about the survey, please contact me on the telephone
number or e-mail address below.
Yours sincerely,
Volunteer name:
Survey coordinator: Emily Thomas, People’s Trust for Endangered Species (PTES)
Contact: [email protected]
Tel: 020 7498 4623
16
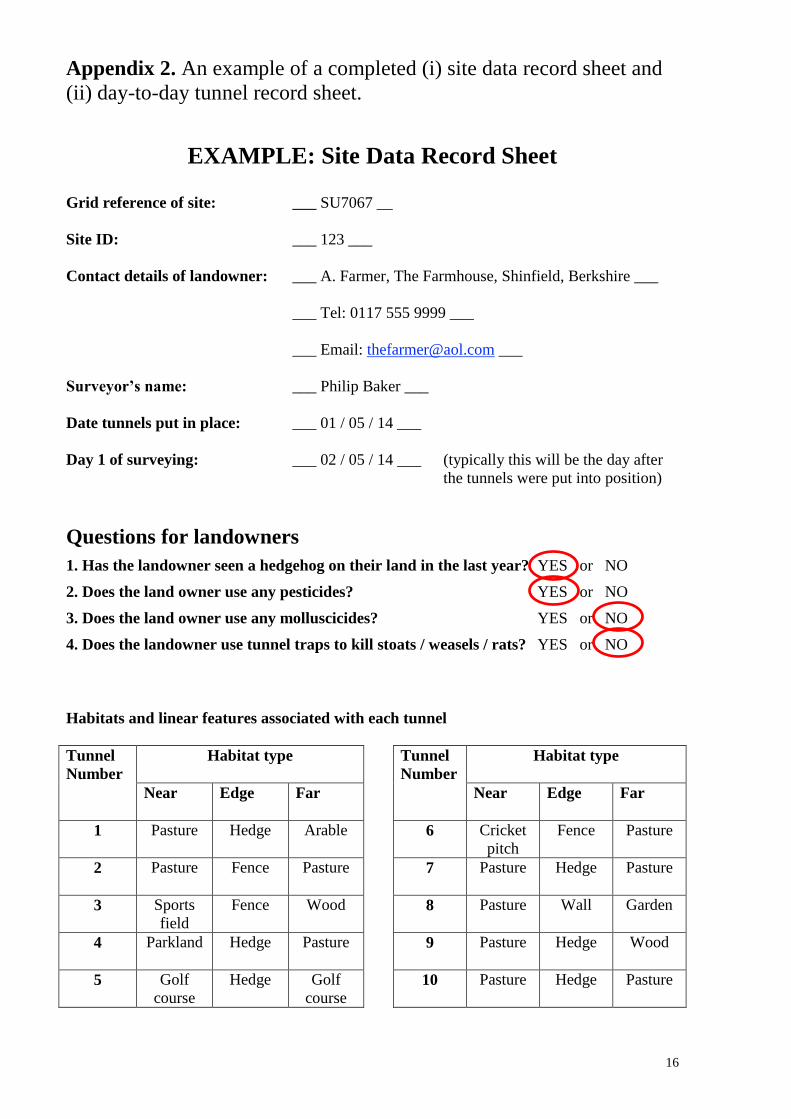
Appendix 2. An example of a completed (i) site data record sheet and
(ii) day-to-day tunnel record sheet.
EXAMPLE: Site Data Record Sheet Grid reference of site: ___ SU7067 __
Site ID: ___ 123 ___
Contact details of landowner: ___ A. Farmer, The Farmhouse, Shinfield, Berkshire ___
___ Tel: 0117 555 9999 ___
___ Email: [email protected] ___
Surveyor’s name: ___ Philip Baker ___
Date tunnels put in place: ___ 01 / 05 / 14 ___
Day 1 of surveying: ___ 02 / 05 / 14 ___ (typically this will be the day after
the tunnels were put into position)
Questions for landowners
1. Has the landowner seen a hedgehog on their land in the last year? YES or NO
2. Does the land owner use any pesticides? YES or NO
3. Does the land owner use any molluscicides? YES or NO
4. Does the landowner use tunnel traps to kill stoats / weasels / rats? YES or NO
Habitats and linear features associated with each tunnel
Tunnel
Number
Habitat type
Tunnel
Number
Habitat type
Near
Edge
Far
Near
Edge
Far
1
Pasture Hedge Arable 6 Cricket
pitch
Fence Pasture
2
Pasture Fence Pasture 7 Pasture Hedge Pasture
3 Sports
field
Fence Wood 8 Pasture Wall Garden
4
Parkland Hedge Pasture 9 Pasture Hedge Wood
5 Golf
course
Hedge Golf
course 10 Pasture Hedge Pasture
17
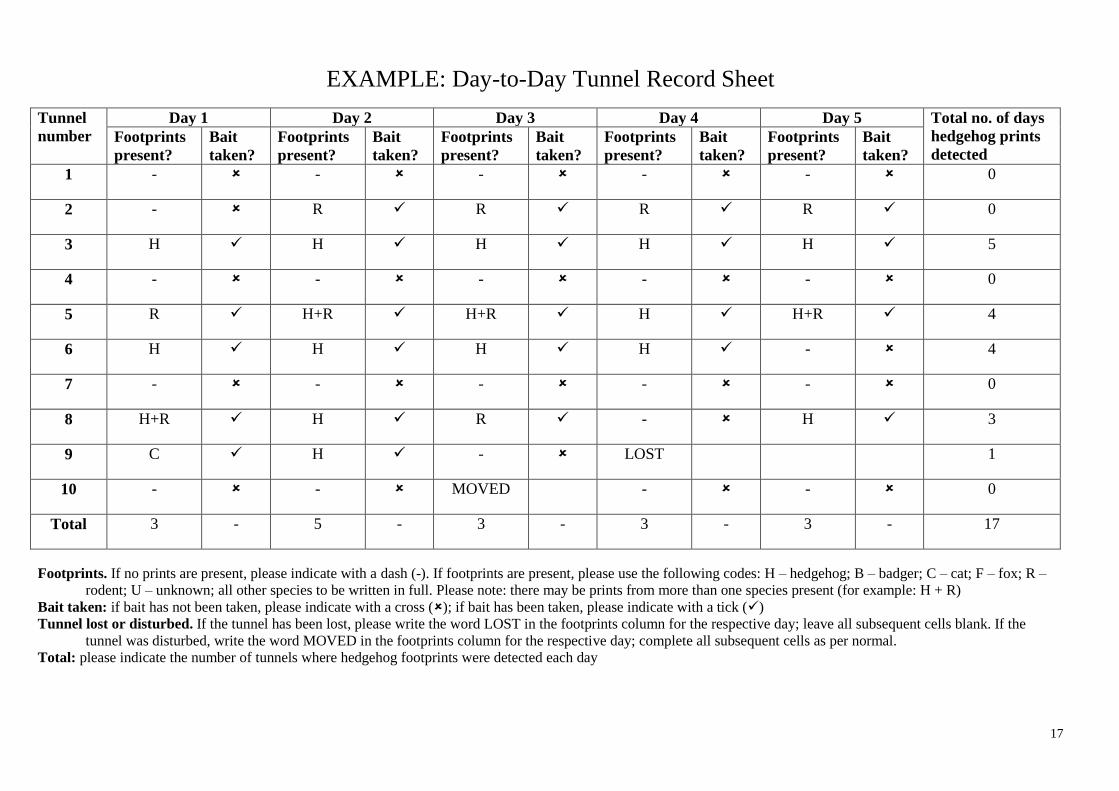
EXAMPLE: Day-to-Day Tunnel Record Sheet
Tunnel
number
Day 1 Day 2 Day 3 Day 4 Day 5 Total no. of days
hedgehog prints
detected Footprints
present?
Bait
taken?
Footprints
present?
Bait
taken?
Footprints
present?
Bait
taken?
Footprints
present?
Bait
taken?
Footprints
present?
Bait
taken?
1 - - - - - 0
2 - R R R R 0
3 H H H H H 5
4 - - - - - 0
5 R H+R H+R H H+R 4
6 H H H H - 4
7 - - - - - 0
8 H+R H R - H 3
9 C H - LOST 1
10 - - MOVED - - 0
Total 3 - 5 - 3 - 3 - 3 - 17
Footprints. If no prints are present, please indicate with a dash (-). If footprints are present, please use the following codes: H – hedgehog; B – badger; C – cat; F – fox; R –
rodent; U – unknown; all other species to be written in full. Please note: there may be prints from more than one species present (for example: H + R)
Bait taken: if bait has not been taken, please indicate with a cross (); if bait has been taken, please indicate with a tick ()
Tunnel lost or disturbed. If the tunnel has been lost, please write the word LOST in the footprints column for the respective day; leave all subsequent cells blank. If the
tunnel was disturbed, write the word MOVED in the footprints column for the respective day; complete all subsequent cells as per normal.
Total: please indicate the number of tunnels where hedgehog footprints were detected each day

18
Appendix 3. Health and Safety Information The following information provides notes on good practice when undertaking fieldwork. The notes
should be helpful to you but the actions outlined are not compulsory.
As a volunteer you are under no obligation to participate in the survey or monitoring programme and
you can cease taking part in the survey at any point. You are responsible for your own health and safety
and should never put yourself or others in a position that could be dangerous. If at any point you have
concerns about your own health and safety or that of others, you are strongly advised not to
undertake/continue the activity.
Please take care with personal safety during the course of your survey. Field studies in the vicinity of
water can be hazardous, especially if there are steep banks, so where possible it is best to work in pairs.
We can take no responsibility for personal injury incurred by volunteers during the course of their
surveys.
Access permission - Before commencing fieldwork you must obtain permission from the relevant
landowner(s). Use this opportunity to ask landowners about the location of any potentially hazardous
animals or natural features on their land. Heed any warning signs present on the land you are surveying.
If access is granted but later revoked you must not continue with your fieldwork.
Park legally and sensibly, preferably off-road. Do not park in passing places. Take care to ensure
entrances are not blocked and traffic is not obstructed.
Personal equipment - Wear appropriate clothing and footwear for the terrain and weather conditions
you are working in. Remember that older boots and shoes may lack the grip necessary for working in
and around water. The weather can be unpredictable so ensure that you have suitable clothing for all
weather conditions. Carry a torch, spare batteries, a compass, whistle, first aid kit, a survival bag and
high-energy food.
Be aware that it is likely you will get ink on your hands and this may transfer to your clothing and
equipment. Try to use items you do not mind getting dirty as the ink may not wash off. If you are
concerned please take extra care and you may want to consider using disposable gloves to protect your
hands. You may want to put a plastic sheet or bin bags down in the car just in case any ink on the
tunnels were to transfer to the upholstery. We are unable to reimburse you for and damage the ink may
cause to any clothing, possessions, equipment or belongings of any kind.
Contact - If possible avoid lone working. However, it is recognized that in some situations it will not
always be possible to avoid lone working and in these situations particular care should be taken. Never
go into the field without informing a responsible person of where you are going (for more remote areas
a grid reference is particularly advised) and when you expect to return, how you intend to travel to (and
access) your site and who to contact if you do not return when expected. Consider also leaving your
vehicle registration details with a responsible person. Ensure that you have a well formed contingency
plan if you do not return when expected. Always carry a fully charged mobile telephone with you.
Mobile phones may not work in some remoter areas and it is advisable to locate the nearest public
telephone box or nearest inhabited house to your survey site.
Weather - Be aware that hazards may increase in rain, strong winds and thunderstorms. If particularly
bad weather is encountered do not commence your survey or cease it if already started. Surveying in
heavy rain, strong winds, thunderstorms and temperatures of below 70C is not advised.
Assessing your site - All fieldworkers should consider the particular hazards that are associated with
their site/s. Identify potential hazards before you commence your survey. Assess your individual
circumstances and medical conditions in relation to the potential hazards on your site before choosing to
undertake the survey.
19
Health and safety reporting - If volunteers are to be accompanied by other people in whatever
capacity, the information provided in this document should be passed onto these other people. Any
particular health and safety concerns that you have about your site/s or the safety methods should be
reported to us.
Livestock - Care should be taken when entering areas with livestock, particularly cattle, rams and
horses. Do not enter fields containing bulls and be especially careful around cows with young calves as
they can be particularly protective of their young. If you have any concerns remove yourself from the
situation. Rutting deer can also be aggressive in autumn. If you intend to take your dog while surveying
ensure that you keep it on a lead and under control at all times. If possible leave it well cared for with
family or friends.
Dogs – Be aware that many farms have working dogs on them and some may be aggressive. Check
with the land owner before proceeding with any field work. If you are confronted with a dog and feel
unsafe, stop the survey and remove yourself from the situation. Do not run as the dog is likely to chase
you; instead walk slowly and calmly away. It is likely the dog is just curious and can smell the bait you
are carrying.
Farm machinery - Farm machinery should not be touched at any point. Avoid fieldwork in close
proximity to working agricultural machinery. Do not stand / walk where stones and other debris may be
flung up e.g. behind a flail mower.
Terrain - Please take extra care when surveying along watercourses, cliff edges, areas of boggy ground,
reed beds and loose rock. Wear appropriate footwear and never cross rivers unless via a bridge. Avoid
hazardous areas such as quarries, railway lines and ravines and do not attempt to climb steep slopes,
walls or fences. If fieldwork is being carried out along roadsides wear bright-coloured clothing and if
walking along roads ensure that you walk facing on-coming traffic. Take particular care on blind bends
in the road. Have somebody keeping watch for traffic.
Where possible avoid muddy or boggy areas. If moving through these areas is unavoidable test every
footstep on the ground before putting your weight on your feet. Proceed slowly and push a stick into the
mud to test its consistency and depth before proceeding.
Human confrontation - If you have any concerns about your personal safety at any point then cease
surveying and remove yourself from the situation. Carry a personal alarm. Carry some identification to
confirm the survey you are involved with. Avoid working alone. Consider the privacy of residents,
particularly when working in and around residential areas.
Diseases - Volunteers may be exposed to disease during survey work.
Handling of faecal material from wild small mammals presents no danger of disease provided that
reasonable precautions are taken to minimise any possible risks. Remember to wash your hands after
collecting the tunnels from the sites and after extracting faeces, and especially before eating , drinking
and smoking.
Cuts or abrasions on the hands should be covered by sticking plaster or rubber gloves. Take particular
care with these simple precautions at sites where brown rats are common since here there may be a risk
of Weil’s disease.
To reduce the risk of spreading disease, ensure footwear and outdoor clothing is cleaned before and
after fieldwork. Follow any bio-security measures present on the land you are surveying, e.g. use
disinfecting mats at gates etc.
If disease is expected or you feel unwell at any time after carrying out your survey then consult your
doctor immediately explaining the type of fieldwork you have been involved in, including details of the

20
mammal species that you have come into contact with. While not common, the following diseases can
have severe effects and in rare cases can cause death:
1. Tetanus – This is caused by the bacterium Clostridium tetani, a common micro-organism found
in soil. The infection of minor wounds and scratches can result in tetanus. All skin wounds should
be covered before fieldwork is commenced and anti-tetanus treatments should be kept up to date.
Always wash your hands after completing field work and before eating, drinking and smoking.
2. Leptospirosis (Weil’s disease) – This bacterium is carried by rodents, particularly rats, and is
excreted by their urine. This disease is commonly found in water and as for tetanus ensure that all
wounds are covered and avoid contact with water that may have been contaminated by rat or cow
urine. The footprint tunnels are also possible reservoirs for Weil’s disease. Wash hands
thoroughly before eating, drinking and smoking. If you suffer from flu-like symptoms following
field work, contact your doctor immediately and mention Weil’s disease.
3. Lyme disease – The bacterium that causes Lyme disease is transmitted via the ticks of various
species including deer, sheep and pheasants. When surveying in long grass or forested areas with
thick undergrowth wear long trousers and long socks. On completing field work check exposed
skin for ticks and if found remove. If a tick is found and you contract flu like symptoms contact
your doctor and explain that you may have been exposed to Lyme disease.
4. Tick-borne encephalitis – This is a viral disease carried by animal ticks. There is a vaccine for
this disease if prolonged exposure to tick-infested areas is a possibility. In Britain and Ireland a
similar disease known as ‘Louping ill’ is also present. This is particularly associated with grouse
and hares in moorland regions and has similar symptoms to tick-borne encephalitis ranging from
flu-like symptoms to severe symptoms requiring hospitalisation.
5. Salmonellosis – This bacterial infection is common in rats and mice. If the bacterium is ingested
as a result of poor hygiene, then mild to severe food poisoning will occur.
Under 18 volunteers - All volunteers under 18 must inform us and must be accompanied during their
fieldwork by an adult or write a letter which states that parents/guardians agree to their children
undertaking the activity and are aware of the associated risks.
For further information on Health and Safety issues, visit the Health and Safety Executive website
www.hse.gov.uk (tel.: 0845 345 0055). The following downloadable HSE guides are particularly
relevant:
INDG163(rev2): Five steps to risk assessment
INDG73: Working alone in safety
If you have any other questions or concerns about Health and Safety, please email Emily Thomas at
PTES: [email protected]
21
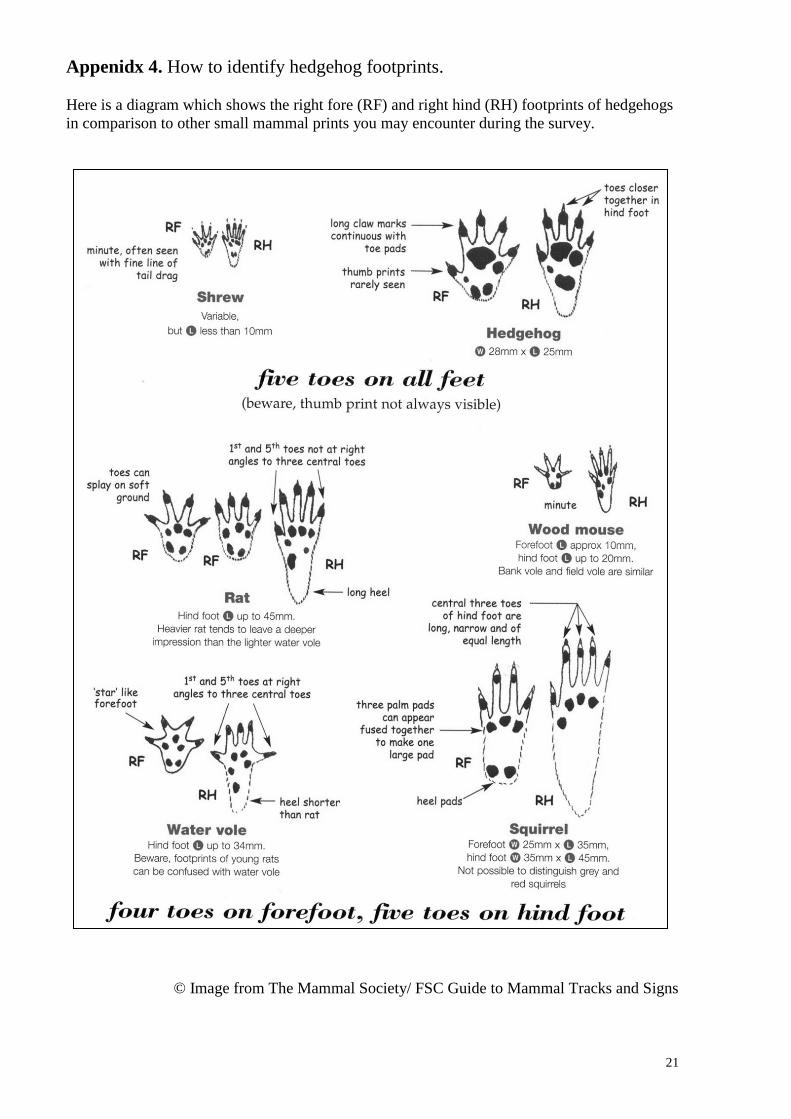
Appenidx 4. How to identify hedgehog footprints.
Here is a diagram which shows the right fore (RF) and right hind (RH) footprints of hedgehogs
in comparison to other small mammal prints you may encounter during the survey.
© Image from The Mammal Society/ FSC Guide to Mammal Tracks and Signs

22
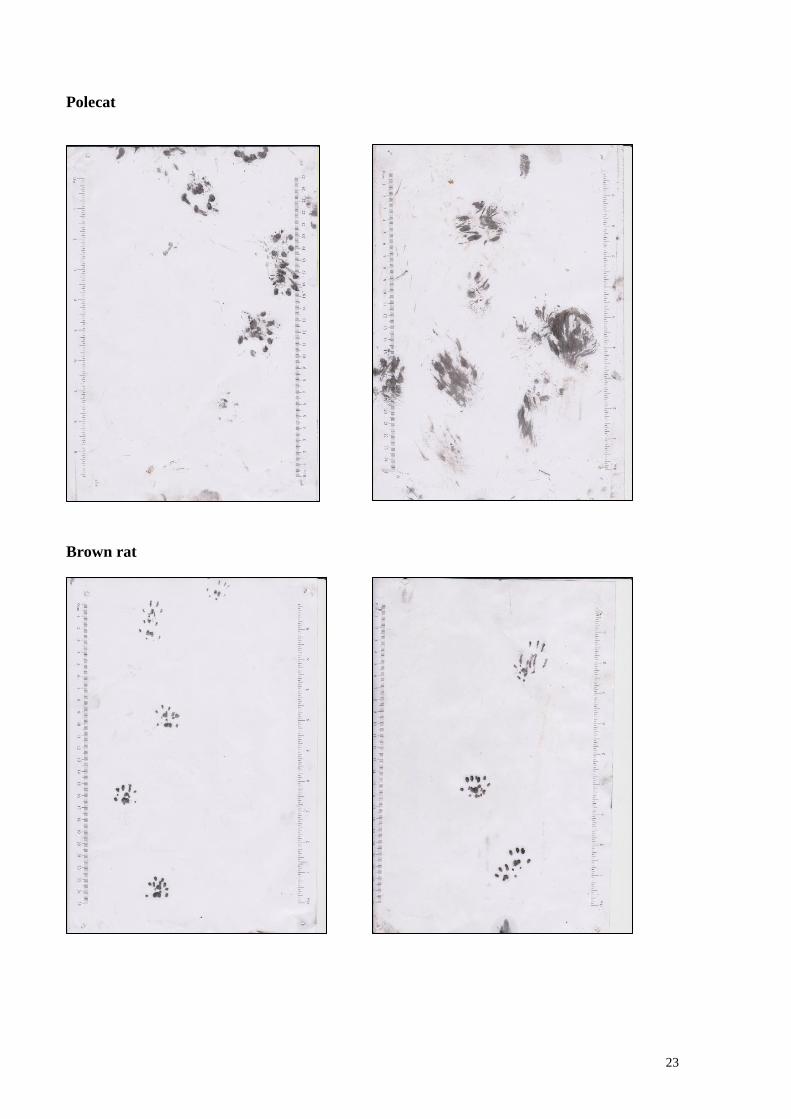
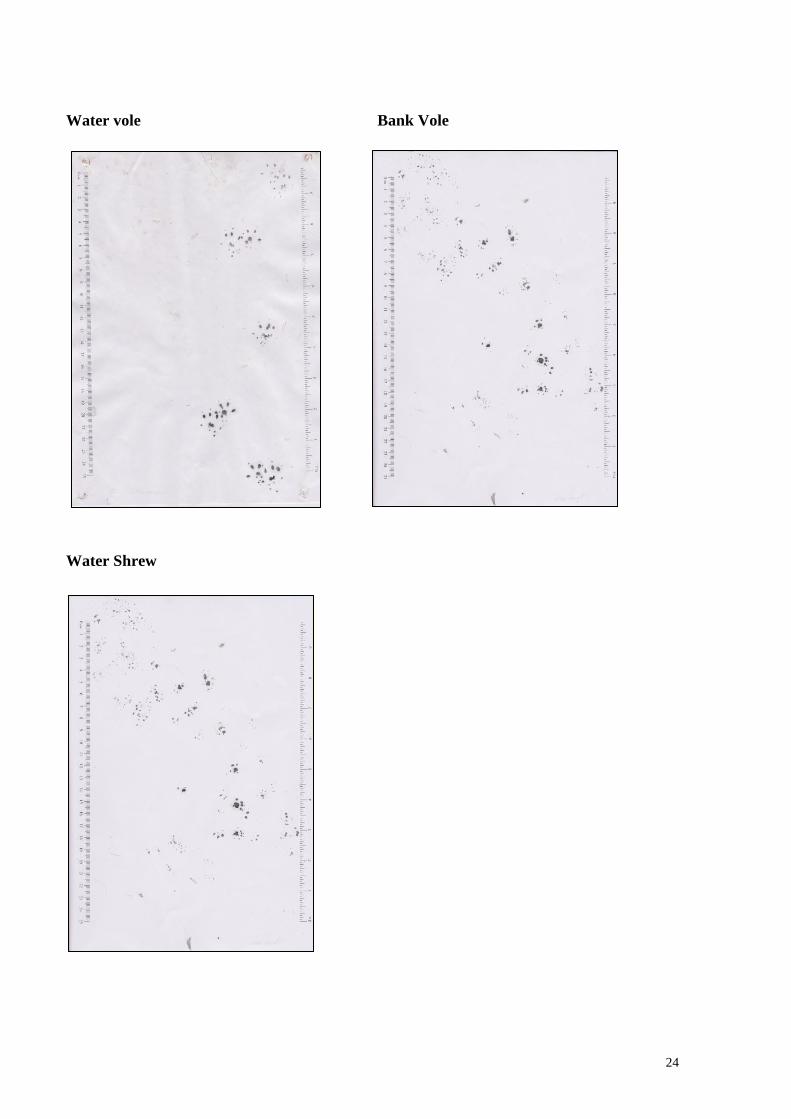
Examples of footprints from hedgehogs in comparison with other mammals that may use the
tunnels during the survey. (Our thanks to Clare Stalford at Wildwood Trust for her help
collecting footprints)
Images are not full-sized, but the box surrounding each image is equivalent to a piece of A4
paper.
Hedgehog
Mink
23
Polecat
Brown rat
24
Water vole Bank Vole
Water Shrew
25
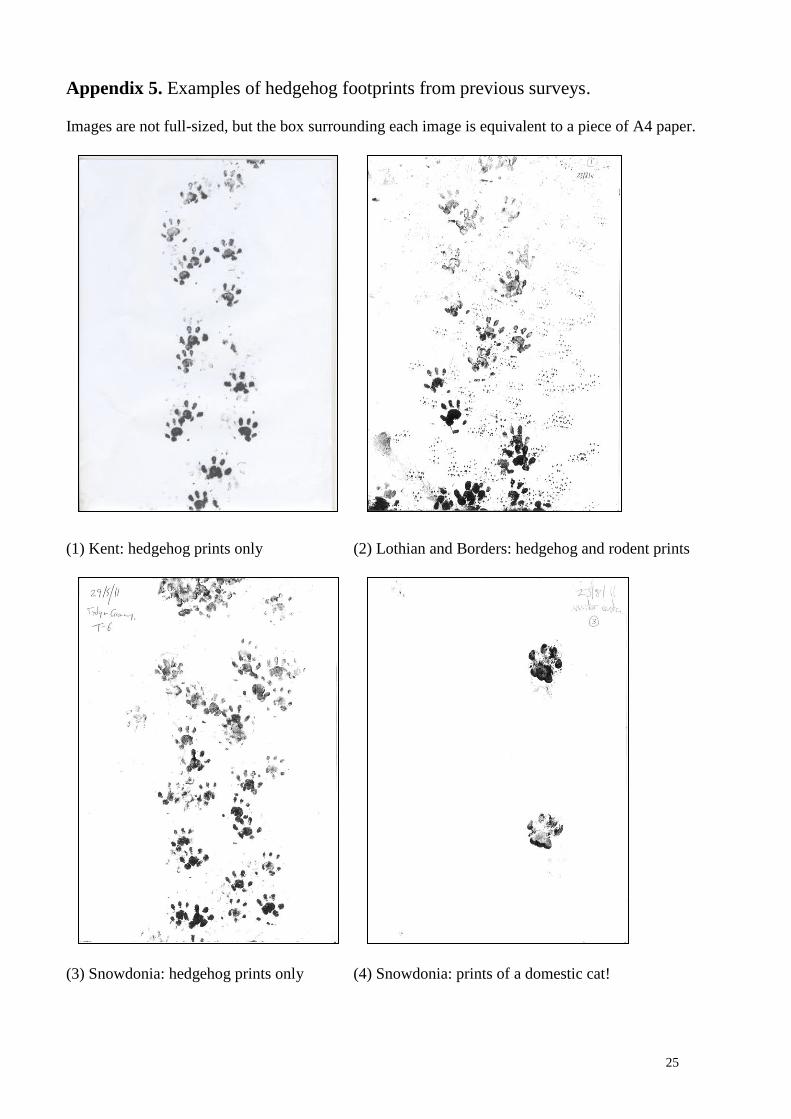
Appendix 5. Examples of hedgehog footprints from previous surveys.
Images are not full-sized, but the box surrounding each image is equivalent to a piece of A4 paper.
(1) Kent: hedgehog prints only (2) Lothian and Borders: hedgehog and rodent prints
(3) Snowdonia: hedgehog prints only (4) Snowdonia: prints of a domestic cat!

26
Appendix 6. Blank copies of the data recording sheets.
The Site Data Record Sheet and the Day-to-Day Tunnel Record Sheet that you will need to use to record
your data are given on the next two pages.
Alternatively, these record sheets can be printed direct from the website.
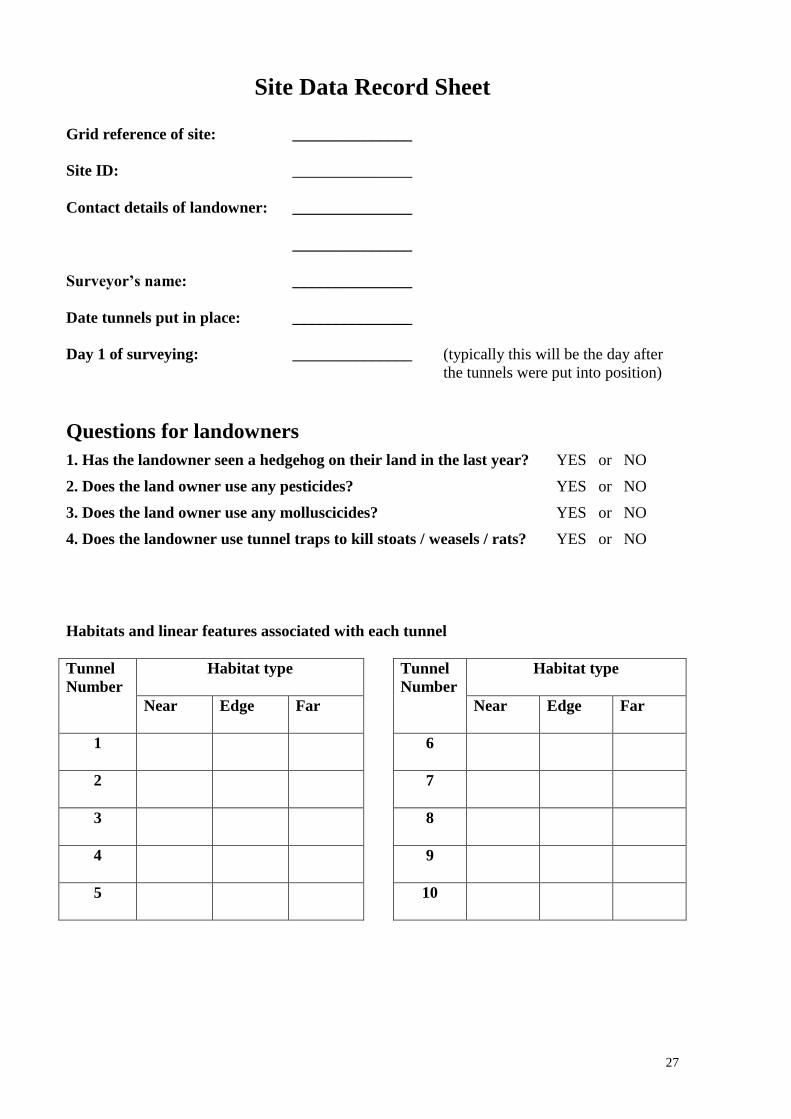
27
Site Data Record Sheet Grid reference of site: _______________
Site ID: _______________
Contact details of landowner: _______________
_______________
Surveyor’s name: _______________
Date tunnels put in place: _______________
Day 1 of surveying: _______________ (typically this will be the day after
the tunnels were put into position)
Questions for landowners
1. Has the landowner seen a hedgehog on their land in the last year? YES or NO
2. Does the land owner use any pesticides? YES or NO
3. Does the land owner use any molluscicides? YES or NO
4. Does the landowner use tunnel traps to kill stoats / weasels / rats? YES or NO
Habitats and linear features associated with each tunnel
Tunnel
Number
Habitat type
Tunnel
Number
Habitat type
Near
Edge
Far
Near
Edge
Far
1
6
2
7
3
8
4
9
5
10

28
Day-to-Day Tunnel Record Sheet
Tunnel
number
Day 1 Day 2 Day 3 Day 4 Day 5 Total no. of days
hedgehog prints
detected Footprints
present?
Bait
taken?
Footprints
present?
Bait
taken?
Footprints
present?
Bait
taken?
Footprints
present?
Bait
taken?
Footprints
present?
Bait
taken?
1
2
3
4
5
6
7
8
9
10
Total - - - - -
Footprints. If no prints are present, please indicate with a dash (-). If footprints are present, please use the following codes: H – hedgehog; B – badger; C – cat; F – fox; R –
rodent; U – unknown; all other species to be written in full. Please note: there may be prints from more than one species present (for example: H + R)
Bait taken: if bait has not been taken, please indicate with a cross (); if bait has been taken, please indicate with a tick ()
Tunnel lost or disturbed. If the tunnel has been lost, please write the word LOST in the footprints column for the respective day; leave all subsequent cells blank. If the
tunnel was disturbed, write the word MOVED in the footprints column for the respective day; complete all subsequent cells as per normal.
Total: please indicate the number of tunnels where hedgehog footprints were detected each day