Embed Size (px)
Citation preview
National Digital Literacy Mission
ICT Academy of Tamil Nadu
ELCOT Complex, 2-7 Developed Plots,
Industrial Estate, Perungudi, Chennai - 600 096
www.ictact.in | [email protected]
National Digital Literacy Mission
ICT Academy of Tamil Nadu
ELCOT Complex, 2-7 Developed Plots,
Industrial Estate, Perungudi, Chennai - 600 096
www.ictact.in | [email protected]
National Digital Literacy Mission
ICT Academy of Tamil Nadu
ELCOT Complex, 2-7 Developed Plots,
Industrial Estate, Perungudi, Chennai - 600 096
www.ictact.in | [email protected]

Table of Content
1. INTRODUCTION TO DIGITAL DEVICES .................................................................................1
I. COMPONENTS, FUNCTIONS AND APPLICATIONS OF COMPUTER ................................................2II. COMPONENTS, FUNCTIONS AND APPLICATIONS OF MOBILE PHONES.......................................9III. COMPONENTS, FUNCTIONS AND APPLICATIONS OF TABLET...................................................11
2. OPERATING DIGITAL DEVICES........................................................................................... 15
I. BASIC FEATURES OF A COMPUTER OPERATING SYSTEM ...........................................................16II. MOBILE PHONE OPERATING SYSTEM AND FEATURES...............................................................37III. TABLET OPERATING SYSTEM AND FEATURES ...........................................................................42
3. ACCESSING GOVERNMENT SERVICES................................................................................ 51
I. LOCATING GOVERNMENT INFORMATION..................................................................................52II. ACCESSING E-GOVERNANCE SERVICES ......................................................................................60
4. SAFETY AND SECURITY IN DIGITAL TECHNOLOGY.............................................................. 83
I. SECURITY.....................................................................................................................................84II. HEALTH AND SAFETY..................................................................................................................86III. ETHICS .......................................................................................................................................90IV. SOCIAL AND HUMAN ISSUES ....................................................................................................92
5. WORD PROCESSING ......................................................................................................... 95
I. INTRODUCTION TO WORD PROCESSOR .................................................................................96II.CREATING, EDITING AND FORMATTING WORD DOCUMENTS .................................................103
6. VIDEO LIST ..................................................................................................................... 132
7. SESSION PLAN................................................................................................................ 133

1. INTRODUCTION TO DIGITAL DEVICES
LEARNING OUTCOMES
By the end of this module, you should be able to:
• Identify and understand various components, functions andapplications of Computer
• Understand components, functions and applications of Mobile Phones• Understand components, functions and applications of Tablet
LESSON PLAN
I. Components, Functions and Applications of ComputerII. Components, Functions and Applications of Mobile PhonesIII. Components, Functions and Applications of Tablet
ICT Academy of Tamil Nadu
2
I. COMPONENTS, FUNCTIONS AND APPLICATIONS OF COMPUTER
1.1 BASICS OF COMPUTER
What is a Computer?A computer is an electronic device used to store and process data and information. It is acollection of two components - Hardware and Software. Hardware consists of the computeritself and any equipment connected to it and Software is the set of instruction that thecomputer follows in performing a task.
Through a computer you can connect with your family and friends living miles away, storeinformation, book railway tickets, access your bank accounts, etc.
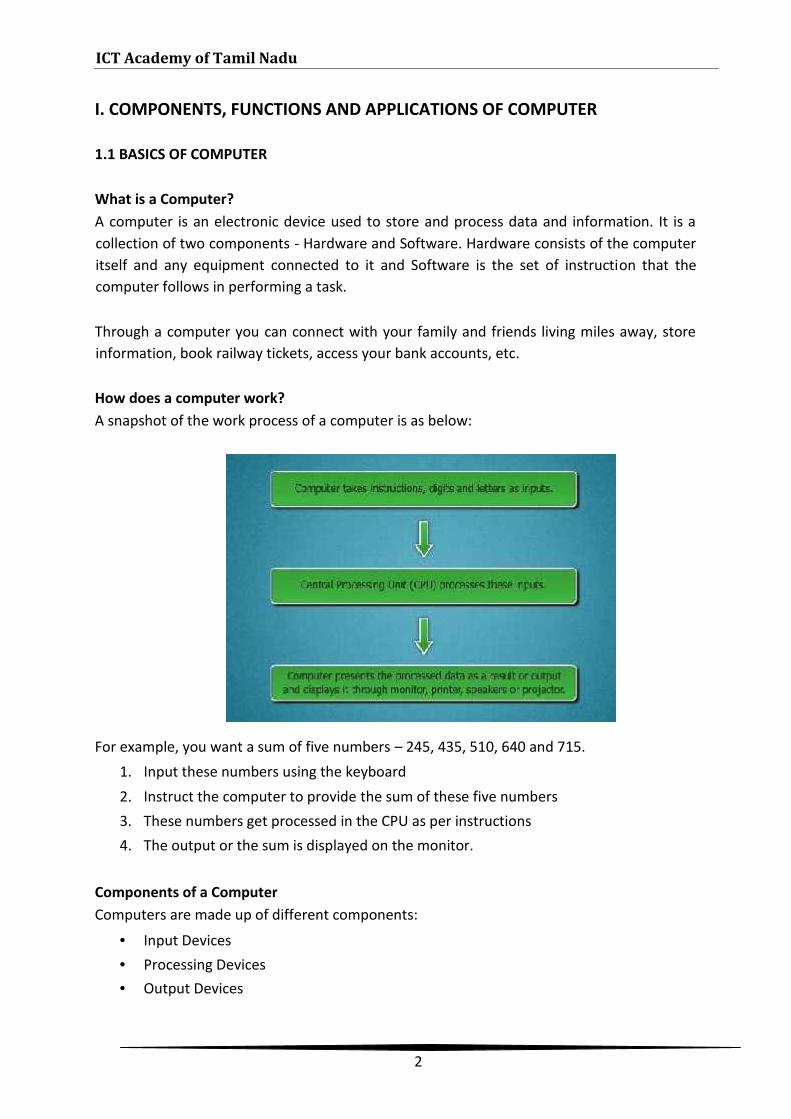
How does a computer work?A snapshot of the work process of a computer is as below:
For example, you want a sum of five numbers – 245, 435, 510, 640 and 715.1. Input these numbers using the keyboard2. Instruct the computer to provide the sum of these five numbers3. These numbers get processed in the CPU as per instructions4. The output or the sum is displayed on the monitor.
Components of a ComputerComputers are made up of different components:
• Input Devices• Processing Devices• Output Devices
Module 1: Introduction to Digital Devices
3
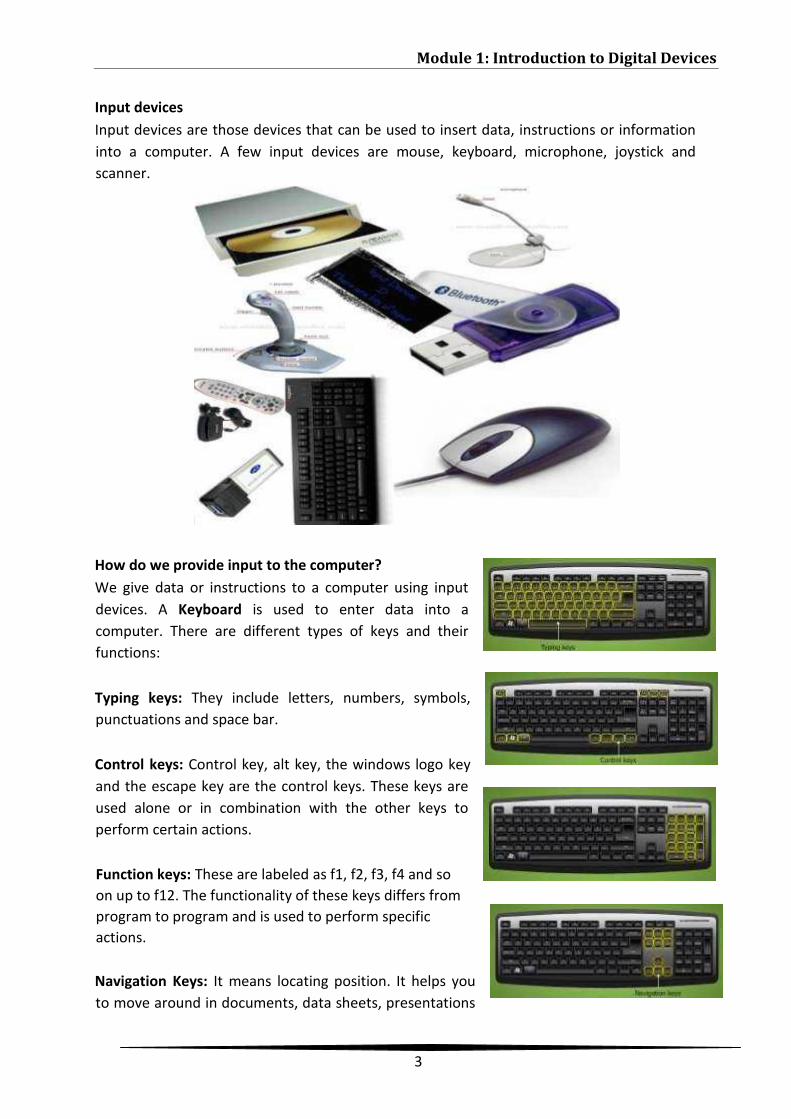
Input devicesInput devices are those devices that can be used to insert data, instructions or informationinto a computer. A few input devices are mouse, keyboard, microphone, joystick andscanner.
How do we provide input to the computer?We give data or instructions to a computer using inputdevices. A Keyboard is used to enter data into acomputer. There are different types of keys and theirfunctions:
Typing keys: They include letters, numbers, symbols,punctuations and space bar.
Control keys: Control key, alt key, the windows logo keyand the escape key are the control keys. These keys areused alone or in combination with the other keys toperform certain actions.
Function keys: These are labeled as f1, f2, f3, f4 and soon up to f12. The functionality of these keys differs fromprogram to program and is used to perform specificactions.
Navigation Keys: It means locating position. It helps youto move around in documents, data sheets, presentations

ICT Academy of Tamil Nadu
4
or WebPages and edit text. These include the arrow keys, home, end page up, page down,delete and insert.
The Numeric keypad is designed like a conventionalcalculator used to input numbers.
What is a mouse and how is it used?A mouse is used as a pointing device to point to andinteract with items on the computer screen. Whenyou move the mouse, you can see a small movingarrow - this is called the ‘pointer’. The pointer canprovide data or instructions to the computer forprocessing. A mouse has two buttons - left andright. It also includes a scroll wheel between thetwo buttons that helps you to move betweendocuments and web pages more easily.
Processing DeviceProcessing devices in a computer are responsible for controlling the storage and retrieval ofinformation. The information is processed by the computer processor (CPU), whichperforms data calculations, data comparisons, and data copying with the information fromthe processing devices. The CPU then saves that information to the computer memory(RAM).
Output DevicesOutput devices are used to display the result to theuser. The main output devices are Monitor, Printer,Speaker, Headphones and Projector.
Monitors: Monitor is the most common output device.Monitor is a screen used to display the output, such aswords, numbers and graphics.
Monitors are of 2 types - Cathode Ray Tube (CRT) and Flat Panel Displays. CRT’s are cheaperand have good viewing angle but they are bulky and consume more power. Flat PanelDisplays are lighter and have no magnetic interference. They are also costlier.

Module 1: Introduction to Digital Devices
5
Printer: A printer takes the processed data from thecomputer (soft copy) and generates a hard copy of thesame. They are commonly used to print text data andimages. Soft copy is and image or text file viewed on acomputers display whereas a hardcopy is the printedversion of the same.
There are three types of printers: Inkjet Printer, LaserPrinter and Dot Matrix Printer.
Speaker: A speaker is an output device through which wecan hear sound. Without a speaker you will not be able tolisten to music, hear an audio content, etc.
Headphones: They give sound output from thecomputer. They are similar to speakers exceptthat they are worn on the ears, so that only oneperson can hear the output at a time.
Projector is an output device with which a text oran image is projected onto a flat screen. Aprojector is often used in meetings or to makepresentations. It allows the display to be visible tomany people.
What is a Computer Memory?When you know something, it is stored in yourmemory. In the same way, the place wherecomputer stores data and programs is calledComputer Memory.
Computer has 2 types of Memory - Primary/MainMemory and Secondary Memory.
ICT Academy of Tamil Nadu
6
The main memory is very fast. It is called Random Access Memory or RAM. Data andinstructions are stored in the main memory from where it can be retrieved from CentralProcessing Unit (CPU) for processing results. RAM is the memory in which all the programsare stored. The speed of the computer depends on the RAM. Cache memory is a memorythat is a part of RAM and is very near to the processor. It is used to improve processingspeed.
The primary memory is limited, so to store unlimited data we use secondary memory. Anydata or program that is kept in secondary memory has to be copied by RAM because thecomputer cannot process data directly on secondary memory.
The examples of Secondary Memory are – Pen Drives, Hard Disk, Floppy Disk, MagneticTapes, Magnetic Bubble Memories and Optical Memories.
How does a computer store data in its memory?Computer stores all information in just two digits 0 and 1. A single binary digit, that is, a 1 ora 0 is called a bit. A group of eight bits is called a byte.
1 byte is equal to 8 bits. 1 Kilobyte or 1 KB is equal to 1024 Bytes 1 Megabyte or 1 MB is equal to 1024 KB 1 Gigabyte or 1 GB is equal to 1024 MB
1.2 CONCEPT OF HARDWARE AND SOFTWARE
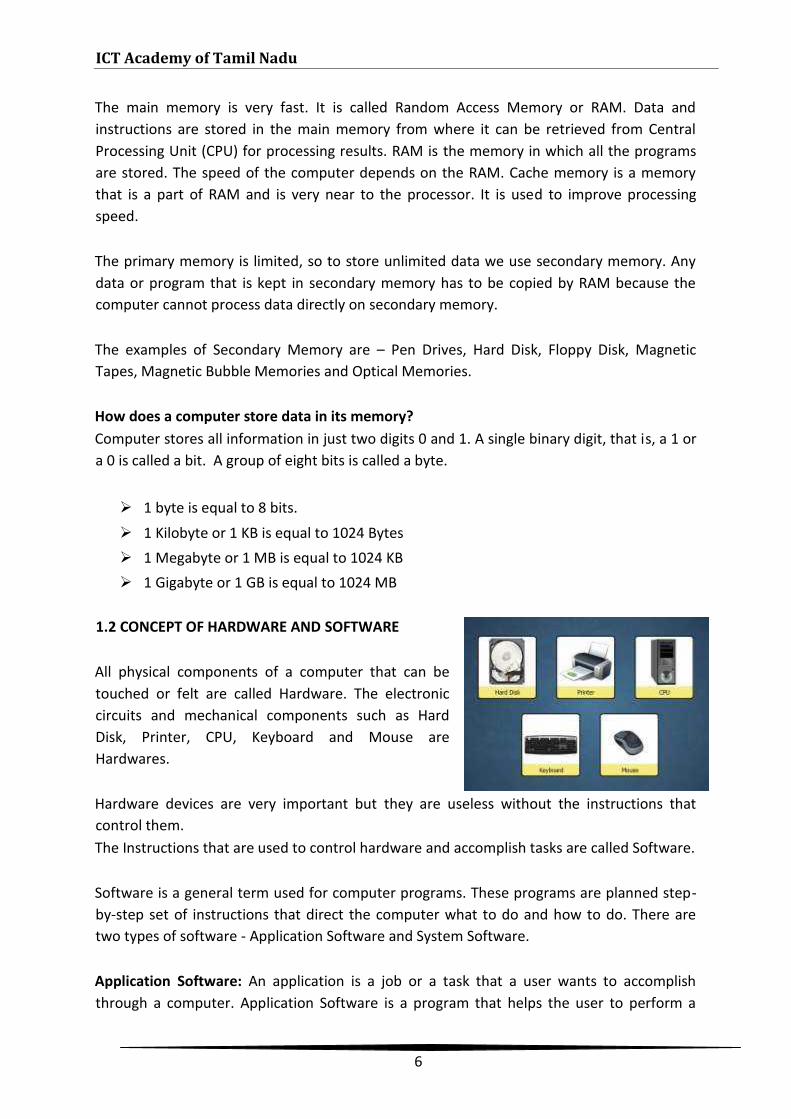
All physical components of a computer that can betouched or felt are called Hardware. The electroniccircuits and mechanical components such as HardDisk, Printer, CPU, Keyboard and Mouse areHardwares.
Hardware devices are very important but they are useless without the instructions thatcontrol them.The Instructions that are used to control hardware and accomplish tasks are called Software.
Software is a general term used for computer programs. These programs are planned step-by-step set of instructions that direct the computer what to do and how to do. There aretwo types of software - Application Software and System Software.
Application Software: An application is a job or a task that a user wants to accomplishthrough a computer. Application Software is a program that helps the user to perform a
Module 1: Introduction to Digital Devices
7
specific job. It enables a user to write a letter or create a drawing. Microsoft Word andMicrosoft Paint are examples of Application Software.
System Software: The programs that are directly related to the computer hardware arecalled System Software. For example, to run a computer you need an operating system,which is a System Software.
1.3 SETTING UP AND WORKING OF A COMPUTER
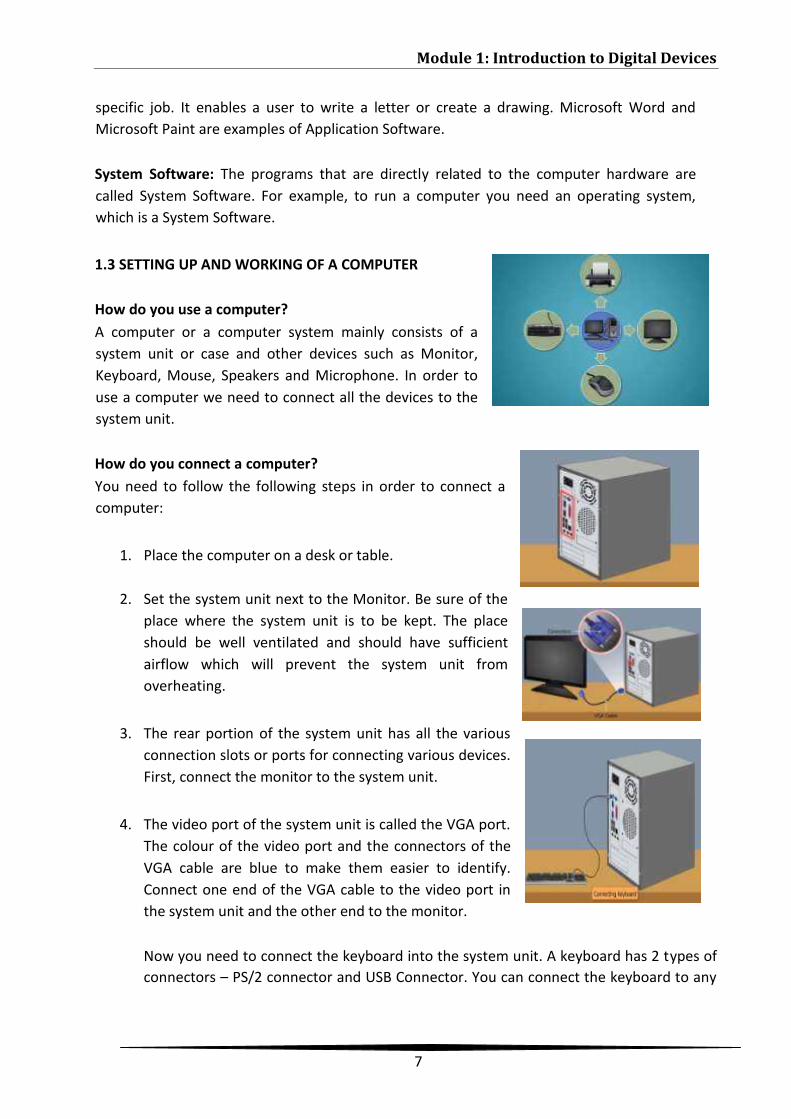
How do you use a computer?A computer or a computer system mainly consists of asystem unit or case and other devices such as Monitor,Keyboard, Mouse, Speakers and Microphone. In order touse a computer we need to connect all the devices to thesystem unit.
How do you connect a computer?You need to follow the following steps in order to connect acomputer:
1. Place the computer on a desk or table.
2. Set the system unit next to the Monitor. Be sure of theplace where the system unit is to be kept. The placeshould be well ventilated and should have sufficientairflow which will prevent the system unit fromoverheating.
3. The rear portion of the system unit has all the variousconnection slots or ports for connecting various devices.First, connect the monitor to the system unit.
4. The video port of the system unit is called the VGA port.The colour of the video port and the connectors of theVGA cable are blue to make them easier to identify.Connect one end of the VGA cable to the video port inthe system unit and the other end to the monitor.
Now you need to connect the keyboard into the system unit. A keyboard has 2 types ofconnectors – PS/2 connector and USB Connector. You can connect the keyboard to any
ICT Academy of Tamil Nadu
8
of the 2 ports depending on its type. Desktop computer keyboard often comes with aPS/2 connector. Connect the keyboard to the keyboard port of the system unit.
5. A mouse has three models of connectors: (i) Mousewith PS/2 Connector; (ii) Mouse with USB Connector;and (iii) Mouse with Serial Connector. You need toconnect the mouse in the appropriate port in thesystem unit. For example, if it has a serial connector,connect it to the serial port in system unit.
6. Now, you need to connect the printer to the system unit. A printer has two modelsof connectors - Parallel Port Connector and USB Port Connector. You can connect theprinter to any one of the two ports in the system unit depending on the type ofconnector in the printer.
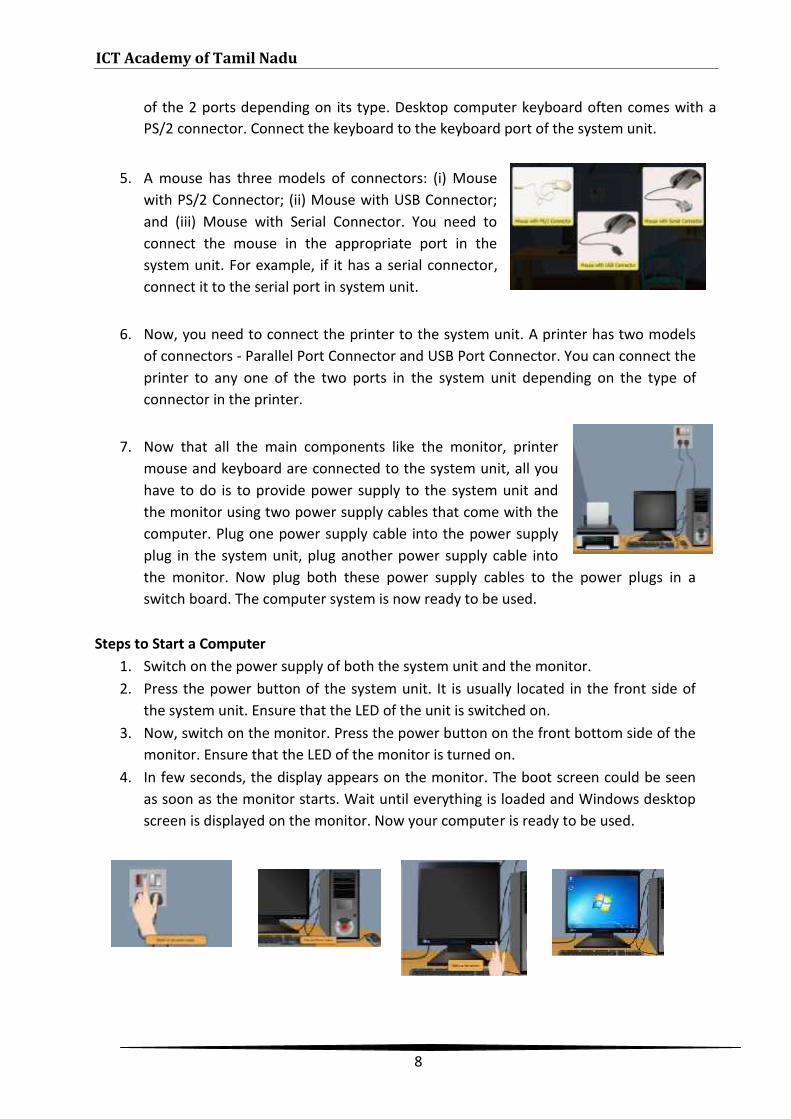
7. Now that all the main components like the monitor, printermouse and keyboard are connected to the system unit, all youhave to do is to provide power supply to the system unit andthe monitor using two power supply cables that come with thecomputer. Plug one power supply cable into the power supplyplug in the system unit, plug another power supply cable intothe monitor. Now plug both these power supply cables to the power plugs in aswitch board. The computer system is now ready to be used.
Steps to Start a Computer1. Switch on the power supply of both the system unit and the monitor.2. Press the power button of the system unit. It is usually located in the front side of
the system unit. Ensure that the LED of the unit is switched on.3. Now, switch on the monitor. Press the power button on the front bottom side of the
monitor. Ensure that the LED of the monitor is turned on.4. In few seconds, the display appears on the monitor. The boot screen could be seen
as soon as the monitor starts. Wait until everything is loaded and Windows desktopscreen is displayed on the monitor. Now your computer is ready to be used.
Module 1: Introduction to Digital Devices
9
COMMON TROUBLE SHOOTING
Some common problems might occur even after you have started a computer. For example:
Problem:You have switched on the power supply of the system unit and the monitor and pressedthe power button of the system unit. Still the LED of the system unit is not ON and the systemdoes not start.Solution: In this case double check if there is any loose connection in the cables. It is advised toremove it and plug-in again and try repeating the procedure of starting a computer.
Problem: After starting the computer, the boot screen does not appear on the monitor.Solution: Check if the monitor is turned on, check the connection of the monitor or re-connect.
Problem: The computer has started but you are unable to use the keyboard or the mouse.Solution: You need to check that the keyboard or mouse is connected to the correct port. Checkthe keyboard or mouse connector for bent, broken or missing pins. Also, you can try reconnectingyour keyboard and mouse, restart your computer and see if that fixes it.
II. COMPONENTS, FUNCTIONS AND APPLICATIONS OF MOBILE PHONES
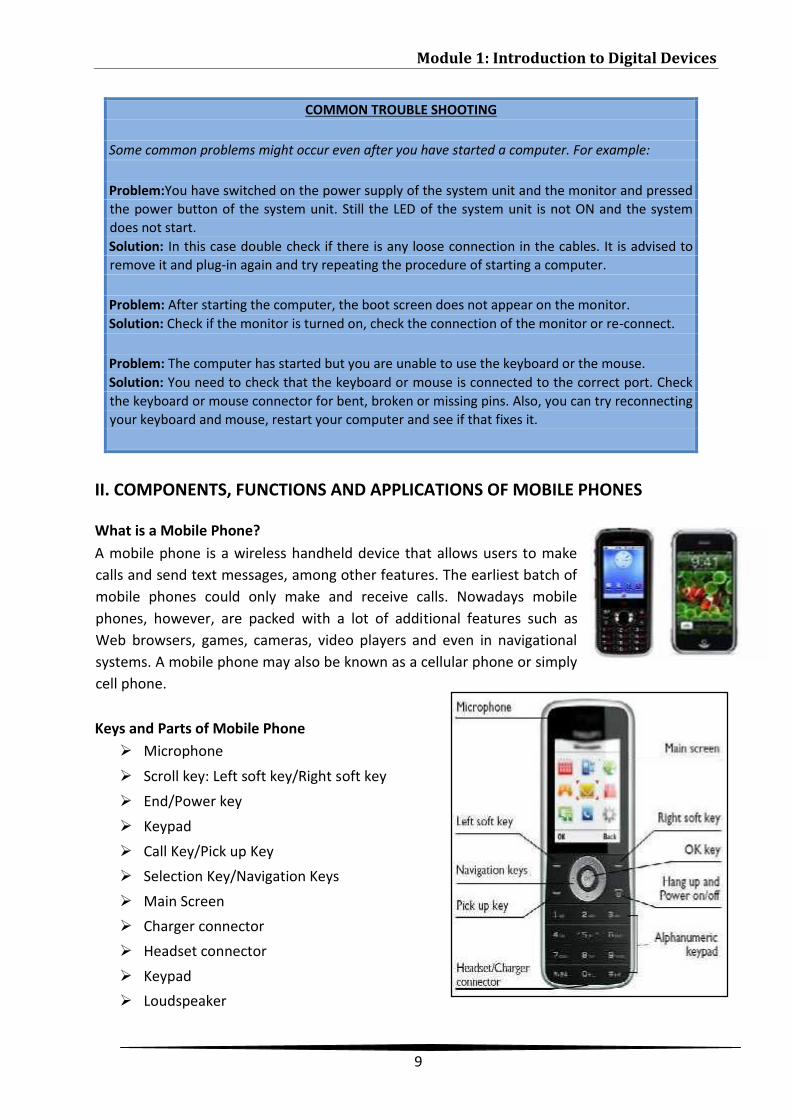
What is a Mobile Phone?A mobile phone is a wireless handheld device that allows users to makecalls and send text messages, among other features. The earliest batch ofmobile phones could only make and receive calls. Nowadays mobilephones, however, are packed with a lot of additional features such asWeb browsers, games, cameras, video players and even in navigationalsystems. A mobile phone may also be known as a cellular phone or simplycell phone.
Keys and Parts of Mobile Phone Microphone Scroll key: Left soft key/Right soft key End/Power key Keypad Call Key/Pick up Key Selection Key/Navigation Keys Main Screen Charger connector Headset connector Keypad Loudspeaker
ICT Academy of Tamil Nadu
10
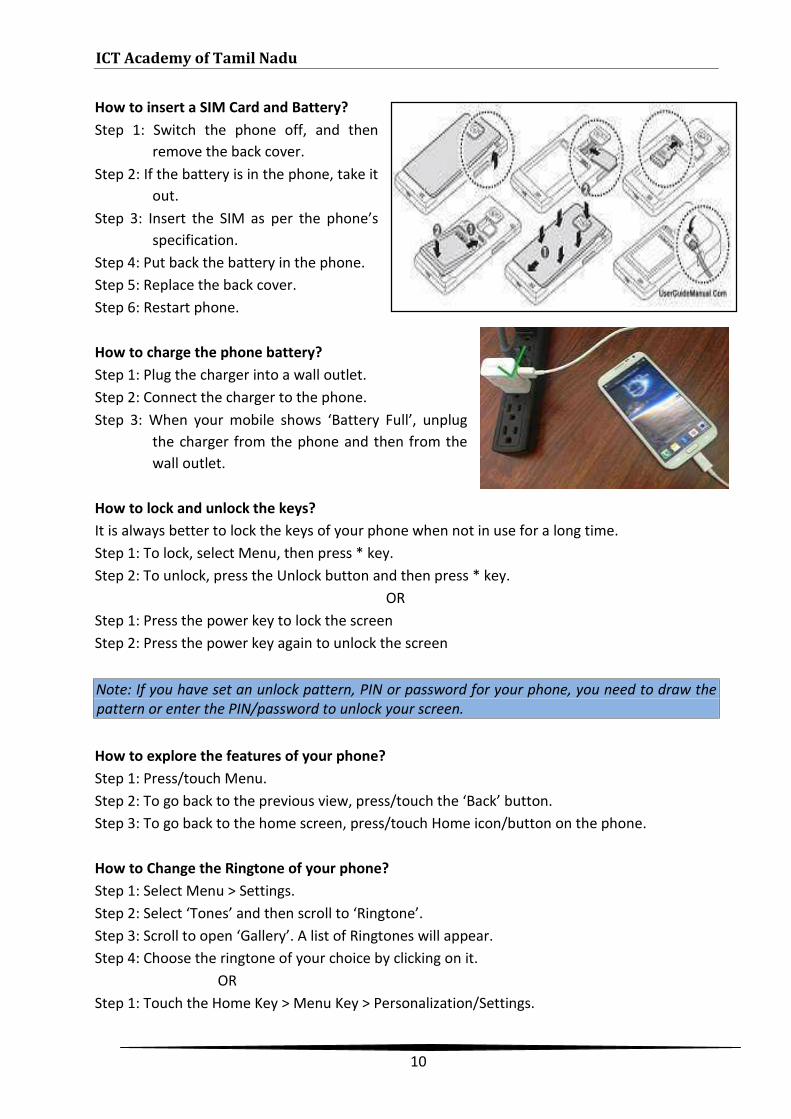
How to insert a SIM Card and Battery?Step 1: Switch the phone off, and then
remove the back cover.Step 2: If the battery is in the phone, take it
out.Step 3: Insert the SIM as per the phone’s
specification.Step 4: Put back the battery in the phone.Step 5: Replace the back cover.Step 6: Restart phone.
How to charge the phone battery?Step 1: Plug the charger into a wall outlet.Step 2: Connect the charger to the phone.Step 3: When your mobile shows ‘Battery Full’, unplug
the charger from the phone and then from thewall outlet.
How to lock and unlock the keys?It is always better to lock the keys of your phone when not in use for a long time.Step 1: To lock, select Menu, then press * key.Step 2: To unlock, press the Unlock button and then press * key.
ORStep 1: Press the power key to lock the screenStep 2: Press the power key again to unlock the screen
Note: If you have set an unlock pattern, PIN or password for your phone, you need to draw thepattern or enter the PIN/password to unlock your screen.
How to explore the features of your phone?Step 1: Press/touch Menu.Step 2: To go back to the previous view, press/touch the ‘Back’ button.Step 3: To go back to the home screen, press/touch Home icon/button on the phone.
How to Change the Ringtone of your phone?Step 1: Select Menu > Settings.Step 2: Select ‘Tones’ and then scroll to ‘Ringtone’.Step 3: Scroll to open ‘Gallery’. A list of Ringtones will appear.Step 4: Choose the ringtone of your choice by clicking on it.
ORStep 1: Touch the Home Key > Menu Key > Personalization/Settings.
Module 1: Introduction to Digital Devices
11
Step 2: Touch Profile settingStep 3: Touch Phone ringtone or Notification ringtone.Step 4: Scroll through the ringtone list and select the ringtone you want to use.Step 5: Touch OK.
How to set an alarm?Step 1: Select Menu > Applications > Alarm Clock.Step 2: Set the alarm time, then select Save.Step 3: To repeat the alarm, select Options > ‘Repeat Days’ and select the days, then select
‘Done’.OR
Step 1: Touch MenuStep 2: Touch ClockStep 3: Touch AlarmStep 4: Set the Alarm time, then touch Save.
III. COMPONENTS, FUNCTIONS AND APPLICATIONS OF TABLET
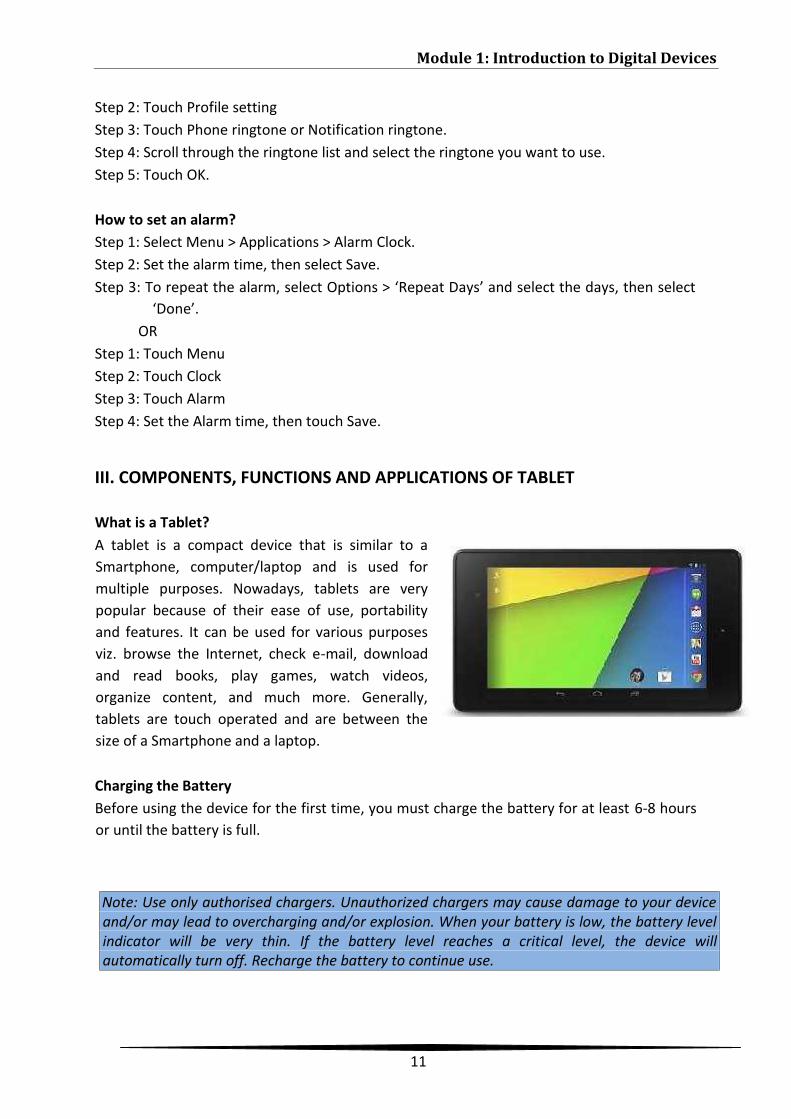
What is a Tablet?A tablet is a compact device that is similar to aSmartphone, computer/laptop and is used formultiple purposes. Nowadays, tablets are verypopular because of their ease of use, portabilityand features. It can be used for various purposesviz. browse the Internet, check e-mail, downloadand read books, play games, watch videos,organize content, and much more. Generally,tablets are touch operated and are between thesize of a Smartphone and a laptop.
Charging the BatteryBefore using the device for the first time, you must charge the battery for at least 6-8 hoursor until the battery is full.
Note: Use only authorised chargers. Unauthorized chargers may cause damage to your deviceand/or may lead to overcharging and/or explosion. When your battery is low, the battery levelindicator will be very thin. If the battery level reaches a critical level, the device willautomatically turn off. Recharge the battery to continue use.
ICT Academy of Tamil Nadu
12
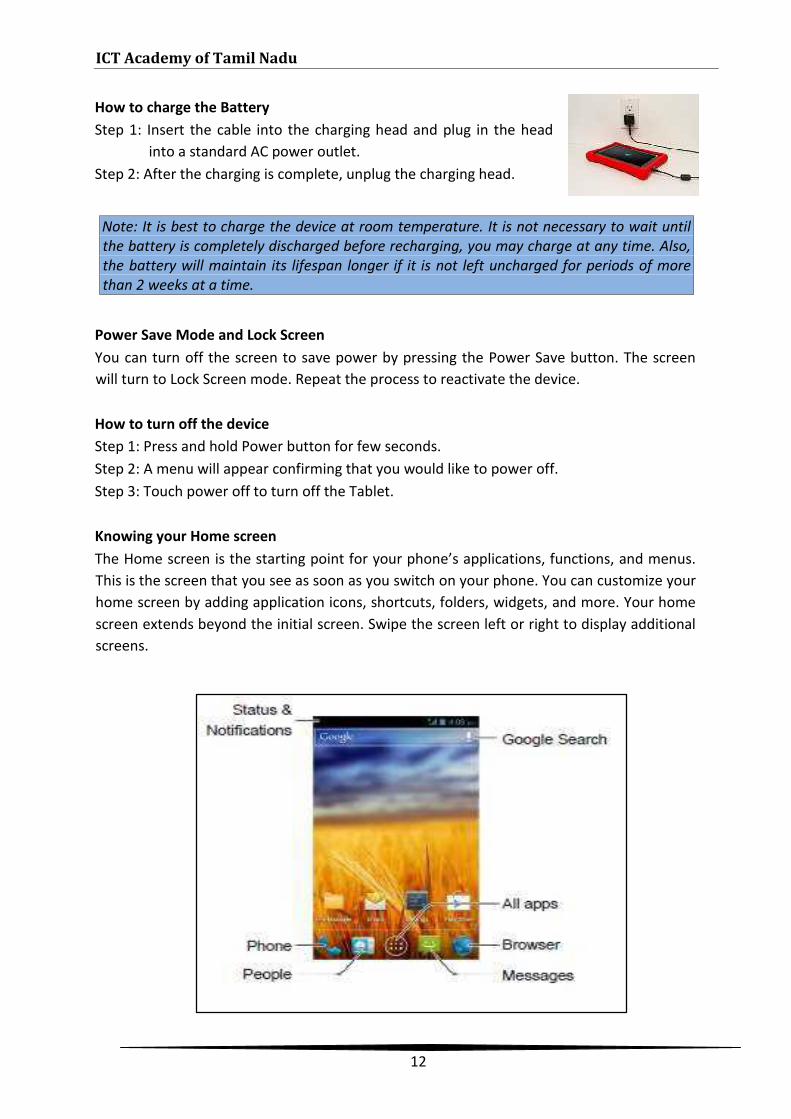
How to charge the BatteryStep 1: Insert the cable into the charging head and plug in the head
into a standard AC power outlet.Step 2: After the charging is complete, unplug the charging head.
Note: It is best to charge the device at room temperature. It is not necessary to wait untilthe battery is completely discharged before recharging, you may charge at any time. Also,the battery will maintain its lifespan longer if it is not left uncharged for periods of morethan 2 weeks at a time.
Power Save Mode and Lock ScreenYou can turn off the screen to save power by pressing the Power Save button. The screenwill turn to Lock Screen mode. Repeat the process to reactivate the device.
How to turn off the deviceStep 1: Press and hold Power button for few seconds.Step 2: A menu will appear confirming that you would like to power off.Step 3: Touch power off to turn off the Tablet.
Knowing your Home screenThe Home screen is the starting point for your phone’s applications, functions, and menus.This is the screen that you see as soon as you switch on your phone. You can customize yourhome screen by adding application icons, shortcuts, folders, widgets, and more. Your homescreen extends beyond the initial screen. Swipe the screen left or right to display additionalscreens.
Module 1: Introduction to Digital Devices
13
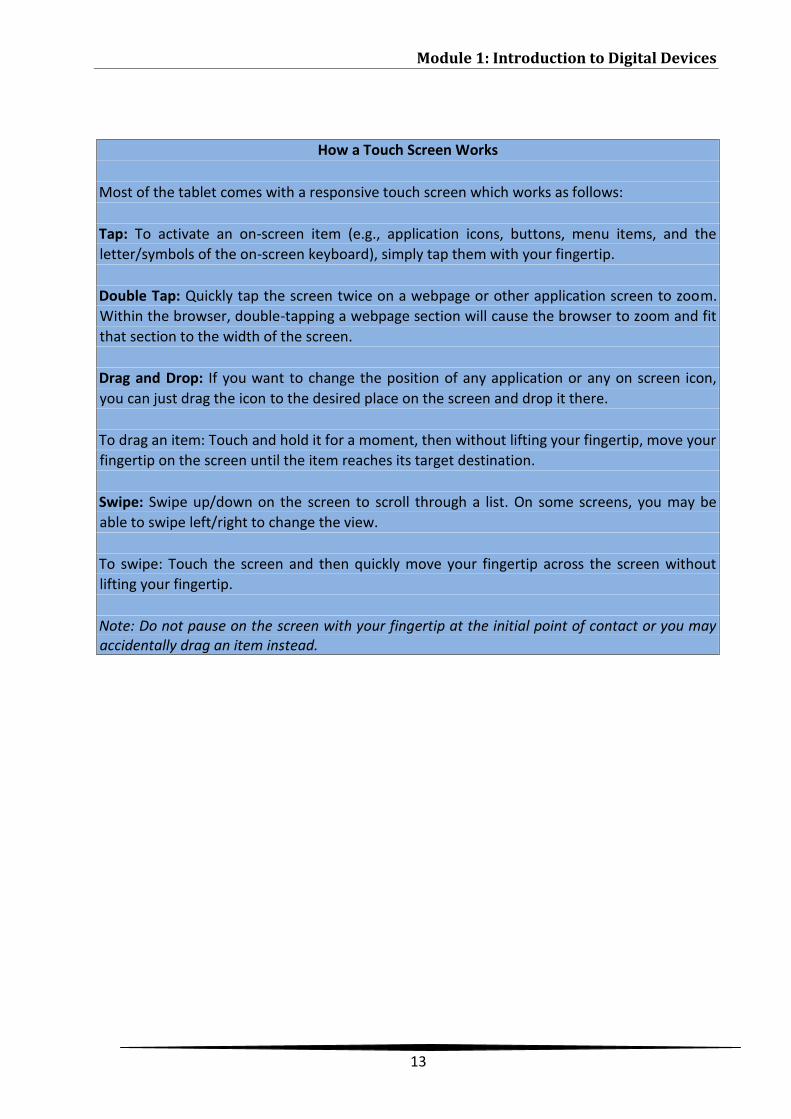
How a Touch Screen Works
Most of the tablet comes with a responsive touch screen which works as follows:
Tap: To activate an on-screen item (e.g., application icons, buttons, menu items, and theletter/symbols of the on-screen keyboard), simply tap them with your fingertip.
Double Tap: Quickly tap the screen twice on a webpage or other application screen to zoom.Within the browser, double-tapping a webpage section will cause the browser to zoom and fitthat section to the width of the screen.
Drag and Drop: If you want to change the position of any application or any on screen icon,you can just drag the icon to the desired place on the screen and drop it there.
To drag an item: Touch and hold it for a moment, then without lifting your fingertip, move yourfingertip on the screen until the item reaches its target destination.
Swipe: Swipe up/down on the screen to scroll through a list. On some screens, you may beable to swipe left/right to change the view.
To swipe: Touch the screen and then quickly move your fingertip across the screen withoutlifting your fingertip.
Note: Do not pause on the screen with your fingertip at the initial point of contact or you mayaccidentally drag an item instead.

2. OPERATING DIGITAL DEVICES
LEARNING OUTCOMES
By the end of the module, the learner would be able to:
• Understand the Basic Features of a Computer Operating System• Understand the Mobile Phone Operating System and its Features• Understand the Tablet Operating System and its Features
LESSON PLAN
I. Basic Features of a Computer Operating SystemII. Mobile Phone Operating System and FeaturesIII. Tablet Operating System and Features

ICT Academy of Tamil Nadu
16
I. BASIC FEATURES OF A COMPUTER OPERATING SYSTEM
What is Operating System?Operating System is a program that helps us to interact with other computer programs. Thecomputer is useless without an operating system. There are various types of operatingsystems available today.
Computers use a different language than us; thislanguage is made up of digits. The operating system actsas an interpreter. It helps us talk to the computer. Insimple language we can say that the operating system isan interface between user and computer. The OperatingSystem also enables you to effectively use the systemresources and access other programs. All other programsneed operating system to start them, but the operatingsystem starts by itself. This is why when we switch on acomputer we see the respective operating systemsscreen. The operating system starts the computerautomatically when power is turned on.
What are the functions of an Operating System?The major functions of the Operating System are:
• It controls and coordinates the operation of acomputer
• It eases the interaction between you and thecomputer
• It controls input and output devices• It controls execution of computer programs• It manages the use of the main memory of
Computer
• It helps you to manage and manipulate files.
Classification of Operating SystemOperating system can be user friendly with manyicons and images or it can be just text or characterbased. The Operating System can be classified into 2types: Character User Interface and Graphical UserInterface.
Module 2: Operating Digital Devices
17
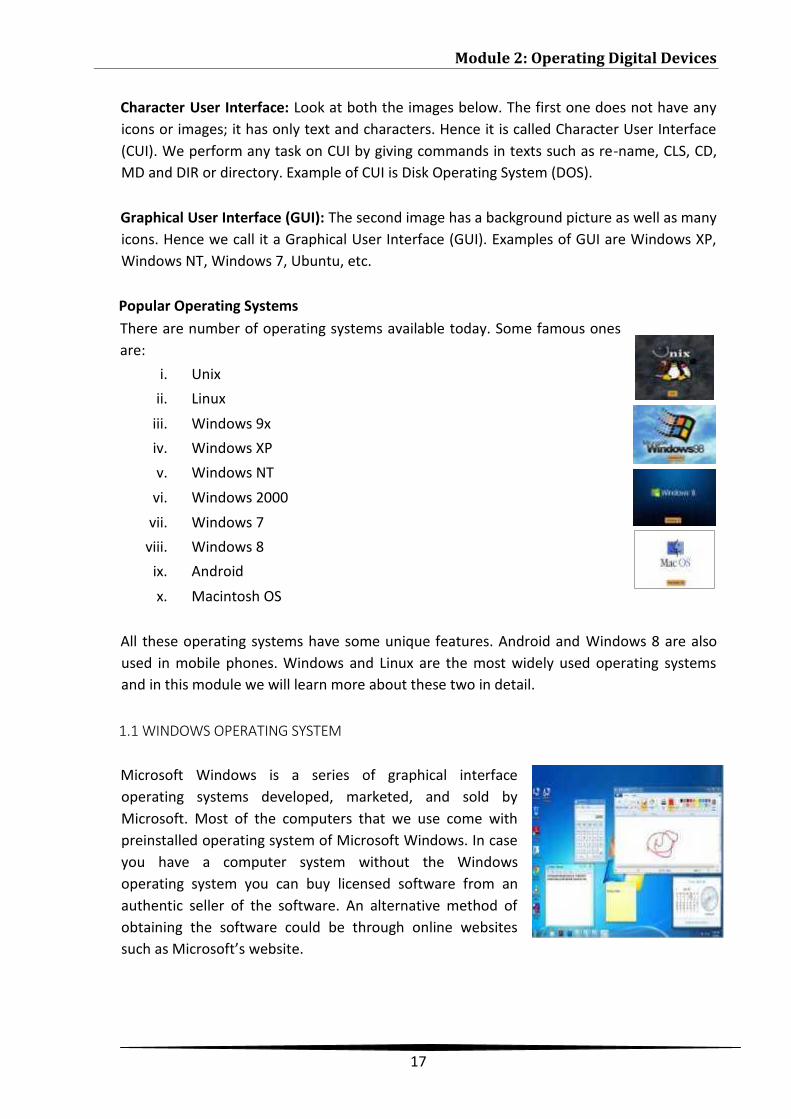
Character User Interface: Look at both the images below. The first one does not have anyicons or images; it has only text and characters. Hence it is called Character User Interface(CUI). We perform any task on CUI by giving commands in texts such as re-name, CLS, CD,MD and DIR or directory. Example of CUI is Disk Operating System (DOS).
Graphical User Interface (GUI): The second image has a background picture as well as manyicons. Hence we call it a Graphical User Interface (GUI). Examples of GUI are Windows XP,Windows NT, Windows 7, Ubuntu, etc.
Popular Operating SystemsThere are number of operating systems available today. Some famous onesare:
i. Unixii. Linux
iii. Windows 9xiv. Windows XPv. Windows NT
vi. Windows 2000vii. Windows 7
viii. Windows 8ix. Androidx. Macintosh OS
All these operating systems have some unique features. Android and Windows 8 are alsoused in mobile phones. Windows and Linux are the most widely used operating systemsand in this module we will learn more about these two in detail.
1.1 WINDOWS OPERATING SYSTEM
Microsoft Windows is a series of graphical interfaceoperating systems developed, marketed, and sold byMicrosoft. Most of the computers that we use come withpreinstalled operating system of Microsoft Windows. In caseyou have a computer system without the Windowsoperating system you can buy licensed software from anauthentic seller of the software. An alternative method ofobtaining the software could be through online websitessuch as Microsoft’s website.
ICT Academy of Tamil Nadu
18
More about GUI of Windows 7This interface makes it easy to interact with the applications that you want to use. It alsohelps you to use programs and keep them organised. Windows are a WYSIWYG kind of GUI,which means, ‘What You See Is What You Get’. If the Operating System in your computer isWindows, the first screen that appears after switching on your computer is the Desktop.You can use the windows desktop to keep all the applications and utilities organised in thecomputer.
The desktop is divided into 2 areas - Main Area or the Desktop and the Task Bar. Thenarrow strip at the bottom is called the Task Bar. The task bar contains a start button thatyou can use to access all the programs of the computer. You can also pin the variousprograms to the task bar as icons to be used as quick access to the programs. The task baralso has a clock at the right side bottom of the desktop. The desktop has a background,which is called Wallpaper.
FILE AND FOLDER MANAGEMENT
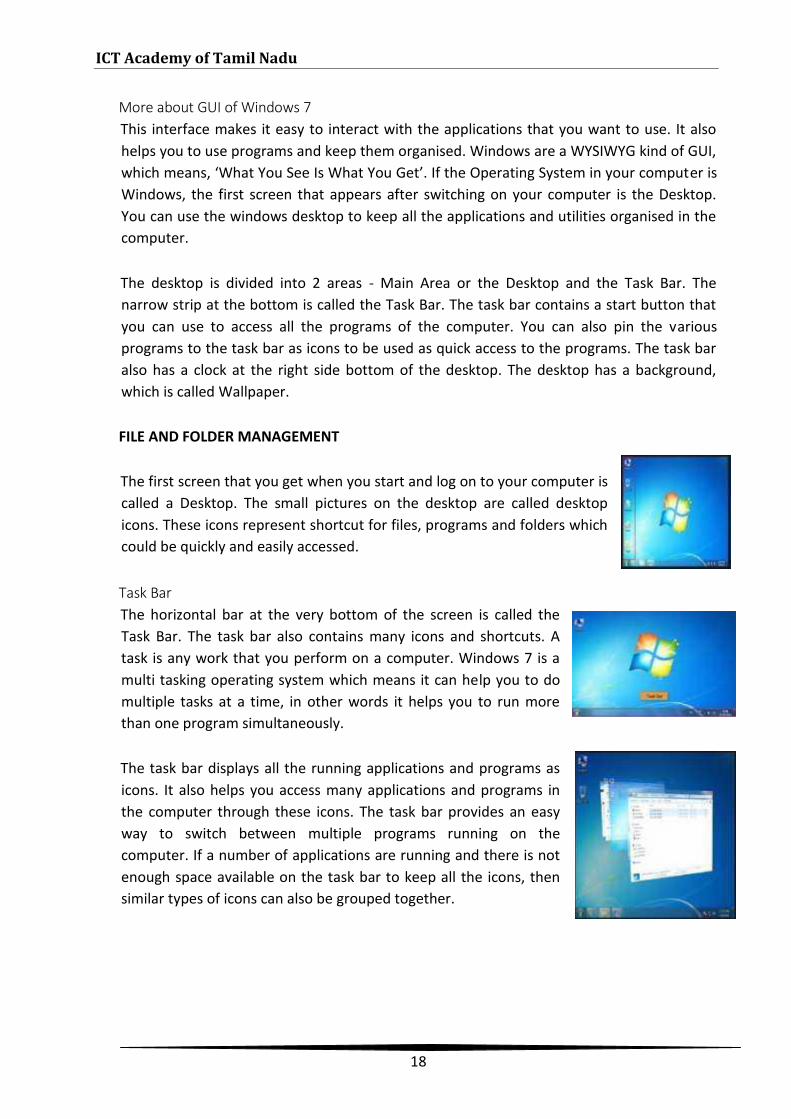
The first screen that you get when you start and log on to your computer iscalled a Desktop. The small pictures on the desktop are called desktopicons. These icons represent shortcut for files, programs and folders whichcould be quickly and easily accessed.
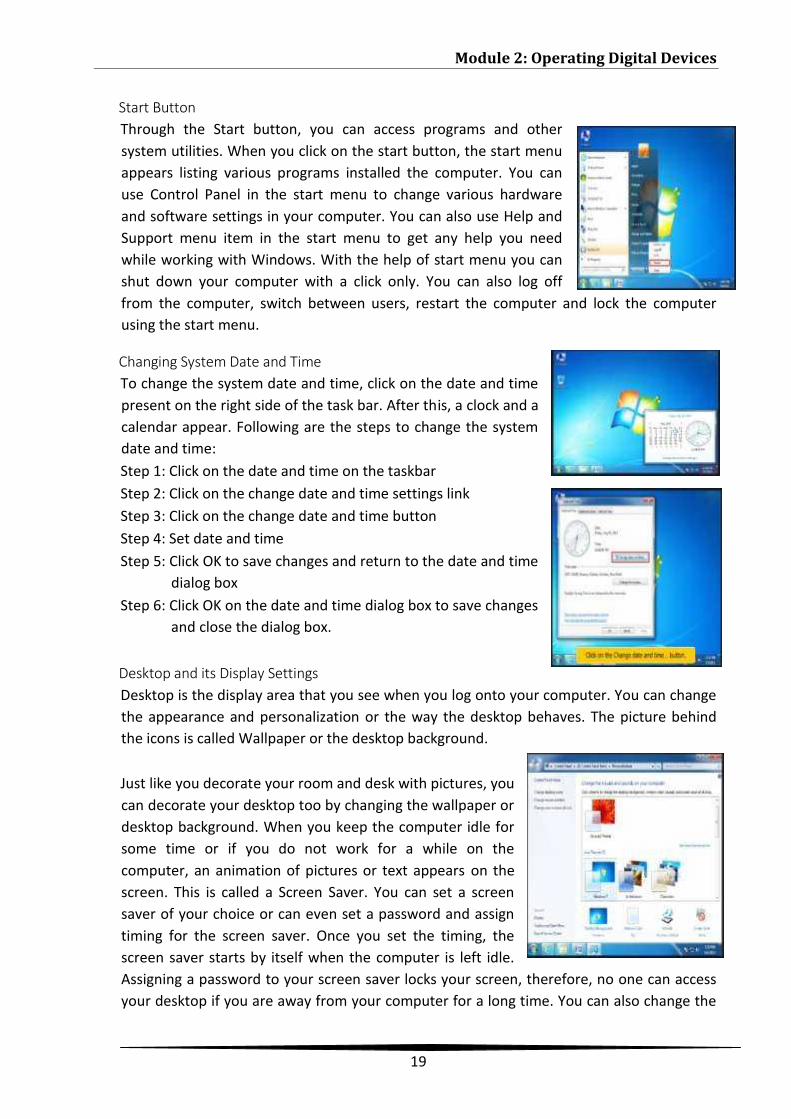
Task BarThe horizontal bar at the very bottom of the screen is called theTask Bar. The task bar also contains many icons and shortcuts. Atask is any work that you perform on a computer. Windows 7 is amulti tasking operating system which means it can help you to domultiple tasks at a time, in other words it helps you to run morethan one program simultaneously.
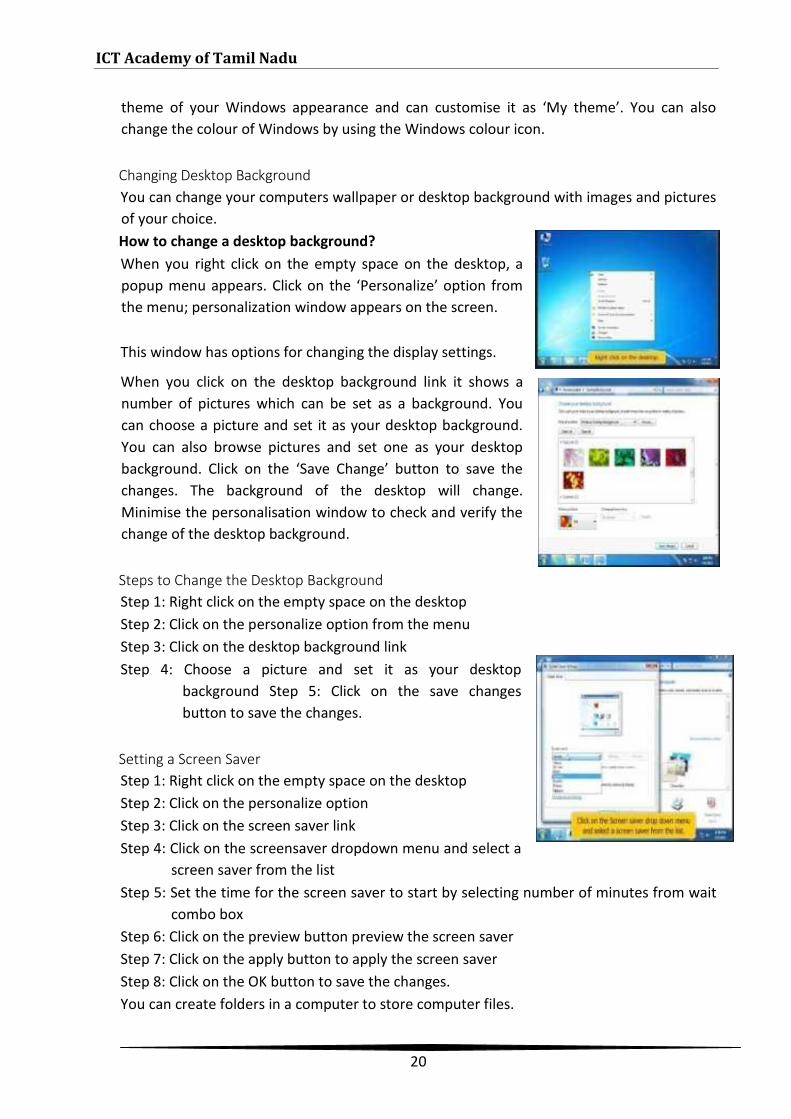
The task bar displays all the running applications and programs asicons. It also helps you access many applications and programs inthe computer through these icons. The task bar provides an easyway to switch between multiple programs running on thecomputer. If a number of applications are running and there is notenough space available on the task bar to keep all the icons, thensimilar types of icons can also be grouped together.
Module 2: Operating Digital Devices
19
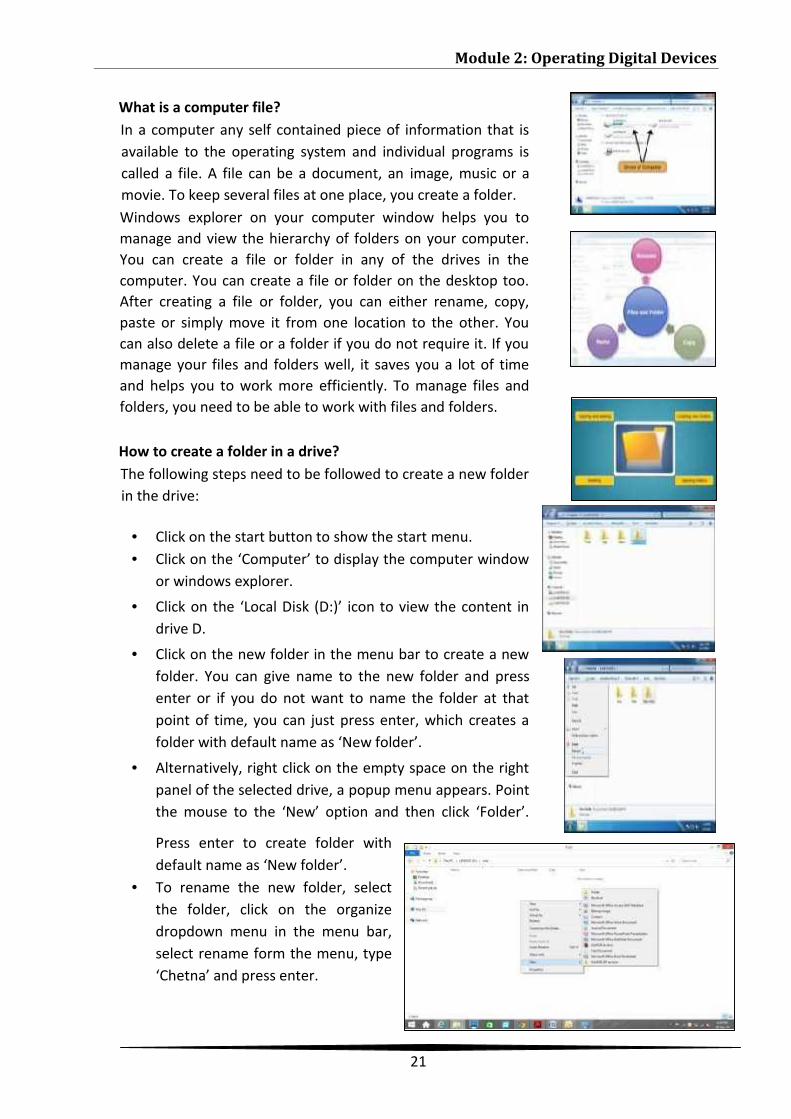
Start ButtonThrough the Start button, you can access programs and othersystem utilities. When you click on the start button, the start menuappears listing various programs installed the computer. You canuse Control Panel in the start menu to change various hardwareand software settings in your computer. You can also use Help andSupport menu item in the start menu to get any help you needwhile working with Windows. With the help of start menu you canshut down your computer with a click only. You can also log offfrom the computer, switch between users, restart the computer and lock the computerusing the start menu.
Changing System Date and TimeTo change the system date and time, click on the date and timepresent on the right side of the task bar. After this, a clock and acalendar appear. Following are the steps to change the systemdate and time:Step 1: Click on the date and time on the taskbarStep 2: Click on the change date and time settings linkStep 3: Click on the change date and time buttonStep 4: Set date and timeStep 5: Click OK to save changes and return to the date and time
dialog boxStep 6: Click OK on the date and time dialog box to save changes
and close the dialog box.
Desktop and its Display SettingsDesktop is the display area that you see when you log onto your computer. You can changethe appearance and personalization or the way the desktop behaves. The picture behindthe icons is called Wallpaper or the desktop background.
Just like you decorate your room and desk with pictures, youcan decorate your desktop too by changing the wallpaper ordesktop background. When you keep the computer idle forsome time or if you do not work for a while on thecomputer, an animation of pictures or text appears on thescreen. This is called a Screen Saver. You can set a screensaver of your choice or can even set a password and assigntiming for the screen saver. Once you set the timing, thescreen saver starts by itself when the computer is left idle.Assigning a password to your screen saver locks your screen, therefore, no one can accessyour desktop if you are away from your computer for a long time. You can also change the
ICT Academy of Tamil Nadu
20
theme of your Windows appearance and can customise it as ‘My theme’. You can alsochange the colour of Windows by using the Windows colour icon.
Changing Desktop BackgroundYou can change your computers wallpaper or desktop background with images and picturesof your choice.How to change a desktop background?When you right click on the empty space on the desktop, apopup menu appears. Click on the ‘Personalize’ option fromthe menu; personalization window appears on the screen.
This window has options for changing the display settings.
When you click on the desktop background link it shows anumber of pictures which can be set as a background. Youcan choose a picture and set it as your desktop background.You can also browse pictures and set one as your desktopbackground. Click on the ‘Save Change’ button to save thechanges. The background of the desktop will change.Minimise the personalisation window to check and verify thechange of the desktop background.
Steps to Change the Desktop BackgroundStep 1: Right click on the empty space on the desktopStep 2: Click on the personalize option from the menuStep 3: Click on the desktop background linkStep 4: Choose a picture and set it as your desktop
background Step 5: Click on the save changesbutton to save the changes.
Setting a Screen SaverStep 1: Right click on the empty space on the desktopStep 2: Click on the personalize optionStep 3: Click on the screen saver linkStep 4: Click on the screensaver dropdown menu and select a
screen saver from the listStep 5: Set the time for the screen saver to start by selecting number of minutes from wait
combo boxStep 6: Click on the preview button preview the screen saverStep 7: Click on the apply button to apply the screen saverStep 8: Click on the OK button to save the changes.You can create folders in a computer to store computer files.
Module 2: Operating Digital Devices
21
What is a computer file?In a computer any self contained piece of information that isavailable to the operating system and individual programs iscalled a file. A file can be a document, an image, music or amovie. To keep several files at one place, you create a folder.Windows explorer on your computer window helps you tomanage and view the hierarchy of folders on your computer.You can create a file or folder in any of the drives in thecomputer. You can create a file or folder on the desktop too.After creating a file or folder, you can either rename, copy,paste or simply move it from one location to the other. Youcan also delete a file or a folder if you do not require it. If youmanage your files and folders well, it saves you a lot of timeand helps you to work more efficiently. To manage files andfolders, you need to be able to work with files and folders.
How to create a folder in a drive?The following steps need to be followed to create a new folderin the drive:
• Click on the start button to show the start menu.• Click on the ‘Computer’ to display the computer window
or windows explorer.
• Click on the ‘Local Disk (D:)’ icon to view the content indrive D.
• Click on the new folder in the menu bar to create a newfolder. You can give name to the new folder and pressenter or if you do not want to name the folder at thatpoint of time, you can just press enter, which creates afolder with default name as ‘New folder’.
• Alternatively, right click on the empty space on the rightpanel of the selected drive, a popup menu appears. Pointthe mouse to the ‘New’ option and then click ‘Folder’.
Press enter to create folder withdefault name as ‘New folder’.
• To rename the new folder, selectthe folder, click on the organizedropdown menu in the menu bar,select rename form the menu, type‘Chetna’ and press enter.
ICT Academy of Tamil Nadu
22
• The new folder has been renamed to ‘Chetna’. A file or folder name cannot containany of the following characters / \ : “ * ? <> |
• You can create a folder within a folder which is called as a sub-folder. Select and openthe folder. Right click on the empty space in the folder and select ‘New’ > ‘Folder’ inthe pop-up menu.
• To create a new file, right click in the empty space in a folder. From the new pop-up,select the type of file that you wish to open.
• Click on it and a new file will open.
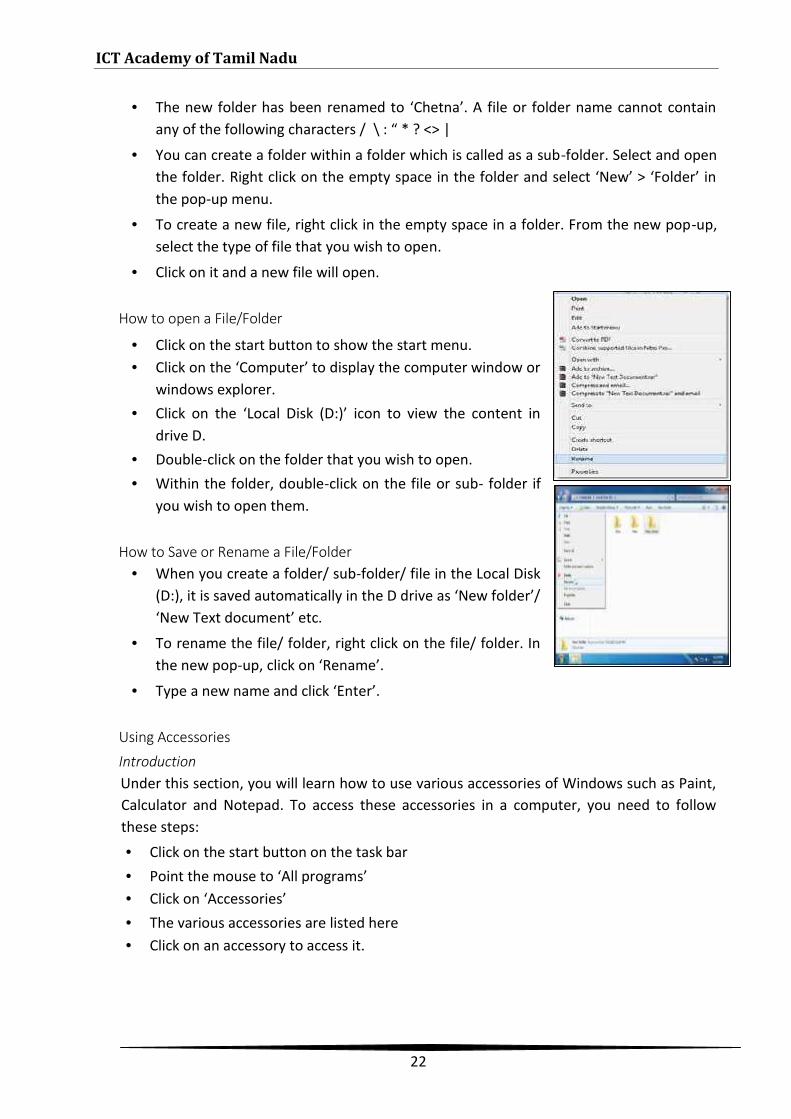
How to open a File/Folder
• Click on the start button to show the start menu.• Click on the ‘Computer’ to display the computer window or
windows explorer.• Click on the ‘Local Disk (D:)’ icon to view the content in
drive D.• Double-click on the folder that you wish to open.• Within the folder, double-click on the file or sub- folder if
you wish to open them.
How to Save or Rename a File/Folder• When you create a folder/ sub-folder/ file in the Local Disk
(D:), it is saved automatically in the D drive as ‘New folder’/‘New Text document’ etc.
• To rename the file/ folder, right click on the file/ folder. Inthe new pop-up, click on ‘Rename’.
• Type a new name and click ‘Enter’.
Using Accessories
IntroductionUnder this section, you will learn how to use various accessories of Windows such as Paint,Calculator and Notepad. To access these accessories in a computer, you need to followthese steps:• Click on the start button on the task bar• Point the mouse to ‘All programs’• Click on ‘Accessories’• The various accessories are listed here• Click on an accessory to access it.
Module 2: Operating Digital Devices
23
PaintYou can use paint to create drawings on a blank drawingarea or in existing pictures. Paint is used to create, editand view pictures. You can use self created pictures as ourdesktop background. You can also copy and paste a paintpicture to any other document.
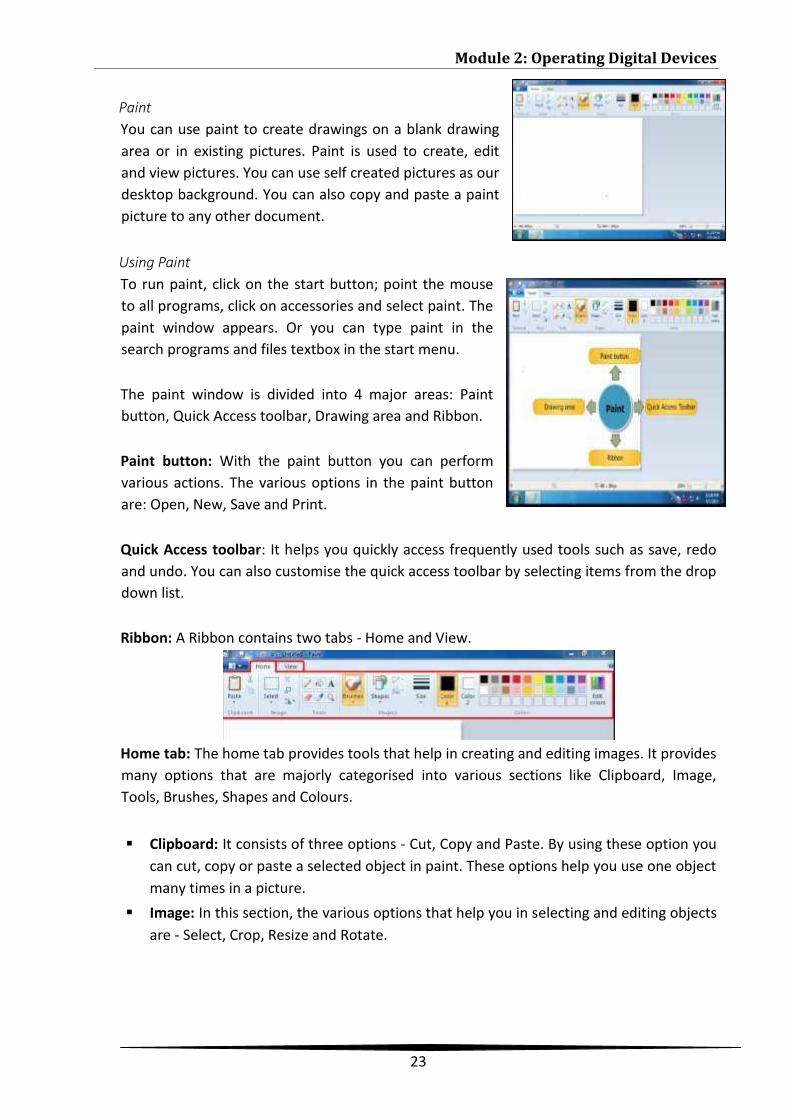
Using PaintTo run paint, click on the start button; point the mouseto all programs, click on accessories and select paint. Thepaint window appears. Or you can type paint in thesearch programs and files textbox in the start menu.
The paint window is divided into 4 major areas: Paintbutton, Quick Access toolbar, Drawing area and Ribbon.
Paint button: With the paint button you can performvarious actions. The various options in the paint buttonare: Open, New, Save and Print.
Quick Access toolbar: It helps you quickly access frequently used tools such as save, redoand undo. You can also customise the quick access toolbar by selecting items from the dropdown list.
Ribbon: A Ribbon contains two tabs - Home and View.
Home tab: The home tab provides tools that help in creating and editing images. It providesmany options that are majorly categorised into various sections like Clipboard, Image,Tools, Brushes, Shapes and Colours.
Clipboard: It consists of three options - Cut, Copy and Paste. By using these option youcan cut, copy or paste a selected object in paint. These options help you use one objectmany times in a picture.
Image: In this section, the various options that help you in selecting and editing objectsare - Select, Crop, Resize and Rotate.
ICT Academy of Tamil Nadu
24
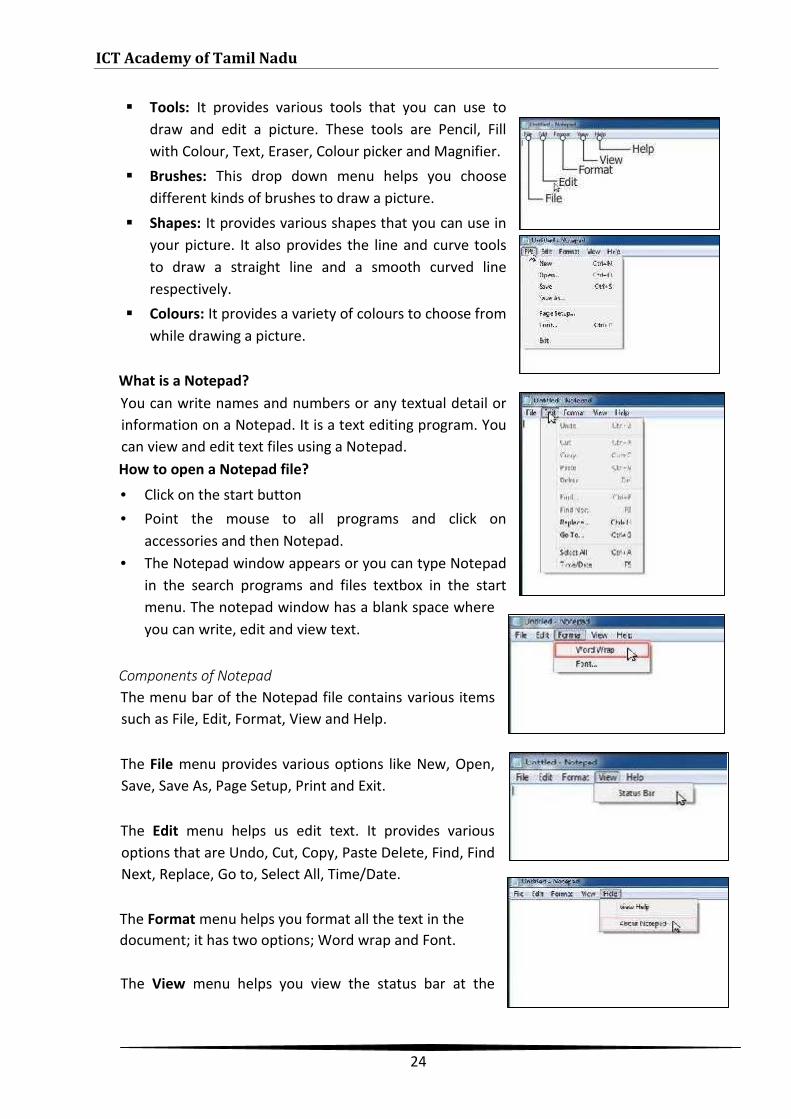
Tools: It provides various tools that you can use todraw and edit a picture. These tools are Pencil, Fillwith Colour, Text, Eraser, Colour picker and Magnifier.
Brushes: This drop down menu helps you choosedifferent kinds of brushes to draw a picture.
Shapes: It provides various shapes that you can use inyour picture. It also provides the line and curve toolsto draw a straight line and a smooth curved linerespectively.
Colours: It provides a variety of colours to choose fromwhile drawing a picture.
What is a Notepad?You can write names and numbers or any textual detail orinformation on a Notepad. It is a text editing program. Youcan view and edit text files using a Notepad.How to open a Notepad file?
• Click on the start button• Point the mouse to all programs and click on
accessories and then Notepad.• The Notepad window appears or you can type Notepad
in the search programs and files textbox in the startmenu. The notepad window has a blank space whereyou can write, edit and view text.
Components of NotepadThe menu bar of the Notepad file contains various itemssuch as File, Edit, Format, View and Help.
The File menu provides various options like New, Open,Save, Save As, Page Setup, Print and Exit.
The Edit menu helps us edit text. It provides variousoptions that are Undo, Cut, Copy, Paste Delete, Find, FindNext, Replace, Go to, Select All, Time/Date.
The Format menu helps you format all the text in thedocument; it has two options; Word wrap and Font.
The View menu helps you view the status bar at the
Module 2: Operating Digital Devices
25
bottom of the notepad window.
The Help menu provides two options View Help and About Notepad.
How to use a Notepad?The steps to create a text file using Notepad are as follows:Step 1: Open the Notepad window.Step 2: Write text.Step 3: Select the text you want to copy.Step 4: Click the edit menu and select copy.Step 5: Put the cursor at the place where you want to paste the copied text.Step 6: Click on the edit menu and select paste.Step 7: Click on the edit menu and select Time/Date.Step 8: Click on the format menu and select Font.Step 9: Select the desired font type, style and size in the font dialog box.Step 10: Click on OK to save changes and close the font dialog box.Step 11: Click on the file menu and select save.Step 12: Select the desired location and folder, write the file name in the file name combo
box.Step 13: Click save to save the file.
How to insert current date and time?To insert date and time click on the edit menu and select Time/Date. You can now apply thedesired font. To set the font, click on the format menu and select font. The font dialog boxappears; select the desired font type, style and size in the font dialog box. Click OK to savethe changes and close the font dialog box. Now to save this file, click on the file menu andselect save. The ‘Save As’ dialog box appears. Now, select the desired location and folderand write the file name in the file name combo box. Now click Save to save the file.
1.2 LINUX OPERATING SYSTEMLinux is one of the most popular versions of UNIX operating System developed by LinusTrovalds. An operating system is a computer software that helps user access applicationsand performs different functions on the computer such as Linux. Linux is very similar toother operating systems, such as Windows and Mac OS X.
The software is free for everybody and can be downloaded from internet. For using anyapplication/ function of LINUX the operating system sends instructions to the computersprocessor which performs the task and sends the results back to the application throughthe operating system.
ICT Academy of Tamil Nadu
26
The LINUX kernel runs on numerous platforms including Intel and Alpha platform and isavailable under the General Public License (GNU).
The unique point of LINUX is that it is very dynamic i.e. the users are free to develop,modify or expand the software. This enables them to integrate new functions, find andeliminate programming bugs quickly.
How to obtain LINUXLinux may be obtained in two different ways – Free Download and Using Distribution. FreeDownload: All the necessary components can be downloaded free of charge from theInternet.
Distribution: An alternative way is to use a Distribution which is offered by variouscompanies and includes a wide variety of applications and installation programs thatsimplify the installation of Linux. In Linux language, a distribution is a version of theoperating system that has the Linux kernel as its foundation. Linux offers a variety ofdifferent distros. Most of them are free and have communities of users who provide eachother with guidance and support.
1. A kernel is the fundamental component of any operating system. It acts as themediator between software and hardware. It is a set of computer instructionsthat enable communication between software applications and the dataprocessing done at the hardware level.
2. FLOSS is the acronym for Free/Libre Open-Source Software. FLOSS software isdifferent from proprietary or commercial software as it is free to use; free toshare, and free to develop.
Linux is successfully being used by several millions of users worldwide. One of the mostpopular Linux distributions is called Ubuntu which is being distributed by a company namedCanonical. It is an example of a commercial project based on the Linux kernel.
ABOUT UBUNTUUbuntu is one of the most popular Linux based operating system and it is free, easy toinstall and simple to use. It is an open source software platform that runs everywhere fromthe smartphone, the tablet and computer. The source code of Ubuntu’s operating system isfreely available, so you can examine the program and make changes as per your specificrequirements.
Ubuntu has a GUI, making it similar to other popular operating systems like Windows, MacOS and Android. Its applications are represented as icons or menu choices that can beselected by using keyboard commands or a mouse. Unlike Linux, there is no need to learn a
Module 2: Operating Digital Devices
27
library of commands or terms. A user, who has used any other operating systems that relyon a GUI, can navigate through Ubuntu easily.
MenuAll GUI-based operating systems use a desktop environment, which defines the look and feel ofthe system, lay-out of the desktop and navigation mechanism of the desktop.
In Linux distributions, a number of desktopenvironments are available. Ubuntu (Version 12.10)uses Unity as the default desktop environment. TheUnity desktop consists of the desktop backgroundand two bars.
a. Menu bar: It is a horizontal bar located atthe top of the desktop.
b. Launcher: It is a vertical bar located at the far left.
The Desktop BackgroundBelow the menu bar, there is an image that covers the entire desktop. This is the defaultdesktop background, or wallpaper, which belongs to the default Ubuntu 12.10 themeknown as Ambiance.
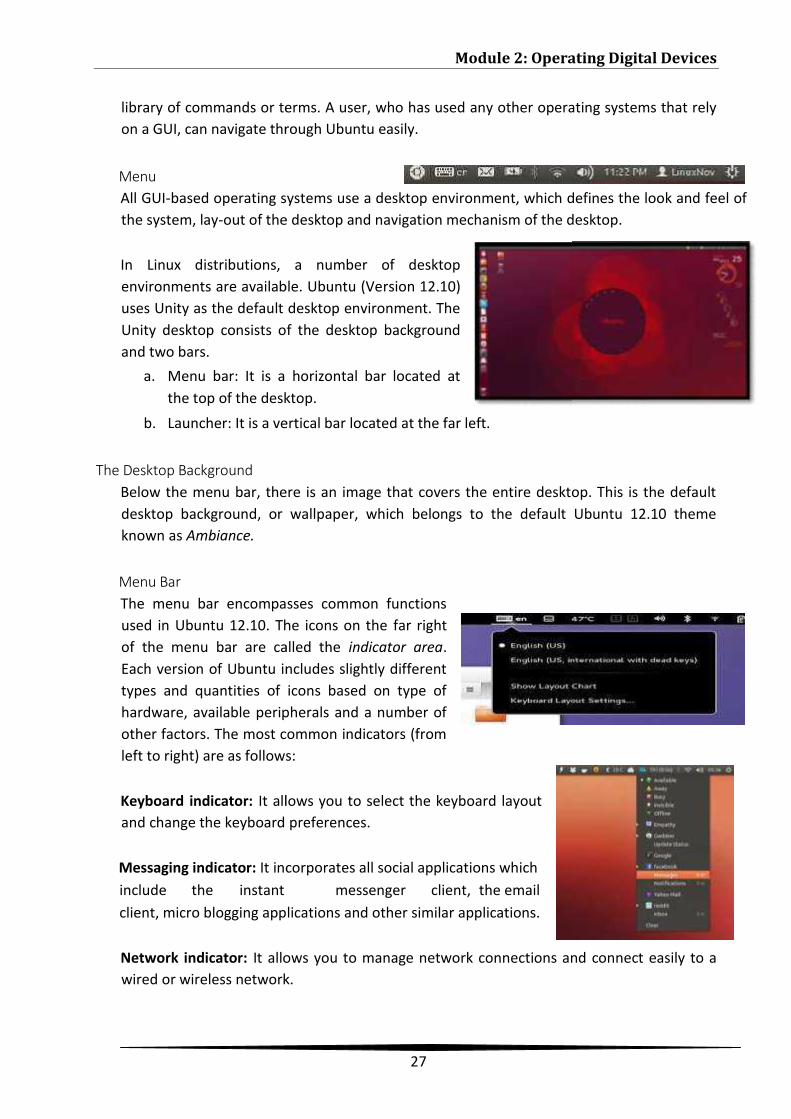
Menu BarThe menu bar encompasses common functionsused in Ubuntu 12.10. The icons on the far rightof the menu bar are called the indicator area.Each version of Ubuntu includes slightly differenttypes and quantities of icons based on type ofhardware, available peripherals and a number ofother factors. The most common indicators (fromleft to right) are as follows:
Keyboard indicator: It allows you to select the keyboard layoutand change the keyboard preferences.
Messaging indicator: It incorporates all social applications whichinclude the instant messenger client, the emailclient, micro blogging applications and other similar applications.
Network indicator: It allows you to manage network connections and connect easily to awired or wireless network.
Module 2: Operating Digital Devices
27
library of commands or terms. A user, who has used any other operating systems that relyon a GUI, can navigate through Ubuntu easily.
MenuAll GUI-based operating systems use a desktop environment, which defines the look and feel ofthe system, lay-out of the desktop and navigation mechanism of the desktop.
In Linux distributions, a number of desktopenvironments are available. Ubuntu (Version 12.10)uses Unity as the default desktop environment. TheUnity desktop consists of the desktop backgroundand two bars.
a. Menu bar: It is a horizontal bar located atthe top of the desktop.
b. Launcher: It is a vertical bar located at the far left.
The Desktop BackgroundBelow the menu bar, there is an image that covers the entire desktop. This is the defaultdesktop background, or wallpaper, which belongs to the default Ubuntu 12.10 themeknown as Ambiance.
Menu BarThe menu bar encompasses common functionsused in Ubuntu 12.10. The icons on the far rightof the menu bar are called the indicator area.Each version of Ubuntu includes slightly differenttypes and quantities of icons based on type ofhardware, available peripherals and a number ofother factors. The most common indicators (fromleft to right) are as follows:
Keyboard indicator: It allows you to select the keyboard layoutand change the keyboard preferences.
Messaging indicator: It incorporates all social applications whichinclude the instant messenger client, the emailclient, micro blogging applications and other similar applications.
Network indicator: It allows you to manage network connections and connect easily to awired or wireless network.
ICT Academy of Tamil Nadu
28
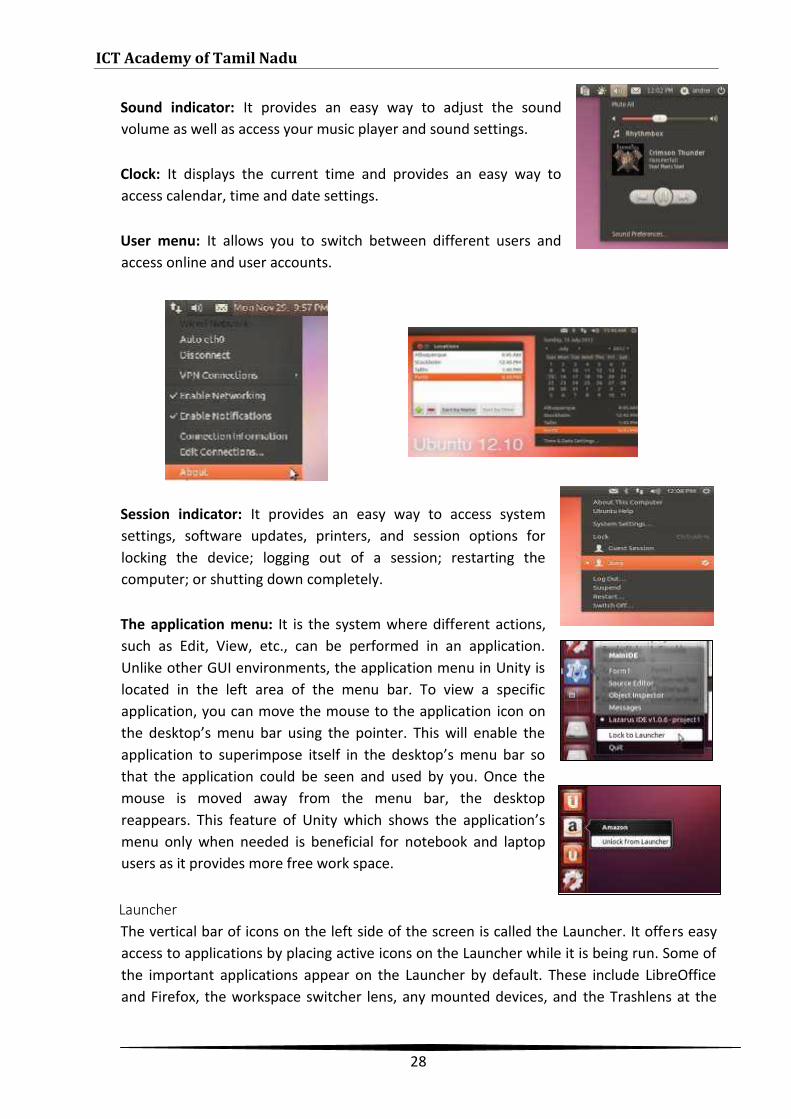
Sound indicator: It provides an easy way to adjust the soundvolume as well as access your music player and sound settings.
Clock: It displays the current time and provides an easy way toaccess calendar, time and date settings.
User menu: It allows you to switch between different users andaccess online and user accounts.
Session indicator: It provides an easy way to access systemsettings, software updates, printers, and session options forlocking the device; logging out of a session; restarting thecomputer; or shutting down completely.
The application menu: It is the system where different actions,such as Edit, View, etc., can be performed in an application.Unlike other GUI environments, the application menu in Unity islocated in the left area of the menu bar. To view a specificapplication, you can move the mouse to the application icon onthe desktop’s menu bar using the pointer. This will enable theapplication to superimpose itself in the desktop’s menu bar sothat the application could be seen and used by you. Once themouse is moved away from the menu bar, the desktopreappears. This feature of Unity which shows the application’smenu only when needed is beneficial for notebook and laptopusers as it provides more free work space.
LauncherThe vertical bar of icons on the left side of the screen is called the Launcher. It offers easyaccess to applications by placing active icons on the Launcher while it is being run. Some ofthe important applications appear on the Launcher by default. These include LibreOfficeand Firefox, the workspace switcher lens, any mounted devices, and the Trashlens at the
Module 2: Operating Digital Devices
29
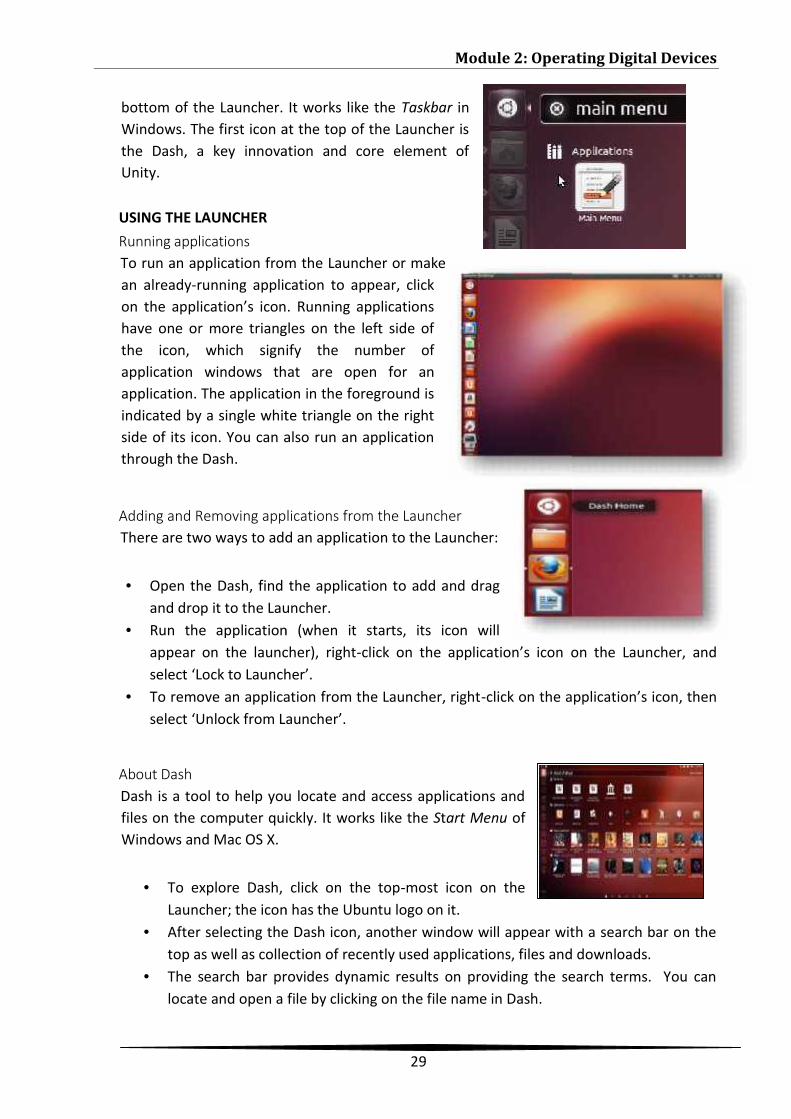
bottom of the Launcher. It works like the Taskbar inWindows. The first icon at the top of the Launcher isthe Dash, a key innovation and core element ofUnity.
USING THE LAUNCHERRunning applicationsTo run an application from the Launcher or makean already-running application to appear, clickon the application’s icon. Running applicationshave one or more triangles on the left side ofthe icon, which signify the number ofapplication windows that are open for anapplication. The application in the foreground isindicated by a single white triangle on the rightside of its icon. You can also run an applicationthrough the Dash.
Adding and Removing applications from the LauncherThere are two ways to add an application to the Launcher:
• Open the Dash, find the application to add and dragand drop it to the Launcher.
• Run the application (when it starts, its icon willappear on the launcher), right-click on the application’s icon on the Launcher, andselect ‘Lock to Launcher’.
• To remove an application from the Launcher, right-click on the application’s icon, thenselect ‘Unlock from Launcher’.
About DashDash is a tool to help you locate and access applications andfiles on the computer quickly. It works like the Start Menu ofWindows and Mac OS X.
• To explore Dash, click on the top-most icon on theLauncher; the icon has the Ubuntu logo on it.
• After selecting the Dash icon, another window will appear with a search bar on thetop as well as collection of recently used applications, files and downloads.
• The search bar provides dynamic results on providing the search terms. You canlocate and open a file by clicking on the file name in Dash.
Module 2: Operating Digital Devices
29
bottom of the Launcher. It works like the Taskbar inWindows. The first icon at the top of the Launcher isthe Dash, a key innovation and core element ofUnity.
USING THE LAUNCHERRunning applicationsTo run an application from the Launcher or makean already-running application to appear, clickon the application’s icon. Running applicationshave one or more triangles on the left side ofthe icon, which signify the number ofapplication windows that are open for anapplication. The application in the foreground isindicated by a single white triangle on the rightside of its icon. You can also run an applicationthrough the Dash.
Adding and Removing applications from the LauncherThere are two ways to add an application to the Launcher:
• Open the Dash, find the application to add and dragand drop it to the Launcher.
• Run the application (when it starts, its icon willappear on the launcher), right-click on the application’s icon on the Launcher, andselect ‘Lock to Launcher’.
• To remove an application from the Launcher, right-click on the application’s icon, thenselect ‘Unlock from Launcher’.
About DashDash is a tool to help you locate and access applications andfiles on the computer quickly. It works like the Start Menu ofWindows and Mac OS X.
• To explore Dash, click on the top-most icon on theLauncher; the icon has the Ubuntu logo on it.
• After selecting the Dash icon, another window will appear with a search bar on thetop as well as collection of recently used applications, files and downloads.
• The search bar provides dynamic results on providing the search terms. You canlocate and open a file by clicking on the file name in Dash.
ICT Academy of Tamil Nadu
30
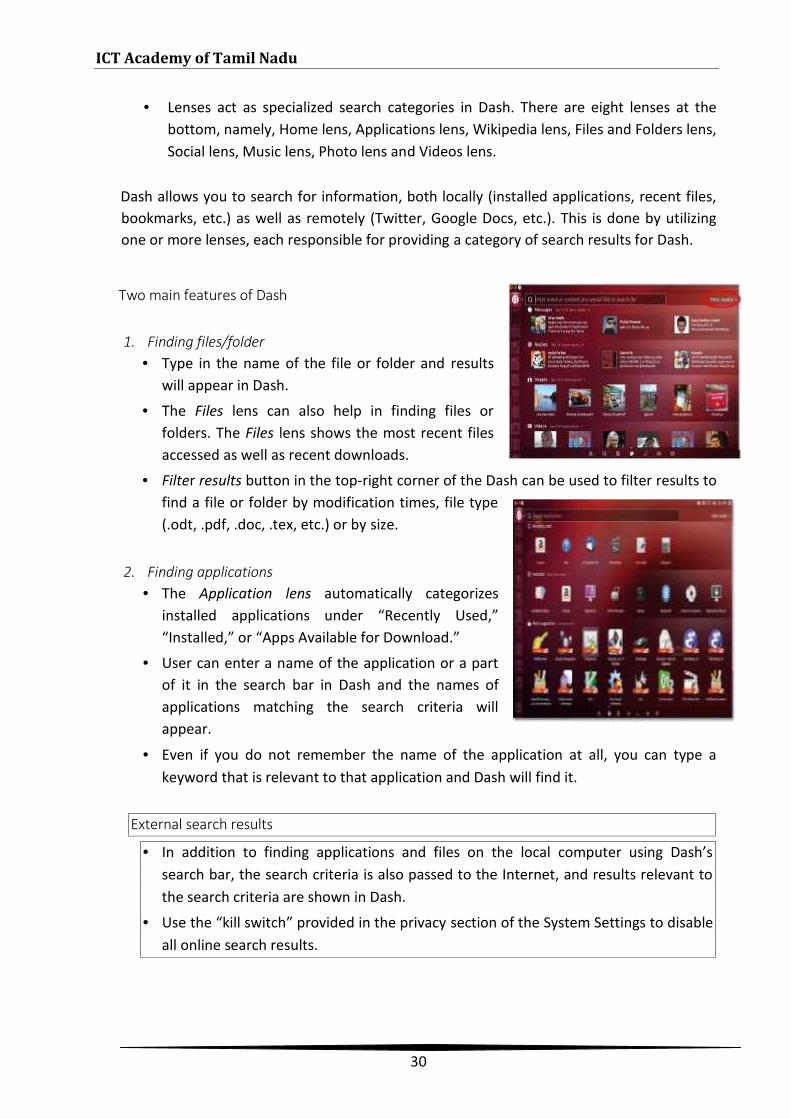
• Lenses act as specialized search categories in Dash. There are eight lenses at thebottom, namely, Home lens, Applications lens, Wikipedia lens, Files and Folders lens,Social lens, Music lens, Photo lens and Videos lens.
Dash allows you to search for information, both locally (installed applications, recent files,bookmarks, etc.) as well as remotely (Twitter, Google Docs, etc.). This is done by utilizingone or more lenses, each responsible for providing a category of search results for Dash.
Two main features of Dash
1. Finding files/folder• Type in the name of the file or folder and results
will appear in Dash.
• The Files lens can also help in finding files orfolders. The Files lens shows the most recent filesaccessed as well as recent downloads.
• Filter results button in the top-right corner of the Dash can be used to filter results tofind a file or folder by modification times, file type(.odt, .pdf, .doc, .tex, etc.) or by size.
2. Finding applications• The Application lens automatically categorizes
installed applications under “Recently Used,”“Installed,” or “Apps Available for Download.”
• User can enter a name of the application or a partof it in the search bar in Dash and the names ofapplications matching the search criteria willappear.
• Even if you do not remember the name of the application at all, you can type akeyword that is relevant to that application and Dash will find it.
External search results
• In addition to finding applications and files on the local computer using Dash’ssearch bar, the search criteria is also passed to the Internet, and results relevant tothe search criteria are shown in Dash.
• Use the “kill switch” provided in the privacy section of the System Settings to disableall online search results.
ICT Academy of Tamil Nadu
30
• Lenses act as specialized search categories in Dash. There are eight lenses at thebottom, namely, Home lens, Applications lens, Wikipedia lens, Files and Folders lens,Social lens, Music lens, Photo lens and Videos lens.
Dash allows you to search for information, both locally (installed applications, recent files,bookmarks, etc.) as well as remotely (Twitter, Google Docs, etc.). This is done by utilizingone or more lenses, each responsible for providing a category of search results for Dash.
Two main features of Dash
1. Finding files/folder• Type in the name of the file or folder and results
will appear in Dash.
• The Files lens can also help in finding files orfolders. The Files lens shows the most recent filesaccessed as well as recent downloads.
• Filter results button in the top-right corner of the Dash can be used to filter results tofind a file or folder by modification times, file type(.odt, .pdf, .doc, .tex, etc.) or by size.
2. Finding applications• The Application lens automatically categorizes
installed applications under “Recently Used,”“Installed,” or “Apps Available for Download.”
• User can enter a name of the application or a partof it in the search bar in Dash and the names ofapplications matching the search criteria willappear.
• Even if you do not remember the name of the application at all, you can type akeyword that is relevant to that application and Dash will find it.
External search results
• In addition to finding applications and files on the local computer using Dash’ssearch bar, the search criteria is also passed to the Internet, and results relevant tothe search criteria are shown in Dash.
• Use the “kill switch” provided in the privacy section of the System Settings to disableall online search results.
Module 2: Operating Digital Devices
31
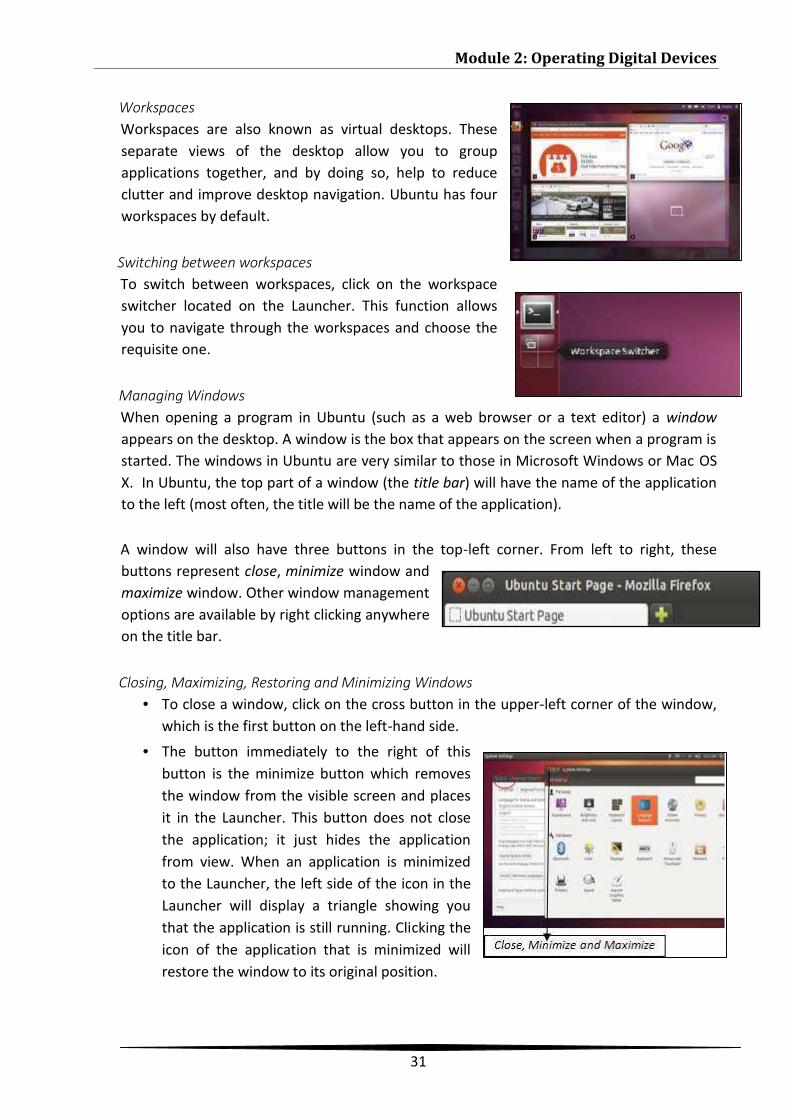
WorkspacesWorkspaces are also known as virtual desktops. Theseseparate views of the desktop allow you to groupapplications together, and by doing so, help to reduceclutter and improve desktop navigation. Ubuntu has fourworkspaces by default.
Switching between workspacesTo switch between workspaces, click on the workspaceswitcher located on the Launcher. This function allowsyou to navigate through the workspaces and choose therequisite one.
Managing WindowsWhen opening a program in Ubuntu (such as a web browser or a text editor) a windowappears on the desktop. A window is the box that appears on the screen when a program isstarted. The windows in Ubuntu are very similar to those in Microsoft Windows or Mac OSX. In Ubuntu, the top part of a window (the title bar) will have the name of the applicationto the left (most often, the title will be the name of the application).
A window will also have three buttons in the top-left corner. From left to right, thesebuttons represent close, minimize window andmaximize window. Other window managementoptions are available by right clicking anywhereon the title bar.
Closing, Maximizing, Restoring and Minimizing Windows• To close a window, click on the cross button in the upper-left corner of the window,
which is the first button on the left-hand side.
• The button immediately to the right of thisbutton is the minimize button which removesthe window from the visible screen and placesit in the Launcher. This button does not closethe application; it just hides the applicationfrom view. When an application is minimizedto the Launcher, the left side of the icon in theLauncher will display a triangle showing youthat the application is still running. Clicking theicon of the application that is minimized willrestore the window to its original position.
ICT Academy of Tamil Nadu
32
• The right-most button is the maximize button, which makes the application windowfill the entire screen. Clicking the maximize button again will return the window to itsoriginal size. If a window is maximized, its top-left buttons and menu areautomatically hidden from view. To make them appear, just move your mouse to themenu bar.
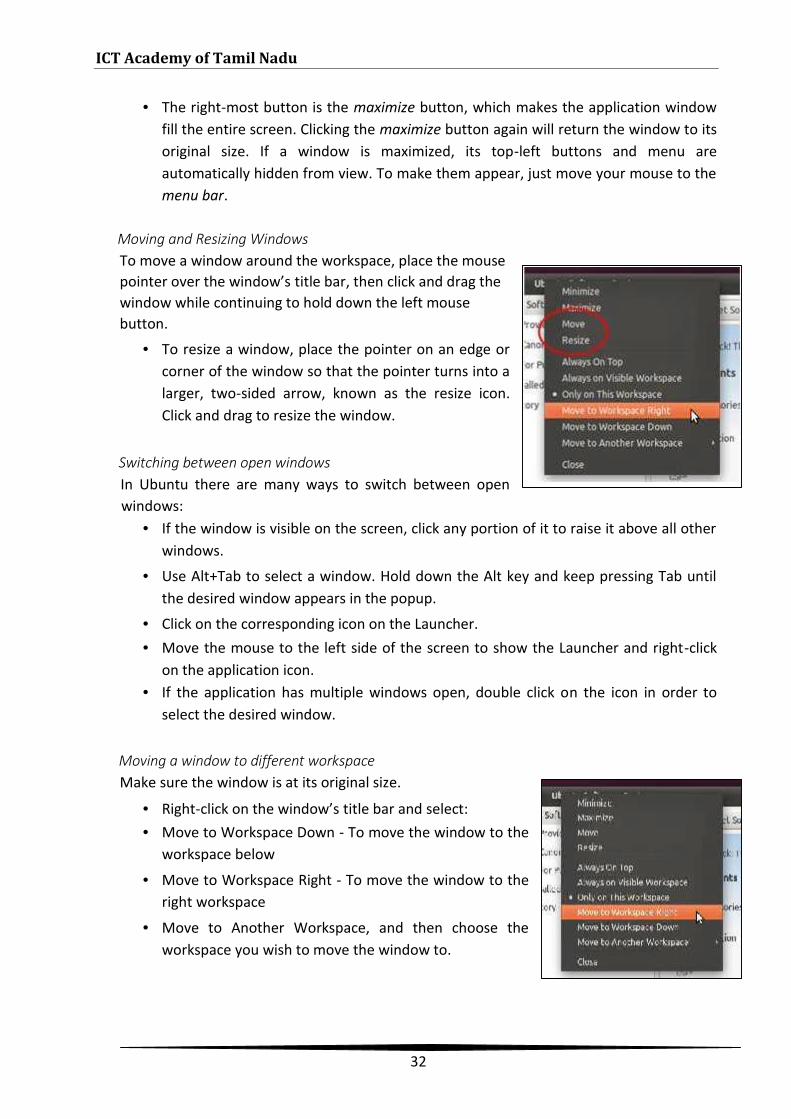
Moving and Resizing WindowsTo move a window around the workspace, place the mousepointer over the window’s title bar, then click and drag thewindow while continuing to hold down the left mousebutton.
• To resize a window, place the pointer on an edge orcorner of the window so that the pointer turns into alarger, two-sided arrow, known as the resize icon.Click and drag to resize the window.
Switching between open windowsIn Ubuntu there are many ways to switch between openwindows:
• If the window is visible on the screen, click any portion of it to raise it above all otherwindows.
• Use Alt+Tab to select a window. Hold down the Alt key and keep pressing Tab untilthe desired window appears in the popup.
• Click on the corresponding icon on the Launcher.• Move the mouse to the left side of the screen to show the Launcher and right-click
on the application icon.• If the application has multiple windows open, double click on the icon in order to
select the desired window.
Moving a window to different workspaceMake sure the window is at its original size.
Right-click on the window’s title bar and select: Move to Workspace Down - To move the window to the
workspace below
Move to Workspace Right - To move the window to theright workspace
Move to Another Workspace, and then choose theworkspace you wish to move the window to.
Module 2: Operating Digital Devices
33
Browsing files on your computerThere are two ways to locate files on the computer:
• Search for a file or access it directly from the folder in which it is placed via Dash inthe Launcher.
• Use the Files and Folders tool to access commonly used folders (such as Documents,Music, Downloads), as well as most recently accessed files.
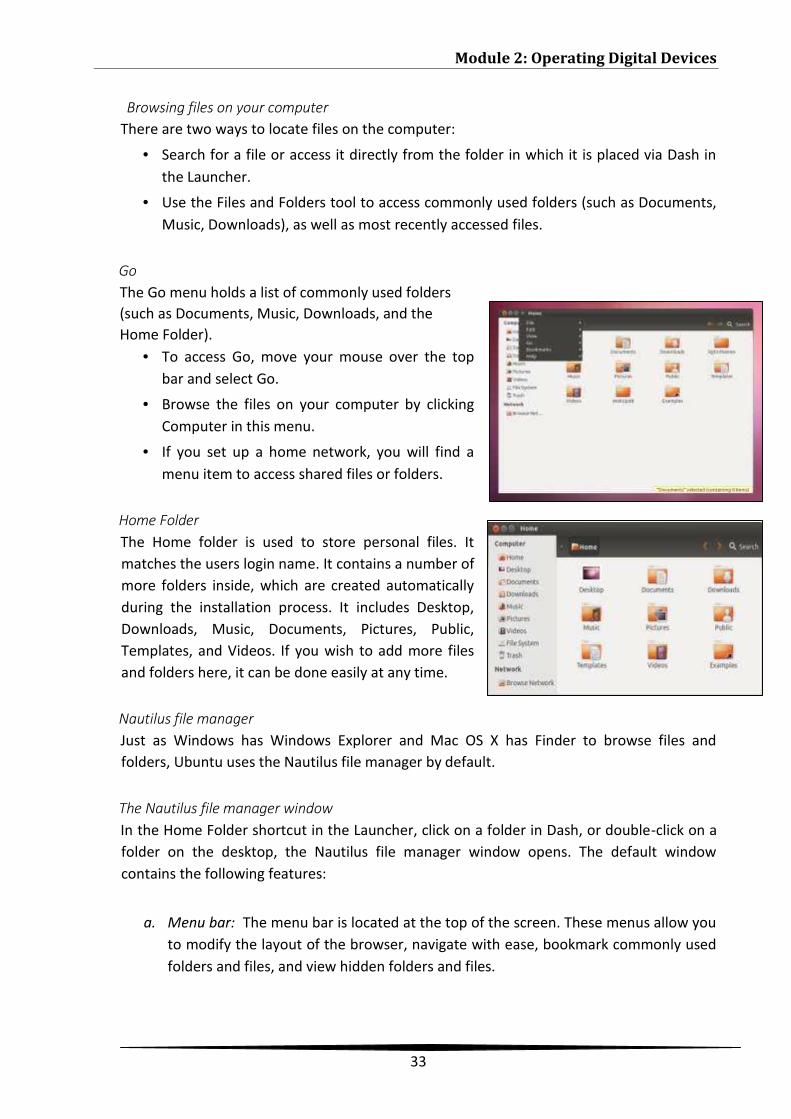
GoThe Go menu holds a list of commonly used folders(such as Documents, Music, Downloads, and theHome Folder).
• To access Go, move your mouse over the topbar and select Go.
• Browse the files on your computer by clickingComputer in this menu.
• If you set up a home network, you will find amenu item to access shared files or folders.
Home FolderThe Home folder is used to store personal files. Itmatches the users login name. It contains a number ofmore folders inside, which are created automaticallyduring the installation process. It includes Desktop,Downloads, Music, Documents, Pictures, Public,Templates, and Videos. If you wish to add more filesand folders here, it can be done easily at any time.
Nautilus file managerJust as Windows has Windows Explorer and Mac OS X has Finder to browse files andfolders, Ubuntu uses the Nautilus file manager by default.
The Nautilus file manager windowIn the Home Folder shortcut in the Launcher, click on a folder in Dash, or double-click on afolder on the desktop, the Nautilus file manager window opens. The default windowcontains the following features:
a. Menu bar: The menu bar is located at the top of the screen. These menus allow youto modify the layout of the browser, navigate with ease, bookmark commonly usedfolders and files, and view hidden folders and files.
ICT Academy of Tamil Nadu
34
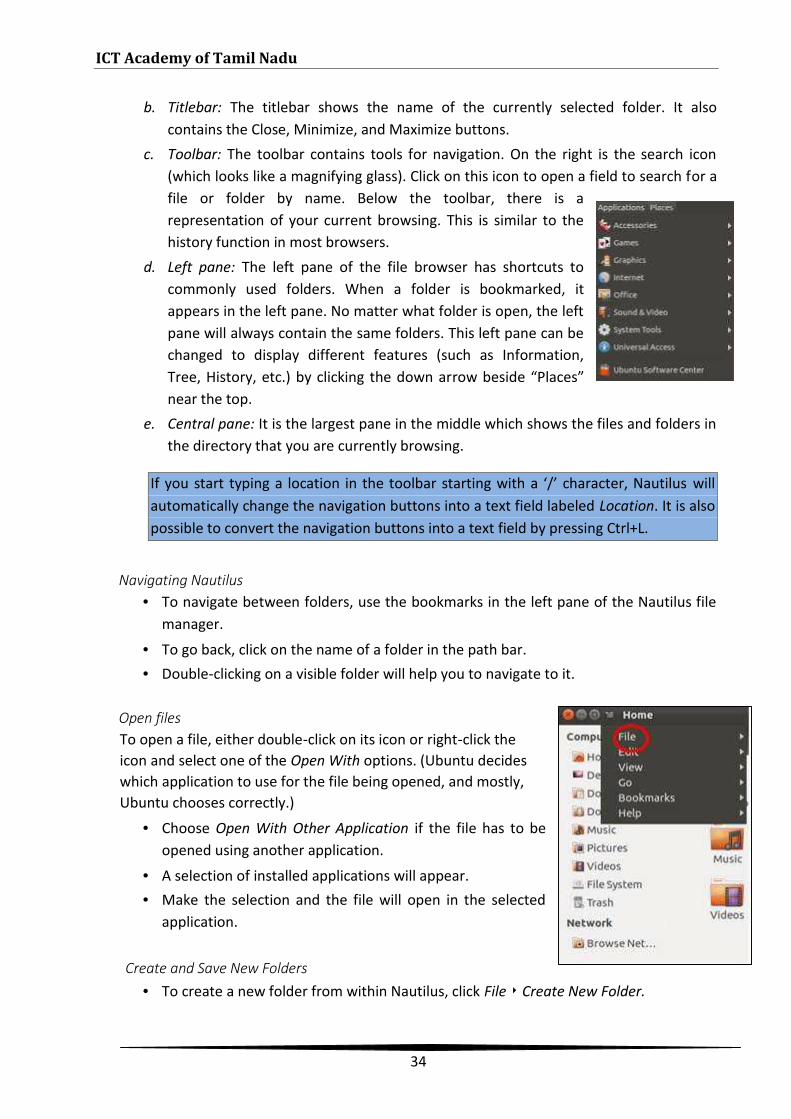
b. Titlebar: The titlebar shows the name of the currently selected folder. It alsocontains the Close, Minimize, and Maximize buttons.
c. Toolbar: The toolbar contains tools for navigation. On the right is the search icon(which looks like a magnifying glass). Click on this icon to open a field to search for afile or folder by name. Below the toolbar, there is arepresentation of your current browsing. This is similar to thehistory function in most browsers.
d. Left pane: The left pane of the file browser has shortcuts tocommonly used folders. When a folder is bookmarked, itappears in the left pane. No matter what folder is open, the leftpane will always contain the same folders. This left pane can bechanged to display different features (such as Information,Tree, History, etc.) by clicking the down arrow beside “Places”near the top.
e. Central pane: It is the largest pane in the middle which shows the files and folders inthe directory that you are currently browsing.
If you start typing a location in the toolbar starting with a ‘/’ character, Nautilus willautomatically change the navigation buttons into a text field labeled Location. It is alsopossible to convert the navigation buttons into a text field by pressing Ctrl+L.
Navigating Nautilus• To navigate between folders, use the bookmarks in the left pane of the Nautilus file
manager.
• To go back, click on the name of a folder in the path bar.• Double-clicking on a visible folder will help you to navigate to it.
Open filesTo open a file, either double-click on its icon or right-click theicon and select one of the Open With options. (Ubuntu decideswhich application to use for the file being opened, and mostly,Ubuntu chooses correctly.)
• Choose Open With Other Application if the file has to beopened using another application.
• A selection of installed applications will appear.• Make the selection and the file will open in the selected
application.
Create and Save New Folders• To create a new folder from within Nautilus, click File ‣ Create New Folder.
Module 2: Operating Digital Devices
35
• Name the folder that appears by replacing the default “Untitled Folder” with thedesired label. It saves the file in Nautilus.
• To create a new folder, press Ctrl+Shift+N or right-click the file browser window andselect Create New Folder from the popup menu.
Hidden Files and Folders• To hide certain folders or files, place a dot (.) in front of the name (e.g., “.School
Documents”).
• To view hidden files, click View ‣ Show Hidden Files or press Ctrl+H
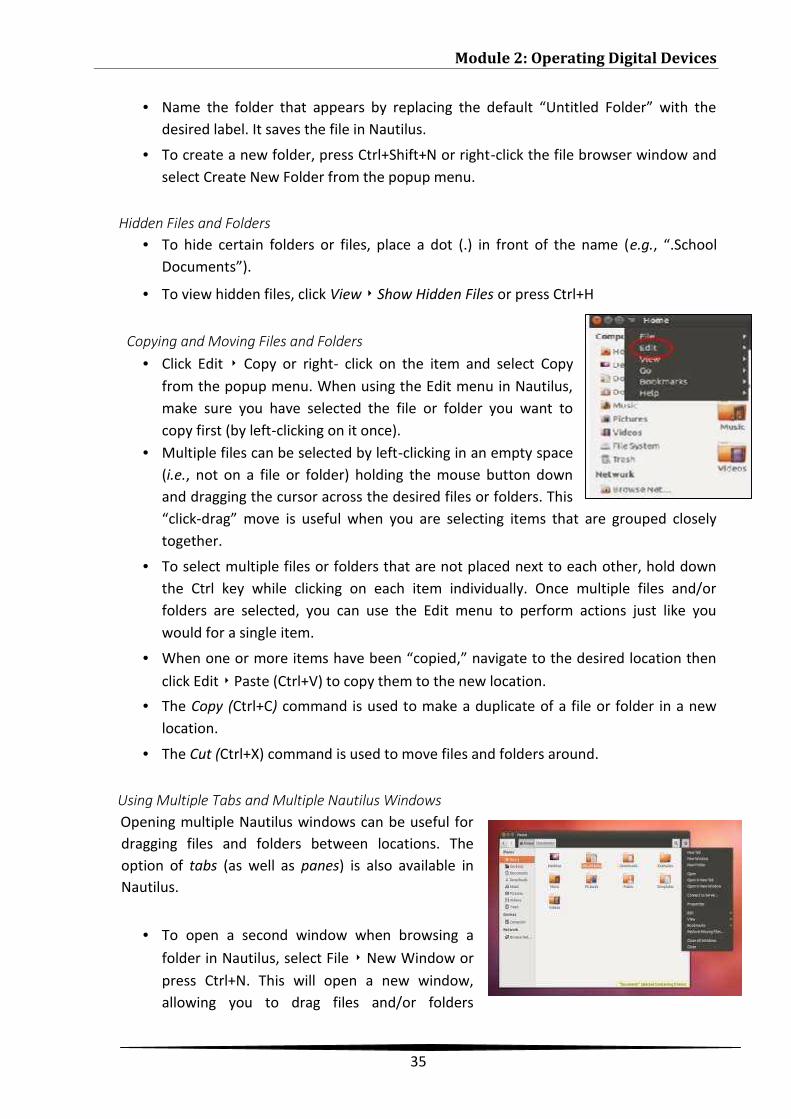
Copying and Moving Files and Folders• Click Edit ‣ Copy or right- click on the item and select Copy
from the popup menu. When using the Edit menu in Nautilus,make sure you have selected the file or folder you want tocopy first (by left-clicking on it once).
• Multiple files can be selected by left-clicking in an empty space(i.e., not on a file or folder) holding the mouse button downand dragging the cursor across the desired files or folders. This“click-drag” move is useful when you are selecting items that are grouped closelytogether.
• To select multiple files or folders that are not placed next to each other, hold downthe Ctrl key while clicking on each item individually. Once multiple files and/orfolders are selected, you can use the Edit menu to perform actions just like youwould for a single item.
• When one or more items have been “copied,” navigate to the desired location thenclick Edit ‣ Paste (Ctrl+V) to copy them to the new location.
• The Copy (Ctrl+C) command is used to make a duplicate of a file or folder in a newlocation.
• The Cut (Ctrl+X) command is used to move files and folders around.
Using Multiple Tabs and Multiple Nautilus WindowsOpening multiple Nautilus windows can be useful fordragging files and folders between locations. Theoption of tabs (as well as panes) is also available inNautilus.
• To open a second window when browsing afolder in Nautilus, select File ‣ New Window orpress Ctrl+N. This will open a new window,allowing you to drag files and/or folders
ICT Academy of Tamil Nadu
36
between two locations.
• To open a new tab, click File ‣ New Tab or press Ctrl+T. A new row will appear abovethe space used for browsing your files containing two tabs.
• To open a second pane, click View ‣ Extra Pane, or press F3 on your keyboard. Thishelps you to see two locations at once on the screen without having to switchbetween tabs or windows.
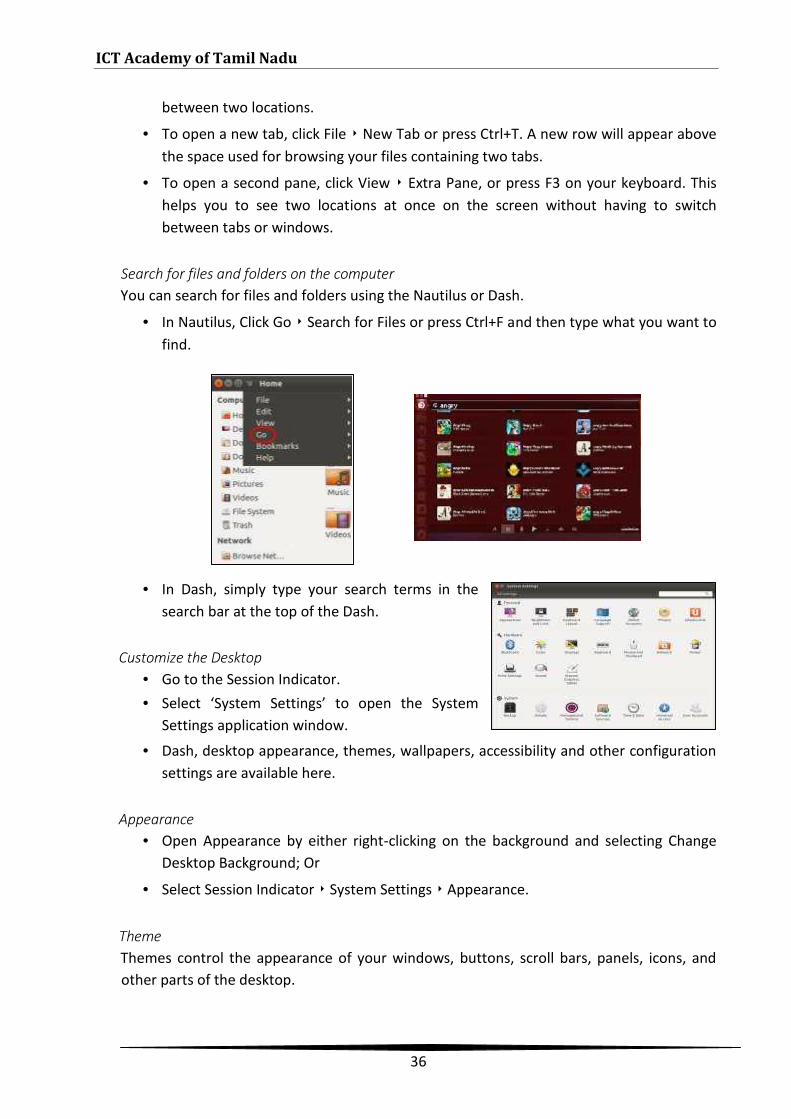
Search for files and folders on the computerYou can search for files and folders using the Nautilus or Dash.
• In Nautilus, Click Go ‣ Search for Files or press Ctrl+F and then type what you want tofind.
• In Dash, simply type your search terms in thesearch bar at the top of the Dash.
Customize the Desktop• Go to the Session Indicator.• Select ‘System Settings’ to open the System
Settings application window.
• Dash, desktop appearance, themes, wallpapers, accessibility and other configurationsettings are available here.
Appearance• Open Appearance by either right-clicking on the background and selecting Change
Desktop Background; Or
• Select Session Indicator ‣ System Settings ‣ Appearance.
ThemeThemes control the appearance of your windows, buttons, scroll bars, panels, icons, andother parts of the desktop.
Module 2: Operating Digital Devices
37
• The “Appearance” window displays the current selected background wallpaper andtheme.
• The Ambiance theme is used by default. Other themes can be chosen by clicking onany of the listed themes.
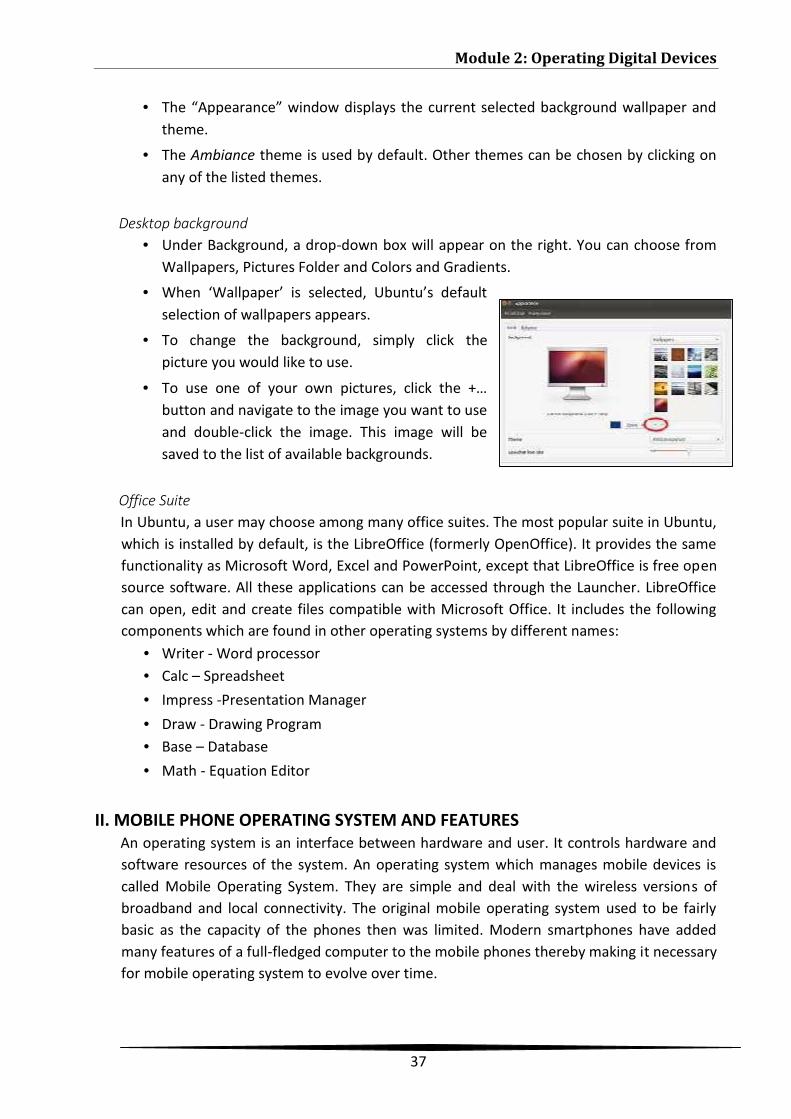
Desktop background• Under Background, a drop-down box will appear on the right. You can choose from
Wallpapers, Pictures Folder and Colors and Gradients.
• When ‘Wallpaper’ is selected, Ubuntu’s defaultselection of wallpapers appears.
• To change the background, simply click thepicture you would like to use.
• To use one of your own pictures, click the +…button and navigate to the image you want to useand double-click the image. This image will besaved to the list of available backgrounds.
Office SuiteIn Ubuntu, a user may choose among many office suites. The most popular suite in Ubuntu,which is installed by default, is the LibreOffice (formerly OpenOffice). It provides the samefunctionality as Microsoft Word, Excel and PowerPoint, except that LibreOffice is free opensource software. All these applications can be accessed through the Launcher. LibreOfficecan open, edit and create files compatible with Microsoft Office. It includes the followingcomponents which are found in other operating systems by different names:
• Writer - Word processor• Calc – Spreadsheet• Impress -Presentation Manager• Draw - Drawing Program• Base – Database• Math - Equation Editor
II. MOBILE PHONE OPERATING SYSTEM AND FEATURESAn operating system is an interface between hardware and user. It controls hardware andsoftware resources of the system. An operating system which manages mobile devices iscalled Mobile Operating System. They are simple and deal with the wireless versions ofbroadband and local connectivity. The original mobile operating system used to be fairlybasic as the capacity of the phones then was limited. Modern smartphones have addedmany features of a full-fledged computer to the mobile phones thereby making it necessaryfor mobile operating system to evolve over time.
ICT Academy of Tamil Nadu
38
Modern mobile operating system combines the features of a personal computer’soperating system with other features, including touch-screen, cellular, Bluetooth, Wi-Fi,GPS mobile navigation, camera, video camera, speech recognition, voice recorder, musicplayer and other features. Most common operating systems for Mobiles and Tablets areAndroid, Windows, iOS and Symbian. In this section, we will discuss some of the basicfeatures of a mobile phone.
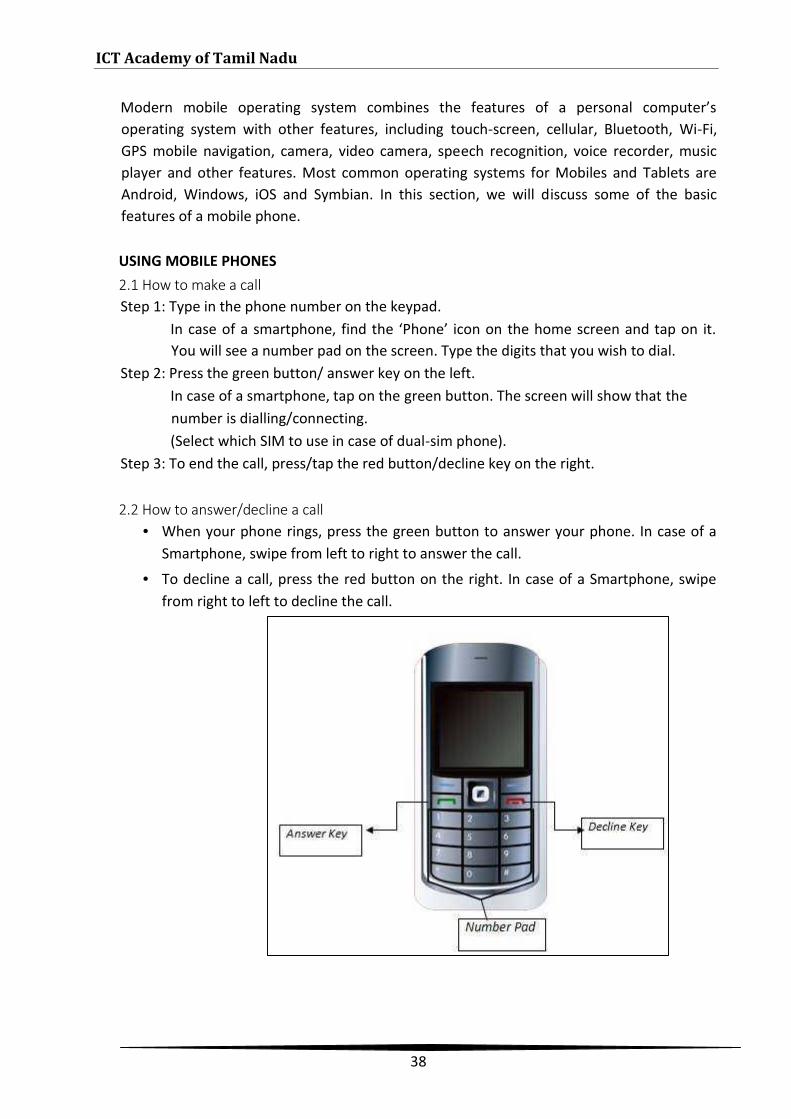
USING MOBILE PHONES2.1 How to make a callStep 1: Type in the phone number on the keypad.
In case of a smartphone, find the ‘Phone’ icon on the home screen and tap on it.You will see a number pad on the screen. Type the digits that you wish to dial.
Step 2: Press the green button/ answer key on the left.In case of a smartphone, tap on the green button. The screen will show that thenumber is dialling/connecting.(Select which SIM to use in case of dual-sim phone).
Step 3: To end the call, press/tap the red button/decline key on the right.
2.2 How to answer/decline a call• When your phone rings, press the green button to answer your phone. In case of a
Smartphone, swipe from left to right to answer the call.
• To decline a call, press the red button on the right. In case of a Smartphone, swipefrom right to left to decline the call.
Module 2: Operating Digital Devices
39
2.3 How to call the last dialed numberStep 1: On the home screen, press the green button on left. It will display a list of recently
dialed numbers. In the case of a smart phone, tap on the ‘Phone’ icon. It will showall calls (dialed, received and missed).
Step 2: Select the number and then press the green button again. Simply tap on thenumber in a smart phone. It will start dialing the number.
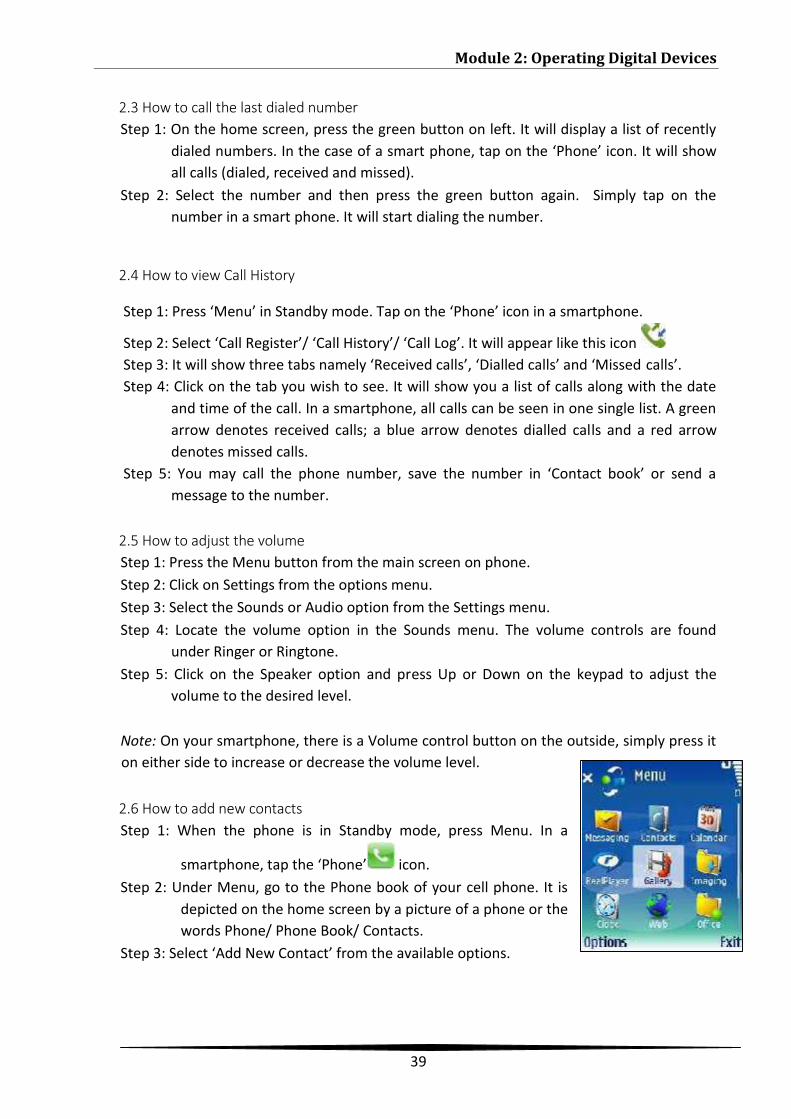
2.4 How to view Call History
Step 1: Press ‘Menu’ in Standby mode. Tap on the ‘Phone’ icon in a smartphone.
Step 2: Select ‘Call Register’/ ‘Call History’/ ‘Call Log’. It will appear like this iconStep 3: It will show three tabs namely ‘Received calls’, ‘Dialled calls’ and ‘Missed calls’.Step 4: Click on the tab you wish to see. It will show you a list of calls along with the date
and time of the call. In a smartphone, all calls can be seen in one single list. A greenarrow denotes received calls; a blue arrow denotes dialled calls and a red arrowdenotes missed calls.
Step 5: You may call the phone number, save the number in ‘Contact book’ or send amessage to the number.
2.5 How to adjust the volumeStep 1: Press the Menu button from the main screen on phone.Step 2: Click on Settings from the options menu.Step 3: Select the Sounds or Audio option from the Settings menu.Step 4: Locate the volume option in the Sounds menu. The volume controls are found
under Ringer or Ringtone.Step 5: Click on the Speaker option and press Up or Down on the keypad to adjust the
volume to the desired level.
Note: On your smartphone, there is a Volume control button on the outside, simply press iton either side to increase or decrease the volume level.
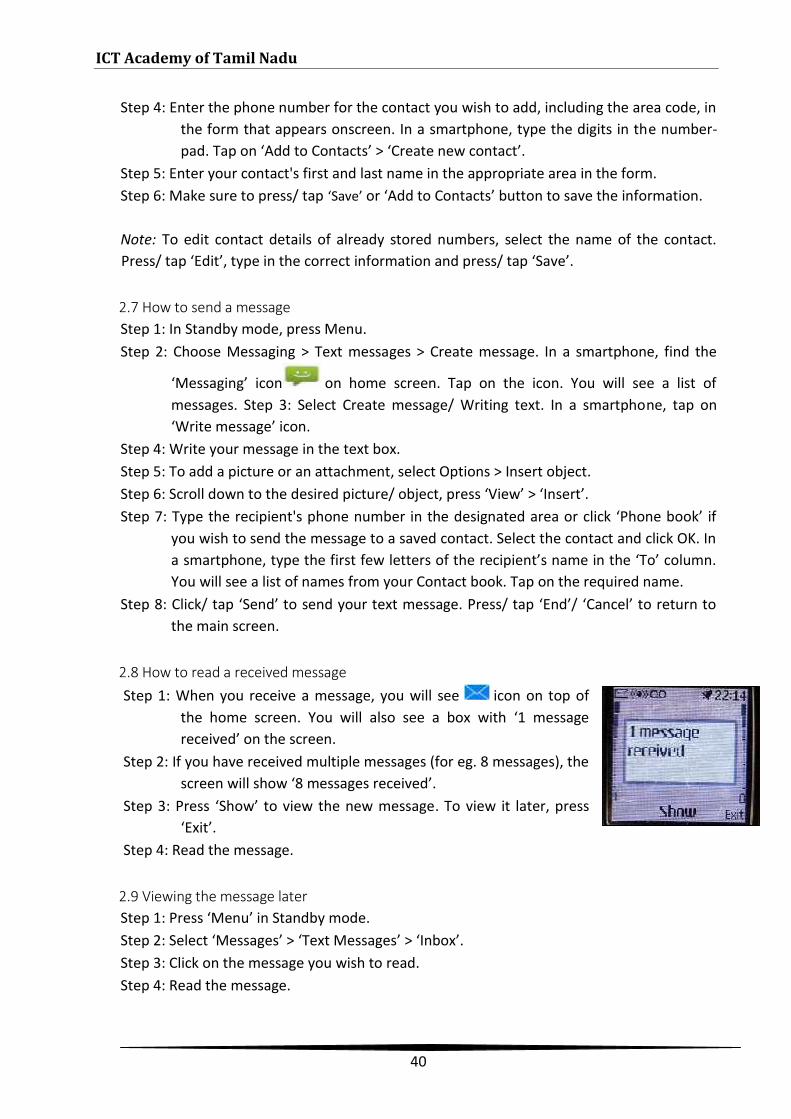
2.6 How to add new contactsStep 1: When the phone is in Standby mode, press Menu. In a
smartphone, tap the ‘Phone’ icon.Step 2: Under Menu, go to the Phone book of your cell phone. It is
depicted on the home screen by a picture of a phone or thewords Phone/ Phone Book/ Contacts.
Step 3: Select ‘Add New Contact’ from the available options.
ICT Academy of Tamil Nadu
40
Step 4: Enter the phone number for the contact you wish to add, including the area code, inthe form that appears onscreen. In a smartphone, type the digits in the number-pad. Tap on ‘Add to Contacts’ > ‘Create new contact’.
Step 5: Enter your contact's first and last name in the appropriate area in the form.Step 6: Make sure to press/ tap ‘Save’ or ‘Add to Contacts’ button to save the information.
Note: To edit contact details of already stored numbers, select the name of the contact.Press/ tap ‘Edit’, type in the correct information and press/ tap ‘Save’.
2.7 How to send a messageStep 1: In Standby mode, press Menu.Step 2: Choose Messaging > Text messages > Create message. In a smartphone, find the
‘Messaging’ icon on home screen. Tap on the icon. You will see a list ofmessages. Step 3: Select Create message/ Writing text. In a smartphone, tap on‘Write message’ icon.
Step 4: Write your message in the text box.Step 5: To add a picture or an attachment, select Options > Insert object.Step 6: Scroll down to the desired picture/ object, press ‘View’ > ‘Insert’.Step 7: Type the recipient's phone number in the designated area or click ‘Phone book’ if
you wish to send the message to a saved contact. Select the contact and click OK. Ina smartphone, type the first few letters of the recipient’s name in the ‘To’ column.You will see a list of names from your Contact book. Tap on the required name.
Step 8: Click/ tap ‘Send’ to send your text message. Press/ tap ‘End’/ ‘Cancel’ to return tothe main screen.
2.8 How to read a received messageStep 1: When you receive a message, you will see icon on top of
the home screen. You will also see a box with ‘1 messagereceived’ on the screen.
Step 2: If you have received multiple messages (for eg. 8 messages), thescreen will show ‘8 messages received’.
Step 3: Press ‘Show’ to view the new message. To view it later, press‘Exit’.
Step 4: Read the message.
2.9 Viewing the message laterStep 1: Press ‘Menu’ in Standby mode.Step 2: Select ‘Messages’ > ‘Text Messages’ > ‘Inbox’.Step 3: Click on the message you wish to read.Step 4: Read the message.
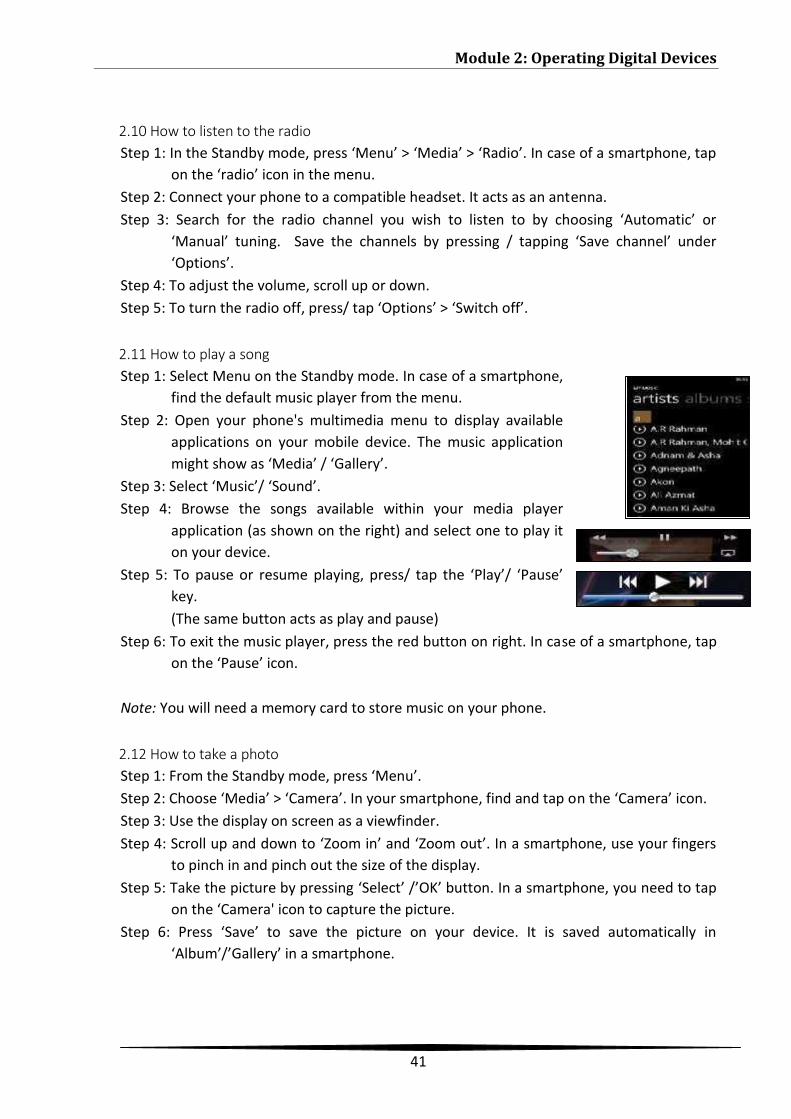
Module 2: Operating Digital Devices
41
2.10 How to listen to the radioStep 1: In the Standby mode, press ‘Menu’ > ‘Media’ > ‘Radio’. In case of a smartphone, tap
on the ‘radio’ icon in the menu.Step 2: Connect your phone to a compatible headset. It acts as an antenna.Step 3: Search for the radio channel you wish to listen to by choosing ‘Automatic’ or
‘Manual’ tuning. Save the channels by pressing / tapping ‘Save channel’ under‘Options’.
Step 4: To adjust the volume, scroll up or down.Step 5: To turn the radio off, press/ tap ‘Options’ > ‘Switch off’.
2.11 How to play a songStep 1: Select Menu on the Standby mode. In case of a smartphone,
find the default music player from the menu.Step 2: Open your phone's multimedia menu to display available
applications on your mobile device. The music applicationmight show as ‘Media’ / ‘Gallery’.
Step 3: Select ‘Music’/ ‘Sound’.Step 4: Browse the songs available within your media player
application (as shown on the right) and select one to play iton your device.
Step 5: To pause or resume playing, press/ tap the ‘Play’/ ‘Pause’key.(The same button acts as play and pause)
Step 6: To exit the music player, press the red button on right. In case of a smartphone, tapon the ‘Pause’ icon.
Note: You will need a memory card to store music on your phone.
2.12 How to take a photoStep 1: From the Standby mode, press ‘Menu’.Step 2: Choose ‘Media’ > ‘Camera’. In your smartphone, find and tap on the ‘Camera’ icon.Step 3: Use the display on screen as a viewfinder.Step 4: Scroll up and down to ‘Zoom in’ and ‘Zoom out’. In a smartphone, use your fingers
to pinch in and pinch out the size of the display.Step 5: Take the picture by pressing ‘Select’ /’OK’ button. In a smartphone, you need to tap
on the ‘Camera' icon to capture the picture.Step 6: Press ‘Save’ to save the picture on your device. It is saved automatically in
‘Album’/’Gallery’ in a smartphone.
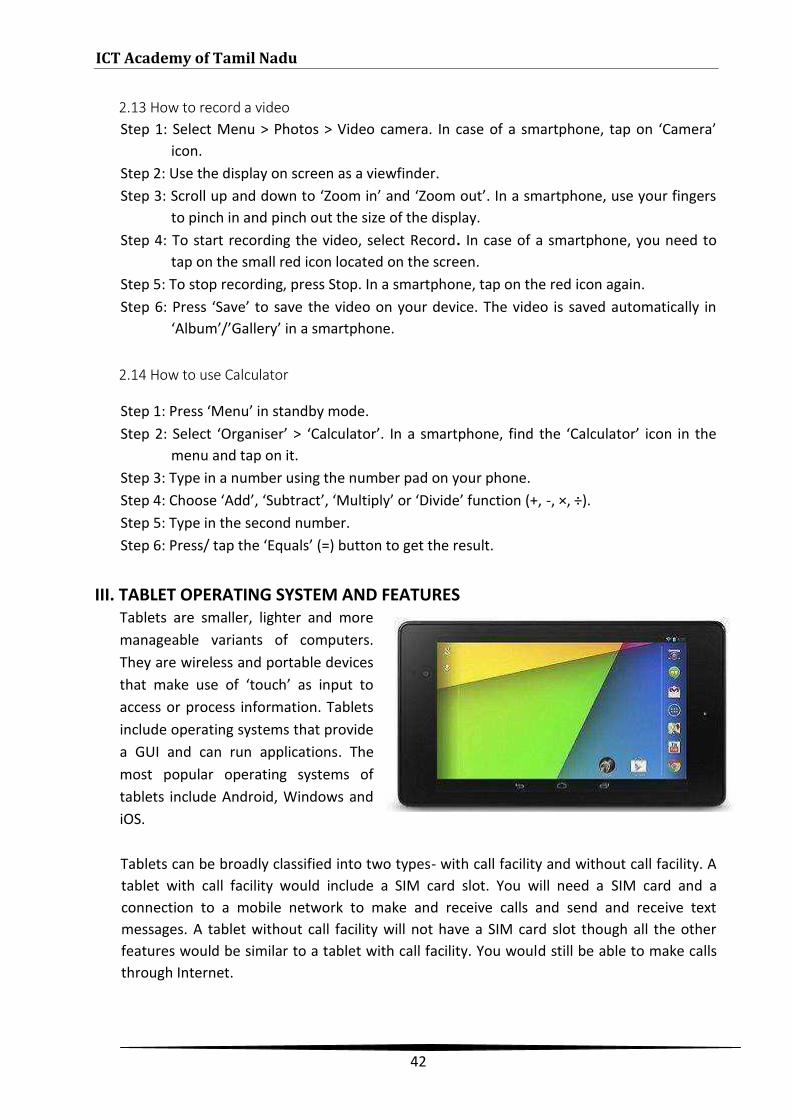
ICT Academy of Tamil Nadu
42
2.13 How to record a videoStep 1: Select Menu > Photos > Video camera. In case of a smartphone, tap on ‘Camera’
icon.Step 2: Use the display on screen as a viewfinder.Step 3: Scroll up and down to ‘Zoom in’ and ‘Zoom out’. In a smartphone, use your fingers
to pinch in and pinch out the size of the display.Step 4: To start recording the video, select Record. In case of a smartphone, you need to
tap on the small red icon located on the screen.Step 5: To stop recording, press Stop. In a smartphone, tap on the red icon again.Step 6: Press ‘Save’ to save the video on your device. The video is saved automatically in
‘Album’/’Gallery’ in a smartphone.
2.14 How to use Calculator
Step 1: Press ‘Menu’ in standby mode.Step 2: Select ‘Organiser’ > ‘Calculator’. In a smartphone, find the ‘Calculator’ icon in the
menu and tap on it.Step 3: Type in a number using the number pad on your phone.Step 4: Choose ‘Add’, ‘Subtract’, ‘Multiply’ or ‘Divide’ function (+, -, ×, ÷).Step 5: Type in the second number.Step 6: Press/ tap the ‘Equals’ (=) button to get the result.
III. TABLET OPERATING SYSTEM AND FEATURESTablets are smaller, lighter and moremanageable variants of computers.They are wireless and portable devicesthat make use of ‘touch’ as input toaccess or process information. Tabletsinclude operating systems that providea GUI and can run applications. Themost popular operating systems oftablets include Android, Windows andiOS.
Tablets can be broadly classified into two types- with call facility and without call facility. Atablet with call facility would include a SIM card slot. You will need a SIM card and aconnection to a mobile network to make and receive calls and send and receive textmessages. A tablet without call facility will not have a SIM card slot though all the otherfeatures would be similar to a tablet with call facility. You would still be able to make callsthrough Internet.
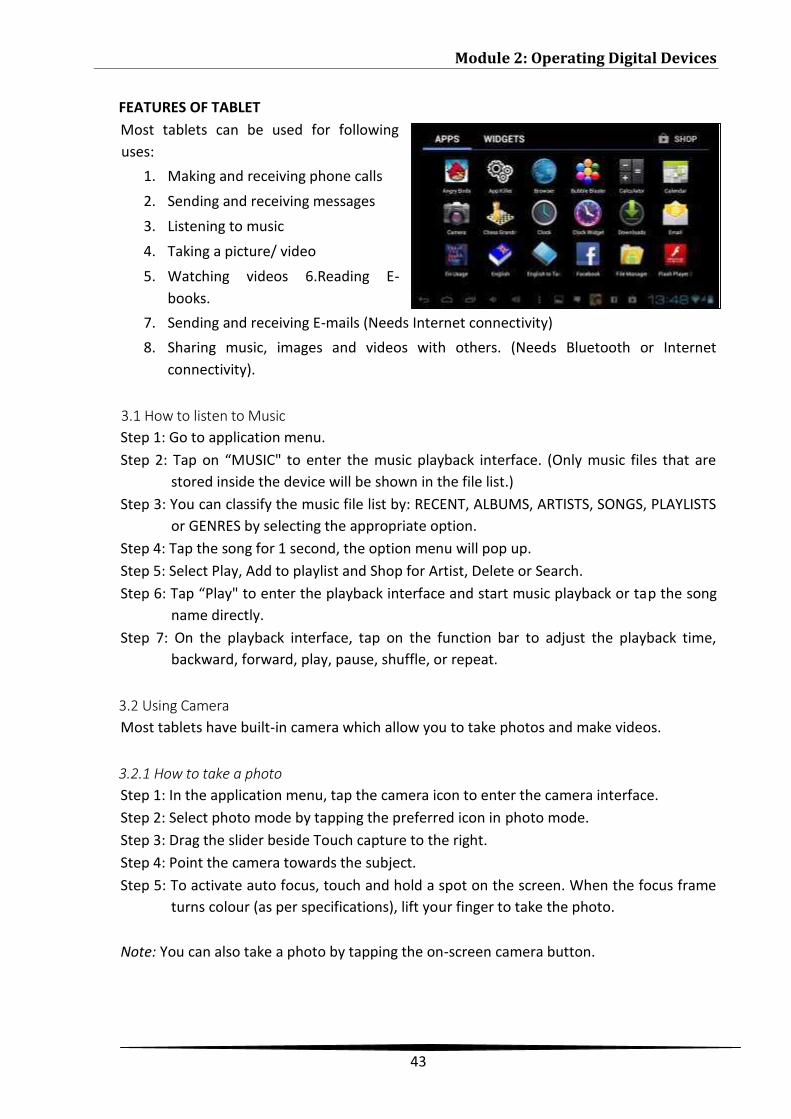
Module 2: Operating Digital Devices
43
FEATURES OF TABLETMost tablets can be used for followinguses:
1. Making and receiving phone calls2. Sending and receiving messages3. Listening to music4. Taking a picture/ video5. Watching videos 6.Reading E-
books.7. Sending and receiving E-mails (Needs Internet connectivity)8. Sharing music, images and videos with others. (Needs Bluetooth or Internet
connectivity).
3.1 How to listen to MusicStep 1: Go to application menu.Step 2: Tap on “MUSIC" to enter the music playback interface. (Only music files that are
stored inside the device will be shown in the file list.)Step 3: You can classify the music file list by: RECENT, ALBUMS, ARTISTS, SONGS, PLAYLISTS
or GENRES by selecting the appropriate option.Step 4: Tap the song for 1 second, the option menu will pop up.Step 5: Select Play, Add to playlist and Shop for Artist, Delete or Search.Step 6: Tap “Play" to enter the playback interface and start music playback or tap the song
name directly.Step 7: On the playback interface, tap on the function bar to adjust the playback time,
backward, forward, play, pause, shuffle, or repeat.
3.2 Using CameraMost tablets have built-in camera which allow you to take photos and make videos.
3.2.1 How to take a photoStep 1: In the application menu, tap the camera icon to enter the camera interface.Step 2: Select photo mode by tapping the preferred icon in photo mode.Step 3: Drag the slider beside Touch capture to the right.Step 4: Point the camera towards the subject.Step 5: To activate auto focus, touch and hold a spot on the screen. When the focus frame
turns colour (as per specifications), lift your finger to take the photo.
Note: You can also take a photo by tapping the on-screen camera button.
ICT Academy of Tamil Nadu
44
3.2.2 How to record a videoStep 1: In the application menu, tap the camera icon to enter the camera interface.Step 2: Select video mode by tapping the preferred icon in photo mode.Step 3: Point the camera towards the subject.Step 4: Tap to start recording.Step 5: Tap to stop recording.
Note: You may exit the Camera interface by pressing the back button to return to theapplication menu.
3.2.3 How to delete a photo or recorded videoStep 1: Browse to the photo or video that you want to delete.
Step 2: Tap the screen to make appear the icon.Step 3: Tap on it to delete the photo or video.
3.2.4 How to view photos and videosStep 1: Find and tap Album.Step 2: Tap a photo or video to view it.Step 3: Flick left to view the next photo or video or flick right to view the previous photo or
video.
3.2.5 How to play a videoStep 1: Open the ‘Pictures’ or ‘Album’ tab from the menu.Step 2: Using grid view or list view, locate the video that you want to open.Step 3: Tap Movies if you wish to view a pre-installed or downloaded video clip.Step 4: Tap the video that you want to play.Step 5: If the playback controls are not displayed, tap the screen to display them.
3.2.6 How to pause a videoStep 1: When a video is playing, tap the screen to display the controls.Step 2: Tap the play/pause icon to pause or restart the video.
3.2.7 How to fast forward and rewind a videoStep 1: When a video is playing, tap the screen to display the controls.Step 2: Drag the progress bar marker left to rewind or right to fast forward.
3.3 How to read an e-BookStep 1: Go to the default book reader installed in the tablet.Step 2: Tap on the icon of the book reader.
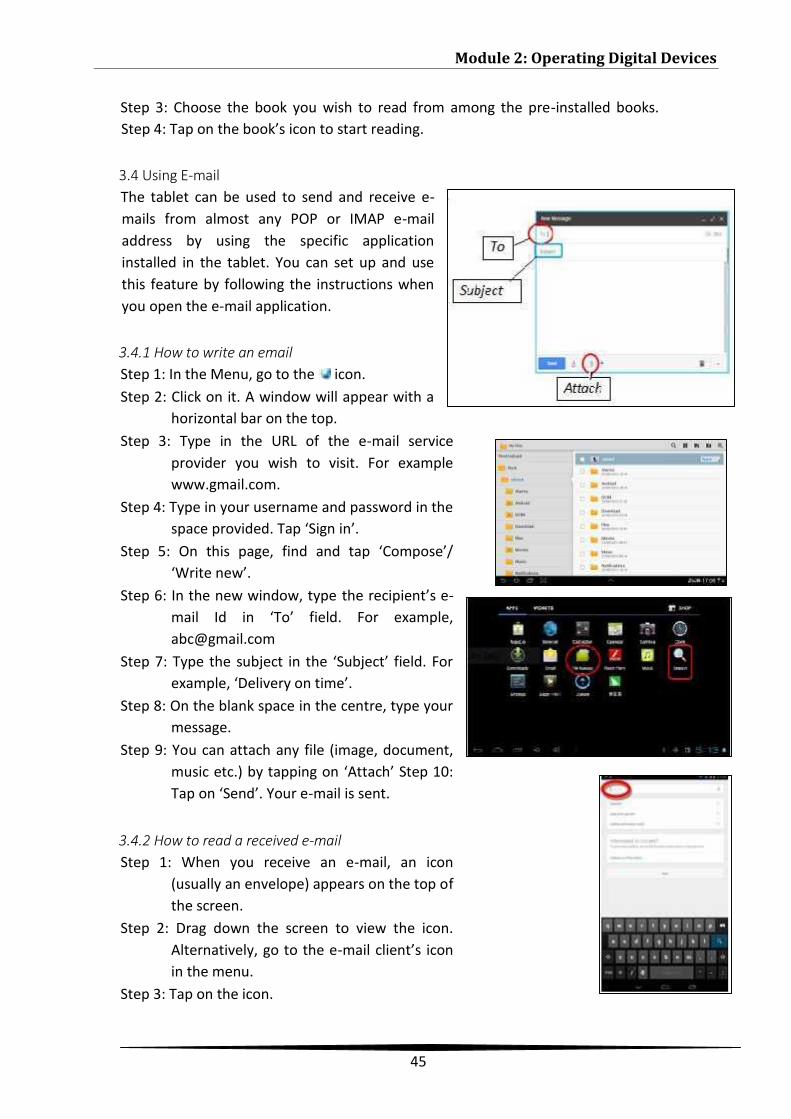
Module 2: Operating Digital Devices
45
Step 3: Choose the book you wish to read from among the pre-installed books.Step 4: Tap on the book’s icon to start reading.
3.4 Using E-mailThe tablet can be used to send and receive e-mails from almost any POP or IMAP e-mailaddress by using the specific applicationinstalled in the tablet. You can set up and usethis feature by following the instructions whenyou open the e-mail application.
3.4.1 How to write an emailStep 1: In the Menu, go to the icon.Step 2: Click on it. A window will appear with a
horizontal bar on the top.Step 3: Type in the URL of the e-mail service
provider you wish to visit. For examplewww.gmail.com.
Step 4: Type in your username and password in thespace provided. Tap ‘Sign in’.
Step 5: On this page, find and tap ‘Compose’/‘Write new’.
Step 6: In the new window, type the recipient’s e-mail Id in ‘To’ field. For example,[email protected]
Step 7: Type the subject in the ‘Subject’ field. Forexample, ‘Delivery on time’.
Step 8: On the blank space in the centre, type yourmessage.
Step 9: You can attach any file (image, document,music etc.) by tapping on ‘Attach’ Step 10:Tap on ‘Send’. Your e-mail is sent.
3.4.2 How to read a received e-mailStep 1: When you receive an e-mail, an icon
(usually an envelope) appears on the top ofthe screen.
Step 2: Drag down the screen to view the icon.Alternatively, go to the e-mail client’s iconin the menu.
Step 3: Tap on the icon.
ICT Academy of Tamil Nadu
46
Step 4: Your mail Inbox will open on the screen.Step 5: Tap on the e-mail and read it.
3.5 How to locate a fileThere are two ways to locate/ search for a file or folder on your Tablet. You can either use‘File Manager’ installed on your phone. You can locate any image, video, e-book, documentor song by using this. Another way is to use the ‘Online search engine’ which is located onthe Home screen. It helps you locate information and facts on the Internet.
a. By using the ‘File Manager’
Step 1: On the Home screen, find the ‘File Manager’ / ‘File Browser’ app. (It is usually pre-installed on your tablet)
Step 2: Tap on it. It will open another window which looks like the image on right. It shows‘My files’ on top.
Step 3: From the list, locate the folder/file that you wish toopen. Tap on it to open it.
Step 4: You can also see the ‘Search’ icon at the top which looks like a magnifying glassStep 5: Tap on it. Type in the name of file/folder you wish to see.Step 6: Search results will be shown on the screen. Tap on the requisite one to open it.
b. By using the online Search Engine
Step 1: On the home screen, locate the ‘Search’ icon which looks like a magnifying glass.Step 2: Tap on it, a new window will appear.Step 3: You will see a horizontal tab with ‘Search’ written in it.Step 4: Type in the ‘Keywords’ of the information that you wish to locate. Step 5: Onlinesearch results will be shown on the screen. Tap on the requisite one to open it.
3.5.1 Open a fileStep 1: Search for a file using the ‘File Manager’ or locate it on the Home screenStep 2: Tap on it to read or view it.
3.6 Messaging3.6.1 How to send a message
Step 1: On the home screen, find the Messaging icon which could look likeStep 2: If you do not find it on the Home screen, tap on the ‘Menu’ icon to view all the
applications on the phone.Step 3: Tap on the ‘Messaging icon’. You will see a list of received messages.
or
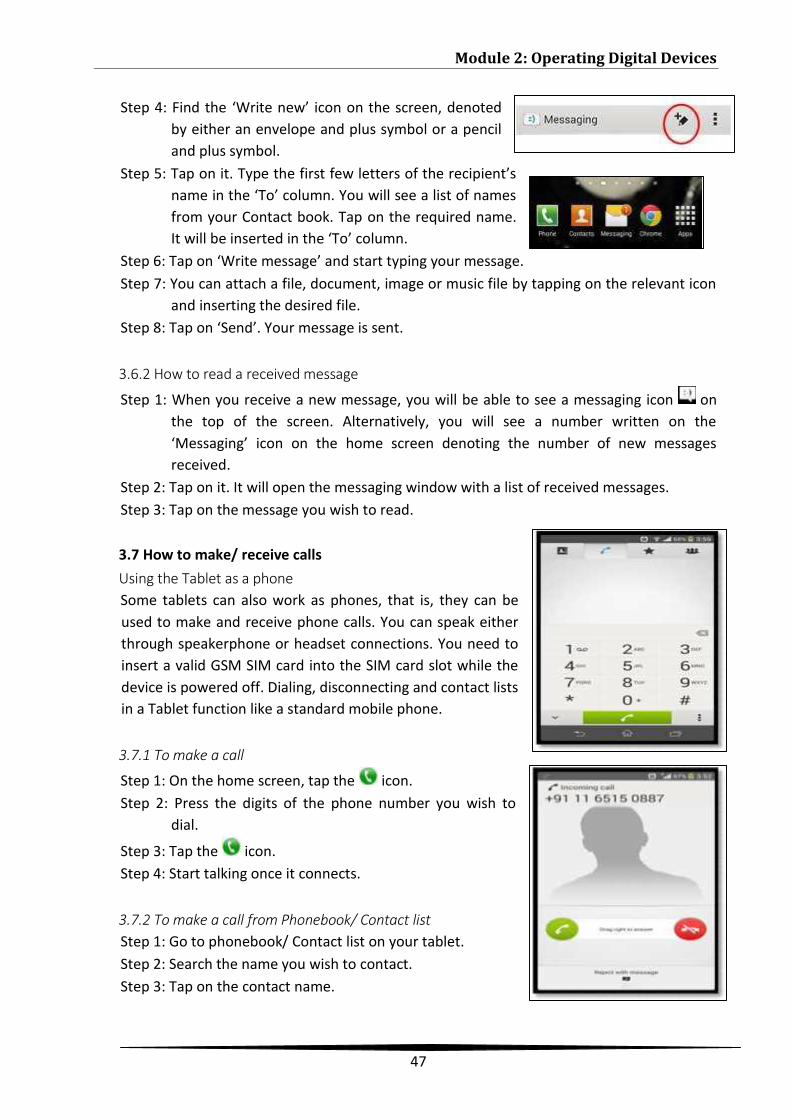
Module 2: Operating Digital Devices
47
Step 4: Find the ‘Write new’ icon on the screen, denotedby either an envelope and plus symbol or a penciland plus symbol.
Step 5: Tap on it. Type the first few letters of the recipient’sname in the ‘To’ column. You will see a list of namesfrom your Contact book. Tap on the required name.It will be inserted in the ‘To’ column.
Step 6: Tap on ‘Write message’ and start typing your message.Step 7: You can attach a file, document, image or music file by tapping on the relevant icon
and inserting the desired file.Step 8: Tap on ‘Send’. Your message is sent.
3.6.2 How to read a received message
Step 1: When you receive a new message, you will be able to see a messaging icon onthe top of the screen. Alternatively, you will see a number written on the‘Messaging’ icon on the home screen denoting the number of new messagesreceived.
Step 2: Tap on it. It will open the messaging window with a list of received messages.Step 3: Tap on the message you wish to read.
3.7 How to make/ receive callsUsing the Tablet as a phoneSome tablets can also work as phones, that is, they can beused to make and receive phone calls. You can speak eitherthrough speakerphone or headset connections. You need toinsert a valid GSM SIM card into the SIM card slot while thedevice is powered off. Dialing, disconnecting and contact listsin a Tablet function like a standard mobile phone.
3.7.1 To make a call
Step 1: On the home screen, tap the icon.Step 2: Press the digits of the phone number you wish to
dial.
Step 3: Tap the icon.Step 4: Start talking once it connects.
3.7.2 To make a call from Phonebook/ Contact listStep 1: Go to phonebook/ Contact list on your tablet.Step 2: Search the name you wish to contact.Step 3: Tap on the contact name.
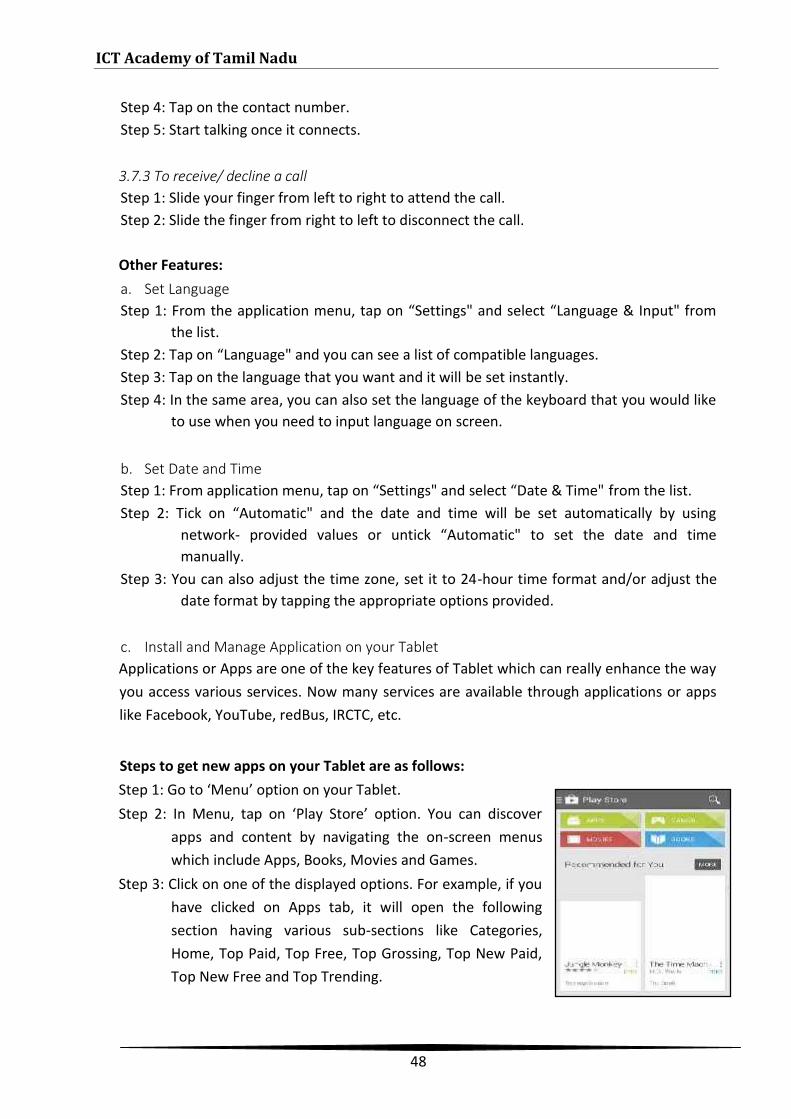
ICT Academy of Tamil Nadu
48
Step 4: Tap on the contact number.Step 5: Start talking once it connects.
3.7.3 To receive/ decline a callStep 1: Slide your finger from left to right to attend the call.Step 2: Slide the finger from right to left to disconnect the call.
Other Features:a. Set LanguageStep 1: From the application menu, tap on “Settings" and select “Language & Input" from
the list.Step 2: Tap on “Language" and you can see a list of compatible languages.Step 3: Tap on the language that you want and it will be set instantly.Step 4: In the same area, you can also set the language of the keyboard that you would like
to use when you need to input language on screen.
b. Set Date and TimeStep 1: From application menu, tap on “Settings" and select “Date & Time" from the list.Step 2: Tick on “Automatic" and the date and time will be set automatically by using
network- provided values or untick “Automatic" to set the date and timemanually.
Step 3: You can also adjust the time zone, set it to 24-hour time format and/or adjust thedate format by tapping the appropriate options provided.
c. Install and Manage Application on your TabletApplications or Apps are one of the key features of Tablet which can really enhance the wayyou access various services. Now many services are available through applications or appslike Facebook, YouTube, redBus, IRCTC, etc.
Steps to get new apps on your Tablet are as follows:Step 1: Go to ‘Menu’ option on your Tablet.Step 2: In Menu, tap on ‘Play Store’ option. You can discover
apps and content by navigating the on-screen menuswhich include Apps, Books, Movies and Games.
Step 3: Click on one of the displayed options. For example, if youhave clicked on Apps tab, it will open the followingsection having various sub-sections like Categories,Home, Top Paid, Top Free, Top Grossing, Top New Paid,Top New Free and Top Trending.
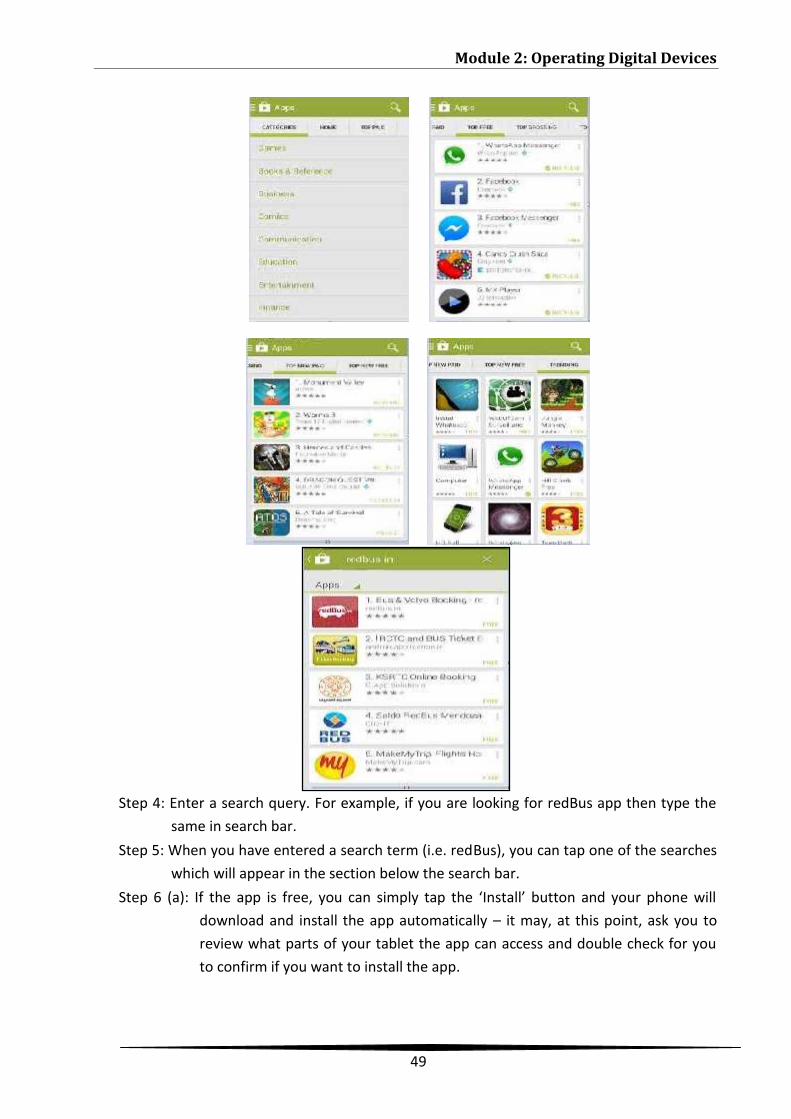
Module 2: Operating Digital Devices
49
Step 4: Enter a search query. For example, if you are looking for redBus app then type thesame in search bar.
Step 5: When you have entered a search term (i.e. redBus), you can tap one of the searcheswhich will appear in the section below the search bar.
Step 6 (a): If the app is free, you can simply tap the ‘Install’ button and your phone willdownload and install the app automatically – it may, at this point, ask you toreview what parts of your tablet the app can access and double check for youto confirm if you want to install the app.
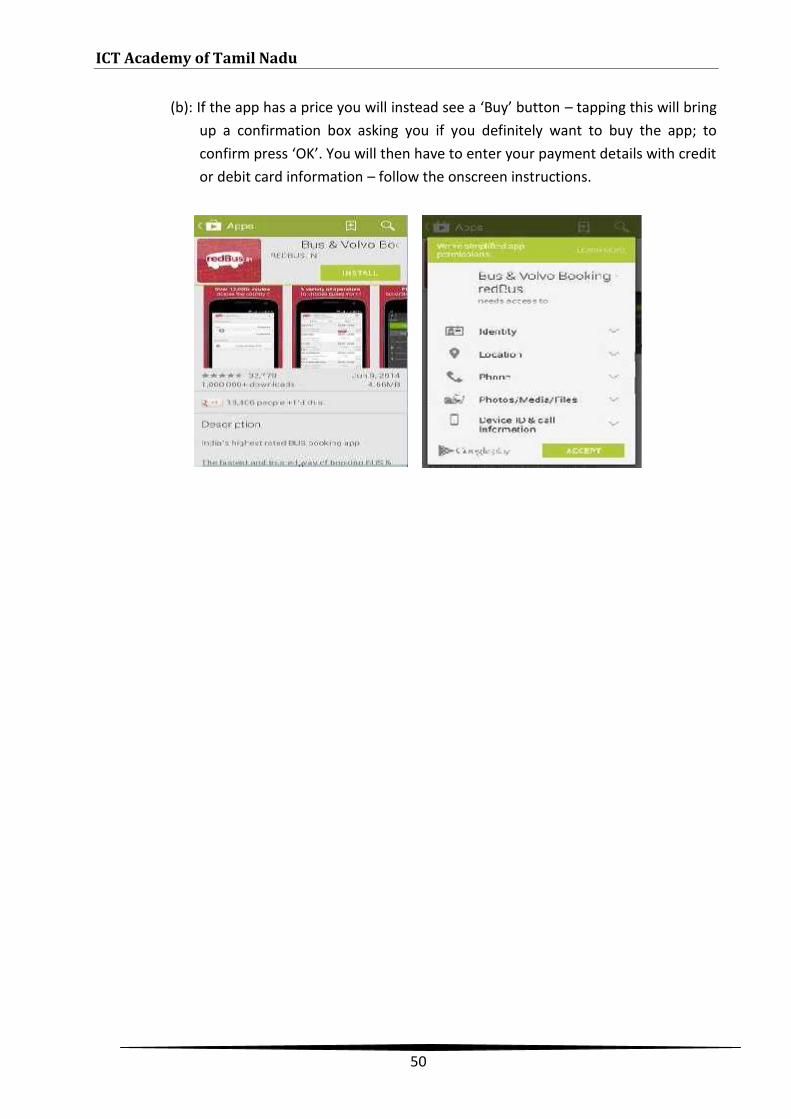
ICT Academy of Tamil Nadu
50
(b): If the app has a price you will instead see a ‘Buy’ button – tapping this will bringup a confirmation box asking you if you definitely want to buy the app; toconfirm press ‘OK’. You will then have to enter your payment details with creditor debit card information – follow the onscreen instructions.
3. ACCESSING GOVERNMENT SERVICES
LEARNING OUTCOMES
By the end of this module, you should be able to:
• Explain the process of accessing various Government Schemes• Use government portals to access various e-Governance services
LESSON PLAN
I. Locating Government informationII. Accessing e-Governance Services
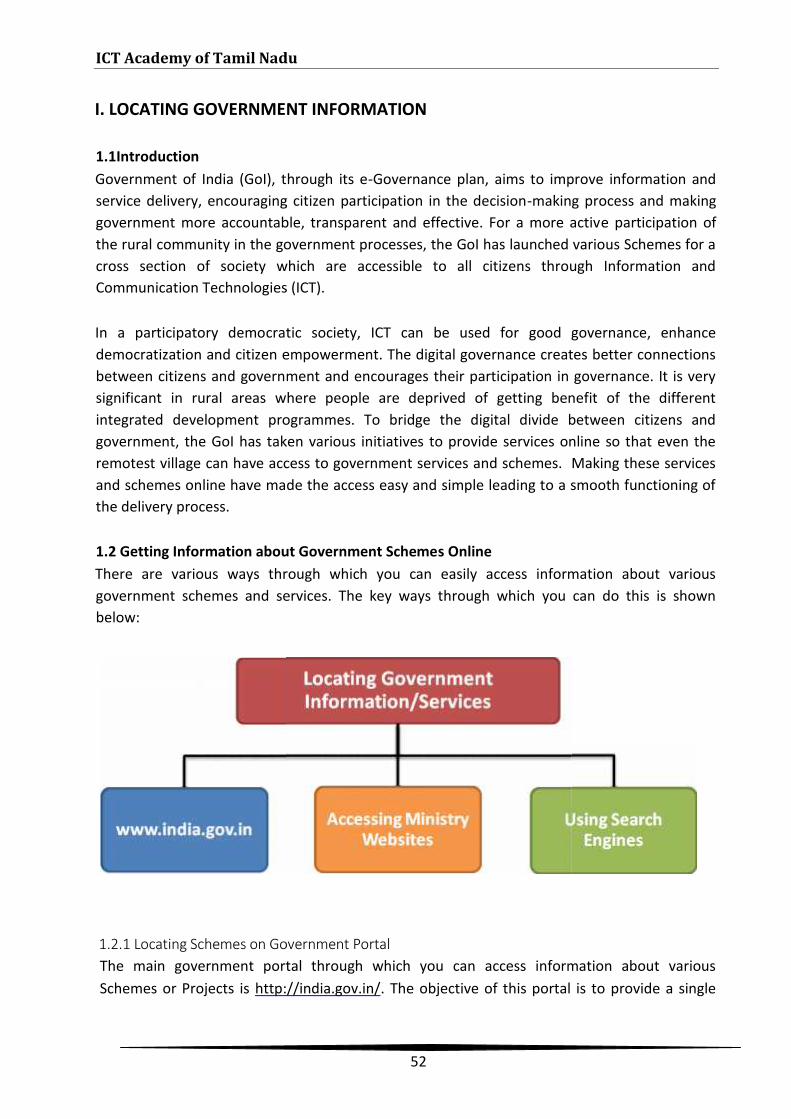
ICT Academy of Tamil Nadu
52
I. LOCATING GOVERNMENT INFORMATION
1.1IntroductionGovernment of India (GoI), through its e-Governance plan, aims to improve information andservice delivery, encouraging citizen participation in the decision-making process and makinggovernment more accountable, transparent and effective. For a more active participation ofthe rural community in the government processes, the GoI has launched various Schemes for across section of society which are accessible to all citizens through Information andCommunication Technologies (ICT).
In a participatory democratic society, ICT can be used for good governance, enhancedemocratization and citizen empowerment. The digital governance creates better connectionsbetween citizens and government and encourages their participation in governance. It is verysignificant in rural areas where people are deprived of getting benefit of the differentintegrated development programmes. To bridge the digital divide between citizens andgovernment, the GoI has taken various initiatives to provide services online so that even theremotest village can have access to government services and schemes. Making these servicesand schemes online have made the access easy and simple leading to a smooth functioning ofthe delivery process.
1.2 Getting Information about Government Schemes OnlineThere are various ways through which you can easily access information about variousgovernment schemes and services. The key ways through which you can do this is shownbelow:
1.2.1 Locating Schemes on Government PortalThe main government portal through which you can access information about variousSchemes or Projects is http://india.gov.in/. The objective of this portal is to provide a single
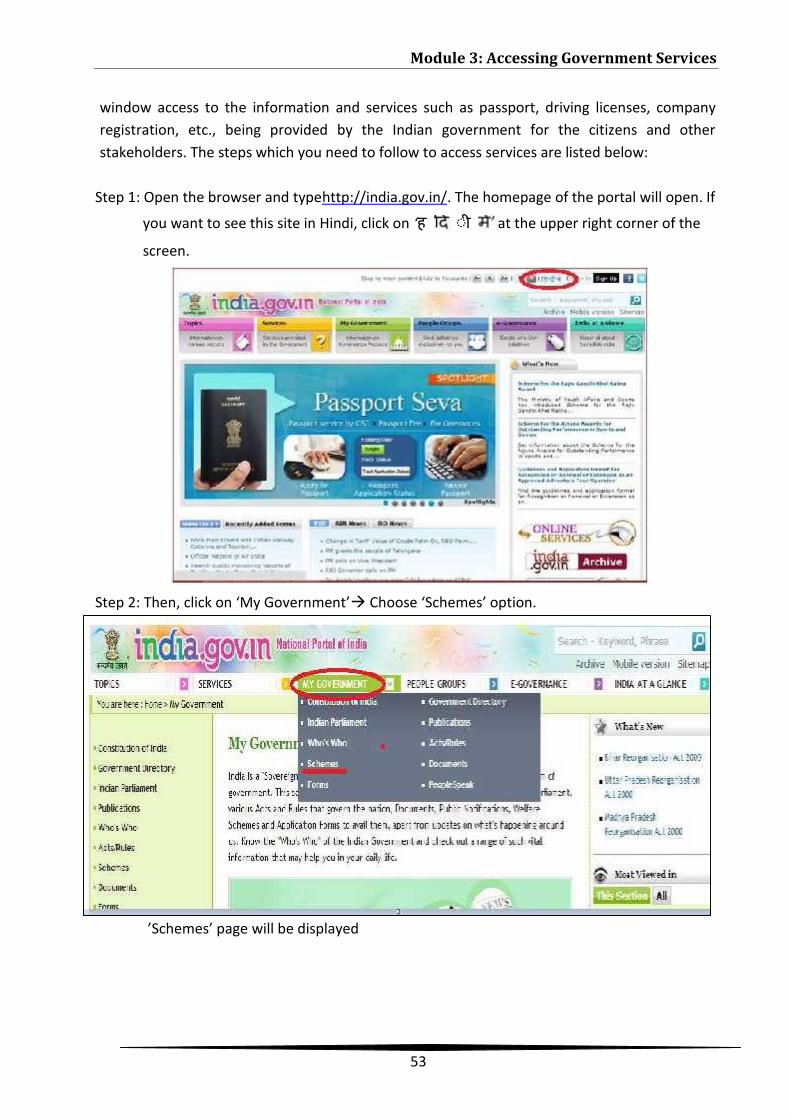
Module 3: Accessing Government Services
53
window access to the information and services such as passport, driving licenses, companyregistration, etc., being provided by the Indian government for the citizens and otherstakeholders. The steps which you need to follow to access services are listed below:
Step 1: Open the browser and typehttp://india.gov.in/. The homepage of the portal will open. If
you want to see this site in Hindi, click on ‘ह ◌ी ’ at the upper right corner of the
screen.
Step 2: Then, click on ‘My Government’ Choose ‘Schemes’ option.
’Schemes’ page will be displayed

ICT Academy of Tamil Nadu
54
Step 3: In ‘Jurisdiction’, choose whether you want to search for Central or State Scheme byclicking on the drop down arrow. In the ‘Ministry’ section, add the name of theministry under which you want to search the scheme (If you do not know the name ofthe Ministry, then choose ‘Any’ in the Ministry option) In Search type name ofSchemethis will display search results for schemes and information about this.
For example, if you are searching for Janani Suraksha Yojana, following page will be displayed.By clicking on the link ‘Information about Janani Suraksha Yojna’, you will get all details aboutthis scheme.
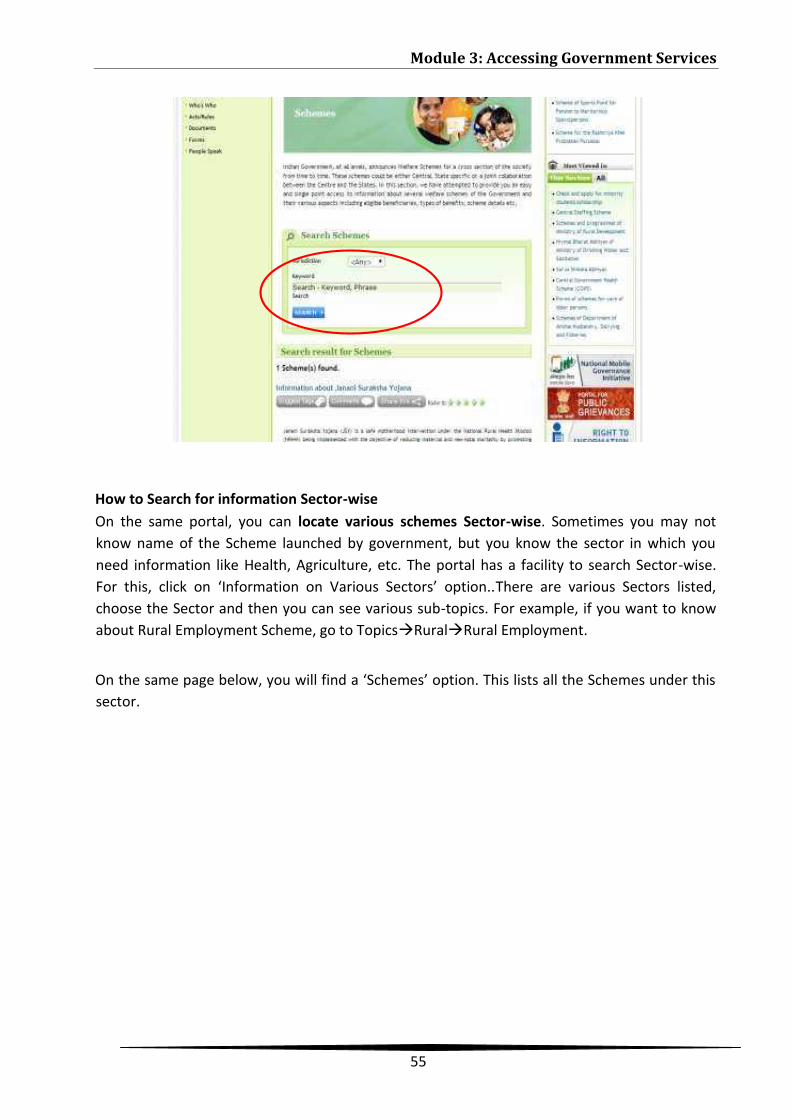
Module 3: Accessing Government Services
55
How to Search for information Sector-wiseOn the same portal, you can locate various schemes Sector-wise. Sometimes you may notknow name of the Scheme launched by government, but you know the sector in which youneed information like Health, Agriculture, etc. The portal has a facility to search Sector-wise.For this, click on ‘Information on Various Sectors’ option..There are various Sectors listed,choose the Sector and then you can see various sub-topics. For example, if you want to knowabout Rural Employment Scheme, go to TopicsRuralRural Employment.
On the same page below, you will find a ‘Schemes’ option. This lists all the Schemes under thissector.
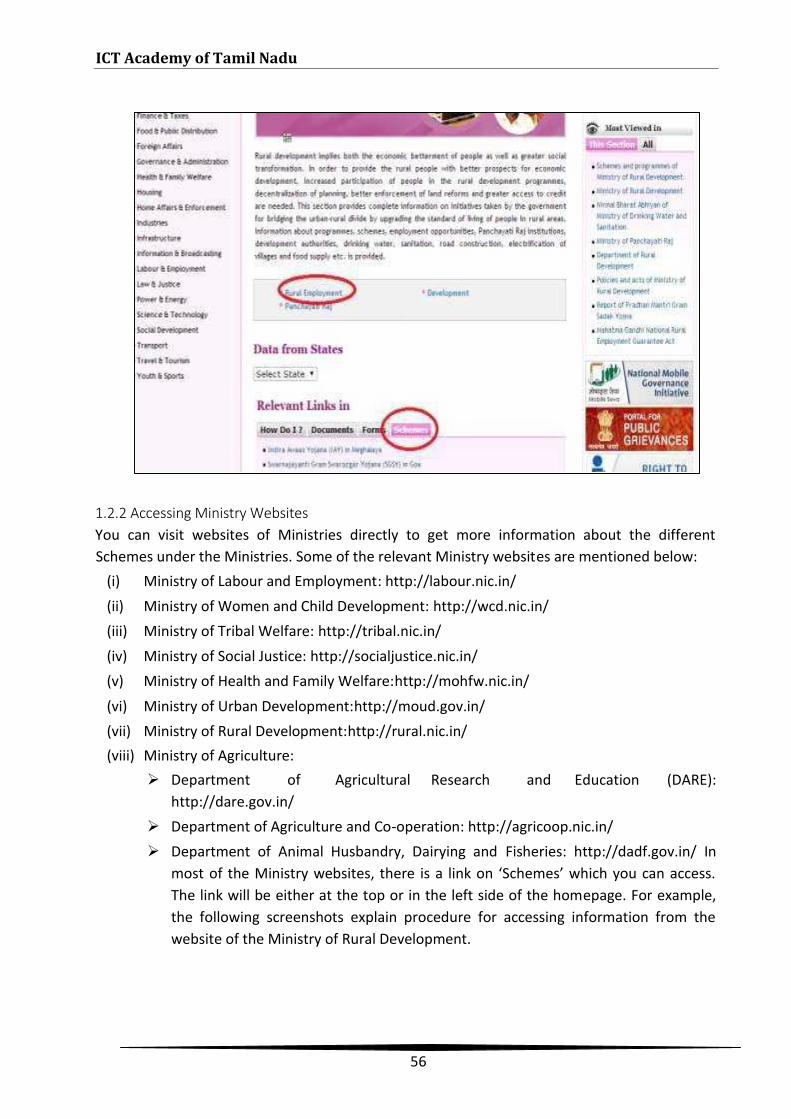
ICT Academy of Tamil Nadu
56
1.2.2 Accessing Ministry WebsitesYou can visit websites of Ministries directly to get more information about the differentSchemes under the Ministries. Some of the relevant Ministry websites are mentioned below:
(i) Ministry of Labour and Employment: http://labour.nic.in/(ii) Ministry of Women and Child Development: http://wcd.nic.in/(iii) Ministry of Tribal Welfare: http://tribal.nic.in/(iv) Ministry of Social Justice: http://socialjustice.nic.in/(v) Ministry of Health and Family Welfare:http://mohfw.nic.in/(vi) Ministry of Urban Development:http://moud.gov.in/(vii) Ministry of Rural Development:http://rural.nic.in/(viii) Ministry of Agriculture:
Department of Agricultural Research and Education (DARE):http://dare.gov.in/
Department of Agriculture and Co-operation: http://agricoop.nic.in/ Department of Animal Husbandry, Dairying and Fisheries: http://dadf.gov.in/ In
most of the Ministry websites, there is a link on ‘Schemes’ which you can access.The link will be either at the top or in the left side of the homepage. For example,the following screenshots explain procedure for accessing information from thewebsite of the Ministry of Rural Development.
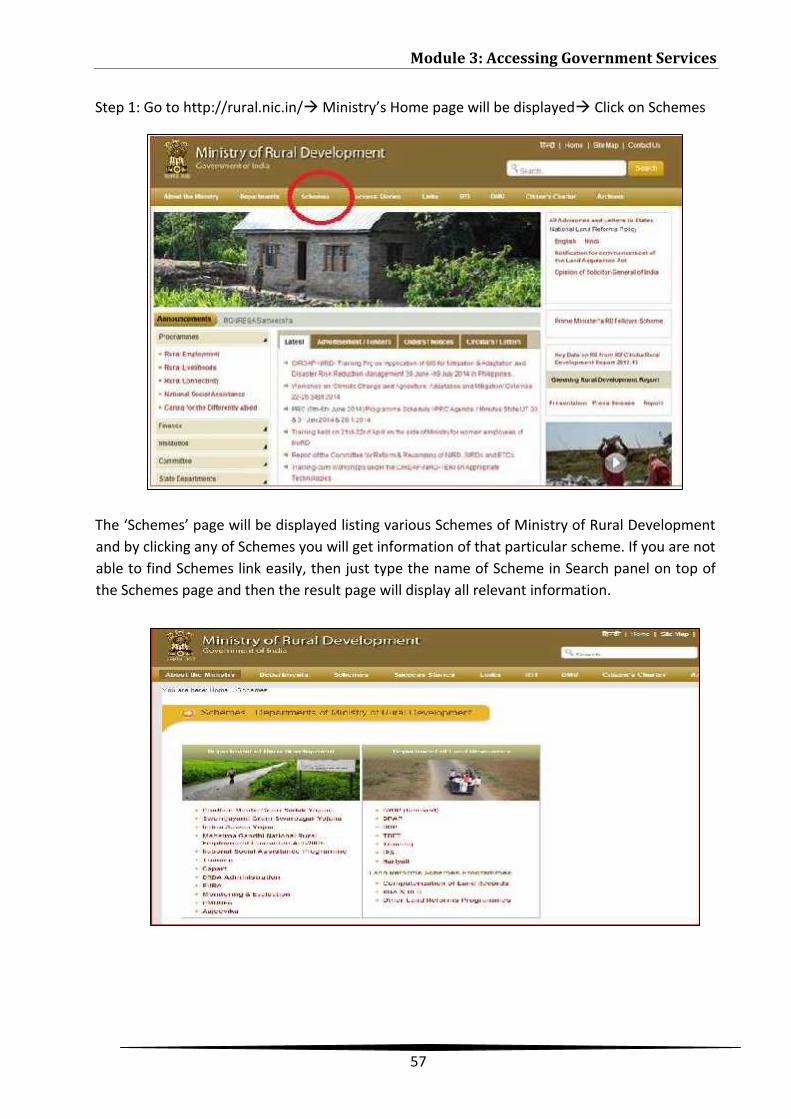
Module 3: Accessing Government Services
57
Step 1: Go to http://rural.nic.in/Ministry’s Home page will be displayed Click on Schemes
The ‘Schemes’ page will be displayed listing various Schemes of Ministry of Rural Developmentand by clicking any of Schemes you will get information of that particular scheme. If you are notable to find Schemes link easily, then just type the name of Scheme in Search panel on top ofthe Schemes page and then the result page will display all relevant information.

ICT Academy of Tamil Nadu
58
1.2.3 Using Internet Search Engines for getting informationIf you are unable to locate information on the government portal or do not know the name ofSchemes or Ministry, then you can search details of these on search engines like Google, Bingor Yahoo.
Step 1: Type www.google.comor www.bing.comin the browserStep 2: Type relevant words, like for education loan type “Education Loan Scheme” or you can
use some other keywords like –• Education loan schemes by government of India• Education loan PIB• Education loan for minority PIB• Education loan for Tribal• Education loan for higher education PIB
(PIB refers to Press Information Bureau which is the official news portal of GoI. By adding it,your search will display results first from this website which will have authentic information).
Important Schemes under various MinistriesSome of the important Schemes under different Ministries are given below:1. Ministry of Health
• National Rural Health Mission (NRHM)• Janani Suraksha Yojana (JSY)• Janani Shishu Suraksha Karyakram (JSSK)• Home Based New Born Care (HBNC)
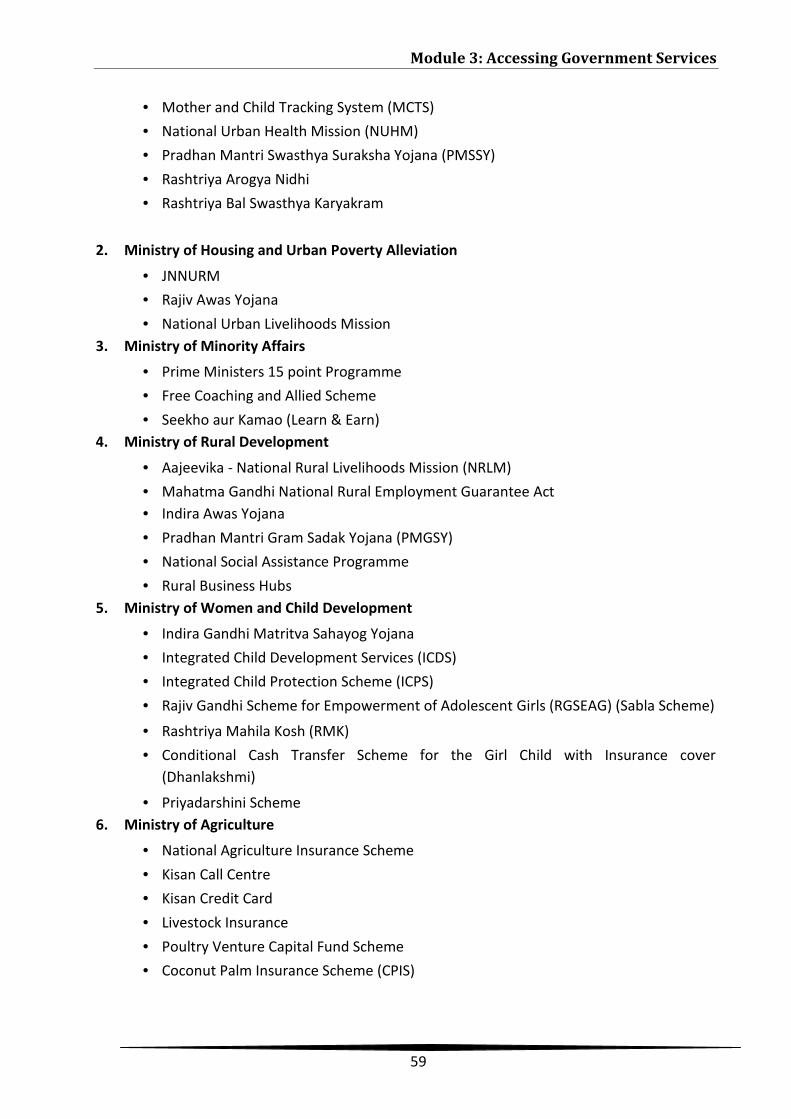
Module 3: Accessing Government Services
59
• Mother and Child Tracking System (MCTS)• National Urban Health Mission (NUHM)• Pradhan Mantri Swasthya Suraksha Yojana (PMSSY)• Rashtriya Arogya Nidhi• Rashtriya Bal Swasthya Karyakram
2. Ministry of Housing and Urban Poverty Alleviation
• JNNURM• Rajiv Awas Yojana• National Urban Livelihoods Mission
3. Ministry of Minority Affairs
• Prime Ministers 15 point Programme• Free Coaching and Allied Scheme• Seekho aur Kamao (Learn & Earn)
4. Ministry of Rural Development
• Aajeevika - National Rural Livelihoods Mission (NRLM)• Mahatma Gandhi National Rural Employment Guarantee Act• Indira Awas Yojana• Pradhan Mantri Gram Sadak Yojana (PMGSY)• National Social Assistance Programme• Rural Business Hubs
5. Ministry of Women and Child Development
• Indira Gandhi Matritva Sahayog Yojana• Integrated Child Development Services (ICDS)• Integrated Child Protection Scheme (ICPS)• Rajiv Gandhi Scheme for Empowerment of Adolescent Girls (RGSEAG) (Sabla Scheme)
• Rashtriya Mahila Kosh (RMK)• Conditional Cash Transfer Scheme for the Girl Child with Insurance cover
(Dhanlakshmi)
• Priyadarshini Scheme6. Ministry of Agriculture
• National Agriculture Insurance Scheme• Kisan Call Centre• Kisan Credit Card• Livestock Insurance• Poultry Venture Capital Fund Scheme• Coconut Palm Insurance Scheme (CPIS)
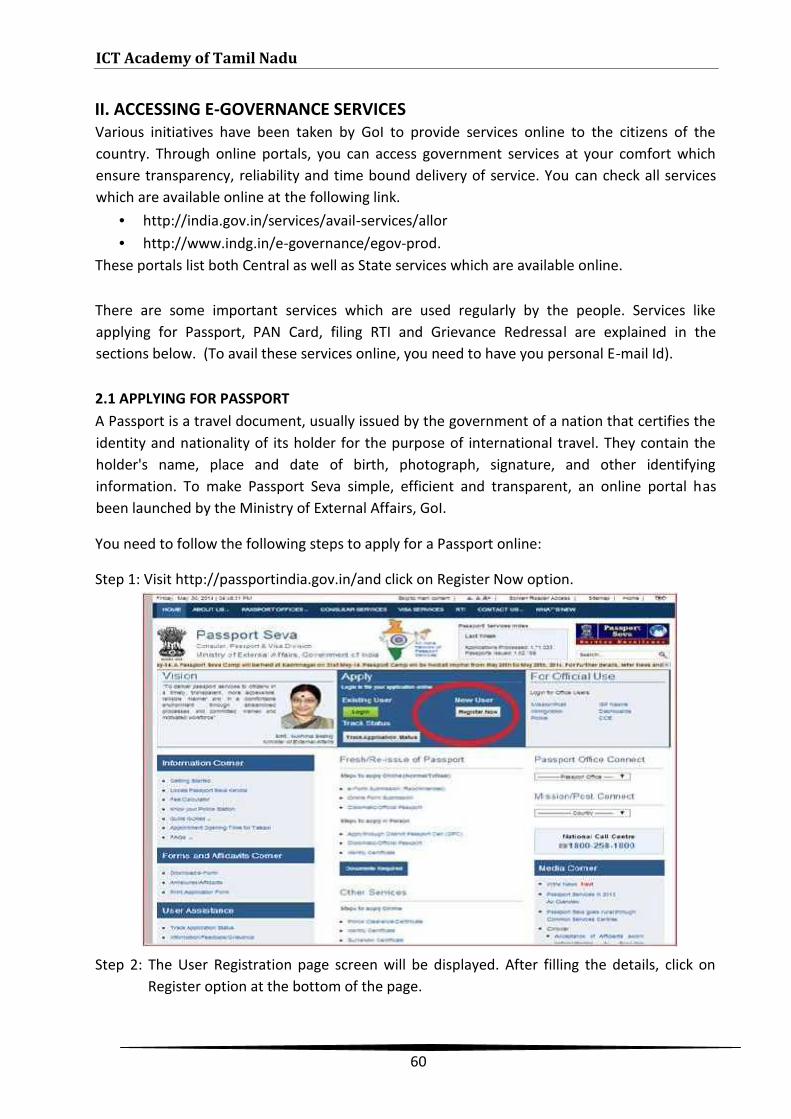
ICT Academy of Tamil Nadu
60
II. ACCESSING E-GOVERNANCE SERVICESVarious initiatives have been taken by GoI to provide services online to the citizens of thecountry. Through online portals, you can access government services at your comfort whichensure transparency, reliability and time bound delivery of service. You can check all serviceswhich are available online at the following link.
http://india.gov.in/services/avail-services/allor http://www.indg.in/e-governance/egov-prod.
These portals list both Central as well as State services which are available online.
There are some important services which are used regularly by the people. Services likeapplying for Passport, PAN Card, filing RTI and Grievance Redressal are explained in thesections below. (To avail these services online, you need to have you personal E-mail Id).
2.1 APPLYING FOR PASSPORTA Passport is a travel document, usually issued by the government of a nation that certifies theidentity and nationality of its holder for the purpose of international travel. They contain theholder's name, place and date of birth, photograph, signature, and other identifyinginformation. To make Passport Seva simple, efficient and transparent, an online portal hasbeen launched by the Ministry of External Affairs, GoI.
You need to follow the following steps to apply for a Passport online:
Step 1: Visit http://passportindia.gov.in/and click on Register Now option.
Step 2: The User Registration page screen will be displayed. After filling the details, click onRegister option at the bottom of the page.
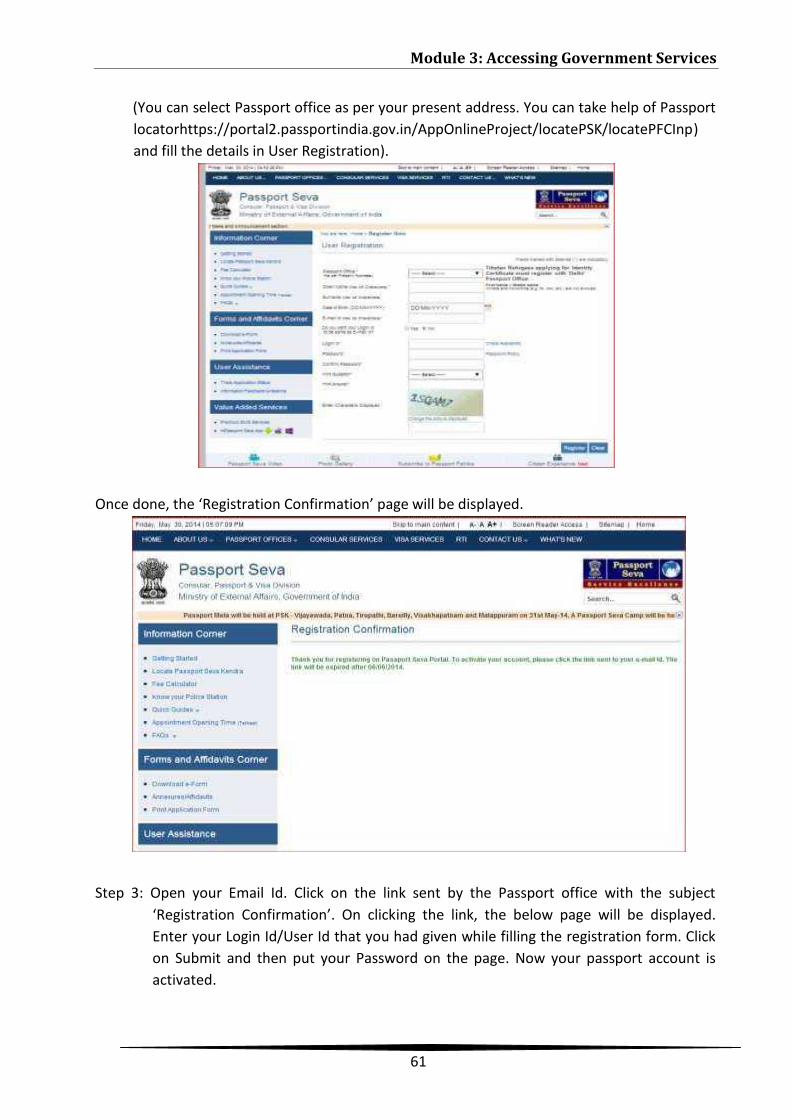
Module 3: Accessing Government Services
61
(You can select Passport office as per your present address. You can take help of Passportlocatorhttps://portal2.passportindia.gov.in/AppOnlineProject/locatePSK/locatePFCInp)and fill the details in User Registration).
Once done, the ‘Registration Confirmation’ page will be displayed.
Step 3: Open your Email Id. Click on the link sent by the Passport office with the subject‘Registration Confirmation’. On clicking the link, the below page will be displayed.Enter your Login Id/User Id that you had given while filling the registration form. Clickon Submit and then put your Password on the page. Now your passport account isactivated.
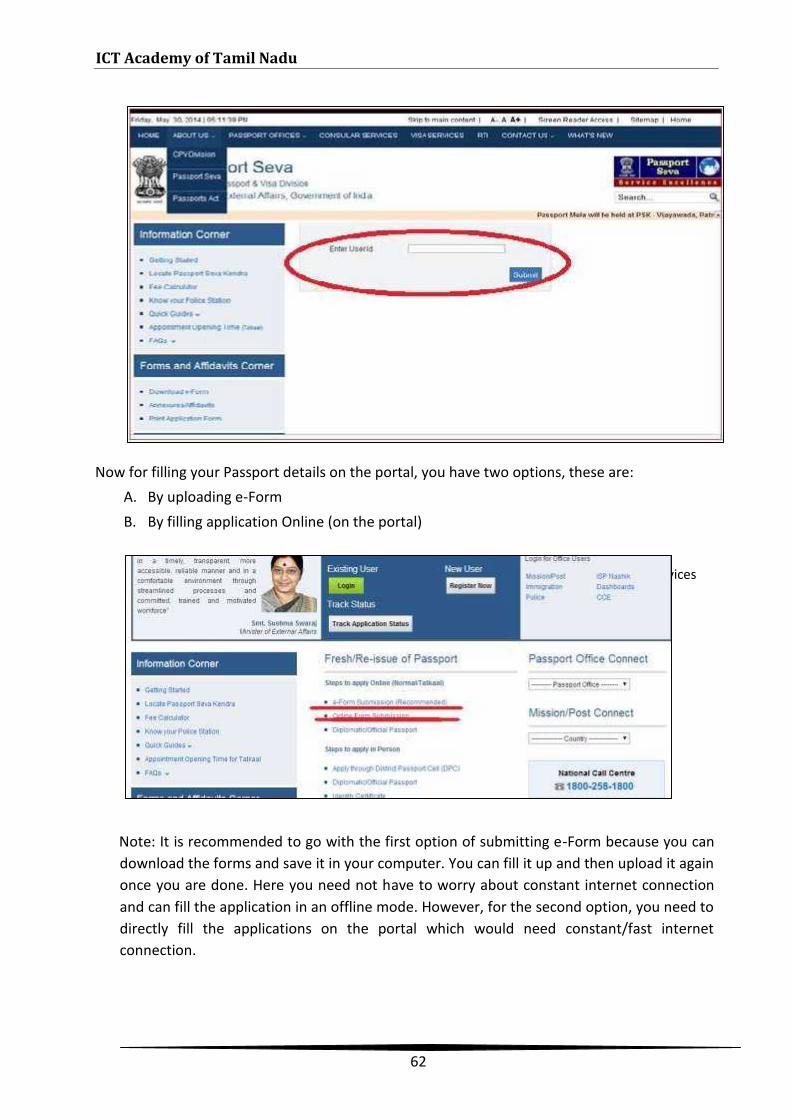
ICT Academy of Tamil Nadu
62
Now for filling your Passport details on the portal, you have two options, these are:A. By uploading e-FormB. By filling application Online (on the portal)
Note: It is recommended to go with the first option of submitting e-Form because you candownload the forms and save it in your computer. You can fill it up and then upload it againonce you are done. Here you need not have to worry about constant internet connectionand can fill the application in an offline mode. However, for the second option, you need todirectly fill the applications on the portal which would need constant/fast internetconnection.
Module 3: Accessing Government Services
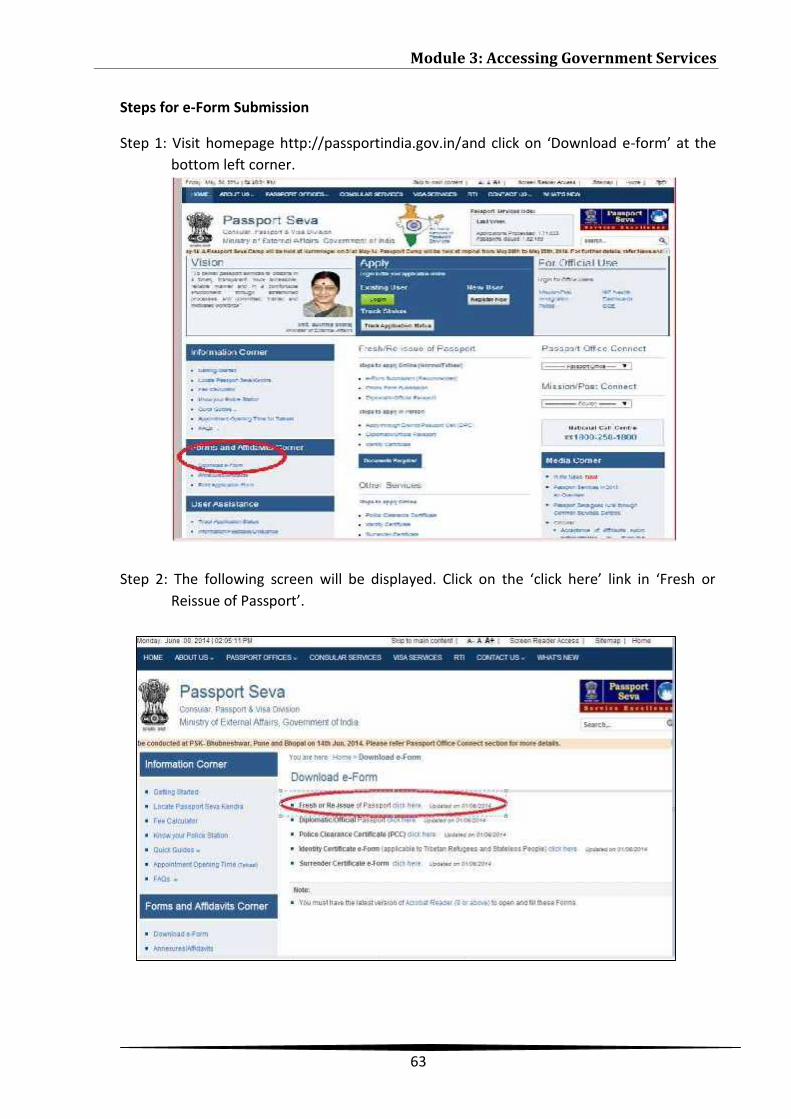
Module 3: Accessing Government Services
63
Steps for e-Form Submission
Step 1: Visit homepage http://passportindia.gov.in/and click on ‘Download e-form’ at thebottom left corner.
Step 2: The following screen will be displayed. Click on the ‘click here’ link in ‘Fresh orReissue of Passport’.
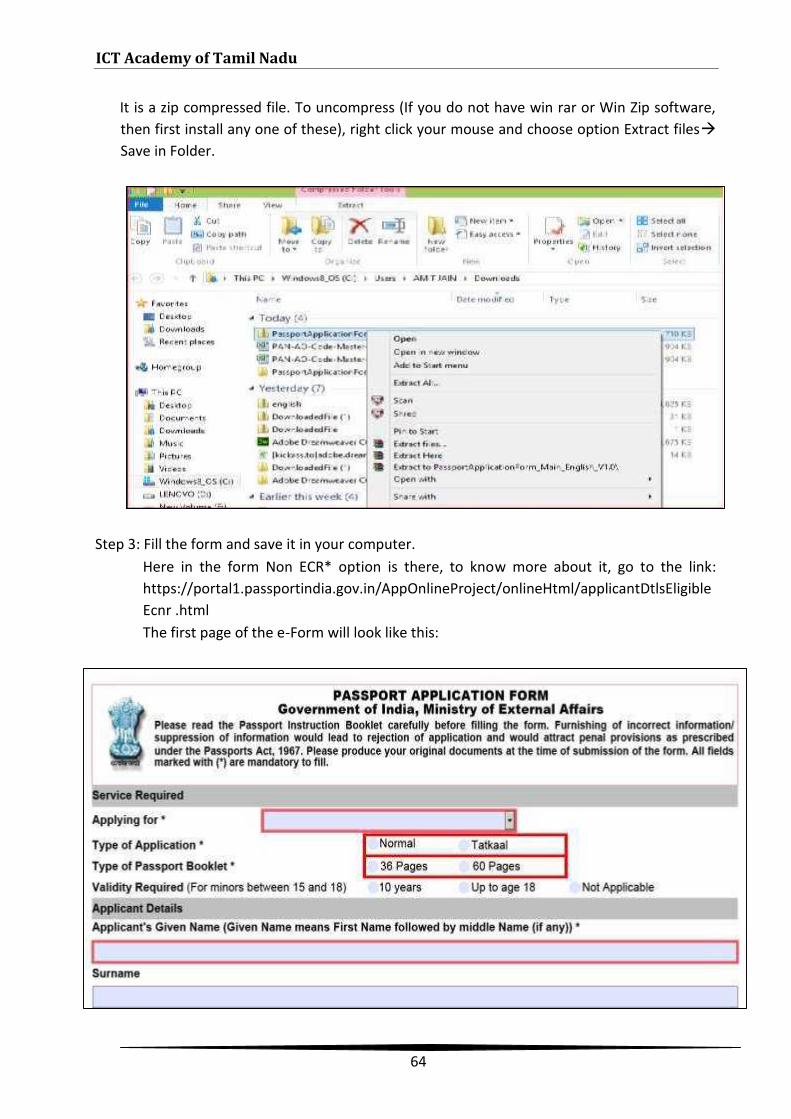
ICT Academy of Tamil Nadu
64
It is a zip compressed file. To uncompress (If you do not have win rar or Win Zip software,then first install any one of these), right click your mouse and choose option Extract filesSave in Folder.
Step 3: Fill the form and save it in your computer.Here in the form Non ECR* option is there, to know more about it, go to the link:https://portal1.passportindia.gov.in/AppOnlineProject/onlineHtml/applicantDtlsEligibleEcnr .htmlThe first page of the e-Form will look like this:
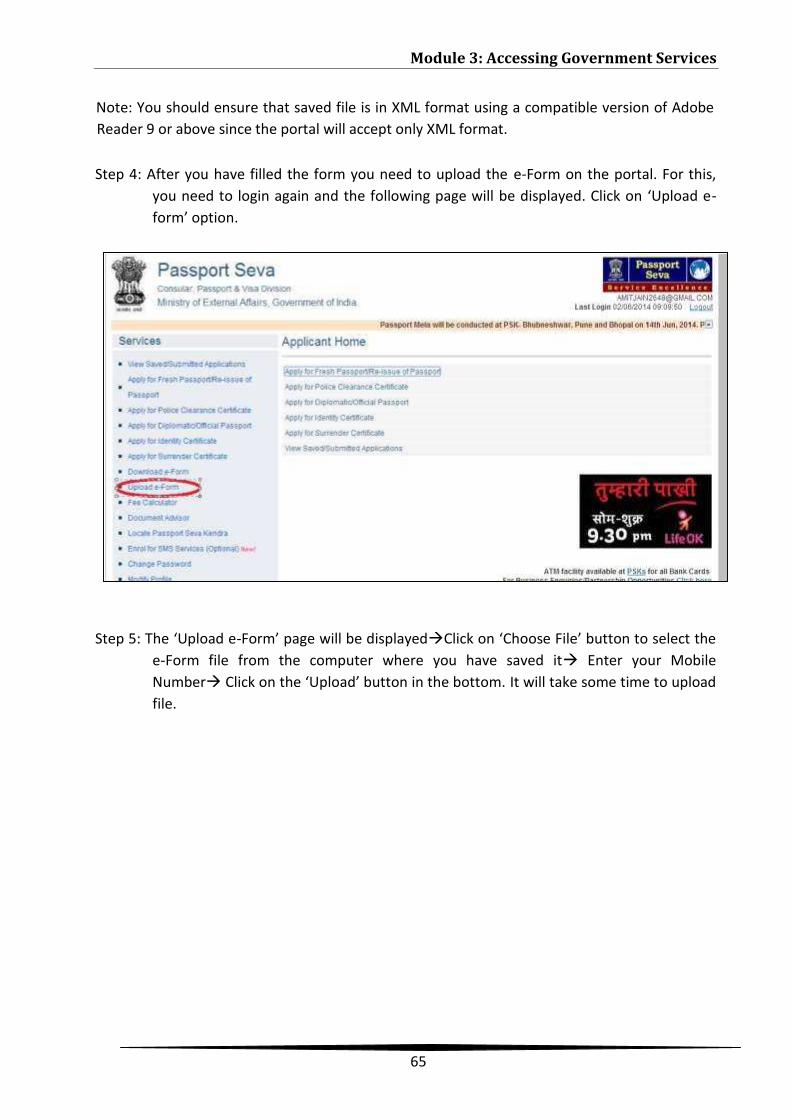
Module 3: Accessing Government Services
65
Note: You should ensure that saved file is in XML format using a compatible version of AdobeReader 9 or above since the portal will accept only XML format.
Step 4: After you have filled the form you need to upload the e-Form on the portal. For this,you need to login again and the following page will be displayed. Click on ‘Upload e-form’ option.
Step 5: The ‘Upload e-Form’ page will be displayedClick on ‘Choose File’ button to select thee-Form file from the computer where you have saved it Enter your MobileNumber Click on the ‘Upload’ button in the bottom. It will take some time to uploadfile.
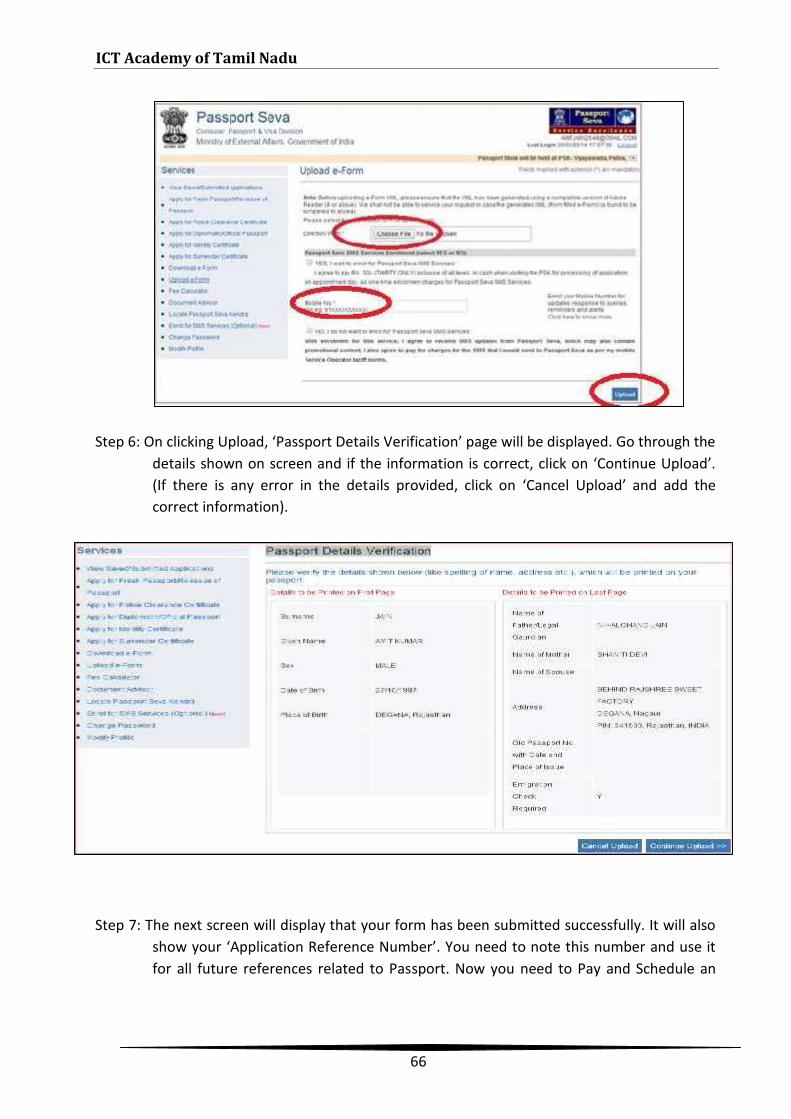
ICT Academy of Tamil Nadu
66
Step 6: On clicking Upload, ‘Passport Details Verification’ page will be displayed. Go through thedetails shown on screen and if the information is correct, click on ‘Continue Upload’.(If there is any error in the details provided, click on ‘Cancel Upload’ and add thecorrect information).
Step 7: The next screen will display that your form has been submitted successfully. It will alsoshow your ‘Application Reference Number’. You need to note this number and use itfor all future references related to Passport. Now you need to Pay and Schedule an
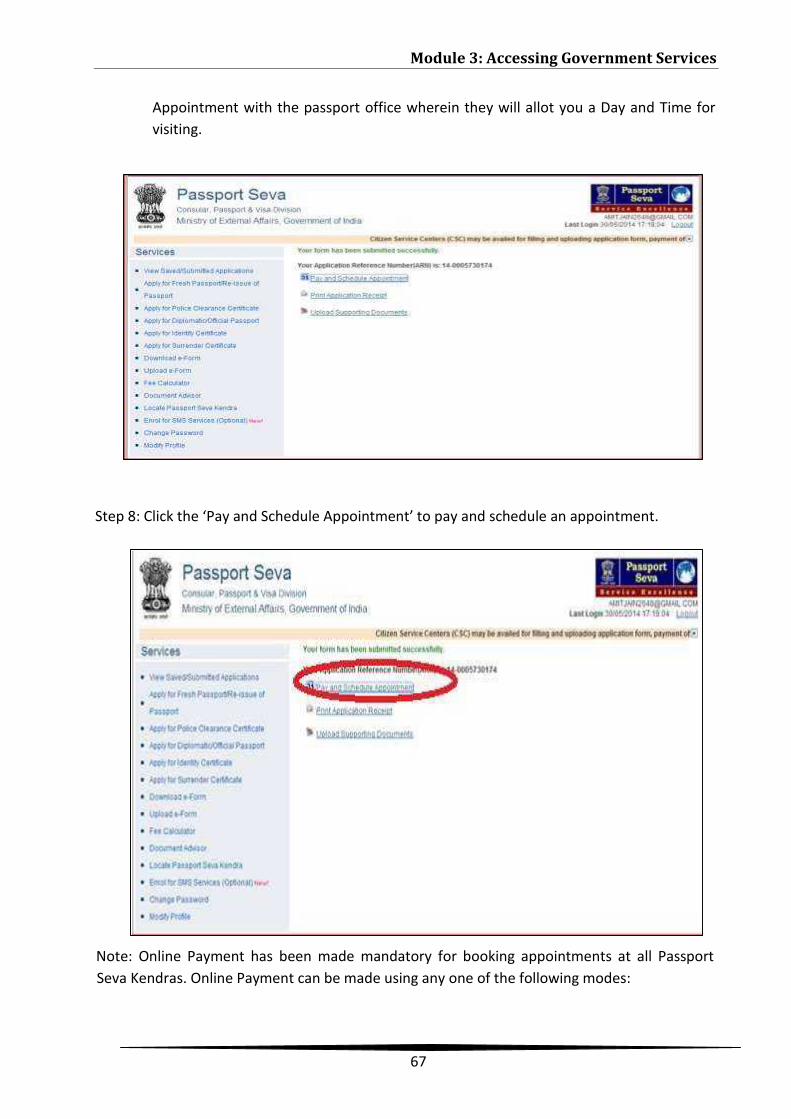
Module 3: Accessing Government Services
67
Appointment with the passport office wherein they will allot you a Day and Time forvisiting.
Step 8: Click the ‘Pay and Schedule Appointment’ to pay and schedule an appointment.
Note: Online Payment has been made mandatory for booking appointments at all PassportSeva Kendras. Online Payment can be made using any one of the following modes:
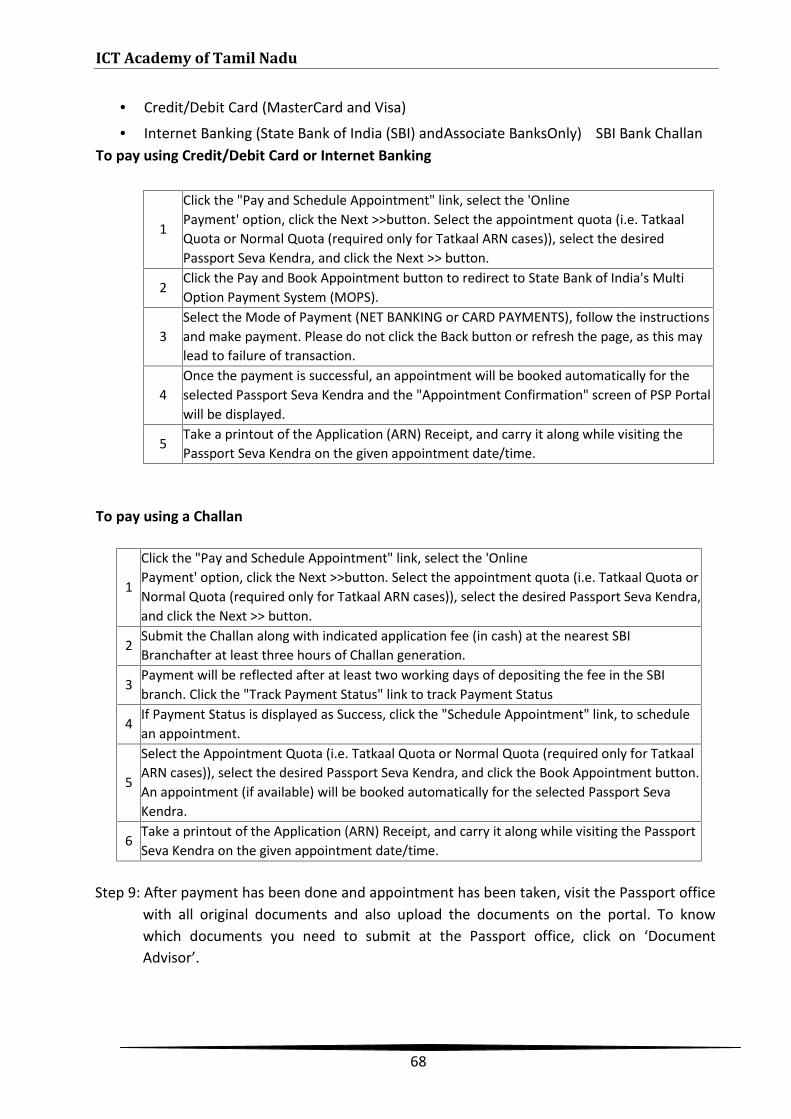
ICT Academy of Tamil Nadu
68
• Credit/Debit Card (MasterCard and Visa)
• Internet Banking (State Bank of India (SBI) andAssociate BanksOnly)SBI Bank ChallanTo pay using Credit/Debit Card or Internet Banking
1
Click the "Pay and Schedule Appointment" link, select the 'OnlinePayment' option, click the Next >>button. Select the appointment quota (i.e. TatkaalQuota or Normal Quota (required only for Tatkaal ARN cases)), select the desiredPassport Seva Kendra, and click the Next >> button.
2Click the Pay and Book Appointment button to redirect to State Bank of India's MultiOption Payment System (MOPS).
3Select the Mode of Payment (NET BANKING or CARD PAYMENTS), follow the instructionsand make payment. Please do not click the Back button or refresh the page, as this maylead to failure of transaction.
4Once the payment is successful, an appointment will be booked automatically for theselected Passport Seva Kendra and the "Appointment Confirmation" screen of PSP Portalwill be displayed.
5Take a printout of the Application (ARN) Receipt, and carry it along while visiting thePassport Seva Kendra on the given appointment date/time.
To pay using a Challan
1
Click the "Pay and Schedule Appointment" link, select the 'OnlinePayment' option, click the Next >>button. Select the appointment quota (i.e. Tatkaal Quota orNormal Quota (required only for Tatkaal ARN cases)), select the desired Passport Seva Kendra,and click the Next >> button.
2Submit the Challan along with indicated application fee (in cash) at the nearest SBIBranchafter at least three hours of Challan generation.
3Payment will be reflected after at least two working days of depositing the fee in the SBIbranch. Click the "Track Payment Status" link to track Payment Status
4If Payment Status is displayed as Success, click the "Schedule Appointment" link, to schedulean appointment.
5
Select the Appointment Quota (i.e. Tatkaal Quota or Normal Quota (required only for TatkaalARN cases)), select the desired Passport Seva Kendra, and click the Book Appointment button.An appointment (if available) will be booked automatically for the selected Passport SevaKendra.
6Take a printout of the Application (ARN) Receipt, and carry it along while visiting the PassportSeva Kendra on the given appointment date/time.
Step 9: After payment has been done and appointment has been taken, visit the Passport officewith all original documents and also upload the documents on the portal. To knowwhich documents you need to submit at the Passport office, click on ‘DocumentAdvisor’.
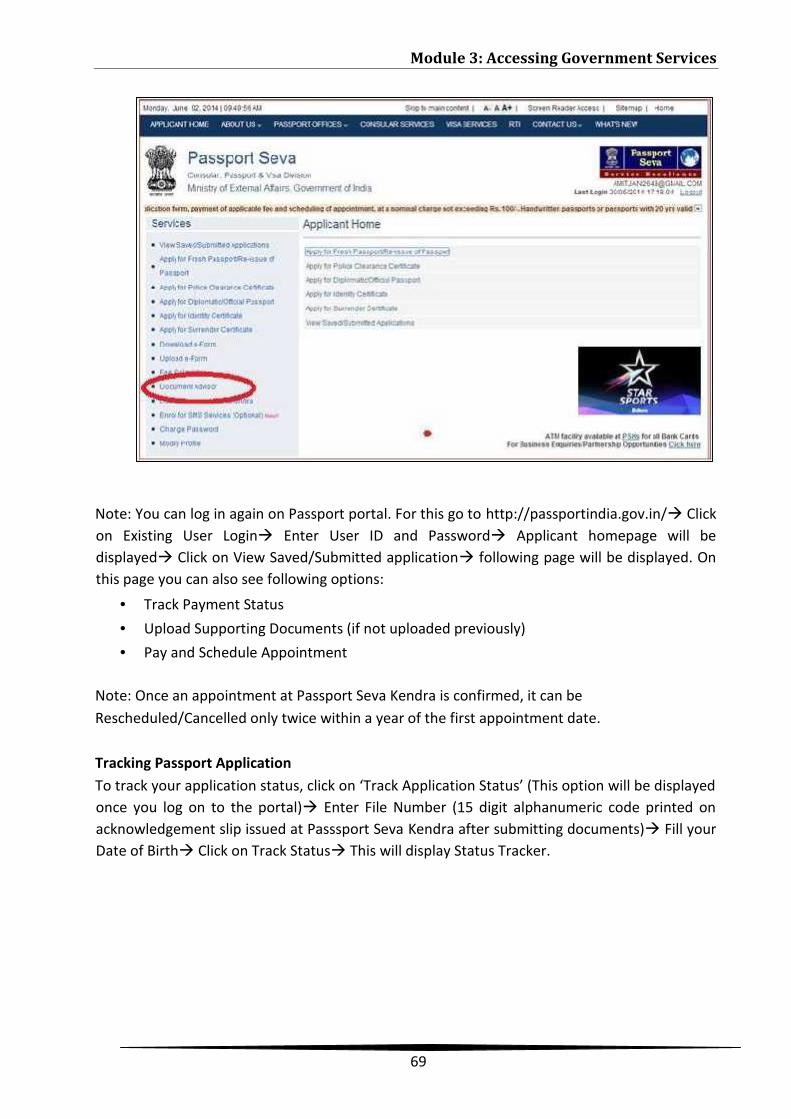
Module 3: Accessing Government Services
69
Note: You can log in again on Passport portal. For this go to http://passportindia.gov.in/ Clickon Existing User Login Enter User ID and Password Applicant homepage will bedisplayed Click on View Saved/Submitted application following page will be displayed. Onthis page you can also see following options:
• Track Payment Status• Upload Supporting Documents (if not uploaded previously)• Pay and Schedule Appointment
Note: Once an appointment at Passport Seva Kendra is confirmed, it can beRescheduled/Cancelled only twice within a year of the first appointment date.
Tracking Passport ApplicationTo track your application status, click on ‘Track Application Status’ (This option will be displayedonce you log on to the portal) Enter File Number (15 digit alphanumeric code printed onacknowledgement slip issued at Passsport Seva Kendra after submitting documents) Fill yourDate of Birth Click on Track Status This will display Status Tracker.

ICT Academy of Tamil Nadu
70
2.2 APPLYING FOR PERMANENT ACCOUNT NUMBER (PAN) CARDPermanent Account Number (PAN) is a unique, 10-character alpha-numeric identifier, issued bythe Indian Income Tax Department under the supervision of the Central Board for Direct Taxes(CBDT) and it also serves as an important proof of identification. This number is almostmandatory for financial transactions such as opening a bank account, receiving taxable salaryor professional fees, sale or purchase of assets above specified limits etc. The primary purposeof PAN is to bring a universal identification to all financial transactions and to prevent taxevasion by keeping track of monetary transactions of high-net-worth individuals. The PAN isunique, valid for life-time of the PAN-holder throughout India and is not affected by change ofaddress.
Online application for PAN can be made either through the NSDLportal http://tin.tin.nsdl.com/pan/index.html or UTITSL portalhttp://www.utitsl.co.in/utitsl/uti/newapp/newpanapplication.jsp.In this section, the NSDLapplication procedure has been explained. Similar steps can be followed on the UTITSL portal.
Normally 15 days are required to process the application, provided application is found to be inorder. If you do not get your PAN card within a month, you can contact Aaykar Sampark Kendra(0124-2438000 or 95124-2438000 from NCR) or visit www.incometaxindia.gov.inor send anemail to [email protected] with your application details.
Before applying for PAN Card online, you should have the following: Area Code: For this visit your nearest Income Tax office or search at
https://tin.tin.nsdl.com/pan2/servlet/AOSearchif you know about the IT office in yourrange.
You can make online payment using the below payment options:
• Demand Draft (DD)*
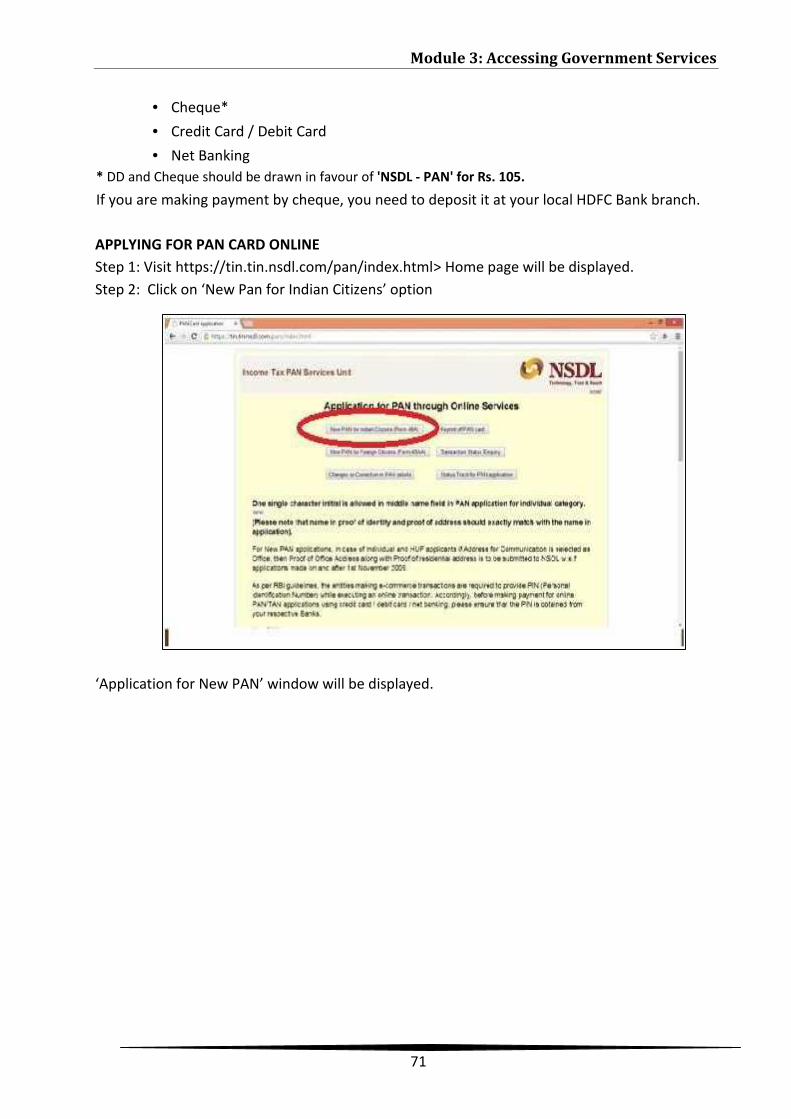
Module 3: Accessing Government Services
71
• Cheque*• Credit Card / Debit Card• Net Banking
* DD and Cheque should be drawn in favour of 'NSDL - PAN' for Rs. 105.If you are making payment by cheque, you need to deposit it at your local HDFC Bank branch.
APPLYING FOR PAN CARD ONLINEStep 1: Visit https://tin.tin.nsdl.com/pan/index.html> Home page will be displayed.Step 2: Click on ‘New Pan for Indian Citizens’ option
‘Application for New PAN’ window will be displayed.
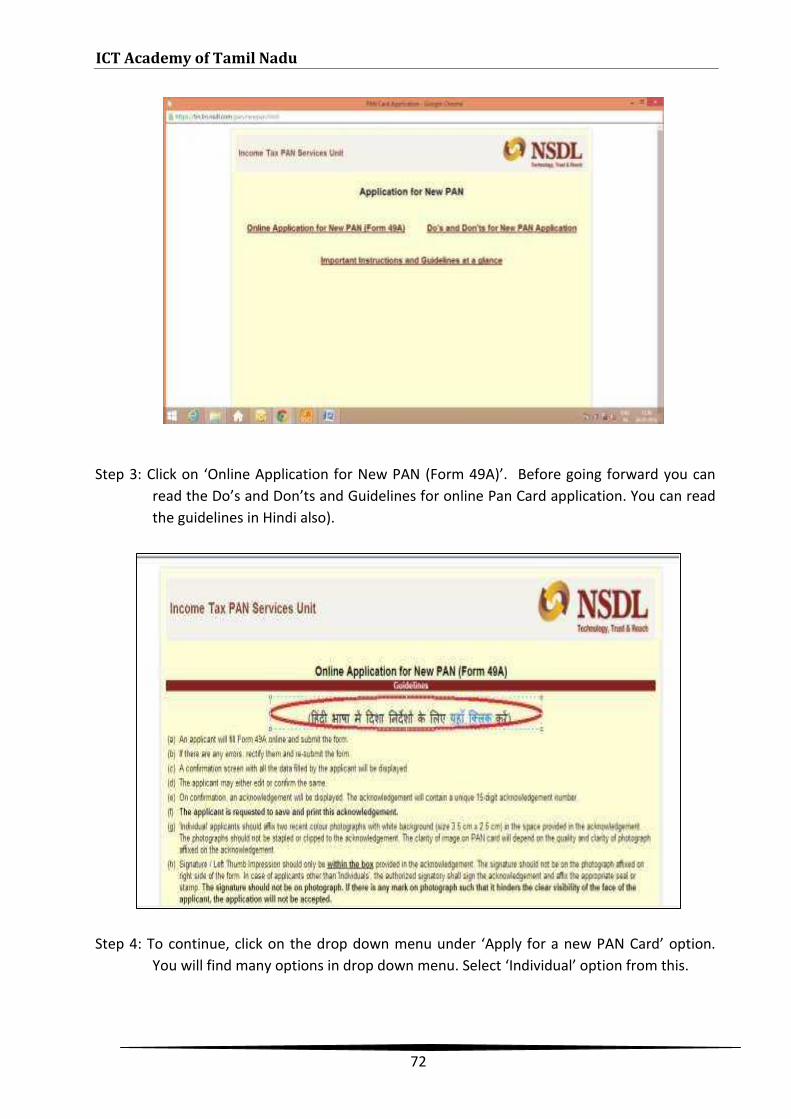
ICT Academy of Tamil Nadu
72
Step 3: Click on ‘Online Application for New PAN (Form 49A)’. Before going forward you canread the Do’s and Don’ts and Guidelines for online Pan Card application. You can readthe guidelines in Hindi also).
Step 4: To continue, click on the drop down menu under ‘Apply for a new PAN Card’ option.You will find many options in drop down menu. Select ‘Individual’ option from this.
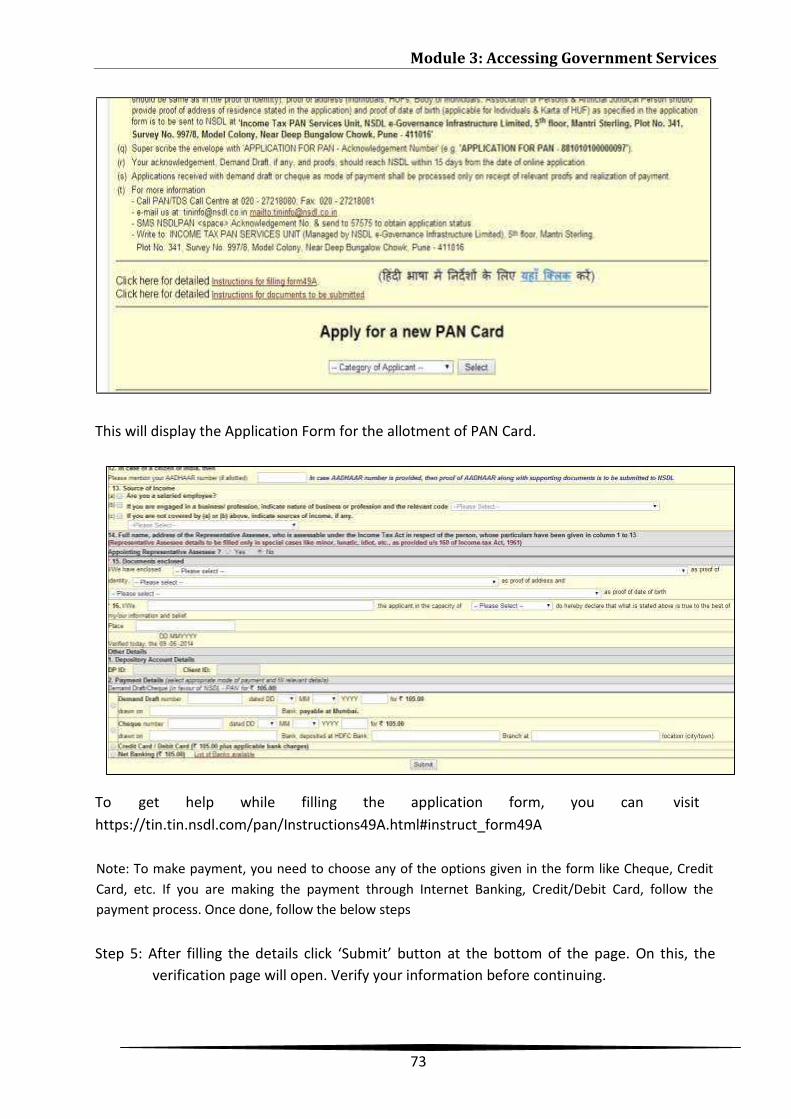
Module 3: Accessing Government Services
73
This will display the Application Form for the allotment of PAN Card.
To get help while filling the application form, you can visithttps://tin.tin.nsdl.com/pan/Instructions49A.html#instruct_form49A
Note: To make payment, you need to choose any of the options given in the form like Cheque, CreditCard, etc. If you are making the payment through Internet Banking, Credit/Debit Card, follow thepayment process. Once done, follow the below steps
Step 5: After filling the details click ‘Submit’ button at the bottom of the page. On this, theverification page will open. Verify your information before continuing.
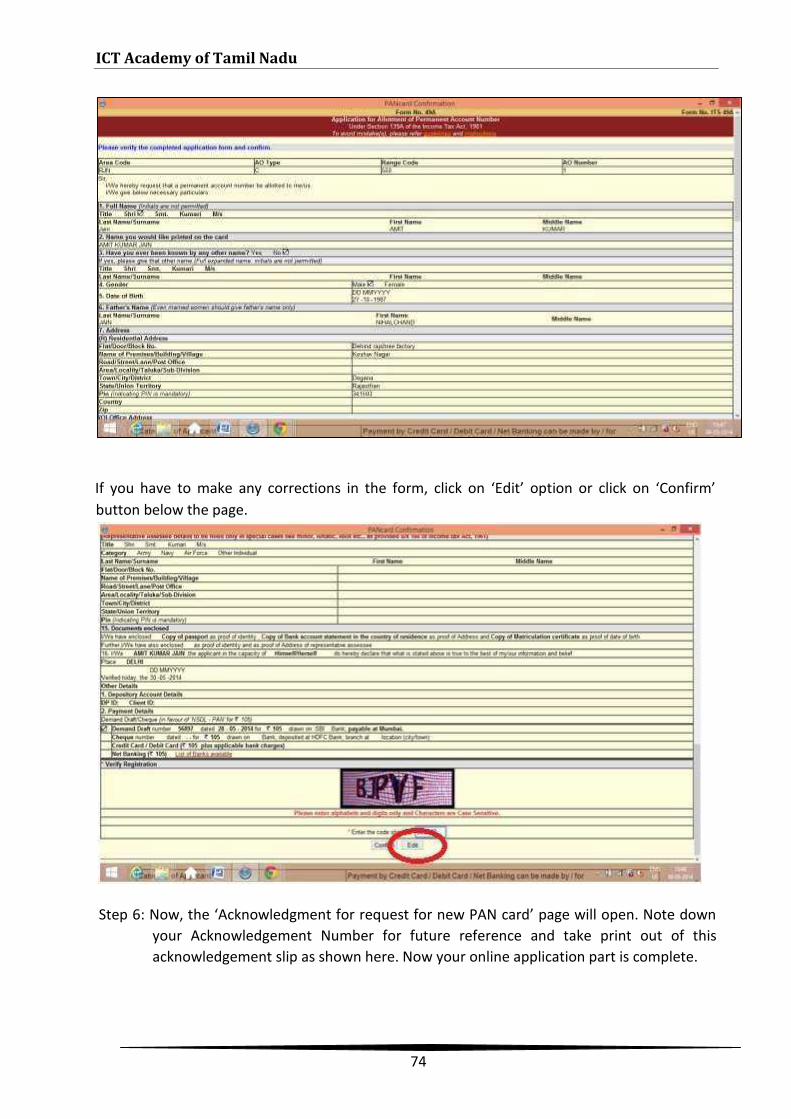
ICT Academy of Tamil Nadu
74
If you have to make any corrections in the form, click on ‘Edit’ option or click on ‘Confirm’button below the page.
Step 6: Now, the ‘Acknowledgment for request for new PAN card’ page will open. Note downyour Acknowledgement Number for future reference and take print out of thisacknowledgement slip as shown here. Now your online application part is complete.
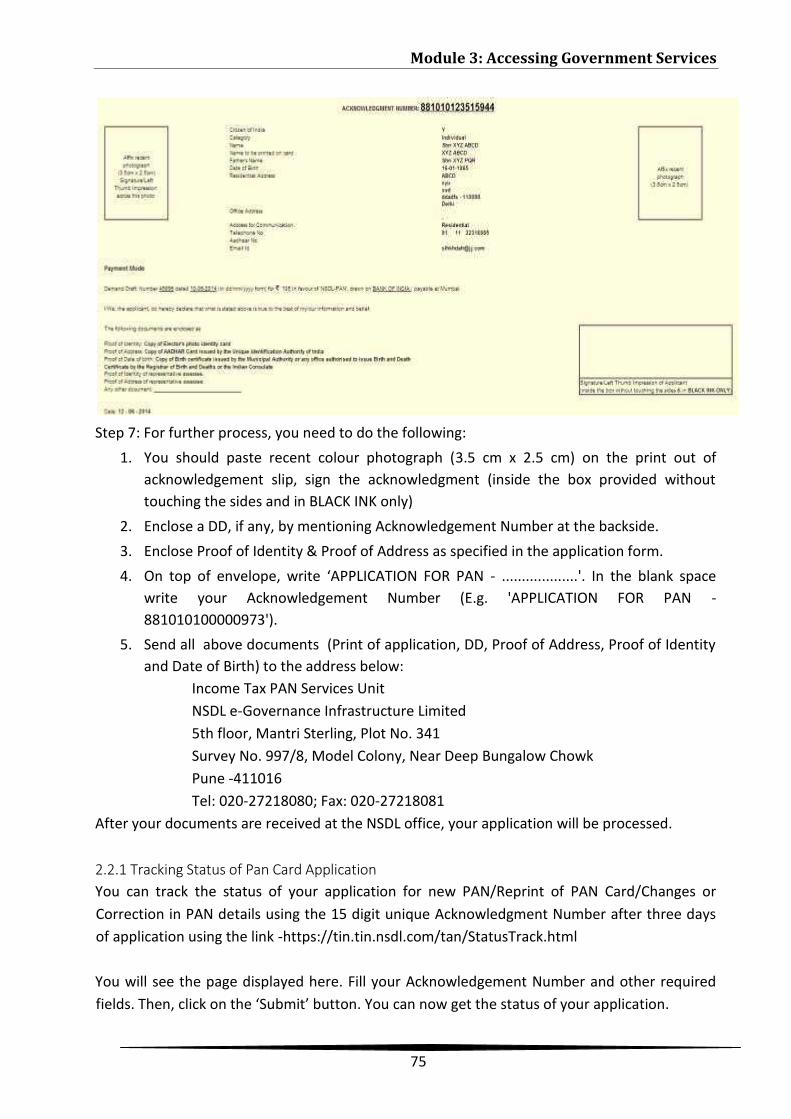
Module 3: Accessing Government Services
75
Step 7: For further process, you need to do the following:1. You should paste recent colour photograph (3.5 cm x 2.5 cm) on the print out of
acknowledgement slip, sign the acknowledgment (inside the box provided withouttouching the sides and in BLACK INK only)
2. Enclose a DD, if any, by mentioning Acknowledgement Number at the backside.3. Enclose Proof of Identity & Proof of Address as specified in the application form.4. On top of envelope, write ‘APPLICATION FOR PAN - ...................'. In the blank space
write your Acknowledgement Number (E.g. 'APPLICATION FOR PAN -881010100000973').
5. Send all above documents (Print of application, DD, Proof of Address, Proof of Identityand Date of Birth) to the address below:
Income Tax PAN Services UnitNSDL e-Governance Infrastructure Limited5th floor, Mantri Sterling, Plot No. 341Survey No. 997/8, Model Colony, Near Deep Bungalow ChowkPune -411016Tel: 020-27218080; Fax: 020-27218081
After your documents are received at the NSDL office, your application will be processed.
2.2.1 Tracking Status of Pan Card ApplicationYou can track the status of your application for new PAN/Reprint of PAN Card/Changes orCorrection in PAN details using the 15 digit unique Acknowledgment Number after three daysof application using the link -https://tin.tin.nsdl.com/tan/StatusTrack.html
You will see the page displayed here. Fill your Acknowledgement Number and other requiredfields. Then, click on the ‘Submit’ button. You can now get the status of your application.
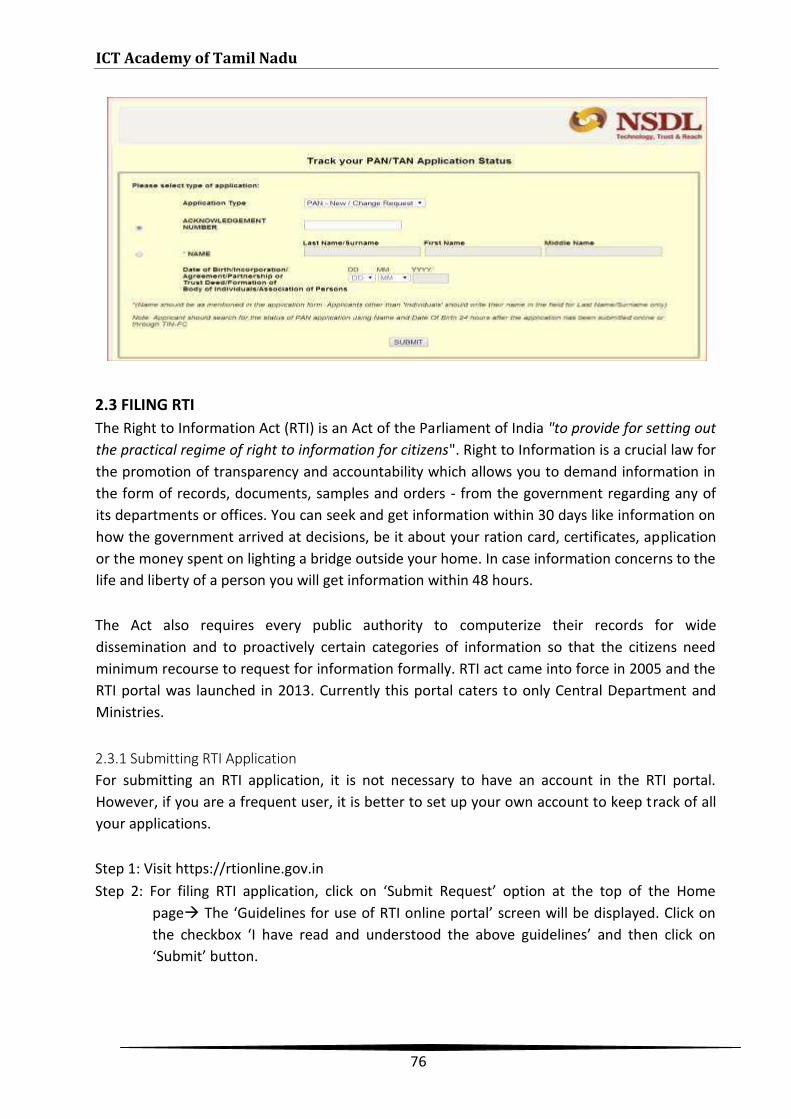
ICT Academy of Tamil Nadu
76
2.3 FILING RTIThe Right to Information Act (RTI) is an Act of the Parliament of India "to provide for setting outthe practical regime of right to information for citizens". Right to Information is a crucial law forthe promotion of transparency and accountability which allows you to demand information inthe form of records, documents, samples and orders - from the government regarding any ofits departments or offices. You can seek and get information within 30 days like information onhow the government arrived at decisions, be it about your ration card, certificates, applicationor the money spent on lighting a bridge outside your home. In case information concerns to thelife and liberty of a person you will get information within 48 hours.
The Act also requires every public authority to computerize their records for widedissemination and to proactively certain categories of information so that the citizens needminimum recourse to request for information formally. RTI act came into force in 2005 and theRTI portal was launched in 2013. Currently this portal caters to only Central Department andMinistries.
2.3.1 Submitting RTI ApplicationFor submitting an RTI application, it is not necessary to have an account in the RTI portal.However, if you are a frequent user, it is better to set up your own account to keep track of allyour applications.
Step 1: Visit https://rtionline.gov.inStep 2: For filing RTI application, click on ‘Submit Request’ option at the top of the Home
page The ‘Guidelines for use of RTI online portal’ screen will be displayed. Click onthe checkbox ‘I have read and understood the above guidelines’ and then click on‘Submit’ button.
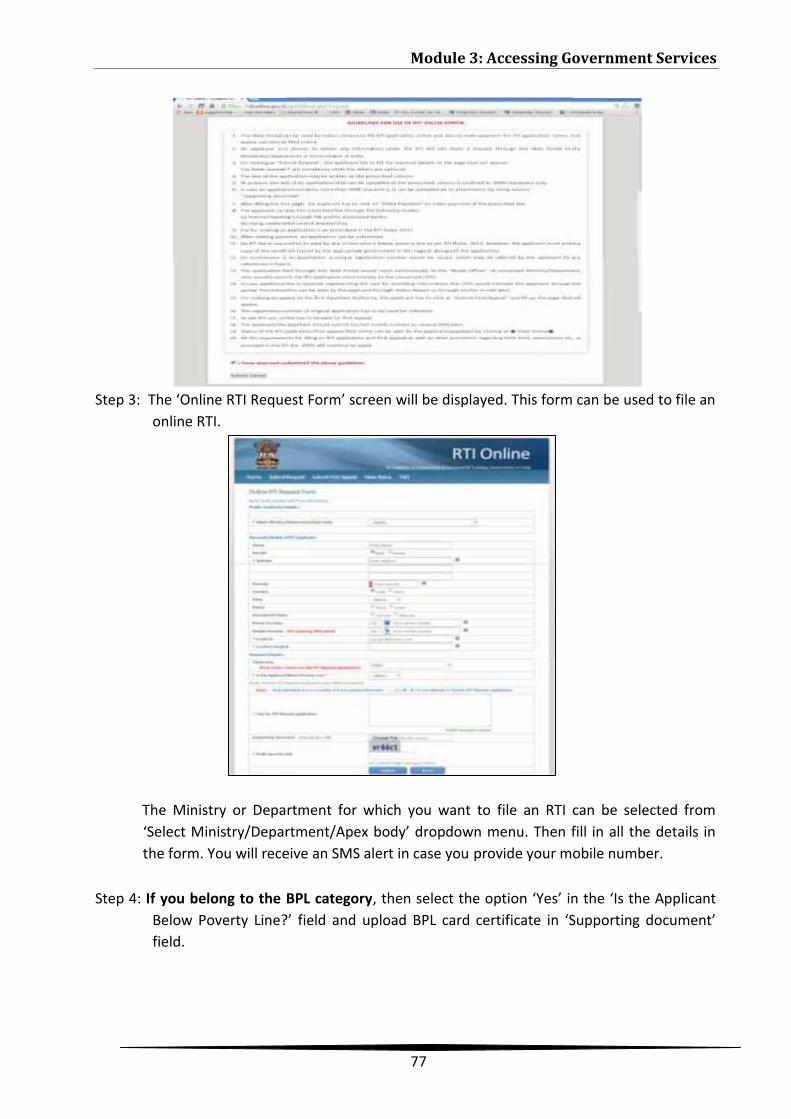
Module 3: Accessing Government Services
77
Step 3: The ‘Online RTI Request Form’ screen will be displayed. This form can be used to file anonline RTI.
The Ministry or Department for which you want to file an RTI can be selected from‘Select Ministry/Department/Apex body’ dropdown menu. Then fill in all the details inthe form. You will receive an SMS alert in case you provide your mobile number.
Step 4: If you belong to the BPL category, then select the option ‘Yes’ in the ‘Is the ApplicantBelow Poverty Line?’ field and upload BPL card certificate in ‘Supporting document’field.
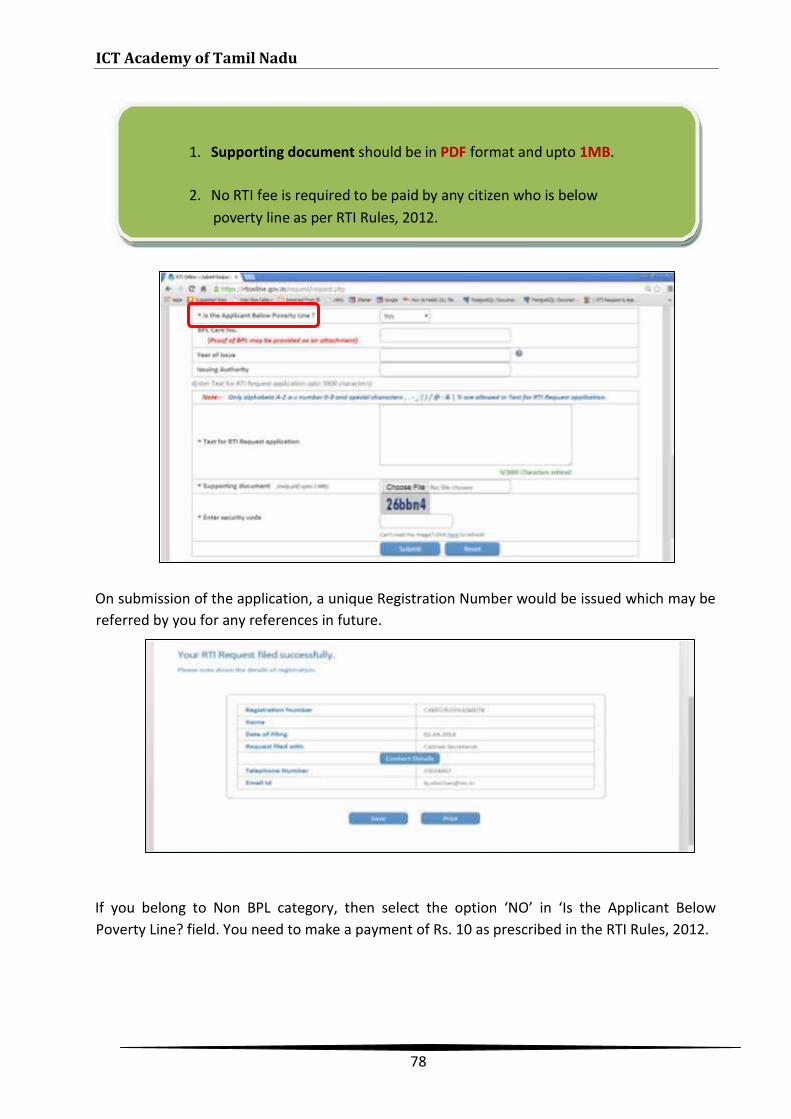
ICT Academy of Tamil Nadu
78
On submission of the application, a unique Registration Number would be issued which may bereferred by you for any references in future.
If you belong to Non BPL category, then select the option ‘NO’ in ‘Is the Applicant BelowPoverty Line? field. You need to make a payment of Rs. 10 as prescribed in the RTI Rules, 2012.
1. Supporting document should be in PDF format and upto 1MB.
2. No RTI fee is required to be paid by any citizen who is belowpoverty line as per RTI Rules, 2012.
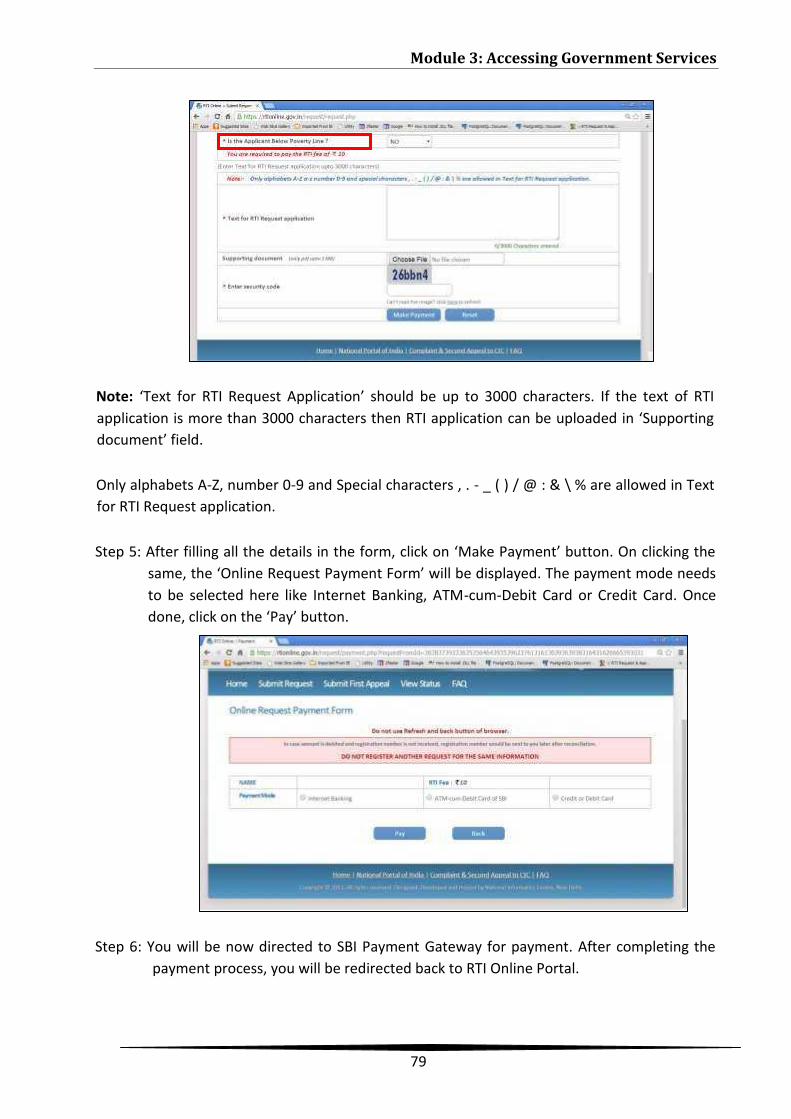
Module 3: Accessing Government Services
79
Note: ‘Text for RTI Request Application’ should be up to 3000 characters. If the text of RTIapplication is more than 3000 characters then RTI application can be uploaded in ‘Supportingdocument’ field.
Only alphabets A-Z, number 0-9 and Special characters , . - _ ( ) / @ : & \ % are allowed in Textfor RTI Request application.
Step 5: After filling all the details in the form, click on ‘Make Payment’ button. On clicking thesame, the ‘Online Request Payment Form’ will be displayed. The payment mode needsto be selected here like Internet Banking, ATM-cum-Debit Card or Credit Card. Oncedone, click on the ‘Pay’ button.
Step 6: You will be now directed to SBI Payment Gateway for payment. After completing thepayment process, you will be redirected back to RTI Online Portal.
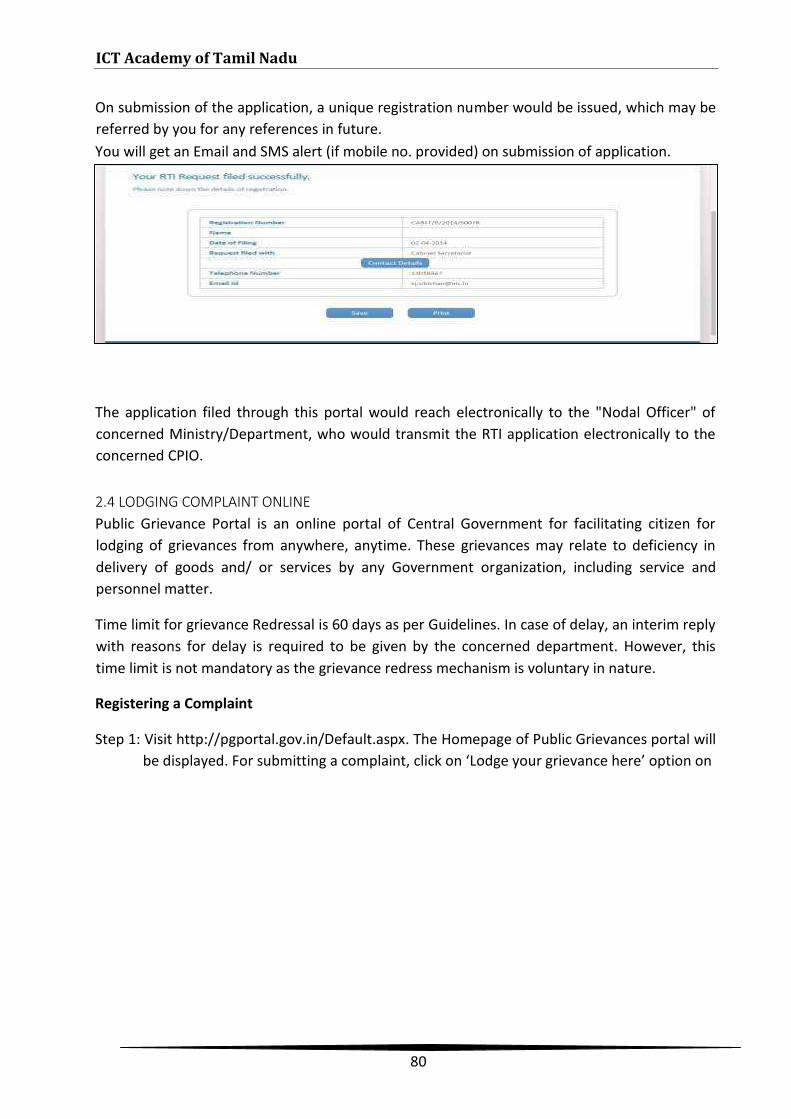
ICT Academy of Tamil Nadu
80
On submission of the application, a unique registration number would be issued, which may bereferred by you for any references in future.You will get an Email and SMS alert (if mobile no. provided) on submission of application.
The application filed through this portal would reach electronically to the "Nodal Officer" ofconcerned Ministry/Department, who would transmit the RTI application electronically to theconcerned CPIO.
2.4 LODGING COMPLAINT ONLINEPublic Grievance Portal is an online portal of Central Government for facilitating citizen forlodging of grievances from anywhere, anytime. These grievances may relate to deficiency indelivery of goods and/ or services by any Government organization, including service andpersonnel matter.
Time limit for grievance Redressal is 60 days as per Guidelines. In case of delay, an interim replywith reasons for delay is required to be given by the concerned department. However, thistime limit is not mandatory as the grievance redress mechanism is voluntary in nature.
Registering a Complaint
Step 1: Visit http://pgportal.gov.in/Default.aspx. The Homepage of Public Grievances portal willbe displayed. For submitting a complaint, click on ‘Lodge your grievance here’ option on
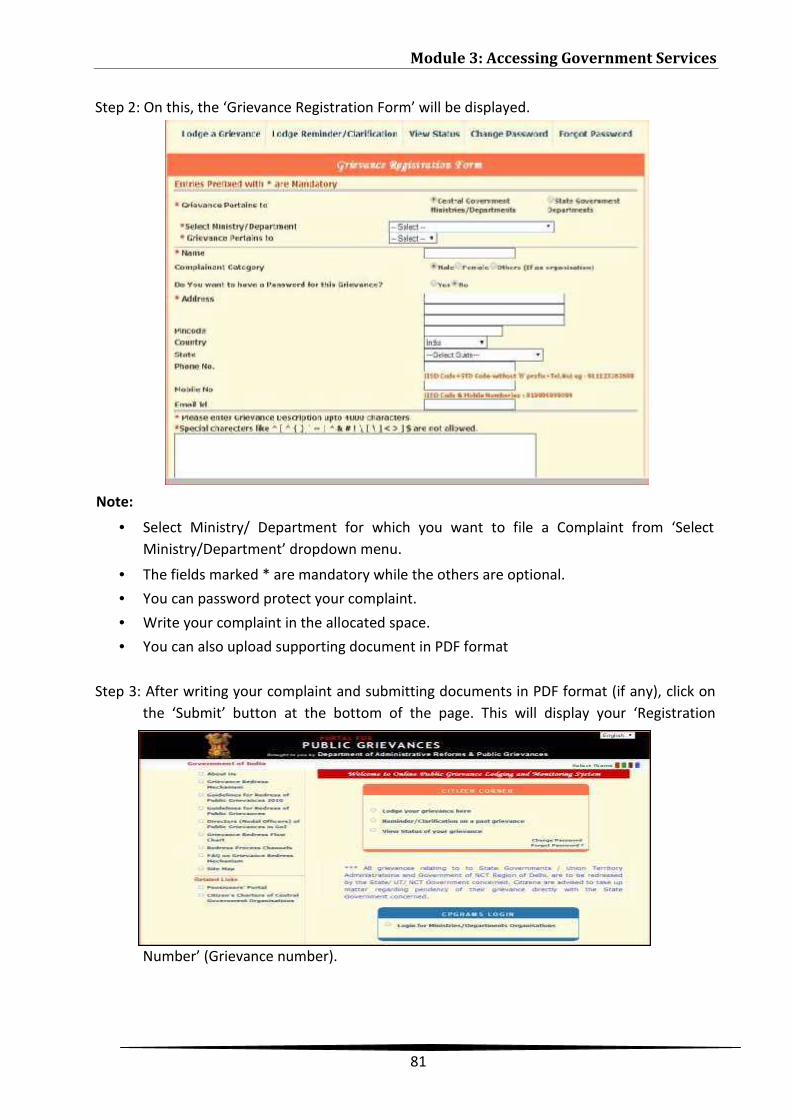
Module 3: Accessing Government Services
81
Step 2: On this, the ‘Grievance Registration Form’ will be displayed.
Note:
• Select Ministry/ Department for which you want to file a Complaint from ‘SelectMinistry/Department’ dropdown menu.
• The fields marked * are mandatory while the others are optional.• You can password protect your complaint.• Write your complaint in the allocated space.• You can also upload supporting document in PDF format
Step 3: After writing your complaint and submitting documents in PDF format (if any), click onthe ‘Submit’ button at the bottom of the page. This will display your ‘Registration
Number’ (Grievance number).
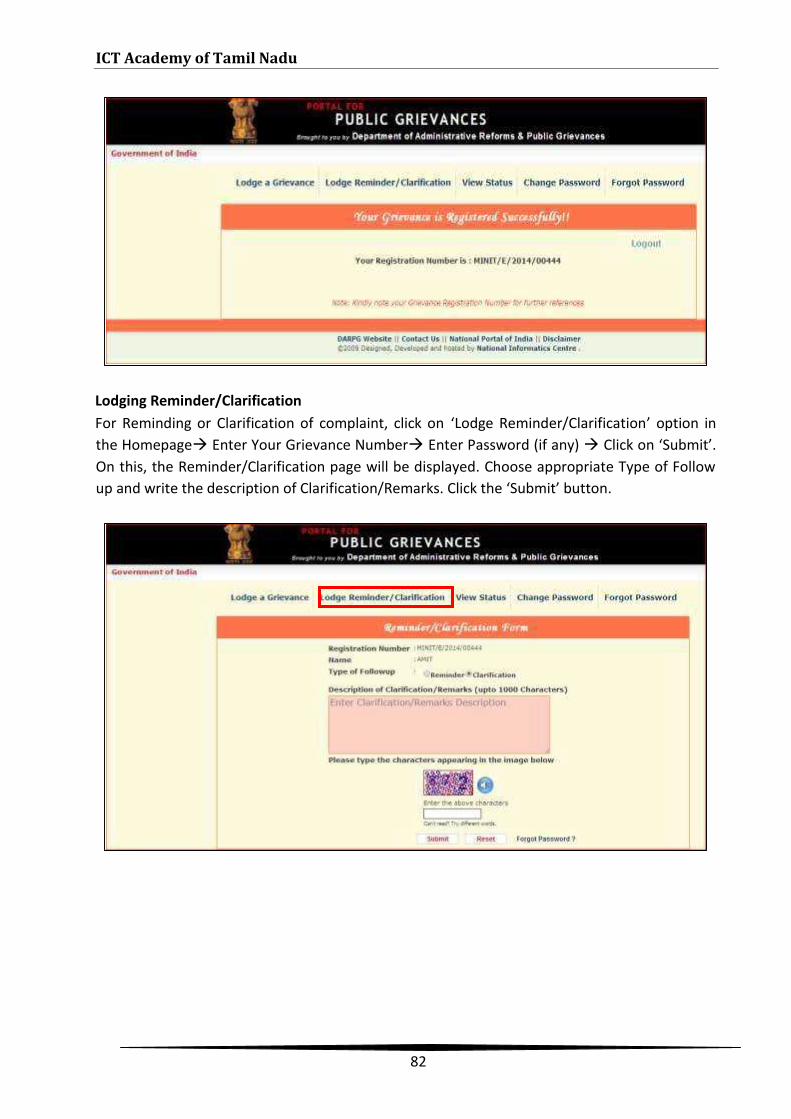
ICT Academy of Tamil Nadu
82
Lodging Reminder/ClarificationFor Reminding or Clarification of complaint, click on ‘Lodge Reminder/Clarification’ option inthe Homepage Enter Your Grievance Number Enter Password (if any) Click on ‘Submit’.On this, the Reminder/Clarification page will be displayed. Choose appropriate Type of Followup and write the description of Clarification/Remarks. Click the ‘Submit’ button.
4. SAFETY AND SECURITY IN DIGITALTECHNOLOGY
LEARNING OUTCOMES
By the end of this module, you should be able to:
• Know the various security threats facing technologies• Know the health and safety hazards of using technology• Appreciate the right use of digital devices• Know the social & human issues arise on use of technology
LESSON PLAN
I. SecurityII. Health and SafetyIII. EthicsIV. Social and Human Issues
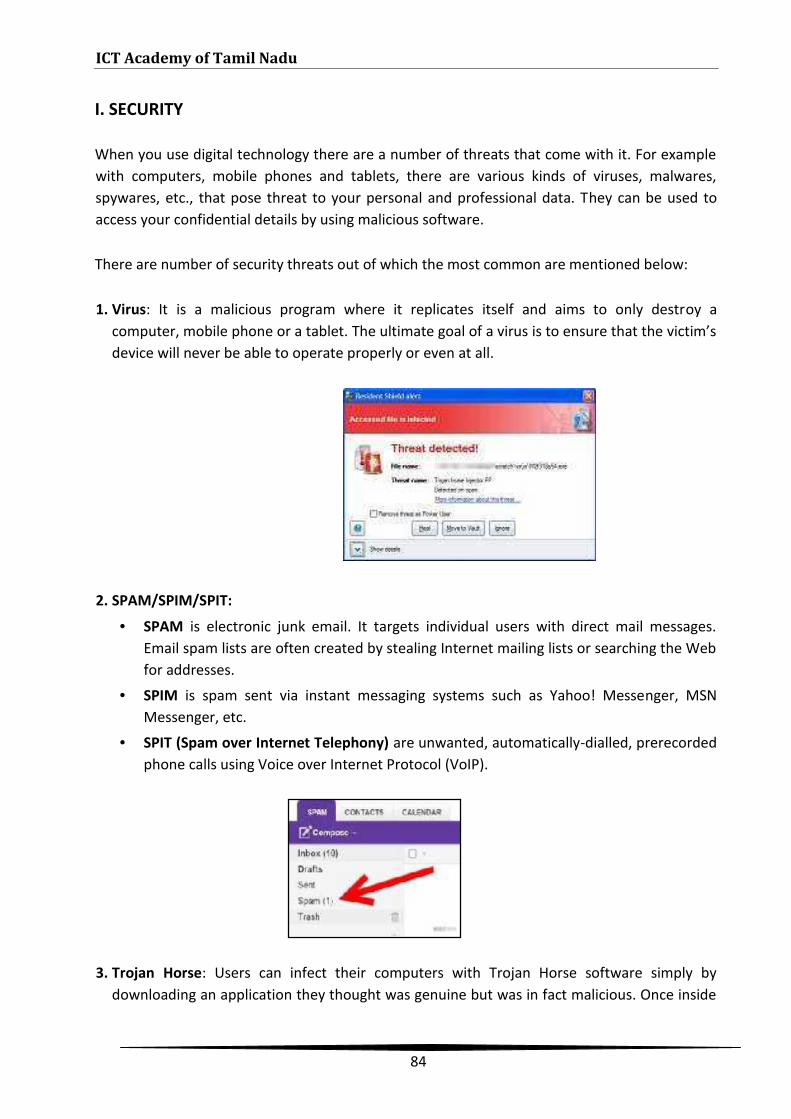
ICT Academy of Tamil Nadu
84
I. SECURITY
When you use digital technology there are a number of threats that come with it. For examplewith computers, mobile phones and tablets, there are various kinds of viruses, malwares,spywares, etc., that pose threat to your personal and professional data. They can be used toaccess your confidential details by using malicious software.
There are number of security threats out of which the most common are mentioned below:
1. Virus: It is a malicious program where it replicates itself and aims to only destroy acomputer, mobile phone or a tablet. The ultimate goal of a virus is to ensure that the victim’sdevice will never be able to operate properly or even at all.
2. SPAM/SPIM/SPIT:
• SPAM is electronic junk email. It targets individual users with direct mail messages.Email spam lists are often created by stealing Internet mailing lists or searching the Webfor addresses.
• SPIM is spam sent via instant messaging systems such as Yahoo! Messenger, MSNMessenger, etc.
• SPIT (Spam over Internet Telephony) are unwanted, automatically-dialled, prerecordedphone calls using Voice over Internet Protocol (VoIP).
3. Trojan Horse: Users can infect their computers with Trojan Horse software simply bydownloading an application they thought was genuine but was in fact malicious. Once inside
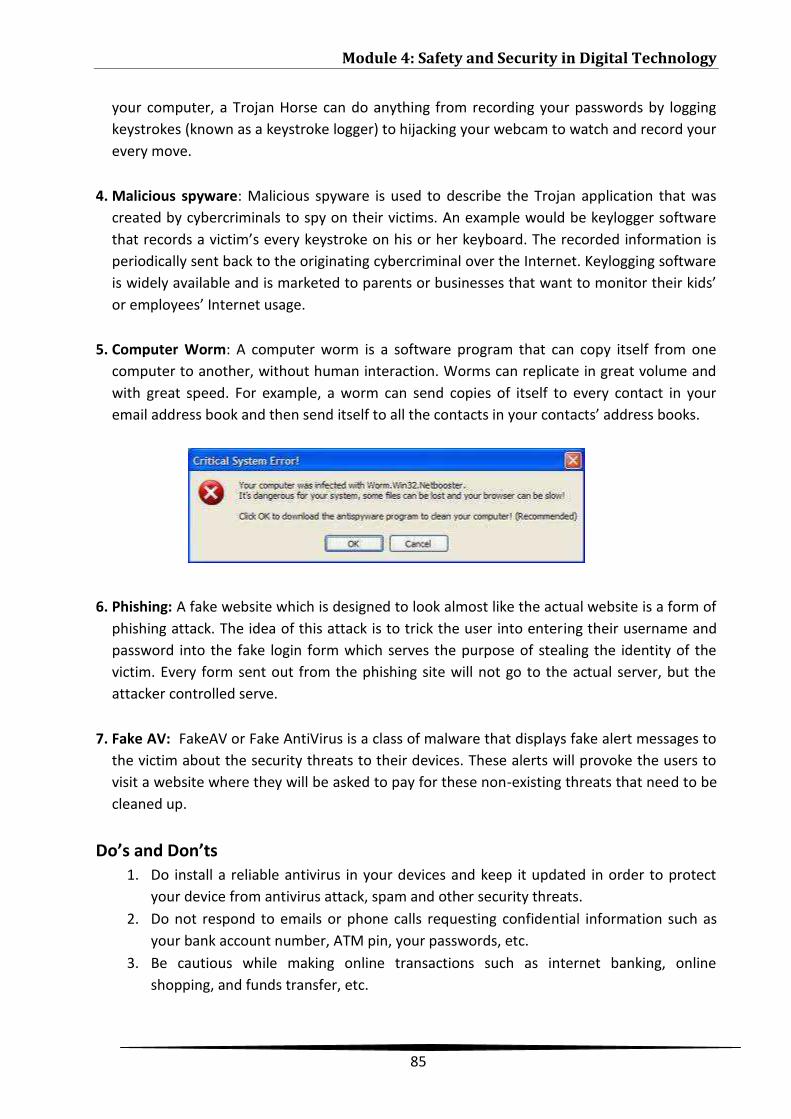
Module 4: Safety and Security in Digital Technology
85
your computer, a Trojan Horse can do anything from recording your passwords by loggingkeystrokes (known as a keystroke logger) to hijacking your webcam to watch and record yourevery move.
4. Malicious spyware: Malicious spyware is used to describe the Trojan application that wascreated by cybercriminals to spy on their victims. An example would be keylogger softwarethat records a victim’s every keystroke on his or her keyboard. The recorded information isperiodically sent back to the originating cybercriminal over the Internet. Keylogging softwareis widely available and is marketed to parents or businesses that want to monitor their kids’or employees’ Internet usage.
5. Computer Worm: A computer worm is a software program that can copy itself from onecomputer to another, without human interaction. Worms can replicate in great volume andwith great speed. For example, a worm can send copies of itself to every contact in youremail address book and then send itself to all the contacts in your contacts’ address books.
6. Phishing: A fake website which is designed to look almost like the actual website is a form ofphishing attack. The idea of this attack is to trick the user into entering their username andpassword into the fake login form which serves the purpose of stealing the identity of thevictim. Every form sent out from the phishing site will not go to the actual server, but theattacker controlled serve.
7. Fake AV: FakeAV or Fake AntiVirus is a class of malware that displays fake alert messages tothe victim about the security threats to their devices. These alerts will provoke the users tovisit a website where they will be asked to pay for these non-existing threats that need to becleaned up.
Do’s and Don’ts1. Do install a reliable antivirus in your devices and keep it updated in order to protect
your device from antivirus attack, spam and other security threats.2. Do not respond to emails or phone calls requesting confidential information such as
your bank account number, ATM pin, your passwords, etc.3. Be cautious while making online transactions such as internet banking, online
shopping, and funds transfer, etc.
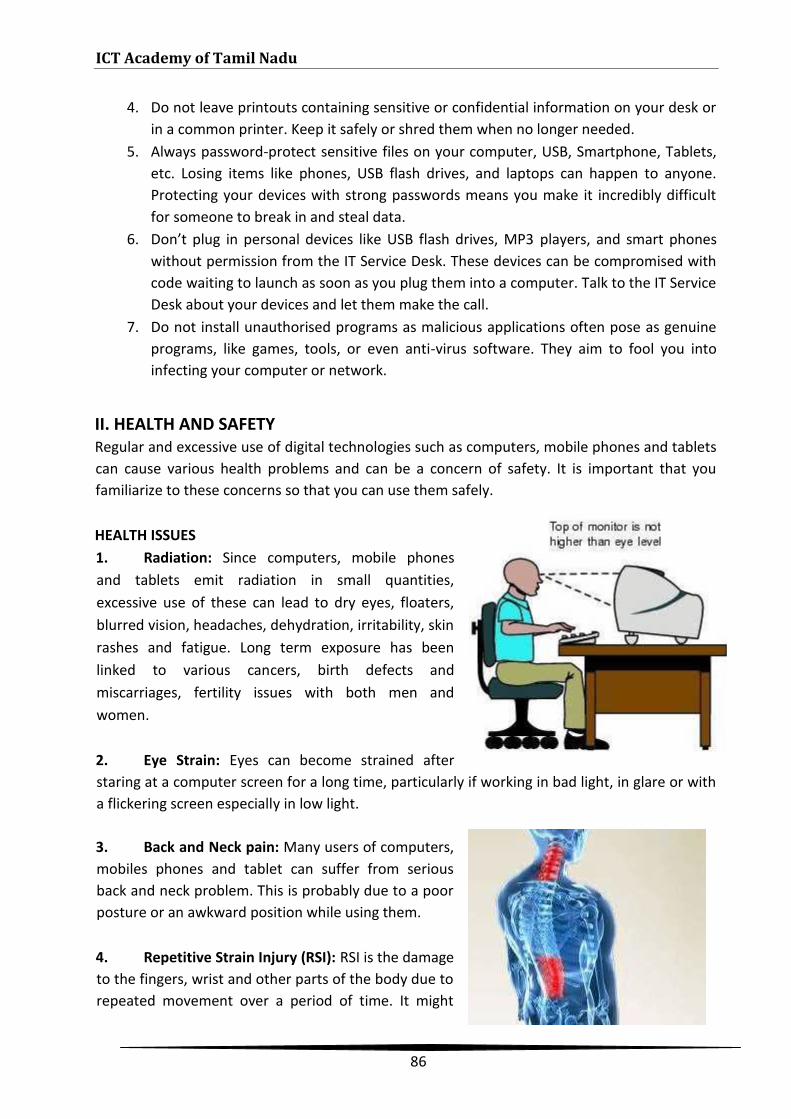
ICT Academy of Tamil Nadu
86
4. Do not leave printouts containing sensitive or confidential information on your desk orin a common printer. Keep it safely or shred them when no longer needed.
5. Always password-protect sensitive files on your computer, USB, Smartphone, Tablets,etc. Losing items like phones, USB flash drives, and laptops can happen to anyone.Protecting your devices with strong passwords means you make it incredibly difficultfor someone to break in and steal data.
6. Don’t plug in personal devices like USB flash drives, MP3 players, and smart phoneswithout permission from the IT Service Desk. These devices can be compromised withcode waiting to launch as soon as you plug them into a computer. Talk to the IT ServiceDesk about your devices and let them make the call.
7. Do not install unauthorised programs as malicious applications often pose as genuineprograms, like games, tools, or even anti-virus software. They aim to fool you intoinfecting your computer or network.
II. HEALTH AND SAFETYRegular and excessive use of digital technologies such as computers, mobile phones and tabletscan cause various health problems and can be a concern of safety. It is important that youfamiliarize to these concerns so that you can use them safely.
HEALTH ISSUES1. Radiation: Since computers, mobile phonesand tablets emit radiation in small quantities,excessive use of these can lead to dry eyes, floaters,blurred vision, headaches, dehydration, irritability, skinrashes and fatigue. Long term exposure has beenlinked to various cancers, birth defects andmiscarriages, fertility issues with both men andwomen.
2. Eye Strain: Eyes can become strained afterstaring at a computer screen for a long time, particularly if working in bad light, in glare or witha flickering screen especially in low light.
3. Back and Neck pain: Many users of computers,mobiles phones and tablet can suffer from seriousback and neck problem. This is probably due to a poorposture or an awkward position while using them.
4. Repetitive Strain Injury (RSI): RSI is the damageto the fingers, wrist and other parts of the body due torepeated movement over a period of time. It might
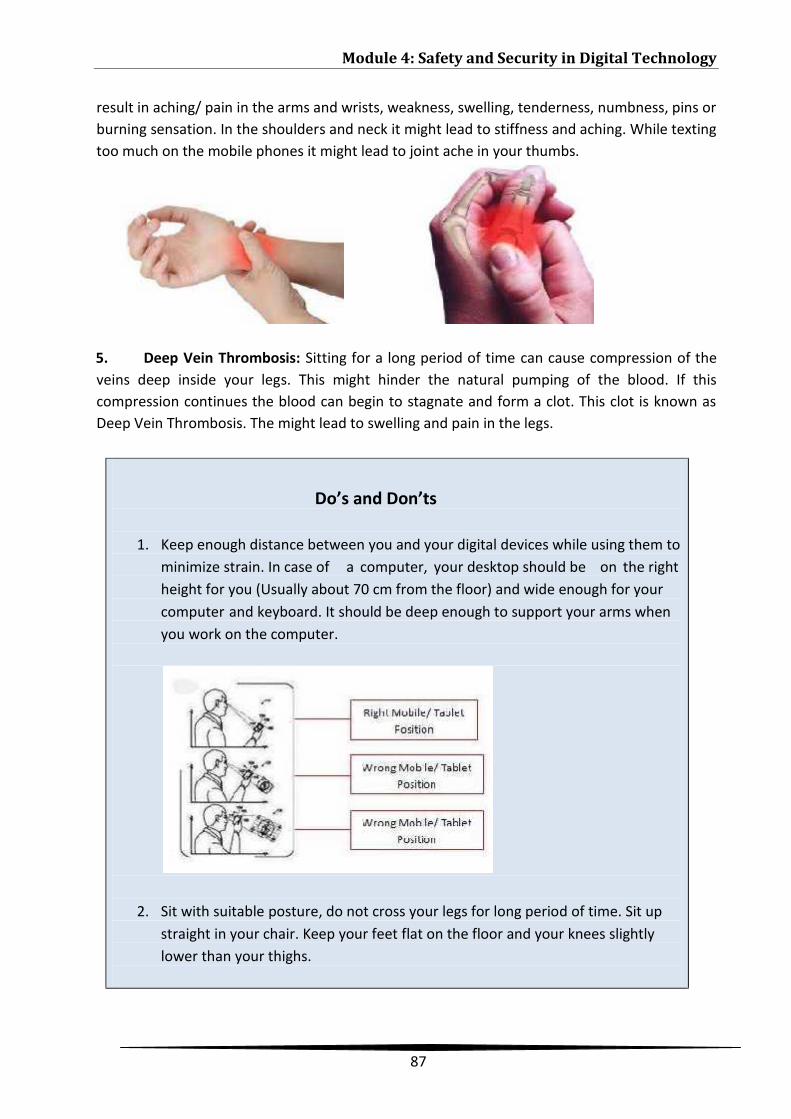
Module 4: Safety and Security in Digital Technology
87
result in aching/ pain in the arms and wrists, weakness, swelling, tenderness, numbness, pins orburning sensation. In the shoulders and neck it might lead to stiffness and aching. While textingtoo much on the mobile phones it might lead to joint ache in your thumbs.
5. Deep Vein Thrombosis: Sitting for a long period of time can cause compression of theveins deep inside your legs. This might hinder the natural pumping of the blood. If thiscompression continues the blood can begin to stagnate and form a clot. This clot is known asDeep Vein Thrombosis. The might lead to swelling and pain in the legs.
Do’s and Don’ts
1. Keep enough distance between you and your digital devices while using them tominimize strain. In case of a computer, your desktop should be on the rightheight for you (Usually about 70 cm from the floor) and wide enough for yourcomputer and keyboard. It should be deep enough to support your arms whenyou work on the computer.
2. Sit with suitable posture, do not cross your legs for long period of time. Sit upstraight in your chair. Keep your feet flat on the floor and your knees slightlylower than your thighs.
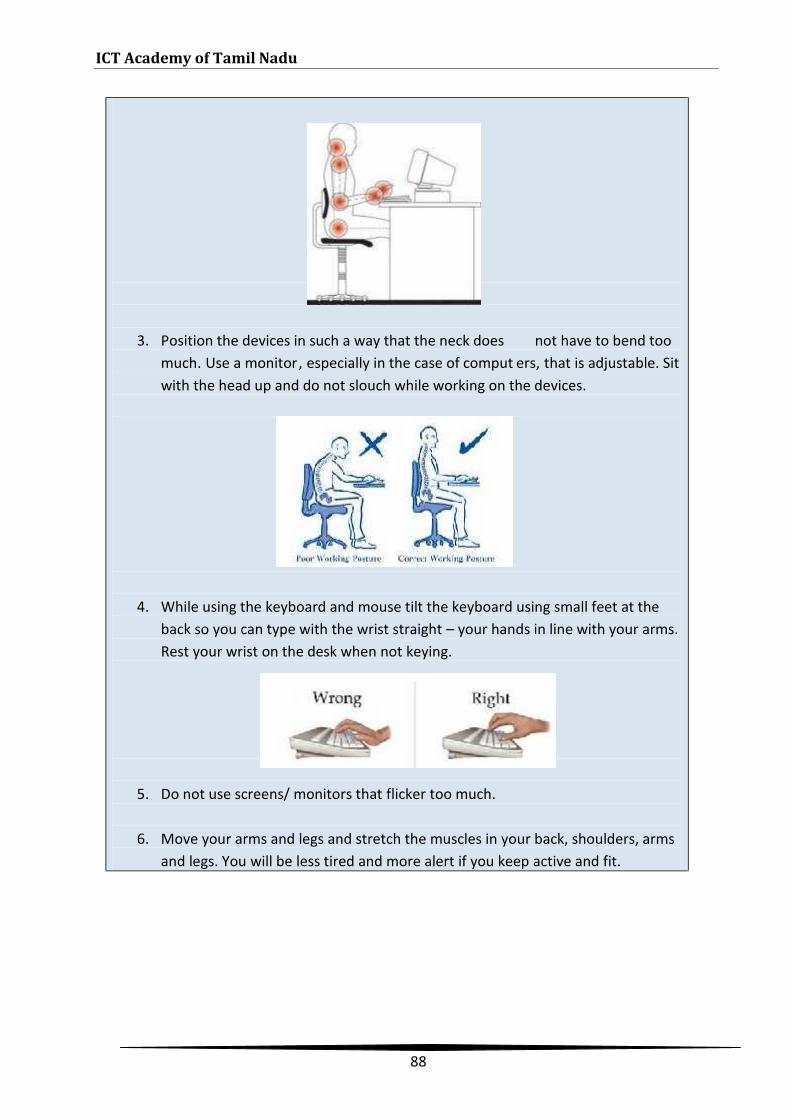
ICT Academy of Tamil Nadu
88
3. Position the devices in such a way that the neck does not have to bend toomuch. Use a monitor, especially in the case of comput ers, that is adjustable. Sitwith the head up and do not slouch while working on the devices.
4. While using the keyboard and mouse tilt the keyboard using small feet at theback so you can type with the wrist straight – your hands in line with your arms.Rest your wrist on the desk when not keying.
5. Do not use screens/ monitors that flicker too much.
6. Move your arms and legs and stretch the muscles in your back, shoulders, armsand legs. You will be less tired and more alert if you keep active and fit.
Module 4: Safety and Security in Digital Technology
89
SAFETY ISSUESDealing with digital devices can sometimes be dangerous and may cause accidents. Therefore,you should take certain precautions to reduce the risk of accidents.
• Ensure that there are no trailing wires across or around the room that can cause peopleto trip or cause accidents. Cables should be placed inside cable ducts or under thecarpet/flooring.
• Ensure that sockets should not be overloaded. Plugging too many power cables into asocket can result in the socket being overloaded, overheated and causing fire. Hence,never plug too many cables into a socket. Always make sure there are fire extinguishersnearby.
• Keep liquids away from your digital devices to avoid spills and the danger of electricalshock.
• Do not use Mobile/ Tablets while driving or walking to avoid accidents.
7. Take 5 minutes break every hour of work especially in the case of computers.Stand up and move around to allow the blood flow in your legs to return tonormal.
8. Keep your eyes healthy by using the right amount of light when using digitaldevices as it reduces eyestrain, neck strain and headaches. Sunlight is the bestlight, but make sure it does not create glare on your computer screen.
9. Have regular eye tests and wear glasses if prescribed.10. Use headphone while talking on mobile phones to minimize radiation exposure.
ICT Academy of Tamil Nadu
90
• Remember to follow any special regulations in force in any area and always switch offyour phone whenever it is forbidden to use it, or it may cause interference or danger.For example, while travelling in aeroplanes one should switch off all digital devicesespecially during takeoff and landing.
• While charging any Mobile/Tablets do not use them as there is an increased risk ofaccidents.
III. ETHICSDigital ethics is a set of moral principles that regulate the use of digital devicessuch as computer, tablets and mobile phones.Some common issues of digital ethics include:
1. Intellectual Property RightsIt is similar to any property and refers to the ideas, knowledge, invention, innovation, creativityand research, etc., of an individual.
Common types of Intellectual Property include:
• Copyright: This protects written or published works such as books, songs, films, webcontent and artistic works.
• Designs: This protects designs, such as drawings or computer models.• Trademarks: This protects signs, symbols, logos, words or sounds that differentiate your
products and services from others.
2. Theft and Fraud• Theft: It may refer to either unauthorized removal of physical items such as hardware or
unauthorized removal or copying of data or information from you device.• Fraud: Fraud on the Internet may occur by following ways:
- To credit card offers which are utilized only to capture personal information.
Module 4: Safety and Security in Digital Technology
91
- To investor postings which promote a stock or investment offer to encourageinvestment which will benefit the person posting the information.
- To medical and pharmaceutical related sites which purport to provide correctmedical advice or sell altered medications.
3. Stalking through digital deviceStalking is a pattern of repeated and unwanted attention, harassment, contact or any othercourse of conduct directed at a specific person that would cause him.
Stalking can include:
• Repeated, unwanted, intrusive and frightening communications from the perpetrator byphone, mail, and/or email.
• Following or waiting for the victim at places such as home, school, work, or recreationplace. Harassing victim through the internet.
• Posting information or spreading rumours about the victim on the internet, in a publicplace.
• Obtaining personal information about the victim by accessing public records, usinginternet search services, going through the victim's garbage, following the victim,contacting victim's friends, family work or neighbours.
4. Software and Multimedia PiracySoftware piracy or multimedia piracy is the unauthorized use ofproprietary software and multimedia resources. By buying thesoftware, you become a licensed user rather than an owner and thusyou are allowed to make copies of the program for backup purposes or to share it with otherindividuals.
5. PlagiarismPlagiarism is an act of using or copying someone else’s ideas, languageor any other work and presenting it as one’s own withoutacknowledging the owner. This includes work represented in hard copy,on disk or on the Internet.
ICT Academy of Tamil Nadu
92
Do’s and Don’ts
1. Privacy: Do not in any way examine or change files or passwords belonging to others.Do not violate the privacy of individuals or organizations.
2. Plagiarism: Following points should be kept in mind while using or copying someoneelse’s work:
Summarize or change the order of the words when using it as a reference. Always give citations or references when using someone else’s work. Anything that is directly quoted from any source must be put in quotation marks and
cited as well.
3. Integrity of the computing systems: Do not develop or use programs that invade,damage or alter computing systems or software. Do not in any way harass other users.
4. Never use someone else's account. Do not use deceptive means to avoid accountingfor the use of computing services.
5. Copyrights and Licenses: To copy a licensed computer program is illegal; it is indeedtheft. Try to use free and open source softwares.
6. Respect the intellectual property of others: Individual programming assignments areexpected to be done by individual. Do not take another's work or ideas to call your own.
7. Make responsible, sensible use of computer hardware, software and data.
IV. SOCIAL AND HUMAN ISSUESDigital devices have made modern life much easier. Modern society and individuals arebecoming too reliant on these devices for all their needs. They help in easy access toinformation, communication and education. It has created a bridge across geographies andculture. However, there is always a positive and negative side of every phenomenon and it isimportant to know how they impact us and our society.The various Human and Social issues of Digital Devices include:
1. Increased Stress: In the digital world, people consume more information throughdifferent devices than ever before. People have a tendency to multitask with laptops,mobile phones, the internet, social networks, games, etc., all giving unwanted hasslefrom time to time. This takes a toll on people causing stress both physically and
Module 4: Safety and Security in Digital Technology
93
mentally. Hence, it is important to be balanced in the use of these devices and takeregular breaks.
2. Alienation and Isolation: The digital devices limit the face to face interaction withpeople. Most people need some form of social interaction in their daily lives, a lack ofwhich might reduce their understanding of and participation in society and culture asthe social environment is reduced to the people you want stay in contact with.
3. Reduced Physical Activity: The users may adopt a more inactive lifestyle. This can leadto health problems such as obesity, heart disease and diabetes. Many countries haveworkplace regulations to prevent problems such as repetitive strain injury or eyestrain,but lack of physical exercise is rarely addressed as a specific health hazard.
4. Information Overload: Simplicity of use, abundance of information, absorbing userswith the excessive information search may lead to the decline of creative thinking. Theway we are currently using the technology is reducing our desire to be inquisitive, think,comprehend and ultimately retain information.
5. Loss of Privacy: Privacy refers to the right of individual/s to determine when, how andto what extent his or her personal data will be shared with others. Breach of privacymeans unauthorized use or distribution or disclosure of personal information likemedical records, sexual preferences, financial status, etc.
ICT Academy of Tamil Nadu
94
6. The Digital Divide: The increasing use of computers has increased the separation of richand poor, creating a digital divide between the information “haves” and “havenots.”Thedigital divide has in many ways separated the people with access and people withoutaccess. People in many parts of the world lack the resources to follow the new digitalworld they are alienated in many ways. The costs of these devices are beyond the reachof many thereby creating social differences.
7. Cyber Crime: The use of digital devices has opened up new windows to the way crimeoccurs in society. There are new methods and efficient tools available for crimes to takeplace, e.g., theft, hacking (for personal information), fraud, gambling, stalking, bullying,etc. This results in moral decadent and generates threat to the society in new andchallenging ways.
5. WORD PROCESSING
LEARNING OUTCOMES
By the end of this module, you should be able to:
• Explain Word Processing• Create, Edit and Format text and use the Formatting Features• Applying Word Processing in Real Life Scenario
LESSON PLAN
I. Introduction to Word ProcessorII. Creating, Editing and Formatting Word DocumentsIII. Apply Word Processing in Real Life Scenario
ICT Academy of Tamil Nadu
96
I. INTRODUCTION TO WORD PROCESSOR
1.1 What is Word Processing?A word processor is a software program capable of creating, storing, and printingdocuments. They have many advantages over the standard typewriter, here usersusing word processors have the ability of creating a document and making anychanges anywhere in the document thus editing an already written text (that cannotbe done using a typewriter). This document can also be saved for modification at alater time or to be opened on any other computer using the same word processor.
Today, the word processor is one of the most frequently used programs used on acomputer today. They are available in a plethora of options like Microsoft Office,OpenOffice.org Writer, LibreOffice Writer, AbiWord, KWord, and LyX. As an example,we have used MICROSOFT WORD and OPEN OFFICE WRITER software in this module.
1.2 Getting Started with Microsoft WordIntroductionThe Microsoft Office Suite has one of the most used applications such as MS Word,MS Excel, MS Power Point and MS Access. Microsoft Word, MS Word or Word is aWord Processing Programme which is used to increase the readability of any text. Italso helps in doing edit, format, print or publish of documents.
By using MS Word you can create various kinds of documents such as letters, memosand reports. You can apply various font styles, font colour, insert pictures, graphs andtables into a document.
How to run MS WordStep 1: To run MS word click on the start button
Step 2: Point the mouse on All Programs
Step 3: Click on Microsoft Office
Step 4: Click Microsoft Office Word 2007
MS Word is divided into various parts, which are: Title Bar, Quick Access Toolbar,Ribbon, Ruler, Workspace or Text area, Scroll Bar and Status Bar.
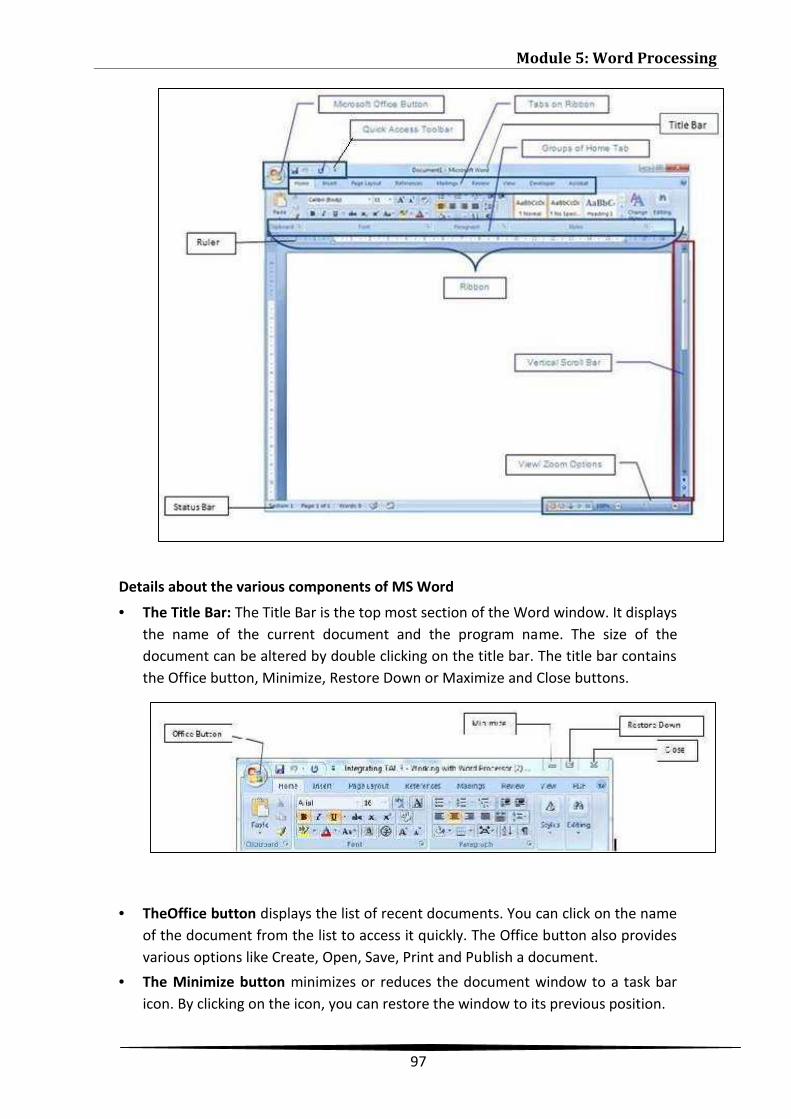
Module 5: Word Processing
97
Details about the various components of MS Word
• The Title Bar: The Title Bar is the top most section of the Word window. It displaysthe name of the current document and the program name. The size of thedocument can be altered by double clicking on the title bar. The title bar containsthe Office button, Minimize, Restore Down or Maximize and Close buttons.
• TheOffice button displays the list of recent documents. You can click on the nameof the document from the list to access it quickly. The Office button also providesvarious options like Create, Open, Save, Print and Publish a document.
• The Minimize button minimizes or reduces the document window to a task baricon. By clicking on the icon, you can restore the window to its previous position.
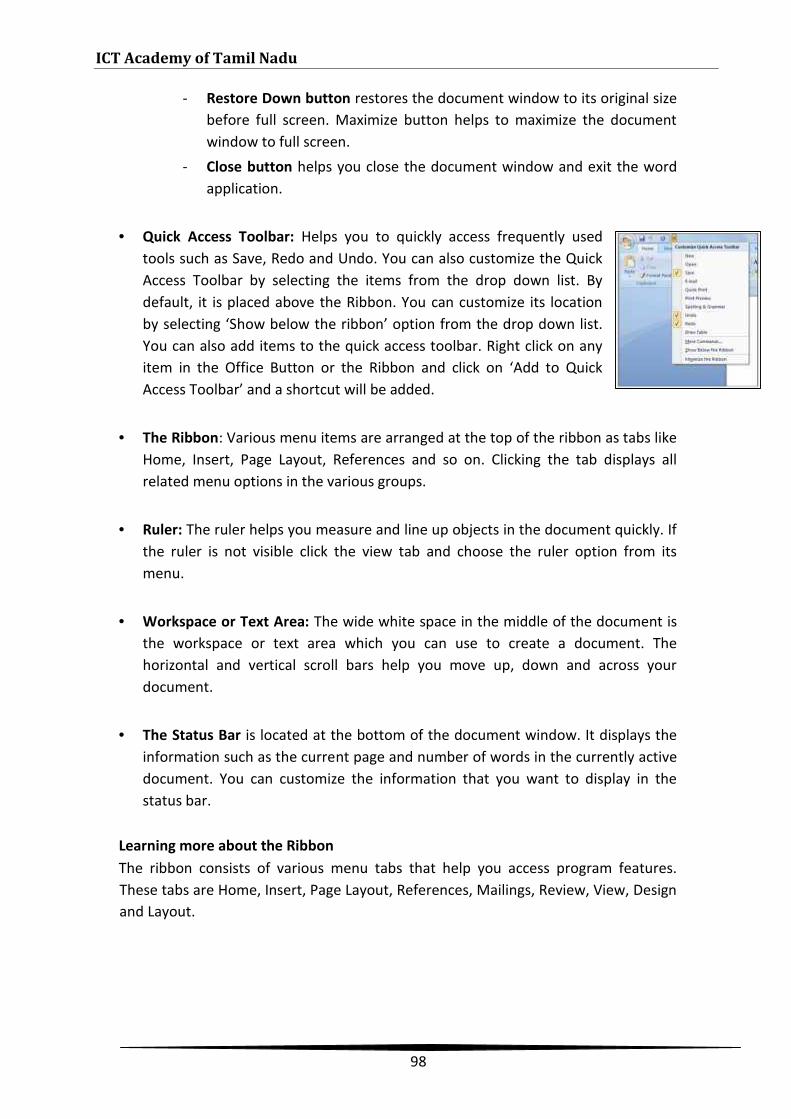
ICT Academy of Tamil Nadu
98
- Restore Down button restores the document window to its original sizebefore full screen. Maximize button helps to maximize the documentwindow to full screen.
- Close button helps you close the document window and exit the wordapplication.
• Quick Access Toolbar: Helps you to quickly access frequently usedtools such as Save, Redo and Undo. You can also customize the QuickAccess Toolbar by selecting the items from the drop down list. Bydefault, it is placed above the Ribbon. You can customize its locationby selecting ‘Show below the ribbon’ option from the drop down list.You can also add items to the quick access toolbar. Right click on anyitem in the Office Button or the Ribbon and click on ‘Add to QuickAccess Toolbar’ and a shortcut will be added.
• The Ribbon: Various menu items are arranged at the top of the ribbon as tabs likeHome, Insert, Page Layout, References and so on. Clicking the tab displays allrelated menu options in the various groups.
• Ruler: The ruler helps you measure and line up objects in the document quickly. Ifthe ruler is not visible click the view tab and choose the ruler option from itsmenu.
• Workspace or Text Area: The wide white space in the middle of the document isthe workspace or text area which you can use to create a document. Thehorizontal and vertical scroll bars help you move up, down and across yourdocument.
• The Status Bar is located at the bottom of the document window. It displays theinformation such as the current page and number of words in the currently activedocument. You can customize the information that you want to display in thestatus bar.
Learning more about the RibbonThe ribbon consists of various menu tabs that help you access program features.These tabs are Home, Insert, Page Layout, References, Mailings, Review, View, Designand Layout.
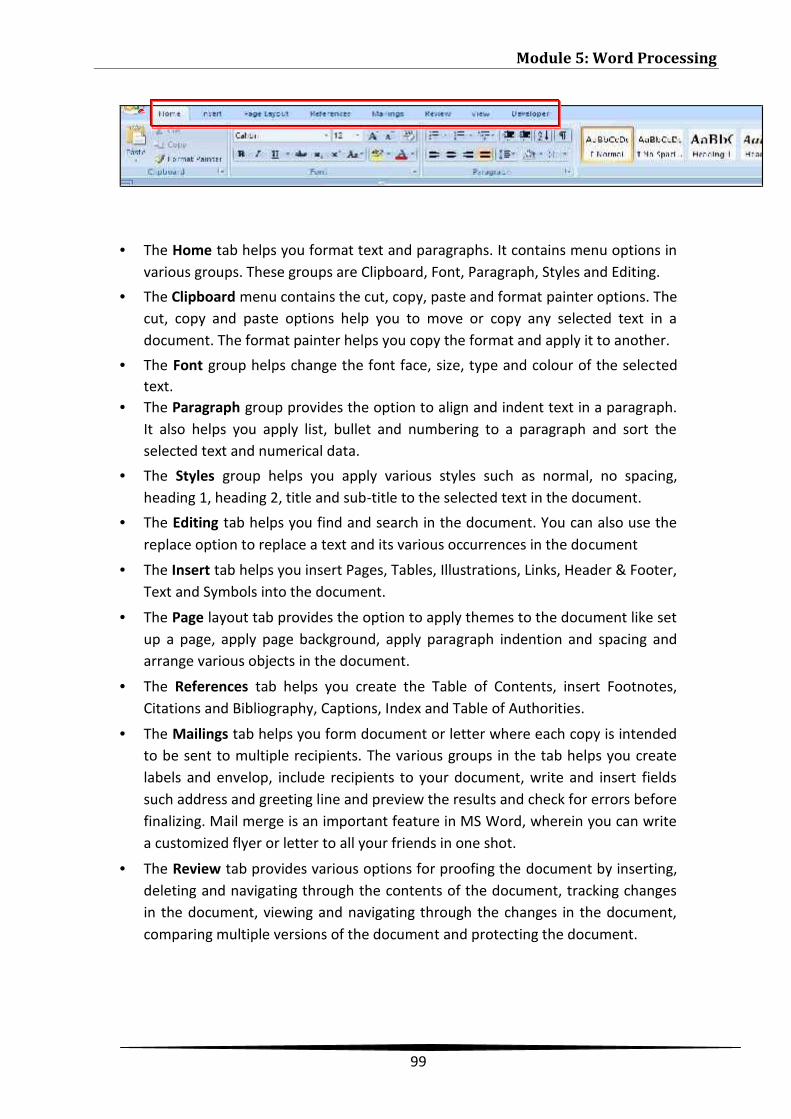
Module 5: Word Processing
99
• The Home tab helps you format text and paragraphs. It contains menu options invarious groups. These groups are Clipboard, Font, Paragraph, Styles and Editing.
• The Clipboard menu contains the cut, copy, paste and format painter options. Thecut, copy and paste options help you to move or copy any selected text in adocument. The format painter helps you copy the format and apply it to another.
• The Font group helps change the font face, size, type and colour of the selectedtext.
• The Paragraph group provides the option to align and indent text in a paragraph.It also helps you apply list, bullet and numbering to a paragraph and sort theselected text and numerical data.
• The Styles group helps you apply various styles such as normal, no spacing,heading 1, heading 2, title and sub-title to the selected text in the document.
• The Editing tab helps you find and search in the document. You can also use thereplace option to replace a text and its various occurrences in the document
• The Insert tab helps you insert Pages, Tables, Illustrations, Links, Header & Footer,Text and Symbols into the document.
• The Page layout tab provides the option to apply themes to the document like setup a page, apply page background, apply paragraph indention and spacing andarrange various objects in the document.
• The References tab helps you create the Table of Contents, insert Footnotes,Citations and Bibliography, Captions, Index and Table of Authorities.
• The Mailings tab helps you form document or letter where each copy is intendedto be sent to multiple recipients. The various groups in the tab helps you createlabels and envelop, include recipients to your document, write and insert fieldssuch address and greeting line and preview the results and check for errors beforefinalizing. Mail merge is an important feature in MS Word, wherein you can writea customized flyer or letter to all your friends in one shot.
• The Review tab provides various options for proofing the document by inserting,deleting and navigating through the contents of the document, tracking changesin the document, viewing and navigating through the changes in the document,comparing multiple versions of the document and protecting the document.
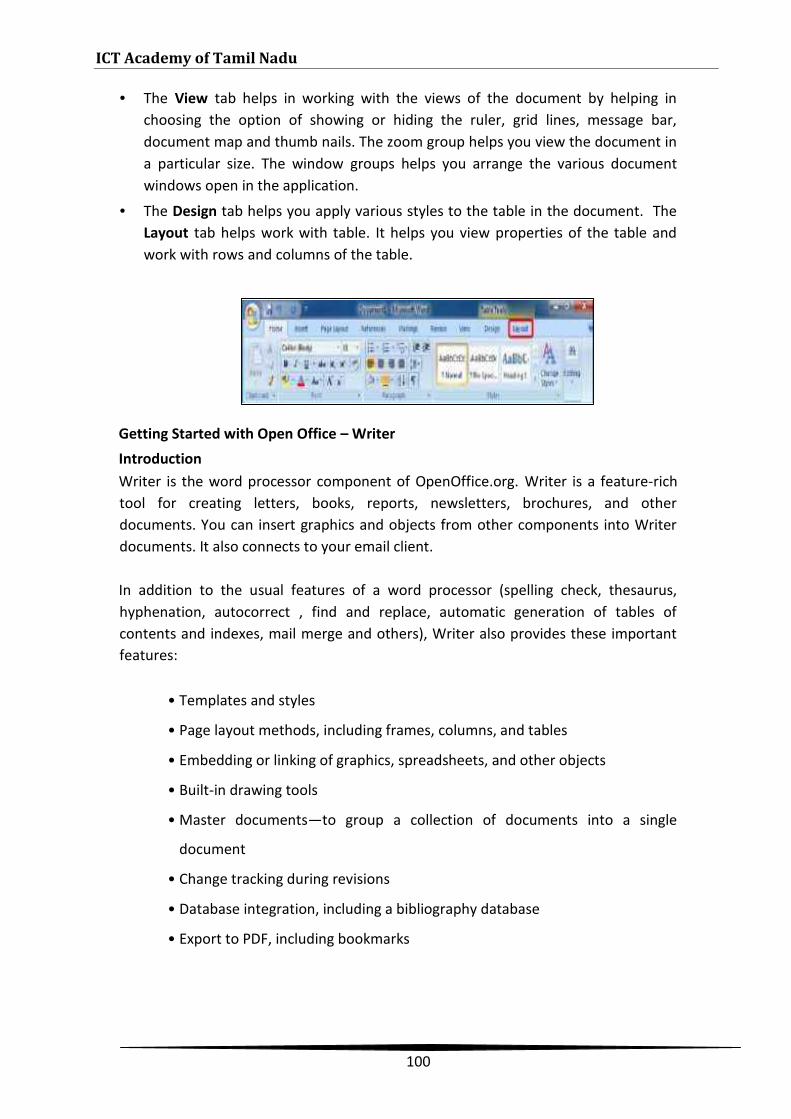
ICT Academy of Tamil Nadu
100
• The View tab helps in working with the views of the document by helping inchoosing the option of showing or hiding the ruler, grid lines, message bar,document map and thumb nails. The zoom group helps you view the document ina particular size. The window groups helps you arrange the various documentwindows open in the application.
• The Design tab helps you apply various styles to the table in the document. TheLayout tab helps work with table. It helps you view properties of the table andwork with rows and columns of the table.
Getting Started with Open Office – WriterIntroductionWriter is the word processor component of OpenOffice.org. Writer is a feature-richtool for creating letters, books, reports, newsletters, brochures, and otherdocuments. You can insert graphics and objects from other components into Writerdocuments. It also connects to your email client.
In addition to the usual features of a word processor (spelling check, thesaurus,hyphenation, autocorrect , find and replace, automatic generation of tables ofcontents and indexes, mail merge and others), Writer also provides these importantfeatures:
• Templates and styles
• Page layout methods, including frames, columns, and tables
• Embedding or linking of graphics, spreadsheets, and other objects
• Built-in drawing tools
• Master documents—to group a collection of documents into a single
document
• Change tracking during revisions
• Database integration, including a bibliography database
• Export to PDF, including bookmarks
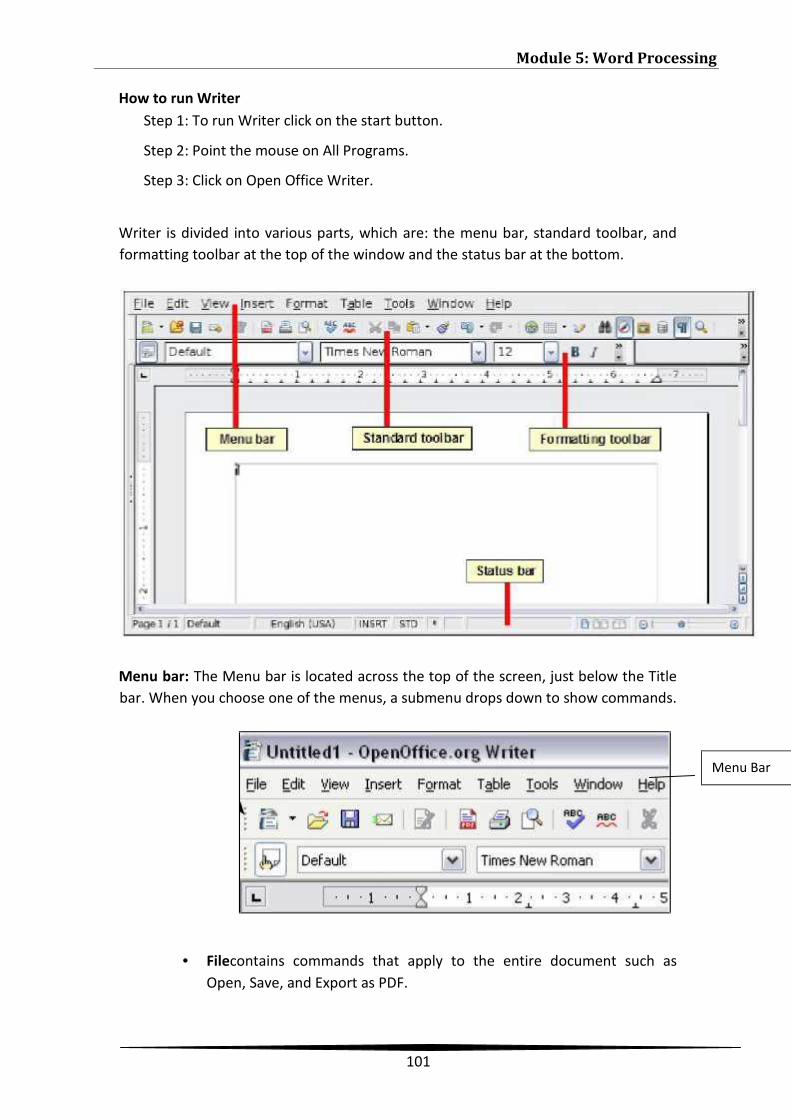
Module 5: Word Processing
101
How to run WriterStep 1: To run Writer click on the start button.
Step 2: Point the mouse on All Programs.
Step 3: Click on Open Office Writer.
Writer is divided into various parts, which are: the menu bar, standard toolbar, andformatting toolbar at the top of the window and the status bar at the bottom.
Menu bar: The Menu bar is located across the top of the screen, just below the Titlebar. When you choose one of the menus, a submenu drops down to show commands.
Menu Bar
• Filecontains commands that apply to the entire document such asOpen, Save, and Export as PDF.
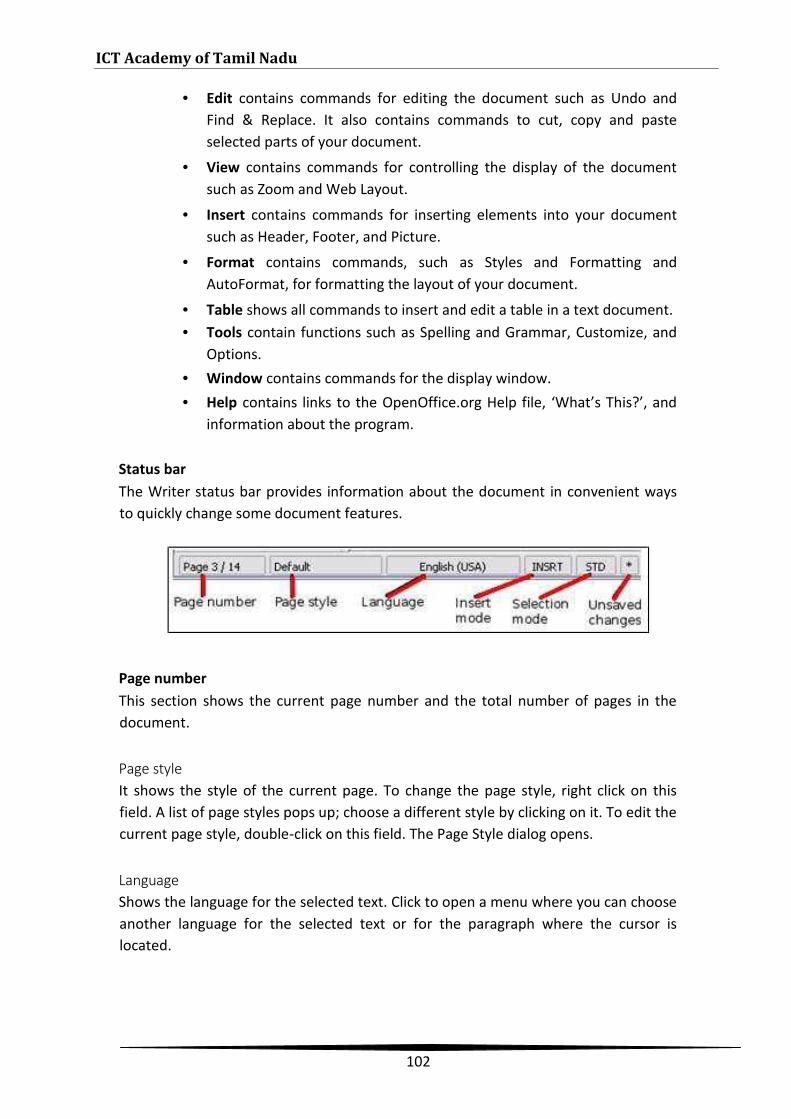
ICT Academy of Tamil Nadu
102
• Edit contains commands for editing the document such as Undo andFind & Replace. It also contains commands to cut, copy and pasteselected parts of your document.
• View contains commands for controlling the display of the documentsuch as Zoom and Web Layout.
• Insert contains commands for inserting elements into your documentsuch as Header, Footer, and Picture.
• Format contains commands, such as Styles and Formatting andAutoFormat, for formatting the layout of your document.
• Table shows all commands to insert and edit a table in a text document.• Tools contain functions such as Spelling and Grammar, Customize, and
Options.• Window contains commands for the display window.• Help contains links to the OpenOffice.org Help file, ‘What’s This?’, and
information about the program.
Status barThe Writer status bar provides information about the document in convenient waysto quickly change some document features.
Page numberThis section shows the current page number and the total number of pages in thedocument.
Page styleIt shows the style of the current page. To change the page style, right click on thisfield. A list of page styles pops up; choose a different style by clicking on it. To edit thecurrent page style, double-click on this field. The Page Style dialog opens.
LanguageShows the language for the selected text. Click to open a menu where you can chooseanother language for the selected text or for the paragraph where the cursor islocated.
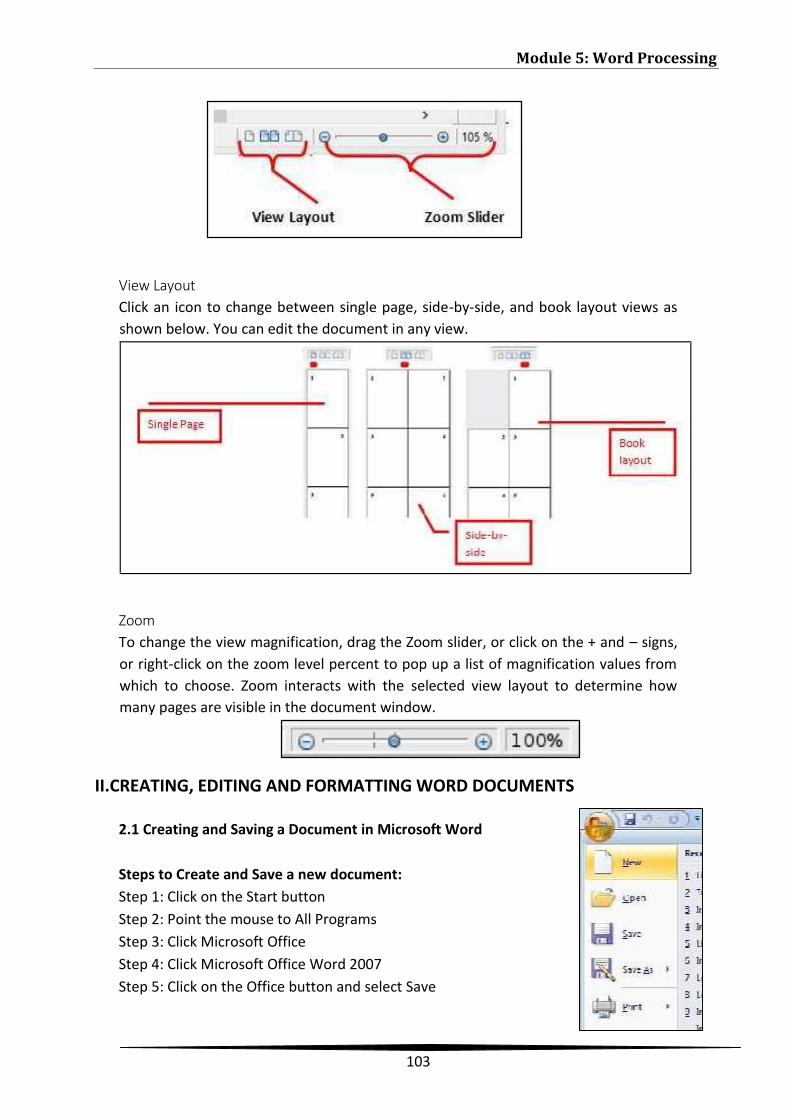
Module 5: Word Processing
103
View LayoutClick an icon to change between single page, side-by-side, and book layout views asshown below. You can edit the document in any view.
ZoomTo change the view magnification, drag the Zoom slider, or click on the + and – signs,or right-click on the zoom level percent to pop up a list of magnification values fromwhich to choose. Zoom interacts with the selected view layout to determine howmany pages are visible in the document window.
II.CREATING, EDITING AND FORMATTING WORD DOCUMENTS
2.1 Creating and Saving a Document in Microsoft Word
Steps to Create and Save a new document:Step 1: Click on the Start buttonStep 2: Point the mouse to All ProgramsStep 3: Click Microsoft OfficeStep 4: Click Microsoft Office Word 2007Step 5: Click on the Office button and select Save
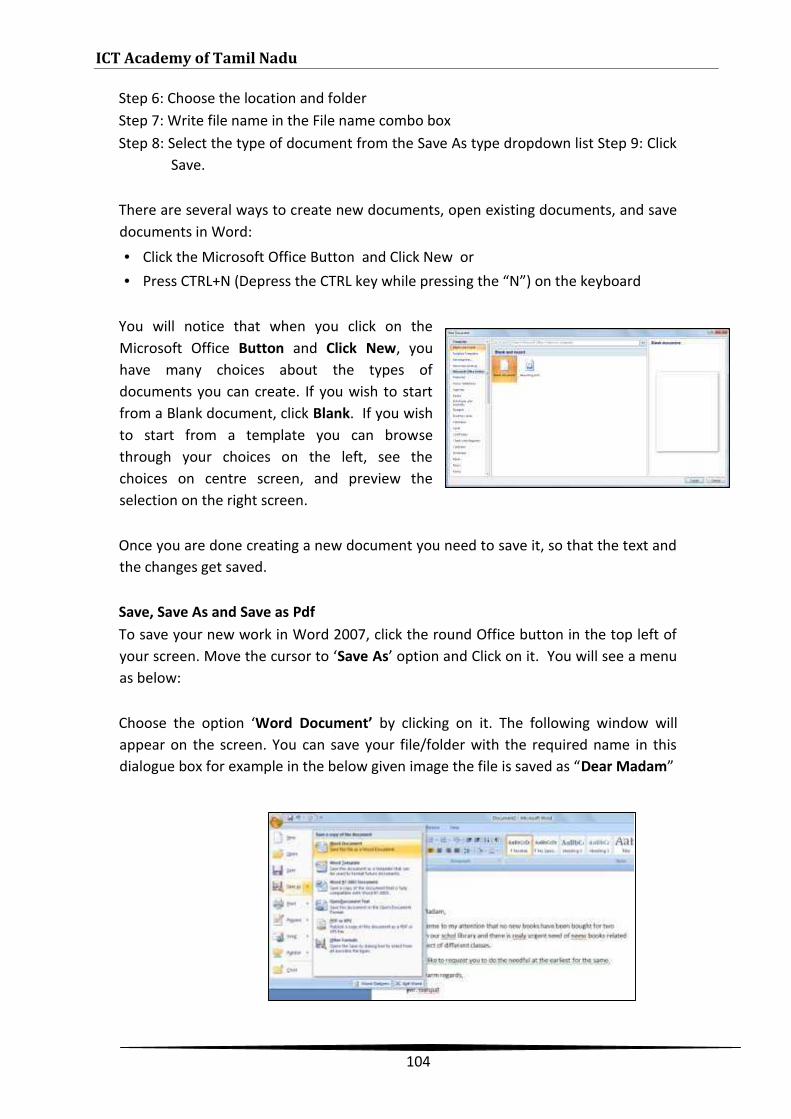
ICT Academy of Tamil Nadu
104
Step 6: Choose the location and folderStep 7: Write file name in the File name combo boxStep 8: Select the type of document from the Save As type dropdown list Step 9: Click
Save.
There are several ways to create new documents, open existing documents, and savedocuments in Word:• Click the Microsoft Office Button and Click New or• Press CTRL+N (Depress the CTRL key while pressing the “N”) on the keyboard
You will notice that when you click on theMicrosoft Office Button and Click New, youhave many choices about the types ofdocuments you can create. If you wish to startfrom a Blank document, click Blank. If you wishto start from a template you can browsethrough your choices on the left, see thechoices on centre screen, and preview theselection on the right screen.
Once you are done creating a new document you need to save it, so that the text andthe changes get saved.
Save, Save As and Save as PdfTo save your new work in Word 2007, click the round Office button in the top left ofyour screen. Move the cursor to ‘Save As’ option and Click on it. You will see a menuas below:
Choose the option ‘Word Document’ by clicking on it. The following window willappear on the screen. You can save your file/folder with the required name in thisdialogue box for example in the below given image the file is saved as “Dear Madam”
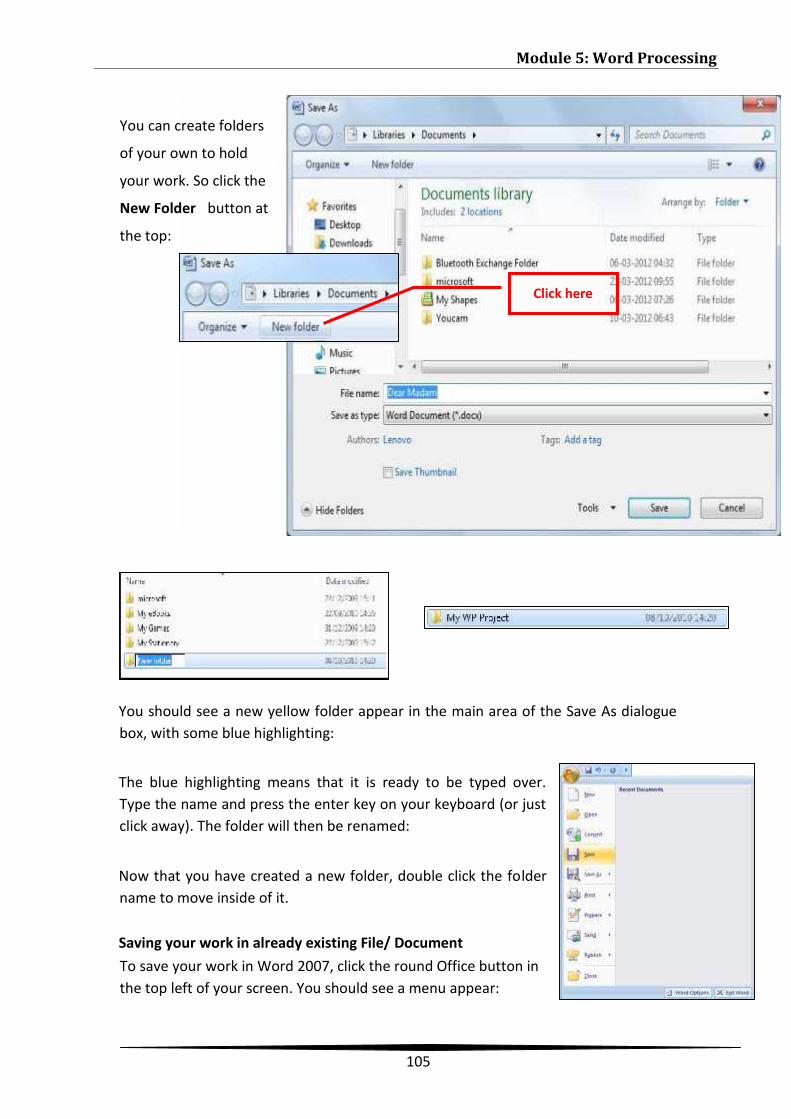
Module 5: Word Processing
105
You should see a new yellow folder appear in the main area of the Save As dialoguebox, with some blue highlighting:
The blue highlighting means that it is ready to be typed over.Type the name and press the enter key on your keyboard (or justclick away). The folder will then be renamed:
Now that you have created a new folder, double click the foldername to move inside of it.
Saving your work in already existing File/ DocumentTo save your work in Word 2007, click the round Office button inthe top left of your screen. You should see a menu appear:
You can create folders
of your own to hold
your work. So click the
New Folder button at
the top:
Click here
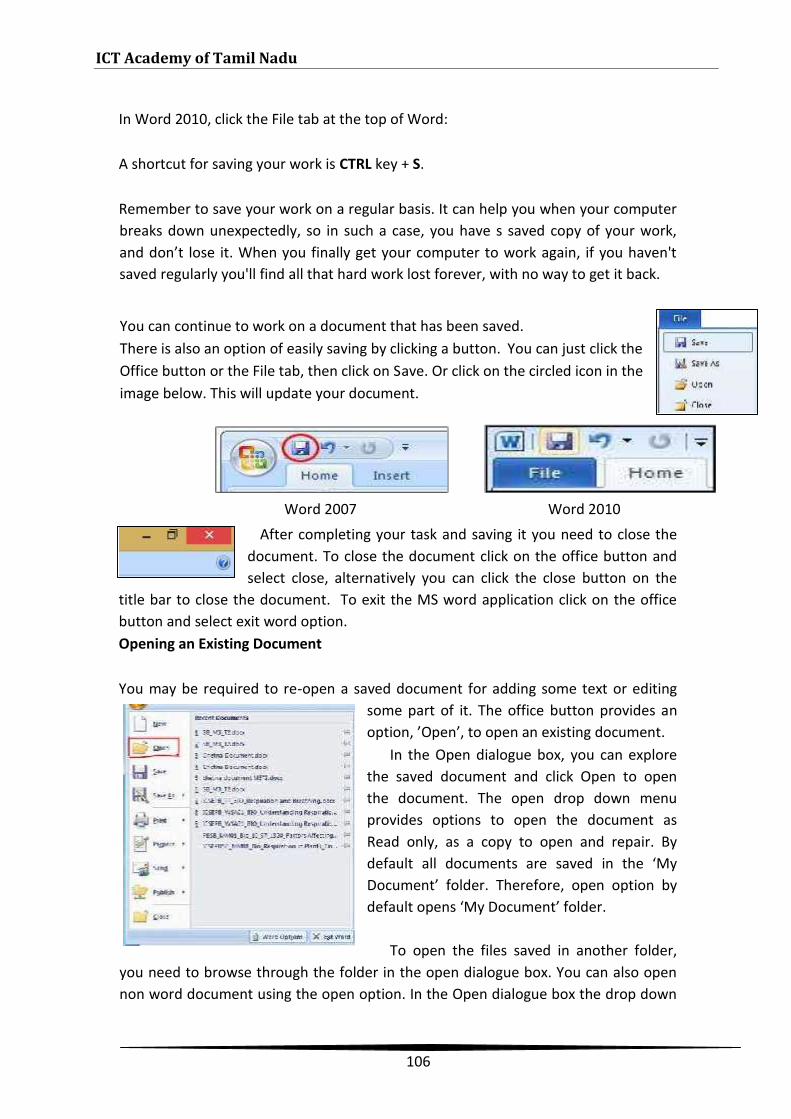
ICT Academy of Tamil Nadu
106
In Word 2010, click the File tab at the top of Word:
A shortcut for saving your work is CTRL key + S.
Remember to save your work on a regular basis. It can help you when your computerbreaks down unexpectedly, so in such a case, you have s saved copy of your work,and don’t lose it. When you finally get your computer to work again, if you haven'tsaved regularly you'll find all that hard work lost forever, with no way to get it back.
After completing your task and saving it you need to close thedocument. To close the document click on the office button andselect close, alternatively you can click the close button on the
title bar to close the document. To exit the MS word application click on the officebutton and select exit word option.Opening an Existing Document
You may be required to re-open a saved document for adding some text or editingsome part of it. The office button provides anoption, ’Open’, to open an existing document.
In the Open dialogue box, you can explorethe saved document and click Open to openthe document. The open drop down menuprovides options to open the document asRead only, as a copy to open and repair. Bydefault all documents are saved in the ‘MyDocument’ folder. Therefore, open option bydefault opens ‘My Document’ folder.
To open the files saved in another folder,you need to browse through the folder in the open dialogue box. You can also opennon word document using the open option. In the Open dialogue box the drop down
You can continue to work on a document that has been saved.There is also an option of easily saving by clicking a button. You can just click theOffice button or the File tab, then click on Save. Or click on the circled icon in theimage below. This will update your document.
Word 2007 Word 2010
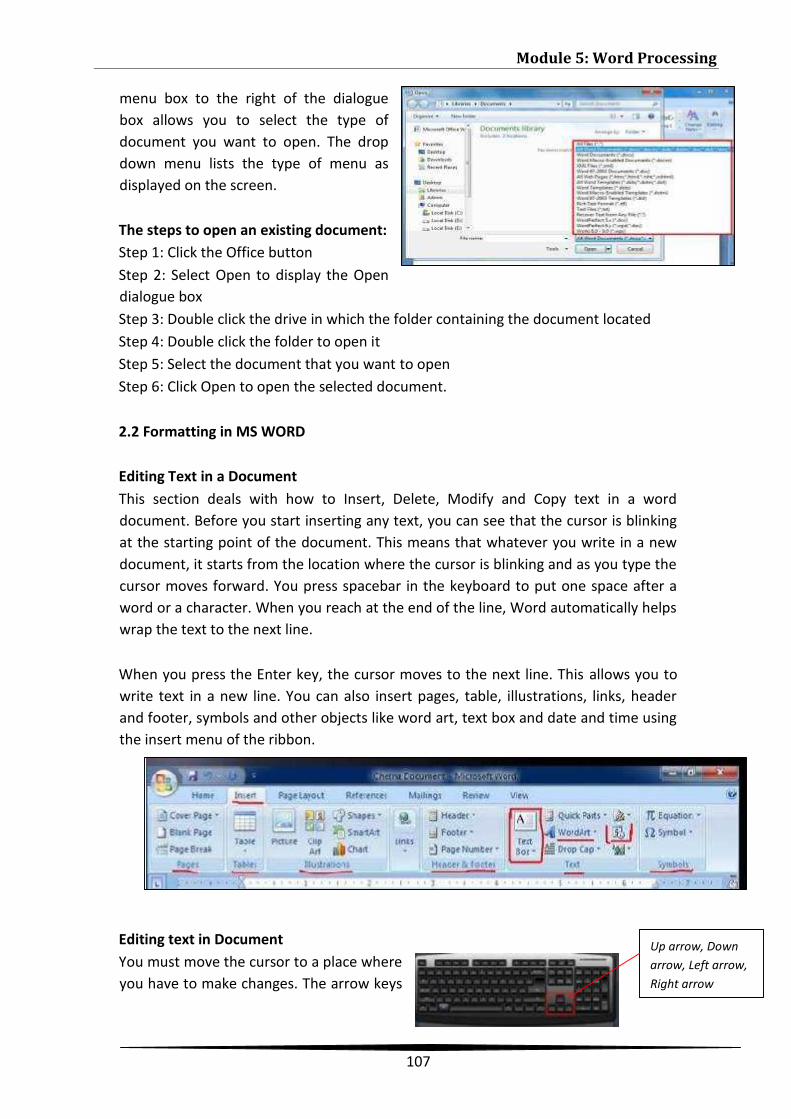
Module 5: Word Processing
107
menu box to the right of the dialoguebox allows you to select the type ofdocument you want to open. The dropdown menu lists the type of menu asdisplayed on the screen.
The steps to open an existing document:Step 1: Click the Office buttonStep 2: Select Open to display the Opendialogue boxStep 3: Double click the drive in which the folder containing the document locatedStep 4: Double click the folder to open itStep 5: Select the document that you want to openStep 6: Click Open to open the selected document.
2.2 Formatting in MS WORD
Editing Text in a DocumentThis section deals with how to Insert, Delete, Modify and Copy text in a worddocument. Before you start inserting any text, you can see that the cursor is blinkingat the starting point of the document. This means that whatever you write in a newdocument, it starts from the location where the cursor is blinking and as you type thecursor moves forward. You press spacebar in the keyboard to put one space after aword or a character. When you reach at the end of the line, Word automatically helpswrap the text to the next line.
When you press the Enter key, the cursor moves to the next line. This allows you towrite text in a new line. You can also insert pages, table, illustrations, links, headerand footer, symbols and other objects like word art, text box and date and time usingthe insert menu of the ribbon.
Editing text in DocumentYou must move the cursor to a place whereyou have to make changes. The arrow keys
Up arrow, Downarrow, Left arrow,Right arrow
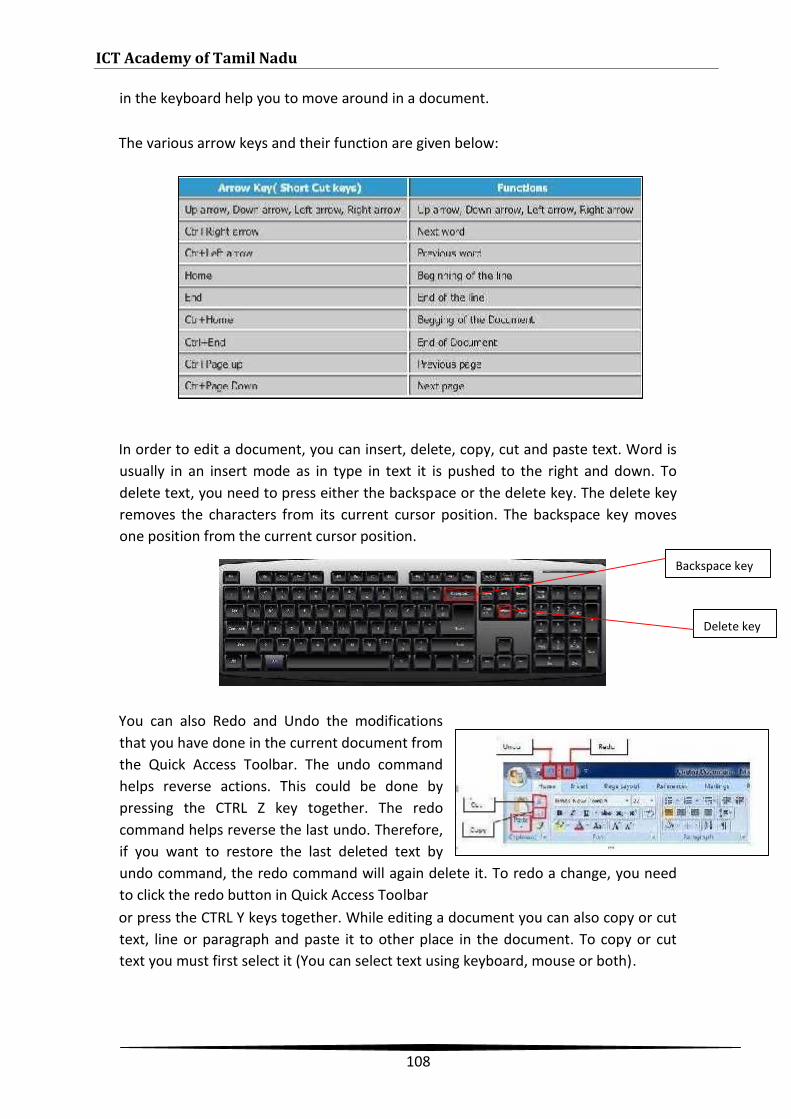
ICT Academy of Tamil Nadu
108
in the keyboard help you to move around in a document.
The various arrow keys and their function are given below:
In order to edit a document, you can insert, delete, copy, cut and paste text. Word isusually in an insert mode as in type in text it is pushed to the right and down. Todelete text, you need to press either the backspace or the delete key. The delete keyremoves the characters from its current cursor position. The backspace key movesone position from the current cursor position.
You can also Redo and Undo the modificationsthat you have done in the current document fromthe Quick Access Toolbar. The undo commandhelps reverse actions. This could be done bypressing the CTRL Z key together. The redocommand helps reverse the last undo. Therefore,if you want to restore the last deleted text byundo command, the redo command will again delete it. To redo a change, you needto click the redo button in Quick Access Toolbaror press the CTRL Y keys together. While editing a document you can also copy or cuttext, line or paragraph and paste it to other place in the document. To copy or cuttext you must first select it (You can select text using keyboard, mouse or both).
Backspace key
Delete key
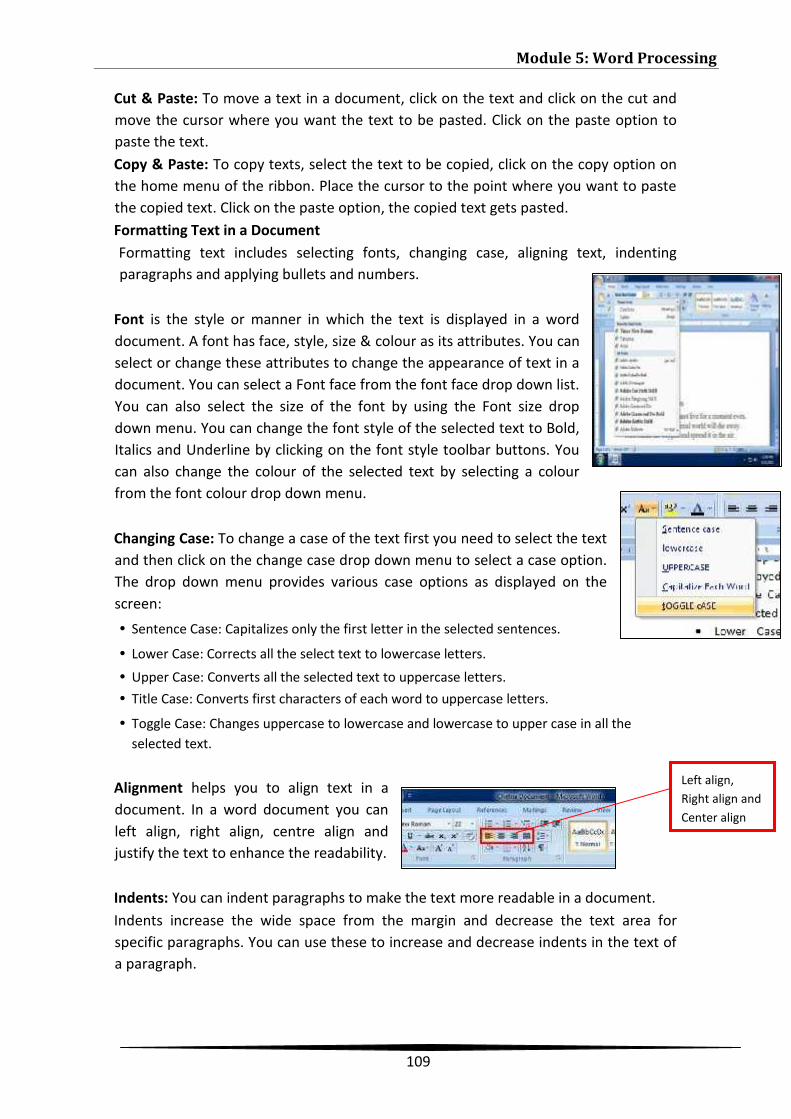
Module 5: Word Processing
109
Cut & Paste: To move a text in a document, click on the text and click on the cut andmove the cursor where you want the text to be pasted. Click on the paste option topaste the text.Copy & Paste: To copy texts, select the text to be copied, click on the copy option onthe home menu of the ribbon. Place the cursor to the point where you want to pastethe copied text. Click on the paste option, the copied text gets pasted.Formatting Text in a DocumentFormatting text includes selecting fonts, changing case, aligning text, indentingparagraphs and applying bullets and numbers.
Font is the style or manner in which the text is displayed in a worddocument. A font has face, style, size & colour as its attributes. You canselect or change these attributes to change the appearance of text in adocument. You can select a Font face from the font face drop down list.You can also select the size of the font by using the Font size dropdown menu. You can change the font style of the selected text to Bold,Italics and Underline by clicking on the font style toolbar buttons. Youcan also change the colour of the selected text by selecting a colourfrom the font colour drop down menu.
Changing Case: To change a case of the text first you need to select the textand then click on the change case drop down menu to select a case option.The drop down menu provides various case options as displayed on thescreen:• Sentence Case: Capitalizes only the first letter in the selected sentences.
• Lower Case: Corrects all the select text to lowercase letters.• Upper Case: Converts all the selected text to uppercase letters.• Title Case: Converts first characters of each word to uppercase letters.
• Toggle Case: Changes uppercase to lowercase and lowercase to upper case in all theselected text.
Alignment helps you to align text in adocument. In a word document you canleft align, right align, centre align andjustify the text to enhance the readability.
Indents: You can indent paragraphs to make the text more readable in a document.Indents increase the wide space from the margin and decrease the text area forspecific paragraphs. You can use these to increase and decrease indents in the text ofa paragraph.
Left align,Right align andCenter align
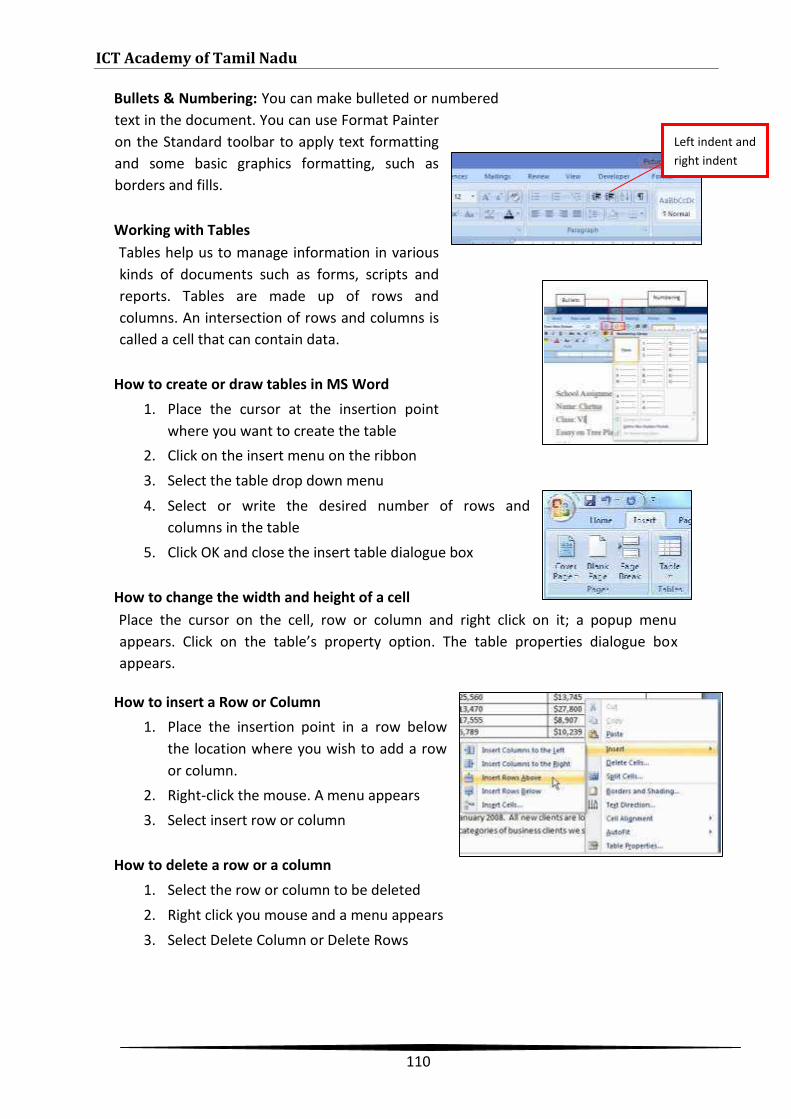
ICT Academy of Tamil Nadu
110
Bullets & Numbering: You can make bulleted or numberedtext in the document. You can use Format Painteron the Standard toolbar to apply text formattingand some basic graphics formatting, such asborders and fills.
Working with TablesTables help us to manage information in variouskinds of documents such as forms, scripts andreports. Tables are made up of rows andcolumns. An intersection of rows and columns iscalled a cell that can contain data.
How to create or draw tables in MS Word1. Place the cursor at the insertion point
where you want to create the table2. Click on the insert menu on the ribbon3. Select the table drop down menu4. Select or write the desired number of rows and
columns in the table5. Click OK and close the insert table dialogue box
How to change the width and height of a cellPlace the cursor on the cell, row or column and right click on it; a popup menuappears. Click on the table’s property option. The table properties dialogue boxappears.
How to insert a Row or Column1. Place the insertion point in a row below
the location where you wish to add a rowor column.
2. Right-click the mouse. A menu appears3. Select insert row or column
How to delete a row or a column1. Select the row or column to be deleted2. Right click you mouse and a menu appears3. Select Delete Column or Delete Rows
Left indent andright indent
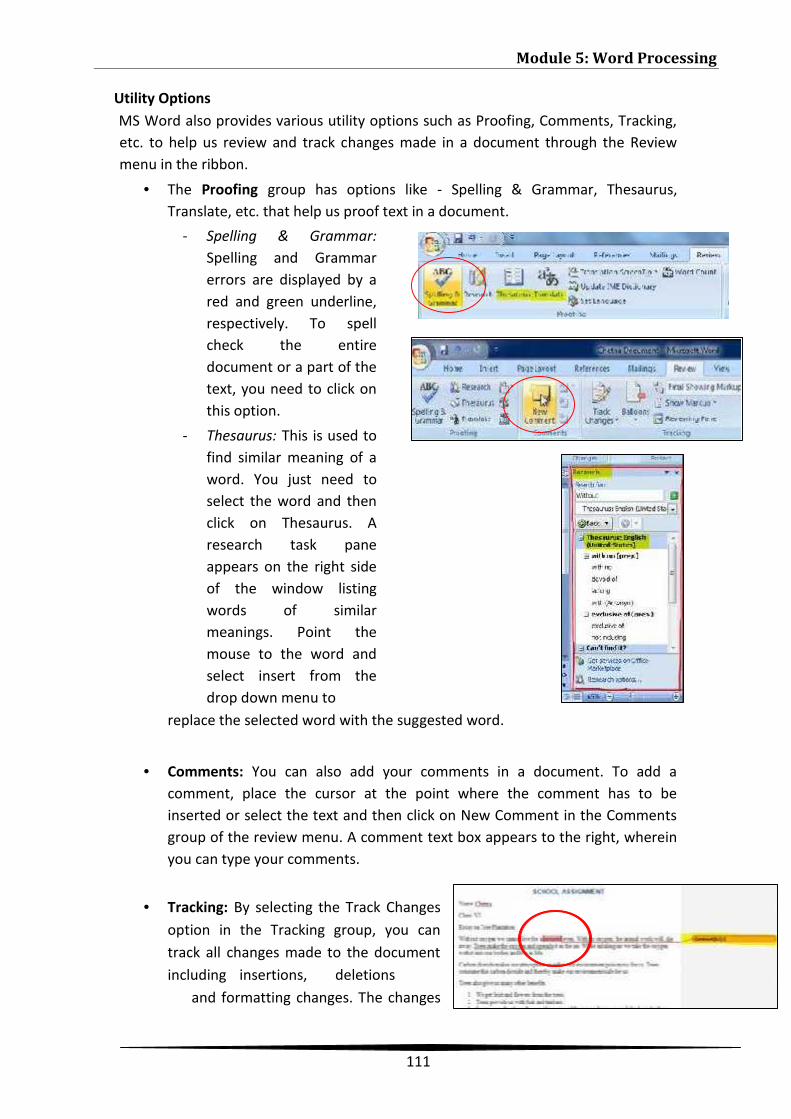
Module 5: Word Processing
111
Utility OptionsMS Word also provides various utility options such as Proofing, Comments, Tracking,etc. to help us review and track changes made in a document through the Reviewmenu in the ribbon.
• The Proofing group has options like - Spelling & Grammar, Thesaurus,Translate, etc. that help us proof text in a document.
- Spelling & Grammar:Spelling and Grammarerrors are displayed by ared and green underline,respectively. To spellcheck the entiredocument or a part of thetext, you need to click onthis option.
- Thesaurus: This is used tofind similar meaning of aword. You just need toselect the word and thenclick on Thesaurus. Aresearch task paneappears on the right sideof the window listingwords of similarmeanings. Point themouse to the word andselect insert from thedrop down menu to
replace the selected word with the suggested word.
• Comments: You can also add your comments in a document. To add acomment, place the cursor at the point where the comment has to beinserted or select the text and then click on New Comment in the Commentsgroup of the review menu. A comment text box appears to the right, whereinyou can type your comments.
• Tracking: By selecting the Track Changesoption in the Tracking group, you cantrack all changes made to the documentincluding insertions, deletions
and formatting changes. The changes

ICT Academy of Tamil Nadu
112
made in Track Change mode helps you to identify the changes made to thedocument. You can also accept or reject changes using the options available inthe Changes group.
Using Open Office Writer
Steps to Create and Save a new document:
Step 1: Use File > New and choose the type of document.OrStep 1: Click on the arrow next to the New button on themain toolbar.
Step 2: From the drop-down menu, select the type ofdocument to be created.
Step 3: Or you can also press Control+N on the keyboardfor starting a new document.
Opening an existing documentWhen no document is open, the Welcome screenprovides an icon for opening an existing document.You can also open an existing document in one ofthe following ways. If a document is already open inWriter, the second document opens in a newwindow.Click File > Open Or Click the Open button on themain toolbar Or Press Control+O on the keyboard.
In each case, the Open dialog appears. Select the fileyou want, and then click Open.In the Open dialog, you can reduce the list of files byselecting the type of file you are looking for.
For example, you will only see documents Writer canopen(including .odt, .doc, .txt);
You can also open an existing document that is in aWriter format by double-clicking on the file’s icon onthe desktop or in Windows Explorer.
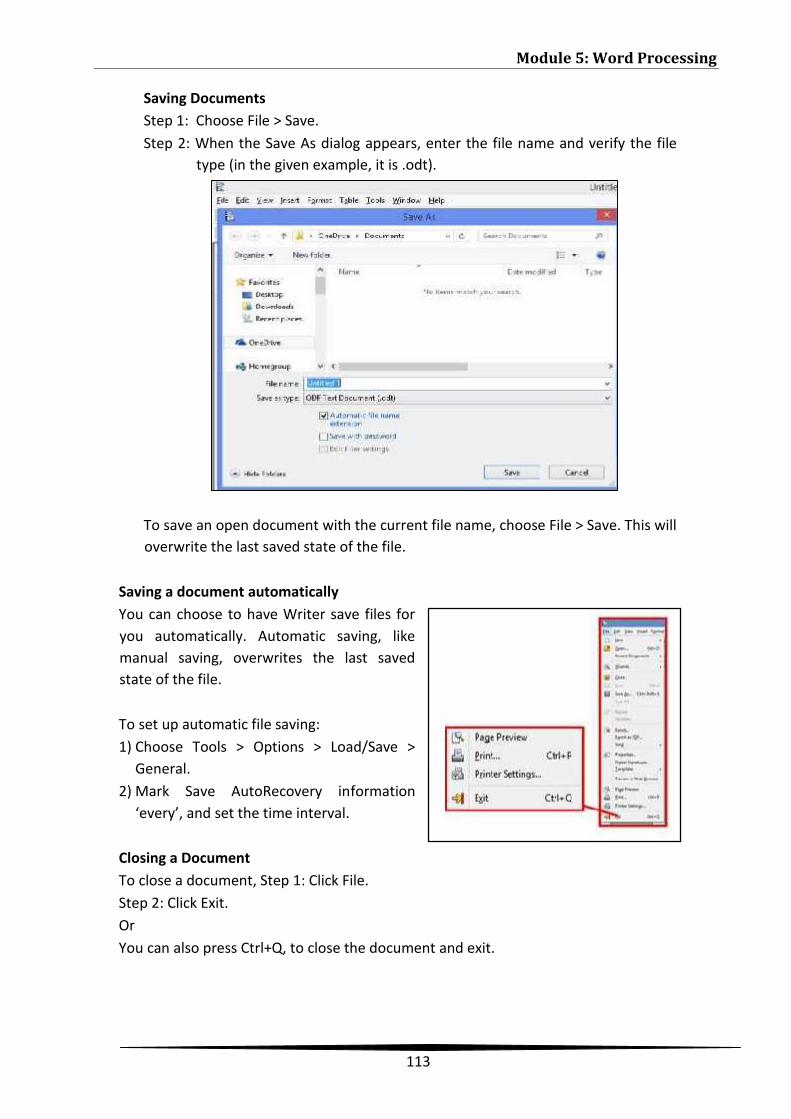
Module 5: Word Processing
113
Saving DocumentsStep 1: Choose File > Save.Step 2: When the Save As dialog appears, enter the file name and verify the file
type (in the given example, it is .odt).
To save an open document with the current file name, choose File > Save. This willoverwrite the last saved state of the file.
Saving a document automaticallyYou can choose to have Writer save files foryou automatically. Automatic saving, likemanual saving, overwrites the last savedstate of the file.
To set up automatic file saving:1) Choose Tools > Options > Load/Save >
General.2) Mark Save AutoRecovery information
‘every’, and set the time interval.
Closing a DocumentTo close a document, Step 1: Click File.Step 2: Click Exit.OrYou can also press Ctrl+Q, to close the document and exit.

ICT Academy of Tamil Nadu
114
You can also close a document by clicking on the Close icon on the document window.This button looks like the red X shown in figure.
If only one window is open, it looks like the sample shown on the right in the Figureabove. Notice the small black X below the large red X. Clicking the small X closes thedocument but leaves Writer window open. Clicking the large red X closes windowcompletely. If the document has not been saved since the last change, a message boxis displayed. Choose whether to save or discard your changes.
• Save: The document is saved and then closed.• Discard: The document is closed, and all modifications since the last save are
lost.• Cancel: Nothing happens, and you return to the document.
Saving as a Microsoft Word fileIf you need to exchange files with users of Microsoft Word, you may not know how toopen and save .odt files. For such cases you can also save a document as a MicrosoftWord file.
Important -First save your document in the file format used by Writer (.odt). If you donot, any changes you made since the last time you saved will appear only in theMicrosoft Word version of the document.
Step 1: Choose File > Save As.
Step 2: On the Save As dialog (As shown inthe figure), in the File type (orSave as type) drop-down menu,select the type of Word formatyou need.
Step 3: Choose Save.
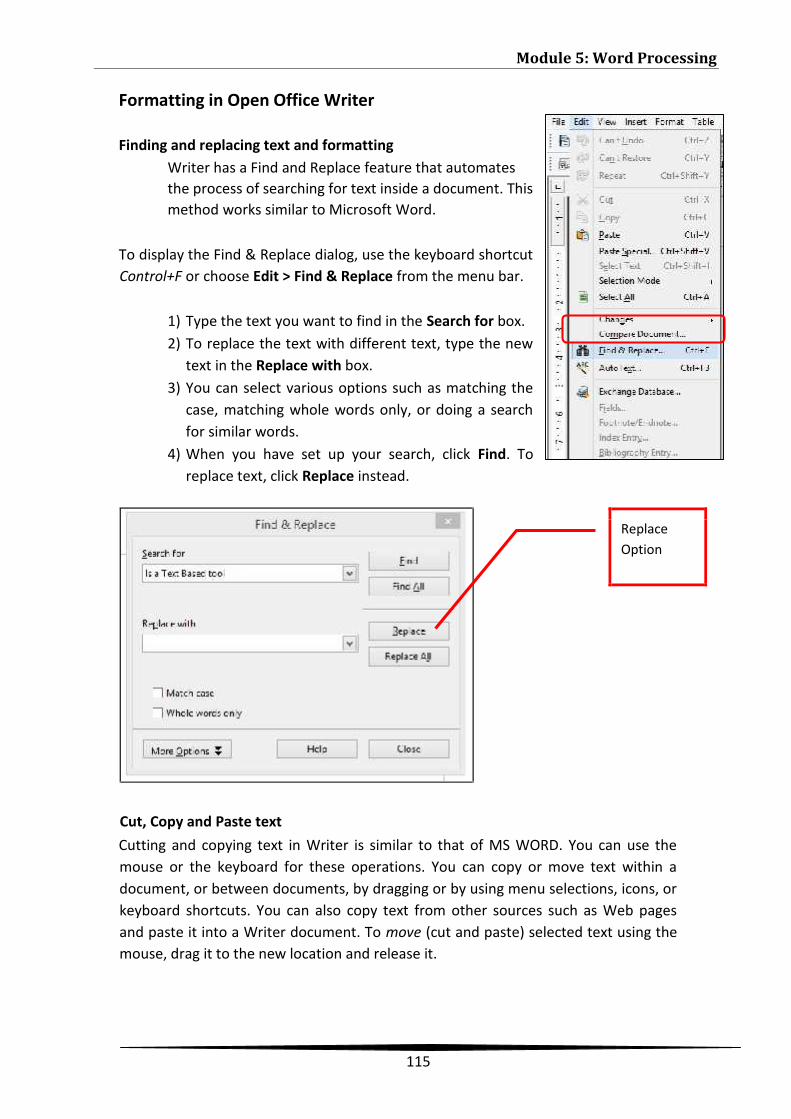
Module 5: Word Processing
115
Formatting in Open Office Writer
Finding and replacing text and formattingWriter has a Find and Replace feature that automatesthe process of searching for text inside a document. Thismethod works similar to Microsoft Word.
To display the Find & Replace dialog, use the keyboard shortcutControl+F or choose Edit > Find & Replace from the menu bar.
1) Type the text you want to find in the Search for box.2) To replace the text with different text, type the new
text in the Replace with box.3) You can select various options such as matching the
case, matching whole words only, or doing a searchfor similar words.
4) When you have set up your search, click Find. Toreplace text, click Replace instead.
ReplaceOption
Cutting and copying text in Writer is similar to that of MS WORD. You can use themouse or the keyboard for these operations. You can copy or move text within adocument, or between documents, by dragging or by using menu selections, icons, orkeyboard shortcuts. You can also copy text from other sources such as Web pagesand paste it into a Writer document. To move (cut and paste) selected text using themouse, drag it to the new location and release it.
Cut, Copy and Paste text
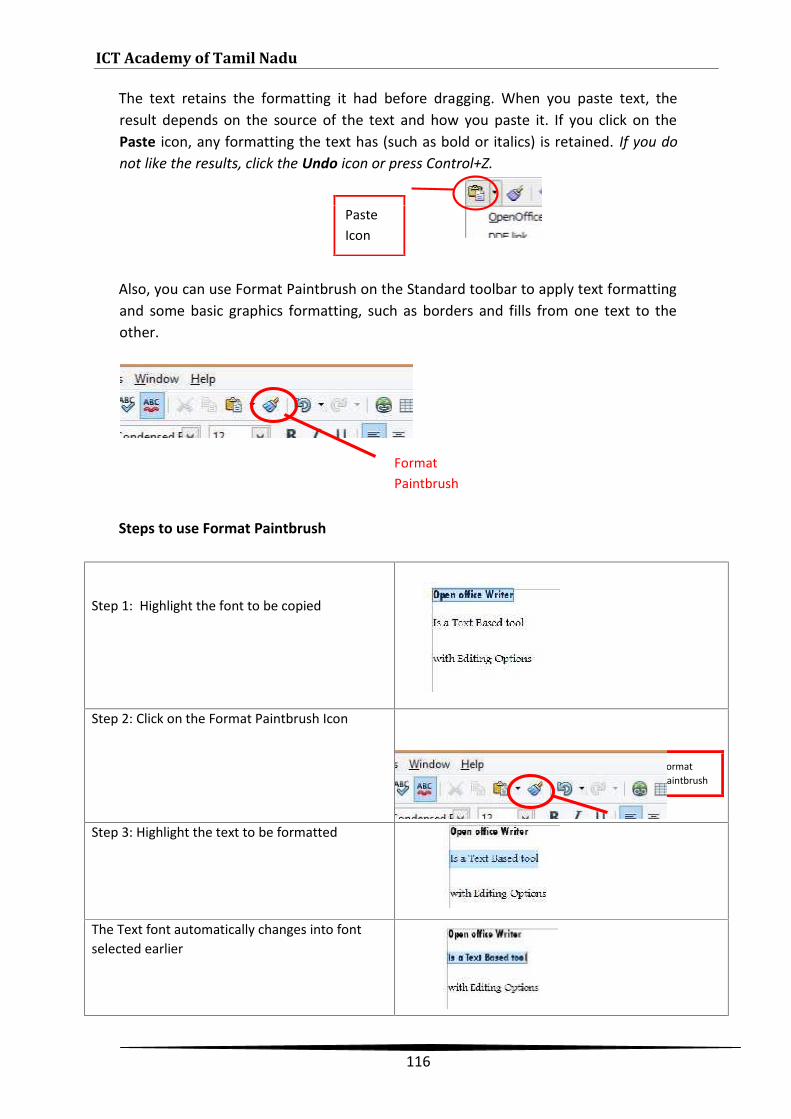
ICT Academy of Tamil Nadu
116
The text retains the formatting it had before dragging. When you paste text, theresult depends on the source of the text and how you paste it. If you click on thePaste icon, any formatting the text has (such as bold or italics) is retained. If you donot like the results, click the Undo icon or press Control+Z.
PasteIcon
Also, you can use Format Paintbrush on the Standard toolbar to apply text formattingand some basic graphics formatting, such as borders and fills from one text to theother.
Steps to use Format Paintbrush
Step 1: Highlight the font to be copied
Step 2: Click on the Format Paintbrush Icon
FormatPaintbrush
Step 3: Highlight the text to be formatted
The Text font automatically changes into fontselected earlier
FormatPaintbrush
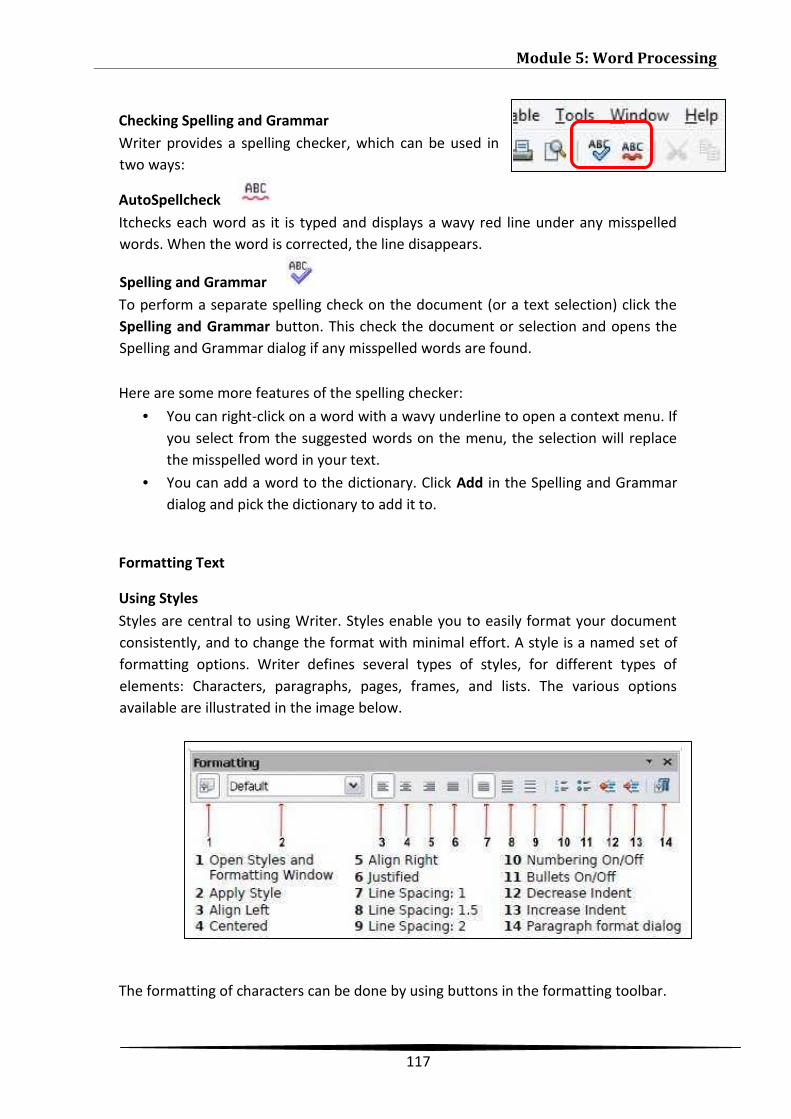
Module 5: Word Processing
117
Checking Spelling and GrammarWriter provides a spelling checker, which can be used intwo ways:
AutoSpellcheckItchecks each word as it is typed and displays a wavy red line under any misspelledwords. When the word is corrected, the line disappears.
Spelling and GrammarTo perform a separate spelling check on the document (or a text selection) click theSpelling and Grammar button. This check the document or selection and opens theSpelling and Grammar dialog if any misspelled words are found.
Here are some more features of the spelling checker: You can right-click on a word with a wavy underline to open a context menu. If
you select from the suggested words on the menu, the selection will replacethe misspelled word in your text.
You can add a word to the dictionary. Click Add in the Spelling and Grammardialog and pick the dictionary to add it to.
Formatting Text
Using StylesStyles are central to using Writer. Styles enable you to easily format your documentconsistently, and to change the format with minimal effort. A style is a named set offormatting options. Writer defines several types of styles, for different types ofelements: Characters, paragraphs, pages, frames, and lists. The various optionsavailable are illustrated in the image below.
The formatting of characters can be done by using buttons in the formatting toolbar.
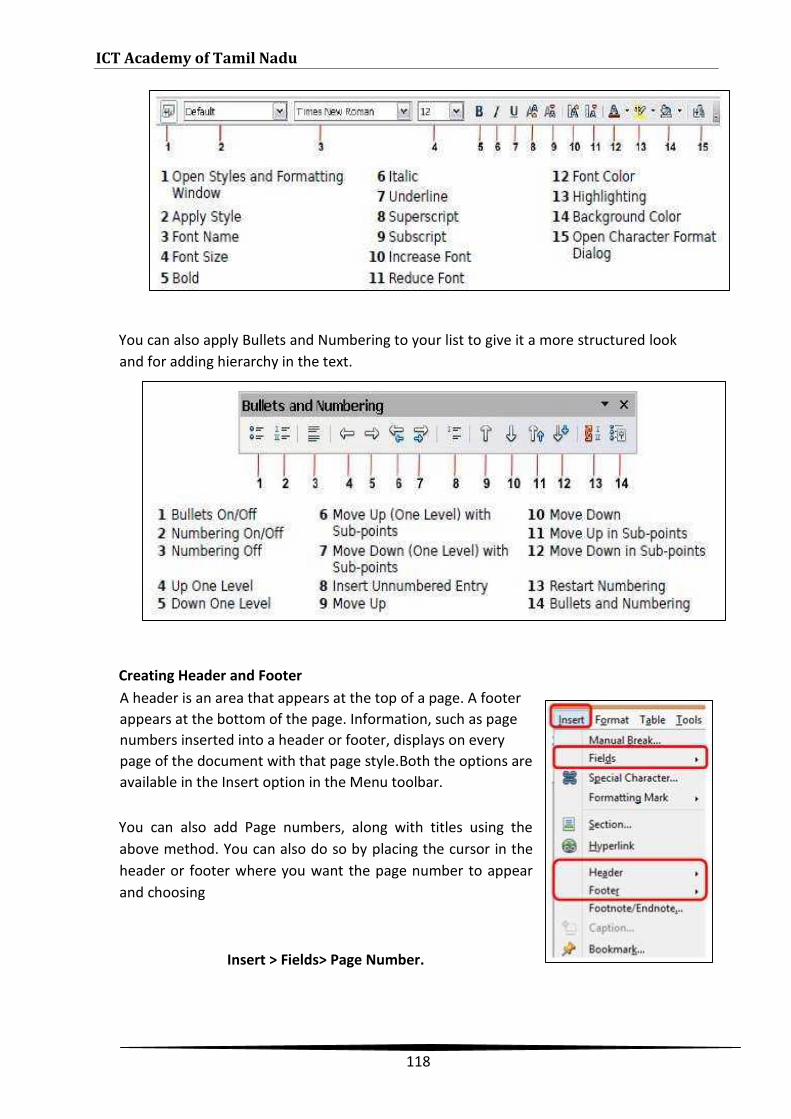
ICT Academy of Tamil Nadu
118
You can also apply Bullets and Numbering to your list to give it a more structured lookand for adding hierarchy in the text.
Creating Header and FooterA header is an area that appears at the top of a page. A footerappears at the bottom of the page. Information, such as pagenumbers inserted into a header or footer, displays on everypage of the document with that page style.Both the options areavailable in the Insert option in the Menu toolbar.
You can also add Page numbers, along with titles using theabove method. You can also do so by placing the cursor in theheader or footer where you want the page number to appearand choosing
Insert > Fields> Page Number.
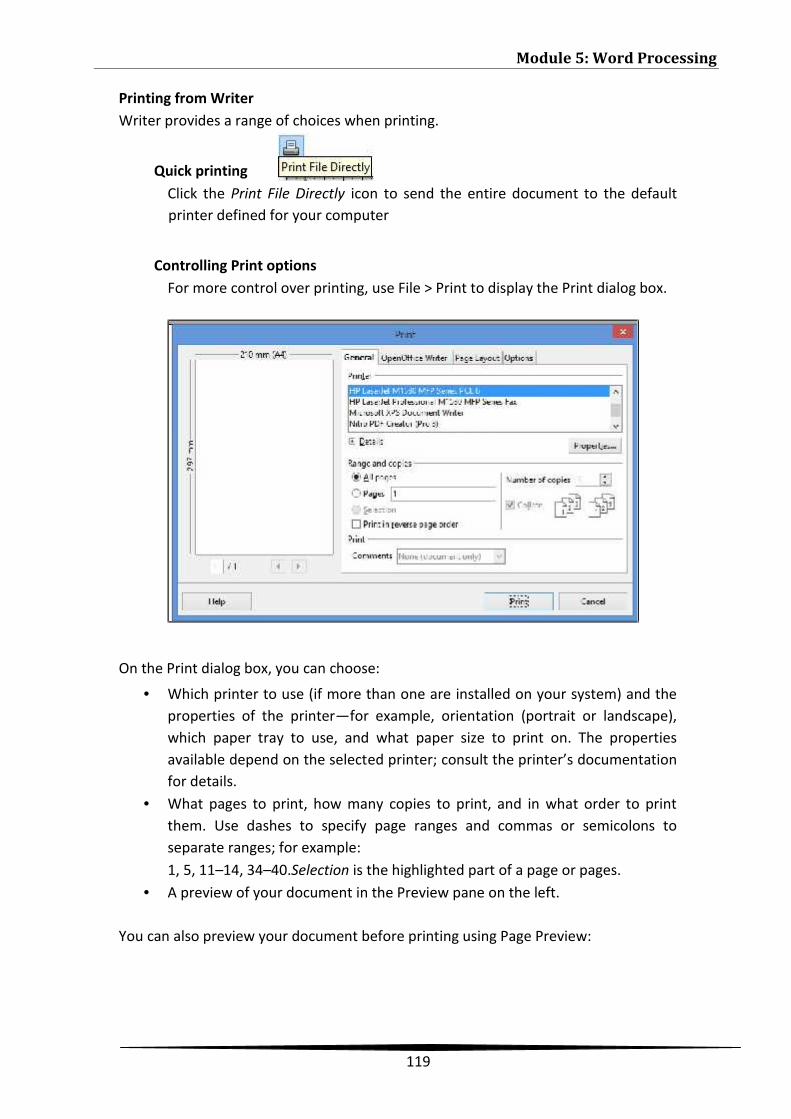
Module 5: Word Processing
119
Printing from WriterWriter provides a range of choices when printing.
Quick printingClick the Print File Directly icon to send the entire document to the defaultprinter defined for your computer
Controlling Print optionsFor more control over printing, use File > Print to display the Print dialog box.
On the Print dialog box, you can choose:
• Which printer to use (if more than one are installed on your system) and theproperties of the printer—for example, orientation (portrait or landscape),which paper tray to use, and what paper size to print on. The propertiesavailable depend on the selected printer; consult the printer’s documentationfor details.
• What pages to print, how many copies to print, and in what order to printthem. Use dashes to specify page ranges and commas or semicolons toseparate ranges; for example:1, 5, 11–14, 34–40.Selection is the highlighted part of a page or pages.
• A preview of your document in the Preview pane on the left.
You can also preview your document before printing using Page Preview:
ICT Academy of Tamil Nadu
120
• Choose File > Page Preview, or click the Page Preview button. The Writerwindow changes to display the current page and the following page, andshows the Page Preview toolbar in place of the Formatting toolbar.
• Click the Book Preview icon to display left and right pages in their correctorientation.
• To print the document from this page view, click the Print page view iconto open the Print dialog. Choose your options and click OK to print as usual.
• To choose margins and other options for the printout, click the Print options
page view icon to display the Print Options dialog.
III. APPLY WORD PROCESSING IN REAL LIFE SCENARIO3.1 CREATING A RESUMERésumé’s are important for applying for a job. It helps you showcase your skills,experience and accomplishments in a structured manner. It is thus a marketing toolwhich contains a summary of relevant job experience and education. In a resume thecontent should be adapted to suit each individual job application and/or applicationsaimed at a particular industry. The resume will be used by your potential employer asa representation of yours.
A Résumé typically has the following content:
• Personal information like name, address, contact number, generally on thetop.
• Information about current work and a summary of past work experience –with the basic information.
• Your education qualifications and the courses that you have undergone.• Information about additional skills and interests• Any Referrals and people who can recommend you.
Steps on Creating the RésuméYou will now see, step by step, the methods required to be followed for writing yourresume. As an example, you can see the given resume.
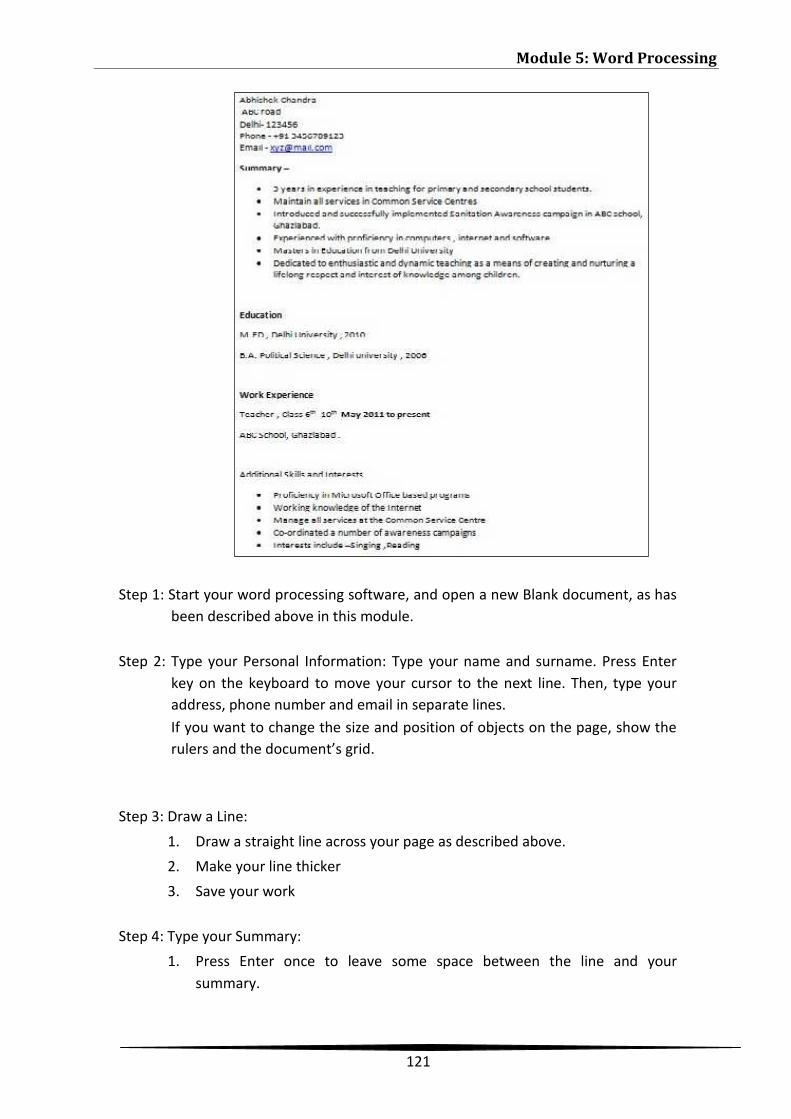
Module 5: Word Processing
121
Step 1: Start your word processing software, and open a new Blank document, as hasbeen described above in this module.
Step 2: Type your Personal Information: Type your name and surname. Press Enterkey on the keyboard to move your cursor to the next line. Then, type youraddress, phone number and email in separate lines.If you want to change the size and position of objects on the page, show therulers and the document’s grid.
Step 3: Draw a Line:1. Draw a straight line across your page as described above.2. Make your line thicker3. Save your work
Step 4: Type your Summary:1. Press Enter once to leave some space between the line and your
summary.
ICT Academy of Tamil Nadu
122
2. Type a heading “SUMMARY”. Then press Enter.3. Do make the heading bold.4. In the lines, type the major tasks achieved during your work experience.5. In the next line, type your highest education degree6. You might want to make a bulleted list of items, for which use can use
bullets and numberings.
Step 5: Information about your work experience:1. Press Enter on your keyboard to move the cursor to the next line.2. Type a heading “Work Experience”. Then press enter.3. Make the heading bold.4. Kindly enter all the details required including your term of work, company
details, job responsibilities, etc.
Step 6: Information about your additional Skills and Interests:1. Press Enter on your keyboard to move the cursor to the next line.2. Type the heading of this section as Skills and Interests.3. Make this heading Bold.4. Type a list of additional skills, responsibilities and interests.
Step 7: Information about references:1. Press Enter on your keyboard to move the cursor to the next line.2. Type the heading of this section as References.3. Make this heading bold.4. Give the name, credentials and contact co-ordinates of the persons whose
references you want to put.
Now that you have completed your work, Save it, and Review your work. Look at theresume at a glance and confirm that the information that you have entered is correctand precise.
Printing DocumentsYou can print the Résumé as required by using the following steps:
Step 1: To print your résumé, click File. Then, click Print. A Print window pops up.Step 2: To select the printer you want to use, click the arrow in the Name list and
select the printer.
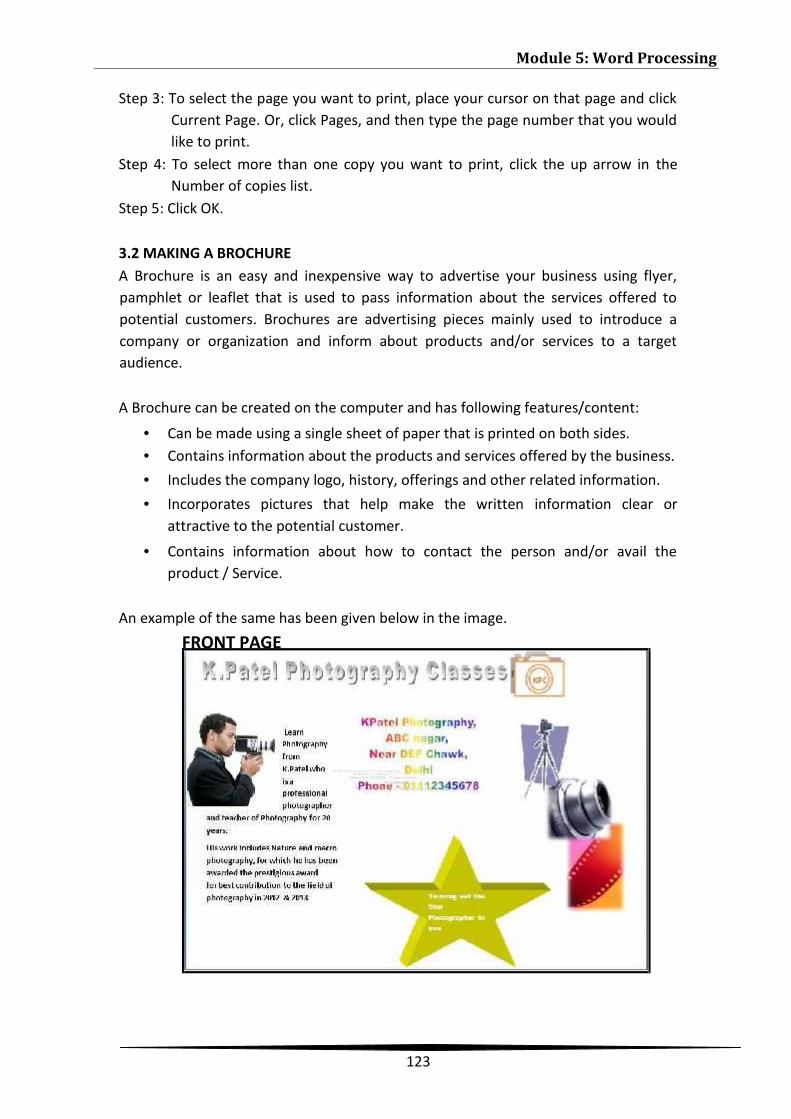
Module 5: Word Processing
123
Step 3: To select the page you want to print, place your cursor on that page and clickCurrent Page. Or, click Pages, and then type the page number that you wouldlike to print.
Step 4: To select more than one copy you want to print, click the up arrow in theNumber of copies list.
Step 5: Click OK.
3.2 MAKING A BROCHUREA Brochure is an easy and inexpensive way to advertise your business using flyer,pamphlet or leaflet that is used to pass information about the services offered topotential customers. Brochures are advertising pieces mainly used to introduce acompany or organization and inform about products and/or services to a targetaudience.
A Brochure can be created on the computer and has following features/content:
• Can be made using a single sheet of paper that is printed on both sides.• Contains information about the products and services offered by the business.• Includes the company logo, history, offerings and other related information.• Incorporates pictures that help make the written information clear or
attractive to the potential customer.
• Contains information about how to contact the person and/or avail theproduct / Service.
An example of the same has been given below in the image.FRONT PAGE
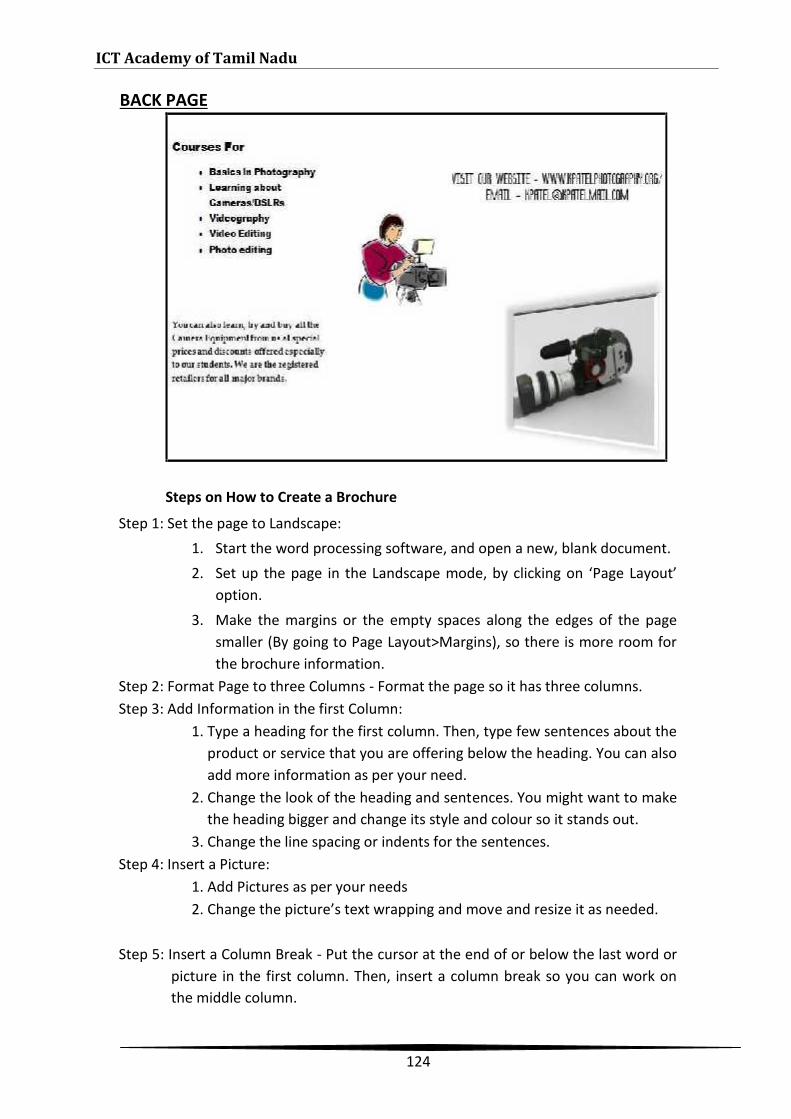
ICT Academy of Tamil Nadu
124
BACK PAGE
Step 1: Set the page to Landscape:1. Start the word processing software, and open a new, blank document.2. Set up the page in the Landscape mode, by clicking on ‘Page Layout’
option.3. Make the margins or the empty spaces along the edges of the page
smaller (By going to Page Layout>Margins), so there is more room forthe brochure information.
Step 2: Format Page to three Columns - Format the page so it has three columns.Step 3: Add Information in the first Column:
1. Type a heading for the first column. Then, type few sentences about theproduct or service that you are offering below the heading. You can alsoadd more information as per your need.
2. Change the look of the heading and sentences. You might want to makethe heading bigger and change its style and colour so it stands out.
3. Change the line spacing or indents for the sentences.Step 4: Insert a Picture:
1. Add Pictures as per your needs2. Change the picture’s text wrapping and move and resize it as needed.
Step 5: Insert a Column Break - Put the cursor at the end of or below the last word orpicture in the first column. Then, insert a column break so you can work onthe middle column.
Steps on How to Create a Brochure
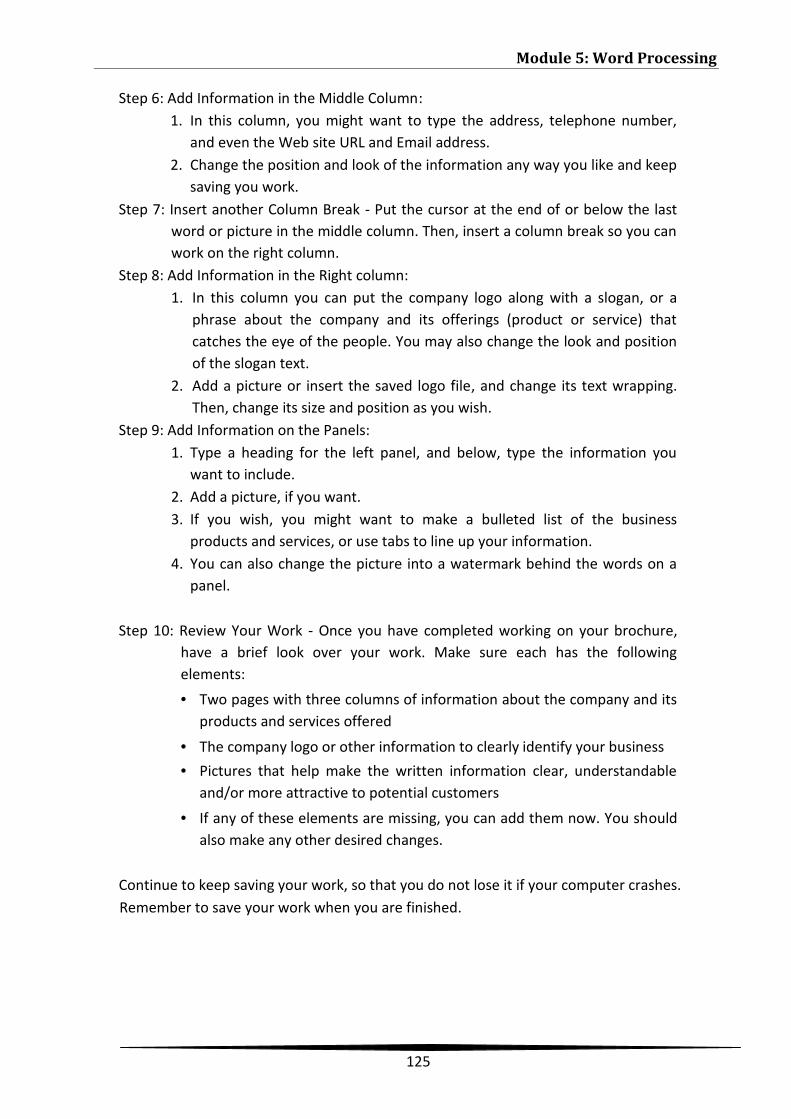
Module 5: Word Processing
125
Step 6: Add Information in the Middle Column:1. In this column, you might want to type the address, telephone number,
and even the Web site URL and Email address.2. Change the position and look of the information any way you like and keep
saving you work.Step 7: Insert another Column Break - Put the cursor at the end of or below the last
word or picture in the middle column. Then, insert a column break so you canwork on the right column.
Step 8: Add Information in the Right column:1. In this column you can put the company logo along with a slogan, or a
phrase about the company and its offerings (product or service) thatcatches the eye of the people. You may also change the look and positionof the slogan text.
2. Add a picture or insert the saved logo file, and change its text wrapping.Then, change its size and position as you wish.
Step 9: Add Information on the Panels:1. Type a heading for the left panel, and below, type the information you
want to include.2. Add a picture, if you want.3. If you wish, you might want to make a bulleted list of the business
products and services, or use tabs to line up your information.4. You can also change the picture into a watermark behind the words on a
panel.
Step 10: Review Your Work - Once you have completed working on your brochure,have a brief look over your work. Make sure each has the followingelements:• Two pages with three columns of information about the company and its
products and services offered
• The company logo or other information to clearly identify your business• Pictures that help make the written information clear, understandable
and/or more attractive to potential customers
• If any of these elements are missing, you can add them now. You shouldalso make any other desired changes.
Continue to keep saving your work, so that you do not lose it if your computer crashes.Remember to save your work when you are finished.
ICT Academy of Tamil Nadu
126
3.3 CREATE A BUSINESS CARDBusiness cards are one of the most basic and the most important marketing andnetworking tools in business circles. It is often the first item customers receive fromyou, so it is your first opportunity to make a strong, positive impression on them.
One of the typical ways that people advertise their business is by handing outbusiness cards. They contain information like your name, designation, thecompany/organization you are working with and your contact details like phonenumber and email ID. An example has been given below:
As in the example above, a Business Card created on the computer typically has:
• The name of the business or your company/organization• The person’s name and designation• A work address• Telephone and fax numbers• An email address and other information (if available)
Steps on How to Create a Business Card
Step 1: Draw a Rectangle:1. Start the word processing software, and open a new, blank document.2. Draw a rectangle that is about the same size as a business card.3. Change the Style and border’s width, style, and colour 4. Click to select
the shape. Change the text wrapping style.5. Click the Layout tab and select Tight.
Module 5: Word Processing
127
Step 2: Make an Attractive Title:1. Make an attractive title with the name of the business.2. Change the text wrapping style. Click Format>WordArt.3. Click the Layout tab and select Tight.4. Resize and move the title as needed.
Step 3: Make a Text Box:1. Make a text box in an empty space in the rectangle. Type the name of the
person you are making the business cards for, and on the next line, ifrequired, type that person’s position in the business.
2. Either use the original text box or make another text box, and type thebusiness’s contact information including the address, the telephonenumber, and perhaps even an email address.
3. Change the look of the text to suit your needsStep 4: Add a Picture:
1. Add a clip art picture that shows something important about the business.
2. Change the picture’s look, text wrapping settings, and move and resize it
as is needed.
Step 5: Copy Your Business Card - Copy and paste the business card as many times asyou need, to fill the page. Move the copies of the business card around sothey are neatly lined up and evenly spaced apart.
Step 6: Review Your Work:1. Look over your business card. Make sure each has the following elements:
• An artful title with the name of the business.
• The name of the person or people the card is for, as well as the
position within the business.
• Contact information including an address, telephone number, and
perhaps even an email address.
• A picture that shows something important about the business.
• A colorful border around the outside of the business card.
If any of these elements are missing, add them now. You should also make any otherdesired changes as required.
Continue to keep saving your work, so that you do not lose it if your computer crashes.Remember to save your work when you are finished.

ICT Academy of Tamil Nadu
128
3.4 WRITING A LETTERA written letter could be helpful for either business or personal use. For example, foremployment purposes, you can write a cover letter. Most people will typically send a“cover letter “along with their résumé or application for employment as a way ofintroducing themselves to potential employers and explaining their suitability for thedesired position. Here is an example:
A cover letter is used in cases where you want to apply for a new job or when youwant a career change or hear about some vacancy. In this case, a cover letterprovides the potential employer with an introduction about your skills and experienceand your desired interest for the position applied for.
As in the example above, a cover letter for a job application created on the computertypically has:
• Personal information like name, address, contact number• The name and address of the person receiving the cover letter• Information about education qualifications

Module 5: Word Processing
129
• Information about interest in the position applied for• Space for signature at the end of the application
Steps on How to Create a Cover Letter
Step 1: Type your personal Information:1. Start the word processing software, and open a new, blank document.2. Type your name and surname. Press Enter key on the keyboard to move
your cursor to the next line. Type your basic information, like address,phone number and email (if available) in separate lines.
Step 2: Type Subject Line and Date:1. Press Enter on the keyboard to leave some space between your personal
information and the subject line.2. Type “Subject -”. Then type a few words about what the application is for.3. Press Enter on the keyboard to move your cursor to the next line. Then,
set and use a right-aligned tab to move the cursor to the right side of thepage. Insert today’s date, and pick whichever date format you like.
Step 3: Type Name and Address of the Recipient:1. Press Enter on your keyboard to move the cursor to the next line.2. Type the name and surname of the person to whom you are sending the
cover letter. Press Enter key on the keyboard to move your cursor to thenext line. Type the person’s title or designation, address, phone numberand email (if available) in separate lines.
Step 4: Type Information about Interest in the Post applied for:1. Type “Dear” followed by the surname of the person to whom you are
addressing the cover letter to.2. Press Enter on your keyboard to move the cursor to the next line.3. Include the following required points when you type information about
your interest in the post applied for, such as:a. Interest in the positionb. Highest educational qualificationc. Work experienced. Additional skillse. Request for an interview/meetingf. Your full name and space for your signature at the end of the
applicationStep 5: Review Your Work:Look over your cover letter. Make sure it has the following elements:
• Personal information like name, address, contact number
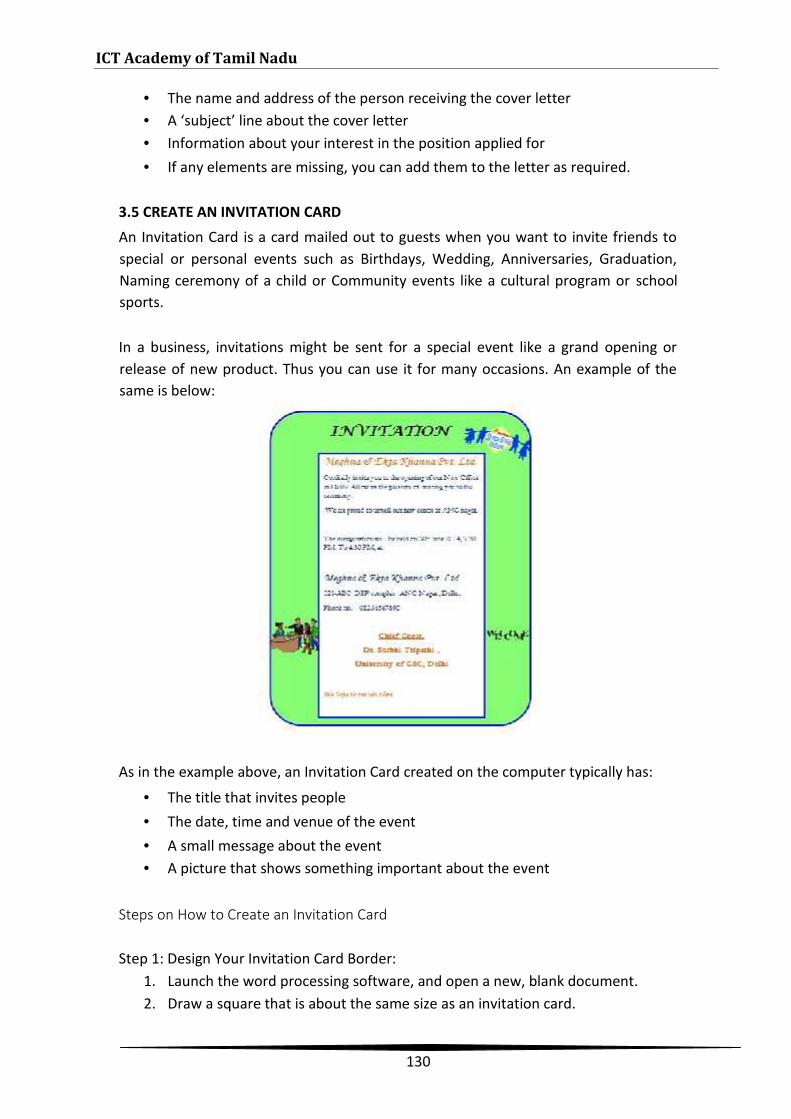
ICT Academy of Tamil Nadu
130
• The name and address of the person receiving the cover letter• A ‘subject’ line about the cover letter• Information about your interest in the position applied for• If any elements are missing, you can add them to the letter as required.
3.5 CREATE AN INVITATION CARDAn Invitation Card is a card mailed out to guests when you want to invite friends tospecial or personal events such as Birthdays, Wedding, Anniversaries, Graduation,Naming ceremony of a child or Community events like a cultural program or schoolsports.
In a business, invitations might be sent for a special event like a grand opening orrelease of new product. Thus you can use it for many occasions. An example of thesame is below:
As in the example above, an Invitation Card created on the computer typically has:
• The title that invites people• The date, time and venue of the event• A small message about the event• A picture that shows something important about the event
Steps on How to Create an Invitation Card
Step 1: Design Your Invitation Card Border:1. Launch the word processing software, and open a new, blank document.2. Draw a square that is about the same size as an invitation card.
Module 5: Word Processing
131
3. Change the border’s look by editing its width, style, and colour.4. Save your work.
Step 2: Add Picture to Your Invitation Card:1. Add a picture to your invitation card. There are two ways you can do this:
a) You can start “Paint” from Start menu and make your own picture.Save your finished painting on your computer and insert it into yourinvitation card.
b) Or you can add a picture from the clip art gallery.2. Resize and move the picture as needed.3. Add another picture if required.
Step 3: Add Text to Your Invitation Card:1. Draw a text box in an empty space in the square.2. Type “Invitation” or any title that you want to add.3. Change the look, style or font of the title, as needed, and move it so it fits
on top of your invitation card.4. Change the look of the words as you wish.5. In the centre of the invitation card, make a text box. Type a small message
about the event. Add the date, time and venue of the event. As needed,change the look and size of words.
6. Change the alignment of words in the text box.7. Change the look of the text box border.8. Move the text box so it is in the centre of your invitation card.
Step 4: Review Your Work:Look over your invitation card. Make sure each has the following elements:
• A title that invites people• The date, time and venue of the event• A short message about the event• A picture that shows something important about the event.• Any other Information about important people or important events related to
the above.

ICT Academy of Tamil Nadu
132
6. VIDEO LIST
Module 1_Introduction to Digital Devices (ENGLISH)https://www.youtube.com/watch?v=b2X_j5Bz-VM
Module 2_Operating System (ENGLISH)https://www.youtube.com/watch?v=7S56nwrsejk
Module 3_Introduction to the Internet (ENGLISH)https://www.youtube.com/watch?v=49xPbj7xS8s
Module 4_Communications Using The Internet (ENGLISH)https://www.youtube.com/watch?v=Jloayp3_F3M
Module 5_USE OF INTERNET (English)https://www.youtube.com/watch?v=26E7PXJk9GA
Module 1_Introduction to Digital Devices (Hindi)https://www.youtube.com/watch?v=fU-mVQaRszg
Module 2_Operating System (Hindi)https://www.youtube.com/watch?v=_98_67UXq4M
Module 3_Introduction to the Internet (Hindi)https://www.youtube.com/watch?v=yeG4HYdW1EI
Module 4_Communications Using The Internet (Hindi)https://www.youtube.com/watch?v=WLNQNQc3p20
Module 5_USE OF INTERNET (Hindi)https://www.youtube.com/watch?v=iQo4-Wu5UEk
Tamil version of video lessons will be published soon.
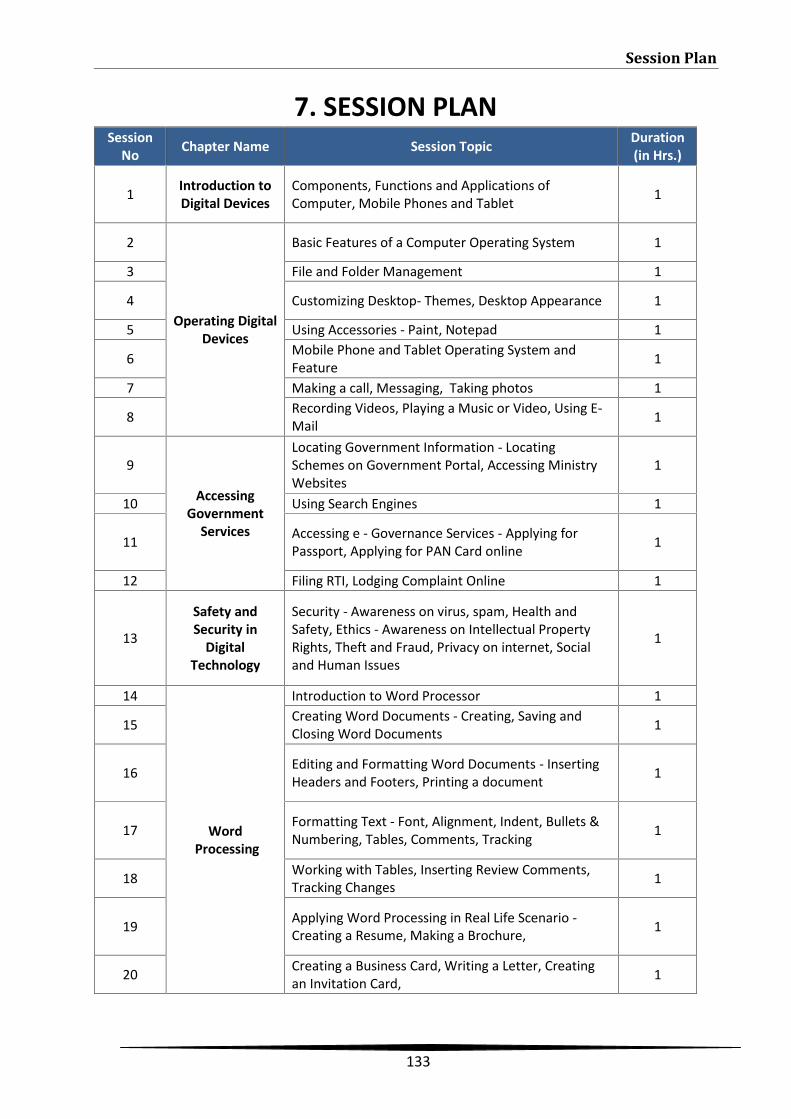
Session Plan
133
7. SESSION PLANSession
No Chapter Name Session Topic Duration(in Hrs.)
1 Introduction toDigital Devices
Components, Functions and Applications ofComputer, Mobile Phones and Tablet 1
2
Operating DigitalDevices
Basic Features of a Computer Operating System 1
3 File and Folder Management 1
4 Customizing Desktop- Themes, Desktop Appearance 1
5 Using Accessories - Paint, Notepad 1
6 Mobile Phone and Tablet Operating System andFeature 1
7 Making a call, Messaging, Taking photos 1
8 Recording Videos, Playing a Music or Video, Using E-Mail 1
9
AccessingGovernment
Services
Locating Government Information - LocatingSchemes on Government Portal, Accessing MinistryWebsites
1
10 Using Search Engines 1
11 Accessing e - Governance Services - Applying forPassport, Applying for PAN Card online 1
12 Filing RTI, Lodging Complaint Online 1
13
Safety andSecurity in
DigitalTechnology
Security - Awareness on virus, spam, Health andSafety, Ethics - Awareness on Intellectual PropertyRights, Theft and Fraud, Privacy on internet, Socialand Human Issues
1
14
WordProcessing
Introduction to Word Processor 1
15 Creating Word Documents - Creating, Saving andClosing Word Documents 1
16 Editing and Formatting Word Documents - InsertingHeaders and Footers, Printing a document 1
17 Formatting Text - Font, Alignment, Indent, Bullets &Numbering, Tables, Comments, Tracking 1
18 Working with Tables, Inserting Review Comments,Tracking Changes 1
19 Applying Word Processing in Real Life Scenario -Creating a Resume, Making a Brochure, 1
20 Creating a Business Card, Writing a Letter, Creatingan Invitation Card, 1