Embed Size (px)
Citation preview

United States Environmental Protection Agency
Office of Water
Washington, DC
EPA-841-R-14-007
National Coastal Condition Assessment 2015
Field Operations Manual
May 2015

National Coastal Condition Assessment 2015 Field Operations Manual Version 1.0 May 2015 Page i
NOTICE
The National Coastal Condition Assessment provides a comprehensive assessment for coastal waters across the United States. The complete documentation of overall project management, design, methods, and standards is contained in four documents:
• National Coastal Condition Assessment 2015: Quality Assurance Project Plan(EPA-841-R-14-005)
• National Coastal Condition Assessment 2015: Site Evaluation Guidelines (EPA-841-R-14-006)
• National Coastal Condition Assessment 2015: Field Operations Manual (EPA-841-R-14-007)
• National Coastal Condition Assessment 2015: Laboratory Operations Manual(EPA-841-R-14-008)
This Field Operations Manual contains a brief introduction and base and site location procedures for sampling water chemistry (grabs and in situ measurements), benthic macroinvertebrates, sediment composition and toxicity, fish tissue, a pathogen indicator, and physical habitat. These methods are based on the guidelines developed and followed in the Coastal 2000 and National Coastal Assessment Monitoring and Assessment Program (USEPA, 2001). All National Coastal Condition Assessment Project Cooperators must follow the methods and guidelines in this Field Operations Manual. Mention of trade names or commercial products in this document does not constitute endorsement or recommendation for use. Details on specific methods for site evaluation and sample processing can be found in the appropriate companion document.
The citation for this document is:
USEPA. 2014. National Coastal Condition Assessment: Field Operations Manual. EPA-841-R-14-007. U.S. Environmental Protection Agency, Washington, DC.

National Coastal Condition Assessment 2015 Field Operations Manual Version 1.0 May 2015 Page ii This page is intentionally blank

National Coastal Condition Assessment 2015 Field Operations Manual Version 1.0 May 2015 Page iii
1 TABLE OF CONTENTS 1 TABLE OF CONTENTS ............................................................................................. iii
LIST OF TABLES ........................................................................................................ viii
LIST OF FIGURES ......................................................................................................... ix
ACRONYMS/ABBREVIATIONS ............................................................................................ x
CONTACT LIST ........................................................................................................... xii
2 BACKGROUND ........................................................................................................ 1
2.1 SURVEY DESIGN ................................................................................................... 1 2.2 TARGET POPULATION AND SAMPLE FRAME ......................................................................... 2 2.3 SITE EVALUATION ................................................................................................. 3
2.3.1 Site Sample-ability ........................................................................................ 3 2.3.2 Replacing Sites ............................................................................................. 4
2.4 DESCRIPTION OF NCCA INDICATORS ............................................................................... 5 2.4.1 In Situ Water Column Measurements ................................................................... 5 2.4.2 Water Chemistry (CHEM) and Associated Measurements ........................................... 5 2.4.3 Algal Toxin (ALGX), Microcystin (MICX) ................................................................ 5 2.4.4 Underwater Video (UVID) ................................................................................. 6 2.4.5 Sediment Assessment (SEDG, SEDC, SEDX, SEDO) .................................................... 6 2.4.6 Benthic Macroinvertebrate Assemblage (BENT) ...................................................... 6 2.4.7 Enterococci Fecal Indicator (ENTE) ..................................................................... 6 2.4.8 Fish Tissue (FTIS, FPLG, HTIS) ........................................................................... 6
2.5 SUPPLEMENTAL MATERIAL TO THE FIELD OPERATIONS MANUAL .................................................... 7 2.6 RECORDING DATA AND OTHER INFORMATION ...................................................................... 7
2.6.1 Electronic Field Forms .................................................................................... 8 2.6.2 Paper Field & Tracking Forms ........................................................................... 8
2.7 DATA MANAGEMENT ............................................................................................... 9 2.8 SAFETY AND HEALTH ............................................................................................ 10
2.8.1 General Considerations ................................................................................. 10 2.8.2 Safety Equipment ........................................................................................ 11 2.8.3 Safety Guidelines for Field Operations .............................................................. 11 2.8.4 General Safety Guidelines for Field Operations ................................................... 12
3 INTRODUCTION TO SAMPLING .................................................................................. 13
3.1 SITE VISIT DURATION ............................................................................................ 13 3.2 FIELD CREW MAKEUP ............................................................................................ 13 3.3 SAMPLING SEQUENCE ............................................................................................ 13 3.4 SAMPLING CONSIDERATIONS ..................................................................................... 13
3.4.1 Considerations for Fish Tissue Collection ........................................................... 13 3.4.2 Considerations for Enterococci Collection .......................................................... 14 3.4.3 Other Considerations .................................................................................... 14
4 PRE-DEPARTURE ACTIVITIES ................................................................................... 17
4.1 DAILY ITINERARIES............................................................................................... 18 4.2 INSTRUMENT CHECKS AND CALIBRATION ......................................................................... 18
4.2.1 Initial Assembly and Setup Procedures for LI-COR frame, sensor and LI-1400 Datalogger . 19 4.3 EQUIPMENT AND SUPPLY PREPARATION .......................................................................... 21
National Coastal Condition Assessment 2015 Field Operations Manual Version 1.0 May 2015 Page iv 5 INITIAL SITE PROCEDURES ...................................................................................... 23
5.1 SITE VERIFICATION .............................................................................................. 23 5.1.1 Equipment & Supplies ................................................................................... 23 5.1.2 Site Verification Procedures ........................................................................... 23 5.1.3 Site Relocation ........................................................................................... 24 5.1.4 Site Characteristics ...................................................................................... 24
5.2 SITE PHOTOGRAPH .............................................................................................. 25 5.3 SAMPLE COLLECTION ............................................................................................ 25 5.4 SECONDARY SEDIMENT OR FISH COLLECTION ZONES ............................................................. 26
5.4.1 Sediment Samples ........................................................................................ 26 5.4.2 Fish Samples .............................................................................................. 28
6 WATER QUALITY MEASUREMENTS ............................................................................. 30
6.1 SUMMARY OF METHOD FOR IN SITU MEASUREMENTS OF WATER COLUMN TRANSPARENCY, DISSOLVED OXYGEN, PH, SALINITY, CONDUCTIVITY, TEMPERATURE, AND LIGHT ATTENUATION ..................................................... 30
6.1.1 Equipment and Supplies ................................................................................ 30 6.2 SAMPLING PROCEDURE – WATER COLUMN TRANSPARENCY (SECCHI DEPTH) ..................................... 30 6.3 SAMPLING PROCEDURE – MULTI-PARAMETER SONDE ............................................................. 31
6.3.1 Calibration ................................................................................................ 31 6.3.2 Dissolved Oxygen Meter................................................................................. 33 6.3.3 pH Meter ................................................................................................... 33 6.3.4 Salinity/Conductivity Meter ........................................................................... 33 6.3.5 Temperature Meter ...................................................................................... 34
6.4 SAMPLING PROCEDURE – DISSOLVED OXYGEN, PH, TEMPERATURE AND SALINITY/ CONDUCTIVITY ............... 34 6.5 PHOTOSYNTHETICALLY ACTIVE RADIATION (PAR) METER ....................................................... 35
6.5.1 Sampling Procedure—Light Attenuation (LI-1400 Datalogger) ................................... 35
7 WATER CHEMISTRY [CHEM], CHLOROPHYLL-A [CHLA], AND NUTRIENTS [NUTS] SAMPLE COLLECTION AND PRESERVATION ................................................................................... 37
7.1 SUMMARY OF METHOD ........................................................................................... 37 7.2 EQUIPMENT AND SUPPLIES ....................................................................................... 37 7.3 SAMPLING PROCEDURE .......................................................................................... 37
8 ALGAL TOXINS [ALGX] INCLUDING MICROCYSTINS [MICX] ............................................... 39
8.1 SUMMARY OF METHOD ........................................................................................... 39 8.2 EQUIPMENT AND SUPPLIES ....................................................................................... 39 8.3 SAMPLING PROCEDURE .......................................................................................... 40
8.3.1 Sample Collection ........................................................................................ 40 8.3.2 Sample Storage ........................................................................................... 40
9 FECAL INDICATOR (ENTEROCOCCI, [ENTE])................................................................. 41
9.1 SUMMARY OF METHOD ........................................................................................... 41 9.2 EQUIPMENT AND SUPPLIES ....................................................................................... 41 9.3 SAMPLING PROCEDURE .......................................................................................... 41
10 PHYTOPLANKTON [PHYT] (GREAT LAKES ONLY) .......................................................... 43
10.1 SUMMARY OF METHOD ........................................................................................... 43 10.2 EQUIPMENT AND SUPPLIES ....................................................................................... 43 10.3 SAMPLING PROCEDURE .......................................................................................... 43
11 UNDERWATER VIDEO [UVID] (GREAT LAKES ONLY) ....................................................... 45
National Coastal Condition Assessment 2015 Field Operations Manual Version 1.0 May 2015 Page v
11.1 SUMMARY OF METHOD ........................................................................................... 45 11.1.1 Equipment and Supplies ................................................................................ 45
11.2 SAMPLING PROCEDURE .......................................................................................... 45 11.2.1 Initial Setup of Underwater Camera System ........................................................ 45 11.2.2 Initial Setup of Underwater Camera System GPS .................................................. 46 11.2.3 Underwater Video Recording Procedure ............................................................. 46 11.2.4 Reviewing Underwater Video Files Procedure ...................................................... 47 11.2.5 Directions for Uploading Video Files from DVR .................................................... 48
12 SEDIMENT COLLECTION.......................................................................................... 49
12.1 SUMMARY OF METHOD ........................................................................................... 49 12.2 EQUIPMENT AND SUPPLIES ....................................................................................... 50 12.3 SAMPLING PROCEDURE .......................................................................................... 50 12.4 PROCESSING PROCEDURE – BENTHIC MACROINVERTEBRATE [BENT] COMPOSITION AND ABUNDANCE ............ 52 12.5 PROCESSING PROCEDURE – SEDIMENT COMPOSITION, CHEMISTRY, AND TOXICITY ............................... 54
13 FISH TISSUE COLLECTION ....................................................................................... 57
13.1 ECOLOGICAL CONTAMINATION FISH TISSUE COLLECTION [FTIS] ................................................. 57 13.1.1 Summary of Method ..................................................................................... 57 13.1.2 Equipment and Supplies ................................................................................ 59 13.1.3 Sampling Procedure ..................................................................................... 59 13.1.4 Sample Storage and Shipping Preparation .......................................................... 61
13.2 FISH TISSUE PLUG [FPLG] ...................................................................................... 66 13.2.1 Summary of Method ..................................................................................... 66 13.2.2 Equipment and Supplies ................................................................................ 66 13.2.3 Sampling Procedure ..................................................................................... 67 13.2.4 Sample Storage ........................................................................................... 69
13.3 HUMAN HEALTH FISH TISSUE COLLECTION [HTIS] (SELECT GREAT LAKES SITES ONLY).......................... 71 13.3.1 Summary of Method ..................................................................................... 71 13.3.2 Equipment and Supplies ................................................................................ 72 13.3.3 Sampling Procedure ..................................................................................... 73 13.3.4 Sample Storage and Shipping Preparation .......................................................... 74
14 FINAL SITE ACTIVITIES ........................................................................................... 77
14.1 GENERAL SITE ASSESSMENT...................................................................................... 78 14.1.1 Shoreline Activities and Disturbances ................................................................ 78 14.1.2 Site Characteristics ...................................................................................... 78 14.1.3 General Assessment ..................................................................................... 78
14.2 PROCESSING THE FECAL INDICATOR ............................................................................. 79 14.2.1 Summary of Method ..................................................................................... 79 14.2.2 Equipment and Supplies ................................................................................ 79 14.2.3 Processing Procedure - Fecal Indicator Filter Blank ............................................... 79 14.2.4 Processing Procedure - Fecal Indicator Sample ..................................................... 80
14.3 PROCESSING THE CHLOROPHYLL-A & DISSOLVED NUTRIENTS INDICATORS ....................................... 82 14.3.1 Summary of Method ..................................................................................... 82 14.3.2 Equipment and Supplies ................................................................................ 82 14.3.3 Processing Procedure .................................................................................... 82
14.4 POST-MEASUREMENT CALIBRATION CHECK OF MULTI-PARAMETER SONDE ....................................... 85 14.5 FIELD DATA & TRACKING FORM REVIEW ......................................................................... 85 14.6 SAMPLE PACKAGING AND LABEL REVIEW ......................................................................... 86 14.7 SAMPLE SHIPMENT & TRACKING FORM SUBMITTAL ............................................................... 86

National Coastal Condition Assessment 2015 Field Operations Manual Version 1.0 May 2015 Page vi
14.7.1 Time-Sensitive Samples ................................................................................. 86 14.7.2 Other Samples ............................................................................................ 87
14.8 EQUIPMENT CLEANUP & CHECK ................................................................................. 87 14.8.1 Boat & Trailer Cleanup ................................................................................. 88 14.8.2 Post Sampling Equipment Care ........................................................................ 88 14.8.3 Additional Decontamination Information ........................................................... 88
15 POST-SAMPLING ACTIVITIES .................................................................................... 90
15.1 SAMPLE SHIPPING ............................................................................................... 90 15.2 TRACKING FORM SUBMITTAL..................................................................................... 90 15.3 DATA SUBMITTAL ................................................................................................ 91
15.3.1 App Users .................................................................................................. 91 15.3.2 Paper Form Users ........................................................................................ 91
15.4 TRACKING REMINDERS ........................................................................................... 92 15.5 SITE EVALUATION SPREADSHEET SUBMITTAL ..................................................................... 92
16 FIELD QUALITY CONTROL ....................................................................................... 93
16.1 STANDARDIZED TRAINING ........................................................................................ 93 16.2 STANDARDIZED FIELD DATA FORMS .............................................................................. 93 16.3 REPEAT SAMPLING ............................................................................................... 93 16.4 FIELD EVALUATION AND ASSISTANCE VISITS ..................................................................... 94
16.4.1 Specifications for QC Assurance ....................................................................... 94 16.4.2 Reporting .................................................................................................. 95
17 LITERATURE CITED ............................................................................................... 97
APPENDIX A: EQUIPMENT AND SUPPLIES LISTS ................................................................... 99
BASE KIT ................................................................................................................. 99 ADDITIONAL BASE KIT ITEMS – GREAT LAKES CREWS ..................................................................... 100 SITE KIT 100 FORM & LABEL PACKET ................................................................................................. 101 HUMAN HEALTH FISH TISSUE SAMPLING SITE KIT ........................................................................ 102 CREW SUPPLIED EQUIPMENT ............................................................................................. 102
APPENDIX B: FIELD FORMS, LABELS & TRACKING FORMS .....................................................105
SITE VERIFICATION (FRONT) ............................................................................................. 106 SITE VERIFICATION (BACK) .............................................................................................. 107 FIELD MEASUREMENT (FRONT) .......................................................................................... 108 FIELD MEASUREMENT (BACK) ............................................................................................ 109 SAMPLE COLLECTION (FRONT) ........................................................................................... 110 SAMPLE COLLECTION (BACK) ............................................................................................ 111 ECO FISH COLLECTION (FRONT) ......................................................................................... 112 ECO FISH COLLECTION (BACK) .......................................................................................... 113 SITE ASSESSMENT (FRONT) .............................................................................................. 114 SITE ASSESSMENT (BACK) ................................................................................................ 115 HUMAN HEALTH FISH COLLECTION (FRONT) ............................................................................. 116 HUMAN HEALTH FISH COLLECTION (BACK) .............................................................................. 117 SAMPLE LABELS (MARINE) ............................................................................................... 118 SAMPLE LABELS (GREAT LAKES) ......................................................................................... 119 SITE AND SAMPLE STATUS/WATER CHEMISTRY LAB TRACKING ........................................................... 120 TRACKING: BATCH SAMPLES - OVERNIGHT (CHILLED) ................................................................... 121 TRACKING: BATCH SAMPLES - OVERNIGHT (DRY ICE) .................................................................... 122

National Coastal Condition Assessment 2015 Field Operations Manual Version 1.0 May 2015 Page vii
TRACKING: BATCH SAMPLES - GROUND (NO ICE) ........................................................................ 123 TRACKING: ECO FISH TISSUE - OVERNIGHT (DRY ICE) ................................................................... 124 TRACKING: PACKS ....................................................................................................... 125 TRACKING: HUMAN HEALTH WHOLE FISH SAMPLE - OVERNIGHT (DRY ICE) .............................................. 126 TRACKING: UVID ....................................................................................................... 127
APPENDIX C: SHIPPING AND TRACKING GUIDELINES ............................................................128
TRACKING FORMS........................................................................................................ 128 T1 – Site & Sample Status/Water Chemistry Lab Tracking Form ........................................ 129 T2 –Tracking: Batch Samples – Overnight (Chilled) Form ................................................. 129 T3 – Tracking: Batch Samples – Overnight (Frozen) Form ................................................ 129 T4 – Tracking: Batch Samples – Ground (No Ice) Form .................................................... 130 T5 – Tracking: Eco Fish Tissue – Overnight (Dry Ice) Form ................................................ 130 T6 – Tracking: Packs Form ...................................................................................... 130 T7 – Tracking: Human Health Whole Fish Sample – Overnight (Dry Ice) Form [Select Great Lakes
sites Only] ................................................................................................... 131 T8 – Tracking: UVID Form [Great Lakes Only] ............................................................... 131
SHIPPING GUIDELINES ................................................................................................... 131
APPENDIX D: FIELD EVALUATION AND ASSISTANCE VISIT CHECKLIST ......................................139

National Coastal Condition Assessment 2015 Field Operations Manual Version 1.0 May 2015 Page viii
LIST OF TABLES TABLE 1.1 CONTACTS ....................................................................................................... xii TABLE 1.2 REGIONAL COORDINATORS ....................................................................................... xii TABLE 2.1 GUIDELINES FOR RECORDING FIELD MEASUREMENTS & TRACKING INFORMATION ..................................... 9 TABLE 2.2 GENERAL HEALTH & SAFETY CONSIDERATIONS .................................................................... 10 TABLE 4.1 STOCK SOLUTIONS, USES & METHODS FOR PREPARATION ......................................................... 22 TABLE 5.1 EQUIPMENT & SUPPLIES: SITE VERIFICATION...................................................................... 23 TABLE 6.1 EQUIPMENT & SUPPLIES: TRANSPARENCY, DO, PH, SALINITY/CONDUCTIVITY, TEMPERATURE, & LIGHT
ATTENUATION ......................................................................................................... 30 TABLE 6.2 EXAMPLE DEPTH MEASUREMENT INTERVALS ....................................................................... 35 TABLE 7.1 EQUIPMENT & SUPPLIES: WATER CHEMISTRY & CHLOROPHYLL-A SAMPLE COLLECTION ............................ 37 TABLE 8.1 EQUIPMENT & SUPPLIES: ALGAL TOXINS, MICROCYSTINS .......................................................... 39 TABLE 9.1 EQUIPMENT & SUPPLIES: FECAL INDICATOR (ENTEROCOCCI) SAMPLING ........................................... 41 TABLE 10.1 EQUIPMENT & SUPPLIES: PHYTOPLANKTON ..................................................................... 43 TABLE 11.1 EQUIPMENT & SUPPLIES: UNDERWATER VIDEO .................................................................. 45 TABLE 12.1 EQUIPMENT & SUPPLIES: SEDIMENT COLLECTION ................................................................ 50 TABLE 13.1 EQUIPMENT & SUPPLIES: ECO FISH TISSUE COLLECTION ......................................................... 59 TABLE 13.2 NORTHEAST REGION PRIMARY AND SECONDARY MARINE TARGET SPECIES - WHOLE BODY FISH TISSUE COLLECTION
(ECOFISH) ............................................................................................................. 62 TABLE 13.3 SOUTHEAST REGION PRIMARY AND SECONDARY MARINE TARGET SPECIES - WHOLE BODY FISH TISSUE COLLECTION
(ECOFISH) ............................................................................................................. 62 TABLE 13.4 GULF REGION PRIMARY AND SECONDARY MARINE TARGET SPECIES - WHOLE BODY FISH TISSUE COLLECTION
(ECOFISH) ............................................................................................................. 63 TABLE 13.5 WESTERN REGION PRIMARY AND SECONDARY MARINE TARGET SPECIES - WHOLE BODY FISH TISSUE COLLECTION
(ECOFISH) ............................................................................................................. 64 TABLE 13.6 GREAT LAKES PRIMARY AND SECONDARY TARGET SPECIES - WHOLE BODY FISH TISSUE COLLECTION (ECOFISH) ... 65 TABLE 13.7 EQUIPMENT & SUPPLIES: FISH TISSUE PLUGS .................................................................... 66 TABLE 13.8 PRIMARY AND SECONDARY MARINE TARGET SPECIES FOR FISH PLUG COLLECTION ................................. 70 TABLE 13.9 PRIMARY AND SECONDARY GREAT LAKES TARGET SPECIES FOR FISH PLUG COLLECTION .......................... 71 TABLE 13.10 EQUIPMENT & SUPPLIES: HUMAN HEALTH FISH TISSUE COLLECTION ............................................ 73 TABLE 13.11 PRIMARY AND SECONDARY TARGET SPECIES FOR HUMAN HEALTH FISH TISSUE COLLECTION ..................... 76 TABLE 14.1 EQUIPMENT & SUPPLIES: ENTEROCOCCI PROCESSING ........................................................... 79 TABLE 14.2 EQUIPMENT & SUPPLIES: CHLOROPHYLL-A & DISSOLVED NUTRIENTS PROCESSING ............................... 82 TABLE 16.1 GENERAL INFORMATION NOTED DURING FIELD EVALUATION ..................................................... 95
National Coastal Condition Assessment 2015 Field Operations Manual Version 1.0 May 2015 Page ix
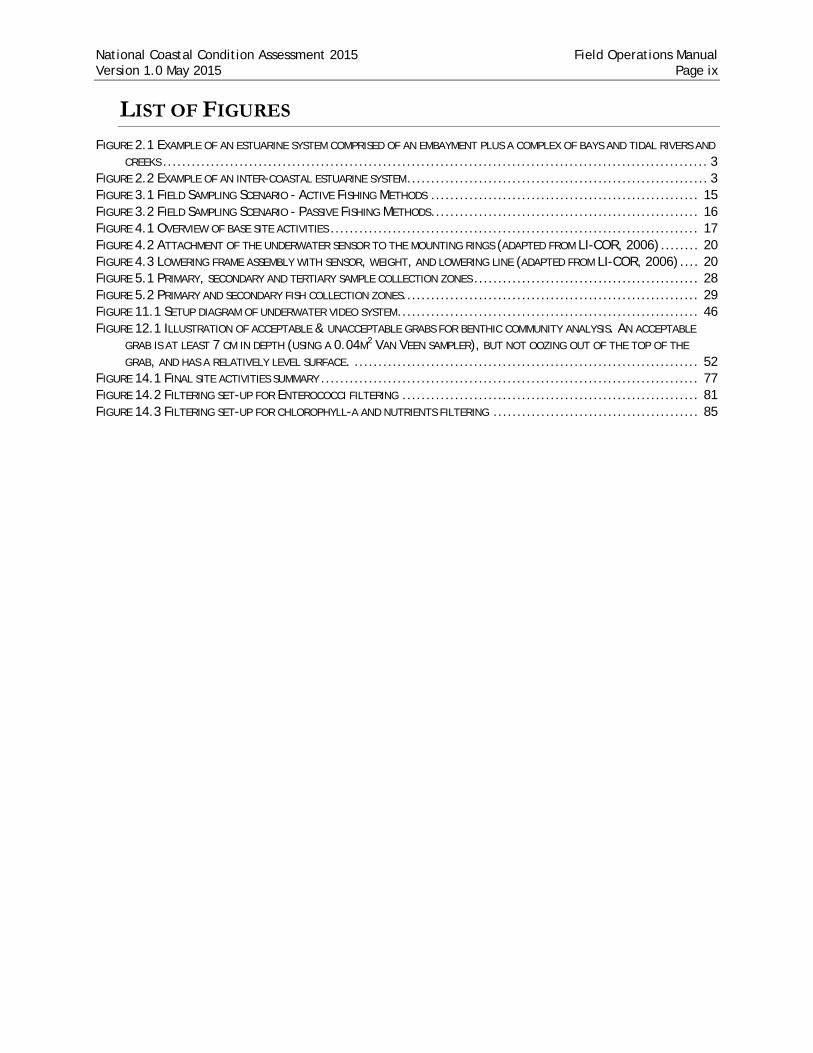
LIST OF FIGURES FIGURE 2.1 EXAMPLE OF AN ESTUARINE SYSTEM COMPRISED OF AN EMBAYMENT PLUS A COMPLEX OF BAYS AND TIDAL RIVERS AND
CREEKS .................................................................................................................. 3 FIGURE 2.2 EXAMPLE OF AN INTER-COASTAL ESTUARINE SYSTEM ............................................................... 3 FIGURE 3.1 FIELD SAMPLING SCENARIO - ACTIVE FISHING METHODS ........................................................ 15 FIGURE 3.2 FIELD SAMPLING SCENARIO - PASSIVE FISHING METHODS ........................................................ 16 FIGURE 4.1 OVERVIEW OF BASE SITE ACTIVITIES ............................................................................. 17 FIGURE 4.2 ATTACHMENT OF THE UNDERWATER SENSOR TO THE MOUNTING RINGS (ADAPTED FROM LI-COR, 2006) ........ 20 FIGURE 4.3 LOWERING FRAME ASSEMBLY WITH SENSOR, WEIGHT, AND LOWERING LINE (ADAPTED FROM LI-COR, 2006) .... 20 FIGURE 5.1 PRIMARY, SECONDARY AND TERTIARY SAMPLE COLLECTION ZONES ............................................... 28 FIGURE 5.2 PRIMARY AND SECONDARY FISH COLLECTION ZONES.............................................................. 29 FIGURE 11.1 SETUP DIAGRAM OF UNDERWATER VIDEO SYSTEM ............................................................... 46 FIGURE 12.1 ILLUSTRATION OF ACCEPTABLE & UNACCEPTABLE GRABS FOR BENTHIC COMMUNITY ANALYSIS. AN ACCEPTABLE
GRAB IS AT LEAST 7 CM IN DEPTH (USING A 0.04M2 VAN VEEN SAMPLER), BUT NOT OOZING OUT OF THE TOP OF THE
GRAB, AND HAS A RELATIVELY LEVEL SURFACE. ........................................................................ 52 FIGURE 14.1 FINAL SITE ACTIVITIES SUMMARY ............................................................................... 77 FIGURE 14.2 FILTERING SET-UP FOR ENTEROCOCCI FILTERING .............................................................. 81 FIGURE 14.3 FILTERING SET-UP FOR CHLOROPHYLL-A AND NUTRIENTS FILTERING ........................................... 85

National Coastal Condition Assessment 2015 Field Operations Manual Version 1.0 May 2015 Page x
ACRONYMS/ABBREVIATIONS CPR Cardiopulmonary resuscitation
DI Deionized
DO Dissolved oxygen
DVR Digital video recorder
EMAP Environmental Monitoring and Assessment Program
EPA Environmental Protection Agency
FLC Field Logistics Coordinator
GED Gulf Ecology Division, U.S. EPA Office of Research and Development
GIS Geographic information system
GL Great Lakes
GPS Global positioning system
GRTS Generalized Random Tessellation Stratified survey design
HDPE High density polyethylene
HQ Headquarters
IM Information Management
MED Mid-Continent Ecology Division, U.S. EPA Office of Research and Development
NAD North American Datum
NARS National Aquatic Resource Surveys
NAWQA National Water-Quality Assessment Program
NCA National Coastal Assessment
NCCA National Coastal Condition Assessment
NEP National Estuaries Program
NHD National Hydrography Dataset
NIST National Institute of Standards
NM Nautical miles
NOAA National Oceanographic and Atmospheric Administration
NRSA National Rivers and Streams Assessment
ORD Office of Research and Development, U.S. EPA

National Coastal Condition Assessment 2015 Field Operations Manual Version 1.0 May 2015 Page xi OSHA Occupational Safety and Health Administration
PAH Polycyclic aromatic hydrocarbon
PAR Photosynthetically active radiation
PBS Phosphate Buffer Solution
PFD Personal flotation device
PSI Pounds per square inch
QAPP Quality Assurance Project Plan
QA/QC Quality assurance/quality control
QCS Quality Check Solution
QRG Quick Reference Guide
SAV Submerged aquatic vegetation
SOPs Standard Operating Procedures
SRM Standard Reference Material
TOC Total organic carbon
TP Total phosphorus
TSS Total suspended solids
USGS United States Geological Survey
WSA Wadeable Streams Assessment

National Coastal Condition Assessment 2015 Field Operations Manual Version 1.0 May 2015 Page xii
CONTACT LIST Table 1.1 Contacts
Role Name Phone/Email Address NCCA Team Lead
Treda Grayson 202-566-0916 [email protected]
US EPA Office of Water 1200 Pennsylvania Avenue NE (4503T) Washington DC 20460
NCCA QA Coordinator
Hugh Sullivan 202-564-1763 [email protected]
US EPA Office of Water 1200 Pennsylvania Ave NE (4504T) Washington DC 20460
NARS QA Coordinator
Sarah Lehmann 202-566-1379 [email protected]
US EPA Office of Water 1200 Pennsylvania Ave NE (4503T) Washington DC 20460
EPA Logistics Coordinator
Colleen Mason 202-343-9641 [email protected]
US EPA Office of Water 1200 Pennsylvania Ave NE (4503T) Washington DC 20460
Contractor Field Logistics Coordinator
Chris Turner 715-829-3737 [email protected]
Great Lakes Environmental Center, Inc. 739 Hastings Street Traverse City, MI 49686
NARS IM Coordinator
Marlys Cappaert 541-754-4467 541-754-4799 (fax) [email protected]
SRA International 200 SW 35th Street Corvallis OR 97333
Great Lakes Human Health Fish Tissue Manager
Leanne Stahl 202-566-0404 [email protected]
US EPA Office of Water 1200 Pennsylvania Avenue NE (4305T) Washington DC 20460
Table 1.2 Regional Coordinators
Role Name Phone/Email Address EPA Region 1 Hilary Snook
Diane Switzer 617-918-8670, [email protected] 617-918-8377, [email protected]
USEPA Region 1 – New England Regional Laboratory 11 Technology Drive North Chelmsford, MA 01863-2431
EPA Region 2 Darvene Adams 732-321-6700 [email protected]
USEPA Facilities Raritan Depot 2890 Woodbridge Avenue Edison, NJ 08837-3679
EPA Region 3 Bill Richardson 215-814-5675 [email protected]
USEPA Region 3 1650 Arch Street Philadelphia, PA 19103-2029
EPA Region 4 Dave Melgaard 404-562-9265, [email protected] USEPA Region 4 61 Forsyth Street, S.W. Atlanta, GA 30303-8960
EPA Region 5 Mari Nord Ed Hammer
312-886-3017, [email protected] 312-886-3019, [email protected]
USEPA Region 5 77 West Jackson Boulevard Chicago, IL 60604-3507

National Coastal Condition Assessment 2015 Field Operations Manual Version 1.0 May 2015 Page xiii Role Name Phone/Email Address EPA Region 6 Rob Cook
Forrest John Mike Schaub
214-665-7141, [email protected] 214-665-8368, [email protected] 214-665-7314, [email protected]
USEPA Region 6 1445 Ross Avenue Suite 1200 Dallas, TX 75202-2733
EPA Region 9 Janet Hashimoto Sara Roser Terrence Fleming
415-972-3452, [email protected] 415-972-3513, [email protected] 415-972-3462, [email protected]
USEPA Region 9 75 Hawthorne Street San Francisco, CA 94105
EPA Region 10 Gretchen Hayslip Lillian Herger
206-553-1685, [email protected] 206-553-1074, [email protected]
USEPA Region 10 1200 Sixth Avenue Seattle, WA 98101

National Coastal Condition Assessment 2015 Field Operations Manual Version 1.0 May 2015 Page 1
2 BACKGROUND The National Coastal Condition Assessment (NCCA) is one of a series of water assessments being conducted by states, tribes, the U.S. Environmental Protection Agency (EPA), and other partners. In addition to coastal waters, the National Aquatic Resource Surveys (NARS) focus on rivers and streams, lakes, and wetlands in a revolving sequence. The purpose of these assessments is to generate statistically-valid reports on the condition of our Nation’s water resources and identify key stressors to these systems.
The goal of the NCCA is to address two key questions about the quality of the Nation’s coastal waters:
• What percent of the Nation’s coastal waters are in good, fair, and poor condition for key indicators of water quality, ecological health, and recreation?
• What is the relative importance of key stressors such as nutrients and contaminated sediments?
The NCCA is designed to be completed during the index period of June through the end of September. Field crews collect a variety of measurements and samples from preselected sampling sites that are located at predetermined coordinates.
This manual describes field protocols and daily operations for crews in the NCCA. As a probability-based survey of our Nation’s coastal and estuarine waters, the NCCA is designed to:
• Assess the condition of the Nation’s coastal and estuarine waters at national and regional scales, including the Great Lakes;
• Identify the relative importance of selected stressors to coastal and estuarine water quality;
• Evaluate changes in condition from previous National Coastal Assessments (NCA) starting in 2000; and
• Help build State and Tribal capacity for monitoring and assessment and promote collaboration across jurisdictional boundaries.
2.1 SURVEY DESIGN EPA selected sampling locations using a probability based survey design, allowing data from a subset of sampled sites to be applied to the larger target population, and permitting assessments with known confidence bounds.
The 2015 NCCA survey design produces:
1. National and regional estimates of the status of all coastal waters, including major estuary groups and the Great Lakes; and
2. National and regional estimates of the change in status in coastal water condition between 2010 and 2015.
With input from the states and other partners, EPA used an unequal probability, stratified design to select 1000 probabilistic sampling events, of which 50% are resample sites (sites

National Coastal Condition Assessment 2015 Field Operations Manual Version 1.0 May 2015 Page 2
that were sampled in 2010 and will be sampled again in 2015). Approximately 10% of the 2010 resample sites are also designated “revisit sites,” which indicates that they will be sampled twice in 2015 to assess crew sampling and temporal variability. In addition to the 1000 probabilistic sampling events, a number of intensification sites have been added to NCCA 2015, many of which were also selected using a stratified probabilistic design.
Sample site stratification is based on major estuaries using the National Oceanic and Atmospheric Administration (NOAA) Coastal Assessment framework and National Estuary Program (NEP). The Great Lakes sites are stratified based on the individual Great Lake, depth zone, and country. Only the shallow nearshore depth zone is included in the design for NCCA Great Lakes sites. The shallow nearshore depth zone is defined as the region extending from the shoreline to a depth of 30 meters, and no more than 5 kilometers from the shoreline.
Oversample sites were drawn to provide alternate sampling sites if primary sites are rejected and to provide supplemental sampling locations for states that wish to conduct a state level or NEP-level condition assessment. Also, sites were identified for the Canadian nearshore zone although sampling of these sites is not a part of the NCCA.
Additional details on the NCCA survey design can be found in the NCCA survey design documents.
2.2 TARGET POPULATION AND SAMPLE FRAME The target population for the estuarine resources consists of all coastal waters of the conterminous United States from the head-of-salt to confluence with the ocean, including inland waterways tidal rivers and creeks, lagoons, fjords, bays, and major embayments (see Figure 2.1 and Figure 2.2 for examples). For the purposes of this study, the head-of- salt is defined as waters with salinity less than 0.5 parts per thousand (ppt) salinity, representing the landward/upstream boundary. The seaward boundary extends out to where an imaginary straight-line intersecting two land features would fully enclose a body of coastal water. All waters within the enclosed area are defined as estuarine, regardless of depth or salinity.
The target population for the Great Lakes consists of all waters of the Great Lakes of the United States and Canada. The current target population is restricted to the shallow nearshore zones of Lake Superior, Lake Michigan, Lake Huron, Lake Erie, and Lake Ontario. The NCCA Great Lakes sites are restricted to waters within the United States. Please refer to the Site Evaluation Guidelines and the NCCA Web site (http://www.epa.gov/owow/monitoring/nationalsurveys.html) for more detailed information on the target population.
The sample frame was derived from prior National Coastal Assessments developed by EPA Office of Research and Development (ORD) Gulf Ecology Division (GED). The prior GED sample frame was enhanced as part of the National Coastal Monitoring Network design by including information from NOAA’s Coastal Assessment Framework, boundaries of NEP and identification of major coastal systems. For NCCA 2010, information on salinity zones was obtained from NOAA. For the Delaware Bay, Chesapeake Bay, Puget Sound and the State of South Carolina, the prior NCA sample frames were replaced by geographic information

National Coastal Condition Assessment 2015 Field Operations Manual Version 1.0 May 2015 Page 3
system (GIS) layers provided by the organizations that manage the coastal waters in these areas, ensuring that prior areas sampled in NCA were not excluded and any differences from the previous sample frames to the current sample frame are clearly identified in this NCCA 2015 sample frame. For the Californian Province excluding San Francisco Bay, the GED sample frame was changed to match a 2004 sample frame used for NCA 2004 study. In 2013, the sample frame was updated to include information related to 1999-2001 and 2005-2006 NCA sample frames. This update is necessary to provide the information required to estimate change between the periods of 2010 and 2015. The sample frame for the Great Lakes sites were obtained from EPA ORD Mid-Continent Ecology Division (MED).
Please refer to the NCCA 2015: Site Evaluation Guidelines for more detailed information on the target population and exclusion criteria.
Figure 2.1 Example of an estuarine system comprised of an embayment plus a complex of bays and tidal rivers and creeks
Figure 2.2 Example of an inter-coastal estuarine system
2.3 SITE EVALUATION Base site sampling points were drawn using a Generalized Random Tessellation Stratified (GRTS) survey design, a stratified design that gives all points within a target population equal probability of selection. Each point selected as a sample site is designated the “X-site” and represents the point at which sample collections are targeted.
2.3.1 SITE SAMPLE-ABILITY X-sites will be found in waterbodies of varied sizes and shapes depending on coastal morphology. Site depth and salinity are considered when the initial site draw is made; therefore, those conditions should not generally be a factor when choosing to replace a planned sampling site. However, there may be instances when a field crew determines

National Coastal Condition Assessment 2015 Field Operations Manual Version 1.0 May 2015 Page 4
that an X-site does not meet the operational definition of an estuary in marine environments, or lacustrine and nearshore coastal waters in the Great Lakes. Sampleable sites must:
• Have access to open water; • Be navigable using a shallow-draw boat. Typically this means that the depth of
the X-site is generally ≥ 1 meter. Actual sampleable depths, however, may be adjusted based on the vessel and sampling equipment being used, and wave action at the site observed by the field crew.
If the specific site does not fit the definition of a sampleable site, and every attempt to relocate a site within the margin provided has been made (see Section 5.1.3), complete the appropriate “Non-Sampleable-Permanent” category on the Site Verification (Front) form. Document the reason for not sampling the site in the comments section of the form. Add any additional explanation as required. (For complete details on the site evaluation process, refer to the NCCA Site Evaluation Guidelines).
2.3.2 REPLACING SITES It is likely that some sites will be determined to be unsampleable; therefore, a number of backup sites, in the form of an oversample list, are provided to each state. A site can be deemed unsampleable for any number of reasons, including being too shallow to properly operate sampling equipment, in the middle of a navigational channel where it is unsafe, or practically on top of a neighboring site.
When a site is determined to be unsampleable, field crews will document the sampling status of the site and select the next oversample site within the same stratum (i.e. same state and estuary type or Great lake) and the same base year (Base 10 sites must be replaced with Base 10 oversamples sites and Base 15 sites must be replaced with Base 15 oversamples sites). This process maintains the probabilistic integrity of the survey. This process is handled through the Site Evaluation Spreadsheets that EPA Headquarters (HQ) has provided for each state. These spreadsheets are available on the NARS SharePoint site. Please refer to the NCCA Site Evaluation Guidelines for more detailed information on determining site sampling status and completion of the Site Evaluation Spreadsheets. These spreadsheets will be turned in when sampling is completed, or throughout the field season should it be necessary for communicating the replacement of specific sites to EPA HQ and the Contractor Field Logistics Coordinator (FLC).
If a dropped site is designated as a revisit site (designated “RVT2” in the panel code) and/or a human health fish tissue site (designated by “FT” in the panel code), then the replacement site takes on the RVT2 and/or FT assignment. That is the site must be visited twice in 2015 (if RVT2) and human health fish tissue collected (if FT).
If a site is generally sampleable, but one or more indicators cannot be collected (e.g. no fish caught or site is too deep to collect sediment), the site should not be dropped. Rather, the crew will flag that indicator and document the reason why the indicator could not be collected. See Section 12 for information regarding the collection of sediment samples, which is potentially the indicator crews may experience difficulty collecting.

National Coastal Condition Assessment 2015 Field Operations Manual Version 1.0 May 2015 Page 5 2.4 DESCRIPTION OF NCCA INDICATORS
Indicators for the 2015 survey will basically remain the same as those used in 2010 and other past coastal surveys, with a few modifications. Again, sample collection methods and laboratory methods will reflect freshwater and saltwater matrices to account for marine and Great Lakes sampling.
2.4.1 IN SITU WATER COLUMN MEASUREMENTS
2.4.1.1 Hydrographic Profile Measurements for dissolved oxygen (DO), pH, salinity (at marine sites) or conductivity (at freshwater sites), and temperature will be taken with a calibrated water quality meter or multi-parameter sonde at each site. Measurements will be taken at specific depth intervals within 37 meters of the X-site. The specific location of the profile (and subsequently the area where several samples are collected) is referred to as the Y-location. This information will be used to detect extremes in condition that might indicate impairment.
2.4.1.2 Light Attenuation A Photosynthetically Active Radiation (PAR) meter will be used to obtain a vertical profile of light in order to calculate the light attenuation coefficient at each station. PAR measurements are taken at the same depths as other water column indicators.
2.4.1.3 Secchi Disk Transparency A Secchi disk is a commonly used black and white patterned disk used to measure the clarity of water within a visible distance.
2.4.2 WATER CHEMISTRY (CHEM) AND ASSOCIATED MEASUREMENTS Water chemistry measurements will be used to determine nutrient enrichment, as well as classification of trophic status. Parameters measured include total and dissolved nitrogen and phosphorus.
2.4.2.1 Chlorophyll-a (CHLA) Chlorophyll-a is the green pigment used in photosynthesis by plants and algae. Its measurement is used to determine algal biomass in the water.
2.4.2.2 Dissolved Nutrients (NUTS) A portion of the filtrate produced from the processing of the chlorophyll-a sample will be collected in the field and processed in the laboratory for dissolved nutrients.
2.4.2.3 Phytoplankton Assemblage (PHYT) Phytoplankton are plant microorganisms that float in the water, such as certain algae, and are the primary source of energy in most lake systems (Schriver et al. 1995). Phytoplankton are highly sensitive to environmental changes in ecosystems (e.g., turbidity and nutrient enrichment). Phytoplankton will be collected in Great Lakes sites only.
2.4.3 ALGAL TOXIN (ALGX), MICROCYSTIN (MICX) Algae are microscopic organisms found naturally at low concentrations in freshwater and marine systems. They often form large blooms under optimal conditions, potentially affecting water quality as well as human health and natural resources. Microcystis, for example, is one organism that produces microcystin, a potent liver toxin. One water

National Coastal Condition Assessment 2015 Field Operations Manual Version 1.0 May 2015 Page 6
sample is taken to analyze for a suite of algal toxins and another will be taken specifically for microcystin.
2.4.4 UNDERWATER VIDEO (UVID) At Great Lakes sites only, crews will use an underwater video camera with recorder to capture one minute of video focused on the substrate at the Y-location. Video will be used in the lab to visually document the bottom composition, and record the presence or absence of zebra mussels, Cladophora, or other organisms.
2.4.5 SEDIMENT ASSESSMENT (SEDG, SEDC, SEDX, SEDO) Sediment grab samples will be obtained to measure sediment composition (e.g., grain size [SEDG] and percent moisture, organic content, etc. [SEDC]), toxicity [SEDX], and contaminant chemistry [SEDO] in order to determine sediment condition.
2.4.6 BENTHIC MACROINVERTEBRATE ASSEMBLAGE (BENT) Benthic macroinvertebrates are bottom-dwelling animals without backbones (“invertebrates”) that are large enough to be seen with the naked eye (“macro”). Examples of macroinvertebrates include: aquatic worms, mollusks, and crustaceans. Populations in the benthic assemblage respond to a wide array of stressors in different ways so that it is often possible to determine the type of stress that has affected a macroinvertebrate assemblage (Klemm et al., 1990). Because many macroinvertebrates have relatively long life cycles of a year or more and are relatively immobile, the structure of the macroinvertebrate assemblage is a response to exposure of present and/or past conditions. The benthic macroinvertebrate data will serve as the basis for assessing aquatic community health.
2.4.7 ENTEROCOCCI FECAL INDICATOR (ENTE) Enterococci are bacteria that are endemic to the guts of warm blooded creatures. These bacteria, by themselves, are not considered harmful to humans but often occur in the presence of potential human pathogens (the definition of an indicator organism). Epidemiological studies of marine and fresh water bathing beaches have established a direct relationship between the density of Enterococci in water and the occurrence of swimming-associated gastroenteritis.
2.4.8 FISH TISSUE (FTIS, FPLG, HTIS) The fish tissue indicator [FTIS], which measures bioaccumulation of persistent toxics, is used to estimate the ecological risks associated with fish consumption by wildlife. In this study fish will be collected and whole body tissue will be homogenized and analyzed to estimate concentrations of target contaminants. Various studies have been conducted on contaminants in different tissues of the fish (e.g., whole fish, fillets, or livers). For this study the focus will be on analyzing whole fish [FTIS] for contaminants to generate data for ecological purposes are referred to as the ecofish sample. At revisit sites, ecofish samples will only be collected during visit 1.
Crews will also collect fish tissue plugs [FPLG] at all NCCA Sites. The plugs will be sent to the lab for analysis of mercury contamination levels to assess the risk to humans of consuming fish tissue. If the fish plug sample is taken from fish other than those being collected for ecological analysis, the fish will be released back into the waters from which

National Coastal Condition Assessment 2015 Field Operations Manual Version 1.0 May 2015 Page 7
they were collected. At revisit sites, fish plug samples will only be collected during visit 1.
In the Great Lakes only, additional fish composite samples will be collected at 150 of the 225 sites (ideally the first 15 of both the Base 10 and Base 15 sites for a combined total of 30 sites per lake). Fillet tissue from these samples will be homogenized and analyzed to generate fish contamination data related to human health [HTIS]. Fish submitted in the human health fish tissue sample should remain intact and fish plugs are not to be taken from these fish. At Great Lakes revisit sites that are also human health fish tissue sites, crews that are unsuccessful at collecting the human health fish tissue sample during visit 1 are expected to attempt the collection of that sample during visit 2.
2.5 SUPPLEMENTAL MATERIAL TO THE FIELD OPERATIONS MANUAL The Field Operations Manual describes field protocols and daily operations for crews to use in the NCCA. Following these detailed protocols will ensure consistency across regions and reproducibility for future assessments. Before sampling a site, crews should prepare a Site Packet for each site containing pertinent information to successfully conduct sampling. This site packet typically includes a road map or navigation chart and a set of directions to the site, topographic/bathymetric maps, land owner access forms (where applicable), sampling permits (if needed), site evaluation forms and other information necessary to ensure an efficient and safe sampling day.
Field crews will also receive a Quick Reference Guide that contains tables and figures summarizing field activities and protocols from the Field Operations Manual. This waterproof handbook will be the primary field reference used by field crews after completing the required field training session. Field crews are also required to keep the Field Operations Manual as well as other equipment manuals (probes, etc.) available in the field for reference and for possible protocol clarification.
Large-scale and/or long-term monitoring programs such as those envisioned for national surveys and assessments require a rigorous Quality Assurance (QA) program that can be implemented consistently by all participants throughout the duration of the monitoring period. QA is a required element of all EPA-sponsored studies that involve the collection of environmental data (USEPA 2000a, 2000b). Field crews will be provided a copy of the integrated Quality Assurance Project Plan (QAPP). The QAPP contains more detailed information regarding QA/ Quality Control (QC) activities and procedures associated with general field operations, sample collection, measurement data collection for specific indicators, data reporting activities, and the information management plan for this project. For more information on the QA procedures, refer to the National Coastal Condition Assessment 2015: Quality Assurance Project Plan (EPA-841-R-14-005).
2.6 RECORDING DATA AND OTHER INFORMATION Field data and sample information must be recorded completely, legibly, accurately, and consistently. The cost of a sampling visit coupled with the short index period severely limits the ability to resample a site if the initial records are inaccurate or illegible. Illegible or incorrect information can result in substantially increased time to transfer information from field forms to the National Aquatic Resource Surveys

National Coastal Condition Assessment 2015 Field Operations Manual Version 1.0 May 2015 Page 8
Information Management (NARS IM) system. Guidelines for recording field measurements are presented in Table 2.1.
Field crews may choose to record field data in one of two formats: electronic or paper field forms. Paper tracking forms must be included in every cooler/box which contains samples being shipped to the labs and must also be submitted to NARS IM electronically (via App, fillable pdfs, scans, or fax). See additional information on each format below.
All samples need to be identified and tracked, and associated information for each sample must be recorded. To assist with sample identification and tracking, tracking forms and labels are preprinted and provided by EPA with sample ID numbers.
2.6.1 ELECTRONIC FIELD FORMS Field crews may choose to utilize the NARS App to complete data collection. The NARS App is available in both Android and iOS formats and is available on the NARS SharePoint site. If a field crew is utilizing the iOS app, they must first provide (via email) the Unique Device Identifier (UDID) for their device to NARS IM and the EPA Logistics Coordinator. This will allow the App to be loaded on a particular device.
The NARS App is the preferred format for data submission as it cuts down on processing time required in scanning paper field forms, prevents data entry errors, eliminates redundant entry of common fields, eliminates issues caused by illegible entries, and provides validation checks of fields. In addition, the app generates all sample IDs based on the initial entry of the CHEM sample ID and includes fish pick lists for consistent naming.
If field crews are utilizing this form of data entry, they will upload site sketches of their sites to the NARS SharePoint site.
2.6.2 PAPER FIELD & TRACKING FORMS Paper field forms are utilized by some crews. Paper tracking forms must be included in every cooler regardless of whether crews choose to use the NARS App or paper field forms. It is important that field crews adhere to the guidelines listed in Table 2.1 when completing paper forms.

National Coastal Condition Assessment 2015 Field Operations Manual Version 1.0 May 2015 Page 9
Table 2.1 Guidelines for recording field measurements & tracking information
Activity Guidelines Field Measurements Data Recording • Record measurement values and observations on data forms preprinted on water-resistant
paper. • Use No. 2 pencil only (fine-point indelible markers can be used if necessary) to record
information on forms. • Record data and information using correct format as provided on data forms. • Be sure to accurately record site and sample IDs. • For all primary sampling visits indicate the event as Visit 1. For revisit sites use Visit 2 to
indicate the second sampling event during the same season. • Print legibly (and as large as possible). Clearly distinguish letters from numbers (e.g., 0 versus
O, 2 versus Z, 7 versus T or F, etc.), but do not use slashes. • When recording comments, print or write legibly. Make notations in comments field only;
avoid marginal notes. Be concise, but avoid using abbreviations or “shorthand” notations. If you run out of space, attach a sheet of paper with the additional information, rather than trying to squeeze everything into the space provided on the form.
Data Qualifiers (Flags)
• Use only defined flag codes and record on data form in appropriate field. • Fn = Miscellaneous flags (n = 1, 2, etc.) assigned by a field crew during a particular sampling
visit (also used for qualifying samples). • Define each flag in comments section on data form. Flags must be re-defined on each form
and on forms from different stations.
Sample Labels • Use adhesive labels with preprinted sample IDs and follow the standard recording format for each type of sample.
• Use a fine tipped permanent marker to record information on label. Cover the completed label with clear tape.
• Record sample ID from label and associated collection information on sample collection form preprinted on water-resistant paper.
Sample Collection and Tracking Sample Qualifiers (Flags)
• Use only defined flag codes and record on sample collection form in appropriate field. • Fn = Miscellaneous flags (n=1, 2, etc.) assigned by a field crew during a particular sampling
visit (also used for field measurements). • Define each flag in comments section on data form. Because the same flag may have different
meanings at different sites, re-define each flag when used on a form and when used on forms from different stations.
Review of Labels and Data Collection Forms
• Before leaving site, compare information recorded on labels and sample collection form to ensure agreement and accuracy.
• Before leaving site, review labels and data collection forms for accuracy, completeness, and legibility.
• The Field Crew Leader must review and initial all data collection forms, verifying consistency, correctness and legibility, before transfer to NARS IM.
2.7 DATA MANAGEMENT All field crews will be given access to the NARS SharePoint site. This site will be a resource for field crews to access important NCCA documentation as well as for facilitating document transfer to and from field crews.

National Coastal Condition Assessment 2015 Field Operations Manual Version 1.0 May 2015 Page 10 2.8 SAFETY AND HEALTH
Sample collection and analysis can pose significant risks to personal safety and health. This section describes recommended training, communications, safety considerations, safety equipment and facilities, and safety guidelines for field operations.
2.8.1 GENERAL CONSIDERATIONS Important considerations related to field safety are presented in Table 2.2. The Field Crew Leader is responsible for ensuring that all field personnel have successfully completed the necessary safety courses and follow all safety policies and procedures. Please follow your own agency’s health and safety protocols. Additional sources of information regarding safety-related training include the American Red Cross (2006), the National Institute for Occupational Safety and Health (1981), and U.S. Coast Guard (1989).
Field crew members should become familiar with the hazards involved with sampling equipment and establish appropriate safety practices prior to their use. Make sure all equipment is in safe working condition. Personnel must consider and prepare for hazards associated with the operation of motor vehicles, boats, winches, tools, and other incidental equipment. Boat operators must meet any state requirements for boat operation and be familiar with U.S. Coast Guard rules and regulations for safe boating contained in the pamphlet, “Federal Requirements for Recreational Boats,” available from a local U.S. Coast Guard Director or Auxiliary or State Boating Official (U.S. Coast Guard, 1989). While on the water, all crew members must wear Personal Flotation Devices (PFD). All boats with motors must be equipped with fire extinguishers, boat horns, PFDs, and flares or other U.S. Coast Guard approved signaling devices.
Table 2.2 General health & safety considerations
Recommended Training
first aid and cardiopulmonary resuscitation (CPR) vehicle safety (e.g., operation of 4-wheel drive vehicles, trailering boats, etc.) field safety (weather, personal safety, navigation, site reconnaissance prior to sampling) equipment design, operation, and maintenance handling of chemicals and other hazardous materials
Communications check-in schedule sampling itinerary (vehicle used & description, time of departure & return, travel route and
destination) contacts for police, ambulance, hospitals, fire departments, search and rescue personnel emergency services available near each sampling site and base location cell (or satellite) phone and VHF radio.
Personal Safety field clothing and other protective gear including PFDs for all crew members medical and personal information (allergies, personal health conditions) personal contacts (family, telephone numbers, etc.) physical exams and immunizations
Prior to beginning a sampling day, each field crew must develop an Emergency Communications Plan. This plan will include contacts for police, fire departments, emergency medical services, hospitals and search and rescue personnel. In addition, the plan must include daily check-in procedures with personnel who will not be in the field. A

National Coastal Condition Assessment 2015 Field Operations Manual Version 1.0 May 2015 Page 11
copy of the plan should be filed with a supervisor, safety specialist or other staff member who is not in the field. All field personnel must be fully aware of all lines of communication and able to initiate emergency communications if needed. Field crew members must carry clothing and equipment to protect from exposure to different weather conditions. Inadequate clothing could lead to hypothermia, heat exhaustion or heat stroke. Field personnel must be able to swim. A PFD and suitable footwear must be worn at all times while on board a boat.
2.8.2 SAFETY EQUIPMENT Crews may face many hazards when working in coastal areas. Broken glass or other sharp objects may be embedded in the substrate. Infectious agents and toxic substances may be present in the water or sediment. Dangerous weather may approach with little warning. Vessels can lose power and navigation.
Field crews must stock appropriate safety apparel such as gloves, foul weather gear, safety glasses, etc., and use them when necessary. All vessels must have first aid kits, fire extinguishers and blankets available in the field, and crew members must be trained in how to use them. All crews must carry cellular or satellite telephones and all crew members must be proficient in how to use them. Crews must carry supplies such as clean water, anti-bacterial soap, and ethyl alcohol for cleaning exposed body parts that may have been contaminated by pollutants in the water.
2.8.3 SAFETY GUIDELINES FOR FIELD OPERATIONS Personnel participating in field activities must be in sound physical condition and have a physical examination annually or in accordance with organizational requirements.
Field crew members must become familiar with the health hazards associated with collecting, preserving, and storing field samples. All surface waters and sediments are considered potential health hazards due to the potential presence of toxic substances or pathogens, and chemical fixing and/or preserving agents are often comprised of hazardous materials. In addition, chemical wastes can be flammable, explosive, toxic, caustic, or chemically reactive. Therefore, all chemical wastes must be discarded according to standardized health and hazards procedures (e.g., National Institute for Occupational Safety and Health [1981]; U.S. EPA [1986]).
During the course of field research activities, field crews may observe violations of environmental regulations, discover improperly disposed hazardous materials, or observe or be involved with an accidental spill or release of hazardous materials. In such cases proper actions must be taken and field personnel must not expose themselves to something harmful.
The following safety guidelines should be applied:
First and foremost, protect the health and safety of all personnel. Take necessary steps to avoid injury or exposure to hazardous materials. If you have been trained to take action such as cleaning up a minor fuel spill during fueling of a boat, do it. However, you should always err on the side of personal safety.
Field personnel should never disturb or retrieve improperly disposed hazardous materials from the field to bring them back to a facility for “disposal”. To do so may worsen the

National Coastal Condition Assessment 2015 Field Operations Manual Version 1.0 May 2015 Page 12
impact, incur personal liability for the crew members and/or their respective organizations, cause personal injury, or cause unbudgeted expenditure of time and money for proper treatment and disposal of the material. Notify the appropriate authorities so they may properly respond to the incident. For most environmental incidents, the following emergency telephone numbers should be provided to all field crews: State or Tribal department of environmental quality or protection, U.S. Coast Guard, and the U.S. EPA regional office. In the event of a major environmental incident, the National Response Center may need to be notified at 1-800-424-8802.
2.8.4 GENERAL SAFETY GUIDELINES FOR FIELD OPERATIONS • At least two crew members must be present during all sample collection
activities, and no one should be left alone while out on the water. • Use caution and wear a suitable PFD. • Use caution using the Ponar-type samplers. The jaws are sharp and may close
unexpectedly. • Exposure to water and sediments should be minimized as much as possible. Use
gloves if necessary, and clean exposed body parts as soon as possible after contact.
• All electrical equipment must bear the approval seal of Underwriters Laboratories and must be properly grounded to protect against electric shock.
• Use appropriate protective equipment (e.g. gloves, safety glasses) when handling and using hazardous chemicals.
• Crews working in areas with venomous snakes must check with the local Drug and Poison Control Center for recommendations on what should be done in case of a bite from a venomous snake.
• Any person allergic to bee stings, other insect bites, or plants (i.e., poison ivy, oak, sumac, etc.) must take proper precautions and have any needed medications handy.
• Field personnel should be familiar with the symptoms of hypothermia and know what to do in case symptoms occur. Hypothermia can kill a person at temperatures much above freezing (up to 10oC or 50oF) if he or she is exposed to wind or becomes wet. Immersion in the cool waters experienced during the summer along most of the marine coasts and Great Lakes can also rapidly result in hypothermia.
• Field personnel should be familiar with the symptoms of heat/sun stroke and be prepared to move a suffering individual into cooler surroundings and hydrate immediately.
• Handle and dispose of chemical wastes properly. Do not dispose of any chemicals in the field.

National Coastal Condition Assessment 2015 Field Operations Manual Version 1.0 May 2015 Page 13
3 INTRODUCTION TO SAMPLING This Field Operations Manual describes procedures for collecting samples for the NCCA 2015. Overall, the same indicators will be collected at both estuarine and coastal freshwater Great Lakes sites, though some of the sampling will be conducted using different equipment. Field crews at all Great Lakes sites will collect additional water samples to be analyzed for phytoplankton and will record underwater video of the bottom substrate. At selected Great Lakes sites, crews will collect an additional fish tissue samples to be analyzed for human health risks.
This section presents a general overview of the field activities and guidelines for field operations, recording data and labeling samples. This section also describes field crew makeup and other sampling considerations.
3.1 SITE VISIT DURATION NCCA field methods are designed to be completed in one field day. Depending on the time needed for sampling and travel, crews may require an additional day to complete sampling, pre-departure and post-sampling activities (e.g., cleaning equipment, repairing gear, shipping samples, and traveling to the next site). Remote sites with lengthy or difficult approaches may require more time, and field crews must plan accordingly. Conversely, some sites may be in relatively close proximity to each other, allowing multiple sites to be sampled in a single day.
3.2 FIELD CREW MAKEUP A field crew typically consists of three to four people. However, a minimum of two people may be able to properly execute sampling activities. To ensure safety, at least two people are always required in a boat when conducting field work for the NCCA. In order to organize field activities efficiently, each field crew should define roles and responsibilities for each crew member prior to beginning field activities. One crew member is primarily responsible for boat operation and navigation. Additional crew members assist with sample collection/processing and/or provide logistical support.
3.3 SAMPLING SEQUENCE The field crew arrives at the site in the early morning to complete the sampling in a single day. The typical sampling scenarios are shown in Figure 3.1 and Figure 3.2.
3.4 SAMPLING CONSIDERATIONS
3.4.1 CONSIDERATIONS FOR FISH TISSUE COLLECTION The sequence of daily field activities may differ depending on whether the field crew is collecting fish that day or another day, or using active (trawling, seining, hook and line, etc.) or passive (gill net, hoop net, long-lines, etc.) fish collection methods. Other minor modifications to the sampling scenario may be made by crews; however, the sequence of sampling events presented in the following figures (depending on the type and timing of

National Coastal Condition Assessment 2015 Field Operations Manual Version 1.0 May 2015 Page 14
fish collection) should be adhered to and is based on the need to protect some types of samples from contamination and to minimize holding times once samples are collected.
3.4.2 CONSIDERATIONS FOR ENTEROCOCCI COLLECTION Enterococci levels tend to be highest in the morning prior to high levels of solar irradiation; therefore, these samples must be collected as early in the day and with as little water and sediment disturbance as possible. Regardless of when the Enterococci samples are collected, crews must complete filtration within six hours of collection. Enterococci samples not filtered within six hours of collection must be discarded, recollected, and filtered.
3.4.3 OTHER CONSIDERATIONS Crew members responsible for collecting water chemistry, sediment grabs, and fish tissue must remember to not apply sunscreen or other chemical contaminants until after each of these samples is collected to avoid compromising the integrity of the sample (or implement measures to reduce contamination by such chemicals if applied such as washing, wearing long gloves, etc.).

National Coastal Condition Assessment 2015 Field Operations Manual Version 1.0 May 2015 Page 15
Figure 3.1 Field Sampling Scenario - Active Fishing Methods

National Coastal Condition Assessment 2015 Field Operations Manual Version 1.0 May 2015 Page 16
Figure 3.2 Field Sampling Scenario - Passive Fishing Methods

National Coastal Condition Assessment 2015 Field Operations Manual Version 1.0 May 2015 Page 17
4 PRE-DEPARTURE ACTIVITIES Field crews conduct a number of activities at their base site (i.e. office or laboratory, camping site, or hotel) before departure to the site and after returning from the field. Before leaving the base site, the crews must know: (1) where they are going; (2) that the site is accessible and that, if necessary, they have permission to sample it; and (3) that equipment and supplies needed to complete the sampling effort are available and in good working order. After sampling, crews must ensure that: (1) samples are labeled, packed, and shipped appropriately; (2) the sampling event is communicated to EPA; and (3) equipment and supplies are cleaned and replenished as necessary.
Figure 4.1 Overview of base site activities
Pre-departure activities are included here, while post-sampling activities are discussed in Section 14: Final Site Activities and Section 15: Post-Sampling Activities. Pre-departure
•Pre-departure Activities •Crew Leader - Prepare daily itinerary •Whole Crew - Site verification •Crew Members - Instrument checks & calibration, equipment & supplies preparation
Pre-departure Activities
Sample Site •Post-Sampling Activities •Crew Leader •Review forms and labels •File status report via email to tracking team •Crew Members •Filter, preserve & inspect samples •Clean boats with 1-10% bleach solution •Perform safety checks on boat (when trailering
between one water body to distinctly different water body) •Clean (and repair, if needed) sampling gear •Charge or replace batteries •Refuel vehicle and boat •Obtain ice and other consumable supplies as
needed •Package and ship samples & data forms
Post-Sampling Activities
National Coastal Condition Assessment 2015 Field Operations Manual Version 1.0 May 2015 Page 18
activities include the development of a daily itineraries, instrument checks and calibration, and equipment and supply preparation.
4.1 DAILY ITINERARIES Field Crew Leaders are responsible for developing daily itineraries and site information, which are compiled as a Site Packet. This site packet typically includes maps, navigational charts, contact information, copies of permission letters, permits, access instructions, location of FedEx offices, and location and contact information of hospitals or other emergency services. Additional activities include confirming the best access routes, calling the landowners or local contacts, confirming lodging plans, and coordinating rendezvous locations with individuals who must meet with field crews prior to accessing a site.
Also, the Field Crew Leader must identify appropriate boat ramps or marinas and gas docks. If the crew is planning a multiple day/multiple site trip, information for each day and site must be developed and compiled into separate site packets.
4.2 INSTRUMENT CHECKS AND CALIBRATION Each field crew must test and calibrate instruments prior to sampling. Equipment can be calibrated either prior to departure for the site or at the site. However, due to variations in elevation, DO probes must be calibrated at the site. The field crew will verify site location using a global positioning system (GPS) receiver. They will collect measurements using a Photosynthetically Active Radiation (PAR) meter and a multi-parameter unit for measuring DO, pH, temperature, salinity (recorded at marine sites) and conductivity (measured at freshwater sites). Field crews must have access to backup instruments if any instruments fail the manufacturer performance tests or calibrations. Prior to departure, field crews must perform the following checks and calibrations:
• If using a hand-held GPS unit, turn on the GPS receiver and check the batteries. Replace batteries immediately if a battery warning is displayed. Boat-mounted GPS units run off of the boat electrical system.
• Test and calibrate the multi-parameter meter (or sonde). Each field crew must refer to and follow the manufacturer's calibration and maintenance procedures to calibrate multi-parameter meters according to manufacturer specifications. Once each week, crews must verify that the meter is functioning properly by performing manufacturer recommended internal diagnostic readouts (e.g. pH millivolts, cell constants, and/or other diagnostic readings). Records of these checks should be saved in a logbook or other documentation. For those meters that do not have internal check capabilities, crews will need to verify that the meter is measuring pH and conductivity properly by measuring a commercially available Quality Check Solution (QCS) with properties similar to YSI 5580 confidence solution.
• Ensure that the PAR meter’s handheld display unit has fresh batteries, that the unit is functioning properly, and that the correct calibration factors are entered for each probe.
National Coastal Condition Assessment 2015 Field Operations Manual Version 1.0 May 2015 Page 19
Note: Calibration factors are supplied by the manufacturer and are specific to each individual probe. PAR sensors require no field calibration; however, they should be returned to the manufacturer at least every 2 years for calibration. Field crews must use the “Procedures for the initial setup of the LI-COR LI-1400 Datalogger” (Section 4.2.1) to verify the setup of the unit or to enter coefficient values should a new sensor need to be installed.
• Crews operating in the Great Lakes must ensure that the underwater video system’s battery is charged and all components are correctly connected. Crews must ensure that the GPS attached to the video system is set up to output information to the GPS overlay (Section 11.2.2). The GPS output will be set prior to shipping to field crews, but the crews must verify proper settings before use.
4.2.1 INITIAL ASSEMBLY AND SETUP PROCEDURES FOR LI-COR FRAME, SENSOR AND LI-1400 DATALOGGER
Field crews must use a pre-configured LI-COR system. Use the following instructions to assemble the system if needed and the following section to reconfigure the LI-COR if needed.
4.2.1.1 Assembly of the LI-COR lowering frame and sensor (from LI-COR 2006) For NCCA, crews will need to attach one LI-192 Underwater Quantum Sensor to the LI-COR lowering frame. IMPORTANT: Do not use LI-COR underwater cable to support the sensor and lowering frame, as damage to the cable can result. The lowering line provided in your base kit should be used to support the lowering frame and sensor by attaching the in-line clip to the suspension ring at the top of the lowering frame. In addition, the cable should not be bent sharply near the sensor.
The lowering frame provides for the placement of two cosine sensors, however, NCCA crews will only attach a single underwater sensor. Each LI-COR underwater sensor has three 6-32 tapped mounting holes on the underside of the sensor for connection to the mounting ring (Figure 4.2). Corrosion resistant mounting screws are used with each sensor.

National Coastal Condition Assessment 2015 Field Operations Manual Version 1.0 May 2015 Page 20
Figure 4.2 Attachment of the underwater sensor to the mounting rings (adapted from LI-COR, 2006)
Figure 4.3 Lowering frame assembly with sensor, weight, and lowering line (adapted from LI-COR, 2006)
The underwater sensor will be attached using the mounting ring on the fin of the lowering frame (Figure 4.3). To accommodate for any tilting of the frame and to ensure a straight downward direction, a compact weight should be attached to the weight ring at the bottom of the frame. Depending upon the speed of the current, moderate weights will often suffice (4 kg). Weights over 25 kg should be avoided.
Once the sensor is installed to the mounting ring using the three screws and insulating washer, plug the underwater cable into the sensor by aligning the sensor pins and tightening the threaded connection. There is a yellow etched mark on the sensor bottom that should be aligned with the raised nub on the cable. If the underwater sensor begins reading negative values at startup, this likely indicates that the plug on the bottom of the underwater sensor is plugged in backwards.
The underwater cable should be attached to the frame such that approximately 25 cm of cable forms a smooth arc to the underwater sensor connector and is restrained from being flexed or supporting any weight. Additionally, the cable must be securely attached to the shaft of the lowering frame at multiple points so that the cable does not slip and put strain on the sensor connector. However, the cable cannot be clamped so tightly as to damage it. Possible methods to use are numerous nylon cable ties along the length of the shaft, or a tight wrap of light cord around the shaft and cable, starting at the suspension ring and extending downward at least 25 cm.
4.2.1.2 Setup Procedures for LI-COR LI-1400 Datalogger The following example demonstrates the process for configuring the LI-1400 (with the instrument keypad) to view or log instantaneous data from a single LI-190SA Quantum Sensor.

National Coastal Condition Assessment 2015 Field Operations Manual Version 1.0 May 2015 Page 21
Example 1a. Configure channel I1 for a LI-COR LI-190SA Quantum Sensor with calibration multiplier of -125.0µmols-1m-2/µAmp (Each sensor has a unique multiplier value supplied from the factory)
1.1. Connect the Quantum LI-190 ambient light sensor to the BNC connector on top of the LI-1400 labeled I1.
1.2. Turn on the LI-1400 meter. 1.3. Press the [Setup] key. 1.4. Use the left ([]) or right ([]) arrow keys to navigate to “SETUP
CHANNELS”. 1.5. Press the [Enter] key to begin the sensor setup. 1.6. Use the left ([]) or right ([]) arrow keys to navigate to “I1=Light”, press
Enter”. 1.7. Using the [Shift] key and the number/ letter keys, type a description for
this channel. This description could describe the type of sensor (i.e. “QUANTUM”), or describe what the reading will be used for in the NCCA sampling (i.e. “AMB”).
1.8. Press the down ([↓]) arrow key to enter the multiplier. The multiplier value is found on the Certificate of Calibration provided with the sensors. Each sensor must have a unique certificate and calibration multiplier value.
1.9. Press the down ([↓]) arrow key; enter “UW” for the unit label. 1.10. Press the down ([↓]) arrow key; select “1 sec” to display instantaneous
values. The running average parameter will not be used, but could be set here to any desired value.
1.11. Press the down ([↓]) arrow key; select “Log Routin=none” 1.12. The remaining options do not need to be set as they apply only when
using a Log Routine. 1.13. Repeat this entire procedure for channel I2 to setup the underwater
sensor (“I2=Light”).
4.3 EQUIPMENT AND SUPPLY PREPARATION Field crews must check the inventory of forms, supplies, and equipment prior to departure using Appendix A: Equipment and Supplies Lists; use of the lists is mandatory. Inventory extra site kits prior to each site visit to ensure sufficient back-up supplies are available. Store extra site kits in the vehicle so that replacement supplies will be readily available in case of loss or damage while at the sampling site.
• Obtain sufficient wet and dry ice for sample preservation and storage. • Pack meters, probes, and sampling gear, taking care to do so in a way that
minimizes physical shock and vibration during transport. • Pack stock solutions as described in Table 4.1 below. Follow the regulations of
the Occupational Safety and Health Administration (OSHA).
Field crews must request paper field forms (if using), tracking forms and labels, and site kits through the supply request form two weeks prior to sampling. Crews using the NARS App must request tracking forms and labels for each site and may wish to request paper form packets as a backup to electronic data collection. Field Crew Leaders collecting
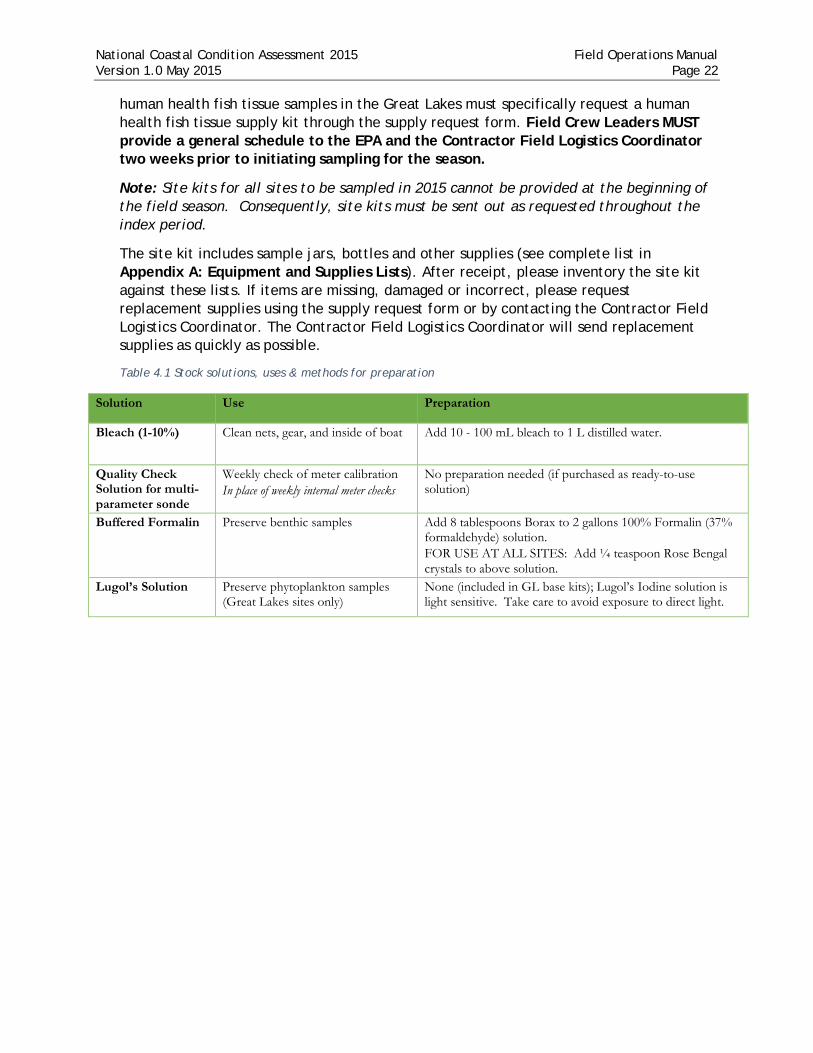
National Coastal Condition Assessment 2015 Field Operations Manual Version 1.0 May 2015 Page 22
human health fish tissue samples in the Great Lakes must specifically request a human health fish tissue supply kit through the supply request form. Field Crew Leaders MUST provide a general schedule to the EPA and the Contractor Field Logistics Coordinator two weeks prior to initiating sampling for the season.
Note: Site kits for all sites to be sampled in 2015 cannot be provided at the beginning of the field season. Consequently, site kits must be sent out as requested throughout the index period.
The site kit includes sample jars, bottles and other supplies (see complete list in Appendix A: Equipment and Supplies Lists). After receipt, please inventory the site kit against these lists. If items are missing, damaged or incorrect, please request replacement supplies using the supply request form or by contacting the Contractor Field Logistics Coordinator. The Contractor Field Logistics Coordinator will send replacement supplies as quickly as possible.
Table 4.1 Stock solutions, uses & methods for preparation
Solution Use Preparation
Bleach (1-10%) Clean nets, gear, and inside of boat Add 10 - 100 mL bleach to 1 L distilled water.
Quality Check Solution for multi-parameter sonde
Weekly check of meter calibration In place of weekly internal meter checks
No preparation needed (if purchased as ready-to-use solution)
Buffered Formalin Preserve benthic samples Add 8 tablespoons Borax to 2 gallons 100% Formalin (37% formaldehyde) solution. FOR USE AT ALL SITES: Add ¼ teaspoon Rose Bengal crystals to above solution.
Lugol’s Solution Preserve phytoplankton samples (Great Lakes sites only)
None (included in GL base kits); Lugol’s Iodine solution is light sensitive. Take care to avoid exposure to direct light.
National Coastal Condition Assessment 2015 Field Operations Manual Version 1.0 May 2015 Page 23
5 INITIAL SITE PROCEDURES Upon arriving at the site, the field crew must confirm that it is the correct site and determine if the site meets the criteria for sampling and data collection activities. The crew verifies site access, safety, and general conditions to determine if the site can be sampled within the swing of the anchored boat.
Note: Inability to collect samples for sediment, benthic or fish indicators does not disqualify a site from meeting sample criteria. See Section 2.3.1 to determine site sampleability.
5.1 SITE VERIFICATION
5.1.1 EQUIPMENT & SUPPLIES Table 5.1 Equipment & supplies: site verification
For locating and verifying site
sampling permit and landowner access (if required) site packet, including access information, site spreadsheet with map coordinates,
navigational charts with “X-site” marked NCCA Fact Sheets for public outreach GPS unit (preferably one capable of recording waypoints) with manual, reference card, extra
battery pack For recording measurements
Site Verification form pencils (for data forms) fine-tipped indelible markers (for labels) clipboard
5.1.2 SITE VERIFICATION PROCEDURES 1. Create a waypoint in the GPS unit that corresponds to the target X-site
coordinates provided by EPA in the site list. This can be done ahead of time in the office.
2. Navigate the sampling vessel as close as possible to the target X-site using GPS (you must be no more than 0.02 nautical miles (NM) or 37 meters from the target X-site). Compare the target X-site coordinates with the GPS coordinates displayed at the sampling site. • Sampling may start when the sampling vessel is within 37 meters of the X-
site. This distance provides the desired level of precision which is approximately equal to that of the GPS receiver without differential fix correction.
• With the exception of fish tissue and sediment samples (see Section 5.4) crews are expected to collect all samples within a circle of 0.02 NM radius around the X-site. This allowable deviation distance accounts for typical “anchor swing” of the sampling vessel.
3. Anchor the sampling vessel in such a way as to minimize the possibility of the anchor(s) dragging or becoming dislodged.
4. Once the anchor has been set and the vessel is essentially stationary, verify that the X-site is still within 0.02 NM or 37 meters. This location (where sampling will begin) is referred to as the Y-location. If the X-site is not within

National Coastal Condition Assessment 2015 Field Operations Manual Version 1.0 May 2015 Page 24
0.02 NM or 37 meters, reposition the vessel by following the steps outlined above.
5. Determine if the site is sampleable. See Section 2.3.1 for specific guidelines. • If not sampleable, proceed to Section 5.1.3. • If sampleable, proceed to the steps below and then to Section 5.1.4.
Record the time of arrival to the Y-location on the Site Verification Form. 6. Record the coordinates of the Y-location on the Site Verification (Front) form
in decimal degrees in the NAD83 datum. 7. Record the number of satellites fixed as ≤3 or ≥4. 8. After anchoring, and throughout all subsequent sampling efforts, monitor the
GPS to ensure that the sampling vessel stays within the proper X-site radius. 9. Indicate any and all methods that were used to verify that you are at the
correct location. 10. Measure and record the water depth at the Y-location on the Site Verification
(Front) form. Make sure an accurate depth reading is taken at the site to ensure the depth is adequate to conduct sampling.
5.1.3 SITE RELOCATION Every attempt should be made to sample within a 0.02 NM (~37 m) radius of the X-site. If the proposed initial sampling location is not sampleable, then relocate using the following guidelines:
1. The Field Crew Leader should choose a specific compass heading (e.g., north, south, east, west) and slowly motor the vessel in that direction.
2. After moving approximately 15-20 m, assess the relocated area using the Site Verification guidelines given above.
3. Should the relocated area fail to meet the “sampleable” definition, then this process may be continued using the same heading out to 37 meters from the X-site.
4. If no suitable sampling location is found along the first chosen heading, return to the X-site and follow a new heading until an acceptable sampling location is found.
5. If after a sufficient amount of effort is expended and no suitable sampling location is found, then the determination may be made that the site is unsampleable.
6. If the site is non-sampleable or inaccessible and cannot be relocated within the designated area, indicate the reason on the Site Verification (Front) form. No further sampling activities are conducted.
7. Replace the original site with the next oversample site on the estuary/state list. • Notify the EPA Regional Coordinator and FLC that the site was replaced and
submit the Site & Sample Status/Water Chemistry Lab Tracking form to NARS IM.
8. Return to Section 5.1.2.
5.1.4 SITE CHARACTERISTICS 1. If the site is sampleable, record the sampling status and method being used
(marine or Great Lakes). 2. Record the general habitat type and the dominant bottom type present at the
sampling site.

National Coastal Condition Assessment 2015 Field Operations Manual Version 1.0 May 2015 Page 25
• In many sites, it may not be possible to record the bottom type until after the sediment collections are performed.
3. Record the presence and type of debris (if any), submerged aquatic vegetation (SAV) present, and/or macroalgae present in the area.
4. Make any general comments about the site that may be important during the data review portion of the assessment or any unusual characteristics about the site, including weather conditions.
5. Record directions to the launch site from an easily recognizable location (city or major road intersection).
6. On the back side of the Site Verification (Back) form, draw a simple sketch of the area. • Include the relative locations of the shoreline, launch point, X-site, Y-
location, and, if different from the Y-location, sediment and fish collection locations. If sediment and fish were collected at different locations from each other, please indicate them separately (see Section 5.4). Include any other specific attributes of the site that may be important during data analysis.
• A printed or copied section of a map with the pertinent information may be submitted in place of the scene sketch. Upload this map to the NARS SharePoint site when you submit your data forms. NARS App users will upload their site sketch to the NARS SharePoint as well.
7. Record the name of all crew members and indicate their primary duties.
5.2 SITE PHOTOGRAPH Although not required, EPA encourages crews to take site photographs, especially if the site is associated with unusual natural or man-made features.
• Date-stamp any site photographs and include the site ID. • Alternatively, start the photograph sequence with one image of an 8.5 × 11
inch piece of paper with the site ID, waterbody name, and date printed in large, thick letters.
• Keep a brief photograph log (site ID, number of photographs, time and date if not stamped by camera) and describe the subject of each photo if it is not self-explanatory.
• Field crews can upload these photos to the NARS SharePoint site.
5.3 SAMPLE COLLECTION Even when the field crew makes every attempt to collect all samples, there will be some circumstances that will prevent all samples from being collected. When site conditions limit full completion of the standard sampling protocol, crews prioritize sample collection and follow a “checklist” for determining the order of sample completion:
1. Measure in situ water parameters and collect all water samples at all sites. 2. Collect benthic grab samples at all sites. Any size sediment grab is acceptable
as long as it meets the definition of a “successful benthic grab” (see Section 12.3). Note: Acceptable means:

National Coastal Condition Assessment 2015 Field Operations Manual Version 1.0 May 2015 Page 26
a) A sediment grab that meets the criteria for benthic samples; or b) Enough sediment can be collected that will allow the crew to obtain the
surficial sub-sample required for the sediment composite to send to the laboratory for abiotic indicator analysis (e.g., organics/metals, TOC, grain size, toxicity).
3. Collect sediment composite material of sand-sized sediment grain or smaller (preferred size). If an acceptable sediment grab cannot be obtained at the Y-location or within a 37 m radius around the X-site, move to a secondary sediment collection area following the procedures in Section 5.4.1 below. Flag and note the reason for limited/missing sediment samples. In the case of limited sediment, prioritize sample distribution in the following order of preference: a) Organics/Metals [SEDO] b) Toxicity [SEDX] c) Total Organic Carbon [SEDC] d) Silt/Clay (Grain Size) [SEDG] Indicate if any of the sediment samples were not successfully collected by marking the "no sample collected" bubble(s) for each pertinent sample.
4. Collect fish for ecological contaminant [FTIS] analysis. For the ecological assessment, fish collections are targeted to areas within a 500 m radius of the X-site. After unsuccessful attempts within this area, crews may move outside of this radius and attempt to collect fish up to 1000 meters from the X-site (see Section 5.4.2). Unsuccessful deployment of fish collection gear or the absence of fish in the catch should not necessarily be used as a determining factor for rendering a site unsampleable.
5. Collect fish tissue plugs [FPLG]. 6. Collect human health fish tissue sample [HTIS] (if applicable). If suitable fish
cannot be collected within 1000 meters of the X-site, crews may move out to a maximum of 1500 meters from the X-site in an effort to collect the human health fish tissue sample.
5.4 SECONDARY SEDIMENT OR FISH COLLECTION ZONES All water, benthos, sediment, and fish samples are expected to be collected at the same location (the Y-location), which is as close to the X-site as possible (within the 37 meter radius around the X-site). However, circumstances may require the field crew to relocate to a secondary location to collect an acceptable sediment grab or fish sample. If benthos, sediment, and/or fish are collected from a secondary location, in situ measurements and water collections do not need to be resampled. Guidelines for relocating to a secondary sample collection zone are covered in the sections below.
5.4.1 SEDIMENT SAMPLES 1. If an acceptable sediment grab cannot be obtained at the Y-location where
water samples were collected, move the vessel within the 37 m radius margin (of the X-site) and try to obtain the sediment sample. Use the site relocation method described previously (Section 5.1.3). On the Sample Collection (Back)
National Coastal Condition Assessment 2015 Field Operations Manual Version 1.0 May 2015 Page 27
form, indicate the sediment collection zone by filling in the "within 37 m from X-site" bubble.
2. In cases where sediment sampling cannot be successfully conducted within 37m of the X-site, grabs may be taken in a secondary sediment collection zone (e.g., > 37 m radius but within a 100 m radius (~0.05 NM) of the X-site) without re-collecting the water samples (Figure 5.1). Draw a second circle with a 100 m radius from the X-site on the site sketch map. Place a mark on the map showing the relative location of the sediment collection zone and the approximate distance and direction from the X-site. Indicate in the comments section approximately how far and in what direction from the X-site the sediment was collected. On the Sample Collection (Back) form, indicate the sediment collection location by filling in the "between 37-100m from X-site" bubble. The data will be flagged for subsequent review.
3. Crews may use the same relocation procedures to move out to a maximum distance of 500 m from the X-site to locate suitable sediment sampling locations (after attempting to collect sediment from within the primary and secondary zones). Draw a 500 m radius circle on the site sketch map indicating the sediment collection area and the approximate distance and direction from the X-site. Indicate in the comments section approximately how far and in what direction from the X-site the sediment was collected. On the Sample Collection (Back) form, indicate the sediment collection zone by filling in the "between 100-500m from X-site" bubble. The data will be flagged for subsequent review.
4. If a suitable location to collect sediment samples has not been found after a minimum of three collection attempts inside each of the acceptable relocation radii, sediment sampling is considered “complete” for the site. All appropriate field form flags and explanations must be completed, as well as pertinent "no sample collected" bubbles.
Note: The Field Crew Leader may choose to make additional sediment grab attempts.
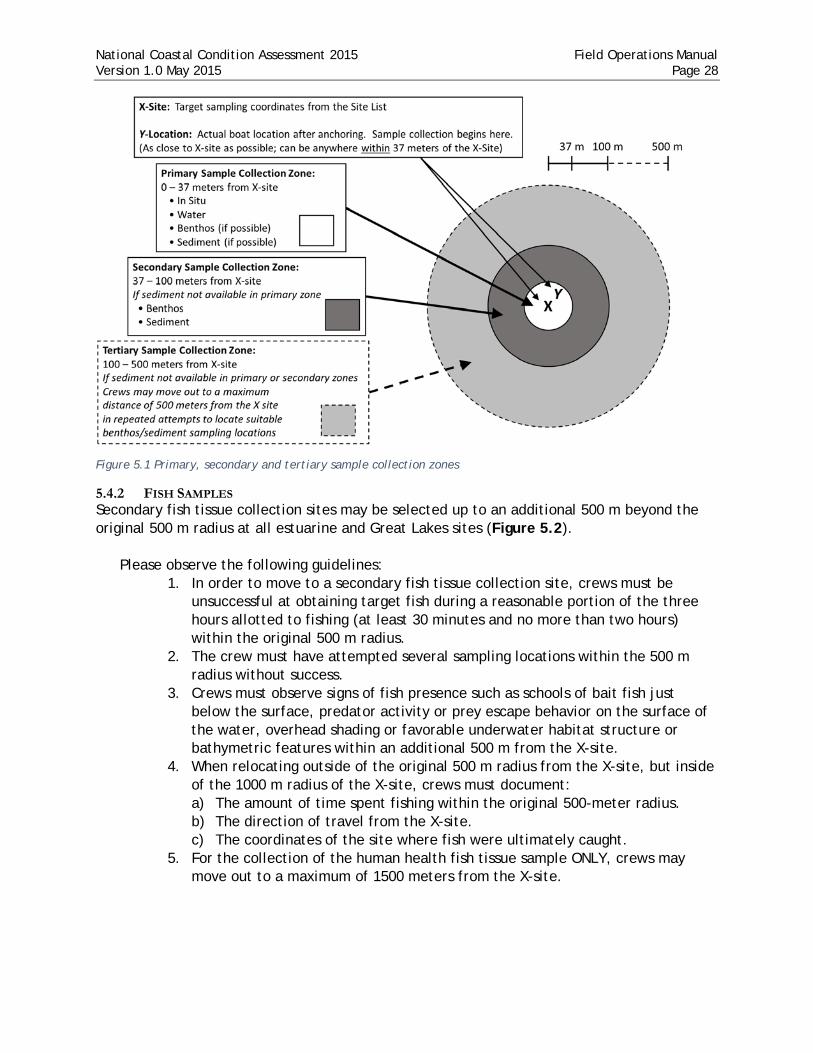
National Coastal Condition Assessment 2015 Field Operations Manual Version 1.0 May 2015 Page 28
Figure 5.1 Primary, secondary and tertiary sample collection zones
5.4.2 FISH SAMPLES Secondary fish tissue collection sites may be selected up to an additional 500 m beyond the original 500 m radius at all estuarine and Great Lakes sites (Figure 5.2).
Please observe the following guidelines:
1. In order to move to a secondary fish tissue collection site, crews must be unsuccessful at obtaining target fish during a reasonable portion of the three hours allotted to fishing (at least 30 minutes and no more than two hours) within the original 500 m radius.
2. The crew must have attempted several sampling locations within the 500 m radius without success.
3. Crews must observe signs of fish presence such as schools of bait fish just below the surface, predator activity or prey escape behavior on the surface of the water, overhead shading or favorable underwater habitat structure or bathymetric features within an additional 500 m from the X-site.
4. When relocating outside of the original 500 m radius from the X-site, but inside of the 1000 m radius of the X-site, crews must document: a) The amount of time spent fishing within the original 500-meter radius. b) The direction of travel from the X-site. c) The coordinates of the site where fish were ultimately caught.
5. For the collection of the human health fish tissue sample ONLY, crews may move out to a maximum of 1500 meters from the X-site.

National Coastal Condition Assessment 2015 Field Operations Manual Version 1.0 May 2015 Page 29
Figure 5.2 Primary and secondary fish collection zones

National Coastal Condition Assessment 2015 Field Operations Manual Version 1.0 May 2015 Page 30
6 WATER QUALITY MEASUREMENTS This section describes the procedures and methods for the field collection and analysis of the water quality indicators (in situ measurements, water column transparency, and light attenuation) from freshwater and marine coastal areas.
6.1 SUMMARY OF METHOD FOR IN SITU MEASUREMENTS OF WATER COLUMN TRANSPARENCY, DISSOLVED OXYGEN, PH, SALINITY, CONDUCTIVITY, TEMPERATURE, AND LIGHT ATTENUATION
Field crews obtain a hydrographic profile at each site (at the Y-location) by measuring DO, pH, salinity (marine sites) or conductivity (freshwater sites), and temperature using a multi-parameter water quality meter (or sonde). They also assess water column transparency using a Secchi disk and light attenuation using a PAR meter. The protocol requires measurements at the prescribed depths as the probe/sensor is both lowered and retrieved, starting just below the surface, progressing down to 0.5 m from the bottom, and returning to just below the surface.
6.1.1 EQUIPMENT AND SUPPLIES Table 6.1 lists the equipment and supplies used to measure water column transparency, DO, pH, salinity/conductivity, temperature, and light attenuation. Crews record in situ measurements on the Field Measurement (Front) form.
Table 6.1 Equipment & supplies: transparency, DO, pH, salinity/conductivity, temperature, & light attenuation
For taking measurements and calibrating the water quality meter
multi-parameter water quality meter with DO, pH, salinity/conductivity, and temperature probes.
extra batteries de-ionized water (lab certified preferred, but not required) calibration cups and standards QCS (used if internal meter checks are not possible) barometer to use for calibration thermometer Secchi disk (20 cm diameter, weighted) & 100' line with clip (marked in
0.5 m intervals) PAR meter (with LI-190 Quantum Sensor and LI-192 Underwater
Quantum Sensor & cables, independent datalogger) For recording measurements Field Measurement form
pencils (for data forms)
6.2 SAMPLING PROCEDURE – WATER COLUMN TRANSPARENCY (SECCHI DEPTH)
A Secchi disk is a 20 cm black and white disk suspended from a non-stretch line that is marked in 0.5 m intervals. Field crews use a Secchi disk to measure water column to nearest 0.1m transparency at every site (at the Y-location). The resulting measurement is called the Secchi disk transparency depth, or “Secchi depth” for short. Below are step-by-step procedures for measuring water column transparency.
National Coastal Condition Assessment 2015 Field Operations Manual Version 1.0 May 2015 Page 31
Note: For valid Secchi depth readings, no sunglasses, hats, or any other devices that shade the eyes may be used by the person who is observing the disappearance and reappearance depths. The Secchi depth is assessed from the shady side of the boat and can only be measured during daylight hours. One crew member must make all three sets of Secchi measurements at a site, and it is desirable to have the same crew member complete Secchi depth readings throughout the entire field season whenever possible.
1. In the “Secchi Depth” section of the Field Measurement (Front) form, record the time Secchi depth readings were started.
2. Slowly lower the Secchi disk until it is no longer visible. In the “DISAPPEARS” column, record the depth where the marking on the line meets the water level. Interpolate between the 0.5m markings on the rope to the nearest 0.1m. • If the disk hits the bottom before disappearing, water column transparency
depth is greater than the water depth. Fill in the “Yes” circle on the data sheet under “Clear to Bottom?” and record the station depth as both the disappearance and reappearance depth in the “Reading 1” row on the data form.
3. Slowly raise the Secchi disk until it just becomes visible and record the depth in the “REAPPEARS” column. Interpolate between the 0.5m markings on the rope to the nearest 0.1m.
4. Repeat steps 1-3 two more times, recording both disappearance and reappearance depths each time.
5. Use the comment space provided on the Field Measurement (Front) form to flag any measurements that the crew feels needs further comment or when a measurement cannot be made.
6. Repeat the entire process if any one disappearance or reappearance measurement differs from the others by more than 0.5 m.
6.3 SAMPLING PROCEDURE – MULTI-PARAMETER SONDE
6.3.1 CALIBRATION Crews calibrate the DO, pH, and salinity/conductivity meter functions of the multi-parameter water quality meter (or sonde) before collecting data at each site. If a crew is sampling multiple sites in a single day, a single calibration is sufficient for the day.
• Crews record the manufacturer and model number of the instruments in the “Calibration Information” section of the Field Measurement (Front) form.
• Crews must calibrate their pH probe according to the manufacturer’s instructions and their own laboratory policies, by using at least a 2-point calibration method. Crews will supply commercially purchased calibration standards (typically pH of 7 and 10 for 2-point calibration and pH of 4, 7, and 10 for 3-point calibration). Any pH standards used must reference NIST Standard Reference Material (SRM) certifications to be used in the calibration of the pH probe. This applies for calibrations done both pre-sampling and post-sampling.
• The calibration buffers must be accurate to 0.02 pH units or better. • The calibration buffers should be replaced with fresh solutions every 3-4
days or sooner if the crew suspects it has become contaminated

National Coastal Condition Assessment 2015 Field Operations Manual Version 1.0 May 2015 Page 32
• Crews will also calibrate their conductivity/salinity probe according to the manufacturer’s specifications and their own laboratory policies, using a commercially supplied, traceable conductivity standard.
• Crews will re-check pH and conductivity/salinity calibration again after daily measurements are complete to document potential meter drift throughout the day.
• For instruments that are factory calibrated and checked (e.g. Sea-Bird Electronics meters, etc.), crews must ensure that factory-certified diagnostics have been completed according to manufacturer specifications (preferably conducted immediately prior to the sampling season) and provide documentation copies during assistance visits. Meters such as these do not require the daily calibration steps or the weekly diagnostic/QCS checks.
• Once each week, crews must verify that the meter is functioning properly by performing manufacturer recommended internal diagnostic checks. This is manufacturer and model specific, but typically involves accessing internal diagnostic readouts (e.g. pH millivolts, cell constants, and/or other diagnostic readings). Results of these checks must be recorded in a logbook or other documentation and saved for potential review.
• For those meters that do not have internal check capabilities, crews will check pH and conductivity against a commercially available QCS with properties similar to YSI 5580 confidence solution. The QCS is provided by the crew. Crews record the successful completion of the internal checks or the expected values and measured values of the QCS in the “Quality Control Check” section of the Field Measurement (Front) form.
• Crews using a commercially purchased pH QCS for the weekly quality checks should follow the guidelines below:
• The pH QCS containers should be labeled with expected values and preparation dates.
• The pH of the QCS should approximate the pH expected at sampling sites. • Crews should have centrally located bulk solutions to replenish allotments
needed for quality checks every 3-4 days or sooner if the crew suspects it has become contaminated.
o Bulk solutions should be replaced according to the manufacturer’s specifications or at any time if crew suspects it has become contaminated.
• Crews use a commercially purchased primary conductivity/seawater standards to be used as the QCS for weekly quality checks of conductivity/salinity.
• A secondary conductivity/seawater standard that is referenced against a certified standard may also be used.
o If a secondary standard is used, then preparation and certification test procedures and results must be logged in a QA notebook and maintained by the state or contractor in-house QA personnel.
o The standard should be representative of the conditions expected in the field (~0.5-35 ppt for marine waters).
o The conductivity/seawater calibration standard and QCS containers must be labeled with expected values and preparation dates.
• The standards should be replaced with fresh solutions every 3-4 days or sooner if the crew suspects they have become contaminated.

National Coastal Condition Assessment 2015 Field Operations Manual Version 1.0 May 2015 Page 33
o Bulk supplies of calibration standards and primary or secondary QCS may be maintained in a central location and used to replenish QA allotments.
o Bulk solutions should be replaced according to manufacturer’s specifications or if the crew suspects that they may have become contaminated.
• At least once per sampling season (usually in a laboratory before crews begin sampling), calibrate the temperature sensor against a National Institute of Standards and Technology (NIST)-traceable thermometer.
• If you observe any irregularities or calibration measurements that fall outside of the specified tolerance ranges use an alternate instrument if available and flag any affected data.
Specific information about calibrating each probe function is presented below.
6.3.2 DISSOLVED OXYGEN METER Calibrate the DO probe in the field against an atmospheric standard (i.e. ambient air saturated with water or water saturated with air) according to manufacturer’s specifications and NCCA QA protocols prior to launching the boat. In addition, follow any of the manufacturer’s recommendations for periodic comparisons with internal quality checks (cell constants, millivolt output, or other readings), or a DO chemical analysis procedure (e.g., Winkler titration) to check accuracy and linearity. Record results and report irregularities as described above.
6.3.3 PH METER Calibrate the pH meter in accordance with the manufacturer’s instructions and with the field crew organization’s existing Standard Operating Procedure (SOP).
After all in situ measurements have been completed for the sampling day, crews perform a post-measurement calibration check of the pH meter. Crews will record the Calibration Standard Value pH and the post-sampling measurement in the appropriate locations in the “Post-Measurement Calibration Check” section of the Field Measurement (Front) form. If significant drift (outside of manufacturer’s specification) is detected, it may indicate that the meter is in need of service. Perform the required service or exchange devices as appropriate and if necessary, and flag any suspect measurements. Discontinue use of any meter that is not functioning properly.
Once a week, each crew must check their multi-parameter sonde using manufacturer recommended internal diagnostic checks (cell constants, millivolt output, or other readings) or against the QCS that they provide. In addition to recording the expected values and results, record the QCS date prepared in the appropriate sections of the “Quality Control Check” section of the Field Measurement (Front) form. Report any calibration or QC irregularities as described above.
6.3.4 SALINITY/CONDUCTIVITY METER Prior to sampling each site, calibrate the salinity/conductivity meter in accordance with the manufacturer’s instructions. After the sampling day is complete, measure the salinity/conductivity of the calibration standard that was used earlier in the day to calibrate the instrument. Record the expected and post-measurement values as described

National Coastal Condition Assessment 2015 Field Operations Manual Version 1.0 May 2015 Page 34
above. Once a week, crews check the conductivity/salinity function using manufacturer recommended internal diagnostic checks (cell constants, millivolt output, or other readings) or against the QCS that they provide. Record results and report irregularities as described above.
6.3.5 TEMPERATURE METER When performing the once-a-season temperature sensor check, incorporate the entire temperature range encountered in the NCCA into the testing procedure and keep a record of test results on file. For use in this accuracy check, the following are the temperature ranges from the NCCA 2010 dataset:
• Northeast: 6.8 °C ≤ T ≤ 32.3 °C • Southeast: 21.2 °C ≤ T ≤ 33.42 °C • Gulf Coast: 22.4 °C ≤ T ≤ 36 °C • Great Lakes: 3.54 °C ≤ T ≤ 30.9 °C • West Coast: 9 °C ≤ T ≤ 24.1 °C
See below methods for measuring DO, pH, salinity (marine sites) or conductivity (freshwater sites), and temperature.
6.4 SAMPLING PROCEDURE – DISSOLVED OXYGEN, PH, TEMPERATURE AND SALINITY/ CONDUCTIVITY
1. Measure the total water depth at the Y-location to the nearest 0.1 m and record on the ”Hydrographic Profile” section on the Field Measurement (Back) form. If the sonde is attached to a data recorder, crews may submit the hydrographic profile data via an electronic file. If a crew chooses to use this option, ensure that all the data is saved correctly, and fill in the “Submitted data via eFile” bubble on the form.
2. Lower the sonde into the water and record DO, pH, salinity/conductivity, and temperature measurements at the following depths: 0.1 m below the surface, 0.5 m below the surface, every 1 m from depths of 1.0 to 10.0 m, and if the site is greater than 10 m, every 5 m thereafter. Take the last set of measurements at 0.5 m from the bottom, making sure to not let the sonde touch the bottom. Record these results in the downcast section of the Field Measurement (Back) form.
3. Repeat the full sets of measurements at each of the same depth intervals as the probe is retrieved (upcast). Two examples are provided below in Table 6.2 that illustrate the depths at which measurements will be taken.
4. Flag any measurements that the crew feels needs further comment or when a measurement cannot be made. The explanation of these flags will be placed on the Field Measurement (Front) form.
5. After all in situ measurements have been completed for the sampling day, perform a “Post-Measurement Calibration Check” of the pH and conductivity probes. Record these values on the Field Measurement (Front) form.

National Coastal Condition Assessment 2015 Field Operations Manual Version 1.0 May 2015 Page 35
Table 6.2 Example depth measurement intervals
6.5 PHOTOSYNTHETICALLY ACTIVE RADIATION (PAR) METER Field crews measure photosynthetically active radiation using a PAR meter attached to a LI-COR® data logger. The PAR meter measures a vertical profile of light attenuation at each station. Measured light values are entered into a regression equation and used to determine the coefficient of attenuation in the water column. PAR sensors require no field calibration; however, they should be returned to the manufacturer at least every 2 years for calibration. Crews measure PAR at the same depths as other water column indicators. See procedures below for measuring light attenuation.
6.5.1 SAMPLING PROCEDURE—LIGHT ATTENUATION (LI-1400 DATALOGGER) 1. Connect a deck sensor (LI-190 Quantum Sensor) and an underwater sensor (LI-
192 Underwater Quantum Sensor) to the PAR meter as described in Section 4.2.1. Enter the calibration factors (supplied by the manufacturer) for each probe.
2. Place the deck sensor in an unshaded location on the boat to record the available ambient light.
3. Turn on the LI-1400 meter. 4. Press the View key. 5. Using the left or right keys, navigate to “NEW DATA” and press Enter. 6. Using the left or right keys, navigate until channel I1I is displayed; this shows
the instantaneous reading for that channel. Scrolling down will allow viewing of 2 channels at once.
7. Lower the underwater sensor, making sure that the sensor is facing up, on the SUNNY (or at least unshaded) side of the boat to a depth of 10 cm (represents “surface”). Allow the readings to stabilize and press “Enter” to manually log the ambient (AMB) and underwater (UW) light readings in the datalogger. NOTE: crews may choose to use alternate methods of recording the two sensor readings as long as both readings are recorded at the same instant. This may
EXAMPLE 1: Water Depth = 7.2 meters
0.1 m 0.5 m 1.0 m 2.0 m 3.0 m 4.0 m 5.0 m 6.0 m 6.7 m
EXAMPLE 2: Water Depth = 23.9 meters
0.1 m 0.5 m 1.0 m 2.0 m 3.0 m 4.0 m 5.0 m 6.0 m 7.0 m 8.0 m 9.0 m
10.0 m 15.0 m 20.0 m 23.4 m

National Coastal Condition Assessment 2015 Field Operations Manual Version 1.0 May 2015 Page 36
include using two people to view the two readings, taking a photograph of the screen, etc.
8. Continue to lower the underwater sensor to each of the required depths (same as other water quality measurements): a) 0.5 m b) Every 1 m from 1.0 m to 10.0 m c) Every 5 m thereafter for sites greater than 10 m d) 0.5 m from the bottom
9. Allow the readings to stabilize at each depth before pressing “Enter” or recording the values on the data form.
10. Repeat the procedure at the same depths, but in reverse order on the upcast. 11. Review the saved data by pressing Esc and using the right or left key to select
“LOG DATA” and pressing Enter. 12. Select “View=ALL.” Press Enter. 13. Use the down key to scroll through stored data by date and time to find the
data that were just logged. Press Enter to access logged data. Use the down key to view both of the sensor readings.
14. Record the values from both sensors (µE/m2/s), at the appropriate water depths of the underwater sensor, on the datasheet. Record the deck sensor reading in the ambient (AMB) column, and the underwater sensor reading in the underwater (UW) column.
15. If the sensor hits bottom, allow 2-3 minutes for the disturbance to settle before taking the reading.
16. If the light measurements become negative before reaching the bottom measurement, terminate the profile at that depth.
17. If the underwater sensor begins reading negative values at startup, this likely indicates that the plug on the bottom of the underwater sensor is plugged in backwards. There is a yellow etched mark on the sensor bottom that should be aligned with the raised nub on the cable.
Note: Pressing the On/Off key will only turn off the screen. To shut down the LI-1400 press the Fct key and use the right or left keys to navigate to “SHUTDOWN”. Press Enter to shut down.
National Coastal Condition Assessment 2015 Field Operations Manual Version 1.0 May 2015 Page 37
7 WATER CHEMISTRY [CHEM], CHLOROPHYLL-A [CHLA], AND NUTRIENTS [NUTS] SAMPLE COLLECTION AND PRESERVATION This section describes the procedures and methods for the field collection and preservation of the water chemistry, chlorophyll-a, and dissolved nutrients samples from freshwater and marine coastal areas.
7.1 SUMMARY OF METHOD The water chemistry samples will be analyzed for chlorophyll-a [CHLA], total nutrients including nitrogen and phosphorus [CHEM], and dissolved ammonia, nitrites, nitrates, and phosphorus [NUTS]. Collect the water samples at the Y-location, 0.5 meters below the surface (or mid-depth if station depth is less than 1.0 meter), with either a water pumping system or water sampling device such as a Niskin, Van Dorn, or Kemmerer bottle and transfer to a rinsed 250 mL amber HDPE bottle. Water for the chlorophyll-a sample will be collected and transferred to a separate 2 L amber HDPE bottle. Store all samples in darkness on ice in a closed cooler. After you filter the chlorophyll-a sample, the filter must be kept frozen until ready to ship. A portion of the filtrate from the chlorophyll-a processing will be collected for the dissolved nutrient sample.
Note: Fecal indicator sample IS NOT collected with these samples.
7.2 EQUIPMENT AND SUPPLIES Table 7.1 Equipment & supplies: water chemistry & chlorophyll-a sample collection
For collecting samples water sampling device or water pumping system nitrile gloves HDPE bottle (250 mL, amber) [CHEM] HDPE bottle (2 L, amber) [CHLA] cooler with wet ice
For recording measurements
Sample Collection form water chemistry sample label pencils (for data forms) fine-tipped indelible markers (for labels) clear tape strips
7.3 SAMPLING PROCEDURE The following describes the sampling procedures for collecting water chemistry samples.
Note: Do not apply sunscreen or other chemical contaminants until after the sample is collected (or implement measures to reduce contamination by such chemicals if applied such as washing, wearing long gloves, etc.).
1. Collect the water chemistry samples at the Y-location, which is no more than 37 meters from the X-site (located via GPS).

National Coastal Condition Assessment 2015 Field Operations Manual Version 1.0 May 2015 Page 38
2. Complete the CHEM sample label with Site ID, date collected, and visit number.
3. Attach the completed label to the 250 mL amber HDPE sample bottle and cover with clear plastic tape.
4. Put on nitrile gloves. 5. Using either a water sampling device or water pumping system, collect a water
sample at 0.5 m below the surface (or mid-depth if station depth is less than 1.0 meter).
a) Rinse the sampling device and the sample containers three times with water from the site. To rinse a pumped sampling system follow your agency’s SOP. If no SOP exists, flush long enough so that the amount of site water flushed is equal to at least three times the total volume of the sampling system (including tubing). Be sure to cap the bottles and rotate them so that the water contacts all the surfaces. Discard the water away from the sampling location if additional water is to be collected.
6. Fill the 250 mL amber HDPE bottle (for water chemistry) and the 2 L amber HDPE bottle (for chlorophyll-a and nutrients) with sample water.
7. Replace the lids and seal the lid of the 250 mL bottle tightly with electrical tape.
8. Place both samples in a cooler on ice at 4°C. 9. Record the collection data on the Sample Collection (Front) form.
a) Note anything that could influence sample chemistry (heavy rain, potential contaminants, etc.) in the Comments section.
b) If the samples were not taken at the Y-location, enter the GPS coordinates of the sampling location and the reason for relocation in the comments field on the Sample Collection (Front) form.
10. Proceed to Section 14.3 for instructions on processing chlorophyll-a and nutrients water sample to obtain a chlorophyll-a filter and the nutrients filtrate.
National Coastal Condition Assessment 2015 Field Operations Manual Version 1.0 May 2015 Page 39
8 ALGAL TOXINS [ALGX] INCLUDING MICROCYSTINS [MICX]
Algae, including Microcystis, are microscopic organisms found naturally at low concentrations in water. Under optimal conditions (such as high light and calm weather, usually in summer), these organisms occasionally form a bloom, or dense aggregation of cells, that floats on the surface of the water forming a thick layer or “mat.” At higher concentrations, algal blooms are so dense that they resemble bright green paint that has been spilled in the water. These blooms potentially affect water quality as well as human health (some algae produce toxins) and natural resources. Decomposition of large blooms can lower the concentration of dissolved oxygen in the water, resulting in hypoxia (low oxygen) or anoxia (no oxygen). Sometimes, this condition results in fish kills. The blooms can also be unsightly, often floating at the surface in a layer of decaying, odiferous, gelatinous scum.
Although the likelihood of people being affected by algal blooms is low, various health effects can occur following contact with or ingestion of algal toxins. People recreationally exposed (e.g., swimmers or personal watercraft operators) to algal blooms have also reported adverse effects. Health problems may occur in animals if they are chronically exposed to water with algal toxins present. Fish and bird mortalities have been reported in waterbodies with persistent algal blooms.
8.1 SUMMARY OF METHOD Two water samples for algal toxin analysis are taken from the Y-location: one for a broad suite of algal toxins [ALGX] and another specifically for microcystins [MICX]. All field crews must collect water grab samples using the water chemistry sample collection device to fill two, 500 mL bottles. Collect these samples after the in situ measurements and water chemistry sample are collected. Store all samples on ice in a closed cooler.
8.2 EQUIPMENT AND SUPPLIES Table 8.1 Equipment & supplies: algal toxins, microcystins
For collecting samples nitrile gloves water chemistry sample collection device 2 HDPE bottles (500 mL, white, wide-mouth) [ALGX] [MICX] cooler with ice
For recording measurements
Sample Collection form algal toxin sample label microcystin sample label pencils (for data forms) fine-tipped indelible markers (for labels) clear tape strips

National Coastal Condition Assessment 2015 Field Operations Manual Version 1.0 May 2015 Page 40 8.3 SAMPLING PROCEDURE
See below for step-by-step procedures for collecting both algal toxins and microcystins samples. Collect both samples from the Y-location.
Note: Make sure not to handle sunscreen or other chemical contaminants until after the sample is collected (or implement measures to reduce contamination by such chemicals if applied such as washing, wearing long gloves, etc.).
8.3.1 SAMPLE COLLECTION 1. Complete the ALGX and MICX sample labels with Site ID, date collected, and
visit number. 2. At marine sites, also write the salinity (in ppt) on both of the labels. 3. Attach the completed labels to each of the 500 mL HDPE sample bottles and
cover with clear plastic tape. 4. Put on nitrile gloves. 5. Rinse the first 500 mL bottle three times with site water. Be sure to cap the
bottle and rotate it so that the water contacts all the surfaces. Discard the water away from the sampling location if additional water is to be collected.
6. Fill the 500 mL bottle. Leave at least one inch of head space in the bottle to allow for expansion when frozen.
7. Replace the lid and seal tightly with electrical tape. 8. Repeat Steps 5-7 for the second 500 mL bottle.
8.3.2 SAMPLE STORAGE 1. Place the 500 mL bottles in a cooler (on ice) and shut the lid. 2. Record the Sample ID on the Sample Collection (Front) form along with the
pertinent site information (site ID, date, etc.). 3. As soon as you return to your base site (hotel, lab, office, etc.), freeze sample
bottles and keep frozen until shipping.

National Coastal Condition Assessment 2015 Field Operations Manual Version 1.0 May 2015 Page 41
9 FECAL INDICATOR (ENTEROCOCCI, [ENTE]) Crews collect water samples to be tested for the presence of Enterococci. They filter water at the field site or a nearby location. The filters are sent to the lab for quantitative polymerase chain reaction (qPCR) analysis. Two filters must be collected and frozen within six hours of collecting the water sample or the sample must be discarded and recollected. Because of the time-sensitive nature of this technique, the position of the Enterococci water sample collection in the sampling sequence varies based upon whether and how fish will be collected at the site and how quickly the crew will be able to begin filtration.
In short, if the crew is using a passive fishing method or is able to filter the samples on the vessel, the Enterococci collection takes place immediately following the hydrographic profile. If the crew is using active fishing methods or will not be able to filter the sample until off the water, the collection of the Enterococci sample takes place at the end of the sampling day. This variation is based on balancing the need to protect the Enterococci sample from potential contamination with minimizing holding times once the sample is collected.
9.1 SUMMARY OF METHOD Crews collect and preserve the fecal indicator sample at the Y-location using the method described in the Sampling Procedure (Section 9.3 below). In addition, crews observe the area around the X-site and record (on the Site Assessment (Front) form) signs of disturbance that may contribute to the presence of fecal contamination to the waterbody.
9.2 EQUIPMENT AND SUPPLIES Table 9.1 Equipment & supplies: fecal indicator (Enterococci) sampling
For collecting samples nitrile gloves HDPE bottle (250 mL, clear, pre-sterilized) sodium thiosulfate tablet wet ice cooler
For recording measurements Sample Collection form fecal indicator sample labels (2 vial labels and 1 bag label) pencils (for data forms) fine-tipped indelible markers (for labels) clear tape strips
9.3 SAMPLING PROCEDURE The following outlines the procedure for collecting the fecal indicator sample.
1. Put on nitrile gloves. 2. Using either a gloved hand (on smaller boats) or pole dipper (on larger vessels),
lower the un-capped, inverted 250 mL sample bottle to a depth of 0.5 meters below the water surface (or mid-depth if station depth is less than 1.0 meter).

National Coastal Condition Assessment 2015 Field Operations Manual Version 1.0 May 2015 Page 42
• Avoid surface scum, vegetation, and substrates. Point the mouth of the container away from the boat. Right the bottle and raise it through the water column, allowing bottle to fill completely.
3. After removing the container from the water, discard a small portion of the sample to allow for proper mixing before filtering.
4. Add the sodium thiosulfate tablet, cap, and shake the bottle 25 times. 5. Store the sample in a cooler on wet ice to chill (not freeze) for at least 15
minutes. Do not hold samples longer than six hours before filtration and freezing.
6. The filtration procedure is contained in Section 14.2.
National Coastal Condition Assessment 2015 Field Operations Manual Version 1.0 May 2015 Page 43
10 PHYTOPLANKTON [PHYT] (GREAT LAKES ONLY)
10.1 SUMMARY OF METHOD In all Great Lakes sites, crews will collect a sample for phytoplankton analysis. Collect this sample from the Y-location at the same time and depth as the other water samples. Fill a 1 L white narrow-mouth HDPE bottle with water from the water sampling device or water pumping system. The phytoplankton sample must be preserved with Lugol’s solution within two hours of collection. Store the samples in darkness inside a cooler with ice or in a refrigerator.
10.2 EQUIPMENT AND SUPPLIES Table 10.1 Equipment & supplies: phytoplankton
For collecting and preserving samples
water sampling device or water pumping system nitrile gloves HDPE bottle (1 L, white, narrow mouth) wet ice cooler Lugol’s solution
For recording measurements
Sample Collection form phytoplankton sample label pencils (for data forms) fine-tipped indelible markers (for labels) clear tape strips
10.3 SAMPLING PROCEDURE The text below describes the sampling and preservation procedures for phytoplankton samples. Collect the phytoplankton water sample at the Y-location along with the other water samples.
Note: Make sure not to apply sunscreen or other chemical contaminants until after the sample is collected (or implement measures to reduce contamination by such chemicals if applied such as washing, wearing long gloves, etc.).
1. Complete the PHYT sample label with Site ID, date collected, and visit number. 2. Attach the completed label to the 1 L white narrow-mouth HDPE sample bottle
and cover with clear plastic tape. 3. Put on nitrile gloves. 4. Using either a pre-rinsed pump system or a water sampling device, collect a
water sample at 0.5 m below the surface (or mid-depth if station depth is less than 1.0 meter).
5. Rinse the sample bottle three times with site water. Be sure to cap the bottle and rotate it so that the water contacts all the surfaces. Discard the water away from the sampling location if additional water is to be collected.
6. Fill the sample bottle with sample water, leaving enough head space for 10 mL of Lugol’s solution, and place in a cooler on ice at 4°C. Store the sample chilled and in darkness at all times.

National Coastal Condition Assessment 2015 Field Operations Manual Version 1.0 May 2015 Page 44
7. The sample must be preserved by adding 10 mL of Lugol’s solution to the bottle within 2 hours of collection.
8. After preservation, replace the lid and seal tightly with electrical tape. 9. Record the collection data on the Sample Collection (Front) form. Include the
depth of collection, time of collection, and time of preservation.

National Coastal Condition Assessment 2015 Field Operations Manual Version 1.0 May 2015 Page 45
11 UNDERWATER VIDEO [UVID] (GREAT LAKES ONLY) At all Great Lakes sites, a 1 minute video image of the substrate at the Y-location will be collected using an underwater video camera system. The video will be enhanced and examined in the lab to visually document the bottom composition, and record the presence or absence of zebra mussels, Cladophora, or other organisms.
11.1 SUMMARY OF METHOD High quality underwater video will be best achieved if the field crew deploys the camera and records the video at approximately the same time as the in situ measurements and water collection activities. Avoid heavy disturbance of the bottom with anchors or sediment samplers before capturing the video images.
At the Y-location, lower the camera into the water on the windward side of the boat and wait for a clear view of the bottom. Record until you have captured 1 min of good bottom footage.
11.1.1 EQUIPMENT AND SUPPLIES
Table 11.1 Equipment & supplies: underwater video
For recording underwater video
Seaviewer underwater camera Seaviewer digital video recorder (DVR) Seaviewer SeaTrak GPS overlay Garmin Etrex GPS camera cable (100’) cable from GPS overlay to DVR cable from GPS overlay to GPS 12v 18ah battery charger for 12v battery power cord (DVR ,Camera ,GPS overlay) power adapters (110VAC – 12VDC) (3) for camera, DVR, and GPS overlay EPA provided USB flash drive stop watch (or similar time keeping device) Seaviewer case (all components will fit into case for transport) 10 amp fuses (Automotive blade (large) type) AA batteries (for GPS)
For recording measurements
Sample Collection Form pencils (for data forms)
11.2 SAMPLING PROCEDURE
11.2.1 INITIAL SETUP OF UNDERWATER CAMERA SYSTEM Underwater camera systems will be assembled and set up prior to shipment to field crews. However, information contained within this section will allow a field crew to verify equipment setup or troubleshoot potential connection problems. The underwater camera system and cables should be set up as shown in Figure 11.1. The system should not be disassembled between sites other than to remove the battery clips. Initial one-time setup of the camera system GPS unit is described below.
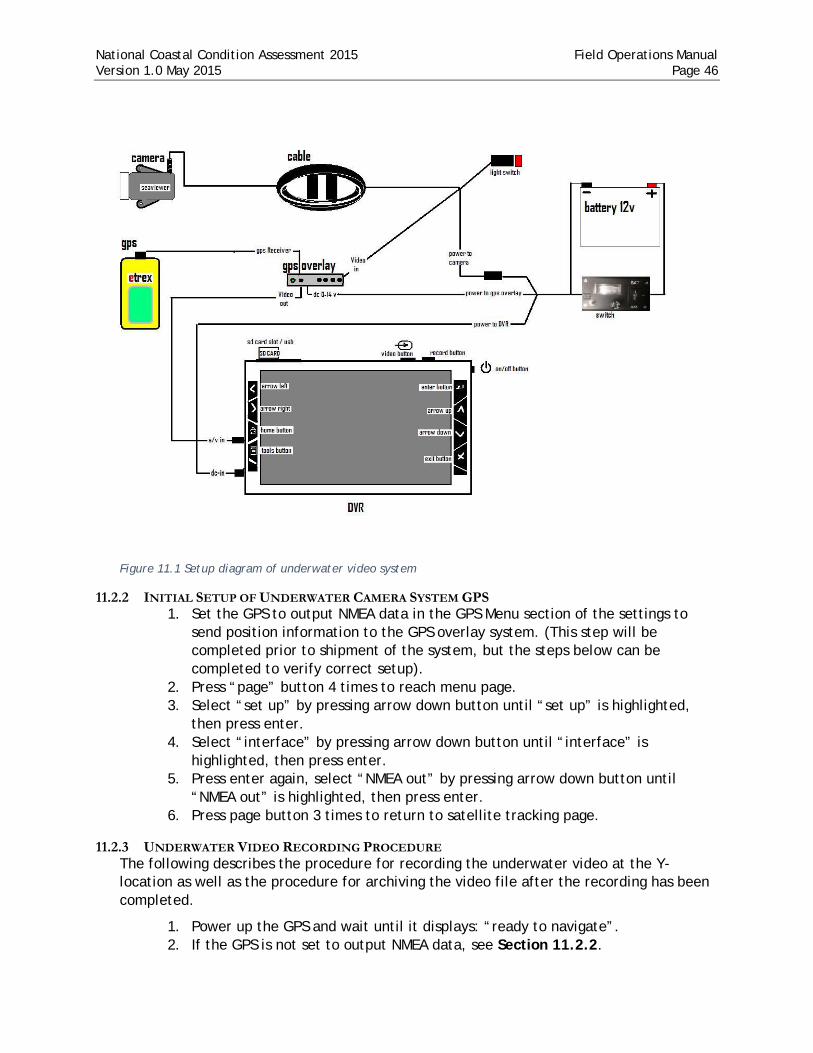
National Coastal Condition Assessment 2015 Field Operations Manual Version 1.0 May 2015 Page 46
Figure 11.1 Setup diagram of underwater video system
11.2.2 INITIAL SETUP OF UNDERWATER CAMERA SYSTEM GPS 1. Set the GPS to output NMEA data in the GPS Menu section of the settings to
send position information to the GPS overlay system. (This step will be completed prior to shipment of the system, but the steps below can be completed to verify correct setup).
2. Press “page” button 4 times to reach menu page. 3. Select “set up” by pressing arrow down button until “set up” is highlighted,
then press enter. 4. Select “interface” by pressing arrow down button until “interface” is
highlighted, then press enter. 5. Press enter again, select “NMEA out” by pressing arrow down button until
“NMEA out” is highlighted, then press enter. 6. Press page button 3 times to return to satellite tracking page.
11.2.3 UNDERWATER VIDEO RECORDING PROCEDURE The following describes the procedure for recording the underwater video at the Y-location as well as the procedure for archiving the video file after the recording has been completed.
1. Power up the GPS and wait until it displays: “ready to navigate”. 2. If the GPS is not set to output NMEA data, see Section 11.2.2.

National Coastal Condition Assessment 2015 Field Operations Manual Version 1.0 May 2015 Page 47
3. Connect either the battery wire to the internal battery or attach the alligator clips to an external 12v battery. Attach red clip to the positive (+) terminal and black clip to the negative (-) terminal.
4. Send power to the camera, GPS overlay, and DVR by switching the battery switch to “Battery” (I) if using the internal battery or “External Power” (II) if using an external 12v battery.
5. Turn on the GPS overlay by pressing its power button. The green light will illuminate.
6. Turn on the DVR by pressing the power button (upper right side of DVR) for 3 seconds. A flash screen will appear for a short time then disappear.
Note: DO NOT PRESS POWER ON AGAIN DURING THIS TIME! A windows type menu screen will appear. 7. Initialize the DVR by pressing the video ( ) button located at top right of
the DVR unit (not on the screen). A video image from the camera should appear on the DVR screen with a latitude / longitude display. (If not, see the trouble shooting section supplied with manufacturer’s literature).
8. While the camera is still out of the water, start recording by pressing the record button (located at the top right of the unit, to the right of the video button). The word “Recording” appears on the screen in red for 10 sec, then disappears. (To pause recording, press the enter button then press it again to resume recording).
9. Once recording, lower the camera into the water on the windward side of the boat. One person is needed to operate the DVR and one to lower the camera. The person operating the DVR should instruct the camera person on descent speed and depth of camera.
10. Once a clear and close-up image of the bottom is displayed (do the best you can in the conditions), record an additional 1 minute of good bottom footage. During this 1 minute recording, slowly rotate the camera 360 degrees while maintaining a clear image of the bottom.
11. In low light conditions, turn on the camera light by pressing the red button on the DVR end of camera cable. Experiment with the light while monitoring the screen for best picture results.
12. Stop recording by pressing the video key (top of unit), or the X button.
11.2.4 REVIEWING UNDERWATER VIDEO FILES PROCEDURE Upon completing the 1 minute of underwater video, it is important to verify that the video has been saved, record the file name on the Sample Collection (Front) form, and preview the video to ensure adequate quality.
1. Select browser by pressing the enter button (upper right key on front of DVR). 2. Arrow down to “DVR”. 3. Select “DVR” by pressing the enter button (upper right key front of DVR). 4. Arrow down to the last file listed. This should be the video you just recorded. 5. Record the file name on the Sample Collection (Front) form. The format of the
file is: DVRyymmdd_hhmm_xxx.avi (yymmdd is the date in year, month and day; hhmm is the time in hours and minutes; xxx is a file number assigned by the DVR, typically 001; and avi is the file format). Check that the date and time on the file name match the date and time of the recording you just made.

National Coastal Condition Assessment 2015 Field Operations Manual Version 1.0 May 2015 Page 48
6. Press enter to play video to evaluate the quality of the video. 7. If the video clearly shows the composition of the bottom then the video is
deemed acceptable; continue to step 9. 8. If the video is un-viewable or is of poor quality, repeat the recording steps
above. 9. Shut down the system by the following the steps below.
a) Power down the DVR by pressing and holding the power button (upper right side).
b) Power down the GPS overlay by pressing the power button. c) Power down the camera by disconnecting the alligator clips from the
battery posts. d) Power down GPS by pressing and holding its power button.
10. Recharge the 12v battery at the end of each day (it is a good idea to assign this task to an individual crew member).
11.2.5 DIRECTIONS FOR UPLOADING VIDEO FILES FROM DVR Follow these procedures to upload video files to another storage device (EPA-provided USB flash drive).
1. Insert the USB flash drive provided by EPA into an available USB port in your computer.
2. Open the silver flap on the top left of the DVR and locate the “USB2” slot on the right hand side.
3. Locate a cord in your kit that has a “USB2” end (doesn’t appear to directly match the opening shape on the DVR, but it is correct!) and a standard computer USB end. It may be in a bag, or loose in the kit under the DVR.
4. Power on the DVR. 5. Once the home screen appears, connect the DVR and computer using the cord. 6. The DVR screen will turn black and flash USB 2.0, once it is connected. 7. On your computer, go My Computer and locate the DVR, “DPA1” –Select 8. Select the DVR folder. 9. All video files should be visible. Select all files – right click – copy – go to the
flash drive under My Computer – right click – paste. 10. Once files are transferred, close all windows. 11. On your computer, go to My Computer and select the flash drive. Confirm all
DVR files are present. 12. Disconnect computer and DVR and remove flash drive. 13. Power off DVR.
National Coastal Condition Assessment 2015 Field Operations Manual Version 1.0 May 2015 Page 49
12 SEDIMENT COLLECTION Crews collect sediments for a variety of analyses. Field crews will sieve one or two sediment grabs and submit the resulting benthic infauna collection to the lab to be analyzed for species composition and abundance. Additional sediment grabs will be analyzed for chemical contaminants (organics/metals and TOC), grain size determination, and acute whole sediment toxicity. In order to provide the minimum volume of sediment for all analyses, crews may need to collect different numbers of grabs at different sites, based on sediment characteristics. While the biology (benthic assemblage) grab is being processed (sieved) by one crew member, other personnel collect the necessary grabs for chemistry, grain size, and toxicity tests. They composite the grabs, mix them and then split them into four separate sample containers. Crews must collect a minimum of 3L of sediment at marine sites and 2L of sediment at Great Lakes sites to submit for chemistry (contaminants), toxicity, and grain size analyses.
12.1 SUMMARY OF METHOD A 1/25 (0.04) m2, stainless steel, Young-modified Van Veen Grab (or similar) sampler is appropriate for collecting sediment samples for both biological and chemical analyses. The top of the sampler is either hinged or otherwise removable so the top layer of sediment can be easily removed for chemical and toxicity sample collection. This gear is relatively easy to operate and requires little specialized training. For crews sampling in the Great Lakes, a standard Ponar grab (box size 22.9 cm x 22.9 cm with depth of 9 cm) with removable top screens should be used for collecting sediments for benthic invertebrate analysis (USEPA 2001); other sediment grab devices may be used for sediment toxicity and contaminant samples at the crew’s discretion. Record the dimensions and sample area of the grab used on the Sample Collection (Back) form. The area of sediment the grab collects is important for data analysis. If the grab sampler size is less than 0.03 m2, take two grabs for the benthic macroinvertebrate collections and composite the sediment into the sieve.

National Coastal Condition Assessment 2015 Field Operations Manual Version 1.0 May 2015 Page 50 12.2 EQUIPMENT AND SUPPLIES
Table 12.1 Equipment & supplies: sediment collection
For collecting samples Young-modified Van Veen (or Ponar) grab with grab stand weights and pads for grab nitrile gloves plastic tub or bucket 0.5 mm stainless steel sieve sieve box or bucket electrical tape forceps (fine-tipped) funnel (wide-mouth) Alconox Formalin (100% buffered) with stain Graduated cylinder for measuring formalin Rose Bengal Stain (for staining formalin solution) Borax ruler (cm) squirt bottle (for ambient water) stainless steel mixing pot or bowl with lid stainless steel or Teflon spoons (15”)/scoops/spatula HDPE bottle(s) (1 L, wide-mouth) [BENT] glass jar (60 mL, amber) [SEDC] glass jar (120 mL, amber) [SEDO] plastic bags (2, 1 quart) [SEDG] screw-top bucket (0.6 gallon) [SEDX] scrub brush cooler with wet ice
For recording measurements
Sample Collection form pencils (for data forms) fine-tipped indelible markers (for labels) clear tape strips
12.3 SAMPLING PROCEDURE The following describes the sampling procedure to obtain sediment samples.
Note: The sampler, spoons and mixing bowl or bucket must be thoroughly rinsed with ambient water after sampling at each site to ensure no sediments remain, and then at the next station washed with Alconox and rinsed with ambient water prior to use. This practice reduces the risk of the equipment carrying contaminants from site to site.
Do not apply sunscreen or other chemical contaminants until after the sample is collected (or implement measures to reduce contamination by such chemicals if applied such as washing, wearing long gloves, etc.). Be sure to use new clean nitrile gloves or wash gloves between stations if they are reused from one station to the next.
1. Attach the sampler to the end of the winch cable with a shackle and tighten the pin.
2. Set the grab according to the manufacturer’s instructions and disengage any safety device designed to lock the sampler open.

National Coastal Condition Assessment 2015 Field Operations Manual Version 1.0 May 2015 Page 51
3. Lower the grab sampler through the water column such that travel through the last 5 meters is no faster than about 1 m/sec. This minimizes the effects of bow wave disturbance to surficial sediments.
4. Allow a moment for the sampler to settle into the substrate and then allow slack on the cable. Letting the cable go slack serves to release the jaws of the sampler so they will close as the sampler is retrieved.
5. Retrieve the sampler and lower it into its cradle or a plastic tub on-board. Open the top and determine whether the sampling is successful or not. • A successful grab is one having relatively level, intact sediment over the
entire area of the grab, and a sediment depth at the center of at least 7 centimeters for the benthic macroinvertebrate grab (see Figure 12.1).
• Grabs containing no sediment, partially filled grabs, or grabs with shelly/rocky substrates or grossly slumped surfaces are unacceptable.
• Grabs completely filled to the top, where the sediment is in direct contact with the hinged top, are also unacceptable.
• It may take several attempts using different amounts of weight to obtain the first acceptable sample. More weight will result in a deeper bite of the grab. In very soft mud, pads may be needed to prevent the sampler from sinking into the mud. If pads are used, the rate of descent near the bottom should be slowed even further to reduce the bow wave.
6. If, after several attempts, only grabs less than 7 centimeters deep can be obtained, use the next successful grab regardless of the depth of sediment at the center of the grab. • Use the comments on the Sample Collection (Back) form to describe your
efforts and be sure to accurately record the depth of the sediment captured by the grab.
• Carefully drain overlying water from the grab. If the grab is used for benthic community analysis, the water must be drained into the container that will receive the sediment to ensure no organisms are lost.
• Enter notes on the condition of the sample (smell, substrate, presence of organisms on the surface, etc.) in the Sediment Characteristics section of the Sample Collection (Back) form.
7. If the grab sampler size is less than 0.03 m2, take two grabs for the benthic macroinvertebrate collections and composite the sediment into the sieve.
8. Process the grab sample for either benthic community analysis or chemistry/toxicity testing as described below.
9. Repeat steps 4-8 until all samples are successfully collected. To minimize the chance of sampling the exact same location twice, the boat engines can be turned periodically to change the drift of the boat, or additional anchor line can be let out.

National Coastal Condition Assessment 2015 Field Operations Manual Version 1.0 May 2015 Page 52
Figure 12.1 Illustration of acceptable & unacceptable grabs for benthic community analysis. An acceptable grab is at least 7 cm in depth (using a 0.04m2 Van Veen sampler), but not oozing out of the top of the grab, and has a relatively level surface.
12.4 PROCESSING PROCEDURE – BENTHIC MACROINVERTEBRATE [BENT]COMPOSITION AND ABUNDANCE
Grab samples obtained to assess the benthic macroinvertebrate community are processed as outlined below.
1. Measure the depth of the sediment at the middle of the sampler and record the value on the Sample Collection (Back) form. The depth should be >7 cm if possible (see previous section).• Record descriptive information about the grab, such as the presence or
absence of a surface floc, color and smell of surface sediments, and visible fauna.
2. Dump the sediment into a clean basin (plastic tub or bucket) and then into a 0.5 mm mesh sieve. Place the sieve into a table (sieve box) containing water from the sampling station, a larger bucket, or place the sieve over the side of the boat.• Gently agitate the sieve to wash away sediments and leave organisms,
detritus, sand particles, and pebbles larger than 0.5 mm. This method minimizes mechanical damage to fauna that is common when forceful jets of water are used to break up sediments.
National Coastal Condition Assessment 2015 Field Operations Manual Version 1.0 May 2015 Page 53
• A gentle flow of water over the sample is acceptable. Extreme care mustbe taken to assure that no sample is lost over the side of the sieve.
3. Drain the water from the sieve and gently rinse the contents of the tray to oneedge. Remove large non-living items such as rocks and sticks after inspectingthem and ensuring that all benthic organisms are included in the collection.• Using either your fingers or a spoon, GENTLY scoop up the bulk of the
sample and place it in the 1 L HDPE bottle (which should be placed in thesieve or a bucket in case some of the sample spills over).
4. Complete the BENT sample label with Site ID, date collected, visit number, andjar number. At marine sites, also write the salinity (in ppt) on the label.
5. Attach the completed label to the 1 L wide mouth sample bottle and coverwith clear plastic tape.
6. Rinse the outside of the sample jar into the sieve, then, using a funnel, rinsethe contents into the jar. The jar should be filled no more than one-half full.• If the quantity of sample exceeds 500 mL, place the remainder of the
sample in a second container with a “2 of 2” label. For samples with a largeamount of benthos, additional jars may be needed.
7. Use a pencil to fill out waterproof benthic infauna (BENT) label(s) with thepertinent sample information and place it inside the bottle(s). Be sure toinclude the sample ID and jar number.
8. Record sample collection location and the total number of jars on the SampleCollection (Back) form.
9. Carefully inspect the sieve to ensure that all organisms are removed. Use fineforceps (if necessary) to transfer fauna from the sieve to the bottle containingthe proper sample number.
10. A stained 100% percent buffered formalin solution is used to fix and preservebenthic samples. The solution should be mixed according to the directions inTable 4.1. 100 mL of the formalin should be added to each sample jar alongwith an additional teaspoon-full of borax to ensure saturation of the buffer.Rose Bengal stain is added to the stock formalin solution for use at all sites.• Make sure that there is sufficient preservative to ensure everything gets
preserved properly, then FILL THE JAR TO THE RIM WITHSEAWATER/LAKEWATER TO ELIMINATE ANY AIR SPACE. This eliminates theproblem of organisms sticking to the cap because of sloshing duringshipment.
• Crews may choose to use a more dilute formalin solution in largerquantities as long as the end concentration of the preservative is at least 6percent.
11. After preservation, replace the bottle lid(s) and seal tightly with electricaltape. Gently rotate the bottle to mix the contents and place in the dark.• If the sample occupies more than one container, label all the sample
bottles containing material from that grab together. All benthos jars from asingle site will have the same sample ID number.
12. Prior to sieving the sample at the next site, use copious amounts of forcefulwater and a stiff brush to clean the sieve, thereby minimizing cross-

National Coastal Condition Assessment 2015 Field Operations Manual Version 1.0 May 2015 Page 54
contamination of samples. Be sure to rinse the brush between each sieve cleaning.
12.5 PROCESSING PROCEDURE – SEDIMENT COMPOSITION, CHEMISTRY, AND TOXICITY
In addition to grab samples collected for benthic community analysis, additional grabs are collected for chemical analyses (organics/metals and TOC), grain size determination, and for use in acute toxicity tests. The top two centimeters of these grabs are removed, homogenized, and split into these four sample types.
The samples are removed and processed in the order described below.
1. As each grab is retrieved, carefully examine it to determine acceptability. The grab is considered acceptable as long as the surface layer is intact. The grab need not be greater than 7 cm in depth for chemistry samples, but the other criteria outlined above apply (see Section 12.3 and Figure 12.1 above).
• Carefully drain off, or siphon, any overlying water, and remove and discard large, non-living surface items such as rocks or pieces of wood. Remove any submerged aquatic vegetation (SAV) after recording its presence on the Sample Collection (Back) form.
Note: Great care must be taken to avoid contamination of this sample from atmospheric contaminants. The boat engine should be turned off or the boat maneuvered to ensure the exhaust is downwind. All containers, including the grab sampler, should be kept closed except when opening is necessary to remove or add samples.
2. A clean stainless steel or Teflon spoon that has been washed with Alconox and rinsed with ambient sitewater is used to remove sediments from grab samples for these analyses.
3. Remove the top 2 cm of sediment using the stainless steel or Teflon spoon. Sediment which is in direct contact with the sides of the sampler should be excluded as they may be contaminated from the device.
• Place the sediment into a pre-cleaned (washed with Alconox and rinsed with ambient sitewater) stainless steel pot or bowl and place the pot in a cooler on wet ice (NOT dry ice). The sample must be stored at 4°C, and MUST NOT BE FROZEN.
4. Repeat obtaining sediment samples from the grab and compositing the sediment in the same stainless pot/bowl until a sufficient quantity of sediment has been collected for all samples (approximately 3L at marine sites and 2L at Great Lakes sites).
• Stir sediment homogenate after every addition to the composite to ensure adequate mixing. Keep the container covered and in the cooler between grabs.
5. Record the location (zone) of the sediment collection on the Sample Collection (Back) form. If sediment was collected from more than one zone, fill in the bubble of the zone where the majority of the sediment was collected and

National Coastal Condition Assessment 2015 Field Operations Manual Version 1.0 May 2015 Page 55
describe the proportions of sediment collected from each zone in the comments section.
6. Homogenize the sediment by stirring with a Teflon paddle or stainless steel spoon for 10 minutes. Divide the composite into the four sample types listed below. In the case of limited sediment, prioritize sample distribution in the order listed. a) ORGANICS and METALS [SEDO]:
• Complete the SEDO sample label with Site ID, date collected, and visit number.
• Attach the completed label to the 120 mL (4 oz) glass sample jar and cover with clear plastic tape.
• Using a clean stainless steel spoon, carefully place approximately 100 mL of sediment into the jar. CARE MUST BE TAKEN TO ENSURE THAT THE INSIDE OF THE JAR, CAP, AND THE SAMPLE IS NOT CONTAMINATED. Be sure that you leave ½ inch headspace to avoid breakage due to possible sample expansion from freezing.
• Replace the lid and seal tightly with electrical tape, wrap the jar in the provided foam sleeve to protect it from breakage, and place the sample in a cooler with dry ice.
• Record sample ID along with any comments on the Sample Collection (Back) form.
• Fill in the "frozen" bubble on the sample collection form to confirm that the sample has been frozen.
b) SEDIMENT TOXICITY [SEDX]:
• Complete the SEDX sample label with Site ID, date collected, and visit number.
• Attach the completed label to the 0.6 gallon plastic sample bucket and cover with clear plastic tape.
• Using the stainless steel spoon, fill the bucket with sediment to within about 1 inch from the rim (Preferred volume for marine sites is 1800 mL; if that is not possible, minimum volume required is 900 mL; for Great Lakes sites, preferred volume is 900 mL, minimum required is 400 mL).
• Replace the lid and tighten so that the locking mechanism engages and holds the lid tightly closed.
• Record sample ID along with any comments on the Sample Collection (Back) form.
• Place the sample on wet ice (NOT dry ice). The sample must be stored at 4°C, and MUST NOT BE FROZEN.
• Fill in the "chilled" bubble on the sample collection form to confirm that the sample has been chilled.
c) TOTAL ORGANIC CARBON [SEDC]: • Complete the SEDC sample label with Site ID, date collected, and
visit number.
National Coastal Condition Assessment 2015 Field Operations Manual Version 1.0 May 2015 Page 56
• Attach the completed label to the 60 mL glass sample jar and cover with clear plastic tape.
• Using a clean stainless steel spoon, place approximately 50 mL of sediment into the jar. Be sure that you leave ½ inch headspace to avoid breakage due to possible sample expansion from freezing.
• Replace the lid and seal tightly with electrical tape, wrap the jar in the provided foam sleeve to protect it from breakage, and place the sample in a cooler with dry ice.
• Record sample ID along with any comments on the Sample Collection (Back) form.
• Fill in the "frozen" bubble on the sample collection form to confirm that the sample has been frozen.
d) SEDIMENT GRAIN SIZE [SEDG]:
• Complete the SEDG sample label with Site ID, date collected, and visit number.
• Attach the completed label to the inner quart sized plastic sample bag and cover with clear plastic tape.
• Using a clean stainless steel spoon, place approximately 100 mL of sediment into the pre-labeled bag. Double bag the sample into a second quart sized plastic bag, ensuring that the tops of both bags are sealed tightly.
• Record sample ID along with any comments on the Sample Collection (Back) form.
• Place the sample on wet ice (NOT dry ice). The sample must be stored at 4°C, and MUST NOT BE FROZEN.
• Fill in the "chilled" bubble on the sample collection form to confirm that the sample has been chilled.

National Coastal Condition Assessment 2015 Field Operations Manual Version 1.0 May 2015 Page 57
13 FISH TISSUE COLLECTION Crews collect fish at all NCCA sites. At revisit sites, ecofish and fish plugs are only collected during visit 1. At Great Lakes revisit sites that are also human health fish tissue sites, crews that are unsuccessful at collecting the human health fish tissue sample during visit 1 are expected to attempt the collection of that sample during visit 2. Labs analyze whole body (also known as “ecological fish” or “ecofish”) tissue samples for concentrations of organic and inorganic contaminants. The results provide information about the ecological risks to wildlife associated with fish consumption. Refer to Section 13.1 for detailed information regarding ecofish collections.
In addition to whole fish samples collected at all sites for ecological risk purposes, crews will also collect fish tissue plugs at all sites. These plugs can be taken from fish collected for the ecofish sample or crews can allow the fish to be released after the tissue plug sample is collected. The sample is analyzed for mercury concentrations and used to provide a measure of human health risk at all sites. Refer to Section 13.2 for a detailed discussion of fish tissue plug collection.
Finally, crews at 150 Great Lakes sites collect a fish tissue sample for human health contaminant analysis. Refer to Section 13.3 for detailed information regarding samples collected for human health fish tissue contaminant analysis.
When target fish are plentiful, crews in the Great Lakes will be able to submit specimens for both the ecofish and human health fish tissue collections. If specimens are less plentiful, crews may be able to split the sample between the two whole fish collection types and still meet the minimum criteria for each sample. In rare cases where only enough fish are collected to fulfill the requirements of one of the samples, crews should submit the fish as the ecofish sample and mark the human health fish tissue sample as not collected.
13.1 ECOLOGICAL CONTAMINATION FISH TISSUE COLLECTION [FTIS]
13.1.1 SUMMARY OF METHOD Ecological Fish Tissue collection protocols require crews to collect at least five individuals of the target species, yielding a minimum of 300 g total mass from each site. These fish are to be collected within a 500 meter radius of the X-site (may expand to 1000 meters if needed – see below and Figure 5.2). Crews may collect these samples using any reasonable method (e.g., otter trawl, hook and line, gill net, seine, etc.) that is most efficient and the best use of available time on station.
For each attempted fish collection method, record equipment details, start and stop times, and fishing location(s) on the Eco Fish Collection (Front) form. Record sample ID, species retained, and specimen lengths on the Eco Fish Collection (Back) form. Secondary fish tissue collection zones for ecofish and/or fish plugs may be selected up to an additional 500 m beyond the original 500 m radius at all estuarine and Great Lakes sites. Please observe the following guidelines:
National Coastal Condition Assessment 2015 Field Operations Manual Version 1.0 May 2015 Page 58
1. In order to move to a secondary fish tissue collection zone, crews must be unsuccessful at obtaining target fish during a reasonable portion of the three hours allotted to fishing (at least 30 minutes and no more than two hours) within the original 500 m radius.
2. The crew must have attempted several sampling locations within the 500 m radius without success.
3. Crews must observe signs of fish presence such as schools of bait fish just below the surface, predator activity or prey escape behavior on the surface of the water, overhead shading or favorable underwater habitat structure or bathymetric features within an additional 500 m from the X-site.
4. When relocating outside of the original 500 m radius from the X-site, but inside of the 1000 m radius of the X-site, crews must document: a) The amount of time spent fishing within the original 500-meter radius. b) The direction of travel from the X-site. c) The coordinates of the site where fish were ultimately caught.
5. For collection of the human health fish tissue sample ONLY (if applicable), crews may move out to a maximum of 1500 meters from the X-site in an effort to collect this sample.
Crews working in each of the regional areas— Northeast, Southeast, Gulf, West Coast, and Great Lakes —collect different target fish species based on biogeographically specific lists. Recommended Primary and Secondary target species are given by region in the following tables:
• Northeast – Table 13.2 • Southeast – Table 13.3 • Gulf of Mexico – Table 13.4 • West – Table 13.5 • Great Lakes – Table 13.6
If a full composite sample is not collected after 3 hours of effort, crews may terminate the sampling, record the details of the sample, and submit as many fish as possible. If the target species are unavailable, the fisheries biologist selects an alternative available species (i.e., a species that is commonly present in the study area and in sufficient numbers to yield a composite) to obtain a fish composite sample. However, all attempts should be made to collect the targeted species if at all possible. Regardless of the species that is ultimately collected, all fish in the composite MUST be of the same species.
Crews may spend additional time fishing (i.e. more than three hours) if desired. It is not recommended that crews purchase fish specimens dockside unless they can document that the purchased fish came from an area in close proximity to the X-site (i.e. within 1000 meters).
Crews identify specimens to species and measure the total length to the nearest millimeter. They record the taxonomic name (genus-species) and the length of each fish on the Eco Fish Collection (Back) form. The preferred minimum length for a specimen for ecological risk purposes is 100 mm with a preferred length range of 100 – 400 mm. All individuals must be of similar size, such that the smallest individual in the composite is no

National Coastal Condition Assessment 2015 Field Operations Manual Version 1.0 May 2015 Page 59
less than 75% of the total length of the largest individual. Up to 20 individuals (a total of 300 g of whole body tissue is needed) should be collected and retained for analysis. If it is suspected that 20 individuals will yield less than 300 g total weight, additional specimens should be collected. The lengths of any additional fish should be recorded in the blank space provided.
13.1.2 EQUIPMENT AND SUPPLIES
Table 13.1 Equipment & supplies: eco fish tissue collection
For collecting fish composite sample
scientific collection permit Otter trawl (or other device to collect sufficient sample) sampling vessel (including boat, motor, trailer, oars, gas, and all required safety
equipment) Coast Guard-approved personal flotation devices Global Positioning System (GPS) unit nitrile gloves livewell and/or buckets measuring board (millimeter scale) scale (in grams) wooden bat
For storing and preserving fish composite sample
self-sealing bag(s) (plastic, 2 gallon) large plastic (composite) bags self-sealing bag(s) (sandwich size) – for labels cooler plastic cable tie dry ice or wet ice (for temporary transport) side cutter (cleaned with Alconox between sites)
For documenting the fish composite sample
Eco Fish Collection form fish tissue sample labels pencils (for data forms) fine-tipped indelible markers (for labels) Tyvek label tag with grommet clear tape strips
For shipping the fish composite samples
Tracking: Eco Fish Tissue – Overnight (Dry Ice) form FedEx airbill (pre-addressed) cooler dry ice (~20 lbs per cooler) packing/strapping tape
13.1.3 SAMPLING PROCEDURE The procedures for collecting and processing ecological fish composite samples are presented below. If fish plugs are to be collected from specimens in the ecofish collection, complete the steps in Section 13.2 before packaging the ecofish collection.
Note: Do not handle any food, drink, sunscreen, or insect repellant until after the composite sample has been collected, measured and bagged (or implement measures to reduce contamination by such chemicals if applied such as washing, wearing long gloves, etc.)
1. Put on clean nitrile gloves before handling the fish.

National Coastal Condition Assessment 2015 Field Operations Manual Version 1.0 May 2015 Page 60
2. Rinse potential target species/individuals in ambient water to remove foreign material from the external surface and place them in clean holding containers (e.g., livewells, buckets).
3. Select at least five fish, with a minimum total weight of 300 grams, to include in the eco fish composite. If needed, 20 or more fish may be composited to reach the minimum weight of 300 grams. The selected fish must meet the following criteria:
• all fish are of the same species. • the preferred specimen length is between 100 and 400 mm; if after
sufficient fishing only smaller or larger fish of the target species are available, those will be accepted.
• all fish are of similar size, so that the smallest individual in a composite is no less than 75% of the total length of the largest individual.
• all fish for one site visit are collected as close to the same time as possible, but no more than one week apart.
Note: Individual fish may have to be frozen until all fish to be included in the composite are available for delivery to the designated laboratory.
4. Identify the fish to species and record the scientific name on the Eco Fish Collection (Back) form.
Note: Accurate taxonomic identification is essential in assuring and defining the composited organisms submitted for analysis. Individuals from different species may not be composited in a single sample. Submit only one species per site.
5. Measure each individual fish from the anterior-most part of the fish to the tip of the longest caudal fin ray (when the lobes of the caudal fin are depressed dorsoventrally) to determine total body length in millimeters.
6. Record collection method and equipment details, start and stop times, and fishing location(s) on the Eco Fish Collection (Back) form. Record sample ID, species name and specimen lengths on the Eco Fish Collection (Back) form. Make sure the sample ID recorded on the collection form match those on the sample labels.
7. While wearing clean nitrile gloves, remove each fish retained for analysis from the clean holding container(s). Dispatch larger fish using a clean wooden bat (or equivalent wooden device).
8. Place all fish from the composite in a two-gallon self-sealing bag. Take care to prevent fish spines from piercing the bag. If spines are likely to puncture the bag, break off or clip the spines with a side-cutter or other appropriate tool (cleaned with Alconox and rinsed with ambient sitewater before use at each site) and place the spine in the bag with the fish. Use additional bags if all the fish collected for a composite will not fit in a single two-gallon bag.
9. Weigh the composite bag(s) to determine if enough fish have been collected to reach a minimum weight of 300 grams.
10. Prepare interior and exterior FTIS sample labels for the two-gallon bag(s), ensuring that the label information matches the information recorded on the

National Coastal Condition Assessment 2015 Field Operations Manual Version 1.0 May 2015 Page 61
Eco Fish Collection (Back) form. Be sure to record scientific name and minimum and maximum lengths on the labels.
• Place the interior label inside a small (sandwich-size) self-sealing bag and place the bag inside the two-gallon bag with the fish composite.
• Affix the exterior label to the two-gallon bag and cover with clear plastic tape. If additional two-gallon bags are used, fill out extra labels with the same sample ID and information for each bag and label accordingly (i.e. bag 2 of 2).
11. Double-bag all specimens in the composite by placing all two-gallon bag(s) from the site inside a large plastic bag.
12. Prepare a sample label for the outer bag, ensuring that the label information matches the information recorded on the Eco Fish Collection (Back) form. Be sure to record scientific name and minimum and maximum lengths on the sample label.
13. Affix the sample label to a Tyvek tag and cover with clear plastic tape. Thread a cable tie through the grommet in the Tyvek tag and seal the outer bag with the cable tie.
13.1.4 SAMPLE STORAGE AND SHIPPING PREPARATION 1. After the sample is packaged, immediately place it on dry ice for shipment.
• Fill in the "frozen" bubble on the Eco Fish Collection (Back) form to confirm that the sample has been frozen.
• Packaged samples may be placed on wet ice in coolers if they will be transported to a laboratory or other interim facility to be frozen before shipment.
• Samples may be stored on wet ice for a maximum of 24 hours. • Freeze the samples within 24 hours of collection at ≤-20°C and store the
frozen samples until shipment within 2 weeks of sample collection. Crews may ship the frozen fish sample along with the other frozen samples from the site using a cooler with a dry ice insert or may ship the ecofish separately. Frozen samples should be packed on at least 20 pounds of layered dry ice and shipped to the batched sample lab via priority overnight delivery service.

National Coastal Condition Assessment 2015 Field Operations Manual Version 1.0 May 2015 Page 62 Table 13.2 Northeast region primary and secondary marine target species - whole body fish tissue collection (Ecofish)
NORTHEAST REGION PRIMARY ECOFISH TARGET SPECIES FAMILY SCIENTIFIC NAME COMMON NAME FISH PLUG LIST*
Ictaluridae Ameiurus catus White catfish Primary Ictalurus punctatus Channel catfish Primary
Moronidae Morone americana White perch Primary Paralichthyidae Paralichthys dentatus Summer flounder Primary Pleuronectidae Pseudopleuronectes americanus Winter flounder Primary
Sciaenidae Cynoscion regalis Gray weakfish Primary Sciaenops ocellatus Red drum Primary
Sparidae Stenotomus chrysops Scup Primary NORTHEAST REGION SECONDARY ECOFISH TARGET SPECIES
FAMILY SCIENTIFIC NAME COMMON NAME FISH PLUG LIST* Achiridae Trinectes maculatus Hogchoaker Anguillidae Anguilla rostrata American eel Secondary Atherinopsidae Menidia menidia Atlantic silverside Batrachoididae Opsanus tau Oyster toadfish Ephippidae Chaetodipterus faber Atlantic spadefish Moronidae Morone saxatilis Rock fish Secondary Mugulidae Mugil cephalus Black mullet Pomatomidae Pomatomus saltatrix Bluefish Secondary
Sciaenidae Bairdiella chrysoura Silver perch Menticirrhus saxatilis Northern kingfish
Serranidae Centropristis striata Black sea bass Triakidae Mustelus canis Smooth dogfish Triglidae Prionotus carolinus Northern searobin
Prionotus evolans Striped searobin * Indicates whether species also occurs in the primary or secondary fish plug list (see Table 13.8).
Table 13.3 Southeast region primary and secondary marine target species - whole body fish tissue collection (Ecofish)
SOUTHEAST REGION PRIMARY ECOFISH TARGET SPECIES FAMILY SCIENTIFIC NAME COMMON NAME FISH PLUG LIST*
Ariidae Ariopsis felis Hardhead sea catfish Primary Bagre marinus Gafftopsail sea catfish Primary
Paralichthyidae Paralichthys albigutta Gulf flounder Primary Paralichthys dentatus Summer flounder Primary Paralichthys lethostigma Southern flounder Primary
Sciaenidae
Cynoscion arenarius Sand weakfish (or seatrout) Primary Cynoscion nebulosus Speckled trout Primary Cynoscion regalis Gray weakfish Primary Leiostomus xanthurus Spot croaker Primary
Sparidae Lagodon rhomboides Pinfish
SOUTHEAST REGION SECONDARY ECOFISH TARGET SPECIES FAMILY SCIENTIFIC NAME COMMON NAME FISH PLUG LIST*
Cichlidae Tilapia mariae Spotted tilapia Haemulidae Haemulon aurolineatum Tomtate
Sciaenidae Bairdiella chrysoura Silver perch Menticirrhus americanus Southern kingfish
Serranidae Centropristis striata Black sea bass * Indicates whether species also occurs in the primary or secondary fish plug list (see Table 13.8).

National Coastal Condition Assessment 2015 Field Operations Manual Version 1.0 May 2015 Page 63 Table 13.4 Gulf region primary and secondary marine target species - whole body fish tissue collection (Ecofish)
GULF REGION PRIMARY ECOFISH TARGET SPECIES FAMILY SCIENTIFIC NAME COMMON NAME FISH PLUG LIST*
Ariidae Ariopsis felis Hardhead sea catfish Primary Bagre marinus Gafftopsail sea catfish Primary
Paralichthyidae Paralichthys albigutta Gulf flounder Primary Paralichthys dentatus Summer flounder Primary Paralichthys lethostigma Southern flounder Primary
Sciaenidae
Cynoscion arenarius Sand weakfish (or seatrout) Primary Cynoscion nebulosus Speckled trout Primary Cynoscion regalis Gray weakfish Primary Leiostomus xanthurus Spot croaker Primary Micropogonias undulatus Atlantic croaker Primary Sciaenops ocellatus Red drum Primary
Sparidae Lagodon rhomboides Pinfish
GULF REGION SECONDARY ECOFISH TARGET SPECIES FAMILY SCIENTIFIC NAME COMMON NAME FISH PLUG LIST*
Carangidae Caranx hippos Crevalle jack Chloroscombrus chrysurus Atlantic bumper
Diodontidae Chilomycterus schoepfii Burrfish Gerreidae Eucinostomus gula Silver jenny Haemulidae Orthopristis chrysoptera Pigfish Ictaluridae Ictalurus furcatus Blue catfish Lepisosteidae Lepisosteus oculatus Spotted gar Lutjanidae Lutjanus griseus Gray snapper Sciaenidae Pogonias cromis Black drum Serranidae Diplectrum formosum Sand perch Triglidae Prionotus scitulus Leopard searobin
* Indicates whether species also occurs in the primary or secondary fish plug list (see Table 13.8).

National Coastal Condition Assessment 2015 Field Operations Manual Version 1.0 May 2015 Page 64
Table 13.5 Western region primary and secondary marine target species - whole body fish tissue collection (Ecofish)
WESTERN REGION PRIMARY ECOFISH TARGET SPECIES FAMILY SCIENTIFIC NAME COMMON NAME FISH PLUG LIST*
Atherinopsidae Atherinops affinis Topsmelt silverside
Cottidae Leptocottus armatus Pacific staghorn sculpin Primary Oligocottus rimensis Saddleback sculpin
Cynoglossidae Symphurus atricaudus California tonguefish
Embiotocidae Cymatogaster aggregata Shiner perch Primary Embiotoca lateralis Striped seaperch Primary
Gasterosteidae Gasterosteus aculeatus Three-spined stickleback
Paralichthyidae Paralichthys californicus California flounder Primary Citharichthys sordidus Pacific sanddab Primary Citharichthys stigmaeus Speckled sanddab
Pleuronectidae
Isopsetta isolepis Butter sole Parophrys vetulus English sole Primary Psettichthys melanostictus Pacific sand sole Platichthys stellatus Starry flounder Primary
Sciaenidae Genyonemus lineatus White croaker Primary
Serranidae Paralabrax nebulifer Barred sand bass Primary Paralabrax maculatofasciatus Spotted sand bass Primary
WESTERN REGION SECONDARY ECOFISH TARGET SPECIES FAMILY SCIENTIFIC NAME COMMON NAME FISH PLUG LIST*
Echinodermata/ Toxopneustidae
Tripneustes gratilla (Hawaii ONLY) Collector urchin
Batrachoididae Porichthys notatus Plainfin midshipman Porichthys myriaster Specklefin midshipman
Chimaeridae Hydrolagus colliei Spotted ratfish Embiotocidae Amphistichus argenteus Barred surfperch Secondary Paralichthyidae Xystreurys liolepis Fantail sole
Pleuronectidae
Pleuronichthys guttulatus Diamond turbot Secondary Microstomus pacificus Dover sole Secondary Lepidopsetta bilineata Rock sole Lyopsetta exilis Slender sole
Sciaenidae Umbrina roncador Yellowfin croaker * Indicates whether species also occurs in the primary or secondary fish plug list (see Table 13.8).
Primary
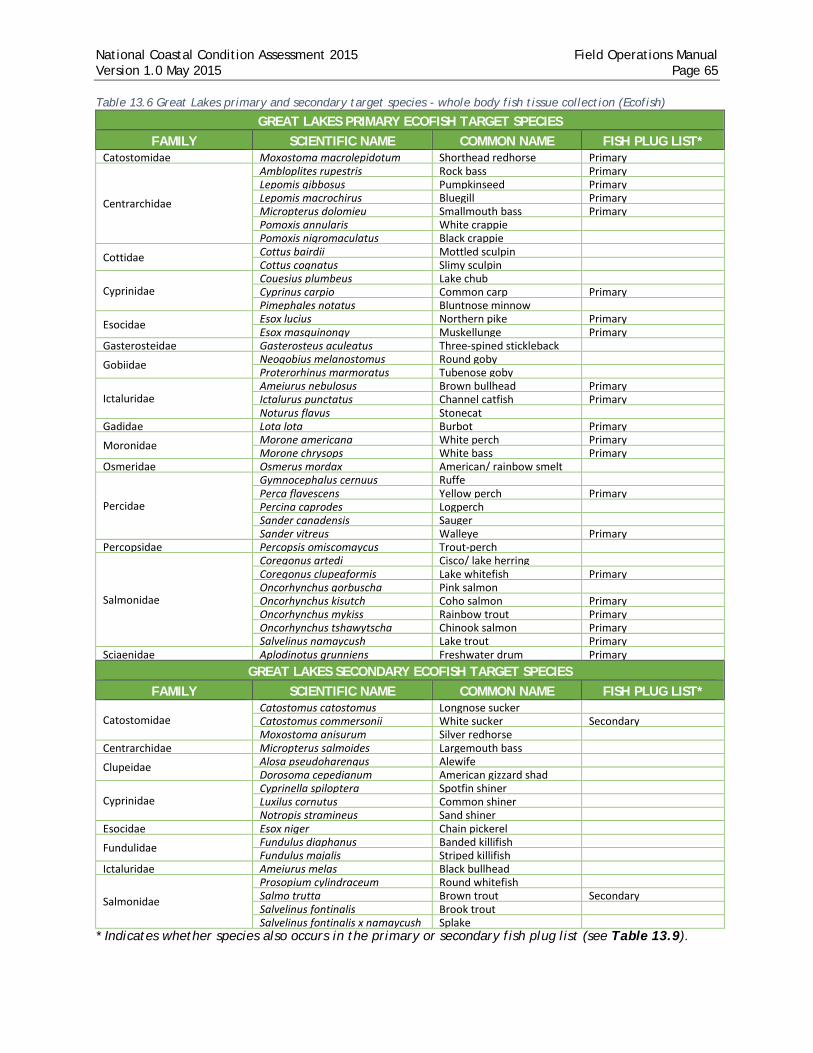
National Coastal Condition Assessment 2015 Field Operations Manual Version 1.0 May 2015 Page 65 Table 13.6 Great Lakes primary and secondary target species - whole body fish tissue collection (Ecofish)
GREAT LAKES PRIMARY ECOFISH TARGET SPECIES FAMILY SCIENTIFIC NAME COMMON NAME FISH PLUG LIST*
Catostomidae Moxostoma macrolepidotum Shorthead redhorse Primary
Centrarchidae
Ambloplites rupestris Rock bass Primary Lepomis gibbosus Pumpkinseed Primary Lepomis macrochirus Bluegill Primary Micropterus dolomieu Smallmouth bass Primary Pomoxis annularis White crappie Pomoxis nigromaculatus Black crappie
Cottidae Cottus bairdii Mottled sculpin Cottus cognatus Slimy sculpin
Cyprinidae Couesius plumbeus Lake chub Cyprinus carpio Common carp Primary Pimephales notatus Bluntnose minnow
Esocidae Esox lucius Northern pike Primary Esox masquinongy Muskellunge Primary
Gasterosteidae Gasterosteus aculeatus Three-spined stickleback
Gobiidae Neogobius melanostomus Round goby Proterorhinus marmoratus Tubenose goby
Ictaluridae Ameiurus nebulosus Brown bullhead Primary Ictalurus punctatus Channel catfish Primary Noturus flavus Stonecat
Gadidae Lota lota Burbot Primary
Moronidae Morone americana White perch Primary Morone chrysops White bass Primary
Osmeridae Osmerus mordax American/ rainbow smelt
Percidae
Gymnocephalus cernuus Ruffe Perca flavescens Yellow perch Primary Percina caprodes Logperch Sander canadensis Sauger Sander vitreus Walleye Primary
Percopsidae Percopsis omiscomaycus Trout-perch
Salmonidae
Coregonus artedi Cisco/ lake herring Coregonus clupeaformis Lake whitefish Primary Oncorhynchus gorbuscha Pink salmon Oncorhynchus kisutch Coho salmon Primary Oncorhynchus mykiss Rainbow trout Primary Oncorhynchus tshawytscha Chinook salmon Primary Salvelinus namaycush Lake trout Primary
Sciaenidae Aplodinotus grunniens Freshwater drum Primary GREAT LAKES SECONDARY ECOFISH TARGET SPECIES
FAMILY SCIENTIFIC NAME COMMON NAME FISH PLUG LIST*
Catostomidae Catostomus catostomus Longnose sucker Catostomus commersonii White sucker Secondary Moxostoma anisurum Silver redhorse
Centrarchidae Micropterus salmoides Largemouth bass
Clupeidae Alosa pseudoharengus Alewife Dorosoma cepedianum American gizzard shad
Cyprinidae Cyprinella spiloptera Spotfin shiner Luxilus cornutus Common shiner Notropis stramineus Sand shiner
Esocidae Esox niger Chain pickerel
Fundulidae Fundulus diaphanus Banded killifish Fundulus majalis Striped killifish
Ictaluridae Ameiurus melas Black bullhead
Salmonidae
Prosopium cylindraceum Round whitefish Salmo trutta Brown trout Secondary Salvelinus fontinalis Brook trout Salvelinus fontinalis x namaycush Splake
* Indicates whether species also occurs in the primary or secondary fish plug list (see Table 13.9).

National Coastal Condition Assessment 2015 Field Operations Manual Version 1.0 May 2015 Page 66 13.2 FISH TISSUE PLUG [FPLG]
13.2.1 SUMMARY OF METHOD Because many fish spend their entire life in a particular water body, they can be important indicators of water quality, especially for toxic pollutants (e.g., pesticides and trace elements). Toxic pollutants, which may be present in the water column or sediments at concentrations below our analytical detection limits, can be found in fish tissue above detection limits due to bioaccumulation.
Typical fish tissue collection methods require the fish to be sacrificed, whether it be a whole fish or a skin-on fillet tissue sample. This can be problematic when there is a need to collect large trophy-sized fish for contaminant analysis or when a large sample size is necessary for statistical analysis. The following method collects fish tissue plugs instead of a skin-on fillet. One fish tissue plug for mercury analysis will be collected from each of two fish of the same species (one plug per fish) from the target list (below) at every site. These fish are collected during the ecological fish tissue collection effort (Sections 13.1 and 13.3). In order of preference, fish tissue plugs should be collected from 1) an ecological fish specimen that will be sent to the lab (when size and species requirements overlap), or 2) a live fish that will be released after the plug has been collected. When possible, select larger individuals from which to collect the fish plugs. Do not collect fish plugs from specimens that are part of the human health fish tissue sample collection. A tissue plug sample is collected by inserting a biopsy punch into a de-scaled area of dorsal muscle section of a fish. After the plug has been collected, ecofish specimens are frozen according to the protocol in Section 13.1; if a plug is collected from a live fish, antibiotic salve is placed over the wound and the fish is released.
13.2.2 EQUIPMENT AND SUPPLIES
Table 13.7 lists the equipment and supplies necessary for field crews to collect fish tissue plug samples. Record the fish tissue plug sampling data in the Fish Tissue Plug Samples section of the Eco Fish Collection (Back) form.
Table 13.7 Equipment & supplies: fish tissue plugs
For fish tissue plug samples
antibiotic salve cooler with dry ice cooler with wet ice dip net biopsy punch (sterile, disposable) fish collection gear (trawl, nets, livewell, etc.) disposable forceps (sterile) glass scintillation vial (20 mL) nitrile gloves measuring board aspirator bulb scale (in grams) scalpel (disposable, sterile)
For recording measurements
Eco Fish Collection (Back) form fish tissue plug sample labels pencils (for data forms) fine-tipped indelible markers (for labels) clear tape strips
National Coastal Condition Assessment 2015 Field Operations Manual Version 1.0 May 2015 Page 67 13.2.3 SAMPLING PROCEDURE
The fish tissue plug indicator samples will be collected using the same gear and procedures used to collect the ecological and/or human health fish tissue samples, and collection occurs within the same area as other fish collections. Samples should be taken from the species listed in the target list (primary and secondary species) found in Table 13.8 and Table 13.9. When ecofish specimens meet the size and species requirements for fish plug samples, the plugs should be taken from the ecofish prior to placing on ice. If ecofish specimens do not meet the size and species requirement for fish plugs, fish plugs should be taken from live fish and the fish are released with antibiotic salve on the wound, as in step 14 below. If the recommended primary and secondary species are unavailable, the fisheries biologist will select an alternative species (i.e., a species that is commonly consumed in the study area, with specimens of harvestable or consumable size) to obtain a sample from the species that are available. If a listed species is unavailable, aim to collect fish in the following order: 1) those that are consumed by humans; 2) predatory fish; and 3) other available fish species. In no instance should fish plugs be removed from specimens submitted for the human health fish tissue sample.
In order of preference, crews should try to submit species from 1) the Primary Target List; 2) the Secondary Target List; and 3) any other available fish. It is recognized that there are species not on these lists that may be culturally or regionally important food sources, essential to subsistence fishers or increasingly popular among food trends. For these reasons, the guidance for selecting species for fish plug samples is purposefully inclusive.
Please note: There are no invertebrate organisms on this list with the exception of sea urchins for Hawaii. Crab, shrimp, molluscs, lobsters, etc., will not be used in assessment of mercury content in fish plugs. If invertebrate species are submitted for FPLG samples, those data will be reported as MISSING for the associated sites.
The procedures for collecting and processing fish plug samples are presented below.
1. Spread out a cooler liner bag on a flat surface for your workspace. 2. Prepare the FPLG sample label with Site ID, date collected, and visit number. 3. Attach the completed label to the 20 milliliter scintillation vial and cover with
clear tape. 4. Put on clean nitrile gloves before handling the fish.
Note: Do not handle any food, drink, sunscreen, or insect repellant until after the plug samples have been collected (or implement measures to reduce contamination by such chemicals if applied such as washing, wearing long gloves, etc.).
5. Rinse potential target species/individuals in ambient water to remove any foreign material from the external surface and place in clean holding containers (e.g., livewells, buckets). Return non-target fishes or small specimens to the water.
6. Retain two individuals of the same target species from each site. The fish should be:
• large enough to collect a fish plug yielding ~ 0.5 grams (wet weight) of tissue,
National Coastal Condition Assessment 2015 Field Operations Manual Version 1.0 May 2015 Page 68
• on the recommended primary or secondary target list (if not available select an alternative species present),
• both the same species, • both satisfy legal requirements of harvestable size (or weight) for the
sampled water body, or at least be of consumable size and • of similar size, so that the smaller individual is no less than 75% of the total
length of the larger individual. Note: Whenever possible, larger specimens should be selected over smaller specimens.
7. Remove one fish retained for analysis from the clean holding container(s) (e.g., livewell) using clean nitrile gloves.
8. Measure the fish to determine total body length. Measure total length of the specimen in millimeters from the anterior-most part of the fish to the tip of the longest caudal fin ray (when the lobes of the caudal fin are depressed dorsoventrally).
9. Weigh the fish in grams using the fish weigh scale. 10. Note any anomalies (e.g., lesions, cuts, sores, tumors, fin erosion) observed on
the fish. 11. Record sample ID, species, and specimen length and weight in the Fish Tissue
Plug Samples section of the Eco Fish Collection (Back) form. Make sure the sample ID numbers and specimen numbers/lengths that are recorded on the collection form match those on the sample tracking form and labels, where applicable.
12. On a meaty portion of the left side, dorsal area of the fish between the dorsal fin and the lateral line, clear a small area of scales with a sterile disposable scalpel.
13. Wearing clean nitrile gloves, insert the 8 millimeter biopsy punch into the dorsal muscle of the fish through the scale-free area. The punch is inserted with a slight twisting motion cutting the skin and muscle tissue. Once full depth of the punch is achieved, a slight bending or tilting of the punch is needed to break off the end of the sample. Remove biopsy punch taking care to ensure sample remains in the punch.
Note: The full depth of the punch should be filled with muscle tissue, which should result in collecting a minimum of 0.25 to 0.35 grams of fish tissue for mercury analysis.
14. If the fish is to be released, apply a generous amount of antibiotic salve to the plug area and gently return the fish to the water. If the fish is part of the ecofish collection, return the fish to the ecofish holding area without the application of antibiotic.
15. Using an aspirator bulb placed on the end of the biopsy punch, give a quick squeeze, blowing the tissue sample into the 20 milliliter scintillation vial.
16. Place the vial with sample immediately on dry ice for temporary storage. 17. Repeat steps 2-15 for the second fish, to collect a second fish plug sample.
Place the second plug in the same scintillation vial as the first. The two plugs

National Coastal Condition Assessment 2015 Field Operations Manual Version 1.0 May 2015 Page 69
should provide at least 0.5 grams of tissue. NOTE: If two qualifying fish cannot be caught, both plugs may be taken from the same fish.
18. Replace the lid and seal tightly with electrical tape, insert the vial into the "bubble bag" to protect it from breakage, and then place it into the 4 by 4 self-sealing bag. Place the sample in a cooler with dry ice
19. Dispose of gloves, scalpel, and biopsy punch.
13.2.4 SAMPLE STORAGE 1. Keep the samples frozen on dry ice or in a freezer at ≤-20°C until shipment. 2. Frozen samples will subsequently be packed on dry ice and shipped to the
batched sample laboratory via priority overnight delivery service within 1 week. Please see Appendix C: Shipping and Tracking Guidelines for next steps.
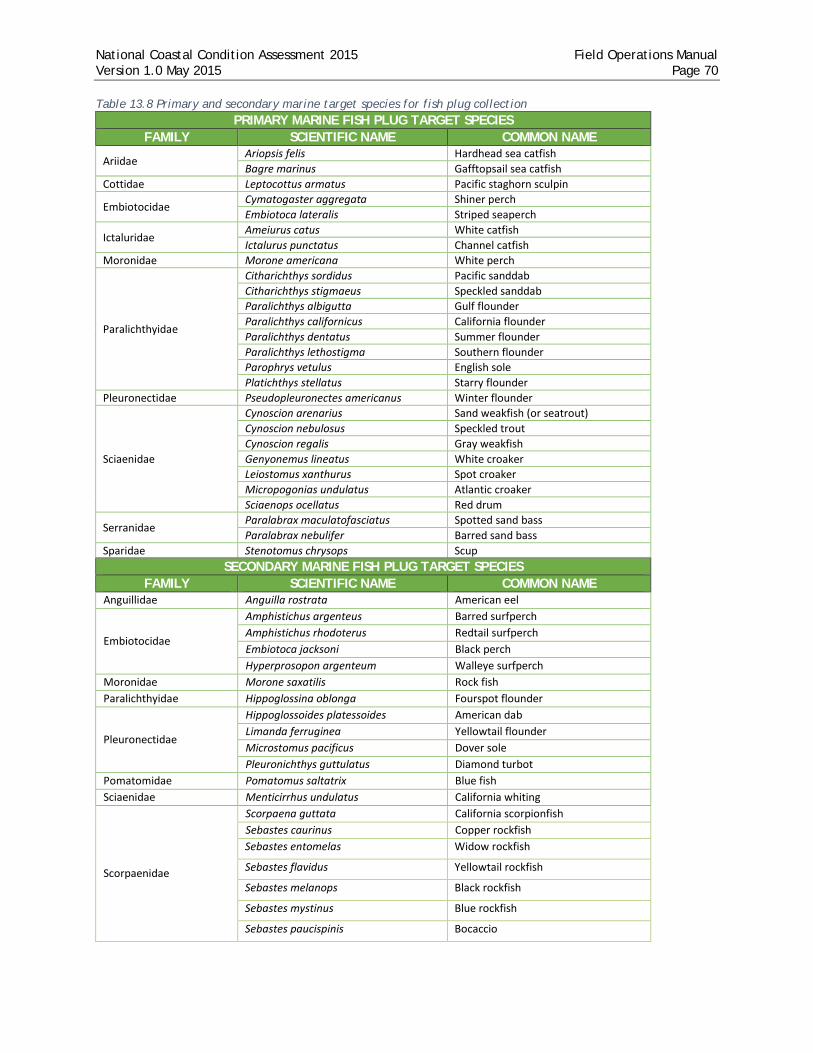
National Coastal Condition Assessment 2015 Field Operations Manual Version 1.0 May 2015 Page 70
Table 13.8 Primary and secondary marine target species for fish plug collection PRIMARY MARINE FISH PLUG TARGET SPECIES
FAMILY SCIENTIFIC NAME COMMON NAME
Ariidae Ariopsis felis Hardhead sea catfish Bagre marinus Gafftopsail sea catfish
Cottidae Leptocottus armatus Pacific staghorn sculpin
Embiotocidae Cymatogaster aggregata Shiner perch Embiotoca lateralis Striped seaperch
Ictaluridae Ameiurus catus White catfish Ictalurus punctatus Channel catfish
Moronidae Morone americana White perch
Paralichthyidae
Citharichthys sordidus Pacific sanddab Citharichthys stigmaeus Speckled sanddab Paralichthys albigutta Gulf flounder Paralichthys californicus California flounder Paralichthys dentatus Summer flounder Paralichthys lethostigma Southern flounder Parophrys vetulus English sole Platichthys stellatus Starry flounder
Pleuronectidae Pseudopleuronectes americanus Winter flounder
Sciaenidae
Cynoscion arenarius Sand weakfish (or seatrout) Cynoscion nebulosus Speckled trout Cynoscion regalis Gray weakfish Genyonemus lineatus White croaker Leiostomus xanthurus Spot croaker Micropogonias undulatus Atlantic croaker Sciaenops ocellatus Red drum
Serranidae Paralabrax maculatofasciatus Spotted sand bass Paralabrax nebulifer Barred sand bass
Sparidae Stenotomus chrysops Scup SECONDARY MARINE FISH PLUG TARGET SPECIES
FAMILY SCIENTIFIC NAME COMMON NAME Anguillidae Anguilla rostrata American eel
Embiotocidae
Amphistichus argenteus Barred surfperch Amphistichus rhodoterus Redtail surfperch Embiotoca jacksoni Black perch Hyperprosopon argenteum Walleye surfperch
Moronidae Morone saxatilis Rock fish Paralichthyidae Hippoglossina oblonga Fourspot flounder
Pleuronectidae
Hippoglossoides platessoides American dab Limanda ferruginea Yellowtail flounder Microstomus pacificus Dover sole Pleuronichthys guttulatus Diamond turbot
Pomatomidae Pomatomus saltatrix Blue fish Sciaenidae Menticirrhus undulatus California whiting
Scorpaenidae
Scorpaena guttata California scorpionfish Sebastes caurinus Copper rockfish Sebastes entomelas Widow rockfish
Sebastes flavidus Yellowtail rockfish
Sebastes melanops Black rockfish
Sebastes mystinus Blue rockfish
Sebastes paucispinis Bocaccio

National Coastal Condition Assessment 2015 Field Operations Manual Version 1.0 May 2015 Page 71
Serranidae Paralabrax clathratus Kelp bass Triakidae Triakis semifasciata Leopard shark
Table 13.9 Primary and secondary Great Lakes target species for fish plug collection
PRIMARY GREAT LAKES FISH PLUG TARGET SPECIES FAMILY SCIENTIFIC NAME COMMON NAME
Catostomidae Moxostoma macrolepidotum Shorthead redhorse
Centrarchidae
Ambloplites rupestris Rock bass
Lepomis gibbosus Pumpkinseed
Lepomis macrochirus Bluegill
Micropterus dolomieu Smallmouth bass
Cyprinidae Cyprinus carpio Common carp
Esocidae Esox lucius Northern pike
Esox masquinongy Muskellunge
Ictaluridae Ameiurus nebulosus Brown bullhead
Ictalurus punctatus Channel catfish
Gadidae Lota lota Burbot
Moronidae Morone americana White perch
Morone chrysops White bass
Percidae Perca flavescens Yellow perch
Sander vitreus Walleye
Salmonidae
Coregonus clupeaformis Lake whitefish
Oncorhynchus kisutch Coho salmon
Oncorhynchus mykiss Rainbow trout
Oncorhynchus tshawytscha Chinook salmon
Salvelinus namaycush Lake trout
Sciaenidae Aplodinotus grunniens Freshwater drum
SECONDARY GREAT LAKES FISH PLUG TARGET SPECIES FAMILY SCIENTIFIC NAME COMMON NAME
Catostomidae Catostomus commersonii White sucker
Ictaluridae Ictalurus furcatus Blue catfish
Salmonidae Salmo trutta Brown trout
13.3 HUMAN HEALTH FISH TISSUE COLLECTION [HTIS] (SELECT GREAT LAKES SITES ONLY)
13.3.1 SUMMARY OF METHOD Field crews collect human health fish tissue composites at a subset of 150 of the Great Lakes sites (30 sites per lake). These sites are designated with “FT” in the panel code. If a site has been designated as a human health fish tissue site and is dropped, the replacement site will take on the FT designation and human health fish tissue should be collected. At revisit sites that are also human health fish tissue sites, crews that are unsuccessful at collecting the human health fish tissue sample during visit 1 are expected to attempt the collection of that sample during visit 2.

National Coastal Condition Assessment 2015 Field Operations Manual Version 1.0 May 2015 Page 72
Labs analyze fillet tissue for mercury, polychlorinated biphenyls (PCBs), fatty acids, perfluorinated compounds (PFCs), and additional contaminants of emerging concern (e.g., polybrominated diphenyl ethers or PBDEs).
This section contains the sampling procedures and target species for human health fish tissue collection. Note that the human health fish species table (Table 13.11) includes 25 primary target species and 18 secondary fish species. Field crews must attempt to collect a primary target species wherever possible. If primary target species are not available at a particular site, then the field crew collects a composite of one of the secondary fish species. In the event that a crew is unable to collect fish which are on the human health species list, then the field crew should contact the Great Lakes Human Health Fish Tissue Manager.
As with the ecological fish tissue samples, crews collect human health fish tissue samples using any reasonable method that represents the most efficient or best use of the available time on station (e.g., gill net, otter trawl, or hook and line). However, in contrast to the allowable procedures for ecological fish tissue samples, crews may not purchase fish for human health fish tissue collection. Record sample collection information on the Human Health Fish Collection (Front) form.
For each attempted fish collection method, record equipment details, start and stop times, and fishing location(s) on the Human Health Fish Collection (Front) form. Record sample ID, species retained, and specimen lengths on the Human Health Fish Collection (Back) form.
Identify and measure the specimens collected for each composite. Record the scientific name (genus and species) and total length for each specimen on the Human Health Fish Collection (Back) form. Human health fish composites should consist of 5 similarly sized (i.e., the total length of the smallest specimen is no less than 75% of the total length of the largest specimen) adult fish of the same species that will collectively yield about 500 g of fillet tissue. This translates to a total of about 20 ounces, or about 4 ounces of fillets per fish (assuming collection of a 5-fish composite). Field crews should make every effort to consistently obtain 5 fish for the human health fish tissue sample; however, a sample of fewer than 5 fish is acceptable if it provides sufficient fillet tissue to meet the requirement (500 g). Conversely, for the exceptions where field crews collect 5 fish that are too small to collectively meet the fillet tissue requirement, they should collect additional fish as necessary to provide adequate tissue.
Fish submitted as part of the human health fish tissue sample should remain intact and be submitted as whole specimens. Crews should not take fish plugs from human health fish tissue specimens.
13.3.2 EQUIPMENT AND SUPPLIES Table 13.10 lists the equipment and supplies necessary for field crews to collect human health fish tissue samples. Additional human health fish collection supplies can be ordered through the Supply Request Form. A list of frequently asked questions and responses will be provided with the fish sampling supplies to clarify situations that field crews may encounter while collecting human health fish composites. Detailed procedures for collecting and processing fish composite samples are presented below.
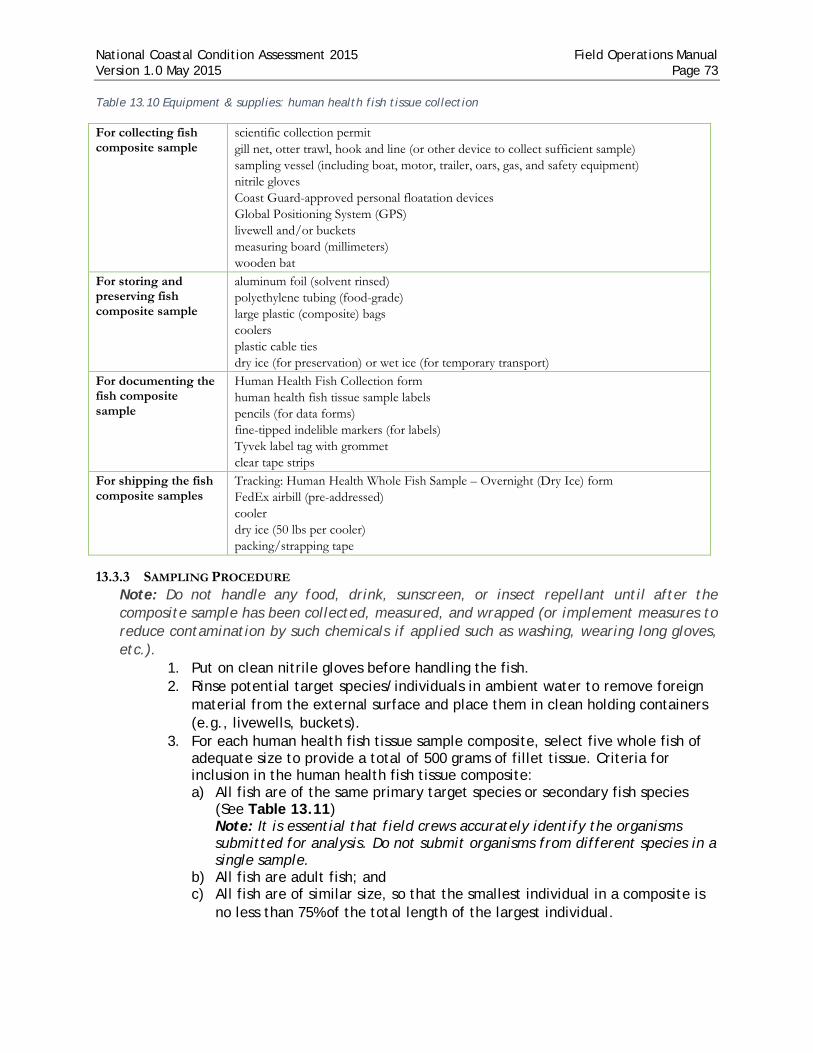
National Coastal Condition Assessment 2015 Field Operations Manual Version 1.0 May 2015 Page 73 Table 13.10 Equipment & supplies: human health fish tissue collection
For collecting fish composite sample
scientific collection permit gill net, otter trawl, hook and line (or other device to collect sufficient sample) sampling vessel (including boat, motor, trailer, oars, gas, and safety equipment) nitrile gloves Coast Guard-approved personal floatation devices Global Positioning System (GPS) livewell and/or buckets measuring board (millimeters) wooden bat
For storing and preserving fish composite sample
aluminum foil (solvent rinsed) polyethylene tubing (food-grade) large plastic (composite) bags coolers plastic cable ties dry ice (for preservation) or wet ice (for temporary transport)
For documenting the fish composite sample
Human Health Fish Collection form human health fish tissue sample labels pencils (for data forms) fine-tipped indelible markers (for labels) Tyvek label tag with grommet clear tape strips
For shipping the fish composite samples
Tracking: Human Health Whole Fish Sample – Overnight (Dry Ice) form FedEx airbill (pre-addressed) cooler dry ice (50 lbs per cooler) packing/strapping tape
13.3.3 SAMPLING PROCEDURE Note: Do not handle any food, drink, sunscreen, or insect repellant until after the composite sample has been collected, measured, and wrapped (or implement measures to reduce contamination by such chemicals if applied such as washing, wearing long gloves, etc.).
1. Put on clean nitrile gloves before handling the fish. 2. Rinse potential target species/individuals in ambient water to remove foreign
material from the external surface and place them in clean holding containers (e.g., livewells, buckets).
3. For each human health fish tissue sample composite, select five whole fish of adequate size to provide a total of 500 grams of fillet tissue. Criteria for inclusion in the human health fish tissue composite: a) All fish are of the same primary target species or secondary fish species
(See Table 13.11) Note: It is essential that field crews accurately identify the organisms submitted for analysis. Do not submit organisms from different species in a single sample.
b) All fish are adult fish; and c) All fish are of similar size, so that the smallest individual in a composite is
no less than 75% of the total length of the largest individual.

National Coastal Condition Assessment 2015 Field Operations Manual Version 1.0 May 2015 Page 74
4. Measure each fish selected for the composite from the anterior-most part of the fish to the tip of the longest caudal fin ray (when the lobes of the caudal fin are depressed dorsoventrally) to determine total body length in millimeters.
5. On the Human Health Fish Collection (Back) form: • Record the sample identification number. • Fill in the circles verifying that all samples are of similar length and the
same species. • Below the header, record species selected for analysis, specimen length
(total length in mm), and any relevant comments. Extra rows are provided on the form in the event that additional specimens are collected to meet the 500 gram fillet tissue requirement (refer to Frequently Asked Questions for further clarification).
• Make sure the sample ID and specimen numbers recorded on the form match those on the sample labels.
6. Wearing clean nitrile gloves, remove each fish selected for analysis from the clean holding container(s). Dispatch each fish using a clean wooden bat (or equivalent wooden device).
7. Wrap each whole fish in extra heavy-duty aluminum foil, with the dull side in contact with the fish (foil will be provided by EPA as solvent-rinsed, oven-baked sheets).
8. Prepare a sample label for each sample specimen, ensuring that the label information matches the information recorded on the Human Health Fish Collection (Back) form. Be sure to record the fish species and specimen length on each label.
9. Cut separate lengths of food grade tubing (provided by EPA) long enough to contain each individual fish, allowing extra length on each end to seal with cable ties. Place each foil-wrapped specimen into the appropriate length of tubing. Seal the ends of each tube with a plastic cable tie. Attach the appropriate sample label to the plastic tubing by wrapping clear tape around the label and then completely around the wrapped fish (so that the clear tape wraps over itself).
10. Double-bag the entire set of specimens in the composite by placing all fish composited from the site inside a large plastic bag (provided by EPA). If additional bags are required for large fish specimens or fish samples, please use plastic bags of similar thickness as those provided by EPA.
11. Prepare a Sample Identification Label for the outer bag, ensuring that the label information matches the information recorded on the Human Health Fish Collection (Back) form. Be sure to record fish species and specimen length range on the label.
12. Affix the sample label to a composite bag tag (Tyvek tag) and cover with clear plastic tape. Thread a cable tie through the grommet in the tag and seal the outer bag with the cable tie.
13.3.4 SAMPLE STORAGE AND SHIPPING PREPARATION 1. After the sample is packaged, immediately place it on dry ice for shipment.
National Coastal Condition Assessment 2015 Field Operations Manual Version 1.0 May 2015 Page 75
• Packaged samples may be placed on wet ice in coolers if they will be transported to a laboratory or other interim facility to be frozen before shipment.
• Samples may be stored on dry ice for a maximum of 24 hours. • If possible, keep all specimens designated for a particular composite in the
same cooler for transport. 2. Crews have two options for freezing and shipping fish tissue samples,
depending on site logistics: a) Ship the samples via priority overnight delivery service (e.g., Federal
Express), packed on dry ice, so that they arrive at the sample preparation laboratory within 24 hours from the time of sample collection. Do NOT ship on Fridays, Saturdays, or the day before federal holidays. Samples must be packed on sufficient dry ice (50 pounds minimum, layered to ensure direct contact between fish and dry ice) to keep them frozen for up to 48 hours. Remember to record the tracking number on the sample tracking form before submitting it to the Information Management Center.
b) Freeze the samples within 24 hours of collection at ≤-20°C, and store the frozen samples until shipment within 2 weeks of sample collection. Frozen samples will subsequently be packed on at least 50 pounds of layered dry ice and shipped to the sample preparation laboratory via priority overnight delivery service. Refer to reminders in option 2a (above) about not shipping on Fridays, Saturdays, or the day before federal holidays and about including sample tracking numbers on tracking forms.

National Coastal Condition Assessment 2015 Field Operations Manual Version 1.0 May 2015 Page 76 Table 13.11 Primary and secondary Great Lakes target species for human health fish tissue collection
PRIMARY HUMAN HEALTH FISH TISSUE TARGET SPECIES FAMILY SCIENTIFIC NAME COMMON NAME
Centrarchidae
Ambloplites rupestris Rock bass Micropterus dolomieu Smallmouth bass Micropterus salmoides Largemouth bass Pomoxis annularis White crappie Pomoxis nigromaculatus Black crappie
Cyprinidae Cyprinus carpio Common carp
Esocidae Esox lucius Northern pike Esox masquinongy Muskellunge Esox niger Chain pickerel
Ictaluridae Ictalurus punctatus Channel catfish Gadidae Lota lota Burbot
Moronidae Morone americana White perch Morone chrysops White bass
Percidae Perca flavescens Yellow perch Sander canadensis Sauger Sander vitreus Walleye
Salmonidae
Coregonus clupeaformis Lake whitefish Oncorhynchus gorbuscha Pink salmon Oncorhynchus kisutch Coho salmon Oncorhynchus tshawytscha Chinook salmon Oncorhynchus mykiss Rainbow trout Salmo salar Atlantic salmon Salmo trutta Brown trout Salvelinus namaycush Lake trout
Sciaenidae Aplodinotus grunniens Freshwater drum
SECONDARY HUMAN HEALTH FISH TISSUE TARGET SPECIES FAMILY SCIENTIFIC NAME COMMON NAME
Catostomidae
Carpiodes cyprinus Quillback Catostomus catostomus Longnose sucker Catostomus commersonii White sucker Hypentelium nigracans Northern hogsucker Ictiobus cyprinellus Bigmouth buffalo Ictiobus niger Black buffalo
Centrarchidae
Lepomis cyanellus Green Sunfish Lepomis gibbosus Pumpkinseed Lepomis gulosus Warmouth Lepomis macrochirus Bluegill Lepomis megalotis Longear Sunfish
Ictaluridae Ameiurus melas Black bullhead Ameiurus natalis Yellow bullhead Ameiurus nebulosus Brown bullhead
Salmonidae
Coregonus artedi Cisco/ lake herring Coregonus hoyi Bloater Prosopium cylindraceum Round whitefish Salvelinus fontinalis Brook trout
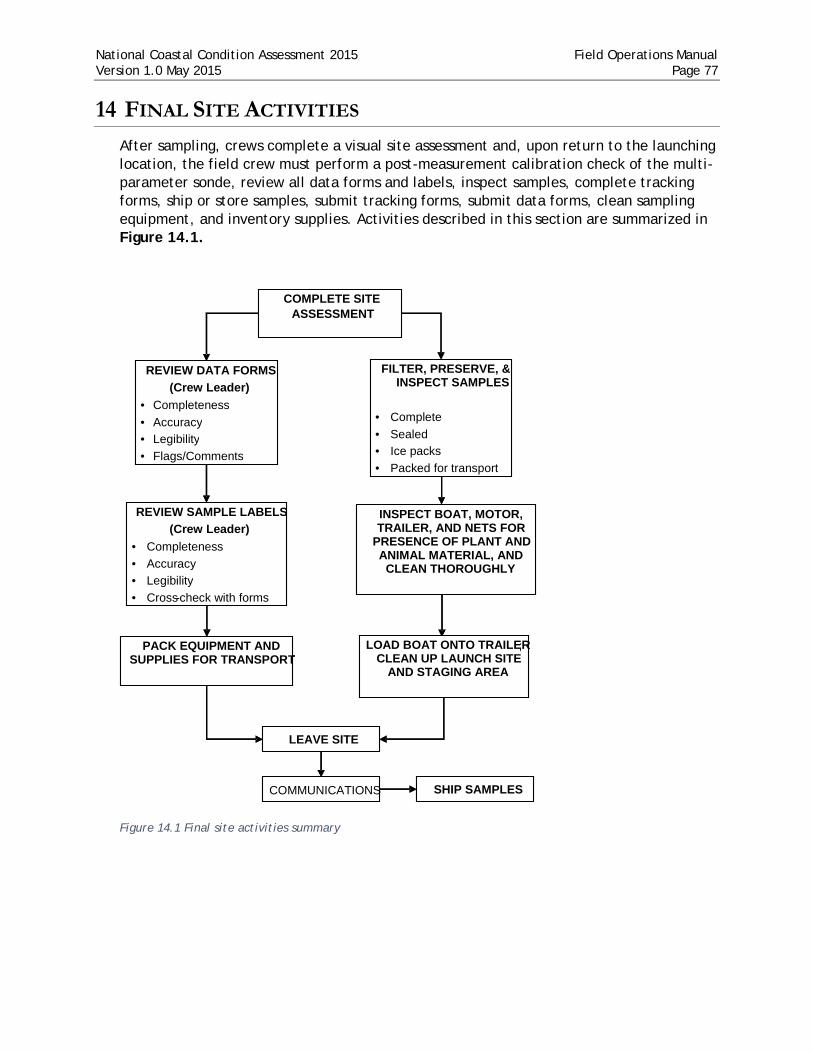
National Coastal Condition Assessment 2015 Field Operations Manual Version 1.0 May 2015 Page 77
14 FINAL SITE ACTIVITIES After sampling, crews complete a visual site assessment and, upon return to the launching location, the field crew must perform a post-measurement calibration check of the multi-parameter sonde, review all data forms and labels, inspect samples, complete tracking forms, ship or store samples, submit tracking forms, submit data forms, clean sampling equipment, and inventory supplies. Activities described in this section are summarized in Figure 14.1.
Figure 14.1 Final site activities summary
COMPLETE SITE ASSESSMENT
(4 People)
REVIEW DATA FORMS (Crew Leader)
• Completeness • Accuracy • Legibility • Flags/Comments
INSPECT BOAT, MOTOR, TRAILER, AND NETS FOR
PRESENCE OF PLANT AND ANIMAL MATERIAL, AND
CLEAN THOROUGHLY (3 People)
PACK EQUIPMENT AND SUPPLIES FOR TRANSPORT
(2 People)
LOAD BOAT ONTO TRAILER ; CLEAN UP LAUNCH SITE
AND STAGING AREA (2 People)
LEAVE SITE
FILTER, PRESERVE, & INSPECT SAMPLES
(3 People) • Complete • Sealed • Ice packs • Packed for transport
REVIEW SAMPLE LABELS (Crew Leader)
• Completeness • Accuracy • Legibility • Cross - check with forms
COMMUNICATIONS SHIP SAMPLES
COMPLETE SITE ASSESSMENT
REVIEW DATA FORMS (Crew Leader)
• Completeness • Accuracy • Legibility • Flags/Comments
INSPECT BOAT, MOTOR, TRAILER, AND NETS FOR
PRESENCE OF PLANT AND ANIMAL MATERIAL, AND
CLEAN THOROUGHLY
PACK EQUIPMENT AND SUPPLIES FOR TRANSPORT
LOAD BOAT ONTO TRAILER ; CLEAN UP LAUNCH SITE
AND STAGING AREA
LEAVE SITE
FILTER, PRESERVE, & INSPECT SAMPLES
• Complete • Sealed • Ice packs • Packed for transport
REVIEW SAMPLE LABELS (Crew Leader)
• Completeness • Accuracy • Legibility • Cross - check with forms
COMMUNICATIONS SHIP SAMPLES

National Coastal Condition Assessment 2015 Field Operations Manual Version 1.0 May 2015 Page 78
14.1 GENERAL SITE ASSESSMENT After sampling, complete the Site Assessment (Front) form which is a template for recording pertinent field observations. Record all observations from the site that were noted during the course of the visit. The Site Assessment (Front) form is by no means comprehensive, and crews are encouraged to record any additional pertinent observations in the General Assessment section.
14.1.1 SHORELINE ACTIVITIES AND DISTURBANCES Rank shoreline activities and disturbances at the site. Consider only the shoreline that is ecologically significant to, adjacent to, and visible from the X-site. Do not consider the shoreline that is not in the same estuary, waterbody and/or embayment as the X-site. If the shore cannot be seen from the X-site (due to weather conditions or distance), note in the comments section the reason that the shoreline assessment was not possible. If an activity or disturbance is present, fill in the appropriate bubble: “L” for low, “M” for medium or “H” for high indicating the level of each.
Note: If an activity or disturbance is not observed, do not fill in any bubble. Also be sure to fill in the ‘super bubble’ at the top the activities and disturbances section to verify that blank fields indicate absence of the specific type of activity or disturbance.
14.1.2 SITE CHARACTERISTICS Record the general characteristics of the site. When assessing site characteristics, look at a 200 m radius around the X-site. Rank the site on a scale of 1 to 5, with 1 indicating “pristine” or “appealing” and 5 indicating “highly disturbed” or “unappealing.” As with other aspects of the general visual assessment, all crew members contribute to the final ranking. Observations of site characteristics will be understandably subjective, but provide valuable information on crew impressions of the overall character of the site. The NCCA analysts use crew observations to help explain data and results. The assessment of visible trash in water (aquatic trash) will provide data for the U.S. EPA’s Trash Free Waters Program. If any items listed are visible in the water from the X-site, fill in a bubble estimating the amount each type of trash. If none are visible, leave the bubbles empty. If possible, list “Other plastic items”, types of “Fishing gear” and “Other” items not accounted for above. Additional information on aquatic trash may be written in the General Assessment area at the crew’s discretion. Document dominant land use. If dominant land use is “forest,” estimate the age class. Document the weather conditions on the day of sampling, as well as any extreme weather conditions just prior to sampling.
Note: If there is no land within 200 meters of the X-site, leave the dominant land use section blank.
14.1.3 GENERAL ASSESSMENT Record any additional information and observations in this narrative section. Include observations on biotic integrity, presence of SAV, presence and abundance of endangered and/or exotic species, local anecdotal information, or any other pertinent information about the site or its adjacent areas. Record any observations that may be useful for future data interpretation.

National Coastal Condition Assessment 2015 Field Operations Manual Version 1.0 May 2015 Page 79 14.2 PROCESSING THE FECAL INDICATOR
14.2.1 SUMMARY OF METHOD At each site, crews collect and filter water samples for fecal indicator analyses. Upon receipt of the filters, the lab uses quantitative polymerase chain reaction (qPCR) analysis to quantify Enterococci bacteria trapped on the filter.
14.2.2 EQUIPMENT AND SUPPLIES Table 14.1 provides the equipment and supplies needed for field crews to filter the fecal indicator sample. The filtering apparatus for this indicator MUST be sterile (i.e. a new unused filter funnel with pre-loaded filter is used for each filtration). Because some implements (forceps, centrifuge tube, etc.) will be reused for the filtering of the chlorophyll sample, Enterococci must be filtered before filtering chlorophyll-a samples.
Table 14.1 Equipment & supplies: Enterococci processing
For processing samples nitrile gloves sterile screw-cap graduated 50 mL centrifuge tube (for measuring sample) filter flask (500 mL with side arm, labeled for ENTE only) rubber stopper (#8 white, with 10mm hole) and small filter funnel adapter 2 filtration units (white base, sterile 100 mL units, includes pre-loaded filter for
ENTE) + 1 extra for revisit sites vacuum pump (electric or hand) sterile phosphate buffer solution 2 sterile disposable forceps 2 sterile microcentrifuge tubes containing sterile glass beads (chilled on dry ice
during pre-sampling activities) + 1 extra for blank filter (at revisit sites) bubble bag (3 microcentrifuge tubes at revisit sites; 2 at all other sites) dry ice cooler
For recording measurements
Sample Collection form pencils (for data forms) fine-tipped indelible markers (for labels) fecal indicator sample labels (2 vial labels and 1 bag label) clear tape strips
14.2.3 PROCESSING PROCEDURE - FECAL INDICATOR FILTER BLANK At revisit sites (sites that will be visited twice in the index period for quality assurance purposes), not only do crews filter the Enterococci samples, but they also prepare a filter blank to be sent to the lab for analysis during both Visit 1 and Visit 2. A filter blank is prepared prior to filtering the Enterococci sample. See below for filter blank field processing procedure.
1. Put on nitrile gloves. 2. Set up the sample filtration apparatus on a flat surface and attach the vacuum
pump (Figure 14.2). Set out: a. 50 mL sterile centrifuge tube, b. 1 bottle of chilled phosphate buffer solution (PBS), c. 2 sterile forceps.

National Coastal Condition Assessment 2015 Field Operations Manual Version 1.0 May 2015 Page 80
3. Attach the filter funnel with pre-loaded sterile filter to the filtering flask with reusable rubber stopper and adapter.
4. Measure 20 mL of the chilled PBS with the sterile graduated centrifuge tube and pour into the filter funnel.
5. Replace the cover on the filter funnel and use the vacuum pump to generate a vacuum of no more than 7 inches of Hg (or ~3.4 psig). Keep pumping until all liquid is in filtrate collection flask.
6. Remove the filter funnel from the base without disturbing the filter. Using sterile disposable forceps remove the filter (touching only the filter edges) and fold it in half, in quarters, in eighths, and then in sixteenths (filter will be folded 4 times).
7. Insert the filter into the chilled microcentrifuge tube (with beads) open end first (pointed end up). Replace and tighten the screw cap.
8. Record the filter blank information on the Sample Collection (Front) form. 9. Prepare a sample label [Filter: Blank] by recording the volume of PBS filtered. 10. Affix the sample label to the microcentrifuge tube. Do NOT place tape on
either the label or the cap of the microcentrifuge tube. 11. Insert the tube into the bubble envelope. Place the bubble envelope on dry ice
while waiting to process the remaining filters. 12. Proceed to Section 14.2.4 for processing the water sample collected for
Enterococci.
14.2.4 PROCESSING PROCEDURE - FECAL INDICATOR SAMPLE The filtering apparatus must be sterile when filtering the fecal indicator sample. A separate, sterile, filter funnel pre-loaded with a filter will be provided for each sample collected and processed. Crews must filter and freeze the fecal indicator sample within 6 hours of collection. See below for field processing procedures.
1. Put on nitrile gloves. 2. Set up the sample filtration apparatus on a flat surface and attach the vacuum
pump (Figure 14.2). Set out: a) 50 mL sterile centrifuge tube, b) 1 bottle of chilled PBS, c) 2 sterile forceps.
3. Attach the filter funnel with pre-loaded sterile filter onto the filtering flask with reusable rubber stopper and adapter.
4. Shake the sample bottle 25 times to mix well. 5. Using the 50 mL sterile graduated centrifuge tube, measure 25 mL of the mixed
water sample and pour into the filter funnel. 6. Replace the cover on the filter funnel. Use the vacuum pump to generate a
vacuum of no more than 7 inches of Hg (or ~3.4 psig). Keep pumping until all liquid is in the filtrate collection flask.
7. If the first 25 mL volume passes readily through the filter, add another 25 mL and continue filtration. If the filter clogs before completely filtering the first or second 25 mL volume, discard the filter and, using a new sterile filter funnel with pre-loaded filter, repeat the filtration using a lesser volume.
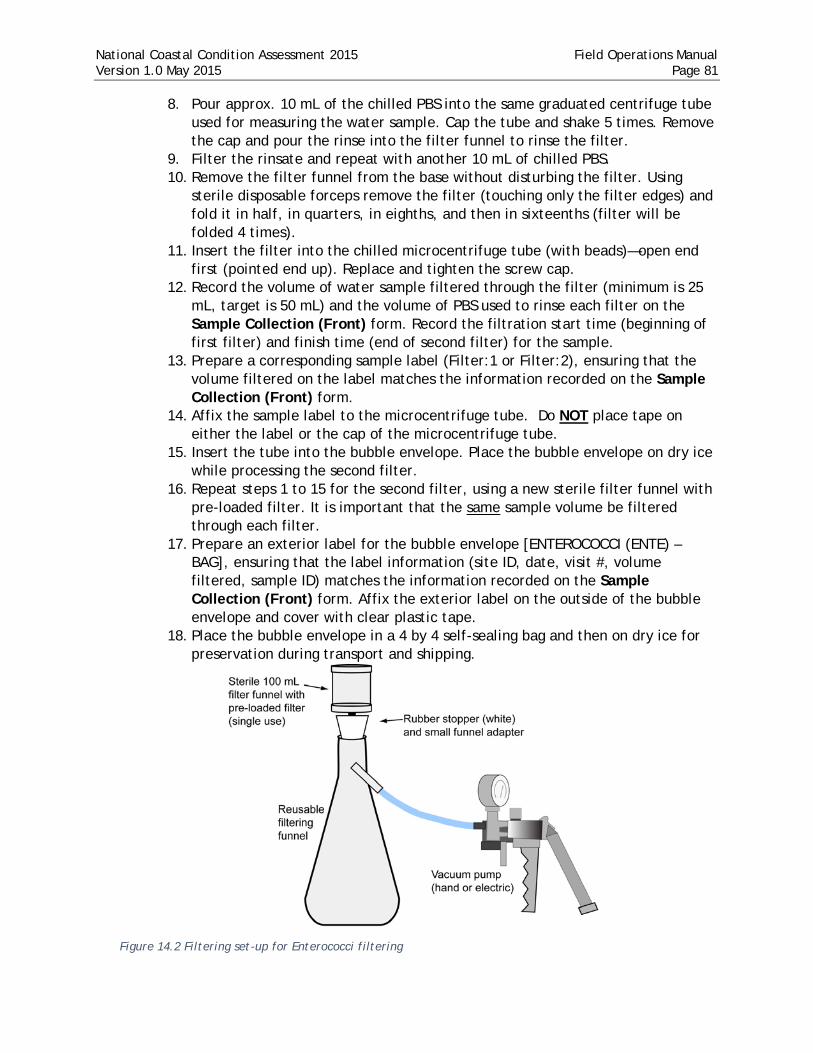
National Coastal Condition Assessment 2015 Field Operations Manual Version 1.0 May 2015 Page 81
8. Pour approx. 10 mL of the chilled PBS into the same graduated centrifuge tube used for measuring the water sample. Cap the tube and shake 5 times. Remove the cap and pour the rinse into the filter funnel to rinse the filter.
9. Filter the rinsate and repeat with another 10 mL of chilled PBS. 10. Remove the filter funnel from the base without disturbing the filter. Using
sterile disposable forceps remove the filter (touching only the filter edges) and fold it in half, in quarters, in eighths, and then in sixteenths (filter will be folded 4 times).
11. Insert the filter into the chilled microcentrifuge tube (with beads)—open end first (pointed end up). Replace and tighten the screw cap.
12. Record the volume of water sample filtered through the filter (minimum is 25 mL, target is 50 mL) and the volume of PBS used to rinse each filter on the Sample Collection (Front) form. Record the filtration start time (beginning of first filter) and finish time (end of second filter) for the sample.
13. Prepare a corresponding sample label (Filter:1 or Filter:2), ensuring that the volume filtered on the label matches the information recorded on the Sample Collection (Front) form.
14. Affix the sample label to the microcentrifuge tube. Do NOT place tape on either the label or the cap of the microcentrifuge tube.
15. Insert the tube into the bubble envelope. Place the bubble envelope on dry ice while processing the second filter.
16. Repeat steps 1 to 15 for the second filter, using a new sterile filter funnel with pre-loaded filter. It is important that the same sample volume be filtered through each filter.
17. Prepare an exterior label for the bubble envelope [ENTEROCOCCI (ENTE) – BAG], ensuring that the label information (site ID, date, visit #, volume filtered, sample ID) matches the information recorded on the Sample Collection (Front) form. Affix the exterior label on the outside of the bubble envelope and cover with clear plastic tape.
18. Place the bubble envelope in a 4 by 4 self-sealing bag and then on dry ice for preservation during transport and shipping.
Figure 14.2 Filtering set-up for Enterococci filtering
National Coastal Condition Assessment 2015 Field Operations Manual Version 1.0 May 2015 Page 82 14.3 PROCESSING THE CHLOROPHYLL-A & DISSOLVED NUTRIENTS INDICATORS
14.3.1 SUMMARY OF METHOD At each site, crews collect and filter water samples for chlorophyll-a and dissolved nutrient analyses. The chlorophyll-a sample is submitted to the lab as residue on a Whatman GF/F filter. Upon receipt of the filters, the lab extracts the pigment from the filter and quantifies it using flourometry. A portion of the filtrate produced from collecting the chlorophyll-a sample is submitted to the laboratory and processed for dissolved nutrients. In order to avoid cross-contamination, a new filter funnel will be used at each site. This filter funnel is provided in each site kit.
14.3.2 EQUIPMENT AND SUPPLIES Table 14.2 Equipment & supplies: chlorophyll-a & dissolved nutrients processing
For filtering chlorophyll-a sample
Whatman GF/F 47mm 0.7 micron filter Nutrients filtering chamber OR 500 mL side-arm filter flask, labeled for CHLA/NUTS only) Filtration unit (blue base filter funnel, 250 mL unit) rubber stopper (#8 blue, with 15mm hole) and large filter funnel adapter vacuum pump (electric or hand) DI water nitrile gloves forceps graduated cylinder (250 mL)
For recording measurements
Sample Collection form chlorophyll-a & dissolved nutrients sample labels pencils (for data forms) fine-tipped indelible markers (for labels) clear tape strips
For sample collection and preservation
centrifuge tube (50 mL, screw-top) aluminum foil square HDPE bottle (250 mL, white) cooler with dry ice electrical tape plastic bag (sandwich size)
14.3.3 PROCESSING PROCEDURE Below presents the field procedures for processing chlorophyll-a and dissolved nutrient samples. The steps below describe using the nutrients filtering chamber supplied in the base kit. Crews have the option of using a side-arm filtering flask or other filtrate collection device in place of the nutrients chamber. If a flask or other device is used, it is important to NOT use the same flask/device as is used for the filtering of Enterococci. Doing so will lead to potential contamination of the nutrients sample with phosphate buffer used to rinse the Enterococci filter. If a flask or other filtrate collection device is used to collect the filtered nutrients sample (as opposed to collecting the sample directly into the nutrients bottle with a chamber), the collection device must be rinsed three times with filtered sample water before allowing any sample to enter the bottle.
Note: Crews must make every attempt to process chlorophyll-a samples in subdued light, out of direct sunlight.
National Coastal Condition Assessment 2015 Field Operations Manual Version 1.0 May 2015 Page 83
1. Complete the NUTS sample label with Site ID, date collected, and visit number. 2. Attach the completed label to the 250 mL clear HDPE sample bottle and cover
with clear plastic tape. 3. Set up the nutrients filtering chamber on a flat surface, insert the sample
bottle into the chamber and attach the vacuum pump (Figure 14.3) 4. Put on nitrile gloves. 5. Crews will use a 250 mL filter funnel (with blue bottom), rubber stopper, and
adapter that are specifically designated for chlorophyll filtering (i.e. not the same ones used for the Enterococci filtering). A new filter funnel will be provided in each site kit and should not be reused. The stopper and adapter are to be cleaned between sampling events. Prior to filtration of the sample, rinse the filter funnel adapter three times with DI water. Rinse graduated cylinders with DI water. After assembling the filtering apparatus and attaching the filter funnel to the nutrients chamber with the correct stopper and adapter, remove the cup portion of the filter funnel from the blue base. Remove the pre-loaded filter (which has a faint grid pattern on it) but leave the white support pad in place.
6. Use clean forceps to place a Whatman GF/F 47 mm 0.7 micron filter on the support pad with the gridded/pressed side of the filter facing down, making sure both the support pad and filter are centered on the base.
7. Reattach the funnel portion of the filter funnel to the base by pressing it straight down firmly until it snaps into place. This will firmly hold the filter in place.
8. Remove the 2 L amber chlorophyll-a collection bottle from cooler and shake to mix the sample. Using the graduated cylinder, measure and pour 250 mL of water into the filter holder, replace the cover, and use the vacuum pump to draw a small portion of the sample through the filter. Do not exceed 7 inches of Hg of vacuum ~3.4 psig or a filtration duration of more than 5 minutes for a single sample volume, to avoid cell damage or loss of contents during filtering.
9. Use the first 10-20 mL of filtrate to rinse the 250 mL sample bottle and discard the rinsate. Be sure to cap the bottle and rotate it so that the filtered water contacts all the surfaces. Replace the bottle and chamber cap and continue filtering. Repeat the rinse of the sample bottle with an additional two rinses of filtered site water then discard the rinsate.
10. If the filter clogs before 250 mL of site water will pass through the filter, discard the filter and water remaining in the filter funnel, rinse the filter funnel with DI water, install a new filter, and repeat the procedures using 100 mL of site water.
11. Observe the filter for readily visible color. If there is visible color, proceed to the next step; if not, filter additional aliquots until color is visible on the filter or until a maximum of 2,000 mL have been filtered.
12. After collecting 250 mL of filtered site water in the dissolved nutrients sample bottle, remove the 250 mL HDPE bottle. Replace the lid and seal tightly with electrical tape. Submit this filtrate for dissolved nutrient analyses.
13. Move the filter funnel and adapter to a side-arm filter flask to complete the filtering process. Additional filtrate will be discarded.
National Coastal Condition Assessment 2015 Field Operations Manual Version 1.0 May 2015 Page 84
14. Record the dissolved nutrients sample information on the Sample Collection (Front) form. Place the sample on wet ice.
15. After achieving a readily visible stain on the filter and collecting the filtrate for dissolved nutrient analyses, record the actual sample volume filtered in the Chlorophyll-a section on the Sample Collection (Front) form and on the sample label.
16. Attach the completed label to the 50 mL centrifuge tube and cover with clear plastic tape.
17. Rinse the graduated cylinder and upper portion of the filter funnel thoroughly with DI water to include any remaining cells adhering to the sides and pump through the filter. Monitor the level of water in the lower chamber to ensure that it does not contact the filter or flow into the pump.
18. Remove the filter from the holder with clean forceps. Avoid touching the colored portion of the filter. Fold the filter in half, with the colored side folded in on itself. Place the folded filter into the 50 mL screw-top centrifuge tube used previously for measuring the Enterococci sample and replace the cap.
19. Tighten the cap as tightly as possible. The cap will seal tightly after an additional ¼ turn past the point at which initial resistance is met. Failure to tighten the lid completely could allow water to infiltrate into the sample and may compromise its integrity. Seal the cap of the centrifuge tube with electrical tape.
20. Wrap the 50 mL tube in a foil square and place in the provided self-sealing plastic bag.
21. Close the plastic bag and place it on dry ice.
Note: if the chlorophyll filtering process did not yield at least 250 mL of filtered site water, install a new GF/F filter and continue filtering site water until 250 mL of filtrate has been collected for the dissolved nutrients sample. Be sure to collect the filtrate prior to any rinsing of the filter funnel with DI water as directed in Step 17.
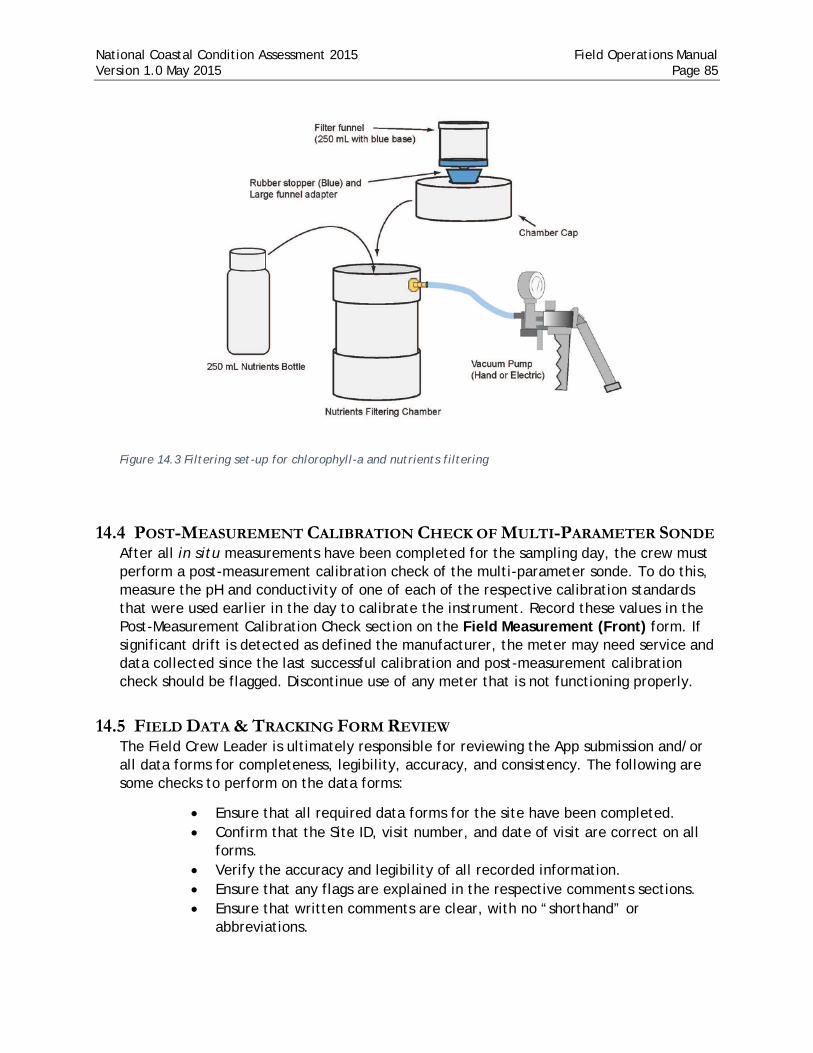
National Coastal Condition Assessment 2015 Field Operations Manual Version 1.0 May 2015 Page 85
Figure 14.3 Filtering set-up for chlorophyll-a and nutrients filtering
14.4 POST-MEASUREMENT CALIBRATION CHECK OF MULTI-PARAMETER SONDE After all in situ measurements have been completed for the sampling day, the crew must perform a post-measurement calibration check of the multi-parameter sonde. To do this, measure the pH and conductivity of one of each of the respective calibration standards that were used earlier in the day to calibrate the instrument. Record these values in the Post-Measurement Calibration Check section on the Field Measurement (Front) form. If significant drift is detected as defined the manufacturer, the meter may need service and data collected since the last successful calibration and post-measurement calibration check should be flagged. Discontinue use of any meter that is not functioning properly.
14.5 FIELD DATA & TRACKING FORM REVIEW The Field Crew Leader is ultimately responsible for reviewing the App submission and/or all data forms for completeness, legibility, accuracy, and consistency. The following are some checks to perform on the data forms:
• Ensure that all required data forms for the site have been completed. • Confirm that the Site ID, visit number, and date of visit are correct on all
forms. • Verify the accuracy and legibility of all recorded information. • Ensure that any flags are explained in the respective comments sections. • Ensure that written comments are clear, with no “shorthand” or
abbreviations.
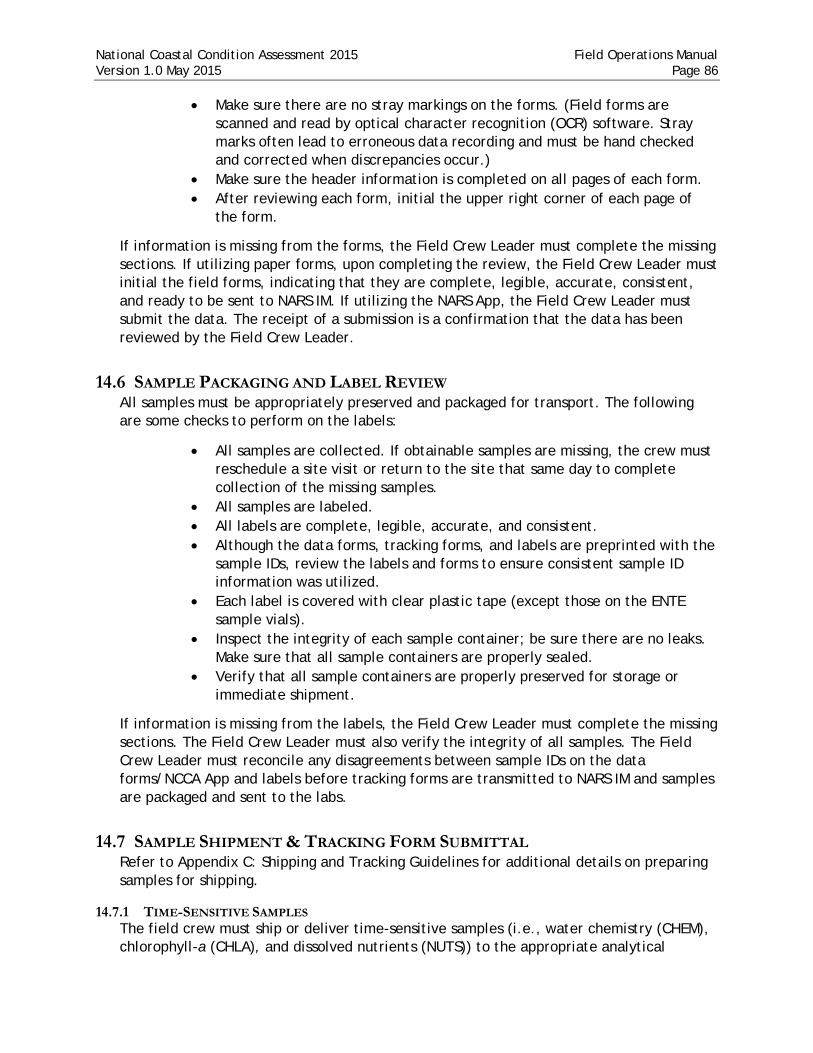
National Coastal Condition Assessment 2015 Field Operations Manual Version 1.0 May 2015 Page 86
• Make sure there are no stray markings on the forms. (Field forms are scanned and read by optical character recognition (OCR) software. Stray marks often lead to erroneous data recording and must be hand checked and corrected when discrepancies occur.)
• Make sure the header information is completed on all pages of each form. • After reviewing each form, initial the upper right corner of each page of
the form.
If information is missing from the forms, the Field Crew Leader must complete the missing sections. If utilizing paper forms, upon completing the review, the Field Crew Leader must initial the field forms, indicating that they are complete, legible, accurate, consistent, and ready to be sent to NARS IM. If utilizing the NARS App, the Field Crew Leader must submit the data. The receipt of a submission is a confirmation that the data has been reviewed by the Field Crew Leader.
14.6 SAMPLE PACKAGING AND LABEL REVIEW All samples must be appropriately preserved and packaged for transport. The following are some checks to perform on the labels:
• All samples are collected. If obtainable samples are missing, the crew must reschedule a site visit or return to the site that same day to complete collection of the missing samples.
• All samples are labeled. • All labels are complete, legible, accurate, and consistent. • Although the data forms, tracking forms, and labels are preprinted with the
sample IDs, review the labels and forms to ensure consistent sample ID information was utilized.
• Each label is covered with clear plastic tape (except those on the ENTE sample vials).
• Inspect the integrity of each sample container; be sure there are no leaks. Make sure that all sample containers are properly sealed.
• Verify that all sample containers are properly preserved for storage or immediate shipment.
If information is missing from the labels, the Field Crew Leader must complete the missing sections. The Field Crew Leader must also verify the integrity of all samples. The Field Crew Leader must reconcile any disagreements between sample IDs on the data forms/NCCA App and labels before tracking forms are transmitted to NARS IM and samples are packaged and sent to the labs.
14.7 SAMPLE SHIPMENT & TRACKING FORM SUBMITTAL Refer to Appendix C: Shipping and Tracking Guidelines for additional details on preparing samples for shipping.
14.7.1 TIME-SENSITIVE SAMPLES The field crew must ship or deliver time-sensitive samples (i.e., water chemistry (CHEM), chlorophyll-a (CHLA), and dissolved nutrients (NUTS)) to the appropriate analytical

National Coastal Condition Assessment 2015 Field Operations Manual Version 1.0 May 2015 Page 87
laboratory (WRS Corvallis or approved state lab) so that the samples will arrive within 48 hours of collection. Therefore, crews must send them via Priority Overnight shipping, preferably the same day as collection, but no later than the following day. Reminder: FedEx does not deliver shipments on Sunday, so you must ensure samples are shipped by Friday afternoon to allow for a Saturday delivery. Be sure to verify the last EXPRESS drop off time at the FedEx facility you plan to use.
The Field Crew Leader will complete a Site and Sample Status/Water Chemistry lab tracking form for the samples and will email the form to [email protected] or submit tracking via the NCCA App (other submittal options are provided in Section 15.3). Please name these files in the following format: NCCA15_T#_Tracking_SiteID_V#, where 'T#' is the number of the tracking form and 'V#' is the visit number (i.e. NCCA15_T1_Tracking_NCCA15-1061_V1). If scanning paper forms, be sure that the file scanned is clear and legible. Genius Scan or Cam Scanner are great apps that are available for free that will help to ensure that the scan is clear and legible.
The Field Crew Leader will place the samples and Site and Sample Status/Water Chemistry lab tracking form (in a waterproof bag or plastic sleeve) in the cooler provided with the site kit. The Field Crew Leader will attach the appropriate pre-addressed FedEx airbill from the site kit marked for the WRS lab. The field crew will either drop off the cooler for shipment at a local FedEx location or arrange for a pick up at the hotel or other appropriate facility. If the field crew has chosen a pick up, they must follow up with the facility at which it has been left to ensure its actual pick up.
14.7.2 OTHER SAMPLES Samples that are less time sensitive will be shipped in batches, according to the chart in Appendix C: Shipping and Tracking Guidelines. See Section 15: Post-Sampling Activities for further guidance.
14.8 EQUIPMENT CLEANUP & CHECK Field crews must take appropriate precautions to avoid transfer of national and regional invasive species of concern. Nuisance species of concern in the U.S. include zebra mussels (Dreissena polymorpha), mitten crabs (Eriocheir sinensis) and Eurasian ruffe (Gymnocephalus ceinuus). In the Great Lakes, Viral Hemorrhagic Septicemia (VHS) is an invasive and deadly fish virus that is threatening Great Lakes fish. VHS was identified as the cause of large fish kills in lakes Huron, St. Clair, Erie, Ontario and the St. Lawrence River in 2005 and 2006. To reduce the risk of transferring nuisance species and pathogens, all equipment and gear must be cleaned and disinfected prior to traveling over land from one field site to another. For specific techniques to disinfect boats and gear in the Great Lakes, please see Section 14.8.3.
Online resources regarding invasive species:
• Aquatic Nuisance Species Task Force (http://www.anstaskforce.gov) • U.S. Geological Survey Nonindigenous Aquatic Species website
(http://nas.er.usgs.gov) • Protect Your Waters website, co-sponsored by the U.S. Fish and Wildlife
Service (http://www.protectyourwaters.net/hitchhikers)
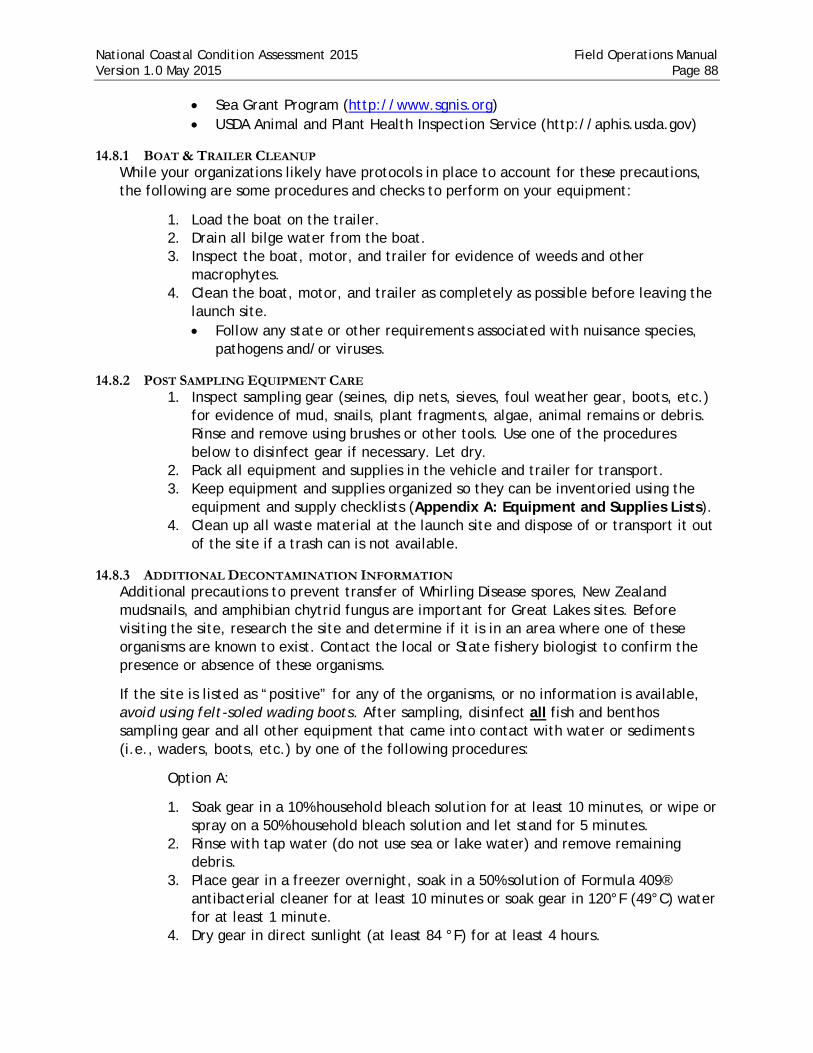
National Coastal Condition Assessment 2015 Field Operations Manual Version 1.0 May 2015 Page 88
• Sea Grant Program (http://www.sgnis.org) • USDA Animal and Plant Health Inspection Service (http://aphis.usda.gov)
14.8.1 BOAT & TRAILER CLEANUP While your organizations likely have protocols in place to account for these precautions, the following are some procedures and checks to perform on your equipment:
1. Load the boat on the trailer. 2. Drain all bilge water from the boat. 3. Inspect the boat, motor, and trailer for evidence of weeds and other
macrophytes. 4. Clean the boat, motor, and trailer as completely as possible before leaving the
launch site. • Follow any state or other requirements associated with nuisance species,
pathogens and/or viruses.
14.8.2 POST SAMPLING EQUIPMENT CARE 1. Inspect sampling gear (seines, dip nets, sieves, foul weather gear, boots, etc.)
for evidence of mud, snails, plant fragments, algae, animal remains or debris. Rinse and remove using brushes or other tools. Use one of the procedures below to disinfect gear if necessary. Let dry.
2. Pack all equipment and supplies in the vehicle and trailer for transport. 3. Keep equipment and supplies organized so they can be inventoried using the
equipment and supply checklists (Appendix A: Equipment and Supplies Lists). 4. Clean up all waste material at the launch site and dispose of or transport it out
of the site if a trash can is not available.
14.8.3 ADDITIONAL DECONTAMINATION INFORMATION Additional precautions to prevent transfer of Whirling Disease spores, New Zealand mudsnails, and amphibian chytrid fungus are important for Great Lakes sites. Before visiting the site, research the site and determine if it is in an area where one of these organisms are known to exist. Contact the local or State fishery biologist to confirm the presence or absence of these organisms.
If the site is listed as “positive” for any of the organisms, or no information is available, avoid using felt-soled wading boots. After sampling, disinfect all fish and benthos sampling gear and all other equipment that came into contact with water or sediments (i.e., waders, boots, etc.) by one of the following procedures:
Option A:
1. Soak gear in a 10% household bleach solution for at least 10 minutes, or wipe or spray on a 50% household bleach solution and let stand for 5 minutes.
2. Rinse with tap water (do not use sea or lake water) and remove remaining debris.
3. Place gear in a freezer overnight, soak in a 50% solution of Formula 409® antibacterial cleaner for at least 10 minutes or soak gear in 120°F (49°C) water for at least 1 minute.
4. Dry gear in direct sunlight (at least 84 °F) for at least 4 hours.
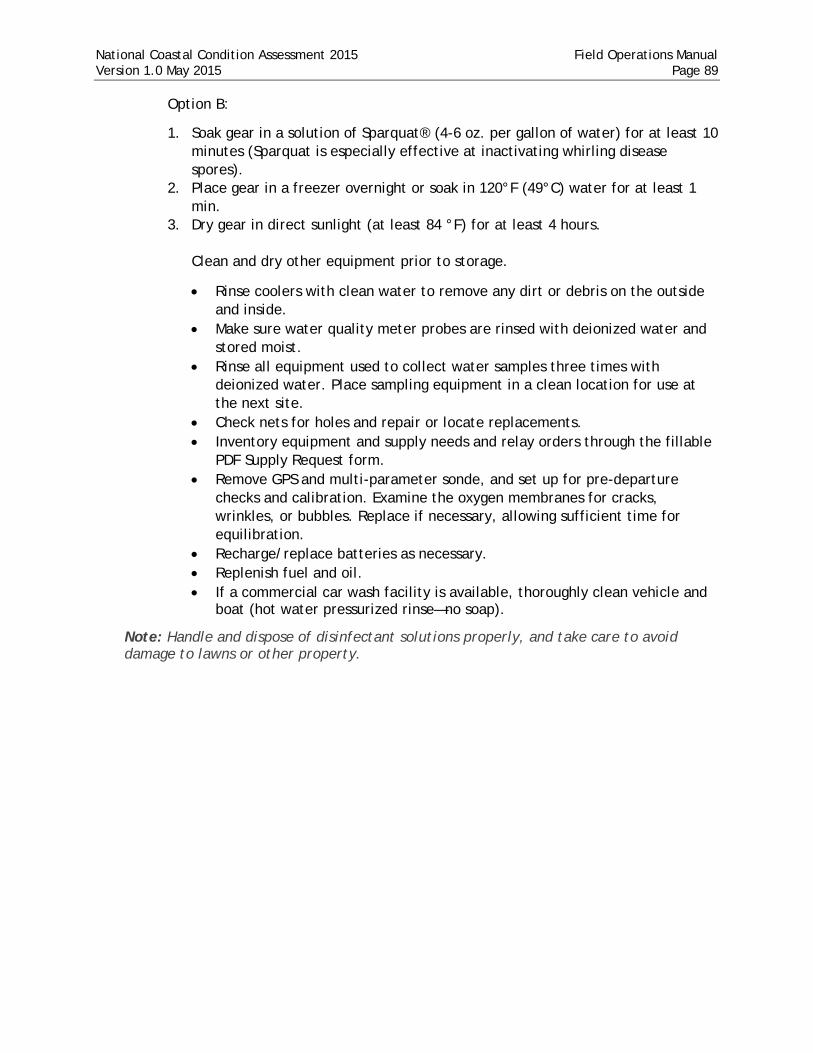
National Coastal Condition Assessment 2015 Field Operations Manual Version 1.0 May 2015 Page 89
Option B:
1. Soak gear in a solution of Sparquat® (4-6 oz. per gallon of water) for at least 10 minutes (Sparquat is especially effective at inactivating whirling disease spores).
2. Place gear in a freezer overnight or soak in 120°F (49°C) water for at least 1 min.
3. Dry gear in direct sunlight (at least 84 °F) for at least 4 hours. Clean and dry other equipment prior to storage.
• Rinse coolers with clean water to remove any dirt or debris on the outside and inside.
• Make sure water quality meter probes are rinsed with deionized water and stored moist.
• Rinse all equipment used to collect water samples three times with deionized water. Place sampling equipment in a clean location for use at the next site.
• Check nets for holes and repair or locate replacements. • Inventory equipment and supply needs and relay orders through the fillable
PDF Supply Request form. • Remove GPS and multi-parameter sonde, and set up for pre-departure
checks and calibration. Examine the oxygen membranes for cracks, wrinkles, or bubbles. Replace if necessary, allowing sufficient time for equilibration.
• Recharge/replace batteries as necessary. • Replenish fuel and oil. • If a commercial car wash facility is available, thoroughly clean vehicle and
boat (hot water pressurized rinse—no soap).
Note: Handle and dispose of disinfectant solutions properly, and take care to avoid damage to lawns or other property.

National Coastal Condition Assessment 2015 Field Operations Manual Version 1.0 May 2015 Page 90
15 POST-SAMPLING ACTIVITIES
15.1 SAMPLE SHIPPING Samples that are less time sensitive will be shipped in batches, according to the chart in Appendix C: Shipping and Tracking Guidelines. The Field Crew Leader will complete the appropriate batch tracking form(s) for the samples and will email electronic copies of the form(s) to [email protected] or submit tracking via the NCCA App (other submittal options are provided in Section 15.3). Please name these files in the following format: NCCA15_T#_Tracking_SiteID_V#, where 'T#' is the number of the tracking form and 'V#' is the visit number (i.e. NCCA15_T1_Tracking_NCCA15-1061_V1).
The Field Crew Leader will place the samples and the correct batch tracking form (in a waterproof bag or plastic sleeve) in a requested batch shipment cooler. The Field Crew Leader will attach the appropriate pre-addressed FedEx airbill from the site kit marked for the appropriate lab. The field crew will either drop off the cooler for shipment at a local FedEx location or arrange for a pick up at the hotel or other appropriate facility. If the field crew has chosen a pick up, they must follow up with the facility at which it has been left and/or track the package through FedEx tracking tools to ensure its actual pick up. Once the package is in the possession of FedEx, the IM Team and FLC will track the package to its destination and take steps necessary to ensure its timely delivery.
15.2 TRACKING FORM SUBMITTAL Each tracking form has been assigned a “T” page number to help crews identify the correct tracking form to use when sending samples. This “T” number is located on the bottom right corner of each tracking form. Crews will also find reference to the same “T” numbers on the individual samples labels and on the top of the pre-printed FedEx return labels provided in the site kits.
Crews include copies of all tracking forms in the coolers when they send samples to the labs. They have several different options for electronically submitting sample and tracking information. A hard copy of the sample tracking form must be submitted to the lab in the cooler and an electronic copy must be submitted to NARS IM using one of four options. If a cooler contains samples from more than one site, then multiple forms must be placed in the cooler and submitted to NARS IM.
In order of preference, the options are:
1. Using the NCCA mobile App, enter data and tracking information into the NCCA App and submit the tracking information. An email will pop up on your device with an attachment and the [email protected] address. Copy yourself, any other crew members or managers, and click send. This form will be returned to you via email after a few minutes in a portable document format (PDF). It may be printed and used as the form for the cooler shipment.
2. Using a handheld device or portable computer, enter data into fillable portable document format (PDF) forms and submit. Please name these files in the following format: NCCA15_T#_Tracking_SiteID_V#, where 'T#' is the number

National Coastal Condition Assessment 2015 Field Operations Manual Version 1.0 May 2015 Page 91
of the tracking form and 'V#' is the visit number (i.e. NCCA15_T1_Tracking_NCCA15-1061_V1) before emailing or using the SUBMIT button. Send the file via email to [email protected]. It may be printed and used as the form for the cooler shipment.
3. Hand-enter data on a paper form. Photograph the form with a handheld device or office scanner. Attach the file (in PDF version) to an email and address to [email protected]. Please name these files in the following format: NCCA15_T#_Tracking_SiteID_V#. Be sure that the file scanned is clear and legible. Genius Scan or Cam Scanner are great apps that are available for free that will help to ensure that the scan is clear and legible. Copy yourself any other crew members or managers, and click send. After scanning, include this form in the cooler.
4. Hand-enter data on a paper form. Fax the form to the number printed on the form. After faxing include this form in the cooler.
If the crew visits a site with the intention of sampling, but determines the site to be unsampleable (either temporarily or permanently), the site status portion of the Site and Sample Status/Water Chemistry Lab Tracking form needs to be completed and submitted, but the water chemistry and batch sample status tracking portion of the form can remain blank. The Field Crew Leader must also submit the Site Verification (Front) form for the site, which contains additional information about the site that is not captured on the tracking form. This can be submitted with the packet of field forms that gets sent out every two weeks. For ease of use, these two forms are available in fillable PDF form on the EPA SharePoint site.
Regardless of the type of sample being shipped, a completed tracking form must be placed inside the cooler with the samples (typically sealed in a plastic bag or pouch and affixed to the inside of the cooler lid). Again, crews may choose to complete either the digital or manual forms. In addition to sending the tracking forms with the shipment, a copy of the tracking form must be submitted to the NARS IM staff at [email protected] before the samples are due to arrive at the lab. The various tracking forms are listed in Appendix C: Shipping and Tracking Guidelines.
15.3 DATA SUBMITTAL
15.3.1 APP USERS For crews utilizing the mobile App, after the Field Crew Leader has reviewed form content at the end of your sampling day, click the submit button. An email will pop up on your device addressed to [email protected]. Copy yourself, any other crew members or managers and click send.
15.3.2 PAPER FORM USERS Every two weeks, the Field Crew Leader will batch the field data forms together and send them to NARS IM. After checking the field data forms for completeness, legibility, accuracy, and consistency, the Field Crew Leader will make scans or copies of them. The Field Crew Leader will complete a Tracking: Packs form for the data packets and will email that form to [email protected]. The Field Crew Leader will place the original field data forms and batch tracking form in the FedEx envelope provided in the site kit.

National Coastal Condition Assessment 2015 Field Operations Manual Version 1.0 May 2015 Page 92
The Field Crew Leader will attach the pre-addressed FedEx airbill from the site kit, and send the original forms to NARS IM via FedEx.
Note: The original forms are specially printed to be used in an optical scanner for automated data entry. Copies of forms will not scan properly and are not acceptable for entering field data. All field forms must be turned in within 2 weeks of completing sampling. A tracking form will be submitted with each shipment of data forms and the data forms will be tracked in the same manner as all other samples.
15.4 TRACKING REMINDERS It is very important to submit the Site and Sample Status/Water Chemistry Lab Tracking form immediately after every sampling event. Prompt status reports allow the FLC to closely track sampling progress. More importantly, it enables NARS IM to track samples that were collected at each site versus those that were not, and to immediately track the shipment of the time-sensitive samples after each sampling event.
The field crews must promptly report any field sampling problems to the FLC and report sample tracking or data reporting problems to NARS IM. They will follow up with the EPA NCCA 2015 Lead throughout the sampling period.
The EPA Logistics Coordinator serves as the central point of contact for information exchange among field crews, the management and QA staff, the NARS IM staff, and the public. The EPA Logistics Coordinator and Contractor Field Logistics Coordinator contact information can be found on Table 1.1 of this manual.
15.5 SITE EVALUATION SPREADSHEET SUBMITTAL Throughout the field season or at the end of the field season, EPA HQ needs field crews to submit their completed Site Evaluation Spreadsheets. These are critical to determining site weights used in data analysis. Please submit these forms to the FLC and EPA Logistics Coordinator within two weeks of completion of your last site.

National Coastal Condition Assessment 2015 Field Operations Manual Version 1.0 May 2015 Page 93
16 FIELD QUALITY CONTROL The NCCA program requires that all cooperators and field crews follow strict quality assurance and quality control guidelines. Standardized training and data forms set the foundation to help ensure that data quality standards for field sampling are met. In addition, repeat sampling and field evaluation and assistance visits address specific aspects of the data quality standards for the NCCA.
16.1 STANDARDIZED TRAINING All Field Crew Leaders must attend a formal three day NCCA training prior to participating in field sampling for the NCCA and all field crew members are encouraged to attend. The training, which is divided into classroom and hands-on field sessions, is designed to reduce sampling variability, and subsequently ensure data comparability from crew to crew and site to site. Standardized training allows the EPA to collect field crew input that will help to identify potential sampling pitfalls and troubleshoot solutions. The entire three day training session is required to qualify a crew for sampling activities.
16.2 STANDARDIZED FIELD DATA FORMS All field crews, with the exception of crews collecting samples in the Great Lakes, collect and record data using identical field forms. The Great Lakes has one additional two-sided data form (D11 & D12) and two additional tracking forms to complete (T7 & T8). These identical forms serve several purposes. First, they ensure that all crews measure and record the same parameters. Second, use of identical field forms promotes efficient data entry and minimizes the opportunities for data transcription errors. Finally, the use of identical forms facilitates field form quality control reviews when data are received at NARS IM.
Paper field forms and the NARS App have been developed for data collection and contain the same data.
16.3 REPEAT SAMPLING The NCCA collects temporal repeat samples in order to estimate site measurement and index period variance. Repeat sampling provides data that can be used to evaluate the potential for the NCCA design to estimate status and detect trends in the target site population.
During the field season, crews will revisit approximately 10% of the target sites as designated in the EPA site list with “RVT2” in the panel code. In order to ensure that sampling procedures are as comparable as possible from the first visit to the second visit, the same field crew who initially sampled the site also conducts the revisit. During site revisits, crews collect the full set of samples and in situ measurement parameters (except all fish tissue samples, which are targeted only on the first visit). At Great Lakes revisit sites that are also human health fish tissue sites, crews that are unsuccessful at collecting the human health fish tissue sample during visit 1 are expected to attempt the collection of that sample during visit 2. When sampling sites are identified as revisit sites, crews collect Enterococci filter blanks during both the initial visit and the revisit. The crews

National Coastal Condition Assessment 2015 Field Operations Manual Version 1.0 May 2015 Page 94
must always collect the filter blanks before the sample is filtered. See Section 14.2.3 for the procedure for collecting filter blanks.
The NCCA identifies sites targeted for repeat visits in the state’s site draw. The number of repeat visit sites varies from state to state, depending on the number of base sites drawn within the state. If a site selected for repeat sampling is dropped, then the alternate site assigned to replace it becomes the revisit site. The time elapsed between the initial and repeat site visits should be as long as possible within the index period, but not shorter than two weeks.
16.4 FIELD EVALUATION AND ASSISTANCE VISITS A rigorous program of field and laboratory evaluation and assistance visits supports the quality assurance and control for the NARS. The following sections focus only on the field evaluation and assistance visits.
By coupling assistance visits conducted early in the data collection process with uniform training, sampling variability associated with specific implementation or interpretation of the protocols will be significantly reduced. Field evaluation and assistance visits provide an opportunity to ensure that crews follow field procedures and meet minimum quality control requirements. In addition, assistance visits allow for uniform evaluation of the standard NCCA data collection methods. When widespread problems or confusion surround a given method, the information from assistance visits contributes to refining the method for sites that are yet to be sampled and in future field manuals.
The field evaluators observe and review the information listed on the Field Evaluation and Assistance Visit Checklist. An assistance visit has been scheduled to evaluate each unique crew collecting and contributing data under this program. If unforeseen events prevent the EPA from evaluating every crew, the NCCA Quality Assurance Coordinator (QAC) will rely on the data review and validation process to identify unacceptable data that will not be included in the final database. If inconsistencies cannot be resolved, the QAC may contact the Field Crew Leader for clarification.
16.4.1 SPECIFICATIONS FOR QC ASSURANCE Field evaluation and assistance personnel are trained in the specific data collection methods detailed in this FOM. A plan and checklist for field evaluation and assistance detail the methods and procedures that will be evaluated. The plan and checklist are included as Attachment D in the QAPP and will be posted on the SharePoint site for crews to access. Table 16.1 summarizes the plan, the checklist, and corrective action procedures.

National Coastal Condition Assessment 2015 Field Operations Manual Version 1.0 May 2015 Page 95 Table 16.1 General information noted during field evaluation
Field Evaluation Plan
• Regional Coordinators or another assigned trained individual arrange the field assistance visit with each field crew, ideally within the first two weeks of sampling.
• The Evaluator observes the performance of a crew through one complete set of sampling activities.
• If the crew misses or incorrectly performs a procedure, the Evaluator notes it on the checklist and immediately points it out so the mistake can be corrected on the spot.
• The Evaluator reviews the results of the evaluation with the field crew before leaving the site, noting positive practices as well as problems.
Field Evaluation and Assistance Visit Checklist
• The Evaluator observes all pre-sampling activities and verifies that equipment is properly calibrated and in good working order, and that NCCA protocols are followed.
• The Evaluator checks the sample containers to verify that they are the correct type and size, and checks the labels to be sure they are correctly and completely filled out.
• The Evaluator confirms that the field crew has followed NCCA protocols for locating the site. • The Evaluator observes the complete set of sampling activities, confirming that all protocols are
followed. • The Evaluator will record responses or concerns, if any, on the Field Evaluation and Assistance
Visit Checklist. Corrective Action Procedures
• If the Evaluator's findings indicate that the field crew is not performing the procedures correctly, safely, or thoroughly, the Evaluator must continue working with this field crew until certain of the crew's ability to conduct the sampling properly and minimize adverse effects on data quality.
• If the Evaluator finds major deficiencies in the field crew operations, the Evaluator must contact the NCCA QA Coordinator immediately (e.g., within 24-48 hours) so that additional correction actions can be taken.
The EPA anticipates that evaluation and assistance visits will be conducted with each Field Crew early in the sampling and data collection process, and that corrective actions will be conducted in real time. The role of the Evaluator is to provide additional training and guidance so that the procedures are being performed in a manner consistent with the Field Operations Manual, all data are recorded correctly, and paperwork is properly completed at the site. If the field crew misses or incorrectly performs a procedure, the Evaluator will note the error on the checklist, immediately point it out and direct the crew to correct it on the spot.
16.4.2 REPORTING Upon completion of the sampling operations, the Evaluator will review the results of the evaluation with the Field Crew before leaving the site (if practicable). The evaluator will note positive practices and problems (termed weaknesses if they might affect data quality or deficiencies if they would adversely affect data quality). The Evaluator ensures that all crew members understand the findings and can perform the procedures properly in the future. The Evaluator will record field crew responses or concerns, if any, on the Field Evaluation and Assistance Visit Checklist. After the Evaluator completes the Field Evaluation and Assistance Visit Checklist, including a brief summary of findings, all field crew members must read and sign off on the evaluation.
If after directing the crew to correct problems, findings indicate that the field crew is not performing the procedures correctly, safely or thoroughly, the Evaluator must continue

National Coastal Condition Assessment 2015 Field Operations Manual Version 1.0 May 2015 Page 96
working with this field crew until certain of the crew's ability to conduct the sampling properly. If the Evaluator finds major deficiencies in the field crew operations (e.g., major misinterpretation of protocols, equipment or performance problems that will adversely affect data quality), they must be reported to the following QA official:
• Hugh Sullivan, EPA NCCA QA Coordinator
The QAC official will contact the Project Manager to determine the appropriate course of action. Data records from sampling sites previously visited by this field crew will be checked to determine whether any sites must be resampled.

National Coastal Condition Assessment 2015 Field Operations Manual Version 1.0 May 2015 Page 97
17 LITERATURE CITED American Red Cross. 2006. First Aid/CPR/AED for schools and the community. Third edition. 210 pgs. Klemm, D. J., P. A. Lewis, F. Fulk, and J. M. Lazorchak. 1990. Macroinvertebrate Field and Laboratory Methods for Evaluating the Biological Integrity of Surface Waters. EPA 600/4-90/030. U.S. Environmental Protection Agency, Cincinnati, Ohio. National Institute for Occupational Safety and Health. 1981. Occupational Health Guidelines for Chemical Hazards (Two Volumes). NIOSH/OSHA Publication No. 81-123. U.S. Government Printing Office, Washington, D.C. Occupational Safety & Health Administration (OSHA). 2006. Regulations (Standards - 29 CFR). Substance technical guidelines for formalin - 1910.1048 App A. Occupational Safety & Health Administration. Washington, DC 20210. Schriver et al. 1995. Impact of Submerged Macrophytes on Fish-Zooplankton- Phytoplankton Interactions - Large-Scale Enclosure Experiments in a Shallow Eutrophic Lake. Freshwater Biology 33, no. 2: 255-70. U.S. Coast Guard. 1989. Federal Requirements for Recreational Boats. U.S. Department of Transportation, United States Coast Guard, Washington, D.C. 27 pgs. USEPA. 2001. National Coastal Assessment: Field Operation Manual. EPA-620-R-01-003. U.S. Environmental Protection Agency., Office of Research and Development, National Health and Environmental Effects Research Laboratory. USEPA. 2000a. EPA Quality Manual for Environmental Programs 5360A1. May 2000. http://www.epa.gov/quality/qs-docs/5360.pdf USEPA. 2000b. EPA Order 5360.1 A2 CHG2, Policy and Program Requirements for Mandatory Agency-wide Quality System, May 5, 2000. http://www.epa.gov/quality/qs-docs/5360- 1.pdf USEPA. 2001. Methods for Collection, Storage, and Manipulation of Sediments for Chemical and Toxicological Analyses: Technical Manual. EPA-823-B-01-002. U. S. Environmental Protection Agency, Office of Water, Washington, D.C. USEPA. 2015. National Coastal Condition Assessment Quality Assurance Project Plan. EPA-841-R-14-005. U.S. Environmental Protection Agency. Office of Water, Washington, DC. Li-COR. 2006. LI-COR Underwater Radiation Sensors Instruction Manual: LI-192 Underwter Quantum Sensor LI-193 Spherical Quantum Sensor. LI-COR, Inc., Lincoln, Nebraska.
Web Pages:
Aquatic Nuisance Species Task Force (http://www.anstaskforce.gov) U.S. Geological Survey Nonindigenous Aquatic Species website (http://nas.er.usgs.gov)

National Coastal Condition Assessment 2015 Field Operations Manual Version 1.0 May 2015 Page 98
Protect Your Waters website, co-sponsored by the U.S. Fish and Wildlife Service (http://www.protectyourwaters.net/hitchhikers) Sea Grant Program (http://www.sgnis.org) USDA Animal and Plant Health Inspection Service (http://aphis.usda.gov)
The Code of Federal Regulations (49 CFR Section 173.150)
National Coastal Condition Assessment 2015: Quality Assurance Project Plan (EPA-841-R-14-005) National Coastal Condition Assessment 2015: Site Evaluation Guidelines (EPA-841-R-14-006) National Coastal Condition Assessment 2015: Field Operations Manual (EPA-841-R-14-007) National Coastal Condition Assessment 2015: Laboratory Operations Manual (EPA-841-R-14-008)
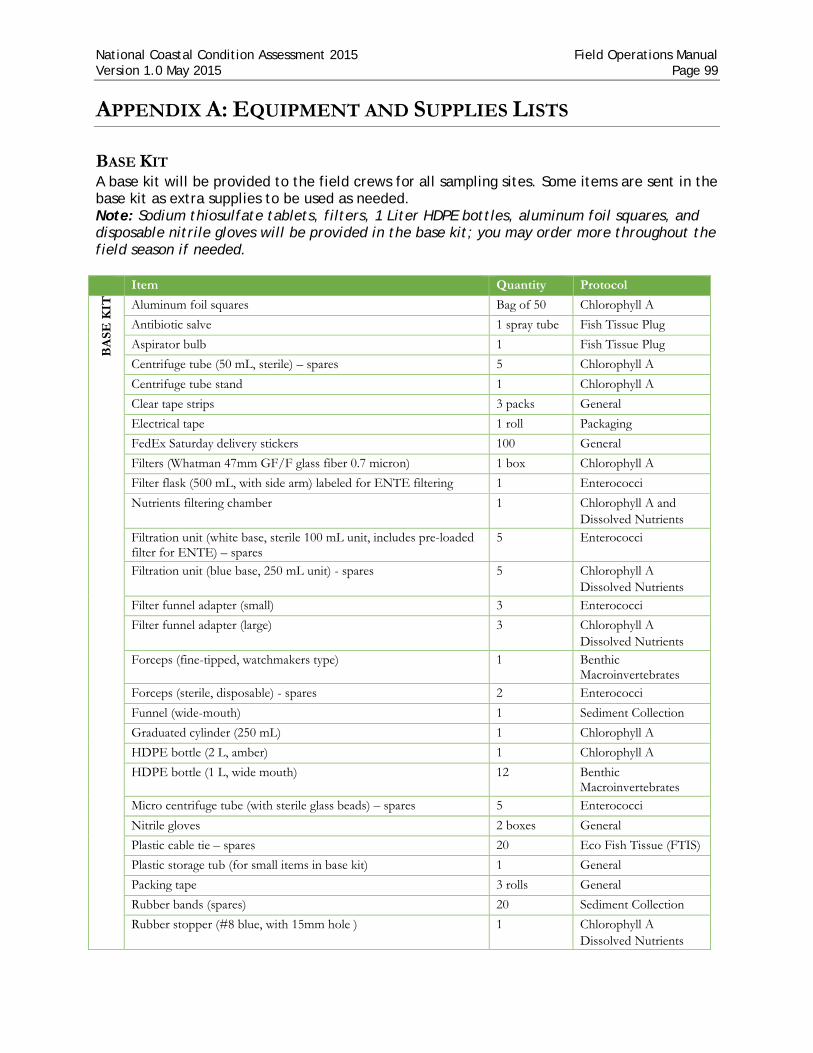
National Coastal Condition Assessment 2015 Field Operations Manual Version 1.0 May 2015 Page 99
APPENDIX A: EQUIPMENT AND SUPPLIES LISTS
BASE KIT A base kit will be provided to the field crews for all sampling sites. Some items are sent in the base kit as extra supplies to be used as needed. Note: Sodium thiosulfate tablets, filters, 1 Liter HDPE bottles, aluminum foil squares, and disposable nitrile gloves will be provided in the base kit; you may order more throughout the field season if needed.
Item Quantity Protocol
BA
SE K
IT
Aluminum foil squares Bag of 50 Chlorophyll A Antibiotic salve 1 spray tube Fish Tissue Plug Aspirator bulb 1 Fish Tissue Plug Centrifuge tube (50 mL, sterile) – spares 5 Chlorophyll A Centrifuge tube stand 1 Chlorophyll A Clear tape strips 3 packs General Electrical tape 1 roll Packaging FedEx Saturday delivery stickers 100 General Filters (Whatman 47mm GF/F glass fiber 0.7 micron) 1 box Chlorophyll A Filter flask (500 mL, with side arm) labeled for ENTE filtering 1 Enterococci Nutrients filtering chamber
1 Chlorophyll A and Dissolved Nutrients
Filtration unit (white base, sterile 100 mL unit, includes pre-loaded filter for ENTE) – spares
5 Enterococci
Filtration unit (blue base, 250 mL unit) - spares 5 Chlorophyll A Dissolved Nutrients
Filter funnel adapter (small) 3 Enterococci Filter funnel adapter (large) 3 Chlorophyll A
Dissolved Nutrients Forceps (fine-tipped, watchmakers type) 1 Benthic
Macroinvertebrates Forceps (sterile, disposable) - spares 2 Enterococci Funnel (wide-mouth) 1 Sediment Collection Graduated cylinder (250 mL) 1 Chlorophyll A HDPE bottle (2 L, amber) 1 Chlorophyll A HDPE bottle (1 L, wide mouth) 12 Benthic
Macroinvertebrates Micro centrifuge tube (with sterile glass beads) – spares 5 Enterococci Nitrile gloves 2 boxes General Plastic cable tie – spares 20 Eco Fish Tissue (FTIS) Plastic storage tub (for small items in base kit) 1 General Packing tape 3 rolls General Rubber bands (spares) 20 Sediment Collection Rubber stopper (#8 blue, with 15mm hole ) 1 Chlorophyll A
Dissolved Nutrients

National Coastal Condition Assessment 2015 Field Operations Manual Version 1.0 May 2015 Page 100
Item Quantity Protocol Rubber stopper (#8 white, with 10 mm hole) 1 Enterococci Sodium thiosulfate tablets Vial of 25 Enterococci Scale (in grams) 1 Fish Tissue Plug Secchi disk (20 cm diameter, weighted) 1 Water Profile 100' of 1/4 inch nylon line for Secchi disk and PAR meter (crews to mark in 0.5 m intervals)
1 Water Profile
Self-sealing bags (2 gallon) – spares 12 Eco Fish Tissue Self-sealing bags (sandwich size) – for labels – spares 100 Eco Fish Tissue Sieve box or bucket (stainless steel, 0.5 mm OR 1.0 mm for CA, OR, & WA)
1 Benthic Macroinvertebrates
Spoon, stainless steel (15”) 1 Sediment Collection Squirt bottle (for ambient water) 1 Sediment Collection Vacuum pump (hand) 1 Chlorophyll A
Enterococci Dissolved Nutrients
Tyvek tag with grommet – spares 20 Eco Fish Tissue (FTIS)
ADDITIONAL BASE KIT ITEMS – GREAT LAKES CREWS
Item Quantity Protocol
GL
BA
SE K
IT
HDPE bottle (1 L, white, narrow mouth) 1/site Phytoplankton Lugol’s 1 Phytoplankton Pipet (10 mL) 2 Phytoplankton Pipet bulb 1 Phytoplankton Seaviewer underwater camera system (with DVR, GPS, cables, case)
1 Underwater video
SITE KIT A site kit will be provided to the field crews for each sampling site. Please submit an electronic request form well in advance of field sampling. Kits must be requested at least three weeks before sampling is to take place. Each site kit will also include necessary coolers and shipping supplies for all samples collected. Prior to sampling, inspect each site kit to ensure all supplies are included. Some items may not be used at all sites and should be held until the end of the field season and shipped back.
The Field Crew Leader MUST provide a general schedule in order to receive the site kits. These kits include:
Item Quantity Protocol
SIT
E K
IT
Bubble bag (microcentrifuge tubes in this) 1 Enterococci (Shipping) Bucket, screw top (0.6 gallon) 1 Sediment Toxicity Centrifuge tube (50 mL, sterile) 1 Chlorophyll A
Enterococci Cooler(s) 1 Shipping FedEx air bills (pre-addressed) plus handle tags, zip ties, etc. Shipping

National Coastal Condition Assessment 2015 Field Operations Manual Version 1.0 May 2015 Page 101
Item Quantity Protocol Filtration unit (white base, sterile 100 mL units, includes pre-loaded filter for ENTE)
2 Enterococci
Filtration unit (blue base, 250 mL unit) 1 Chlorophyll A Dissolved Nutrients
Fish Tissue Plug Kit Biopsy punch (sterile, disposable) Disposable forceps (sterile) Glass scintillation vial (20 mL)
Scalpel (sterile, disposable) Bubble bag for vial Outer bag for vial
1 1 1 1 1 1 1
Fish Tissue Plugs
Forceps (sterile, disposable) 2 Enterococci Chlorophyll A
Glass jar (120 mL, amber) 1 Sediment Organics/Metals
Glass jar (60 mL, amber) 1 Sediment TOC HDPE bottle (250 mL, white) 1 Dissolved Nutrients HDPE bottle (250 mL, amber) 1 Water Chemistry HDPE bottle (250 mL, white, sterile) 1 Enterococci HDPE bottle (500 mL, white, wide mouth) 2 Algal Toxin
Microcystin HDPE bottle (1 L, white, wide mouth) 1 Benthic
Macroinvertebrates Plastic bag (large, composite) 1 Eco Fish Tissue
Plastic bag (sandwich size) for CHLA tube 1 Chlorophyll A
Plastic bag (quart) 2 Sediment Grain Size
Plastic cable ties 1 Eco Fish Tissue
Self-sealing bags (2 gallon) 2 Eco Fish Tissue
Self-sealing bags (sandwich size) – for eco fish labels 2 Eco Fish Tissue
Sterile phosphate buffer solution (PBS) 1 jar Enterococci Tyvek tags with grommets 10 Eco Fish Tissue
FORM & LABEL PACKET A form & label packet will be provided to the field crews for all sampling sites (separately from site kits). Please submit an electronic request form well in advance of field sampling. A packet must be requested at least three weeks before sampling is to take place. Prior to sampling, inspect each packet to ensure all forms and labels are included. Depending on what your crew is doing (type of sites and whether you are using e-forms), you may request:
• Great Lakes field forms, tracking forms & labels • Marine field forms, tracking forms & labels • Tracking forms & labels only (e-forms users)

National Coastal Condition Assessment 2015 Field Operations Manual Version 1.0 May 2015 Page 102 HUMAN HEALTH FISH TISSUE SAMPLING SITE KIT A human health fish tissue kit will be provided to the field crews for selected sampling sites (separately from site kits). Please submit an electronic request form well in advance of field sampling. Kits must be requested at least three weeks before sampling is to take place. Prior to sampling, inspect each human health fish tissue kit to ensure all supplies are included. These kits include:
Item Quantity Protocol
HH
FIS
H T
ISSU
E K
IT
Aluminum foil (solvent rinsed & baked) 5 Packaging Cooler (blue) 1 Storage & Shipping Dry ice (Class 9) shipping label 1 Shipping FedEx airbill (pre-addressed) 1 Shipping Nitrile gloves 5 pairs Packaging Plastic bags (large, composite) 1 Packaging Plastic cable ties 12 Packaging Polyethylene tubing (heavy-duty, food grade) 1 roll Packaging Tyvek tags with grommets 1 Packaging
CREW SUPPLIED EQUIPMENT
Item Quantity Protocol
GE
NE
RA
L Active/passive fish sampling device (e.g. trawl, seine, hook & line, etc.) Fish Collection Alconox Sediment Collection Barometer (for calibration) Water Profile Batteries (AA) GPS, Water Profile,
Underwater Video Bleach (1-10% solution) Decontamination Borax Sediment Collection Buckets (large) Sediment Collection Calibration cups & standards Profile Cell phone, 2-way radios, walkie talkies General Clipboard(s) 1-2 General De-ionized water (lab certified preferred, not required) Water Profile Digital camera (with extra memory card & batteries) General Dip net 1 Fish Collection Dry ice ~50 lbs/site Shipping Fine-tipped, indelible markers General Formalin (100% buffered) with stain Sediment Collection Fuses (10 amp) Underwater Video GPS unit (with manual & reference card, extra battery pack); General Graduated cylinder (for measuring formalin) 1 Benthos Knife General Livewell/buckets with aerator Fish Collection Maps & access instructions General Measuring board (mm scale) 1 Fish Collection
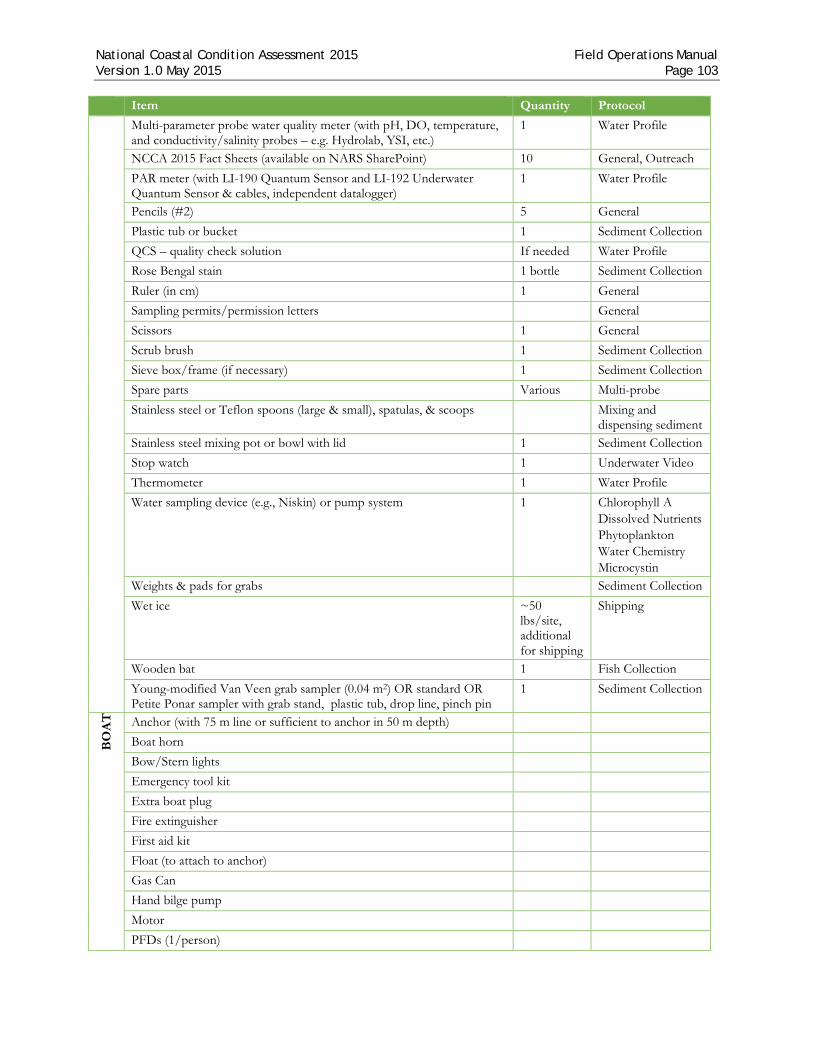
National Coastal Condition Assessment 2015 Field Operations Manual Version 1.0 May 2015 Page 103
Item Quantity Protocol Multi-parameter probe water quality meter (with pH, DO, temperature, and conductivity/salinity probes – e.g. Hydrolab, YSI, etc.)
1 Water Profile
NCCA 2015 Fact Sheets (available on NARS SharePoint) 10 General, Outreach PAR meter (with LI-190 Quantum Sensor and LI-192 Underwater Quantum Sensor & cables, independent datalogger)
1 Water Profile
Pencils (#2) 5 General Plastic tub or bucket 1 Sediment Collection QCS – quality check solution If needed Water Profile Rose Bengal stain 1 bottle Sediment Collection Ruler (in cm) 1 General Sampling permits/permission letters General Scissors 1 General Scrub brush 1 Sediment Collection Sieve box/frame (if necessary) 1 Sediment Collection Spare parts Various Multi-probe Stainless steel or Teflon spoons (large & small), spatulas, & scoops Mixing and
dispensing sediment Stainless steel mixing pot or bowl with lid 1 Sediment Collection Stop watch 1 Underwater Video Thermometer 1 Water Profile Water sampling device (e.g., Niskin) or pump system 1 Chlorophyll A
Dissolved Nutrients Phytoplankton Water Chemistry Microcystin
Weights & pads for grabs Sediment Collection Wet ice ~50
lbs/site, additional for shipping
Shipping
Wooden bat 1 Fish Collection Young-modified Van Veen grab sampler (0.04 m2) OR standard OR Petite Ponar sampler with grab stand, plastic tub, drop line, pinch pin
1 Sediment Collection
BO
AT
Anchor (with 75 m line or sufficient to anchor in 50 m depth) Boat horn Bow/Stern lights Emergency tool kit Extra boat plug Fire extinguisher First aid kit Float (to attach to anchor) Gas Can Hand bilge pump Motor PFDs (1/person)

National Coastal Condition Assessment 2015 Field Operations Manual Version 1.0 May 2015 Page 104
Item Quantity Protocol Pingers Sonar unit Spare prop Spare prop shear pin Type IV PFD (throwable life saving device)

National Coastal Condition Assessment 2015 Field Operations Manual Version 1.0 May 2015 Page 105
APPENDIX B: FIELD FORMS, LABELS & TRACKING FORMS

National Coastal Condition Assessment 2015 Field Operations Manual Version 1.0 May 2015 Page 106
SITE VERIFICATION (FRONT)

National Coastal Condition Assessment 2015 Field Operations Manual Version 1.0 May 2015 Page 107 SITE VERIFICATION (BACK)
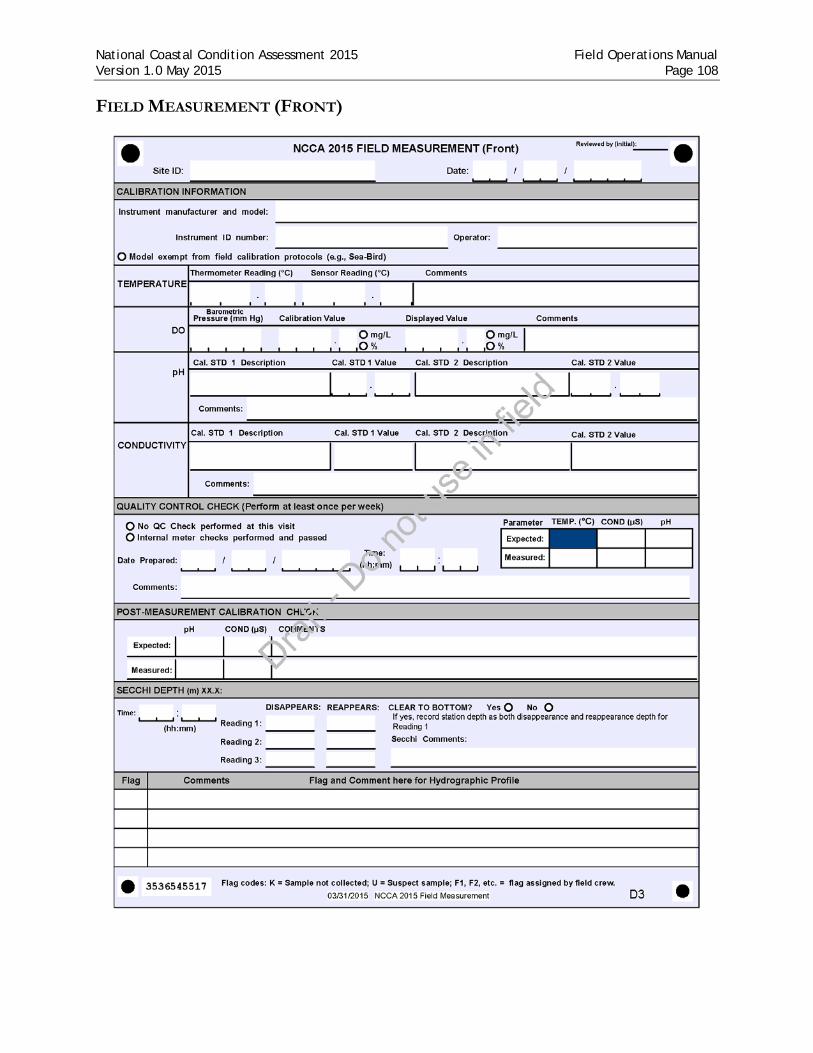
National Coastal Condition Assessment 2015 Field Operations Manual Version 1.0 May 2015 Page 108 FIELD MEASUREMENT (FRONT)

National Coastal Condition Assessment 2015 Field Operations Manual Version 1.0 May 2015 Page 109 FIELD MEASUREMENT (BACK)

National Coastal Condition Assessment 2015 Field Operations Manual Version 1.0 May 2015 Page 110 SAMPLE COLLECTION (FRONT)

National Coastal Condition Assessment 2015 Field Operations Manual Version 1.0 May 2015 Page 111 SAMPLE COLLECTION (BACK)

National Coastal Condition Assessment 2015 Field Operations Manual Version 1.0 May 2015 Page 112 ECO FISH COLLECTION (FRONT)

National Coastal Condition Assessment 2015 Field Operations Manual Version 1.0 May 2015 Page 113 ECO FISH COLLECTION (BACK)
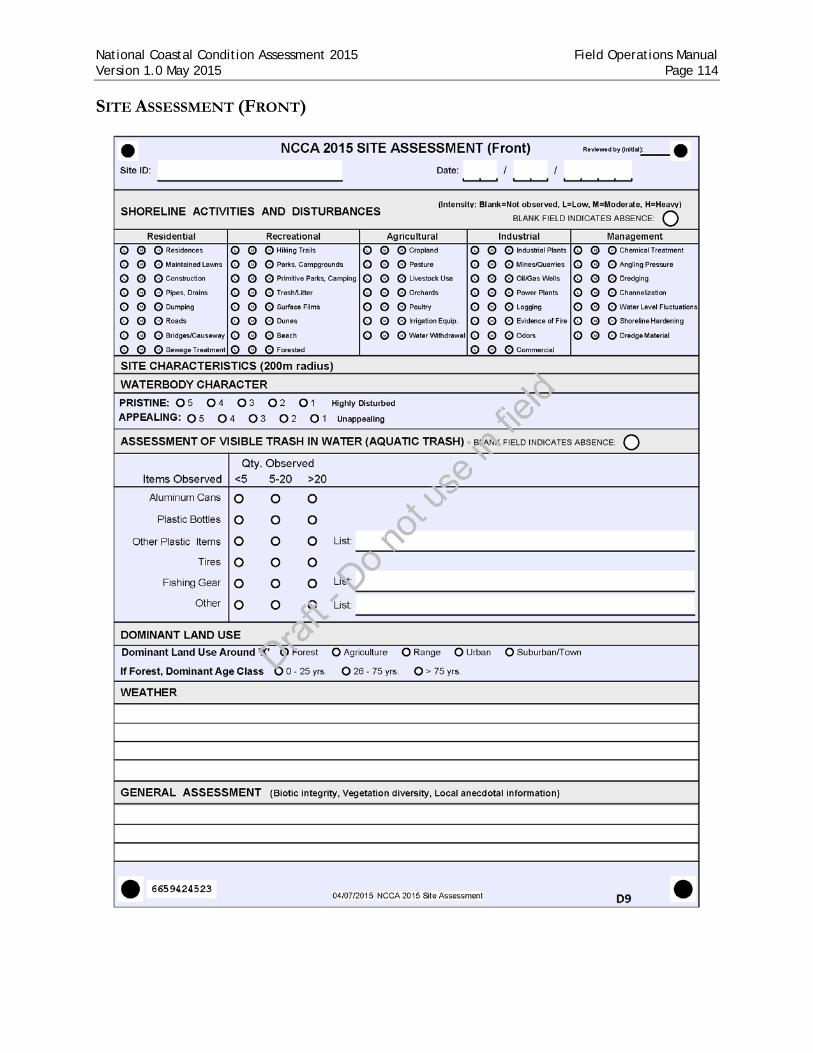
National Coastal Condition Assessment 2015 Field Operations Manual Version 1.0 May 2015 Page 114 SITE ASSESSMENT (FRONT)

National Coastal Condition Assessment 2015 Field Operations Manual Version 1.0 May 2015 Page 115 SITE ASSESSMENT (BACK)
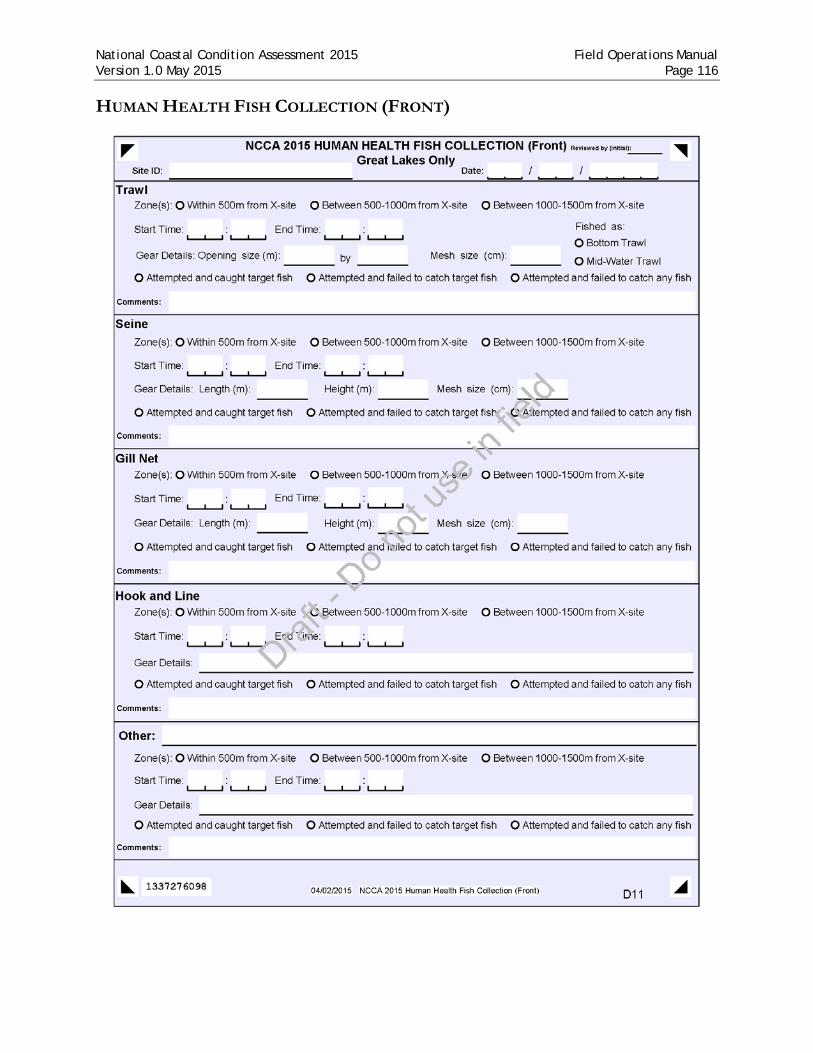
National Coastal Condition Assessment 2015 Field Operations Manual Version 1.0 May 2015 Page 116 HUMAN HEALTH FISH COLLECTION (FRONT)

National Coastal Condition Assessment 2015 Field Operations Manual Version 1.0 May 2015 Page 117 HUMAN HEALTH FISH COLLECTION (BACK)

National Coastal Condition Assessment 2015 Field Operations Manual Version 1.0 May 2015 Page 118 SAMPLE LABELS (MARINE)

National Coastal Condition Assessment 2015 Field Operations Manual Version 1.0 May 2015 Page 119 SAMPLE LABELS (GREAT LAKES)

National Coastal Condition Assessment 2015 Field Operations Manual Version 1.0 May 2015 Page 120 SITE AND SAMPLE STATUS/WATER CHEMISTRY LAB TRACKING

National Coastal Condition Assessment 2015 Field Operations Manual Version 1.0 May 2015 Page 121 TRACKING: BATCH SAMPLES - OVERNIGHT (CHILLED)

National Coastal Condition Assessment 2015 Field Operations Manual Version 1.0 May 2015 Page 122 TRACKING: BATCH SAMPLES - OVERNIGHT (DRY ICE)
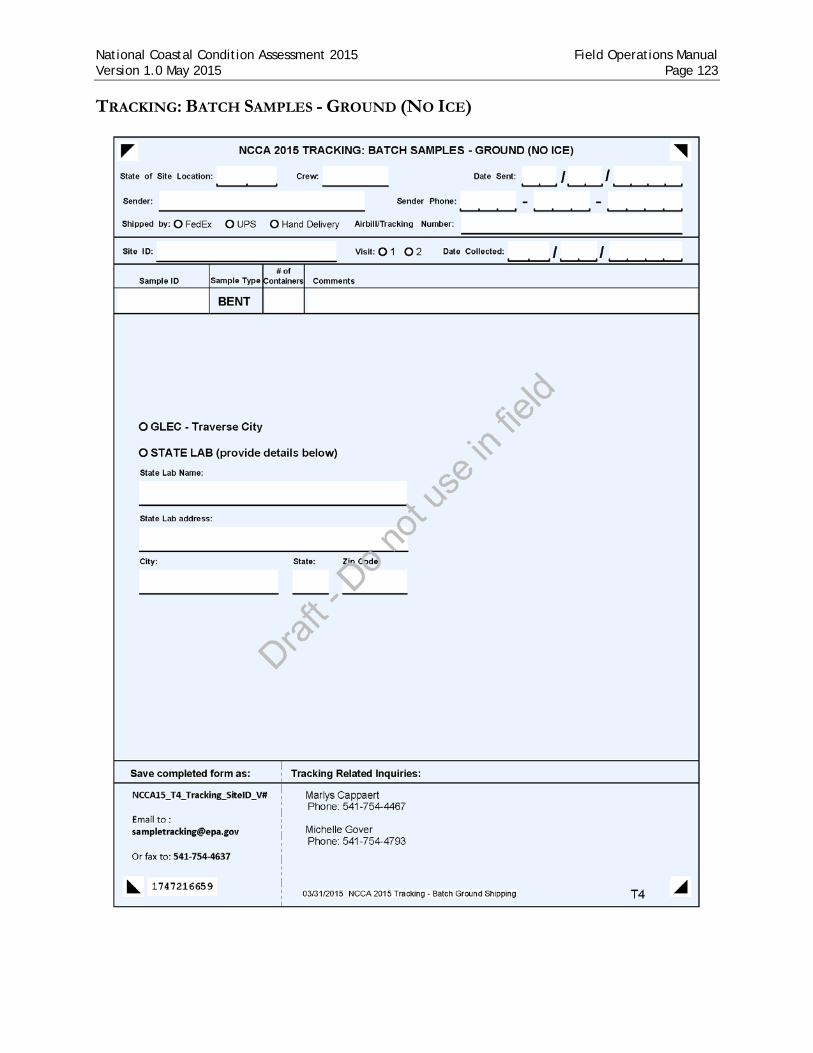
National Coastal Condition Assessment 2015 Field Operations Manual Version 1.0 May 2015 Page 123 TRACKING: BATCH SAMPLES - GROUND (NO ICE)

National Coastal Condition Assessment 2015 Field Operations Manual Version 1.0 May 2015 Page 124 TRACKING: ECO FISH TISSUE - OVERNIGHT (DRY ICE)

National Coastal Condition Assessment 2015 Field Operations Manual Version 1.0 May 2015 Page 125 TRACKING: PACKS

National Coastal Condition Assessment 2015 Field Operations Manual Version 1.0 May 2015 Page 126 TRACKING: HUMAN HEALTH WHOLE FISH SAMPLE - OVERNIGHT (DRY ICE)
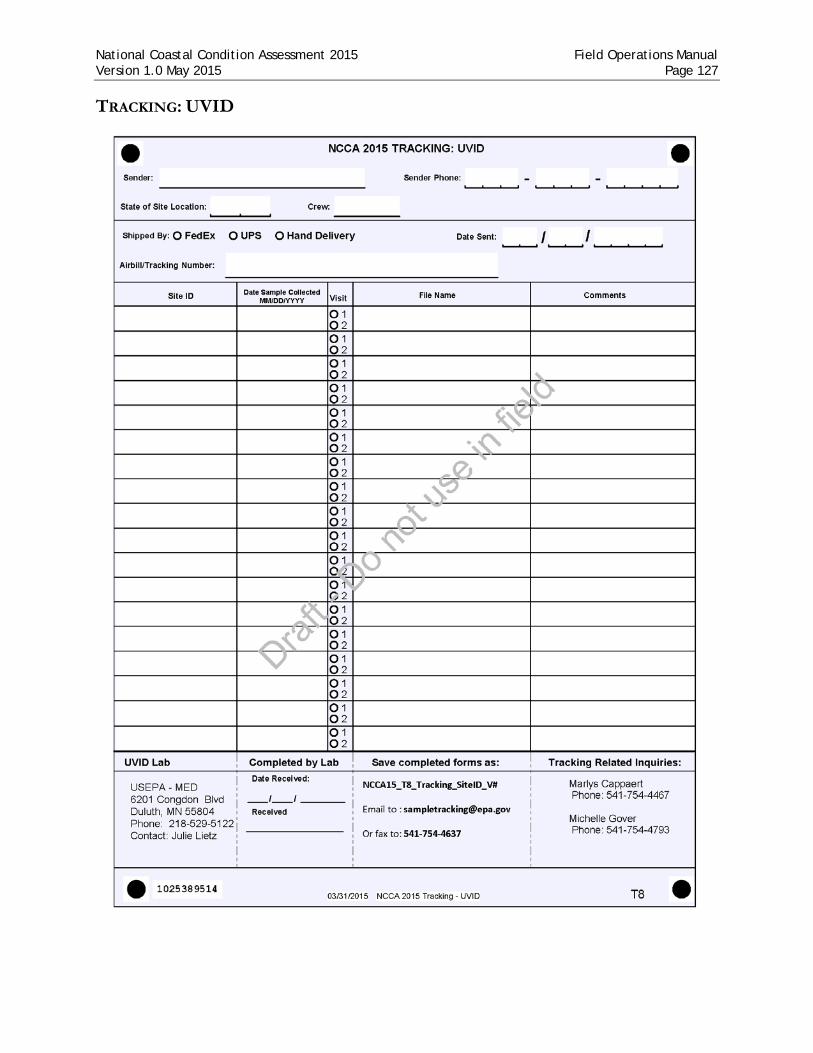
National Coastal Condition Assessment 2015 Field Operations Manual Version 1.0 May 2015 Page 127 TRACKING: UVID

National Coastal Condition Assessment 2015 Field Operations Manual Version 1.0 May 2015 Page 128
APPENDIX C: SHIPPING AND TRACKING GUIDELINES
TRACKING FORMS Each tracking form has been assigned a “T” page number to help crews identify the correct tracking form to use when sending samples. This “T” number is located on the bottom right corner of each tracking form. Crews will also find reference to the same “T” numbers on the individual samples labels and on the top of the pre-printed FedEx return labels provided in the site kits.
Crews include copies of all tracking forms in the coolers when they send samples to the labs. They have several different options for electronically submitting sample and tracking information. A hard copy of the sample tracking form must be submitted to the lab in the cooler and an electronic copy must be submitted to NARS IM using one of four options. If a cooler contains samples from more than one site, then multiple forms must be placed in the cooler and submitted to NARS IM.
In order of preference, the options are:
1. Using the NCCA mobile App, enter data and tracking information into the NCCA App and submit the tracking information. An email will pop up on your device with the [email protected] address. Copy yourself, any other crew members or managers, and click send. This form will be returned to you via email after a few minutes in a portable document format (PDF). It may be printed and used as the form for the cooler shipment.
2. Using a handheld device or portable computer, enter data into a fillable PDF form, save, and submit it via email. Please name these files in the following format: NCCA15_T#_Tracking_SiteID_V#, where 'T#' is the number of the tracking form and 'V#' is the visit number (i.e. NCCA15_T1_Tracking_NCCA15-1061_V1) before emailing or using the SUBMIT button. Send the file via email to [email protected]. It may be printed and used as the form for the cooler shipment.
3. Hand-enter data on a paper form. Photograph or scan the form with a handheld device or office scanner. Attach the file (in PDF version) to an email and address to [email protected]. Please name these files in the following format: NCCA15_T#_Tracking_SiteID_V#, where 'T#' is the number of the tracking form and 'V#' is the visit number (i.e. NCCA15_T1_Tracking_NCCA15-1061_V1). Be sure that the file scanned is clear and legible. Genius Scan or Cam Scanner are great apps that are available for free that will help to ensure that the scan is clear and legible. After scanning, include the form in the cooler.
4. Hand-enter data on a paper form. Fax the form to the number printed on the form. After faxing, include the form in the cooler.
It is very important to submit the Site and Sample Status/Water Chemistry Lab Tracking form immediately after every sampling event. Prompt status reports allow the FLC to closely track sampling progress. More importantly, it enables NARS IM to track samples that were collected at each site versus those that were not, and to immediately track the shipment of the time-sensitive samples after each sampling event.

National Coastal Condition Assessment 2015 Field Operations Manual Version 1.0 May 2015 Page 129 If the crew visits a site with the intention of sampling, but determines the site to be unsampleable (either temporarily or permanently), the site status portion of the Site and Sample Status/Water Chemistry Lab Tracking form needs to be completed and submitted, but the Water chemistry and Batch sample status tracking portion of the form can remain blank.
Daily Form:
T1 – SITE & SAMPLE STATUS/WATER CHEMISTRY LAB TRACKING FORM • Complete the Site and Sample Status/Water Chemistry Lab Tracking form for
the samples that are shipped immediately after each sampling event (water chemistry (CHEM), chlorophyll A (CHLA), dissolved nutrients (NUTS)).
• Send an electronic copy of this form to NARS IM using one of the options listed above. This serves as the “status report” for that sampling event.
• Ship all of the samples to the lab in the same cooler with a hard copy of this form.
• Samples from two sites may be shipped together in a single cooler if they were collected on the same day.
• Samples need to be shipped on fresh wet ice. • Water chemistry samples should be shipped within 24 hours of collection.
Batch Forms:
• Crews may hold BATCHED samples and ship them within the designated time frame.
• Electronically send the tracking form(s) to NARS IM when the samples are SHIPPED using one of the options listed above.
• Use one form for each site’s worth of samples in the cooler. (i.e. if you have batched samples from 4 sites in the cooler, there should be 4 forms completed).
• Include paper copies of the forms in the cooler. • All samples in the cooler should be listed on one of the included tracking
forms.
T2 –TRACKING: BATCH SAMPLES – OVERNIGHT (CHILLED) FORM • Use this form for shipping batches of chilled samples:
• Sediment toxicity • Sediment grain size • Phytoplankton (Great Lakes sites only)
• Up to 3 site's worth of samples may be shipped together in a single cooler. • Samples need to be shipped on fresh wet ice • Chilled batched samples should be shipped at least every week
T3 – TRACKING: BATCH SAMPLES – OVERNIGHT (FROZEN) FORM • Use this form for shipping batches of frozen samples:
• Microcystins • Algal Toxins • Enterococci
National Coastal Condition Assessment 2015 Field Operations Manual Version 1.0 May 2015 Page 130
• Fish tissue plugs • Sediment TOC • Sediment Organics/Metals • Ecofish samples (may be shipped separately)
• 2-3 site's worth of samples may be shipped together in a single cooler, depending on whether the ecofish sample is included and the size of the fish comprising that sample.
• Samples need to be shipped with approximately 20 pounds of dry ice • Frozen batched samples should be shipped at least every 2 weeks
T4 – TRACKING: BATCH SAMPLES – GROUND (NO ICE) FORM • Use this form for shipping batches of non-chilled samples:
• Benthic Macroinvertebrates • Up to 12 site's worth of samples may be shipped together in a single cooler,
depending on whether more than one bottle of sample was collected at a site. • Samples need to be shipped with absorbent material and no ice. • Non-chilled batched samples should be shipped every 2-3 weeks.
NOTE: Federal regulations and FedEx rules allow for ground shipping of certain quantities of flammable liquids WITHOUT the need for special certifications and labeling. Flammable liquids may NOT be shipped via air carrier unless shipper is trained and qualified to do so and specific documentation and labeling requirements are met. The Code of Federal Regulations (49 CFR Section 173.150) lists the exceptions which allow shipping of flammable liquids via ground carrier without labeling or special certifications. Ethanol and formalin can be considered to be in either Packaging Group 2 or 3, so we use the more stringent PG 2 as our guideline. The limited quantity exclusion allows ground shipping of PG 2 flammable liquids provided that the individual containers inside the package are not over 1.0 liters each, that the gross weight of the package does not exceed 66 pounds, and that the outer packaging is a sturdy container. Please ensure that your shipment meets these criteria to ensure the legal ground shipment of these samples.
T5 – TRACKING: ECO FISH TISSUE – OVERNIGHT (DRY ICE) FORM • Use this form for shipping batches of frozen eco fish samples: • Eco Fish samples may be sent in the same cooler as the other frozen batched
samples listed above or may be sent separately. • 2-4 site's worth of samples may be shipped together in a single cooler,
depending on whether eco fish are included and the size of the eco fish sample.
• Samples need to be shipped with approximately 20 pounds of dry ice • Frozen batched samples should be shipped at least every 2 weeks
T6 – TRACKING: PACKS FORM • If utilizing paper field forms, review and ship all field forms in the envelope
provided in the site kit to NARS IM every 2 weeks. • Before shipping, make copies or scans for your records and as a backup in the
event the forms are lost during shipping.

National Coastal Condition Assessment 2015 Field Operations Manual Version 1.0 May 2015 Page 131 T7 – TRACKING: HUMAN HEALTH WHOLE FISH SAMPLE – OVERNIGHT (DRY ICE) FORM [SELECT GREAT LAKES SITES ONLY]
• Use this form for shipping frozen human health fish tissue samples. • More than one site's worth of samples may be shipped together in a single
cooler, depending on the size of the fish. • Samples need to be shipped with 50 pounds of dry ice. • Human health fish tissue samples should be shipped within 2 weeks of
collection.
T8 – TRACKING: UVID FORM [GREAT LAKES ONLY] • Use this form for shipping the EPA-provided USB flash drive containing all
underwater video recorded during the season. • Before shipping, make copies of the video files for your records and as a
backup in the event the forms are lost during shipping.
SHIPPING GUIDELINES Samples will be shipped according to the chart in Appendix C: Shipping and Tracking Guidelines. The Field Crew Leader will complete the appropriate tracking form for the samples and will submit tracking via one of the options listed in the tracking forms section above. The Field Crew Leader will place the samples and the tracking form (in a waterproof bag or plastic sleeve) in a shipment cooler. The Field Crew Leader will attach the appropriate pre-addressed airbill from the site kit marked for the appropriate lab. The field crew will either drop off the cooler for shipment at a local FedEx location or arrange for a pick up at the hotel or other appropriate facility. If the field crew has chosen a pick up, they must follow up with the facility at which it has been left and/or track the package through FedEx tracking tools to ensure its actual pick up. Once the package is in the possession of FedEx, the IM Team and FLC will track the package to its destination and take steps necessary to ensure its timely delivery. Prior to shipping, there are a few other guidelines to be aware of:
Preservation
•See chart for specific preservation information for each sample
Holding Time
•Note the holding time window for each sample •Ensure that samples will be shipped in time for the lab to be able to process them within the allowable holding time frame
Shipping
•Samples may be shipped on wet ice, dry ice, or with no ice •Secure the cooler with strapping tape •See dry ice shipping protocols

National Coastal Condition Assessment 2015 Field Operations Manual Version 1.0 May 2015 Page 132
Wet Ice
• Ensure that the ice is fresh immediately prior to shipment; • Line the cooler with a large plastic liner bag. Double bag the ice with enough
white or clear 1 gallon zippered plastic bags to pack the entire cooler. • To prevent misidentification of any water leakage as a possible hazardous
material spill, use an indelible marker to label all bags of ice as “ICE”. • Place bagged samples and bags of ice inside the cooler liner and seal the liner. • Secure the cooler lid with strapping tape.
Dry Ice
• Note: Not all FedEx locations will accept shipments containing dry ice. Dry ice shipments can be shipped from “FedEx staffed” locations. You can also arrange for a pick-up from your lab or hotel. Dry ice shipments usually cannot be shipped from FedEx Kinko's Office and Print Centers® or FedEx Authorized ShipCenter® locations. These types of locations are differentiated on FedEx.com in the “Find FedEx Locations” feature. Please be sure to call in advance to ensure your location will accept the package for shipment.
• Attach the provided FedEx airbill: • Ensure that the label indicates the amount of dry ice in the package.
• Label the cooler with a Class 9 Dangerous Goods label • Place the label on the front side of the
cooler, not the top. • If it is not already completed, fill out the
upper corners of the label with the same shipper and recipient information as on the FedEx airbill.
• Declare the weight (in kg) of the dry ice in the lower right hand corner of the label, ensuring it is the same weight listed on the airbill.
• Secure the cooler lid with strapping tape. Do not completely seal the entire edge of the cooler such that pressure inside the cooler could build.
• Place the provided FedEx airbill on the top of the cooler or on a handle tag secured to one of the cooler's handles.
No Ice • Surround the jars with crumpled newpaper, vermiculite or other absorbent
material
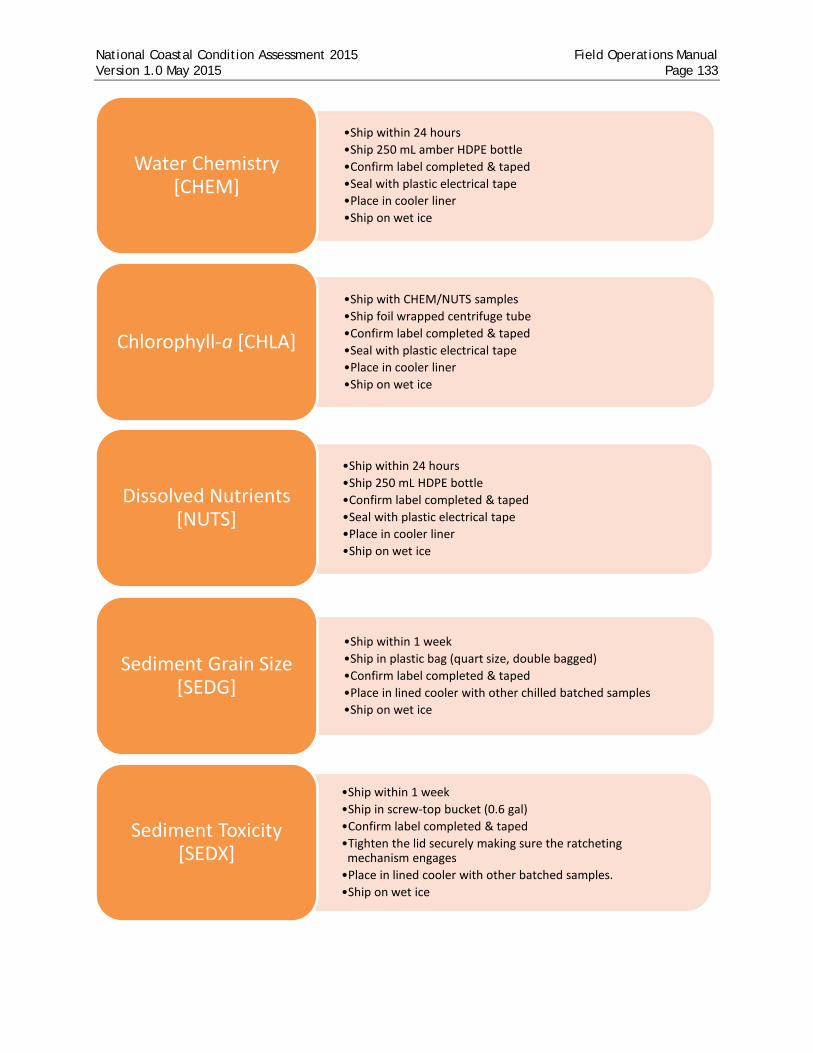
National Coastal Condition Assessment 2015 Field Operations Manual Version 1.0 May 2015 Page 133
•Ship within 24 hours •Ship 250 mL amber HDPE bottle •Confirm label completed & taped •Seal with plastic electrical tape •Place in cooler liner •Ship on wet ice
Water Chemistry [CHEM]
•Ship with CHEM/NUTS samples •Ship foil wrapped centrifuge tube •Confirm label completed & taped •Seal with plastic electrical tape •Place in cooler liner •Ship on wet ice
Chlorophyll-a [CHLA]
•Ship within 24 hours •Ship 250 mL HDPE bottle •Confirm label completed & taped •Seal with plastic electrical tape •Place in cooler liner •Ship on wet ice
Dissolved Nutrients [NUTS]
•Ship within 1 week •Ship in plastic bag (quart size, double bagged) •Confirm label completed & taped •Place in lined cooler with other chilled batched samples •Ship on wet ice
Sediment Grain Size [SEDG]
•Ship within 1 week •Ship in screw-top bucket (0.6 gal) •Confirm label completed & taped •Tighten the lid securely making sure the ratcheting
mechanism engages •Place in lined cooler with other batched samples. •Ship on wet ice
Sediment Toxicity [SEDX]

National Coastal Condition Assessment 2015 Field Operations Manual Version 1.0 May 2015 Page 134
•Ship at least every 2 weeks•Ship in frozen, microcentrifuge tubes•Confirm labels completed•Place each tube in small bubble bag with label on outside•Place bags in zip-top bag•Place in cooler lined with dry ice insert along with other
frozen batched samples•Pack cooler with 20 lbs of dry ice
Enterococci [ENTE]
•Ship within 1 week•Ship in HDPE bottle (1 L, white, narrow mouth)•Confirm preserved with 10ml Lugol's solution•Confirm label completed & taped•Seal with plastic electrical tape•Place in cooler lined cooler with other chilled batched samples•Ship on wet ice
Phytoplankton [PHYT] (GL only)
•Ship at least every 2 weeks•Freeze after collection•Ship in HDPE bottle (500 mL, white, wide-mouth)•Confirm labels completed & taped•Place in cooler lined with dry ice insert along with other
frozen batched samples•Pack cooler with 20 lbs of dry ice
Algal toxin [ALGX] and Microcystin [MICX]
•Ship at least every 2 weeks•Ship in frozen, glass jar (60 mL) (leave headspace)•Confirm label completed & taped•Seal with plastic electrical tape•Place jar in foam sleeve•Place in cooler lined with dry ice insert along with other
frozen batched samples•Pack cooler with 20 pounds of dry ice. Pack with fill material
such as newspaper if necessary to ensure no shifting
Sediment TOC [SEDC]
•Ship at least every 2 weeks•Ship in frozen, glass jar (120 mL) (leave headspace)•Confirm label completed & taped•Seal with plastic electrical tape•Place jar in foam sleeve•Place in cooler lined with dry ice insert along with other
frozen batched samples•Pack cooler with 20 pounds of dry ice. Pack with fill material
such as newspaper if necessary to ensure no shifting
Sediment Organics/Metals
[SEDO]

National Coastal Condition Assessment 2015 Field Operations Manual Version 1.0 May 2015 Page 135
•Ship at least every 2 weeks •Freeze after collection •Ship in glass scintillation vial •Confirm label completed & taped •Place vial in small bubble bag •Place bubble bag in zip-top bag •Wrap packing material around bag to prevent breakage •Place in cooler lined with dry ice insert along with other
frozen batched samples •Pack cooler with 20 lbs of dry ice
Fish Plugs [FPLG]
•Ship at least every 2 weeks •Freeze after collection, as soon as possible (-20 cooler) •Ship in bags •Confirm label completed & taped •Place in cooler lined with dry ice insert along with other
frozen batched samples •Pack cooler with 20 lbs of dry ice
Ecological Whole Fish Tissue [FTIS]
•Ship at least every 2 weeks •Freeze after collection, as soon as possible (-20 cooler) •Ship in bags •Confirm label completed & taped •Pack cooler with 50 lbs of dry ice
Human Health Whole Fish Tissue [HTIS]
(select sites GL only)
•Ship at end of season •Transfer files from DVR system to EPA-provided flash drive •Back up files to computer hard drive •Be sure files are named appropriately •Package EPA-provided flash drive(s) in padded envelope
securely
Underwater Video [UVID] (GL only)
•Ship every 2-3 weeks •Preserve benthos samples immediately upon collection •Ship in HDPE bottle (1 L, white, wide mouth) •Confirm label completed & taped •Seal with plastic electrical tape •Surround the jars with crumpled newpaper, vermiculite or
other absorbent material •Place in cooler liner •Ship with NO ice
Benthic Macroinvertebrates
[BENT]

National Coastal Condition Assessment 2015 Field Operations Manual Version 1.0 May 2015 Page 136
[T1]
“WRS” Samples
1 – HDPE bottle (250 mL, amber)
CHEM 1 – Filter in centrifuge
tube (50 mL), in zip-top bag
CHLA 1 – HDPE bottle (250
mL, white) NUTS
Pack 1 day’s worth of samples (up to 2
sites) in lined cooler with ice in bags
ICE
SHIP WITHIN 24 HOURS
(MON-FRI)
PRIORITY OVERNIGHT
Pack 2-4 sites’ worth of samples (depending on whether Eco Fish are
included and size of Eco Fish sample) in cooler with dry ice insert and dry ice
DRY ICE
SHIP WITHIN 2 WEEKS (MON-FRI)
PRIORITY OVERNIGHT
[T3] Frozen Samples (Batched)
1 – HDPE bottle (500 mL, white, wide-mouth)
MICX 1 - HDPE bottle (500 mL, white,
wide-mouth) ALGX 2 – Filters in centrifuge tubes in
bag (plus 1 blank if revisit site) ENTE
1 – Glass scintillation vial with 2 plugs FPLG 1 – Glass jar (60 mL) SEDC 1 – Glass jar (120 mL) SEDO
[T2] Chilled Samples
(Batched)
1 – Plastic bag (quart size, double bagged)
SEDG 1 – Screw-top bucket
(0.6 gal) SEDX 1 – HDPE (1L, white narrow mouth) PHYT
SHIP WEEKLY (MON-FRI)
PRIORITY OVERNIGHT
Pack 2-3 sites’ worth of samples in lined cooler with ice
in bags
ICE
[T4] Non-Chilled
Samples (Batched)
1 or more – HDPE bottle (1 L, white, wide-mouth)
BENT
Pack up to 12 sites’ worth of
samples in lined cooler with
NO ICE
NO ICE
SHIP EVERY 2-3 WEEKS ANYTIME
GROUND
[T7] Frozen HH Whole Fish
Samples (Batched)
5 – Fish in large plastic composite bags
HTIS
SHIP MON - THURS
(No Saturday Delivery)
PRIORITY OVERNIGHT
Pack frozen fish in cooler
with 50 pounds of
dry ice DRY ICE
[T8] UW VIDEO (Batched)
1 – File UVID
Put onto SD card, backup to
computer Place in padded
envelope with tracking form
SHIP AT END OF SEASON
[T6] Completed Data Packs (Batched)
All data forms from a site, reviewed for completeness, legibility and accuracy
PACK
Make copies or scans as backup.
Organize by form number.
Place in envelope with tracking form
SHIP EVERY 2 WEEKS
[T5] Eco Fish Samples (Batched)
5-20+ fish in large plastic composite bag FTIS May be shipped with other frozen samples (T3) if
desired, or can be shipped separately

National Coastal Condition Assessment 2015 Field Operations Manual Version 1.0 May 2015 Page 137
SAMPLE SAMPLE TARGET VOLUME
CONTAINER PRESERVATIVE PACKAGING FOR
SHIPMENT
HOLDING TIME
WRS (T1)
Water Chemistry (CHEM)
250 mL HDPE bottle (250 mL, amber)
Wet ice Ship in cooler with wet ice
24 hours; ship these samples together to WRS lab - Corvallis or approved State lab
Chlorophyll-a (CHLA)
Collection: 2L HDPE bottle (2 L, amber)
Processing: readily visible stain on filter, max 2000 mL
Filter in 50 mL centrifuge tube (foil wrapped)
Dry ice in field
Dissolved Nutrients (NUTS)
250 mL of filtrate from chl-a filtering
HDPE bottle (250 mL, white)
Wet ice in field
CHILLED BATCHED
(T2)
Sediment Grain Size (SEDG)
100 mL Plastic bag (double bagged, quart size)
Wet ice in field Ship in cooler with wet ice
Batch; ship at least every week to GLEC lab – Traverse City Sediment Toxicity
(SEDX) 1800 mL preferred; minimum requirement 900 mL (marine); for GL, preferred volume is 900 mL, minimum required is 400 mL.
screw top bucket (0.6 gal)
Wet ice in field
Phytoplankton (PHYT) – Great Lakes only
1 L HDPE bottle (1 L, white, narrow-mouth)
Add 10 mL Lugol’s solution Wet ice in field Hold chilled in the dark
FROZEN BATCHED
(T3)
Algal Toxins (ALGX)
500 mL (leave headspace)
HDPE bottle (500 mL. white, wide-mouth)
Wet ice in field, Freeze as soon as possible
Ship in cooler with dry ice insert and 20 pounds of DRY ICE Note: Frozen Batched (T3)and Ecofish samples (T5) may be shipped together or separately
Batch, ship at least every 2 weeks to GLEC lab – Traverse City Microcystins
(MICX) 500 mL (leave headspace)
HDPE bottle (500 mL. white, wide-mouth)
Wet ice in field, Freeze as soon as possible
Enterococci (ENTE)
Collection: 250 mL HDPE bottle (250 mL, pre-sterilized, clear)
Processing: 2 – 50mL filtrations
2 filters in microcentrifuge tubes
Dry ice in field; hold in freezer; MUST be filtered & frozen within 6 hours of collection Hold in freezer or on dry ice
Filter blanks (revisit sites only): 1 – 20 mL filtrations of PBS
1 filter in microcentrifuge tube
Fish Tissue Plugs (FPLG)
2 plugs glass scintillation vial (20 mL)
Dry ice in field; Hold in freezer or on dry ice
Sediment Total Organic Carbon (SEDC)
50 mL (leave headspace)
glass jar (60 mL, amber)
Dry ice in field
Sediment Organics/Metals (SEDO)
100 mL (leave headspace)
glass jar (120 mL, amber)
Dry ice in field
ECOFISH SAMPLES
(T5)
Whole Fish Tissue Sample (FTIS)
5-20+ fish (300 g whole body tissue)
2 gallon self-sealing bags Large outer bag
Dry ice in field; Hold in freezer
NON-CHILLED BATCHED
(T4)
Benthic Macroinvertebrates (BENT)
All organisms in grab(s)
HDPE bottle(s) (1 L, white, wide-mouth)
Stained formalin solution
Ship in cooler or sturdy container
Batch, ship at least every 2-3 weeks to GLEC lab – Traverse City

National Coastal Condition Assessment 2015 Field Operations Manual Version 1.0 May 2015 Page 138
SAMPLE SAMPLE TARGET VOLUME
CONTAINER PRESERVATIVE PACKAGING FOR
SHIPMENT
HOLDING TIME
DATA FORMS
(T6)
Data Packets (PACK)
1 completed field form packet
Organize in proper order Put in envelope from site kit
N/A Ship in envelope Batch, ship monthly to NARS IM
HH WHOLE
FISH* (T7)
Human Health Whole Fish Tissue Sample (HTIS)* – Great Lakes only
5 whole fish (500 g of fillet weight)
Wrapped individually in solvent rinsed foil Sealed in poly tubing Large outer plastic bag
Dry ice in field; Hold in freezer
Ship in cooler provided with 50 pounds of DRY ICE
Batch, ship weekly (except on Fridays, Saturdays, or the day before Federal holidays) to HTIS lab
UW VIDEO (T8)
Underwater Video (UVID) – Great Lakes only
1 minute video Download from DVR to USB flash drive via computer, send flash drive
N/A Ship in padded envelope
Batch, ship at end of season to EPA Duluth lab
* Human Health Fish Tissue is collected at select Great Lakes sites only

National Coastal Condition Assessment 2015 Field Operations Manual Version 1.0 May 2015 Page 139
APPENDIX D: FIELD EVALUATION AND ASSISTANCE VISIT CHECKLIST
Evaluation Date(s):
NCCA 2015 SITE ID:
Location:
Evaluation Team Member(s): Name Organization Phone
Field Crew ID: Name Organization Phone
Other Observers Present During Evaluation: Name Organization Phone
Please send completed form to Colleen Mason: o Email scanned document (pdf): [email protected] (preferred) o OR fax: 202-343.9641 (If faxing please leave a message at 202-566-0417 so Colleen
knows to check the fax machine) o OR mail hardcopy (and keep a copy) to:
Colleen Mason EPA 1200 Pennsylvania Ave., NW (4503T) Washington, DC 20460
If major corrective actions are required, please email Colleen Mason and Hugh Sullivan ([email protected]) and provide: o brief summary of the areas of concern o best dates/times for a teleconference to discuss the concerns and resolution.

National Coastal Condition Assessment 2015 Field Operations Manual Version 1.0 May 2015 Page 140
PREDEPARTURE ACTIVITIES
Equipment and Supply Preparation
Did the crew request a site kit at least two weeks prior to sampling? Was the site kit available for the site?
Y N N/A
Great Lakes Only: Did field crews request a Great Lakes human health fish tissue supply kit for appropriate sites (if applicable) or know that they must do so?
Y N N/A
Was the supply kit available for the site? Y N N/A
Did the crew have phytoplankton bottle(s) available for sampling? Y N N/A
Refer to Appendix A of the Field Operations Manual. Does the crew have all of the required equipment and supplies?
Y N N/A
Did the crew have back-up site kit(s) available during the sampling? Y N N/A
Did the crew obtain sufficient wet and dry ice for sample preservation and storage? Record the amount of ice in lbs: Dry: Wet:
Y N N/A
Are the meters, probes, and sampling gear packed in such a way as to minimize physical shock and vibration during transport?
Y N N/A
Are copies of the Field Operations Manual, the Quick Reference Guide, equipment manuals, etc. available?
Y N N/A
Preservatives and other Solutions
Are the recipes for stock preservatives readily available for crew reference?
Y N N/A
Were stock preservatives prepared? Y N N/A
Did the crew pack stock solutions as described in FOM Table 4.1? (Bleach, 100% stained buffered formalin, etc.)?
Y N N/A
Site Information and Access
Did the crew verify that it had completed the site evaluation spreadsheet for sites dropped based on desktop recon?
Y N N/A
Did the crew verify that replacement sites were chosen from the same stratum/base year combination
Y N N/A
Was the Verification Form completed for sites visited with the intent to sample but not sampled?
Y N N/A
Were individual site packets, including directions to the site, available and organized?
Y N N/A
Was the site access information/permission letter available? Y N N/A
Was the landowner contacted prior to site visit, if applicable? Y N N/A
Were other key contact persons notified (e.g., Regional Coordinator, State or Tribal contacts)? Identify who was notified:
Y N N/A

National Coastal Condition Assessment 2015 Field Operations Manual Version 1.0 May 2015 Page 141
Vehicle/Boat
Did the crew perform necessary checks to the vehicle before leaving for the day?
Y N N/A
Were the trailer and hitch inspected prior to departing to the site to ensure that the trailer was securely fastened?
Y N N/A
Was the boat(s) in good working order and inspected before departure? Y N N/A
Were PFDs available for all passengers? Y N N/A
Global Positioning System Receiver
Were the batteries checked? Are spare batteries available (if applicable)? Y N N/A
Did the crew verify that any additional tests/checks recommended by the operating manual were performed?
Y N N/A
Multi-Probe
Were the sensors stored properly to prevent damage and desiccation? Y N N/A
Was the multi-probe meter inspected according to the manufacturer’s specifications?
Y N N/A
Did the crew confirm that the accuracy of the temperature sensor was checked against a thermometer that is traceable to the National Institute of Standards at least once per sampling season? Record the date of the last test:
Y N N/A
Photosynthetically Active Radiation (PAR) meter
Were the batteries checked? Y N N/A
Was the PAR meter assembled as described in the FOM (check sensor connections and positions)
Y N N/A
Were the correct calibration factors entered for each probe? (These factors are supplied by the manufacturer and are specific to each individual probe.)
Y N N/A
If the probe is not new, has it been returned to the manufacturer and calibrated within the last two years? (simply ask the crew, we do not need written proof). Date calibrated: _______________________________
Y N N/A
Was a weight attached to the underwater probe frame so it hung vertically?
Y N N/A
Was the sounding line to be used with the PAR marked at least every 0.5 meters? (These marks should indicate the distance to the underwater sensor)
Y N N/A
Containers/Labels
Were labels affixed to containers and covered with clear tape when required (pre-labeling is recommended)?
Y N N/A
Were labels completed where feasible and appropriate (before or after collection) using a permanent marker (pencil for benthos inside jar label) and covered with clear tape?
Y N N/A

National Coastal Condition Assessment 2015 Field Operations Manual Version 1.0 May 2015 Page 142
PREDEPARTURE ACTIVITIES NOTES
BASE AND LAUNCH SITE ACTIVITIES
Instrument Calibration
Was the DO calibration done at the launch site or other on-site location (in accordance with section 6.3.1)?
Y N N/A
Were the calibration values recorded on the data sheet? Y N N/A
Was the pH and salinity/conductivity calibration conducted and the values recorded on the data sheet?
Y N N/A
Were manufacturer recommended internal diagnostic checks of the meter performed within the last week to ensure correct meter function (e.g. cell constants, millivolt output, or other readings)?
Y N N/A
Is the instrument not able to be calibrated in the field, but was factory calibrated before field measurements were taken (i.e. Seabird)? Date calibrated:__________________________________ Instrument number/Serial number:___________________________ Does documentation match instrument identification/serial number (AV evaluator may need to contact office or lab separately if documentation not carried into field)?
Y
Y
N
N
N/A
N/A
If the internal meter checks were not done, was a commercially available Quality Check Solution (QCS) used within the last week to verify values of pH and conductivity?
Y N N/A
Other Preparations
Were the Enterococci filter microcentrifuge tubes with beads placed on dry ice before filtering commenced?
Y N N/A
Was a cooler(s) prepared with wet ice for storing samples? Y N N/A

National Coastal Condition Assessment 2015 Field Operations Manual Version 1.0 May 2015 Page 143
BASE AND LAUNCH SITE ACTIVITIES NOTES
SITE VERIFICATION
Site Verification at the Launch Site
Are the location coordinates the same in the crew’s paperwork and EPA’s spreadsheet of target sites?
Y N N/A
Was a description of the final part of the route to the site recorded on the site verification form?
Y N N/A
Was the arrival time (and later the departure time) recorded on the site verification form?
Y N N/A
Were the names of the field crew recorded? Y N N/A
Site Verification at the Index Site Location
Was the site classified correctly (e.g., target vs. nontarget vs. inaccessible)?
Y N N/A
Were the target coordinates (X-site) from the site list entered into the crew's GPS unit?
Y N N/A
Did the crew navigate to within 0.02nm or 37 meters from the X site? Y N N/A
If the initial sampling location was not sampleable, did the crew use the steps outlined in the FOM to attempt locate a sampleable location within the 37 meter radius (see Section 5.1.3)?
Y N N/A
Was the GPS checked after anchoring the boat to ensure the location was within 37 meters?
Y N N/A
Were the GPS coordinates of the initial sampling location (Y-Location) recorded on the verification form?
Y N N/A

National Coastal Condition Assessment 2015 Field Operations Manual Version 1.0 May 2015 Page 144
Was the GPS consulted periodically to ensure the sampling vessel had not drifted further away from the X-site due to anchor drag?
Y N N/A
Was the habitat assessment information completed? Y N N/A
Were photographs of the site taken if site has unique characteristics (optional)?
Y N N/A
SITE VERIFICATION NOTES
Y-LOCATION SAMPLING
Did the crew collect the probe and water column data as close to the X-site as possible, but no further than 37 m?
Y N N/A
Dissolved Oxygen, pH, Temperature, Salinity/Conductivity
Was the depth measured at the Y- location, and the intervals calculated before probe was placed in the water?
Y N N/A
Were all measurements allowed to stabilize before recording? Y N N/A
On the downcast, were the measurements at each depth interval conducted and recorded according to the protocol (0.1m, 0.5m, every meter from 1.0 to 10.0 meters and every 5 meters thereafter)?
Y N N/A
Were the recorded data entered on the Field Measurement Form or saved as an electronic file in the instrument?
Y N N/A
If the crew will be submitting the hydrographic profile via an electronic file, was the “Submitted data via eFile” bubble filled in?
Y N N/A
Was the last measurement taken at 0.5 meters from the bottom? Y N N/A
Did the probe touch the bottom? Y N N/A

National Coastal Condition Assessment 2015 Field Operations Manual Version 1.0 May 2015 Page 145
On the upcast, were the measurements at each depth interval conducted and recorded according to the protocol on the Field Measurement Form (using the exact same depths as above)?
Y N N/A
Did the crew flag any measurements that could not be made or that required further comment?
Y N N/A
Was the probe stored correctly after the measurement? Y N N/A
Secchi Disk Transparency
Was the Secchi disk being used the black and white 20 cm patterned disk? Y N N/A
Was the calibrated sounding line visibly marked in at least 0.5 meter intervals? Y N N/A
Were Secchi depths recorded to the nearest 0.1 meter? Y N N/A
Was the measurement taken from the shady side of the boat? Y N N/A
Was the recorder wearing sunglasses or a hat? (should not have any on) Y N N/A
Was a viewscope used? (should not be used) Y N N/A
If the disk could be seen at the bottom, did the crew mark the "clear to bottom" bubble and record the station depth as both the disappearance and reappearance depth for Reading 1?
Y N N/A
If any one of the three sets of measurements varied more than 0.5 meters from the others, was the entire process repeated?
Y N N/A
Photosynthetically Active Radiation (PAR) Meter
Verify that the correct calibration factors were entered for the probe, unit is set up correctly, and underwater sensor is plugged in correctly.
Y N N/A
Was the deck sensor placed on the boat on a non-shaded location? Y N N/A
Was the underwater sensor lowered on the sunny (or least shaded) side of the boat to a depth of 10cm?
Y N N/A
Was the underwater probe lowered by means of the rope attached to the probe frame, not the cord?
Y N N/A
Were both the ambient and underwater sensor readings taken at the same instant? Indicate how (e.g., data logger, two operators, camera):
Y N N/A
Were both the deck and underwater sensor readings recorded at each of the other depths calculated for the hydrographic profile?
Y N N/A
If the underwater sensor hit the bottom, did the crew wait 2-3 minutes before taking the reading?
Y N N/A
If the light measurements became negative, was the profile terminated at that depth?
Y N N/A
Was the process repeated on the upcast? Y N N/A
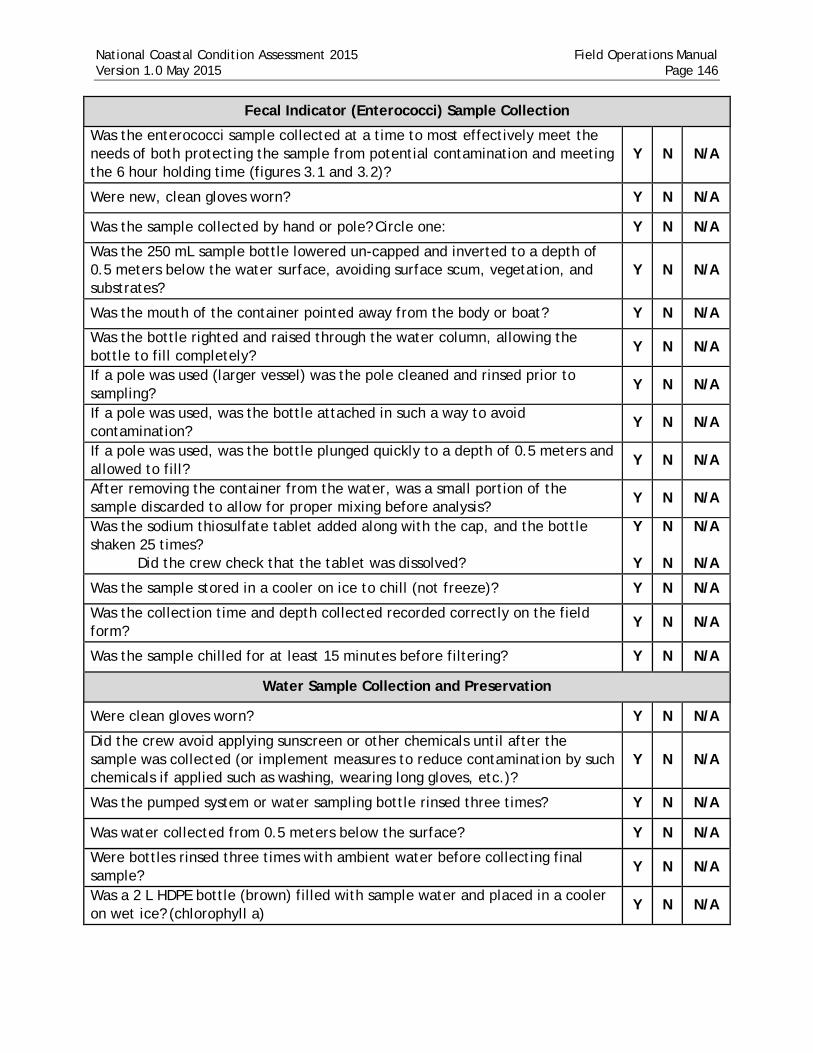
National Coastal Condition Assessment 2015 Field Operations Manual Version 1.0 May 2015 Page 146
Fecal Indicator (Enterococci) Sample Collection
Was the enterococci sample collected at a time to most effectively meet the needs of both protecting the sample from potential contamination and meeting the 6 hour holding time (figures 3.1 and 3.2)?
Y N N/A
Were new, clean gloves worn? Y N N/A
Was the sample collected by hand or pole? Circle one: Y N N/A
Was the 250 mL sample bottle lowered un-capped and inverted to a depth of 0.5 meters below the water surface, avoiding surface scum, vegetation, and substrates?
Y N N/A
Was the mouth of the container pointed away from the body or boat? Y N N/A
Was the bottle righted and raised through the water column, allowing the bottle to fill completely?
Y N N/A
If a pole was used (larger vessel) was the pole cleaned and rinsed prior to sampling?
Y N N/A
If a pole was used, was the bottle attached in such a way to avoid contamination?
Y N N/A
If a pole was used, was the bottle plunged quickly to a depth of 0.5 meters and allowed to fill?
Y N N/A
After removing the container from the water, was a small portion of the sample discarded to allow for proper mixing before analysis?
Y N N/A
Was the sodium thiosulfate tablet added along with the cap, and the bottle shaken 25 times?
Did the crew check that the tablet was dissolved?
Y
Y
N
N
N/A
N/A
Was the sample stored in a cooler on ice to chill (not freeze)? Y N N/A
Was the collection time and depth collected recorded correctly on the field form?
Y N N/A
Was the sample chilled for at least 15 minutes before filtering? Y N N/A
Water Sample Collection and Preservation
Were clean gloves worn? Y N N/A
Did the crew avoid applying sunscreen or other chemicals until after the sample was collected (or implement measures to reduce contamination by such chemicals if applied such as washing, wearing long gloves, etc.)?
Y N N/A
Was the pumped system or water sampling bottle rinsed three times? Y N N/A
Was water collected from 0.5 meters below the surface? Y N N/A
Were bottles rinsed three times with ambient water before collecting final sample?
Y N N/A
Was a 2 L HDPE bottle (brown) filled with sample water and placed in a cooler on wet ice? (chlorophyll a)
Y N N/A

National Coastal Condition Assessment 2015 Field Operations Manual Version 1.0 May 2015 Page 147
Fecal Indicator (Enterococci) Sample Collection
Was the 250 mL brown bottle filled with sample water, the correct label affixed, label information correctly filled out and the label taped over with clear tape? (water chemistry)
Y N N/A
Were two 500 mL HDPE bottles filled with sample water, the correct labels affixed, label information correctly filled out and the labels taped over with clear tape? (microcystins and algal toxins)
Y N N/A
Did the microcystins and algal toxins bottles have at least an inch of headspace to allow for expansion during freezing?
Y N N/A
Were the samples placed on wet ice in a dark cooler? Y N N/A
Were comments about anything that could influence the sample chemistry (heavy rain, etc.) included in the comments section of the sample collection form?
Y N N/A
GREAT LAKES ONLY: Was a 1L narrow mouth, white HDPE bottle filled with sample water for phytoplankton?
Y N N/A
GREAT LAKES ONLY: Were approximately 10 mL of Lugol’s added to the 1L bottle for phytoplankton preservation within 2 hours of collection?
Y N N/A
Y-LOCATION SAMPLING NOTES
UNDERWATER VIDEO FOR GREAT LAKES ONLY
Was the camera deployed during the same time period as the in situ measurements and water collection activities occurred?
Y N N/A
Was the camera deployed at the Y-Location? Y N N/A
Was the GPS unit powered up and displaying ‘ready to navigate’ prior to starting?
Y N N/A
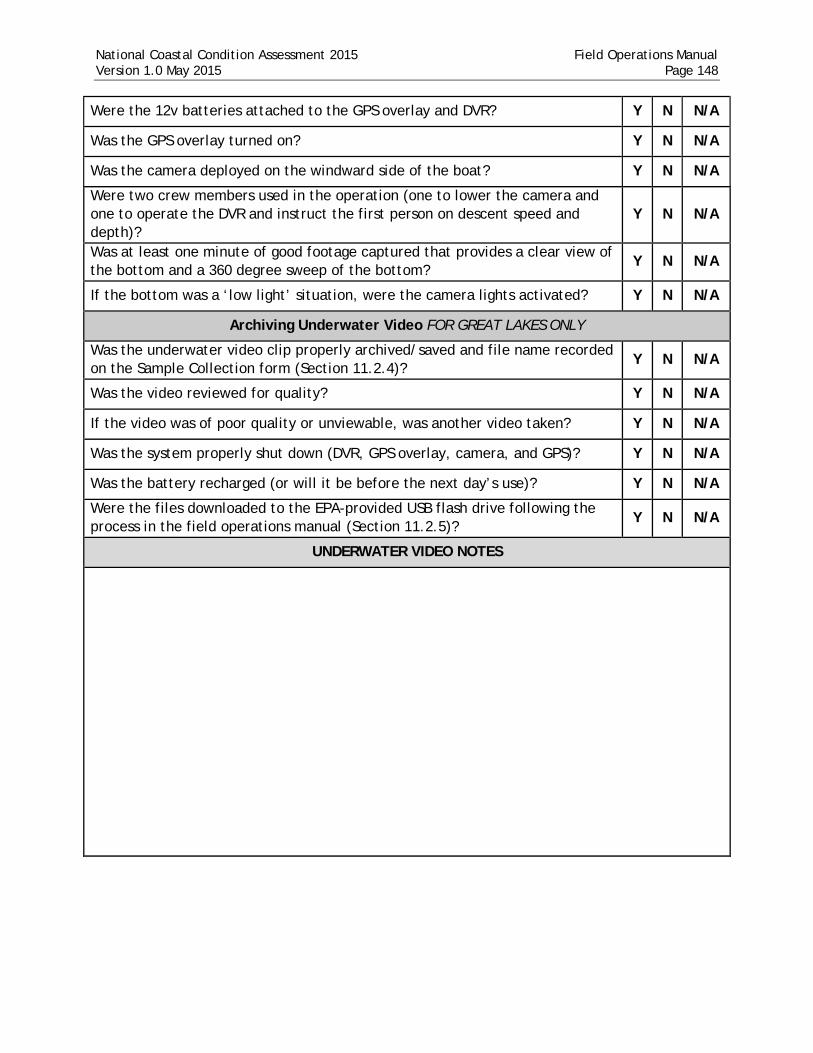
National Coastal Condition Assessment 2015 Field Operations Manual Version 1.0 May 2015 Page 148
Were the 12v batteries attached to the GPS overlay and DVR? Y N N/A
Was the GPS overlay turned on? Y N N/A
Was the camera deployed on the windward side of the boat? Y N N/A
Were two crew members used in the operation (one to lower the camera and one to operate the DVR and instruct the first person on descent speed and depth)?
Y N N/A
Was at least one minute of good footage captured that provides a clear view of the bottom and a 360 degree sweep of the bottom?
Y N N/A
If the bottom was a ‘low light’ situation, were the camera lights activated? Y N N/A
Archiving Underwater Video FOR GREAT LAKES ONLY
Was the underwater video clip properly archived/saved and file name recorded on the Sample Collection form (Section 11.2.4)?
Y N N/A
Was the video reviewed for quality? Y N N/A
If the video was of poor quality or unviewable, was another video taken? Y N N/A
Was the system properly shut down (DVR, GPS overlay, camera, and GPS)? Y N N/A
Was the battery recharged (or will it be before the next day’s use)? Y N N/A
Were the files downloaded to the EPA-provided USB flash drive following the process in the field operations manual (Section 11.2.5)?
Y N N/A
UNDERWATER VIDEO NOTES
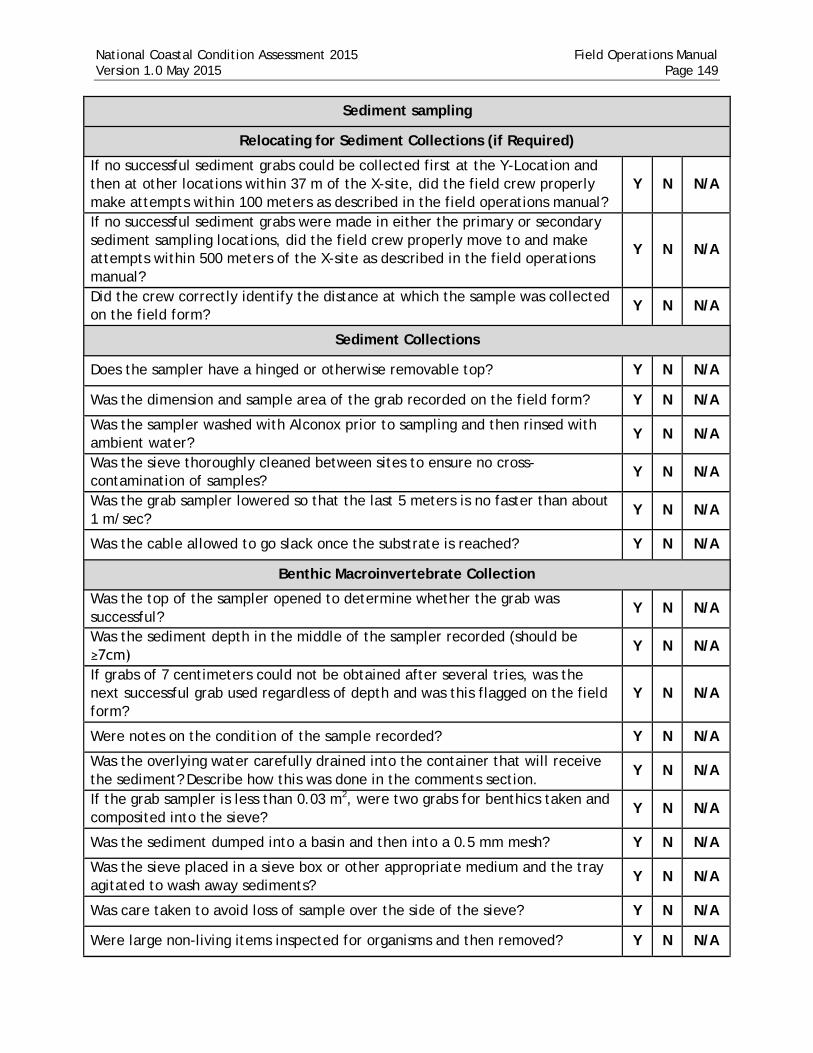
National Coastal Condition Assessment 2015 Field Operations Manual Version 1.0 May 2015 Page 149
Sediment sampling
Relocating for Sediment Collections (if Required)
If no successful sediment grabs could be collected first at the Y-Location and then at other locations within 37 m of the X-site, did the field crew properly make attempts within 100 meters as described in the field operations manual?
Y N N/A
If no successful sediment grabs were made in either the primary or secondary sediment sampling locations, did the field crew properly move to and make attempts within 500 meters of the X-site as described in the field operations manual?
Y N N/A
Did the crew correctly identify the distance at which the sample was collected on the field form?
Y N N/A
Sediment Collections
Does the sampler have a hinged or otherwise removable top? Y N N/A
Was the dimension and sample area of the grab recorded on the field form? Y N N/A
Was the sampler washed with Alconox prior to sampling and then rinsed with ambient water?
Y N N/A
Was the sieve thoroughly cleaned between sites to ensure no cross-contamination of samples?
Y N N/A
Was the grab sampler lowered so that the last 5 meters is no faster than about 1 m/sec?
Y N N/A
Was the cable allowed to go slack once the substrate is reached? Y N N/A
Benthic Macroinvertebrate Collection
Was the top of the sampler opened to determine whether the grab was successful?
Y N N/A
Was the sediment depth in the middle of the sampler recorded (should be ≥7cm)
Y N N/A
If grabs of 7 centimeters could not be obtained after several tries, was the next successful grab used regardless of depth and was this flagged on the field form?
Y N N/A
Were notes on the condition of the sample recorded? Y N N/A
Was the overlying water carefully drained into the container that will receive the sediment? Describe how this was done in the comments section.
Y N N/A
If the grab sampler is less than 0.03 m2, were two grabs for benthics taken and composited into the sieve?
Y N N/A
Was the sediment dumped into a basin and then into a 0.5 mm mesh? Y N N/A
Was the sieve placed in a sieve box or other appropriate medium and the tray agitated to wash away sediments?
Y N N/A
Was care taken to avoid loss of sample over the side of the sieve? Y N N/A
Were large non-living items inspected for organisms and then removed? Y N N/A

National Coastal Condition Assessment 2015 Field Operations Manual Version 1.0 May 2015 Page 150
Was the bulk of the sample gently scooped up and placed in a 1-L Nalgene bottle?
Y N N/A
Was the outside of the sample jar rinsed into the sieve, then the contents rinsed into the sample jar using a funnel?
Y N N/A
Was the sieve inspected to make sure all organisms are transferred to a container?
Y N N/A
Were all sample jars filled no more than ½ full with sample? Y N N/A
If more than one jar is needed are they appropriately labeled (e.g., 2 of 2)? Y N N/A
Is all information correctly recorded on sample labels and field form? Y N N/A
Was a sample label, completed in pencil, placed inside the sample jar? Y N N/A
Are all containers preserved with a minimum of 100 mL of stained buffered formalin solution and an additional teaspoon of borax added? (End concentration of the preservative should be at least 6 percent)
Y N N/A
Was each jar filled to the rim with seawater/lakewater to eliminate any air space?
Y N N/A
Was the lid sealed with electrical tape? Y N N/A
Are sample labels covered with clear tape? Y N N/A
Were each of the jars gently rotated and then placed in the dark? Y N N/A
Sediment Composition, Chemistry and Toxicity
Was the top of the sampler opened to determine whether the grab was successful (does not have to be greater than 7 cm for these indicators)?
Y N N/A
Was any overlying water drained off and large, non-living surface items removed? Describe how this was done in the comments section.
Y N N/A
Was any SAV removed after recording its presence on the field form? Y N N/A
Was the boat engine turned off or was the boat maneuvered to keep the engine downwind?
Y N N/A
Was a stainless steel or Teflon spoon washed with Alconox, rinsed with ambient water, and used to collect sediment?
Y N N/A
Was only the top two cm of sediment removed and used for sample? Y N N/A
Were any sediment used that was in direct contact with the sides of the sampler? (Should not be used)
Y N N/A
Was sediment placed in a stainless steel pot or bowl, and the pot placed on wet ice? Was the container covered and in the cooler or on ice between grabs?
Y N N/A
Was the process repeated until approximately 3 L of sediment (2 L in Great Lakes) was collected? Identify the approximate number of grabs and total amount of time required: Number of Grabs: Time required:
Y N N/A
Was the sediment stirred to sufficiently homogenize ALL sediment with the spoon for approximately 10 minutes?
Y N N/A
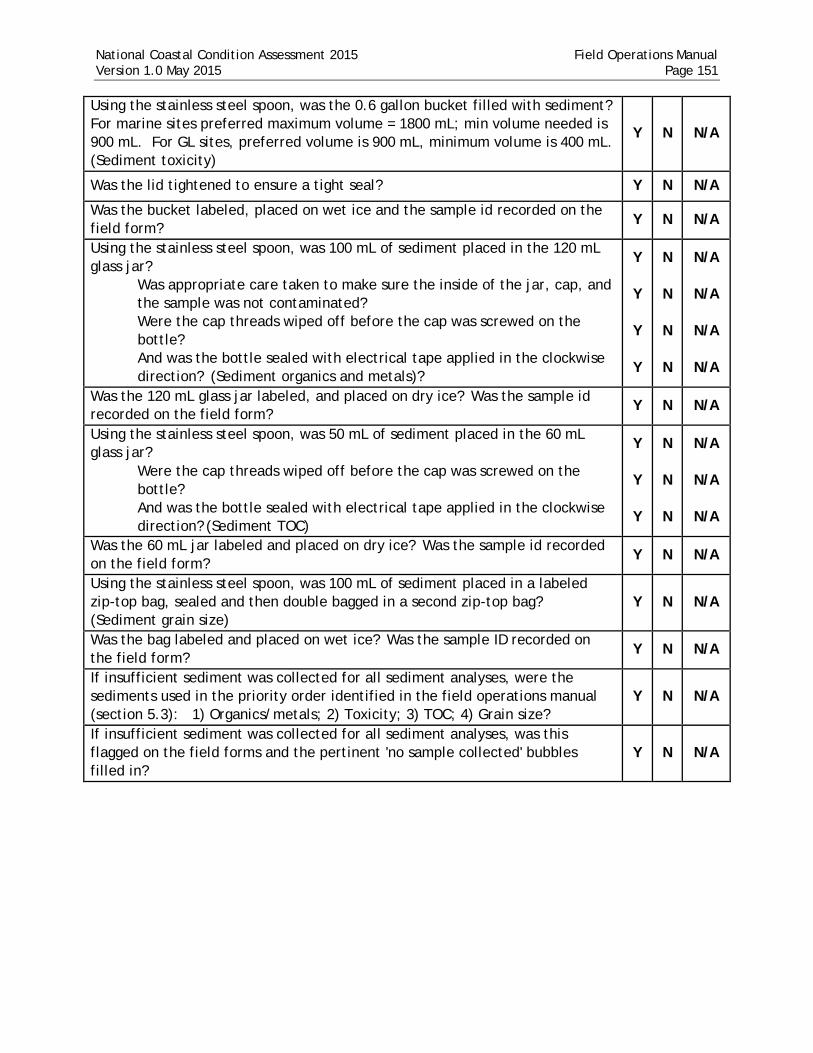
National Coastal Condition Assessment 2015 Field Operations Manual Version 1.0 May 2015 Page 151
Using the stainless steel spoon, was the 0.6 gallon bucket filled with sediment? For marine sites preferred maximum volume = 1800 mL; min volume needed is 900 mL. For GL sites, preferred volume is 900 mL, minimum volume is 400 mL. (Sediment toxicity)
Y N N/A
Was the lid tightened to ensure a tight seal? Y N N/A
Was the bucket labeled, placed on wet ice and the sample id recorded on the field form?
Y N N/A
Using the stainless steel spoon, was 100 mL of sediment placed in the 120 mL glass jar?
Was appropriate care taken to make sure the inside of the jar, cap, and the sample was not contaminated? Were the cap threads wiped off before the cap was screwed on the bottle? And was the bottle sealed with electrical tape applied in the clockwise direction? (Sediment organics and metals)?
Y
Y
Y
Y
N
N
N
N
N/A
N/A
N/A
N/A
Was the 120 mL glass jar labeled, and placed on dry ice? Was the sample id recorded on the field form?
Y N N/A
Using the stainless steel spoon, was 50 mL of sediment placed in the 60 mL glass jar?
Were the cap threads wiped off before the cap was screwed on the bottle? And was the bottle sealed with electrical tape applied in the clockwise direction? (Sediment TOC)
Y
Y
Y
N
N
N
N/A
N/A
N/A
Was the 60 mL jar labeled and placed on dry ice? Was the sample id recorded on the field form?
Y N N/A
Using the stainless steel spoon, was 100 mL of sediment placed in a labeled zip-top bag, sealed and then double bagged in a second zip-top bag? (Sediment grain size)
Y N N/A
Was the bag labeled and placed on wet ice? Was the sample ID recorded on the field form?
Y N N/A
If insufficient sediment was collected for all sediment analyses, were the sediments used in the priority order identified in the field operations manual (section 5.3): 1) Organics/metals; 2) Toxicity; 3) TOC; 4) Grain size?
Y N N/A
If insufficient sediment was collected for all sediment analyses, was this flagged on the field forms and the pertinent 'no sample collected' bubbles filled in?
Y N N/A

National Coastal Condition Assessment 2015 Field Operations Manual Version 1.0 May 2015 Page 152
SEDIMENT SAMPLING NOTES
Describe the tools used for transferring sample into sample containers and how the crew ensured the tools were not contaminated from prior sampling sites.
Other comments:

National Coastal Condition Assessment 2015 Field Operations Manual Version 1.0 May 2015 Page 153
FISH TISSUE COLLECTION (Performed at Visit 1 only at Revisit sites)
Was a reasonable method for fish collection used and the method recorded on the field form along with required gear specifics?
Y N N/A
Were fish tissue collections attempted from within 500 meters of the X-site? Y N N/A
If no fish were collected within 500 meters of the X-site, did the crew attempt fish collections from areas between 500 and 1000 meters from the X-site?
Y N N/A
For human health fish tissue collections ONLY, if no suitable fish were collected within 1000 meters of the X-site, did the crew attempt to collect the HTIS sample between 1000 and 1500 meters from the X-site?
Y N N/A
For each gear type used, were the pertinent GPS readings recorded? Y N N/A
Were clean nitrile gloves worn for handling fish? Y N N/A
Were crew members handling fish careful to avoid handling food, drink, sunscreen and insect repellant prior to collecting fish?
Y N N/A
Were potential target species/individuals rinsed in ambient water and placed in live well?
Y N N/A
Eco Fish Tissue Collection
If no species on either the primary or secondary lists were available, did the crew select an appropriate alternate species?
Y N N/A
Was a target species with at least 5 fish of adequate size to provide a total weight of 300 grams identified?
Y N N/A
Did the field crew judge that all of the identified fish were of the same species?
Y N N/A
Were all of the fish in the sample at least 75% of the total length of the largest fish? Provide length of longest fish, L*0.75, and length of smallest fish in comments: Longest fish: Smallest fish:
Y N N/A
Did the field crew report that all fish were collected at the same time (or no more than one week apart?)
Y N N/A
If fewer than 5 fish were collected, do they still meet the total weight and other criteria?
Y N N/A
If fewer than 5 fish were collected, did the crew spend at least 3 hours attempting to collect fish?
Y N N/A
Were the fish identified to species and the scientific name recorded on the Eco Fish Collection Form?
Y N N/A
Were total lengths measured in mm from the anterior most of the fish to the top of the longest caudal fin ray (when the lobes of the caudal fin are depressed dorsoventrally)?
Y N N/A
Was the sample number, species retained, specimen lengths, location collected, and sampling date/time recorded on the fish collection form?
Y N N/A
Did the crew make sure that the sample ID recorded on the collection form matches those on the sample labels?
Y N N/A
If necessary, was each fish to be used as part of the sample dispatched with a clean wooden bat (or equivalent wooden device)?
Y N N/A
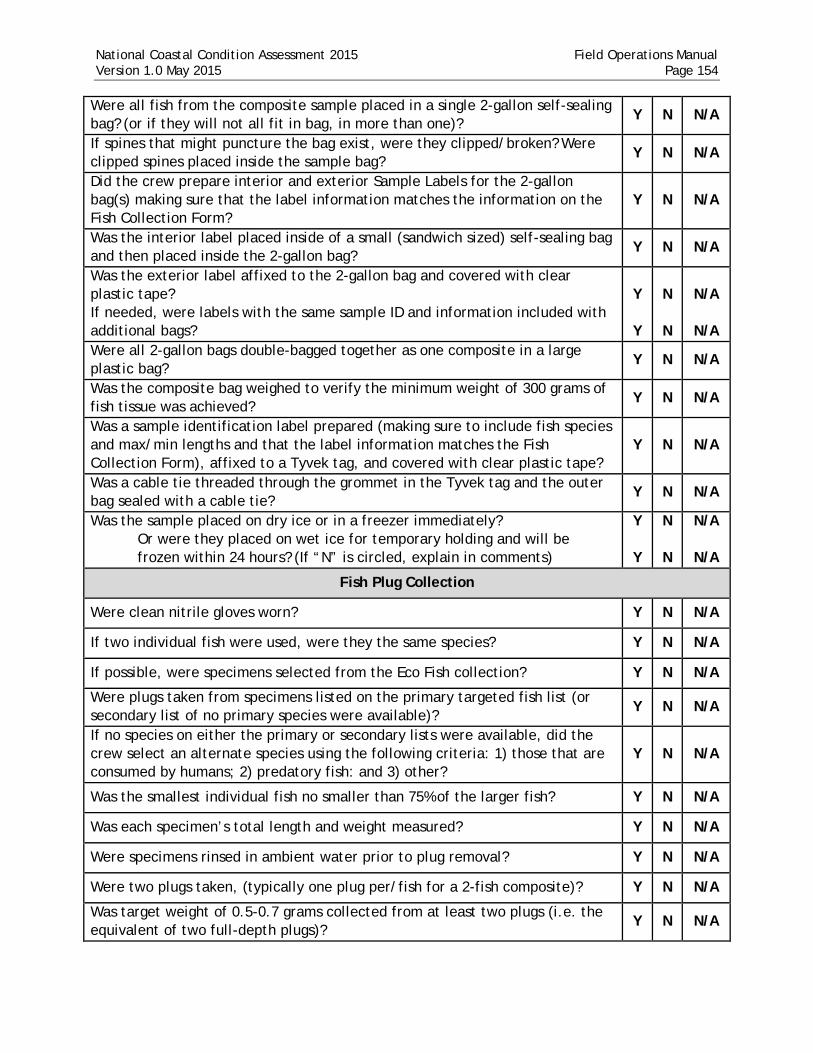
National Coastal Condition Assessment 2015 Field Operations Manual Version 1.0 May 2015 Page 154
Were all fish from the composite sample placed in a single 2-gallon self-sealing bag? (or if they will not all fit in bag, in more than one)?
Y N N/A
If spines that might puncture the bag exist, were they clipped/broken? Were clipped spines placed inside the sample bag?
Y N N/A
Did the crew prepare interior and exterior Sample Labels for the 2-gallon bag(s) making sure that the label information matches the information on the Fish Collection Form?
Y N N/A
Was the interior label placed inside of a small (sandwich sized) self-sealing bag and then placed inside the 2-gallon bag?
Y N N/A
Was the exterior label affixed to the 2-gallon bag and covered with clear plastic tape? If needed, were labels with the same sample ID and information included with additional bags?
Y
Y
N
N
N/A
N/A
Were all 2-gallon bags double-bagged together as one composite in a large plastic bag?
Y N N/A
Was the composite bag weighed to verify the minimum weight of 300 grams of fish tissue was achieved?
Y N N/A
Was a sample identification label prepared (making sure to include fish species and max/min lengths and that the label information matches the Fish Collection Form), affixed to a Tyvek tag, and covered with clear plastic tape?
Y N N/A
Was a cable tie threaded through the grommet in the Tyvek tag and the outer bag sealed with a cable tie?
Y N N/A
Was the sample placed on dry ice or in a freezer immediately? Or were they placed on wet ice for temporary holding and will be frozen within 24 hours? (If “N” is circled, explain in comments)
Y
Y
N
N
N/A
N/A
Fish Plug Collection
Were clean nitrile gloves worn? Y N N/A
If two individual fish were used, were they the same species? Y N N/A
If possible, were specimens selected from the Eco Fish collection? Y N N/A
Were plugs taken from specimens listed on the primary targeted fish list (or secondary list of no primary species were available)?
Y N N/A
If no species on either the primary or secondary lists were available, did the crew select an alternate species using the following criteria: 1) those that are consumed by humans; 2) predatory fish: and 3) other?
Y N N/A
Was the smallest individual fish no smaller than 75% of the larger fish? Y N N/A
Was each specimen’s total length and weight measured? Y N N/A
Were specimens rinsed in ambient water prior to plug removal? Y N N/A
Were two plugs taken, (typically one plug per/fish for a 2-fish composite)? Y N N/A
Was target weight of 0.5-0.7 grams collected from at least two plugs (i.e. the equivalent of two full-depth plugs)?
Y N N/A

National Coastal Condition Assessment 2015 Field Operations Manual Version 1.0 May 2015 Page 155
If the specimens were not part of the Eco Fish collection, was antibiotic spray applied to the plug sites and the fish released?
Y N N/A
FISH TISSUE COLLECTION NOTES
Human Health Fish Tissue Collection (Great Lakes Only)
If no species on either the primary or secondary target lists were available, did the crew select an appropriate alternate species?
Y N N/A
Was a target species with at least 5 fish of adequate size to provide a total of 500 grams of fillet tissue identified (fewer large fish are acceptable)?
Y N N/A
Did the field crew judge that all of the identified fish were of the same species?
Y N N/A
Were all fish in the sample at least 75% of the total length of the largest fish? Y N N/A
Did the field crew report that all fish collected at the same time (or no more than one week apart?)
Y N N/A
If fewer than 5 fish were collected, do they still meet the total weight and other criteria?
Y N N/A
Were the fish identified to species and this information recorded on the Human Health Fish Collection Form?
Y N N/A
Were total lengths measured in mm from the anterior most of the fish to the top of the longest caudal fin ray (when the lobes of the caudal fin are depressed dorsoventrally)?
Y N N/A
Was the sample number, species retained, specimen lengths, location collected, and sampling date/time recorded on the Human Health Fish Collection Form?
Y N N/A
Did the crew make sure that the sample ID recorded on the collection form matches those on the sample labels?
Y N N/A
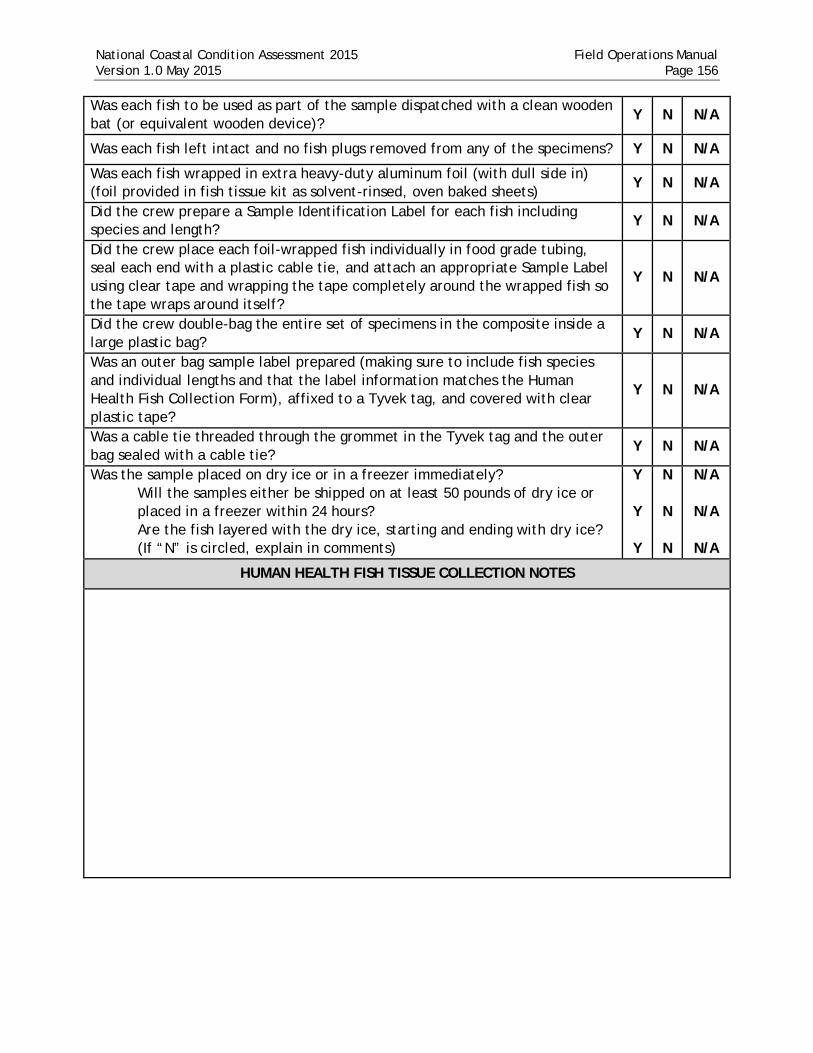
National Coastal Condition Assessment 2015 Field Operations Manual Version 1.0 May 2015 Page 156
Was each fish to be used as part of the sample dispatched with a clean wooden bat (or equivalent wooden device)?
Y N N/A
Was each fish left intact and no fish plugs removed from any of the specimens? Y N N/A
Was each fish wrapped in extra heavy-duty aluminum foil (with dull side in) (foil provided in fish tissue kit as solvent-rinsed, oven baked sheets)
Y N N/A
Did the crew prepare a Sample Identification Label for each fish including species and length?
Y N N/A
Did the crew place each foil-wrapped fish individually in food grade tubing, seal each end with a plastic cable tie, and attach an appropriate Sample Label using clear tape and wrapping the tape completely around the wrapped fish so the tape wraps around itself?
Y N N/A
Did the crew double-bag the entire set of specimens in the composite inside a large plastic bag?
Y N N/A
Was an outer bag sample label prepared (making sure to include fish species and individual lengths and that the label information matches the Human Health Fish Collection Form), affixed to a Tyvek tag, and covered with clear plastic tape?
Y N N/A
Was a cable tie threaded through the grommet in the Tyvek tag and the outer bag sealed with a cable tie?
Y N N/A
Was the sample placed on dry ice or in a freezer immediately? Will the samples either be shipped on at least 50 pounds of dry ice or placed in a freezer within 24 hours? Are the fish layered with the dry ice, starting and ending with dry ice? (If “N” is circled, explain in comments)
Y
Y
Y
N
N
N
N/A
N/A
N/A
HUMAN HEALTH FISH TISSUE COLLECTION NOTES

National Coastal Condition Assessment 2015 Field Operations Manual Version 1.0 May 2015 Page 157
ENTEROCOCCI FILTERING
Processing the Fecal Indicator Filter Blank
Is the site a Revisit site? If yes, filter blanks should be prepared and the following questions should be answered. If no, skip to next section.
Y N
Was the filter blank prepared before the filtration of the Enterococci sample? Y N N/A
Were the microcentrifuge tubes with beads chilled on dry ice? (enough for both the blanks and the samples?)
Y N N/A
Were clean gloves worn? Y N N/A
Was the sterile phosphate buffer chilled on wet ice? Y N N/A
Was a new sterile 100 mL filter funnel with pre-loaded filter used?? Y N N/A
Was the filter funnel attached to the side arm filter flask using the correct rubber stopper (white) and adapter? (or crew supplied manifold system was assembled appropriately) See figure 14.2.
Y N N/A
Was 20 mL of the sterile phosphate buffer measured in the sterile 50 mL graduated centrifuge tube and poured into the filter funnel?
Y N N/A
Was a hand or electric vacuum pump attached to the filtering apparatus Circle which was used.
Y N N/A
Was care taken to ensure the vacuum pressure did not exceed 7 inches of mercury ~ 3.4 psig?
Y N N/A
Was it pumped until all liquid was in the filtrate collection flask/reservoir? Y N N/A
Was the top of the filter funnel removed from the base without disturbing filter?
Y N N/A
Were sterile disposable forceps used to remove the filter (touching only the filter edges)?
Y N N/A
Was the filter folded it in half, in quarters, eighths, and then in sixteenths (filter is folded 4 times)?
Y N N/A
Was the filter inserted into chilled filter extraction tube (with beads) point side up?
Y N N/A
Was the screw cap replaced and tightened? Y N N/A
Was the volume of buffer filtered through the filter recorded on the filter blank sample label?
Y N N/A
Was the label attached to the microcentrifuge tube and not on cap? Y N N/A
Was any tape applied to the cap or elsewhere on the microcentrifuge tube (SHOULD NOT BE)?
Y N N/A
Was the tube(s) inserted into bubble wrap bag on dry ice for preservation during transport and shipping?
Y N N/A
Did the crew mark the "Blank Collected" bubble on the Sample Collection Form? Y N N/A
Processing the Fecal Indicator Sample
Were nitrile gloves worn? Y N N/A

National Coastal Condition Assessment 2015 Field Operations Manual Version 1.0 May 2015 Page 158
Were the microcentrifuge tubes with beads chilled on dry ice? Y N N/A
Was the Enterococci sample chilled for at least 15 minutes before filtering? Y N N/A
Was the sterile phosphate buffer chilled on wet ice? Y N N/A
Was a new sterile 100 mL filter funnel with pre-loaded filter used? Y N N/A
Was the filter funnel attached to the side arm filter flask using the correct rubber stopper (white) and adapter? (or crew supplied manifold system was assembled appropriately) See figure 14.2.
Y N N/A
Was the sample bottle shaken 25 times to mix well? Y N N/A
Was the 25 mL of the mixed water sample measured in the sterile graduated 50 mL centrifuge tube and poured into the filter funnel?
Y N N/A
Was a hand or electric vacuum pump attached to the filtering apparatus Circle which was used.
Y N N/A
Was care taken to ensure the vacuum pressure did not exceed 7 inches of mercury ~ 3.4 psig?
Y N N/A
Was it pumped until all liquid was in the filtrate collection flask? Y N N/A
If the first 25 mL volume passed readily through the filter, was another 25 mL measured and added and the filtration continued?
Y N N/A
If the filter clogged before completely filtering the first or second 25 mL volume, was the filter discarded and the filtration repeated using a lesser volume and a new sterile filter funnel?
Y N N/A
Was approx. 10 mL of the chilled sterile phosphate buffer poured into the graduated 50 mL centrifuge tube used for the sample?
Y N N/A
Was the tube capped and shaken 5 times? Y N N/A
Was the cap removed and the rinsate poured into the filter funnel to rinse filter?
Y N N/A
Was the rinsate filtered and repeated with another 10 mL of sterile buffer? Y N N/A
Was the top of the filter funnel removed from the base without disturbing filter?
Y N N/A
Were sterile disposable forceps used to remove the filter (touching only the filter edges)?
Y N N/A
Was the filter folded it in half, in quarters, eighths, and then in sixteenths (filter is folded 4 times)?
Y N N/A
Was the filter inserted into chilled filter extraction tube (with beads) point side up?
Y N N/A
Was the screw cap replaced and tightened? Y N N/A
Was the volume of water sample filtered through the filter recorded on the sample label?
Y N N/A
Was the label attached to the microcentrifuge tube? Y N N/A
Was any tape applied to the cap or elsewhere on the microcentrifuge tube (SHOULD NOT BE)?
Y N N/A
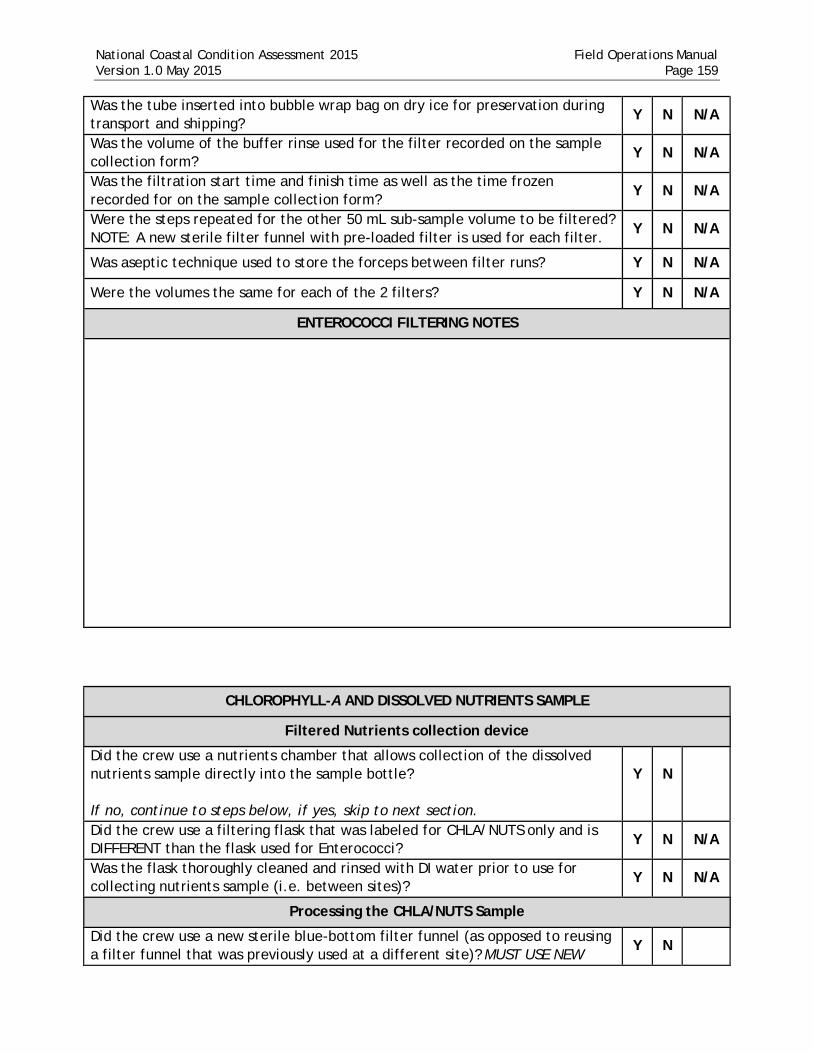
National Coastal Condition Assessment 2015 Field Operations Manual Version 1.0 May 2015 Page 159
Was the tube inserted into bubble wrap bag on dry ice for preservation during transport and shipping?
Y N N/A
Was the volume of the buffer rinse used for the filter recorded on the sample collection form?
Y N N/A
Was the filtration start time and finish time as well as the time frozen recorded for on the sample collection form?
Y N N/A
Were the steps repeated for the other 50 mL sub-sample volume to be filtered? NOTE: A new sterile filter funnel with pre-loaded filter is used for each filter.
Y N N/A
Was aseptic technique used to store the forceps between filter runs? Y N N/A
Were the volumes the same for each of the 2 filters? Y N N/A
ENTEROCOCCI FILTERING NOTES
CHLOROPHYLL-A AND DISSOLVED NUTRIENTS SAMPLE
Filtered Nutrients collection device
Did the crew use a nutrients chamber that allows collection of the dissolved nutrients sample directly into the sample bottle? If no, continue to steps below, if yes, skip to next section.
Y
N
Did the crew use a filtering flask that was labeled for CHLA/NUTS only and is DIFFERENT than the flask used for Enterococci?
Y N N/A
Was the flask thoroughly cleaned and rinsed with DI water prior to use for collecting nutrients sample (i.e. between sites)?
Y N N/A
Processing the CHLA/NUTS Sample
Did the crew use a new sterile blue-bottom filter funnel (as opposed to reusing a filter funnel that was previously used at a different site)? MUST USE NEW
Y N

National Coastal Condition Assessment 2015 Field Operations Manual Version 1.0 May 2015 Page 160
Were Nitrile gloves worn? Y N N/A
Was the filter funnel attached to the chamber or side arm filter flask using the correct rubber stopper (blue) and adapter? See figure 14.3.
Y N N/A
Was the originally loaded filter (patterned) removed from the base, but the filter pad left in place?
Y N N/A
Was a glass fiber filter placed in the filter funnel, pressed (gridded) side down (i.e. rough side up)?
Y N N/A
Was the filter handled with clean forceps? Y N N/A
Was 250 mL of site water measured with a clean graduated cylinder and poured into the filter funnel, the cap replaced, and the sample pumped through the filter?
Y N N/A
Was a hand or electric vacuum pump attached to the filtering apparatus Circle which was used.
Y N N/A
Was care taken to ensure the vacuum pressure did not exceed 7 inches of mercury (~ 3.4 psig) and that no single sample volume was filtered for longer than 5 minutes?
Y N N/A
If a filter flask was used to collect filtrate, was 10-20 mL of filtrate used to rinse the filter flask and then discarded and was this process performed a total of 3 times?
Y N N/A
Was 10-20 mL of filtrate used to rinse the sample bottle and then discarded and was this process performed a total of 3 times?
Y N N/A
If 250 mL of water did not pass through the filter, was the filter changed, the apparatus rinsed with DI water, and the procedures (including rinses) repeated using 100 mL of site water?
Y N N/A
If a filter flask was used to collect filtrate, was 250 mL of filtrate poured into a 250 mL HDPE bottle? (if no flask used, was 250 mL of filtered water collected directly into the sample bottle)?
Y N N/A
Was the dissolved nutrients label affixed to the bottle and then covered with clear plastic tape?
Y N N/A
Was the sample information recorded on the sample collection form and the sample placed on wet ice?
Y N N/A
Was the filter observed for visible color? Y N N/A
If there was no visible color, did the process proceed until color was visible on the filter or until a maximum of 2,000 mL was filtered? NOTE, if the crew is using a filter chamber, they should switch to a flask or manifold setup once the nutrients sample is collected.
Y N N/A
Was the level of water monitored in the lower chamber to ensure that it did not contact the filter or flow into the pump?
Y N N/A
After readily visible color was seen on the filter, was the actual sample volume filtered recorded on the Sample Collection Form and on the CHLA sample label?
Y N N/A
Was the graduated cylinder and the upper portion of the filter funnel rinsed thoroughly with DI water to include any remaining cells adhering to the sides and pumped through the filter?
Y N N/A

National Coastal Condition Assessment 2015 Field Operations Manual Version 1.0 May 2015 Page 161
Was the filter removed from the holder with clean forceps? Y N N/A
Was the filter folded in half, with the colored side folded inward? Y N N/A
Was the folded filter placed into a 50 mL centrifuge tube and capped? Y N N/A
Was the cap sealed tightly by turning an additional ¼ turn past the point at which initial resistance is met and then taped with electrical tape?
Y N N/A
Was the sample volume filtered recorded on a chlorophyll label and attached to the centrifuge tube?
Y N N/A
Was the label covered with a strip of clear tape? Y N N/A
Does the “total volume of water filtered” on the Sample Collection Form match the total volume recorded on the sample label?
Y N N/A
Was the 50-mL centrifuge tube wrapped in aluminum foil and placed in a self-sealing plastic bag?
Y N N/A
Was this bag placed on dry ice? Y N N/A
CHLOROPHYLL-A AND DISSOLVED NUTRIENTS SAMPLE NOTES
FINAL SITE ACTIVITIES
General site Assessment
Were any of the shoreline activities and disturbances recorded that were observed on the shoreline adjacent to the sampling site visible from the X-site?
Y N N/A
For shoreline activities and disturbances that the crew observed, was the rating of the abundance or influence marked as low (L), moderate (M), or heavy (H) on the line next to the listed disturbance?
Y N N/A
If shoreline activities were not noted, did the crew leave the bubbles blank? Y N N/A

National Coastal Condition Assessment 2015 Field Operations Manual Version 1.0 May 2015 Page 162
Were observations regarding the general characteristics of the site recorded on the Site Assessment Form (in a 200 m circle around the X-site) using the scale of 1-5?
Did all field crew members contribute to the evaluation?
Y
Y
N
N
N/A
N/A
Were other items such as signs of pipe outflows, extreme weather, etc. recorded?
Y N N/A
Was the comments section used on the Site Assessment Form to note any other pertinent information about the site?
Y N N/A
Data Forms and Sample Inspection
After the Site Assessment Form was completed, did the Field Crew Leader review all of the data forms and sample labels for accuracy, completeness, and legibility?
Y N N/A
Did the other crew member(s) inspect all sample containers and packages in preparation for transport, storage, or shipment?
Y N N/A
Did the crew ensure that all required data forms for the site were completed? Y N N/A
Did the crew confirm that the SITE-ID and date of visit are correct on all forms? Y N N/A
On each form, did the crew verify that all information was recorded accurately, the recorded information was legible, and any flags were explained in the comments section?
Y N N/A
Did the crew ensure that comments were clear and legible, with no "shorthand" or abbreviations?
Y N N/A
After reviewing each form (if using paper forms), was the upper right corner of each page of the form initialed?
Y N N/A
Did the crew ensure that all samples were labeled, all labels are completely filled in, and each label was covered with clear plastic tape?
Y N N/A
If any samples were not collected, was the pertinent “no sample collected” bubble(s) filled in on the data form(s)
Y N N/A
Were all sample containers checked to ensure that they were properly sealed? Y N N/A
Will the coolers be shipped with fresh bags of ice in cooler? Y N N/A
Verify that the coolers will be shipped by overnight courier ASAP after collection (e.g. the same or next day). Identify shipping date: / /2015
Y N N/A
If samples will be held after collection, will they be kept cold and in darkness? Identify where they will be stored:
Y N N/A
Launch Site Cleanup
Were the boat, motor, and trailer inspected for evidence of weeds and other macrophytes?
Y N N/A
Were the boat, motor, and trailer cleaned as completely as possible before leaving the launch site?
Y N N/A
Were all nets/sieves etc. inspected for pieces of macrophyte or other organisms and as much as possible was removed before packing for transport?
Y N N/A
Were all equipment and supplies packed in the vehicle and trailer for transport and kept organized as presented in the equipment checklists?
Y N N/A

National Coastal Condition Assessment 2015 Field Operations Manual Version 1.0 May 2015 Page 163
Was all waste material at the launch site cleaned up and disposed of or transported out of the site if a trash can is not available?
Y N N/A
Were equipment needs identified and those needs will be conveyed to the FLC or Requested via the Request Form?
Y N N/A
Miscellaneous
Do the crew members know the phone numbers for pertinent points of communication (FLC, IM Team, RMC, and/or HQ), is the number saved in cell phone, or do they know the location of numbers in Field Ops Manual?
Y N N/A
Do the crew members have suggestions/problems concerning the sampling Procedures, forms, lodging, logistics, etc.?
Y N N/A
FINAL SITE ACTIVITIES NOTES
National Coastal Condition Assessment 2015 Field Operations Manual Version 1.0 May 2015 Page 164
FINAL EVALUATION ACTIVITIES
Areas of Strength
Areas of Concern
National Coastal Condition Assessment 2015 Field Operations Manual Version 1.0 May 2015 Page 165
FINAL EVALUATION ACTIVITIES
Was the crew debriefed on the results of the evaluation by the evaluator? Y N N/A
COMMENTS OF THE CREW BEING EVALUATED

National Coastal Condition Assessment 2015 Field Operations Manual Version 1.0 May 2015 Page 166
SIGNATURES
_________________________________________ ____________________________________
Evaluator Date Field Crew Leader Date
_________________________________________ ____________________________________
Field QC Officer (if assigned by site) Date Field Crew Member Date
_________________________________________ ____________________________________
Field Crew Member Date Field Crew Member Date
_________________________________________ ____________________________________
Field Crew Member Date Field Crew Member Date
_________________________________________ _____________________________________
Field Crew Member Date Field Crew Member Date