Embed Size (px)
Citation preview

nanoKeyer Kit, Firmware Upload Guide
Introducing…
Firmware Upload Guide
by Oscar, DJ0MY

nanoKeyer Kit, Firmware Upload Guide
nanoKeyer Arduino K3NG Firmware Upload Guide
Compiled by DJ0MY
Introduction:
This keyer kit requires in addition an Arduino Nano microcontroller plug-in board. The
Arduino Nano must be purchased separately from one of the various Arduino dealers.
Make sure to use only an Arduino Nano V3.0 (or compatible) based on a ATMEGA 328 chip.
The Arduino Nano V2.x, which is ATMEGA 168 based, has not sufficient flash memory to hold
the size required by the K3NG Arduino keyer source code.
In order for the Arduino Nano to act like a keyer it needs to be programmed first.
Programming is fast and easy and done via the USB cable (no programmers needed!)
This guide should help Arduino beginners to program their device for use with nanoKeyer.
If you have already experience with Arduino’s and the Arduino IDE software already installed
please proceed to the “Second Stage” section of this document.
Getting Started
For getting started with Arduino I suggest to read the “Getting Started” section on the
Arduino website: http://arduino.cc/en/Guide/HomePage
That site will show you what Arduino is and why you'd want to use it (not just for
nanoKeyer). It will also explain you the Arduino development environment, whi we will use
later for uploading the Firmware via the USB cable into the Arduino board.
And last but not least the site may give you advice on what to do if things don't work.
nanoKeyer Kit, Firmware Upload Guide
First Stage:
This first stage assumes you are using a WINDOWS system. For a tutorial how to do it on a
MAC or a LINUX machine please see the Arduino website.
The following Step-by-step instructions for setting up the Arduino software and connecting it
to an Arduino Nano has been taken directly from the Arduino website.
Source: http://arduino.cc/en/Guide/Windows
Getting Started with Arduino on Windows
This document explains how to connect your Arduino board to the computer and upload your first sketch. (A firmware source code is called “sketch” in the Arduino world)
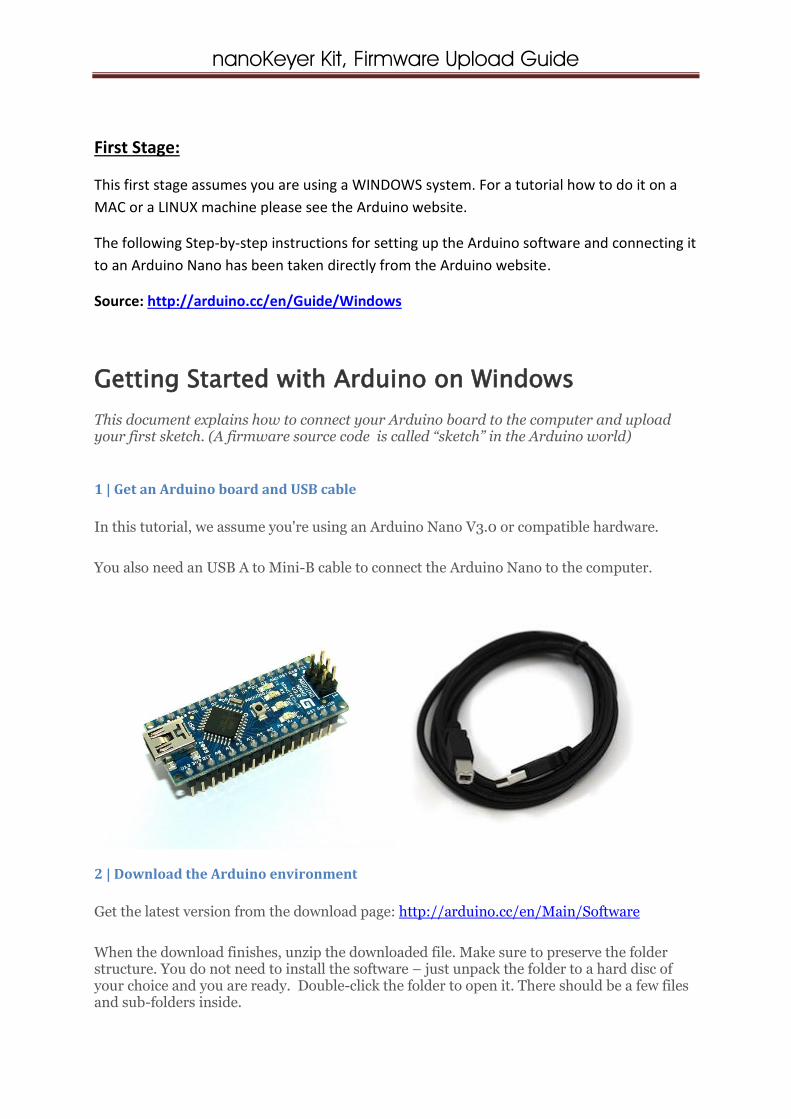
1 | Get an Arduino board and USB cable
In this tutorial, we assume you're using an Arduino Nano V3.0 or compatible hardware.
You also need an USB A to Mini-B cable to connect the Arduino Nano to the computer.
2 | Download the Arduino environment
Get the latest version from the download page: http://arduino.cc/en/Main/Software
When the download finishes, unzip the downloaded file. Make sure to preserve the folder structure. You do not need to install the software – just unpack the folder to a hard disc of your choice and you are ready. Double-click the folder to open it. There should be a few files and sub-folders inside.

nanoKeyer Kit, Firmware Upload Guide 3 | Connect the Arduino Nano board
The Arduino Nano automatically draw power from either the USB connection to the computer or an external power supply.
Connect the Arduino board to your computer using the USB cable. The power LED (labelled PWR) should go on.
4 | Install the drivers
Installing drivers for the Arduino Nano with Windows7, Vista, or XP:
When you connect the board, Windows should initiate the driver installation process (if you haven't used the computer with an Arduino or any other FTDI chip based serial COM port based board before).
On Windows Vista and 7, the driver should be automatically downloaded and installed. (Really, it works!)
On Windows XP, the Add New Hardware wizard will open:
When asked Can Windows connect to Windows Update to search for software? select No, not this time. Click next.
Select Install from a list or specified location (Advanced) and click next. Make sure that Search for the best driver in these locations is checked; uncheck
Search removable media; check Include this location in the search and browse to the drivers/FTDI USB Drivers directory of the Arduino distribution. (The latest version of the drivers can be found on the FTDI website.) Click next.
The wizard will search for the driver and then tell you that a "USB Serial Converter" was
found. Click finish. The new hardware wizard will appear again. Go through the same steps and select the same
options and location to search. This time, a "USB Serial Port" will be found.
You can check that the drivers have been installed by opening the Windows Device Mananger (in the Hardware tab of System control panel).
Look for a "USB Serial Port" in the Ports section; that's the Arduino board. You should write down the assigned COM port (e.g. COM 3 or a double digit COM number)
nanoKeyer Kit, Firmware Upload Guide
5 | Launch the Arduino application
Double-click the Arduino application.
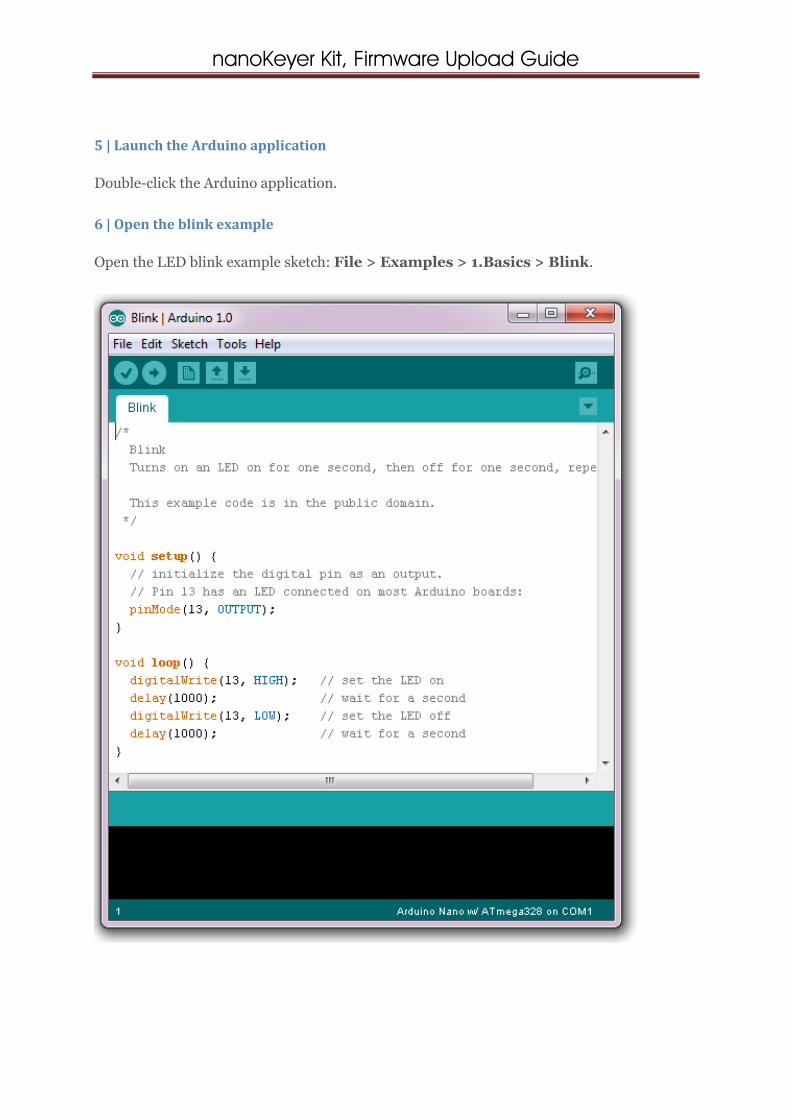
6 | Open the blink example
Open the LED blink example sketch: File > Examples > 1.Basics > Blink.

nanoKeyer Kit, Firmware Upload Guide
7 | Select your board
You'll need to select the entry in the Tools > Board menu that corresponds to your Arduino.
Selecting an Arduino Nano (Atmega328 based) – see red rectangle above…
In our case for the Arduino Nano V3.0 with an ATmega328 we select the entry Arduino Nano.
8 | Select your serial port
Select the serial device of the Arduino board from the Tools | Port menu. This is likely to be COM3 or higher (COM1 and COM2 are usually reserved for hardware serial ports on older computers). To find out, you can disconnect your Arduino board and re-open the menu; the entry that disappears from the menu should be the Arduino board. Reconnect the board and select that serial port.

nanoKeyer Kit, Firmware Upload Guide
9 | Upload the program
Make sure the Arduino Nano board is not yet plugged into the nanoKeyer PCB.
Now, simply click the "Upload" button (Right Arrow in a circle) in the Arduino software. The Arduino development environment software will start to compile the source code.
Wait a few seconds - you should see the RX and TX LEDs on the board flashing during the upload of the compiled sketch. If the upload is successful, the message "Done uploading." will appear in the status bar.
A few seconds after the upload finishes, you should see the pin 13 (L) LED on the board start to blink (in orange).
If it does, congratulations! You've gotten your Arduino Nano up-and-running.
If you have problems, please see the trouble shooting suggestions on the Arduino site: http://arduino.cc/en/Guide/Troubleshooting
Second Stage:
This second stage assumes that you are familiar with Arduino or at least successfully
completed the first stage above.
Please download the K3NG source code (called “sketch” in Arduino world) from the
Download section of the nanoKeyer website: http://nanokeyer.wordpress.com/
When opening the K3NG keyer ZIP file folder you should see various source code files and a
subfolder called Libraries. In the Libraries folder you will see various subfolders. As from IDE
V 1.6.6 we need to move all contents of that library folder to the sketchbook folder of your
Arduino IDE.
In order to do so we copy & paste all those folders into the custom libraries folder of your
Arduino IDE installation. Starting from WINDOWS7 the default setting is usually located in
C:\Users\Yourname\My Documents\Arduino\

nanoKeyer Kit, Firmware Upload Guide
Now move the full Libraries folder from the ZIP file over to the Arduino Sketchbook folder.
The resulting subfolders in your sketchbook should look like this (see screenshot below)
The Arduino IDE will detect this libraries now automatically at next startup as a custom
added library. Congratulations, you are now ready for the next step
Now with the Libraries at the correct location we are almost ready to start the firmware
upload into the Arduino Nano board. But first copy all the contents of the main firmware
folder of the K3NG_Keyer.ZIP file into a new folder at a location of your choice.

nanoKeyer Kit, Firmware Upload Guide
IMPORTANT: make sure that this new folder is named k3ng_keyer
(otherwise compile errors may occur)
Go to Files > Open… menu in the Arduino IDE and open the extracted K3NG firmware file in
the folder created in the previous step. (you will recognize it by the file type extension .INO)
If you get a warning message like this, something went wrong with the chosen folder name
Maybe you have a typo?
Press Cancel and repeat the above steps making really sure the files are only extracted into a
folder named k3ng_keyer…
Since Version 2.0 of the K3NG Firmware there have been some changes in how the software
is configured. The good news is that it is now more user friendly as it comes already with
some preprogrammed hardware selection features.
To access the nanoKeyer feature settings once the k3ng_keyer.ino file is loaded please go to
the drop down list in the upper right area of the Arduino IDE software.
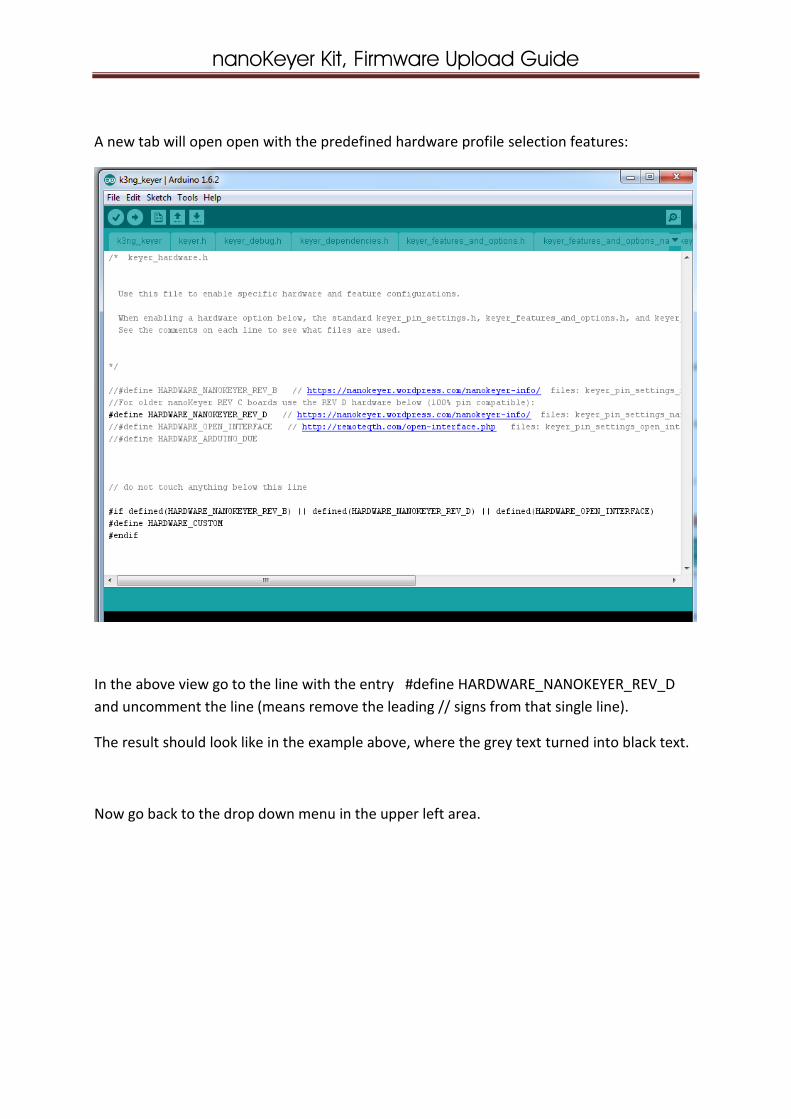
Select the entry - keyer_hardware.h as highlighted below:
nanoKeyer Kit, Firmware Upload Guide
A new tab will open open with the predefined hardware profile selection features:
In the above view go to the line with the entry #define HARDWARE_NANOKEYER_REV_D
and uncomment the line (means remove the leading // signs from that single line).
The result should look like in the example above, where the grey text turned into black text.
Now go back to the drop down menu in the upper left area.

nanoKeyer Kit, Firmware Upload Guide
Select the entry - keyer_features_and_options_nanokeyer_rev_d.h as highlighted below:
You will then see on the screen a new tab with a list of all available compile features:

nanoKeyer Kit, Firmware Upload Guide
The desired / not desired features and functions of the firmware are selected by simply
commenting (means adding // in front of the line) or uncommenting each line.
For making most use of your nanoKeyer hardware I suggest you to keep the default settings
which make maximum use of all the available hardware features of your nanoKeyer.
Be aware that the currently selected features use up to around 96% of all available
programming memory of the Arduino Nano. If you add complex features, most likely the
Arduino will run out of memory. You always need to do a test-compile to see if the resulting
file size still fits into the Arduino board or not.
Sometimes you may need to give up one feature and swap it for another more favored one.
Now you should be ready to upload the Firmware. Make sure the USB cable is connected
and the correct COM port and Arduino type selected (like in the First Stage of this document)
In case you use an old REV. B PCB: Make sure the Arduino Nano board is not yet plugged into the nanoKeyer PCB.
The REV. C and REV. D PCB can be programmed while the Arduino Nano is plugged into the nanoKeyer. For this purpose please make sure that jumper JP1 is OPEN. This will keep the automatic serial reset feature active which is needed to upload new firmware via the bootloader.
Now, simply click the "Upload" button (Right Arrow in a circle) in the Arduino software. The Arduino development environment software will start to compile the source code.
Wait several seconds (takes much longer than the Blinking LED example code in the First Stage) – after successful compilation you should see the RX and TX LEDs on the Arduino board flicker during the upload of the compiled sketch. If the upload is successful, the message "Done uploading." will appear in the status bar.
If the PCB is plugged in (REV C and D PCB) the Arduino Nano will automatically reset itself
after the upload is complete and you will hear a “HI” greeting message in CW from the
nanoKeyer piezo buzzer.

nanoKeyer Kit, Firmware Upload Guide
IMPORTANT NOTE:
Now for normal keyer operation (especially for K1EL Winkeyer mode) you need to close JP1
again with the provided jumper header to avoid unintended resets of the nanoKeyer
firmware due to serial communication with logging programs on the PC.
Congratulations – You have successfully uploaded your firmware. Now I suggest to please study all the features/modes/menus etc. of the K3NG firmware in the K3NG firmware documentation on K3NG’s website to make yourself familiar with all the features.
ADVANCED CONFIGURATIONS
Here a few hints on the most common feature modifications many OM’s use:
Configure for SO2R operation
The default mode is to operate as SO1R (single operator one radio). However since the
Winkeyer 2 standard also supports SO2R operation (single operator 2 radios) via many
contest logging programs, it is possible to reconfigure the nanoKeyer hardware and use the
external PTT keying line to key CW a second radio instead of using it for PTT purposes.
(the PPT feature is not needed by most hams with modern radios anyway)
This is how to change the configuration files to support SO2R:
Select the entry - keyer_pin_settings_nanokeyer_rev_d.h as highlighted below:

nanoKeyer Kit, Firmware Upload Guide
You will then see on the screen a new tab with a list of all pin configurations:
All you have to do is to change the value of two lines:
#define tx_key_line_2 0 - change this value from 0 to 13
This will cause keying of radio 2 via pin 13 (pin 13 is connected to the PTT jack)
#define ptt_tx_1 13 - change this value from 13 to 0
This will cause the PTT function of radio 1 not to be assigned to any pin – hence zero.
To reverse the configuration back to SO1R, just change it again to the original settings.
Configure for Serial Command Line Interface instead of Winkey serial protocol

nanoKeyer Kit, Firmware Upload Guide
While most contest logging software and a few others such as LogForOM or HRD are
supporting external keyers via the so called Winkey protocol, there might be a desire to be
able to program the keyer features via a serial command mode interface by means of a
connected terminal program. (you still have the option always to program it as well via
paddle command mode, so that the serial mode does not add much of additional value)
Main problem when using the CLI feature is that it requires quite a large amount of compiled
program memory space and therefore you need to make a tradeoff and deactivate some of
the other less used features.
Select the entry - keyer_features_and_options_nanokeyer_rev_d.h as highlighted below:
Now please uncomment (remove the leading // signs) the two following lines:
#define FEATURE_COMMAND_LINE_INTERFACE
#define FEATURE_SERIAL_HELP
These two lines will activate the CLI mode and the additional serial mode help file that will
output a list of commands when you request it from the keyer in command mode.
Now if you would compile at this stage without deactivating other features you would get an
“Sketch too big” error as the resulting file size might be much larger than the 32kByte
memory an Arduino Nano has.

nanoKeyer Kit, Firmware Upload Guide
In order to free up memory space I suggest deactivating the following default features by
commenting them out (add the leading // signs to each of that lines):
//#define FEATURE_PS2_KEYBOARD
//#define OPTION_WINKEY_STRICT_HOST_OPEN
//#define OPTION_WINKEY_2_SUPPORT
//#define OPTION_WINKEY_SEND_BREAKIN_STATUS_BYTE
//#define OPTION_WINKEY_INTERRUPTS_MEMORY_REPEAT
//#define OPTION_WINKEY_2_HOST_CLOSE_NO_SERIAL_PORT_RESET
This should provide you with sufficient memory to compile the CLI mode.
To test this mode after compilation and upload you may use the built in terminal of the
Arduino IDE. You can access it under the menu Tools - Serial Monitor
You need to set the serial port speed to baud to communicate with the nanoKeyer.
To test the connection type \? That is the help command and dice we have compiled the
serial help feature the keyer should respond with a full list of commands as seen in the
screenshot below.

nanoKeyer Kit, Firmware Upload Guide
You may now play with trying to change some of the keyer settings via the serial port.
Most keyer settings will be written into the non-volatile EEPROM of the keyer, even if at a
later stage you decide to deactivate the serial command line interface mode and go back
into e.g. Winkeyer mode.