Embed Size (px)
Citation preview
Address: Room 1705,Block A1, Longyuan Plaza, Longkouxi Road, Guangzhou, China, 510640 Website: http://www.arm9.net
Sales: +86-20-85201025 Tech Support: +86-13719442657 Fax: +86-20-85261505
Email for Business and Cooperation: [email protected] Email for Tech Support: [email protected]
第 - 1 - 页
Nano PC User’s Manual
REVISION ORIGINATOR SCR REV DATE
0.1.0 Guangzhou FriendlyARM Co., Ltd April 15, 2014
Guangzhou FriendlyARM Computer Tech Co., Ltd Confidential:
This document and information contained in it shall not be reproduced
by, used by, or disclosed to others except as expressly authorized in
writing by Guangzhou FriendlyARM Co., Ltd.
Guangzhou FriendlyARM
Computer Tech Co., Ltd
Guangzhou, China
Copyright@2014
Address: Room 1705,Block A1, Longyuan Plaza, Longkouxi Road, Guangzhou, China, 510640 Website: http://www.arm9.net
Sales: +86-20-85201025 Tech Support: +86-13719442657 Fax: +86-20-85261505
Email for Business and Cooperation: [email protected] Email for Tech Support: [email protected]
第 - 2 - 页
COPYRIGHT STATEMENT
The content (content being images, text, programs and scripts) of this English
manual is copyright © Guangzhou FriendlyARM Computer Tech Co., Ltd. All
rights expressly reserved.
Any content of the manual printed or downloaded may not be sold, licensed,
transferred, copied or reproduced in whole or in part in any manner or in or on
any media to any person without the prior written consent of Guangzhou
FriendlyARM Computer Tech Co., Ltd including but not limited to:
transmission by any method
storage in any medium, system or program
display in any form
performance
hire, lease, rental or loan
Requests for permission to reproduce material from this manual should be
addressed to Guangzhou FriendlyARM Computer Tech Co., Ltd.
Address: Room 1705,Block A1, Longyuan Plaza, Longkouxi Road, Guangzhou, China, 510640 Website: http://www.arm9.net
Sales: +86-20-85201025 Tech Support: +86-13719442657 Fax: +86-20-85261505
Email for Business and Cooperation: [email protected] Email for Tech Support: [email protected]
第 - 3 - 页
Index
1 INTRODUCTION................................................................................................................................................... - 4 -
1.1 NANO PC BOARD ..................................................................................................................................... - 5 -
1.1.1 Nano PC Hardware Feature ............................................................................................................ - 5 -
2 GET STARTED ..................................................................................................................................................... - 8 -
2.1 BURNING SUPERBOOT TO SD CARD ....................................................................................................... - 8 -
2.2 RUN UBUNTU ON NANO PC FROM SD CARD ....................................................................................... - 11 -
2.2.1 Prepare SD Card ............................................................................................................................ - 11 -
2.2.2 Run Ubuntu from SD ..................................................................................................................... - 13 -
2.2.3 Set HDMI Resolution ..................................................................................................................... - 15 -
2.3 FLASH UBUNTU TO NANO PC ............................................................................................................... - 15 -
2.3.1 Set HDMI Resolution ..................................................................................................................... - 17 -
Address: Room 1705,Block A1, Longyuan Plaza, Longkouxi Road, Guangzhou, China, 510640 Website: http://www.arm9.net
Sales: +86-20-85201025 Tech Support: +86-13719442657 Fax: +86-20-85261505
Email for Business and Cooperation: [email protected] Email for Tech Support: [email protected]
第 - 4 - 页
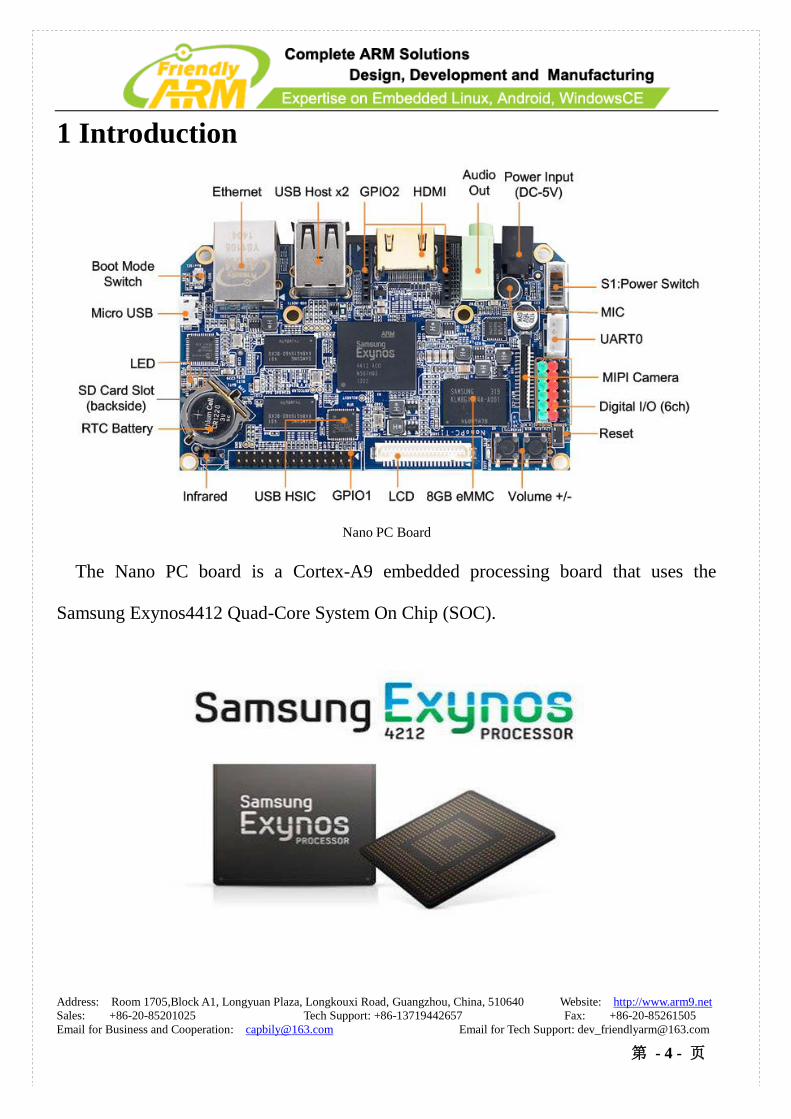
1 Introduction
Nano PC Board
The Nano PC board is a Cortex-A9 embedded processing board that uses the
Samsung Exynos4412 Quad-Core System On Chip (SOC).
Address: Room 1705,Block A1, Longyuan Plaza, Longkouxi Road, Guangzhou, China, 510640 Website: http://www.arm9.net
Sales: +86-20-85201025 Tech Support: +86-13719442657 Fax: +86-20-85261505
Email for Business and Cooperation: [email protected] Email for Tech Support: [email protected]
第 - 5 - 页
The Exynos4412 integrates the Mali-400 MP GPU graphic engine with hardware
support for 3D and can drive video playing on screens up to 1080P. These features make
it easily and widely used in MID development, Android notepads, auto electronic
devices, industrial applications, GPS systems and multimedia systems.
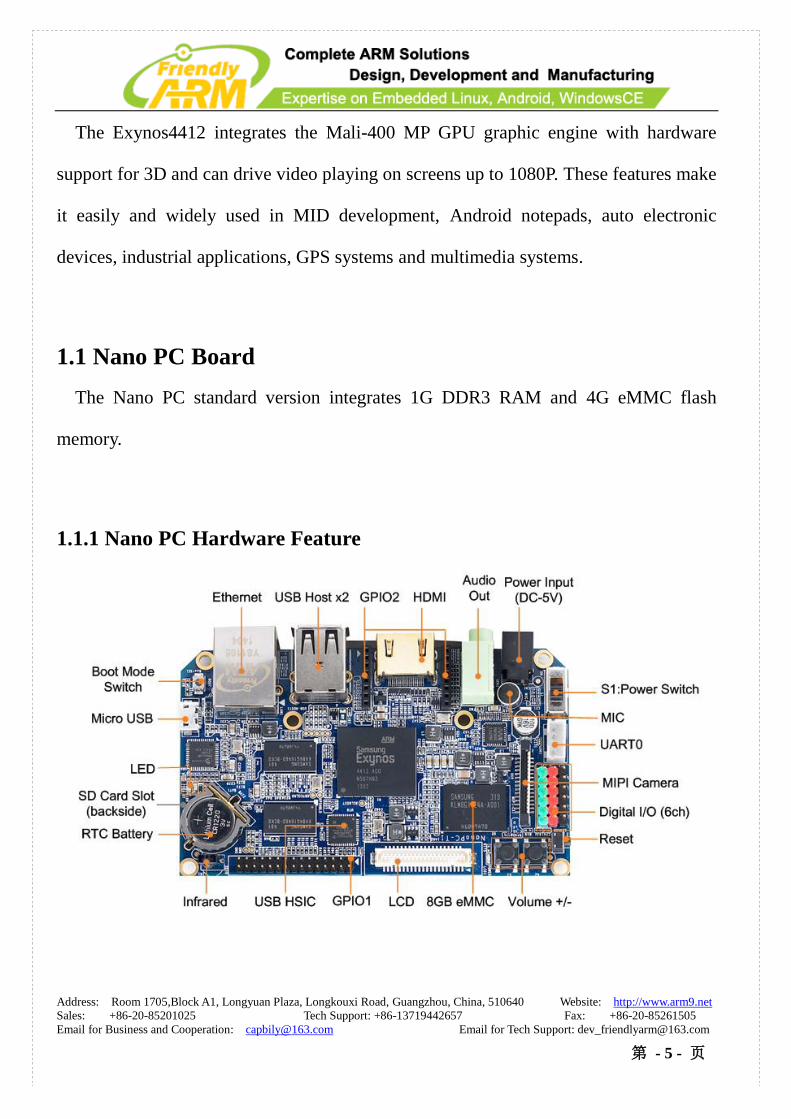
1.1 Nano PC Board
The Nano PC standard version integrates 1G DDR3 RAM and 4G eMMC flash
memory.
1.1.1 Nano PC Hardware Feature
Address: Room 1705,Block A1, Longyuan Plaza, Longkouxi Road, Guangzhou, China, 510640 Website: http://www.arm9.net
Sales: +86-20-85201025 Tech Support: +86-13719442657 Fax: +86-20-85261505
Email for Business and Cooperation: [email protected] Email for Tech Support: [email protected]
第 - 6 - 页
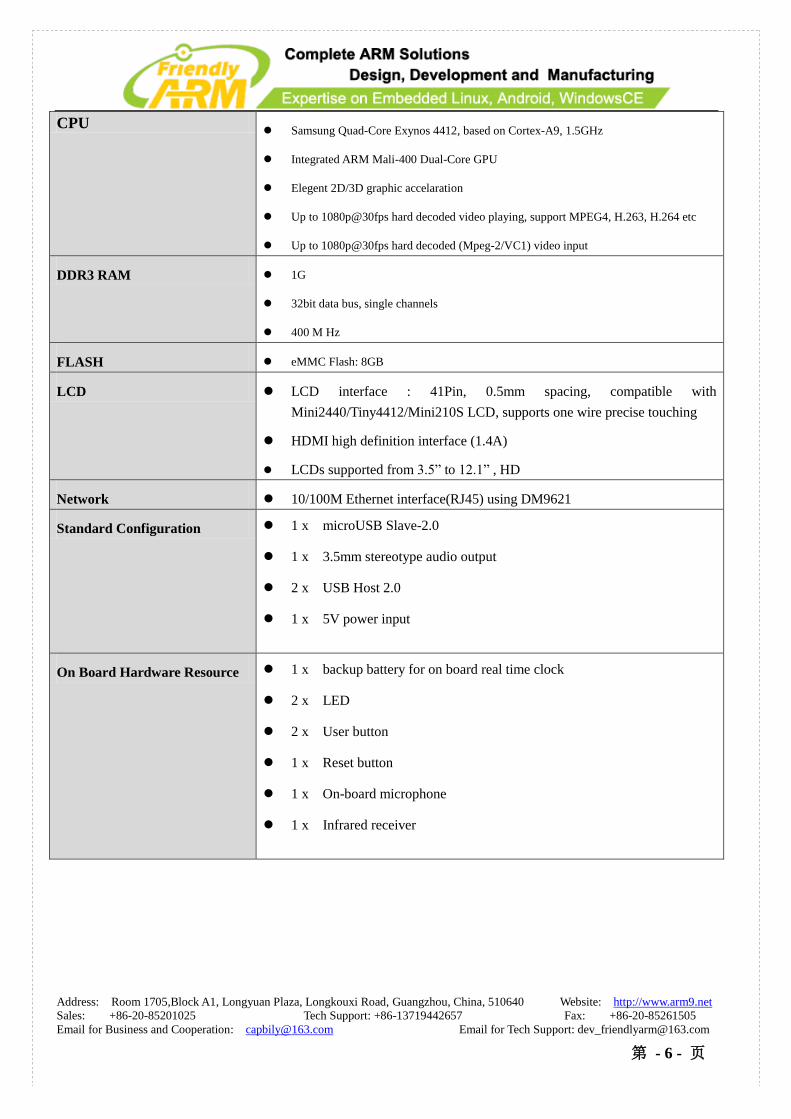
CPU Samsung Quad-Core Exynos 4412, based on Cortex-A9, 1.5GHz
Integrated ARM Mali-400 Dual-Core GPU
Elegent 2D/3D graphic accelaration
Up to 1080p@30fps hard decoded video playing, support MPEG4, H.263, H.264 etc
Up to 1080p@30fps hard decoded (Mpeg-2/VC1) video input
DDR3 RAM 1G
32bit data bus, single channels
400 M Hz
FLASH eMMC Flash: 8GB
LCD LCD interface : 41Pin, 0.5mm spacing, compatible with
Mini2440/Tiny4412/Mini210S LCD, supports one wire precise touching
HDMI high definition interface (1.4A)
LCDs supported from 3.5” to 12.1” , HD
Network 10/100M Ethernet interface(RJ45) using DM9621
Standard Configuration 1 x microUSB Slave-2.0
1 x 3.5mm stereotype audio output
2 x USB Host 2.0
1 x 5V power input
On Board Hardware Resource 1 x backup battery for on board real time clock
2 x LED
2 x User button
1 x Reset button
1 x On-board microphone
1 x Infrared receiver
Address: Room 1705,Block A1, Longyuan Plaza, Longkouxi Road, Guangzhou, China, 510640 Website: http://www.arm9.net
Sales: +86-20-85201025 Tech Support: +86-13719442657 Fax: +86-20-85261505
Email for Business and Cooperation: [email protected] Email for Tech Support: [email protected]
第 - 7 - 页
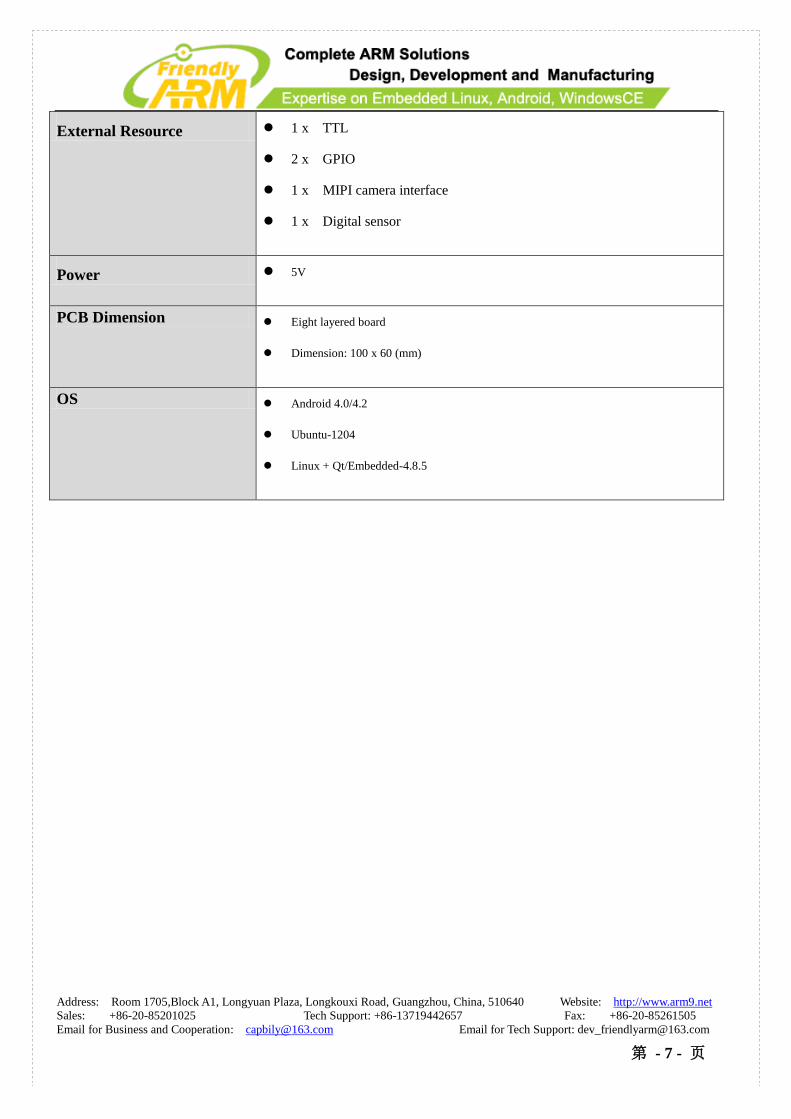
External Resource 1 x TTL
2 x GPIO
1 x MIPI camera interface
1 x Digital sensor
Power 5V
PCB Dimension Eight layered board
Dimension: 100 x 60 (mm)
OS Android 4.0/4.2
Ubuntu-1204
Linux + Qt/Embedded-4.8.5
Address: Room 1705,Block A1, Longyuan Plaza, Longkouxi Road, Guangzhou, China, 510640 Website: http://www.arm9.net
Sales: +86-20-85201025 Tech Support: +86-13719442657 Fax: +86-20-85261505
Email for Business and Cooperation: [email protected] Email for Tech Support: [email protected]
第 - 8 - 页
2 Get Started
We provide various OS image files. Users can flash those files to the board via an SD
card. We will guide you through these steps in this chapter.
2.1 Burning Superboot to SD Card
In order to boot from an SD card, you need to burn BIOS to it. FriendlyARM offers a
flashing utility: SD-Flasher.exe which can burn our Bootloader (Superboot4412.bin) to
an SD card.
We tested the following steps on Windows7
Note: users complained that some notebook’s integrated SD card reader cannot work
properly with card burning or reading. So far we haven’t encountered this issue and we
suggest that you should try a common card reader in this case.
Our SD-Flasher.exe formats a 130M space for the bootloader therefore an SD card
whose memory is less than 256M cannot work and we recommend using one whose
memory is at least 4G
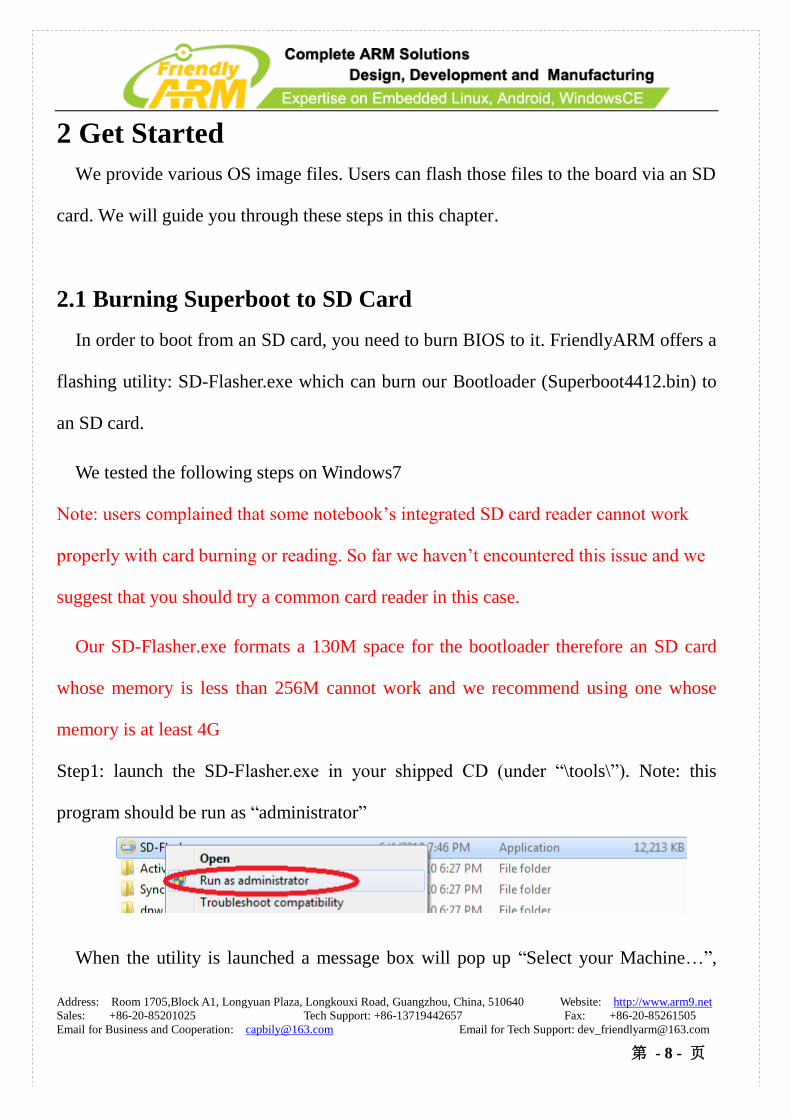
Step1: launch the SD-Flasher.exe in your shipped CD (under “\tools\”). Note: this
program should be run as “administrator”
When the utility is launched a message box will pop up “Select your Machine…”,
Address: Room 1705,Block A1, Longyuan Plaza, Longkouxi Road, Guangzhou, China, 510640 Website: http://www.arm9.net
Sales: +86-20-85201025 Tech Support: +86-13719442657 Fax: +86-20-85261505
Email for Business and Cooperation: [email protected] Email for Tech Support: [email protected]
第 - 9 - 页
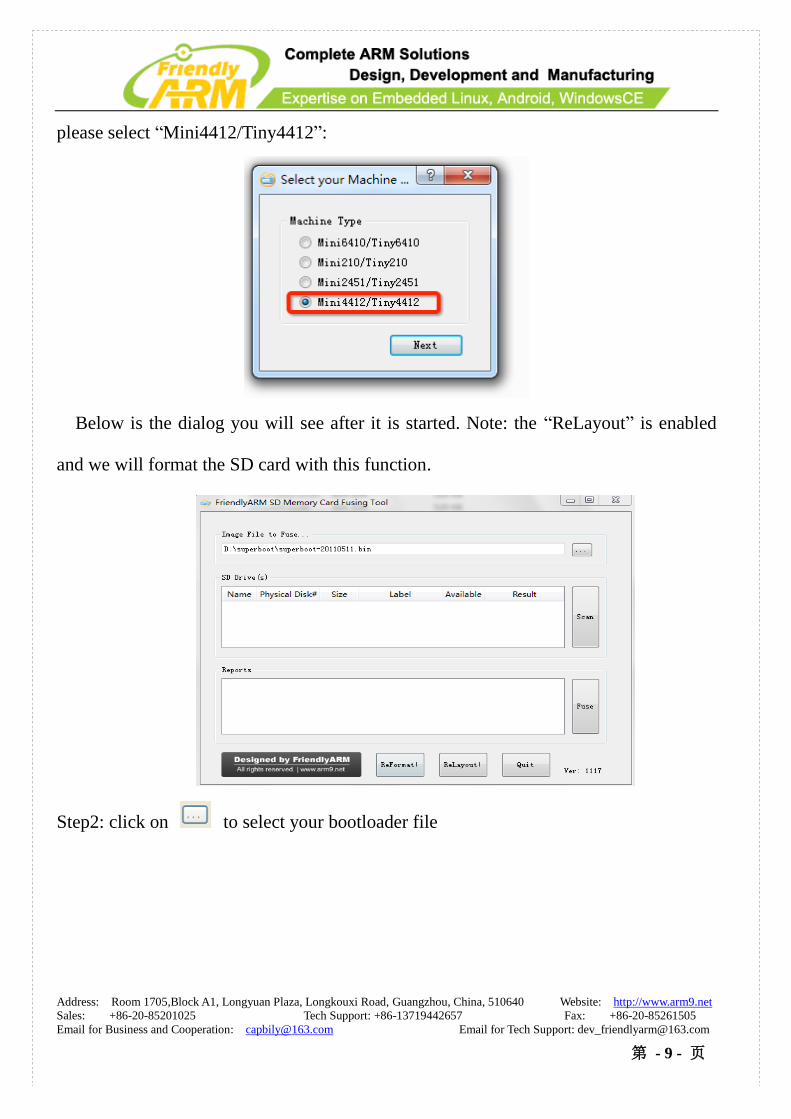
please select “Mini4412/Tiny4412”:
Below is the dialog you will see after it is started. Note: the “ReLayout” is enabled
and we will format the SD card with this function.
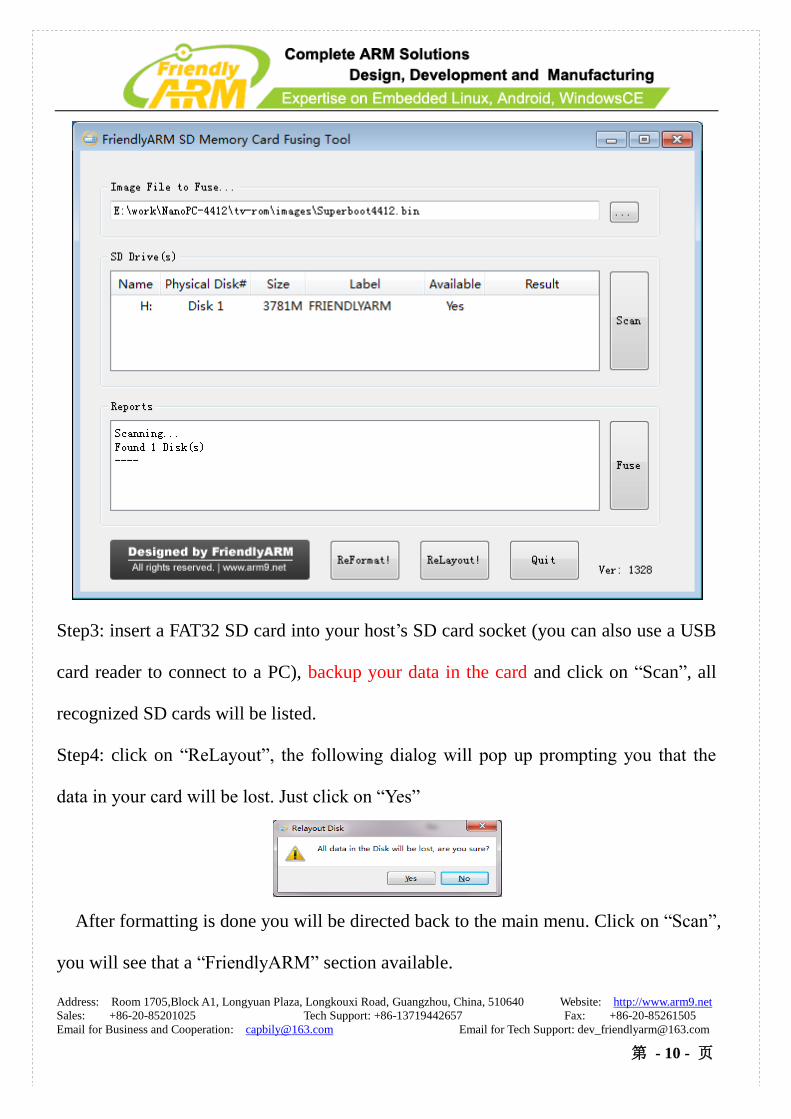
Step2: click on to select your bootloader file
Address: Room 1705,Block A1, Longyuan Plaza, Longkouxi Road, Guangzhou, China, 510640 Website: http://www.arm9.net
Sales: +86-20-85201025 Tech Support: +86-13719442657 Fax: +86-20-85261505
Email for Business and Cooperation: [email protected] Email for Tech Support: [email protected]
第 - 10 - 页
Step3: insert a FAT32 SD card into your host’s SD card socket (you can also use a USB
card reader to connect to a PC), backup your data in the card and click on “Scan”, all
recognized SD cards will be listed.
Step4: click on “ReLayout”, the following dialog will pop up prompting you that the
data in your card will be lost. Just click on “Yes”
After formatting is done you will be directed back to the main menu. Click on “Scan”,
you will see that a “FriendlyARM” section available.
Address: Room 1705,Block A1, Longyuan Plaza, Longkouxi Road, Guangzhou, China, 510640 Website: http://www.arm9.net
Sales: +86-20-85201025 Tech Support: +86-13719442657 Fax: +86-20-85261505
Email for Business and Cooperation: [email protected] Email for Tech Support: [email protected]
第 - 11 - 页
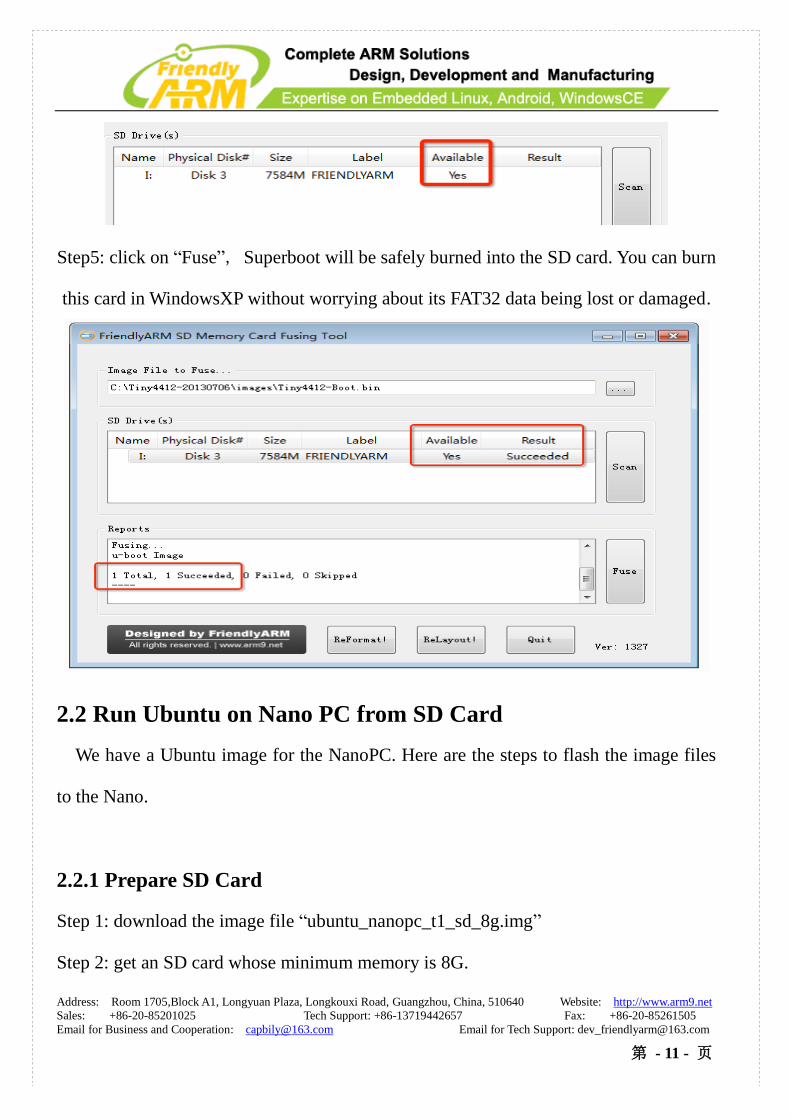
Step5: click on “Fuse”, Superboot will be safely burned into the SD card. You can burn
this card in WindowsXP without worrying about its FAT32 data being lost or damaged.
2.2 Run Ubuntu on Nano PC from SD Card
We have a Ubuntu image for the NanoPC. Here are the steps to flash the image files
to the Nano.
2.2.1 Prepare SD Card
Step 1: download the image file “ubuntu_nanopc_t1_sd_8g.img”
Step 2: get an SD card whose minimum memory is 8G.
Address: Room 1705,Block A1, Longyuan Plaza, Longkouxi Road, Guangzhou, China, 510640 Website: http://www.arm9.net
Sales: +86-20-85201025 Tech Support: +86-13719442657 Fax: +86-20-85261505
Email for Business and Cooperation: [email protected] Email for Tech Support: [email protected]
第 - 12 - 页
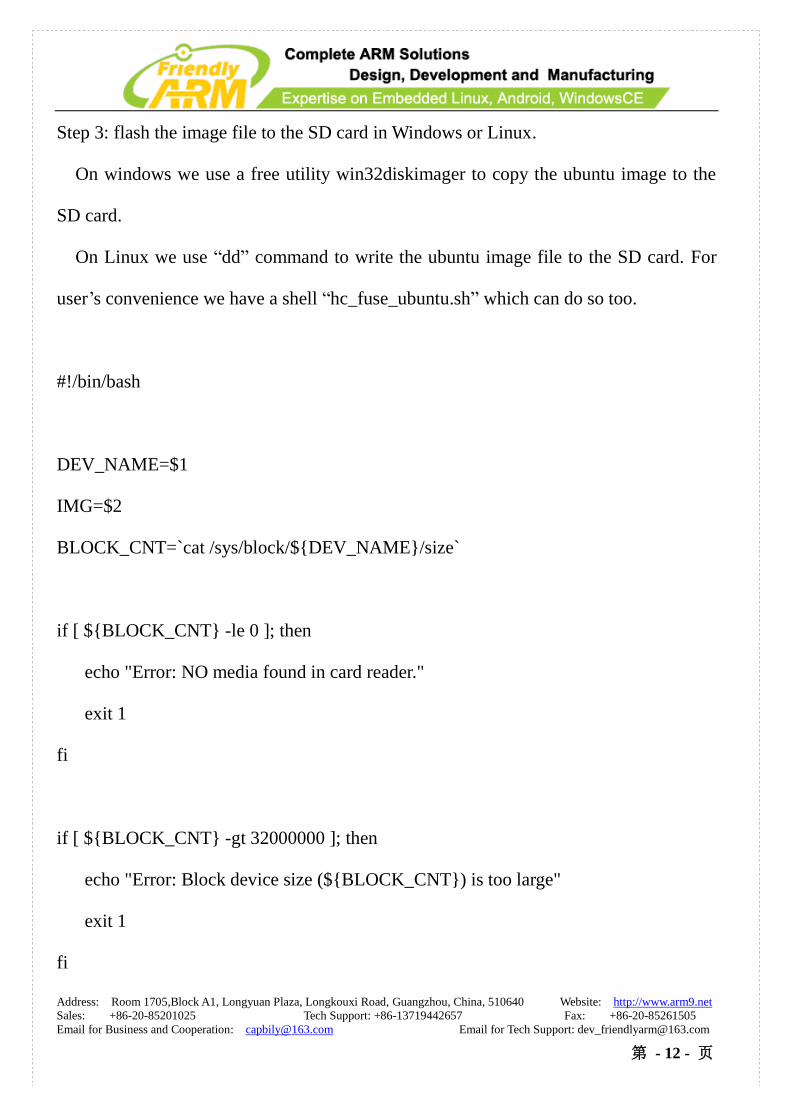
Step 3: flash the image file to the SD card in Windows or Linux.
On windows we use a free utility win32diskimager to copy the ubuntu image to the
SD card.
On Linux we use “dd” command to write the ubuntu image file to the SD card. For
user’s convenience we have a shell “hc_fuse_ubuntu.sh” which can do so too.
#!/bin/bash
DEV_NAME=$1
IMG=$2
BLOCK_CNT=`cat /sys/block/${DEV_NAME}/size`
if [ ${BLOCK_CNT} -le 0 ]; then
echo "Error: NO media found in card reader."
exit 1
fi
if [ ${BLOCK_CNT} -gt 32000000 ]; then
echo "Error: Block device size (${BLOCK_CNT}) is too large"
exit 1
fi
Address: Room 1705,Block A1, Longyuan Plaza, Longkouxi Road, Guangzhou, China, 510640 Website: http://www.arm9.net
Sales: +86-20-85201025 Tech Support: +86-13719442657 Fax: +86-20-85261505
Email for Business and Cooperation: [email protected] Email for Tech Support: [email protected]
第 - 13 - 页
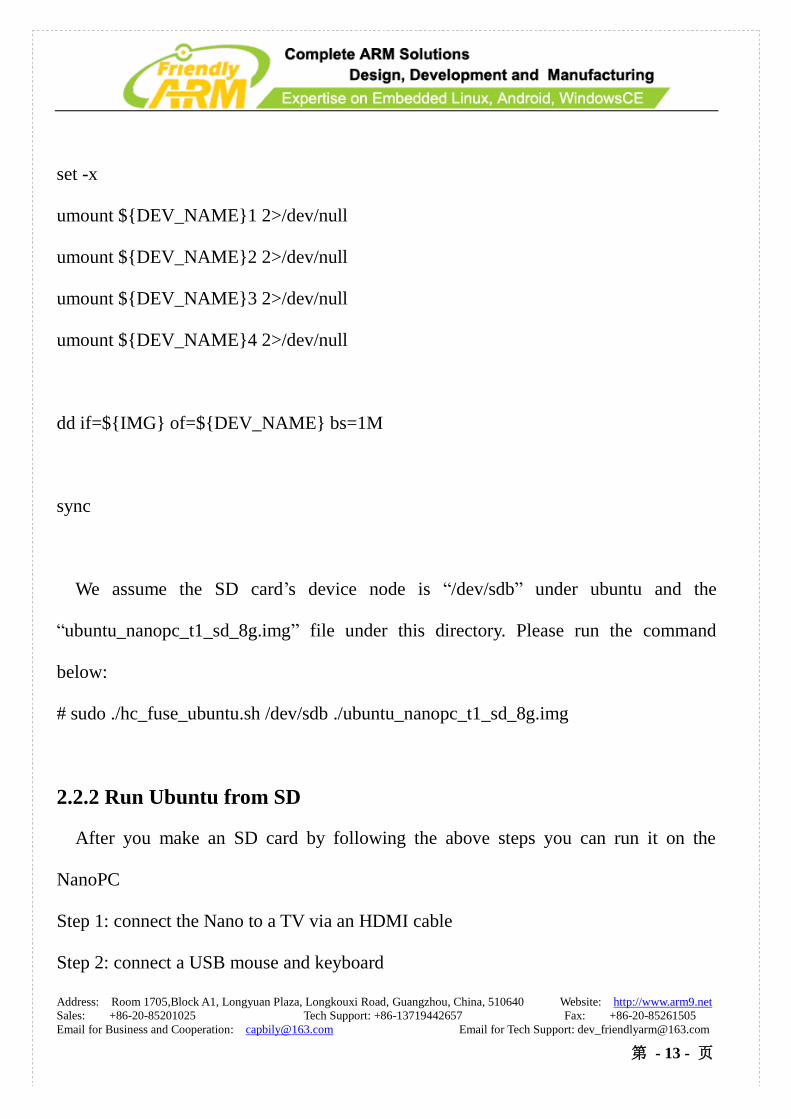
set -x
umount ${DEV_NAME}1 2>/dev/null
umount ${DEV_NAME}2 2>/dev/null
umount ${DEV_NAME}3 2>/dev/null
umount ${DEV_NAME}4 2>/dev/null
dd if=${IMG} of=${DEV_NAME} bs=1M
sync
We assume the SD card’s device node is “/dev/sdb” under ubuntu and the
“ubuntu_nanopc_t1_sd_8g.img” file under this directory. Please run the command
below:
# sudo ./hc_fuse_ubuntu.sh /dev/sdb ./ubuntu_nanopc_t1_sd_8g.img
2.2.2 Run Ubuntu from SD
After you make an SD card by following the above steps you can run it on the
NanoPC
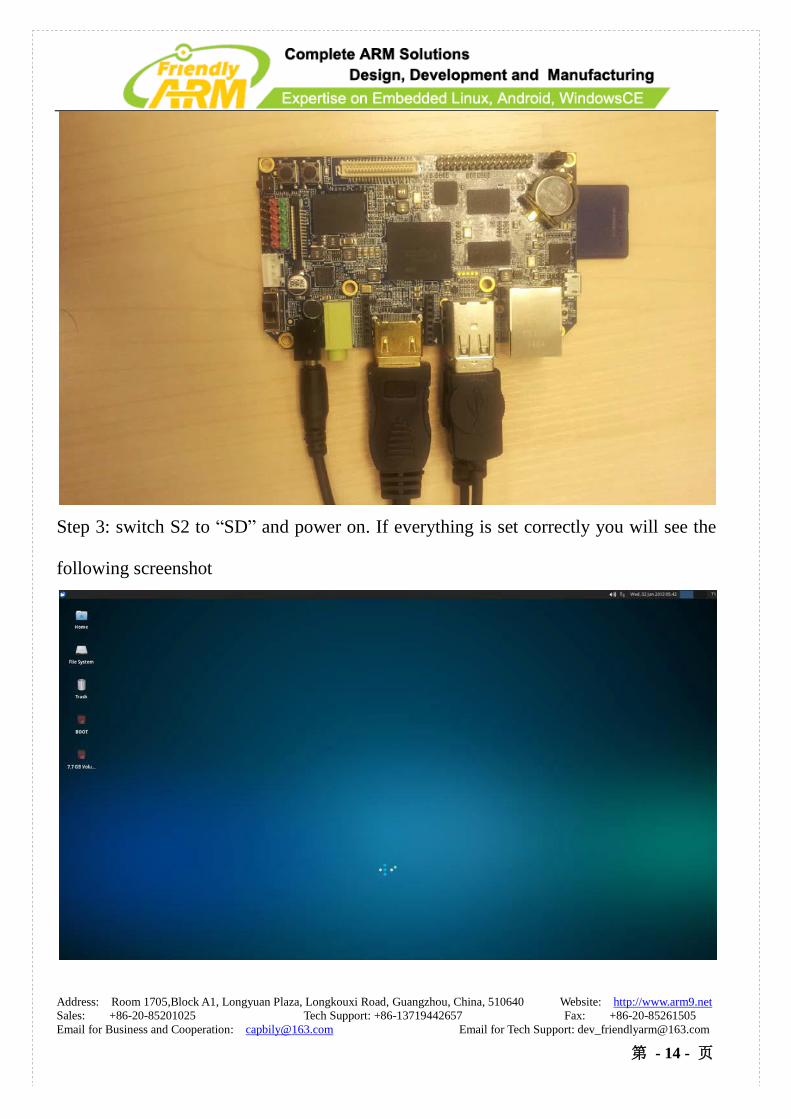
Step 1: connect the Nano to a TV via an HDMI cable
Step 2: connect a USB mouse and keyboard
Address: Room 1705,Block A1, Longyuan Plaza, Longkouxi Road, Guangzhou, China, 510640 Website: http://www.arm9.net
Sales: +86-20-85201025 Tech Support: +86-13719442657 Fax: +86-20-85261505
Email for Business and Cooperation: [email protected] Email for Tech Support: [email protected]
第 - 14 - 页
Step 3: switch S2 to “SD” and power on. If everything is set correctly you will see the
following screenshot
Address: Room 1705,Block A1, Longyuan Plaza, Longkouxi Road, Guangzhou, China, 510640 Website: http://www.arm9.net
Sales: +86-20-85201025 Tech Support: +86-13719442657 Fax: +86-20-85261505
Email for Business and Cooperation: [email protected] Email for Tech Support: [email protected]
第 - 15 - 页
2.2.3 Set HDMI Resolution
Users can set the HDMI’s resolution in Uboot’s commandline. The default is as
follows:
root=/dev/mmcblk0p2 rootfstype=ext4 console=ttySAC0,115200n8 lcd=S70 skipcali=y
ctp=2 video=HDMI-A-1:1920x1080@60
Users can change the “video” parameter to set the resolution. For example to set it to
1280 x 720 you can set it to:
root=/dev/mmcblk0p2 rootfstype=ext4 console=ttySAC0,115200n8 lcd=S70 skipcali=y
ctp=2 video=HDMI-A-1:1280x720M@60
Here are the steps to change the resolution:
Step 1: connect the NanoPC to a PC via a TTL2RS232 board
Step 2: power on the board from “SD” and as soon as the board is powered on press any
key to enter the bootloader’s commandline mode
Step 3: run the command below to change the parameter
# set bootargs root=/dev/mmcblk0p2 rootfstype=ext4 console=ttySAC0,115200n8
lcd=S70 skipcali=y ctp=2 video=HDMI-A-1:1280x720M@60
Step 4: run “ saveenv” to save the change
2.3 Flash Ubuntu to Nano PC
We have a Ubuntu image for the NanoPC. Here are the steps to flash the needed files
to the Nano PC. The minimum requirement for the eMMC is 8G.
Address: Room 1705,Block A1, Longyuan Plaza, Longkouxi Road, Guangzhou, China, 510640 Website: http://www.arm9.net
Sales: +86-20-85201025 Tech Support: +86-13719442657 Fax: +86-20-85261505
Email for Business and Cooperation: [email protected] Email for Tech Support: [email protected]
第 - 16 - 页
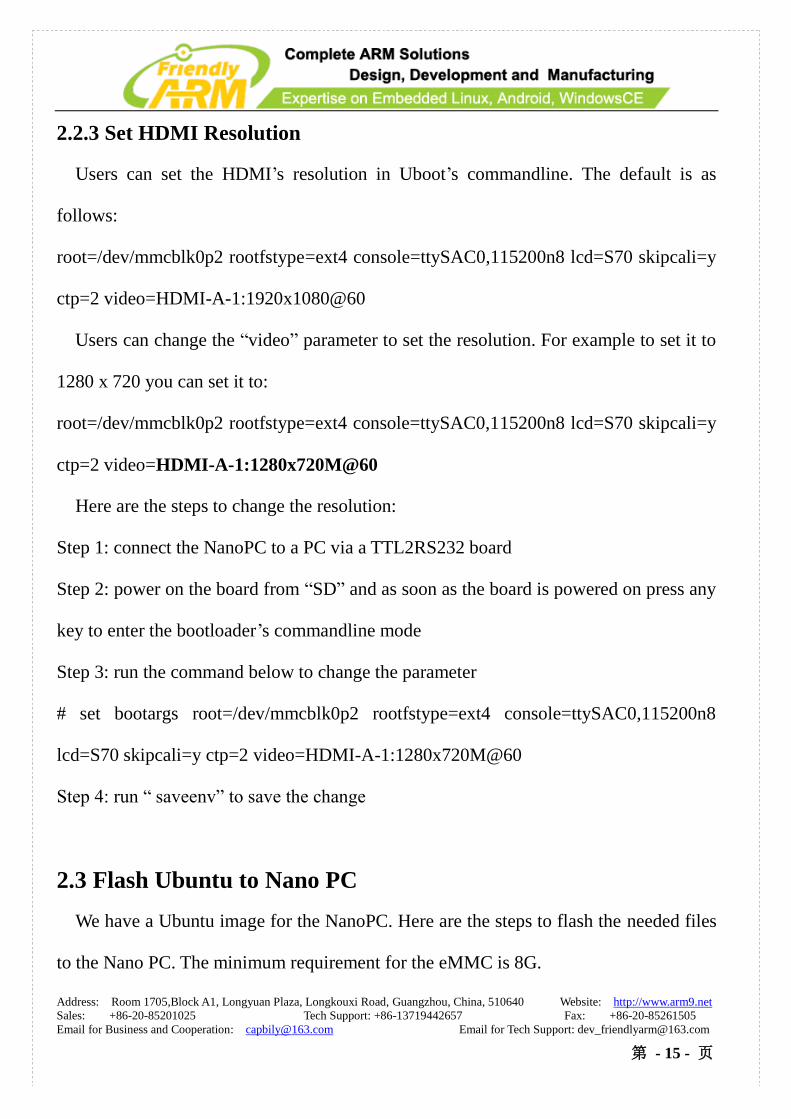
Step 1: please follow the steps in the previous section to run Ubuntu from an SD card
Step 2: enter the root directory of the ubuntu system and you will find a
“UBUNTU_INSTALL” directory. Enter this directory
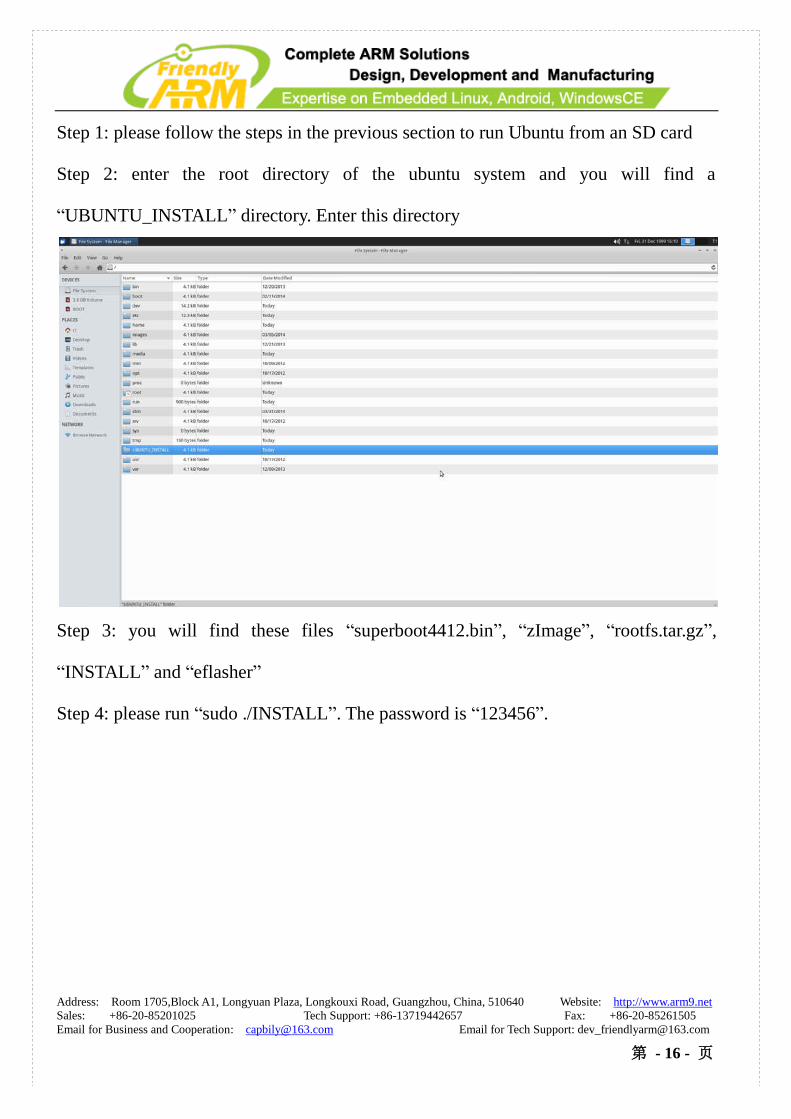
Step 3: you will find these files “superboot4412.bin”, “zImage”, “rootfs.tar.gz”,
“INSTALL” and “eflasher”
Step 4: please run “sudo ./INSTALL”. The password is “123456”.
Address: Room 1705,Block A1, Longyuan Plaza, Longkouxi Road, Guangzhou, China, 510640 Website: http://www.arm9.net
Sales: +86-20-85201025 Tech Support: +86-13719442657 Fax: +86-20-85261505
Email for Business and Cooperation: [email protected] Email for Tech Support: [email protected]
第 - 17 - 页
The installation takes about 10 minutes. After it is done restart the Nano from
“NAND” you will see ubuntu loading.
2.3.1 Set HDMI Resolution
When run Ubuntu from eMMC you can change the HDMI resolution by following
the steps below
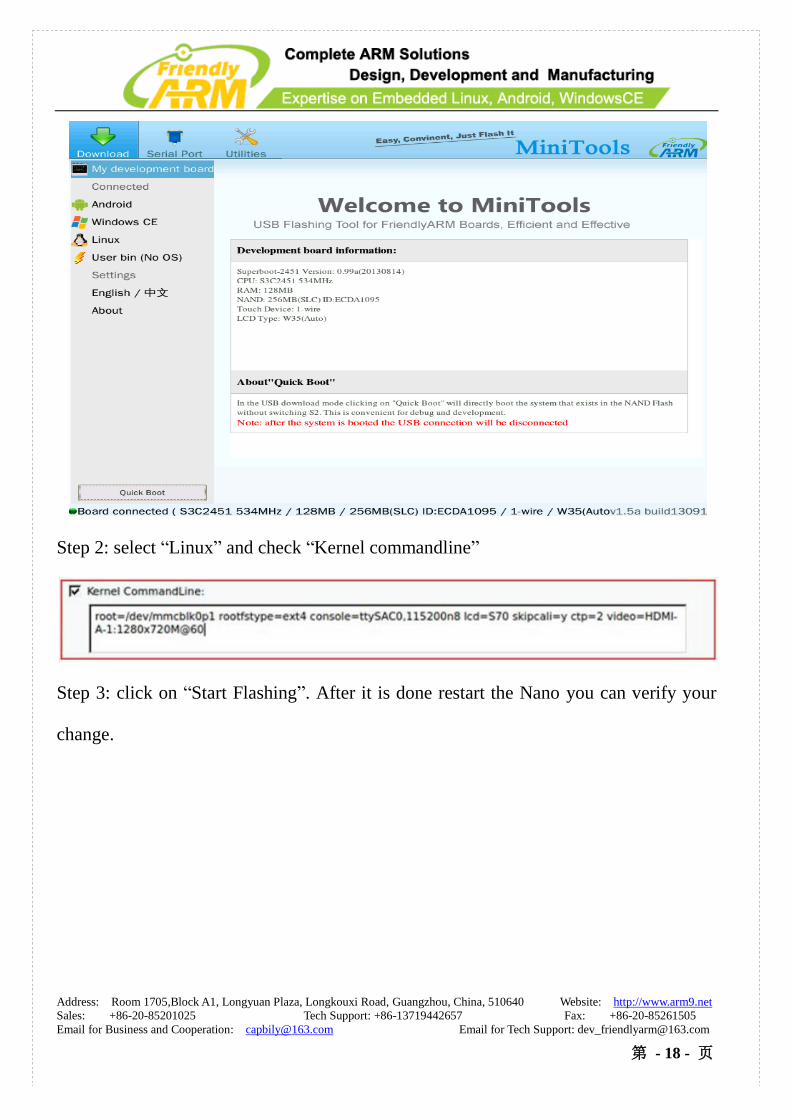
Step 1: install MiniTools
Address: Room 1705,Block A1, Longyuan Plaza, Longkouxi Road, Guangzhou, China, 510640 Website: http://www.arm9.net
Sales: +86-20-85201025 Tech Support: +86-13719442657 Fax: +86-20-85261505
Email for Business and Cooperation: [email protected] Email for Tech Support: [email protected]
第 - 18 - 页
Step 2: select “Linux” and check “Kernel commandline”
Step 3: click on “Start Flashing”. After it is done restart the Nano you can verify your
change.