Embed Size (px)
Citation preview

MySQL Migration Toolkit

MySQL Migration ToolkitAbstract
This is the MySQL Migration Toolkit Manual.
Document generated on: 2006-10-18 (revision: 3666)
Copyright 2005-2006 MySQL AB
This documentation is NOT distributed under a GPL license. Use of this documentation is subject to the following terms: You maycreate a printed copy of this documentation solely for your own personal use. Conversion to other formats is allowed as long as theactual content is not altered or edited in any way. You shall not publish or distribute this documentation in any form or on any me-dia, except if you distribute the documentation in a manner similar to how MySQL disseminates it (that is, electronically for down-load on a website with the software) or on a CD-ROM or similar medium, provided however that the documentation is dissemin-ated together with the software on the same medium. Any other use, such as any dissemination of printed copies or use of this doc-umentation, in whole or in part, in another publication, requires the prior written consent from an authorized representative ofMySQL AB. MySQL AB reserves any and all rights to this documentation not expressly granted above.
Please email <[email protected]> for more information or if you are interested in doing a translation.

Table of Contents1. Introduction to the MySQL Migration Toolkit ............................................................... 12. Installation ............................................................................................................. 2
2.1. Introduction ................................................................................................. 22.2. Installing Under Windows .............................................................................. 2
2.2.1. Using the Windows Installer ................................................................. 22.2.2. Installing From the ZIP File .................................................................. 2
2.3. Installing Under Linux ................................................................................... 32.3.1. Installing the Generic Tarball ................................................................ 32.3.2. RPM Installation ................................................................................ 3
2.4. Installing Under Mac OS X ............................................................................. 43. Removing GUI Tools ............................................................................................... 5
3.1. Uninstall – Windows ...................................................................................... 53.2. Uninstall – Linux .......................................................................................... 53.3. Uninstall – OS X ........................................................................................... 6
4. Running MySQL GUI Tools ...................................................................................... 74.1. Running Under Windows ................................................................................ 74.2. Running Under Linux .................................................................................... 74.3. Running On Mac OS X .................................................................................. 8
5. An Overview of the Migration Process ......................................................................... 96. The Migration Process In-Depth ............................................................................... 12
6.1. Introduction ............................................................................................... 126.2. The Welcome Screen ................................................................................... 126.3. The Configuration Type Screen ...................................................................... 126.4. The Source Database Screen .......................................................................... 13
6.4.1. Microsoft Access .............................................................................. 146.4.2. Microsoft SQL Server ........................................................................ 146.4.3. Oracle ............................................................................................ 156.4.4. MySQL .......................................................................................... 176.4.5. Saving Connection Information ........................................................... 18
6.5. The Target Database Screen .......................................................................... 186.6. The Connect to Server Screen ........................................................................ 196.7. The Source Schema Selection Screen .............................................................. 206.8. The Reverse Engineering Screen .................................................................... 216.9. The Object Type Selection Screen .................................................................. 22
6.9.1. Migrating a Sub-Set of an Object Type ................................................. 236.10. The Object Mapping Screen ........................................................................ 24
6.10.1. GRT Object ................................................................................... 256.10.2. Table Objects ................................................................................. 25
6.11. The Meta Migration Screen ......................................................................... 266.12. The Manual Editing Screen ......................................................................... 266.13. The Object Creation Options Screen .............................................................. 286.14. The Creating Objects Screen ........................................................................ 296.15. The Data Mapping Options Screen ................................................................ 306.16. The Bulk Data Transfer Screen ..................................................................... 316.17. The Summary Screen ................................................................................. 326.18. Saving the Current Application State ............................................................. 33
7. Extending The MySQL Migration Toolkit .................................................................. 347.1. Introduction ............................................................................................... 347.2. Architecture of the MySQL Migration Toolkit .................................................. 347.3. The Modular Migration Process ..................................................................... 347.4. Tools Required to Extend the MySQL Migration Toolkit .................................... 35
8. Preparing a Microsoft Access Database for Migration ................................................... 36
iv
List of Figures5.1. The MySQL Migration Toolkit Migration Plan ........................................................... 96.1. The MySQL Migration Toolkit welcome screen ........................................................ 126.2. The Configuration Type screen .............................................................................. 136.3. Source database – Microsoft Access ........................................................................ 146.4. Source database – Microsoft SQL Server ................................................................. 146.5. Source database – Oracle ...................................................................................... 156.6. Oracle JDBC driver not attached ............................................................................ 166.7. Source database – MySQL .................................................................................... 176.8. Target Database – MySQL .................................................................................... 186.9. The Connect to Servers screen ............................................................................... 196.10. The Source Schema Selection screen ..................................................................... 206.11. The Reverse Engineering screen ........................................................................... 216.12. The Object Type Selection screen ......................................................................... 226.13. The detail view of the Object Type Selection screen ................................................. 236.14. The Add Ignore Pattern dialog ............................................................................. 246.15. The Object Mapping screen ................................................................................. 256.16. The Meta Migration screen .................................................................................. 266.17. The Manual Editing screen .................................................................................. 266.18. The Manual Editing screen – detailed view ............................................................. 276.19. The Object Creation Options screen ...................................................................... 286.20. The Creating Objects screen ................................................................................ 296.21. The Data Mapping Options screen ........................................................................ 306.22. The Bulk Data Transfer screen ............................................................................. 316.23. The Summary screen .......................................................................................... 328.1. The show section ................................................................................................. 368.2. The system objects .............................................................................................. 368.3. Granting access to the system objects ...................................................................... 37
v
Chapter 1. Introduction to the MySQL MigrationToolkit
The MySQL Migration Toolkit is a graphical tool provided by MySQL AB for migrating schema anddata from various relational database systems to MySQL.
MySQL Migration Toolkit is designed to work with MySQL versions 5.0 and higher.
The current version of MySQL Migration Toolkit is a release candidate. While every effort has beenmade to ensure it is free of bugs, it should not be used in a production environment. Always back upyour data before using the MySQL Migration Toolkit. If you find it's lacking some feature important toyou, or if you discover a bug, please use our MySQL Bug System [http://bugs.mysql.com] to requestfeatures or report problems.
At the moment, MySQL Migration Toolkit is only available for Windows.
1
Chapter 2. Installation2.1. Introduction
MySQL GUI Tools run on Windows, Linux, and Mac OS X. You can find MySQL GUI Tools for theoperating system of your choice on the MySQL GUI Tools Downloads[http://dev.mysql.com/downloads//gui-tools/5.0.html] page.
2.2. Installing Under WindowsMySQL GUI Tools run on recent 32-bit Windows NT based operating systems, including Windows2000, XP, and 2003. They don't run on Windows NT 4 and below.
2.2.1. Using the Windows InstallerMySQL GUI Tools can be installed on all Windows operating systems using the Windows Installer(.msi) installation package. The MSI package is contained within a ZIP archive named mysql-gui-tools-version-win32.msi, where version indicates the MySQL GUI Tools version.
The Microsoft Windows Installer Engine was updated with the release of Windows XP; those using aprevious version of Windows can reference this Microsoft Knowledge Base article[http://support.microsoft.com/default.aspx?scid=kb;EN-US;292539] for information on upgrading to thelatest version of the Windows Installer Engine.
In addition, Microsoft has recently introduced the WiX (Windows Installer XML) toolkit. This is thefirst highly acknowledged Open Source project from Microsoft. We have switched to WiX because it isan Open Source project and it allows us to handle the complete Windows installation process in a flex-ible manner using scripts.
Improving the MySQL Installation Wizard depends on the support and feedback of users like you. Ifyou find that the MySQL Installation Wizard is lacking some feature important to you, or if you discov-er a bug, please report it in our bugs database using the instructions given in How to Report Bugs orProblems [http://dev.mysql.com/doc/refman/5.1/en/bug-reports.html].
To install MySQL GUI Tools, right click on the MSI file and select Install.
At the Setup Type window you may choose a complete or custom installation. If you do notwish to install all of the MySQL GUI Tools choose the custom option. Custom installation also givesyou the option of installing support for languages other than English. MySQL GUI Tools supports, Ger-man, Greek, Japanese, Polish, and Brazilian Portuguese.
Unless you choose otherwise, MySQL GUI Tools are installed inC:\%PROGRAMFILES%\MySQL\MySQL Tools for version\, where %PROGRAMFILES% isthe default directory for programs on your machine and version is the version number of MySQLGUI Tools. The %PROGRAMFILES%directory might be C:\Program Files or C:\programme.
Note
Installing MySQL GUI Tools using the Windows installer automatically creates entries inthe Start menu.
2.2.2. Installing From the ZIP FileIf you are having problems running the installer, as an alternative, you can download a ZIP file withoutan installer. That file is called mysql-gui-tools-noinstall-version-win32.zip. Using a
2
ZIP program, unpack it to the directory of your choice. You may also want to create shortcuts toMySQLAdministrator.exe, MySQLMigrationTool.exe, MySQLQueryBrowser.exe, andMySQLWorkbench.exe for your desktop or the quick launch bar.
2.3. Installing Under LinuxMySQL GUI Tools runs on Linux machines that have a graphical desktop installed. It is designed to rununder the Gnome desktop with GTK2 and has been tested on Linux kernel versions 2.4 and 2.6. Itshould also run on other versions, and even on a number of Unix-like operating systems.
2.3.1. Installing the Generic TarballThe generic tar archive allows you to install MySQL GUI Tools on most Linux distributions. The tarballfile is called mysql-gui-tools-version.tar.gz, where version indicates the MySQL GUITools version (for example, 5.0r3).
To see all files in the tarball, run this command:
shell> tar -tzf mysql-gui-tools-version.tar.gz
To install MySQL GUI Tools, run this command:
shell> tar --directory=/opt -xzvf mysql-gui-tools-version.tar.gz
This installs the various application binaries in the directory, /opt/mysql-gui-tools-version.
If you install MySQL GUI Tools to the opt directory, icons for use with desktop shortcuts or for creat-ing menu items are found under the opt/mysql-gui-tools-version/share/mysql-gui dir-ectory.
2.3.2. RPM InstallationIn addition to a generic tarball, some distribution-specific RPMs are available. Currently these includeRed Hat Enterprise Linux (RHEL) 3 and 4, Fedora Core 5 (FC5), and SuSE Linux 10.x. For FC5 andSuSE the gtkmm24 toolkit is a requirement for installing the RPM version of MySQL GUI Tools. OnFC5 you may install this toolkit from the command line in the following way:
shell> yum -install gtkmm24
For installation on SuSE Linux:
shell> yast2 -i gtkmm24
Note
You may need root privileges to run the yast2 command.
The Red Hat RPMs are self contained so no additional packages need to be installed.
The RPM downloads are made up of the individual GUI Tools components combined into a single TARarchive. Extract the individual RPMs in the following way:
shell> tar -zxf mysql-gui-tools-version.tar.gz
Installation
3
This will decompress the RPM files to the current directory.
Install all the RPM files by typing:
shell> rpm -iv mysql-*.rpm
If you are upgrading to a newer version of MySQL GUI Tools type:
shell> rpm -Uv mysql-*.rpm
If you install the RPM files individually, you must install the mysql-gui-tools-version.rpmfile first in order to satisfy dependencies.
When upgrading, packages cannot be installed separately because version conflicts will arise.
If you wish, you may install only one of the MySQL GUI Tools. For example, to install MySQL Admin-istrator only, do the following:
shell> rpm -iv mysql-gui-toolsversion.rpm mysql-administratorversion.rpm
If possible, the RPM installation process creates shortcuts in the start menu of your window manager.For example, SuSE Linux with the KDE window manager adds shortcuts to the MySQL GUI Tools un-der the Development, Other Tools menu item. Likewise, with FC5, shortcuts are created under the De-velopment menu item.
Icons for use with desktop shortcuts or for creating menu items are found under the /usr/share/mysql-gui directory.
See the MySQL GUI Tools Downloads [http://dev.mysql.com/downloads//gui-tools/5.0.html] page forthe most up-to-date listing of the various RPM packages available.
2.4. Installing Under Mac OS XTo install MySQL Administrator under Mac OS X, double-click the downloaded .dmg file and wait forit to be opened and attached. Once a window containing the MySQL GUI Tools icon pops up, drag it toyour Applications folder — or any other location you prefer.
Once the copy is complete, you may eject the disk image.
Installation
4
Chapter 3. Removing GUI ToolsUnder Linux and OS X it is easy to remove all the MySQL GUI Tools or individual applications. UnderWindows, removing individual applications is a bit more problematic.
3.1. Uninstall – WindowsTo uninstall MySQL GUI Tools, open the Control Panel and Choose Add or Remove Pro-grams. Find the MySQL Tools entry and choose the Remove button. Choosing this option will re-move all of the GUI Tools.
Note
Currently, there is no command line option for removing MySQL GUI Tools.
After you have removed MySQL GUI Tools you may remove the MySQL Tools for versiondirectory. Unless you chose otherwise on installation, you should find this directory below theC:\%PROGRAMFILES%\MySQL\ directory.
You may remove individual applications manually. Go to the C:\%PROGRAMFILES%\MySQL\ dir-ectory and delete the exe and chm files associated with the application you wish to remove. Also re-move the appropriate icon from the Start menu.
Note
Removing an application manually will not remove all the files belonging to that applica-tion.
3.2. Uninstall – LinuxUnless you chose otherwise, you should find MySQL GUI Tools in the/opt/mysql-gui-tools-version directory.
If you installed MySQL GUI Tools using the RPM files you can remove all the tools by typing at thecommand line:
shell> rpm -U mysql-*.rpm
You may remove individual tools by using the U with the name of the specific tool you wish to remove.For instance, to remove only the Administrator tool type:
shell> rpm -U mysql-administrator-version.rpm
Note
Remember, if you plan to keep any one of the MySQL GUI Tools you must also keep themysql-gui-tools-version.rpm file.
After removal of all the MySQL GUI Tools, remove the /opt/mysql-gui-tools-version dir-ectory. if you have removed only selected tools, remove only the associated directories.
If you installed MySQL GUI Tools using the generic tarball, you can remove the tools by deleting the /opt/mysql-gui-tools-version directory. If you wish to remove an individual tool, find the dir-ectory associated with that tool and delete it.
5

3.3. Uninstall – OS XFind the directory where you installed MySQL GUI Tools, and remove applications by moving theiricons to the Trash.
Removing GUI Tools
6
Chapter 4. Running MySQL GUI ToolsHow you start any one of the MySQL GUI Tools depends on the operating system you are using.
4.1. Running Under WindowsUnder Windows, the names of the executable files in the MySQL GUI Tools suite are:
• MySQLAdministrator.exe
• MySQLQueryBrowser.exe
• MySQLWorkbench.exe
• MySQLMigrationTool.exe
Start any one of the MySQL GUI Tools by double clicking its desktop icon, or by selecting it from theStart menu. Alternatively, you can open a DOS window and start it from the command line. For ex-ample, you could run the MySQL Administrator in the following way:
C:\> "C:\%PROGRAMFILES%\MySQL\MySQL Tools for version\MySQLAdministrator.exe"
%PROGRAMFILES% is the default directory for programs on your machine, for example C:\ProgramFiles or C:\programme. If your path contains spaces, you must enclose the command within quota-tion marks as shown above.
4.2. Running Under LinuxUnder Linux, the names of the executable files in the MySQL GUI Tools suite are:
• mysql-administrator
• mysql-query-browser
• mysql-workbench
Note
There is no Linux version of MySQL Migration Toolkit.
If you installed MySQL GUI Tools to the /opt directory using the tar archive file, change into the /opt/mysql-gui-tools-version directory to run any one of the MySQL GUI Tools.
To run MySQL Administrator you would type:
shell> ./mysql-administrator
However, adding /opt/mysql-gui-tools-version to the PATH variable makes it much simplerto run MySQL GUI Tools — you need not worry about your present working directory.
7
When installed from RPM files, the MySQL GUI Tools are found in the /usr/bin directory. This dir-ectory is usually included in the PATH variable, so running any one of the MySQL GUI Tools simply re-quires typing the executable file name, regardless of your current directory. For example:
shell> mysql-administrator
For those distributions that create menu items, you may also, of course, start any one of the tools bychoosing the menu item.
4.3. Running On Mac OS XOn Mac OS X, navigate to the MySQL GUI Tools installation directory and double-click on the applica-tion you wish to start.
Note
There is no OS X version of MySQL Migration Toolkit.
Running MySQL GUI Tools
8

Chapter 5. An Overview of the MigrationProcess
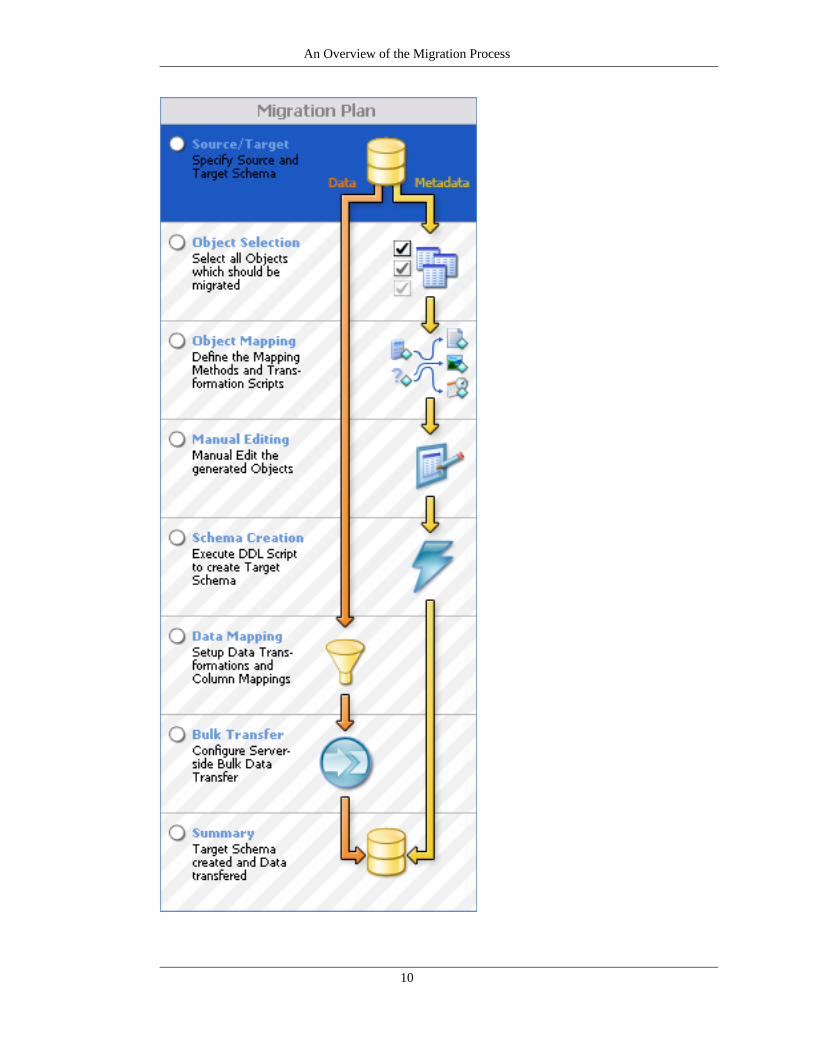
Migrating data from an external RDBMS to MySQL is an eight step process :
Figure 5.1. The MySQL Migration Toolkit Migration Plan
9
An Overview of the Migration Process
10
• Source/Target Selection: In the first step you specify the connection parameters for thesource and target database servers.
• Object Selection: In the second step you select the objects (tables, views, stored procedures)that will be migrated.
• Object Mapping: In the third step you choose the method used for mapping and transformingthe objects.
• Manual Editing: In the fourth step you can manually edit the new objects to ensure a propertransformation.
• Schema Creation: In the fifth step the MySQL Migration Toolkit creates the transformed objecton the target MySQL server.
• Data Mapping: In the sixth step you specify any changes that need to be made to the data as it ismigrated.
• Bulk Transfer: In the seventh step the MySQL Migration Toolkit transfers the data from thesource server to the target server.
• Summary: In the eighth and final step the MySQL Migration Toolkit creates a summary report ofthe migration process for you to review.
Each of these sections will be covered in more detail in the coming chapters.
An Overview of the Migration Process
11

Chapter 6. The Migration Process In-Depth6.1. Introduction
In this chapter we will cover the different steps of the MySQL Migration Toolkit in depth. The differentsteps will be covered in the order that they appear in the MySQL Migration Toolkit.
6.2. The Welcome ScreenThe first screen of the MySQL Migration Toolkit is the Welcome Screen:
Figure 6.1. The MySQL Migration Toolkit welcome screen
The welcome screen indicates the progress of loading the various components of the MySQL MigrationToolkit. If you encounter any errors on the welcome screen you should close the MySQL MigrationToolkit and confirm that you have properly installed the Java Runtime Environment. See Introduction[http://dev.mysql.com/doc/migration-toolkit/en/mysql-migration-toolkit-installation-introduction.html]for information on downloading and installing the Java Runtime Environment.
6.3. The Configuration Type Screen
12
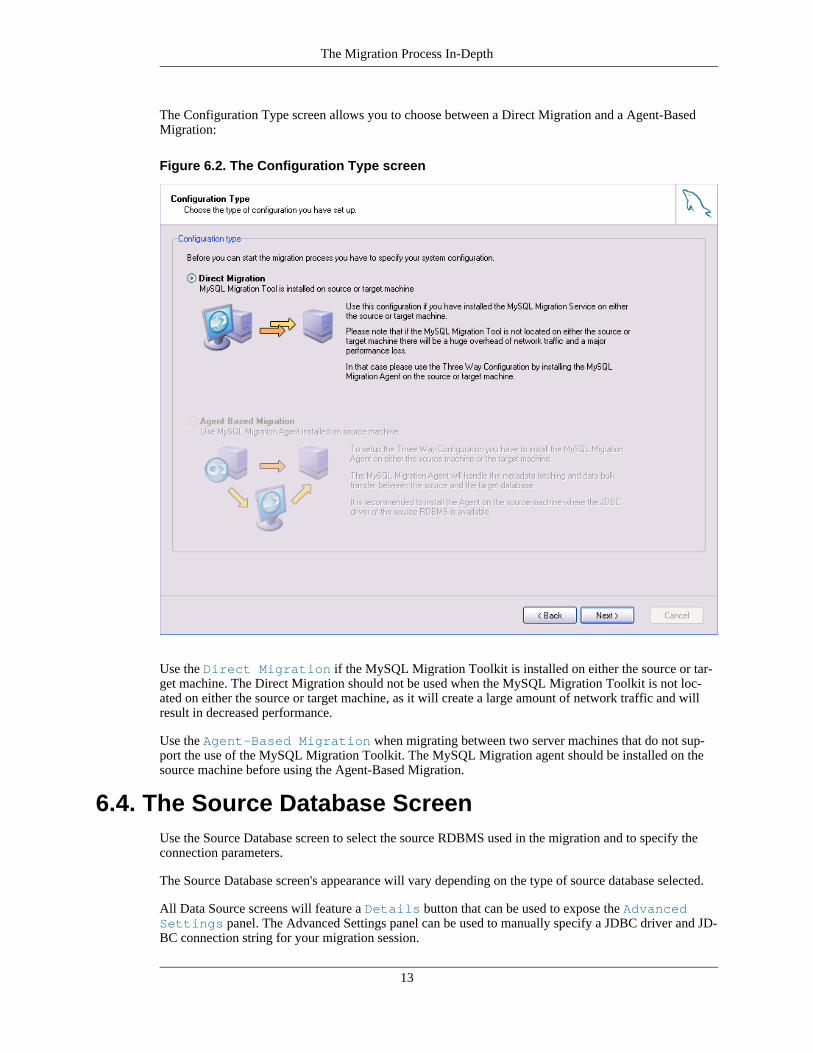
The Configuration Type screen allows you to choose between a Direct Migration and a Agent-BasedMigration:
Figure 6.2. The Configuration Type screen
Use the Direct Migration if the MySQL Migration Toolkit is installed on either the source or tar-get machine. The Direct Migration should not be used when the MySQL Migration Toolkit is not loc-ated on either the source or target machine, as it will create a large amount of network traffic and willresult in decreased performance.
Use the Agent-Based Migration when migrating between two server machines that do not sup-port the use of the MySQL Migration Toolkit. The MySQL Migration agent should be installed on thesource machine before using the Agent-Based Migration.
6.4. The Source Database ScreenUse the Source Database screen to select the source RDBMS used in the migration and to specify theconnection parameters.
The Source Database screen's appearance will vary depending on the type of source database selected.
All Data Source screens will feature a Details button that can be used to expose the AdvancedSettings panel. The Advanced Settings panel can be used to manually specify a JDBC driver and JD-BC connection string for your migration session.
The Migration Process In-Depth
13

6.4.1. Microsoft AccessThe Source Database screen appears as follows when you select Microsoft Access as the source data-base:
Figure 6.3. Source database – Microsoft Access
Specify the path to the .mdb database file in the Database File field and specify the database user-name and password information if applicable.
You must make special modifications to your Access database file before it can be used with MySQL Mi-gration Toolkit. Please see Chapter 8, Preparing a Microsoft Access Database for Migration for furtherinformation.
6.4.2. Microsoft SQL ServerThe Source Database screen appears as follows when you select MS SQL Server as the source data-base:
Figure 6.4. Source database – Microsoft SQL Server
The Migration Process In-Depth
14
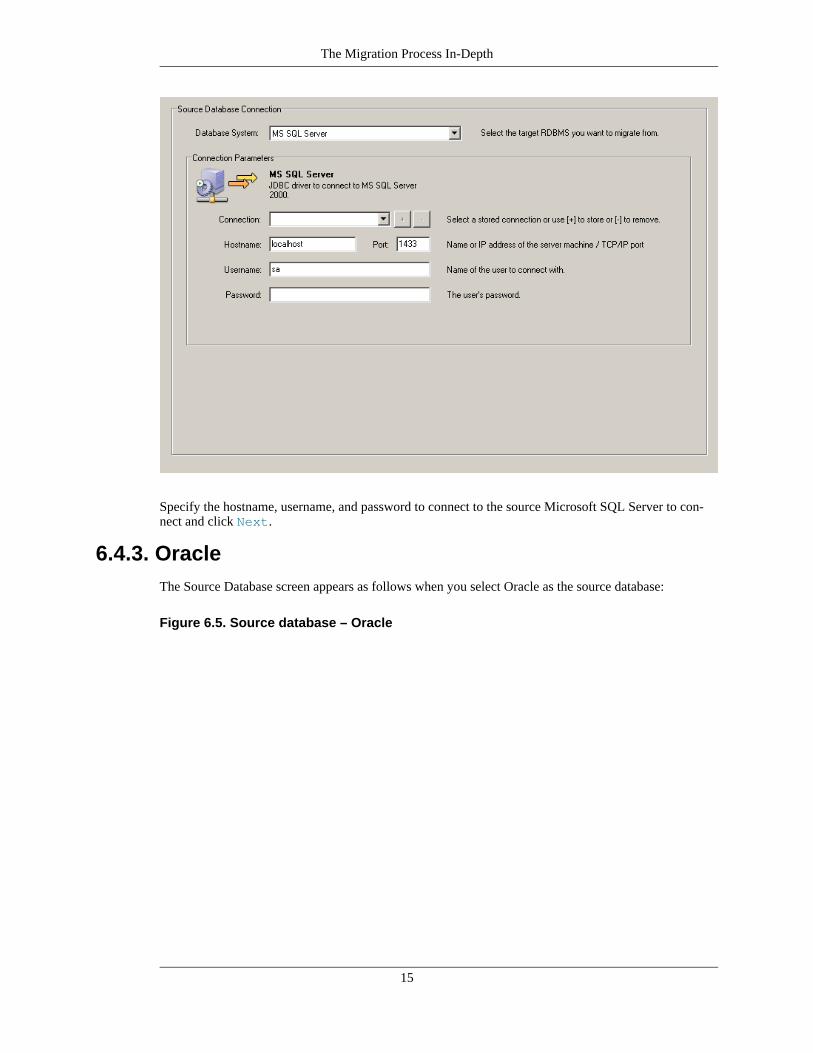
Specify the hostname, username, and password to connect to the source Microsoft SQL Server to con-nect and click Next.
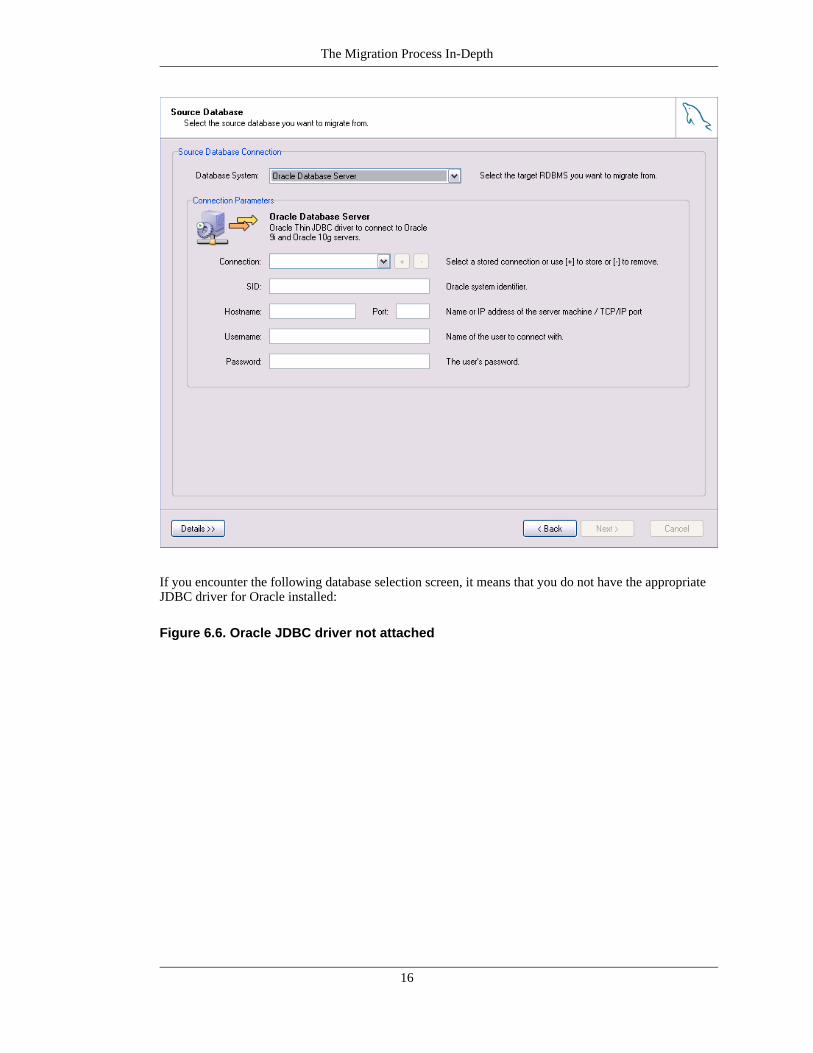
6.4.3. OracleThe Source Database screen appears as follows when you select Oracle as the source database:
Figure 6.5. Source database – Oracle
The Migration Process In-Depth
15
If you encounter the following database selection screen, it means that you do not have the appropriateJDBC driver for Oracle installed:
Figure 6.6. Oracle JDBC driver not attached
The Migration Process In-Depth
16
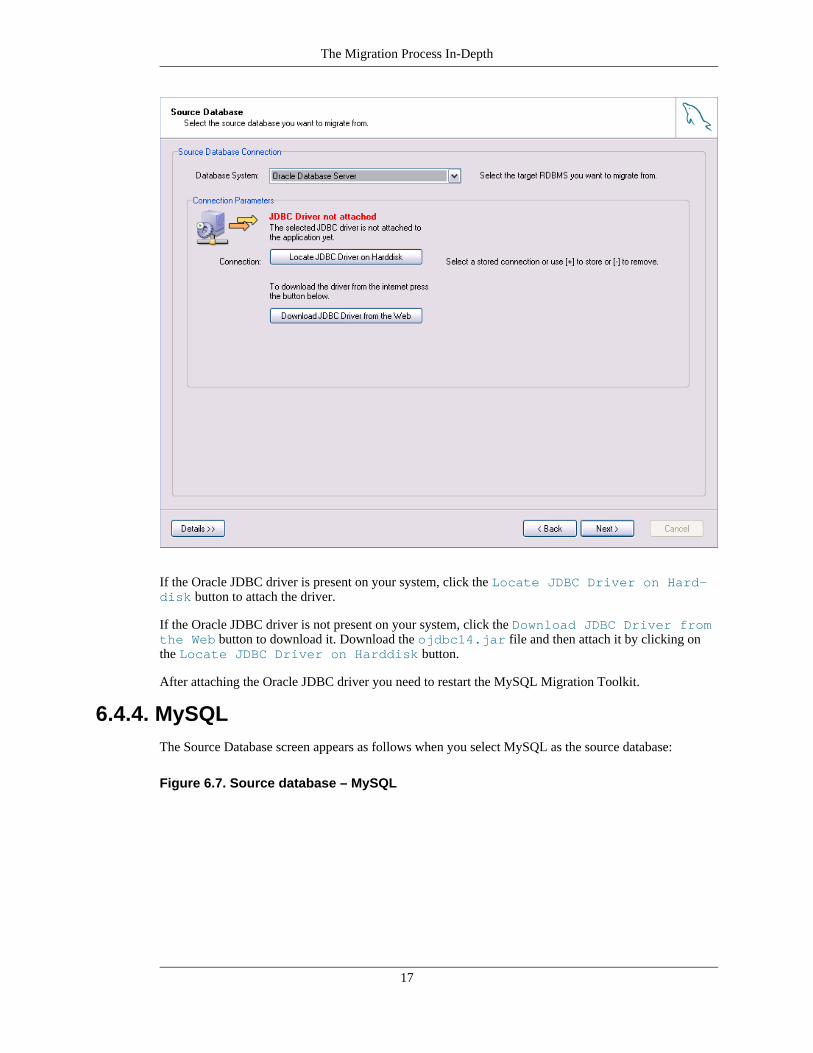
If the Oracle JDBC driver is present on your system, click the Locate JDBC Driver on Hard-disk button to attach the driver.
If the Oracle JDBC driver is not present on your system, click the Download JDBC Driver fromthe Web button to download it. Download the ojdbc14.jar file and then attach it by clicking onthe Locate JDBC Driver on Harddisk button.
After attaching the Oracle JDBC driver you need to restart the MySQL Migration Toolkit.
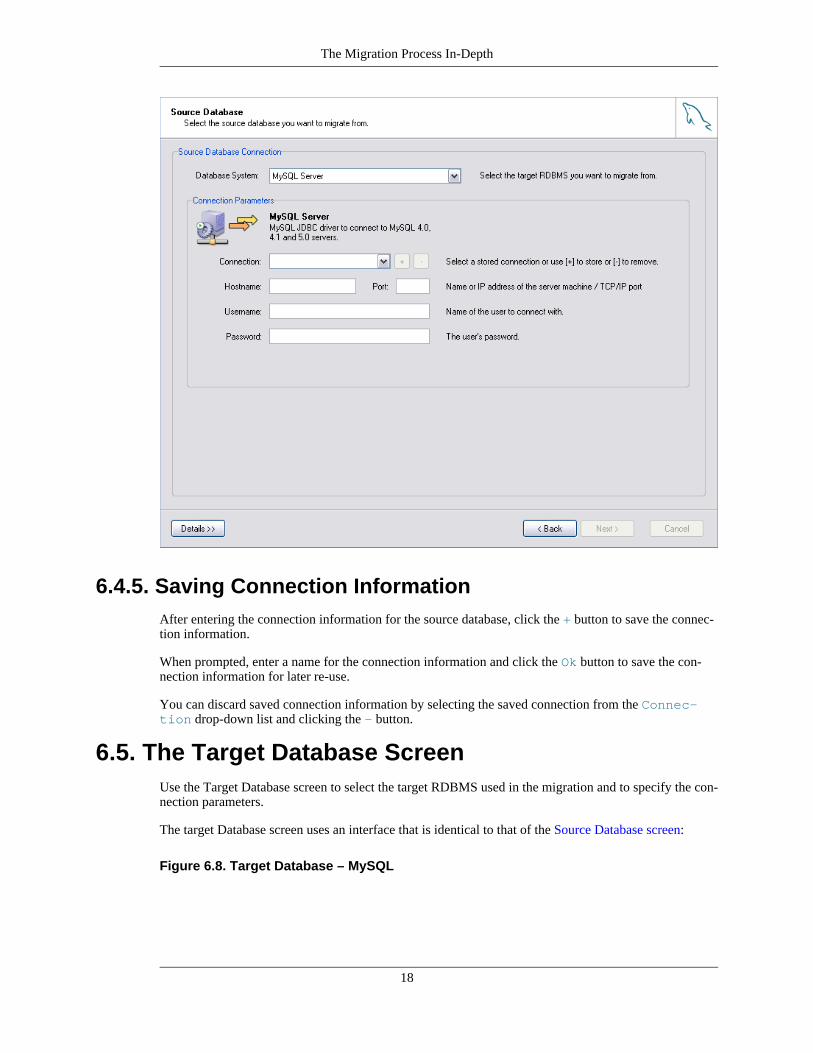
6.4.4. MySQLThe Source Database screen appears as follows when you select MySQL as the source database:
Figure 6.7. Source database – MySQL
The Migration Process In-Depth
17
6.4.5. Saving Connection InformationAfter entering the connection information for the source database, click the + button to save the connec-tion information.
When prompted, enter a name for the connection information and click the Ok button to save the con-nection information for later re-use.
You can discard saved connection information by selecting the saved connection from the Connec-tion drop-down list and clicking the – button.
6.5. The Target Database ScreenUse the Target Database screen to select the target RDBMS used in the migration and to specify the con-nection parameters.
The target Database screen uses an interface that is identical to that of the Source Database screen:
Figure 6.8. Target Database – MySQL
The Migration Process In-Depth
18
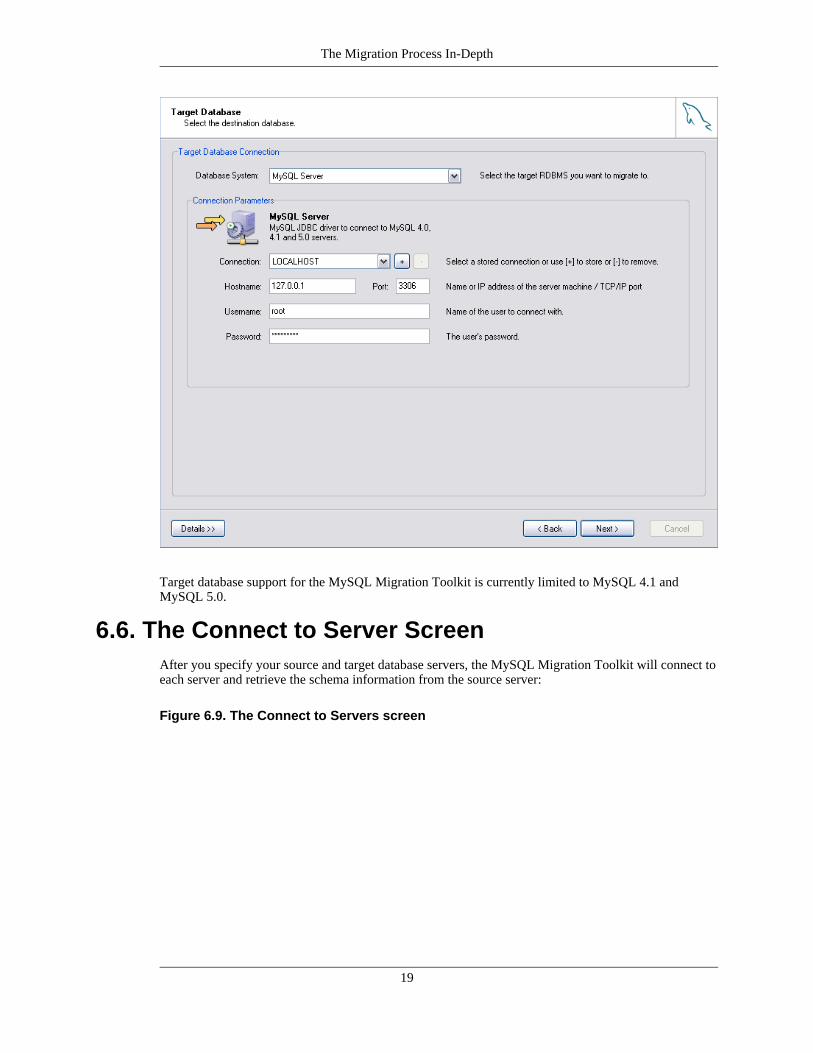
Target database support for the MySQL Migration Toolkit is currently limited to MySQL 4.1 andMySQL 5.0.
6.6. The Connect to Server ScreenAfter you specify your source and target database servers, the MySQL Migration Toolkit will connect toeach server and retrieve the schema information from the source server:
Figure 6.9. The Connect to Servers screen
The Migration Process In-Depth
19
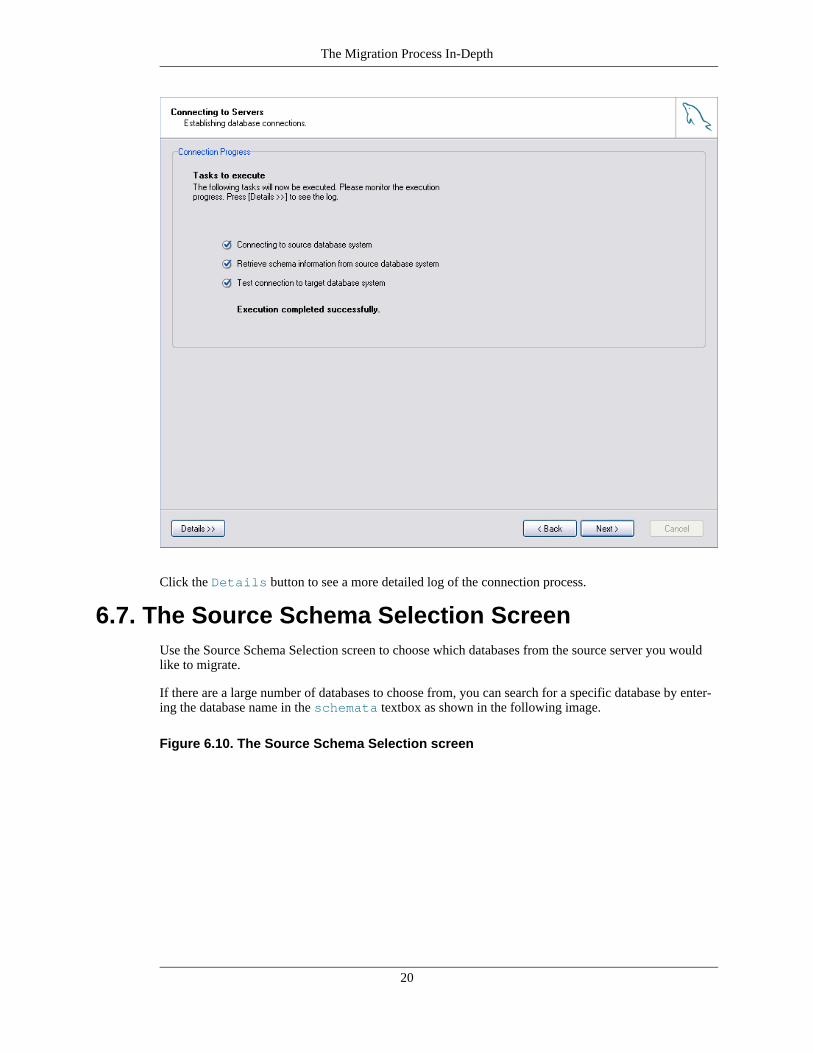
Click the Details button to see a more detailed log of the connection process.
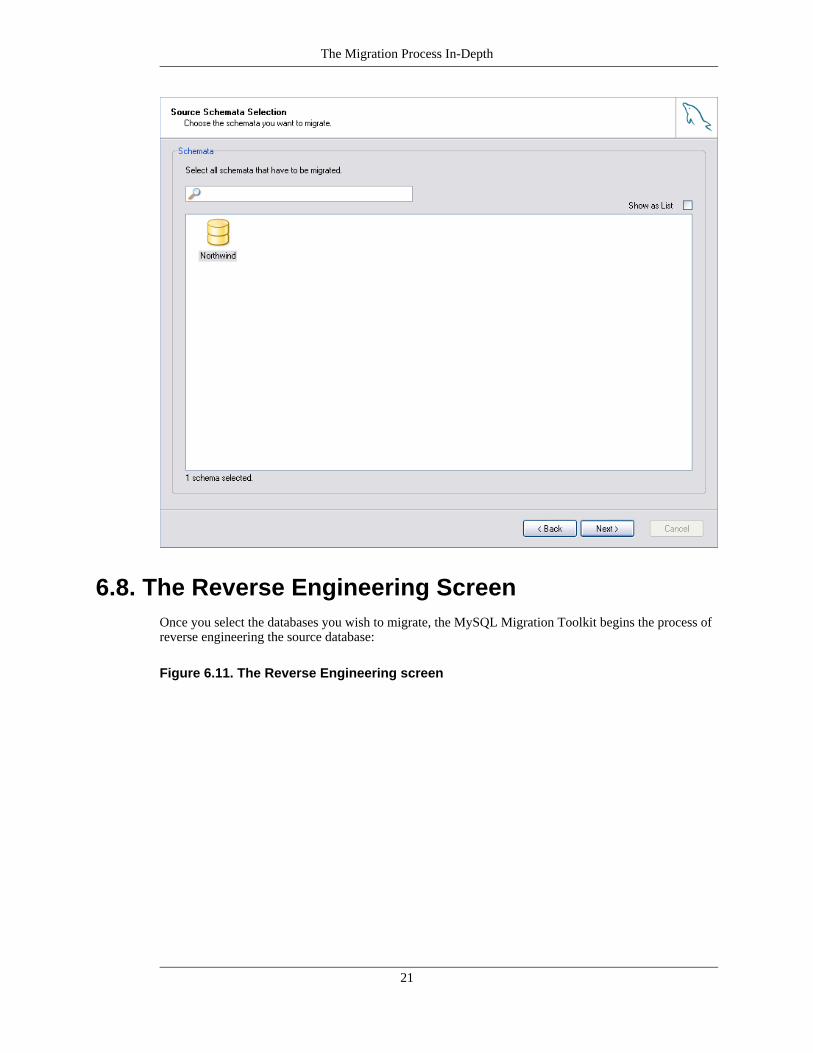
6.7. The Source Schema Selection ScreenUse the Source Schema Selection screen to choose which databases from the source server you wouldlike to migrate.
If there are a large number of databases to choose from, you can search for a specific database by enter-ing the database name in the schemata textbox as shown in the following image.
Figure 6.10. The Source Schema Selection screen
The Migration Process In-Depth
20
6.8. The Reverse Engineering ScreenOnce you select the databases you wish to migrate, the MySQL Migration Toolkit begins the process ofreverse engineering the source database:
Figure 6.11. The Reverse Engineering screen
The Migration Process In-Depth
21
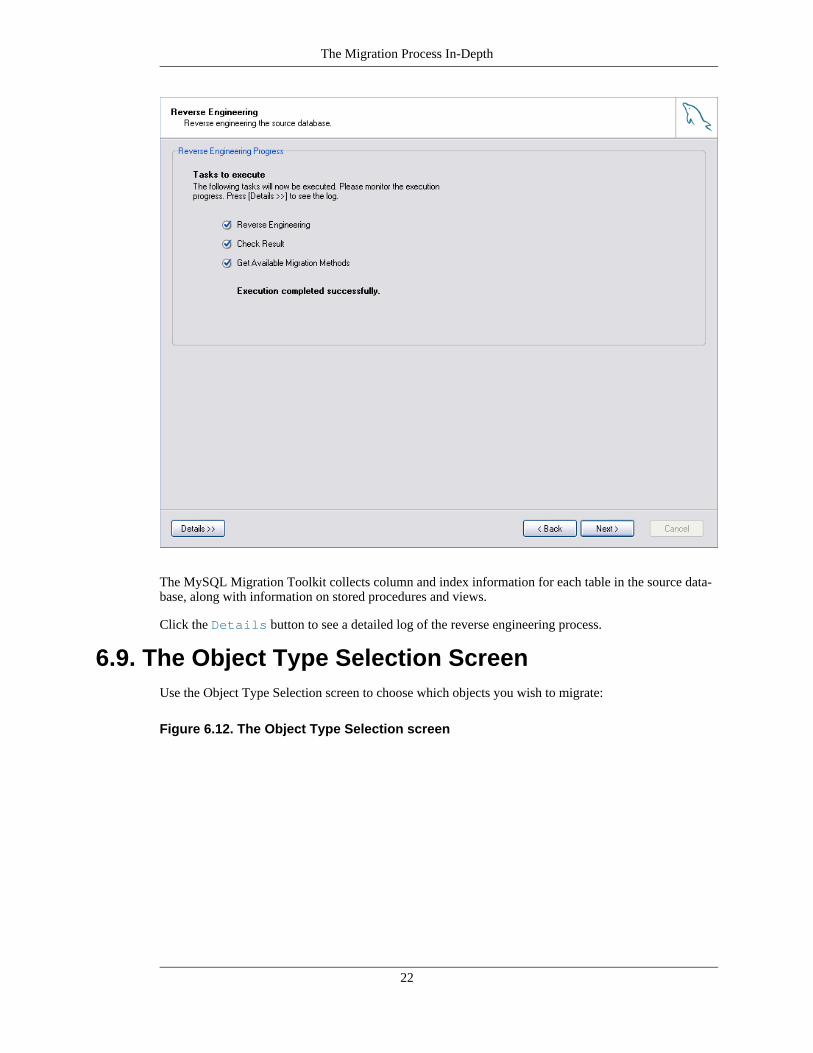
The MySQL Migration Toolkit collects column and index information for each table in the source data-base, along with information on stored procedures and views.
Click the Details button to see a detailed log of the reverse engineering process.
6.9. The Object Type Selection ScreenUse the Object Type Selection screen to choose which objects you wish to migrate:
Figure 6.12. The Object Type Selection screen
The Migration Process In-Depth
22
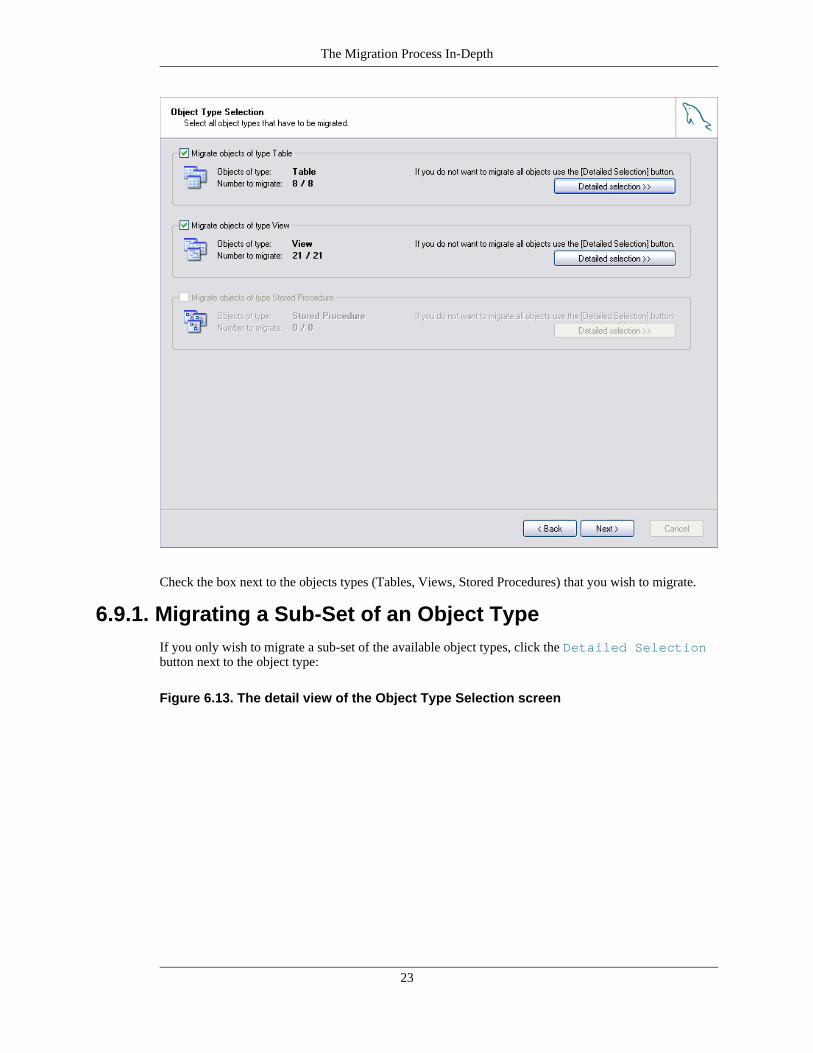
Check the box next to the objects types (Tables, Views, Stored Procedures) that you wish to migrate.
6.9.1. Migrating a Sub-Set of an Object TypeIf you only wish to migrate a sub-set of the available object types, click the Detailed Selectionbutton next to the object type:
Figure 6.13. The detail view of the Object Type Selection screen
The Migration Process In-Depth
23
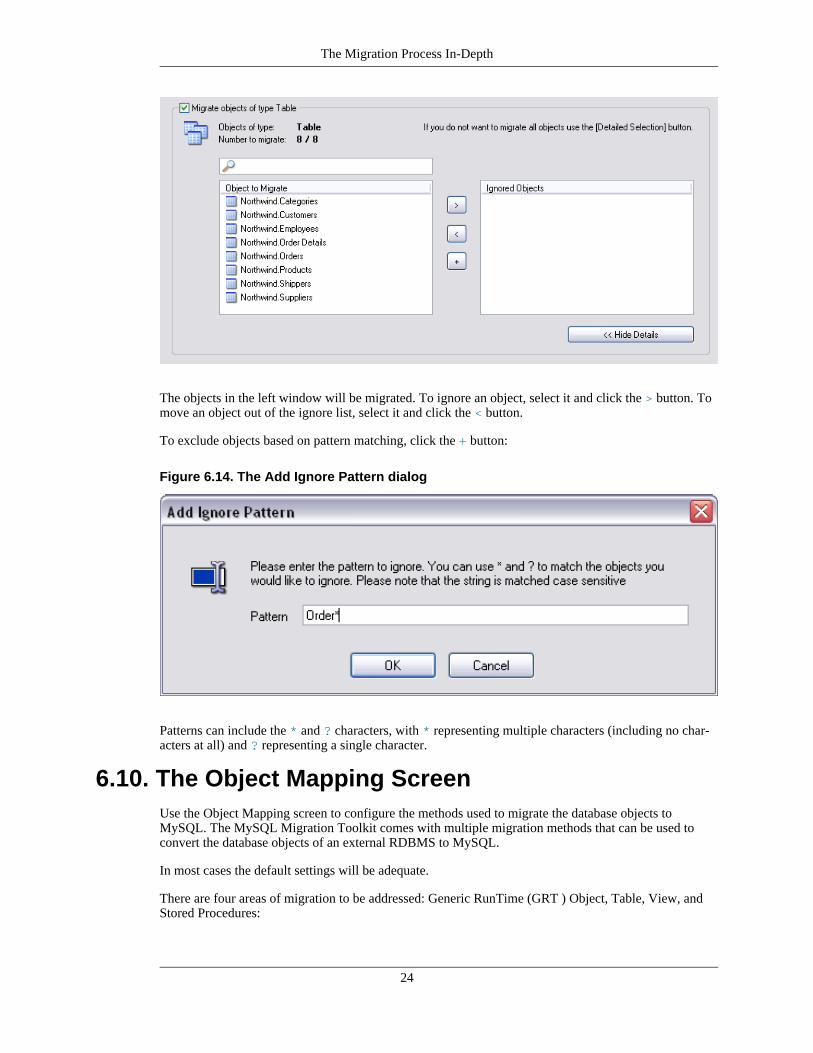
The objects in the left window will be migrated. To ignore an object, select it and click the > button. Tomove an object out of the ignore list, select it and click the < button.
To exclude objects based on pattern matching, click the + button:
Figure 6.14. The Add Ignore Pattern dialog
Patterns can include the * and ? characters, with * representing multiple characters (including no char-acters at all) and ? representing a single character.
6.10. The Object Mapping ScreenUse the Object Mapping screen to configure the methods used to migrate the database objects toMySQL. The MySQL Migration Toolkit comes with multiple migration methods that can be used toconvert the database objects of an external RDBMS to MySQL.
In most cases the default settings will be adequate.
There are four areas of migration to be addressed: Generic RunTime (GRT ) Object, Table, View, andStored Procedures:
The Migration Process In-Depth
24
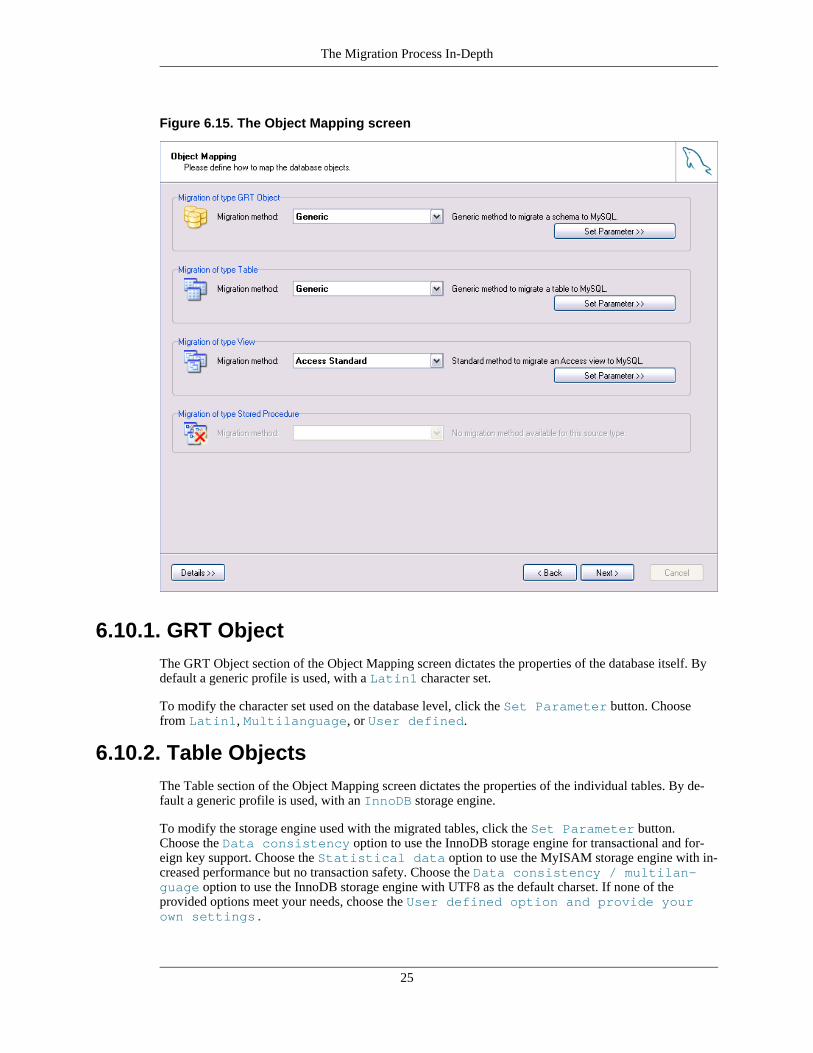
Figure 6.15. The Object Mapping screen
6.10.1. GRT ObjectThe GRT Object section of the Object Mapping screen dictates the properties of the database itself. Bydefault a generic profile is used, with a Latin1 character set.
To modify the character set used on the database level, click the Set Parameter button. Choosefrom Latin1, Multilanguage, or User defined.
6.10.2. Table ObjectsThe Table section of the Object Mapping screen dictates the properties of the individual tables. By de-fault a generic profile is used, with an InnoDB storage engine.
To modify the storage engine used with the migrated tables, click the Set Parameter button.Choose the Data consistency option to use the InnoDB storage engine for transactional and for-eign key support. Choose the Statistical data option to use the MyISAM storage engine with in-creased performance but no transaction safety. Choose the Data consistency / multilan-guage option to use the InnoDB storage engine with UTF8 as the default charset. If none of theprovided options meet your needs, choose the User defined option and provide yourown settings.
The Migration Process In-Depth
25
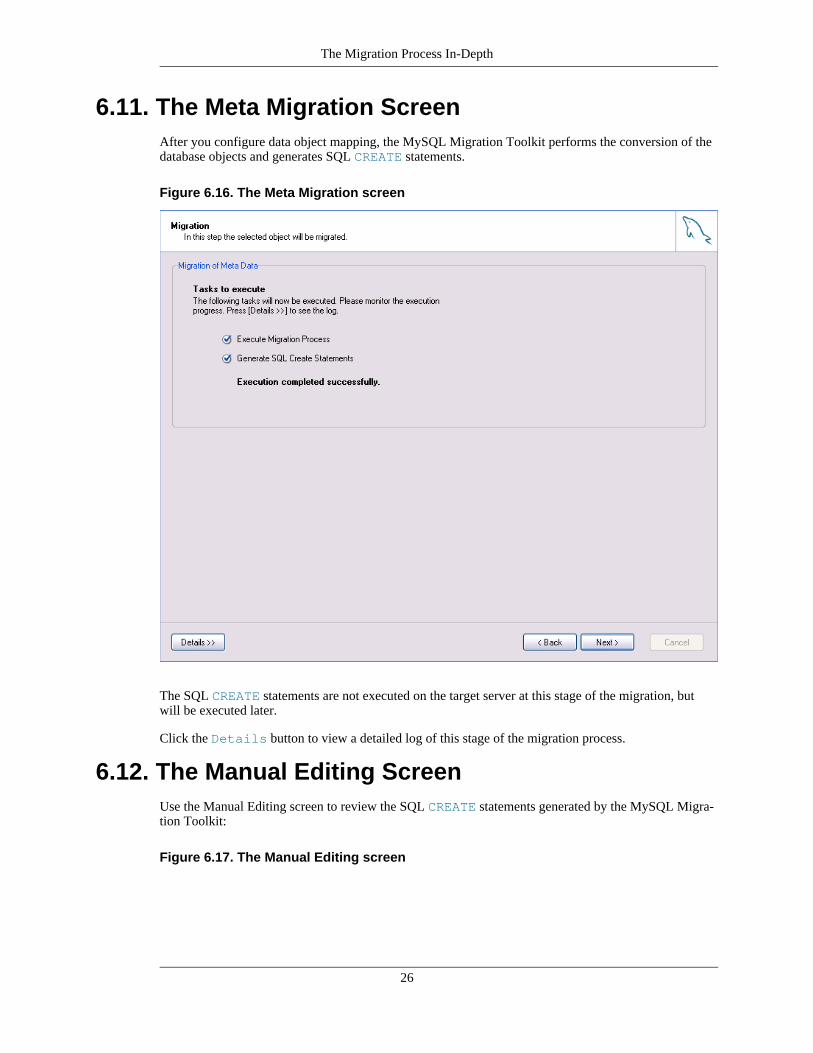
6.11. The Meta Migration ScreenAfter you configure data object mapping, the MySQL Migration Toolkit performs the conversion of thedatabase objects and generates SQL CREATE statements.
Figure 6.16. The Meta Migration screen
The SQL CREATE statements are not executed on the target server at this stage of the migration, butwill be executed later.
Click the Details button to view a detailed log of this stage of the migration process.
6.12. The Manual Editing ScreenUse the Manual Editing screen to review the SQL CREATE statements generated by the MySQL Migra-tion Toolkit:
Figure 6.17. The Manual Editing screen
The Migration Process In-Depth
26
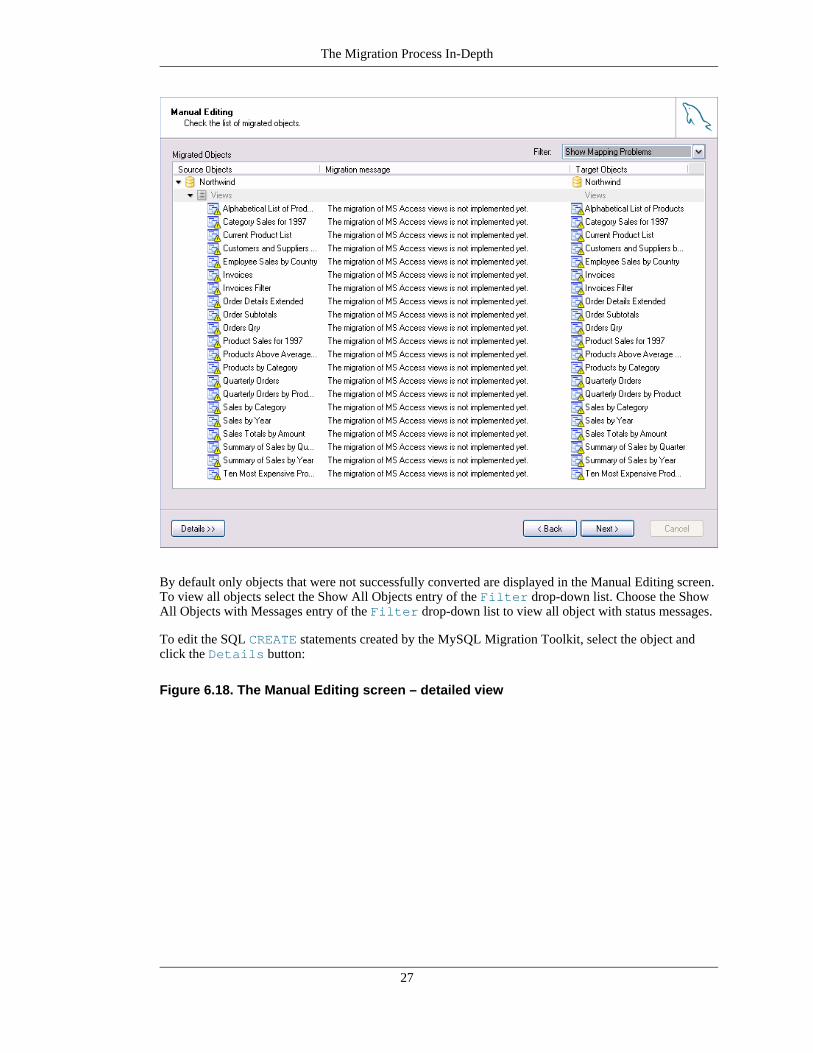
By default only objects that were not successfully converted are displayed in the Manual Editing screen.To view all objects select the Show All Objects entry of the Filter drop-down list. Choose the ShowAll Objects with Messages entry of the Filter drop-down list to view all object with status messages.
To edit the SQL CREATE statements created by the MySQL Migration Toolkit, select the object andclick the Details button:
Figure 6.18. The Manual Editing screen – detailed view
The Migration Process In-Depth
27
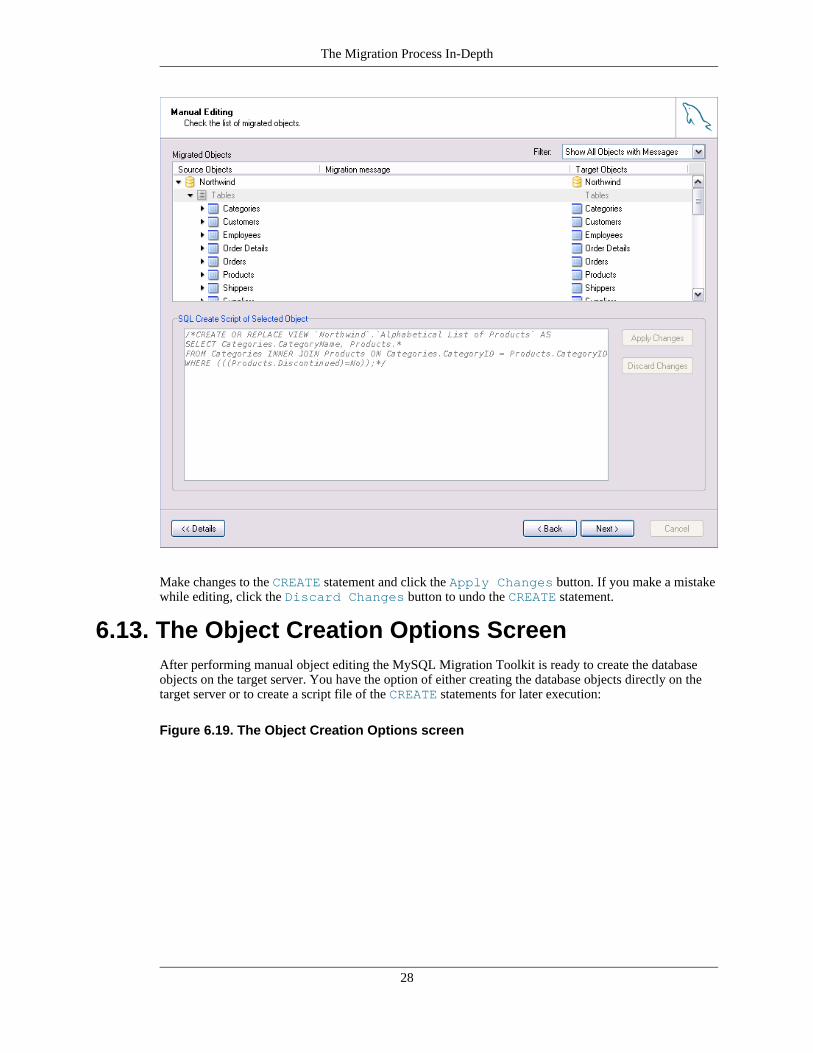
Make changes to the CREATE statement and click the Apply Changes button. If you make a mistakewhile editing, click the Discard Changes button to undo the CREATE statement.
6.13. The Object Creation Options ScreenAfter performing manual object editing the MySQL Migration Toolkit is ready to create the databaseobjects on the target server. You have the option of either creating the database objects directly on thetarget server or to create a script file of the CREATE statements for later execution:
Figure 6.19. The Object Creation Options screen
The Migration Process In-Depth
28

Select both options to create the target database objects and preserve a backup copy of the CREATEstatements for later use.
6.14. The Creating Objects ScreenOnce you choose object creation objects, the MySQL Migration Toolkit connects to the target server andcreates the database objects (assuming you chose to have the MySQL Migration Toolkit connect to thetarget server to create the database objects). If you chose to have a copy of the CREATE statementssaved to disk this will be performed at this time.
Figure 6.20. The Creating Objects screen
The Migration Process In-Depth
29
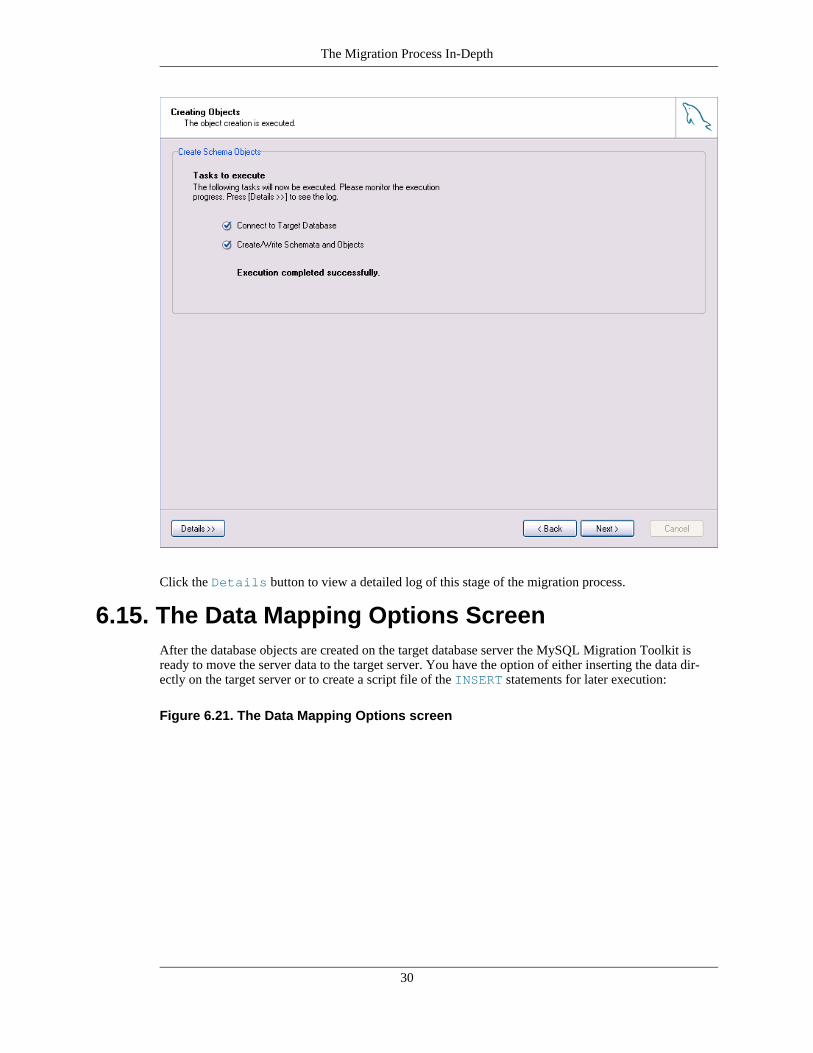
Click the Details button to view a detailed log of this stage of the migration process.
6.15. The Data Mapping Options ScreenAfter the database objects are created on the target database server the MySQL Migration Toolkit isready to move the server data to the target server. You have the option of either inserting the data dir-ectly on the target server or to create a script file of the INSERT statements for later execution:
Figure 6.21. The Data Mapping Options screen
The Migration Process In-Depth
30
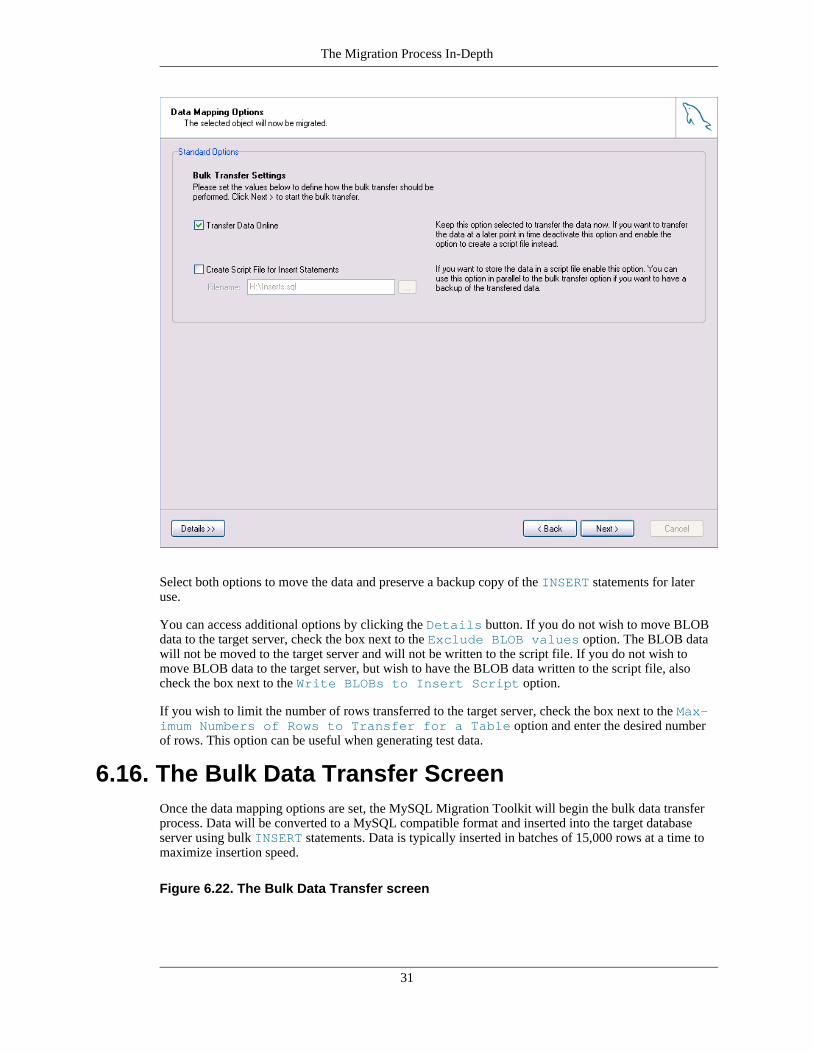
Select both options to move the data and preserve a backup copy of the INSERT statements for lateruse.
You can access additional options by clicking the Details button. If you do not wish to move BLOBdata to the target server, check the box next to the Exclude BLOB values option. The BLOB datawill not be moved to the target server and will not be written to the script file. If you do not wish tomove BLOB data to the target server, but wish to have the BLOB data written to the script file, alsocheck the box next to the Write BLOBs to Insert Script option.
If you wish to limit the number of rows transferred to the target server, check the box next to the Max-imum Numbers of Rows to Transfer for a Table option and enter the desired numberof rows. This option can be useful when generating test data.
6.16. The Bulk Data Transfer ScreenOnce the data mapping options are set, the MySQL Migration Toolkit will begin the bulk data transferprocess. Data will be converted to a MySQL compatible format and inserted into the target databaseserver using bulk INSERT statements. Data is typically inserted in batches of 15,000 rows at a time tomaximize insertion speed.
Figure 6.22. The Bulk Data Transfer screen
The Migration Process In-Depth
31
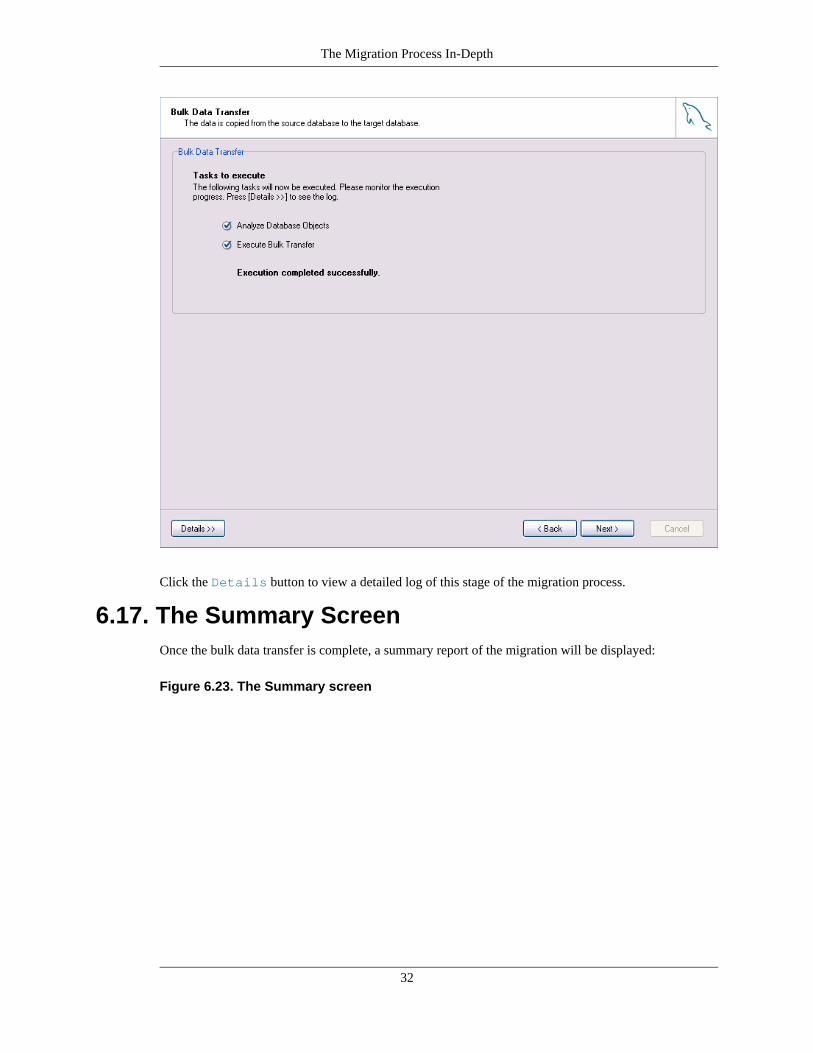
Click the Details button to view a detailed log of this stage of the migration process.
6.17. The Summary ScreenOnce the bulk data transfer is complete, a summary report of the migration will be displayed:
Figure 6.23. The Summary screen
The Migration Process In-Depth
32
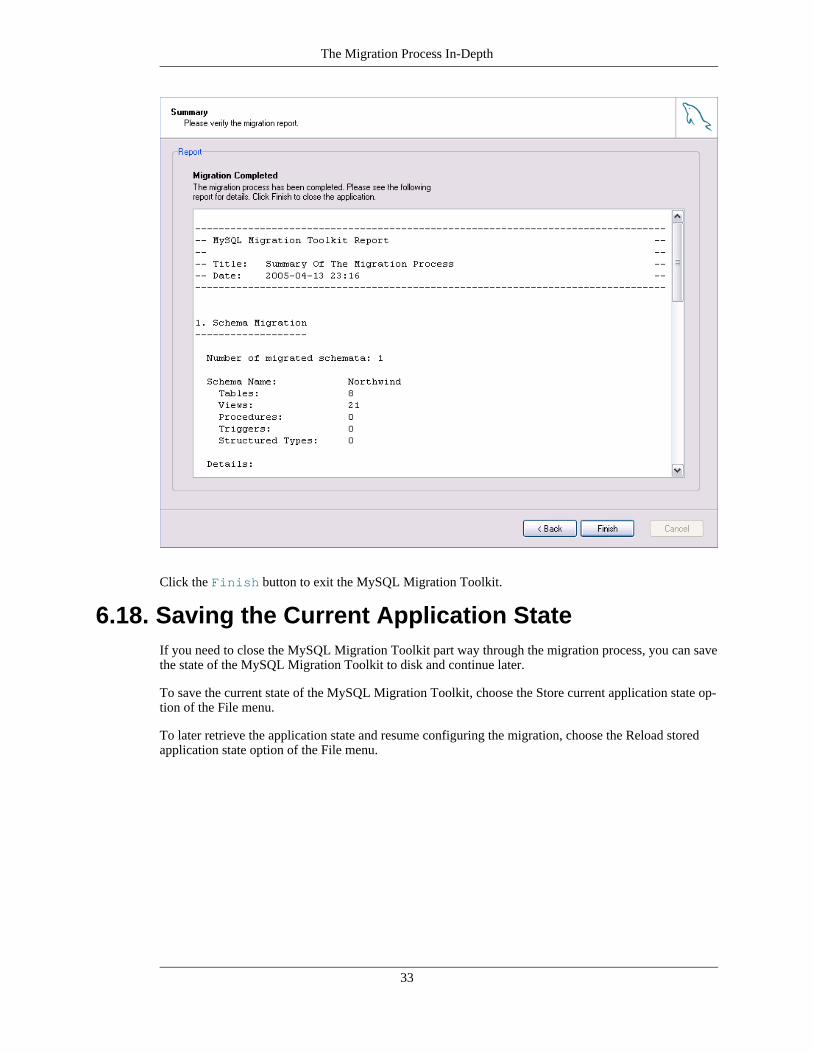
Click the Finish button to exit the MySQL Migration Toolkit.
6.18. Saving the Current Application StateIf you need to close the MySQL Migration Toolkit part way through the migration process, you can savethe state of the MySQL Migration Toolkit to disk and continue later.
To save the current state of the MySQL Migration Toolkit, choose the Store current application state op-tion of the File menu.
To later retrieve the application state and resume configuring the migration, choose the Reload storedapplication state option of the File menu.
The Migration Process In-Depth
33
Chapter 7. Extending The MySQL MigrationToolkit7.1. Introduction
One of the key features of the MySQL Migration Toolkit is that it can be easily extended and custom-ized to support new data sources. Through the use of its Generic RunTime (GRT) Environment, theMySQL Migration Toolkit can support new behavior and data sources using code written in languagessuch as Java, PHP, and C.
Extending the MySQL Migration Toolkit to support a new RDBMS requires the creation of two newmodules: one module that reverse engineers (ie., retrieves schema information) the source database ob-jects and converts them into GRT objects, and one module that migrates the source GRT objects intoMySQL GRT objects. The MySQL Migration Toolkit then converts the GRT MySQL objects into SQLstatements that create the the target MySQL server objects.
Existing modules can be easily expanded and customized to achieve the perfect migration for individualrequirements. New migration “methods” that define how the migration is performed can be added easily.The new methods are listed and can be selected from the Wizard interface or used in migration scripts.
7.2. Architecture of the MySQL Migration ToolkitThe GRT is a thin C layer, inspired by Objective C, which allows for dynamic typing and dynamic dataobjects. The MySQL Migration Toolkit is written on top of this layer and supports the creation of newmodules written in C, Java, PHP, and Lua, with support for Python and Mono forthcoming.
The MySQL Migration Toolkit is built on three primary modules: reverse engineer modules, migrationmodules, and transformation modules.
Reverse engineering modules retreive the schema information from the source database and return GRTobjects that describe the schema. Reverse engineering modules will have a name similar to Re-verseEngineeringAccess.
Migration modules convert the source database GRT objects to MySQL GRT objects and then handlethe bulk data transfer between the source and MySQL databases. Migration modules will have a namesimilar to MigrationAccess.
Transformation modules convert the MySQL GRT objects into the actual SQL statements used to createobjects such as tables and views on the target MySQL server. Transformation modules will have a namesimilar to TransformationMySQL. Transformation modules are supplied by the MySQL GUI teamand need not be created to add support for a new source database.
All modules are derived from base classes whose methods can be re-written to match the new sourcedatabase.
7.3. The Modular Migration ProcessFrom the point of view of modular development, the migration process is as follows:
1. The MySQL Migration Toolkit prompts the user for a source database and connection parameters.The user selection determines which modules will be used for the source database.
2. The MySQL Migration Toolkit calls the testConnection method of the reverse engineering
34
module. The testConnection method returns success or failure to the MySQL MigrationToolkit.
3. The MySQL Migration Toolkit calls the getSchemata method of the reverse engineering mod-ule. The getSchemata method returns a list of the schemas available on the source RDBMS forthe user to choose from.
4. Once the user has selected one or more schema to migrate, the MySQL Migration Toolkit calls thereverseEngineer method of the reverse engineering module. The reverseEngineermethod converts all objects in the source RDBMS (tables, views, procedures) into a collection ofGRT objects.
5. After the source database has been reverse engineered, the MySQL Migration Toolkit calls the mi-grationMethods method of the migration module. The migrationMethods method gener-ates a list of available methods than can be selected by the user in the Object Mapping Screen.
6. Once the user has selected the migration methods, the MySQL Migration Toolkit calls the mi-grate method of the migration module. The migrate method converts the source RDBMS GRTobjects into MySQL GRT objects by calling the selected migration method for each source schemaobject. If no explicit method is assigned, the default migration method for the object type will beused.
7. After the MySQL GRT objects have been created, the MySQL Migration Toolkit calls the trans-formation moldule to convert the MySQL GRT objects into SQL statements that will create the ob-jects on the target MySQL server. The MySQL Migration Toolkit then either executes the SQLstatements on the target MySQL server or writes them to a script file.
8. In the final step, the MySQL Migration Toolkit calls the dataBulkTransfer method of the mi-gration module. The dataBulkTransfer method loops through the selected tables in the selec-ted schema and migrates the rows of the tables to the target MySQL database or loads them into ascript file, depending on the user preference.
7.4. Tools Required to Extend the MySQL MigrationToolkit
The MySQL AB GUI Team uses Eclipse for development of the MySQL Migration Toolkit modulesand recommends Elcipse for use when developing modules for the MySQL Migration Toolkit. See ht-tp://www.eclipse.org/ for more information.
Extending The MySQL Migration Toolkit
35
Chapter 8. Preparing a Microsoft AccessDatabase for Migration
The MySQL Migration Toolkit requires access to the system tables of a Microsoft Access database forthe purpose of reverse-engineering. By default, read access to the system tables of an Access database isrestricted for external applications.
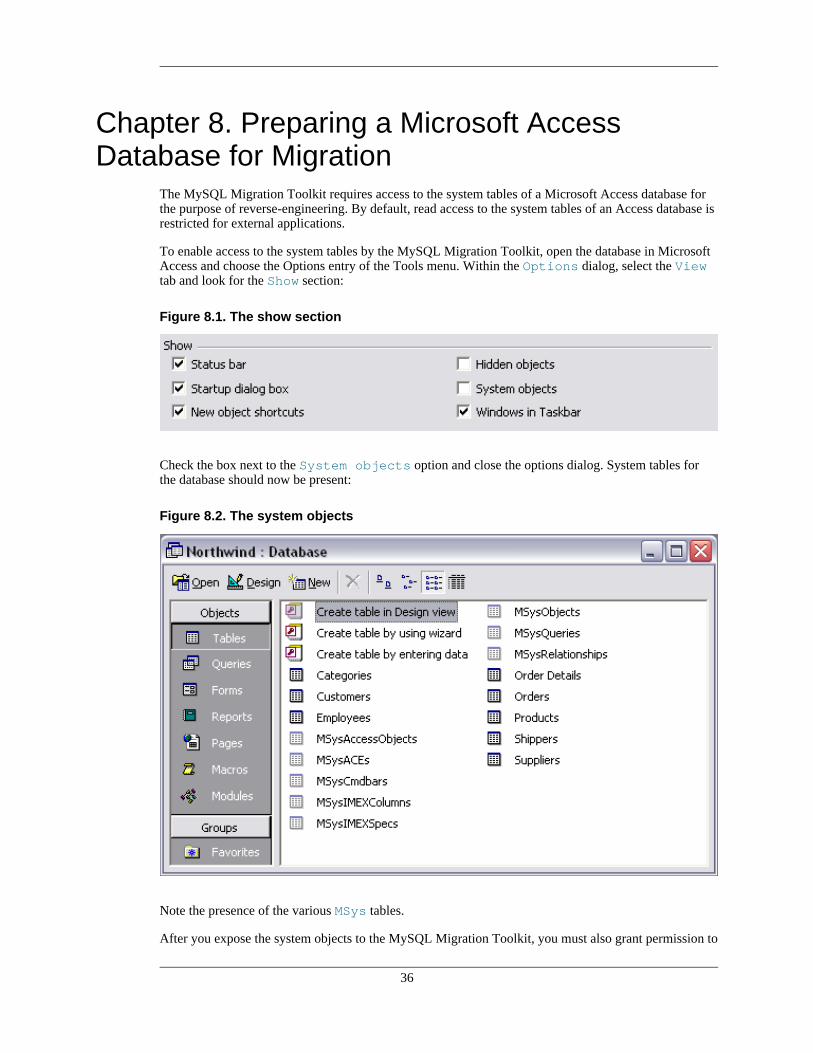
To enable access to the system tables by the MySQL Migration Toolkit, open the database in MicrosoftAccess and choose the Options entry of the Tools menu. Within the Options dialog, select the Viewtab and look for the Show section:
Figure 8.1. The show section
Check the box next to the System objects option and close the options dialog. System tables forthe database should now be present:
Figure 8.2. The system objects
Note the presence of the various MSys tables.
After you expose the system objects to the MySQL Migration Toolkit, you must also grant permission to
36
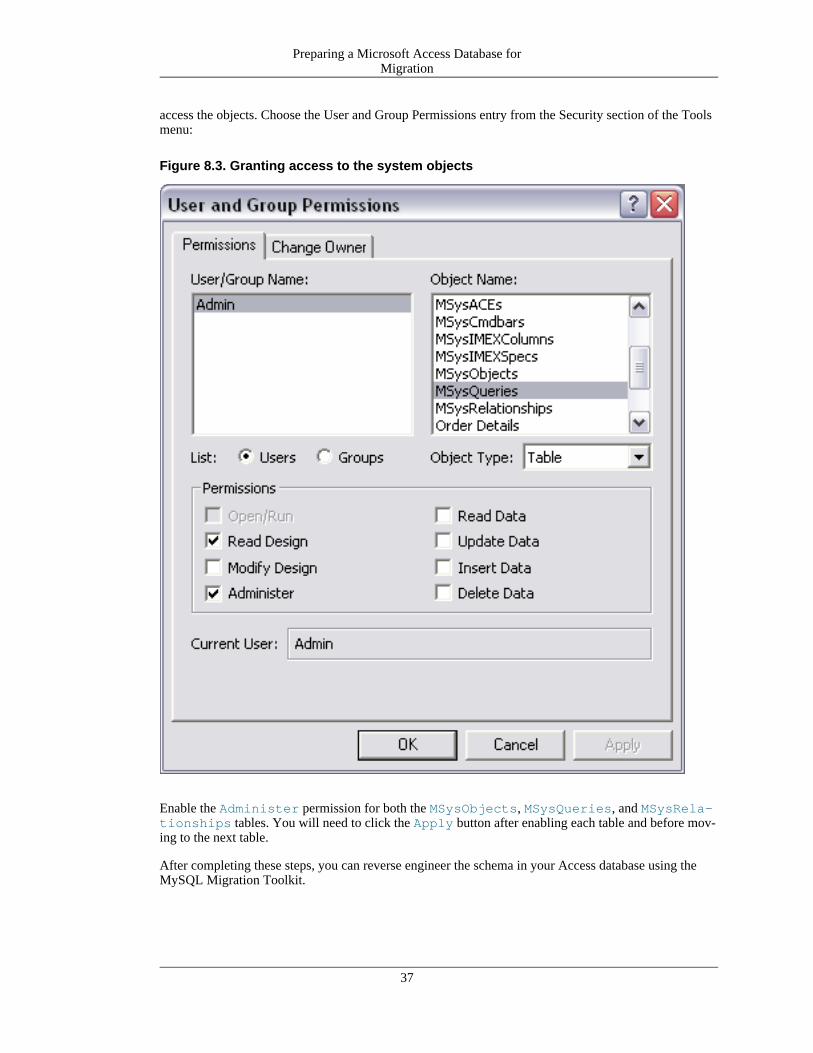
access the objects. Choose the User and Group Permissions entry from the Security section of the Toolsmenu:
Figure 8.3. Granting access to the system objects
Enable the Administer permission for both the MSysObjects, MSysQueries, and MSysRela-tionships tables. You will need to click the Apply button after enabling each table and before mov-ing to the next table.
After completing these steps, you can reverse engineer the schema in your Access database using theMySQL Migration Toolkit.
Preparing a Microsoft Access Database forMigration
37