Embed Size (px)
Citation preview
MySQL Cluster – Evaluation and Tests, OCTOBER 2, 2012 1
MySQL Cluster – Evaluation and TestsMichael Raith (B.Sc.), Master-Student
F
Abstract
Websites or web applications, whether they represent shopping systems, on demand services or a social networks, havesomething in common: data must be stored somewhere and somehow. This job can be achieved by various solutions with verydifferent performance characteristics, e.g. based on simple data files, databases or high performance RAM storage solutions.
For today’s popular web applications it is important to handle database operations in a minimum amount of time, becausethey are struggling with a vast increase in visitors and user generated data. Therefore, a major requirement for modern databaseapplication is to handle huge data (also called “big data”) in a short amount of time and to provide high availability for that data.
A very popular database application in the open source community is MySQL, which was originally developed by aswedisch company called MySQL AB and is now maintenanced by Oracle. MySQL is shipped in a bundle with the Apache webserver and therefore has a large distribution. This database is easily installed, maintained and administrated. By default MySQLis shipped with the MyISAM storage engine, which has good performance on read requests, but a poor one on massive parallelwrite requests. With appropriate tuning of various database settings, special architecture setups (replication, partitioning, etc.)or other storage engines, MySQL can be turned into a fast database application. For example Wikipedia uses MySQL for theirbackend data storage.
In the lecture “Ultra Large Scale Systems” and “System Engineering” teached by Walter Kriha at Media University Stuttgart,the question “Can a MySQL database application handle more then 3000 database requests per second?” came up some time.Inspired by this issue, I got myself going to find out, if MySQL is able to handle such a amount of requests per second. At thattime I also read something about the high availability and scalability solution MySQL Cluster and it was the right time to testthe performance of that solution.
In this paper I describe how to set up a MySQL database server with the additional MySQL Cluster storage engine“ndbcluster” and how to configure a database cluster. In addition I execute some database tests on that cluster to proof that it’spossible the get a throughput of >= 3000 read requests per second with a MySQL database.
Index Terms
MySQL, MySQL Cluster, JMeter, high availability, high performance, auto sharding, database test
1 INTRODUCING MYSQL CLUSTER
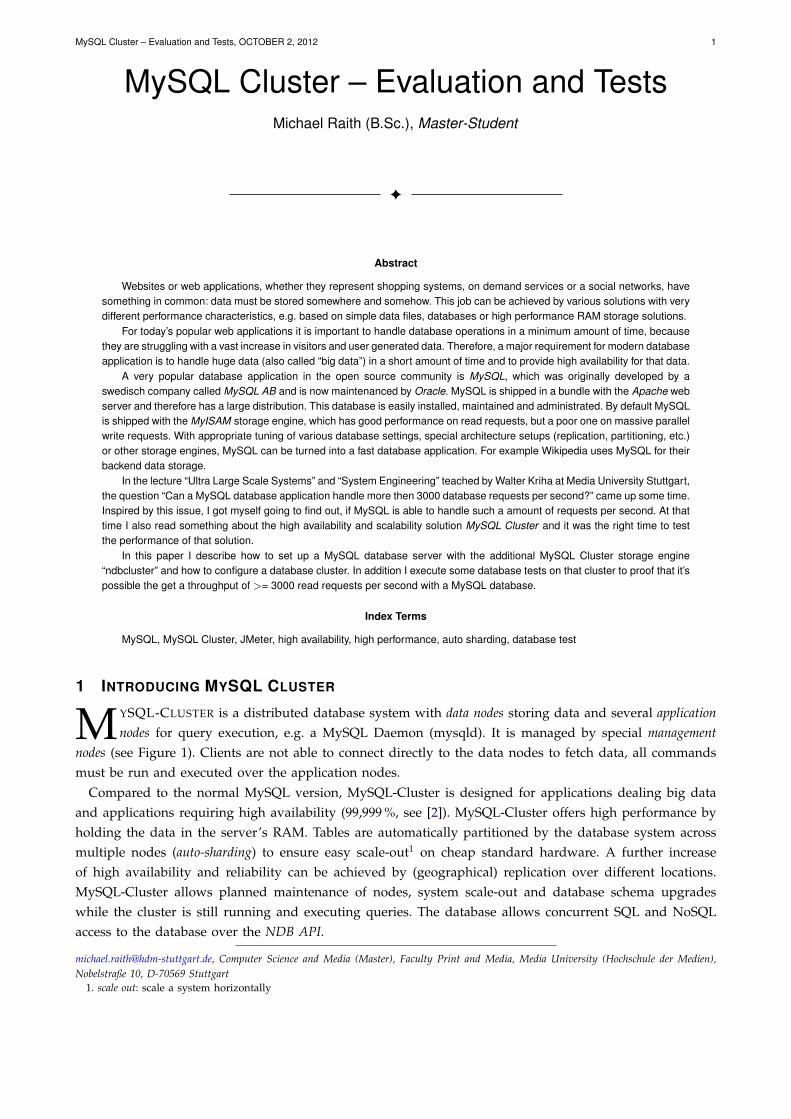
M YSQL-CLUSTER is a distributed database system with data nodes storing data and several applicationnodes for query execution, e.g. a MySQL Daemon (mysqld). It is managed by special management
nodes (see Figure 1). Clients are not able to connect directly to the data nodes to fetch data, all commandsmust be run and executed over the application nodes.
Compared to the normal MySQL version, MySQL-Cluster is designed for applications dealing big dataand applications requiring high availability (99,999 %, see [2]). MySQL-Cluster offers high performance byholding the data in the server’s RAM. Tables are automatically partitioned by the database system acrossmultiple nodes (auto-sharding) to ensure easy scale-out1 on cheap standard hardware. A further increaseof high availability and reliability can be achieved by (geographical) replication over different locations.MySQL-Cluster allows planned maintenance of nodes, system scale-out and database schema upgradeswhile the cluster is still running and executing queries. The database allows concurrent SQL and NoSQLaccess to the database over the NDB API.
[email protected], Computer Science and Media (Master), Faculty Print and Media, Media University (Hochschule der Medien),Nobelstraße 10, D-70569 Stuttgart
1. scale out: scale a system horizontally
2 MySQL Cluster – Evaluation and Tests, OCTOBER 2, 2012
Clients
MySQL Cluster Appliaction Nodes
C++ LDAP
MySQL Cluster Management MySQL Cluster Management
MySQL Cluster Data Nodes
Figure 1: architecture of a MySQL-Cluster (cf. [1])
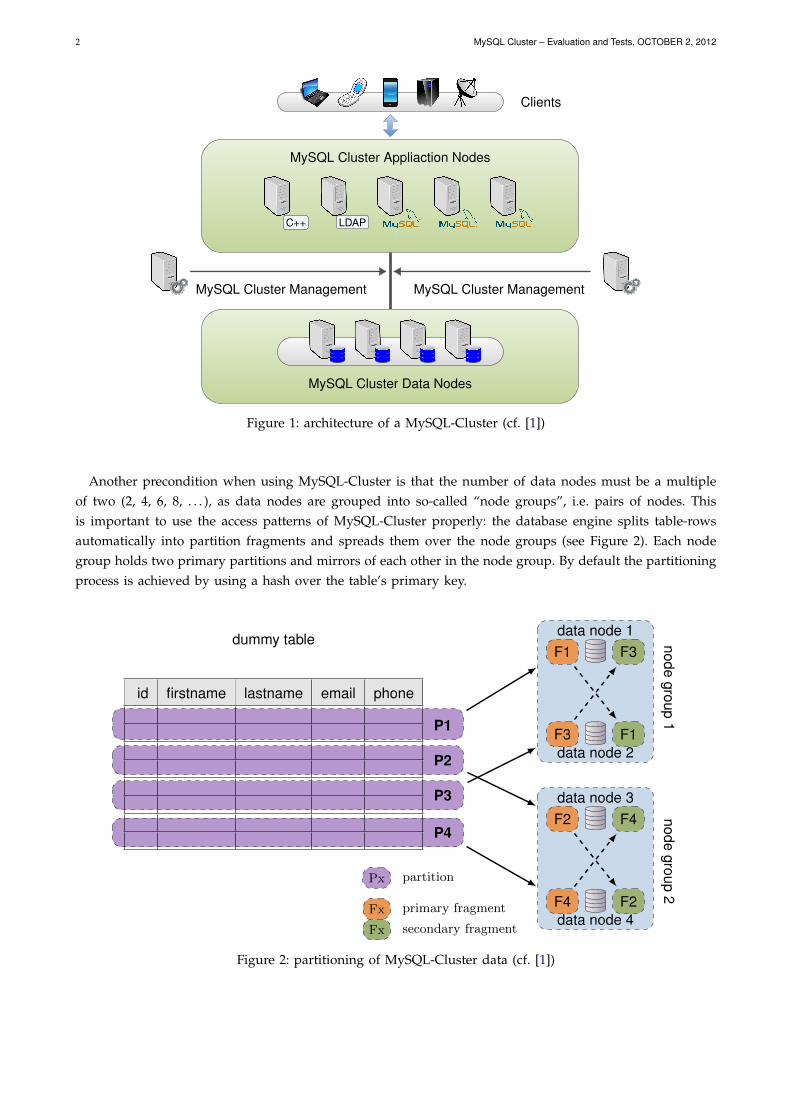
Another precondition when using MySQL-Cluster is that the number of data nodes must be a multipleof two (2, 4, 6, 8, . . . ), as data nodes are grouped into so-called “node groups”, i.e. pairs of nodes. Thisis important to use the access patterns of MySQL-Cluster properly: the database engine splits table-rowsautomatically into partition fragments and spreads them over the node groups (see Figure 2). Each nodegroup holds two primary partitions and mirrors of each other in the node group. By default the partitioningprocess is achieved by using a hash over the table’s primary key.
P1
P2
P3
P4
dummy table
id firstname lastname email phone
nodegroup
1
data node 1F1 F3
data node 2F3 F1
nodegroup
2
data node 3F2 F4
data node 4F4 F2
Px partition
Fx primary fragment
Fx secondary fragment
Figure 2: partitioning of MySQL-Cluster data (cf. [1])
MySQL Cluster – Evaluation and Tests 3
2 SETUP
2.1 Preparing the test environment
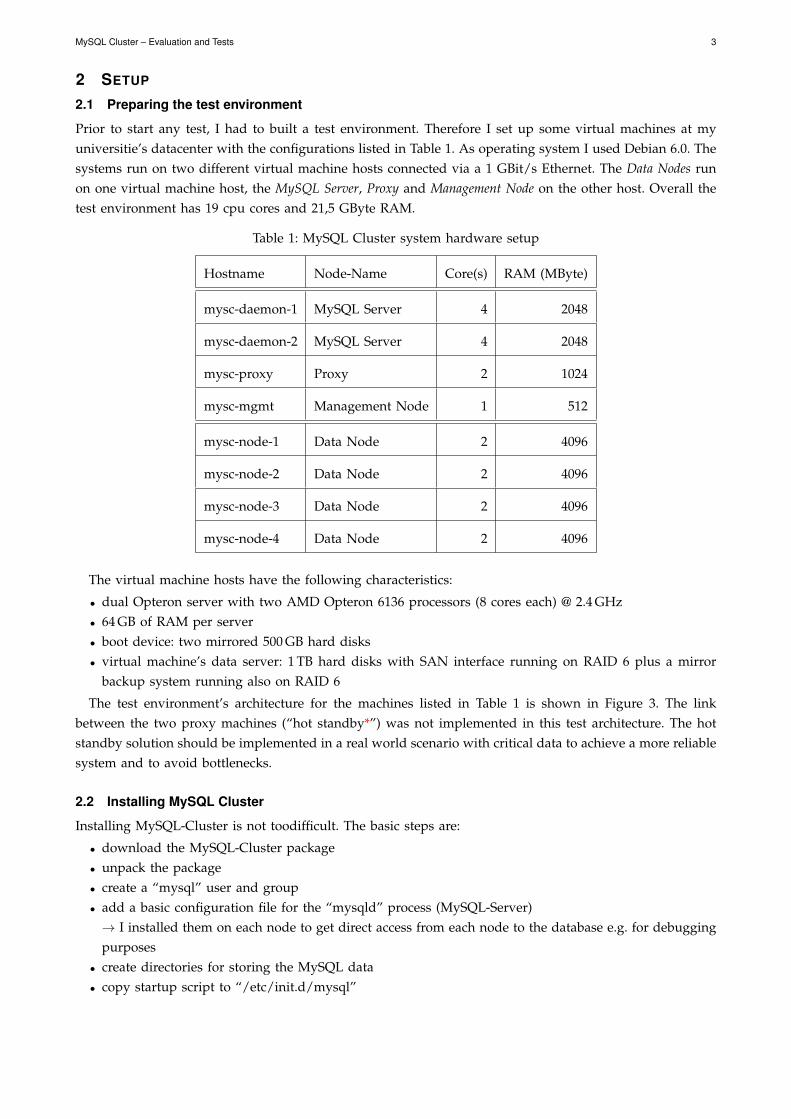
Prior to start any test, I had to built a test environment. Therefore I set up some virtual machines at myuniversitie’s datacenter with the configurations listed in Table 1. As operating system I used Debian 6.0. Thesystems run on two different virtual machine hosts connected via a 1 GBit/s Ethernet. The Data Nodes runon one virtual machine host, the MySQL Server, Proxy and Management Node on the other host. Overall thetest environment has 19 cpu cores and 21,5 GByte RAM.
Table 1: MySQL Cluster system hardware setup
Hostname Node-Name Core(s) RAM (MByte)
mysc-daemon-1 MySQL Server 4 2048
mysc-daemon-2 MySQL Server 4 2048
mysc-proxy Proxy 2 1024
mysc-mgmt Management Node 1 512
mysc-node-1 Data Node 2 4096
mysc-node-2 Data Node 2 4096
mysc-node-3 Data Node 2 4096
mysc-node-4 Data Node 2 4096
The virtual machine hosts have the following characteristics:
• dual Opteron server with two AMD Opteron 6136 processors (8 cores each) @ 2.4 GHz• 64 GB of RAM per server• boot device: two mirrored 500 GB hard disks• virtual machine’s data server: 1 TB hard disks with SAN interface running on RAID 6 plus a mirror
backup system running also on RAID 6
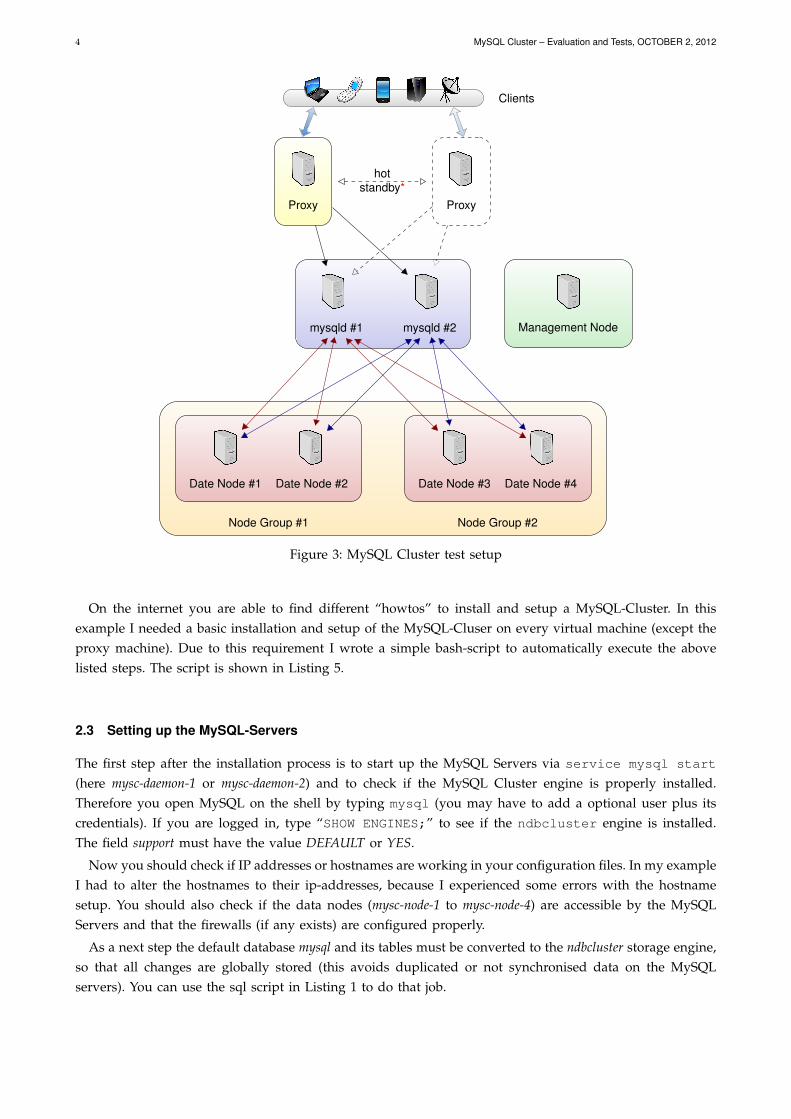
The test environment’s architecture for the machines listed in Table 1 is shown in Figure 3. The linkbetween the two proxy machines (“hot standby*”) was not implemented in this test architecture. The hotstandby solution should be implemented in a real world scenario with critical data to achieve a more reliablesystem and to avoid bottlenecks.
2.2 Installing MySQL Cluster
Installing MySQL-Cluster is not toodifficult. The basic steps are:
• download the MySQL-Cluster package• unpack the package• create a “mysql” user and group• add a basic configuration file for the “mysqld” process (MySQL-Server)→ I installed them on each node to get direct access from each node to the database e.g. for debuggingpurposes
• create directories for storing the MySQL data• copy startup script to “/etc/init.d/mysql”
4 MySQL Cluster – Evaluation and Tests, OCTOBER 2, 2012
Proxy Proxy
Clients
mysqld #1 mysqld #2 Management Node
Date Node #1 Date Node #2
Node Group #1
Date Node #3 Date Node #4
Node Group #2
hotstandby*
Figure 3: MySQL Cluster test setup
On the internet you are able to find different “howtos” to install and setup a MySQL-Cluster. In thisexample I needed a basic installation and setup of the MySQL-Cluser on every virtual machine (except theproxy machine). Due to this requirement I wrote a simple bash-script to automatically execute the abovelisted steps. The script is shown in Listing 5.
2.3 Setting up the MySQL-Servers
The first step after the installation process is to start up the MySQL Servers via service mysql start
(here mysc-daemon-1 or mysc-daemon-2) and to check if the MySQL Cluster engine is properly installed.Therefore you open MySQL on the shell by typing mysql (you may have to add a optional user plus itscredentials). If you are logged in, type “SHOW ENGINES;” to see if the ndbcluster engine is installed.The field support must have the value DEFAULT or YES.
Now you should check if IP addresses or hostnames are working in your configuration files. In my exampleI had to alter the hostnames to their ip-addresses, because I experienced some errors with the hostnamesetup. You should also check if the data nodes (mysc-node-1 to mysc-node-4) are accessible by the MySQLServers and that the firewalls (if any exists) are configured properly.
As a next step the default database mysql and its tables must be converted to the ndbcluster storage engine,so that all changes are globally stored (this avoids duplicated or not synchronised data on the MySQLservers). You can use the sql script in Listing 1 to do that job.
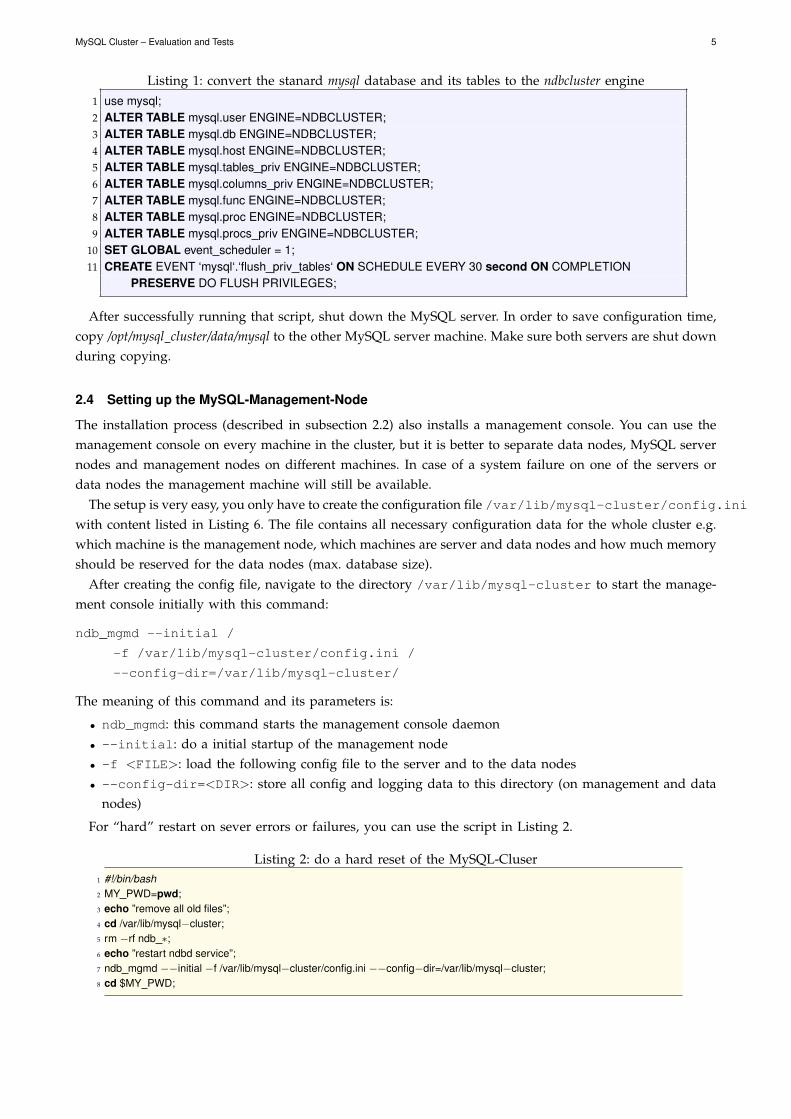
MySQL Cluster – Evaluation and Tests 5
Listing 1: convert the stanard mysql database and its tables to the ndbcluster engine1 use mysql;2 ALTER TABLE mysql.user ENGINE=NDBCLUSTER;3 ALTER TABLE mysql.db ENGINE=NDBCLUSTER;4 ALTER TABLE mysql.host ENGINE=NDBCLUSTER;5 ALTER TABLE mysql.tables priv ENGINE=NDBCLUSTER;6 ALTER TABLE mysql.columns priv ENGINE=NDBCLUSTER;7 ALTER TABLE mysql.func ENGINE=NDBCLUSTER;8 ALTER TABLE mysql.proc ENGINE=NDBCLUSTER;9 ALTER TABLE mysql.procs priv ENGINE=NDBCLUSTER;
10 SET GLOBAL event scheduler = 1;11 CREATE EVENT ‘mysql‘.‘flush priv tables‘ ON SCHEDULE EVERY 30 second ON COMPLETION
PRESERVE DO FLUSH PRIVILEGES;
After successfully running that script, shut down the MySQL server. In order to save configuration time,copy /opt/mysql cluster/data/mysql to the other MySQL server machine. Make sure both servers are shut downduring copying.
2.4 Setting up the MySQL-Management-Node
The installation process (described in subsection 2.2) also installs a management console. You can use themanagement console on every machine in the cluster, but it is better to separate data nodes, MySQL servernodes and management nodes on different machines. In case of a system failure on one of the servers ordata nodes the management machine will still be available.
The setup is very easy, you only have to create the configuration file /var/lib/mysql-cluster/config.iniwith content listed in Listing 6. The file contains all necessary configuration data for the whole cluster e.g.which machine is the management node, which machines are server and data nodes and how much memoryshould be reserved for the data nodes (max. database size).
After creating the config file, navigate to the directory /var/lib/mysql-cluster to start the manage-ment console initially with this command:
ndb_mgmd --initial /
-f /var/lib/mysql-cluster/config.ini /
--config-dir=/var/lib/mysql-cluster/
The meaning of this command and its parameters is:
• ndb_mgmd: this command starts the management console daemon• --initial: do a initial startup of the management node• -f <FILE>: load the following config file to the server and to the data nodes• --config-dir=<DIR>: store all config and logging data to this directory (on management and data
nodes)
For “hard” restart on sever errors or failures, you can use the script in Listing 2.
Listing 2: do a hard reset of the MySQL-Cluser1 #!/bin/bash2 MY PWD=pwd;3 echo ”remove all old files”;4 cd /var/lib/mysql−cluster;5 rm −rf ndb ∗;6 echo ”restart ndbd service”;7 ndb mgmd −−initial −f /var/lib/mysql−cluster/config.ini −−config−dir=/var/lib/mysql−cluster;8 cd $MY PWD;
6 MySQL Cluster – Evaluation and Tests, OCTOBER 2, 2012
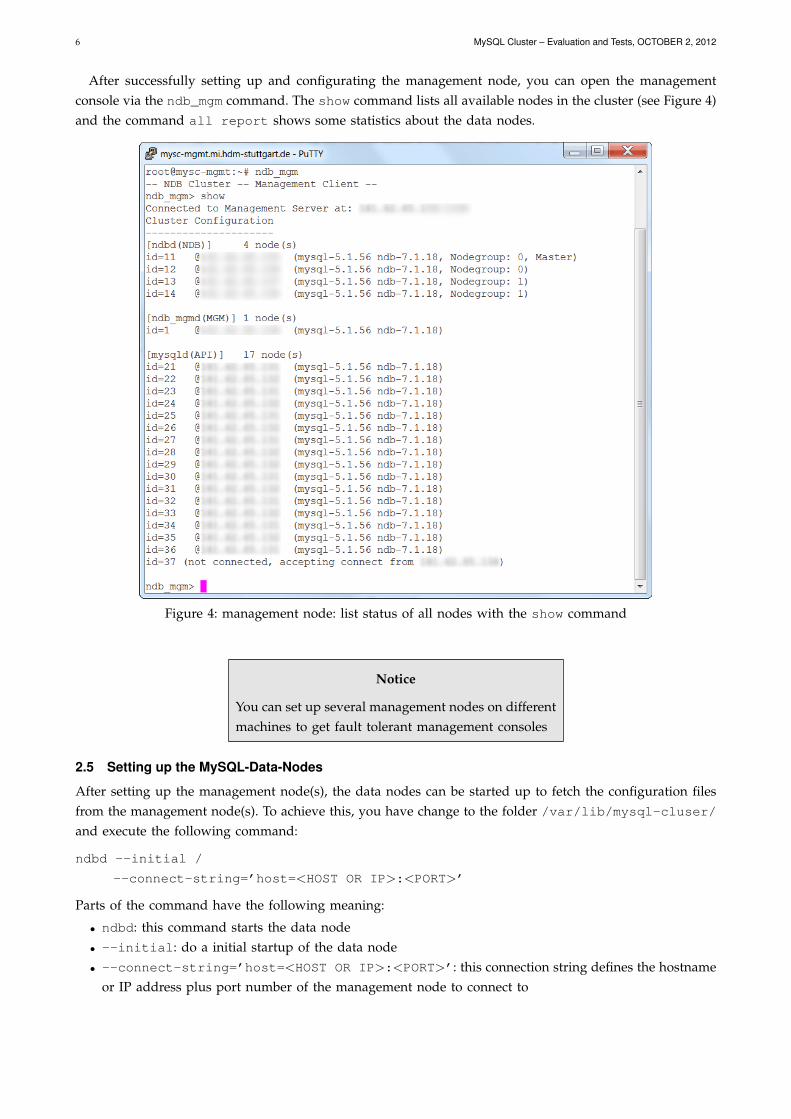
After successfully setting up and configurating the management node, you can open the managementconsole via the ndb_mgm command. The show command lists all available nodes in the cluster (see Figure 4)and the command all report shows some statistics about the data nodes.
Figure 4: management node: list status of all nodes with the show command
Notice
You can set up several management nodes on differentmachines to get fault tolerant management consoles
2.5 Setting up the MySQL-Data-Nodes
After setting up the management node(s), the data nodes can be started up to fetch the configuration filesfrom the management node(s). To achieve this, you have change to the folder /var/lib/mysql-cluser/and execute the following command:
ndbd --initial /
--connect-string=’host=<HOST OR IP>:<PORT>’
Parts of the command have the following meaning:
• ndbd: this command starts the data node• --initial: do a initial startup of the data node• --connect-string=’host=<HOST OR IP>:<PORT>’: this connection string defines the hostname
or IP address plus port number of the management node to connect to

MySQL Cluster – Evaluation and Tests 7
To do a “hard” restart on sever errors or failures, you can use the script in Listing 3.
Listing 3: do a hard reset of the MySQL-Cluser1 #!/bin/bash2 MY PWD=pwd;3 echo ”remove all old files”;4 cd /var/lib/mysql−cluster;5 rm −rf ndb ∗;6 echo ”restart ndbd service”;7 ndbd −−initial −−connect−string=HOST:PORT;8 cd $MY PWD;
2.6 Setting up the MySQL-Proxy
Installing the MySQL-Proxy package can be achieved by executing the command apt-get install mysql-
proxy under Debian Linux. Once the installation process has finished, create the folder /etc/mysql-proxyand switch to that folder. The next step is to create the config file /etc/mysql-proxy/mysql-proxy.confwith configuration settings depending on your setup. In Listing 8 you can see some example settings forthis MySQL Cluster setup.
MySQL-Proxy also has support for admin and reporter scripts respectively interfaces. You can find someexamples in the MySQL Proxy Guide [3].
Starting up the proxy is easy by firing the following command:
mysql-proxy --defaults-file=/etc/mysql-proxy/mysql-proxy.conf
Argument --defaults-file defines the default configuration file with which the proxy should be started– in this example our previously created configuration file.
After starting up the proxy, the MySQL server access settings must be adjusted. Accessing a MySQL serveris only allowed from localhost by default. In this example setup we don’t want to allow access from variousclients directly to the MySQL servers, but we want to allow access over the load balancer (MySQL Proxy)to the servers. Therefore the MySQL user settings have to be adjusted.
This can be achieved by logging into one of the MySQL server via the mysql console. By executing the sql-command SELECT host,user,password FROM mysql.user; you can see the current users and theiraccess host. To allow the access over the proxy to the servers, a new user has to be created e.g. “mysql-proxy”.
Listing 4: create a new user and allow only the access over the proxy1 ”cluster−user”@”ADDRESS−OR−IP−OF−PROXY” IDENTIFIED BY ”PASSWORD”;2
3 GRANT ALL PRIVILEGES ON ∗.∗4 TO ”cluster−user”@”ADDRESS−OR−IP−OF−PROXY” IDENTIFIED BY ”PASSWORD”;
In Listing 4 a new user called “mysql-proxy” is created. The statement "ADDRESS-OR-IP-OF-PROXY"defines the access of the proxy, so “mysql-proxy”-users are only allowed to access the MySQL servers overthis host respectively proxy. Lines 3 and 4 set some rights, here the full access to all databases and theirtables. Notice: Be careful granting all rights to a user, especially if third-party users have access to yoursystems! See [4] to get more information about this topic.
You should now be able to access the MySQL Cluster server over the proxy e.g. by this JDBC resourceaddress jdbc:mysql://PROXY-ADDRESS:PORT/DATABASE and the corresponding credentials.
3 TESTS
The objective of a database (load) test is to get some numbers of maximum throughput. These numbersare important to calculate how much concurrent users a database system can handle until the maximum
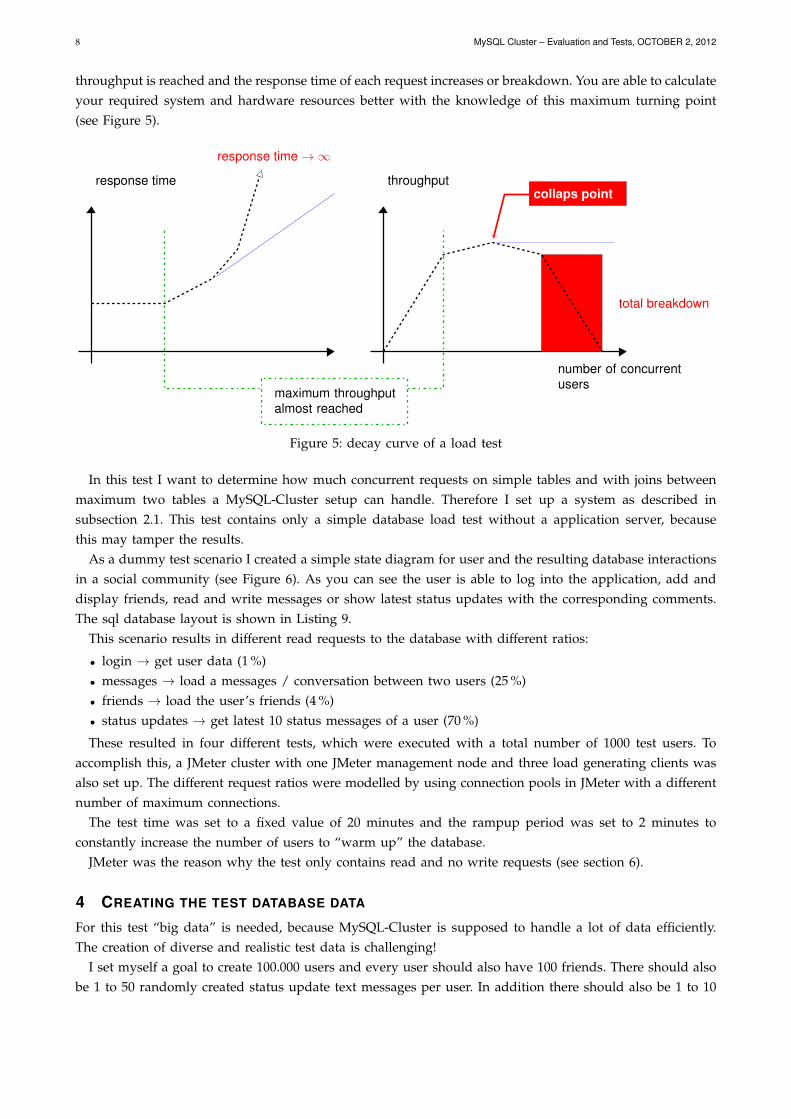
8 MySQL Cluster – Evaluation and Tests, OCTOBER 2, 2012
throughput is reached and the response time of each request increases or breakdown. You are able to calculateyour required system and hardware resources better with the knowledge of this maximum turning point(see Figure 5).
response time
response time → ∞throughput
number of concurrentusers
total breakdown
collaps point
maximum throughputalmost reached
Figure 5: decay curve of a load test
In this test I want to determine how much concurrent requests on simple tables and with joins betweenmaximum two tables a MySQL-Cluster setup can handle. Therefore I set up a system as described insubsection 2.1. This test contains only a simple database load test without a application server, becausethis may tamper the results.
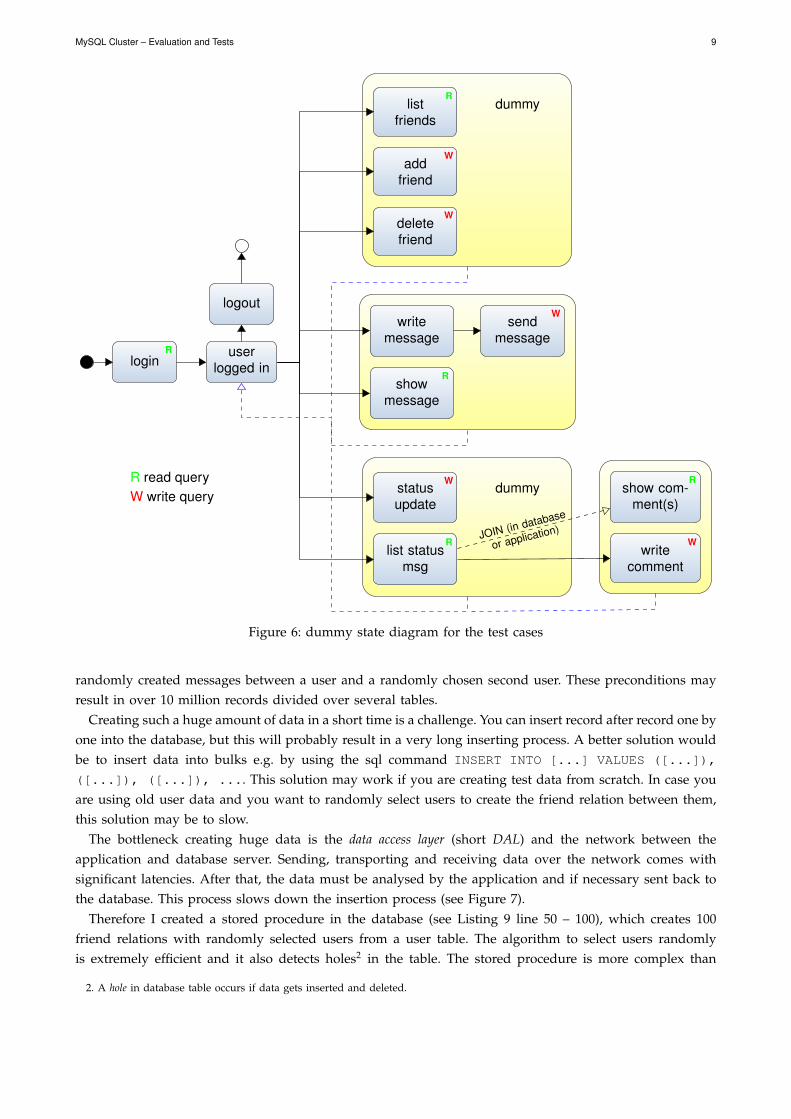
As a dummy test scenario I created a simple state diagram for user and the resulting database interactionsin a social community (see Figure 6). As you can see the user is able to log into the application, add anddisplay friends, read and write messages or show latest status updates with the corresponding comments.The sql database layout is shown in Listing 9.
This scenario results in different read requests to the database with different ratios:
• login → get user data (1 %)• messages → load a messages / conversation between two users (25 %)• friends → load the user’s friends (4 %)• status updates → get latest 10 status messages of a user (70 %)
These resulted in four different tests, which were executed with a total number of 1000 test users. Toaccomplish this, a JMeter cluster with one JMeter management node and three load generating clients wasalso set up. The different request ratios were modelled by using connection pools in JMeter with a differentnumber of maximum connections.
The test time was set to a fixed value of 20 minutes and the rampup period was set to 2 minutes toconstantly increase the number of users to “warm up” the database.
JMeter was the reason why the test only contains read and no write requests (see section 6).
4 CREATING THE TEST DATABASE DATA
For this test “big data” is needed, because MySQL-Cluster is supposed to handle a lot of data efficiently.The creation of diverse and realistic test data is challenging!
I set myself a goal to create 100.000 users and every user should also have 100 friends. There should alsobe 1 to 50 randomly created status update text messages per user. In addition there should also be 1 to 10
MySQL Cluster – Evaluation and Tests 9
loginuser
logged in
logoutwrite
messagesend
message
showmessage
listfriends
dummy
addfriend
deletefriend
statusupdate
dummy
list statusmsg
show com-ment(s)
writecomment
JOIN (in database
or application)
R
R
R
R
R
W
W
W
W
W
R read queryW write query
Figure 6: dummy state diagram for the test cases
randomly created messages between a user and a randomly chosen second user. These preconditions mayresult in over 10 million records divided over several tables.
Creating such a huge amount of data in a short time is a challenge. You can insert record after record one byone into the database, but this will probably result in a very long inserting process. A better solution wouldbe to insert data into bulks e.g. by using the sql command INSERT INTO [...] VALUES ([...]),
([...]), ([...]), .... This solution may work if you are creating test data from scratch. In case youare using old user data and you want to randomly select users to create the friend relation between them,this solution may be to slow.
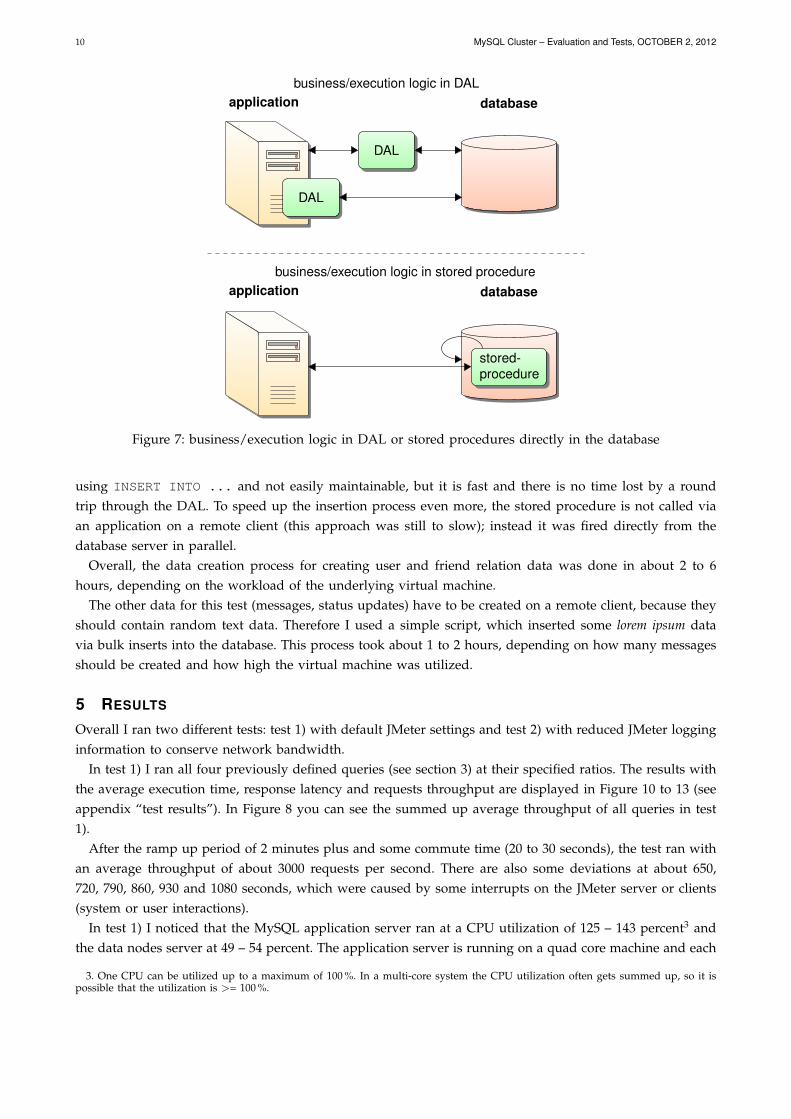
The bottleneck creating huge data is the data access layer (short DAL) and the network between theapplication and database server. Sending, transporting and receiving data over the network comes withsignificant latencies. After that, the data must be analysed by the application and if necessary sent back tothe database. This process slows down the insertion process (see Figure 7).
Therefore I created a stored procedure in the database (see Listing 9 line 50 – 100), which creates 100friend relations with randomly selected users from a user table. The algorithm to select users randomlyis extremely efficient and it also detects holes2 in the table. The stored procedure is more complex than
2. A hole in database table occurs if data gets inserted and deleted.
10 MySQL Cluster – Evaluation and Tests, OCTOBER 2, 2012
business/execution logic in DALapplication
DAL
DAL
database
business/execution logic in stored procedureapplication database
stored-procedure
Figure 7: business/execution logic in DAL or stored procedures directly in the database
using INSERT INTO ... and not easily maintainable, but it is fast and there is no time lost by a roundtrip through the DAL. To speed up the insertion process even more, the stored procedure is not called viaan application on a remote client (this approach was still to slow); instead it was fired directly from thedatabase server in parallel.
Overall, the data creation process for creating user and friend relation data was done in about 2 to 6hours, depending on the workload of the underlying virtual machine.
The other data for this test (messages, status updates) have to be created on a remote client, because theyshould contain random text data. Therefore I used a simple script, which inserted some lorem ipsum datavia bulk inserts into the database. This process took about 1 to 2 hours, depending on how many messagesshould be created and how high the virtual machine was utilized.
5 RESULTS
Overall I ran two different tests: test 1) with default JMeter settings and test 2) with reduced JMeter logginginformation to conserve network bandwidth.
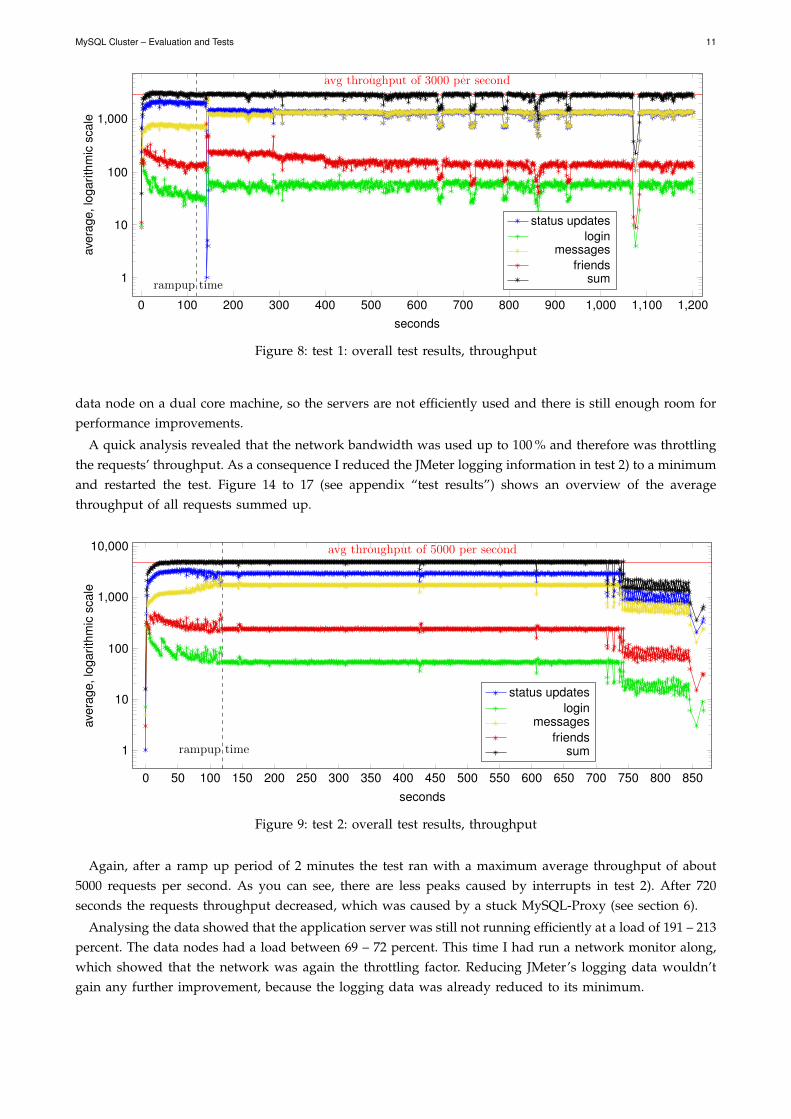
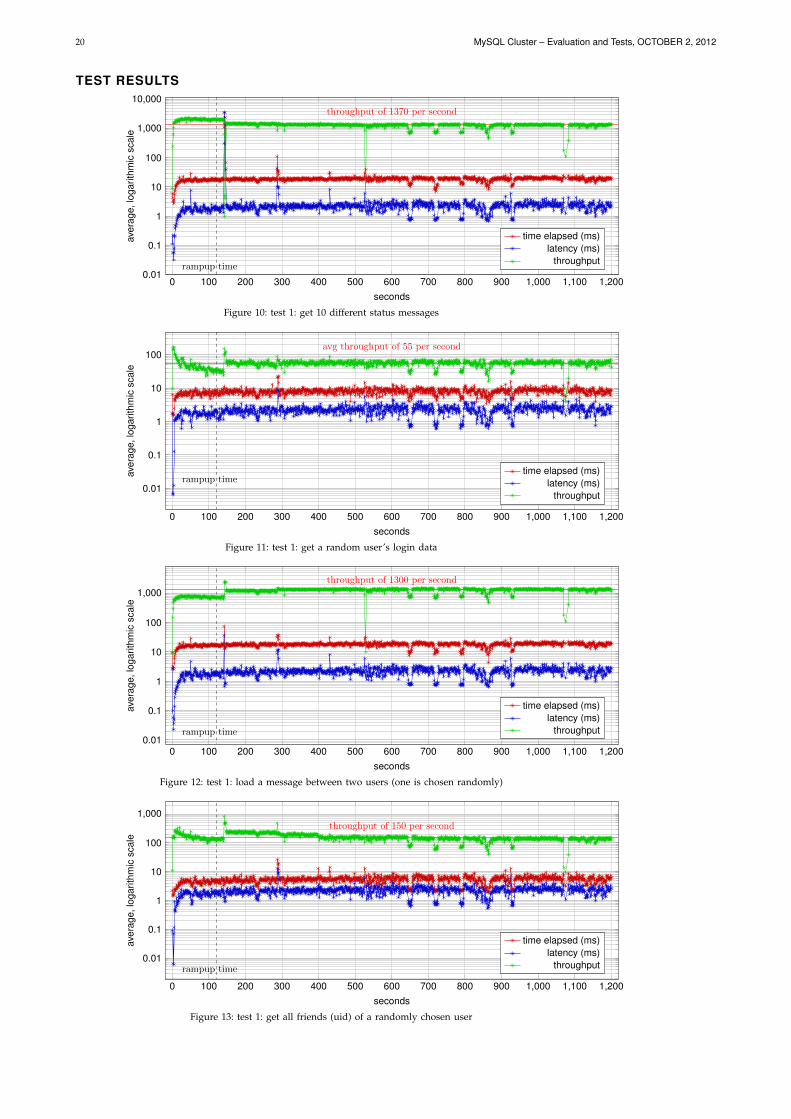
In test 1) I ran all four previously defined queries (see section 3) at their specified ratios. The results withthe average execution time, response latency and requests throughput are displayed in Figure 10 to 13 (seeappendix “test results”). In Figure 8 you can see the summed up average throughput of all queries in test1).
After the ramp up period of 2 minutes plus and some commute time (20 to 30 seconds), the test ran withan average throughput of about 3000 requests per second. There are also some deviations at about 650,720, 790, 860, 930 and 1080 seconds, which were caused by some interrupts on the JMeter server or clients(system or user interactions).
In test 1) I noticed that the MySQL application server ran at a CPU utilization of 125 – 143 percent3 andthe data nodes server at 49 – 54 percent. The application server is running on a quad core machine and each
3. One CPU can be utilized up to a maximum of 100 %. In a multi-core system the CPU utilization often gets summed up, so it ispossible that the utilization is >= 100 %.
MySQL Cluster – Evaluation and Tests 11
0 100 200 300 400 500 600 700 800 900 1,000 1,100 1,200
1
10
100
1,000
avg throughput of 3000 per second
rampup time
seconds
aver
age,
loga
rithm
icsc
ale
status updateslogin
messagesfriends
sum
Figure 8: test 1: overall test results, throughput
data node on a dual core machine, so the servers are not efficiently used and there is still enough room forperformance improvements.
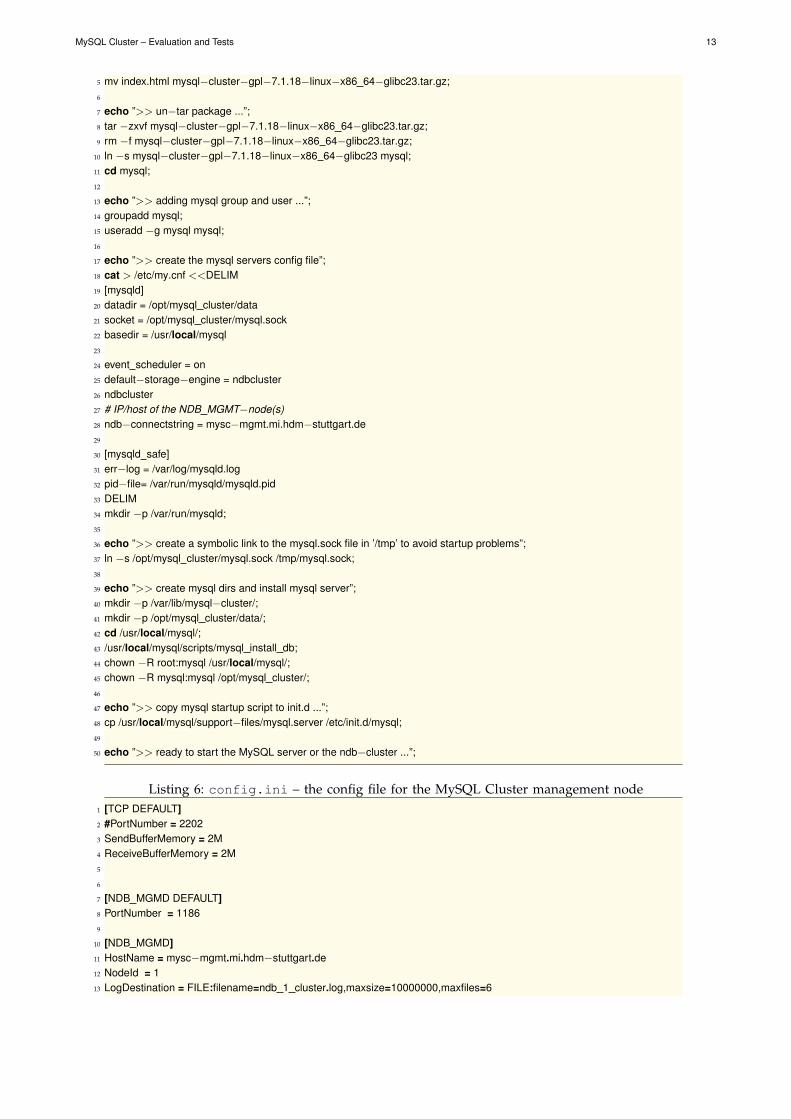
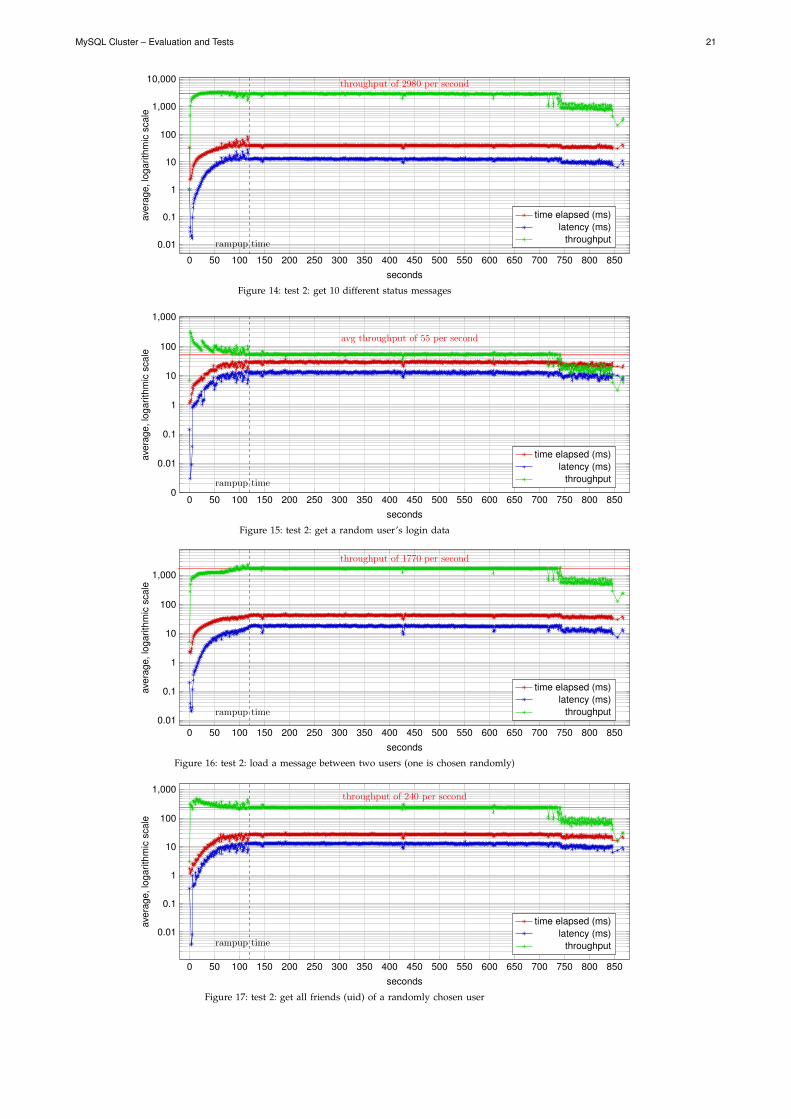
A quick analysis revealed that the network bandwidth was used up to 100 % and therefore was throttlingthe requests’ throughput. As a consequence I reduced the JMeter logging information in test 2) to a minimumand restarted the test. Figure 14 to 17 (see appendix “test results”) shows an overview of the averagethroughput of all requests summed up.
0 50 100 150 200 250 300 350 400 450 500 550 600 650 700 750 800 850
1
10
100
1,000
10,000 avg throughput of 5000 per second
rampup time
seconds
aver
age,
loga
rithm
icsc
ale
status updateslogin
messagesfriends
sum
Figure 9: test 2: overall test results, throughput
Again, after a ramp up period of 2 minutes the test ran with a maximum average throughput of about5000 requests per second. As you can see, there are less peaks caused by interrupts in test 2). After 720seconds the requests throughput decreased, which was caused by a stuck MySQL-Proxy (see section 6).
Analysing the data showed that the application server was still not running efficiently at a load of 191 – 213percent. The data nodes had a load between 69 – 72 percent. This time I had run a network monitor along,which showed that the network was again the throttling factor. Reducing JMeter’s logging data wouldn’tgain any further improvement, because the logging data was already reduced to its minimum.

12 MySQL Cluster – Evaluation and Tests, OCTOBER 2, 2012
6 PROBLEMS
The first problem I ran into was JMeter: the test application was not able to execute update and deletestatements with prepared statement data. The result statements of the database server and JMeter werenot helping either to solve that problem. A test with raw update and delete sql-queries showed that thesequeries were working fine. Therefore I had to discard all write tests with JMeter.
Another problem occurred randomly in the MySQL proxy after some time. The proxy had a CPU utilizationof 100 percent and got stuck. Curiously, there were no entries in the log files and now error statements. Asearch for this strange behaviour was without any result. The only solution that worked was to “kill” theproxy application, so it was difficult to execute all tests successfully. In a live environment, I would probablynot rely on MySQL Proxy and rather use another proxy application or a hardware load balancer.
During the tests I ran into another problem: the network capacity was at its limit. Reducing the transferedlogging data produced by JMeter lowered that issue only a little bit. In a real world scenario a single 1GBit/s interface would not be enough to handle all the resulting requests generated by JMeter.
7 CONCLUSION
The test showed that it is possible to read more then 3000 requests concurrently from a specialized MySQLdatabase. MySQL-Cluster was designed to handle such high number of requests.
The results also showed that the database in this test scenario was not fully utilized during tests andprobably had been able to handle a more requests. I tried to improve the throughput by reducing thelogging and meta data of JMeter, but the network bandwidth was still the limiting factor in this test setup.In a real world scenario I would probably configure the system to use more than one network interface inparallel or install a 10 GBit/s network interface. I would also use real physical machines rather then virtualmachines, because the virtual IO mapping in this test scenario is a limiting factor too.
Setting up a MySQL-Cluster is not easy at the beginning, but you get used to the behaviour of thedatabase and know how to handle it soon. The management console is a really handy tool to manage thewhole cluster and to do planned system updates or maintenance. If you know how to design databasetables for a distrusted application (less table columns and joins), you get a really powerful, high availableand easily scalable in memory database which can be used in addition to existing MySQL database servers.
APPENDIX
REFERENCES
[1] Sun Microsystems Inc., Leistungsoptimierung fur das Datenbanksystem MySQL Cluster, 2010.[2] “MySQL Cluster CGE,” [Online Available 2012-10-01]. [Online]. Available: http://www.mysql.com/products/
cluster/[3] Oracle, “MySQL Proxy Guide,” December 2011, [Online; accessed 18-August-2012]. [Online]. Available:
http://downloads.mysql.com/docs/mysql-proxy-en.pdf[4] ——, “MySQL GRANT Syntax,” [Online; accessed 18-August-2012]. [Online]. Available: http://dev.mysql.com/
doc/refman/5.1/en/grant.html
SCRIPTS
Listing 5: install-ndb-cluster-package.sh – script to automatic download, install and pre-set upmysql cluster
1 #!/bin/bash2 echo ”>> get the ndb−cluster tar package from mysql.com ...”;3 cd /usr/local/;4 wget http://www.mysql.com/get/Downloads/MySQL−Cluster−7.1/mysql−cluster−gpl−7.1.18−linux−x86 64−glibc23.tar.
gz/from/http://sunsite.informatik.rwth−aachen.de/mysql/;
MySQL Cluster – Evaluation and Tests 13
5 mv index.html mysql−cluster−gpl−7.1.18−linux−x86 64−glibc23.tar.gz;6
7 echo ”>> un−tar package ...”;8 tar −zxvf mysql−cluster−gpl−7.1.18−linux−x86 64−glibc23.tar.gz;9 rm −f mysql−cluster−gpl−7.1.18−linux−x86 64−glibc23.tar.gz;
10 ln −s mysql−cluster−gpl−7.1.18−linux−x86 64−glibc23 mysql;11 cd mysql;12
13 echo ”>> adding mysql group and user ...”;14 groupadd mysql;15 useradd −g mysql mysql;16
17 echo ”>> create the mysql servers config file”;18 cat > /etc/my.cnf <<DELIM19 [mysqld]20 datadir = /opt/mysql cluster/data21 socket = /opt/mysql cluster/mysql.sock22 basedir = /usr/local/mysql23
24 event scheduler = on25 default−storage−engine = ndbcluster26 ndbcluster27 # IP/host of the NDB MGMT−node(s)28 ndb−connectstring = mysc−mgmt.mi.hdm−stuttgart.de29
30 [mysqld safe]31 err−log = /var/log/mysqld.log32 pid−file= /var/run/mysqld/mysqld.pid33 DELIM34 mkdir −p /var/run/mysqld;35
36 echo ”>> create a symbolic link to the mysql.sock file in ’/tmp’ to avoid startup problems”;37 ln −s /opt/mysql cluster/mysql.sock /tmp/mysql.sock;38
39 echo ”>> create mysql dirs and install mysql server”;40 mkdir −p /var/lib/mysql−cluster/;41 mkdir −p /opt/mysql cluster/data/;42 cd /usr/local/mysql/;43 /usr/local/mysql/scripts/mysql install db;44 chown −R root:mysql /usr/local/mysql/;45 chown −R mysql:mysql /opt/mysql cluster/;46
47 echo ”>> copy mysql startup script to init.d ...”;48 cp /usr/local/mysql/support−files/mysql.server /etc/init.d/mysql;49
50 echo ”>> ready to start the MySQL server or the ndb−cluster ...”;
Listing 6: config.ini – the config file for the MySQL Cluster management node1 [TCP DEFAULT]2 #PortNumber = 22023 SendBufferMemory = 2M4 ReceiveBufferMemory = 2M5
6
7 [NDB MGMD DEFAULT]8 PortNumber = 11869
10 [NDB MGMD]11 HostName = mysc−mgmt.mi.hdm−stuttgart.de12 NodeId = 113 LogDestination = FILE:filename=ndb 1 cluster.log,maxsize=10000000,maxfiles=6
14 MySQL Cluster – Evaluation and Tests, OCTOBER 2, 2012
14 ArbitrationRank = 115
16 # 2 Manegment Server (not configurated at the moment)17 #[NDB MGMD]18 #HostName =19 #NodeId = 220
21
22 [NDBD DEFAULT]23 NoOfReplicas = 224 DataDir = /var/lib/mysql−cluster25 DataMemory = 2560M26 IndexMemory = 768M27
28 MaxNoOfExecutionThreads = 429 MaxNoOfConcurrentTransactions = 819230 MaxNoOfConcurrentOperations = 6553631
32 [NDBD]33 HostName = mysc−node−1.mi.hdm−stuttgart.de34 NodeId = 1135 [NDBD]36 HostName = mysc−node−2.mi.hdm−stuttgart.de37 NodeId = 1238 [NDBD]39 HostName = mysc−node−3.mi.hdm−stuttgart.de40 NodeId = 1341 [NDBD]42 HostName = mysc−node−4.mi.hdm−stuttgart.de43 NodeId = 1444
45
46 [MYSQLD DEFAULT]47 DefaultOperationRedoProblemAction = QUEUE48 BatchSize = 51249 #BatchByteSize = 2048K50 #MaxScanBatchSize = 2048K51
52 # 2 MySQL Nodes53 [MYSQLD]54 HostName = mysc−daemon−1.mi.hdm−stuttgart.de55 NodeId = 2156 [MYSQLD]57 HostName = mysc−daemon−1.mi.hdm−stuttgart.de58 NodeId = 2359 [MYSQLD]60 HostName = mysc−daemon−1.mi.hdm−stuttgart.de61 NodeId = 2562 [MYSQLD]63 HostName = mysc−daemon−1.mi.hdm−stuttgart.de64 NodeId = 2765 [MYSQLD]66 HostName = mysc−daemon−2.mi.hdm−stuttgart.de67 NodeId = 2268 [MYSQLD]69 HostName = mysc−daemon−2.mi.hdm−stuttgart.de70 NodeId = 2471 [MYSQLD]72 HostName = mysc−daemon−2.mi.hdm−stuttgart.de73 NodeId = 2674 [MYSQLD]
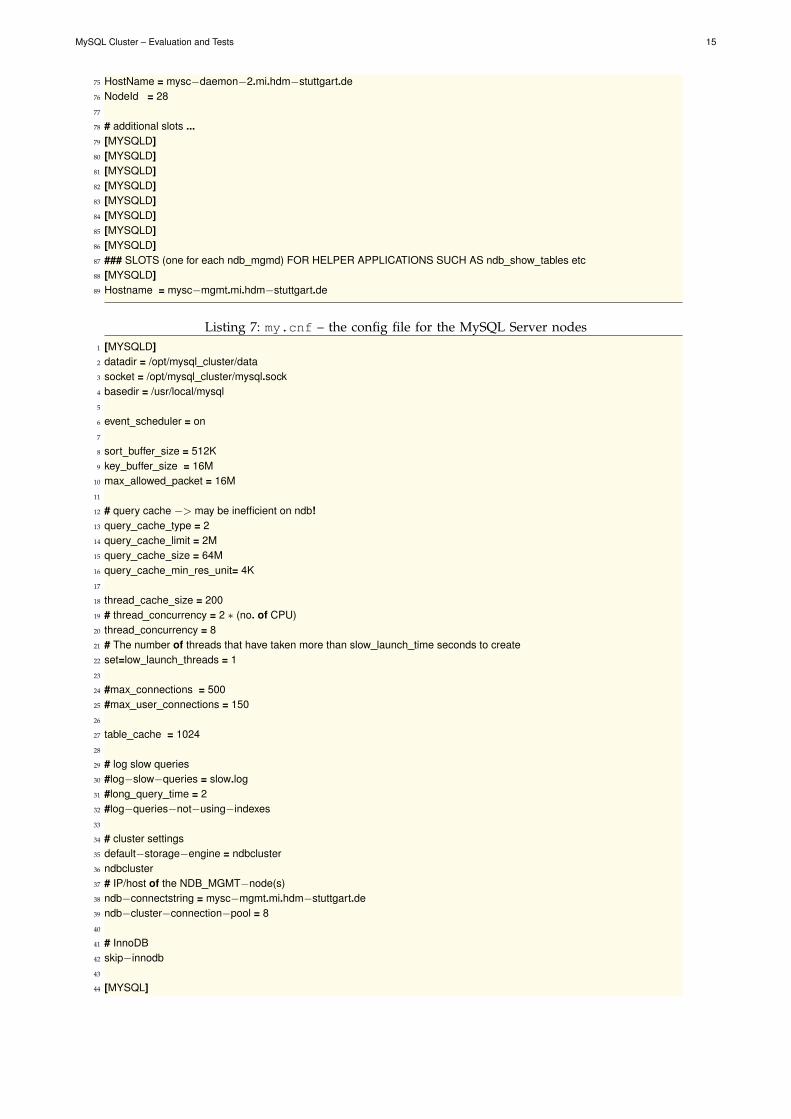
MySQL Cluster – Evaluation and Tests 15
75 HostName = mysc−daemon−2.mi.hdm−stuttgart.de76 NodeId = 2877
78 # additional slots ...79 [MYSQLD]80 [MYSQLD]81 [MYSQLD]82 [MYSQLD]83 [MYSQLD]84 [MYSQLD]85 [MYSQLD]86 [MYSQLD]87 ### SLOTS (one for each ndb mgmd) FOR HELPER APPLICATIONS SUCH AS ndb show tables etc88 [MYSQLD]89 Hostname = mysc−mgmt.mi.hdm−stuttgart.de
Listing 7: my.cnf – the config file for the MySQL Server nodes1 [MYSQLD]2 datadir = /opt/mysql cluster/data3 socket = /opt/mysql cluster/mysql.sock4 basedir = /usr/local/mysql5
6 event scheduler = on7
8 sort buffer size = 512K9 key buffer size = 16M
10 max allowed packet = 16M11
12 # query cache −> may be inefficient on ndb!13 query cache type = 214 query cache limit = 2M15 query cache size = 64M16 query cache min res unit= 4K17
18 thread cache size = 20019 # thread concurrency = 2 ∗ (no. of CPU)20 thread concurrency = 821 # The number of threads that have taken more than slow launch time seconds to create22 set=low launch threads = 123
24 #max connections = 50025 #max user connections = 15026
27 table cache = 102428
29 # log slow queries30 #log−slow−queries = slow.log31 #long query time = 232 #log−queries−not−using−indexes33
34 # cluster settings35 default−storage−engine = ndbcluster36 ndbcluster37 # IP/host of the NDB MGMT−node(s)38 ndb−connectstring = mysc−mgmt.mi.hdm−stuttgart.de39 ndb−cluster−connection−pool = 840
41 # InnoDB42 skip−innodb43
44 [MYSQL]
16 MySQL Cluster – Evaluation and Tests, OCTOBER 2, 2012
45 socket = /opt/mysql cluster/mysql.sock46
47 [MYSQL CLUSTER]48 ndb−connectstring = mysc−mgmt.mi.hdm−stuttgart.de49
50 [MYSQLD SAFE]51 err−log = /var/log/mysqld.log52 pid−file= /var/run/mysqld/mysqld.pid
Listing 8: mysql-config.conf – the config file for the MySQL Proxy1 [mysql−proxy]2 daemon = true3 keepalive = true4 event−threads = 25 proxy−skip−profiling = true6 proxy−address = mysc−proxy.mi.hdm−stuttgart.de:40407
8 # do not change allow the ”CHANGE USER” command9 proxy−pool−no−change−user = true
10
11 ## backend servers ##12 proxy−backend−addresses = mysc−daemon−1.mi.hdm−stuttgart.de:3306,mysc−daemon−2.mi.hdm−stuttgart.de:330613
14 ## log stuff ##15 log−file = /var/log/mysql−proxy.log16 log−level = warning17 #log−backtrace−on−crash
Listing 9: install.sql – installation script for the test database1 CREATE DATABASE IF NOT EXISTS ‘fakebook‘ CHARACTER SET utf8 COLLATE utf8 general ci;2 USE ‘fakebook‘;3
4 CREATE TABLE IF NOT EXISTS ‘fakebook‘.‘users‘ (5 ‘id‘ bigint(20) unsigned NOT NULL AUTO INCREMENT6 ,‘name‘ varchar(50) NOT NULL7 ,‘name first‘ varchar(50) NOT NULL8 ,‘pass‘ varchar(40) NOT NULL9 ,‘mail‘ varchar(100) NOT NULL
10 ,UNIQUE KEY ‘id‘ (‘id‘)11 ,UNIQUE KEY ‘mail‘ (‘mail‘)12 );13
14 CREATE TABLE IF NOT EXISTS ‘fakebook‘.‘relations‘ (15 ‘id 1‘ bigint(20) unsigned NOT NULL16 ,‘id 2‘ bigint(20) unsigned NOT NULL17 ,CONSTRAINT ‘relations ibfk 1‘ FOREIGN KEY (‘id 1‘) REFERENCES ‘fakebook‘.‘users‘ (‘id‘) ON DELETE CASCADE18 ,CONSTRAINT ‘relations ibfk 2‘ FOREIGN KEY (‘id 2‘) REFERENCES ‘fakebook‘.‘users‘ (‘id‘) ON DELETE CASCADE19 );20
21 CREATE TABLE IF NOT EXISTS ‘fakebook‘.‘relations 2‘ (22 ‘uid‘ bigint(20) unsigned NOT NULL,23 ‘friends‘ TEXT NOT NULL,24 CONSTRAINT ‘relations 2 ibfk 1‘ FOREIGN KEY (‘uid‘) REFERENCES ‘fakebook‘.‘users‘ (‘id‘) ON DELETE
CASCADE25 );26
27
28 −−29 −− list all user’s friends in a view

MySQL Cluster – Evaluation and Tests 17
30 −−31 DROP VIEW IF EXISTS ‘fakebook‘.‘users friends‘;32 CREATE VIEW ‘fakebook‘.‘users friends‘ AS33 SELECT ‘id‘34 ,‘name‘35 ,‘name first‘36 ,‘mail‘37 ,COUNT( r.id 1 ) AS friends38 ,GROUP CONCAT( r.id 2 ORDER BY r.id 2 ASC SEPARATOR ” ”) AS friend ids39 FROM ‘users‘ AS u40 LEFT JOIN relations AS r ON u.id = r.id 141 GROUP BY u.id;42
43 −−44 −− stored procedure to insert random friend data45 −− param−1: min. userId to start from46 −− param−2: max. userId to go to −−> min. to max. is th range47 −− param−3: insert this number of friends at once48 −−49 DROP PROCEDURE IF EXISTS ‘fakebook‘.‘addRandFriends‘;50 DELIMITER $$51 CREATE PROCEDURE ‘fakebook‘.‘addRandFriends‘(IN iMin INTEGER unsigned, IN iMax INTEGER unsigned, IN
numFriends INTEGER unsigned)52 BEGIN53 DECLARE a,b,v,rand num INT;54 SET v = iMin;55 SET @stmt text = ”INSERT IGNORE INTO relations (id 1,id 2) VALUES ”;56
57 −− iterate over each user in the range58 WHILE v <= iMax DO59 SET b = numFriends;60
61 WHILE b >= 1 DO62 −− generate some random user−friend−id’s ...63 −− see: http://jan.kneschke.de/projects/mysql/order−by−rand/64 SET rand num = (SELECT r1.id FROM users as r1 JOIN (SELECT (RAND()∗(SELECT MAX(id) FROM users)) AS
id) AS r2 WHERE r1.id >= r2.id ORDER BY r1.id ASC LIMIT 1);65 −− ... and insert values66 SET @stmt text = CONCAT(@stmt text, ”(”, v, ”,”, rand num ,”)”);67
68 IF v = iMax AND b = 1 THEN69 SET @stmt text = CONCAT(@stmt text, ”;”);70 ELSE71 SET @stmt text = CONCAT(@stmt text, ”,”);72 END IF;73
74 SET b = b − 1;75 END WHILE;76
77 −− next user id ...78 SET v = v + 1;79 END WHILE;80
81 −− disable unique constraints checks82 SET unique checks=0;83 SET foreign key checks=0;84
85 −− start a transaction to speed up the insert process86 START TRANSACTION;87
88 −− fire prepared insert statement
18 MySQL Cluster – Evaluation and Tests, OCTOBER 2, 2012
89 PREPARE stmt FROM @stmt text;90 EXECUTE stmt;91 DEALLOCATE PREPARE stmt;92
93 −− fire transaction94 COMMIT;95
96 −− re−enable checks ...97 SET foreign key checks=1;98 SET unique checks=1;99 END; $$
100 DELIMITER ;101
102 −−103 −− stored procedure to insert random friend data, but into another way as before. we do not use foreign key constraints for
the friends, we’ll store them all at once in a big TEXT field104 −− param−1: min. userId to start from105 −− param−2: max. userId to go to −−> min. to max. is th range106 −− param−3: insert this number of friends at once107 −−108 DROP PROCEDURE IF EXISTS ‘fakebook‘.‘addRandFriendsV2‘;109 DELIMITER $$110 CREATE PROCEDURE ‘fakebook‘.‘addRandFriendsV2‘(IN iMin INTEGER unsigned, IN iMax INTEGER unsigned, IN
numFriends INTEGER unsigned)111 BEGIN112 DECLARE a,b,v,rand num INT;113 SET v = iMin;114 SET @stmt text = ”INSERT IGNORE INTO relations 2 (uid,friends) VALUES ”;115
116 −− iterate over each user in the range117 WHILE v <= iMax DO118 SET b = numFriends;119 SET @uids = ””;120
121 WHILE b >= 1 DO122 −− generate some random user−friend−id’s ...123 −− see: http://jan.kneschke.de/projects/mysql/order−by−rand/124 SET rand num = (SELECT r1.id FROM users as r1 JOIN (SELECT (RAND()∗(SELECT MAX(id) FROM users)) AS
id) AS r2 WHERE r1.id >= r2.id ORDER BY r1.id ASC LIMIT 1);125 −− ... and add them to a string126 SET @uids = CONCAT(@uids, rand num, ” ”);127
128 SET b = b − 1;129 END WHILE;130
131 IF v = iMax THEN132 SET @stmt text = CONCAT(@stmt text, ”(”, v, ”,’”, @uids, ”’);”);133 ELSE134 SET @stmt text = CONCAT(@stmt text, ”(”, v, ”,’”, @uids, ”’),”);135 END IF;136
137 −− next user id ...138 SET v = v + 1;139 END WHILE;140
141 −− disable unique constraints checks142 SET unique checks=0;143 SET foreign key checks=0;144
145 −− start a transaction to speed up the insert process146 START TRANSACTION;

MySQL Cluster – Evaluation and Tests 19
147
148 −− fire prepared insert statement149 PREPARE stmt FROM @stmt text;150 EXECUTE stmt;151 DEALLOCATE PREPARE stmt;152
153 −− fire transaction154 COMMIT;155
156 −− re−enable checks ...157 SET foreign key checks=1;158 SET unique checks=1;159 END; $$160 DELIMITER ;161
162 −−163 −− create a table to exchange messages between users164 −−165 CREATE TABLE IF NOT EXISTS ‘fakebook‘.‘messages‘ (166 ‘msg id‘ bigint(20) unsigned NOT NULL AUTO INCREMENT,167 ‘sender‘ bigint(20) unsigned NOT NULL,168 ‘receiver‘ bigint(20) unsigned NOT NULL,169 ‘header‘ varchar(100) NOT NULL,170 ‘date‘ timestamp NOT NULL,171 ‘content‘ TEXT NOT NULL,172 PRIMARY KEY (‘msg id‘),173 CONSTRAINT ‘messages ibfk 1‘ FOREIGN KEY (‘sender‘) REFERENCES ‘fakebook‘.‘users‘ (‘id‘) ON DELETE
CASCADE,174 CONSTRAINT ‘messages ibfk 2‘ FOREIGN KEY (‘receiver‘) REFERENCES ‘fakebook‘.‘users‘ (‘id‘) ON DELETE
CASCADE175 );176
177 −−178 −− create a table for user notifications179 −−180 CREATE TABLE IF NOT EXISTS ‘fakebook‘.‘notification‘ (181 ‘notification id‘ bigint(20) unsigned NOT NULL AUTO INCREMENT,182 ‘uid‘ bigint(20) unsigned NOT NULL,183 ‘date‘ timestamp NOT NULL,184 ‘content‘ TEXT NOT NULL,185 PRIMARY KEY ‘notification id‘ (‘notification id‘),186 CONSTRAINT ‘notification ibfk 1‘ FOREIGN KEY (‘uid‘) REFERENCES ‘fakebook‘.‘users‘ (‘id‘) ON DELETE CASCADE187 );188
189 −−190 −− create a table for comments on user notifications191 −−192 CREATE TABLE IF NOT EXISTS ‘fakebook‘.‘comments‘ (193 ‘comment id‘ bigint(20) unsigned NOT NULL AUTO INCREMENT,194 ‘notification id‘ bigint(20) unsigned NOT NULL,195 ‘uid‘ bigint(20) unsigned NOT NULL,196 ‘date‘ timestamp NOT NULL,197 ‘content‘ TEXT NOT NULL,198 PRIMARY KEY ‘comment id‘ (‘comment id‘),199 CONSTRAINT ‘comment ibfk 1‘ FOREIGN KEY (‘uid‘) REFERENCES ‘fakebook‘.‘users‘ (‘id‘) ON DELETE CASCADE,200 CONSTRAINT ‘comment ibfk 2‘ FOREIGN KEY (‘notification id‘) REFERENCES ‘fakebook‘.‘notification‘ (‘notification id
‘) ON DELETE CASCADE201 );
20 MySQL Cluster – Evaluation and Tests, OCTOBER 2, 2012
TEST RESULTS
0 100 200 300 400 500 600 700 800 900 1,000 1,100 1,2000.01
0.1
1
10
100
1,000
10,000throughput of 1370 per second
rampup time
seconds
aver
age,
loga
rithm
icsc
ale
time elapsed (ms)latency (ms)
throughput
Figure 10: test 1: get 10 different status messages
0 100 200 300 400 500 600 700 800 900 1,000 1,100 1,200
0.01
0.1
1
10
100avg throughput of 55 per second
rampup time
seconds
aver
age,
loga
rithm
icsc
ale
time elapsed (ms)latency (ms)
throughput
Figure 11: test 1: get a random user’s login data
0 100 200 300 400 500 600 700 800 900 1,000 1,100 1,2000.01
0.1
1
10
100
1,000throughput of 1300 per second
rampup time
seconds
aver
age,
loga
rithm
icsc
ale
time elapsed (ms)latency (ms)
throughput
Figure 12: test 1: load a message between two users (one is chosen randomly)
0 100 200 300 400 500 600 700 800 900 1,000 1,100 1,200
0.01
0.1
1
10
100
1,000throughput of 150 per second
rampup time
seconds
aver
age,
loga
rithm
icsc
ale
time elapsed (ms)latency (ms)
throughput
Figure 13: test 1: get all friends (uid) of a randomly chosen user
MySQL Cluster – Evaluation and Tests 21
0 50 100 150 200 250 300 350 400 450 500 550 600 650 700 750 800 850
0.01
0.1
1
10
100
1,000
10,000 throughput of 2980 per second
rampup time
seconds
aver
age,
loga
rithm
icsc
ale
time elapsed (ms)latency (ms)
throughput
Figure 14: test 2: get 10 different status messages
0 50 100 150 200 250 300 350 400 450 500 550 600 650 700 750 800 8500
0.01
0.1
1
10
100
1,000
avg throughput of 55 per second
rampup time
seconds
aver
age,
loga
rithm
icsc
ale
time elapsed (ms)latency (ms)
throughput
Figure 15: test 2: get a random user’s login data
0 50 100 150 200 250 300 350 400 450 500 550 600 650 700 750 800 8500.01
0.1
1
10
100
1,000
throughput of 1770 per second
rampup time
seconds
aver
age,
loga
rithm
icsc
ale
time elapsed (ms)latency (ms)
throughput
Figure 16: test 2: load a message between two users (one is chosen randomly)
0 50 100 150 200 250 300 350 400 450 500 550 600 650 700 750 800 850
0.01
0.1
1
10
100
1,000throughput of 240 per second
rampup time
seconds
aver
age,
loga
rithm
icsc
ale
time elapsed (ms)latency (ms)
throughput
Figure 17: test 2: get all friends (uid) of a randomly chosen user