Embed Size (px)
Citation preview

MYOB Exo Payroll NZ Edition
2019.01
User Guide

i
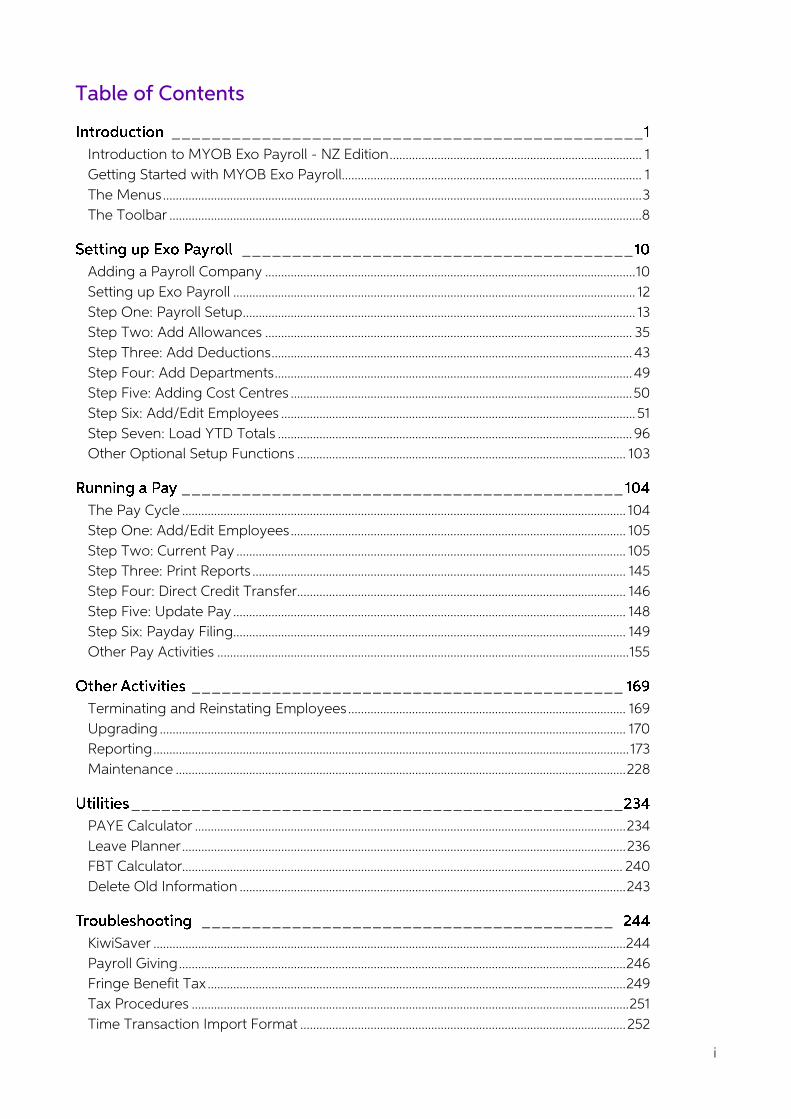
Table of Contents
_______________________________________________
Introduction to MYOB Exo Payroll - NZ Edition ............................................................................... 1
Getting Started with MYOB Exo Payroll.............................................................................................. 1
The Menus ...................................................................................................................................................... 3
The Toolbar .................................................................................................................................................... 8
_______________________________________
Adding a Payroll Company .................................................................................................................... 10
Setting up Exo Payroll .............................................................................................................................. 12
Step One: Payroll Setup ........................................................................................................................... 13
Step Two: Add Allowances ................................................................................................................... 35
Step Three: Add Deductions ................................................................................................................. 43
Step Four: Add Departments ................................................................................................................ 49
Step Five: Adding Cost Centres ........................................................................................................... 50
Step Six: Add/Edit Employees ............................................................................................................... 51
Step Seven: Load YTD Totals ............................................................................................................... 96
Other Optional Setup Functions ....................................................................................................... 103
____________________________________________
The Pay Cycle ........................................................................................................................................... 104
Step One: Add/Edit Employees ......................................................................................................... 105
Step Two: Current Pay .......................................................................................................................... 105
Step Three: Print Reports ..................................................................................................................... 145
Step Four: Direct Credit Transfer ....................................................................................................... 146
Step Five: Update Pay ........................................................................................................................... 148
Step Six: Payday Filing........................................................................................................................... 149
Other Pay Activities ................................................................................................................................. 155
___________________________________________
Terminating and Reinstating Employees ....................................................................................... 169
Upgrading .................................................................................................................................................. 170
Reporting ..................................................................................................................................................... 173
Maintenance ............................................................................................................................................. 228
_________________________________________________
PAYE Calculator ....................................................................................................................................... 234
Leave Planner ........................................................................................................................................... 236
FBT Calculator.......................................................................................................................................... 240
Delete Old Information ......................................................................................................................... 243
_________________________________________
KiwiSaver .................................................................................................................................................... 244
Payroll Giving ............................................................................................................................................ 246
Fringe Benefit Tax ................................................................................................................................... 249
Tax Procedures ......................................................................................................................................... 251
Time Transaction Import Format ...................................................................................................... 252
Table of Contents
ii
Costing ......................................................................................................................................................... 256
How To Pay ............................................................................................................................................... 263
How To Deduct ......................................................................................................................................... 281 Incorrect Pays ........................................................................................................................................... 286
Printing Reports ....................................................................................................................................... 288
__________________________________________________
1
Introduction to MYOB Exo Payroll - NZ Edition
As New Zealand s leading supplier of computerised payroll systems, MYOB talks to businesses of every size and type, every day of the week about Payroll management.
With on-going tax and legislation changes, you have an increased burden in time & money preparing pays, tracking holiday and sick leave and keeping all the necessary records required by the government.
MYOB Exo Payroll is designed and supported in New Zealand and is capable of handling a wide variety of types and sizes of payroll, from a single payroll company to several payrolls for multiple companies, all within the same program.
MYOB Exo Payroll has been designed with people in mind. We know from experience gained in helping thousands of companies implement payroll management systems, that people who prepare payrolls aren t necessarily computer literate, but they are used to, and skilled in, preparing payrolls by other methods.
With MYOB Exo Payroll the processing of pays each week is quick and simple, thus freeing you or your staff up to do more.
Getting Started with MYOB Exo Payroll
Before you get underway with setting up your payroll we suggest that you take the time to familiarise yourself with the general structure and philosophies of the system.
This is best handled by working your way around the Demonstration Payroll Company that is installed with the package. This will help you learn how to move through the screens and understand better the information that is needed to set up your own Payroll Company.
Starting the Software
NOTE: If you are installing a Live version, you will need to register the product. Once you have registered the software, or if this is a demonstration version, read on.
Start the Exo Payroll software by double-clicking on the MYOB Exo Employer Services icon on your desktop or click the Windows Start button and choose the program from Programs > MYOB Exo Employer Services.
Introduction
2
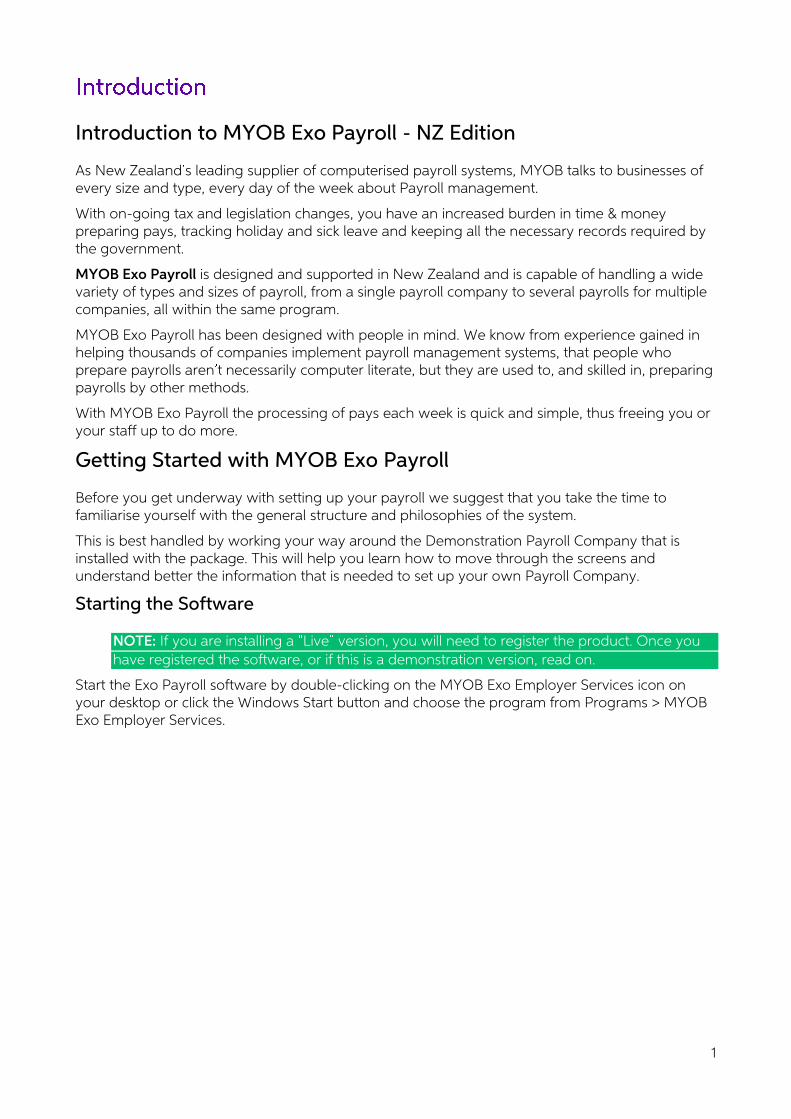
The first thing you will see is the MYOB Login Screen with the Demonstration Company in the list of payrolls. Exo Payroll is a multi-company system (you can have unlimited additional payroll companies). Once you add your own Payroll Company (see page 10), its name will appear in this list.
The Demonstration Company line will be highlighted. To open a company, either select a company and press ENTER or double-click on it. You must enter the login details of a user account that has been set up in the Exo Payroll system.
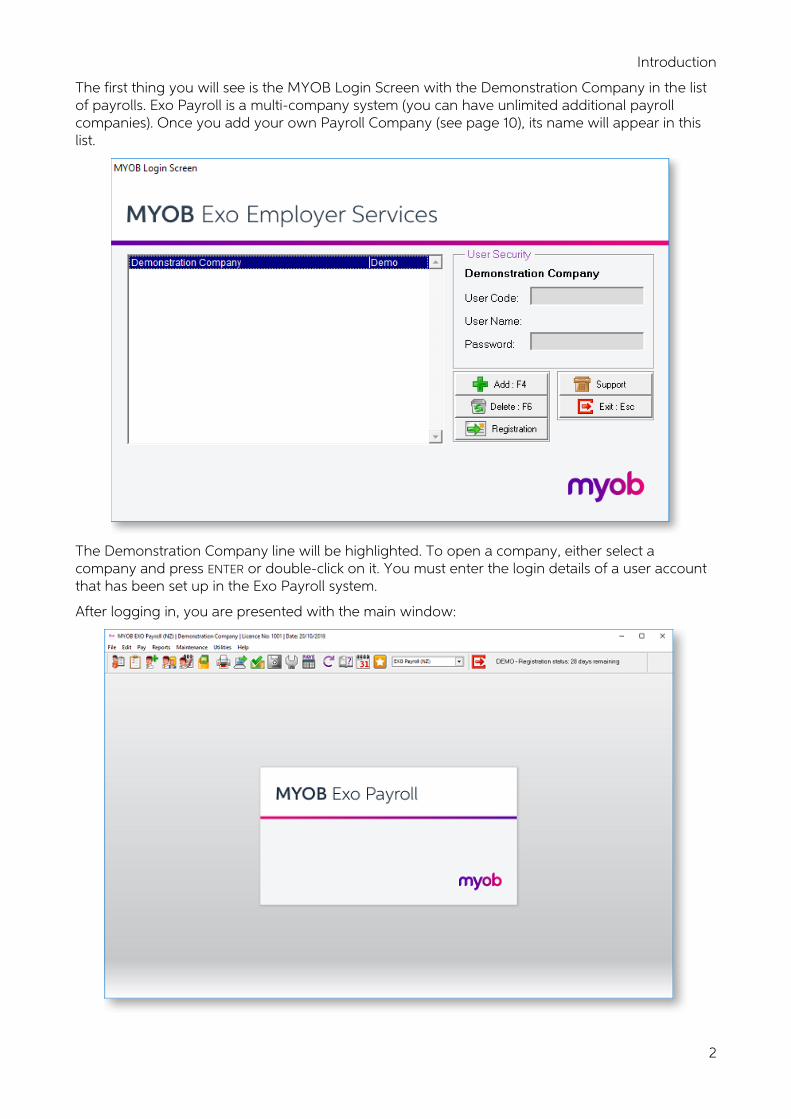
After logging in, you are presented with the main window:
MYOB EXO Payroll User Guide
3
The main window includes the following interface features:
• All functions are available from the main menus (see page 3).
• Important functions can be accessed by clicking on the icons on the main Toolbar (see page 8). Hovering the mouse pointer over these icons (without clicking) will display tool tips, which indicate what part of the payroll they access.
• Keyboard shortcuts are available for common operations.
Once you are familiar with the interface, you can begin to perform the main functions of the Exo Payroll system:
• Setting up the details of your company (see page 11)
• Running a pay (see page 104)
• Printing reports (see page 173)
• Maintenance functions (see page 228)
The Menus
The following menus are available in the main Exo Payroll interface:
File Menu
Menu Item Description
New Employee This is used to add a new employee to the payroll (see page 51).
Open Employee This is used to access an existing employee (see page 51) when you wish to perform any masterfile changes.
Employee List Opens a window displaying a filterable list of all employees in the system (see page 208). You can add, view and edit employees, and access other employee-related functions.
Employee Notes This takes you to the selected employee s personnel notes screen (see page 76). This screen can also be accessed by pressing the F12 key.
Terminate/Reinstate Allows you to terminate any employee who will not receive any final pay or to reinstate an employee who returns (see page 169).
Change Payroll Company
Allows you to log out of the payroll you are in and access another payroll company if you are running multiple payrolls.
New Test Company Create a test company based on this company. Test companies have restricted functionality, but do not count towards your licensing limits, so you can use them to test out configuration changes without affecting the original company.
Refresh Test Company
Load the latest data from the original company into the test company, overwriting any changes you have made to the test company.
Introduction
4
Archive Company Archive this company. Archived companies are read-only for all users, but do not count towards your licensing limits.
Unarchive Company Restore an archived company to Live status (which means it will once again count towards your licensing limits.)
Exit Takes you out of the application and returns you to the desktop.
Edit Menu
Menu Item Description
Undo Cancel the last operation and revert back to the previous status.
Redo Reapply the last operation at the current cursor position.
Cut Move the currently selected text into the Windows clipboard.
Copy Copy the currently selected text into the Windows clipboard.
Paste Copy the contents of the Windows clipboard to the cursor position.
Clear Delete the contents of the entire field, at the cursor position.
Select All Select the contents of the entire field, at the cursor position.
Pay Menu
Menu Item Description
Current Pay This is where the pay is processed each pay period (see page 105) as part of the Pay Cycle. This is an alternative path to the Pay Cycle for accessing the Payroll function.
One-Off Pay Allows you to run manual pays at any time outside the normal pay cycle (see page 155). This can be used for corrections, terminations, special pays etc.
Pay List Opens a window displaying a filterable list of all pays in the system (see page 209). You can view individual pays, and access reports and functions relating to pays.
Direct Credit Transfer From here you can create Direct Credit files (see page 146), in order to initiate the electronic banking of your employees pay components. For example, wages, allowance, leave, and deductions.
Import Time Transactions This menu item is only enabled if you are importing times (see page 157) from an outside source or add-on such as MYOB Exo Time and Attendance.
MYOB EXO Payroll User Guide
5
Back Pay Calculator This menu item opens a utility that lets you calculate back pay for salary or waged staff (see page 159).
Rapid Load Pay This menu item is only enabled if the Rapid Load Pay option has been enabled in the Payroll Setup. It allows you to load hours, leave and allowances in batch form for quick entry (see page 164).
EXO Remote If you have the EXO Remote Timesheet or EXO Timesheet add-on, this opens the EXO Remote Cycle, allowing you to send employee data to a different computer for remote data entry.
MyStaffInfo This add-on application is used to enhance and modernise your payroll operation by publishing and retrieving content online.
Update This is where the pay is updated each pay period (see page 148) as part of the Pay Cycle. This is an alternative path to the Pay Cycle for accessing the Payroll function.
Reports Menu
Menu Item Description
Print Report This opens the list of available reports (see page 176).
Report Runs This is where you are able to set up groups of reports (see page 204) for printing in batches.
Report Views This provides access to the Employee List (see page 208), Pay List (see page 209), Holiday Pay List (see page 212) and BAPS Leave Details (see page 213) windows.
Consolidated Reports
This is useful if you want total amounts over more than one Payroll company (see page 213).
Clarity Report Writer
This utility enables you to create your own customised reports.
Report Writer This is an older utility for customising reports. It is no longer available for installation.
Export General Ledger
This is for exporting journalised pay amounts (see page 215) for the current/one off pay to your accounting software.
Post to EXO Business
This function allow you to integrate with the MYOB EXO Business product by posting pay runs to EXO Business (see page 226).
Introduction
6
Maintenance Menu
TIP: The Maintenance menu can be accessed in three different ways: via the menu, by clicking the toolbar (see page 8) icon, or by pressing F2 at any time.
Menu Item Description
Allowances Allows you to make additional payments to employees that are not hourly or salary payments (see page 35). Examples of an allowance would be Meal Money, Shift Allowance etc.
Deductions Allows you to deduct money from an employee s pay (see page 43). Examples of deductions would be Child Support, Union Fees etc.
Departments Allow you to allocate your employees to different departments (see page 49), thereby giving you the ability to analyse your payroll costs over those departments.
Cost Centres Allows you to allocate Payroll costs to different areas of your business (see page 50).
General Ledger Allows you to create the necessary codes to either produce a Payroll general ledger listing or even interface directly to your general ledger (see page 228).
Note Types Allows you to set up the codes that personnel notes are categorised by (see page 228).
Holiday Pay Groups Allows you to set your employees up in groups with common Holiday Pay entitlement rules (see page 230).
KiwiSaver Groups Allows you to set your employees up in groups with common KiwiSaver entitlement rules (see page 231).
Payroll Giving Donees Allows you to set up donee organisations for a payroll giving scheme (see page 233).
Utilities Menu
Menu Item Description
PAYE Calculator This is a utility that allows you to calculate PAYE on any amount at any time (see page 234). While the Payroll calculates PAYE as part of the pay process, there are times when you may need to do a one-off calculation.
Leave Planner This is for forward planning of annual leave, shifts and rosters (see page 236) and is contained within a calendar interface.
FBT Calculator This is a tool which draws on payroll information in order to start the process of filling out your quarterly Fringe Benefit Tax payable (see page 240), under the Alternate Rate Calculation method.
MYOB EXO Payroll User Guide
7
Backup Allows you to back up your data at any time to either floppy disks or your hard drive.
Restore This is used when you need to restore a backup due to hardware failure or corruption.
File Reindex This is a file repair utility.
Recalculate Standard Pays
Recalculates all employees Standard Pays. This may be necessary if incorrect amounts are appearing when reporting on Standard Pays.
Setup Exo Payroll This contains the company s details and several control settings (see page 13), such as your hourly rate structure etc. This option is also available from the Payroll Setup Cycle.
User Security MYOB Exo Payroll is a multi-user system. This is where you set up the various users who will have access to the payroll and allocates what rights they have.
Delete Old Information This is where you can clear out old pay and costing data to conserve disk space and memory (see page 243). This also has the added benefit of speeding up access times on older computers.
Load YTD Totals This is used to load employees gross earnings liable for PAYE, student loan repayments, and PAYE (see page 96) for taxation purposes, from the start of the current financial year to the pay period before your first live pay run. It also has the ability to load the employees gross earnings liable for holiday pay, from the start of the each employee s holiday pay year to the pay period before your first live pay run.
Backup Options This allows you to configure settings that affect backups of your data.
Help Menu
Menu Item Description
Help Opens the online help. Help can also be accessed anywhere in the program by pressing F1.
MYOB Education Centre Opens the MYOB Education Centre website in a web browser.
What s New in this Release
Opens a window showing the major features in the latest release, with a short overview video and links to PDF Release Notes.
Online Knowledgebase Opens the MYOB Enterprise Knowledgebase website in a web browser.
Introduction
8
Get Training and Consultation
Opens the MYOB Training and Events web page in a web browser.
IRD Forms Opens a web page with links to commonly used IRD forms.
Setup Cycle This is used to access the Setup Cycle (see page 11) when initially setting up a company.
Pay Cycle This is used to access the Pay Cycle (see page 104) when running a pay.
Show Reminders Displays all employee notes with Reminder dates up to today s date that have not yet been marked as completed.
Upgrade Software This is a tool with which you can upgrade your current version of MYOB software (see page 170), providing you have the most recently available MYOB CD.
Upgrade Software Online This function accesses the Internet to upgrade your current version of MYOB software online (see page 172).
About This window contains support information such as the current version, install location and licence holder. Press F11 at any time to view the About screen independently of the menu.
Special Menu
If any additional modules have been added to the Exo Payroll system, a Special menu becomes available. This menu has one option: Special Applications. Selecting this option opens a window that lets you open any available special modules.
The Toolbar
The following icons are available in the toolbar of the main Exo Payroll interface:
Icon Function Description
Employee List Opens a window displaying a filterable list of all employees in the system (see page 208). You can add, view and edit employees, and access other employee-related functions.
Pay List Opens a window displaying a filterable list of all pays in the system (see page 209). You can view individual pays, and access reports and functions relating to pays.
Payday Filing Opens a list of Employment Information (EI) return files for payday filing (see page 149), where you can create new EI return files or batches of files, view their details and update their statuses once they have been sent to the IRD.
New Employee This is used to add a new employee (see page 51) to the payroll.
MYOB EXO Payroll User Guide
9
Edit Employee This is used to access an existing employee (see page 51) to perform any masterfile changes.
Notes Opens the selected employee s personnel notes (see page 76). This window can also be accessed via the F12 key.
Current Pay This is where the pay is processed (see page 105) each pay period, as part of the Pay Cycle.
Print Reports Opens the list of available reports (see page 176).
Direct Credit Transfer Allows you to create Direct Credit files (see page 146) for electronic banking.
Update Pay This is where the pay is updated (see page 148) each pay period, as part of the Pay Cycle.
Backup This is a facility to archive a copy of your data files, in the case of needing to Restore/Rollback to them at some point.
Maintenance This is the menu (see page 228) where you set up your Allowances, Deductions, Non Cash Benefits, Superannuations, Departments, Cost Centres, General Ledger Codes, Annual Leave Groups and Note Types. This menu can be accessed three ways: via the drop down menu, toolbar icon or by pressing F2 at any time.
The PAYE Calculator This is a small utility that allows you to calculate Pay As You Earn tax (see page 234) on any amount at any time. While the Payroll calculates PAYE as part of the pay process, there are times when you may need to do a one-off calculation.
The Pay Cycle This is used to access the Pay Cycle (see page 104) when running a pay.
Help Opens the Online Help.
Diary Opens the Diary, which is a form of a daily planner, giving you a place to enter comments on any given day, for Payroll company-related tasks, appointments and reminders.
Show Items Opens a window showing all available toolbar icons, where you can choose which icons to display and which to hide.
Exit Takes you out of Exo Payroll and returns you to the Windows desktop. You will be asked if you want to back up the database before exiting.
10
Adding a Payroll Company
MYOB Exo Payroll can have unlimited live payrolls in the same program, in addition to the Demonstration Company.
After opening Exo Payroll, the first screen that appears is the MYOB Login Screen.
This screen allows you to add a new company, as a separate entity from the Demonstration Company. Click Add or press F4 to add a Company. The following screen appears:
MYOB EXO Payroll User Guide
11
Company Name Enter the name for the new company. This is the name that will appear in the list of payrolls. You may wish to add Wages or Salaries or the branch name, to show who the new payroll is for.
Directory The directory name will be automatically generated for you, based on the first few characters of your company name.
Copy information from an existing company This option allows you to speed up the initial setup process by copying basic setup data from another company. This is useful where you have split the Wages and Salaries payrolls into two payrolls, both of which follow similar payroll practices.
Tick the Copy Information From box, and select the closest matching company from the list. If in doubt, choose the Demonstration Company. You will then be able to specify which areas of the other payroll you want to copy by ticking the appropriate boxes.
Once the procedure is complete click Save or press F10 and you will be taken to your new Payroll Company.
Once in the new Payroll Company you will be presented with the Payroll Setup Cycle screen (see page 11). This screen will step you through the process of configuring the various essential settings.
Deleting Payroll Companies
If you want to delete a payroll company for any reason, select the company on the Login Screen and click Delete or press F6. You are then prompted for the name of the company to delete. Select by clicking on the company of your choice. You are then asked to confirm that you want to delete this company. Click No to cancel, or click Yes to proceed. Before you delete any companies forever, it is recommended that you make a backup first.
Setting up Exo Payroll
12
Setting up Exo Payroll
Before you can enter any employee information and commence the preparation of your payroll, it is necessary to set up the payroll to handle your company s unique requirements. This requires not only setting the structure for your payroll(s), but also entering historical information, such as Gross Year to Date totals, annual leave entitlements etc.
Although some of this preparation may be handled by MYOB in the course of the installation and training, it is necessary for you, the user, to have an overview so that you may be better equipped to successfully understand your payroll system.
The Exo Payroll Setup Cycle
The Setup Cycle steps you through the process of setting up the various masterfiles that will be called on when pays are run. These masterfiles define the types of payments your staff may be eligible for during a pay.
The Setup Cycle opens automatically the first time you open a newly created company. From then on, the cycle can be accessed by selecting Setup Cycle from the Help menu.
Click on each of the steps in turn to perform all of the necessary operations for setting up your company.
• Step One: Payroll Setup (see page 13) • Step Two: Add Allowances (see page 35) • Step Three: Add Deductions (see page 43) • Step Four: Add Departments (see page 49) • Step Five: Add Cost Centres (see page 50) • Step Six: Add/Edit Employees (see page 51) • Step Seven: Load Year To Date Totals (see page 96)
TIP: The steps covered in this Cycle can also be performed by selecting the appropriate option from the Maintenance menu (see page 228).
MYOB EXO Payroll User Guide
13
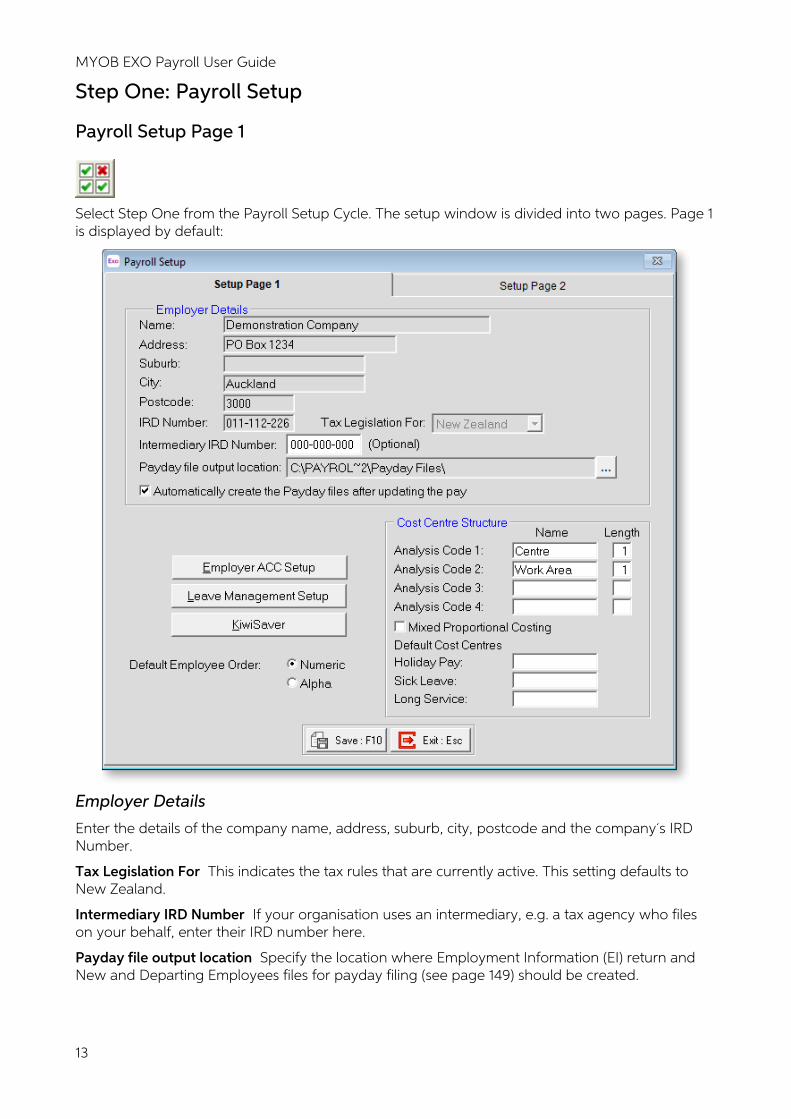
Step One: Payroll Setup
Payroll Setup Page 1
Select Step One from the Payroll Setup Cycle. The setup window is divided into two pages. Page 1 is displayed by default:
Employer Details
Enter the details of the company name, address, suburb, city, postcode and the company s IRD Number.
Tax Legislation For This indicates the tax rules that are currently active. This setting defaults to New Zealand.
Intermediary IRD Number If your organisation uses an intermediary, e.g. a tax agency who files on your behalf, enter their IRD number here.
Payday file output location Specify the location where Employment Information (EI) return and New and Departing Employees files for payday filing (see page 149) should be created.
Setting up Exo Payroll
14
Automatically create the Payday files after updating the pay If this option is ticked, you will be prompted to generate files for payday filing every time a pay is updated. If it is not ticked, you will need to create the files manually on the Employer Information Return window (see page 149).
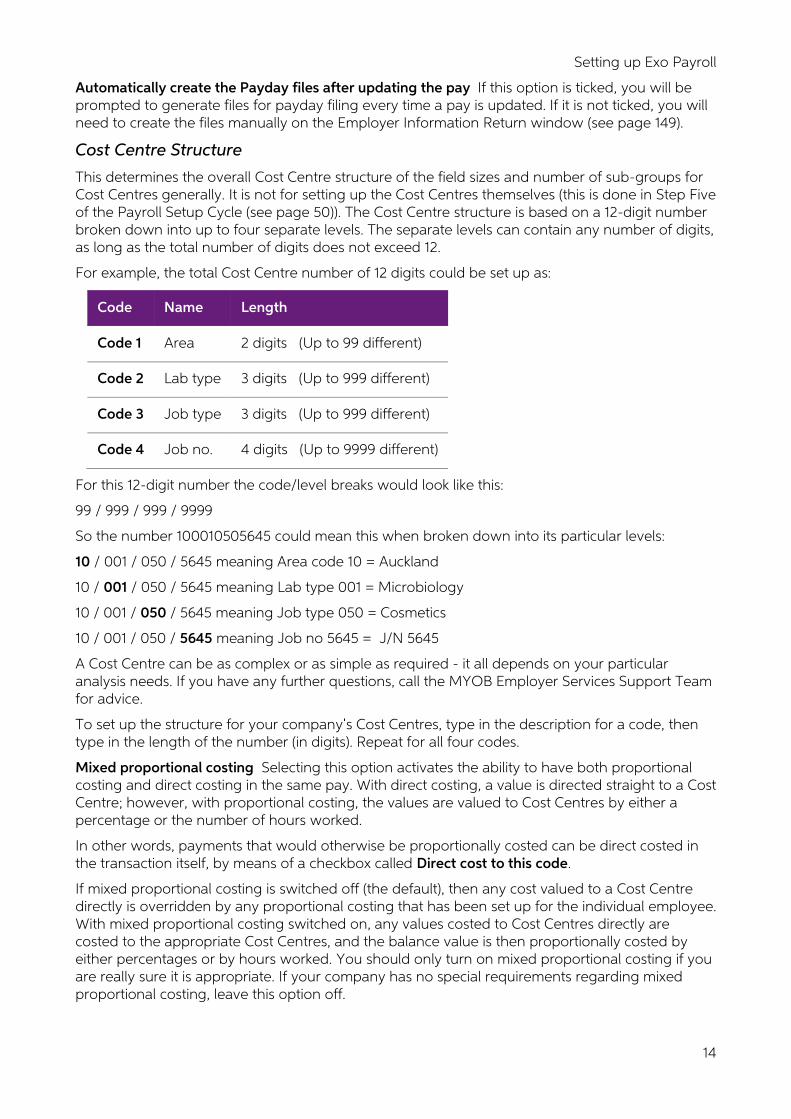
Cost Centre Structure
This determines the overall Cost Centre structure of the field sizes and number of sub-groups for Cost Centres generally. It is not for setting up the Cost Centres themselves (this is done in Step Five of the Payroll Setup Cycle (see page 50)). The Cost Centre structure is based on a 12-digit number broken down into up to four separate levels. The separate levels can contain any number of digits, as long as the total number of digits does not exceed 12.
For example, the total Cost Centre number of 12 digits could be set up as:
Code Name Length
Code 1 Area 2 digits (Up to 99 different)
Code 2 Lab type 3 digits (Up to 999 different)
Code 3 Job type 3 digits (Up to 999 different)
Code 4 Job no. 4 digits (Up to 9999 different)
For this 12-digit number the code/level breaks would look like this:
99 / 999 / 999 / 9999
So the number 100010505645 could mean this when broken down into its particular levels:
10 / 001 / 050 / 5645 meaning Area code 10 = Auckland
10 / 001 / 050 / 5645 meaning Lab type 001 = Microbiology
10 / 001 / 050 / 5645 meaning Job type 050 = Cosmetics
10 / 001 / 050 / 5645 meaning Job no 5645 = J/N 5645
A Cost Centre can be as complex or as simple as required - it all depends on your particular analysis needs. If you have any further questions, call the MYOB Employer Services Support Team for advice.
To set up the structure for your company s Cost Centres, type in the description for a code, then type in the length of the number (in digits). Repeat for all four codes.
Mixed proportional costing Selecting this option activates the ability to have both proportional costing and direct costing in the same pay. With direct costing, a value is directed straight to a Cost Centre; however, with proportional costing, the values are valued to Cost Centres by either a percentage or the number of hours worked.
In other words, payments that would otherwise be proportionally costed can be direct costed in the transaction itself, by means of a checkbox called Direct cost to this code.
If mixed proportional costing is switched off (the default), then any cost valued to a Cost Centre directly is overridden by any proportional costing that has been set up for the individual employee. With mixed proportional costing switched on, any values costed to Cost Centres directly are costed to the appropriate Cost Centres, and the balance value is then proportionally costed by either percentages or by hours worked. You should only turn on mixed proportional costing if you are really sure it is appropriate. If your company has no special requirements regarding mixed proportional costing, leave this option off.
MYOB EXO Payroll User Guide
15
Default Cost Centres When paying any holiday pay, sick pay or long service leave, the amount is automatically costed to the employee s default Cost Centre (the one that is listed against an employee when you add new employees, or edit existing ones).
If you do not want the values to be costed to a different Cost Centre (normally because you have one general ledger code for any holiday pay that has been paid to the employees) then leave these fields blank otherwise, enter the number of the new default Cost Centre for any of the following:
• Holiday Pay • Sick Pay • Long Service
TIP: Remember that you have to add the Cost Centres (see page 50) first. If you have not, you can press F2 key to access the Maintenance menu (see page 228) and choose Cost Centres.
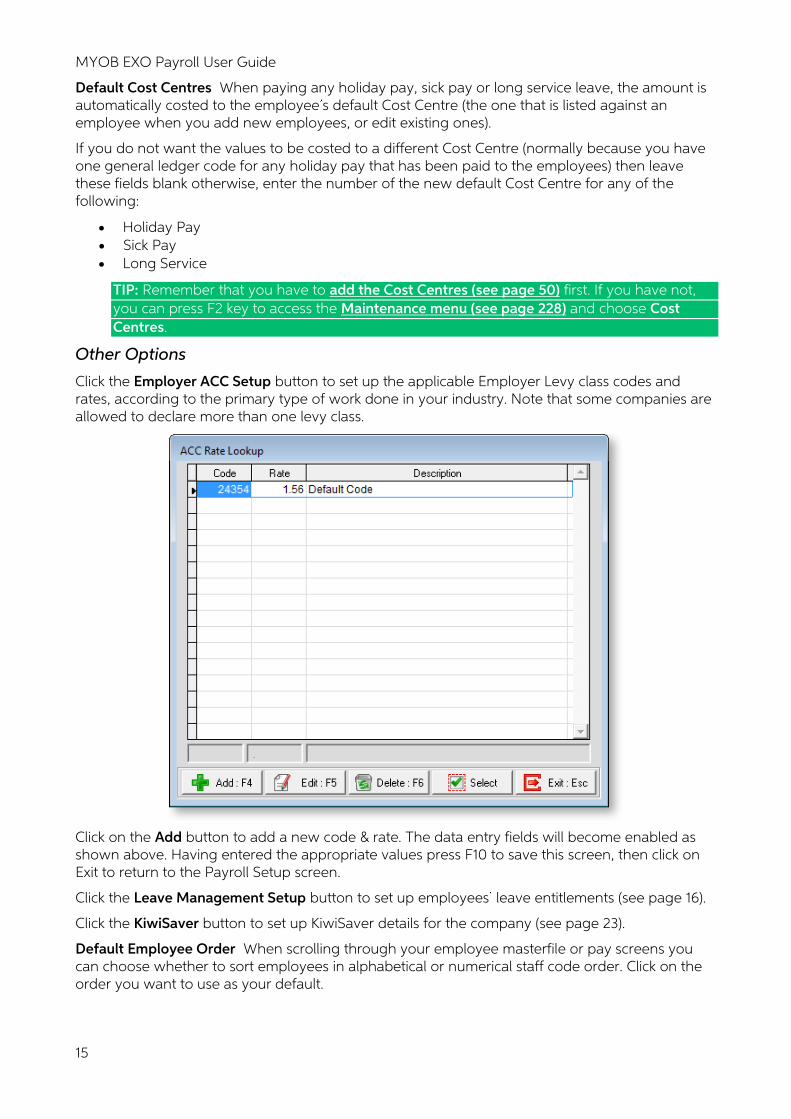
Other Options
Click the Employer ACC Setup button to set up the applicable Employer Levy class codes and rates, according to the primary type of work done in your industry. Note that some companies are allowed to declare more than one levy class.
Click on the Add button to add a new code & rate. The data entry fields will become enabled as shown above. Having entered the appropriate values press F10 to save this screen, then click on Exit to return to the Payroll Setup screen.
Click the Leave Management Setup button to set up employees leave entitlements (see page 16).
Click the KiwiSaver button to set up KiwiSaver details for the company (see page 23).
Default Employee Order When scrolling through your employee masterfile or pay screens you can choose whether to sort employees in alphabetical or numerical staff code order. Click on the order you want to use as your default.
Setting up Exo Payroll
16
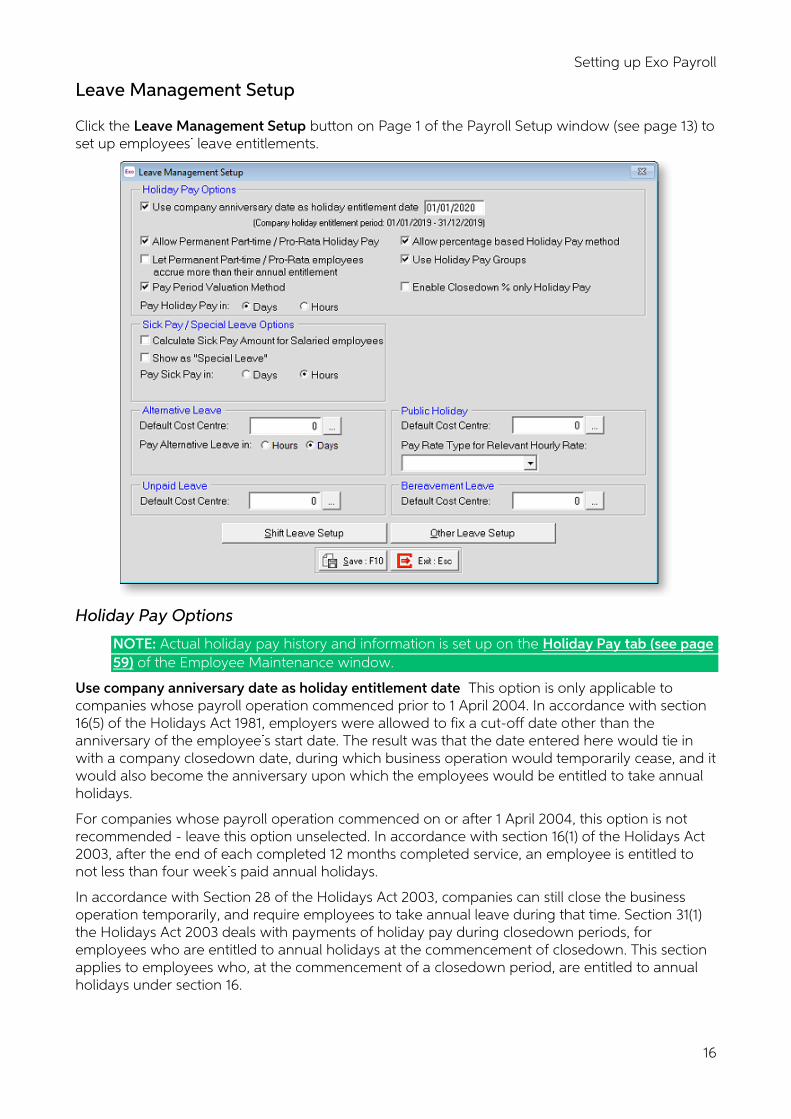
Leave Management Setup
Click the Leave Management Setup button on Page 1 of the Payroll Setup window (see page 13) to set up employees leave entitlements.
Holiday Pay Options
NOTE: Actual holiday pay history and information is set up on the Holiday Pay tab (see page 59) of the Employee Maintenance window.
Use company anniversary date as holiday entitlement date This option is only applicable to companies whose payroll operation commenced prior to 1 April 2004. In accordance with section 16(5) of the Holidays Act 1981, employers were allowed to fix a cut-off date other than the anniversary of the employee s start date. The result was that the date entered here would tie in with a company closedown date, during which business operation would temporarily cease, and it would also become the anniversary upon which the employees would be entitled to take annual holidays.
For companies whose payroll operation commenced on or after 1 April 2004, this option is not recommended - leave this option unselected. In accordance with section 16(1) of the Holidays Act 2003, after the end of each completed 12 months completed service, an employee is entitled to not less than four week s paid annual holidays.
In accordance with Section 28 of the Holidays Act 2003, companies can still close the business operation temporarily, and require employees to take annual leave during that time. Section 31(1) the Holidays Act 2003 deals with payments of holiday pay during closedown periods, for employees who are entitled to annual holidays at the commencement of closedown. This section applies to employees who, at the commencement of a closedown period, are entitled to annual holidays under section 16.

MYOB EXO Payroll User Guide
17
In summary, the Holidays Act 2003, which came into effect on 1 April 2004, does not prohibit an employer from enacting a company closedown and requiring employees to take leave at that time, but it does prohibit the employee s anniversary of holiday pay allocation from falling due on any date other than the anniversary of the employee s start date.
Allow Permanent Part-time / Pro-Rata Holiday Pay This option gives employees a holiday pay entitlement on a pro-rata basis. Select this option if you have employees who are permanent but work variable hours. The hours/days paid that you transact each pay period would normally be a variable figure. This is because the accrual is designed to reflect the work pattern. In other words, the accrual will be reflective of the average number of days paid, over the course of the entitlement year. The system will vary the final length of the holiday pay entitlement. Consequently, an employee who is found to be paid for 4 days per week on average would receive 16 days of holiday pay entitlement.
This method works with holiday being paid by the hour or by the day. Where a full-time person gets 20 days of entitlement a year holiday and works 260 days, an employee who works only 130 days will accrue an entitlement on a pro-rata basis of 10 days as that is exactly half of a full time employee s entitlement.
If your company does not have special holiday requirements regarding permanent part-time/pro-rata employees, leave this box unticked.
If this option is not used, Exo Payroll assumes its default holiday pay accrual mode, which is known as the Percentage/Days method. Under the default method (which is used for full-time employees) the hours/days paid that you transact each pay period would normally be a static figure. This is because the accrual is designed to reflect a fixed work pattern.
The Percentage/Days method is reliant on a predetermined length of days per week, and the system will not vary the final length of the holiday pay entitlement. Consequently, an employee who is on a 20 day entitlement rule will only ever receive 20 days of holiday pay entitlement, at the end of the year. Entitlements may vary from employee to employee, e.g. 4 x 3 = 12 days, 4 x 4 = 16 days, 4 x 5 = 20 days, but the length of the entitlement week remains fixed.
The Percentage/Days method expects a full-time work pattern, having a regular number of days paid per week that does not exceed 5 days per week. This is because the final holiday pay entitlement does not exceed 5 days per week.
The only exception to this is when it can be clearly established that the employee has a fixed work pattern of 6 days per week, in which case the holiday pay entitlement is in fact 6 x 4 = 24, as opposed to 5 x 4 = 20. The hours/days paid that are for remuneration (variable figures) are tracked separately from the hours/days paid for accrual purposes (static figures), in the Current Pay.
Let Permanent Part-time / Pro-Rata employees accrue more than their annual entitlement This option can give employees a holiday pay entitlement on a pro-rata basis compared to a full-time employee, which exceeds 5 days per week. In other words, the 4-week entitlement is extended with an extra allocation of holidays, should the days paid in the entire entitlement year exceed that of a full-time employee on a fixed work pattern.
For example, an employee who works 270 days will accrue an entitlement on a pro-rata basis of 21.56 days. This is calculated as follows:
accrual = proportion of year worked * full time annual entitlement rule
accrual = 270 / 260 * 20
accrual = 1.078 * 20
accrual = 21.56 days
Setting up Exo Payroll
18
Pay Period Valuation Method If you want to value your Holiday Pay according to the Holidays Act, i.e. based on the 4/52 (4-week) equivalent rule, it is recommended that this option be turned on. This will fix the Days Paid accumulator to 5 for each pay week, as derived from the Standard Pay, resulting in 260 days accumulated at the end of the holiday pay year.
The system will then take 1/260th of the gross earnings liable for holiday in the last 12 months to form a daily rate of pay. The employee s total holiday entitlement will then become 20/260 at the end of the holiday pay year in other words the equivalent of 4/52.
Allow percentage based holiday pay method This option gives an employee a holiday entitlement as a percentage of their current holiday pay year earnings. This method allows you to then pay holiday pay in portions of the total percentage, e.g. an employee has earned $5000.00 so far this holiday pay year. They have been given an annual entitlement percentage of 8% so they will have accrued $400.00. At any time the employee can ask for holiday pay and instead of being given a number of days they are given a dollar value up to the amount they have accrued. In this case this would be up to $400.00. If your company does not have special holiday requirements regarding percentage-based holiday pay, leave this box unticked.
Use Holiday Pay Groups Selecting this option allows you to create groups of Holiday Pay types (see page 230), and then place employees in their appropriate group. This grouping enables automatic rollovers into employees next entitlement brackets, and will accommodate a split of accumulating holiday rules over the course of a holiday pay year.
What this means is that you could have an employee starting at 8% and 20 days entitlement. After 60 months or 5 years service moving to 10% and 25 days entitlement, and finally moving to 12% and 30 days entitlement after 120 months or 10 years service. These entitlements will automatically be given to the employee on the appropriate length of service anniversaries.
If your company does not have special holiday requirements regarding Holiday Pay Groups then leave this box blank.
Enable Closedown Holiday Pay This enables the Closedown Holiday Pay section on the Holiday Pay section of the Current Pay (see page 116). This allows you to use the Closedown Holiday Pay wizard (see page 123) to pay Holiday Pay to employees who have not yet reached an entitlement to four weeks annual leave, but who are required to take leave over a company closedown period (see page 279).
NOTE: This feature is for use in the specific scenario of paying Holiday Pay to employees with no outstanding leave over a closedown period - do not enable this setting if you do not need to account for this scenario.
Pay Holiday Pay in Specify which method of holiday pay accrual and payment you want to use. The system defaults to using the Days method, as that is the most common standard (8% or 20 days per year).
Only use the Hours method if you have staff that are paid their holiday pay based on an employee s average hourly rate & the number of hours entitlement per year (8% or 160 hours per year).
If your company does not have special holiday requirements regarding holiday pay methods, leave the option set to Days. If you select Hours, you are asked to confirm this change.
NOTE: If your employees have already been set up, changing this option will not automatically reset their entitlement to the correct unit values, e.g. if they were on 25 days they would not automatically be changed to 200 hours. This must be done manually.
MYOB EXO Payroll User Guide
19
Sick Pay / Special Leave Options
Show as Special Leave This option was previously used to place sick leave and bereavement leave under a universal entitlement. The Holiday Act 2003 requires that these entitlements are now to be kept separate after 1 April 2004 - this option is no longer recommended.
Calculate Sick Pay Amount for Salaried employees Normally, when Salaried employees take sick leave there is no editing to do the employee simply receives their normal salary. This option tells the payroll to suggest a dollar value for the Sick Pay and reduce the standard salary accordingly, so that the gross pay remains the same. The benefit of this is that the sick leave is tracked permanently in the system, without altering the annual salary package.
Pay Sick Pay in Specify which method of sick leave entitlement and payment you want to use. You can set up Sick Pay entitlements as either a number of hours or as a number of days. This option allows Sick Pay entitlement to be set up as either a number of hours or as a number of days, e.g. an employee is entitled to 5 days or 40 hours sick a year. If your company does not have special requirements regarding sick leave methods, leave the option set to Days. If you select Hours, you are asked to confirm this change.
Allow percentage based Sick Pay method Using this option for an employee means that Sick Pay is accrued for each employee as a percentage of their hours worked, e.g. 2% is entered as an employee s sick entitlement. This will result in 2 hours sick accruing for every 100 hours that the employee works. If your company has no special requirements regarding permanent part-time staff and/or percentage based Sick Pay then leave this box unticked.
NOTE: The percentage-based method is not compliant with the Holidays Act and is not recommended. Unless you are already using this method, the Allow percentage based Sick Pay will not be available.
Alternative Leave
Default Cost Centre Enter a global Cost Centre to which all payments of this leave type will be costed. If this value is left at zero, the payments will instead be costed to each employee s default Cost Centre.
Pay Alternative Leave in Specify the units in which you wish to measure your alternative days. Choose from either Days or Hours (the default is Days).
NOTE: If your employees have already been set up, changing this option will not automatically reset their balance of leave to the correct unit values i.e. if they were on 1 day they would not automatically be changed to 7.5 hrs. This must be done manually.
Alternative Day balances are displayed on the Sick & Other Leave tab (see page 65) of the Employee Maintenance screen, and can be corrected positively or negatively via a One Off adjustment pay (see page 155).
Public Holiday
Default Cost Centre Enter a global Cost Centre to which all payments of this leave type will be costed. If this value is left at zero, the payments will instead be costed to each employee s default Cost Centre.
Pay Rate Type for Relevant Hourly Rate The Holidays Act requires employers to pay employees time and a half of the employee s relevant daily rate for any time worked on a public holiday. Select the Stat Day Worked option in this field.
NOTE: if you choose another Pay Rate Type, such as time and a half, then relevant hourly rate will flow through to any Standard Pays you have which use that rate.
Setting up Exo Payroll
20
Unpaid Leave
Default Cost Centre Enter a global Cost Centre to which all payments of this leave type will be costed. If this value is left at zero, the payments will instead be costed to each employee s default Cost Centre.
Bereavement Leave
Default Cost Centre Enter a global Cost Centre to which all payments of this leave type will be costed. If this value is left at zero, the payments will instead be costed to each employee s default Cost Centre.
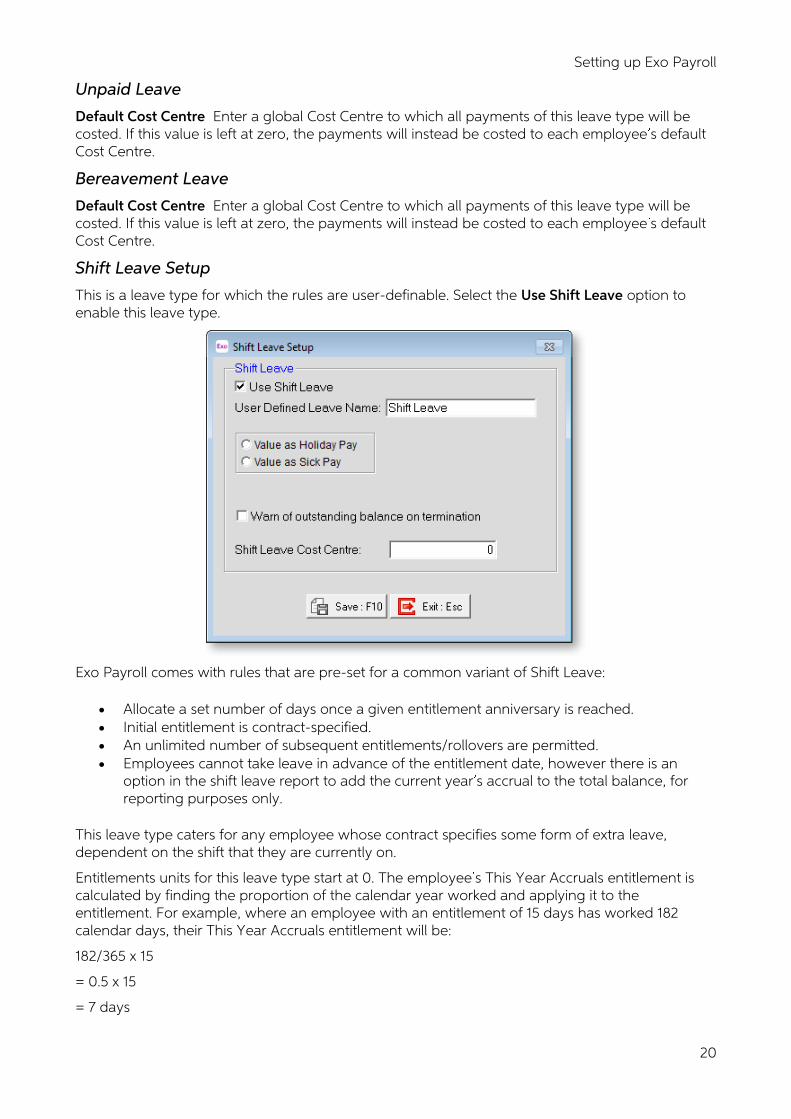
Shift Leave Setup
This is a leave type for which the rules are user-definable. Select the Use Shift Leave option to enable this leave type.
Exo Payroll comes with rules that are pre-set for a common variant of Shift Leave:
• Allocate a set number of days once a given entitlement anniversary is reached. • Initial entitlement is contract-specified. • An unlimited number of subsequent entitlements/rollovers are permitted. • Employees cannot take leave in advance of the entitlement date, however there is an
option in the shift leave report to add the current year s accrual to the total balance, for reporting purposes only.
This leave type caters for any employee whose contract specifies some form of extra leave, dependent on the shift that they are currently on.
Entitlements units for this leave type start at 0. The employee s This Year Accruals entitlement is calculated by finding the proportion of the calendar year worked and applying it to the entitlement. For example, where an employee with an entitlement of 15 days has worked 182 calendar days, their This Year Accruals entitlement will be:
182/365 x 15
= 0.5 x 15
= 7 days
MYOB EXO Payroll User Guide
21
The employee s Previous Year Outstanding Accruals is calculated by taking the This Year Accruals amount and rolling it over into Previous Year 1 at the Annual Entitlement Date rollover point. The employee s Total Days Entitlement value is calculated by finding the Previous Year Outstanding units.
User Defined Leave Name This is the preferred name of the leave that will show on the employee s payslip, leave entitlement report, leave entitlement screen and pay screen.
Value as Holiday Pay Select this option to pay the leave at the same rate which you would pay Holiday Pay. The system will suggest either the employee s ordinary daily rate, or their average daily rate for the last 12 months, whichever is the higher.
Value as Sick Pay Select this option to pay the leave at the same rate which you would pay Sick Pay, i.e. at the employee s relevant daily rate.
Warn of outstanding balance on termination When an employee has leave units outstanding to be taken from a previous rollover, you can be notified of this when you run the Termination Wizard (see page 119).
Cost Centre Enter a global cost centre to which all payments of this leave type will be costed. If this value is left at zero, the payments will instead be costed each employee s default cost centre.
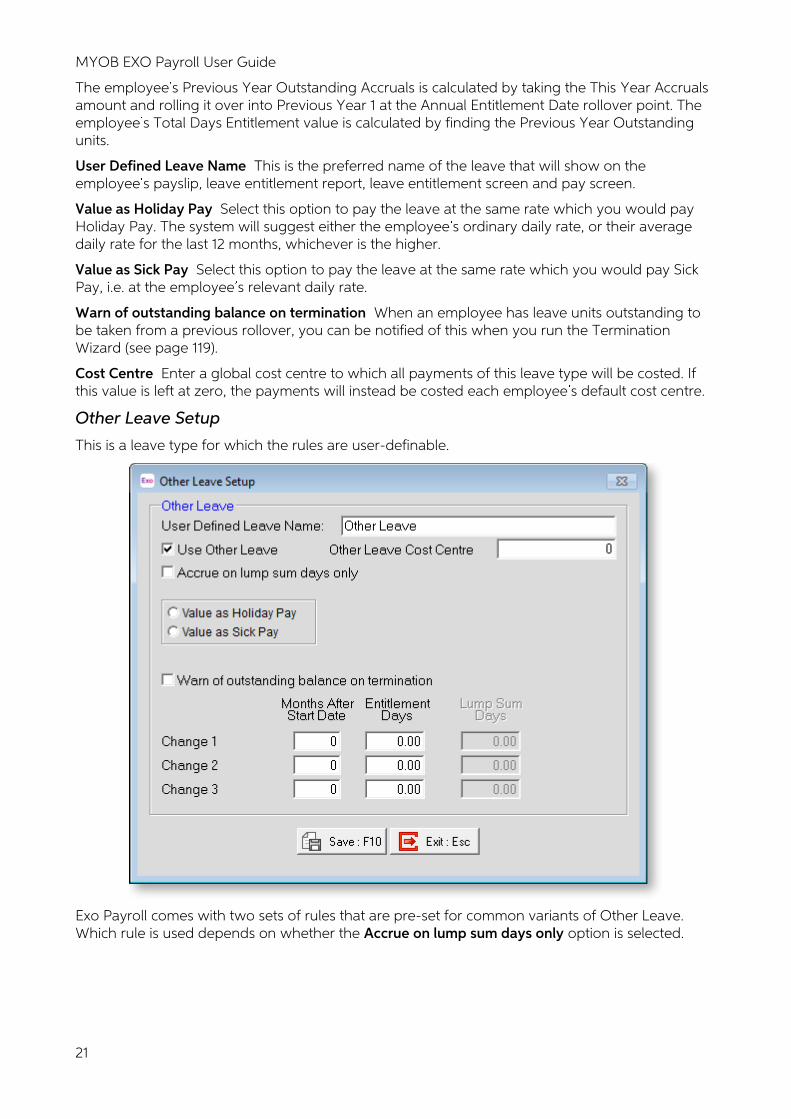
Other Leave Setup
This is a leave type for which the rules are user-definable.
Exo Payroll comes with two sets of rules that are pre-set for common variants of Other Leave. Which rule is used depends on whether the Accrue on lump sum days only option is selected.
Setting up Exo Payroll
22
Normal Method
• Allocate a set number of days once a given entitlement anniversary is reached • Initial entitlement is contract-specified • Up to 3 entitlement changes/rollovers are permitted • Can pay in advance, i.e. pay days from the current year Accrual + days from the Previous
Years Outstanding.
This caters for any employee whose contract specifies some form of extra leave.
Entitlements units for this leave type start at 0. The employee s This Year Accruals entitlement is calculated by finding the proportion of the calendar year worked and applying it to the entitlement. For example, where an employee with an entitlement of 15 days has worked 182 calendar days, their This Year Accruals entitlement will be:
182/365 x 15
= 0.5 x 15
= 7 days
The employee s Previous Year Outstanding Accruals is calculated by taking the This Year Accruals amount and rolling it over into Previous Year 1 at the Annual Entitlement Date rollover point(s).
The employee s Paid in Advance amount is calculated by storing any payments made during the year at a time when the total of the current year accrual and previous years outstanding were not enough to cover the requested payment.
The employee s Total Days Entitlement value is calculated by adding the This year Accrual and Previous Year Outstanding amounts and subtracting the Paid In Advance amount.
Lump Sum Method
• Allocate a set number of days once a given entitlement date is reached • First entitlement = contract-specified • Upon a rollover, the employee gets the set number of days entitlement, and gets that
same number of days entitlement again for every subsequent year (anniversary of start date) until a new changeover is due.
• Up to 3 entitlement changes/rollovers are permitted • Employees cannot take leave in advance of the entitlement date
This caters for any employee whose contract specifies some form of extra leave.
Entitlements units for this leave type start at 0. The employee s This Year Accruals entitlement is calculated by finding the proportion of the calendar year worked and applying it to the entitlement. For example, where an employee with an entitlement of 15 days has worked 182 calendar days, their This Year Accruals entitlement will be:
182/365 x 15
= 0.5 x 15
= 7 days
The employee s Previous Year Outstanding Accruals is calculated by taking the This Year Accruals amount and rolling it over into Previous Year 1 at the Annual Entitlement Date rollover point(s).
The employee s Paid in Advance amount is calculated by storing any payments made during the year at a time when the total of the current year accrual and previous years outstanding were not enough to cover the requested payment.
The employee s Total Days Entitlement value is calculated by finding the Previous Year Outstanding units.
MYOB EXO Payroll User Guide
23
User-Defined Leave Name This is the preferred name of the leave that will show on the employee s payslip, leave entitlement report, leave entitlement screen and pay screen.
Accrue On Lump Sum Days Only Selecting this option means that the Lump Sum Method is used, i.e. a one-off payment is allocated when an employee s entitlement date is reached, rather than renewing on each anniversary.
Value as Holiday Pay Pay the leave at the same rate which you would pay Holiday Pay. The system will suggest either the employee s ordinary daily rate, or their average daily rate for the last 52 weeks, whichever is the higher.
Value as Sick Pay Pay the leave at the same rate which you would pay Sick Pay, i.e. at the employee s relevant daily rate.
Warn of outstanding balance on termination When an employee has leave units outstanding to be taken from a previous rollover, you can be notified of this when you run the Termination Wizard (see page 119).
Cost Centre Enter a global cost centre to which all payments of this leave type will be costed. If this value is left at zero, the payments will instead be costed each employee s default cost centre.
Entitlements
Change 1 This is the period that the employee must serve out in order to gain an initial entitlement.
Months After Start Date Enter the number of months the employee must serve in order to be eligible for leave.
Entitlement Days Enter the number of days/hours that the employee will receive upon their initial entitlement.
Lump Sum Days Available when the Accrue on Lump Sum days only option is selected. Enter the units to pay at the rollover point. This is a one-off allocation.
Change 2 / Change 3 The system allows for up to three rule changes for Other Leave. Change 2 and Change 3 work the same way as Change 1.
KiwiSaver Setup
Click the KiwiSaver Setup button on Page 1 of the Payroll Setup window (see page 13) to set up KiwiSaver details for the company.
The KiwiSaver Act 2006 establishes KiwiSaver, a government-sponsored, work-based savings scheme. KiwiSaver was implemented 1 July 2007. The purpose of KiwiSaver is to encourage a long-term savings habit and asset accumulation by individuals who are not in a position to enjoy standards of living in retirement similar to those in pre-retirement. KiwiSaver is aimed at increasing individuals wellbeing and financial independence, particularly in retirement, and to provide retirement benefits.

Setting up Exo Payroll
24
Make new employees KiwiSaver members by default Selecting this option means that any new employees will be automatically enrolled in KiwiSaver. MYOB recommends that this option is enabled. If a specific employee notifies the intention to opt out, you can alter their KiwiSaver status on the KiwiSaver tab (see page 90) of their Standard Pay.
NOTE: Casual employees are not opted in by default, in line with KiwiSaver legislation; you will need to manually opt in any new casual employees.
Assign new employees to The KiwiSaver Act allows employers to have a chosen KiwiSaver scheme for their employees who do not select their own scheme. If the default scheme is not suitable, you can create new groups in the KiwiSaver Groups maintenance window (see page 231).
Cost employer contributions based on gross pay cost centre The Employer s KiwiSaver contribution will appear as an additional expense on the Costing and General Ledger reports. Selecting this option will result in the extra expense being proportionally costed using the same proportions as the gross expenditure. If this option is not selected, the extra expense is shown against its own specific Cost Centre and/or General Ledger code.
For example, if this option is enabled:
In the Current Pay:
Transaction Type Amount Cost Centre
Wages $400 1 Wages
Leave $100 2 Leave
Employee KiwiSaver $20
Employer KiwiSaver $20 cost to gross pay cost centre
In the Costing Analysis Report:
Transaction Type Amount Cost Centre
Wages $400 1 Wages
Leave $100 2 Leave
Employer KiwiSaver $16 1 Wages
Employer KiwiSaver $4 2 Leave
• Transaction Type Amount Cost Centre • Wages $400 1 Wages • Leave $100 2 Leave • Employer KiwiSaver $ 16 1 Wages • Employer KiwiSaver $ 4 2 Leave
Here the Employer s KiwiSaver contribution is costed to the Cost Centres of the pay. No Cost Centre field will be visible for the specific KiwiSaver transaction in the Pay. The Employer s KiwiSaver contribution will appear against the General Ledger codes that relate to each type of Gross Expenditure, in the General Ledger reports.
When this option is disabled:
MYOB EXO Payroll User Guide
25
In the Current Pay:
Transaction Type Amount Cost Centre
Wages $400 1 Wages
Leave $100 2 Leave
Employee KiwiSaver $20
Employer KiwiSaver $20 3 KiwiSaver
In the Costing Analysis Report:
Transaction Type Amount Cost Centre
Wages $400 1 Wages
Leave $100 2 Leave
Employer KiwiSaver $20 3 KiwiSaver
Now the Employer s KiwiSaver contribution is costed to its own Cost Centre, as defined at either the company level (this window), or the group level (KiwiSaver Groups Maintenance window), or the transaction level (KiwiSaver window, Standard Pay). The Employer s KiwiSaver contribution can then appear against its own General Ledger code in the General Ledger reports.
Employer contribution Default Cost Centre This option will only be available when employer contributions are not being costed to gross pay cost centres, i.e. this option is not available if the Cost employer contributions based on gross pay cost centre option is ticked. Here you can specify a global default Cost Centre against which all Employer KiwiSaver contributions will appear in the Costing and General Ledger reports.
Setting up Exo Payroll
26
Payroll Setup Page 2
Page 2 of the Payroll Setup window deals with how wages are paid out to employees.
Payment
Round Exo Payroll calculates net pay values to the nearest cent. When paying cash, it is common practice to take the calculated net pay and round it to the nearest ten cents (if the employee is paid coins) or the nearest five dollars (if the employee is paid only in notes).
When rounding employees net pay, Exo Payroll uses any rounding carried forward from the previous pay, and attempts to round up. If there is insufficient rounding carried forward, it will round down.
When pays are rounded down to an appropriate increment, the amount that the pay was adjusted by is accumulated against the employee, i.e. carried forward for use in the next pay. The amount carried forward is visible in the Other tab (see page 75) of the Employee Maintenance screen. In the first instance, Exo Payroll will attempt to use any rounding carried forward, and round up. If the amount carried forward is not sufficient, the payroll will round down.
MYOB EXO Payroll User Guide
27
If you want to automate rounding of the net pay amount, select from the following list:
• None • All Pays • Cash Pays
Cash Priority The Priority options relate to the values that are paid out when the employee does not work their regular hours during the pay period. Setting this value to 1 will result in fixed dollar cash payments being paid out in preference to cheque payments (with a value of 2 or greater), if there are insufficient funds to meet both fixed dollar payments.
Part Payment Ticking this box will result in fixed dollar cash payments being partially paid out if the sufficient funds are enough to pay out only part of the fixed dollar amount.
Cheque Priority The Priority options relates to the values that are paid out when the employee does not work their regular hours during the pay period. Setting this value to 1 will result in fixed dollar cheque payments being paid out in preference to cash payments (with a value of 2 or greater), if there are insufficient funds to meet both fixed dollar payments.
Part Payment Ticking this box will result in fixed dollar cheque payments being partially paid out if the sufficient funds are enough to pay out only part of the fixed dollar amount.
Number Notes If you pay cash, you are able to select the Minimum and Maximum of each dollar denomination from $5 to $100. Say for your cash pays you want at least 2x $5 dollar bills, 3x $50 dollar bills and no $100 dollar bills in every pay. All you do is enter 2 in the $5 dollar column of the Minimum line, 3 in the $50 dollar column of the Maximum line, and a 0 in the $100 dollar column of the Maximum line. The numbers required for each dollar denomination is read from left to right on the Minimum line, drops down and reads from right to left in the Maximum line.
Pay Rate Types
You can define up to nine different pay rate types, based on the employee s hourly rate and a multiplier. The standard hourly rate should be considered as having a multiplier of 1.
Description This is a meaningful term for the rate of pay, and will display on the wages line(s) on the employees payslips.
Rate This is a multiplier, which is used to arrive at a dollar amount for a wage payment. For example:
40.00 hours x 15.00 per hour x 1.00 = an ordinary wage amount of $600.00, the applicable Rate being 1.00 for Ordinary time.
3.00 hours x 15.00 per hour x 1.50 = an overtime wage amount of $67.50, the applicable Rate being 1.50 for Time & Half.
Pay Super If you want the pay rate type that you have just entered to be used when calculating any Superannuation deductions, tick this box.
Auto Load To make sure that all new waged employees have a pay rate type loaded in their Standard Pay, these are Auto loaded . This automatically places the appropriate wage line in the Wages tab (see page 80) of their Standard Pay. It will not allot any hours, only the ability to pay an employee this pay rate type. This saves time when entering an employee s Standard Pay, as you do not need to load wage lines manually. The same lines are also loaded into a waged employee s Wages tab when entering a One-Off Pay (see page 155).
NOTE: Unless Autoload is selected before Employees are added the Rate Type will only apply to Employees added after Autoload is selected.
Setting up Exo Payroll
28
Pay Period Status
This section is maintained by the system, and shows you the Current Pay period dates for all your pay frequencies and their corresponding pay numbers. Every time you open a new pay period it is given a new number, starting at 1 and going up. This section also shows if the Current Pay period is still open or has been updated.
NOTE: Pay numbers do not match to pay weeks - this is unnecessary when you are able to report on any given date period and for any given pay number.
Special Options
Click the Special Options Setup button to set up optional features of the Exo Payroll system (see page 28).
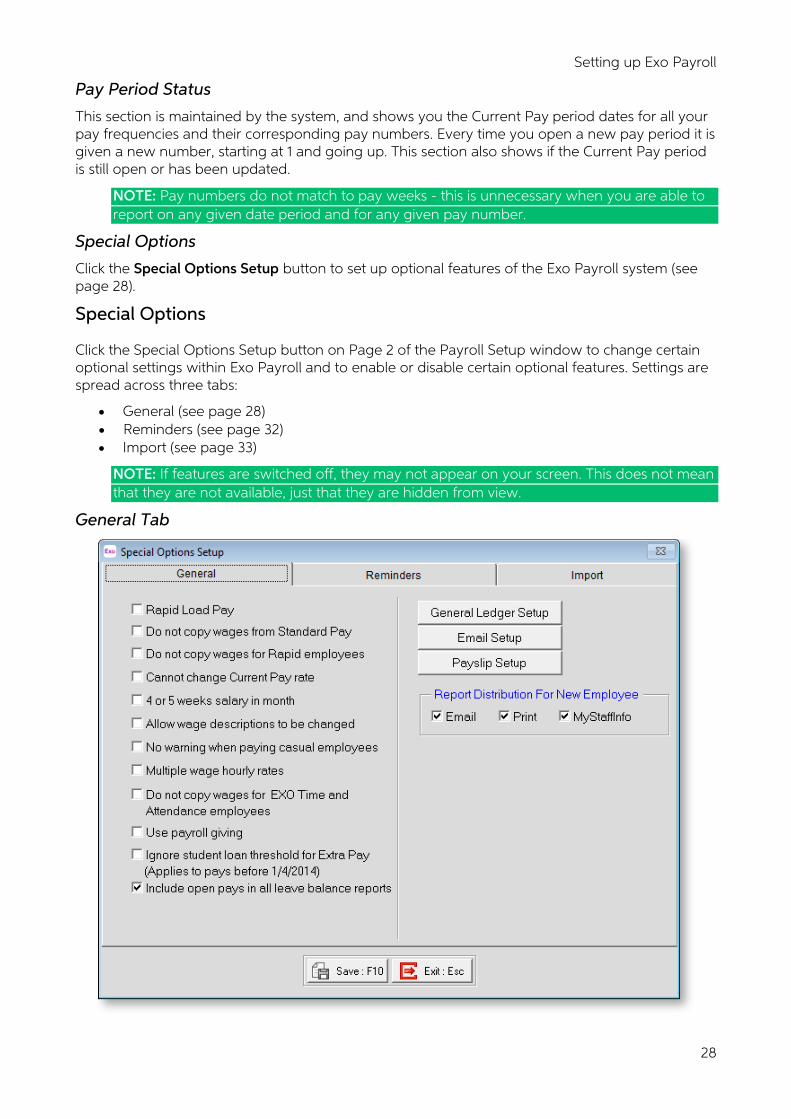
Special Options
Click the Special Options Setup button on Page 2 of the Payroll Setup window to change certain optional settings within Exo Payroll and to enable or disable certain optional features. Settings are spread across three tabs:
• General (see page 28) • Reminders (see page 32) • Import (see page 33)
NOTE: If features are switched off, they may not appear on your screen. This does not mean that they are not available, just that they are hidden from view.
General Tab
MYOB EXO Payroll User Guide
29
Rapid Load Pay Selecting this option enables the Rapid Load Pay (see page 164) module in the Pay menu. Rapid loading is a method of entering pay period details that vary pay-period-by-pay-period. It allows for speed loading of transactions that go into making up employees pay rather than copying the Standard Pay into the Current Pay.
Do not copy wages from Standard Pay Selecting this option means that when you create the Current Pay (see page 105), the wage lines in an employee s Standard Pay (see page 79) will not be copied into the Current Pay. You may need to use this option if you are importing wages from a Remote Site or TimeSheet.
Do not copy wages for Rapid employees Selecting this option means that when you create the Current Pay (see page 105), the wage lines in an employee s Standard Pay (see page 79) will not be copied into the Current Pay (everything else will, just not the contents of the Wages tab (see page 80)). This option should only be selected if you are entering Current Pay information via Rapid loading (see page 164) or electronic time clock. It is to ensure that you do not double up wage/hours information with what may be in employees Standard Pay.
Cannot change Current Pay rate Selecting this option means that after creating your Current Pay, you are unable to change an employee s Hourly Rate when editing that Current Pay. This is to be used as a safeguard against an error being made in a Current Pay and someone accidentally changing an employee s Hourly Rate and processing the pay without noticing the error has been made. If you may have a reason to change an Hourly Rate while you are running a Current Pay, leave this option off.
4 or 5 weeks salary in month Selecting this option enables you to pay salaried employees as a 4- or 5-week month. When you create a monthly pay with this option on, the create pay screen will ask you how many weeks in this pay month. Enter 4 or 5 and the system will calculate the rest.
If you are going to use this option, then when you load the Standard Pay for monthly salaried employees you must divide their annual salary by 52, and enter this amount. Exo Payroll will multiply this amount by either 4 or 5, as you specify. You should also never alter the tax rate, as the system calculates it automatically - if you make any changes, you are in danger of understating an employee s yearly earnings, thus the employee would be underpaying their PAYE for the year.
Allow wage descriptions to be changed Selecting this option allows you to edit the wage line description when paying wages in employees pay (see page 80). The description can be changed by highlighting the wage line you want to change and then pressing F5 or clicking Edit. These added descriptions will also show on the Paysheet report and the employee s payslip.
No warning when paying casual employees When paying a casual employee, the system normally shows a message stating that the employee is a casual employee and asking if you want to pay them that pay period. This can become unnecessary if you are paying casual employees regularly or paying a large number of casuals. Selecting this option on stops this warning message from appearing.
Multiple wage hourly rates Selecting this option means you are able to define up to nine different Hourly Rates (see page 85) for any individual employee.
Do not copy wages for Exo Time and Attendance employees Selecting this option means that when you create the Current Pay (see page 105), the wage lines in an employee s Standard Pay (see page 79) will not be copied into the Current Pay if they have been tagged as an Exo Time and Attendance employee (everything else will, just not the contents of the Wages tab (see page 80)). This option should only be enabled if you are entering Current Pay information via MYOB Exo Time and Attendance. It ensures that you do not double up wage/hours information with what may be in the employee s Standard Pay.
Setting up Exo Payroll
30
Use payroll giving Select this option to enable payroll giving (see page 246). This is a system that allows employees to make donations to organisations of their choice and receive a tax credit.
NOTE: Do not change the Use payroll giving option while a Current or One Off Pay is open. This option affects the tax credits that employees receive for their payroll giving donations; turning it on or off while a pay is open could result in incorrect PAYE amounts being calculated for employees.
Ignore student loan threshold for Extra Pay This option applies to pays prior to 1 April 2014. If this option is selected, then for any pays consisting of an Extra Pay Allowance only, the student loan amount for the Extra Pay will not deduct the student loan threshold. If the pay consists of an Extra Pay in addition to salary, wages, etc. this setting does not apply. For pays after 1 April 2014, this setting is ignored and the system will always ignore the student loan threshold on pays consisting of an Extra Pay Allowance only.
Include open pays in all leave balance reports Selecting this option means that all leave reports will include any leave being paid in the open Current Pay(s) in their totals. If this option is not ticked, leave in open pays will be ignored.
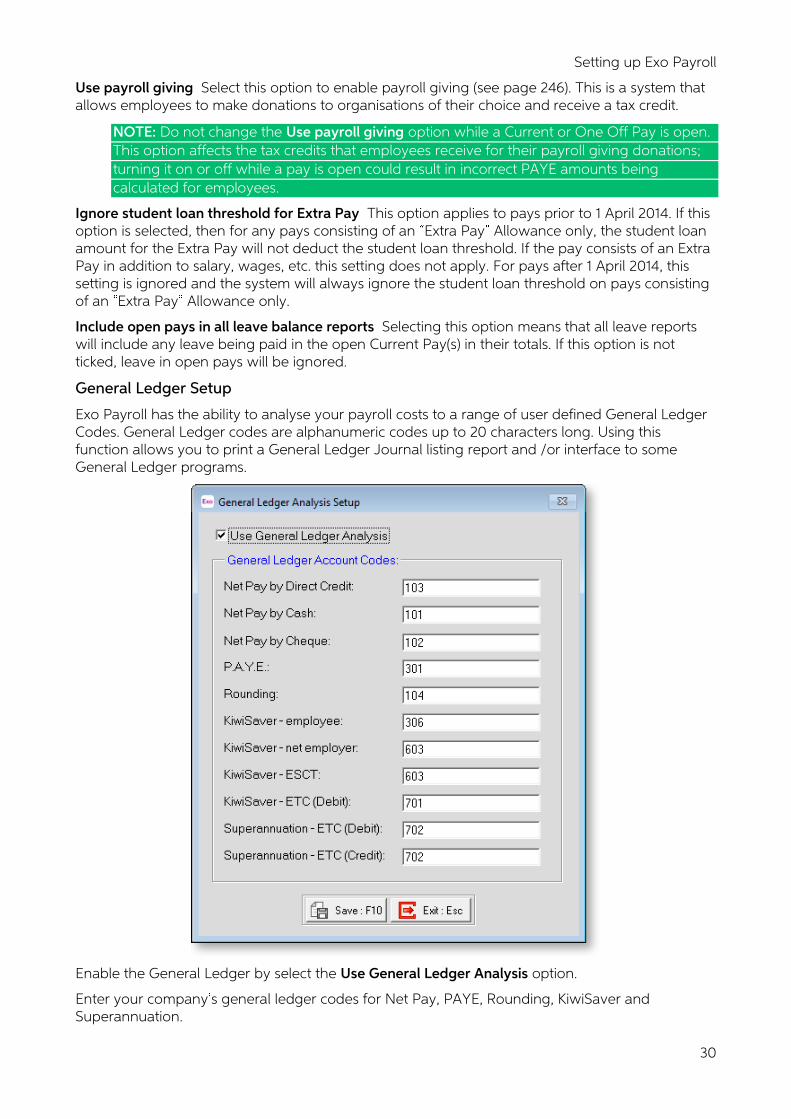
General Ledger Setup
Exo Payroll has the ability to analyse your payroll costs to a range of user defined General Ledger Codes. General Ledger codes are alphanumeric codes up to 20 characters long. Using this function allows you to print a General Ledger Journal listing report and /or interface to some General Ledger programs.
Enable the General Ledger by select the Use General Ledger Analysis option.
Enter your company s general ledger codes for Net Pay, PAYE, Rounding, KiwiSaver and Superannuation.
MYOB EXO Payroll User Guide
31
If your company has General Ledger codes for each department s pay then just enter a Clearing Account code for each of the above.
NOTE: You can enter the remainder of your General Ledger codes on the General Ledger maintenance window (see page 228).
Email Setup
MYOB Exo Payroll has the ability to send payslips to employees electronically as PDF files. Providing that a significant number of your employees have access to their own computers and email accounts, and are not paid by cash, this may offer some long term financial savings in Payroll administration costs, as there is no expenditure or stocktaking involved for printers, payslip paper, ink cartridges, envelopes, postage, etc. Payslips are password-protected so that only the intended employee can read the file.
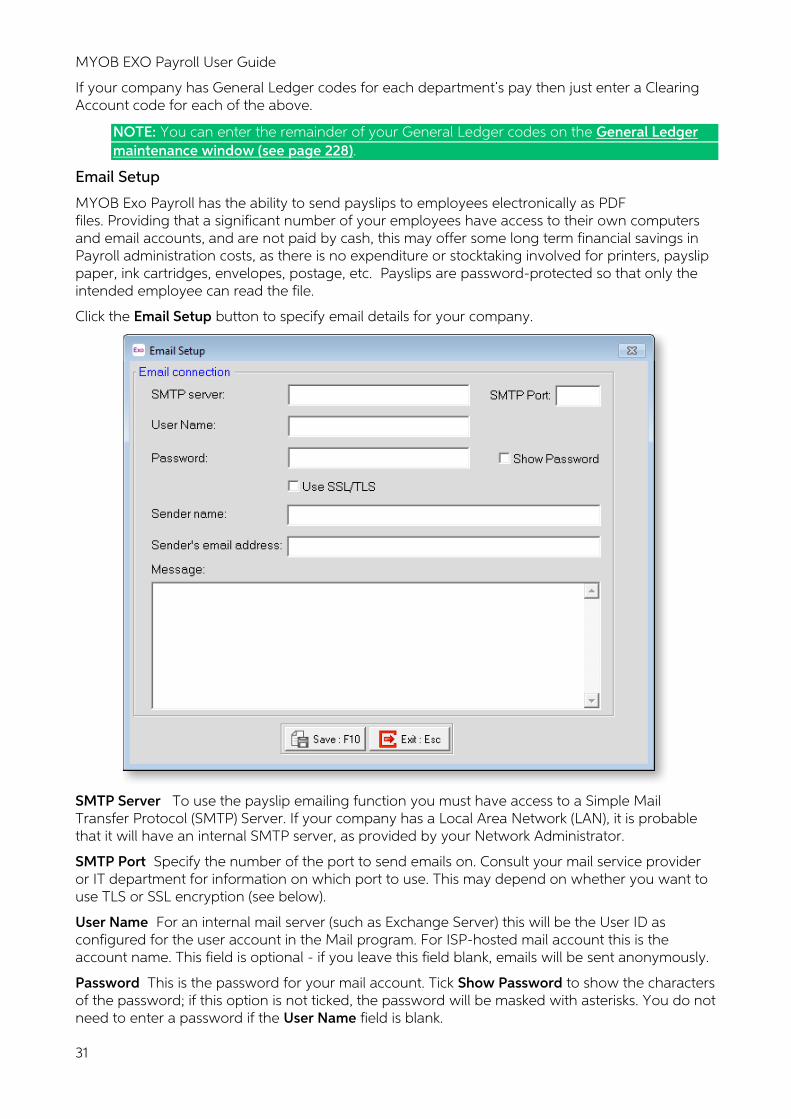
Click the Email Setup button to specify email details for your company.
SMTP Server To use the payslip emailing function you must have access to a Simple Mail Transfer Protocol (SMTP) Server. If your company has a Local Area Network (LAN), it is probable that it will have an internal SMTP server, as provided by your Network Administrator.
SMTP Port Specify the number of the port to send emails on. Consult your mail service provider or IT department for information on which port to use. This may depend on whether you want to use TLS or SSL encryption (see below).
User Name For an internal mail server (such as Exchange Server) this will be the User ID as configured for the user account in the Mail program. For ISP-hosted mail account this is the account name. This field is optional - if you leave this field blank, emails will be sent anonymously.
Password This is the password for your mail account. Tick Show Password to show the characters of the password; if this option is not ticked, the password will be masked with asterisks. You do not need to enter a password if the User Name field is blank.
Setting up Exo Payroll
32
Use SSL/TLS Tick this box to secure emails using TLS or SSL encryption, if the SMTP server supports them. SSL takes precedence over TLS; if both are available, SSL encryption will be used.
Sender Name Enter the name of the person responsible for sending the payslips (normally the pay clerk).
Sender s Email Address Enter the email address of the person responsible for sending the payslips (normally the pay clerk).
Message Enter a short note to the employee, which will appear in the body of the email.
Payslip Setup
Click the Payslip Setup button to enable and configure the Custom Payslip report (see page 200).
Report Distribution for New Employee
These options determine the default report distribution (see page 203) settings for employees, i.e. whether reports should be distributed to them by email, print, and/or MyStaffInfo. You can change an individual employee s report distribution settings on the Other tab of the Employee Maintenance window (see page 75).
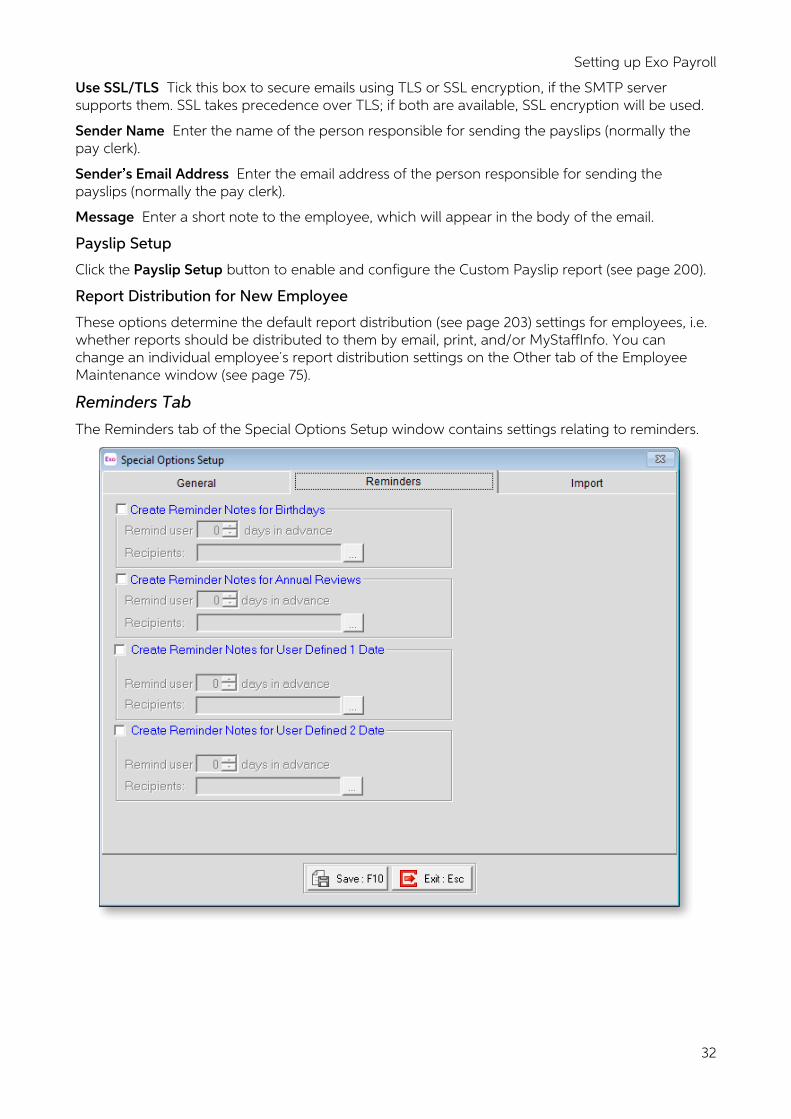
Reminders Tab
The Reminders tab of the Special Options Setup window contains settings relating to reminders.
MYOB EXO Payroll User Guide
33
Exo Payroll can automatically generate a reminder note in the Reminders window for the following events:
• Birthdays - generate a reminder when an employee is due to have a birthday • Annual Reviews - generate a reminder when an employee is due to have a performance
review • User Defined Date 1 - generate a reminder when the pay period prior to the employee s
primary User Defined date rolls over • User Defined Date 2 - generate a reminder when the pay period prior to the employee s
secondary User Defined date rolls over
NOTE: User Defined dates are set up for each employee on the Other tab of the Employee Maintenance screen (see page 75).
When the Current Pay is updated, the system will run an internal check to see if any employees are entitled to receive a note in the future. Appropriate notes will then appear in the Show Reminders screen, either as an advance notification or as a notification on the day.
To set up automatic reminder generation, tick the box(es) for the reminder(s) you want to generate, then set the following properties:
Remind user x days in advance Generates the note earlier, for prior warning. For example, set this value to 1 to receive the reminder 1 day before the review.
Recipients Click the button to nominate specific users only. Automatic reminder notes for annual reviews will only be seen by these users.
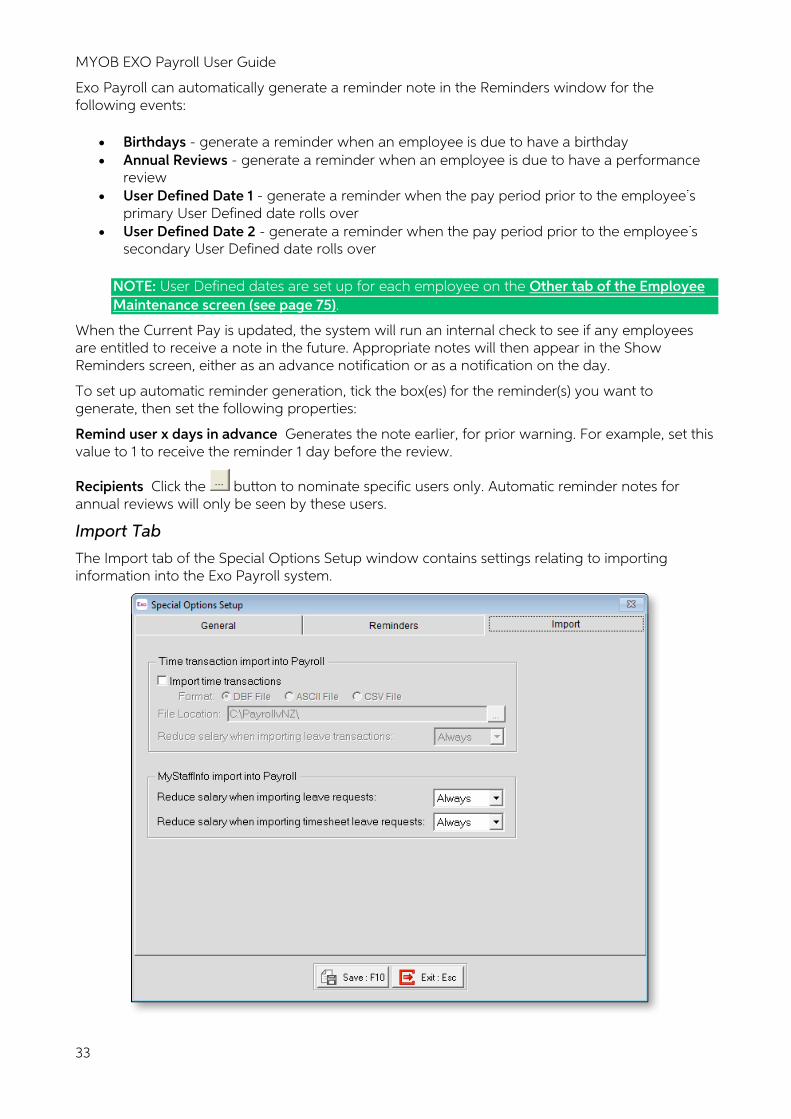
Import Tab
The Import tab of the Special Options Setup window contains settings relating to importing information into the Exo Payroll system.
Setting up Exo Payroll
34
Import time transactions Selecting this option allows you to import a time attendance file (see page 157) from an outside time and attendance software program. This program, such as MYOB Exo Time and Attendance, combined with an electronic time clock creates a file that then loads all employee hours and what allowances they are entitled to for that pay period.
Format If the Import time transactions option is selected, you must specify the format of the import file (see page 251) that will be created by the time and attendance program: choose between DBF, ASCII and CSV formats. The DBF format is preferable, as it supports the tracking of each calendar day of leave taken, where the other formats do not.
File Location If the Import time transactions option is selected, you must specify the location where the import files are stored.
NOTE: Import files can also be placed in the root install directory (usually C:\Payrollv).
Reduce salary when importing leave transactions Specify how the system should behave with regard to reducing salary (see page 115) when importing leave via the import time transactions function:
• Always reduce salary. • Never reduce salary. • Display a prompt to the user, asking if they want to reduce salary.
MyStaffInfo import into Payroll These properties are only available if the MYOB MyStaffInfo product (see page 168) is installed. When importing leave requests from MyStaffInfo, specify how the system should behave with regard to reducing salary (see page 115):
• Always reduce salary. • Never reduce salary. • Display a prompt to the user, asking if they want to reduce salary.
Two properties are available: one to specify behaviour for imported leave requests, and one for imported timesheet leave requests, i.e. timesheet transactions where the Type is Leave . These properties apply to all leave types.

MYOB EXO Payroll User Guide
35
Step Two: Add Allowances
Adding Allowances
The Add Allowances screen lets you add and edit the allowances to be used when setting up your Employees. MYOB Exo Payroll comes with several default allowances that you can edit to make them appropriate to your specific situation, as well as creating new ones. You can also globally load allowances (see page 39) to all employees. Select Step Two from the Payroll Setup Cycle (see page 11) to open a window where you can select the allowance to edit.
TIP: The Maintenance menu, which provides access to Allowance maintenance, can also be chosen at any time by pressing F2.
Click the Add button to create a new allowance or select an existing allowance and click Select to edit it.
Code Enter the code number you wish to list this allowance as. This number can be up to 3 digits in length (1-999).
Name Enter the name of this allowance (up to 20 characters).
Taxable / Non Taxable Select whether or not this allowance is to be taxable.
Calculation Method Your allowances can be calculated using a number of methods. Choose from:
• Fixed Dollar Amount - This means that the allowance is to be either a fixed sum, such as an Attendance allowance of $30.00 per week. If the amount is to be a varying amount depending on the employee, then choose this calculation type but do not enter in any amount in the next field e.g. a fixed dollar amount bonus allowance that is different for each employee and will be entered when running the pay.
Setting up Exo Payroll
36
• Percentage of Salary and Wage - This means that the allowance will be calculated as a percentage of the total gross wage or salary that is being paid to an employee. e.g. an employee has a salary of $500.00 gross and the allowance is set to pay 5%, then it will automatically pay $25.00.
• Total Hours - This means that you set the rate to pay an employee, and it will automatically calculate, based on the total number of hours worked e.g. an employee works 40 hours normal time and 5 hours overtime, and this allowance is tool money at .10¢ per hour then this will pay 45 hours x .10¢.
• Equivalent Hours - This type is very similar to Total Hours but instead, it uses the hours based on the pay rate used e.g. As above, a tool money allowance is .10¢ per hour for a 40 normal hours, 5 overtime (time & a 1/2) hours, then it will pay 47.5 hours x .10¢, as 5 x 1.5 = 7.5.
• Specific Hours - This means that you enter the number of hours to pay this allowance. • Rated Units - This means that you have either a payment or an item that is valued at a
certain rate per time it is paid. When this allowance is paid you merely enter in the number of units to pay, e.g. to set a mileage allowance of .55¢ per km then choose this calculation method and set the rate at .55 or Meal Money @ $5.00 per meal etc.
• Hourly Rate - This calculation type will use the hourly rate for an employee and pay the number of hours that you enter in for that pay period. Therefore it would pick up the hourly rate for the individual employee and you would just enter in the hours to pay. Remember when paying an allowance using this method you need to enter in the pay rate type to be used, e.g. 1 for ordinary hourly rate, 2 for 1.5x the hourly rate.
• Percentage of Total Gross - This method is a non-taxable method only. This will calculate an amount based on the total gross pay of the employee. Select the appropriate Calculation Method and press the Enter key.
Amount/Rate/Percentage Enter the amount or rate that the allowance is to use. Remember if the amounts or rates vary from employee to employee then leave this field blank and enter the particular amount or rate for the employee in their specific Standard Pay/Allowances screen.
Pay Rate Type If the Allowance is using the Hourly Rate calculation method, this field is used to dictate whether the rate type to be used would be Ordinary, Time & Half etc.
Maximum Number To give better control over payment of certain allowances this feature sets the maximum number of the allowance that is permitted to be paid in one entry.
To set this number enter the maximum number allowed in the field available. Any time you try and pay more than the allowed maximum an error box will pop-up. This means that if you set the maximum number for say, meal money is 7, you would not be able to pay more than 7 meal moneys at one time.
Wage Rate Code If you are using any of the Hours based calculation methods and you have multiple hourly rates switched on then you are able to specify which wage rate code you wish this allowance to use in its calculations. If you do not type in anything into this field when it is accessible the Payroll will calculate using the default of wage rate code 1. If you wish an allowance to calculate using this wage rate code then move to the next field; otherwise, type in the number of the Wage Rate Code you wish this allowance to pay on, e.g. To pay an allowance on Hourly Rate 1 you would type in a 1 and then move to the next field.
Type Choose from:
• Normal - This is the default used for most allowances. • Reimbursement - This is only to be used for non-taxable reimbursements • Withholding Payment - This is for earnings subject to withholding tax and will be shown
on the Employer Monthly Schedule. A Withholding Tax Rate must be entered when this type is selected.
MYOB EXO Payroll User Guide
37
• Extra Pay - These are for taxable earnings only, and are liable for the Earner Levy unless the lump sum is for a retirement or redundancy allowance. An Extra Pay Rate must be entered when this type is selected.
Cost Centre The Cost Centre for each Allowance will automatically default to the employee s own default Cost Centre which is the one you place against an employee when you add them to the Payroll. If you want to cost an allowance to a different Cost Centre then enter type in the cost centre number that you wish this allowance to be costed to. Remember that this will override any employees default cost centres but not any proportional costing
Override Tax Rate A taxable allowance will automatically be added to an employee s gross pay and taxed as such. If you wish this allowance to be taxed at a different tax rate then enter the tax rate (as a percentage) that you wish this allowance to be taxed at.
Withholding Tax Rate A Withholding Tax Rate must be entered when Withholding Payment is selected for the Type. The withholding tax rate ranges from 15% to 45% depending on the nature of work and whether or not the employee has declared a tax code.
Extra Pay Rate A rate must be entered when Extra Pay is selected for the Type. The possible rates are 10.5%, 17.5%, 30% or 33%.
NOTE: These are the only rates that can be entered in current data. The Extra Pay Rate field may contain other rates in historical data.
The rate specified here may not be the rate that is ultimately applied to the Extra Pay. When the Extra Pay is paid to an employee, the system grosses up the last month/four weeks paid in order to project the annual earnings, and determine what the tax rate will be:
• If Annual Gross-up + Extra Pay amount <= $14,000, Tax rate in pay = 10.5% • If Annual Gross-up + Extra Pay amount > $14,000 and <= $48,000, Tax rate in pay = 17.5% • If Annual Gross-up + Extra Pay amount > $48,000 and <= $70,000, Tax rate in pay = 30% • If Annual Gross-up + Extra Pay amount > $70,000, Tax rate in pay = 33%
If the employee has chosen to be taxed at a rate that is higher than the one determined by the Annual Gross-up, the higher rate is used.
NOTE: For secondary income (i.e. all income taxed on the SB, SB SL, S, S SL, SH, SH SL, ST or ST SL tax codes), a different calculation is used for determining which tax rate to use: Annual Gross-up + Extra Pay amount + Minimum Threshold Amount. The Minimum Threshold Amount is the lowest amount that applies to the employee s tax code, e.g. for S, this would be $14,001.
Historical Allowance Over a long period of time, you may find that some allowance codes are no longer required. To avoid having to scroll through long lists of unnecessary codes, you can hide obsolete codes from the code lookup screens by marking the codes as historical. You cannot mark an allowance as historical if it is currently included in employees Standard or Current Pays. You may reverse the historical setting at any time, making the code current again.
NOTE: This option is not available for system-created Allowances.
Notes
• Reports that are unfiltered will, by default, show transactions relating to historical codes.
• Reports that have a filter available for certain codes will have the ability to show current codes, or optionally show current and historical codes.
• Reports that have a filter set on certain codes must have the current and historical codes specifically chosen for inclusion in the query.
Setting up Exo Payroll
38
For example, in the Allowances report, you can apply a filter on Allowance Code. If you select the default items, you will only see current codes on the report. In other words, codes that are not on the Selected side of the list will not be visible on the report. In order to see current and historical codes, turn on the Show Historical option, and select all of the codes.
Options
Add to Gross for Holiday Pay Select this option if you want this allowance to add into the gross pay that is being used for the ordinary and average daily rate calculations, which encompass holiday pay.
Examples of payments that would have the Add to Gross for Holiday Pay option turned on:
• Productivity or incentive-based payments (including commission) if those payments are a regular part of the employee s pay.
• Payments for overtime if those payments are a regular part of the employee s pay. • Payments for overtime if those payments would have otherwise been received on the day
concerned.
Examples of payments that would have the Add to Gross for Holiday Pay option turned off:
• Productivity or incentive-based payments (including commission) if those payments are not a regular part of the employee s pay.
• Payments for overtime if those payments are not a regular part of the employee s pay. • Any one-off or exceptional payments. • Any discretionary payments that the employer is not bound, under the terms of the
employee s employment agreement, to pay the employee.
(See also Exclude from Ordinary Earnings below.)
Add to Gross for Super Select this option if you want this allowance to add into the gross pay that is being used for the calculating superannuation. Turn this option off if superannuation is calculated based on a true percentage of gross pay only.
Add to Gross for Relevant Daily Rate If you want this allowance to add into the gross pay that is being used for the Relevant Daily Rate calculation, then click on this option or press your Space Bar to switch this option on or off. This calculation encompasses sick leave, alternative leave, bereavement leave, public holidays, shift leave, and other leave.
Examples of payments that would have the Add to Gross for Relevant Daily Rate option turned on:
• Productivity or incentive-based payments (including commission) if those payments would have otherwise been received on the day concerned.
• Payments for overtime if those payments would have otherwise been received on the day concerned.
Examples of payments that would have the Add to Gross for Relevant Daily Rate option turned off:
• Productivity or incentive-based payments (including commission) if those payments would not have otherwise been received on the day concerned.
• Payments for overtime if those payments would not have otherwise been received on the day concerned.
MYOB EXO Payroll User Guide
39
Add Earner Levy This option is enabled if you entered a percentage in the Override Tax Rate, Withholding Tax Rate or Extra Pay Rate fields. You have the option of deciding whether or not to add the Earner Levy to this different tax rate. If you want this allowance to add the Earner Levy to the tax rate, select this option.
Not Liable for ACC Enabling this option means that this allowance will not be liable to have the employers ACC Levy (Employer Premium) valued against it. Some payments may not be subject to Employer Premium, such as ACC first week payments and Directors fees.
Can Modify Name Enabling this option allows you to modify the name of an allowance for a particular employee. The allowance will still be tracked and costed to the allowance number.
Eligible for PG Enabling this option means that this allowance counts as part of employees earnings for payroll giving (see page 246). This affects the maximum tax credit that can be received from payroll giving.
NOTE: If the Override Tax Rate field is used to set a fixed tax rate for an Allowance, the Eligible for PG option is automatically disabled. These types of Allowances are outside of the employee s tax code and therefore are not salary or wages, which means they are not liable for payroll giving.
Exclude from Ordinary Earnings The calculation of an employee s Ordinary Earnings in relation to the Holidays Act can be based on their last four weeks earnings. A large allowance that is paid infrequently, e.g. a Christmas bonus, can distort this calculation - you can ensure employees Ordinary Earnings are more representative of their true earnings.
The effect of excluding an allowance from an employee s Ordinary Earnings becomes apparent when defining a pattern of earnings in relation to the Holidays Act. The employee s Ordinary Daily Rate method may be set to 4 Week Average , as detailed in the employee s Holiday Pay tab. In the event of the Ordinary Daily rate taking precedence over other possible rates of holiday pay, the employee s Edit Days screen will show that the employee s Ordinary Earnings column can show a lower figure than the Gross Pay column, the impact of which is that allowance amounts which have an Exclude status will be counted towards the employee s 12-month average, but not towards the employee s 4-week average.
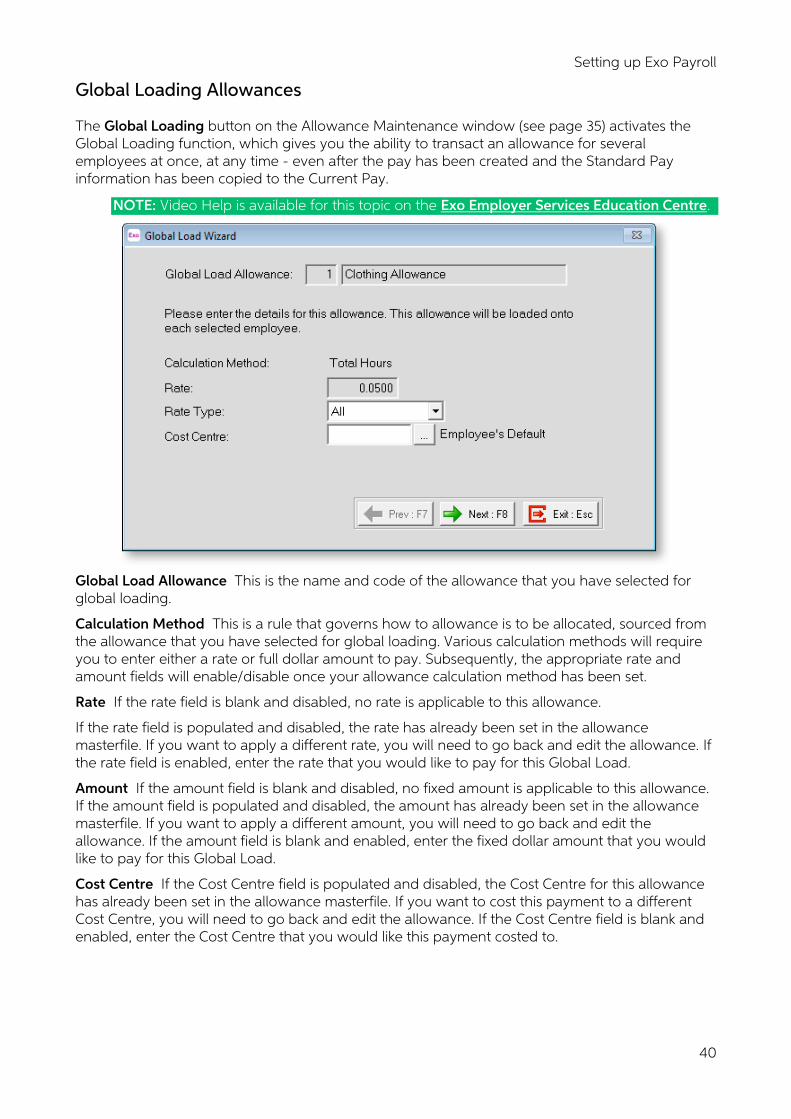
Setting up Exo Payroll
40
Global Loading Allowances
The Global Loading button on the Allowance Maintenance window (see page 35) activates the Global Loading function, which gives you the ability to transact an allowance for several employees at once, at any time - even after the pay has been created and the Standard Pay information has been copied to the Current Pay.
NOTE: Video Help is available for this topic on the Exo Employer Services Education Centre.
Global Load Allowance This is the name and code of the allowance that you have selected for global loading.
Calculation Method This is a rule that governs how to allowance is to be allocated, sourced from the allowance that you have selected for global loading. Various calculation methods will require you to enter either a rate or full dollar amount to pay. Subsequently, the appropriate rate and amount fields will enable/disable once your allowance calculation method has been set.
Rate If the rate field is blank and disabled, no rate is applicable to this allowance.
If the rate field is populated and disabled, the rate has already been set in the allowance masterfile. If you want to apply a different rate, you will need to go back and edit the allowance. If the rate field is enabled, enter the rate that you would like to pay for this Global Load.
Amount If the amount field is blank and disabled, no fixed amount is applicable to this allowance. If the amount field is populated and disabled, the amount has already been set in the allowance masterfile. If you want to apply a different amount, you will need to go back and edit the allowance. If the amount field is blank and enabled, enter the fixed dollar amount that you would like to pay for this Global Load.
Cost Centre If the Cost Centre field is populated and disabled, the Cost Centre for this allowance has already been set in the allowance masterfile. If you want to cost this payment to a different Cost Centre, you will need to go back and edit the allowance. If the Cost Centre field is blank and enabled, enter the Cost Centre that you would like this payment costed to.
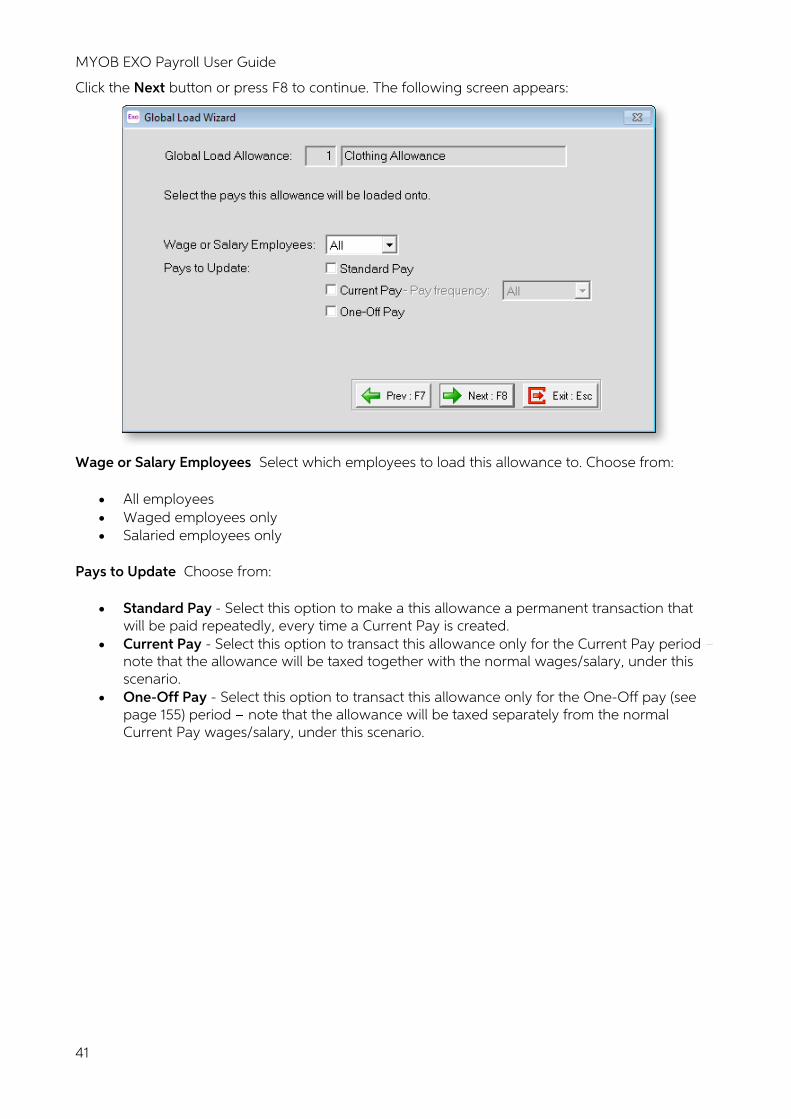
MYOB EXO Payroll User Guide
41
Click the Next button or press F8 to continue. The following screen appears:
Wage or Salary Employees Select which employees to load this allowance to. Choose from:
• All employees • Waged employees only • Salaried employees only
Pays to Update Choose from:
• Standard Pay - Select this option to make a this allowance a permanent transaction that will be paid repeatedly, every time a Current Pay is created.
• Current Pay - Select this option to transact this allowance only for the Current Pay period note that the allowance will be taxed together with the normal wages/salary, under this scenario.
• One-Off Pay - Select this option to transact this allowance only for the One-Off pay (see page 155) period note that the allowance will be taxed separately from the normal Current Pay wages/salary, under this scenario.
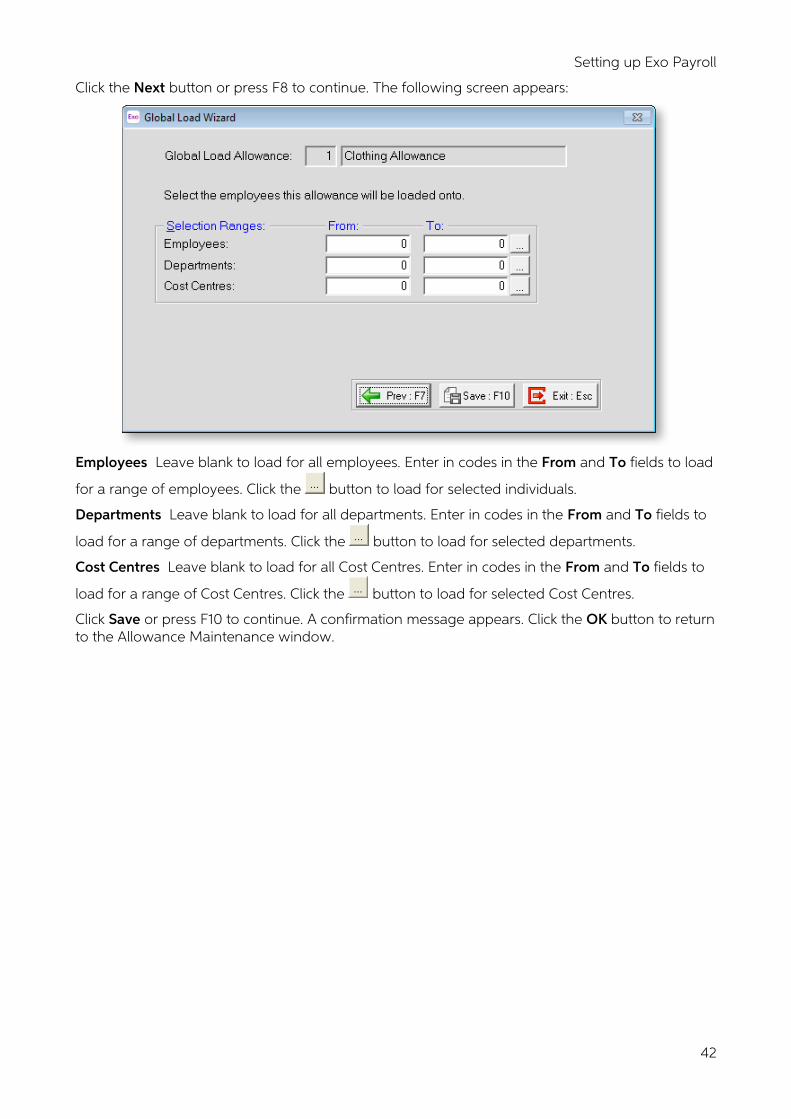
Setting up Exo Payroll
42
Click the Next button or press F8 to continue. The following screen appears:
Employees Leave blank to load for all employees. Enter in codes in the From and To fields to load
for a range of employees. Click the button to load for selected individuals.
Departments Leave blank to load for all departments. Enter in codes in the From and To fields to
load for a range of departments. Click the button to load for selected departments.
Cost Centres Leave blank to load for all Cost Centres. Enter in codes in the From and To fields to
load for a range of Cost Centres. Click the button to load for selected Cost Centres.
Click Save or press F10 to continue. A confirmation message appears. Click the OK button to return to the Allowance Maintenance window.
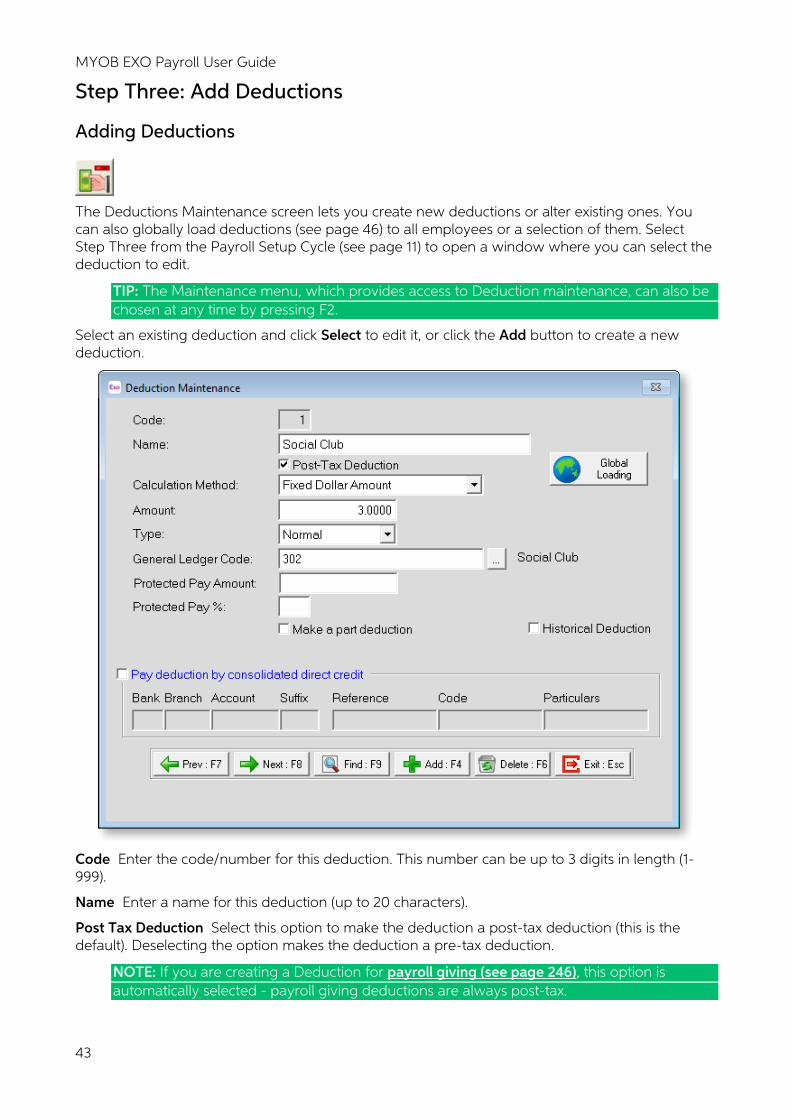
MYOB EXO Payroll User Guide
43
Step Three: Add Deductions
Adding Deductions
The Deductions Maintenance screen lets you create new deductions or alter existing ones. You can also globally load deductions (see page 46) to all employees or a selection of them. Select Step Three from the Payroll Setup Cycle (see page 11) to open a window where you can select the deduction to edit.
TIP: The Maintenance menu, which provides access to Deduction maintenance, can also be chosen at any time by pressing F2.
Select an existing deduction and click Select to edit it, or click the Add button to create a new deduction.
Code Enter the code/number for this deduction. This number can be up to 3 digits in length (1-999).
Name Enter a name for this deduction (up to 20 characters).
Post Tax Deduction Select this option to make the deduction a post-tax deduction (this is the default). Deselecting the option makes the deduction a pre-tax deduction.
NOTE: If you are creating a Deduction for payroll giving (see page 246), this option is automatically selected - payroll giving deductions are always post-tax.
Setting up Exo Payroll
44
Calculation Method Every deduction must have a calculation method that it will use when calculating deductions. This method can be one of the following:
• Fixed Dollar Amount - This means that the deduction is to be a fixed sum, such as a social club deduction of $3.00 per week. If the amount is to be a varying amount depending on the employee, then choose this calculation type and do not enter in any amount in the next field.
• Percentage of Gross Pay - This means that the deduction amount is based on a percentage of the employee s gross pay. This deduction calculation method is used for deductions like superannuation.
• Reducing Balance - This calculation method is for any deduction that is based on an amount of money that is to be deducted in portions from an employee s pay every time they are paid. e.g. staff loans where an amount was borrowed and the employee is to pay that sum back in instalments. The actual amount that is to be reduced is loaded for the particular employee in the employee s Standard Pay (see page 79) screen.
• IRD - This calculation method is to be used for Tax Reclaims etc as per the calculation method supplied by the IRD. This states that the amount to be deducted is either 10% of the total claimed, or 20% of the employee s total gross salary or wages, unless that amount is less than $100.00 and if so then only $10.00 is deducted.
Amount/Rate/Percentage Enter the amount, rate or percentage that the deduction you are creating is to use. Remember that if the any of the amounts, rates or percentages vary from employee to employee then leave this field blank and type in the particular amount, rate or percentage for the employee in the Standard Pay/Deductions screen.
Type Each deduction has its own type. Most deductions are of the normal type but some must be listed as a differing type as they have to be tracked for reporting.
• Normal - Use this type for most deductions. Only if a deduction matches the criteria below do you need to change the type from normal.
• Employer Super - If the deduction is for the purposes of tracking an employer s contribution to an employees superannuation then you must choose this type. It will mean that no money is actually removed from an employee s pay but the employer s contribution amount is tracked in the superannuation report.
• Employee Super - Choose this type if the deduction is for an employee s superannuation. By choosing this type it will not only deduct the amount required from an employee s pay but also track the amount involved in the superannuation report.
• Child Support - If the deduction is for the purposes of deducting Liable Parent Child Support, you must select this type as this will flag the dollar amount to appear as child support for reporting purposes.
• Payroll Giving - If the deduction is a donation for the payroll giving scheme (see page 246), you must select this type.
• Attachment Order - If the deduction is for a District Court attachment order, you must select this type.
NOTE: If Child Support is selected you must set the Protected Pay % field to 60%, that is, the deduction will not be made if it causes the Net Pay to reduce below the % stated. You also have the ability to make a part deduction in case earnings fluctuate. If Attachment Order is selected, you must enter a value for the Protected Pay % - this will be specified by the attachment order, but it is usually 60%.
MYOB EXO Payroll User Guide
45
When paying child support in the Current Pay, if the deduction amount is different from the previous period, you will be prompted for a variation code, you have a choice of:
• C = Ceased Employment • A = Advanced Payment • P = Protected Earnings • S = Short Term Absence • D = Deducted Previously • O = Other
Complying superannuation fund This option is available if the Employer Super or Employee Super types are selected. Specify whether or not the deduction is for a complying superannuation fund.
General Ledger Code If you have enabled the Use General Ledger Analysis option during the Payroll Setup (see page 30), you can attach a General ledger code to this deduction for the purposes of costing this deduction value to the General Ledger report. If the code you enter, you will be asked if you want to create it as a new code.
Protected Pay Amount You can optionally specify thresholds of protected earnings for multiple pay frequencies. The Protected Pay Amount is an amount that must be left after tax and child support is deducted, to ensure that all of an employee s wages are not deducted for child support payments. Where making the full deduction would take the employee s pay under this amount, the deduction is reduced to an amount that will leave the specified amount.
Protected Pay % Tells the system not to make the deduction if the net pay (technically Gross less PAYE, excluding the ACC earners levy) after the deduction would result in the employee receiving less than the specified percentage of their usual net pay. This is for situations where the employee works irregular hours and may not be financially prepared for a large deduction to be made.
Make a Part Deduction If you have chosen to protect a portion of employees pay, you may also wish to say that if an employee does not earn enough gross pay to ensure that the full deduction is being deducted, at least deduct some of it. Select this option to do so. If the option is not selected, the deduction will not be deducted at all if the employee s pay does not have enough funds to cover it
NOTE: If a pay contains one ore more deductions that will not be paid (or will be partially paid) due to the employee s pay not having enough funds for them, a warning icon will appear on the Deductions button on the Standard Pay and Current Pay windows.
Payroll Giving Donee If you selected Payroll Giving for the Type property, you must specify the donee organisation that the donation will be made to. Click the editing button for a list of all Payroll Giving Donees (see page 233).
Historical Deduction Over a long period of time, you may find that some deduction codes are no longer required. To avoid having to scroll through long lists of unnecessary codes, you can hide obsolete codes from the code lookup screens by marking them as historical. You cannot mark an deduction as historical if it is currently included in employees Standard or Current Pays. You may reverse the historical setting at any time, making the code current again.
NOTE: This option is not available for system-created Deductions.
Pay Deduction by Consolidated Direct Credit This is used to redirect funds from multiple deductions across many employees to a single bank account, e.g. a social club deduction. Tick this box to enter an appropriate bank account. This will be processed during the Direct Credit Transfer (see page 146), along with other wage & salary payments.
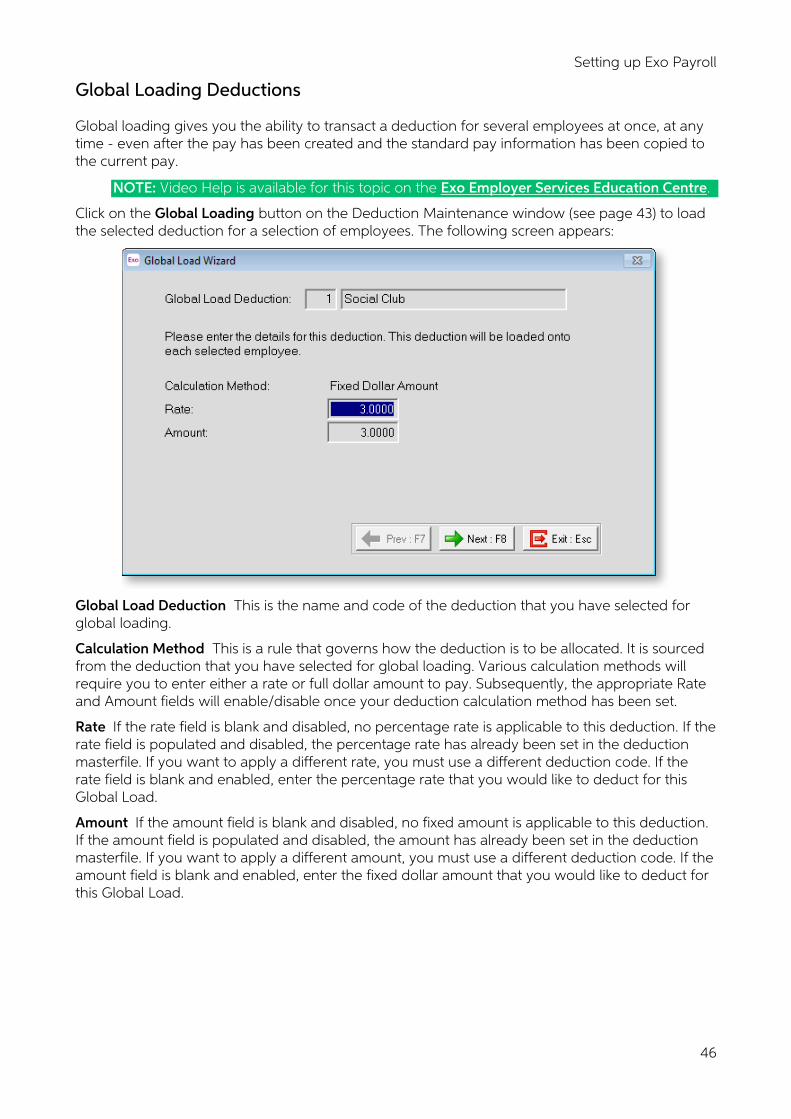
Setting up Exo Payroll
46
Global Loading Deductions
Global loading gives you the ability to transact a deduction for several employees at once, at any time - even after the pay has been created and the standard pay information has been copied to the current pay.
NOTE: Video Help is available for this topic on the Exo Employer Services Education Centre.
Click on the Global Loading button on the Deduction Maintenance window (see page 43) to load the selected deduction for a selection of employees. The following screen appears:
Global Load Deduction This is the name and code of the deduction that you have selected for global loading.
Calculation Method This is a rule that governs how the deduction is to be allocated. It is sourced from the deduction that you have selected for global loading. Various calculation methods will require you to enter either a rate or full dollar amount to pay. Subsequently, the appropriate Rate and Amount fields will enable/disable once your deduction calculation method has been set.
Rate If the rate field is blank and disabled, no percentage rate is applicable to this deduction. If the rate field is populated and disabled, the percentage rate has already been set in the deduction masterfile. If you want to apply a different rate, you must use a different deduction code. If the rate field is blank and enabled, enter the percentage rate that you would like to deduct for this Global Load.
Amount If the amount field is blank and disabled, no fixed amount is applicable to this deduction. If the amount field is populated and disabled, the amount has already been set in the deduction masterfile. If you want to apply a different amount, you must use a different deduction code. If the amount field is blank and enabled, enter the fixed dollar amount that you would like to deduct for this Global Load.
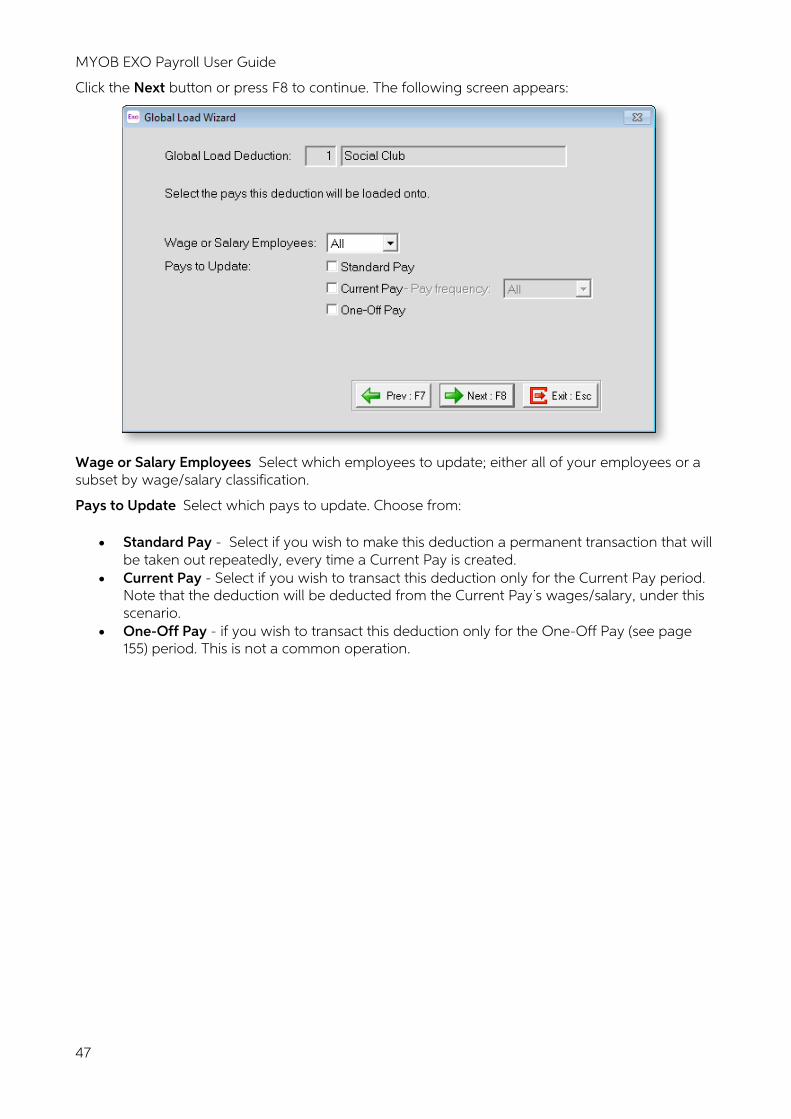
MYOB EXO Payroll User Guide
47
Click the Next button or press F8 to continue. The following screen appears:
Wage or Salary Employees Select which employees to update; either all of your employees or a subset by wage/salary classification.
Pays to Update Select which pays to update. Choose from:
• Standard Pay - Select if you wish to make this deduction a permanent transaction that will be taken out repeatedly, every time a Current Pay is created.
• Current Pay - Select if you wish to transact this deduction only for the Current Pay period. Note that the deduction will be deducted from the Current Pay s wages/salary, under this scenario.
• One-Off Pay - if you wish to transact this deduction only for the One-Off Pay (see page 155) period. This is not a common operation.

Setting up Exo Payroll
48
Click on the Next button or press F8 to continue. The following screen appears:
Employees Leave blank to load for all employees. Enter in codes in the From and To fields to load
for a range of employees. Click the button to load for selected individuals.
Departments Leave blank to load for all departments. Enter in codes in the From and To fields to
load for a range of departments. Click on the button to load for selected departments.
Cost Centres Leave blank to load for all Cost Centres. Enter in codes in the From and To fields to
load for a range of cost centres. Click on the button to load for selected Cost Centres.
Click Save or press F10 to continue. A confirmation message appears. Click the OK button to return to the Deduction Maintenance window.
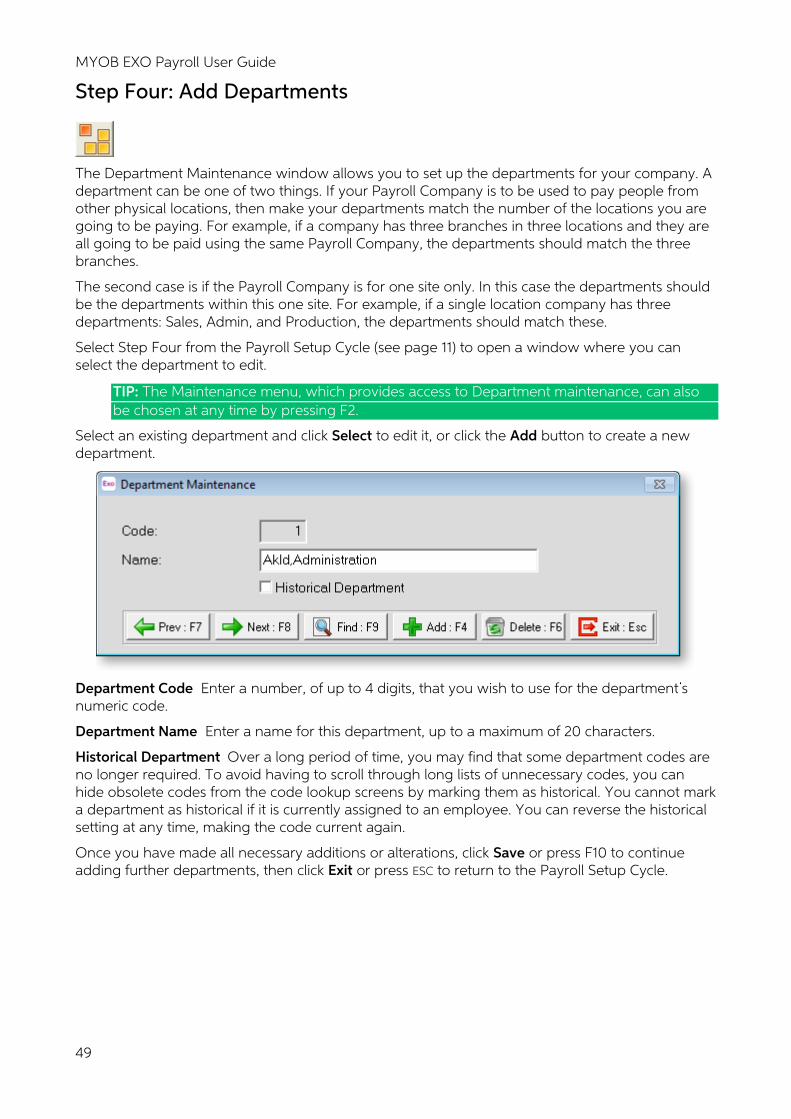
MYOB EXO Payroll User Guide
49
Step Four: Add Departments
The Department Maintenance window allows you to set up the departments for your company. A department can be one of two things. If your Payroll Company is to be used to pay people from other physical locations, then make your departments match the number of the locations you are going to be paying. For example, if a company has three branches in three locations and they are all going to be paid using the same Payroll Company, the departments should match the three branches.
The second case is if the Payroll Company is for one site only. In this case the departments should be the departments within this one site. For example, if a single location company has three departments: Sales, Admin, and Production, the departments should match these.
Select Step Four from the Payroll Setup Cycle (see page 11) to open a window where you can select the department to edit.
TIP: The Maintenance menu, which provides access to Department maintenance, can also be chosen at any time by pressing F2.
Select an existing department and click Select to edit it, or click the Add button to create a new department.
Department Code Enter a number, of up to 4 digits, that you wish to use for the department s numeric code.
Department Name Enter a name for this department, up to a maximum of 20 characters.
Historical Department Over a long period of time, you may find that some department codes are no longer required. To avoid having to scroll through long lists of unnecessary codes, you can hide obsolete codes from the code lookup screens by marking them as historical. You cannot mark a department as historical if it is currently assigned to an employee. You can reverse the historical setting at any time, making the code current again.
Once you have made all necessary additions or alterations, click Save or press F10 to continue adding further departments, then click Exit or press ESC to return to the Payroll Setup Cycle.
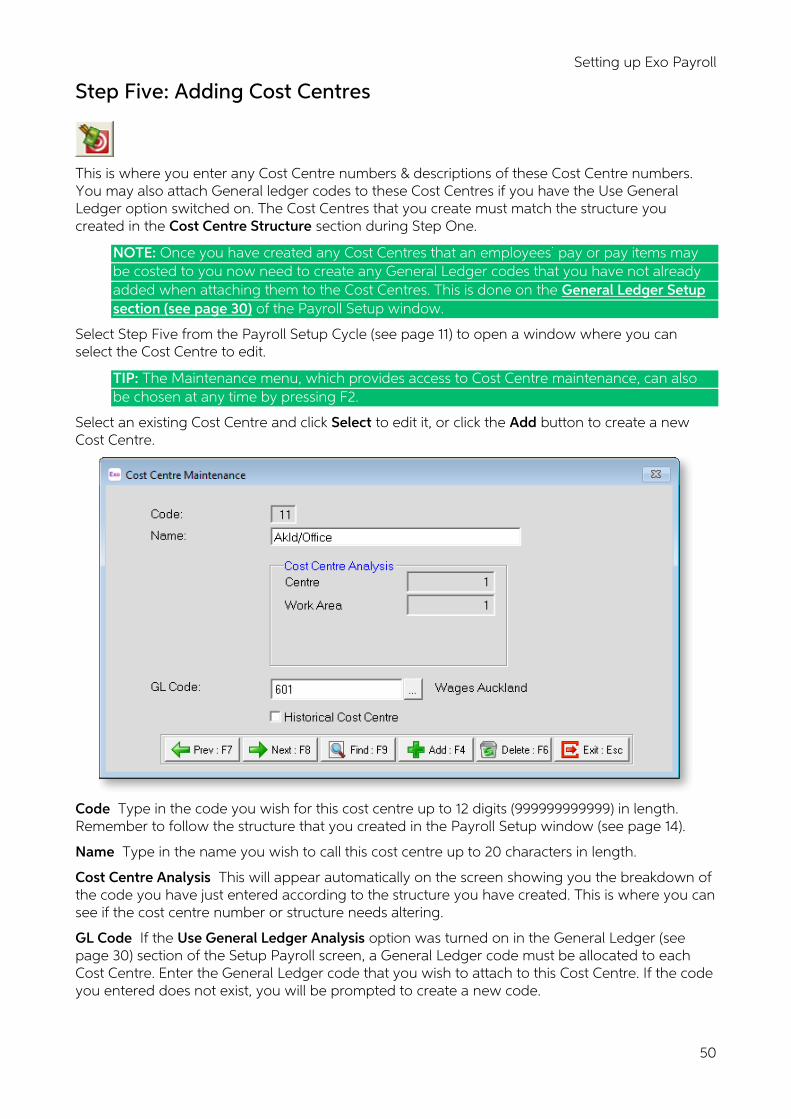
Setting up Exo Payroll
50
Step Five: Adding Cost Centres
This is where you enter any Cost Centre numbers & descriptions of these Cost Centre numbers. You may also attach General ledger codes to these Cost Centres if you have the Use General Ledger option switched on. The Cost Centres that you create must match the structure you created in the Cost Centre Structure section during Step One.
NOTE: Once you have created any Cost Centres that an employees pay or pay items may be costed to you now need to create any General Ledger codes that you have not already added when attaching them to the Cost Centres. This is done on the General Ledger Setup section (see page 30) of the Payroll Setup window.
Select Step Five from the Payroll Setup Cycle (see page 11) to open a window where you can select the Cost Centre to edit.
TIP: The Maintenance menu, which provides access to Cost Centre maintenance, can also be chosen at any time by pressing F2.
Select an existing Cost Centre and click Select to edit it, or click the Add button to create a new Cost Centre.
Code Type in the code you wish for this cost centre up to 12 digits (999999999999) in length. Remember to follow the structure that you created in the Payroll Setup window (see page 14).
Name Type in the name you wish to call this cost centre up to 20 characters in length.
Cost Centre Analysis This will appear automatically on the screen showing you the breakdown of the code you have just entered according to the structure you have created. This is where you can see if the cost centre number or structure needs altering.
GL Code If the Use General Ledger Analysis option was turned on in the General Ledger (see page 30) section of the Setup Payroll screen, a General Ledger code must be allocated to each Cost Centre. Enter the General Ledger code that you wish to attach to this Cost Centre. If the code you entered does not exist, you will be prompted to create a new code.
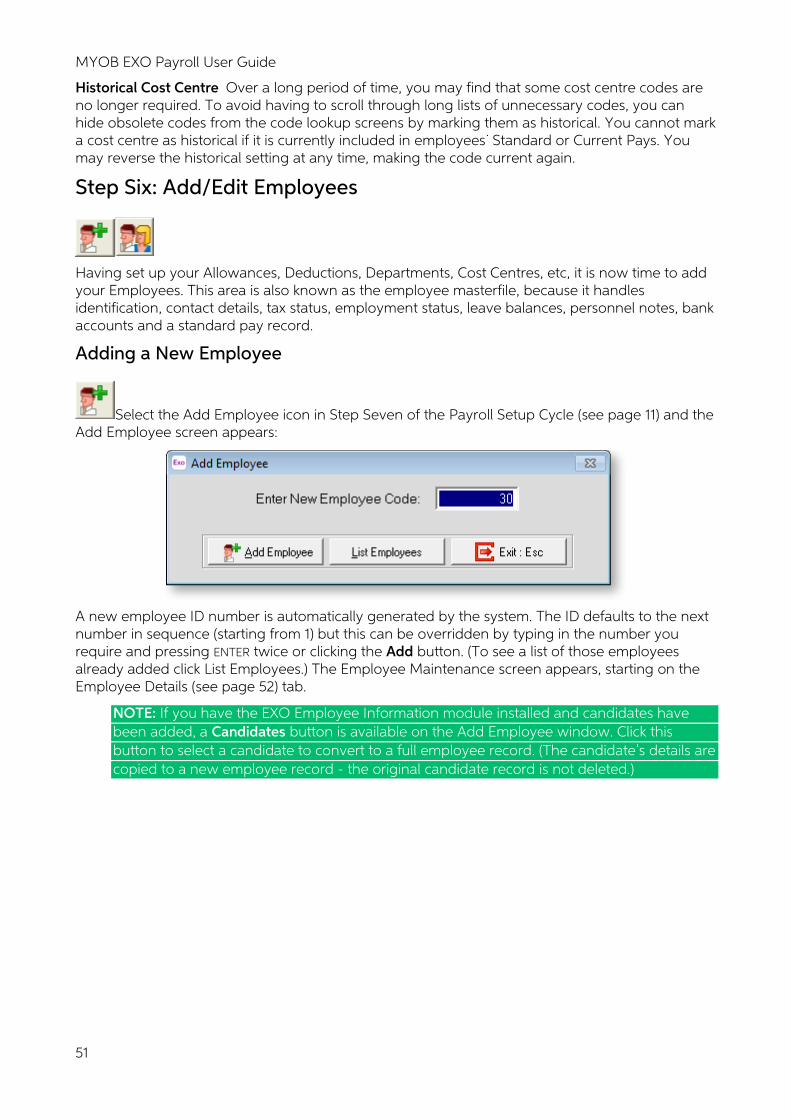
MYOB EXO Payroll User Guide
51
Historical Cost Centre Over a long period of time, you may find that some cost centre codes are no longer required. To avoid having to scroll through long lists of unnecessary codes, you can hide obsolete codes from the code lookup screens by marking them as historical. You cannot mark a cost centre as historical if it is currently included in employees Standard or Current Pays. You may reverse the historical setting at any time, making the code current again.
Step Six: Add/Edit Employees
Having set up your Allowances, Deductions, Departments, Cost Centres, etc, it is now time to add your Employees. This area is also known as the employee masterfile, because it handles identification, contact details, tax status, employment status, leave balances, personnel notes, bank accounts and a standard pay record.
Adding a New Employee
Select the Add Employee icon in Step Seven of the Payroll Setup Cycle (see page 11) and the Add Employee screen appears:
A new employee ID number is automatically generated by the system. The ID defaults to the next number in sequence (starting from 1) but this can be overridden by typing in the number you require and pressing ENTER twice or clicking the Add button. (To see a list of those employees already added click List Employees.) The Employee Maintenance screen appears, starting on the Employee Details (see page 52) tab.
NOTE: If you have the EXO Employee Information module installed and candidates have been added, a Candidates button is available on the Add Employee window. Click this button to select a candidate to convert to a full employee record. (The candidate s details are copied to a new employee record - the original candidate record is not deleted.)
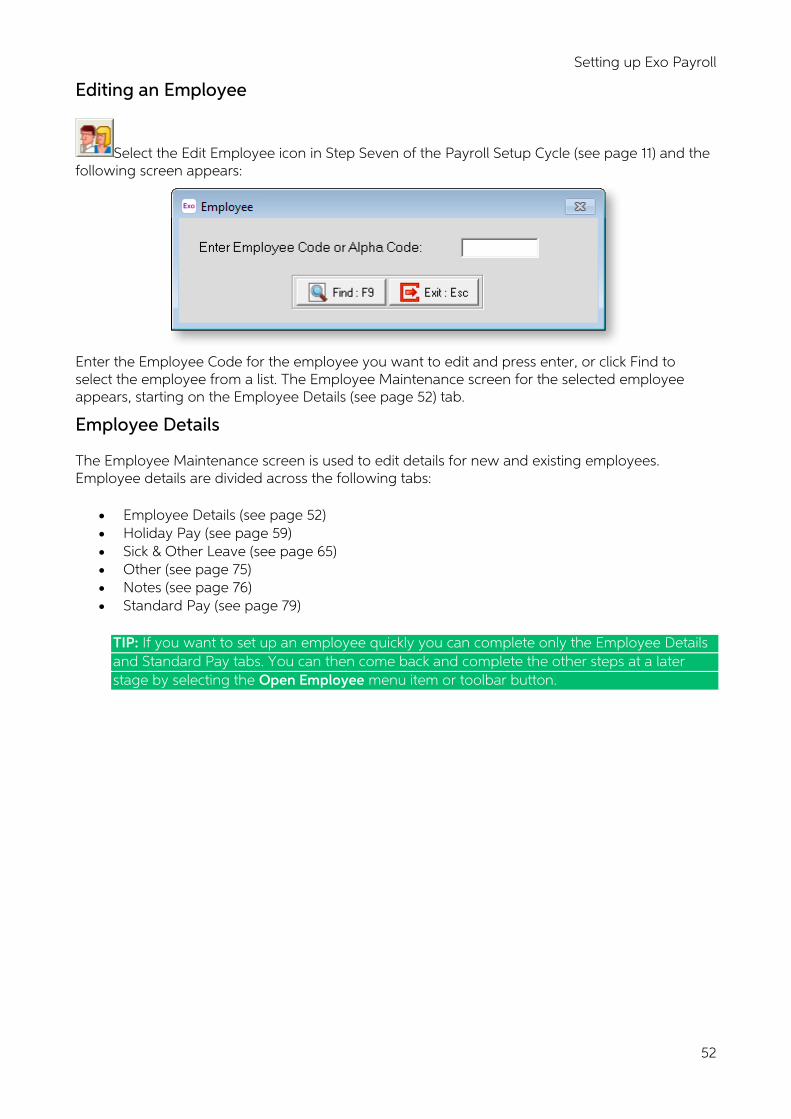
Setting up Exo Payroll
52
Editing an Employee
Select the Edit Employee icon in Step Seven of the Payroll Setup Cycle (see page 11) and the following screen appears:
Enter the Employee Code for the employee you want to edit and press enter, or click Find to select the employee from a list. The Employee Maintenance screen for the selected employee appears, starting on the Employee Details (see page 52) tab.
Employee Details
The Employee Maintenance screen is used to edit details for new and existing employees. Employee details are divided across the following tabs:
• Employee Details (see page 52) • Holiday Pay (see page 59) • Sick & Other Leave (see page 65) • Other (see page 75) • Notes (see page 76) • Standard Pay (see page 79)
TIP: If you want to set up an employee quickly you can complete only the Employee Details and Standard Pay tabs. You can then come back and complete the other steps at a later stage by selecting the Open Employee menu item or toolbar button.
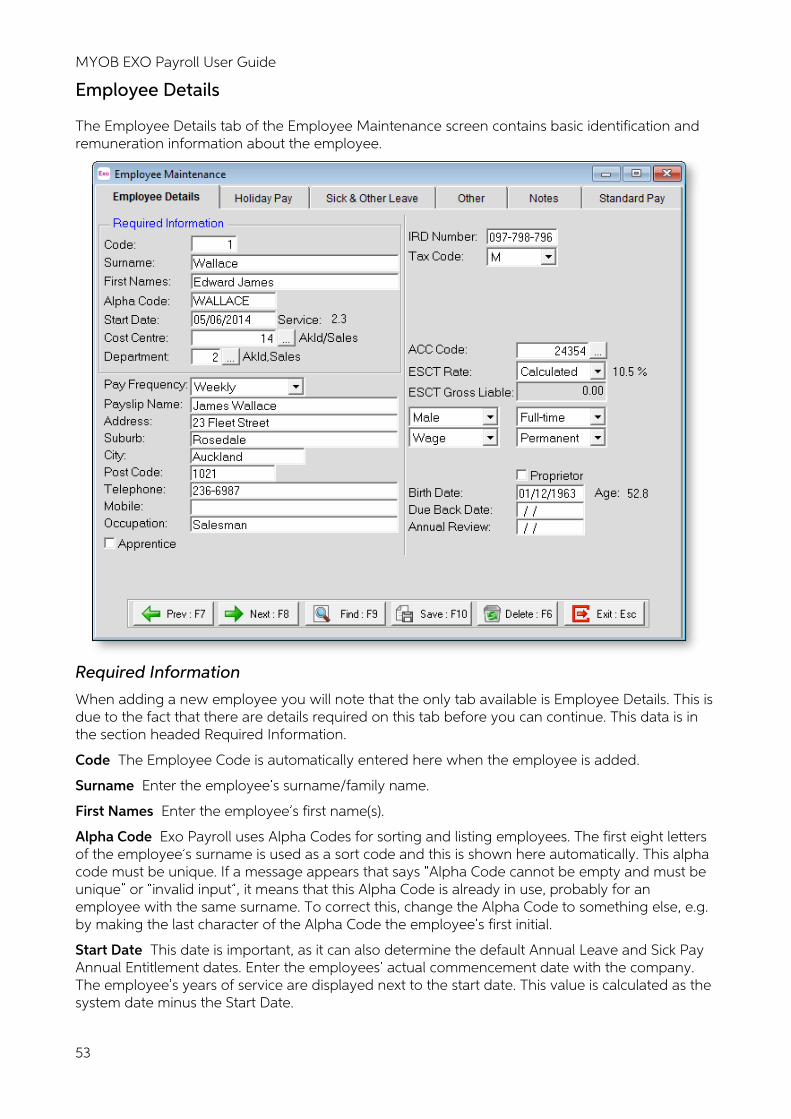
MYOB EXO Payroll User Guide
53
Employee Details
The Employee Details tab of the Employee Maintenance screen contains basic identification and remuneration information about the employee.
Required Information
When adding a new employee you will note that the only tab available is Employee Details. This is due to the fact that there are details required on this tab before you can continue. This data is in the section headed Required Information.
Code The Employee Code is automatically entered here when the employee is added.
Surname Enter the employee s surname/family name.
First Names Enter the employee s first name(s).
Alpha Code Exo Payroll uses Alpha Codes for sorting and listing employees. The first eight letters of the employee s surname is used as a sort code and this is shown here automatically. This alpha code must be unique. If a message appears that says Alpha Code cannot be empty and must be unique or invalid input , it means that this Alpha Code is already in use, probably for an employee with the same surname. To correct this, change the Alpha Code to something else, e.g. by making the last character of the Alpha Code the employee s first initial.
Start Date This date is important, as it can also determine the default Annual Leave and Sick Pay Annual Entitlement dates. Enter the employees actual commencement date with the company. The employee s years of service are displayed next to the start date. This value is calculated as the system date minus the Start Date.
Setting up Exo Payroll
54
Cost Centre This field shows the Cost Centre that the employee belongs to. This Cost Centre is chosen from the Cost Centres that were set up during Step Five: Add Cost Centres (see page 50). The Cost Centre chosen for each employee acts as their default Cost Centre (which can be overridden).
TIP: If you have not created the Cost Centre that you need for any employee at this stage, you can press F2 to open the Maintenance window. Choose Cost Centres to create the Cost Centre without having to exit from the employee file.
Department Each employee must belong to a department. This department is chosen from the departments that were set up during Step Four: Add Departments (see page 49). The department chosen for each employee acts as a grouping for reports or as a way of allocating costs.
Enter the code for the department you wish to use. If you do not know the code for the department you want to select for an employee, leave the field blank and press enter. This will display a list of departments for you to choose from.
TIP: If you have not created the department that you need for any employee at this stage, you can press F2 to open the Maintenance window. Choose Departments to create the department without having to exit from the employee file.
Once all of the above fields have been completed, the other tabs on the Employee Maintenance screen become available, as well as with the remaining sections of the Employee Details tab.
Optional Information
Pay Frequency Select the required Pay Frequency. Choose from:
• Weekly • Fortnightly • Bi-monthly • 4 weekly • Monthly
Personal Information
Payslip Name When printing a Payslip the payroll will print the employee s surname, then the employee s first names. If you wish a different name to appear on the Payslip then enter here what you would like to appear on the Payslip. Remember to include a surname because what goes in here is all that prints on the Payslip.
Address, Suburb, City, Post Code Enter the employee s address details. These are not critical for the running of the payroll but it means that these details can appear on the employee s payslips.
Telephone Enter the employee s telephone number. This field is optional, but filling it in means that you are able to print a telephone list report.
Mobile Enter the employee s mobile phone number. As above, entering this is not critical - not all employees may be in possession of a mobile phone. However, it could prove useful in the case of an emergency.
Occupation Enter the employee s occupation so that it will appear on the Employees report (see page 176).
Apprentice Select this option if the employee is an apprentice. Once selected, an Hours field appears. Enter the accumulated hours from commencement of the apprenticeship.
MYOB EXO Payroll User Guide
55
Tax Information
IRD Number If the IRD number is blank or invalid, the Tax Code will default to ND with a tax rate of 45% to cover student loan and child support issues. Taking that into account, it is in the employee s interest to declare their correct tax code.
IRD numbers must be unique - if the number you enter belongs to another employee IRD numbers also contain a hidden computation to ensure that they are valid. If this validity check fails, then either the wrong number has been typed in or an incorrect number has been given. If an invalid number is entered the error message The number you have entered is invalid appears. MYOB recommends obtaining a printed statement if any dispute arises.
Tax Code Select the employee s tax code. The default tax code is M. The following tax codes are available:
• ND - No notification rate. This is the default rate if no IRD number has been specified. • M - Main income • M SL - Main income with student loan • ME - Main income - Independent Earner Tax Credit (IETC) • ME SL - Main income with student loan and IETC • S - Secondary income $14,001 to $48,000 • S SL - Secondary income $14,001 to $48,000 with student loan • SB - Secondary income <= $14,000 • SB SL - Secondary income <= $14,000 with student loan • SH - Secondary income $48,001 to $70,000 • SH SL - Secondary income $48,000 to $70,000 with student loan • ST - Secondary income > $70,001 • ST SL - Secondary income > $70,001 with student loan • CAE - Casual agricultural employee • EDW - Election day worker • NSW - Non-resident seasonal worker • STC - Special tax code from IR 23 • WT - Withholding tax (used for the Employer Monthly Schedule) • MC - Children with an IRD number, for claiming the child tax credit. Not available after 1
April 2013. • ML - Main income < $9,880. Not available after 1 April 2013. • ML SL - Main income < $9,880 with student loan. Not available after 1 April 2013. • CHILD - Zero rated & excluded from the IR348. Not available after 1 April 2013.
Depending on which tax code is selected, additional options may become available.
Add Earner Levy If this employee s earnings are to have earner levy calculated against them then make sure there is an tick in the box by pressing the Space Bar, if no earner levy is to be calculated then press the Space Bar to remove the tick.
Tax Rate Enter the percentage rate to tax this employee at, e.g. 21.00 for 21%.
Student Loan Information
Student Loan Rate Enter the percentage rate at which the employee s student loan repayments should be calculated. By default, Exo Payroll uses the normal student loan rate of 12% - this field is intended as an override.
NOTE: Rates greater than 12% should not be entered - to contribute more than 12%, use the SLCIR and/or SLBOR options. Rates lower than 12% may be possible if the employee has been granted a Special Deduction Rate (SDR). The SDR certificate supplied by Inland Revenue will advise the rate that repayments should be calculated at.
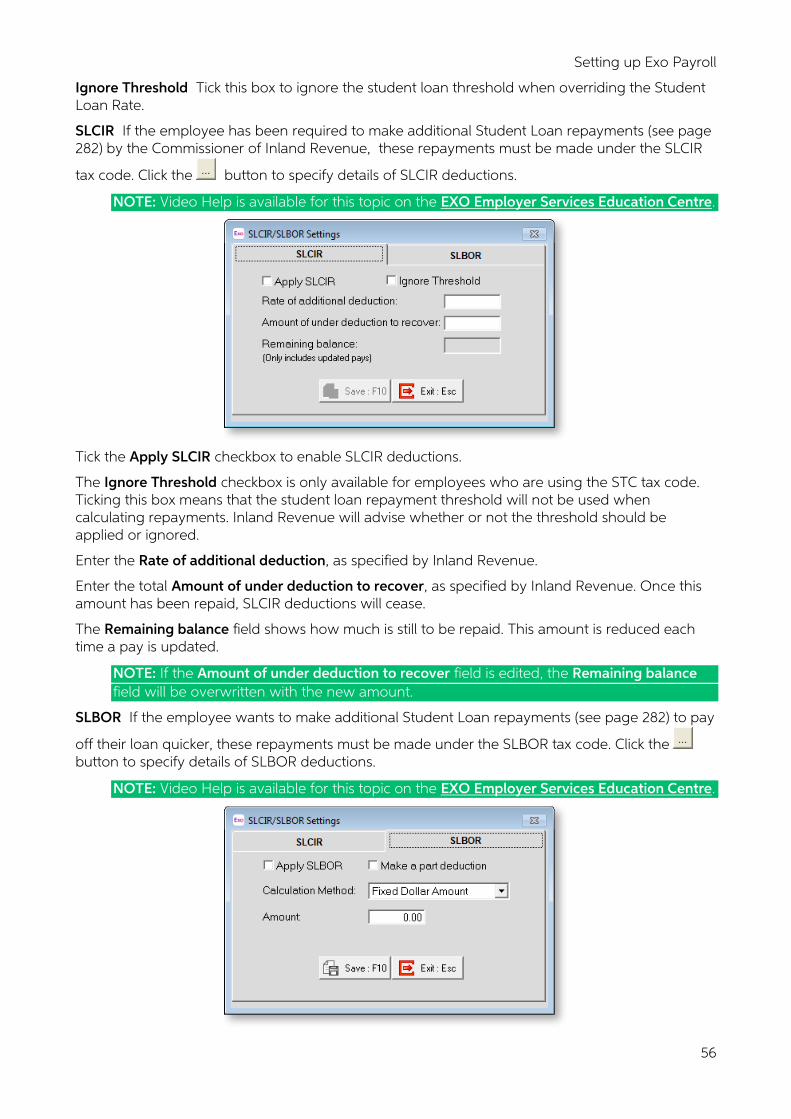
Setting up Exo Payroll
56
Ignore Threshold Tick this box to ignore the student loan threshold when overriding the Student Loan Rate.
SLCIR If the employee has been required to make additional Student Loan repayments (see page 282) by the Commissioner of Inland Revenue, these repayments must be made under the SLCIR
tax code. Click the button to specify details of SLCIR deductions.
NOTE: Video Help is available for this topic on the EXO Employer Services Education Centre.
Tick the Apply SLCIR checkbox to enable SLCIR deductions.
The Ignore Threshold checkbox is only available for employees who are using the STC tax code. Ticking this box means that the student loan repayment threshold will not be used when calculating repayments. Inland Revenue will advise whether or not the threshold should be applied or ignored.
Enter the Rate of additional deduction, as specified by Inland Revenue.
Enter the total Amount of under deduction to recover, as specified by Inland Revenue. Once this amount has been repaid, SLCIR deductions will cease.
The Remaining balance field shows how much is still to be repaid. This amount is reduced each time a pay is updated.
NOTE: If the Amount of under deduction to recover field is edited, the Remaining balance field will be overwritten with the new amount.
SLBOR If the employee wants to make additional Student Loan repayments (see page 282) to pay
off their loan quicker, these repayments must be made under the SLBOR tax code. Click the button to specify details of SLBOR deductions.
NOTE: Video Help is available for this topic on the EXO Employer Services Education Centre.
MYOB EXO Payroll User Guide
57
Tick the Apply SLBOR checkbox to enable SLBOR deductions.
Select how to calculate the additional deductions. Choose from:
• A fixed dollar amount • A percentage of the employee s Gross Pay • A percentage of the employee s Gross Pay over the student loan repayment threshold
Once the method is selected, enter the amount or rate to deduct.
NOTE: Being voluntary, SLBOR deductions are taken out of the employee s pay after all other compulsory deductions are taken out. Ticking the Make a part deduction box means that if the employee does not have enough pay to cover the full amount of the SLBOR deduction once all other deductions are taken out, a part deduction of their remaining pay will be made. If the box is not ticked, the SLBOR deduction will not be made at all.
Other Details
ACC Code This shows the ACC levy code that the system will use when calculating the amount to
pay when printing the ACC Employer Premium report. Click the button to add, edit or delete ACC Codes and their applicable rates on the following window:
Double-clicking a rate or clicking Select will pick that rate. Rates can be added or edited by clicking the appropriate buttons, then entering the Code, Rate and an optional Description (remember to click Save when done). You may have as many ACC Rates as you like. If a rate has already been used by a staff member, then you will be unable to delete it until their rate is changed.
Setting up Exo Payroll
58
ESCT Rate If you have Employer Super deductions set up in the Deductions masterfile (see page 43), you will in effect be making a superannuation contribution, defined as a contribution made to a superannuation fund that an employer makes for their employees benefit. Such contributions are liable for Employer s Superannuation Contribution Tax, or ESCT. The choices for the rate of ESCT to apply are as follows:
• Calculated - To determine the employee s ESCT rate, Exo Payroll scans the total earnings liable for superannuation for the previous financial year; for employees who have been employed less than a full financial year, an estimate of their yearly earnings (the total salary or wages plus gross employer cash contributions that the employee has received or will receive) must be entered in the ESCT Gross Liable field. In either case, the system then automatically applies a rate of tax that is in alignment with the employee s income:
o Income $16,800 or less, tax rate will be 10.5% o Income between $16,801 and $57,600, tax rate will be 17.5% o Income between $57,601 and $84,000, tax rate will be 30% o Income $84,001 or more, tax rate will be 33%
• 10.5% - The employer and employee may agree to elect the lowest rate of tax, based on the employee s expected annual income.
• 17.5% - The employer and employee may agree to elect a lower rate of tax, based on the employee s expected annual income.
• 30% - The employer and employee may agree to elect a lower rate of tax, based on the employee s expected annual income.
• 33% - The employer and employee may agree to choose the flat rate option. From 1 April 2012, this option is only valid for defined benefit funds - in all other cases Calculated should be used instead.
NOTE: The ESCT Rate combo box also contains settings for 12.5% and 21%. As of 1 October 2010, these rates are no longer used, but are available for historical records.
ESCT Gross Liable This field is available if Calculated is select for the ESCT Rate field. It is editable if the employee has been employed for less than a full financial year. Enter an estimate of the amount that employee is expected to earn over the current financial year - this includes the total salary or wages plus gross employer cash contributions that the employee has received or will receive. This amount will be used to calculate the employee s ESCT rate.
Employment Type These choices show details about the status of the employee as a person and as an employee. Choose from:
Detail Options
Gender Male or Female
Hours Full-time or Part time
Remuneration Salary or Wage
Term Permanent or Casual
Hours Per Pay Period This field is only available for salaried employees. Enter the number of hours per pay period, to be used in calculating amounts for the Department of Statistics report. The salary that you enter in an employee s Standard Pay must stand for a number of hours, e.g. Weekly = 40 hours, Monthly = 173.33 hours.
MYOB EXO Payroll User Guide
59
Allow Overtime This option is only available for salaried employees. Selecting this option means that the employee can be paid additional waged hours. (Remember that waged employees are already allowed overtime by virtue of being waged employees.)
Proprietor Tick this box if the employee is a working proprietor, to be counted as such in the Department of Statistics report.
Birth Date, Age This field shows the employee s birthday and the computer then calculates the employee s age.
TIP: The system can automatically remind you that the birthday is approaching - this is set up in the Special Options Setup (see page 32) window.
Due Back Date This field shows the date the employee is due back from their holidays. This will tell the system not to copy across their Standard Pay into the current pay until this date is reached. This date is usually automatically entered from the Holiday Pay screen but can also be maintained from this location.
Annual Review This field records the date of the annual review of wages or salary, if one is applicable.
TIP: The system can automatically remind you that the review date is approaching - this is set up in the Special Options Setup (see page 32) window.
Holiday Pay
The Holiday Pay tab of the Employee Maintenance window contains the employee s Holiday Pay status, including their Annual Entitlement, Current Year Accrual and Outstanding Entitlements from previous holiday pay years. While it is not necessary to have loaded the data in this screen before you start paying your staff, it is recommended, as you will eventually come to a point where you will have to pay out someone s holiday pay and therefore will need to have their outstanding balance from previous years, and current accrual for this year, in the system.

Setting up Exo Payroll
60
Holiday Pay
Holiday Pay Group This is the group code containing the holiday pay rule that will be allocated to this employee, as defined in the holiday pay groups (see page 230) masterfile.
If Holiday Pay Groups are enabled on the Leave Management Setup (see page 16) window in the Payroll Setup, and you assign a holiday pay group code to the employee, the entitlement days and percentage will be drawn from the group rule.
If a group rule is not being employed you will have to assign the entitlement %days manually.
Annual Entitlement % This is normally set at 8%.
This percentage will also be used to calculate a person s holiday pay who is terminating before 12 months work and for the part of the current year worked for any person who is to be terminated before their next anniversary. In other words, incomplete years of holiday pay are paid out as x percentage of the current year s gross earnings.
Conversely, complete years of holiday are normally paid out at as x days at the employee s average daily rate for that year. Therefore there is a need to record both the entitlement % and entitlement days.
NOTE: If you are using Holiday Pay Groups and the employee has been allocated to one then the value behind this field will be drawn from the group rule.
Annual Entitlement Days For permanent full-timers enter the number of weeks converted to days (only 5 days per week) that a person is entitled to for the year. Four weeks is normally set to 20 days.
For permanent part-timers, set a person entitled to four weeks to 20 days. The payroll will pro-rata the actual days accruals for Permanent Part-timers to the number of days they have worked in the year, e.g. a person who works only two days per week would accrue only 8 days (of their average daily rate) if set to four weeks/20 days.
Even when you are unsure of how many days a person will in fact work in the year, this method will accrue the correct proportion of holidays per year for the actual days worked, providing you tell the system each pay period how many days you want to divide the holiday pay year by. (This is done using in the Days Paid button in the Current Pay (see page 142).)
Holiday Anniversary Date This field will have a date, which is the next Holiday Pay anniversary for this employee. (This is always a date in the future and This Years entitlement is always building up towards this date)
You will note that the Days entitlement are automatically being built up by the computer program. From the last anniversary date (a year prior to the date showing) towards the next anniversary date (the one showing) The actual date they have been accrued to is shown at the bottom right of screen which will, in normal circumstances, be the date of the next Pay. So that when you do the next pay the days accrued will include the pay you are working on and be accurate if you decided to terminate an employee.
The options to the right of these properties are only available if they have been activated on the Leave Management Setup window (see page 16) in the Payroll Setup.
• Pay Casual holiday Pay each Pay This will automatically give a casual employee holiday pay each pay. This does not come off the hourly rate but will always be 8% added to the Gross.
• Permanent Part Time / Pro Rata This allows the program to pro-rata the days accrued to the number of days worked, e.g. a person on two days a week would accrue eight days per year.

MYOB EXO Payroll User Guide
61
• Percentage Entitlement Only Under this method only dollar amounts will display - the system will not track daily rates, it will take a percentage of the current year s gross earnings for holiday pay valuation.
NOTE: Before changing these settings for an existing employee, take note of their existing entitlements; otherwise you may lose them.
Hours per Standard Day This field allows Exo Payroll to work out an hourly equivalent of the number of days of holidays paid out, for reports such as the Statistics Return.
It is also used for calculating the employee s Relevant Daily Rate, for leave types such as:
• Sick leave • Bereavement Leave • Public Holidays • Alternative Leave Paid • Shift Leave (where Shift Leave is being valued as Sick Leave in Leave Management Setup) • Other Leave (where Shift Leave is being valued as Sick Leave in Leave Management Setup)
For companies who allocate the holiday pay accrual in days, the Relevant Daily Rate is calculated as follows:
• Gross earnings liable for holiday pay for last 4 weeks / days paid for last 4 weeks / Hours per Standard Day = Relevant Hourly Rate
• Relevant Hourly Rate X Hours per Standard Day = Relevant Daily Rate
(For companies who allocate the holiday pay accrual in hours, the Relevant Daily Rate is calculated as follows:
• Gross earnings liable for holiday pay for last 4 weeks / hours paid for last 4 weeks = Relevant Hourly Rate
• Relevant Hourly Rate X Hours per Standard Day = Relevant Daily Rate
NOTE: If the employee works different hours for each day of the week, you may choose to pay the employee at their hourly rate, and specify the number of hours to pay based on the number of hours that the employee is rostered for on that day of the week (refer to the Sick & Other Leave tab (see page 65) for details on setting the Relevant Rate method to Hourly Rate). In that case, you would leave the Hours per Standard Day at zero, indicating that the employee does not work standard hours for each day.
Setting up Exo Payroll
62
This Year Entitlement Changes If you have attached a Holiday Pay Group (see page 230) to the employee, the This Year Holiday Pay Entitlements button will become enabled. Clicking this button opens the following window:
This window contains the employee s holiday pay gross earnings for the current holiday pay year, and any rule changes which have occurred partway through the year.
To add a new rule, click the Add button, then set the following properties:
• From - enter the date from which the rule change applies. • Percentage - enter the employee s annual percentage entitlement • Days/Hours - enter the employee s annual entitlement in Days or Hours, depending on
which method was chosen on the Leave Management Setup window (see page 16).
Click Save. The Gross Paid value is calculated automatically based on pay history.
You can edit an existing rule by selecting it and clicking Edit.
Entitlement Year
The lower part of the window shows you the fields where the Holiday Pay liable earning records are kept. These figures are separate and different from the Tax Year figures. These records will also be influenced by what you decide goes into the Gross Pay for the Holiday Pay Year, e.g. when creating an allowance you decide whether this is to be added to the Gross for the Holiday Pay. You do not use this screen while actually paying Holiday pay: You use the Holiday Pay screen in the Current Pay, which gathers its information for here.
MYOB EXO Payroll User Guide
63
The Entitlement Year section holds the days/hours and amounts for the current holiday entitlement year - the end date of which is shown in the holiday pay screen as the Holiday Anniversary Date, and the start date of which is end the date less one year.
Days/Hours Paid The number of days/hours that an employee has worked and been paid for, based on a maximum of five days per week.
Amount Paid The total gross earnings liable for Holiday Pay, for the Holiday Pay year to date.
Accrued Days/Hours This field is automatically calculated by the Payroll. The calculation is as follows:
The number of calendar days between the employees last Holiday Entitlement date and the current or next pay period date, divided into 365 which gives us a fraction of the year worked, e.g. if there have been 183 days since the last anniversary then the fraction is 50%. This is then applied to the employees normal annual entitlement value to arrive at an accrual e.g. 20 x 0.50 = 10 Accrued Days.
Accrued Amount This field is automatically calculated by the Payroll. The calculation is as follows:
The Amount Paid for the Entitlement Year X the Annual Entitlement %, e.g. 2280 X 0.08 = $182.40 for an employee on the Percentage Only method.
Outstanding Days/Hours Enter the number of days/hours of holiday pay owing and still outstanding from years prior to the last anniversary date. This value is calculated automatically as pays are run and as holiday pay years roll over.
Outstanding Amount Enter the lump sum of holiday pay owing and still outstanding from years prior to the last anniversary date, for an employee who is on the Percentage Only Method. This value is calculated automatically as pays are run and as holiday pay years roll over.
Advanced Days/Hours Enter the number of days/hours of holiday pay that have been paid in advance of the next Holiday Anniversary Date. This value is calculated automatically as pays are run and as holiday pay is paid out of the employee s current year s accrual of holidays.
Advanced Amount Enter the lump sum of holiday pay that have been paid in advance of the next Holiday Anniversary Date, for an employee who is on the Percentage Only Method. This value is calculated automatically as pays are run and as holiday pay is paid out of the employee s current year s accrual of holidays.
Days/Hours Balance Calculated at accrued days/hours + outstanding days/hours advanced days/hours.
Amount Balance Calculated at accrued amount + outstanding amount advanced amount, for an employee who is on the Percentage Only Method.
Last 12 Months
This section is used purely for calculating an average daily rate of holiday, by dividing the gross earnings liable for holiday pay (for the last 12 months), by the days/hours paid (for the last 12 months).
The last 12 months is defined as being from the pay period prior to the Current Pay, less one year.
Gross Pay The gross earnings liable for holiday pay will be divided by the days/hours paid to calculate the average daily rate of holiday pay, when paying outstanding or advanced days of holiday pay.
The gross earnings liable for holiday pay will also be used to calculate a value for termination pay. For example, if the Gross Paid for the current entitlement year = $30,000, the value of termination pay would be 6% of $30,000 or $1800, plus any outstanding days holiday pay x the daily rate for those days.
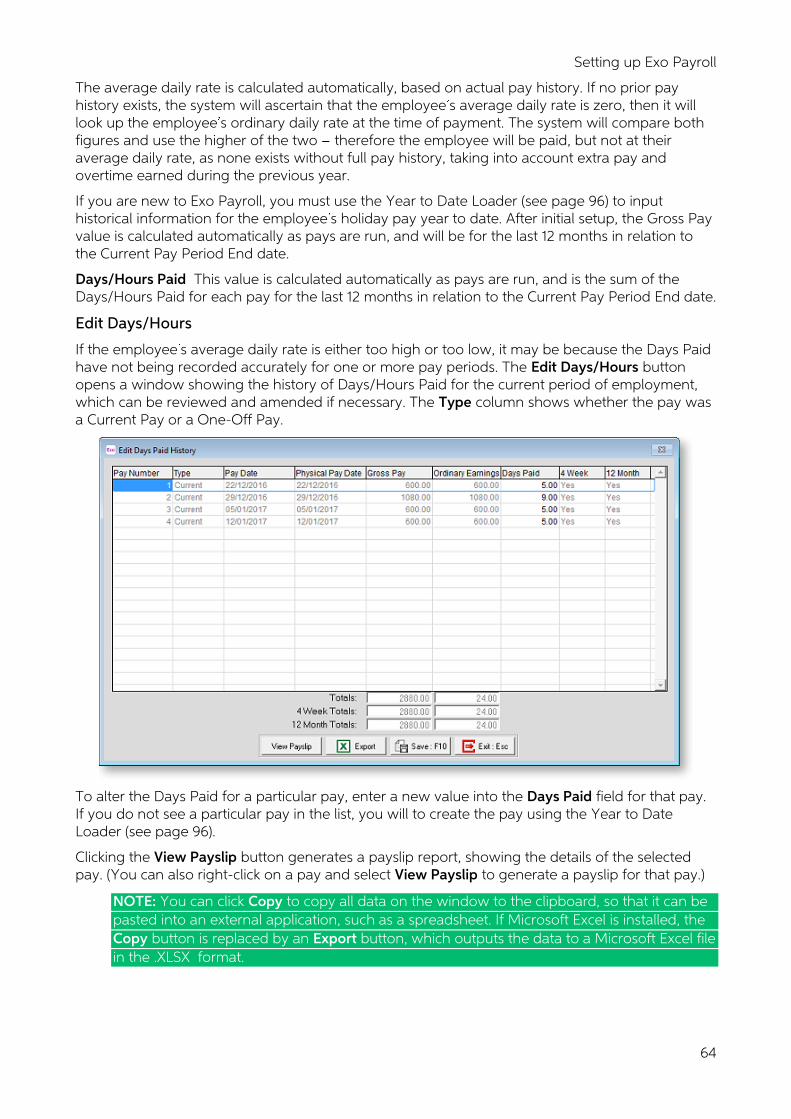
Setting up Exo Payroll
64
The average daily rate is calculated automatically, based on actual pay history. If no prior pay history exists, the system will ascertain that the employee s average daily rate is zero, then it will look up the employee s ordinary daily rate at the time of payment. The system will compare both figures and use the higher of the two therefore the employee will be paid, but not at their average daily rate, as none exists without full pay history, taking into account extra pay and overtime earned during the previous year.
If you are new to Exo Payroll, you must use the Year to Date Loader (see page 96) to input historical information for the employee s holiday pay year to date. After initial setup, the Gross Pay value is calculated automatically as pays are run, and will be for the last 12 months in relation to the Current Pay Period End date.
Days/Hours Paid This value is calculated automatically as pays are run, and is the sum of the Days/Hours Paid for each pay for the last 12 months in relation to the Current Pay Period End date.
Edit Days/Hours
If the employee s average daily rate is either too high or too low, it may be because the Days Paid have not being recorded accurately for one or more pay periods. The Edit Days/Hours button opens a window showing the history of Days/Hours Paid for the current period of employment, which can be reviewed and amended if necessary. The Type column shows whether the pay was a Current Pay or a One-Off Pay.
To alter the Days Paid for a particular pay, enter a new value into the Days Paid field for that pay. If you do not see a particular pay in the list, you will to create the pay using the Year to Date Loader (see page 96).
Clicking the View Payslip button generates a payslip report, showing the details of the selected pay. (You can also right-click on a pay and select View Payslip to generate a payslip for that pay.)
NOTE: You can click Copy to copy all data on the window to the clipboard, so that it can be pasted into an external application, such as a spreadsheet. If Microsoft Excel is installed, the Copy button is replaced by an Export button, which outputs the data to a Microsoft Excel file in the .XLSX format.
MYOB EXO Payroll User Guide
65
This Year Accrued To This property represents the end of the date span of the current year s holiday pay accrual. This date will be:
• Prior to the first pay run the system date of your computer • While the Current Pay matching the employee s pay frequency is open the Current Pay
period end date. • While the Current Pay matching the employee s pay frequency is closed the Current Pay
period end date plus one pay period.
It is advisable to print reports that track changes in leave liability, such as the Holiday Pay report, while the Current Pay is still open. If you are using leave liability reports for scheduling purposes, e.g. in order to allocate labour for the next working week, it is advisable to print these reports when the Current Pay is closed.
Ordinary Daily/Hourly Rate Select where to obtain the daily/hourly rate for Ordinary Pay calculation:
• Standard Pay - the daily/hourly rate is taken from the employee s Standard Pay. If the Standard Pay is not defined, i.e. the Standard Pay gross is zero, the system will use the 4 Week Average.
• 4 Week Average - the daily/hourly rate is calculated using the last four weeks earnings, regardless of what is in the Standard Pay. This is useful for casual employees who work irregular hours, or employees who have a basic pay but often have extra earnings to be included in the calculation for leave, such as regular overtime or commissions.
• Higher Rate - the employee s rate will be the higher of their Standard Pay or 4 Week Average rate. This option can be useful for cases like employees who occasionally work overtime, but mostly work to their Standard Pay, e.g. employees doing seasonal work.
Holiday Pay Cost Centre If you use a specific Cost Centre for each employees or departments Holiday Pay when paid, this can be entered here and will be the default when paying Holiday Pay.
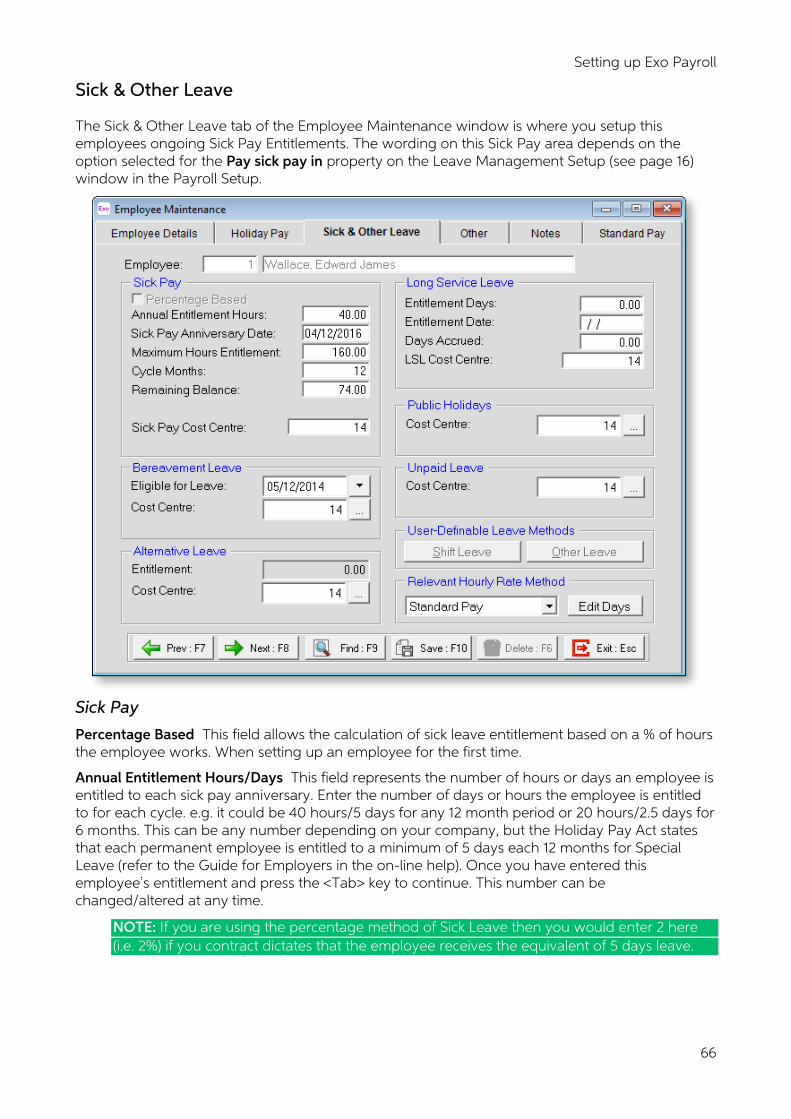
Setting up Exo Payroll
66
Sick & Other Leave
The Sick & Other Leave tab of the Employee Maintenance window is where you setup this employees ongoing Sick Pay Entitlements. The wording on this Sick Pay area depends on the option selected for the Pay sick pay in property on the Leave Management Setup (see page 16) window in the Payroll Setup.
Sick Pay
Percentage Based This field allows the calculation of sick leave entitlement based on a % of hours the employee works. When setting up an employee for the first time.
Annual Entitlement Hours/Days This field represents the number of hours or days an employee is entitled to each sick pay anniversary. Enter the number of days or hours the employee is entitled to for each cycle. e.g. it could be 40 hours/5 days for any 12 month period or 20 hours/2.5 days for 6 months. This can be any number depending on your company, but the Holiday Pay Act states that each permanent employee is entitled to a minimum of 5 days each 12 months for Special Leave (refer to the Guide for Employers in the on-line help). Once you have entered this employee s entitlement and press the <Tab> key to continue. This number can be changed/altered at any time.
NOTE: If you are using the percentage method of Sick Leave then you would enter 2 here (i.e. 2%) if you contract dictates that the employee receives the equivalent of 5 days leave.
MYOB EXO Payroll User Guide
67
Sick Pay Anniversary Date This is the date that the employee will next get their entitlement. The program will default to a date 18 months from the Start Date in the same year that this program commences and 6 months from the start date for a new employee, i.e. 6 months after their start date and yearly thereafter. If a new date is required this field can again be changed/altered at any time.
Maximum Hours/Days Entitlement This field contains the maximum number of hours or days an employee can accumulate over the years. Enter the maximum accumulation of non-taken sick leave hours/days permitted, recommended at 160 hours. If left blank the field has no maximum and will keep accumulating. Once completed press the <Tab> key to continue. This can be changed/altered at any time.
Cycle Months This is the cycle that sick pay is based over in months. Enter the number of months that apply to each set of Entitlement Hours/Days. The range is 3 to 12 ie a normal employee has a 12 month cycle so enter 12 here. Once finished press the <Tab> key to continue.
Remaining Balance This is the number of hours or days an employee still has left to take. When setting up an employee for the first time, enter the number of non-taken sick pay hours/days available at the time of commencing the first payroll on this program, i.e. an employee still has 3 days sick pay left to use, simply enter 3. The payroll automatically updates this every time sick pay is paid and the Current Pay is updated. Once finished press the <Tab> key to continue.
Hours Worked This Year If the Percentage Based Sick Pay method is activated the program will record the Hours worked this year every time the Current Pay is updated.
This is based on the total number of hours paid for any employee who you choose to accrue sick leave by this method.
To set up an employee for the first time using this option then:
Sick Pay Cost Centre If you use a specific Cost Centre for each employees or departments Sick Pay when paid, this can be entered here and will be the default when paying Sick Pay.
User Definable Leave Methods
There are two optional leave methods, which have some degree of customisation, and may be suitable for your needs. In the Leave Management Setup (see page 16) window in the Payroll Setup you can set options for how this will operate.
Payroll comes pre-set with Shift Leave and Other Leave.
Setting up Exo Payroll
68
Shift Leave
This screen contains the Shift Leave balances for the current employee.
Entitlement Days This field represents the number of hours or days an employee is entitled to each anniversary
Entitlement Date This is the date that the employee will next get their entitlement.
Days Accrued Days or Hours amassed since the start of the anniversary, to which the employee will be entitled upon the next rollover.
Days Outstanding from previous entitlements Accruals which were due on the last entitlement rollover but have not yet been taken by the employee.
Total Days Entitlement By default, shift leave is configured so that it cannot be paid in advance of the entitlement date, therefore it is inclusive of days outstanding and exclusive of days accrued.
Shift Leave Cost Centre If you use a specific Cost Centre for each employees or departments Shift Leave when paid, this can be entered here and will be the default when paying Shift Leave.
MYOB EXO Payroll User Guide
69
This Year Entitlement Changes
This screen contains the Shift Leave rules for the current employee.
To add new changes:
1. Click Add.
2. The From date becomes editable, at this point it is defaulting to today s date. Enter the new number of entitlement days. Press F10 to Save. From this point on, the employee will get the new number of entitlement days upon their next rollover.
3. Once you have added the appropriate rules click Exit to return to the Shift Leave screen.
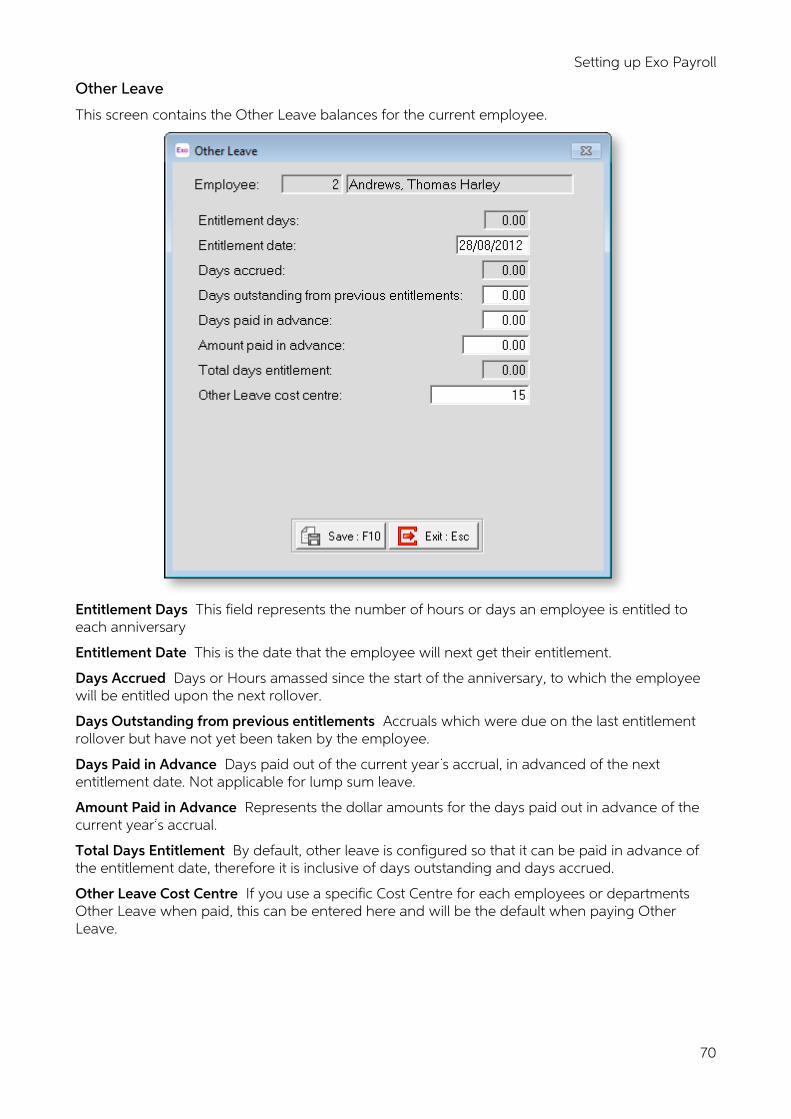
Setting up Exo Payroll
70
Other Leave
This screen contains the Other Leave balances for the current employee.
Entitlement Days This field represents the number of hours or days an employee is entitled to each anniversary
Entitlement Date This is the date that the employee will next get their entitlement.
Days Accrued Days or Hours amassed since the start of the anniversary, to which the employee will be entitled upon the next rollover.
Days Outstanding from previous entitlements Accruals which were due on the last entitlement rollover but have not yet been taken by the employee.
Days Paid in Advance Days paid out of the current year s accrual, in advanced of the next entitlement date. Not applicable for lump sum leave.
Amount Paid in Advance Represents the dollar amounts for the days paid out in advance of the current year s accrual.
Total Days Entitlement By default, other leave is configured so that it can be paid in advance of the entitlement date, therefore it is inclusive of days outstanding and days accrued.
Other Leave Cost Centre If you use a specific Cost Centre for each employees or departments Other Leave when paid, this can be entered here and will be the default when paying Other Leave.
MYOB EXO Payroll User Guide
71
Bereavement Leave
Eligible for Leave All employees are entitled to paid bereavement leave after completing six months of continuous employment with their employer. The Holidays Act also provides bereavement leave entitlements after six months to employees, including casual employees, whose employment is not continuous if, during those six months, they have worked:
1. An average of at least 10 hours per week, and 2. At least one hour per week or 40 hours per month.
An employee may take bereavement leave if the employee suffers a bereavement on the death of the employee s:
• spouse • parent • child • brother or sister • grandparent • grandchild • spouse s parent
or on the death of any other person if the employer accepts that the employee has suffered a bereavement as a result of the death.
In the first seven examples the employee qualifies for three days of bereavement, which do not have to be taken consecutively.
In the last example the employee qualifies for one day of bereavement. For this type of bereavement the employer must take into account relevant factors such as:
• The closeness of the association employee and the deceased person • Whether the employee has to take significant responsibility for all or any of the
arrangements for the ceremonies relating to the death. • Any cultural responsibilities of the employee in relation to the death
Cost Centre If you use a specific Cost Centre for each employees or departments Bereavement Leave when paid, this can be entered here and will be the default when paying Bereavement Leave.
Long Service Leave
This is for the leave paid as a special after a given number of years as a one-off, e.g. 5 days long service leave after 7 years. Some companies pay long service and some do not, if not skip this area. To set up an employee for the first time using this option then.
Entitlement Days Enter the number of days of Long Service Leave payable when the Entitlement Date is reached
Entitlement Date Enter the date (dd/mm/yyyy) when the Entitlement Days become due. The program can accept dates into the next century if entered in the xx/xx/xxxx format
Days Accrued This field shows the number of days of long service leave that have accrued up until the date this payroll commences.
Setting up Exo Payroll
72
To set up an employee for the first time:
• If the employee has no long service leave entitlement when the payroll is being setup then leave this field blank and the system will start accruing the days when the entitlement date is reached.
• If an employee has an entitlement when the payroll is being set up then type in the number of days long service leave the employee still has left to take. This number can be changed/altered at any time.
Long Service Leave Cost Centre If you use a specific Cost Centre for each employee s or department s Long Service Leave when paid, this can be entered here and will be the default when paying Long Service Leave.
Public Holidays
Cost Centre If you use a specific Cost Centre for each employee s or department s Public Holidays when paid, this can be entered here and will be the default when paying Public Holidays.
Unpaid Leave
Cost Centre If you use a specific Cost Centre for each employee s or department s Unpaid Leave, this can be entered here and will be the default when employees take Unpaid Leave.
Alternative Leave
Whenever an employee works any hours on a public holiday, they are paid at a Pay Rate for Time & a Half. If the employee was rostered on for the day of the week on which the Public Holiday fell, they also accrue an alternative day, or day in lieu.
Entitlement This field holds the outstanding balance of alternative days owing to the employee. If the employee works on a Public Holiday, the value in this field will increase by 1 day, signifying that the employee has received a future holiday in exchange for coming in to work. When the employee subsequently takes the holiday, this is known as an Alternative Day Paid, causing the entitlement to decrease by 1 day after the Current Pay is updated, thus clearing the leave liability.
If you are loading leave balances for your employees for the first time, you will need to run a One Off adjustment pay, dated for the day on which the leave was originally accrued (if known) or the period end date of the pay period prior to your first live pay, if the original Public Holiday/accrual date is unknown. In this pay you will need to transact however many units of Alternative Leave Accrued are owed to the employee.
Cost Centre If you use a specific Cost Centre for each employees or departments Alternative Leave when paid, this can be entered here and will be the default when paying Alternative leave.
MYOB EXO Payroll User Guide
73
Relevant Hourly Rate Method
The Relevant Hourly Rate Method determines the valuation of sick leave, public holidays, alternative leave and bereavement leave. The following options are available:
• Standard Pay - In the case of workers with regular contracted hours that have been set up in the Standard Pay, the relevant daily rate can be drawn from the standard rate, i.e. Standard Pay gross liable earnings / days paid / standard hours per day.
• Average Daily Pay - In the case of part time workers with irregular hours, where no Standard Pay has been set up, the relevant rate can be drawn from an average, which is calculated as follows:
o The employee s gross earnings for the 52 calendar weeks before the end of the pay period immediately before the calculation is made,
o Divided by:
o The number of whole or part days during which the employee earned those gross earnings, including any day on which the employee was on a paid holiday or paid leave; but excluding any other day on which the employee did not actually work.
• Daily/Hourly Rate - In the case of casual workers, the relevant rate can be drawn from the employee s daily/hourly wage rate. In this case, you would pay the employee for the same number of days/hours that they would have worked, had they not taken leave.
• Special Rate - Employers and employees can agree on a specific daily rate to be used for Holiday Pay valuation. This rate must be equal to or greater than the Relevant Daily Pay for the employee. When this option is selected, an extra field becomes available; enter the special rate into this field. Exo Payroll compares the rate entered here with the rate derived from all other available methods. If any other method gives a rate higher than the value specified for special rate, the higher rate will be used.
The Average Daily Pay calculation uses actual pay history you may need to override the suggested amount if:
• if the employee has received an unusually high and irregular amount of pay in the last 52 weeks, for whatever reason.
• if you are using Exo Payroll for the first time, after converting from some other record-keeping system there may be insufficient payroll history from which to calculate an income test in which case you may be receive a suggested dollar amount of $0.
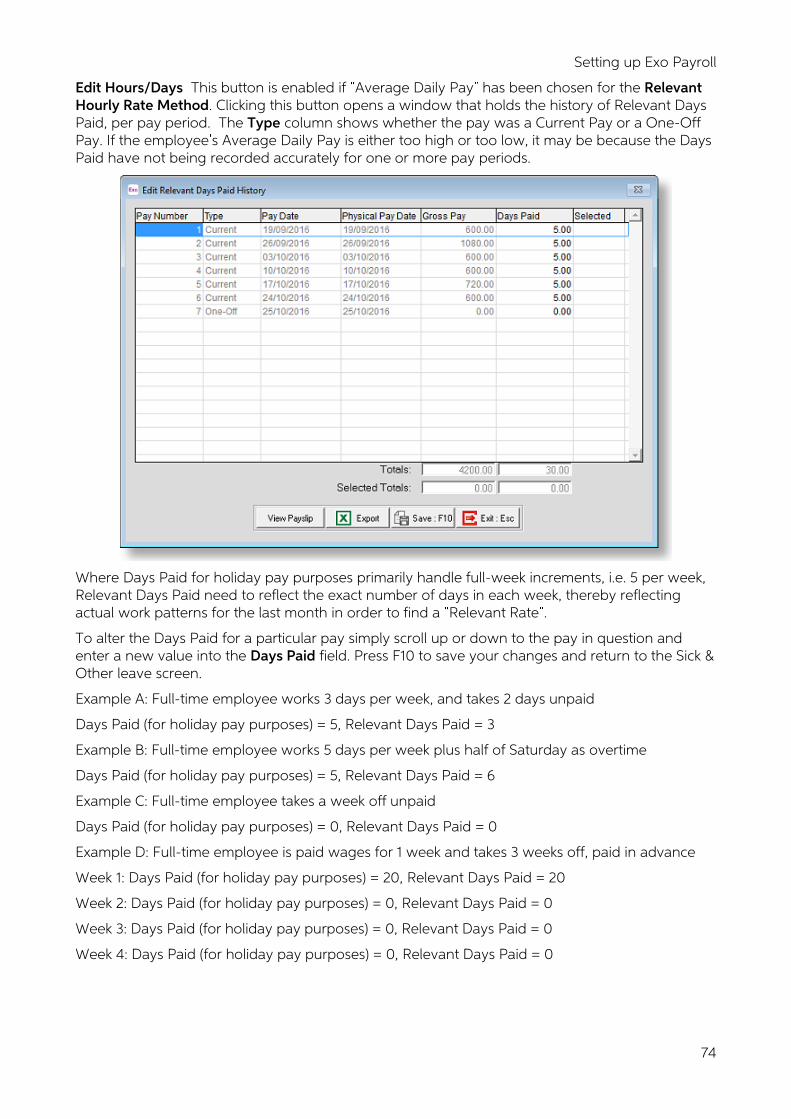
Setting up Exo Payroll
74
Edit Hours/Days This button is enabled if Average Daily Pay has been chosen for the Relevant Hourly Rate Method. Clicking this button opens a window that holds the history of Relevant Days Paid, per pay period. The Type column shows whether the pay was a Current Pay or a One-Off Pay. If the employee s Average Daily Pay is either too high or too low, it may be because the Days Paid have not being recorded accurately for one or more pay periods.
Where Days Paid for holiday pay purposes primarily handle full-week increments, i.e. 5 per week, Relevant Days Paid need to reflect the exact number of days in each week, thereby reflecting actual work patterns for the last month in order to find a Relevant Rate .
To alter the Days Paid for a particular pay simply scroll up or down to the pay in question and enter a new value into the Days Paid field. Press F10 to save your changes and return to the Sick & Other leave screen.
Example A: Full-time employee works 3 days per week, and takes 2 days unpaid
Days Paid (for holiday pay purposes) = 5, Relevant Days Paid = 3
Example B: Full-time employee works 5 days per week plus half of Saturday as overtime
Days Paid (for holiday pay purposes) = 5, Relevant Days Paid = 6
Example C: Full-time employee takes a week off unpaid
Days Paid (for holiday pay purposes) = 0, Relevant Days Paid = 0
Example D: Full-time employee is paid wages for 1 week and takes 3 weeks off, paid in advance
Week 1: Days Paid (for holiday pay purposes) = 20, Relevant Days Paid = 20
Week 2: Days Paid (for holiday pay purposes) = 0, Relevant Days Paid = 0
Week 3: Days Paid (for holiday pay purposes) = 0, Relevant Days Paid = 0
Week 4: Days Paid (for holiday pay purposes) = 0, Relevant Days Paid = 0
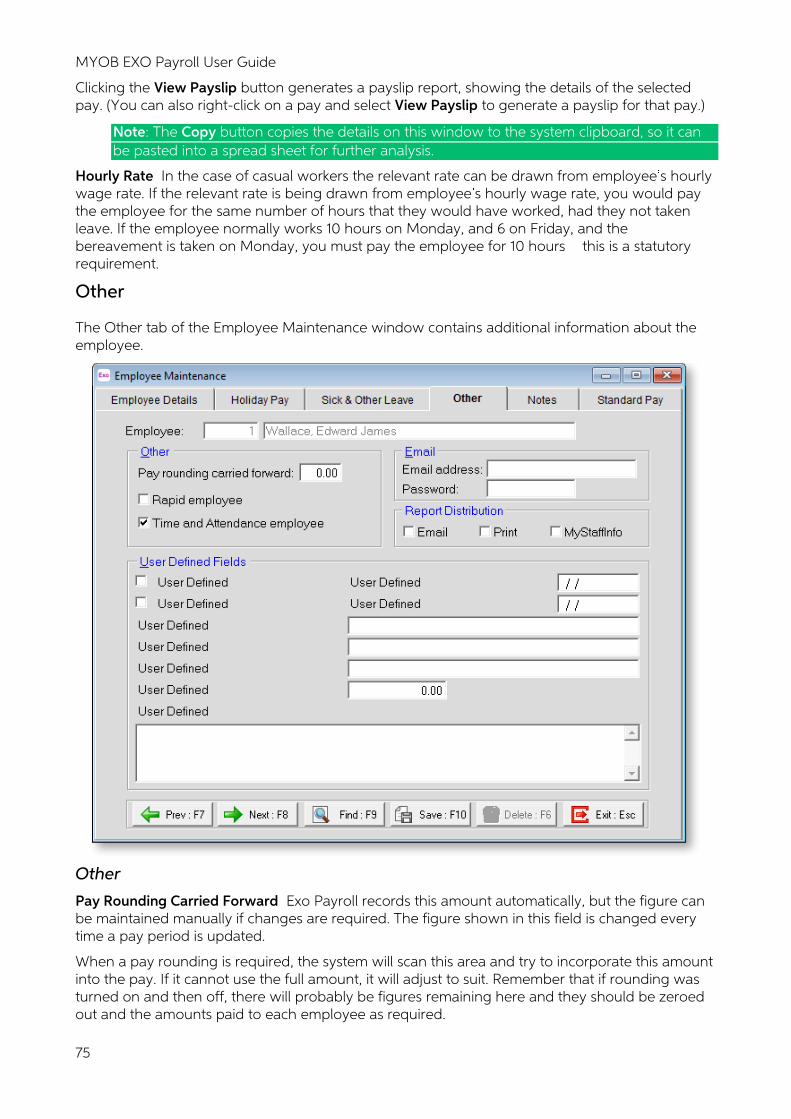
MYOB EXO Payroll User Guide
75
Clicking the View Payslip button generates a payslip report, showing the details of the selected pay. (You can also right-click on a pay and select View Payslip to generate a payslip for that pay.)
Note: The Copy button copies the details on this window to the system clipboard, so it can be pasted into a spread sheet for further analysis.
Hourly Rate In the case of casual workers the relevant rate can be drawn from employee s hourly wage rate. If the relevant rate is being drawn from employee s hourly wage rate, you would pay the employee for the same number of hours that they would have worked, had they not taken leave. If the employee normally works 10 hours on Monday, and 6 on Friday, and the bereavement is taken on Monday, you must pay the employee for 10 hours this is a statutory requirement.
Other
The Other tab of the Employee Maintenance window contains additional information about the employee.
Other
Pay Rounding Carried Forward Exo Payroll records this amount automatically, but the figure can be maintained manually if changes are required. The figure shown in this field is changed every time a pay period is updated.
When a pay rounding is required, the system will scan this area and try to incorporate this amount into the pay. If it cannot use the full amount, it will adjust to suit. Remember that if rounding was turned on and then off, there will probably be figures remaining here and they should be zeroed out and the amounts paid to each employee as required.
Setting up Exo Payroll
76
When setting up an employee for the first time:
• If the employee has no Pay rounding carried forward when the payroll is being set up, leave this field blank and the system will start accruing pay rounding automatically.
• If an employee has Pay rounding when the Payroll is being set up, enter the amount of pay rounding the employee has, so the system can try to incorporate this amount into the pay when an employee is being paid. This amount can be changed/altered at any time.
Rapid Employee/Time and Attendance Employee If you have purchased the MYOB Exo Time and Attendance system or you are using the MYOB Rapid Data entry system, these fields will be available to use. This field allows you to define whether an employee is on the Exo Time and Attendance or Rapid System and as such, their wage hour s information will be imported into the Payroll via Exo Time and Attendance or posted from Rapid. It also notifies Exo Time and Attendance which of your employees are using the TimeClock.
Email Address Enter the employee s email address. Payslips generated by the Payslip PDF Email report will be forwarded to this address, e.g. [email protected]. This is an alternative to handing the employee a paper slip, or mailing payslips via the post.
Password The Emailed payslip will be in a PDF format (this will require Adobe s Acrobat Reader to be installed). Payslips can be password protected so that only intended recipient can open the file in the Acrobat Reader.
Report Distribution Tick the Email, Print and/or MyStaffInfo boxes to determine how payslips should be distributed to this employee when using the Distribution function (see page 203).
User Defined Fields
With User Defined Fields you can extend the power of the Exo Payroll storage system to record items of interest that are not otherwise covered elsewhere, by turning on the show user defined fields option in the Employees report (see page 176).
The following types of User Defined Field are available:
• Logical - Place a tick in the box to turn on a logical field. • Date - Enter a date in the format dd/mm/yyyy. • Text - Enter a short comment here. • Memo - Enter a long comment or description here. It can run over several lines.
To give a meaningful name to a field, double-click on the User Defined name; this will make the caption editable.
NOTE: The names you enter for the User Defined fields apply to all employees, but the information you enter for the fields values is specific to the employee you are currently editing. For example, if you change one of the text fields to Middle Name , then this field will be called Middle Name for all employees; however, the actual contents of the field is entered separately for each employee.
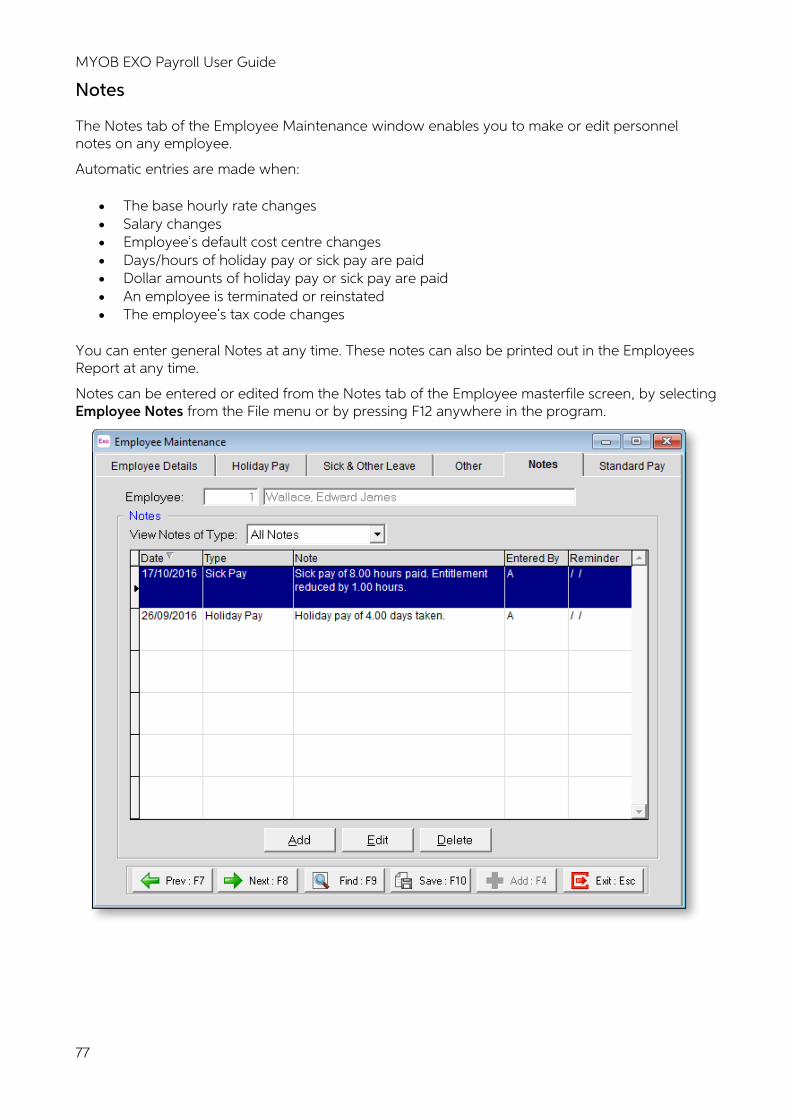
MYOB EXO Payroll User Guide
77
Notes
The Notes tab of the Employee Maintenance window enables you to make or edit personnel notes on any employee.
Automatic entries are made when:
• The base hourly rate changes • Salary changes • Employee s default cost centre changes • Days/hours of holiday pay or sick pay are paid • Dollar amounts of holiday pay or sick pay are paid • An employee is terminated or reinstated • The employee s tax code changes
You can enter general Notes at any time. These notes can also be printed out in the Employees Report at any time.
Notes can be entered or edited from the Notes tab of the Employee masterfile screen, by selecting Employee Notes from the File menu or by pressing F12 anywhere in the program.
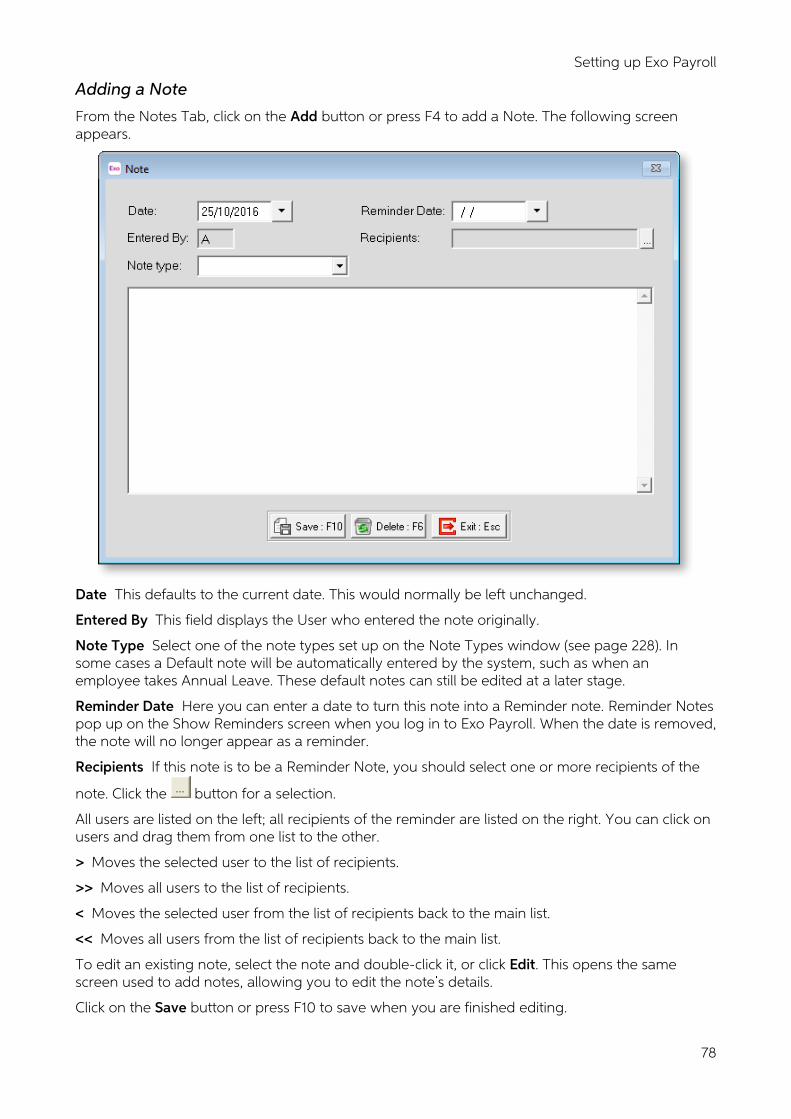
Setting up Exo Payroll
78
Adding a Note
From the Notes Tab, click on the Add button or press F4 to add a Note. The following screen appears.
Date This defaults to the current date. This would normally be left unchanged.
Entered By This field displays the User who entered the note originally.
Note Type Select one of the note types set up on the Note Types window (see page 228). In some cases a Default note will be automatically entered by the system, such as when an employee takes Annual Leave. These default notes can still be edited at a later stage.
Reminder Date Here you can enter a date to turn this note into a Reminder note. Reminder Notes pop up on the Show Reminders screen when you log in to Exo Payroll. When the date is removed, the note will no longer appear as a reminder.
Recipients If this note is to be a Reminder Note, you should select one or more recipients of the
note. Click the button for a selection.
All users are listed on the left; all recipients of the reminder are listed on the right. You can click on users and drag them from one list to the other.
> Moves the selected user to the list of recipients.
>> Moves all users to the list of recipients.
< Moves the selected user from the list of recipients back to the main list.
<< Moves all users from the list of recipients back to the main list.
To edit an existing note, select the note and double-click it, or click Edit. This opens the same screen used to add notes, allowing you to edit the note s details.
Click on the Save button or press F10 to save when you are finished editing.
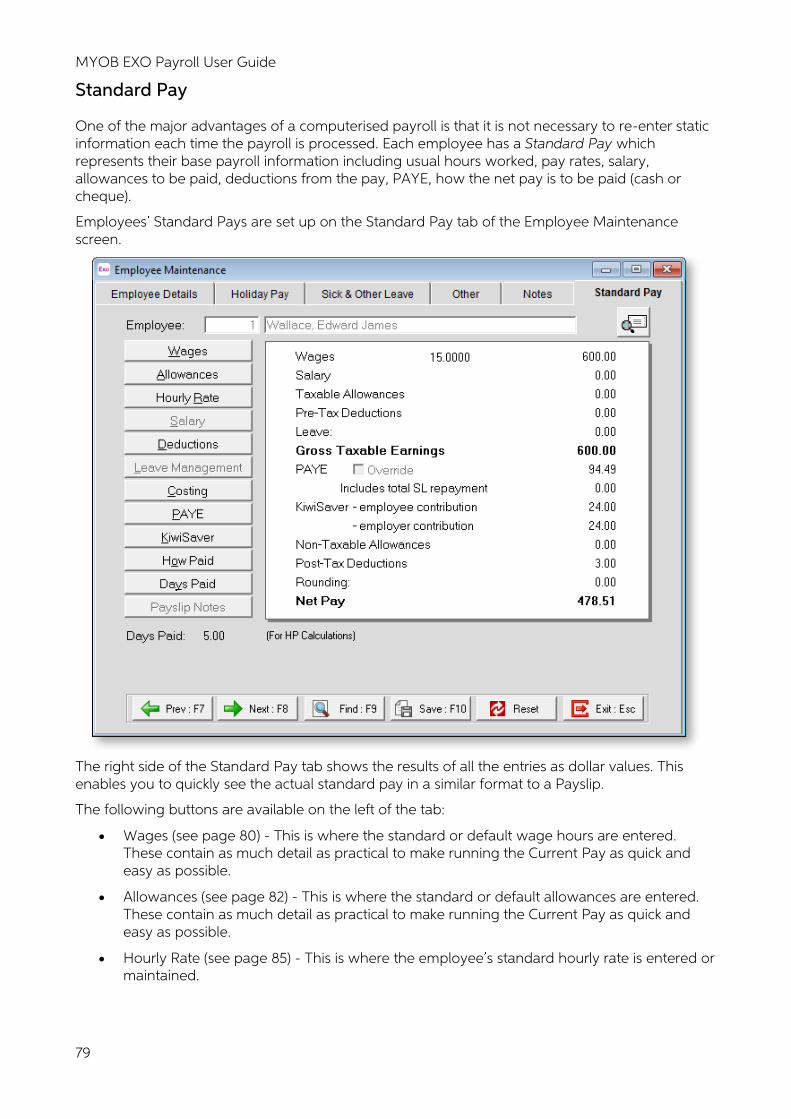
MYOB EXO Payroll User Guide
79
Standard Pay
One of the major advantages of a computerised payroll is that it is not necessary to re-enter static information each time the payroll is processed. Each employee has a Standard Pay which represents their base payroll information including usual hours worked, pay rates, salary, allowances to be paid, deductions from the pay, PAYE, how the net pay is to be paid (cash or cheque).
Employees Standard Pays are set up on the Standard Pay tab of the Employee Maintenance screen.
The right side of the Standard Pay tab shows the results of all the entries as dollar values. This enables you to quickly see the actual standard pay in a similar format to a Payslip.
The following buttons are available on the left of the tab:
• Wages (see page 80) - This is where the standard or default wage hours are entered. These contain as much detail as practical to make running the Current Pay as quick and easy as possible.
• Allowances (see page 82) - This is where the standard or default allowances are entered. These contain as much detail as practical to make running the Current Pay as quick and easy as possible.
• Hourly Rate (see page 85) - This is where the employee s standard hourly rate is entered or maintained.
Setting up Exo Payroll
80
• Salary (see page 85) - This is where the employee s salary for their matching pay frequency is entered. This option is only enabled if the employee has been setup as Salaried in the Employee Details tab.
• Deductions (see page 86) - This is where any deductions that are to be taken out of an employees pay on a regular basis are entered.
• Leave Management - This option is not available in the Standard Pay - leave is only paid out in the Current or One-Off Pay (see page 114).
• Costing (see page 89) - If you wish to proportionally cost an employee s wages or salary by hours or by percentages to different cost centres then this is where it is both switched on at the employee level and set-up.
• PAYE (see page 90) - If left unaltered, the computer will automatically calculate the PAYE payable on the employees gross taxable amount, based on the tax code selected in the Employee Details Tab. If required, you do have the ability to override the PAYE with your own amounts.
• KiwiSaver (see page 90) - This is where you set up an employee s KiwiSaver contributions, or opt them out of the KiwiSaver scheme.
• How Paid (see page 93) - This is where we setup the way an employee s net pay is to be handled. You can setup payment by cash, cheque, direct credit or by a combination of these.
• Days Paid / Hours Paid (see page 95) - For the purposes of the Standard Pay the number shown in this field is the number of days or hours that the Standard Pay represents.
• Payslip Notes - This option is not available in the Standard Pay - it is only used in the Current or One-Off Pay (see page 143).
You can click the button to generate a preview payslip showing the employee s Standard Pay.
If the employee s pay situation changes, you can reset the pay by clicking the Reset button at the bottom of the window. A reset operation will re-initialise all Standard Pay values to zero, set the balance of pay to Cheque, and remove all transaction lines.
Standard Pay - Wages
Clicking the Wages button on the Standard Pay tab (see page 79) open this window, where the wage information is entered. It shows the standard number of hours an employee works for their selected pay frequency. If an employee works a varying number of hours or is a casual/part time employee this can be left as zero in the Standard Pay and the hours entered on a pay period by pay period basis. It also displays the hourly rate, the amount (if a number of hours are entered), the pay rate type (as per the Payroll Setup screen) and the pay rate description.
If no hours are entered here in the Standard Pay, then every time a pay is created, the employees hours to be paid will have to be entered. We recommend that you enter at least the employee s base hours, as this speeds up payroll processing on pay day, as the Standard Pay is copied and becomes the Current Pay. Therefore on payday you will only need to alter the hours if they vary from the Standard Pay.
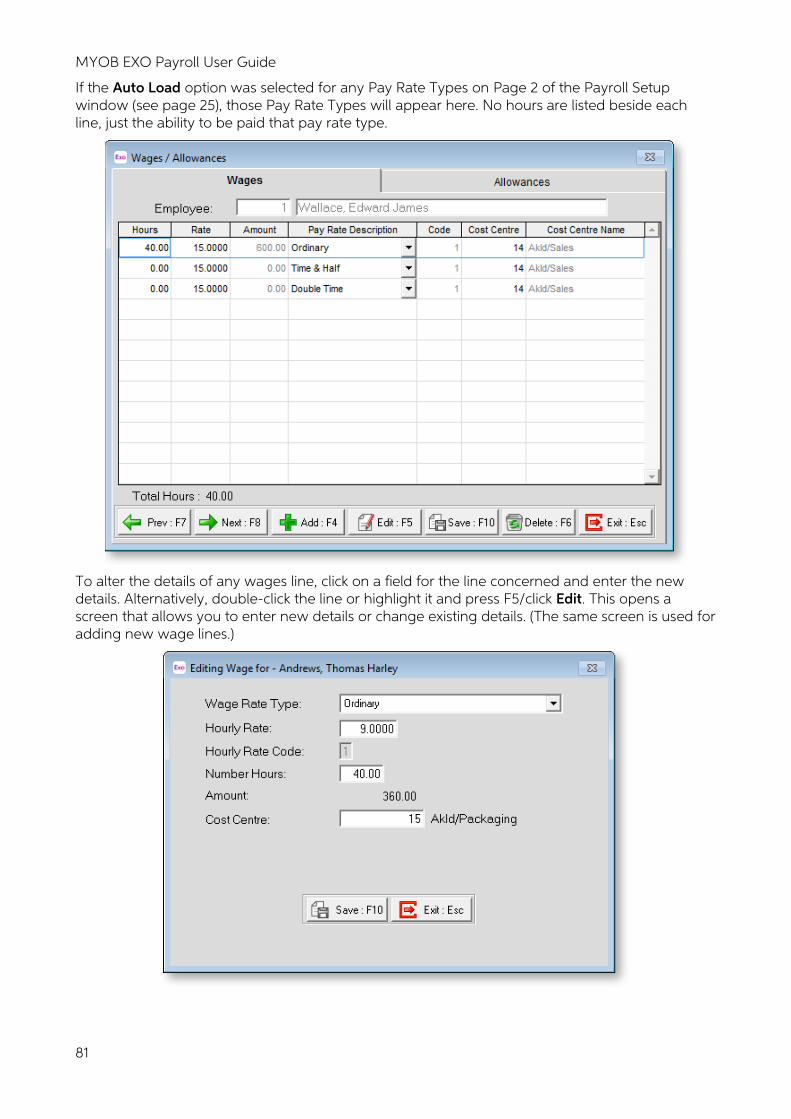
MYOB EXO Payroll User Guide
81
If the Auto Load option was selected for any Pay Rate Types on Page 2 of the Payroll Setup window (see page 25), those Pay Rate Types will appear here. No hours are listed beside each line, just the ability to be paid that pay rate type.
To alter the details of any wages line, click on a field for the line concerned and enter the new details. Alternatively, double-click the line or highlight it and press F5/click Edit. This opens a screen that allows you to enter new details or change existing details. (The same screen is used for adding new wage lines.)
Setting up Exo Payroll
82
Wage Rate Type Select the Pay Rate Type you want to allocate. These are listed from the types (1-9) created on Page 2 of the Payroll Setup window (see page 25). They show the rate type number, the description and the multiplier of the hourly rate. This screen defaults to Pay Rate Type 1.
Hourly Rate This shows the employees base hourly rate. It defaults to the hourly rate entered in the Hourly Rate window (see page 85). The Base Rate is used for each Rate Type i.e. if the employee s Hourly Rate is $10.00 per hour then this shows against each line that was applicable.
Rates used for overtime always display the base rate, as the system will multiply this by the Rate factor as setup in the Payroll Setup screen.
NOTE: If the hourly rate is changed after a pay period has been opened, the new hourly rate will not take effect until the next pay period is opened.
Hourly Rate Code Where you are using Multiple Hourly Rates this field represents the Code or number of the rate that is being used.
Number Hours For the purposes of the Standard Pay, this is the number of hours for each pay rate type the employee would get for an average pay period. The reason for doing this is so that when a pay period is created, for most pay periods you will only need to enter the Wages Tab screen if there are changes to be made. For example, if an employee normally works a 40 hour week, but can occasionally work overtime at 1.5 times the hourly rate, load 40 hours for ordinary time and leave the overtime hours field blank.
Amount This is a computer-calculated field that is the result of the pay rate x the number of hours, showing the dollar value.
Cost Centre Use this field to enter the cost centre number if it is different from the employee s default cost centre. The Cost Centre Name or Description for the selected Cost Centre is also displayed.
Direct cost to this code This option is available if the Mixed Proportional Costing option is enabled on the Payroll Setup Page 1 window (see page 13). Selecting this option means that this wage line will be costed directly to the employee s default cost centre, rather than being proportioned.
Alternative Type Desc This field is available if the Allow wage descriptions to be changed option on the Special Options Setup window (see page 28) in the Payroll Setup is ticked. Enter an alternative description to appear in the Pay Rate Description column on the Wages window.
Once you have entered all the required information, click Save or press F10 to save and return to the Wages screen.
If further standard hours are to be loaded or edited for this employee, repeat the above process for each new or existing wage line.
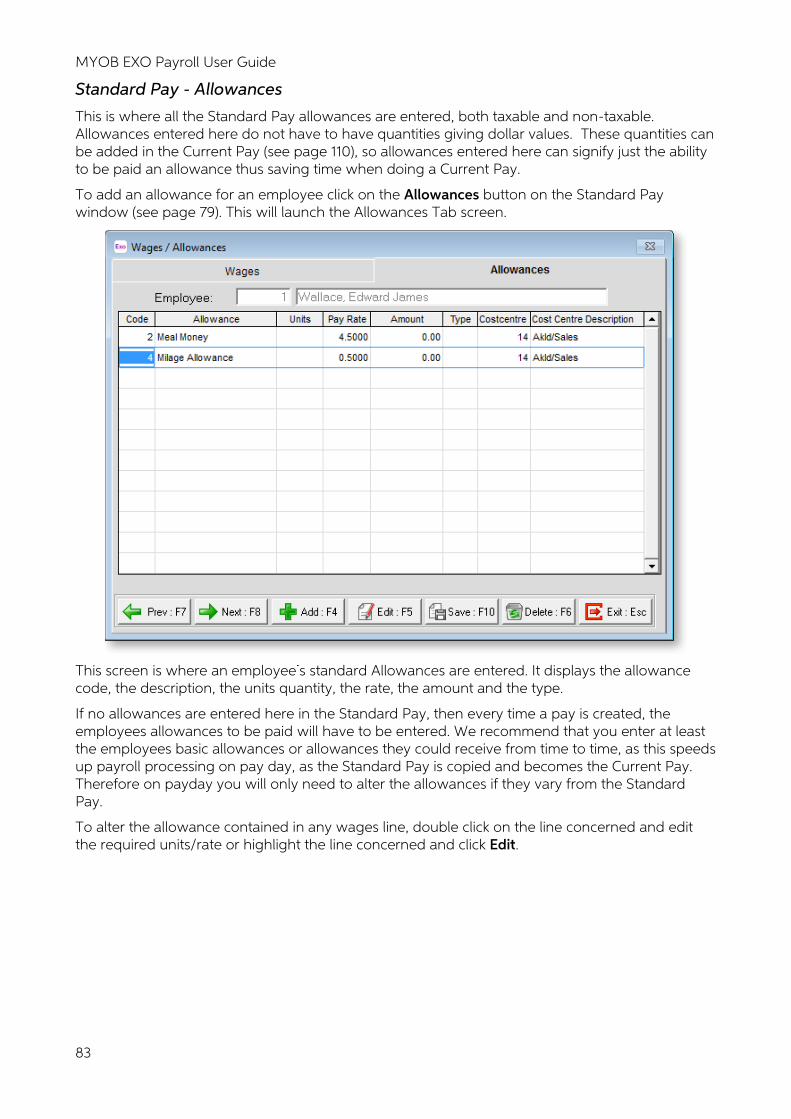
MYOB EXO Payroll User Guide
83
Standard Pay - Allowances
This is where all the Standard Pay allowances are entered, both taxable and non-taxable. Allowances entered here do not have to have quantities giving dollar values. These quantities can be added in the Current Pay (see page 110), so allowances entered here can signify just the ability to be paid an allowance thus saving time when doing a Current Pay.
To add an allowance for an employee click on the Allowances button on the Standard Pay window (see page 79). This will launch the Allowances Tab screen.
This screen is where an employee s standard Allowances are entered. It displays the allowance code, the description, the units quantity, the rate, the amount and the type.
If no allowances are entered here in the Standard Pay, then every time a pay is created, the employees allowances to be paid will have to be entered. We recommend that you enter at least the employees basic allowances or allowances they could receive from time to time, as this speeds up payroll processing on pay day, as the Standard Pay is copied and becomes the Current Pay. Therefore on payday you will only need to alter the allowances if they vary from the Standard Pay.
To alter the allowance contained in any wages line, double click on the line concerned and edit the required units/rate or highlight the line concerned and click Edit.
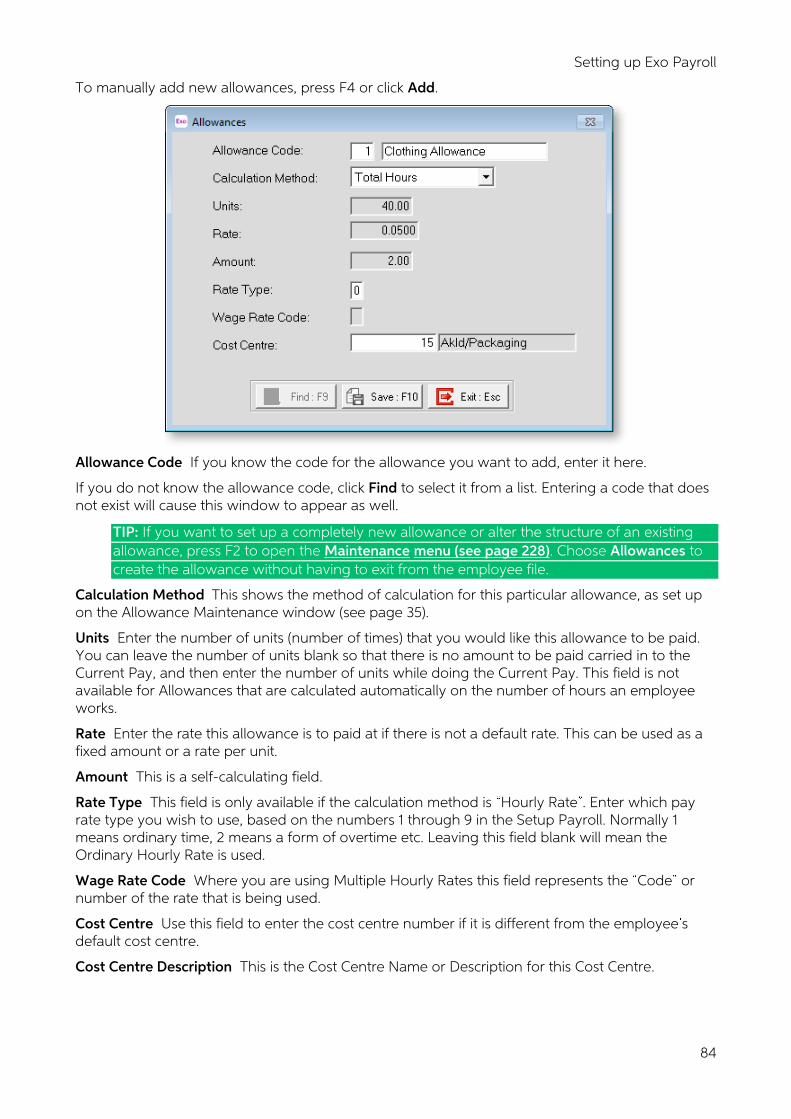
Setting up Exo Payroll
84
To manually add new allowances, press F4 or click Add.
Allowance Code If you know the code for the allowance you want to add, enter it here.
If you do not know the allowance code, click Find to select it from a list. Entering a code that does not exist will cause this window to appear as well.
TIP: If you want to set up a completely new allowance or alter the structure of an existing allowance, press F2 to open the Maintenance menu (see page 228). Choose Allowances to create the allowance without having to exit from the employee file.
Calculation Method This shows the method of calculation for this particular allowance, as set up on the Allowance Maintenance window (see page 35).
Units Enter the number of units (number of times) that you would like this allowance to be paid. You can leave the number of units blank so that there is no amount to be paid carried in to the Current Pay, and then enter the number of units while doing the Current Pay. This field is not available for Allowances that are calculated automatically on the number of hours an employee works.
Rate Enter the rate this allowance is to paid at if there is not a default rate. This can be used as a fixed amount or a rate per unit.
Amount This is a self-calculating field.
Rate Type This field is only available if the calculation method is Hourly Rate . Enter which pay rate type you wish to use, based on the numbers 1 through 9 in the Setup Payroll. Normally 1 means ordinary time, 2 means a form of overtime etc. Leaving this field blank will mean the Ordinary Hourly Rate is used.
Wage Rate Code Where you are using Multiple Hourly Rates this field represents the Code or number of the rate that is being used.
Cost Centre Use this field to enter the cost centre number if it is different from the employee s default cost centre.
Cost Centre Description This is the Cost Centre Name or Description for this Cost Centre.
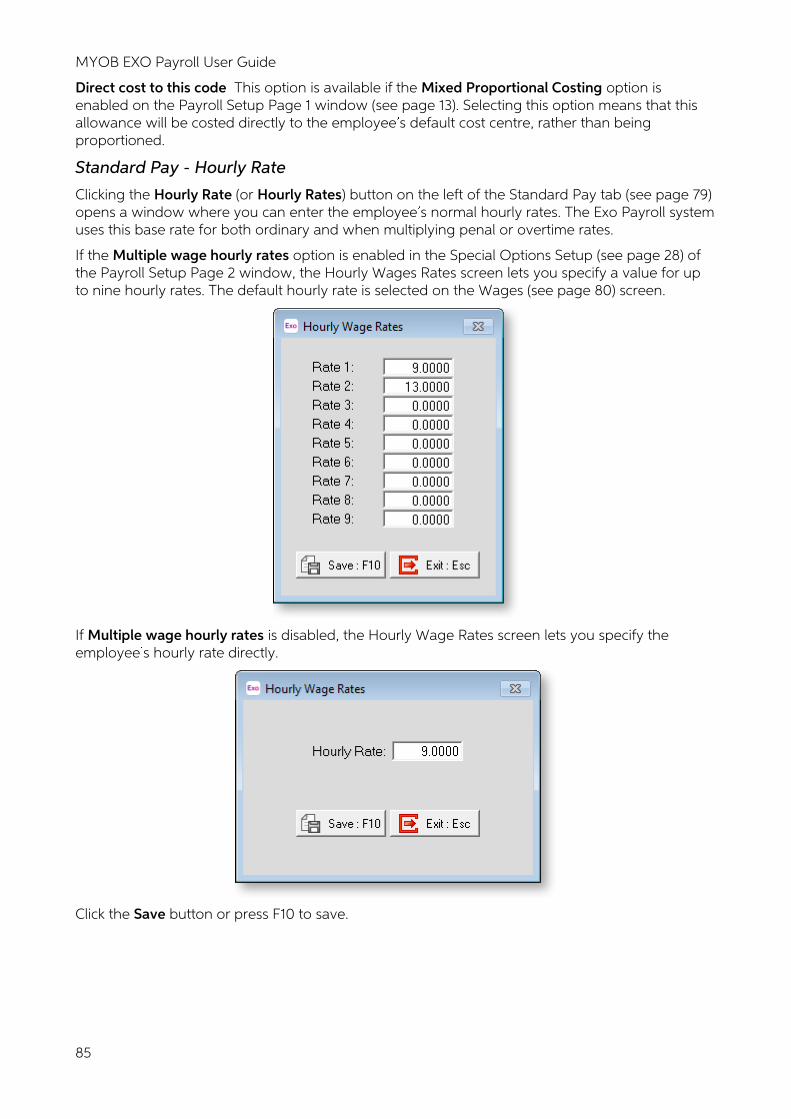
MYOB EXO Payroll User Guide
85
Direct cost to this code This option is available if the Mixed Proportional Costing option is enabled on the Payroll Setup Page 1 window (see page 13). Selecting this option means that this allowance will be costed directly to the employee s default cost centre, rather than being proportioned.
Standard Pay - Hourly Rate
Clicking the Hourly Rate (or Hourly Rates) button on the left of the Standard Pay tab (see page 79) opens a window where you can enter the employee s normal hourly rates. The Exo Payroll system uses this base rate for both ordinary and when multiplying penal or overtime rates.
If the Multiple wage hourly rates option is enabled in the Special Options Setup (see page 28) of the Payroll Setup Page 2 window, the Hourly Wages Rates screen lets you specify a value for up to nine hourly rates. The default hourly rate is selected on the Wages (see page 80) screen.
If Multiple wage hourly rates is disabled, the Hourly Wage Rates screen lets you specify the employee s hourly rate directly.
Click the Save button or press F10 to save.
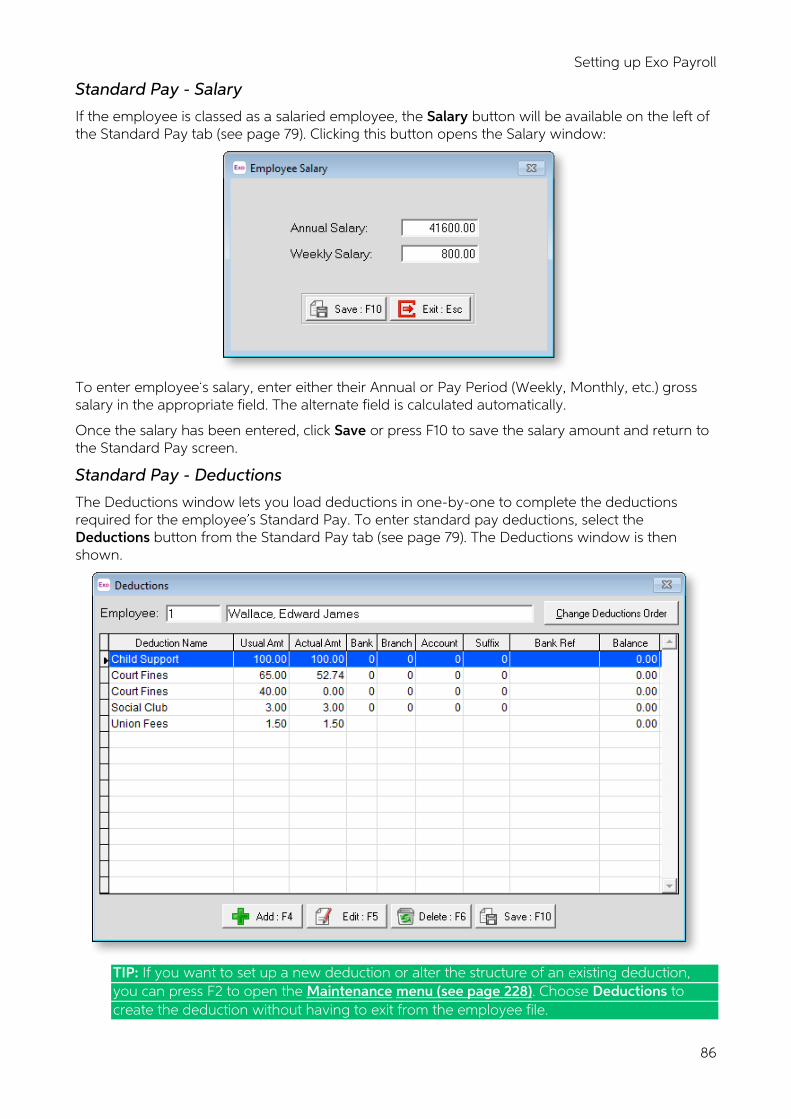
Setting up Exo Payroll
86
Standard Pay - Salary
If the employee is classed as a salaried employee, the Salary button will be available on the left of the Standard Pay tab (see page 79). Clicking this button opens the Salary window:
To enter employee s salary, enter either their Annual or Pay Period (Weekly, Monthly, etc.) gross salary in the appropriate field. The alternate field is calculated automatically.
Once the salary has been entered, click Save or press F10 to save the salary amount and return to the Standard Pay screen.
Standard Pay - Deductions
The Deductions window lets you load deductions in one-by-one to complete the deductions required for the employee s Standard Pay. To enter standard pay deductions, select the Deductions button from the Standard Pay tab (see page 79). The Deductions window is then shown.
TIP: If you want to set up a new deduction or alter the structure of an existing deduction, you can press F2 to open the Maintenance menu (see page 228). Choose Deductions to create the deduction without having to exit from the employee file.
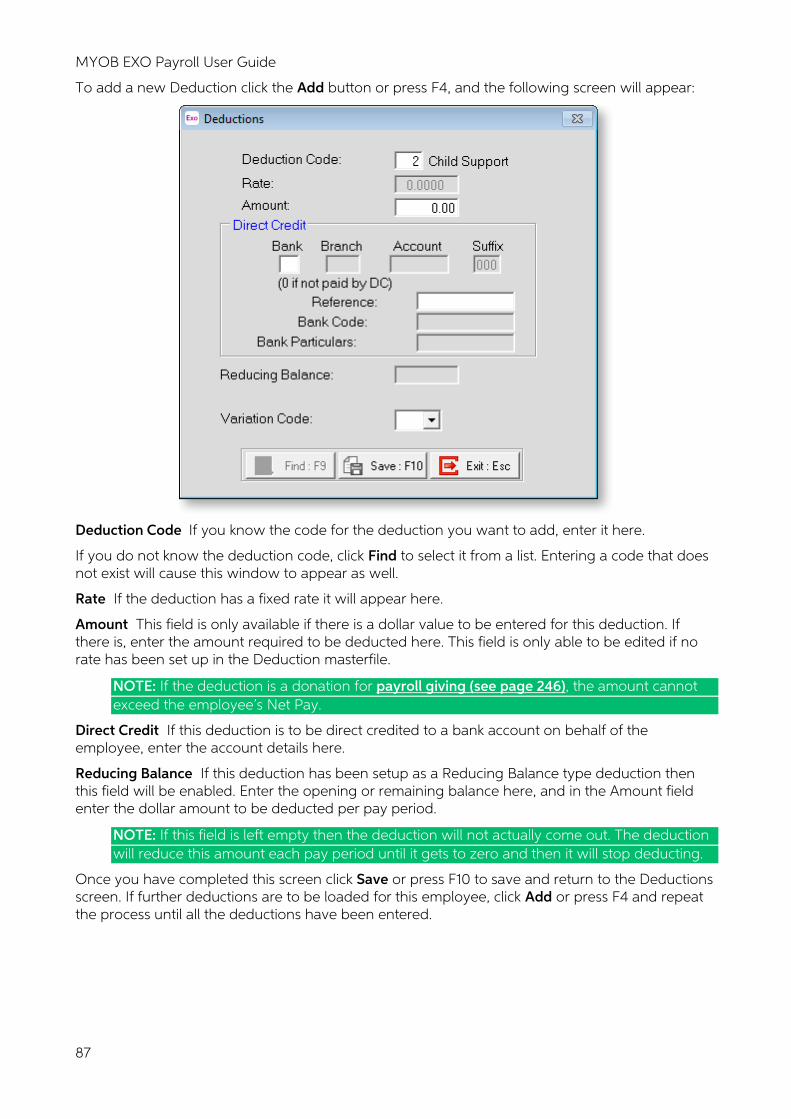
MYOB EXO Payroll User Guide
87
To add a new Deduction click the Add button or press F4, and the following screen will appear:
Deduction Code If you know the code for the deduction you want to add, enter it here.
If you do not know the deduction code, click Find to select it from a list. Entering a code that does not exist will cause this window to appear as well.
Rate If the deduction has a fixed rate it will appear here.
Amount This field is only available if there is a dollar value to be entered for this deduction. If there is, enter the amount required to be deducted here. This field is only able to be edited if no rate has been set up in the Deduction masterfile.
NOTE: If the deduction is a donation for payroll giving (see page 246), the amount cannot exceed the employee s Net Pay.
Direct Credit If this deduction is to be direct credited to a bank account on behalf of the employee, enter the account details here.
Reducing Balance If this deduction has been setup as a Reducing Balance type deduction then this field will be enabled. Enter the opening or remaining balance here, and in the Amount field enter the dollar amount to be deducted per pay period.
NOTE: If this field is left empty then the deduction will not actually come out. The deduction will reduce this amount each pay period until it gets to zero and then it will stop deducting.
Once you have completed this screen click Save or press F10 to save and return to the Deductions screen. If further deductions are to be loaded for this employee, click Add or press F4 and repeat the process until all the deductions have been entered.
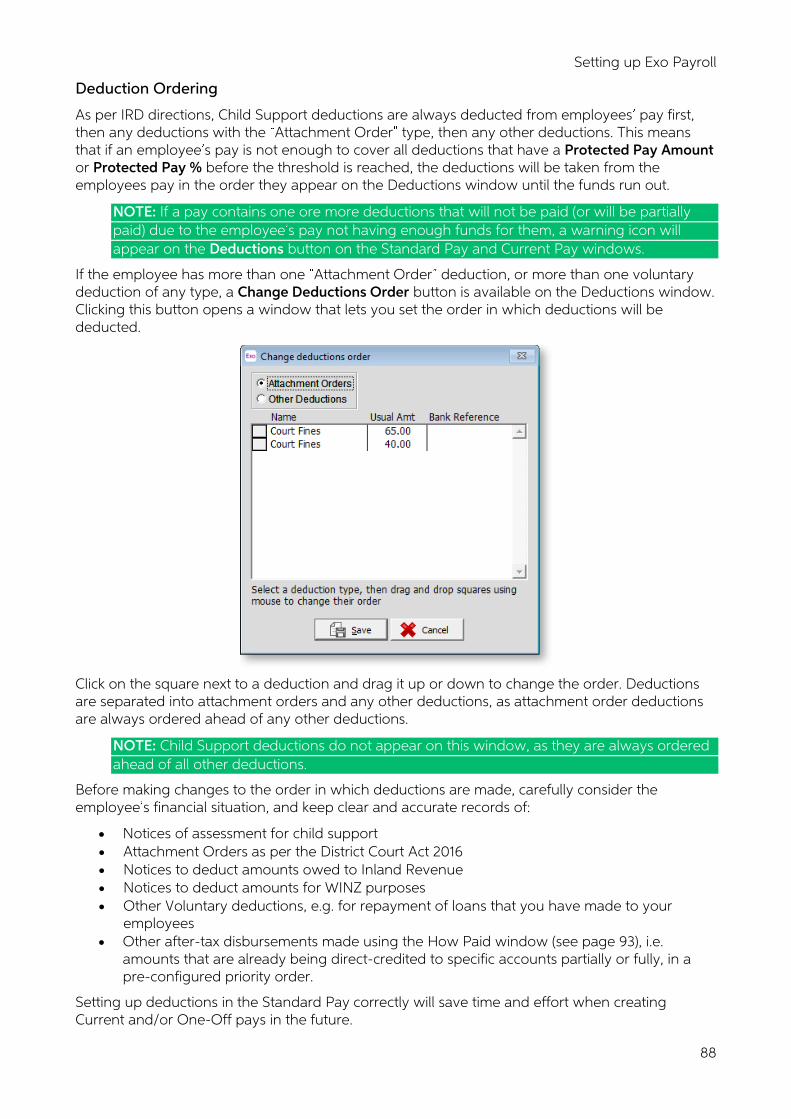
Setting up Exo Payroll
88
Deduction Ordering
As per IRD directions, Child Support deductions are always deducted from employees pay first, then any deductions with the Attachment Order type, then any other deductions. This means that if an employee s pay is not enough to cover all deductions that have a Protected Pay Amount or Protected Pay % before the threshold is reached, the deductions will be taken from the employees pay in the order they appear on the Deductions window until the funds run out.
NOTE: If a pay contains one ore more deductions that will not be paid (or will be partially paid) due to the employee s pay not having enough funds for them, a warning icon will appear on the Deductions button on the Standard Pay and Current Pay windows.
If the employee has more than one Attachment Order deduction, or more than one voluntary deduction of any type, a Change Deductions Order button is available on the Deductions window. Clicking this button opens a window that lets you set the order in which deductions will be deducted.
Click on the square next to a deduction and drag it up or down to change the order. Deductions are separated into attachment orders and any other deductions, as attachment order deductions are always ordered ahead of any other deductions.
NOTE: Child Support deductions do not appear on this window, as they are always ordered ahead of all other deductions.
Before making changes to the order in which deductions are made, carefully consider the employee s financial situation, and keep clear and accurate records of:
• Notices of assessment for child support • Attachment Orders as per the District Court Act 2016 • Notices to deduct amounts owed to Inland Revenue • Notices to deduct amounts for WINZ purposes • Other Voluntary deductions, e.g. for repayment of loans that you have made to your
employees • Other after-tax disbursements made using the How Paid window (see page 93), i.e.
amounts that are already being direct-credited to specific accounts partially or fully, in a pre-configured priority order.
Setting up deductions in the Standard Pay correctly will save time and effort when creating Current and/or One-Off pays in the future.
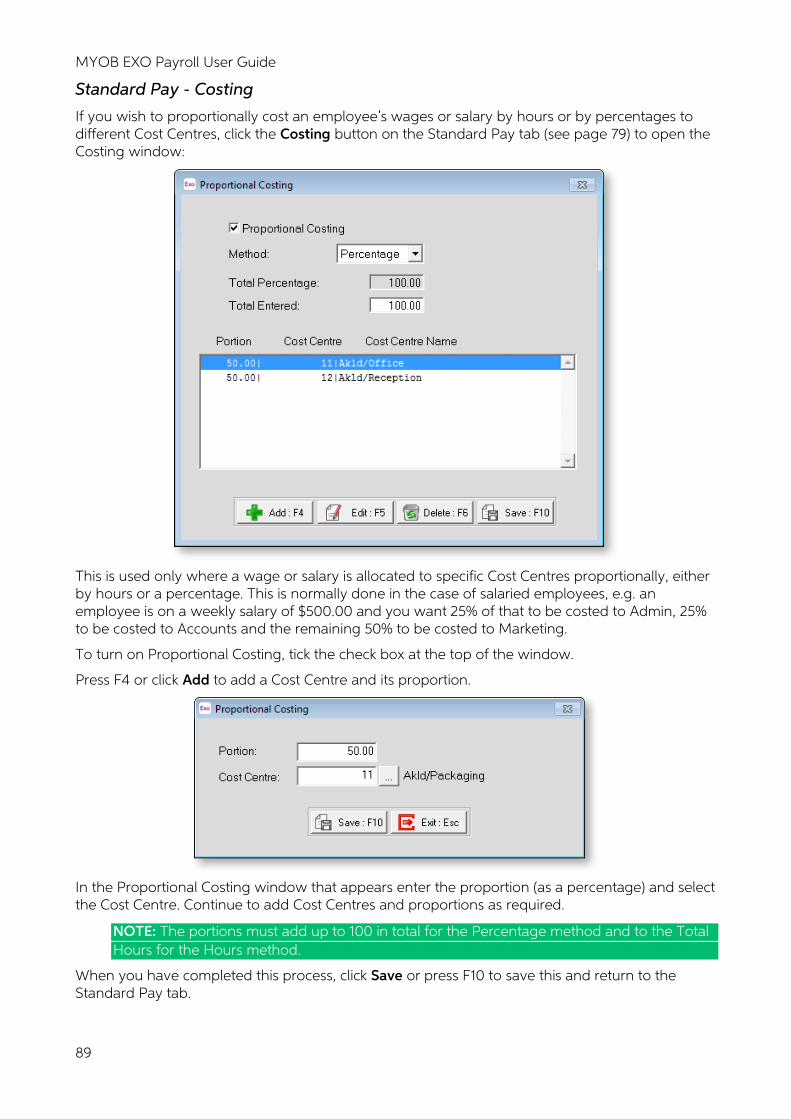
MYOB EXO Payroll User Guide
89
Standard Pay - Costing
If you wish to proportionally cost an employee s wages or salary by hours or by percentages to different Cost Centres, click the Costing button on the Standard Pay tab (see page 79) to open the Costing window:
This is used only where a wage or salary is allocated to specific Cost Centres proportionally, either by hours or a percentage. This is normally done in the case of salaried employees, e.g. an employee is on a weekly salary of $500.00 and you want 25% of that to be costed to Admin, 25% to be costed to Accounts and the remaining 50% to be costed to Marketing.
To turn on Proportional Costing, tick the check box at the top of the window.
Press F4 or click Add to add a Cost Centre and its proportion.
In the Proportional Costing window that appears enter the proportion (as a percentage) and select the Cost Centre. Continue to add Cost Centres and proportions as required.
NOTE: The portions must add up to 100 in total for the Percentage method and to the Total Hours for the Hours method.
When you have completed this process, click Save or press F10 to save this and return to the Standard Pay tab.
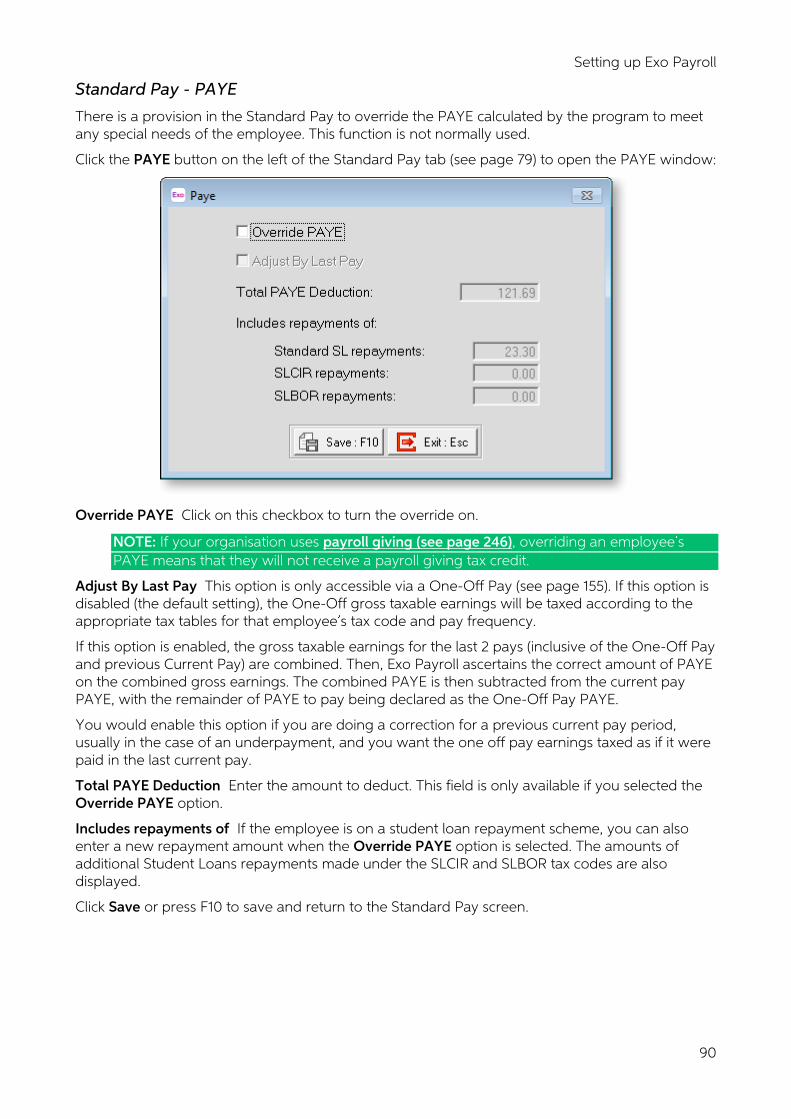
Setting up Exo Payroll
90
Standard Pay - PAYE
There is a provision in the Standard Pay to override the PAYE calculated by the program to meet any special needs of the employee. This function is not normally used.
Click the PAYE button on the left of the Standard Pay tab (see page 79) to open the PAYE window:
Override PAYE Click on this checkbox to turn the override on.
NOTE: If your organisation uses payroll giving (see page 246), overriding an employee s PAYE means that they will not receive a payroll giving tax credit.
Adjust By Last Pay This option is only accessible via a One-Off Pay (see page 155). If this option is disabled (the default setting), the One-Off gross taxable earnings will be taxed according to the appropriate tax tables for that employee s tax code and pay frequency.
If this option is enabled, the gross taxable earnings for the last 2 pays (inclusive of the One-Off Pay and previous Current Pay) are combined. Then, Exo Payroll ascertains the correct amount of PAYE on the combined gross earnings. The combined PAYE is then subtracted from the current pay PAYE, with the remainder of PAYE to pay being declared as the One-Off Pay PAYE.
You would enable this option if you are doing a correction for a previous current pay period, usually in the case of an underpayment, and you want the one off pay earnings taxed as if it were paid in the last current pay.
Total PAYE Deduction Enter the amount to deduct. This field is only available if you selected the Override PAYE option.
Includes repayments of If the employee is on a student loan repayment scheme, you can also enter a new repayment amount when the Override PAYE option is selected. The amounts of additional Student Loans repayments made under the SLCIR and SLBOR tax codes are also displayed.
Click Save or press F10 to save and return to the Standard Pay screen.
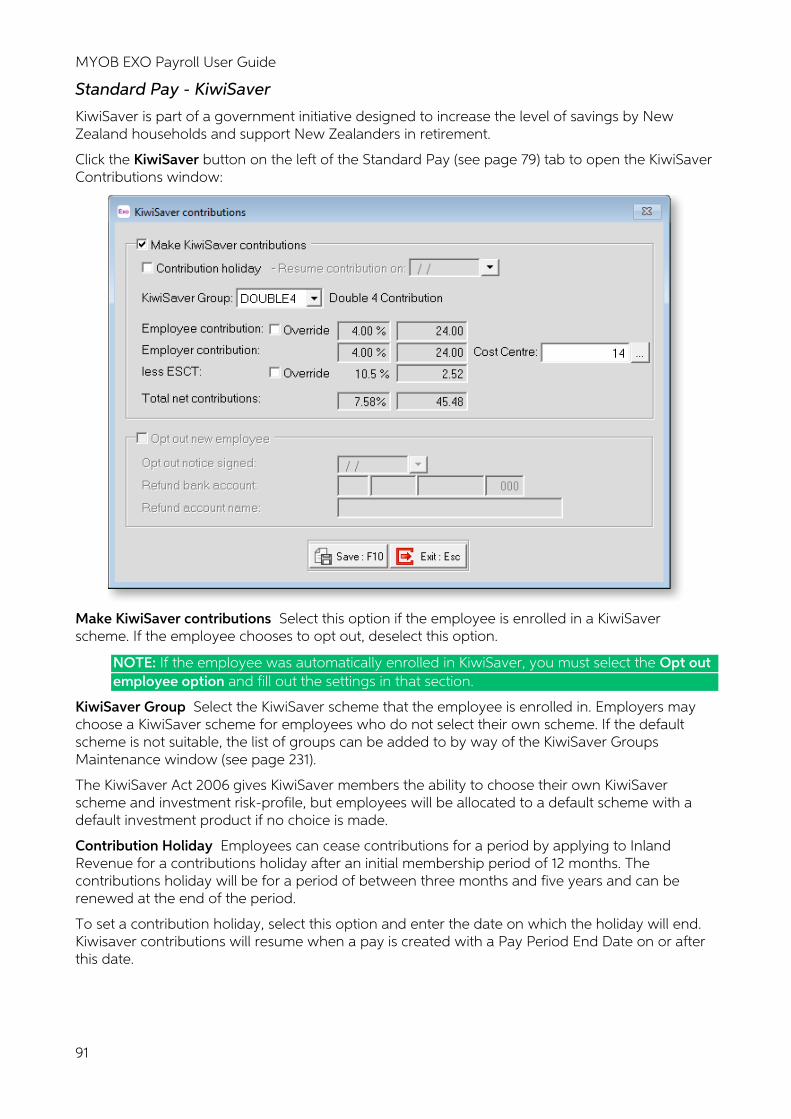
MYOB EXO Payroll User Guide
91
Standard Pay - KiwiSaver
KiwiSaver is part of a government initiative designed to increase the level of savings by New Zealand households and support New Zealanders in retirement.
Click the KiwiSaver button on the left of the Standard Pay (see page 79) tab to open the KiwiSaver Contributions window:
Make KiwiSaver contributions Select this option if the employee is enrolled in a KiwiSaver scheme. If the employee chooses to opt out, deselect this option.
NOTE: If the employee was automatically enrolled in KiwiSaver, you must select the Opt out employee option and fill out the settings in that section.
KiwiSaver Group Select the KiwiSaver scheme that the employee is enrolled in. Employers may choose a KiwiSaver scheme for employees who do not select their own scheme. If the default scheme is not suitable, the list of groups can be added to by way of the KiwiSaver Groups Maintenance window (see page 231).
The KiwiSaver Act 2006 gives KiwiSaver members the ability to choose their own KiwiSaver scheme and investment risk-profile, but employees will be allocated to a default scheme with a default investment product if no choice is made.
Contribution Holiday Employees can cease contributions for a period by applying to Inland Revenue for a contributions holiday after an initial membership period of 12 months. The contributions holiday will be for a period of between three months and five years and can be renewed at the end of the period.
To set a contribution holiday, select this option and enter the date on which the holiday will end. Kiwisaver contributions will resume when a pay is created with a Pay Period End Date on or after this date.
Setting up Exo Payroll
92
Employee Contribution Employees contribute at 2% (prior to 1 April 2013), 3% (after 1 April 2013), 4%, 6% (after 1 April 2019), 8% or 10% (after 1 April 2019) of gross salary or wages. The definition of gross salary or wages includes paid leave and allowances liable for superannuation. The contribution comes out of the employees pay, after PAYE, and will appear on the KiwiSaver and IR348 reports as a form of deduction. The contribution rate is derived from the KiwiSaver Group rule. To change the employee s contribution, tick the Override box and enter a new amount.
Employer Contribution From 1 April 2009, employer contributions of 2% are required. From 1 April 2013, employer contributions of 3% are required. Employers can still contribute voluntarily at a higher rate of employees salaries. All employer contributions are liable for Employer Superannuation Contribution Tax (ESCT).
When the calendar rolls into a new financial year, you will be prompted to review your KiwiSaver Group settings.
NOTE: If the Gross-up Employer Contribution option for the employee s KiwiSaver Group (see page 231) is ticked, the Employer Contribution will be grossed-up to offset the ESCT amount. The name of this field changes to Employer Contribution (grossed up) to indicate that the amount displayed is the grossed-up amount.
Cost Centre Enter a Cost Centre code here to cost the employer s contribution to that Cost Centre, or leave the field blank to cost to the employee s default Cost Centre.
NOTE: The KiwiSaver Setup window (see page 23) contains options that affect how KiwiSaver contributions are costed to Cost Centres.
Direct cost to this code This option is available if the Mixed Proportional Costing option is enabled on the Payroll Setup Page 1 window (see page 13). Selecting this option means that the employer s contribution will be costed directly to the specified Cost Centre, rather than being proportioned.
less ESCT Employer Superannuation and Employer KiwiSaver are classified as superannuation contributions, on which a tax (on schedular payments) is levied: Employer s Superannuation Contribution Tax (ESCT). ESCT amounts are reported on the KiwiSaver, IR345, and Superannuation reports. This value is automatically calculated by the system (unless the Override option is ticked), based on the ESCT rate set up on the Employee Details tab (see page 52).
This value also takes into account any ESCT exemption that may be applicable. The ESCT exemption is a historic setting which took effect from 1 July 2007 to 31 March 2011. For those historic pay periods, it is automatically calculated by the system, as follows:
A tax exemption from ESCT was available to the extent that the superannuation contribution is for an employee s KiwiSaver scheme and is not more than the Compulsory Employer Contribution to either the Complying Superannuation fund or the KiwiSaver fund (2%).
As of 1 April 2012, there is no longer a tax exemption from ESCT. All compulsory and/or voluntary Employer contributions to either the Superannuation fund or the KiwiSaver fund are fully taxable.
Total net contributions This value will be automatically calculated by the system, from the Employer s KiwiSaver contribution less ESCT, and will be displayed on the IR345, IR348, KiwiSaver, and Superannuation reports.
Opt out new employee Tick this box if the employee was automatically enrolled in KiwiSaver (i.e. if they were employed after the introduction of KiwiSaver) and they want to opt out of the KiwiSaver scheme within the Opt Out period.
Opt out notice signed Enter the date that the employee signed their New Employee Opt-Out Request form.
Refund bank account / Refund account name Enter bank account details for the employee so that their initial contributions can be refunded.
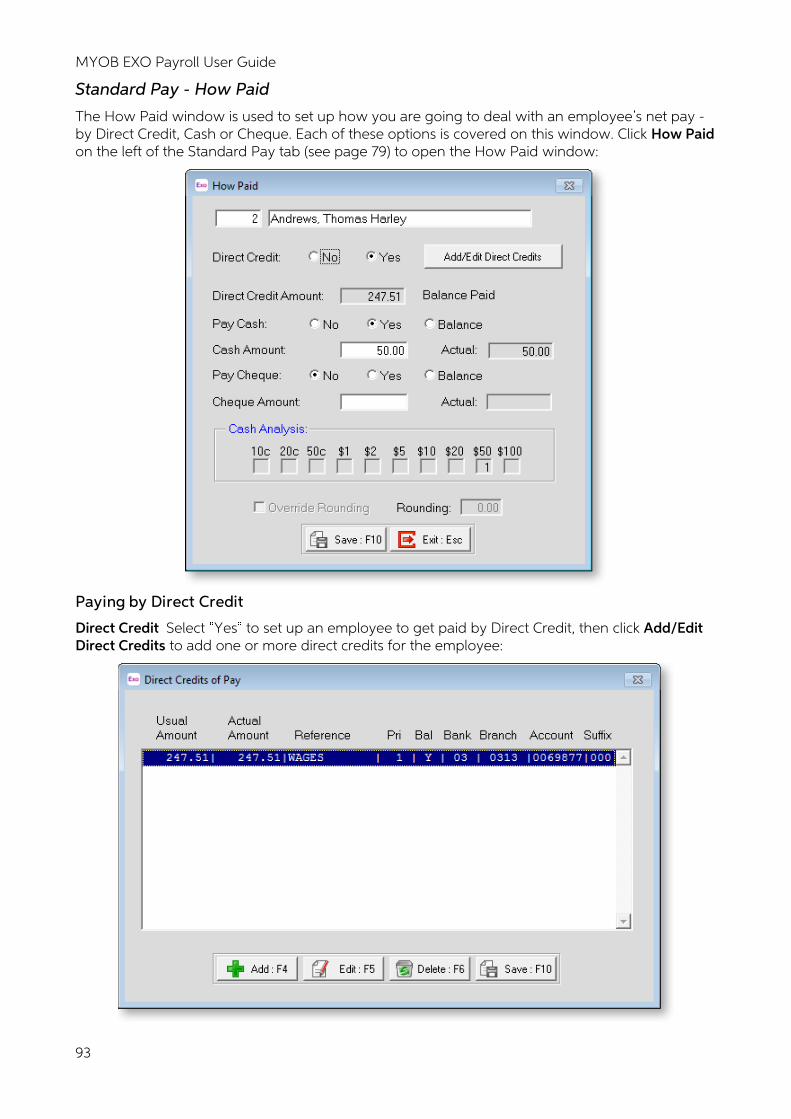
MYOB EXO Payroll User Guide
93
Standard Pay - How Paid
The How Paid window is used to set up how you are going to deal with an employee s net pay - by Direct Credit, Cash or Cheque. Each of these options is covered on this window. Click How Paid on the left of the Standard Pay tab (see page 79) to open the How Paid window:
Paying by Direct Credit
Direct Credit Select Yes to set up an employee to get paid by Direct Credit, then click Add/Edit Direct Credits to add one or more direct credits for the employee:
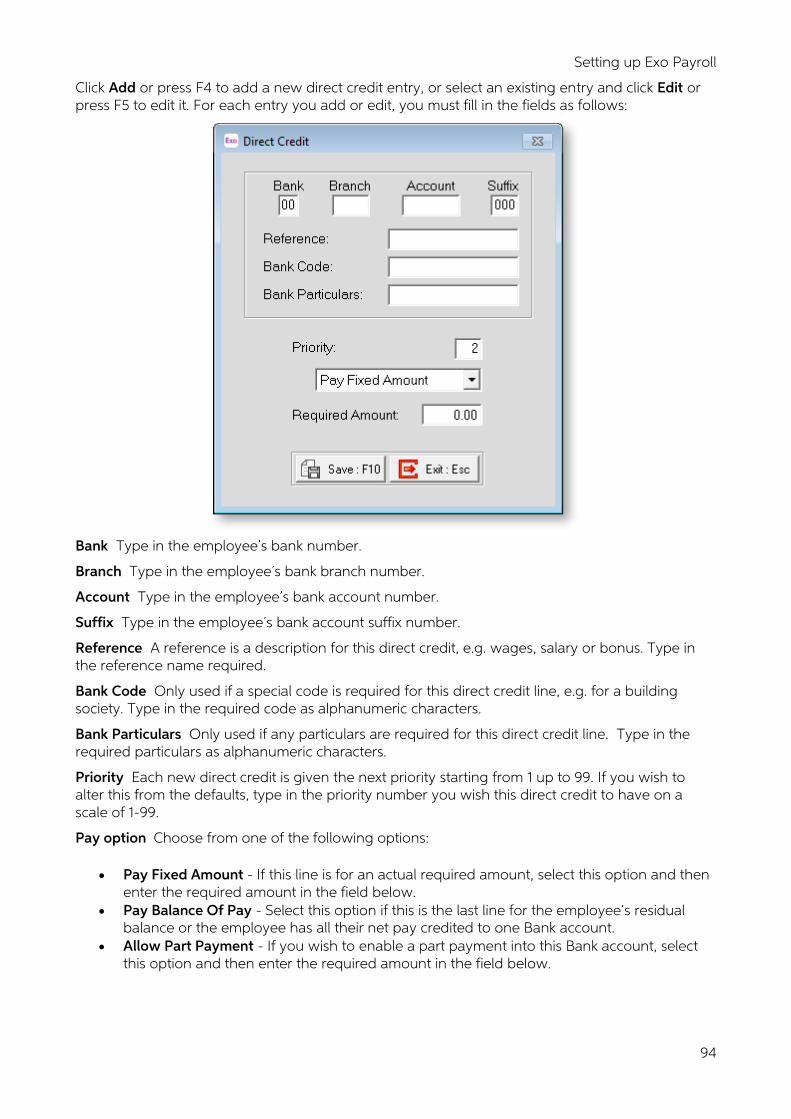
Setting up Exo Payroll
94
Click Add or press F4 to add a new direct credit entry, or select an existing entry and click Edit or press F5 to edit it. For each entry you add or edit, you must fill in the fields as follows:
Bank Type in the employee s bank number.
Branch Type in the employee s bank branch number.
Account Type in the employee s bank account number.
Suffix Type in the employee s bank account suffix number.
Reference A reference is a description for this direct credit, e.g. wages, salary or bonus. Type in the reference name required.
Bank Code Only used if a special code is required for this direct credit line, e.g. for a building society. Type in the required code as alphanumeric characters.
Bank Particulars Only used if any particulars are required for this direct credit line. Type in the required particulars as alphanumeric characters.
Priority Each new direct credit is given the next priority starting from 1 up to 99. If you wish to alter this from the defaults, type in the priority number you wish this direct credit to have on a scale of 1-99.
Pay option Choose from one of the following options:
• Pay Fixed Amount - If this line is for an actual required amount, select this option and then enter the required amount in the field below.
• Pay Balance Of Pay - Select this option if this is the last line for the employee s residual balance or the employee has all their net pay credited to one Bank account.
• Allow Part Payment - If you wish to enable a part payment into this Bank account, select this option and then enter the required amount in the field below.
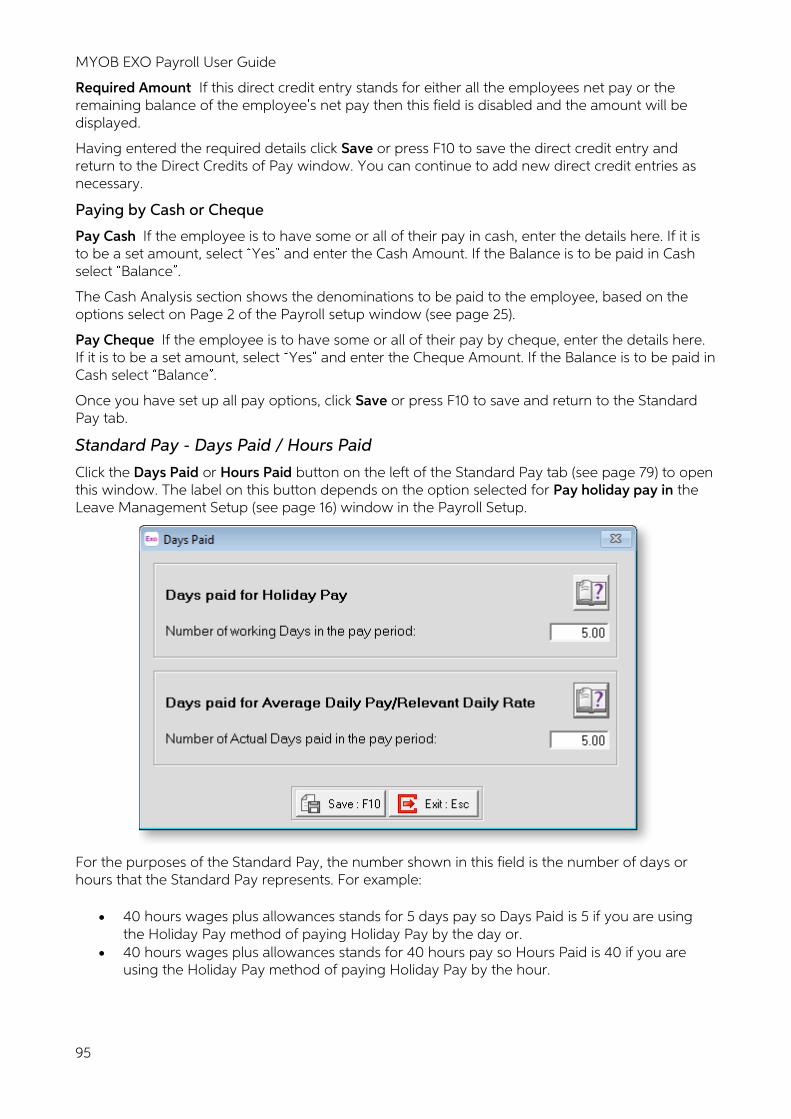
MYOB EXO Payroll User Guide
95
Required Amount If this direct credit entry stands for either all the employees net pay or the remaining balance of the employee s net pay then this field is disabled and the amount will be displayed.
Having entered the required details click Save or press F10 to save the direct credit entry and return to the Direct Credits of Pay window. You can continue to add new direct credit entries as necessary.
Paying by Cash or Cheque
Pay Cash If the employee is to have some or all of their pay in cash, enter the details here. If it is to be a set amount, select Yes and enter the Cash Amount. If the Balance is to be paid in Cash select Balance .
The Cash Analysis section shows the denominations to be paid to the employee, based on the options select on Page 2 of the Payroll setup window (see page 25).
Pay Cheque If the employee is to have some or all of their pay by cheque, enter the details here. If it is to be a set amount, select Yes and enter the Cheque Amount. If the Balance is to be paid in Cash select Balance .
Once you have set up all pay options, click Save or press F10 to save and return to the Standard Pay tab.
Standard Pay - Days Paid / Hours Paid
Click the Days Paid or Hours Paid button on the left of the Standard Pay tab (see page 79) to open this window. The label on this button depends on the option selected for Pay holiday pay in the Leave Management Setup (see page 16) window in the Payroll Setup.
For the purposes of the Standard Pay, the number shown in this field is the number of days or hours that the Standard Pay represents. For example:
• 40 hours wages plus allowances stands for 5 days pay so Days Paid is 5 if you are using the Holiday Pay method of paying Holiday Pay by the day or.
• 40 hours wages plus allowances stands for 40 hours pay so Hours Paid is 40 if you are using the Holiday Pay method of paying Holiday Pay by the hour.

Setting up Exo Payroll
96
This field will default to a number based upon the employee s pay frequency:
• Weekly = 5 days paid or 40 hrs • Fortnightly = 10 days paid or 80 hrs • Bi-Monthly = 10.83 days paid or 86.67 hrs • Monthly = 21.67 days paid or 173.33 hrs
To set up the Days/Hours Paid section, enter the number of days that this pay represents (or the new default). Click Save or press F10 to save and exit back to the Standard Pay tab.
Step Seven: Load YTD Totals
If you have purchased MYOB Exo Payroll part way through the year, it may be useful to be able to load each employee s Year to Date information. To enter this information, follow the steps below. Remember that you should have entered some minimal details for employees who have worked for you during the Current Tax Year but who have now terminated. That way you will be able to match your existing Company Year to Date figures.
NOTE: Ideally this information should be loaded before you run your first Live Pay Period, but it can be loaded at anytime.
NOTE: Video Help is available for this topic on the EXO Employer Services Education Centre.
Select Step Seven from the Payroll Setup Cycle (see page 11) to start the Load Year to Date Totals wizard. This wizard allows you to load two kinds of totals:
• Annual Leave (see page 96) • Pay and Taxation History (see page 100)
To load both kinds of totals, you will have to run the Load Year to Date Totals wizard twice.
NOTE: You may need to run the wizard up to three times - it may be necessary to run the wizard for Pay and Taxation History twice. See the Load Year to Date Totals for Pay and Taxation History (see page 100) section below for details.
Load Year to Date Totals for Annual Leave
The gross earnings liable for holiday pay will be divided by the days paid to calculate the average daily rate of holiday pay, when paying outstanding or advanced days of holiday pay.
The gross earnings liable for holiday pay will also be used to calculate a value for termination pay. For example, if the Gross Paid for the current entitlement year = $30,000, the value of termination pay would be 8% of $30,000 or $2400, plus any outstanding days holiday pay x the daily rate for those days.
As both the Gross Paid and Days Paid accumulators are essential to holiday pay valuation, it is important that these figures are loaded from your prior payroll system, before holiday pay is paid out in your live pay run.
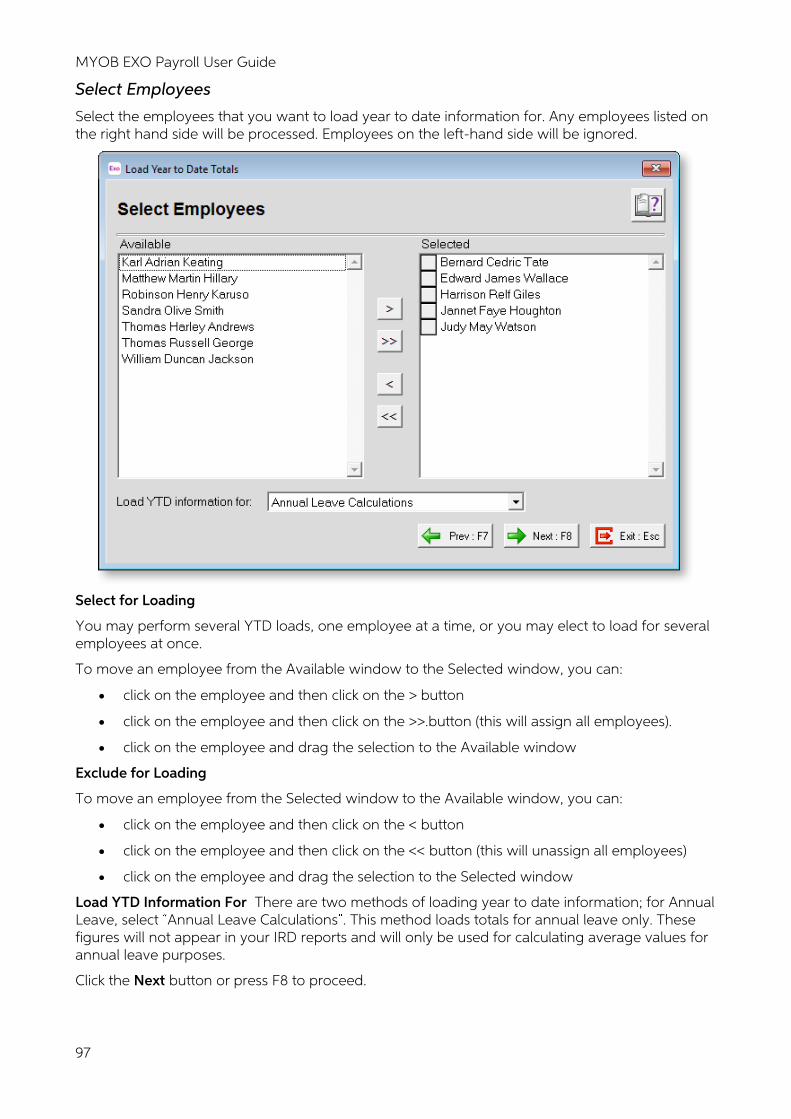
MYOB EXO Payroll User Guide
97
Select Employees
Select the employees that you want to load year to date information for. Any employees listed on the right hand side will be processed. Employees on the left-hand side will be ignored.
Select for Loading
You may perform several YTD loads, one employee at a time, or you may elect to load for several employees at once.
To move an employee from the Available window to the Selected window, you can:
• click on the employee and then click on the > button
• click on the employee and then click on the >>.button (this will assign all employees).
• click on the employee and drag the selection to the Available window
Exclude for Loading
To move an employee from the Selected window to the Available window, you can:
• click on the employee and then click on the < button
• click on the employee and then click on the << button (this will unassign all employees)
• click on the employee and drag the selection to the Selected window
Load YTD Information For There are two methods of loading year to date information; for Annual Leave, select Annual Leave Calculations . This method loads totals for annual leave only. These figures will not appear in your IRD reports and will only be used for calculating average values for annual leave purposes.
Click the Next button or press F8 to proceed.
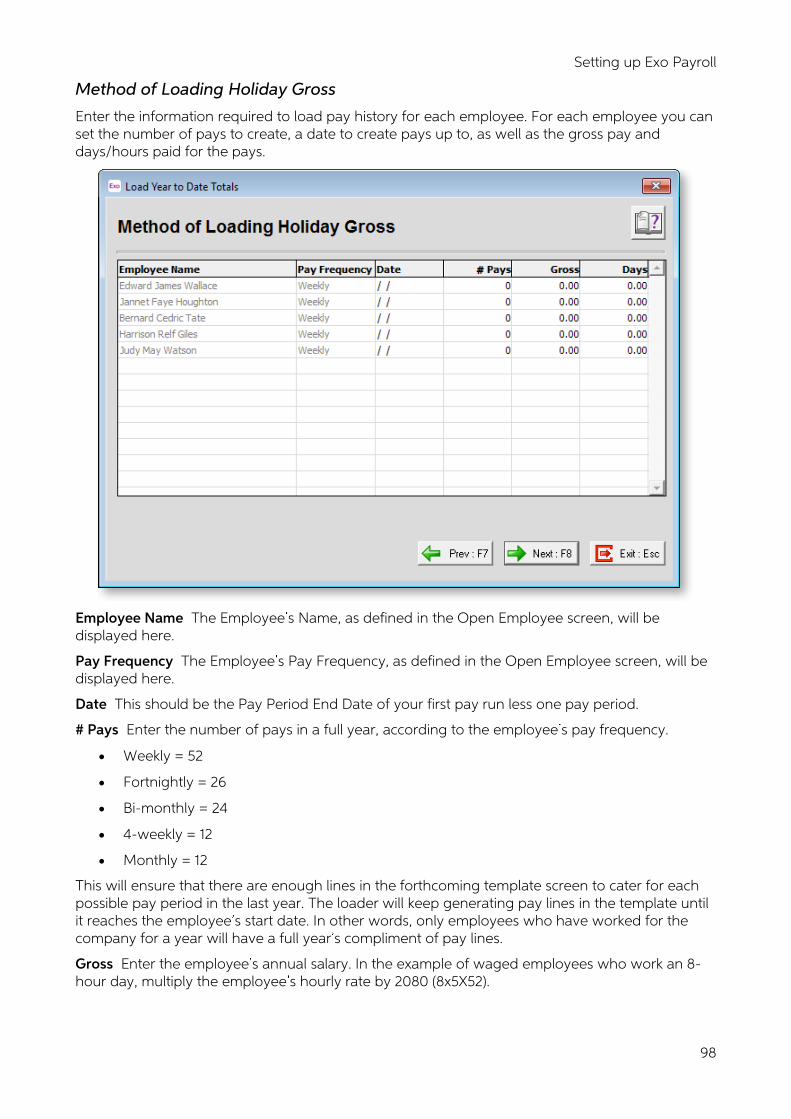
Setting up Exo Payroll
98
Method of Loading Holiday Gross
Enter the information required to load pay history for each employee. For each employee you can set the number of pays to create, a date to create pays up to, as well as the gross pay and days/hours paid for the pays.
Employee Name The Employee s Name, as defined in the Open Employee screen, will be displayed here.
Pay Frequency The Employee s Pay Frequency, as defined in the Open Employee screen, will be displayed here.
Date This should be the Pay Period End Date of your first pay run less one pay period.
# Pays Enter the number of pays in a full year, according to the employee s pay frequency.
• Weekly = 52
• Fortnightly = 26
• Bi-monthly = 24
• 4-weekly = 12
• Monthly = 12
This will ensure that there are enough lines in the forthcoming template screen to cater for each possible pay period in the last year. The loader will keep generating pay lines in the template until it reaches the employee s start date. In other words, only employees who have worked for the company for a year will have a full year s compliment of pay lines.
Gross Enter the employee s annual salary. In the example of waged employees who work an 8-hour day, multiply the employee s hourly rate by 2080 (8x5X52).

MYOB EXO Payroll User Guide
99
This will ensure that the annual gross divided by the number of pays = the employee s standard weekly earnings for each pay line in the template. This provides a starting point for the forthcoming template screen, from which amendments can be made if the Gross / Days Paid fluctuated across the pays.
Days Enter the employee s annual days paid. In the example of employees who work a 5-day week, multiply the standard days per week by 52. For example, 5 x 52 = 260.
Click the Next button or press F8 to proceed.
Load Holiday Gross Information
Your starting point for the Year to Date load is the employee s standard wage/salary.
Employee Name The Employee s Name, as defined in the Open Employee screen, will be displayed here.
Pay Date This is the suggested Pay Period End Date for each pay in the load. You can change the Date for any pay line if it does not match the actual pay date.
Gross This is the suggested gross earnings liable for holiday pay, based on the employees Annual Earnings factored down to a Pay Period. You can change or zero the Amount for any pay line if it does not match that of the actual pay.
Days/Hours This is the suggested days or hours paid for holiday pay purposes, based on the employees Annual Days Paid factored down to a Pay Period. You can change or zero the days/hours for any pay line if it does not match that of the actual pay.
Click the Next button or press F8 to proceed.
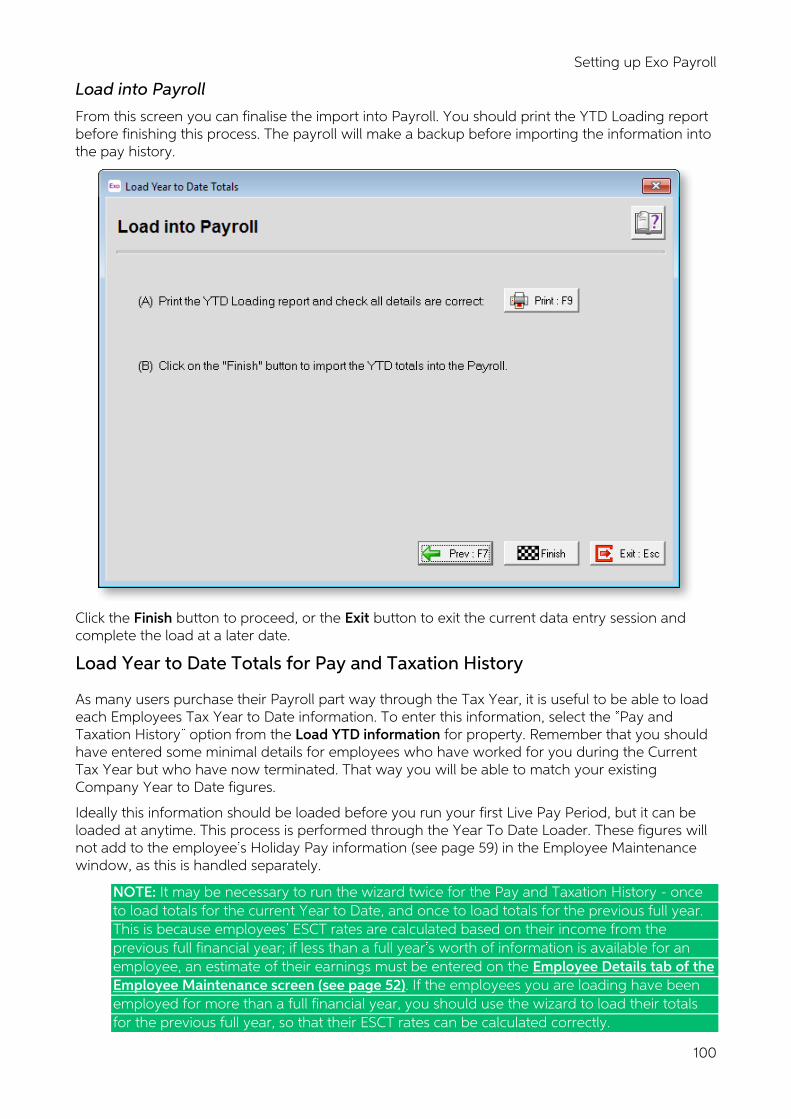
Setting up Exo Payroll
100
Load into Payroll
From this screen you can finalise the import into Payroll. You should print the YTD Loading report before finishing this process. The payroll will make a backup before importing the information into the pay history.
Click the Finish button to proceed, or the Exit button to exit the current data entry session and complete the load at a later date.
Load Year to Date Totals for Pay and Taxation History
As many users purchase their Payroll part way through the Tax Year, it is useful to be able to load each Employees Tax Year to Date information. To enter this information, select the Pay and Taxation History option from the Load YTD information for property. Remember that you should have entered some minimal details for employees who have worked for you during the Current Tax Year but who have now terminated. That way you will be able to match your existing Company Year to Date figures.
Ideally this information should be loaded before you run your first Live Pay Period, but it can be loaded at anytime. This process is performed through the Year To Date Loader. These figures will not add to the employee s Holiday Pay information (see page 59) in the Employee Maintenance window, as this is handled separately.
NOTE: It may be necessary to run the wizard twice for the Pay and Taxation History - once to load totals for the current Year to Date, and once to load totals for the previous full year. This is because employees ESCT rates are calculated based on their income from the previous full financial year; if less than a full year s worth of information is available for an employee, an estimate of their earnings must be entered on the Employee Details tab of the Employee Maintenance screen (see page 52). If the employees you are loading have been employed for more than a full financial year, you should use the wizard to load their totals for the previous full year, so that their ESCT rates can be calculated correctly.
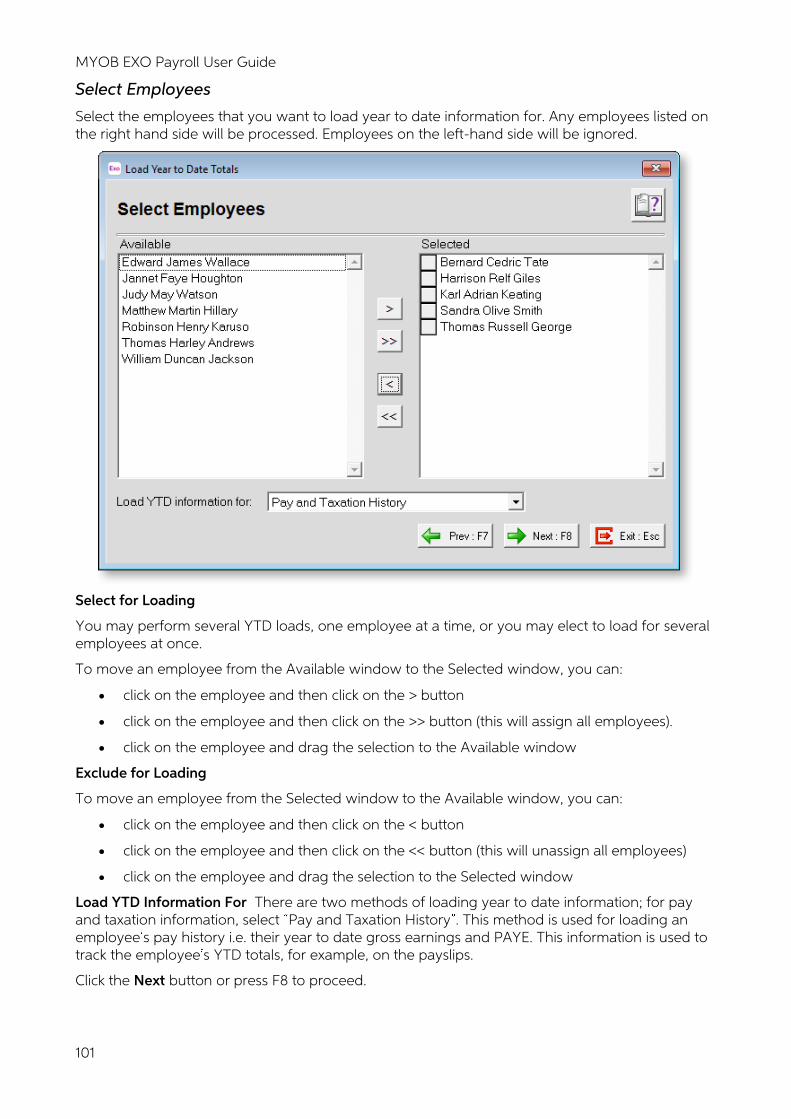
MYOB EXO Payroll User Guide
101
Select Employees
Select the employees that you want to load year to date information for. Any employees listed on the right hand side will be processed. Employees on the left-hand side will be ignored.
Select for Loading
You may perform several YTD loads, one employee at a time, or you may elect to load for several employees at once.
To move an employee from the Available window to the Selected window, you can:
• click on the employee and then click on the > button
• click on the employee and then click on the >> button (this will assign all employees).
• click on the employee and drag the selection to the Available window
Exclude for Loading
To move an employee from the Selected window to the Available window, you can:
• click on the employee and then click on the < button
• click on the employee and then click on the << button (this will unassign all employees)
• click on the employee and drag the selection to the Selected window
Load YTD Information For There are two methods of loading year to date information; for pay and taxation information, select Pay and Taxation History . This method is used for loading an employee s pay history i.e. their year to date gross earnings and PAYE. This information is used to track the employee s YTD totals, for example, on the payslips.
Click the Next button or press F8 to proceed.
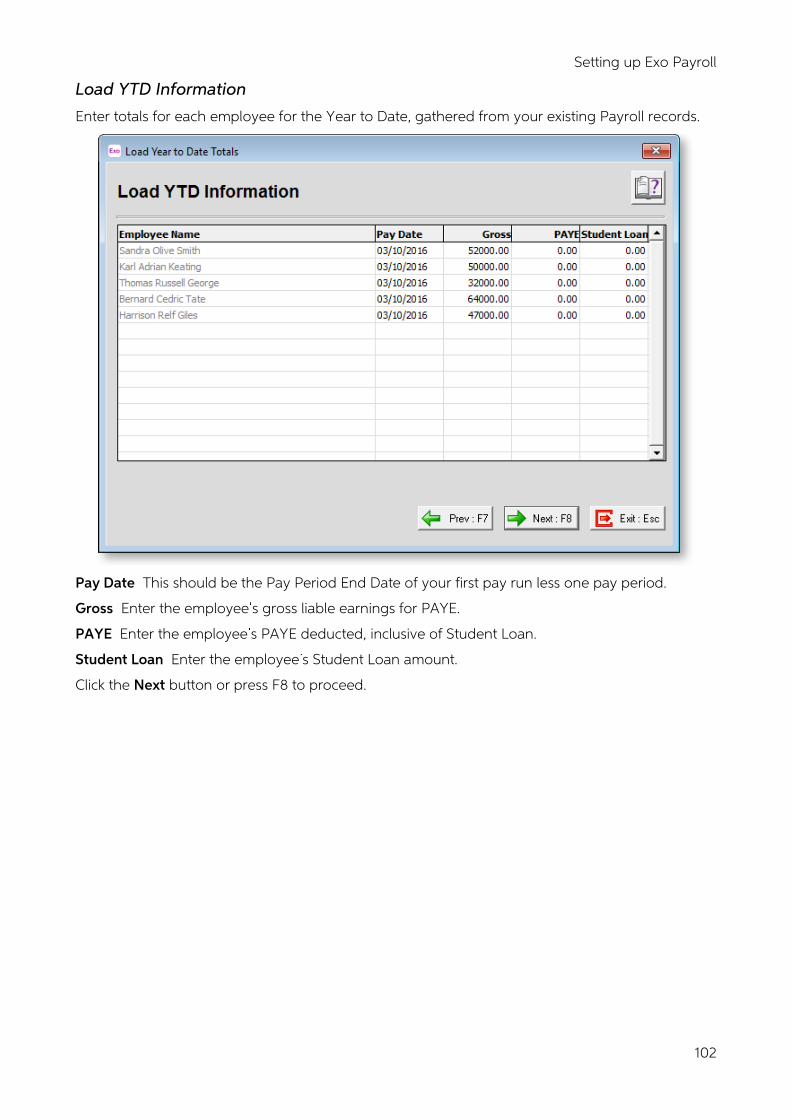
Setting up Exo Payroll
102
Load YTD Information
Enter totals for each employee for the Year to Date, gathered from your existing Payroll records.
Pay Date This should be the Pay Period End Date of your first pay run less one pay period.
Gross Enter the employee s gross liable earnings for PAYE.
PAYE Enter the employee s PAYE deducted, inclusive of Student Loan.
Student Loan Enter the employee s Student Loan amount.
Click the Next button or press F8 to proceed.
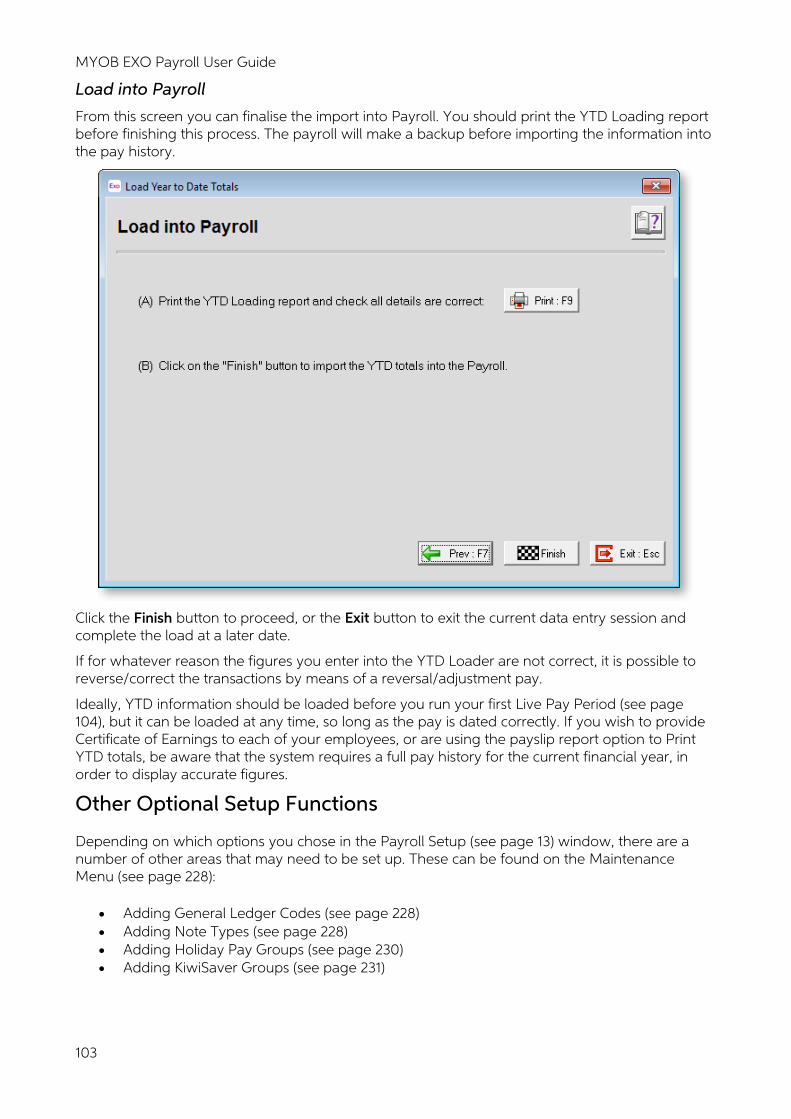
MYOB EXO Payroll User Guide
103
Load into Payroll
From this screen you can finalise the import into Payroll. You should print the YTD Loading report before finishing this process. The payroll will make a backup before importing the information into the pay history.
Click the Finish button to proceed, or the Exit button to exit the current data entry session and complete the load at a later date.
If for whatever reason the figures you enter into the YTD Loader are not correct, it is possible to reverse/correct the transactions by means of a reversal/adjustment pay.
Ideally, YTD information should be loaded before you run your first Live Pay Period (see page 104), but it can be loaded at any time, so long as the pay is dated correctly. If you wish to provide Certificate of Earnings to each of your employees, or are using the payslip report option to Print YTD totals, be aware that the system requires a full pay history for the current financial year, in order to display accurate figures.
Other Optional Setup Functions
Depending on which options you chose in the Payroll Setup (see page 13) window, there are a number of other areas that may need to be set up. These can be found on the Maintenance Menu (see page 228):
• Adding General Ledger Codes (see page 228) • Adding Note Types (see page 228) • Adding Holiday Pay Groups (see page 230) • Adding KiwiSaver Groups (see page 231)
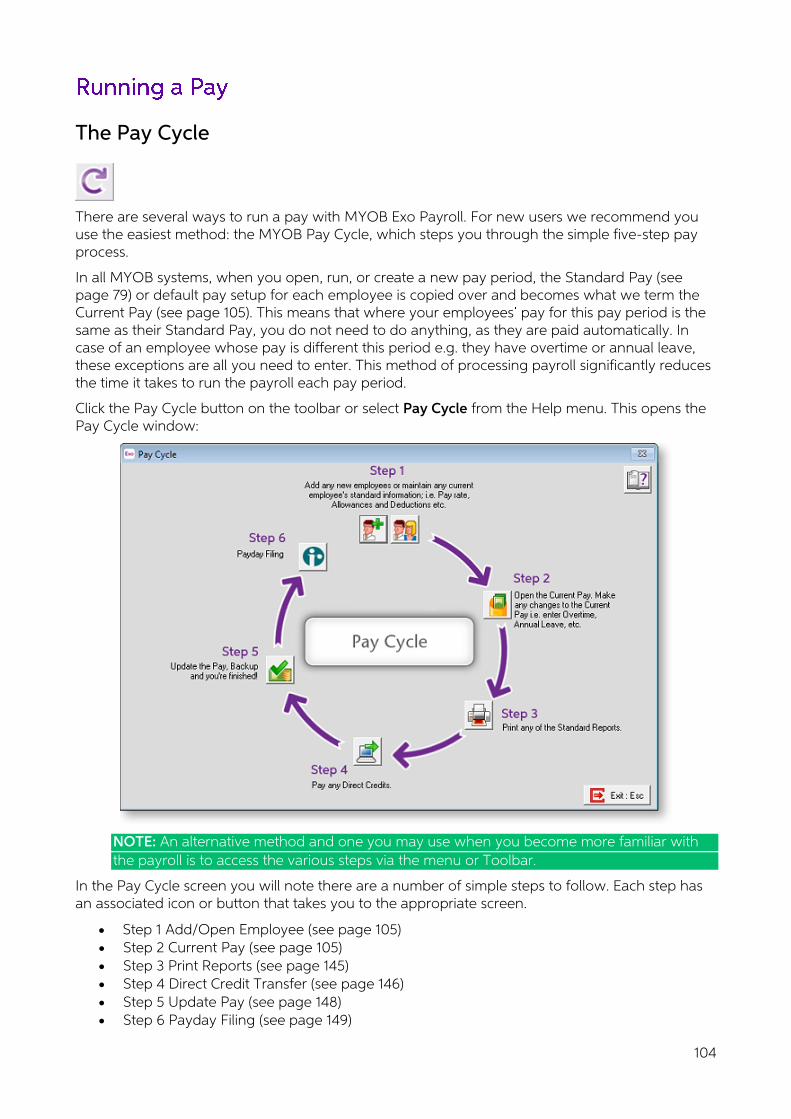
104
The Pay Cycle
There are several ways to run a pay with MYOB Exo Payroll. For new users we recommend you use the easiest method: the MYOB Pay Cycle, which steps you through the simple five-step pay process.
In all MYOB systems, when you open, run, or create a new pay period, the Standard Pay (see page 79) or default pay setup for each employee is copied over and becomes what we term the Current Pay (see page 105). This means that where your employees pay for this pay period is the same as their Standard Pay, you do not need to do anything, as they are paid automatically. In case of an employee whose pay is different this period e.g. they have overtime or annual leave, these exceptions are all you need to enter. This method of processing payroll significantly reduces the time it takes to run the payroll each pay period.
Click the Pay Cycle button on the toolbar or select Pay Cycle from the Help menu. This opens the Pay Cycle window:
NOTE: An alternative method and one you may use when you become more familiar with the payroll is to access the various steps via the menu or Toolbar.
In the Pay Cycle screen you will note there are a number of simple steps to follow. Each step has an associated icon or button that takes you to the appropriate screen.
• Step 1 Add/Open Employee (see page 105) • Step 2 Current Pay (see page 105) • Step 3 Print Reports (see page 145) • Step 4 Direct Credit Transfer (see page 146) • Step 5 Update Pay (see page 148) • Step 6 Payday Filing (see page 149)
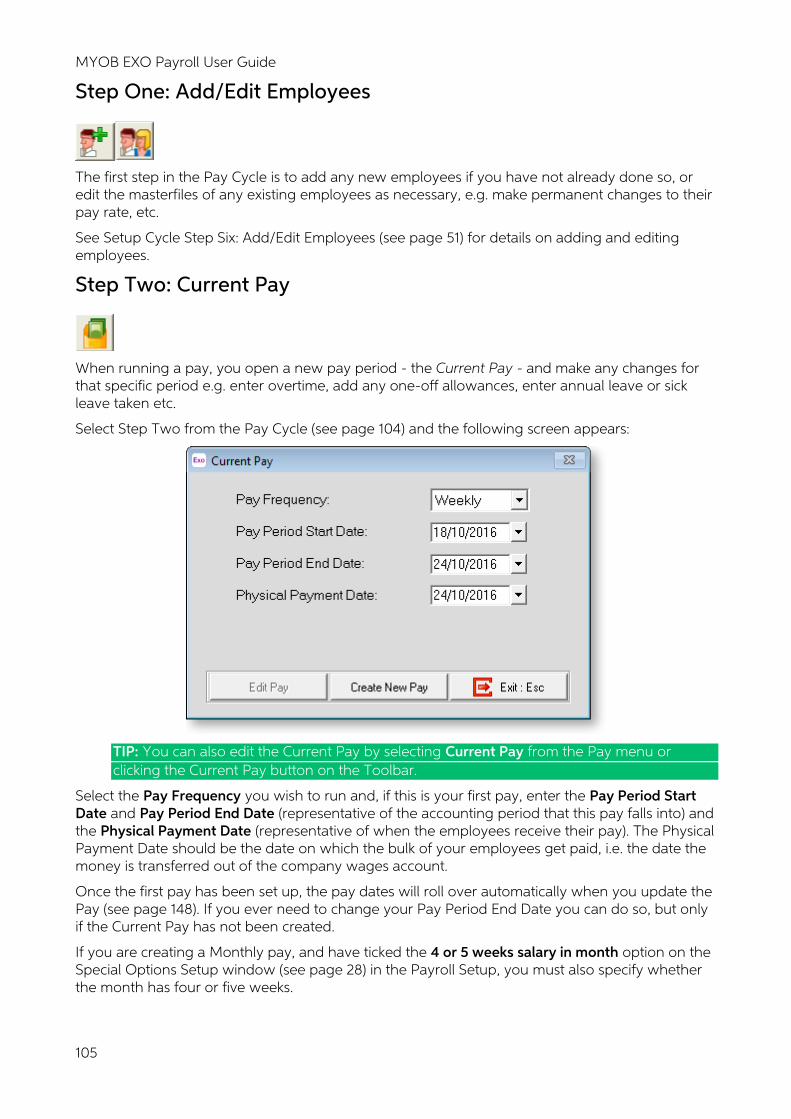
MYOB EXO Payroll User Guide
105
Step One: Add/Edit Employees
The first step in the Pay Cycle is to add any new employees if you have not already done so, or edit the masterfiles of any existing employees as necessary, e.g. make permanent changes to their pay rate, etc.
See Setup Cycle Step Six: Add/Edit Employees (see page 51) for details on adding and editing employees.
Step Two: Current Pay
When running a pay, you open a new pay period - the Current Pay - and make any changes for that specific period e.g. enter overtime, add any one-off allowances, enter annual leave or sick leave taken etc.
Select Step Two from the Pay Cycle (see page 104) and the following screen appears:
TIP: You can also edit the Current Pay by selecting Current Pay from the Pay menu or clicking the Current Pay button on the Toolbar.
Select the Pay Frequency you wish to run and, if this is your first pay, enter the Pay Period Start Date and Pay Period End Date (representative of the accounting period that this pay falls into) and the Physical Payment Date (representative of when the employees receive their pay). The Physical Payment Date should be the date on which the bulk of your employees get paid, i.e. the date the money is transferred out of the company wages account.
Once the first pay has been set up, the pay dates will roll over automatically when you update the Pay (see page 148). If you ever need to change your Pay Period End Date you can do so, but only if the Current Pay has not been created.
If you are creating a Monthly pay, and have ticked the 4 or 5 weeks salary in month option on the Special Options Setup window (see page 28) in the Payroll Setup, you must also specify whether the month has four or five weeks.
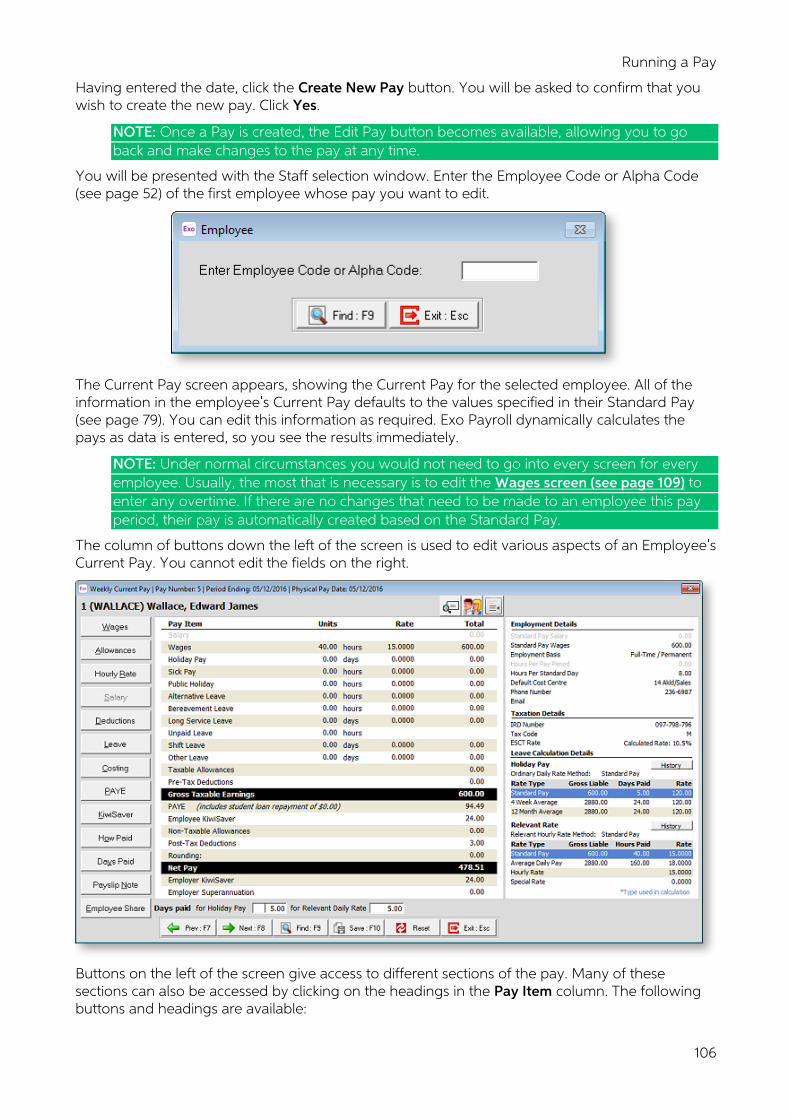
Running a Pay
106
Having entered the date, click the Create New Pay button. You will be asked to confirm that you wish to create the new pay. Click Yes.
NOTE: Once a Pay is created, the Edit Pay button becomes available, allowing you to go back and make changes to the pay at any time.
You will be presented with the Staff selection window. Enter the Employee Code or Alpha Code (see page 52) of the first employee whose pay you want to edit.
The Current Pay screen appears, showing the Current Pay for the selected employee. All of the information in the employee s Current Pay defaults to the values specified in their Standard Pay (see page 79). You can edit this information as required. Exo Payroll dynamically calculates the pays as data is entered, so you see the results immediately.
NOTE: Under normal circumstances you would not need to go into every screen for every employee. Usually, the most that is necessary is to edit the Wages screen (see page 109) to enter any overtime. If there are no changes that need to be made to an employee this pay period, their pay is automatically created based on the Standard Pay.
The column of buttons down the left of the screen is used to edit various aspects of an Employee s Current Pay. You cannot edit the fields on the right.
Buttons on the left of the screen give access to different sections of the pay. Many of these sections can also be accessed by clicking on the headings in the Pay Item column. The following buttons and headings are available:
MYOB EXO Payroll User Guide
107
Button Heading Description
Wages Wages Wages (see page 109) - This is where the employee s wage hours for the Current Pay are entered. This option is only enabled if the employee has been setup as Waged in the Employee Details tab (see page 52) of the Employee Maintenance screen.
Allowances Taxable Allowances Non-Taxable Allowances
Allowances (see page 110) - This is where allowances for the Current Period are entered.
Hourly Rates Hourly Rates (see page 111) - This is where the employee s hourly rates are entered or maintained. This option is only enabled if the employee has been setup as Waged in the Employee Details tab (see page 52) of the Employee Maintenance screen.
Salary Salary Salary (see page 112) - This is where the employee s salary for their matching pay frequency is entered. This option is only enabled if the employee has been setup as Salaried in the Employee Details tab (see page 52) of the Employee Maintenance screen.
Deductions Pre-Tax Deductions Post-Tax Deductions Employer Superannuation
Deductions (see page 113) - This is where any deductions that are to be taken out of the employee s pay for the Current Pay are entered.
Leave Leave Management (see page 114) - This is where you pay the employee leave for the Current Pay period. Clicking on any of the leave type headings, e.g. Holiday Pay, Sick Pay, opens the screen for that particular leave type.
Costing Costing (see page 140) - If you wish to proportionally cost an employee s wages or salary by hours or by percentages to different Cost Centres then this is where it is switched on at both the employee level and setup.
PAYE PAYE PAYE (see page 140) - If left unaltered, the computer will automatically calculate the PAYE payable on the employees gross taxable amount, based on the tax code selected in the Employee Details Tab. If required, you do have the ability to override the PAYE with your own amounts.
KiwiSaver Employee KiwiSaver Employer KiwiSaver
KiwiSaver (see page 141) - This is where you set up an employee s KiwiSaver contributions.
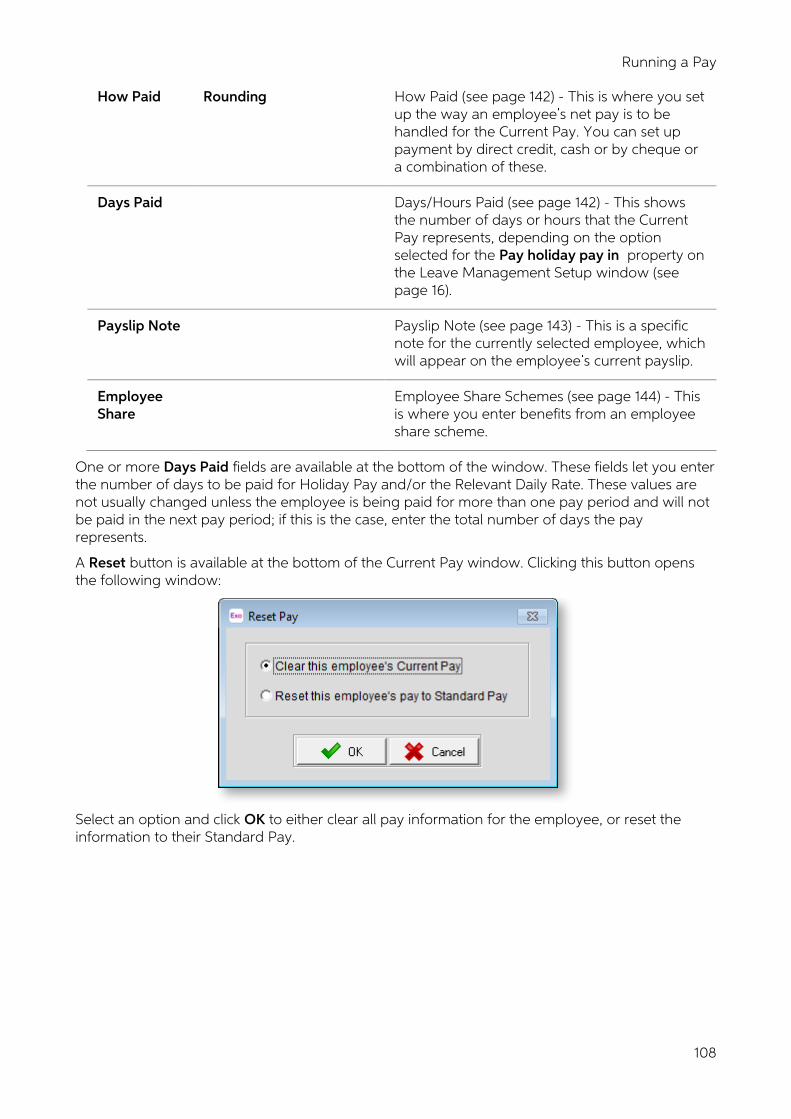
Running a Pay
108
How Paid Rounding How Paid (see page 142) - This is where you set up the way an employee s net pay is to be handled for the Current Pay. You can set up payment by direct credit, cash or by cheque or a combination of these.
Days Paid Days/Hours Paid (see page 142) - This shows the number of days or hours that the Current Pay represents, depending on the option selected for the Pay holiday pay in property on the Leave Management Setup window (see page 16).
Payslip Note Payslip Note (see page 143) - This is a specific note for the currently selected employee, which will appear on the employee s current payslip.
Employee Share
Employee Share Schemes (see page 144) - This is where you enter benefits from an employee share scheme.
One or more Days Paid fields are available at the bottom of the window. These fields let you enter the number of days to be paid for Holiday Pay and/or the Relevant Daily Rate. These values are not usually changed unless the employee is being paid for more than one pay period and will not be paid in the next pay period; if this is the case, enter the total number of days the pay represents.
A Reset button is available at the bottom of the Current Pay window. Clicking this button opens the following window:
Select an option and click OK to either clear all pay information for the employee, or reset the information to their Standard Pay.
MYOB EXO Payroll User Guide
109
View Employee Details
Three buttons are available for viewing additional information about the employee.
Button Description
This button generates a preview of the employee s payslip for this pay.
This button opens the Employee Maintenance screen (see page 51) in a read-only capacity. This is handy for referencing an employee s personal details, which you may need to know about before processing the employee s pay.
This button shows and hides the popup section on the right of the Current Pay window. This section displays additional details about the employee, as well as leave calculation information.
Problems Found in Current Pay
It is essential that employees who are to be paid by direct credit in this pay have a positive Net Pay value. The net pay value is calculated as follows:
Gross Pay (Waged Hours + Salary + Taxable Allowances + Leave - Pre-Tax Deductions) + Non Taxable Allowances - Post Tax Deductions - PAYE (Income tax + ACC Earner Levy + rounding) = Net Pay
The net pay value is usually paid by direct credit. Some employees have their net pay forwarded to multiple bank accounts. When this occurs, the secondary bank account usually has a prescribed amount transacted each pay period, with the balance going to the primary bank account. The fixed amount must be positive money cannot direct debited from employees bank accounts, through payroll. If the positive pay components are not sufficient to cover the fixed direct credit amount, a warning screen will appear.
To fix the problem, you may need to edit the Current Pay for the affected employees, either reducing the fixed direct credit amount, or increasing the positive pay components.
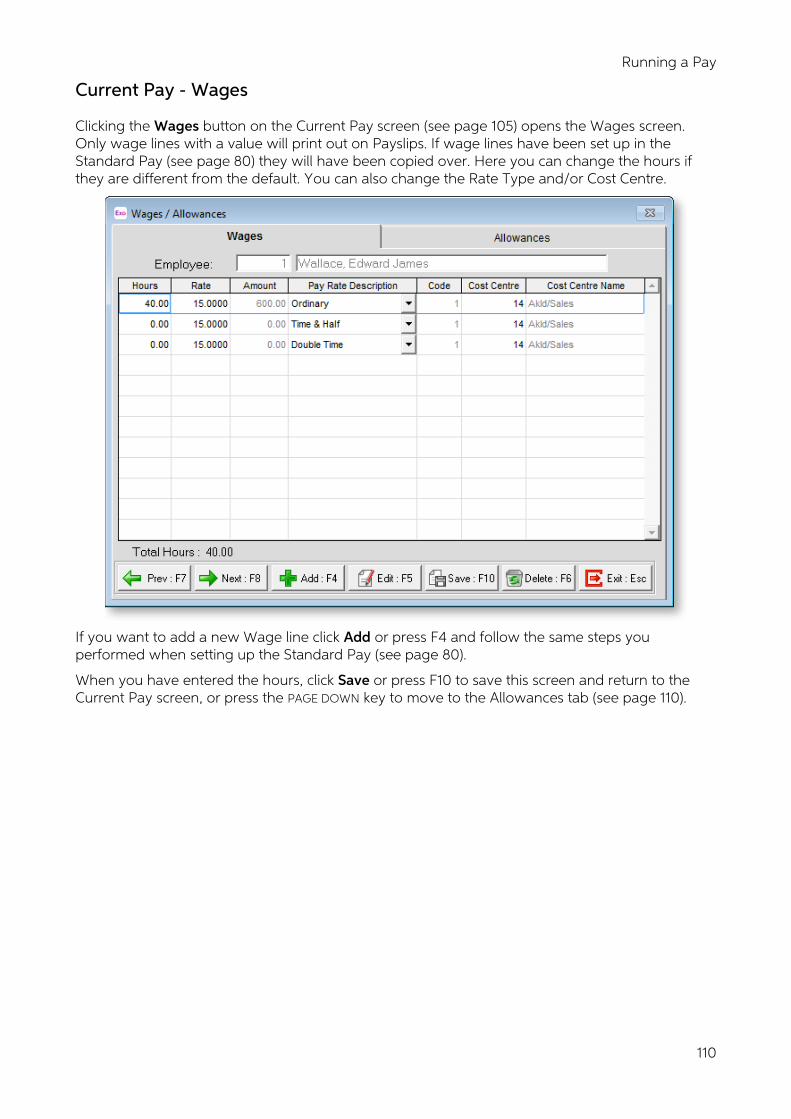
Running a Pay
110
Current Pay - Wages
Clicking the Wages button on the Current Pay screen (see page 105) opens the Wages screen. Only wage lines with a value will print out on Payslips. If wage lines have been set up in the Standard Pay (see page 80) they will have been copied over. Here you can change the hours if they are different from the default. You can also change the Rate Type and/or Cost Centre.
If you want to add a new Wage line click Add or press F4 and follow the same steps you performed when setting up the Standard Pay (see page 80).
When you have entered the hours, click Save or press F10 to save this screen and return to the Current Pay screen, or press the PAGE DOWN key to move to the Allowances tab (see page 110).
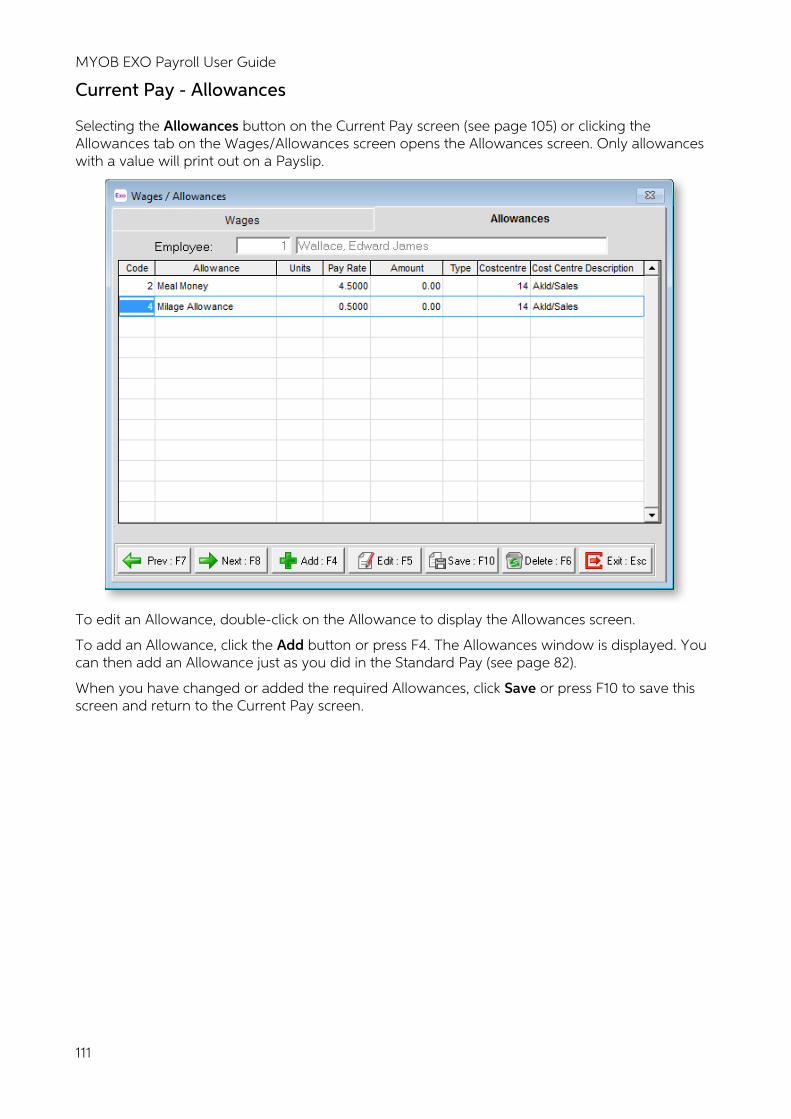
MYOB EXO Payroll User Guide
111
Current Pay - Allowances
Selecting the Allowances button on the Current Pay screen (see page 105) or clicking the Allowances tab on the Wages/Allowances screen opens the Allowances screen. Only allowances with a value will print out on a Payslip.
To edit an Allowance, double-click on the Allowance to display the Allowances screen.
To add an Allowance, click the Add button or press F4. The Allowances window is displayed. You can then add an Allowance just as you did in the Standard Pay (see page 82).
When you have changed or added the required Allowances, click Save or press F10 to save this screen and return to the Current Pay screen.

Running a Pay
112
Current Pay - Hourly Wage Rates
Employees hourly rates are generally set up as a default in the Standard Pay (see page 85). However, if necessary, they can be changed by clicking the Hourly Rates (or Hourly Rate) button on the Current Pay screen (see page 105) to open this window.
If the Multiple Wage Hourly Rates option is enabled in the Special Options Setup (see page 28) section of the Payroll Setup screen, the Hourly Wages Rates screen lets you specified a value for up to nine hourly rates. The hourly rate to use for this pay is selected on the Wages (see page 80) screen.
If Multiple wage hourly rates is disabled, the Hourly Wage Rates screen lets you specify the employee s hourly rate directly.
Click the Save button or press F10 to save.
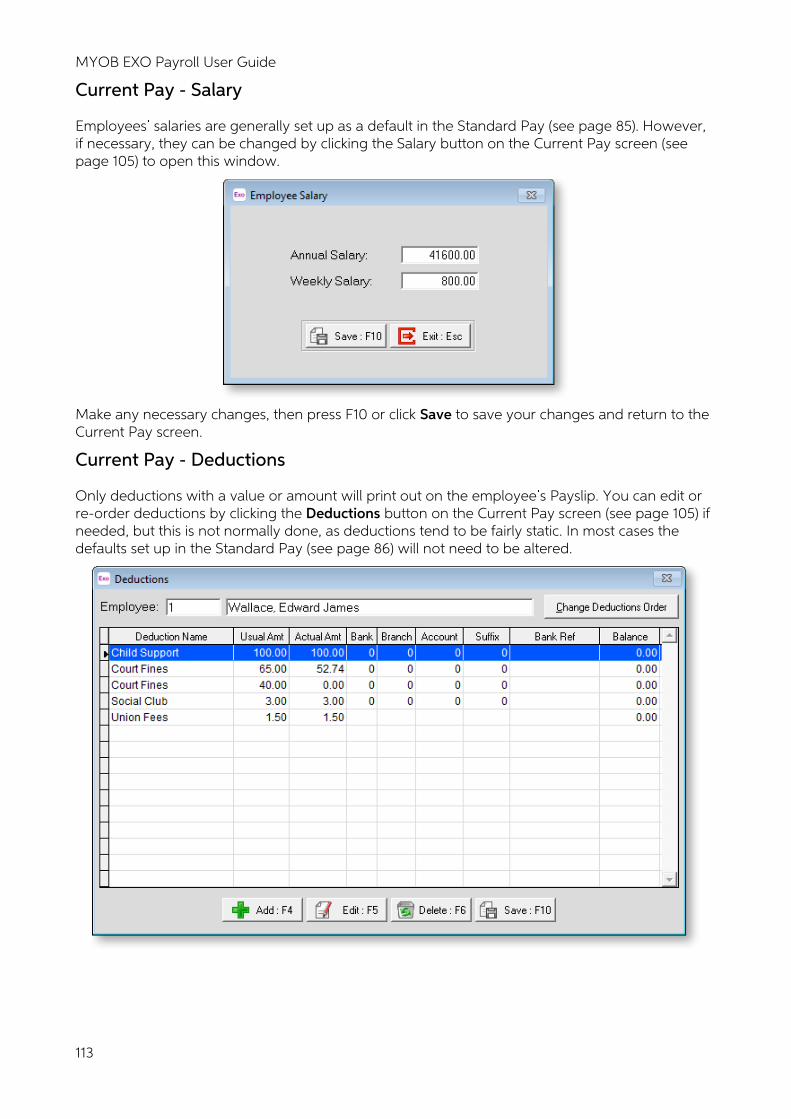
MYOB EXO Payroll User Guide
113
Current Pay - Salary
Employees salaries are generally set up as a default in the Standard Pay (see page 85). However, if necessary, they can be changed by clicking the Salary button on the Current Pay screen (see page 105) to open this window.
Make any necessary changes, then press F10 or click Save to save your changes and return to the Current Pay screen.
Current Pay - Deductions
Only deductions with a value or amount will print out on the employee s Payslip. You can edit or re-order deductions by clicking the Deductions button on the Current Pay screen (see page 105) if needed, but this is not normally done, as deductions tend to be fairly static. In most cases the defaults set up in the Standard Pay (see page 86) will not need to be altered.
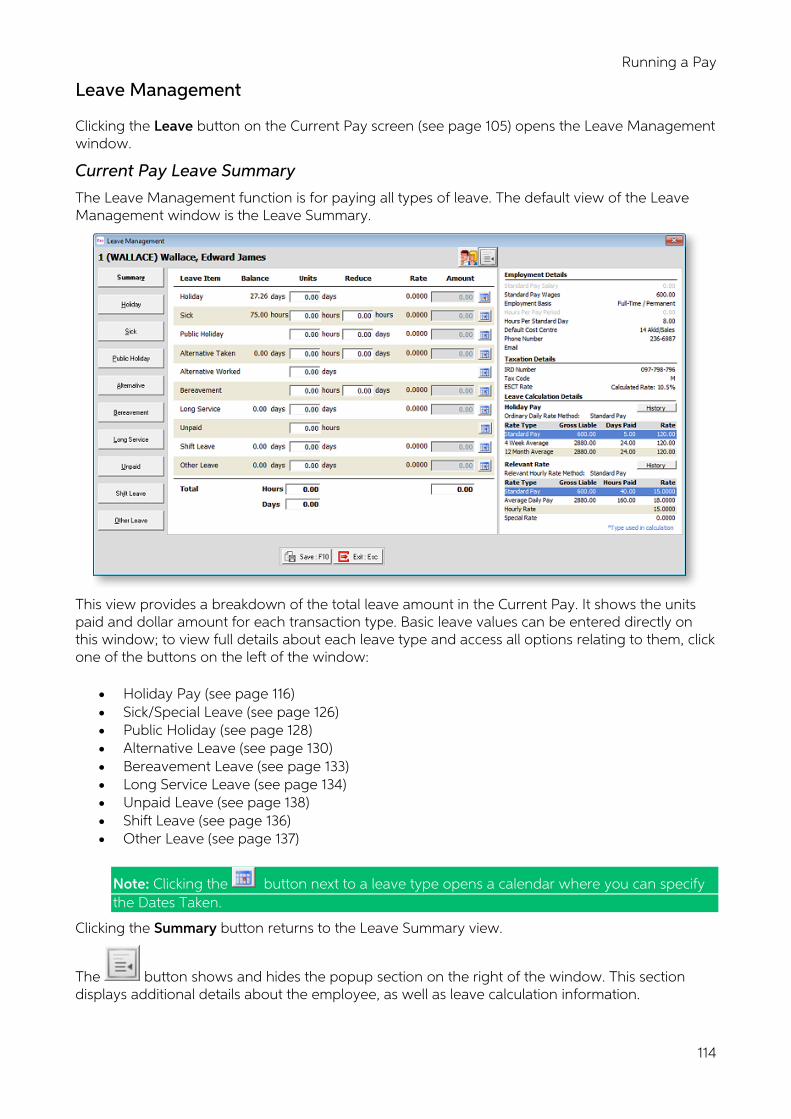
Running a Pay
114
Leave Management
Clicking the Leave button on the Current Pay screen (see page 105) opens the Leave Management window.
Current Pay Leave Summary
The Leave Management function is for paying all types of leave. The default view of the Leave Management window is the Leave Summary.
This view provides a breakdown of the total leave amount in the Current Pay. It shows the units paid and dollar amount for each transaction type. Basic leave values can be entered directly on this window; to view full details about each leave type and access all options relating to them, click one of the buttons on the left of the window:
• Holiday Pay (see page 116) • Sick/Special Leave (see page 126) • Public Holiday (see page 128) • Alternative Leave (see page 130) • Bereavement Leave (see page 133) • Long Service Leave (see page 134) • Unpaid Leave (see page 138) • Shift Leave (see page 136) • Other Leave (see page 137)
Note: Clicking the button next to a leave type opens a calendar where you can specify the Dates Taken.
Clicking the Summary button returns to the Leave Summary view.
The button shows and hides the popup section on the right of the window. This section displays additional details about the employee, as well as leave calculation information.
MYOB EXO Payroll User Guide
115
Salary Reduction
When saving from the Leave Management screen, and processing a pay for a Salaried Employee, you will be prompted to reduce the salary when you pay leave with the salary (in the expectation that the total gross pay will remain the same).
In effect you are tracking leave amounts for this employee without paying in excess of the contracted salary package.
Hours/Days Paid
This screen appears after clicking Save if you have made changes in the Leave Management screens.
The value displayed is not usually changed unless the employee is being paid for more than one pay period and will not be paid in the next pay period. If this is the case, enter the total number of days the pay represents.
Note: The days paid can also be entered directly into the fields at the bottom of the main Current Pay screen (see page 105).
Running a Pay
116
Current Pay - Holiday Pay
Click the Holiday Pay button on the Leave Management screen (see page 114) to pay an employee Holiday Pay.
Enter the number of Days or Hours Holiday Pay the employee is taking, or if you are using the Percentage method of leave, enter a dollar amount to pay. This will be some or all of the total entitlement as shown next to Termination Holiday Pay. Whatever you pay out will be reduced from that amount once this Pay has been updated.
Entitlement Balances
If the employee is on the Percentage Method of Holiday Pay calculation, the following fields appear at the top of the window:
• Amount Accrued This field shows the dollar amount an employee has accrued so far this holiday pay year.
• Amount Outstanding This field gives you the ability to include with any holiday pay any outstanding amounts from previous holiday pay years.
• Amount Advanced This field shows the dollar amount an employee has taken out of their holiday accrual amount so far this holiday pay year.
• Days/Hours Cashed-Up This field shows the number of days that the employee has chosen to cash up (see page 278) this holiday pay year.
• Total Amount Entitlement This field shows the employee s total entitlement, calculated as Amount from Previous Years + Amount Accrued this Year - Amount Paid In Advance
MYOB EXO Payroll User Guide
117
If the employee is not on the Percentage Method, the following fields appear:
• Days/Hours Accrued This field shows the number of days an employee has accrued so far this holiday pay year.
• Days/Hours Outstanding This field shows the number of days an employee still has left from the previous holiday pay years.
• Days/Hours Advanced This field shows the number of days that the employee has taken out of their holidays accrued so far this holiday pay year.
• Total Days This field shows the employee s total entitlement, calculated as Days from Previous Years + Days Accrued This Year Days Paid in Advance.
• Days/Hours Cashed-Up This field shows the number of days that the employee has chosen to cash up (see page 278) this holiday pay year.
Leave Paid
Leave This field is used to type in the number of days holiday pay to be paid. The dollar amount will be suggested for you, based on the either employee s ordinary daily rate, or their average daily rate for the last 52 weeks, whichever is the higher.
If the days to be paid exceed the Total Days Entitlement showing on the screen a warning message is displayed.
Dates Taken Clicking on this button opens a calendar where you specify which calendar days were taken:
Click on the appropriate day(s) to select them. To print the calendar month for the current employee, click on the Printer icon from the toolbar at top left. Click Save or press F10 to save your changes.
Running a Pay
118
Override Amount This field is used if you wish to override the holiday pay dollar figure for any reason.
If a zero is typed in the Amount column the amount of days paid will show on the Payslip and reduce the Total Days Entitlement but no dollar value will be recorded.
This is used in the situation where the employee s salary may continue whilst on holiday but it is desirable to keep a record of Holiday Days taken and a record of Days still outstanding for the particular employee.
The Days taken are recorded automatically in the Notes for each employee.
Future-dated leave This field is used to enter leave that is being paid in this pay, but taken in a later pay period. Leave paid in this way is added to the employee s pay as an Allowance and taxed as Extra Pay. The Holiday Pay Amount is calculated automatically; this value can be overridden and entered manually if necessary by ticking the Override option.
Cash-Up This field is used if the employee wants to cash up some of their Holiday Pay entitlement (see page 278). Enter the amount to cash up. The Holiday Pay Amount is calculated automatically; this value can be overridden and entered manually if necessary by ticking the Override option.
NOTE: Employees cannot cash up more than one week s Holiday Pay in a single year. Exo Payroll checks that employees are not cashing up more Holiday Pay than they are currently owed; however, it is up to the employer to ensure that employee doesn t cash up more than one week of leave in a year. Employees must have been employed for more than one year to be entitled to Holiday Pay - cash-ups are not allowed for employees who have been employed for less than one year.
Date Due Back From Holiday If an employee is going to be on holiday for an extended period of time or at least for the next pay period, enter that date that they will be returning on.
Cost Centre This field is used if you want this holiday pay to be costed to a different cost centre other than the default cost centre specified on the Payroll Setup Page 1 window (see page 13) or the employee s default cost centre.
Direct cost to this code This option is available if the Mixed Proportional Costing option is enabled on the Payroll Setup Page 1 window (see page 13). Selecting this option means that leave will be costed directly to the employee s default cost centre, rather than being proportioned.
Extra Allowances/Deductions Clicking this button opens a window where pay extra allowances to those already entered or make any extra deductions from the holiday pay. This may be necessary if an employee is on holiday for an extended period of time.
Holiday Pay Note Clicking this button opens a window where you can make an addition to the notes that are automatically recorded for the number of holiday days taken.
Termination
Termination Holiday Pay Amount This is the estimated amount of Holiday Pay that would be included in the employee s termination pay. If the employee has been terminated, this field is replaced by a Termination Amount field, which displays the actual Holiday Pay amount of the employee s termination pay.
Termination Wizard This option is used if this pay is to include an employee s final pay or you wish to pay an employee all the holiday pay that they are currently entitled to. When you click this button, the Termination Pay Wizard (see page 169) opens.
MYOB EXO Payroll User Guide
119
Holiday Closedown
NOTE: This section is only available if the Enable Closedown Holiday Pay option is enabled on the Leave Management Setup window (see page 16).
Closedown Holiday Pay Amount This is the estimated amount of Holiday Pay that would be included in the employee s pay.
Closedown % only Holiday Pay Wizard When you click this button, the Closedown % only Holiday Pay Wizard (see page 123) opens. This wizard lets you calculate and pay 8% Holiday Pay for an employee who is required to take annual leave over a company closedown period, but who have not yet reached an entitlement to four weeks annual leave.
If the employee has been paid Holiday Pay using this wizard, the button changes to Undo Closedown % only Holiday Pay Wizard - clicking this button lets you undo the effects of the wizard.
Termination Holiday Pay Wizard
The Termination Holiday Pay Wizard provides a breakdown of the information that it has gathered in order to arrive at the final termination amount.
This amounts to:
Holiday pay outstanding from previous holiday pay years/anniversaries. + Holiday pay accruals for the current year. - Holiday pay paid in advance off the current year accrual.
All of these things need to be taken into consideration for termination pays.
NOTE: Employees are terminated using the Terminate/Reinstate option (see page 169) from the File menu. The Termination Holiday Pay Wizard gives you the option of terminating the employee after it is complete.
Click the Termination Wizard button on the Holiday Pay tab of the Leave Management screen to begin. A confirmation message appears - click Yes to proceed.
The starting point for the calculation of termination pay is the find the number of days of holiday pay outstanding. In other words, days that the employee was entitled to on their last holiday anniversary but have not yet taken to date.

Running a Pay
120
Step 1: Outstanding Leave
Outstanding Leave The Value for outstanding days of holiday pay is calculated as the Days Outstanding multiplied by the higher of two rates:
• Average Rate - this rate is calculated as the gross paid for the last twelve months divided by the days paid for the last twelve months.
• Ordinary Rate - this rate is either taken from the Standard Pay or calculated as an average of the last four week s earnings, depending on the employee s Ordinary Daily/Hourly Rate setting on the Holiday Pay tab of the Employee Maintenance window (see page 59).
Exo Payroll selects the higher of the two rates - this is shown in bold (if neither is bold, it is because the two rates are the same).
Dates Taken This button lets you specify the calendar days that the termination pay covers. Note that if the coverage of days includes a statutory holiday, the employee should receive the statutory on top of, not in lieu of, their holiday pay.
Last Year Short Paid Amount Pre April 2004 this was a self calculating field based upon the rate an employee was paid for holiday pay and what should have been paid come the end of the holiday pay year. Post April 2004 this field will not accumulate dollars, as holiday pay will always be valued at the average daily rate for the last 12 months. If there is an amount in this field, it should be paid the employee upon termination.
Includes 8.00% of outstanding leave Section 26 of the Holidays Act states that the gross earnings, for the purposes of section 25(2) includes any payments under section 24(2). Therefore the gross earnings to which the entitlement percentage applies, includes gross earnings from Steps 1 and 2. Here we see the percentage amount of the 1st calculation that will be added to the percentage amount of the 2nd calculation in order to form a total percentage amount.
Once these details are completed, click Next or press F8 to proceed to the next screen.
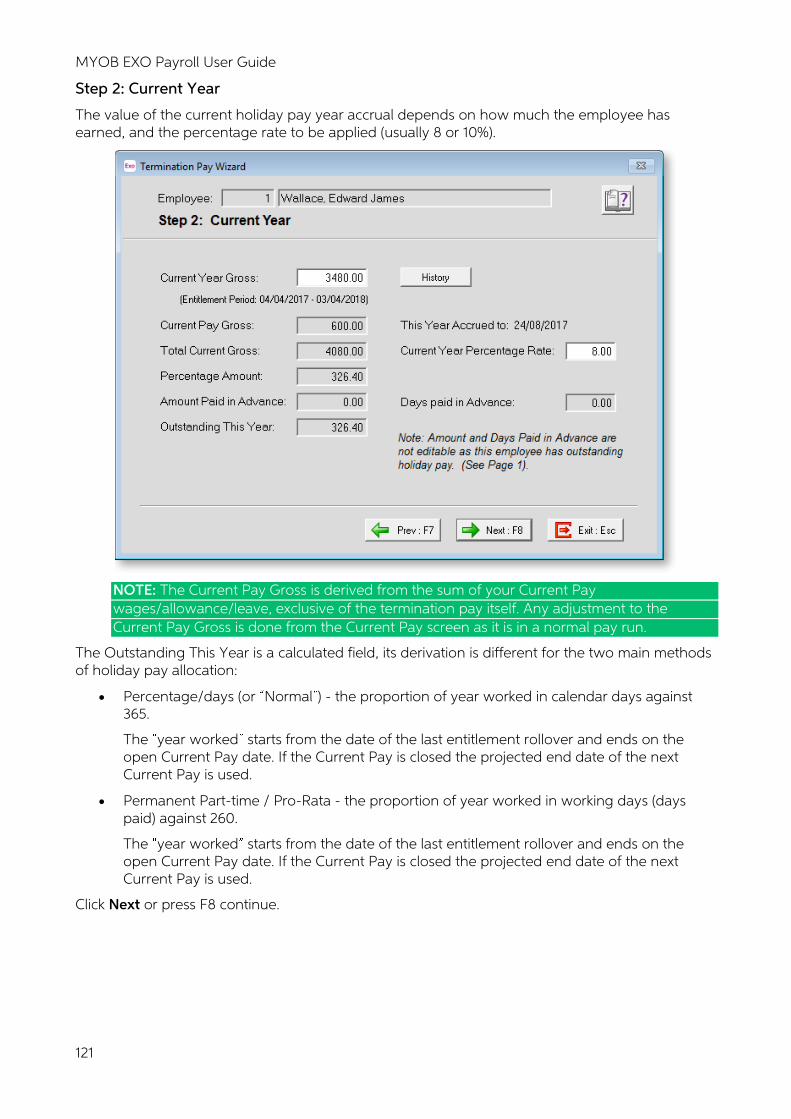
MYOB EXO Payroll User Guide
121
Step 2: Current Year
The value of the current holiday pay year accrual depends on how much the employee has earned, and the percentage rate to be applied (usually 8 or 10%).
NOTE: The Current Pay Gross is derived from the sum of your Current Pay wages/allowance/leave, exclusive of the termination pay itself. Any adjustment to the Current Pay Gross is done from the Current Pay screen as it is in a normal pay run.
The Outstanding This Year is a calculated field, its derivation is different for the two main methods of holiday pay allocation:
• Percentage/days (or Normal ) - the proportion of year worked in calendar days against 365.
The year worked starts from the date of the last entitlement rollover and ends on the open Current Pay date. If the Current Pay is closed the projected end date of the next Current Pay is used.
• Permanent Part-time / Pro-Rata - the proportion of year worked in working days (days paid) against 260.
The year worked starts from the date of the last entitlement rollover and ends on the open Current Pay date. If the Current Pay is closed the projected end date of the next Current Pay is used.
Click Next or press F8 continue.
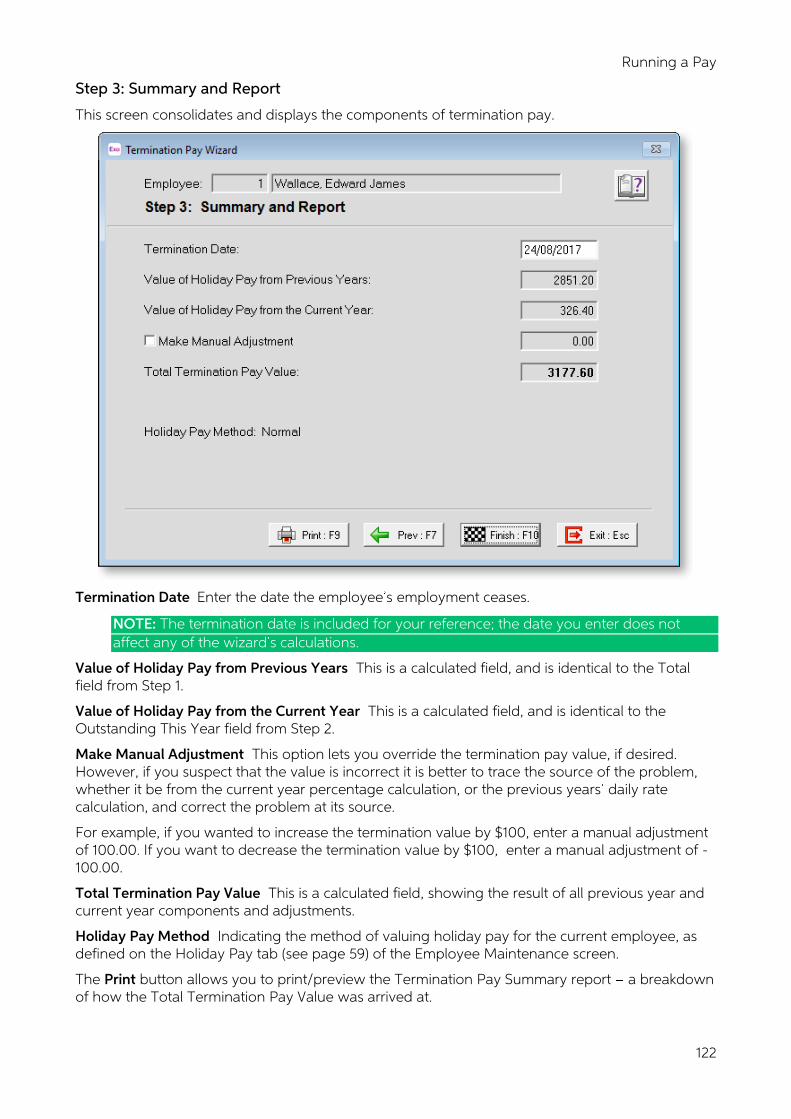
Running a Pay
122
Step 3: Summary and Report
This screen consolidates and displays the components of termination pay.
Termination Date Enter the date the employee s employment ceases.
NOTE: The termination date is included for your reference; the date you enter does not affect any of the wizard s calculations.
Value of Holiday Pay from Previous Years This is a calculated field, and is identical to the Total field from Step 1.
Value of Holiday Pay from the Current Year This is a calculated field, and is identical to the Outstanding This Year field from Step 2.
Make Manual Adjustment This option lets you override the termination pay value, if desired. However, if you suspect that the value is incorrect it is better to trace the source of the problem, whether it be from the current year percentage calculation, or the previous years daily rate calculation, and correct the problem at its source.
For example, if you wanted to increase the termination value by $100, enter a manual adjustment of 100.00. If you want to decrease the termination value by $100, enter a manual adjustment of -100.00.
Total Termination Pay Value This is a calculated field, showing the result of all previous year and current year components and adjustments.
Holiday Pay Method Indicating the method of valuing holiday pay for the current employee, as defined on the Holiday Pay tab (see page 59) of the Employee Maintenance screen.
The Print button allows you to print/preview the Termination Pay Summary report a breakdown of how the Total Termination Pay Value was arrived at.
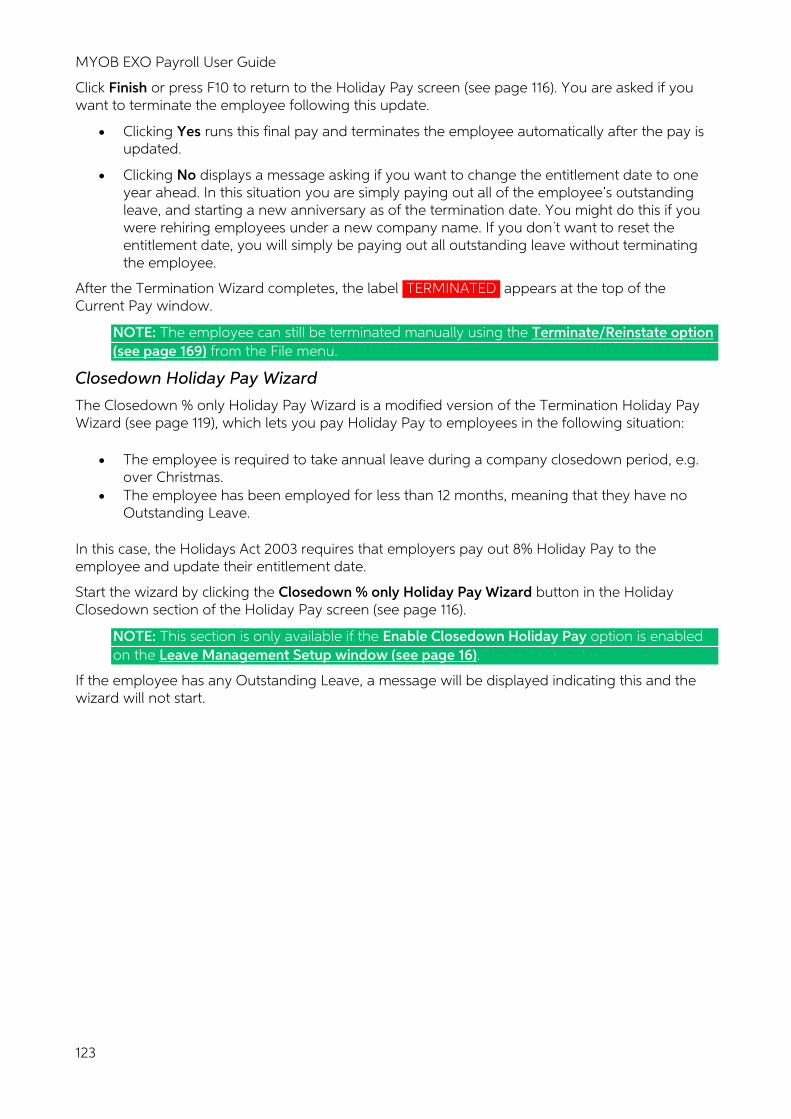
MYOB EXO Payroll User Guide
123
Click Finish or press F10 to return to the Holiday Pay screen (see page 116). You are asked if you want to terminate the employee following this update.
• Clicking Yes runs this final pay and terminates the employee automatically after the pay is updated.
• Clicking No displays a message asking if you want to change the entitlement date to one year ahead. In this situation you are simply paying out all of the employee s outstanding leave, and starting a new anniversary as of the termination date. You might do this if you were rehiring employees under a new company name. If you don t want to reset the entitlement date, you will simply be paying out all outstanding leave without terminating the employee.
After the Termination Wizard completes, the label TERMINATED appears at the top of the Current Pay window.
NOTE: The employee can still be terminated manually using the Terminate/Reinstate option (see page 169) from the File menu.
Closedown Holiday Pay Wizard
The Closedown % only Holiday Pay Wizard is a modified version of the Termination Holiday Pay Wizard (see page 119), which lets you pay Holiday Pay to employees in the following situation:
• The employee is required to take annual leave during a company closedown period, e.g. over Christmas.
• The employee has been employed for less than 12 months, meaning that they have no Outstanding Leave.
In this case, the Holidays Act 2003 requires that employers pay out 8% Holiday Pay to the employee and update their entitlement date.
Start the wizard by clicking the Closedown % only Holiday Pay Wizard button in the Holiday Closedown section of the Holiday Pay screen (see page 116).
NOTE: This section is only available if the Enable Closedown Holiday Pay option is enabled on the Leave Management Setup window (see page 16).
If the employee has any Outstanding Leave, a message will be displayed indicating this and the wizard will not start.
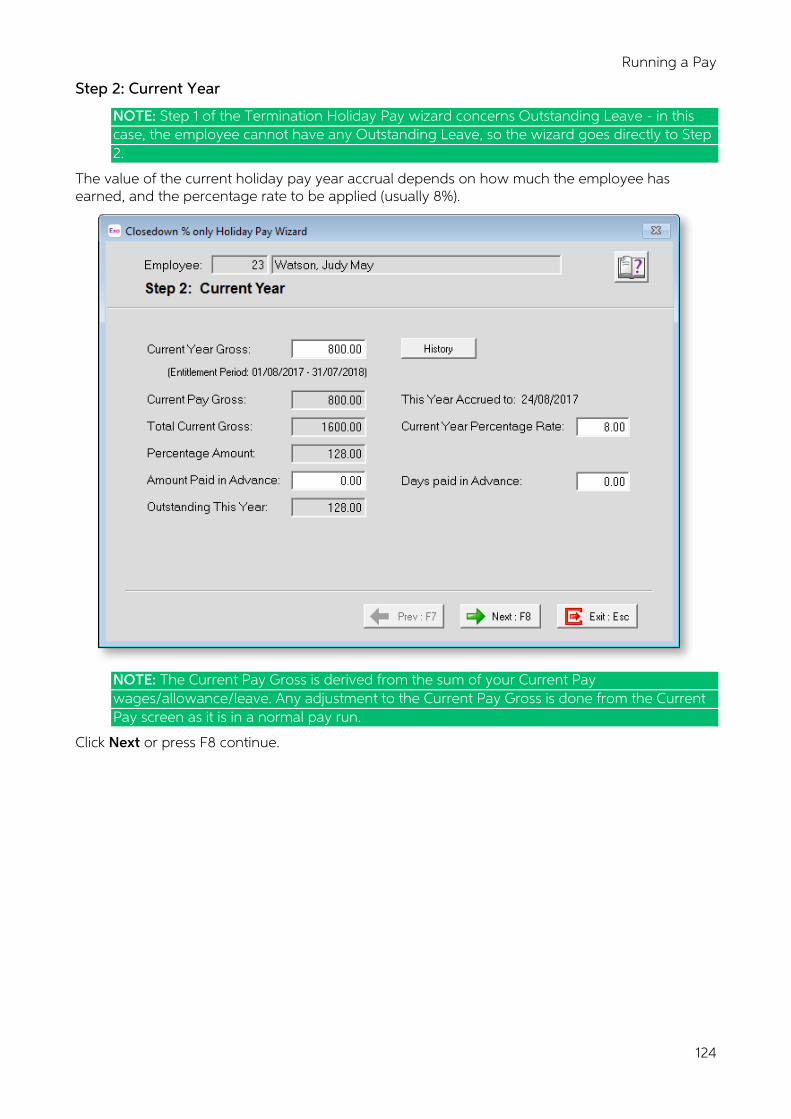
Running a Pay
124
Step 2: Current Year
NOTE: Step 1 of the Termination Holiday Pay wizard concerns Outstanding Leave - in this case, the employee cannot have any Outstanding Leave, so the wizard goes directly to Step 2.
The value of the current holiday pay year accrual depends on how much the employee has earned, and the percentage rate to be applied (usually 8%).
NOTE: The Current Pay Gross is derived from the sum of your Current Pay wages/allowance/leave. Any adjustment to the Current Pay Gross is done from the Current Pay screen as it is in a normal pay run.
Click Next or press F8 continue.
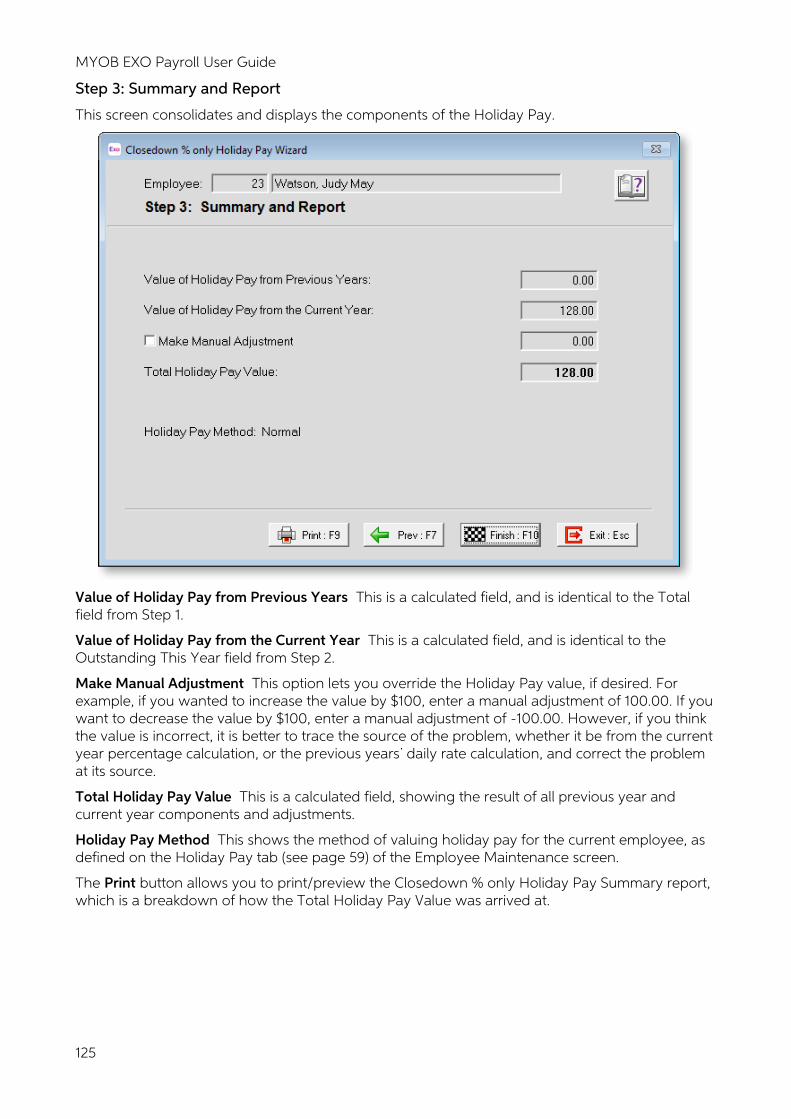
MYOB EXO Payroll User Guide
125
Step 3: Summary and Report
This screen consolidates and displays the components of the Holiday Pay.
Value of Holiday Pay from Previous Years This is a calculated field, and is identical to the Total field from Step 1.
Value of Holiday Pay from the Current Year This is a calculated field, and is identical to the Outstanding This Year field from Step 2.
Make Manual Adjustment This option lets you override the Holiday Pay value, if desired. For example, if you wanted to increase the value by $100, enter a manual adjustment of 100.00. If you want to decrease the value by $100, enter a manual adjustment of -100.00. However, if you think the value is incorrect, it is better to trace the source of the problem, whether it be from the current year percentage calculation, or the previous years daily rate calculation, and correct the problem at its source.
Total Holiday Pay Value This is a calculated field, showing the result of all previous year and current year components and adjustments.
Holiday Pay Method This shows the method of valuing holiday pay for the current employee, as defined on the Holiday Pay tab (see page 59) of the Employee Maintenance screen.
The Print button allows you to print/preview the Closedown % only Holiday Pay Summary report, which is a breakdown of how the Total Holiday Pay Value was arrived at.
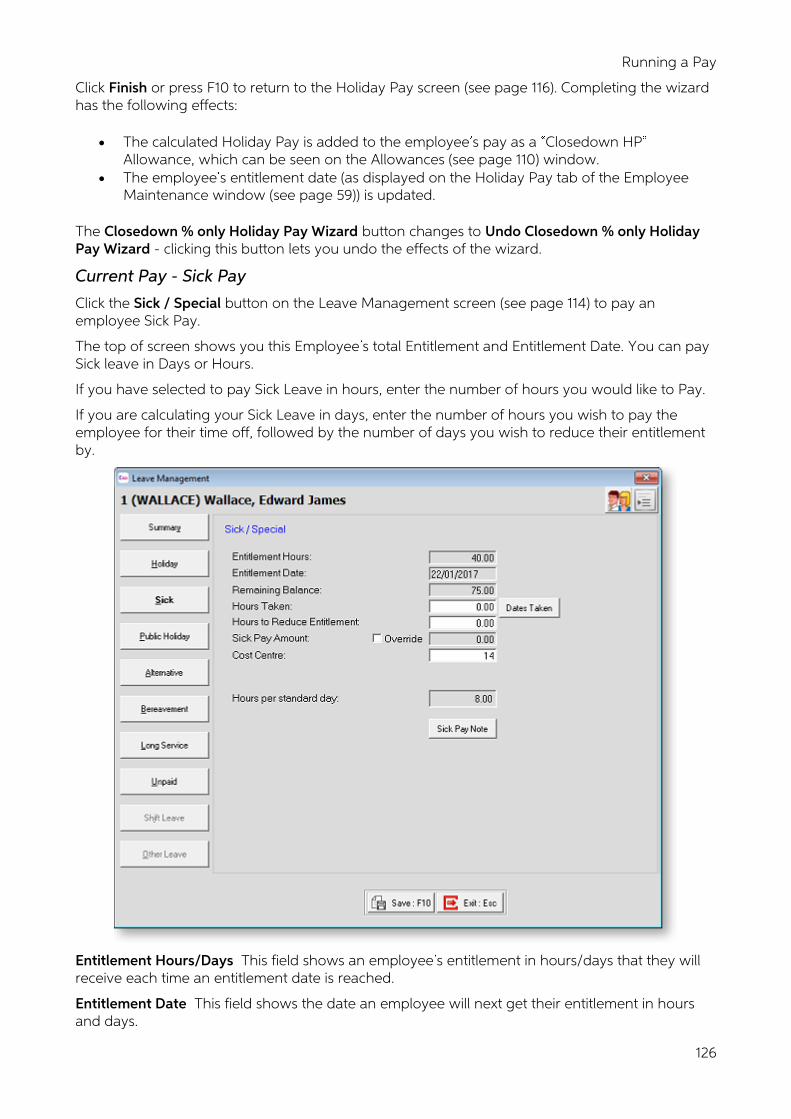
Running a Pay
126
Click Finish or press F10 to return to the Holiday Pay screen (see page 116). Completing the wizard has the following effects:
• The calculated Holiday Pay is added to the employee s pay as a Closedown HP Allowance, which can be seen on the Allowances (see page 110) window.
• The employee s entitlement date (as displayed on the Holiday Pay tab of the Employee Maintenance window (see page 59)) is updated.
The Closedown % only Holiday Pay Wizard button changes to Undo Closedown % only Holiday Pay Wizard - clicking this button lets you undo the effects of the wizard.
Current Pay - Sick Pay
Click the Sick / Special button on the Leave Management screen (see page 114) to pay an employee Sick Pay.
The top of screen shows you this Employee s total Entitlement and Entitlement Date. You can pay Sick leave in Days or Hours.
If you have selected to pay Sick Leave in hours, enter the number of hours you would like to Pay.
If you are calculating your Sick Leave in days, enter the number of hours you wish to pay the employee for their time off, followed by the number of days you wish to reduce their entitlement by.
Entitlement Hours/Days This field shows an employee s entitlement in hours/days that they will receive each time an entitlement date is reached.
Entitlement Date This field shows the date an employee will next get their entitlement in hours and days.
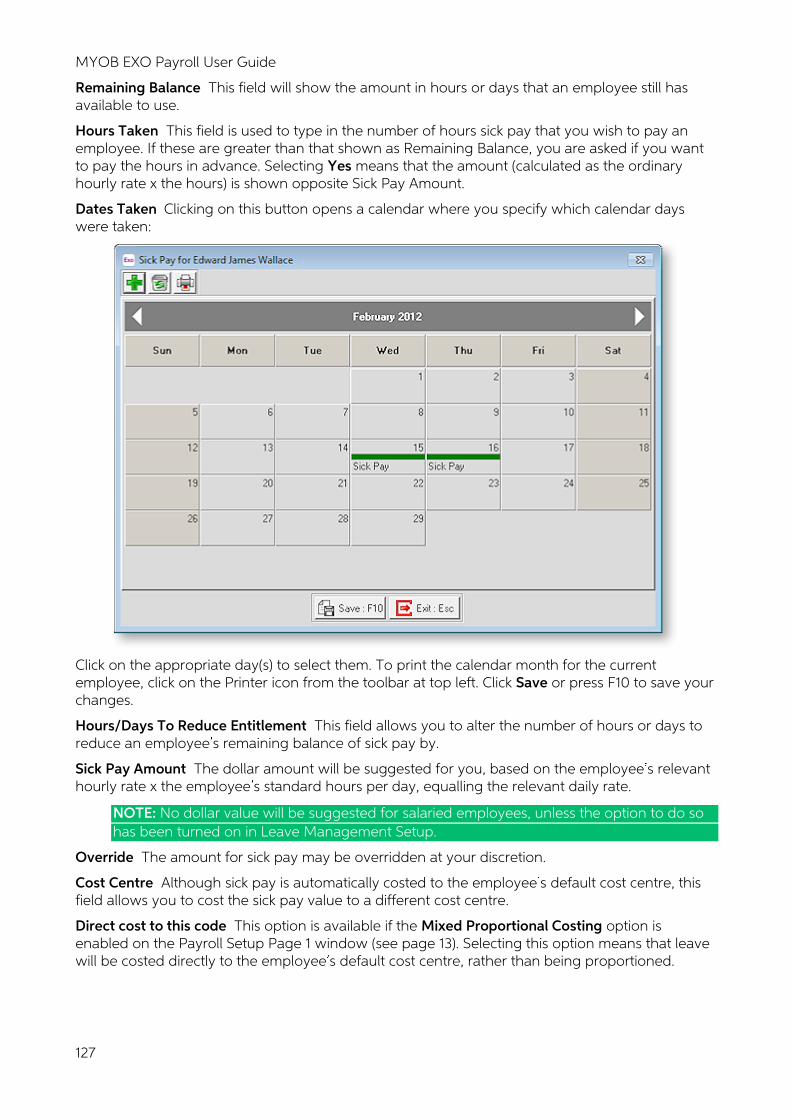
MYOB EXO Payroll User Guide
127
Remaining Balance This field will show the amount in hours or days that an employee still has available to use.
Hours Taken This field is used to type in the number of hours sick pay that you wish to pay an employee. If these are greater than that shown as Remaining Balance, you are asked if you want to pay the hours in advance. Selecting Yes means that the amount (calculated as the ordinary hourly rate x the hours) is shown opposite Sick Pay Amount.
Dates Taken Clicking on this button opens a calendar where you specify which calendar days were taken:
Click on the appropriate day(s) to select them. To print the calendar month for the current employee, click on the Printer icon from the toolbar at top left. Click Save or press F10 to save your changes.
Hours/Days To Reduce Entitlement This field allows you to alter the number of hours or days to reduce an employee s remaining balance of sick pay by.
Sick Pay Amount The dollar amount will be suggested for you, based on the employee s relevant hourly rate x the employee s standard hours per day, equalling the relevant daily rate.
NOTE: No dollar value will be suggested for salaried employees, unless the option to do so has been turned on in Leave Management Setup.
Override The amount for sick pay may be overridden at your discretion.
Cost Centre Although sick pay is automatically costed to the employee s default cost centre, this field allows you to cost the sick pay value to a different cost centre.
Direct cost to this code This option is available if the Mixed Proportional Costing option is enabled on the Payroll Setup Page 1 window (see page 13). Selecting this option means that leave will be costed directly to the employee s default cost centre, rather than being proportioned.
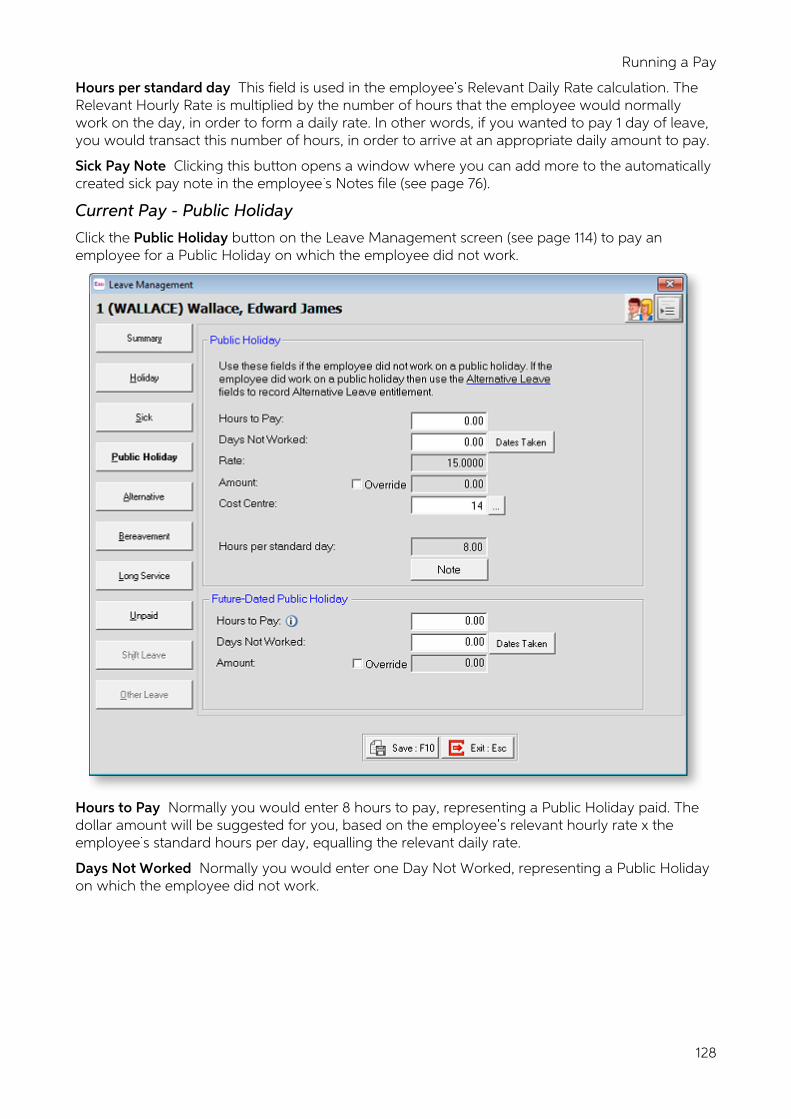
Running a Pay
128
Hours per standard day This field is used in the employee s Relevant Daily Rate calculation. The Relevant Hourly Rate is multiplied by the number of hours that the employee would normally work on the day, in order to form a daily rate. In other words, if you wanted to pay 1 day of leave, you would transact this number of hours, in order to arrive at an appropriate daily amount to pay.
Sick Pay Note Clicking this button opens a window where you can add more to the automatically created sick pay note in the employee s Notes file (see page 76).
Current Pay - Public Holiday
Click the Public Holiday button on the Leave Management screen (see page 114) to pay an employee for a Public Holiday on which the employee did not work.
Hours to Pay Normally you would enter 8 hours to pay, representing a Public Holiday paid. The dollar amount will be suggested for you, based on the employee s relevant hourly rate x the employee s standard hours per day, equalling the relevant daily rate.
Days Not Worked Normally you would enter one Day Not Worked, representing a Public Holiday on which the employee did not work.
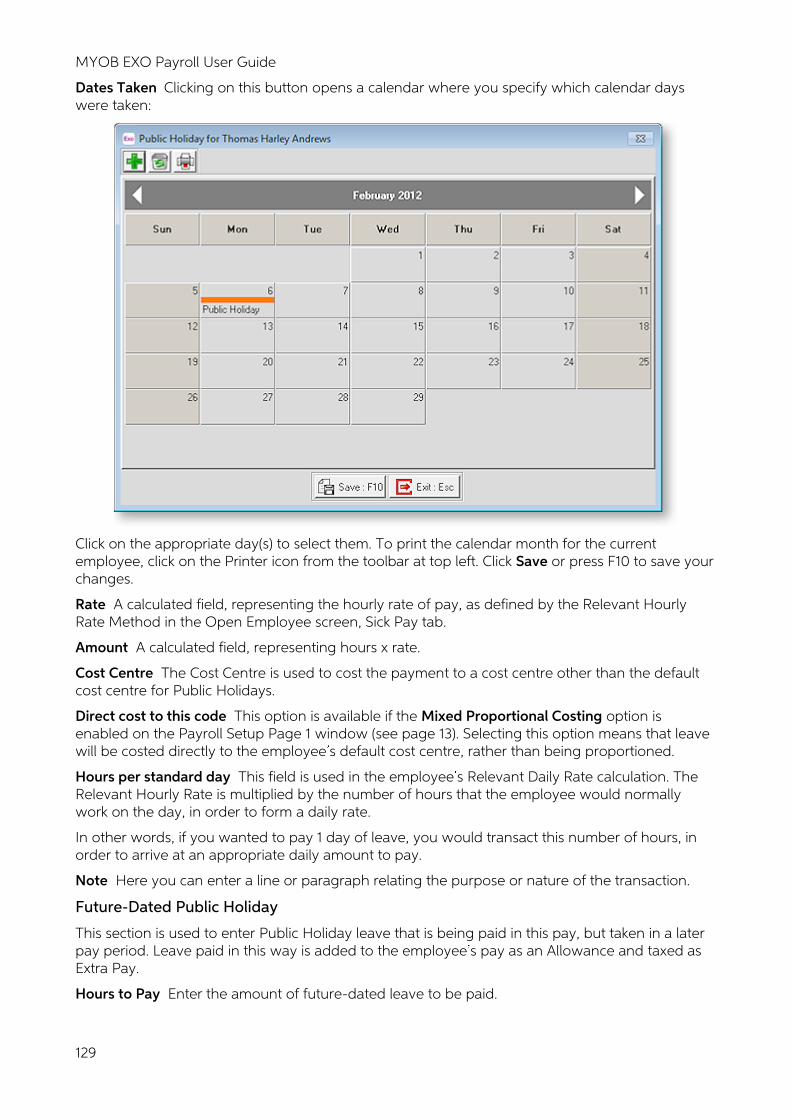
MYOB EXO Payroll User Guide
129
Dates Taken Clicking on this button opens a calendar where you specify which calendar days were taken:
Click on the appropriate day(s) to select them. To print the calendar month for the current employee, click on the Printer icon from the toolbar at top left. Click Save or press F10 to save your changes.
Rate A calculated field, representing the hourly rate of pay, as defined by the Relevant Hourly Rate Method in the Open Employee screen, Sick Pay tab.
Amount A calculated field, representing hours x rate.
Cost Centre The Cost Centre is used to cost the payment to a cost centre other than the default cost centre for Public Holidays.
Direct cost to this code This option is available if the Mixed Proportional Costing option is enabled on the Payroll Setup Page 1 window (see page 13). Selecting this option means that leave will be costed directly to the employee s default cost centre, rather than being proportioned.
Hours per standard day This field is used in the employee s Relevant Daily Rate calculation. The Relevant Hourly Rate is multiplied by the number of hours that the employee would normally work on the day, in order to form a daily rate.
In other words, if you wanted to pay 1 day of leave, you would transact this number of hours, in order to arrive at an appropriate daily amount to pay.
Note Here you can enter a line or paragraph relating the purpose or nature of the transaction.
Future-Dated Public Holiday
This section is used to enter Public Holiday leave that is being paid in this pay, but taken in a later pay period. Leave paid in this way is added to the employee s pay as an Allowance and taxed as Extra Pay.
Hours to Pay Enter the amount of future-dated leave to be paid.
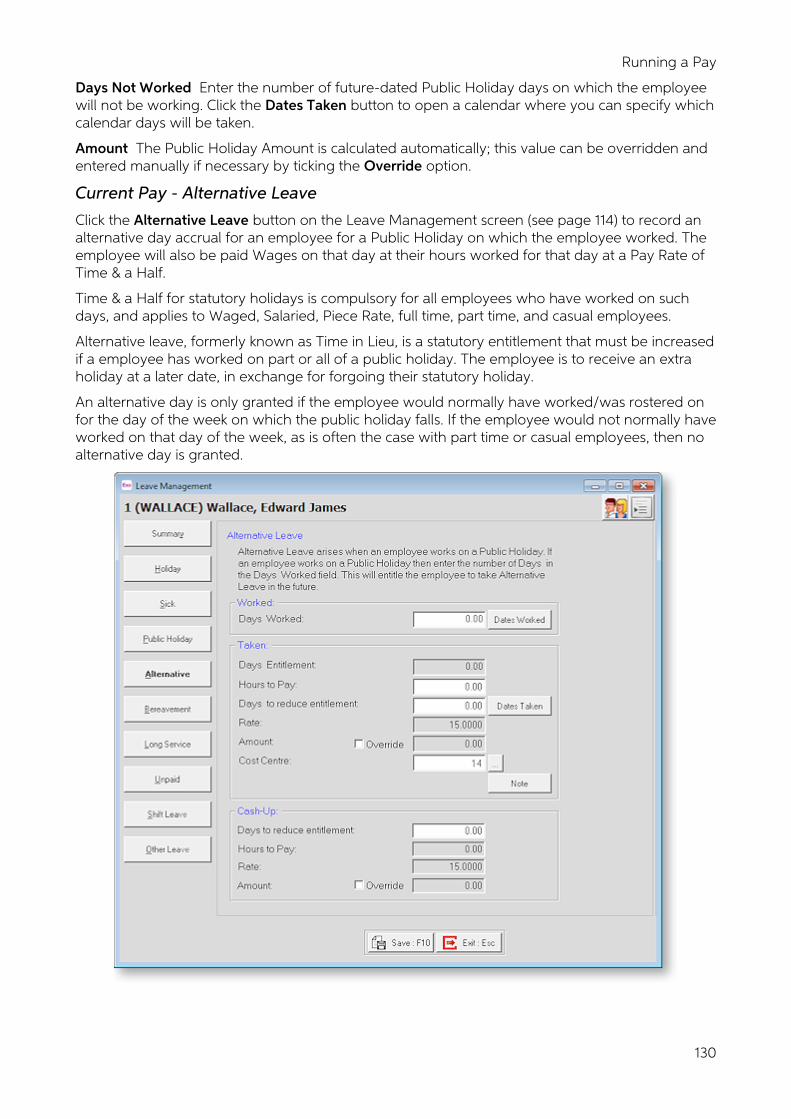
Running a Pay
130
Days Not Worked Enter the number of future-dated Public Holiday days on which the employee will not be working. Click the Dates Taken button to open a calendar where you can specify which calendar days will be taken.
Amount The Public Holiday Amount is calculated automatically; this value can be overridden and entered manually if necessary by ticking the Override option.
Current Pay - Alternative Leave
Click the Alternative Leave button on the Leave Management screen (see page 114) to record an alternative day accrual for an employee for a Public Holiday on which the employee worked. The employee will also be paid Wages on that day at their hours worked for that day at a Pay Rate of Time & a Half.
Time & a Half for statutory holidays is compulsory for all employees who have worked on such days, and applies to Waged, Salaried, Piece Rate, full time, part time, and casual employees.
Alternative leave, formerly known as Time in Lieu, is a statutory entitlement that must be increased if a employee has worked on part or all of a public holiday. The employee is to receive an extra holiday at a later date, in exchange for forgoing their statutory holiday.
An alternative day is only granted if the employee would normally have worked/was rostered on for the day of the week on which the public holiday falls. If the employee would not normally have worked on that day of the week, as is often the case with part time or casual employees, then no alternative day is granted.
MYOB EXO Payroll User Guide
131
Worked
Days Worked Normally you would enter one Day Worked, representing a Public Holiday on which the employee worked and is therefore entitled to an alternative holiday.
The number of hours actually worked on the public holiday is irrelevant to the increase of the alternative leave entitlement. If the employee worked for any length of time on a public holiday they are entitled to one full alternative day.
Dates Worked Clicking on this button opens a calendar where you specify which calendar day the worked public holiday fell on:
Click on the appropriate day(s) to select them. To print the calendar month for the current employee, click on the Printer icon from the toolbar at top left. Click Save or press F10 to save your changes.
Taken
Days Entitlement To decrease the Alternative Leave entitlement and pay the employee for the alternative holiday, you would use the Taken section. The Days Entitlement field will show the number of hours or days that an employee still has available to use.
Hours to Pay Normally you would enter 8 hours to pay, representing an Alternative Holiday taken. The dollar amount will be suggested for you, based on the employee s relevant hourly rate x the employee s standard hours per day, equalling the relevant daily rate.
Days to Reduce Entitlement Normally you would enter 1 Day to reduce, representing a reduction in the outstanding Alternative Leave liability to the company.
Running a Pay
132
Dates Taken Clicking on this button opens a calendar where you specify which calendar days were taken:
To colour a cell, click on the appropriate day, then click the button. To print the calendar month for the current employee, click on the Printer icon from the toolbar at top left. Click Save or press F10 to save your changes.
Rate A calculated field, representing the hourly rate of pay, as defined by the Relevant Hourly Rate Method on the Sick & Other Leave tab of the Employee Maintenance screen (see page 65).
Amount A calculated field, representing hours x rate.
Cost Centre The cost centre is used to cost the payment to a cost centre other than the default cost centre for Alternative Leave.
Direct cost to this code This option is available if the Mixed Proportional Costing option is enabled on the Payroll Setup Page 1 window (see page 13). Selecting this option means that leave will be costed directly to the employee s default cost centre, rather than being proportioned.
Note Clicking this button opens a window where you can enter a line or paragraph relating the purpose or nature of the transaction.
Cash-Up
Days to reduce entitlement This field is used if the employee wants to cash up some of their Alternative Leave entitlement (see page 278). Enter the amount to cash up. The Hours to Pay, Rate and Amount are calculated automatically; the Amount value can be overridden and entered manually if necessary by ticking the Override option.
NOTE: Exo Payroll checks that employees are not cashing up more leave than they are currently owed; however, it is up to the employer to decide on how much leave an employee may cash up and to ensure that employees don t cash up more than that amount.
MYOB EXO Payroll User Guide
133
Current Pay - Bereavement Leave
Click the Bereavement Leave button on the Leave Management screen (see page 114) to pay an employee Bereavement leave in the Current Pay.
Hours to Pay Normally you would enter 8 hours to pay, representing a day of Bereavement Leave. The dollar amount will be suggested for you, based on the employee s relevant hourly rate x the employee s standard hours per day, equalling the relevant daily rate.
If the employee is not yet eligible for bereavement leave, a warning message appears. If you still want to pay the bereavement leave, click Yes. Paying bereavement leave in advance is not recommended, and the Payroll system has no accumulator for bereavement leave paid in advance, for the purposes of subtracting leave owing to the company upon termination.
Running a Pay
134
Days Taken Normally you would enter 1 Day Taken. Click on the Dates Taken button a calendar will appear from which you can specify the calendar days on which the leave occurred. Click on the appropriate day(s) to select them.
Press F10 to save your changes, and return to the Bereavement Leave screen.
Rate A calculated field, representing the hourly rate of pay, as defined by the Relevant Hourly Rate Method in the Open Employee screen, Sick Pay tab.
Amount A calculated field, representing hours x rate.
Cost Centre The cost centre is used to cost the payment to a cost centre other than the default cost centre for Bereavement Leave.
Direct cost to this code This option is available if the Mixed Proportional Costing option is enabled on the Payroll Setup Page 1 window (see page 13). Selecting this option means that leave will be costed directly to the employee s default cost centre, rather than being proportioned.
Hours per standard day This field is used in the employee s Relevant Daily Rate calculation. The Relevant Hourly Rate is multiplied by the number of hours that the employee would normally work on the day, in order to form a daily rate.
In other words, if you wanted to pay one day of leave, you would transact this number of hours, in order to arrive at an appropriate daily amount to pay.
Note Clicking this button opens a window where you can enter a line or paragraph relating the purpose or nature of the transaction.

MYOB EXO Payroll User Guide
135
Current Pay - Long Service Leave
Click the Long Service button on the Leave Management screen (see page 114) to pay an employee Long Service Leave.
Long Service Leave
Entitlement Hours/Days This field shows an employee s entitlement in hours/days that they will receive each time an entitlement date is reached.
Entitlement Date This field shows the date an employee will next get their entitlement.
Current Balance This field will show the number of hours or days that an employee still has available to use.
Days Taken For waged employees enter the number of days to pay, and the value will be calculated for you at the employee s standard daily rate. For salaried employees enter the number of days to pay. The value will default to zero, assuming that employee is paid their normal salary and that the day of long service merely acts as a counter to reduce the entitlement. Click the Dates Taken button to open a calendar where you specify which calendar days were taken.
Long Service Amount You may wish to value long service leave at the standard daily rate. In other words, the Standard Pay gross pay divided by days paid. For example:
$600 per week / 5 days paid = $120 per day.
In which case you would enter 120.00 into the Long Service Amount field.
Override The amount for Long Service Leave may be overridden at your discretion.
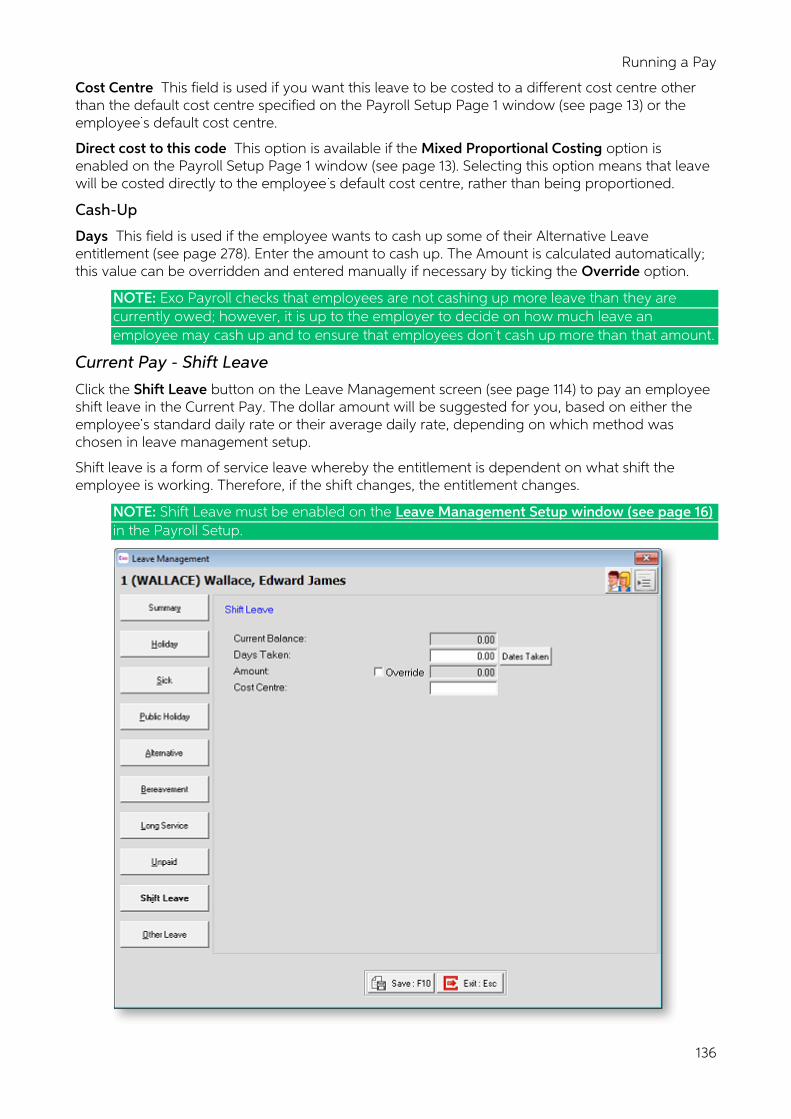
Running a Pay
136
Cost Centre This field is used if you want this leave to be costed to a different cost centre other than the default cost centre specified on the Payroll Setup Page 1 window (see page 13) or the employee s default cost centre.
Direct cost to this code This option is available if the Mixed Proportional Costing option is enabled on the Payroll Setup Page 1 window (see page 13). Selecting this option means that leave will be costed directly to the employee s default cost centre, rather than being proportioned.
Cash-Up
Days This field is used if the employee wants to cash up some of their Alternative Leave entitlement (see page 278). Enter the amount to cash up. The Amount is calculated automatically; this value can be overridden and entered manually if necessary by ticking the Override option.
NOTE: Exo Payroll checks that employees are not cashing up more leave than they are currently owed; however, it is up to the employer to decide on how much leave an employee may cash up and to ensure that employees don t cash up more than that amount.
Current Pay - Shift Leave
Click the Shift Leave button on the Leave Management screen (see page 114) to pay an employee shift leave in the Current Pay. The dollar amount will be suggested for you, based on either the employee s standard daily rate or their average daily rate, depending on which method was chosen in leave management setup.
Shift leave is a form of service leave whereby the entitlement is dependent on what shift the employee is working. Therefore, if the shift changes, the entitlement changes.
NOTE: Shift Leave must be enabled on the Leave Management Setup window (see page 16) in the Payroll Setup.
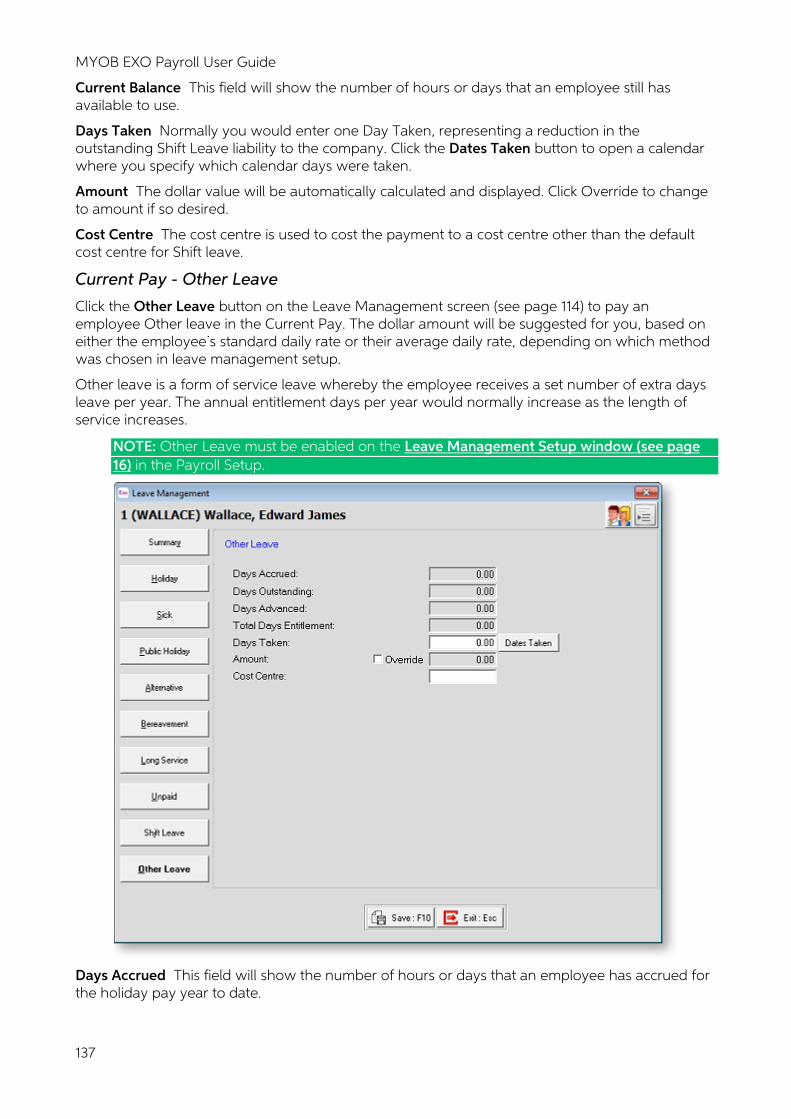
MYOB EXO Payroll User Guide
137
Current Balance This field will show the number of hours or days that an employee still has available to use.
Days Taken Normally you would enter one Day Taken, representing a reduction in the outstanding Shift Leave liability to the company. Click the Dates Taken button to open a calendar where you specify which calendar days were taken.
Amount The dollar value will be automatically calculated and displayed. Click Override to change to amount if so desired.
Cost Centre The cost centre is used to cost the payment to a cost centre other than the default cost centre for Shift leave.
Current Pay - Other Leave
Click the Other Leave button on the Leave Management screen (see page 114) to pay an employee Other leave in the Current Pay. The dollar amount will be suggested for you, based on either the employee s standard daily rate or their average daily rate, depending on which method was chosen in leave management setup.
Other leave is a form of service leave whereby the employee receives a set number of extra days leave per year. The annual entitlement days per year would normally increase as the length of service increases.
NOTE: Other Leave must be enabled on the Leave Management Setup window (see page 16) in the Payroll Setup.
Days Accrued This field will show the number of hours or days that an employee has accrued for the holiday pay year to date.
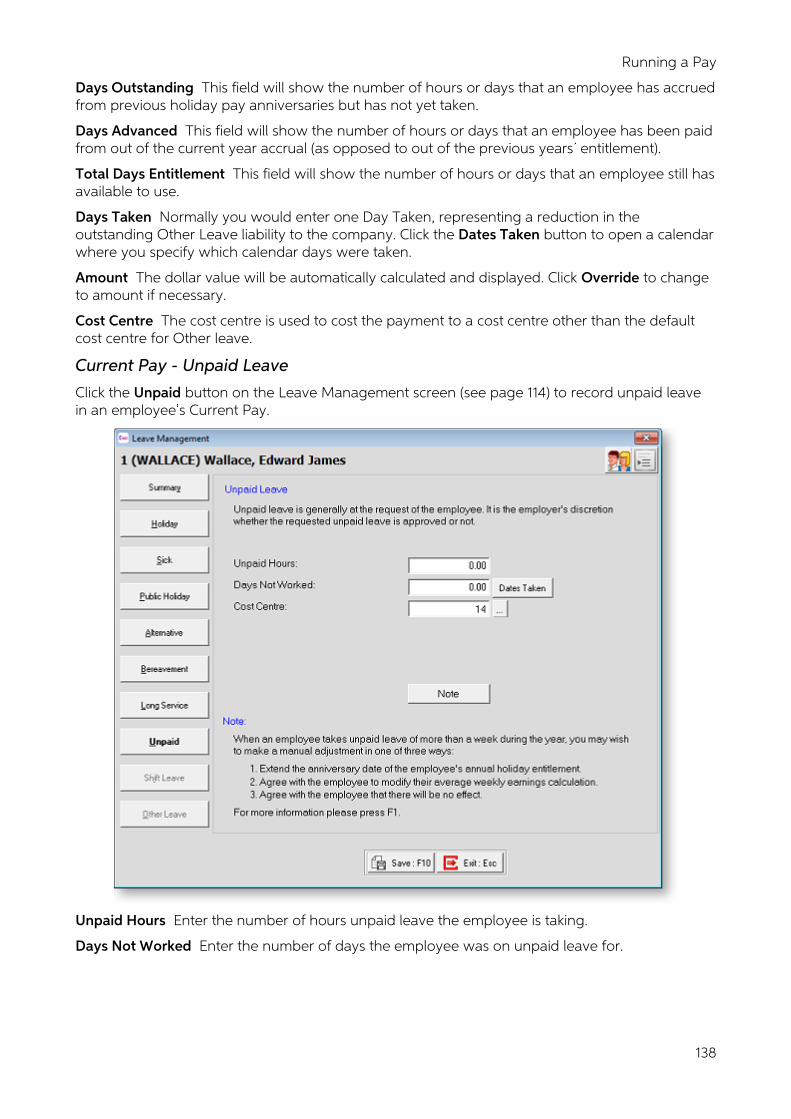
Running a Pay
138
Days Outstanding This field will show the number of hours or days that an employee has accrued from previous holiday pay anniversaries but has not yet taken.
Days Advanced This field will show the number of hours or days that an employee has been paid from out of the current year accrual (as opposed to out of the previous years entitlement).
Total Days Entitlement This field will show the number of hours or days that an employee still has available to use.
Days Taken Normally you would enter one Day Taken, representing a reduction in the outstanding Other Leave liability to the company. Click the Dates Taken button to open a calendar where you specify which calendar days were taken.
Amount The dollar value will be automatically calculated and displayed. Click Override to change to amount if necessary.
Cost Centre The cost centre is used to cost the payment to a cost centre other than the default cost centre for Other leave.
Current Pay - Unpaid Leave
Click the Unpaid button on the Leave Management screen (see page 114) to record unpaid leave in an employee s Current Pay.
Unpaid Hours Enter the number of hours unpaid leave the employee is taking.
Days Not Worked Enter the number of days the employee was on unpaid leave for.
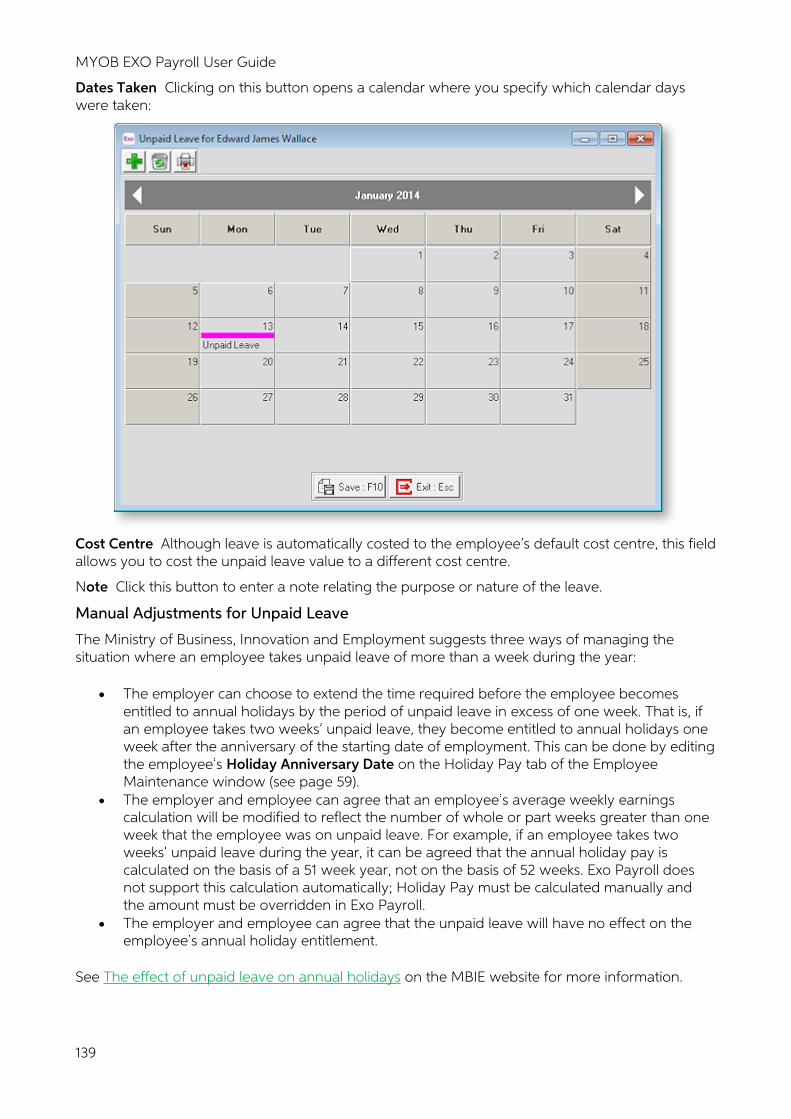
MYOB EXO Payroll User Guide
139
Dates Taken Clicking on this button opens a calendar where you specify which calendar days were taken:
Cost Centre Although leave is automatically costed to the employee s default cost centre, this field allows you to cost the unpaid leave value to a different cost centre.
Note Click this button to enter a note relating the purpose or nature of the leave.
Manual Adjustments for Unpaid Leave
The Ministry of Business, Innovation and Employment suggests three ways of managing the situation where an employee takes unpaid leave of more than a week during the year:
• The employer can choose to extend the time required before the employee becomes entitled to annual holidays by the period of unpaid leave in excess of one week. That is, if an employee takes two weeks unpaid leave, they become entitled to annual holidays one week after the anniversary of the starting date of employment. This can be done by editing the employee s Holiday Anniversary Date on the Holiday Pay tab of the Employee Maintenance window (see page 59).
• The employer and employee can agree that an employee s average weekly earnings calculation will be modified to reflect the number of whole or part weeks greater than one week that the employee was on unpaid leave. For example, if an employee takes two weeks unpaid leave during the year, it can be agreed that the annual holiday pay is calculated on the basis of a 51 week year, not on the basis of 52 weeks. Exo Payroll does not support this calculation automatically; Holiday Pay must be calculated manually and the amount must be overridden in Exo Payroll.
• The employer and employee can agree that the unpaid leave will have no effect on the employee s annual holiday entitlement.
See The effect of unpaid leave on annual holidays on the MBIE website for more information.
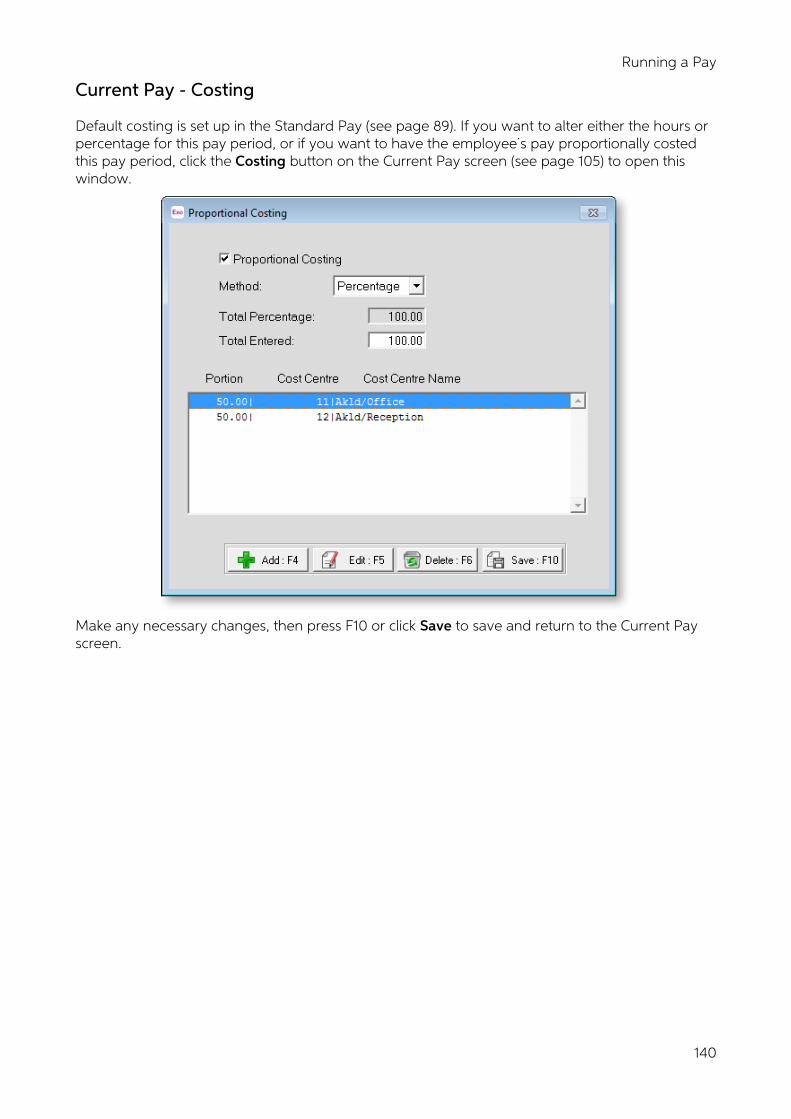
Running a Pay
140
Current Pay - Costing
Default costing is set up in the Standard Pay (see page 89). If you want to alter either the hours or percentage for this pay period, or if you want to have the employee s pay proportionally costed this pay period, click the Costing button on the Current Pay screen (see page 105) to open this window.
Make any necessary changes, then press F10 or click Save to save and return to the Current Pay screen.
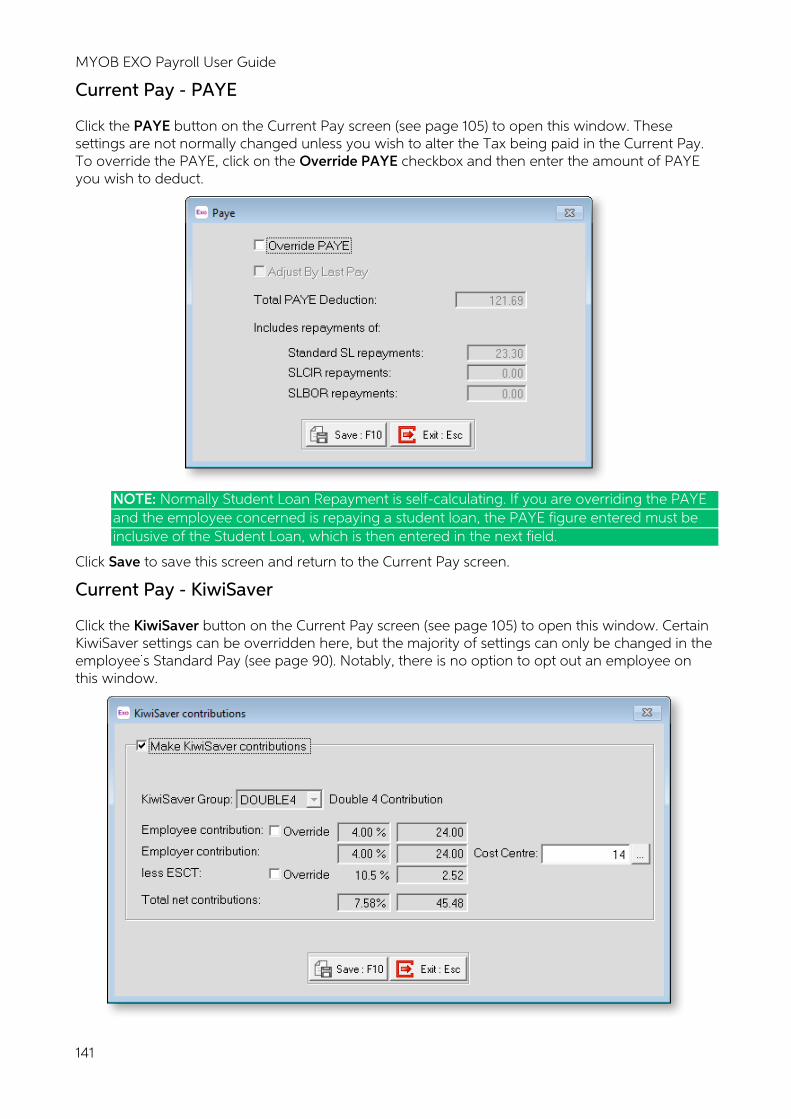
MYOB EXO Payroll User Guide
141
Current Pay - PAYE
Click the PAYE button on the Current Pay screen (see page 105) to open this window. These settings are not normally changed unless you wish to alter the Tax being paid in the Current Pay. To override the PAYE, click on the Override PAYE checkbox and then enter the amount of PAYE you wish to deduct.
NOTE: Normally Student Loan Repayment is self-calculating. If you are overriding the PAYE and the employee concerned is repaying a student loan, the PAYE figure entered must be inclusive of the Student Loan, which is then entered in the next field.
Click Save to save this screen and return to the Current Pay screen.
Current Pay - KiwiSaver
Click the KiwiSaver button on the Current Pay screen (see page 105) to open this window. Certain KiwiSaver settings can be overridden here, but the majority of settings can only be changed in the employee s Standard Pay (see page 90). Notably, there is no option to opt out an employee on this window.

Running a Pay
142
To override the Employee contribution or less ESCT values, tick the appropriate Override box and enter the new value.
Click Save to save this screen and return to the Current Pay screen.
Current Pay - How Paid
Clicking How Paid on the Current Pay screen (see page 105) lets you edit how the Employee s net pay is to be paid. Normally this will have been setup in the Standard Pay (see page 93) and will not need to be changed.
Click Save or press F10 to save this screen and return to the Current Pay screen.
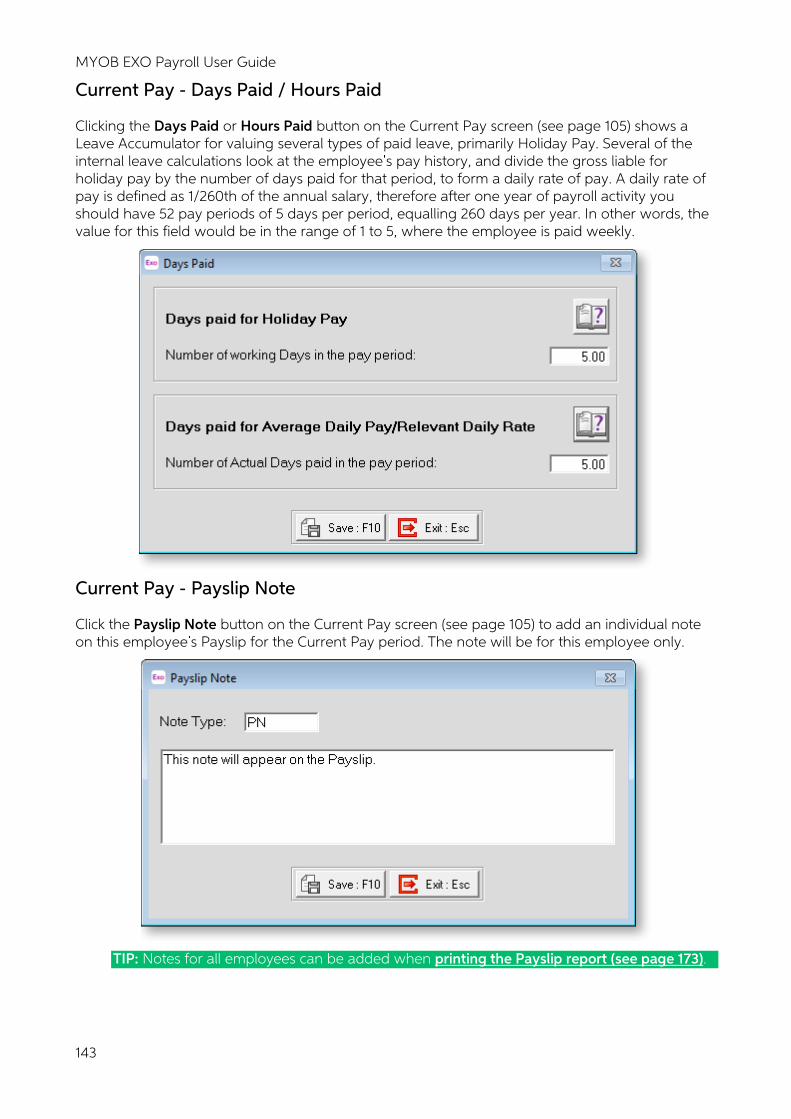
MYOB EXO Payroll User Guide
143
Current Pay - Days Paid / Hours Paid
Clicking the Days Paid or Hours Paid button on the Current Pay screen (see page 105) shows a Leave Accumulator for valuing several types of paid leave, primarily Holiday Pay. Several of the internal leave calculations look at the employee s pay history, and divide the gross liable for holiday pay by the number of days paid for that period, to form a daily rate of pay. A daily rate of pay is defined as 1/260th of the annual salary, therefore after one year of payroll activity you should have 52 pay periods of 5 days per period, equalling 260 days per year. In other words, the value for this field would be in the range of 1 to 5, where the employee is paid weekly.
Current Pay - Payslip Note
Click the Payslip Note button on the Current Pay screen (see page 105) to add an individual note on this employee s Payslip for the Current Pay period. The note will be for this employee only.
TIP: Notes for all employees can be added when printing the Payslip report (see page 173).
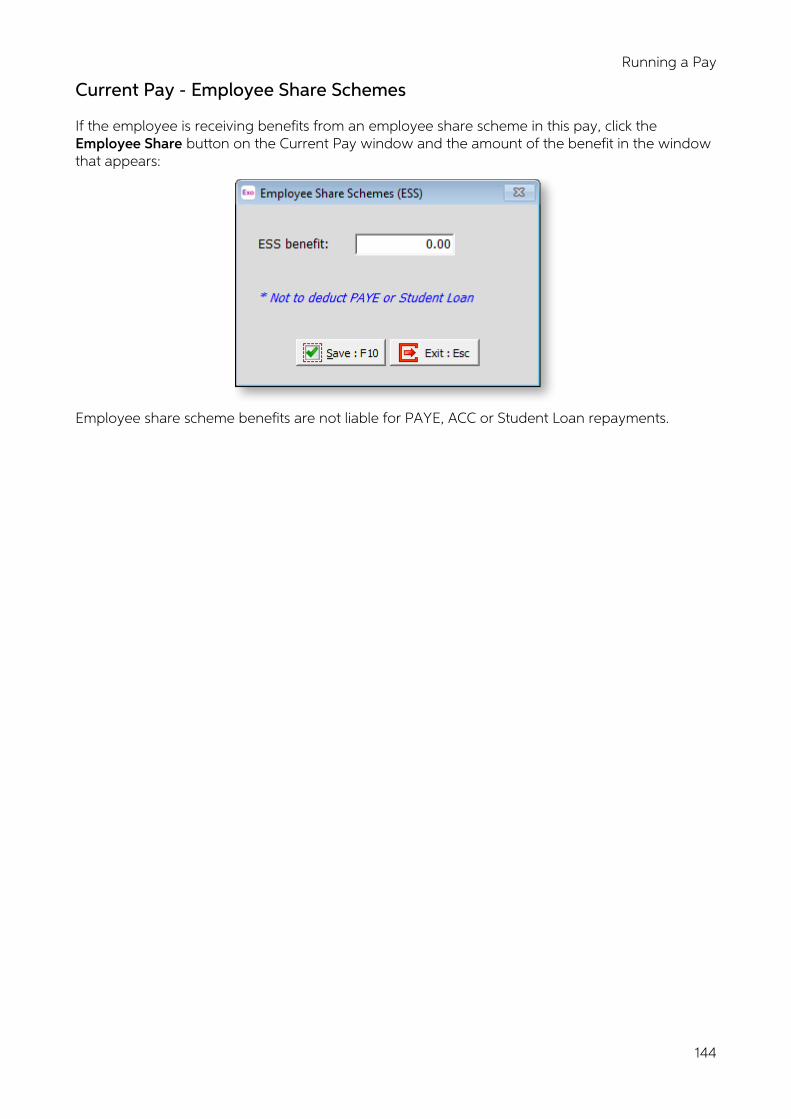
Running a Pay
144
Current Pay - Employee Share Schemes
If the employee is receiving benefits from an employee share scheme in this pay, click the Employee Share button on the Current Pay window and the amount of the benefit in the window that appears:
Employee share scheme benefits are not liable for PAYE, ACC or Student Loan repayments.
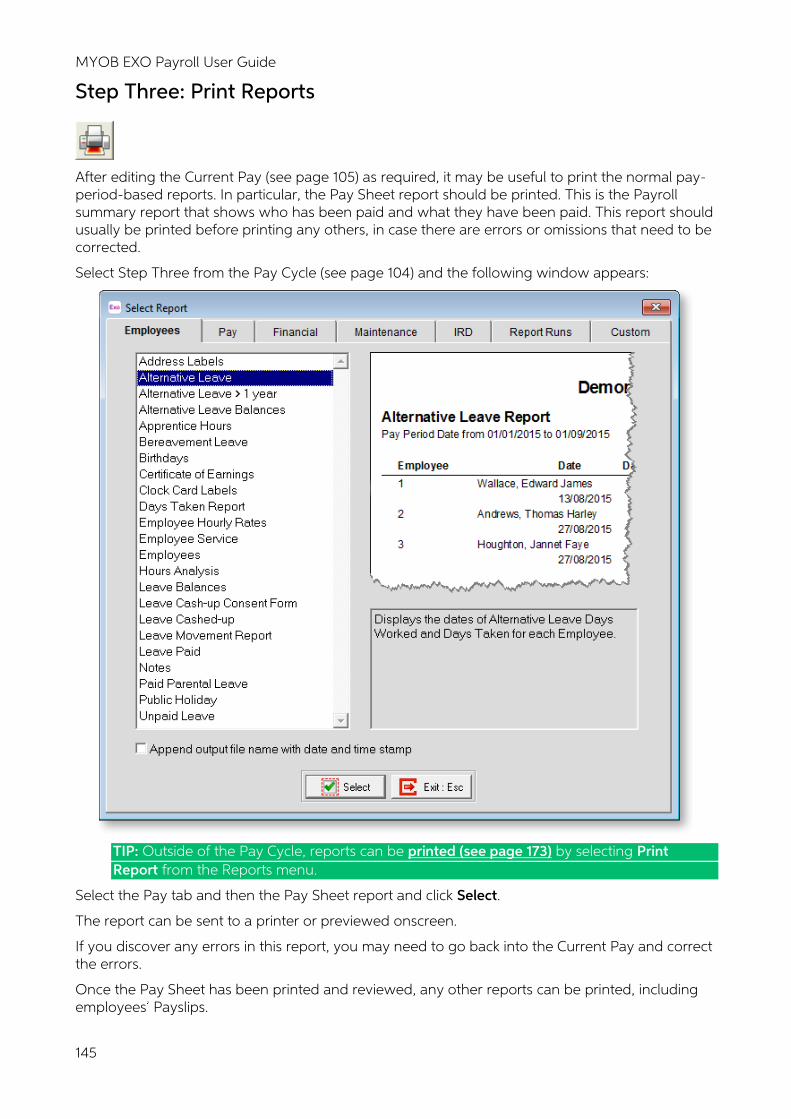
MYOB EXO Payroll User Guide
145
Step Three: Print Reports
After editing the Current Pay (see page 105) as required, it may be useful to print the normal pay-period-based reports. In particular, the Pay Sheet report should be printed. This is the Payroll summary report that shows who has been paid and what they have been paid. This report should usually be printed before printing any others, in case there are errors or omissions that need to be corrected.
Select Step Three from the Pay Cycle (see page 104) and the following window appears:
TIP: Outside of the Pay Cycle, reports can be printed (see page 173) by selecting Print Report from the Reports menu.
Select the Pay tab and then the Pay Sheet report and click Select.
The report can be sent to a printer or previewed onscreen.
If you discover any errors in this report, you may need to go back into the Current Pay and correct the errors.
Once the Pay Sheet has been printed and reviewed, any other reports can be printed, including employees Payslips.
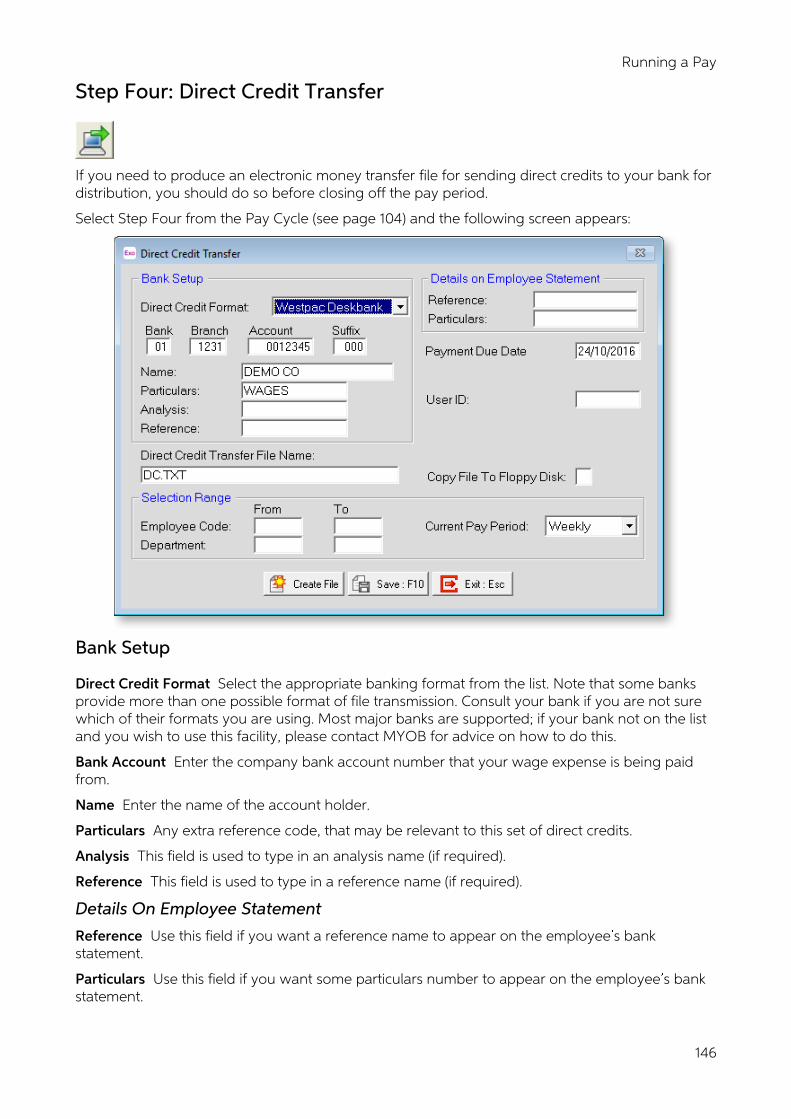
Running a Pay
146
Step Four: Direct Credit Transfer
If you need to produce an electronic money transfer file for sending direct credits to your bank for distribution, you should do so before closing off the pay period.
Select Step Four from the Pay Cycle (see page 104) and the following screen appears:
Bank Setup
Direct Credit Format Select the appropriate banking format from the list. Note that some banks provide more than one possible format of file transmission. Consult your bank if you are not sure which of their formats you are using. Most major banks are supported; if your bank not on the list and you wish to use this facility, please contact MYOB for advice on how to do this.
Bank Account Enter the company bank account number that your wage expense is being paid from.
Name Enter the name of the account holder.
Particulars Any extra reference code, that may be relevant to this set of direct credits.
Analysis This field is used to type in an analysis name (if required).
Reference This field is used to type in a reference name (if required).
Details On Employee Statement
Reference Use this field if you want a reference name to appear on the employee s bank statement.
Particulars Use this field if you want some particulars number to appear on the employee s bank statement.
MYOB EXO Payroll User Guide
147
Payment Due Date This field is used to enter the date the payment is to be made to the employee s account and enables you to process pays in advance. It will default to the Current Pay date. Only change the date if you require a new date that the payment is to be made on. Type in the new date in the format of (dd/mm/yy).
Payment Set No. This field is available when the HSBCnet format is selected. It defaults to PS1 , which should be suitable in most cases; however, if multiple direct credit files are sent on the same day, each one must have a unique payment set number. HSBC should supply you with the payment set numbers to use.
Batch Number This field is required for the following formats:
• ANZ MTS via disk
• BNZ MTS via disk
• National MTS via disk
• TSB Bank
Used in particular for identifying electronic payment batches coming from customers of these banks. If this field is visible on the direct credits screen, you will need to contact your bank for a batch number. This field only permits two digits. if your bank supplies a three digit code, enter only the last two digits of the code into this field.
Batch/Account Suffix (ASB Payment Service) If this field is visible on the direct credits screen, you will need to contact your bank for a two-digit suffix.
Ordering Party Name (Citibank Citidirect) Enter the name of the entity that is initiating the direct credit transactions.
User ID (Westpac (Aust) or Westpac (BACHO)) If this field is visible on the direct credits screen, you will need to contact your bank for a unique user ID code.
Select Range
Employee Code This field is used to select the employees you wish to be paid in the current pay. Leave the field blank if all employees are to be paid or enter the range of employee codes to pay.
Department This field is used to select the departments you wish to be paid in the current pay. Leave the field blank if all departments are to be paid or enter the range of department codes to pay.
Current Pay Period This field is used to select the pay frequency required for this direct credit file.
Create File
Click Create File to proceed with creation of the Direct Credit Transfer File. On each pay run, you will be asked if you want to print a Direct Credit Schedule report. Click Yes to preview the Direct Credit Schedule.
When the preview screen closes, you may see another message, asking if you want to overwrite the Direct Credit file. This refers to the last file that Exo Payroll created (providing that you have run this process before). If the last file you created was for an already processed and updated pay, respond Yes to this question.
If you wish to permanently change any given setting (with the exception of the Select Ranges) click on the Save button - the system will use the same settings for the next pay period s direct credits.
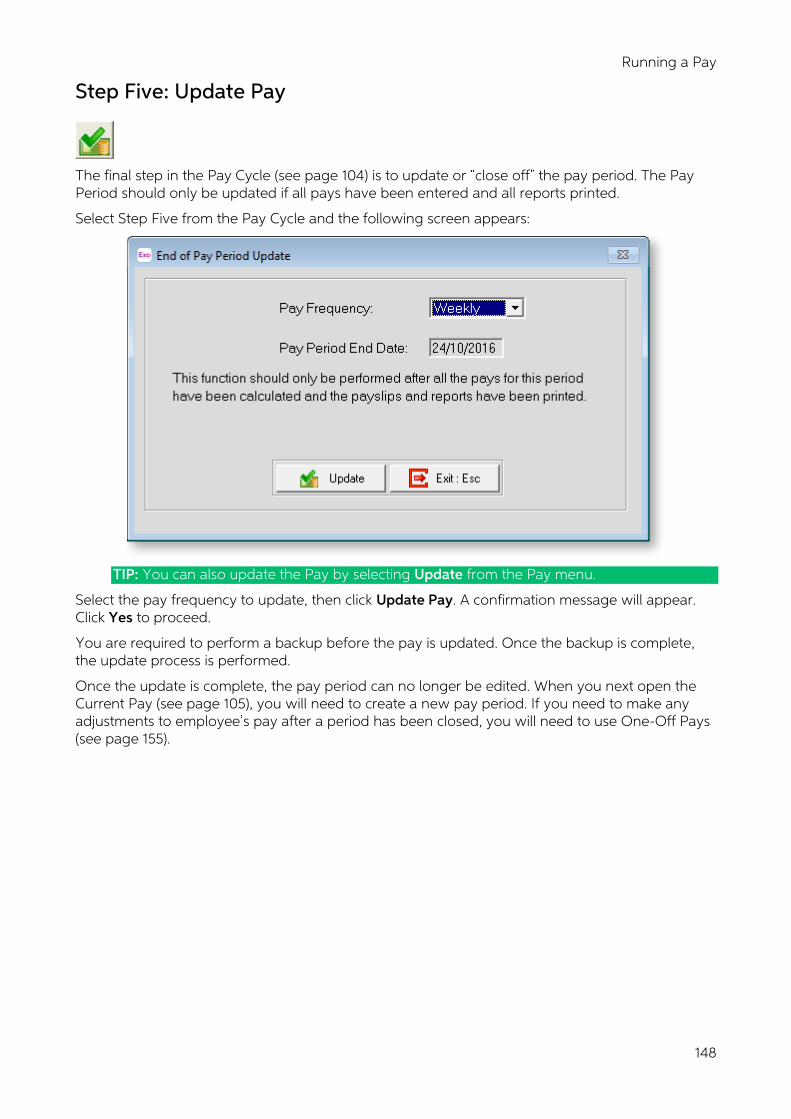
Running a Pay
148
Step Five: Update Pay
The final step in the Pay Cycle (see page 104) is to update or close off the pay period. The Pay Period should only be updated if all pays have been entered and all reports printed.
Select Step Five from the Pay Cycle and the following screen appears:
TIP: You can also update the Pay by selecting Update from the Pay menu.
Select the pay frequency to update, then click Update Pay. A confirmation message will appear. Click Yes to proceed.
You are required to perform a backup before the pay is updated. Once the backup is complete, the update process is performed.
Once the update is complete, the pay period can no longer be edited. When you next open the Current Pay (see page 105), you will need to create a new pay period. If you need to make any adjustments to employee s pay after a period has been closed, you will need to use One-Off Pays (see page 155).
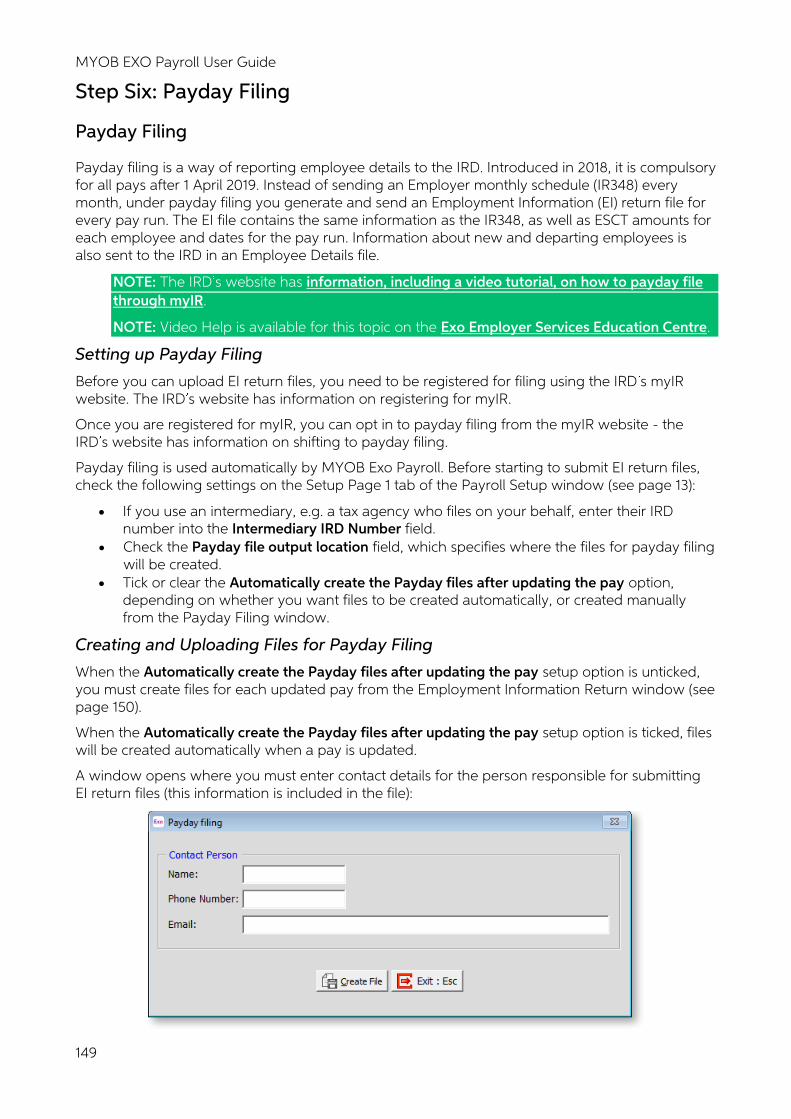
MYOB EXO Payroll User Guide
149
Step Six: Payday Filing
Payday Filing
Payday filing is a way of reporting employee details to the IRD. Introduced in 2018, it is compulsory for all pays after 1 April 2019. Instead of sending an Employer monthly schedule (IR348) every month, under payday filing you generate and send an Employment Information (EI) return file for every pay run. The EI file contains the same information as the IR348, as well as ESCT amounts for each employee and dates for the pay run. Information about new and departing employees is also sent to the IRD in an Employee Details file.
NOTE: The IRD s website has information, including a video tutorial, on how to payday file through myIR.
NOTE: Video Help is available for this topic on the Exo Employer Services Education Centre.
Setting up Payday Filing
Before you can upload EI return files, you need to be registered for filing using the IRD s myIR website. The IRD s website has information on registering for myIR.
Once you are registered for myIR, you can opt in to payday filing from the myIR website - the IRD s website has information on shifting to payday filing.
Payday filing is used automatically by MYOB Exo Payroll. Before starting to submit EI return files, check the following settings on the Setup Page 1 tab of the Payroll Setup window (see page 13):
• If you use an intermediary, e.g. a tax agency who files on your behalf, enter their IRD number into the Intermediary IRD Number field.
• Check the Payday file output location field, which specifies where the files for payday filing will be created.
• Tick or clear the Automatically create the Payday files after updating the pay option, depending on whether you want files to be created automatically, or created manually from the Payday Filing window.
Creating and Uploading Files for Payday Filing
When the Automatically create the Payday files after updating the pay setup option is unticked, you must create files for each updated pay from the Employment Information Return window (see page 150).
When the Automatically create the Payday files after updating the pay setup option is ticked, files will be created automatically when a pay is updated.
A window opens where you must enter contact details for the person responsible for submitting EI return files (this information is included in the file):
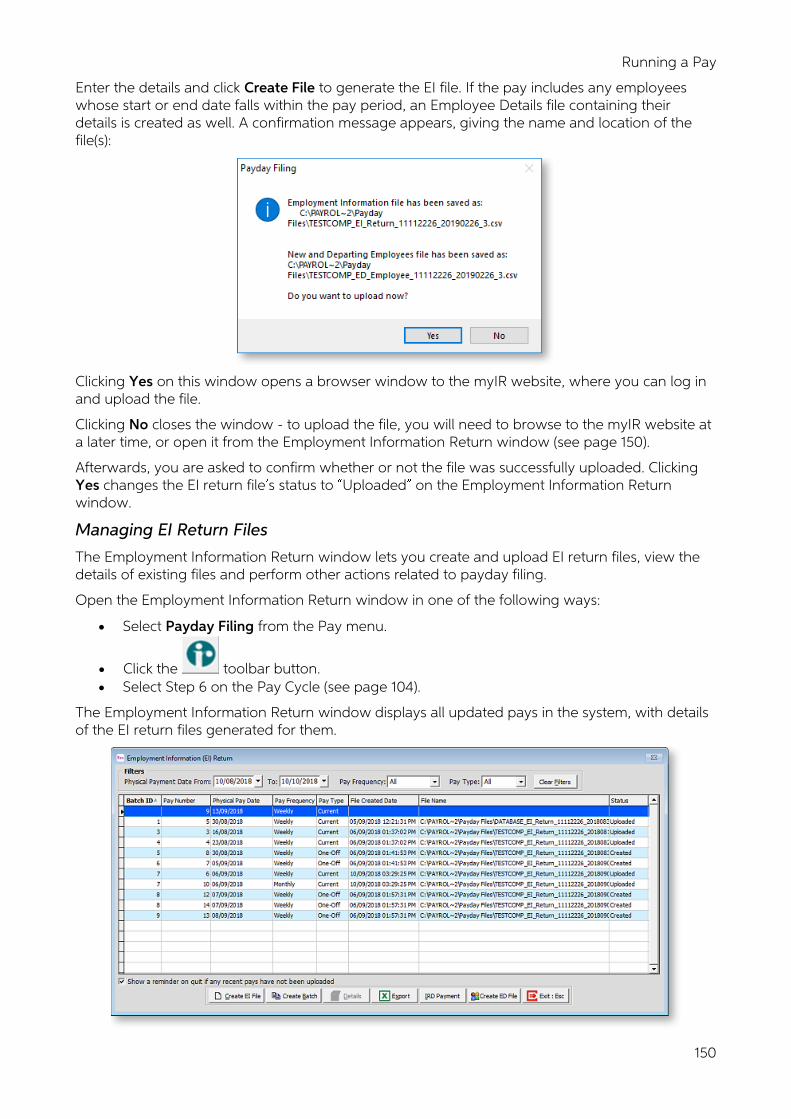
Running a Pay
150
Enter the details and click Create File to generate the EI file. If the pay includes any employees whose start or end date falls within the pay period, an Employee Details file containing their details is created as well. A confirmation message appears, giving the name and location of the file(s):
Clicking Yes on this window opens a browser window to the myIR website, where you can log in and upload the file.
Clicking No closes the window - to upload the file, you will need to browse to the myIR website at a later time, or open it from the Employment Information Return window (see page 150).
Afterwards, you are asked to confirm whether or not the file was successfully uploaded. Clicking Yes changes the EI return file s status to Uploaded on the Employment Information Return window.
Managing EI Return Files
The Employment Information Return window lets you create and upload EI return files, view the details of existing files and perform other actions related to payday filing.
Open the Employment Information Return window in one of the following ways:
• Select Payday Filing from the Pay menu.
• Click the toolbar button. • Select Step 6 on the Pay Cycle (see page 104).
The Employment Information Return window displays all updated pays in the system, with details of the EI return files generated for them.
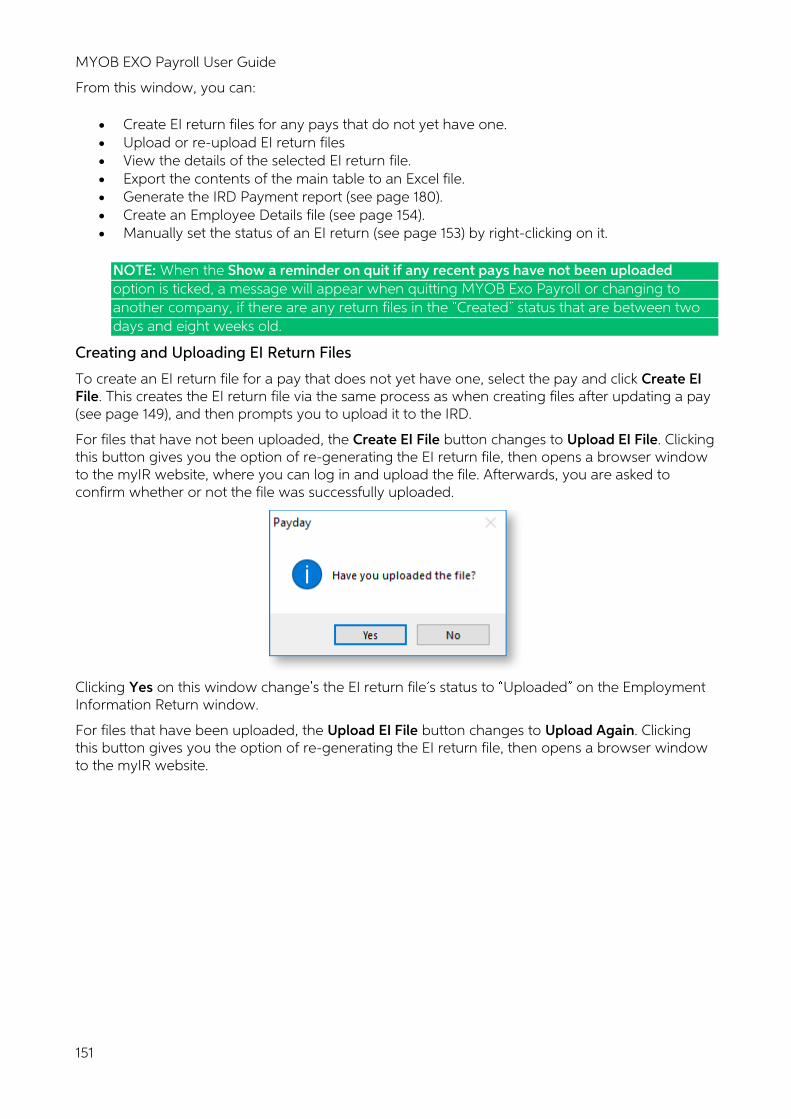
MYOB EXO Payroll User Guide
151
From this window, you can:
• Create EI return files for any pays that do not yet have one. • Upload or re-upload EI return files • View the details of the selected EI return file. • Export the contents of the main table to an Excel file. • Generate the IRD Payment report (see page 180). • Create an Employee Details file (see page 154). • Manually set the status of an EI return (see page 153) by right-clicking on it.
NOTE: When the Show a reminder on quit if any recent pays have not been uploaded option is ticked, a message will appear when quitting MYOB Exo Payroll or changing to another company, if there are any return files in the Created status that are between two days and eight weeks old.
Creating and Uploading EI Return Files
To create an EI return file for a pay that does not yet have one, select the pay and click Create EI File. This creates the EI return file via the same process as when creating files after updating a pay (see page 149), and then prompts you to upload it to the IRD.
For files that have not been uploaded, the Create EI File button changes to Upload EI File. Clicking this button gives you the option of re-generating the EI return file, then opens a browser window to the myIR website, where you can log in and upload the file. Afterwards, you are asked to confirm whether or not the file was successfully uploaded.
Clicking Yes on this window change s the EI return file s status to Uploaded on the Employment Information Return window.
For files that have been uploaded, the Upload EI File button changes to Upload Again. Clicking this button gives you the option of re-generating the EI return file, then opens a browser window to the myIR website.
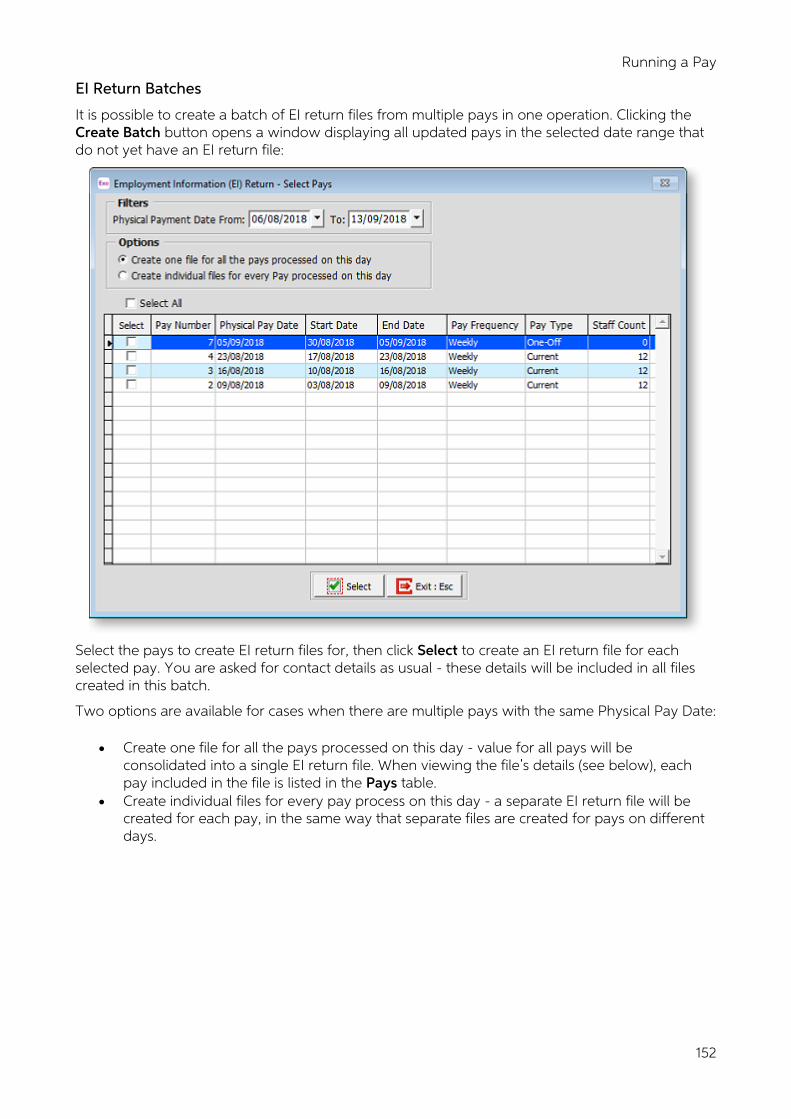
Running a Pay
152
EI Return Batches
It is possible to create a batch of EI return files from multiple pays in one operation. Clicking the Create Batch button opens a window displaying all updated pays in the selected date range that do not yet have an EI return file:
Select the pays to create EI return files for, then click Select to create an EI return file for each selected pay. You are asked for contact details as usual - these details will be included in all files created in this batch.
Two options are available for cases when there are multiple pays with the same Physical Pay Date:
• Create one file for all the pays processed on this day - value for all pays will be consolidated into a single EI return file. When viewing the file s details (see below), each pay included in the file is listed in the Pays table.
• Create individual files for every pay process on this day - a separate EI return file will be created for each pay, in the same way that separate files are created for pays on different days.
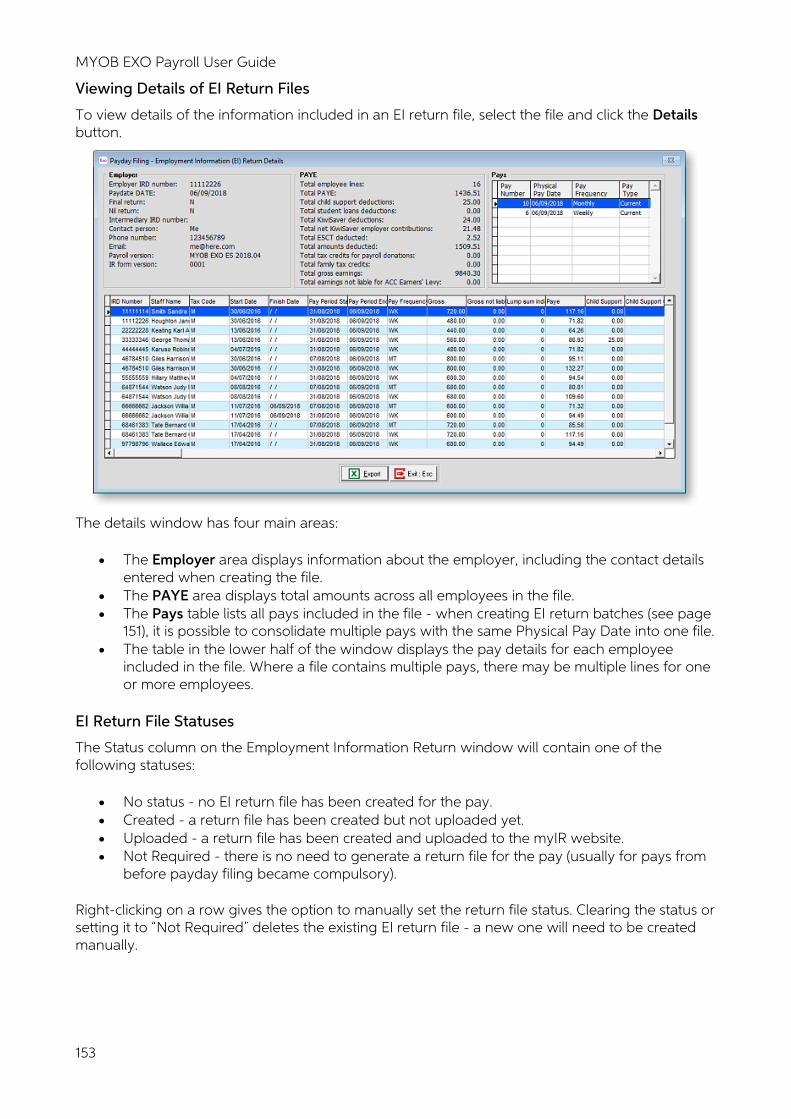
MYOB EXO Payroll User Guide
153
Viewing Details of EI Return Files
To view details of the information included in an EI return file, select the file and click the Details button.
The details window has four main areas:
• The Employer area displays information about the employer, including the contact details entered when creating the file.
• The PAYE area displays total amounts across all employees in the file. • The Pays table lists all pays included in the file - when creating EI return batches (see page
151), it is possible to consolidate multiple pays with the same Physical Pay Date into one file. • The table in the lower half of the window displays the pay details for each employee
included in the file. Where a file contains multiple pays, there may be multiple lines for one or more employees.
EI Return File Statuses
The Status column on the Employment Information Return window will contain one of the following statuses:
• No status - no EI return file has been created for the pay. • Created - a return file has been created but not uploaded yet. • Uploaded - a return file has been created and uploaded to the myIR website. • Not Required - there is no need to generate a return file for the pay (usually for pays from
before payday filing became compulsory).
Right-clicking on a row gives the option to manually set the return file status. Clearing the status or setting it to Not Required deletes the existing EI return file - a new one will need to be created manually.
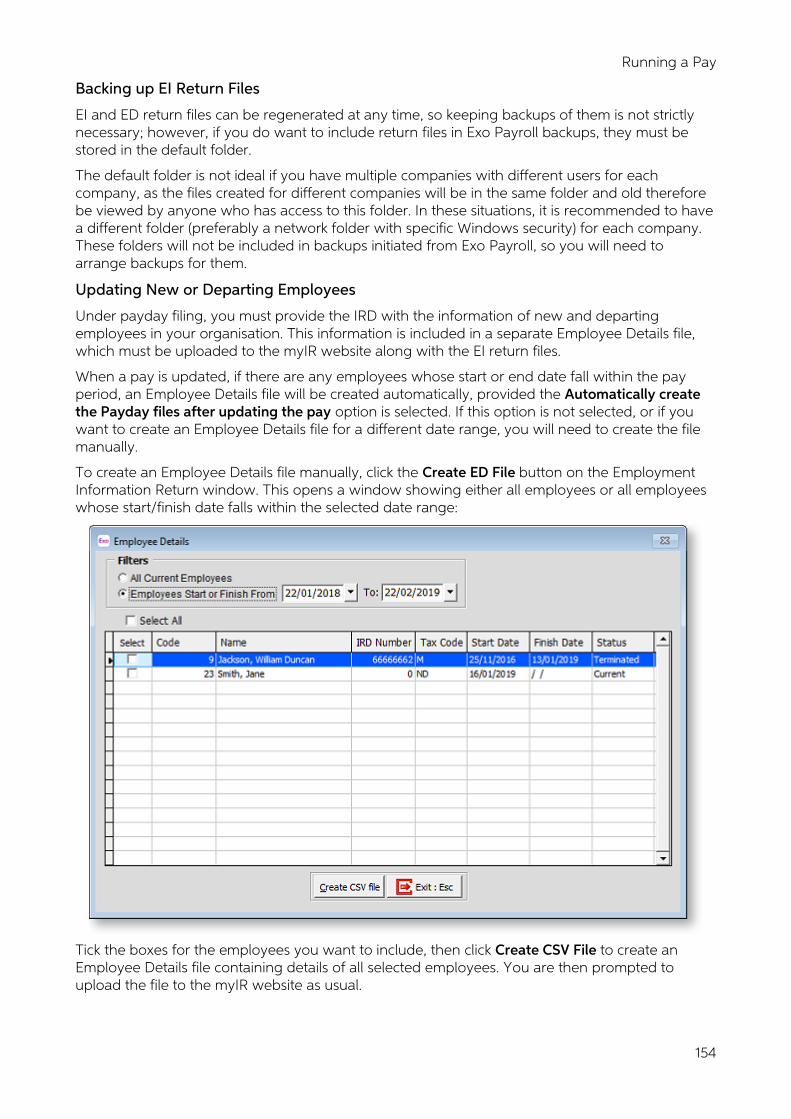
Running a Pay
154
Backing up EI Return Files
EI and ED return files can be regenerated at any time, so keeping backups of them is not strictly necessary; however, if you do want to include return files in Exo Payroll backups, they must be stored in the default folder.
The default folder is not ideal if you have multiple companies with different users for each company, as the files created for different companies will be in the same folder and old therefore be viewed by anyone who has access to this folder. In these situations, it is recommended to have a different folder (preferably a network folder with specific Windows security) for each company. These folders will not be included in backups initiated from Exo Payroll, so you will need to arrange backups for them.
Updating New or Departing Employees
Under payday filing, you must provide the IRD with the information of new and departing employees in your organisation. This information is included in a separate Employee Details file, which must be uploaded to the myIR website along with the EI return files.
When a pay is updated, if there are any employees whose start or end date fall within the pay period, an Employee Details file will be created automatically, provided the Automatically create the Payday files after updating the pay option is selected. If this option is not selected, or if you want to create an Employee Details file for a different date range, you will need to create the file manually.
To create an Employee Details file manually, click the Create ED File button on the Employment Information Return window. This opens a window showing either all employees or all employees whose start/finish date falls within the selected date range:
Tick the boxes for the employees you want to include, then click Create CSV File to create an Employee Details file containing details of all selected employees. You are then prompted to upload the file to the myIR website as usual.
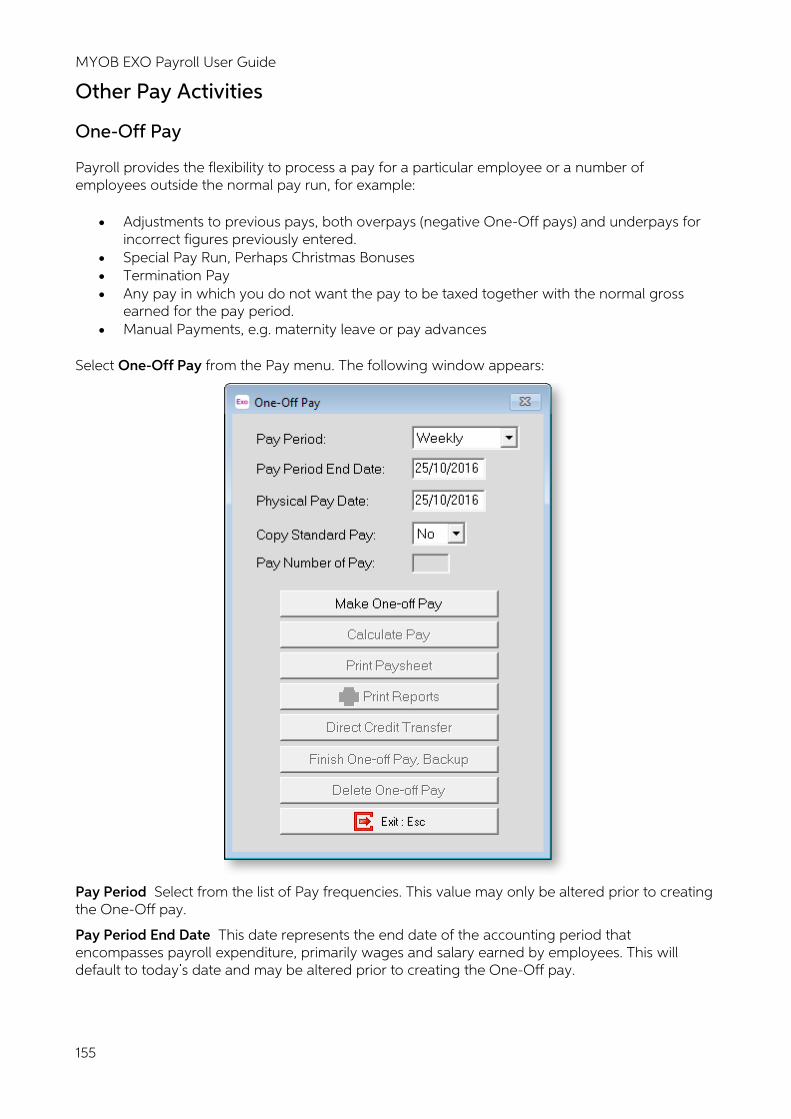
MYOB EXO Payroll User Guide
155
Other Pay Activities
One-Off Pay
Payroll provides the flexibility to process a pay for a particular employee or a number of employees outside the normal pay run, for example:
• Adjustments to previous pays, both overpays (negative One-Off pays) and underpays for incorrect figures previously entered.
• Special Pay Run, Perhaps Christmas Bonuses • Termination Pay • Any pay in which you do not want the pay to be taxed together with the normal gross
earned for the pay period. • Manual Payments, e.g. maternity leave or pay advances
Select One-Off Pay from the Pay menu. The following window appears:
Pay Period Select from the list of Pay frequencies. This value may only be altered prior to creating the One-Off pay.
Pay Period End Date This date represents the end date of the accounting period that encompasses payroll expenditure, primarily wages and salary earned by employees. This will default to today s date and may be altered prior to creating the One-Off pay.
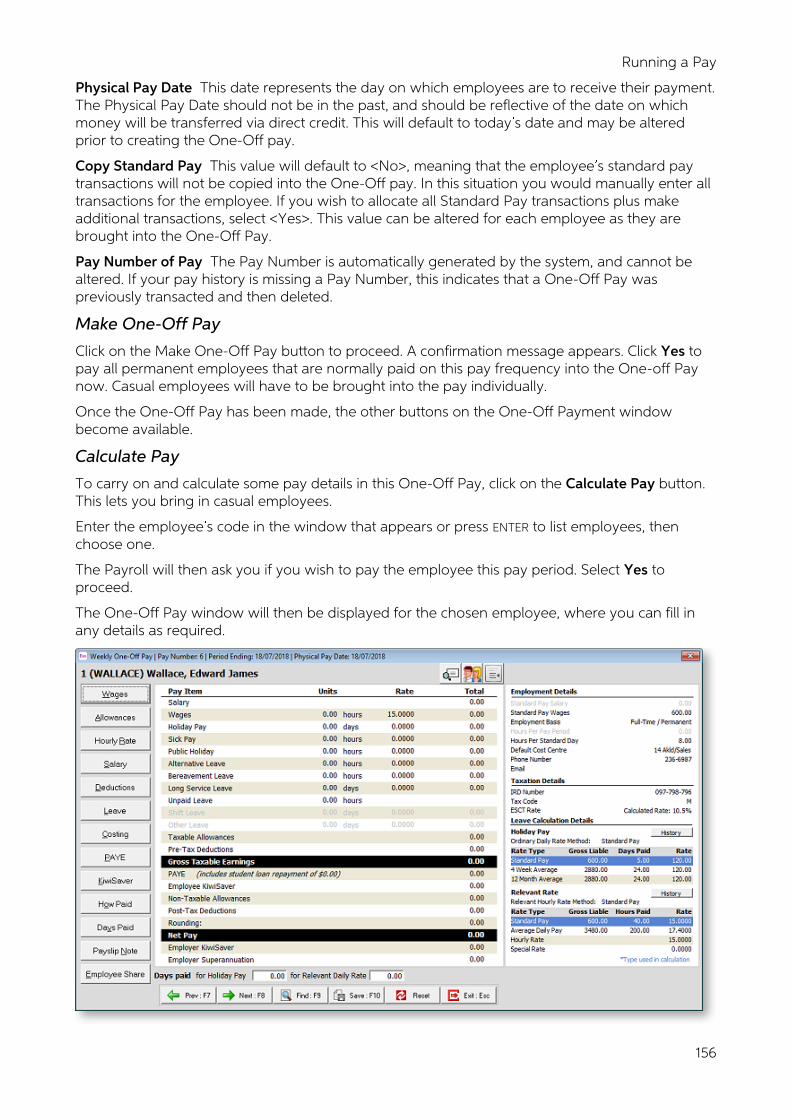
Running a Pay
156
Physical Pay Date This date represents the day on which employees are to receive their payment. The Physical Pay Date should not be in the past, and should be reflective of the date on which money will be transferred via direct credit. This will default to today s date and may be altered prior to creating the One-Off pay.
Copy Standard Pay This value will default to <No>, meaning that the employee s standard pay transactions will not be copied into the One-Off pay. In this situation you would manually enter all transactions for the employee. If you wish to allocate all Standard Pay transactions plus make additional transactions, select <Yes>. This value can be altered for each employee as they are brought into the One-Off Pay.
Pay Number of Pay The Pay Number is automatically generated by the system, and cannot be altered. If your pay history is missing a Pay Number, this indicates that a One-Off Pay was previously transacted and then deleted.
Make One-Off Pay
Click on the Make One-Off Pay button to proceed. A confirmation message appears. Click Yes to pay all permanent employees that are normally paid on this pay frequency into the One-off Pay now. Casual employees will have to be brought into the pay individually.
Once the One-Off Pay has been made, the other buttons on the One-Off Payment window become available.
Calculate Pay
To carry on and calculate some pay details in this One-Off Pay, click on the Calculate Pay button. This lets you bring in casual employees.
Enter the employee s code in the window that appears or press ENTER to list employees, then choose one.
The Payroll will then ask you if you wish to pay the employee this pay period. Select Yes to proceed.
The One-Off Pay window will then be displayed for the chosen employee, where you can fill in any details as required.

MYOB EXO Payroll User Guide
157
Once all employees have been entered, click Save or press F10 to save any entered information.
You can exit the One-Off Pay, and it will remain open for you to either finish at a later time, or to add new employee that had not been entered at the time it was created. Selecting One-Off Pay from the Pay menu again will take you back to the One-Off Pay window where you may exit or access any of the other functions.
NOTE: You cannot start a new One-Off Pay until the current one has been finished or deleted.
Print Paysheet
Click this button to print the Pay Sheet for this One-Off Pay only.
You will see the Pay Sheet Print Report window where you fill in the details and set up the options in the same way as you would when printing reports (see page 173). The only difference being that the pay number for this One-Off Pay has already been locked in, as this is a Current Pay and it needs to be differentiated from any other Current Pay for this frequency that may be open. Printing this report will allow you to check the details that have been entered and if any errors are discovered then you can go back into the Calculate Pay to amend these errors.
Print Other Reports
Click this button if you want to print any other reports for this One-Off Pay.
The Select Report window appears, allowing you to choose any other reports that you may wish to print, such as a Payslip for the employees. As above, the only difference is that the pay number for this One-Off Pay has already been locked in as this is a Current Pay and it needs to be differentiated from any other Current Pay for this frequency that may also be open.
Direct Credit Transfer
This option allows you to create a Direct Credit Transfer file (see page 146), as you would when running the Current Pay.
Finish One-Off Pay
If the One-Off Pay is correct and you wish to update it and lock the figures into the pay history, click this button.
You will be asked to confirm this. Click Yes and the pay will follow the Update procedure (see page 148) as for running a Current pay. You will need to perform a backup before the One-Off Pay is processed. Select Yes for any confirmation messages that appear.
Delete One-Off Pay
Click this button if you do not want to continue with this One-Off Pay and want to delete it completely.
You will be asked to confirm this. Click Yes and the pay will be deleted.

Running a Pay
158
Import Time Transactions
The Import Time Transactions menu item is used to import time transactions from other software, such as MYOB Exo Time and Attendance.
In order for this item to be available, the Import time transactions setting in the Special Options Setup window (see page 28) in the Payroll Setup must be ticked, and the File Location must be specified.
The information to be imported can be stored in a DBF table, a CSV file or a TXT file. The information must be recorded in a specific format (see page 251). Import files must be copied to the specified File Location.
If files are present in the File Location directory, selecting the Import Time Transactions menu item opens the Import Time Transactions window:
Tick the Show previously imported files option to include files that have already been imported in the Available list.
Click on available files and use the arrow buttons to select or de-select them, then click Next to proceed.
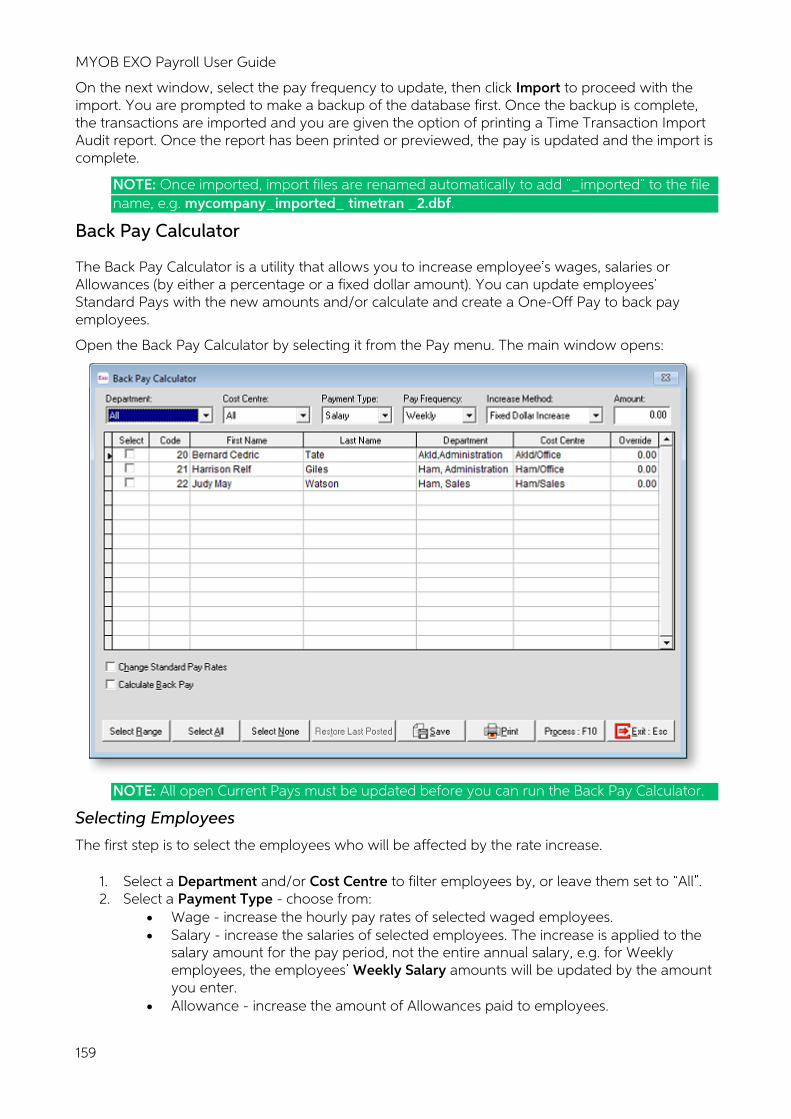
MYOB EXO Payroll User Guide
159
On the next window, select the pay frequency to update, then click Import to proceed with the import. You are prompted to make a backup of the database first. Once the backup is complete, the transactions are imported and you are given the option of printing a Time Transaction Import Audit report. Once the report has been printed or previewed, the pay is updated and the import is complete.
NOTE: Once imported, import files are renamed automatically to add _imported to the file name, e.g. mycompany_imported_ timetran _2.dbf.
Back Pay Calculator
The Back Pay Calculator is a utility that allows you to increase employee s wages, salaries or Allowances (by either a percentage or a fixed dollar amount). You can update employees Standard Pays with the new amounts and/or calculate and create a One-Off Pay to back pay employees.
Open the Back Pay Calculator by selecting it from the Pay menu. The main window opens:
NOTE: All open Current Pays must be updated before you can run the Back Pay Calculator.
Selecting Employees
The first step is to select the employees who will be affected by the rate increase.
1. Select a Department and/or Cost Centre to filter employees by, or leave them set to All . 2. Select a Payment Type - choose from:
• Wage - increase the hourly pay rates of selected waged employees. • Salary - increase the salaries of selected employees. The increase is applied to the
salary amount for the pay period, not the entire annual salary, e.g. for Weekly employees, the employees Weekly Salary amounts will be updated by the amount you enter.
• Allowance - increase the amount of Allowances paid to employees.
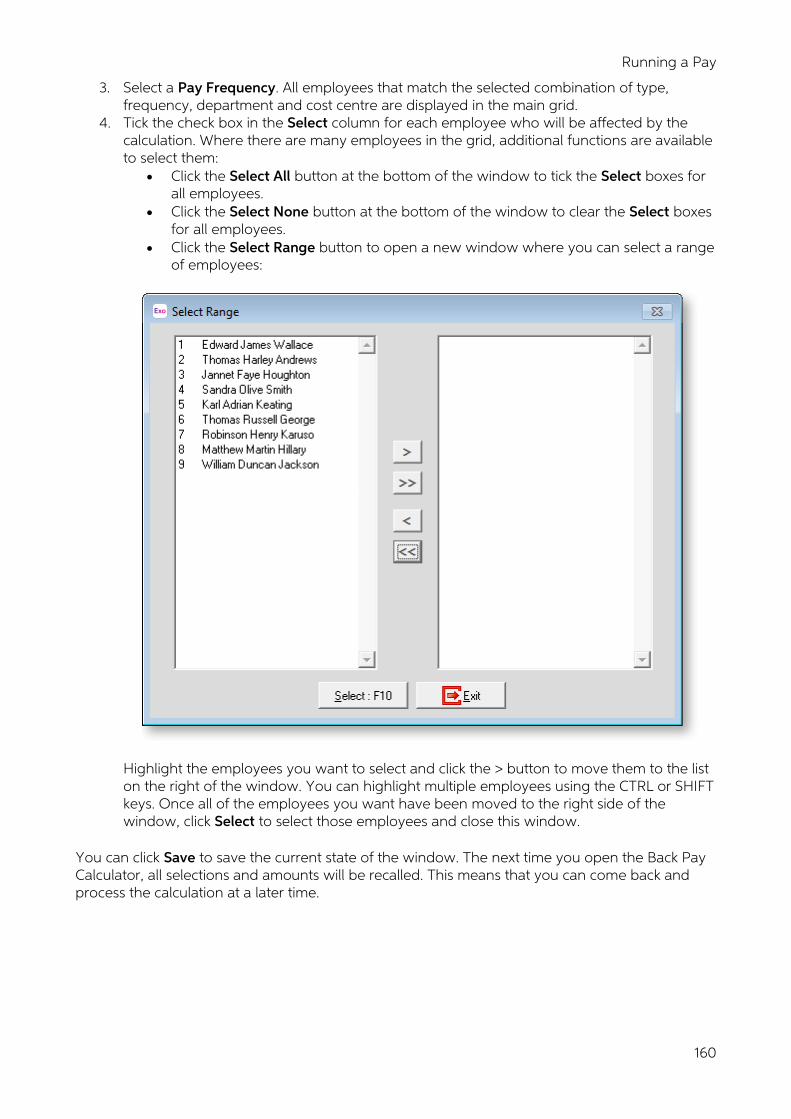
Running a Pay
160
3. Select a Pay Frequency. All employees that match the selected combination of type, frequency, department and cost centre are displayed in the main grid.
4. Tick the check box in the Select column for each employee who will be affected by the calculation. Where there are many employees in the grid, additional functions are available to select them:
• Click the Select All button at the bottom of the window to tick the Select boxes for all employees.
• Click the Select None button at the bottom of the window to clear the Select boxes for all employees.
• Click the Select Range button to open a new window where you can select a range of employees:
Highlight the employees you want to select and click the > button to move them to the list on the right of the window. You can highlight multiple employees using the CTRL or SHIFT keys. Once all of the employees you want have been moved to the right side of the window, click Select to select those employees and close this window.
You can click Save to save the current state of the window. The next time you open the Back Pay Calculator, all selections and amounts will be recalled. This means that you can come back and process the calculation at a later time.
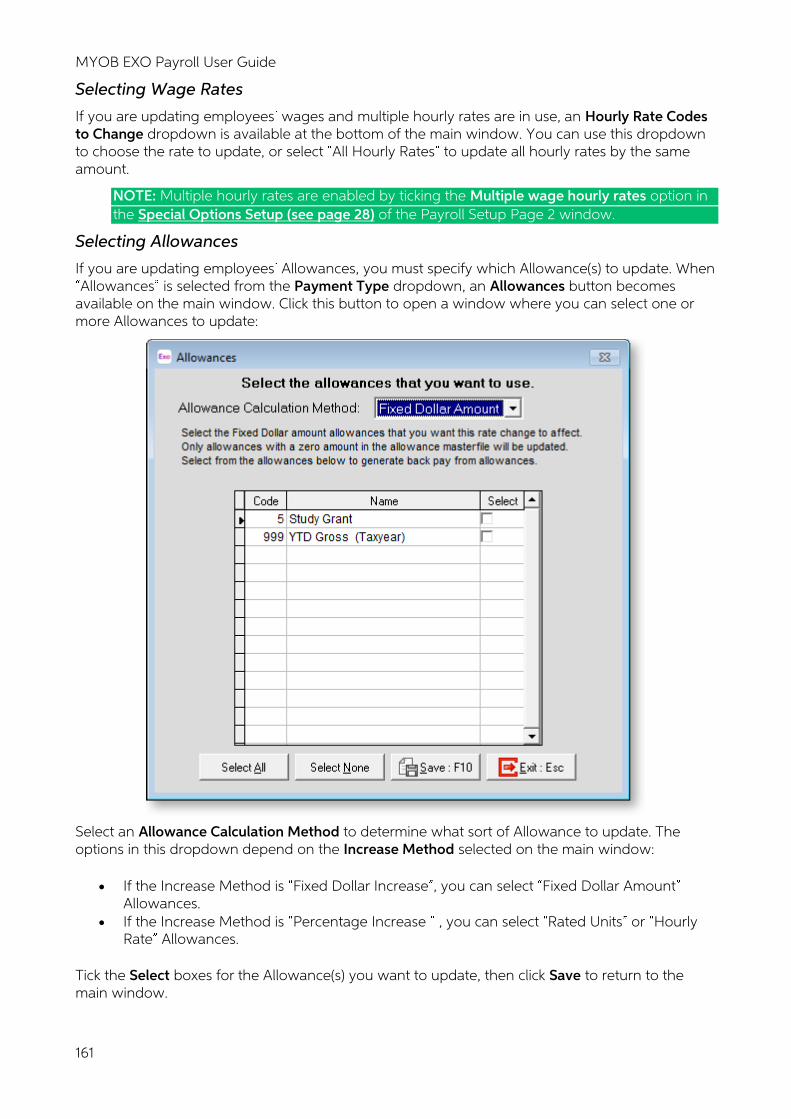
MYOB EXO Payroll User Guide
161
Selecting Wage Rates
If you are updating employees wages and multiple hourly rates are in use, an Hourly Rate Codes to Change dropdown is available at the bottom of the main window. You can use this dropdown to choose the rate to update, or select All Hourly Rates to update all hourly rates by the same amount.
NOTE: Multiple hourly rates are enabled by ticking the Multiple wage hourly rates option in the Special Options Setup (see page 28) of the Payroll Setup Page 2 window.
Selecting Allowances
If you are updating employees Allowances, you must specify which Allowance(s) to update. When Allowances is selected from the Payment Type dropdown, an Allowances button becomes
available on the main window. Click this button to open a window where you can select one or more Allowances to update:
Select an Allowance Calculation Method to determine what sort of Allowance to update. The options in this dropdown depend on the Increase Method selected on the main window:
• If the Increase Method is Fixed Dollar Increase , you can select Fixed Dollar Amount Allowances.
• If the Increase Method is Percentage Increase , you can select Rated Units or Hourly Rate Allowances.
Tick the Select boxes for the Allowance(s) you want to update, then click Save to return to the main window.
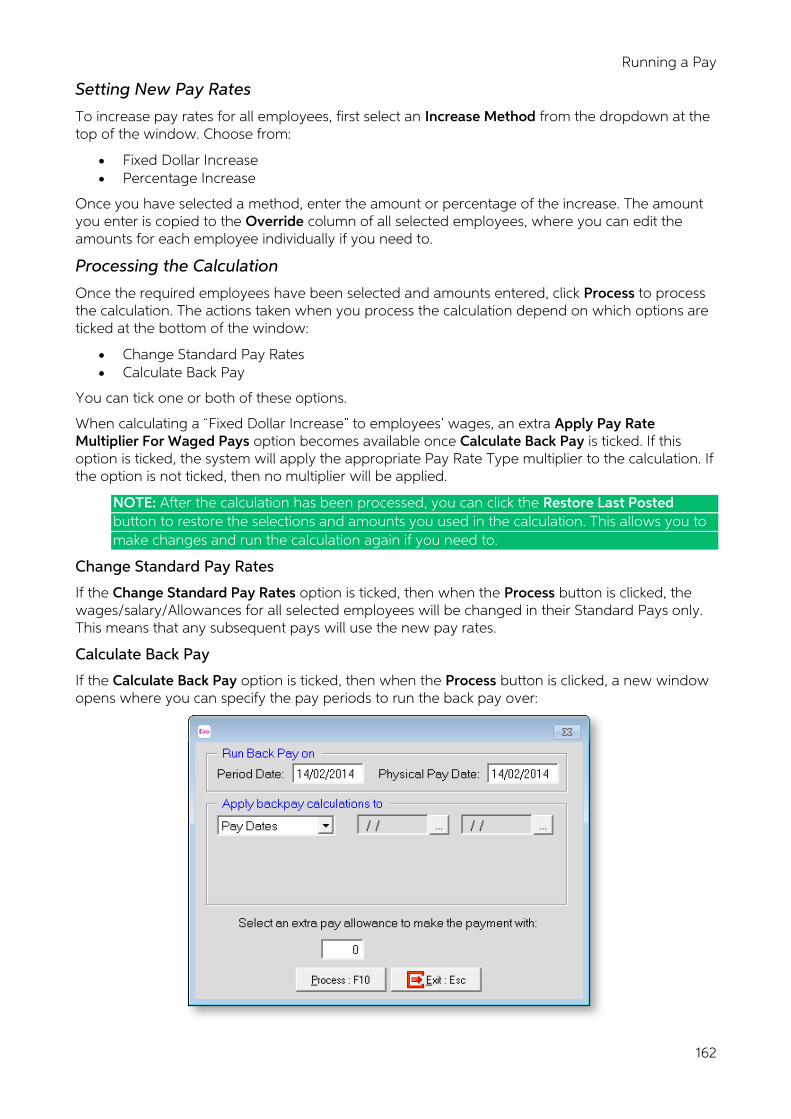
Running a Pay
162
Setting New Pay Rates
To increase pay rates for all employees, first select an Increase Method from the dropdown at the top of the window. Choose from:
• Fixed Dollar Increase • Percentage Increase
Once you have selected a method, enter the amount or percentage of the increase. The amount you enter is copied to the Override column of all selected employees, where you can edit the amounts for each employee individually if you need to.
Processing the Calculation
Once the required employees have been selected and amounts entered, click Process to process the calculation. The actions taken when you process the calculation depend on which options are ticked at the bottom of the window:
• Change Standard Pay Rates • Calculate Back Pay
You can tick one or both of these options.
When calculating a Fixed Dollar Increase to employees wages, an extra Apply Pay Rate Multiplier For Waged Pays option becomes available once Calculate Back Pay is ticked. If this option is ticked, the system will apply the appropriate Pay Rate Type multiplier to the calculation. If the option is not ticked, then no multiplier will be applied.
NOTE: After the calculation has been processed, you can click the Restore Last Posted button to restore the selections and amounts you used in the calculation. This allows you to make changes and run the calculation again if you need to.
Change Standard Pay Rates
If the Change Standard Pay Rates option is ticked, then when the Process button is clicked, the wages/salary/Allowances for all selected employees will be changed in their Standard Pays only. This means that any subsequent pays will use the new pay rates.
Calculate Back Pay
If the Calculate Back Pay option is ticked, then when the Process button is clicked, a new window opens where you can specify the pay periods to run the back pay over:
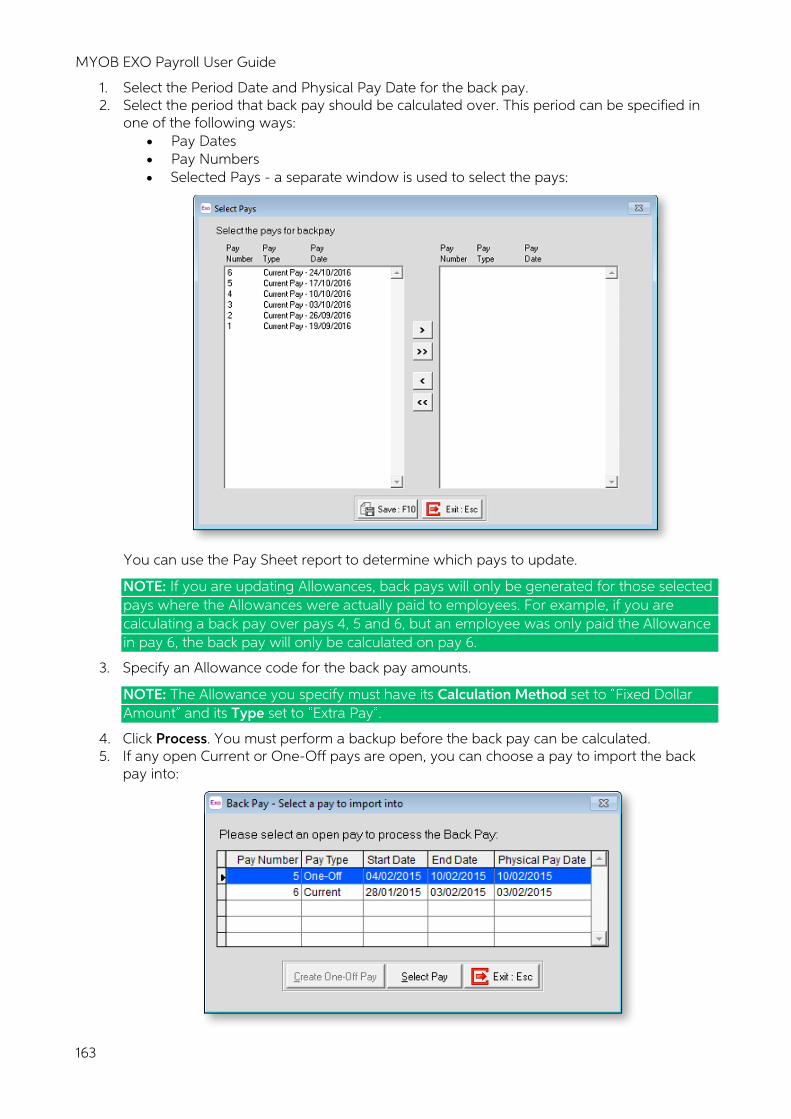
MYOB EXO Payroll User Guide
163
1. Select the Period Date and Physical Pay Date for the back pay. 2. Select the period that back pay should be calculated over. This period can be specified in
one of the following ways: • Pay Dates • Pay Numbers • Selected Pays - a separate window is used to select the pays:
You can use the Pay Sheet report to determine which pays to update.
NOTE: If you are updating Allowances, back pays will only be generated for those selected pays where the Allowances were actually paid to employees. For example, if you are calculating a back pay over pays 4, 5 and 6, but an employee was only paid the Allowance in pay 6, the back pay will only be calculated on pay 6.
3. Specify an Allowance code for the back pay amounts.
NOTE: The Allowance you specify must have its Calculation Method set to Fixed Dollar Amount and its Type set to Extra Pay .
4. Click Process. You must perform a backup before the back pay can be calculated. 5. If any open Current or One-Off pays are open, you can choose a pay to import the back
pay into:
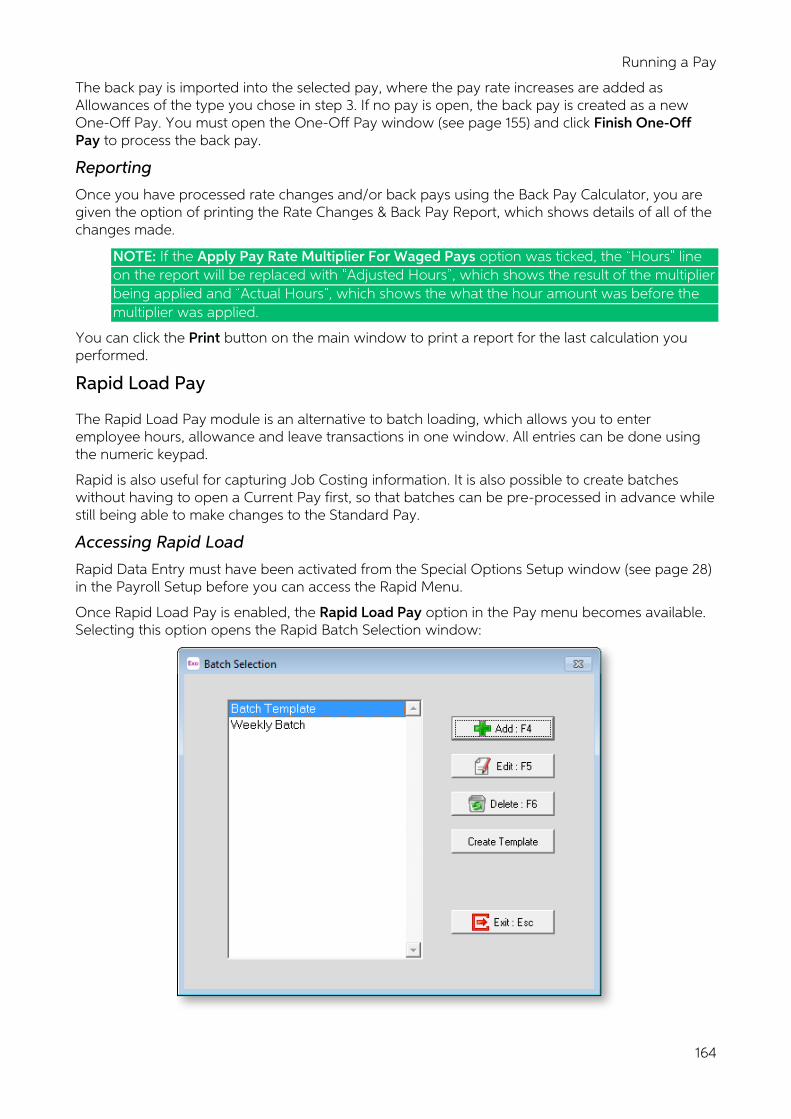
Running a Pay
164
The back pay is imported into the selected pay, where the pay rate increases are added as Allowances of the type you chose in step 3. If no pay is open, the back pay is created as a new One-Off Pay. You must open the One-Off Pay window (see page 155) and click Finish One-Off Pay to process the back pay.
Reporting
Once you have processed rate changes and/or back pays using the Back Pay Calculator, you are given the option of printing the Rate Changes & Back Pay Report, which shows details of all of the changes made.
NOTE: If the Apply Pay Rate Multiplier For Waged Pays option was ticked, the Hours line on the report will be replaced with Adjusted Hours , which shows the result of the multiplier being applied and Actual Hours , which shows the what the hour amount was before the multiplier was applied.
You can click the Print button on the main window to print a report for the last calculation you performed.
Rapid Load Pay
The Rapid Load Pay module is an alternative to batch loading, which allows you to enter employee hours, allowance and leave transactions in one window. All entries can be done using the numeric keypad.
Rapid is also useful for capturing Job Costing information. It is also possible to create batches without having to open a Current Pay first, so that batches can be pre-processed in advance while still being able to make changes to the Standard Pay.
Accessing Rapid Load
Rapid Data Entry must have been activated from the Special Options Setup window (see page 28) in the Payroll Setup before you can access the Rapid Menu.
Once Rapid Load Pay is enabled, the Rapid Load Pay option in the Pay menu becomes available. Selecting this option opens the Rapid Batch Selection window:
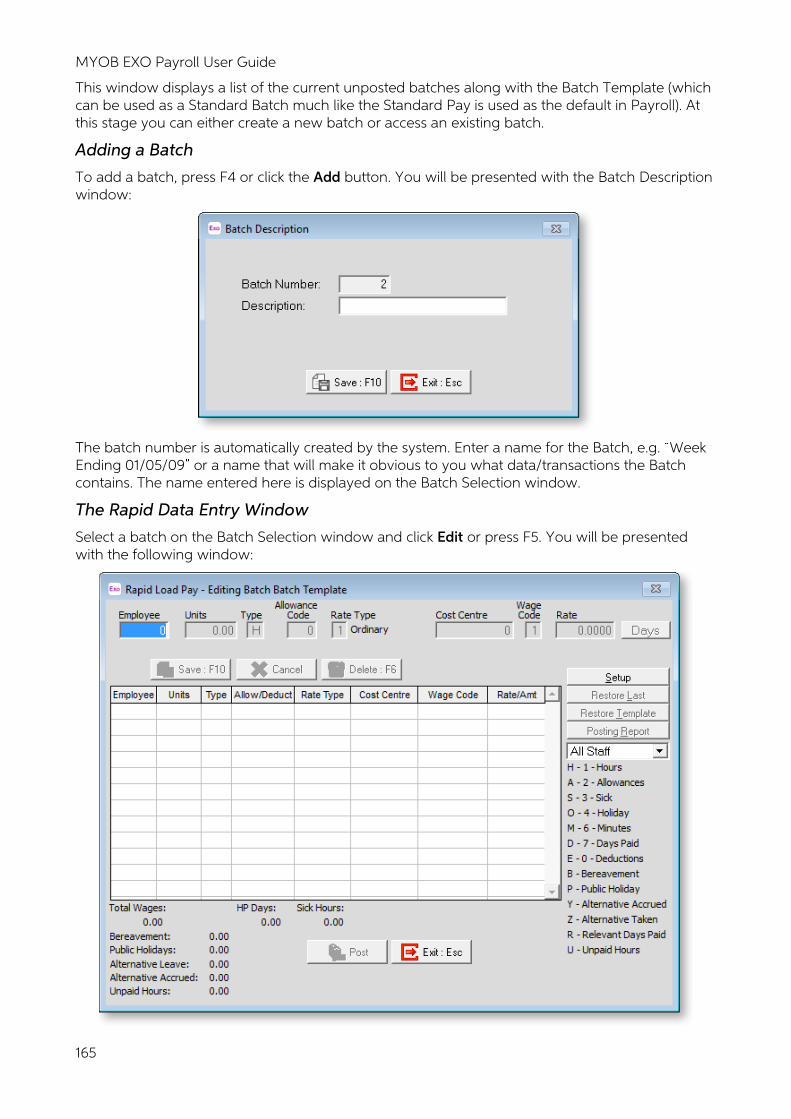
MYOB EXO Payroll User Guide
165
This window displays a list of the current unposted batches along with the Batch Template (which can be used as a Standard Batch much like the Standard Pay is used as the default in Payroll). At this stage you can either create a new batch or access an existing batch.
Adding a Batch
To add a batch, press F4 or click the Add button. You will be presented with the Batch Description window:
The batch number is automatically created by the system. Enter a name for the Batch, e.g. Week Ending 01/05/09 or a name that will make it obvious to you what data/transactions the Batch contains. The name entered here is displayed on the Batch Selection window.
The Rapid Data Entry Window
Select a batch on the Batch Selection window and click Edit or press F5. You will be presented with the following window:
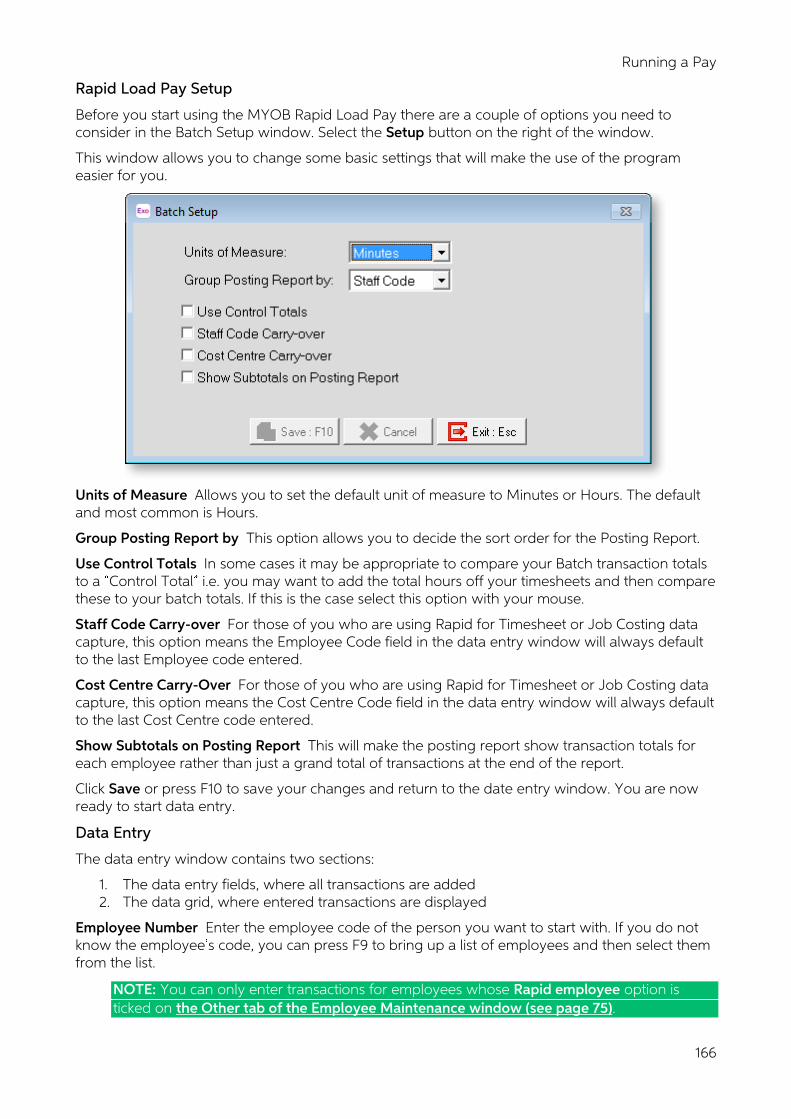
Running a Pay
166
Rapid Load Pay Setup
Before you start using the MYOB Rapid Load Pay there are a couple of options you need to consider in the Batch Setup window. Select the Setup button on the right of the window.
This window allows you to change some basic settings that will make the use of the program easier for you.
Units of Measure Allows you to set the default unit of measure to Minutes or Hours. The default and most common is Hours.
Group Posting Report by This option allows you to decide the sort order for the Posting Report.
Use Control Totals In some cases it may be appropriate to compare your Batch transaction totals to a Control Total i.e. you may want to add the total hours off your timesheets and then compare these to your batch totals. If this is the case select this option with your mouse.
Staff Code Carry-over For those of you who are using Rapid for Timesheet or Job Costing data capture, this option means the Employee Code field in the data entry window will always default to the last Employee code entered.
Cost Centre Carry-Over For those of you who are using Rapid for Timesheet or Job Costing data capture, this option means the Cost Centre Code field in the data entry window will always default to the last Cost Centre code entered.
Show Subtotals on Posting Report This will make the posting report show transaction totals for each employee rather than just a grand total of transactions at the end of the report.
Click Save or press F10 to save your changes and return to the date entry window. You are now ready to start data entry.
Data Entry
The data entry window contains two sections:
1. The data entry fields, where all transactions are added 2. The data grid, where entered transactions are displayed
Employee Number Enter the employee code of the person you want to start with. If you do not know the employee s code, you can press F9 to bring up a list of employees and then select them from the list.
NOTE: You can only enter transactions for employees whose Rapid employee option is ticked on the Other tab of the Employee Maintenance window (see page 75).
MYOB EXO Payroll User Guide
167
Units Enter the number of units you want to pay, dependent upon the type selected.
Type The type of transaction that is being entered. Depending on whether you want to use the alpha or numeric section of your keyboard you can use either the number or letter below:
• H or 1 for Hours • A or 2 for Allowances • S or 3 for Sick Leave • O or 4 for Annual Leave • L or 5 for Lieu Time • M or 6 for Minutes • D or 7 for Days Paid • E or 0 for Deductions • B for Bereavement Leave • P for Public Holidays • Y for Alternative Leave Accrued • Z for Alternative Leave Taken • R for Relevant Days Paid (the number of days paid for the purposes of valuing a relevant
daily rate) • U for Unpaid Leave
Allowance Code If you are paying an allowance, enter in the corresponding allowance code here. If you do not know the Allowance code, you can press F9 to pop up a lookup list of Allowances and then select them from the list.
Rate This is the pay rate indicator that will be used i.e. 1 =ordinary, 2= time and a half etc. This is based on the Rate Types set up on the Payroll Setup Page 2 window (see page 25).
Type Displays the name of the pay rate type being used.
Cost Centre Allows you to enter a cost centre code against the payment, leave as zero to use the employees default cost centre. If you do not know the Cost Centre code, you can press F9 to pop up a lookup list of Cost Centre and then select them from the list. This field would be used for the Job Numbers if you are doing Job Costing.
Wage Code Enter a code here for the Hourly Rate required if you are using multiple hourly rates.
Rate Allows you to enter an alternate pay rate for this transaction or leave as zero to use the employees default rate.
To move between fields you can use the ENTER or the TAB key. You do not need to move through all fields if you are not changing them i.e. you can just enter an Employee Code and some Hours if that is all that is needed.
NOTE: All fields are validated, i.e. you can only enter a valid Employee Code, Allowance, Cost Centre etc. If you want to see a list of any of these codes, press F9 at any time.
As you key and save transactions you will see them build in a list in the data grid section of the window.
Editing Transactions
Once an item has been entered in the Transaction fields it can still be edited in the Data Grid section of the window. To do this, simply click on the line and tab to the field you want to change. You can then arrow to the line you want to edit.
The Batch Template and Restore Template Button
If your staff are generally fairly static in the number of hours, allowances etc that they receive, you are able to set up a Template Batch, which is similar to the Standard Pay in payroll. This can then be used to create the basic data for your other batches.
Running a Pay
168
This option provides you with a way of quickly creating batches where you only have a few small changes to make each pay period. Edit the Batch Template and enter any standard transactions i.e. 40 hours etc for each employee.
When it comes time to create a new batch you are able to copy your Template into the new batch by selecting the Restore Template button at the right of the data entry window.
Restore Last
In some circumstances it may be necessary to restor the last posted batch i.e. the posting file is corrupted in some way. This option restores the last set of posted data; if for example it was posted before some information was entered it could be brought back, changed and then posted to the payroll again.
NOTE: Selecting this option after having entered data into a batch will result in the loss of that data.
Posting Report
Sends a report to the printer, which shows all the details of what will be posted to the payroll system.
Staff Selection list
This option lets you determine how staff are displayed in the browse window. Choose from:
• All staff - Shows all staff to be posted • Specific staff - Shows only the employee being worked on
Post Select this to save the details for the employee you are entering. You can also save a transaction by pressing F10 key or the + (plus) key.
Exo Remote
If you have the Remote Timesheet or Timesheet add-on, the EXO Remote item in the Pay menu allows you to send employee data to a different computer for remote data entry. The Remote Cycle has its own Help file - click the Help button on the cycle or press F1 to access it.
MYOB MyStaffInfo
The MYOB MyStaffInfo product expands the payroll operation onto a secure internet site: http://www.mystaffinfo.com
By releasing certain payroll-related information to employees and managers on-line, you can streamline the payroll process by:
• keeping all data in electronic form, hosted, supported and secured by MYOB • having the employees maintain and input their own contact details, timesheets, and leave
requests • having the managers approve the payroll transactions • having leave requests imported as reminder notes • having timesheets imported directly into the Current Pay
Avoid disruptive phone calls and piles of paper - get your employees to submit their payroll queries using the in-built messaging system.
Contact the MYOB sales team today for a free presentation.
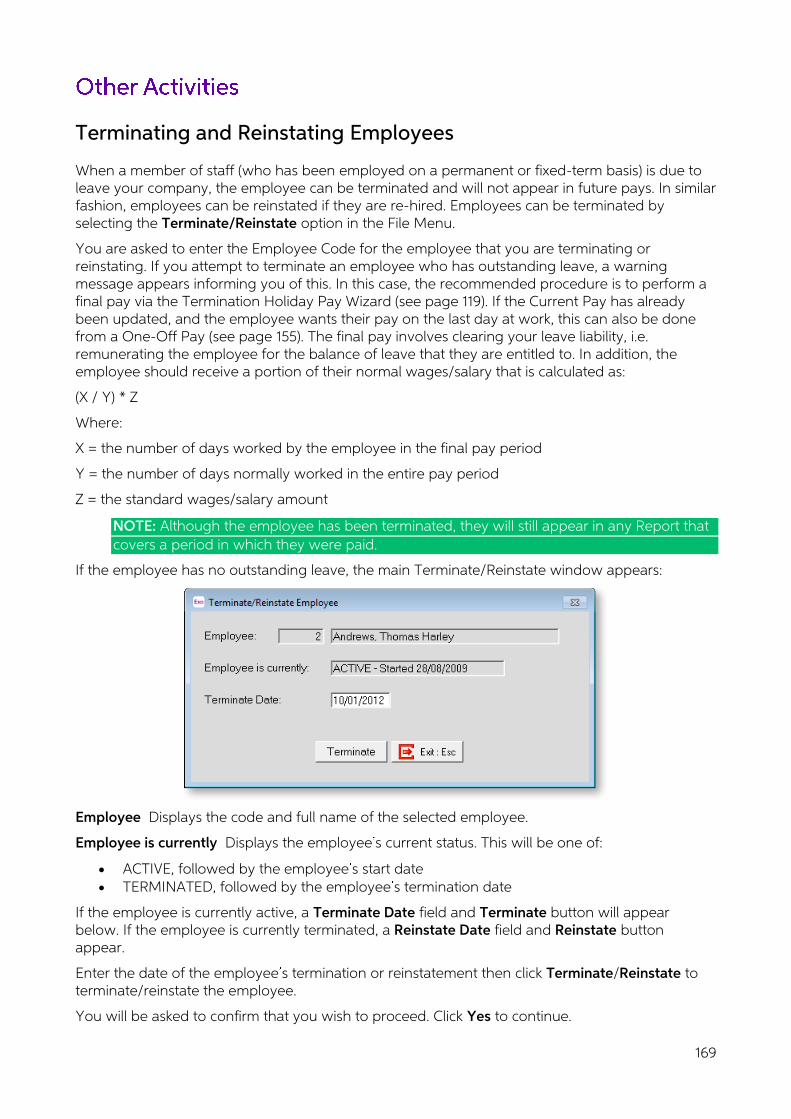
169
Terminating and Reinstating Employees
When a member of staff (who has been employed on a permanent or fixed-term basis) is due to leave your company, the employee can be terminated and will not appear in future pays. In similar fashion, employees can be reinstated if they are re-hired. Employees can be terminated by selecting the Terminate/Reinstate option in the File Menu.
You are asked to enter the Employee Code for the employee that you are terminating or reinstating. If you attempt to terminate an employee who has outstanding leave, a warning message appears informing you of this. In this case, the recommended procedure is to perform a final pay via the Termination Holiday Pay Wizard (see page 119). If the Current Pay has already been updated, and the employee wants their pay on the last day at work, this can also be done from a One-Off Pay (see page 155). The final pay involves clearing your leave liability, i.e. remunerating the employee for the balance of leave that they are entitled to. In addition, the employee should receive a portion of their normal wages/salary that is calculated as:
(X / Y) * Z
Where:
X = the number of days worked by the employee in the final pay period
Y = the number of days normally worked in the entire pay period
Z = the standard wages/salary amount
NOTE: Although the employee has been terminated, they will still appear in any Report that covers a period in which they were paid.
If the employee has no outstanding leave, the main Terminate/Reinstate window appears:
Employee Displays the code and full name of the selected employee.
Employee is currently Displays the employee s current status. This will be one of:
• ACTIVE, followed by the employee s start date • TERMINATED, followed by the employee s termination date
If the employee is currently active, a Terminate Date field and Terminate button will appear below. If the employee is currently terminated, a Reinstate Date field and Reinstate button appear.
Enter the date of the employee s termination or reinstatement then click Terminate/Reinstate to terminate/reinstate the employee.
You will be asked to confirm that you wish to proceed. Click Yes to continue.
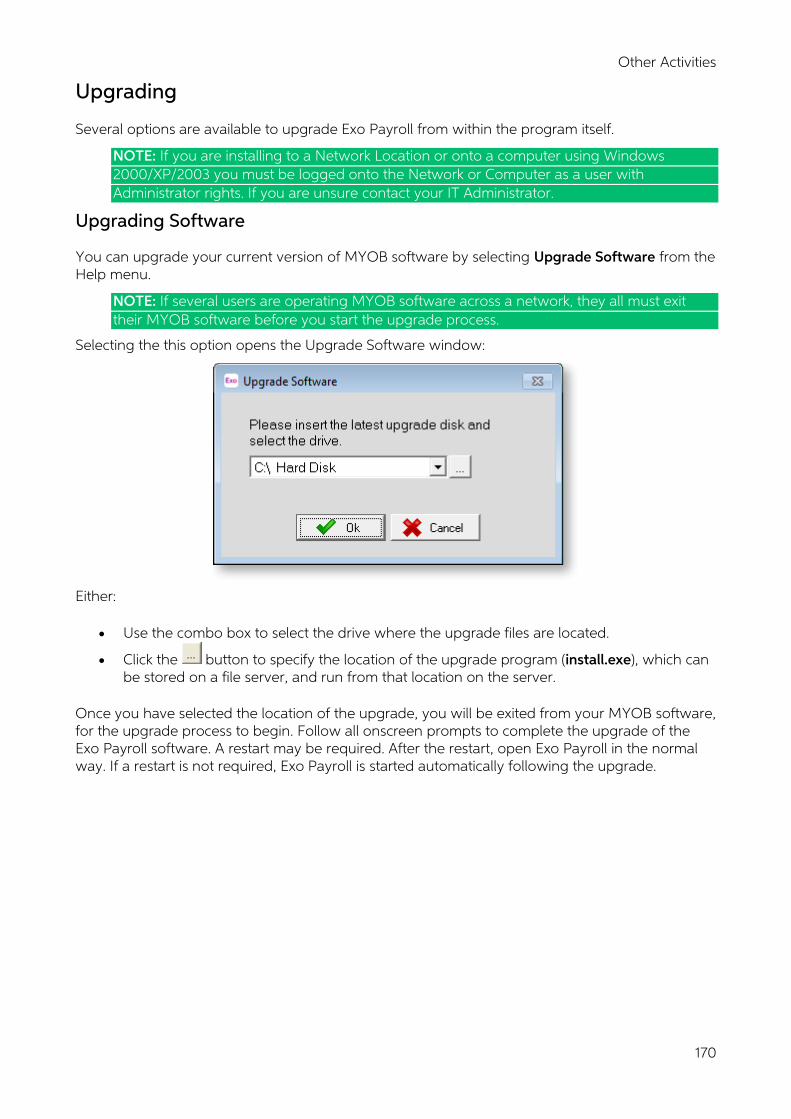
Other Activities
170
Upgrading
Several options are available to upgrade Exo Payroll from within the program itself.
NOTE: If you are installing to a Network Location or onto a computer using Windows 2000/XP/2003 you must be logged onto the Network or Computer as a user with Administrator rights. If you are unsure contact your IT Administrator.
Upgrading Software
You can upgrade your current version of MYOB software by selecting Upgrade Software from the Help menu.
NOTE: If several users are operating MYOB software across a network, they all must exit their MYOB software before you start the upgrade process.
Selecting the this option opens the Upgrade Software window:
Either:
• Use the combo box to select the drive where the upgrade files are located.
• Click the button to specify the location of the upgrade program (install.exe), which can be stored on a file server, and run from that location on the server.
Once you have selected the location of the upgrade, you will be exited from your MYOB software, for the upgrade process to begin. Follow all onscreen prompts to complete the upgrade of the Exo Payroll software. A restart may be required. After the restart, open Exo Payroll in the normal way. If a restart is not required, Exo Payroll is started automatically following the upgrade.

MYOB EXO Payroll User Guide
171
When you restart Exo Payroll, the upgrade process for your company files will begin automatically. The Upgrade Software window appears, prompting you to specify which companies you want to back up during the upgrade process.
Select which companies you want to back up and click the > button to move them to the list on the right. During the upgrade, a backup will be made for each company listed on the right of the screen.
If you chose to back up your companies, the backup is performed before that company s data is upgraded. As each company is upgraded, the names of the files being upgraded are displayed in the top right corner of the screen. Do not interrupt this process. It may take several minutes.
You may be prompted to Convert 3.0 resource file to 6.0 format . Click Yes.
Once the upgrade process has finished, you will be returned to the company selection window. You can now continue using the software in the normal way.
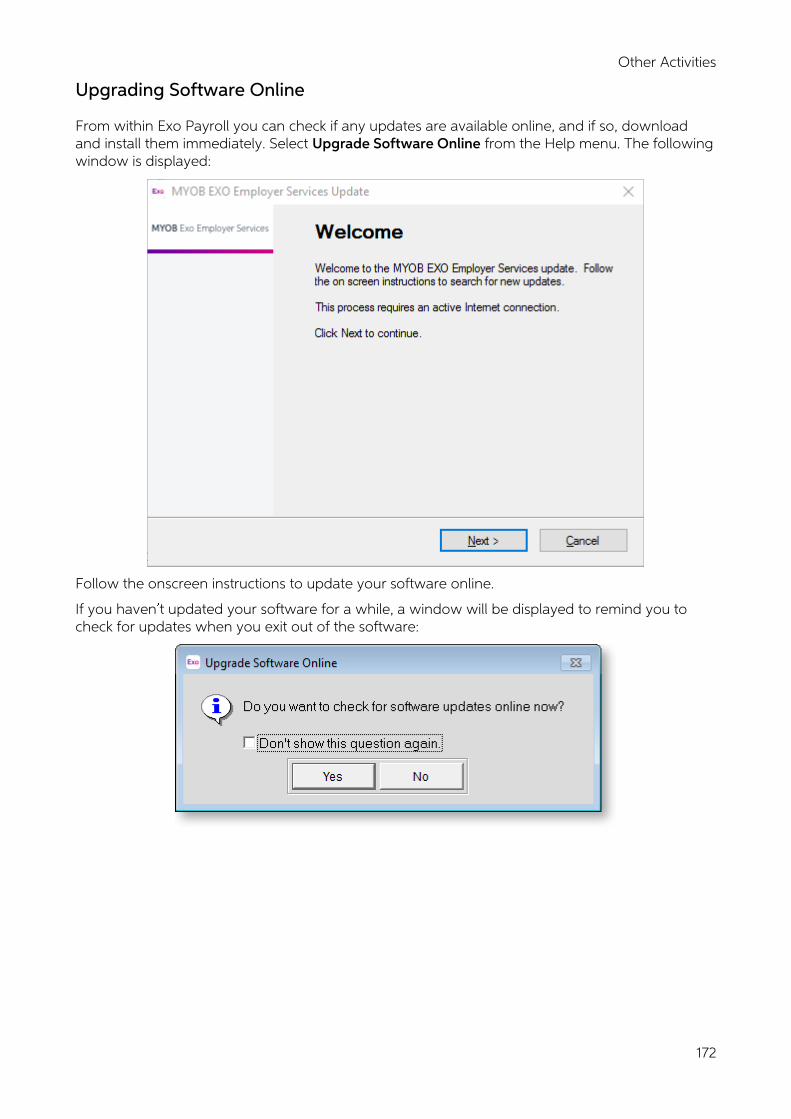
Other Activities
172
Upgrading Software Online
From within Exo Payroll you can check if any updates are available online, and if so, download and install them immediately. Select Upgrade Software Online from the Help menu. The following window is displayed:
Follow the onscreen instructions to update your software online.
If you haven t updated your software for a while, a window will be displayed to remind you to check for updates when you exit out of the software:
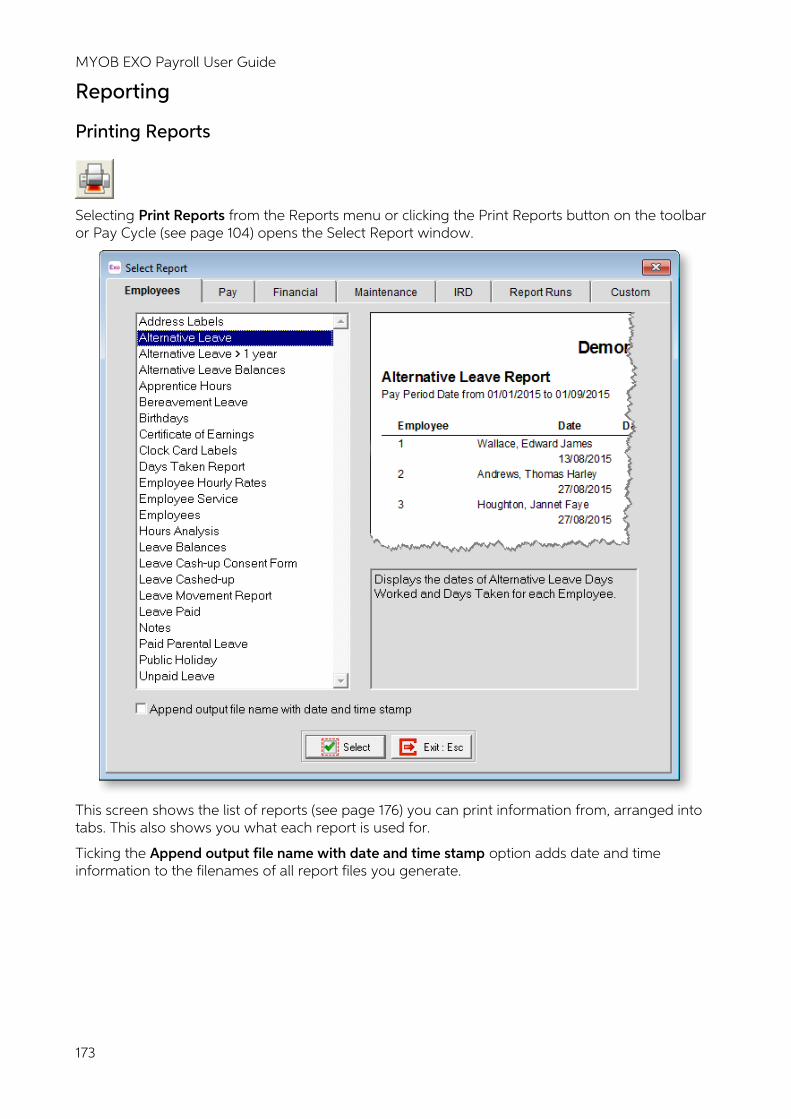
MYOB EXO Payroll User Guide
173
Reporting
Printing Reports
Selecting Print Reports from the Reports menu or clicking the Print Reports button on the toolbar or Pay Cycle (see page 104) opens the Select Report window.
This screen shows the list of reports (see page 176) you can print information from, arranged into tabs. This also shows you what each report is used for.
Ticking the Append output file name with date and time stamp option adds date and time information to the filenames of all report files you generate.
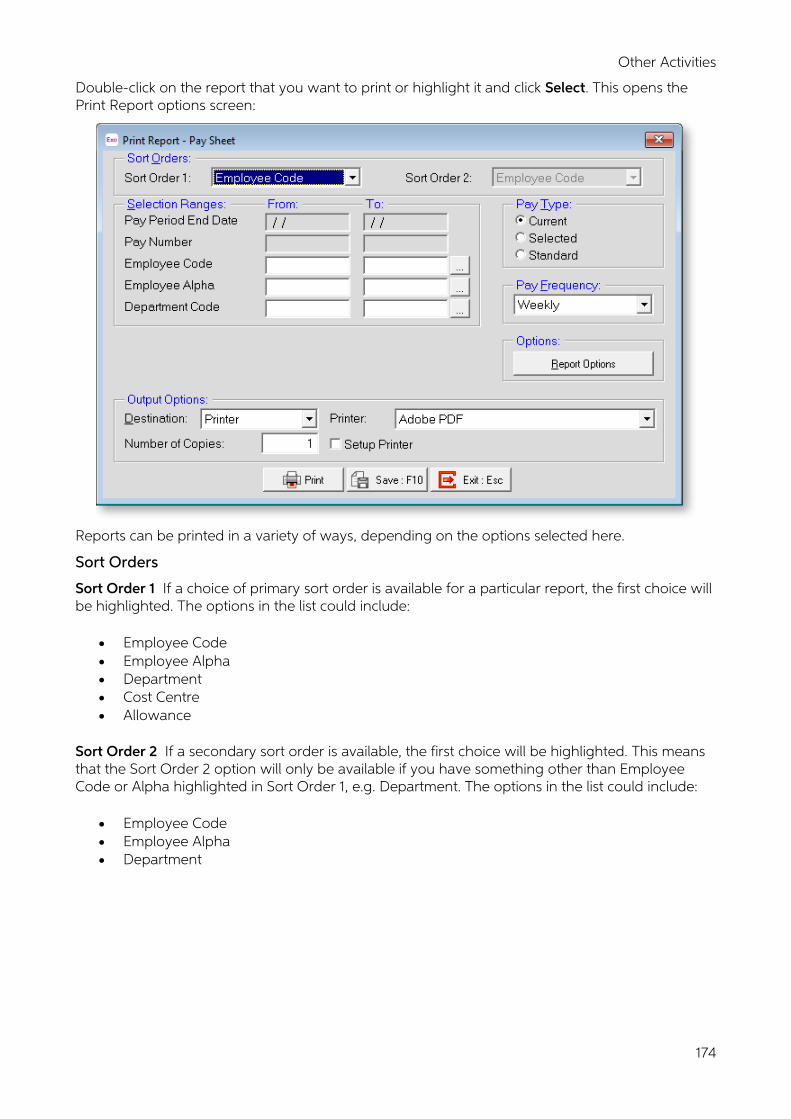
Other Activities
174
Double-click on the report that you want to print or highlight it and click Select. This opens the Print Report options screen:
Reports can be printed in a variety of ways, depending on the options selected here.
Sort Orders
Sort Order 1 If a choice of primary sort order is available for a particular report, the first choice will be highlighted. The options in the list could include:
• Employee Code • Employee Alpha • Department • Cost Centre • Allowance
Sort Order 2 If a secondary sort order is available, the first choice will be highlighted. This means that the Sort Order 2 option will only be available if you have something other than Employee Code or Alpha highlighted in Sort Order 1, e.g. Department. The options in the list could include:
• Employee Code • Employee Alpha • Department
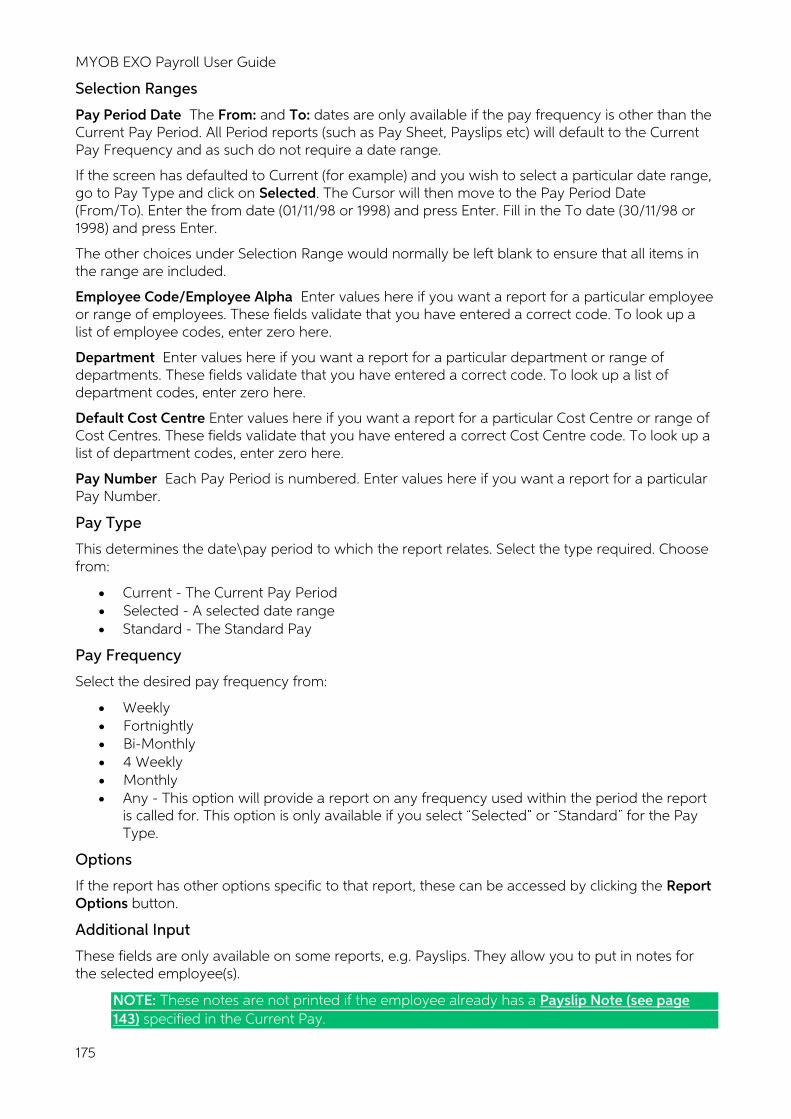
MYOB EXO Payroll User Guide
175
Selection Ranges
Pay Period Date The From: and To: dates are only available if the pay frequency is other than the Current Pay Period. All Period reports (such as Pay Sheet, Payslips etc) will default to the Current Pay Frequency and as such do not require a date range.
If the screen has defaulted to Current (for example) and you wish to select a particular date range, go to Pay Type and click on Selected. The Cursor will then move to the Pay Period Date (From/To). Enter the from date (01/11/98 or 1998) and press Enter. Fill in the To date (30/11/98 or 1998) and press Enter.
The other choices under Selection Range would normally be left blank to ensure that all items in the range are included.
Employee Code/Employee Alpha Enter values here if you want a report for a particular employee or range of employees. These fields validate that you have entered a correct code. To look up a list of employee codes, enter zero here.
Department Enter values here if you want a report for a particular department or range of departments. These fields validate that you have entered a correct code. To look up a list of department codes, enter zero here.
Default Cost Centre Enter values here if you want a report for a particular Cost Centre or range of Cost Centres. These fields validate that you have entered a correct Cost Centre code. To look up a list of department codes, enter zero here.
Pay Number Each Pay Period is numbered. Enter values here if you want a report for a particular Pay Number.
Pay Type
This determines the date\pay period to which the report relates. Select the type required. Choose from:
• Current - The Current Pay Period • Selected - A selected date range • Standard - The Standard Pay
Pay Frequency
Select the desired pay frequency from:
• Weekly • Fortnightly • Bi-Monthly • 4 Weekly • Monthly • Any - This option will provide a report on any frequency used within the period the report
is called for. This option is only available if you select Selected or Standard for the Pay Type.
Options
If the report has other options specific to that report, these can be accessed by clicking the Report Options button.
Additional Input
These fields are only available on some reports, e.g. Payslips. They allow you to put in notes for the selected employee(s).
NOTE: These notes are not printed if the employee already has a Payslip Note (see page 143) specified in the Current Pay.

Other Activities
176
Output Options
Destination Select where the report should be directed to. Choose from:
• Printer • Screen • File (PDF) • CSV Output • Excel Output (XLSX) • MyStaffInfo, if the MYOB MyStaffInfo product (see page 168) is installed • Distribution - this option lets you print, email and/or upload payslips to all or some
employees in a single operation (see page 203).
NOTE: See the MyStaffInfo Help for information on sending reports and payslips to MyStaffInfo.
The custom payslip report (see page 200) offers an additional Email option, which emails the report to all employees who have an email address defined.
Printer This displays the name of the printer that you are printing to. Select the Setup Print option to display printing options before the report is printed; otherwise the report will be sent directly to the printer using the default options.
File Name This displays the name of the file that will be created when File or CSV Output are selected.
Number of copies The default number of copies is 1. Enter the number of copies you require.
Available Reports
MYOB Exo Payroll has a comprehensive and ever-increasing selection of Reports, arranged into several categories. These categories appears as tabs on the Select Report window.
The following tables list all available reports by the category that they appear in.
Employees
Report Description
Address Labels Employee names in label form.
Alternative Leave Tracks increases and decreases in Alternative Leave History.
Alternative Leave > 1 Year Displays alternative leave entitlement for alternative leave accrued > 1 year ago, in other words alternative leave that may be cashed out. Set the As At Date to the current date + year for the current balance of all alternative leave.
Alternative Leave Balances This report will display the current Alternative Leave balance and value. The valuation is based on the employees Relevant Rate method, either Standard Pay, 4 Week Average or Hourly Rate.
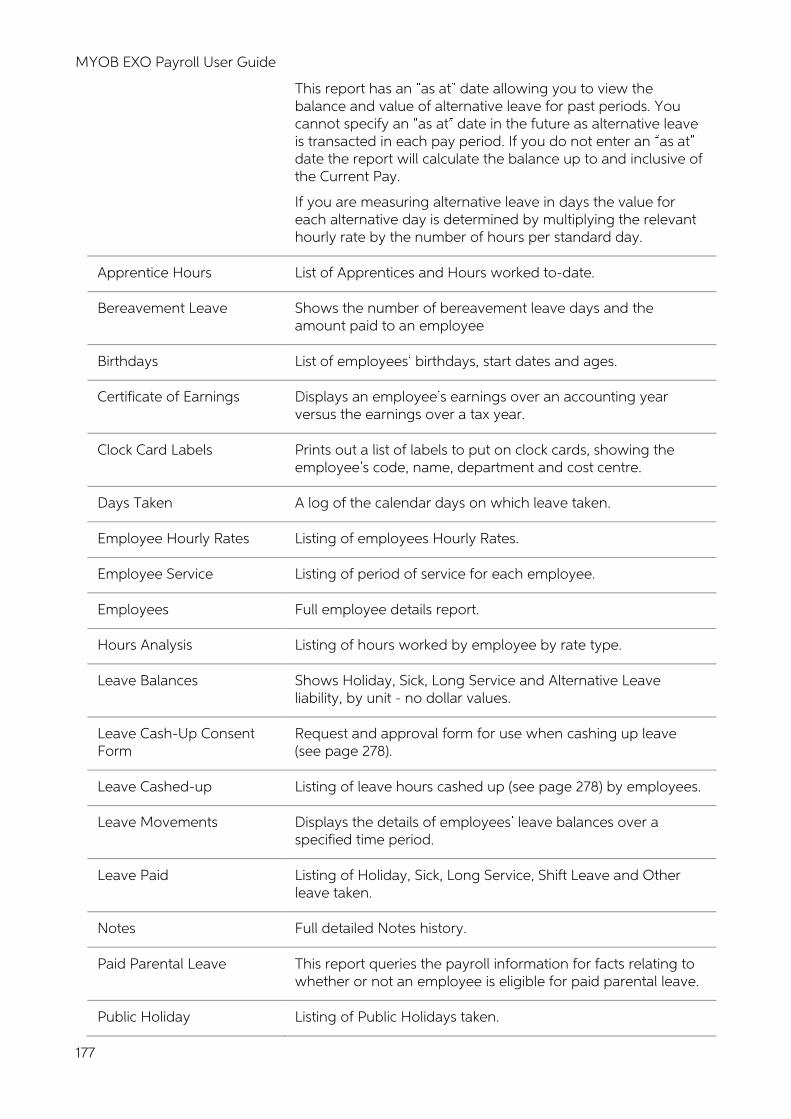
MYOB EXO Payroll User Guide
177
This report has an as at date allowing you to view the balance and value of alternative leave for past periods. You cannot specify an as at date in the future as alternative leave is transacted in each pay period. If you do not enter an as at date the report will calculate the balance up to and inclusive of the Current Pay.
If you are measuring alternative leave in days the value for each alternative day is determined by multiplying the relevant hourly rate by the number of hours per standard day.
Apprentice Hours List of Apprentices and Hours worked to-date.
Bereavement Leave Shows the number of bereavement leave days and the amount paid to an employee
Birthdays List of employees birthdays, start dates and ages.
Certificate of Earnings Displays an employee s earnings over an accounting year versus the earnings over a tax year.
Clock Card Labels Prints out a list of labels to put on clock cards, showing the employee s code, name, department and cost centre.
Days Taken A log of the calendar days on which leave taken.
Employee Hourly Rates Listing of employees Hourly Rates.
Employee Service Listing of period of service for each employee.
Employees Full employee details report.
Hours Analysis Listing of hours worked by employee by rate type.
Leave Balances Shows Holiday, Sick, Long Service and Alternative Leave liability, by unit - no dollar values.
Leave Cash-Up Consent Form
Request and approval form for use when cashing up leave (see page 278).
Leave Cashed-up Listing of leave hours cashed up (see page 278) by employees.
Leave Movements Displays the details of employees leave balances over a specified time period.
Leave Paid Listing of Holiday, Sick, Long Service, Shift Leave and Other leave taken.
Notes Full detailed Notes history.
Paid Parental Leave This report queries the payroll information for facts relating to whether or not an employee is eligible for paid parental leave.
Public Holiday Listing of Public Holidays taken.
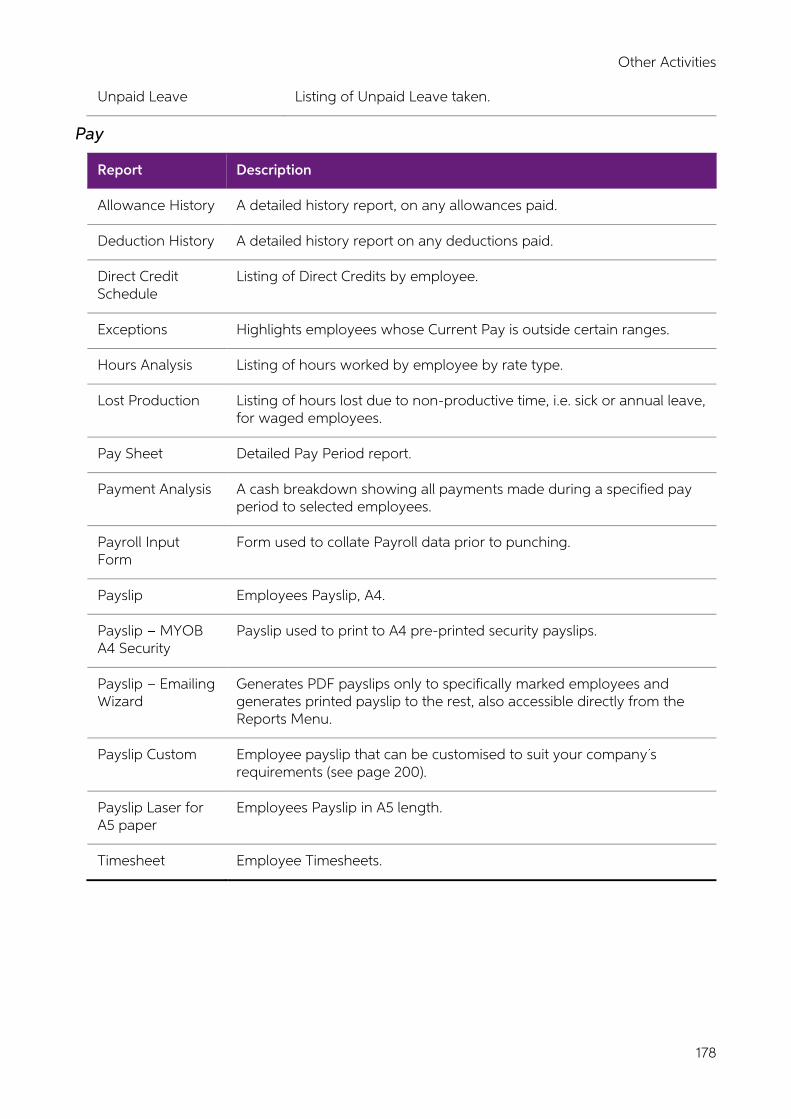
Other Activities
178
Unpaid Leave Listing of Unpaid Leave taken.
Pay
Report Description
Allowance History A detailed history report, on any allowances paid.
Deduction History A detailed history report on any deductions paid.
Direct Credit Schedule
Listing of Direct Credits by employee.
Exceptions Highlights employees whose Current Pay is outside certain ranges.
Hours Analysis Listing of hours worked by employee by rate type.
Lost Production Listing of hours lost due to non-productive time, i.e. sick or annual leave, for waged employees.
Pay Sheet Detailed Pay Period report.
Payment Analysis A cash breakdown showing all payments made during a specified pay period to selected employees.
Payroll Input Form
Form used to collate Payroll data prior to punching.
Payslip Employees Payslip, A4.
Payslip MYOB A4 Security
Payslip used to print to A4 pre-printed security payslips.
Payslip Emailing Wizard
Generates PDF payslips only to specifically marked employees and generates printed payslip to the rest, also accessible directly from the Reports Menu.
Payslip Custom Employee payslip that can be customised to suit your company s requirements (see page 200).
Payslip Laser for A5 paper
Employees Payslip in A5 length.
Timesheet Employee Timesheets.
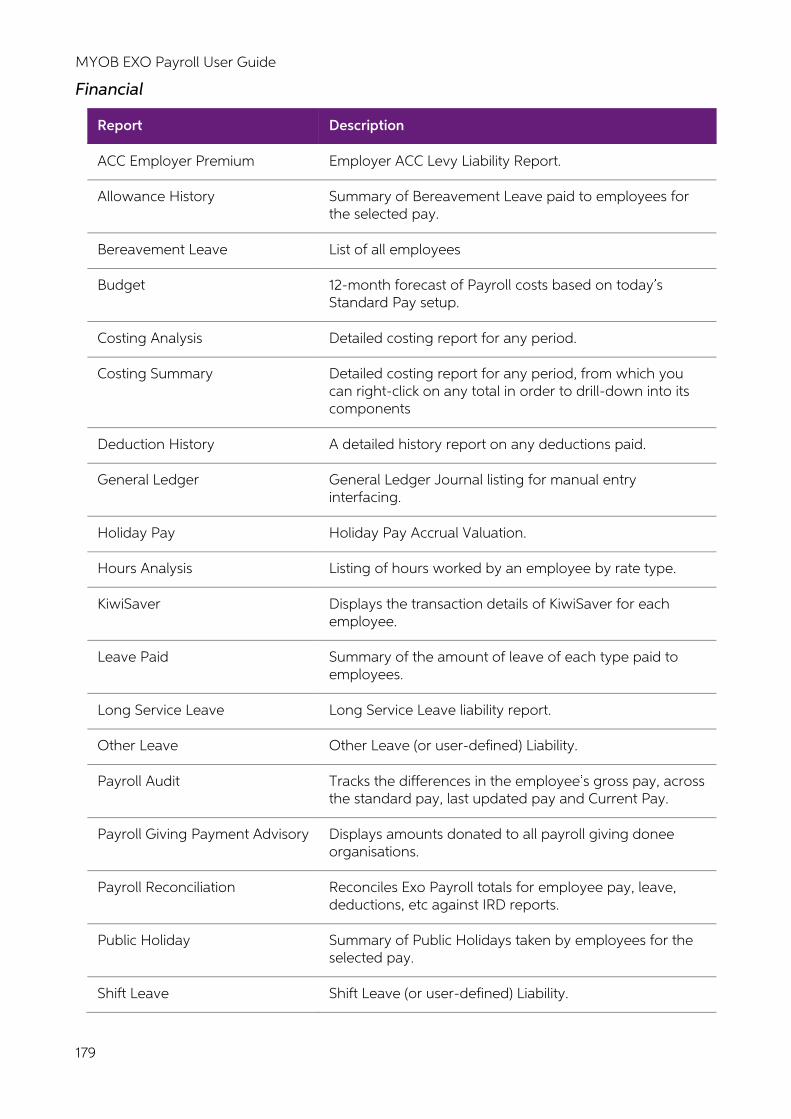
MYOB EXO Payroll User Guide
179
Financial
Report Description
ACC Employer Premium Employer ACC Levy Liability Report.
Allowance History Summary of Bereavement Leave paid to employees for the selected pay.
Bereavement Leave List of all employees
Budget 12-month forecast of Payroll costs based on today s Standard Pay setup.
Costing Analysis Detailed costing report for any period.
Costing Summary Detailed costing report for any period, from which you can right-click on any total in order to drill-down into its components
Deduction History A detailed history report on any deductions paid.
General Ledger General Ledger Journal listing for manual entry interfacing.
Holiday Pay Holiday Pay Accrual Valuation.
Hours Analysis Listing of hours worked by an employee by rate type.
KiwiSaver Displays the transaction details of KiwiSaver for each employee.
Leave Paid Summary of the amount of leave of each type paid to employees.
Long Service Leave Long Service Leave liability report.
Other Leave Other Leave (or user-defined) Liability.
Payroll Audit Tracks the differences in the employee s gross pay, across the standard pay, last updated pay and Current Pay.
Payroll Giving Payment Advisory Displays amounts donated to all payroll giving donee organisations.
Payroll Reconciliation Reconciles Exo Payroll totals for employee pay, leave, deductions, etc against IRD reports.
Public Holiday Summary of Public Holidays taken by employees for the selected pay.
Shift Leave Shift Leave (or user-defined) Liability.

Other Activities
180
Sick Leave Entitlement Sick Leave Liability.
Statistics Return Dept of Statistics Labour Survey.
Superannuation Superannuation Deduction Report, shows the Employees and the Employer contributions.
Trial Balance A Summary of all Pay Details for any period i.e. YTD or MTD.
Maintenance
Report Description
Allowances Allowance masterfile listing.
Cost Centres Listing of Cost Centres.
Deductions Deduction masterfile listing.
Departments Department masterfile listing.
General Ledger Maintenance
A listing of all General Ledger types that have been added to the system.
Holiday Pay Groups Displays a list of Holiday Pay groups that have been added to the system.
KiwiSaver Groups Displays a list of KiwiSaver groups that have been added to the system.
Note Types Shows all note types added to the system.
User Security This report lists all the users that have access to the system and the areas they can access.
IRD
Report Description
ACC Employer Premium Employer ACC Levy Liability report.
ETC Reconciliation Summary report for KiwiSaver Employer Tax Credit information.
IR345 Employer Deductions Provides summary monthly/fortnightly gross, PAYE, ESCT & schedules to update the IR345.
IR348 Employer Monthly Schedule
A summary version of the IR345, output to a file for electronic submission to the IRD. You can produce a printed version of the report for your own records, but this cannot be sent to the IRD.
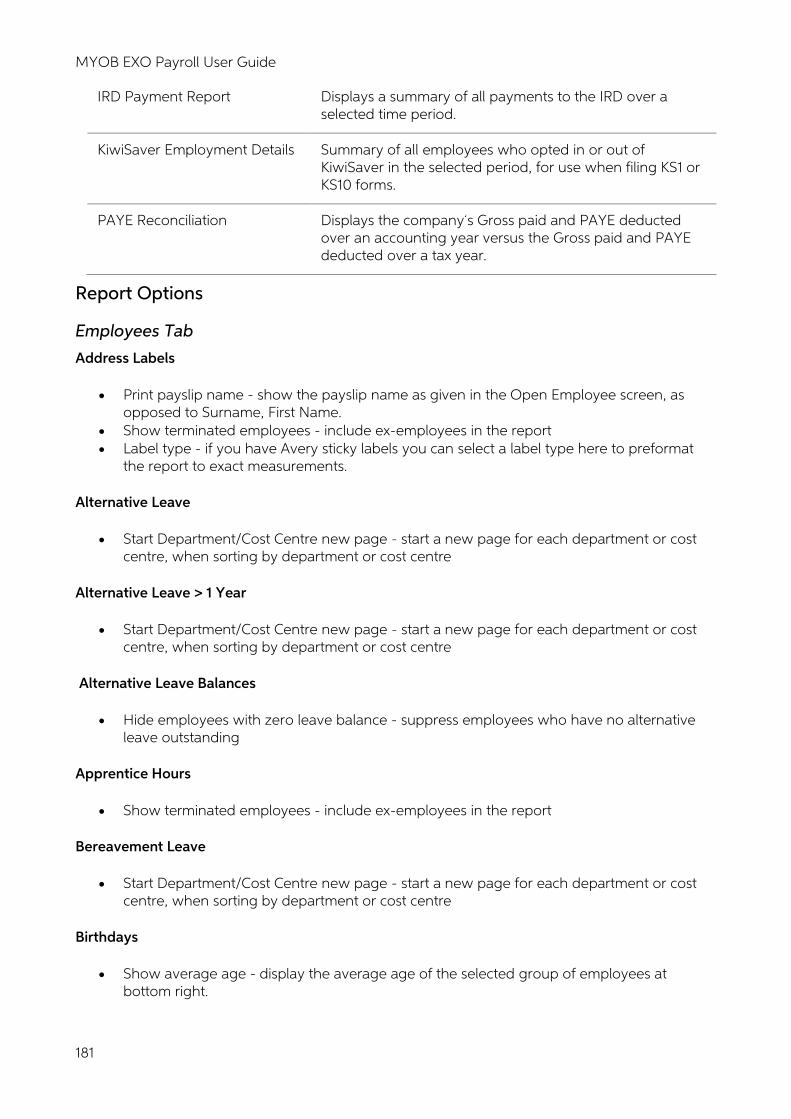
MYOB EXO Payroll User Guide
181
IRD Payment Report Displays a summary of all payments to the IRD over a selected time period.
KiwiSaver Employment Details Summary of all employees who opted in or out of KiwiSaver in the selected period, for use when filing KS1 or KS10 forms.
PAYE Reconciliation Displays the company s Gross paid and PAYE deducted over an accounting year versus the Gross paid and PAYE deducted over a tax year.
Report Options
Employees Tab
Address Labels
• Print payslip name - show the payslip name as given in the Open Employee screen, as opposed to Surname, First Name.
• Show terminated employees - include ex-employees in the report • Label type - if you have Avery sticky labels you can select a label type here to preformat
the report to exact measurements.
Alternative Leave
• Start Department/Cost Centre new page - start a new page for each department or cost centre, when sorting by department or cost centre
Alternative Leave > 1 Year
• Start Department/Cost Centre new page - start a new page for each department or cost centre, when sorting by department or cost centre
Alternative Leave Balances
• Hide employees with zero leave balance - suppress employees who have no alternative leave outstanding
Apprentice Hours
• Show terminated employees - include ex-employees in the report
Bereavement Leave
• Start Department/Cost Centre new page - start a new page for each department or cost centre, when sorting by department or cost centre
Birthdays
• Show average age - display the average age of the selected group of employees at bottom right.
Other Activities
182
Certificate of Earnings
• Show terminated employees - include ex-employees in the report
Clock Card Labels
• Print payslip name - show the payslip name as given in the Open Employee screen, as opposed to Surname, First Name.
• Label type - if you have Avery sticky labels you can select a label type here to preformat the report to exact measurements.
Days Taken
• Start Department/Cost Centre new page - start a new page for each department or cost centre, when sorting by department or cost centre
• Show terminated employees - include ex-employees in the report
Employee Hourly Rates
• Start Department on new page - start a new page for each department, when sorting by department
• Show All Employees - show all employees regardless of whether or not they are waged or salaried
• Show Wages Employees - show only waged employees, exclude salaried employees • Show Salary Employees - show only salaried employees - will show the standard salary
rather than an hourly rate • Report Layout - choose from Landscape or Portrait orientation
Employee Service
None.
Employee Text Messenger
None.
Employees
• Show terminated employees - include ex-employees in the report • Show telephone number - include the contact phone number • Show address - include the contact address • Show employee details - include the occupation, employment, ACC and IRD status • Show leave entitlements - include contractual leave entitlement rules for these leave types
as specified in the sick pay and holiday pay tabs of the Open Employee screen • Show notes - include the contents of the Notes tab for the specified employee • Show user defined fields - display the optional custom fields that are stored in the Other
page tab of the Open Employee screen. User defined fields store values against employees that would not otherwise be stored in the system
• Start Department/Cost Centre on a new page - start a new page for each department/cost centre, when sorting by department/cost centre
• Show only terminated employees - display only ex-employees in the report
MYOB EXO Payroll User Guide
183
Hours Analysis
• Detail Report - if the report is over a selected date range, show a date and breakdown of hours for each pay
• Show Employee Totals - if the report is over a selected date range, show a total line for the breakdown of hours for each pay
• Show Amount Analysis - show a dollar value for the hours worked at the specified rate type for each employee
• Show Premium Amounts - provide an analysis of the difference, or premium between ordinary dollars and overtime dollars
• Start Department/Cost Centre on a new page - start a new page for each department/cost centre, when sorting by department/cost centre
• Show Terminated Employees - include ex-employees in the report • Show Zero Dollar Value Wage Rates - show all wage rate types entered in a pay, including
those where the dollar value is zero
Leave Balances
• Start Department/Cost Centre on a new page - starts a new page for each department/cost centre, when sorting by department/cost centre
• Hide holiday entitlement - don t show currently outstanding holiday pay • Hide sick entitlement - don t show currently outstanding sick pay • Hide long service entitlement - don t show currently outstanding long service leave • Hide alternative leave entitlement - don t show currently outstanding alternative
Leave Cash-Up Consent Form
None.
Leave Cashed-up
• Print Department/Cost Centre new page - start a new page for each department or cost centre, when sorting by department or cost centre
Leave Movement
• Generate the report for leave types - specify whether to include Holiday Pay, Sick Pay or both in the report.
Leave Paid
• Start Department/Cost Centre on a new page - starts a new page for each department/cost centre, when sorting by department/cost centre
• Hide employees with no leave paid - show only the employees who were paid leave, within the given date range
• Report Type - choose from: o Detail - if the report is over a selected date range, show a date and total units of
leave paid for each pay o Summary - if the report is over a selected date range, show only the total units of
leave paid across all pays within the given date range • Show Extra Fields - determines what additional leave information should be displayed,
apart form the standard values. Choose from: o Show User Defined Leave - displays values for Shift Leave (see page 20) and/or
Other Leave (see page 21), if they have been enabled. o Shows Cashed-Up Leave - displays values for cashed-up leave (see page 278).
Other Activities
184
NOTE: If Shift Leave and Other Leave are both disabled, the report always displays cashed-up leave values, regardless of what is selected for Show Extra Fields.
Notes
None.
Paid Parental Leave
None.
Public Holiday
• Start Department/Cost Centre new page - start a new page for each department or cost centre, when sorting by department or cost centre
Unpaid Leave
• Productive Value based on the current - select how to calculate the amounts in the Productive Value column: based on the Standard Hourly Rate or the Relevant Hourly Rate
Pay Tab
Allowance History
• New page per allowance - starts a new page for each allowance code • Show zero allowances - show allowances which have been transacted but have no dollar
value in the pay, e.g. unpaid leave. • Report Type - choose from:
o Detail - if the report is over a selected date range, shows a date, total units and dollar amount of the allowance for each pay
o Summary - if the report is over a selected date range, show only the total units and dollar amount across all pays within the given date range
Deduction History
• Detailed report - if the report is over a selected date range, shows a date and dollar amount of the deduction for each pay. Leave this option off for a summary report.
• Start Department/Cost Centre on a new page - starts a new page for each department/cost centre, when sorting by department/cost centre
Direct Credit Schedule
• Start Department/Cost Centre on a new page - starts a new page for each department/cost centre, when sorting by department/cost centre
• Show payer details - show your company s name, bank account and particulars in the report header.
• Orientation - choose from Landscape or Portrait orientation
Exceptions
• Report Type - choose from: o Detail - if the report is over a selected date range, show a date and breakdown of
each pay for each pay period o Summary - if the report is over a selected date range, show only totals from the pay
periods that fall within the given date range
MYOB EXO Payroll User Guide
185
Hours Analysis
• Detail report - if the report is over a selected date range, show a date and breakdown of hours for each pay
• Show employee totals - if the report is over a selected date range, show a total line for the breakdown of hours for each pay
• Show amount analysis - show a dollar value for the hours worked at the specified rate type for each employee
• Show premium amounts - provide an analysis of the difference, or premium between ordinary dollars and overtime dollars
• Start Department/Cost Centre on a new page - start a new page for each department/cost centre, when sorting by department/cost centre
• Show terminated employees - include ex-employees in the report • Show Zero Dollar Value Wage Rates - show all wage rate types entered in a pay, including
those where the dollar value is zero
Lost Production
• New Page per Department - starts a new page for each department • Include Leave Hours - shows extra columns for leave hours, to better indicate how the
taking of leave has affected work production.
Pay Sheet
• Detail report - provide greater depth of information, actual wage, allowance and deduction lines. Leave this option off to see a summarised view (totals only for wages allowances and deductions).
• Print each Department/cost centre on a new page - start a new page for each department and/or cost centre.
• Portrait report - tick this option for Portrait orientation, untick it for Landscape view. • Print summary on a new page - start a new page for Pay Summary section, as opposed to
printing the Pay Summary section on the line below the last detail line. • Show relevant units paid - include relevant units paid on the report. • Print report using - select whether to print the report by Pay Period End Date or Physical
Pay Date.
Payment Analysis
• New page per Department - starts a new page for each department • Report Details - Choose from:
o Show all transactions - show transactions of all types - cash, cheque, and direct credit
o Signature list only - so that employees can sign off their wages - usually printed together with a normal payment analysis
o Exclude direct credits details - don t show direct credits, just cash & cheque analysis
Payroll Input Form
• Selection ranges as for the Payslip report. • Headings to appear at the top of each column on the form.
Other Activities
186
Payslip
• Show Company Name - displays the company name at the top of each payslip, as provided in Payroll Setup screen.
• Show Address - shows address as given in the Employee Maintenance screen. • Show IRD Number - displays employee s IRD numbers • Show Hourly Rate - an extra line apart from the wages lines, to indicate the employee s
base hourly rate from the standard pay. If the employee is salaried, this option will print the employee s annual salary instead.
• Show Holiday Pay Entitlement - displays the current Holiday Pay entitlements inclusive of the current pay, assuming that the current pay is open.
• Show Other Leave Entitlement - displays the current Other Leave entitlements inclusive of the current pay, assuming that the current pay is open.
• Show Shift Leave Entitlement - displays the current Shift Leave entitlements inclusive of the current pay, assuming that the current pay is open.
• Show Sick Pay Entitlement - displays the current sick pay entitlements inclusive of the current pay, assuming that the current pay is open.
• Show Alternative Leave Entitlement - displays the current Alternative Leave entitlements inclusive of the current pay, assuming that the current pay is open.
• Show Long Service Leave Entitlement - displays the current long service entitlements inclusive of the current pay, assuming that the current pay is open.
• Show Year to Date Totals - displays current gross earnings, PAYE and student loan repayments for the tax year that the pay period falls into.
• Print Summary Slip - prints a separate sheet of totals for the pay at the end of the payslip run.
• Only print pays that have changed - hides the employee from the report if the current pay is identical to the standard pay.
• Show lines used in the A4 Security payslip to show line separators between header and footer, for cosmetic enhancement
• Show titles (for non-preprinted payslips) the MYOB A4 security payslip has line separators between each section of the pre-printed A4 Security payslip. If you don t have this type of pre-printed payslip, but you still want to use the MYOB A4 Security report format, you may want to see section separators anyway, in which case you would turn this option on.
• Show bank account number - show the bank account numbers for any direct credits in the pay.
• Show accrued leave units - show accrued days for holiday pay and other leave and count towards the total balance turn off to exclude, i.e. show total balance as leave outstanding from previous years only.
• Show Year To Date KiwiSaver Totals - show year to date KiwiSaver contribution totals for the employee.
• Lines Group - choose from: o Detail - show individual wage lines as they appear in the Current Pay wages screen,
and a total for the wages lines at bottom. o Summary - show only a total across all wages lines in the pay, rather than each line
by units, rate and rate type. • Top Margin Adjustment - used for the A4 security payslip enables you to increase or
decrease the top margin by 5mm either way useful if you want the payslip to start printing higher or lower on the page.
• Alignment - choose from left aligned or centre aligned. The centre aligned option allows for a larger left hand margin - use only if your payslips print too far to the left.
• Paper Size - choose from A4 or A5 paper. • Calculate YTD Totals - choose how to calculate Year-to-Date totals. Choose from:

MYOB EXO Payroll User Guide
187
o pay period end date - the report will start the Year-to-Date accrual with pays that have a Pay Period End Date of 1 April or later.
o physical pay date - the report will start the Year-to-Date accrual with pays that have a Physical Payment Date of 1 April or later.
Payslip MYOB A4 Security
As for the Payslip report.
Payslip Emailing Wizard
Full information is available in the topic Emailing Payslips (see page 194) .
Payslip Custom
NOTE: Custom payslip layouts are set up on the Payslip Setup window (see page 200).
• Print Summary Slip - prints a separate sheet of totals for the pay at the end of the payslip run.
• Show Company Name - displays the company name at the top of each payslip, as provided in Payroll Setup screen.
• Show Address - shows address as given in the Employee Maintenance screen. • Show IRD Number - displays employee s IRD numbers • Show Hourly Rate - an extra line apart from the wages lines, to indicate the employee s
base hourly rate from the standard pay. If the employee is salaried, this option will print the employee s annual salary instead.
• Show Holiday Pay Entitlement - displays the current Holiday Pay entitlements inclusive of the current pay, assuming that the current pay is open.
• Show Other Leave Entitlement - displays the current Other Leave entitlements inclusive of the current pay, assuming that the current pay is open.
• Show Shift Leave Entitlement - displays the current Shift Leave entitlements inclusive of the current pay, assuming that the current pay is open.
• Show Sick Pay Entitlement - displays the current sick pay entitlements inclusive of the current pay, assuming that the current pay is open.
• Show Alternative Leave Entitlement - displays the current Alternative Leave entitlements inclusive of the current pay, assuming that the current pay is open.
• Show Long Service Leave Entitlement - displays the current long service entitlements inclusive of the current pay, assuming that the current pay is open.
• Show Year to Date Totals - displays current gross earnings, PAYE and student loan repayments for the tax year that the pay period falls into.
• Show Year To Date KiwiSaver and Superannuation Totals - show year to date KiwiSaver/superannuation contribution totals for the employee.
• Show Bank Account Number - show the bank account numbers for any direct credits in the pay.
• Show Accrued Leave Units - show accrued days for Holiday Pay and other leave and count towards the total balance. Turn this option off to exclude, i.e. show total balance as leave outstanding from previous years only.
• Only print for pays that have changed - hides the employee from the report if the current pay is identical to the standard pay.
• Calculate YTD Totals - choose how to calculate Year-to-Date totals. Choose from: • pay period end date - the report will start the Year-to-Date accrual with pays that
have a Pay Period End Date of 1 April or later. • physical pay date - the report will start the Year-to-Date accrual with pays that
have a Physical Payment Date of 1 April or later. • Wage lines - choose how to display employees wage lines:

Other Activities
188
• Detail - show individual wage lines as they appear in the current pay wages window, and a total for the wages lines at bottom.
• Summary - show only a total across all wages lines in the pay, rather than each line by units, rate and rate type.
• Print payslip layout - Choose which custom payslip layout to use when printing payslips: A4, A5 or MYOB A4 Security.
• Email payslip layout - Choose which custom payslip layout to use when emailing payslips: A4, A5 or MYOB A4 Security.
Payslip Laser for A5 paper
As for the Payslip report.
Timesheet
• New page per employee - print a timesheet for each employee on a separate page, rather than grouping all employees on the same page.
• Start Day - allows you to specify which day of the week that the first Heading input field corresponds to - in other words the start day of your roster.
Financial Tab
ACC Employer Premium
• Show employee detail - display a breakdown of how each employee’s earnings has contributed to the earnings liable for ACC Employer Premium
NOTE: The ACC Employer Premium report applies a GST rate of 12.5% for periods that end before 1 October 2010 and 15% for periods that start on or after 1 October 2010. Selecting a date range that spans 1 October 2010 will apply a rate of 12.5%, which will result in incorrect values. The ACC Employer Premium report should not be run for periods that span 1 October 2010.
Allowance History
• New page per allowance - start a new page for each allowance code • Show zero allowances - show allowances which have been transacted but have no dollar
value in the pay, e.g. unpaid leave. • Report Type - choose from:
• Detail - if the report is over a selected date range, shows a date, total units and dollar amount of the allowance for each pay
• Summary - if the report is over a selected date range, show only totals of allowance units and amounts for the given date range
Bereavement Leave
• Start Department/Cost Centre new page - start a new page for each department or cost centre, when sorting by department or cost centre
MYOB EXO Payroll User Guide
189
Budget
• Report Type - choose from: • Detail - display a breakdown of how of each employee s wage lines, allowance
lines and salary contribute to the projected annual earnings • Summary - display only a total of wages, allowances and salary per employee, for
the projected annual earnings
Costing Analysis
• Show detail - show each transaction in the pay, and how it accumulates towards the cost centre. Turn off to see only transaction totals per cost centre.
• Show wage hours - shows the actual hours worked alongside the wage line • Print each Department on a new page - start a new page for each department • Show employee totals - use in combination with the Summary view to see totals per cost
centre plus totals for employees within that cost centre, without having to see all the transaction details
• Hide salary amounts - prevent salaries from factoring into the totals per cost centre and the grand total - useful when you only want to see wages expense
• Hide wage amounts - prevent wages from factoring into the totals per cost centre and the grand total - useful when you only want to see salaries expense
• Hide allowance amounts - prevent allowances from factoring into the totals per cost centre and the grand total
• Hide holiday pay amounts - prevent holiday pay from factoring into the totals per cost centre and the grand total
• Hide sick leave amounts - prevent sick pay from factoring into the totals per cost centre and the grand total
• Hide long service leave amounts - prevent long service leave from factoring into the totals per cost centre and the grand total
• Hide shift leave amounts - prevent shift leave from factoring into the totals per cost centre and the grand total
• Hide other leave amounts - prevent other leave from factoring into the totals per cost centre and the grand total
• Hide Employer KiwiSaver amounts - prevent the Employer s contribution to the KiwiSaver scheme from factoring into the totals per cost centre and the grand total
Costing Summary
None.
Deduction History
• Detail report - if the report is over a selected date range, shows a date and dollar amount of the deduction for each pay
• Start Department/Cost Centre on a new page - starts a new page for each deduction code
Other Activities
190
General Ledger
• Show employee totals - shows total hours, debits and credits for each employee. Useful in the summary view when you want to see how the summarised total is spread over the employees without having to see each transaction. Useful in the detailed view when you want to see the total result of each employee s transaction. Not recommended when you are exporting the general file.
• Create a batch file - tells the system to output general ledger data to an accounting package such as ACCPAC Plus, DacEasy, Quantum-5 Cashbook, Global 3000, GECL General Ledger, or ASCII version 1. For other file formats, use the General Ledger Exporter (see page 215).
• When creating a batch file export select from one of the following: • All general ledger payments - always export all of the transactions in the pay. • Only payments not yet posted - when you create a general ledger file, the
transactions in it are deemed to be posted to the general ledger. Using this option avoids doubled-up postings, in that if there is a mistake in the GL file and you have to recreate it, only the transactions that are new to the second file will be posted, and the same accounts won t be processed twice.
• Export to accounting software - choose your file format here. • Report Type - choose from:
• Summary - Show only totals for the given sort order, e.g. totals per employee, totals per GL code, without showing the details of the transaction.
• Detail - Show each transactions in the pay and total them, for the given sort order, e.g. totals per employee and the breakdown of the pay for the employee, totals for the GL code, broken down into totals for the employee, and broken down further into each individual transaction.
Holiday Pay
• New page per department - start a new page for each department code • Show Summary for Department/Cost Centre Only - when the report is sorted by
Department Code or Default Cost Centre and this option is ticked, the report will show only the sub-totals for each Department/Cost Centre, and not the individual values for each employee.
Hours Analysis
• Detail report - if the report is over a selected date range, show a date and breakdown of hours for each pay
• Show employee totals - if the report is over a selected date range, show a total line for the breakdown of hours for each pay
• Show amount analysis - show a dollar value for the hours worked at the specified rate type for each employee
• Show premium amounts - provide an analysis of the difference, or premium between ordinary dollars and overtime dollars
• Start Department/Cost Centre on a new page - start a new page for each department/cost centre, when sorting by department/cost centre
• Show terminated employees - include ex-employees in the report
MYOB EXO Payroll User Guide
191
KiwiSaver
• Start Department/Cost Centre on a new page - starts a new page for either a department or cost centre, depending on which of these is set as Sort Order 1
• Show terminated employees - include ex-employees in the report
Leave Paid
• Start Department/Cost Centre on a new page - starts a new page for either a department or cost centre, depending on which of these is set as Sort Order 1
• Hide employees with no leave paid - starts a new page for either a department or cost centre
• Report Type - choose from: • Detail - if the report is over a selected date range, shows a date and total units of
leave paid for each pay • Summary - if the report is over a selected date range, shows only total units of
leave paid, doesn t show individual transactions.
Long Service Leave
• New page per Cost Centre/Department - start a new page for each department code • Don t show employees with zero balance - hide employees who have no long service
leave outstanding
Other Leave
None.
Payroll Audit
• Ignore Casual Employees - casual employees can often create variances, because they are paid intermittently. Although the variances exist, they are often not the kind of variances you want to see - if so, turn this option on to eliminate casual variances.
• Hide Gross Pay Variance prevent variances in gross taxable earnings from displaying. • Hide Net Pay Variance prevent variances in net pay after tax from displaying. • Hide Rate/Salary Variance prevent changes in the salary/hourly wage rate from
displaying. • Hide Allowance Variance prevent changes in allowance value from displaying. • Hide Bank Account Variance prevent changes in bank account numbers and values
transacted to those accounts, from displaying. • Hide Last Five Pays - prevent the grand totals for the last five pays from displaying. • Hide Variance Legend prevent the chart of variance types and descriptions from
displaying. • Hide Employees Started Finished prevent employment commencement and cessation
from displaying. • Hide Audit Notes prevent notes pertaining to audit tracking from displaying.
Payroll Giving Payment Advisory
None.
Other Activities
192
Payroll Reconciliation
• Show monthly detail lines - this shows the values per month as they are returned on the IR348. Note that the cents in the gross pay are trimmed per employee per month, according to IRD requirements. This option highlights the differences between the IRD return and actual payroll value, and why the differences occur.
Public Holiday
• Start Department/Cost Centre new page - start a new page for each department or cost centre, when sorting by department or cost centre
Shift Leave
• Show Accrued Shift Leave - normally, the shift leave accrual for the current shift leave year does count toward the employee s entitlement because it is not due yet. Use this option to count the current shift year accrual towards the company leave liability, regardless of this assumption.
Sick Leave Entitlement
• New page per department - start a new page for each department code • Don t show staff with 0 balances - hide employees who have no sick pay outstanding
Statistics Return
• Report Type - choose from: • Summary Report - show totals across the entire company • Details Report - show totals across the company, but broken down into
department/cost centre
Superannuation
• Includes - choose whether to display Superannuation contributions, KiwiSaver contributions or both.
Trial Balance
• Detail report - if the report is over a selected date range, shows a record for each pay for each employee rather than a total for all pays for each employee
• Print Each Department on a new page - starts a new page for each department employee rather than a total for all pays for each employee
• Orientation - choose from Landscape or Portrait orientation. The landscape version offers an extended breakdown of leave paid.
Maintenance Tab
Allowances
None.
Cost Centres
None.
MYOB EXO Payroll User Guide
193
Deductions
None.
Departments
None.
General Ledger Maintenance
None.
Holiday Pay Groups
None.
KiwiSaver Groups
None.
Note Types
• Report Type - choose from: o Detail - show the default note/comment for each note type o Summary - show note type codes and names only
User Security
None.
IRD Tab
ACC Employer Premium
• Show employee detail - displays a breakdown of how each employee has contributed to the ACC Employer Premium
ETC Reconciliation
None.
IR345 Employer Deductions
• Defer ETC Claims to Month End - Defers any claims on the KiwiSaver Employer Tax Credit to the end of the month.
IR348 Employer Monthly Schedule
• Exclude zero PAYE employees - Do not show any employees whose PAYE amount is $0.00.
• Presentation - choose from: • Draft - print a hard copy of the IR348 report in draft format for your own records. • Final - print a hard copy of the IR348 report for your own records.
NOTE: IR348 returns must be filed electronically using the myIR website. You can generate and keep printed IR348 reports for your own records, but these cannot be sent to the IRD.
IRD Payment
None.
KiwiSaver Employment Details
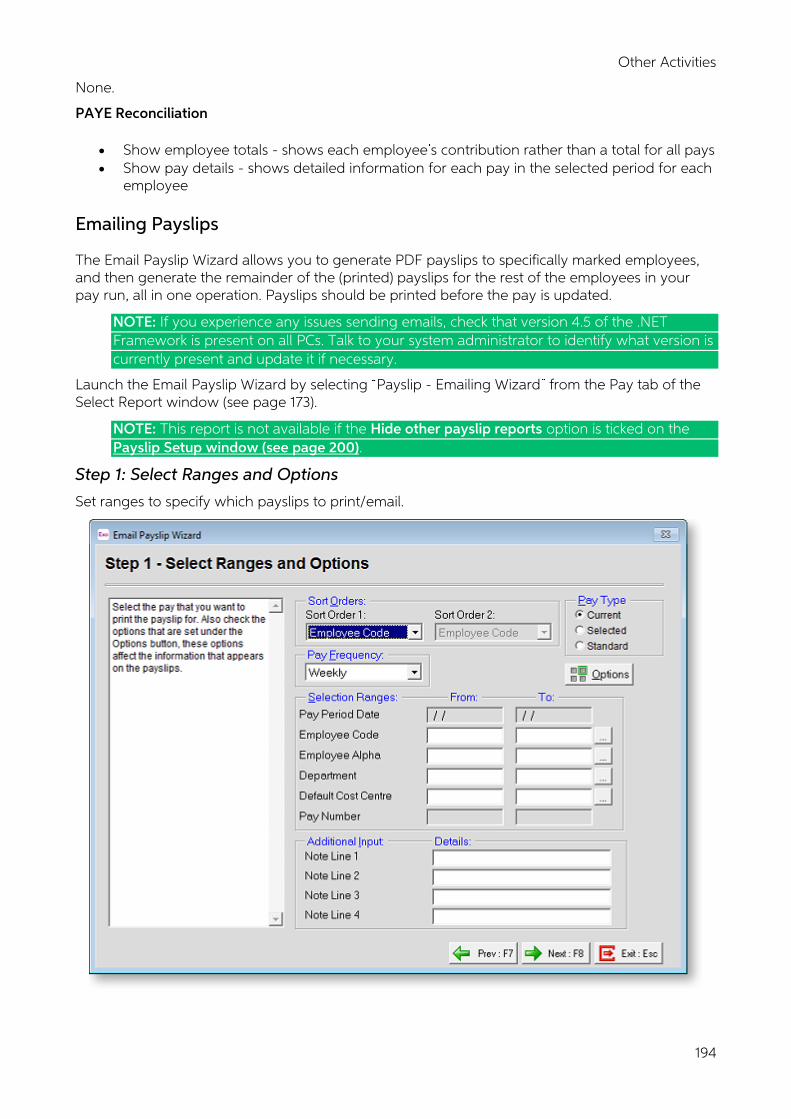
Other Activities
194
None.
PAYE Reconciliation
• Show employee totals - shows each employee s contribution rather than a total for all pays • Show pay details - shows detailed information for each pay in the selected period for each
employee
Emailing Payslips
The Email Payslip Wizard allows you to generate PDF payslips to specifically marked employees, and then generate the remainder of the (printed) payslips for the rest of the employees in your pay run, all in one operation. Payslips should be printed before the pay is updated.
NOTE: If you experience any issues sending emails, check that version 4.5 of the .NET Framework is present on all PCs. Talk to your system administrator to identify what version is currently present and update it if necessary.
Launch the Email Payslip Wizard by selecting Payslip - Emailing Wizard from the Pay tab of the Select Report window (see page 173).
NOTE: This report is not available if the Hide other payslip reports option is ticked on the Payslip Setup window (see page 200).
Step 1: Select Ranges and Options
Set ranges to specify which payslips to print/email.
MYOB EXO Payroll User Guide
195
Sort Orders Payslips that are printed from the Wizard can be grouped and sorted in a variety of ways:
• Employee Code • Employee Alpha • Department • Payment Method • Default Cost Centre
For example, if each supervisor is responsible for handing out payslips to his or her own staff, you may elect to adjust Sort Order 1 to Department, and potentially set Sort Order 2 to Employee Alpha (an alphanumeric code derived from the surname), so that payslips are distributed more efficiently.
Pay Frequency Select an appropriate pay frequency from the list this is vital for establishing exactly which current pay the payslip run is for.
Pay Type This represents the pay for which you want to generate payslips. Normally this would be an open pay, and would be either the Current pay, or a One Off Pay (via the Selected pay type).
Selection Ranges The selection ranges act as a filter the Payslip Wizard will exclude any employees whose codes are less than the From range and greater than the To range.
Options Note that the options set here control the layout and visibility of various items that may appear on the payslips. Refer to page 152 for detailed description of payslip report options.
Once you have made your selections, click Next or press F8 to continue.
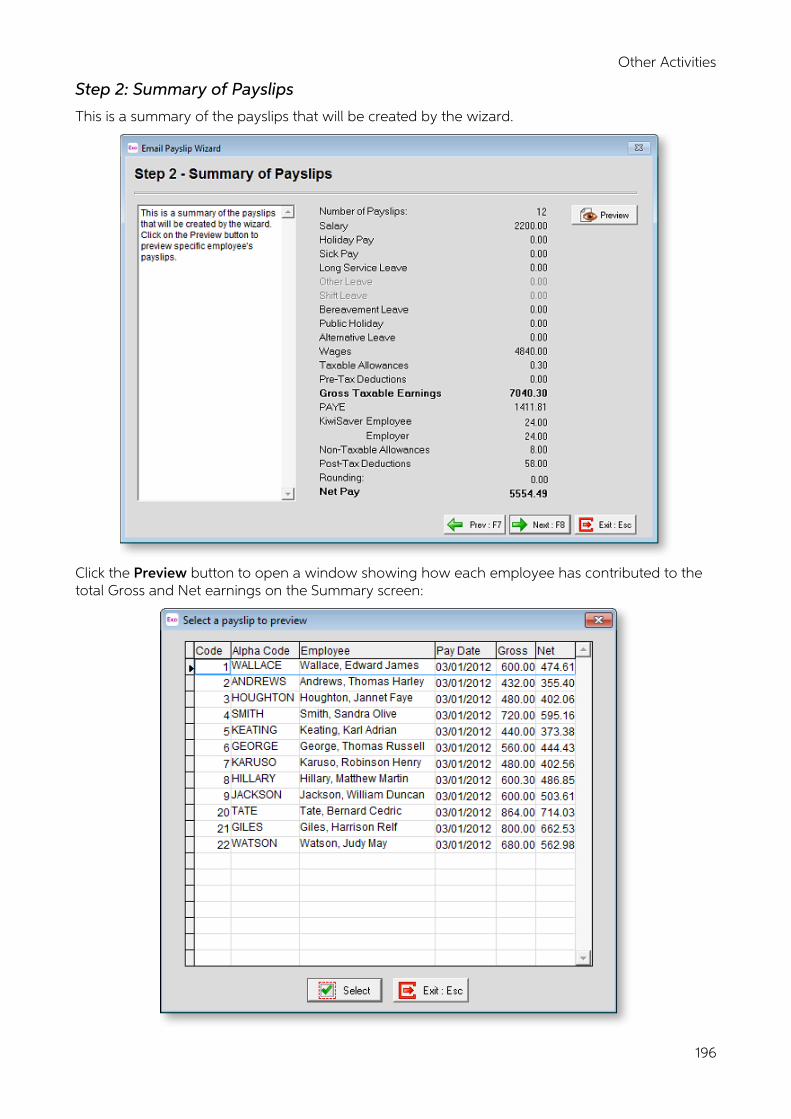
Other Activities
196
Step 2: Summary of Payslips
This is a summary of the payslips that will be created by the wizard.
Click the Preview button to open a window showing how each employee has contributed to the total Gross and Net earnings on the Summary screen:

MYOB EXO Payroll User Guide
197
To ascertain the makeup of a particular employee s pay, click on the appropriate row in the grid and click the Select button. The employee s payslip appears on screen.
Once you have finished with the Summary screen, click Next or press F8 to continue.
Step 3: Destination
From this step you can change the destination of the employee s payslips.
If the employee has previously been set up to receive payslips via email the Destination will default to the employee s email address.
To change an employee s email address, right-click on the employee s record in the list and select Edit employee email settings.
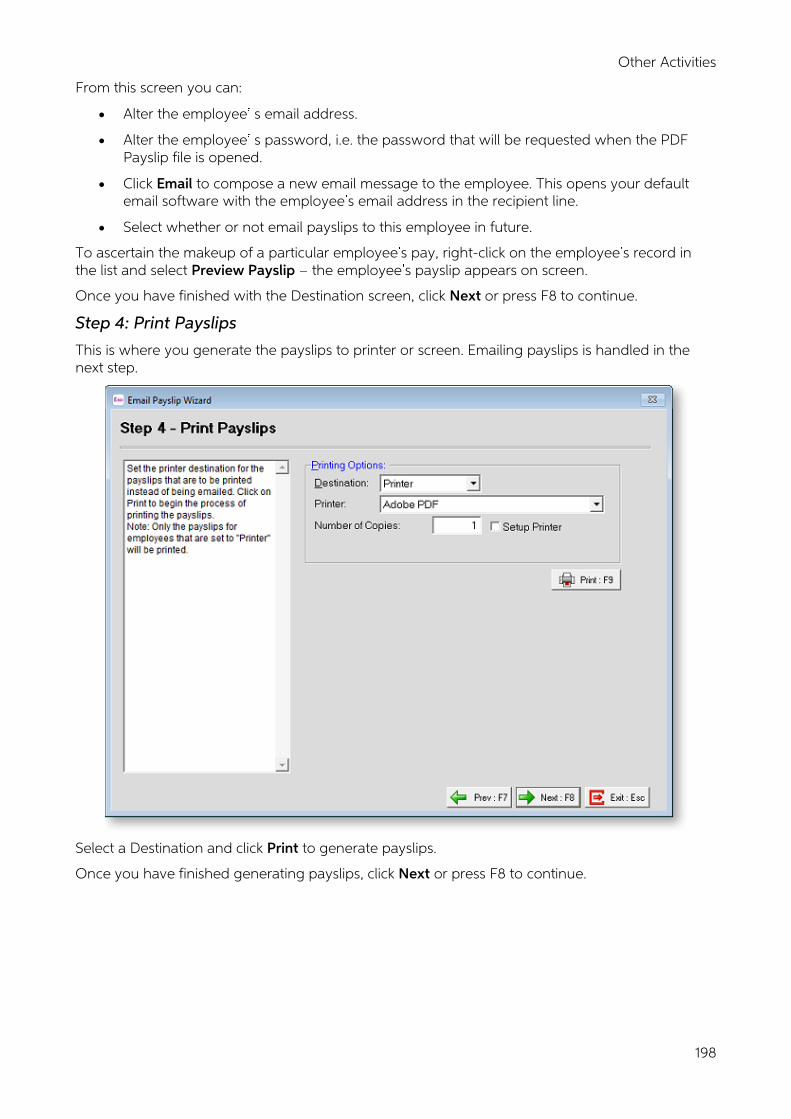
Other Activities
198
From this screen you can:
• Alter the employee s email address.
• Alter the employee s password, i.e. the password that will be requested when the PDF Payslip file is opened.
• Click Email to compose a new email message to the employee. This opens your default email software with the employee s email address in the recipient line.
• Select whether or not email payslips to this employee in future.
To ascertain the makeup of a particular employee s pay, right-click on the employee s record in the list and select Preview Payslip the employee s payslip appears on screen.
Once you have finished with the Destination screen, click Next or press F8 to continue.
Step 4: Print Payslips
This is where you generate the payslips to printer or screen. Emailing payslips is handled in the next step.
Select a Destination and click Print to generate payslips.
Once you have finished generating payslips, click Next or press F8 to continue.

MYOB EXO Payroll User Guide
199
Step 5: Send Emails
This is where you email the payslips.
Email settings default to those specified on the Email Setup window (see page 31) in the Payroll Setup, but they can be edited if necessary.
Emails are sent one at a time, which means that for large organisations with many staff members, sending emails can take a long time. Ticking the Send Emails Asynchronously box speeds up the process by sending multiple emails concurrently.
Click the Email button to send emails.
NOTE: Once the emails are sent, they cannot be retrieved.
Once you have finished sending emails, click Next or press F8 button to continue.

Other Activities
200
Finished Print Summary
The wizard is now complete.
Click the Print Summary Slip button to generate a report that displays the status of each payslip, i.e. whether or not a payslip was emailed to the employee or sent to the printer successfully.
Click the Finish button to exit the Email Payslip Wizard.

MYOB EXO Payroll User Guide
201
Custom Payslip
MYOB Exo Payroll includes a payslip report that can be fully customized to suit your company s needs.
Setting up the Custom Payslip
Before the custom payslip can be used, it must be enabled and configured. Open the Payslip Setup window by clicking the Payslip Setup button on the Special Options Setup window in the Payroll Setup (see page 28).
Enable custom payslip report Tick this option to enable the Payslip Custom report on the Pay tab of the Select Report window (see page 178).
Hide other payslip reports If the custom payslip has been enabled, you can tick this option to hide all other payslip reports on the Select Report window.
Payslip layout EXO Payroll allows you to set up and use three different custom reports in the following layouts:
• A4 (210mm x 297mm) • A5 (148mm x 210mm) • MYOB A4 Security
Select the layout format of the custom payslip to edit. You can specify which layout to use when printing or emailing reports as part of the report options for the Payslip Custom report (see page 184).
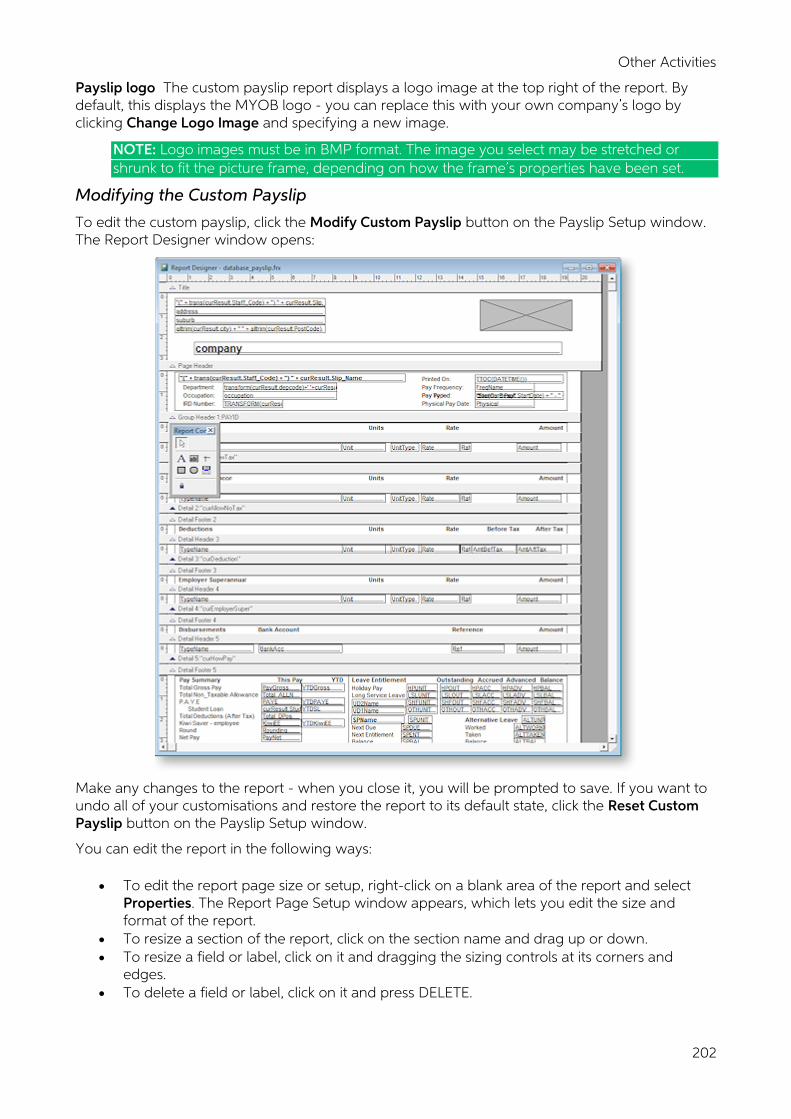
Other Activities
202
Payslip logo The custom payslip report displays a logo image at the top right of the report. By default, this displays the MYOB logo - you can replace this with your own company s logo by clicking Change Logo Image and specifying a new image.
NOTE: Logo images must be in BMP format. The image you select may be stretched or shrunk to fit the picture frame, depending on how the frame s properties have been set.
Modifying the Custom Payslip
To edit the custom payslip, click the Modify Custom Payslip button on the Payslip Setup window. The Report Designer window opens:
Make any changes to the report - when you close it, you will be prompted to save. If you want to undo all of your customisations and restore the report to its default state, click the Reset Custom Payslip button on the Payslip Setup window.
You can edit the report in the following ways:
• To edit the report page size or setup, right-click on a blank area of the report and select Properties. The Report Page Setup window appears, which lets you edit the size and format of the report.
• To resize a section of the report, click on the section name and drag up or down. • To resize a field or label, click on it and dragging the sizing controls at its corners and
edges. • To delete a field or label, click on it and press DELETE.
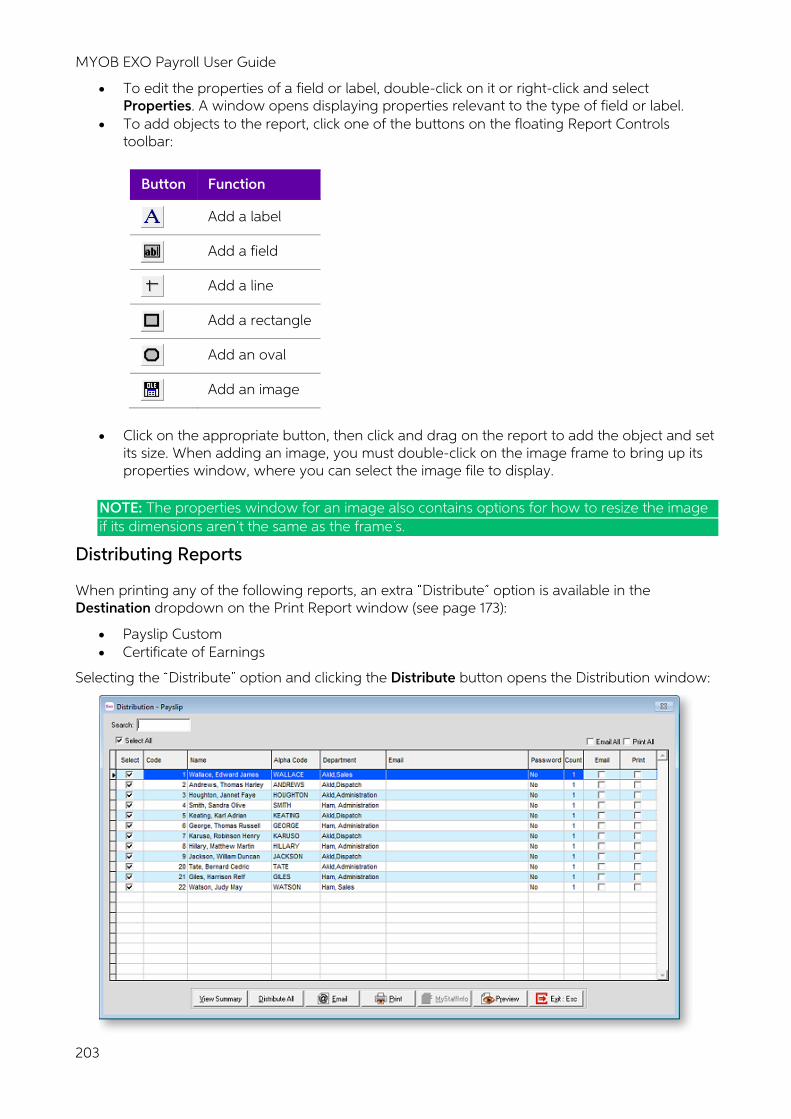
MYOB EXO Payroll User Guide
203
• To edit the properties of a field or label, double-click on it or right-click and select Properties. A window opens displaying properties relevant to the type of field or label.
• To add objects to the report, click one of the buttons on the floating Report Controls toolbar:
Button Function
Add a label
Add a field
Add a line
Add a rectangle
Add an oval
Add an image
• Click on the appropriate button, then click and drag on the report to add the object and set its size. When adding an image, you must double-click on the image frame to bring up its properties window, where you can select the image file to display.
NOTE: The properties window for an image also contains options for how to resize the image if its dimensions aren t the same as the frame s.
Distributing Reports
When printing any of the following reports, an extra Distribute option is available in the Destination dropdown on the Print Report window (see page 173):
• Payslip Custom • Certificate of Earnings
Selecting the Distribute option and clicking the Distribute button opens the Distribution window:
Other Activities
204
From this window, you can print reports, send them by email, upload them to MyStaffInfo, or any combination of the three.
You can preview report information before distribution by clicking the Preview button, which displays the report for the selected employee. For the custom payslip, a View Summary button is also available - clicking this displays the Payslip Summary report.
To distribute reports:
1. Select the employees who you want to distribute the reports to by ticking the appropriate boxes in the Select column or by ticking Select All.
2. Select the destination(s) for the employees reports: o To email the report to an employee, tick the appropriate box in the Email column,
or tick Email All to select all employees. o To print the report for an employee, tick the appropriate box in the Print column, or
tick Print All to select all employees. o To upload an employee s report to MyStaffInfo, tick the appropriate box in the MSI
column, or tick MSI All to select all employees. 3. Distribute the reports by one or more methods:
o To print reports for all selected employees who have the Print option ticked, click Print.
o To email reports to all selected employees who have the Email option ticked, click Email.
o To upload reports to MyStaffInfo for all selected employees who have the MSI option ticked, click MSI.
o To send reports to all selected employees by all of the selected destinations in one operation, click Distribute All.
Custom Reports
If you require specific items of information that are not readily available from the existing standard reports, you can ask MYOB to write and install a custom report for you.
When a custom report is installed, a new tab containing the custom report becomes available on the Select Report screen (see page 173). From here you can select the custom report and print it in the normal fashion.
Report Runs
A report run is a way of grouping reports together to process several at a time. This saves the repetitive task of having to navigate to, set up, preview, and print the same reports for pay after pay, from the report selection screen.
When a report is in a run, it can be customised permanently for that run. For example, you could have a Payslip run with a filter for printing only weekly pays, and another run with a filter for printing only monthly pays. A common scenario is to have an end-of-pay run, and end-of-period run, an end-of-month run, etc.
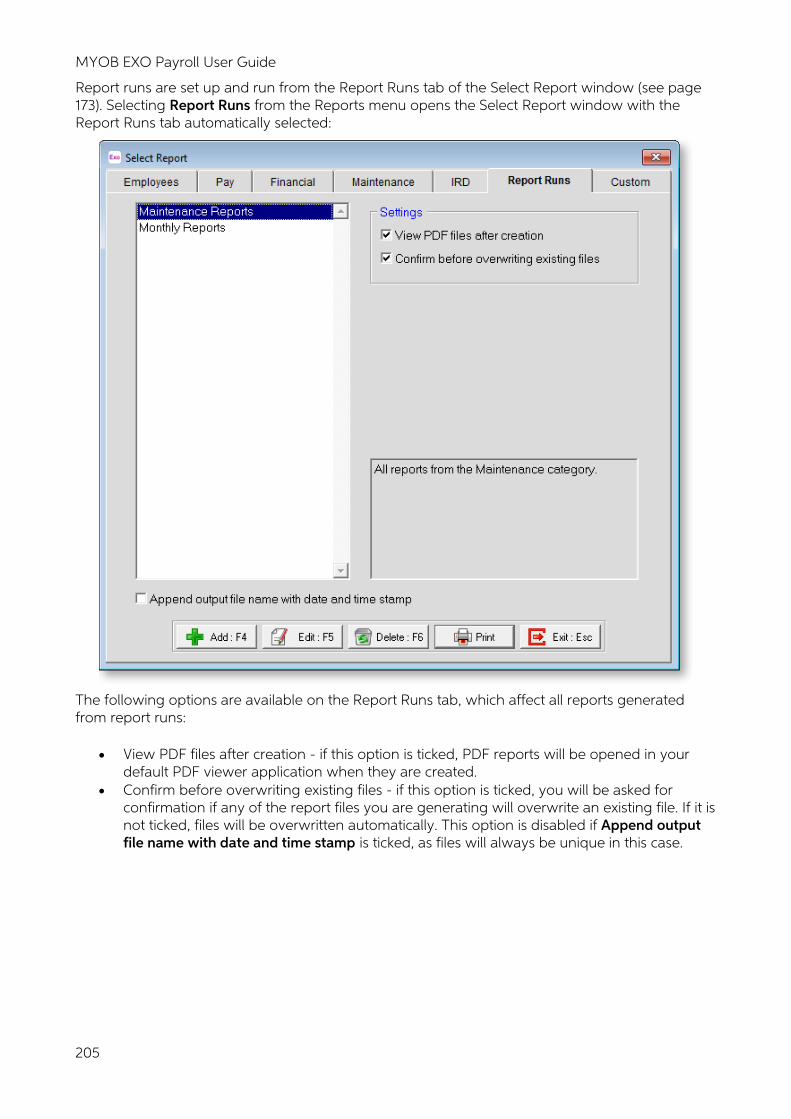
MYOB EXO Payroll User Guide
205
Report runs are set up and run from the Report Runs tab of the Select Report window (see page 173). Selecting Report Runs from the Reports menu opens the Select Report window with the Report Runs tab automatically selected:
The following options are available on the Report Runs tab, which affect all reports generated from report runs:
• View PDF files after creation - if this option is ticked, PDF reports will be opened in your default PDF viewer application when they are created.
• Confirm before overwriting existing files - if this option is ticked, you will be asked for confirmation if any of the report files you are generating will overwrite an existing file. If it is not ticked, files will be overwritten automatically. This option is disabled if Append output file name with date and time stamp is ticked, as files will always be unique in this case.
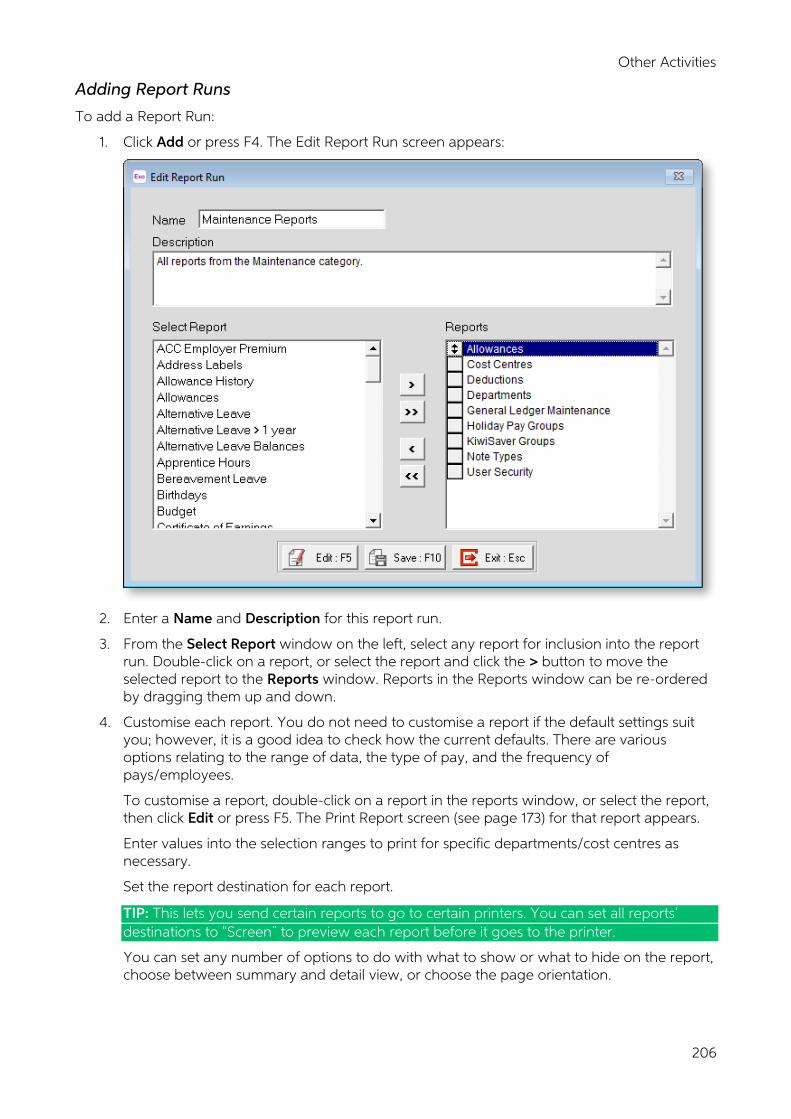
Other Activities
206
Adding Report Runs
To add a Report Run:
1. Click Add or press F4. The Edit Report Run screen appears:
2. Enter a Name and Description for this report run.
3. From the Select Report window on the left, select any report for inclusion into the report run. Double-click on a report, or select the report and click the > button to move the selected report to the Reports window. Reports in the Reports window can be re-ordered by dragging them up and down.
4. Customise each report. You do not need to customise a report if the default settings suit you; however, it is a good idea to check how the current defaults. There are various options relating to the range of data, the type of pay, and the frequency of pays/employees.
To customise a report, double-click on a report in the reports window, or select the report, then click Edit or press F5. The Print Report screen (see page 173) for that report appears.
Enter values into the selection ranges to print for specific departments/cost centres as necessary.
Set the report destination for each report.
TIP: This lets you send certain reports to go to certain printers. You can set all reports destinations to Screen to preview each report before it goes to the printer.
You can set any number of options to do with what to show or what to hide on the report, choose between summary and detail view, or choose the page orientation.
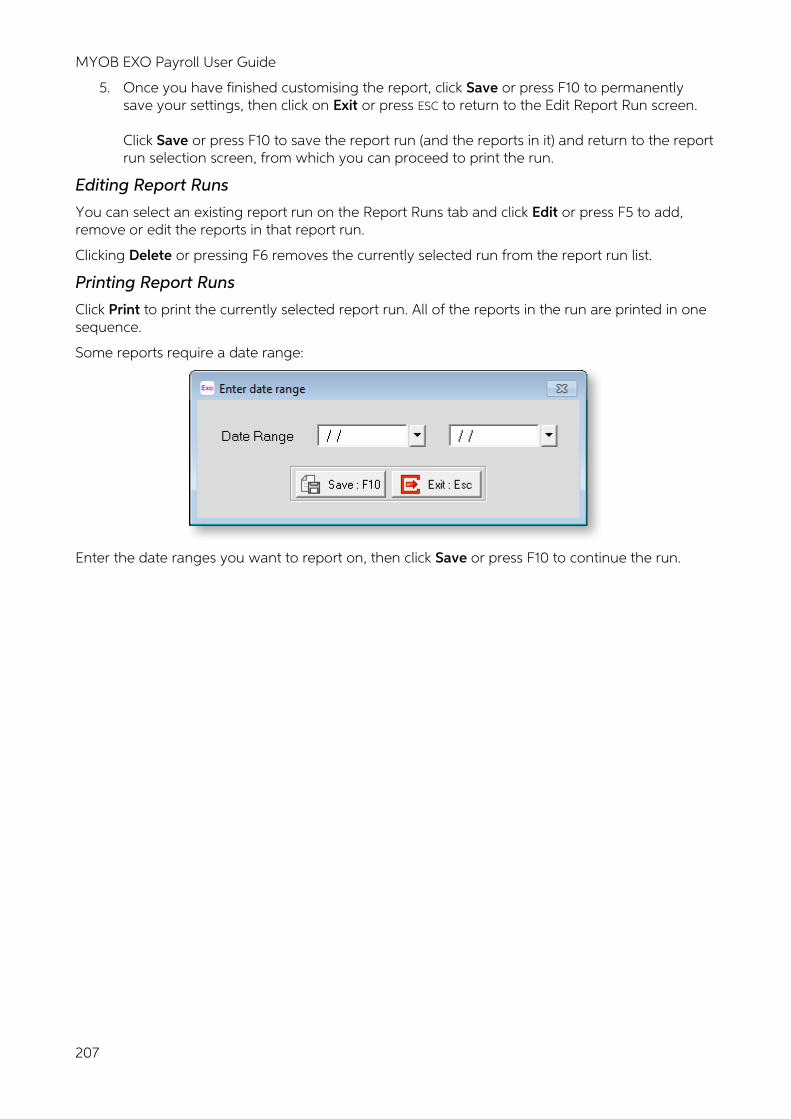
MYOB EXO Payroll User Guide
207
5. Once you have finished customising the report, click Save or press F10 to permanently save your settings, then click on Exit or press ESC to return to the Edit Report Run screen. Click Save or press F10 to save the report run (and the reports in it) and return to the report run selection screen, from which you can proceed to print the run.
Editing Report Runs
You can select an existing report run on the Report Runs tab and click Edit or press F5 to add, remove or edit the reports in that report run.
Clicking Delete or pressing F6 removes the currently selected run from the report run list.
Printing Report Runs
Click Print to print the currently selected report run. All of the reports in the run are printed in one sequence.
Some reports require a date range:
Enter the date ranges you want to report on, then click Save or press F10 to continue the run.
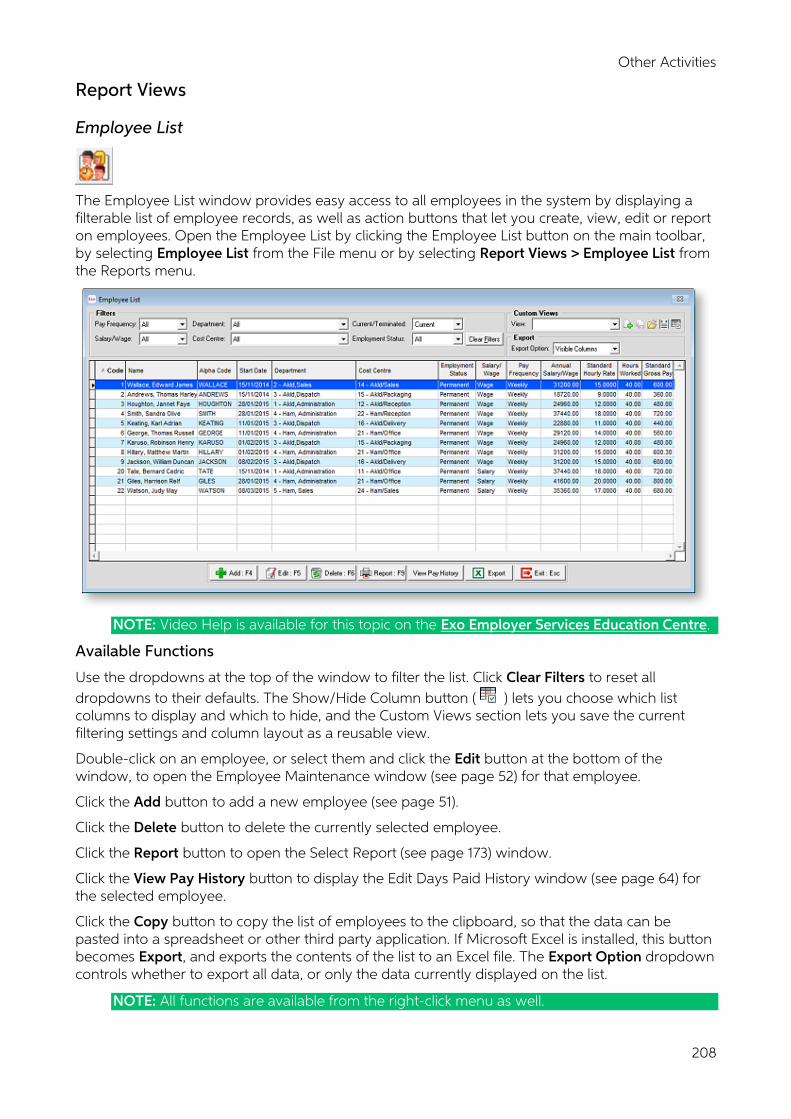
Other Activities
208
Report Views
Employee List
The Employee List window provides easy access to all employees in the system by displaying a filterable list of employee records, as well as action buttons that let you create, view, edit or report on employees. Open the Employee List by clicking the Employee List button on the main toolbar, by selecting Employee List from the File menu or by selecting Report Views > Employee List from the Reports menu.
NOTE: Video Help is available for this topic on the Exo Employer Services Education Centre.
Available Functions
Use the dropdowns at the top of the window to filter the list. Click Clear Filters to reset all dropdowns to their defaults. The Show/Hide Column button ( ) lets you choose which list columns to display and which to hide, and the Custom Views section lets you save the current filtering settings and column layout as a reusable view.
Double-click on an employee, or select them and click the Edit button at the bottom of the window, to open the Employee Maintenance window (see page 52) for that employee.
Click the Add button to add a new employee (see page 51).
Click the Delete button to delete the currently selected employee.
Click the Report button to open the Select Report (see page 173) window.
Click the View Pay History button to display the Edit Days Paid History window (see page 64) for the selected employee.
Click the Copy button to copy the list of employees to the clipboard, so that the data can be pasted into a spreadsheet or other third party application. If Microsoft Excel is installed, this button becomes Export, and exports the contents of the list to an Excel file. The Export Option dropdown controls whether to export all data, or only the data currently displayed on the list.
NOTE: All functions are available from the right-click menu as well.
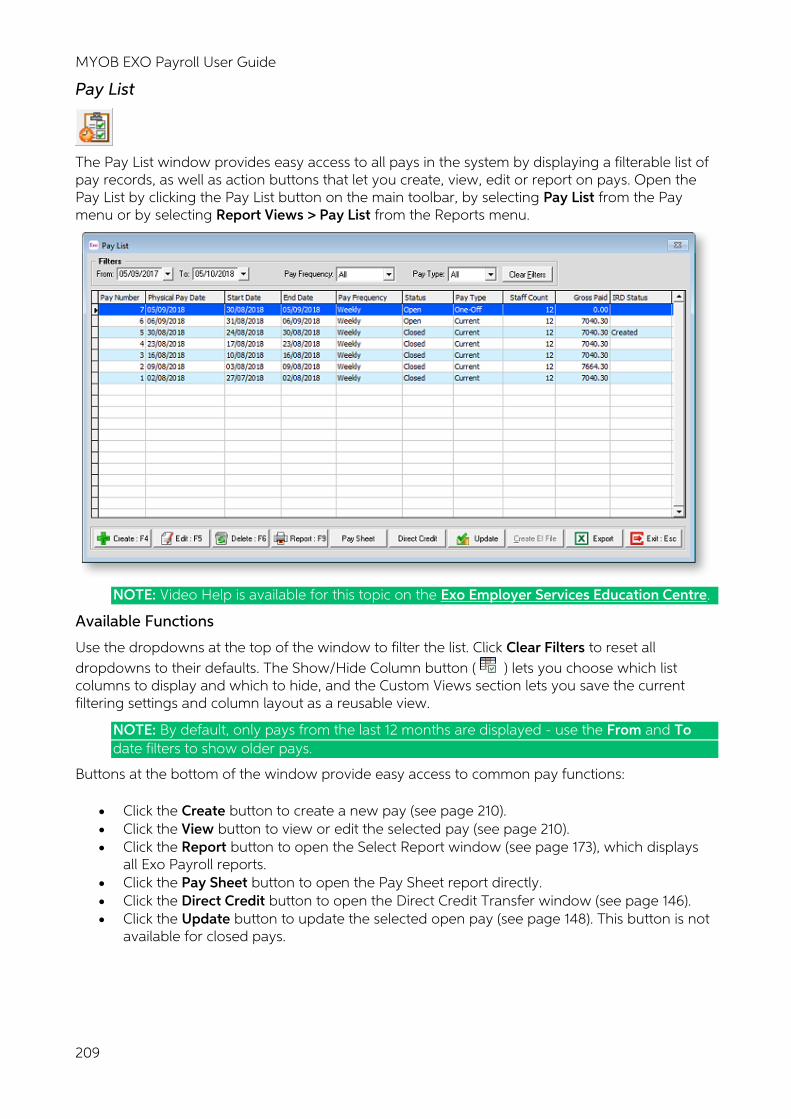
MYOB EXO Payroll User Guide
209
Pay List
The Pay List window provides easy access to all pays in the system by displaying a filterable list of pay records, as well as action buttons that let you create, view, edit or report on pays. Open the Pay List by clicking the Pay List button on the main toolbar, by selecting Pay List from the Pay menu or by selecting Report Views > Pay List from the Reports menu.
NOTE: Video Help is available for this topic on the Exo Employer Services Education Centre.
Available Functions
Use the dropdowns at the top of the window to filter the list. Click Clear Filters to reset all dropdowns to their defaults. The Show/Hide Column button ( ) lets you choose which list columns to display and which to hide, and the Custom Views section lets you save the current filtering settings and column layout as a reusable view.
NOTE: By default, only pays from the last 12 months are displayed - use the From and To date filters to show older pays.
Buttons at the bottom of the window provide easy access to common pay functions:
• Click the Create button to create a new pay (see page 210). • Click the View button to view or edit the selected pay (see page 210). • Click the Report button to open the Select Report window (see page 173), which displays
all Exo Payroll reports. • Click the Pay Sheet button to open the Pay Sheet report directly. • Click the Direct Credit button to open the Direct Credit Transfer window (see page 146). • Click the Update button to update the selected open pay (see page 148). This button is not
available for closed pays.
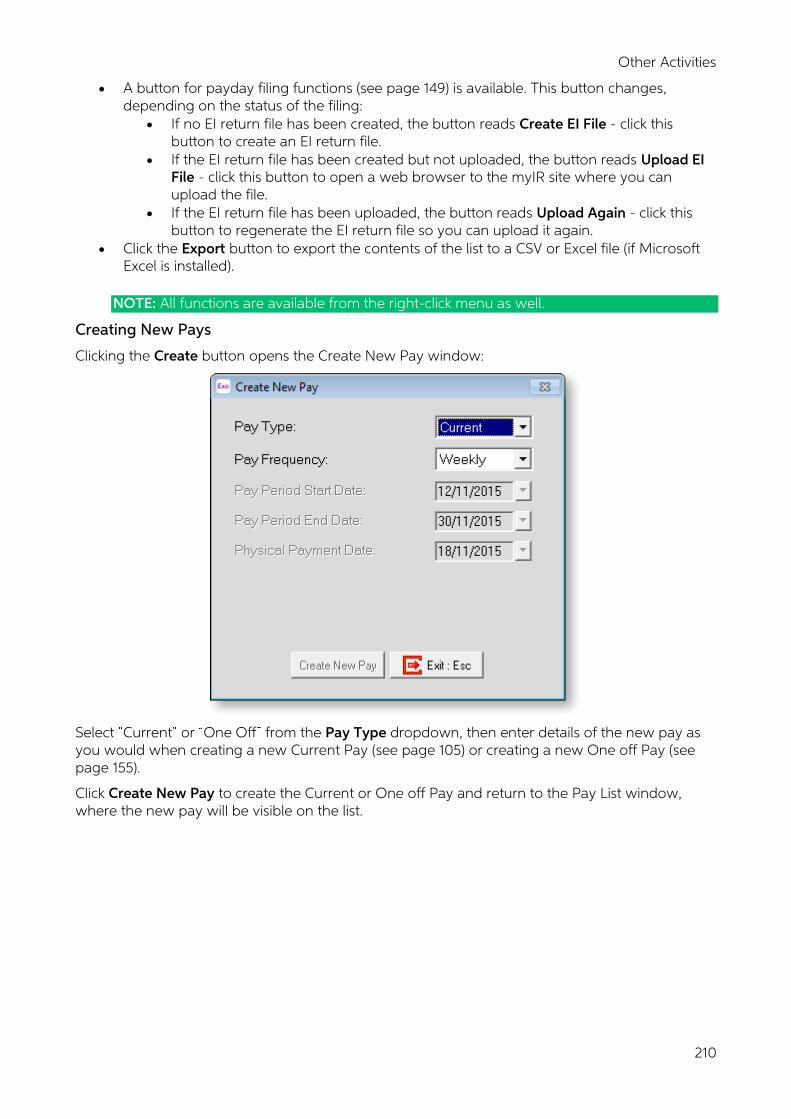
Other Activities
210
• A button for payday filing functions (see page 149) is available. This button changes, depending on the status of the filing:
• If no EI return file has been created, the button reads Create EI File - click this button to create an EI return file.
• If the EI return file has been created but not uploaded, the button reads Upload EI File - click this button to open a web browser to the myIR site where you can upload the file.
• If the EI return file has been uploaded, the button reads Upload Again - click this button to regenerate the EI return file so you can upload it again.
• Click the Export button to export the contents of the list to a CSV or Excel file (if Microsoft Excel is installed).
NOTE: All functions are available from the right-click menu as well.
Creating New Pays
Clicking the Create button opens the Create New Pay window:
Select Current or One Off from the Pay Type dropdown, then enter details of the new pay as you would when creating a new Current Pay (see page 105) or creating a new One off Pay (see page 155).
Click Create New Pay to create the Current or One off Pay and return to the Pay List window, where the new pay will be visible on the list.
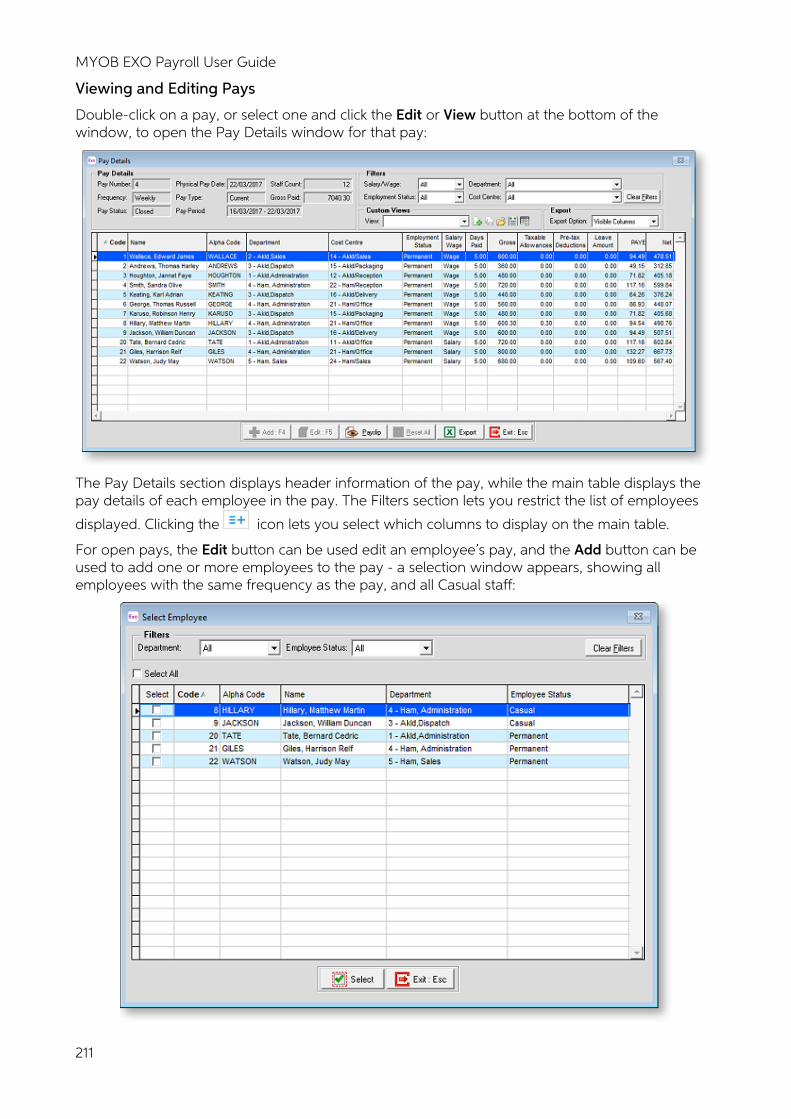
MYOB EXO Payroll User Guide
211
Viewing and Editing Pays
Double-click on a pay, or select one and click the Edit or View button at the bottom of the window, to open the Pay Details window for that pay:
The Pay Details section displays header information of the pay, while the main table displays the pay details of each employee in the pay. The Filters section lets you restrict the list of employees
displayed. Clicking the icon lets you select which columns to display on the main table.
For open pays, the Edit button can be used edit an employee s pay, and the Add button can be used to add one or more employees to the pay - a selection window appears, showing all employees with the same frequency as the pay, and all Casual staff:
Other Activities
212
Select one or more employees and click Select to add them to the pay. For One Off Pays, you are given the option of copying their Standard Pay into the One Off Pay.
Clicking the Payslip button opens a Custom Payslip report showing the pay details for the selected employee.
The Reset All button lets you clear or reset the pays of all listed employees (i.e. only those employees who match the current filter settings will be affected, which may not be all employees in the pay). You are asked to confirm the operation, and then select the operation to apply to the employees:
Note: While the Reset All button resets the pays of all employees in the list, the Reset Pay right-click menu option lets you reset the pay of the individual employee who was right-clicked on.
The Copy button copies all employees pay details to the clipboard, so that the data can be pasted into a spreadsheet or other third party application. If Microsoft Excel is installed, this button becomes Export, and exports the contents of the list to an Excel file. The Export Option dropdown controls whether to export all data, or only the data currently displayed on the list.
Holiday Pay List
The Holiday Pay List window provides easy access to Holiday Pay information for all employees in the system. Open the Holiday Pay List by selecting Report Views > Holiday Pay from the Reports menu.
MYOB EXO Payroll User Guide
213
Available Functions
Use the dropdowns at the top of the window to filter the list. Click Clear Filters to reset all dropdowns to their defaults. The Show/Hide Column button ( ) lets you choose which list columns to display and which to hide, and the Custom Views section lets you save the current filtering settings and column layout as a reusable view.
Double-click on an employee, or select them and click the View Employee button at the bottom of the window, to open the Employee Maintenance window (see page 52) for that employee.
Click the Copy button to copy the contents of the list to the clipboard. If Microsoft Excel is installed, this button is replaced with an Export button, which exports the contents of the list to an Excel file in the .XLSX format. The Export Option dropdown controls whether to export all data, or only the data currently displayed on the list.
BAPS Leave List
The BAPS Leave list window provides easy access to BAPS leave (Bereavement, Alternative, Public Holiday and Sick leave) information for all employees in the system. Open the BAPS Leave list by selecting Report Views > BAPS Leave Details from the Reports menu.
Available Functions
Use the dropdowns at the top of the window to filter the list. Click Clear Filters to reset all dropdowns to their defaults. The Show/Hide Column button ( ) lets you choose which list columns to display and which to hide, and the Custom Views section lets you save the current filtering settings and column layout as a reusable view.
Double-click on an employee, or select them and click the View Employee button at the bottom of the window, to open the Employee Maintenance window (see page 52) for that employee.
Click the Copy button to copy the contents of the list to the clipboard. If Microsoft Excel is installed, this button is replaced with an Export button, which exports the contents of the list to an Excel file in the .XLSX format. The Export Option dropdown controls whether to export all data, or only the data currently displayed on the list.
Other Activities
214
Consolidated Reports
Selecting Consolidated Reports from the Reports menu lets you consolidate multiple companies with the same IRD number into a single report. Several consolidated reports are available for selection. All reports are also available on the Select Reports window (see page 173) for individual companies.
After selecting a report, you are presented with a list from which you can choose the companies to consolidate. Double-click on a company, or select it and click the > button to add it to the list of companies to consolidate. Each company is password protected via its Administration password.
Once you have selected all companies you want to consolidate, click the Print button to set report options (see page 193) and generate the report.
MYOB EXO Payroll User Guide
215
IR348 Employer Monthly Schedule
Several options are available when generating the IR348 Employer Monthly Schedule report:
• To generate a file for electronic submission to the IRD, set Destination to File and enter a path and file name in the File name field. By default the filename is IR348_EMS.CSV .
• To generate a printed IR348 for your own records, set Destination to Printer .
Export General Ledger
The General Ledger Exporter is a utility designed to take a General Ledger output file from Exo Payroll and export it to an external software package. The following software packages are supported at present:
• ACCPAC
• Accredo
• Arrow
• Attache
• Axapta
• CBA
• CashManager
• Decfin
• emPower
• Enprise SAP
• EXO Business
• Finance One
• Greentree
• Midas
• Moneyworks
• MYOB AccountRight Live
• MYOB Cashbook Plus
• MYOB Standard File
• MYOB v 1.0 - 3.0
• MYOB v 4.0
• NZA Gold
• Navision
• Navision Dataport
• PSL
• Profax
• Quantum EE
• Quickbooks IIF
• Sage
• SAP
• SAP R/3 Format
• SYSPRO
• Solomon
• SunSystems
• Systime (Kerridge)
• Triumph
• User Defined
The MYOB Standard File format exports a file in plain text.
The User Defined format allows you to choose the payroll fields to export. File formats supported by the User Defined format export are:
• Comma separated value file (CSV) • dBase database file (DBF) • Microsoft Excel file (XLS) • Microsoft Access file (MDB) • Tab separated value file (CSV)
Notes
• All wages, allowances and leave should have a Cost Centre (see page 50) assigned to the transaction. That Cost Centre is in turn linked to a General Ledger code (see page 228). Problems with the General Ledger export can sometimes be traced back to the Costing Analysis report.
• Deductions (except from Employer Superannuation) do not have a cost centre but do have a General Ledger code, and as such are in the General Ledger.
• For a detailed view of the transactions that make up the General Ledger Export file, use the General Ledger Report of the Financial tab of the Select Reports screen (select Print Reports from the Reports menu) with the Detailed Report option turned on.
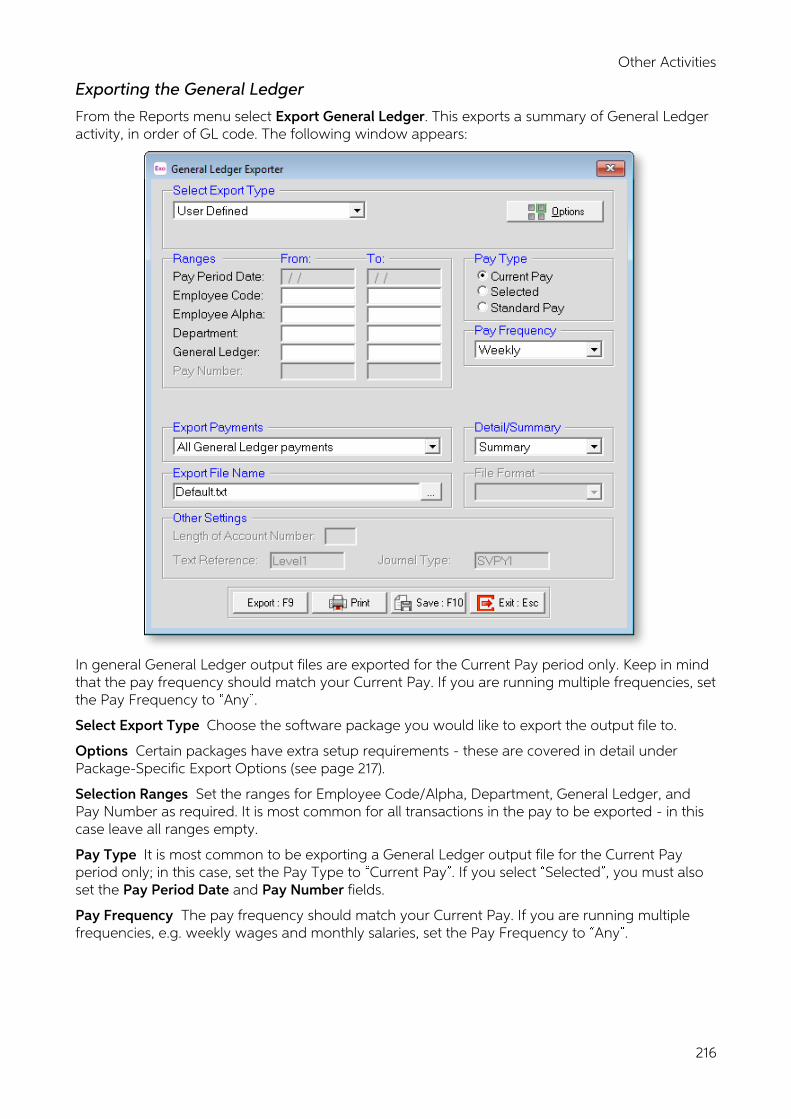
Other Activities
216
Exporting the General Ledger
From the Reports menu select Export General Ledger. This exports a summary of General Ledger activity, in order of GL code. The following window appears:
In general General Ledger output files are exported for the Current Pay period only. Keep in mind that the pay frequency should match your Current Pay. If you are running multiple frequencies, set the Pay Frequency to Any .
Select Export Type Choose the software package you would like to export the output file to.
Options Certain packages have extra setup requirements - these are covered in detail under Package-Specific Export Options (see page 217).
Selection Ranges Set the ranges for Employee Code/Alpha, Department, General Ledger, and Pay Number as required. It is most common for all transactions in the pay to be exported - in this case leave all ranges empty.
Pay Type It is most common to be exporting a General Ledger output file for the Current Pay period only; in this case, set the Pay Type to Current Pay . If you select Selected , you must also set the Pay Period Date and Pay Number fields.
Pay Frequency The pay frequency should match your Current Pay. If you are running multiple frequencies, e.g. weekly wages and monthly salaries, set the Pay Frequency to Any .
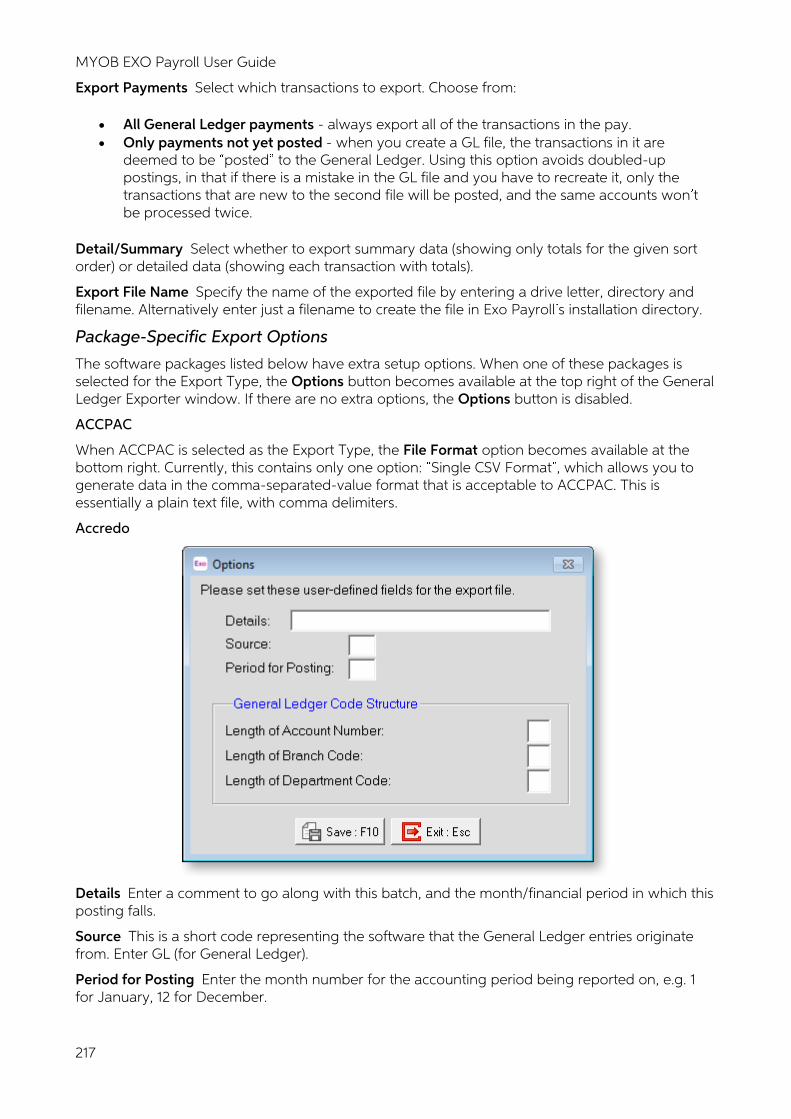
MYOB EXO Payroll User Guide
217
Export Payments Select which transactions to export. Choose from:
• All General Ledger payments - always export all of the transactions in the pay. • Only payments not yet posted - when you create a GL file, the transactions in it are
deemed to be posted to the General Ledger. Using this option avoids doubled-up postings, in that if there is a mistake in the GL file and you have to recreate it, only the transactions that are new to the second file will be posted, and the same accounts won t be processed twice.
Detail/Summary Select whether to export summary data (showing only totals for the given sort order) or detailed data (showing each transaction with totals).
Export File Name Specify the name of the exported file by entering a drive letter, directory and filename. Alternatively enter just a filename to create the file in Exo Payroll s installation directory.
Package-Specific Export Options
The software packages listed below have extra setup options. When one of these packages is selected for the Export Type, the Options button becomes available at the top right of the General Ledger Exporter window. If there are no extra options, the Options button is disabled.
ACCPAC
When ACCPAC is selected as the Export Type, the File Format option becomes available at the bottom right. Currently, this contains only one option: Single CSV Format , which allows you to generate data in the comma-separated-value format that is acceptable to ACCPAC. This is essentially a plain text file, with comma delimiters.
Accredo
Details Enter a comment to go along with this batch, and the month/financial period in which this posting falls.
Source This is a short code representing the software that the General Ledger entries originate from. Enter GL (for General Ledger).
Period for Posting Enter the month number for the accounting period being reported on, e.g. 1 for January, 12 for December.
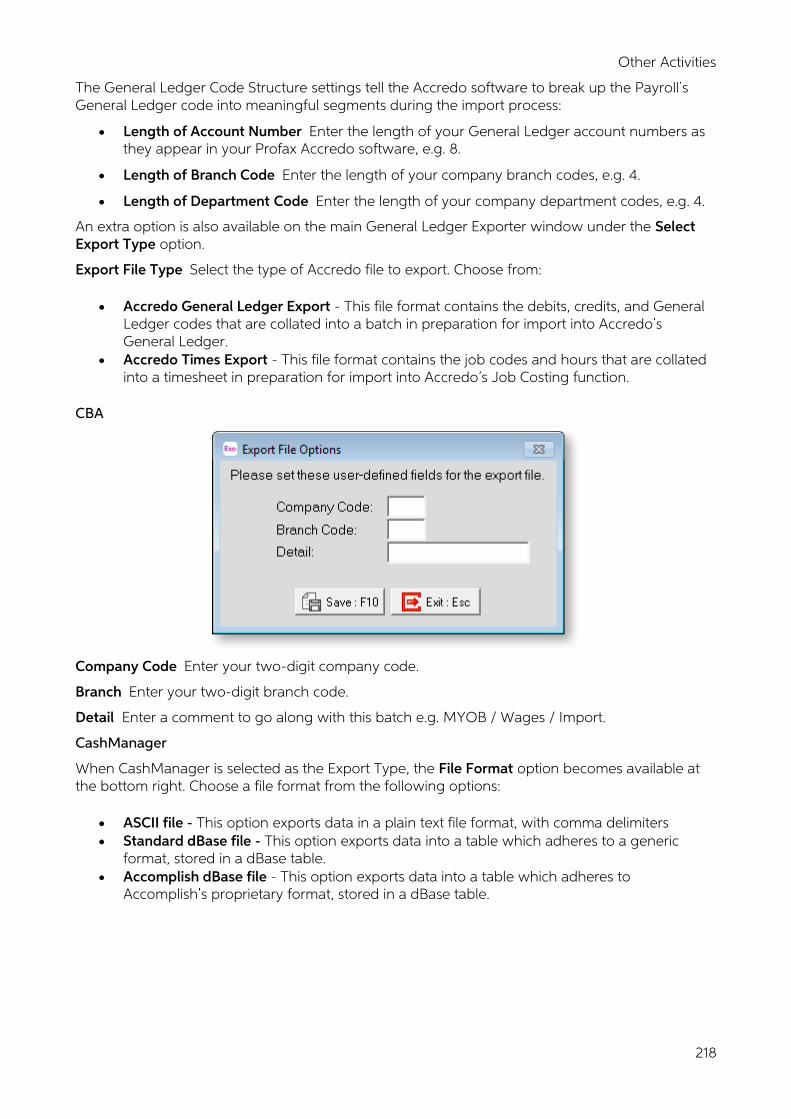
Other Activities
218
The General Ledger Code Structure settings tell the Accredo software to break up the Payroll s General Ledger code into meaningful segments during the import process:
• Length of Account Number Enter the length of your General Ledger account numbers as they appear in your Profax Accredo software, e.g. 8.
• Length of Branch Code Enter the length of your company branch codes, e.g. 4.
• Length of Department Code Enter the length of your company department codes, e.g. 4.
An extra option is also available on the main General Ledger Exporter window under the Select Export Type option.
Export File Type Select the type of Accredo file to export. Choose from:
• Accredo General Ledger Export - This file format contains the debits, credits, and General Ledger codes that are collated into a batch in preparation for import into Accredo s General Ledger.
• Accredo Times Export - This file format contains the job codes and hours that are collated into a timesheet in preparation for import into Accredo s Job Costing function.
CBA
Company Code Enter your two-digit company code.
Branch Enter your two-digit branch code.
Detail Enter a comment to go along with this batch e.g. MYOB / Wages / Import.
CashManager
When CashManager is selected as the Export Type, the File Format option becomes available at the bottom right. Choose a file format from the following options:
• ASCII file - This option exports data in a plain text file format, with comma delimiters • Standard dBase file - This option exports data into a table which adheres to a generic
format, stored in a dBase table. • Accomplish dBase file - This option exports data into a table which adheres to
Accomplish s proprietary format, stored in a dBase table.
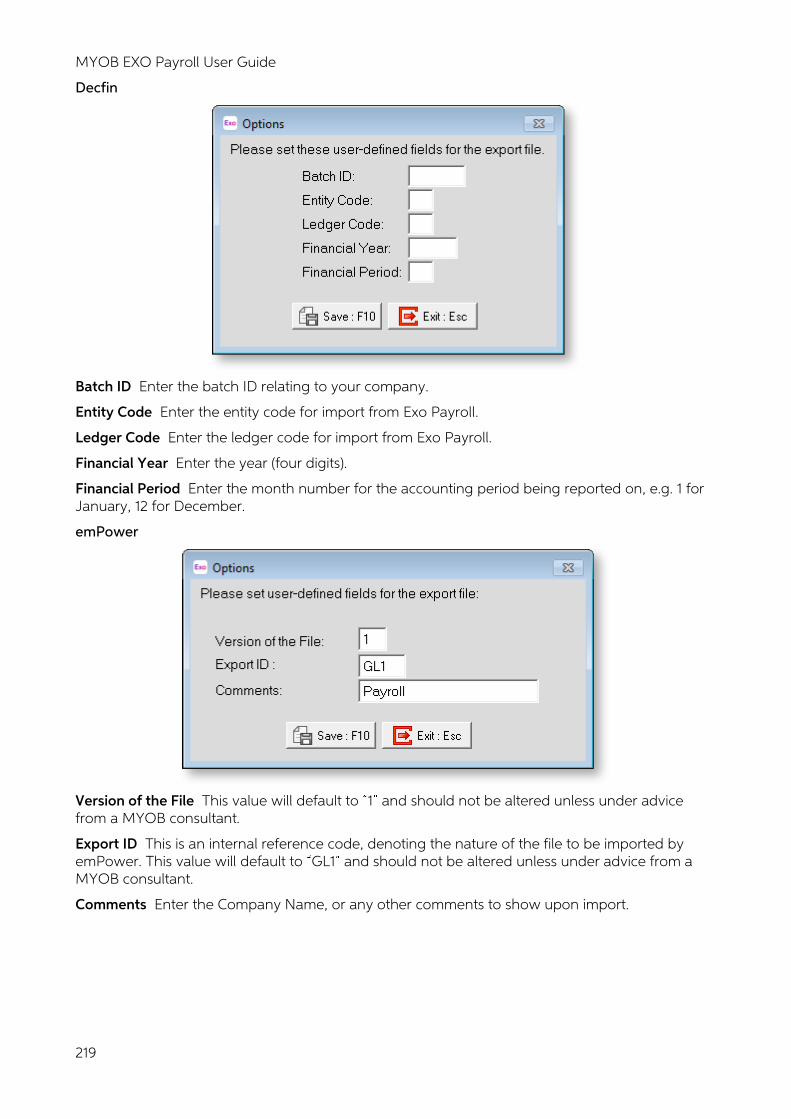
MYOB EXO Payroll User Guide
219
Decfin
Batch ID Enter the batch ID relating to your company.
Entity Code Enter the entity code for import from Exo Payroll.
Ledger Code Enter the ledger code for import from Exo Payroll.
Financial Year Enter the year (four digits).
Financial Period Enter the month number for the accounting period being reported on, e.g. 1 for January, 12 for December.
emPower
Version of the File This value will default to 1 and should not be altered unless under advice from a MYOB consultant.
Export ID This is an internal reference code, denoting the nature of the file to be imported by emPower. This value will default to GL1 and should not be altered unless under advice from a MYOB consultant.
Comments Enter the Company Name, or any other comments to show upon import.
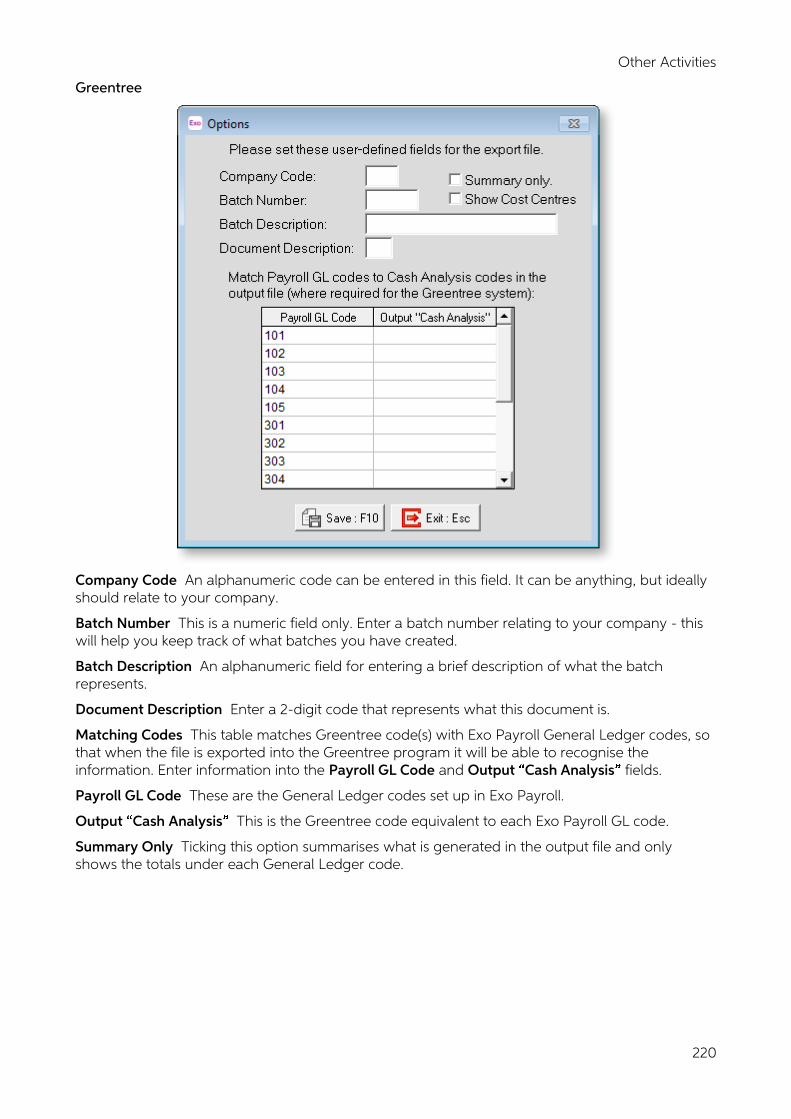
Other Activities
220
Greentree
Company Code An alphanumeric code can be entered in this field. It can be anything, but ideally should relate to your company.
Batch Number This is a numeric field only. Enter a batch number relating to your company - this will help you keep track of what batches you have created.
Batch Description An alphanumeric field for entering a brief description of what the batch represents.
Document Description Enter a 2-digit code that represents what this document is.
Matching Codes This table matches Greentree code(s) with Exo Payroll General Ledger codes, so that when the file is exported into the Greentree program it will be able to recognise the information. Enter information into the Payroll GL Code and Output Cash Analysis fields.
Payroll GL Code These are the General Ledger codes set up in Exo Payroll.
Output Cash Analysis This is the Greentree code equivalent to each Exo Payroll GL code.
Summary Only Ticking this option summarises what is generated in the output file and only shows the totals under each General Ledger code.
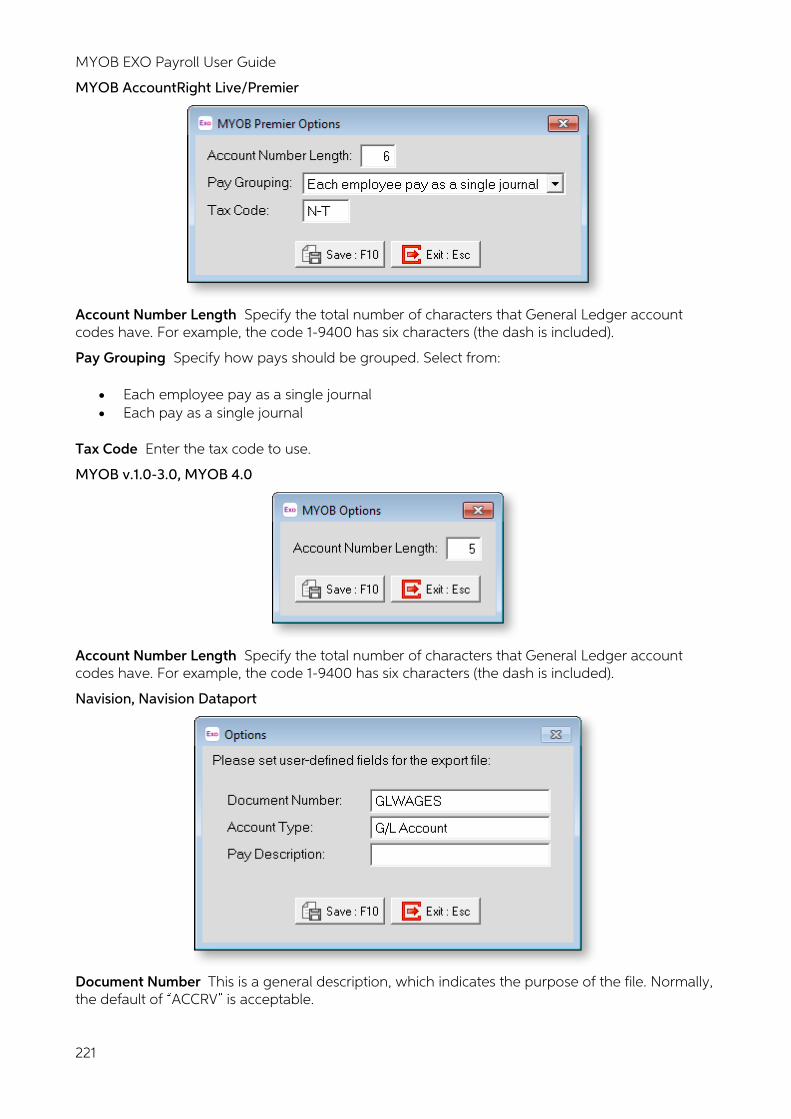
MYOB EXO Payroll User Guide
221
MYOB AccountRight Live/Premier
Account Number Length Specify the total number of characters that General Ledger account codes have. For example, the code 1-9400 has six characters (the dash is included).
Pay Grouping Specify how pays should be grouped. Select from:
• Each employee pay as a single journal • Each pay as a single journal
Tax Code Enter the tax code to use.
MYOB v.1.0-3.0, MYOB 4.0
Account Number Length Specify the total number of characters that General Ledger account codes have. For example, the code 1-9400 has six characters (the dash is included).
Navision, Navision Dataport
Document Number This is a general description, which indicates the purpose of the file. Normally, the default of ACCRV is acceptable.

Other Activities
222
Account Type This is a general description, which indicates the type of account being affected. Normally, the default of G/L Account is acceptable.
Pay Description Enter a brief description of what the pay represents.
Profax
Details Enter a comment to go along with this batch e.g. MYOB / Wages / Import.
Period for Posting Enter the month number for the accounting period being reported on, e.g. 1 for January, 12 for December.
Quantum EE
Journal Date The date of processing of this batch of journal entries.
Narration Enter a comment/reference to go along with this batch e.g. MYOB / Wages / Import.
SAP
Batch ID A unique identifier for this batch.
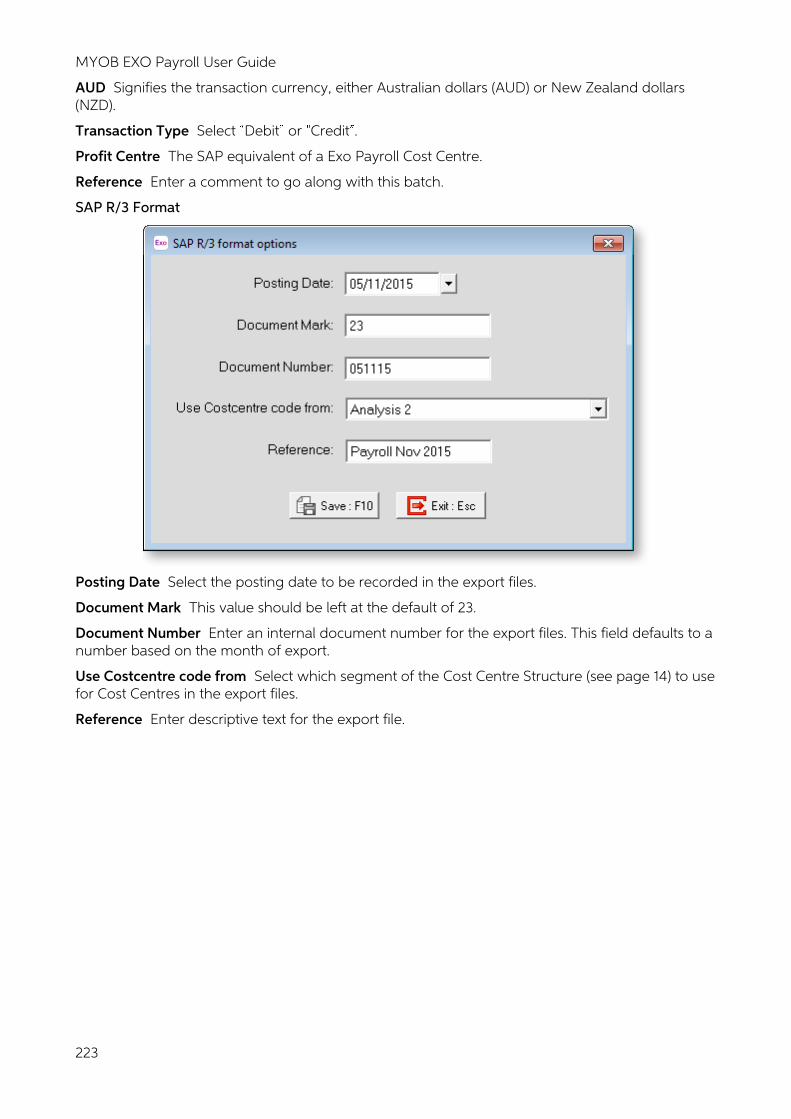
MYOB EXO Payroll User Guide
223
AUD Signifies the transaction currency, either Australian dollars (AUD) or New Zealand dollars (NZD).
Transaction Type Select Debit or Credit .
Profit Centre The SAP equivalent of a Exo Payroll Cost Centre.
Reference Enter a comment to go along with this batch.
SAP R/3 Format
Posting Date Select the posting date to be recorded in the export files.
Document Mark This value should be left at the default of 23.
Document Number Enter an internal document number for the export files. This field defaults to a number based on the month of export.
Use Costcentre code from Select which segment of the Cost Centre Structure (see page 14) to use for Cost Centres in the export files.
Reference Enter descriptive text for the export file.
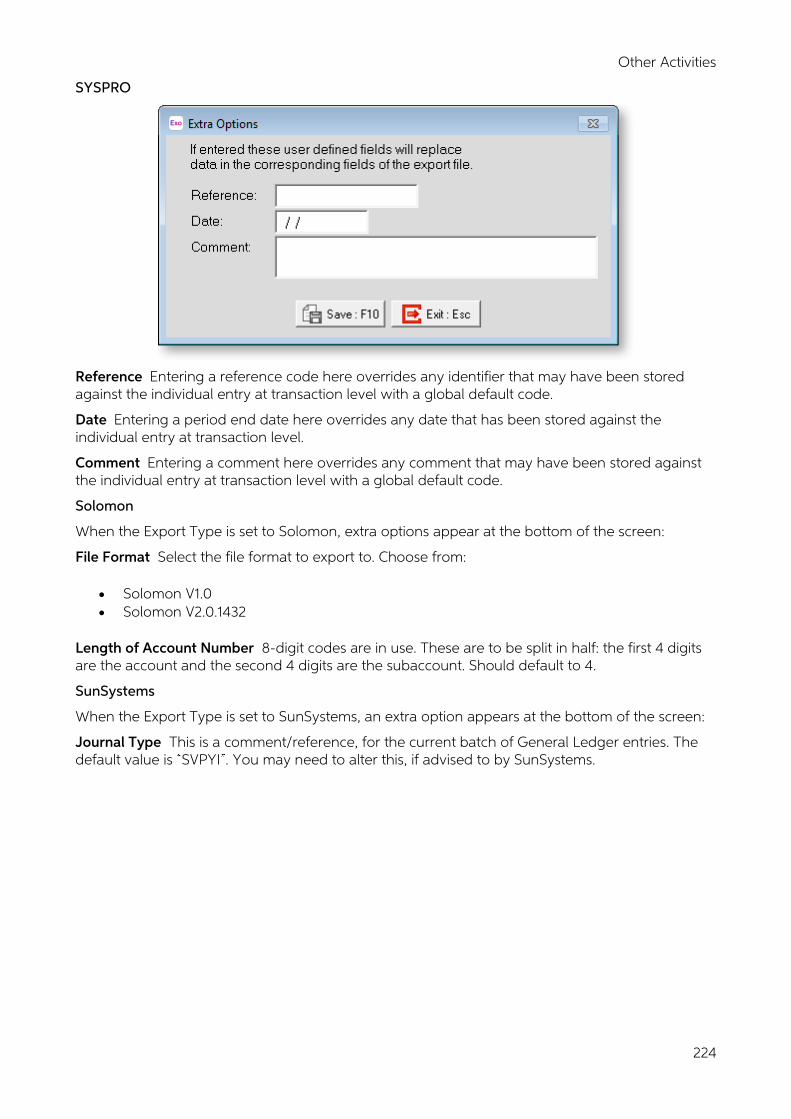
Other Activities
224
SYSPRO
Reference Entering a reference code here overrides any identifier that may have been stored against the individual entry at transaction level with a global default code.
Date Entering a period end date here overrides any date that has been stored against the individual entry at transaction level.
Comment Entering a comment here overrides any comment that may have been stored against the individual entry at transaction level with a global default code.
Solomon
When the Export Type is set to Solomon, extra options appear at the bottom of the screen:
File Format Select the file format to export to. Choose from:
• Solomon V1.0 • Solomon V2.0.1432
Length of Account Number 8-digit codes are in use. These are to be split in half: the first 4 digits are the account and the second 4 digits are the subaccount. Should default to 4.
SunSystems
When the Export Type is set to SunSystems, an extra option appears at the bottom of the screen:
Journal Type This is a comment/reference, for the current batch of General Ledger entries. The default value is SVPYI . You may need to alter this, if advised to by SunSystems.
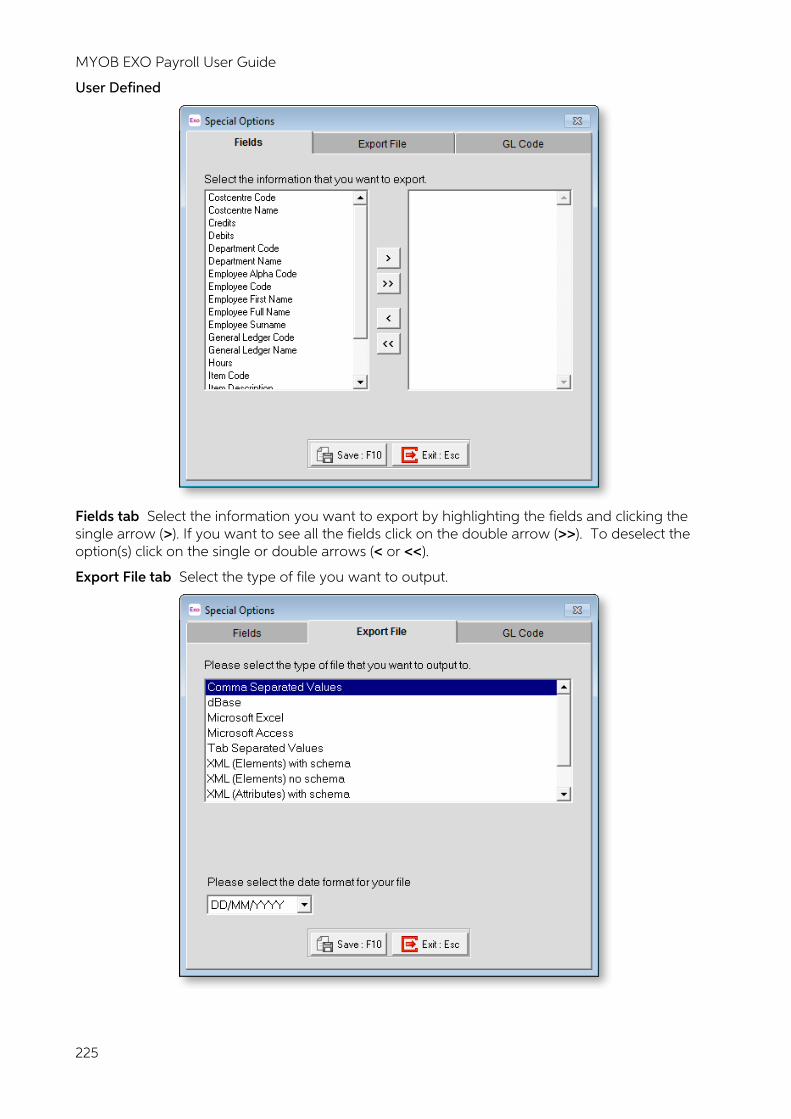
MYOB EXO Payroll User Guide
225
User Defined
Fields tab Select the information you want to export by highlighting the fields and clicking the single arrow (>). If you want to see all the fields click on the double arrow (>>). To deselect the option(s) click on the single or double arrows (< or <<).
Export File tab Select the type of file you want to output.
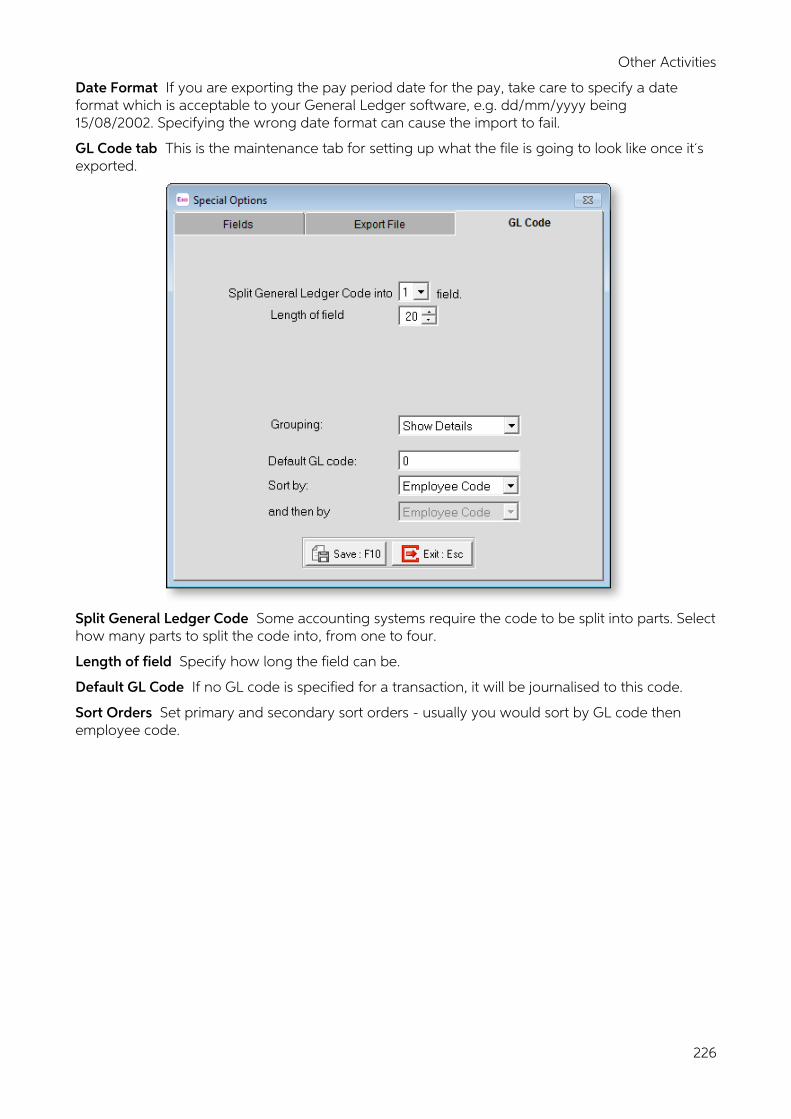
Other Activities
226
Date Format If you are exporting the pay period date for the pay, take care to specify a date format which is acceptable to your General Ledger software, e.g. dd/mm/yyyy being 15/08/2002. Specifying the wrong date format can cause the import to fail.
GL Code tab This is the maintenance tab for setting up what the file is going to look like once it s exported.
Split General Ledger Code Some accounting systems require the code to be split into parts. Select how many parts to split the code into, from one to four.
Length of field Specify how long the field can be.
Default GL Code If no GL code is specified for a transaction, it will be journalised to this code.
Sort Orders Set primary and secondary sort orders - usually you would sort by GL code then employee code.
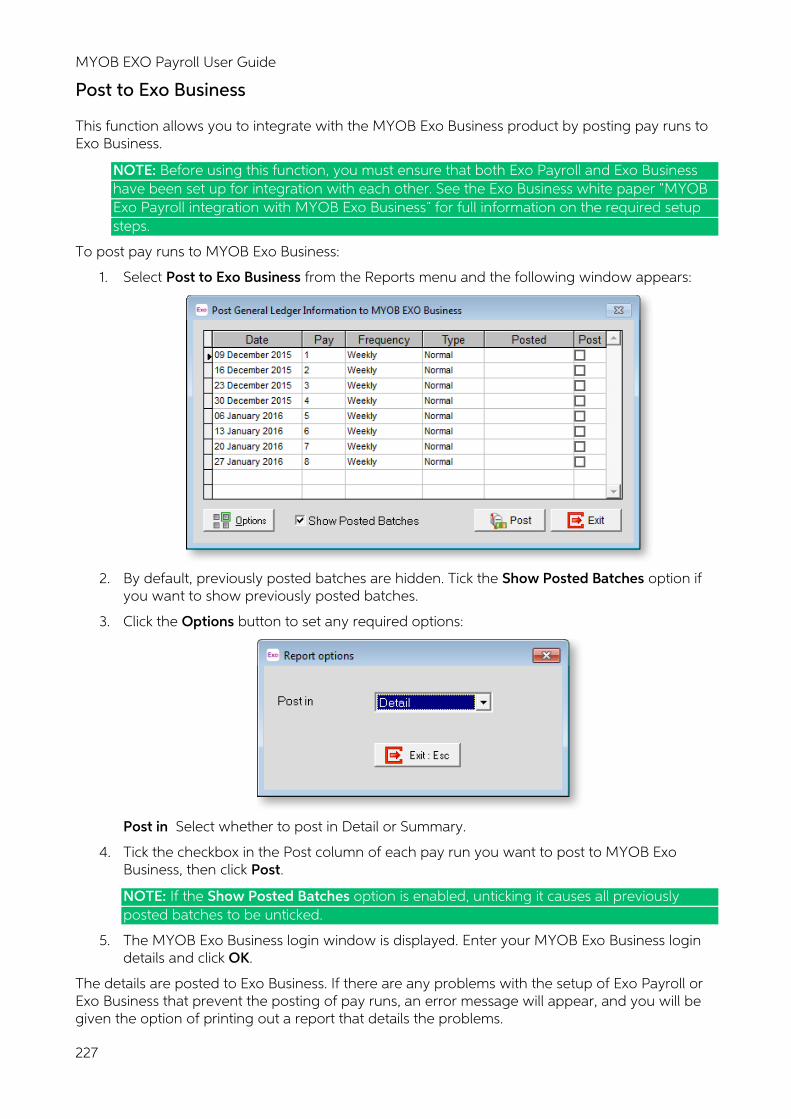
MYOB EXO Payroll User Guide
227
Post to Exo Business
This function allows you to integrate with the MYOB Exo Business product by posting pay runs to Exo Business.
NOTE: Before using this function, you must ensure that both Exo Payroll and Exo Business have been set up for integration with each other. See the Exo Business white paper MYOB Exo Payroll integration with MYOB Exo Business for full information on the required setup steps.
To post pay runs to MYOB Exo Business:
1. Select Post to Exo Business from the Reports menu and the following window appears:
2. By default, previously posted batches are hidden. Tick the Show Posted Batches option if
you want to show previously posted batches.
3. Click the Options button to set any required options:
Post in Select whether to post in Detail or Summary.
4. Tick the checkbox in the Post column of each pay run you want to post to MYOB Exo Business, then click Post.
NOTE: If the Show Posted Batches option is enabled, unticking it causes all previously posted batches to be unticked.
5. The MYOB Exo Business login window is displayed. Enter your MYOB Exo Business login details and click OK.
The details are posted to Exo Business. If there are any problems with the setup of Exo Payroll or Exo Business that prevent the posting of pay runs, an error message will appear, and you will be given the option of printing out a report that details the problems.
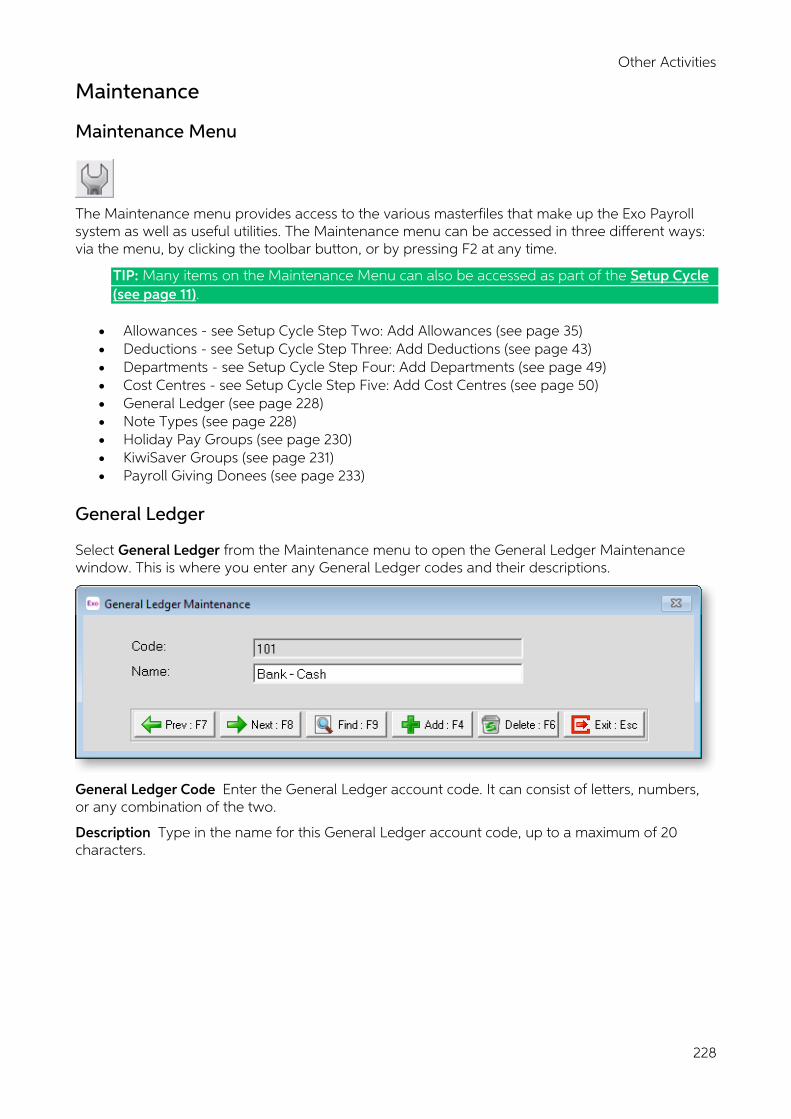
Other Activities
228
Maintenance
Maintenance Menu
The Maintenance menu provides access to the various masterfiles that make up the Exo Payroll system as well as useful utilities. The Maintenance menu can be accessed in three different ways: via the menu, by clicking the toolbar button, or by pressing F2 at any time.
TIP: Many items on the Maintenance Menu can also be accessed as part of the Setup Cycle (see page 11).
• Allowances - see Setup Cycle Step Two: Add Allowances (see page 35) • Deductions - see Setup Cycle Step Three: Add Deductions (see page 43) • Departments - see Setup Cycle Step Four: Add Departments (see page 49) • Cost Centres - see Setup Cycle Step Five: Add Cost Centres (see page 50) • General Ledger (see page 228) • Note Types (see page 228) • Holiday Pay Groups (see page 230) • KiwiSaver Groups (see page 231) • Payroll Giving Donees (see page 233)
General Ledger
Select General Ledger from the Maintenance menu to open the General Ledger Maintenance window. This is where you enter any General Ledger codes and their descriptions.
General Ledger Code Enter the General Ledger account code. It can consist of letters, numbers, or any combination of the two.
Description Type in the name for this General Ledger account code, up to a maximum of 20 characters.
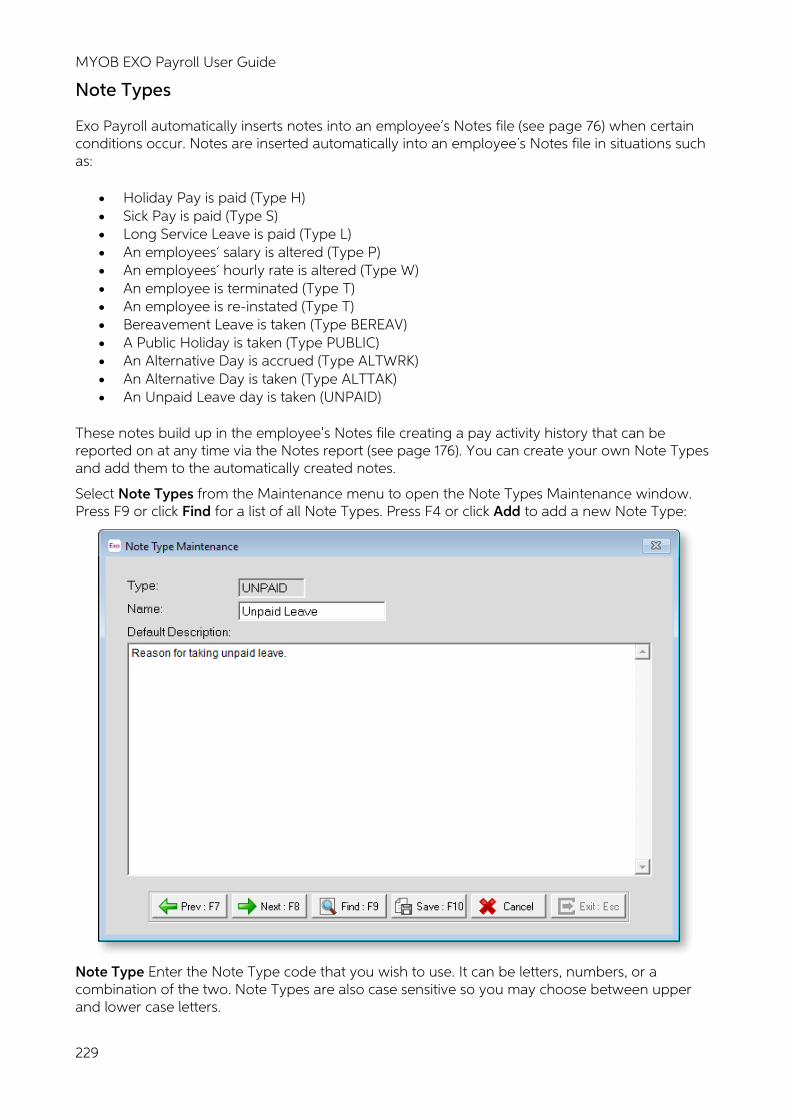
MYOB EXO Payroll User Guide
229
Note Types
Exo Payroll automatically inserts notes into an employee s Notes file (see page 76) when certain conditions occur. Notes are inserted automatically into an employee s Notes file in situations such as:
• Holiday Pay is paid (Type H) • Sick Pay is paid (Type S) • Long Service Leave is paid (Type L) • An employees salary is altered (Type P) • An employees hourly rate is altered (Type W) • An employee is terminated (Type T) • An employee is re-instated (Type T) • Bereavement Leave is taken (Type BEREAV) • A Public Holiday is taken (Type PUBLIC) • An Alternative Day is accrued (Type ALTWRK) • An Alternative Day is taken (Type ALTTAK) • An Unpaid Leave day is taken (UNPAID)
These notes build up in the employee s Notes file creating a pay activity history that can be reported on at any time via the Notes report (see page 176). You can create your own Note Types and add them to the automatically created notes.
Select Note Types from the Maintenance menu to open the Note Types Maintenance window. Press F9 or click Find for a list of all Note Types. Press F4 or click Add to add a new Note Type:
Note Type Enter the Note Type code that you wish to use. It can be letters, numbers, or a combination of the two. Note Types are also case sensitive so you may choose between upper and lower case letters.
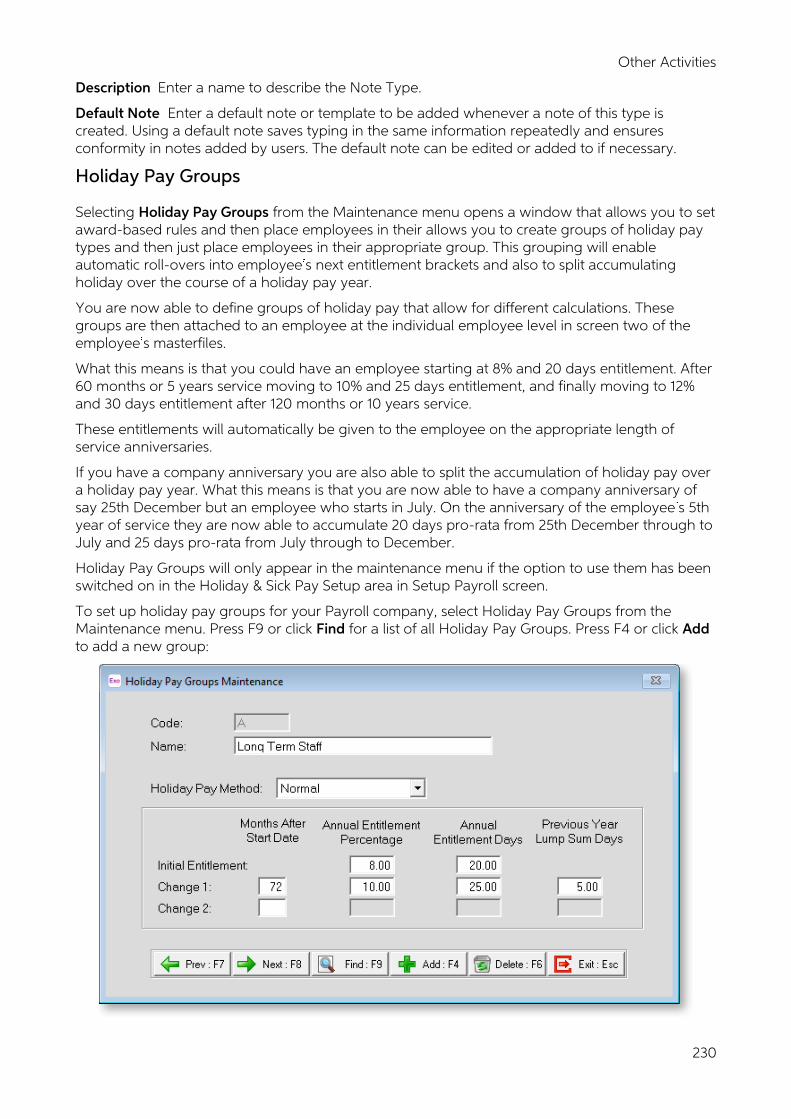
Other Activities
230
Description Enter a name to describe the Note Type.
Default Note Enter a default note or template to be added whenever a note of this type is created. Using a default note saves typing in the same information repeatedly and ensures conformity in notes added by users. The default note can be edited or added to if necessary.
Holiday Pay Groups
Selecting Holiday Pay Groups from the Maintenance menu opens a window that allows you to set award-based rules and then place employees in their allows you to create groups of holiday pay types and then just place employees in their appropriate group. This grouping will enable automatic roll-overs into employee s next entitlement brackets and also to split accumulating holiday over the course of a holiday pay year.
You are now able to define groups of holiday pay that allow for different calculations. These groups are then attached to an employee at the individual employee level in screen two of the employee s masterfiles.
What this means is that you could have an employee starting at 8% and 20 days entitlement. After 60 months or 5 years service moving to 10% and 25 days entitlement, and finally moving to 12% and 30 days entitlement after 120 months or 10 years service.
These entitlements will automatically be given to the employee on the appropriate length of service anniversaries.
If you have a company anniversary you are also able to split the accumulation of holiday pay over a holiday pay year. What this means is that you are now able to have a company anniversary of say 25th December but an employee who starts in July. On the anniversary of the employee s 5th year of service they are now able to accumulate 20 days pro-rata from 25th December through to July and 25 days pro-rata from July through to December.
Holiday Pay Groups will only appear in the maintenance menu if the option to use them has been switched on in the Holiday & Sick Pay Setup area in Setup Payroll screen.
To set up holiday pay groups for your Payroll company, select Holiday Pay Groups from the Maintenance menu. Press F9 or click Find for a list of all Holiday Pay Groups. Press F4 or click Add to add a new group:
MYOB EXO Payroll User Guide
231
Code Enter the Group Code you want to use
Name Enter the name you want to label this Group code number
Holiday Pay Method Every Holiday Pay group must have a calculation method that it will use when calculating Holiday Pay. This method can be any one of the following.
• Normal - This is the default as most employees use this method. It uses a percentage entitlement & days to accrue holiday pay.
• Casual Holiday Pay Each Pay Period - This method will allow an employee to receive a definable % of their gross pay each pay period as a separate holiday pay amount.
• Permanent Part-Time / Pro-Rata - This method allows the employee to accrue a number of days or hours based on a pro-rata comparison against a full time employee. The more days or hours the employee works, the more days or hours they accrue.
• Percentage Entitlement Only - This method means the employee does not accrue any days or hours entitlements. All the employee will accrue is a value of holiday pay based upon the amount of money they have earned.
Once you have chosen a calculation method to use you are then able to define what the employee s initial entitlement is.
This is what the employee will start off on. e.g. If you are using the Normal holiday pay method this would normally be 8% and 20 days but if you wish this can be altered to define a starting holiday pay entitlement of say 10% and 25 days.
You are then able to define the next two brackets the holiday pay group will roll-over into.
Initial Entitlement Enter an employee s initial entitlement as a percentage, then enter an employees initial entitlement in days (or hours if you are paying holiday pay by the hour)
Change 1 Enter the number of months after an employees start date that the first change in their Holiday Pay will take place. e.g. 5 years = 60 months, then enter the new annual entitlement as a percentage and in days (or hours if you are paying holiday pay by the hour)
If the employee is to receive a lump sum of days at this time then type in how many days they are to receive when this first change is made.
Change 2 The system allows for up to two rule changes for Holiday Pay. Change 2 works in the same way as Change 1.
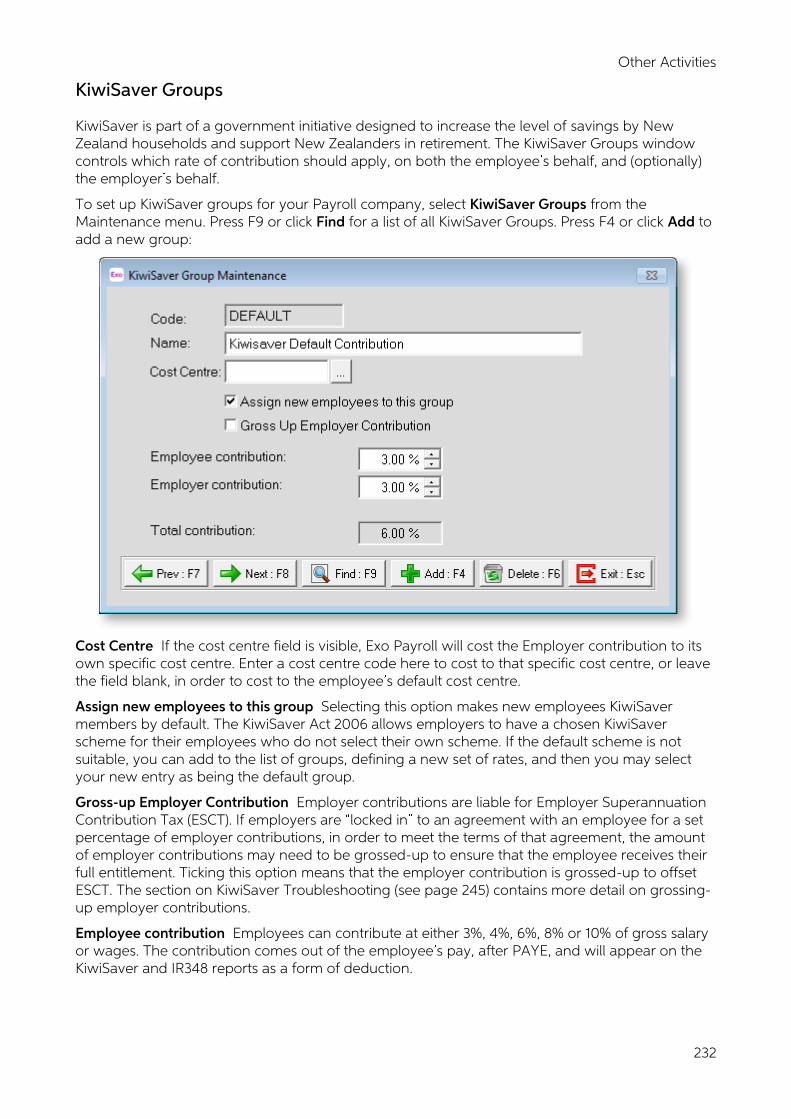
Other Activities
232
KiwiSaver Groups
KiwiSaver is part of a government initiative designed to increase the level of savings by New Zealand households and support New Zealanders in retirement. The KiwiSaver Groups window controls which rate of contribution should apply, on both the employee s behalf, and (optionally) the employer s behalf.
To set up KiwiSaver groups for your Payroll company, select KiwiSaver Groups from the Maintenance menu. Press F9 or click Find for a list of all KiwiSaver Groups. Press F4 or click Add to add a new group:
Cost Centre If the cost centre field is visible, Exo Payroll will cost the Employer contribution to its own specific cost centre. Enter a cost centre code here to cost to that specific cost centre, or leave the field blank, in order to cost to the employee s default cost centre.
Assign new employees to this group Selecting this option makes new employees KiwiSaver members by default. The KiwiSaver Act 2006 allows employers to have a chosen KiwiSaver scheme for their employees who do not select their own scheme. If the default scheme is not suitable, you can add to the list of groups, defining a new set of rates, and then you may select your new entry as being the default group.
Gross-up Employer Contribution Employer contributions are liable for Employer Superannuation Contribution Tax (ESCT). If employers are locked in to an agreement with an employee for a set percentage of employer contributions, in order to meet the terms of that agreement, the amount of employer contributions may need to be grossed-up to ensure that the employee receives their full entitlement. Ticking this option means that the employer contribution is grossed-up to offset ESCT. The section on KiwiSaver Troubleshooting (see page 245) contains more detail on grossing-up employer contributions.
Employee contribution Employees can contribute at either 3%, 4%, 6%, 8% or 10% of gross salary or wages. The contribution comes out of the employee s pay, after PAYE, and will appear on the KiwiSaver and IR348 reports as a form of deduction.
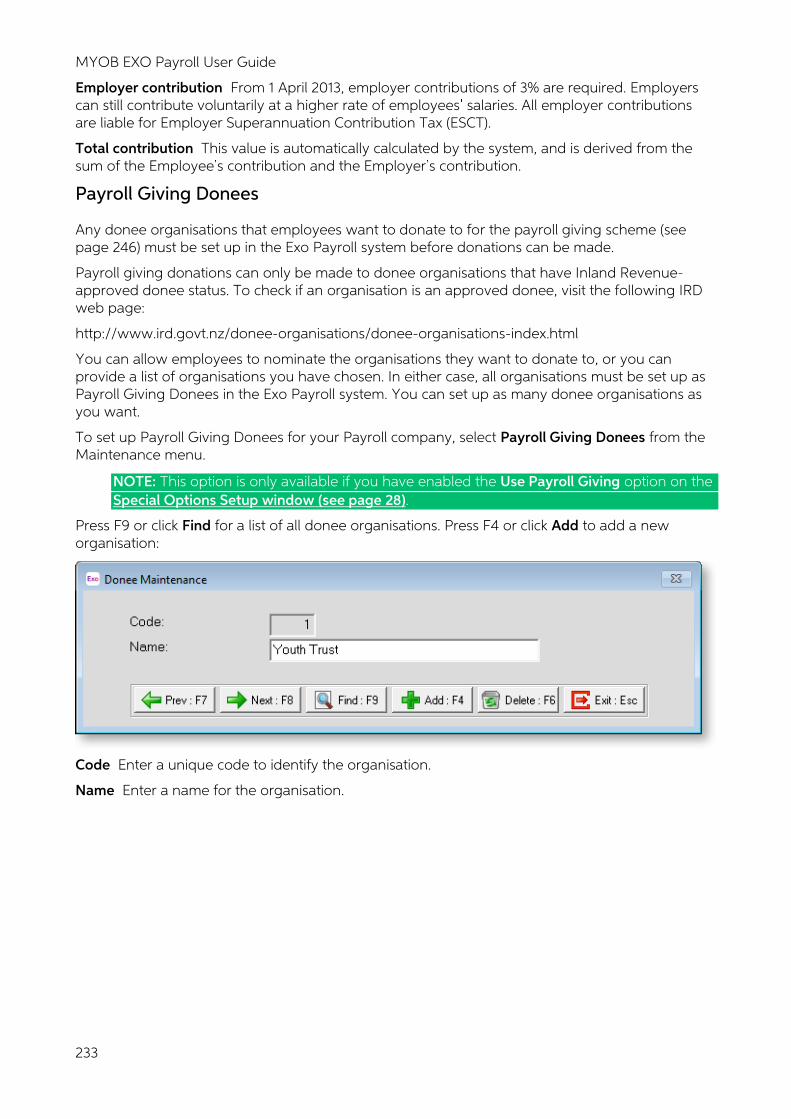
MYOB EXO Payroll User Guide
233
Employer contribution From 1 April 2013, employer contributions of 3% are required. Employers can still contribute voluntarily at a higher rate of employees salaries. All employer contributions are liable for Employer Superannuation Contribution Tax (ESCT).
Total contribution This value is automatically calculated by the system, and is derived from the sum of the Employee s contribution and the Employer s contribution.
Payroll Giving Donees
Any donee organisations that employees want to donate to for the payroll giving scheme (see page 246) must be set up in the Exo Payroll system before donations can be made.
Payroll giving donations can only be made to donee organisations that have Inland Revenue-approved donee status. To check if an organisation is an approved donee, visit the following IRD web page:
http://www.ird.govt.nz/donee-organisations/donee-organisations-index.html
You can allow employees to nominate the organisations they want to donate to, or you can provide a list of organisations you have chosen. In either case, all organisations must be set up as Payroll Giving Donees in the Exo Payroll system. You can set up as many donee organisations as you want.
To set up Payroll Giving Donees for your Payroll company, select Payroll Giving Donees from the Maintenance menu.
NOTE: This option is only available if you have enabled the Use Payroll Giving option on the Special Options Setup window (see page 28).
Press F9 or click Find for a list of all donee organisations. Press F4 or click Add to add a new organisation:
Code Enter a unique code to identify the organisation.
Name Enter a name for the organisation.
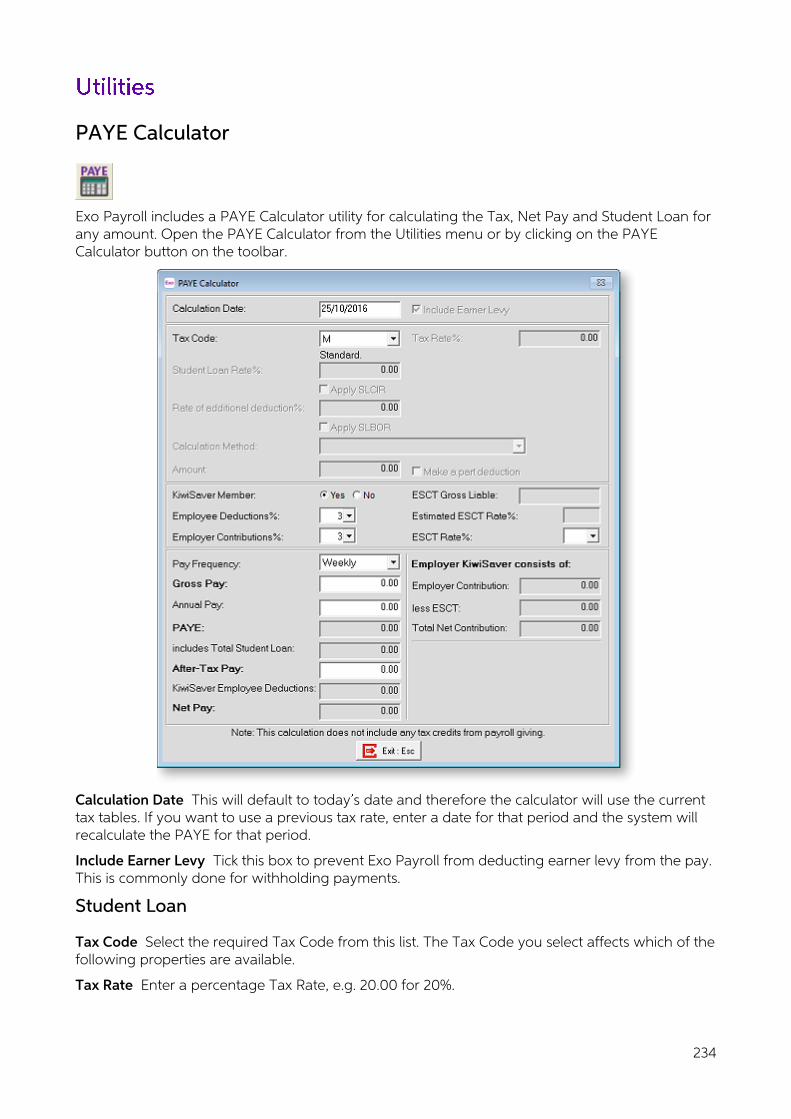
234
PAYE Calculator
Exo Payroll includes a PAYE Calculator utility for calculating the Tax, Net Pay and Student Loan for any amount. Open the PAYE Calculator from the Utilities menu or by clicking on the PAYE Calculator button on the toolbar.
Calculation Date This will default to today s date and therefore the calculator will use the current tax tables. If you want to use a previous tax rate, enter a date for that period and the system will recalculate the PAYE for that period.
Include Earner Levy Tick this box to prevent Exo Payroll from deducting earner levy from the pay. This is commonly done for withholding payments.
Student Loan
Tax Code Select the required Tax Code from this list. The Tax Code you select affects which of the following properties are available.
Tax Rate Enter a percentage Tax Rate, e.g. 20.00 for 20%.
MYOB EXO Payroll User Guide
235
Student Loan Rate This field lets you override the student loan rate - by default, student loan is calculated at 12% of the gross taxable earnings when the Calculation Date is after 01/04/2013 and at 10% before this date.
Ignore Student Loan Threshold Tick this box to ignore the student loan threshold when overriding the Student Loan Rate.
Apply SLCIR Tick this box to include additional student loan deductions that are required by the Commissioner of Inland Revenue. Enter the rate of additional deduction, as specified by Inland Revenue.
NOTE: An Ignore Threshold checkbox is available for SLCIR when the STC tax code is selected. Ticking this box means that the student loan threshold will not be used when calculating repayments.
Apply SLBOR Tick this box to include additional student loan deductions that are made voluntarily by the employee. Select the calculation method (see page 56), then enter the desired amount/rate. Tick the Make a part deduction box to make a partial SLBOR deduction in cases where there is not enough Net Pay to cover the full deduction amount.
KiwiSaver
KiwiSaver Member Select an option to specify whether or not KiwiSaver contributions are made for the employee.
Employee Deductions Select the percentage rate of employee KiwiSaver deductions. Choose from 2, 3, 4, 6, 8 or 10.
Employer Contributions Select the percentage rate of employer KiwiSaver contributions. Choose any number from 0 - 12.
ESCT Rate The gross amount liable for Employer Superannuation Contribution Tax (ESCT) is displayed; the estimated ESCT rate is determined based on this amount. You can override this rate by specifying a new rate here.
Totals
Select the required Pay Frequency from the list, then enter an amount into any of the pay fields:
• Gross Pay - the gross earnings for the selected pay frequency. • Annual Pay - the employee s annual earnings. • After-Tax Pay - the pay amount after PAYE has been deducted, but before any KiwiSaver
deductions are made.
When an amount is entered into one of these fields, all other fields are updated.
PAYE Exo Payroll calculates the appropriate PAYE and earner premium. The amount displayed here includes any student loan payments.
incls Total Student Loan The student loan repayment amount that is included in the PAYE amount appears here for Tax Codes that include a student loan.
KiwiSaver Employee Deductions The total amount deducted for the employee s contribution to KiwiSaver.
Net Pay How much money the employee will receive after tax.
Employer KiwiSaver consists of These fields show a breakdown of the employer s contribution to KiwiSaver, showing the contribution amount and the amount of ESCT on it.
Total SL consists of These fields show a breakdown of the Student Loan amount, showing how much of it is the regular Student Loan repayment, and how much is additional repayments under the SLCIR and/or SLBOR tax codes.
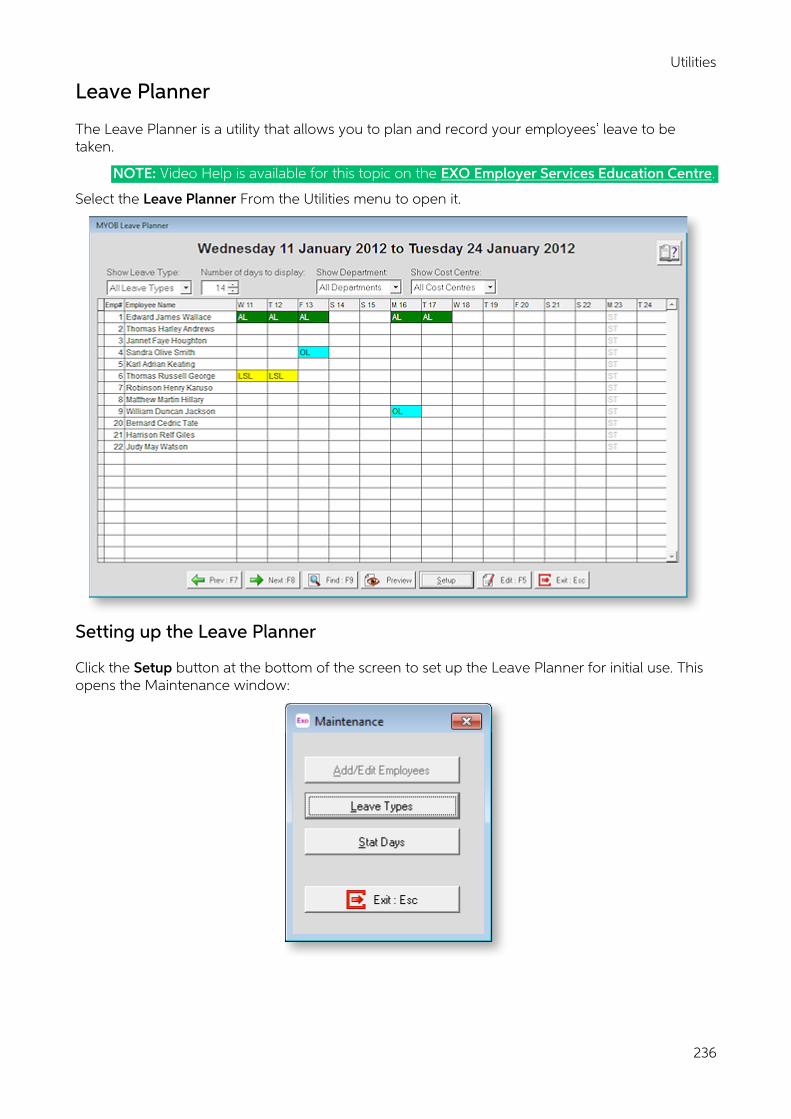
Utilities
236
Leave Planner
The Leave Planner is a utility that allows you to plan and record your employees leave to be taken.
NOTE: Video Help is available for this topic on the EXO Employer Services Education Centre.
Select the Leave Planner From the Utilities menu to open it.
Setting up the Leave Planner
Click the Setup button at the bottom of the screen to set up the Leave Planner for initial use. This opens the Maintenance window:
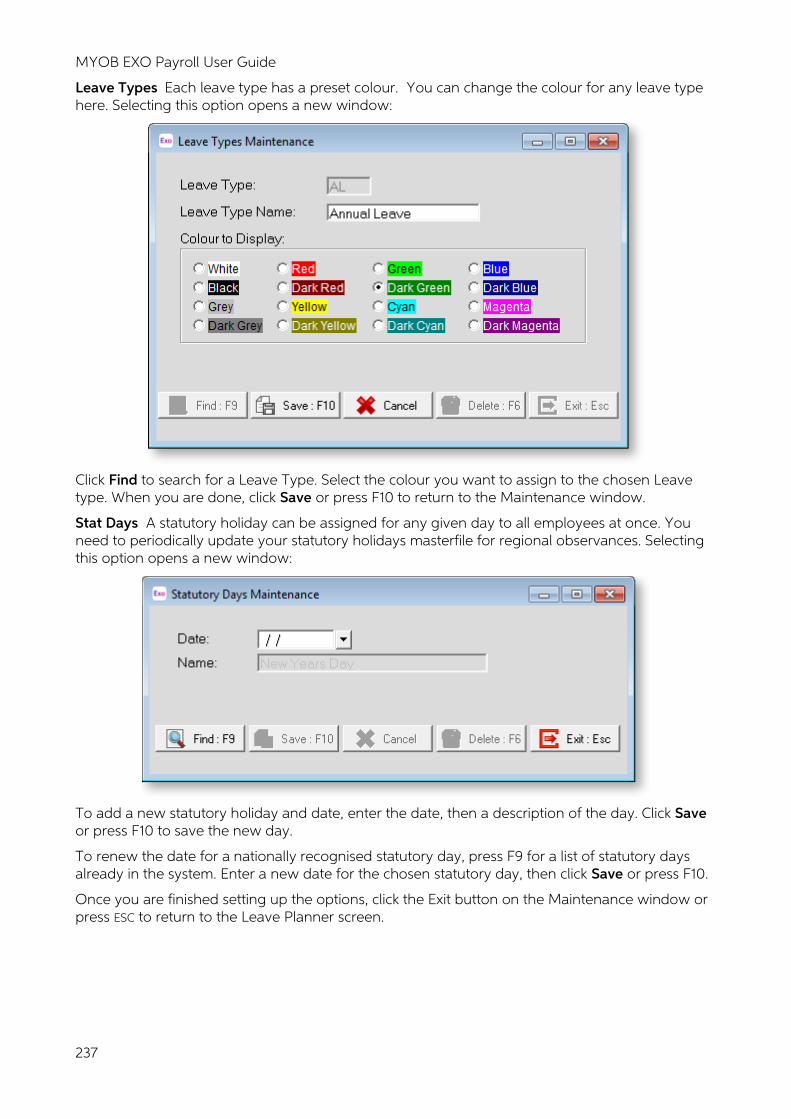
MYOB EXO Payroll User Guide
237
Leave Types Each leave type has a preset colour. You can change the colour for any leave type here. Selecting this option opens a new window:
Click Find to search for a Leave Type. Select the colour you want to assign to the chosen Leave type. When you are done, click Save or press F10 to return to the Maintenance window.
Stat Days A statutory holiday can be assigned for any given day to all employees at once. You need to periodically update your statutory holidays masterfile for regional observances. Selecting this option opens a new window:
To add a new statutory holiday and date, enter the date, then a description of the day. Click Save or press F10 to save the new day.
To renew the date for a nationally recognised statutory day, press F9 for a list of statutory days already in the system. Enter a new date for the chosen statutory day, then click Save or press F10.
Once you are finished setting up the options, click the Exit button on the Maintenance window or press ESC to return to the Leave Planner screen.

Utilities
238
Using the Leave Planner
The Leave Planner makes it easier for pay clerks to judge their staffing levels and to plan in advance when employees may take annual leave, long service leave or statutory holidays.
The Leave Planner has two different views. Initially, you are presented with a grid showing the overall Company view. Selecting an employee takes you to the Employee view, which details a single employee s leave. You can perform all functions from either view.
Company View
A number of filters along the top of the screen let you choose what to display.
Show Leave Type Choose from the list to see only annual leave, only long service, only lieu days etc.
Number of days to display Narrow or widen the calendar scope of the grid, up to 250 days.
Show Department Choose from the list to see the leave only for a certain department. Departments are drawn from Payroll data.
Show Cost Centre Choose from the list to see the leave only for a certain Cost Centre. Cost Centres are drawn from Payroll data.
To assign a leave type, click on the cell that corresponds to the employee and day you want to assign leave to. Select a leave type from the list box that appears.
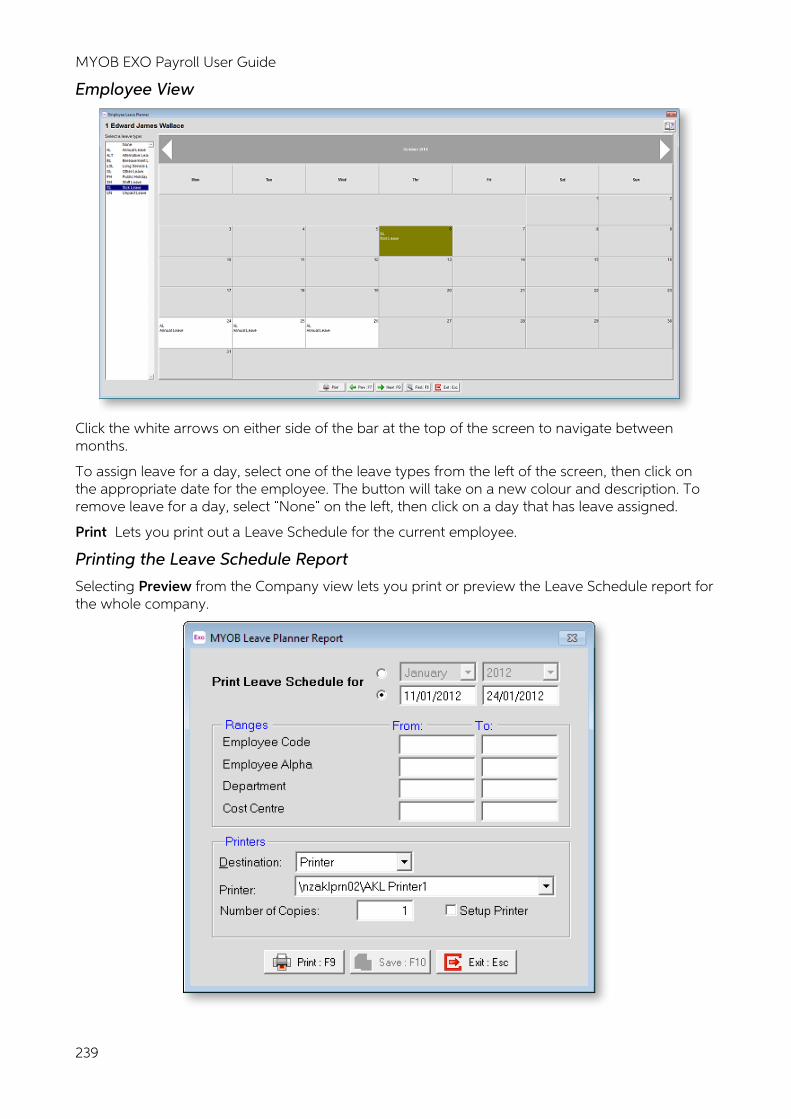
MYOB EXO Payroll User Guide
239
Employee View
Click the white arrows on either side of the bar at the top of the screen to navigate between months.
To assign leave for a day, select one of the leave types from the left of the screen, then click on the appropriate date for the employee. The button will take on a new colour and description. To remove leave for a day, select None on the left, then click on a day that has leave assigned.
Print Lets you print out a Leave Schedule for the current employee.
Printing the Leave Schedule Report
Selecting Preview from the Company view lets you print or preview the Leave Schedule report for the whole company.
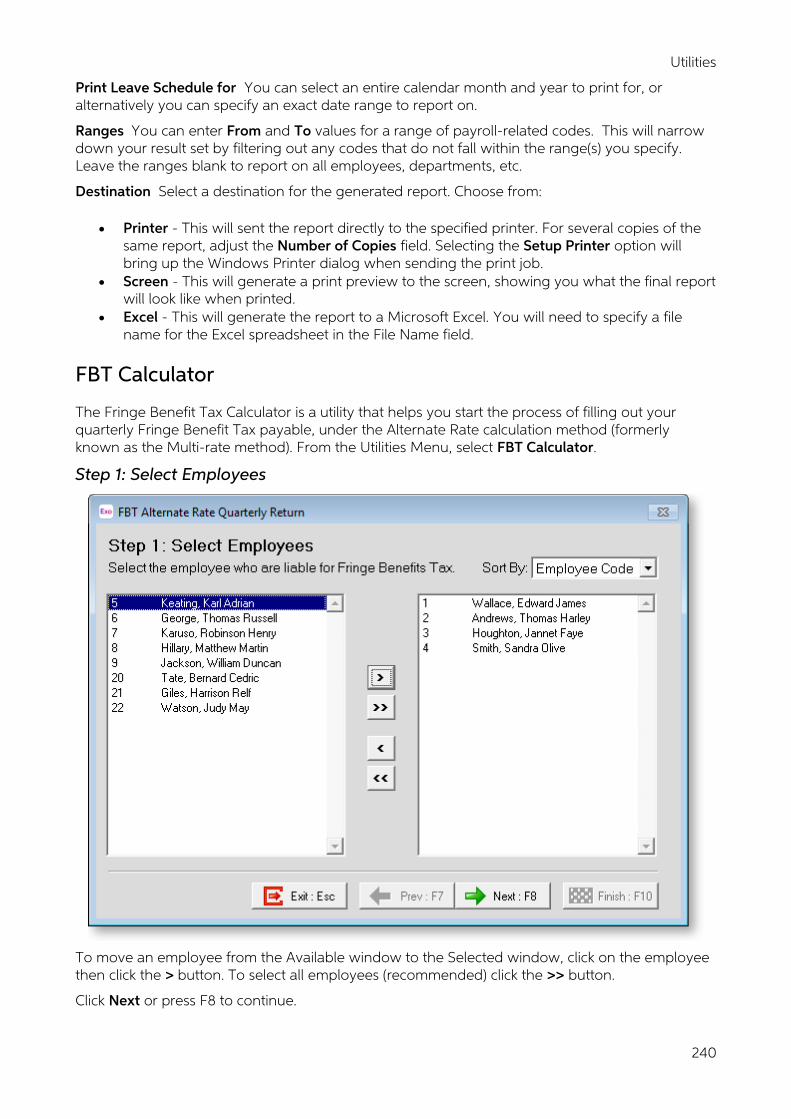
Utilities
240
Print Leave Schedule for You can select an entire calendar month and year to print for, or alternatively you can specify an exact date range to report on.
Ranges You can enter From and To values for a range of payroll-related codes. This will narrow down your result set by filtering out any codes that do not fall within the range(s) you specify. Leave the ranges blank to report on all employees, departments, etc.
Destination Select a destination for the generated report. Choose from:
• Printer - This will sent the report directly to the specified printer. For several copies of the same report, adjust the Number of Copies field. Selecting the Setup Printer option will bring up the Windows Printer dialog when sending the print job.
• Screen - This will generate a print preview to the screen, showing you what the final report will look like when printed.
• Excel - This will generate the report to a Microsoft Excel. You will need to specify a file name for the Excel spreadsheet in the File Name field.
FBT Calculator
The Fringe Benefit Tax Calculator is a utility that helps you start the process of filling out your quarterly Fringe Benefit Tax payable, under the Alternate Rate calculation method (formerly known as the Multi-rate method). From the Utilities Menu, select FBT Calculator.
Step 1: Select Employees
To move an employee from the Available window to the Selected window, click on the employee then click the > button. To select all employees (recommended) click the >> button.
Click Next or press F8 to continue.
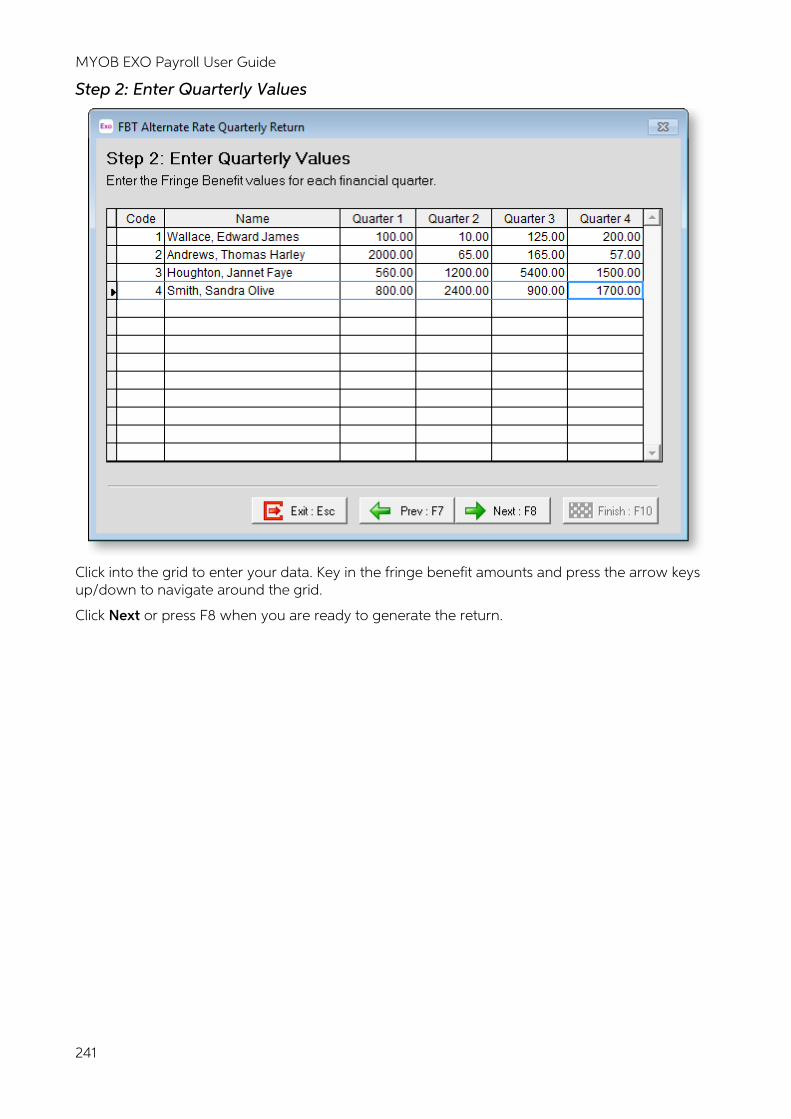
MYOB EXO Payroll User Guide
241
Step 2: Enter Quarterly Values
Click into the grid to enter your data. Key in the fringe benefit amounts and press the arrow keys up/down to navigate around the grid.
Click Next or press F8 when you are ready to generate the return.
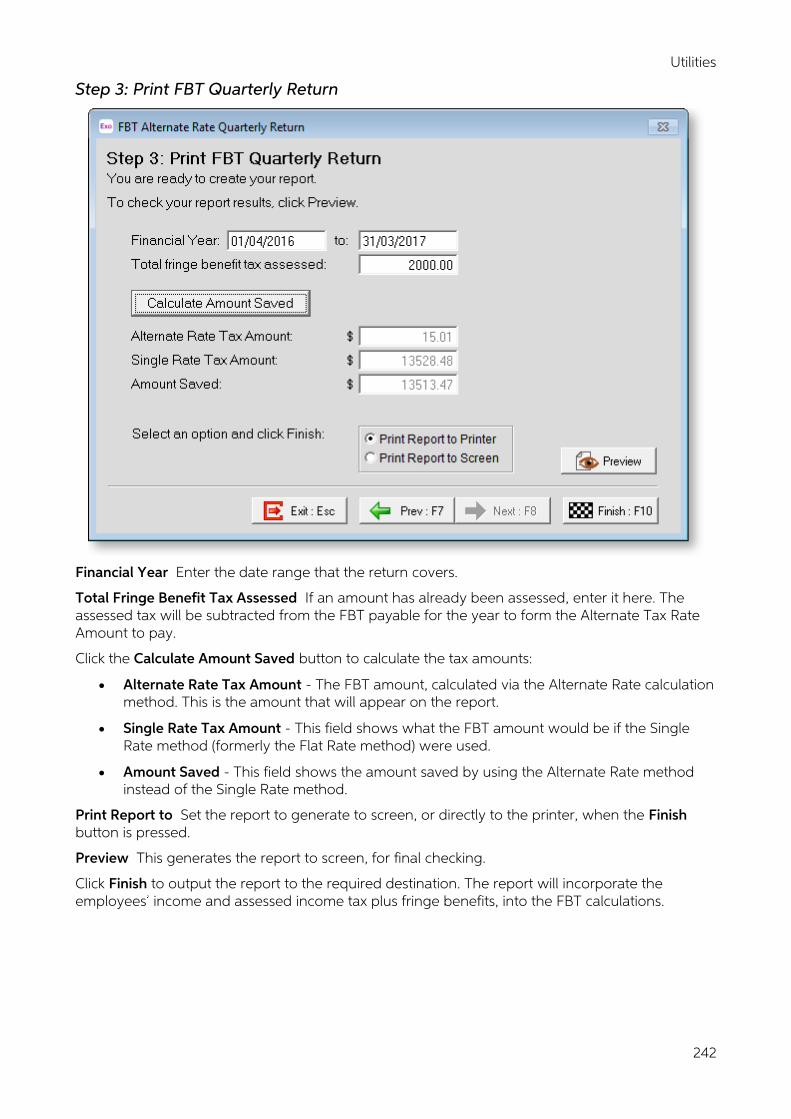
Utilities
242
Step 3: Print FBT Quarterly Return
Financial Year Enter the date range that the return covers.
Total Fringe Benefit Tax Assessed If an amount has already been assessed, enter it here. The assessed tax will be subtracted from the FBT payable for the year to form the Alternate Tax Rate Amount to pay.
Click the Calculate Amount Saved button to calculate the tax amounts:
• Alternate Rate Tax Amount - The FBT amount, calculated via the Alternate Rate calculation method. This is the amount that will appear on the report.
• Single Rate Tax Amount - This field shows what the FBT amount would be if the Single Rate method (formerly the Flat Rate method) were used.
• Amount Saved - This field shows the amount saved by using the Alternate Rate method instead of the Single Rate method.
Print Report to Set the report to generate to screen, or directly to the printer, when the Finish button is pressed.
Preview This generates the report to screen, for final checking.
Click Finish to output the report to the required destination. The report will incorporate the employees income and assessed income tax plus fringe benefits, into the FBT calculations.
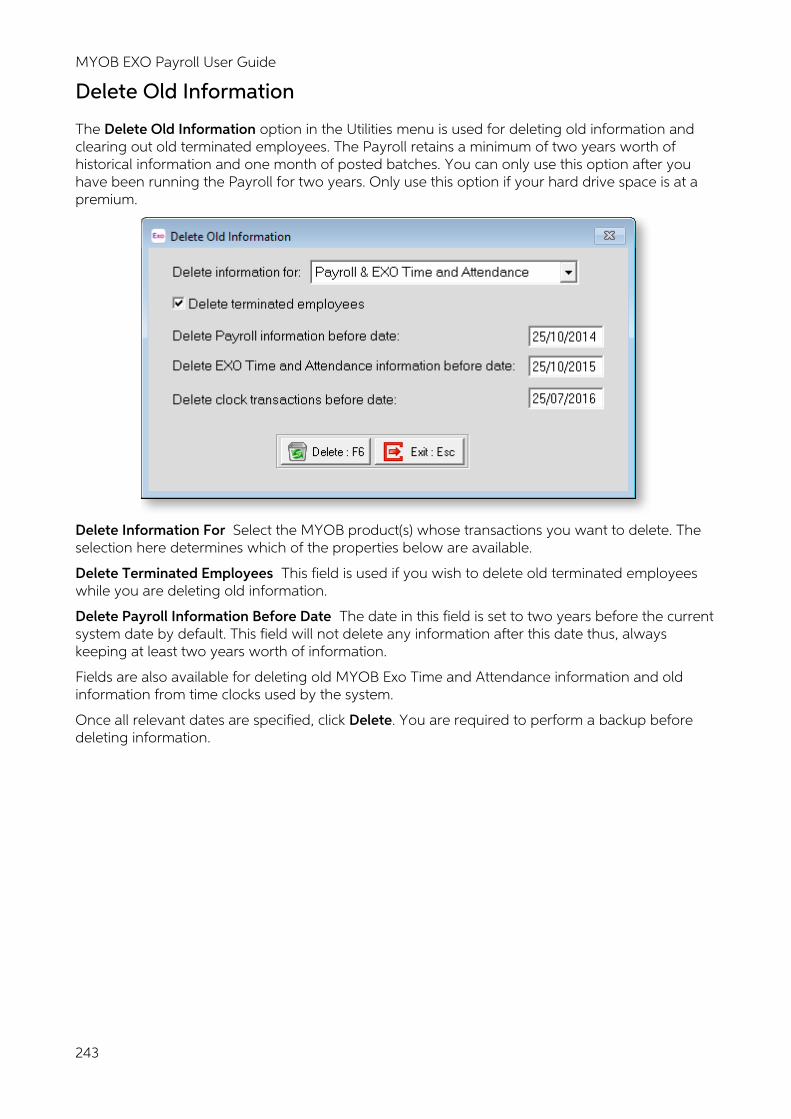
MYOB EXO Payroll User Guide
243
Delete Old Information
The Delete Old Information option in the Utilities menu is used for deleting old information and clearing out old terminated employees. The Payroll retains a minimum of two years worth of historical information and one month of posted batches. You can only use this option after you have been running the Payroll for two years. Only use this option if your hard drive space is at a premium.
Delete Information For Select the MYOB product(s) whose transactions you want to delete. The selection here determines which of the properties below are available.
Delete Terminated Employees This field is used if you wish to delete old terminated employees while you are deleting old information.
Delete Payroll Information Before Date The date in this field is set to two years before the current system date by default. This field will not delete any information after this date thus, always keeping at least two years worth of information.
Fields are also available for deleting old MYOB Exo Time and Attendance information and old information from time clocks used by the system.
Once all relevant dates are specified, click Delete. You are required to perform a backup before deleting information.
244
KiwiSaver
Opting In
This information is for KiwiSaver Employment Details (KED) reporting to the IRD. KED reporting is a facet of IR-Filing which allows employers to electronically notify the IRD of employees who start or stop participation in KiwiSaver. The KS1 form is a facet of KED reporting which covers the Opt In process, and can be generated by the Payroll by way of the KiwiSaver Employment Details report/KED file.
Turn the Make KiwiSaver Contributions option on in order to opt in.
Considerations relating to Opting In:
• from 1 July 2007, employees starting new employment must be automatically enrolled in KiwiSaver. Casual employees are not automatically enrolled, and must be manually opted in.
• participation in KiwiSaver is not compulsory for existing employees • is the employee aged 18 or older as the intended first contribution date • is the employee entitled to be in New Zealand indefinitely • is the employee permanent, as opposed to casual • is the employer exempt from KiwiSaver
As a general rule, opt in employees that you have hired since 1 July 2007, and opt in employees hired before 1 July 2007 that have voluntarily chosen to participate.
NOTE: Employees with the tax code NSW are not eligible for KiwiSaver, and should therefore not be opted in.
IRD s Opt In Guidelines:
• Participation in KiwiSaver will not be compulsory and will be open for individuals to join provided they are entitled to be in New Zealand indefinitely.
• Existing employees can opt in to KiwiSaver through their employer or by contracting directly with a provider.
• Employees automatically enrolled will have KiwiSaver contributions deducted from their salary or wages from their first pay that is dated on or after 1 July 2007.
• The Act requires employers to provide all new employees subject to automatic enrollment with an information pack, supplied by Inland Revenue. This pack will contain information about KiwiSaver, an opt-out form and information about default providers and schemes.
• An up-front government contribution of $1,000 will be credited to a member s KiwiSaver account when contributions are first paid by Inland Revenue to the provider.
• The Act allows employers apply to the Government Actuary for an exemption from the automatic enrolment rules if they provide access to an approved registered superannuation scheme. Employees whose employer is exempt from the automatic enrollment provisions will still be able to join KiwiSaver (by opting in).
MYOB EXO Payroll User Guide
245
Opting Out
New employees can opt out of KiwiSaver within the Opt Out period. Employees may not opt out until they have been employed for two weeks (14 days), but must opt out within eight weeks (56 days) from the day they started. Opting in/out is performed by changing the settings on the KiwiSaver section of the Standard Pay (see page 90).
New Employees - Automatically Enrolled
It is possible for employees to have been automatically enrolled by the pay clerk, and then give notice to opt out within the opt-out period. Turn the Make KiwiSaver Contributions option off in order to stop future KiwiSaver transactions. The Opt Out fields will become enabled. Tick the Opt Out New Employee option. Check for the presence of KiwiSaver transactions in any pays which may be open at the time.
New Employees - Not Yet Enrolled
The Make KiwiSaver Contributions option will be off. The Opt Out fields will be enabled. Tick the Opt Out New Employee option. Enter the date on which the Opt Out decision was made. You will still need to enter bank account details.
Considerations relating to Opting Out:
You have to declare Opt Out details for new employees who are subject to the automatic enrolment rules, and who have Opted Out within the Opt Out period by default, the Opt out fields are enabled for employees who have never made KiwiSaver contributions (new employees) the opt out period is from the end of week two to the end of week eight after starting employment a late opt out period exists, up to three months from the start date, however this requires direct permission from the IRD you have to stop making contributions for existing employees who have participated in the past but now elect to opt out existing employees, having not been enrolled automatically, may opt out at any time existing employees, having not been enrolled automatically, are not required to give notice that they have opted out, unless since 1 July 2007 they have elected to voluntarily opt in employees who opt out cannot opt back in.
Grossing-up Employer Contributions
Employer contributions are liable for Employer Superannuation Contribution Tax (ESCT). If employers are locked in to an agreement with an employee for a set percentage of employer contributions, in order to meet the terms of that agreement, the amount of employer contributions may need to be grossed-up to ensure that the employee receives their full entitlement.
For example, an employee earning $2,500 per week ($130,000 per annum) has an employment contract that requires a 4% employee contribution, matched by a 4% employer contribution. The employee s weekly savings are:
Contribution Amount
KiwiSaver deduction (4%) $100.00
Employer contribution (4%) $100.00
Total contribution 200.00
ESCT must be paid on the employer contribution (with a salary of $130,000, the employee s ESCT rate is 33%).
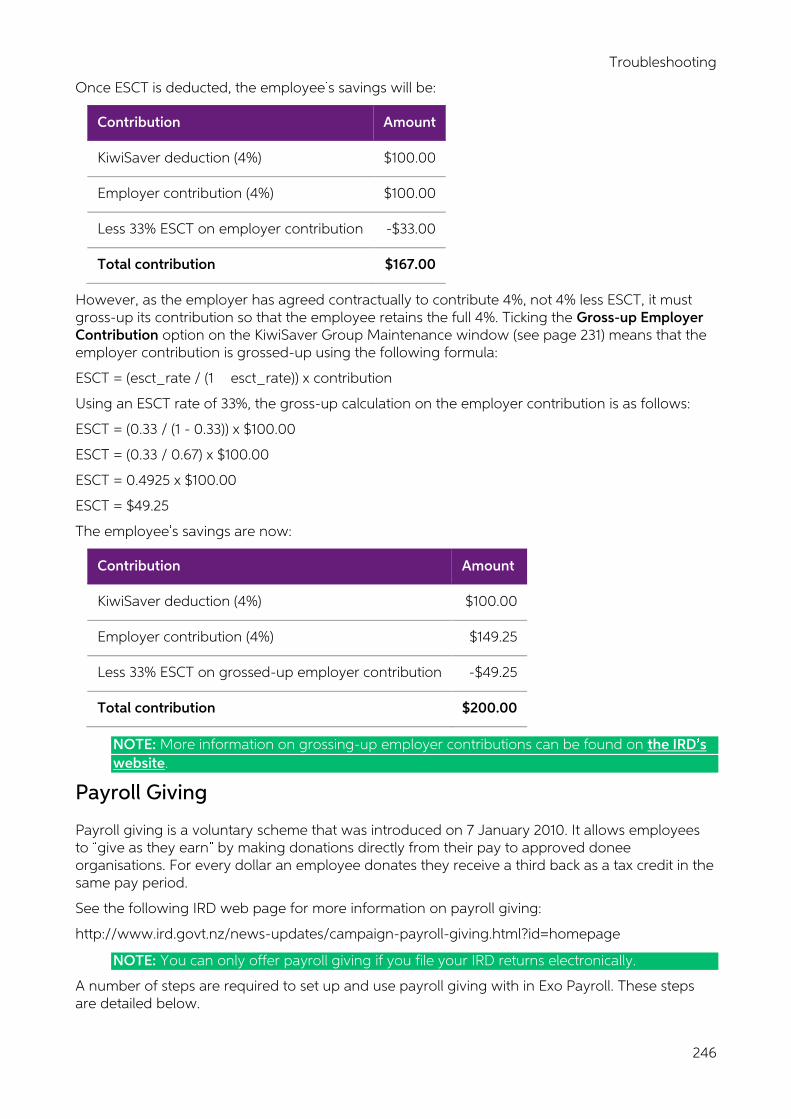
Troubleshooting
246
Once ESCT is deducted, the employee s savings will be:
Contribution Amount
KiwiSaver deduction (4%) $100.00
Employer contribution (4%) $100.00
Less 33% ESCT on employer contribution -$33.00
Total contribution 167.00
However, as the employer has agreed contractually to contribute 4%, not 4% less ESCT, it must gross-up its contribution so that the employee retains the full 4%. Ticking the Gross-up Employer Contribution option on the KiwiSaver Group Maintenance window (see page 231) means that the employer contribution is grossed-up using the following formula:
ESCT = (esct_rate / (1 esct_rate)) x contribution
Using an ESCT rate of 33%, the gross-up calculation on the employer contribution is as follows:
ESCT = (0.33 / (1 - 0.33)) x $100.00
ESCT = (0.33 / 0.67) x $100.00
ESCT = 0.4925 x $100.00
ESCT = $49.25
The employee s savings are now:
Contribution Amount
KiwiSaver deduction (4%) $100.00
Employer contribution (4%) $149.25
Less 33% ESCT on grossed-up employer contribution -$49.25
Total contribution 200.00
NOTE: More information on grossing-up employer contributions can be found on the IRD s website.
Payroll Giving
Payroll giving is a voluntary scheme that was introduced on 7 January 2010. It allows employees to give as they earn by making donations directly from their pay to approved donee organisations. For every dollar an employee donates they receive a third back as a tax credit in the same pay period.
See the following IRD web page for more information on payroll giving:
http://www.ird.govt.nz/news-updates/campaign-payroll-giving.html?id=homepage
NOTE: You can only offer payroll giving if you file your IRD returns electronically.
A number of steps are required to set up and use payroll giving with in Exo Payroll. These steps are detailed below.
MYOB EXO Payroll User Guide
247
Step 1: Enable Payroll Giving
To enable payroll giving:
1. Select Setup Exo Payroll from the Utilities menu.
2. The Payroll Setup window appears. Go to the Setup Page 2 tab and click the Special Options Setup button.
3. The Special Options Setup window opens. Enable the Use payroll giving option.
4. Click Save to exit from all windows.
Payroll giving is now enabled, which means that the various options and features that relate to payroll giving are available.
NOTE: If you enable payroll giving, any Current or One Off Pays that you create after that point will have tax credits automatically calculated for all applicable employees. You should update all of your open pays before setting up payroll giving.
Step 2: Set up Payroll Giving Donees
Any donee organisations that employees want to donate to for the payroll giving scheme must be set up in the Exo Payroll system before donations can be made. Payroll giving donations can only be made to donee organisations that have Inland Revenue-approved donee status. To check if an organisation is an approved donee, visit the following IRD web page:
http://www.ird.govt.nz/donee-organisations/donee-organisations-index.html
You can allow employees to nominate the organisations they want to donate to, or you can provide a list of organisations you have chosen. In either case, all organisations must be set up as Payroll Giving Donees (see page 233). You can set up as many donee organisations as you want.
Step 3: Create Payroll Giving Deductions
Create a Deduction for each payroll donee:
1. From the Maintenance menu choose Deductions to open the Deductions window (see page 43).
2. Using the first free deduction code, add a new deduction.
3. Enter a Name that describes the donation, e.g. the name of the donee organisation.
4. Set the Calculation Method to Fixed Dollar Amount .
5. Leave the Amount at zero.
6. Set the Type to Payroll Giving .
7. Select the Payroll Giving Donee that donations will be made to.
8. Click Save or press F10 to save.
Troubleshooting
248
Step 4: Add Payroll Giving Deductions to Employee Pays
Add payroll giving Deductions to employees Standard Pays if they want to make regular donations each pay period. To make a one-off donation, add payroll giving Deductions to employees Current Pays.
NOTE: Employees who use the WT tax code are not eligible for payroll giving. Do not add payroll giving Deductions to these employees pays. (The system does not enforce this restriction.)
To add a Deduction to an employee s pay:
1. Open the Standard Pay or Current Pay and select the employee you want to set up the donation for.
2. Click the Deductions button to open the Deductions window (see page 86).
3. Click Add or press F4 to add a new Deduction, then enter the Deduction code number you created previously.
4. Enter the dollar amount to be donated.
NOTE: The donation amount cannot exceed the employee s Net Pay. There is no minimum amount for donations, although you can mandate one if you want to.
5. Click Save or press F10 on all screens to save.
Payroll giving donations will now be deducted from employee s pay for the relevant pay period(s), and the tax credit will be calculated and added to their pay automatically.
NOTE: The tax credit amount cannot exceed the tax on the employee s income (i.e. the PAYE amount less the ACC levy). If it does, the tax credit will be reduced to the tax amount. The full donation will still be made, however. Enabling the Eligible for PG optionon Allowances means that they count towards the employee s earnings for the purposes of calculating the maximum tax credit.
NOTE: If you override an employee s PAYE (see page 90), they will not receive a tax credit.
NOTE: If you want to use a One-Off Pay (see page 155) to reverse a pay that contains a payroll giving donation, you must reverse the entire pay; you cannot reverse only parts of it (e.g. salary only, Deductions only, Allowances only). You cannot reverse only the payroll giving donation (Deduction).
Step 5: Forward Donations and Notify Donees
After pays containing payroll giving donations have been completed, it is the responsibility of the employer to:
• Send donations to the relevant donee organisations. • Advise the donee organisations that donations have been sent to them from a payroll
giving scheme.
Use the Payroll Giving Payment Advisory report to determine which donees need to be advised, and how much to forward to each one. This report is available on the Financial tab of the Select Report window (see page 173).
Donations have to be passed to donee organisations on or before the PAYE payment due date that is closest to the end of the two months from the last day of the pay period when the donation was deducted. See Passing payroll giving donations to the donee organisation on the IRD website for examples of how to work out this date.

MYOB EXO Payroll User Guide
249
Fringe Benefit Tax
The rules for fringe benefit tax (FBT) affect the way you complete your fourth or final quarterly return (for the period 1 January to 31 March 2001) or annual or income year returns (for the year ended 31 March 2001). You have a choice of FBT rates to use. You can choose to work out your FBT to pay using the Single FBT rate (formerly Flat Rate), or the Alternate Rate calculation process (formerly Multi-rate).
The FBT Quarterly Return covers the Alternate Rate calculation method only. This involves attributing fringe benefits to individual employees who have received them and calculating the FBT to pay on the cash remuneration and fringe benefits they received in the year.
NOTE: The FBT Calculator utility (see page 240) uses the Alternate Rate calculation method only.
If you are completing the Alternate Rate calculations make sure you have the following information before you start filling in this return:
• Your completed taxable value calculation sheets for the year, showing the amount of the taxable value for motor vehicles, low-interest loans, free or subsidised or discounted goods and services and employer contributions to funds, insurance, health insurance and superannuation schemes.
• Cash remuneration details for each employee where the fringe benefits they have received have been attributed.
• As the calculator is designed for quarterly filing only, your first three quarters FBT returns. After you have entered the appropriate data, you may print out the calculation sheet and copy the figures to your IR-420 form, as provided by the IRD.
Notes
• Income attributed under the attribution rules Cash remuneration now includes any amount of income attributed under the attribution rules. The attribution rule applies when an employee structures their employment relationship so that an entity, such as a trust or company, is between them and the services they provide to their employer.
• Low-interest loans provided by life insurers Low-interest loans provided by life insurers are now deemed to be non-attributed benefits.
• Non-resident shareholder-employee If remuneration is paid to a non-resident shareholder-employee, the calculation of the deemed amount of tax payable on the remuneration includes any tax credit as if the shareholder-employee was a resident for fringe benefit tax purposes.
• Associated persons receiving benefits Fringe benefits provided to an associate of an employee are to be taxed in the hands of the employee rather than the associate.
• Subsidised transport The subsidised transport exception that allows employers to pool benefits, if all employees have the same or similar entitlement to the benefit, now includes employers who are closed companies.
Troubleshooting
250
Options to consider Single Rate or Alternate Rate calculations
The following factors may help you when deciding which option best suits your business s particular circumstances:
• The income level of your employees who receive fringe benefits.
• If your employees receiving fringe benefits are higher income earners (over $60,000 annually) you should consider using the single rate when calculating FBT. This method involves little change from what you do at present.
• If your employees receiving benefits include some on low to middle income levels, you should consider the new calculation process.
• The amount of non-attributed benefits (under the Alternate Rate option, non-attributed benefits are taxed differently).
• The record keeping and calculations required under the Alternate Rate process.
You cannot use a combination of the Single Rate option and the Alternate Rate calculations option. You must select only one option.
Timing Issues
If you elect the Alternate Rate option when determining the rate to apply to a shareholder-employee there are three possible scenarios:
• All the remuneration details relating to a shareholder-employee are known. You must use the Alternate Rate calculations.
• If some of the remuneration details are not available at the time you complete the return you can use the Alternate Rate when calculating the FBT payable on the attributed benefits provided to that shareholder-employee. When you complete your next year s fourth quarter or annual FBT return you align the FBT payable from this year with the actual remuneration received by the shareholder-employee using the Alternate Rate calculations.
• If some of the remuneration details are not available at the time you complete the return you can use the Single Rate to calculate FBT payable on the attributed benefits provided. No further calculations are required next year when using this option.
Attributed Income
Cash remuneration now includes any remuneration provided by an employer. This includes any amount of income attributed under the attribution rule.
The attribution rule applies when an employee structures their employment relationship so that an entity (a trust or company) is between them and the services they provide to their employer.
The person providing the services and the trust or company must be associated persons.
The company or trust receives the payment for the services performed by with the actual remuneration received by the employee using the Alternate Rate calculations.
If some of the remuneration details are not available at the time you complete your return, you can use the flat rate to calculate FBT payable on the attributed benefits provided.
No further calculations are required next year when using this option. The rules for shareholder-employees and attributed income do not apply to income year filers as the due date for this return is aligned with the end-of-year tax date of the employer and therefore all necessary income information would be known by this date.
MYOB EXO Payroll User Guide
251
As with other benefits provided, all benefits must either be paid at the Single Rate or calculated using the Alternate Rate process. You cannot use both options.
Completing the IR 420
Use the FBT Calculator utility (see page 240). The FBT Calculator calculates FBT using the Alternate Rate.
Tax Procedures
Hiring Employees
IR330
The employee is required to fill out an IR330 form (provided by the employer) as a declaration of their tax code. This also applies to staff whose earnings are liable for withholding tax.
Monthly Requirements
IR345
• Covering totals for gross pay, PAYE, net pay, student loans, child support, employee start and finish dates.
• Due monthly on the 20th of the following month for small employers. • Due twice monthly for large employers, the return for payments made during the 1st to
15th of any given month is due on the 5th of the following month; the return for payments made during the 15th to 31st of any given month is due on the 20th of the following month.
• Printed from a Consolidated Company if you have 2 companies with same IRD No. • Inland Revenue stationery should be used, the form is hand-written. • Takes the physical payment date, rather than the pay period end date.
IR348 (Employer Monthly Schedule)
• Compulsory for large employers (>500,000 PAYE + ESCT per annum). • Printed from a Consolidated Company if you have 2 companies with same IRD No. • Covering breakdowns for individual employees for gross pay, PAYE, net pay, student loans,
child support, employee share scheme benefits, employee start and finish dates. • Due once monthly on the 20th of the following month for small employers. • Due once monthly on the 5th of the following month for large employers. Large employers
must file the December IR348 by January 15. • Takes the physical payment date, rather than the pay period end date. • The Employer Monthly Schedule report generates a file containing the appropriate
information. To achieve this set the report destination to File , and enter a report name ending in .CSV, e.g. IR348_EMS.CSV.
• You can produce a printed version of the report for your own records, but this cannot be submitted to the IRD.
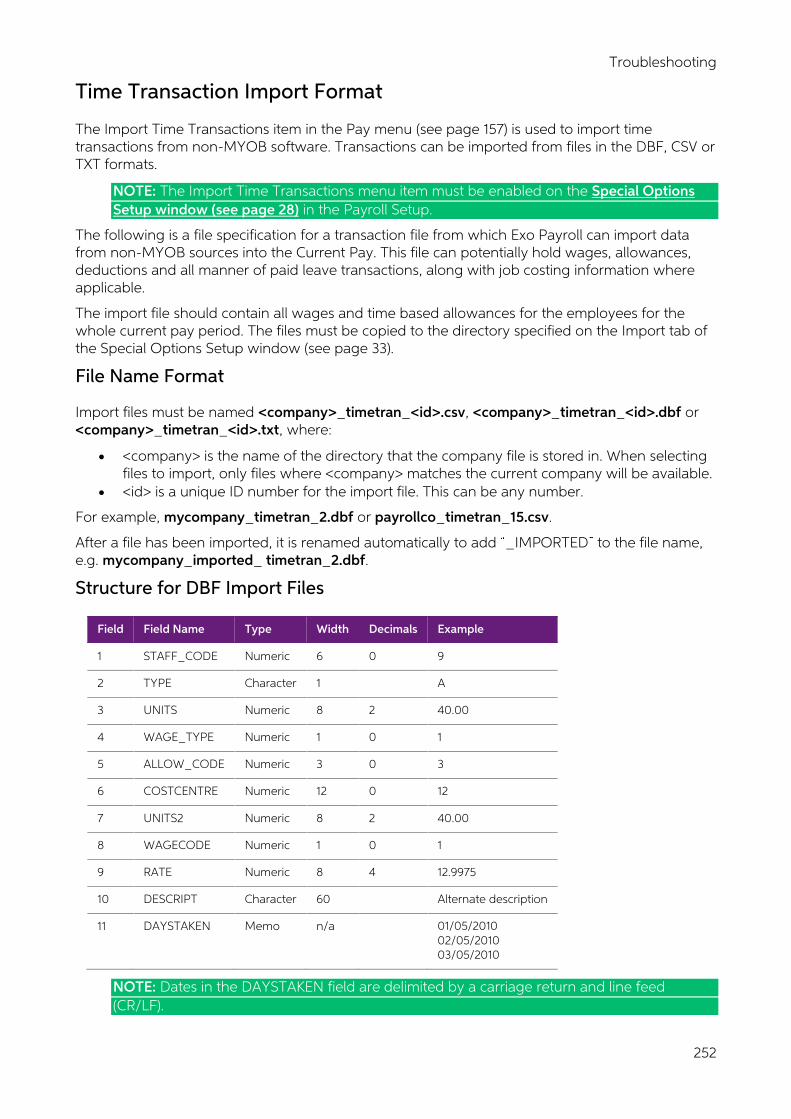
Troubleshooting
252
Time Transaction Import Format
The Import Time Transactions item in the Pay menu (see page 157) is used to import time transactions from non-MYOB software. Transactions can be imported from files in the DBF, CSV or TXT formats.
NOTE: The Import Time Transactions menu item must be enabled on the Special Options Setup window (see page 28) in the Payroll Setup.
The following is a file specification for a transaction file from which Exo Payroll can import data from non-MYOB sources into the Current Pay. This file can potentially hold wages, allowances, deductions and all manner of paid leave transactions, along with job costing information where applicable.
The import file should contain all wages and time based allowances for the employees for the whole current pay period. The files must be copied to the directory specified on the Import tab of the Special Options Setup window (see page 33).
File Name Format
Import files must be named <company>_timetran_<id>.csv, <company>_timetran_<id>.dbf or <company>_timetran_<id>.txt, where:
• <company> is the name of the directory that the company file is stored in. When selecting files to import, only files where <company> matches the current company will be available.
• <id> is a unique ID number for the import file. This can be any number.
For example, mycompany_timetran_2.dbf or payrollco_timetran_15.csv.
After a file has been imported, it is renamed automatically to add _IMPORTED to the file name, e.g. mycompany_imported_ timetran_2.dbf.
Structure for DBF Import Files
Field Field Name Type Width Decimals Example
1 STAFF_CODE Numeric 6 0 9
2 TYPE Character 1 A
3 UNITS Numeric 8 2 40.00
4 WAGE_TYPE Numeric 1 0 1
5 ALLOW_CODE Numeric 3 0 3
6 COSTCENTRE Numeric 12 0 12
7 UNITS2 Numeric 8 2 40.00
8 WAGECODE Numeric 1 0 1
9 RATE Numeric 8 4 12.9975
10 DESCRIPT Character 60 Alternate description
11 DAYSTAKEN Memo n/a 01/05/2010 02/05/2010 03/05/2010
NOTE: Dates in the DAYSTAKEN field are delimited by a carriage return and line feed (CR/LF).
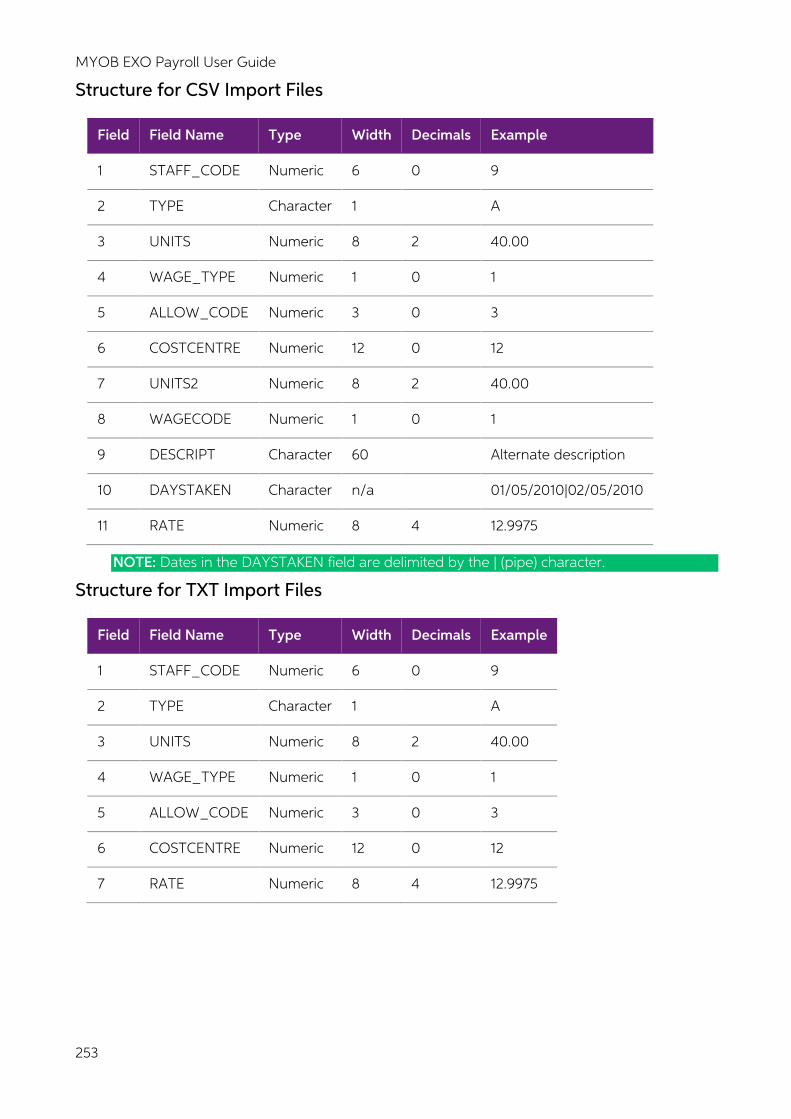
MYOB EXO Payroll User Guide
253
Structure for CSV Import Files
Field Field Name Type Width Decimals Example
1 STAFF_CODE Numeric 6 0 9
2 TYPE Character 1 A
3 UNITS Numeric 8 2 40.00
4 WAGE_TYPE Numeric 1 0 1
5 ALLOW_CODE Numeric 3 0 3
6 COSTCENTRE Numeric 12 0 12
7 UNITS2 Numeric 8 2 40.00
8 WAGECODE Numeric 1 0 1
9 DESCRIPT Character 60 Alternate description
10 DAYSTAKEN Character n/a 01/05/2010|02/05/2010
11 RATE Numeric 8 4 12.9975
NOTE: Dates in the DAYSTAKEN field are delimited by the | (pipe) character.
Structure for TXT Import Files
Field Field Name Type Width Decimals Example
1 STAFF_CODE Numeric 6 0 9
2 TYPE Character 1 A
3 UNITS Numeric 8 2 40.00
4 WAGE_TYPE Numeric 1 0 1
5 ALLOW_CODE Numeric 3 0 3
6 COSTCENTRE Numeric 12 0 12
7 RATE Numeric 8 4 12.9975
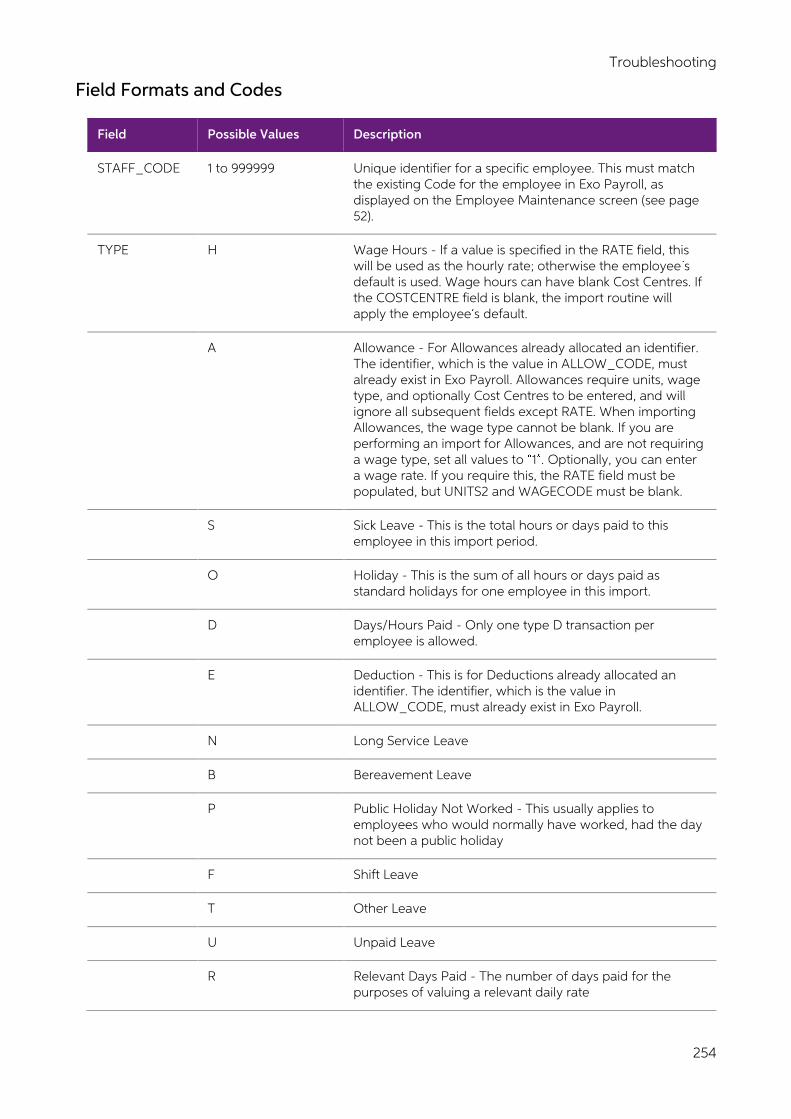
Troubleshooting
254
Field Formats and Codes
Field Possible Values Description
STAFF_CODE 1 to 999999 Unique identifier for a specific employee. This must match the existing Code for the employee in Exo Payroll, as displayed on the Employee Maintenance screen (see page 52).
TYPE H Wage Hours - If a value is specified in the RATE field, this will be used as the hourly rate; otherwise the employee s default is used. Wage hours can have blank Cost Centres. If the COSTCENTRE field is blank, the import routine will apply the employee s default.
A Allowance - For Allowances already allocated an identifier. The identifier, which is the value in ALLOW_CODE, must already exist in Exo Payroll. Allowances require units, wage type, and optionally Cost Centres to be entered, and will ignore all subsequent fields except RATE. When importing Allowances, the wage type cannot be blank. If you are performing an import for Allowances, and are not requiring a wage type, set all values to 1 . Optionally, you can enter a wage rate. If you require this, the RATE field must be populated, but UNITS2 and WAGECODE must be blank.
S Sick Leave - This is the total hours or days paid to this employee in this import period.
O Holiday - This is the sum of all hours or days paid as standard holidays for one employee in this import.
D Days/Hours Paid - Only one type D transaction per employee is allowed.
E Deduction - This is for Deductions already allocated an identifier. The identifier, which is the value in ALLOW_CODE, must already exist in Exo Payroll.
N Long Service Leave
B Bereavement Leave
P Public Holiday Not Worked - This usually applies to employees who would normally have worked, had the day not been a public holiday
F Shift Leave
T Other Leave
U Unpaid Leave
R Relevant Days Paid - The number of days paid for the purposes of valuing a relevant daily rate
MYOB EXO Payroll User Guide
255
Y Alternate Leave Accrued - This usually applies to employees who have worked a public holiday
Z Alternate Leave Paid
UNITS -9999.99 to 99999.99 The number of units for a transaction
WAGE_TYPE 1 to 9 The code number of the wage rate multiplier to use.
ALLOW_CODE 1 to 999 Unique identifier for an Allowance or Deduction. Must be left blank if the TYPE is not A or E. For these types, it must specify an existing code (cannot be used to create a new one).
COSTCENTRE Unique identifier for the Cost Centre that the transaction is to be charged to. Only one Cost Centre can be assigned to a transaction; to apply multiple Cost Centres, use multiple transactions. If no Cost Centre is specified, the employee s default will be applied.
UNITS2 -9999.99 to 99999.99 The number of units to reduce this entitlement type by.
WAGECODE 1 to 9 Unique identifier of the Hourly Rate to use. If multiple Hourly Rates are not used, set this to 1.
RATE -9999.99 to 99999.99 The allowance rate for type A transactions, the amount to override a wage line payment for type H (if multiple hours rates are turned off), or the number of days to reduce entitlement for types S,Z,B,P.
DESCRIPT Text, up to 60 characters
A description for Allowances and wage lines.
DAYSTAKEN Text, formatted dd/mm/yyyy
A list of dates that the employee accrued or extended leave on. In DBF files, dates are separated by a carriage return; in CSV files, dates are separated by the | (pipe) character.
Other Considerations for Importing
• Transaction units (excluding wages and allowances) must be summed where there is a common transaction type.
• A discrepancy report is available showing any invalid transactions. This must be printed directly after the import.
• In the CSV format there is a maximum of 25 dates of the format dd/mm/yyyy or 30 of the format dd/mm/yy per line. This is a limitation of the format itself. If more dates are required, the DBF format will need to be used.
Troubleshooting
256
Costing
Costing Setup and Structure
Exo Payroll allows for a very simple or very complex cost centre structure depending on what you require. Numeric codes are used. You can select the levels and possible number of cost centres by the number of digits you use to make up that code number.
Example
Consider a simple costing setup that uses two-digit cost centres. The first digit could represent a Centre, say 1 = Auckland, 2 = Hamilton and so on up to nine centres. The second digit could be used to represent a Work Area like 1 = Office, 2 = Sales, 3 = Dispatch and so on up to nine work areas.
Under this scheme, you would get cost centre code numbers like:
11 = Auckland/Office,
21 = Hamilton/ Office.
13 = Auckland/Dispatch
23 = Hamilton/Dispatch
This two-digit example is used as the basis of the setup instructions below.
Setup
Set up the Structure
The first step is to set up the structure that your payroll company will be using:
1. On the Utilities menu choose Payroll Setup (see page 13).
2. In the Cost Centre Structure (see page 14) section, next to Analysis Code 1, enter Centre for the Name and 1 for the Length.
3. Next to Analysis Code 2, enter a Name of Work Area and a Length of 1.
Specify Valid Cost Centres
The second step is to specify the possible valid cost centres for your business, and their names.
1. On the Maintenance menu choose Cost Centres (see page 50).
2. Add codes and descriptions. Note that the codes are two digits, meaning that they have combined the two structures you created in the Payroll Setup
Assign Cost Centres to Employees
The third step is to assign the cost centre to the appropriate employees. You can assign a cost centre to a dollar amount in several ways:
• To the employee s default cost centre - thus rendering all pay for that employee to go to the one cost centre
• To an individual wage line - useful for job costing or employees who work in various areas of the business
• To a shared cost centre for leave • To an allowance
MYOB EXO Payroll User Guide
257
One employee can have several cost centres. You can assign expected proportions of costing for salaried or waged employees by choosing Costing in the Standard Pay screen (see page 89). The payroll can handle in excess of 10,000 cost centres.
You can capture this information in the Costing Analysis report (see page 179). Similarly, you can sort most reports by the employee s default cost centre. If necessary you can link a corresponding general ledger account to any given cost centre, for accounting purposes.
Deciding on a Structure
The important issue for each user to decide is, what do you want to analyse in relation to wages and salary paid out?
A restaurant owner may only want to know the wages/salary costs in each restaurant. He would use a single level code, maybe only one digit. If he wanted to know what wages cost in the Kitchen, Waiting, and Administration areas for each restaurant then he would need to include another level in his structure. Maybe one digit for each level, a total of two digits would be sufficient.
Up to 12 digits can be used in the cost centre field to identify centres. These digits can be divided into up to four levels.
For example, you may want to have a cost centre like the following:
Area - Department - Job Type - Job Number
To achieve this you select the number of digits to always represent each level.
For this four level structure, you need to decide on the number of digits likely to be used for each level.
One digit allows up to 9 Cost Centres; two digits allow up to 99; three digits up to 999.
The total digits used must not exceed 12. All digits and all levels do not need to be used.
NOTE: Creating Departments and Cost Centres are two separate issues in Exo Payroll. Departments are used as pay points - a means of grouping employees and being able to report on those groupings and obviously total wages for a department will be reported on those reports.
Costing Methods
Which method is right for you?
There are essentially three separate levels of costing within the Payroll, these are standard or direct costing, (see page 260) proportional costing (see page 261) and mixed proportional costing (see page 262). These all have different rules as explained below.
There are also global default cost centres that apply company-wide to leave.
These global defaults override all other settings. If a global default is in use the corresponding cost centre field in the Standard Pay and any open pays will not be used.
When a global default cost centre is entered in setup, it will overwrite the Standard Pay and any open pays but will not change historical data.
Troubleshooting
258
Standard/Direct Costing
All expenses are costed to the cost centres that have been entered against them, regardless of whether it is the employee default cost centres or not. All cost centre fields can be edited.
Example: Employee s default cost centre is 12
Pay details are as follows:
Description Amount Cost Centre
Wages $600 12
Holiday Pay $400 15
The costing report would show:
Cost Centre Wages Holiday Pay
12 $600
15 $400
If a holiday pay global default were set up as cost centres 13 then the costing report would show:
Cost Centre Wages Holiday Pay
12 $600
13 $400
Proportional Costing
There are two methods of proportional costing - Percentage and Hours:
• Percentage: Total entered must add up to 100. Proportions are expressed as percentages. • Hours: A total hour s amount is entered and all amounts entered must add up to this figure.
Proportions are expressed as a percentage of total hours.
For either costing method the calculations are essentially the same.
All expenses are split between the proportions set up. It does not matter if the expenses are costed to the employee default cost centres or not, they will still be split. All cost centre fields in wages, allowances, and leave in all pays are disabled.
Example: Employee s default cost centres is 12
Pay details are as follows:
Description Amount Cost Centre
Wages $600 12
Holiday Pay $400 15
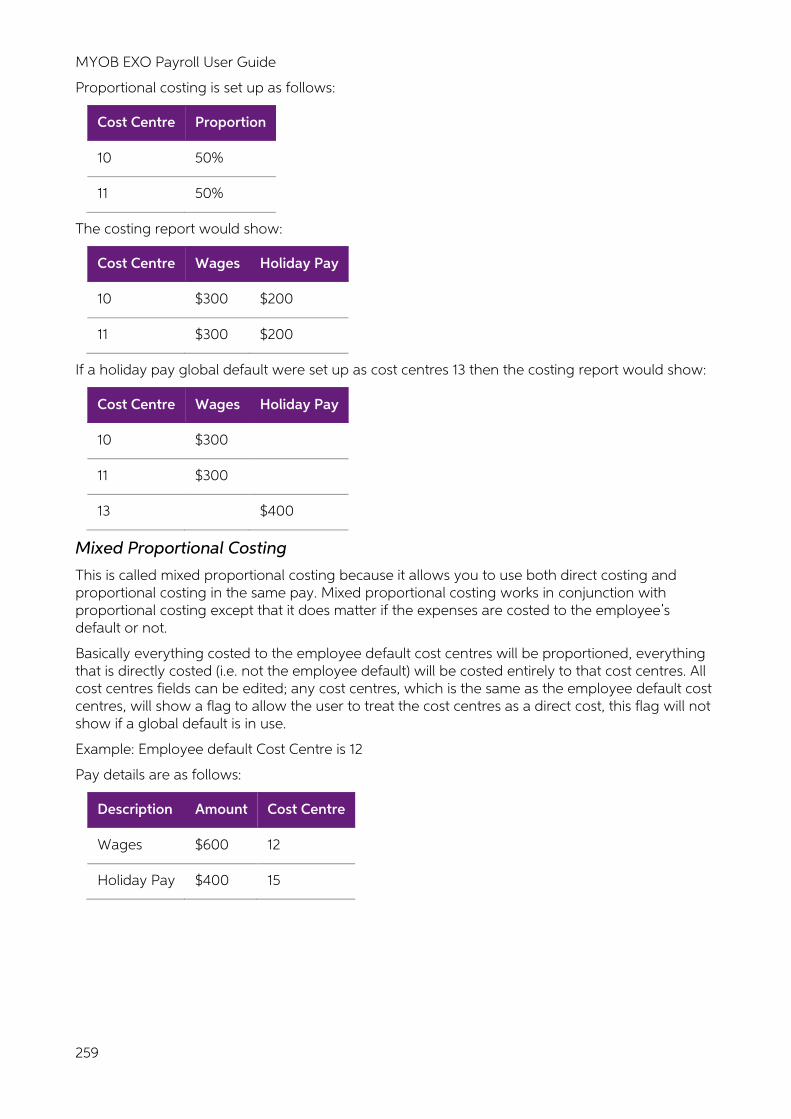
MYOB EXO Payroll User Guide
259
Proportional costing is set up as follows:
Cost Centre Proportion
10 50%
11 50%
The costing report would show:
Cost Centre Wages Holiday Pay
10 $300 $200
11 $300 $200
If a holiday pay global default were set up as cost centres 13 then the costing report would show:
Cost Centre Wages Holiday Pay
10 $300
11 $300
13 $400
Mixed Proportional Costing
This is called mixed proportional costing because it allows you to use both direct costing and proportional costing in the same pay. Mixed proportional costing works in conjunction with proportional costing except that it does matter if the expenses are costed to the employee s default or not.
Basically everything costed to the employee default cost centres will be proportioned, everything that is directly costed (i.e. not the employee default) will be costed entirely to that cost centres. All cost centres fields can be edited; any cost centres, which is the same as the employee default cost centres, will show a flag to allow the user to treat the cost centres as a direct cost, this flag will not show if a global default is in use.
Example: Employee default Cost Centre is 12
Pay details are as follows:
Description Amount Cost Centre
Wages $600 12
Holiday Pay $400 15
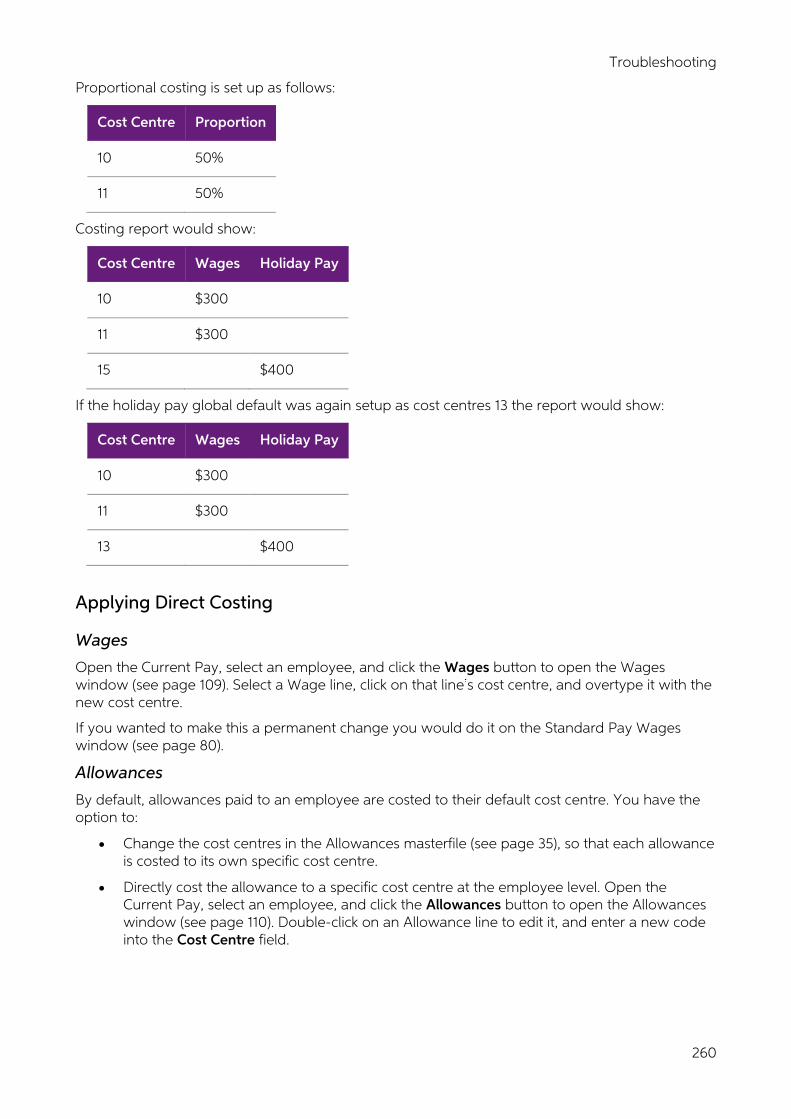
Troubleshooting
260
Proportional costing is set up as follows:
Cost Centre Proportion
10 50%
11 50%
Costing report would show:
Cost Centre Wages Holiday Pay
10 $300
11 $300
15 $400
If the holiday pay global default was again setup as cost centres 13 the report would show:
Cost Centre Wages Holiday Pay
10 $300
11 $300
13 $400
Applying Direct Costing
Wages
Open the Current Pay, select an employee, and click the Wages button to open the Wages window (see page 109). Select a Wage line, click on that line s cost centre, and overtype it with the new cost centre.
If you wanted to make this a permanent change you would do it on the Standard Pay Wages window (see page 80).
Allowances
By default, allowances paid to an employee are costed to their default cost centre. You have the option to:
• Change the cost centres in the Allowances masterfile (see page 35), so that each allowance is costed to its own specific cost centre.
• Directly cost the allowance to a specific cost centre at the employee level. Open the Current Pay, select an employee, and click the Allowances button to open the Allowances window (see page 110). Double-click on an Allowance line to edit it, and enter a new code into the Cost Centre field.
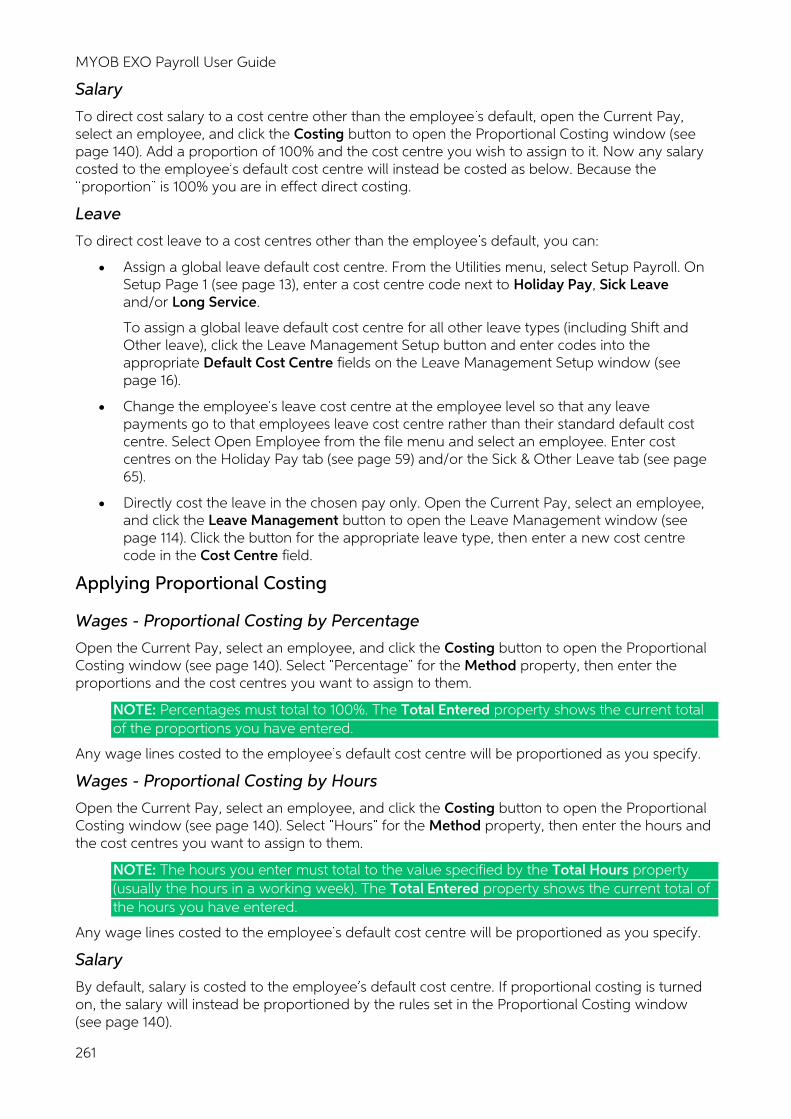
MYOB EXO Payroll User Guide
261
Salary
To direct cost salary to a cost centre other than the employee s default, open the Current Pay, select an employee, and click the Costing button to open the Proportional Costing window (see page 140). Add a proportion of 100% and the cost centre you wish to assign to it. Now any salary costed to the employee s default cost centre will instead be costed as below. Because the proportion is 100% you are in effect direct costing.
Leave
To direct cost leave to a cost centres other than the employee s default, you can:
• Assign a global leave default cost centre. From the Utilities menu, select Setup Payroll. On Setup Page 1 (see page 13), enter a cost centre code next to Holiday Pay, Sick Leave and/or Long Service.
To assign a global leave default cost centre for all other leave types (including Shift and Other leave), click the Leave Management Setup button and enter codes into the appropriate Default Cost Centre fields on the Leave Management Setup window (see page 16).
• Change the employee s leave cost centre at the employee level so that any leave payments go to that employees leave cost centre rather than their standard default cost centre. Select Open Employee from the file menu and select an employee. Enter cost centres on the Holiday Pay tab (see page 59) and/or the Sick & Other Leave tab (see page 65).
• Directly cost the leave in the chosen pay only. Open the Current Pay, select an employee, and click the Leave Management button to open the Leave Management window (see page 114). Click the button for the appropriate leave type, then enter a new cost centre code in the Cost Centre field.
Applying Proportional Costing
Wages - Proportional Costing by Percentage
Open the Current Pay, select an employee, and click the Costing button to open the Proportional Costing window (see page 140). Select Percentage for the Method property, then enter the proportions and the cost centres you want to assign to them.
NOTE: Percentages must total to 100%. The Total Entered property shows the current total of the proportions you have entered.
Any wage lines costed to the employee s default cost centre will be proportioned as you specify.
Wages - Proportional Costing by Hours
Open the Current Pay, select an employee, and click the Costing button to open the Proportional Costing window (see page 140). Select Hours for the Method property, then enter the hours and the cost centres you want to assign to them.
NOTE: The hours you enter must total to the value specified by the Total Hours property (usually the hours in a working week). The Total Entered property shows the current total of the hours you have entered.
Any wage lines costed to the employee s default cost centre will be proportioned as you specify.
Salary
By default, salary is costed to the employee s default cost centre. If proportional costing is turned on, the salary will instead be proportioned by the rules set in the Proportional Costing window (see page 140).
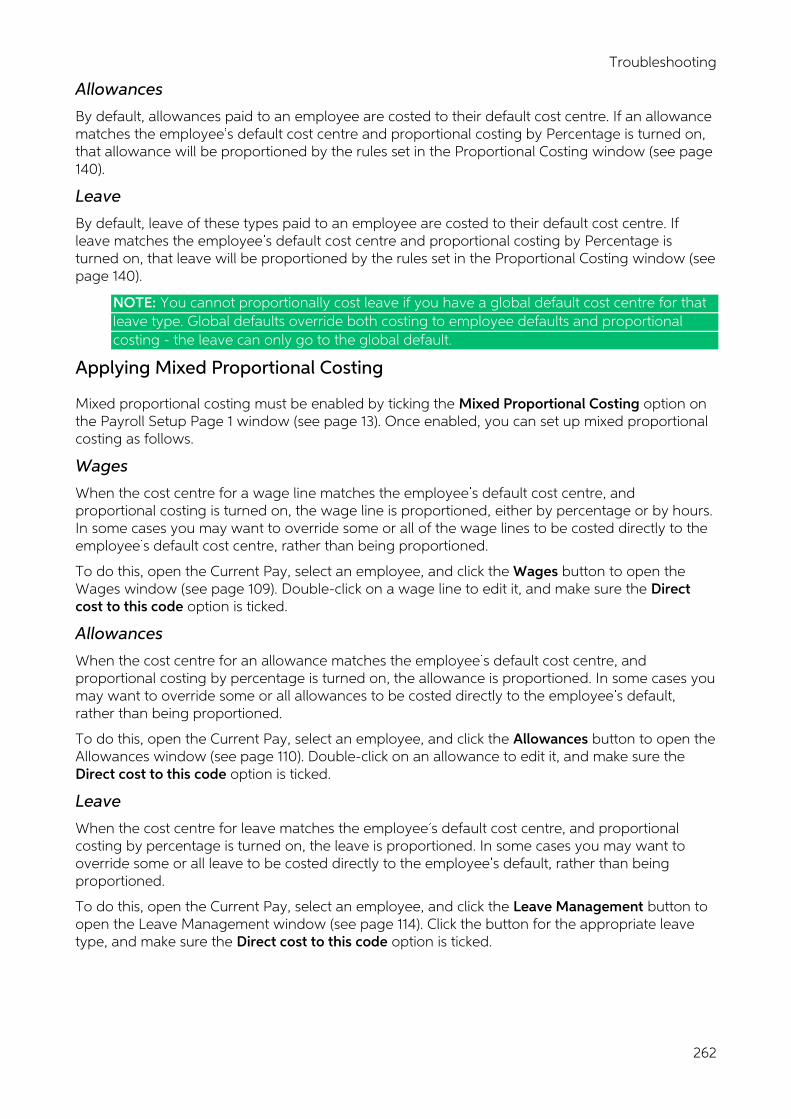
Troubleshooting
262
Allowances
By default, allowances paid to an employee are costed to their default cost centre. If an allowance matches the employee s default cost centre and proportional costing by Percentage is turned on, that allowance will be proportioned by the rules set in the Proportional Costing window (see page 140).
Leave
By default, leave of these types paid to an employee are costed to their default cost centre. If leave matches the employee s default cost centre and proportional costing by Percentage is turned on, that leave will be proportioned by the rules set in the Proportional Costing window (see page 140).
NOTE: You cannot proportionally cost leave if you have a global default cost centre for that leave type. Global defaults override both costing to employee defaults and proportional costing - the leave can only go to the global default.
Applying Mixed Proportional Costing
Mixed proportional costing must be enabled by ticking the Mixed Proportional Costing option on the Payroll Setup Page 1 window (see page 13). Once enabled, you can set up mixed proportional costing as follows.
Wages
When the cost centre for a wage line matches the employee s default cost centre, and proportional costing is turned on, the wage line is proportioned, either by percentage or by hours. In some cases you may want to override some or all of the wage lines to be costed directly to the employee s default cost centre, rather than being proportioned.
To do this, open the Current Pay, select an employee, and click the Wages button to open the Wages window (see page 109). Double-click on a wage line to edit it, and make sure the Direct cost to this code option is ticked.
Allowances
When the cost centre for an allowance matches the employee s default cost centre, and proportional costing by percentage is turned on, the allowance is proportioned. In some cases you may want to override some or all allowances to be costed directly to the employee s default, rather than being proportioned.
To do this, open the Current Pay, select an employee, and click the Allowances button to open the Allowances window (see page 110). Double-click on an allowance to edit it, and make sure the Direct cost to this code option is ticked.
Leave
When the cost centre for leave matches the employee s default cost centre, and proportional costing by percentage is turned on, the leave is proportioned. In some cases you may want to override some or all leave to be costed directly to the employee s default, rather than being proportioned.
To do this, open the Current Pay, select an employee, and click the Leave Management button to open the Leave Management window (see page 114). Click the button for the appropriate leave type, and make sure the Direct cost to this code option is ticked.
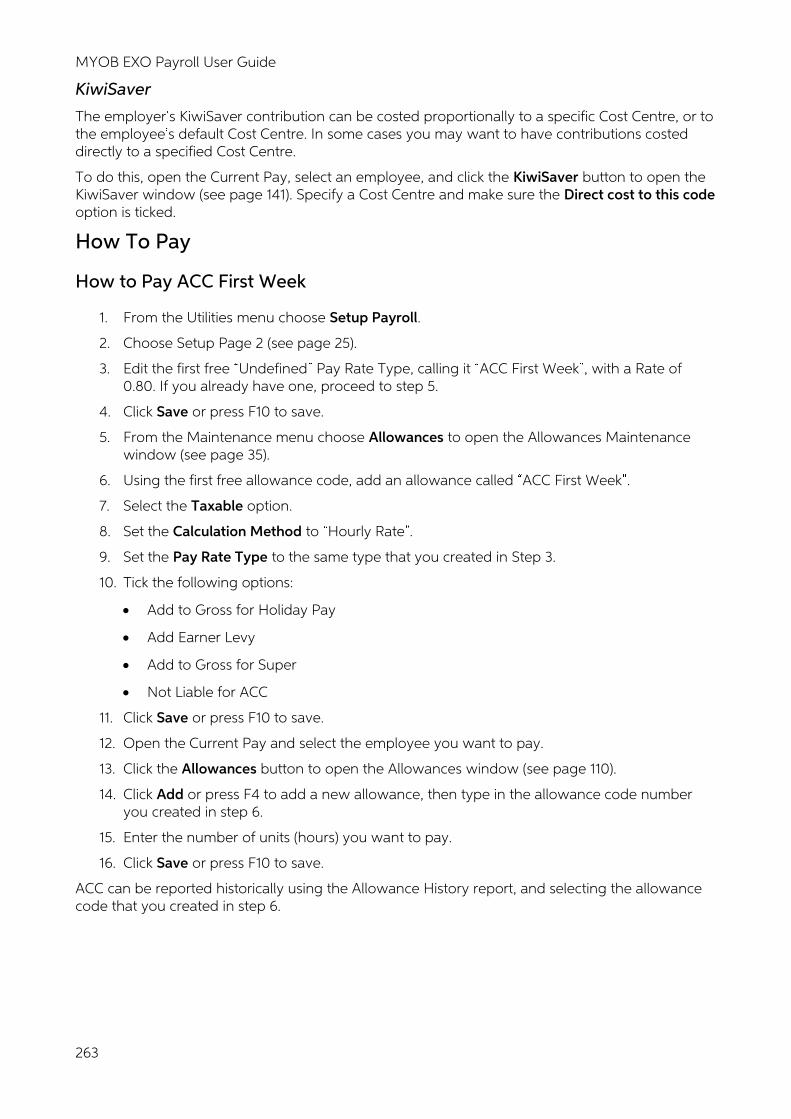
MYOB EXO Payroll User Guide
263
KiwiSaver
The employer s KiwiSaver contribution can be costed proportionally to a specific Cost Centre, or to the employee s default Cost Centre. In some cases you may want to have contributions costed directly to a specified Cost Centre.
To do this, open the Current Pay, select an employee, and click the KiwiSaver button to open the KiwiSaver window (see page 141). Specify a Cost Centre and make sure the Direct cost to this code option is ticked.
How To Pay
How to Pay ACC First Week
1. From the Utilities menu choose Setup Payroll.
2. Choose Setup Page 2 (see page 25).
3. Edit the first free Undefined Pay Rate Type, calling it ACC First Week , with a Rate of 0.80. If you already have one, proceed to step 5.
4. Click Save or press F10 to save.
5. From the Maintenance menu choose Allowances to open the Allowances Maintenance window (see page 35).
6. Using the first free allowance code, add an allowance called ACC First Week .
7. Select the Taxable option.
8. Set the Calculation Method to Hourly Rate .
9. Set the Pay Rate Type to the same type that you created in Step 3.
10. Tick the following options:
• Add to Gross for Holiday Pay
• Add Earner Levy
• Add to Gross for Super
• Not Liable for ACC
11. Click Save or press F10 to save.
12. Open the Current Pay and select the employee you want to pay.
13. Click the Allowances button to open the Allowances window (see page 110).
14. Click Add or press F4 to add a new allowance, then type in the allowance code number you created in step 6.
15. Enter the number of units (hours) you want to pay.
16. Click Save or press F10 to save.
ACC can be reported historically using the Allowance History report, and selecting the allowance code that you created in step 6.
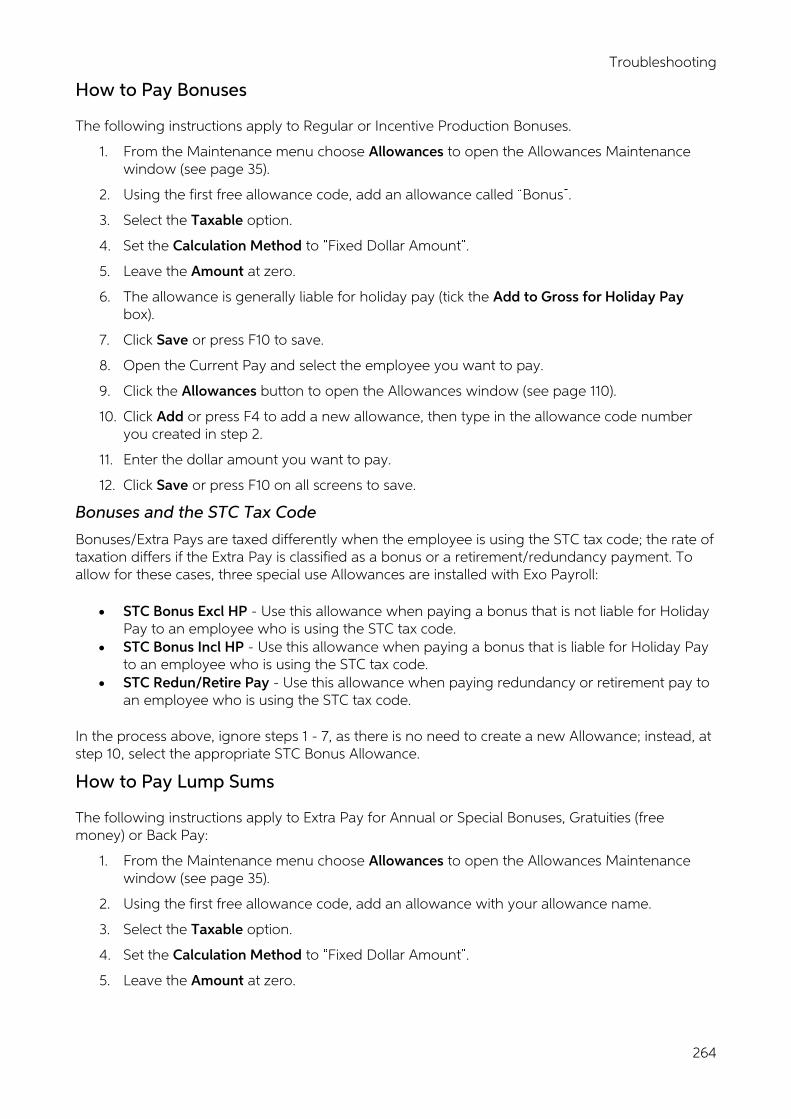
Troubleshooting
264
How to Pay Bonuses
The following instructions apply to Regular or Incentive Production Bonuses.
1. From the Maintenance menu choose Allowances to open the Allowances Maintenance window (see page 35).
2. Using the first free allowance code, add an allowance called Bonus .
3. Select the Taxable option.
4. Set the Calculation Method to Fixed Dollar Amount .
5. Leave the Amount at zero.
6. The allowance is generally liable for holiday pay (tick the Add to Gross for Holiday Pay box).
7. Click Save or press F10 to save.
8. Open the Current Pay and select the employee you want to pay.
9. Click the Allowances button to open the Allowances window (see page 110).
10. Click Add or press F4 to add a new allowance, then type in the allowance code number you created in step 2.
11. Enter the dollar amount you want to pay.
12. Click Save or press F10 on all screens to save.
Bonuses and the STC Tax Code
Bonuses/Extra Pays are taxed differently when the employee is using the STC tax code; the rate of taxation differs if the Extra Pay is classified as a bonus or a retirement/redundancy payment. To allow for these cases, three special use Allowances are installed with Exo Payroll:
• STC Bonus Excl HP - Use this allowance when paying a bonus that is not liable for Holiday Pay to an employee who is using the STC tax code.
• STC Bonus Incl HP - Use this allowance when paying a bonus that is liable for Holiday Pay to an employee who is using the STC tax code.
• STC Redun/Retire Pay - Use this allowance when paying redundancy or retirement pay to an employee who is using the STC tax code.
In the process above, ignore steps 1 - 7, as there is no need to create a new Allowance; instead, at step 10, select the appropriate STC Bonus Allowance.
How to Pay Lump Sums
The following instructions apply to Extra Pay for Annual or Special Bonuses, Gratuities (free money) or Back Pay:
1. From the Maintenance menu choose Allowances to open the Allowances Maintenance window (see page 35).
2. Using the first free allowance code, add an allowance with your allowance name.
3. Select the Taxable option.
4. Set the Calculation Method to Fixed Dollar Amount .
5. Leave the Amount at zero.
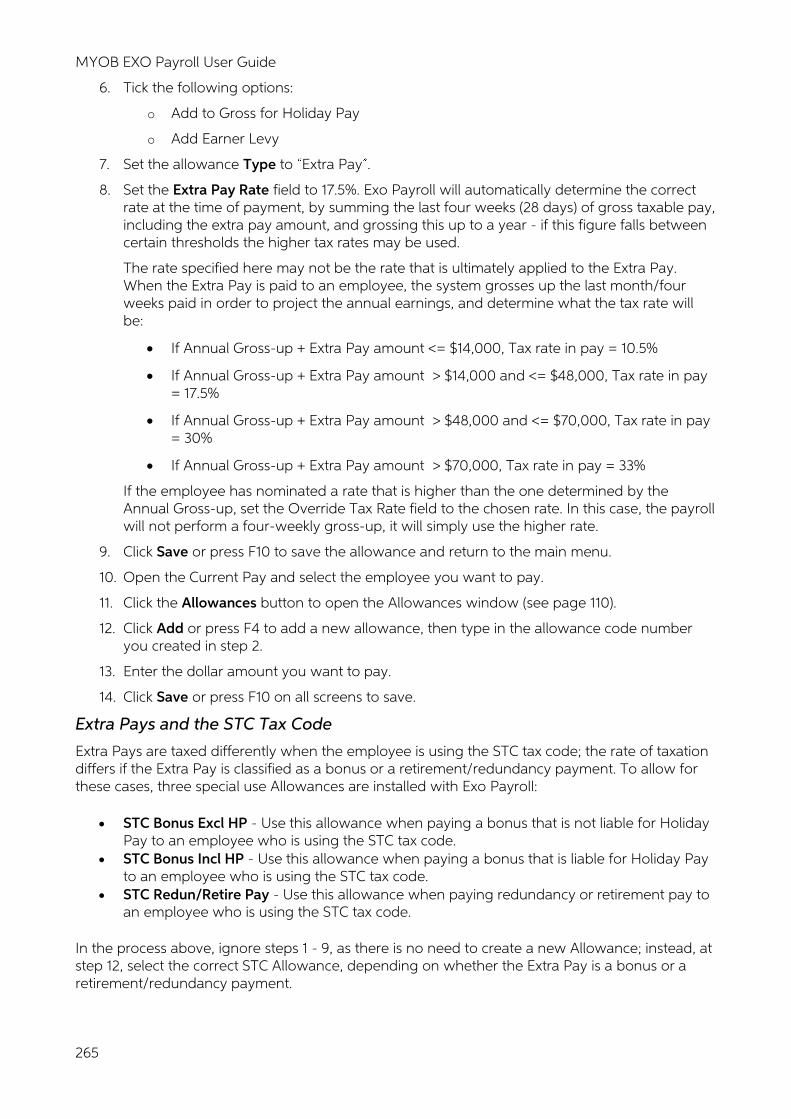
MYOB EXO Payroll User Guide
265
6. Tick the following options:
o Add to Gross for Holiday Pay
o Add Earner Levy
7. Set the allowance Type to Extra Pay .
8. Set the Extra Pay Rate field to 17.5%. Exo Payroll will automatically determine the correct rate at the time of payment, by summing the last four weeks (28 days) of gross taxable pay, including the extra pay amount, and grossing this up to a year - if this figure falls between certain thresholds the higher tax rates may be used.
The rate specified here may not be the rate that is ultimately applied to the Extra Pay. When the Extra Pay is paid to an employee, the system grosses up the last month/four weeks paid in order to project the annual earnings, and determine what the tax rate will be:
• If Annual Gross-up + Extra Pay amount <= $14,000, Tax rate in pay = 10.5%
• If Annual Gross-up + Extra Pay amount > $14,000 and <= $48,000, Tax rate in pay = 17.5%
• If Annual Gross-up + Extra Pay amount > $48,000 and <= $70,000, Tax rate in pay = 30%
• If Annual Gross-up + Extra Pay amount > $70,000, Tax rate in pay = 33%
If the employee has nominated a rate that is higher than the one determined by the Annual Gross-up, set the Override Tax Rate field to the chosen rate. In this case, the payroll will not perform a four-weekly gross-up, it will simply use the higher rate.
9. Click Save or press F10 to save the allowance and return to the main menu.
10. Open the Current Pay and select the employee you want to pay.
11. Click the Allowances button to open the Allowances window (see page 110).
12. Click Add or press F4 to add a new allowance, then type in the allowance code number you created in step 2.
13. Enter the dollar amount you want to pay.
14. Click Save or press F10 on all screens to save.
Extra Pays and the STC Tax Code
Extra Pays are taxed differently when the employee is using the STC tax code; the rate of taxation differs if the Extra Pay is classified as a bonus or a retirement/redundancy payment. To allow for these cases, three special use Allowances are installed with Exo Payroll:
• STC Bonus Excl HP - Use this allowance when paying a bonus that is not liable for Holiday Pay to an employee who is using the STC tax code.
• STC Bonus Incl HP - Use this allowance when paying a bonus that is liable for Holiday Pay to an employee who is using the STC tax code.
• STC Redun/Retire Pay - Use this allowance when paying redundancy or retirement pay to an employee who is using the STC tax code.
In the process above, ignore steps 1 - 9, as there is no need to create a new Allowance; instead, at step 12, select the correct STC Allowance, depending on whether the Extra Pay is a bonus or a retirement/redundancy payment.
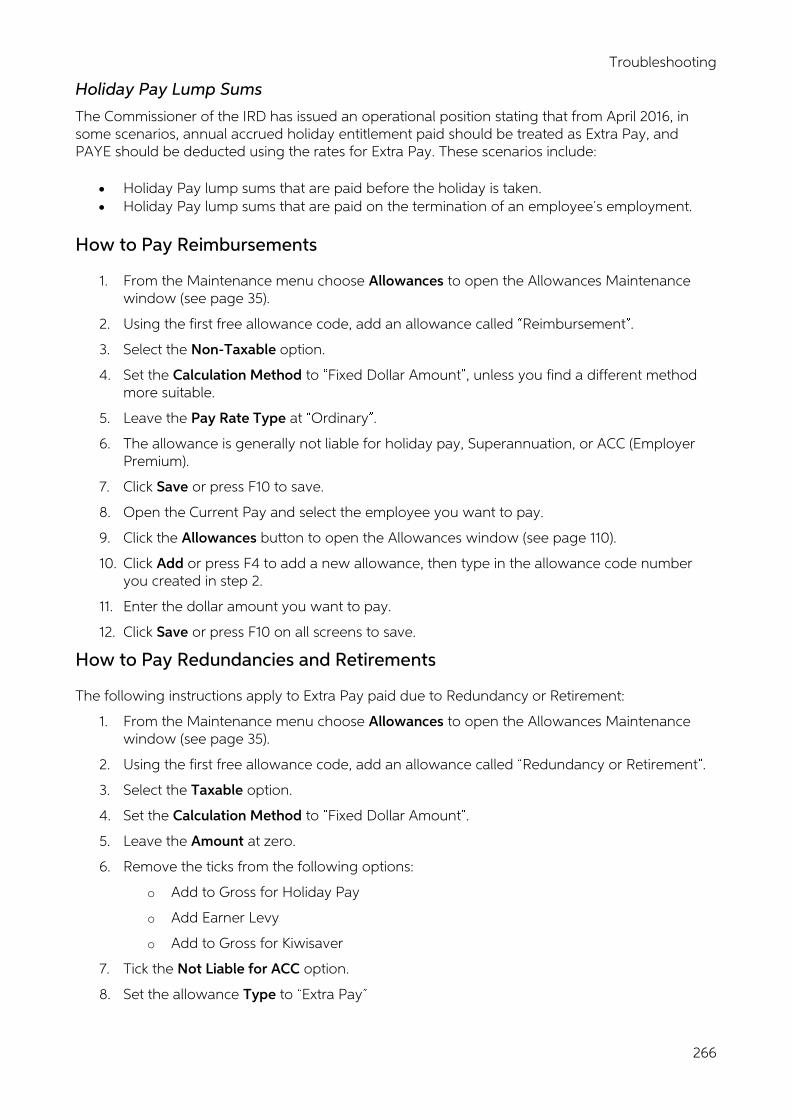
Troubleshooting
266
Holiday Pay Lump Sums
The Commissioner of the IRD has issued an operational position stating that from April 2016, in some scenarios, annual accrued holiday entitlement paid should be treated as Extra Pay, and PAYE should be deducted using the rates for Extra Pay. These scenarios include:
• Holiday Pay lump sums that are paid before the holiday is taken. • Holiday Pay lump sums that are paid on the termination of an employee s employment.
How to Pay Reimbursements
1. From the Maintenance menu choose Allowances to open the Allowances Maintenance window (see page 35).
2. Using the first free allowance code, add an allowance called Reimbursement .
3. Select the Non-Taxable option.
4. Set the Calculation Method to Fixed Dollar Amount , unless you find a different method more suitable.
5. Leave the Pay Rate Type at Ordinary .
6. The allowance is generally not liable for holiday pay, Superannuation, or ACC (Employer Premium).
7. Click Save or press F10 to save.
8. Open the Current Pay and select the employee you want to pay.
9. Click the Allowances button to open the Allowances window (see page 110).
10. Click Add or press F4 to add a new allowance, then type in the allowance code number you created in step 2.
11. Enter the dollar amount you want to pay.
12. Click Save or press F10 on all screens to save.
How to Pay Redundancies and Retirements
The following instructions apply to Extra Pay paid due to Redundancy or Retirement:
1. From the Maintenance menu choose Allowances to open the Allowances Maintenance window (see page 35).
2. Using the first free allowance code, add an allowance called Redundancy or Retirement .
3. Select the Taxable option.
4. Set the Calculation Method to Fixed Dollar Amount .
5. Leave the Amount at zero.
6. Remove the ticks from the following options:
o Add to Gross for Holiday Pay
o Add Earner Levy
o Add to Gross for Kiwisaver
7. Tick the Not Liable for ACC option.
8. Set the allowance Type to Extra Pay

MYOB EXO Payroll User Guide
267
9. Set the Extra Pay Rate field to 17.5%. Exo Payroll will automatically determine the correct rate at the time of payment, by summing the last four weeks (28 days) of gross taxable pay, including the extra pay amount, and grossing this up to a year - if this figure falls between certain thresholds the higher tax rates may be used.
The rate specified here may not be the rate that is ultimately applied to the Extra Pay. When the Extra Pay is paid to an employee, the system grosses up the last month/four weeks paid in order to project the annual earnings, and determine what the tax rate will be:
• If Annual Gross-up + Extra Pay amount <= $14,000, Tax rate in pay = 10.5%
• If Annual Gross-up + Extra Pay amount > $14,000 and <= $48,000, Tax rate in pay = 17.5%
• If Annual Gross-up + Extra Pay amount > $48,000 and <= $70,000, Tax rate in pay = 30%
• If Annual Gross-up + Extra Pay amount > $70,000, Tax rate in pay = 33%
If the employee has nominated a rate that is higher than the one determined by the Annual Gross-up, set the Extra Pay Rate field to the chosen rate. In this case, the payroll will not perform a four-weekly gross-up, it will simply use the higher rate.
10. Click Save or press F10 to save.
11. Open the Current Pay and select the employee you want to pay.
12. Click the Allowances button to open the Allowances window (see page 110).
13. Click Add or press F4 to add a new allowance, then type in the allowance code number you created in step 2.
14. Enter the dollar amount you want to pay.
15. Click Save or press F10 on all screens to save.
Extra Pays and the STC Tax Code
Redundancy/Retirement Extra Pays are taxed differently when the employee is using the STC tax code; the rate of taxation differs if the Extra Pay is classified as a bonus or a retirement/redundancy payment. To allow for these cases, three special use Allowances are installed with Exo Payroll:
• STC Bonus Excl HP - Use this allowance when paying a bonus that is not liable for Holiday Pay to an employee who is using the STC tax code.
• STC Bonus Incl HP - Use this allowance when paying a bonus that is liable for Holiday Pay to an employee who is using the STC tax code.
• STC Redun/Retire Pay - Use this allowance when paying redundancy or retirement pay to an employee who is using the STC tax code.
In the process above, ignore steps 1 - 10, as there is no need to create a new Allowance; instead, at step 13, select the STC Redun/Retire Pay Allowance.
Troubleshooting
268
How to Pay Withholding Payments
You have the option of paying a withholding payment as an allowance, or by setting the employee up on a WT tax code.
As an Allowance:
1. From the Maintenance menu select Allowances to open the Allowances Maintenance window (see page 35).
2. Using the first free allowance code, add an allowance give it a name, e.g. Commission @ 19% .
3. Select the Taxable option.
4. Set the Type to Withholding Payment .
5. Enter the Withholding Tax Rate you want to tax at.
6. The payment is not liable for earner premium and generally not liable for ACC Employer Premium.
7. Click Save or press F10 to save.
8. If paying GST on the withholding payment, add another new allowance using the next free code. Specify a name, e.g. GST @ 15% . Set the Calculation Method to Percentage of Total Gross . Make the payment non-taxable and enter the Percentage Rate of 15.
9. In either the Standard or Current pay, choose your employee, then click the Allowances button to open the Allowances window (see page 110). Add the allowance created in Step 2. If paying the GST portion, also add the allowance created in Step 8.
NOTE: Withholding payments are shown on the IR348 as a separate line for the employee, with tax code WT.
By Tax Code:
1. From the File menu select Open Employee and choose the employee you want to edit.
2. On the Employee Details tab (see page 52) of the Employee Maintenance window, set the employee s Tax Code to WT (Withholding Tax).
3. A Tax Rate field appears below the Tax Code. Specify a tax rate, e.g. 17 for 17%. Withholding Payments are not liable for Earner Premium, so leave the Add Earner Levy option unticked. They do not add to the gross pay when calculating student loan entitlements, so therefore should not have a Student Loan Rate entered.
4. If paying GST on the withholding payment, from the Maintenance menu select Allowances to open the Allowances Maintenance window (see page 35). Add a new allowance using the next free allowance code. Specify a name, e.g. GST @ 15% . Set the Calculation Method to Percentage of Total Gross . Make the payment non-taxable and enter the Percentage Rate of 15.
5. Enter Wages/Salary into the Standard or Current Pay as per usual. All amounts will be taxed at the flat withholding tax rate you specified in step 3, with a GST proportion added to it, if you also add the allowance created in step 4 into the pay.
NOTE: Withholding payments are shown on the IR348 as a separate line for the employee, with tax code WT.
MYOB EXO Payroll User Guide
269
Holiday Pay
About Holiday Pay
Holiday Pay Incrementing
All future activity on this particular screen is handled automatically by the program. As each pay is updated, the system will increment the days entitlement, days paid and days accrued, for the current holiday pay year.
Holiday Rollover
When you update a Current Pay that is dated within one pay period of the employee s holiday anniversary date, that employee s holiday year will roll over. In other words, the accrued days will instead become outstanding days, to indicate that the employee now has an outstanding balance (holiday pay owing). In addition, the accrued days will begin accumulating again, from zero, in recognition of the new holiday pay year.
Holiday Pay Methods
Certain fields in the holiday pay screen will enable/disable, depending on the contents of the leave management setup screen:
• permanent part time / pro-rata method enabled/disabled status • percentage-only method enabled/disabled status • holiday pay groups enabled/disabled status
and also the employee details tab
• salary/wage status • full-time/part time status • permanent/casual status
Because each method only enables fields which are relevant to that method it is necessary to choose the best method for your employee, based on their working and contractual conditions, before entering any data.
Normal (Percentage/Days) Method
This method requires you to estimate the worker s standard working week, and set a 4-week rule based on that (usually 20 days). This is naturally easier to predict for full time workers, and also part-time workers who work a regular number of days per week
By default, the Payroll system calculates holiday pay equivalent to four weeks of holiday pay per year. It does this by storing and accruing two important values at the end of each pay period:
• the days paid for the pay period (up to 5 days) • the amount paid for the pay period (up to 7 days).
The accrual method assumes that one working week equates to (and does not exceed) 5 days. To achieve this, you will need to turn on the Pay Period Valuation method in the Leave Management Setup (see page 13) screen. This will fix the accrual to a standard five day per week. In other words, the holiday accrual will not be allowed to exceed 4 five day weeks of holiday pay.
Points to remember:
• The Payroll accrues over a five day week • The Payroll averages over a five day week to arrive at a daily rate for holiday pay • The Payroll gives four lots of five day weeks (20 days) as an annual entitlement at the end
of the year
Troubleshooting
270
If you were to force the accrual method to exceed 5 days (i.e. turning off Pay Period Valuation), you could run into a situation where:
The accrual is over a six day week
The average is therefore over a six day week
The Payroll gives four lots of five day weeks (20 days) as an annual entitlement at the end of the year. You would have to override the Annual Entitlement to 24 days per year, to make your entitlement rule reflect your accrual and your average calculations. For many employers this is costly and impractical. Add to this the difficulty of estimating whether a six day week is the employee s usual work pattern, in order to qualify for 24 days of holiday pay.
Calculation Example:
Employee A earns $600 working Monday to Saturday, therefore 600 / 6 = 100. This employee occasionally works Saturday for more money.
Employee B earns $600 working Monday to Friday, therefore 600/5 = 120 (Payroll calculation)
It appears that Employee B will get less $20 holiday pay, on average.
This in fact will not be the case.
In Employees A s example he will get 24 days x 100 = 2400.
or he might get 20 days x 100 = 2000, should it be deemed that he did not in general work a six day week.
In Employees B s example he will get 20 days x 120 = 2400.
in effect Exo Payroll s calculation is easier to administer because you don t have to decide how many days are in a standard working week for all of the employees on a case-by-case basis, at the end of the year.
Permanent Part-Time / Pro-Rata
Unlike the Normal method, this calculation does not require you to estimate an employee s standard working week, which in any case is hard to do with employees who work irregular hours.
If an employee does not work set number of days per week, it is recommended that the Permanent Part Time / Pro-Rata holiday pay method be used.
This method applies the number of actual days paid across the year against a full timer s standard working year (usually 260 days), to find a proportion of the year worked. It then applies that same proportion against the full timer s standard yearly entitlement (usually 20 days).
Examples:
Days Paid = 260 Employee receives 260/260
= 1.000 x 205
= 20 entitled days of holiday
Days Paid = 200 Employee receives 200/260
= 0.769 x 20
= 15.38 entitled days of holiday
Days Paid = 130 Employee receives 130/260
= 0.500 x 20
= 10.00 entitled days of holiday
MYOB EXO Payroll User Guide
271
Percentage
Recommended for employees who are employed on a part-time basis, and whose hours/days per week fluctuate over the course of a year, to the point where estimating a standard number of hours/days per week for holiday pay valuation would prove difficult.
Under this method, employees will receive a lump sum of holiday pay as a separate dollar amount (from their wages) at the end of the holiday pay year. This method is not recommended for employees who are expected to work a full year.
If the employee starts out on the Percentage Method and completes a year of service, it is recommended that the employee is transferred to the Normal method (on their first holiday anniversary) and be left on that Method indefinitely.
For this method you have to specify the percentage entitlement that is applied to the gross paid per holiday pay year.
When the entitlement date is reached the employee will receive a percentage or their gross earnings as holiday pay.
Example:
Gross this holiday pay year = 38,000
Annual entitlement % = 8.00
= 38000 x 0.080
= $3040 entitled dollars
Casual
Recommended for employees who have an agreement with the employer to receive holiday pay with their normal pay whenever they are paid. In this instance you would enable the option to Pay Holiday Pay Each Pay
For this method you have to specify the percentage entitlement that is applied to the gross paid per pay.
Examples:
Current pay wages = $500, Entitlement % = 8.00
Employee receives in their pay 500 + (500 x 0.08)
= 500 + 40
= $540 gross taxable earnings
Holiday Pay Calculations
Exo Payroll follows the Holiday Pays Act when calculating an employee s holiday pay value. We have spent a lot of time trying to perfect the way that the holiday pay calculates and we believe there is a way suitable for everyone! The current holiday pay entitlements at any given time are kept in the Holiday Pay tab of the Open Employee screen. We have taken elements of the Holiday Pay act and incorporated them into this screen
The Normal (Percentage/Days) Method & the Average Daily Rate
The law requires a Full-time Employee who has become entitled to Holiday Pay to be paid four weeks of their average weekly earnings or four weeks of an ordinary week s earning at the time they are taking holiday, whichever is the greater. For practical reasons, Employers want to break down the average weekly earnings to the average daily earnings as people often want to take one day or part only of their holidays. This can be achieved by dividing the Gross paid by 260 days, which equals 52 weeks of 5 days and paying a total of 20 days per year of this daily average.
Troubleshooting
272
Employers also have people who fall into the category of Section 17 of the Holiday Pay Act, meaning that employees who have not worked a full year, but intend being full-time and would like to take some part of their holiday in advance of entitlement.
Clause 5 of Section 17 suggests that once the full year has been worked their total holiday pay should be calculated on the same basis as those under section 16. So then we can set up the same calculation method for both categories. (4/52 of Gross or 20/260 of Gross) or if higher (4 x ordinary weekly pay at time of Holiday or 20 x daily average of weekly pay at time Holiday is taken.
Exo Payroll can do this all automatically for you if you are applying the right rules for the individual. But please note the following:
In breaking an average weekly earnings down to a Daily Average Rate for Holiday Pay you must make sure that you are dividing an average weeks pay by the correct number of days.
If you set the entitlement days as 20 days, then you are defining a week s Holiday Pay to have 5 days only regardless of whether a worker earns his weeks earnings over more than 5 days. It is important then to never regard a week for holiday pay calculation purposes as having more than 5 days even when people work 5.5 to 7 days, so that the average daily rate of a weeks pay can be worked out accurately. (Gross divided by 52 weeks divided by 5 days gives the daily average of the weekly average)
If a person sometimes works 4 days and sometimes 6 days per week and the person is a full time person expected to work 52 weeks in a year then it is best to maintain the days worked at 5 days per week. (For holiday calculations a year has 52 weeks of 5 days which = 260 days) To reach a true daily average for the holiday year you do not want the days paid to either exceed or be less than 260 days for the whole holiday year.
The only time the 5 days would be increased would be if extra pay for holidays or Public holiday is being paid and included in the weeks pay before they are actually taken. So that in the end you are still reaching 260 days per year.
The Ordinary Daily Rate vs the Average Daily Rate
Enter the ordinary wages and ordinary days paid for those wages into the Standard Pay.
In paying holiday pay, the system will value a day s worth of holiday pay at the higher of the Ordinary Daily Rate or the Average Daily Rate.
Ordinary Daily Rate
The Ordinary Daily Rate dropdown on the Holiday Pay tab of the Employee Maintenance window (see page 59) provides three options for how the Ordinary Daily Rate is calculated:
• Standard Pay - the Ordinary Daily Rate sums from the Standard Pay (the standard contracted wages + allowances liable for holiday pay in the Standard Pay) and divides by the ordinary days paid over that period. If the Standard Pay is not defined, i.e. the Standard Pay gross is zero, the system will use the 4 Week Average (see below).
• 4 Week Average - the Ordinary Daily Rate is calculated as the gross earnings for the last four weeks divided by the days paid for the last four weeks. This is useful for casual employees who work irregular hours, or employees who have a basic pay but often have extra earnings to be included in the calculation for leave, such as regular overtime or commissions.
• Higher Rate - the Ordinary Daily Rate is the higher of their Standard Pay or 4 Week Average rate. This option can be useful for employees who occasionally work overtime, but mostly work to their Standard Pay, e.g. employees doing seasonal work.

MYOB EXO Payroll User Guide
273
Average Daily Rate
An accrual, which is kept in the Holiday Pay tab of the Open Employee screen. This accrual takes the sum of gross liable for holiday pay and divides by the ordinary days paid, for the last 12 months.
This accrual increments each time a pay is updated. Each increment is calculated as follows:
Sums from the Current Pay, standard contracted wages + allowances liable for holiday pay + weekly overtime wages (week s wages in surplus of the standard wages + weekend s wages) and divides by the ordinary days paid over that period.
There is a clause in the Holiday Pay Act which indicates that the rate of pay may not be less than the rate of the ordinary pay as at the date in which the employee takes leave. If the average daily rate for the year is lower than the current rate of pay, the ordinary daily rate calculation is used instead. This is why both rates should be maintained.
Paying Holiday Pay
There are three basic situations in which you could pay holiday pay:
When the employee has no outstanding entitlement, the system can pay the day in advance of the entitlement, at the higher of the ordinary daily rate or the average daily rate. At end of year rollover, in the holiday pay screen, the system will reduce the accrued entitlement by 1 at the end of the year rollover, so in effect only 20 days are still given in total.
When the employee is terminated, the system can pay the outstanding day at the higher of the ordinary daily rate or the average daily rate plus apply the entitlement percentage to the current year gross liable for holiday pay to date inclusive of the Current Pay and exclusive of the termination value itself, to form a percentage amount
Holiday Pay Units of Measurement
Employees will often want to take their holidays in days rather than weeks. Therefore instead of using average weekly earnings the payroll goes by the average daily earnings. Some companies prefer to pay holiday pay by the hour, the system can cater for this also, see the Holiday Pay Options section of the Leave Management Setup window (see page 16).
Zero Pays
Note that the system will not accrue days paid if the gross amount in the pay is zero. Therefore if there is no pay for an employee he/she will not accrue Days Paid. If an employee goes on leave and they were being paid their normal wages plus three weeks of holiday in the same pay, you would enter 20 days paid at the time of payment and leave the system to accrue 0 days paid for the following three weeks. This is specifically for employees who are away for 1 or more complete weeks.
Effect of Pay Increase
If a person s wages have been increased recently, then their ordinary daily rate will become irrelevant. The Payroll will look at two figures:
• The average daily rate that has been calculating over the last 12 months • The daily rate in the Standard pay. It will decide which is the highest, then multiply this
figure by the days you select to pay
Troubleshooting
274
Employees who do not work for part of the year
Scenario: A person who will only work 46 weeks in the year - they may have school holidays off without pay. This employee could be set up as a Permanent Part Timer and this would give them the right number of days, provided you controlled the number of days, dividing the Holiday pay year correctly in the Current Pay. Alternatively, do not use the Permanent Part-time method but do following:
This person s entitlement can be worked out as follows:
They are entitled to the same proportion of four weeks paid (20 days paid) as the weeks worked is to 52 weeks.
Divide 46 weeks by 52 weeks = percentage of year worked which is 0.8846%
20 day Holiday per year multiplied by 0.8846 % = Percentage of days entitlement which is 17.69 days paid
Or 20 divided by 52 = 0.3846 days accrued per week
Multiply this by weeks worked = 46 x 0.3846 = 17.69
If you know this and set the entitlement days to 17.69 and make pays zero when not paid so the days worked would finally amount to 46 weeks or 230 days. The gross paid will be divided by the days worked to determine the average daily rate: 17.69 days of this rate would be paid which would be equal to 4 weeks of the average weekly pay for a whole year.
If the average daily rate is higher in the Standard Pay due to a recent increase, you will be paying the 17.96 days at this higher rate. If you leave the year s entitlement at 20 days, the payroll will calculate the 20 days at the higher rate.
Doing the above does not mean that the person would not be entitled to being away four weeks or that you are not paying them four weeks of their average weekly pay for the whole year - that is exactly what you are doing, as well as covering the possibility of a higher rate of pay at the time of taking holiday.
Termination Pay
A) For Termination Pay: If a full year has not been worked, 8% of gross will be paid, less any amount already paid.
B) If days are owed from the previous year, these will be paid at the average daily rate for the last 12 months, unless the ordinary daily rate evaluates to be higher, in which case the latter is used. The system will then add any holiday entitlement for the current year from (A) plus 8% of the current leave (excluding the termination value itself).
How to Pay Percentage-Only Staff
To pay a day of holiday pay for a Percentage-only Employee:
1. Ascertain the employee s standard daily rate:
a. From the File menu select Open Employee and choose the employee you want to edit.
b. Select the Standard Pay tab (see page 79) and note the Gross Taxable Earnings figure.
c. Click the Days Paid button and note the number of working days displayed on the Days Paid window (see page 95).
d. Take the Gross Taxable Earnings figure (excluding gross not liable for holiday pay) and divide this by the Days Paid figure to arrive at the standard daily rate.
2. Open the Current Pay and select the employee you want to pay.
MYOB EXO Payroll User Guide
275
3. Click the Leave Management button, then click Holiday Pay to open the Holiday Pay window (see page 116).
4. Enter the dollar amount you want to pay. This would equate to x days at the standard daily rate.
5. Click Save or press F10 to save.
Converting Holiday Pay Units of Measurement
Changing the units of measurement is a setup function:
1. From the Utilities menu, select Setup EXO Payroll and click the Leave Management Setup button.
2. On the Leave Management Setup window (see page 16), select an option for the Pay holiday pay in setting:
• Days - pays holiday pay in daily units and records entitlements in daily units
• Hours - pays holiday pay in hourly units and records entitlements in hourly units
• Mixed - pays holiday pay in daily units and records entitlements in hourly units
To convert Holiday Pay units from days to hours:
1. Open the Employee Maintenance screen and select the Holiday Pay tab (see page 59).
2. Update the Annual Entitlement Days field:
days x hours per standard day = hours entitlement
e.g. 20 x 8 = 120
3. Update the Entitlement Year Outstanding Days value:
days x hours per standard day = hours entitlement
e.g. 5 x 8 = 40
4. Click the Edit Days button to update the Entitlement Year Days Paid and Last 12 Months Days Paid values:
days x hours per standard day = hours paid
e.g. 130 x 8 = 2040
In the Current Pay (or in a One-off Pay):
1. Click the Leave Management Setup button and select the Holiday Pay tab (see page 116).
2. Update the Days field:
days x hours per standard day = hours holiday pay taken
e.g. 3 x 8 = 24
In the Standard Pay, Current Pay, or in a One-off Pay:
1. Click the Days Paid button.
2. Update the value on the Days Paid window (see page 95):
days x hours per standard day = hours paid
e.g. 21.67 x 8 = 173.36

Troubleshooting
276
Relevant Daily Pay Valuation
An area of the Holidays Act that has caused a lot of confusion is the relevant daily pay.
The requirement of a Relevant Daily Pay is to pay an employee the amount they would have received had they worked on the day on which they had sick leave, bereavement, alternative leave, or a public holiday.
For many employees this is not an easy thing to calculate, as they may work highly variable hours. In addition, the relevant daily pay must also factor in commission payments and productivity or incentive based payments and any overtime that the employee would have received had they worked on the day.
For employees with no definable Relevant Daily Pay, an averaging calculation must be used. For Holiday Pay, a 4-week average is used; for all other leave types, the Average Daily Pay (basically a 52-week average) is used.
The 4-week average calculation takes the gross earnings the employee has received in the past four weeks and divides it by the number of physical days worked over the four week period.
The Average Daily Pay is defined as:
The employee s gross earnings for the 52 calendar weeks before the end of the pay period immediately before the calculation is made,
Divided by:
The number of whole or part days during which the employee earned those gross earnings, including any day on which the employee was on a paid holiday or paid leave; but excluding any other day on which the employee did not actually work.
To use an averaging calculation to value an employee s leave:
• For Holiday Pay, select 4 Week Average for the Ordinary Daily/Hourly Rate property on the Holiday Pay tab of the Employee Maintenance screen. (see page 59)
• For all other leave types, select Average Daily Pay for the Relevant Hourly Rate Method property on the Sick & Other Leave tab of the Employee Maintenance screen (see page 65).
To assist with the calculation, Exo Payroll includes a new field in the current pay that records the physical days worked in a pay period.
This field is called Days Paid for Relevant Daily Rate if you are working in days, or Hours Paid for Relevant Daily Rate if you are working in hours. It only appears for employees that are set to the Average Daily Pay Relevant Hourly Rate Method in the Sick & Other Leave tab.
MYOB EXO Payroll User Guide
277
Days paid for Relevant Daily Rate This field should represent the number of physical days that the employee has worked on in the pay period.
Any portion of a day worked should be counted as 1 day.
For example, if an employee has worked 5 full days and 1 half day you would enter 6.
When paying sick leave, bereavement leave, alternative leave or public holidays the rate is broken down to an hourly amount by dividing the average day amount by the hours per standard day value.
Even if your employees are working highly variable hours you would still define an hours per standard day value.
If you are unsure of what value to use enter 8 (this value is defined in the employee maintenance holiday pay screen).
When paying a full day of sick leave, bereavement leave, alternative leave or public holiday you would enter the hours per standard day amount as the number of hours to pay.
If you wanted to pay half a day, then enter half the hours per standard day value as the hours to pay.
To pay the employee their relevant daily pay for 1 day of sick leave, bereavement leave, public holiday or alternative leave you would enter 8 hours (the hours per standard day amount).
The hours per standard day value now appears on the leave payment screen for sick, bereavement and public holidays so you can see how many hours to enter when paying leave to get the average day amount.
Editing Relevant Days Paid History
On upgrade to the new version, Exo Payroll will populate the physical days worked history with the values from the regular days paid history.
In the case of employees using the permanent part time / pro-rata holiday accrual, the days paid for holiday pay should already represent the physical days worked amount.
You should not need to edit the data for these employees.
For employees that are using an averaging calculation for their relevant rate and are set to a full time holiday accrual you may need to edit the physical days worked history.
To edit the history use the Edit Days button next to the relevant rate selection.
The button will only appear when the Average Daily Pay method is selected.
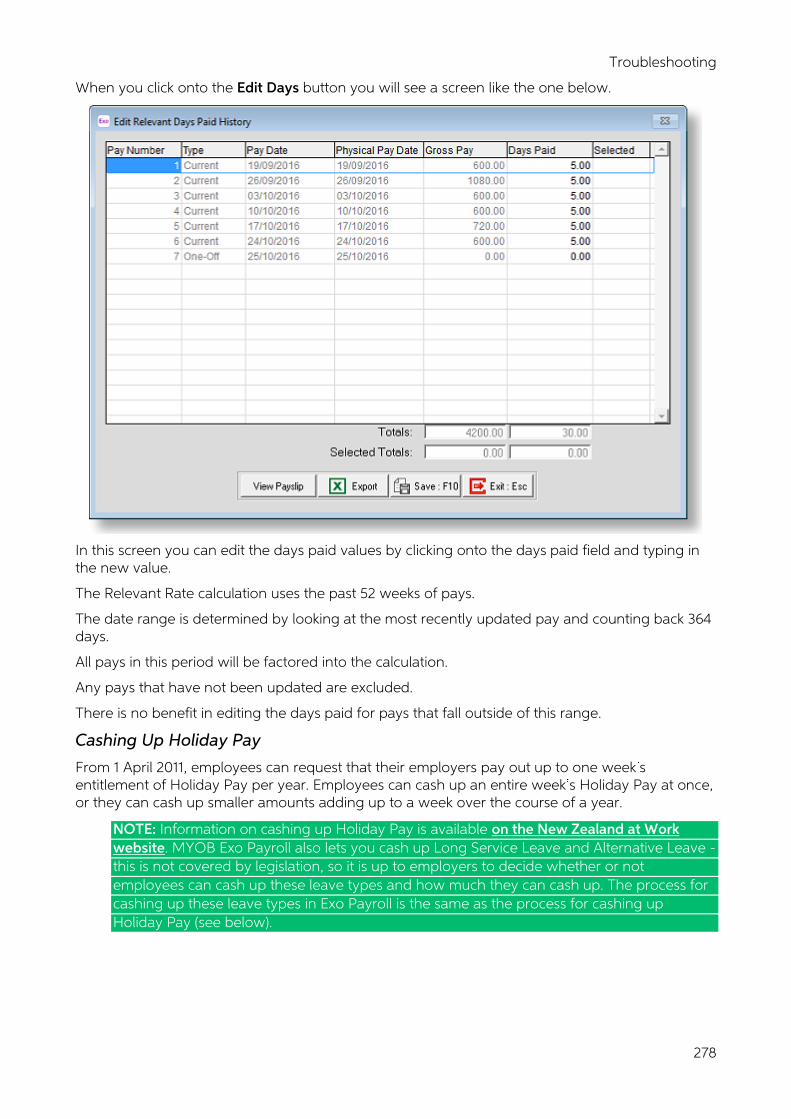
Troubleshooting
278
When you click onto the Edit Days button you will see a screen like the one below.
In this screen you can edit the days paid values by clicking onto the days paid field and typing in the new value.
The Relevant Rate calculation uses the past 52 weeks of pays.
The date range is determined by looking at the most recently updated pay and counting back 364 days.
All pays in this period will be factored into the calculation.
Any pays that have not been updated are excluded.
There is no benefit in editing the days paid for pays that fall outside of this range.
Cashing Up Holiday Pay
From 1 April 2011, employees can request that their employers pay out up to one week s entitlement of Holiday Pay per year. Employees can cash up an entire week s Holiday Pay at once, or they can cash up smaller amounts adding up to a week over the course of a year.
NOTE: Information on cashing up Holiday Pay is available on the New Zealand at Work website. MYOB Exo Payroll also lets you cash up Long Service Leave and Alternative Leave - this is not covered by legislation, so it is up to employers to decide whether or not employees can cash up these leave types and how much they can cash up. The process for cashing up these leave types in Exo Payroll is the same as the process for cashing up Holiday Pay (see below).

MYOB EXO Payroll User Guide
279
Setting Up
All cashed up leave is paid as an Allowance. Default Holiday Pay Cash-Up , LSL Cash-Up and ALT Leave Cash-Up Allowances are installed with Exo Payroll; if necessary, these Allowances can be edited.
NOTE: Holiday Pay cannot be cashed up if the Mixed method of paying Holiday Pay is used. The Pay Holiday pay in setting on the Leave Management Screen must be set to Days or Hours .
How to Cash Up Leave
Employees must request a Holiday Pay cash up in writing. The employer can accept or decline the request, but must respond in writing within a reasonable time.
The Leave Cash-up Consent Form report, available at Select Report > Employees (see page 176), can be printed out and used as a combined request/approval form.
NOTE: These steps are required for Holiday Pay - for other leave types, employers can decide on their own processes.
Once the cash up request is accepted, the cash up can be added to the Current Pay, or a One Off Pay can be created.
To add a leave cash up to a pay:
1. Open the pay and select the employee you want to pay.
2. Go to the Leave Management screen, then open the Holiday Pay screen (see page 116), the Long Service Leave screen (see page 134), or the Alternative Leave screen (see page 130), depending on the type of leave being cashed up.
3. Enter the amount of leave to cash up into the Cash Up field.
NOTE: Employees cannot cash up more than one week s Holiday Pay in a single year. Exo Payroll checks that employees are not cashing up more Holiday Pay than they are currently owed; however, it is up to the employer to ensure that employee doesn t cash up more than one week of leave in a year. Employees must have been employed for more than one year to be entitled to Holiday Pay - cash-ups are not allowed for employees who have been employed for less than one year.
4. The Amount is calculated automatically. If this amount needs to be overridden, tick the Override box and enter the new amount.
5. Click Save or press F10 on all screens to save.
Cashing up leave causes an Allowance to be added to the employee s pay. This Allowance is read-only, with the exception of the Cost Centre - to change the cash up amount, you must edit it from the relevant leave screen in the Current Pay.
Troubleshooting
280
Mandatory Holiday Closedowns
Companies may require that employees take leave during a company closedown period, e.g. over Christmas. Normally, this is paid as Holiday Pay as normal; however, employees who have not yet reached an entitlement to four weeks annual leave must be treated differently. Under the Holidays Act 2003, employers are required to pay out 8% Holiday Pay to any such employees who are made to take annual leave over a closedown period. MYOB Exo Payroll has features that allow these payments to be made.
Setting Up
To enable support for paying Holiday Pay over closedown periods, tick the Enable Closedown Holiday Pay option on the Leave Management Setup window (see page 16). Ticking this option activates the Holiday Closedown section on the Holiday Pay section of the Current Pay (see page 116).
How to Pay Holiday Pay over a Closedown Period
To pay an employee:
1. Open the pay and select the employee you want to pay.
2. Go to the Leave Management screen, then open the Holiday Pay screen (see page 116).
3. Click the Closedown % only Holiday Pay Wizard button. The Closedown % only Holiday Pay Wizard (see page 123) opens.
4. Check the values on the first screen of the wizard. These should not need to be changed, but you can make adjustments if necessary, e.g. change the Current Year Percentage Rate value from 8% if the employee s contract specifies a higher value.
5. Click Next.
6. On the second screen of the wizard, review the calculated Holiday Pay value. If you want to change this value, tick the Make Manual Adjustment box and enter the adjustment amount. To adjust the amount up, enter a positive value; to adjust the amount down, enter a negative amount.
7. Click Finish.
8. A Closedown % Only Holiday Pay Summary report is generated. Click Yes to view the report or No to return to the Holiday Pay screen without viewing it.
Once the wizard has been completed, the employee s pay is updated as follows:
• The calculated Holiday Pay is added to the employee s pay as a Closedown HP Allowance, which can be seen on the Allowances (see page 110) window.
• When the pay is updated, the employee s entitlement date (as displayed on the Holiday Pay tab of the Employee Maintenance window (see page 59)) will be updated to one year from the pay s Pay Period End Date.
MYOB EXO Payroll User Guide
281
How To Deduct
How to Deduct Child Support Payments
1. From the Maintenance menu choose Deductions to open the Deductions Maintenance window (see page 43).
2. Using the first free deduction code, add a deduction called Child Support .
3. Ensure that the Post-Tax Deduction checkbox is ticked.
4. Set the Calculation Method to Fixed Dollar Amount .
5. Leave the Amount at zero.
6. Set the Type to Child Support .
7. Set the Protected Pay % field to 60. This deduction should not be made if it causes the Net Pay to reduce below the stated percentage.
8. Select the Make Part Deduction option. In cases where earnings fluctuate to such a degree that the net pay is not sufficient to leave 60% of the pay remaining, a part deduction will be applied.
9. Click Save or press F10 to save.
10. From the File menu select Open Employee and choose the employee you want to edit.
11. Select the Standard Pay tab and click the Deductions button to open the Deductions window (see page 86).
12. Add the deduction created in step 2. Specify the dollar amount which is to be deducted each pay period.
13. If, during the Current Pay, the deduction amount varies from the norm, you will need to edit the Current Pay. Select your employee, choose the Deductions window (see page 113), edit the deduction amount and assign one of the following variance codes:
• C = Ceased Employment - If an employee stops working for you, deduct child support from the last full pay you gave them and from any holiday pay due. Enter code C so that the IRD can remove the employee from your records. Do not use this variation code if the employee stops then restarts working for within the same month.
• A = Advanced Payment - If an employee is paid in advance (say if they are on holiday during the next payday) deduct child support from the advance as though you are paying the employee on the usual payday. Then add this to the other child support deductions for the period when the employee was given the advance pay. The child support deducted will be more than usual for that period, so enter A as the variation code.
• P = Protected Earnings - If the employee s earnings are lower than usual, you may not be able to deduct the full child support requested due to the net protected earnings rule. In this case, enter P as the variation code.
• S = Short Term Absence - If the employee is off work on unpaid leave for a short period of time and you cannot deduct any or all of the amount requested, enter S as the variation code.
• D = Deducted previously - If the full amount of child support hasn t been deducted from an employee s wages because you previously made an advance payment, the child support will be less for that period, so enter D as the variation code.
Troubleshooting
282
• O = Other - Enter O if none of the other variation codes explain why the amount of child support deducted is different from what was expected.
14. Click Save or press F10 to save.
How to Deduct Student Loan Repayments
Student loan deductions are included as part of PAYE, which is handled by the tax codes.
From the File menu select Open Employee and choose the employee you want to edit. The employee s Tax Code is displayed on the Employee Details tab (see page 52).
• If your employee is on code M, set the Tax Code to M SL . • If your employee is on code ME, set the Tax Code to ME SL . • If your employee is on code S, set the Tax Code to S SL . • If your employee is on code SB, set the Tax Code to SB SL . • If your employee is on code SH, set the Tax Code to SH SL . • If your employee is on code ST, set the Tax Code to ST SL .
By default, Student Loan repayments are calculated at a rate of 12% on income over the pay period repayment threshold for primary employment earnings. For secondary income, Student Loan repayments are calculated at a rate of 12% on the gross payment of salary or wages, i.e. the repayment threshold does not apply.
If you need to deduct repayments at a specific percentage, you can specify a value in the Student Loan Rate field on the Employee Details tab. This field is only available when a Tax Code ending in SL is selected. For example, if the employee has applied for and been issued with a Special Deduction Rate certificate, they can have their Student Loan deductions taken at a rate lower than 12%.
NOTE: If you need to make additional Student Loan repayments (see page 282), do not alter the Student Loan Rate; instead use the SLCIR or SLBOR settings.
Alternatively, you can override the PAYE amount:
1. From the File menu select Open Employee and choose the employee you want to edit.
2. Select the Standard Pay tab and click the PAYE button to open the PAYE window (see page 90).
3. Select the Override PAYE option and enter dollar amounts.
4. Click Save or press F10 to save.
If you increase the student loan deduction, you must also increase the tax by the same amount. If the gross taxable varies between pay periods, you will have to override the PAYE in each Current Pay.
Additional Repayments
Employees may make additional Student Loan repayments, either voluntarily to repay their loan faster, or because they have been required to by Inland Revenue. Additional repayments are made under a separate tax code: SLBOR for voluntary repayments and SLCIR for compulsory repayments.
NOTE: It is possible for an employee to make deductions under both the SLCIR and SLBOR tax codes at the same time.
MYOB EXO Payroll User Guide
283
Voluntary Repayments
Student Loan borrowers can choose to make additional deductions to pay off their loan quicker. The borrower must inform their employer that they want to make additional deductions; the employer must then set up these deductions using the SLBOR tax code:
1. Open the Employee Maintenance window for the employee.
2. If the employee is not already using a Student Loan tax code (one that ends in SL ), select the appropriate code for them. When a Student Loan tax code is selected, extra options relating to Student Loans appear.
3. Click the editing button next to the SLBOR tick box. The SLCIR/SLBOR Settings window appears with the SLBOR tab selected.
4. Tick the Apply SLBOR box to enable additional repayments under the SLBOR tax code.
5. Tick Make a part deduction if the employee wants to make a part deduction in cases where their Net Pay isn t sufficient to cover the full amount of the deduction. (If this box is not ticked, and the employee s pay does not cover the deduction amount, no deduction will be made.)
6. Select a deduction method:
• Choose Fixed Dollar Amount to deduct a set amount each pay period.
• Choose % of Gross Pay to deduct a set percentage of the employee s Gross Pay each pay period.
• Choose % of Gross Pay over Threshold to deduct a set percentage of the portion of the employee s Gross Pay that is over the student loan repayment threshold each pay period.
7. Enter the amount or rate to deduct.
8. Click Save.
Compulsory Repayments
If a Student Loan borrower has fallen behind in their repayments, Inland Revenue may decide to recover the shortfall via additional deductions. In this case, Inland Revenue will notify the borrower and the employer that additional deductions are required, and provide information detailing the rate that the additional deductions should be made at, and the total amount to be recovered. The employer must then set up these deductions using the SLCIR tax code:
1. Open the Employee Maintenance window for the employee.
2. If the employee is not already using a Student Loan tax code (one that ends in SL ), select the appropriate code for them. When a Student Loan tax code is selected, extra options relating to Student Loans appear.
3. Click the editing button next to the SLCIR tick box. The SLCIR/SLBOR Settings window appears with the SLCIR tab selected.
4. Tick the Apply SLCIR box to enable additional repayments under the SLCIR tax code.
5. If the employee is using the STC tax code, an Ignore Threshold checkbox will be available. Inland Revenue will specify whether or not the student loan repayment threshold should be applied or ignored; set this checkbox accordingly.
6. Enter the rate to deduct additional repayments at, as specified by Inland Revenue. The rate entered here is the percentage of the employee s gross earnings, and will be between 1% and 5%. Inland Revenue may specify the rate as a percentage of the normal Student Load repayment, in which case you should enter the equivalent rate as per the table below:
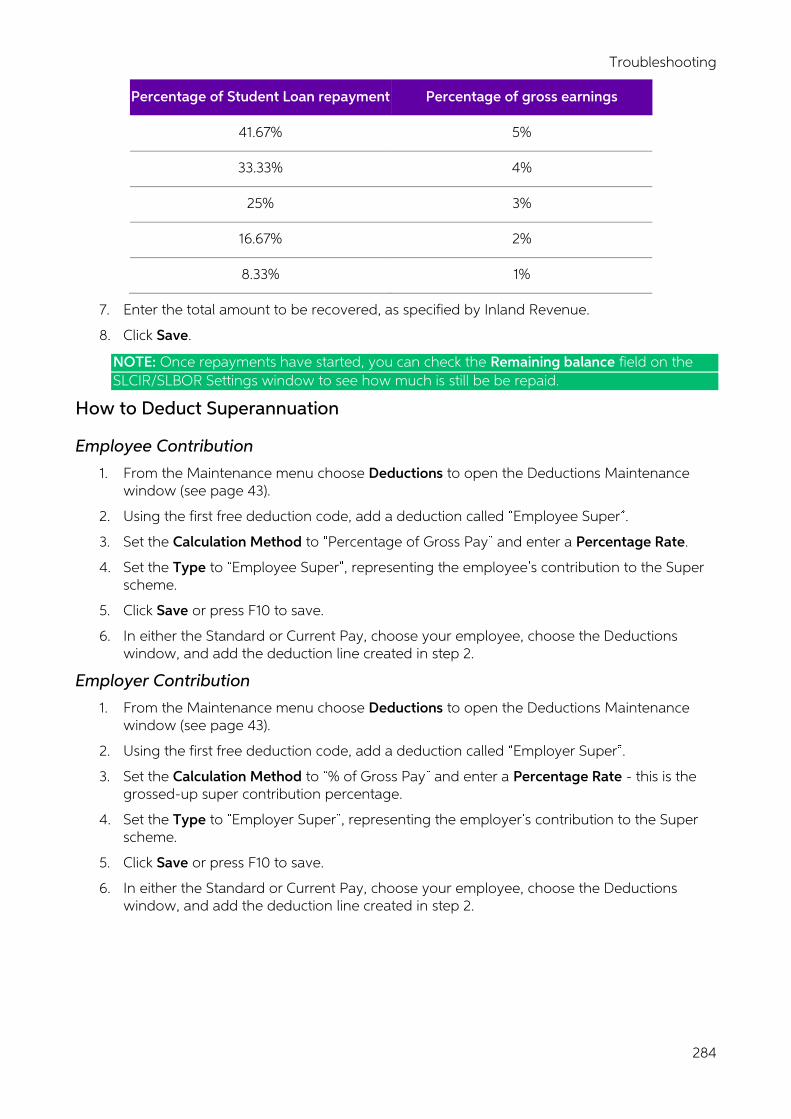
Troubleshooting
284
Percentage of Student Loan repayment Percentage of gross earnings
41.67% 5%
33.33% 4%
25% 3%
16.67% 2%
8.33% 1%
7. Enter the total amount to be recovered, as specified by Inland Revenue.
8. Click Save.
NOTE: Once repayments have started, you can check the Remaining balance field on the SLCIR/SLBOR Settings window to see how much is still be be repaid.
How to Deduct Superannuation
Employee Contribution
1. From the Maintenance menu choose Deductions to open the Deductions Maintenance window (see page 43).
2. Using the first free deduction code, add a deduction called Employee Super .
3. Set the Calculation Method to Percentage of Gross Pay and enter a Percentage Rate.
4. Set the Type to Employee Super , representing the employee s contribution to the Super scheme.
5. Click Save or press F10 to save.
6. In either the Standard or Current Pay, choose your employee, choose the Deductions window, and add the deduction line created in step 2.
Employer Contribution
1. From the Maintenance menu choose Deductions to open the Deductions Maintenance window (see page 43).
2. Using the first free deduction code, add a deduction called Employer Super .
3. Set the Calculation Method to % of Gross Pay and enter a Percentage Rate - this is the grossed-up super contribution percentage.
4. Set the Type to Employer Super , representing the employer s contribution to the Super scheme.
5. Click Save or press F10 to save.
6. In either the Standard or Current Pay, choose your employee, choose the Deductions window, and add the deduction line created in step 2.
MYOB EXO Payroll User Guide
285
Example
A super scheme says that the employer is to contribute 7% of the employees gross earnings towards a super fund.
Employee earns $1000
1000 x .07 = $70 = net super contribution
Assuming that ESCT = 33% of the gross super contribution (otherwise definable in the Open Employee screen), the ESCT calculation is as follows:
ESCT rate/(1 - ESCT rate) x NET Contribution
= .33/(1 - .33) x 70
= .33/.67 x 70
= .49253731 x 70
= 34.4776
NET contribution + ESCT = Gross contribution
70 + 34.4776 = 104.4776
Find out what percentage of the gross pay is the gross contribution, in order to apply a % of gross pay rate of deduction.
= 104.4776/1000 x 100/1
= 10.45 % (2.d.p.)
Application of the Percentage Rate at time of pay:
Gross in Current Pay = $1500
Gross contribution
= $1500 x .1045
= $156.75
Final Result in Reports:
GROSS contribution - ESCT = NET contribution
156.75 - (156.75 x .33) = NET contribution
156.75 - 51.7275 = 105.02

Troubleshooting
286
Incorrect Pays
Incorrect PAYE/Taxation
Points to check if PAYE is incorrect:
• Check the version number of the payroll. You will find this on the About screen (press F11). If you suspect that you are running an old version, you will need to contact MYOB for an upgrade or upgrade online (see page 170). You should receive at least one upgrade whenever tax legislation changes.
• Check the Override PAYE option on the PAYE window of the Standard Pay (see page 90) and Current Pay (see page 140); if this has been turned on then the payroll will not be able to calculate the PAYE correctly.
• Check that the pay date is correct. The payroll uses the physical payment date, not the pay period end date, to calculate taxation. This means pays dated with physical payment dates beyond the date of the last change in tax regulations may use different tax rates than those in force currently.
• Check the employee has the correct tax code. Student loan tax codes are M SL, ME SL, S SL, SB SL, SH SL, ST SL and STC.
• Check whether or not Earner Premium is turned on.
• If taxing holiday pay, check how many periods the money is being taxed over.
• Check the employee s pay frequency is correct.
• If paying withholding payments or extra pay, check that these have the correct flat tax rate assigned.
• Check the gross earnings liable for PAYE.
• Remember to use Adjust By Last Pay if correcting overpayments or underpayments in a one-off pay.
• Enter the components of the pay screen into the PAYE Calculator and compare them.
• Verify that any allowances paid should be taxable or non-taxable.
• Verify that any deductions paid should be post-tax or pre-tax.
• If paying a extra pay, in some circumstances the payroll will force the high rate of 33% instead of the low rate of 21%.
• Check whether the Current Payment, once grossed up to a year, does not exceed the maximum earnings liable for Earner Premium. The payroll will only calculate Earner Premium on the proportion of the pay which is liable for Earner Premium. It calculates this at the time of payment.
• When reversing a pay for an employee who is making voluntary Student Loan repayments using the SLBOR tax code, you may need to manually override the amount of PAYE and SLBOR on the PAYE screen.
• When reversing a pay for an employee who at one time had SLCIR activity and has since settled their SLCIR repayments, you may find that a negative transaction appears for SLCIR. To suppress this negative transaction and/or lines for negative SLCIR activity in the IR348, you can either override the PAYE/SLCIR amount to zero, or turn off the Apply SLCIR option in the SLCIR employee s setup screen, until further notice.
MYOB EXO Payroll User Guide
287
Incorrect Pay Dates
If a pay has been opened or has fallen into the wrong date or you want to change the Current Pay date you must first update the open pay.
Before updating the pay you must go through each employee in the Current Pay (see page 105) and click the Reset button, then choose the Clear this employee s Current Pay option - this will make the employee s pays zero.
After clearing the pay, print a Pay Sheet (see page 145) to make sure that the totals are zero.
Then update the pay as you normally would, taking a backup.
The period ending date will have rolled over; if this is not the date you want to use for your next pay, you are able to change it before creating and opening the pay.
To do this you must type in the new date in the pay period ending box before you select the Create New Pay button.
NOTE: Once the pay is open, the date cannot be changed and the pay cannot be deleted.
How to Reverse a Pay Using a One-Off Pay
1. From the Pay menu, select One-Off Pay. The One Off Pay window (see page 155) appears.
2. Select the appropriate Pay Period for the employee(s) you to put in the one off pay.
3. The Pay Period End Date will default to today s date. You may choose to alter this date so that the one off pay falls into the correct period for reporting purposes.
NOTE: If you are processing a negative one off pay, remember to make the pay period end date the same as the original pay that you processed for the employee(s).
4. The Physical Pay Date will default to today s date. You may choose to alter this date so that it represents the actual day on which the employee is to be paid. This in turn will alter the Payment Due Date for any direct credits belong to this pay.
5. The Copy Standard Pay setting tells the system whether or not to copy transactions, such as standard wages and salary, from the standard pay to the one off pay. Not recommended tor reversal pays.
NOTE: The employee s How Paid settings will be copied from the Standard Pay to the one off pay, regardless of the Copy Standard Pay setting. This is to ensure that the employee is still paid via their normal method, e.g. cash/cheque/direct credit, regardless of the dollar value of their pay.
6. The Pay Number will be automatically generated for you, and cannot be altered manually.
7. To create the one off pay click the Make One Off Pay option. You are asked Pay all employees of this frequency? If you want to create a pay with all employees of the specified frequency i.e. Weekly then select Yes; otherwise select No.
8. After the pay is opened the, Calculate Pay button is available. Clicking this button opens the employee lookup window.
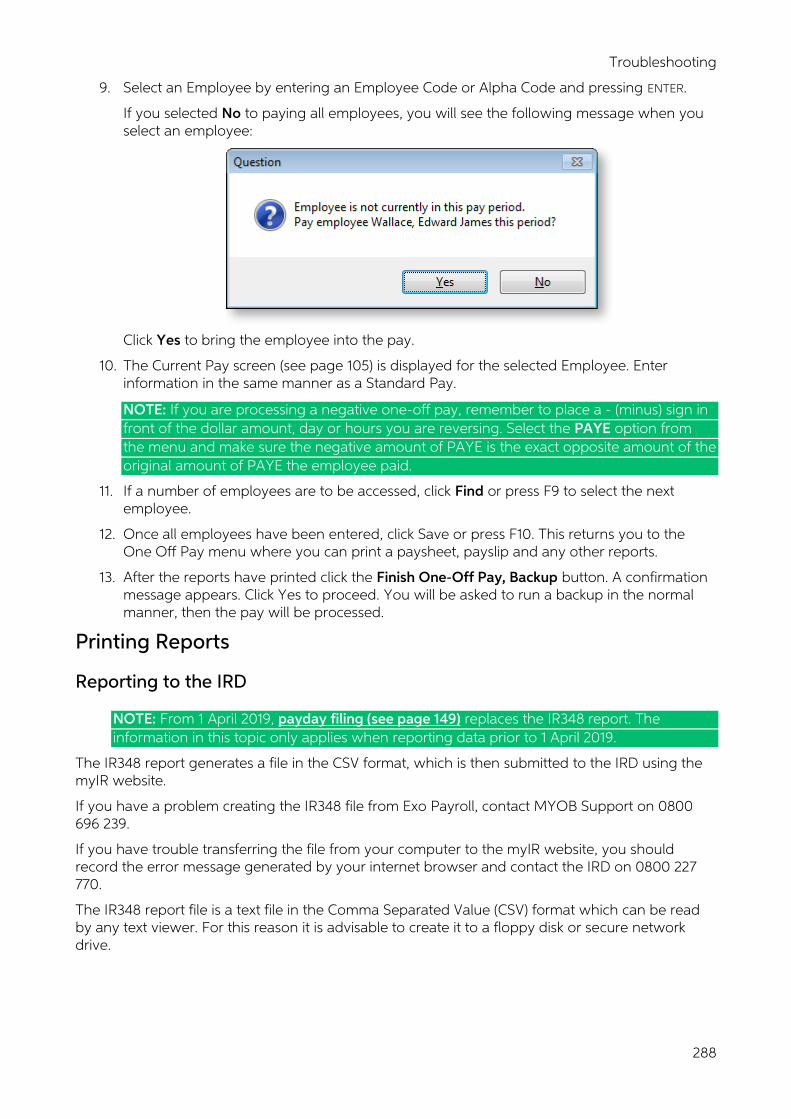
Troubleshooting
288
9. Select an Employee by entering an Employee Code or Alpha Code and pressing ENTER.
If you selected No to paying all employees, you will see the following message when you select an employee:
Click Yes to bring the employee into the pay.
10. The Current Pay screen (see page 105) is displayed for the selected Employee. Enter information in the same manner as a Standard Pay.
NOTE: If you are processing a negative one-off pay, remember to place a - (minus) sign in front of the dollar amount, day or hours you are reversing. Select the PAYE option from the menu and make sure the negative amount of PAYE is the exact opposite amount of the original amount of PAYE the employee paid.
11. If a number of employees are to be accessed, click Find or press F9 to select the next employee.
12. Once all employees have been entered, click Save or press F10. This returns you to the One Off Pay menu where you can print a paysheet, payslip and any other reports.
13. After the reports have printed click the Finish One-Off Pay, Backup button. A confirmation message appears. Click Yes to proceed. You will be asked to run a backup in the normal manner, then the pay will be processed.
Printing Reports
Reporting to the IRD
NOTE: From 1 April 2019, payday filing (see page 149) replaces the IR348 report. The information in this topic only applies when reporting data prior to 1 April 2019.
The IR348 report generates a file in the CSV format, which is then submitted to the IRD using the myIR website.
If you have a problem creating the IR348 file from Exo Payroll, contact MYOB Support on 0800 696 239.
If you have trouble transferring the file from your computer to the myIR website, you should record the error message generated by your internet browser and contact the IRD on 0800 227 770.
The IR348 report file is a text file in the Comma Separated Value (CSV) format which can be read by any text viewer. For this reason it is advisable to create it to a floppy disk or secure network drive.
MYOB EXO Payroll User Guide
289
To create an IR348 file:
1. From the Select Report window (see page 173) choose the IRD tab, then select the IR348 Employer Monthly Schedule report.
2. Enter the physical payment start and finish dates for the month. (The finish date must be the last day of the month for which you are filing.)
3. Enter a pay clerk name, phone number and email address. 4. Set Destination to Printer, making sure the correct printer is selected from the list of
available printers. Click Print to create a printed IR348 to review. 5. After reviewing your figures, change the Destination to File . By default the file name is
IR348_EMS.CSV. Click Create File to generate the file
There are some limitations to the file path:
• The entire file path cannot exceed 30 characters (inclusive of c:\), e.g. c:\payrollv\irfiles\newcompany\january\ir348_ems.csv
• The file path cannot include a space, e.g. c:\program files\internet explorer
Once you log on to the myIR website, you will be directed to an electronic form which asks you for the file path to the IR348 file - this is the same file path to which you created the file in the previous step.
Once you have sent the file, you should receive a confirmation email. The email may contain a warning message if you have duplicate IRD numbers in the file, e.g.
From: GenTran Admin User [[email protected]]
Subject: IR-File error
EHR,011112226,19990430
ETL,000000000,D002,Warning - the same employee IRD number occurs more
than once in the schedule.
W at end of line = WARNING - the file will not be rejected, but contains information that should be remedied next time
R at end of line = REJECTED - for example:
ETL,068461383,F015,The file is in an incorrect format and cannot be read.
A common reason for rejected files is that the format does not permit apostrophes in employees names. Review the First Names and Surname field in your employee records. (You can still enter the full name with apostrophes into the Payslip name field, so that the correct names appear on the payslips.)
If your file is still rejected with code R, contact MYOB Support on 0800 696 239.
When you have more than one payroll company representing more than one business entity will need to specify a filename unique to that company when creating the file. You then need to ensure that you select the correct filename when they go to send the file. This needs to be repeated each week so that the correct file is sent for the correct company.
When you have more than one payroll company representing the same business entity, you will need to Consolidate the IR348 between one or more applicable companies.
To do this, make sure all companies to be consolidated have the same company IRD number, then from the Reports menu choose Consolidated Reports (see page 213).
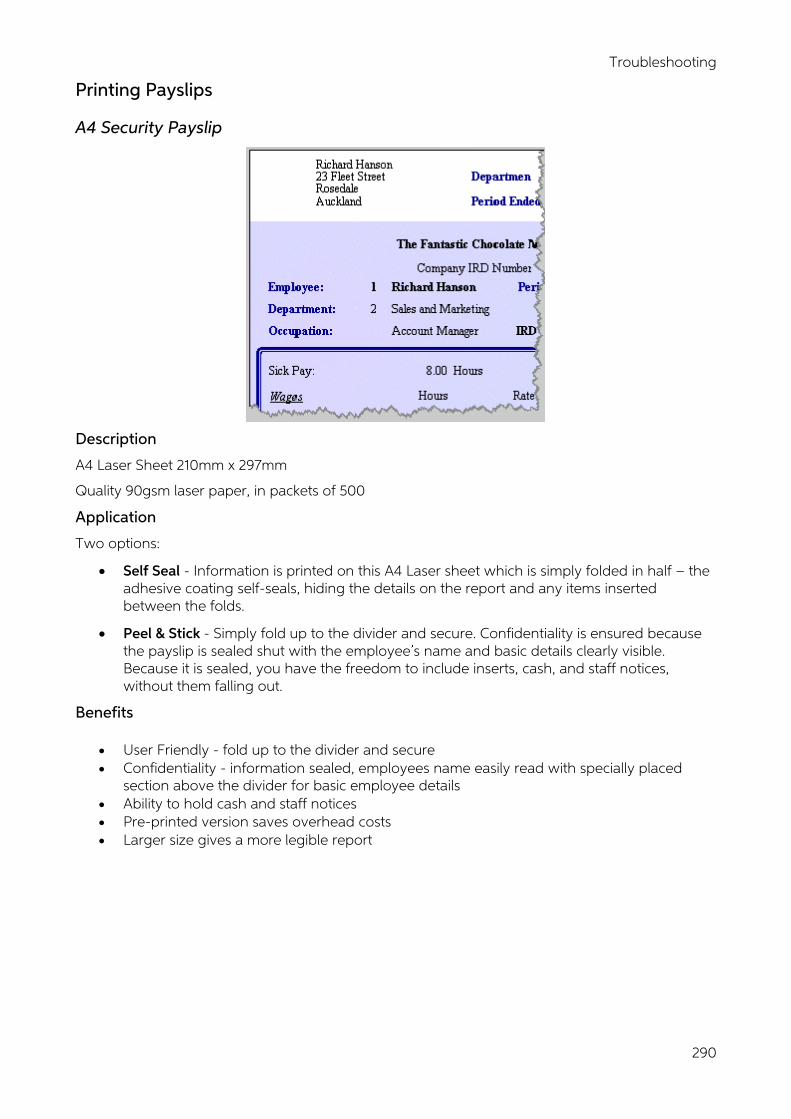
Troubleshooting
290
Printing Payslips
A4 Security Payslip
Description
A4 Laser Sheet 210mm x 297mm
Quality 90gsm laser paper, in packets of 500
Application
Two options:
• Self Seal - Information is printed on this A4 Laser sheet which is simply folded in half the adhesive coating self-seals, hiding the details on the report and any items inserted between the folds.
• Peel & Stick - Simply fold up to the divider and secure. Confidentiality is ensured because the payslip is sealed shut with the employee s name and basic details clearly visible. Because it is sealed, you have the freedom to include inserts, cash, and staff notices, without them falling out.
Benefits
• User Friendly - fold up to the divider and secure • Confidentiality - information sealed, employees name easily read with specially placed
section above the divider for basic employee details • Ability to hold cash and staff notices • Pre-printed version saves overhead costs • Larger size gives a more legible report

MYOB EXO Payroll User Guide
291
Pay Packet (5542)
Description
A5 Laser Sheet
Special Security Envelope
Shrink wrapped in 200 s in a carton, easy storage next to printer
Application
Information is printed on A5 Laser sheet which is simply folded in half and manually inserted into the security envelope and secured
Benefits
• User Friendly - insert and secure
• Confidentiality - information sealed in envelope, employees name easily read with specially placed window on envelope
• Ability to Hold Inserts cash and staff notices
• Distribution - internal or by post
• Speed - 50 pay packets takes approx 8 minutes, compared with 50 Rediform Security Forms approx 9 minutes
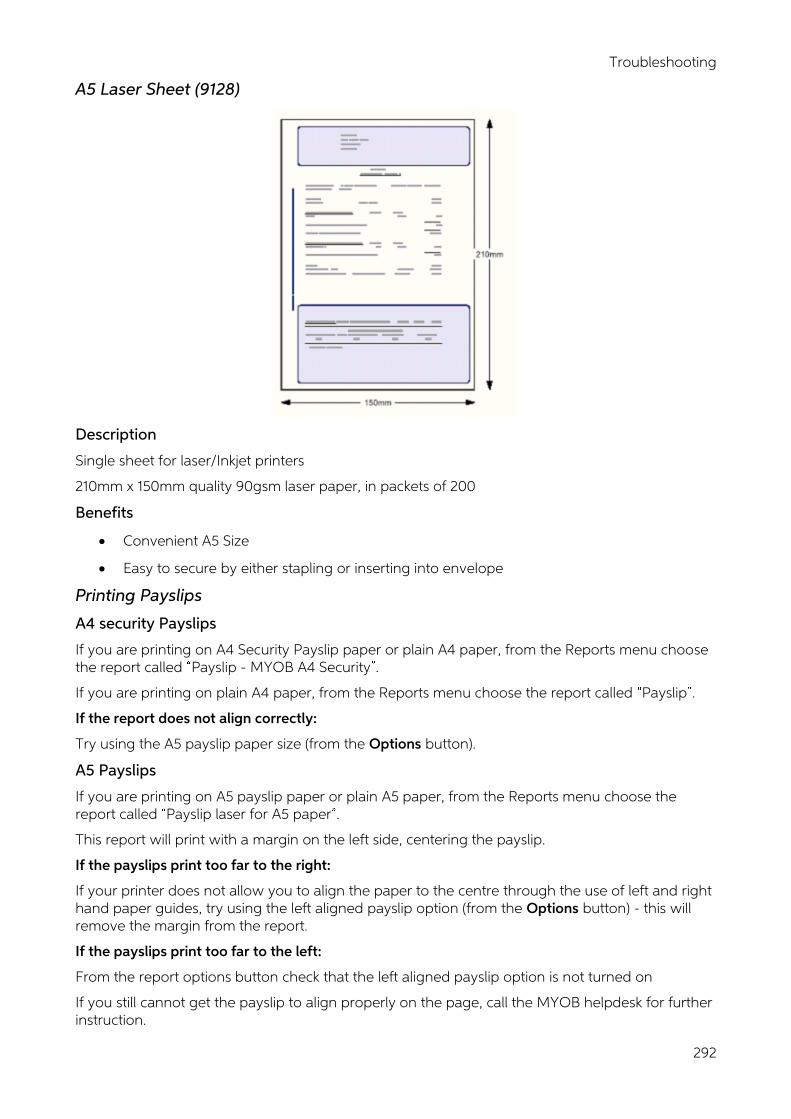
Troubleshooting
292
A5 Laser Sheet (9128)
Description
Single sheet for laser/Inkjet printers
210mm x 150mm quality 90gsm laser paper, in packets of 200
Benefits
• Convenient A5 Size
• Easy to secure by either stapling or inserting into envelope
Printing Payslips
A4 security Payslips
If you are printing on A4 Security Payslip paper or plain A4 paper, from the Reports menu choose the report called Payslip - MYOB A4 Security .
If you are printing on plain A4 paper, from the Reports menu choose the report called Payslip .
If the report does not align correctly:
Try using the A5 payslip paper size (from the Options button).
A5 Payslips
If you are printing on A5 payslip paper or plain A5 paper, from the Reports menu choose the report called Payslip laser for A5 paper .
This report will print with a margin on the left side, centering the payslip.
If the payslips print too far to the right:
If your printer does not allow you to align the paper to the centre through the use of left and right hand paper guides, try using the left aligned payslip option (from the Options button) - this will remove the margin from the report.
If the payslips print too far to the left:
From the report options button check that the left aligned payslip option is not turned on
If you still cannot get the payslip to align properly on the page, call the MYOB helpdesk for further instruction.
293
A
Allowances 35 adding 35 Current Pay 111 loading globally 40 Standard Pay 83
Alternative Leave 130 entitlement 66 setting up 19
B
Back Pay Calculator 159
BAPS Leave List 213
Bereavement Leave 133 entitlement 66 setting up 20
bonuses 264
C
cashing up Holiday Pay 278
companies 10 adding 10 setting up 13
Consolidated Reporting 214
Cost Centres 50 adding 50 setup 14
Costing Current Pay 140 Standard Pay 89
Current Pay 105
custom payslip 201
D
Days Paid Current Pay 143 Standard Pay 95
Deductions 43 adding 43 Current Pay 113 loading globally 46 Standard Pay 86
Delete Old Information 243
Departments 49 adding 49
Direct Credit Transfer 146
donee organisations (payroll giving) 233
E
ED file 149
EI Return file 149
email emailing Payslips 194 employee addresses 75 setup 31
Employee Details file 149
Employee List 208
Employee Share Schemes 144
employees 51 adding 51 details 53 editing 51 hiring 251 reinstating 169 terminating 169
Employees reports 176
Employer ACC Setup 15
Employment Information return 149
EXO Remote 168
Export General Ledger 215
F
FBT Calculator 240
Financial reports 179
Fringe Benefit Tax 249 calculating 240
G
General Ledger exporting 215 maintenance 228 setting up 30
H
Holiday Pay 116 cashing up 278 entitlements 59 groups 230 setting up 16 termination 119
294
Holiday Pay List 212
Hourly Rate Current Pay 112 Standard Pay 85
Hours Paid Current Pay 143 Standard Pay 95
How Paid Current Pay 142 Standard Pay 93
I
Import Time Transactions 158 transaction import format 252
K
KiwiSaver 244 Current Pay 141 grossing-up employer contributions 245 groups 232 setting up 23 Standard Pay 91
L
Leave Management 114 Alternative Leave 130 Bereavement Leave 133 Current Pay Other Leave 137 Long Service Leave 135 Public Holiday 128 setting up 16 Shift Leave 136 Sick Pay 126 Unpaid Leave 138
Leave Planner 236
logging in 10
Long Service Leave 135 entitlement 66
M
Maintenance menu 228
menus 3
MyStaffInfo 168
N
Notes 77 types 229
O
One-Off Pay 155
Other Leave 137 entitlement 66
setting up 21
Other settings 75
P
Pay Cycle 104
Pay List 209
Pay Period Status 28
Pay Rate Types 27
Pay reports 178
Payday filing 149
PAYE Current Pay 141 Standard Pay 90
PAYE Calculator 234
payroll giving 246 donee organisations 233 enabling 28 setting up 246
Payroll Giving Donees 233
Payroll Setup 13 Page 1 13 Page 2 26
payslip custom payslip 201 reports 178
Payslip Note 143
Post to EXO Business 227
Public Holidays 128 setting up 19
R
Rapid Load Pay 164
report options Employees tab 181 Financial tab 188 IRD tab 193 Maintenance tab 192 Pay tab 184
Report Runs 204
reports 176 consolidating 214 customising 204 distributing 203 grouping 204 list of reports 176 printing 173 printing (Pay Cycle) 145
MYOB EXO Payroll User Guide
295
S
Salary Current Pay 113 Standard Pay 86
Setup Cycle 12
share schemes 144
Shift Leave 136 entitlements 66 setting up 20
Sick Pay 126 entitlements 66 setting up 19
Special Options 28
Standard Pay 79
Student Loans 282 settings 55
T
Tax reports 180
Termination Holiday Pay Wizard 119
toolbar 8
U
Unpaid Leave 138
Update Pay 148
upgrading 170 online 172
W
Wages Current Pay 110 Standard Pay 80
Y
Year To Date Totals 96