Embed Size (px)
Citation preview
MYOB EXO Business EXO Training
Super User Training
Momentum Software Solutions
Momentum provide Support for all MYOB EXO Business and Employer Services modules
Suite 22, Ocean Central, 2 Ocean Street, Maroochydore, 4558
+617 5479 1877 +617 5345 5267

Momentum Software Solutions Customer Support
As a valued customer of Momentum, we provide support for all MYOB EXO Business and Employer Services modules.
You can lodge a Support Request.
Via email:-
Via our website:-
http://www.momentumsoftwaresolutions.com.au/support
Or contact our Help Desk:-
07 5479 1877
There is easy access to information on hardware, network and operating system requirements for efficient operation of MYOB EXO Business software. You can download minimum hardware and network requirements from our website at:-
http://www.momentumsoftwaresolutions.com.au/products
EXO Super User Training Manual Momentum Software Solutions Page | 1
Table of Contents OVERVIEW ............................................................................................................................................... 2
SYSTEM SETUP ........................................................................................................................................ 3
COMPANY ............................................................................................................................................... 4
ESSENTIAL ............................................................................................................................................... 6
ADMINISTRATION SETTINGS ................................................................................................................. 11
SYSTEM SETTINGS ................................................................................................................................. 26
UNDERSTANDING PROFILE SETTINGS ................................................................................................... 34
FORMS ................................................................................................................................................... 38
CUSTOM BUTTONS ............................................................................................................................... 40
STAFF ..................................................................................................................................................... 42
QUICK INSERTS ...................................................................................................................................... 52
APPENDIX A ‐ POPULAR PROFILE SETTINGS .......................................................................................... 81

EXO Super User Training Manual Momentum Software Solutions Page | 2
OVERVIEW
This training manual is designed for the User/s designated as the ‘System Administrator’ for MYOB
EXO Business. This User should be a trusted senior employee with authority to setup new users and
define access and authority permissions throughout the EXO Business Software.
This manual generally refers to functions and processes in the EXO Business Configuration Assistant
module (ConfigWizard).
Some activities in this manual should only be conducted either with or by your MYOB EXO Business
Support Partner – Momentum Software Solutions. In this manual they will be highlighted as per
below.
Attempting to use this feature without qualified assistance could result in serious
consequences for your system and require chargeable support assistance, system downtime, data
correction or restore from backup depending on the actions taken.
EXO Super User Training Manual Momentum Software Solutions Page | 3
SYSTEM SETUP
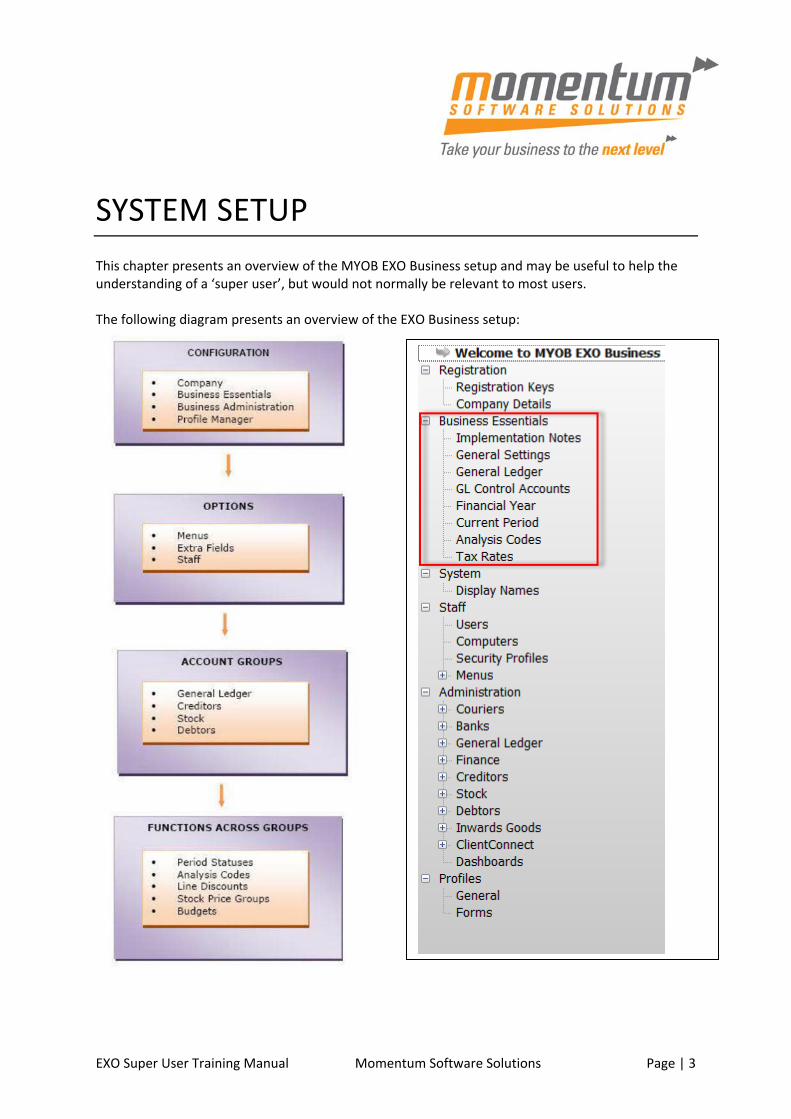
This chapter presents an overview of the MYOB EXO Business setup and may be useful to help the understanding of a ‘super user’, but would not normally be relevant to most users. The following diagram presents an overview of the EXO Business setup:

EXO Super User Training Manual Momentum Software Solutions Page | 4
COMPANY
Updating Registration Codes
The Registration section is the first section you should view on opening the Configuration Assistant, as it controls the registry codes that are required for the MYOB EXO Business system to work. The Registration Keys section controls the registration code entry for MYOB EXO Business modules. The registration codes are specific to the company name, the individual EXO Business product, number of users and the expiry date of the registration code. To enter registration information manually:
1. Double‐click the “EXO Business” module name. 2. Enter the following fields:
Max Users‐ The registered number of users, as per the number of concurrent licences purchased from MYOB.
Registration Key‐ The registration code received from MYOB for the selected module.
Expiry Date‐ The expiry date for the EXO Business module. For more information of how this will be applied to the end user, refer to the Terms and Conditions of the End User Licence Agreement.
3. Click Save to save these settings.
Tip: Specific registration codes are not required for the core modules included with MYOB EXO
Business, with the exception of EXO Business Config.
Note: The colour of the highlight bar and module. If the line is red, then the module, number of
users, security code, expiry date and/or company name do not match the code given. Check that all
the items match the code requested. The colour will change from red to black when edited
successfully.
Modules are divided into two sections: Core and Add‐on. A single registration code applies to all
Core modules. Add‐on modules are all separately licensed—a registration code must be supplied for
each one. Registration codes can be downloaded and applied automatically, or they can be obtained
from MYOB and entered manually. Both operations are performed from the Registration Keys
section.

EXO Super User Training Manual Momentum Software Solutions Page | 5
Company Details
The Company Details section holds details such as the name and address of the company using
MYOB EXO Business. This information is primarily used in reports for displaying the company’s
contact details, but some fields also have a specific purpose in the system such as the Country and
Bank Account fields.
Field Description
Company Name Displays the company’s name. Read‐only in this section – the company name can be changed in the Registration section.
Postal Address Enter the company’s postal address. Four lines are available
Street Address Enter the company’s street address, or tick Street address is the same as postal address to copy the postal address details
County
Select the country that the company operates in.
Note: It is very important that you choose the right Country setting. This influences the tax rates to be used on the system.
Phone Number Enter a contact phone number for the company
Fax Number Enter a contact fax number for the company
Email Address Enter a contact email address for the company
Web Site Enter the company’s web site
Tax Number The name of the property depends on the country that the company operates in. Enter the company’s tax number (e.g. GST number, VAT number)
Bank account Enter the company’s bank account number
Account name Enter the name on the company’s bank account
EXO Super User Training Manual Momentum Software Solutions Page | 6
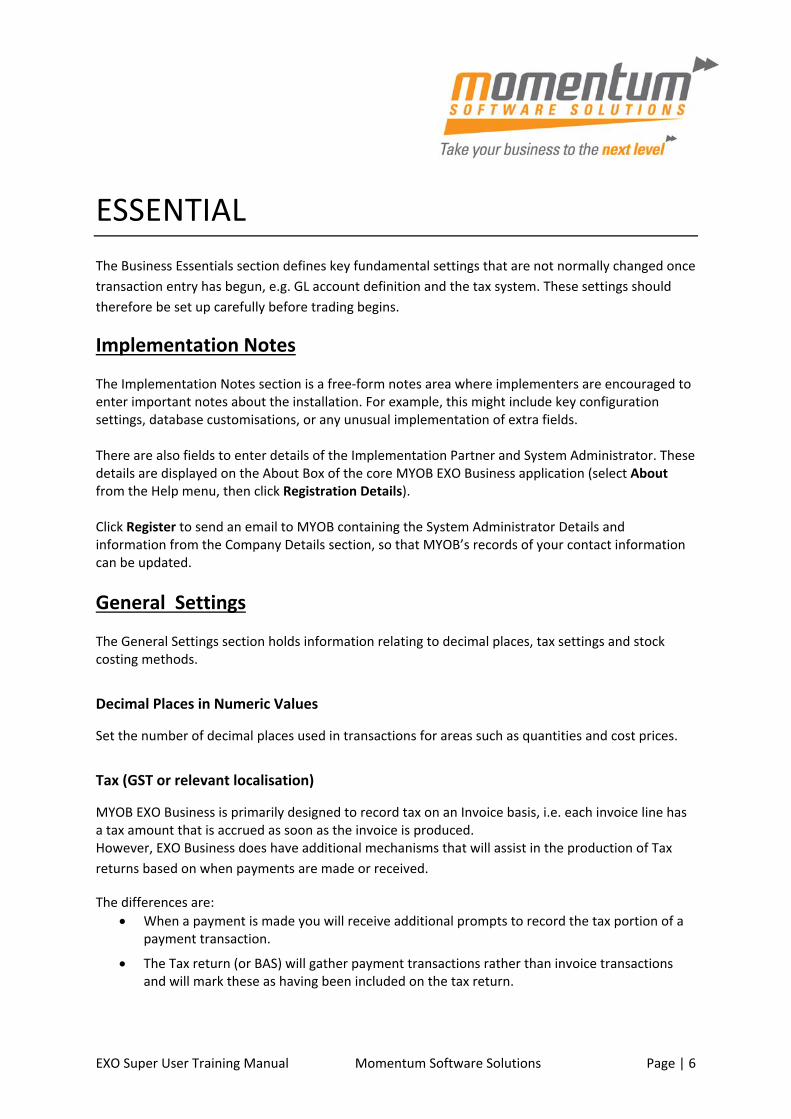
ESSENTIAL
The Business Essentials section defines key fundamental settings that are not normally changed once
transaction entry has begun, e.g. GL account definition and the tax system. These settings should
therefore be set up carefully before trading begins.
Implementation Notes
The Implementation Notes section is a free‐form notes area where implementers are encouraged to enter important notes about the installation. For example, this might include key configuration settings, database customisations, or any unusual implementation of extra fields. There are also fields to enter details of the Implementation Partner and System Administrator. These details are displayed on the About Box of the core MYOB EXO Business application (select About from the Help menu, then click Registration Details). Click Register to send an email to MYOB containing the System Administrator Details and information from the Company Details section, so that MYOB’s records of your contact information can be updated.
General Settings
The General Settings section holds information relating to decimal places, tax settings and stock costing methods.
Decimal Places in Numeric Values
Set the number of decimal places used in transactions for areas such as quantities and cost prices.
Tax (GST or relevant localisation)
MYOB EXO Business is primarily designed to record tax on an Invoice basis, i.e. each invoice line has a tax amount that is accrued as soon as the invoice is produced. However, EXO Business does have additional mechanisms that will assist in the production of Tax
returns based on when payments are made or received.
The differences are:
When a payment is made you will receive additional prompts to record the tax portion of a payment transaction.
The Tax return (or BAS) will gather payment transactions rather than invoice transactions and will mark these as having been included on the tax return.
EXO Super User Training Manual Momentum Software Solutions Page | 7
Tick the TAX inclusive pricing for debtors box if prices are entered inclusive of tax. Leaving the box clear indicates tax exclusive pricing. Select the default tax rates applied to debtor and creditor transactions for analysis. To apply witholding tax to Creditors Payments, tick the Witholding Tax on Creditors Payments option and specify a tax rate (note: if paying a creditor without an ABN withholding tax will be deducted at the set rate).
Other
This area contains other key settings, including selecting the Stock/Bill of Materials costing method to be used, and how “special” transactions are to be handled when using the AVERAGE stock costing method. Tick the Operate in multiple currencies box to enable Multi‐Currency support, which assists business
who trade in foreign currencies.
General Ledger
In this section, you can configure the General Ledger as per the customer’s requirements. This information entered into this will seldom change after the initial setup and in some cases may actually have system‐wide implications if it is changed. GL Account Code Structure The structure of the General Ledger coding method is set up here. GL account codes can be divided into up to three sections:
Branch‐Account‐Subaccount
Both the branch prefix and sub‐account suffix are optional. Select whether branches and/or sub‐account sections are needed, and the number of digits for each section. An example of the structure you have entered is displayed below in red. This example updates as changes are made.
GL Stock Integration
Selects the method of stock system integration to the General Ledger: Periodic stock This option is more suited to stock valuation where processes such as Job Costing or
Manufacturing (including the allocation of overhead or labour costs to the finished product) are
used. This feature requires the user to have the "GL Closing Stock" procedure on their menu.
Periodic Stock allows the user to determine the level of stock‐on‐hand to be reflected in the
accounts at the end of the period
Perpetual stock
This option is the more complex of the two inventory integration methods. This method allows the posting of physical stock transactions to the General Ledger on a one‐to‐one basis. Disabling this feature will require the user to manually post stock valuations in a periodic manner (Periodic Stock system). Perpetual Stock is more suited to warehousing and retail type situations with standard stock in/ stock out movements, and only supports Average stock costing methods. To use Perpetual

EXO Super User Training Manual Momentum Software Solutions Page | 8
Stock two additional accounts are required to be setup in the GL Control Accounts (Stock Clearing Account and a Stock Adjustment Account). The Post Stock to GL menu procedure must be added to the users menu. The Stock Purchases GL Code for physical stock should point to the Stock Clearing Account; the "Stock GL Coding" function included in the GL Utilities can be used to achieve this. Select a Cost of Sales method – this controls the posting of cost of sales to the General Ledger. Choose from: Post to Cost of Sales from GL Control A/c – This option posts all cost of sales to a single control account: the Cost of Sales account specified in the GL Control Accounts section.
Post to Cost of Sales A/c from Stock Item – This option allows the user to select multiple trading accounts based on the Stock item. Cost of sales is posted to the account specified by the C.O.S. GL code setting on the Stock Details tab for the relevant Stock item.
Other
Branch no. for balance sheet Specify the default branch number for transactions on the Balance Sheet. This field should only be set when first setting up a site. Any attempt to change its value once transactions have been entered will have unknown consequences, and may potentially corrupt the Balance Sheet branch reporting and/or data.
Chart of Accounts
While an organisation’s Chart of Accounts can be set up manually from the main MYOB EXO Business application (Account menu > General Ledger), the Configuration Assistant allows you to select a pre‐made Chart of Accounts from a list. Select an Industry classification and Business type, and the pre‐made Chart of Accounts appears in the section below. Alternatively, you can import a chart of accounts from a CSV file, e.g. one provided by a company accountant. Click the Import button to select the CSV file containing the chart of accounts definition. See “Appendix 1: Chart of Accounts Import” on page 100 for details of the expected file format. Once the Chart of Accounts has been selected or imported, it appears in the area at the bottom of the General Ledger section, where it can be altered manually if necessary: To edit an item, right‐click on it and select Edit. Make any changes then click OK.
To delete an item, right‐click on it and select Delete, then click Yes to confirm.
To create a new group, account or sub‐account, right‐click on the node you want to create the item under and select New GL Group, New Account or New Sub‐Account as appropriate. Enter details for the new item and click OK.
GL Control Accounts
Once the Chart of Accounts has been set up, (by importing the information or manual entry), the key accounts can be brought through to the General Ledger Control Accounts. The GL Control Accounts are divided into General and Custom tabs. The General tab contains the
standard control accounts, while the Custom tab contains the control accounts for more specialised
areas, such as foreign exchange and advanced stock. If a pre‐made Chart of Accounts was selected
on the General Ledger screen, a set of default GL Control Accounts will be displayed here.

EXO Super User Training Manual Momentum Software Solutions Page | 9
To set a GL Control Account: 1. Right‐click on an account and select Search. A search dialog appears:
Financial year
Financial Year
The Financial Year section is used to set up the periods that compose the financial year. To set up the financial year: 1. Select a period and click the Edit button, or double‐click to edit.
2. Enter a name for the period, as well as a short code and report code (which is useful to set the sequence in a report).
3. Under Transaction Entry Validation, select if the month is a standard calendar month or if specific dates are used.
4. If a period is not a standard calendar month, the Dates Between ... and ... of the period must be specified. These dates also contain the year, so these dates must be set up at the beginning of every financial year to reflect the change in dates.
5. Click Save to save the settings.
Note: Ensure the first name in the sequence is the first period of the financial year. This may be
different to a standard calendar year.
The Load button allows you to specify and create a standard twelve month financial year. You must also specify the first period of doing business and the period that represents January.
Caution: Incorrect setting of the Accounting period representing January will result in incorrect
population of the Period History table, as well as causing issues with the current calendar year.
Ensure this is set correctly.
Analysis Codes
This section is where you set up Analysis Codes (see page 62). Analysis Codes are arbitrary codes
used in software applications that can be assigned to transactions. They do not perform any function
themselves and are independent of the normal grouping of account codes; they are simply a
customisable way of grouping related transactions together for sorting and reporting.
Current Period
The Current Period settings track the current period of operation, and help to enforce period transaction dates. As the Financial Year can be defined purely in calendar months rather than explicit dates, the Current Period settings are used to align the calendar months and calendar year to the financial periods. These are then used for period/date enforcement.

EXO Super User Training Manual Momentum Software Solutions Page | 10
Field Description
First month of the calendar year
This is required to ascertain which financial period will roll over the Current calendar year when an end of month is performed. The system cannot determine this automatically because the financial year may start in any calendar month, and the actual financial period name is customisable (e.g.”Jan”,”‘January”, “01”), so it must be explicitly set.
Note: Incorrectly setting the first month of the calendar year will result in incorrect population of the Period History table, as well as causing issues with the current calendar year. Ensure this is et correctly.
Current financial period Current calendar year
These values confirm the current period of operation for each ledger. These automatically increment at the correct time during end of period rolls. Transaction ages in EXO Business are numbered from current (0) backwards. EXO Business knows which period in the period table is the current one, and uses this as a point of reference to display the name of the period on reports and within data entry screens.
Default posting age Enter the default age for transactions when they are posted to the posted to the Debtors, Creditors, Stock or General ledgers.
Year names You can customise the display names for the last, current and next year periods if necessary.
Tax Rates
The Tax Rates section sets the tax rates used by the company, which are then used to create the tax return form entries. Tax rates have the ability to use separate GL Control Accounts, and link to a Tax Return Key Point for tax reporting. To set up tax rates: 1. Select a tax rate and click the Edit button, or double‐click the tax rate to edit.
2. Enter the Tax Rate details, including Name and Tax rate, and select the relevant Tax Return Key Point reference to be used on the tax return.
Company
This section is only available in EXO Business Config, and only when the InterCompany module is in use. Enter the Company number for this company, as specified on Setup Source Companies window in the InterCompany module. See the InterCompany User Guide for more information on these Company numbers.
EXO Job Costing
This section is only available in EXO Business Config, and only when the EXO Job Costing module is in use. See the EXO Job Costing User Guide for information on these settings.

EXO Super User Training Manual Momentum Software Solutions Page | 11
ADMINISTRATION SETTINGS
The Business Essentials section of the Configuration Assistant and the EXO Business Config
application contains sections that business department managers may own to control their area of
responsibility, e.g. stock group names, account group names.
Settings are grouped into the following subsections:
Courier
Period
Banks
General Ledger
Finance
Creditors
Stock
Debtors
Inwards Goods
ClientConnect – no longer used
EXO Fixed Assets (EXO Business Config only)
EXO Intercompany Consolidations (EXO Business Config only)
Serviceable Units (EXO Business Config only)
Courier
This section lets you set up the couriers used for stock transfers. The following items can be set up:
Couriers – Set up all couriers used for stock transfers. Click New to create a new courier,
then enter details (including the dispatch method) and click Save to save your changes.
Stock Request Types – Stock Request Types are used to indicate and record the type of
request required, e.g. By Courier, Urgent, etc. Click New to create a new type. Enter a
description and click Save to save your changes.

EXO Super User Training Manual Momentum Software Solutions Page | 12
Period
This section is available in EXO Business Config only.
Current Period –
This section is the same as the Current Period section in the Essential Settings
Financial Year
This section is the same as the Financial Year section in the Essential Settings
Period Statuses
This section displays the statuses of all accounting periods, showing whether they are currently
locked or unlocked. Double‐clicking on a period toggles between the locked and unlocked state.
You can enter default posting ages for each ledger ‐ these are the same settings that are available on
the Current Period section.
Period History
This section displays the history of all recorded accounting periods. Select a period and click Edit to
change its details.
Banks
Debtors (Direct Debit)
Set up the file formats for generating direct debit transfer files for Debtors. Formats for major local
banks are set up by Momentum Software Solutions.
Click New to set up a new format manually, or Load Bank File to import a text file containing bank
format information.
Click Edit to change an existing format. When editing the details of a format, click the File Format
button to set up the fields that should appear in the output file:
Click New to add a new field to the format, then specify:
• Which part of the file it appears in (Header, Body or Footer).
• An Order number, which specifies the field’s place in the file.
• A description.
• The type of data that the field contains.
EXO Super User Training Manual Momentum Software Solutions Page | 13
Once these details are supplied, you can enter specific information about the contents of the field in
the Details section.
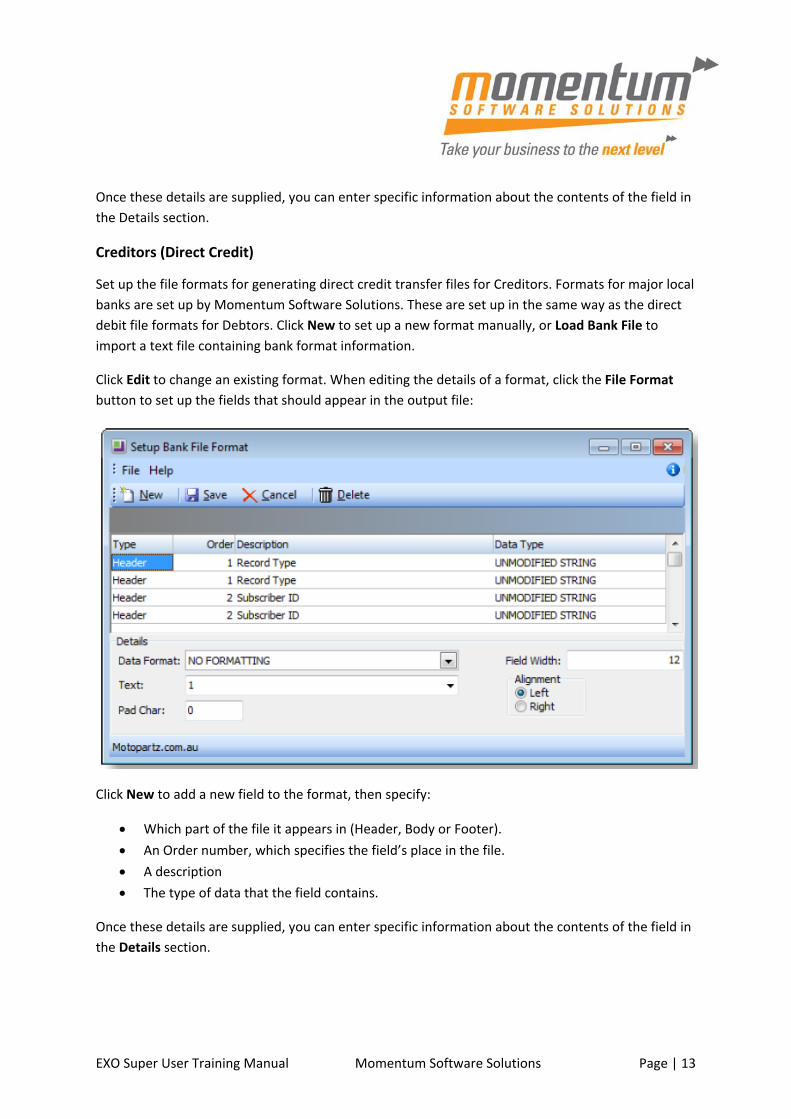
Creditors (Direct Credit)
Set up the file formats for generating direct credit transfer files for Creditors. Formats for major local
banks are set up by Momentum Software Solutions. These are set up in the same way as the direct
debit file formats for Debtors. Click New to set up a new format manually, or Load Bank File to
import a text file containing bank format information.
Click Edit to change an existing format. When editing the details of a format, click the File Format
button to set up the fields that should appear in the output file:
Click New to add a new field to the format, then specify:
Which part of the file it appears in (Header, Body or Footer).
An Order number, which specifies the field’s place in the file.
A description
The type of data that the field contains.
Once these details are supplied, you can enter specific information about the contents of the field in
the Details section.
EXO Super User Training Manual Momentum Software Solutions Page | 14
Creditors (M‐Powered) ‐ Set up bank details to be used when making payments via the MYOB M‐
Powered Payments system. Click New to create a new bank, then enter details and click Save to save
your changes.
Bank Formats (Reconciliation) ‐ This section lets you set up bank file formats for use with the Bank
Reconciliation function. These settings are also available in the EXO Finance module.
Setup
Dispatch Methods – Set up the available dispatch methods for stock transfers, e.g. Same Day,
Overnight, etc. Click New to create a new method. Enter a description and click Save to save your
changes.
General Ledger
This section contains settings that affect the operation of the General Ledger.
Account Groups
The General Ledger is grouped into accounts with different functions such as Sales, Asset and
Liability accounts and Overheads. When setting your GL you need to name and define the groups
you require. This section lets you set up GL Account Groups.
GL Control Accounts
This section is only available in EXO Business Config, and is the same as the GL Control Accounts
section in the Essential Settings.
GL Report Batches
Allows the batching of General Ledger reports (already created using the GL Reporting tool),
including selecting parameters such as branches and periods, so that batches of reports can be
scheduled. This interface is also available in the main EXO Business application at Reports menu >
General Ledger Reports > Setup GL Report Batches. Batches can be run by selecting Reports menu >
General Ledger Reports > Run GL Report Batch.
EXO Finance
Branches
Set up branches and branch names if analysis by branch is required. A branch is usually a separate
profit centre within the business. Branches often equate to locations which designate a stock
holding area however multiple stock locations could also exist within a branch. Virtual locations

EXO Super User Training Manual Momentum Software Solutions Page | 15
could also exist (and possibly cross branch boundaries) to separate stock for other reasons, e.g.
seconds stock or work in progress.
Note: Branches are numbered starting at 0, whereas Stock Locations are numbered starting at 1.
Be careful of this difference if you have a one‐to‐one relationship between branches and locations.
Tax Rates
This section is only available in EXO Business Config. It allows you to set up the tax rates used by the
tax system
Currencies
If multiple currencies are used, the Currencies screen is needed to set up and maintain the individual
currencies, as well as their current buy rates and sell rates. The option to enable or disable multiple
currencies is set in the Business Essentials > General Settings section.
By default, Currency Number 0 is the local currency of the system, and would normally have a Buy
and Sell Rate of 1.
Currencies for Australia and New Zealand are set up by default. Click New to add new currencies.
The exchange rate of other currencies can be changed as necessary, relative to the default currency,
by selecting a currency name and clicking the Edit button, or double‐clicking a currency to edit.
Payment Groups / Payment Types
Payment groups cluster payment types together, and determine properties such as the GL Bank
account associated with the payment media. Payment types define the properties of payment
‘media’, including whether the payment option is available, rounding, and how it integrates with the
EXO Business POS add‐on module.
This section lets you set up the Payment Types used in the EXO Business system, e.g. cash, cheque,
EFTPOS. Payment Types define the properties of payment media, including whether the payment
option is available, rounding, and how it integrates with the EXO Business POS add‐on module.
Payment Denominations
This section lets you set up the denominations used in the EXO Business system. Payment
denominations determine the denominations that are available for each payment type.
Denominations for the CASH payment type and the local currency are set up by default, but
denominations can be added for other types. Click New to add a new denomination.
EXO Super User Training Manual Momentum Software Solutions Page | 16
Tax Return Key Points
Tax Return Key Points are internally defined rates that are used in the Tax Return functions, which
are set up automatically during installation. Each key point relates to a point on the Tax Return form;
key points are therefore specific to each country. Tax Return Key Points are automatically set up
based on the country selected during installation. They should be associated with Tax Rates.
Credit Terms
Credit Terms are set up by default on install, but it is possible to add new terms, specifying positive
credit factors for "net day" terms, and negative credit factors for "month following" terms (0 = Cash
Only), and whether they are active for Debtors or Creditors. Click New to create new credit terms.
For credit factors ‐29 to ‐31, it is assumed due dates are for the end of the month following, so the
day of the month is decreased, if need be, until a valid date is achieved, e.g. ‐31 could equate to
28.02.03 or 30.04.04.
Creditors
Creditor Account Groups/Alternate Creditor Account Groups
These sections let you set up Creditor Account Groups and Alternate Creditor Account Groups .
Creditor Account Groups are useful in reporting scenarios to group different creditor types together.
Tip: The names used to reference creditor account groups in MYOB EXO Business can be customised
at System > Display Name in EXO Config.
Stock
Stock Groups/Alternate Stock Groups
These sections let you set up Stock Groups and Alternate Stock Groups.
Enter Stock Group names for reporting or sorting purposes. Group names can also be shown on
stock search screens and filters. Select a name and click the Edit button, or double‐click on it. This is
where you enter autocode prefixes and auto suffixes for one‐off stock items. Enter the expected
profit margin and variances and the GL code for Sales, Purchases and COS per stock group.
Note: For Stock Groups, the Parent group property references an Alternate Stock Group.
Tip: The names used to reference stock groups in MYOB EXO Business can be customised at
System > Display Name in EXO Config.

EXO Super User Training Manual Momentum Software Solutions Page | 17
Stock Locations
Select a location and click the Edit button, or double‐click on it. Enter names for the stock locations,
using both short‐form codes and long names. There are also options useful for reporting and forms,
such as the location Address, and flags to allow exclusion from reports. Click New to add new
locations beyond the default ten locations.
Note: Stock Locations are numbered starting at 1, whereas Branches are numbered starting at 0.
Be careful of this difference if you have a one‐to‐one relationship between branches and locations.
Stock Price Groups
Enter the names of the Price Groups to be applied to stock items, and utilities in the pricing policies
and updates.
Stock Price Groups allow similar products to be grouped together so that they may share common
pricing policies. Using Stock Price Groups means only the price policies relating to the group need to
be changed, and not every stock item. The stock item is added to a Stock Price Group in the MYOB
EXO Business core module at Account > Stock > Details 1 tab.
Note: See the "Pricing and Discount Policies" whitepaper for more detail.
Stock Unit Definitions
Set up the names of the stock units that will be available, e.g. "EACH" or "PACK".
Price Names
Set up Price Names that set the base prices used for Debtor accounts. Select a name and click the
Edit button, or double‐click the item to edit.
Price SQL is used with the Account > Stock Item > Sell Price Formulation function.
Currency is used when a price is set based a foreign currency, when used in the Pricing Calculator. It
does not restrict the price to foreign currency accounts.
Note: See the "Pricing and Discount Policies" whitepaper for more detail.
Warranty
Set up the warranties available on stock items. Click Add to create a new warranty. Enter a
description and a Charge Stock Code (you can enter part of a stock code and press ENTER to open a
Search window). You must also select the Stock Group and Alternate Stock Group that this warranty
applies to.
EXO Super User Training Manual Momentum Software Solutions Page | 18
Debtors
Debtor Account Groups/Alternate Debtor Account Groups
These sections let you set up Debtor Account Groups and Alternate Debtor Account Groups . Set up
the Debtor Account Groups and Alternate Debtor Account Groups as required to help group debtors
together, e.g. by region or client type. These can be added to search grids as extra fields, and used
for reporting purposes.
Tip: The names used to reference debtor account groups in MYOB EXO Business can be customised
at System > Display Name.
Debtor Price Policy Groups
Create names to be used for grouping debtors into Price Policy groups. Individual debtors can then
join a Price Policy Group by selecting the Price Policy Group name on the Account > Debtors >
Discounts/Prices tab. The Debtor Price Policy Group is then associated with a Price Policy. All debtor
accounts that belong to that Policy Group will then receive that Price Policy’s prices and discounts.
Inwards Goods
Cost Codes
Set up cost codes that relate to the shipment of goods, e.g. customs or duty.
Shipment Status
Shipment statuses define the stages of the flow of goods from the supplier to your warehouse.
These should be generic stages that apply to all methods of shipping.
Shipment Method
Shipment Methods define the type of transport being used to transport (or ship) the goods. This can
also be used for report filtering.
Dashboards
Reports > Dashboards
Dashboards are customisable displays showing one or more “widgets”. In most cases these widgets
are summary reports, making the Dashboard an at‐a‐glance overview of the entire MYOB EXO
Business system. Other functions can be added as widgets however, including external applications.

EXO Super User Training Manual Momentum Software Solutions Page | 19
The default Business Flow Menus (see page 58) of several EXO Business modules are composed of Dashboard interfaces, which allows them to be customised by each user, and also means that they can display current system data on the main menu. Data on Dashboard reports can be printed or exported using the options on each widget’s toolbar.
EXO Fixed Assets
This section is only available in EXO Business Config, and only when the Fixed Assets module is in
use. It contains settings that affect the operation of the Fixed Assets module. See the Fixed Assets
User Guide for more information on these Company numbers.
EXO Intercompany Consolidations
This section is only available in EXO Business Config, and only when the InterCompany module is in
use. It contains settings that affect the operation of the InterCompany module. See the
InterCompany User Guide for more information on these Company numbers.

EXO Super User Training Manual Momentum Software Solutions Page | 20
Serviceable Units
This section is only available in EXO Business Config, and only when the Job Costing module is in use.
It contains settings that affect the operation of the Job Costing module. See the Job Costing User
Guide for information on these settings.
Analytics
EXO Business Analytics is a separate module that presents a customisable overview of the
organization’s business status. It is intended for use by management to monitor business
performance. EXO Business Analytics extracts data from various sources in the MYOB EXO Business
system and then displays it in a consolidated format. This allows managers to quickly get a complete
picture of the entire business.

EXO Super User Training Manual Momentum Software Solutions Page | 21
Social Media
MYOB EXO Business can display social media information about companies (Debtors, Creditors and Non Accounts), Contacts and Opportunities. The following social media services are currently supported:
LinkedIn Users have the option of viewing social media information using their own login details, or using details for the company. For example, while users may use the company details by default, a salesperson may want to view an Opportunity’s LinkedIn details while logged in to their own account, so that they can see any connections between themselves and the Opportunity. It is possible to switch between company and personal accounts at any time.
Setting Up Social Media
Company‐wide social media details are set up in EXO Business Config at Admin > Social Media > Setup Social Media. From this screen you can: � Authorise social media applications using a company account
� Enter IDs for the company’s social media accounts

EXO Super User Training Manual Momentum Software Solutions Page | 22
Note: The Social Media section in EXO Business Config also includes an Application Key/Secret
section. This section contains details used by the EXO Business application to connect to social
media networks. Do not alter these details unless instructed to do so by MYOB; altering these
details could cause the social media functions to stop working.
Authorising Social Media Applications
To use the social media functionality, the EXO Business application must be authorised to log in to
the various social networks. Users have the option of logging in and viewing social media
information using their own accounts, or using a company account. To log in and authorise social
media applications using a company account, click the toolbar buttons for each social media
network:
Doing so retrieves an “access token”, which is stored and used to log users in using the company’s
details.
Note: To change the company account in use, go to the Twitter, Facebook or LinkedIn website and
log out, then come back to this screen in EXO Business Config. You will be prompted to log in
again.
Setting up Company Social Media Accounts
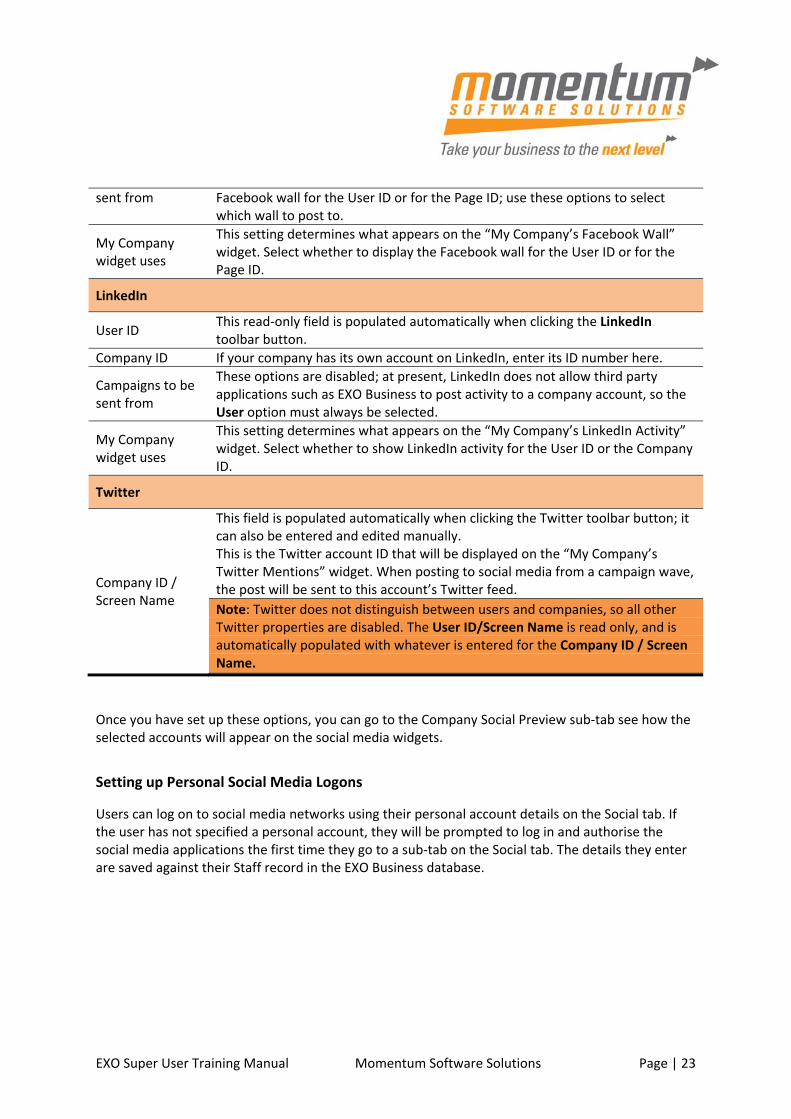
The Company Social IDs sub‐tab in the Social Media > Setup Social Media section contains social media account IDs or usernames for the company. The accounts entered here will be displayed by the social media widgets and used when posting to social media from a campaign wave (EXO Business CRM). Facebook and LinkedIn distinguish between user accounts and accounts for pages or companies,
which exist independently of an individual user. Extra settings are available to determine how to
manage these. The following table describes all available settings:
Field Description
User ID / Name This read‐only field is populated automatically when clicking the Facebook toolbar button.
Page ID / Name If your company has its own Facebook page, enter its ID number or name here.
Campaigns to be When posting to social media from a campaign wave, you can post to the
EXO Super User Training Manual Momentum Software Solutions Page | 23
sent from Facebook wall for the User ID or for the Page ID; use these options to select which wall to post to.
My Company widget uses
This setting determines what appears on the “My Company’s Facebook Wall” widget. Select whether to display the Facebook wall for the User ID or for the Page ID.
User ID This read‐only field is populated automatically when clicking the LinkedIn toolbar button.
Company ID If your company has its own account on LinkedIn, enter its ID number here.
Campaigns to be sent from
These options are disabled; at present, LinkedIn does not allow third party applications such as EXO Business to post activity to a company account, so the User option must always be selected.
My Company widget uses
This setting determines what appears on the “My Company’s LinkedIn Activity” widget. Select whether to show LinkedIn activity for the User ID or the Company ID.
Company ID / Screen Name
This field is populated automatically when clicking the Twitter toolbar button; it can also be entered and edited manually. This is the Twitter account ID that will be displayed on the “My Company’s Twitter Mentions” widget. When posting to social media from a campaign wave, the post will be sent to this account’s Twitter feed.
Note: Twitter does not distinguish between users and companies, so all other Twitter properties are disabled. The User ID/Screen Name is read only, and is automatically populated with whatever is entered for the Company ID / Screen Name.
Once you have set up these options, you can go to the Company Social Preview sub‐tab see how the selected accounts will appear on the social media widgets.
Setting up Personal Social Media Logons
Users can log on to social media networks using their personal account details on the Social tab. If the user has not specified a personal account, they will be prompted to log in and authorise the social media applications the first time they go to a sub‐tab on the Social tab. The details they enter are saved against their Staff record in the EXO Business database.

EXO Super User Training Manual Momentum Software Solutions Page | 24
Setting up Social Media IDs
Social media usernames or account IDs can be set up for companies and Contacts in the following places:
On the Details 2 tab of the Debtor Account Details window.
On the Details 2 tab of the Creditor Account Details window.
On the Details tab of the Non Account Details window.
On the Details tab of the Contacts window. Opportunities use the social media details set up for the company that they are associated with. If you do not know social media details for a company or Contact, they can be searched for and filled
in automatically from the Social tab.
Note: The LinkedIn ID must be the numerical ID, not a username. The Facebook ID can be a
numerical ID or a Facebook username, if one has been set up.
The Social Tab
Social media information is displayed on the Social tab, which is available on the Debtor, Creditor,
Non Account, Opportunity and Contact screens
Note: The Disable Social Media Tabs profile setting can be used to hide this tab on some or all of
these screens.
If no details have been entered social media account details for the company/Contact/Opportunity being viewed, each sub‐tab displays the results of a search for the company/Contact/Opportunity’s name. Each search result has a keep button next to it; clicking this button populates the company/Contact/ Opportunity’s social media details with the details from that search result. (EXO

EXO Super User Training Manual Momentum Software Solutions Page | 25
Business captures as many details as it can; for example, LinkedIn search results may also specify a website and a Twitter feed ‐ these details will be copied as well if they are not already present.) Once account details have been entered or found, the following social media information is displayed:
Twitter ‐ The company/Contact/Opportunity’s Twitter feed.
Facebook ‐ The contents of the company/Contact/Opportunity’s Facebook wall.
LinkedIn ‐ All of the company/Contact/Opportunity’s activity on LinkedIn.
LinkedIn Connections ‐ All of the company’s employees, sorted by degree of connection to the logged in user.
Note: The LinkedIn Connections tab is available for Opportunities only.
Each sub‐tab has a More Results link at the bottom. Clicking this button opens a separate browser window to display the company’s Twitter feed, Facebook wall or LinkedIn page. On all tabs, each entry has a keep button ‐ clicking this button copies the entry to the
company/Contact/ Opportunity’s History Notes tab
Company vs. Personal Account
On the Facebook and LinkedIn sub‐tabs, buttons are available to switch between the user’s personal account and the company account:
Your Account ‐ when using the company account, this button switches to using the personal account.
Company Account ‐ when using the personal account, this button switches to using the company account.
Log Off ‐ when using the personal account, this button logs off the personal account. If the user has not specified a personal account, they will be prompted to log on the first time they go to a sub‐tab on the Social tab. The details they enter will be saved against their Staff record in the EXO Business database.
Social Media Widgets
The following widgets are available to display social information about your own company on dashboard displays (see page 505):
My Company’s Twitter Mentions
My Company’s Facebook Wall
My Company’s LinkedIn Activity These widgets use the account IDs entered in EXO Business Config; if no details have been entered,
these widgets perform a search for the Company Name as set up in EXO Business Config > Company
> Company Details.
EXO Super User Training Manual Momentum Software Solutions Page | 26
SYSTEM SETTINGS
The System section of the Configuration Assistant and the EXO Business Config application contains
settings that affect the operation or appearance of the EXO Business system.
Display Names
Display Names allows customisation of the reference names displayed for some generic functions.
Examples include the names for Debtor Secondary Group (e.g. change to "Sales Region"), and Job
Costing Description (e.g. change to "Problem"). Highlight a record you want to change the display
name and click Edit. You can then enter the following details and click Save.
Field Description
Display Name
Enter the name that you want to appear on EXO Business applications
Display Hint
Enter the hint text that you want to appear when a user hovers the mouse pointer over the name on EXO Business applications.
Note: Group IDs are system‐generated and not customisable.
Event Log
This section is available in EXO Business Config only. It is where you set up the Event Log.
MYOB EXO Business includes the ability to maintain an audit log of key events that you may want to
track. For certain events in EXO Business, you can identify the event, and record the reason and time
of the event, and who performed it. Audit events can occur in multiple places throughout the
software. The event types are referred to as Event Reason Classes and are hooks in the system
provided by EXO Business. Tracking of each class is optional. You can set up a list of valid reasons
within each class to be chosen at run time. An additional comment may be entered by the user for
each event instance should a “covering note” be required.
For example, if you activate the Event Reason Class corresponding to a Debtor’s Stop Credit flag being changed, the following window appears whenever you change the Stop Credit field on a Debtor account:
EXO Super User Training Manual Momentum Software Solutions Page | 27
Multiple reasons are available for selection, and additional comments can be entered if necessary. If the event is activated, but set to “Silent”, this window will not appear; the event will be logged, but the user will not be alerted. EXO Business
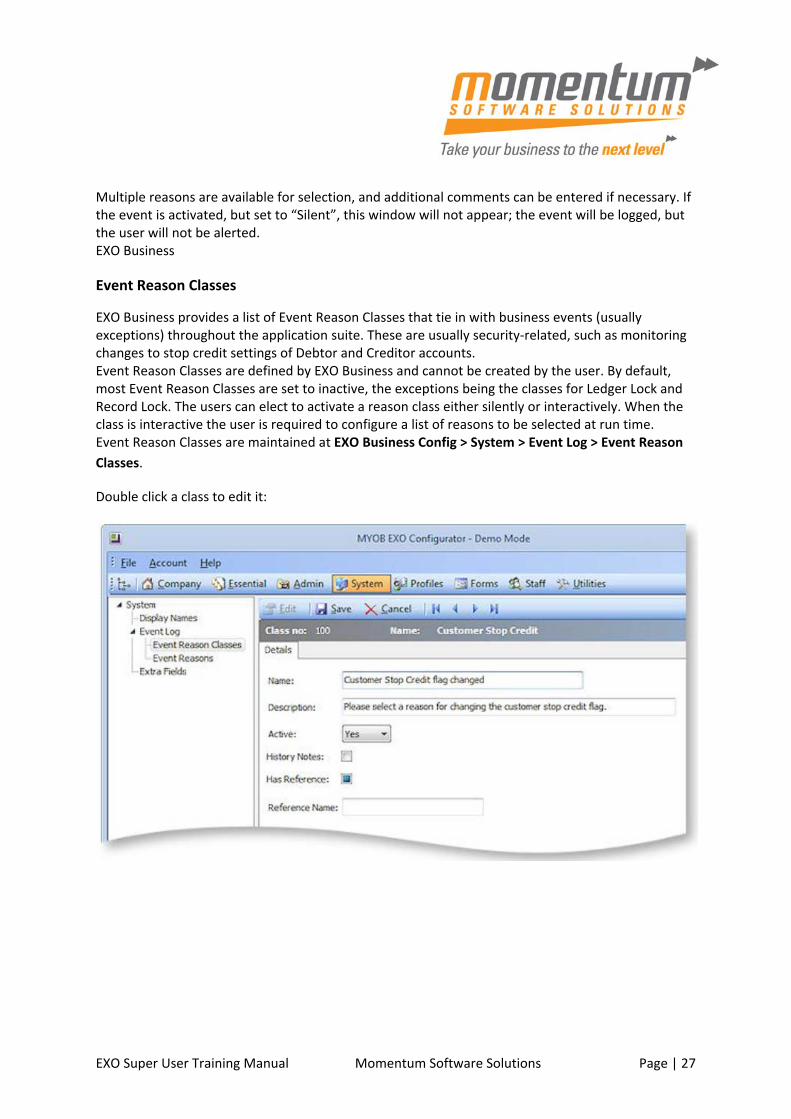
Event Reason Classes
EXO Business provides a list of Event Reason Classes that tie in with business events (usually exceptions) throughout the application suite. These are usually security‐related, such as monitoring changes to stop credit settings of Debtor and Creditor accounts. Event Reason Classes are defined by EXO Business and cannot be created by the user. By default, most Event Reason Classes are set to inactive, the exceptions being the classes for Ledger Lock and Record Lock. The users can elect to activate a reason class either silently or interactively. When the class is interactive the user is required to configure a list of reasons to be selected at run time. Event Reason Classes are maintained at EXO Business Config > System > Event Log > Event Reason
Classes.
Double click a class to edit it:

EXO Super User Training Manual Momentum Software Solutions Page | 28
The fields on this screen are:
Field Description
Name This will be the caption of the window requesting a reason for the logged activity.
Description This displays a more explicit description to indicate circumstances of use to the user
Active
This field has 3 possible settings:
No – An audit log will not be maintained for this Reason Class
Yes – A window will be displayed requesting the user choose a reason for this event.
Silent – No window will be displayed, instead an event log entry will be created silently.
Note: You must set Event Reasons for any class that is set to “Active” or “Silent”
History Notes Ticking this option will also create an entry in the History Notes of the primary entity (Debtor, Creditor, Stock item, Job).
Has Reference When this option is ticket, an extra field is available on the Event Reason window, allowing users to record a reference with the logged Event. If this option is ticked, you must also set a Reference Name
Reference Name This specifies the label for the reference field on the Event Reason window, e.g. “Voucher? For a discount override.
Event Reasons
Event Reasons within an Event Reason Class form a list of reasons that can be chosen at run time when an event is logged. With the exception of the ledger and record lock reason classes, which cannot be deactivated, EXO Business does not automatically set up any reasons. You must establish at least one reason for each class you want to activate. Event Reasons are maintained at EXO Business Config > System > Event log > Event Reasons. Click New to create a new Event Reason:

EXO Super User Training Manual Momentum Software Solutions Page | 29
The fields on this screen are:
Field Description
Class This is Event Reason Class that the reason belongs to
Name This is the name of the reason that will selectable in the list when an event for the class occurs.
Description This is a short description to indicate to the user the circumstances when this reason should be used
Report Code Determines the sequence reasons appear in the list within a reason class
Must Fill Reference
This option is available if Has Reference is ticked for the reason’s class. Ticking this option will prevent the reference from being left blank when an event is logged for this reason.
Extra Fields
To allow the capture of customised information, MYOB EXO Business supports Extra Fields. These
are flexible points of data entry that can be defined at implementation time. They are used to collect
information at time of data entry, to appear on forms or to be analysed and reported.
Examples of use of extra fields are many and varied, but could include:
• Capturing demographic information at the point of sale
• Custom personal information about customers, such as birth dates or anniversaries

EXO Super User Training Manual Momentum Software Solutions Page | 30
• Recording specific information on stock items, such as warranty terms or links to images
Extra fields can be created in various areas of MYOB EXO Business, including:
• • Sales orders
• • Purchase orders
• • Debtor, Creditor and GL accounts
• • Contacts
• • Stock items
• • Invoices
Extra fields appear on account masters and transaction entry windows through the extra field tab or
through the line periscope.
Creating Extra Fields
EXO Business Config > [System] > Extra Fields
MYOB EXO Business allows users to create extra fields on various tables to hold vital information
needed on the system.
EXO Super User Training Manual Momentum Software Solutions Page | 31
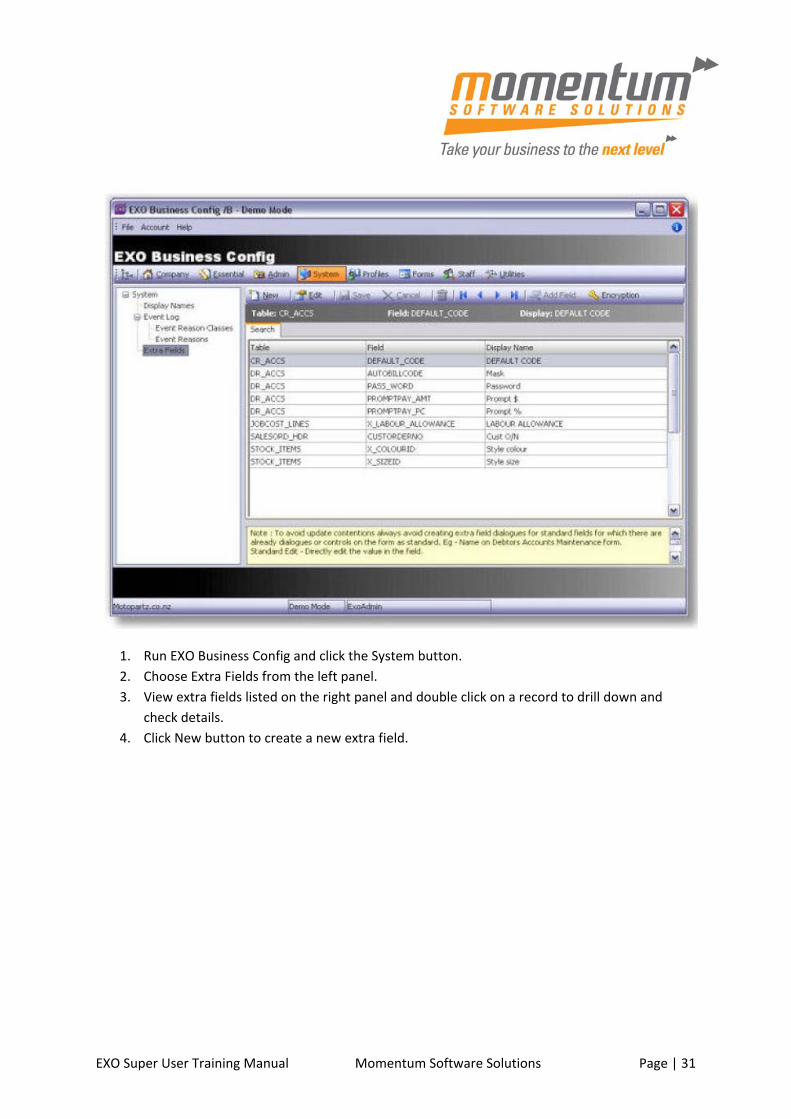
1. Run EXO Business Config and click the System button.
2. Choose Extra Fields from the left panel.
3. View extra fields listed on the right panel and double click on a record to drill down and
check details.
4. Click New button to create a new extra field.

EXO Super User Training Manual Momentum Software Solutions Page | 32
5. Choose Table name where you want to add or display a field.
6. Click the Add field button to add a field on the chosen table. System will automatically add a
prefix of X_ if not keyed by the user. Ensure to key in the correct data type and default value
if necessary. No spaces are permitted in this name, use and underscore to insert spaces (_).
E.g. International Number
7. Choose the correct field name to be displayed on the window. It can be a user created field
or an existing field in the system.
8. Key in the position and size of extra field. Used and unused positions are displayed on the
right side panel of the window.
9. Choose the correct dialog type based on the chosen field. E.g. choose date picker for dates,
standard edit for varchars, check box for char(1), etc.
When you choose drop down edit or drop down selection as the dialog type, the combo boxes for
Lookup Table, Keyfields and Display fields are activated.
Summary
This diagram summarises the overall connection between the configuration of the extra fields and
how they appear in the tabs of the account window.

EXO Super User Training Manual Momentum Software Solutions Page | 33
Note: Extra fields can be displayed on details 1 tab or extra fields tab of an account window. On
transaction windows, they appear on the header or line periscope windows.
EXO Super User Training Manual Momentum Software Solutions Page | 34
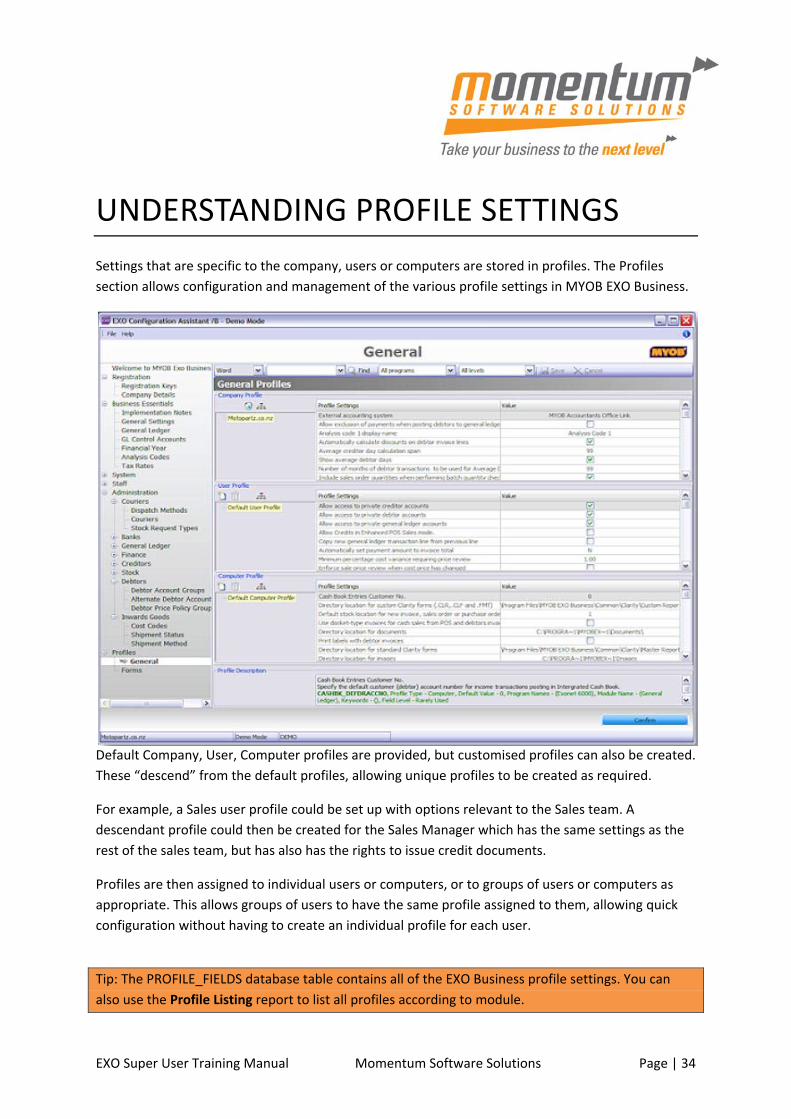
UNDERSTANDING PROFILE SETTINGS
Settings that are specific to the company, users or computers are stored in profiles. The Profiles
section allows configuration and management of the various profile settings in MYOB EXO Business.
Default Company, User, Computer profiles are provided, but customised profiles can also be created.
These “descend” from the default profiles, allowing unique profiles to be created as required.
For example, a Sales user profile could be set up with options relevant to the Sales team. A
descendant profile could then be created for the Sales Manager which has the same settings as the
rest of the sales team, but has also has the rights to issue credit documents.
Profiles are then assigned to individual users or computers, or to groups of users or computers as
appropriate. This allows groups of users to have the same profile assigned to them, allowing quick
configuration without having to create an individual profile for each user.
Tip: The PROFILE_FIELDS database table contains all of the EXO Business profile settings. You can
also use the Profile Listing report to list all profiles according to module.
EXO Super User Training Manual Momentum Software Solutions Page | 35
Profile Types
The three profile types are all accessed from the Profiles section.
Company Profile
The Company profile stores company‐wide settings. Because MYOB EXO Business only supports one
company per database, only one company profile can exist. As such, this profile is given the name of
the registered company.
User Profiles
User profiles relate to options that are applicable to specific users, e.g. granting the user the rights to
edit account information. User profiles are then attached to staff at Staff > Users.
Computer Profiles
Computer Profiles store settings related to the computer hardware, or the computer’s network location in a workplace. These settings include printer settings for forms and reports (because most printout destinations are associated with where the computer is located), hardware related issues (such as EFTPOS terminal hardware), and mapped file directories. Computer profiles are assigned to physical computers at Staff > Computers.
Hierarchy ‐ Each profile has default settings, and these form the default profiles (e.g. the Company
Profile, Default User Profile, and the Default Computer Profile).
In a simple business, these default settings may be overridden and all users and computers could use
the same settings.
However, in most business, different users and different workstations require different settings.
MYOB EXO Business uses a parent/child model, where descending profiles inherit the settings of the
parent. Each child profile can then override individual settings to suit specific needs. Note that
changing any settings of a parent profile will also be reflected in the child profile, unless the child
profile setting is explicitly overwritten.
For example, a descendant of the Default User Profile could be created for the Sales Team, which is
set up with all the usual salesperson rights and access. A descendant of the Sales Team profile could
be created for the Sales Manager, which inherits all the settings of the Sales team, but then has an
additional setting to allow credit transactions to be created.
To continue the example, a second descendant of the Default User Profile could also be created for
the Finance Team. And a descendant of the Finance team could be created for the Finance Manager,
who was given the ability to post to prior periods.
EXO Super User Training Manual Momentum Software Solutions Page | 36
Creating Profiles ‐ The default Company, User, and Computer profiles exist in all databases. These
may be altered directly, or descendant profiles created.
To create a new profile:
1. Select the parent profile, and click New. A prompt will appear to name the new profile. A
new profile will then be created, and inherits all the settings of the parent profile.
2. The individual Profile Settings of this new profile can then be set or changed as needed.
These changes override the settings of the parent profile.
When an individual setting is selected, relevant help notes are displayed in the panel at the bottom
of the window. This may also detail restrictions when operating certain profile combinations.
The Show/Hide Parent Settings button ( ) shows all of the profile settings by default. Toggling
this button on shows only the profile settings that have been explicitly set in the current profile,
highlighting the specific differences between the parent and the child profiles.
Filtering and Searching Profile Settings ‐ Filters at the top of the window can be applied to help
locate relevant profile settings. For example, entering “serial” and clicking Find will display only
profiles settings that reference serial numbers.
Note: Multiple words are treated as an exact phrase for filtering. Separate words with a comma to
search for settings that contain the words in any combination. For example, entering “account
group” will display only those settings that contain the phrase “account group”; entering “account,
group” will display settings that contain the words “account” and “group” anywhere.
To further categorise profile settings, each setting is classified by module and function. Choose
Modules from the box at the top left of the screen. All application modules and their functions are
displayed in a tree to the left of the profile settings. Clicking on a module or function on the tree will
refine the list of profile settings to just that module or function.
The profile settings can also be filtered by Program, e.g. select Finance to show only those profiles
related to Finance.
Finally, profiles can be filtered by commonality. For instance, selecting only the Frequently Used
profile settings will only show the most common configuration options needed in setting up a site.
Approaches to Setting up Profiles ‐ A layer‐by‐layer approach may be taken to setting the various
profiles. Normally only one type of filter would be applied at a time, and this would help determine
the approach taken to configuring the profiles. For example: Clear the search field and step through
all the Company profile settings, then all the User profile settings, and the Computer profile settings.
EXO Super User Training Manual Momentum Software Solutions Page | 37
Use a filter to set all relevant options in a specific area of interest. For example, set the Word filter to
“serial”, then step through the company profile settings, user profile setting, and computer profile
settings one‐by‐one to set all the options pertaining to serial numbers.
Perform a module search, and only have the Frequently Used commonality option selected. Then
step through the company profile settings, user profile settings, and computer profile settings one‐
by‐one to set all the most common options used in an implementation. A second pass could then be
done later on the Frequently Used options for more “finer” detail setting, or individual settings
located and set as needed.
Select the first Module in the module tree with no filter applied. Step through the company profile
settings, then user profile settings, and computer profile settings, to set the ‘Contacts’ settings one‐
by‐one. Then select the second Module, (i.e. Creditors), and do the same. And then repeat through
all modules.
Normally a layer‐by‐layer approach is taken, covering the main areas first and followed by a more
selective approach once the initial setup is complete. However, the method chosen is a personal
preference, and a combination of methods could be used to suit the situation.
More information relating to Profile Fields can be found at Appendix A on pg 81

EXO Super User Training Manual Momentum Software Solutions Page | 38
FORMS
Clarity Form Profiles
The Forms section gives various profiles access to different MYOB EXO Business forms. The Company
profile specifies the Clarity files for a selection of forms.
Note: Clarity forms and reports must be stored at the directory specified in the computer profile
options Directory for Custom Clarity forms (.CLR,.CLF and. FMT) or Directory for Standard Clarity
Forms(.CLR,.CLF and .FMT). MYOB EXO Business looks into the Custom Clarity Directory first before
going into the Standard clarity Directory.
User profiles configure a variety of user prompts relating to forms.
Computer profiles contain the following settings for each form:
Destination A form’s primary destination can be set to None, Printer, File, Viewer, Email or
Grid.
Email Option Tick this box to send a copy of this document via email, in addition to sending
a copy to the specified destination. All email options are conditional upon the "Email client"
profile setting being enabled for the user.
Output Device This is the file format that is used if the Destination is set to “File”. If the
Email Option is ticked, it is the file format of the attachment.
Commonly viewable graphics file formats are PDF and BMP. Text and spreadsheet options
are also available. If the email option is disabled and the primary destination is printer or
screen this option can be only printer or screen.
Printer Name This is the Windows UNC name for the printer. This printer must be one that is already
available to you in the Windows printer settings list.
Note: Clarity forms and reports must be stored at the directory specified in the computer profile
options Directory for Custom Clarity forms (.CLR,.CLF and .FMT) or Directory for Standard Clarity
Forms (.CLR, .CLF and.FMT)
MYOB EXO Business looks into the Custom Clarity Directory first before going into the Standard
Clarity Directory. User profiles configure a variety of user prompts relating to forms. Computer
profiles contain the following settings for each form:

EXO Super User Training Manual Momentum Software Solutions Page | 39
Field Description
Destination
A form’s primary destination can be set to None, printer, File, Viewer, Email or Grid.
Email Option
Tick this box to send a copy of this document via email, in addition to sending a copy to the specified destination. All email options are conditional upon the “Email client” profile setting being enabled for the user.
Output Device
This is the file format that is used if the Destination is set to “File”. If the Email Option is ticked it is the file format of the attachment. Commonly viewable graphics file formats are PDF and BMP. Text and spreadsheet options are also available. If the email option is disabled and the primary destination is printer or screen this option can be only printer or screen.
Printer Name
This is the Windows UNC name for the printer. This print must be one that is already available to you in the Windows printer settings list.
EXO Super User Training Manual Momentum Software Solutions Page | 40
CUSTOM BUTTONS
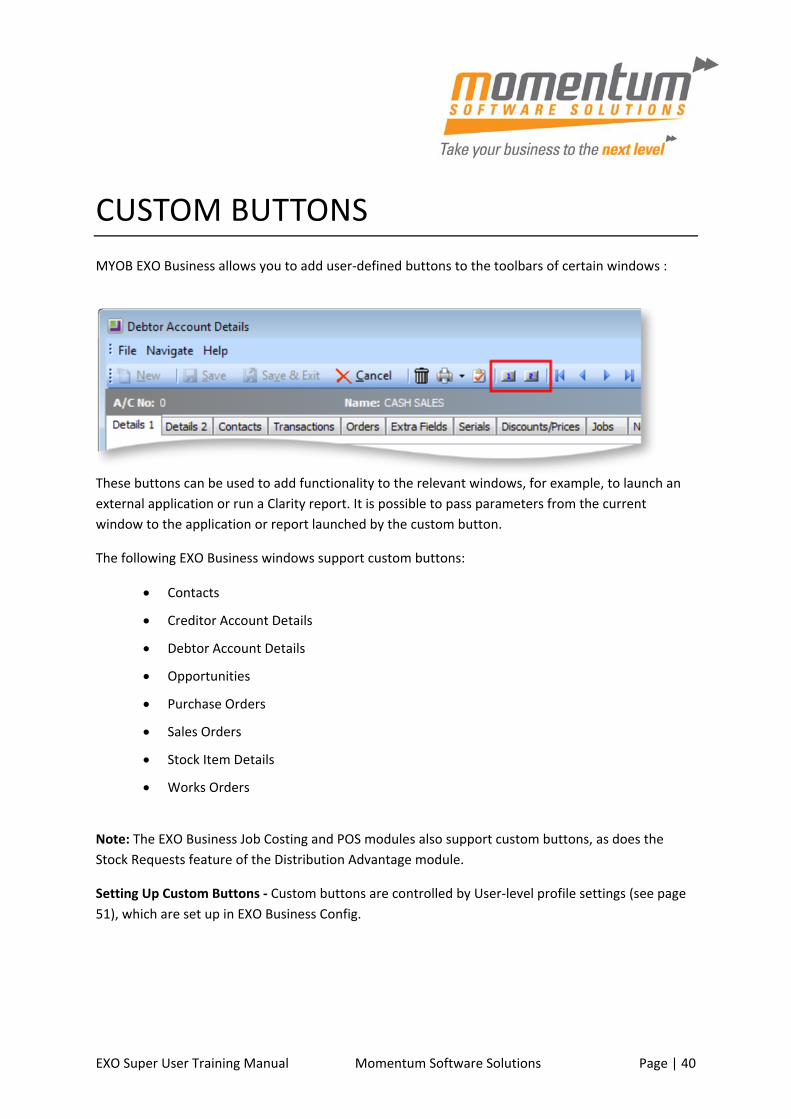
MYOB EXO Business allows you to add user‐defined buttons to the toolbars of certain windows :
These buttons can be used to add functionality to the relevant windows, for example, to launch an
external application or run a Clarity report. It is possible to pass parameters from the current
window to the application or report launched by the custom button.
The following EXO Business windows support custom buttons:
Contacts
Creditor Account Details
Debtor Account Details
Opportunities
Purchase Orders
Sales Orders
Stock Item Details
Works Orders
Note: The EXO Business Job Costing and POS modules also support custom buttons, as does the
Stock Requests feature of the Distribution Advantage module.
Setting Up Custom Buttons ‐ Custom buttons are controlled by User‐level profile settings (see page
51), which are set up in EXO Business Config.

EXO Super User Training Manual Momentum Software Solutions Page | 41
Each button has two profile settings: one that specifies the caption for the button and one that
specifies the command that should be run when the button is clicked. For example, to add a custom
button to the Debtors window, configure the settings:
Debtor custom button 1 caption
Debtor custom button 1 command line Both settings must be configured; if either setting is blank, the custom button will not appear on the
window’s toolbar.
Caption Setting ‐ The text entered for the “caption” profile setting of a custom button appears
when the mouse pointer is hovered over the custom button:
Command Line Setting ‐ The text entered for the “command line” profile setting of a custom button
specifies the command that will run when the button is clicked.
To run an external program, enter: “MyProg.EXE <LOGIN> <CURRENT>“
Where <LOGIN> passes the database connection details and <CURRENT> passes out the key field
identifier (most commonly the SEQNO) of the current record that you have loaded on the screen at
the time that you press the button.
Any parameter entered with the extension .CLR will assume that you want to run a clarity report and
will call Clarity directly. It is not necessary that Clarity.EXE exist to do this, for example:
“MYREPORT.CLR /S=SEQNO=<CURRENT>“
EXO Super User Training Manual Momentum Software Solutions Page | 42
STAFF
Menus
The Menu Designer lets you set up customised user menus for all MYOB EXO Business modules.
These menus, once defined, are then assigned to one or more staff members, possibly organised by
the company staff structure. By setting up different menu structure for different users, you can
restrict certain functions to those users with the authority to access them, and customize the
appearance of the EXO Business interface to suit the needs of the organization.
Dropdown Menu
Dropdown Menus determine the layout of the MYOB EXO Business menus. Each Dropdown Menu
listed in the Configuration Assistant defines the menus for all of the EXO Business modules. The top
level of each menu is restricted to File, Account, Transactions, Reports, Utilities, Setup and Help.
Below that, the menus are fully user‐definable, allowing the menus under the menu groupings to be
defined to meet a user’s specific needs.
A selection of Dropdown Menus are available by default. Two of them, EXO Business Master and
EXO Business Default, are provided as “maximum” and “minimum” examples of menu
configurations, and cannot be changed directly. Instead, they can be copied using the Copy Menu
toolbar button ( ) to form the basis of a new custom menu. All other default menus can be edited.
TIP: The dropdown Menu assigned to the current user is highlighted in green.
To add a new Dropdown Menu:
1. Select the module whose menu you want to edit from the Program box, then click New to
create a new menu.
The left‐hand pane holds the “blank” menu structure, showing the top level menu items File,
Account and so on. The right‐hand pane contains a list of all available menu procedures.
2. In the Name field, enter a new name for the menu, which will be referred to when assigning
the menu to users.
3. Enter some text into in the Filter field to filter the list of menu procedures.
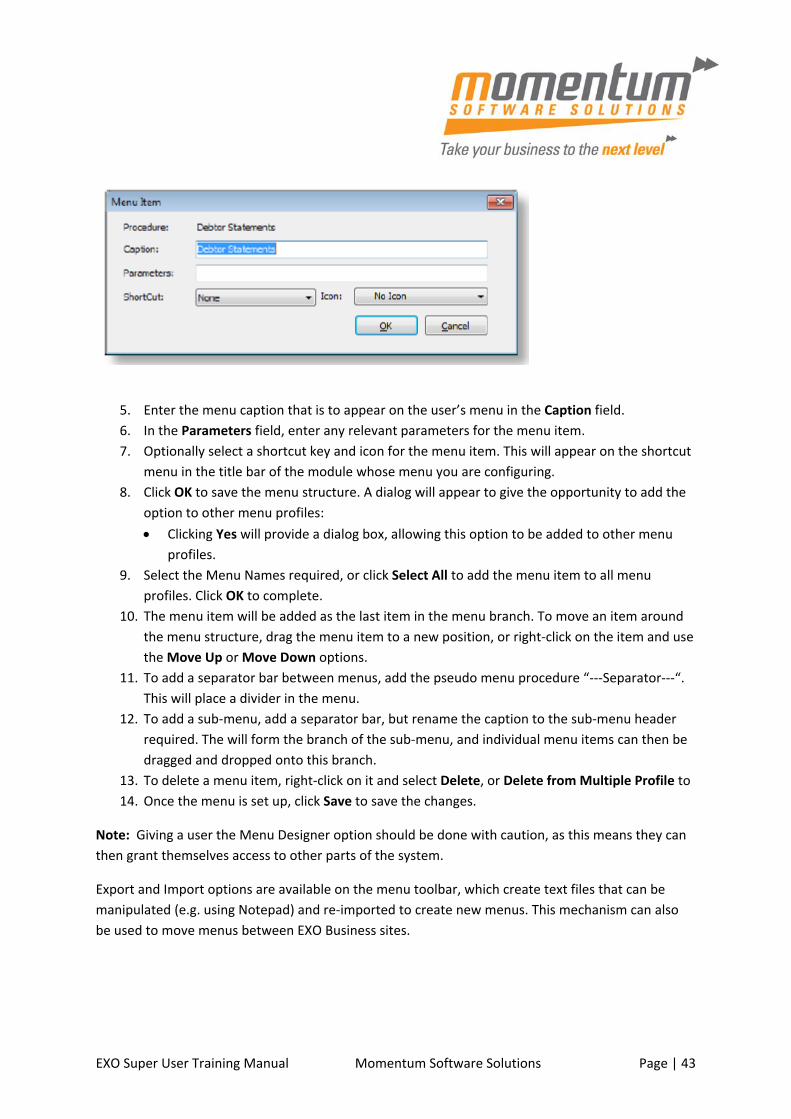
4. Drag menu items from the right hand pane onto the appropriate menu heading on the left
hand pane. A menu item caption and parameter dialog box is displayed:
EXO Super User Training Manual Momentum Software Solutions Page | 43
5. Enter the menu caption that is to appear on the user’s menu in the Caption field.
6. In the Parameters field, enter any relevant parameters for the menu item.
7. Optionally select a shortcut key and icon for the menu item. This will appear on the shortcut
menu in the title bar of the module whose menu you are configuring.
8. Click OK to save the menu structure. A dialog will appear to give the opportunity to add the
option to other menu profiles:
Clicking Yes will provide a dialog box, allowing this option to be added to other menu
profiles.
9. Select the Menu Names required, or click Select All to add the menu item to all menu
profiles. Click OK to complete.
10. The menu item will be added as the last item in the menu branch. To move an item around
the menu structure, drag the menu item to a new position, or right‐click on the item and use
the Move Up or Move Down options.
11. To add a separator bar between menus, add the pseudo menu procedure “‐‐‐Separator‐‐‐“.
This will place a divider in the menu.
12. To add a sub‐menu, add a separator bar, but rename the caption to the sub‐menu header
required. The will form the branch of the sub‐menu, and individual menu items can then be
dragged and dropped onto this branch.
13. To delete a menu item, right‐click on it and select Delete, or Delete from Multiple Profile to
14. Once the menu is set up, click Save to save the changes.
Note: Giving a user the Menu Designer option should be done with caution, as this means they can
then grant themselves access to other parts of the system.
Export and Import options are available on the menu toolbar, which create text files that can be
manipulated (e.g. using Notepad) and re‐imported to create new menus. This mechanism can also
be used to move menus between EXO Business sites.
EXO Super User Training Manual Momentum Software Solutions Page | 44
Business Flow Menu
Business Flow Menus define the structure and appearance of the main section of each MYOB EXO
Business module interface. A Business Flow Menu can contain buttons, menus and links to user‐
defined functions, as well as graphical elements to customize the look and feel of the interface.
Business Flow Menus are optional. If no Business Flow Menu is specified, the EXO Business module
interface will contain only the main dropdown menu.
Default Business Flow Menus are available to mimic the appearance of the MYOB Premier and
MYOB Aurora One products, to provide familiarity for user migrating from those products. Default
menus can be copied with the Copy Menu button ( ) and used as the basis of a new menu.
Note: The Business Flow Menu assigned to the current user is highlighted in green.
To add a new Business Flow Menu:
1. Select the module whose menu you want to edit from the Program box, then click New to
create a new menu.
The left‐hand pane is the designer area where the menu is created. The right‐hand pane
contains a toolbox of menu elements and a list of all available menu procedures. A floating
Menu Designer Component Browser window lets you configure the properties of the
currently selected item and its “child” component items. The Component Browser also
displays the name of the menu item that the mouse is current over.

EXO Super User Training Manual Momentum Software Solutions Page | 45
2. In the Menu Name field, enter a new name for the menu, which will be referred to when
assigning the menu to users.
3. Click on the WorkSpace item on the Menu Designer Toolbox, then click on the design area
on place it.
4. To change the size of the WorkSpace, hover the mouse over it and hold down CTRL. While CTRL
is held down, moving the mouse resizes the WorkSpace. Alternatively, double‐click on the
WorkSpace to view its Properties dialog and enter Width and Height values.
5. To position the WorkSpace, hover the mouse over it and hold down SHIFT. While SHIFT is held
down, moving the mouse resizes the WorkSpace. Alternatively, right‐click on the WorkSpace
to view its Properties dialog and enter Top and Left values.
Tip: To make the WorkSpace resizable, double‐click on it and set the Custom property to “R” and the
Align property to “Client”.
The WorkSpace forms the base of the Business Flow menu, defining its size and shape. All other
menu items are placed on it.
EXO Super User Training Manual Momentum Software Solutions Page | 46
Tip: You can place Panel items on the Workspace, then place other items on the panel. This allows
you to position multiple items at one.
To add a text link to a Business Flow Menu:
1. Enter some text into in the Filter field to filter the list of available procedures.
2. Drag a procedure from the list to the WorkSpace. A window displaying the link’s parameters
appears:
3. Enter any parameters that may be required, then click OK.
Tip: You can add links to an external file or executable by dragging the “External Program”
procedure onto the Workspace, then changing its Name and entering the filename of the
file/executable into its Parameters field. Similarly, you can add a link to a Clarity report by dragging
the “Run Clarity Report” procedure onto the WorkSpace, then specifying the report.
To add a button to a Business Flow Menu:
1. Click on the Buttons item on the Menu Designer Toolbox.
2. Select the style of button (Standard, Focus or Transparent), then click anywhere on the
WorkSpace to place it.
Note: Transparent buttons allow more than one image to be specified. These images correspond to
the various states of the button, e.g. inactive, active, hover.
3. Enter any parameters that may be required, then click OK.
4. Size and position the button using the CTRL and SHIFT keys.
5. Enter some text into in the Filter field to filter the list of available procedures.
6. Drag a procedure from the list onto the button. This is the procedure that will be activated
when the button is clicked.
7. Enter any parameters that may be required, then click OK.
Tip: You can set a button to link to an external file of executable by dragging the “External Program”
procedure onto the button, then changing its Name and entering the filename of the file/executable
into its Parameters field.
To add a drop‐down menu to a Business Flow Menu:
1. Click on the Drop Buttons item on the Menu Designer Toolbox.
2. Select the style of button (Standard, Focus or Transparent), then click anywhere on the
WorkSpace to place it.
Note: Transparent buttons allow more than one image to be specified. These images correspond
to the various states of the button, e.g. inactive, active, hover.

EXO Super User Training Manual Momentum Software Solutions Page | 47
3. Enter any parameters that may be required, then click OK.
4. Size and position the button using the CTRL and SHIFT keys.
5. Enter some text into in the Filter field to filter the list of available procedures.
6. Drag a procedure from the list onto the button. (To add a sub‐menu, drag the “SubMenu”
item from the list.)
7. Enter any parameters that may be required, then click OK.
8. Repeat steps 5 – 7 for all other procedures you want to be available from the drop‐down
menu.
The drop‐down menu works in real time on the Menu designer: click on the menu to view the items
that will appear under it.
To add graphical elements to a Business Flow Menu:
1. Click on the Label, Image or Line item on the Menu Designer Toolbox, then click anywhere
on the WorkSpace to place the item.
2. Enter any parameters that may be required:
3. For labels, this includes the label text.
4. For images, this includes the image file to display.
5. For lines, this includes the line style an orientation.
6. Click OK.
7. Size and position the item using the CTRL and SHIFT keys.
To add a tabbed layout to a Business Flow Menu:
Two varieties of tabbed layouts are available: Standard and Enhanced. Enhanced layouts allow
transparency and mouse over effects; Standard layouts do not allow these effects, but are more
flexible with how tab buttons can be arranged.
1. Click on the MultiPage > Standard > Multipage or Multipage > Enhanced > Multipage item on
the Menu Designer Toolbox, then click anywhere on the WorkSpace to place it.
Tip: Standard MultiPages have a TabPos properly that lets you specify which side of the multipage
tabs will appear on. Enhanced Multipages can only have tabs at the top.
2. Size and position the MultiPage using the CTRL and SHIFT keys.
3. Click on the MultiPage > Standard > Tabsheet or Multipage > Enhanced > Tabsheet item on
the Designer Toolbox, then click on the MultiPage. Enter a name and optionally an image
then click OK. This adds a tab to the top of the MultiPage.
Note: Enhanced tabsheets allow more than one image to be specified. These images correspond to
the various states of the tab button, e.g. inactive, active, hover.
4. Repeat step 3 to add more tabs to the MultiPage.

EXO Super User Training Manual Momentum Software Solutions Page | 48
5. Click on a tab, then drag other items such as links and buttons onto the MultiPage. These
items will only appear when that tab is clicked.
6. Click on another tab. The items you added to the previous tab will disappear. Drag more
items to the MultiPage for this tab.
7. Repeat steps 5 and 6 for all tabs.
8. The tabbed layout works in real time on the Menu designer: click on a tab to view the items
that will appear on that tab.
To add a Dashboard interface to a Business Flow Menu:
A procedure called "Dashboard" is available in the list of procedures; dragging this procedure onto a
Business Flow Menu means that a Dashboard interface will be available when running the module.
The Dashboard can be customised and widgets can be added to it at run time. It is also possible to
add a working Dashboard interface that can be edited at design time:
1. Click on the Panels > Dock Panel item on the Menu Designer Toolbox, then click anywhere
on the WorkSpace to place it. A Dashboard interface appears on the WorkSpace.
2. Size and position the Dashboard using the CTRL and SHIFT keys.
Tip: To have the Dashboard take up all of the available area, set its Align properly to “Client”
3. Click on the Panels > Panel item on the Menu Designer Toolbox, then click on the Dashboard. This adds a panel and automatically converts it to a Dashboard widget.
4. Repeat step 3 to add more widgets to the Dashboard.
5. Click on a widget, then drag other items such as links and buttons onto the widget. Repeat for all widgets.
Special Procedures ‐ The “Task Scheduler” and “Dashboards” procedures can be “docked” in the
WorkSpace, so that they appear as part of the core EXO Business interface, rather than appearing in
a new window.
When dragging either of these procedures onto the WorkSpace, enter “D” into the Custom field for
the procedure to indicate that it is dockable. Enter “DR” to indicate that it is dockable and resizable.
The Align property should be set to "Client".
Menu Definition
A menu definition is a set consisting of a Dropdown Menu and a Business Flow Menu. Menu
definitions are associated with users at Staff > Users, and determine which menus will be used for
that user.
Tip: The definition assigned to the current user is highlighted in green.

EXO Super User Training Manual Momentum Software Solutions Page | 49
To set up a Menu Definition:
Click New to create a new definition, or Edit to alter an existing one.
1. 1. Enter a Name for the definition. 2. Select the Drop Down Menu for this definition. 3. Select a Business Flow Menu for this definition, or click Clear if you do not want to display a
Business Flow Menu. 4. Click Save to save the settings.
Profile Assignment
Staff
The Staff section of the Configuration Assistant and the EXO Business Config application is where
you set up customised menus, as well as records for users (staff members), computers and security
profiles.
The Users section is used to set up new staff members. This includes personal details (such as Job
Title and Phone details) and authority values (creditor invoice limits, purchase order limits). Users
are configured at:
The Staff > Profile Assignment > Staff section of EXO Business Config
The Staff > Users section of the Configuration Assistant
The Users section also manages login access to MYOB EXO Business (see page 24). The staff member
is assigned a Login ID, and a password managed with the Change Password button. The Account
Status setting shows and/or sets the status of the user’s account and password (Account OK, Locked,
or Expired).
The Users section is also where Profiles are associated with the user. Specifically, this is where the
user is assigned a User Profile (to define user‐specific settings), a Security Profile (to determine how
the user’s password is managed), and a Menu Definition (to associate a menu structure with the
user).

EXO Super User Training Manual Momentum Software Solutions Page | 50
Computer
Computer profiles store settings related to the computer hardware, or the computer’s location in a
workplace. These settings include form and report printer settings (because most printout
destinations are associated with where the computer is located in a workplace), hardware related
settings (such as EFTPOS terminal hardware), and mapped file directories. Computers are configured
at:
The Staff > Profile Assignment > Computer section of EXO Business Config
The Staff > Computers section of the Configuration Assistant
The Computers section manages the association of computer profiles to physical
workstations.
Note: User interface preferences such as customised ExoGrids and screen selection check boxes are stored in the user’s Window’s registry, to ensure they are unique per user. These settings will therefore ‘follow’ the Windows login. Computer (and user) profiles can be shared by more than one computer or user, and are therefore not suitable for this purpose. To assign a computer profile to a computer:
1. Alter the computer profile selection method by clicking the toolbar button (note that
changing this setting mid‐operation may result in having to delete and remap computer
profiles). Options available are:
GUID – the historical method where a unique identifier is stored within the computer’s
registry. This works fine if the Windows Login user is consistent, however this may not
be appropriate as network operating systems tighten security and workstations have
multiple users. This option will not work in a Terminal Services environment.
ComputerName, ClientName – two separate options which are relevant for some
operating systems, but not others. For instance, ComputerName is suitable for
Windows XP as uniquely identifying the workstation, but in some Terminal Services
environments the ComputerName is the main server and ClientName is the unique
username.
ComputerName + ClientName – a compound setting that is unique in most mixed
operating system environments, and is the normal suggested setting.
2. Double‐click on the appropriate computer name to assign a profile.
3. Select the required Computer Profile from the drop‐down selection.
The computer running MYOB EXO Business needs to be associated with a computer profile.
However, a computer cannot be assigned a profile until that computer runs an EXO Business
application, which then "registers" the computer with EXO Business, giving the configuration
applications a reference with which to associate a profile.
EXO Super User Training Manual Momentum Software Solutions Page | 51
To assist, EXO Business has a Company‐level profile setting Use Default Profiles, which if enabled,
will assign any new computer the default computer profile. If this setting is disabled, the user will be
prompted to select a computer profile the first time an EXO Business application is run on the
computer.
If a user regularly moves their notebook computer between offices (or maybe home and office),
then the computing environment could change radically. For instance, different printers could be
available or the preferred location to obtain reports from could change.
Security Profiles
The Security Profiles section controls options relating to login/password security. Security options include areas such as password complexity and how often the password must be changed. While
more than one security profile can exist, most sites generally will just alter the default profile. Security profiles are available at:
Profiles > Security Profiles and Staff > Profile Assignment > Security Profiles in EXO Business
Config
Staff > Security Profiles in the Configuration Assistant
Security profiles are attached to staff through the Staff > Users section.
Note: Security profiles do not control the user’s access to parts of MYOB EXO Business; user access is
controlled by User profile settings, combined with menu access.
EXO Super User Training Manual Momentum Software Solutions Page | 52
QUICK INSERTS
Overview ‐ Quick Insert is method to facilitate importation of data and to enable rapid updates of
multiple records in a grid format, without the use of third party database explorer tools.
It is used by EXO to control the quick insert tabs of account groups and product groups etc, but it can
also be used to define Quick insert tabs with validation for user defined tables.
It is assumed that the operator is familiar with relational database technologies and the EXO
schema. If you are unsure of the effects of using these tools please ask your EXO implementation
partner for advice on its use.
The purpose of this section is to outline the standard configuration and demonstrate the
functionality to readers already familiar with the EXO relational database.
Quick Insert Metadata Changes ‐ In EXO version 6.187, a number of Quick insert tab definitions and
profile settings were added automatically by the DBUpdate routine. These are:
Add Quick Insert Template menu options
Add QUICK_INSERT_TABSHEET Table
Add Quick Insert Template Directory profiles
Add Quick Insert Data Directory profile
Add Quick Insert Template File Extension profile
Add Quick Insert Purge Table Before Inserting Data profile
Add Quick Insert Update Existing Records When Inserting profile
Add Quick Insert Identity Insert On profile
Add Quick Insert Copy Column Captions profile
Add Quick Insert Copy/Paste Column Names profile
Add Quick Insert Data File Has Column Names profile
Add Quick Insert Copy/Paste Column Delimiter
Add Quick Insert Data File Column Delimiter
Add Quick Insert Tab Sheet for Courier Setup
Add Quick Insert Tab Sheet for Stock Request Types
Add Quick Insert Tab Sheet for Financial Year
Add Quick Insert Tab Sheet for Period History

EXO Super User Training Manual Momentum Software Solutions Page | 53
Add Quick Insert Tab Sheet for General Ledger Account Groups
Add Quick Insert Tab Sheet for Dispatch Methods
Add Quick Insert Tab Sheet for Branches
Add Quick Insert Tab Sheet for Currencies
Add Quick Insert Tab Sheet for Payment Groups
Add Quick Insert Tab Sheet for Payment Types
Add Quick Insert Tab Sheet for Credit Terms
Add Quick Insert Tab Sheet for Creditor Account Groups
Add Quick Insert Tab Sheet for Alternate Creditor Account Groups
Add Quick Insert Tab Sheet for Stock Groups
Add Quick Insert Tab Sheet for Alternate Stock Groups
Add Quick Insert Tab Sheet for Stock Locations
Add Quick Insert Tab Sheet for Stock Price Groups
Add Quick Insert Tab Sheet for Price Names
Add Quick Insert Profile for Size_Colour_Enabled
Add Quick Insert Admin for Style Sizes
Add Quick Insert Admin for Style Colours
Add Quick Insert Admin for Debtor Account Groups
Add Quick Insert Admin for Alternate Debtor Account Groups
Add Quick Insert Admin for Debtor Price Policy Groups
Add Quick Insert Admin for Marketing
Add Quick Insert Admin for Display Names
Add Quick Insert Admin for Extra Fields
Add Quick Insert Admin for Staff
Add Quick Insert Admin for Profile Assignment
Add Quick Insert Admin for Computer
Add Quick Insert Admin for Menu Designer
Add Quick Insert Admin for Bank Formats
Add Quick Insert Admin for Source Companies
Add Quick Insert Admin for GL Account Mappings

EXO Super User Training Manual Momentum Software Solutions Page | 54
Add Quick Insert Admin for GL Contra Accounts
Add Quick Insert Admin for Conversion Rates
Add Quick Insert Admin for Inter‐Company Companies
Add Quick Insert Admin for Asset Locations
Add Quick Insert Admin for Asset Groups
Quick Insert profile settings
COMPANY PROFILES:
Quick Insert template file extension ‐ file extension of Quick Insert template files
Quick Insert purge table before inserting data ‐ Option default to purge the table of any
records before inserting data in the Quick Insert utility
Quick Insert update existing records when inserting ‐ Option default to update records
that already exist while inserting data in the Quick Insert utility
Quick Insert identity insert on ‐ MSSQL only option default to switch the identity insert
on for the table inserting records into in the Quick Insert utility
Quick Insert copy column captions ‐ Option default to include the column captions when
copying data from the table grid in the Quick Insert utility'
Quick Insert copy / paste column names ‐ Option default to include the column names
when copying / pasting data from / to the table grid in the Quick Insert utility
Quick Insert data file has column names ‐ Option default to indicate data file has column
names when loading from the data file in the Quick Insert utility

EXO Super User Training Manual Momentum Software Solutions Page | 55
Quick Insert copy / paste column delimiter ‐ the Quick Insert copy / paste column
delimiter option default (Tab or Comma)
Quick Insert data file column delimiter‐ the Quick Insert data file column delimiter
option default (Tab or Comma)
COMPUTER PROFILE SETTINGS:
Quick Insert template directory ‐ where Quick Insert template files are stored
Quick Insert data directory ‐ where Quick Insert data files are stored
EXO "QUICK INSERT TEMPLATE" MENU OPTION
Add to menu, specifying template name in Parameters:
Choose from menu:

EXO Super User Training Manual Momentum Software Solutions Page | 56
ExoCfg> Utilities> Quick Insert> Tabsheets

EXO Super User Training Manual Momentum Software Solutions Page | 57
The tabsheet name ‘STOCK_GROUPS’ is used by the system to link the ExoCfg> Admin> Stock> Stock
Groups setup screen to the specified template name ‘STOCK_GROUPS.tem’.
If ‘Is active’ is selected, a ‘Quick Insert’ tab will appear in the ExoCfg> Admin> Stock> Stock Groups
setup screen:
If there is no valid tabsheet record for the ExoCfg> Admin> Stock> Stock Groups setup screen, i.e.,
there is no record, or the tabsheet name is incorrect, you will get a message informing you of this
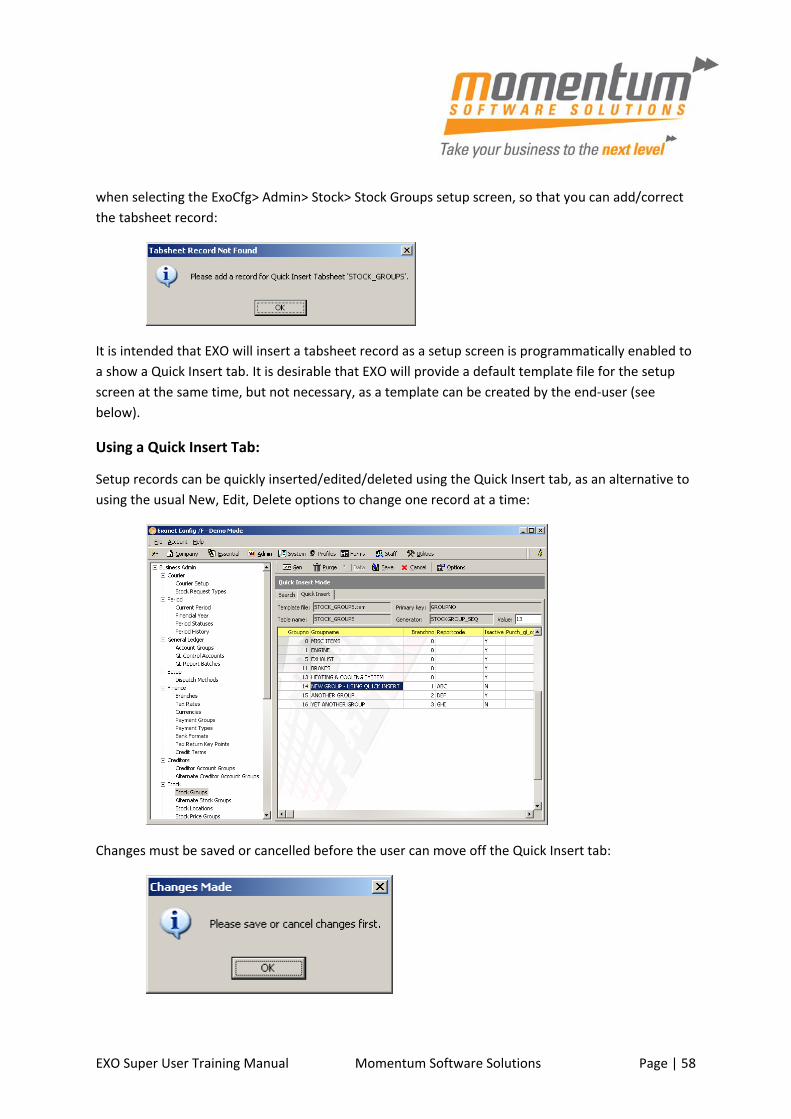
EXO Super User Training Manual Momentum Software Solutions Page | 58
when selecting the ExoCfg> Admin> Stock> Stock Groups setup screen, so that you can add/correct
the tabsheet record:
It is intended that EXO will insert a tabsheet record as a setup screen is programmatically enabled to
a show a Quick Insert tab. It is desirable that EXO will provide a default template file for the setup
screen at the same time, but not necessary, as a template can be created by the end‐user (see
below).
Using a Quick Insert Tab:
Setup records can be quickly inserted/edited/deleted using the Quick Insert tab, as an alternative to
using the usual New, Edit, Delete options to change one record at a time:
Changes must be saved or cancelled before the user can move off the Quick Insert tab:

EXO Super User Training Manual Momentum Software Solutions Page | 59
Saved changes are reflected in the Search tab:
ExoCfg> Utilities> Quick Insert> Templates
Quick Insert templates can be created, changed, deleted and previewed in the Templates setup
screen:
New:

EXO Super User Training Manual Momentum Software Solutions Page | 60
Select the New option:
Select the table name ‘ADJUSTMENT_TYPES’, change the automatically generated template file
name to ‘MYOB_ADJUSTMENT_TYPES.tem’, and select the ‘Add All’ button (or right click and select
the ‘Add All’ option):
Select the Preview option and select ‘No’ to the ‘save first’ question (handy when editing an existing
template, to check effect of changes before saving):
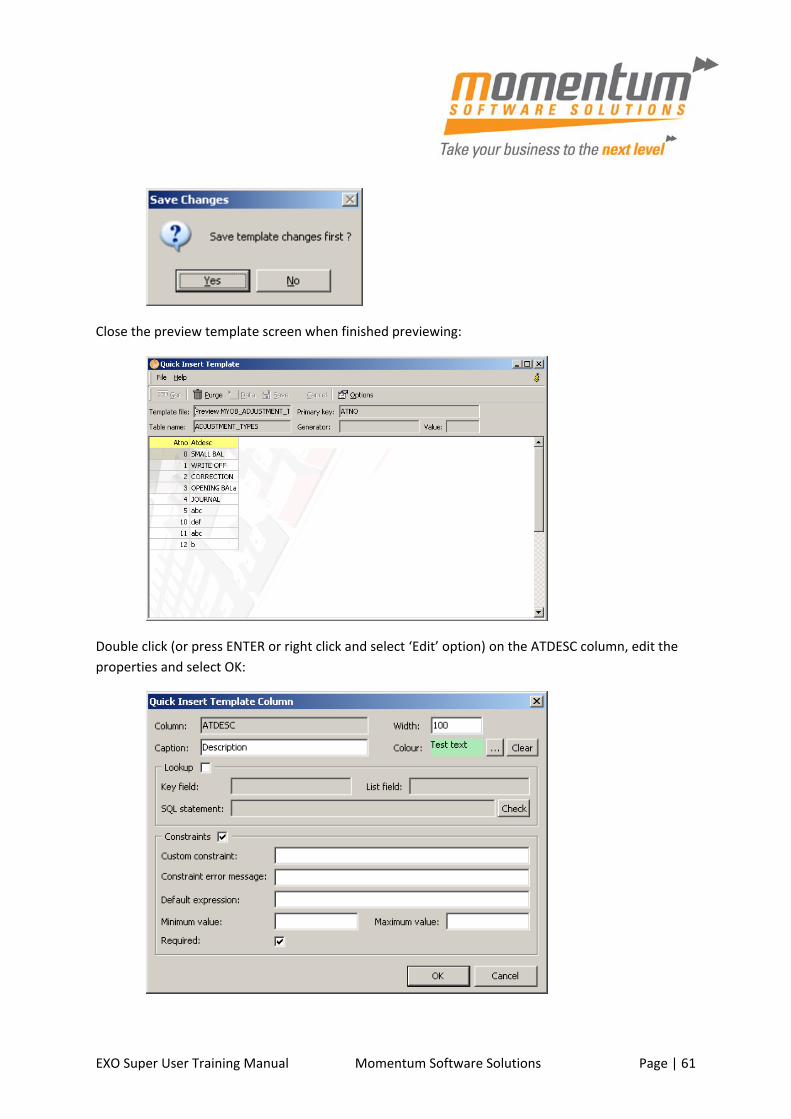
EXO Super User Training Manual Momentum Software Solutions Page | 61
Close the preview template screen when finished previewing:
Double click (or press ENTER or right click and select ‘Edit’ option) on the ATDESC column, edit the
properties and select OK:

EXO Super User Training Manual Momentum Software Solutions Page | 62
Select the Preview option again:
Select Options, enter a data file name, change default options, and select Ok:
Select Yes to the warning message (as this can be addressed later):

EXO Super User Training Manual Momentum Software Solutions Page | 63
Select Save to save the new template and return to the List tab.
Edit:
Double click, press ENTER, or select Edit on the ‘STOCK_GROUPS.tem’ template:
In the Unselected Columns list, right click and select the ‘Sort’ option, enter ‘P’ and arrow down to
the ‘PURCH_GLSUBCODE’ column, right click and select the ‘Add’ option (or press ENTER or double
click).
In the Template Columns list, select the ISACTIVE column and move it down to the last position (right
click ‘Down’ option, or the Down arrow button or press Ctrl‐Down keys). Note columns can also be
moved up and alphabetically sorted in this list. Select the ‘REPORTCODE’ column and select the
delete option (right click ‘Delete’ option or Delete key) to move it to the Unselected Columns list.
Note all columns can be deleted with the ‘Delete All’ option.
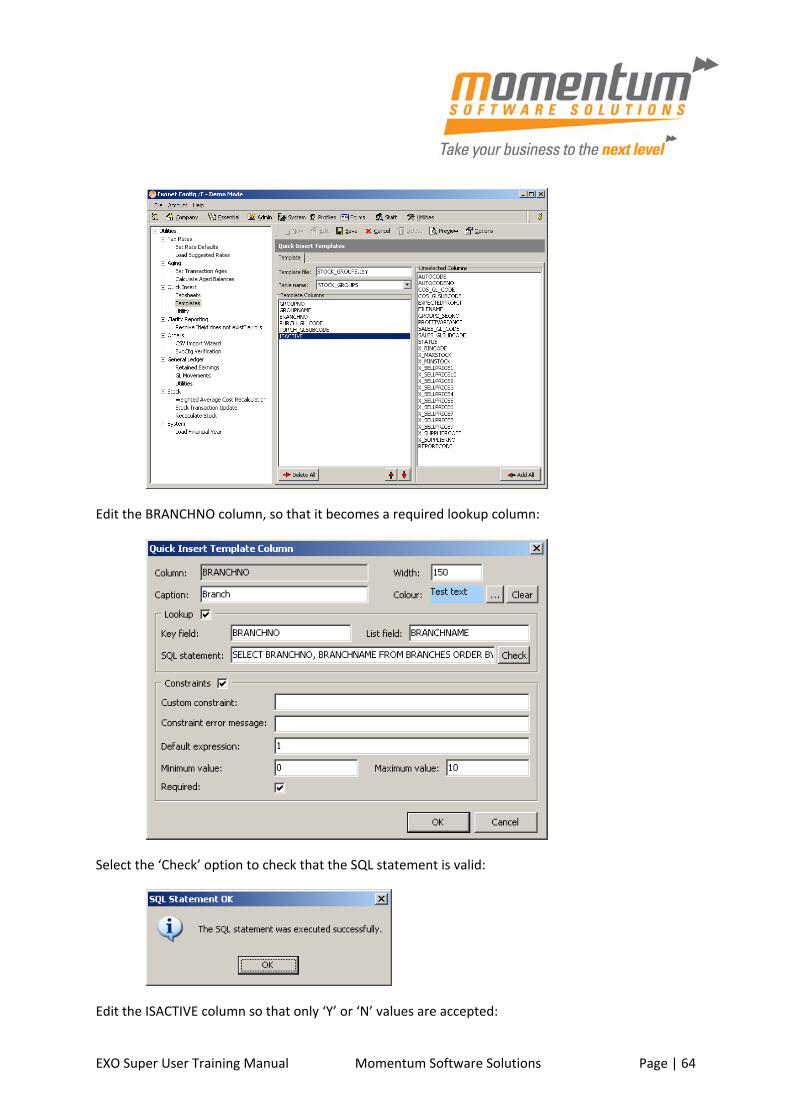
EXO Super User Training Manual Momentum Software Solutions Page | 64
Edit the BRANCHNO column, so that it becomes a required lookup column:
Select the ‘Check’ option to check that the SQL statement is valid:
Edit the ISACTIVE column so that only ‘Y’ or ‘N’ values are accepted:

EXO Super User Training Manual Momentum Software Solutions Page | 65
Rename the template file (which will delete the original file and create a new one):
Edit the Options:

EXO Super User Training Manual Momentum Software Solutions Page | 66
Preview the template, and then save it.
The template file is saved as readable text:

EXO Super User Training Manual Momentum Software Solutions Page | 67
This file can be edited directly, for example, adding an extra column:
<COLUMN=GROUPNO_INVALID,"CAPTION=Invalid Group No">
If templates are passed around and loaded on different databases, there is the likelihood of none‐
existent columns. Also, columns may be spelt incorrectly (if entered manually). If we save the
manual template edition above, and then edit the template within ExoCfg, we will see it in the
Invalid Columns list:

EXO Super User Training Manual Momentum Software Solutions Page | 68
On saving the template, the user will be informed of any invalid columns, but there is no harm
leaving them there, as they will simply be ignored when the template is loaded for use:
Delete:
To delete a template file, select it in the list and select the Delete option (or right click ‘Delete’
option) and select ‘Yes’ to the confirmation:
Changing a Quick Insert tabsheet template
To use the newly edited and renamed ‘TEST_STOCK_GROUPS.tem’ template within the Stock Groups setup
screen, edit the tabsheet record to point to the new template.

EXO Super User Training Manual Momentum Software Solutions Page | 69
In the Quick Insert Tabsheets screen, right click the grid title and select the ‘Select visible columns’
option, and select the ‘Tabsheet name’ column:
Locate the record with the ‘STOCK_GROUPS’ tabsheet name, double click and change the Template
name to ‘TEST_STOCK_GROUPS.tem’:
In ExoCfg> Admin> Stock> Stock Groups, click the Quick Insert tab to see the new template loaded:

EXO Super User Training Manual Momentum Software Solutions Page | 70
ExoCfg> Utilities> Quick Insert> Utility
The Quick Insert Utility lists all the templates:
Double click or press ENTER on a template to load it:

EXO Super User Training Manual Momentum Software Solutions Page | 71
Once a template is loaded, records in the template table can be inserted, edited and deleted, the
generator/identity can be set, the table can be purged, the data file can be loaded, and the template
options can be viewed and changed.
Gen/Ident:
After entering a new generator/identity value in the Value field (in the header), select the ‘Gen’ /
‘Ident’ option to save the value. The user will be asked to confirm the new value:
Values less than the maximum primary key / identity column value are not permitted:
Purge:
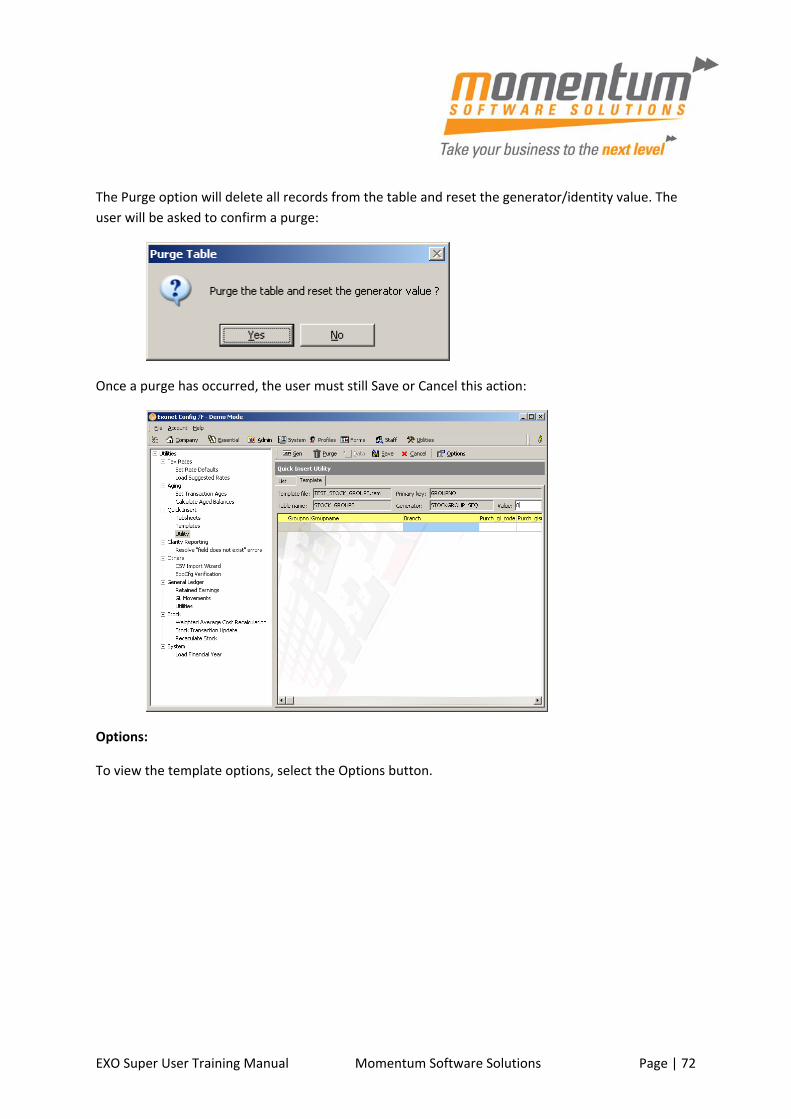
EXO Super User Training Manual Momentum Software Solutions Page | 72
The Purge option will delete all records from the table and reset the generator/identity value. The
user will be asked to confirm a purge:
Once a purge has occurred, the user must still Save or Cancel this action:
Options:
To view the template options, select the Options button.

EXO Super User Training Manual Momentum Software Solutions Page | 73
These options can be changed on the fly and have an immediate effect to the template (on selecting
OK), provided there are no unsaved changes, in which case the user is informed on entering the
Options screen (and the Ok button is disabled):
Data file options:
These options are used when loading a data file into the grid. The data file name specifies the file to
load when the Data option (see below) is selected. The ‘Purge records first’ option will purge the
table of all records before loading the data file. If the data file contains column names as the first
row, ensure the ‘Includes column names’ option is selected. This option is handy when the column
order may not be the same as in the template, or there are less columns in the file than in the grid,
in which case the template columns are reloaded to reflect this. Select the delimiter in the ‘Delimits
columns with’ option that is used in the data file to separate columns.
Clipboard copy / paste options:
If the user is copying / pasting data directly to / from the grid, ensure these settings are set
appropriately. If the ‘Copy column captions’ option is selected, a copy from the grid will copy the
column captions as the first row (handy for documentation purposes). The ‘Copy / paste column
names’ option can be used to copy the column names (handy when need to know the actual column

EXO Super User Training Manual Momentum Software Solutions Page | 74
name when creating the data file (see above)), and it can be used when pasting text from the
clipboard that includes the column names as the first row (in which case the columns are reloaded
(see above)). The ‘Columns delimited with’ option specifies how the text being copied / pasted is
delimited.
General options:
This list options that are not specific to the 2 sections above. If the ‘Update existing records’ option is
selected, and a record which already exists is being pasted to the grid (either from the data file or
directly from the clipboard), the record is simply located and updated, rather than giving a ‘unique
key violation’ error. This option assumes there is a single primary key column, and that it is the first
one in the column list.
Data:
The Data option is only enabled when there is a valid data file name specified in the Options screen.
If this option is selected, the table is purged (if the ‘Purge records first’ option is selected), the data
file is opened and its contents is copied to the clipboard, and then pasted to the grid as per the data
file options and the ‘Update existing records’ option specified (see above).
Save/Cancel:
The changes to the data grid must be saved or canceled before moving off the tab. Changes are only
applied to the database once the Save option is selected. To undo all changes (since the last Save or
Cancel), select the Cancel option.
Editing / Inserting / Deleting data in the grid
To edit a record, simply select the row / column and start typing. Lookup columns need the value to
be selected from a drop down list. Once in the lookup up column, either click the column again,
press the SPACEBAR or simply type the first letter of the value you want to select, to show the list.
Columns with constraints will validate when moving off the column, e.g., entering ‘n’ in the ‘Is
Active’ column will show the following error:
Pressing ESCAPE will undo the change just made.

EXO Super User Training Manual Momentum Software Solutions Page | 75
To insert a record, press the DOWN arrow and start typing in the new row just inserted. This row will
contain any defaults specified on the Column properties, e.g. ‘WELLINGTON’ (Branch No 2) for the
BRANCHNO lookup column. The row will only be posted once all required fields are set, e.g., if the
user arrows off the line before setting the active flag the following message will be shown:
If the user attempts to save invalid changes, the following message will be shown:
Multiple records can be selected at once (by holding down the Shift key and arrow up/down, or by
holding down the Control key and clicking the row with the mouse) and then deleted by pressing the
Control‐Delete keys and answering Ok to the confirmation.
Creating a data file
To create the ‘StockGroups.csv’ data file specified on the TEST_STOCK_GROUPS.tem template
(which does not yet exist in the Quick Insert data directory):
Load the template in ExoCfg> Utilities> Quick Insert> Utility, select the Options option, and select the
‘Copy / paste column names’ option, and select OK:
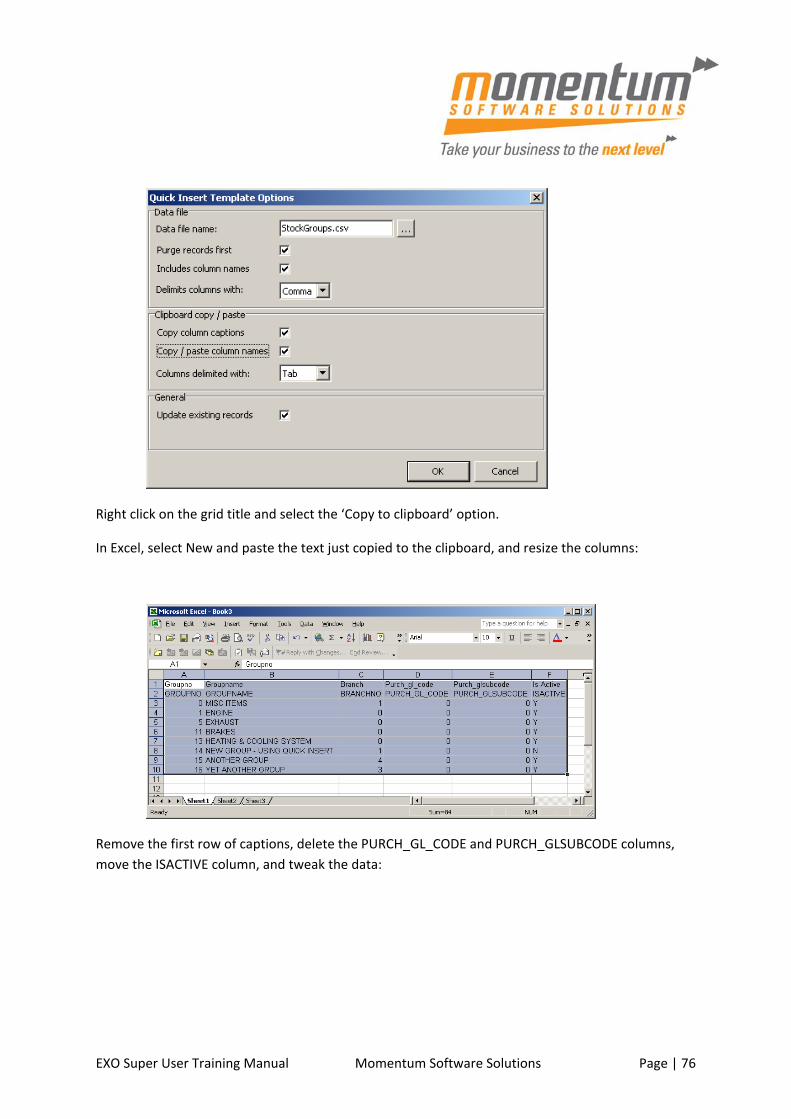
EXO Super User Training Manual Momentum Software Solutions Page | 76
Right click on the grid title and select the ‘Copy to clipboard’ option.
In Excel, select New and paste the text just copied to the clipboard, and resize the columns:
Remove the first row of captions, delete the PURCH_GL_CODE and PURCH_GLSUBCODE columns,
move the ISACTIVE column, and tweak the data:

EXO Super User Training Manual Momentum Software Solutions Page | 77
Save the spreadsheet as ‘StockGroups.csv’ and close it, ensuring that it is saved in CSV format
(readable from Notepad).
Data files can also be created with a Tab column delimiter, by copying cells from Excel and pasting
into Notepad. The data file ‘Delimits columns with’ options would need to be set to ‘Tab’, and the
data file name would need to point to this file:
Using the data file created
Reload the template in ExoCfg> Utilities> Quick Insert> Utility and see that the Data option is now
enabled:
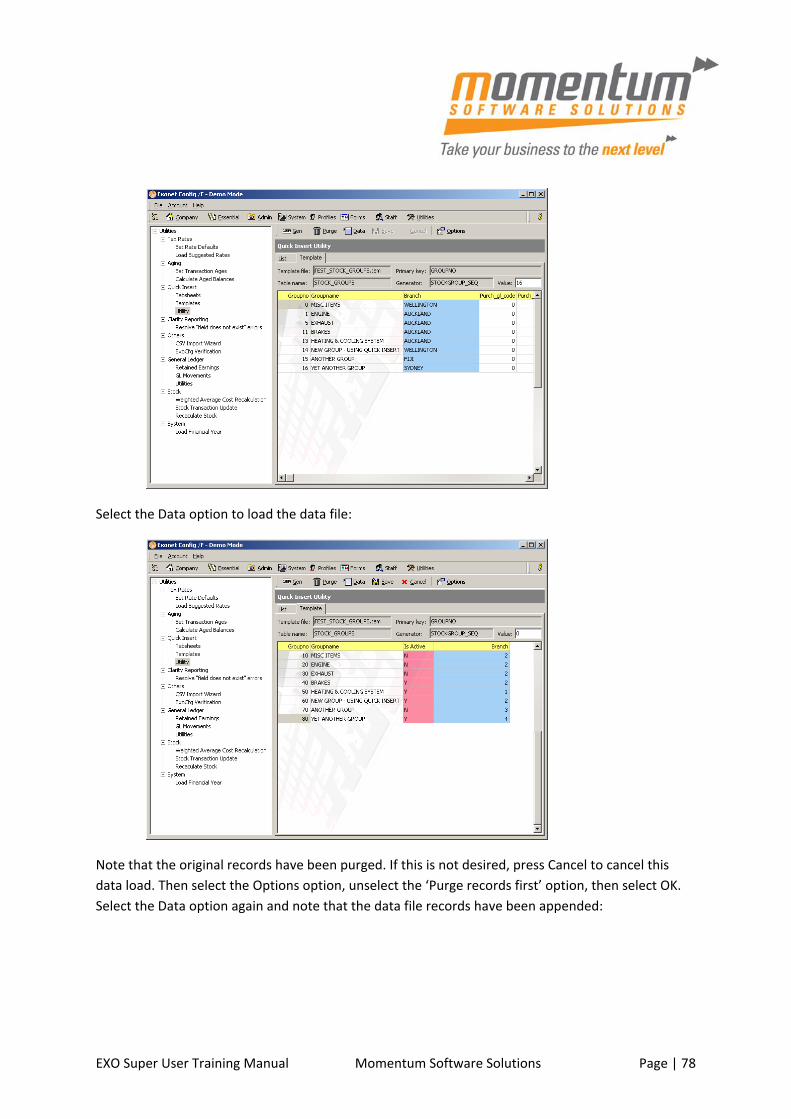
EXO Super User Training Manual Momentum Software Solutions Page | 78
Select the Data option to load the data file:
Note that the original records have been purged. If this is not desired, press Cancel to cancel this
data load. Then select the Options option, unselect the ‘Purge records first’ option, then select OK.
Select the Data option again and note that the data file records have been appended:
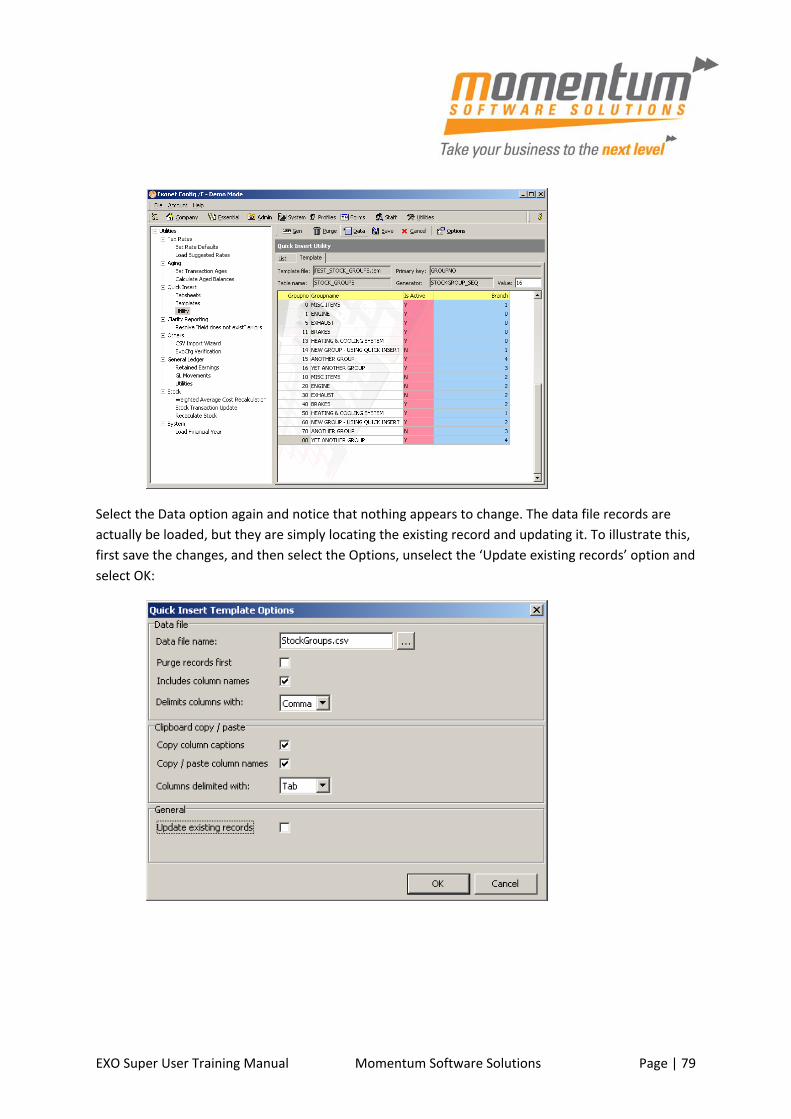
EXO Super User Training Manual Momentum Software Solutions Page | 79
Select the Data option again and notice that nothing appears to change. The data file records are
actually be loaded, but they are simply locating the existing record and updating it. To illustrate this,
first save the changes, and then select the Options, unselect the ‘Update existing records’ option and
select OK:

EXO Super User Training Manual Momentum Software Solutions Page | 80
Select the Data option again and a key violation error will occur on the first record:
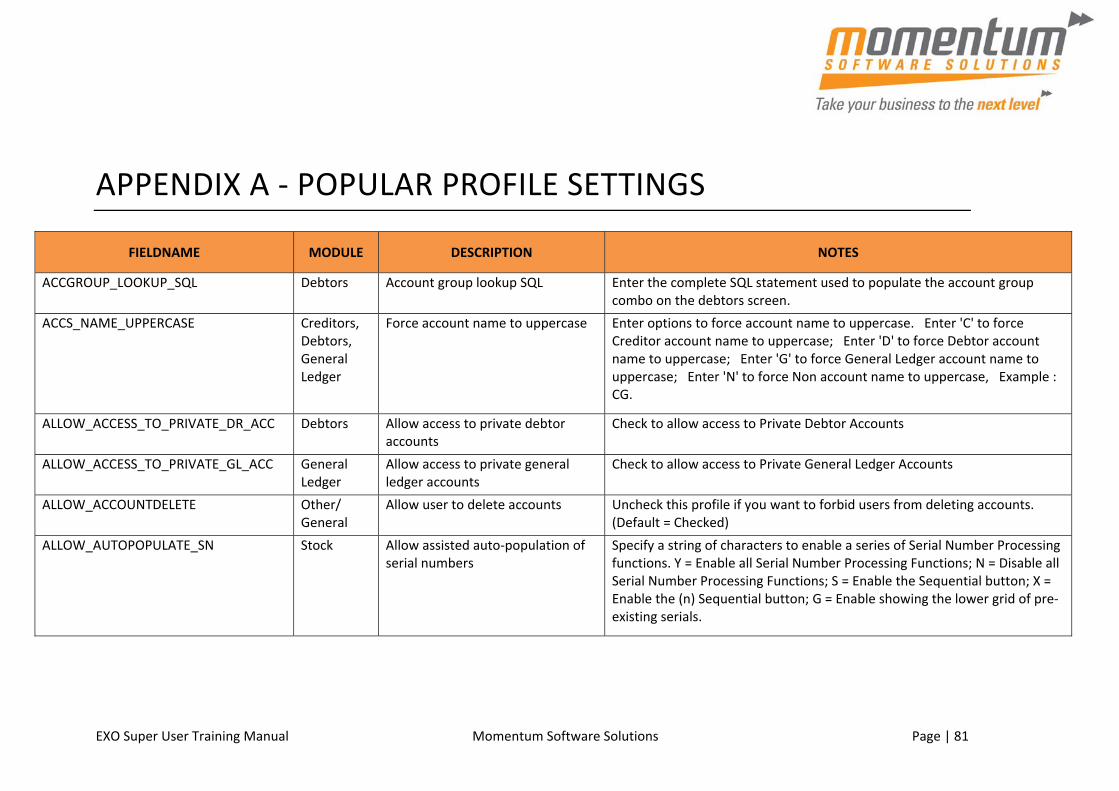
EXO Super User Training Manual Momentum Software Solutions Page | 81
APPENDIX A ‐ POPULAR PROFILE SETTINGS
FIELDNAME MODULE DESCRIPTION NOTES
ACCGROUP_LOOKUP_SQL Debtors Account group lookup SQL Enter the complete SQL statement used to populate the account group combo on the debtors screen.
ACCS_NAME_UPPERCASE Creditors, Debtors, General Ledger
Force account name to uppercase Enter options to force account name to uppercase. Enter 'C' to force Creditor account name to uppercase; Enter 'D' to force Debtor account name to uppercase; Enter 'G' to force General Ledger account name to uppercase; Enter 'N' to force Non account name to uppercase, Example : CG.
ALLOW_ACCESS_TO_PRIVATE_DR_ACC Debtors Allow access to private debtor accounts
Check to allow access to Private Debtor Accounts
ALLOW_ACCESS_TO_PRIVATE_GL_ACC General Ledger
Allow access to private general ledger accounts
Check to allow access to Private General Ledger Accounts
ALLOW_ACCOUNTDELETE Other/ General
Allow user to delete accounts Uncheck this profile if you want to forbid users from deleting accounts. (Default = Checked)
ALLOW_AUTOPOPULATE_SN Stock Allow assisted auto‐population of serial numbers
Specify a string of characters to enable a series of Serial Number Processing functions. Y = Enable all Serial Number Processing Functions; N = Disable all Serial Number Processing Functions; S = Enable the Sequential button; X = Enable the (n) Sequential button; G = Enable showing the lower grid of pre‐existing serials.
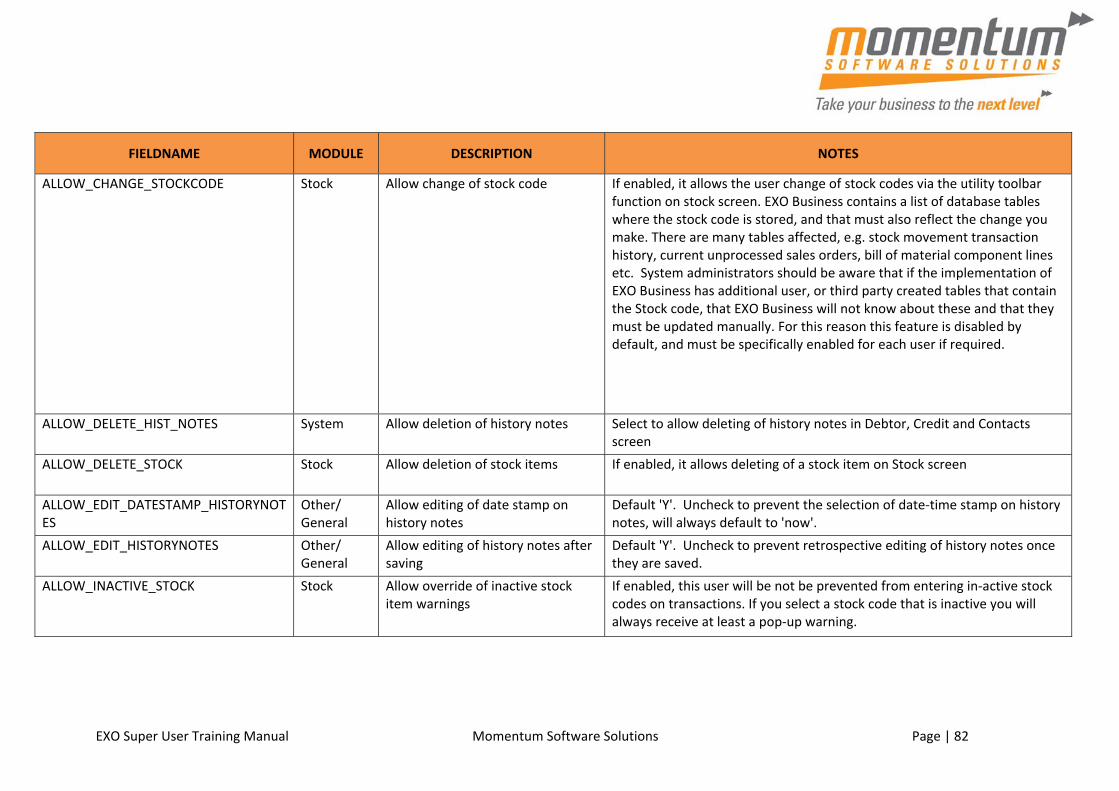
EXO Super User Training Manual Momentum Software Solutions Page | 82
FIELDNAME MODULE DESCRIPTION NOTES
ALLOW_CHANGE_STOCKCODE Stock Allow change of stock code If enabled, it allows the user change of stock codes via the utility toolbar function on stock screen. EXO Business contains a list of database tables where the stock code is stored, and that must also reflect the change you make. There are many tables affected, e.g. stock movement transaction history, current unprocessed sales orders, bill of material component lines etc. System administrators should be aware that if the implementation of EXO Business has additional user, or third party created tables that contain the Stock code, that EXO Business will not know about these and that they must be updated manually. For this reason this feature is disabled by default, and must be specifically enabled for each user if required.
ALLOW_DELETE_HIST_NOTES System Allow deletion of history notes Select to allow deleting of history notes in Debtor, Credit and Contacts screen
ALLOW_DELETE_STOCK Stock Allow deletion of stock items If enabled, it allows deleting of a stock item on Stock screen
ALLOW_EDIT_DATESTAMP_HISTORYNOTES
Other/ General
Allow editing of date stamp on history notes
Default 'Y'. Uncheck to prevent the selection of date‐time stamp on history notes, will always default to 'now'.
ALLOW_EDIT_HISTORYNOTES Other/ General
Allow editing of history notes after saving
Default 'Y'. Uncheck to prevent retrospective editing of history notes once they are saved.
ALLOW_INACTIVE_STOCK Stock Allow override of inactive stock item warnings
If enabled, this user will be not be prevented from entering in‐active stock codes on transactions. If you select a stock code that is inactive you will always receive at least a pop‐up warning.

EXO Super User Training Manual Momentum Software Solutions Page | 83
FIELDNAME MODULE DESCRIPTION NOTES
ALLOW_ONEOFF_STOCK Purchasing,Sales Orders, POS & DR Invoices
Allow creation of one‐off stock items
When set to 'N' the user will be prevented from choosing the option to create one‐off stock items on transaction lines. Acts independently of the profile setting ‐ Stock Items View Only.
ALLOWACCESS_EXOCFG System Allow access to ExoConfig Setting this option to 'N' will prevent users from accessing the EXO Business configuration settings via ExoConfig
ALLOWBANKRECEDITS Finance Allow editing of bank reconciliations
This will allow the user to edit previous bank reconciliations. To ensure better control and auditability of financial information, EXO Business recommends that you do NOT allow editing of previous bank reconciliations.
ALLOWCRINVPAYMENT Purchasing Allow entry of creditor payments Select to enable the payment tab on the Creditors Invoice entry screen. Select to enable new payments to be entered on the Creditors Account Screen.
ALLOWDRINVPAYMENT POS & DR Invoices
Allow entry of debtor payments Select to enable the payment tab on the Debtors Invoice entry screen. Select to enable new payments to be entered on the Debtors Account Screen.
ALLOWGSTINCCHANGE POS & DR Invoices
Allow change between tax‐inclusive and ‐exclusive
Select to enable a Tax Inc box on the debtor invoice entry screen for this user, to switch between tax inclusive and exclusive at any time during invoice and sales order entry process. This restriction applies to both the invoice and the invoice line level.
ALLOWLINEDISCOUNTS POS & DR Invoices
Allow debtor line discounts Select to allow Debtor Line Discounts for this user.
ALLOWVENDORDISCOUNT Finance Allow vendor discounts Select to enable Vendor Discounts

EXO Super User Training Manual Momentum Software Solutions Page | 84
FIELDNAME MODULE DESCRIPTION NOTES
AUTHORISEPURCHORDERS Purchasing Enable authorisation on purchase orders
Select to enforce authorisation of purchase orders before they can be released for printing or emailing. The 'Extended Purchase Order Statuses Enabled' profile field needs to be also enabled.
AUTO_REPEAT_GL_DETAILS General Ledger
Copy new general ledger transaction line from previous line
Select to automatically repeat the details, chq no and inv no fields from the previous line in the GL transaction entry screen.
AUTOCHANGE_SALESPERSON Debtors Suppress 'salesperson change' warning messages
Select to suppress warning messages on Sales Order and Debtor's Invoice Entry Screens whenever the default salesperson changes
AUTOCOSTCHECK Finance Check supplier cost prices when purchase prices change
Select to prompt to update the supplier cost price when overriding prices when placing a purchase order (creating or editing a purchase order as opposed to receipting stock). The intent of this profile is to interactively maintain alternative supplier price lists during purchase order entry. The pop up prompts the operator to update the supplier cost for the supplier stock code combination (in the Stock Item> Details 2> Alternate suppliers / stock codes screen, which is different to the main stock item screen cost price).
AUTOFREIGHT Stock Stock code for auto freight Enter a stock code that will be used on the pop up window to automatically freight to invoices.
AUTOLINEDISC Debtors Automatically calculate discounts on debtor invoice lines
Select to enable setting of Discount Policies so that the discounts by line can be automatically pre‐determined for each customer on various stock items and stock groups. To enable Discount Policies, select Invoice Line Discounts also.
AUTOPERISCOPE Other/ General
Enable automatic periscope on line items
This will activate the line periscope automatically on several transaction screens

EXO Super User Training Manual Momentum Software Solutions Page | 85
FIELDNAME MODULE DESCRIPTION NOTES
AUTOPRICECHECKMIN Purchasing Minimum percentage cost variance requiring price review
Set the minimum percentage variance in landed cost (local currency) required to activate price review popup screen. Required profile 'Check prices when cost change' to be enabled
AUTOPRICECHK Finance Enforce sale price review when cost price has changed
Select to display a price review pop up screen if the cost price of the item has changed when receipting a purchase order or entering creditor invoices (using stock). The pop up prompts the operator to reset the sell prices so as to maintain the same percent margin. This pop up does not maintain Cost (supplier) prices; use the profile Check Supplier Cost Prices when Purchase Prices Change to maintain supplier cost prices. Also set profiles Price Change Margin Base Cost and Cost Change Check Threshold when using this profile
AUTOSEARCH System Search automatically Select to search automatically on opening the master accounts, documents or transactional search screens
AVG_DEBTORDAY Debtors Show average debtor days Select to show the average number of days that a debtor pays on the Analysis Tab of Debtor Account Screen
AVG_DEBTORDAY_CALCULATIONSPAN Debtors Number of months of debtor transactions to be used for Average Debtor Days calculation
Specify how far back (in months) when including debtor transactions in average debtor days calculation. Default value is 99 months.
B2B_NEWPURCHLINESTATUS Purchasing B2B new purchase line status Purchase orders from B2B are created with this line status

EXO Super User Training Manual Momentum Software Solutions Page | 86
FIELDNAME MODULE DESCRIPTION NOTES
BALANCE_WARNING Debtors Enable debtor balance warning Select to display a warning message during invoice entry and sales order entry based on the calculation specified in the Credit Terms specified. By default this is if the aged balance of the debtor customer account is greater than $10.00 in the 3‐month column.
BATCHSALESORDER_TIMER Sales Orders
Batch Sales Orders refresh interval. Select how often in seconds Batch Sales Ordering will refresh and synchronize with the live sales orders.
BRANCH_FROM_CREDITOR Creditors Use creditor's branch for purchase orders and creditor invoices
Select to copy the branch number from the BRANCHNO field of the creditor account, to the purchase order and creditor invoice at the time of generating the invoice, rather than the default user branch number.
BRANCH_FROM_DEBTOR Debtors Use debtor's branch for sales orders and debtor invoices
Select to copy the branch number from the BRANCHNO field of the debtor account, to the sales order and debtor invoice at the time of generating the invoice, rather than the default user branch number. Note: If using consolidated debtors posting to the GL, you will not be able to drill‐down to source transactions from the GL, if this option is set.
CASHBK_DEFCRACCNO General Ledger
Cashbook entries default supplier number
Specify the default supplier (creditor) account number for expense transactions posting in Integrated Cash Book.
cENFORCETERMS Finance Enforce account credit terms during invoice entry
Select to strictly enforce the account credit terms at the time of invoice entry based on the account's credit status. For example, if an account's credit status is Cash Only, then an invoice cannot be saved if the payment amount is less than the invoice total
CHECKSUPPLIERS Purchasing Restrict purchases to approved suppliers for stock item
Select to only allow purchases from one of the three suppliers nominated on the stock item. This will restrict users to using only these suppliers for each stock item.

EXO Super User Training Manual Momentum Software Solutions Page | 87
FIELDNAME MODULE DESCRIPTION NOTES
CHQ_PASSWORD Finance Password for cheque audit access Enter the password to use to access the Cheque Audit screen from the Creditor Payment Processor utility
CONFIRM_EMAIL System Confirm before sending email Setting to automatically send the emails from Clarity without prompting the user.
CONFIRM_PART_SUPPLY Debtors Enable warning for partially‐supplied orders
Select to display a warning message in the Sales orders when the 'Process' button is pressed and the order is not fully supplied. Users are prompted whether they want to process the order or not.
CONSIGNORDERS Sales Orders
Allow consignment stock orders through sales orders
Select to allow the entry of consignment stock orders through sales orders. An extra field will be added to the sales order entry screen to allow the selection of the consignment location.
CONTACT_ALERTS Contacts Enable pop‐up history alerts on startup
Show Popup History Alerts on Startup
CONTACTONTRANS Contacts Add debtor contact details to transactions
Select to add a contact name from the debtor account to the sales order screen, and an additional field is automatically added to the payments tab of the debtor invoice entry screen to allow entry of the contacts name. This is useful to record who placed the order.
CONTACTS_UPPERCASE Contacts Contacts displayed in upper case Select to force data fields within the contacts screens to upper case. By default Contact fields are not forced to upper case, but all other areas of EXO Business are.
CR_BUTTON1_CAPTION Creditors Creditor custom button 1 caption Enter a name to add User Defined Button #1 to the top left of the creditor screen. See also User Defined Button #1 EXE. Example : My Button

EXO Super User Training Manual Momentum Software Solutions Page | 88
FIELDNAME MODULE DESCRIPTION NOTES
CR_BUTTON1_EXE Creditors Creditor custom button 1 command line
Custom buttons are provided for you to add you own shortcuts to many of the main screens. Here you may enter the details of a sub‐program to be run whenever you press the button on this screen.Example ‐ to run an external program, 'MyProg.EXE <LOGIN> <CURRENT>', where <LOGIN> passes the database connection details and <CURRENT> passes out the key field identifier (most commonly the SEQNO) of the current record that you have loaded on the screen at the time that you press the button. A '|' is optional after the name of the executable. To run a Clarity Report, any parameter entered with the extension MYREPORT.CLR will assume that you wish to run a clarity report and will call Clarity directly. It is not necessary that Clarity.EXE exist to do this, e.g. 'MYREPORT.CLR /S=SEQNO=<CURRENT>'
CR_BUTTON2_CAPTION Creditors Creditor custom button 2 caption Enter a name to add User Defined Button #1 to the top of the creditors screen. See also User Defined Button #1 EXE. Example : My Button

EXO Super User Training Manual Momentum Software Solutions Page | 89
FIELDNAME MODULE DESCRIPTION NOTES
CR_BUTTON2_EXE Creditors Creditor custom button 2 command line
Custom buttons are provided for you to add you own shortcuts to many of the main screens. Here you may enter the details of a sub‐program to be run whenever you press the button on this screen.Example ‐ to run an external program, 'MyProg.EXE <LOGIN> <CURRENT>', where <LOGIN> passes the database connection details and <CURRENT> passes out the key field identifier (most commonly the SEQNO) of the current record that you have loaded on the screen at the time that you press the button. A '|' is optional after the name of the executable. To run a Clarity Report, any parameter entered with the extension MYREPORT.CLR will assume that you wish to run a clarity report and will call Clarity directly. It is not necessary that Clarity.EXE exist to do this, e.g. 'MYREPORT.CLR /S=SEQNO=<CURRENT>'
CREDITORS_CUSTOMFILTER Creditors Creditors Custom Filter SQL This is an optional SQL based filter which will be applied on Cr Account Screen, Purchase Order Screen, Inwards Goods Receipts and Inwards goods costing, and Stock Items transaction Screen. Its primary purpose is to allow company reps to access a restricted view of the database. A practical example would be to restrict a user to viewing transactions to specific staff associated with a supplier. The CR_ACCS table has a field (SALESNO) allowing a staff member to be associated with a supplier therefore we could apply a filter by user as CR_ACCS.SALESNO in (1,2) and the STAFF member would only be able to see Accounts specifically assigned to Account Managers 1 or 2. Any field on the CR_ACCS table can be used, such as Branch no,this also includes extra fields.

EXO Super User Training Manual Momentum Software Solutions Page | 90
FIELDNAME MODULE DESCRIPTION NOTES
CREDITORSREADONLY Creditors Creditors account access level Select the access level to Creditors Account screen: Prevent Access ‐ Creditors Account screen will not be accessible at all. View Only ‐ Creditors Account screen can only be viewed and not editable. Full Access ‐ Full Access to Creditors Account screen. Read Only with Invoice Editing ‐ Similar to 'View Only' but allows editing of Invoices. Read Only with New Transactions ‐ Similar to 'Read Only with Invoice Editing' but also allows payment, allocation and purchase order.
CRLINEDISCS Creditors Allow manual entry of discounts on creditor invoice and purchase order lines
Select to enable manual entry of a discount percentage on each creditors invoice line or each purchase order line.
CRM_SYNC_CONTACT_FLAG_DEFAULT Contacts, CRM
Sync contact flag default If checked, sync with outlook checkbox on Contact form will be checked by default for new contacts.
CRPMTREMIT_DOCPROMPT Creditors Prompt to print payment remittance
Select how you want to be prompted to print a payment remittance (CRPMTREMIT.CLF) when individual Creditor Payments are made
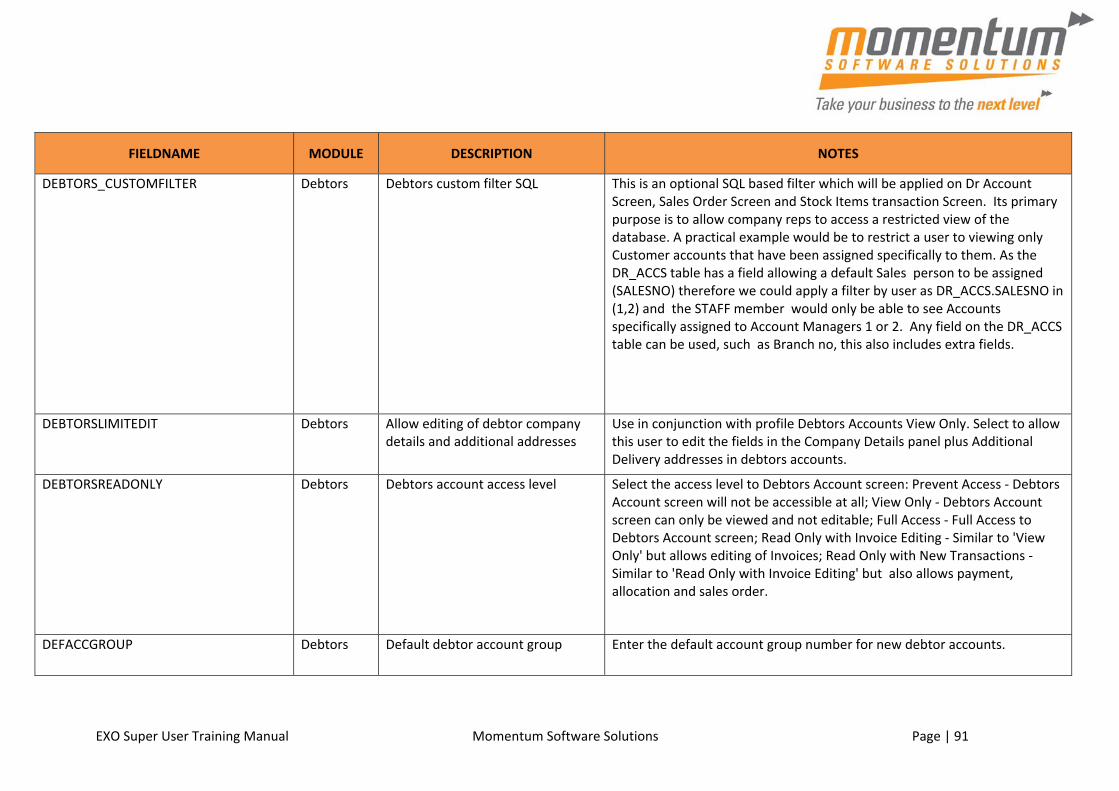
EXO Super User Training Manual Momentum Software Solutions Page | 91
FIELDNAME MODULE DESCRIPTION NOTES
DEBTORS_CUSTOMFILTER Debtors Debtors custom filter SQL This is an optional SQL based filter which will be applied on Dr Account Screen, Sales Order Screen and Stock Items transaction Screen. Its primary purpose is to allow company reps to access a restricted view of the database. A practical example would be to restrict a user to viewing only Customer accounts that have been assigned specifically to them. As the DR_ACCS table has a field allowing a default Sales person to be assigned (SALESNO) therefore we could apply a filter by user as DR_ACCS.SALESNO in (1,2) and the STAFF member would only be able to see Accounts specifically assigned to Account Managers 1 or 2. Any field on the DR_ACCS table can be used, such as Branch no, this also includes extra fields.
DEBTORSLIMITEDIT Debtors Allow editing of debtor company details and additional addresses
Use in conjunction with profile Debtors Accounts View Only. Select to allow this user to edit the fields in the Company Details panel plus Additional Delivery addresses in debtors accounts.
DEBTORSREADONLY Debtors Debtors account access level Select the access level to Debtors Account screen: Prevent Access ‐ Debtors Account screen will not be accessible at all; View Only ‐ Debtors Account screen can only be viewed and not editable; Full Access ‐ Full Access to Debtors Account screen; Read Only with Invoice Editing ‐ Similar to 'View Only' but allows editing of Invoices; Read Only with New Transactions ‐ Similar to 'Read Only with Invoice Editing' but also allows payment, allocation and sales order.
DEFACCGROUP Debtors Default debtor account group Enter the default account group number for new debtor accounts.
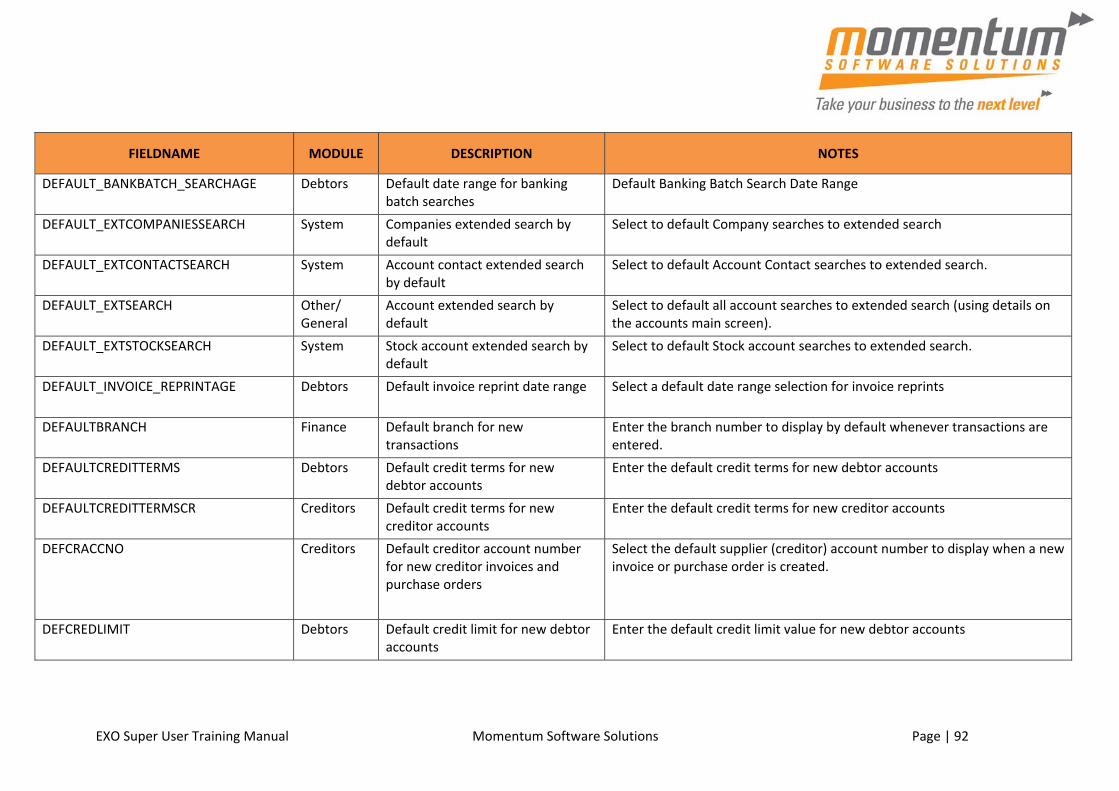
EXO Super User Training Manual Momentum Software Solutions Page | 92
FIELDNAME MODULE DESCRIPTION NOTES
DEFAULT_BANKBATCH_SEARCHAGE Debtors Default date range for banking batch searches
Default Banking Batch Search Date Range
DEFAULT_EXTCOMPANIESSEARCH System Companies extended search by default
Select to default Company searches to extended search
DEFAULT_EXTCONTACTSEARCH System Account contact extended search by default
Select to default Account Contact searches to extended search.
DEFAULT_EXTSEARCH Other/ General
Account extended search by default
Select to default all account searches to extended search (using details on the accounts main screen).
DEFAULT_EXTSTOCKSEARCH System Stock account extended search by default
Select to default Stock account searches to extended search.
DEFAULT_INVOICE_REPRINTAGE Debtors Default invoice reprint date range Select a default date range selection for invoice reprints
DEFAULTBRANCH Finance Default branch for new transactions
Enter the branch number to display by default whenever transactions are entered.
DEFAULTCREDITTERMS Debtors Default credit terms for new debtor accounts
Enter the default credit terms for new debtor accounts
DEFAULTCREDITTERMSCR Creditors Default credit terms for new creditor accounts
Enter the default credit terms for new creditor accounts
DEFCRACCNO Creditors Default creditor account number for new creditor invoices and purchase orders
Select the default supplier (creditor) account number to display when a new invoice or purchase order is created.
DEFCREDLIMIT Debtors Default credit limit for new debtor accounts
Enter the default credit limit value for new debtor accounts
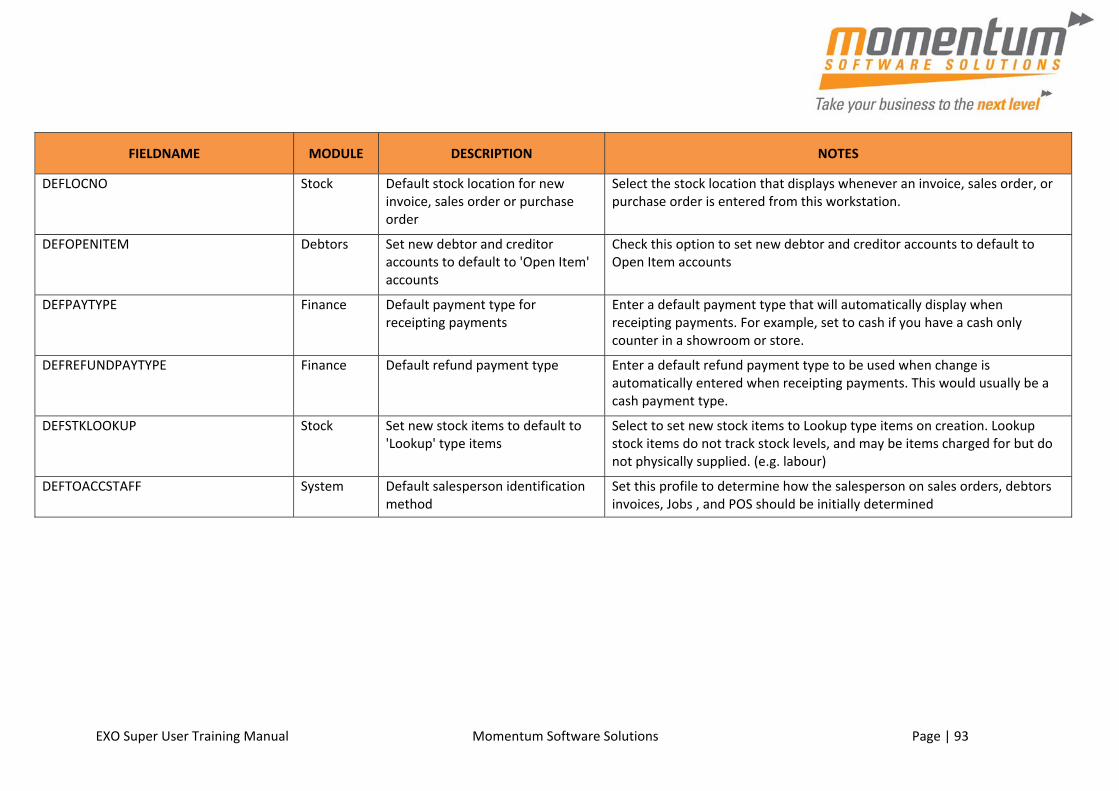
EXO Super User Training Manual Momentum Software Solutions Page | 93
FIELDNAME MODULE DESCRIPTION NOTES
DEFLOCNO Stock Default stock location for new invoice, sales order or purchase order
Select the stock location that displays whenever an invoice, sales order, or purchase order is entered from this workstation.
DEFOPENITEM Debtors Set new debtor and creditor accounts to default to 'Open Item' accounts
Check this option to set new debtor and creditor accounts to default to Open Item accounts
DEFPAYTYPE Finance Default payment type for receipting payments
Enter a default payment type that will automatically display when receipting payments. For example, set to cash if you have a cash only counter in a showroom or store.
DEFREFUNDPAYTYPE Finance Default refund payment type Enter a default refund payment type to be used when change is automatically entered when receipting payments. This would usually be a cash payment type.
DEFSTKLOOKUP Stock Set new stock items to default to 'Lookup' type items
Select to set new stock items to Lookup type items on creation. Lookup stock items do not track stock levels, and may be items charged for but do not physically supplied. (e.g. labour)
DEFTOACCSTAFF System Default salesperson identification method
Set this profile to determine how the salesperson on sales orders, debtors invoices, Jobs , and POS should be initially determined

EXO Super User Training Manual Momentum Software Solutions Page | 94
FIELDNAME MODULE DESCRIPTION NOTES
DISALLOW_NEGATIVESTOCKQUANTITY Stock Prevent processing to negative stock levels
Enable features to avoid processing stock to negative stock levels ‐ Setting this profile to 'Y' enables numerous protection controls intended to avoid situations where stock levels in any stock location can fall below Zero into a negative level. The most common is selling stock or transferring it to other location before the stock is receipted and costed. The warning controls extend to the main areas of the system interface, however it is possible to force the system into negative by using manual means (e.g. importing transactions or external programs). When an attempt to process a transaction that would create a negative stock level this is logged in the Audit_log table as an event.
DISCOUNTDECIMALS Debtors Decimals in discounts Enter the number of decimal places to show in discounts
DISCPAGEONACCT Debtors Debtor discount/price policy access level
Select an editing level to enable this user to edit a Debtor Discount/Price policy. Hide ‐ Hides the discount/price policy page on Debtor Account Screen; View Only ‐ Shows discount/price policy page but will not be able to edit or drill to the discount/price policy details; Edit ‐ Shows discount/price policy page and full access to discount/price policy details
DOCLINKDBASK Contacts Documents stored in database Setting to determine if documents are stored in the database.
DR_BUTTON1_CAPTION Debtors Debtor custom button 1 caption Enter a caption for User Defined button #1 to be added to the top of the debtors screen
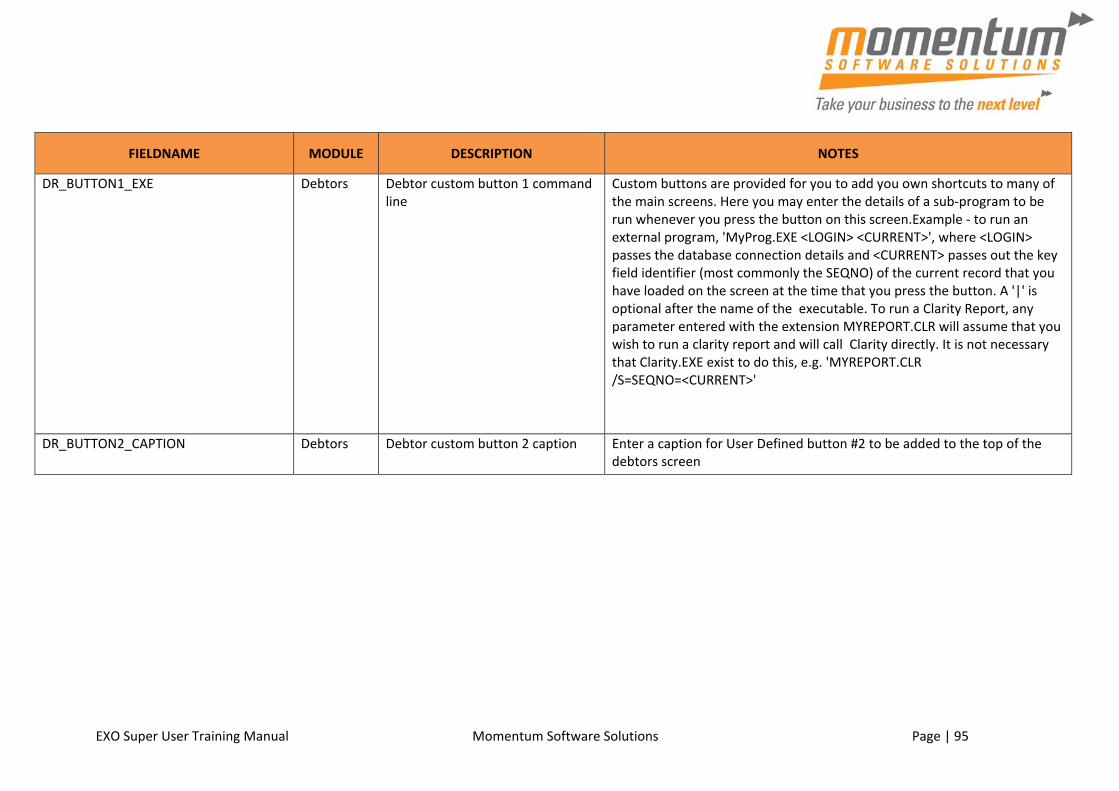
EXO Super User Training Manual Momentum Software Solutions Page | 95
FIELDNAME MODULE DESCRIPTION NOTES
DR_BUTTON1_EXE Debtors Debtor custom button 1 command line
Custom buttons are provided for you to add you own shortcuts to many of the main screens. Here you may enter the details of a sub‐program to be run whenever you press the button on this screen.Example ‐ to run an external program, 'MyProg.EXE <LOGIN> <CURRENT>', where <LOGIN> passes the database connection details and <CURRENT> passes out the key field identifier (most commonly the SEQNO) of the current record that you have loaded on the screen at the time that you press the button. A '|' is optional after the name of the executable. To run a Clarity Report, any parameter entered with the extension MYREPORT.CLR will assume that you wish to run a clarity report and will call Clarity directly. It is not necessary that Clarity.EXE exist to do this, e.g. 'MYREPORT.CLR /S=SEQNO=<CURRENT>'
DR_BUTTON2_CAPTION Debtors Debtor custom button 2 caption Enter a caption for User Defined button #2 to be added to the top of the debtors screen

EXO Super User Training Manual Momentum Software Solutions Page | 96
FIELDNAME MODULE DESCRIPTION NOTES
DR_BUTTON2_EXE Debtors Debtor custom button 2 command line
Custom buttons are provided for you to add you own shortcuts to many of the main screens. Here you may enter the details of a sub‐program to be run whenever you press the button on this screen.Example ‐ to run an external program, 'MyProg.EXE <LOGIN> <CURRENT>', where <LOGIN> passes the database connection details and <CURRENT> passes out the key field identifier (most commonly the SEQNO) of the current record that you have loaded on the screen at the time that you press the button. A '|' is optional after the name of the executable. To run a Clarity Report, any parameter entered with the extension MYREPORT.CLR will assume that you wish to run a clarity report and will call Clarity directly. It is not necessary that Clarity.EXE exist to do this, e.g. 'MYREPORT.CLR /S=SEQNO=<CURRENT>'
DR_CR_SEARCH_ACCGROUP Debtors Enable account group search Select to enable an 'account group' search field in the Debtor and Creditor Account details (search) screen. This allows a search by account groups, and adds an Account Group column to the search results table
DR_INV_DUE_CAPTION Debtors Debtor invoice due date field caption
Enter a new caption to override the Due Date field caption on the debtor invoice screen. Example : Due by
DR_INV_REF_CAPTION Debtors Debtor invoice reference caption Enter a new caption to override the Reference field caption on debtor invoice screen.
DR_PAYMENT_DISPLAY_FIELD Debtors Debtor payment display field Enter a database field name from DR_ACCS to be displayed on the Debtor Payment Entry.

EXO Super User Training Manual Momentum Software Solutions Page | 97
FIELDNAME MODULE DESCRIPTION NOTES
DRGLBATCH Debtors Post debtors payments to GL as batches
If enabled, all debtors’ payments with a valid banking batch no. excluding deposits will be posted to GL as one batch instead individual transactions. This profile will stop payments that have not yet been batched from being posted to GL
DRLINEDISCS Debtors Allow manual entry/override of discounts on debtor invoice and sales order lines
Select to enable manual entry or overriding of the predefined discount percentage on each debtors invoice line and each sales order line.
DRPMTRECEIPT_DOCPROMPT Debtors Prompt to print payment receipt Select how you want to be prompted to print a payment receipt (DRPMTRECEIPT.CLF) when individual Debtors Payments are made
DRTAX_OVERRIDE Debtors Allow override of tax amount for invoice lines
Select to enable a Tax button in the top of the debtors invoice entry screen to allow overriding of the tax amount for a selected invoice line, using the line options periscope.
EDITCRTRANS Creditors Permitted level of access to creditor transaction editing
Select an editing level to enable this user to edit a Creditor transaction after it has been saved, provided the invoice has not been posted to the General Ledger.
EDITDRTRANS Debtors Permitted level of access to debtor transaction editing
Select an editing level to enable this user to edit a Debtor invoice after it has been saved, provided the invoice has not been posted to the General Ledger.
ENABLESUPPLYPACKQTY Purchasing Allow purchase pack description, quantity and price for alternate suppliers
This allows you to set a purchase pack description, Purchase pack Quantity and Purchase pack price for each alternate supplier. These are resolved to the correct into‐stock effect when using inwards goods. Columns are added to purchase orders.
ENFORCE_BATCHQTYCHECK Other/ General
Enforce batch quantity checks Select to check quantities when using batches

EXO Super User Training Manual Momentum Software Solutions Page | 98
FIELDNAME MODULE DESCRIPTION NOTES
ENFORCEPERIODS Finance Enforce transaction period dates during invoice entry
Specify how the system enforces transaction date and period date when saving an invoice. AutoEnforce (automatically set accounting period according to date that user enters); Enforce (warn user if the date chosen does not match period and do not allow save until they match); Do not enforce (no checking, dates independent of accounting period definition.) Accounting periods can be set to distinct date ranges or calendar months for validation.
ENHANCEDSTOCKCODES Purchasing Show stock/catalogue number on purchase orders
Select to show the suppliers' stock or catalog number on the purchase order form.

EXO Super User Training Manual Momentum Software Solutions Page | 99
FIELDNAME MODULE DESCRIPTION NOTES
EXTRA_BOM_SEARCHFIELDS Manufacturing
Extra BOM search fields The format to extend Extra Search Fields is : ‐ ADatabaseFieldName=FriendlyCaption=SearchBehaviour ‐ Multiple fields are separated by commas ‐ The =FriendlyCaption=SearchBehaviour is optional For Example X_AFIELD=A Caption, X_ANOTHERFIELD=Another Caption, X_THIRDFIELD The =FriendlyCaption=SearchBehaviour is optional. Additional control over the extra search field behaviour is set as follows: For Example X_MyField1=Mycaption=GSWUE, X_Myfield2=MyField2=E If no behaviour parameters are passed in it assumes a default search behaviour of GSWU where =G show this field as an optional visible column in the search grid. =S add this field as part of the select statement. =W make this field value a condition in the WHERE clause. =U force a character to uppercase for comparison. (String Fields) =E use Exact match (=) in the where clause rather than LIKE. (String Fields) Note: Ambiguous field names (field names that exist in both tables) should be prefixed by a table alias For Example Alias.FieldName, Alias2.FieldName The list of aliases are On Bill of Materials Screen = H=BILLOMAT_HDR, L=BILLOMAT_LINES On Bill of Materials Search Screen = H=BILLOMAT_HDR, B=STOCK_ITEMS, C=STOCK_GROUPS

EXO Super User Training Manual Momentum Software Solutions Page | 100
FIELDNAME MODULE DESCRIPTION NOTES
EXTRA_CONTACTSEARCHFIELDS Contacts Extra contacts search fields To extend Extra Search Fields: ‐ ADatabaseFieldName=FriendlyCaption=SearchBehaviour. Multiple fields are separated by commas. The =FriendlyCaption=SearchBehaviour is optional. For example X_AFIELD=A Caption,X_ANOTHERFIELD=Another Caption,X_THIRDFIELD. Additional control over the extra search field behaviour is set as follows: X_MyField1=Mycaption=GSWUE,X_Myfield2=MyField2=E. If no behaviour parameters are passed in it assumes a default search behaviour of GSWU where: =G ‐ show this field as an optional visible column in the search grid; =S ‐ add this field as part of the select statement; =W ‐ make this field value a condition in the WHERE clause; =U ‐ force a character to uppercase for comparison; (String Fields) =E ‐ use exact match (=) in the where clause rather than LIKE. (String Fields) Note: Ambiguous field names (field names that exist in both tables) should be prefixed by a table alias For Example Alias.FieldName,Alias2.FieldName The List of aliases are C=CONTACTS
EXTRA_CR_CONTACTSEARCHFIELDS Contacts Extra creditor contact search fields A comma separated list of fields to add to the grid on the search screen. This list may contain a mixture of contact and account fields. e.g.. If you want to display the creditor 'Alphacode' and the contacts 'Default contact flag' you would set the profile to ALPHACODE,DEFCONTACT. Note: Ambiguous columns (columns that exist in both tables) should be prefixed by 'A.' or 'C.' e.g. A.ADDRESS1, C.ADDRESS1
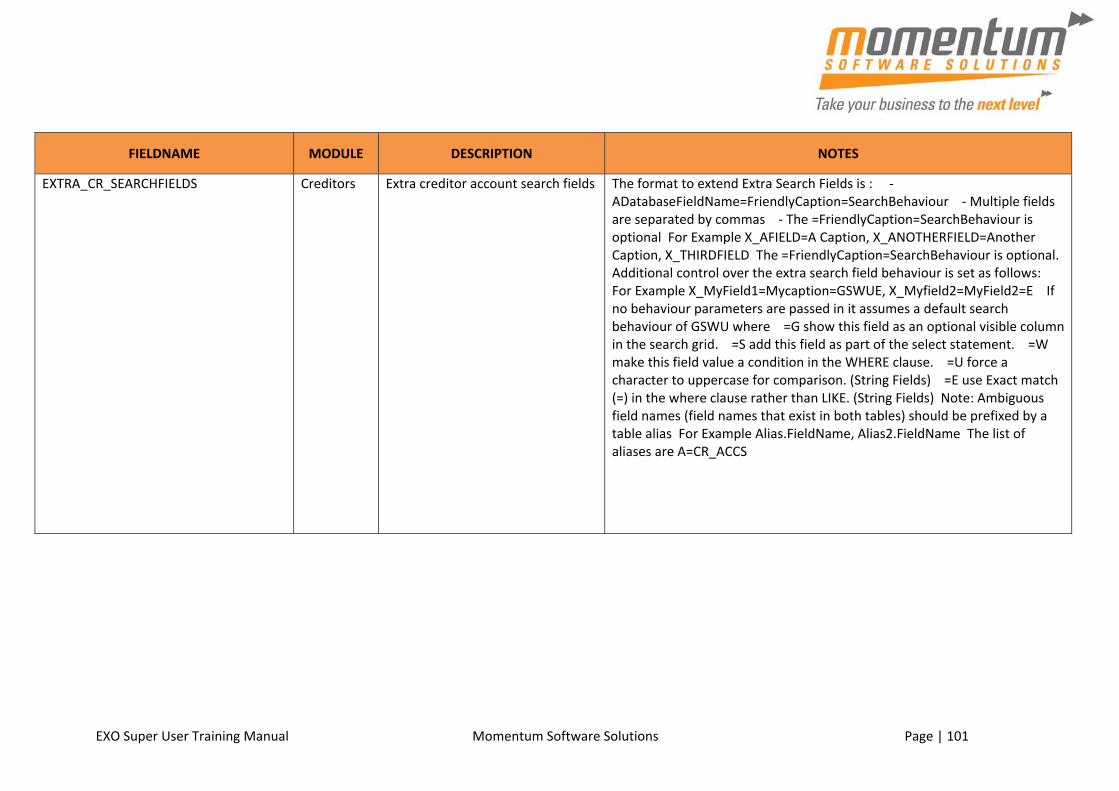
EXO Super User Training Manual Momentum Software Solutions Page | 101
FIELDNAME MODULE DESCRIPTION NOTES
EXTRA_CR_SEARCHFIELDS Creditors Extra creditor account search fields The format to extend Extra Search Fields is : ‐ ADatabaseFieldName=FriendlyCaption=SearchBehaviour ‐ Multiple fields are separated by commas ‐ The =FriendlyCaption=SearchBehaviour is optional For Example X_AFIELD=A Caption, X_ANOTHERFIELD=Another Caption, X_THIRDFIELD The =FriendlyCaption=SearchBehaviour is optional. Additional control over the extra search field behaviour is set as follows: For Example X_MyField1=Mycaption=GSWUE, X_Myfield2=MyField2=E If no behaviour parameters are passed in it assumes a default search behaviour of GSWU where =G show this field as an optional visible column in the search grid. =S add this field as part of the select statement. =W make this field value a condition in the WHERE clause. =U force a character to uppercase for comparison. (String Fields) =E use Exact match (=) in the where clause rather than LIKE. (String Fields) Note: Ambiguous field names (field names that exist in both tables) should be prefixed by a table alias For Example Alias.FieldName, Alias2.FieldName The list of aliases are A=CR_ACCS
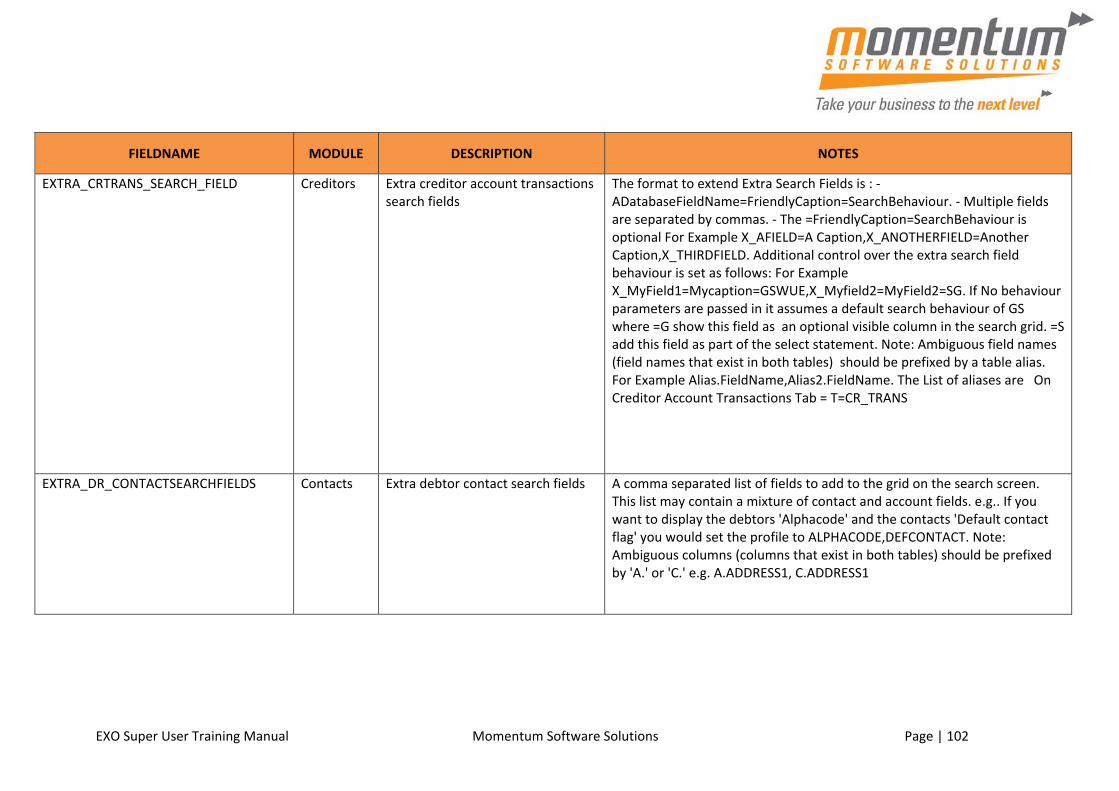
EXO Super User Training Manual Momentum Software Solutions Page | 102
FIELDNAME MODULE DESCRIPTION NOTES
EXTRA_CRTRANS_SEARCH_FIELD Creditors Extra creditor account transactions search fields
The format to extend Extra Search Fields is : ‐ ADatabaseFieldName=FriendlyCaption=SearchBehaviour. ‐ Multiple fields are separated by commas. ‐ The =FriendlyCaption=SearchBehaviour is optional For Example X_AFIELD=A Caption,X_ANOTHERFIELD=Another Caption,X_THIRDFIELD. Additional control over the extra search field behaviour is set as follows: For Example X_MyField1=Mycaption=GSWUE,X_Myfield2=MyField2=SG. If No behaviour parameters are passed in it assumes a default search behaviour of GS where =G show this field as an optional visible column in the search grid. =S add this field as part of the select statement. Note: Ambiguous field names (field names that exist in both tables) should be prefixed by a table alias. For Example Alias.FieldName,Alias2.FieldName. The List of aliases are On Creditor Account Transactions Tab = T=CR_TRANS
EXTRA_DR_CONTACTSEARCHFIELDS Contacts Extra debtor contact search fields A comma separated list of fields to add to the grid on the search screen. This list may contain a mixture of contact and account fields. e.g.. If you want to display the debtors 'Alphacode' and the contacts 'Default contact flag' you would set the profile to ALPHACODE,DEFCONTACT. Note: Ambiguous columns (columns that exist in both tables) should be prefixed by 'A.' or 'C.' e.g. A.ADDRESS1, C.ADDRESS1

EXO Super User Training Manual Momentum Software Solutions Page | 103
FIELDNAME MODULE DESCRIPTION NOTES
EXTRA_DR_SEARCHFIELDS Debtors Extra debtors account search fields The format to extend Extra Search Fields is : ‐ ADatabaseFieldName=FriendlyCaption=SearchBehaviour ‐ Multiple fields are separated by commas ‐ The =FriendlyCaption=SearchBehaviour is optional For Example X_AFIELD=A Caption, X_ANOTHERFIELD=Another Caption, X_THIRDFIELD The =FriendlyCaption=SearchBehaviour is optional. Additional control over the extra search field behaviour is set as follows: For Example X_MyField1=Mycaption=GSWUE, X_Myfield2=MyField2=E If no behaviour parameters are passed in it assumes a default search behaviour of GSWU where =G show this field as an optional visible column in the search grid. =S add this field as part of the select statement. =W make this field value a condition in the WHERE clause. =U force a character to uppercase for comparison. (String Fields) =E use Exact match (=) in the where clause rather than LIKE. (String Fields) Note: Ambiguous field names (field names that exist in both tables) should be prefixed by a table alias For Example Alias.FieldName, Alias2.FieldName The list of aliases are A=DR_ACCS

EXO Super User Training Manual Momentum Software Solutions Page | 104
FIELDNAME MODULE DESCRIPTION NOTES
EXTRA_DRTRANS_SEARCH_FIELD Debtors Extra debtor account transactions search fields
The format to extend Extra Search Fields is : ‐ ADatabaseFieldName=FriendlyCaption=SearchBehaviour. ‐ Multiple fields are separated by commas. ‐ The =FriendlyCaption=SearchBehaviour is optional. For Example X_AFIELD=A Caption,X_ANOTHERFIELD=Another Caption,X_THIRDFIELD. Additional control over the extra search field behaviour is set as follows: For Example X_MyField1=Mycaption=GSWUE,X_Myfield2=MyField2=SG. If No behaviour parameters are passed in it assumes a default search behaviour of GS where =G show this field as an optional visible column in the search grid. =S add this field as part of the select statement. Note: Ambiguous field names (field names that exist in both tables) should be prefixed by a table alias. For Example Alias.FieldName,Alias2.FieldName. The List of aliases are On Debtor Account Transactions Tab = T=DR_TRANS
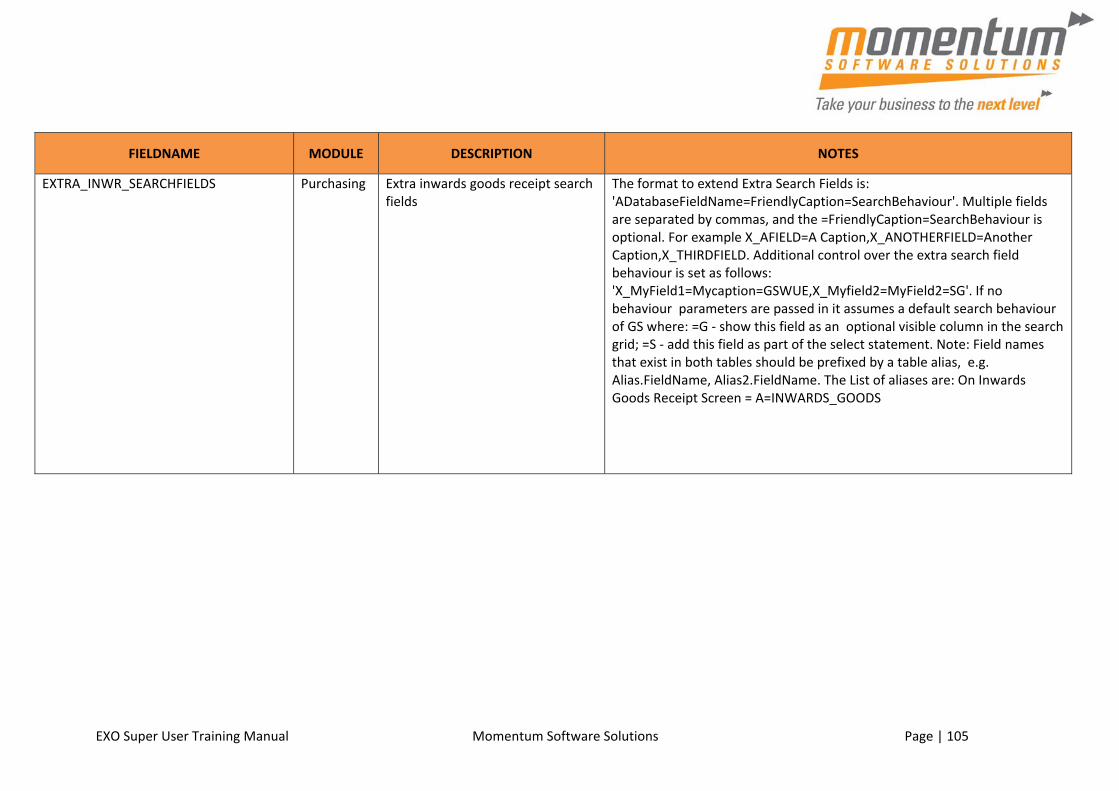
EXO Super User Training Manual Momentum Software Solutions Page | 105
FIELDNAME MODULE DESCRIPTION NOTES
EXTRA_INWR_SEARCHFIELDS Purchasing Extra inwards goods receipt search fields
The format to extend Extra Search Fields is: 'ADatabaseFieldName=FriendlyCaption=SearchBehaviour'. Multiple fields are separated by commas, and the =FriendlyCaption=SearchBehaviour is optional. For example X_AFIELD=A Caption,X_ANOTHERFIELD=Another Caption,X_THIRDFIELD. Additional control over the extra search field behaviour is set as follows: 'X_MyField1=Mycaption=GSWUE,X_Myfield2=MyField2=SG'. If no behaviour parameters are passed in it assumes a default search behaviour of GS where: =G ‐ show this field as an optional visible column in the search grid; =S ‐ add this field as part of the select statement. Note: Field names that exist in both tables should be prefixed by a table alias, e.g. Alias.FieldName, Alias2.FieldName. The List of aliases are: On Inwards Goods Receipt Screen = A=INWARDS_GOODS

EXO Super User Training Manual Momentum Software Solutions Page | 106
FIELDNAME MODULE DESCRIPTION NOTES
EXTRA_INWS_SEARCHFIELDS Purchasing Extra inwards goods shipment search fields
The format to extend Extra Search Fields is: 'ADatabaseFieldName=FriendlyCaption=SearchBehaviour'. Multiple fields are separated by commas, and the =FriendlyCaption=SearchBehaviour is optional. For example X_AFIELD=A Caption,X_ANOTHERFIELD=Another Caption,X_THIRDFIELD. Additional control over the extra search field behaviour is set as follows: 'X_MyField1=Mycaption=GSWUE,X_Myfield2=MyField2=SG'. If no behaviour parameters are passed in it assumes a default search behaviour of GS where: =G ‐ show this field as an optional visible column in the search grid; =S ‐ add this field as part of the select statement. Note: Field names that exist in both tables should be prefixed by a table alias, e.g. Alias.FieldName, Alias2.FieldName. The List of aliases are: On Inwards Goods Shipment Screen = H=SHIPMENT_HDR
EXTRA_STOCK_SEARCH_CAPTION Stock Extra stock search field caption Enter the caption for the field added by Extra Stock Search Field option, which is displayed in the stock search results grid. This Profile field has been phased out and is superseded by the EXTRA_STOCK_SEARCH_FIELD profile.
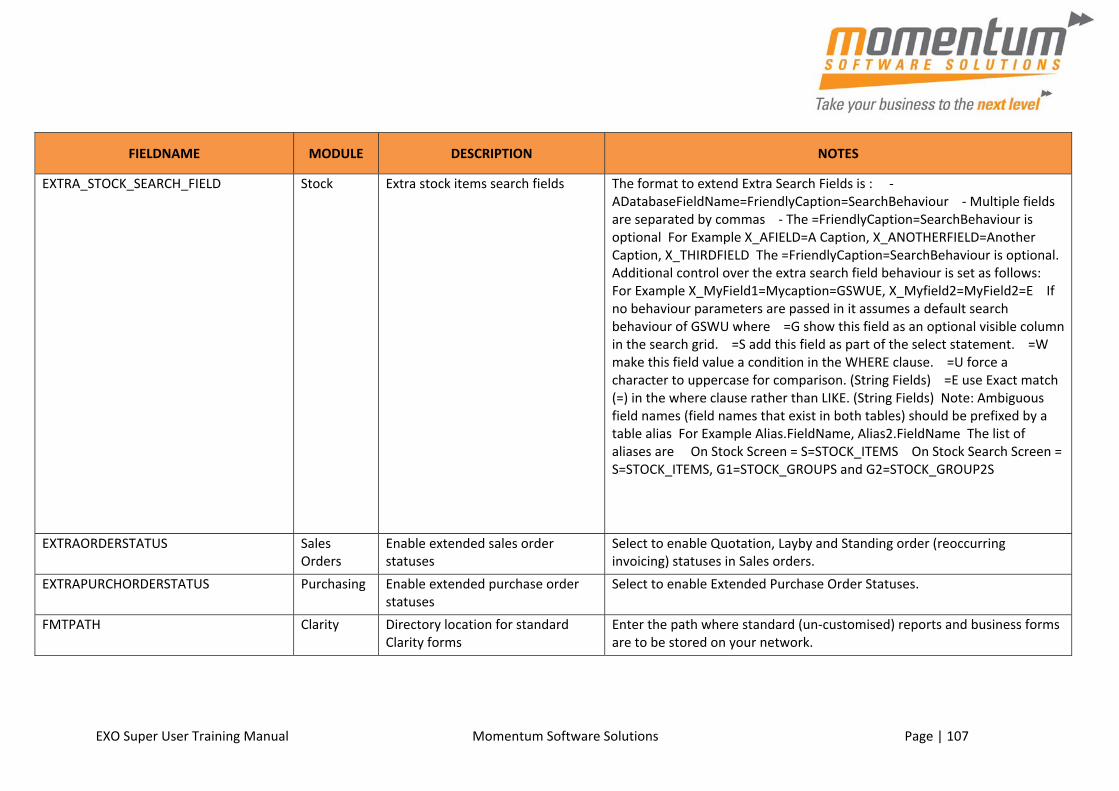
EXO Super User Training Manual Momentum Software Solutions Page | 107
FIELDNAME MODULE DESCRIPTION NOTES
EXTRA_STOCK_SEARCH_FIELD Stock Extra stock items search fields The format to extend Extra Search Fields is : ‐ ADatabaseFieldName=FriendlyCaption=SearchBehaviour ‐ Multiple fields are separated by commas ‐ The =FriendlyCaption=SearchBehaviour is optional For Example X_AFIELD=A Caption, X_ANOTHERFIELD=Another Caption, X_THIRDFIELD The =FriendlyCaption=SearchBehaviour is optional. Additional control over the extra search field behaviour is set as follows: For Example X_MyField1=Mycaption=GSWUE, X_Myfield2=MyField2=E If no behaviour parameters are passed in it assumes a default search behaviour of GSWU where =G show this field as an optional visible column in the search grid. =S add this field as part of the select statement. =W make this field value a condition in the WHERE clause. =U force a character to uppercase for comparison. (String Fields) =E use Exact match (=) in the where clause rather than LIKE. (String Fields) Note: Ambiguous field names (field names that exist in both tables) should be prefixed by a table alias For Example Alias.FieldName, Alias2.FieldName The list of aliases are On Stock Screen = S=STOCK_ITEMS On Stock Search Screen = S=STOCK_ITEMS, G1=STOCK_GROUPS and G2=STOCK_GROUP2S
EXTRAORDERSTATUS Sales Orders
Enable extended sales order statuses
Select to enable Quotation, Layby and Standing order (reoccurring invoicing) statuses in Sales orders.
EXTRAPURCHORDERSTATUS Purchasing Enable extended purchase order statuses
Select to enable Extended Purchase Order Statuses.
FMTPATH Clarity Directory location for standard Clarity forms
Enter the path where standard (un‐customised) reports and business forms are to be stored on your network.
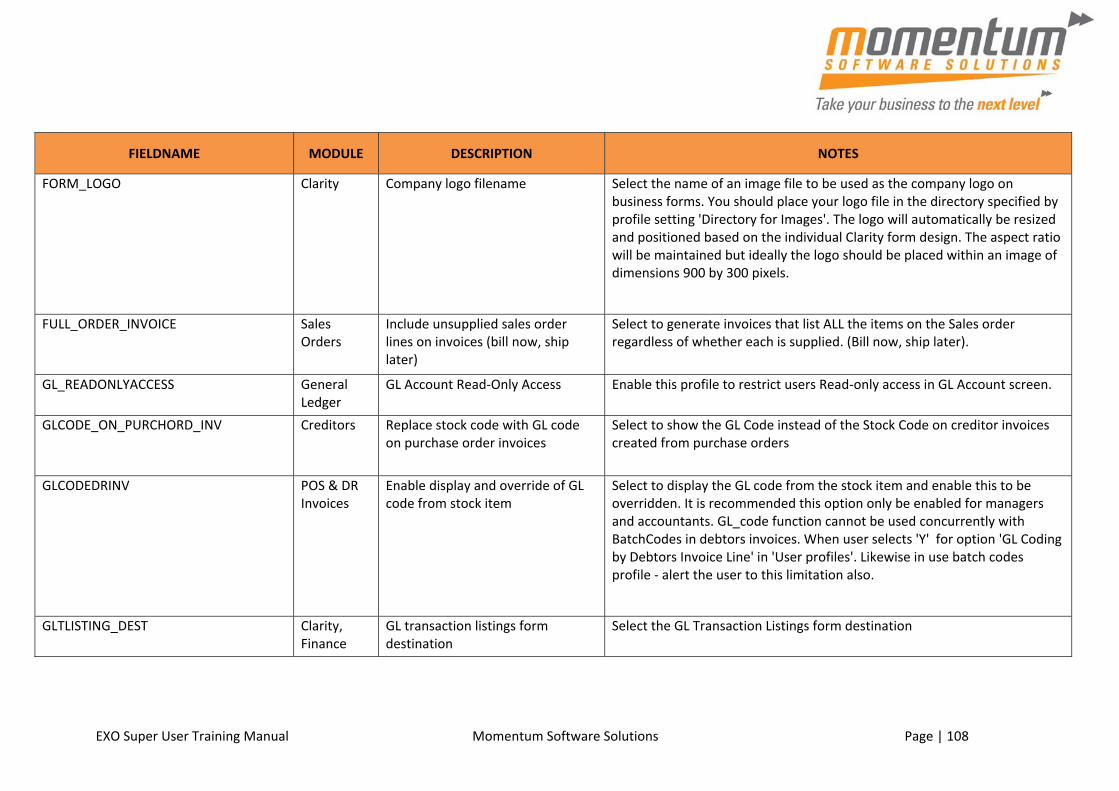
EXO Super User Training Manual Momentum Software Solutions Page | 108
FIELDNAME MODULE DESCRIPTION NOTES
FORM_LOGO Clarity Company logo filename Select the name of an image file to be used as the company logo on business forms. You should place your logo file in the directory specified by profile setting 'Directory for Images'. The logo will automatically be resized and positioned based on the individual Clarity form design. The aspect ratio will be maintained but ideally the logo should be placed within an image of dimensions 900 by 300 pixels.
FULL_ORDER_INVOICE Sales Orders
Include unsupplied sales order lines on invoices (bill now, ship later)
Select to generate invoices that list ALL the items on the Sales order regardless of whether each is supplied. (Bill now, ship later).
GL_READONLYACCESS General Ledger
GL Account Read‐Only Access Enable this profile to restrict users Read‐only access in GL Account screen.
GLCODE_ON_PURCHORD_INV Creditors Replace stock code with GL code on purchase order invoices
Select to show the GL Code instead of the Stock Code on creditor invoices created from purchase orders
GLCODEDRINV POS & DR Invoices
Enable display and override of GL code from stock item
Select to display the GL code from the stock item and enable this to be overridden. It is recommended this option only be enabled for managers and accountants. GL_code function cannot be used concurrently with BatchCodes in debtors invoices. When user selects 'Y' for option 'GL Coding by Debtors Invoice Line' in 'User profiles'. Likewise in use batch codes profile ‐ alert the user to this limitation also.
GLTLISTING_DEST Clarity, Finance
GL transaction listings form destination
Select the GL Transaction Listings form destination

EXO Super User Training Manual Momentum Software Solutions Page | 109
FIELDNAME MODULE DESCRIPTION NOTES
GLTLISTING_EMAIL Clarity, Finance
GL transaction listings form email option
Select to enable emailing of the GL Transaction Listings form
GLTLISTING_OUTPUTDEV Clarity, Finance
GL transaction listings form output device
Select the GL Transaction Listings form output device or file format
GLTLISTING_PRINTERNAME Clarity, Finance
GL transaction listings form printer name
Enter the GL Transaction Listings form printer path name
HIDE Stock Enable extended stock search filter Enable extended stock search filter.
HIDE_ALT_SUPPLIER_INFO Stock Hide alternate supplier information Select to prevent access to alternate supplier info in Stock screen.
HIDE_ANALYSISCODES Hide Analysis Codes Column Hides analysis codes column on Sales Order, Purchase Order, CR Invoice, DR Invoice, Cashbook and Journal entry screen.
HIDE_ANALYTICS_TABS Other/ General
Hide tabs in EXO Analytics Enter options to hide tabs in EXO Analytics. Enter 'S' to hide Sales Tab Enter 'I' to hide Invoice List Tab Enter 'O' to hide Order List Tab Enter 'T' to hide Stock Tab Enter 'F' to hide Finance Tab Enter 'P' to hide Purchases Tab Example : Q,T,I
HIDE_DISCOUNT Sales Orders
Hide discount % column in debtor invoice and sales order entry screens
Select to remove the 'Discount%' column from the debtor invoice entry screen (POS) and the sales order entry screen.
HIDE_GLTRANS General Ledger
Hide GL transactions when viewing an account
Select to disable the automatic loading of GL transactions when viewing an account. It is useful for sites that frequently browse through GL accounts and have a large transaction volume.
HIDESENDTOHO Debtors Hide 'send to head office' button on debtor account screen
Enabling this option will hide the Send To Head Office button on the Debtor account screen.

EXO Super User Training Manual Momentum Software Solutions Page | 110
FIELDNAME MODULE DESCRIPTION NOTES
HIDESTOCKCOSTS Stock Hide stock costs Select to hide Stock Costs from this user
INVNOOVERRIDE Debtors Allow override of debtor invoice numbers
Allows the overriding of the automatic invoice number for the current debtor invoice
INWCREATEINVOICE Purchasing Prompt to create inwards goods creditor invoices
Select to be prompted to create inwards goods creditor invoices.
IWG_HIDE_CONTROLS Inwards Goods
Hide Inwards Goods Receipt controls
Specify a string of characters to hide controls in the Inwards Goods Receipting screen. E = Disable 'Receipt All' button
IWGREVERSAL Inwards Goods
Inwards goods reversal screen access level
Select access level for reversal of Inwards Goods Receipts. This controls access to the right click functions from the Inwards Goods search screen: None – Assisted reversal is not available; Delete – Can delete an IWG Receipt that has not been costed. This also reverses the previous update of receipted quantities in the purchase order but has no affect on the stock ledger; Reversal – Can reverse a costed IWG Receipt. This also reverses the previous update of receipted quantities in the purchase order and creates reversal transactions in the stock ledger. NOTE : Reversals may not return the data, especially average cost, to a state equivalent to before the initial receipt. Use with caution and get advice from your implementation partner. Both – Can Delete or reverse a receipt based on its status.
JobCodeOnTrans Debtors Enable job code or reference number on sales order and debtor invoice entry screens
Select to record an optional 'job code' or reference number on the sales order and debtors invoice entry screen.

EXO Super User Training Manual Momentum Software Solutions Page | 111
FIELDNAME MODULE DESCRIPTION NOTES
KEEPOUTOFGL General Ledger
Disable General Ledger entry Select to prevent General Ledger transaction entry for this user
MANREP_CUSTOM_TAB1_CAPTION Other/ General
Analytics custom tab 1 caption Enter a caption for user defined tab #1 to be added to EXO Analytics. If no caption is entered, the tab does not get created.
MANREP_CUSTOM_TAB2_CAPTION Other/ General
Analytics custom tab 2 caption Enter a caption for user defined tab #2 to be added to EXO Analytics. If no caption is entered, the tab does not get created.
MANREP_EXCLUDE_QUOTES_FROM_SO Other/ General
Exclude Quotes from Sales Orders Select to exclude quotes from sales orders in Management Reports
MANREP_KPI_AVGINVOICE Other/ General
Enable Average Invoice KPI Select to enable Average Invoice KPI in Management Reports
MANREP_KPI_GP_PERCENTAGE Other/ General
Enable GP% KPI Select to enable GP% KPI in Management Reports
MANREP_KPI_STOCKTURN Other/ General
Enable Annualised Stockturn KPI Select to enable Annualised Stockturn KPI in Management Reports
MANREP_RECALCONSTARTUP Other/ General
Recalculate and Refresh Analytics on Startup
Select to recalculate the Analytics Snapshots whenever launching Analytics
MANREP_RECALCREPORT Other/ General
Recalculate and Refresh Analytics every 15 mins when loaded
Select to recalculate the Analytics Snapshots every 15 mins on this computer
MAXTOCASHACC Debtors Maximum sale value for accounts with cash sale terms
Enter an amount to set a maximum sale value for accounts with cash sale terms. Alternatively leave this set to 0 for no limit. Useful to ensure customer accounts and information is captured on larger sales for marketing or warranty purposes.
NO_PURCHORD_DRILL Creditors Disable purchase order drill‐down Select to prevent users from drilling down into purchase orders from the stock screen. See also No Sales Order Drill

EXO Super User Training Manual Momentum Software Solutions Page | 112
FIELDNAME MODULE DESCRIPTION NOTES
NO_SALESORD_DRILL Debtors Disable sales order drill‐down Select to prevent the click‐through to sales orders from the stock item screen and debtor account screens.
ORDER_MAX_FWD_DAYS Stock Sales order max forward days Enter the number of days to count ahead, from the current day, for which forward dated sales orders will be included in the free stock calculation on stock items. Applies to sales orders only. Defaults to 90 days.
ORDQTYONINVLINE Sales Orders
Display quantity ordered on invoice lines
Select to show the quantity ordered as well as the quantity actually supplied on invoice lines. If selected, the field will also need to be added to the invoice business form design
PACKINGSLIP_SHOWCOMMENTS Sales Orders
Print comments on packing slip Select to print comment lines (non stock lines) on sales order packing slips. [FMT Only]
PASSWORD_PRICEEDIT System Password required for price override
Select to enable that price editing requires a password
PAY_BATCH_NOT_DEFAULT_GL Debtors Uncheck debtors payment batch entry 'Post to GL' checkbox
Select to clear the 'Post to GL' checkbox on the debtors Payment Batch Entry on start up
PICKINGSLIP_CLF_FILES Sales Orders
Picking slip form file list
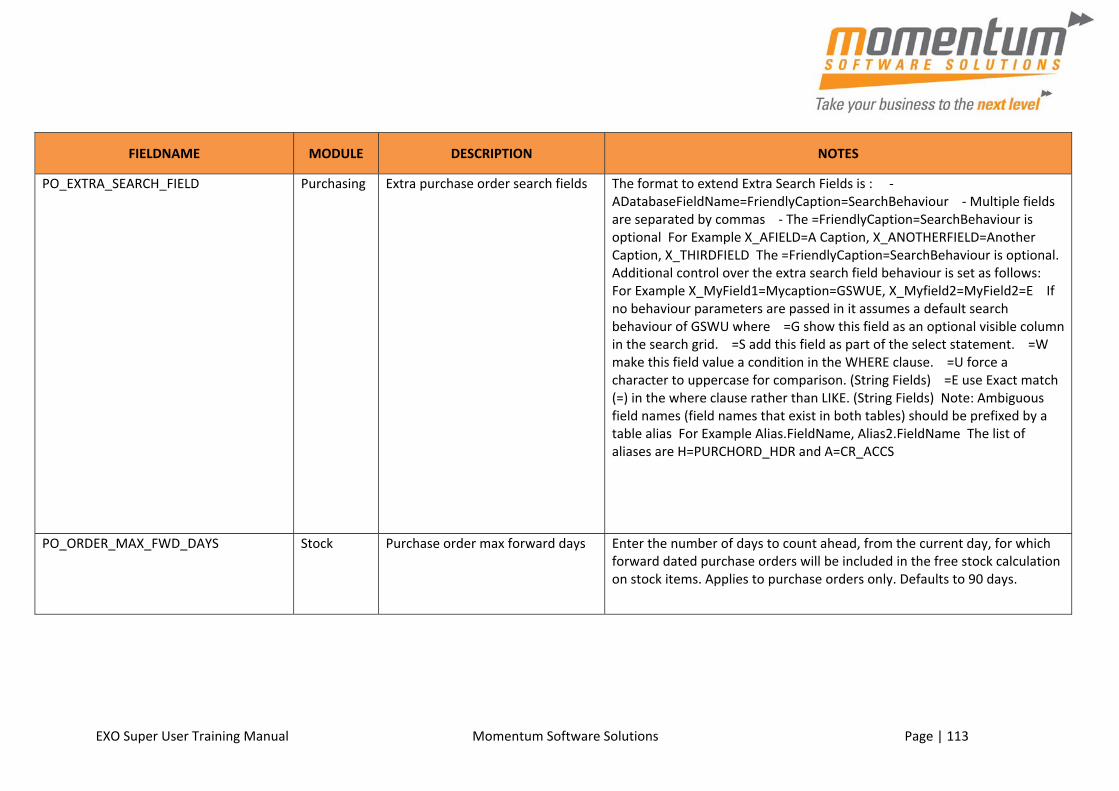
EXO Super User Training Manual Momentum Software Solutions Page | 113
FIELDNAME MODULE DESCRIPTION NOTES
PO_EXTRA_SEARCH_FIELD Purchasing Extra purchase order search fields The format to extend Extra Search Fields is : ‐ ADatabaseFieldName=FriendlyCaption=SearchBehaviour ‐ Multiple fields are separated by commas ‐ The =FriendlyCaption=SearchBehaviour is optional For Example X_AFIELD=A Caption, X_ANOTHERFIELD=Another Caption, X_THIRDFIELD The =FriendlyCaption=SearchBehaviour is optional. Additional control over the extra search field behaviour is set as follows: For Example X_MyField1=Mycaption=GSWUE, X_Myfield2=MyField2=E If no behaviour parameters are passed in it assumes a default search behaviour of GSWU where =G show this field as an optional visible column in the search grid. =S add this field as part of the select statement. =W make this field value a condition in the WHERE clause. =U force a character to uppercase for comparison. (String Fields) =E use Exact match (=) in the where clause rather than LIKE. (String Fields) Note: Ambiguous field names (field names that exist in both tables) should be prefixed by a table alias For Example Alias.FieldName, Alias2.FieldName The list of aliases are H=PURCHORD_HDR and A=CR_ACCS
PO_ORDER_MAX_FWD_DAYS Stock Purchase order max forward days Enter the number of days to count ahead, from the current day, for which forward dated purchase orders will be included in the free stock calculation on stock items. Applies to purchase orders only. Defaults to 90 days.

EXO Super User Training Manual Momentum Software Solutions Page | 114
FIELDNAME MODULE DESCRIPTION NOTES
PO_STOCK_FMT_FIELD Purchasing Print labels for purchase lines Using this option to have the ability to flag stock items with a checkbox to indicate whether a STOCK FMT file is printed for each stock item on a purchase order. Ideal for label printing or delivery goods notices etc. For this to work on purchase orders, set this custom option equal to a value that is the field name of the extra field on the stock item record (which should be a CHAR(1) connected to a check box). Do the same for sales orders, using the setup option SO_STOCK_FMT_FIELD. [FMT Only]
POGENINV Purchasing Purchase orders ‐ generate Invoice Purchase orders ‐ Generate Invoice
POINVASSUP Purchasing Purchase orders ‐ invoice as supplied
Purchase Orders ‐ Invoice as Supplied
POLINEDISCS Purchasing Allow manual entry/override of discounts on purchase order lines
Select to enable manual entry or overriding of the predefined discount percentage on each purchase order line.
POPURCHPACKQTYCOLUMNSWAP Purchasing Swap 'PO Qty' and 'Pack Description' columns
Swap the Qty Column on the purchase orders screen with the purchase pack description field
POSSKIPROUNDMSG POS & DR Invoices
Disable 'The invoice value has changed due to rounding ' message
Select to suppress the 'The invoice value has changed due to rounding' message when an invoice is saved. The invoice will save without prompting.
POSSKIPSURE POS & DR Invoices
Disable invoice 'Are you sure' message
Select to suppress the 'Are you sure?' pop up screen when an invoice is saved. The invoice will save without prompting.
POSSKIPTOQTY POS & DR Invoices
Bypass invoice description field Select to automatically skip to the Quantity field once the stock code has been entered, bypassing the description field.
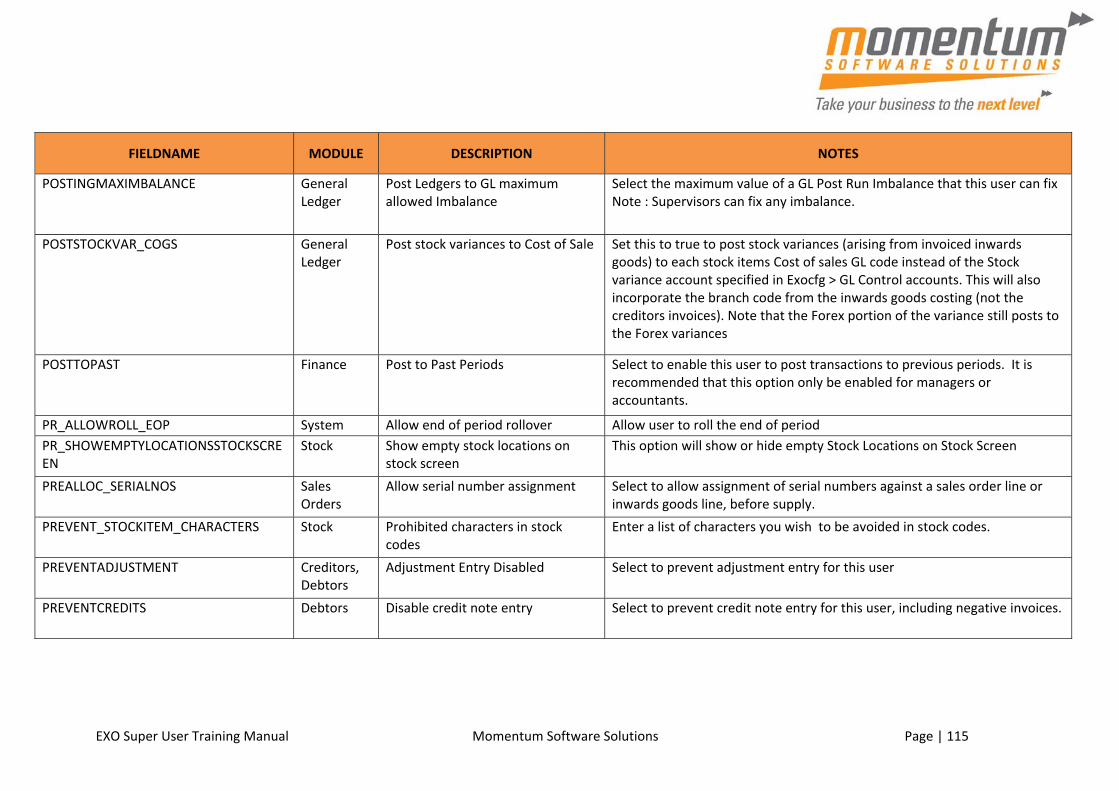
EXO Super User Training Manual Momentum Software Solutions Page | 115
FIELDNAME MODULE DESCRIPTION NOTES
POSTINGMAXIMBALANCE General Ledger
Post Ledgers to GL maximum allowed Imbalance
Select the maximum value of a GL Post Run Imbalance that this user can fix Note : Supervisors can fix any imbalance.
POSTSTOCKVAR_COGS General Ledger
Post stock variances to Cost of Sale Set this to true to post stock variances (arising from invoiced inwards goods) to each stock items Cost of sales GL code instead of the Stock variance account specified in Exocfg > GL Control accounts. This will also incorporate the branch code from the inwards goods costing (not the creditors invoices). Note that the Forex portion of the variance still posts to the Forex variances
POSTTOPAST Finance Post to Past Periods Select to enable this user to post transactions to previous periods. It is recommended that this option only be enabled for managers or accountants.
PR_ALLOWROLL_EOP System Allow end of period rollover Allow user to roll the end of period
PR_SHOWEMPTYLOCATIONSSTOCKSCREEN
Stock Show empty stock locations on stock screen
This option will show or hide empty Stock Locations on Stock Screen
PREALLOC_SERIALNOS Sales Orders
Allow serial number assignment Select to allow assignment of serial numbers against a sales order line or inwards goods line, before supply.
PREVENT_STOCKITEM_CHARACTERS Stock Prohibited characters in stock codes
Enter a list of characters you wish to be avoided in stock codes.
PREVENTADJUSTMENT Creditors, Debtors
Adjustment Entry Disabled Select to prevent adjustment entry for this user
PREVENTCREDITS Debtors Disable credit note entry Select to prevent credit note entry for this user, including negative invoices.

EXO Super User Training Manual Momentum Software Solutions Page | 116
FIELDNAME MODULE DESCRIPTION NOTES
PREVENTPRICECHANGE Debtors Prevent override of price in sales orders and debtor invoices
Select to disable price override function during Order and Invoice entry by this user
PREVENTREFUNDS Debtors Disable Refunds in Enhanced POS. Select to disable refunds inside Enhanced POS.
PROMPT_PRINT_UPDATED_LAYBY_DOCPROMPT
Debtors Prompt to print updated layby Select how you want to be prompted when deposits of a layby has been updated.
PROMPTPRINTLABELS Inwards Goods
Prompt to print receipt labels Specify when to be prompted to print Stock labels in Inwards goods.
PURCH_AUTO_USE_EOQ Purchasing EOQ on Auto Purchase Orders Select to use the economical order quantity in forecast based purchase ordering, if an EOQ is specified on the stock item.
PURCH_PROMPT_EOQ Stock EOQ prompt on purchase orders Select the action to be taken if the purchase order quantity entered is not a multiple of the Economical order Quantity (EOQ). Select Prompt to prompt to adjust the purchase qty to a multiple of the EOQ, Force to change the entered qty automatically.
PURCH_STOCK_DESC_FIELD Purchasing Display purchase order stock description field
Enter the field name from the STOCK_ITEMS table to be used as an alternative description on purchase orders. Example: X_ALTDESCRIPTION
PURCHORD_HIDE_CONTROLS Purchasing Purchase order hide controls Specify a string of characters to disable a series of controls in the Purchase order screen. A = Disable 'Add line' button S = Disable 'Save' button D = Disable 'Delete' button P = Disable 'Process' and 'Receipt All' buttons F = Disable 'Force to processed' checkbox I = Disable 'IWG Receipt' button R = Disable 'Receipt' button e.g.. 'AS' ‐ will disable 'Add' and 'Save'
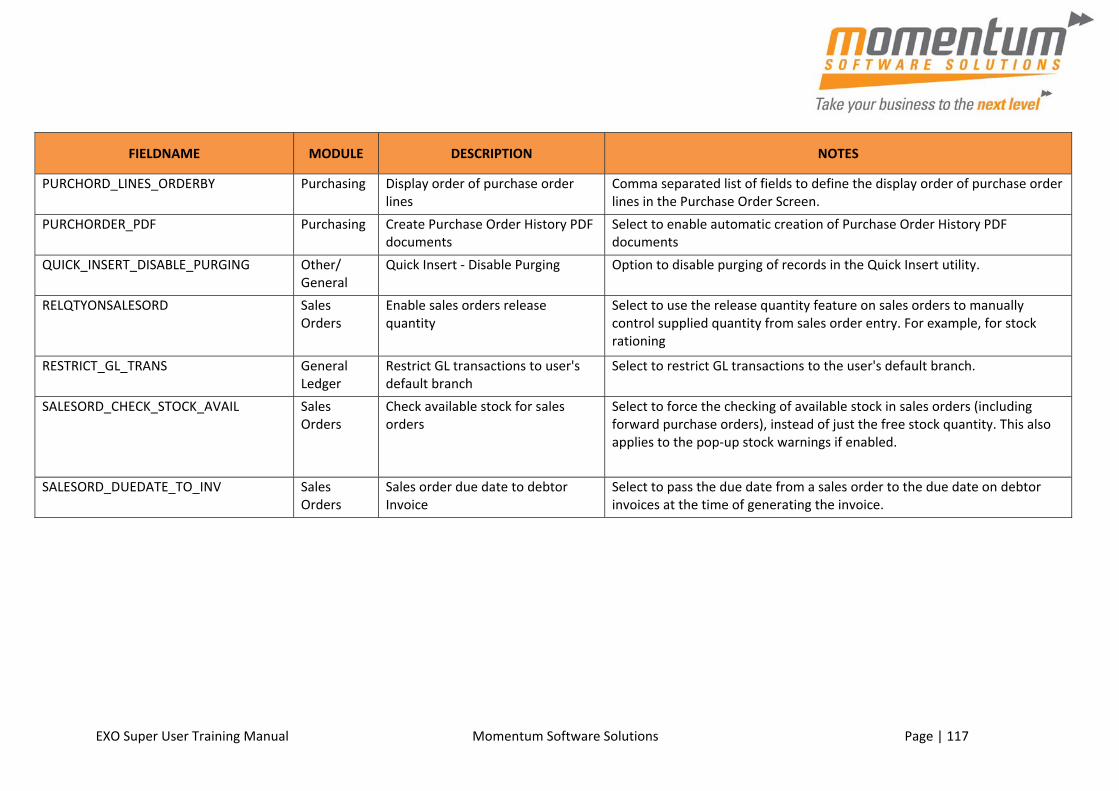
EXO Super User Training Manual Momentum Software Solutions Page | 117
FIELDNAME MODULE DESCRIPTION NOTES
PURCHORD_LINES_ORDERBY Purchasing Display order of purchase order lines
Comma separated list of fields to define the display order of purchase order lines in the Purchase Order Screen.
PURCHORDER_PDF Purchasing Create Purchase Order History PDF documents
Select to enable automatic creation of Purchase Order History PDF documents
QUICK_INSERT_DISABLE_PURGING Other/ General
Quick Insert ‐ Disable Purging Option to disable purging of records in the Quick Insert utility.
RELQTYONSALESORD Sales Orders
Enable sales orders release quantity
Select to use the release quantity feature on sales orders to manually control supplied quantity from sales order entry. For example, for stock rationing
RESTRICT_GL_TRANS General Ledger
Restrict GL transactions to user's default branch
Select to restrict GL transactions to the user's default branch.
SALESORD_CHECK_STOCK_AVAIL Sales Orders
Check available stock for sales orders
Select to force the checking of available stock in sales orders (including forward purchase orders), instead of just the free stock quantity. This also applies to the pop‐up stock warnings if enabled.
SALESORD_DUEDATE_TO_INV Sales Orders
Sales order due date to debtor Invoice
Select to pass the due date from a sales order to the due date on debtor invoices at the time of generating the invoice.

EXO Super User Training Manual Momentum Software Solutions Page | 118
FIELDNAME MODULE DESCRIPTION NOTES
SALESORD_HIDE_CONTROLS Sales Orders
Hide sales order controls Enter options to hide buttons in the Sales order screens: 'D' to hide Delete button; 'A' to hide Add button; 'Q' to hide Quick supply button; 'F' to hide Force order to fully processed button; 'R' to hide Release all button; 'K' to hide Pick all button; 'U' to hide Supply all button; 'I' to hide Invoice all button; 'L' to hide Supply button; 'P' to hide Process button;'B' to hide the Batch Sales Order processing button; 'b' to make the Batch Sales Order supply options read only; 'q' to make the Quick supply options read only; 'O' to hide the Generate PO(s) button and right‐click menu item. Example : DA
SALESORDER_BRANCHLOCK Sales Orders
Allow sales order search, view and creation for other branches
Select this option to restrict users from searching, viewing and creating sales orders not belonging to their branch on the sales order screen.
SALESORDER_BRANCHSQL Sales Orders
Sales order branch filter SQL statement
Enter SQL conditional logic to control what branches are available to users on the sales order screen. Lock Sales order branch to default branch profile setting logic will override the logic used here, if enabled.
SALESORDER_DOC_NUMBERING Sales Orders
Use alternate sales order packing slip and invoice numbering
Set this option to 'Y' if you wish to have EXO Business generate packing slip and invoice numbers in sales order entry that are based upon the sales order number plus a document counter rather than a using a simple distinct system generated number. EG. '1234/01', '1234/02' etc.
SALESORDER_PDF Sales Orders
Create sales order history PDF documents
Select to enable automatic creation of Sales Order History PDF documents

EXO Super User Training Manual Momentum Software Solutions Page | 119
FIELDNAME MODULE DESCRIPTION NOTES
SALESTAXINC Debtors Debtors tax‐inclusive pricing Select if sell prices are entered as inclusive of tax. This requires the Sell Prices on your Stock Items must be entered as tax inclusive,
SELLPRICEEXCEPTIONS Sales Orders
Sales entry price exception warning level
Sell price exception warnings Select the level of price exception warnings that occur in sales entry. No warnings, just attempts to sell Below Costprice or all attempts to sell Outside product group guidelines. A zero Expected GP%on the product group will disable profitability exception warnings for all items in that that product group e.g. Freight services.
SERIALNOTRACKING Stock Enable serial number tracking Select to track and record the serial number of stock items (inwards and outwards).
SIZE_COLOUR_CODE_FORMULA System Size colour code formula Size Colour Code Formula used to construct unique stock items.
SIZE_COLOUR_DESC_FORMULA System Size/colour description formula Size Colour Description Formula used to construct stock items descriptions.
SIZE_COLOUR_ENABLED System Enable size/colour Enable Size Colour Feature.
SNOVERRIDE System Allow serial number override Specify a string of characters to disable a series of Serial Number Admin functions. Y = Enable all Serial Number Admin Functions N = Disable all Serial Number Admin Functions A = Enable Adding of Serial Number Admin Function E = Enable Editing of Serial Number Admin Function R = Enable Removal of Serial Number Admin Function D = Enable De‐assigning of Serial Number Admin Function
SNUSEEXPIRYDATES Stock Use expiry dates for batched and serialised items
Check this box to use and show expiry dates on Serialized Items and Batch Items.
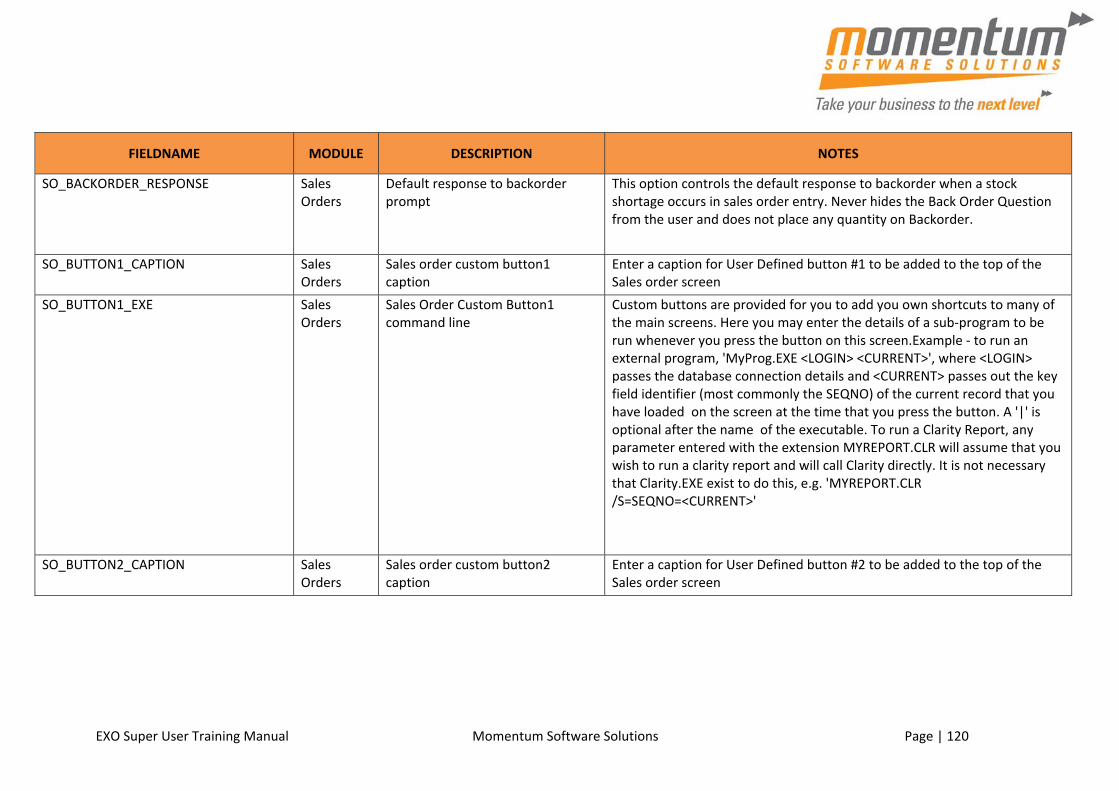
EXO Super User Training Manual Momentum Software Solutions Page | 120
FIELDNAME MODULE DESCRIPTION NOTES
SO_BACKORDER_RESPONSE Sales Orders
Default response to backorder prompt
This option controls the default response to backorder when a stock shortage occurs in sales order entry. Never hides the Back Order Question from the user and does not place any quantity on Backorder.
SO_BUTTON1_CAPTION Sales Orders
Sales order custom button1 caption
Enter a caption for User Defined button #1 to be added to the top of the Sales order screen
SO_BUTTON1_EXE Sales Orders
Sales Order Custom Button1 command line
Custom buttons are provided for you to add you own shortcuts to many of the main screens. Here you may enter the details of a sub‐program to be run whenever you press the button on this screen.Example ‐ to run an external program, 'MyProg.EXE <LOGIN> <CURRENT>', where <LOGIN> passes the database connection details and <CURRENT> passes out the key field identifier (most commonly the SEQNO) of the current record that you have loaded on the screen at the time that you press the button. A '|' is optional after the name of the executable. To run a Clarity Report, any parameter entered with the extension MYREPORT.CLR will assume that you wish to run a clarity report and will call Clarity directly. It is not necessary that Clarity.EXE exist to do this, e.g. 'MYREPORT.CLR /S=SEQNO=<CURRENT>'
SO_BUTTON2_CAPTION Sales Orders
Sales order custom button2 caption
Enter a caption for User Defined button #2 to be added to the top of the Sales order screen

EXO Super User Training Manual Momentum Software Solutions Page | 121
FIELDNAME MODULE DESCRIPTION NOTES
SO_BUTTON2_EXE Sales Orders
Sales order custom button2 command line
Custom buttons are provided for you to add you own shortcuts to many of the main screens. Here you may enter the details of a sub‐program to be run whenever you press the button on this screen.Example ‐ to run an external program, 'MyProg.EXE <LOGIN> <CURRENT>', where <LOGIN> passes the database connection details and <CURRENT> passes out the key field identifier (most commonly the SEQNO) of the current record that you have loaded on the screen at the time that you press the button. A '|' is optional after the name of the executable. To run a Clarity Report, any parameter entered with the extension MYREPORT.CLR will assume that you wish to run a clarity report and will call Clarity directly. It is not necessary that Clarity.EXE exist to do this, e.g. 'MYREPORT.CLR /S=SEQNO=<CURRENT>'
SO_BUTTON3_CAPTION Sales Orders
Sales order custom button3 caption
Enter a caption for User Defined button #1 to be added to the top of the Sales order screen
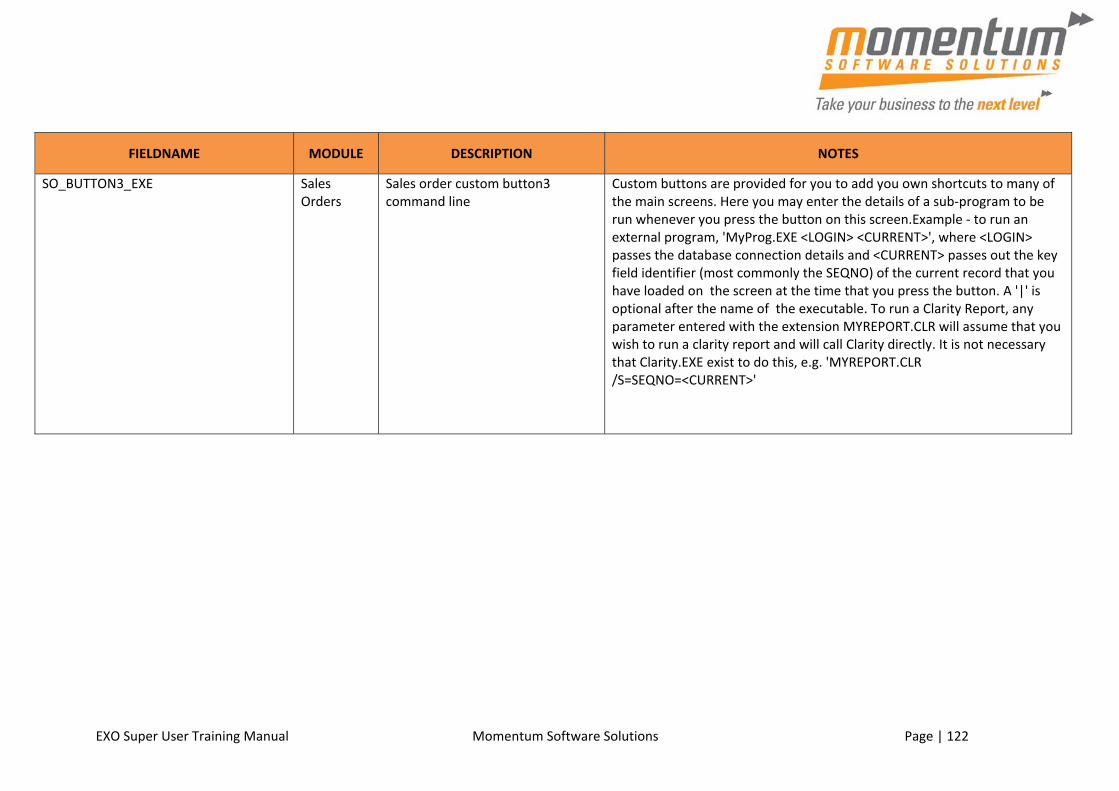
EXO Super User Training Manual Momentum Software Solutions Page | 122
FIELDNAME MODULE DESCRIPTION NOTES
SO_BUTTON3_EXE Sales Orders
Sales order custom button3 command line
Custom buttons are provided for you to add you own shortcuts to many of the main screens. Here you may enter the details of a sub‐program to be run whenever you press the button on this screen.Example ‐ to run an external program, 'MyProg.EXE <LOGIN> <CURRENT>', where <LOGIN> passes the database connection details and <CURRENT> passes out the key field identifier (most commonly the SEQNO) of the current record that you have loaded on the screen at the time that you press the button. A '|' is optional after the name of the executable. To run a Clarity Report, any parameter entered with the extension MYREPORT.CLR will assume that you wish to run a clarity report and will call Clarity directly. It is not necessary that Clarity.EXE exist to do this, e.g. 'MYREPORT.CLR /S=SEQNO=<CURRENT>'
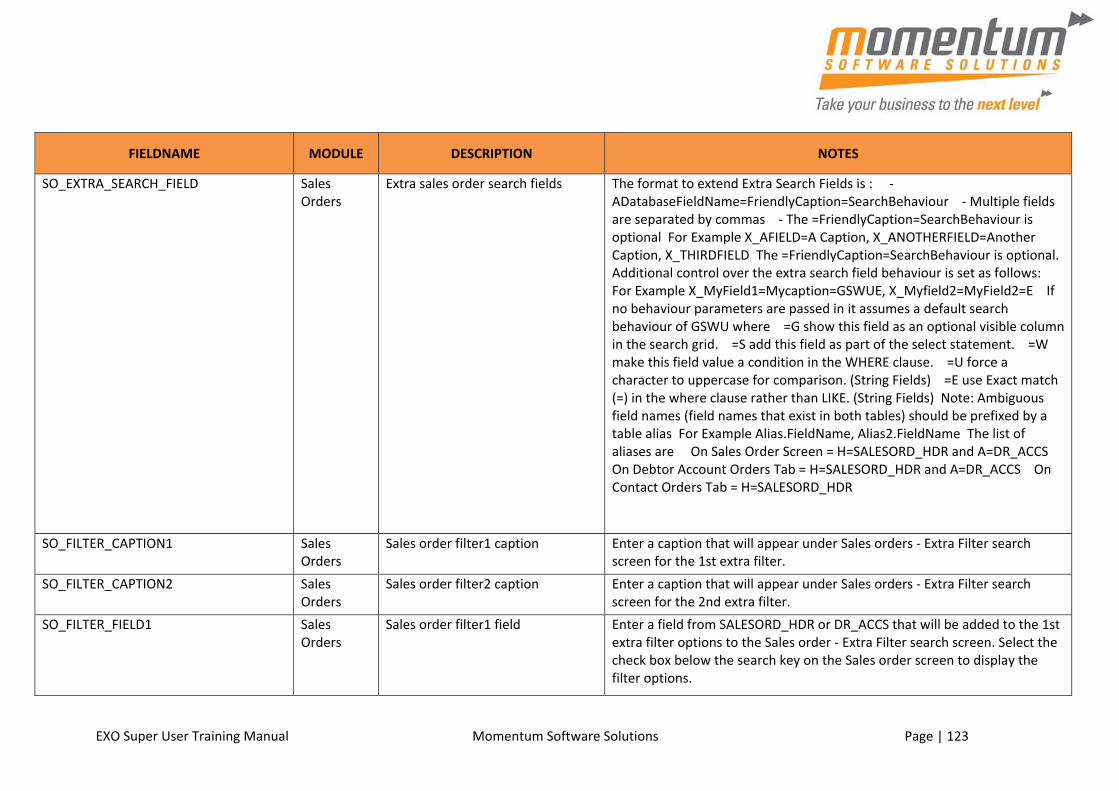
EXO Super User Training Manual Momentum Software Solutions Page | 123
FIELDNAME MODULE DESCRIPTION NOTES
SO_EXTRA_SEARCH_FIELD Sales Orders
Extra sales order search fields The format to extend Extra Search Fields is : ‐ ADatabaseFieldName=FriendlyCaption=SearchBehaviour ‐ Multiple fields are separated by commas ‐ The =FriendlyCaption=SearchBehaviour is optional For Example X_AFIELD=A Caption, X_ANOTHERFIELD=Another Caption, X_THIRDFIELD The =FriendlyCaption=SearchBehaviour is optional. Additional control over the extra search field behaviour is set as follows: For Example X_MyField1=Mycaption=GSWUE, X_Myfield2=MyField2=E If no behaviour parameters are passed in it assumes a default search behaviour of GSWU where =G show this field as an optional visible column in the search grid. =S add this field as part of the select statement. =W make this field value a condition in the WHERE clause. =U force a character to uppercase for comparison. (String Fields) =E use Exact match (=) in the where clause rather than LIKE. (String Fields) Note: Ambiguous field names (field names that exist in both tables) should be prefixed by a table alias For Example Alias.FieldName, Alias2.FieldName The list of aliases are On Sales Order Screen = H=SALESORD_HDR and A=DR_ACCS On Debtor Account Orders Tab = H=SALESORD_HDR and A=DR_ACCS On Contact Orders Tab = H=SALESORD_HDR
SO_FILTER_CAPTION1 Sales Orders
Sales order filter1 caption Enter a caption that will appear under Sales orders ‐ Extra Filter search screen for the 1st extra filter.
SO_FILTER_CAPTION2 Sales Orders
Sales order filter2 caption Enter a caption that will appear under Sales orders ‐ Extra Filter search screen for the 2nd extra filter.
SO_FILTER_FIELD1 Sales Orders
Sales order filter1 field Enter a field from SALESORD_HDR or DR_ACCS that will be added to the 1st extra filter options to the Sales order ‐ Extra Filter search screen. Select the check box below the search key on the Sales order screen to display the filter options.

EXO Super User Training Manual Momentum Software Solutions Page | 124
FIELDNAME MODULE DESCRIPTION NOTES
SO_FILTER_FIELD2 Sales Orders
Sales order filter2 field Enter a field from SALESORD_HDR or DR_ACCS that will be added to the 2nd extra filter options to the Sales order search screen. Select the check box below the search key on the Sales order screen to display the filter options.
SO_WARN_DUPLICATE_STOCK Sales Orders
Warn if stock items duplicated on sales orders
When adding a line to a sales order for a stock item that already exists elsewhere on the order, the system now pops a warning dialogue
SOCHKSTOCK Sales Orders
Sales orders process action 'check stock' default switch
Sales Orders process action Check Stock default switch
SOENTERPAY Sales Orders
Sales orders process action 'enter payment now' default switch
Sales Orders process action Enter Payment Now default switch
SOGENINV Sales Orders
Sales orders process action 'generate invoice' default switch
Sales Orders process action Generate Invoice default switch
SOINVASSUP Sales Orders
Sales orders process action 'invoice as supplied' switch
Sales Orders process action Invoice as Supplied switch
SOPACKSLIP Sales Orders
Sales orders process action 'print packing slip' default switch
Sales Orders process action Print Packing Slip default switch
SOPRINTINV Sales Orders
Sales orders process action 'print invoice now' default switch
Sales Orders process action Print Invoice Now default switch

EXO Super User Training Manual Momentum Software Solutions Page | 125
FIELDNAME MODULE DESCRIPTION NOTES
SOSO_CHECKSTOCK Sales Orders
Quick Supply and Batch sales orders action 'check stock levels' default
Quick Supply and Batch Sales Orders action Check Stock levels default
SOSO_DELIVERYMETHOD Sales Orders
Quick Supply and Batch sales orders action 'delivery method' default
Quick Supply and Batch Sales Orders action Delivery Method default
SOSO_DOINVOICEALL Sales Orders
Quick Supply and Batch sales orders action 'invoice all' default
Quick Supply and Batch Sales Orders action Invoice All default
SOSO_DOPICKALL Sales Orders
Quick Supply and Batch sales orders action 'pick all' default
Quick Supply and Batch Sales Orders action Pick All default
SOSO_DORELEASEALL Sales Orders
Quick Supply and Batch sales orders action 'release all' default
Quick Supply and Batch Sales Orders action Release All default
SOSO_DOSUPPLYALL Sales Orders
Quick Supply and Batch sales orders action 'supply all' default
Quick Supply and Batch Sales Orders action Supply All default
SOSO_ENTERPAYMENT Sales Orders
Quick Supply and Batch sales orders action 'enter payment' default
Quick Supply and Batch Sales Orders action Enter Payment default
SOSO_FORCEFULLYPROCESSED Sales Orders
Quick Supply and Batch sales orders action 'force to fully processed' default
Quick Supply and Batch Sales Orders action Force to Fully Processed default

EXO Super User Training Manual Momentum Software Solutions Page | 126
FIELDNAME MODULE DESCRIPTION NOTES
SOSO_INVOICEDATEASSO Sales Orders
Quick Supply and Batch sales orders action 'set invoice date as sales order date'
Quick Supply and Batch Sales Orders action Set Invoice Date as Sales Order Date
SOSO_INVOICESUPPLIED Sales Orders
Quick Supply and Batch sales orders action 'invoice as supplied' default
Quick Supply and Batch Sales Orders action Invoice as Supplied default
SOSO_OVERRIDEDELIVERY Sales Orders
Quick Supply and Batch sales orders action 'override delivery' default
Quick Supply and Batch Sales Orders action Override Delivery default
SOSO_PRINTBACKORDER Sales Orders
Quick Supply and Batch sales orders action 'print back order' default
Quick Supply and Batch Sales Orders action Print Back Order default
SOSO_PRINTCONFIRMATION Sales Orders
Quick Supply and Batch sales orders action 'print confirmation slip' default
Quick Supply and Batch Sales Orders action Print Confirmation Slip default
SOSO_PRINTINVOICE Sales Orders
Quick Supply and Batch sales orders action 'print tax invoice' default
Quick Supply and Batch Sales Orders action Print Tax Invoice default
SOSO_PRINTITEMDOCUMENT Sales Orders
Quick Supply and Batch sales orders action 'print item document' default
Quick Supply and Batch Sales Orders action Print Item Document default
SOSO_PRINTLABEL Sales Orders
Quick Supply and Batch sales orders action 'print label' default
Quick Supply and Batch Sales Orders action Print Label default
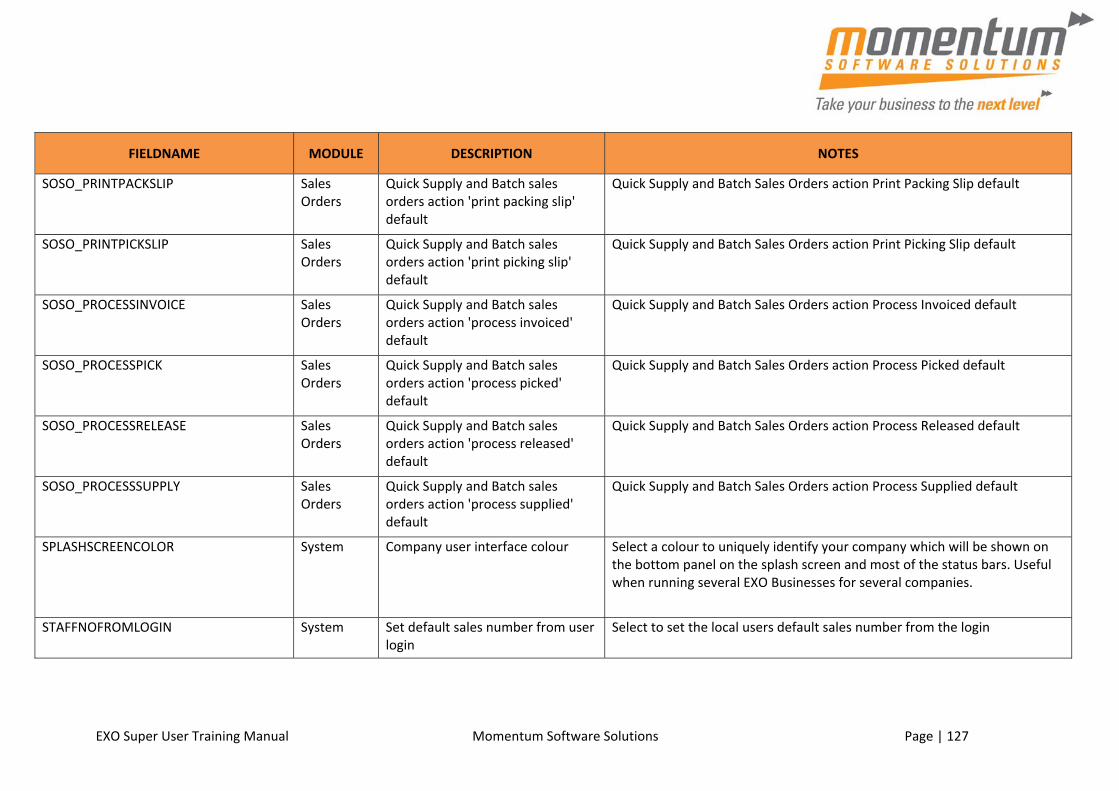
EXO Super User Training Manual Momentum Software Solutions Page | 127
FIELDNAME MODULE DESCRIPTION NOTES
SOSO_PRINTPACKSLIP Sales Orders
Quick Supply and Batch sales orders action 'print packing slip' default
Quick Supply and Batch Sales Orders action Print Packing Slip default
SOSO_PRINTPICKSLIP Sales Orders
Quick Supply and Batch sales orders action 'print picking slip' default
Quick Supply and Batch Sales Orders action Print Picking Slip default
SOSO_PROCESSINVOICE Sales Orders
Quick Supply and Batch sales orders action 'process invoiced' default
Quick Supply and Batch Sales Orders action Process Invoiced default
SOSO_PROCESSPICK Sales Orders
Quick Supply and Batch sales orders action 'process picked' default
Quick Supply and Batch Sales Orders action Process Picked default
SOSO_PROCESSRELEASE Sales Orders
Quick Supply and Batch sales orders action 'process released' default
Quick Supply and Batch Sales Orders action Process Released default
SOSO_PROCESSSUPPLY Sales Orders
Quick Supply and Batch sales orders action 'process supplied' default
Quick Supply and Batch Sales Orders action Process Supplied default
SPLASHSCREENCOLOR System Company user interface colour Select a colour to uniquely identify your company which will be shown on the bottom panel on the splash screen and most of the status bars. Useful when running several EXO Businesses for several companies.
STAFFNOFROMLOGIN System Set default sales number from user login
Select to set the local users default sales number from the login
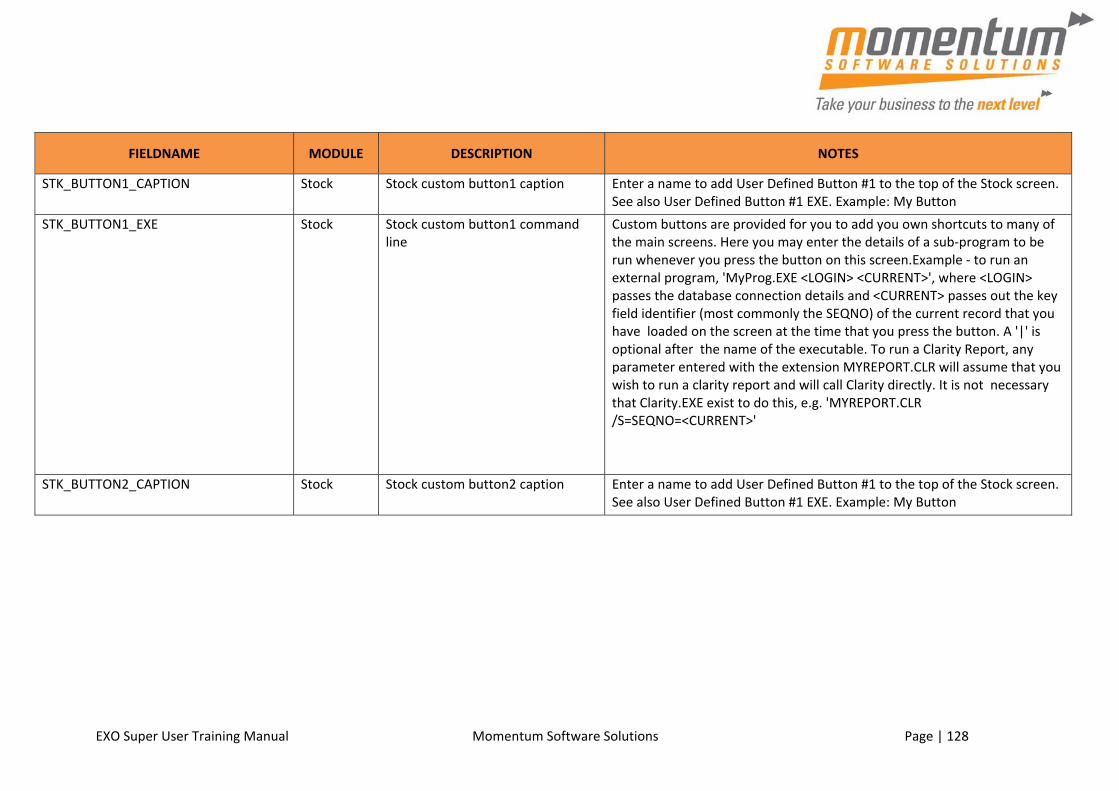
EXO Super User Training Manual Momentum Software Solutions Page | 128
FIELDNAME MODULE DESCRIPTION NOTES
STK_BUTTON1_CAPTION Stock Stock custom button1 caption Enter a name to add User Defined Button #1 to the top of the Stock screen. See also User Defined Button #1 EXE. Example: My Button
STK_BUTTON1_EXE Stock Stock custom button1 command line
Custom buttons are provided for you to add you own shortcuts to many of the main screens. Here you may enter the details of a sub‐program to be run whenever you press the button on this screen.Example ‐ to run an external program, 'MyProg.EXE <LOGIN> <CURRENT>', where <LOGIN> passes the database connection details and <CURRENT> passes out the key field identifier (most commonly the SEQNO) of the current record that you have loaded on the screen at the time that you press the button. A '|' is optional after the name of the executable. To run a Clarity Report, any parameter entered with the extension MYREPORT.CLR will assume that you wish to run a clarity report and will call Clarity directly. It is not necessary that Clarity.EXE exist to do this, e.g. 'MYREPORT.CLR /S=SEQNO=<CURRENT>'
STK_BUTTON2_CAPTION Stock Stock custom button2 caption Enter a name to add User Defined Button #1 to the top of the Stock screen. See also User Defined Button #1 EXE. Example: My Button

EXO Super User Training Manual Momentum Software Solutions Page | 129
FIELDNAME MODULE DESCRIPTION NOTES
STK_BUTTON2_EXE Stock Stock custom button2 command line
Custom buttons are provided for you to add you own shortcuts to many of the main screens. Here you may enter the details of a sub‐program to be run whenever you press the button on this screen.Example ‐ to run an external program, 'MyProg.EXE <LOGIN> <CURRENT>', where <LOGIN> passes the database connection details and <CURRENT> passes out the key field identifier (most commonly the SEQNO) of the current record that you have loaded on the screen at the time that you press the button. A '|' is optional after the name of the executable. To run a Clarity Report, any parameter entered with the extension MYREPORT.CLR will assume that you wish to run a clarity report and will call Clarity directly. It is not necessary that Clarity.EXE exist to do this, e.g. 'MYREPORT.CLR /S=SEQNO=<CURRENT>'
STK_REQ_PCT_WARN Stock Stock request transfer percentage warning
Specify a percentage for the minimum stock to be left in the From location when using Stock Requests for transfers. This does not restrict the transfer quantity but generates an alert when attempting to deplete stock below this level.
STK_REQ_QTY_WARN Stock Stock request transfer quantity warning
Specify a quantity for the minimum stock to be left in the From location when using Stock Requests for transfers. This does not restrict the transfer quantity but generates an alert when attempting to deplete stock below this level.
STK_REQ_TRANSIT_LOC Stock Intermediate stock location for goods in transit
Specify the intermediate stock location for goods in transit when using Stock Requests
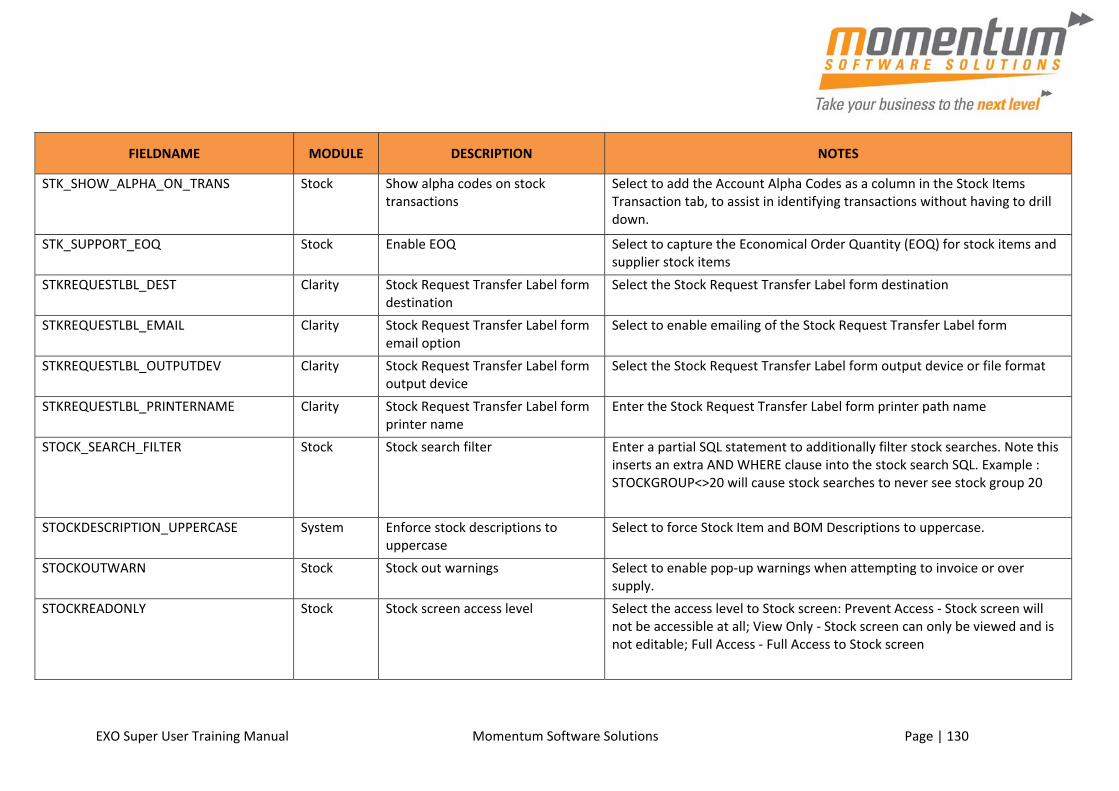
EXO Super User Training Manual Momentum Software Solutions Page | 130
FIELDNAME MODULE DESCRIPTION NOTES
STK_SHOW_ALPHA_ON_TRANS Stock Show alpha codes on stock transactions
Select to add the Account Alpha Codes as a column in the Stock Items Transaction tab, to assist in identifying transactions without having to drill down.
STK_SUPPORT_EOQ Stock Enable EOQ Select to capture the Economical Order Quantity (EOQ) for stock items and supplier stock items
STKREQUESTLBL_DEST Clarity Stock Request Transfer Label form destination
Select the Stock Request Transfer Label form destination
STKREQUESTLBL_EMAIL Clarity Stock Request Transfer Label form email option
Select to enable emailing of the Stock Request Transfer Label form
STKREQUESTLBL_OUTPUTDEV Clarity Stock Request Transfer Label form output device
Select the Stock Request Transfer Label form output device or file format
STKREQUESTLBL_PRINTERNAME Clarity Stock Request Transfer Label form printer name
Enter the Stock Request Transfer Label form printer path name
STOCK_SEARCH_FILTER Stock Stock search filter Enter a partial SQL statement to additionally filter stock searches. Note this inserts an extra AND WHERE clause into the stock search SQL. Example : STOCKGROUP<>20 will cause stock searches to never see stock group 20
STOCKDESCRIPTION_UPPERCASE System Enforce stock descriptions to uppercase
Select to force Stock Item and BOM Descriptions to uppercase.
STOCKOUTWARN Stock Stock out warnings Select to enable pop‐up warnings when attempting to invoice or over supply.
STOCKREADONLY Stock Stock screen access level Select the access level to Stock screen: Prevent Access ‐ Stock screen will not be accessible at all; View Only ‐ Stock screen can only be viewed and is not editable; Full Access ‐ Full Access to Stock screen

EXO Super User Training Manual Momentum Software Solutions Page | 131
FIELDNAME MODULE DESCRIPTION NOTES
STOCKSEARCHUSEDEFAULTLOCATION Stock Stock search only shows default location info
Tick this profile to always show the stock levels for the default stock location on stock search dialogs. Untick this profile and the stock search dialogs will show the default location stock level information unless a different location is more relevant to the transaction.
STOCKTAKE_EXCLUDEZEROSFROMVAR Stock Stock take exclude zeros from variance report
Select to exclude items with zero stock from the Stock take Variance Report
TAXRETURN_USEPERIODS Finance Select transactions based on period for tax return
Select transactions based on Period, for Tax Return
UPDATE_SUPPLIER_CODE_LASTUPDATE Purchasing Update last update field for supplier code cost price when purchase prices change
Select to update the LastUpdate field when prompted to update the supplier cost price.
USEBACKORDERS Sales Orders
Enable sales order back order quantity
Select to use the back order quantity feature on sales orders and permit manual control of the back order quantity from sales order entry. When this profile is inactive, a quantity can still appear in the calculated field Unsupplied. Activating this profile allows differentiation of the unsupplied quantity into Back Ordered and non‐Back Ordered.
USEBATCHCODES Stock Enable stock batch codes Select to track batches of stock.
USECRPROMPTPAY Creditors Calculate prompt payment discounts for creditors
Select to calculate prompt payment discounts with the Payment Processor
USEDEPOSITS Finance Allow deposits in sales orders and general ledger
Select to enable Deposits in sales orders and the General Ledger
USEEMAILSENDER Email client Email sender
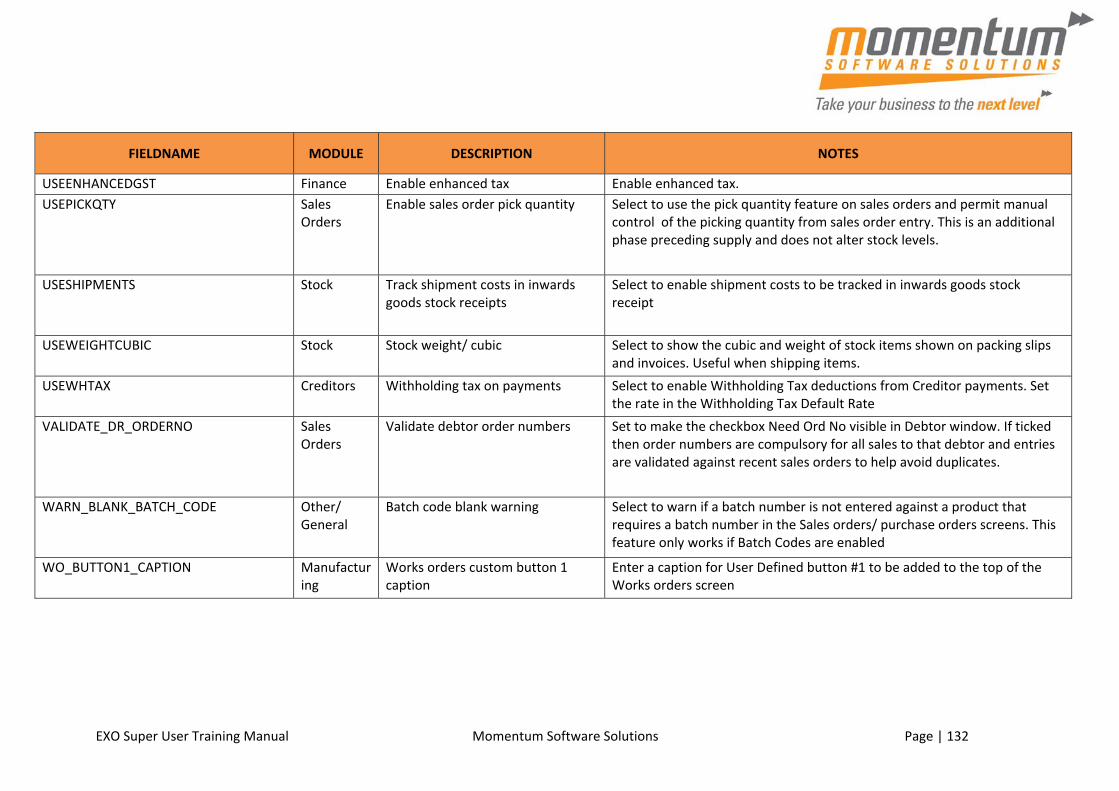
EXO Super User Training Manual Momentum Software Solutions Page | 132
FIELDNAME MODULE DESCRIPTION NOTES
USEENHANCEDGST Finance Enable enhanced tax Enable enhanced tax.
USEPICKQTY Sales Orders
Enable sales order pick quantity Select to use the pick quantity feature on sales orders and permit manual control of the picking quantity from sales order entry. This is an additional phase preceding supply and does not alter stock levels.
USESHIPMENTS Stock Track shipment costs in inwards goods stock receipts
Select to enable shipment costs to be tracked in inwards goods stock receipt
USEWEIGHTCUBIC Stock Stock weight/ cubic Select to show the cubic and weight of stock items shown on packing slips and invoices. Useful when shipping items.
USEWHTAX Creditors Withholding tax on payments Select to enable Withholding Tax deductions from Creditor payments. Set the rate in the Withholding Tax Default Rate
VALIDATE_DR_ORDERNO Sales Orders
Validate debtor order numbers Set to make the checkbox Need Ord No visible in Debtor window. If ticked then order numbers are compulsory for all sales to that debtor and entries are validated against recent sales orders to help avoid duplicates.
WARN_BLANK_BATCH_CODE Other/ General
Batch code blank warning Select to warn if a batch number is not entered against a product that requires a batch number in the Sales orders/ purchase orders screens. This feature only works if Batch Codes are enabled
WO_BUTTON1_CAPTION Manufacturing
Works orders custom button 1 caption
Enter a caption for User Defined button #1 to be added to the top of the Works orders screen

EXO Super User Training Manual Momentum Software Solutions Page | 133
FIELDNAME MODULE DESCRIPTION NOTES
WO_BUTTON1_EXE Manufacturing
Works orders custom button 1 command line
Custom buttons are provided for you to add you own shortcuts to many of the main screens. Here you may enter the details of a sub‐program to be run whenever you press the button on this screen.Example ‐ to run an external program, 'MyProg.EXE <LOGIN> <CURRENT>', where <LOGIN> passes the database connection details and <CURRENT> passes out the key field identifier (most commonly the SEQNO) of the current record that you have loaded on the screen at the time that you press the button. A '|' is optional after the name of the executable. To run a Clarity Report, any parameter entered with the extension MYREPORT.CLR will assume that you wish to run a clarity report and will call Clarity directly. It is not necessary that Clarity.EXE exist to do this, e.g. 'MYREPORT.CLR /S=SEQNO=<CURRENT>'
WO_BUTTON2_CAPTION Manufacturing
Works orders custom button 2 caption
Enter a caption for User Defined button #2 to be added to the top of the Works orders screen
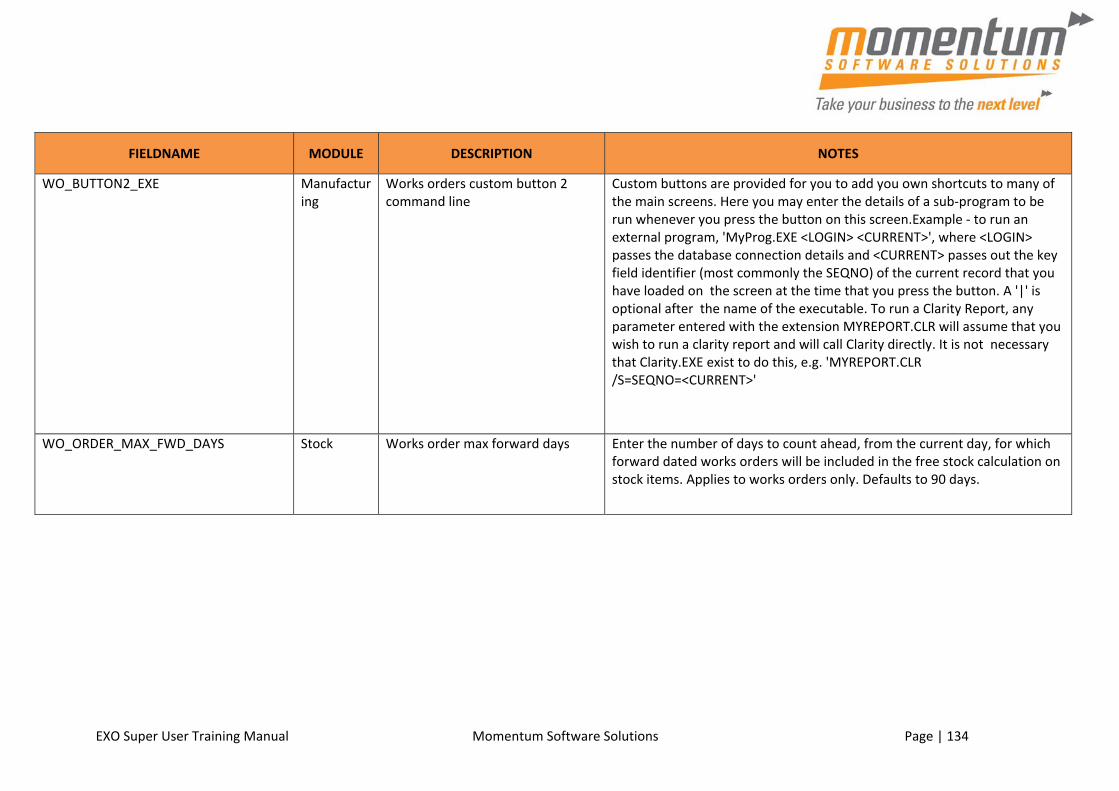
EXO Super User Training Manual Momentum Software Solutions Page | 134
FIELDNAME MODULE DESCRIPTION NOTES
WO_BUTTON2_EXE Manufacturing
Works orders custom button 2 command line
Custom buttons are provided for you to add you own shortcuts to many of the main screens. Here you may enter the details of a sub‐program to be run whenever you press the button on this screen.Example ‐ to run an external program, 'MyProg.EXE <LOGIN> <CURRENT>', where <LOGIN> passes the database connection details and <CURRENT> passes out the key field identifier (most commonly the SEQNO) of the current record that you have loaded on the screen at the time that you press the button. A '|' is optional after the name of the executable. To run a Clarity Report, any parameter entered with the extension MYREPORT.CLR will assume that you wish to run a clarity report and will call Clarity directly. It is not necessary that Clarity.EXE exist to do this, e.g. 'MYREPORT.CLR /S=SEQNO=<CURRENT>'
WO_ORDER_MAX_FWD_DAYS Stock Works order max forward days Enter the number of days to count ahead, from the current day, for which forward dated works orders will be included in the free stock calculation on stock items. Applies to works orders only. Defaults to 90 days.

EXO Super User Training Manual Momentum Software Solutions Page | 135
UNDERSTANDING FORM SETTINGS
FIELDNAME MODULE DESCRIPTION NOTES
BATCHINVOICE_Dest Clarity Batch invoice form destination Select the Batch Invoice Form destination
BATCHINVOICE_Email Clarity Batch invoice form email option Select to enable emailing of the Batch Invoice Form
BATCHINVOICE_OutputDev Clarity Batch invoice form output device Select the Batch Invoice Form output device or file format
BATCHINVOICE_PrinterName Clarity Batch invoice form printer name Enter the Batch Invoice Form printer path name
CHEQUEREP_DEST Clarity PP ‐ cheque details ( non‐manual ) form destination
Select the Payment processor ‐ Cheque Details ( non‐manual ) form destination
CHEQUEREP_EMAIL Clarity PP ‐ cheque details ( non‐manual ) form email option
Select to enable emailing of the Payment processor ‐ Cheque Details ( non‐manual ) form
CHEQUEREP_OUTPUTDEV Clarity PP ‐ cheque details ( non‐manual ) form output device
Select the Payment processor ‐ Cheque Details ( non‐manual ) form output device or file format
CHEQUEREP_PRINTERNAME Clarity PP ‐ cheque details ( non‐manual ) form printer name
Enter the Payment processor ‐ Cheque Details ( non‐manual ) form printer path name
CRPMTREMIT_Dest Clarity Creditor payment remittance form destination
Select the Creditor Payment Remittance Form destination
CRPMTREMIT_Email Clarity Creditor payment remittance form email option
Select to enable emailing of the Creditor Payment Remittance Form
CRPMTREMIT_OutputDev Clarity Creditor payment remittance form output device
Select the Creditor Payment Remittance Form output device or file format
CRPMTREMIT_PrinterName Clarity Creditor payment remittance form printer name
Enter the Creditor Payment Remittance Form printer path name
DRPMTRECEIPT_Dest Clarity Debtor payment receipt form destination
Select the Debtor Payment Receipt Form destination

EXO Super User Training Manual Momentum Software Solutions Page | 136
FIELDNAME MODULE DESCRIPTION NOTES
DRPMTRECEIPT_Email Clarity Debtor payment receipt Form email option
Select to enable emailing of the Debtor Payment Receipt Form
DRPMTRECEIPT_OutputDev Clarity Debtor payment receipt form output device
Select the Debtor Payment Receipt Form output device or file format
DRPMTRECEIPT_PrinterName Clarity Debtor payment receipt form printer name
Enter the Debtor Payment Receipt Form printer path name
FINPPCHEQWR_DEST Clarity PP ‐ processed cheques form destination
Select the Payment processor ‐ Processed Cheques form destination
FINPPCHEQWR_EMAIL Clarity PP ‐ processed cheques form email option
Select to enable emailing of the Payment processor ‐ Processed Cheques form
FINPPCHEQWR_OUTPUTDEV Clarity PP ‐ processed cheques form output device
Select the Payment processor ‐ Processed Cheques form output device or file format
FINPPCHEQWR_PRINTERNAME Clarity PP ‐ processed cheques form printer name
Enter the Payment processor ‐ Processed Cheques form printer path name
FINPPCHQPAYMENT_DEST Clarity PP ‐ all outstanding payments ( released ) form destination
Select the Payment processor ‐ All Outstanding Payments ( released ) form destination
FINPPCHQPAYMENT_EMAIL Clarity PP ‐ All outstanding payments ( released ) form email option
Select to enable emailing of the Payment processor ‐ All Outstanding Payments ( released ) form
FINPPCHQPAYMENT_OUTPUTDEV Clarity PP ‐ All outstanding payments ( released ) form output device
Select the Payment processor ‐ All Outstanding Payments ( released ) form output device or file format
FINPPCHQPAYMENT_PRINTERNAME Clarity PP ‐ All outstanding payments ( released ) form printer name
Enter the Payment processor ‐ All Outstanding Payments ( released ) form printer path name
FINPPCHQRUNREP_DEST Clarity PP ‐ proposed payment run form destination
Select the Payment processor ‐ Proposed Payment Run form destination
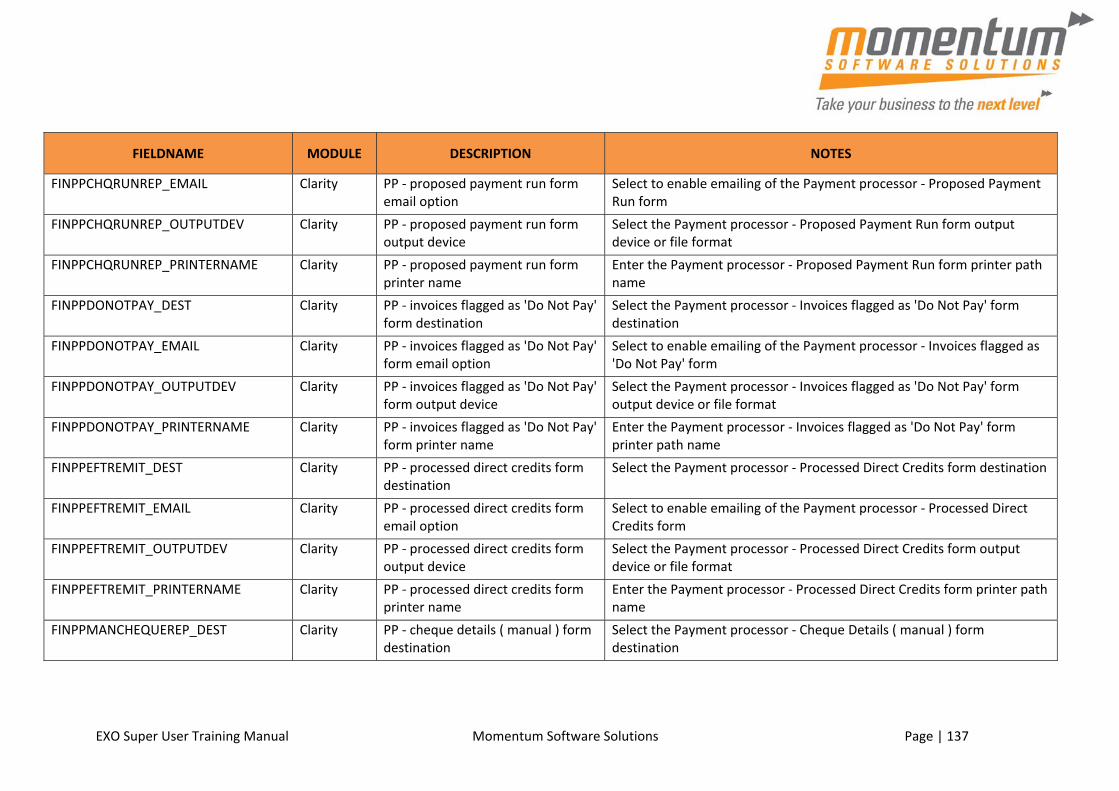
EXO Super User Training Manual Momentum Software Solutions Page | 137
FIELDNAME MODULE DESCRIPTION NOTES
FINPPCHQRUNREP_EMAIL Clarity PP ‐ proposed payment run form email option
Select to enable emailing of the Payment processor ‐ Proposed Payment Run form
FINPPCHQRUNREP_OUTPUTDEV Clarity PP ‐ proposed payment run form output device
Select the Payment processor ‐ Proposed Payment Run form output device or file format
FINPPCHQRUNREP_PRINTERNAME Clarity PP ‐ proposed payment run form printer name
Enter the Payment processor ‐ Proposed Payment Run form printer path name
FINPPDONOTPAY_DEST Clarity PP ‐ invoices flagged as 'Do Not Pay' form destination
Select the Payment processor ‐ Invoices flagged as 'Do Not Pay' form destination
FINPPDONOTPAY_EMAIL Clarity PP ‐ invoices flagged as 'Do Not Pay' form email option
Select to enable emailing of the Payment processor ‐ Invoices flagged as 'Do Not Pay' form
FINPPDONOTPAY_OUTPUTDEV Clarity PP ‐ invoices flagged as 'Do Not Pay' form output device
Select the Payment processor ‐ Invoices flagged as 'Do Not Pay' form output device or file format
FINPPDONOTPAY_PRINTERNAME Clarity PP ‐ invoices flagged as 'Do Not Pay' form printer name
Enter the Payment processor ‐ Invoices flagged as 'Do Not Pay' form printer path name
FINPPEFTREMIT_DEST Clarity PP ‐ processed direct credits form destination
Select the Payment processor ‐ Processed Direct Credits form destination
FINPPEFTREMIT_EMAIL Clarity PP ‐ processed direct credits form email option
Select to enable emailing of the Payment processor ‐ Processed Direct Credits form
FINPPEFTREMIT_OUTPUTDEV Clarity PP ‐ processed direct credits form output device
Select the Payment processor ‐ Processed Direct Credits form output device or file format
FINPPEFTREMIT_PRINTERNAME Clarity PP ‐ processed direct credits form printer name
Enter the Payment processor ‐ Processed Direct Credits form printer path name
FINPPMANCHEQUEREP_DEST Clarity PP ‐ cheque details ( manual ) form destination
Select the Payment processor ‐ Cheque Details ( manual ) form destination
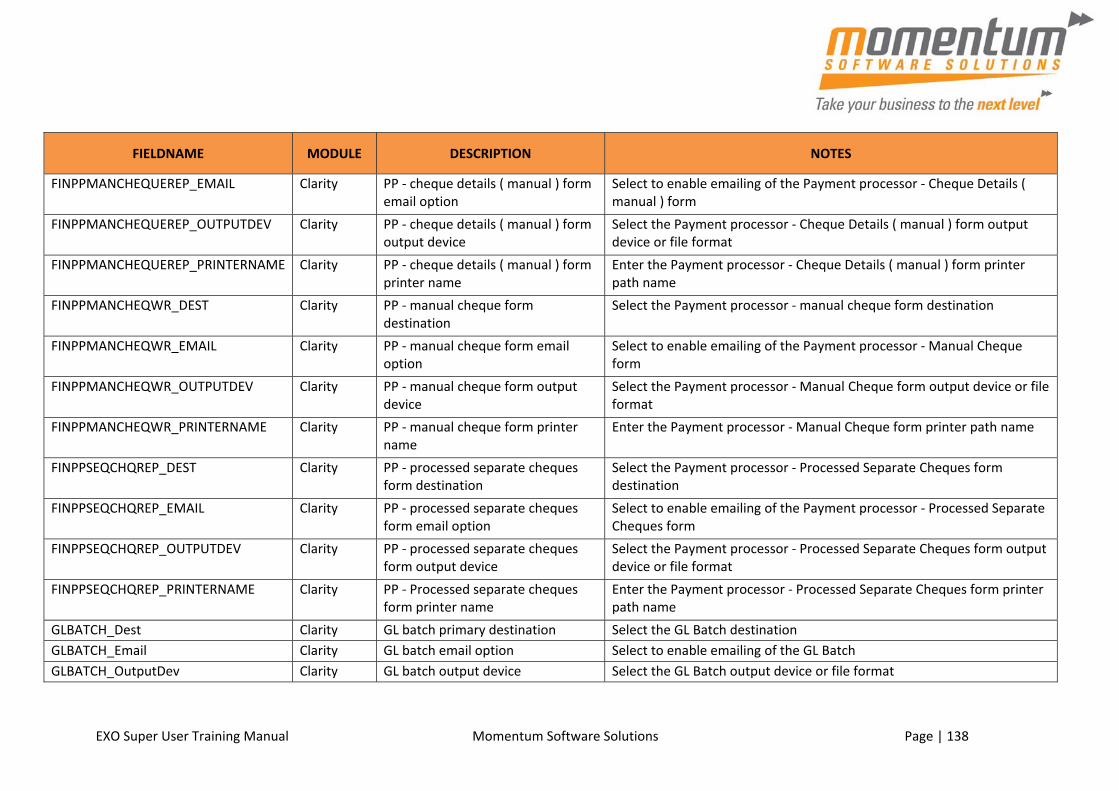
EXO Super User Training Manual Momentum Software Solutions Page | 138
FIELDNAME MODULE DESCRIPTION NOTES
FINPPMANCHEQUEREP_EMAIL Clarity PP ‐ cheque details ( manual ) form email option
Select to enable emailing of the Payment processor ‐ Cheque Details ( manual ) form
FINPPMANCHEQUEREP_OUTPUTDEV Clarity PP ‐ cheque details ( manual ) form output device
Select the Payment processor ‐ Cheque Details ( manual ) form output device or file format
FINPPMANCHEQUEREP_PRINTERNAME Clarity PP ‐ cheque details ( manual ) form printer name
Enter the Payment processor ‐ Cheque Details ( manual ) form printer path name
FINPPMANCHEQWR_DEST Clarity PP ‐ manual cheque form destination
Select the Payment processor ‐ manual cheque form destination
FINPPMANCHEQWR_EMAIL Clarity PP ‐ manual cheque form email option
Select to enable emailing of the Payment processor ‐ Manual Cheque form
FINPPMANCHEQWR_OUTPUTDEV Clarity PP ‐ manual cheque form output device
Select the Payment processor ‐ Manual Cheque form output device or file format
FINPPMANCHEQWR_PRINTERNAME Clarity PP ‐ manual cheque form printer name
Enter the Payment processor ‐ Manual Cheque form printer path name
FINPPSEQCHQREP_DEST Clarity PP ‐ processed separate cheques form destination
Select the Payment processor ‐ Processed Separate Cheques form destination
FINPPSEQCHQREP_EMAIL Clarity PP ‐ processed separate cheques form email option
Select to enable emailing of the Payment processor ‐ Processed Separate Cheques form
FINPPSEQCHQREP_OUTPUTDEV Clarity PP ‐ processed separate cheques form output device
Select the Payment processor ‐ Processed Separate Cheques form output device or file format
FINPPSEQCHQREP_PRINTERNAME Clarity PP ‐ Processed separate cheques form printer name
Enter the Payment processor ‐ Processed Separate Cheques form printer path name
GLBATCH_Dest Clarity GL batch primary destination Select the GL Batch destination
GLBATCH_Email Clarity GL batch email option Select to enable emailing of the GL Batch
GLBATCH_OutputDev Clarity GL batch output device Select the GL Batch output device or file format
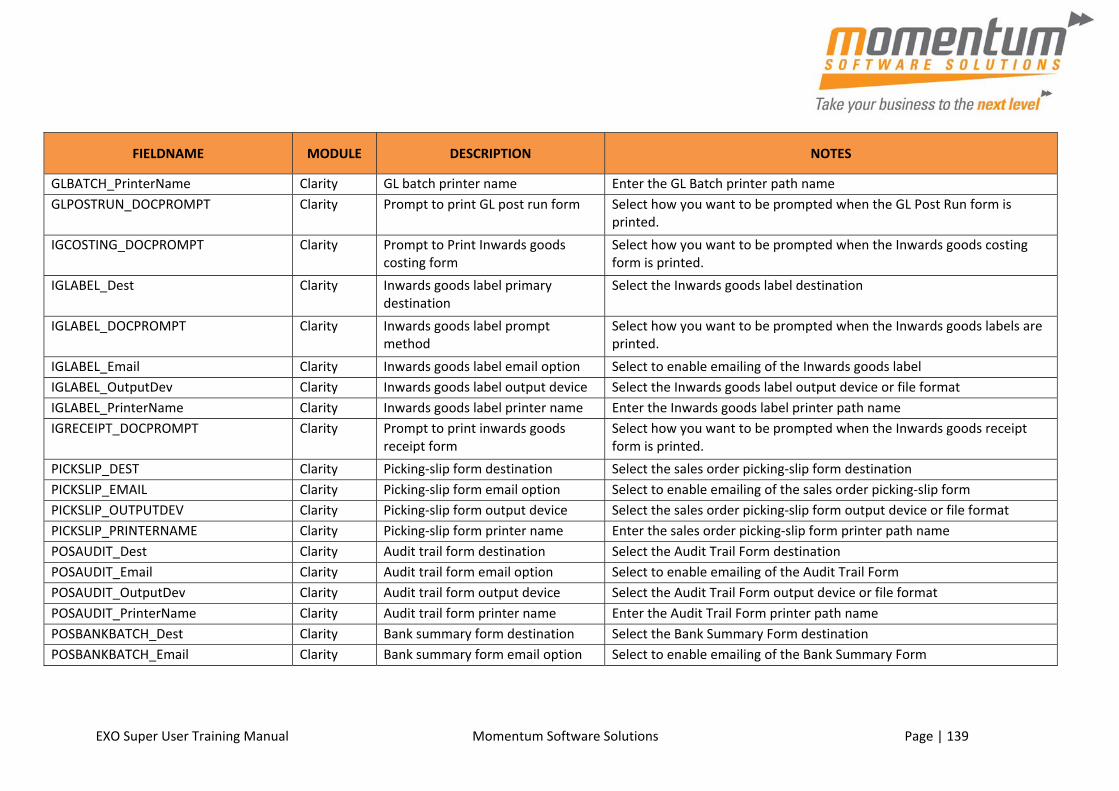
EXO Super User Training Manual Momentum Software Solutions Page | 139
FIELDNAME MODULE DESCRIPTION NOTES
GLBATCH_PrinterName Clarity GL batch printer name Enter the GL Batch printer path name
GLPOSTRUN_DOCPROMPT Clarity Prompt to print GL post run form Select how you want to be prompted when the GL Post Run form is printed.
IGCOSTING_DOCPROMPT Clarity Prompt to Print Inwards goods costing form
Select how you want to be prompted when the Inwards goods costing form is printed.
IGLABEL_Dest Clarity Inwards goods label primary destination
Select the Inwards goods label destination
IGLABEL_DOCPROMPT Clarity Inwards goods label prompt method
Select how you want to be prompted when the Inwards goods labels are printed.
IGLABEL_Email Clarity Inwards goods label email option Select to enable emailing of the Inwards goods label
IGLABEL_OutputDev Clarity Inwards goods label output device Select the Inwards goods label output device or file format
IGLABEL_PrinterName Clarity Inwards goods label printer name Enter the Inwards goods label printer path name
IGRECEIPT_DOCPROMPT Clarity Prompt to print inwards goods receipt form
Select how you want to be prompted when the Inwards goods receipt form is printed.
PICKSLIP_DEST Clarity Picking‐slip form destination Select the sales order picking‐slip form destination
PICKSLIP_EMAIL Clarity Picking‐slip form email option Select to enable emailing of the sales order picking‐slip form
PICKSLIP_OUTPUTDEV Clarity Picking‐slip form output device Select the sales order picking‐slip form output device or file format
PICKSLIP_PRINTERNAME Clarity Picking‐slip form printer name Enter the sales order picking‐slip form printer path name
POSAUDIT_Dest Clarity Audit trail form destination Select the Audit Trail Form destination
POSAUDIT_Email Clarity Audit trail form email option Select to enable emailing of the Audit Trail Form
POSAUDIT_OutputDev Clarity Audit trail form output device Select the Audit Trail Form output device or file format
POSAUDIT_PrinterName Clarity Audit trail form printer name Enter the Audit Trail Form printer path name
POSBANKBATCH_Dest Clarity Bank summary form destination Select the Bank Summary Form destination
POSBANKBATCH_Email Clarity Bank summary form email option Select to enable emailing of the Bank Summary Form

EXO Super User Training Manual Momentum Software Solutions Page | 140
FIELDNAME MODULE DESCRIPTION NOTES
POSBANKBATCH_OutputDev Clarity Bank summary form output device Select the Bank Summary Form output device or file format
POSBANKBATCH_PrinterName Clarity Bank summary form printer name Enter the Bank Summary Form printer path name
POSSALES_Dest Clarity Sales analysis form destination Select the Sales Analysis Form destination
POSSALES_Email Clarity Sales analysis form email option Select to enable emailing of the Sales Analysis Form
POSSALES_OutputDev Clarity Sales analysis form output device Select the Sales Analysis Form output device or file format
POSSALES_PrinterName Clarity Sales analysis form printer name Enter the Sales Analysis Form printer path name
CRINVOICE_DEST Creditors Creditor invoice form primary destination
Do you want to send a copy of this document via email in addition to sending a copy to the specified destination. All email options are conditional upon the 'Allow email capability' profile setting being enabled for the user
CRINVOICE_EMAIL Creditors Creditor invoice form email option Do you want to send a copy of this document via email in addition to sending a copy to the specified destination. All email options are conditional upon the 'Allow email capability' profile setting being enabled for the user.
CRINVOICE_OUTPUTDEV Creditors Creditor invoice form output device This is the file format that is used; A) If the primary destination is set to File; B) If the email option is enabled it is the file format of the attachment. Commonly viewable graphics file formats are PDF and BMP. Text and spreadsheet options are also available. If the email option is disabled and the primary destination is printer or screen this option can be only printer or screen.
CRINVOICE_PRINTERNAME Creditors Creditor invoice form printer name This is the Windows UNC name for the printer. This printer must be one that is already available to you in the Windows printer settings list.

EXO Super User Training Manual Momentum Software Solutions Page | 141
FIELDNAME MODULE DESCRIPTION NOTES
REMITTANCE_DEST Creditors Creditor remittance form primary destination
Do you want to send a copy of this document via email in addition to sending a copy to the specified destination. All email options are conditional upon the 'Allow email capability' profile setting being enabled for the user
REMITTANCE_EMAIL Creditors Creditor remittance form email option
Do you want to send a copy of this document via email in addition to sending a copy to the specified destination. All email options are conditional upon the 'Allow email capability' profile setting being enabled for the user.
REMITTANCE_OUTPUTDEV Creditors Creditor remittance form output device
This is the file format that is used; A) If the primary destination is set to File; B) If the email option is enabled it is the file format of the attachment. Commonly viewable graphics file formats are PDF and BMP. Text and spreadsheet options are also available. If the email option is disabled and the primary destination is printer or screen this option can be only printer or screen.
REMITTANCE_PRINTERNAME Creditors Creditor remittance form printer name
This is the Windows UNC name for the printer. This printer must be one that is already available to you in the Windows printer settings list.
INVOICE_DEST Debtors Debtor invoice form primary destination
Do you want to send a copy of this document via email in addition to sending a copy to the specified destination. All email options are conditional upon the 'Allow email capability' profile setting being enabled for the user
INVOICE_EMAIL Debtors Debtor invoice form email option Do you want to send a copy of this document via email in addition to sending a copy to the specified destination. All email options are conditional upon the 'Allow email capability' profile setting being enabled for the user.
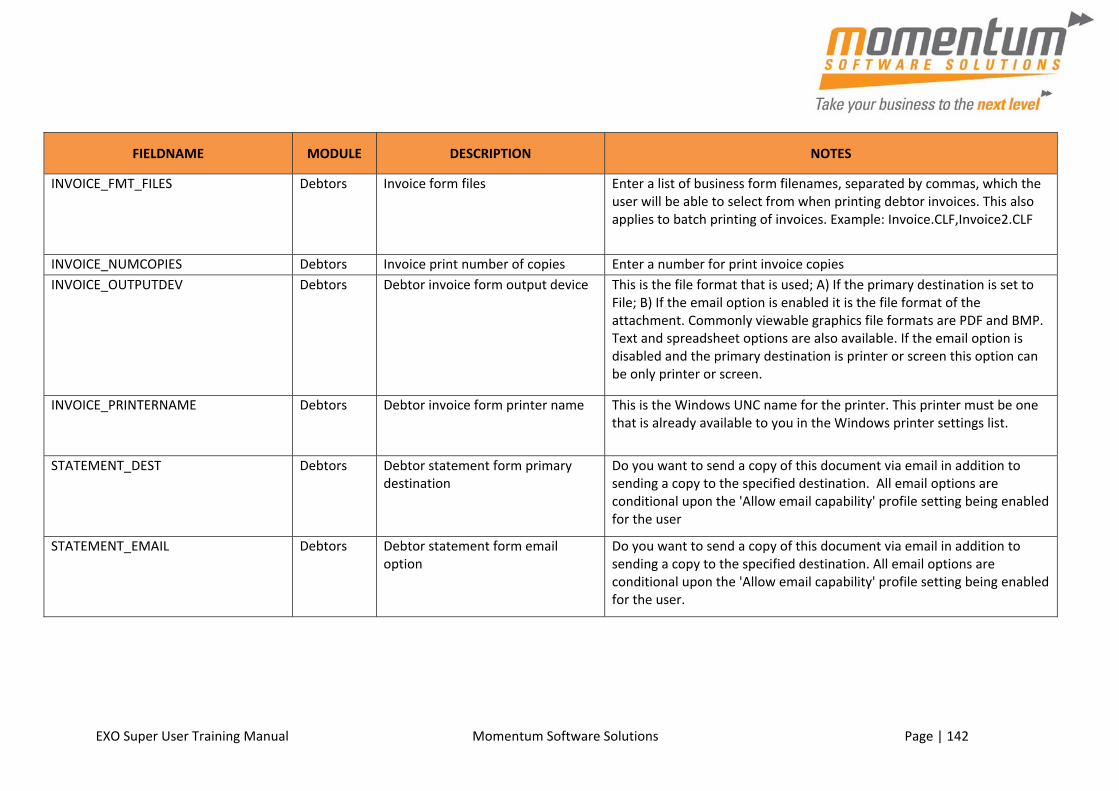
EXO Super User Training Manual Momentum Software Solutions Page | 142
FIELDNAME MODULE DESCRIPTION NOTES
INVOICE_FMT_FILES Debtors Invoice form files Enter a list of business form filenames, separated by commas, which the user will be able to select from when printing debtor invoices. This also applies to batch printing of invoices. Example: Invoice.CLF,Invoice2.CLF
INVOICE_NUMCOPIES Debtors Invoice print number of copies Enter a number for print invoice copies
INVOICE_OUTPUTDEV Debtors Debtor invoice form output device This is the file format that is used; A) If the primary destination is set to File; B) If the email option is enabled it is the file format of the attachment. Commonly viewable graphics file formats are PDF and BMP. Text and spreadsheet options are also available. If the email option is disabled and the primary destination is printer or screen this option can be only printer or screen.
INVOICE_PRINTERNAME Debtors Debtor invoice form printer name This is the Windows UNC name for the printer. This printer must be one that is already available to you in the Windows printer settings list.
STATEMENT_DEST Debtors Debtor statement form primary destination
Do you want to send a copy of this document via email in addition to sending a copy to the specified destination. All email options are conditional upon the 'Allow email capability' profile setting being enabled for the user
STATEMENT_EMAIL Debtors Debtor statement form email option
Do you want to send a copy of this document via email in addition to sending a copy to the specified destination. All email options are conditional upon the 'Allow email capability' profile setting being enabled for the user.
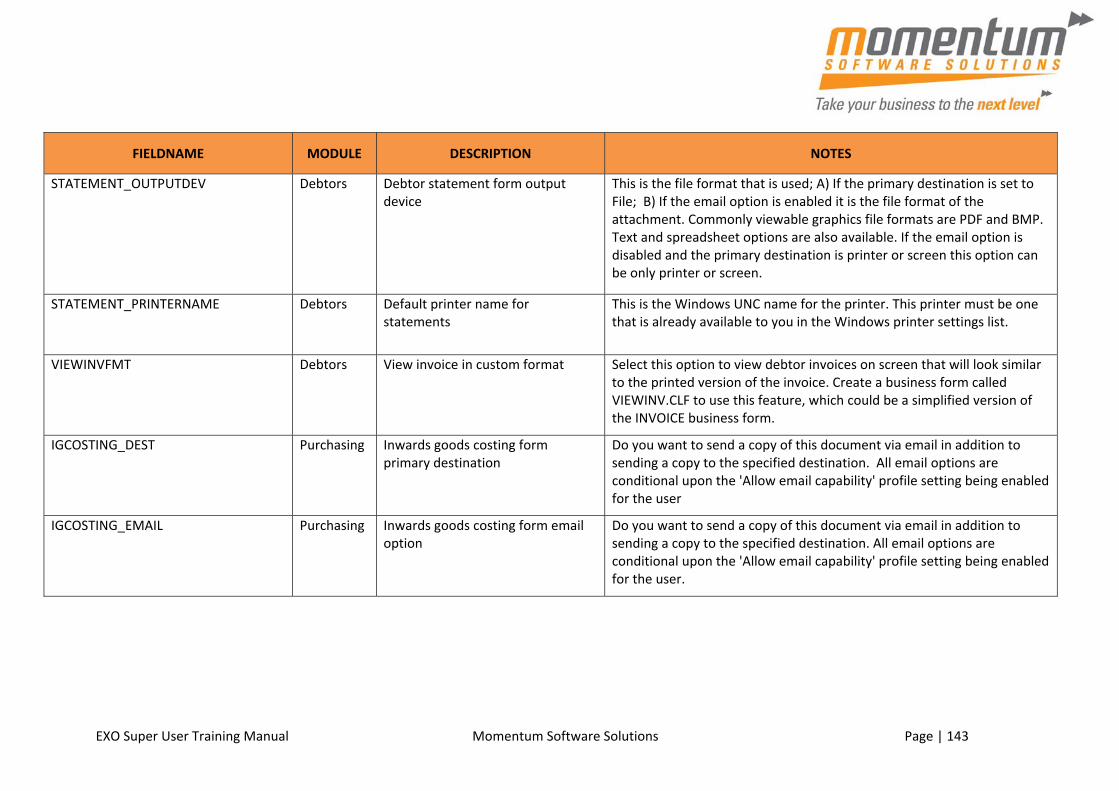
EXO Super User Training Manual Momentum Software Solutions Page | 143
FIELDNAME MODULE DESCRIPTION NOTES
STATEMENT_OUTPUTDEV Debtors Debtor statement form output device
This is the file format that is used; A) If the primary destination is set to File; B) If the email option is enabled it is the file format of the attachment. Commonly viewable graphics file formats are PDF and BMP. Text and spreadsheet options are also available. If the email option is disabled and the primary destination is printer or screen this option can be only printer or screen.
STATEMENT_PRINTERNAME Debtors Default printer name for statements
This is the Windows UNC name for the printer. This printer must be one that is already available to you in the Windows printer settings list.
VIEWINVFMT Debtors View invoice in custom format Select this option to view debtor invoices on screen that will look similar to the printed version of the invoice. Create a business form called VIEWINV.CLF to use this feature, which could be a simplified version of the INVOICE business form.
IGCOSTING_DEST Purchasing Inwards goods costing form primary destination
Do you want to send a copy of this document via email in addition to sending a copy to the specified destination. All email options are conditional upon the 'Allow email capability' profile setting being enabled for the user
IGCOSTING_EMAIL Purchasing Inwards goods costing form email option
Do you want to send a copy of this document via email in addition to sending a copy to the specified destination. All email options are conditional upon the 'Allow email capability' profile setting being enabled for the user.
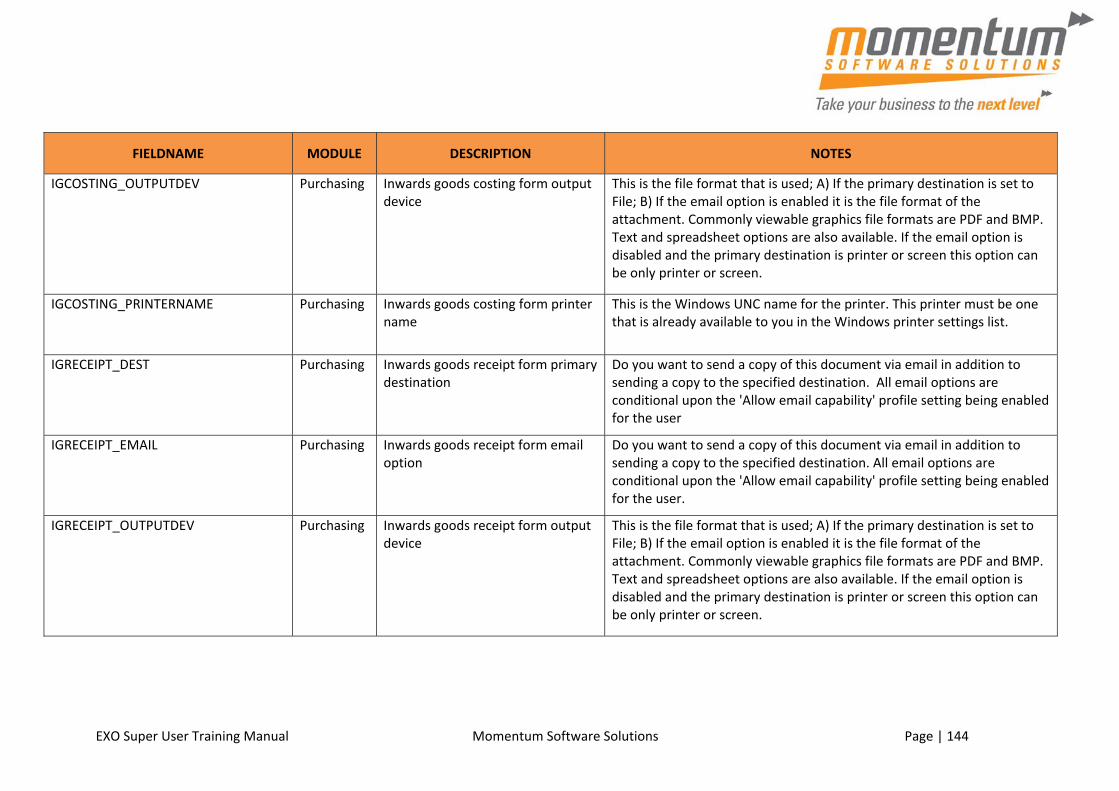
EXO Super User Training Manual Momentum Software Solutions Page | 144
FIELDNAME MODULE DESCRIPTION NOTES
IGCOSTING_OUTPUTDEV Purchasing Inwards goods costing form output device
This is the file format that is used; A) If the primary destination is set to File; B) If the email option is enabled it is the file format of the attachment. Commonly viewable graphics file formats are PDF and BMP. Text and spreadsheet options are also available. If the email option is disabled and the primary destination is printer or screen this option can be only printer or screen.
IGCOSTING_PRINTERNAME Purchasing Inwards goods costing form printer name
This is the Windows UNC name for the printer. This printer must be one that is already available to you in the Windows printer settings list.
IGRECEIPT_DEST Purchasing Inwards goods receipt form primary destination
Do you want to send a copy of this document via email in addition to sending a copy to the specified destination. All email options are conditional upon the 'Allow email capability' profile setting being enabled for the user
IGRECEIPT_EMAIL Purchasing Inwards goods receipt form email option
Do you want to send a copy of this document via email in addition to sending a copy to the specified destination. All email options are conditional upon the 'Allow email capability' profile setting being enabled for the user.
IGRECEIPT_OUTPUTDEV Purchasing Inwards goods receipt form output device
This is the file format that is used; A) If the primary destination is set to File; B) If the email option is enabled it is the file format of the attachment. Commonly viewable graphics file formats are PDF and BMP. Text and spreadsheet options are also available. If the email option is disabled and the primary destination is printer or screen this option can be only printer or screen.

EXO Super User Training Manual Momentum Software Solutions Page | 145
FIELDNAME MODULE DESCRIPTION NOTES
IGRECEIPT_PRINTERNAME Purchasing Inwards goods receipt form printer name
This is the Windows UNC name for the printer. This printer must be one that is already available to you in the Windows printer settings list.
POQUOTE_DEST Purchasing Purchase order request for quotation form primary destination
Do you want to send a copy of this document via email in addition to sending a copy to the specified destination. All email options are conditional upon the 'Allow email capability' profile setting being enabled for the user
POQUOTE_EMAIL Purchasing Purchase order request for quotation form email option
Do you want to send a copy of this document via email in addition to sending a copy to the specified destination. All email options are conditional upon the 'Allow email capability' profile setting being enabled for the user.
POQUOTE_OUTPUTDEV Purchasing Purchase order request for quotation form output device
This is the file format that is used; A) If the primary destination is set to File; B) If the email option is enabled it is the file format of the attachment. Commonly viewable graphics file formats are PDF and BMP. Text and spreadsheet options are also available. If the email option is disabled and the primary destination is printer or screen this option can be only printer or screen.
POQUOTE_PRINTERNAME Purchasing Purchase order request for quotation form printer name
This is the Windows UNC name for the printer. This printer must be one that is already available to you in the Windows printer settings list.
PURCHORD_DEST Purchasing Purchase order form primary destination
Do you want to send a copy of this document via email in addition to sending a copy to the specified destination. All email options are conditional upon the 'Allow email capability' profile setting being enabled for the user

EXO Super User Training Manual Momentum Software Solutions Page | 146
FIELDNAME MODULE DESCRIPTION NOTES
PURCHORD_EMAIL Purchasing Purchase order form email option Do you want to send a copy of this document via email in addition to sending a copy to the specified destination. All email options are conditional upon the 'Allow email capability' profile setting being enabled for the user.
PURCHORD_FMT_FILES Purchasing Purchase order form files Enter a list of business form filenames, separated by commas, that the user will be able to select from when printing purchase orders. This allows a choice of multiple purchase order printout formats. Example: PurchOrd1.CLF, PurchOrd2.CLF
PURCHORD_OUTPUTDEV Purchasing Purchase order form output device This is the file format that is used; A) If the primary destination is set to File; B) If the email option is enabled it is the file format of the attachment. Commonly viewable graphics file formats are PDF and BMP. Text and spreadsheet options are also available. If the email option is disabled and the primary destination is printer or screen this option can be only printer or screen.
PACKSLIP_DEST Sales Orders
Packing slip form primary destination
Do you want to send a copy of this document via email in addition to sending a copy to the specified destination. All email options are conditional upon the 'Allow email capability' profile setting being enabled for the user
PACKSLIP_EMAIL Sales Orders
Packing slip form email option Do you want to send a copy of this document via email in addition to sending a copy to the specified destination. All email options are conditional upon the 'Allow email capability' profile setting being enabled for the user.

EXO Super User Training Manual Momentum Software Solutions Page | 147
FIELDNAME MODULE DESCRIPTION NOTES
PACKSLIP_OUTPUTDEV Sales Orders
Packing slip form output device This is the file format that is used; A) If the primary destination is set to File; B) If the email option is enabled it is the file format of the attachment. Commonly viewable graphics file formats are PDF and BMP. Text and spreadsheet options are also available. If the email option is disabled and the primary destination is printer or screen this option can be only printer or screen.
PACKSLIP_PRINTERNAME Sales Orders
Packing slip form printer name This is the Windows UNC name for the printer. This printer must be one that is already available to you in the Windows printer settings list.
QUOTE_DEST Sales Orders
Quote form primary destination Do you want to send a copy of this document via email in addition to sending a copy to the specified destination. All email options are conditional upon the 'Allow email capability' profile setting being enabled for the user
QUOTE_EMAIL Sales Orders
Quote form email option Do you want to send a copy of this document via email in addition to sending a copy to the specified destination. All email options are conditional upon the 'Allow email capability' profile setting being enabled for the user.
QUOTE_OUTPUTDEV Sales Orders
Quote form output device This is the file format that is used; A) If the primary destination is set to File; B) If the email option is enabled it is the file format of the attachment. Commonly viewable graphics file formats are PDF and BMP. Text and spreadsheet options are also available. If the email option is disabled and the primary destination is printer or screen this option can be only printer or screen.

EXO Super User Training Manual Momentum Software Solutions Page | 148
FIELDNAME MODULE DESCRIPTION NOTES
QUOTE_PRINTERNAME Sales Orders
Quote form printer name This is the Windows UNC name for the printer. This printer must be one that is already available to you in the Windows printer settings list.
SALESORD_DEST Sales Orders
Sales order form primary destination
Do you want to send a copy of this document via email in addition to sending a copy to the specified destination. All email options are conditional upon the 'Allow email capability' profile setting being enabled for the user
SALESORD_EMAIL Sales Orders
Sales order form email option Do you want to send a copy of this document via email in addition to sending a copy to the specified destination. All email options are conditional upon the 'Allow email capability' profile setting being enabled for the user.
SALESORD_FMT_FILES Sales Orders
Sales order form file list Enter a list of business form filenames, separated by commas, to allow the user to select from when printing sales orders. Example: SalesOrd.CLF, SalesOrd1.CLF
SALESORD_OUTPUTDEV Sales Orders
Sales order form output device This is the file format that is used; A) If the primary destination is set to File; B) If the email option is enabled it is the file format of the attachment. Commonly viewable graphics file formats are PDF and BMP. Text and spreadsheet options are also available. If the email option is disabled and the primary destination is printer or screen this option can be only printer or screen.
SALESORD_PRINT_BACKORDS Sales Orders
Sales order print back orders. Select to print a backorder report using BackOrd.CLF after partially supplying a sales order, to print a separate backorder notice.
SALESORD_PRINTERNAME Sales Orders
Sales order form printer name This is the Windows UNC name for the printer. This printer must be one that is already available to you in the Windows printer settings list.
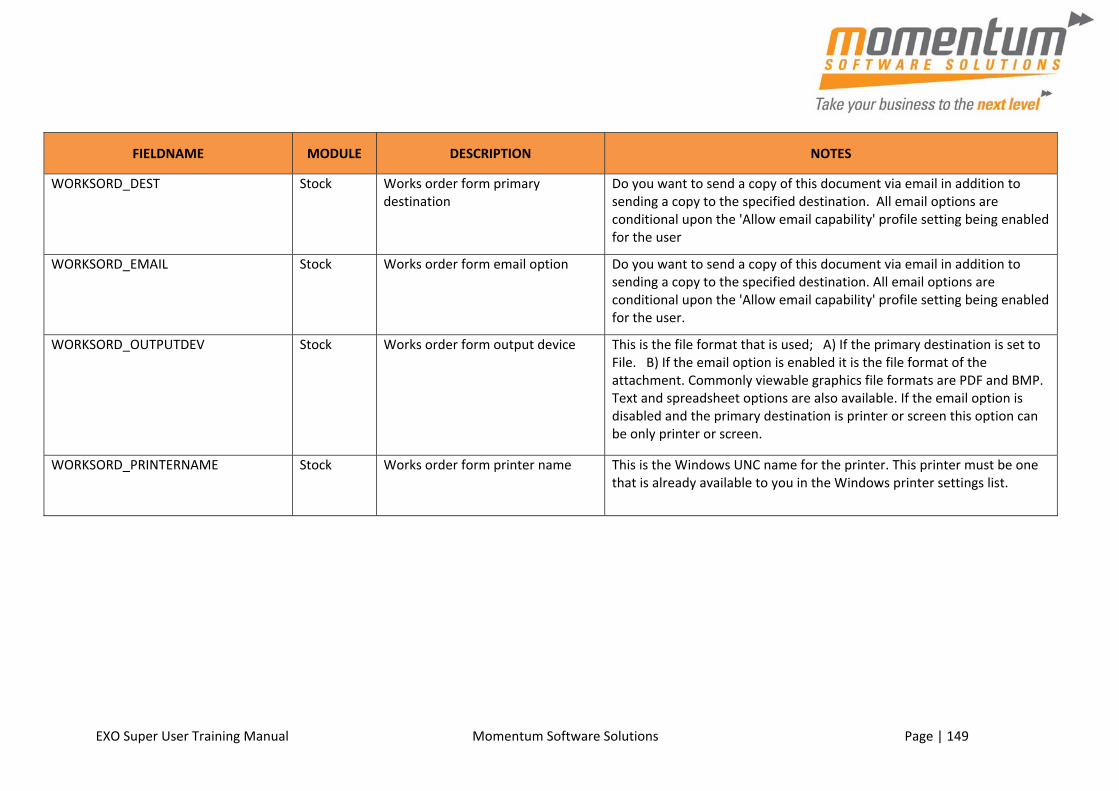
EXO Super User Training Manual Momentum Software Solutions Page | 149
FIELDNAME MODULE DESCRIPTION NOTES
WORKSORD_DEST Stock Works order form primary destination
Do you want to send a copy of this document via email in addition to sending a copy to the specified destination. All email options are conditional upon the 'Allow email capability' profile setting being enabled for the user
WORKSORD_EMAIL Stock Works order form email option Do you want to send a copy of this document via email in addition to sending a copy to the specified destination. All email options are conditional upon the 'Allow email capability' profile setting being enabled for the user.
WORKSORD_OUTPUTDEV Stock Works order form output device This is the file format that is used; A) If the primary destination is set to File. B) If the email option is enabled it is the file format of the attachment. Commonly viewable graphics file formats are PDF and BMP. Text and spreadsheet options are also available. If the email option is disabled and the primary destination is printer or screen this option can be only printer or screen.
WORKSORD_PRINTERNAME Stock Works order form printer name This is the Windows UNC name for the printer. This printer must be one that is already available to you in the Windows printer settings list.
EXO Super User Training Manual Momentum Software Solutions Page | 150 Lvl 1
59 The Esplanad
e Maroochydore 4558 PO Box 808 M
aroochydore 4558 P + 617 5443 4988 F +617 5443 4977 [email protected] ABN 41 142 525 988