Embed Size (px)
Citation preview
Mync Standard 1.4Mync Basic 1.4
www.myncworld.comF2541804102
April 2018

2
New Features And ModificationsThis section explains new features and modifications employed on each version of Mync.
New Features And Modifications on Version 1.3 f Added tagging function with keyboard shortcuts (w page 45) f Added subclip creation function at storyboard editing (w page 56) f Supported simultaneous preview of multiple still image clips (w page 39)
New Features And Modifications on Version 1.4 f Supported switching of color spaces (such as HDR) in preview of clips and storyboards (w page 39) f Supported HDR file export on storyboards (w page 60)
3
Notice to Reader f It is prohibited to copy a part or all of this product without prior permission. f The contents or specifications of this product may be changed without prior notice. f We have prepared the contents of this product to the best of our ability; however if you have any questions about the contents, or if there are any errors or missing items, please contact Grass Valley.
f However we do not take any responsibility for malfunctions arising from use, irrespective of the points outlined in the preceding paragraph.
f Irrespective of whether it was due to a usage error, Grass Valley takes no responsibility for extraordinary, incidental or derivative claims, including those for lost earnings generated by the application of this product.
f It is prohibited to analyze, reverse engineer, decompile, or disassemble any of the items included with this product, including the software, hardware, and manuals.
f Grass Valley, GV STRATUS, K2, Aurora, Summit, Infinity, and EDIUS are either registered trademarks or trademarks of Grass Valley USA, LLC in the United States and/or other countries.
f Mync and EDIUS Mync are trademarks of Belden Inc. f Microsoft, Windows, and Internet Explorer are trademarks or registered trademarks of Microsoft Corporation in the United States and other countries.
f Intel, Xeon, and Core Duo are trademarks or registered trademarks of Intel Corporation or its subsidiaries in the United States and other countries.
f QuickTime and QuickTime logo are trademarks used under licenses. QuickTime is a trademark registered in the United States and other countries.
f Final Cut Pro, Macintosh, and Apple ProRes are trademarks of Apple Inc., registered in the U.S. and other countries. f Adobe, Adobe logo, Adobe Reader, Photoshop, Adobe PDF and Adobe PDF logo, After Effects, Flash and Flash logo, and Adobe Flash Player are trademarks of Adobe Systems Incorporated.
f Manufactured under license from Dolby Laboratories. Dolby and the double-D symbol are trademarks or Dolby Laboratories. Unpublished work. Copyright 2003-2012 Dolby Laboratories, Inc. and Dolby Laboratories Licensing Corporation. All right reserved.
f HDV is a trademark of Sony Corporation and JVC KENWOOD Corporation. f XDCAM, XDCAM EX, XAVC, XAVC S, and SxS are trademarks of Sony Corporation. f GF is a trademark of Toshiba Corporation. f The terms HDMI and High-Definition Multimedia Interface, and the HDMI Logo are trademarks or registered trademarks of HDMI Licensing Administrator, Inc. in the United States and other countries.
f P2, AVCCAM, AVC-Intra, and AVC-Ultra are trademarks of Panasonic Corporation. f AVCHD is a trademark of Panasonic Corporation and Sony Corporation. f EOS is a trademark of Canon Inc. f Blu-ray is a trademark of Blu-ray Disc Association. f SD card is a trademark of SD Association. f Google Chrome, YouTube, and YouTube logo are trademarks or registered trademarks of Google Inc. f Vimeo is a trademark or registered trademark of Vimeo, LLC. f The trademark, service mark, product name logo, and product name of RED are trademarks or registered trademarks of Red.com, Inc. in the United States and other countries.
f Avid, Pro Tools, Media Composer, Avid DNxHD, and Avid DNxHR are trademarks or registered trademarks of Avid Technology, Inc. or its subsidiaries in the United States.
f AMD is a trademark of Advanced Micro Devices, Inc. f Firefox is a trademark or registered trademark of Mozilla Foundation in the U.S. and other countries. f GoPro is a trademark or registered trademark of GoPro, Inc. in the U.S. and other countries. f Facebook is a trademark or registered trademark of Facebook, Inc. f Other product names or related brand names are trademarks or registered trademarks of their respective companies.
4
Manual Explanation f If there are any variations between the explanation in this manual and the actual application method, priority is given to the actual application method.
f The images and illustrations used in this manual are prototypes and they may be different from the actual product. f This manual is written for people who have a basic knowledge of how to use a computer. If there are no special instructions, perform the same operation as a normal computer operation.
f The procedures in this manual are described based on mouse operations. f The procedures in this manual are described based on an assumption that the OS of the computer in use is Windows 10. f In this manual, EDIUS Workgroup, EDIUS Pro, and EDIUS series are called “EDIUS”. f In this manual, Microsoft® Windows® operating system products are called as follows.
g Microsoft® Windows® 7 operating system: Windows 7 (collective term for Ultimate, Enterprise, Professional, Home Premium, and Home Basic)
g Microsoft® Windows® 8 operating system: Windows 8 (collective term for Enterprise, Pro, and Core Edition) g Microsoft® Windows® 8.1 operating system: Windows 8.1 (collective term for Enterprise, Pro, and Core Edition) g Microsoft® Windows® 10 operating system: Windows 10 (collective term for Enterprise, Education, Pro, and Home)
f The signs and definitions in this manual are as follows.
Signs Definitions2 This sign indicates the important point of the operation.
1 Alternative This sign indicates an alternative method for the same operation that differs from the one in the procedure.
3 Note This sign indicates cautions and restrictions on the operation.
DANGER
Health PrecautionsIn rare cases, flashing lights or stimulation from the bright light of a computer display or TV monitor may trigger temporary epileptic seizures or loss of consciousness. It is believed that even individuals whom have never experienced such symptoms may be susceptible. If you or close relatives have experienced any of these symptoms, consult a doctor before using this product.If you edit 3D video more than an hour continuously, take a rest of 10 to 15 minutes per hour. If you feel tired or uncomfortable, stop using the product.
CopyrightDo not use captured image/sound data created by other ones without authorization of the right holder regardless of whether it is moving or still image, except for personal fun. Also, duplication of such data is sometimes limited even for personal hobby. Please notice that we are exempted from responsibility for the use of captured data.
Copyright Copyright © 2018 Grass Valley. All rights reserved. Portions of software © 2000 - 2018, Microsoft Corporation. All rights reserved. This document may not be copied in whole or in part, or otherwise reproduced except as specifically permitted under U.S. copyright law, without the prior written consent of Grass Valley USA, LLC, P.O. Box 59900, Nevada City, California 95959-7900. This product may be covered by one or more U.S. and foreign patents.Grass Valley is a trademark of GVBB Holdings S.a.r.l.
Disclaimer Product options and specifications subject to change without notice. The information in this manual is furnished for informational use only, is subject to change without notice, and should not be construed as a commitment by Grass Valley USA, LLC. Grass Valley assumes no responsibility or liability for any errors or inaccuracies that may appear in this publication.
U.S. Government Restricted Rights Legend
Use, duplication, or disclosure by the United States Government is subject to restrictions as set forth in subparagraph (c)(1)(ii) of the Rights in Technical Data and Computer Software clause at DFARS 252.277-7013 or in subparagraph c(1) and (2) of the Commercial Computer Software Restricted Rights clause at FAR 52.227-19, as applicable.
Trademarks and Logos Grass Valley is a trademark of GVBB Holdings S.a.r.l. Grass Valley USA, LLC products are covered by U.S. and foreign patents, issued and pending. Additional information regarding Grass Valley USA, LLC trademarks and other proprietary rights may be found at the following URL.http://www.grassvalley.com/
Grass Valley Web Site This public Web site contains all the latest manuals and documentation, and additional support information. Use the following URL.http://www.grassvalley.com/
5
Contents
ContentsNew Features And Modifications 2
New Features And Modifications on Version 1.3 2New Features And Modifications on Version 1.4 2
Notice to Reader 3 Manual Explanation 4 DANGER 4
Health Precautions 4Copyright 4
Chapter 1 Mync
Summary 9Mync 9Structure of Mync 10Supported Format 10
Supported Formats of Professional Media 10Operating Environment 12Table for Functions of Each Mync Product 13
Chapter 2 Installation
Installation/Activation 16Before Installation 16
Creating eID 16Downloading Setup File 17
Installing Mync 18Activating Mync 19
Uninstallation 21eID Web 22
[Login] 22[News] 22[Serial List] 22[EDIUS] 22[Mync] 23[My account] 23
[Log out] 23
Chapter 3 Startup
Starting Up 25How to Start up 25How to Exit 25
Screen Configuration 26Main Dialog Screen 26
Menu Bar 27Search Bar 28Tool Bar 28Sidebar ([Library]/[Folder]) 28Display Bar 29Thumbnail Pane 29Preview Pane 30
6
Contents
Properties Pane 30[Settings] Dialog Box 30
Chapter 4 Importing Sources
Importing/Registering Sources 33Importing from Devices 33Importing from PC 35Viewing Imported Histories 35Searching for Imported Histories 35Registering Frequently Used Import Destination 36
Chapter 5 Playback of Clip
Playback of Clip 38
Chapter 6 Organizing/Managing Clips
Organizing Clips ([Catalog]/[Smart Catalog]) 41Grouping Clips ([Catalog]) 41
Creating New Catalog 41Registering Clip to Catalog 42
Refined Search 42Grouping Clips That Meet the Search Conditions ([Smart Catalog]) 42
Creating New Smart Catalog 43Managing Clips 44
Registering to [Favorites] 44Restoring Offline Clips 44Searching Duplicated Clips 45Tagging to Clips 45
Registering Tags 45Tagging with Keyboard Shortcut Operation 46
Editing/Utilizing Clips 47Changing Color Spaces 47Exporting Still Images 47Setting Still Image Clips as Sequence 48
Canceling a Set Sequence 48
Chapter 7 Creating Movies
Creating Movies ([Storyboard]) 50Screen Configuration of Storyboard Editing 50
Thumbnail Pane ([Storyboard]) 51Preview Pane ([Storyboard]) 52Properties Pane ([Storyboard]) 52
Creating New Storyboard 54Creating New Storyboard from Catalog/Smart Catalog 54Copying Storyboard 54
Editing Storyboard 55Registering Clip to Storyboard 55Deleting Clip in Storyboard 55Copying Clip in Storyboard 55Dividing Clip in Storyboard 55Moving Clip in Storyboard 56
7
Contents
Trimming Clip in Storyboard 56Adding Background Music to Storyboard 57Playback of Storyboard 59Exporting Storyboard to File 60Configuring Storyboard 61Searching for Storyboard 61
Chapter 8 Sharing Online
Sharing Clips Online 64Account Registration 64Uploading File 64
Uploading File to YouTube 64Uploading File to Facebook 65
Chapter 9 Interaction with EDIUS
Interaction with EDIUS 67Interaction with Source Browser 67Registering a Clip to Bin Individually 67Registering Catalog/Smart Catalog to Bin 67
Registering to Bin from Source Browser 67Importing XML File and Registering to Bin 68
Registering Storyboard to Bin 68
Chapter 10 Appendix
Keyboard Shortcuts for Mync 71
8
Chapter 1MyncThis chapter explains the outline, supported formats, and operating environment of Mync.
Chapter 1 Mync — Summary
9
SummaryMync is a software application that can comfortably handle media files such as a picture and video.
MyncMync is a tool for source management that can register sources in various formats as clips, preview them, and group them by category.You can also use those managed clips to create movies and upload them to video-sharing websites by simple operations.The main features of Mync are as follows. f Various display view ([Thumbnail], [Details], [Calendar], [Timeline]) f Video source previewing (full-screen preview supported) f Automatic recognition of sources that are stored in the device (such as smartphone, USB memory, SD memory card used for camera) f Automatic creation of metadata such as date or camera model f Uploading to Vimeo, YouTube, Facebook, and other servers f Grouping sources by [Catalog]/[Smart Catalog] f Creating movies using [Storyboard] and exporting the files f Touch operation supported f 2 in 1 supported f Supported language: Japanese, English, French, German, Italian, Spanish, Chinese (traditional, simplified), Korean
2 f The latest information about Mync is released on the website “MYNCWORLD.COM”.Please visit MYNCWORLD.COM, and you can find online manual for Mync, FAQ, and other information.http://www.myncworld.com/
3 Note f There are two types of Mync, Mync Standard and Mync Basic. f For the the respective functions of Mync Standard and Mync Basic, see “Table for Functions of Each Mync Product”.“Table for Functions of Each Mync Product” (w page 13)
r Interaction with EDIUSIf you use Mync that has come with EDIUS, you can effectively use it in interaction with EDIUS.Clips managed by Mync can be registered to the bin from the source browser of EDIUS. By selecting and sorting necessary clips using Mync in advance, you can quickly start editing with EDIUS.In the source browser of EDIUS, grouping by [Catalog] and [Smart Catalog] can be displayed as they are, and contents edited with [Storyboard] can be handled as clips. You can also export catalogs to XML files from Mync and import them to the bin of EDIUS directly.In addition, you can export the contents edited with EDIUS to a file, register it to Mync, and upload it to video-sharing websites such as YouTube.You can export storyboards from Mync to XML files, import them to EDIUS, etc., and then register the sources and edited data used when creating the storyboards to the bin of EDIUS, etc.Various editing procedures will be possible, for example, you can select the sources and perform rough cut editing and story creation with Mync, and then finish it up with EDIUS on another PC.By using the interaction function between Mync and EDIUS, sources can be managed and edited in a seamless connection.
2 f When EDIUS is installed, Mync is installed automatically. f You can also start up Mync alone from the desktop, etc.
3 Note f Interaction with EDIUS is supported only for Mync that comes with EDIUS.

Chapter 1 Mync — Summary
10
Structure of Mync
EDIUS
YouTubeVimeo
FacebookFTP
Registering to [Favorites]
Grouping Clips
Grouping Clips That Meet the Search Conditions
Creating movies
[Library]
[Favorites]
[Catalog]
ClipsSources
PC
Device
[Smart Catalog]
[Storyboard]
3 Note f Imported files are added in [Library] of Mync as clips. If the location or name of an imported or stored source is changed, the link to the clips on Mync becomes dead, and the clip will become an offline clip.“Restoring Offline Clips” (w page 44)
f Mync Basic is not supported for export of storyboards to files. f Interaction with EDIUS is supported only for Mync that comes with EDIUS.
Supported FormatOperation is not guaranteed for all formats described in this section.
Extension
*.3g2, *.3gp, *.aac, *.amc, *.asf, *.avi, *.bmp, *.dib, *.dif, *.dpx, *.dv, *.ec3, *.emf, *.f4v, *.gif, *.icb, *.idx, *.iff, *.jfif, *.jpeg, *.jpg, *.m2a, *.m2p, *.m2t, *.m2ts, *.m2v, *.m4v, *.mod, *.mov, *.mp4, *.mpeg, *.mpg, *.mpo, *.mpv, *.mts, *.mxf, *.pct, *.pic, *.pict, *.png, *.psd, *.r3d, *.rgb, *.rle, *.sgi, *.targa, *.tga, *.tif, *.tiff, *.tod, *.ts, *.vda, *.vob, *.vro, *.vst, *.wmf, *.wmv, *.ac3, *.wma, *.mp2, *.mp3, *.wav, *.w64, *.m4a, *.mpa, *.ogg, *.aif, *.aiff
Video codec
H.264/AVC, MPEG-2, Grass Valley HQ, Grass Valley HQX, Grass Valley Lossless, DV, DVCPRO, DVCPRO HD, Motion JPEG, Apple ProRes, uncompressed YUV, uncompressed UYVY, uncompressed v210, uncompressed RGB, Windows Media Video, REDCODE, Sony RAW, Cinema RAW, Cinema RAW Light, H.265 (HEVC)
Audio codec PCM, Dolby Digital (AC-3), MPEG-4 AAC, MP3, Ogg Audio, Windows Media Audio
Supported Formats of Professional MediaThe supported formats of professional media differ depending on the product. f For Mync that comes with EDIUS, “Mync Standard” applies.
r Decoding
Format Mync Basic Mync StandardAVCHD l l
AVC-Ultra ― l
Cinema RAW ― l
Cinema RAW Light ― l
Grass Valley HQ/Grass Valley HQX l l
H.265 (HEVC) l l

Chapter 1 Mync — Summary
11
Format Mync Basic Mync StandardMXF ― l
P2 ― l
RED ― l
Sony RAW ― l
XAVC ― l
XAVC S l l
XDCAM ― l
XDCAM EX ― l
XF ― l
XF-AVC ― l
r Encoding
Format Mync Basic Mync StandardMP4 ― l
2 f The new H.264 software encoder can be used.

Chapter 1 Mync — Operating Environment
12
Operating EnvironmentTo use Mync, the following license and environment are required:
r LicenseOne of the following licenses is required. f License of EDIUS Workgroup or EDIUS Pro version 8 or later
g Register the serial number of EDIUS in advance. f License of Mync Basic or Mync Standard
r OS f Windows 7 64-bit (Service Pack 1 or later) f Windows 8.1 64-bit f Windows 10 64-bit (Version 1607 or later)
2 f Not available on Windows 7 32-bit. f Not available on Windows 8, Windows Vista, and Windows XP.
r CPU f Intel Core 2, Intel Core iX CPU, or higher f Intel or AMD single core CPU with a 3 GHz processor speed or faster (multiple CPUs or multicore CPUs recommended) f SSSE3 (Supplemental SSE3) compatibility
r Memory f 4 GB or higherThe minimum system requirements of RAM differ depending on the project. g For SD/HD project: 4 GB or higher recommended g For 4K project: 8 GB or higher recommended
r Internet Environment f Internet environment is required for software authorization, update, and support.
2 f Mync requires constant Internet connection for license authorization.
3 Note f Operation is not guaranteed for all environment that meet the operating environment and specifications described in this section. f Visit our website for the latest operating environment/specifications.URLs of our website are as follows. g http://www.grassvalley.com/ g http://www.ediusworld.com/ g http://www.myncworld.com/
Chapter 1 Mync — Table for Functions of Each Mync Product
13
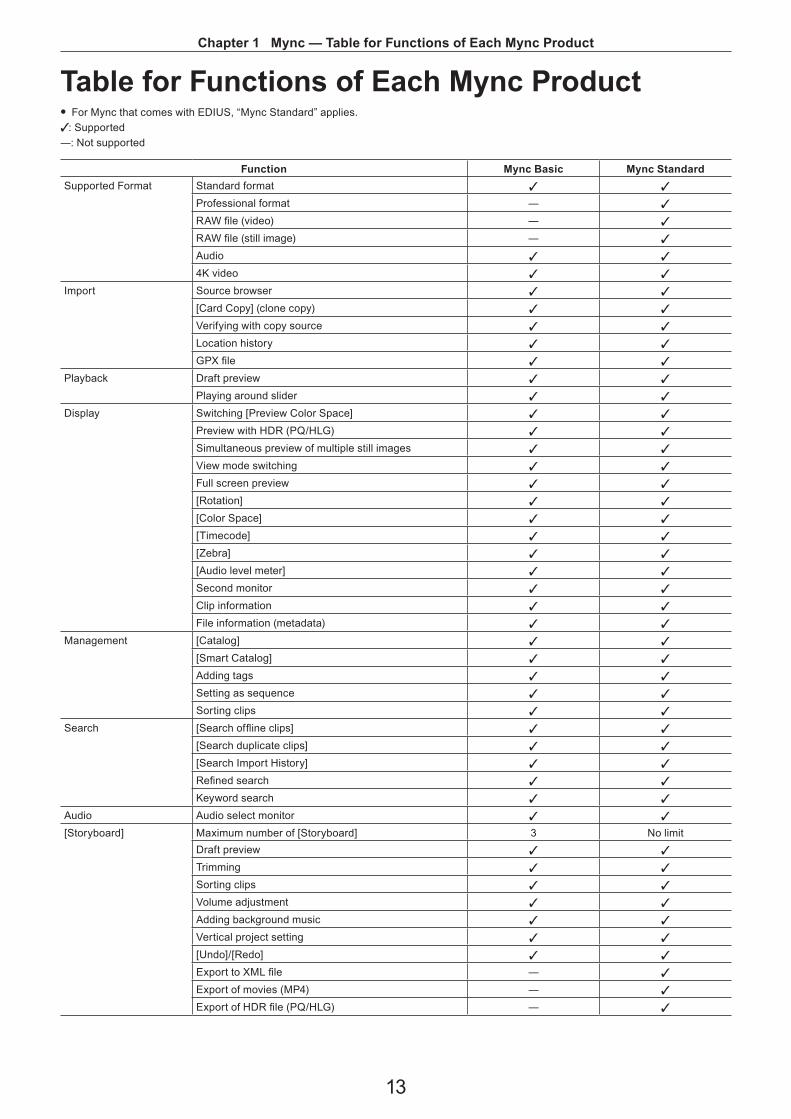
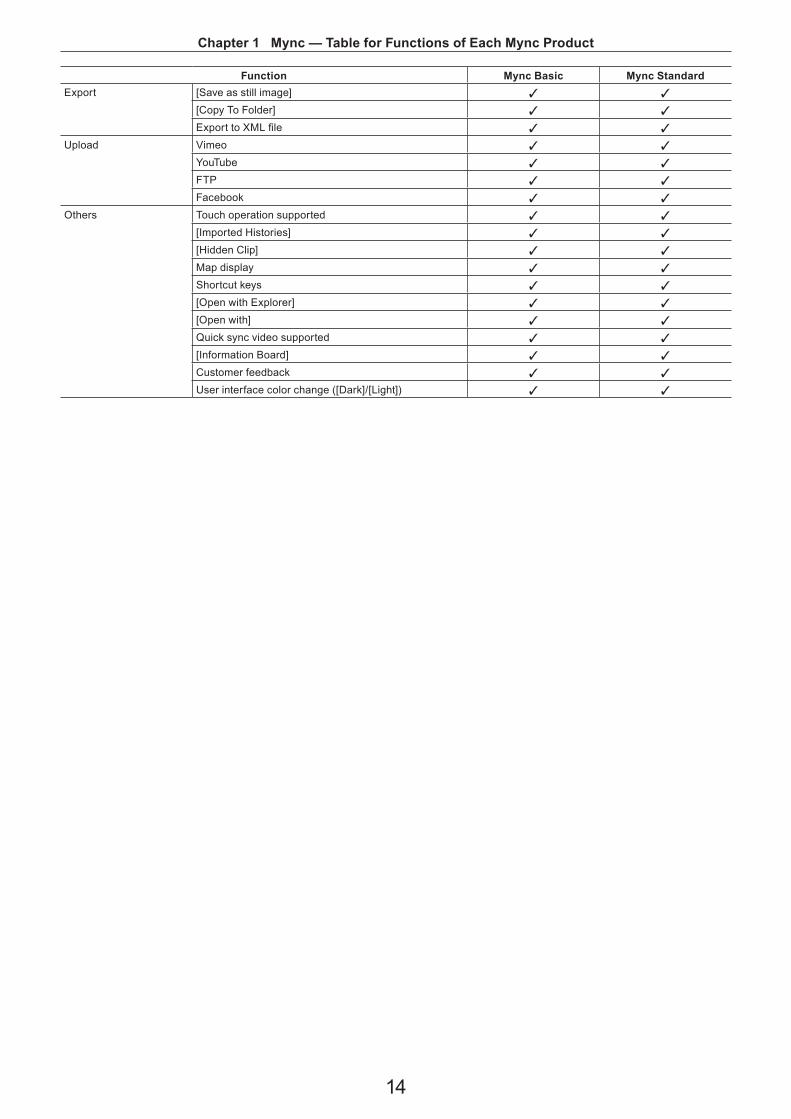
Table for Functions of Each Mync Product f For Mync that comes with EDIUS, “Mync Standard” applies.
l: Supported―: Not supported
Function Mync Basic Mync StandardSupported Format Standard format l l
Professional format ― l
RAW file (video) ― l
RAW file (still image) ― l
Audio l l
4K video l l
Import Source browser l l
[Card Copy] (clone copy) l l
Verifying with copy source l l
Location history l l
GPX file l l
Playback Draft preview l l
Playing around slider l l
Display Switching [Preview Color Space] l l
Preview with HDR (PQ/HLG) l l
Simultaneous preview of multiple still images l l
View mode switching l l
Full screen preview l l
[Rotation] l l
[Color Space] l l
[Timecode] l l
[Zebra] l l
[Audio level meter] l l
Second monitor l l
Clip information l l
File information (metadata) l l
Management [Catalog] l l
[Smart Catalog] l l
Adding tags l l
Setting as sequence l l
Sorting clips l l
Search [Search offline clips] l l
[Search duplicate clips] l l
[Search Import History] l l
Refined search l l
Keyword search l l
Audio Audio select monitor l l
[Storyboard] Maximum number of [Storyboard] 3 No limitDraft preview l l
Trimming l l
Sorting clips l l
Volume adjustment l l
Adding background music l l
Vertical project setting l l
[Undo]/[Redo] l l
Export to XML file ― l
Export of movies (MP4) ― l
Export of HDR file (PQ/HLG) ― l
Chapter 1 Mync — Table for Functions of Each Mync Product
14
Function Mync Basic Mync StandardExport [Save as still image] l l
[Copy To Folder] l l
Export to XML file l l
Upload Vimeo l l
YouTube l l
FTP l l
Facebook l l
Others Touch operation supported l l
[Imported Histories] l l
[Hidden Clip] l l
Map display l l
Shortcut keys l l
[Open with Explorer] l l
[Open with] l l
Quick sync video supported l l
[Information Board] l l
Customer feedback l l
User interface color change ([Dark]/[Light]) l l
15
Chapter 2InstallationThis chapter explains installation/uninstallation of Mync, registration of eID, etc.

Chapter 2 Installation — Installation/Activation
16
Installation/Activation3 Note
f There are two types of Mync, Mync Standard and Mync Basic. f For the the respective functions of Mync Standard and Mync Basic, see “Table for Functions of Each Mync Product”.“Table for Functions of Each Mync Product” (w page 13)
f If you use EDIUS Workgroup or EDIUS Pro version 8 or later, Mync (Mync Standard) will be installed automatically at the installation of EDIUS. You do not need to install Mync independently.
f To use a Grass Valley product such as EDIUS or Mync, the PC to which they are to be installed must be connected to the Internet. Note that you cannot use it in an environment where Internet connection is not available.
f Confirm that the PC to be used satisfies the conditions of the operating environment for the product.“Operating Environment” (w page 12)
f This section explains how to install on Windows 10.
Before InstallationActivation of the serial number and eID is required to use a Grass Valley product such as EDIUS or Mync. At the first startup after installation, the activation screen for the serial number and eID is displayed. The software starts up after a successful activation.
3 Note f Activation of eID is optional when you use EDIUS Workgroup. f Before starting installation, close all other applications including resident software. f Installation requires the account authorized for the administrator (such as PC administrator). f Applications to be installed and setup files necessary for installation may differ depending on model. f If antivirus software (security software) is running, you may need to stop the software operation.
Creating eIDCreate eID.
r What is eID?eID is an online ID function to link the license of Grass Valley products in possession to the user. The license will be more secure and the uniqueness of the license will be established by linking the serial number and eID at the time of first activation of the serial number.Also, the information of the serial number in possession can be browsed or products can be downloaded on the membership website “eID Web” that can be logged in with eID.“eID Web” (w page 22)
3 Note f Use eID after fully understanding this manual and the precautions on the Web. f Recommended environment for eID Web is as follows.
g Browser: Internet Explorer, Mozilla Firefox, Google Chrome
1) Go to the [Login] page in eID Web. f Access the following URL.https://ediusid1.grassvalley.com/
Chapter 2 Installation — Installation/Activation
17
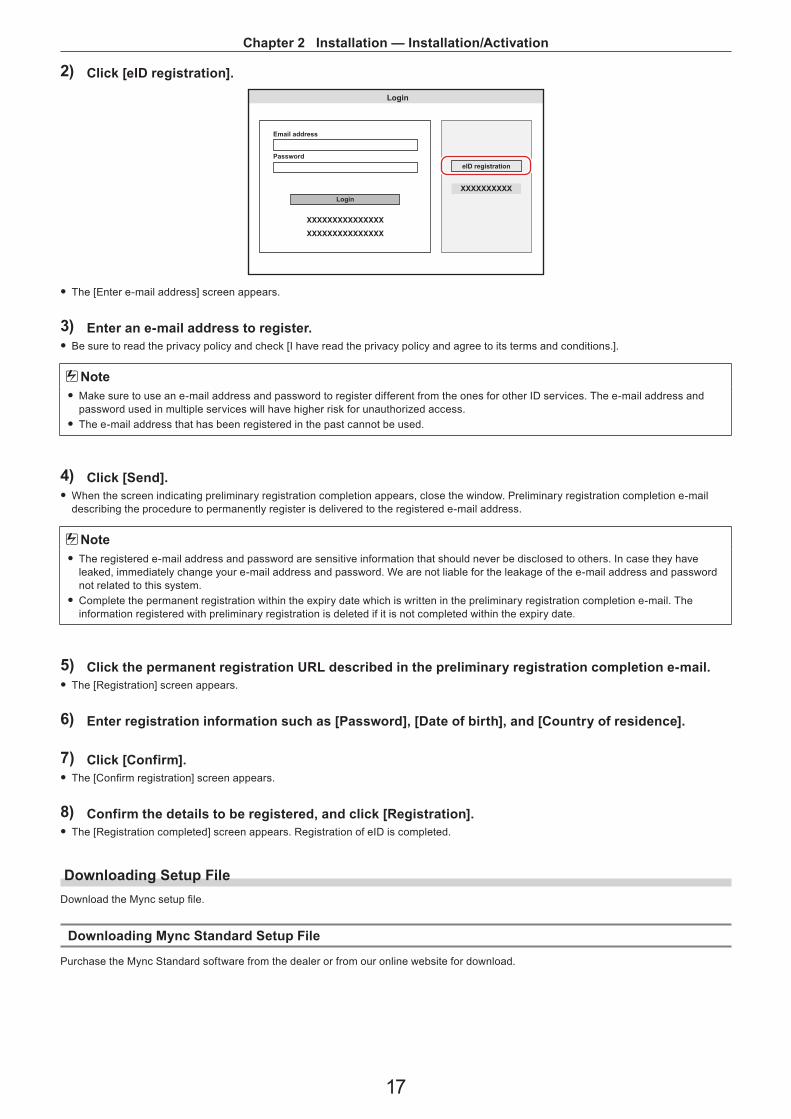
2) Click [eID registration].
XXXXXXXXXXXXXXX
XXXXXXXXXXXXXXX
XXXXXXXXXX
Login
Email address
Password
Login
eID registration
f The [Enter e-mail address] screen appears.
3) Enter an e-mail address to register. f Be sure to read the privacy policy and check [I have read the privacy policy and agree to its terms and conditions.].
3 Note f Make sure to use an e-mail address and password to register different from the ones for other ID services. The e-mail address and password used in multiple services will have higher risk for unauthorized access.
f The e-mail address that has been registered in the past cannot be used.
4) Click [Send]. f When the screen indicating preliminary registration completion appears, close the window. Preliminary registration completion e-mail describing the procedure to permanently register is delivered to the registered e-mail address.
3 Note f The registered e-mail address and password are sensitive information that should never be disclosed to others. In case they have leaked, immediately change your e-mail address and password. We are not liable for the leakage of the e-mail address and password not related to this system.
f Complete the permanent registration within the expiry date which is written in the preliminary registration completion e-mail. The information registered with preliminary registration is deleted if it is not completed within the expiry date.
5) Click the permanent registration URL described in the preliminary registration completion e-mail. f The [Registration] screen appears.
6) Enter registration information such as [Password], [Date of birth], and [Country of residence].
7) Click [Confirm]. f The [Confirm registration] screen appears.
8) Confirm the details to be registered, and click [Registration]. f The [Registration completed] screen appears. Registration of eID is completed.
Downloading Setup FileDownload the Mync setup file.
Downloading Mync Standard Setup File
Purchase the Mync Standard software from the dealer or from our online website for download.

Chapter 2 Installation — Installation/Activation
18
Downloading Mync Basic Setup File
1) Access MYNCWORLD.COM. f Access the following URL.http://www.myncworld.com/
2) Display the download page.
3) Follow the description in the download page to access eID Web. f The [Login] page of eID Web appears.
4) Enter [Email address] and [Password], and click [Login]. f When you have logged in successfully, [My page top] appears.
2 f For [Email address] and [Password], enter the registration information for eID.
5) Click [Mync] on the sidebar at the left of the screen.
・20XX/XX/XX XXXXXXXXXXXXXXXXXXXX
・20XX/XX/XX XXXXXXXXXXXXXXXXXXXX
Log out My page top
My account
Mync
EDIUS
Serial List
NewsNews
f The [Mync] page appears.
6) Click the list button and select [Mync Basic].
XXXXXXXXXXXXXXXXXXXX XXX
Mync Basic
.........
.........
Log out Mync
My account
Mync
EDIUS
Serial List
News
f Be sure to read the disclaimer and precautions displayed on the screen.
7) Click [Send]. f A guidance e-mail will be delivered to the e-mail address registered for eID.
8) Click the URL for download described in the guidance e-mail. f Follow the on-screen instructions to download the setup file.
3 Note f To use Mync Basic, entering the serial number described in the guidance e-mail is required. Be careful not to lose the guidance e-mail.
Installing MyncInstall Mync.Download the Mync Standard or Mync Basic setup file in advance.
Chapter 2 Installation — Installation/Activation
19
“Downloading Setup File” (w page 17)
3 Note f It is necessary to agree to the End User License Agreement displayed during the installation to use this software. If you do not agree to the license agreement of this software, click [Close] to cancel the installation.
f Be sure to read through the terms and conditions by scrolling the whole descriptions. f Check [Automatically send diagnostic and usage data to Grass Valley] to automatically send the data for a diagnosis result and usage conditions of the software to be installed to Grass Valley.The sent data is used for the purposes of improving the quality, reliability, and performance of the software.
f When installation does not succeed, please check with the website of the manufacturer of the antivirus software (security software) in your system or our website for the latest updates.The URL of our website is as follows. g http://www.grassvalley.com/ g http://www.ediusworld.com/ g http://www.myncworld.com/
1) Double-click the setup file of Mync (exe format). f Follow the on-screen instructions for installation.
Activating MyncActivation of the serial number and eID is required at the first startup of Mync. Mync cannot be started if the serial number or eID has not been activated.
3 Note f Online environment is required for activation of the serial number or eID.
1) Double-click the Mync icon on the desktop. f The entry screen for the serial number is displayed only when Mync is started for the first time.
1 Alternative f If the Mync icon is not on the desktop, click the Windows logo at the lower left of the start screen to display the start menu, and click [Grass Valley] → [Mync].
f If you use Mync that has come with EDIUS, you can use the following procedure to start up Mync. g Click [Tools] on the EDIUS menu bar, and click [Mync]. g In the folder view of the EDIUS source browser, right-click [Mync], and click [Open Mync]. g In the folder view of the EDIUS source browser, click on a folder under [Mync]. Right-click on a clip displayed in the clip view, and click [Show in Mync].
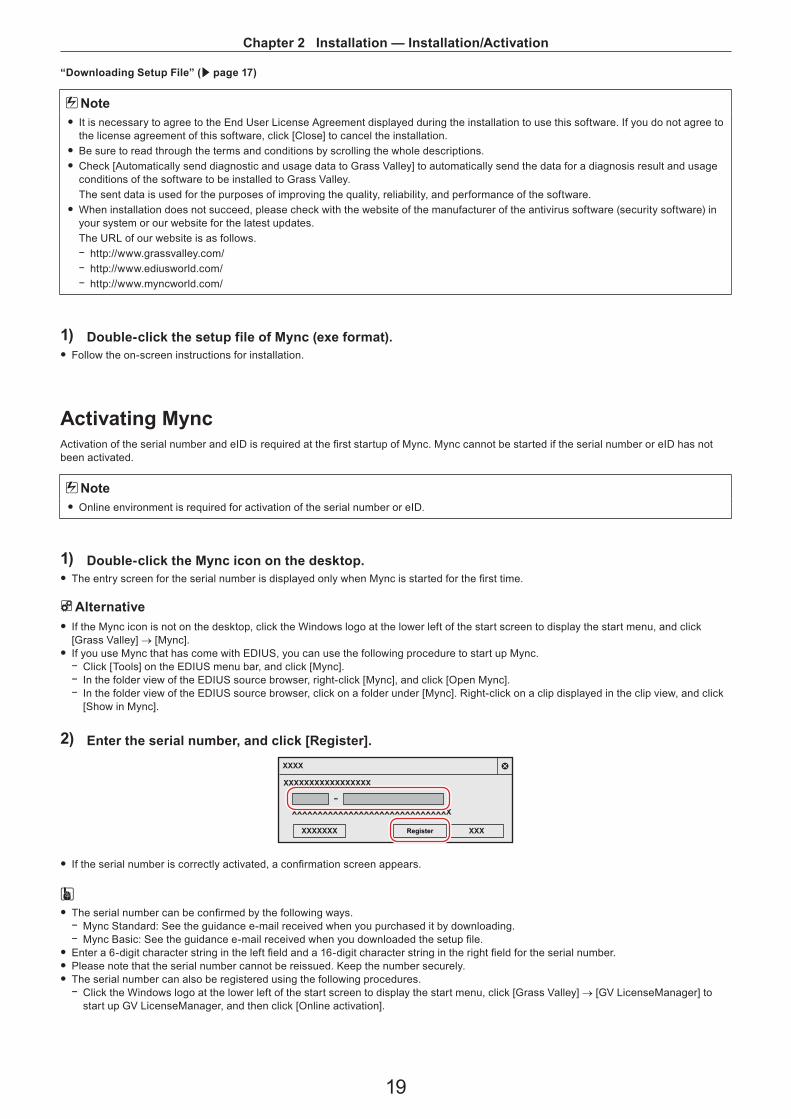
2) Enter the serial number, and click [Register].
XXXXXXXXXXXXXXXXX
-
XXXXXXXXXXXXXXXXXXXXXXXXXXXXXXX
XXXX
XXXXXXX XXXRegister
f If the serial number is correctly activated, a confirmation screen appears.
2 f The serial number can be confirmed by the following ways.
g Mync Standard: See the guidance e-mail received when you purchased it by downloading. g Mync Basic: See the guidance e-mail received when you downloaded the setup file.
f Enter a 6-digit character string in the left field and a 16-digit character string in the right field for the serial number. f Please note that the serial number cannot be reissued. Keep the number securely. f The serial number can also be registered using the following procedures.
g Click the Windows logo at the lower left of the start screen to display the start menu, click [Grass Valley] → [GV LicenseManager] to start up GV LicenseManager, and then click [Online activation].
Chapter 2 Installation — Installation/Activation
20
3) Click [OK] on the confirmation screen. f The entry screen for eID appears.
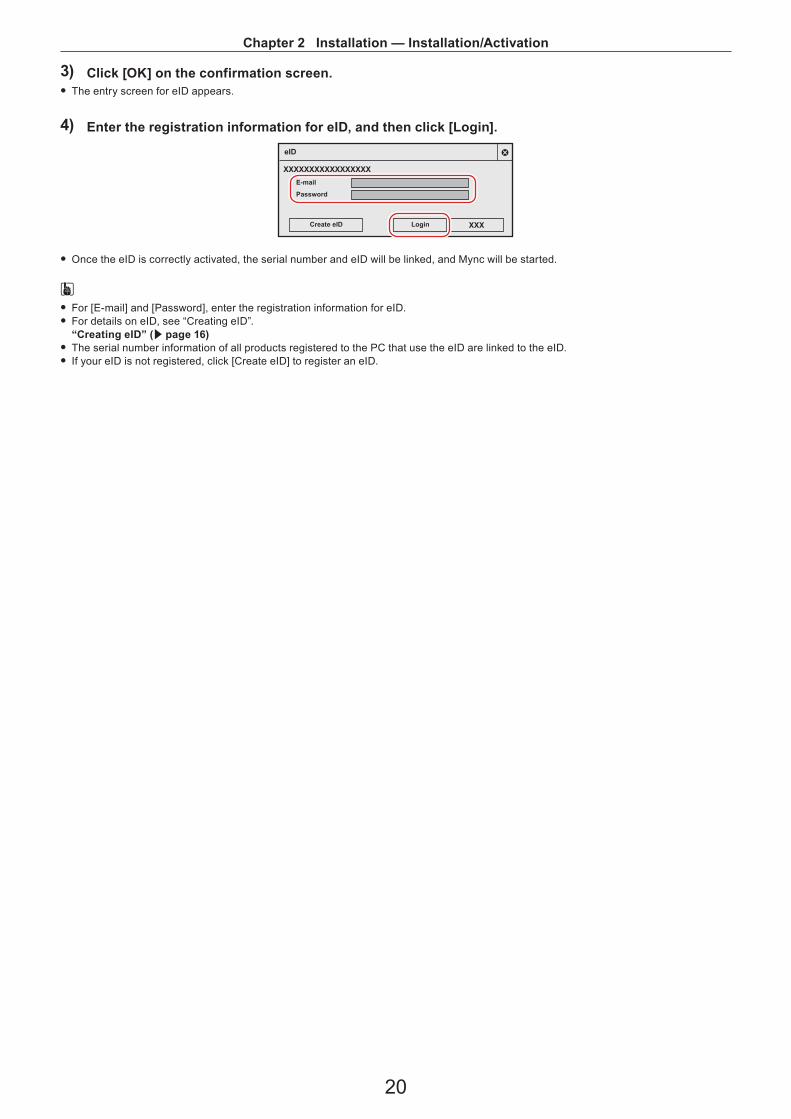
4) Enter the registration information for eID, and then click [Login].
XXXXXXXXXXXXXXXXX
XXX
Password
Create eID Login
eID
f Once the eID is correctly activated, the serial number and eID will be linked, and Mync will be started.
2 f For [E-mail] and [Password], enter the registration information for eID. f For details on eID, see “Creating eID”.“Creating eID” (w page 16)
f The serial number information of all products registered to the PC that use the eID are linked to the eID. f If your eID is not registered, click [Create eID] to register an eID.
Chapter 2 Installation — Uninstallation
21
Uninstallation3 Note
f Close all other applications including resident software before starting uninstallation. f Uninstallation requires the account authorized for the administrator (such as PC administrator). f This section explains how to uninstall on Windows 10.The operation may differ depending on the type or version of OS on your PC.
1) Click the Windows logo at the lower left of the start screen to display the start menu, and click [Settings].
2) Click [Apps].
3) Select [Mync], click [Uninstall], and uninstall according to the on-screen instructions.
3 Note f If you use Mync that has come with EDIUS, uninstalling EDIUS does not uninstall Mync. To uninstall Mync, you must uninstall Mync separately.
Chapter 2 Installation — eID Web
22
eID WebVarious membership functions such as confirmation of serial number and acquiring of trial version can be used by logging in to eID Web.
[Login]
1) Go to the [Login] page in eID Web. f Access the following URL.https://ediusid1.grassvalley.com/
2) Enter [Email address] and [Password], and click [Login]. f [My page top] is displayed after successful login, allowing to use the various membership website functions. f Selecting an item on the sidebar at the left of the screen displays the respective menu.“[News]” (w page 22)“[Serial List]” (w page 22)“[EDIUS]” (w page 22)“[Mync]” (w page 23)“[My account]” (w page 23)
2 f For [Email address] and [Password], enter the registration information for eID. f If you have forgotten the e-mail address or the password, click [Forgot your email address?] or [Forgot your password] and reset them following the on-screen instructions.
[News]The latest information on the Grass Valley product will be displayed.
[Serial List]In [Serial List], the serial number information linked to eID can be confirmed.
[Product name Version] Displays the product name and version information.[Serial number] Displays the serial number.[Initial activation date] Displays the date on which the activation is first performed.[Expiration] Displays the validity date.[Download] Clicking the icon downloads the trial version of EDIUS or Mync Basic that has been acquired from the eID
Web.[Note] This is a free entry field. Enter text and click [Save] to save the entered content.
2 f The products linked to eID are as follows.
g Mync (Mync Basic, Mync Standard) g EDIUS 9 (EDIUS Workgroup 9, EDIUS Pro 9) g EDIUS 8 (EDIUS Workgroup 8, EDIUS Pro 8) g EDIUS 7 (EDIUS Elite 7, EDIUS Pro 7) g EDIUS 6.5 (EDIUS Elite, EDIUS Pro 6.5) g EDIUS Neo 3.5 g EDIUS Express g Optional licenses for above generations
f The trial version products of Grass Valley are also linked to eID.
3 Note f Information of serial numbers linked with each product is locked as a unique license.
[EDIUS]The trial version of EDIUS can be acquired.
Chapter 2 Installation — eID Web
23
Click the list button and select a desired product, and then click [Send]. A guidance e-mail describing the information such as the URL for download and serial number is delivered to the registered e-mail address.
3 Note f The trial versions of EDIUS can be downloaded only once per product.
[Mync]Mync Basic can be acquired.Click the list button and select [Mync Basic], and then click [Send]. A guidance e-mail describing the information such as the URL for download and serial number is delivered to the registered e-mail address.“Downloading Mync Basic Setup File” (w page 18)
3 Note f Mync Basic can be downloaded only once per product.
[My account]Various information registered in eID can be viewed and edited.
r Editing registration information of eID
1) On the [My account] screen, click [Edit information].
2) Change the registration information, and click [Change]. f The password entry screen appears.
3) Enter the current password, and then click [Change]. f Registration change is completed. An e-mail for confirmation of change in the registration information will be delivered to the registered e-mail address.
3 Note f When the registration information is changed, reactivation of eID may be necessary at the startup of Mync.
[Log out]
1) Click [Log out] at the top of the screen. f You will be logged out from eID Web.

24
Chapter 3StartupThis chapter explains how to start up Mync and the screen configuration.
Chapter 3 Startup — Starting Up
25
Starting Up
How to Start upStart up Mync. f Activation of the serial number and eID is required at the first startup.“Activating Mync” (w page 19)
1) Double-click the Mync icon on the desktop. f Mync starts up. f On [Information Board] that appears, you can view [News] and [How to use]. Clicking on an item opens the browser to show the details.
2 f To close [Information Board], click [×] on the upper right of [Information Board]. f Check [Don't show again.] and close [Information Board], to hide it at the next startup and later. f [Information Board] can be displayed at any time by clicking [Help], then [News] on the menu bar.
1 Alternative f If the Mync icon is not on the desktop, click the Windows logo at the lower left of the start screen to display the start menu, and click [Grass Valley] → [Mync].
f If you use Mync that has come with EDIUS, you can use the following procedure to start up Mync. g Click [Tools] on the EDIUS menu bar, and click [Mync]. g In the folder view of the EDIUS source browser, right-click [Mync], and click [Open Mync]. g In the folder view of the EDIUS source browser, click on a folder under [Mync]. Right-click on a clip displayed in the clip view, and click [Show in Mync].
How to ExitExit Mync.
1) Click [File] on the menu bar, and click [Exit].
1 Alternative f Click [×] on the upper right of the main dialog box. f Exiting Mync: [Alt] + [F4]

Chapter 3 Startup — Screen Configuration
26
Screen Configuration
Main Dialog ScreenXXXX XXXX XXXX XXXX XXXX XXXX
XXX
XXX
XXX XXX
XXXXXX
XXXX
XXXXXXXXXX... 00:00
XXXXXXXXXX... 00:00
XXXXXXXXXX... 00:00
XXXXXXXXXX... 00:00
XXXXXXXXXX... 00:00
XXXXXXXXXX... 00:00
XXXXXXXXXX... 00:00
XXXXXXXXXX... 00:00
XXXXXXXXXXXX
XXX
XXX
XXXX[XX]
XXXX[XX]
XXXX[XX]
XXXX/XX/XX XX:XX
XXXX
XXX
XXXX
All 1 2 3 4
Library All Video Still Audio
Folder
Catalog
Smart Catalog
Storyboard
Imported Histories
All Clips
Recycle bin
Favorites
Full
Favorite Folder
Computer
Removable Device
(6) (7)
(3)
(5)
(4)
(1)(2) (8)
(9)
(1) Menu bar Perform various operations.“Menu Bar” (w page 27)
(2) Search bar Search for stored clips.“Search Bar” (w page 28)
(3) Display bar Switch the display of the thumbnail pane.“Display Bar” (w page 29)
(4) Sidebar ([Library]) Display [Catalog]/[Smart Catalog] to organize clips, [Storyboard] to create movies, and other items.“Sidebar ([Library]/[Folder])” (w page 28)“Creating Movies ([Storyboard])” (w page 50)
(5) Sidebar ([Folder]) Display the folders of PC or devices connected to the PC (such as smartphone, USB memory, SD memory card used for camera) in a tree structure.Click it to display the files in the PC or device.“Sidebar ([Library]/[Folder])” (w page 28)
(6) Thumbnail pane*1 Display registered clips. Switch the display view to [Timeline], [Calendar], or [Thumbnail], etc.“Thumbnail Pane” (w page 29)
(7) Preview pane*1 Click [View] on the menu bar, and click [Preview] to display.Preview areaThe preview of a clip selected in the thumbnail pane is displayed.Operation areaYou can perform operations such as playback/stop, volume adjustment, and audio channel selection in the operation area.“Playback of Clip” (w page 37)To select an audio channel, click the audio expand button in the operation area to expand the operation area. Click on an audio channel displayed in the expanded area to select it.
(8) Tool bar Change the window layout and open the [Settings] dialog box.“Tool Bar” (w page 28)
(9) Properties pane*1 Display the properties of a clip selected in the thumbnail pane.“Properties Pane” (w page 30)
*1 The screen configuration differ while in storyboard editing.“Thumbnail Pane ([Storyboard])” (w page 51)
Chapter 3 Startup — Screen Configuration
27
“Preview Pane ([Storyboard])” (w page 52)“Properties Pane ([Storyboard])” (w page 52)
Menu Bar
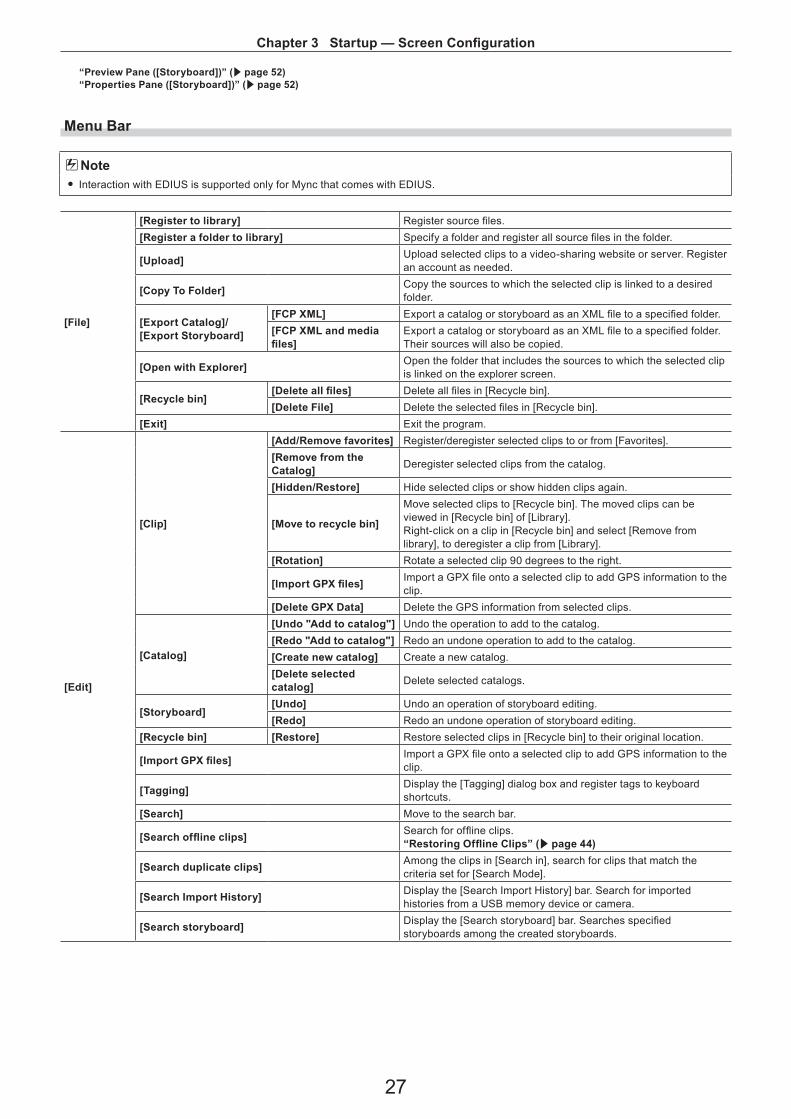
3 Note f Interaction with EDIUS is supported only for Mync that comes with EDIUS.
[File]
[Register to library] Register source files.[Register a folder to library] Specify a folder and register all source files in the folder.
[Upload] Upload selected clips to a video-sharing website or server. Register an account as needed.
[Copy To Folder] Copy the sources to which the selected clip is linked to a desired folder.
[Export Catalog]/[Export Storyboard]
[FCP XML] Export a catalog or storyboard as an XML file to a specified folder.[FCP XML and media files]
Export a catalog or storyboard as an XML file to a specified folder. Their sources will also be copied.
[Open with Explorer] Open the folder that includes the sources to which the selected clip is linked on the explorer screen.
[Recycle bin][Delete all files] Delete all files in [Recycle bin].[Delete File] Delete the selected files in [Recycle bin].
[Exit] Exit the program.
[Edit]
[Clip]
[Add/Remove favorites] Register/deregister selected clips to or from [Favorites].[Remove from the Catalog] Deregister selected clips from the catalog.
[Hidden/Restore] Hide selected clips or show hidden clips again.
[Move to recycle bin]
Move selected clips to [Recycle bin]. The moved clips can be viewed in [Recycle bin] of [Library].Right-click on a clip in [Recycle bin] and select [Remove from library], to deregister a clip from [Library].
[Rotation] Rotate a selected clip 90 degrees to the right.
[Import GPX files] Import a GPX file onto a selected clip to add GPS information to the clip.
[Delete GPX Data] Delete the GPS information from selected clips.
[Catalog]
[Undo "Add to catalog"] Undo the operation to add to the catalog.[Redo "Add to catalog"] Redo an undone operation to add to the catalog.[Create new catalog] Create a new catalog.[Delete selected catalog] Delete selected catalogs.
[Storyboard][Undo] Undo an operation of storyboard editing.[Redo] Redo an undone operation of storyboard editing.
[Recycle bin] [Restore] Restore selected clips in [Recycle bin] to their original location.
[Import GPX files] Import a GPX file onto a selected clip to add GPS information to the clip.
[Tagging] Display the [Tagging] dialog box and register tags to keyboard shortcuts.
[Search] Move to the search bar.
[Search offline clips] Search for offline clips.“Restoring Offline Clips” (w page 44)
[Search duplicate clips] Among the clips in [Search in], search for clips that match the criteria set for [Search Mode].
[Search Import History] Display the [Search Import History] bar. Search for imported histories from a USB memory device or camera.
[Search storyboard] Display the [Search storyboard] bar. Searches specified storyboards among the created storyboards.
Chapter 3 Startup — Screen Configuration
28
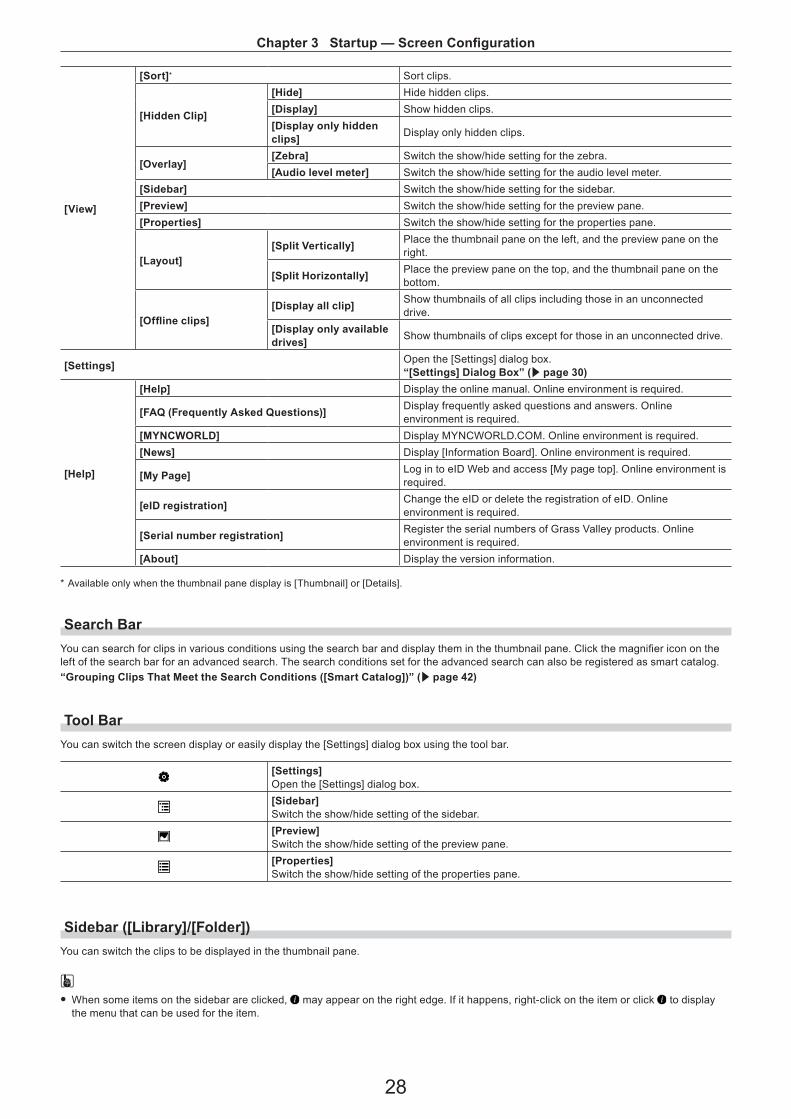
[View]
[Sort]* Sort clips.
[Hidden Clip]
[Hide] Hide hidden clips.[Display] Show hidden clips.[Display only hidden clips] Display only hidden clips.
[Overlay][Zebra] Switch the show/hide setting for the zebra.[Audio level meter] Switch the show/hide setting for the audio level meter.
[Sidebar] Switch the show/hide setting for the sidebar.[Preview] Switch the show/hide setting for the preview pane.[Properties] Switch the show/hide setting for the properties pane.
[Layout][Split Vertically] Place the thumbnail pane on the left, and the preview pane on the
right.
[Split Horizontally] Place the preview pane on the top, and the thumbnail pane on the bottom.
[Offline clips][Display all clip] Show thumbnails of all clips including those in an unconnected
drive.[Display only available drives] Show thumbnails of clips except for those in an unconnected drive.
[Settings] Open the [Settings] dialog box.“[Settings] Dialog Box” (w page 30)
[Help]
[Help] Display the online manual. Online environment is required.
[FAQ (Frequently Asked Questions)] Display frequently asked questions and answers. Online environment is required.
[MYNCWORLD] Display MYNCWORLD.COM. Online environment is required.[News] Display [Information Board]. Online environment is required.
[My Page] Log in to eID Web and access [My page top]. Online environment is required.
[eID registration] Change the eID or delete the registration of eID. Online environment is required.
[Serial number registration] Register the serial numbers of Grass Valley products. Online environment is required.
[About] Display the version information.
* Available only when the thumbnail pane display is [Thumbnail] or [Details].
Search BarYou can search for clips in various conditions using the search bar and display them in the thumbnail pane. Click the magnifier icon on the left of the search bar for an advanced search. The search conditions set for the advanced search can also be registered as smart catalog.“Grouping Clips That Meet the Search Conditions ([Smart Catalog])” (w page 42)
Tool BarYou can switch the screen display or easily display the [Settings] dialog box using the tool bar.
[Settings]Open the [Settings] dialog box.[Sidebar]Switch the show/hide setting of the sidebar.[Preview]Switch the show/hide setting of the preview pane.[Properties]Switch the show/hide setting of the properties pane.
Sidebar ([Library]/[Folder])You can switch the clips to be displayed in the thumbnail pane.
2 f When some items on the sidebar are clicked, may appear on the right edge. If it happens, right-click on the item or click to display the menu that can be used for the item.
Chapter 3 Startup — Screen Configuration
29
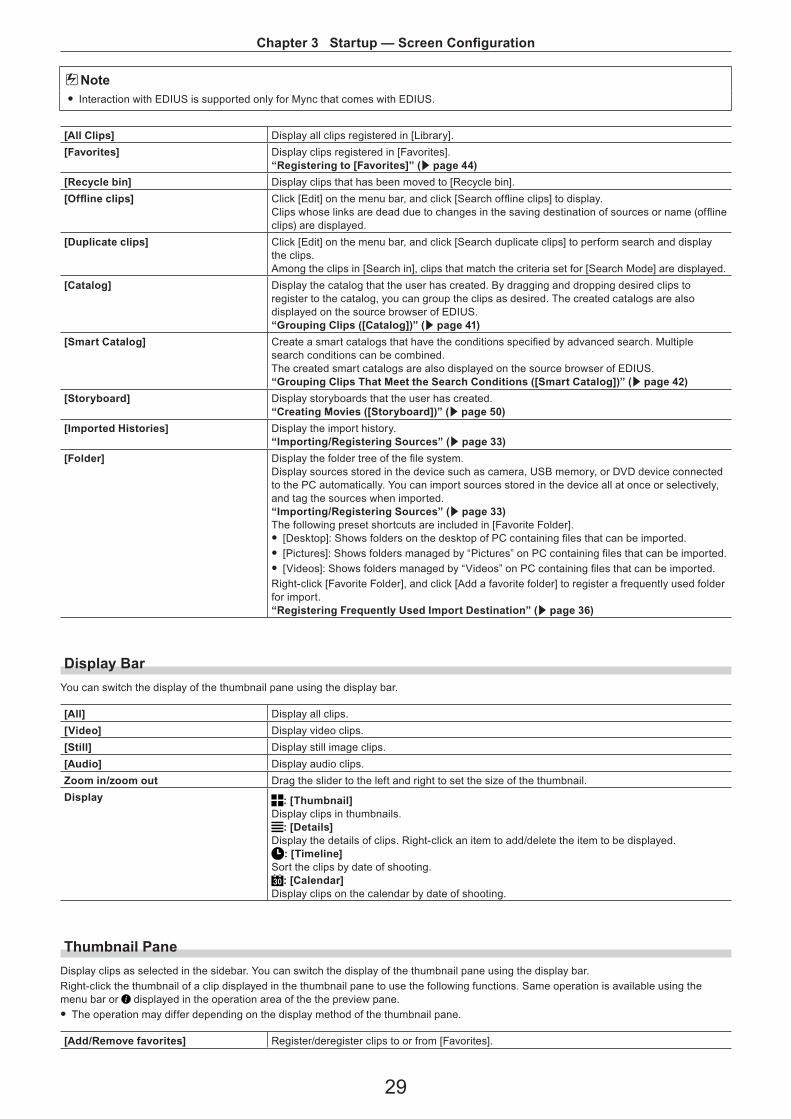
3 Note f Interaction with EDIUS is supported only for Mync that comes with EDIUS.
[All Clips] Display all clips registered in [Library].[Favorites] Display clips registered in [Favorites].
“Registering to [Favorites]” (w page 44)[Recycle bin] Display clips that has been moved to [Recycle bin].[Offline clips] Click [Edit] on the menu bar, and click [Search offline clips] to display.
Clips whose links are dead due to changes in the saving destination of sources or name (offline clips) are displayed.
[Duplicate clips] Click [Edit] on the menu bar, and click [Search duplicate clips] to perform search and display the clips.Among the clips in [Search in], clips that match the criteria set for [Search Mode] are displayed.
[Catalog] Display the catalog that the user has created. By dragging and dropping desired clips to register to the catalog, you can group the clips as desired. The created catalogs are also displayed on the source browser of EDIUS.“Grouping Clips ([Catalog])” (w page 41)
[Smart Catalog] Create a smart catalogs that have the conditions specified by advanced search. Multiple search conditions can be combined.The created smart catalogs are also displayed on the source browser of EDIUS.“Grouping Clips That Meet the Search Conditions ([Smart Catalog])” (w page 42)
[Storyboard] Display storyboards that the user has created.“Creating Movies ([Storyboard])” (w page 50)
[Imported Histories] Display the import history.“Importing/Registering Sources” (w page 33)
[Folder] Display the folder tree of the file system.Display sources stored in the device such as camera, USB memory, or DVD device connected to the PC automatically. You can import sources stored in the device all at once or selectively, and tag the sources when imported.“Importing/Registering Sources” (w page 33)The following preset shortcuts are included in [Favorite Folder]. f [Desktop]: Shows folders on the desktop of PC containing files that can be imported. f [Pictures]: Shows folders managed by “Pictures” on PC containing files that can be imported. f [Videos]: Shows folders managed by “Videos” on PC containing files that can be imported.
Right-click [Favorite Folder], and click [Add a favorite folder] to register a frequently used folder for import.“Registering Frequently Used Import Destination” (w page 36)
Display BarYou can switch the display of the thumbnail pane using the display bar.
[All] Display all clips.[Video] Display video clips.[Still] Display still image clips.[Audio] Display audio clips.Zoom in/zoom out Drag the slider to the left and right to set the size of the thumbnail.Display : [Thumbnail]
Display clips in thumbnails.: [Details]
Display the details of clips. Right-click an item to add/delete the item to be displayed.: [Timeline]
Sort the clips by date of shooting.: [Calendar]
Display clips on the calendar by date of shooting.
Thumbnail PaneDisplay clips as selected in the sidebar. You can switch the display of the thumbnail pane using the display bar.Right-click the thumbnail of a clip displayed in the thumbnail pane to use the following functions. Same operation is available using the menu bar or displayed in the operation area of the the preview pane. f The operation may differ depending on the display method of the thumbnail pane.
[Add/Remove favorites] Register/deregister clips to or from [Favorites].
Chapter 3 Startup — Screen Configuration
30
[Remove from the Catalog] Deregister selected clips from the catalog.[Hidden/Restore] Hide clips or show hidden clips again.[Rotation] Rotate a clip 90 degrees to the right.[Preview] Preview a clip in the full screen view. You can also preview a clip by double-clicking it.[Upload] Upload clips to Vimeo, YouTube, or Facebook. To upload clips to Vimeo, YouTube, or
Facebook, account registration is required. Still image clips cannot be uploaded to Vimeo or YouTube.
[Copy To Folder] Copy the sources to which the clip is linked to a desired folder.[Open with Explorer] Open the folder that includes the sources to which the clip is linked on the explorer screen.[Move to recycle bin] Move clips to [Recycle bin]. The moved clips can be viewed in [Recycle bin].[Restore] Restore the selected clips in [Recycle bin] to their original location.[Remove from library] Deregister clips from [Library].[Delete File] Delete the selected clips in [Recycle bin].[Open with] Open clips with the associated program.[Restore offline clip] Re-link the selected clips in [Offline clips].
This item is displayed only when [Offline clips] is selected in the sidebar.“Restoring Offline Clips” (w page 44)
2 f Depending on the clip conditions, a square mark may be displayed at the lower right of a thumbnail. (For [Thumbnail] view or [Timeline] view only)The clip conditions by colors are as follows. g Green: Clips registered to catalog g Yellow: Hidden clips g Red: Clips registered to [Library] (displayed only for thumbnails in [Folder]) g Blue: Clips with comments
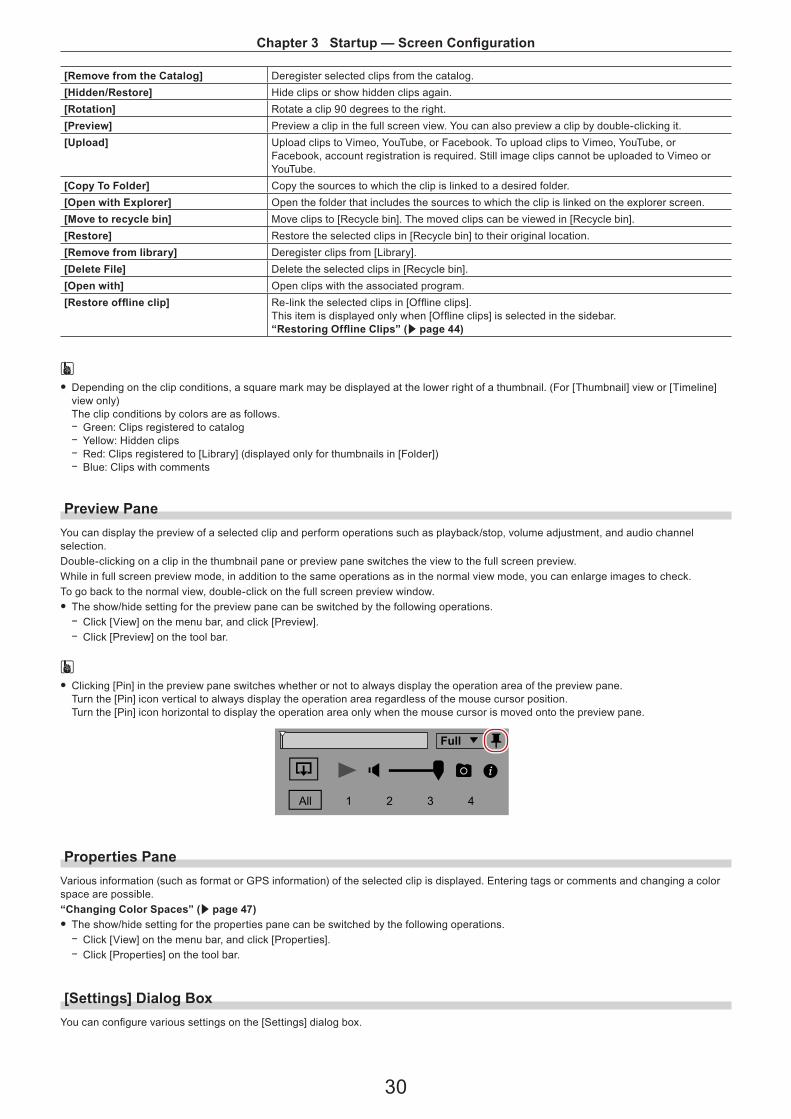
Preview PaneYou can display the preview of a selected clip and perform operations such as playback/stop, volume adjustment, and audio channel selection.Double-clicking on a clip in the thumbnail pane or preview pane switches the view to the full screen preview.While in full screen preview mode, in addition to the same operations as in the normal view mode, you can enlarge images to check.To go back to the normal view, double-click on the full screen preview window. f The show/hide setting for the preview pane can be switched by the following operations.
g Click [View] on the menu bar, and click [Preview]. g Click [Preview] on the tool bar.
2 f Clicking [Pin] in the preview pane switches whether or not to always display the operation area of the preview pane.Turn the [Pin] icon vertical to always display the operation area regardless of the mouse cursor position.Turn the [Pin] icon horizontal to display the operation area only when the mouse cursor is moved onto the preview pane.
All 1 2 3 4
Full
Properties PaneVarious information (such as format or GPS information) of the selected clip is displayed. Entering tags or comments and changing a color space are possible.“Changing Color Spaces” (w page 47) f The show/hide setting for the properties pane can be switched by the following operations.
g Click [View] on the menu bar, and click [Properties]. g Click [Properties] on the tool bar.
[Settings] Dialog BoxYou can configure various settings on the [Settings] dialog box.
Chapter 3 Startup — Screen Configuration
31
[General]
[Language] Set the display language.[Layout] Set the display mode according to the type of PC on which Mync is used.[Theme] Change the user interface color.
[Importer]
Checking [Enable QuickTime Importer] enables to handle the following format files.(Custom installation of QuickTime is required.) f Video: 3GP, 3G2, M4V, and MOV files of other codecs f Still image: Flash Pix, JPEG2000, Mac Pict, QuickTime Image f Audio: MOV (except for LPCM and AAC), QuickTime Audio
[Feedback]
Check this item to automatically send the data for a diagnosis result and usage conditions of Mync to Grass Valley.The sent data is used for the purposes of improving the quality, reliability, and performance of the software.If the dialog box for the user account control has appeared after clicking the check box, click [Yes] to continue the operation.
[View]
[Thumbnail] Set the poster frame to be displayed for thumbnail by specifying the number of seconds from the top frame.
[Sidebar] Set show/hide and number of items displayed on the imported histories of the sidebar, or set number of items displayed on the storyboard.
[Timecode] Set the TC mode to be used when a clip does not have timecode.
[Preview]
[Zebra] Set show/hide of zebra. You can set the upper/lower limit of the brightness level to detect, or select the color of the striped pattern to be displayed when the upper/lower limit is exceeded.
[On Screen Display] Set show/hide of audio level meter in the preview pane. You can also set the font size and display position of audio level meter.
[Full Screen Preview] This item is displayed only in the multiple monitor environment.You can select the monitor to display a full screen preview.
[Import]
[Card Copy] By selecting the check box of [Verify imported items when Card Copy], verify whether the imported sources are the same as the copy sources.
[Snapshot]Set the file format, quality, etc. of the still images exported from video.In [Destination], set the saving destination of exported still image files.“Exporting Still Images” (w page 47)
[Metadata] [Metadata] Edit/delete metadata such as tags or camera name.[Share] [Upload] Add/delete Vimeo, YouTube, or Facebook accounts.
[Performance] [Hardware decode] Decoding of H.264, H.265, and video RAW files can be made quicker using hardware. f The items that can be selected may differ depending on the editing environment.

32
Chapter 4Importing SourcesThis chapter explains how to import sources from a device such as USB memory or camera connected to PC and register them to [Library].
Chapter 4 Importing Sources — Importing/Registering Sources
33
Importing/Registering SourcesYou can copy and import sources from a device connected to PC (such as smartphone, USB memory, SD memory card used for camera) and register them to [Library].You can also import source files saved in the PC.The imported histories are recorded so that later reference or search will be available.
Importing from DevicesYou can import sources from a device such as USB memory or camera connected to PC and register them to [Library].You can also perform batch import of sources, or just register them to [Library] without importing.
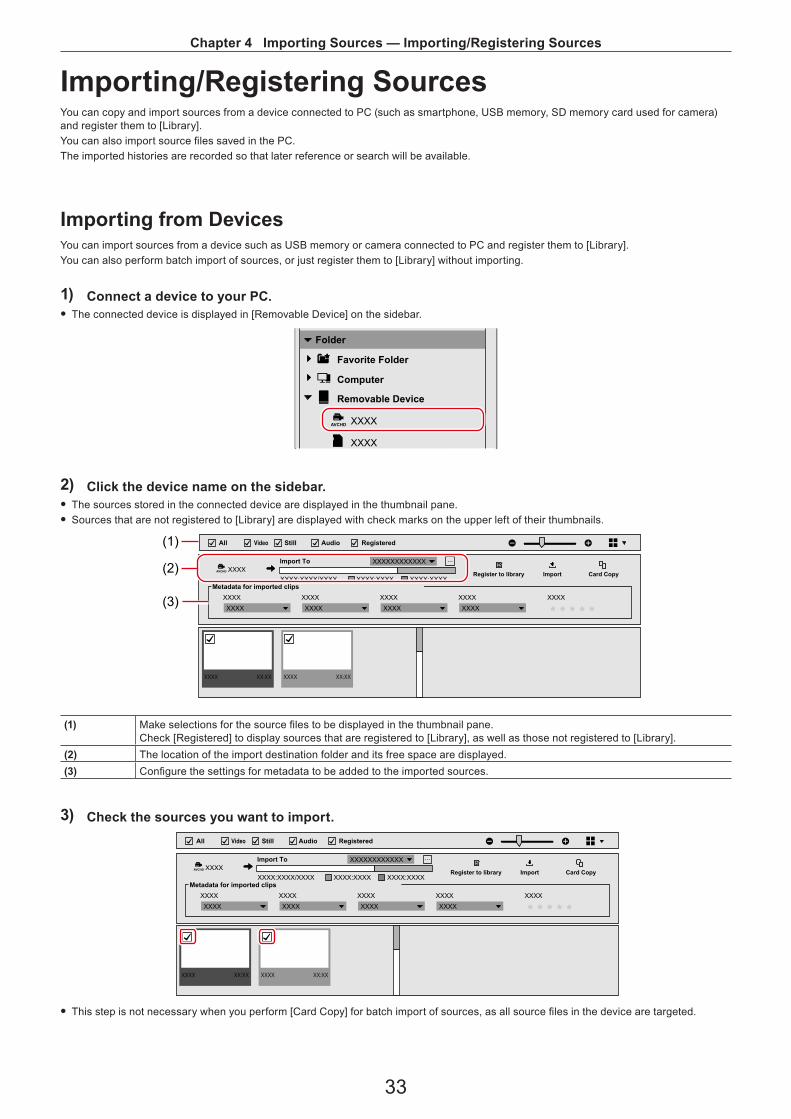
1) Connect a device to your PC. f The connected device is displayed in [Removable Device] on the sidebar.
XXXX
XXXX
Folder
Favorite Folder
Computer
Removable Device
2) Click the device name on the sidebar. f The sources stored in the connected device are displayed in the thumbnail pane. f Sources that are not registered to [Library] are displayed with check marks on the upper left of their thumbnails.
XXXX:XXXXXXXX:XXXXXXXX:XXXX/XXXX
XXXX XX:XX
XXXX
XXXXXXXXXXXX
XXXXXXXX
XXXXXXXX
XXXXXXXX
XXXX
XXXX
XXXX
XXXX XX:XX
...
Register to library Import Card Copy
Metadata for imported clips
All Video Still Audio
Import To
Registered(1)
(2)
(3)
(1) Make selections for the source files to be displayed in the thumbnail pane.Check [Registered] to display sources that are registered to [Library], as well as those not registered to [Library].
(2) The location of the import destination folder and its free space are displayed.(3) Configure the settings for metadata to be added to the imported sources.
3) Check the sources you want to import.
XXXX:XXXXXXXX:XXXXXXXX:XXXX/XXXX
XXXX XX:XX
XXXX
XXXXXXXXXXXX
XXXXXXXX
XXXXXXXX
XXXXXXXX
XXXX
XXXX
XXXX
XXXX XX:XX
...
Register to library Import Card Copy
Metadata for imported clips
All Video Still Audio
Import To
Registered
f This step is not necessary when you perform [Card Copy] for batch import of sources, as all source files in the device are targeted.
Chapter 4 Importing Sources — Importing/Registering Sources
34
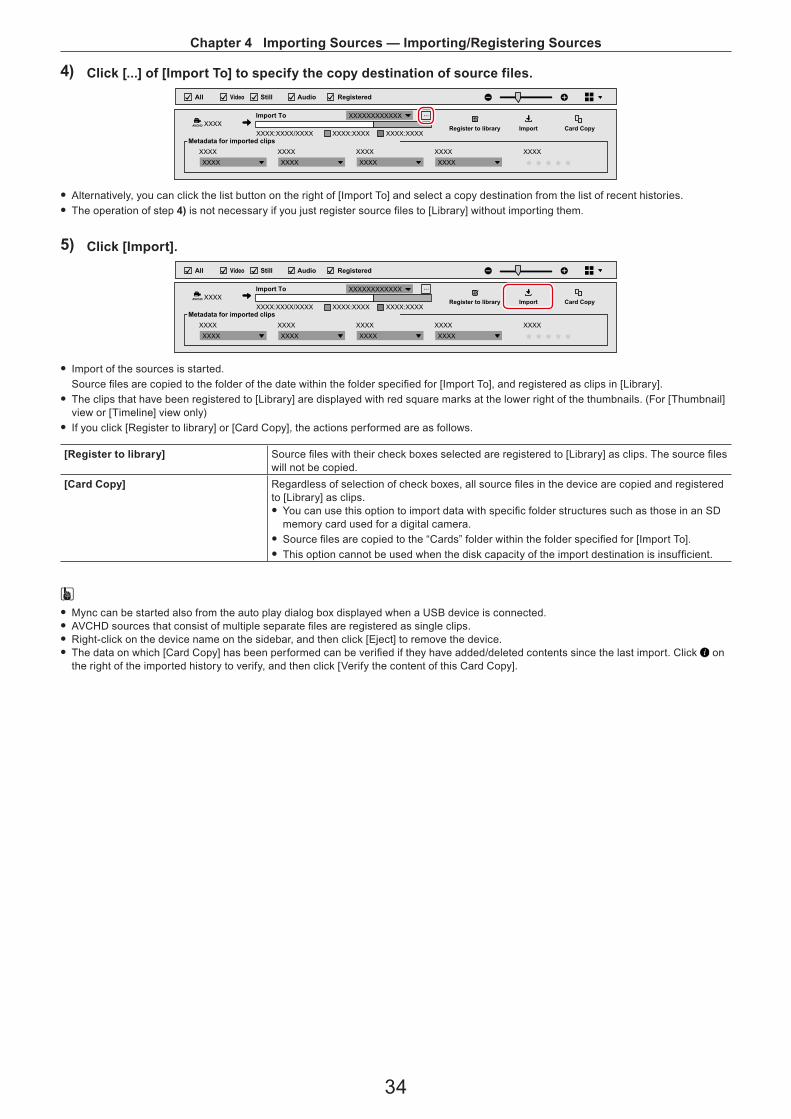
4) Click [...] of [Import To] to specify the copy destination of source files.
XXXX:XXXXXXXX:XXXXXXXX:XXXX/XXXX
XXXX
XXXXXXXXXXXX
XXXXXXXX
XXXXXXXX
XXXXXXXX
XXXX
XXXX
XXXX
...
Register to library Import Card Copy
Metadata for imported clips
All Video Still Audio
Import To
Registered
f Alternatively, you can click the list button on the right of [Import To] and select a copy destination from the list of recent histories. f The operation of step 4) is not necessary if you just register source files to [Library] without importing them.
5) Click [Import].
XXXX:XXXXXXXX:XXXXXXXX:XXXX/XXXX
XXXX
XXXXXXXXXXXX
XXXXXXXX
XXXXXXXX
XXXXXXXX
XXXX
XXXX
XXXX
...
Register to library Import Card Copy
Metadata for imported clips
All Video Still Audio
Import To
Registered
f Import of the sources is started.Source files are copied to the folder of the date within the folder specified for [Import To], and registered as clips in [Library].
f The clips that have been registered to [Library] are displayed with red square marks at the lower right of the thumbnails. (For [Thumbnail] view or [Timeline] view only)
f If you click [Register to library] or [Card Copy], the actions performed are as follows.
[Register to library] Source files with their check boxes selected are registered to [Library] as clips. The source files will not be copied.
[Card Copy] Regardless of selection of check boxes, all source files in the device are copied and registered to [Library] as clips. f You can use this option to import data with specific folder structures such as those in an SD memory card used for a digital camera.
f Source files are copied to the “Cards” folder within the folder specified for [Import To]. f This option cannot be used when the disk capacity of the import destination is insufficient.
2 f Mync can be started also from the auto play dialog box displayed when a USB device is connected. f AVCHD sources that consist of multiple separate files are registered as single clips. f Right-click on the device name on the sidebar, and then click [Eject] to remove the device. f The data on which [Card Copy] has been performed can be verified if they have added/deleted contents since the last import. Click on the right of the imported history to verify, and then click [Verify the content of this Card Copy].
Chapter 4 Importing Sources — Importing/Registering Sources
35
Importing from PCYou can import sources saved on a PC and register them to [Library].
1) Click on the [Computer] tree on the sidebar, and then click the folder where the source you want to import is stored.
f The sources in the selected folder are displayed.
2) Check the sources you wish to import, and click [Import]. f Source files are copied to the import destination folder and registered as clips in [Library].
1 Alternative f Click [File] on the menu bar, and click [Register to library]. Select a source and click [Open] to register the clip to [Library]. The source files will not be copied.
f Click [File] on the menu bar, and click [Register a folder to library]. Select a folder and click [Select Folder] to register all source files in the selected folder to [Library]. The source files will not be copied.
Viewing Imported HistoriesAfter performing [Import] or [Card Copy], you can view the imported histories of source files from a device or PC.
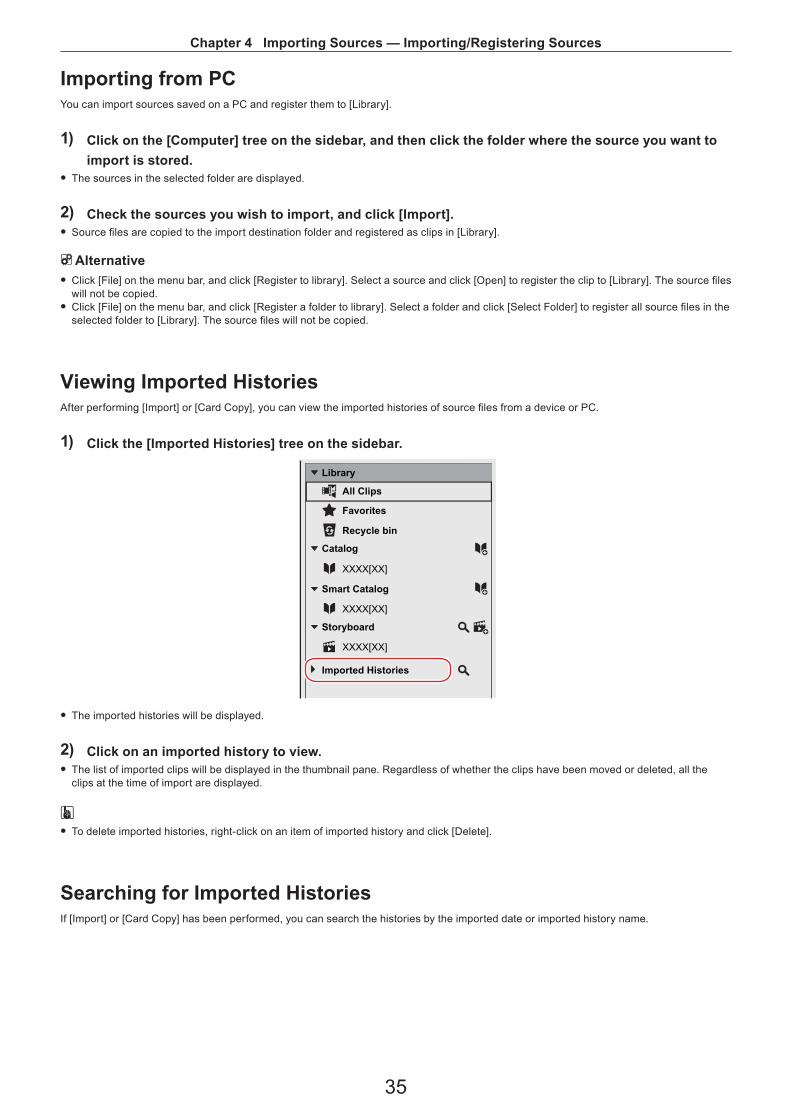
1) Click the [Imported Histories] tree on the sidebar.
XXXX[XX]
XXXX[XX]
XXXX[XX]
Library
Catalog
Smart Catalog
Storyboard
Imported Histories
All Clips
Recycle bin
Favorites
f The imported histories will be displayed.
2) Click on an imported history to view. f The list of imported clips will be displayed in the thumbnail pane. Regardless of whether the clips have been moved or deleted, all the clips at the time of import are displayed.
2 f To delete imported histories, right-click on an item of imported history and click [Delete].
Searching for Imported HistoriesIf [Import] or [Card Copy] has been performed, you can search the histories by the imported date or imported history name.
Chapter 4 Importing Sources — Importing/Registering Sources
36
1) Click [Edit] on the menu bar, and click [Search Import History]. f The [Search Import History] bar appears.
XXXX/XX/XX X:XX:XX XX XXXX/XX/XX X:XX:XX XX
4321
ID
XXXXXXXXXXXXXXXXXXXXXXXX
XXXXXXXX
XXXX/XX/XX XX:XX:XXXXXX/XX/XX XX:XX:XXXXXX/XX/XX XX:XX:XXXXXX/XX/XX XX:XX:XX
Media TypeImported Histories Imported Date
All Video Still Audio
Search Import History
Registered
f Alternatively, you can click the magnifier icon on the right of [Imported Histories] of the sidebar to display the [Search Import History] bar.
2) Specify the search conditions. f The search result is displayed in a list. f If you click on the history you want to view, the list of the imported clips is displayed in the thumbnail pane. Regardless of whether the clips have been moved or deleted, all the clips at the time of import are displayed.
Registering Frequently Used Import DestinationYou can register folders that are frequently used when you import sources stored on PC to [Favorite Folder].Once registered, the folders can be displayed quickly.
2 f The following preset shortcuts are included in the [Favorite Folder].
g [Desktop]: Shows folders on the desktop of PC containing files that can be imported. g [Pictures]: Shows folders managed by “Pictures” on PC containing files that can be imported. g [Videos]: Shows folders managed by “Videos” on PC containing files that can be imported.
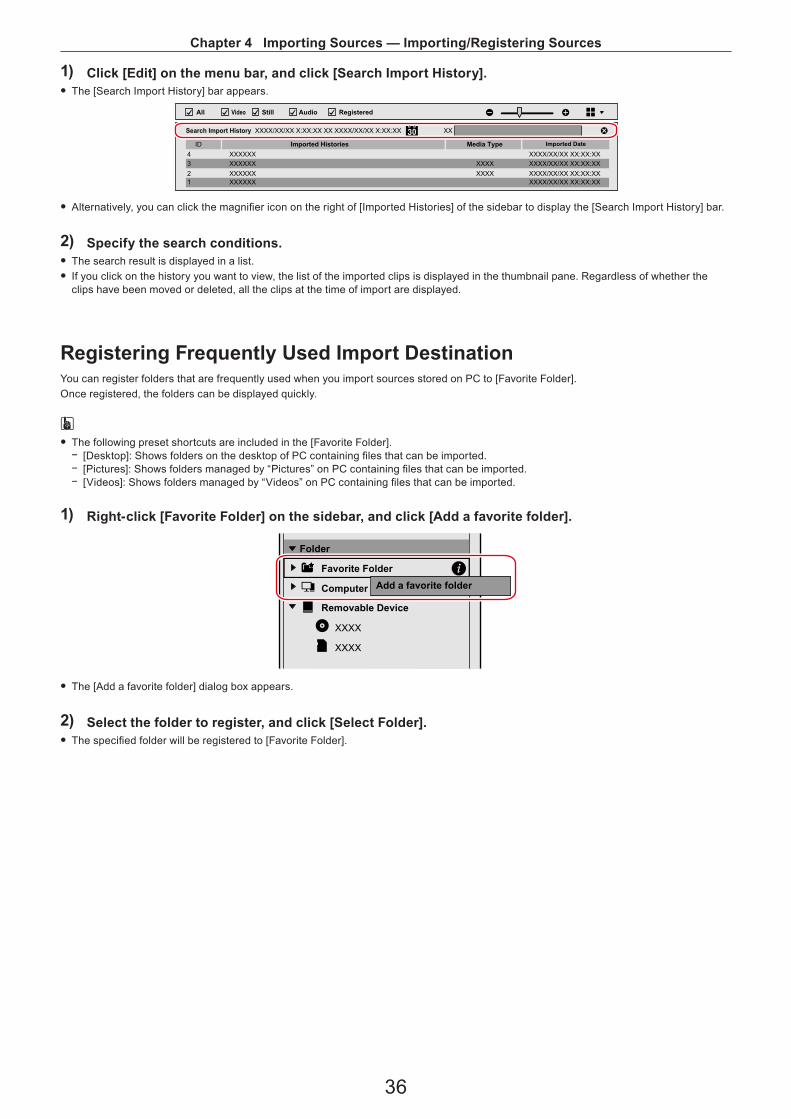
1) Right-click [Favorite Folder] on the sidebar, and click [Add a favorite folder].
XXXX
XXXX
Folder
Favorite Folder
Computer
Removable Device
Add a favorite folder
f The [Add a favorite folder] dialog box appears.
2) Select the folder to register, and click [Select Folder]. f The specified folder will be registered to [Favorite Folder].
37
Chapter 5Playback of ClipThis chapter explains how to play back clips that are registered to [Library].
Chapter 5 Playback of Clip — Playback of Clip
38
Playback of ClipClips registered to [Library] can be played back in the preview pane. f Click [View] on the menu bar, and click [Preview] to display the preview pane in advance.
1) Click on a clip in the thumbnail pane. f A preview image will be displayed in the preview pane. f For a video clip or music clip, proceed to step 2).
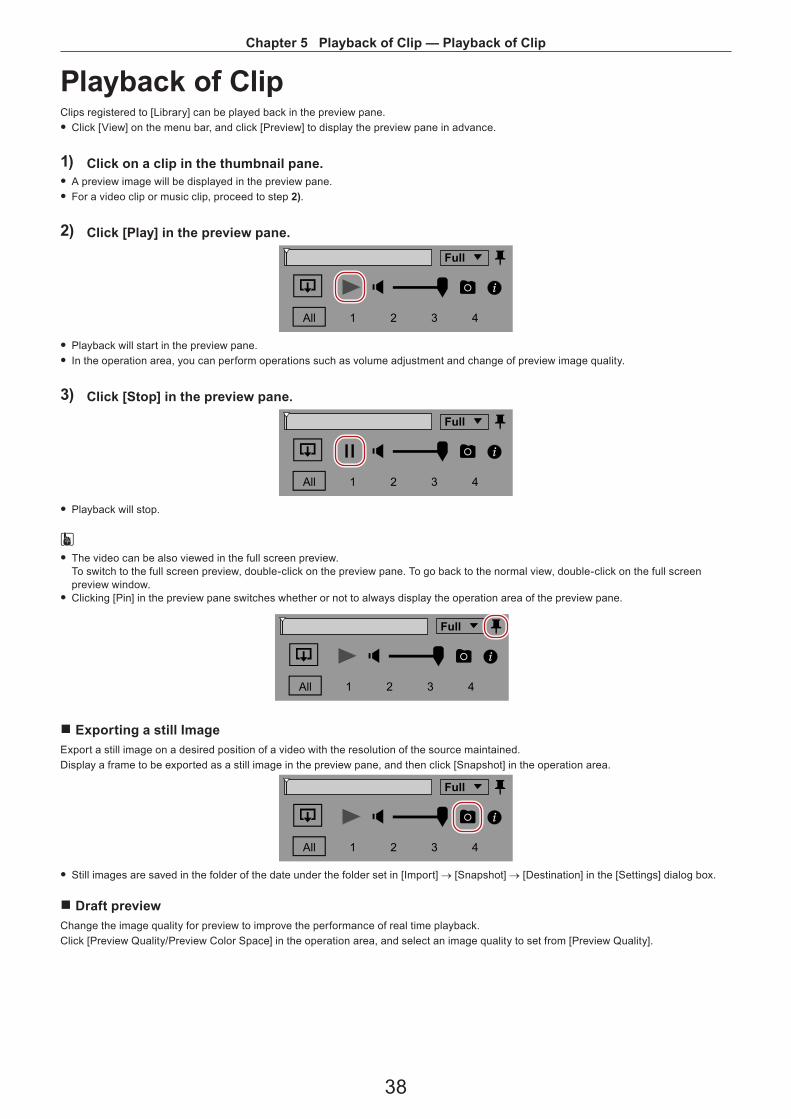
2) Click [Play] in the preview pane.
All 1 2 3 4
Full
f Playback will start in the preview pane. f In the operation area, you can perform operations such as volume adjustment and change of preview image quality.
3) Click [Stop] in the preview pane.
All 1 2 3 4
Full
f Playback will stop.
2 f The video can be also viewed in the full screen preview.To switch to the full screen preview, double-click on the preview pane. To go back to the normal view, double-click on the full screen preview window.
f Clicking [Pin] in the preview pane switches whether or not to always display the operation area of the preview pane.
All 1 2 3 4
Full
r Exporting a still ImageExport a still image on a desired position of a video with the resolution of the source maintained.Display a frame to be exported as a still image in the preview pane, and then click [Snapshot] in the operation area.
All 1 2 3 4
Full
f Still images are saved in the folder of the date under the folder set in [Import] → [Snapshot] → [Destination] in the [Settings] dialog box.
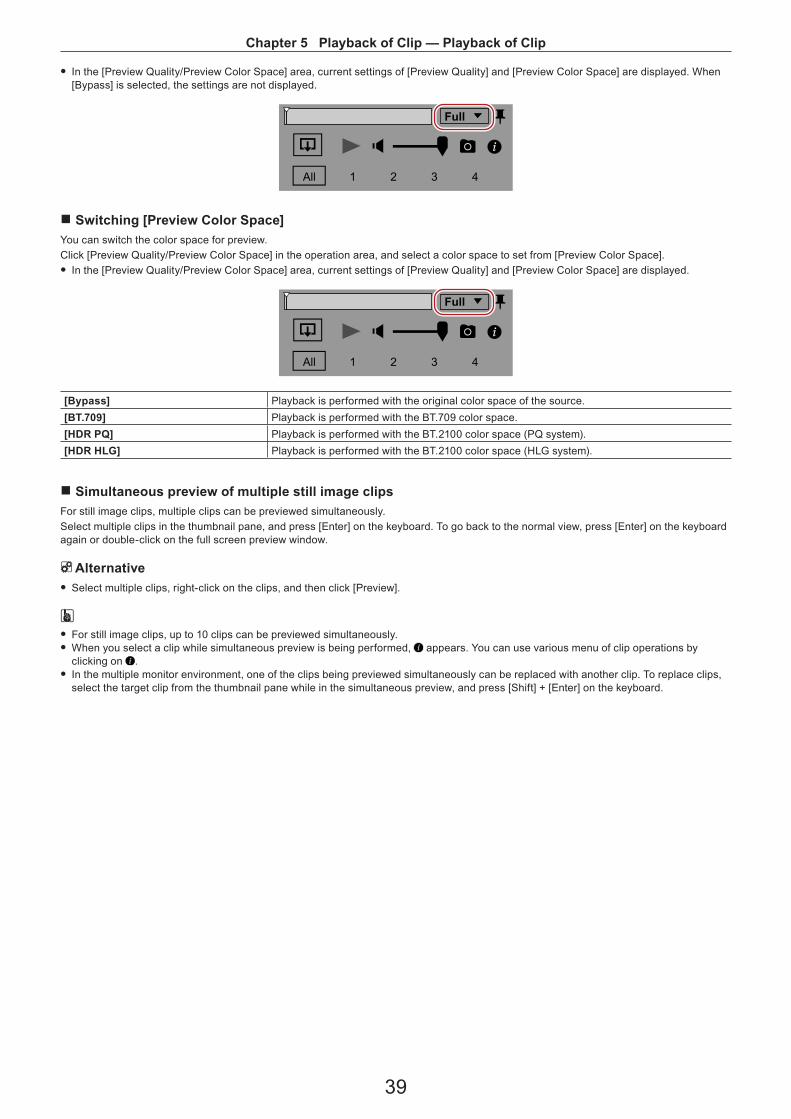
r Draft previewChange the image quality for preview to improve the performance of real time playback.Click [Preview Quality/Preview Color Space] in the operation area, and select an image quality to set from [Preview Quality].
Chapter 5 Playback of Clip — Playback of Clip
39
f In the [Preview Quality/Preview Color Space] area, current settings of [Preview Quality] and [Preview Color Space] are displayed. When [Bypass] is selected, the settings are not displayed.
All 1 2 3 4
Full
r Switching [Preview Color Space]You can switch the color space for preview.Click [Preview Quality/Preview Color Space] in the operation area, and select a color space to set from [Preview Color Space]. f In the [Preview Quality/Preview Color Space] area, current settings of [Preview Quality] and [Preview Color Space] are displayed.
All 1 2 3 4
Full
[Bypass] Playback is performed with the original color space of the source.[BT.709] Playback is performed with the BT.709 color space.[HDR PQ] Playback is performed with the BT.2100 color space (PQ system).[HDR HLG] Playback is performed with the BT.2100 color space (HLG system).
r Simultaneous preview of multiple still image clipsFor still image clips, multiple clips can be previewed simultaneously.Select multiple clips in the thumbnail pane, and press [Enter] on the keyboard. To go back to the normal view, press [Enter] on the keyboard again or double-click on the full screen preview window.
1 Alternative f Select multiple clips, right-click on the clips, and then click [Preview].
2 f For still image clips, up to 10 clips can be previewed simultaneously. f When you select a clip while simultaneous preview is being performed, appears. You can use various menu of clip operations by clicking on .
f In the multiple monitor environment, one of the clips being previewed simultaneously can be replaced with another clip. To replace clips, select the target clip from the thumbnail pane while in the simultaneous preview, and press [Shift] + [Enter] on the keyboard.
40
Chapter 6Organizing/Managing ClipsThis chapter explains how to utilize [Catalog] and [Smart Catalog] to manage clips and how to restore offline clips.
Chapter 6 Organizing/Managing Clips — Organizing Clips ([Catalog]/[Smart Catalog])
41
Organizing Clips ([Catalog]/[Smart Catalog])On Mync, you can use [Catalog] and [Smart Catalog] for tools to organize clips registered to [Library].Grouping by [Catalog] and [Smart Catalog] can be used as it is on the [Storyboard] (for movie creation) or source browser of EDIUS.
3 Note f Interaction with EDIUS is supported only for Mync that comes with EDIUS.
r What is [Catalog]?You can drag and drop the clips in [Library] to collect desired clips.
r What is [Smart Catalog]?The sources that match the specified conditions can be searched for and collected automatically.You can set a combination of multiple conditions for each smart catalog by selecting [Maker], [Camera Model], [Creator], [Tag], [Rating], etc.Update in [Library] is reflected in real time so that the latest search result can be obtained any time.
Grouping Clips ([Catalog])Using the [Catalog] function, you can group registered clips, create [Storyboard] from grouped [Catalog] to edit movies, and perform other operations.If you use Mync that has come with EDIUS, the grouped [Catalog] and [Storyboard] can be displayed on the source browser of EDIUS or registered to the bin of EDIUS.“Creating New Storyboard from Catalog/Smart Catalog” (w page 54)“Interaction with EDIUS” (w page 67)
3 Note f Interaction with EDIUS is supported only for Mync that comes with EDIUS.
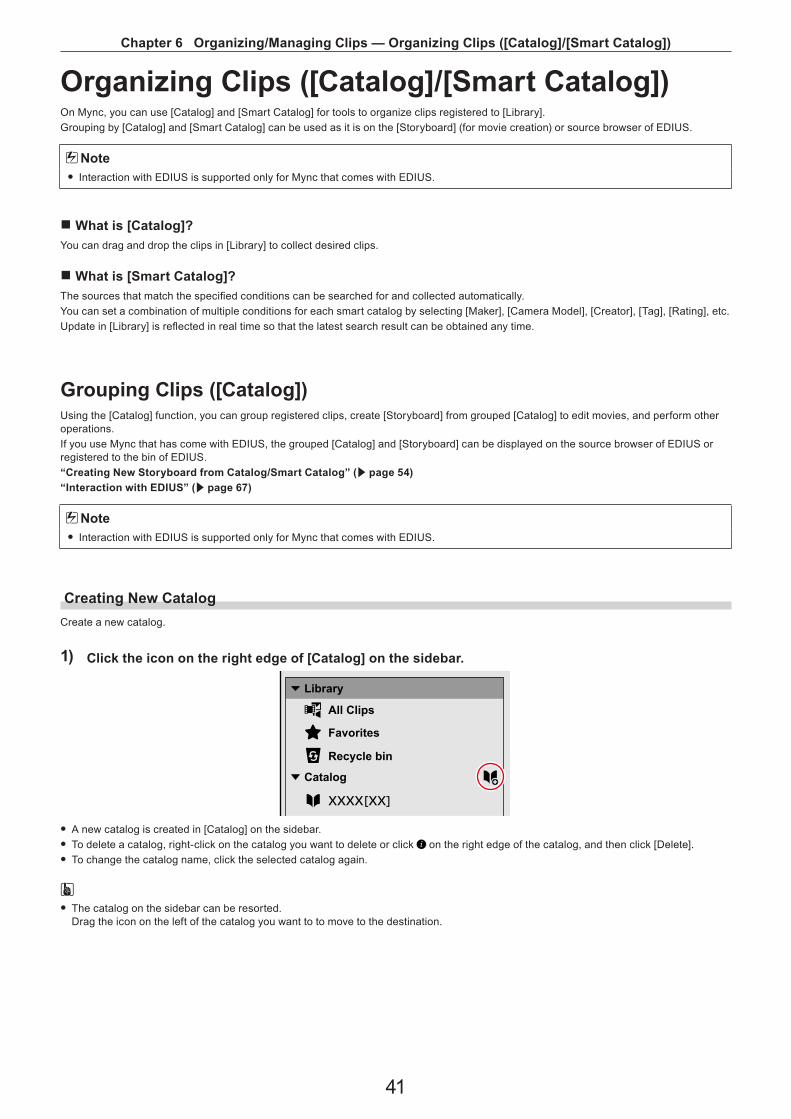
Creating New CatalogCreate a new catalog.
1) Click the icon on the right edge of [Catalog] on the sidebar.
XXXX[XX]
Library
Catalog
All Clips
Recycle bin
Favorites
f A new catalog is created in [Catalog] on the sidebar. f To delete a catalog, right-click on the catalog you want to delete or click on the right edge of the catalog, and then click [Delete]. f To change the catalog name, click the selected catalog again.
2 f The catalog on the sidebar can be resorted.Drag the icon on the left of the catalog you want to to move to the destination.
Chapter 6 Organizing/Managing Clips — Organizing Clips ([Catalog]/[Smart Catalog])
42
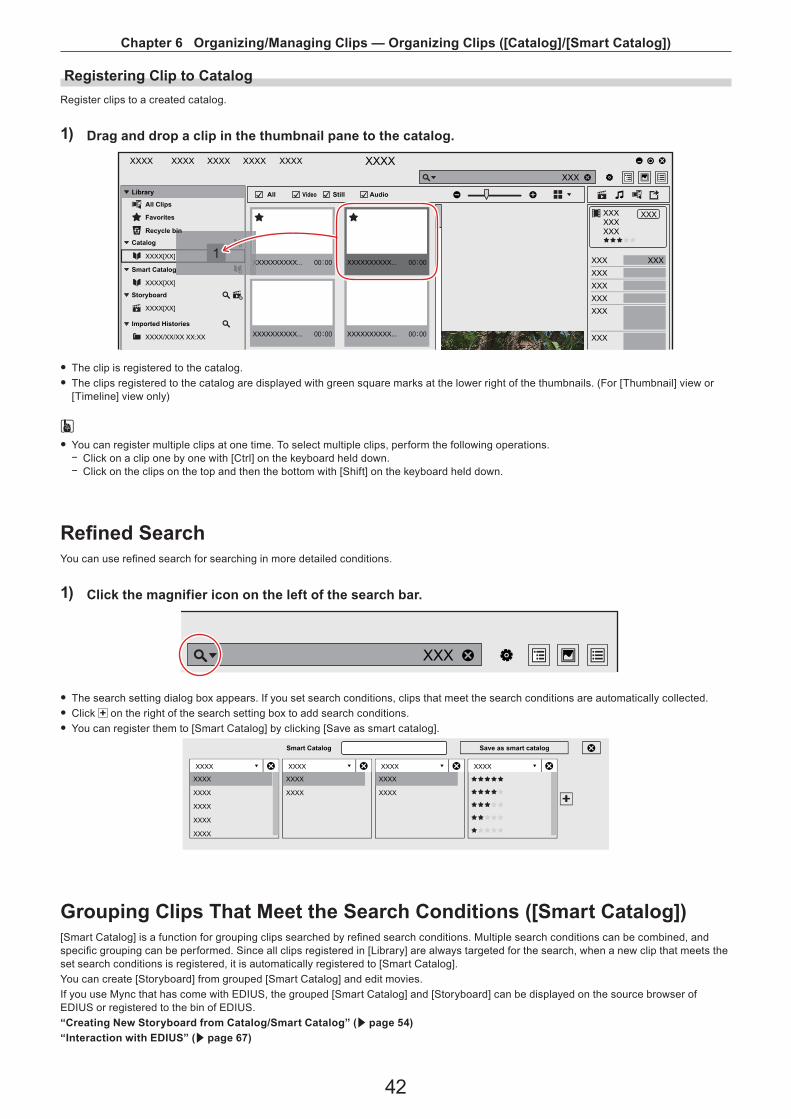
Registering Clip to CatalogRegister clips to a created catalog.
1) Drag and drop a clip in the thumbnail pane to the catalog.
XXXX XXXX XXXX XXXX XXXX XXXXXXX
XXX
XXX XXX
XXXXXX
XXXXXXXXXX... 00:00
XXXXXXXXXX... 00:00
XXXXXXXXXX... 00:00
XXXXXXXXXX... 00:00
XXXXXXXXXXXX
XXX
XXXX[XX]
XXXX[XX]
XXXX[XX]
XXXX/XX/XX XX:XX
XXX
XXXXXXXXXX..1
Library All Video Still Audio
Catalog
Smart Catalog
Storyboard
Imported Histories
All Clips
Recycle bin
Favorites
f The clip is registered to the catalog. f The clips registered to the catalog are displayed with green square marks at the lower right of the thumbnails. (For [Thumbnail] view or [Timeline] view only)
2 f You can register multiple clips at one time. To select multiple clips, perform the following operations.
g Click on a clip one by one with [Ctrl] on the keyboard held down. g Click on the clips on the top and then the bottom with [Shift] on the keyboard held down.
Refi ned SearchYou can use refi ned search for searching in more detailed conditions.
1) Click the magnifier icon on the left of the search bar.
XXX
f The search setting dialog box appears. If you set search conditions, clips that meet the search conditions are automatically collected. f Click on the right of the search setting box to add search conditions. f You can register them to [Smart Catalog] by clicking [Save as smart catalog].
XXXX XXXX XXXX
XXXX
XXXX
XXXX
XXXX
XXXX XXXX
XXXX XXXX XXXX XXXX
Smart Catalog Save as smart catalog
Grouping Clips That Meet the Search Conditions ([Smart Catalog])[Smart Catalog] is a function for grouping clips searched by refi ned search conditions. Multiple search conditions can be combined, and specifi c grouping can be performed. Since all clips registered in [Library] are always targeted for the search, when a new clip that meets the set search conditions is registered, it is automatically registered to [Smart Catalog].You can create [Storyboard] from grouped [Smart Catalog] and edit movies.If you use Mync that has come with EDIUS, the grouped [Smart Catalog] and [Storyboard] can be displayed on the source browser of EDIUS or registered to the bin of EDIUS.“Creating New Storyboard from Catalog/Smart Catalog” (w page 54)“Interaction with EDIUS” (w page 67)
Chapter 6 Organizing/Managing Clips — Organizing Clips ([Catalog]/[Smart Catalog])
43
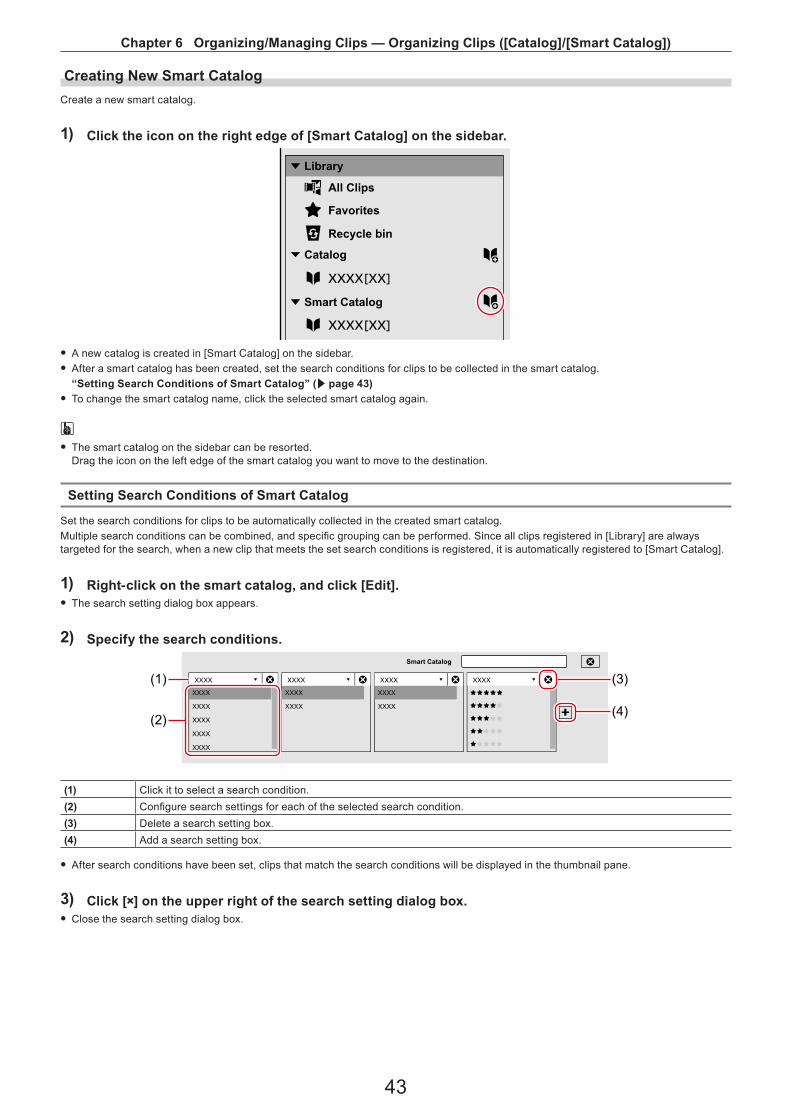
Creating New Smart CatalogCreate a new smart catalog.
1) Click the icon on the right edge of [Smart Catalog] on the sidebar.
XXXX[XX]
XXXX[XX]
Library
Catalog
All Clips
Recycle bin
Favorites
Smart Catalog
f A new catalog is created in [Smart Catalog] on the sidebar. f After a smart catalog has been created, set the search conditions for clips to be collected in the smart catalog.“Setting Search Conditions of Smart Catalog” (w page 43)
f To change the smart catalog name, click the selected smart catalog again.
2 f The smart catalog on the sidebar can be resorted.Drag the icon on the left edge of the smart catalog you want to move to the destination.
Setting Search Conditions of Smart Catalog
Set the search conditions for clips to be automatically collected in the created smart catalog.Multiple search conditions can be combined, and specific grouping can be performed. Since all clips registered in [Library] are always targeted for the search, when a new clip that meets the set search conditions is registered, it is automatically registered to [Smart Catalog].
1) Right-click on the smart catalog, and click [Edit]. f The search setting dialog box appears.
2) Specify the search conditions.
XXXX XXXX XXXX
XXXX
XXXX
XXXX
XXXX
XXXX XXXX
XXXX XXXX XXXX XXXX
Smart Catalog
(1)
(2)
(3)
(4)
(1) Click it to select a search condition.(2) Configure search settings for each of the selected search condition.(3) Delete a search setting box.(4) Add a search setting box.
f After search conditions have been set, clips that match the search conditions will be displayed in the thumbnail pane.
3) Click [×] on the upper right of the search setting dialog box. f Close the search setting dialog box.
Chapter 6 Organizing/Managing Clips — Managing Clips
44
Managing ClipsYou can register clips that are registered to [Library] to [Favorites], or restore offline clips with dead links. You can also search for registered clips that are duplicated, and hide or delete them.
Registering to [Favorites]
1) Click the star mark on the upper left of the thumbnail in the thumbnail pane. f The clip is registered to [Favorites].Click the star mark again to unregister it from [Favorites].
1 Alternative f Drag and drop the clip in the thumbnail pane to the [Favorites] on the sidebar.
2 f Clips registered to [Favorites] are automatically rated as three stars in [Rating].The number of stars in [Rating] can be changed by clicking a star in the properties. Rating can be set up to five stars, and clips can be searched by the number of stars.“Refined Search” (w page 42)
Restoring Offline ClipsIf a source registered to [Library] is moved or renamed, the link between Mync and the source will be lost, and the clips will become offline clips. This section describes the method to support restoration of an offline clip.
1) Click [Edit] on the menu bar, and click [Search offline clips]. f Offline clips are searched, and [Offline clips] will be created in the [Library] of the sidebar. Click [Offline clips] to display offline clips in the thumbnail pane.
f Offline clips are displayed with red circle marks at the lower right of the thumbnails in the thumbnail pane.
2) Right-click an offline clip in the thumbnail pane, and click [Restore offline clip]. f The [Restore offline clip] dialog box appears.
3) Click [...] in [Target file path]. f The [Restore offline clip] dialog box appears. f To specify a folder and search for a source with an identical name in the specified folder and its sub folders, click [Search Folder].
4) Select a source, and click [Open]. f If [Search Folder] has been clicked in step 3), specify a folder to search, and click [Select Folder]. f If the offline clip matches the selected file, a check mark appears on [Consistency].
5) Click [Start]. f Mync and the source are re-linked. f When re-linking has been succeeded, a check mark appears on [Restore], and the red circle displayed on the thumbnail in the thumbnail pane disappears.
6) Click [Close]. f The [Restore offline clip] dialog box is closed.
2 f When specifying a folder to search, you can select multiple offline clips in step 2) to search at once.
Chapter 6 Organizing/Managing Clips — Managing Clips
45
Searching Duplicated ClipsYou can specify search conditions and search for duplicated clips.The duplicated clips that have been detected can be edited in properties, hidden, or moved to the recycle bin.
2 f To search in a specific catalog, select the target catalog before searching.
Example:
To change the properties of a duplicated clip
1) Click [Edit] on the menu bar, and click [Search duplicate clips]. f The [Search duplicate clips] dialog box appears.
2) Set [Search Mode] and [Search in]. f [Search Mode] specifies the details of duplication to search. [Search in] refines the search targets. f To search in specified catalogs, select [Selected catalogs] in [Search in].
3) Click [Search]. f Duplicated clips will be searched, and [Duplicate clips] will be created in [Library] of the sidebar. The duplicated clips are displayed in the thumbnail pane.
f An identical [Duplicate ID] is given to duplicated clips.[Duplicate ID] can be viewed by switching the thumbnail pane display to [Details].
4) Select the check boxes of the clips whose properties are to be edited, and click [Edit properties]. f The [Edit properties] dialog box appears.
5) Edit the properties and click [OK].
2 f If you click [Hide] in step 4), the clips with their check boxes selected will be hidden. f If you click [Move to recycle bin] in step 4), the clips with their check boxes selected will be moved to the recycle bin.
Tagging to ClipsTags can be set to clips in simple operations by registering tag information to keyboard shortcuts.
Registering TagsRegister tag information to the prepared keyboard shortcuts.
1) Click [Edit] on the menu bar, and click [Tagging]. f The [Tagging] dialog box appears.
2) Enter tag information in the entry field. f Enter the information in the entry field for the keyboard shortcut to use. f Clicking on of the entry field shows existing tags used in [Library] of Mync. Clicking on a tag to use populates the entry field with the tag.
3) Press [Enter] on the keyboard. f The entered information is confirmed and registered as a keyboard shortcut. f Multiple tags can be registered to a single keyboard shortcut. To continue registering keyboard shortcuts, repeat steps 2) through 3).
4) Click [×] on the upper right of the [Tagging] dialog box. f The [Tagging] dialog box is closed.
1 Alternative f Showing/hiding the [Tagging] dialog box: [Ctrl] + [K]

Chapter 6 Organizing/Managing Clips — Managing Clips
46
2 f By clicking on a registered tag in the entry field of the [Tagging] dialog box, you can edit tag information or delete the tag.
Tagging with Keyboard Shortcut OperationYou can tag clips with keyboard shortcut operation.“Registering Tags” (w page 45)
Example:
To add a tag registered as keyboard shortcut [Ctrl] + [1] to a clip
1) Click on a clip in the thumbnail pane.
2) Press [Ctrl] + [1] on the keyboard.
2 f The tags of the selected clip are displayed in [Tags in selected clips] of the [Tagging] dialog box. It is useful to keep the [Tagging] dialog box displayed so that you can tag while checking the information of the tags added to the clip.
f Showing [Tagging] dialog box and tagging with keyboard shortcuts are available while full screen preview is being performed. f Tags added with keyboard shortcuts can be deleted using the same keyboard shortcuts.
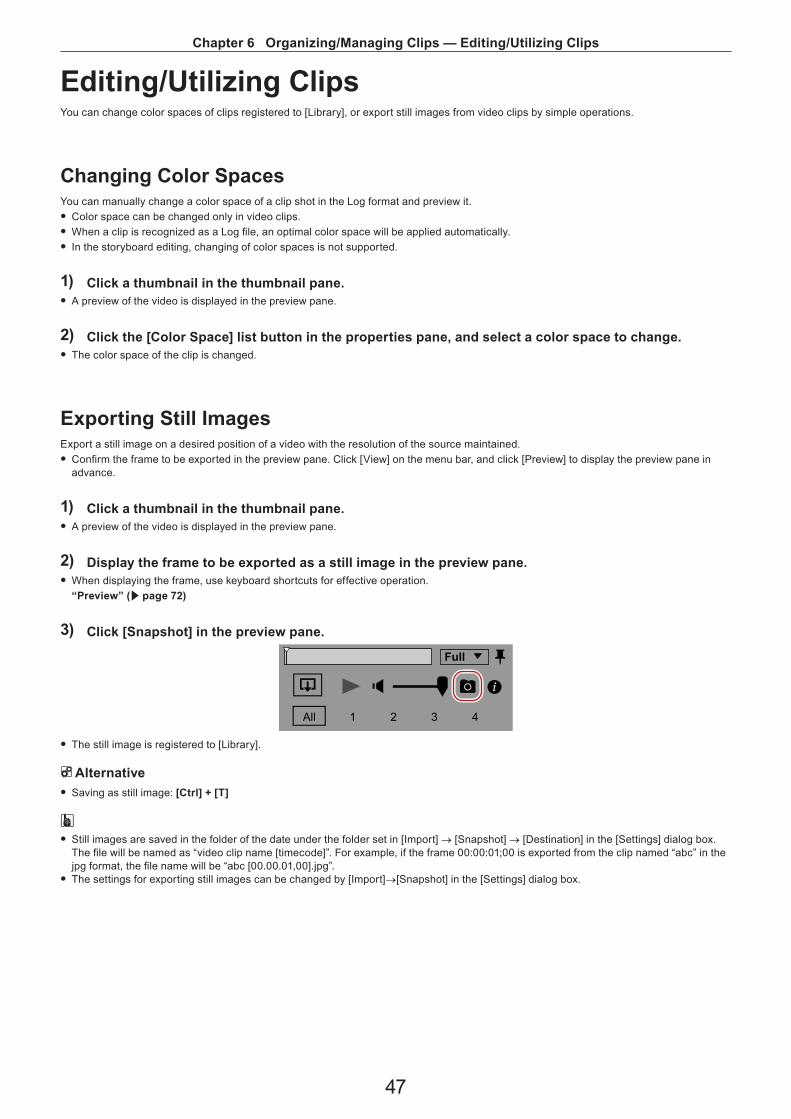
Chapter 6 Organizing/Managing Clips — Editing/Utilizing Clips
47
Editing/Utilizing ClipsYou can change color spaces of clips registered to [Library], or export still images from video clips by simple operations.
Changing Color SpacesYou can manually change a color space of a clip shot in the Log format and preview it. f Color space can be changed only in video clips. f When a clip is recognized as a Log file, an optimal color space will be applied automatically. f In the storyboard editing, changing of color spaces is not supported.
1) Click a thumbnail in the thumbnail pane. f A preview of the video is displayed in the preview pane.
2) Click the [Color Space] list button in the properties pane, and select a color space to change. f The color space of the clip is changed.
Exporting Still ImagesExport a still image on a desired position of a video with the resolution of the source maintained. f Confirm the frame to be exported in the preview pane. Click [View] on the menu bar, and click [Preview] to display the preview pane in advance.
1) Click a thumbnail in the thumbnail pane. f A preview of the video is displayed in the preview pane.
2) Display the frame to be exported as a still image in the preview pane. f When displaying the frame, use keyboard shortcuts for effective operation.“Preview” (w page 72)
3) Click [Snapshot] in the preview pane.
All 1 2 3 4
Full
f The still image is registered to [Library].
1 Alternative f Saving as still image: [Ctrl] + [T]
2 f Still images are saved in the folder of the date under the folder set in [Import] → [Snapshot] → [Destination] in the [Settings] dialog box.The file will be named as “video clip name [timecode]”. For example, if the frame 00:00:01;00 is exported from the clip named “abc” in the jpg format, the file name will be “abc [00.00.01,00].jpg”.
f The settings for exporting still images can be changed by [Import]→[Snapshot] in the [Settings] dialog box.

Chapter 6 Organizing/Managing Clips — Editing/Utilizing Clips
48
Setting Still Image Clips as SequenceCombine multiple still image clips as a single sequence clip and register it to [Library].You can create a movie-like time lapse clip that is made of combined still images shot in a certain intervals.
3 Note f If the frame sizes of selected still image clips differ, they cannot be combined. f Sequence clips can be shared online only via FTP.
1) Select multiple still image clips in the thumbnail pane.
2 f To select multiple clips, perform the following operations.
g Click on a clip one by one with [Ctrl] on the keyboard held down. g Click on a clip on the top and then the bottom with [Shift] on the keyboard held down.
2) Right-click on the selected still image clips, and click [Set as Still Sequence]. f The selected still image clips are combined in the order of file names and registered to [Library] as a single sequence clip. f The name of the sequence clip will be the same as the first clip among the combined clips. f The number of combined still image clips appears on the upper right of the thumbnail of created sequence clip.
2 f To change the playback speed, change the frame rate of the sequence clip. Click the [Frame Rate] list button in the properties pane, and select a frame rate to apply.
Canceling a Set SequenceCancel combining of a sequence clip.
1) Right-click on a sequence clip, and click [Cancel Sequence]. f After the sequence is canceled, the clip name returns to the one before the clips are combined.

49
Chapter 7Creating MoviesThis chapter explains how to use clips registered to [Library] to create movies by simple operations.
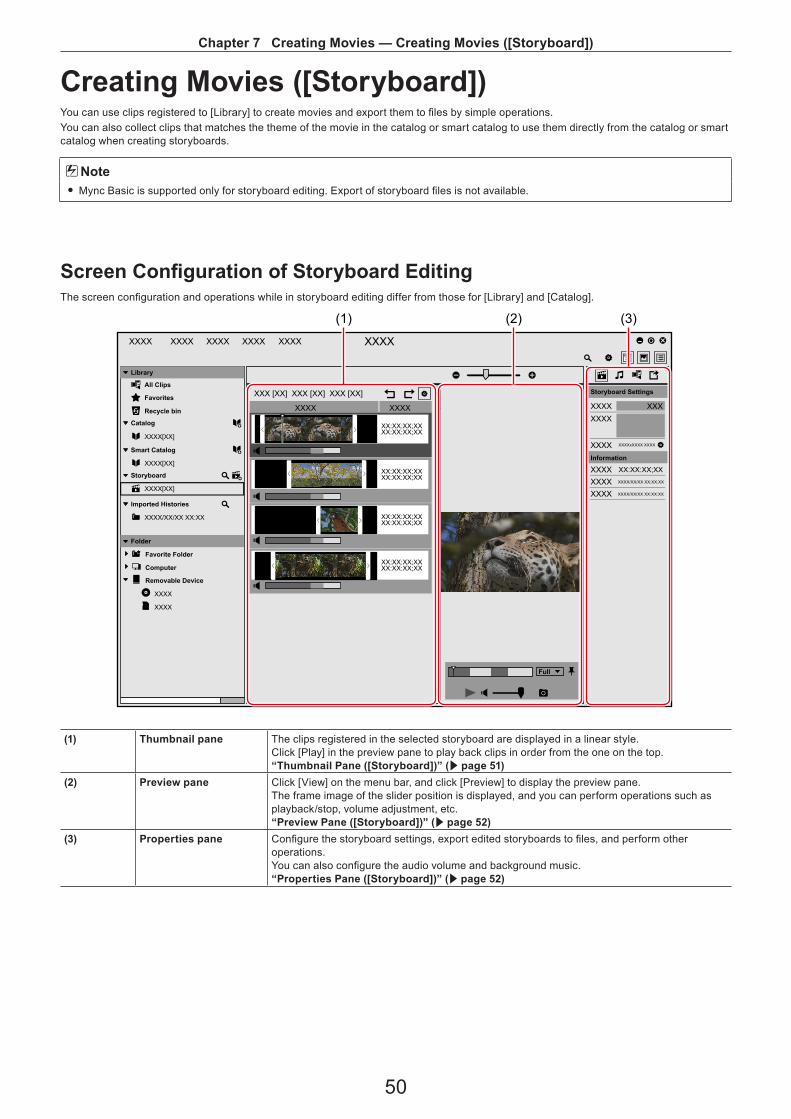
Chapter 7 Creating Movies — Creating Movies ([Storyboard])
50
Creating Movies ([Storyboard])You can use clips registered to [Library] to create movies and export them to files by simple operations.You can also collect clips that matches the theme of the movie in the catalog or smart catalog to use them directly from the catalog or smart catalog when creating storyboards.
3 Note f Mync Basic is supported only for storyboard editing. Export of storyboard files is not available.
Screen Configuration of Storyboard EditingThe screen configuration and operations while in storyboard editing differ from those for [Library] and [Catalog].
XXXX XXXX XXXX XXXX XXXX XXXX
XXXX XXX
XXXX
XX:XX:XX;XXXX:XX:XX;XX<
<
XX:XX:XX;XXXX:XX:XX;XX<
<
XX:XX:XX;XXXX:XX:XX;XX<
<
XX:XX:XX;XXXX:XX:XX;XX<
<
XXXX
XXXX[XX]
XXXX[XX]
XXXX[XX]
XXXX/XX/XX XX:XX
XXXX
XXX [XX] XXX [XX] XXX [XX]
XXXX XXXX
XXXX XXXXxXXXX XXXX
XXXX XX:XX:XX;XX
XXXX XXXX/XX/XX XX:XX:XX
XXXX XXXX/XX/XX XX:XX:XX
Library
Folder
Catalog
Smart Catalog
Storyboard
Imported Histories
All Clips
Recycle bin
Favorites
Full
Favorite Folder
Computer
Removable Device
Storyboard Settings
Information
(3)(1) (2)
(1) Thumbnail pane The clips registered in the selected storyboard are displayed in a linear style.Click [Play] in the preview pane to play back clips in order from the one on the top.“Thumbnail Pane ([Storyboard])” (w page 51)
(2) Preview pane Click [View] on the menu bar, and click [Preview] to display the preview pane.The frame image of the slider position is displayed, and you can perform operations such as playback/stop, volume adjustment, etc.“Preview Pane ([Storyboard])” (w page 52)
(3) Properties pane Configure the storyboard settings, export edited storyboards to files, and perform other operations.You can also configure the audio volume and background music.“Properties Pane ([Storyboard])” (w page 52)
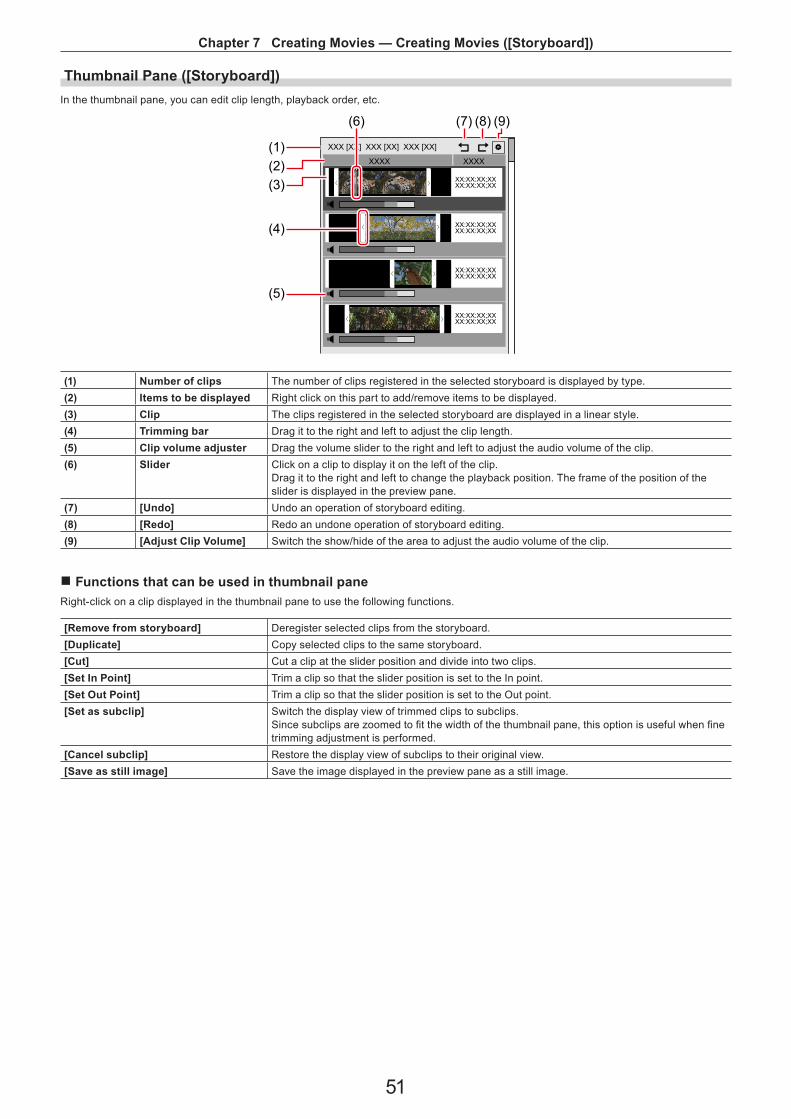
Chapter 7 Creating Movies — Creating Movies ([Storyboard])
51
Thumbnail Pane ([Storyboard])In the thumbnail pane, you can edit clip length, playback order, etc.
XX:XX:XX;XXXX:XX:XX;XX<
<
XX:XX:XX;XXXX:XX:XX;XX<
<
XX:XX:XX;XXXX:XX:XX;XX<
<
XX:XX:XX;XXXX:XX:XX;XX<
<
XXX [XX] XXX [XX] XXX [XX]
XXXX XXXX(1)(2)(3)
(4)
(5)
(6) (7) (8) (9)
(1) Number of clips The number of clips registered in the selected storyboard is displayed by type.(2) Items to be displayed Right click on this part to add/remove items to be displayed.(3) Clip The clips registered in the selected storyboard are displayed in a linear style.(4) Trimming bar Drag it to the right and left to adjust the clip length.(5) Clip volume adjuster Drag the volume slider to the right and left to adjust the audio volume of the clip.(6) Slider Click on a clip to display it on the left of the clip.
Drag it to the right and left to change the playback position. The frame of the position of the slider is displayed in the preview pane.
(7) [Undo] Undo an operation of storyboard editing.(8) [Redo] Redo an undone operation of storyboard editing.(9) [Adjust Clip Volume] Switch the show/hide of the area to adjust the audio volume of the clip.
r Functions that can be used in thumbnail paneRight-click on a clip displayed in the thumbnail pane to use the following functions.
[Remove from storyboard] Deregister selected clips from the storyboard.[Duplicate] Copy selected clips to the same storyboard.[Cut] Cut a clip at the slider position and divide into two clips.[Set In Point] Trim a clip so that the slider position is set to the In point.[Set Out Point] Trim a clip so that the slider position is set to the Out point.[Set as subclip] Switch the display view of trimmed clips to subclips.
Since subclips are zoomed to fit the width of the thumbnail pane, this option is useful when fine trimming adjustment is performed.
[Cancel subclip] Restore the display view of subclips to their original view.[Save as still image] Save the image displayed in the preview pane as a still image.
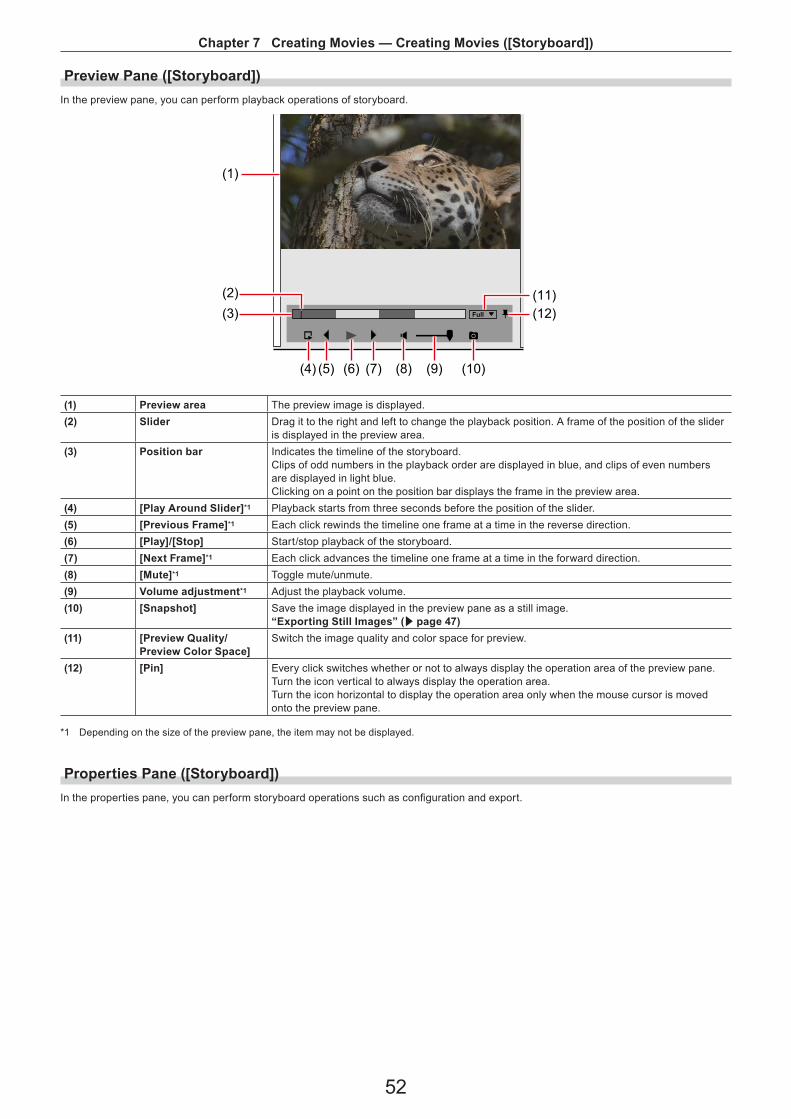
Chapter 7 Creating Movies — Creating Movies ([Storyboard])
52
Preview Pane ([Storyboard])In the preview pane, you can perform playback operations of storyboard.
Full
(1)
(2)(3)
(4) (5) (6) (7) (8) (9) (10)
(12)(11)
(1) Preview area The preview image is displayed.(2) Slider Drag it to the right and left to change the playback position. A frame of the position of the slider
is displayed in the preview area.(3) Position bar Indicates the timeline of the storyboard.
Clips of odd numbers in the playback order are displayed in blue, and clips of even numbers are displayed in light blue.Clicking on a point on the position bar displays the frame in the preview area.
(4) [Play Around Slider]*1 Playback starts from three seconds before the position of the slider.(5) [Previous Frame]*1 Each click rewinds the timeline one frame at a time in the reverse direction.(6) [Play]/[Stop] Start/stop playback of the storyboard.(7) [Next Frame]*1 Each click advances the timeline one frame at a time in the forward direction.(8) [Mute]*1 Toggle mute/unmute.(9) Volume adjustment*1 Adjust the playback volume.(10) [Snapshot] Save the image displayed in the preview pane as a still image.
“Exporting Still Images” (w page 47)(11) [Preview Quality/
Preview Color Space]Switch the image quality and color space for preview.
(12) [Pin] Every click switches whether or not to always display the operation area of the preview pane.Turn the icon vertical to always display the operation area.Turn the icon horizontal to display the operation area only when the mouse cursor is moved onto the preview pane.
*1 Depending on the size of the preview pane, the item may not be displayed.
Properties Pane ([Storyboard])In the properties pane, you can perform storyboard operations such as configuration and export.
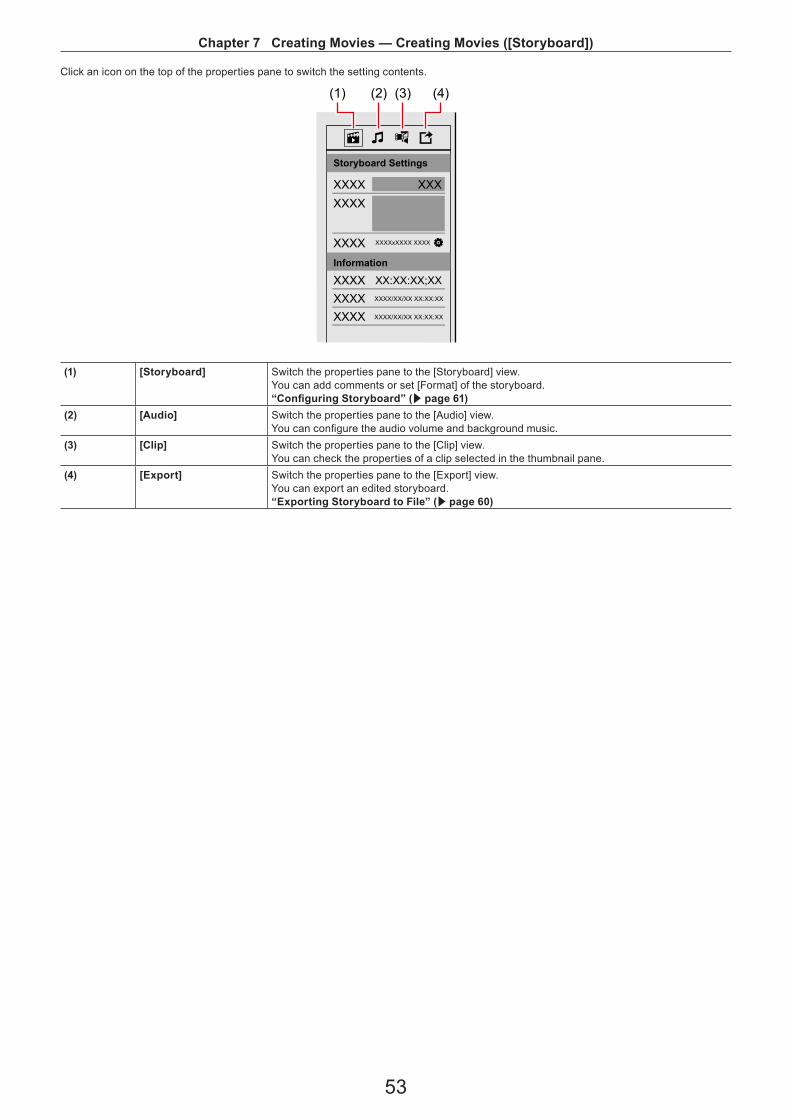
Chapter 7 Creating Movies — Creating Movies ([Storyboard])
53
Click an icon on the top of the properties pane to switch the setting contents.
XXXX XXXXXXX
XXXX XXXXxXXXX XXXX
XXXX XX:XX:XX;XX
XXXX XXXX/XX/XX XX:XX:XX
XXXX XXXX/XX/XX XX:XX:XX
Storyboard Settings
Information
(1) (3)(2) (4)
(1) [Storyboard] Switch the properties pane to the [Storyboard] view.You can add comments or set [Format] of the storyboard.“Configuring Storyboard” (w page 61)
(2) [Audio] Switch the properties pane to the [Audio] view.You can configure the audio volume and background music.
(3) [Clip] Switch the properties pane to the [Clip] view.You can check the properties of a clip selected in the thumbnail pane.
(4) [Export] Switch the properties pane to the [Export] view.You can export an edited storyboard.“Exporting Storyboard to File” (w page 60)
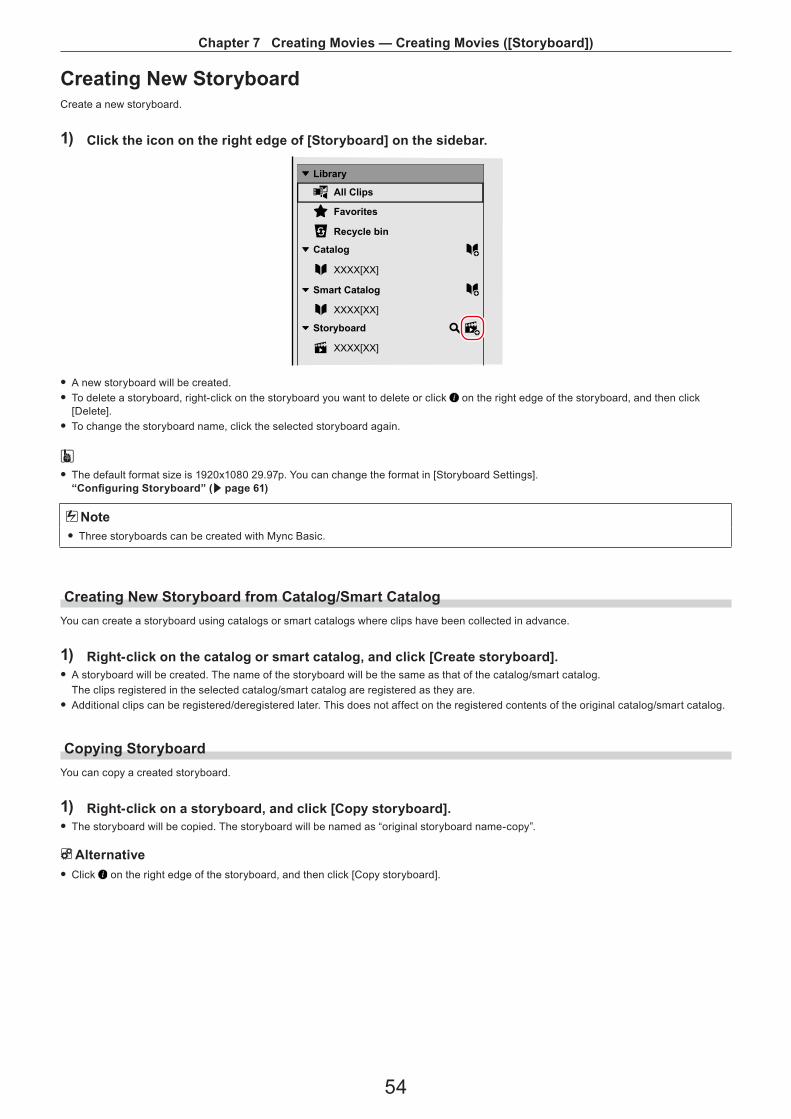
Chapter 7 Creating Movies — Creating Movies ([Storyboard])
54
Creating New StoryboardCreate a new storyboard.
1) Click the icon on the right edge of [Storyboard] on the sidebar.
XXXX[XX]
XXXX[XX]
XXXX[XX]
Library
Catalog
Smart Catalog
Storyboard
All Clips
Recycle bin
Favorites
f A new storyboard will be created. f To delete a storyboard, right-click on the storyboard you want to delete or click on the right edge of the storyboard, and then click [Delete].
f To change the storyboard name, click the selected storyboard again.
2 f The default format size is 1920x1080 29.97p. You can change the format in [Storyboard Settings].“Configuring Storyboard” (w page 61)
3 Note f Three storyboards can be created with Mync Basic.
Creating New Storyboard from Catalog/Smart CatalogYou can create a storyboard using catalogs or smart catalogs where clips have been collected in advance.
1) Right-click on the catalog or smart catalog, and click [Create storyboard]. f A storyboard will be created. The name of the storyboard will be the same as that of the catalog/smart catalog.The clips registered in the selected catalog/smart catalog are registered as they are.
f Additional clips can be registered/deregistered later. This does not affect on the registered contents of the original catalog/smart catalog.
Copying StoryboardYou can copy a created storyboard.
1) Right-click on a storyboard, and click [Copy storyboard]. f The storyboard will be copied. The storyboard will be named as “original storyboard name-copy”.
1 Alternative f Click on the right edge of the storyboard, and then click [Copy storyboard].
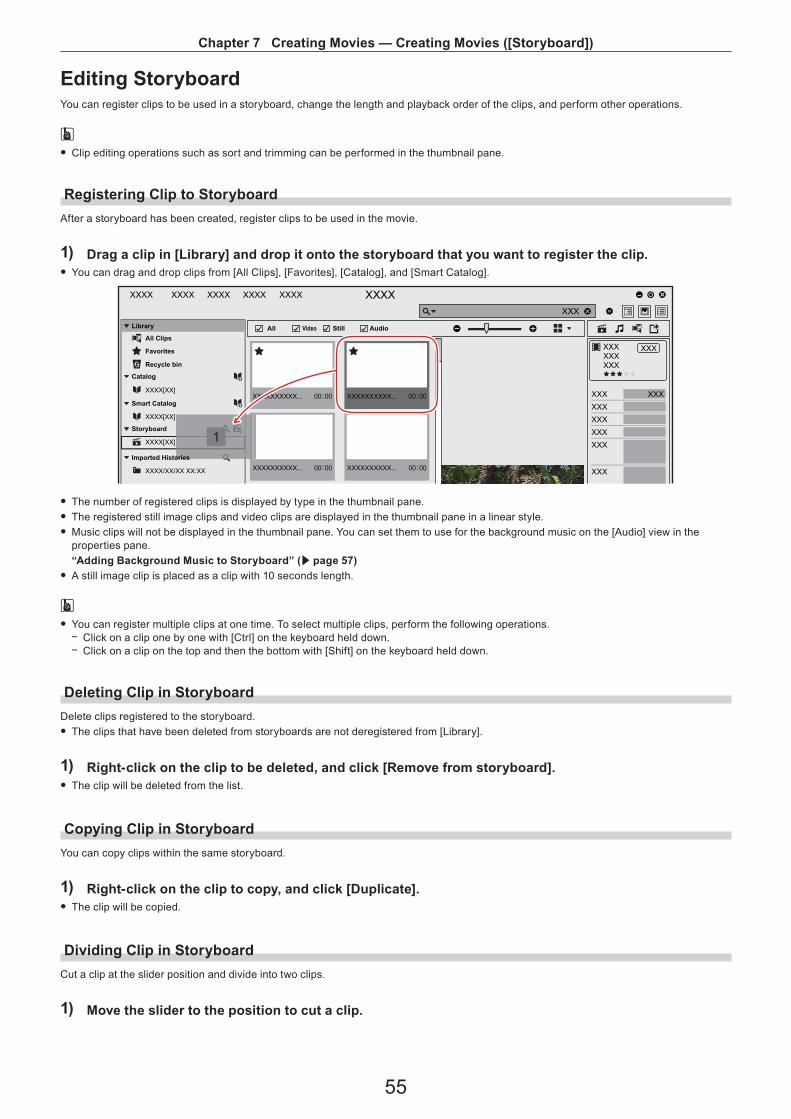
Chapter 7 Creating Movies — Creating Movies ([Storyboard])
55
Editing StoryboardYou can register clips to be used in a storyboard, change the length and playback order of the clips, and perform other operations.
2 f Clip editing operations such as sort and trimming can be performed in the thumbnail pane.
Registering Clip to StoryboardAfter a storyboard has been created, register clips to be used in the movie.
1) Drag a clip in [Library] and drop it onto the storyboard that you want to register the clip. f You can drag and drop clips from [All Clips], [Favorites], [Catalog], and [Smart Catalog].
XXXX XXXX XXXX XXXX XXXX XXXXXXX
XXX
XXX XXX
XXXXXX
XXXXXXXXXX... 00:00
XXXXXXXXXX... 00:00
XXXXXXXXXX... 00:00
XXXXXXXXXX... 00:00
XXXXXXXXXXXX
XXX
XXXX[XX]
XXXX[XX]
XXXX[XX]
XXXX/XX/XX XX:XX
XXX
1
Library All Video Still Audio
Catalog
Smart Catalog
Storyboard
Imported Histories
All Clips
Recycle bin
Favorites
f The number of registered clips is displayed by type in the thumbnail pane. f The registered still image clips and video clips are displayed in the thumbnail pane in a linear style. f Music clips will not be displayed in the thumbnail pane. You can set them to use for the background music on the [Audio] view in the properties pane.“Adding Background Music to Storyboard” (w page 57)
f A still image clip is placed as a clip with 10 seconds length.
2 f You can register multiple clips at one time. To select multiple clips, perform the following operations.
g Click on a clip one by one with [Ctrl] on the keyboard held down. g Click on a clip on the top and then the bottom with [Shift] on the keyboard held down.
Deleting Clip in StoryboardDelete clips registered to the storyboard. f The clips that have been deleted from storyboards are not deregistered from [Library].
1) Right-click on the clip to be deleted, and click [Remove from storyboard]. f The clip will be deleted from the list.
Copying Clip in StoryboardYou can copy clips within the same storyboard.
1) Right-click on the clip to copy, and click [Duplicate]. f The clip will be copied.
Dividing Clip in StoryboardCut a clip at the slider position and divide into two clips.
1) Move the slider to the position to cut a clip.
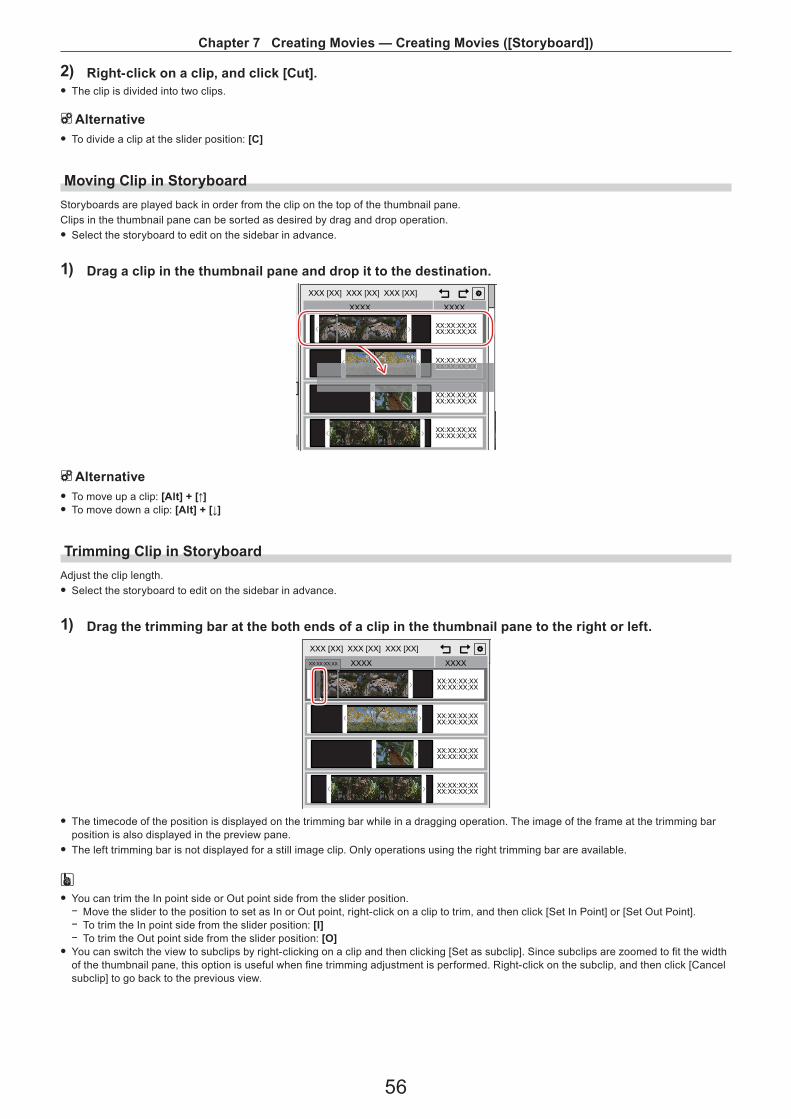
Chapter 7 Creating Movies — Creating Movies ([Storyboard])
56
2) Right-click on a clip, and click [Cut]. f The clip is divided into two clips.
1 Alternative f To divide a clip at the slider position: [C]
Moving Clip in StoryboardStoryboards are played back in order from the clip on the top of the thumbnail pane.Clips in the thumbnail pane can be sorted as desired by drag and drop operation. f Select the storyboard to edit on the sidebar in advance.
1) Drag a clip in the thumbnail pane and drop it to the destination.
XX:XX:XX;XXXX:XX:XX;XX<
<
XX:XX:XX;XXXX:XX:XX;XX<
<
XX:XX:XX;XXXX:XX:XX;XX<
<
XX:XX:XX;XXXX:XX:XX;XX<
<
XXX [XX] XXX [XX] XXX [XX]
XXXX XXXX
XX:XX:XX;XXXX:XX:XX;XX<
<
お気に入りフォルダー
1 Alternative f To move up a clip: [Alt] + [↑] f To move down a clip: [Alt] + [↓]
Trimming Clip in StoryboardAdjust the clip length. f Select the storyboard to edit on the sidebar in advance.
1) Drag the trimming bar at the both ends of a clip in the thumbnail pane to the right or left.
XX:XX:XX;XXXX:XX:XX;XX<
<
XX:XX:XX;XXXX:XX:XX;XX<
<
XX:XX:XX;XXXX:XX:XX;XX<
<
XX:XX:XX;XXXX:XX:XX;XX<
<
XXX [XX] XXX [XX] XXX [XX]
XXXX XXXXXX:XX:XX;XX
f The timecode of the position is displayed on the trimming bar while in a dragging operation. The image of the frame at the trimming bar position is also displayed in the preview pane.
f The left trimming bar is not displayed for a still image clip. Only operations using the right trimming bar are available.
2 f You can trim the In point side or Out point side from the slider position.
g Move the slider to the position to set as In or Out point, right-click on a clip to trim, and then click [Set In Point] or [Set Out Point]. g To trim the In point side from the slider position: [I] g To trim the Out point side from the slider position: [O]
f You can switch the view to subclips by right-clicking on a clip and then clicking [Set as subclip]. Since subclips are zoomed to fi t the width of the thumbnail pane, this option is useful when fi ne trimming adjustment is performed. Right-click on the subclip, and then click [Cancel subclip] to go back to the previous view.
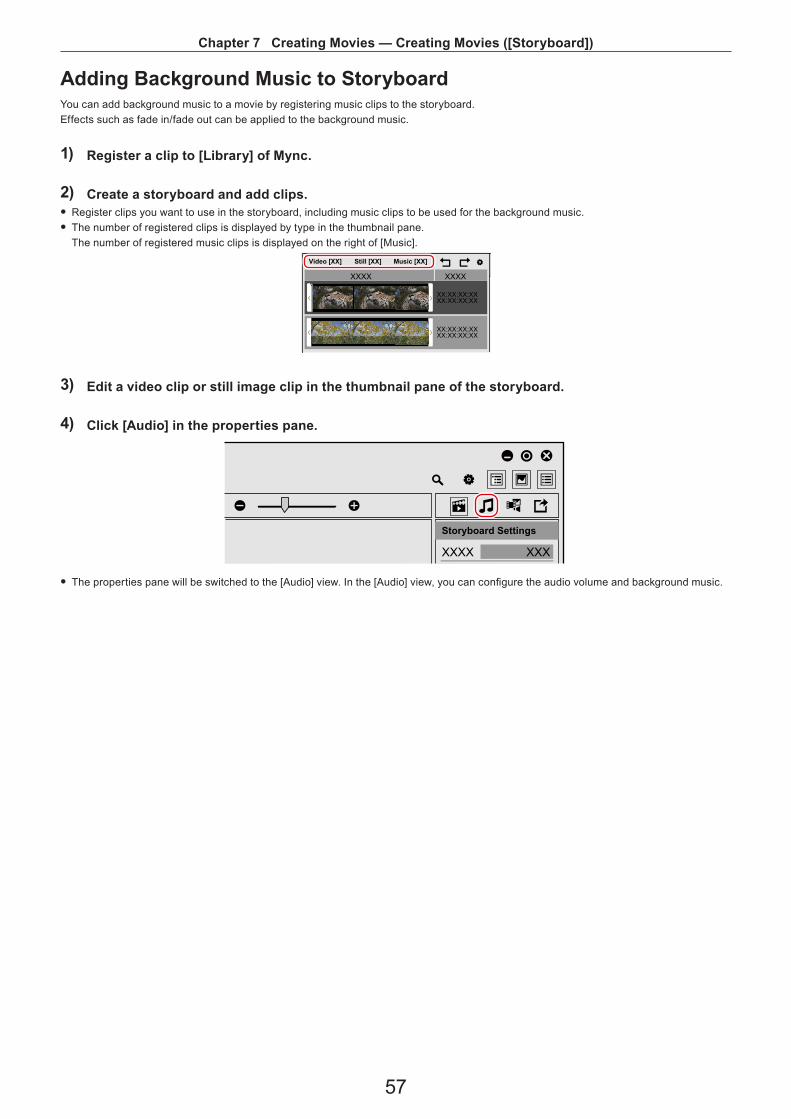
Chapter 7 Creating Movies — Creating Movies ([Storyboard])
57
Adding Background Music to StoryboardYou can add background music to a movie by registering music clips to the storyboard.Effects such as fade in/fade out can be applied to the background music.
1) Register a clip to [Library] of Mync.
2) Create a storyboard and add clips. f Register clips you want to use in the storyboard, including music clips to be used for the background music. f The number of registered clips is displayed by type in the thumbnail pane.The number of registered music clips is displayed on the right of [Music].
XX:XX:XX;XXXX:XX:XX;XX
<
XX:XX:XX;XXXX:XX:XX;XX<
XXXX XXXX
<
<
Video [XX] Still [XX] Music [XX]
3) Edit a video clip or still image clip in the thumbnail pane of the storyboard.
4) Click [Audio] in the properties pane.
XXXX XXX
Storyboard Settings
f The properties pane will be switched to the [Audio] view. In the [Audio] view, you can configure the audio volume and background music.
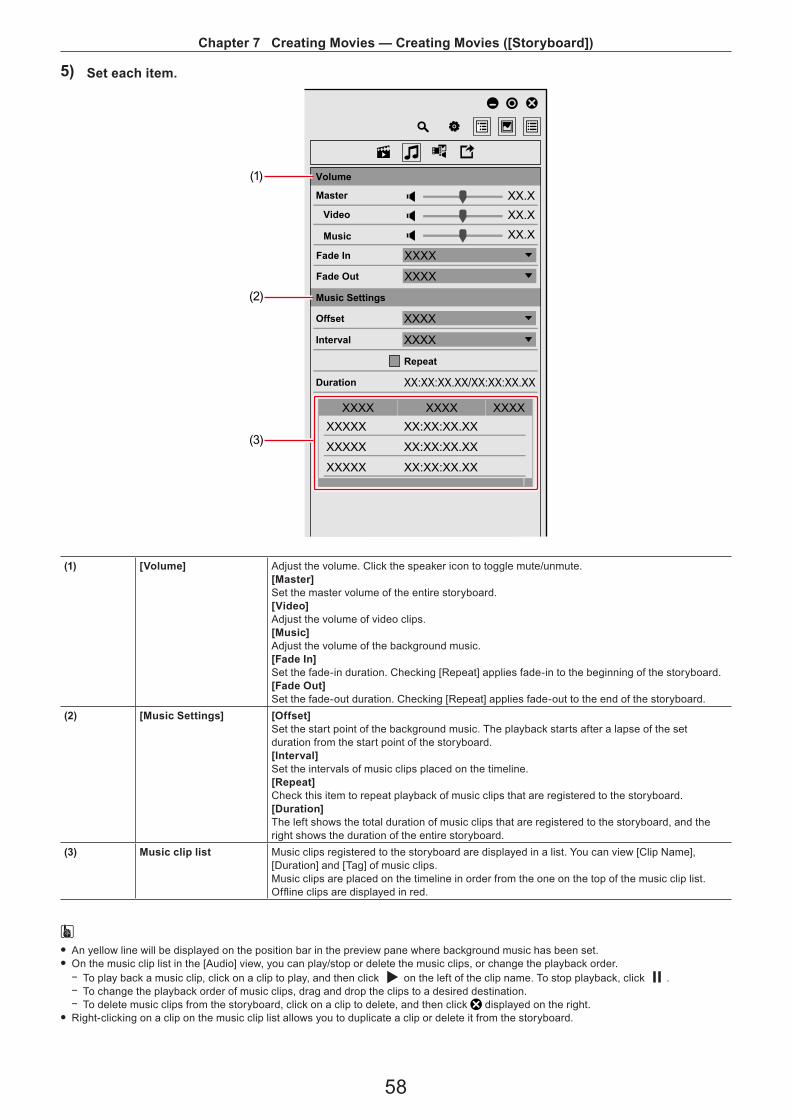
Chapter 7 Creating Movies — Creating Movies ([Storyboard])
58
5) Set each item.
XXXX
XXXX
XXXX
XXXX
XXXX XXXX XXXX
XX:XX:XX.XX/XX:XX:XX.XX
XXXXX XX:XX:XX.XX
XX:XX:XX.XX
XX:XX:XX.XX
XXXXX
XXXXX
(3)
(1)
(2)
XX.XXX.XXX.X
Volume
Music Settings
Master
Repeat
Fade In
Fade Out
Offset
Interval
Duration
Video
Music
(1) [Volume] Adjust the volume. Click the speaker icon to toggle mute/unmute.[Master]Set the master volume of the entire storyboard.[Video]Adjust the volume of video clips.[Music]Adjust the volume of the background music.[Fade In]Set the fade-in duration. Checking [Repeat] applies fade-in to the beginning of the storyboard.[Fade Out]Set the fade-out duration. Checking [Repeat] applies fade-out to the end of the storyboard.
(2) [Music Settings] [Offset]Set the start point of the background music. The playback starts after a lapse of the set duration from the start point of the storyboard.[Interval]Set the intervals of music clips placed on the timeline.[Repeat]Check this item to repeat playback of music clips that are registered to the storyboard.[Duration]The left shows the total duration of music clips that are registered to the storyboard, and the right shows the duration of the entire storyboard.
(3) Music clip list Music clips registered to the storyboard are displayed in a list. You can view [Clip Name], [Duration] and [Tag] of music clips.Music clips are placed on the timeline in order from the one on the top of the music clip list.Offline clips are displayed in red.
2 f An yellow line will be displayed on the position bar in the preview pane where background music has been set. f On the music clip list in the [Audio] view, you can play/stop or delete the music clips, or change the playback order.
g To play back a music clip, click on a clip to play, and then click on the left of the clip name. To stop playback, click . g To change the playback order of music clips, drag and drop the clips to a desired destination. g To delete music clips from the storyboard, click on a clip to delete, and then click displayed on the right.
f Right-clicking on a clip on the music clip list allows you to duplicate a clip or delete it from the storyboard.
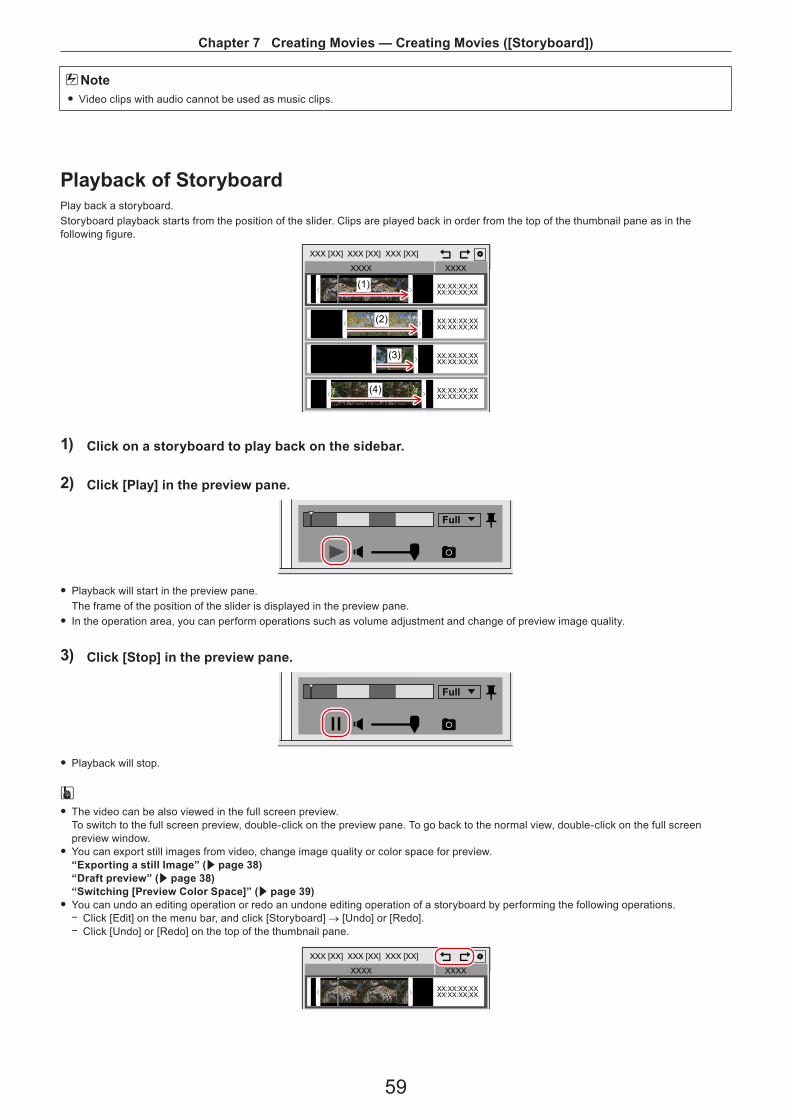
Chapter 7 Creating Movies — Creating Movies ([Storyboard])
59
3 Note f Video clips with audio cannot be used as music clips.
Playback of StoryboardPlay back a storyboard.Storyboard playback starts from the position of the slider. Clips are played back in order from the top of the thumbnail pane as in the following figure.
XX:XX:XX;XXXX:XX:XX;XX<
<
XX:XX:XX;XXXX:XX:XX;XX<
<
XX:XX:XX;XXXX:XX:XX;XX<
<
XX:XX:XX;XXXX:XX:XX;XX<
<
XXX [XX] XXX [XX] XXX [XX]
XXXX XXXX
(1)
(2)
(3)
(4)
1) Click on a storyboard to play back on the sidebar.
2) Click [Play] in the preview pane.
Full
f Playback will start in the preview pane.The frame of the position of the slider is displayed in the preview pane.
f In the operation area, you can perform operations such as volume adjustment and change of preview image quality.
3) Click [Stop] in the preview pane.
Full
f Playback will stop.
2 f The video can be also viewed in the full screen preview.To switch to the full screen preview, double-click on the preview pane. To go back to the normal view, double-click on the full screen preview window.
f You can export still images from video, change image quality or color space for preview.“Exporting a still Image” (w page 38)“Draft preview” (w page 38)“Switching [Preview Color Space]” (w page 39)
f You can undo an editing operation or redo an undone editing operation of a storyboard by performing the following operations. g Click [Edit] on the menu bar, and click [Storyboard] → [Undo] or [Redo]. g Click [Undo] or [Redo] on the top of the thumbnail pane.
XX:XX:XX;XXXX:XX:XX;XX<
<
XXX [XX] XXX [XX] XXX [XX]
XXXX XXXX
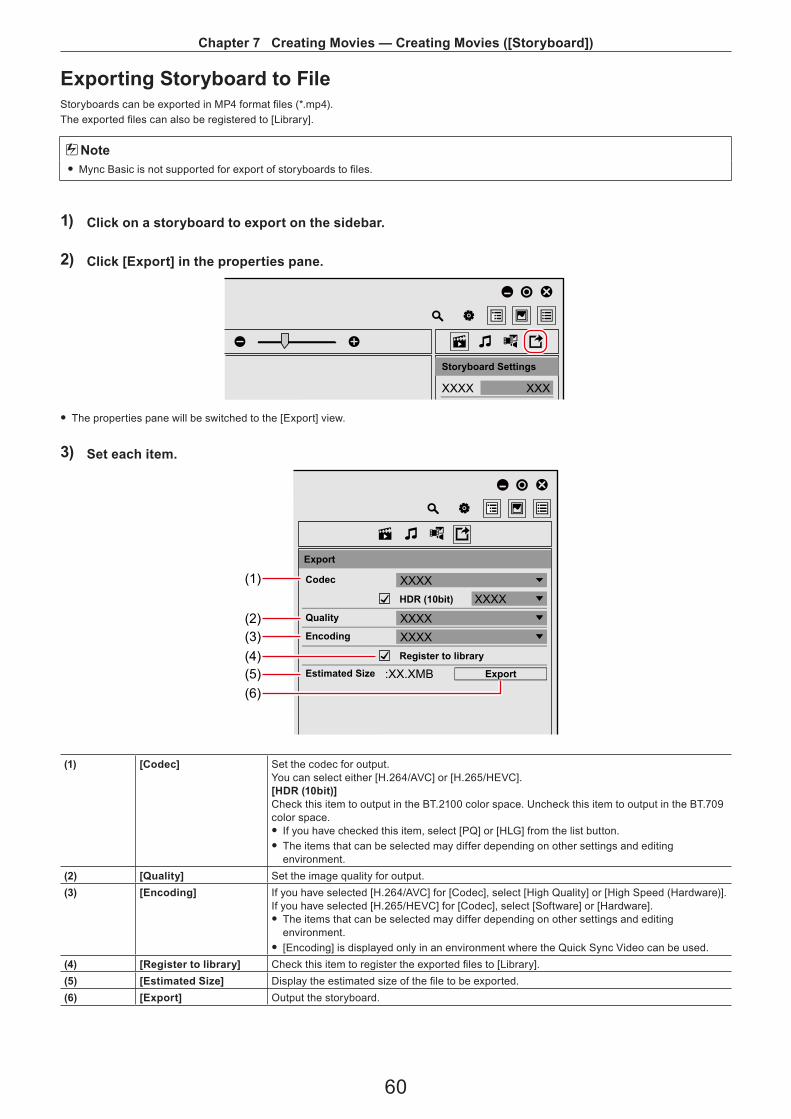
Chapter 7 Creating Movies — Creating Movies ([Storyboard])
60
Exporting Storyboard to FileStoryboards can be exported in MP4 format files (*.mp4).The exported files can also be registered to [Library].
3 Note f Mync Basic is not supported for export of storyboards to files.
1) Click on a storyboard to export on the sidebar.
2) Click [Export] in the properties pane.
XXXX XXX
Storyboard Settings
f The properties pane will be switched to the [Export] view.
3) Set each item.
XXXXXXXX
XXXXXXXX
:XX.XMB
Export
Encoding
Codec
HDR (10bit)
Estimated Size
Quality
Register to library
Export
(3)
(1)
(2)
(5)(4)
(6)
(1) [Codec] Set the codec for output.You can select either [H.264/AVC] or [H.265/HEVC].[HDR (10bit)]Check this item to output in the BT.2100 color space. Uncheck this item to output in the BT.709 color space. f If you have checked this item, select [PQ] or [HLG] from the list button. f The items that can be selected may differ depending on other settings and editing environment.
(2) [Quality] Set the image quality for output.(3) [Encoding] If you have selected [H.264/AVC] for [Codec], select [High Quality] or [High Speed (Hardware)].
If you have selected [H.265/HEVC] for [Codec], select [Software] or [Hardware]. f The items that can be selected may differ depending on other settings and editing environment.
f [Encoding] is displayed only in an environment where the Quick Sync Video can be used.(4) [Register to library] Check this item to register the exported files to [Library].(5) [Estimated Size] Display the estimated size of the file to be exported.(6) [Export] Output the storyboard.
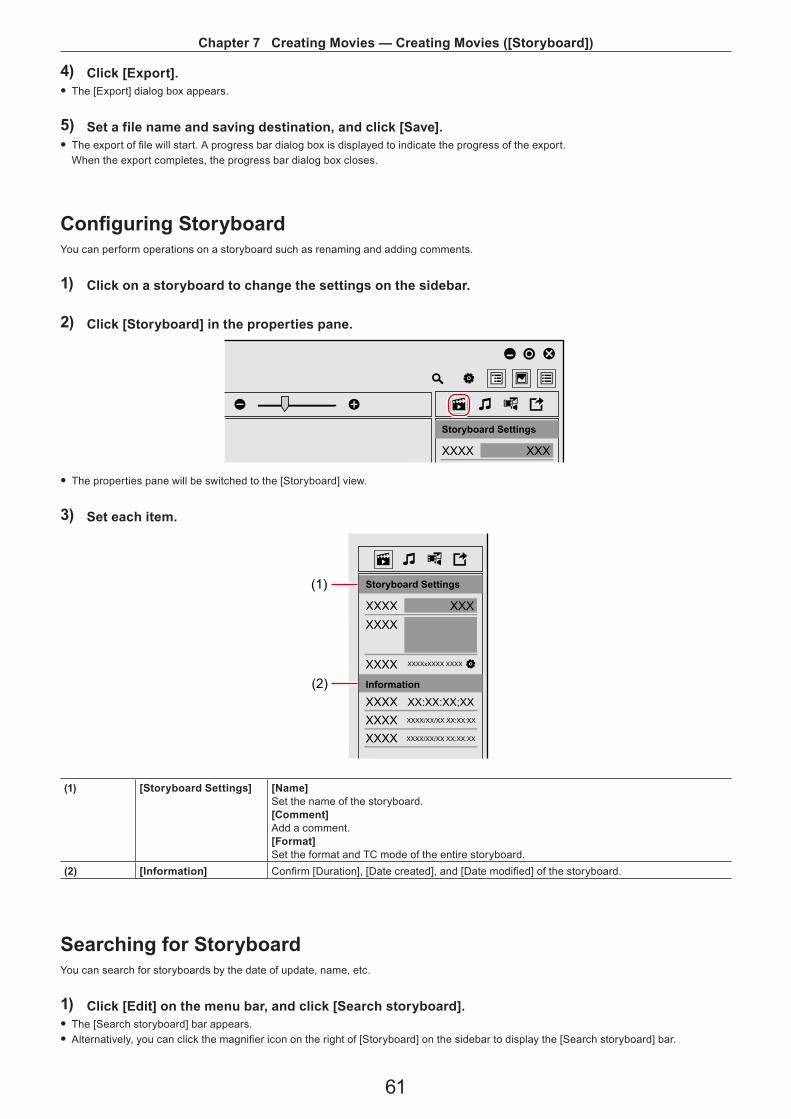
Chapter 7 Creating Movies — Creating Movies ([Storyboard])
61
4) Click [Export]. f The [Export] dialog box appears.
5) Set a file name and saving destination, and click [Save]. f The export of file will start. A progress bar dialog box is displayed to indicate the progress of the export.When the export completes, the progress bar dialog box closes.
Configuring StoryboardYou can perform operations on a storyboard such as renaming and adding comments.
1) Click on a storyboard to change the settings on the sidebar.
2) Click [Storyboard] in the properties pane.
XXXX XXX
Storyboard Settings
f The properties pane will be switched to the [Storyboard] view.
3) Set each item.
XXXX XXXXXXX
XXXX XXXXxXXXX XXXX
XXXX XX:XX:XX;XX
XXXX XXXX/XX/XX XX:XX:XX
XXXX XXXX/XX/XX XX:XX:XX
Storyboard Settings
Information
(1)
(2)
(1) [Storyboard Settings] [Name]Set the name of the storyboard.[Comment]Add a comment.[Format]Set the format and TC mode of the entire storyboard.
(2) [Information] Confirm [Duration], [Date created], and [Date modified] of the storyboard.
Searching for StoryboardYou can search for storyboards by the date of update, name, etc.
1) Click [Edit] on the menu bar, and click [Search storyboard]. f The [Search storyboard] bar appears. f Alternatively, you can click the magnifier icon on the right of [Storyboard] on the sidebar to display the [Search storyboard] bar.

Chapter 7 Creating Movies — Creating Movies ([Storyboard])
62
2) Specify the search conditions. f The search result will be displayed in a list. f Click on the storyboard you want to view, to display the list of the clips registered to the storyboard in the thumbnail pane.
2 f If you right-click on the storyboard displayed in the search result and click [Show in the sidebar], you can display the storyboard on the sidebar.

63
Chapter 8Sharing OnlineThis chapter explains how to upload files to video-sharing websites such as Vimeo and YouTube or to Facebook.
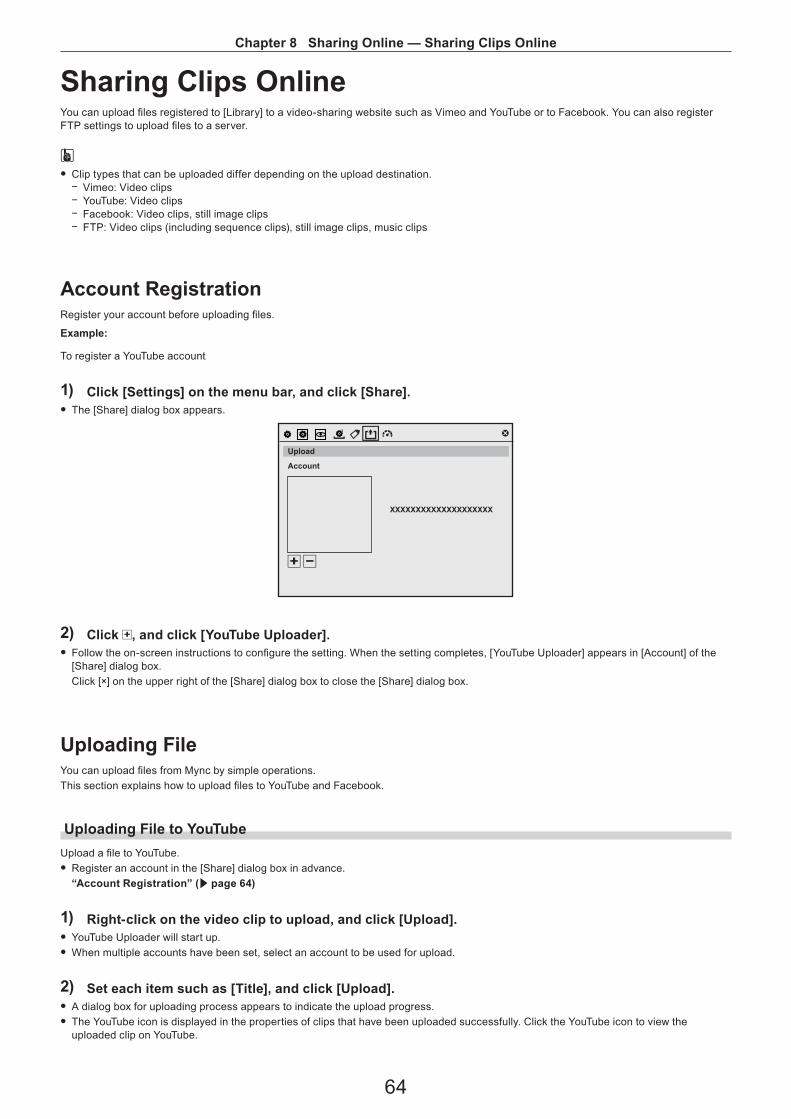
Chapter 8 Sharing Online — Sharing Clips Online
64
Sharing Clips OnlineYou can upload files registered to [Library] to a video-sharing website such as Vimeo and YouTube or to Facebook. You can also register FTP settings to upload files to a server.
2 f Clip types that can be uploaded differ depending on the upload destination.
g Vimeo: Video clips g YouTube: Video clips g Facebook: Video clips, still image clips g FTP: Video clips (including sequence clips), still image clips, music clips
Account RegistrationRegister your account before uploading files.
Example:
To register a YouTube account
1) Click [Settings] on the menu bar, and click [Share]. f The [Share] dialog box appears.
XXXXXXXXXXXXXXXXXXXX
Upload
Account
2) Click , and click [YouTube Uploader]. f Follow the on-screen instructions to configure the setting. When the setting completes, [YouTube Uploader] appears in [Account] of the [Share] dialog box.Click [×] on the upper right of the [Share] dialog box to close the [Share] dialog box.
Uploading FileYou can upload files from Mync by simple operations.This section explains how to upload files to YouTube and Facebook.
Uploading File to YouTubeUpload a file to YouTube. f Register an account in the [Share] dialog box in advance.“Account Registration” (w page 64)
1) Right-click on the video clip to upload, and click [Upload]. f YouTube Uploader will start up. f When multiple accounts have been set, select an account to be used for upload.
2) Set each item such as [Title], and click [Upload]. f A dialog box for uploading process appears to indicate the upload progress. f The YouTube icon is displayed in the properties of clips that have been uploaded successfully. Click the YouTube icon to view the uploaded clip on YouTube.

Chapter 8 Sharing Online — Sharing Clips Online
65
Uploading File to FacebookUpload a file to Facebook. f Register an account in the [Share] dialog box in advance.“Account Registration” (w page 64)
1) Right-click on the video clip or still image clip to upload, and click [Upload]. f Facebook Uploader will start up. f When multiple accounts have been set, select an account to be used for upload.
2) Set each item such as [Description], and click [Post]. f A dialog box for uploading process appears to indicate the upload progress. f The Facebook icon is displayed in the properties of clips that have been uploaded successfully. Click the Facebook icon to view the uploaded clip on Facebook.

66
Chapter 9Interaction with EDIUSThis chapter explains the interaction with EDIUS.If you use Mync that has come with EDIUS, you can display [Library] of Mync in the source browser of EDIUS, and you can start up EDIUS from the source browser.
Chapter 9 Interaction with EDIUS — Interaction with EDIUS
67
Interaction with EDIUSIf you use Mync that has come with EDIUS, clips registered to Mync can be displayed in the source browser of EDIUS.You can register catalogs/smart catalogs whose clips have been grouped with Mync directly to the bin.You can also start up Mync from the source browser.
3 Note f Interaction with EDIUS is supported only for Mync that comes with EDIUS.
Interaction with Source BrowserClips registered to Mync are displayed on the source browser of EDIUS. [Catalog], [Smart Catalog], and [Storyboard] that have been created with Mync are displayed in a folder structure similar to that of the sidebar of Mync, and you can view the clips that are registered and created.Alternatively, you can right-click on a clip registered with Mync in the source browser, and then click [Show in Mync], to display it in Mync. By using the interaction function between Mync and EDIUS, sources can be managed and edited in a seamless connection.
Registering a Clip to Bin IndividuallyExample:
To register clips using [All Clips]
1) Start up EDIUS and create a project.
2) Click the [Mync] tree in the folder view of the source browser.
2 f To update the information of Mync, right-click [Mync] and click [Refresh].
3) Click [All Clips]. f All the clips registered to Mync are displayed in the clip view.
4) Right-click on the clip to register, and click [Add to Bin]. f [Mync] is created in the folder view of the bin. Clicking [Mync] displays the sources in the clip view. f Right-click on a clip and then click [Add and Transfer to Bin] to start data transfer to the PC in the background at the same time that the clip is registered to the bin.
2 f Storyboards are registered to the bin as timeline sequence clips. f Storyboards are registered to [Storyboard] that has been created in [Mync] in the bin. If you have performed [Add and Transfer to Bin] in step 4), clips registered to each storyboard are registered to the folder named after their storyboard under the [Storyboard] layer.
Registering Catalog/Smart Catalog to Bin
Registering to Bin from Source BrowserCatalogs and smart catalogs created with Mync can be registered to the EDIUS bin from the source browser of EDIUS.
1) Create a catalog or smart catalog on Mync, and register clips. f “Grouping Clips ([Catalog])” (w page 41) f “Grouping Clips That Meet the Search Conditions ([Smart Catalog])” (w page 42)
2) Start up EDIUS and create a project.
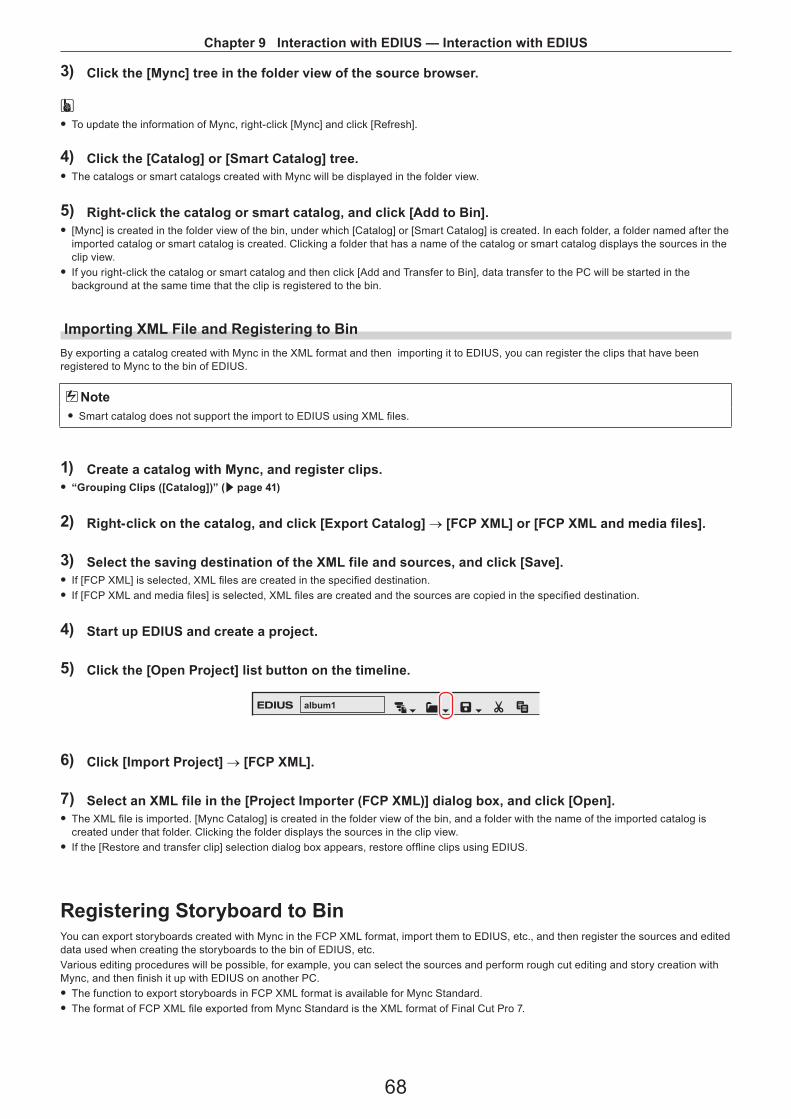
Chapter 9 Interaction with EDIUS — Interaction with EDIUS
68
3) Click the [Mync] tree in the folder view of the source browser.
2 f To update the information of Mync, right-click [Mync] and click [Refresh].
4) Click the [Catalog] or [Smart Catalog] tree. f The catalogs or smart catalogs created with Mync will be displayed in the folder view.
5) Right-click the catalog or smart catalog, and click [Add to Bin]. f [Mync] is created in the folder view of the bin, under which [Catalog] or [Smart Catalog] is created. In each folder, a folder named after the imported catalog or smart catalog is created. Clicking a folder that has a name of the catalog or smart catalog displays the sources in the clip view.
f If you right-click the catalog or smart catalog and then click [Add and Transfer to Bin], data transfer to the PC will be started in the background at the same time that the clip is registered to the bin.
Importing XML File and Registering to BinBy exporting a catalog created with Mync in the XML format and then importing it to EDIUS, you can register the clips that have been registered to Mync to the bin of EDIUS.
3 Note f Smart catalog does not support the import to EDIUS using XML files.
1) Create a catalog with Mync, and register clips. f “Grouping Clips ([Catalog])” (w page 41)
2) Right-click on the catalog, and click [Export Catalog] → [FCP XML] or [FCP XML and media files].
3) Select the saving destination of the XML file and sources, and click [Save]. f If [FCP XML] is selected, XML files are created in the specified destination. f If [FCP XML and media files] is selected, XML files are created and the sources are copied in the specified destination.
4) Start up EDIUS and create a project.
5) Click the [Open Project] list button on the timeline.
album1
6) Click [Import Project] → [FCP XML].
7) Select an XML file in the [Project Importer (FCP XML)] dialog box, and click [Open]. f The XML file is imported. [Mync Catalog] is created in the folder view of the bin, and a folder with the name of the imported catalog is created under that folder. Clicking the folder displays the sources in the clip view.
f If the [Restore and transfer clip] selection dialog box appears, restore offline clips using EDIUS.
Registering Storyboard to BinYou can export storyboards created with Mync in the FCP XML format, import them to EDIUS, etc., and then register the sources and edited data used when creating the storyboards to the bin of EDIUS, etc.Various editing procedures will be possible, for example, you can select the sources and perform rough cut editing and story creation with Mync, and then finish it up with EDIUS on another PC. f The function to export storyboards in FCP XML format is available for Mync Standard. f The format of FCP XML file exported from Mync Standard is the XML format of Final Cut Pro 7.

Chapter 9 Interaction with EDIUS — Interaction with EDIUS
69
3 Note f Mync Basic is not supported for export of storyboards to XML files.
1) Create and edit a storyboard with Mync. f “Creating New Storyboard” (w page 54) f “Editing Storyboard” (w page 55)
2) Right-click on the storyboard, and click [Export Storyboard] → [FCP XML] or [FCP XML and media files].
3) Select the saving destination of the XML file and sources, and click [Save]. f If [FCP XML] is selected, XML files are created in the specified destination. f If [FCP XML and media files] is selected, XML files are created and the sources are copied in the specified destination.
4) Start up EDIUS and create a project.
5) Click the [Open Project] list button on the timeline.
album1
6) Click [Import Project] → [FCP XML].
7) Select an XML file in the [Project Importer (FCP XML)] dialog box, and click [Open]. f The XML file is imported. The storyboard is registered to the bin as a timeline sequence clip. f If the [Restore and transfer clip] selection dialog box appears, restore offline clips using EDIUS.

70
Chapter 10AppendixThis chapter explains the keyboard shortcuts for Mync.
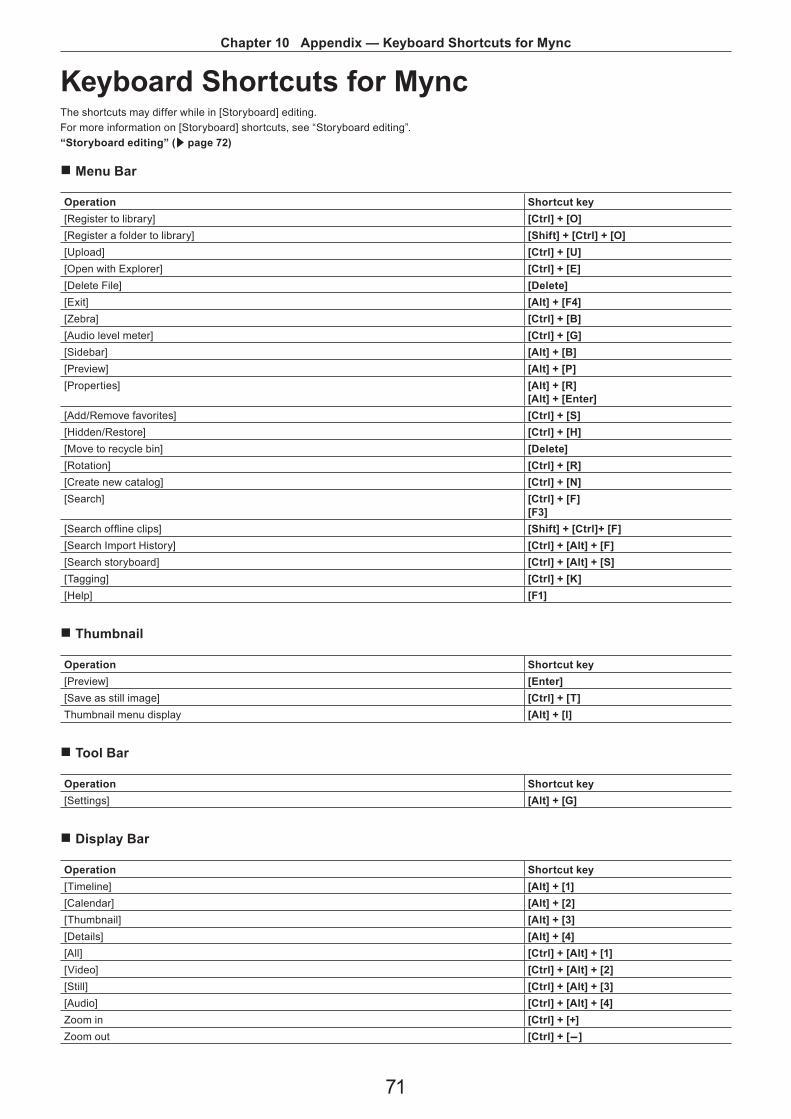
Chapter 10 Appendix — Keyboard Shortcuts for Mync
71
Keyboard Shortcuts for MyncThe shortcuts may differ while in [Storyboard] editing.For more information on [Storyboard] shortcuts, see “Storyboard editing”.“Storyboard editing” (w page 72)
r Menu Bar
Operation Shortcut key[Register to library] [Ctrl] + [O][Register a folder to library] [Shift] + [Ctrl] + [O][Upload] [Ctrl] + [U][Open with Explorer] [Ctrl] + [E][Delete File] [Delete][Exit] [Alt] + [F4][Zebra] [Ctrl] + [B][Audio level meter] [Ctrl] + [G][Sidebar] [Alt] + [B][Preview] [Alt] + [P][Properties] [Alt] + [R]
[Alt] + [Enter][Add/Remove favorites] [Ctrl] + [S][Hidden/Restore] [Ctrl] + [H][Move to recycle bin] [Delete][Rotation] [Ctrl] + [R][Create new catalog] [Ctrl] + [N][Search] [Ctrl] + [F]
[F3][Search offline clips] [Shift] + [Ctrl]+ [F][Search Import History] [Ctrl] + [Alt] + [F][Search storyboard] [Ctrl] + [Alt] + [S][Tagging] [Ctrl] + [K][Help] [F1]
r Thumbnail
Operation Shortcut key[Preview] [Enter][Save as still image] [Ctrl] + [T]Thumbnail menu display [Alt] + [I]
r Tool Bar
Operation Shortcut key[Settings] [Alt] + [G]
r Display Bar
Operation Shortcut key[Timeline] [Alt] + [1][Calendar] [Alt] + [2][Thumbnail] [Alt] + [3][Details] [Alt] + [4][All] [Ctrl] + [Alt] + [1][Video] [Ctrl] + [Alt] + [2][Still] [Ctrl] + [Alt] + [3][Audio] [Ctrl] + [Alt] + [4]Zoom in [Ctrl] + [+]Zoom out [Ctrl] + [-]
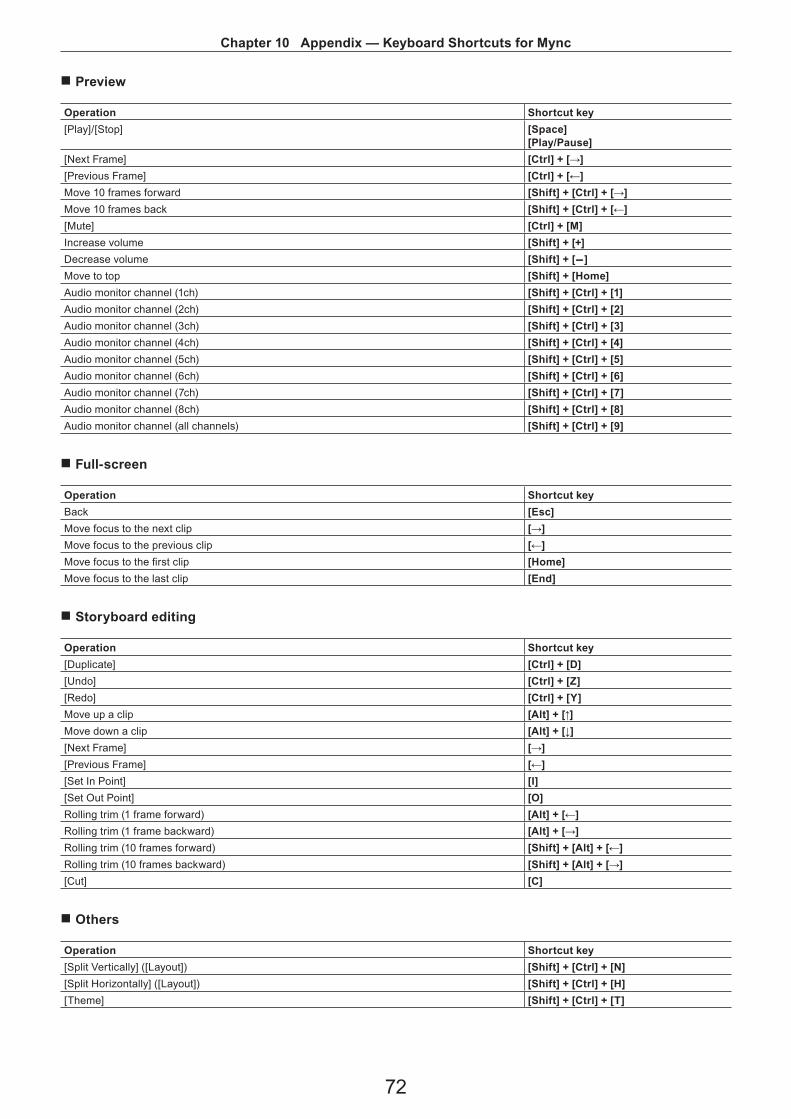
Chapter 10 Appendix — Keyboard Shortcuts for Mync
72
r Preview
Operation Shortcut key[Play]/[Stop] [Space]
[Play/Pause][Next Frame] [Ctrl] + [→][Previous Frame] [Ctrl] + [←]Move 10 frames forward [Shift] + [Ctrl] + [→]Move 10 frames back [Shift] + [Ctrl] + [←][Mute] [Ctrl] + [M]Increase volume [Shift] + [+]Decrease volume [Shift] + [-]Move to top [Shift] + [Home]Audio monitor channel (1ch) [Shift] + [Ctrl] + [1]Audio monitor channel (2ch) [Shift] + [Ctrl] + [2]Audio monitor channel (3ch) [Shift] + [Ctrl] + [3]Audio monitor channel (4ch) [Shift] + [Ctrl] + [4]Audio monitor channel (5ch) [Shift] + [Ctrl] + [5]Audio monitor channel (6ch) [Shift] + [Ctrl] + [6]Audio monitor channel (7ch) [Shift] + [Ctrl] + [7]Audio monitor channel (8ch) [Shift] + [Ctrl] + [8]Audio monitor channel (all channels) [Shift] + [Ctrl] + [9]
r Full-screen
Operation Shortcut keyBack [Esc]Move focus to the next clip [→]Move focus to the previous clip [←]Move focus to the first clip [Home]Move focus to the last clip [End]
r Storyboard editing
Operation Shortcut key[Duplicate] [Ctrl] + [D][Undo] [Ctrl] + [Z][Redo] [Ctrl] + [Y]Move up a clip [Alt] + [↑]Move down a clip [Alt] + [↓][Next Frame] [→][Previous Frame] [←][Set In Point] [I][Set Out Point] [O]Rolling trim (1 frame forward) [Alt] + [←]Rolling trim (1 frame backward) [Alt] + [→]Rolling trim (10 frames forward) [Shift] + [Alt] + [←]Rolling trim (10 frames backward) [Shift] + [Alt] + [→][Cut] [C]
r Others
Operation Shortcut key[Split Vertically] ([Layout]) [Shift] + [Ctrl] + [N][Split Horizontally] ([Layout]) [Shift] + [Ctrl] + [H][Theme] [Shift] + [Ctrl] + [T]

Mync Standard 1.4/Mync Basic 1.4April 9, 2018
Copyright © 2018 Grass Valley. All rights reserved.


![Comfortably Numb: Danish Teens’ Attitudes Towards Social … · Comfortably Numb SMSociety, July 2018, Copenhagen, Denmark fewer consequences [3,24]. The messages or Snaps sent](https://img.pdfslide.us/doc/110x75/5e9dd80e7b65f040af68fe20/comfortably-numb-danish-teensa-attitudes-towards-social-comfortably-numb-smsociety.jpg)