Embed Size (px)
Citation preview

MyLifeOrganized
User's Guide
No parts of this work may be reproduced in any form or by any means - graphic, electronic, or mechanical, includingphotocopying, recording, taping, or information storage and retrieval systems - without the written permission of thepublisher.
Products that are referred to in this document may be either trademarks and/or registered trademarks of therespective owners. The publisher and the author make no claim to these trademarks.
While every precaution has been taken in the preparation of this document, the publisher and the author assume noresponsibility for errors or omissions, or for damages resulting from the use of information contained in thisdocument or from the use of programs and source code that may accompany it. In no event shall the publisher andthe author be liable for any loss of profit or any other commercial damage caused or alleged to have been causeddirectly or indirectly by this document.
MyLifeOrganized - Help
© 2015, mylifeorganized.net. All rights reserved.

IContents
User's Guide
Table of Contents
Chapter I Introduction 5
Chapter II Installation 8
................................................................................................................................... 81 System Requirements
................................................................................................................................... 82 Installing MyLifeOrganized
................................................................................................................................... 83 How To Register
.......................................................................................................................................................... 9Registering MLO to launch from a removable media
.......................................................................................................................................................... 9What if I have lost my Activation Code?
Chapter III Getting Started 12
................................................................................................................................... 121 The Main Window
................................................................................................................................... 162 The Basic Steps
Chapter IV Working with MLO Data Files 20
................................................................................................................................... 201 Create, Open, and Save MLO Files
................................................................................................................................... 202 Import/Export
................................................................................................................................... 213 Templates
................................................................................................................................... 224 Searching
................................................................................................................................... 235 Auto-Save
................................................................................................................................... 236 Advanced Backup of Data Files
Chapter V Basic concepts: Outline, To-Do, View,Workspace 26
................................................................................................................................... 271 Outliner
.......................................................................................................................................................... 29Default Outline Views
.......................................................................................................................................................... 30Adding a Task or Subtask
.......................................................................................................................................................... 31Deleting a Task or Subtask
.......................................................................................................................................................... 31Rearranging the Tasks and Subtasks
.......................................................................................................................................................... 32Performing Actions on Tasks
.......................................................................................................................................................... 34Zoom In and Zoom Out
.......................................................................................................................................................... 34Outline Navigation
......................................................................................................................................................... 35Creating Links Betw een Tasks
......................................................................................................................................................... 36Bookmarks
................................................................................................................................... 372 The To-Do List
.......................................................................................................................................................... 37Default To-Do List Views
................................................................................................................................... 393 Views
.......................................................................................................................................................... 39Manage Views
.......................................................................................................................................................... 41Task Filtering
......................................................................................................................................................... 43Filter Controls
.......................................................................................................................................................... 45Task Grouping and Sorting
......................................................................................................................................................... 45Understanding Task List Ordering

ContentsII
User's Guide
......................................................................................................................................... 46Computed-Score Priority
................................................................................................................................... 46More Details on Computed-Score Priority
.......................................................................................................................................................... 51Columns
................................................................................................................................... 514 Workspace tabs
Chapter VI Task properties 56
................................................................................................................................... 561 Assigning Contexts to a Task
................................................................................................................................... 572 Importance for parent
................................................................................................................................... 573 Urgency
................................................................................................................................... 584 Goal for week, month and year
................................................................................................................................... 585 Task To-Do List Visibility
................................................................................................................................... 596 Timing & Reminder
.......................................................................................................................................................... 59Start, Due date and Lead time
.......................................................................................................................................................... 60Recurrence
.......................................................................................................................................................... 62Reminder
................................................................................................................................... 637 Effort
.......................................................................................................................................................... 63Task Effort
.......................................................................................................................................................... 63Time Required for a Task
................................................................................................................................... 648 Dependencies
................................................................................................................................... 659 Project
................................................................................................................................... 6510 Review
................................................................................................................................... 6611 Task Format
................................................................................................................................... 6712 Task Statistics
................................................................................................................................... 6713 Flags
................................................................................................................................... 6814 Starred
................................................................................................................................... 6815 Advanced Task Properties
Chapter VII Contexts 70
................................................................................................................................... 701 Creating and Deleting Contexts
................................................................................................................................... 712 Included Contexts
................................................................................................................................... 713 Context Hours
................................................................................................................................... 714 Context Options
Chapter VIII Keyboard Shortcuts 74
Chapter IX More Advanced Features 78
................................................................................................................................... 781 Automatic Formatting
................................................................................................................................... 792 Synchronization
.......................................................................................................................................................... 80Synchronization profiles
......................................................................................................................................................... 80Adding a Synchronization Profile
......................................................................................................................................................... 83Synchronizing Data Files
......................................................................................................................................................... 85Editing a Synchronization Profile
......................................................................................................................................................... 85Deleting a Synchronization Profile
......................................................................................................................................................... 85Importing and Exporting Synchronization Profiles
.......................................................................................................................................................... 86Synchronization w ith MyLifeOrganized Cloud

IIIContents
User's Guide
......................................................................................................................................................... 87Automatic sync w ith Cloud
.......................................................................................................................................................... 88Synchronization w ith MLO BlackBerry
.......................................................................................................................................................... 89WiFi Synchronization
.......................................................................................................................................................... 89Collaboration
......................................................................................................................................................... 90Collaboration using MLO Cloud
......................................................................................................................................................... 90Collaboration using sync to a hub f ile on LAN or FTP
.......................................................................................................................................................... 91Synchronization for Portable Scenarios
.......................................................................................................................................................... 92Resolving Synchronization Conflicts
.......................................................................................................................................................... 92Outlook Sync User Manual
......................................................................................................................................................... 931. Performing the Synchronization
......................................................................................................................................................... 932. Setting Up MLO for Outlook Synchronization
......................................................................................................................................... 932.1 Outlook Folder
......................................................................................................................................... 942.2 Tasks synchronization action
......................................................................................................................................... 942.3 Advanced sync options
................................................................................................................................... 942.3.1 MLO Outlook Sync Presets
................................................................................................................................... 952.3.2 General Tab
................................................................................................................................... 972.3.3 Outlook Categories Tab
................................................................................................................................... 992.3.4 Priority Mapping Tab
................................................................................................................................... 1002.3.5 User defined f ields Tab
................................................................................................................................... 1012.3.6 Tab Buttons
......................................................................................................................................................... 1013. Notes and Troubleshooting
......................................................................................................................................... 1013.1 Changing MLO Outlook sync settings after sync operation
......................................................................................................................................... 1013.2 Changing Outlook folder after sync process
......................................................................................................................................... 1013.3 Recurring task in both places MLO and Outlook
......................................................................................................................................... 1023.4 Deletion of a task in Outlook w hich has subtasks in MLO
......................................................................................................................................... 102
3.5. How backup and restore of your Outlook tasks could affect MLO
sync
......................................................................................................................................... 1023.6 The MLO Sync Log
......................................................................................................................................... 1023.7 Misc Notes
................................................................................................................................... 1023 Input parsing
................................................................................................................................... 1064 Drag'n'Drop
................................................................................................................................... 1075 The Rapid Task Entry Dialog
................................................................................................................................... 1086 Alternative complete
................................................................................................................................... 1087 Printing and Reporting
................................................................................................................................... 1098 Printing PocketMod
................................................................................................................................... 1109 Archiving
.......................................................................................................................................................... 111Archiving Manually
.......................................................................................................................................................... 111Archiving Using AutoArchive
................................................................................................................................... 11210 Using the Command Line
Chapter X Options 116
................................................................................................................................... 1161 Current MLO data file
.......................................................................................................................................................... 116Appearance
.......................................................................................................................................................... 116Automatic Formatting
.......................................................................................................................................................... 116To-Do List Ordering Options
.......................................................................................................................................................... 117To-Do List Format
.......................................................................................................................................................... 118WiFi Synchronization
.......................................................................................................................................................... 118AutoArchive
.......................................................................................................................................................... 119Password protection
................................................................................................................................... 1192 General Application Options

ContentsIV
User's Guide
.......................................................................................................................................................... 119Themes and Formatting
.......................................................................................................................................................... 120Behavior
.......................................................................................................................................................... 121Auto-Save Files
.......................................................................................................................................................... 121The Rapid Task Entry Dialog
.......................................................................................................................................................... 122Backup
.......................................................................................................................................................... 123E-mail Account
.......................................................................................................................................................... 123Hot Keys
.......................................................................................................................................................... 123Troubleshooting
Chapter XI Technical Support 126
Chapter XII License Agreement 128
Chapter XIII Glossary 132
Index 135
Acknowledgements
I would like to express my deeply-felt gratitude to all those who have helped me make MyLifeOrganized happen.
I am very grateful to my wife Katrin and my sons Michael and Ivan for their support and patiencethroughout the development of MLO, which has resulted in my coming home late on many days.
I am deeply indebted to the MLO community for their help and advice that have resulted in a large number ofimportant corrections and improvements. My special thanks go to:
Bob Pankratz, for his outstanding support in the initial phase of the MLO project. Bob is the author ofthe computed score priority algorithm and other great ideas. MLO would not be the way it is nowwithout Bob's help.
Mark Levison, for his ideas, promotion of MLO, and support.
Luciano Passuello, for his excellent and easy-to-implement feature requests as well as for the bugreports.
Keith Russell and Tim Howland, for their meticulous technical writing work.
Ilias Sarris, for the detailed and well-thought-out posts, extremely useful feedback and support of theMLO community.
Tom Drahokoupil (tomd), for his active role in the MLO community from the beginning of MLOdevelopment.
Thanks to Lisa Stroyan, Dwight Arthur, Ron Stockfleth, Steve Wynn, Jim McGowan (J-Mac), DavidRees (reesd), Josh Powell (Swifty) and other people I may have forgotten to mention.
Jon Rumens (Kudos), for the excellent work on AutoHotkey Scripts for MLO

Chapter
I


Introduction 5
User's Guide
1 Introduction
"Before you can do anything, you have to do something first." Murphy's Law
MyLifeOrganized (MLO) is a personal task outliner that will help you organize your goals, projects andtasks into a tree. A to-do list of actions that require immediate attention will be generated automatically.This to-do list will be sorted in order of priority to keep you focused on your most important tasks. Theto-do list ordering is based on sophisticated algorithms to determine optimum prioritization.
There are the following mobile clients for MyLifeOrganized: Android, iPhone, iPad.
There is the MyLifeOrganized Cloud Sync service allows you to synchronize data between differentdevices with MyLifeOrganized installed.
This manual mainly covers MyLifeOrganized for Windows and synchronization with other platforms.However many ideas from this manual may be applied to MyLifeOrganized on mobile platforms. Moreinformation may be found on our site: www.MyLifeOrganized.net
MLO can be synchronized with Outlook, and can import/export data from MindManager.
MLO will help you track your personal projects and achieve your most important goals.
Time management means planning and organizing your time in such a way that you accomplish yourmost important goals as quickly as possible. Yet many people work very hard with no idea of what theirreal goals are. If you do not have goals for yourself, you will be forever working to achieve the goals ofsomeone else. Every day, many of us spend time on urgent but low priority tasks, while the mostimportant tasks get put off to another day. Unfortunately, "another day" never seems to arrive. If youkeep putting things off, you'll eventually wake up one day and realize life has passed you by. MLOencourages you to think and act differently -and doing things differently is the first step to diggingyourself out of the procrastination rut.
The main idea of MLO is to help you stay focused on the activities which drive you to achieve your mostimportant goals as quickly as possible. One of the key advantages of MyLifeOrganized is that, despitebeing a very powerful and sophisticated piece of software, it is extremely easy for even the most novicecomputer user. MLO will not replace your Calendar, Outlook or Excel, but it will help you organize yourtasks into an outline, determine the most important ones, and generate a concrete and sequential list ofspecific actions to achieve your goals as quickly as possible. MLO is being actively developed, so jointhe MLO community and share your ideas: http://groups.google.com/group/MyLifeOrganized.
Key Features- Hierarchical to-do list manager (outliner)- Generate to-do list (next actions) based on sophisticated algorithms to determine optimumprioritization- Easy set and manage goals- Complete the tasks in a specific order- Simple personal projects tracking- Dependencies- Custom views- Search-as-you-type

Chapter 16
User's Guide
- Intuitive and customizable interface- Extremely easy for everyday usage- Cloud sync and collaboration- Synchronization with MLO on mobile devices - Smart synchronization with MS Outlook- XML import/export that can be used to create project templates and exchange data with otherapplications including Excel and MindManager.- Advanced printing functionality- Easy one-click Excel export can be used to create and print any reports in MS Excel
www.MyLifeOrganized.net

Chapter
II

Chapter 28
User's Guide
2 Installation
2.1 System Requirements
MyLifeOrganized - Windows System Requirements:
- Windows 8, Windows 7, Vista, XP, 2003 - 12 MB of disk space- MS Outlook 2000+ if you want to sync MLO with Outlook
2.2 Installing MyLifeOrganized
How to install1. If you downloaded the MLO installer, MLO-Setup.exe, just run it and follow the instructions. If youalready have a previous version of MLO installed, just close the application before updating, and it will beupdated with the new version automatically (no uninstall needed).
2. If you downloaded the zip file, MLO.zip, then no installation is needed. Simply unzip the files to afolder of your choice and run the application mlo.exe.
Tip: MLO is specially designed to be able to run from USB flash drives. Youcan store your data files along with mlo.exe on your flash drive and runMLO directly from it.
How to uninstall1. If you used the MLO installer to install the program, then use "Add or Remove Programs" from yourWindows Control Panel to completely uninstall MLO.2. If you used the zip archive to install MLO, simply delete all the files from the folder you copied theapplication to.
2.3 How To Register
There are two ways to register MyLifeOrganized: you may register from within the application, or on ourwebsite.
To register using the MyLifeOrganized application1) Select Help > Registration... from the application menu 2) In the Registration dialog, click the buy online link. You will be taken to the Registration webpage.3) Select the Application Edition you would like to buy a license for, and click the Buy using share*itbutton on this web page.4) Follow the instructions on the share*it website to complete your secure order and receive anActivation Code.5) Enter the Activation Code you receive into the appropriate text input in the MLO Registration dialog.

Installation 9
User's Guide
6) Click the Register button. Your application is now registered!
To register using our website1) Click on the link below, select the MyLifeOrganized product, and follow the instructions. http://www.mylifeorganized.net/shop/buy.htm2) Enter your Activation Code in the application, as described in steps 5 and 6 above.
See alsoWhat if I have lost my Activation CodeWhat if my Activation Code does not work?How to register FAQ
2.3.1 Registering MLO to launch from a removable media
How do I launch a registered copy of MyLifeOrganized from removable media (such as a USBFlash drive) ?
1. Register MyLifeOrganized using the Activation Code provided.2. From the application menu, select Help > Registration, to open the Registration dialog. 3. In the Registration dialog, click "Export registration information to a file" and specify a folder where thefile mlo.keym should be created.4. Copy the following files to the same folder on your removable media: mlo.exe - the main application mlo.keym - the file containing the registration information You can also copy any *.ml files that contain your data.5. You can now run mlo.exe from the removable drive on any computer.
See alsoHow To Register
2.3.2 What if I have lost my Activation Code?
What if I have lost my Activation Code? What if my Activation Code does not work with a new version of MyLifeOrganized?
Use our Online Activation Recovery Service to have a new Activation Codeemailed to you:http://www.mylifeorganized.net/support/activator.htm
How do I change the registration email? What do I do if I have forgotten the e-mail address used when registering, or if the e-mailaccount is not valid anymore?
Use our Online Activation Recovery Service: http://www.mylifeorganized.net/support/activator.htm
See alsoHow To Register


Chapter
III

Chapter 312
User's Guide
3 Getting Started
MyLifeOrganized (MLO) is a personal task outliner and to-do list manager that will help you organizeyour goals, projects, and tasks into a tree, and generate the to-do list of actions that require immediateattention. This to-do list will be sorted in order of priority to keep you focused on the most importanttasks. The to-do list can be filtered, grouped, and ordered based on sophisticated algorithms, todetermine optimum prioritization.
We recommend you start your discovery of MLO with the following topics:
1. The Main Window 2. The Basic Steps 3. Basic concepts: Outline, To-Do, View, Workspace4. Contexts5. Goals6. Projects After you have reviewed these topics and understand the basic concepts of MyLifeOrganized, you canlearn even more about the application in later topics of this help documentation.
You can also download the printable version of MyLifeOrganized User's Guide from our web site.
3.1 The Main Window
Here is a brief overview of each element in the MyLifeOrganized main window.

Getting Started 13
User's Guide
Chapter 314
User's Guide
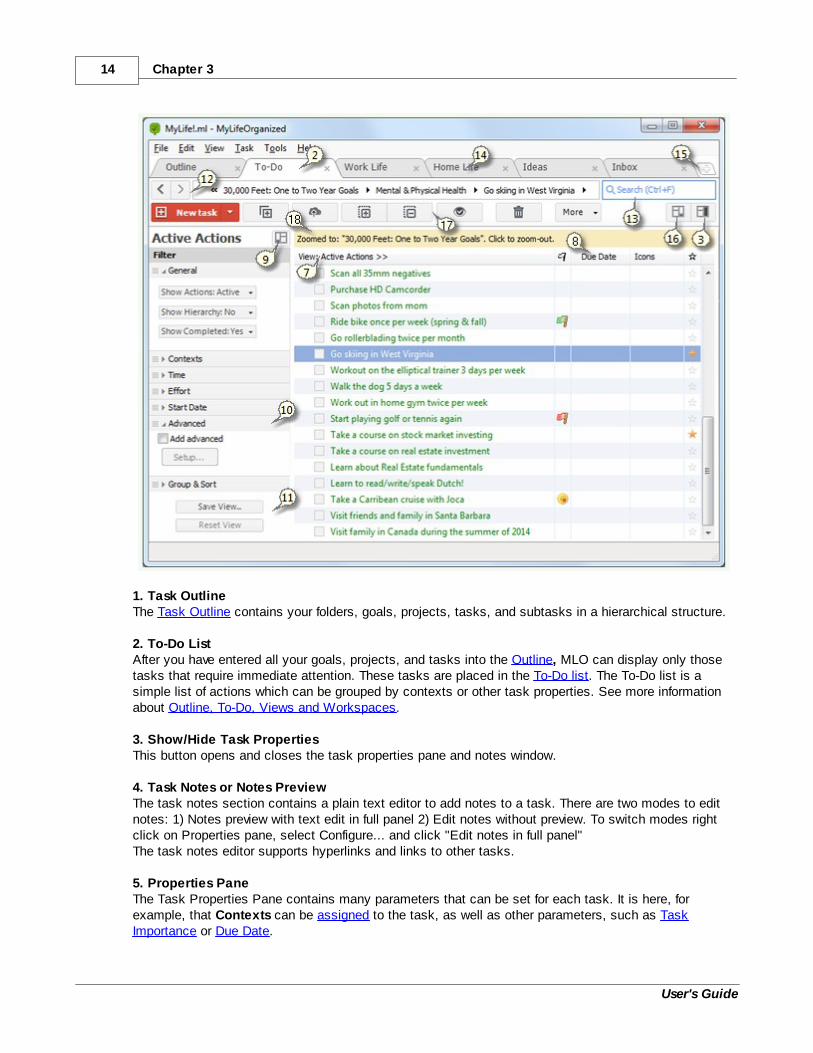
1. Task OutlineThe Task Outline contains your folders, goals, projects, tasks, and subtasks in a hierarchical structure. 2. To-Do ListAfter you have entered all your goals, projects, and tasks into the Outline, MLO can display only thosetasks that require immediate attention. These tasks are placed in the To-Do list. The To-Do list is asimple list of actions which can be grouped by contexts or other task properties. See more informationabout Outline, To-Do, Views and Workspaces.
3. Show/Hide Task PropertiesThis button opens and closes the task properties pane and notes window.
4. Task Notes or Notes PreviewThe task notes section contains a plain text editor to add notes to a task. There are two modes to editnotes: 1) Notes preview with text edit in full panel 2) Edit notes without preview. To switch modes rightclick on Properties pane, select Configure... and click "Edit notes in full panel"The task notes editor supports hyperlinks and links to other tasks.
5. Properties PaneThe Task Properties Pane contains many parameters that can be set for each task. It is here, forexample, that Contexts can be assigned to the task, as well as other parameters, such as TaskImportance or Due Date.

Getting Started 15
User's Guide
6. Property Sections Task properties are grouped into Property Sections. Click on a Property Section to expand or collapseit. You can also use Keyboard Shortcuts for quick access to the Property Sections. Which parametersappear in each section can be set in the Options dialog box, on the Appearance page.
7. ViewsAll tasks in MyLifeOrganized can be filtered, sorted and grouped in various ways, and the filtering,sorting and grouping rules stored as "views". To switch to another view, use one of the ways below:1) Select a view in the left panel with Views tree2) Click on the column where the current view name is displayed and select other view in the list opened
8. Columns You can choose which columns to display in the current View. Right-click on the column header to seethe full list of columns. The columns configuration is stored for each view.
9. Show/Hide filter for current viewClick to show or hide the filter pane with filtering, sorting and grouping rules for the current view.
10. Filter Pane SectionsThe filtering properties are grouped into Filter Sections and allow creating various custom filters,groupings, and sorting rules for the task list.
11. Manage Views PaneAny filtering and grouping you define can be saved as a View. You can also reset settings to theprevious state on this panel.
Tip: To manage views (rearrange, rename, delete, etc.), you can use theViews Pane. Just right click on a View in the Views pane and select a command from themenu. Drag and drop views in the Views pane to rearrange them.
12. NavigationWhile you are browsing through the outline of your tasks, you can use various navigation buttons tomove back, forward or select different levels. The full path to the selected task is displayed under tabs.Click on the full path to select another level. You can also use Workspaces (tabs), Task Links,Bookmarks and Keyboard Shortcuts to speed up your outline navigation.
13. Search tasks MyLifeOrganized includes a very fast full-text search feature.
14. Workspace tabsWorkspace tabs are used to switch quickly to a different way to see your tasks. For example, in one tabyou can focus on a current project, while in a second tab you view your household chores list. In a thirdtab, you might choose to manage your Inbox. And you can switch between these Workspaces with asingle click! When you create new MyLifeOrganized file there are two default tabs are created: Outline (with AllTasks view selected to see all your tasks in hierarchical view) and To-Do (with Active Actions viewselected to see only active tasks as plain list). You can create additional Workspaces according to yourway to manage tasks.
15. Create new workspace (tab)Click this button to create new Workspace (tab)
16. Edit notes in full panelClick to hide task properties to edit the notes in full panel

Chapter 316
User's Guide
17. Toolbar
18. ZoomDisplayed the task name of the Zoom you set.
19. View groupViews can be organized in groups. When you click a group in the Views pane the last used View fromthis group is selected. The view groups are highlighted with blue line and the View inside this group isselected with red line and red font. Expand the View group to see what is the actual view was selectedwhen you select this group.
Tip: You can temporally hide tabs, views pane, toolbar and task properties tosee your task list full screen. Just select View->Full screen (F12).
See alsoThe Basic StepsBasic concepts: Outline, To-Do, View, WorkspaceThe OutlinerThe To Do ListViewsAppearance
3.2 The Basic Steps
Here are four basic steps to help you start using MyLifeOrganized.
1. Outline your tasks Use the MLO Outliner to organize your goals, projects, and tasks into a tree. Start by entering what youwould like to accomplish. If a task is large, break it down into its component elements, by creating sub-tasks underneath it. If these components are themselves large, break them down further into their ownsub-tasks. Mark tasks as Projects by checking "This is a project" in the task's properties (under theProject section of the properties pane). Mark tasks as Goals by setting the "This tasks is a goal for"property of the task (under the general section of the properties pane). For more information on creatingtasks, see Adding a Task or Subtask.
2. Ask yourself what is importantFor each task, you can specify its importance to it's parent task, to the goal the task will contribute to.In other To-Do programs, when you set the priority of a task, you must set an absolute priority in relationto all other tasks in your list. This is very difficult to determine sometimes! In MLO, the process ofsetting priorities is made easier: you only consider how important each task is to completing its parenttask or project. If you later change the importance of a project, all of it's sub-tasks will be reprioritizedaccordingly, without you having to change the importance sliders for those subtasks individually. Seethe Importance for parent topic for more details.
3. Assign Contexts to each task Some tasks in your list can be completed only in certain Contexts or situations. For example, say the

Getting Started 17
User's Guide
task "Buy new mouse" cannot be completed unless you are in a computer store. Thus, you may wantto create a new Context named "Computer store", or "Shopping", and assign this Context to the task.Later on, you can filter or group the To-Do list by assigned Contexts.
A Context can include other Contexts, so it is easy to construct a realistic model of your everydayContexts or situations. For example, the Context "Computer store" could be included by the moregeneral context "Shopping", so you can either bring up all shopping tasks, or bring up tasks only for theComputer store.
Another way to think of Contexts is as categories for the tasks. Several contexts can be assigned for atask. The contexts could be also open or closed.
4. View the automatically generated To-Do list After you have entered your goals, projects, and tasks into the Outliner, MLO will display only thosetasks that are ready for your immediate attention. These tasks are placed in the To-Do list -a simple listof actions. In the default "Active Actions" view, tasks that have uncompleted subtasks are not shown inthe To-Do list, and scheduled tasks appear in the list only at appropriate times. See the To-Do List topicfor more details on how the to-do list is created.
The To-Do list can be sorted by priority so that you stay focused on what is really important to you,separate importance from urgency, and overcome procrastination.
The tasks in the To-Do List can also be filtered based on different parameters, such as context, amountof time you have available right now, etc.
The tasks on the To-Do list can also be grouped by various properties. It is easy to create a customizedTo-Do List View that is filtered, sorted, and grouped according to your needs. Each time you complete a task, the to-do list is regenerated, properly updated and ordered.
See also Getting StartedBasic concepts: Outline, To-Do, View, WorkspaceTiming & ReminderSetting GoalsPersonal Projects Tracking


Chapter
IV

Chapter 420
User's Guide
4 Working with MLO Data Files
4.1 Create, Open, and Save MLO Files
MLO stores your data in a single binary file. The default file extension for MLO data files is *.ml
To create a new MLO file:1. Select File > New...2. Choose to create a blank file or choose a template to start with. (Template files have a *.mlt fileextension.) 3. The current file will be closed and the new file created.
To save an MLO file:1. Select File > Save
Note: Each time you save your data file a backup file is created, named<YourFileName>.ml.bak. (The file will be named slightly differently ifyou chose "Keep last N backups" in the advanced backup settings.)Another backup is also created right before every Outlook sync, named <YourFileName>.ml.sync.bak
Tip: To save the file under a different name, select File > Save as... andenter a new file name.
Note: By selecting different file types in the File > Save as... dialog, you canexport the entire outline to different formats.
To open an MLO file:1. Select File > Open...2. Chose the type of the file you want to open.3. Browse to and select the file you want to open.4. Click the Open button.
Note: By selecting different file types in the File > Open dialog, you canimport data in different formats.
Note: To recover from a backup file, simply open the backup file in theMyLifeOrganized application.
See alsoImport/ExportAuto-Save OptionsAdvanced Backup Options
4.2 Import/Export
Import and Export commands are used to exchange data between MyLifeOrganized and otherapplications. When exporting, you are given a choice to export only the selected branch (a task and allof its subtasks), or the entire outline. When importing, you can import into the selected task, or into theroot of the outline.

Working with MLO Data Files 21
User's Guide
Import and Export is accessed with menu File > Import or Export. Export FormatsMyLifeOrganized can export to the following formats:1) MyLifeOrganized XML Document (*.xml)2) MyLifeOrganized Template (*.mlt)3) Tab-delimited Text Document (*.tab)4) Excel XML Document (*.xml)5) MindManager XML Document (*.xml)
Import FormatsMyLifeOrganized can import from the following formats:1) MyLifeOrganized XML Document (*.xml)2) MyLifeOrganized Template (*.mlt)3) Tab-delimited Text Document (*.tab)4) MindManager XML document (*.xml)
XML and tab-delimited text are standard formats supported by a variety of applications.
Note: You can also export or import the entire outline by selecting File >Save as... or File > Open... respectively. You just need to select thetype of file you would like to export to, or import from.
Tip: By exporting to an Excel XML document, you can use the power ofExcel's reporting to create all k inds of reports about your projects andtasks. For example you can use Excel's Autofilter to report on all thetasks you completed last week and print out the report.
Tip: Export can be used to duplicate tasks and entire projects, and creatingreusable templates that can be imported into your main file any timeneeded.
Tip: You can use XSLT (http://www.w3.org/TR/xslt), a relatively easylanguage, to apply further magic on your xml exports (outside of MLO),such as conversion to other file formats or creating custom reports.
See alsoCreate, Open, and Save MLO FilesTemplates
4.3 Templates
Templates are used to store predefined content and structure so that you can reuse it later whencreating new MLO data files.
How to create a new data file based on a template1. Select File > New... 2. Choose Create from existing template3. In the File Dialog, select the template you would like to use.
Chapter 422
User's Guide
4. Click the Open button
Note: Each time you create a data file based on a template, MLO processesit to "catch-up" all the recurring tasks to the current date.
Tip: One special template, called the "MyLife Organized - Demo.mlt", can beused to create a demo outline with some tips and examples of how to useMLO.
Tip: You can also import data from a template into a selected task of thecurrent data file.
How to create new template1. Open or create a data file that you would like to store as a template to reuse later.2. Click File > Save as... 3. In the Save as type list select MyLifeOrganized Template (*.mlt) 4. Enter a file name5. Click Save
Tip: You can use export to create a template based on only the selectedbranch of the current outline.
See alsoCreate, Open and Save MLO FilesImport/Export
4.4 Searching
You can locate tasks by searching all the task captions and/or task notes in your MLO data file. Thesearch feature is very fast and provides search-as-you-type: it immediately displays search results asyou type the text you want to find.
To search for text in the task captions and/or task notes:1. Click into the Search text box in the upper-right corner of the MyLifeOrganized window. 2. In the search box, type the text you want to find.
The search results are displayed in a pane at the top of the window.
Tip: MLO implements Google-like search, which means that it can search forany combination of typed words, or can search for a specific phrase ifquotation marks are placed around the phrase.
Tip: After entering your search text, press Enter to change focus to thesearch results and jump to the first result.
Notes: · There is an option in the Search panel to search in All Tasks, in All
Except Completed, and in only the Current View.· To narrow down the list of search results, use the Search in captions
and Search in notes check boxes above the search results pane. For

Working with MLO Data Files 23
User's Guide
example, to search only in the task captions of open tasks, select the Search in captions check box, clear the Search in notes check boxand select All Except Completed.
· If more than one match is found in the task notes, a plus sign isdisplayed next to the task caption. Click the plus sign to displayadditional rows. The number of rows corresponds to the number ofmatches found in Task Notes. Click one of these rows to see thecorresponding matching text highlighted in the Task Notes.
· You can sort the search results by any column in the search resultspane. Click the name of the column that you want to use for the sortorder. To reverse the direction of the sort (ascending or descending),click the name of the column again.
3. Select a row in the search results pane. The matching task name is highlighted on the current tab. If the matching text is found in the tasknotes, it is highlighted on the Task Notes.
Note: If task is not found in the current tab MLO will continue search in thefirst tab. If task is not found in the first tab the new tab is created withoutfilter (to show all tasks there) and the task is found in this new tab.
Tip: To change focus to the Task list, press Enter.
4. To hide the search results pane, click Close in the upper-right of the search results pane or pressEsc when focus is in the Search Panel.
4.5 Auto-Save
By default MLO automatically saves your data file. However you can set manual saving mode.
There are two options:1) Save all changes automatically2) User manually saves the changes
To select an Auto-Save option:1. Select Tools > Options...2. Select Autosave files page 3. Select the Auto-Save option you need.
See alsoOption - Auto-Save Files
4.6 Advanced Backup of Data Files
Advanced Backup stores backup copies of your MLO data files on each save. Should you lose yourdata, you can open a backup file or use import/export to restore your data.
MLO can retain daily, weekly, and monthly backup files, as well as the last N copies of your data files.
Advanced Backup is not enabled by default.

Chapter 424
User's Guide
To configure Advanced Backup settings:1. Select Tools > Options...2. Select the Backup section. 3. Select the backup settings you need. (See backup settings for more details.)
Tip: To recover from a backup, simply open the backup data file (*.bak) inMyLifeOrganized application (menu: File >Open)
See alsoBackup SettingsArchiving

Chapter
V
Chapter 526
User's Guide
5 Basic concepts: Outline, To-Do, View, Workspace
Below you can find the description of the main concepts of MyLifeOrganized application and how theywork together.
OutlineOutline is the list of Goals, Projects, and other tasks displayed in hierarchy that shows the relationshipsof subtasks to their respective parents. The Outline is used to organize your tasks. You can view yourOutline using different views. When you create a new data file, MyLifeOrganized creates several defaultOutline views for you. The new tab Outline is also created. When you click on this tab the Outline viewAll tasks is selected.
Note: The Outline is just a definition of filtered tasks (views) presented hierarchically. Youcan create your own Outline view by creating new custom hierarchical view.
More details about Outline.
The To-Do ListAfter you have added all your goals, projects, tasks and subtasks to the Outline, MLO can display onlythose tasks which require immediate attention and place them in the To-Do List. This is a simple non-hierarchical list of actions selected from the entire Outline. This list can be sorted and grouped usingdifferent parameters. You can view your To-Do list using different views. When you create a new data file,MyLifeOrganized creates several default To-Do list views for you. The new tab To-Do is also created.When you click on this tab the To-Do view Active Actions is selected.
Note: The To-Do list is just a definition of filtered tasks (views) presented in a plain (non-hierarchical) list. You can create your own To-Do lists by creating non-hierarchical views.
More details about To-Do list.
ViewView is a particular way of displaying a filtered, sorted and grouped tasks. By default MyLifeOrganizedcreates several default views such as Outline views (hierarchical) and To-Do list views (non-hierarchical).Views are displayed in the left Views pane so that you can select a view with a single click.
Note: Views can be organized into the groups. When you click a group in the Views panethe last used View from this group is selected. The view groups are highlighted with blueline and the View inside this group is selected with red line and red font. Expand the Viewgroup to see what is the actual view was selected when you selected this group. By defaultthe following groups of views are created in MLO: Outline, To-Do, Completed, More Views.
More details about views.
Workspaces (tabs)There are tabs on the top of the MyLifeOrganized application we call Workspaces. The Workspaces areused to store and quick access the particular configuration for the selected view, additional filters, zoom,selected tasks etc. The Workspaces can show different parts of the same data files in different views.For example, in one tab you can work on a current project in the other – view a small household choresand the third tab -handle the Inbox. And you can switch between these Workspaces with a single click!

Basic concepts: Outline, To-Do, View, Workspace 27
User's Guide
When you create new data file, MyLifeOrganized creates two default Workspaces for you: Outline andTo-Do so that you can quickly switch between hierarchy in All Tasks view on Outline tab to the plain listin Active Actions view on To-Do tab.
When you select a view inside Workspace or change the filter, you actually change the configuration ofthe current Workspace. When you click other Workspace you will see other configuration in it. Whenyou return back to the first Workspace your changes for this Workspace will be still there. If you want topropagate the changes to filtering, sorting and grouping in one Workspace to other Workspaces, youmust first save these changes into a View. This way all the Workspaces which are using this View inunchanged state will receive the new settings.
Note: Some parameters like Selection and Zoom may be configured to sync with the firsttab. This is needed, for example, when you want to see the place in the Outline of the taskselected in the To-Do list. To configure the Workspace right click on it and select Set upworkspace...
More details about Workspaces.
See alsoThe Basic StepsZoom In and Zoom Out
5.1 Outliner
The Outliner is where you organize your tasks. Here is an overview of its many features.

Chapter 528
User's Guide
1. Switch from Outline to To-Do list2. Hide completed tasks3. Current view. Click to change the view4. View group5. Navigation buttons and full path to the selected task6. Completed task7. Completed Goal8. Weekly goal9. This task is a Project10. Project completion progress bar11. Folder12. Context column13. Flag14. This task has notes15. Due date set for this task16. Reminder set for this task17. Dependency set for this task18. Open task properties pane19. Side color bar20. Starred task21. Add new Workspace22. Active Action23. Overdue task

Basic concepts: Outline, To-Do, View, Workspace 29
User's Guide
24. Open filter setup pane25. Add subtask26. Cloud sync (there are local modifications now)27. Zoom in / Zoom out28. Current zoom
An Outline is a hierarchical list of Goals, Projects, and other Tasks displayed in a way that shows thetasks relationships, including Parent Tasks and their Subtasks. This hierarchy is sometimes referred toas a tree, with root items (top-level items, or items at the top of the hierarchy), branches, and leaves(tasks that have no subtasks). If you have a list of goals that you wish to work on, you can first enterthese goals at the top level of the outline. Then, for each goal, you can enter sub-projects and subtasksthat will help you to accomplish that goal.
If you prefer to concentrate on projects and not goals, you can simply enter your projects, and then, foreach project, enter its subtasks.
In addition to entering new tasks, you can also edit or delete existing tasks in the Outline.
If you have enabled the Properties Pane in the View menu, properties and notes pertaining to theselected tasks are displayed on the right side of the main window, and you can set individual propertiesfor the selected tasks there.
Goals, projects, and tasks that you enter in the outline are then listed in the To-Do List based on theirposition in the hierarchy and on the properties that you assign to them.
To make it easier to view your uncompleted tasks, without being distracted by those that are alreadydone, there is a button to hide completed tasks from the display. You can hide all completed tasks orcompleted tasks which are older than a specified time. There is a refresh option (F5), to update thedisplay with all recent changes. You can also select from a list of Outline views that will display all yourtasks, only your goals, only your projects etc.
If you want to view only subtasks of a single goal, project, or parent task, you can zoom in to that taskand all other tasks will be removed from the display, so that you can concentrate on the branch at hand.
See alsoCreating Tasks and SubtasksRearranging the OutlineOutline NavigationActions on TasksZoom In and Zoom OutViews
5.1.1 Default Outline Views
You can view tasks in the Outline in different ways, called Views.
View name View description
All Tasks Shows all tasks and subtasks, displayed the way youentered them.
Chapter 530
User's Guide
Projects Shows tasks with property Project checked with theirsubtasks.
Goals Shows tasks set as Goals with their subtasks. (youcan assign this property from the General section ofthe task Properties Pane).
Review Shows all tasks (and their subtasks) with propertyNext Review set for today or for the past. This view isused to perform periodical review of your projects andtasks. Once the project is reviewed mark it bycommand "Mark Reviewed" to move the review on nextdate.
To change the View from views pane:1. Double click Outline in the left panel with views to expand all Outline views.2. Select the view you need.
To change the View from menu:1. Click the Views: <View Name> header to open the pop-up menu containing a list of views.2. From the pop-up menu, select the view you need.
Tip: You can create your custom views using filtering, grouping and sorting.
Tip: You can use the Alt+V shortcut to open the view pop-up menu.
Tip: To save the space on the screen you can hide task views pane byselecting menu: View->Task views pane. (Alt-F1) .
See alsoOutlinerWorkspace tabsGoals SettingProjects TrackingZoom In and Zoom Out
5.1.2 Adding a Task or Subtask
A task can be added below the selected task, or as a child of the selected task.
To add a task:
1. On the Task menu, click New task, and type a task name.
Tip: You can also press the Insert key shortcut or use New task toolbarbutton.
Basic concepts: Outline, To-Do, View, Workspace 31
User's Guide
To add a subtask:
1. Click the task you want to add a subtask to.2. On the Task menu, click New subtask, and type a subtask name.
Tip: You can also press Alt+Insert as a shortcut or use the toolbar button.
See alsoActions on TasksOutliner
5.1.3 Deleting a Task or Subtask
To delete a task or subtask:
1. Right-click the task or subtask.2. On the shortcut menu, click Delete task.
Tip: You can also use Ctrl+Del as a shortcut or the button in the toolbar.
Tip: If you want to revert the deletion you made, use the undo command. Toundo, select menu Edit > Undo or press CTRL+Z.
See alsoActions on TasksOutliner
5.1.4 Rearranging the Tasks and Subtasks
You can change the hierarchy and position of any task or subtask displayed in a hierarchical view.
To move a task or subtask into another task:
1. In any hierarchical view left-click a task you want to move.2. Drag the selected task onto the task you want to move it under.
The task you have moved will be displayed as a subtask under the corresponding outline item.
Note: if the task you moved to is collapsed, drag & drop puts the subtask asthe last subtask in the list; otherwise, if the task is expanded, drag &drop puts it as the first subtask in the list.
To convert a subtask into a task:
1. In any hierarchical view left-click a subtask.2. Drag the selected subtask into the left side of the task list, and then release the mouse button.
Chapter 532
User's Guide
Tip: You can also use shortcuts to rearrange the tasks (see Rearrange tasksin the outline).
Tip: If you want to cancel the rearrangement you made, use the undocommand as many times as necessary. To use undo select menu Edit >Undo or press CTRL+Z.
Tip: Drag & Drop tasks to a group in the task list to assign correspondingproperties for the task .
See alsoOutliner
5.1.5 Performing Actions on Tasks
You can perform different actions on the task items. All available actions are listed in the Task menu orlocal menu. To open the local menu, right-click a task in the list.
Tip: There are Keyboard Shortcuts assigned for many task actions.
Note: After most actions, you can use the Undo operation: Edit > Undo.
Action name in the local menu Action description
New task Create a new task
New subtask Create a new subtask
New folder Create a new folder
New project Create a new project
New from template... Create a new task branch using one of the existing tasks as atemplate
Zoom In Perform Zoom In action. See Zoom in and Zoom out for details.
Zoom out Perform Zoom Out action. See Zoom in and Zoom out fordetails.
Refresh Update the display with all recent changes in the Outline
Set due date... Activate the Timing & Reminder property section and focus onthe Due Date control to select new due date for the task.
Skip occurrence... Skip occurrence of a recurring task.
Cut task Cut the selected task to the clipboard. When you paste the taskto another location or another MLO window this task will beremoved.
Copy task Copy the selected task to the clipboard. Tasks copied to theclipboard can be pasted to other MLO instances or to otherapplications as outlined text.
Copy as
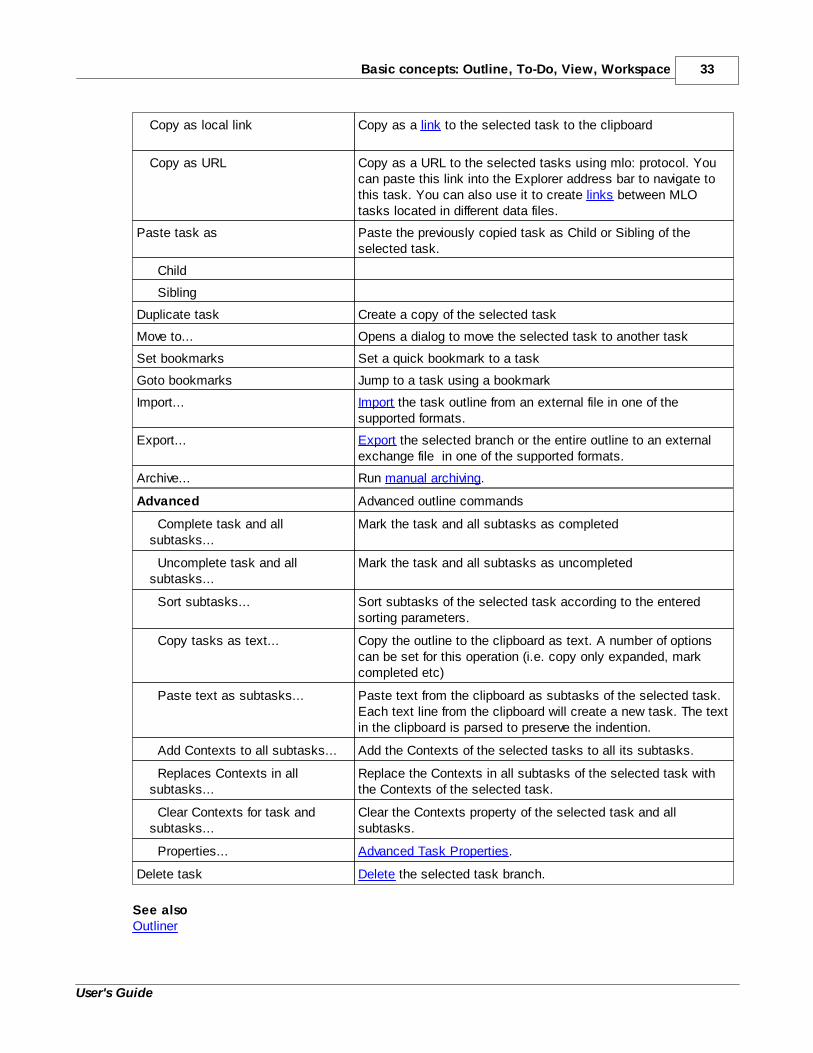
Basic concepts: Outline, To-Do, View, Workspace 33
User's Guide
Copy as local link Copy as a link to the selected task to the clipboard
Copy as URL Copy as a URL to the selected tasks using mlo: protocol. Youcan paste this link into the Explorer address bar to navigate tothis task. You can also use it to create links between MLOtasks located in different data files.
Paste task as Paste the previously copied task as Child or Sibling of theselected task.
Child
Sibling
Duplicate task Create a copy of the selected task
Move to... Opens a dialog to move the selected task to another task
Set bookmarks Set a quick bookmark to a task
Goto bookmarks Jump to a task using a bookmark
Import... Import the task outline from an external file in one of thesupported formats.
Export... Export the selected branch or the entire outline to an externalexchange file in one of the supported formats.
Archive... Run manual archiving.
Advanced Advanced outline commands
Complete task and allsubtasks...
Mark the task and all subtasks as completed
Uncomplete task and allsubtasks...
Mark the task and all subtasks as uncompleted
Sort subtasks... Sort subtasks of the selected task according to the enteredsorting parameters.
Copy tasks as text... Copy the outline to the clipboard as text. A number of optionscan be set for this operation (i.e. copy only expanded, markcompleted etc)
Paste text as subtasks... Paste text from the clipboard as subtasks of the selected task.Each text line from the clipboard will create a new task. The textin the clipboard is parsed to preserve the indention.
Add Contexts to all subtasks... Add the Contexts of the selected tasks to all its subtasks.
Replaces Contexts in allsubtasks...
Replace the Contexts in all subtasks of the selected task withthe Contexts of the selected task.
Clear Contexts for task andsubtasks...
Clear the Contexts property of the selected task and allsubtasks.
Properties... Advanced Task Properties.
Delete task Delete the selected task branch.
See alsoOutliner

Chapter 534
User's Guide
5.1.6 Zoom In and Zoom Out
If you have a complex tree of tasks with many branches and want to concentrate on one project andtemporally hide all the others, you can use the Zoom in command.
To Zoom in:1. Select a task in the Outline2. Right-click the task 3. Click Zoom-in... .
Tip: you can also use shortcut Ctrl+R or toolbar button to Zoom in
The task you selected will be the new Root for your task tree. Its name will be shown on the top of theoutline.
Tip: You can use this command as many times as you want to move deeperand deeper into the task tree.
Note: The Zoom in command in the first Workspace (tab) will also affect theother Workspaces if these Workspaces configured with option "Synczoom with first tab". If this option is not set then the Zoom in commanddoes not affect this Workspace.
To return to the normal view1. Click the Zoom information bar on the top of the outline.
See alsoViewsWorkspace tabs
5.1.7 Outline Navigation
While you are browsing through the outline of your tasks, you can use various navigation buttons tomove back, forward or to other level. You can also use: Workspace tabs, Task Links, Bookmarks andKeyboard Shortcuts to speed up your outline navigation.
Note that a full path to the task you selected is always displayed in the path control on top of theapplication window. It can be used to jump quickly to other level of the outline.
Basic concepts: Outline, To-Do, View, Workspace 35
User's Guide
See alsoWorkspace tabsLinks to TasksBookmarksKeyboard Shortcuts
5.1.7.1 Creating Links Between Tasks
You may need to associate a task to related tasks or files. You can do this by inserting links into thetask notes. When you click a task link, the linked task is selected in the Outline. When you click a filelink, the linked file opens in its associated program or viewer.
You can insert the following types of links:
· A link to a task in the same MLO file. · A link to a task in another MLO data file. · A link to a file or hyperlink.
You can also link to MLO tasks from other applications using the registered protocol mlo:// .
To insert a task link by using the Task Notes command: 1. Click the Task Notes tab of the task in which you want to create a link.2. Right-click in the Task Notes tab.3. On the menu, select Insert link to a task.4. In the "Select Task" dialog box, select the task you want to link to and click OK.5. Repeat steps 2–4 to insert additional links.
To paste a task link into the task notes:1. In the Outline select the task that you want to link to.2. Right-click this task.3. On the menu, select Copy as > Copy as link. A link to this task is placed into the clipboard.4. Right-click in the Task Notes tab of the task in which you want to create a link.5. On the menu, select Paste.6. Repeat steps 1–5 to insert additional links.
Note: An example of a link to a task in the same MLO file: \\mlo:{9FBDC6E4-3D95-4F02-8EF0-3AB5D4CE6507}
To insert a link to a task in another MLO data file:1. Open the MLO data file containing the task that you want to link to.2. Right-click this task in the Outline.3. On the menu, select Copy as > Copy as URL. The URL of this task is placed into the clipboard.4. Open the MLO data file containing the task in which you want to create a link.5. Right-click in the Task Notes tab of this task.6. On the menu, select Paste.7. Repeat steps 1–6 to insert additional links.
Note:To convert the pasted URL to a link (so that it is underlined in the notes),type two backslashes (\\) at the beginning of the URL. An example of alink to a task in another MLO data file: \\mlo://c:\MyMLOFiles\Sample%20MLO%20file.ml?{F9BA410A-AB32-41BB-AE04-

Chapter 536
User's Guide
869F0F490981}
Tip:You can use this command to link to a MLO task from other applicationusing the mlo:// registered protocol. For example you can enter this URLin the explorer address bar and press Enter. MLO will open the taskspecified by Task GUID:mlo://c:\MyMLOFiles\Sample%20MLO%20file.ml?{F9BA410A-AB32-41BB-AE04-869F0F490981}
To insert a link to a file:1. Select a task from in want to create a link.2. Right-click in the Task Notes tab of this task.3. On the menu, select Insert link to a file.4. Browse to the file you want to link to. 5. Select the file and click Open.
Notes: · If you create a link to a task from the zoomed-in view using the Copy
as link or Copy as URL command, the task link will include the zoom-in command. So when you click the task link , the caption of thedestination task will be highlighted in the zoomed-in view.
· You can specify both absolute and relative (in relation to the foldercontaining the current MLO data file) paths in file links.
See also:Outline NavigationOutliner
5.1.7.2 Bookmarks
To speed up the navigation in the outline, you can set a bookmark to a task and then jump back to itanytime with a single key stroke. There are 10 slots available for quick bookmarks: keys 0 through 9.
To set a bookmark to a task1. Select a task in the outline you would like to set a bookmark to.2. Select menu View > Set bookmarks > Bookmark <N> , or press Ctrl + Shift + <N>, where <N> is any key from 0 through 9.
To jump to a task using bookmark1. Select menu View > Go to bookmarks > Bookmark <N> or press Ctrl + <N>, where <N> is any key from 0 through 9.

Basic concepts: Outline, To-Do, View, Workspace 37
User's Guide
Tip: You can use shortcuts "Ctrl + >" and "Ctrl + <" to navigate to the nextand previous bookmarks.
To review the list of all bookmarks available, select menu View > Go to bookmarks > Bookmarks... orpress Ctrl + Alt + > .
See alsoOutline NavigationLinks to TasksOutlinerKeyboard Shortcuts
5.2 The To-Do List
After you have added all your goals, projects, tasks and subtasks to the Outline, MLO can display onlythose tasks which require immediate attention and place them in the To-Do List. This is a simple non-hierarchical list of actions selected from the entire Outline. This list can be sorted and grouped usingdifferent parameters. You can view your To-Do list using different views.
The To-Do list is updated automatically once you complete a task, change context or if it is time toupdate the To-Do list.
To understand how MLO selecting tasks for the To-Do list basing on your Outline and task parameters, learn how default To-Do views are working.
Note: The To-Do list is just a definition of filtered tasks (views) presented in a plain (non-hierarchical) list. You can create your own To-Do lists by creating non-hierarchical views.
See also Default To-Do List ViewsManage Views To-Do List Format
5.2.1 Default To-Do List Views
When you create a new MLO data file, the standard To-Do List Views are created. You can also createany custom To-Do List Views.
Below is a description of the standard To-Do Views.
Active ActionsThis is the basic view for generating To-Do lists in MLO. It is important to understand how it works sincemany views are based on it. The following tasks appear on the To-Do list in Active Actions view:1) Tasks without open subtasks (whose subtasks have all been completed) 2) Tasks that do not have completed parent tasks3) Tasks without a Start Date, or whose Start Date is today or in the past 4) Tasks that do not have the option Folder checked 5) Tasks that do not have the option Hide branch in To-Do List checked for this task as well as for any ofits parents 6) If one of the task's parents has the option Complete subtasks in order checked, this task must have

Chapter 538
User's Guide
all above siblings completed - or these siblings must have their Hide in To-Do or Folder option set. 7) Tasks that do not have dependency or these dependencies are completed
Active Actions by ContextThis view contains all the tasks described in the "Active Actions" view, but grouped by Contextsassigned to the tasks.
Active Actions by FlagThis view contains all the tasks described in the "Active Actions" view, but grouped by Flag assigned tothe tasks.
Next Actions by ProjectThis view is based on the "Active Actions" view. The difference is that only one task for each project (thefirst one) is placed on the To-Do list in this view. This list is grouped by project of the tasks.
Note: If there are Active Tasks without a parent project, then only the first task for eachroot task is selected for this view and these tasks placed under the (none) project group onthe To-Do List.
Note: If a project does not have open tasks, then this project itself is also placed on theTo-Do list as Next Action.
Active StarredThis view is based on the "Active Actions" view, but only starred tasks are added to this view. Also theActive Starred view is manually sorted. The Active Starred view has predefined settings which cannot bechanged because it is synced to MLO running on mobile devices.
Active GoalsThis view is based on the "Active Actions" view, but only tasks with the goal property are added to thisview.
Start next 7 days / Start next 30 daysThis view is based on the "Active Actions" view. The difference is that only active actions with Start dateare displayed in this view including future tasks if their Start date within next 7 or 30 days accordingly.
Due next 7 days / Due next 30 daysThis view is based on the "Active Actions" view. The difference is that only active actions with Due dateare displayed in this view including future tasks if their Due date within next 7 or 30 days accordingly.
Note: The "Starred" view is different from "Active Starred". The Starred viewcontains all starred tasks (active and non-active). You can star any task byclick ing on the Starred column. The Starred view is also manually sorted. TheStarred view has predefined settings which cannot be changed because it issynced to MLO running on mobile devices.
Note: if you create a new data file from a template, there might be otherstandard views added to your data file by default.
Tip: Additional information such as project name or path can be displayed inthe task title on the To-Do list. See To-Do List Format for more details.
See also
Basic concepts: Outline, To-Do, View, Workspace 39
User's Guide
Manage Views To-Do List Format
5.3 Views
View is a particular way of displaying the filtered, sorted and grouped tasks. When you create new datafile, MyLifeOrganized creates default views for you. All available views are displayed in the left panelcalled Views pane. You can create your own views using built-in MLO features for filtering, sorting andgrouping of your tasks.
The views can be hierarchical and in this case we call them Outline views. The views can be non-hierarchical and in this case we call them To-Do views.
Views can be organized into the groups. When you click a group in the Views pane the last used Viewfrom this group is selected. The view groups are highlighted with blue line and the View inside this groupis selected with red line and red font. Expand the View group to see what is the actual view wasselected when you selected this group. By default the following groups of views are created in MLO: Outline, To-Do, Completed, More Views.
To save the space on the screen you can hide task views pane by selecting menu: View->Task viewspane. (Alt-F1). In this case you can open the view list by clicking the header of the task list.
You can open any view in new window so that you can drag&drop tasks from one list of tasks to anotherone.
See the topics below for more information about Views:
Default Outline ViewsDefault To-Do List ViewsTask FilteringTask Grouping and SortingManage Views (create, rename, delete, rearrange, etc) To-Do List Format
5.3.1 Manage Views
The Views pane is used to create new views, rename view names, reorder views in the list, delete views,assigning icons to views. You can also assign hotkeys for the selected views. Use these hotkeys toactivate selected views with a single click.
You can use export/import to move your views to other MyLifeOrganized data file.
Right click on a view in Views pane to access all available commands.
To create a new custom view1. Open Views pane if it is closed (Alt+F1)2. Right click to open local menu3. Select New view... The new view will be created under selected view. 4. Enter the view name
To change the settings of the created view

Chapter 540
User's Guide
1. Select this view from in the Views pane2. Click Filter button to open Filter settings for this view. 3. Change its settings (see filtering, grouping and sorting for more details) 4. Click "Save view..." in the bottom of the Filter pane5. Change name if needed and click OK in the View Name dialog
Tip: You can also create a new view based on your current view. Just select aview and click "Save view..." on Filter pane. Enter new name for the view. Aduplicate of the current view with new name will be created.
To rename a view1. Select view in the Views pane2. Right click to open local menu3. Click Rename view... 4. Enter the new name5. Click OK
To reorder the views list1. Drag the view in the Views pane to the desired position.
To assign a hotkey to a view 1. Select view in the Views pane2. Right click to open local menu3. Click Assign hotkey... 4. Press the new hotkey in the edit box.5. Click Assign hotkey button
Views can be organized into the groups. When you click a group in the Views pane the last used Viewfrom this group is selected.To convert a view into view group1. Select view in the Views pane2. Right click to open local menu3. Click This is a view group...
To delete a view1. Select a view (or several views ) in the Views pane2. Right click to open local menu3. Click Delete... and confirm deletion of the selected view(s)
If you have changed or deleted standard views, you can always recreate them or restore their defaultsettings. To reset standard views1. Right click Views pane to open local menu2. Click Restore default views... and confirm this action
To export views
Basic concepts: Outline, To-Do, View, Workspace 41
User's Guide
1. Select views in the Views pane2. Right click to open local menu3. Click Export view(s)... 4. Enter a file name.
Note: The views you created in one data file are not synced to other data files.You can export your views from one data file and import them into anotherdata file.
You can open any view in new window so that you can drag&drop tasks from one list of tasks toanother.To open view in new window1. Right click Views pane to open local menu2. Click Open in new window...
See also To-Do ListTask FilteringTask Grouping and Sorting
5.3.2 Task Filtering
Use filtering to select the tasks from the entire outline which should be placed on the current view.
The filter parameters are set on the Filter Pane. To open the Filter Pane click Filter button on Viewspane or press Alt+F. The tasks are selected using a conjunction of Action Filter, Hierarchy Filter,Completion Filter, other Filter Controls and Advanced Filter.
Action FilterWith the Action Filter you should select what types of the tasks are placed to the filtered list. There arefive options for this filter:
1. ActiveIf Active is selected as the Action Filter then only Active tasks are placed in the list first and then otherfilters can be used to select tasks from this list. To be placed on the list of Active actions, a task mustmeet all criteria listed below:1) the task must not have subtasks or these subtasks should be completed 2) the task must not have completed parent tasks3) the Start Date for the task is not set or Start Date is now or in the past 4) the task must not have the option Folder checked 5) the task must not have the option Hide branch in To-Do List checked for this task as well as for any ofits parents 6) If one of the task's parents has the option Complete subtasks in order checked, this task must haveall above siblings completed to be placed in the list. Or these siblings can have Hide in To-Do optionset. 7) If the task has dependency tasks these dependency tasks must have been completed.
2. Available

Chapter 542
User's Guide
If Available is selected as the Action Filter, then only Available tasks are placed in the list first and thenother filters can be used to select tasks from this list. To be placed on the list of Available tasks a taskshould meet all the criteria listed for Active Actions except #6 and #7. This means that the option"Complete subtasks in order" and "Dependency" are not considered when retrieving the tasks for thislist. The subtasks will appear on the list normally even if the parent task has "Complete subtasks inorder" option set and even if dependency is set.
3. Next ActionsIf Next Actions is selected as the Action Filter then only Next Actions are placed in the list first and thenother filters can be used to select tasks from this list. To be placed on the list of Next Actions a taskshould meet all the criteria listed for Active Actions. However only one (first) active task for each projectis placed in the list.
Note: If there are Active Tasks without parent project then only first task for each root taskis selected.
Note: If a project does not have open tasks then this project itself is also placed on the listas Next Action.
4. CompletedIf Completed is selected as the Action Filter then only Completed tasks from all levels of the outline areplaced in the list first and then other filters can be used to select tasks from this list.
5. AllIf All is selected as the Action Filter then all tasks from all levels of the outline are placed in the list firstand then other filters can be used to select tasks from this list.
Hierarchy FilterWith Hierarchy Filter you should select if parent tasks and/or subtasks should be also placed to thefiltered list together with the tasks matched the filter. There are two options:1) Show Hierarchy: No - the parent and children tasks will be not placed to the filtered list. The resultof the filter will be the plain non-hierarchical list of tasks (To-Do List)2) Show Hierarchy: Yes - the parent and/or child tasks of the filtered items will be also placed to theresulted list. The result of the filter will be a hierarchy (Outline).When you choose to show the hierarchy you can continue to set the parameters for this view. Click Config button to see more options:- Include parent items - include parent tasks for the tasks filtered with the main filter. You can also setadditional filter for these parent tasks by clicking the link Set parent filter.- Include child items - include child tasks to the tasks filtered with the main filter. You can also setadditional filter for these child tasks by clicking the link Set children filter - Continue searching in branch after main filter match - set this option to extract tasks matchedto the main filter from the children branch to the root of the hierarchy. - Highlight matched to the main filter - highlight the tasks in the list which match the main filter.
Completion FilterWith Completion Filter you should select if completed tasks must be added to the filtered list. There arethree options:1) Show Completed: Yes - include completed tasks to the filtered list2) Show Completed: No - exclude completed tasks from the filtered list3) Show Completed: Recent - include only recently completed tasks to the filtered list. You canconfigure the date of the completion to include the task in additional settings for this option.

Basic concepts: Outline, To-Do, View, Workspace 43
User's Guide
Filter ControlsAfter selecting the Action Filter, Hierarchy Filter and Completion Filter (placed in General section of thefilter pane) additional filters can be applied to the filtered list. For example you might want to select onlyActive tasks with specified Contexts and Effort parameters.The special controls are used to apply additional filtering to the list. These controls are placed in thesections which could be expanded and collapsed. To be placed on the filtered list a task should meet allcriteria specified in the filter sections. See Filter Controls for more details.
Note: if filter settings are changed for controls in a section, the caption of thissection changes to bold.
Tip: You can reorder or hide filter sections that are not used. To reorder justdrag a section using its caption. To hide unused sections, right click thesections and select items in Sections submenu.
Advanced FilterAdvanced filter is used to add additional power to the filtered list. Using advanced filter, more complexqueries can be added to the filter. To use Advanced filter, open Advanced section, check "Addadvanced" checkbox and click "Setup..." button. In the "Setup Advanced Filtering" dialog setup the rulesand click OK.
Please note that Advanced Filter is used in conjunction with parameters set in Action Filter, HierarchyFilter, Completion Filter and Filter Controls.
The selected list of tasks can also be grouped and sorted. You can also save the current list's settingsas View. Just click "Save View..." link in the bottom of the Filter Pane. See Manage Views for moredetails.
Tip: The asterisk ( * ) next to the view name indicates the filter criteria of theview have been edited and require saving. If you wish to retain the changeclick "Save View..." link at the bottom of the "Filter" panel and the ' * ' willdisappear. You can also roll-back to the View as last saved, by click ing on"Reset Settings" button.
See also Filter ControlsGrouping and Sorting on the To-Do listManage Views
5.3.2.1 Filter Controls
The filter settings of the selected View can be changed "on the fly" using Filter Controls. The filtercontrols are placed to the sections which are described below.
Chapter 544
User's Guide
Tip: if you do not see the filter pane click Filter in the bottom of the viewslist (#9 in the Main Window overview). Some of the sections in the filterpane maybe hidden. To unhide them, right click any section and checkthe hidden sections in the menu.
GeneralThis section contains the following filters: Action Filter, Hierarchy Filter and Completion Filter. Thesefilters are described in Task Filtering section.
TextYou can filter the task list by any text contained in the task title, task notes or context assigned to atask. Click the configuration button in this section to select where to find the text.
ContextsYou can filter the task list by Context. In this case, only tasks assigned to this Context (or any of itsincluded Contexts) will be listed in list.
If a Context you have selected is closed at the moment, the tasks associated with this Context will NOTbe shown in the list unless you check the Include closed check box.
Several contexts can be selected if Ctrl+Click is used. Change "operation" to AND to see the tasks thatcontain all selected contexts. Change operation to OR if you want to see tasks that contain at least oneof the selected contexts.
FlagsYou can filter the task list by Flag. In this case, only tasks assigned to the selected flags will be listedin list.
TimeYou can filter the list by the time you have available now. MLO will list all tasks that fit into the timeusing current sorting order for you to choose the best fit. So for a task to be listed in the list with the Time filter set, its Time required for the task Min and Max values must be inside the range selectedin Time filter.
Tip: click to "Look up in Outlook" link to calculate the time you havebefore next appointment in your Outlook calendar.
EffortYou can filter the list by the Effort required for the task. When the Effort filter is set, for a task to belisted in the list, its Effort parameter value must be between the selected range in the Effort filter
ReferencesYou can filter the list to show all tasks that depend on the selected task(s) or link to the selected task(s). Right click on a task in the main list and select one of the commands: "Tasks that depend on thistask..." or "Tasks that link to this task...". The selected tasks will be added to the References filter andyou will get the filtered task list. Click the configuration button in this section to select filter type or clearthis filter.
Start DateYou can filter tasks by Start Date. When the Start Date filter is set, for a task to be listed in the list, itsStart Date parameter must be between the selected range in the Start Date filter.

Basic concepts: Outline, To-Do, View, Workspace 45
User's Guide
See alsoTask FilteringTo-Do ListContextsAssigning Contexts to a Task
5.3.3 Task Grouping and Sorting
The filtered list of tasks in a view can also be grouped and sorted.
To group and sort the tasks in the View1. On Views pane click Filter button (or Alt+F) 2. Open the Group&Sort section3. Click "Group by..." button to group the list or "Sort..." to sort the list
You can also save the current list as a view. Just click "Save view..." button in the bottom of the FilterPane. See Manage To-Do List Views for more details.
See more about automatic and manual sorting.
See also Task FilteringManage Views Manual sorting
5.3.3.1 Understanding Task List Ordering
Tasks on the list can be sorted either automatically or manually.
Automatic sorting
You can select different options to automatically sort the task list. Automatic sorting of the task listdepends on the parameters you set for the tasks.
One of the automatic sorting mode is Computed-Score Priority You will get excellent results if you takethe time to configure the tasks more or less correctly. You will find that MyLifeOrganized will do anexcellent job in presenting to-do lists that are sensibly prioritized according to the importance, urgencyand date.
Manual sorting
You can switch from automatic sorting to manual sorting for any View. When a View is in manual sortingmode you can manually reorder the tasks in the list by dragging them to the desired positions. To switchto and from manual sorting mode click Sort... button in Filtering Pane and select Manual sortingoption.
See also Computed-Score PriorityTo-Do List Ordering Options

Chapter 546
User's Guide
To-Do List
5.3.3.1.1 Computed-Score Priority
Computed-Score Priority mode uses the details you supply about each task to compute an individualscore for each task in your outline. These scores are then used to provide a priority-ordered task list.The factors that contribute to each task's score are its Importance, its Urgency and Time.
1) Importance: Set the importance of each task only with regards to its parent item. Items with higherimportance will be near the top of the task list. If a parent task has a lower importance; that will lower theimportance of its child tasks (Importance inherits down the).
2) Urgency: Set the urgency of each task only with regards to its parent item. Items that have a higherurgency will be near the top of the task list. If a parent task has a higher urgency; that will raise theurgency of its child tasks (Urgency inherits down the outline).
3) Time: If you set a due date or a due date + start date; then the urgency of the task will be boosted asthose dates get closer and are passed. Urgency will continue to climb even if the task is severelyoverdue.
How much effect the start and due date will have on the overall urgency of the task can be configured inthe MLO preferences. The preferences allow you to set the start and due date weighting factors
individually. The higher you set the weights, the more influence the dates will have on the list ordering.
MLO allows you to configure it to order tasks by just importance, just urgency or a combination of both.
More details on Computed Score Priority
5.3.3.1.1.1 More Details on Computed-Score Priority
Computed-Score Priority mode uses the details you supply about each task to compute an individualscore for each task in your outline. These scores are then used to provide a priority-ordered To-Do List.The factors that contribute to each task's score are its Importance and its Urgency. The To-Do List willinclude tasks that have no uncompleted children tasks, ordered by their Computed-Score Priorities.
The To-Do list can be configured to order tasks by just Importance, just Urgency, or a combination of
both.
Importance Slider The absolute importance of each task is a computed value and is not directly set by the user. Instead,for each task you set the importance of that task with regards to its immediate parent. Once you havedone that, the program will compute the task's actual importance. A task's importance to its parent iscontrolled by a slider. The slider ranges along an inverted natural logarithm curve. This actual curve isdocumented below. The slider values range from 0.9964 to 1.0036, with a midpoint value of 1.0000.Because of the logarithm curve applied any position on the slider to the left of the midpoint has an exactopposite to the right of the midpoint. This allows a lower importance to be nullified by an equal butopposite higher importance.
Suppose that you have two projects in the root of the outline (Prj1 and Prj2), and that each of them has
one subtask (p1 and p2, respectively. The importance of each task will be calculated as follows: Computed actual importance of p1 =(Prj1 Importance to outline) * (p1 Importance to Prj1)
Basic concepts: Outline, To-Do, View, Workspace 47
User's Guide
Computed actual importance of p2 =(Prj2 Importance to outline) * (p2 Importance to Prj2)
For example, if the importance values are set as follows: Prj1 = 0.9972, Prj2 = 0.9964, ps1 =1.0036, ps2 = 1.0036
then these tasks' computed importance scores will be as follows: Prj1 = 0.9972
Prj2 = 0.9964 p1 = 0.9972 * 1.0036 = 1.0001p2 = 0.9964 * 1.0036 = 1.0000
If you are ordering your To-Do List solely by importance, the To-Do List will order the tasks as follows: p1 p2
If p2 is completed first, the To-Do List will now display: p1
Prj2
However, if p1 is completed first, the To-Do list will display: p2 Prj1
Note: if you use a task just to group together other like tasks, you should setthis "container" task to midpoint importance relatively to its parent, toavoid artificially lowering the importance of the tasks it contains.
Urgency Slider The absolute urgency of each task is a computed value and is not directly set by the user. Instead, foreach task, you set its urgency with regards to its immediate parent. Once you have done that, theprogram will compute the task's actual urgency. A task's urgency with respect to its parent is controlledby a slider . The slider ranges along an inverted natural logarithm curve. This actual curve isdocumented below. The slider values range from 0.9964 to 1.0036, with a midpoint value of 1.0000.Because of the logarithm curve applied any position on the slider to the left of the midpoint has an exactopposite to the right of the midpoint. This allows a lower urgency can be nullified by an equal butopposite higher urgency...
Repeating our example from the importance overview, you have two projects in the root of the MLOoutline (Prj1 and Prj2), and each project has one subtask (p1 and p2, respectively). The urgency of each
task is computed as follows: Computed actual urgency of p1 =(Prj1 urgency to outline)*(p1 urgency to Prj1) Computed actual urgency of p2 =(Prj2 urgency to outline)*(p2 urgency to Prj2)
For example, if the importance values are as follows: Prj1 = 0.9979, Prj2 = 0.9960, ps1 =1.0030, ps2 = 1.0030
and if the tasks have no due dates set (see a later section for the effect of due dates on urgency), the
computed urgency scores will be as follows: Prj1 = 0.9979 Prj2 = 0.9960
p1 = 1.0030 * 0.9979 = 1.0009p2 = 0.9960 * 1.0030 = 0.9990

Chapter 548
User's Guide
If you are ordering your To-Do List solely by Urgency, the To-Do List will be ordered as follows: p1p2
If p1 is completed first, the To-Do List will now be ordered as follows: p2 Prj1
However, if p2 is completed first, the To-Do List will now be ordered like this: p1 Prj2
Weekly Goal Weighting factorsIf a task is marked as a weekly goal, then the urgency gets an extra boost. The weekly goal slider valueranges from 0.02 – 6.00. This boost re-computes the urgency as:
Computed actual urgency of p1 = (Prj1 urgency to outline) * ((p1 urgency to Prj1) +(WeelkyGoalSliderWeight/150))
Importance and Urgency Combined If you set MLO to consider both Urgency and Importance in calculating task scores, the score for each
task will be the product of its important and its urgency.
Revisiting the examples in the previous two sections, the assigned importance values were: iPrj1 = 0.9972, iPrj2 = 0.9964, ips1 =1.0036, ips2 = 1.0036
and the assigned urgency values were: uPrj1 = 0.9979, uPrj2 = 0.9960, ups1 =1.0030, ups2 = 1.0030
The combined importance and urgency scores will then be: Prj1 = 0.9972 * 0.9979 = 0.9951 Prj2 = 0.9964 * 0.9960 = 0.9924
p1 = 0.9972 *1.0036 * 0.9979 * 1.0030 = 1.0017p2 = 0.9964 *1.0036 * 0.9960 * 1.0030 = 0.9990
If you are ordering your To-Do List by both urgency and importance, then, the To-Do List will display the
tasks ordered as follows: p1 p2
If p2 is completed first, the To-Do List will now be ordered as follows: p1
Prj2
However, if p1 is completed first, the To-Do List will now be ordered as follows: p2 Prj1

Basic concepts: Outline, To-Do, View, Workspace 49
User's Guide
Factoring Dates into the Urgency Calculation If the preferences are set to order the To-do List by "Urgency" or by "Importance and Urgency" (that is, ifUrgency is to be considered and not just Importance), then start and due dates are used to weight thescore of each task based on the nearness to today's date of the dates in question.
How much effect the start and due date will have on the overall urgency of the task can be configured inthe preferences. The preferences allow you to set the start and due date weighting factors individually.The higher you set the weights, the more influence the dates will have on the list ordering. Since theweights can be set independently, you can configure the to-do list the way you like, including givinghigher priority to start dates than to due dates.
Date dependant weightsIn the preference you can set the start dates and due date weighting factors. These factors control thenet effect of the following calculations on the final computed scores. The DateScoreContribution iscomputed based on which dates are set and whether or not the overdue boosting is turned on where theStarDateWeightFactor and DueDateWeightFactor range from 0 to 6
If No Start Date and No Due Date
DateScoreContribution=0
If Start Date and no Due Date
Elapsed = now - StartDateStartDateScore = (StartDateWeightFactor * Elpased) /500DateScoreContribution = StartDateScore
If Due Date and no Start Date
Remaining = now – DueDateIf OverDueBoost Is turned on AND remaining < 0 then
boost = remaining * -0.25 Else
boost = 1.0End IfDueDateScore = (DueDateWeightFactor * Remaining * boost)/500DateScoreContribution = DueDateScore
If Due Date and Start Date both set
Compute DateDateScore and StartDateScore as aboveDateScoreContribution = DueDateScore +_StartDateScore
Determining the final scoreOnce the start and due date score contributions are computed, they are simply added to the current
priority score. If you are viewing the To-Do List by just urgency you then get:
Score = UrgencyScore + DateScoreContribution

Chapter 550
User's Guide
If you are viewing the To-Do List by importance and urgency combined, you get:
Score=(ImportanceScore * UrgencyScore) + DateScoreContribution
Providing a meaningful example of these results in writing is beyond the scope of this documentation.You are encouraged to play with the program settings and observe the results. It will quickly becomeapparent that items increase in priority as their start and due dates approach. Just how much theyincrease depends on how the weighting preferences are set. The program defaults should provide areasonable starting point for just about everyone.
The Really Heavy MathAs mentioned above the importance and urgency sliders ranges along an inverted natural logarithmcurve. That curve is calculated with the formula below. Why is this formula used? (1) The natural logcurve is very predictable. (2) If can be reversed through simple multiplication. Items (1) and (2) allows aslider at a positive position of X to be reverse by a slider at position –X.
Through this approach inherited importance and urgency are calculated using a simple lightweightmultiplication formula that is very fast. More importantly this formula allows for importance and urgencyto have a Neutral Center position allowing each task to either raise OR lower it's importance and urgencyvalues.
Minimum Slider Position Input Value = 1000Maximum Slider Position Input Value = 1050Default Slider Position Input Value = 1025
For the current importance slider the value = AFor the current urgency slider the value = B
You compute x=importance and u=urgency with this formula
If A <= 1025 thenx = LogN(1025, A)
Else if A > 1025 thenx = 1+(1-(LogN(1025, 1025-(A-1025))))
end if
If B <= 1025 thenu = LogN(1025, B)
Else if B > 1025 thenu = 1+(1-(LogN(1025, 1025-(B-1025))))
end if
Now computing these computing logs is not a very CPU friendly proposition especially on the ppc, toavoid this overhead MLO uses a lookup table. This introduces a very minor rounding error into thecalculations; which is the trade off for much greater speed. This rounding error should not affect theresults unless an outline is greater than 10 levels deep and even then it will be inconsequential.

Basic concepts: Outline, To-Do, View, Workspace 51
User's Guide
5.3.4 Columns
You can select which columns to display in the current view.
To select columns:1. Right-click on the task list header.2. From the pop-up menu, select the columns you need.
Tip: Select Auto Resizing in the columns pop-up menu if you want taskcolumns to resize together with the MLO window.
Note: The column configuration is stored for the current view.
See alsoViews
5.4 Workspace tabs
There are tabs on the top of the MyLifeOrganized application we call Workspaces. The Workspaces areused to store and quick access the particular configuration for the selected view, additional filter controls, zoom, selected tasks etc. The Workspaces can show different parts of the same data files in differentviews.
When you select a view inside Workspace or change the filter, you actually change the configuration ofthe current Workspace. When you click other Workspace you will see other configuration in it. Whenyou return back to the first Workspace your changes for this Workspace will be still there. If you want topropagate the changes to filtering, sorting and grouping in one Workspace to other Workspaces, youmust first save these changes into a View. This way all the Workspaces which are using this View inunchanged state will receive the new settings.
To create a new Workspace1. Click "+" button in the tabs line2. Enter name for the new Workspace3. If needed, set other parameters (see below)4. Click any part of the main window to hide the popup window
To rename a Workspace1. Right click on a Workspace tab2. Select "Set up workspace..." from menu3. Enter new name in the popup dialog4. Click any part of the main window to hide the popup window
To delete a Workspace1. Click sign "x" in the right part of the Workspace tab
Note: The last workspace cannot be deleted
You can set default settings for a Workspace to restore them quickly at any time. You can set zoom,view and additional filters to store them as default for this Workspace.

Chapter 552
User's Guide
To set default for a Workspace1. Set necessary settings for a Workspace2. Right click on this Workspace tab2. Select "Set as default for this tab" from menuNow if the settings of the Workspace are changed the tab will be marked with "*" symbol. If you doubleclick on the tab (or select command "Restore default for this tab") the default setting for the tab will berestored.
Tip: With the command "Lock default in this tab" you can also lock thedefault settings so that they are not changed for the tab. The new tab iscreated if you try to change the settings of the locked tab.
You can pin Workspace tab so that it is placed in first position and protected from accidental deletion.To pin a Workspace1. Right click on a Workspace tab2. Select "Pin this tab" from menu
When you set Workspace option "Sync selection with first tab" the task selection in this tab will be insync with the selection in the first tab. It means that if you select a task in the first tab and then switchto other tab, with this option set, the selected task will be also selected in the new tab after switching (ifit is found on this tab).
To sync selection with the first tab1. Right click on a Workspace tab2. Select "Set up workspace..." from menu3. Check option: "Sync selection with first tab"
To assign an icon for the tab1. Right click on a Workspace tab2. From the menu select "Assign icon": Current view icon - the tab icon will be always the same as the icon of the selected view Custom icon - the selected custom icon will be always visible No icon - there will be no icon for this tab
To select a hotkey for the tab1. Right click on a Workspace tab2. Select "Assign hotkey" from the menu3. Press a hotkey for this tab and click "Assign hotkey"
When you set Workspace option "Sync zoom with first tab" the zoom you set in this tab will be also setin the first tab. It means that if you set zoom to a task in the first tab and then switch to other tab, withthis option set, the same zoom will set in the new tab after switching.
To sync zoom with the first tab1. Right click on a Workspace tab2. Select "Set up workspace..." from menu3. Check option: "Sync zoom with first tab"

Basic concepts: Outline, To-Do, View, Workspace 53
User's Guide
You can open any Workspace in new window so that you can drag&drop tasks from one list of tasks toanother one.
To open Workspace in new window1. Right click on a Workspace tab2. Select "Open in new window" from menu or F3
See alsoBasic concepts: Outline, To-Do, View, WorkspaceViewsZoom


Chapter
VI

Chapter 656
User's Guide
6 Task properties
You can set additional parameters on a task. These parameters are used in the task. For example, TaskImportance or Due Date parameters are used in the to-do list ordering algorithm. All these parametersare placed in the Properties Pane and grouped into Property Sections. Click on a Property Section toopen or close it. You can also use Keyboard Shortcuts for quick access to the Property Sections.
To open a Property Section and enter task parameters:1. Open the Properties Pane by selecting menu View > Properties Pane2. Select the Properties tab and open the section you need3. Enter parameters for the selected task
Tip: double-click ing on the splitter between the task list and Properties Panewill optimize the width of the Properties Pane.
See alsoUnderstanding of Main Window
6.1 Assigning Contexts to a Task
Many tasks in your list can be completed only in certain Contexts or situations. You can assign specificContexts for tasks so that you can filter these tasks later in the To Do list. You can also think ofContexts as categories for the tasks. Each Context can also include other Contexts in a hierarchy.
To select Contexts for a task1. Open the Properties Pane by selecting menu View > Properties Pane2. Select the Properties tab and open the General section3. Write the Context name in the Contexts edit box.
Note: If you enter a Context name which does not exist in the Contexts list,you will be prompted to create the new Context.
Tip: You can assign hotkeys to particular Contexts to toggle these Contextsfor a task with a single keystroke.
Tip: You can use the Alt+2 shortcut to perform actions 1 and 2 above.
Tip: You can also use a hotkey (the default is Alt+L) to open Contextsdialog.
Note: Multiple Contexts may be assigned to a task .
IMPORTANT : The Contexts will NOT be displayed on the task propertiespage if the Contexts check box is NOT selected on theAppearance page of the Options dialog box.
See also

Task properties 57
User's Guide
ContextsFilter ControlsOptions - AppearanceKeyboard Shortcuts
6.2 Importance for parent
For each task you can specify its importance in relation to accomplishing the project that contains thistask in the outline. This parameter is used in the to-do list ordering.
To change importance of a task:1. Open the Properties Pane by selecting menu View > Properties Pane2. Select the Properties tab and open the General section3. Drag the Importance for parent slider right to increase the importance of a task for the project.
Tip: You can use Alt+2 shortcut to perform actions 1 and 2 above.
Note: When you set the priority of a task in most other To-Do programs youactually set the absolute priority, and must compare it to all other tasksin the list. In MLO, however, you only consider how important it is tocomplete the task with respect to the parent project.
IMPORTANT : The Importance for parent will NOT be displayed on the taskproperties page if the Importance/Urgency check box is NOTselected on the Appearance page of the Options dialog box.
See alsoUnderstanding of To-Do List OrderingOptions - Appearance
6.3 Urgency
For each task you can specify its Urgency. This parameter is used in to-do list ordering.
To change urgency of a task:1. Open the Properties Pane by selecting menu View > Properties Pane2. Select the Properties tab and open the General section3. Drag the Urgency slider right to increase the urgency of a task.
Tip: You can use Alt+2 shortcut to perform actions 1 and 2 above.
IMPORTANT : The Urgency will NOT be displayed on the task properties pageif the Importance/Urgency check box is NOT selected on theAppearance page of the Options dialog box.
Chapter 658
User's Guide
See alsoComputed Score PriorityUnderstanding of To-Do List OrderingOptions - Appearance
6.4 Goal for week, month and year
MLO helps you organize your goals. You can indicate that a task is a weekly goal, monthly goal oryearly goal. The special Goals view is designed to easily review all your goals.
The weekly goal is what you should focus your activities on for the week. Monthly goals should bereviewed on a weekly basis to determine specific actions that can be done this week to achieve monthlygoals. Yearly goals are usually reviewed on a monthly basis to determine if some of them can becomegoals for the current month.
To indicate that the task is a goal1. Select a task you want to set as a goal2. On the General section of the task Properties Pane, select Week, Month or Year
Tip: You can use a configurable hotkey to make a task a week ly goal (Alt+Wby default).
Note: The week ly goal parameter can be used in to-do list ordering.
Note: Week ly goal tasks are marked with "!" in the task list
Note: Completed goals are marked with a Green Tick icon in the task list.
IMPORTANT : The Goals will NOT be displayed on the task properties page ifthe Goals check box is NOT selected on the Appearance pageof the Options dialog box.
See alsoOutline ViewsOptions - AppearanceUnderstanding of To-Do List OrderingProjects Tracking
6.5 Task To-Do List Visibility
Task To-Do List Visibility determines whether the task should be included in the To-Do list in standardviews.
FolderThis task is not shown in the To-Do list in standard views because it is just a container for other tasks.Folders contain tasks but, unlike regular tasks that have subtasks, folders do not appear in the To-Dolist themselves after all their subtasks are completed.
Hide the branch in To-Do ListThis task and all of its subtasks are excluded from standard views on the To-Do list. This option isusually needed if the entire branch is not actionable at the moment or if it contains only reference
Task properties 59
User's Guide
information.Note: Tasks which are set to be hidden in the To-Do list will appear dimmed
in the Outline.
Complete subtasks in orderYou can instruct MLO to place the next subtask of a project in the To-Do list only after the previoussubtask is completed. This way you can create projects where certain tasks are dependent on thecompletion of other tasks.
Note: This option can be suppressed and all subtasks shown in the To-Dolist if Available is set in Action Filter.
To assign To-Do visibility parameter to a task:1. Select task(s) in the outline.2. Click the Properties Pane and open the General section.3. Select an option in the Task To-Do Visibility group.
See alsoTo-Do ListOptions - AppearanceImportance of the Task
6.6 Timing & Reminder
The Timing & Reminder property section contains the following parameters for a task: - Start date, due date, lead time - Task recurrence - Reminder
IMPORTANT : The Timing & Reminder property section will NOT bedisplayed on the task properties page if the Timing &Reminder check box is NOT selected on the Appearance pageof the Options dialog box.
Tip: Date and time text input fields are very powerful: they are interpreted andconverted to valid dates and times. For example you can type"in 30 min" or "tomorrow at 2pm". See Input parsing for moredetails.
See alsoOptions - AppearanceInput parsing
6.6.1 Start, Due date and Lead time
You can specify when a task should appear in your to-do list and when a task is the due. The Start dateparameter indicates when this task should appear in the to-do list. Due date shows when this taskshould be completed. Lead time is the time between Due date and Start date.

Chapter 660
User's Guide
To set start and due date for a task:1. Open the Properties Pane by selecting menu View > Properties Pane2. Select the Properties tab and open the Timing & Reminder property section3. Enter start date and due date in the appropriate controls.
Note: By default all subtasks inherit the dates of the parent task unless youset specific dates for the child task . If you want to revert the subtaskdates to the inherited parent dates just check the "Inherit parent dates"checkbox.
Tip: In addition to the date, you can also enter start and due time. Justcheck Use time check box and enter time in appropriate controls.
Tip: Date and time text input fields are very powerful: they are interpreted andconverted to valid dates and times. For example you can type "in 30 min"or "tomorrow at 2pm". See Input parsing for more details.
Tip: Today, next day, next week links will set the corresponding date in theactive date control. For example Next day adds one day to the datecurrently set in the active control.
Note: The Start date field is disabled if you set recurrence for the task . Startdate can be changed only in the Recurrence dialog.
See alsoTask recurrenceTo-Do ListUnderstanding To-Do List OrderingInput parsing
6.6.2 Recurrence
You can set a task to occur repeatedly. For example a task that occurs on a regular basis, such as aweekly status report or periodical car maintenance, can be set up as a recurring task.
To make a task a recurring task:1. Open the Properties Pane by selecting the menu option View > Properties Pane2. Select the Properties tab and locate the Timing & Reminder property section3. Check the Set due date check box4. Click the Recurrence button to open the Task Recurrence dialog5. Click the frequency (Hourly, Daily, Weekly, Monthly, Yearly) at which you want the task to recur.6. Select the desired options on the right side of the Recurrence pattern group box and click OK.
Note: Recurring tasks appear one at a time in the Outline. When you markone occurrence of the task complete, the next occurrence appears in thelist.
Note: After you set a task as recurring, the Start, Due, and Lead Time datecontrols in the Timing & Reminder property section will be disabled. To

Task properties 61
User's Guide
change the date/time parameters of a recurring task you should open the Task Recurrence dialog and change them there. This is because in thecase of a complex pattern (for example: "first Monday of every othermonth") the date parameters should be controlled to fit this pattern.
Tip: To repeat a task based on the date it is marked complete, in the TaskRecurrence dialog click Regenerate new task, and then type a timeinterval in the box.
Note: The task 's Due date is used for recurrence (not the Start Date). Forexample if you set a task to "reoccur every Sun" this means that the duedate will be set to Sunday for each future occurrence.
Recurring tasks: Advanced options
The following settings become available when you click on the Advanced options button of the TaskRecurrence dialog.
Automatic resetting of subtasks when this task recursThis option is used if you want all subtasks of the recurring task to be unchecked with a newoccurrence.
Automatic recurring behavior for this taskThis option is used if you want the recurring task to automatically recur when its subtask is completed. Automatically recur if any subtask is completed - the task will recur if any subtask is completed(even without checking off the recurring task itself). Automatically recur if all subtasks are completed - the task will recur if all subtasks are completed(even without checking off the recurring task itself). Disable automatic recurrence - you would have to check off the task itself before it recurs.
Do not create a completed copy of this task on recurringSet this option to not create a completed copy of the recurring task on each new occurrence.
Note: If subtasks of a recurring task have their own start and due dates, theshift between the recurring task 's date and the dates of each itssubtasks will be preserved on its next occurrence. To preserve this shiftwith the next occurrence, the option Automatic resetting of subtaskswhen this task recurs must be set.
Example: Thanksgiving Dinner (due 3rd Thursday every November) Invite relatives I like (due 20 days before event) Clean house (3 days before event) Buy turkey (due 1 week before event) Thaw turkey (2 days before event) Cook dinner (day of event) Clean house (1 day after event)
To stop a recurring task
Chapter 662
User's Guide
1. Select the recurring task you want to stop.2. Locate the Timing & Reminder property section as indicated above.3. Click the Recurrence button to open the Task Recurrence dialog.4. Click Remove Recurrence.
To skip occurrences of a recurring task1. Select the recurring task you want to skip. 2. Select Task >Skip occurrence... command4. Choose if you want to skip only current occurrence or all occurrences of the task up to today.
6.6.3 Reminder
You can set a reminder for a task.
To set a reminder for a task1. Open the Properties Pane by selecting the menu option View > Properties Pane2. Select the Properties tab and locate the Timing & Reminder property section3. Check the Reminder check box4. Set date and time for the reminder
You can configure different Alert Actions for each reminder such as "play sound", "send e-mail" etc.
To set Alert Actions for a reminder1. In the Timing & Reminder property section click the Advanced... button2. In the dialog Setup Reminder check Alert Actions you want to be executed for this reminder3. Click OK.
List of Alert Actions
Alert Action Description
Activate in Reminders Window Activate Reminders Window and place the taskdescription in it. You can then dismiss or snoozethe reminder in this window.
Show Desktop Alert A Desktop Alert is a notification that appears onyour desktop and fades automatically. Set thisoption to show the task description in a DesktopAlert.
Note: If you want to keep a Desktop Alert visibleso that you can take more time to read it, pauseyour cursor on the alert before it fades from view.
Send e-mail Sends an e-mail message with the taskdescription to selected e-mail addresses. Separatee-mails with semicolons (;). Click Setup toconfigure SMTP options
Task properties 63
User's Guide
Run application You can run any application or reminder. Type theapplication command line in the text input.
Show modal dialog Check this option to show a modal dialog with taskdescription when the reminder is activated.
Play sound Check this option and select a sound file to play itwhen the reminder is activated.
Note: You can set Repeat Alert Actions option to repeat alerts several timesor until you dismiss the reminder.
See alsoStart, Due date and Lead time
6.7 Effort
The Effort property section contains the following parameters of a task: - Effort - Time Required for a Task
IMPORTANT : The Effort property section will NOT be displayed on the taskproperties page if the Effort check box is NOT selected on theAppearance page of the Options dialog box.
6.7.1 Task Effort
You can select how much Effort it will take you to complete the task.
This value affects the dynamically calculated completion percentage for a project. This percentage isbased on how many subtasks of the project are completed and what their Task Effort properties are. If atask has higher value of Task Effort property it adds more value to the completion percentage for theentire project.
Task Effort is also used in To-Do List filtering.
Note: This parameter is different from Time required for a task parameter. Forexample if you just read a book, it would require less effort than if youwrite MLO help documentation :-). It might take you the same amount ofthe time to accomplish these tasks but the Effort would be different.
See alsoProjects TrackingTime required for a task
6.7.2 Time Required for a Task
You can enter how much time is required to accomplish a task. The minimum and maximum values canbe entered. This time will be used in the Time filter in the To-Do list.
Chapter 664
User's Guide
To enter the time required for a task 1. Open the Properties Pane by selecting menu View > Properties Pane2. Select the Properties tab and open the Effort section3. Enter the minimum and maximum time in the Time required for the task controls.
Tip: You can use the Alt+3 shortcut to perform actions 1 and 2 above.
Time Required for a Task is also used in To-Do List filtering.
See alsoFilter ControlsTask EffortKeyboard Shortcuts
6.8 Dependencies
There can be tasks in the outline which cannot be started until some tasks from other branches arecompleted. To prevent a task from being shown in the To-Do list in Active Actions view until other tasksare completed, add these tasks to the Dependencies section for the task you want to block.
To hide task A on the To-Do list in Active Actions view until tasks B, C and D are completed:1. Select task A in the outline2. On the Dependencies section of the task Properties Pane, click Add... link3. Select tasks B, C, D (use Ctrl for multi select) and press OK
The task A will appear in Active Actions view only when all tasks (B, C, D) are completed.
Tip: If you want to unblock task A when only one of the tasks B, C, D arecompleted click on ALL/ANY link to set the appropriate option.
Tip: If the task has a dependency set, a corresponding icon is displayed inthe Icons column.
Note: The dependency can be ignored if Available is set in Action Filter.
Note: If a task in a dependency list cannot be completed a special indicatoris added to it. Point your mouse at this indicator to see why the task cannotbe completed.
A special Dependency Counter column shows how many tasks depend on the current task.
You can also set Delayed Dependency for tasks. If delay is set together with dependency then afterthe dependency tasks are completed, the task will continue to be inactive for the delay period you havespecified. After the delay is over, the task will be shown in the To-Do list. For example, you can see thetask "Hang wallpaper" activated in 1 day after you completed the dependency task "Paint the door".
To set Delayed Dependency1. Set dependency for a task as described above2. In the field Delay set the time to delay the activation of the task after the dependency tasks arecompleted
Task properties 65
User's Guide
Note: if all tasks need to be completed to open the dependency (option ALLset) then the delay will count from the time of the last task completed. If ANYoption is set for the dependency then the delay will count from the time of the first task completed in the dependency list.
See alsoTask To-Do Visibility
6.9 Project
You can indicate that a certain task is a Project. All projects are included in a special Projects view. Inthis view, projects are grouped by statuses and are easy to review.
To indicate that a task is a project:1. Select a task you want to indicate as a Project2. On the Project section of the task Properties Pane, select This is a project
You can set a status for the project. The following statuses are possible: Not Started, In Progress,Suspended, Completed. Statuses are only uses for grouping in the Projects view.
To change the status of a project:1. Select a task 2. On the Project section of the task Properties Pane, select new status from the Status combo box.
Note: The status of a project is not automatically changed (to In Progress orCompleted) when you complete the project subtasks. You must alwayschange the status of a project manually.
Each project has dynamically calculated Completion Percentage. This percentage is based on howmany subtasks of the project are completed and what their Task Effort properties are. If a subtask hashigher value of Task Effort property, it adds more value to the completion percentage for the entireproject.
The Time required for the entire project read-only property of a project is the sum of the Timerequired for the task property of all subtasks of the project.
IMPORTANT : The Project property section will NOT be displayed on the taskproperties page if the Project check box is NOT selected onthe Appearance page of the Options dialog box.
See alsoTask EffortOutline ViewsOptions - AppearanceReview
6.10 Review
You can indicate that a certain task should be periodically reviewed. For example you can review aproject weekly to add new tasks to it or to change priorities of the subtasks. When it is time for the next

Chapter 666
User's Guide
review this project is placed to the Review default view. You can open this view periodically to review thetasks. Once the task is reviewed mark it by command "Mark Reviewed" to move the review for this taskon the next date.
Review is a good way to keep your task list in order and keep the most important project running.
To configure current task for periodical review1. Open the Properties Pane by selecting menu View > Properties Pane (if it is closed)2. Open the Review section3. Check Next Review option and select a date for the next review. 4. In the filed Review Every set the period for the review.
To perform periodical review1. When you have free time just open the view Outline->Review2. All the tasks ready for the review will be placed to the list together with their subtasks3. Perform actions needed for the project in review (add new tasks, change properties of other tasks,etc.)4. Once the project is reviewed mark it by command "Mark Reviewed" in the list or in task properties
See alsoProjects
6.11 Task Format
You can assign custom formatting to tasks. Parameters such as font color or bold can be set.
To assign custom format to task:1. Select the task(s) you want to format 2. On the Format section of the task Properties Pane, select the task format needed.
Note: if you change task formatting with controls on the Format section, theflag "Use custom formatting" will be set automatically.
Note: if you select option "Subtasks inherit custom formatting" then allsubtasks of the selected task will have the formatting you set for the parent unless childtasks have their own formatting.
To remove custom formatting from task(s):1. Select the task(s) you want to revert to the default formatting 2. On the Format section of the task Properties Pane, uncheck Use custom formatting checkbox.
See alsoTask Properties
Task properties 67
User's Guide
6.12 Task Statistics
You can review task statistics. The following properties are available: Created, Modified, Completed.Each is indicated with date and time.
To review task statistics:1. Open the properties pane by selecting menu View > Properties Pane2. Select Properties tab and open Task Statistics section
Tip: You can also open the Task Statistics section with the Alt+5 shortcut.
IMPORTANT : The Task Statistics property section will NOT be displayed onthe task properties page if the Task Statistics check box isNOT selected on the Appearance page of the Options dialogbox.
See alsoKeyboard Shortcuts
6.13 Flags
You can mark a task with a flag. This is used to visually highlight tasks with icons and separate themfrom other tasks while grouping in the To-Do list.
To assign a flag to a task:1. Make sure that the Flag column is displayed in the task list. If it is not, Right-click on the task tree
header and select Flag. 2. Select task(s) you want to flag 3. Right-click in the Flag column and select a flag.
You can customize the flag list and assign any icon to a flag.
To customize the flag list1. Click Tools > Manage Flags... to open the Manage Flags dialog.2. To add a new flag, right-click in the flag list and select New Flag...3. To delete a flag, right-click in the flag list and select Delete Flag4. To change a flag's position, drag and drop the flag in the list5. To assign a new icon to a flag, click the Icon... button and select an icon from the list in the SelectIcon dialog..
Tip: in the Manage Flags dialog, you can assign a shortcut to a flag and useit to flag tasks quick ly while editing them in the task list.
Tip: to add new icons to the Select Icon dialog, click Load from file... andselect an icon from the file.
Please note that MLO supports only 16x16,24x24,32x32 32-bit images in the .ico format.

Chapter 668
User's Guide
See alsoAssigning Contexts to a TaskStarred
6.14 Starred
You can mark a task with a star by clicking on the corresponding column in the list. This is used toinclude tasks in a special Starred view.
Tip: If the Starred column is not visible just right click on the header andselect it from the list.
See alsoAssigning Contexts to a TaskFlagsStarred view
6.15 Advanced Task Properties
In the Advanced Task Properties dialog, you can edit task properties like completion date and custom AutoArchive settings for current task.
How to open Advanced Task Properties dialog1. On the Task menu, click Advanced and then click Properties...
System properties tab
CreatedModifiedCompletedDates of creation, modification and completion of the selected task.
Task IDInternal task ID.
AutoArchive tab
Do not archive tasks in this branchIf this option is set, the current tasks and all subtasks will not be archived during AutoArchive.
See alsoArchiving Using AutoArchiveTask properties

Chapter
VII
Chapter 770
User's Guide
7 Contexts
Understanding ContextsMany tasks can be completed only in certain Contexts (or situations). For example you can completetask "Buy the compact disk " only when you are in the music store. So you can create new Context "Music store" and assign this Context to the task. Now you can select Context "Music store" in theContext filter to see only tasks assigned to this Context.
You can also think of the Contexts as categories for the tasks.
Each Context can also include other Contexts in the hierarchy.
Each Context can have an open/closed schedule.
You can create, rename, delete and assign parameters for Contexts in Manage Contexts dialog. Toopen this dialog select menu Tools >Manage Contexts...
See alsoCreating and Deleting ContextsAssigning Contexts to a TaskFilter Controls
7.1 Creating and Deleting Contexts
To create a Context:
1. Select menu Tools > Manage Contexts... or click F8 to open the Manage Contexts dialog2. Right-click on the list of Contexts to open the local menu and select the New Context command3. Enter a name for new Context
Tip: You can use the Insert keyboard shortcut to create a Context
To delete a Context:
1. Select menu Tools > Manage Contexts... or click F8 to open the Manage Contexts dialog2. Select the Context(s) you want to delete3. Right-click to open the local menu and select the Delete Context command
Tip: You can use the Del keyboard shortcut to delete Context(s)
Note: In all tasks that have the Context being deleting, the Context will beremoved or replaced with another Context depending on the option youselect in the confirmation dialog.
Note: Included Contexts will not be deleted but will be disconnected from thedeleted Context
See also
Contexts 71
User's Guide
Included ContextsAssigning Contexts to a Task
7.2 Included Contexts
Each Context may include other Contexts. This can form a hierarchy of contexts.
For example Contexts "Phone" and "Internet" can be included by the Context "Work" as well as by theContext "Home".
So imagine that you have a task "Call Bob" which is assigned to the Context "Phone". If you select"Home" in the Context filter you will see this task in the to-do list. This is because Context "Home" hasContext "Phone" included. The same situation will happen if you select "Work" in the Context filter: youwill see "Call Bob" in the to-do list because this task is assigned to Context "Phone" which is includedby the selected Context "Work".
To include Contexts in another Context:
1. Select menu Tools > Manage Contexts... or click F8 to open the Manage Contexts dialog2. Select a Context that will include other Contexts.3. Set included Contexts on the Included Contexts tab
See alsoCreating and Deleting ContextsAssigning Contexts to a TaskFilter Controls
7.3 Context Hours
A Context may have a schedule: specific times during which it is open or closed. If a Context you selectas a To-Do filter is closed at the moment, the tasks associated with this Context will NOT be shown inthe To-Do list, unless you check the Include closed check box in the Context filter group.
To set Open/Closed schedule for a Context1. Select menu Tools > Manage Contexts... or click F8 to open the Manage Contexts dialog3. In the Manage Contexts dialog, select the Hours tab4. Click and drag the mouse in the Context open/closed schedule to set open and closed times.
Note: The green line in the calendar shows the current time.
See alsoContextsTo-Do filtering by a Context
7.4 Context Options
Additional parameters can be set for a Context on the Properties tab in Manage Contexts dialog.
Hide this Context in the To-Do list Context filter
Chapter 772
User's Guide
If this option is set, the Context will not be shown in the Context filter list on the filter pane.
Hide this Context in the task properties Context selectorIf this option is set, the Context will not be shown in the Context Selector for task Contexts option.
HotkeyYou can specify a hotkey to toggle the context for a task.
Tip: if you assign the identical hotkeys for different contexts then a localmenu with the list of all these contexts will be shown when this hotkey ispressed.

Chapter
VIII

Chapter 874
User's Guide
8 Keyboard Shortcuts
The MLO team pays special attention to accelerating application usage. There are keyboard shortcutsfor frequently used operations. The most important keyboard shortcuts are listed below.
Note: Not all keyboard shortcuts are listed here. Please investigate theapplication menu, local menus, and hints to find out the shortcut for theoperation you need.
Shortcut Action or commandAlt+F1 Task views pane open/close Alt+F2 Properties pane open/close F12 Full screenAlt+1 Toggle between Task List and Task Notes (Contexts List and Contexts Notes)Alt+2 General properties section open/closeAlt+3 Timing & Reminder properties section open/closeAlt+4 Effort properties section open/closeAlt+5 Project properties section open/closeAlt+6 Dependencies properties section open/closeAlt+7 Format properties section open/closeAlt+8 Review properties section open/closeAlt+9 Task Statistics properties section open/closeF6 Collapse entire task listF7 Expand entire task listF3 Open current workspace in new windowAlt+Shift+LeftAlt+Shift+RightAlt+Shift+UpAlt+Shift+Down
Rearrange tasks in the outline
Ctrl+UpCtrl+Down
Select next/previous visible task without focusing this task list. The currentactive control will be still focused during task change by this shortcut. Useful toiterate quickly through the list of tasks and change specific task parameter.
Alt+UpAlt+Down
Select next/previous sibling in the current outline
Ctrl+Alt+UpCtrl+Alt+Down
Select next/previous project in the current outline
Ctrl+` Collapse/Expand all subtasks of the current taskShift+Ctrl+0Shift+Ctrl+1...Shift+Ctrl+9
Set quick bookmark #1, 2...9 to a task in the outline
Ctrl+0Ctrl+1...Ctrl+9
Go to bookmark #1, 2...9 in the outline
Ctrl+<Ctrl+>
Go to previous/next bookmark set
Ctrl+Alt+> Open Bookmarks dialogAlt+C Edit Context for a taskAlt+L Select Context for a task from the listAlt+V Select View Alt+P Toggle complete subtasks in order Alt+Y Toggle hide in todo
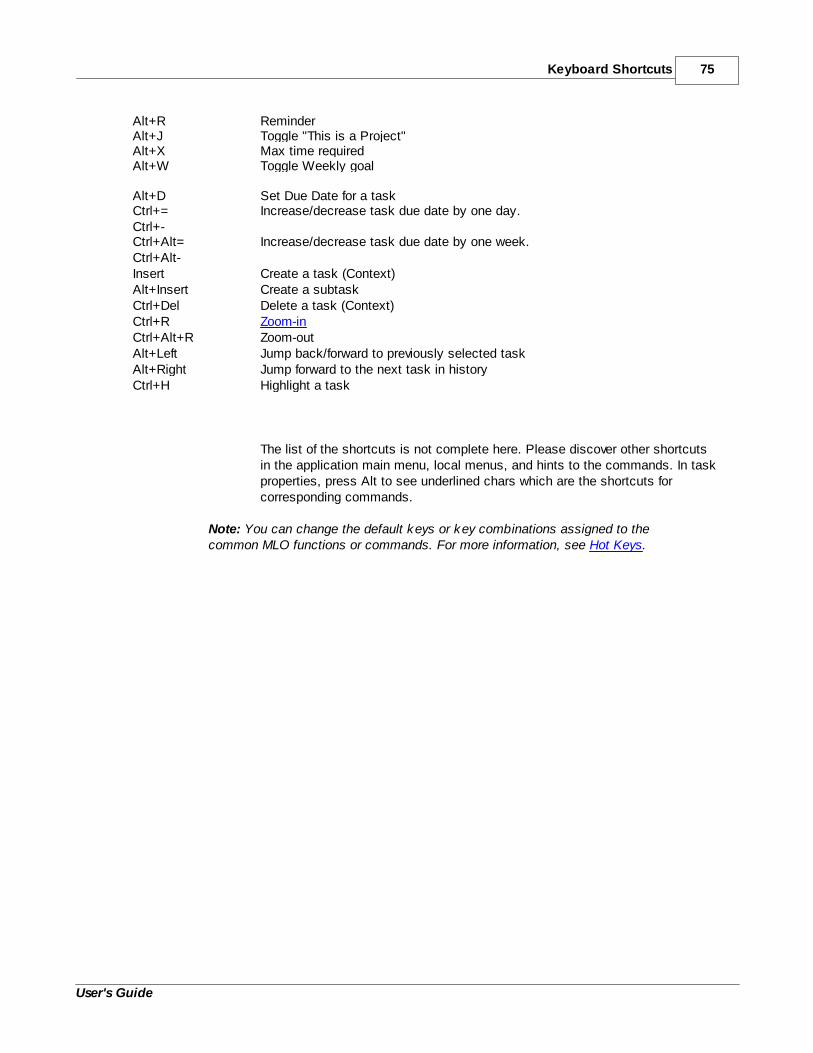
Keyboard Shortcuts 75
User's Guide
Alt+R ReminderAlt+J Toggle "This is a Project"Alt+X Max time required Alt+W Toggle Weekly goal
Alt+D Set Due Date for a taskCtrl+= Ctrl+-
Increase/decrease task due date by one day.
Ctrl+Alt= Ctrl+Alt-
Increase/decrease task due date by one week.
Insert Create a task (Context)Alt+Insert Create a subtaskCtrl+Del Delete a task (Context)Ctrl+R Zoom-inCtrl+Alt+R Zoom-outAlt+LeftAlt+Right
Jump back/forward to previously selected taskJump forward to the next task in history
Ctrl+H Highlight a task
The list of the shortcuts is not complete here. Please discover other shortcutsin the application main menu, local menus, and hints to the commands. In taskproperties, press Alt to see underlined chars which are the shortcuts forcorresponding commands.
Note: You can change the default keys or key combinations assigned to thecommon MLO functions or commands. For more information, see Hot Keys.


Chapter
IX
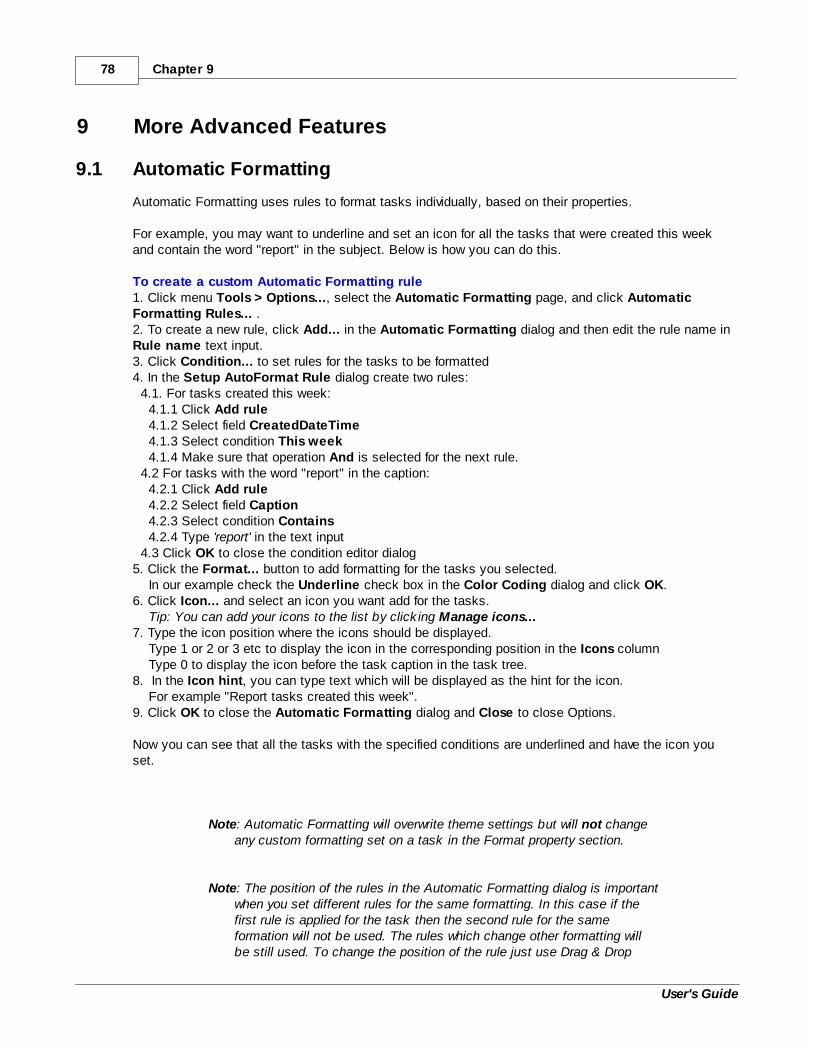
Chapter 978
User's Guide
9 More Advanced Features
9.1 Automatic Formatting
Automatic Formatting uses rules to format tasks individually, based on their properties.
For example, you may want to underline and set an icon for all the tasks that were created this weekand contain the word "report" in the subject. Below is how you can do this.
To create a custom Automatic Formatting rule 1. Click menu Tools > Options..., select the Automatic Formatting page, and click AutomaticFormatting Rules... . 2. To create a new rule, click Add... in the Automatic Formatting dialog and then edit the rule name inRule name text input.3. Click Condition... to set rules for the tasks to be formatted 4. In the Setup AutoFormat Rule dialog create two rules: 4.1. For tasks created this week: 4.1.1 Click Add rule 4.1.2 Select field CreatedDateTime 4.1.3 Select condition This week 4.1.4 Make sure that operation And is selected for the next rule. 4.2 For tasks with the word "report" in the caption: 4.2.1 Click Add rule 4.2.2 Select field Caption 4.2.3 Select condition Contains 4.2.4 Type 'report' in the text input 4.3 Click OK to close the condition editor dialog5. Click the Format... button to add formatting for the tasks you selected. In our example check the Underline check box in the Color Coding dialog and click OK.6. Click Icon... and select an icon you want add for the tasks. Tip: You can add your icons to the list by click ing Manage icons... 7. Type the icon position where the icons should be displayed. Type 1 or 2 or 3 etc to display the icon in the corresponding position in the Icons column Type 0 to display the icon before the task caption in the task tree.8. In the Icon hint, you can type text which will be displayed as the hint for the icon. For example "Report tasks created this week".9. Click OK to close the Automatic Formatting dialog and Close to close Options.
Now you can see that all the tasks with the specified conditions are underlined and have the icon youset.
Note: Automatic Formatting will overwrite theme settings but will not changeany custom formatting set on a task in the Format property section.
Note: The position of the rules in the Automatic Formatting dialog is importantwhen you set different rules for the same formatting. In this case if thefirst rule is applied for the task then the second rule for the sameformation will not be used. The rules which change other formatting willbe still used. To change the position of the rule just use Drag & Drop

More Advanced Features 79
User's Guide
For example you may define two rules which set different icons to the sameposition.
Rule1: If Task created today set icon New to position 1.Rule2: If Task caption contains "!" set icon ! in position 1
The rules will work this way:If the task was created today and contains "!" in the caption, you will see
icon New since Rule1 overwrites Rule2 for icon position 1If the task was created yesterday and contains "!" in the caption you will see
icon ! since Rule1 does not work and Rule2 is used to place the icon toposition 1
Note: The Icon type in the Automatic Formatting dialog contains predefinedtypes of the icons with the following behaviour:
Dependency: This icon type displays task dependency in the hint and opensthe dependency editor if you click on this icon
Goal: This icon type displays the goal type in the hint.Notes: This icon type displays task notes in the hint and opens the notes
editor if you click on this iconReminder: This icon type displays reminder details in the hint and opens the
reminders editor if you click on this icon.(Custom): This icon type displays the text you entered for the hint.
Tip: By default there are several optional rules that are disabled in theAutomatic Formatting dialog. For example there are rules that displayicons for new tasks or mark the tasks you edited recently. You may wantto enable these rules to see how they work .
See alsoThemes and FormattingCustom Formatting
9.2 Synchronization
You can synchronize the tasks contained in an MLO data file with:
· MyLifeOrganized Cloud (recommended) - Use this type of synchronization to sync your tasksbetween different devices in which you are using MyLifeOrganized task manager. This way you canwirelessly sync your tasks on PC with iPhone/iPod/iPad, Android, BlackBerry or Windows Mobiledevice. You can perform synchronization anytime and in any location while you have Internetconnection. You can also share your tasks with other people located anywhere or even worktogether on the same project. Low cost subscription required to use MLO Cloud: https://sync.mylifeorganized.net
· WiFi sync allows you to synchronize MLO-Windows with MLO on mobile devices (such as iPhone)connected to the same WiFi network. The data transfer performed to your device directly. It worksfaster than Cloud however you can sync only if you located near your PC with MLO-Windowsrunning on it.

Chapter 980
User's Guide
· Tasks stored in another MLO data file, which is located on another computer on the LAN or on anFTP server - You can use this type of synchronization if you collaborate with other people on thesame projects or tasks.
Tip: this type of synchronization is not recommended anymore since entirefile transferred on each sync.
Use MLO Cloud instead since it works better sending only updates to/fromthe Cloud and handling conflicts.
· Tasks stored in another MLO data file, which is located on removable media (such as a USB flashdrive) - Choose this type of synchronization for various portable scenarios such as working on tasksboth at work and home or working on tasks during travel.
Tip: MLO Cloud works better for these portable scenarios if you haveInternet connection
· Tasks stored in MLO BlackBerry using USB connection - Use this type of synchronization if youwant to synchronize tasks between MLO Desktop and MLO BlackBerry connected using USB.
Tip: It is recommended to use MLO Cloud instead if you want to use overthe air synchronization
· Microsoft Outlook data - Use this type of synchronization if you want to synchronize your tasks withMicrosoft Outlook data or the Outlook GTD Add-in through Outlook. Using advanced filtering youcan select a list of tasks which should be synced to Outlook.
Note: Microsoft Outlook does not support hierarchy of tasks so after the syncyour hierarchy is stored only in MLO and Outlook will contain tasks youselected for sync in plain list
See also:Synchronization profilesAdding a Synchronization Profile
9.2.1 Synchronization profiles
This section of the help documentation describes how to configure synchronization profiles to sync with: 1) MLO Cloud sync service2) Your FTP server3) BlackBerry connected to USB4) Other MLO data file located on local computer, flash drive or LAN.
See also the following synchronization types which described in other sections:WiFi SynchronizationSynchronize to MS Outlook.
9.2.1.1 Adding a Synchronization Profile
To synchronize one data file with another, you need to add a new Synchronization Profile. ASynchronization Profile specifies the synchronization parameters such as the name and location of theremote data file with which to synchronize the current (local) data file and the synchronization direction.
You can add a Synchronization Profile by using only the basic synchronization parameters or by usingall the available parameters (both basic and advanced). Use only the basic synchronization parameters ifyou want to quickly add a new Synchronization Profile. Use both basic and advanced parameters if youwant to fine-tune the Synchronization Profile to your specific needs.
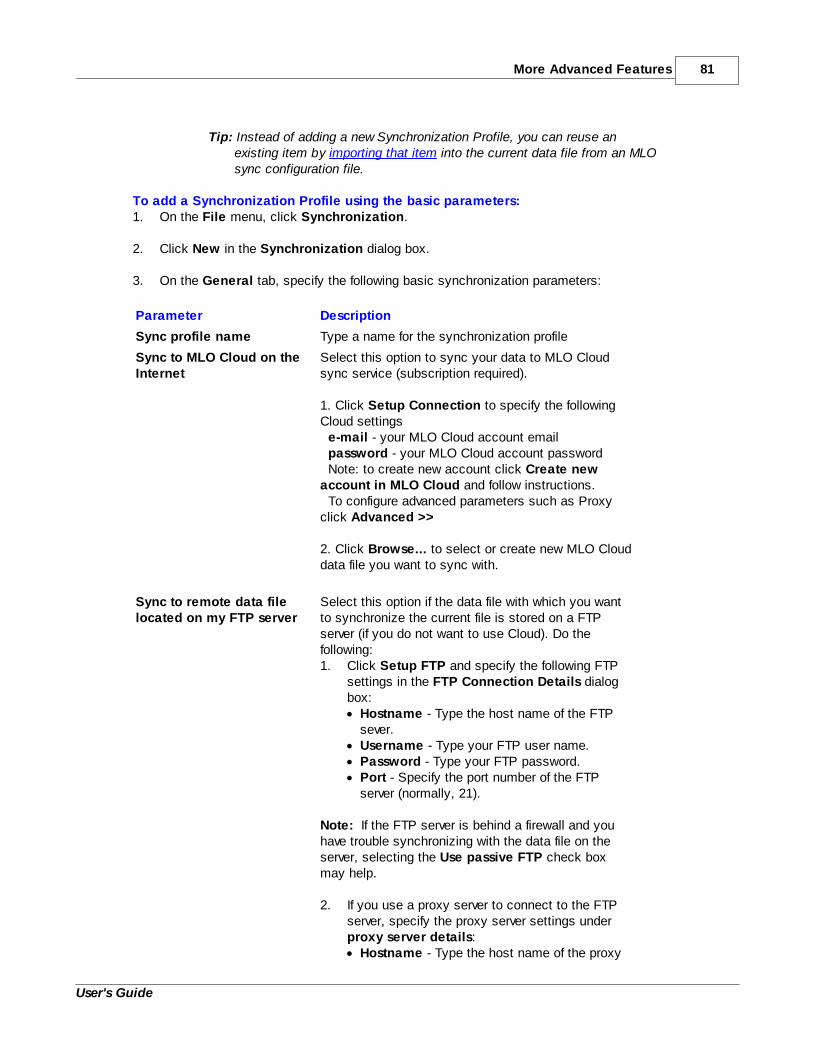
More Advanced Features 81
User's Guide
Tip: Instead of adding a new Synchronization Profile, you can reuse anexisting item by importing that item into the current data file from an MLOsync configuration file.
To add a Synchronization Profile using the basic parameters:1. On the File menu, click Synchronization.
2. Click New in the Synchronization dialog box.
3. On the General tab, specify the following basic synchronization parameters:
Parameter Description
Sync profile name Type a name for the synchronization profile
Sync to MLO Cloud on theInternet
Select this option to sync your data to MLO Cloudsync service (subscription required).
1. Click Setup Connection to specify the followingCloud settings e-mail - your MLO Cloud account email password - your MLO Cloud account password Note: to create new account click Create newaccount in MLO Cloud and follow instructions. To configure advanced parameters such as Proxyclick Advanced >>
2. Click Browse... to select or create new MLO Clouddata file you want to sync with.
Sync to remote data filelocated on my FTP server
Select this option if the data file with which you wantto synchronize the current file is stored on a FTPserver (if you do not want to use Cloud). Do thefollowing: 1. Click Setup FTP and specify the following FTP
settings in the FTP Connection Details dialogbox:· Hostname - Type the host name of the FTP
sever. · Username - Type your FTP user name.· Password - Type your FTP password.· Port - Specify the port number of the FTP
server (normally, 21).
Note: If the FTP server is behind a firewall and youhave trouble synchronizing with the data file on theserver, selecting the Use passive FTP check boxmay help.
2. If you use a proxy server to connect to the FTPserver, specify the proxy server settings under proxy server details:· Hostname - Type the host name of the proxy

Chapter 982
User's Guide
server.· Username - Type your proxy login user name.· Password - Type your proxy login password.· Port - Type the port number of the proxy
server.· Proxy type - Select a proxy server type.
3. Click Test FTP settings to check whether MLOcan connect to the FTP server using the specifiedsettings. If the connection has been established,MLO displays a "Logged in successfully"message. If the connection attempt has failed,MLO displays a corresponding error message.Correct the FTP settings and click Test FTPsettings again.
4. Click OK to return to the Sync Item dialog box.
Sync to BlackBerryconnected to USB
Select this option to sync your data file with MLO-BlackBerry data file using USB connection if you donot plan to use MLO Cloud.1. Connect your BlackBerry device to USB cable2. Click Browse... to browse to the remote databaseon MLO-BlackBerry.
Sync to other data filelocated on my computer,flash drive or LAN
Select this option if the data file with which you wantto synchronize the current (local) file is stored on thesame computer, within the same local-area network(LAN), or on a USB flash drive (if you do not plan touse Cloud). Click Browse to browse to the remote file.
4. Click OK.
To add a synchronization profile using all the parameters (basic and advanced):1. Complete the "To add a Synchronization Profile using the basic parameters" procedure above to
specify the basic synchronization parameters.
2. Select the Add this sync item to quick synchronization check box to be able to quicklysynchronize the data files using this Synchronization Profile.
3. Select Sync automatically this cloud profile to sync this profile with MyLifeOrganized Cloudautomatically.
4. Click the Branch sync tab and select one of the following options: · Synchronize all tasks - Select this option if you want to synchronize all the tasks in both data
files. · Synchronize only selected branch of tasks - Select this option if you want to synchronize
only a specific branch of the task tree (a particular task and its subtasks). Specify whether thetask branch is contained in the local or remote file. Next, click OK, select the branch in theOutline and click OK again. The Branch of task to sync box displays the name of the selectedbranch.
Note: If the selected task branch exists only in one file, it will be added to the
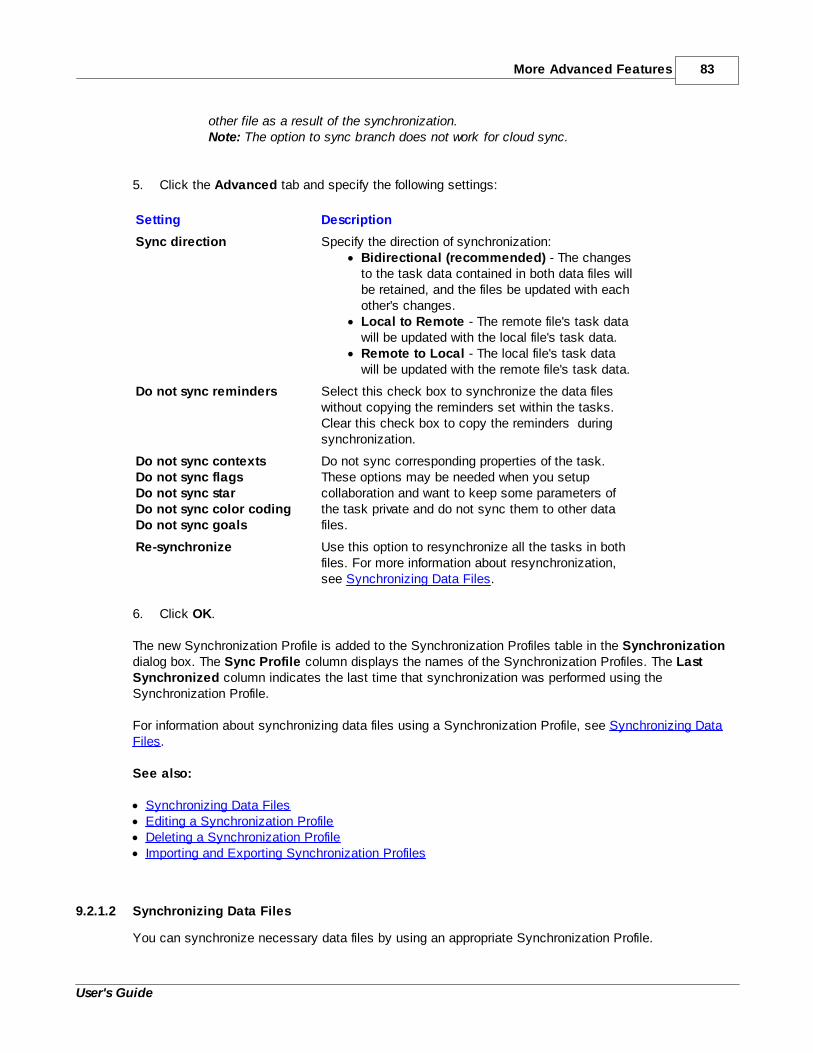
More Advanced Features 83
User's Guide
other file as a result of the synchronization.Note: The option to sync branch does not work for cloud sync.
5. Click the Advanced tab and specify the following settings:
Setting Description
Sync direction Specify the direction of synchronization:· Bidirectional (recommended) - The changes
to the task data contained in both data files willbe retained, and the files be updated with eachother's changes.
· Local to Remote - The remote file's task datawill be updated with the local file's task data.
· Remote to Local - The local file's task datawill be updated with the remote file's task data.
Do not sync reminders Select this check box to synchronize the data fileswithout copying the reminders set within the tasks.Clear this check box to copy the reminders duringsynchronization.
Do not sync contextsDo not sync flagsDo not sync starDo not sync color codingDo not sync goals
Do not sync corresponding properties of the task.These options may be needed when you setupcollaboration and want to keep some parameters ofthe task private and do not sync them to other datafiles.
Re-synchronize Use this option to resynchronize all the tasks in bothfiles. For more information about resynchronization, see Synchronizing Data Files.
6. Click OK.
The new Synchronization Profile is added to the Synchronization Profiles table in the Synchronizationdialog box. The Sync Profile column displays the names of the Synchronization Profiles. The LastSynchronized column indicates the last time that synchronization was performed using theSynchronization Profile.
For information about synchronizing data files using a Synchronization Profile, see Synchronizing DataFiles.
See also:
· Synchronizing Data Files· Editing a Synchronization Profile· Deleting a Synchronization Profile· Importing and Exporting Synchronization Profiles
9.2.1.2 Synchronizing Data Files
You can synchronize necessary data files by using an appropriate Synchronization Profile.
Chapter 984
User's Guide
You can quickly synchronize data files if a Synchronization Profile has been defined for them and thatitem has been designated for quick synchronization. To define a Synchronization Profile, see Adding aSynchronization Profile. To designate a Synchronization Profile for quick synchronization, select theappropriate item in the Synchronization dialog box, click Edit and then select the Add this sync itemto quick synchronization check box on the General tab.
You have any problems synchronizing the data files, resynchronizing them may help. Resynchronizinglets you re-apply synchronization to all the tasks in both files.
To synchronize data files using synchronization profile:1. On the File menu, click Synchronization.
2. In the Synchronization dialog box, select the appropriate synchronization profile and click SyncNow.If the data files have been synchronized successfully, the MLO status bar displays "Synchronized."If the synchronization has failed, the Sync dialog box details the error. Correct the error and repeatthis procedure.
Note: If you have selected more than one Synchronization Profile, MLO willsynchronize the data files defined in the selected synchronization profilessequentially, in the order that the synchronization profiles are listed in the Synchronization dialog box.
Important: If the files being synchronized specify conflicting taskinformation, MLO displays the details of the conflict in a dialog box. You mustresolve the conflict to complete the synchronization. For information aboutresolving synchronization conflicts, see Resolving Synchronization Conflicts.
To quickly synchronize data files:
· Do one of the following:On the Tools menu, click Synchronize.Press customizable shortcut (default F9).
If the data files have been synchronized successfully, the Sync dialog box displays "Synchronized."If the synchronization has failed, the Sync dialog box details the error. Correct the error and repeatthis procedure.
To resynchronize data files:1. In the Synchronization dialog box, select the appropriate Synchronization Profile and click Edit.
2. In the Sync Profile dialog box, click the Advanced tab and then click Re-synchronize.
3. In the Confirm - MyLifeOrganized message box, click Yes.
4. Click OK in the MyLifeOrganized dialog box and then in the Synch Profile dialog box.
5. Click Sync Now.
See also:· Resolving Synchronization Conflicts· Adding a Synchronization Profile· Editing a Synchronization Profile

More Advanced Features 85
User's Guide
9.2.1.3 Editing a Synchronization Profile
You can edit a Synchronization Profile to adjust some of an item's parameters. For example, thelocation of the remote file that you synchronize the local file with has changed, and you need to updatethe path to the remote file.
To edit a Synchronization Profile:1. On the File menu, click Synchronization.
2. In the Synchronization dialog box, select the item that you want to edit and click Edit.
3. Change the synchronization parameters on the General, Branch sync, and Advanced tabs asneeded and click OK.
Note: For a description of the synchronization parameters, see Adding aSynchronization Profile.
See also:· Adding a Synchronization Profile· Synchronizing Data Files· Deleting a Synchronization Profile· Importing and Exporting Synchronization Profiles
9.2.1.4 Deleting a Synchronization Profile
You can delete a Synchronization Profile that you no longer need.
To delete a Synchronization Profile:1. On the File menu, click Synchronization.
2. In the Synchronization dialog box, select the item that you want to delete and click Delete.
3. In the Confirm - MyLifeOrganized message box, click Yes.
See also:
· Adding a Synchronization Profile· Editing a Synchronization Profile
9.2.1.5 Importing and Exporting Synchronization Profiles
You can use a Synchronization Profile defined in another data file and previously saved as an MLO syncconfiguration file (a file with the mlsc extension) by loading that sync configuration file into the currentdata file. This process is called importing a Synchronization Profile.
You can reuse a Synchronization Profile defined in the current data file, in another data file by saving theitem as an MLO sync configuration file, placing the file in an appropriate location, and then loading(importing) it from that location into the other data file. This process is called exporting aSynchronization Profile. Exporting is useful if you want to share the Synchronization Profile with other

Chapter 986
User's Guide
people. By exporting the sync configuration file to a location on your computer or another computer onthe local-area network (LAN), you enable other users to access it and use the Synchronization Profile itcontains.
Note: You can export more one Synchronization Profile in a syncconfiguration file.
To import a Synchronization Profile:1. On the File menu, click Synchronization.
2. In the Synchronization dialog box, click More>Import.
3. Locate the MLO sync configuration file that contains the Synchronization Profile that you want toimport.
4. Click Open.The Synchronization Profile is added to the Synchronization Profiles table in the Synchronizationdialog box. The Sync Name column displays the name of the Synchronization Profile. You canimmediately use the Synchronization Profile to synchronize the data files it specifies (see Synchronizing Data Files) or edit the item before using it (see Editing a Synchronization Profile).
To export a Synchronization Profile:1. On the File menu, click Synchronization.
2. In the Synchronization dialog box, select the Synchronization Profiles that you want to export.
3. Click More>Export.
4. In the Save MLO Sync Config dialog box, browse to the location where you want to place a newmlsc file and type a name for the file in the File Name box.
5. Click Save.The file is now available from the selected location for importing into another data file.
See also:
· Adding a Synchronization Profile· Editing a Synchronization Profile· Synchronizing Data Files
9.2.2 Synchronization with MyLifeOrganized Cloud
MyLifeOrganized Cloud Sync service allows you to synchronize your data between different devices inwhich you are using MyLifeOrganized task manager.
You can add your tasks in MLO-Desktop then get them on your MLO-iPhone, MLO-iPad, MLO-Android,MLO-BlackBerry, MLO-PocketPC or other MLO-Desktop over the air with a single click and then syncupdated tasks back to MLO-Desktop.
With MLO Cloud you can share your task list with other people located anywhere or even work togetheron the same project.
MLO Cloud Sync service takes precautions to protect your information both online and off-line. Periodicalbackups of your data stored in secure and robust MLO Cloud environment.
More Advanced Features 87
User's Guide
To configure MLO-Desktop to sync with MLO Cloud follow the instructions to create new sync profile andselect option Sync to MLO Cloud on the Internet.
By default your cloud sync profile configured to sync automatically with MyLifeOrganized Cloud.
See also:Synchronization profilesAdding a Synchronization ProfileCollaboration using MLO CloudWiFi SynchronizationAutomatic sync with Cloud
9.2.2.1 Automatic sync with Cloud
When you configure the synchronization with MyLifeOrganized Cloud Sync service it is set to syncautomatically with the cloud by default. When this option is set MyLifeOrganized keeps your desktopdata in sync with Cloud.
There is a special algorithm designed to optimize the number of requests to the server while still haveyour changes from the cloud when you need them on desktop and send changed back to the cloudwhen you need them on your devices. This algorithm also minimizes possible conflicts by prevent thesync in the same time when you are editing your data file on desktop.
Here is the full algorithm of the autosync in MyLifeOrganized for Windows.1. When MLO is started (or new data file is opened) the check for the cloud changes initiated. If thereare cloud changes the autosync is started immediately (to get modifications from the cloud before youstart working with MLO on desktop).
2. When MLO is being closed (or current data file is being closed) and there are local modifications theautosync is started (to send local modifications to the cloud).
3. If MLO is running and there is full inactivity on your computer for 8-10 min and there are localmodifications the autosync is started (to send the local modifications to the cloud after you have alreadyleft your computer).
4. If MLO is running and there was inactivity on your computer for more than 10 min and you startedusing the computer after this long inactivity the check for the cloud changes initiated. If there are cloudchanges the autosync is started (to get possible modifications from the cloud before you continueworking with MLO on desktop)
5. If MLO is running but has not been used for more than 10 min and you started using MLO after thislong delay the check for the cloud changes initiated. If there are cloud changes the autosync is started(to get possible modifications from the cloud before you continue working with mlo on desktop)
There are the following special cases for the autosync algorithm:6. If there are more than 150 modifications on the cloud, the sync on first start (1) is not initiatedautomatically to prevent long delay on MLO start. The sign that there are modifications on the cloud willstill be shown in the toolbar so that you could decide when to get these modifications manually.
7. If there are critical errors detected during the sync, the autosync will stop initiating the syncautomatically. The “sync error” sign will be displayed in MLO toolbar. The critical errors are: conflict,
Chapter 988
User's Guide
cloud account expired, invalid login.
8. If there are non-critical errors detected during sync (for example connection to the cloud lost) theautosync will continue the attempts to complete the sync. The “sync error” sign will be displayed in MLOtoolbar until sync succeeded.
9. On each MLO window activation the check for the cloud modifications is initiated and special sign isdisplayed in the toolbar if there are cloud modifications. The sync is not started unless other conditionsof the algorithm are met (1-5).
Note: The current implementation of the algorithm may show you a conflictwindow if you continue editing a task while sync is in progress (for examplenotes editing). We plan to improve this issue. In the meantime it isrecommended to try not to make changes to the tasks during sync process(usually several seconds).
See also:Synchronization with MyLifeOrganized CloudSynchronization profilesAdding a Synchronization Profile
9.2.3 Synchronization with MLO BlackBerry
You can synchronize your tasks to MLO-BlackBerry application with one of the methods:
1) Using MLO Cloud sync (recommended).
How to sync your BlackBerry device to MLO Cloud1. Run MLO-BlackBerry application and open a database IMPORTANT: if you have already synced your tasks to Cloud using MLO-Desktop then create newempty database on MLO-BlackBerry and get your data from Cloud to avoid duplications.2. Select menu Settings->Cloud Sync3. Enter your MLO Cloud credentials4. Select a file on MLO Cloud to sync with5. Select Save6. Select Synchronize from the main menu.
2) Using BlackBerry Device Manager and USB connection
How to sync MLO Desktop with MLO-BlackBerry using USB connection1. Make sure BlackBerry Device manager is installed and running on yourcomputer2. Connect your BlackBerry Device to your computer3. Run MLO on BlackBerry4. Run MLO on Desktop5. In MLO on Desktop select File->Synchronization…6. Click New…7. Enter the Sync profile name (for example “Bob’s BB USB Sync”)8. Click “Sync to BlackBerry connected to USB”9. Click “Browse…” and select file on the BlackBerry you want to sync with10. Click OK to save your Sync Profile
More Advanced Features 89
User's Guide
11. Click Close to close Synchronization dialog12. Click F9 (Tools->Synchronize) to sync to BlackBerry
See also:MyLifeOrganized CloudSynchronization profilesAdding a Synchronization Profile
9.2.4 WiFi Synchronization
WiFi Synchronization allows you to synchronize MLO-Windows with MLO on mobile devices (such asiPhone) connected to the same WiFi network. The data transfer performed to your device directly. Youcan sync only if you located near your PC with MLO-Windows running on it.
How to sync your device with MLO-Windows on your PC using WiFi1. Run MLO on your device (such as iPhone)2. Run MLO on you PC, unblock it in Firewall and open your data file.3. Pair your device with MLO-Windows on PC 4. Start WiFi sync from your device
Look at this online guide for step-by-step WiFi sync instructions.
Note: MLO WiFi module should be installed on your PC. If it is not installedrun the MLO installation again and select it.
Note: Each MLO data file on your PC can sync only to one profile on a single device. To sync your device with desktop the paired data file should be open in MLO-Windows To sync this desktop data file to other profile on device or with other device you needto un-pair old profile from PC and pair new profile.
See also:MyLifeOrganized Cloud
9.2.5 Collaboration
Team of people can work together on the same project or tasks using MLO collaboration features:
1) Collaboration using MLO Cloud (recommended)
2) Collaboration using sync to a hub file on LAN or FTP
See also:Synchronization with MLO CloudSynchronization profiles

Chapter 990
User's Guide
9.2.5.1 Collaboration using MLO Cloud
You can share your MLO Cloud file with other Cloud users to work together on the same tasks orprojects.
To share your MLO Cloud file 1. Open your synchronization profile which is synced with MLO Cloud.2. Click Browse... button to show the list of your MLO Cloud files3. Select a MLO Cloud file which you want to share with other MLO Cloud user(s)4. Click Properties... button to open file details5. Select Sharing tab6. Click Share... button and enter MLO Cloud user login you want to share your file with. 7. Click OK.8. Click OK in Cloud Sync File Properties dialog9. Click Close in MLO Cloud Sync Files dialog.
Tip: to remove sharing with specified user click Remove Sharing... button inCloud File properties dialog.
See also:Synchronization with MLO CloudAdding a Synchronization Profile
9.2.5.2 Collaboration using sync to a hub file on LAN or FTP
Several people can work on the same project or tasks using sync to a hub file located on LAN or yourFTP.
Note: this method is outdated and MLO Cloud sync is recommended forcollaboration now.
MLO enables small and medium-sized teams to efficiently collaborate on projects and tasks by usingthe synchronization feature. Managers can use this feature to centrally manage and track projects.Team members can use the synchronization functionality to report on the progress of assigned tasksand ensure that changes they made to their tasks are shared with the entire team.
To successfully collaborate using MLO, the team members must perform the following steps dependingon their role within the team.
Manager's Setup1. Create an MLO data file and add tasks and subtasks to the file to represent a hierarchy of projects
and related tasks. 2. Create another data file in an appropriate location on the LAN or on an FTP server. This data file is
used as a shared database file which serves the sync hub. 3. Add a Synchronization Profile to be able to synchronize his or her data file with an MLO file located
on the LAN or an FTP server. 4. Synchronize his or her MLO data file with the one located on the LAN or an FTP server.
The manager can get the most up-to-date information on the progress of the assigned tasks and thuscalculate the percentage completion for the entire project by regularly synchronizing his or her file withthe one located on the LAN or a FTP server.
Each Subordinate's Setup

More Advanced Features 91
User's Guide
1. Create an MLO data file.2. Add a Synchronization Profile to be able to synchronize his or her data file with the MLO file located
on the LAN or a FTP server. 3. Synchronize his or her MLO data file with the one located on the LAN or an FTP server.
The team members can report to the manager on the current progress of the assigned tasks bysynchronizing his or her file with the one on the LAN or an FTP server at agreed intervals.
See also:Collaboration using MLO CloudAdding a Synchronization ProfileSynchronizing Data FilesEditing a Synchronization ProfileDeleting a Synchronization ProfileImporting and Exporting Synchronization Profiles
9.2.6 Synchronization for Portable Scenarios
The synchronization feature of MLO enables users to manage tasks in various portable scenarios, thatis, those situations that involve using removable media such as a USB flash drive. Examples of portablescenarios:
· Working on tasks at work and home and using a USB flash drive to synchronize the tasks betweenthe office and home computers.
· Synchronizing the tasks stored on the office computer with the ones on removable media to make itpossible to work on the tasks on business travel.
To synchronize tasks in portable scenarios, perform the following steps:
1. Add a Synchronization Profile.
Note: Be sure to select the Sync to other data file located on mycomputer, flash drive or LAN check box in the Sync Profile dialog box.
2. Synchronize the data files containing the tasks.
Tip: MLO Cloud works better for these portable scenarios
See also:Synchronization with MLO CloudResolving Synchronization Conflicts

Chapter 992
User's Guide
9.2.7 Resolving Synchronization Conflicts
A synchronization conflict refers to a situation when changes were made to a specific property (forexample, task due date or importance) of the same task or subtask in both data files beforesynchronization, which results in different values of that property in the files and prevents thesynchronization from being completed. To resolve a synchronization conflict, you need to specify whichfile—local (current) or remote—takes precedence. For example, if both files include different due datesfor the same task, you can specify that the due date in the local (current) file overrides the due date fromthe remote file, or vice versa.
If MLO-Desktop detects that the data files include conflicting information, it displays the Resolve SyncConflict dialog box, which giving details of the conflict, and prompts you to resolve the conflict beforecontinuing with the synchronization. If more than one task in the data files gives conflicting information, aseparate row is displayed for each task in the Resolve Sync Conflict dialog box.
To resolve a synchronization conflict:
1. To identify the conflicting information, click an ellipsis in the Details column in the Resolve SyncConflict dialog box.The Task Difference dialog box lists all the task properties, and the properties that specify theconflicting information are highlighted in red. The Local data and Remote data columns displaythe conflicting values in the local file and remote file respectively.
2. Click Close to return to the Resolve Sync Conflict dialog box.3. In the Action column, select one of the following values:
· Replace --> - Select this value to override the information in the remote file with thecorresponding information in the local file.
· <-- Replace - Select this value to override the information in the local file with the information inthe remote file.
4. Click OK. MLO complete the synchronization using the task property values of the data file specified to takeprecedence.
Tip: for multiple update select all the tasks in Resolve Sync Conflict window,right click to open Local Menu and select conflict resolve action.
See also:
Synchronizing Data Files
9.2.8 Outlook Sync User Manual
This manual will help you in setting up synchronization between MyLifeOrganized (MLO) andMicrosoft Outlook. You might want to synchronize with Outlook if you are a power Outlook user

More Advanced Features 93
User's Guide
and want to use Outlook together with MLO in your planning. Note that the task synchronizationfeature is available in the desktop version of MLO only.
MLO Outlook Sync supports three preset modes:
1. Basic Mode2. Standard Palm User Mode3. Advanced Outlook Mode
Also supported is a Custom mode for those users from whom none of the three modes isappropriate.
MLO currently synchronizes only with Outlook tasks.
Most of what you need to know about MLO Outlook Sync, and what you will spend the bulk ofyour time with, involves the setup and configuration of the Outlook Sync module. Once you have setit up the way you want it, things should work relatively seamlessly. Section 2 of the manual, whichcomprises the bulk of the document, explains how to set things up, as well as the consequences ofmaking various choices during configuration. Section 3 contains additional random notes andexplanations, as well as troubleshooting help.
9.2.8.1 1. Performing the Synchronization
To synchronize MLO and Outlook tasks with default sync settings: 1) go to menu File | Outlook synchronization...2) select the Task Synchronization Action (i.e. MLO<-->Outlook)3) click the "Sync now" button.
Tip: Once you have synchronization set up the way you want it, you can simplyselect "Synchronize Outlook" from the Tools menu, and synchronization will takeplace automatically, using the existing settings.
See also:Setting Up MLO for Outlook Synchronization
9.2.8.2 2. Setting Up MLO for Outlook Synchronization
This section of the documentation describes how to perform advanced synchronization setupbetween MLO and Outlook. To set up MLO Outlook sync, click on the File menu and select “Setup Outlook sync”.
9.2.8.2.1 2.1 Outlook Folder
The first thing you need to do is select the Outlook folder with which you will be synchronizing yourMLO tasks. To do so, click on the Browse button in the initial dialog.

Chapter 994
User's Guide
Tip: You will usually want to synchronize with the Tasks folder in your OutlookPersonal Folders tree. If you are just a little squeamish, you might want to create anew folder in Outlook for your initial testing or to separate all your MLO tasks inOutlook. To do so, click on the New button and create it. Finally, click on the folderyou wish to synchronize and click OK. The selected folder path should now bedisplayed in the text box.
9.2.8.2.2 2.2 Tasks synchronization action
Next, you will need to decide the direction of synchronization. You have three choices:
1. Outlook --> MLO (Copy Outlook tasks to MLO)– Typically, you will make this selectiononly when you are starting out and want to move your Outlook tasks into MLO so that youcan work with them there. Once this is done, you will probably want to switch to one of thefollowing actions. (See the suggestion below for the best way to make this change.)
Note: existing MLO tasks (not connected to Outlook) will not be affected in thismode.
2. MLO --> Outlook (Copy MLO tasks to Outlook) – You will want to choose this actionwhen you do not have existing Outlook tasks you want to work with and you want to copyyour MLO tasks to Outlook. This action would also be appropriate if you want to useOutlook only for viewing your tasks and do not plan to ever make any changes to your tasksfrom within Outlook.
Important: once you perform the sync using this mode, all your Outlook taskswhich are not connected to MLO will be deleted in this Outlook folder.
3. MLO <--> Outlook (Synchronize tasks)– This action allows you to make changes to yourtasks in either MLO or Outlook and to have these changes moved in both directions.
9.2.8.2.3 2.3 Advanced sync options
After you have selected your Outlook synchronization folder and chosen the direction ofsynchronization you can click Advanced button to complete the setup.
9.2.8.2.3.1 2.3.1 MLO Outlook Sync Presets
The MLO Outlook Sync Presets dialog is displayed automatically only if you enter Advancedmode the first time. You now need to make the decision as to which mode you will use for yoursynchronization. Later you can open this dialog again (click Preset Modes button in the OutlookSync Options dialog) and change the preset mode.
If you are a Palm user and want to synchronize your MLO tasks with your PDA so that you can usethe data when you are separated from the desktop, you will probably want to use the StandardPalm User Mode or the Advanced Outlook Mode. Using either of these modes, you will then be

More Advanced Features 95
User's Guide
able to make changes on your Palm and then move them back to MLO.
Choose Standard Palm User Mode if you are using only the native Palm PIM applications or tools(such as Datebk) that run on top of the native Palm databases. This mode allows MLO to mapmultiple data fields onto one field on the Palm in a way that allows filtering of the data on the Palmdevice without breaking the ability to perform bidirectional syncing between the Palm and MLO.If you are using advanced Palm tools such as KeySuite, you will want to choose AdvancedOutlook Mode, which will allow you to sync a richer data set to your Palm PDA.
If you are not a Palm user, you will want to select any mode other than Standard Palm User Mode.
Basic Mode is the synchronization mode designed for people who simply want an easy way toshuttle data back and forth between Outlook and MLO. This mode makes minimal use of Outlookfields and features.
Advanced Outlook Mode provides advanced MLO data via Outlook's advanced and user-defined fields. The target audience is advanced users of the Outlook GTD Add-in tool and Palmpower users that are using tools such as KeySuite and Beyond Contacts. Data is mapped in such asway as to leverage the advanced features of these various tools without breaking the ability toperform bidirectional syncing between the Palm and MLO.
After you have selected your preferred mode, the Outlook Sync Options dialog opens. This dialogincludes four tabs with a variety of settings that you can change if you want to create a CustomSync Mode different from any of the built-in presets. Custom Mode is intended for power userswho are not satisfied with any of the standard presets. Custom Configurations can be saved to a MLO Outlook Sync Settings file - *.mos (which is actually XML file) for future reuse and sharingamongst users. This mode allows you to configure the tool to meet specific unique needs that cannotbe anticipated ahead of time. Custom Modes can be saved to named mos files. (If you plan to work in one of the preset modes, you can skip the following information and go on toSection 3.0 – “Notes and Troubleshooting” )
9.2.8.2.3.2 2.3.2 General Tab
2.3.2.1 New Outlook tasks will be added to this root MLO taskIf you create new tasks in Outlook, you might want to be able to easily find them in MLO so thatyou can then set MLO-specific properties. One way to do this is to synchronize all such tasks into aspecific top-level task in MLO. To do so, just type the name of this task into the text box.
2.3.2.2 Remove tasks from Outlook not visible in MLO To-Do ViewIf you set this option then only tasks visible in selected MLO To-Do view will be synced to Outlook. Therest of the tasks will be deleted on Outlook side.
2.3.2.3 To-Do Visible option tracks Open and Closed ContextsThese two options allow Outlook and other tools to create a view of tasks similar to any MLO To-Do List View. If this option activated the tasks visible in the selected MLO To-Do List View will be added to theOutlook and all the other tasks will be removed from Outlook during synchronization. Use

Chapter 996
User's Guide
predefined view name <Default View: "Active Actions"> to sync only Active Actions. If you checkoption track Open and Closed Contexts then tasks with assigned Contexts which are closed at themoment will not be synced to Outlook.
2.3.2.4 Sync remindersCheck this option to synchronize MLO reminders to Outlook reminders.
2.3.2.5 Conflict resolutionIf you are synchronizing both ways and have made changes to the same item in both MLO and Outlook,MLO Outlook Sync needs to know how to resolve the differences. The drop-down box gives you threechoices:
Use MLO data – The MLO item will overwrite the Outlook item.Use Outlook data – The Outlook item will overwrite the MLO item.Add records to both sides – Both versions of the item will be added to both MLO and Outlook.
If you check "Show warnings on conflicts", you will be shown a warning if an item has been changedin both MLO and Outlook. The log file will contain detailed records about all conflicts. You canwant to analyze the conflicts and remove duplicated tasks from MLO or Outlook.
2.3.2.6 Encode MLO project nameA task's immediate parent project (its "primary project") can be encoded into the Outlook tasksubject during sync to Outlook.
Note: This encoding supports a commonly used approach of individuals followingthe GTD™ philosophy via a scheme sometimes referred to as the "pigpod method"or "vanilla GTD". See the Palm_GTD Yahoo group for extensive discussions of thistopic.
The primary project name is either prefixed or suffixed with the title of the MLO task. The availableencodings are:Notation Location[Project] Prepended to subject[Project] Appended to subject<Project> Prepended to subject<Project> Appended to subject
2.3.2.7 System settings
Use redemption library to avoid Outlook security warningsCheck this option to use Outlook redemption library during sync process. The redemption library isneeded only to avoid Outlook security warnings during sync process. You can download theredemption library from www.MyLifeOrganized.net and place it in the same with mlo.exe folder.The sync process is able to continue without redemption library however in some cases you can seethe Outlook security warning message(s).
Auto sync MLO with Outlook periodicallySet this option to sync MLO with Outlook periodically using default settings configured for "QuickOutlook sync" command.

More Advanced Features 97
User's Guide
Allow Outlook sync only on this computerIf enabled then MLO will sync with Outlook only on computer with specified name. It can be usefulif you move the same data file between computers (work and home for example) and only the workcomputer should be synced with your Outlook.
9.2.8.2.3.3 2.3.3 Outlook Categories Tab
Outlook uses categories to group related tasks. MLO does not use categories, but it does includethe concepts of contexts and projects. You can choose whether or not you wish to have MLOcontexts and projects synchronize to particular Outlook categories.
2.3.3.1 Do NOT sync MLO Contexts with Outlook categoriesIf you prefer, you can completely disable the syncing of contexts and projects to OutlookCategories. Once this feature is disabled, MLO contexts and projects will not be coordinated duringsynchronization. However, several other legacy features become enabled that allow the selectivefiltering of which categories sync and how task deletions are processed, through the use of the twosub-options, described below . This mode exists for three reasons. First it is useful if you haveOutlook tasks that you want to be moved to MLO when first starting. Second, it allows you to usethe legacy sync behavior of MLO if you desire it. Lastly, this option provides a simple method forcreating a backup copy of all MLO tasks within Outlook to any desired folder.Sync only Outlook tasks containing this string in the categoryIf you type a string of characters into this box, only Outlook tasks whose category includes thisstring will be synchronized. For example, if this box contains "MLO", tasks in the "MLO Task" or"MLO Project" Outlook categories will be moved to MLO, but tasks in the "Task" and "Project"categories will not be moved during sync process. If you leave this box empty all Outlook tasks will be synced with MLO.When a task is deleted in MLO…This option is enable is you typed process category described above. By making a selection fromthis dropdown box, you can choose to have tasks which have been deleted in MLO also be deletedin Outlook, or to have them moved to Outlook and assigned to a particular category specified in thefollowing text box. For example, you can use a category such as "Deleted from M_L_O".
Note: If you process all Outlook tasks during sync (substring for task category isempty) the only option for deleted in MLO task is available. corresponding taskswill be also deleted in Outlook.
Note: There is a limitation for Outlook category of deleted in MLO tasks. The deletecategory should not contain process category as substring. This rule will preventdeleted in MLO tasks appear in MLO again after sync.
Example: if you set the process category to "MLO" it is not allowed to set thesestrings to delete category: "Deleted in MLO ", "MLO_Del" etc. You can enter thefollowing strings: "Deleted in M_L_O".

Chapter 998
User's Guide
The following table summarizes the sub-options available:
Function ExecutionFilter Categories Allow entry of arbitrary string. Only
Outlook categories containing thatstring will be synced.
Deleted in MLO Option 1 – Delete it in Outlook.Deleted in MLO Option 2 – Move it to an Outlook
category specified by a string value.
2.3.3.2 Sync MLO Contexts and Projects with Outlook CategoriesTasks can be categorized in Outlook according to their contexts in MLO. When this option isactivated, the task will be placed in a category mapped to each context associated with it. Sinceboth MLO and Outlook allow multiple items in contexts and categories respectively, this mapping isvery straightforward. If you do choose to synchronize MLO contexts and projects with Outlookcategories, you have several options.ContextsAssign Context categories only for To-Do visible tasks – When this option is checked,context categories will be assigned in Outlook to any tasks that appear in MLO's To-Do list. Tasksthat are not current to-do's will not be assigned a context category. Tasks not currently visible in theto-do list will still be transferred to Outlook, but will not be assigned a context category. These non-actionable tasks can still be categorized by project, as described below.
Add prefix for "Contexts" categories – If this box is checked, context categories will becreated in Outlook, with a prefix added to each category name to identify it as an MLO context.The default is "Cntx:", but you can change this to "Context:" or any other prefix you prefer.
Context reduction to 15 categories - The number of Outlook categories to which you syncMLO contexts can be restricted to 15. This special mode is designed to support the synchronizing oftasks from Outlook to PalmOS based PDAs running the legacy Palm applications, which supportonly 15 categories. If projects are synced to a reserved category (as described below), the
restriction becomes 14 categories, with the 15th being consumed by the Reserved Projectscategory. When you check this box, another dialog will open so that you can map needed MLO contexts tothe 14 or 15 Outlook categories that you wish to be synchronized to Outlook. (You can also accessthis dialog by clicking on the "Advanced" button.)
When active, this mode uses only the primary MLO context for synchronization. The Primary MLOcontext is the first one in the list of contexts for each task. Currently, you will need to manually orderthe context string to change the primary context, by editing Contexts edit box on the General taskoption section.
ProjectsIf option Assign task to corresponding project category is set the tasks will be categorized inOutlook according to the project they belong to. The Outlook category with the name of the project
More Advanced Features 99
User's Guide
this task belong to will be created and assigned to this task in the Outlook after sync. This Outlook category can be also created with a prefix if option Add prefix for "Project"categories is set. The default is "Prj:", but you can change this by typing a different string into thetext box.
Note: The "primary project" for a task in MLO is always the first parent in the treethat is flagged as a project. If a task has three ancestors flagged as projects, thattask belongs to three projects. However only the first ancestor is sent to Outlook asa category.
As an additional option you can check "Assign MLO projects to this Outlook category only:".This will force all tasks flagged as projects to be brought into a special reserved Outlook categoryonly. The default Outlook category to be used for this purpose is "Projects", but you can alsochange this by typing a different category name into the text box.
Note: This option takes precedence over any other category related features, andany MLO contexts assigned to the project will not be added to the Outlook categorywhen this mode is active.
Note: When this option is active, ALL projects are synchronized to Outlook even ifthey have uncompleted descendant tasks or are in "closed contexts" and wouldnormally be hidden by the "Remove tasks from Outlook not visible in MLO To-DoList" setting described in section 2.3.2.2.
Note: This mode exists to support the Outlook GTD™ Add-in tool and other toolsthat leverage this sort of setup.
Note: If both contexts and projects are being synchronized to Outlook categories,either projects or contexts must use a prefix. This ensures that MLO can detectwhether a previously unseen Outlook category is a new context or a new project.
9.2.8.2.3.4 2.3.4 Priority Mapping Tab
Priority is a computed property in MLO. Therefore, it cannot be modified outside of MLO, but it isnevertheless very useful information outside of MLO. MLO allows multiple ways to send the priorityinformation over to Outlook. Each mode can be enabled or disabled separately.Any changes that you make to task priorities in Outlook will be ignored.If you want MLO priorities to be sent to Outlook, check the first checkbox on this tab: “MapMLO task priority to Outlook”. You can choose to use Outlook's Low/Normal/High priority forvery general priorities, or/and you can use MLO priorities to create multi-level numbered priorities inOutlook.If you check “Map MLO priority to Outlook's Low/Normal/High priority”, MLO tasks will beassigned Outlook priorities as follows (depending on the current To-Do ordering method):
Outlook Priority Computed Score Mode Hierarchical ModeHigh Priority > 3 Items marked as Weekly
Chapter 9100
User's Guide
Goals in MLOMedium 1.0 <= Priority <= 3 Top items on the MLO to-
do listLow Priority < 1.0 Items in the end of the
MLO to-do list
If you check “Encode MLO task priority into the Outlook task subject”, you can choose fromtwo optional encoding methods. The first method assigns simple three-digit priorities (001, 002,003…..100…xxx). The second assigns a letter followed by a two-digit number (A01, A02, A03..A10, B01, B02..B10, C01….xxx). These Outlook priorities are assigned to the MLO tasks bywalking the MLO To-Do list in linear order. The first ten tasks from this list get A01-A10 (or 001-010), the tasks #11-20 from the To-Do list get B01-B10 (011-020), etc.You can also choose the format and location of the encoded priority. It can be placed at either thebeginning or end of the task subject, and can be surrounded by bullets or tildes. Thus, if you havethe task “Weekly review” which receives an encoded priority of A01, you can use the dropdownbox to determine whether the task's name will be changed to “·A01· Weekly review”, “Weeklyreview ·A01·”, “~A01~ Weekly review”, or “Weekly review ~A01~”.
9.2.8.2.3.5 2.3.5 User defined f ields Tab
Many MLO properties do not map naturally to the built-in Outlook fields. Those that do aremapped as shown in the following table (and are mapped bidirectionally, if you are usingbidirectional synchronization). This mapping is done automatically in all modes.
Outlook Field MLO FieldID# Outlook ID#Subject TitleDue Date Due DateStart Date Start DateCategories ContextsNotes NoteComplete Status
You can choose to map additional MLO properties by checking “Fill the following User DefinedFields in Outlook:”. When you check this option, the fields listed in the box will be created inOutlook as User Defined Fields (UDFs) and mapped to the matching task properties in MLO.
Tip: UDF fields will not show up in normal Outlook views, but will be available foradvanced users creating their own views. To view these UDF fields in Outlook:
1. Set the UDF option in MLO.2. Sync MLO > Outlook (or MLO <--> Outlook).3. Open the folder in Outlook to which you synced the MLO data.4. Right click on the header row of the table in Outlook and select "Field chooser".5. Select "User-defined fields in folder" from the combo box.6. Drag the needed MLO fields to the Outlook table header row.
More Advanced Features 101
User's Guide
9.2.8.2.3.6 2.3.6 Tab Buttons
The following buttons appear on all tabs, and perform the described functions:
OK – Exits the settings dialog and saves the selected settings.
Cancel – Exits the settings dialog without saving any changes.
Preset modes – Lets you change to any of the three preset modes, as described in section2.3.1.
Import – Allows you to import from a file a set of settings created by another user.
Export – Allows you to save your current settings to a file for use by other users.
9.2.8.3 3. Notes and Troubleshooting
9.2.8.3.1 3.1 Changing MLO Outlook sync settings after sync operation
It is recommended to use the MLO --> Outlook sync action right after changing any critical Outlooksync settings in MLO. Otherwise it can cause the resynchronization between MLO and Outlooktasks. MLO will display this recommendation after you change the critical Outlook sync settings.
For example: if you want to change the Outlook sync settings after several MLO <--> Outlook syncoperations this is currently the most stable method:
1. Sync MLO <--> Outlook with the OLD (!) settings. 2. Change the settings. 3. Sync MLO --> Outlook (!) with the new settings. 4. Start MLO <--> Outlook sync (using the new settings).
9.2.8.3.2 3.2 Changing Outlook folder after sync process
3.2.1 If the Outlook folder was just renamed or moved inside the current pst file, MLO will detectthis situation and the sync process will continue with no changes.3.2.2 If you change MLO sync setting to completely different Outlook folder, then all MLO taskswill be disconnected from Outlook. So, after synchronization with new Outlook folder, all existingMLO tasks will be considered as new tasks and will be processed according to the selected syncaction
9.2.8.3.3 3.3 Recurring task in both places MLO and Outlook
It is not recommended to set a task as recurring in both MLO and Outlook. Please set the items asrecurring in only one Program. Failure to do so will result in duplicated tasks and unexpected resultsduring the sync process.

Chapter 9102
User's Guide
9.2.8.3.4 3.4 Deletion of a task in Outlook w hich has subtasks in MLO
If you delete a task in Outlook which has subtasks in MLO, all these subtasks are placed in a<NewOutlookTasks> project after sync, because MLO does not know where these subtasksshould be linked after deleting the parent.
9.2.8.3.5 3.5. How backup and restore of your Outlook tasks could affect MLO sync
From the MLO FAQ:Q: Outlook sync trashed my outline! All my tasks are in MLO <NewOutlookTasks> projectagain. A: Here is the situation: You have copied all your Outlook tasks to MLO, created the outline thereand everything worked well for some time. But after one of the sync all of your outlined tasksappeared in the <NewOutlookTasks> again. The reason is that one day you copied all your Outlook tasks into a backup Outlook folder thendeleted the original tasks and restored them from this backup folder. While restored tasks lookidentical to you, they look different to MLO now. This is because the IDs of the tasks have beenchanged. MLO uses only internal Outlook task IDs to identify tasks for sync. Thus, during the sync,MLO deleted all your tasks in the outline and copied "new" Outlook tasks to the default project.You can always identify what happened during sync, by reviewing Outlook sync log file (link to it isplaced in "Setup Outlook Sync" dialog).
9.2.8.3.6 3.6 The MLO Sync Log
If you have unexpected problems during synchronization, you can go to File | Setup Outlook syncand click on “Open sync log”. This will display a log of all sync activity, which can be used introubleshooting the problem.
9.2.8.3.7 3.7 Misc Notes
Start Date without Due Date.MLO allows you to set the Start Date of a task without setting a Due Date. Outlook. however, does notsupport tasks which have a Start Date but do not have a Due Date. To resolve this situation, a specialdate, 12/31/2900, is set for the Due Date in the Outlook task after sync from MLO. This date isinterpreted as an "empty date" when the task is synced back from Outlook to MLO.
9.3 Input parsing
MLO can parse -or interpret- the text you enter in some text input fields. For example you can enter "in30 min" or "next Friday at 2pm" in date and time pickers.
In the Rapid Task Entry dialog, you can type "Call Bob about the party tomorrow at 3pm remind 10 minin advance". The task "Call Bob about the party" will be added to the outline with correspondingparameters parsed from the rest of the input.
You can also parse the task caption entered to the task list if you press Alt+Enter instead of Enter.
More Advanced Features 103
User's Guide
Parsing input in date time pickersDate time pickers like Start, Due and Reminder can parse user's input and convert it to valid date andtime. Days of the week and months can be used in English and your current locale.
Here are the examples of valid input which can be converted to date and time:
tomorrow 3pmin 5 daysFriday (nearest Friday in future)next Friday (next Friday after nearest Friday in future)Tue 11:20Jan26August 26thNov 26 08in 3 weeks 2pmin 3 weeks Friin 30 minin 2 monthstoday in 1h 25 minnext year3-26-200826-3-2008
Parsing input in Rapid Task Entry dialog and Outline
If you want MLO to parse date and time from your input you should enter your tasks using the followingpattern: <What?> <When?>
Examples: Organize party with my friends 5/22 Call Jim tomorrow 4pm Prepare report for Bob 15:10 22/5
Note: Parsing is deactivated in Rapid Task Entry dialog by default. Toactivate it you should open this dialog, click Options button and checkParse input like... check box.
Note: Date and time is parsed according to the rules applied for date timepickers described above.
Tip: use –s or –start to put the date only in the start date field when parsing inRTE or the Outline: "Call Bob tomorrow -s"
Tip: use –d or –due to put the date only in the due date field when parsing inRTE or the Outline: "Send report -due in 5d"
Tip: If MLO fails to parse your input correctly press Ctrl+Z in the main windowto return the original text to RTE change the text and try again.

Chapter 9104
User's Guide
Reminder If you add reserved words "remind" or "reminder", or the abbreviation "rmd" to the phrase, the reminderwill be set in MLO. The pattern: <What?> [<When?>] remind[er] I rmd [<When?>]
Examples: Organize party with my friends May 22 reminder May 21 3pm Call Jim in 3 days at 4pm remind 10 min in advance Send report to Bob in 3 days remind me tomorrow 2pmCall Jim tomorrow at 4pm remind me Send report rmd 3pm
ContextIf you add reserved words "context" or "@" to the phrase the contexts will be added to the task. Thecontexts should be separated by semicolons (;) The pattern:<What?> [<When?>] [remind[er]] [<When?>] [context | @] <context1>; <context2>; <context3>
Examples:Call Jim tomorrow context @office; @callsSend report in 3 days remind tomorrow 10:00 @ ProjectX
Tip: If the context starts with "@" you can sk ip the reserved words. In thiscase the first word which starts with "@" is interpreted as a context.
Example:Call Jim tomorrow @office; @callsTip: you can use the +@ switch to add contexts to the task (not replace
them). Example: “Call Bob +@ phone” or "Buy ticket +@internet"
More complex inputs You can use short and long week day names and names of months in English or in your current locale.You can also use phrases like "today", "tomorrow", "next Friday", "in 3 weeks", "in 4 weeks Fri", "in 3years", "in 2 months 1 week 4 days" etc. You can use abbreviation: d=day(s); w=week(s); m=month(s)or = minute(s); min=minute(s); h, hr, hrs = hour(s).
Examples: Send report next Tue 11am Send report in 3 weeks Monday 15:30 remind me tomorrow 10am Send report Jan 10 Send report February8 2009 context Send report in 1 month 2 weeks 1 day @ ProjectX; ReportsSend report in 1 m 2 w 1 d Send report remind me in 3 hrs
Reserved words MLO tries to interpret your input and separate reserved words from the task caption. However it is notalways possible. For example if you use numbers in the task caption, it may be interpreted as a date, or
More Advanced Features 105
User's Guide
you may want to use reserved words "reminder", "context" etc. If MLO fails to correctly parse yourentry, use quotation marks (") to separate you task caption from parameters that should be parsed.
Examples: "Inform about meeting with Bob tomorrow 16:00" tomorrow at 16:00 remind me 10 m "Send next reminder to Jim" tomorrow
The text inside quotation marks is not parsed and placed in the task caption.
Complete list of reserved words:1) The week day names (short and log) in English and in your current locale (Mon, Monday, .. Sun,Sunday)2) Names of months (short and log) in English and your current locale (Jan, January... Dec, December)3) Numbers (0, 1..9)4) The following words:context,@, remind, reminder, next, in, after, before, day, days, d, month, months, m, year, years, y,week, weeks, tomorrow, w, am, pm, p, h, hr, hrs, hours, hour, minute, minutes, min, mins, today, now
Additional parsing switchesAdditional parsing switches can be used in Rapid Task Entry or Outline parsing
Additional parsing switches:-i1 -i2 … -i5 : set Importance for the task 1=min .. 5=max-u1 -u2 … -u5 : set Urgency for the task 1=min .. 5=max-e1 -e2 … -e5 : set Effort for the task 1=min .. 5=max-t<time> : set time required for the task. Examples –t10; -t2h15min-tmax<time> : set time required max for the task-l<time> : set lead time for the task. Example: -l2d; -l3d15m-s or -start : the date will be placed in the Start field-d or -due : the date will be placed in the Due field-h : hide task in todo-o : complete subtasks in order-p : set IsProject option for the task-f : set Folder option for the task-g : set Goal option for the task-fl<FlagName>: set flag for the task. Example: "Buy umbrella -flGreen"-c<Color>: set font color for the task-toprj<ProjectName> or -toprj=<ProjectName> : move task to a project. Example: "Paint wall -toprjHome"-tofld<FolderName> or -tofld=<FolderName> : move task to a folder-to<TaskName> or -to=<TaskName> : move task to make it a subtask of specified task.+@: add contexts to the task (not replace). Example: “Call Bob +@ phone”-star or -* : set starred to the task. Example: "Call Mike tomorrow -star"
Example. Type this in the outline and press Alt+Enter when in-place editor is active:“Call Katrin -t10 tomorrow 3p remind me 15 min in advance @calls -i1 -e4 -cr”As a result of the parsing a task with the following parameters will be added to your outline:Caption: “Call Katrin”,

Chapter 9106
User's Guide
Due Date: tomorrow 3:00pm, Reminder 2:45pm,Context: @calls, Time Required 10min, Importance Max, Effort: More,Color: Red.
Parsing task caption in the OutlinerYou can benefit from input parsing in the Task Outliner as well. To parse the task caption entered in theOutliner, press Alt+Enter while you are in in-place editor mode. The task caption will be parsedaccording to the rules described above.
Tip: If MLO fails to parse your input press Ctrl+Z several times to return tothe initial caption of the task .
See alsoThe Rapid Task Entry DialogTiming & Reminder
9.4 Drag'n'Drop
Drag & Drop operations can be used in MyLifeOrganized.
Drag & Drop inside MLO.You can Drag & Drop MLO tasks from one branch to another. Depending on the options, the Contexts ofthe task can be changed according to the new parent.
Alternative Drag & DropYou can use the right mouse button for alternative Drag & Drop operations: Add to dependency and Addlinks to notes. Just start the Drag process with the right mouse button and select the option from themenu after the Drop.
Drag & Drop from Microsoft Outlook to MLO.You can Drag & Drop items like e-mails, tasks, appointments etc from MS Outlook to MLO tasks. Thenotes of the Outlook item are placed in the MLO task notes, together with additional parameters and alink to the original item in Outlook. Multiple Outlook items can turn into multiple MLO tasks.
Note: if there are Outlook security warnings displayed during Drag & Dropoperations then download the redemption library from this location andunzip it to the same folder where mlo.exe is installed.
See alsoActions on TasksOutliner

More Advanced Features 107
User's Guide
Options:Behavior
9.5 The Rapid Task Entry Dialog
It is very handy to use the Rapid Task Entry dialog to quickly add tasks to MyLifeOrganized while youare working in other Windows applications. Rapid Task Entry can be configured to be accessed from theMLO tray icon and via a hotkey. This dialog is also always accessible from MLO's main menu: View >Rapid task entry window.
Text entered in Rapid Task Entry can be parsed to set specific options of a task before placing it inMLO. For example if you enter "Call Jim tomorrow 3pm remind me 10 min in advance", the task "CallJim" will be added to MLO with the specified date, time and reminder. See Input parsing for more details.
To enable the Rapid Task Entry in MLO tray:
1. Open the application's Options dialog by selecting Tools > Options... from the menu..2. Select the Rapid Task Entry dialog option page in the options tree on the left.3. Check the Enable rapid task entry dialog from tray icon check box.
Note: for advanced dialog options see Options: Rapid Task Entry Dialog
To activate the Rapid Task Entry dialog from tray:
1. This function must be enabled as described above. 2. Now Right-click on MLO's system tray icon to open the tray menu.3. Select the Rapid task entry... menu item.
Tip: You can assign a hotkey to activate the Rapid Task Entry dialog at anytime. The default hotkey Ctrl+Shift+M, is already set for you, but can bechanged.
To select a default task parent
To select a default task parent for your task entry, click the Parent button and choose a task from theSelect Task dialog.
Advanced options.
Click "Options" button to open advanced settings for Rapid Task Entry dialog which are describedbelow.
The Rapid Task Entry dialog works in two modes Multiple task entry and Single task entry.
To select Multiple task entry mode
Check the Multiple task entry check box
Chapter 9108
User's Guide
In this mode, each text line will be interpreted as a separate task when you press the Add task(s)button. You can use indentation to create subtasks.
To select Single task entry mode
Uncheck the Multiple task entry check box
In this mode, only one task will be added to the MyLifeOrganized application when you press the Addtask button. If the text you entered has more than one line, the first line will be used for the task nameand the entire text (including the first line) will be placed in the task note.
To enable parsing of the input
To enable parsing of the input, check Parse input like.... The input "Call Jim tomorrow 3pm remind me10 min in advance" will be parsed before adding the task to MLO. See Input parsing for more details.
To inherit parent Contexts
If you want the entered task(s) to inherit the Contexts of the parent task, check the Inherit parentContexts check box. If you uncheck this option, you will be able to specify Contexts for the enteredtask(s).
See also:Options: Rapid Task Entry DialogInput parsing
9.6 Alternative complete
Alternative complete is a way to complete a task with some additional actions.
To use alternative complete instead of simple task complete just hold down the Ctrl key while you checkthe task with a mouse click or with the space bar.
Right now the following additional actions are performed on alternative complete:1) A completed copy of the task is created instead of the original task completion2) The original task is moved to the end of the branch (if you completed it in the Outline) or to the end ofthe current list (if you completed it in the To-Do).
Note: These additional actions are useful if you are using the Autofocus taskmanagement system (by Mark Forster) or another system which requires these actions.
See alsoActions on Tasks
9.7 Printing and Reporting
You can print the tasks from the task list. The current view is used to generate print report.

More Advanced Features 109
User's Guide
To print tasks:1. Select File > Print from the menu2. In the Print dialog, select the Print template you want to use3. In the Print what, select Current selection or All tasks in view 4. Click Print button
Tip: If you want to print only expanded items in the outline select Expandedonly check box
Tip: You can enter a custom title for your report in Report Title
Note: Before printing, each report is saved to a file. The default file name isMLOPrint.htm and you can change this name in the Output file edit box.
If you click Open in browser, the current report will be opened in your default browser. Depending onthe print template you have selected you may setup the report in the browser and use the browser's printfunctionality to print it.
Advanced options are available if you click Advanced button. You can select the information you wouldlike to include to your print report.
To limit the number of lines to be printed for each task notes select Limit notes to XX lines checkbox.
Note: Lines are defined by the Return character. When typing a note, pressEnter to start a new line.
The Reset template button will restore the default print templates from resources. Press this button ifyou edited the templates and want to revert all your changes to default.
The print templates are placed in a Reports sub folder: Outline Style.mrpt - print template for Outline style reports Memo Style.mrpt - print template for Memo style reports
You can use existing templates as an example to create your own print templates. If you place yourtemplates into the Reports sub folder, they can be used for printing.
See alsoImport/ExportPrinting PocketMod
9.8 Printing PocketMod
MyLifeOrganized can generate PocketMod-style reports. PocketMod is a piece of paper you can cleverlyfold into a small booklet. Each page of this booklet can contain different information you select.
More info about PocketMod.
How to print PocketMod using MyLifeOrganized1. Select menu File > Print PocketMod... 2. From the list on the left select a PocketMod profile or create a new one by clicking New.. button on

Chapter 9110
User's Guide
the top.3. Customize each page of the PocketMod on the right by clicking on the Setup... link for appropriate
page. 4. Click "Preview & Print" to open your PocketMod in MS Word.
When you customize PocketMod pages you can select from the following options:Cover: prints a cover page with name of the MLO owner.Blank : prints blank page To-Do View: prints the current To-Do view with specified parameters. You can split a view on several
PocketMod pages by selecting "Print View Page#" parameter which specifies what page shouldbe taken from the view. So you can place View Page# 1 on the PocketMod Cover and ViewPage# 2 on another PocketMod page.
Note: the settings for the views split across pages should be identical so thatpages are split correctly.
Outline/One task : prints selected task with its notes or branch of the outline.Widget: prints different widgets like Lines or Day Hourly schedule. Widgets can be also imported
from files. RTF is used to create widgets. See example of PocketMod widget in this file:<MLO>\Reports\PocketMod\Weekly.rtf
Note: The Microsoft Word application is needed to print MyLifeOrganizedPocketMod
Tip: If your PocketMod does not fit into the page, click Global Settings andselect Report template (for A4 or Letter), number of lines printed on eachPocketMod page and width of each line in pixels. Adjust these parameters forthe PocketMod to fit your page.
See alsoPrinting and Reporting
9.9 Archiving
Archiving is a way to backup or delete old completed tasks from MyLifeOrganized.
Depending on the configuration, completed tasks that are over a certain age can be moved to an archivedata file, copied to an archive data file or deleted permanently.
Archiving can be run manually or automatically according to a schedule you set in the AutoArchivefeature.
See alsoArchiving ManuallyArchiving Using AutoArchiveAutoArchive settingsAdvanced Backup of Data Files
More Advanced Features 111
User's Guide
9.9.1 Archiving Manually
Manual archiving allows you to run archiving at any moment for the selected branch or for the entireoutline.
How to run archiving manually1. On the File menu, click Archive.... 2. Configure manual archive settings (see below)3. Click OK
Configuring manual archive settings:
Archive all tasks according to default settingsSet this option to archive the entire outline according to default AutoArchive settings. Click the DefaultArchiving Settings button to configure these settings.
Archive tasks from selected branch onlySet this option to archive only the selected branch according to custom archive settings (see below).
Clean out tasks completed before <date>This option sets how old completed tasks must be, to be archived. The task must have been completedbefore this date to be archived.
Clean out completed tasks only with all subtasks completedCheck this option if you want to archive only the tasks for which all subtasks are completed. Otherwise,a task with uncompleted subtasks will be ignored during archiving even if it is old enough for archiving.
Include tasks with "Do not archive branch" checkedThis overrides the option Do not archive tasks in this branch for a task and archives it anyway. SeeArchiving Using AutoArchive for more details on the "do not archive branch" option.
Copy old tasks to archive:Specify a data file where you would like to copy or move old tasks.
Remove old tasks after copy (i.e. move to selected archive)If you set this option, the original archived tasks will be removed from the current data file after beingcopied to the archive file.If you clear this option, archiving will just copy old tasks to the selected archive file. This could be usefulif you want to review archived tasks before removing them from the current data file.
Permanently delete old tasksIf you select this option old tasks will be deleted permanently during archiving.
See alsoArchiving Using AutoArchive
9.9.2 Archiving Using AutoArchive
MLO can perform archiving automatically, every N days. To activate this feature, you should setupAutoArchive settings.

Chapter 9112
User's Guide
How to setup AutoArchive settings1. On the Tools menu, click Options, and then click the AutoArchive. 2. Check Run AutoArchive every N days 3. Setup other AutoArchive settings (see AutoArchive settings for more details).4. Click OK
Note: Once configured, the AutoArchive procedure starts on the specifiedday, a few minutes after you open the MLO data file.
If you do not want a task and all its subtasks to be archived, check option Do not archive tasks in thisbranch for this task:
How to set "do not archive branch" option1. On the Task menu, click Advanced and then click Properties... 2. Select the AutoArchive tab 3. Check Do not archive tasks in this branch
Note: archiving is not performed in the following cases:1) Completed subtasks from open projects. Complete the project to archive
its completed subtasks2) Completed subtasks of the recurrence tasks3) Completed tasks if other tasks depend on these tasks with delay
See alsoArchiving ManuallyAutoArchive settings
9.10 Using the Command Line
You can perform certain operations on your MLO data files or tasks by using the command line.
To work with MLO from the command line:
1. To display the list of available commands run the following command-line command:
mlo.exe /?
The following command-line syntax for MLO is displayed in a dialog box.
mlo.exe [<FileToOpen>] [-QuickSync] [-PocketMod="<PocketMod Profile>"] [-task={TASKGUID}] [-zoom={TASKGUID}] [-AddSubtask="<TaskCaption>"] [-Parse] [-saveXML="<FileName>"] [-saveML="<FileName>"] [-console] [-help|-?]
The parameters represent the operations you can perform. The following parameters are available:
Parameter Meaning
<FileToOpen> Opens the specified MLO data file in MLO. The file must be in MLObinary or MLO XML format.
Note: You can specify a relative or absolute path to the file.
-task Selects the task with the specified GUID in the Outline. Put the <FileToOpen> parameter before this parameter to specify the MLO

More Advanced Features 113
User's Guide
data file that contains the task. Make sure that the task's GUID isenclosed in braces: { }.
Tip: To view a task 's GUID, select the task in the Outline, right-clickand select Advanced >Properties. The Task ID box on the Systemproperties tab displays the task 's GUID.
-zoom Zooms in on the task with the specified GUID. Put the <FileToOpen>parameter before this parameter to specify the MLO data file thatcontains the task.
-AddSubtask Adds a new subtask to the task with the GUID specified in the taskparameter. Enclose the name of the subtask in quotation marks. Putthe <FileToOpen> parameter before this parameter to specify theMLO data file that contains the task.
-Parse Use parsing when adding new subtask with parameter -AddSubtask
-QuickSync Executes sync operation as if you press "Tools >Synchronize" inMLO.You can use this command to setup periodical sync in ScheduledTasks.
Example:mlo.exe D:\MLO\home.ml -quicksync -console
Notes:MLO v.4+ includes new cloud auto-sync functionality. It isnot needed to use this parameter with cloud syncanymore
-PocketMod="<ProfileName>"
Creates and opens for preview selected PocketMod profile.
Example:mlo.exe D:\MLO\home.ml -pocketmod="ActiveTasks"
-saveXML Save the MLO data file specified by <FileToOpen> as a new MLOXML file. Enclose the file name of the new XML file in quotation marks.
Notes: · You must specify a different file name for the new file. MLO will
not overwrite any existing files.· If you want to save the file to a folder other than current folder,
specify an absolute or relative path to the file.
-saveML Save the MLO data file specified by <FileToOpen> as a new MLObinary file. Enclose the file name of the new file in quotation marks.
Notes: · You must specify a different file name for the new file. MLO will
not overwrite any existing files.· If you want to save the file to a folder other than the MLO folder,
specify an absolute or relative path to the file.
-console Performs the command in console mode (without displaying the MLOuser interface). If this command is specified then MLO exists afterprocessing the commands.
Chapter 9114
User's Guide
-help Displays the MLO command-line syntax dialog box.
Examples:mlo.exe MyDataFile.ml -task={213DCA87-6D2E-254D772616FA} -
AddSubtask="NewSubtask #1"mlo.exe MyDataFile.ml -SaveXML="d:\path\MyXML.xml" -console
2. Run the appropriate command.
The following ERRORLEVEL values can be returned.
ERRORLEVEL Meaning
0 The command was executed successfully.
1 The command failed because it contains an invalid argument.
2 The command failed because an existing file was specified in the -saveXX command. MLO will not overwrite any existing files.
3 The command failed because a data-writing error (for example, a"disk full" error) occurred.
100 The command failed because an error other than a data-writing erroroccurred.

Chapter
X

Chapter 10116
User's Guide
10 Options
All MyLifeOrganized settings are accessible in the Options dialog.
To open the MLO options dialog:1. Select menu Tools > Options... 2. Select the option page you need in the tree on the left part of the dialog.
10.1 Current MLO data file
The Current MLO Data File Options are stored in the current MLO data file. In other words, you can setdifferent options for different *.ml files.
10.1.1 Appearance
This options page allows you to setup the controls which should be visible in MLO. These parametersare stored in the current MLO data file.
Importance/Urgency Check to show Importance and Urgency controls in the Generalproperty section
Contexts Check to show all Contexts related controls: Contexts tab, Contexts inthe General property section
Goals Check to show the Goals group box in the General property section
Timing & Reminder Check to show the Timing & Reminder property section
Review Check to show the Review property section
Effort Check to show the Effort property section
Project Check to show the Project property section
Dependency Check to show the Dependency property section
Task Format Check to show the Format property section
Task Statistics Check to show the Task Statistics property section
See alsoUnderstanding of Main Window
10.1.2 Automatic Formatting
Here you can setup Automatic Formatting rules.
See alsoAutomatic Formatting
10.1.3 To-Do List Ordering Options
This options page allows you to adjust the parameters used in the task list ordering algorithm whenComputed-Score is used to sort tasks. These parameters are stored in the current MLO data file.
Options 117
User's Guide
Weight factors (Due date, Start date, Weekly goal) These settings control how greatly each parameter affects the position of the task in the task list. Thehigher you set a weight, the more influence the parameter will have on the list ordering.
Use increased priority for overdue tasks - check this option to boost priority of overdue tasks
Prioritization method This option represents which slider (Importance, Urgency or both) will affect the position of the task inthe task list.
Restore all Tasks to normal Importance and Urgency... Click this button to reset Importance and Urgency parameters of all tasks to the Normal value.
Note: The Restore default button will reset all Computed-Score Priorityparameters to their default values.
For more details on how these parameters are used in the to-do list ordering please refer to the topic on Computed-Score Priority.
See alsoUnderstanding Task List OrderingTo-Do List
10.1.4 To-Do List Format
The To-Do list format options page allows you to set up the parameters which are used in formatting thetasks in the To-Do list. For example, you can start each task in the To-Do list with its project name.
To encode the project name in To-Do list tasks 1. Choose Tools > Options from the menu and click on To-Do list format in the options tree on the left.2. Check the Encode additional information for tasks on the To-Do list check box.3. On the Projects tab, set the Encode project name check box.4. Select whether you want the Immediate or Top level project to be displayed for tasks.5. Enter the start and end string that will be used around the project name to separate it from the taskname. 6. Select Prefix if you want the task name to be preceded by the project and Postfix if you want thetask name to be followed by the project name. 7. Click OK.
To encode the project path in To-Do list tasks1. On the To-Do list format options page, check the Encode additional information for tasks on theTo-Do list check box.2. On the Task path tab, check the Encode task path check box.3. Enter the task path depth, character limit. and separator character.4. Enter the start and end string that will be used to separate the task path from the task name.
Chapter 10118
User's Guide
5. Select Prefix if you want the task name to be preceded by the path and Postfix if you want the taskname to be followed by the path name. 6. Click OK.
Tip: In the Example section, you can review how tasks will be displayed inthe To-Do list with the current settings.
See alsoThe To-Do list
10.1.5 WiFi Synchronization
WiFi Synchronization allows you to synchronize MLO-Windows with MLO on mobile devices (such asiPhone) connected to the same WiFi network. The data transfer performed to your device directly. Youcan sync only if you located near your PC with MLO-Windows running on it.
This options page will help you to pair with your mobile device. It displays the current status of WiFisync pairing for the opened file and additional information and instructions.
See also:WiFi SynchronizationMyLifeOrganized Cloud
10.1.6 AutoArchive
You can setup AutoArchive settings to instruct MLO to perform archiving of old completed tasksautomatically every N days .
Run AutoArchive every NN daysCheck this option to enable the AutoArchive feature.
Prompt before AutoArchive runsCheck this option if you want MLO to show a message before archiving begins.
Clean out tasks completed more than XX agoThis option shows how old completed task should be, to be archived.
Clean out completed tasks only with all subtasks completedCheck this option if you want only tasks with all subtasks completed to be archived. Otherwise, a taskwith uncompleted subtasks will be ignored during archiving even if it is old enough for archiving.
Copy old tasks to archive:Specify a data file where you would like to copy or move old tasks.
Remove old tasks after copy (i.e. move to selected archive)If you set this option the original archived tasks will be removed from the current data file after copy toarchive file.If you clear this option, archiving will just copy old tasks to the selected archive file. This could be usefulif you want to review archived tasks before removing them from the current data file.
Permanently delete old tasks
Options 119
User's Guide
If you select this option, old tasks will be deleted permanently during archiving.
Note: Once configured, the AutoArchive procedure starts on the specifiedday, 3 minutes after you open the MLO data file.
See alsoArchivingArchiving Using AutoArchiveAdvanced Backup of Data Files
10.1.7 Password protection
You can enter a password to open current MLO data file.
Note: it is not possible to restore your password for the MLO data file or openthis file without password.
10.2 General Application Options
The General Application Options are stored in the Windows registry and take effect in all instances ofthe MLO application.
10.2.1 Themes and Formatting
On this options page you can choose themes and formatting for the MLO application. These parametersare stored in the Windows registry and are in effect for all MLO instances.
ThemesTheme settings are used to change font and color for standard elements like Tasks, Projects, Folders,Selection, Notes, Outline etc. You can select one of the predefined themes or create your own.
Tip: To format tasks using rules based on their properties, use AutomaticFormatting
Tip: To change the format of individual tasks, use Custom Formatting
Date and Time FormatThis option represents the format of the date and time as it is shown in the task tree. You can selectdifferent formats for different type of tasks. For example, future tasks can show the full date, while tasksscheduled for this week can show only the day of the week.
The format string is used to define the date and time format. For example: d mmm yy ddd (R)Here are the various date time format strings:
d Displays the day as a number without a leading zero (1-31).
dd Displays the day as a number with a leading zero (01-31).
ddd Displays the day as an abbreviation (Sun-Sat) using the strings given by Window' regionalsettings.
dddd Displays the day as a full name (Sunday-Saturday) using the strings given by Windowsregional settings.

Chapter 10120
User's Guide
ddddd Displays the date using the short format given by Windows regional settings.
dddddd
Displays the date using the long format given by Windows regional settings.
m Displays the month as a number without a leading zero (1-12).
mm Displays the month as a number with a leading zero (01-12).
mmm Displays the month as an abbreviation (Jan-Dec) using the strings given by Windows regionalsettings.
mmmm
Displays the month as a full name (January-December) using the strings given by Windowsregional settings.
yy Displays the year as a two-digit number (00-99).
yyyy Displays the year as a four-digit number (0000-9999).
/ Displays the date separator character given by Windows regional settings.
: Displays the time separator character given by Windows regional settings.
'xx'/"xx"
Characters enclosed in single or double quotes are displayed as-is, and do not affectformatting.
R Displays number of days from today in long format: “in 3 days”, “– 5 days”
r Displays number of days from today in short format: “+3d”, “–5d”
See alsoAutomatic FormattingCustom FormattingUnderstanding the Main Window
10.2.2 Behavior
Behavior options are used to setup MLO application behavior. All parameters listed here are stored in theWindows registry and are in affect for all MLO instances.
Always show icon in system tray Check to show the MLO icon in the system tray when MLO isrunning.
Escape minimizes the application If set, the MLO application can be minimized by pressing the Escape key
Minimize to system tray If set, the minimized MLO application does not appear, neitherin the task bar nor in the Alt+Tab list. You can activate MLO byclicking on the icon in the tray or using the MLO shortcut.
Close to system tray If set, the Close Window icon will actually minimize the MLOapplication. You can still exit the MLO application by selectingmenu File > Exit.
One click edit mode If this option is set, you need only one mouse click to edit atask caption in the task list.
Save window position If this option is set, the MLO application stores its last windowposition.
Associate with *.ml files Associates MLO data files with the MLO application, so thatdouble-clicking an mlo file launches MLO and opens that file.
Options 121
User's Guide
Allow multiple instances Set this option if you want to be able to run multiple instancesof the MLO application. Otherwise only one instance is allowed.
When Drag & Drop task to a newparent
You can configure to inherit Contexts of the parent task when atask is moved to another parent. If option "Ask what to do withContexts of moved task " is set a confirmation dialog will beshown each time you Drag & Drop or move a task.
System Shortcut Key You can select any shortcut to activate/deactivate the MLOapplication.
See alsoUnderstanding of Main Window
10.2.3 Auto-Save Files
There are two modes for saving your MLO data file. These parameters are stored in the Windows registryand are in effect in all MLO instances.
Save all changes automaticallyAll your changes are saved to the data file automatically right after you made the modifications
User manually saves the changesYou need to click Ctrl+S to save your data file after changes as you usually do with document editors. Critical updates like synchronization are still saved automatically in this mode
See alsoAuto-saveCreate, Open and Save MLO FilesImport/ExportBackup
10.2.4 The Rapid Task Entry Dialog
The Rapid Task Entry dialog option (accessed from Tools > Options) allows you to set up the behaviourof the Rapid Task Entry dialog. The parameters you set are stored in the Windows registry and areapplied to all MyLifeOrganized instances.
Enable Rapid Task Entry dialog from tray icon Enables this advanced feature
Close dialog after adding task(s) If this option is checked, the dialog will closeautomatically when you press the Add task(s)button.
Stay on top The Rapid Task Entry dialog will stay on top of allother Windows applications.
Clicking on tray opens Rapid Task Entrydialog
If this option is checked, left clicking on the MLOsystem tray icon will activate the Rapid Task Entrydialog rather than open the MyLifeOrganized mainwindow.
Place additional text in task note if textentered is greater than XX characters
If the name of a task you have entered in the RapidTask Entry dialog is longer than XX characters, thetask name will be truncated and the entire text will

Chapter 10122
User's Guide
be placed in the task note.
Inactivity transparency For Windows 2000/XP, the transparency can beset for the dialog when it is inactive.
Hotkey This option allows you to change the systemshortcut key, which can be used to activate/deactivate the Rapid Task Entry dialog at anytime.
See alsoRapid Task Entry Dialog
10.2.5 Backup
On this page, you can configure how MLO should backup your data files.
Perform advanced backup for each data file during savingEnables advanced backup functionality.
Keep last N backups of each data file as: <file>.ml-(NN).bakMLO stores the last N copies of your data file, renaming them according to the given template.
For example if you set this option to 3 you will have the following files in your backup folder:myfile.ml-(01).bakmyfile.ml-(02).bakmyfile.ml-(03).bakIn this example myfile.ml-(01).bak is the most recent file.
Tip:set this option to 0 to disable keeping the last N backups.
Backup in:A folder where all backup files will be placed.
Keep daily backups as: <file>.ml-YYYY-MM-DD.bakMLO stores one copy of your data file for each day, renaming it according to the given template. Youcan select a custom folder for daily backups.
Keep weekly backups as: <file>.ml-YYYY-(NN week).bakMLO stores one copy of your data file for each week, renaming it according to the given template. Youcan select a custom folder for weekly backups.
Keep monthly backups as: <file>.ml-YYYY-(NN month).bakMLO stores one copy of your data file for each month, renaming it according to the given template. Youcan select a custom folder for monthly backups.
Restore defaultClick to restore default backup settings.
Note: Backup settings are application related and stored in Windows registry.

Options 123
User's Guide
This means that once configured they will be used for back ing up allMLO data files for the current user on this computer .
Tip: To recover from a backup, simply open the backup data file (*.bak) inMyLifeOrganized application (menu: File >Open)
See alsoAdvanced Backup of Data FilesAuto-save FilesArchiving
10.2.6 E-mail Account
On this page, e-mail SMTP settings are configured. These settings are used to send e-mails from MLO.
10.2.7 Hot Keys
The Hot Keys section of the General Application Options dialog box lists the default keyboardshortcuts (hot keys) for the most common MLO functions and commands. You can customize thekeyboard shortcuts by changing the default keyboard shortcuts to the keys or combinations of keys thatyou want to use.
To customize the keyboard shortcuts:
1. Select Tools > Options > Hotkeys2. In the Hot Keys list, select the command or function that you want to assign a different keyboard
shortcut to. 3. In the Hotkey box, press the key or combination of keys that you want to assign. For example,
press SHIFT plus the key that you want to use.4. Click Modify.5. Repeat steps 1–3 to change the default keyboard shortcut for each additional function or command.6. Click Apply or OK to save the change to the keyboard shortcut assignment.
Notes: · You can restore the keyboard shortcut assignments to their default
settings by click ing Reset All.· You can remove the keyboard shortcut assigned to a function or
command by selecting that function or command and click ing Clear.
See also:
Keyboard Shortcuts
10.2.8 Troubleshooting
This page is used to enable additional logging in MyLifeOrganized for troubleshooting and sending logsto support for investigations of possible issues.


Chapter
XI

Chapter 11126
User's Guide
11 Technical Support
If you have a question about MyLifeOrganized, you can:
1. Consult the MyLifeOrganized help and on-line documentation2. Access our Frequently Asked Questions. There is a good chance that you'll find the answer to yourquestion there. 3. Post a message to the MyLifeOrganized community. People are very friendly there and can help youwith any MLO questions you may have.4. If you can't find the answer from any of these sources, feel free to send an e-mail message to [email protected]

Chapter
XII

Chapter 12128
User's Guide
12 License Agreement
MyLifeOrganized Application - End User License There are two versions of the MyLifeOrganized application:
1. Free 45-day Trial Version 2. Registered version (Standard Edition or Professional Edition). You can find out what version you have by checking the About window at Help >About menu.
Please read the license agreement below. If you disagree with this agreement, please delete allMyLifeOrganized application files from your computer.
Free 45-day Trial Version
You may freely distribute 45-day Trial Version to any number of people. Any user who installs and runsthe trial version is automatically subject to this license agreement.
You may not charge money for the Trial Version in excess of the distribution media and handling costs.You may not misrepresent the program origin, claim the authorship, alter the program files, anddistribute the program without license file or help file. Reverse engineering, decompiling anddisassembling the program is strictly prohibited.
After using the program for 45 days you may either purchase the fully functional version ofMyLifeOrganized (Standard Edition or Professional Edition) or stop using the program and uninstall itfrom your computer's disk. Use of this software after the trial period of 45 days is in violation ofinternational Copyright law!
Registered version (Standard Edition or Professional Edition)
When you purchase the fully functional version of MyLifeOrganized, one user license is granted to you.You may choose from two editions of the application: Standard Edition or Professional Edition. You maymake copies of the software for backup purposes and to install it on up to five computers, as long asonly one person uses the software. This way, you may install it at home and in office for your personaluse. Additional licenses are necessary if more than one person is using the program.
Along with the license to use the software you will receive free updates of MyLifeOrganized to all newminor versions in appropriate Edition. Anyone that bought the full (professional) version would get freeupgrade to all new updates (including major) released within 12 months from the date of their purchase.
Please visit the MyLifeOrganized application website at www.mylifeorganized.net for additionalinformation about acquiring the fully functional version.
Liability
Although we tried to make the MyLifeOrganized application as bug-free as possible, no software iscompletely error-free. Descriptions of the bugs will be gladly accepted, but we cannot guarantee that wewill be able to correct them.
MYLIFEORGANIZED SOFTWARE IS PROVIDED "AS IS" WITHOUT WARRANTY OF ANY KIND,EITHER EXPRESSED OR IMPLIED, INCLUDING BUT NOT LIMITED TO THE IMPLIED WARRANTIESOF MERCHANTABILITY AND/OR SUITABILITY FOR A PARTICULAR PURPOSE.

License Agreement 129
User's Guide
THE USER ASSUMES THE ENTIRE RISK OF ANY DAMAGE CAUSED BY THIS SOFTWARE.
IN NO EVENT SHALL THE CREATOR OF THIS SOFTWARE BE LIABLE FOR ANY SPECIAL,INCIDENTAL, INDIRECT, OR CONSEQUENTIAL DAMAGES WHATSOEVER (INCLUDING, WITHOUTLIMITATION, DAMAGES FOR LOSS OF BUSINESS PROFITS, BUSINESS INTERRUPTION, LOSS OFBUSINESS INFORMATION, OR ANY OTHER PECUNIARY LOSS) ARISING OUT OF THE USE OF ORINABILITY TO USE THE SOFTWARE PRODUCT OR THE FAILURE TO PROVIDE SUPPORTSERVICES.
(c) 2003-2015, MyLifeOrganized.net. All rights reserved.


Chapter
XIII

Chapter 13132
User's Guide
13 Glossary
Listed here are terms that are commonly used in MyLifeOrganized (MLO), many of which have meaningsin this context that differ from everyday usage.
Note that within each definition, terms that are defined elsewhere in theglossary are capitalized and colored blue.
Action – A piece of work that needs to be completed to accomplish a Goal.
Child Task – One of a group of smaller tasks that must be completed in order to complete a largerParent Task. Completion Percentage – A number that is calculated for a Project, based on how many Subtasks ofthe project are completed and how much Effort is required for each subtask.
Context – A particular location or situation in which a Task can be completed. A Context can alsoinclude other Contexts in the hierarchy and can have Open/Close Schedule.
Due Date – The final date by which a Task absolutely must be completed.
Effort – An estimate of the amount of energy needed to accomplish a task. The amount of time neededfor the task's completion can also enter into this estimate; however, MLO has a separate Time Requiredestimate, so the concentration here should be on the energy required.
Export – To save an MLO file in a format that makes it usable by another application.
Goal - A user's aim; the end to which Effort is directed. Any Task in the Outline can be indicated as aweekly goal, monthly goal or yearly goal. The special Goals view is designed to easily review all yourgoals.
Import – To insert tasks from a file that has been saved by another application, in a non-MLO format.
Importance – A judgment of how critical a Task is to the completion of its Parent. In MLO, importanceis not an overall rating of priority relative to all tasks. Rather, importance is set with regard to completingthe immediate Parent Task. Importance is also distinct from Urgency. It is possible (in fact, quitecommon) for an unimportant task to be urgent; obviously, important tasks are not always urgent.
Lead Time – The number of hours or days that will be needed in order to complete a task by its DueDate. Lead time is used to calculate the Start Date (due date – lead time).
Open/Closed Schedule – The hours during which a particular Context is available for accomplishingtasks.
Outline – A list of Goals, Projects, and other Tasks displayed in a way that shows the relationships ofSubtasks to their respective Parents. Starting from MLO v.4 the Outline can be filtered, sorted andgrouped according to different settings and saved as View.
Parent or Parent Task – A task which contains or includes multiple Subtasks which must becompleted before the parent task is considered to be complete.
Project – In general terms, any Task that has Subtasks. In MLO you can indicate that a certain task is

Glossary 133
User's Guide
a Project by setting the special task property. All marked projects are included in the Projects view.
Start Date – The date by which a Task must be begun in order to complete it by its Due Date. Also thefirst day a Task will appear in the To-Do List.
Subtask – A group of Tasks that must be completed in order for their Parent Task to be completed.
Task An item of work that needs to be completed. In general terms, a task can be either a single itemof work or a larger piece of work that can be broken down into easier, quicker Subtasks. In MLO anytask can be converted to a Goal or Project.
Time Required - An estimate of how long it will take to complete a task.
To-Do List – A non-hierarchical list of Tasks that require attention. The To-Do List can be filtered, sortedand grouped according to different settings saved as To-Do List View.
Tree – Another name of the Outline.
Urgency – A measure of how necessary it is to complete a Task immediately. An urgent task is onethat has a deadline in the near future. View – A particular way of displaying a filtered, sorted and grouped Tasks.
XML – A standard format that is recognized by various types of applications and that allows files to beshared between those applications.
Zoom in – To display only a single branch of the Task Tree to avoid interference from other tasks. Onlyitems in this branch are displayed in the Outline and in the To-Do List.
Task GUID - Globally Unique Identifier of the Task or Task ID. To see the GUID of the task select menu:Task > Advanced > PropertiesExample of the Task GUID: {F9BA410A-AB32-41BB-AE04-869F0F490981}
Workspace - tabs on the top of the MyLifeOrganized application. The Workspaces are used to storeand quick access the particular configuration for the selected view, additional filter controls, zoom,selected tasks etc. The Workspaces can show different parts of the same data files in different views.For example, in one tab you can work on a current project in the other – view a small household choresand the third tab -handle the Inbox.

Index 135
User's Guide
Index- A -
Action Filter 41
Actions 37
Activation Code does not work 9
Active Actions 37
Advanced Filter 41
advanced task properties 68
alert 62
Alternative complete 108
archiving 110
archiving manually 111
AutoArchive 111
Autofocus 108
Automatic cloud sync 87
automatic formatting 78
automatic resetting of subtasks 60
auto-save 23
- B -
backup 20, 23
bookmarks 36
- C -
Cloud sync 86
collaboration 89, 90
Collaboration using Cloud 90
Columns 51
command line 112
complete subtasks in order 58
completed 67
Completion Filter 41
completion percent 65
Computed-Score Priority 45, 46
more details 46
Context 56
contexts 70
creating/deleting 70
included contexts 71
open/closed hours 71
options 71
created 67
creating 70
context 70
task 30
- D -
Default outline views 29
Delayed dependency 64
deleting 70
context 70
task 31
demo file 21
Dependency 64
do not archive task 68
do not create a completed copy 60
drag&drop 31
drag'n'drop 106
drag'n'drop from Outlook 106
due date 59
- E -
edit completion date 68
effort 63
- F -
Filter Controls 41, 43
Filtering 41
find 22
flags 67
flash drive 9
folder 58
fonts and color 119
format dates 119
formatting 119
- G -
general options 119
getting started 12
Glossary 132
goals view 58
Grouping 45
GUID 132
Index136
User's Guide
- H -
hide task in to-do 58
Hierarchy Filter 41
how it works 16
- I -
import/export 20
importance 57
input parsing 102, 107
installing 8
- K -
keyboard shortcuts 74
customizing 123
- L -
lead time 59
License Agreement 128
logs 123
Lost Activation Code 9
- M -
main window 12
Manual ordering 45
mlo:// 35
modifed 67
monthly goals 58
- N -
Next Actions 37
- O -
Online Activation Service 9
open file 20
open/closed hours 71
options 116
appearance 116
AutoArchive 118
automatic formatting 116
auto-save files 121
backup 122
behavior 120
email 123
hot keys 123
password protection 119
rapid task entry 121
themes 119
to-do list format 117
to-do list ordering 116
troubleshooting 123
wifi sync 118
options of current data file 116
Ordering of To Do list 45
outline 26, 27
Outline views 29, 39
outliner 27
outlook sync 92
- P -
PocketMod 109
Print 108, 109
printing
reporting 108, 109
project 65
projects view 65
purge completed tasks 110
- R -
rapid task entry 107
rearranging tasks in outline 31
recover from backup 20
recurring behavior 60
registration
Activation Code 8
registration for offline computer 8
reminder 62
removable media 9
reoccurrence 60
Review 65
Index 137
User's Guide
- S -
search 22
search as you type 22
searching 22
send logs 123
set task as project 65
skip occurrences 60
Sorting 45
Starred 68
start date 59
subtask 30
Sync with BlackBerry 88
synchronization 79
between work and home computers 91
collaboration 90
portable scenarios 91
resolving synchronization conflicts 92
with Microsoft Outlook 92
synchronization conflicts
resolving 92
synchronization items
using for collaboration 90
using for portable scenarios 91
synchronization profile
adding 80
deleting 85
editing 85
exporting 85
importing 85
synchronizing data files with 83
Synchronization profiles 80
synchronizing data files 83
- T -
Tab 26
tab delimited 20
task 30, 31
task effort 65
Task Format 66
task links 35
task properties 56
assigning context 56
complete subtasks in order 58
Dependency 64
due date 59
effort 63
flags 67
folder 58
goal 58
hide task in to-do 58
importance 57
lead time 59
project 65
reminder 62
reoccurrence 60
Review 65
Starred 68
start date 59
Task Format 66
task statistics 67
time 59
time & reminder 59
time required 63
urgency 57
tasks
actions 32
creating 30
creating links between 35
deleting 31
navigation 34
rearranging tasks in outline 31
working on at work and home 91
working on tasks on travel 91
technical support 126
templates 20, 21
themes 119
thumb drive 9
time & reminder 59
time required 63
To Do list 37
ordering 45
To-Do 26
To-Do views 37, 39
- U -
urgency 57
- V -
View 26

Index138
User's Guide
Views 29, 34, 39
Create 39
Delete 39
Export 39
Manage 39
Rename 39
- W -
weekly goals 58
WiFi sync 89
window 12
Workspace 26
Worslpace tabs 51
- X -
XML 20
- Y -
yearly goals 58
- Z -
zoom in 34
zoom out 34
Endnotes 2... (after index)
139
© 2015, mylifeorganized.net