Embed Size (px)
Citation preview
1
MyClarion Training
PeopleSoft Campus Solutions - Student Services Center Training
Clarion University
www.clarion.edu/myclarion
31-MAR-2011
2
3
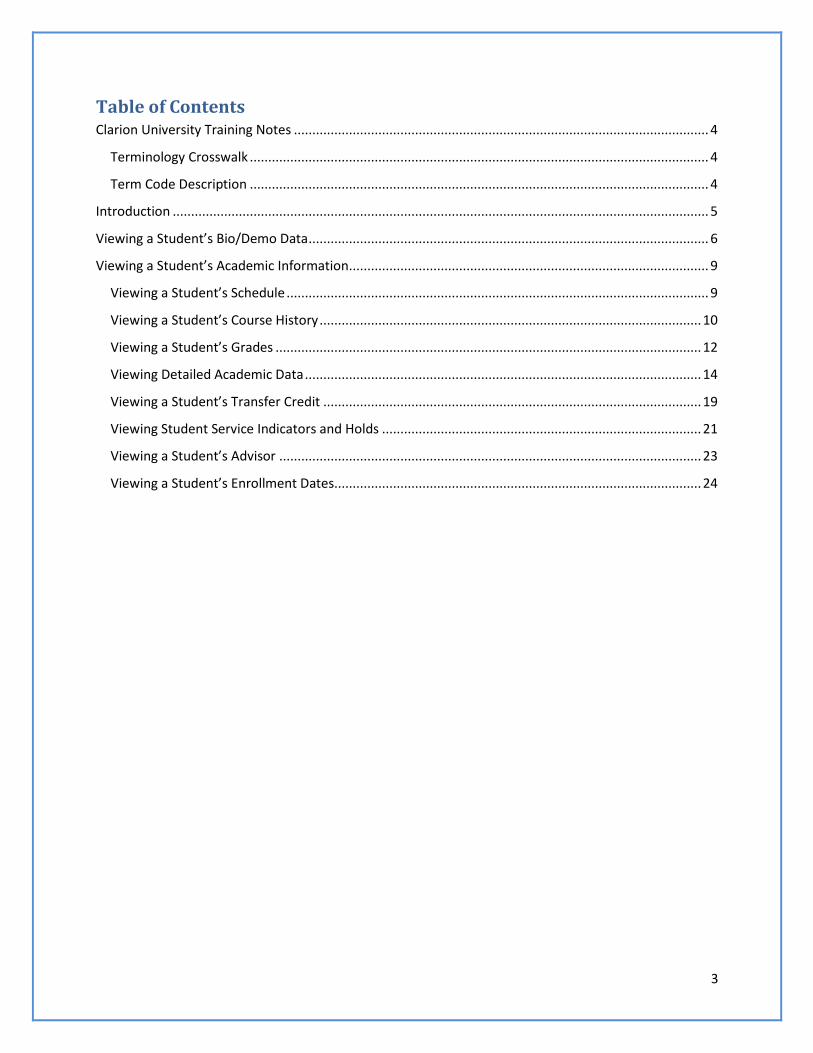
Table of Contents Clarion University Training Notes ................................................................................................................. 4
Terminology Crosswalk ............................................................................................................................. 4
Term Code Description ............................................................................................................................. 4
Introduction .................................................................................................................................................. 5
Viewing a Student’s Bio/Demo Data ............................................................................................................. 6
Viewing a Student’s Academic Information .................................................................................................. 9
Viewing a Student’s Schedule ................................................................................................................... 9
Viewing a Student’s Course History ........................................................................................................ 10
Viewing a Student’s Grades .................................................................................................................... 12
Viewing Detailed Academic Data ............................................................................................................ 14
Viewing a Student’s Transfer Credit ....................................................................................................... 19
Viewing Student Service Indicators and Holds ....................................................................................... 21
Viewing a Student’s Advisor ................................................................................................................... 23
Viewing a Student’s Enrollment Dates.................................................................................................... 24
4
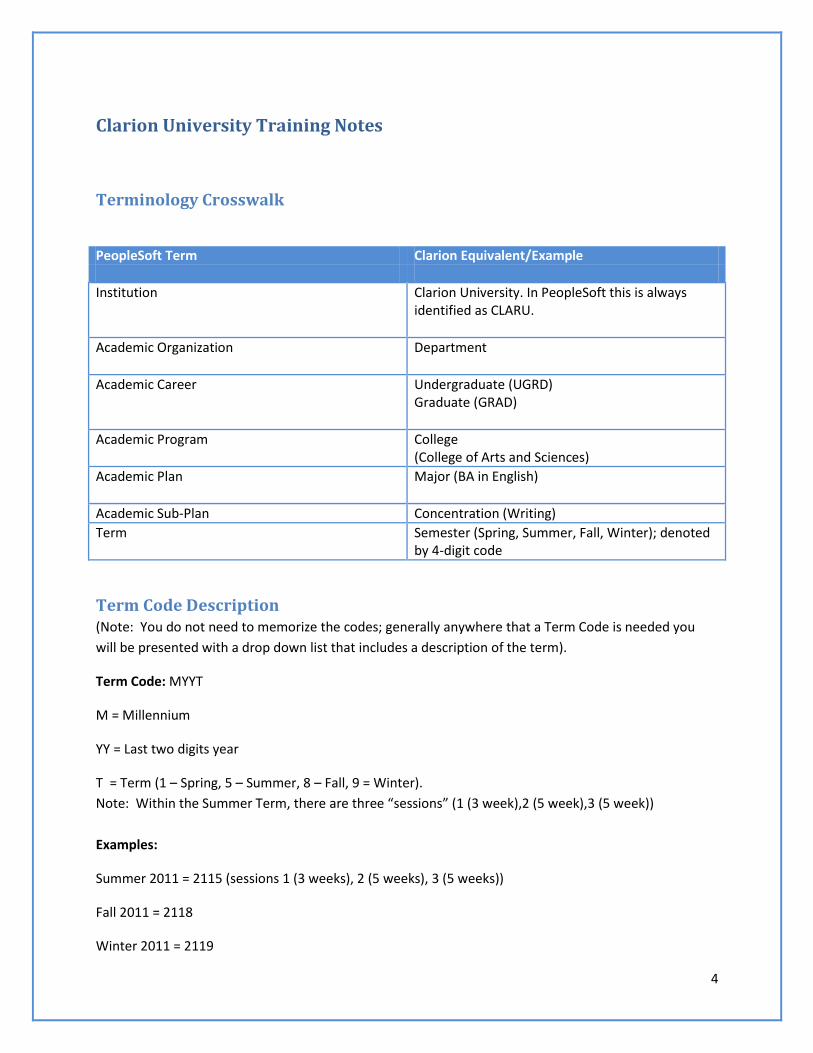
Clarion University Training Notes
Terminology Crosswalk
PeopleSoft Term Clarion Equivalent/Example
Institution Clarion University. In PeopleSoft this is always identified as CLARU.
Academic Organization Department
Academic Career Undergraduate (UGRD) Graduate (GRAD)
Academic Program College (College of Arts and Sciences)
Academic Plan Major (BA in English)
Academic Sub-Plan Concentration (Writing)
Term Semester (Spring, Summer, Fall, Winter); denoted by 4-digit code
Term Code Description (Note: You do not need to memorize the codes; generally anywhere that a Term Code is needed you
will be presented with a drop down list that includes a description of the term).
Term Code: MYYT
M = Millennium
YY = Last two digits year
T = Term (1 – Spring, 5 – Summer, 8 – Fall, 9 = Winter).
Note: Within the Summer Term, there are three “sessions” (1 (3 week),2 (5 week),3 (5 week))
Examples:
Summer 2011 = 2115 (sessions 1 (3 weeks), 2 (5 weeks), 3 (5 weeks))
Fall 2011 = 2118
Winter 2011 = 2119
5
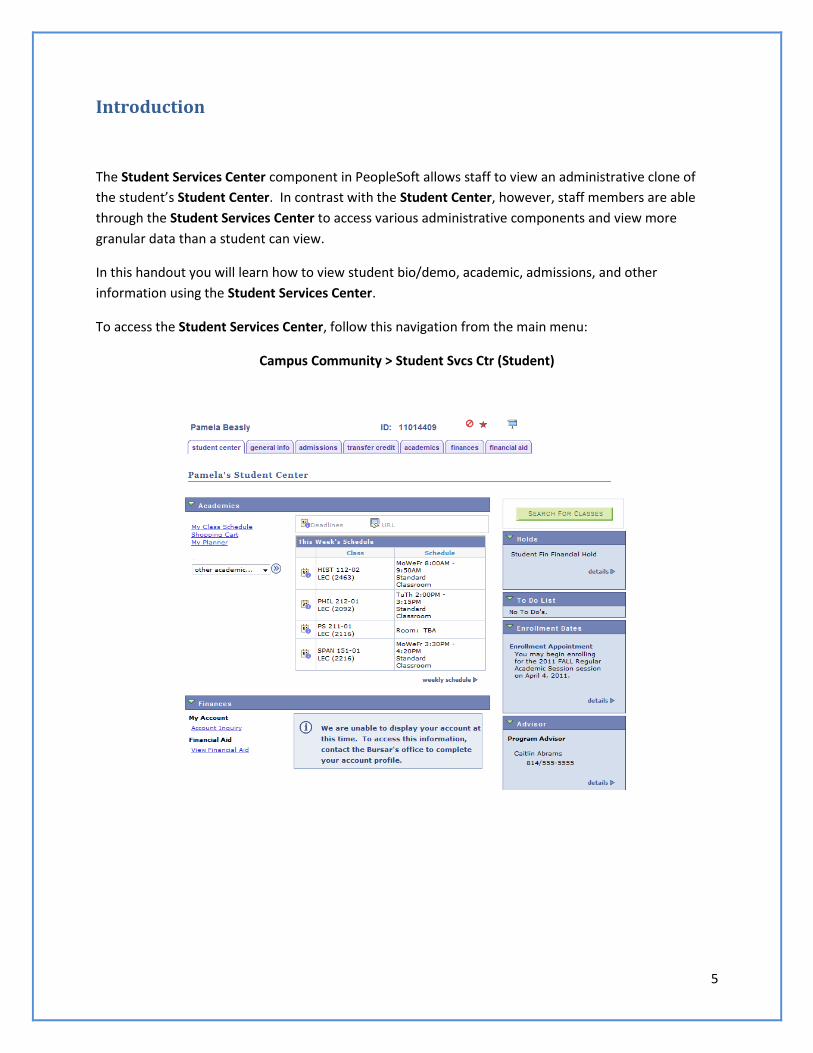
Introduction
The Student Services Center component in PeopleSoft allows staff to view an administrative clone of
the student’s Student Center. In contrast with the Student Center, however, staff members are able
through the Student Services Center to access various administrative components and view more
granular data than a student can view.
In this handout you will learn how to view student bio/demo, academic, admissions, and other
information using the Student Services Center.
To access the Student Services Center, follow this navigation from the main menu:
Campus Community > Student Svcs Ctr (Student)
6
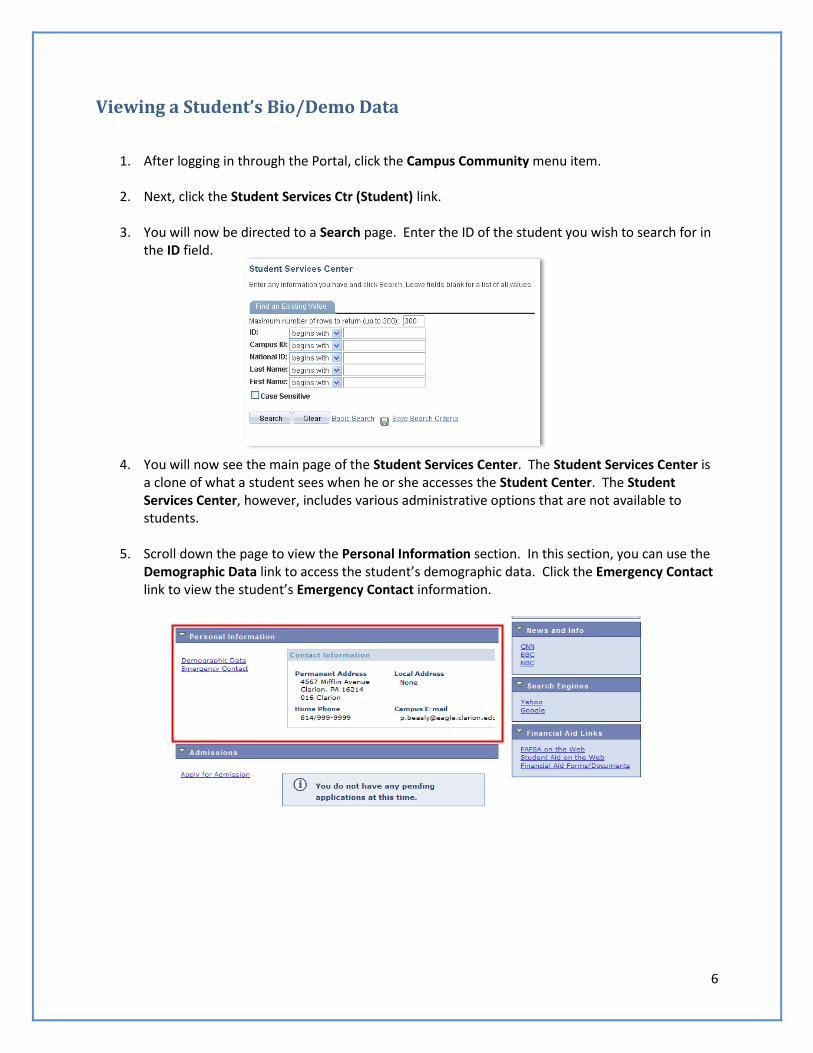
Viewing a Student’s Bio/Demo Data
1. After logging in through the Portal, click the Campus Community menu item.
2. Next, click the Student Services Ctr (Student) link.
3. You will now be directed to a Search page. Enter the ID of the student you wish to search for in
the ID field.
4. You will now see the main page of the Student Services Center. The Student Services Center is a clone of what a student sees when he or she accesses the Student Center. The Student Services Center, however, includes various administrative options that are not available to students.
5. Scroll down the page to view the Personal Information section. In this section, you can use the Demographic Data link to access the student’s demographic data. Click the Emergency Contact link to view the student’s Emergency Contact information.
7
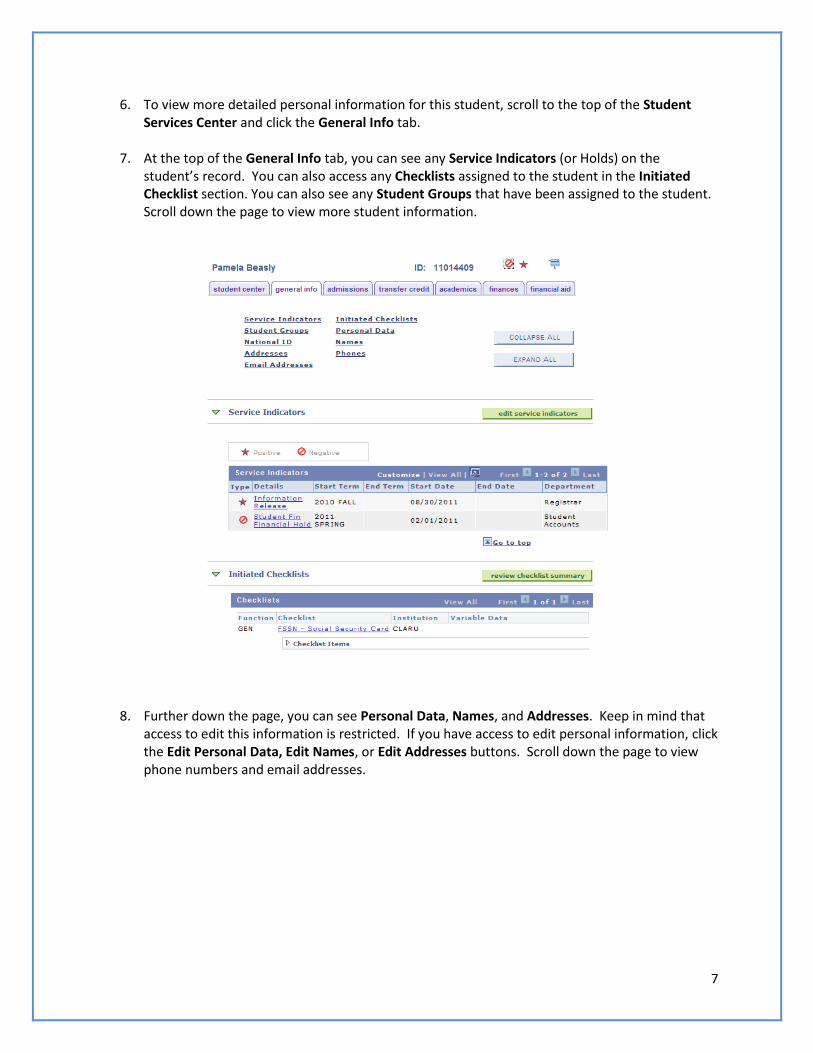
6. To view more detailed personal information for this student, scroll to the top of the Student Services Center and click the General Info tab.
7. At the top of the General Info tab, you can see any Service Indicators (or Holds) on the student’s record. You can also access any Checklists assigned to the student in the Initiated Checklist section. You can also see any Student Groups that have been assigned to the student. Scroll down the page to view more student information.
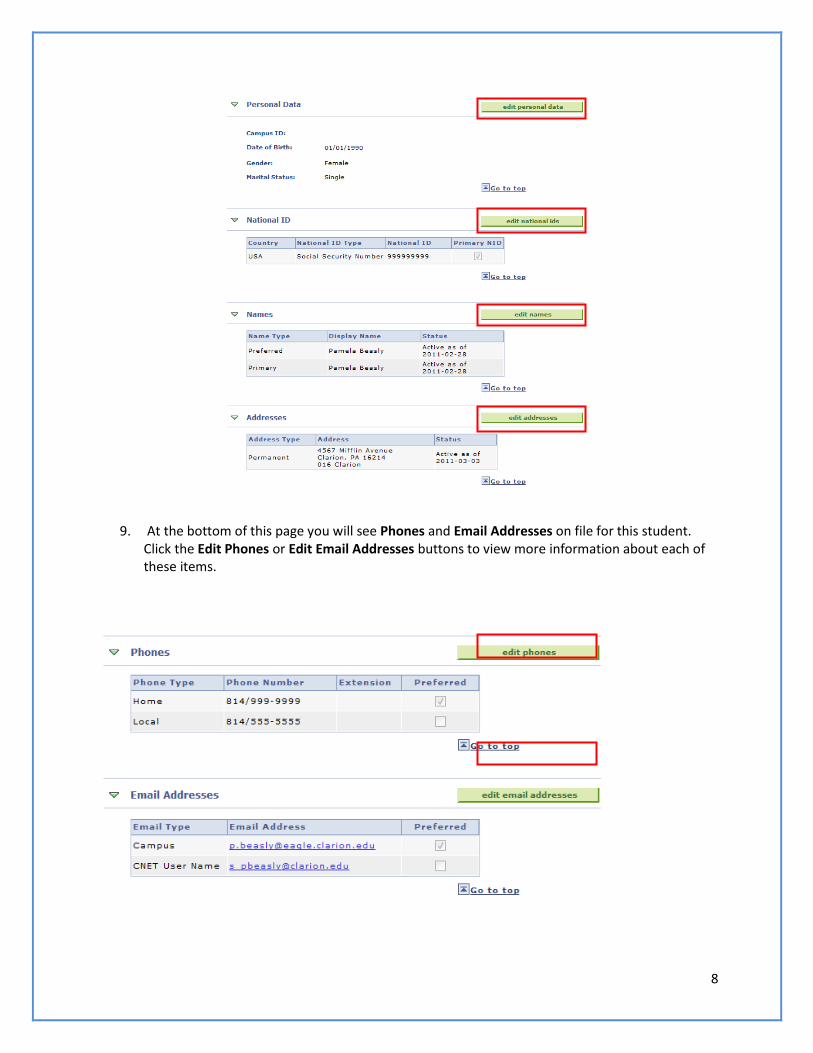
8. Further down the page, you can see Personal Data, Names, and Addresses. Keep in mind that access to edit this information is restricted. If you have access to edit personal information, click the Edit Personal Data, Edit Names, or Edit Addresses buttons. Scroll down the page to view phone numbers and email addresses.
8
9. At the bottom of this page you will see Phones and Email Addresses on file for this student. Click the Edit Phones or Edit Email Addresses buttons to view more information about each of these items.
9
Viewing a Student’s Academic Information
Viewing a Student’s Schedule
1. First, click the Campus Community menu item.
2. Next, click the Student Services Ctr (Student) link.
3. You will now be directed to a Search page. Enter the ID of the student you wish to search for in the ID field.
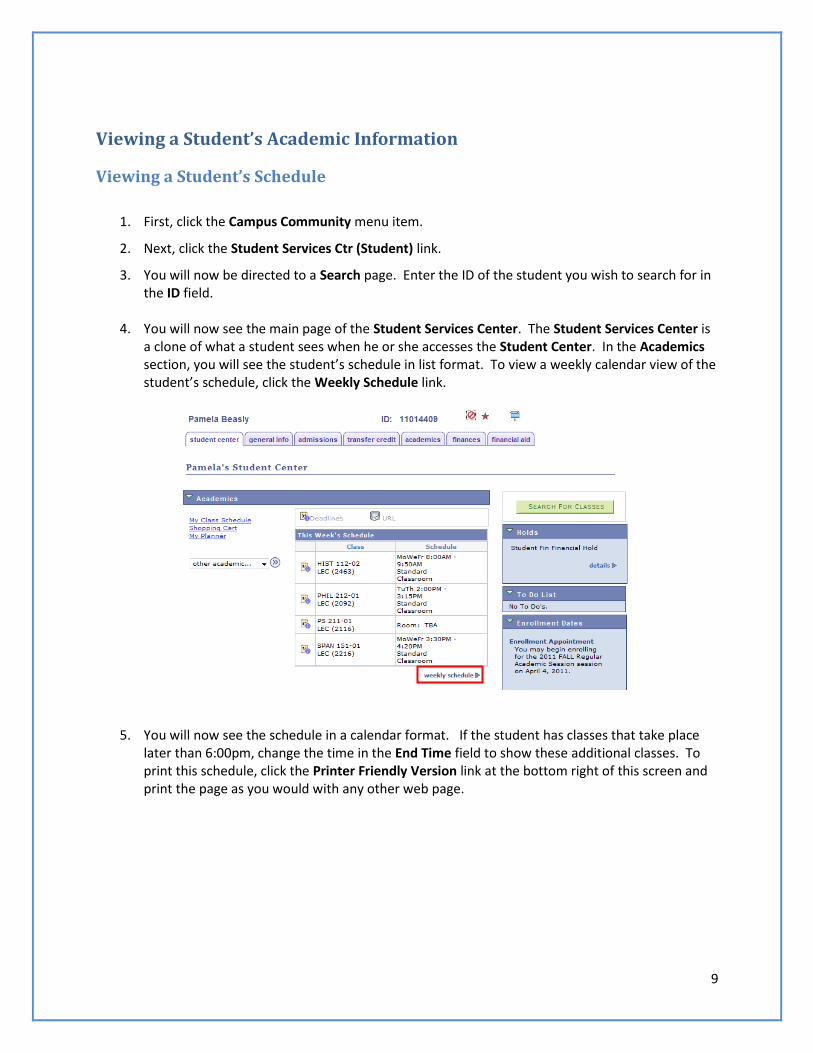
4. You will now see the main page of the Student Services Center. The Student Services Center is a clone of what a student sees when he or she accesses the Student Center. In the Academics section, you will see the student’s schedule in list format. To view a weekly calendar view of the student’s schedule, click the Weekly Schedule link.
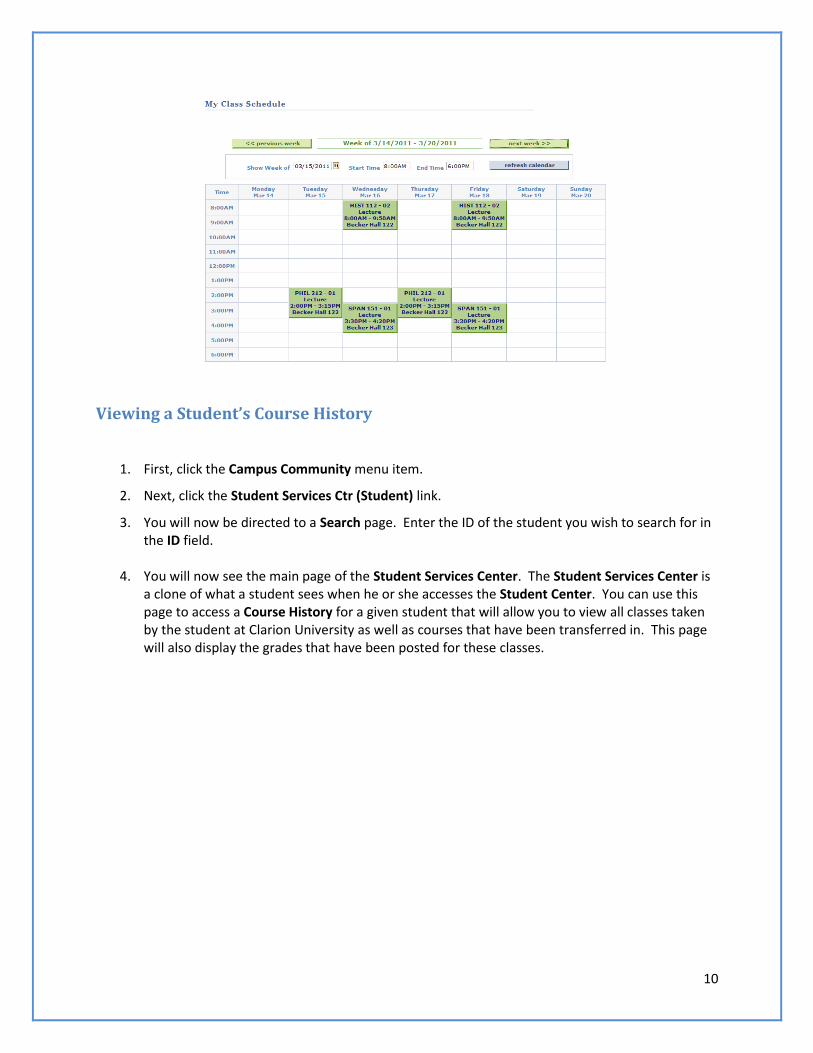
5. You will now see the schedule in a calendar format. If the student has classes that take place
later than 6:00pm, change the time in the End Time field to show these additional classes. To print this schedule, click the Printer Friendly Version link at the bottom right of this screen and print the page as you would with any other web page.
10
Viewing a Student’s Course History
1. First, click the Campus Community menu item.
2. Next, click the Student Services Ctr (Student) link.
3. You will now be directed to a Search page. Enter the ID of the student you wish to search for in the ID field.
4. You will now see the main page of the Student Services Center. The Student Services Center is a clone of what a student sees when he or she accesses the Student Center. You can use this page to access a Course History for a given student that will allow you to view all classes taken by the student at Clarion University as well as courses that have been transferred in. This page will also display the grades that have been posted for these classes.
11
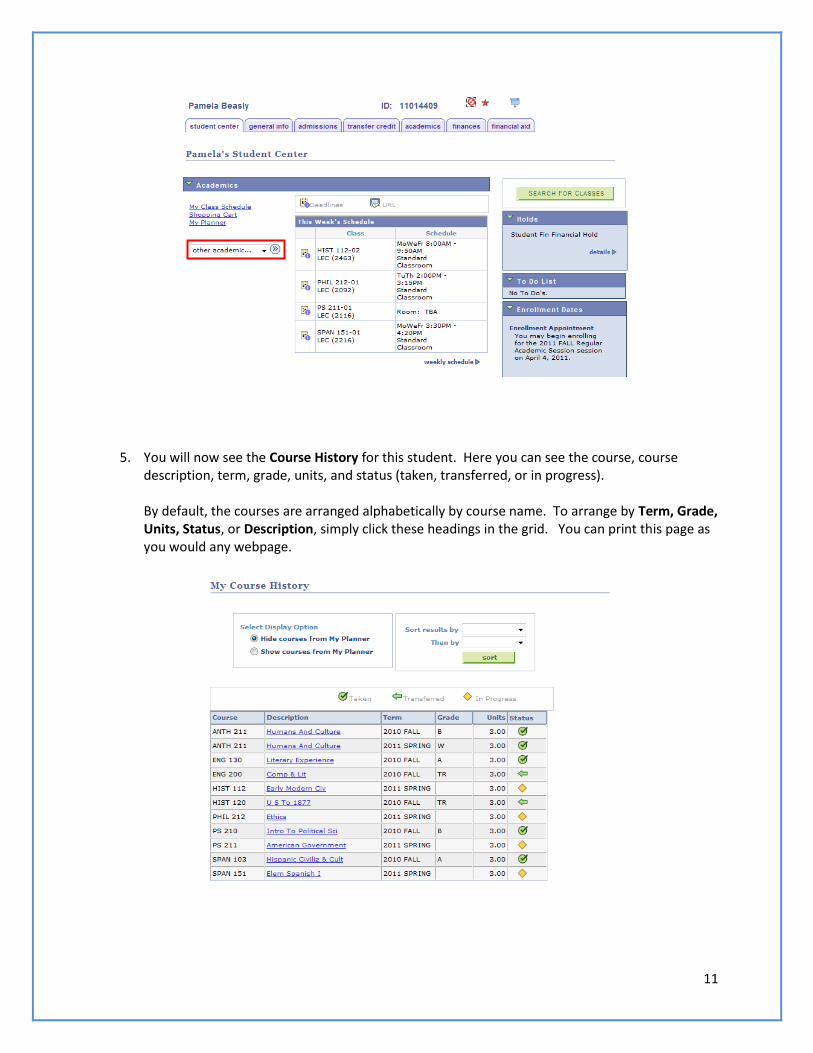
5. You will now see the Course History for this student. Here you can see the course, course
description, term, grade, units, and status (taken, transferred, or in progress). By default, the courses are arranged alphabetically by course name. To arrange by Term, Grade, Units, Status, or Description, simply click these headings in the grid. You can print this page as you would any webpage.
12
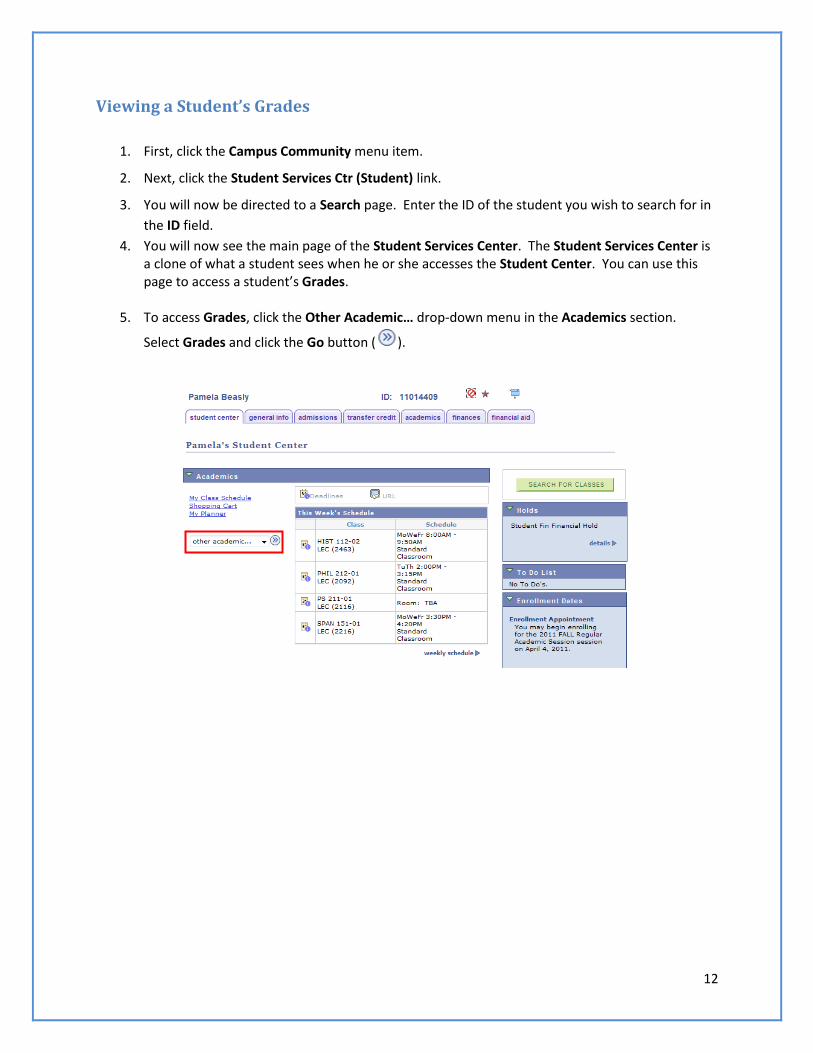
Viewing a Student’s Grades
1. First, click the Campus Community menu item.
2. Next, click the Student Services Ctr (Student) link.
3. You will now be directed to a Search page. Enter the ID of the student you wish to search for in
the ID field.
4. You will now see the main page of the Student Services Center. The Student Services Center is a clone of what a student sees when he or she accesses the Student Center. You can use this page to access a student’s Grades.
5. To access Grades, click the Other Academic… drop-down menu in the Academics section.
Select Grades and click the Go button ( ).
13
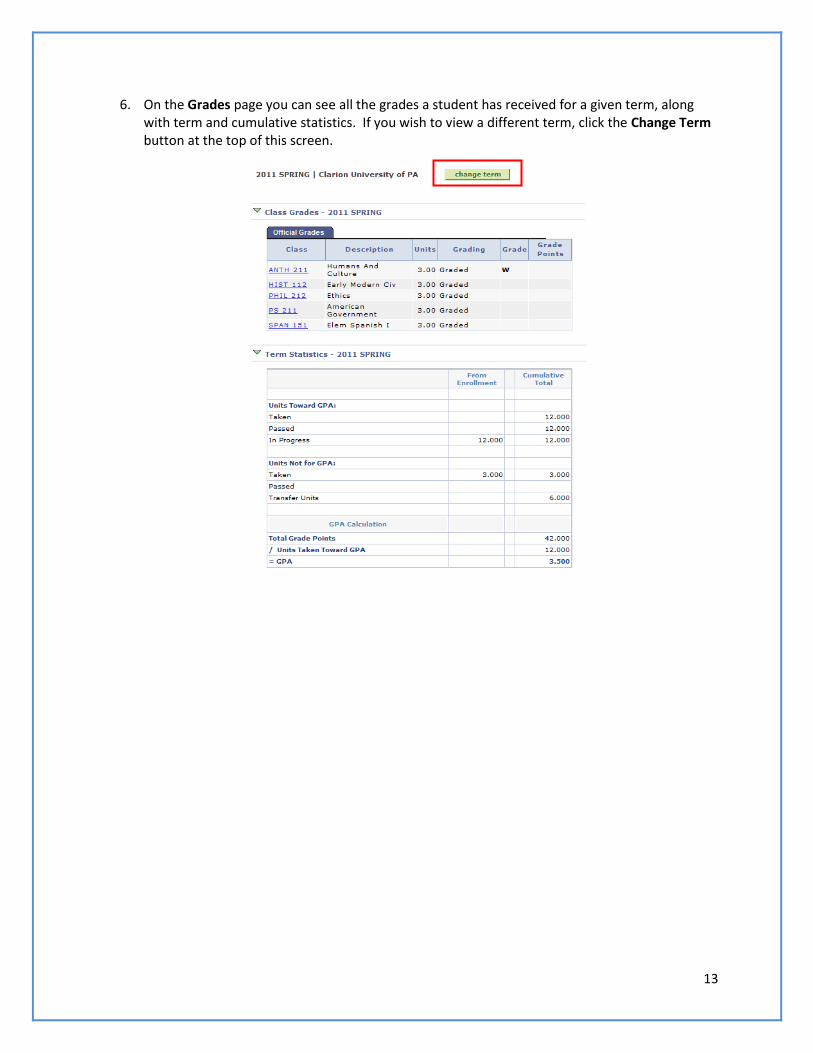
6. On the Grades page you can see all the grades a student has received for a given term, along with term and cumulative statistics. If you wish to view a different term, click the Change Term button at the top of this screen.
14
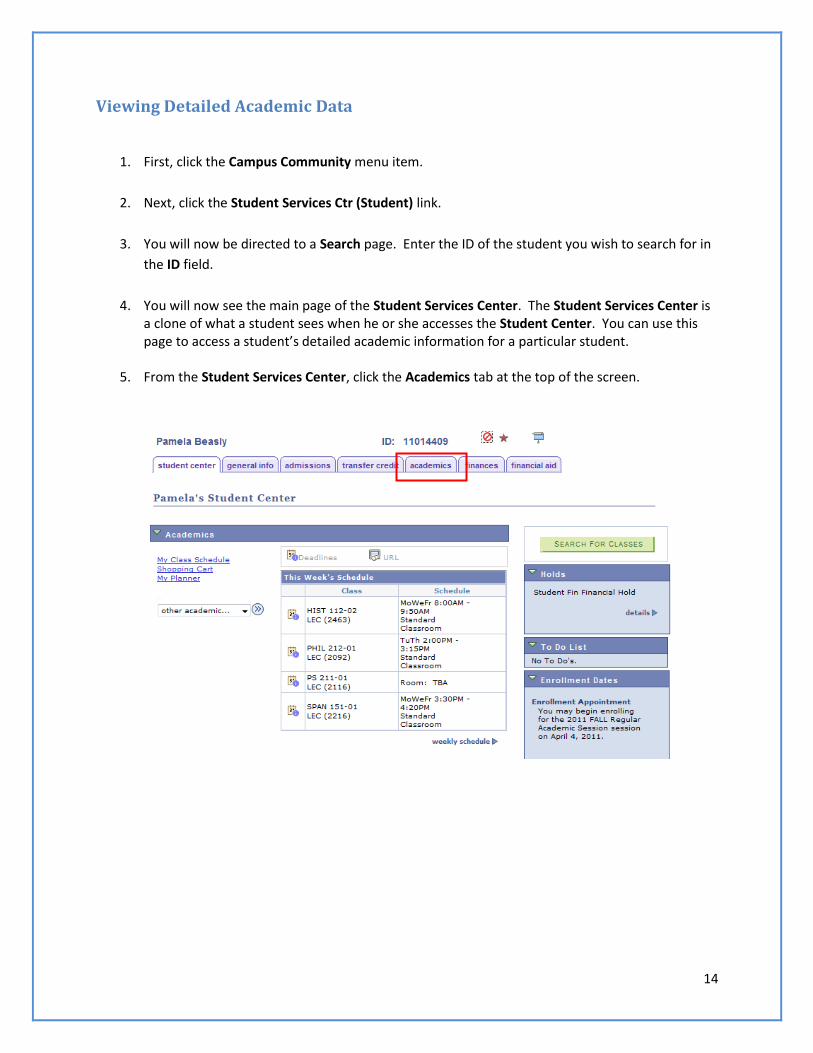
Viewing Detailed Academic Data
1. First, click the Campus Community menu item.
2. Next, click the Student Services Ctr (Student) link.
3. You will now be directed to a Search page. Enter the ID of the student you wish to search for in
the ID field.
4. You will now see the main page of the Student Services Center. The Student Services Center is a clone of what a student sees when he or she accesses the Student Center. You can use this page to access a student’s detailed academic information for a particular student.
5. From the Student Services Center, click the Academics tab at the top of the screen.
15
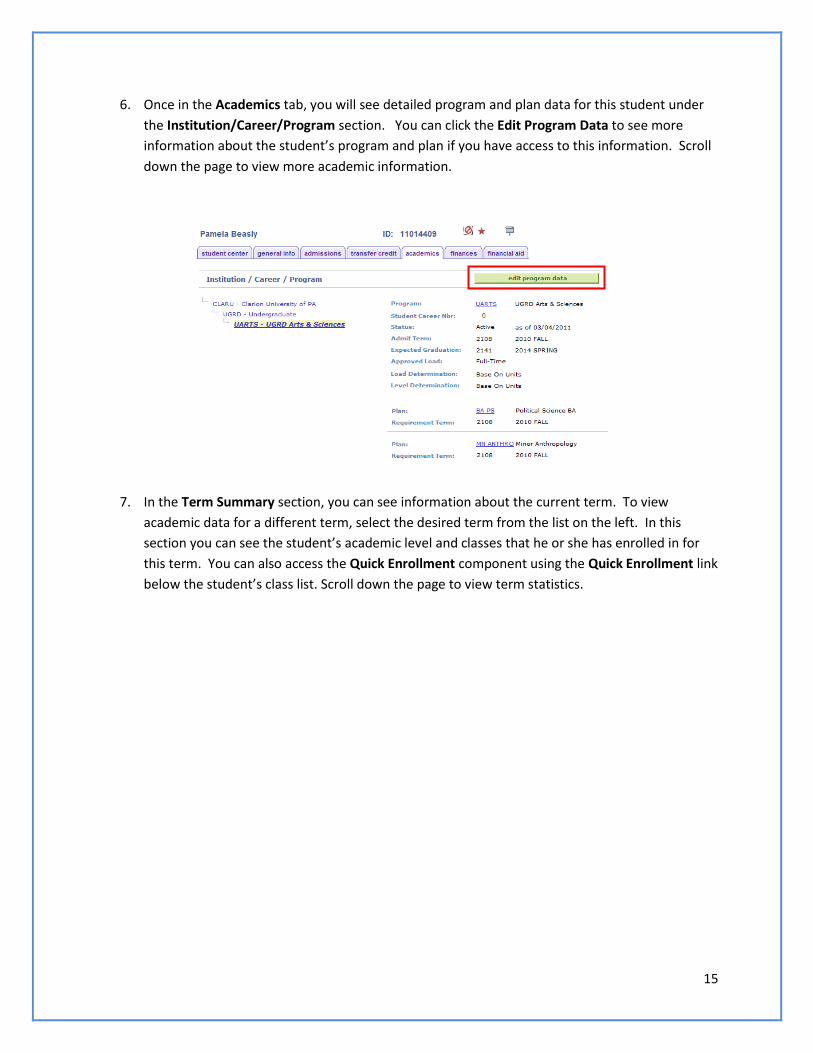
6. Once in the Academics tab, you will see detailed program and plan data for this student under
the Institution/Career/Program section. You can click the Edit Program Data to see more
information about the student’s program and plan if you have access to this information. Scroll
down the page to view more academic information.
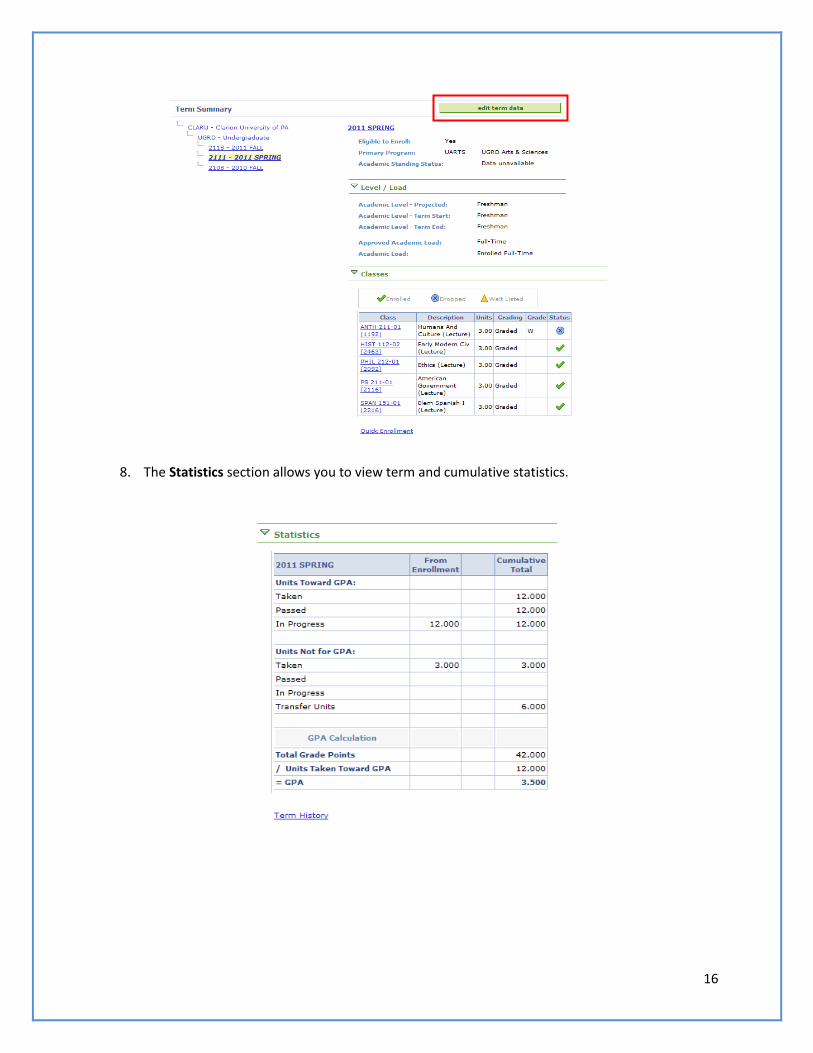
7. In the Term Summary section, you can see information about the current term. To view
academic data for a different term, select the desired term from the list on the left. In this
section you can see the student’s academic level and classes that he or she has enrolled in for
this term. You can also access the Quick Enrollment component using the Quick Enrollment link
below the student’s class list. Scroll down the page to view term statistics.
16
8. The Statistics section allows you to view term and cumulative statistics.
17
Viewing Student Admissions Information
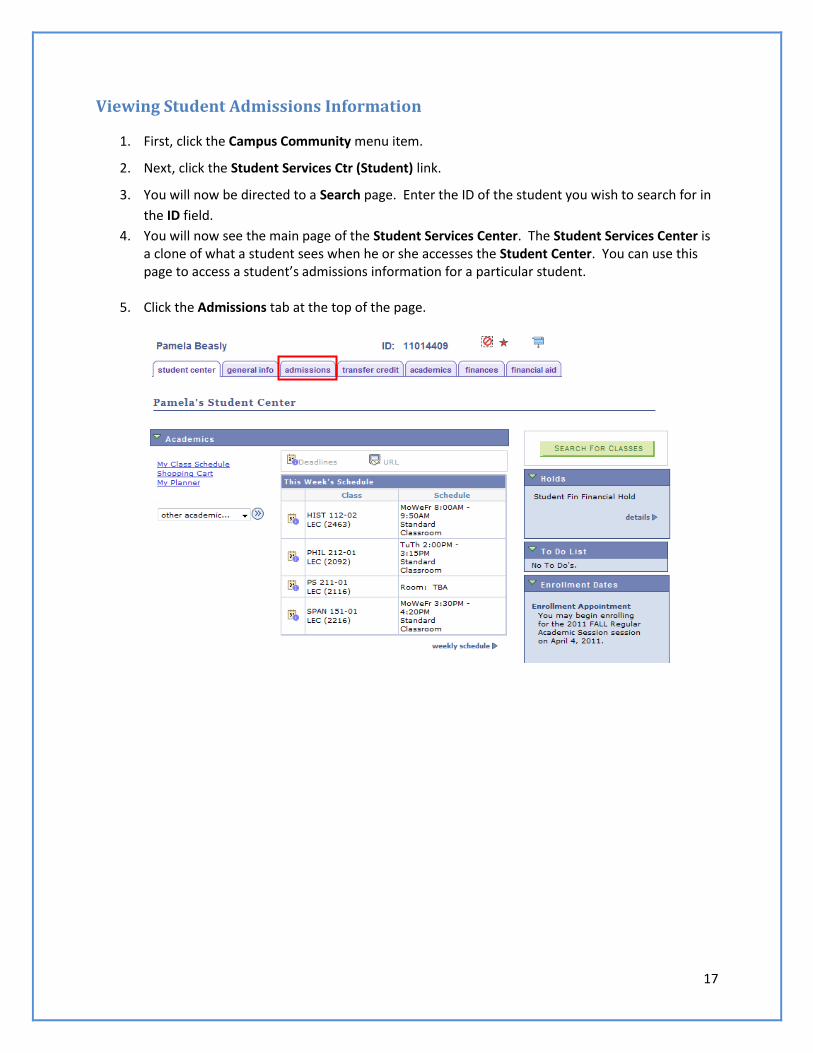
1. First, click the Campus Community menu item.
2. Next, click the Student Services Ctr (Student) link.
3. You will now be directed to a Search page. Enter the ID of the student you wish to search for in
the ID field.
4. You will now see the main page of the Student Services Center. The Student Services Center is a clone of what a student sees when he or she accesses the Student Center. You can use this page to access a student’s admissions information for a particular student.
5. Click the Admissions tab at the top of the page.
18
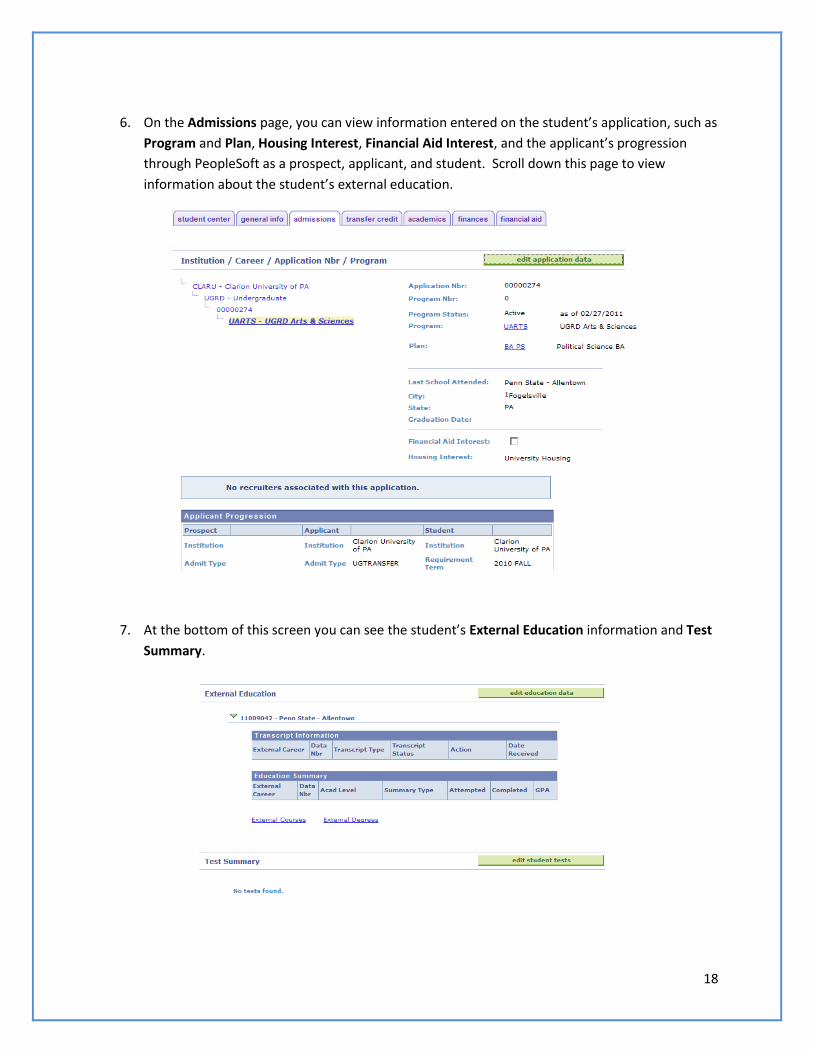
6. On the Admissions page, you can view information entered on the student’s application, such as
Program and Plan, Housing Interest, Financial Aid Interest, and the applicant’s progression
through PeopleSoft as a prospect, applicant, and student. Scroll down this page to view
information about the student’s external education.
7. At the bottom of this screen you can see the student’s External Education information and Test
Summary.
19
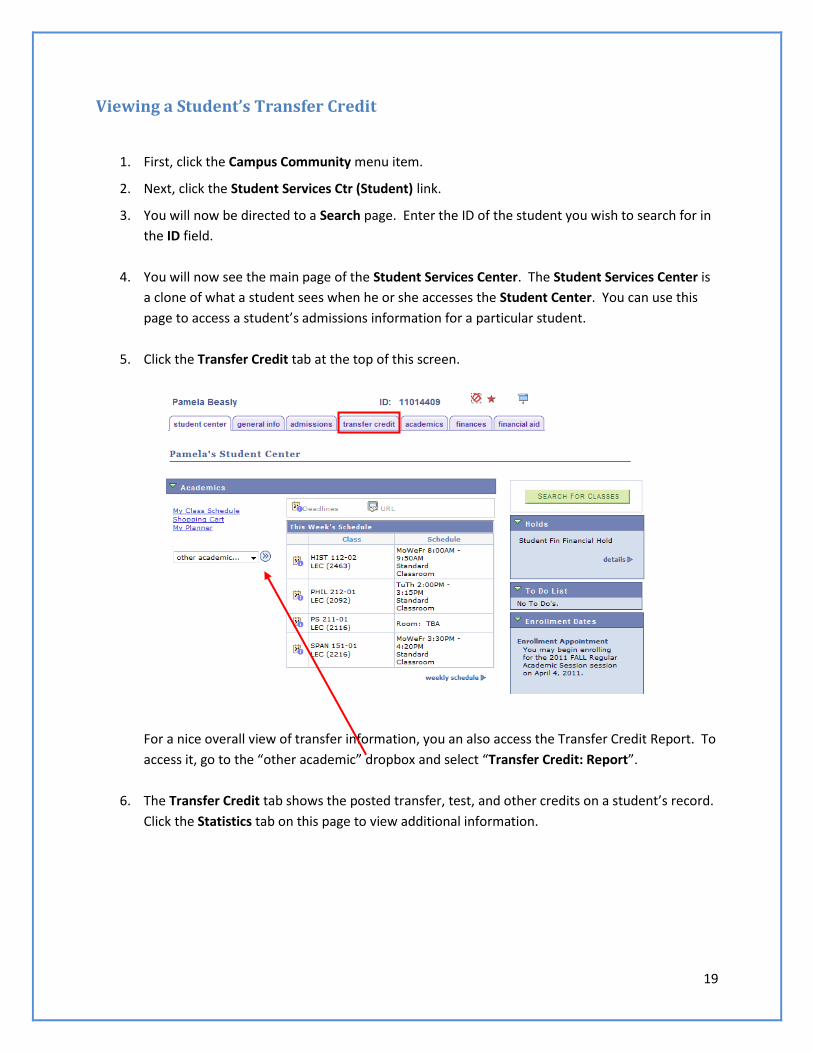
Viewing a Student’s Transfer Credit
1. First, click the Campus Community menu item.
2. Next, click the Student Services Ctr (Student) link.
3. You will now be directed to a Search page. Enter the ID of the student you wish to search for in
the ID field.
4. You will now see the main page of the Student Services Center. The Student Services Center is
a clone of what a student sees when he or she accesses the Student Center. You can use this
page to access a student’s admissions information for a particular student.
5. Click the Transfer Credit tab at the top of this screen.
For a nice overall view of transfer information, you an also access the Transfer Credit Report. To
access it, go to the “other academic” dropbox and select “Transfer Credit: Report”.
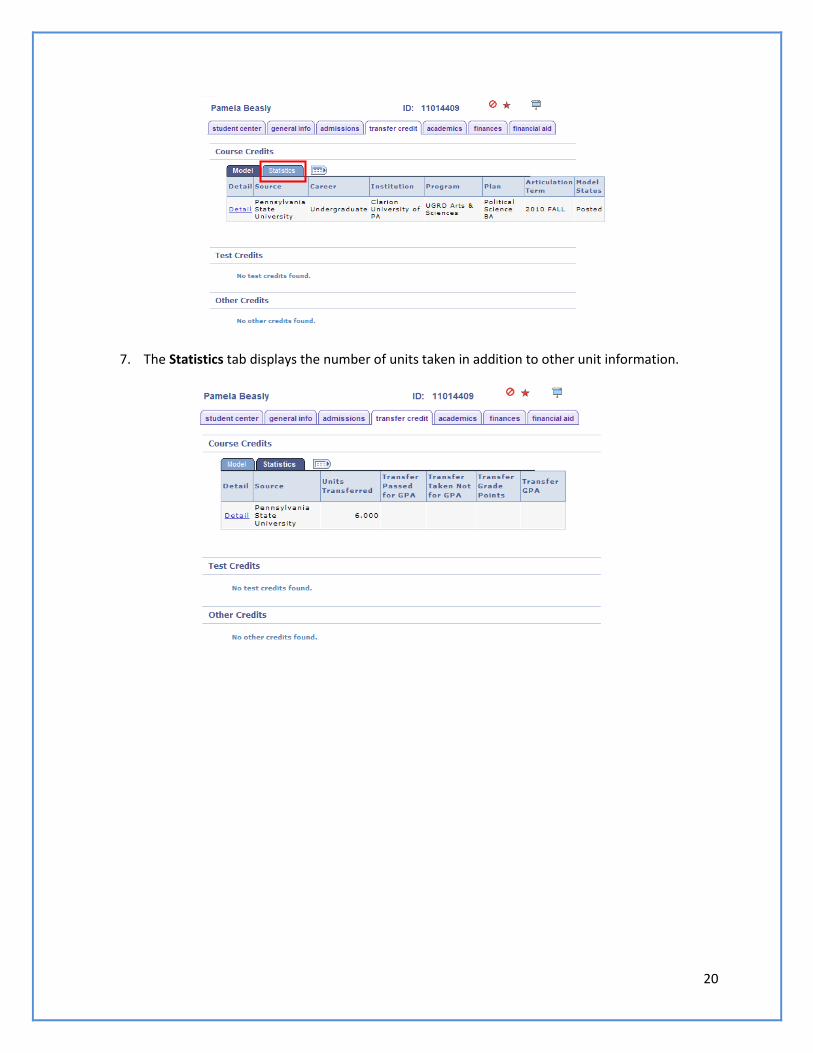
6. The Transfer Credit tab shows the posted transfer, test, and other credits on a student’s record.
Click the Statistics tab on this page to view additional information.
20
7. The Statistics tab displays the number of units taken in addition to other unit information.

21
Viewing Student Service Indicators and Holds
1. First, click the Campus Community menu item.
2. Next, click the Student Services Ctr (Student) link.
3. You will now be directed to a Search page. Enter the ID of the student you wish to search for in
the ID field.
4. Service Indicators are indicators in PeopleSoft that allow you to impose holds or identify some
special characteristic of a student.
A Negative Service Indicator, denoted by a small red “No” sign at the top of every page on the
student’s record ( ), indicates that some sort of impact has been imposed on the student.
For example, a student may not be able to enroll because they have an outstanding charge on
their account.
A Positive Service Indicator is denoted by a small red star ( ) and indicates a special
characteristic about a student, for example, if the student has allowed certain non-directory
information to be viewed by certain family members. This service indicator has no effect on the
student and is only meant for informational purposes.
22
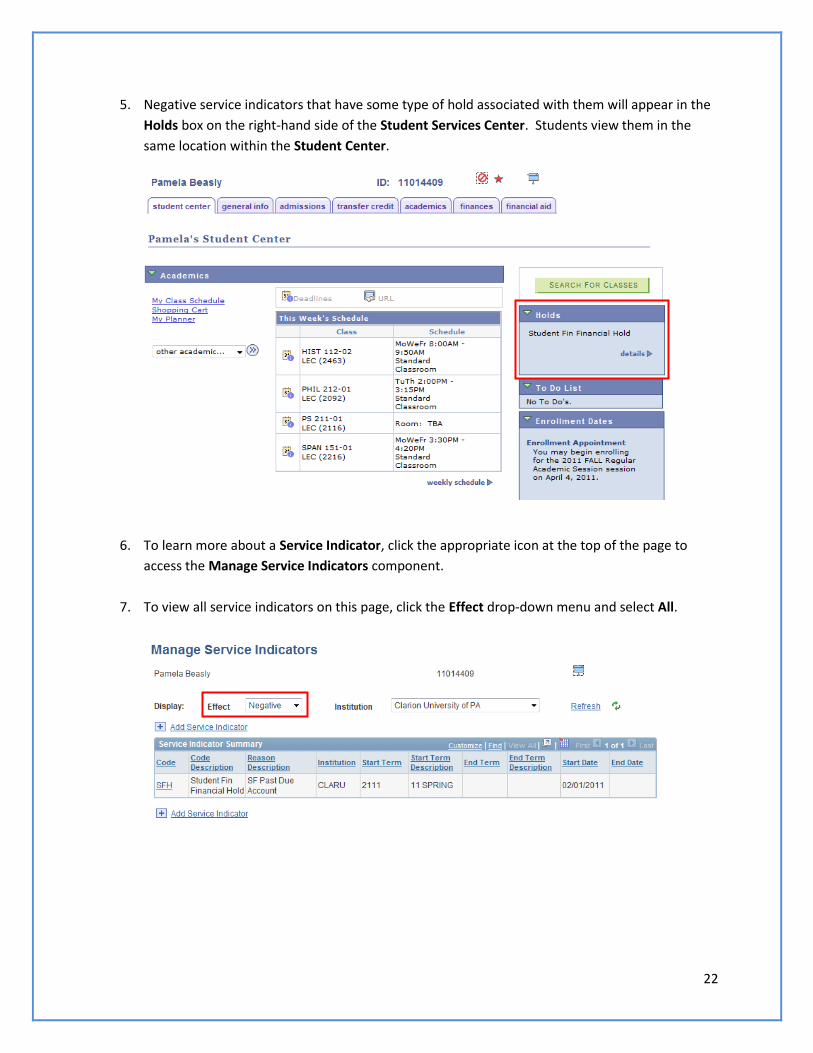
5. Negative service indicators that have some type of hold associated with them will appear in the
Holds box on the right-hand side of the Student Services Center. Students view them in the
same location within the Student Center.
6. To learn more about a Service Indicator, click the appropriate icon at the top of the page to
access the Manage Service Indicators component.
7. To view all service indicators on this page, click the Effect drop-down menu and select All.

23
8. Click the Code link to learn who placed the service indicator. On the detailed page, you can
scroll to the bottom to see what impacts this service indicator imposes upon the student (for
example, CENR means that the student may not enroll).
Viewing a Student’s Advisor
1. First, click the Campus Community menu item.
2. Next, click the Student Services Center link.
3. You will now be directed to a Search page. Enter the ID of the student you wish to search for in
the ID field.
4. On the main Student Services Center page, scroll down to find the Advisor box on the right-
hand side of the page. This box will display the student’s advisor. For more information about
this advisor, click the Details link.
24
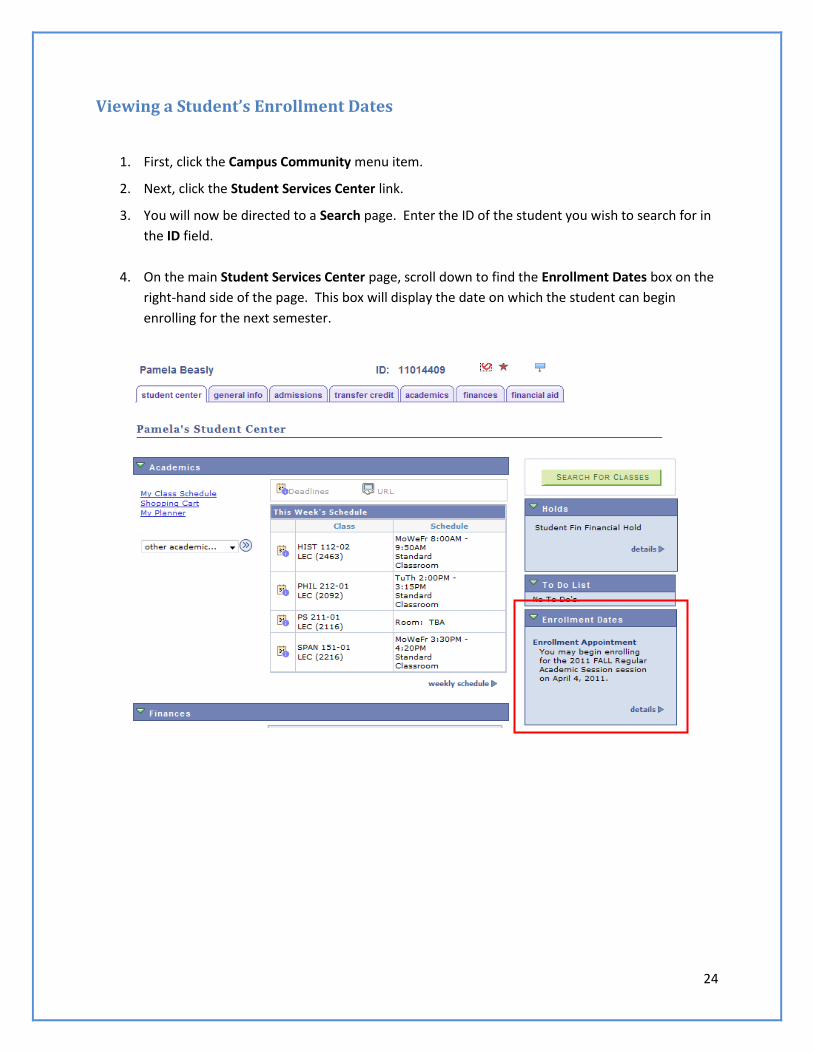
Viewing a Student’s Enrollment Dates
1. First, click the Campus Community menu item.
2. Next, click the Student Services Center link.
3. You will now be directed to a Search page. Enter the ID of the student you wish to search for in
the ID field.
4. On the main Student Services Center page, scroll down to find the Enrollment Dates box on the
right-hand side of the page. This box will display the date on which the student can begin
enrolling for the next semester.