Embed Size (px)
Citation preview

502020.75.28_021H2D0101_1010_IM_bernette 20 25_EN
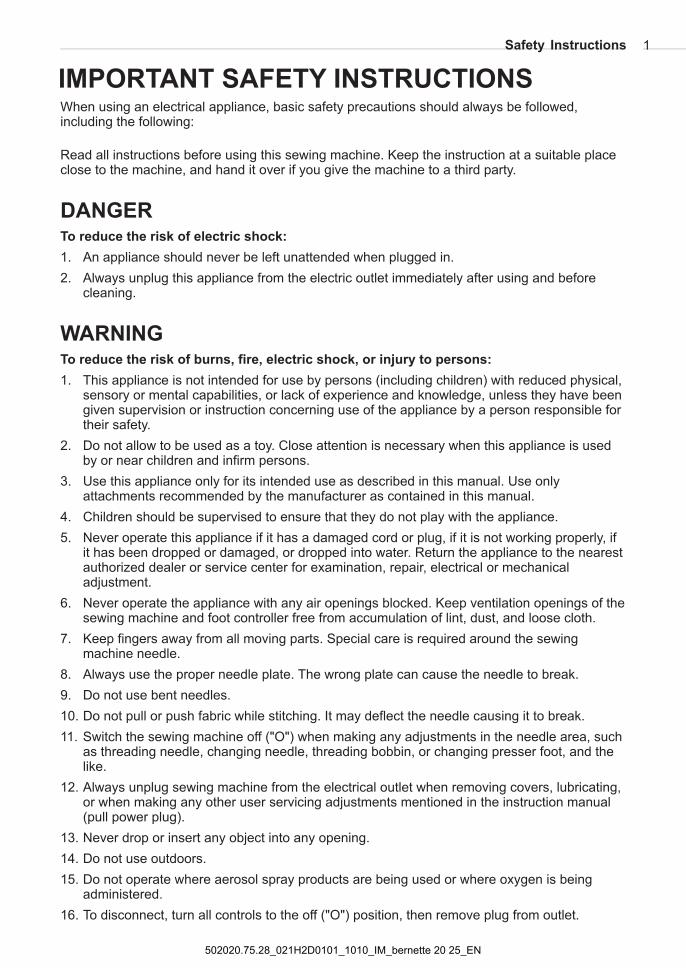
When using an electrical appliance, basic safety precautions should always be followed,including the following:
Read all instructions before using this sewing machine. Keep the instruction at a suitable placeclose to the machine, and hand it over if you give the machine to a third party.
1. An appliance should never be left unattended when plugged in.
2. Always unplug this appliance from the electric outlet immediately after using and beforecleaning.
1. This appliance is not intended for use by persons (including children) with reduced physical,sensory or mental capabilities, or lack of experience and knowledge, unless they have beengiven supervision or instruction concerning use of the appliance by a person responsible fortheir safety.
2. Do not allow to be used as a toy. Close attention is necessary when this appliance is usedby or near children and infirm persons.
3. Use this appliance only for its intended use as described in this manual. Use onlyattachments recommended by the manufacturer as contained in this manual.
4. Children should be supervised to ensure that they do not play with the appliance.
5. Never operate this appliance if it has a damaged cord or plug, if it is not working properly, ifit has been dropped or damaged, or dropped into water. Return the appliance to the nearestauthorized dealer or service center for examination, repair, electrical or mechanicaladjustment.
6. Never operate the appliance with any air openings blocked. Keep ventilation openings of thesewing machine and foot controller free from accumulation of lint, dust, and loose cloth.
7. Keep fingers away from all moving parts. Special care is required around the sewingmachine needle.
8. Always use the proper needle plate. The wrong plate can cause the needle to break.
9. Do not use bent needles.
10. Do not pull or push fabric while stitching. It may deflect the needle causing it to break.
11. Switch the sewing machine off ("O") when making any adjustments in the needle area, suchas threading needle, changing needle, threading bobbin, or changing presser foot, and thelike.
12. Always unplug sewing machine from the electrical outlet when removing covers, lubricating,or when making any other user servicing adjustments mentioned in the instruction manual(pull power plug).
13. Never drop or insert any object into any opening.
14. Do not use outdoors.
15. Do not operate where aerosol spray products are being used or where oxygen is beingadministered.
16. To disconnect, turn all controls to the off ("O") position, then remove plug from outlet.
DANGER
WARNING
To reduce the risk of electric shock:
To reduce the risk of burns, fire, electric shock, or injury to persons:
Safety Instructions
IMPORTANT SAFETY INSTRUCTIONS
1
502020.75.28_021H2D0101_1010_IM_bernette 20 25_EN

Safety Instructions
SERVICING OF DOUBLE-INSULATED PRODUCTS
SAVE THESE INSTRUCTIONS
In a double-insulated product, two systems of insulation are provided instead of grounding. Nogrounding means is provided on a double-insulated product nor should a means for groundingbe added to the product. Servicing a double-insulated product requires extreme care andknowledge of the system and should only be done by qualified service personnel. Replacementparts for a double-insulated product must be identical to those parts in the product. A doubleinsulated product is marked with the words "DOUBLE INSULATION" or "DOUBLE INSULATED".
The symbol may also be marked on the product.
This sewing machine is intended for household use only.
BERNINA is committed to the protection of the environment. We strive to minimize theenvironmental impact of our products by continuously improving product design andour technology of manufacturing.
Do not dispose of electrical appliances as unsorted municipal waste, use separatecollection facilities.
Contact your local government for information regarding the collection systemsavailable.
If electrical appliances are disposed of in landfills or dumps, hazardous substancescan leak into the groundwater and get into the food chain, damaging your health andwell-being.
When replacing old appliances with new ones, the retailer is legally obligated to takeback your old appliance for disposal at least for free of charge.
Do not view directly with optical instrumentsClass 1M LED product
ENVIRONMENTAL PROTECTION
LED RADIATION
17. Do not unplug by pulling on cord. To unplug, grasp the plug, not the cord.
18. If the supply cord fixed with foot controller is damaged, it must be replaced by themanufacturer or its service agent or a similar qualified person in order to avoid a hazard.
19. Never place anything on the foot control.
20. This sewing machine is provided with double insulation (except U.S.A / Canada). Use onlyidentical replacement parts. See instructions for Servicing of double-insulated products.
2
502020.75.28_021H2D0101_1010_IM_bernette 20 25_EN

Attention:
All rights reserved
This sewing machine is intended for household use only. If used intensively or commercially,regular cleaning and especially attentive care is required.Signs of wear and tear owing to intensive or commercial use are not covered automatically,even if they occur within the warranty period. The decision on how to deal with any such casesrests with the local authorised servicing staff.
For technical and product improvement reasons, the sewing computer's features, parts andaccessory are subject to unannounced changes and alterations at any time. The accessoryincluded can differ from country to country.
3Safety Instructions
502020.75.28_021H2D0101_1010_IM_bernette 20 25_EN
Safety Instructions 1
Contents 4
Machine Overview 5
Machine Setup 8
Important Sewing Information 20
Display Explanation 23
Operating Instructions 26
Stitches Overview 31
Detail of the Machine 5
Accessories - model 20 6
Accessories - model 25 7
Connecting the Machine 8
Foot Control 8
Sewing Table 9
Winding the Bobbin 10
Inserting the Bobbin 12
Threading the Upper Thread 13
Needle Threader 15
Replacing the Needle 16
Thread Cutter 16
Thread Tension 17
Adjusting Presser Foot Pressure 17
Changing the Presser Foot 18
Two-Step Presser Foot 19
To Raise or Drop the Feed Dog 19
Presser Foot Application Chart-model 20 21
Presser Foot Application Chart-model 25 22
Information on the LED Display 23
Buttons Explanation 26
Function Buttons 27
Needle, Fabric, Thread Selection Guide 20
4 Contents
Basic Sewing Procedures 34
Special Functions 61
Maintenance 76
Trouble Shooting 77
Useful Skills 34
Straight Stitches and Needle Position 36
Zigzag Stitches 36
Stretch Stitch 37
Overcasting Stitches 38
Blind Hem 39
Button Sewing 40
Buttonhole Stitching 41
Eyelet Stitch 44
Darning Stitch 45
Zipper Insertion 47
Invisible zipper insertion 49
Narrow Hemming 50
Cording 51
Satin Stitch Sewing 52
Quilting 53
Fagoting 55
Scallop Stitch 55
Gathering 56
Smocking 57
Free Motion Darning,Embroidery and Monogramming 58
Walking Foot 60
Mirror Stitch Pattern - model 25 61
Twin Needle Sewing - model 25 62
Memory - model 25 64
Warning Functions 75
Cleaning 76
Replacing the LED Lamp 76
Trouble Shooting Guide 77
502020.75.28_021H2D0101_1010_IM_bernette 20 25_EN
1
2
3
4
5
6
789
10
11
12
13
14
15
16
17
18
19
20
21
22
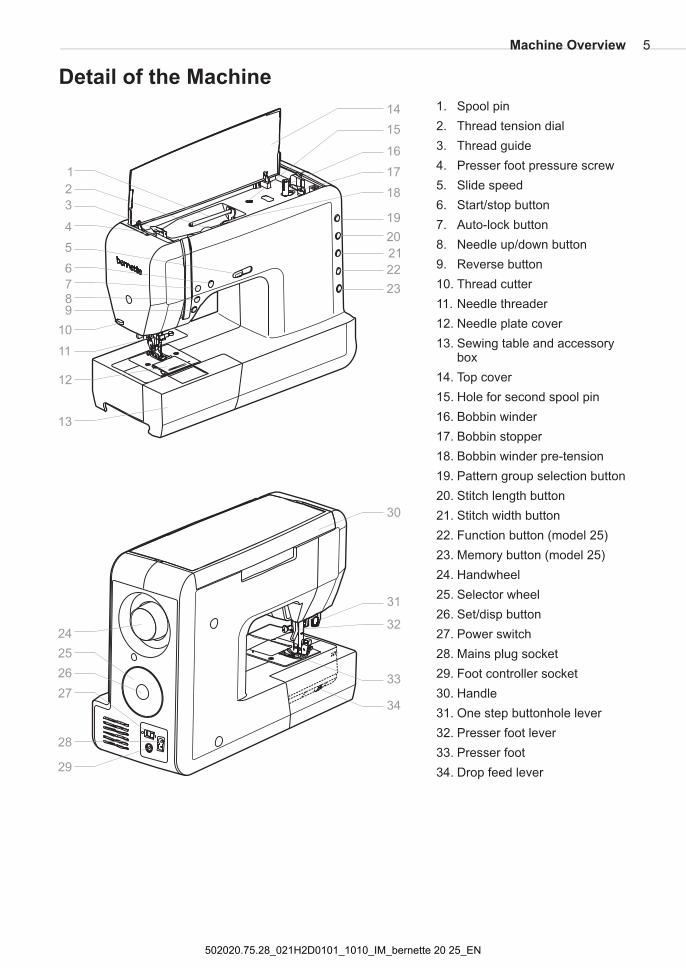
Detail of the Machine
1. Spool pin
2. Thread tension dial
3. Thread guide
4. Presser foot pressure screw
5. Slide speed
6. Start/stop button
7. Auto-lock button
8. Needle up/down button
9. Reverse button
10. Thread cutter
11. Needle threader
12. Needle plate cover
13. Sewing table and accessorybox
14. Top cover
15. Hole for second spool pin
16. Bobbin winder
17. Bobbin stopper
18. Bobbin winder pre-tension
19. Pattern group selection button
20. Stitch length button
21. Stitch width button
22. Function button (model 25)
23. Memory button (model 25)
24. Handwheel
25. Selector wheel
26. Set/disp button
27. Power switch
28. Mains plug socket
29. Foot controller socket
30. Handle
31. One step buttonhole lever
32. Presser foot lever
33. Presser foot
34. Drop feed lever
24
25
26
27
28
30
31
32
33
23
29
34
Machine Overview 5
502020.75.28_021H2D0101_1010_IM_bernette 20 25_EN
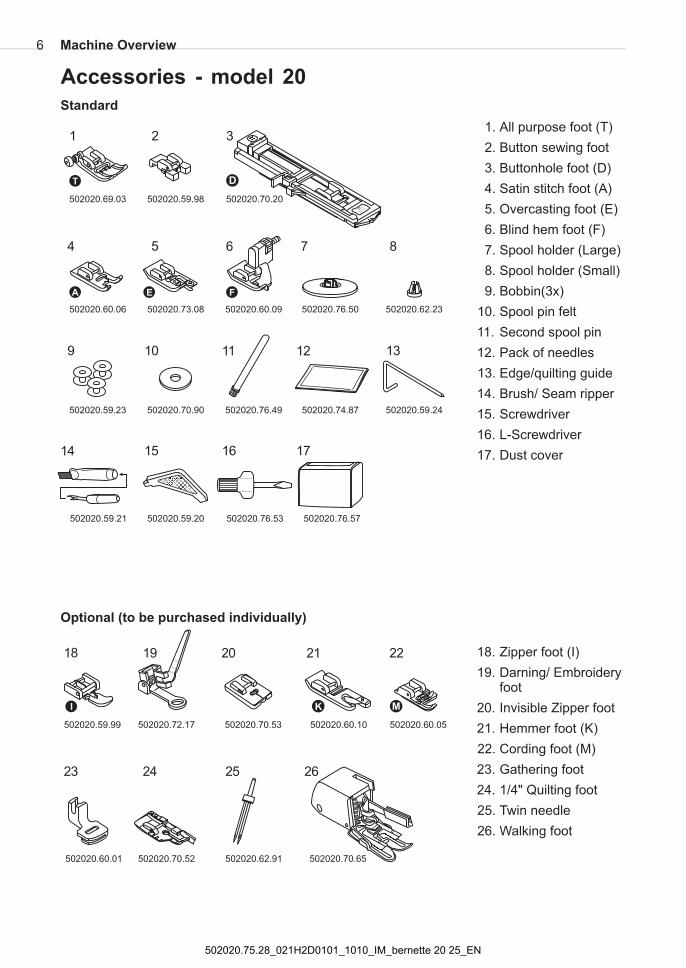
Accessories - model 20
1. All purpose foot (T)
2. Button sewing foot
3. Buttonhole foot (D)
4. Satin stitch foot (A)
5. Overcasting foot (E)
6. Blind hem foot (F)
7. Spool holder (Large)
8. Spool holder (Small)
9. Bobbin(3x)
10. Spool pin felt
11. Second spool pin
12. Pack of needles
13.
14. Brush/ Seam ripper
15. Screwdriver
16. L-Screwdriver
17. Dust cover
18. Zipper foot (I)
19. Darning/ Embroideryfoot
20. Invisible Zipper foot
21. Hemmer foot (K)
22. Cording foot (M)
23. Gathering foot
24. 1/4" Quilting foot
25. Twin needle
26. Walking foot
Edge/quilting guide
1 2 3
5
T
EA
Standard
502020.69.03
502020.73.08
6
502020.59.98
502020.60.06
4
F
502020.60.09 502020.76.50
8
109
502020.62.23
11
502020.59.23
12
502020.76.49
Optional (to be purchased individually)
502020.74.87
D
502020.70.20
7
502020.59.21
502020.59.24
13
14 15 16
502020.59.20
502020.70.90
502020.76.53 502020.76.57
17
Machine Overview6
K
502020.60.10502020.70.53502020.72.17
18 19
24
M
502020.60.05
20 21
502020.60.01 502020.70.52
23 26
502020.62.91 502020.70.65
25
I
502020.59.99
22
502020.75.28_021H2D0101_1010_IM_bernette 20 25_EN
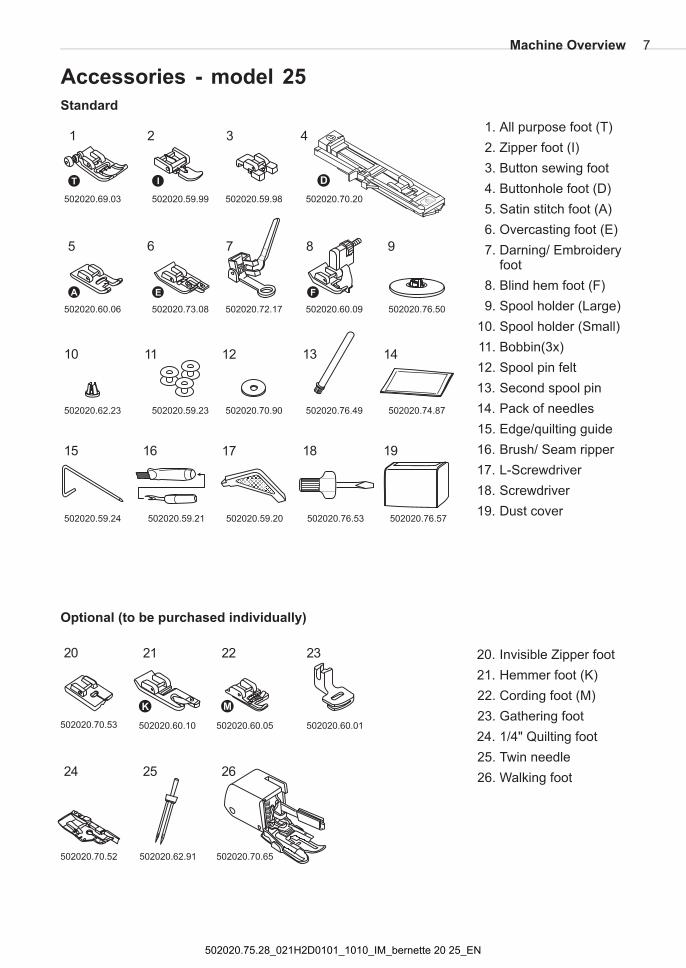
1. All purpose foot (T)
2. Zipper foot (I)
3. Button sewing foot
4. Buttonhole foot (D)
5. Satin stitch foot (A)
6. Overcasting foot (E)
7. Darning/ Embroideryfoot
8. Blind hem foot (F)
9. Spool holder (Large)
10. Spool holder (Small)
11. Bobbin(3x)
12. Spool pin felt
13. Second spool pin
14. Pack of needles
15. Edge/quilting guide
16. Brush/ Seam ripper
17. L-Screwdriver
18. Screwdriver
19. Dust cover
20. Invisible Zipper foot
21. Hemmer foot (K)
22. Cording foot (M)
23. Gathering foot
24. 1/4" Quilting foot
25. Twin needle
26. Walking foot
Accessories - model 25
1 2 3 4
6
T I
EA
Standard
75
F
98
1110 12 13 14
15 16
Optional (to be purchased individually)
K M
20 21
25
17 18
22 23
D
24
502020.62.91 502020.70.65
502020.60.10 502020.60.05 502020.60.01
502020.59.21502020.59.24 502020.76.53502020.59.20
502020.59.23 502020.70.90 502020.76.49 502020.74.87502020.62.23
502020.69.03 502020.59.98 502020.70.20502020.59.99
502020.73.08502020.60.06 502020.60.09 502020.76.50502020.72.17
502020.76.57
19
26
502020.70.52
502020.70.53
7Machine Overview
502020.75.28_021H2D0101_1010_IM_bernette 20 25_EN
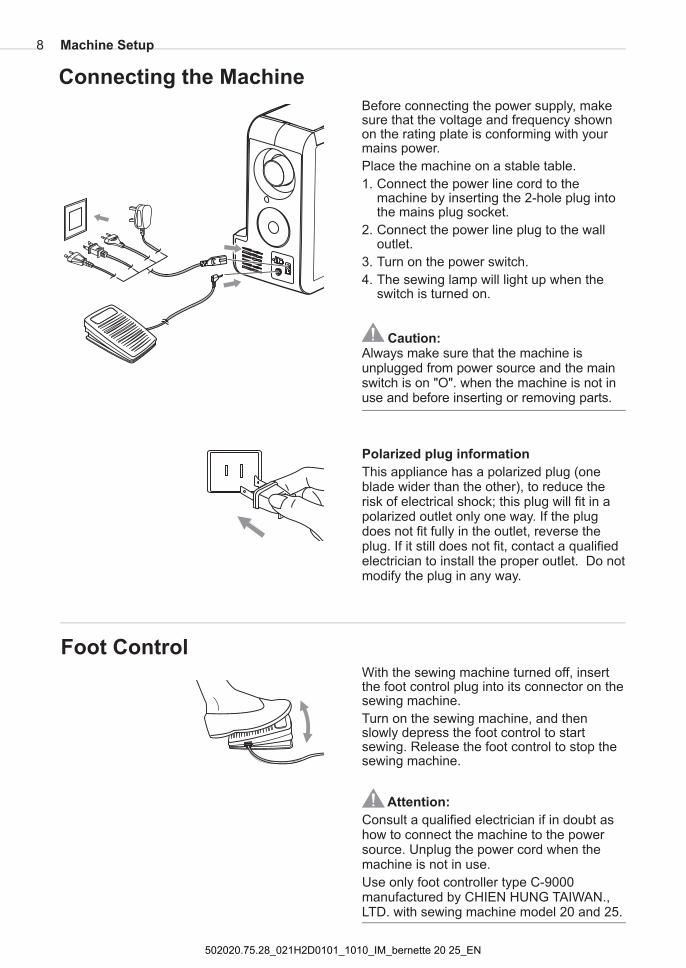
Before connecting the power supply, makesure that the voltage and frequency shown
Place the machine on a stable table.
1. Connect the power line cord to themachine by inserting the 2-hole plug intothe
2. Connect the power line plug to the walloutlet.
3. Turn on the power switch.
4. The sewing lamp will light up when theswitch is turned on.
on the rating plate is conforming with yourmains power.
mains plug socket.
With the sewing machine turned off, insertthe foot control plug into its connector on thesewing machine.
Turn on the sewing machine, and thenslowly depress the foot control to startsewing. Release the foot control to stop thesewing machine.
Caution:Always make sure that the machine isunplugged from power source and the mainswitch is on "O". when the machine is not inuse and before inserting or removing parts.
Attention:
Consult a qualified electrician if in doubt ashow to connect the machine to the powersource. Unplug the power cord when themachine is not in use.
Use only foot controller type C-9000manufactured by CHIEN HUNG TAIWAN.,LTD. with sewing machine model 20 and 25.
Polarized plug information
This appliance has a polarized plug (oneblade wider than the other), to reduce therisk of electrical shock; this plug will fit in apolarized outlet only one way. If the plugdoes not fit fully in the outlet, reverse theplug. If it still does not fit, contact a qualifiedelectrician to install the proper outlet. Do notmodify the plug in any way.
Connecting the Machine
Foot Control
Machine Setup8
502020.75.28_021H2D0101_1010_IM_bernette 20 25_EN
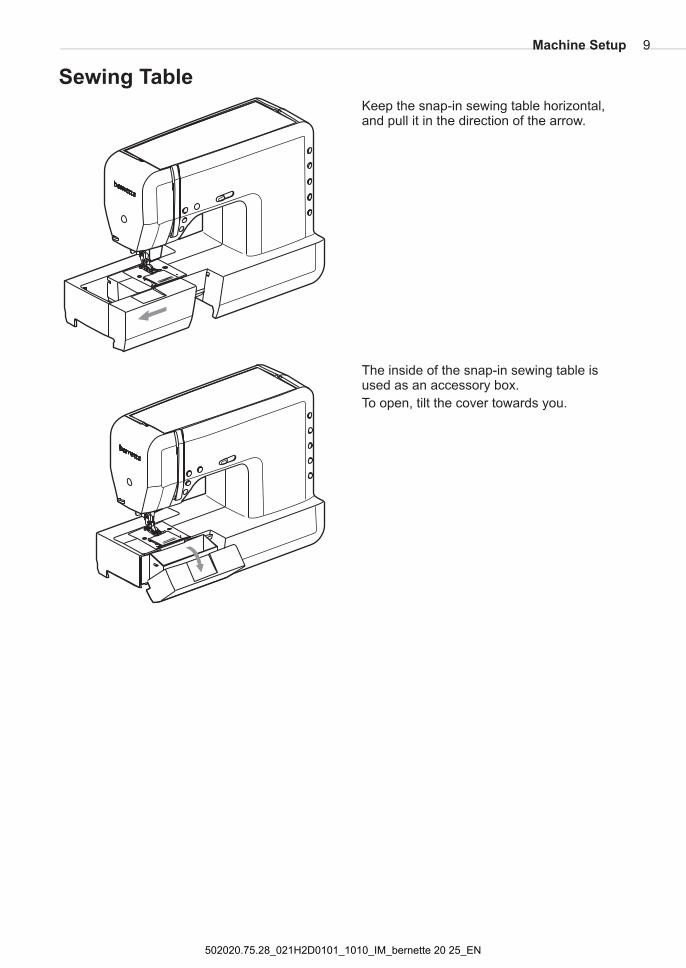
Keep the snap-in sewing table horizontal,and pull it in the direction of the arrow.
The inside of the snap-in sewing table isused as an accessory box.
To open, tilt the cover towards you.
Sewing Table
Machine Setup 9
502020.75.28_021H2D0101_1010_IM_bernette 20 25_EN
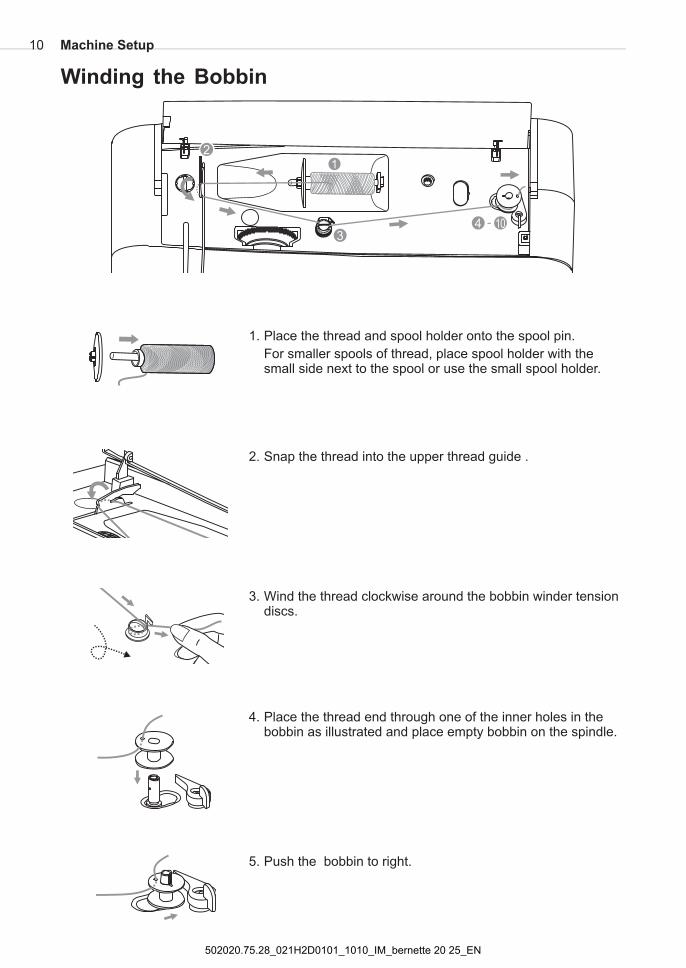
1. Place the thread and spool holder onto the spool pin.
For smaller spools of thread, place spool holder with thesmall side next to the spool or use the small spool holder.
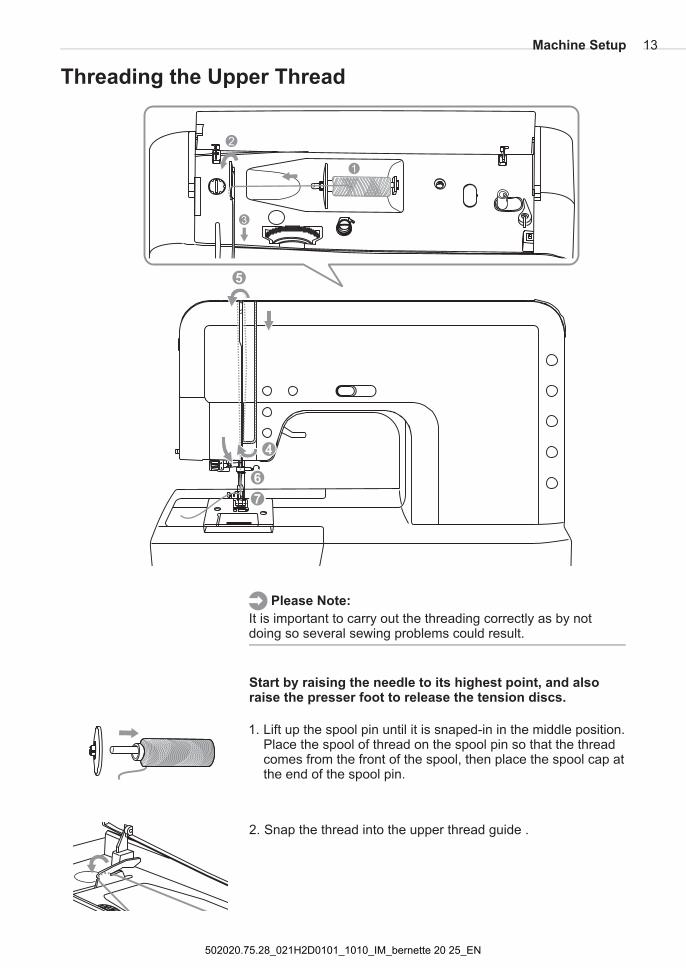
2. Snap the thread into the upper thread guide .
3. Wind the thread clockwise around the bobbin winder tensiondiscs.
4. Place the thread end through one of the inner holes in thebobbin as illustrated and place empty bobbin on the spindle.
5. Push the bobbin to right.
1
2
34 �
Winding the Bobbin
Machine Setup10
502020.75.28_021H2D0101_1010_IM_bernette 20 25_EN
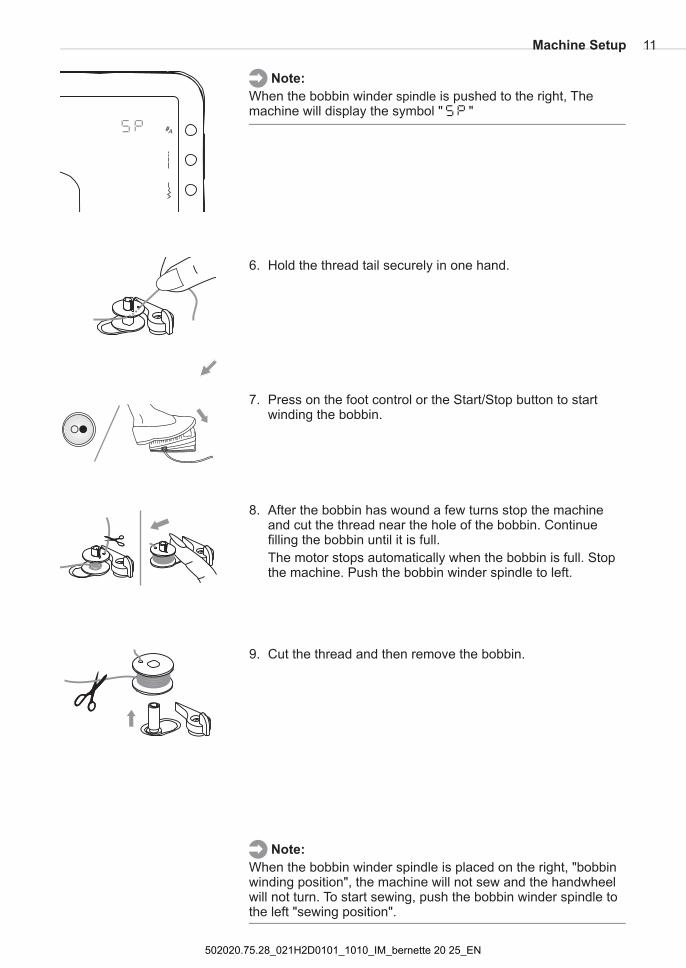
8. After the bobbin has wound a few turns stop the machineand cut the thread near the hole of the bobbin. Continuefilling the bobbin until it is full.
The motor stops automatically when the bobbin is full. Stopthe machine. Push the bobbin winder spindle to left.
9. Cut the thread and then remove the bobbin.
Note:
When the bobbin winder is placed on the right, "bobbinwinding position", the machine will not sew and the handwheelwill not turn. To start sewing, push the bobbin winder spindle tothe left "sewing position".
spindle
Note:
When the bobbin winder is pushed to the right, Themachine will display the symbol " "
spindle
6. Hold the thread tail securely in one hand.
7. Press on the foot control or the Start/Stop button to startwinding the bobbin.
Machine Setup 11
502020.75.28_021H2D0101_1010_IM_bernette 20 25_EN
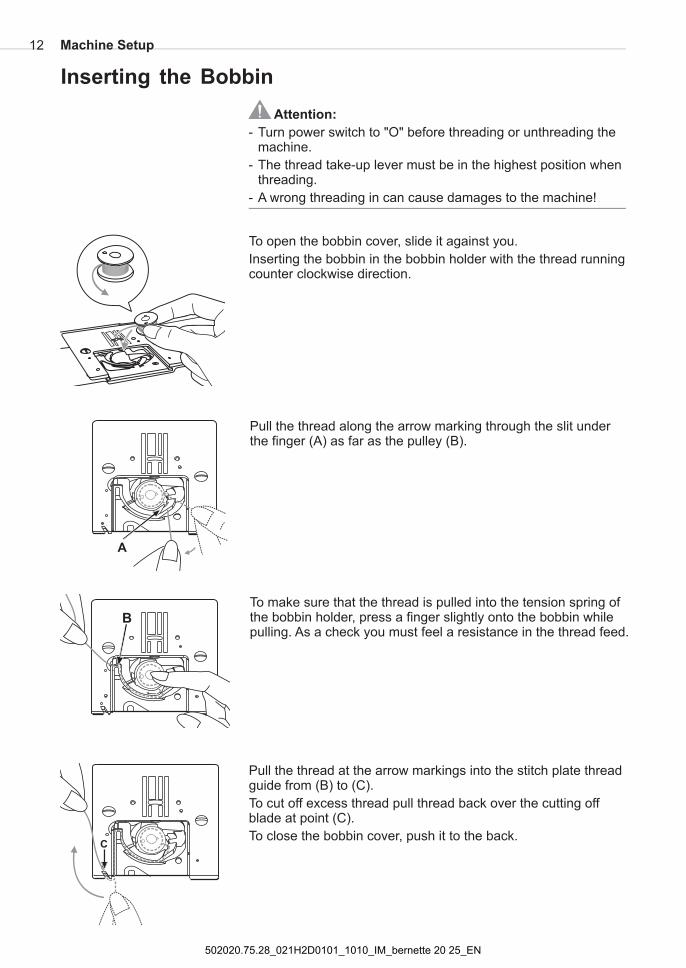
To open the bobbin cover, slide it against you.
Inserting the bobbin in the bobbin holder with the thread runningcounter clockwise direction.
Pull the thread along the arrow marking through the slit underthe finger (A) as far as the pulley (B).
To make sure that the thread is pulled into the tension spring ofthe bobbin holder, press a finger slightly onto the bobbin whilepulling. As a check you must feel a resistance in the thread feed.
Pull the thread at the arrow markings into the stitch plate threadguide from (B) to (C).
To cut off excess thread pull thread back over the cutting offblade at point (C).
To close the bobbin cover, push it to the back.
Attention:
- Turn power switch to "O" before threading or unthreading themachine.
- The thread take-up lever must be in the highest position whenthreading.
- A wrong threading in can cause damages to the machine!
Inserting the Bobbin
Machine Setup12
502020.75.28_021H2D0101_1010_IM_bernette 20 25_EN
2. Snap the thread into the upper thread guide .
5
7
6
4
Please Note:
It is important to carry out the threading correctly as by notdoing so several sewing problems could result.
Start by raising the needle to its highest point, and alsoraise the presser foot to release the tension discs.
1. Lift up the spool pin until it is snaped-in in the middle position.Place the spool of thread on the spool pin so that the threadcomes from the front of the spool, then place the spool cap atthe end of the spool pin.
3
1
2
3
Threading the Upper Thread
Machine Setup 13
502020.75.28_021H2D0101_1010_IM_bernette 20 25_EN
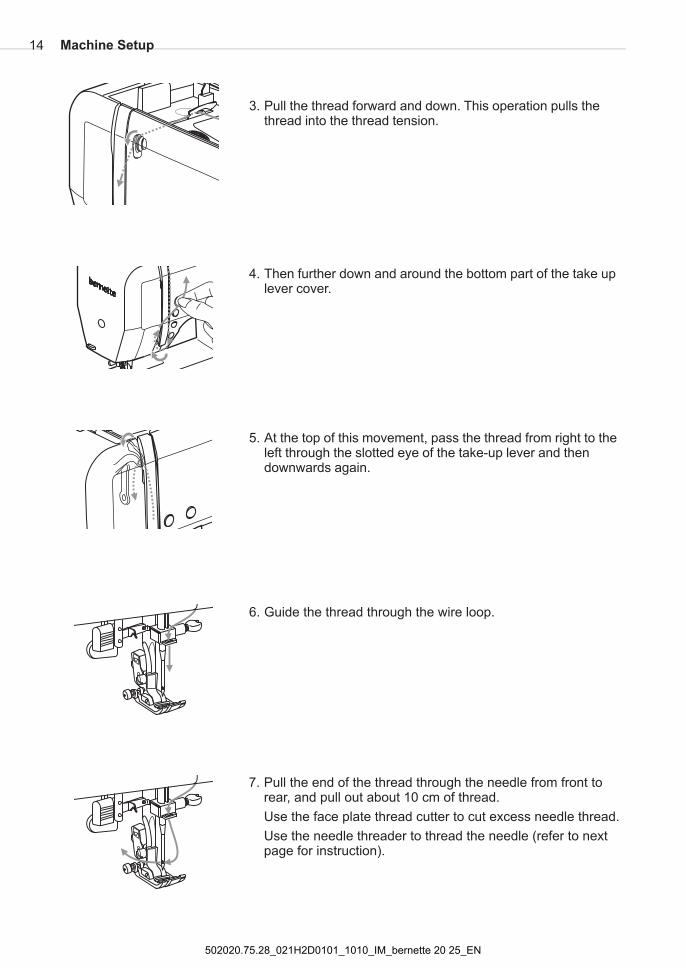
4. Then further down and around the bottom part of the take uplever cover.
5. At the top of this movement, pass the thread from right to theleft through the slotted eye of the take-up lever and thendownwards again.
3. Pull the thread forward and down. This operation pulls thethread into the thread tension.
7. Pull the end of the thread through the needle from front torear, and pull out about 10 cm of thread.
Use the face plate thread cutter to cut excess needle thread.
Use the needle threader to thread the needle (refer to nextpage for instruction).
6. Guide the thread through the wire loop.
Machine Setup14
502020.75.28_021H2D0101_1010_IM_bernette 20 25_EN
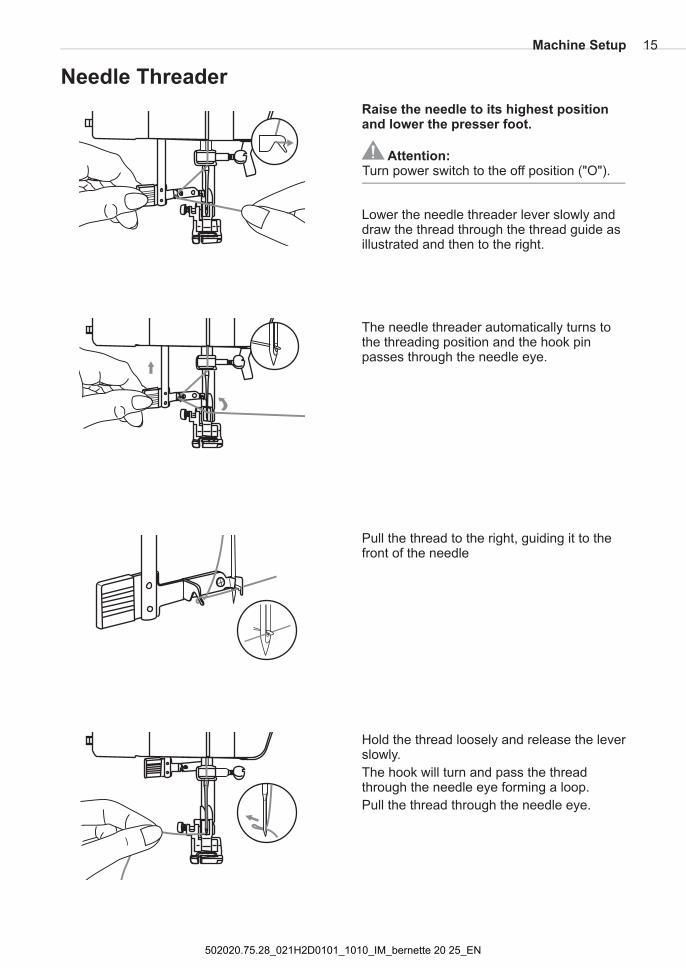
The needle threader automatically turns tothe threading position and the hook pinpasses through the needle eye.
Pull the thread to the right, guiding it to thefront of the needle
Hold the thread loosely and release the leverslowly.
The hook will turn and pass the threadthrough the needle eye forming a loop.
Pull the thread through the needle eye.
Raise the needle to its highest positionand lower the presser foot.
Lower the needle threader lever slowly anddraw the thread through the thread guide asillustrated and then to the right.
Attention:Turn power switch to the off position ("O").
Needle Threader
Machine Setup 15
502020.75.28_021H2D0101_1010_IM_bernette 20 25_EN
The thread cutter serves two purposes.
1. Cut the thread after threading the needle
2. Cut the thread after finishing a seam.
To cut the thread after completing your workraise the presser foot.
Remove the fabric, draw the threads to theleft side of the face cover and cut using thethread cutter.
The threads are cut at the proper length tostart the next seam.
Thread Cutter
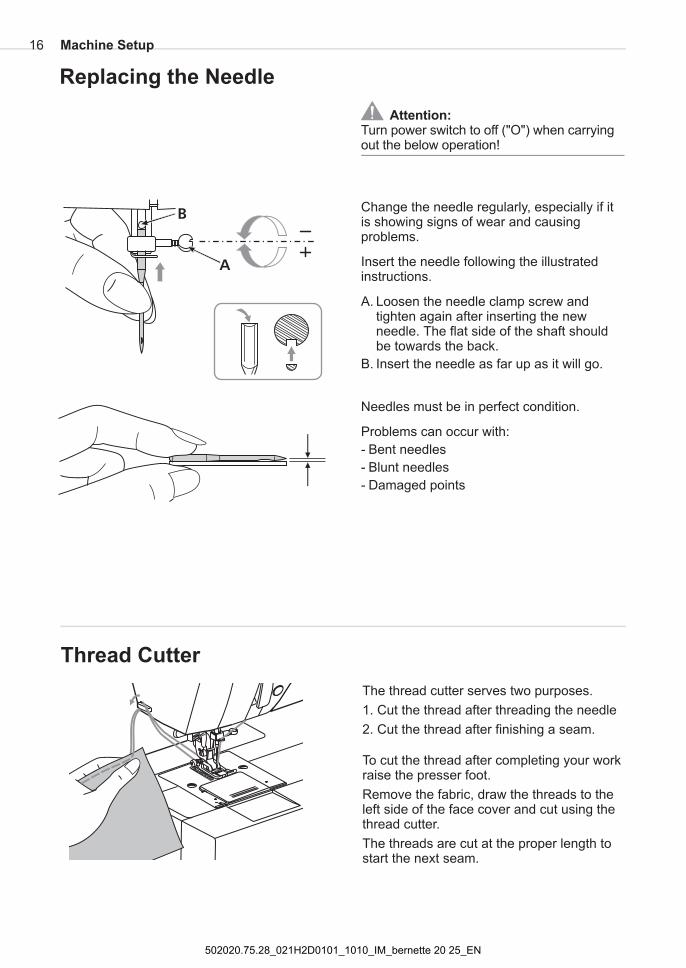
Change the needle regularly, especially if itis showing signs of wear and causingproblems.
Insert the needle following the illustratedinstructions.
A. Loosen the needle clamp screw andtighten again after inserting the newneedle. The flat side of the shaft shouldbe towards the back.
B. Insert the needle as far up as it will go.
Needles must be in perfect condition.
Problems can occur with:
- Bent needles
- Blunt needles
- Damaged points
A
B
Attention:Turn power switch to off ("O") when carryingout the below operation!
Replacing the Needle
Machine Setup16
502020.75.28_021H2D0101_1010_IM_bernette 20 25_EN
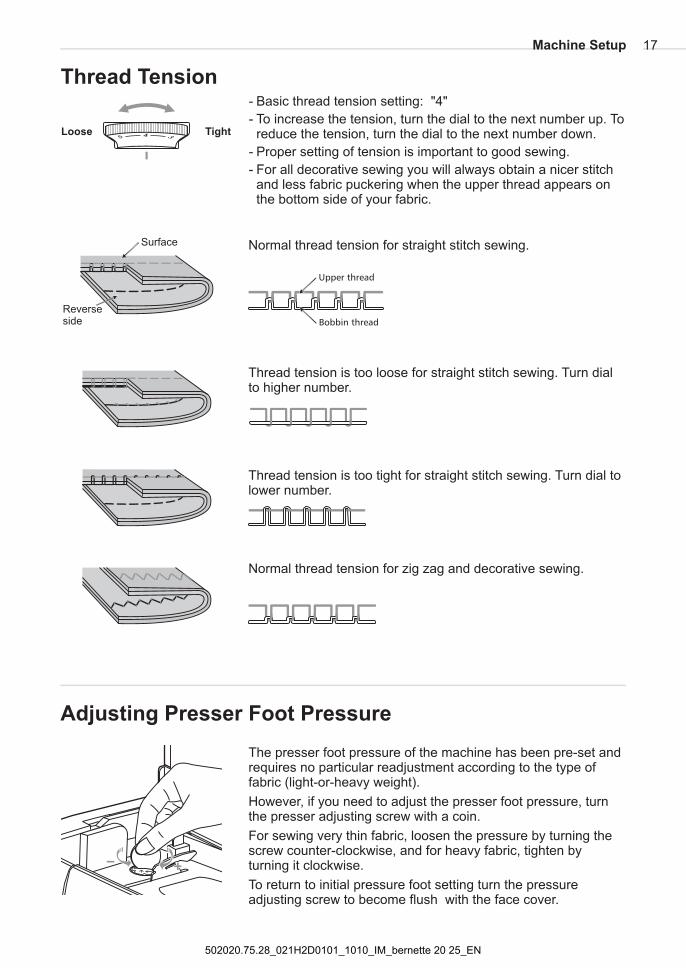
- Basic thread tension setting: "4"
- To increase the tension, turn the dial to the next number up. Toreduce the tension, turn the dial to the next number down.
- Proper setting of tension is important to good sewing.
- For all decorative sewing you will always obtain a nicer stitchand less fabric puckering when the upper thread appears onthe bottom side of your fabric.
TightLoose
Thread tension is too loose for straight stitch sewing. Turn dialto higher number.
Thread tension is too tight for straight stitch sewing. Turn dial tolower number.
Normal thread tension for zig zag and decorative sewing.
Normal thread tension for straight stitch sewing.
Reverseside
Surface
Upper thread
Bobbin thread
Thread Tension
The presser foot pressure of the machine has been pre-set andrequires no particular readjustment according to the type offabric (light-or-heavy weight).
However, if you need to adjust the presser foot pressure, turnthe presser adjusting screw with a coin.
For sewing very thin fabric, loosen the pressure by turning thescrew counter-clockwise, and for heavy fabric, tighten byturning it clockwise.
To return to initial pressure foot setting turn the pressureadjusting screw to become flush with the face cover.
Adjusting Presser Foot Pressure
Machine Setup 17
502020.75.28_021H2D0101_1010_IM_bernette 20 25_EN
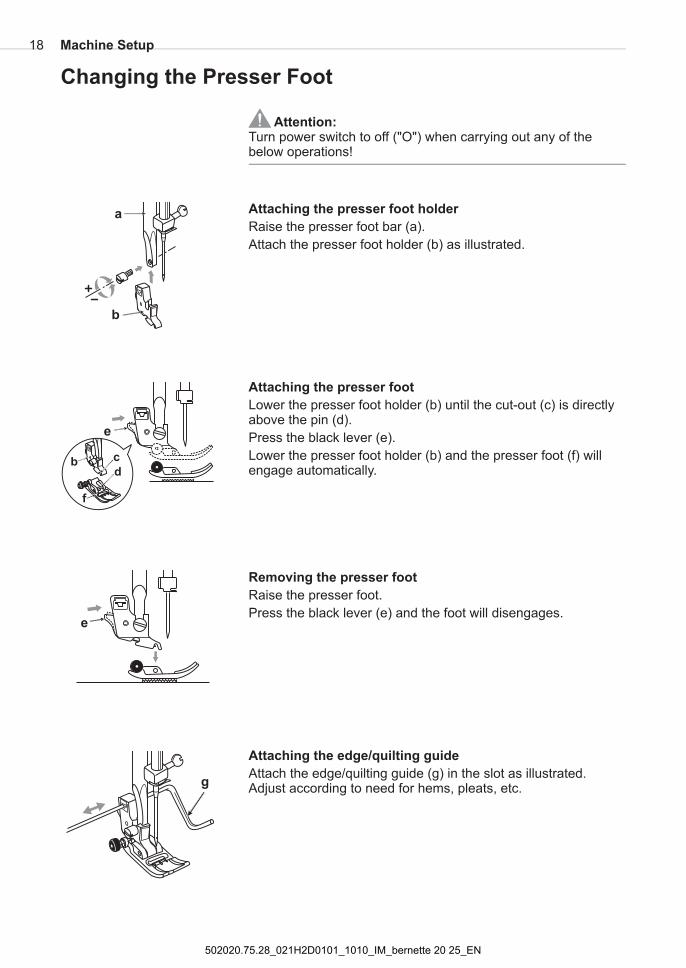
Turn power switch to off ("O") when carrying out any of thebelow operations!
Raise the presser foot bar (a).
Attach the presser foot holder (b) as illustrated.
Lower the presser foot holder (b) until the cut-out (c) is directlyabove the pin (d).
Press the black lever (e).
Lower the presser foot holder (b) and the presser foot (f) willengage automatically.
Raise the presser foot.
Press the black lever (e) and the foot will disengages.
Attach the guide (g) in the slot as illustrated.Adjust according to need for hems, pleats, etc.
Attention:
Attaching the presser foot holder
Attaching the presser foot
Removing the presser foot
Attaching the guideedge/quilting
edge/quilting
b
a
d
c
f
d
e
e
g
Changing the Presser Foot
Machine Setup18
502020.75.28_021H2D0101_1010_IM_bernette 20 25_EN
a
b
ab
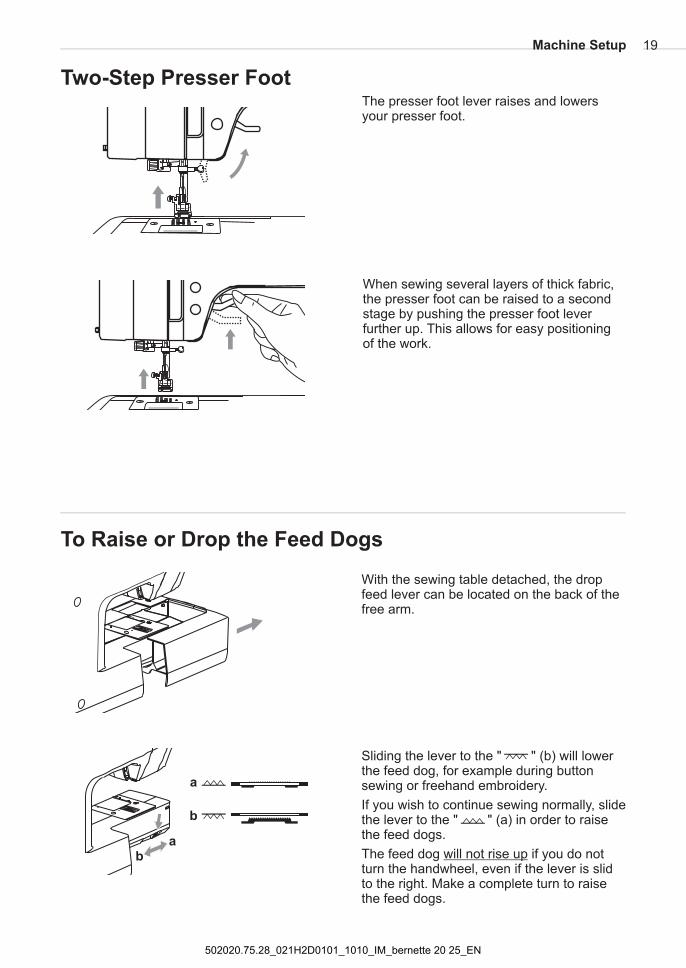
The presser foot lever raises and lowersyour presser foot.
When sewing several layers of thick fabric,the presser foot can be raised to a secondstage by pushing the presser foot leverfurther up. This allows for easy positioningof the work.
With the sewing table detached, the dropfeed lever can be located on the back of thefree arm.
To Raise or Drop the Feed Dogs
Sliding the lever to the " " (b) will lowerthe feed dog, for example during buttonsewing or freehand embroidery.
If you wish to continue sewing normally, slidethe lever to the " " (a) in order to raisethe feed dogs.
The feed dog if you do notturn the handwheel, even if the lever is slidto the right. Make a complete turn to raisethe feed dogs.
will not rise up
Two-Step Presser Foot
19Machine Setup
502020.75.28_021H2D0101_1010_IM_bernette 20 25_EN
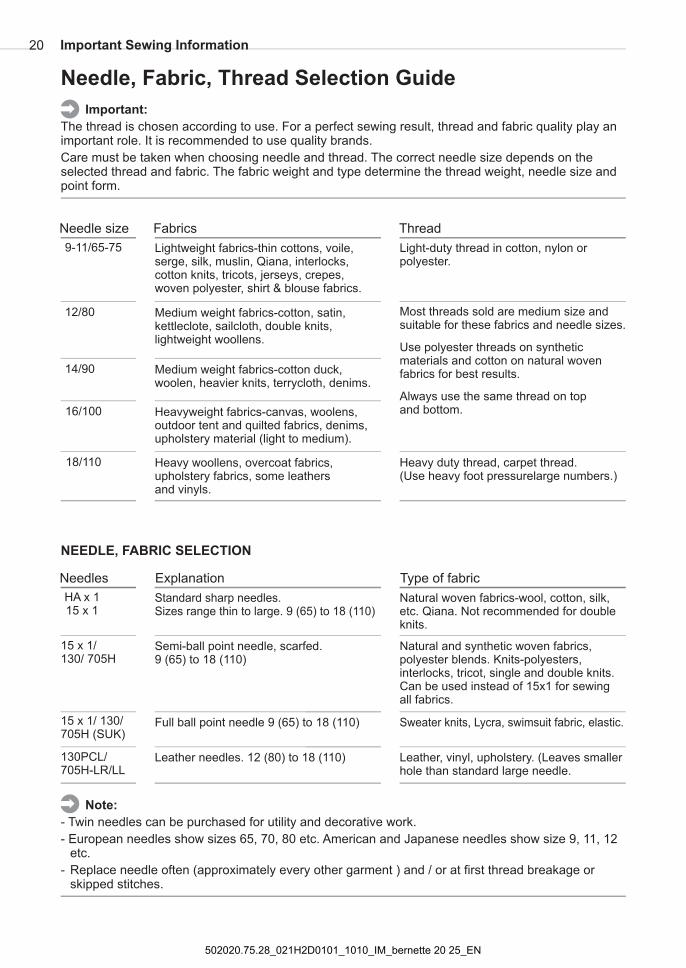
Needle, Fabric, Thread Selection Guide
Needle size Fabrics Thread
Most threads sold are medium size andsuitable for these fabrics and needle sizes.
9-11/65-75 Lightweight fabrics-thin cottons, voile,serge, silk, muslin, Qiana, interlocks,cotton knits, tricots, jerseys, crepes,woven polyester, shirt & blouse fabrics.
Light-duty thread in cotton, nylon orpolyester.
Use polyester threads on syntheticmaterials and cotton on natural wovenfabrics for best results.
Always use the same thread on topand bottom.
12/80 Medium weight fabrics-cotton, satin,kettleclote, sailcloth, double knits,lightweight woollens.
14/90 Medium weight fabrics-cotton duck,woolen, heavier knits, terrycloth, denims.
16/100 Heavyweight fabrics-canvas, woolens,outdoor tent and quilted fabrics, denims,upholstery material (light to medium).
18/110 Heavy woollens, overcoat fabrics,upholstery fabrics, some leathersand vinyls.
Heavy duty thread, carpet thread.(Use heavy foot pressurelarge numbers.)
NEEDLE, FABRIC SELECTION
Needles Explanation Type of fabric
15 x 1/ 130/705H (SUK)
HA x 115 x 1
15 x 1/130/ 705H
130PCL/705H-LR/LL
Standard sharp needles.Sizes range thin to large. 9 (65) to 18 (110)
Leather needles. 12 (80) to 18 (110)
Full ball point needle 9 (65) to 18 (110)
Semi-ball point needle, scarfed.9 (65) to 18 (110)
Natural and synthetic woven fabrics,polyester blends. Knits-polyesters,interlocks, tricot, single and double knits.Can be used instead of 15x1 for sewingall fabrics.
Leather, vinyl, upholstery. (Leaves smallerhole than standard large needle.
Sweater knits, Lycra, swimsuit fabric, elastic.
Natural woven fabrics-wool, cotton, silk,etc. Qiana. Not recommended for doubleknits.
Note:
- Twin needles can be purchased for utility and decorative work.
- European needles show sizes 65, 70, 80 etc. American and Japanese needles show size 9, 11, 12etc.
- Replace needle often (approximately every other garment ) and / or at first thread breakage orskipped stitches.
Important:
The thread is chosen according to use. For a perfect sewing result, thread and fabric quality play animportant role. It is recommended to use quality brands.
Care must be taken when choosing needle and thread. The correct needle size depends on theselected thread and fabric. The fabric weight and type determine the thread weight, needle size andpoint form.
Important Sewing Information20
502020.75.28_021H2D0101_1010_IM_bernette 20 25_EN
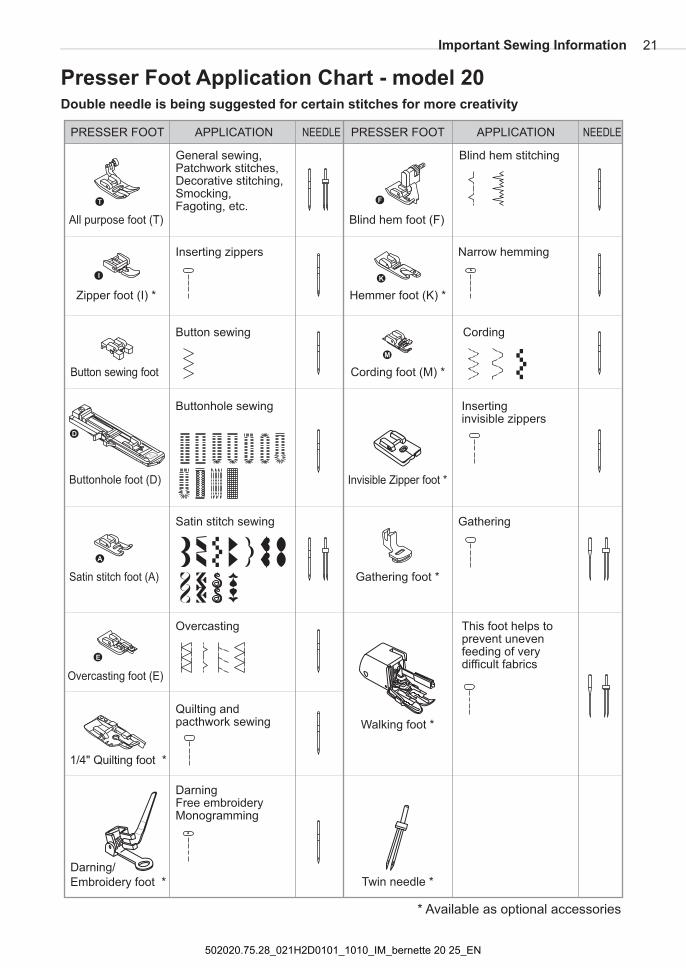
Presser Foot Application Chart - model 20Double needle is being suggested for certain stitches for more creativity
All purpose foot (T)
Zipper foot (I) *
Buttonhole foot (D)
Overcasting foot (E)
Blind hem foot (F)
Gathering foot *
APPLICATIONPRESSER FOOT
General sewing,Patchwork stitches,Decorative stitching,Smocking,Fagoting, etc.
PRESSER FOOT APPLICATION
Inserting zippers
Buttonhole sewing
Overcasting
Satin stitch sewing
Darning/
Embroidery foot *
DarningFree embroideryMonogramming
Button sewing
Satin stitch foot (A)
NEEDLE NEEDLE
Button sewing foot
Hemmer foot (K) *
Narrow hemming
Gathering
Quilting andpacthwork sewing
Cording foot (M) *
Invisible Zipper foot *
1/4" Quilting foot *
Insertingzippersinvisible
Blind hem stitching
Cording
Walking foot *
This foot helps toprevent unevenfeeding of verydifficult fabrics
* Available as optional accessories
Twin needle *
Important Sewing Information 21
502020.75.28_021H2D0101_1010_IM_bernette 20 25_EN
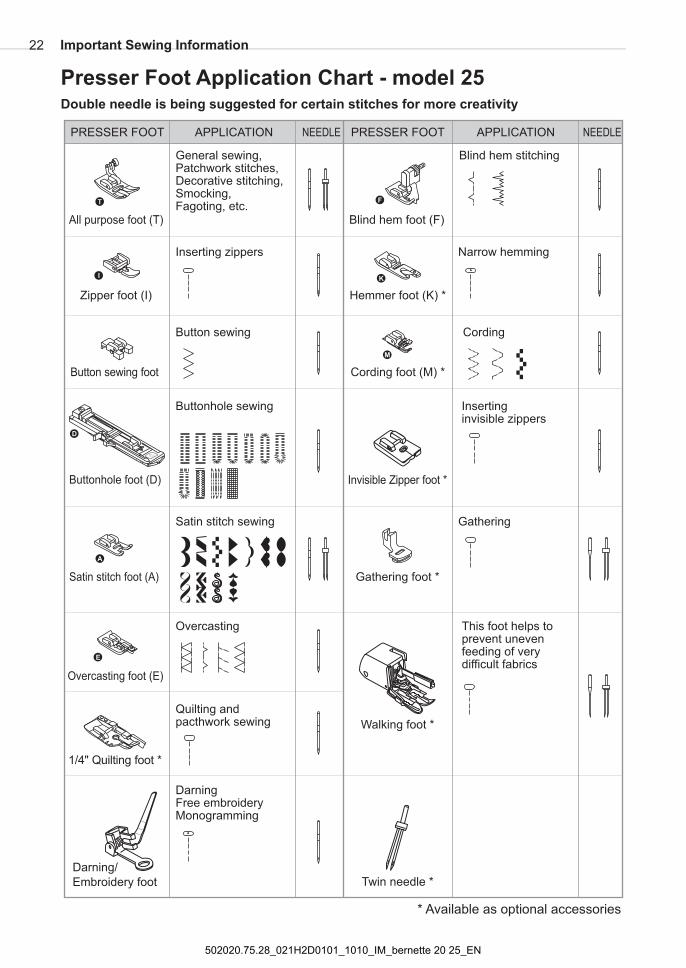
Presser Foot Application Chart - model 25Double needle is being suggested for certain stitches for more creativity
All purpose foot (T)
Zipper foot (I)
Buttonhole foot (D)
Overcasting foot (E)
Blind hem foot (F)
Gathering foot *
APPLICATIONPRESSER FOOT
General sewing,Patchwork stitches,Decorative stitching,Smocking,Fagoting, etc.
PRESSER FOOT APPLICATION
Inserting zippers
Buttonhole sewing
Overcasting
Satin stitch sewing
Darning/
Embroidery foot
DarningFree embroideryMonogramming
Button sewing
Satin stitch foot (A)
NEEDLE NEEDLE
Button sewing foot
Hemmer foot (K) *
Narrow hemming
Gathering
Quilting andpacthwork sewing
Cording foot (M) *
Invisible Zipper foot *
1/4" Quilting foot *
Insertingzippersinvisible
Blind hem stitching
Cording
Walking foot *
This foot helps toprevent unevenfeeding of verydifficult fabrics
* Available as optional accessories
Twin needle *
22 Important Sewing Information
502020.75.28_021H2D0101_1010_IM_bernette 20 25_EN
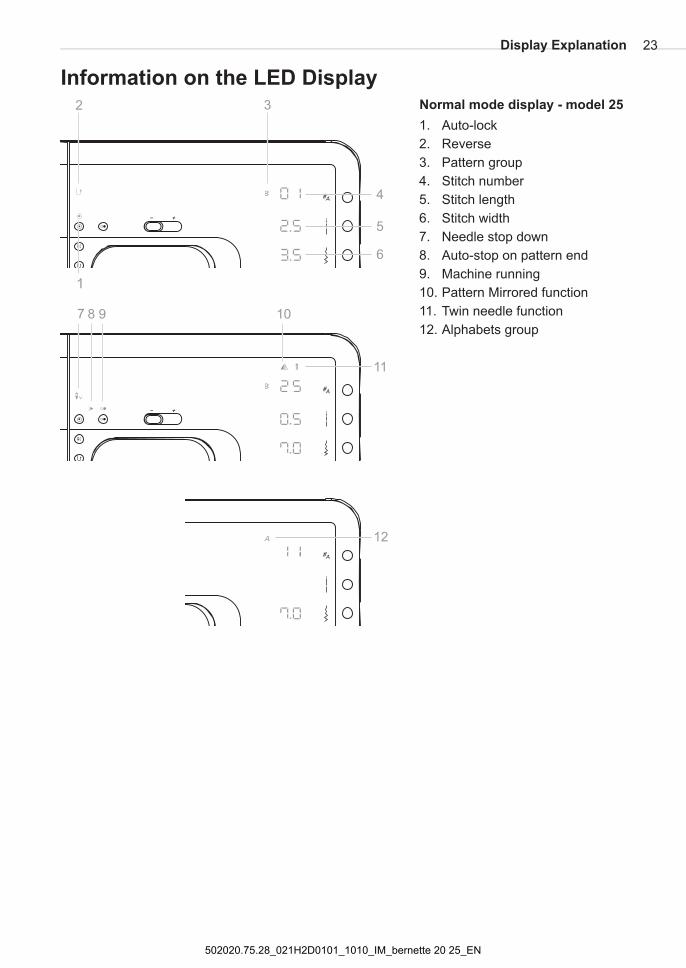
Information on the LED Display
Display Explanation
Normal mode display - model 25
1.
2.
4.
5.
6.
7.
8.
9.
10.
11.
12.
Auto-lock
Reverse
3.
Stitch number
Stitch length
Stitch width
Auto-stop on pattern end
Pattern Mirrored function
Twin needle function
Alphabets group
Pattern group
Needle stop down
Machine running1
2 3
4
5
6
7 8 9 10
11
12
23
502020.75.28_021H2D0101_1010_IM_bernette 20 25_EN
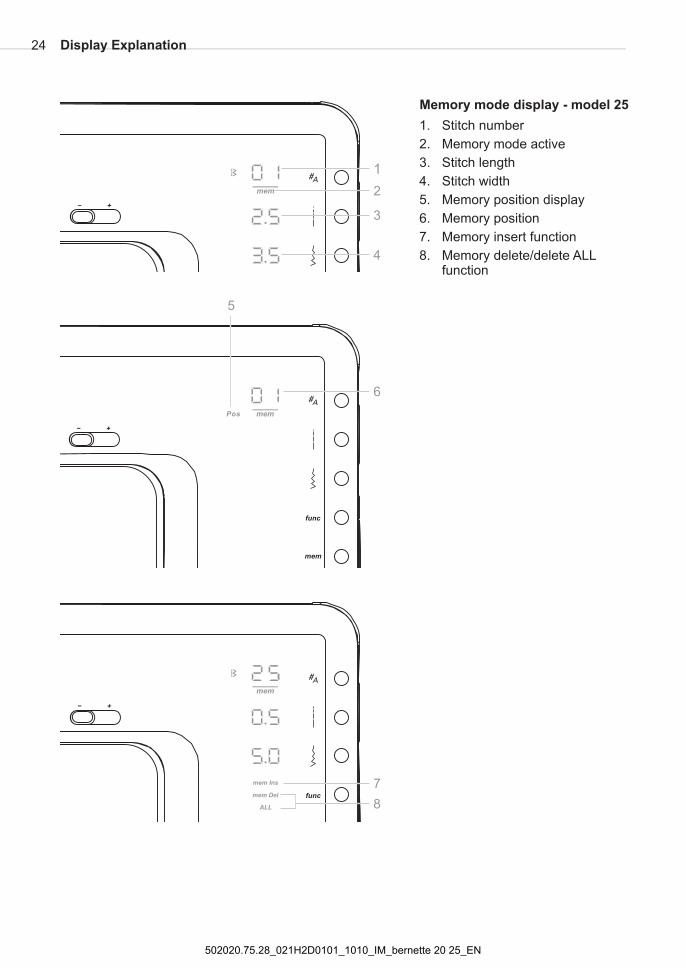
Memory mode display - model 25
1. Stitch number
3. Stitch length
4. Stitch width
5. Memory position display
6. Memory position
7. Memory insert function
8. Memory delete/delete ALLfunction
2. Memory mode active
1
2
3
4
5
6
7
8
Display Explanation24
502020.75.28_021H2D0101_1010_IM_bernette 20 25_EN
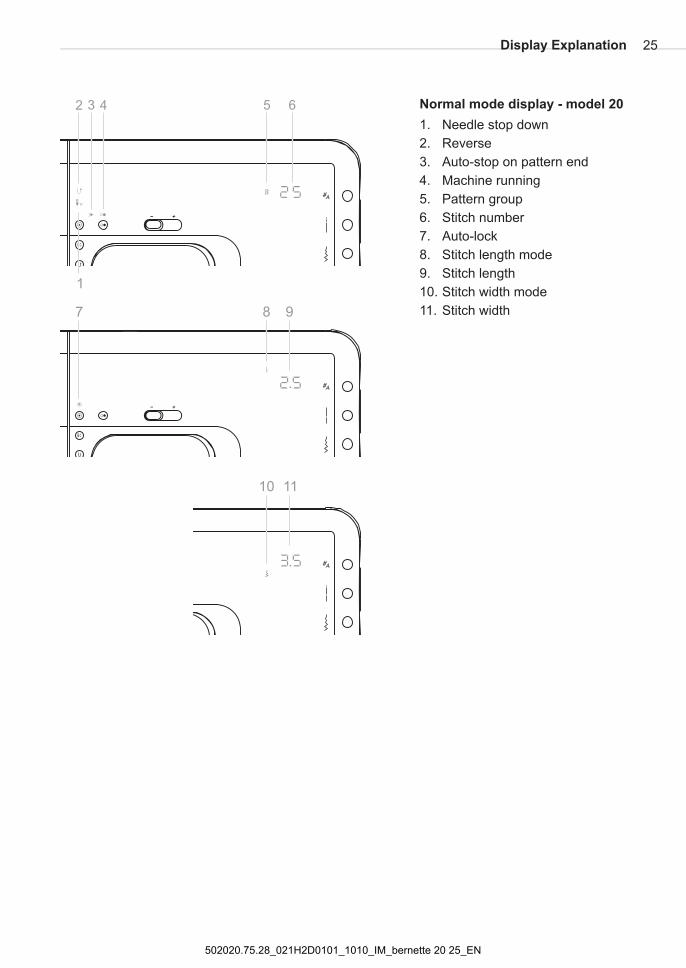
Normal mode display - model 20
1.
2.
4.
6.
7.
8.
9.
10.
11.
Reverse
3. Auto-stop on pattern end
5.
Stitch number
Auto-lock
Stitch length mode
Stitch length
Stitch width mode
Stitch width
Needle stop down
Machine running
Pattern group
1
2 3 4 5 6
7 8 9
10 11
Display Explanation 25
502020.75.28_021H2D0101_1010_IM_bernette 20 25_EN
Operating Instructions
1.
2.
4.
5.
6.
7.
9.
11.
3.
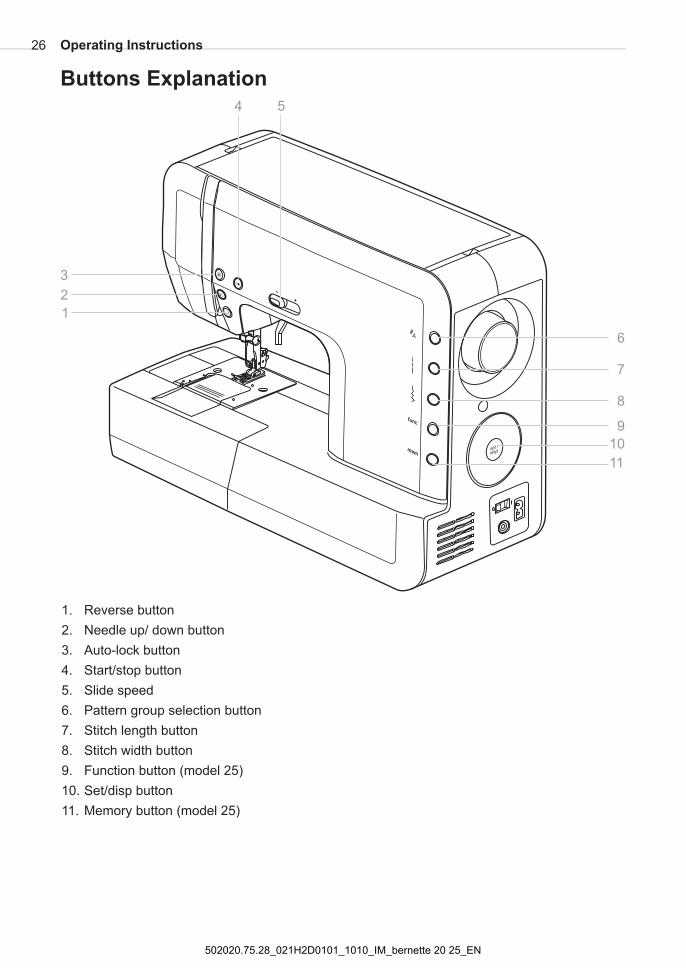
Pattern group selection
8.
Function
10.
Reverse button
Needle up/ down button
Auto-lock button
Start/stop button
Slide speed
button
Stitch length button
Stitch width button
button (model 25)
button
Memory button (model 25)
Set/disp
Buttons Explanation
6
7
1
2
3
4
8
9
5
10
11
26
502020.75.28_021H2D0101_1010_IM_bernette 20 25_EN
Function Buttons
Operating Instructions
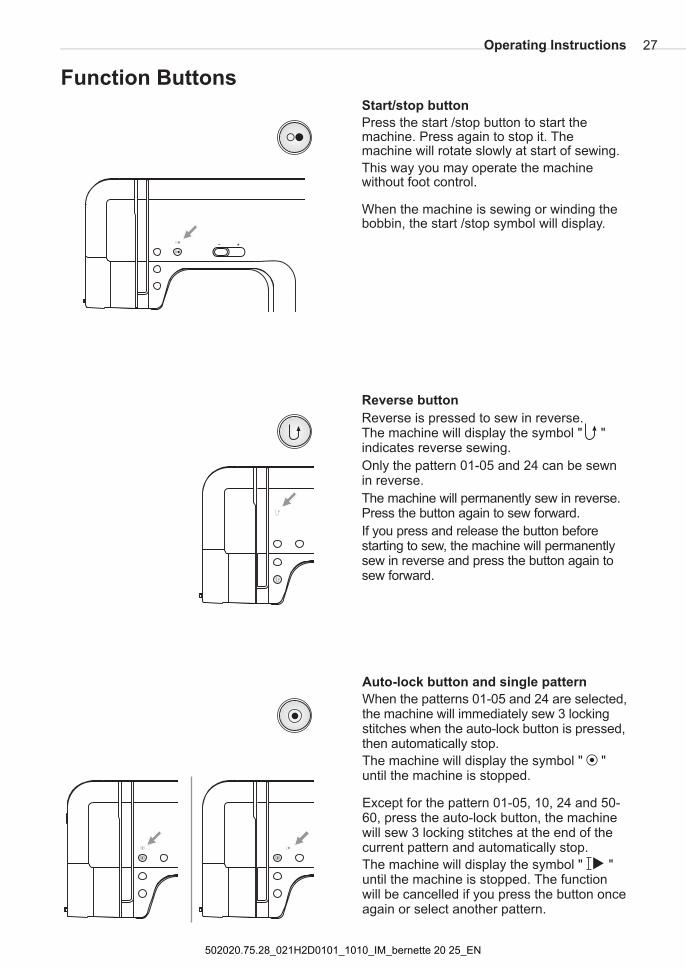
Auto-lock button and single pattern
When the are selected,the machine will immediately sew 3 lockingstitches when the auto-lock button is pressed,then automatically stop.
The machine will display the symbol " "until the machine is stopped.
Except for the, press the auto-lock button, the machine
will sew 3 locking stitches at the end of thecurrent pattern and automatically stop.
patterns 01-05 and 24
pattern 01-05, 10, 24 and 50-60
The machine will display the symbol " "until the machine is stopped. The functionwill be cancelled if you press the button onceagain or select another pattern.
Reverse button
The machine will display the symbol " "indicates reverse sewing.
the pattern 01-05 and 24 can be
The machine
Reverse is pressed to sew in reverse.
Only sewnin reverse.
will permanently sew in reverse.Press the button again to sew forward.
If you press and release the button beforestarting to sew, the machine will permanentlysew in reverse and press the button again tosew forward.
27
Start/stop button
Themachine will rotate slowly at start of sewing.
Press the start /stop button to start themachine. Press again to stop it.
This way you may operate the machinewithout foot control.
When the machine is sewing or winding thebobbin, the start /stop symbol will display.
502020.75.28_021H2D0101_1010_IM_bernette 20 25_EN
Operating Instructions
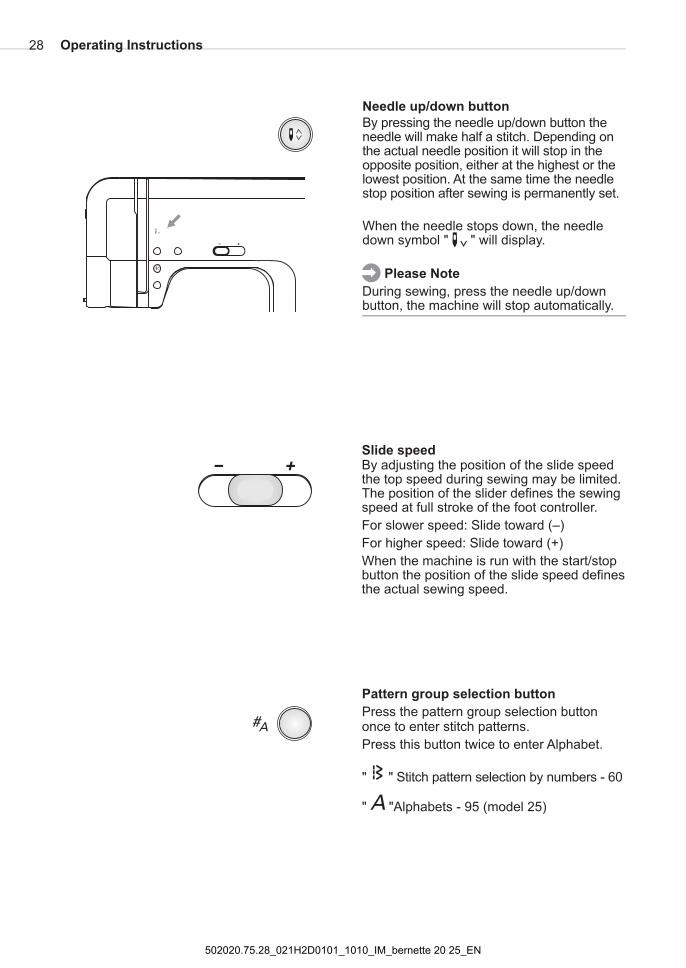
Slide speedBy adjusting the position of the slide speedthe top speed during sewing may be limited.The position of the slider defines the sewingspeed at full stroke of the foot controller.
For slower speed: Slide toward ( )
For higher speed: Slide toward (+)
When the machine is run with the start/stopbutton the position of the slide speed definesthe actual sewing speed.
–
Pattern group
Press the pattern group selection buttononce to enter stitch patterns.
Press this button twice to enter Alphabet.
" " Stitch pattern selection by numbers - 60
" "Alphabets - 95 ( )
selection button
model 25
28
Needle up/down button
By pressing the needle up/down button theneedle will make half a stitch. Depending onthe actual needle position it will stop in theopposite position, either at the highest or thelowest position. At the same time the needlestop position after sewing is permanently set.
When the needle stops down, the needledown symbol " " will display.
Please Note
During sewing, press the needle up/downbutton, the machine will stop automatically.
502020.75.28_021H2D0101_1010_IM_bernette 20 25_EN

Operating Instructions
Stitch length button
Press the stitch length button to enter stitchlength adjustment mode.
To shorten the stitch length, turn thecounter clockwise.
To increase the stitch length, turn theclockwise.
The stitch length can be adjusted between"0.0-4.5 mm". Certain stitches have a limitedlength.
When you select a stitch, the machine willautomatically set the recommended stitchlength which will be indicated by numbers onthe screen.
selectorwheel
selector wheel
Stitch width button
Press the stitch width button to enter stitchwidth adjustment mode.
For a narrower stitch, turn thecounter clockwise.
For a wider stitch, turn theclockwise.
The stitch width can be adjusted between"0.0-7.0 mm". Certain stitches have a limitedstitch width.
When you select a stitch, the machine willautomatically set the recommended stitchwidth, which will be indicated by numbers onthe screen.
selector wheel
selector wheel
Function button - model 25
Press the function button to open functionprogram and change your sewing setting(mirror, twin needle...etc) .
See chapter special functions details aboutthe use of this button.
29
502020.75.28_021H2D0101_1010_IM_bernette 20 25_EN
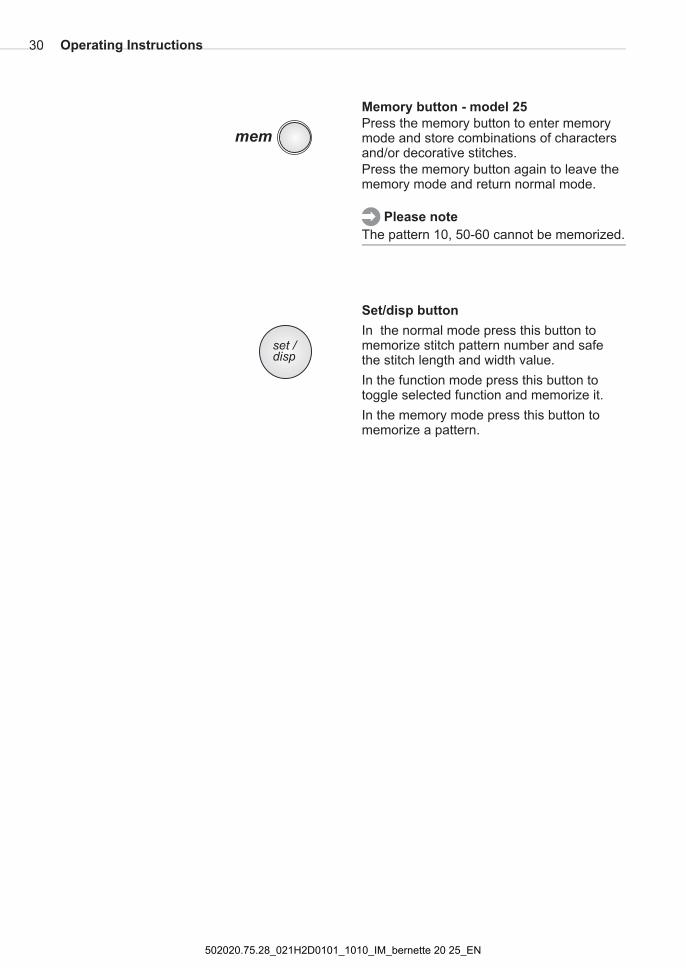
Memory button
Please note
Press the memory button to enter memorymode and store combinations of charactersand/or decorative stitches.
Press the memory button again to leave thememory mode and return mode.
The pattern 10, 50-60 cannot be memorized.
-
normal
model 25
Set/disp button
In the normal mode press this button tomemorize stitch pattern number and safethe stitch length and width value.
In the function mode press this button totoggle selected function and memorize it.
In the memory mode press this button tomemorize a pattern.
Operating Instructions30
502020.75.28_021H2D0101_1010_IM_bernette 20 25_EN
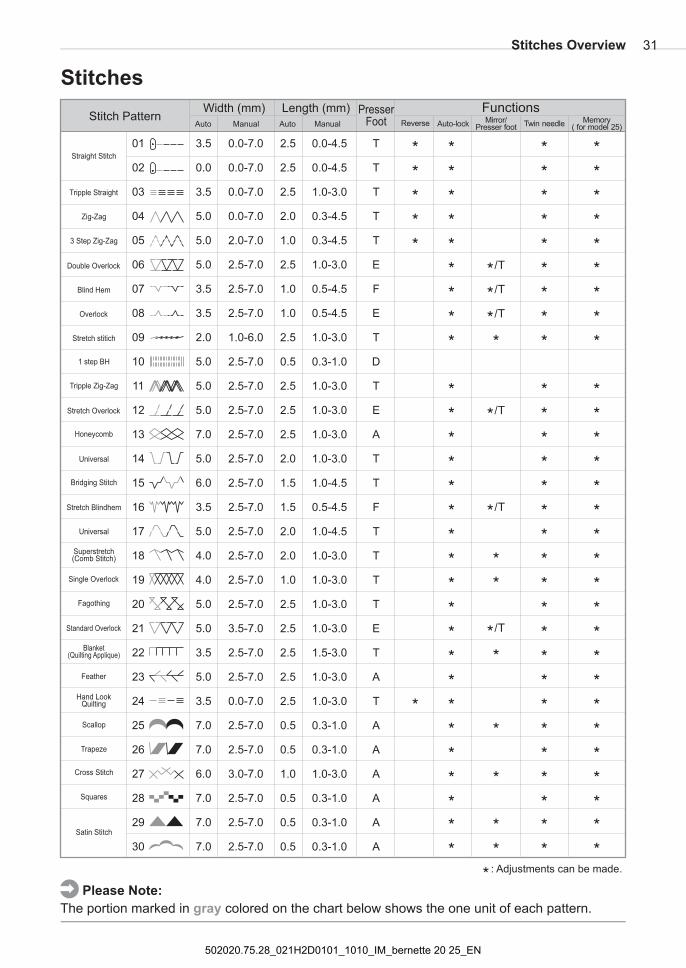
Please Note:
The portion marked in colored on the chart below shows the one unit of each pattern.gray
Stitches Overview
Stitches
31
01
02
03
04
05
06
07
08
09
10
11
12
13
14
15
16
17
18
19
20
21
22
23
24
25
26
27
28
29
30
3.5
0.0
3.5
5.0
5.0
5.0
3.5
3.5
2.0
5.0
5.0
5.0
7.0
5.0
6.0
3.5
5.0
4.0
4.0
5.0
5.0
3.5
5.0
3.5
7.0
7.0
6.0
7.0
7.0
7.0
0.0-7.0
0.0-7.0
0.0-7.0
0.0-7.0
2.0-7.0
2.5-7.0
2.5-7.0
2.5-7.0
1.0-6.0
2.5-7.0
2.5-7.0
2.5-7.0
2.5-7.0
2.5-7.0
2.5-7.0
2.5-7.0
2.5-7.0
2.5-7.0
2.5-7.0
2.5-7.0
3.5-7.0
2.5-7.0
2.5-7.0
0.0-7.0
2.5-7.0
2.5-7.0
3.0-7.0
2.5-7.0
2.5-7.0
2.5-7.0
2.5
2.5
2.5
2.0
1.0
2.5
1.0
1.0
2.5
0.5
2.5
2.5
2.5
2.0
1.5
1.5
2.0
2.0
1.0
2.5
2.5
2.5
2.5
2.5
0.5
0.5
1.0
0.5
0.5
0.5
0.0-4.5
0.0-4.5
1.0-3.0
0.3-4.5
0.3-4.5
1.0-3.0
0.5-4.5
0.5-4.5
1.0-3.0
0.3-1.0
1.0-3.0
1.0-3.0
1.0-3.0
1.0-3.0
1.0-4.5
0.5-4.5
1.0-4.5
1.0-3.0
1.0-3.0
1.0-3.0
1.0-3.0
1.5-3.0
1.0-3.0
1.0-3.0
0.3-1.0
0.3-1.0
1.0-3.0
0.3-1.0
0.3-1.0
0.3-1.0
T
T
T
T
T
E
F
E
T
D
T
E
A
T
T
F
T
T
T
T
E
T
A
T
A
A
A
A
A
A
FunctionsPresserFootStitch Pattern
Auto Manual Auto Manual Auto-lock Mirror/Presser foot
Reverse
Width (mm) Length (mm)
: Adjustments can be made.
Straight Stitch
Tripple Straight
Zig-Zag
3 Step Zig-Zag
Double Overlock
Blind Hem
Overlock
Stretch stitich
1 step BH
Tripple Zig-Zag
Stretch Overlock
Honeycomb
Universal
Bridging Stitch
Stretch Blindhem
Universal
Superstretch(Comb Stitch)
Single Overlock
Fagothing
Standard Overlock
Blanket(Quilting Applique)
Feather
Hand LookQuilting
Scallop
Trapeze
Cross Stitch
Squares
Satin Stitch
/T
/T
/T
/T
/T
/T
Twin needle ( for )model 25Memory
502020.75.28_021H2D0101_1010_IM_bernette 20 25_EN
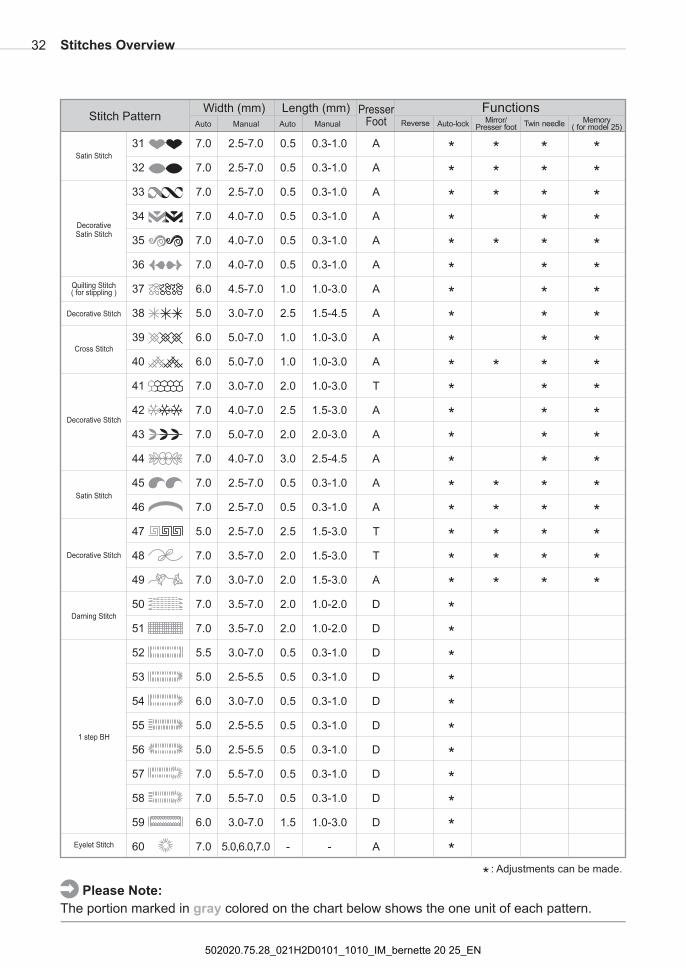
Please Note:
The portion marked in colored on the chart below shows the one unit of each pattern.gray
Stitches Overview32
31
32
33
34
35
36
37
38
39
40
41
42
43
44
45
46
47
48
49
50
51
52
53
54
55
56
57
58
59
60
7.0
7.0
7.0
7.0
7.0
7.0
6.0
5.0
6.0
6.0
7.0
7.0
7.0
7.0
7.0
7.0
5.0
7.0
7.0
7.0
7.0
5.5
5.0
6.0
5.0
5.0
7.0
7.0
6.0
7.0
2.5-7.0
2.5-7.0
2.5-7.0
4.0-7.0
4.0-7.0
4.0-7.0
4.5-7.0
3.0-7.0
5.0-7.0
5.0-7.0
3.0-7.0
4.0-7.0
5.0-7.0
4.0-7.0
2.5-7.0
2.5-7.0
2.5-7.0
3.5-7.0
3.0-7.0
3.5-7.0
3.5-7.0
3.0-7.0
2.5-5.5
3.0-7.0
2.5-5.5
2.5-5.5
5.5-7.0
5.5-7.0
3.0-7.0
5.0,6.0,7.0
0.5
0.5
0.5
0.5
0.5
0.5
1.0
2.5
1.0
1.0
2.0
2.5
2.0
3.0
0.5
0.5
2.5
2.0
2.0
2.0
2.0
0.5
0.5
0.5
0.5
0.5
0.5
0.5
1.5
-
0.3-1.0
0.3-1.0
0.3-1.0
0.3-1.0
0.3-1.0
0.3-1.0
1.0-3.0
1.5-4.5
1.0-3.0
1.0-3.0
1.0-3.0
1.5-3.0
2.0-3.0
2.5-4.5
0.3-1.0
0.3-1.0
1.5-3.0
1.5-3.0
1.5-3.0
1.0-2.0
1.0-2.0
0.3-1.0
0.3-1.0
0.3-1.0
0.3-1.0
0.3-1.0
0.3-1.0
0.3-1.0
1.0-3.0
-
A
A
A
A
A
A
A
A
A
A
T
A
A
A
A
A
T
T
A
D
D
D
D
D
D
D
D
D
D
A
FunctionsPresserFootStitch Pattern
Auto Manual Auto Manual Auto-lock Mirror/Presser foot Twin needleReverse
Width (mm) Length (mm)Memory
( for )model 25
: Adjustments can be made.
Eyelet Stitch
1 step BH
Satin Stitch
DecorativeSatin Stitch
Quilting Stitch( for stippling )
Decorative Stitch
Cross Stitch
Decorative Stitch
Satin Stitch
Decorative Stitch
Darning Stitch
502020.75.28_021H2D0101_1010_IM_bernette 20 25_EN
Alphabets - model 25
Stitches Overview
���
��������
���
Please Note:
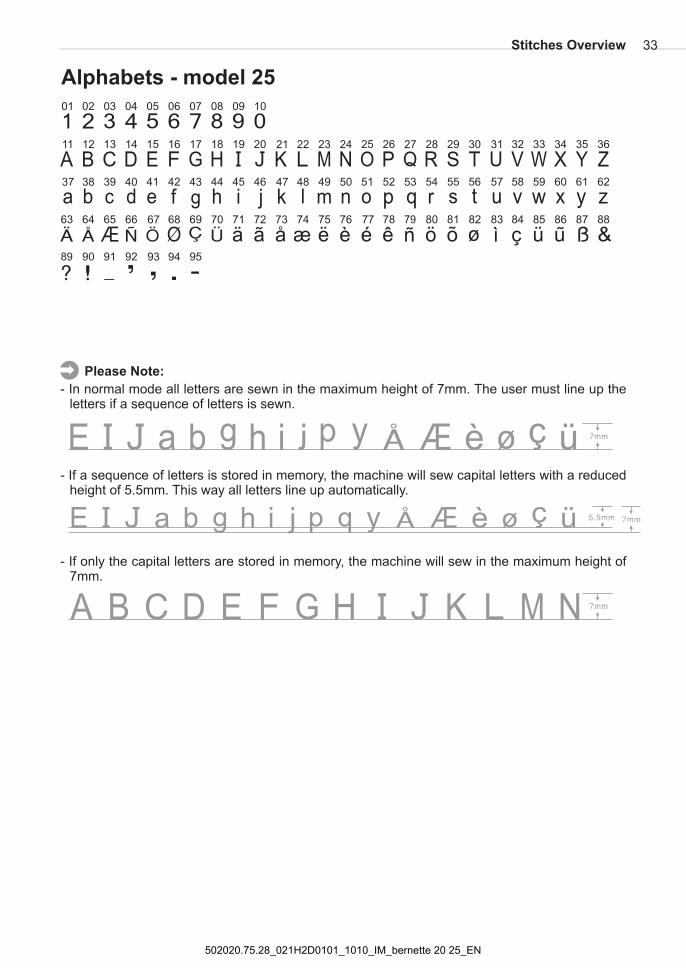
- In normal mode all letters are sewn in the maximum height of 7mm. The user must line up theletters if a sequence of letters is sewn.
- If a sequence of letters is stored in memory, the machine will sew capital letters with a reducedheight of 5.5mm. This way all letters line up automatically.
- If only the capital letters are stored in memory, the machine will sew in the maximum height of7mm.
33
502020.75.28_021H2D0101_1010_IM_bernette 20 25_EN
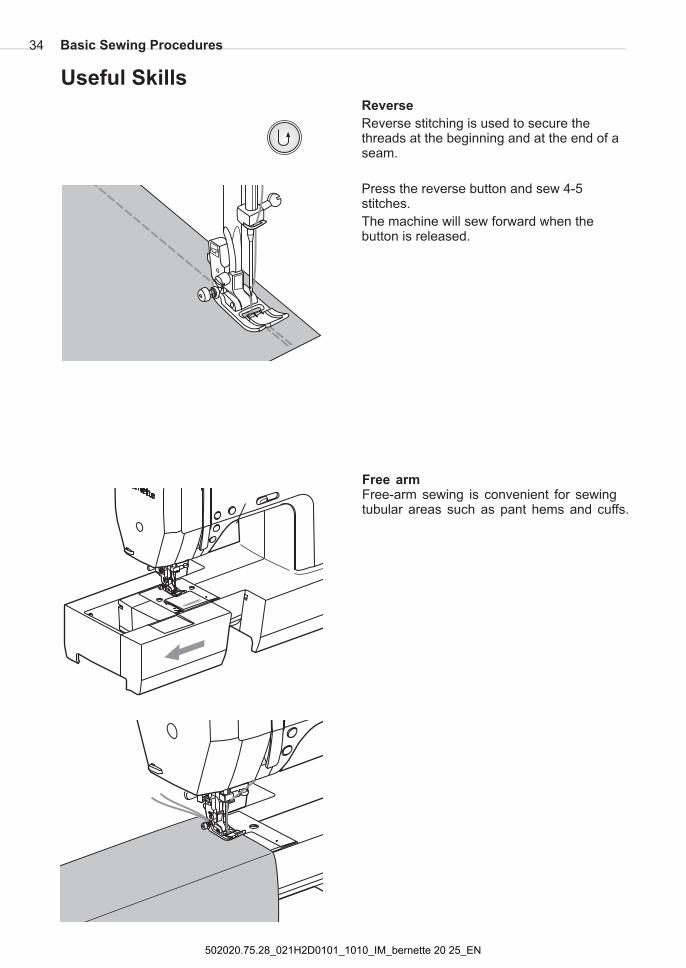
Reverse
Reverse stitching is used to secure thethreads at the beginning and at the end of aseam.
Press the reverse button and sew 4-5stitches.
The machine will sew forward when thebutton is released.
Free armFree-arm sewing is convenient for sewingtubular areas such as pant hems and cuffs.
Basic Sewing Procedures
Useful Skills
34
502020.75.28_021H2D0101_1010_IM_bernette 20 25_EN
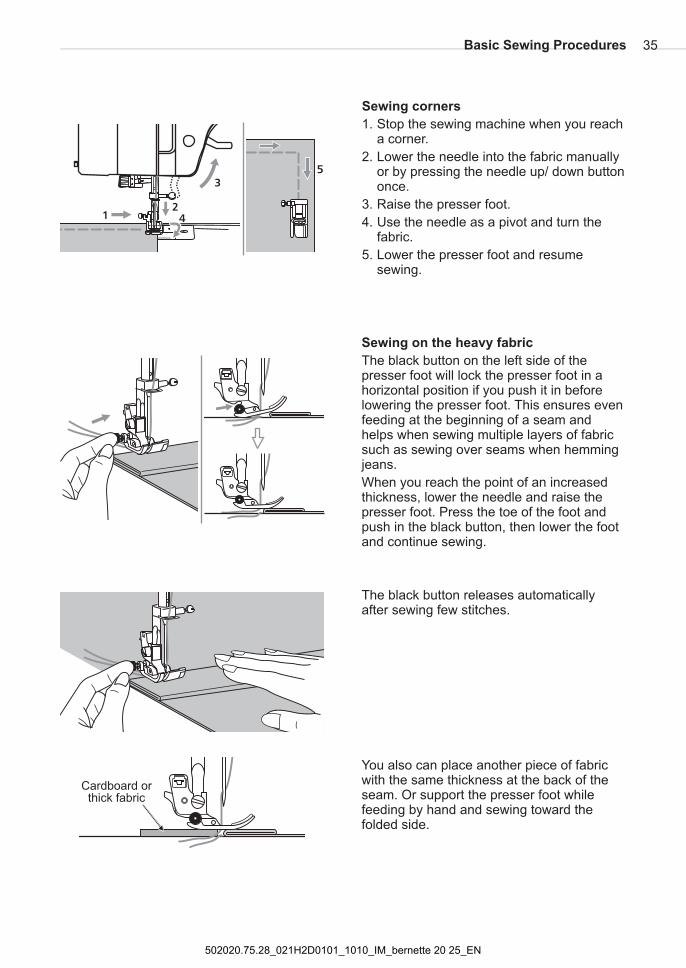
Sewing corners
1. Stop the sewing machine when you reacha corner.
2. Lower the needle into the fabric manuallyor by pressing the needle up/ down buttononce.
3. Raise the presser foot.
4. Use the needle as a pivot and turn thefabric.
5. Lower the presser foot and resumesewing.
5
1
3
22
4
Sewing on the heavy fabric
The black button on the left side of thepresser foot will lock the presser foot in ahorizontal position if you push it in beforelowering the presser foot. This ensures evenfeeding at the beginning of a seam andhelps when sewing multiple layers of fabricsuch as sewing over seams when hemmingjeans.
When you reach the point of an increasedthickness, lower the needle and raise thepresser foot. Press the toe of the foot andpush in the black button, then lower the footand continue sewing.
The black button releases automaticallyafter sewing few stitches.
You also can place another piece of fabricwith the same thickness at the back of theseam. Or support the presser foot whilefeeding by hand and sewing toward thefolded side.
Cardboard orthick fabric
Basic Sewing Procedures 35
502020.75.28_021H2D0101_1010_IM_bernette 20 25_EN

Changing the stitch length
Press the stitch length button to enter stitchlength adjustment mode.
To shorten the stitch length, turn thecounter clockwise. For a longer stitch
length, turn the clockwise.
Generally speaking, the thicker the fabric,thread and needle, the longer the stitchshould be.
selectorwheel
selector wheel
Adjusting the stitch width
The maximum zigzag stitch width for zigzagstitching is "7.0"; however, the width can bereduced on any patterns.
tPress the stitch width button to enter stitchwidth adjustment mode, he stitch width canbe adjusted between "0.0-7.0 mm".
Adjusting the stitch length
The density of zigzag stitches increase asthe setting of stitch length approaches "0.3".
Neat zigzag stitches are usually achieved at"1.0-2.5". Closed up zigzag stitches (closetogether) are referred to as a satin stitch.4.53.02.01.00.5
7.05.03.01.00.0
4.53.02.01.00.5
0.0 2.0 3.5 5.0 7.0
Straight Stitches and Needle Position
Zigzag Stitches
Basic Sewing Procedures
Changing the needle position
These setting apply only to pattern 01-03, 24.The pre-set position is " 3.5", center position.
Press the stitch width button to enter stitchwidth adjustment mode. When you turn the
counter clockwise, the needleposition will move to the left. When you turnthe clockwise, the needleposition will move to the right.
selector wheel
selector wheel
36
502020.75.28_021H2D0101_1010_IM_bernette 20 25_EN
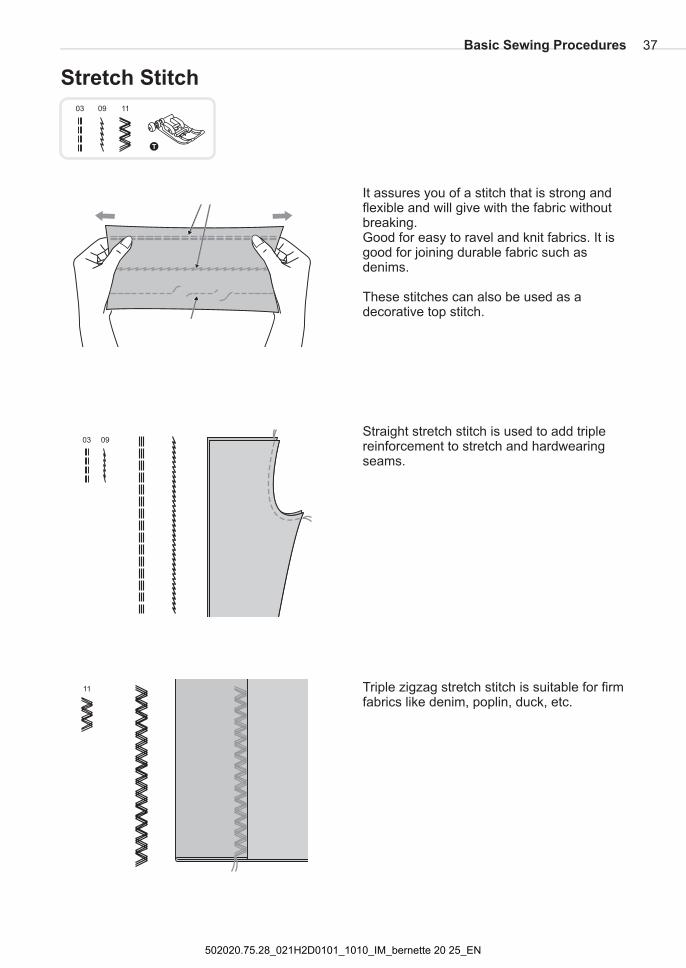
It assures you of a stitch that is strong andflexible and will give with the fabric withoutbreaking.Good for easy to ravel and knit fabrics. It isgood for joining durable fabric such asdenims.
These stitches can also be used as adecorative top stitch.
Triple zigzag stretch stitch is suitable for firmfabrics like denim, poplin, duck, etc.
Straight stretch stitch is used to add triplereinforcement to stretch and hardwearingseams.
Stretch Stitch
Basic Sewing Procedures 37
502020.75.28_021H2D0101_1010_IM_bernette 20 25_EN
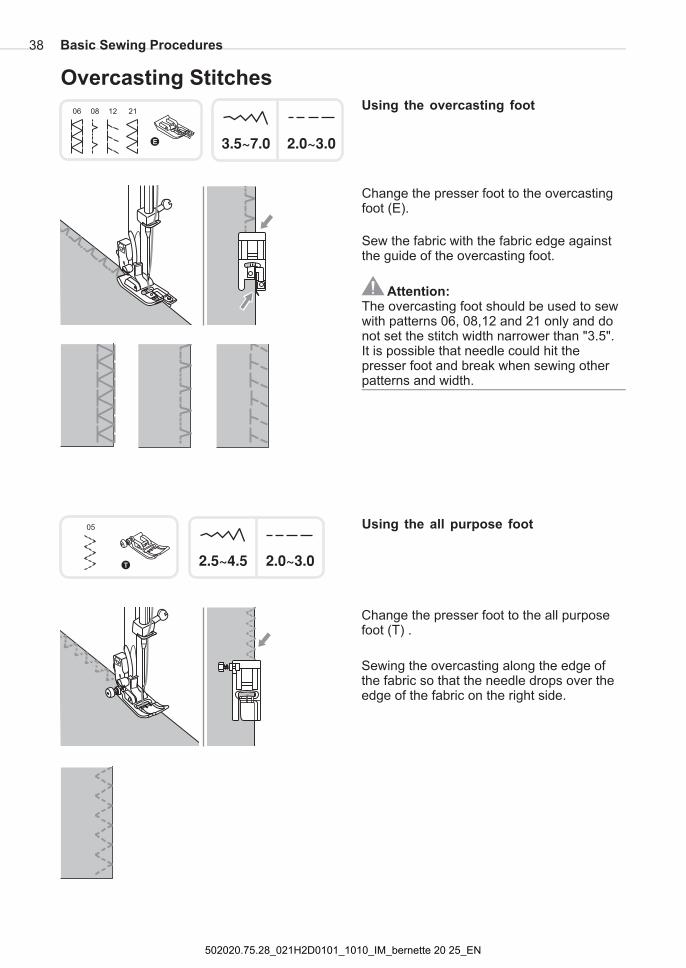
Using the overcasting foot
Change the presser foot to the all purposefoot (T) .
Sewing the overcasting along the edge ofthe fabric so that the needle drops over theedge of the fabric on the right side.
Using the all purpose foot
Change the presser foot to the overcastingfoot (E).
Sew the fabric with the fabric edge againstthe guide of the overcasting foot.
The overcasting foot should be used to sewwith patterns and 21 only and donot set the stitch width narrower than "3.5".It is possible that needle could hit thepresser foot and break when sewing otherpatterns and width.
Attention:
06, 08,12
Overcasting Stitches
Basic Sewing Procedures
������� �������
������ �������
38
502020.75.28_021H2D0101_1010_IM_bernette 20 25_EN
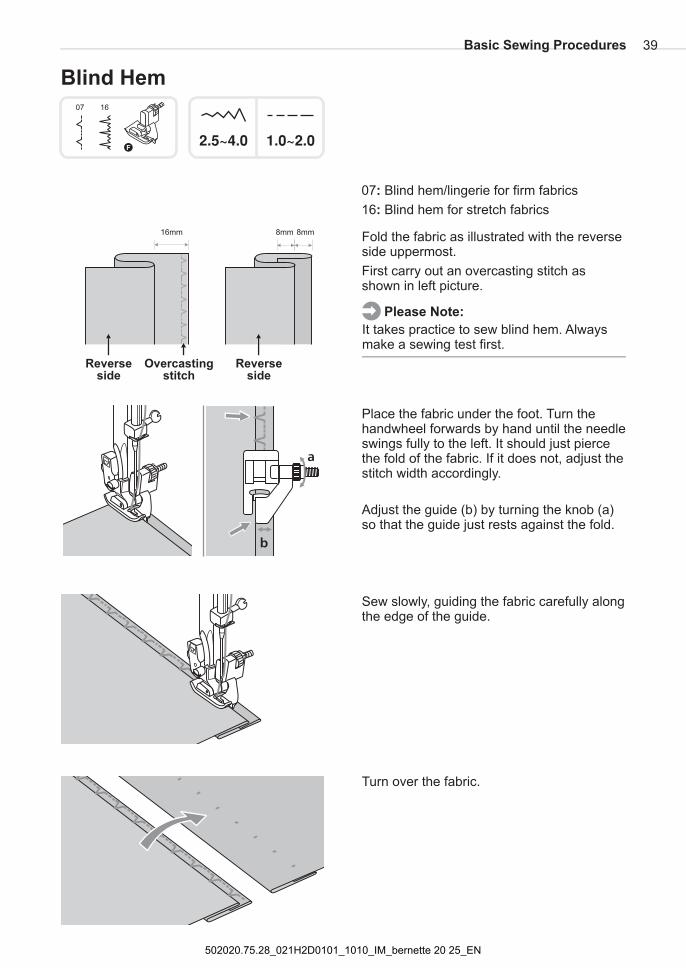
Fold the fabric as illustrated with the reverseside uppermost.
First carry out an overcasting stitch asshown in left picture.
Place the fabric under the foot. Turn thehandwheel forwards by hand until the needleswings fully to the left. It should just piercethe fold of the fabric. If it does not, adjust thestitch width accordingly.
Adjust the guide (b) by turning the knob (a)so that the guide just rests against the fold.
Sew slowly, guiding the fabric carefully alongthe edge of the guide.
Turn over the fabric.
07 Blind hem/lingerie for firm fabrics
16 Blind hem for stretch fabrics
:
:
16mm 8mm
Reverseside
Reverseside
a
b
������ ������
Please Note:
It takes practice to sew blind hem. Alwaysmake a sewing test first.
Blind Hem
Basic Sewing Procedures
Overcastingstitch
8mm
39
502020.75.28_021H2D0101_1010_IM_bernette 20 25_EN
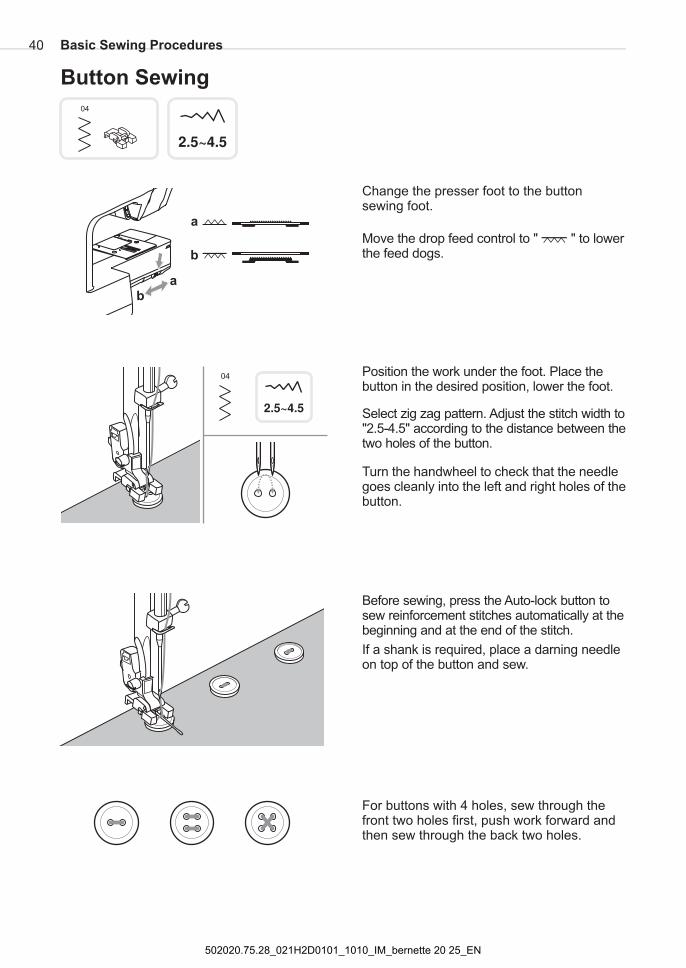
Change the presser foot to the buttonsewing foot.
Position the work under the foot. Place thebutton in the desired position, lower the foot.
Select zig zag pattern. Adjust the stitch width to"2.5-4.5" according to the distance between thetwo holes of the button.
Turn the handwheel to check that the needlegoes cleanly into the left and right holes of thebutton.
Before sewing, press the Auto-lock button tosew reinforcement stitches automatically at thebeginning and at the end of the stitch.
If a shank is required, place a darning needleon top of the button and sew.
For buttons with 4 holes, sew through thefront two holes first, push work forward andthen sew through the back two holes.
Move the drop feed control to " " to lowerthe feed dogs.
������
������
Button Sewing
Basic Sewing Procedures
a
b
ab
40
502020.75.28_021H2D0101_1010_IM_bernette 20 25_EN
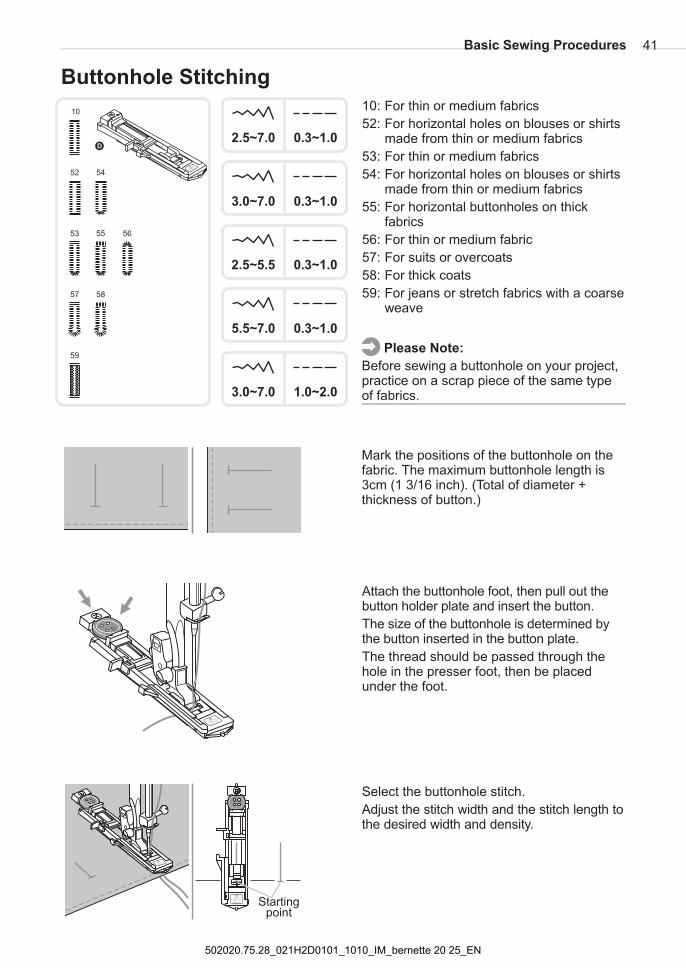
Mark the positions of the buttonhole on thefabric. The maximum buttonhole length is3cm (1 3/16 inch). (Total of diameter +thickness of button.)
Attach the buttonhole foot, then pull out thebutton holder plate and insert the button.
The size of the buttonhole is determined bythe button inserted in the button plate.
The thread should be passed through thehole in the presser foot, then be placedunder the foot.
Buttonhole Stitching
Please Note:
Before sewing a buttonhole on your project,practice on a scrap piece of the same typeof fabrics.
Select the buttonhole stitch.
Adjust the stitch width and the stitch length tothe desired width and density.
2.5~7.0 0.3~1.0
3.0~7.0 0.3~1.0
2.5~5.5 0.3~1.0
5.5~7.0 0.3~1.0
3.0~7.0 1.0~2.0
10: For thin or medium fabrics
52: For horizontal holes on blouses or shirtsmade from thin or medium fabrics
53: For thin or medium fabrics
54: For horizontal holes on blouses or shirtsmade from thin or medium fabrics
55: For horizontal buttonholes on thickfabrics
56: For thin or medium fabric
57: For suits or overcoats
58: For thick coats
59: For jeans or stretch fabrics with a coarseweave
Basic Sewing Procedures 41
Startingpoint
D
502020.75.28_021H2D0101_1010_IM_bernette 20 25_EN
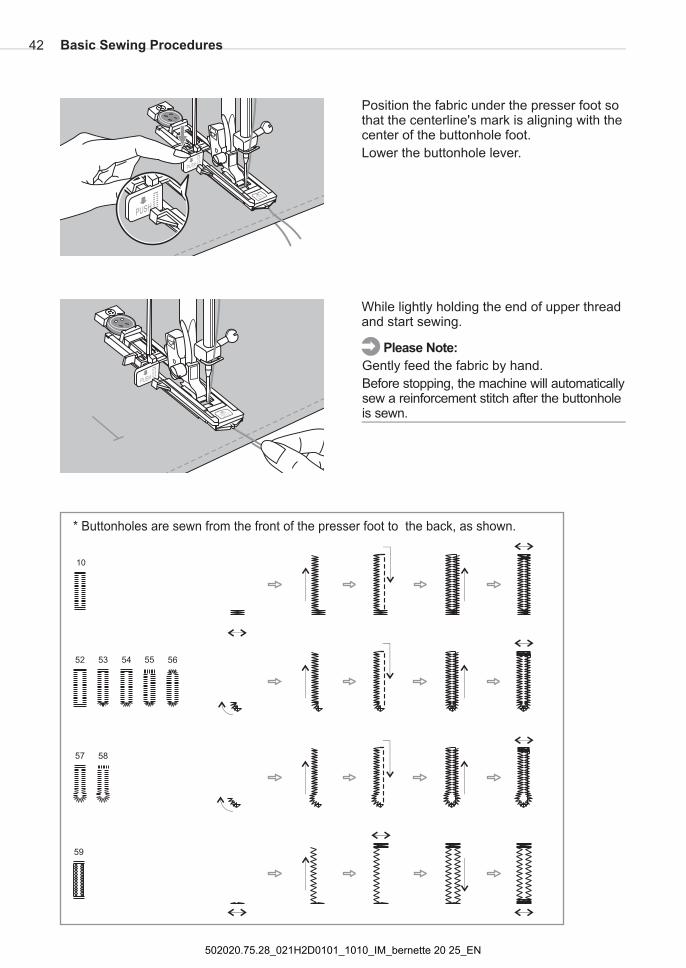
Position the fabric under the presser foot sothat the centerline's mark is aligning with thecenter of the buttonhole foot.
Lower the buttonhole lever.
While lightly holding the end of upper threadand start sewing.
Please Note:
Gently feed the fabric by hand.
Before stopping, the machine will automaticallysew a reinforcement stitch after the buttonholeis sewn.
* Buttonholes are sewn from the front of the presser foot to the back, as shown.
Basic Sewing Procedures42
502020.75.28_021H2D0101_1010_IM_bernette 20 25_EN

Raise the presser foot and cut thread.
To sew over same buttonhole, raise thepresser foot (will return to original position).
After sewing the buttonhole stitch, raise thebuttonhole lever until it stops.
Cut the center of the buttonhole beingcareful not to cut any stitches on either side.Use a pin as a stopper at the bar tack so youdo not cut too much.
When sewing buttonholes on stretch fabric,hook heavy thread or cord under the button-hole foot.
Attach the buttonhole foot and hook thegimp thread onto the back of the presserfoot.
Bring the two gimp thread ends to the frontof the foot and insert them into the grooves,then temporarily tie them there. Lower thepresser foot and start sewing.
Set the stitch width to match the diameter ofthe gimp thread.
Once sewing is completed, pull the gimpthread gently to remove any slack, then trimoff any excess.
Please Note:
It is suggested that you use interfacing onthe backside of the fabric.
Making a buttonhole on stretch fabrics
Basic Sewing Procedures 43
502020.75.28_021H2D0101_1010_IM_bernette 20 25_EN
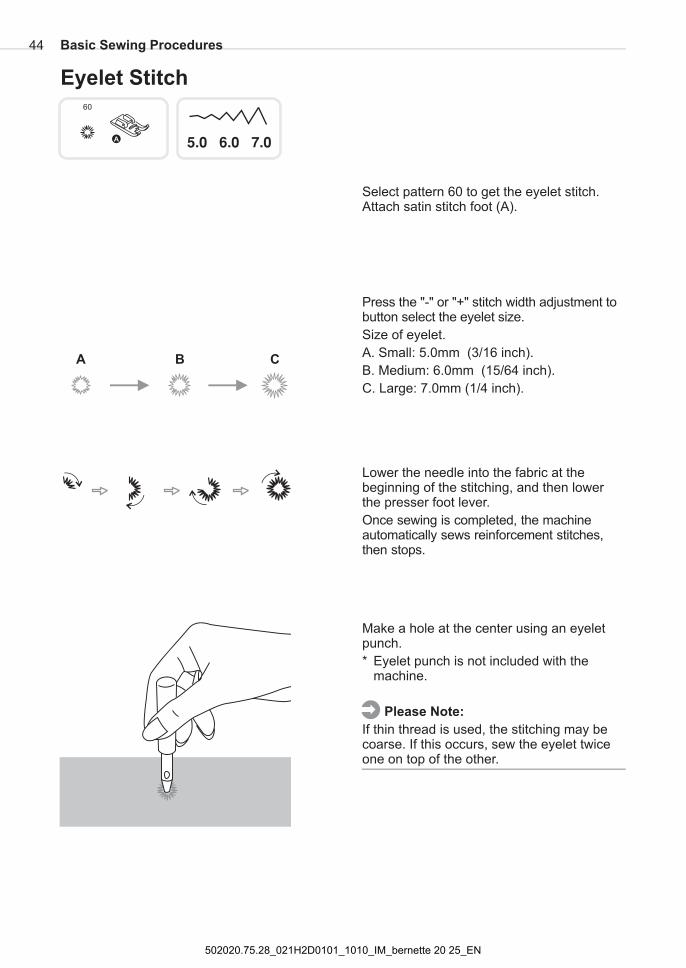
Select pattern 60 to get the eyelet stitch.Attach satin stitch foot (A).
A���������������
Press the "-" or "+" stitch width adjustment tobutton select the eyelet size.
Size of eyelet.
A. Small: 5.0mm (3/16 inch).
B. Medium: 6.0mm (15/64 inch).
C. Large: 7.0mm (1/4 inch).
Lower the needle into the fabric at thebeginning of the stitching, and then lowerthe presser foot lever.
Once sewing is completed, the machineautomatically sews reinforcement stitches,then stops.
Make a hole at the center using an eyeletpunch.
* Eyelet punch is not included with themachine.
If thin thread is used, the stitching may becoarse. If this occurs, sew the eyelet twiceone on top of the other.
Please Note:
Eyelet Stitch
A B C
Basic Sewing Procedures44
502020.75.28_021H2D0101_1010_IM_bernette 20 25_EN
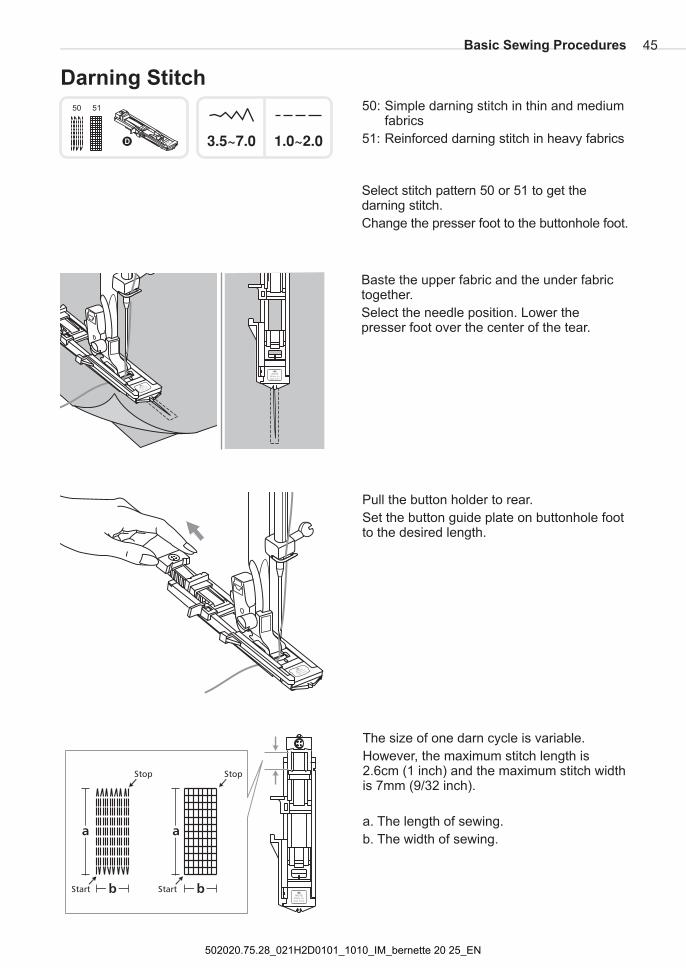
Select stitch pattern 50 or 51 to get thedarning stitch.
Change the presser foot to the buttonhole foot.
Pull the button holder to rear.
Set the button guide plate on buttonhole footto the desired length.
Baste the upper fabric and the under fabrictogether.
Select the needle position. Lower thepresser foot over the center of the tear.
������� ������
Darning Stitch
The size of one darn cycle is variable.
However, the maximum stitch length is2.6cm (1 inch) and the maximum stitch widthis 7mm (9/32 inch).
a. The length of sewing.
b. The width of sewing.
D
Basic Sewing Procedures
50: Simple darning stitch in thin and mediumfabrics
51: Reinforced darning stitch in heavy fabrics
45
Start
a
b
StopStop
a
Start b
502020.75.28_021H2D0101_1010_IM_bernette 20 25_EN
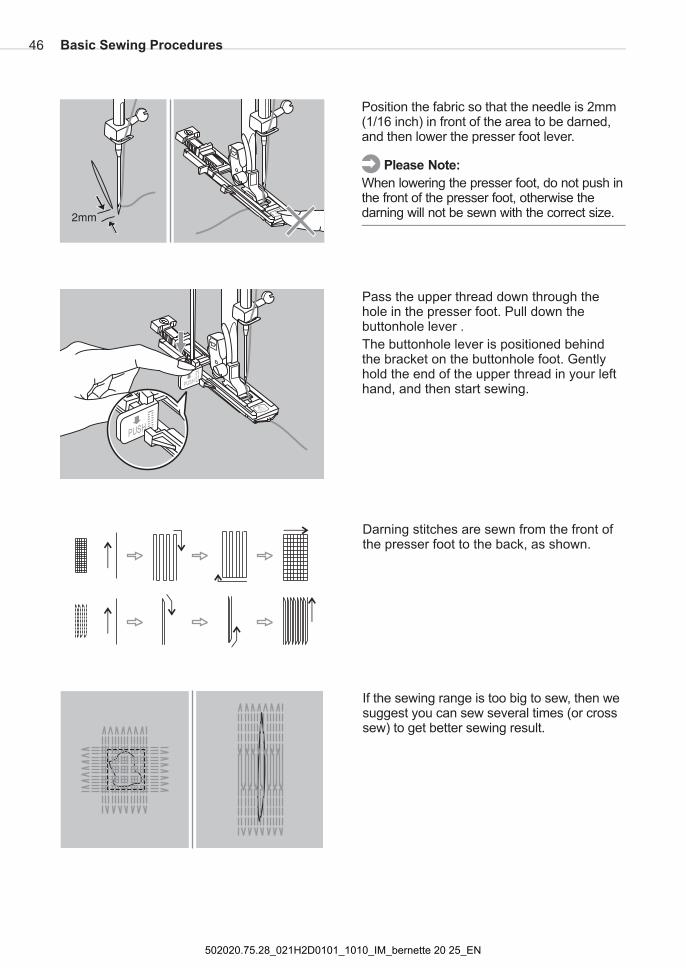
Position the fabric so that the needle is 2mm(1/16 inch) in front of the area to be darned,and then lower the presser foot lever.
When lowering the presser foot, do not push inthe front of the presser foot, otherwise thedarning will not be sewn with the correct size.
Please Note:
Pass the upper thread down through thehole in the presser foot. Pull down thebuttonhole lever .
The buttonhole lever is positioned behindthe bracket on the buttonhole foot. Gentlyhold the end of the upper thread in your lefthand, and then start sewing.
If the sewing range is too big to sew, then wesuggest you can sew several times (or crosssew) to get better sewing result.
Darning stitches are sewn from the front ofthe presser foot to the back, as shown.
Basic Sewing Procedures46
���
502020.75.28_021H2D0101_1010_IM_bernette 20 25_EN
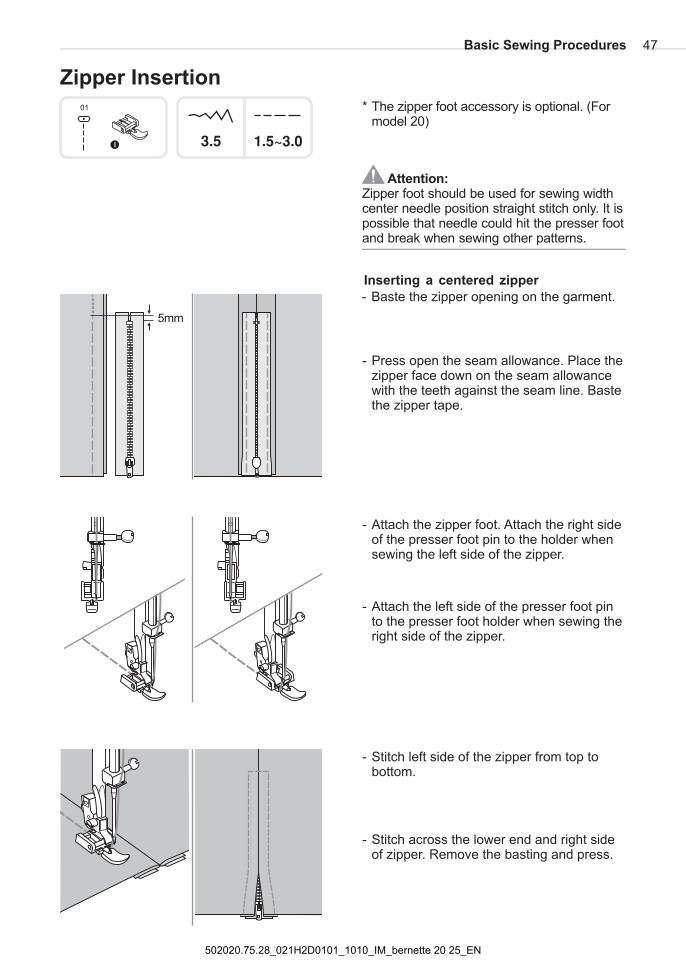
- Baste the zipper opening on the garment.
- Press open the seam allowance. Place thezipper face down on the seam allowancewith the teeth against the seam line. Bastethe zipper tape.
- Attach the zipper foot. Attach the right sideof the presser foot pin to the holder whensewing the left side of the zipper.
- Attach the left side of the presser foot pinto the presser foot holder when sewing theright side of the zipper.
- Stitch left side of the zipper from top tobottom.
- Stitch across the lower end and right sideof zipper. Remove the basting and press.
I
Inserting a centered zipper
Attention:Zipper foot should be used for sewing widthcenter needle position straight stitch only. It ispossible that needle could hit the presser footand break when sewing other patterns.
5mm
������
Zipper Insertion
Basic Sewing Procedures
���
47
* The zipper accessory is optional. (Formodel 20)
foot
502020.75.28_021H2D0101_1010_IM_bernette 20 25_EN
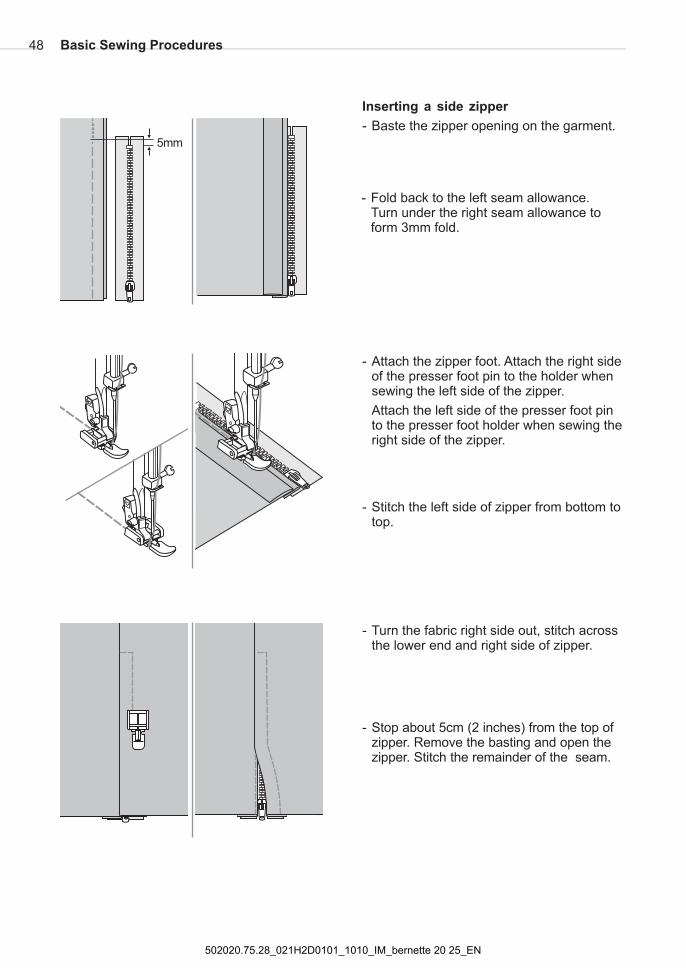
Inserting a side zipper
- Baste the zipper opening on the garment.
- Fold back to the left seam allowance.Turn under the right seam allowance toform 3mm fold.
- Attach the zipper foot. Attach the right sideof the presser foot pin to the holder whensewing the left side of the zipper.
Attach the left side of the presser foot pinto the presser foot holder when sewing theright side of the zipper.
- Stitch the left side of zipper from bottom totop.
- Turn the fabric right side out, stitch acrossthe lower end and right side of zipper.
- Stop about 5cm (2 inches) from the top ofzipper. Remove the basting and open thezipper. Stitch the remainder of the seam.
5mm
Basic Sewing Procedures48
502020.75.28_021H2D0101_1010_IM_bernette 20 25_EN
������
Invisible zipper insertion
1/4"
5/8"
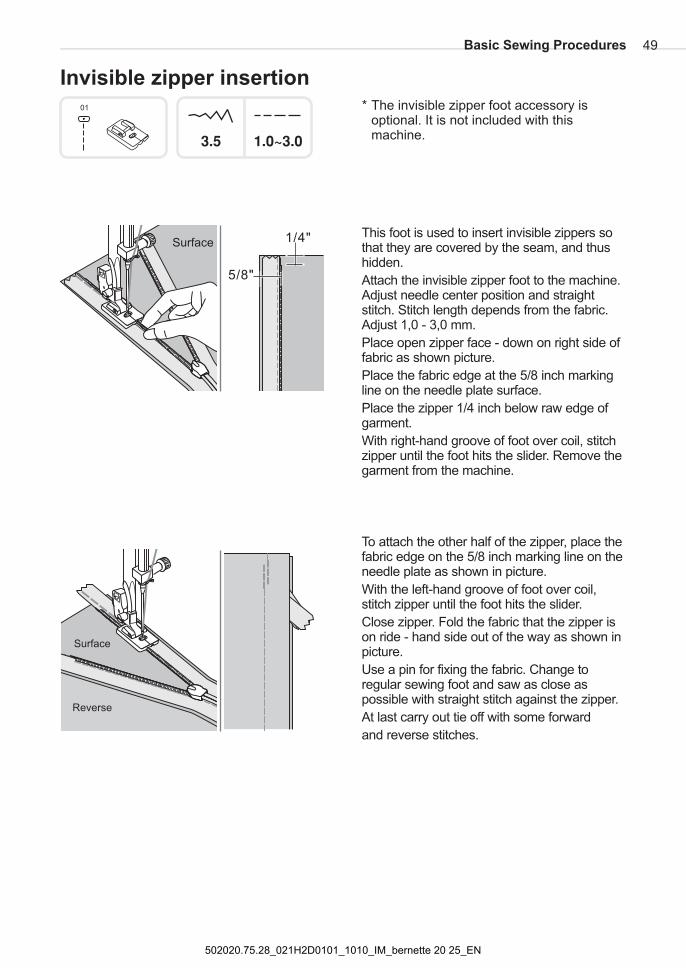
SurfaceThis foot is used to insert invisible zippers sothat they are covered by the seam, and thushidden.
Attach the invisible zipper foot to the machine.Adjust needle center position and straightstitch. Stitch length depends from the fabric.Adjust 1,0 - 3,0 mm.
Place open zipper face - down on right side offabric as shown picture.
Place the fabric edge at the 5/8 inch markingline on the needle plate surface.
Place the zipper 1/4 inch below raw edge ofgarment.
With right-hand groove of foot over coil, stitchzipper until the foot hits the slider. Remove thegarment from the machine.
To attach the other half of the zipper, place thefabric edge on the 5/8 inch marking line on theneedle plate as shown in picture.
With the left-hand groove of foot over coil,stitch zipper until the foot hits the slider.
Close zipper. Fold the fabric that the zipper ison ride - hand side out of the way as shown inpicture.
Use a pin for fixing the fabric. Change toregular sewing foot and saw as close aspossible with straight stitch against the zipper.
At last carry out tie off with some forward
and reverse stitches.
Reverse
Surface
* The invisible zipper foot accessory isoptional. It is not included with thismachine.
Basic Sewing Procedures 49
���
502020.75.28_021H2D0101_1010_IM_bernette 20 25_EN
K
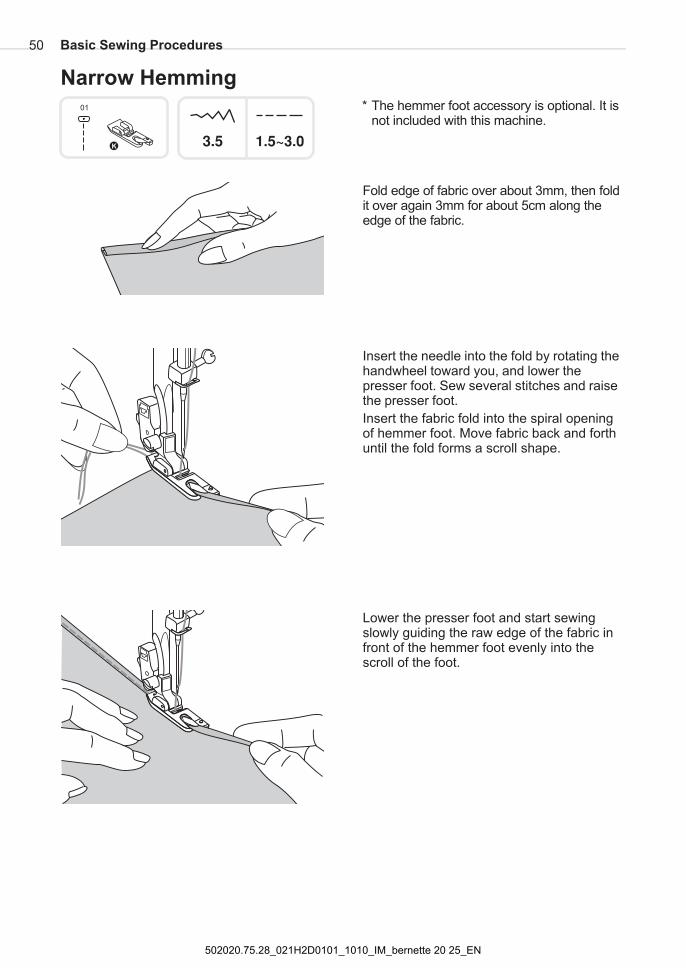
Fold edge of fabric over about 3mm, then foldit over again 3mm for about 5cm along theedge of the fabric.
Insert the needle into the fold by rotating thehandwheel toward you, and lower thepresser foot. Sew several stitches and raisethe presser foot.
Insert the fabric fold into the spiral openingof hemmer foot. Move fabric back and forthuntil the fold forms a scroll shape.
Lower the presser foot and start sewingslowly guiding the raw edge of the fabric infront of the hemmer foot evenly into thescroll of the foot.
������
Narrow Hemming
* The hemmer foot accessory is optional. It isnot included with this machine.
���
Basic Sewing Procedures50
502020.75.28_021H2D0101_1010_IM_bernette 20 25_EN
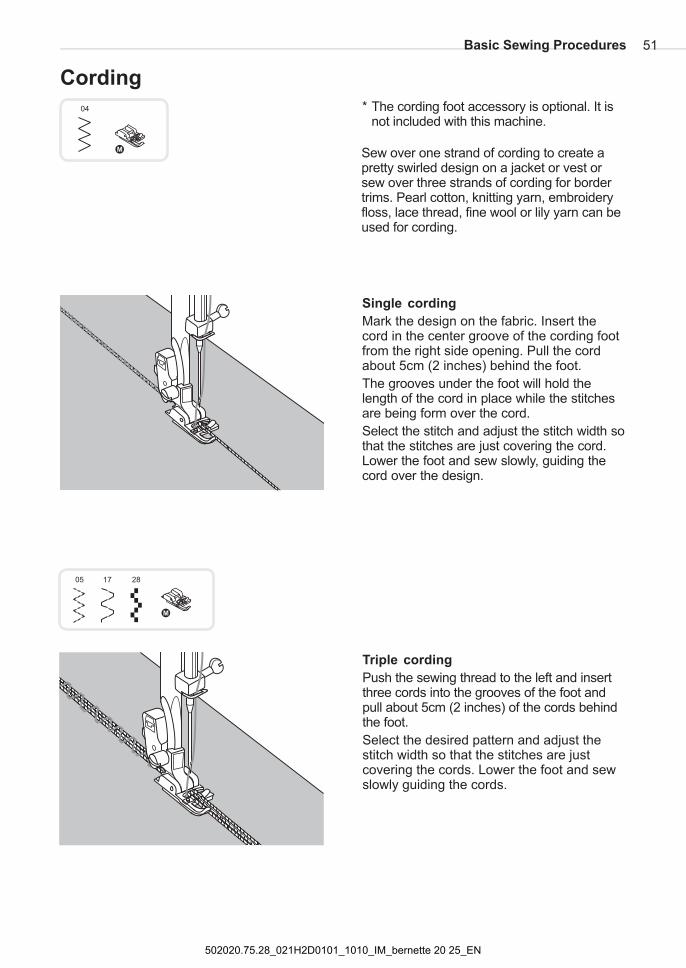
M Sew over one strand of cording to create apretty swirled design on a jacket or vest orsew over three strands of cording for bordertrims. Pearl cotton, knitting yarn, embroideryfloss, lace thread, fine wool or lily yarn can beused for cording.
M
Triple cording
Push the sewing thread to the left and insertthree cords into the grooves of the foot andpull about 5cm (2 inches) of the cords behindthe foot.
Select the desired pattern and adjust thestitch width so that the stitches are justcovering the cords. Lower the foot and sewslowly guiding the cords.
Cording
Single cording
Mark the design on the fabric. Insert thecord in the center groove of the cording footfrom the right side opening. Pull the cordabout 5cm (2 inches) behind the foot.
The grooves under the foot will hold thelength of the cord in place while the stitchesare being form over the cord.
Select the stitch and adjust the stitch width sothat the stitches are just covering the cord.Lower the foot and sew slowly, guiding thecord over the design.
* The accessory is optional. It isnot included with this machine.
cording foot
Basic Sewing Procedures 51
502020.75.28_021H2D0101_1010_IM_bernette 20 25_EN
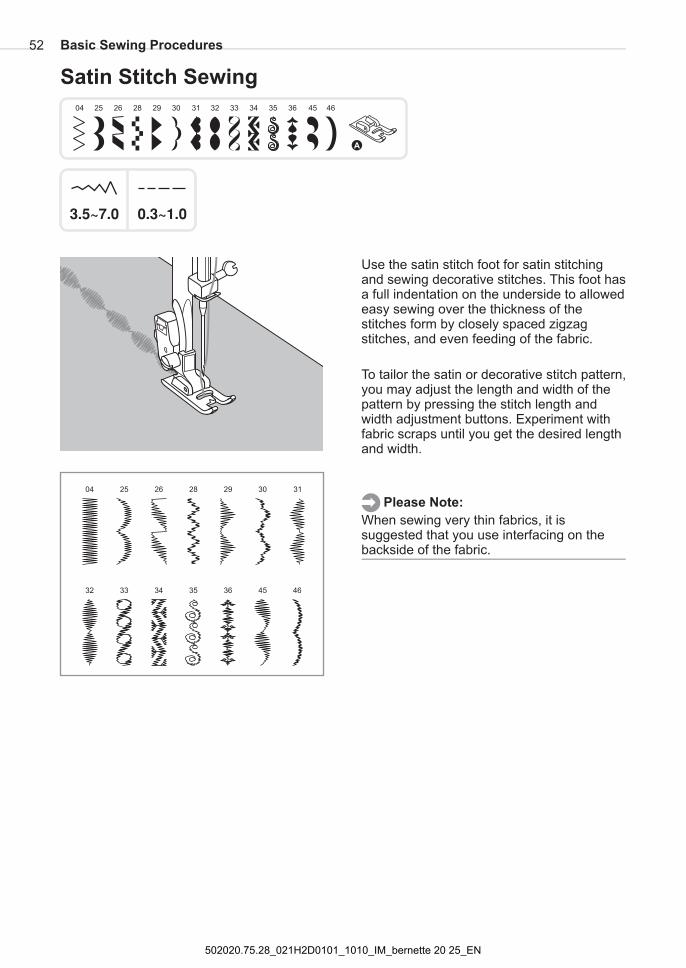
Use the satin stitch foot for satin stitchingand sewing decorative stitches. This foot hasa full indentation on the underside to allowedeasy sewing over the thickness of thestitches form by closely spaced zigzagstitches, and even feeding of the fabric.
To tailor the satin or decorative stitch pattern,you may adjust the length and width of thepattern by pressing the stitch length andwidth adjustment buttons. Experiment withfabric scraps until you get the desired lengthand width.
When sewing very thin fabrics, it issuggested that you use interfacing on thebackside of the fabric.
Please Note:
������� ������
Satin Stitch Sewing
A
Basic Sewing Procedures52
502020.75.28_021H2D0101_1010_IM_bernette 20 25_EN
������
Quilting
���
1/4"
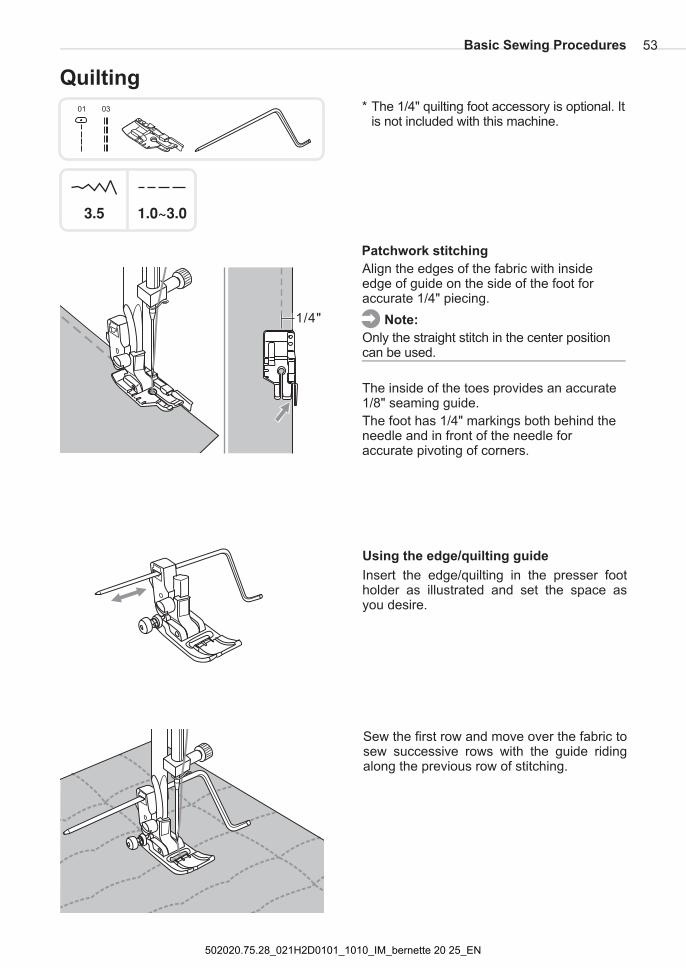
Patchwork stitching
Align the edges of the fabric with insideedge of guide on the side of the foot foraccurate 1/4" piecing.
The inside of the toes provides an accurate1/8" seaming guide.
The foot has 1/4" markings both behind theneedle and in front of the needle foraccurate pivoting of corners.
Note:
Only the straight stitch in the center positioncan be used.
Using the edge/quilting guide
edge/quiltingInsert the in the presser footholder as illustrated and set the space asyou desire.
Sew the first row and move over the fabric tosew successive rows with the guide ridingalong the previous row of stitching.
* The 1/4" quilting foot accessory is optional. Itis not included with this machine.
Basic Sewing Procedures 53
502020.75.28_021H2D0101_1010_IM_bernette 20 25_EN
������
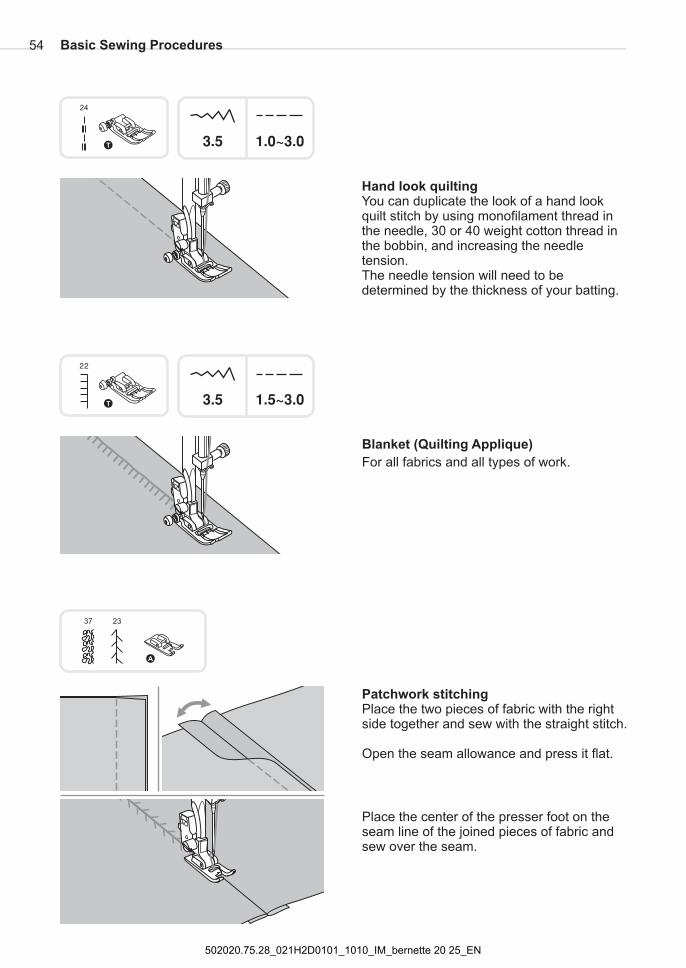
Hand look quiltinghand look
quiltYou can duplicate the look of a
stitch by using monofilament thread inthe needle, 30 or 40 weight cotton thread inthe bobbin, and increasing the needletension.The needle tension will need to bedetermined by the thickness of your batting.
Patchwork stitchingPlace the two pieces of fabric with the rightside together and sew with the straight stitch.
Open the seam allowance and press it flat.
Place the center of the presser foot on theseam line of the joined pieces of fabric andsew over the seam.
A
��� ������
Blanket (Quilting Applique)
For all fabrics and all types of work.
���
Basic Sewing Procedures54
502020.75.28_021H2D0101_1010_IM_bernette 20 25_EN
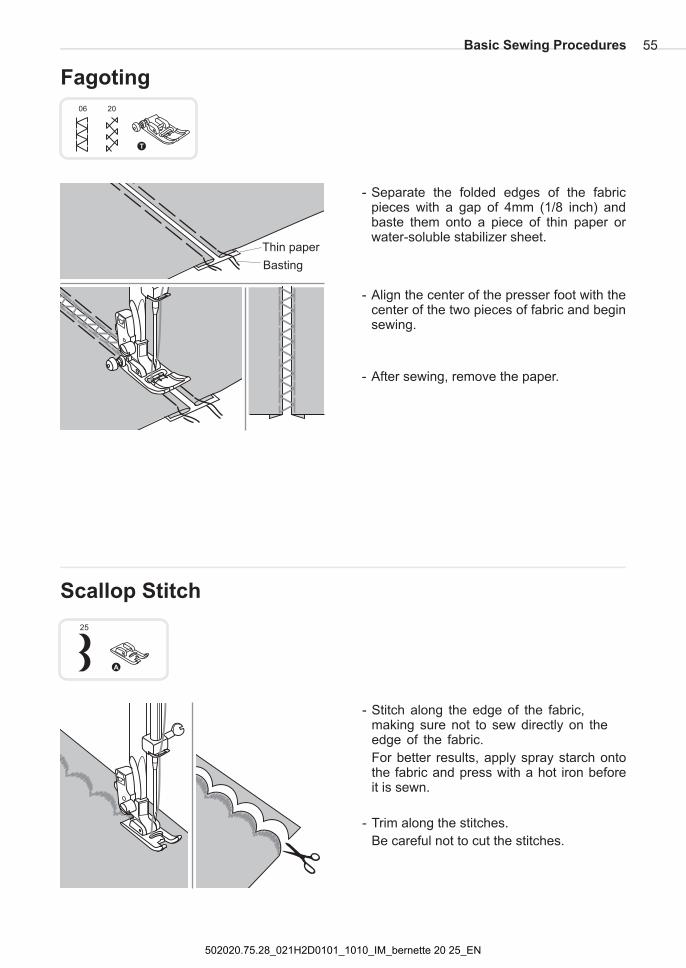
- Stitch along the edge of the fabric,making sure not to sew directly on theedge of the fabric.
For better results, apply spray starch ontothe fabric and press with a hot iron beforeit is sewn.
- Trim along the stitches.
Be careful not to cut the stitches.
A
Scallop Stitch
- Separate the folded edges of the fabricpieces with a gap of 4mm (1/8 inch) andbaste them onto a piece of thin paper orwater-soluble stabilizer sheet.
- Align the center of the presser foot with thecenter of the two pieces of fabric and beginsewing.
- After sewing, remove the paper.
Thin paper
Basting
T
Fagoting
Basic Sewing Procedures 55
502020.75.28_021H2D0101_1010_IM_bernette 20 25_EN
��
Gathering
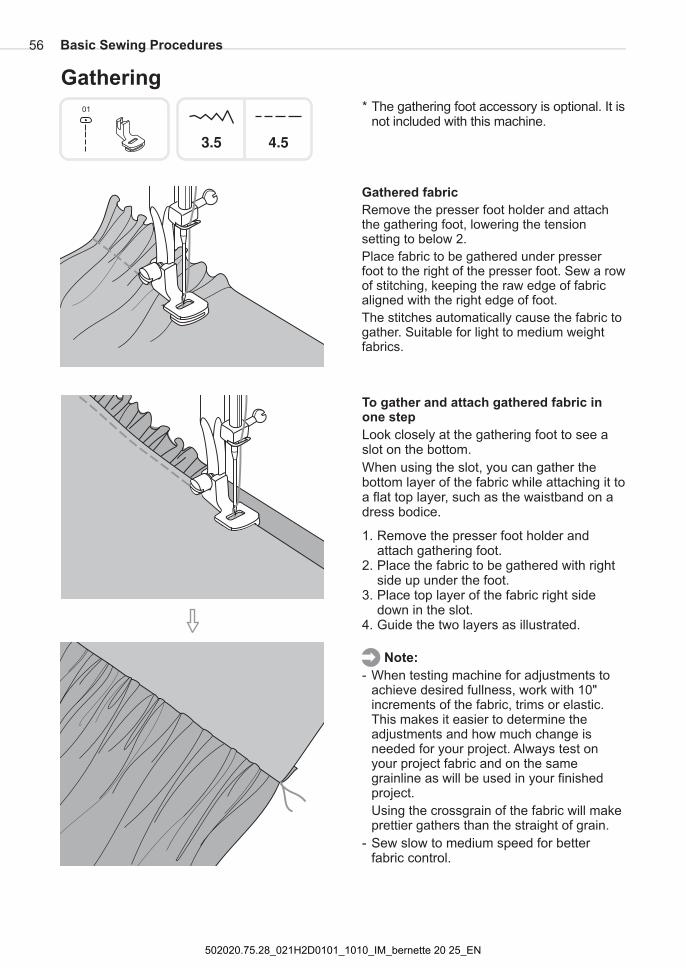
To gather and attach gathered fabric inone step
Look closely at the gathering foot to see aslot on the bottom.
When using the slot, you can gather thebottom layer of the fabric while attaching it toa flat top layer, such as the waistband on adress bodice.
1. Remove the presser foot holder andattach gathering foot.
2. Place the fabric to be gathered with rightside up under the foot.
3. Place top layer of the fabric right sidedown in the slot.
4. Guide the two layers as illustrated.
- Sew slow to medium speed for betterfabric control.
Note:
- When testing machine for adjustments toachieve desired fullness, work with 10"increments of the fabric, trims or elastic.This makes it easier to determine theadjustments and how much change isneeded for your project. Always test onyour project fabric and on the samegrainline as will be used in your finishedproject.
Using the crossgrain of the fabric will makeprettier gathers than the straight of grain.
Gathered fabric
Remove the presser foot holder and attachthe gathering foot, lowering the tensionsetting to below 2.
Suitable for light to medium weightfabrics.
Place fabric to be gathered under presserfoot to the right of the presser foot. Sew a rowof stitching, keeping the raw edge of fabricaligned with the right edge of foot.
The stitches automatically cause the fabric togather.
* The accessory is optional. It isnot included with this machine.
gathering foot
���
Basic Sewing Procedures56
502020.75.28_021H2D0101_1010_IM_bernette 20 25_EN
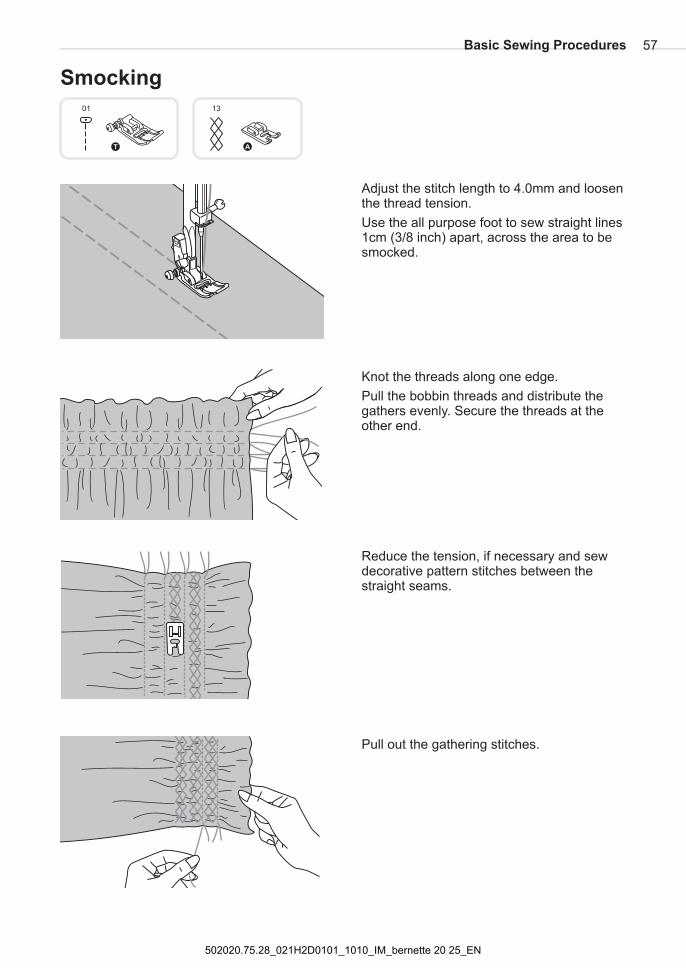
Adjust the stitch length to 4.0mm and loosenthe thread tension.
Use the all purpose foot to sew straight lines1cm (3/8 inch) apart, across the area to besmocked.
Knot the threads along one edge.
Pull the bobbin threads and distribute thegathers evenly. Secure the threads at theother end.
Reduce the tension, if necessary and sewdecorative pattern stitches between thestraight seams.
Pull out the gathering stitches.
A
Smocking
T
Basic Sewing Procedures 57
502020.75.28_021H2D0101_1010_IM_bernette 20 25_EN
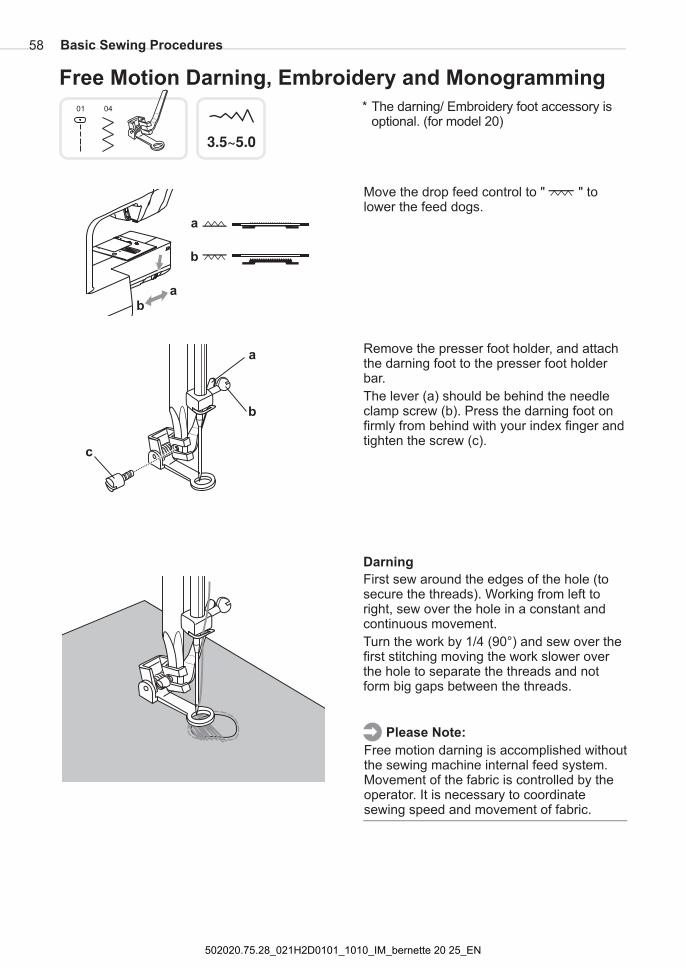
Remove the presser foot holder, and attachthe darning foot to the presser foot holderbar.
The lever (a) should be behind the needleclamp screw (b). Press the darning foot onfirmly from behind with your index finger andtighten the screw (c).
First sew around the edges of the hole (tosecure the threads). Working from left toright, sew over the hole in a constant andcontinuous movement.
Turn the work by 1/4 (90 ) and sew over thefirst stitching moving the work slower overthe hole to separate the threads and notform big gaps between the threads.
°
Darning
�������
Free Motion Darning, Embroidery and Monogramming
Please Note:
Free motion darning is accomplished withoutthe sewing machine internal feed system.Movement of the fabric is controlled by theoperator. It is necessary to coordinatesewing speed and movement of fabric.
Move the drop feed control to " " tolower the feed dogs.
a
b
c
a
b
ab
* The d accessory isoptional.
arning/ Embroidery foot(for model 20)
Basic Sewing Procedures58
502020.75.28_021H2D0101_1010_IM_bernette 20 25_EN
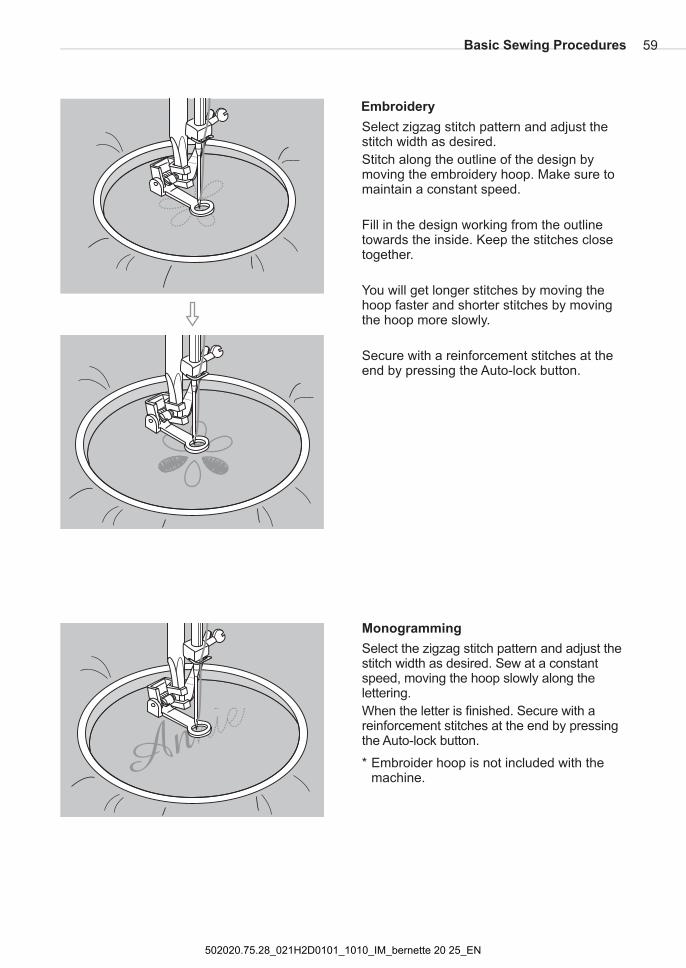
Select zigzag stitch pattern and adjust thestitch width as desired.
Stitch along the outline of the design bymoving the embroidery hoop. Make sure tomaintain a constant speed.
Fill in the design working from the outlinetowards the inside. Keep the stitches closetogether.
You will get longer stitches by moving thehoop faster and shorter stitches by movingthe hoop more slowly.
Secure with a reinforcement stitches at theend by pressing the Auto-lock button.
Select the zigzag stitch pattern and adjust thestitch width as desired. Sew at a constantspeed, moving the hoop slowly along thelettering.
When the letter is finished. Secure with areinforcement stitches at the end by pressingthe Auto-lock button.
* Embroider hoop is not included with themachine.
Monogramming
Embroidery
Basic Sewing Procedures 59
502020.75.28_021H2D0101_1010_IM_bernette 20 25_EN
Always try to sew first without the walking foot accessorywhich should be used only when necessary.
It is easier to guide the fabric and you have a better view of theseam when using the standard, regular foot on your machine.
Your sewing machine offers excellent stitch quality on a wide rangeof fabrics from delicate chiffons to multiple layers of denim.
The Walking Foot accessory equalizes the feeding of the upperand lower layers of fabric and improves the matching of plaids,stripes and patterns. It also helps to prevent uneven feeding of verydifficult fabrics. The Walking Foot accessory equalizes the feedingof the upper and lower layers of fabric and improves the matchingof plaids, stripes and patterns. It also helps to prevent unevenfeeding of very difficult fabrics.
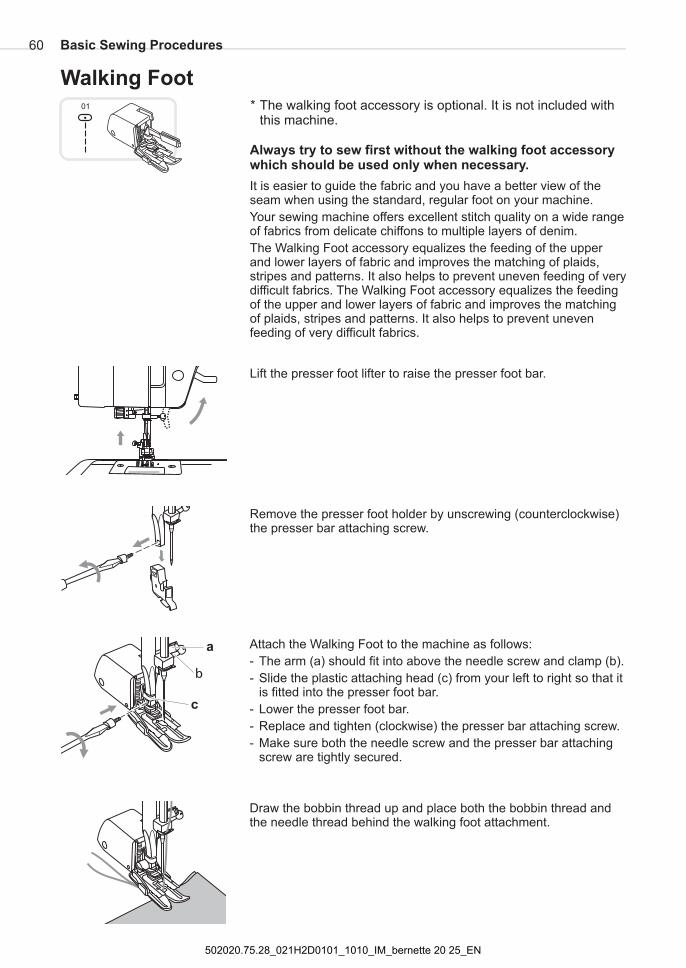
Lift the presser foot lifter to raise the presser foot bar.
Remove the presser foot holder by unscrewing (counterclockwise)the presser bar attaching screw.
Attach the Walking Foot to the machine as follows:
- The arm (a) should fit into above the needle screw and clamp (b).
- Slide the plastic attaching head (c) from your left to right so that itis fitted into the presser foot bar.
- Lower the presser foot bar.
- Replace and tighten (clockwise) the presser bar attaching screw.
- Make sure both the needle screw and the presser bar attachingscrew are tightly secured.
Draw the bobbin thread up and place both the bobbin thread andthe needle thread behind the walking foot attachment.
* The walking foot accessory is optional. It is not included withthis machine.
Walking Foot
c
b
a
60 Basic Sewing Procedures
502020.75.28_021H2D0101_1010_IM_bernette 20 25_EN
Mirror Stitch Pattern - model 25
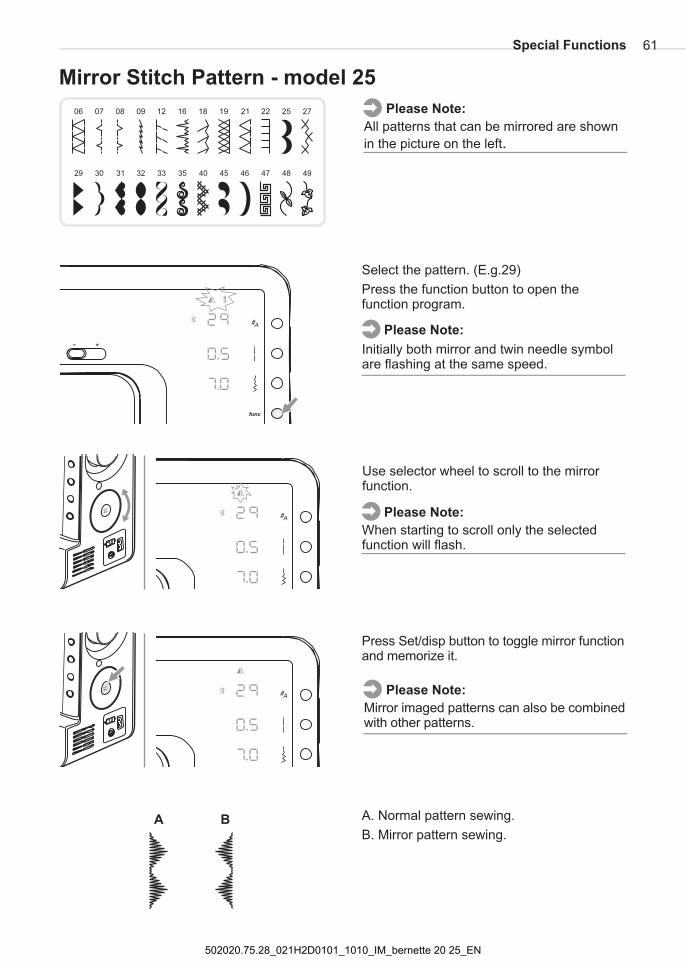
Select the pattern. ( )
Press the function button to open thefunction program.
E.g.29
Use selector wheel to scroll to the mirrorfunction.
Press Set/disp tobutton toggle mirror functionand memorize it.
Please Note:
All patterns that can be mirrored are shown
in the picture on the left.
Please Note:
When starting to scroll only the selectedfunction will flash.
A. Normal pattern sewing.
B. Mirror pattern sewing.
Please Note:
Mirror imaged patterns can also be combinedwith other patterns.
A B
Please Note:
Initially both mirror and twin needle symbolare flashing at the same speed.
Special Functions 61
502020.75.28_021H2D0101_1010_IM_bernette 20 25_EN
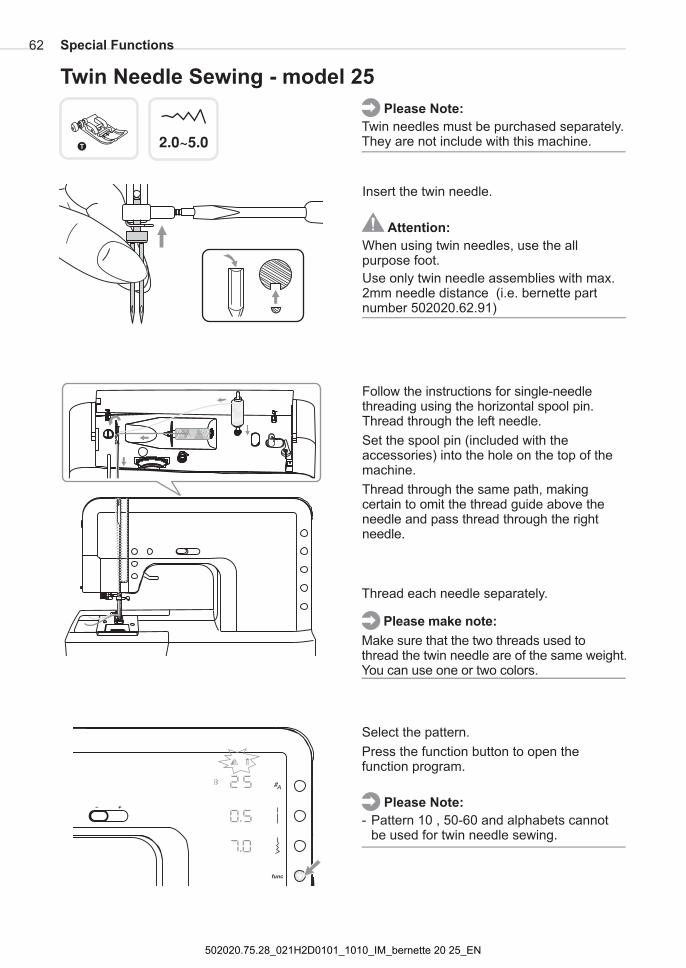
Twin Needle Sewing - model 25
T �������
Insert the twin needle.
Attention:
When using twin needles, use the allpurpose foot.
Use only twin needle assemblies with max.2mm needle distance (i.e. bernette partnumber 502020.62.91)
Follow the instructions for single-needlethreading using the horizontal spool pin.Thread through the left needle.
Set the spool pin (included with theaccessories) into the hole on the top of themachine.
Thread through , makingcertain to omit the thread guide above theneedle and pass thread through the rightneedle.
the same path
Thread each needle separately.
Make sure that the two threads used tothread the twin needle are of the same weight.You can use one or two colors.
Please make note:
Please Note:
Twin needles must be purchased separately.They are not include with this machine.
Select the pattern.
Press the function button to open thefunction program.
Please Note:
- Pattern 10 , 50-60 and alphabets cannotbe used for twin needle sewing.
Special Functions62
502020.75.28_021H2D0101_1010_IM_bernette 20 25_EN
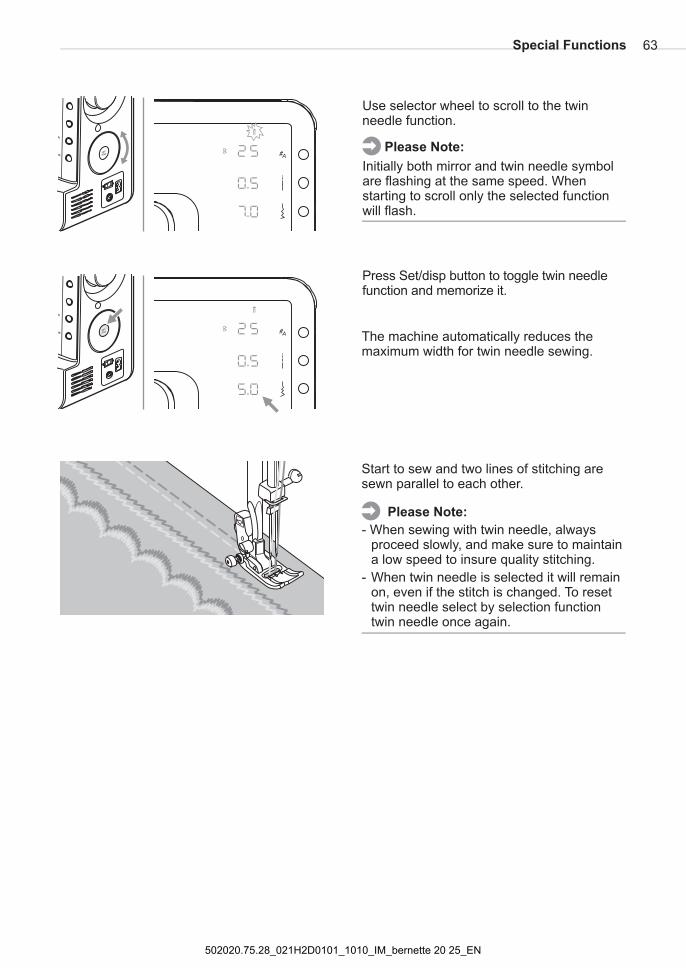
Use selector wheel to scroll to the twinneedle function.
Press Set/disp tobutton toggle twin needlefunction and memorize it.
Please Note:
Initially both mirror and twin needle symbolare flashing at the same speed. Whenstarting to scroll only the selected functionwill flash.
The machine automatically reduces themaximum width for twin needle sewing.
Start to sew and two lines of stitching aresewn parallel to each other.
Please Note:
- When sewing with twin needle, alwaysproceed slowly, and make sure to maintaina low speed to insure quality stitching.
- When twin needle is selected it will remainon, even if the stitch is changed. To resettwin needle select by selection functiontwin needle once again.
Special Functions 63
502020.75.28_021H2D0101_1010_IM_bernette 20 25_EN
Several stitch patterns may be combined to one sewing sequence using the memoryfunction. These pattern sequences are stored for later use. Even when the sewingmachine is switched off the memory contents are retained.
- The machine provides one memory with 30 .
- Multiple patterns can be selected from the pattern selection by numbers group or the alphabetgroup and then sewn together.
- Pattern 10 and 50-60 cannot be stored.
- While the machine is sewing the memory patterns, the reverse button can not be operated.
Please Note:
positions
Memory - model 25
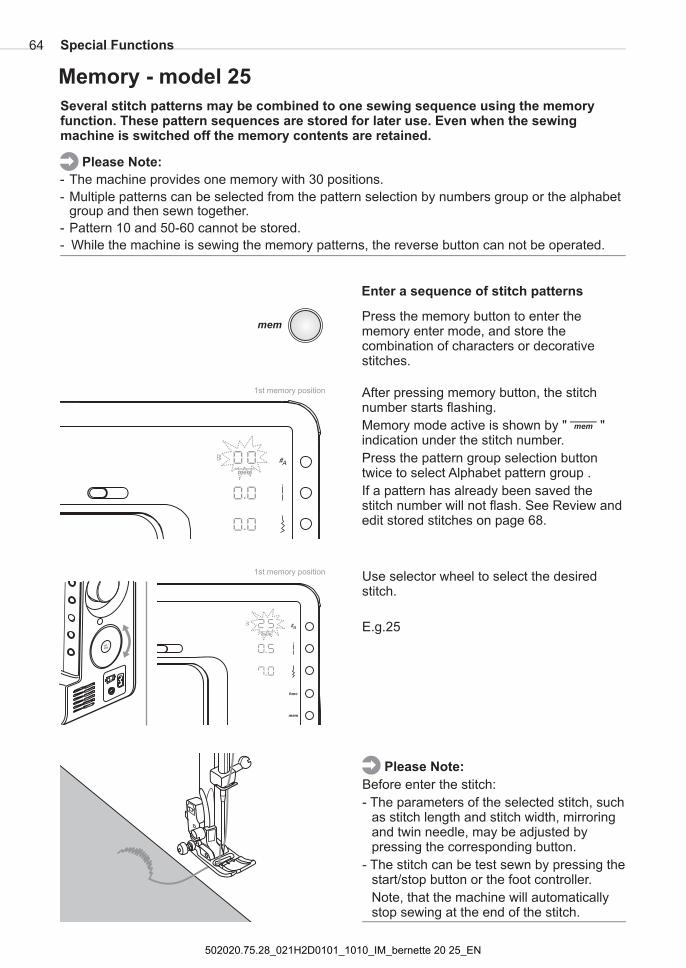
Enter a sequence of stitch patterns
Press the memory button to enter thememory enter mode, and store thecombination of characters or decorativestitches.
Use selector wheel to select the desiredstitch.
E.g.25
After pressing memory button, the stitchnumber starts flashing.
Press the pattern group selection buttontwice to select Alphabet pattern group .
If a pattern has already been saved thestitch number will not flash. See Review andedit stored stitches on page 68.
Memory mode active is shown by " "indication under the stitch number.
Before enter the stitch:
- The parameters of the selected stitch, suchas stitch length and stitch width, mirroringand twin needle, may be adjusted bypressing the corresponding button.
- The stitch can be test sewn by pressing thestart/stop button or the foot controller.
Note, that the machine will automaticallystop sewing at the end of the stitch.
Please Note:
1st memory position
1st memory position
Special Functions64
502020.75.28_021H2D0101_1010_IM_bernette 20 25_EN
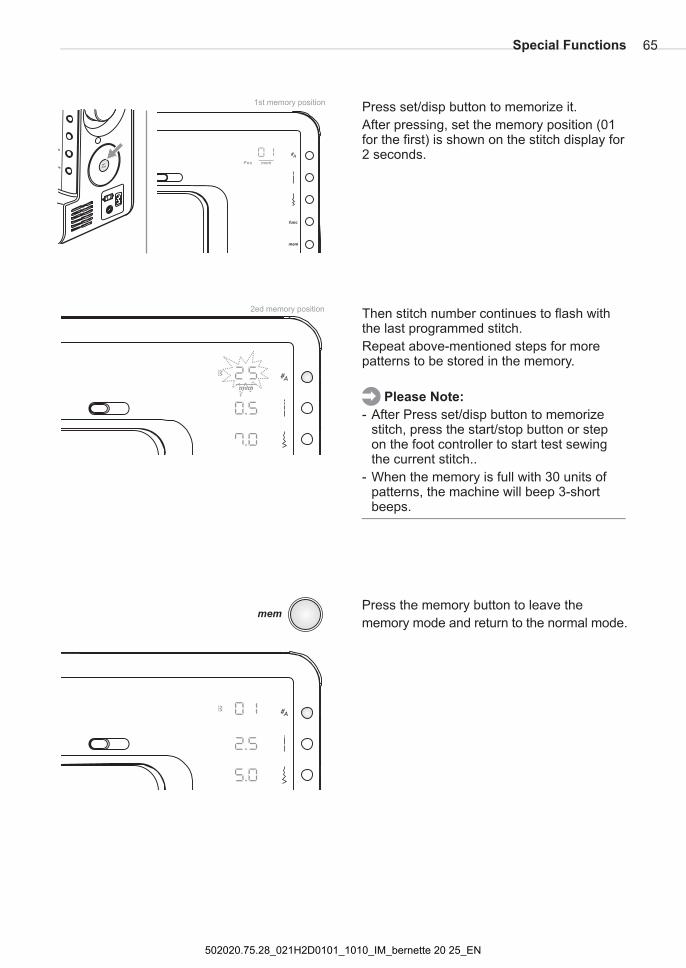
Press set/disp button to memorize it.
After pressing, set the memory position (01for the first) is shown on the stitch display for2 seconds.
Then stitch number continues to flash withthe last programmed stitch.
Press set/disp to
test sewingthe current stitch.
Repeat above-mentioned steps for morepatterns to be stored in the memory.
ress the start/stop button or stepon the foot controller to start
3-shortbeeps
Please Note:
- After button memorizestitch, p
.
- When the memory is full with 30 units ofpatterns, the machine will beep
.
Press the memory button to leave the
memory mode return to the normal modeand .
1st memory position
2ed memory position
Special Functions 65
502020.75.28_021H2D0101_1010_IM_bernette 20 25_EN
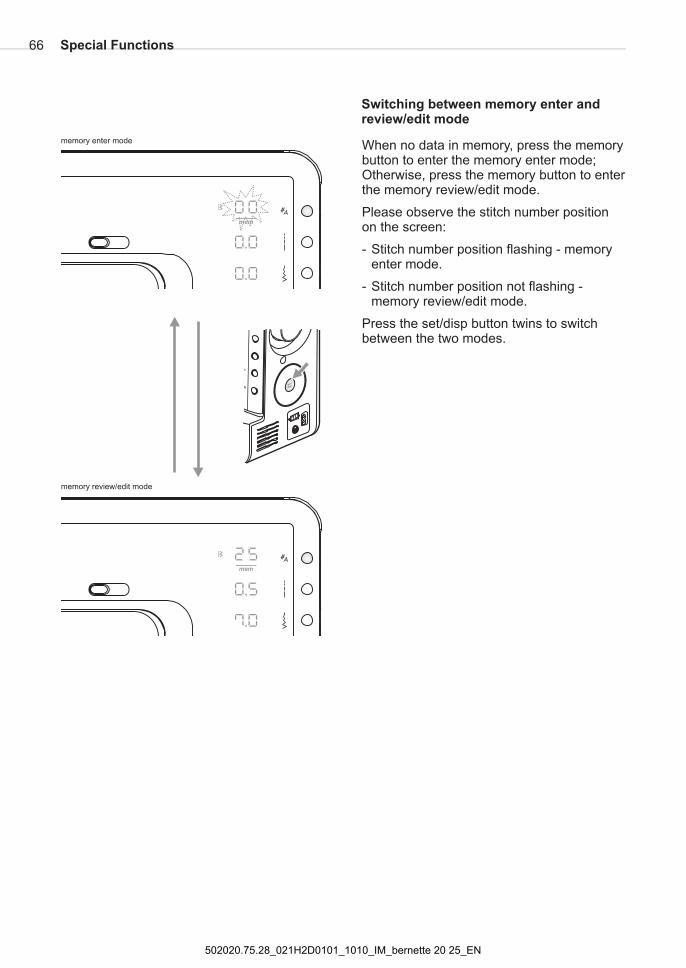
Switching between memory andmode
enterreview/edit
When no data in memory, press the memorybutton to enter the memory enter mode;O , press the memory button to enterthe memory
Please observe the stitch number positionon the screen:
- Stitch number position flashing - memorymode.
- Stitch number position not flashing -memory
Press the to switchbetween the two modes.
therwisereview/edit
enter
review/edit
set/disp
mode.
mode.
button twins
memory enter mode
memory review/edit mode
Special Functions66
502020.75.28_021H2D0101_1010_IM_bernette 20 25_EN
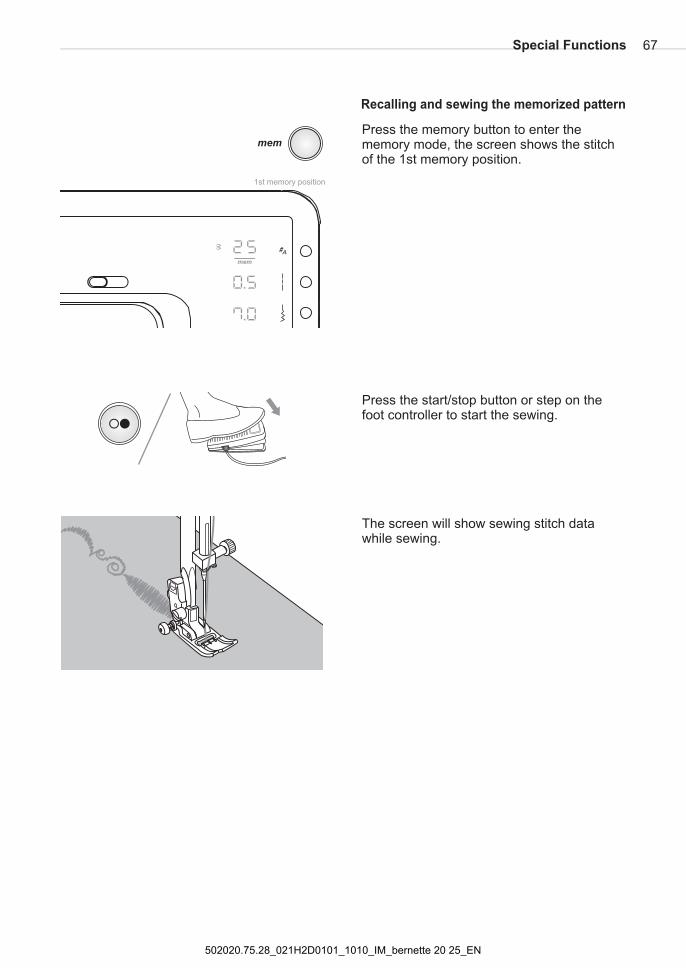
Recalling and sewing the memorized pattern
Press the memory button to enter thememory mode, the screen shows the stitchof the 1st memory .position
Press the start/stop button or step on thefoot controller to start the sewing.
The screen will showwhile sewing.
sewing stitch data
1st memory position
Special Functions 67
502020.75.28_021H2D0101_1010_IM_bernette 20 25_EN
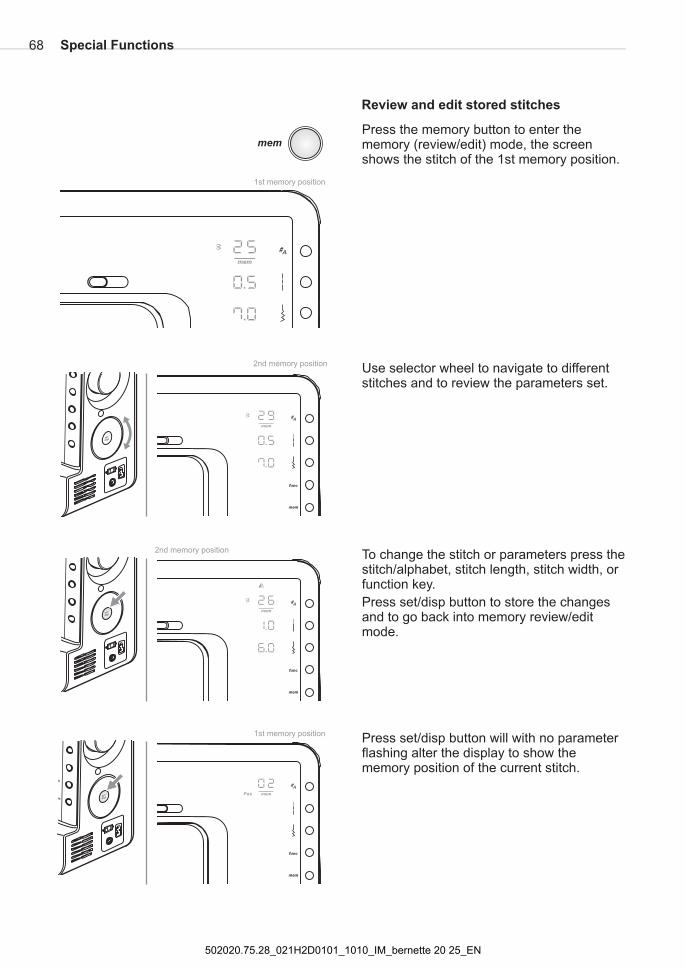
Review and edit stored stitches
Press the memory button to enter thememory ( , the screenshows the stitch of the 1st memory .
review/edit)position
mode
Use selector wheel to navigate to differentand to review the parameters set.stitches
2nd memory position
2nd memory position
1st memory position
To change the stitch or parameters press thestitch/alphabet, stitch length, stitch width, orfunction key.
Press set/disp button to store the changesand to go back into memory review/editmode.
1st memory positionPress set/disp button will with no parameterflashing alter the display to show thememory position of the current stitch.
Special Functions68
502020.75.28_021H2D0101_1010_IM_bernette 20 25_EN
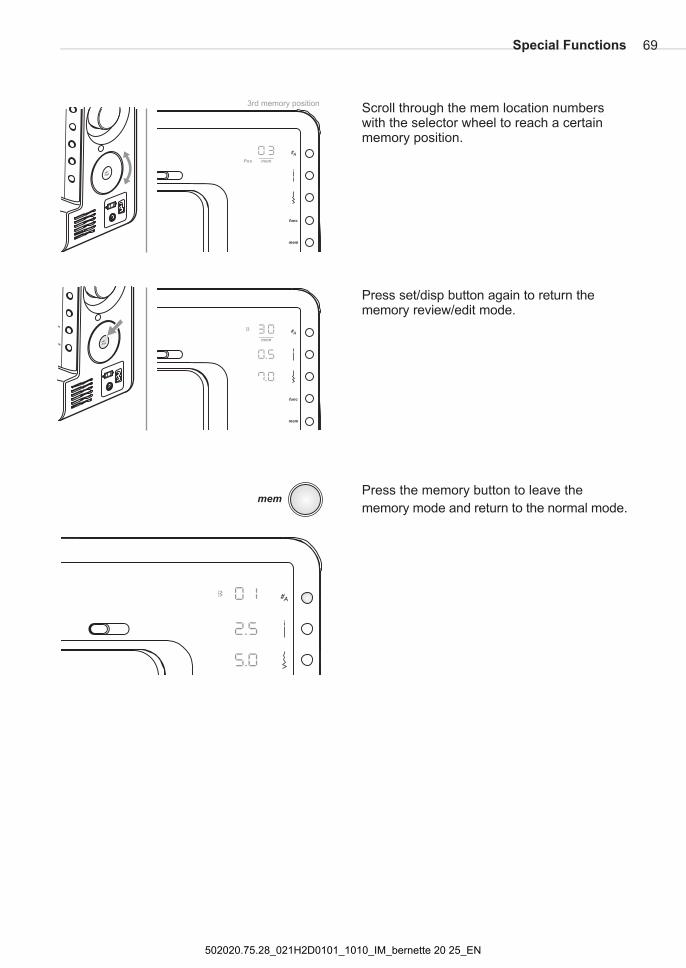
Scroll through the mem location numberswith the reach a certainmemory position.
selector wheel to
3rd memory position
Press set/dispreview/edit
again to return thebuttonmode.memory
Press the memory button to leave the
memory mode return to the normal modeand .
Special Functions 69
502020.75.28_021H2D0101_1010_IM_bernette 20 25_EN
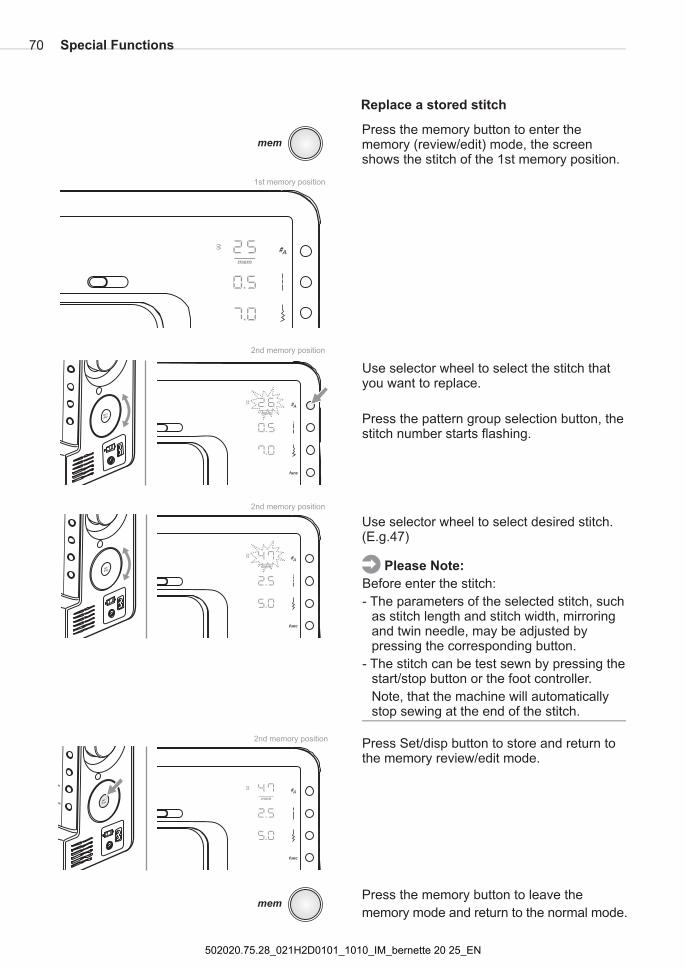
Replace a stored stitch
Use selector wheel to select the stitch thatyou want to replace
Press the p selection button
.
,attern group thestitch number starts flashing.
Use selector wheel to select desired stitch.(E.g.47)
Press the memory button to enter thememory ( , the screenshows the stitch of the 1st memory .
review/edit)position
mode
1st memory position
2nd memory position
2nd memory position
2nd memory positionPress Set/disp to and
review/editbutton
mode.store return to
the memory
Press the memory button to leave the
memory mode return to the normal modeand .
Before enter the stitch:
- The parameters of the selected stitch, suchas stitch length and stitch width, mirroringand twin needle, may be adjusted bypressing the corresponding button.
- The stitch can be test sewn by pressing thestart/stop button or the foot controller.
Note, that the machine will automaticallystop sewing at the end of the stitch.
Please Note:
Special Functions70
502020.75.28_021H2D0101_1010_IM_bernette 20 25_EN
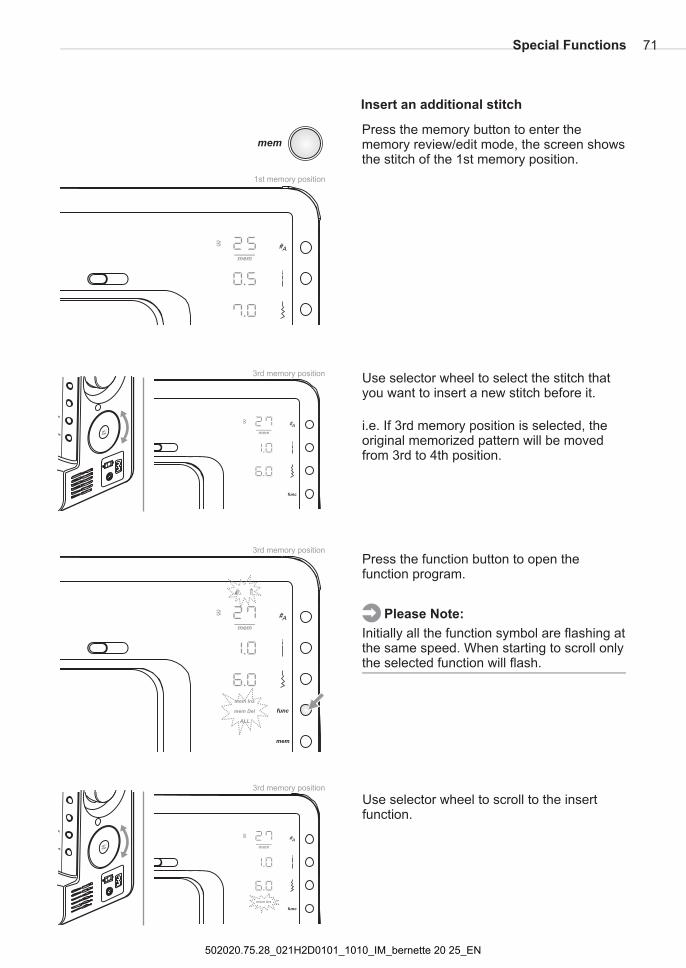
Insert an additional stitch
1st memory position
Use selector wheel to select the stitch thatyou want to insert a new stitch before it.
i.e. If 3rd memory position is selected, theoriginal memorized pattern will be movedfrom 3rd to 4th .position
Press the function button to open thefunction program.
Press the memory button to enter thememory , the screen showsthe stitch of the 1st memory .
review/editposition
mode
Use selector wheel to scroll to the insertfunction.
Please Note:
Initially all the function symbol are flashing atthe same speed. When starting to scroll onlythe selected function will flash.
3rd memory position
3rd memory position
3rd memory position
Special Functions 71
502020.75.28_021H2D0101_1010_IM_bernette 20 25_EN
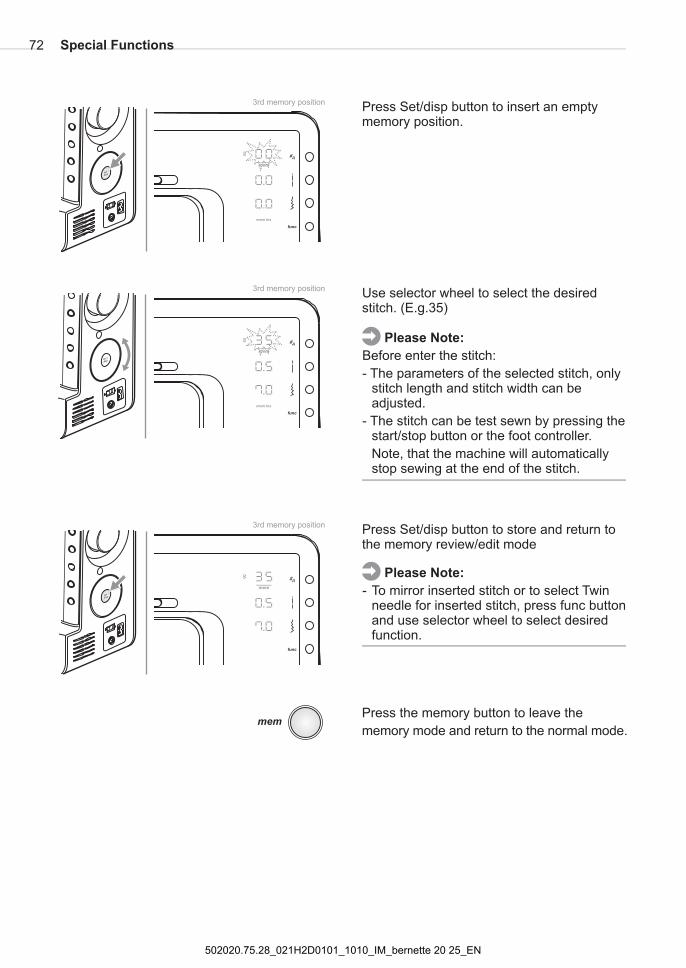
Press Set/disp button to insert an emptymemory position.
Use selector wheel to select the desiredstitch. (E.g.35)
3rd memory position
3rd memory position
3rd memory positionPress Set/disp to and
review/editbutton
modestore return to
the memory
Press the memory button to leave the
memory mode return to the normal modeand .
Before enter the stitch:
- The parameters of the selected stitch, onlystitch length and stitch width can beadjusted.
- The stitch can be test sewn by pressing thestart/stop button or the foot controller.
Note, that the machine will automaticallystop sewing at the end of the stitch.
Please Note:
- To mirror inserted stitch or to select Twinneedle for inserted stitch, press func buttonand use selector wheel to select desiredfunction.
Please Note:
Special Functions72
502020.75.28_021H2D0101_1010_IM_bernette 20 25_EN
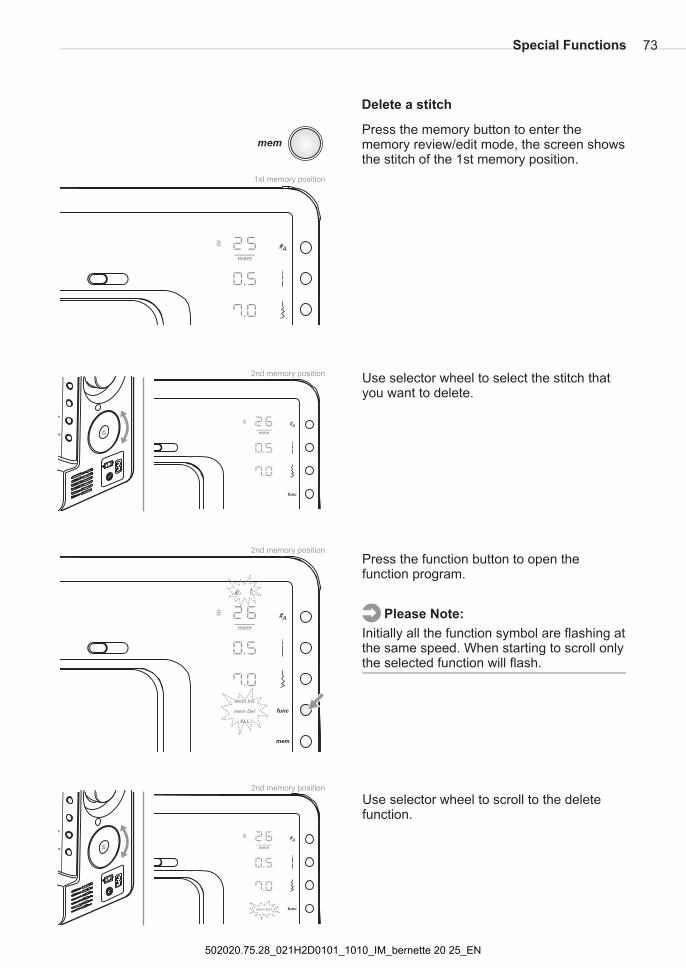
Delete a stitch
1st memory position
Use selector wheel to select the stitch thatyou want to delete.
Press the function button to open thefunction program.
Press the memory button to enter thememory , the screen showsthe stitch of the 1st memory .
review/editposition
mode
Please Note:
Initially all the function symbol are flashing atthe same speed. When starting to scroll onlythe selected function will flash.
2nd memory position
2nd memory position
Use selector wheel to scroll to the deletefunction.
2nd memory position
Special Functions 73
502020.75.28_021H2D0101_1010_IM_bernette 20 25_EN
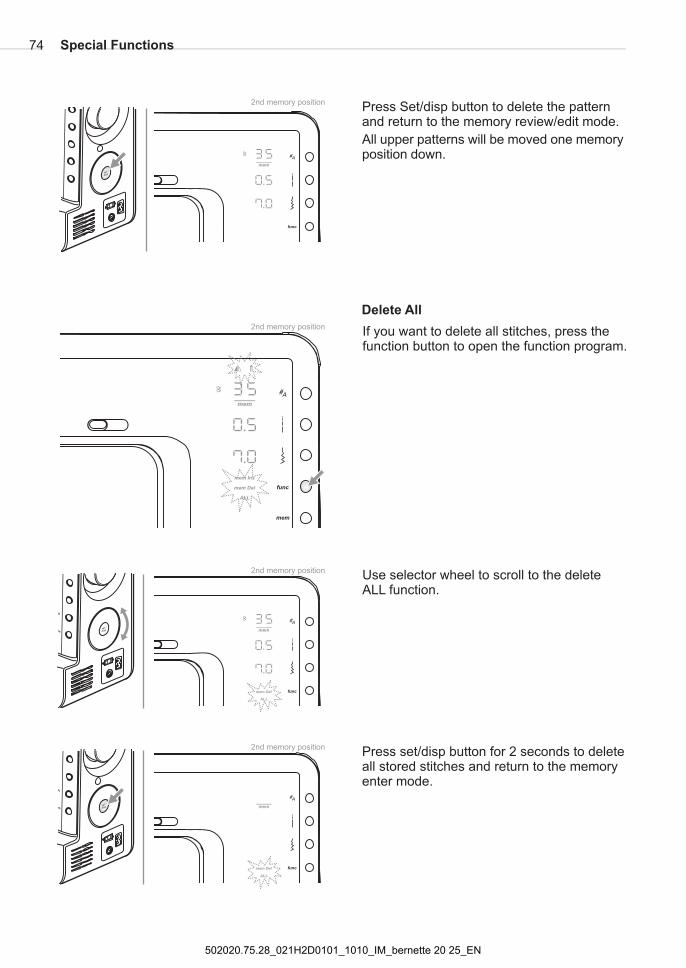
Press Set/disp toand review/edit
down
buttonmode.
delete the patternreturn to the memory
All upper patterns will be moved one memoryposition .
2nd memory position
If you want to delete all stitches, press thefunction button to open the function program.
2nd memory position
Use selector wheel to scroll to the deleteALL function.
2nd memory position
Press set/dispand
button
mode.
for 2 seconds to deleteall stored stitches return to the memoryenter
2nd memory position
Delete All
Special Functions74
502020.75.28_021H2D0101_1010_IM_bernette 20 25_EN
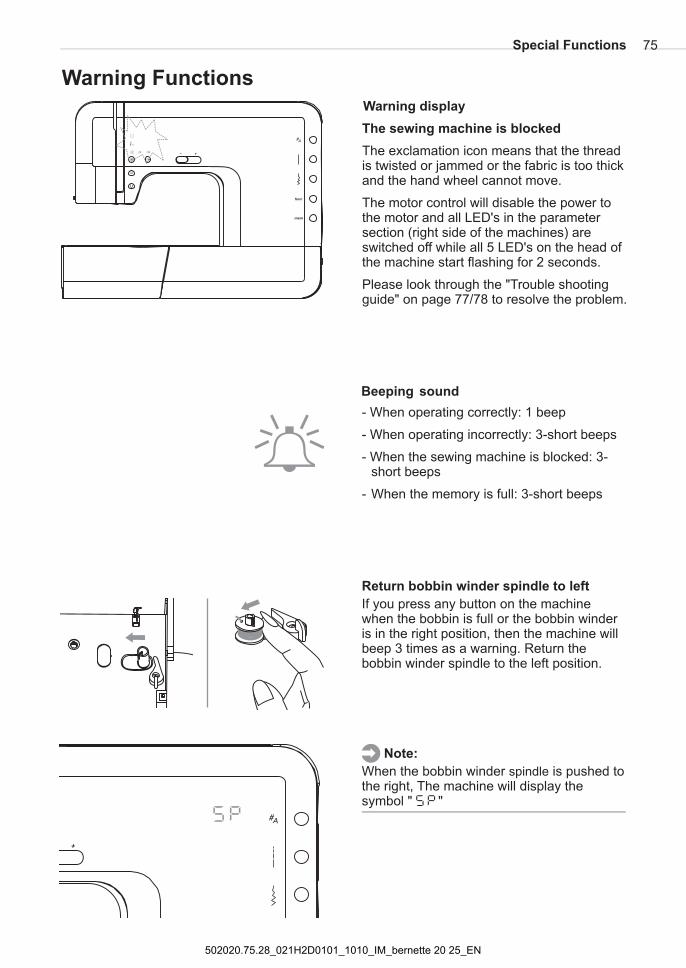
Warning Functions
- When operating correctly: 1 beep
- When operating incorrectly: 3-short beeps
- When the sewing machine is blocked: 3-short beeps
- When the memory is full: 3-short beeps
Beeping sound
Warning display
The sewing machine is
The exclamation icon means that the threadis twisted or jammedand the hand wheel cannot move.
The motor control will disable the power tothe motor and all LED's in the parametersection (right side of the machines) areswitched off while all 5 LED's on the head ofthe machine start flashing for 2 seconds.
Please look through the "Trouble shootingguide" on page 77/78 to
blocked
or the fabric is too thick
resolve the problem.
Return bobbin winder spindle to left
If you press any button on the machinewhen the bobbin is full or the bobbin winderis in the right position, then the machine willbeep 3 times as a warning. Return thebobbin winder spindle to the left position.
Note:
When the bobbin winder is pushed tothe right, The machine will display thesymbol " "
spindle
Special Functions 75
502020.75.28_021H2D0101_1010_IM_bernette 20 25_EN
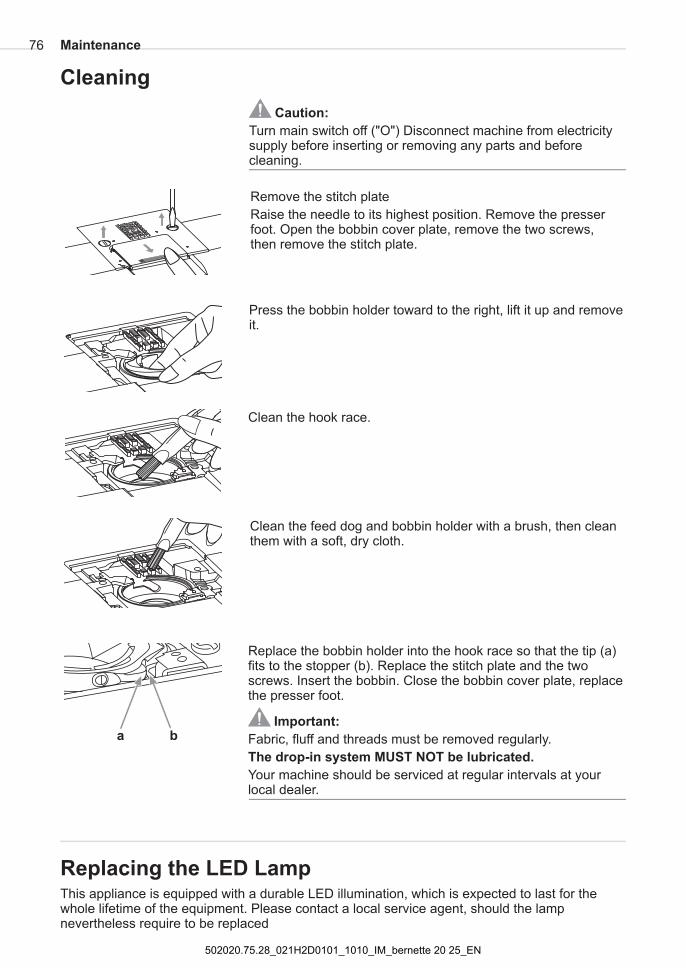
Turn main switch off ("O") Disconnect machine from electricitysupply before inserting or removing any parts and beforecleaning.
Caution:
Remove the stitch plate
Raise the needle to its highest position. Remove the presserfoot. Open the bobbin cover plate, remove the two screws,then remove the stitch plate.
Press the bobbin holder toward to the right, lift it up and removeit.
Cleaning
Clean the hook race.
Clean the feed dog and bobbin holder with a brush, then cleanthem with a soft, dry cloth.
Replace the bobbin holder into the hook race so that the tip (a)fits to the stopper (b). Replace the stitch plate and the twoscrews. Insert the bobbin. Close the bobbin cover plate, replacethe presser foot.
Important:
The drop-in system MUST NOT be lubricated.
Fabric, fluff and threads must be removed regularly.
Your machine should be serviced at regular intervals at yourlocal dealer.
a b
This appliance is equipped with a durable LED illumination, which is expected to last for thewhole lifetime of the equipment. Please contact a local service agent, should the lampnevertheless require to be replaced
Replacing the LED Lamp
Maintenance76
502020.75.28_021H2D0101_1010_IM_bernette 20 25_EN
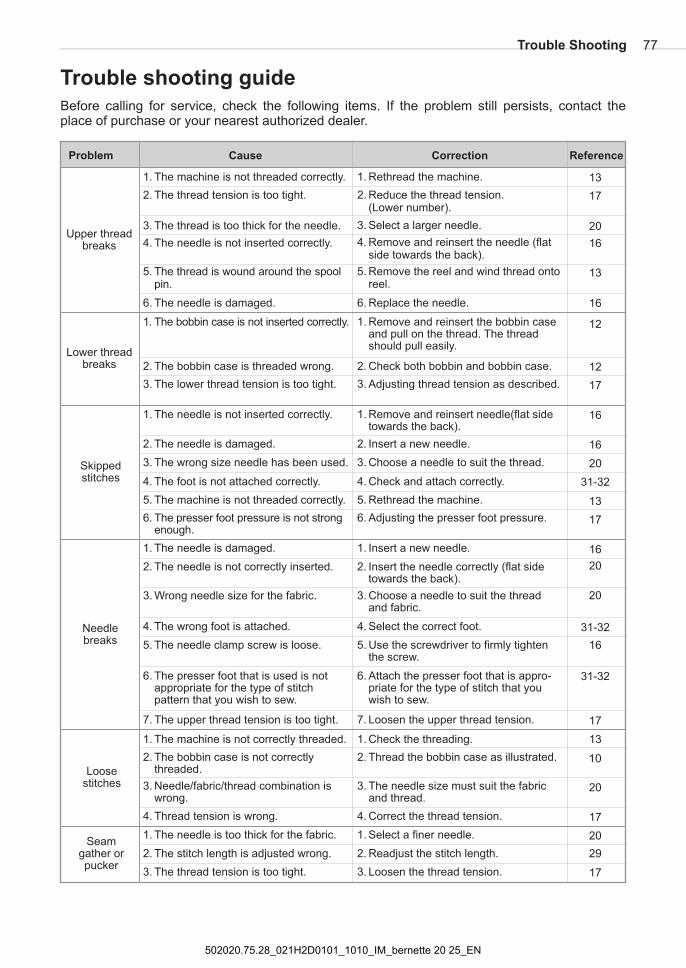
Before calling for service, check the following items. If the problem still persists, contact theplace of purchase or your nearest authorized dealer.
Upper threadbreaks
Lower threadbreaks
Skippedstitches
Needlebreaks
Loosestitches
Seamgather orpucker
1. The machine is not threaded correctly.
2. The thread tension is too tight.
3. The thread is too thick for the needle.
4. The needle is not inserted correctly.
5. The thread is wound around the spoolpin.
6. The needle is damaged.
1. The bobbin case is not inserted correctly.
2. The bobbin case is threaded wrong.
3. The lower thread tension is too tight.
1. The needle is not inserted correctly.
2. The needle is damaged.
3. The wrong size needle has been used.
4. The foot is not attached correctly.
5. The machine is not threaded correctly.
6. The presser foot pressure is not strongenough.
1. The needle is damaged.
2. The needle is not correctly inserted.
3. Wrong needle size for the fabric.
4. The wrong foot is attached.
5. The needle clamp screw is loose.
6. The presser foot that is used is notappropriate for the type of stitchpattern that you wish to sew.
7. The upper thread tension is too tight.
1. The machine is not correctly threaded.
2. The bobbin case is not correctlythreaded.
3. Needle/fabric/thread combination iswrong.
4. Thread tension is wrong.
1. The needle is too thick for the fabric.
2. The stitch length is adjusted wrong.
3. The thread tension is too tight.
1. Select a finer needle.
2. Readjust the stitch length.
3. Loosen the thread tension.
1. Check the threading.
2. Thread the bobbin case as illustrated.
3. The needle size must suit the fabricand thread.
4. Correct the thread tension.
1. Insert a new needle.
2. Insert the needle correctly (flat sidetowards the back).
3. Choose a needle to suit the threadand fabric.
4. Select the correct foot.
5. Use the screwdriver to firmly tightenthe screw.
6. Attach the presser foot that is appro-priate for the type of stitch that youwish to sew.
7. Loosen the upper thread tension.
1. Remove and reinsert needle(flat sidetowards the back).
2. Insert a new needle.
3. Choose a needle to suit the thread.
4. Check and attach correctly.
5. Rethread the machine.
6. Adjusting the presser foot pressure.
1. Remove and reinsert the bobbin caseand pull on the thread. The threadshould pull easily.
2. Check both bobbin and bobbin case.
3. Adjusting thread tension as described.
1. Rethread the machine.
2. Reduce the thread tension.(Lower number).
3. Select a larger needle.
4. Remove and reinsert the needle (flatside towards the back).
5. Remove the reel and wind thread ontoreel.
6. Replace the needle.
Trouble shooting guide
Problem Cause Correction Reference
Trouble Shooting
13
17
20
16
13
16
12
12
17
16
16
20
31-32
13
17
16
20
20
31-32
16
31-32
17
13
20
17
10
20
29
17
77
502020.75.28_021H2D0101_1010_IM_bernette 20 25_EN
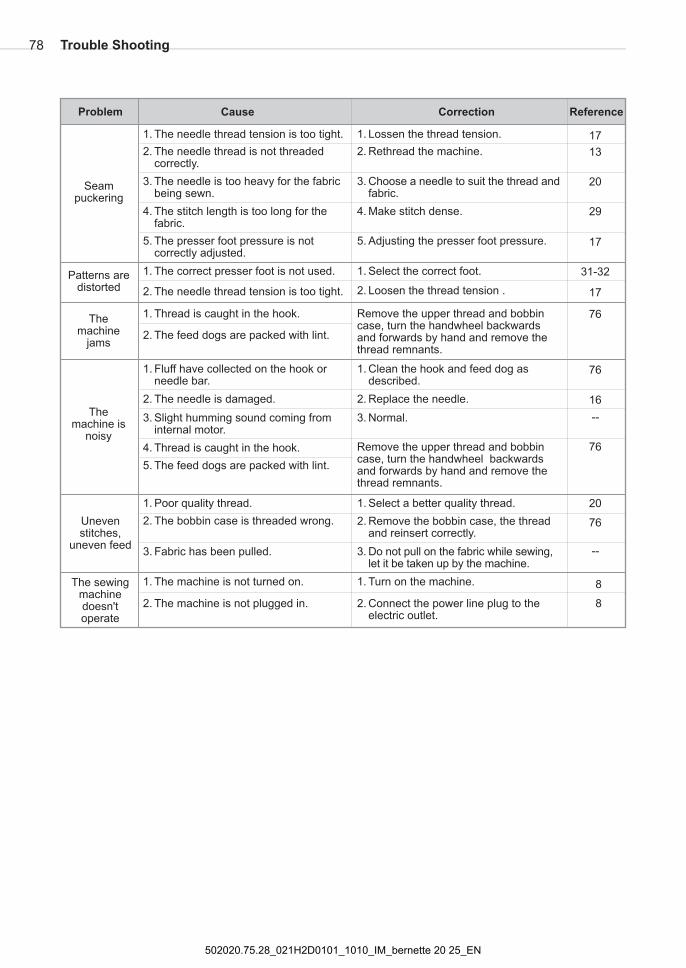
Seampuckering
Patterns aredistorted
1. The needle thread tension is too tight.
2. The needle thread is not threadedcorrectly.
3. The needle is too heavy for the fabricbeing sewn.
4. The stitch length is too long for thefabric.
5. The presser foot pressure is notcorrectly adjusted.
1. The correct presser foot is not used.
2. The needle thread tension is too tight.
1. Select the correct foot.
2. Loosen the thread tension .
1. Lossen the thread tension.
2. Rethread the machine.
3. Choose a needle to suit the thread andfabric.
4. Make stitch dense.
5. Adjusting the presser foot pressure.
The sewingmachinedoesn'toperate
1. The machine is not turned on. 1. Turn on the machine.
Themachine
jams
Remove the upper thread and bobbincase, turn the handwheel backwardsand forwards by hand and remove thethread remnants.
Themachine is
noisy
1. Fluff have collected on the hook orneedle bar.
2. The needle is damaged.
1. Clean the hook and feed dog asdescribed.
2. Replace the needle.
Unevenstitches,
uneven feed
1. Poor quality thread.
2. The bobbin case is threaded wrong.
3. Fabric has been pulled.
1. Select a better quality thread.
2. Remove the bobbin case, the threadand reinsert correctly.
3. Do not pull on the fabric while sewing,let it be taken up by the machine.
Problem Cause Correction Reference
4. Thread is caught in the hook.
3. Slight humming sound coming frominternal motor.
3. Normal.
5. The feed dogs are packed with lint.
Remove the upper thread and bobbincase, turn the handwheel backwardsand forwards by hand and remove thethread remnants.
1. Thread is caught in the hook.
2. The feed dogs are packed with lint.
2. Connect the power line plug to theelectric outlet.
2. The machine is not plugged in.
Trouble Shooting
17
13
20
29
17
31-32
17
76
76
16
--
76
20
76
8
8
--
78
502020.75.28_021H2D0101_1010_IM_bernette 20 25_EN

502020.75.28_021H2D0101_1010_IM_bernette 20 25_EN