Embed Size (px)
Citation preview
I N S T A L L A T I O N I N S T R U C T I O N S
Installation Instructions and System Manager’s Guide for the SAS® System under MVS
Release 6.09 Enhanced TS475
l SAS Publishing
Copyright Notice
The correct bibliographic citation for this manual is as follows: SAS Institute Inc., Installation Instructions and System Manager’s Guide for the SAS® System under MVS, Cary, NC: SAS Institute Inc., 2000.
Installation Instructions and System Manager’s Guide for the SAS® System under MVS Copyright © 2000 SAS Institute Inc., Cary, NC, USA. All rights reserved. Printed in the United States of America. No part of this publication may be reproduced, stored in a retrieval system, or transmitted, by any form or by any means, electronic, mechanical, photocopying, or otherwise, without the prior written permission of the publisher, SAS Institute, Inc. Limited permission is granted to store the copyrighted material in your system and display it on terminals, print only the number of copies required for use by those persons responsible for installing and supporting the SAS programming and licensed programs for which this material has been provided, and to modify the material to meet specific installation requirements. The SAS Institute copyright notice must appear on all printed versions of this material or extracts thereof and on the display medium when the material is displayed. Permission is not granted to reproduce or distribute the material except as stated above.
U.S. Government Restricted Rights Notice. Use, duplication, or disclosure of the software by the government is subject to restrictions as set forth in FAR 52.227-19 Commercial Computer Software-Restricted Rights (June 1987).
SAS Institute Inc., SAS Campus Drive, Cary, North Carolina 27513. SAS and all other SAS Institute Inc. product or service names are registered trademarks or trademarks of SAS Institute Inc. in the USA and other countries. ® indicates USA registration. Other brand and product names are trademarks of their respective companies.
i
Installation Instructions and System Manager’s Guide
for the SAS® System under MVS,
Release 6.09 Enhanced (TS475) Table of Contents
Using this Book ........................................................................................................................1 Contents of this Document ........................................................................................1 Terminology ................................................................................................................2 References ....................................................................................................................2 Contacting SAS Institute ............................................................................................2
Section I, Installation Instructions........................................................................................3
Part 1, Pre-Installation Checklist...........................................................................................5 Introduction .................................................................................................................5 Checking Available Disk Space ................................................................................5 Checking System Requirements ...............................................................................5 Choosing Installation Options ..................................................................................5
Choosing a Primary Installation Action ....................................................6 Determining When to Use Action A............................................6 Determining When to Use Action B ............................................6 Determining When to Use Action C ............................................6
Using Maintenance Actions ........................................................................7 Choosing Installation Modes ......................................................................7
Verifying SETINIT Status ..........................................................................................8 Determining Installation Parameters .......................................................................9
Part 2, Installing the SAS® System.......................................................................................13
Overview......................................................................................................................13 Outlining the Installation Process.............................................................................14
Common Installation Process .....................................................................14 Post-Installation Processing ........................................................................15
Overview for Action A: INSTALL-NEW ....................................15 Overview for Action B: INSTALL-DIRECT................................15 Overview for Action C: INSTALL-TO-STAGE ..........................15
Overview for Installation with National Language Support (NLS) ....................16 Performing the Installation Process..........................................................................17
Unloading the Installation Jobs — Run IEBUPDTE ................................17 Specifying Installation Parameters.............................................................18 Unloading the SAS Product Libraries........................................................25 Generated SAS Installation Jobs .................................................................26 Running SASINEW, SASIHOLD, or SASINSGO.....................................28 Verifying the System Installation ...............................................................29 Performing Site-Specific Product Implementation ..................................31
ii
Post-Installation Processing...................................................................................... 32 Completing the Installation for Action A................................................. 32
Implementing SAS TSO Support................................................. 32 Completing Base SAS System Customization........................... 36
Completing the Installation for Action B.................................................. 37 Completing the Installation for Action C ................................................. 37
Part 3, Installing SAS® System Maintenance.................................................................... 41
Identifying the Contents of Your Media................................................................. 41 Installing the SAS System, Release 6.09 Enhanced for the First Time at TS475 or Adding a New SAS System Product at TS475 ....................................................... 42 Upgrading Your Currently Licensed Products to TS475 or Installing Supplemental Maintenance ...................................................................................... 42
Post-Installation Step................................................................................... 43 Copying Staged Libraries to Production .................................................. 43
For SAS/SHARE and SAS/CONNECT Software Customers Only ................... 44
Section II, System Manager's Guide ................................................................................... 45
Part 1, Setting Up the SAS® System.................................................................................... 47 Customizing Default Options and System Configuration Files.......................... 47 Selecting a Bundled Configuration.......................................................................... 57
MVS/XA or ESA Non-LPA (ENTRY=SASXA1) ..................................... 57 MVS/XA or ESA LPA (ENTRY=SASXAL).............................................. 57
Installing the SAS System into the LPA.................................................................. 58 Customizing Your SAS CLIST and Cataloged Procedure.................................... 60 Customizing Your NEWS and SITEINFO Files ..................................................... 63 Installing the SAS SVC Routine ............................................................................... 64 Installing the SAS SMF Exit ...................................................................................... 68
Part 2, Maintaining the SAS® System................................................................................. 71 Renewing Your License............................................................................................. 71 Installing Maintenance Modules ............................................................................. 71 Installing Supplementary Maintenance Material .................................................. 72 Processing SAS Notes Libraries ............................................................................... 72
Running Batch Jobs to Execute SAS Notes Programs............................. 73 Accessing SAS Notes Interactively............................................................ 74
Accessing SAS Notes with FSBROWSE ..................................... 74 Accessing SAS Notes with the SUPPORT Application............ 74
Copying Staged Libraries (Action D) ...................................................................... 74 Deleting SAS Product Libraries ............................................................................... 75
Deleting a Set of SAS Installation Libraries (Action E)........................... 76 Deleting SAS System Libraries Components (Action F) ........................ 77
Appendix A, Unloading the Installation Instructions from Tape ................................. 79 Obtaining the Instructions ........................................................................................ 79
iii
Appendix B, Customizing SAS® System Forms................................................................81 Customizing the Printer Selection List ....................................................................81 Customizing the Print File Parameter Program .....................................................81 Printing Help Files with Customizing Information...............................................81
Appendix C, Installing the BMDP Interface ......................................................................83 Introduction .................................................................................................................83 Installation of the BMDP Interface ...........................................................................83
Appendix D, Implementing the SAS/IML® Interface to the Engineering and Scientific Subroutine Library (ESSL) and the SAS/OR® Interface to the Optimization Subroutine Library (OSL) .............................................................................85
Implementing the SAS/IML Interface to ESSL.......................................................85 Implementing the SAS/OR Interface to OSL..........................................................85
Appendix E, Using the IBM 3090 Vector Facility with the SAS® System ....................87
Appendix F, Implementing SAS/ACCESS® Interface to ADABAS Software .............89 Customizing the SAS CLIST and Cataloged Procedure........................................89 Using the NATURAL Security Interface .................................................................90 Using the Samples.......................................................................................................90 SAS System Options for this Interface .....................................................................90 NATURAL Date and Time Support.........................................................................91
Appendix G, Implementing SAS/ACCESS® Interface to CA-DATACOM/DB Software......................................................................................................................................................93
Customizing the SAS CLIST and Cataloged Procedure........................................93 Using the Samples.......................................................................................................94 SAS System Options for this Interface .....................................................................94
Appendix H, Implementing SAS/ACCESS® Interface to CA-IDMS Software ...........95 Customizing the SAS CLIST and Cataloged Procedure........................................95 IDMWHST SAS System Options for this Interface ................................................96 SAS/ACCESS Data Step Interface Enhancement...................................................96
Appendix I, Implementing SAS/ACCESS® Interface to DB2 Software .......................97 Defining the Interface to DB2 and DB2 Users.........................................................97 Customizing the SAS CLIST and Cataloged Procedure........................................98 Verifying Installation of SAS/ACCESS Interface to DB2 Software .....................99 Creating and Loading the Sample Tables................................................................100 SAS System Options for this Interface .....................................................................100
Appendix J, Implementing SAS/ACCESS® Interface to IMS Software .......................101 Customizing the SAS CLIST and Cataloged Procedure........................................101 Verifying Installation of SAS/ACCESS Interface to IMS Software .....................103 SAS System Options for this Interface .....................................................................103
iv
Appendix K, Implementing SAS/ACCESS® Interface to ORACLE Software ............ 105 Linking the ORACLE RDBMS Interface Subroutines........................................... 105 Customizing the SAS CLIST and Cataloged Procedure....................................... 105 Verifying Installation of SAS/ACCESS Interface to ORACLE Software ........... 107 Creating and Loading the Sample Tables............................................................... 107
Appendix L, Implementing SAS/ACCESS® Interface to SYSTEM 2000® Software . 109 Customizing the SASS2K CLIST and Cataloged Procedure ................................ 109 Executing the SASS2K CLIST to Access the SAS System ..................................... 110 Executing the Cataloged Procedure to Access the SAS System .......................... 111 Testing with Sample Data......................................................................................... 111 Verifying Installation of SAS/ACCESS Interface to SYSTEM 2000 Software ... 112
Appendix M, Implementing the SAS System under MSP.............................................. 113 Setting Up Entry Points............................................................................................. 113 Implementing TSS Support ...................................................................................... 113 Configuration Options .............................................................................................. 113 SMF Processing Zap .................................................................................................. 113 SAS/GRAPH Driver Customization....................................................................... 114 Special Considerations .............................................................................................. 114
Appendix N, Implementing SAS/ACCESS Interface to SymfoWARE Software ....... 115 Customizing the SAS CLIST and Catalogued Procedure..................................... 115 Verifying Installation of SAS/ACCESS Interface to SymfoWARE Software .... 117 Creating and Loading the Sample Tables............................................................... 118 SAS System Options for this Interface .................................................................... 118
Appendix O, Post-Installation Setup for SAS/CONNECT® Software......................... 121 Storing and Locating SAS/CONNECT Script Files .............................................. 121 System Configuration for the TELNET and TCP Access Methods..................... 122
Software Requirements............................................................................... 122 Installing the SAS/C Transient Library.................................................... 123 Network Configuration Data for TCP/IP ................................................ 123 IBM's TCP/IP ............................................................................................... 124 Interlink's SNS/TCP.................................................................................... 124 Ensure TCP/IP Configuration Data Is Accessible .................................. 124 Search Logic.................................................................................................. 126 Create an ETC.RESOLV.CONF File for Name Resolution .................... 126
Finding Host Names and Addresses .......................................... 126 Configuration Data Sets.............................................................................. 127 Setting TCP/IP-Related SAS System Options ......................................... 128 Troubleshooting........................................................................................... 129 References ..................................................................................................... 129
System Configuration for the APPC Access Method............................................ 129 Software Requirements............................................................................... 129 System Configuration for APPC................................................................ 130 Setting APPC-Related SAS System Options ............................................ 132
Implementing SAS/CONNECT MVS/ESA APPC/MVS Subsystem Exploitation...................................................................................................................................... 134
References ..................................................................................................... 137
v
Appendix P, Implementing SAS/CPE® Software..............................................................139
Appendix Q, Implementing SAS/GRAPH® Software .....................................................141 Understanding How this Appendix Is Organized.................................................141 Part 1, Accessing the SAS/GRAPH Maps Data Sets..............................................143 Part 2, Customizing Devices......................................................................................143
Setting Up a SAS/GRAPH Translate Table ..............................................143 Using SAS/GRAPH Software with ASCII Terminals and ASCII Terminal Emulators.......................................................................................................144 Using SAS/GRAPH Software with ASCII Printers or Plotters..............146 Installing the Linkable Driver.....................................................................148 Understanding the Linkable Driver Used in Version 6 of the SAS System.........................................................................................................................149
Overview of the Linkable Device Driver ....................................150 How the Linkable Device Driver Works.......................150 Plotting Routines Used by the Linkable Device Driver............................................................................................151
Generating an Executable Module...............................................152 Customizing Device Characteristics ............................................154 Testing the Linkable Device Driver .............................................156 Special Instructions for Versatec Plotter Users ..........................156
Generating Graphics Using RANDOM Software........156 Generating Graphics Using VGS Software...................160
Special Instructions for Xerox EPIC or XPPI Version 1.0 Users...........................................................................................................166
Modifications to the Installation Process ......................166 Generating Graphics Using EPIC or XPPI 1.0 Software............................................................................................168
Special Instructions for Xerox XPPI Version 1.1 Users .............170 Modifications to the Installation Process ......................170 Generating Graphics Using XPPI Version 1.1 Software............................................................................................173
Common Problems and Solutions ...............................................178 Using SAS/GRAPH Software with IBM 3270-Type Terminals and 3270 Emulators........................................................................180 Specifying the Correct Device Driver ..........................................181 Customizing of the IBM 3274 Control Unit ................................182 Specifying VTAM Node Definitions and Mode Tables ............182 Requirements for 3270 Emulators................................................185 Support for Canadian-French Keyboards...................................186 Common Installation Problems and How to Solve Them ........186
Using SAS/GRAPH Software with IBM 3287, 3268, and 4224 Printers.........................................................................................................................189
Using SAS/GRAPH Software with IBM 3287 and 3268 Printers...........................................................................................................190
GOPTIONS Statement for Use with IBM 3287 and 3268 Printers ..............................................................................190 JCL for Special SYSOUT Handling................................191
Using SAS/GRAPH Software with an IBM 4224 Printer .........192 The SASWTR External Writer Program ......................................192
Starting and Modifying the Writer ................................193

vi
Aborting the Writer......................................................... 194 Alternative Routing for Operator's Messages............. 194 SASWTR Messages ......................................................... 196
Common Installation Problems and How to Solve Them ....... 203 VTAM Definitions for IBM 3287, 3268, and 4224 Printers....... 205
Using SAS/GRAPH Software with GDDM............................................. 208 GDDM Nicknames ........................................................................ 209 GDDM Tokens ............................................................................... 209 GDDM Drivers for Graphics Terminals ..................................... 209 GDDM Drivers for IEEE-attached Plotters ................................ 210 GDDM Drivers for the IBM 3287, 3268, and 4224 Printers ...... 211 GDDM Drivers for the IBM 3812 Model 2 and IBM 3816 Printers (with IPDS) ..................................................................................... 212 GDDM Drivers for IBM 3800-Type Printers.............................. 212 Creating GDF and ADMGDF Files ............................................. 214 Using SAS/GRAPH Software with GDDM/PCLK.................. 215
Part 3, Setting Up and Modifying Device Catalogs .............................................. 216 How Device Catalogs Are Used ................................................................ 216 How and When to Modify Catalog Entries.............................................. 217
Examples......................................................................................... 217 Part 4, Device HELP Screens .................................................................................... 221
Appendix R, Implementing SAS/SESSION® for CICS Software ................................. 223 Introduction ................................................................................................................ 223 Defining SAS/SESSION to the VTAM System...................................................... 224
Define the VTAM Applications ................................................................. 224 Define the VTAM Logon Mode ................................................................. 224
Defining SAS/SESSION to APPC/MVS ................................................................ 225 Security Considerations .............................................................................. 226
Defining SAS/SESSION to CICS/ESA ................................................................... 227 Activating the Interface ............................................................................................. 230 Executing the SAS System ........................................................................................ 231
Appendix S, Implementing SAS/SHARE® Software ...................................................... 233 Special Files for Use with SAS/SHARE Software ................................................. 233
Customizing the Started Task JCL Procedure for a Server.................... 233 Configuration File for a Server .................................................................. 233
Customizing the SAS/SHARE Autocall Macros................................................... 234 Installing the SAS SVC Routine ............................................................................... 234 Selecting Communications Access Methods to Use.............................................. 235 System Configuration for the Cross-Memory Access Method ............................ 237
Installing the SASVXMS Load Module .................................................... 237 Defining an Anchor Point........................................................................... 238
System Configuration for the VTAM LU 6.2 Access Method.............................. 239 Software Requirements............................................................................... 239 Configuration for a Server.......................................................................... 239 Configuration for Users .............................................................................. 240
System Configuration for the VTAM LU 0 Access Method................................. 242 Software Requirements............................................................................... 242 Enabling the VTAM LU 0 Access Method ............................................... 242 Overview from the VTAM Perspective .................................................... 243
vii
Planning Your SAS/SHARE VTAM Configuration................................243 Creating VTAM Definitions ........................................................................243
Example VTAM Definitions .........................................................246 Defining Your VTAM Configuration to the SAS System........................248
Defining User Names.....................................................................248 Defining Server Names .................................................................248
System Configuration for the TCP/IP Access Method..........................................248 Software Requirements................................................................................248 The TCPIPMCH Option...............................................................................249 System Configuration for TCP/IP .............................................................249
Specify the SAS System Option TCPSEC=_SECURE_ for the Server Execution.............................................................................249 Installing the SAS/C Transient Library ......................................249 Specify Server Names and Ports ..................................................250 Ensure TCP/IP Configuration Data Is Accessible .....................250 Create an ETC.RESOLV.CONF File for Name Resolution.......251 Allocate the SASCTCPE DDName in SAS Sessions that Use the TCP/IP Access Method .................................................................252
Network Configuration Data for TCP/IP .................................................252 Configuration Data Sets ................................................................252 Search Logic ....................................................................................253 Finding Host Names and Addresses...........................................254
The ICSRSLV Option....................................................................................255
Appendix T, Implementing SAS/TOOLKIT® Software ..................................................257
Appendix U, Implementing SAS/TUTOR® Courses........................................................259 Verifying Data Set Access for Users.........................................................................259 Initializing the SAS/TUTOR System .......................................................................259 Verifying Installation and Initialization of SAS/TUTOR Courses ......................260 Adding a Course Administrator to the SAS/TUTOR System..............................260 Restoring Tracking Data from Release 6.08 to Release 6.09..................................260 Renaming SAS/TUTOR Data Sets ...........................................................................261
Appendix V, Post-Installation Setup for SAS/ASSIST® Software ................................263 Profile Changes and Enhancements.........................................................................263 Converting User Profiles From a Previous Release ...............................................263 Converting Existing Master and Group Profiles ....................................................265 Adding a Master Profile.............................................................................................266 Installing Sample DB2 Tables and a Sample Query Manager..............................268
Appendix W, Logging Directly On to the SAS® System .................................................271 Installing the Direct Logon Procedure.....................................................................271
Example Logon Procedure ..........................................................................272 Using Direct Logon.....................................................................................................273
Logging On to the SAS Display Manager System ...................................273 Logging On to a Windowing Application ................................................273
Restrictions...................................................................................................................273 Accounting Considerations.........................................................................274

viii
Appendix X, Licensing the SAS® System (Action G) ...................................................... 275 Introduction ................................................................................................................ 275 Processing Renewal of the SAS System .................................................................. 275 SETINIT Troubleshooting......................................................................................... 277
ix
Appendix Y, Installing National Language Support (NLS).............................................279 Important Notes ..........................................................................................................279 General Information ...................................................................................................279 Installing NLS for any Language..............................................................................282
Installing a New SAS System Plus One NLS Language .........................282 Installing to a System Where any Prior Installation Activity is Complete and Has Been Promoted to Your Production (Final) Libraries ..............283 Installing to a System Where a Prior Staged Installation Has Not Been Promoted to Your Production (Final) Libraries .......................................285 Short Installs to Add NLS to an Existing System.....................................287 Installing a Subsequent Language .............................................................288
Promoting Subsequent Language Systems to Production Status and Promoting any NLS to Production Status over a Prior TS Level NLS (Action D).................290 Renewing the License for a System with One or More NLS Extensions.............291 Using NLS Media to Perform a Non-NLS Installation..........................................291
Government Notice..................................................................................................................293 Reviewing the Federal Government Rights Notice................................................293 Processing the Government Rights Notice..............................................................293

Page 1
Using this Book
Contents of this Document
This document is divided into two sections, each containing two parts, and a set of appendices. The following describes the contents of each section of this document.
Section I, Installation Instructions, details all of the steps required for installing the SAS System. Complete this section before continuing with any other section.
❏ Section I, Part 1, "Pre-Installation Checklist"
Gives you an overview of installation requirements and defines the installation parameters you need to supply for the install process. It also describes the installation actions and options from which you can choose.
❏ Section I, Part 2, "Installing the SAS System"
Describes the common installation process you use for all actions and identifies the steps that are necessary for you to complete the different post-installation processing for each action.
Section II, System Manager's Guide, contains information on setting up and maintaining your SAS System. Keep this document as a reference after you complete the installation.
❏ Section II, Part 1, "Setting up the SAS System"
Describes how you can customize SAS System invocation at your site. It also addresses issues that pertain to running the SAS System effectively at any site. You should carefully review all of this information.
❏ Section II, Part 2, "Maintaining the SAS System"
Describes how to process the SAS Notes libraries as well as how to delete SAS product libraries.
The Appendices supply information for specialized concerns, including notes on special implementation processing for individual products. Review the sections that are relevant to the products you received. In most cases, you need to perform the steps described to run the products successfully at your site.
2 Installation Instructions and System Manager's Guide
Using This Book
Terminology
Although several media types are used for distributing SAS software products, these instructions refer to all media as tape.
During the first step of the installation process, you are instructed to allocate a data set into which all SAS System installation jobs will be loaded. The name of this data set is completely arbitrary and is referred to throughout this document as the CNTL data set.
CAUTION! If the CNTL data set is deleted, you will have to restart the installation process from the beginning to recreate the data set. Therefore, keep this data set on disk.
Other installation libraries are referenced in this document using the names specified in the LIBSEL member of the CNTL data set.
References
The following SAS Institute manuals assist users with Version 6 of the SAS System and may provide helpful information for completing your system set up and product implementation:
❑ SAS Companion for the MVS Environment, Version 6, First Edition
❑ SAS Companion for the MVS Environment, Version 6, Second Edition
❏ Technical Report P-218, Changes and Enhancements to the SAS System, Release 6.07 under MVS
❑ Technical Report U-116, A Guide to the SAS Notes, Sample Library, and Online Customer Support Facility
Contacting SAS Institute
If you have questions about this document or any of the procedures described in it, contact the SAS Institute Technical Support Division at (919) 677-8008, between 9 a.m. and 8 p.m., Eastern Time.
Section I, Installation Instructions
Part 1, Pre-Installation Checklist
Part 2, Installing the SAS System
Part 3, Installing SAS System Maintenance

Page 5
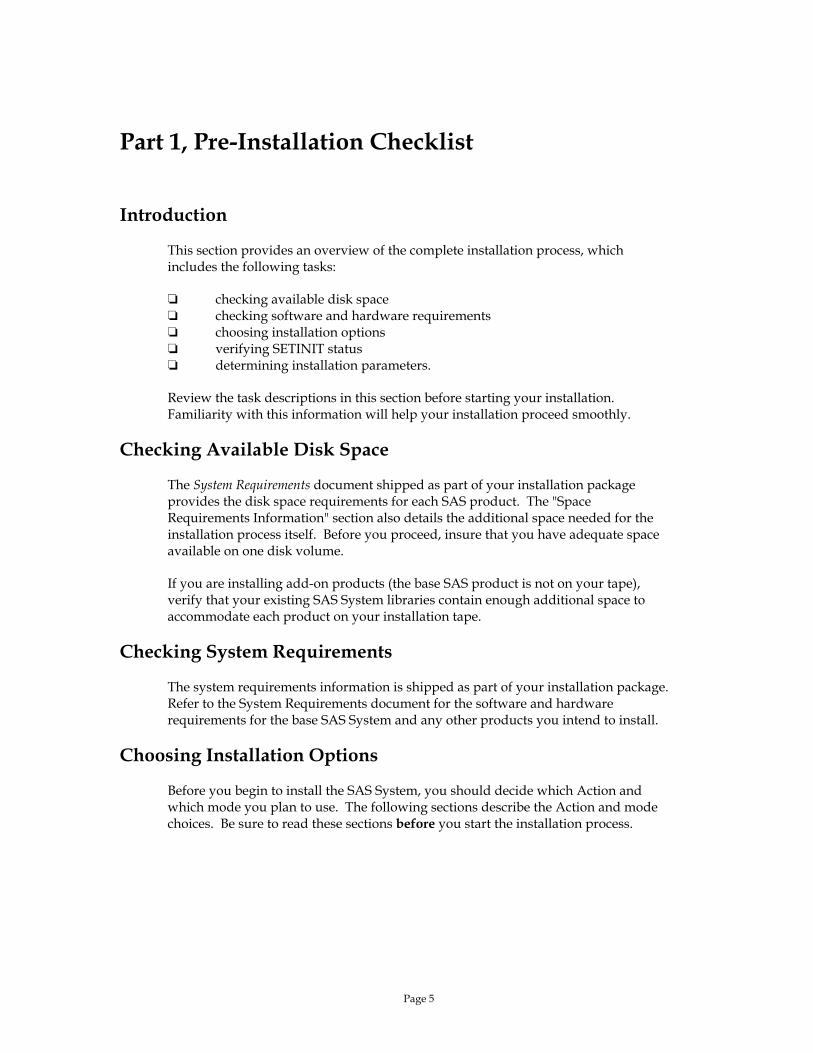
Part 1, Pre-Installation Checklist
Introduction
This section provides an overview of the complete installation process, which includes the following tasks:
❏ checking available disk space ❏ checking software and hardware requirements ❏ choosing installation options ❏ verifying SETINIT status ❏ determining installation parameters.
Review the task descriptions in this section before starting your installation. Familiarity with this information will help your installation proceed smoothly.
Checking Available Disk Space
The System Requirements document shipped as part of your installation package provides the disk space requirements for each SAS product. The "Space Requirements Information" section also details the additional space needed for the installation process itself. Before you proceed, insure that you have adequate space available on one disk volume.
If you are installing add-on products (the base SAS product is not on your tape), verify that your existing SAS System libraries contain enough additional space to accommodate each product on your installation tape.
Checking System Requirements
The system requirements information is shipped as part of your installation package. Refer to the System Requirements document for the software and hardware requirements for the base SAS System and any other products you intend to install.
Choosing Installation Options
Before you begin to install the SAS System, you should decide which Action and which mode you plan to use. The following sections describe the Action and mode choices. Be sure to read these sections before you start the installation process.
6 Installation Instructions and System Manager's Guide
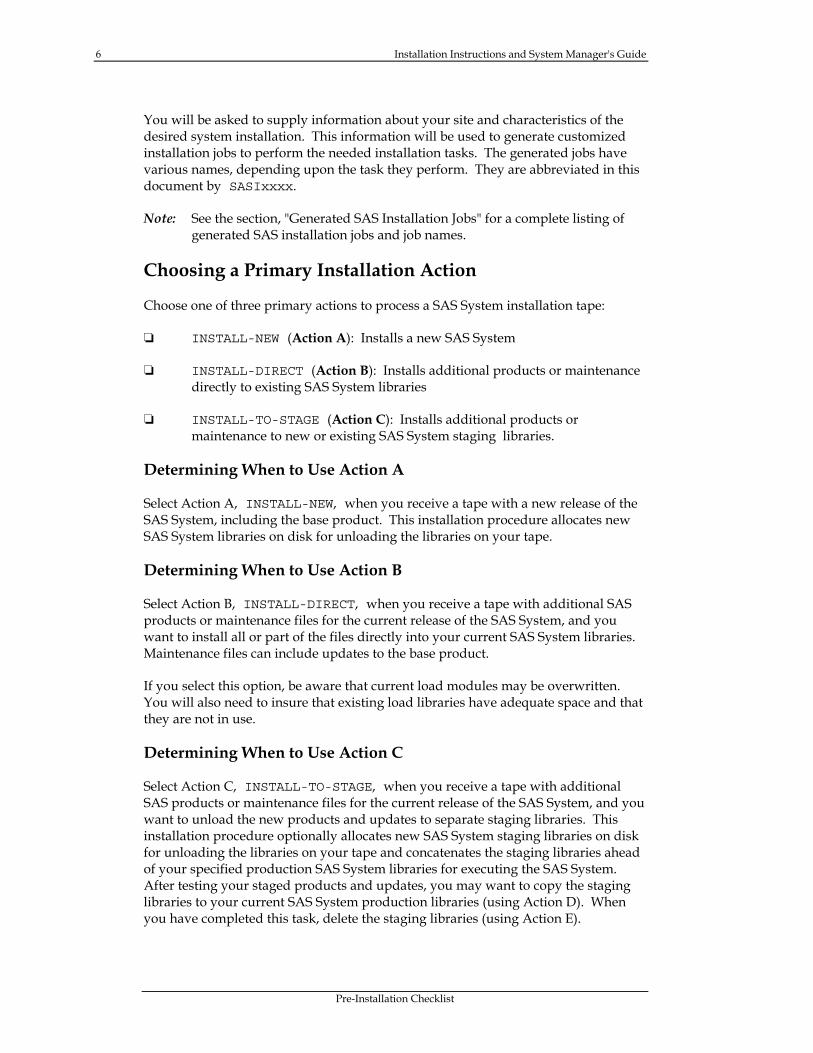
Pre-Installation Checklist
You will be asked to supply information about your site and characteristics of the desired system installation. This information will be used to generate customized installation jobs to perform the needed installation tasks. The generated jobs have various names, depending upon the task they perform. They are abbreviated in this document by SASIxxxx.
Note: See the section, "Generated SAS Installation Jobs" for a complete listing of generated SAS installation jobs and job names.
Choosing a Primary Installation Action
Choose one of three primary actions to process a SAS System installation tape:
❏ INSTALL-NEW (Action A): Installs a new SAS System
❏ INSTALL-DIRECT (Action B): Installs additional products or maintenance directly to existing SAS System libraries
❏ INSTALL-TO-STAGE (Action C): Installs additional products or maintenance to new or existing SAS System staging libraries.
Determining When to Use Action A
Select Action A, INSTALL-NEW, when you receive a tape with a new release of the SAS System, including the base product. This installation procedure allocates new SAS System libraries on disk for unloading the libraries on your tape.
Determining When to Use Action B
Select Action B, INSTALL-DIRECT, when you receive a tape with additional SAS products or maintenance files for the current release of the SAS System, and you want to install all or part of the files directly into your current SAS System libraries. Maintenance files can include updates to the base product.
If you select this option, be aware that current load modules may be overwritten. You will also need to insure that existing load libraries have adequate space and that they are not in use.
Determining When to Use Action C
Select Action C, INSTALL-TO-STAGE, when you receive a tape with additional SAS products or maintenance files for the current release of the SAS System, and you want to unload the new products and updates to separate staging libraries. This installation procedure optionally allocates new SAS System staging libraries on disk for unloading the libraries on your tape and concatenates the staging libraries ahead of your specified production SAS System libraries for executing the SAS System. After testing your staged products and updates, you may want to copy the staging libraries to your current SAS System production libraries (using Action D). When you have completed this task, delete the staging libraries (using Action E).
Installation Instructions and System Manager's Guide 7
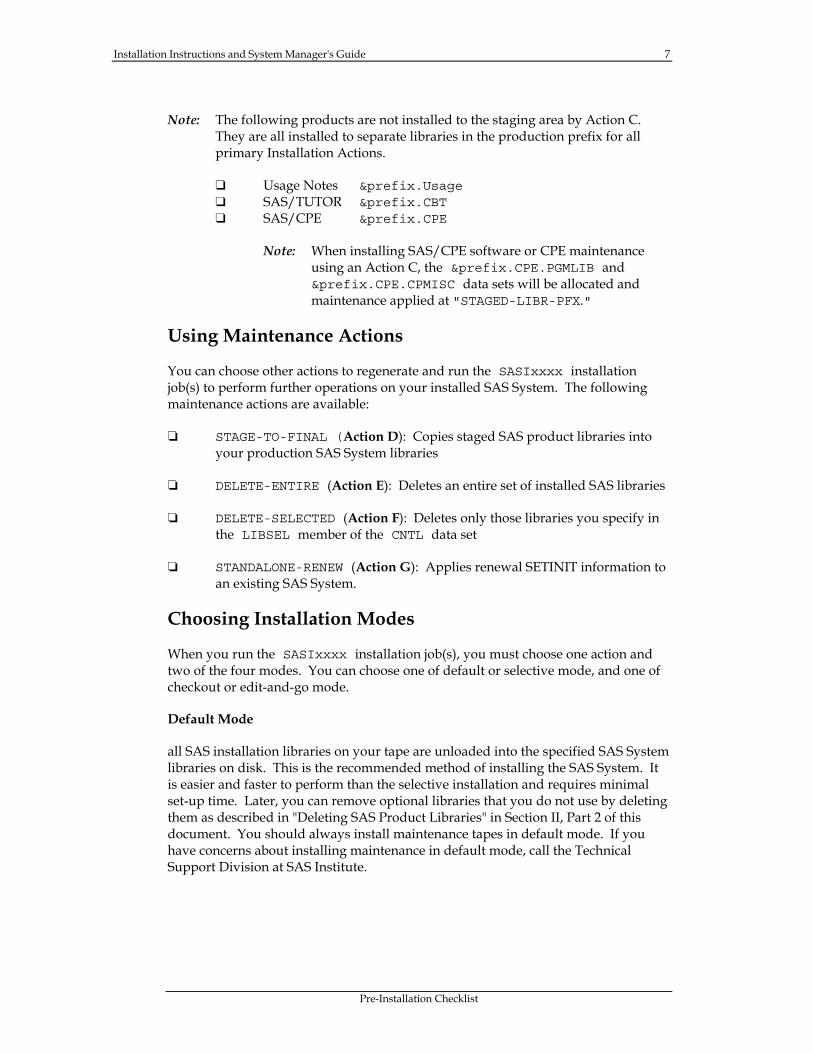
Pre-Installation Checklist
Note: The following products are not installed to the staging area by Action C. They are all installed to separate libraries in the production prefix for all primary Installation Actions.
❑ Usage Notes &prefix.Usage ❑ SAS/TUTOR &prefix.CBT ❑ SAS/CPE &prefix.CPE
Note: When installing SAS/CPE software or CPE maintenance using an Action C, the &prefix.CPE.PGMLIB and &prefix.CPE.CPMISC data sets will be allocated and maintenance applied at "STAGED-LIBR-PFX."
Using Maintenance Actions
You can choose other actions to regenerate and run the SASIxxxx installation job(s) to perform further operations on your installed SAS System. The following maintenance actions are available:
❏ STAGE-TO-FINAL (Action D): Copies staged SAS product libraries into your production SAS System libraries
❏ DELETE-ENTIRE (Action E): Deletes an entire set of installed SAS libraries
❏ DELETE-SELECTED (Action F): Deletes only those libraries you specify in the LIBSEL member of the CNTL data set
❏ STANDALONE-RENEW (Action G): Applies renewal SETINIT information to an existing SAS System.
Choosing Installation Modes
When you run the SASIxxxx installation job(s), you must choose one action and two of the four modes. You can choose one of default or selective mode, and one of checkout or edit-and-go mode.
Default Mode
all SAS installation libraries on your tape are unloaded into the specified SAS System libraries on disk. This is the recommended method of installing the SAS System. It is easier and faster to perform than the selective installation and requires minimal set-up time. Later, you can remove optional libraries that you do not use by deleting them as described in "Deleting SAS Product Libraries" in Section II, Part 2 of this document. You should always install maintenance tapes in default mode. If you have concerns about installing maintenance in default mode, call the Technical Support Division at SAS Institute.
8 Installation Instructions and System Manager's Guide
Pre-Installation Checklist
Selective Mode
you specify which products or product libraries are unloaded from the tape. You may want to perform a selective install when disk space is insufficient for installing an entire tape. When performing a selective installation, you must indicate whether to select by product or by product library. If you choose to select by individual library rather than by product, carefully review the product library information in the LIBSEL member of the CNTL data set. You must install all libraries marked REQUIRED for a product in order to run that product at your site.
Checkout Mode
the installation process pauses to allow you to review the customized SASIxxxx job(s) before it runs. To run the install in checkout mode, you edit and run the job SASINEW (Action A) or SASIHOLD (other Actions) in the CNTL data set after specifying your installation parameters in SASEDITP. This job creates the installation job(s) SASIxxxx in the CNTL data set, which you can review or edit before submitting.
Note: You must run in checkout mode if your site does not allow running jobs to submit other jobs directly to the MVS internal reader.
Edit-and-Go Mode
the installation process continues without pausing when you finish editing the necessary files. To perform the installation in edit-and-go mode, edit and run the job SASINSGO in the CNTL data set after specifying your installation parameters in SASEDITP. This job generates and submits customized SASIxxxx job(s) that perform the action you select, and stores the job(s) in the CNTL data set. SASINSGO cannot be used for Action A.
Note: If SASINEW is used for an action other than Action A, or SASIHOLD/SASINSGO is used for Action A, the jobs will halt with a return code 12 and a Severe Error message in the SYSTERM data set. The SASINEW job will not be in your CNTL data set if Base SAS software is not on your tape.
Verifying SETINIT Status
In many cases, the installation tape that you receive includes pre-applied licensing, or SETINIT, information. If your tape does not include a valid SETINIT, you must enter the SAS SETINIT statements included with your installation package. Each SAS System product must be licensed for your site in order for you to run it.
If the Cover Letter included in your installation package states that you have received a tape with an expired SETINIT, you must enter your customized SETINIT statements into the RENEWPRM member of the CNTL data set after you unload the installation jobs but before you run any of them.
For more information about the SETINIT process, see Appendix X, "Licensing the SAS System (Action G)".
Installation Instructions and System Manager's Guide 9
Pre-Installation Checklist
Determining Installation Parameters
As you install the SAS System, you are asked to supply various site parameters for the installation jobs. These parameters follow, listed in alphabetical order, and are described with reference to where they occur in the installation process. Review the parameters and determine which values to supply before you begin the installation.
Two types of parameters appear in this installation process: selectable and keyword=value. Selectable parameters help reduce the amount of data you need to type, thereby reducing the number of possible keying errors. Selectable parameters are activated by removing comment characters. If there is a selection that you want, make sure that you remove the comment symbol associated with the parameter. Likewise, if there is an alternate selection that you do not want, be sure that the parameter is commented out. With keyword=value parameters, you specify your site value after keyword=. Do not leave any spaces between the equal sign and your value.
The parameters that are defined in this section appear in the SASEDITP member of the CNTL data set, which is the member that you edit to supply site-specific parameters, and the SASINEW/SASIHOLD/SASINSGO job, which is the job you submit to create your SASIxxxx job(s) for the action you specify in SASEDITP.
If you choose to perform your installation in selective mode, you must also edit one or both of the PRODSEL and LIBSEL members of the CNTL data set. All parameters in these members are selectable parameters. Comments in each member explain the parameters.
Note: You will see that some of the following parameters are used in the IEBUPDTE portion of the install. The sample IEBUPDTE job does not specify these parameters by name, but you need to specify the corresponding value in the JCL.
❏ CLST-DSN-SFX= (used in SASEDITP) specifies the final qualifier of the data set name of the command procedure library into which command procedures (CLISTs) are copied. It is appended to the installation library prefix that you specify with the action you select in SASEDITP. If you do not want to use this name, you can comment-out this parameter, uncomment the CLST-DSN parameter, and specify the entire data set name. The default is CLIST. The CLIST-DSN-SFX and CLST-DSN parameters are used only when installing the SAS System using Action A.
❏ CNTLDSN= (used in IEBUPDTE, SASEDITP, and SASINEW/SASIHOLD/SASINSGO) specifies the data set name of the PDS where you unload the installation jobs in the initial IEBUPDTE job. This is the critical CNTL data set described in "Introduction." You should keep this data set after you complete the installation.
10 Installation Instructions and System Manager's Guide
Pre-Installation Checklist
❏ COPYMOD= (used in SASEDITP) specifies the IEBCOPY control statement to use when unloading your SAS installation load libraries from tape. The COPYMOD statement causes the load libraries to be reblocked to the blocksize specified by the LOADBLK= parameter. The default is COPYMOD. If you do not use COPYMOD, your load library blocksize will be 6144.
❑ CPBK= (used in SASEDITP only if the CPE product is included on your tape) allows you to set a block size of 6144 if your DASD will not support the default CPE PDB data set block size of 23040.
❏ DISKUNIT= (used in SASEDITP) specifies the JCL unit name or unit address for the volume on which the SAS installation libraries reside. This parameter is used for installing libraries and for printing the installation instructions. The default is DISK.
❏ ENTRY= (used in SASEDITP) specifies the entry point for the SAS System that is used in in-stream procedures during installation, in the cataloged procedures, and in CLISTs. The default is SASHOST, which runs the unbundled version of the SAS System. The "System Manager's Guide" in Section II of this document contains information on different bundling configurations that you can use to customize Version 6 of the SAS System for your site.
❏ EXPDATE= (used in SASEDITP) specifies the expiration date value used in accessing the installation tape. The value may need to be changed to 98000 for sites using a tape library management system. This parameter is used for installing libraries and for printing the installation instructions. The default is 99365.
❏ LOADBLK= (used in SASEDITP when you use COPYMOD) specifies the blocksize that you want to use for your SAS load library. The default is 32760.
❏ *PREFIX/*PFX= (used in SASEDITP) specifies the high-level qualifiers for the SAS installation libraries that the SASIxxxx job(s) will use when performing an action. The exact name of the PREFIX parameters varies according to the action you specify. The SASEDITP member of the CNTL data set groups each action with the corresponding prefix parameters that you need to specify.
❏ PROC-DSN-SFX= (used in SASEDITP) specifies the final qualifier of the data set name of the cataloged procedure library into which cataloged procedures (PROCs) are copied. It is appended to the installation library prefix that you specify with the action you select in SASEDITP. If you do not want to use this name, you can comment-out this parameter, uncomment the PROC-DSN parameter, and specify the entire data set name. The default is PROCLIB. The PROC-DSN-SFX and PROC-DSN parameters are used only when installing the SAS System using Action A.
❏ SASCNM= (used in SASEDITP) specifies the name you want to use for the SAS command procedure (CLIST). The default is SAS609.
Installation Instructions and System Manager's Guide 11
Pre-Installation Checklist
❏ SASINST-ACTION (used in SASEDITP) provides a "turned-on" (active) value for the action you want the installation job(s) to perform. A separate selectable parameter represents each possible action. Choose the action you want by commenting out the "*NO*" to the left of the action name. The installation job(s) do not permit more than one action to be active at a time. Possible actions are:
❏ Action A, INSTALL-NEW ❏ Action B, INSTALL-DIRECT ❏ Action C, INSTALL-TO-STAGE ❏ Action D, STAGE-TO-FINAL ❏ Action E, DELETE-ENTIRE ❏ Action F, DELETE-SELECTED ❏ Action G, STANDALONE-RENEW.
Refer to "Choosing Installation Options" earlier in this section for a description of each action. There is no default action.
❏ SASPNM= (used in SASEDITP) specifies the name you want to use for the SAS cataloged procedure. The default is SAS609.
❏ SMS-ALLOC (used in SASEDITP) specifies that you intend to use IBM's SMS to help manage your installation data set allocations. By default, this parameter is commented-out. If you want to use SMS, uncomment the parameter.
❏ SYSOUT= (used in IEBUPDTE, SASEDITP, SASINEW/SASIHOLD/SASINSGO) specifies the SYSOUT class you want to use for jobs. The default is *.
❏ TAPEUNIT= (used in SASEDITP) specifies the JCL unit name or unit address for the tape drive on which the installation tape is mounted. This parameter is used for unloading tape libraries and for printing the installation instructions. The default is TAPE.
❏ TMPUNI= (used in SASEDITP) specifies the value your site uses as the system-assigned name for temporary storage. The default is SYSDA, which is the standard IBM default value.
❏ VOLDISK= (used in SASEDITP) specifies the volume serial of the disk pack for installing SAS product libraries. This parameter is ignored if you specify the use of SMS.
❏ WORKSPC= (used in SASEDITP) specifies the size, in 6144-byte blocks, for the WORK allocation for CLISTs, cataloged procedures, and in-stream procedures used throughout installation. The first value is the primary allocation, followed by a comma, and the second value is the secondary allocation. The default is 500,200.

Page 13
Part 2, Installing the SAS® System
Overview
When you process a SAS System installation tape under MVS, you choose one of the following primary installation actions:
❏ INSTALL-NEW (Action A)
installs a new SAS System at your site.
❏ INSTALL-DIRECT (Action B)
installs additional products or maintenance files into existing SAS System libraries at your site. Also use this action to install a tape containing only Usage Notes.
❏ INSTALL-TO-STAGE (Action C )
installs additional products or maintenance files into new or existing SAS System staging libraries at your site.
See "Choosing a Primary Installation Action" in Part 1 for a more detailed description of each option.
All options require you to follow the same steps to unload the SAS product libraries into your installation libraries. After unloading the installation jobs into the CNTL data set using the initial IEBUPDTE job, you specify your site values for installation parameters in the SASEDITP member of the CNTL data set and, optionally, in the PRODSEL, LIBSEL, and RENEWPRM members. Then you must create customized SASIxxxx installation job(s) for your site. Create these using one of the following:
❏ SASINEW does not directly submit the generated SASIxxxx job(s). The job is "held" and you must submit it when you are ready. Use for Action A only.
❏ SASIHOLD does not directly submit the generated SASIxxxx job(s). The job is "held," and you must submit it when you are ready. Use for actions other than Action A.
❏ SASINSGO submits the generated SASIxxxx job(s) directly as soon as it is complete. Use for actions other than Action A.
Once the SASIxxxx job(s) complete, you may need to perform site-specific implementation for some products. The steps necessary here depend on the products on your tape, not on the installation action you select.

14 Installation Instructions and System Manager's Guide
Installing the SAS System
When the tape libraries are installed and the product-specific implementation is complete, you may need to perform further steps, depending on the action you selected and your site requirements. If you are installing the base SAS System, you may want to customize your SAS System configuration. If you are installing new products or maintenance files into SAS System staging libraries, you may later want to integrate them into your production SAS System.
Outlining the Installation Process
The outline contained in this section summarizes the installation process and the post-installation processing appropriate for each action. Following this summary, each process identified is discussed in greater detail.
Common Installation Process
1. Pick a name for a new CNTL data set.
2. Unload the installation jobs by running IEBUPDTE.
3. Check the #CONTENT file to verify that needed products and/or maintenance are on this tape.
4. Check the ##README file for any special installation instructions for your tape.
5. Specify installation parameters.
❏ Supply SASEDITP parameter values. ❏ If you are using selective mode, specify products/product libraries
in PRODSEL/LIBSEL. ❏ If special SETINIT instructions are indicated in the Cover Letter or
your SETINIT has expired, enter RENEWPRM data.
6. Unload the SAS product libraries.
❏ Supply SASINEW/SASIHOLD/SASINSGO parameter values. ❏ Run SASINEW/SASIHOLD/SASINSGO. ❏ If you are using checkout mode, run the appropriate SAS install job.
7. Verify the system installation.
❏ Verify successful completion of the SAS install job. ❏ Run *VALID jobs for installed products.
8. Complete site-specific implementation as needed for installed products.
Installation Instructions and System Manager's Guide 15
Installing the SAS System
Post-Installation Processing
The post-installation steps that you must perform are determined by the Action you are using. The following sections provide an overview for each action.
Overview for Action A: INSTALL-NEW
1. Implement TSO support if you are running under TSO.
2. Complete base SAS System customization.
❏ Review Section II, Part 1, "Setting up the SAS System." ❏ Perform customizations as appropriate.
Overview for Action B: INSTALL-DIRECT
Apply site changes, if needed, to maintenance versions of customized files.
Overview for Action C: INSTALL-TO-STAGE
1. Apply site customizations, if needed, to installed staging CLIST and PROC.
2. Apply site changes, if needed, to maintenance versions of customized files.
3. Perform site testing as desired.
4. Copy contents of staging libraries to the production SAS System libraries, using Action D. This task is optional but strongly recommended. See Section II Part 2, "Maintaining the SAS System" for more information.
❏ Supply SASEDITP parameter values. ❏ Specify products/product libraries in PRODSEL/LIBSEL if you are
using selective mode. ❏ Supply SASIHOLD/SASINSGO parameter values. ❏ Run SASIHOLD/SASINSGO. ❏ Run the generated SASIxxxx job(s) if you are using checkout
mode. ❏ Perform site-specific post-implementation for the final libraries. See
"Performing Site-Specific Product Implementation," later in this section.
❏ Perform site testing as desired.
5. Delete staging libraries, using Action E. This task is optional. See Section II Part 2, "Maintaining the SAS System" for more information.
❏ Supply SASEDITP parameter values. ❏ Supply SASIHOLD/SASINSGO parameter values. ❏ Run SASIHOLD/SASINSGO. ❏ Run SASIDSTG if you are using checkout mode.

16 Installation Instructions and System Manager's Guide
Installing the SAS System
Overview for Installation with National Language Support (NLS)
Note: The presence of NLS installation considerations in your documentation does not imply the presence of NLS files on your tape. The #CONTENT member of the control data set from your tape indicates whether or not your tape contains NLS files.
Installation with NLS consists of the actions described above with certain additional SASEDITP parameters supplied, whose values vary depending on the nature of your installation. Nearly all of the information you supply for an NLS installation enables the Action A, B, or C as above. The additional information controls the manner in which NLS files are added to the main (English language) system. Each of the N actions employs an Action A, B, or C to complete it. These variations are briefly listed below. See Appendix Y, "Installing National Language Support (NLS)" for more information and instructions. Be sure to read and understand the sections, "Important Notes" and "General Information" in Appendix Y.
Most installations will use Actions NA, NC, or NM.
❏ NA installing a new SAS System with NLS, uses Action A
❏ NC installing new products and NLS to an existing SAS System, or installing new products to an existing SAS System with NLS, uses Action C
❏ NM installing maintenance and NLS to an existing SAS System, or installing NLS to an existing SAS System, or installing maintenance to an existing SAS System with NLS, uses Action C
❏ NS adding NLS to an existing staged install at TS475, no new products, uses Action C
❏ NN adding NLS to an existing staged install with new products at TS475, uses Action C
❏ NP adding NLS to an existing staged install at TS450, uses Action C
❏ NB adding NLS only directly to a SAS System at TS475, short install, uses Action B
❏ NX adding NLS and maintenance directly to a SAS System at TS450, short install, uses Action B
❏ N2C adding a second NLS to a staged install, uses Action C
❏ N2B adding a second NLS directly to final libraries, uses Action B
❏ Third and subsequent NLS installations
❏ Using an NLS media to perform a non-NLS installation.
Installation Instructions and System Manager's Guide 17
Installing the SAS System
The next section begins the step-by-step explanation of the installation process. You must follow the instructions regardless of the Action you choose.
Performing the Installation Process
This section details all of the steps required to process a SAS System installation tape, regardless of the primary action selected. You must complete these instructions in their entirety to insure a complete, working SAS System. Once you have completed the installation process, complete the post-installation steps as described in "Post-Installation Processing." For post-installation, remember to follow the steps for the action you selected.
Unloading the Installation Jobs — Run IEBUPDTE
Step 1: Determine a name for a new CNTL data set.
Pick a name to use in the IEBUPDTE utility to contain the installation program. This must be a new, unused data set. Each media set from SAS must have its own CNTL data set. Violating this rule often causes troubles that are difficult to debug. A suggested naming convention is:
&prefix.MMMDDYY.CNTL
where &prefix is the prefix you are installing to and MMMDDYY is the date of installation. For example, SYS.SAS609.FEB1494.CNTL follows this naming convention.
Step 2: Set up a job to allocate and load a CNTL data set.
The job you create unloads all product installation members from the tape. The newly allocated data set is referred to hereafter as the CNTL data set. Use the example IEBUPDTE job, which follows, to create your site-specific job.
Note: A new CNTL data set must be allocated. Do not use the same CNTL data set name used for previous installations of SAS products.
To modify the example script, change the italicized text in the example to reflect your site-specific information. Change the information as indicated below:
a. Modify the first lines of the IEBUPDTE job to contain jobcard information for your site.
b. Change your.cntl.dataset to specify the data set name for your CNTL data set. (This text appears twice in the example. Be sure to replace it both times.)
c. Replace disk with the unit type you are using for the CNTL data set.
18 Installation Instructions and System Manager's Guide
Installing the SAS System
d. Replace dddddd with the volume serial of the disk pack on which the CNTL data set will be created.
e. Replace vvvvvv with the volser of the first tape in the series of tapes that you are installing.
f. Replace uuuu with the unit type for a tape drive at your site.
The example IEBUPDTE job follows:
//IEBUPDTE JOB (account information),'programmer', // TIME=(m,s),MSGCLASS=a //* //ALLOC EXEC PGM=IEFBR14 //OUTCNTL DD DSN=your.cntl.dataset,DISP=(NEW,CATLG,DELETE), // UNIT=disk,VOL=SER=dddddd, // DCB=(BLKSIZE=6160,LRECL=80, // DSORG=PO,RECFM=FB),SPACE=(6160,(450,45,35)) //* //UPDTE EXEC PGM=IEBUPDTE,PARM='NEW' //SYSIN DD DSN=SAS.SASROOT,DISP=OLD,VOL=SER=vvvvvv, // LABEL=(1,SL),UNIT=uuuu //SYSPRINT DD SYSOUT=* //SYSUT2 DD DSN=your.cntl.dataset,DISP=OLD //*
Step 3: Execute the IEBUPDTE job that you just modified.
Step 4: Check the ##README file for any special installation instructions for your tape.
This member was unloaded into the CNTL data set by the IEBUPDTE job you just ran. It contains any special instructions you may need to follow to complete the installation of the tape you received.
Specifying Installation Parameters
The SASEDITP member of the CNTL data set contains parameters for which all users must specify installation-specific values.
Other members of the CNTL data set contain information that you need to edit only under the following circumstances:
❏ PRODSEL contains product selection parameters.
Edit only if you want to perform the installation in selective mode.
❏ LIBSEL contains product library selection parameters.
Edit only if you want to perform the installation in selective mode, and you want to select by individual product library.
Installation Instructions and System Manager's Guide 19
Installing the SAS System
❏ RENEWPRM contains SETINIT text.
Edit only if the Cover Letter included with your installation package instructs you to do so.
For your convenience, the CNTL data set contains backup copies of SASEDITP, PRODSEL, and LIBSEL, with the names @SASEDTP, @PRODSEL, and @LIBSEL. The backup copies contain the default parameter values as unloaded from the tape. They exist for you to use as reference, to help you recover from possible error situations, and to reinitialize SASEDITP, PRODSEL, and LIBSEL, if desired, for performing additional actions. The current values in each member are always used when creating customized SASIxxxx job(s).
Step 1: Supply SASEDITP parameter values.
Note: Although comments in this member use lower case for readability, all parameter values you enter should be in upper case. Set CAPS ON in your edit session before entering your values.
❏ Provide job header information:
Use JOBCARD1= through JOBCARD5= to create JOB statements for the generated SASIxxxx job(s). The default JOBCARD1 value contains a jobname value of SYSNAME, which resolves so that the jobname is the same as that of the member name that contains the JCL for the job. Do not change the //%SYSNAME. symbol in the existing JOBCARD1 value. Update the remainder of the JOBCARDx parameters with the appropriate values (/*JOBPARM, /*ROUTE, //*MAIN, or //*FORMAT statements) for your installation. You may, for example, want to add a /*JOBPARM FETCH statement for online retrieval of your jobs.
Note: Be sure to leave the JOB statement values enclosed in quotes ("). Do not increase the number of characters (50) contained between the quotes in JOBCARD1.
❏ Select National Language Support (NLS) Options:
See Appendix Y, "Installing National Language Support (NLS)" for information on the proper settings for these options. These values only appear in SASEDITP if your tape contains NLS files. If these values appear in your SASEDITP, do not attempt installation until you have read Appendix Y.
❏ SKIP-NLS= Blank out the *NO* on this line if so directed by Appendix Y.
20 Installation Instructions and System Manager's Guide
Installing the SAS System
❏ NLS-ONLY= Blank out the *NO* on this line if so directed by Appendix Y.
Note: The presence of NLS installation considerations in this documentation does not imply the presence of NLS files on your tape. The #CONTENT member of the control data set from your tape indicates whether or not your tape contains NLS files, and for what products.
❏ Select a single SAS install action and supply the corresponding library prefix values. The maximum prefix length is 23 characters, or 20 if you are installing NLS files.
Select the action you want (Action A, B, or C) by blanking out or deleting the *NO* that precedes the action name. Verify that you have only one action value active. If more than one action is selected, a return code of 12 is set, and error messages specifying the duplicate selections are posted to SYSPRINT and SYSTERM.
Specify library prefixes as follows:
❏ If you are using Action A: INSTALL-NEW
Use NEW-SAS-PREFIX= to specify the high-level prefix that you want to use for the SAS product libraries created by SASINSTA. The default is SAS.SAS609.
❏ If you are using Action B: INSTALL-DIRECT
Use EXISTING-SAS-PFX= to specify the high-level prefix of the existing SAS System libraries at your site into which you want to unload the tape libraries. The default is SAS.SAS609.
If you cannot use exclusive access to the existing SAS Libraries (DISP=OLD), blank out the *NO* before BUDSP=SHR.
❏ If you are using Action C: INSTALL-TO-STAGE
Use STAGED-LIBR-PFX= to specify the high-level prefix of the SAS System staging libraries into which you want to unload the tape libraries. The default is SAS.SAS609.NEW, and it creates these libraries as part of the SAS install process for this action.
Use FINAL-SASLIB-PFX= to specify the high-level qualifiers of an existing set of complete SAS System libraries. These libraries cannot be staging libraries from a previous maintenance install. The CLIST and cataloged procedure unloaded from the tape with the INSTALL-TO-STAGE action
Installation Instructions and System Manager's Guide 21
Installing the SAS System
concatenate the staging libraries in front of the production libraries for executing the SAS System.
❏ PROD-BATCH-CFG= specifies the name of a production batch SAS CONFIG file.
❏ PROD-TSO-CONFIG= specifies the name of a production TSO SAS CONFIG file.
To concatenate your production CONFIG files into the generated staging PROC and CLIST, blank out the *NO* on these lines and provide fully qualified data set names.
Note: These parameters are found in the SAS install ACTION C grouping along with STAGED-LIBR-PFX and FINAL-SASLIB-PFX.
❏ Provide site-specific parameter values for the following:
❏ CNTLDSN= specifies the CNTL data set you created by running the IEBUPDTE job.
❏ TAPEUNIT= specifies the JCL unit name or unit address for the tape drive on which the installation tape is mounted.
❏ EXPDATE= specifies the expiration date value used in accessing the installation tape. You may need to change the value to 98000 if your site uses a tape library management system.
❏ DISKUNIT= specifies the JCL unit name or unit address for the volume for the SAS installation libraries.
❏ WORKSPC= specifies the size, in 6144-byte blocks, for the SAS WORK library allocation for CLISTs, cataloged procedures, and in-stream procedures used throughout installation. The first value is the primary allocation, followed by a comma, and the second value is the secondary allocation.
❏ INTREADR= specifies the syntax for program submission to the JES internal reader. Optionally disables use of the internal reader if not available or allowed at your site.
To REVISE the syntax to invoke your internal reader, modify the data between the quotes as shown in the following example:
INTREADR='DD ALTERNATE,SYNTAX'
Do not remove the surrounding quotes. If your syntax contains single quotes, change the surrounding quotes to double quotes as shown in the following example:
22 Installation Instructions and System Manager's Guide
Installing the SAS System
INTREADR="DD 'ALTERNATE',SYNTAX"
IMPORTANT: If you modify INTREADR= and want to use SASINSGO, you must make a corresponding change to the SYSUT2 DD statement of the SUBKICKR step of SASINSGO.
To DISABLE use of the internal reader, remove the *NO* before the INTREADR= with the blank value. SASINSGO becomes unusable. To complete the install you must individually submit each generated job in sequence following the successful completion of the prior step. See the listings and discussions in the following section, "Generated SAS Installation Jobs," for job names, functions, and sequencing.
❏ ENTRY= specifies the entry point for the SAS System that is used in in-stream procedures during installation, in the cataloged procedures, and the CLISTs. The default is SASHOST, which runs the unbundled version of the SAS System. The "System Manager's Guide" in Section II of this document contains information on the different bundling configurations you can choose in customizing Version 6 of the SAS System for your site.
❏ SYSOUT= specifies the SYSOUT class you want to use for jobs.
❏ TMPUNI= specifies the value your site uses as the system-assigned name for temporary disk storage .
❏ VOLDISK= specifies the volume serial of the disk pack for installing SAS product libraries. This parameter is ignored if you specify the use of SMS.
❏ SMS-ALLOC specifies whether you intend to use IBM's SMS to help manage your installation data set allocations. By default, this parameter is commented out. If you do want to use SMS, delete the *NO* to invoke your site's installed SMS allocation features. VOLDISK will be ignored. Your site default SMS values will be used unless you delete the *NO* on each appropriate SMS parameter and supply the parameter combinations required by your installation. Consult your SMS documentation and system support personnel for further information and appropriate values.
The following SMS parms are supported by the SAS System LIBNAME and FILENAME statements via SVC 99 calls:
❑ SMS-STORCLAS SMS "STORCLAS=" value
❑ SMS-MGMTCLAS SMS "MGMTCLAS=" value
Installation Instructions and System Manager's Guide 23
Installing the SAS System
❑ SMS-DATACLAS SMS "DATACLAS=" value
Note: The SAS FILENAME statement supports the SMS DSNTYPE parameter, but the SAS LIBNAME statement does not support SMS DSNTYPE. The installation process sets a DSNTYPE=PDS override in any new allocation of a non-sequential data set in an SMS installation. This prevents a default DSNTYPE=LIBRARY in a customer SMS definition causing the installation to allocate PDSE data sets for SAS system content, resulting in installation failure.
❏ JES3SYS= Delete the *NO* on this line if you are running on a JES3 system. This will cause certain dynamic data set allocations for Actions B, C, or D to be performed in a separate job named SASIALOB, SASIALOC, or SASIALOD, respectively.
❏ COPYMOD= specifies the IEBCOPY command name to use when unloading your SAS installation load libraries from tape. Using the COPYMOD command causes the load libraries to be reblocked to the blocksize specified by the LOADBLK= parameter. The default is COPYMOD. If you use COPY, your load library blocksize will be 6144.
❏ CPBK= if SAS/CPE software is installed on your tape, CPE PDB data sets will normally be blocked to 23040. If you are using 3390 native mode DASD, delete the *NO* in front of CPBK=27648, and comment out CPBK=23040 by inserting *NO*.
❏ LOADBLK= when you use COPYMOD, specifies the blocksize you want to use for your SAS load library. The default is 32760. If you are performing an INSTALL-DIRECT, use this parameter when your target library blocksize is not 6144.
❏ PROC-DSN-SFX= specifies the final node of the data set name of the cataloged procedure library to which cataloged procedures (PROCs) are copied. It is appended to the installation library prefix that you specify with the action you select in SASEDITP. If you do not want to use this name, you can comment-out this parameter, uncomment the PROC-DSN parameter, and specify the entire data set name. The default is PROCLIB. The PROC-DSN-SFX and PROC-DSN parameters are used only when installing the SAS System with Action A.
❏ SASPNM= specifies the name you want to use for the SAS cataloged procedure. The default is SAS609.

24 Installation Instructions and System Manager's Guide
Installing the SAS System
❏ CLST-DSN-SFX= specifies the final node of the data set name of the command procedure library to which command procedures (CLISTs) are copied. It is appended to the installation library prefix that you specify. If you do not want to use this name, you can comment-out this parameter, uncomment the CLST-DSN parameter, and specify the entire data set name. The default is CLIST. The CLIST-DSN-SFX and CLIST-DSN parameters are used only when installing the SAS System with Action A.
❏ SASCNM= specifies the name you want to use for the SAS command procedure (CLIST). The default is SAS609.
Step 2: If you choose selective mode, specify products in PRODSEL or product libraries in LIBSEL.
Note: The recommended installation mode is the default mode. If you are installing in default mode, skip to Step 3.
If you choose to install in selective mode, you first choose whether to install by product or by individual product library.
If you want to install by product, edit the member PRODSEL of the CNTL data set. By default, all products on your tape are installed. If you do not want to install certain products, turn those products off by removing the asterisk from column one for those products in the PRODSEL member.
If you want to install by individual product library, you can choose between the following two methods:
❏ Specify (or deselect) the product libraries that you do not want to install. Use this method when you want to install everything except for a few product libraries.
In LIBSEL, specify the libraries that you want to omit by removing the asterisk from column one of the ignore line for each unwanted product library.
❏ Select the product libraries that you do want to install. Use this method when you want to install only a few product libraries.
In PRODSEL, remove the asterisk from the DEFLTSEL=%TURNDOFF statement. In LIBSEL, remove the asterisk from column one of the dotask line for the product libraries that you want to install.
Installation Instructions and System Manager's Guide 25
Installing the SAS System
Step 3: If a special SETINIT is indicated in the Cover Letter or your SETINIT has expired, enter RENEWPRM data.
If the Cover Letter in your installation package indicates that your tape contains an expired SETINIT, then your package should also include customized SETINIT data for you to enter at installation. If your SETINIT has expired since the tape was cut, contact SAS Institute for the current SETINIT data. Enter this data into the RENEWPRM member of the CNTL data set exactly as it appears on paper.
Unloading the SAS Product Libraries
SASINEW, SASIHOLD, and SASINSGO are jobs that use the installation parameter values you specified to create customized SAS installation jobs. To run in edit-and-go mode, use the SASINSGO job. To run in checkout mode, use the SASINEW or SASIHOLD job. For more information about these modes, see the section "Choosing Installation Modes" in Part 1, "Pre-Installation Checklist".
Note: If you are installing the SAS System for the first time, you cannot run SASIHOLD.
These jobs save the SAS install task programs they generate in specific members of the CNTL data set, listed in the table below. The jobnames for these tasks correspond to the CNTL data set member names.
Normally the jobs in each grouping will submit the next in turn until the task is done. It is important to verify that all the install jobs complete successfully before continuing to the post-installation tasks.
26 Installation Instructions and System Manager's Guide
Installing the SAS System
Generated SAS Installation Jobs
The table of names for SAS installation tasks can also be found in the SASEDITP member of the control data set. A brief description of each follows below.
Install Action Description Job Name and CNTLDSN Member Name
Action A Main Install Job SASINSTA
Follows SASINSTA Utility & Lists Install SASINSXA
Action A NLS Install Language Support SASINLSA
Action B JES3 JES3 Standalone Alloc SASIALOB
Action B Main Install Job SASINSTB
Follows SASINSTB Utility & Lists Install SASINSXB
Action B NLS Install Language Support SASINLSB
Action C JES3 JES3 Standalone Alloc SASIALOC
Action C Main Install Job SASINSTC
Follows SASINSTC Utility & Lists Install SASINSXC
Action C NLS Install Language Support SASINLSC
Action D JES3 JES3 Standalone Alloc SASIALOD
Action D Copy Stage to Final SASISTFN
Action E Delete Staged Libs SASIDSTG
Action F Delete Selected Libs SASIDSEL
Action G Renew License Job SASIRENW
Action A Install a SAS System to a new, unused prefix:
Submit the generated SASINSTA job. This job does the bulk of a new installation, including all the maintenance up to the date of the media. It in turn submits the SASINSXA job that installs tests, utilities, and other installation data. It is important to verify that the second job completes successfully. If it does not, it is usually due to an invalid jobcard. You need to fix the jobcard and manually submit the job. If you are also installing National Language Support, this job submits SASINLSA, which installs language support.
Installation Instructions and System Manager's Guide 27
Installing the SAS System
Action B Install new products or maintenance DIRECTLY to an existing SAS System:
(If you are running JES3, submit the generated SASIALOB JES3 conditional data set new allocation job. This submits the following job:)
Submit the generated SASINSTB job. This job does the bulk of new product and/or maintenance installation. It also submits the SASINSXB job that installs tests, utilities, and other installation data. It is important to verify that the second job completes successfully. If it does not, it is usually due to an invalid jobcard. You need to fix the jobcard and manually submit the job. If you are also installing National Language Support, this job submits SASINLSB, which installs or upgrades language support.
Action C Install new products or maintenance to a test or STAGING prefix:
(If you are running JES3, submit the generated SASIALOC JES3 conditional data set new allocation job. This submits the following job:)
Submit the generated SASINSTC job. This job does the bulk of new product and/or maintenance installation. It also submits the SASINSXC job that installs tests, utilities, and other installation data. It is important to verify that the second job completes successfully. If it does not, it is usually due to an invalid jobcard. You need to fix the jobcard and manually submit the job. If you are also installing National Language Support, this job submits SASINLSC, which installs or upgrades language support.
Action D Copy new products or maintenance from the test or STAGING prefix to production or final libraries:
(If you are running JES3, submit the generated SASIALOD JES3 conditional data set new allocation job. This submits the following job:)
Submit the generated SASISTFN job. This job performs all necessary copy actions.
Action E Delete all SAS allocated data sets contained in a given prefix, usually the test or staging prefix:
Submit the generated SASIDSTG job.
Action F Delete selected SAS libraries from the SAS System in a given prefix:
Submit the generated SASIDSEL job.
Action G Renew or install the license information (SETINIT) to the SAS System at a given prefix:
Submit the generated SASIRENW job.
28 Installation Instructions and System Manager's Guide
Installing the SAS System
IMPORTANT: If your site does not support or allow program controlled submission to the internal reader, see the discussion on the INTREADR= parm of the SASEDITP member of the CNTL data set. In this case, you will have to manually submit each job of a particular action after the prior job completes, in the same order as listed above.
Running SASINEW, SASIHOLD, or SASINSGO
Complete the following steps:
Step 1: Supply SASINEW, SASIHOLD, or SASINSGO parameter values.
❏ Edit the PROC parameters in the SASINEW, SASIHOLD, or SASINSGO member of the CNTL data set you choose, and modify the jobcard information to reflect the values needed at your site. For more information about these modes, see "Choosing Installation Modes," in Part 1, "Pre-Installation Checklist."
Update the parameter values using the following parameter descriptions as guidelines:
Note: If you are running SASINEW or SASIHOLD, you will need to add the following line anywhere in the SAS EDIPT member to insure that the latest maintenance is installed:
INSTALL@TS475=X
IMPORTANT: SASIHOLD and SASINSGO have parameters to supply both at the beginning and the middle of the program. CNTLDSN= must be supplied twice. Be sure this specification is identical in both places. A dissimilar specification will usually cause SASIHOLD and SASINSGO to fail.
❏ CNTLDSN= specifies the name of the installation CNTL data set you allocated using the IEBUPDTE job in Step 1 of "Unloading the Installation Jobs."
❏ SASEDTP= specifies the name of the CNTL data set member that contains the SASEDITP user site parameter values you have entered to control SAS installation tasks. The default is SASEDITP.
❏ PRODSEL= specifies the name of the CNTL data set member that contains the product selection parameter values you want to use to control SAS installation tasks. The default is PRODSEL, and selects all products.
❏ LIBSEL= specifies the name of the CNTL data set member that contains the library selection parameter values you want to use to control SAS installation tasks. The default is LIBSEL, and selects all product libraries.
Installation Instructions and System Manager's Guide 29
Installing the SAS System
❏ SYSOUT= specifies the SYSOUT class you want to use for this job.
❏ DISKUNI= specifies the unit name at your site for temporary storage.
Step 2: Run the SASINEW, SASIHOLD, or SASINSGO job to generate the SASIxxxx job(s).
Note: The SASINEW, SASIHOLD, SASINSGO, and SASIxxxx jobs require exclusive access to the CNTL data set. Be sure to terminate your edit session or otherwise free the data set after submitting the job you choose.
❏ If you run the SASINSGO job, it also submits the install job string it creates.
Verify that all jobs complete successfully. When it completes, your product libraries are installed, and you are ready to verify installation and proceed with site-specific product implementation.
IMPORTANT: If syntax '//DDNAME DD SYSOUT=(A,INTRDR)' is not correct to submit to the internal reader at your site, you cannot use SASINSGO. Use SASIHOLD and modify the INTREADR= parm in SASEDITP.
❏ If you choose checkout mode, verify and run the generated SASIxxxx job(s).
The SASINEW or SASIHOLD job completes with the creation of the install job string. Review, and then submit the generated SASIxxxx job(s). If you use an edit session to review the install job string, be sure to terminate it or otherwise free the CNTL data set. Verify that the install job string completes successfully. When it completes, your product libraries are installed, and you are ready to verify installation and proceed with site-specific product implementation.
Verifying the System Installation
Step 1: Check the job log to verify successful completion of the SASIxxxx job(s).
You should not receive any error messages, and the job should finish with completion codes of zero.
Several steps of the jobs may produce the following messages:
❏ +NO CONFIG File Available
❏ NOTE: Apparent keyword reference could not be resolved.
These messages are purely informational and can be ignored.
30 Installation Instructions and System Manager's Guide
Installing the SAS System
Step 2: Submit the initial verification job.
The job VALID in the CNTL data set performs basic validation of your SAS System installation. Check the SAS log to verify execution. You should not receive any error messages, and the job should finish with a completion code of zero. The VALID job should be run only if Base SAS software is installed because it does not have a corresponding "valid" job to run against if Base SAS software is not on the tape.
Step 3: Submit product verification jobs.
Separate validation jobs are included for many of the SAS software products. Each provides a more in-depth validation test for the specified SAS software product. For some products, post-installation implementation must be completed in order to run the products at your site. For these products, details on running the validation jobs appear in the appendix for the individual product.
The CNTL data set contains jobs used to validate products. You can run the following jobs without performing any special implementation for the products. Submit the relevant jobs for the products on your installation tape. Check the SAS log to verify execution of each job.
The following jobs are contained in the CNTL data set and validate the products indicated:
❏ BAVALID verifies base SAS product installation.
If you perform any of the customizations described in "Setting up the SAS System" in the "System Manager's Guide" in Section II, you may want to rerun BAVALID (after modifying it to execute your customized procedure) as a regression test.
❏ ETVALID verifies SAS/ETS product installation.
❏ GRVALID verifies SAS/GRAPH product installation.
❏ MLVALID verifies SAS/IML product installation.
❏ ORVALID verifies SAS/OR product installation.
❏ QCVALID verifies SAS/QC product installation.
❏ STVALID verifies SAS/STAT product installation.
Note: If you receive errors while executing any of the validation jobs and cannot determine their cause, contact the Technical Support Division at SAS Institute as described in the introduction to this document. Validation jobs that invoke experimental status procedures may issue warning messages to alert you to the experimental status of those components.
Installation Instructions and System Manager's Guide 31
Installing the SAS System
Performing Site-Specific Product Implementation
Most SAS software products require no special implementation procedures. Products that do have special requirements are listed in this section. Refer to the appropriate product appendix for any required product-specific processing and customization information. You cannot run these products at your site until you complete the implementation information described in the appropriate product appendix.
❏ SAS/ACCESS Interface to ADABAS Software
❏ SAS/ACCESS Interface to CA-DATACOM/DB Software
❏ SAS/ACCESS Interface to CA-IDMS Software
❏ SAS/ACCESS Interface to DB2 Software
❏ SAS/ACCESS Interface to IMS Software
❏ SAS System under MSP
❏ SAS/ACCESS Interface to ORACLE Software
❏ SAS/ACCESS Interface to SymfoWARE Software
❏ SAS/ACCESS for SYSTEM 2000 Software
❏ SAS/ASSIST Software
❏ SAS/CONNECT Software
Note: In order to run SAS/CONNECT software, you need to complete system configuration for the access method appropriate for your site.
❏ SAS/CPE Software
❏ SAS/GRAPH Software
❏ SAS/SESSION for CICS Software
❏ SAS/SHARE Software
❏ SAS/TOOLKIT Software
❏ SAS/TUTOR Courses
32 Installation Instructions and System Manager's Guide
Installing the SAS System
Post-Installation Processing
Now, your tape libraries are installed, and the site-specific product implementation is complete. You may need to perform further steps, depending on the action you selected and your site requirements. The following lists some of the tasks you may need to perform:
❏ After you install the base SAS System, you can customize your SAS System configuration.
❏ After you install maintenance files, you may need to apply site changes to maintenance versions of customized files.
❏ After you install new products or maintenance files into SAS System staging libraries, you may want to integrate them into your production SAS System.
ATTENTION! The rest of this section is divided into three subsections. Be sure to follow the instructions provided for the Action that you are using.
Completing the Installation for Action A
Be sure to read all of the appropriate sections if you are installing using Action A.
Implementing SAS TSO Support
Note: This task is required if you are running under TSO.
If you plan to run the SAS System under TSO, you must install the SASCP TSO command processor as outlined in the following. Otherwise, you can run the SAS System in batch mode only. You must also use the CLIST supplied with this installation tape to run the Release 6.09 SAS System under TSO. Do not try to use a SAS CLIST from a previous release.
SAS TSO support includes two different facilities. The SAS TSO command processor allows you to invoke the SAS System from a TSO session. The SAS TSO command support feature provides a SAS statement for executing TSO commands from a SAS session and allows SAS Data Step programs to execute TSO commands conditionally.
The SAS System supports these features through installation-modifiable modules. These modules contain all of the TSO service routine dependent functions and make no reference to SAS service routines or data areas. These modules are:
SASCP the TSO command processor for invoking the SAS System.
Note: SASCP is backward compatible and replaces the modules from previous releases. You can continue to execute previous releases of the SAS System and SASCP with the Release 6.09 SASCP installed on your system.
Installation Instructions and System Manager's Guide 33
Installing the SAS System
SASTSO the TSO command executor for executing TSO commands.
34 Installation Instructions and System Manager's Guide
Installing the SAS System
SASCALL the TSO CALL command processor used by SASTSO.
SASTSMAC the macros necessary to assemble these modules.
These source modules are unloaded from the tape during installation into the &prefix.BAMISC library. The default load modules SASCP, SASTSO, and SASCALL are unloaded into your &prefix.LIBRARY. These modules work correctly under all levels of TSO.
Most sites will not need to modify the modules. If you do not need to customize the modules, proceed to Step 3. However, should your site have special needs, Steps 1 and 2 describe how to modify and reassemble these modules.
Step 1: Determine if the distributed TSO support modules require installation customization for your site. Perform customization if needed. (Optional)
If you customize SASCP or SASTSO, and if your site has TSO/E Version 1 or base TSO installed, you must also change the GBLC set symbol &TSOE from its default value of 2 to 1 in each module that you reassemble. You do not need to make this change if your site runs TSO/E Version 2 or later.
The Assembler source code for the SASCP, SASTSO, and SASCALL modules is available in your &prefix.BAMISC library for modification. Assembly requires that the SYSLIB concatenation contain the general use system macro library SYS1.MACLIB, the product-sensitive system macro library SYS1.AMODGEN or SYS1.MODGEN, and the BAMISC library. Examine the source code for the TSO support modules for further details. Sample JCL for assembling and linking these modules is included with the comments of the modules.
If your site has modified the source code and relinked the SASCP module, you can use the TSO TEST command to test SASCP directly from the SAS library by specifying the CP option of TEST. Create a test version of the SAS609 CLIST and insert the TEST command with the CP option immediately before the SASCP invocation at the end of the CLIST.
Step 2: Modify system tables as needed. (Optional)
This installation may also require that you modify certain system tables, such as the PCF and/or ISPF Command Authorization tables. These modifications may require the assistance of local systems or technical support personnel.
The TSO command executor, SASTSO, contains support for TSO command validation by both PCF and ACF2. The use of ACF2 command validation must be explicitly enabled either by modifying and reassembling SASTSO (following the instructions given in the program header), or by using the MVS service aid, AMASPZAP. Contact the

Installation Instructions and System Manager's Guide 35
Installing the SAS System
Technical Support division at SAS Institute if you have any questions concerning these procedures.
36 Installation Instructions and System Manager's Guide
Installing the SAS System
The functionality that will allow you to interface the SAS System with IBM's ISPF is included in this release in beta form. For this reason, you should examine the ISPF Command Table, ISPTCM. For more information about this functionality, refer to Developing ISPF Applications with the SAS System, Preliminary Documentation.
If the SAS command processor, SASCP, is defined within your installation's ISPTCM, the flag bit to allow a function pool to be created for the command must be on x'40'. If SASCP is not in your ISPTCM, then either the default flag value must include the preceding bit, or you should do one of the following:
❏ change the default flag value ❏ add SASCP to the table with the flag on.
Note that the bit is ON in the default flag value in the sample ISPTCM that is distributed by IBM.
Step 3: Copy the SASCP module to your TSO command load library.
Note: This step is required if you are running under TSO.
Installation of SAS TSO support requires that the module SASCP be copied from the &prefix.LIBRARY to a load library that contains TSO commands. This can be a STEPLIB library defined in a LOGON procedure, a system link list library, or a link pack area library. (The SASTSO and SASCALL modules should remain in &prefix.LIBRARY.)
Use job BASASCP in the CNTL data set to copy SASCP to your TSO command load library. The CMDDSN, CMDUNIT, and CMDVOL JCL procedure parameters specify the user command load library into which you copy the SASCP module. Modify these values to specify your TSO command library. If you have customized the SASCP module and are storing it in a library other than &prefix.LIBRARY, you also need to specify its new location in the //SASLIB DD statement.
Check the JCL and run the BASASCP job.
Completing Base SAS System Customization
Although no further implementation is required for you to run the base SAS product at your site, you should review the topics in Section II, Part 1 of this document. The information contained in "Setting up the SAS System" in the "System Manager's Guide" can help you customize the SAS System effectively for your users. In this discussion, you should select a bundled configuration and install the bundles in your Link Pack Area. This section also describes how you can customize your SAS invocation procedures and your default options settings. The other topics that address use of the SAS SVC and SMF Exit may be relevant for your site as well.
If you have a prior release of the SAS System installed, you may want to make the corresponding customizations in your newly installed release.

Installation Instructions and System Manager's Guide 37
Installing the SAS System
Completing the Installation for Action B
Apply site changes, if needed, to maintenance versions of customized files.
❏ If you have customized the default options table (DFLTOPTS):
If your site has customized DFLTOPTS and your maintenance load library contains the module SASHOST, you need to reassemble DFLTOPTS and relink the appropriate modules after installing the SAS maintenance load library. See Step 3 in Section II, Part 1 of this document, "Customizing Default Options and System Configuration Files" for details on assembling and linking the DFLTOPTS table.
❏ If you install SAS System bundles in the Link Pack Area (LPA):
If your site installs bundles in the LPA/ELPA, and your maintenance load library contains any of these bundles, you will need to install the new versions in the LPA. See Section II, Part 1 of this document, "Installing the SAS System into the LPA," for details on this process.
Completing the Installation for Action C
Step 1: Merge site customizations, if needed, with installed staging CLIST and PROC.
If your site has customized the default CLIST or PROC, you need to apply your site customizations to the installed staging CLIST and PROC under one of the following conditions:
❏ you need to test the staged system with the site customizations in place
❏ you intend to run the staged system in a production mode.
If your site customizations are small, you may simply want to add them to the install-created staging CLIST and PROC. The SASIxxxx jobs copy the staging CLIST BACLST01 and the staging PROC BAPROC01 in the CNTL data set only. Rename these and copy them to the appropriate PROCLIB and CLISTLIBS for your site.
38 Installation Instructions and System Manager's Guide
Installing the SAS System
If you made many site customizations, you may want to add the staging libraries to the appropriate DDname concatenations in your customized CLIST and PROC. Add the concatenations as follows:
IMPORTANT: The staging libraries do not contain everything required to run the SAS System. The concatenations shown below are required to correctly run SAS.
❏ Cataloged procedure modifications
To concatenate the load library data sets, locate the JCL statements in the PROC that look like the following:
//STEPLIB DD DISP=SHR,DSN=&LOAD // DD DISP=SHR,DSN=&final-saslib-pfx.LIBRARY
Change this DD statement as follows, providing the prefix values specified in SASEDITP:
//STEPLIB DD DISP=SHR,DSN=&LOAD // DD DISP=SHR,DSN=&staged-libr-pfx.LIBRARY // DD DISP=SHR,DSN=&final-saslib-pfx.LIBRARY
To concatenate the SASMSG library data sets, locate the JCL statements in the PROC that look like the following:
//SASMSG DD DSN=&final-saslib-pfx.SASMSG,DISP=SHR
Change this DD statement as follows, providing the prefix values specified in SASEDITP:
//SASMSG DD DSN=&staged-libr-pfx.SASMSG,DISP=SHR // DD DSN=&final-saslib-pfx.SASMSG,DISP=SHR
To concatenate the AUTOLIB library data sets, locate the JCL statements in the PROC that look like the following:
//SASAUTOS DD DSN=&final-saslib-pfx.AUTOLIB,DISP=SHR
Change this DD statement as follows, providing the prefix values specified in SASEDITP:
//SASAUTOS DD DISP=(SHR,PASS),DSN=&SASAUTO // DD DISP=SHR,DSN=&staged-libr-pfx.AUTOLIB // DD DISP=SHR,DSN=&final-saslib-pfx.AUTOLIB
Since you cannot concatenate SAS data libraries, you must run with the SASHELP library that was updated with your installation tape. The SASIxxxx jobs merge the contents of &staged-libr-pfx.SASHELP with your &final-saslib-pfx.SASHELP. The resulting, merged SAS data library is the &staged-libr-pfx.SASHELP data set.
Installation Instructions and System Manager's Guide 39
Installing the SAS System
Locate the JCL statement in the PROC that looks like the following:
//SASHELP DD DSN=&final-saslib-pfx.SASHELP,DISP=SHR
Change this DD statement as follows, providing the prefix values specified in SASEDITP:
//SASHELP DD DSN=&staged-libr-pfx.SASHELP,DISP=SHR
❏ CLIST modifications
To concatenate the load library data sets, locate the line in the CLIST that reads:
SASLOAD('''&final-saslib-pfx.LIBRARY''')
Change this statement as follows, providing the prefix values specified in SASEDITP:
SASLOAD('''&staged-libr-pfx.LIBRARY'' ''&final-saslib-pfx.LIBRARY''')
To concatenate the SASMSG library data sets, locate the following line in the CLIST:
SASMSG('''&final-saslib-pfx.SASMSG''')
Change this statement as follows, providing the prefix values specified in SASEDITP:
SASMSG('''&staged-libr-pfx.SASMSG'' ''&final-saslib-pfx.SASMSG''')
To allocate the appropriate SASHELP library data sets, locate the following line in the CLIST:
SASHELP('''&final-saslib-pfx.SASHELP''')
Change this statement as follows, providing the prefix values specified in SASEDITP:
SASHELP('''&staged-libr-pfx.SASHELP''')
To concatenate the AUTOLIB library data sets, locate the following line in the CLIST:
MAUTS('''&final-saslib-pfx.AUTOLIB''')
Change this statement as follows, providing the prefix values specified in SASEDITP:
MAUTS('''&staged-libr-pfx.AUTOLIB''') '''&final-saslib-pfx.AUTOLIB''')
40 Installation Instructions and System Manager's Guide
Installing the SAS System
Step 2: Apply site-specific changes, if needed, to maintenance versions of customized files.
❏ If you have customized the default options table (DFLTOPTS):
If your site has customized the DFLTOPTS table, and your maintenance load library contains the module SASHOST, you should reassemble DFLTOPTS and relink the appropriate modules after installing the SAS maintenance load library. See Step 3 in Section II, Part 1 of this document, "Customizing Default Options and System Configuration Files" for details on assembling and linking the DFLTOPTS table.
❏ If you install SAS System bundles in the LPA:
If your site installs bundles in the LPA/ELPA, and your maintenance load library contains any of these bundles, you should install the new versions in the LPA. See Section II, Part 1 of this document, "Installing the SAS System into the LPA," for details on this process.
Step 3: Perform site testing as desired.
Step 4: Copy contents of staging libraries to production SAS System libraries using Action D (optional).
See Section II, Part 2, "Maintaining the SAS System," for more information on this process.
Step 5: Delete staging libraries using Action E (optional).
See Section II, Part 2, "Maintaining the SAS System," for more information.
Step 6: Perform any required product-specific processing as described in the appendix addressing a particular product.
Page 41
Part 3, Installing SAS® System Maintenance
This section contains instructions for installing SAS System maintenance files. Whether you are installing Release 6.09 Enhanced of the SAS System for the first time, adding an additional SAS System product, or specifically installing maintenance files, SAS Institute recommends that you utilize the information in this section to unload the most current maintenance and enhancements for Release 6.09 Enhanced of the SAS System.
Identifying the Contents of Your Media
Before you can proceed with the installation process, you must identify the contents of your media. Complete the following steps.
1. Unload the CNTL data set using the IEBUPDTE job as described on page 17 in "Unloading the Installation Jobs - Run IEBUPDTE," in Part 2, "Installing the SAS System".
2. Edit the #CONTENT member of the CNTL data set. This member contains information about your installation media, as well as instructions on unloading your software.
3. Find the following line in the #CONTENT member:
This tape contains the following products and/or maintenance files:
A list of products usually follows this line. However, if you see only:
MAINTENANCE FILES: to upgrade your new or existing system to TS475
then you have maintenance-only media. Skip to the section "Upgrading Your Currently Licensed Products to TS475 or Installing Supplemental Maintenance" later in this section. If you see this line and a list of products, continue to the next section.
42 Installation Instructions and System Manager's Guide
Installing SAS System Maintenance
Installing the SAS System, Release 6.09 Enhanced for the First Time at TS475 or Adding a New SAS System Product at TS475
Whether you are installing Release 6.09 Enhanced of the SAS System for the first time or adding a new SAS System product, you should add the following step to the installation process in Part 2, "Installing the SAS System" to upgrade your Release 6.09 Enhanced SAS System to TS475.
Follow the installation process until you get to page 18, "Specifying Installation Parameters". In this section, you are instructed to edit the SASEDITP member of your CNTL data set. While editing this member, specify the text string INSTALL@TS475=X (in uppercase) anywhere in SASEDITP. Although it can be specified anywhere in the member, it must be in uppercase. If you do not add this text string in SASEDITP, the SAS System will install at TS450.
Continue with the installation process as documented in Part 2, "Installing the SAS System".
Note: If you are adding a new SAS System product and your base SAS System is already upgraded to TS475, you do not have to add the INSTALL@TS475=X text string to SASEDITP. The installation process will detect a base SAS System currently running at TS475 and your new system will automatically install at the same TS level.
Note: If you are adding a new SAS System product and your base SAS System is currently at
TS450 through TS470, you must add the INSTALL@TS475=X text string to SASEDITP. Failure to add this text string will generate a system running mismatched maintenance. This type of installation is not supported and will result in spurious abends, looping situations, and other unpredictable results.
Upgrading Your Currently Licensed Products to TS475 or Installing Supplemental Maintenance
If the media in your package contains only maintenance files and usage notes or you want to install supplemental maintenance, follow the steps below:
1. Unload the CNTL data set using the IEBUPDTE job as described on page 17 in "Unloading the Installation Jobs - Run IEBUPDTE," in Part 2, "Installing the SAS System".
2. Edit the SASEDITP member of the CNTL data set created in step 1 above.
Follow the steps for editing instructions as documented on pages 18 through 24 in "Specifying Installation Parameters," in Part 2, "Installing the SAS System". It is recommended you perform an Action C installation process. See "Choosing a Primary Installation Action," in Part 1, "Pre-Installation Checklist" for a description of the actions. Once you have specified your installation parameters, proceed with the next step.
Note: Only Action B or Action C is available.
3. Edit the SPKEYLST member of the CNTL data set. To upgrade your currently licensed products to TS475, add the keywords 475SUPLMAINT and USAGENOTES (both in uppercase) to this data set following instructions in the SPKEYLST member.
To install the SAS/C transient library, add the additional keyword V7TRANSLIB.
Installation Instructions and System Manager's Guide 43
Installing SAS System Maintenance
4. Edit the MAKESUPL job in the CNTL data set. Modify the job card per your site specifications and follow the editing instructions in the comments of the MAKESUPL member.
5. Run the MAKESUPL job.
Note: The MAKESUPL job needs exclusive access to the CNTL data set. You should back out of the CNTL data set after submitting MAKESUPL.
6. Upon successful completion of the MAKESUPL job, a SASISUPL member is created in the CNTL data set. This job is customized by your editing parameters in SASEDITP and the execution of MAKESUPL. Submit the SASISUPL job to install TS475 maintenance to your system.
Note: The SASISUPL job needs exclusive access to the CNTL data set. You
should back out of the CNTL data set after submitting SASISUPL.
7. After SASISUPL completes, a new SAS clist and SAS procedure are created in the CNTL data set. The SAS clist is stored in member BACLST01. The SAS procedure is stored in BAPROC01. The new clist and procedure will execute the SAS System at TS475. Use these to test your upgraded system either in interactive or batch mode, respectively.
Post-Installation Step
If you are upgrading your SAS System installation from an earlier TS level to TS475 and you have set SAS System options by assembling the DEFAULT OPTIONS TABLE using the BAOPTS1 member of your original CNTL data set, you must re-assemble this table. Edit the BAOPTS1 member in your original CNTL data set. Change the SYSLMOD DD in all three LINK EDIT steps to point to the new HLQ.library (the TS475 version) and rerun BAOPTS1.
If you are running the SAS System out of the LPA with PGM=SASXAL, it is necessary to refresh the LPA after completing the installation of maintenance.
Copying Staged Libraries to Production
If you performed the recommended Action C above on your maintenance-only media, you will eventually want to move these staging libraries to production. After testing TS475, complete the following steps to move these libraries to production:
1. Edit the SASEDITP member of the CNTL data set. You should comment out Action C and activate Action D within SASEDITP following the instructions on in "Copying Staged Libraries (Action D)" Section II, Part 2, "Maintaining the SAS System". You only need to perform step 1 in "Copying Staged Libraries (Action D)".

44 Installation Instructions and System Manager's Guide
Installing SAS System Maintenance
2. Edit the MAKESUPL member of the CNTL data set and submit it. No editing should be required in MAKESUPL.
Note: The MAKESUPL job needs exclusive access to the CNTL data set. You should back out of the CNTL data set after submitting MAKESUPL.
3. After MAKESUPL completes successfully, edit the SASISPSF member of the CNTL data set. This job was customized for submission by your editing parameters in SASEDITP and the submission of MAKESUPL. Run SASISPSF to copy the staging libraries to production.
After SASISPSF completes, your production libraries will be upgraded to run TS475.
For SAS/SHARE and SAS/CONNECT Software Customers Only
Support for IBM's TCP/IP, Version 3.2 is available on this media via a new SAS/C Transient Library. If your installation media only contains maintenance, you can unload the new SAS/C Transient Library using the V7TRANSLIB keyword as described in step 3 in "Upgrading Your Currently Licensed Products to TS475 or Installing Supplemental Maintenance" above.
If the installation media contains SAS System products, install the new SAS/C Transient Library by submitting the ULCTRANL job in the CNTL installation data set.
Page 45
Section II, System Manager's Guide
Part 1, Setting Up the SAS® System
Part 2, Maintaining the SAS® System

Page 47
Part 1, Setting Up the SAS® System
Part 1 describes how to tailor your SAS System installation to suit your particular site configuration. The following topics are discussed in this section:
❏ customizing default options and system configuration files (recommended) ❏ selecting a bundled configuration (recommended) ❏ installing the SAS System into the LPA (recommended) ❏ customizing your SAS CLIST and cataloged procedure (recommended) ❏ customizing your NEWS and SITEINFO files (recommended) ❏ installing the SAS SVC routine (optional) ❏ installing the SAS SMF exit. (optional)
Note: Some of the actions may require knowledge of MVS operating system principles.
Customizing Default Options and System Configuration Files
Note: You should complete this task.
In the process of installing Release 6.09 of the SAS System under MVS, you establish default SAS system options for all SAS invocations at your site. You can set these global defaults in any of the following places:
❏ Default Options Table ❏ System configuration file ❏ Restricted Options Table.
Two sample system configuration files are shipped with the SAS System. One has option settings set specifically for TSO (TSOXA in the CNTL data set). The other has settings for batch execution (BATCHXA). These files are discussed in more detail later in this section.
Users can also specify options in any of the following locations:
❏ in a user configuration file, which is specified using the CONFIG operand in the CLIST and the CONFIG parameter in the cataloged procedure
❏ on the command line when invoking the SAS System under TSO
❏ with the OPTIONS parameter in the cataloged procedure, if invoking it under batch
❏ from within a SAS session, either on an options statement or from the options window in DMS.
48 Installation Instructions and System Manager's Guide
Setting Up the SAS System
The following indicates the order in which the SAS System processes options from the various sources:
1. Options in the DFLTOPTS table (if one is linked in with SASHOST or the supervisor bundle that your ENTRY= option specifies)
2. Options in a system configuration file (if one is used)
3. Options in a user configuration file (if one is specified)
4. Options supplied on the command line in the invocation of the CLIST (TSO) or using the OPTIONS parameter in the cataloged procedure (batch)
5. Options in the restricted options table (if there is a SASOP609 module in the linklist)
6. SAS session options. Since session options can be specified during a SAS session on an OPTIONS statement or in the Options window, their specification is not restricted.
Note that later specification of an option overrides an earlier specification. For example, options set in a user configuration file override options set in the system configuration file. Depending upon where you set them, you can streamline system startup or restrict use of options by users.
To streamline system startup for users under TSO, for example, you can add all option defaults needed for TSO at your site to the Default Options Table. Then, users need not allocate a system configuration file at startup time. You can remove its allocation from the CLIST to streamline system startup. Note that in this case, you still need a system configuration file for batch jobs to override the values tailored for TSO in the Default Options Table.
To restrict use of options by users, you can set them in the Restricted Options Table. Since this table is processed last after the Default Options Table, configuration files, and command line options, values set here override all earlier specifications. However, only the configuration options, which are specified at invocation, can be effectively restricted by specifying them in the Restricted Options Table.
Step 1: Determine default values for SAS system options at your site.
SAS system options that can be used in any operating system environment in which the SAS System resides are described as portable and discussed in SAS Language: Reference, Version 6, First Edition. Portable options new in Release 6.07 are discussed in Technical Report P-222, Changes and Enhancements to Base SAS Software. MVS-specific system options are discussed in the SAS Companion for the MVS Environment, Version 6, First Edition. MVS-specific SAS system options new in Release 6.07 are discussed in Technical Report P-218, Changes and Enhancements to the SAS System, Release 6.07, for the MVS Environment. The section "Summary of SAS System Options" in the MVS changes and enhancements document contains a table that lists all options available, both portable and MVS-specific. The options are listed in alphabetical order for easy reference.
Installation Instructions and System Manager's Guide 49
Setting Up the SAS System
This table shows the system default value for each option and includes a reference to the appropriate document for further details.
MVS-specific options that warrant special attention at installation time are discussed in the following. These options include the SMF- and SVC-related options, and the superblocking memory-use tuning options.
❏ SMF and SVC Options
The following options should be set in the Restricted Options Table with values that you choose at installation time. The settings on these options are unlikely to require change. Because of the measurements that these options govern, it is prudent to remove these option settings from general user access.
❏ SMF|NOSMF causes an SMF record to be written for every PROC or DATA step containing resource usage statistics for CPU time, storage, and EXCP count. NOSMF disables writing of utilization statistics by the SAS System. The default is NOSMF.
Note: The SAS system option STIMER must also be on for SMF records to be written.
❏ SMFEXIT=name identifies the user SMF recording exit load module. This load module is loaded and given control before SMF records are written. It allows the user to modify the contents of the record to be written or to disallow the writing of the record (if SMF option is in effect). There is no default.
For information on installing the SMF exit, see "Installing the SAS SMF Exit" later in this section.
❏ SMFTYPE=recnum identifies the SMF record type to record and specifies the default user type for the SAS System to place in the SMF records it generates when the SMF option is on. The value must be greater than 127 for the SAS SVC to write the SMF record. The default is 128.
❏ SVC0R15=value specifies the value to be placed in Register 15 before invoking the SAS SVC. The default is 4.
For information about installing the SAS SVC, see "Installing the SAS SVC Routine" later in this section.
❏ SVC0SVC=number specifies the SVC number invoked for functions requiring the SAS SVC. The default is 109.
For information about installing the SAS SVC, see "Installing the SAS SVC Routine" later in this section.
50 Installation Instructions and System Manager's Guide
Setting Up the SAS System
❏ Superblocking Memory-use Tuning Options
To decrease memory fragmentation, the SAS System has the ability to obtain large blocks of memory from the operating system to satisfy multiple requests for smaller blocks of memory. This scheme, which is called superblocking, not only reduces fragmentation but also reduces the number of system GETMAIN calls that are issued. This facility is controlled by setting the superblocking options. When they are set to zero, no superblocking is performed. Refer to Chapter 12 in the SAS Companion for the MVS Environment for more background and additional details on superblocking.
The superblocking options warrant special attention at installation time because useful values can depend on the mode (batch or TSO) in which the SAS System runs. The default system configuration files unloaded from the tape contain the recommended defaults. These default values are based on early and fairly limited experience in running Release 6.08 of the SAS System. In most cases you should not need to alter these from their default values.
The SAS System issues superblock overflow warning messages if secondary (OSA) superblock memory is needed. These messages can help you to tune these values for your site.
The following options can be used at SAS invocation or in a configuration file to specify the size of the superblocks. The values may be specified in bytes or Kilobytes (K).
❏ PSUPISA=value specifies the size of the Initial Size Allocation (ISA) for the portable supervisor. The system default is 136K. The installation configuration file TSOXA sets this option to 170K.
❏ PSUPOSA=value specifies the size of the Overflow Size Allocation (OSA) for the portable supervisor. The system default is 4K. The installation configuration file TSOXA sets this option to 20K.
❏ VMCTLISA=value specifies the size of the ISA for SAS system memory management control blocks.
❏ VMTAISA=value specifies the size of the ISA for temporary memory above the 16MB line. Temporary memory is that memory which needs to be resident only while the task or procedure is active. This type of memory is highly transient so it is always cleaned up at the end of the task or procedure. In an MVS/XA or MVS/ESA environment, almost all PROC step memory, DATA step memory, and I/O buffers come from this class of memory. The value of this option is not used on an MVS/370 system.
❏ VMTAOSA=value specifies the size of the OSA for temporary memory above the 16MB line. The value of this option is not used on an MVS/370 system.
Installation Instructions and System Manager's Guide 51
Setting Up the SAS System
❏ VMTBISA=value specifies the size of the ISA for temporary memory below the 16MB line.
52 Installation Instructions and System Manager's Guide
Setting Up the SAS System
❏ VMTBOSA=value specifies the size of the OSA for temporary memory below the 16MB line.
❏ VMNSISA=value specifies the initial size allocation of NOSIG pools.
❏ VMNSOSA=value specifies the overflow size allocation of NOSIG pools.
❏ VMPAISA=value specifies the size of the ISA for permanent memory above the 16 MB line. Permanent memory is memory that is used past procedure or task termination, typically by the host and core supervisor. The system default is 0. The installation configuration files BATCHXA and TSOXA set this option to 256K.
❏ VMPAOSA=value specifies the size of the OSA for permanent memory above the 16 MB line. The system default is 0. The installation configuration files BATCHXA and TSOXA set this option to 128K.
❏ VMPBISA=value specifies the size of the ISA for permanent memory below the 16 MB line. The system default is 0. The installation configuration files BATCHXA and TSOXA set this option to 256K.
❏ VMPBOSA=value specifies the size of the OSA for permanent memory below the 16 MB line. The system default is 0. The installation configuration files BATCHXA and TSOXA default this option value to 128K.
Additional superblocking options specify ISA and OSA sizes for temporary memory. These options are rarely needed. Refer to Chapter 12 in the SAS Companion for the MVS Environment for more information.
❏ The BNDLSUFX= Option
The BNDLSUFX= option specifies a character that is to be appended to every bundle load module name before it is searched for or loaded. The character is appended to the name of every bundle load module (these modules have a prefix of SAB). If the name of the bundle is eight characters long already, the suffix character replaces the last character. The value for the BNDLSUFX= option can be enclosed in quotes, but does not have to be.
By using this option, the installation can cause those bundles that are installed in the Link Pack Area (LPA) and the Extended Link Pack Area (ELPA) to be renamed when they are copied to the installation's LPA library. Thus, the bundle modules can continue to exist in the SAS library with their original names, simplifying the application of maintenance and the concurrent running of different releases of the SAS System.
Installation Instructions and System Manager's Guide 53
Setting Up the SAS System
The suffix character is not used for the SASXAL, SASXAL2, or SAS370L modules. Your site may want to also rename these modules as well, using the suffix character for consistency. Note that the new names for the SASXAL and SASXAL2 modules must be the same except the SASXAL2 name has a 2 appended to it (or replacing the last character).
The BNDLSUFX= option is typically used only by system administrators, and not by the general user.
Step 2: Determine where to set your option defaults.
Review the procedures for setting default option values in the next three steps. Decide which options should be set in the Default Options Table, the system configuration files, and the Restricted Options Table. Save these lists for use in later steps.
Step 3: Customize the supplied DFLTOPTS table.
Customizing DFLTOPTS (Default Options Table) is optional. If you decide to customize it, edit the DFLTOPTS assembler source by adding the options to the table that you would like to include and removing those you do not want. For example, you can put options that have the same value in all execution modes in the Default Options Table.
The source for the DFLTOPTS table resides in the &prefix.BAMISC library member DFLTOPTS. This source represents the DFLTOPTS table that is linked into the SAS load modules on your installation tape. The JCL to assemble and link it is in member BAOPTS1 in the CNTL data set. Run the job to assemble the DFLTOPTS CSECT and link it into SASHOST individually, and into the bundles of which SASHOST is a part. Be sure that if you run a bundled configuration, you relink the bundles that you use.
IMPORTANT: If you customize DFLTOPTS, you must reassemble it and relink the appropriate modules whenever you receive a SAS Maintenance load library that includes the SASHOST load module.
Since the DFLTOPTS table is linked with SASHOST, it does not have to be loaded to be read. If you can put all the default options that you need in the DFLTOPTS table, you do not have to use a system configuration file.
The DFLTOPTS table can contain as many option length/value pairs as needed. An option length/value pair consists of a half word length field, followed by a character string of the form option, NOoption, or option=value. The OPT macro in the assembler source calculates the length fields given the character strings. The table must be terminated by a pair with a length field of 0.
54 Installation Instructions and System Manager's Guide
Setting Up the SAS System
Step 4: Customize the system configuration files.
Although a configuration file is not required for running Release 6.09 of the SAS System, a system configuration file provides an easy way to establish installation-wide default values for commonly used options. The default SAS CLIST and cataloged procedure installed from the tape always allocate a system configuration file and allow for specification of a user configuration file using the CONFIG operand and parameter.
Customizing your system configuration files involves customizing the following default system configuration files supplied with the installation:
❏ TSOXA running under TSO ❏ BATCHXA running in batch mode.
These default system configuration files are unloaded into the CNTL data set as samples for you to review. They contain some of the options for which you may want to establish installation-wide default values that would likely vary, depending on batch or interactive execution mode. However, not all of these attributes are required.
The CNTL data set, where the sample configuration files reside, is a blocked partitioned data set with fixed-length, 80-byte records. You can create a system or user configuration file as any sequential data set or member of a PDS, as long as the data set has fixed-length, 80-byte records.
The sample configuration files contain option settings separated into logical groups by comments. Records in a configuration file are either comment lines (indicated by an asterisk in column 1) or option lines. In the sample configuration files, options are listed one per line to make them easier to read and maintain. However, this is not required; more than one option can be included on a single line.
For options that require a value, the option must be specified as option=value with no blanks before or after the equal sign. Any SAS system option can be specified in the system configuration file. Those options include:
❏ options that must be specified only at invocation (sometimes referred to as configuration options). These options can be specified in a configuration file, on the CLIST command line, or in the batch OPTIONS parameter.
❏ options that can be specified any time (sometimes referred to as session options).
Once you have entered the options in the system configuration file, no further processing is necessary (unlike options specified in the Default Options Table or Restricted Options Table). However, if you move the configuration files from the installation CNTL data set, be sure to update

Installation Instructions and System Manager's Guide 55
Setting Up the SAS System
your CLIST and cataloged procedure accordingly to reference the new data set names.
56 Installation Instructions and System Manager's Guide
Setting Up the SAS System
Step 5: Create a Restricted Options Table (optional).
Since this is the last place from which invocation options are processed and a later specification of an option always overrides an earlier specification, an invocation option specified in the Restricted Options Table cannot be overridden by the user. (Note that session options can be overridden.) For options in the Restricted Options Table to be processed, the SASOP609 module must come from a linklist library but does not have to be APF authorized.
The format of the Restricted Options Table is the same as that for the DFLTOPTS table, except that the option length/value pairs must be preceded by the header ***SASOPTRS***. Like the Default Options Table, the Restricted Options Table is an assembler source module that must be assembled and linked.
The source for the sample Restricted Options Table is in the &prefix.BAMISC library member SASOPTRS. The JCL to assemble and link this table is in member BAOPTS2 in the CNTL data set. The Restricted Options Table is optional. If you decide to install it, edit the SASOPTRS member containing the assembler source, adding the options to the table that you would like to include and removing those that you do not want to use. Run the BAOPTS2 job to assemble the SASOP609 module and link it into a linklist library.
Be sure that the SYSLMOD DD statement in the BAOPTS2 job points to a linklist library since the SASOP609 module must come from a linklist library in order to be processed.
Note: The sample table provided with this installation restricts the use of Display Manager and access to VSAM data sets. You should not run this sample "as is" unless you want to restrict the use of these features.
Step 6: Verify your default option settings.
After performing the various steps described in this section to set default option values for your site, you should run PROC OPTIONS; to verify that the desired defaults are in place. The MVS-specific SMF and SVC options are not normally displayed by PROC OPTIONS. Specify PROC OPTIONS APF; to review these options.
Installation Instructions and System Manager's Guide 57
Setting Up the SAS System
Selecting a Bundled Configuration
Note: You should complete this task.
Version 6 of the SAS System for MVS is distributed in two bundled configurations that are tailored for execution in the MVS/SP Version 2 or later (MVS/XA and MVS/ESA) environments, and one unbundled configuration. The two bundled configurations differ in that one is tailored for execution with some modules installed in the Link Pack Area (LPA), while the other is tailored for execution with no modules installed in the LPA. Note that the code is identical across the three versions; the only difference is in the packaging.
The ENTRY parameter of the JCL cataloged procedure or TSO CLIST determines which configuration is used. The default entry point name is SASHOST, which runs the unbundled configuration. If you want to run a bundled configuration, which is highly recommended, edit your installed SAS CLIST and cataloged procedure to specify the appropriate entry point name for your site as described in the following section.
MVS/XA or ESA Non-LPA (ENTRY=SASXA1)
The bundled components of the MVS/XA (or ESA) non-LPA configuration consist of the following modules located in your installed SAS LIBRARY data set: SASXA1, SASXA2, SABXSPL, SABXINI, SABXTRM, SABXDM, SABDSC, SABDSX, SABZPLM, SABZPLC, as well as others when other Institute Program Products (IPPs) are installed. SABXINI and SABXTRM are transient modules used during initialization and termination, respectively. SABDSC and SABDSX are the DATA step compilation and execution modules, respectively.
The SASXA1 module resides below the 16 MB line, while all the other modules reside above it. SASXA1 is the entry module. To execute the SAS System using this configuration, specify ENTRY=SASXA1 in your SASEDITP member before you run the SASIxxxx job(s), or directly in your SAS CLIST and PROC.
MVS/XA or ESA LPA (ENTRY=SASXAL)
The bundled components of the MVS/XA (or ESA) LPA configuration consist of the following modules located in your installed SAS LIBRARY data set: SASXAL, SASXAL2, SABXSPH, SABZPLH, as well as others when other Institute Program Products (IPPs) are installed.
The SASXAL module resides below the 16 MB line, while all the other modules reside above it. SASXAL is the entry module. To execute the SAS System using this configuration, specify ENTRY=SASXAL in your SASEDITP member before you run SASINST, or directly in your SAS CLIST and PROC.
58 Installation Instructions and System Manager's Guide
Setting Up the SAS System
Installing the SAS System into the LPA
Note: You should complete this task.
You can install the bundled modules in the LPA/ELPA. If the bundled modules are not installed in the LPA/ELPA, they are loaded into the address space of each SAS System user. This can cause a significant increase in the working set size, placing a heavy burden on the paging subsystem. If you have many users of the SAS System, this may be an important consideration.
Step 1: Decide whether to install the SAS System in the LPA/ELPA.
Contact your systems programming staff to discuss the particular considerations involved at your site. You can install just the basic supervisor bundles, or the supervisor bundles and the other bundles listed below. The module sizes are as follows:
MVS/XA or MVS/ESA Configuration:
Bundled Module for LPA Size
SASXAL 202K
Bundled Modules for ELPA
Size
SASXAL2 604K (recommended) SABXSPH 1477K (recommended) SABDS 371K (recommended; DATA step) SABDPDL 453K (optional; used by SAS/ASSIST,
SAS/TUTOR) SABSCLL 769K (optional; used by SAS/ASSIST,
SAS/TUTOR and SCL applications) SABDBGL 127K (optional; SCL debugger,
SAS/TUTOR) SABFSPL 351K (optional; part of SAS/FSP) SABZPLH 55K (optional; printing routines) SABXGPH 588K (optional; part of SAS/GRAPH) SABAFL 803K (optional; part of SAS/AF) Total for Configuration 5800K
Step 2: Install the modules into the LPA/ELPA using the standard procedure at your site.
Step 3: Remove the bundled modules from the installed SAS LIBRARY data set or rename them. You can also rename the modules in the LPA/ELPA.
Note: Step 3 is necessary to prevent MVS from loading LPA/ELPA modules into the user's address space when a JOBLIB or STEPLIB DD statement (batch), or a LOAD or SASLOAD CLIST parameter (TSO) references the SAS System LOAD LIBRARY.
Installation Instructions and System Manager's Guide 59
Setting Up the SAS System
Some of the bundle names appear in internal tables; therefore, you cannot simply rename them without identifying them to the SAS System. To do this, you add a single character to the end of the bundle names, and identify that character to the SAS System using the BNDLSUFX= option. (Please note the exception for SASXAL2 given later in this discussion.) This approach allows you to apply maintenance directly to the SAS LIBRARY, as well as test it, and then move it into production by copying and renaming the affected bundles.
Note: If you use BNDLSUFX= for any of the bundled modules, you must rename them all, including those bundles which are added later. A mixture of bundles that have been renamed and those that have not will cause the system to fail.
For simplicity and consistency, you should use the last digit of the release number as your suffix character; for example, use 9 for Release 6.09. If you choose to rename the modules in the LPA/ELPA, follow these rules for MVS/XA (or ESA):
❏ Change the default for the ENTRY parameter of the JCL cataloged procedure and TSO CLIST to the new name for the SASXAL module that you renamed in the LPA.
❏ If you plan to make further CLIST or procedure customizations, edit the SASEDITP member of the CNTL data set to specify your name for the ENTRY= parameter.
❏ The new name for the module SASXAL2 must be the same as the new name for SASXAL with a 2 appended to it. If the new name for SASXAL is eight characters long, the 2 must replace the last letter. For example, if you choose the character 9 as your suffix character, rename the modules listed as follows:
Original Name New Name
SASXAL SASXAL9 SASXAL2 SASXAL92 <=== exception SABXSPH SABXSPH9 SABDS SABDS9 SABDPDL SABDPDL9 SABSCLL SABSCLL9 SABDBGL SABDBGL9 SABFSPL SABFSPL9 SABZPLH SABZPLH9 SABXGPH SABXGPH9 SABAFL SABAFL9
Note: Your list of modules may not include all those in this example. Your list will depend on the SAS System products that you have licensed.
Note: If you specify the BNDLSUFX= option for running the SAS System, you must rename all the bundles as described, whether you install them in the LPA/ELPA or not.
60 Installation Instructions and System Manager's Guide
Setting Up the SAS System
Customizing Your SAS CLIST and Cataloged Procedure
Note: You should complete this task.
The SASIxxxx job(s) that you ran to complete the installation created tailored versions of the SAS609 CLIST and cataloged procedures.
You can further customize these tailored versions of the CLIST and cataloged procedure. For example, the CLIST includes statements that allocate a permanent SASUSER data library for each user. If no permanent SASUSER data library exists for the user, the CLIST creates one. If you do not want each user at your site to maintain an individual permanent SASUSER data library, you can remove these statements from the CLIST. You may also want to make changes as part of selecting a bundled configuration to run or as part of installing the SAS System in the LPA/ELPA, as previously described. Step 1 in this section describes some of the changes you may want to make.
If you want to make any of these or other modifications, modify your CLIST and PROC directly by using standard procedures for your site. The installed CLIST resides in the CNTL data set as BACLST01. The SASIxxxx jobs copied it to the command procedure library you specified in SASEDITP under the name you specified as SASCNM=. The installed cataloged procedure resides in the CNTL data set as BAPROC01. The SASIxxxx jobs copied it to the procedure library you specified in SASEDITP under the name you specified as SASPNM=. Determine the changes you want to make as described in Step 1 and apply the changes according to your standard procedures.
Note: Only Action A will move CLIST and catalogued procedure into a specified library. Actions B and C require that you manually copy and rename BAPROC01 and BACLST01 to the appropriate libraries.
Step 1: Determine the customizations you need.
Review the following information that discusses changes you may want to make. If you are installing any of the SAS/ACCESS products, you may want to review the appropriate appendices and incorporate those changes now. If you plan to run the BMDP interface, you may also want to customize BACLST02 and BAPROC02. There may be other site-specific issues for you to address.
❏ SASUSER Considerations
The Version 6 CLIST allocates a permanent SASUSER data library for each user the first time the user invokes the SAS System. When there is no SASUSER data library allocated to a session, the system by default assigns the SASUSER libref to the temporary WORK data library. In this case, data written to SASUSER disappears when the WORK data library is deleted.
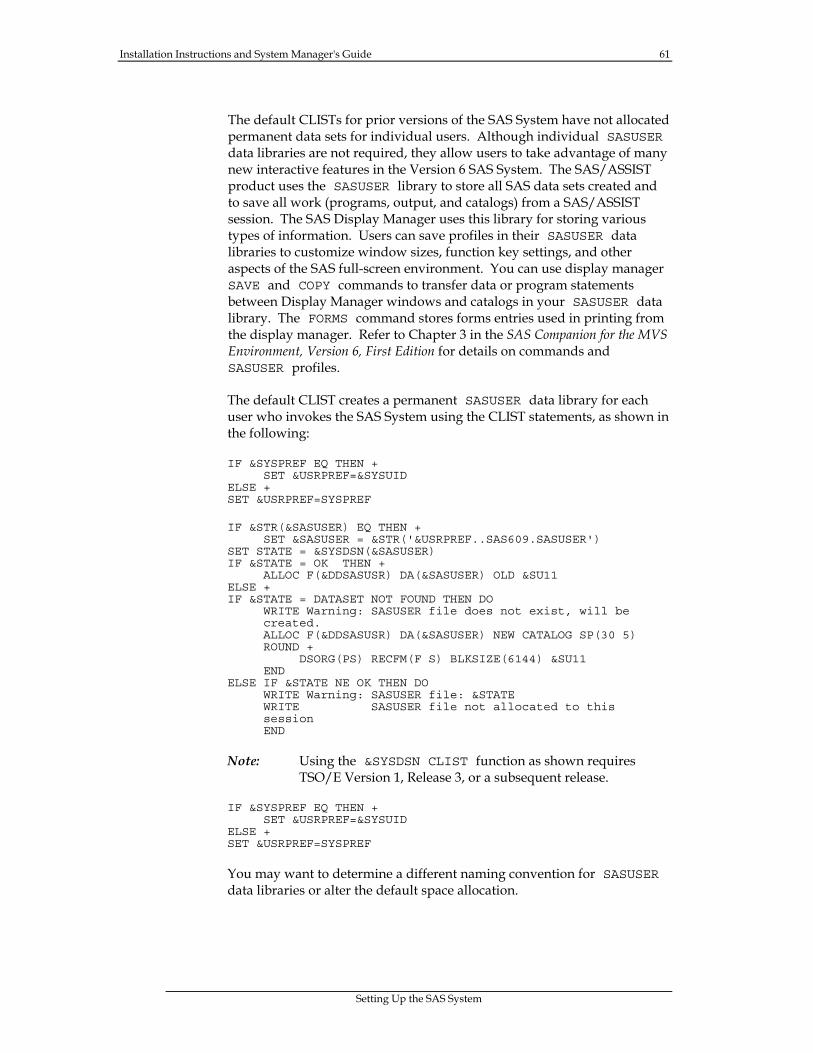
Installation Instructions and System Manager's Guide 61
Setting Up the SAS System
The default CLISTs for prior versions of the SAS System have not allocated permanent data sets for individual users. Although individual SASUSER data libraries are not required, they allow users to take advantage of many new interactive features in the Version 6 SAS System. The SAS/ASSIST product uses the SASUSER library to store all SAS data sets created and to save all work (programs, output, and catalogs) from a SAS/ASSIST session. The SAS Display Manager uses this library for storing various types of information. Users can save profiles in their SASUSER data libraries to customize window sizes, function key settings, and other aspects of the SAS full-screen environment. You can use display manager SAVE and COPY commands to transfer data or program statements between Display Manager windows and catalogs in your SASUSER data library. The FORMS command stores forms entries used in printing from the display manager. Refer to Chapter 3 in the SAS Companion for the MVS Environment, Version 6, First Edition for details on commands and SASUSER profiles.
The default CLIST creates a permanent SASUSER data library for each user who invokes the SAS System using the CLIST statements, as shown in the following:
IF &SYSPREF EQ THEN + SET &USRPREF=&SYSUID
ELSE + SET &USRPREF=SYSPREF
IF &STR(&SASUSER) EQ THEN + SET &SASUSER = &STR('&USRPREF..SAS609.SASUSER')
SET STATE = &SYSDSN(&SASUSER) IF &STATE = OK THEN +
ALLOC F(&DDSASUSR) DA(&SASUSER) OLD &SU11 ELSE + IF &STATE = DATASET NOT FOUND THEN DO
WRITE Warning: SASUSER file does not exist, will be created. ALLOC F(&DDSASUSR) DA(&SASUSER) NEW CATALOG SP(30 5) ROUND +
DSORG(PS) RECFM(F S) BLKSIZE(6144) &SU11 END
ELSE IF &STATE NE OK THEN DO WRITE Warning: SASUSER file: &STATE WRITE SASUSER file not allocated to this session END
Note: Using the &SYSDSN CLIST function as shown requires TSO/E Version 1, Release 3, or a subsequent release.
IF &SYSPREF EQ THEN + SET &USRPREF=&SYSUID
ELSE + SET &USRPREF=SYSPREF
You may want to determine a different naming convention for SASUSER data libraries or alter the default space allocation.
62 Installation Instructions and System Manager's Guide
Setting Up the SAS System
❏ Special Cataloged Procedure Parameters
The default cataloged procedure includes two symbolic parameters that allow concatenation of user libraries before your SAS System installation libraries:
❏ LOAD=
The LOAD= parameter allows you to specify a user load library DSN to concatenate before the SAS load library data set.
❏ SASAUTO=
The SASAUTO= parameter allows you to specify a user autocall macro library DSN to concatenate before the system autocall macro library.
These parameters are intended to provide added flexibility for invoking the SAS System in batch mode. Please note that any existing JCL you use to invoke earlier releases of the SAS System may not work as expected with the new default PROC. If large volumes of production JCL at your site contain DD overrides for //SASAUTOS and //STEPLIB, you may want to customize the SAS609 PROC to change the concatenation order of the data sets for these DD statements.
❏ Entry Name Considerations
If you plan to run a bundled configuration from modules installed in your LPA/ELPA, change the default ENTRY name in your CLIST and cataloged procedure. Valid standard ENTRY names are as follows:
❏ SASHOST for MVS/XA (or ESA) non-bundled configuration ❏ SASXA1 for MVS/XA (or ESA) non-LPA bundled configuration ❏ SASXAL for MVS/XA (or ESA) LPA bundled configuration
See the sections "Selecting a Bundled Configuration" and "Installing SAS on the LPA," earlier in this document for considerations relating to ENTRY name selection.
❏ Running Versions 5 and 6 of the SAS System Concurrently
If your users run both Versions 5 and 6 of the SAS System concurrently in the same TSO session, you may also want to customize the CLIST to avoid DDname conflicts.
To do so, determine a naming convention for the SAS file DDnames allocated, such as WORK, and specify your DDnames in the CLIST. The CLIST includes special DDname operands for you to use when specifying your SAS file DDnames. When you use these operands, the CLIST specifies the appropriate corresponding SAS system options for you. Specify alternate DDnames in this manner for any files that would cause conflicts at your site.
Installation Instructions and System Manager's Guide 63
Setting Up the SAS System
❏ Further DDname Considerations
Note that the Version 6 SAS System no longer uses the FORTRAN-style DDnames that were used in previous releases for the SAS log, print, and PARMS data sets. If you want to use the same DDnames in Version 6 as in earlier releases, you need to customize your CLIST, PROC, and system default options. Customize the CLIST and PROC by changing the DDnames as follows:
❏ change SASLOG to FT11F001 ❏ change SASLIST to FT12F001 ❏ change SASPARM to FT15F001.
Customize your default options by adding the following option values to your DFLTOPTS table or system configuration file.
LOG=FT11F001 PRINT=FT12F001 PARMCARDS=FT15F001
If you need more information about these options, the first section in "Setting Up the SAS System" contains details on customizing your DFLTOPTS table and system configuration file.
❏ SORT Library Considerations
If your users run PROC SORT and your site does not provide your system sort routine in a linklist library, set the SORTLINK CLIST operand to null and specify the load library that contains your system sort routine in the SORTLDSN operand. In the cataloged procedure, concatenate your system sort load library to the STEPLIB DD statement.
Step 2: Make the CLIST and PROC changes according to standard procedures at your site.
Customizing Your NEWS and SITEINFO Files
Note: You should complete this task.
The installation process unloads default NEWS and SITEINFO members into your NEWS partitioned data set. You can update these members with information appropriate for your site.
Information contained in the NEWS data set is displayed on the SAS log at invocation time when the NEWS= SAS system option is specified. The NEWS= option specifies either a logical or a physical name for the NEWS data set. The default system configuration files loaded into your CNTL data set at installation time contain the NEWS= system option specifying the physical name of the NEWS member in the NEWS data set allocated by the SASIxxxx jobs. You can modify the NEWS member to contain any information appropriate for your site, or, if you do not want to display standard information at invocation time, you can remove the NEWS= option from your system configuration files.
64 Installation Instructions and System Manager's Guide
Setting Up the SAS System
Information contained in the SITEINFO data set is displayed in the SETINIT SITEINFO window when the SITEINFO= SAS system option is specified. The SITEINFO= option specifies either a logical or a physical name for the SITEINFO data set. The default system configuration files loaded into your CNTL data set at installation time contain the SITEINFO= system option that specifies the physical name of the SITEINFO member in the NEWS data set allocated by the SASIxxxx jobs. The SITEINFO member provided with this installation includes a framework of information that you can specify and expand.
Installing the SAS SVC Routine
Note: This procedure is optional, but recommended.
Step 1: Decide whether to install the SAS SVC routine.
In most cases, where the function provided or supported by the SVC routine is not utilized or required, installation of the SVC routine is not absolutely necessary. However, you should complete the installation for the following reasons:
❏ You may decide at a later time to utilize the otherwise unavailable functions.
❏ If you later install a SAS Institute product that requires this SVC routine, the SVC is already installed, tested, and available.
Installation of the SAS SVC is absolutely required if:
❏ You are using the SAS SMF system option to write user SMF records ❏ Your site plans to install the Version 6 SAS/SHARE product.
The Release 6.09 SVC routine provides all the functions available with the Release 6.08, 6.07, 6.06, and Version 5 SVC routines. In addition, the 6.09 routine provides the third party RACF checking required by Release 6.09 of SAS/SHARE software. Therefore, if you intend to run Release 6.08 or previous releases of the SAS System on the same operating system as Release 6.09, you should replace the Release 6.08, 6.07, 6.06, or Version 5 SVC routine with the 6.09 SVC routine.
❏ System Integrity Guidelines
The SAS SVC Routine has been designed, written, and tested using IBM guidelines for system integrity. When it is properly installed, you cannot use the SAS SVC routine to violate system integrity as defined by IBM for the MVS/XA and MVS/ESA operating systems, or to obtain control in an authorized state, or to bypass system security or password protection.
Installation Instructions and System Manager's Guide 65
Setting Up the SAS System
Step 2: Select the ESR SVC routing code or SVC number for the SAS SVC routine.
You can install the SVC routine one of two ways:
❏ as a Type 4 Extended Support Router SVC (ESR SVC 109) entry
❏ as a standard "user" SVC (SVC routines 200-255) defined in member IEASVCxx of SYS1.PARMLIB or in SYSGEN Stage I.
You should install the SVC routine as a Type 4 ESR SVC (SVC 109). This technique has several advantages, one being that a user SVC reserved exclusively for the SAS SVC is not required. Additionally, if the Type 4 ESR SVC routing code you choose is selected for use by another software vendor, it is relatively easy for you to change the routing code used by the SAS SVC.
If you decide to install the SVC routine as a Type 4 ESR SVC entry, you must select a "routing code" that exclusively designates the SAS SVC routine. It is your responsibility to select the routing code to be used, to ensure that no other product or operating system component is using the routing code selected, and to maintain an awareness of the routing code selected so that no other product or operating system component that uses the same routing code is inadvertently installed. SMP/E could be used to accomplish this.
To choose the Type 4 ESR SVC (SVC 109) routing code to use, first determine which routing codes are already installed or in use by the operating system or other software products. To do this, list the names of members beginning with IGX00 in SYS1.LPALIB and all other libraries listed in the LPALSTxx member of SYS1.PARMLIB. You should also check the IEALPAxx member of SYS1.PARMLIB for IGX00nnn modules that may be placed in MLPA. The nnn suffix is the routing code (always in decimal) by which the ESR SVC routine is invoked. For example, the ESR SVC routine IGX00019 would be invoked by loading register 15 with the decimal value 19 and then executing a SVC 109 instruction. Members beginning with IGX but not IGX00 are subsequent loads of the routine named IGX00nnn and are not ESR entries.
IBM has reserved routing codes between 200-255 for customer use under MVS/ESA. Under MVS/XA, use a code between 0 and 36. SAS Institute recommends that you choose a routing code within these ranges. However, the default routing code is 4, for compatibility with previous releases of the SAS System. It is your responsibility to pick a routing code unused at your site and ensure its integrity.
66 Installation Instructions and System Manager's Guide
Setting Up the SAS System
If you decide to install the SVC routine as a "user" SVC routine, then you must ensure that the selected user SVC number is currently unused. For operating system releases later than MVS/SP 2.2.0, check the IEASVCxx member in SYS1.PARMLIB. For example, if you decide to install the SAS SVC as SVC 200, code the following SVCPARM statement in IEASVCxx:
SVCPARM 200,REPLACE,TYPE(4)
Note that the SAS SVC is installed as a Type 4, preemptive, unauthorized SVC with no locks held. For releases prior to MVS/SP 2.2.0, code the following SVCTABLE macro operand in the SYSGEN Stage I:
SVC-200-T4-FC00
The first "load" of a Type 4 SVC routine is named according to MVS convention, that is, IGC00nnc, where nnc is the zoned EBCDIC representation of the SVC routine's number resulting from the unpacking (using the UNPK instruction) of the positive, packed decimal value that is the SVC routine number. For example, the first load of a Type 4 SVC routine invoked using SVC 234 would be named IGC0023D, because X'234C', when unpacked, yields X'F2F3C4' or C'23D'.
In Step 3, you copy the load module of the SVC routine into SYS1.LPALIB or any other appropriate operating system library of your choice. You must name the copied load module appropriately. Therefore, in Step 3, you need to change the ### in IGC00#### on the IEBCOPY control statement to the unpacked, zoned EBCDIC form of the signed, packed decimal representation of the SVC number.
Step 3: Install the SVC routine into SYS1.LPALIB or a LNKLSTxx library, as appropriate.
You can install the SVC routine load module into the appropriate operating system library using IEBCOPY or any other utility that you desire. The sample JCL presented here uses IEBCOPY. We recommend that you install the SVC load module by the same mechanism that you use to install local operating system modifications or other software vendor products that require additions to system resident volume libraries.
You can install the SAS SVC into SYS1.LPALIB or any other LPA library pointed to by the LPALSTxx member of SYS1.PARMLIB. Optionally, you can install the SAS SVC into a LNKLSTxx library and bring it into the LPA at IPL time by a specification in the IEALPAxx member of SYS1.PARMLIB and an MLPA=xx specification in IEASYS00.
One load module (SVC0MVS) must be installed into SYS1.LPALIB (or other appropriate library) and given an appropriate name. If you have decided to install the SVC as a Type 4 ESR SVC entry, the following JCL can be used to copy SVC0MVS to SYS1.LPALIB and rename it:

Installation Instructions and System Manager's Guide 67
Setting Up the SAS System
//SVCESR JOB (account information),'programmer', // MSGCLASS=A,MSGLEVEL=(1,1),TIME=(0,59) //* //********************************************************** //* //* INSTALL SAS SVC AS A TYPE 4 ESR SVC //* //********************************************************** //* //COPY EXEC PGM=IEBCOPY //SYSPRINT DD SYSOUT=A //SYSUT3 DD UNIT=SYSDA,SPACE=(CYL,(1,1)) //SYSUT4 DD UNIT=SYSDA,SPACE=(CYL,(1,1)) //LPALIB DD DISP=OLD,DSN=SYS1.LPALIB //SASLIB DD DISP=SHR,DSN=&prefix.LIBRARY <== your SAS LIBRARY //SYSIN DD * COPY INDD=SASLIB,OUTDD=LPALIB S M=((SVC0MVS,IGX00###,R)) <== ### = SVC0R15= value /* //
If you have decided to install the SAS SVC as a Type 4 "user" SVC, then the following JCL can be used to copy SVC0MVS to SYS1.LPALIB and rename it:
//SVCUSER JOB (account information),'programmer', // MSGCLASS=A,MSGLEVEL=(1,1),TIME=(0,59) //* //********************************************************** //* //* INSTALL SAS SVC AS A TYPE 4 USER SVC //* //********************************************************** //* //COPY EXEC PGM=IEBCOPY //SYSPRINT DD SYSOUT=A //SYSUT3 DD UNIT=SYSDA,SPACE=(CYL,(1,1)) //SYSUT4 DD UNIT=SYSDA,SPACE=(CYL,(1,1)) //LPALIB DD DISP=OLD,DSN=SYS1.LPALIB //SASLIB DD DISP=SHR,DSN=&prefix.LIBRARY <== your SAS LIBRARY //SYSIN DD * COPY INDD=SASLIB,OUTDD=LPALIB S M=((SVC0MVS,IGC00###,R)) <== ### = SVC0SVC= UNPK /* //
You must IPL after the SVC routine is actually copied into SYS1.LPALIB (or another system library, such as SYS1.SVCLIB, SYS1.LINKLIB, or a LNKLSTxx system link list data set) and made resident in the link pack area using MLPA. You must IPL specifying the CLPA parameter (or an MLPA=xx parameter in conjunction with an IEALPAxx member of SYS1.PARMLIB) in response to the IEA101A message before you are able to use the SVC routine or continue with the next step of these installation instructions.
Step 4: Verify and, if needed, update the SVC SAS system options.
If you do not use the default values, you should set these options in the Restricted Options Table. See "Customizing Default Options and System Configuration Files" for details on creating a Restricted Options Table.
68 Installation Instructions and System Manager's Guide
Setting Up the SAS System
The following SAS system options are directly related to the SAS SVC routine and the manner in which it is installed. You must set these options as described in the following to invoke the SVC routine correctly.
❏ SVC0SVC=
The default is 109 for ESR SVC 109. If not 109, it should be within the range 200-255, defining the user SVC number with which the SAS SVC routine has been installed into the operating system.
❏ SVC0R15=
The default is 4 for compatibility with previous releases of the SAS System. Otherwise, it should specify the routing code that you use that is loaded into register 15 before invoking the SAS SVC routine using a SVC 109 instruction.
If SVC0SVC=109, this value represents the suffix of IGX00 used to determine the module invoked by the Type 4 extended SVC router (SVC 109). If SVC0SVC is other than 109, then the value of SVC0R15 is unused.
Installing the SAS SMF Exit
Note: This procedure is optional.
The SMF SAS system option controls whether SMF records formatted by the SAS System are written to the SMF file at the termination of every SAS Software step. If you intend to enable the SMF option in order to write SMF records, and if you would like to tailor the SMF records that the SAS System writes, you must install the SMF exit and set the SMFEXIT= system option.
Step 1: Decide whether you need to install the SMF exit.
You can use the SMF exit to examine the SMF record that the SAS System has formatted, modify fields within the record, write the record to a user file, and suppress the writing of the record by the SAS System.
Note: If SMF records are to be written to the SMF file, the SAS SVC must be installed. See "Installing the SAS SVC Routine " earlier in this document.
The use of the SMF exit is entirely optional. Even if it is not installed, records are written to the SMF file if the SMF and STIMER options are in effect and the SAS SVC is installed. If you install the SMF exit, you can still use the SMFEXIT= option to specify whether or not it is to be invoked. If you do not specify the SMFEXIT= option, the exit is not invoked. If the value specified is the name of a load module in the search paths, the exit is invoked.
Installation Instructions and System Manager's Guide 69
Setting Up the SAS System
Step 2: Tailor the SMF exit source to meet the requirements of your site.
The sample SMF exit is an assembler source module that must be modified to suit your needs. The source for the sample SMF exit is in the BAMISC library member SMFEXIT.
Note: In MVS/XA and ESA environments, the exit is entered in AMODE 31. If you are writing to a user file using an access method that requires you to be in AMODE 24, change AMODE for the access method calls, then return to AMODE 31 before returning from the exit.
The exit is called at SAS System initialization, at SAS Software step termination, and at SAS System termination. At entry to the exit, R15 contains the entry point address, R14 contains the return address, R13 points to a standard register save area, and R1 contains the address of a fullword. If the fullword is 0, the call is being made after the SAS System is initialized so that the exit can perform any initialization necessary. If your exit is writing records to a user file, you probably want to open the file on this call. If the fullword is -1, the call is being made before the SAS System is terminated so that the exit can perform any termination necessary. If your exit is writing records to a user file, you probably want to close the file on this call. If the fullword contains neither 0 nor -1, it is assumed to be the address of the SMF record to be written.
If the exit returns 0 in R15, the SAS System writes the SMF record pointed to by R1. If the exit returns a non-zero value in R15, the SAS System suppresses the writing of the SMF record. The following approaches may be taken in the exit:
❏ Zero R15 and return immediately to write the SMF record, as is.
❏ Return immediately leaving a non-zero value in R15 to suppress the writing of the record.
❏ Modify the record pointed to by R1, as desired, including adding data in the user area provided, or perhaps changing the record type. Note, however, that record type must be greater than 127. If it is not, the SAS SVC does not write the record to the SMF file. Note also that the record length in the standard header on input does not include the user area. If data is added in this area, the length field must be incrementally lengthened by the number of bytes added. Return a 0 in R15 to cause the SAS System to write the modified SMF record.
❏ Modify the record pointed to by R1, as desired, and write the record to a user file. In this case, record-type checking is up to you. Return a non-zero value in R15 to cause the SAS System to suppress writing of the SMF record.
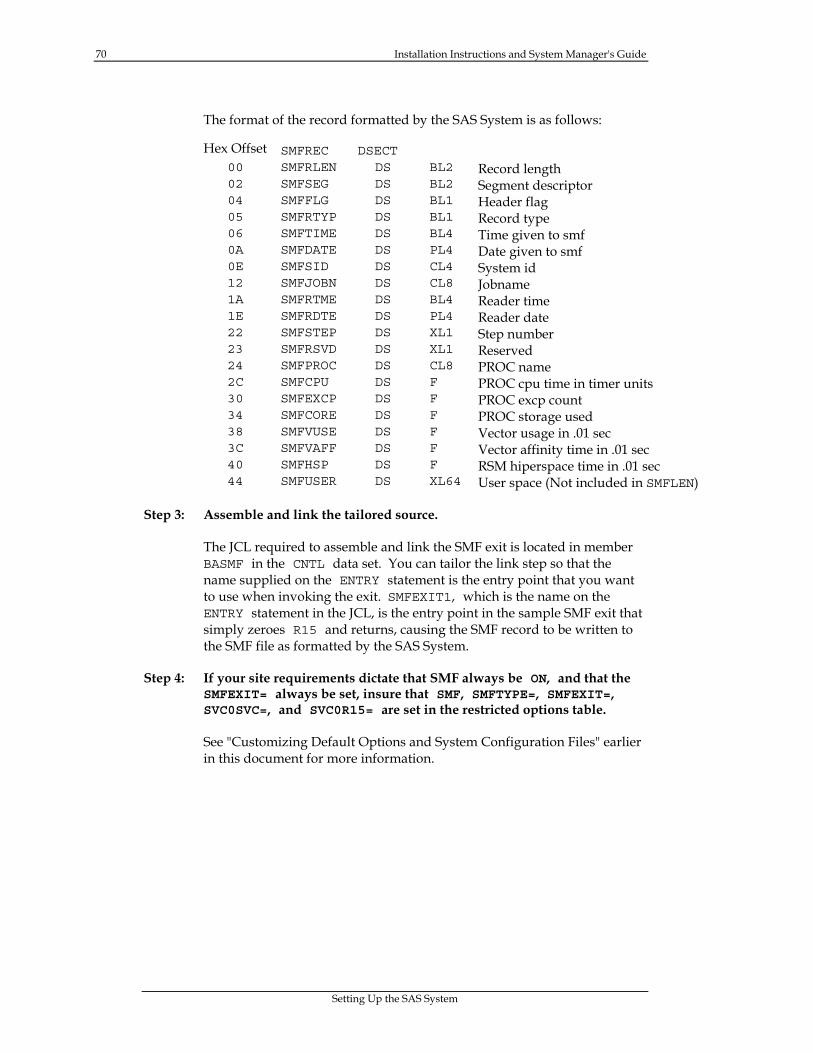
70 Installation Instructions and System Manager's Guide
Setting Up the SAS System
The format of the record formatted by the SAS System is as follows:
Hex Offset SMFREC DSECT 00 SMFRLEN DS BL2 Record length 02 SMFSEG DS BL2 Segment descriptor 04 SMFFLG DS BL1 Header flag 05 SMFRTYP DS BL1 Record type 06 SMFTIME DS BL4 Time given to smf 0A SMFDATE DS PL4 Date given to smf 0E SMFSID DS CL4 System id 12 SMFJOBN DS CL8 Jobname 1A SMFRTME DS BL4 Reader time 1E SMFRDTE DS PL4 Reader date 22 SMFSTEP DS XL1 Step number 23 SMFRSVD DS XL1 Reserved 24 SMFPROC DS CL8 PROC name 2C SMFCPU DS F PROC cpu time in timer units 30 SMFEXCP DS F PROC excp count 34 SMFCORE DS F PROC storage used 38 SMFVUSE DS F Vector usage in .01 sec 3C SMFVAFF DS F Vector affinity time in .01 sec 40 SMFHSP DS F RSM hiperspace time in .01 sec 44 SMFUSER DS XL64 User space (Not included in SMFLEN)
Step 3: Assemble and link the tailored source.
The JCL required to assemble and link the SMF exit is located in member BASMF in the CNTL data set. You can tailor the link step so that the name supplied on the ENTRY statement is the entry point that you want to use when invoking the exit. SMFEXIT1, which is the name on the ENTRY statement in the JCL, is the entry point in the sample SMF exit that simply zeroes R15 and returns, causing the SMF record to be written to the SMF file as formatted by the SAS System.
Step 4: If your site requirements dictate that SMF always be ON, and that the SMFEXIT= always be set, insure that SMF, SMFTYPE=, SMFEXIT=, SVC0SVC=, and SVC0R15= are set in the restricted options table.
See "Customizing Default Options and System Configuration Files" earlier in this document for more information.
Page 71
Part 2, Maintaining the SAS® System
SAS Institute Inc. provides several services to assist you in maintaining and using your SAS software. These include the ability to easily renew your license onsite, to process the SAS Notes library that contains the SAS Usage Notes and the SAS Notes documentation, and to copy and delete SAS product libraries. Each of these procedures is discussed in this section.
Renewing Your License
If your SETINIT has expired, and you have received renewal SETINIT text, follow the instructions in Appendix X, "Licensing the SAS System (Action G)" to renew your SAS System license.
Installing Maintenance Modules
If you license a new product, or if you order Usage Notes, the installation tape you receive will contain the maintenance modules required to bring all of your SAS software products up to the current maintenance level. An Action B or Action C install will automatically update any installed product on your site to the most current maintenance level. A new product is automatically at current maintenance.
Note: Editing PRODSEL and LIBSEL has no effect on installation of maintenance. SAS Institute highly recommends that you always apply current maintenance. In the rare case that installing to the current maintenance level is inappropriate, contact Technical Support for alternative procedures.
Note: Since all maintenance is cumulative, each maintenance release contains all the modifications since the original production release. If you receive a second tape within the same maintenance period, maintenance is not duplicated. To ensure a correct install, products and maintenance should be applied to your system in the order in which they were received.
IMPORTANT: Each maintenance, Usage Notes, or multi tape set requires its own unused CNTL data set and IEBUPDTE unload utility. A suggested naming convention is &prefix.MMMDDYY.CNTL, where &prefix is the prefix you are installing to and MMMDDYY is the date of installation. The following example uses this naming convention: SYS.SAS609.AUG1996.CNTL.
72 Installation Instructions and System Manager's Guide
Maintaining the SAS System
Installing Supplementary Maintenance Material
Occasionally, supplemental modules, macros, and other materials are shipped with a SAS installation tape or Usage Notes tape. These are usually materials to deal with specialized situations. Normally you do not need to be concerned about them. You do not need to examine a list of them to see if they apply to you. If you do need to install one of them at your site, they are brought to your attention in an Alert Note, or in a Usage Note that you have already referenced for some reason, or by SAS Institute Technical Support.
Each of these special materials is given a keyword which is used by a MAKE program (member MAKESUPL in the control data set) to create a mini install to unload the material to your system (member SASISUPL in the control data set). The keyword is contained in the Alert or Usage Note, or given to you by someone from SAS Institute. Without the keyword, MAKESUPL will not generate the mini install. MAKESUPL looks for keywords in the SPKEYLST member of the control data set.
Complete the following steps to install supplemental material:
1. Edit the SPKEYLST member in the control data set. (A backup copy of this member is contained in the @SPKYLST member of the &prefix.CNTL data set).
2. Add the keyword(s) per the header instructions in the member.
3. Edit the MAKESUPL member of the control data set using the instructions for the SASIHOLD job in the installation instructions. Use the same values for &CNTLDSN, &SASEDTP, &PRODSEL, and &LIBSEL that you used for the standard installation.
4. Edit the SASEDITP member using the same values as SASEDITP member that you used for the standard installation. (If you are installing from a Usage Notes tape, it is recommended that you do so specifying Action C in SASEDITP, and supplying the requested staging library prefix. If you do decide to install supplemental material directly to your production system from a Usage Notes tape, choose Action B in SASEDITP.)
5. Submit the MAKESUPL job. It creates a member in the control data set called SASISUPL, which contains a job with the same name.
6. Submit the SASISUPL job. It unloads the supplementary material from tape and installs it to your system.
Processing SAS Notes Libraries
The SAS Notes library contains the SAS Usage Notes, the screens and formats necessary to access the Usage Notes, and the program entries necessary for the SUPPORT application. Complete the installation process before trying to process the SAS Notes libraries as described in this section.
Installation Instructions and System Manager's Guide 73
Maintaining the SAS System
Note: If you received a tape containing only Usage Notes, note that you must still allocate a new CNTL data set, and unload the SAS.SASROOT data set using the IEBUPDTE utility provided in "Unloading the Installation Jobs -- Run IEBUPDTE" in this document. Complete Action B to perform your install. The SASIxxxx job(s) generated by SASIHOLD/SASINSGO will allocate the necessary libraries, unload the notes libraries from tape, and tailor the provided Usage Notes jobs with the site parameters you provide in SASEDITP.
Usage Notes programs and CLISTs are loaded into &prefix.USAGE.PGMS, which is abbreviated as PGMS in the following discussion.
Running Batch Jobs to Execute SAS Notes Programs
Four programs, SELECT, PRINT, FIXREPT, and ZAPREPT, are distributed with SAS Notes. Four batch jobs USSELECT, USPRINT, USFIXRPT, and USZAPRPT are included to run the SAS Notes programs. The SAS Notes programs and batch jobs are installed into your PGMS library.
Before you run any of these programs, edit the PARMS member of the PGMS library. Change the parameters as described in the comment block preceding each parameter. The PARMS member is used by all three Version 6 SAS Notes programs. It is not necessary to edit any of the other members in the PGMS library.
To access the Version 6 SAS Notes, execute the following jobs:
❏ USSELECT
(member USSELECT of the PGMS data set) executes the SAS Notes SELECT program. Because the distributed Usage Notes data set contains notes for all SAS products, the SELECT program allows you to keep only the Usage Notes for certain products and releases. The Usage Notes include descriptions of known problems, usage tips, and compatibility issues. The SELECT program also allows you to select or discard only the compatibility issues.
❏ USPRINT
(member USPRINT of the PGMS data set) executes the SAS Notes PRINT program. The PRINT program is provided for those sites that do not license SAS/FSP software and for other sites that require a hard copy of the Usage Notes.
❏ USFIXRPT
(member USFIXRPT of the PGMS data set) executes the SAS Notes FIXREPT program. The FIXREPT program produces a report, displayed by SAS product and TS level, of all the source code fixes available.
74 Installation Instructions and System Manager's Guide
Maintaining the SAS System
❏ USZAPRPT
(member USZAPRPT of the PGMS data set) executes the SAS Notes ZAPREPT program. The ZAPREPT program produces a report of the zaps for a given release of one or more SAS products. The report organizes the zaps according to category and includes a listing of those zaps that have prerequisites.
Accessing SAS Notes Interactively
You can access the SAS Notes interactively by using either FSBROWSE or the SUPPORT application.
Accessing SAS Notes with FSBROWSE
Those sites that license SAS/FSP software may want to access the SAS Notes interactively with PROC FSBROWSE. Submit the following SAS statements after invoking the Version 6 SAS System:
LIBNAME LIBRARY '&prefix.USAGE.NOTES'; PROC FSBROWSE DATA=LIBRARY.USAGE SCREEN=LIBRARY.SCREEN; RUN;
Accessing SAS Notes with the SUPPORT Application
The SUPPORT application, a full-screen SAS software application shipped as part of the SAS Notes, allows you to browse the usage notes and compatibility issues, generate an index listing of sample programs available for various products, and edit and execute these sample programs. The SUPPORT CLIST (located in the PGMS data set) invokes this application. The AUTOEXEC member, SPRTAUTO, provides the SUPPORT CLIST with the SAS statements necessary to invoke the SUPPORT application. Copy this CLIST to the standard location for CLISTs at your site.
Copying Staged Libraries (Action D)
This section describes how to copy staged SAS product libraries into your production SAS System libraries. Perform this step when the staged system (installed with Action C) is sufficiently tested and ready to be merged with the production SAS System.
Step 1: Supply SASEDITP parameter values.
❏ Blank out the *NO* that precedes the action name STAGE-TO-FINAL. Verify that you have only one action value active. If more than one action is selected, a return code of 12 is set, and error messages specifying the duplicated selections are posted to SYSPRINT and SYSTERM.
❏ Specify the prefix of the staged libraries as the STAGE-LIB-PREFIX and the prefix of the final libraries as the FINAL-SAS-PREFIX.
Installation Instructions and System Manager's Guide 75
Maintaining the SAS System
❏ If you cannot use exclusive access to the final libraries (DISP=OLD), blank out the *NO* before DUDSP=SHR.
Step 2: If you are using selective mode, specify products/product libraries in PRODSEL/LIBSEL.
If you choose to install in selective mode, you first choose whether to install by product or by individual product library.
If you want to install by product, edit the member PRODSEL of the CNTL data set. By default, all products on your tape are installed. If you do not want to install certain products, turn those products off by removing the asterisk from column one for those products in the PRODSEL member.
If you want to install by individual product library, you can choose between the following two methods:
❏ Specify (or deselect) the product libraries that you do not want to copy. Use this method when you want to copy everything except for a few product libraries.
In LIBSEL, specify the libraries that you want to omit by removing the asterisk from column one of the ignore line for each unwanted product library.
❏ Select the product libraries that you do want to copy. Use this method when you want to copy only a few product libraries.
In PRODSEL, remove the asterisk from the DEFLTSEL=%TURNDOFF statement. In LIBSEL, remove the asterisk from column one of the DOTASK line for the product libraries that you want to copy.
Step 3: Supply SASINSGO or SASIHOLD parameter values.
Step 4: Run SASINSGO or SASIHOLD (checkout mode).
Step 5: If you are using checkout mode (SASIHOLD), run the generated SASISTFN job (SASIALOD if JES3).
IMPORTANT: Be sure to perform site-specific post-implementation for the final libraries. See "Performing Site-Specific Product Implementation," in Section I, Part 2, "Installing the SAS System."
Deleting SAS Product Libraries
This section describes how to delete SAS product libraries. Although we recommend that you install all SAS product libraries when you receive an installation tape, you may decide at a later time that you no longer need certain product libraries. If you decide to delete any SAS product libraries, use the steps in this section to do so.
76 Installation Instructions and System Manager's Guide
Maintaining the SAS System
The SASIxxxx jobs provide you with two methods to delete SAS product libraries:
❏ DELETE-ENTIRE (Action E): deletes an entire set of SAS staging libraries.
Action E is intended to be used to delete staged libraries after the STAGE-TO-FINAL (Action D) action has been executed. Please note that SAS/CPE software, SAS/TUTOR libraries, and Usage Notes libraries are not staged, and are likewise not deleted by this action.
❏ DELETE-SELECTED (Action F): deletes individual components related to the product library you selected from the SAS installation libraries.
Action E deletes entire data sets that have the prefix you specify, while Action F deletes product specific components from the SAS installation libraries. Action F does not delete an entire data set, so the number of data sets is the same when the action completes as it was before you ran this action.
Note: This section is optional and is included only to assist you in maintaining the SAS System in accordance with your installation needs. You might want to Use Action F to delete libraries if you originally installed several optional libraries that you only want to access for a limited time.
IMPORTANT: Refer to the LIBSEL member of the CNTL data set before selecting any SAS product libraries for deletion. Deleting any required libraries will produce unexpected results, and the product will not function correctly, if at all. If you inadvertently delete libraries you want to retain, you must reinstall them from your installation tape, or restore the entire system from backup.
Deleting a Set of SAS Installation Libraries (Action E)
To delete an entire set of SAS installation staging libraries, complete the following steps:
Step 1: Supply SASEDITP parameter values.
❏ Select DELETE-ENTIRE (Action E) by blanking out the *NO* before the action. Verify that you have only one action value active. If more than one action is selected, a return code of 12 is set, and error messages specifying the duplicate selections are posted to SYSPRINT and SYSTERM.
❏ Use the DEL-STAGELIB_PFX parameter to specify the prefix of the SAS libraries to be deleted.
Step 2: Edit and submit the SASINSGO or SASIHOLD job.
Step 3: If you are running in checkout mode, run SASIDSTG.
Step 4: Verify successful completion of SASIDSTG.
Installation Instructions and System Manager's Guide 77
Maintaining the SAS System
Deleting SAS System Libraries Components (Action F)
To delete SAS System library components for a SAS software product, complete the following steps:
IMPORTANT: Refer to the LIBSEL member of the CNTL data set before selecting any SAS product libraries for deletion. Deleting any required libraries will produce unexpected results, and the product will not function correctly, if at all. If you inadvertently delete libraries you want to retain, you must reinstall them from your installation tape.
Step 1: Supply SASEDITP parameter values.
❏ Select DELETE-SELECTED (Action F) by blanking out the *NO* before the action. Verify that you have only one action value active. If more than one action is selected, a return code of 12 is set, and error messages specifying the duplicate selections are posted to SYSPRINT and SYSTERM.
❏ Use the DEL-LIBRARY-PFX parameter to specify the prefix of the libraries with components to be deleted .
Step 2: Disable PRODSEL.
Note: You cannot use PRODSEL to select an entire product for deletion.
To disable PRODSEL, blank out the * before DEFLTSEL=%TURNDOFF to uncomment this parameter. Type an * in column one before the DEFLTSEL=%TURNEDON parameter.
Step 3: Supply LIBSEL parameter values.
To delete a product, select all the libraries associated with the product by uncommenting the line associated with the library specifying %DOTASK.
Step 4: Edit and submit the SASINSGO or SASIHOLD job.
Step 5: If you are running in checkout mode, run the SASIDSEL job to delete the libraries specified.
Step 6: Verify successful completion of SASIDSEL.

Page 79
Appendix A, Unloading the Installation Instructions from Tape
These installation instructions for the SAS System are included on the installation tape in text-editor-readable form. A job is provided for you to offload them at your site. The text file containing these instructions does not reside in any of the SAS libraries unloaded from tape during installation. This job reads the instruction text file directly from tape, so a mount of the installation tape is required.
Obtaining the Instructions
Note: This task is optional.
Step 1: Examine the ULINSDOC member of the CNTLDSN.
You can specify a data set name other than the default, &prefix.VIEW.INS.MAN.
Step 2: Submit the ULINSDOC job to allocate the data set and read the documentation from the tape.
Step 3: Scan the documentation by using a text editor on the SCANTEXT member.
Note: Other members may have been included in the data set.

Page 81
Appendix B, Customizing SAS® System Forms
As the SAS Consultant for your site, you have the ability to customize all SAS forms for your operating system. Associated with each form is a list of available printers. Review this information if users at your site require a site customized print form for use in DMS, SAS/AF®, SAS/FSP, SAS/CALC, SAS/ASSIST, or SAS/EIS Software.
Note: You must have SAS/AF Software licensed to modify the site form.
Customizing the Printer Selection List
Note: This task is optional.
Whenever you create a SAS System form, a list of printers is displayed. You can modify this list to reflect only those printers available for your site. Information on changing the printer selection list has been included in a CBT help file within the SASHELP library. To find out more about customizing this printer list, issue the following command from the Display Manager:
af c=sashelp.base.pdevice.cbt
Customizing the Print File Parameter Program
Note: This task is optional.
The MVS Print File program can be customized for your site if you have the SAS/AF software product installed. To view information about customizing the Print File Parameter program, issue the following command from the Display Manager:
af c=sashelp.base.formscph.cbt
Printing Help Files with Customizing Information
Note: This task is optional.
The PDEVICE.CBT help file, which describes how to customize the printer list, and the FORMSCPH.CBT help file, which describes how to customize the Print File Parameter program, can be printed if you have the SAS/AF software product installed at your site.
82 Installation Instructions and System Manager's Guide
Appendix B, Customizing SAS System Forms
Issue the following program statements to print these CBT help files for review:
proc build c=sashelp.base batch; print display select=pdevice.cbt;run;
proc build c=sashelp.base batch; print display select=formscph.cbt;run;
or,
proc build c=sashelp.base batch; print display select=(pdevice,cbt formscph.cbt);run;
or, to route the output to a file:
proc build c=sashelp.base batch; print display select=(pdevice.cbt formscph.cbt)prtfile='file name' run;
Page 83
Appendix C, Installing the BMDP Interface
Introduction
The BMDP procedure (PROC BMDP) converts an input SAS data set into a BMDP save file and loads user-provided BMDP control statements for processing the file. It then calls a BMDP program (for example, BMDP1D) to execute the control statements. PROC BMDP then prints the output of the BMDP program, interspersing by-line information if a BY statement is given.
The SAS BMDP interface is not necessary if your site does not have BMDP, or if you are only accessing BMDP data through the BMDP engine (via the LIBNAME statement or PROC CONVERT). You may want to survey your SAS software users to determine if and how the BMDP interface will be used.
Installation of the BMDP Interface
Note: This task is optional.
If your users plan to run PROC BMDP, you need to customize the SASBMDP CLIST and cataloged procedure (PROC) and install them in the appropriate libraries for user access at your site.
Step 1: Edit the BMDPEDTP member of the CNTL data set to specify the desired values for the BMDP parameters.
The BMDP parameters are defined as follows:
❏ BMDPPNM= specifies the name of the PROC to execute the SAS BMDP interface at your site.
❏ BMDPCNM= specifies the name of the command procedure to invoke the SAS BMDP interface at your site.
❏ BMDPLOD= specifies the name of the load library that contains the BMDP programs. This item is required.
❏ BMDPNWS= specifies the BMDP news file name. This is optional, and displays as part of the BMDP program's output. Use NULLFILE if you do not want to view the BMDP news file name in your log.
❏ BMDPMAC= specifies the name of the BMDP macro file. This is only used by the BMDP program and is optional. Use NULLFILE if it is not wanted.

84 Installation Instructions and System Manager's Guide
Appendix C, Installing the BMDP Interface
Step 2: Review and submit the BMDPPOST job in the CNTL data set.
Submit the BMDPPOST job to tailor the CLIST and PROC, as well as the BABMDP job.
Step 3: Review the SASBMDP CLIST and PROC located in your CNTL data set.
Member BACLST02 contains the CLIST. BAPROC02 contains the PROC. The cataloged procedure and CLIST contain file allocations for three sets of files. These files are required for the Version 6 SAS System, PROC BMDP, and the BMDP program.
If you have customized your SAS CLIST and cataloged procedure as described in the section "Customizing your SAS CLIST and Cataloged Procedure" of Part 1 of Section II, "System Manager's Guide," you may want to apply the same customizations here as well.
The files required for PROC BMDP are identified by the DDnames FT05F001, FT06F001, and FT03F001, which are defined as follows:
❏ FT05F001 identifies the file into which PROC BMDP writes the BMDP control statements.
❏ FT06F001 identifies the file into which PROC BMDP directs the BMDP program output listing for post-processing. This contrasts with the Version 5 SAS System, in which the BMDP program output listing was written directly to SYSOUT.
❏ FT03F001 identifies the file into which PROC BMDP writes the converted BMDP save file. While the user can have PROC BMDP write to any unit number, FT03F001 is the default. The user must supply the additional JCL if another DDname is used.
Step 4: Review and then submit the BABMDP job in the CNTL data set that was tailored by the BMDPPOST job submitted in Step 2.
This job copies the tailored SASBMDP CLIST and PROC to the libraries that you specified earlier in SASEDITP and executes the TESTBMDP validation program to verify the installation of the BMDP interface.
Page 85
Appendix D, Implementing the SAS/IML® Interface to the Engineering and Scientific Subroutine Library (ESSL) and the SAS/OR® Interface to the Optimization Subroutine Library (OSL)
Implementing the SAS/IML Interface to ESSL
Note: This task is optional.
If you license the IBM Engineering and Scientific Subroutine Library, you can implement an interface with PROC IML of the SAS/IML product by creating the SASESSL load module as described in member ESSL of &prefix.BAMISC.
Implementing the SAS/OR Interface to OSL
Note: This task is optional.
If you license the IBM Optimization Subroutine Library, you can implement an interface with PROC NETFLOW of the SAS/OR product by creating the SASOSL load module as described in member OSL of &prefix.BAMISC. To use this interface with PROC NETFLOW, specify the USEOSL procedure option when invoking PROC NETFLOW.

Page 87
Appendix E, Using the IBM 3090 Vector Facility with the SAS® System
If you have an IBM 3090 with Vector Facility, the Vector Facility instructions are used by default by some SAS procedures, most noticeably PROC GLM. Specify the NOVECTOR SAS system option to disable use of the Vector Facility.


Page 89
Appendix F, Implementing SAS/ACCESS® Interface to ADABAS Software
Customizing the SAS CLIST and Cataloged Procedure
Note: This task is required.
If the ADABAS interface is used extensively at your site, and if your ADABAS system load library is not a link list library, you may want to modify the SAS CLIST and cataloged procedure to allocate the necessary files by default. Alternatively, users must specify the SASLOAD operand shown below when invoking the CLIST and must override STEPLIB when running batch to concatenate the library that contains your site's Software AG load modules. In either case, they may also be required to allocate DDCARD, as appropriate.
Note: The concatenation order of the SAS LOAD LIBRARY and the load library for data base access may be interchanged. Generally, if more database access activities will occur in the SAS session or batch job, place the data base load library first in the concatenation (or ahead of the SAS LOAD LIBRARY). The opposite is true when SAS processing dominates the session or JOB.
❏ Make the following changes to the CLIST:
❏ Replace the following line in the installation-supplied CLIST:
SASLOAD ('''&prefix.LIBRARY''')
with the line
SASLOAD ('''your.ADABAS.loadlib'' ''&prefix.LIBRARY''')
❏ Optionally, add an appropriate ALLOCATE statement for the fileref DDCARD, unless appropriate parameters are included in the ADARUN module.
❏ Make the following changes to the cataloged procedure:
❏ Modify the STEPLIB DD statement to concatenate your Software AG load library as follows:
//STEPLIB DD DISP=SHR,DSN=&LOAD // DD DISP=SHR,DSN=&prefix.LIBRARY // DD DISP=SHR,DSN=your.ADABAS.loadlib
90 Installation Instructions and System Manager's Guide
Appendix F, Implementing SAS/ACCESS Interface to ADABAS Software
❏ Optionally, add an appropriate DDCARD DD statement, unless appropriate parameters are included in the ADARUN module. The following example illustrates the DDCARD parameters required by this interface:
ADARUN DATABASE=001 /*site-specific value*/ ADARUN DEVICE=3380 /*site-specific value*/ ADARUN MODE=MULTI /*multi (default) or single*/ ADARUN SVC=253 /*site-specific value*/ ADARUN PROGRAM=USER /*required*/
Using the NATURAL Security Interface
Note: This task is optional.
The modules NSCDDM and NSCDDM21 unloaded to your SAS LIBRARY data set are the NATURAL Security Interface modules supplied by Software AG. If you do not have the NATURAL Security Software, or do not want to use it, delete or rename the load module NSCDDM.
The module NSCDDM is support for NATURAL Release 2.2 or later. If you are using NATURAL Release 2.1 and you want to use the NATURAL Security Interface, delete or rename the existing NSCDDM module and then rename the module NSCDDM21 to NSCDDM.
Using the Samples
Note: This task is optional.
Two samples for the ADABAS interface are unloaded into your &prefix.SAMPLE library at install time:
❑ ADBDOC, which is used to create sample data sets. These sample data sets are referenced in SAS/ACCESS Interface to ADABAS Usage and Reference, Version 6, First Edition.
❑ ADBUTL contains input to the ADABAS Utilities that are used to create the database referenced in SAS/ACCESS Interface to ADABAS Usage and Reference, Version 6, First Edition. ADBUTL creates a new ADABAS database with four files. You may want to create NATURAL DDMs to match these files using the NATURAL software.
SAS System Options for this Interface
Note: This task is optional.
Appendix 1 in the SAS/ACCESS Interface to ADABAS Usage and Reference manual lists the SAS system options for this interface. You may want to review these during installation. All options have defaults.
Installation Instructions and System Manager's Guide 91
Appendix F, Implementing SAS/ACCESS Interface to ADABAS Software
The options applicable to this interface are invocation options. That means you can change them when you invoke the SAS System but not during a SAS session. Some system options are also data set options; these can be changed during a SAS Procedure or DATA step.
You are allowed to restrict changes to invocation options by placing them in the Restricted Options Table, SASOPTRS. This process is described in "Customizing Default Options and System Configuration Files" in Section II, Part 1 of this document.
One option, ADBUPD=, is suggested as a restricted option. The ADBUPD= option determines whether the SAS/ACCESS for ADABAS engine can perform both read and update operations or is restricted to read only. The default option value, Y, specifies that both reads and updates are allowed. The option value, N, specifies that the engine can only read ADABAS data; any attempt to update an ADABAS file results in an error.
Note: The ABDUPD= option is the same as the ADBENGMD= option described in the user documentation for this interface.
Other options you may want to examine first are those listed in Appendix 1 of the SAS/ACCESS Interface to ADABAS Usage and Reference, Version 6, First Edition under the heading ADABAS System Options.
NATURAL Date and Time Support
The SAS/ACCESS Interface to ADABAS now supports NATURAL Date (D) and Time (T) datatypes. Such fields will have their data values translated into the equivalent SAS dates and times respectively.
When an access descriptor is created on a NATURAL or PREDICT DDM containing a date field, the default SAS format and informat is set to DATE7. As with other default formats and informats on the Access Descriptor Display window, this can be changed to another compatible SAS format/informat.
A NATURAL time field has a default SAS format and informat of TIME8. This can be changed to another SAS format/informat.
If the NATURAL time field is an extended time field, this can be interpreted as a SAS datetime value by specifying an E in the DB Content field. In this case, the default SAS format and informat is changed from TIME8. to DATETIME16. This can be changed to another compatible SAS format/informat.
While it is not possible to display these values as simple numeric values (date or time values), NATURAL date and time values are stored differently than SAS date and time values. Thus the values displayed in this manner will not be the same as if they had been displayed through a NATURAL application. It is not recommended that these values be used as other than their corresponding date or time values.


Page 93
Appendix G, Implementing SAS/ACCESS®
Interface to CA-DATACOM/DB Software
Customizing the SAS CLIST and Cataloged Procedure
Note: This task is required.
If the DATACOM/DB interface is used extensively at your site, and your DATACOM system load library is not a link list library, you may want to modify the SAS CLIST and cataloged procedure to allocate the necessary files by default. If you do not, users will be required to specify the SASLOAD operand shown below when invoking the CLIST, and to override STEPLIB when running batch to concatenate the library that contains your site's CA-provided load modules.
Note: The concatenation order of the SAS LOAD LIBRARY and the load library for data base access may be interchanged. Generally, if more database access activities will occur in the SAS session or batch job, place the data base load library first in the concatenation (or ahead of the SAS LOAD LIBRARY). The opposite is true when SAS processing dominates the session or JOB.
❏ Make the following change to the CLIST:
❏ Replace the following line in the installation-supplied CLIST:
SASLOAD ('''&prefix.LIBRARY''')
with the line:
SASLOAD ('''your.DATACOM.loadlib'' ''&prefix.LIBRARY''')
❏ Make the following change to the cataloged procedure:
❏ Modify the STEPLIB DD statement to concatenate your CA-provided load module library as follows:
//STEPLIB DD DISP=SHR,DSN=&LOAD // DD DISP=SHR,DSN=&prefix.LIBRARY // DD DISP=SHR,DSN=your.DATACOM.loadlib
94 Installation Instructions and System Manager's Guide
Appendix G, Implementing SAS/ACCESS Interface to CA-DATACOM/DB Software
Using the Samples
Note: This task is optional.
Two samples for the DATACOM/DB interface are unloaded into your &prefix.SAMPLE library at install time:
❑ DDBDOC is used to create sample data sets referred to in SAS/ACCESS Interface to CA-DATACOM/DB Usage and Reference Version 6, First Edition.
❑ DDBUTL contains input to the CA-DATADICTIONARY Batch Utility that creates the database referred to in SAS/ACCESS Interface to CA-DATACOM/DB Usage and Reference. DDBUTL creates a new CA-DATACOM/DB database with four tables.
SAS System Options for this Interface
Note: This task is optional.
Appendix 1 in SAS/ACCESS Interface to CA-DATACOM/DB Usage and Reference, Version 6, First Edition lists the SAS system options for this interface. Chapter 4 in Technical Report P-221, SAS/ACCESS Software Changes and Enhancements describes how to set these option values to override the defaults. You may want to review this information during installation. All options have defaults.
The options applicable to this interface are invocation options. That means you can change them when you invoke the SAS System, but not during a SAS session. Some system options are also data set options; these can be changed during a SAS procedure or DATA Step. Refer to Appendix 2 in SAS/ACCESS Interface Usage and Reference, Version 6, First Edition for information on these data set options.
One invocation option, DDBMISS=, specifies a value to be used for representing null values when the SAS/ACCESS engine for CA-DATACOM/DB inserts or updates records in a database table. Valid values for the DDBMISS= option are blank (0X40) which is the default, and 0X00.
You are allowed to restrict changes to invocation options by placing them in the Restricted Options Table, SASOPTRS. This process is described in "Customizing Default Options and System Configuration Files," in Section II, Part 1 of this document.
One option, DDBUPD=, is suggested as a restricted option. The DDBUPD= system option determines whether the SAS/ACCESS for CA-DATACOM/DB engine can perform both read and update operations, or is restricted to read only. The default option value, Y, specifies that both reads and updates are allowed. The option value, N, specifies that the engine can only read CA-DATACOM/DB tables; any attempt to update a CA-DATACOM/DB table results in an error.
Note: The DDBUPD= option is the same as the DDBENGMD= option described in the user documentation for this interface.
Page 95
Appendix H, Implementing SAS/ACCESS® Interface to CA-IDMS Software
Customizing the SAS CLIST and Cataloged Procedure
Note: This task is required.
If the CA/IDMS interface is used extensively at your site, and your IDMS system load library is not a link list library, you may want to modify the SAS CLIST and cataloged procedure to allocate the necessary files by default. If you do not, you are required to specify the SASLOAD operand shown below when invoking the CLIST, and to override STEPLIB when running batch to concatenate the library that contains your site's CA-IDMS load modules. If you are accessing the IDMS databases using central version, you may also be required to load the SYSCTL file. If you are accessing the IDMS databases using local mode, you may also be required to allocate the database files.
❏ Make the following changes to the CLIST:
❏ Replace the following line in the installation-supplied CLIST:
SASLOAD ('''&prefix.LIBRARY''')
with the line:
SASLOAD ('''your.IDMS.loadlib'' ''&prefix.LIBRARY''')
❏ Add an appropriate ALLOCATE statement for the fileref SYSCTL, if you are accessing your IDMS databases using central version.
❏ Add the appropriate ALLOCATE statements for the IDMS databases you have authority to access, if you are accessing your IDMS databases using local mode.
❏ Make the following change to the cataloged procedure:
❏ Modify the STEPLIB DD statement to concatenate your CA-provided load module library as follows:
//STEPLIB DD DISP=SHR,DSN=&LOAD DISP=(SHR,PASS) // DD DISP=SHR,DSN=&prefix.LIBRARY // DD DISP=SHR,DSN=your.IDMS.loadlib
❏ Add the appropriate DD statements for the fileref SYSCTL, if you are accessing your IDMS databases using central version.
96 Installation Instructions and System Manager's Guide
Appendix H, Implementing SAS/ACCESS Interface to CA-IDMS Software
❏ Add the appropriate DD statements for the IDMS databases you have authority to access, if you are accessing your IDMS databases using local mode.
IDMWHST SAS System Options for this Interface
Note: This task is optional.
The IDMWHST option is a SAS System invocation option as well as a data set option. The default value for this option is I. You may want to change the default during the installation process. The default can be overwritten by supplying a different value for the IDMWHST option at SAS System invocation, or as a data set option.
The WHERE clause that is used on the IDMS view descriptor, the data step, or a procedure using an IDMS view descriptor, is handled differently according to the parameter.
SAS/ACCESS Data Step Interface Enhancement
A data step component to enhance the SAS/ACCESS Interface to CA-IDMS is available with this release. This component allows you to directly access network data using special SAS System extensions for the standard SAS INFILE statement, along with DATA step programming statements. The INFILE statement extensions, along with the DATA step programming statements, allow you to generate DML calls to the database.
Parameter Action
S The SAS System handles all of the WHERE clause processing.
I* IDMS handles the WHERE clause processing. The engine will fail if it cannot handle any of the WHERE clause or if a WHERE clause is not entered.
*This is the default.
E Either the SAS System or IDMS handles the WHERE clause. IDMS builds the XDEs and makes a call to the database. If the call fails, the SAS System handles the WHERE clause.
Page 97
Appendix I, Implementing SAS/ACCESS® Interface to DB2 Software
Defining the Interface to DB2 and DB2 Users
Note: This task is required.
The DB2 data base administrator at your site must perform the following steps.
If you installed and implemented the Release 6.06, 6.07, or 6.08 SAS/ACCESS Interface to DB2, and completed the BIND and GRANT steps at that time, you do not need to repeat them for Release 6.09.
Step 1: Bind the DBRMs into an application plan (required).
You can bind the application plan by using the BIND option from the DB2I panels under ISPF. Alternatively, you can issue the BIND command from TSO through the DSN command processor running in either foreground or background. A new plan will be created. If a plan with this name already exists on your system, it will be replaced.
The syntax of the BIND command is:
BIND PLAN(SASDB2E) MEMBER(SASDB2E,SASDB2L) LIBRARY('&prefix.DBRM') ISOLATION(CS)
If you plan to use DRDA support, you must regenerate plan SASDB2E to include:
1. bind packages for each server you plan to access 2. bind for the plan that must include all bind packages.
The syntax for binding packages and the plan is:
BIND PACKAGE(server1.userid) OWNER(userid) QUALIFIER(userid) MEMBER(SASDB2E) ACTION(REPLACE) ISOLATION(CS) LIBRARY('&prefix.DBRM')
BIND PACKAGE(server2.userid) OWNER(userid) QUALIFIER(userid) MEMBER(SASDB2E) ACTION(REPLACE) ISOLATION(CS) LIBRARY('&prefix.DBRM')
BIND PLAN(SASDB2E) PKLIST(server1.userid.SASDB2E, server2.userid.SASDB2E) ACTION(REPLACE) ISOLATION(CS)
98 Installation Instructions and System Manager's Guide
Appendix I, Implementing SAS/ACCESS Interface to DB2 Software
Step 2: Grant EXECUTE authority to users (required).
Grant EXECUTE authority for the plan created by the BIND command to all users of the plan or to PUBLIC for general use. Issue the GRANT command as follows:
GRANT EXECUTE ON PLAN SASDB2E TO userid
Step 3: Set the DB2SSID= SAS system option to match a valid DB2 subsystem identifier at your site.
Contact a DBA at your site to obtain this default value.
Customizing the SAS CLIST and Cataloged Procedure
Note: This task is required.
If the DB2 interface is used extensively at your site, and if your DB2 system load library is not a link list library, you may want to modify the SAS CLIST and cataloged procedure to allocate your DB2 system load library by default. See Steps 1 and 2, which follow, for the changes to make.
If you do not make the changes described in Steps 1 and 2, users must specify the LOAD operand shown in the following example when invoking the CLIST. The user must also specify the LOAD= parameter when executing the cataloged procedure to concatenate your DB2 system load library.
Note: The concatenation order of the SAS LOAD LIBRARY and the load library for data base access may be interchanged. Generally, if more database access activities will occur in the SAS session or batch job, place the data base load library first in the concatenation (or ahead of the SAS LOAD LIBRARY). The opposite is true when SAS processing dominates the session or JOB.
❑ Enter the following command under TSO to start a SAS session in which you will execute the DB2 interface:
SASname LOAD('''your.db2.loadlib''')
where your.db2.loadlib is the DB2 system load library and SASname is the name of the CLIST you use to invoke the SAS System.
❑ To use the DB2 interface with the SAS cataloged procedure, use the LOAD= parameter of the PROC to specify your site's DB2 load library. For example, you can use the following code in your JCL:
//SASDB2 EXEC SASname,LOAD='your.DB2.loadlib'
Installation Instructions and System Manager's Guide 99
Appendix I, Implementing SAS/ACCESS Interface to DB2 Software
Step 1: Update your SAS CLIST (optional).
If the DB2 interface is used extensively at your site, you may want to alter the CLIST so that your DB2 load library is allocated and concatenated before the SAS load library in the TASKLIB symbol. Replace the following line in the installation-supplied CLIST (where SASLOAD is a replacement parameter in the CLIST):
SASLOAD ('''&prefix.LIBRARY''')+
with this line:
SASLOAD ('''your.db2.loadlib'' ''&prefix.LIBRARY''') +
Step 2: Update your SAS cataloged procedure (optional).
If the DB2 interface is used extensively at your site with the SAS cataloged procedure, you may want to permanently change the STEPLIB DD statement in your cataloged procedure. To always execute the SAS System using the DB2 interface, modify the STEPLIB DD statement in your cataloged procedure to reflect the following lines.
//STEPLIB DD DISP=SHR,DSN=&LOAD // DD DISP=SHR,DSN=&prefix.LIBRARY // DD DISP=SHR,DSN=your.db2.loadlib
where &prefix.LIBRARY is the SAS System load library and your.db2.loadlib is the DB2 System load library.
Verifying Installation of SAS/ACCESS Interface to DB2 Software
Note: This task is required.
Step 1: Set up JCL to invoke the cataloged procedure you updated as described in the preceding Step 2. Include a SYSIN DD statement like the following to run the installation verification program for this product:
//SYSIN DD DISP=SHR,DSN=&prefix.TESTS(TESTDB2)
Step 2: Submit the job and verify the results.
This job should complete with return code 0.
100 Installation Instructions and System Manager's Guide
Appendix I, Implementing SAS/ACCESS Interface to DB2 Software
Creating and Loading the Sample Tables
Note: This task is optional.
Refer to SAS/ACCESS Interface to DB2: Usage and Reference, Version 6, First Edition for a number of coding examples based on sample DB2 tables that can be created at your site. Creating these tables will assist the users at your site in learning how to use the SAS/ACCESS Interface to DB2 product.
The program to create these sample tables is in the SAMPLE library member DBLDB2. To execute this program, use the JCL as previously described, with the SYSIN DD card referring to the DBLDB2 member in the SAMPLE library as follows:
//SYSIN DD DISP=SHR,DSN=&prefix.SAMPLE(DBLDB2)
SAS System Options for this Interface
Note: This task is optional.
Refer to SAS/ACCESS Interface to DB2: Usage and Reference for a list of the SAS system options for this interface. You may want to review these during installation. All options have defaults.
The options applicable to this interface are invocation options. That means you can change them when you invoke the SAS System, but not during a SAS session. Some system options are also data set options; these can be changed during a SAS Procedure or DATA step.
You are allowed to restrict changes to invocation options by placing them in the Restricted Options Table, SASOP609. This process is described in "Customizing Default Options and System Configuration Files," in Section II, Part 1 of this document.
One option, DB2UPD=, is suggested as a restricted option. The DB2UPD= option determines whether the SAS/ACCESS for DB2 engine can perform both read and update operations, or is restricted to read only. The default option value, Y, specifies that both reads and updates are allowed. The option value, N, specifies that the engine can only read DB2 data; any attempt to update a DB2 file results in an error.
Another option that you may want to include is DB2PKCHK. If you set this option to yes, the interface checks the DB2 catalogs to see if any primary keys exist for a table. If a primary key is found, it is honored. The default option value is N. When no is specified for this option, the DB2 catalogs are not checked.
Page 101
Appendix J, Implementing SAS/ACCESS®
Interface to IMS Software
Customizing the SAS CLIST and Cataloged Procedure
Note: This task is required.
If the IMS interface is used extensively at your site, you may want to alter the CLIST and cataloged procedure so that your IMS libraries are allocated and concatenated.
Note: The concatenation order of the SAS LOAD LIBRARY and the load library for data base access may be interchanged. Generally, if more database access activities will occur in the SAS session or batch job, place the data base load library first in the concatenation (or ahead of the SAS LOAD LIBRARY). The opposite is true when SAS processing dominates the session or JOB.
Step 1: Determine the IMS library data set names and identify the IMS libraries you need to allocate at your site.
In order to access your IMS databases, you need to add allocations for the following IMS data sets to your SAS CLIST and cataloged procedure:
❏ DFSRESLB ❏ DFSVSAMP (only required for VSAM and OSAM access methods, as
defined in the dbd)
❏ IEFRDER ❏ IMS
❏ DD statements for your IMS databases if using DLI or DBB region.
Depending on how your site runs IMS, you may also want to add allocations for these additional data sets:
❏ IMSACB ❏ IMSERR ❏ RECON1 ❏ RECON2
Step 2: Add allocations to your SAS CLIST, specifying your IMS library data set names as determined in Step 1.
Replace the following line in the installation-supplied CLIST (where SASLOAD is a replacement parameter in the CLIST) so that your IMS RESLIB is concatenated before the SAS Load library in the TASKLIB symbol.
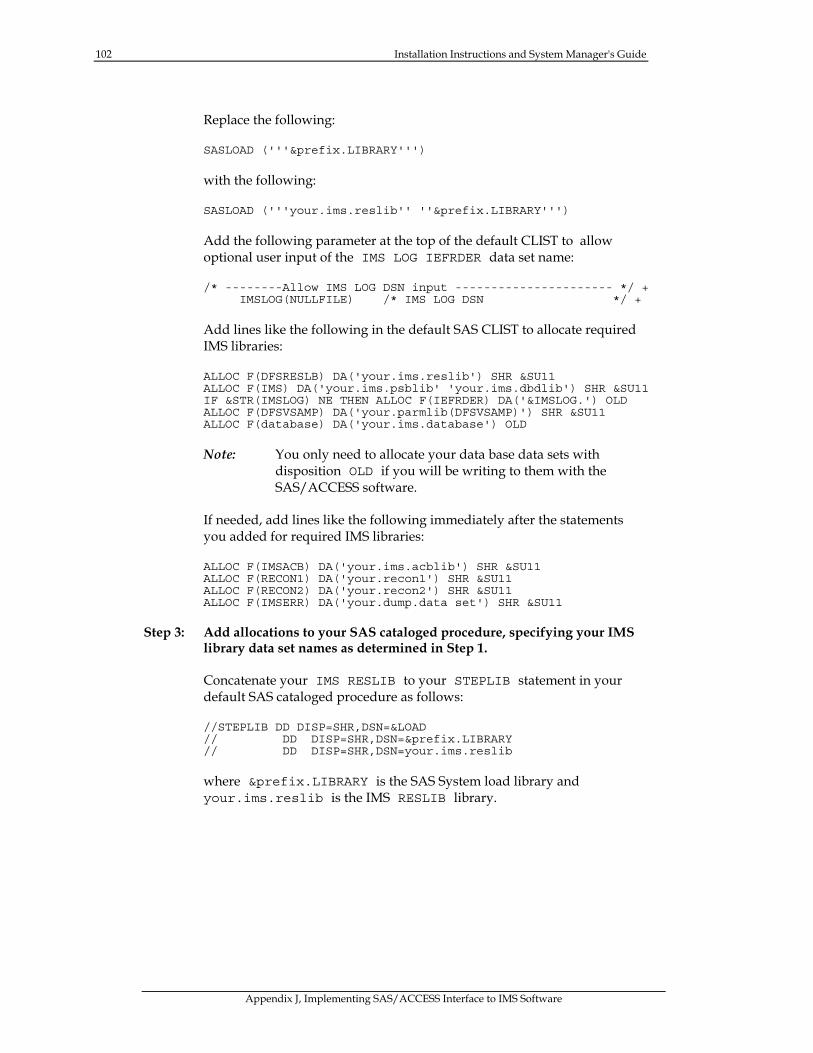
102 Installation Instructions and System Manager's Guide
Appendix J, Implementing SAS/ACCESS Interface to IMS Software
Replace the following:
SASLOAD ('''&prefix.LIBRARY''')
with the following:
SASLOAD ('''your.ims.reslib'' ''&prefix.LIBRARY''')
Add the following parameter at the top of the default CLIST to allow optional user input of the IMS LOG IEFRDER data set name:
/* --------Allow IMS LOG DSN input ---------------------- */ + IMSLOG(NULLFILE) /* IMS LOG DSN */ +
Add lines like the following in the default SAS CLIST to allocate required IMS libraries:
ALLOC F(DFSRESLB) DA('your.ims.reslib') SHR &SU11 ALLOC F(IMS) DA('your.ims.psblib' 'your.ims.dbdlib') SHR &SU11 IF &STR(IMSLOG) NE THEN ALLOC F(IEFRDER) DA('&IMSLOG.') OLD ALLOC F(DFSVSAMP) DA('your.parmlib(DFSVSAMP)') SHR &SU11 ALLOC F(database) DA('your.ims.database') OLD
Note: You only need to allocate your data base data sets with disposition OLD if you will be writing to them with the SAS/ACCESS software.
If needed, add lines like the following immediately after the statements you added for required IMS libraries:
ALLOC F(IMSACB) DA('your.ims.acblib') SHR &SU11 ALLOC F(RECON1) DA('your.recon1') SHR &SU11 ALLOC F(RECON2) DA('your.recon2') SHR &SU11 ALLOC F(IMSERR) DA('your.dump.data set') SHR &SU11
Step 3: Add allocations to your SAS cataloged procedure, specifying your IMS library data set names as determined in Step 1.
Concatenate your IMS RESLIB to your STEPLIB statement in your default SAS cataloged procedure as follows:
//STEPLIB DD DISP=SHR,DSN=&LOAD // DD DISP=SHR,DSN=&prefix.LIBRARY // DD DISP=SHR,DSN=your.ims.reslib
where &prefix.LIBRARY is the SAS System load library and your.ims.reslib is the IMS RESLIB library.

Installation Instructions and System Manager's Guide 103
Appendix J, Implementing SAS/ACCESS Interface to IMS Software
Add lines like the following in your default SAS cataloged procedure. If you want to use the IMS LOG facility, be sure to include appropriate DD specifications for your site in the IEFRDER DD statement.
//DFSRESLB DD DISP=SHR,DSN=your.ims.reslib //IMS DD DISP=SHR,DSN=your.ims.psblib // DD DISP=SHR,DSN=your.ims.dbdlib //IEFRDER DD DSN=NULLFILE,DISP=(,KEEP), // UNIT=(TAPE,,DEFER),VOLSER=xxxxxx, // DCB=(RECFM=VB,BLKSIZE=1920,LRECL=1916, // BUFNO=2) //database DD DISP=OLD,DSN=your.ims.database
Note: You only need to allocate your data base data sets with disposition OLD if you will be writing to them with the SAS/ACCESS software.
If needed at your site, also add lines like the following in your default SAS cataloged procedure:
//IMSACB DD DISP=SHR,DSN=your.ims.acblib //RECON1 DD DISP=SHR,DSN=your.recon1 //RECON2 DD DISP=SHR,DSN=your.recon2 //IMSERR DD DISP=SHR,DSN=your.dump.dataset
Verifying Installation of SAS/ACCESS Interface to IMS Software
Note: This task is required.
Step 1: Set up JCL to invoke the cataloged procedure you updated as described in the preceding Step 3.
Include a SYSIN DD statement like the following to run the installation verification program for this product:
//SYSIN DD DISP=SHR,DSN=&prefix.TESTS(TESTIMS)
Step 2: Submit the job and verify the results.
This job should complete with return code 0.
SAS System Options for this Interface
Note: This task is optional.
Refer to Appendix 1 in SAS/ACCESS Interface to IMS-DL/1, Usage and Reference, Version 6, Second Edition for a list of the SAS system options for this interface. You may want to review these during installation. All options have defaults.
The BMPREAD=, DLIREAD=, IMSDLUPD=, IMSBPUPD=, IMSREGTP=, IMSID=, and IMSWHST= options for this interface are invocation options. That means you can change them when you invoke the SAS System, but not during a SAS session. All other options are classified as session options.
104 Installation Instructions and System Manager's Guide
Appendix J, Implementing SAS/ACCESS Interface to IMS Software
You are allowed to restrict changes to invocation options by placing them in the Restricted Options Table, SASOPTRS. This process is described in "Customizing Default Options and System Configuration Files" in Section II, Part 1 of this document.
IMSDLUPD=, BMPREAD=, DLIREAD=, and IMSBPUPD= are suggested as restricted options. The IMSDLUPD= and IMSBPUPD= options determine whether the SAS/ACCESS for IMS engine can perform both read and update operations, or is restricted to read only. The default option value, Y, specifies that both reads and updates are allowed. The option value, N, specifies that the engine can only read IMS data; any attempt to update an IMS file results in an error. The BMPREAD= and DLIREAD= options determine whether the SAS/ACCESS Interface to IMS Data Step can perform both read and update operations, or is restricted to read only. The default value, N, allows update processing. The option value, Y, causes the SAS System to return a status code of SE and set _ERROR_=1 if a DL/I update call is issued. For more information about these options, refer to SAS/ACCESS Interface to IMS-DL/I, Usage and Reference, Version 6, Second Edition.

Page 105
Appendix K, Implementing SAS/ACCESS® Interface to ORACLE Software
Linking the ORACLE RDBMS Interface Subroutines
Note: This task is required.
The modules SASORA6 and SASORA7 are shipped with SAS/ACCESS Interface to ORACLE software to provide the ORACLE application interface support. The module SASORA6 is used to access ORACLE Version 6 systems, and SASORA7 is used to access ORACLE Version 7 systems. You will need to decide whether your site requires access to ORACLE Version 6, Version 7, or both.
Once you have linked these modules, you may need to relink them if you install additional ORACLE products, or if you install a new version of ORACLE.
Note: SAS/ACCESS to ORACLE software requires either the SASORAV6, or the SASORAV7 module. Do not change the name of these modules.
Step 1: Create the load module(s) (required).
The member OCLPOST of the CNTL data set contains JCL for linking the SASORA6 and SASORA7 load modules. If you want to link SASORAV6 for ORACLE Version 6, comment out the Version 7 lines and uncomment the Version 6. Alternatively, if you want to link SASORAV7 for ORACLE Version 7, comment out the Version 6 lines and uncomment the Version 7. Remove the appropriate step if you will not be using that version of ORACLE. Specify your site’s data set name for the ORACLE SQLLIB as indicated.
Submit the job and verify successful completion.
Customizing the SAS CLIST and Cataloged Procedure (Required)
The SAS System option ORAVER= controls the version of ORACLE that you use in your SAS session. The default is V7, which means that the SAS session will expect to access ORACLE Version 7 libraries. If you want to use ORACLE Version 6, set the ORAVER= option to V6.
If the ORACLE interface is used extensively at your site, and if your ORACLE system load library is not a link list library, you may want to modify the SAS CLIST and cataloged procedure to allocate your ORACLE system load library by default. See Steps 1 and 2 below for the changes to make.
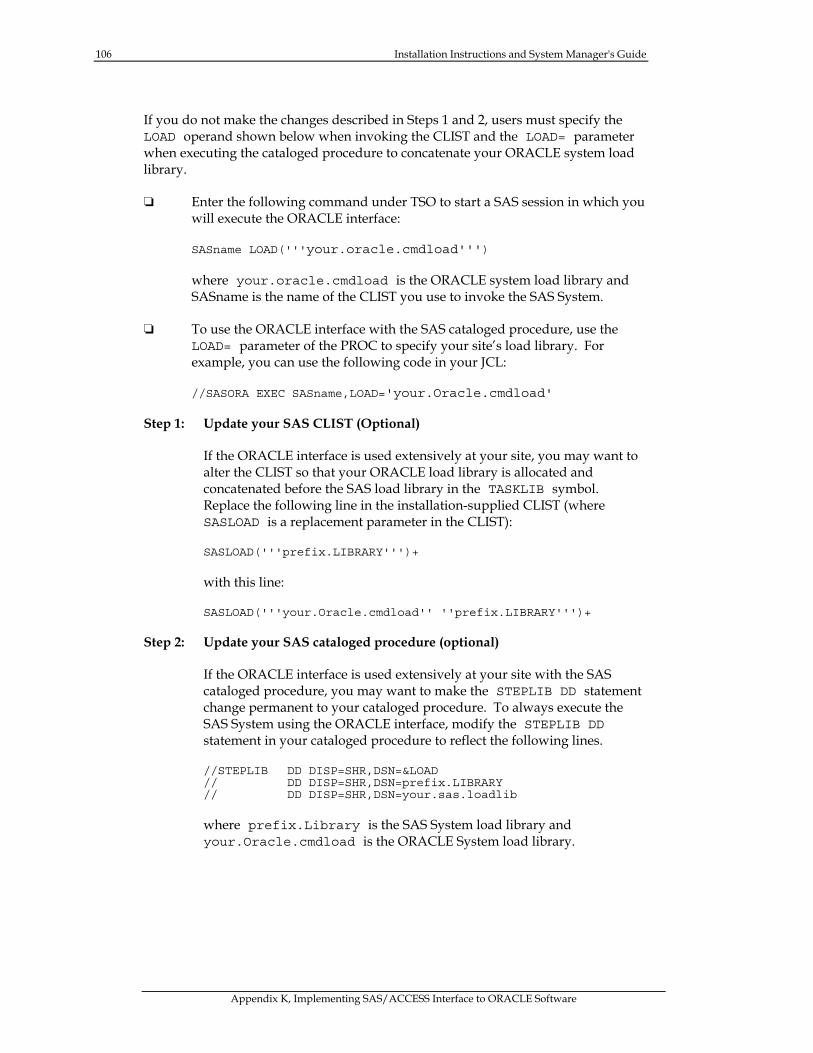
106 Installation Instructions and System Manager's Guide
Appendix K, Implementing SAS/ACCESS Interface to ORACLE Software
If you do not make the changes described in Steps 1 and 2, users must specify the LOAD operand shown below when invoking the CLIST and the LOAD= parameter when executing the cataloged procedure to concatenate your ORACLE system load library.
❏ Enter the following command under TSO to start a SAS session in which you will execute the ORACLE interface:
SASname LOAD('''your.oracle.cmdload''')
where your.oracle.cmdload is the ORACLE system load library and SASname is the name of the CLIST you use to invoke the SAS System.
❏ To use the ORACLE interface with the SAS cataloged procedure, use the LOAD= parameter of the PROC to specify your site’s load library. For example, you can use the following code in your JCL:
//SASORA EXEC SASname,LOAD='your.Oracle.cmdload'
Step 1: Update your SAS CLIST (Optional)
If the ORACLE interface is used extensively at your site, you may want to alter the CLIST so that your ORACLE load library is allocated and concatenated before the SAS load library in the TASKLIB symbol. Replace the following line in the installation-supplied CLIST (where SASLOAD is a replacement parameter in the CLIST):
SASLOAD('''prefix.LIBRARY''')+
with this line:
SASLOAD('''your.Oracle.cmdload'' ''prefix.LIBRARY''')+
Step 2: Update your SAS cataloged procedure (optional)
If the ORACLE interface is used extensively at your site with the SAS cataloged procedure, you may want to make the STEPLIB DD statement change permanent to your cataloged procedure. To always execute the SAS System using the ORACLE interface, modify the STEPLIB DD statement in your cataloged procedure to reflect the following lines.
//STEPLIB DD DISP=SHR,DSN=&LOAD // DD DISP=SHR,DSN=prefix.LIBRARY // DD DISP=SHR,DSN=your.sas.loadlib
where prefix.Library is the SAS System load library and your.Oracle.cmdload is the ORACLE System load library.
Installation Instructions and System Manager's Guide 107
Appendix K, Implementing SAS/ACCESS Interface to ORACLE Software
Verifying Installation of SAS/ACCESS Interface to ORACLE Software (Required)
Step 1: Set up JCL to invoke the cataloged procedure you updated as described in Step 2 above. Include a SYSIN DD statement like the following to run the installation verification program for this product:
//SYSIN DD DISP=SHR,DSN=&prefix.TESTS(TESTORL)
Step 2: Run the job and verify the results.
This job should complete with return code 0.
Creating and Loading the Sample Tables (Optional)
Refer to SAS/ACCESS Interface to ORACLE: Usage and Reference for coding examples based on sample ORACLE tables that can be created at your site. Creating these tables will assist the users at your site in learning how to use the SAS/ACCESS Interface to ORACLE product.
The program to create these sample tables is in the SAMPLE library member DBLORA. To execute this program, use the JCL as previously described, with the SYSIN DD card referring to the DBLORA member in the SAMPLE library as follows:
//SYSIN DD DISP=SHR,DSN=&prefix.SAMPLE(DBLORA)

Page 109
Appendix L, Implementing SAS/ACCESS® Interface to SYSTEM 2000® Software
Customizing the SASS2K CLIST and Cataloged Procedure
Note: This task is required.
Step 1: Edit the S2EDITP member of the CNTL data set and specify the parameter values as described in the following.
❏ S2KLOAD= your SYSTEM 2000 LOAD library where SYSTEM 2000 is installed
❏ S2KTEST= the name of the test library where SYSTEM 2000 is installed at your site
❏ S2KCNM= the name of the CLIST to be installed to invoke the SAS System and the SYSTEM 2000 Interface, referred to in this appendix as the SASS2K CLIST
❏ S2KPNM= the name of the cataloged procedure to be installed to invoke the SAS System and the SYSTEM 2000 Interface, referred to in this appendix as the SASS2K cataloged procedure
❏ TS2K= the name of the CLIST you previously installed with SYSTEM 2000 to invoke SYSTEM 2000
❏ TS2KFREE= the name of the CLIST previously installed with SYSTEM 2000 to free all SYSTEM 2000 files.
Step 2: Submit the S2KPOST job.
This job modifies the SASS2K CLIST and cataloged procedure with the S2EDITP parameter values, and copies them to &prefix.CLIST and &prefix.PROCLIB, respectively.
110 Installation Instructions and System Manager's Guide
Appendix L, Implementing SAS/ACCESS Interface to SYSTEM 2000 Software
Executing the SASS2K CLIST to Access the SAS System
Note: This task is required.
Step 1: Verify the S2KLLIB parameter in the SASS2K CLIST.
The SASS2K CLIST is located in &prefix.CLIST under the name that you supplied in S2EDITP. The SASS2K CLIST has two functions. The first function is to allocate all the files that are necessary to access SYSTEM 2000 databases, while the second function is to execute the SAS System.
All the SYSTEM 2000 file allocations are isolated in a CLIST called S2K that is delivered with the base SYSTEM 2000 product. The SASS2K CLIST calls the S2K CLIST to allocate the files, but not to execute SYSTEM 2000. The SASS2K parameters that do not apply to the SAS System are there to pass options to the S2K CLIST. Refer to the SYSTEM 2000 installation instructions for an explanation of these parameters.
The S2KLLIB parameter is modified by the S2KPOST job to reflect the value you specified for the S2KLOAD= parameter in the S2EDITP member of the CNTL data set; however, you should verify that the S2KLLIB parameter in the SASS2K CLIST refers to your site's SYSTEM 2000 load library as follows:
S2KLLIB ('''your.S2K.loadlib''') +
Step 2: If you have not received the base SAS product on your installation tape, verify that the SASS2K CLIST's default values match those in your site's SAS and S2K CLISTs.
If you have received the base SAS product, these default values were already modified by S2KPOST job.
Move the SASS2K CLIST to the standard location for CLISTs at your site.
Step 3: Execute the SASS2K CLIST to access SYSTEM 2000 database via the SAS System.
Installation Instructions and System Manager's Guide 111
Appendix L, Implementing SAS/ACCESS Interface to SYSTEM 2000 Software
Executing the Cataloged Procedure to Access the SAS System
Note: This task is required.
The SASS2K cataloged procedure performs the same function for the batch environment as the SASS2K CLIST provides for the TSO environment. The procedure allocates the necessary files to access SYSTEM 2000 databases and executes the SAS System.
Step 1: Verify that your site's SYSTEM 2000 libraries are allocated as desired.
Step 2: Run a batch job to invoke the cataloged procedure to access SYSTEM 2000.
Testing with Sample Data
Note: This task is optional.
Refer to SAS/ACCESS Interface to SYSTEM 2000 Data Management Software: Usage and Reference, Version 6, First Edition for coding examples based on the EMPLOYEE data base that is delivered with the SYSTEM 2000 product. These examples can help the users at your site learn how to use the SAS/ACCESS Interface to SYSTEM 2000 software. The SAS sample files contain SAS programs for creating additional files used in the documentation. The sample files also contain SAS programs, catalogs, and data files used in the document.
Step 1: Refer to the SYSTEM 2000 installation instructions for information on restoring the EMPLOYEE database.
Step 2: Refer to the (optional) SAMPLE library unloaded at installation time for the sample programs used as examples in the Usage and Reference guide and in the SYSTEM 2000 Software Sampler, Version 6 Edition.
Note: The (optional) SAMPSIO SAS data library for the SAS/ACCESS Interface to SYSTEM 2000 unloaded at installation time contains sample SAS data files, SAS/ACCESS views, and SAS catalogs that correspond to the examples found in the SYSTEM 2000 Software Sampler, Version 6 Edition.
112 Installation Instructions and System Manager's Guide
Appendix L, Implementing SAS/ACCESS Interface to SYSTEM 2000 Software
Verifying Installation of SAS/ACCESS Interface to SYSTEM 2000 Software
Note: This task is required.
The job S2VALID included in the CNTL data set validates your SAS/ACCESS Interface to SYSTEM 2000 software installation. Run this job only after the SAS/ACCESS Interface to SYSTEM 2000 software has been installed.
Step 1: Submit the S2VALID job (member S2VALID of the CNTL data set).
This job verifies the correct installation and customization of the SAS/ACCESS Interface to SYSTEM 2000 software. Although the VALID job is run during installation of the SAS System, the S2VALID job provides a more in-depth validation test specifically written for the SAS/ACCESS Interface to SYSTEM 2000 software.
Step 2: Check the SAS log to verify that the S2VALID job has completed successfully.
You should not receive any errors, and the job should finish with a completion code of zero.
Note: If you receive errors while executing the S2VALID job, and you cannot determine their cause, contact the Technical Support Division at SAS Institute, using the method described in the introduction to this document.
Page 113
Appendix M, Implementing the SAS System under MSP
Users of Fujitsu's MSP operating system should read these special considerations before proceeding with the installation.
Setting Up Entry Points
SAS module entry point names under MSP must be specified as follows:
unbundled, non-LPA resident load module SASHOSTF bundled, non-LPA resident load module SASXA1F bundled, LPA resident load module SASXALF
The appropriate entry point must be declared in the ENTRY= parameter of SASEDITP in the section Specifying Installation Parameters of Part 2, "Installing the SAS System".
Implementing TSS Support
Step 3 of Post-Installation Processing (Implementing SAS TSO Support) requires users to copy module SASCP to a TSO command library. MSP TSS users must also copy alias SASCPF and this alias name must be the module name invoked from the SAS CLIST. A sample CLIST (FUJICLST) can be found within the CNTL data set created during the installation of this software. Please note that the entry point specified with the CLIST should be changed from SASHOSTFF to one of those specified above.
Configuration Options
MSP users must specify these configuration options:
Sorting SORTANOM=235 DYNALLOC
Fujitsu terminal users FSMODE=FACOM
SMF Processing Zap
If SMF processing is required, the following zap must be applied to the distributed SVC module prior to its inclusion in your LPA library.
NAME SVC0MVS
VER 0006 9113,3074 REP 0006 9112,3074
114 Installation Instructions and System Manager's Guide
Appendix M, Implementing the SAS System under MSP
SAS/GRAPH Driver Customization
If installing the GSP SAS/GRAPH driver, edit and submit the following job.
//***********************Your Job Cards************************ //* //LINKGSP EXEC PGM=JQAL, PARM='LIST,LET,CALL' ,REGION=1024K //SYSPRINT DD SYSOUT=* //SYSLIB DD DSN=SYS1.TGSLIB, DISP=SHR //SYSLMOD DD DSN=SAS.SAS608.LIBRARY, DISP=SHR //SYSUT1 DD UNIT=SYSDA, SPACE=(1024, (200,20)) //SYSLIN DD * INCLUDE SYSLMOD (SASGSPX)
MODE AMODE(31),RMODE (ANY) ENTRY SASGSP NAME SASGSP (R)
/*
Modify underlined data set names to your installation standards. Confirm the successful installation of the GSP interface driver by running a simple SAS/GRAPH test, such as the following (for 6683 terminal with graphics feature installed):
GOPTIONS DEV=GSP6683; PROC GTESTIT PIC=1; RUN;
Ensure that the terminal is defined for GSP display (by running a non-SAS program invoking GSP display subroutines).
Special Considerations
While SAS Institute endeavors to provide as fully functional a release as possible to MSP users, there may be some functions described (for example, in the publication SAS Companion for the MVS Environment, Version 6) that prove to be inoperable under MSP. SAS Institute will investigate and remedy such deficiencies if possible.
Page 115
Appendix N, Implementing SAS/ACCESS Interface to SymfoWARE Software
Customizing the SAS CLIST and Catalogued Procedure
Note: This task is required.
Invoking the SymfoWARE interface requires that several load library and database definitions be provided via your SAS CLIST and catalogued procedure. These definitions are the following.
❏ AIM load library, containing SymfoWARE system modules. This library may be concatenated ahead of or behind the SAS LOAD LIBRARY depending upon whether SAS processing or database activities dominate the SAS session or batch job.
To invoke the AIM load library under TSS, either enter the following command:
SASname LOAD('''your AIM loadlib''')
where SASname is the name of your SAS CLIST and your AIM loadlib is your AIM system load library containing SymfoWARE system modules.
or:
Update your SAS CLIST to permanently invoke the AIM system load library. To do this, replace the following line in your installation supplied CLIST.
SASLOAD('''&prefix.LIBRARY''')
with:
SASLOAD('''your AIM loadlib'' ''prefix.LIBRARY''')
To invoke the AIM system load library in batch via your SAS catalogued procedure, you may either identify the AIM load library via the LOAD= parameter of the SAS PROC, for example:
//SASSYM EXEC SASname,LOAD='your AIM loadlib'
where SASname is the name of your SAS catalogued procedure.
116 Installation Instructions and System Manager's Guide
Appendix N, Implementing SAS/ACCESS Interface to SymfoWARE Software
Or, alternatively, you may wish to permanently invoke the AIM system load library by changing the STEPLIB concatenation in your SAS catalogued procedure, for example:
//STEPLIB DD DISP=SHR,DSN=&LOAD // DD DISP=SHR,DSN=your AIM loadlib // DD DISP=SHR,DSN=&prefix.LIBRARY
❏ The name of the data set that comprises the database space for metadatabases and public databases. This data set is allocated during metadatabase definition, as performed by your database administrator according to the specifications outlined in the Fujitsu manual OSIV SymfoWARE Server RDB USER’S GUIDE. An example of such a definition is contained within the sample files on the installation tape.
The data set is defined via the filename/DDname SYSDBDCT. An example of a SAS CLIST definition would be the following.
ALLOC F(SYSDBDCT) DA(‘USERID.RDB.MD01’) SHR
A JCL definition within the SAS catalogued procedure might appear as the following.
//SYSDBDCT DD DSN=USERID.RDB.MD01,DISP=SHR
❏ The names of the PED and APG definitions that apply to the metadatabases and public databases you wish to use. These definitions are made by your database administrator according to the specifications outlined in the Fujitsu manuals OSIV SymfoWARE Server RDB USER’S GUIDE and AIM ADL Reference Manual. An example PED definition is included with the sample files on the installation tape.
You invoke these definitions within your SAS CLIST via the AIMALLOC command, for example:
AIMALLOC PED(PEDXXX) APG(APGYY)
where PEDXXX and APGYY are names chosen by your database administrator according to site standards.
To free the PED after use, include the command:
AIMFREE PED(PEDXXX)
To invoke these definitions within your SAS catalogued procedure, code a JCL statement as follows:
//AIMPED DD SUBSYS=(AIM,PEDXXX,APGYY)
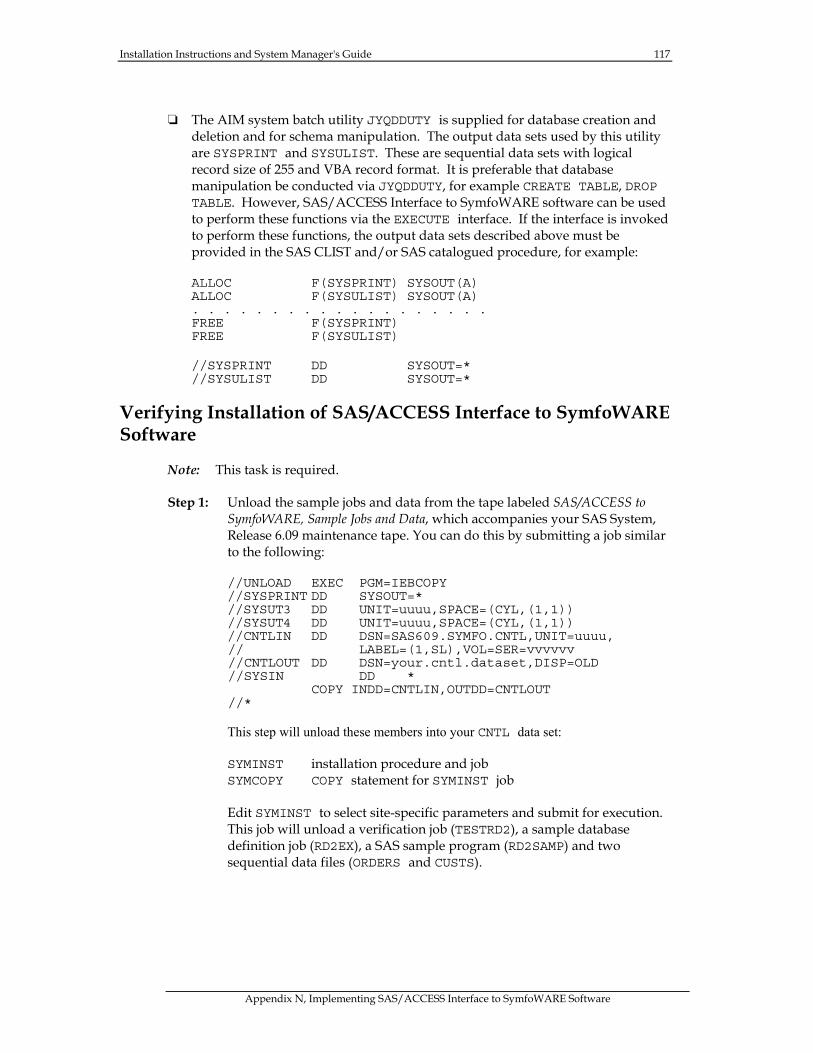
Installation Instructions and System Manager's Guide 117
Appendix N, Implementing SAS/ACCESS Interface to SymfoWARE Software
❏ The AIM system batch utility JYQDDUTY is supplied for database creation and deletion and for schema manipulation. The output data sets used by this utility are SYSPRINT and SYSULIST. These are sequential data sets with logical record size of 255 and VBA record format. It is preferable that database manipulation be conducted via JYQDDUTY, for example CREATE TABLE, DROP TABLE. However, SAS/ACCESS Interface to SymfoWARE software can be used to perform these functions via the EXECUTE interface. If the interface is invoked to perform these functions, the output data sets described above must be provided in the SAS CLIST and/or SAS catalogued procedure, for example:
ALLOC F(SYSPRINT) SYSOUT(A) ALLOC F(SYSULIST) SYSOUT(A) . . . . . . . . . . . . . . . . . . . FREE F(SYSPRINT) FREE F(SYSULIST)
//SYSPRINT DD SYSOUT=* //SYSULIST DD SYSOUT=*
Verifying Installation of SAS/ACCESS Interface to SymfoWARE Software
Note: This task is required.
Step 1: Unload the sample jobs and data from the tape labeled SAS/ACCESS to SymfoWARE, Sample Jobs and Data, which accompanies your SAS System, Release 6.09 maintenance tape. You can do this by submitting a job similar to the following:
//UNLOAD EXEC PGM=IEBCOPY //SYSPRINT DD SYSOUT=* //SYSUT3 DD UNIT=uuuu,SPACE=(CYL,(1,1)) //SYSUT4 DD UNIT=uuuu,SPACE=(CYL,(1,1)) //CNTLIN DD DSN=SAS609.SYMFO.CNTL,UNIT=uuuu, // LABEL=(1,SL),VOL=SER=vvvvvv //CNTLOUT DD DSN=your.cntl.dataset,DISP=OLD //SYSIN DD * COPY INDD=CNTLIN,OUTDD=CNTLOUT //*
This step will unload these members into your CNTL data set:
SYMINST installation procedure and job SYMCOPY COPY statement for SYMINST job
Edit SYMINST to select site-specific parameters and submit for execution. This job will unload a verification job (TESTRD2), a sample database definition job (RD2EX), a SAS sample program (RD2SAMP) and two sequential data files (ORDERS and CUSTS).
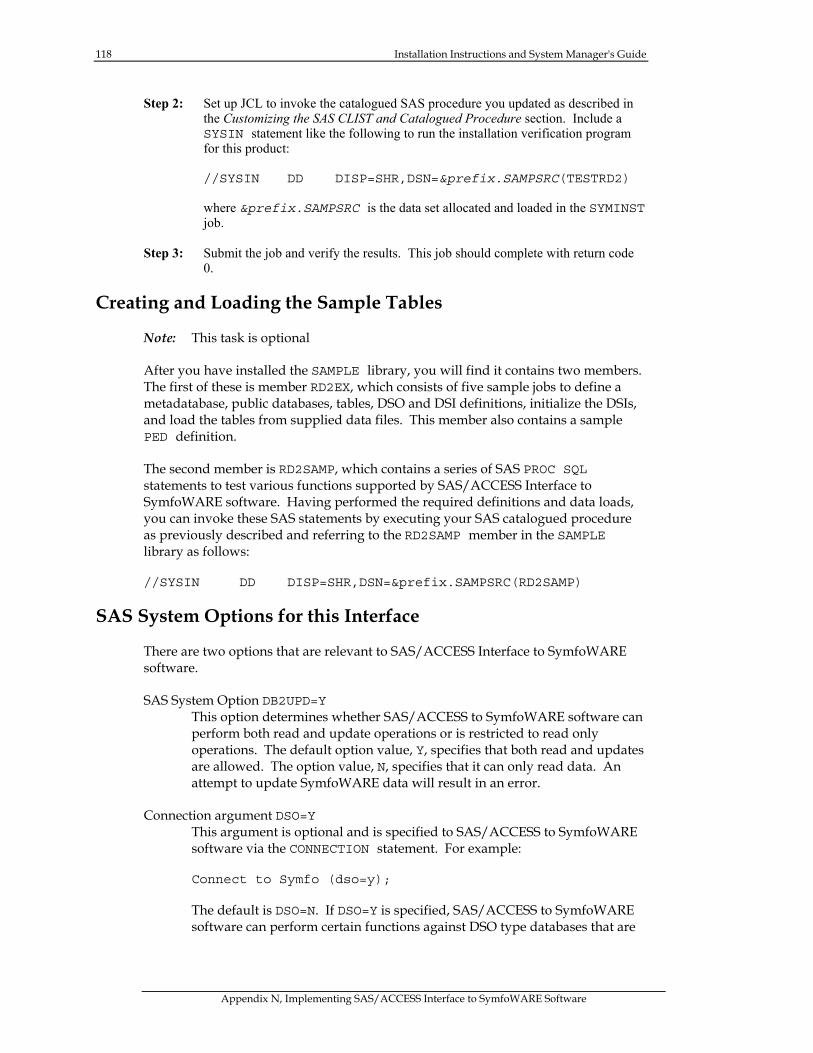
118 Installation Instructions and System Manager's Guide
Appendix N, Implementing SAS/ACCESS Interface to SymfoWARE Software
Step 2: Set up JCL to invoke the catalogued SAS procedure you updated as described in the Customizing the SAS CLIST and Catalogued Procedure section. Include a SYSIN statement like the following to run the installation verification program for this product:
//SYSIN DD DISP=SHR,DSN=&prefix.SAMPSRC(TESTRD2)
where &prefix.SAMPSRC is the data set allocated and loaded in the SYMINST job.
Step 3: Submit the job and verify the results. This job should complete with return code
0.
Creating and Loading the Sample Tables
Note: This task is optional
After you have installed the SAMPLE library, you will find it contains two members. The first of these is member RD2EX, which consists of five sample jobs to define a metadatabase, public databases, tables, DSO and DSI definitions, initialize the DSIs, and load the tables from supplied data files. This member also contains a sample PED definition.
The second member is RD2SAMP, which contains a series of SAS PROC SQL statements to test various functions supported by SAS/ACCESS Interface to SymfoWARE software. Having performed the required definitions and data loads, you can invoke these SAS statements by executing your SAS catalogued procedure as previously described and referring to the RD2SAMP member in the SAMPLE library as follows:
//SYSIN DD DISP=SHR,DSN=&prefix.SAMPSRC(RD2SAMP)
SAS System Options for this Interface
There are two options that are relevant to SAS/ACCESS Interface to SymfoWARE software.
SAS System Option DB2UPD=Y This option determines whether SAS/ACCESS to SymfoWARE software can perform both read and update operations or is restricted to read only operations. The default option value, Y, specifies that both read and updates are allowed. The option value, N, specifies that it can only read data. An attempt to update SymfoWARE data will result in an error.
Connection argument DSO=Y This argument is optional and is specified to SAS/ACCESS to SymfoWARE software via the CONNECTION statement. For example:
Connect to Symfo (dso=y);
The default is DSO=N. If DSO=Y is specified, SAS/ACCESS to SymfoWARE software can perform certain functions against DSO type databases that are
Installation Instructions and System Manager's Guide 119
Appendix N, Implementing SAS/ACCESS Interface to SymfoWARE Software
normally performed by the utility program JYQDDUTY, e.g., CREATE TABLE, INITIALIZE DSI, etc.

Page 121
Appendix O, Post-Installation Setup for SAS/CONNECT® Software
The first section in this appendix, "Storing and Locating SAS/CONNECT Script Files," describes the use of the sample script files shipped with the product. The remaining sections in this appendix list supported software for access methods available on MVS and outline configuration procedures for those access methods that require additional configuration.
The access methods supported for MVS are TELNET, TCP/IP, and APPC. They are described in the order listed. Refer to the appropriate sections for the access methods that you will be using at your site for requirement information. Remote capability for the ASYNC, PC3270, PCLINK, and RSAS7171 access methods supported in previous releases is available in this release as well. There is no change in the requirements for these access methods, so they will not be discussed in this appendix. Refer to SAS/CONNECT Software: Usage and Reference, Version 6, Second Edition for complete details on the access methods supported by other systems.
Storing and Locating SAS/CONNECT Script Files
Several sample script files are shipped with SAS/CONNECT software. SAS/CONNECT software uses these script files to establish a connection to a remote SAS session.
A new SAS system option, SASSCRIPT, points to the location of the SAS/CONNECT script files. The SASSCRIPT option is used by SAS/ASSIST and could be used by user-written SCL applications.
The value of the SASSCRIPT option can be a logical name or one or more concatenated PDS names. The install process places the script files into your &prefix.CTMISC data set.
The simplest way for you to give your users automatic access to the installed sample script files is to assign a physical name to the SASSCRIPT option in your system configuration file or DFLTOPTS table:
SASSCRIPT="&prefix.CTMISC"
where &prefix.CTMISC specifies your installation CTMISC data set name. See the "System Manager's Guide" in Section II of this document for details on updating the configuration files and DFLTOPTS table.
122 Installation Instructions and System Manager's Guide
Appendix O, Post-Installation Setup for SAS/CONNECT Software
You can also specify other PDS names to concatenate behind your &prefix.CTMISC data set in the preceding example, or assign a logical name to the SASSCRIPT option. When you use a logical name, update your site's SAS CLIST to allocate the appropriate script data sets using the logical name specified as the DD name. For example, the following line could be added to your system configuration file or DFLTOPTS table:
SASSCRIPT=SASSCRIP
and the following statement could be added to your CLIST, following the SAMPSIO allocation:
/* /* Allocate SASSCRIP for CONNECT scripts /* ALLOC F(SASSCRIP) DA('&prefix.CTMISC') SHR &SU11
System Configuration for the TELNET and TCP Access Methods
Using the TELNET or TCP access method, a user on MVS can connect to any supported platform that is on the TCP/IP network, is running a SAS Release that has the corresponding access method support, and has SAS/CONNECT software licensed. With the TCP/IP access method, one of the supported TCP/IP products must be installed on any node, local or remote, that you want to use with SAS/CONNECT. For the TELNET access method, a supported TCP/IP package must be installed on the local node. The remote node does not have to run a supported TCP/IP product, but must run some TCP/IP product to make the node accessible via TELNET. Both the TCP/IP and TELNET access methods require line-mode TELNET on the remote host in order for a connection to be established through SAS/CONNECT software.
Software Requirements
SAS/CONNECT software requires SAS/C Transient Library Release 5.50 or later and one of the following levels of system software to support the TCP/IP access method:
❏ IBM TCP/IP Release 2.0 or later ❏ Interlink's SNSTCP, Version 2.0 or higher.
The SAS/C Transient Library has an open architecture that permits the use of TCP/IP products from different vendors. Vendors enable the transient library to utilize their communication software by providing a compatible SAS/C transient library module. The SAS/C transient library loads this module and directs communication to it. This requires that the module meet a defined interface for how it will be called by the SAS/C library. The IBM TCP/IP interface module is shipped by SAS Institute in the SAS/C transient library. If you have a product from another vendor, then you must obtain a module from them. Additional vendors will be added to the above list as they are verified.
Installation Instructions and System Manager's Guide 123
Appendix O, Post-Installation Setup for SAS/CONNECT Software
Installing the SAS/C Transient Library
Note: This task is required in order to use the TELNET or TCP/IP access method.
The SAS TCP/IP access method for MVS uses routines in the SAS/C Transient Library for communication services. The library is included with both the SAS/CONNECT and SAS/SHARE products. If your site has installed release 5.50 of the SAS/C transient library you must either replace it with the included transient library (see installation below) or apply zap Z5500974 to your installed library. If your site does not have this library installed or if your site has an earlier version installed, you must install the included transient library as follows:
Step 1: Install the SAS/C Transient Library.
The CNTL data set member ULCTRANL contains JCL updated with job, &_prefix and allocation information you supplied in the SASEDITP member. If you run this job as supplied, it unloads the SAS/C Transient Library Version 5.50 or later from your install tape to a data set named &prefix.SASC.TRANSLIB.
If you want a different name for the library, modify the JCL in ULCTRANL. Change the DSN= on the SASCTRAN DD statement in the IEFBR14 step and on the DDOT0 DD statement in the IEBCOPY step.
Submit the job and verify successful completion.
Step 2: Allocate the SAS/C Transient Library for SAS execution.
Modify your SAS CLIST to add a CTRANS allocation as follows:
ALLOC F(CTRANS) DA(‘your.sasc.translib’) SHR &SU11
Modify your SAS cataloged procedure to allocate the SAS/C Transient Library as follows:
//CTRANS DD DSN=your.sasc.translib, // DISP=SHR
Note: If you choose to install your SAS/C Transient Library to a link list data set, you do not need to allocate it in your CLIST and cataloged procedure.
Network Configuration Data for TCP/IP
The operation of the TCP/IP access method depends on its ability to access the configuration information for a site. This section discusses the location of site configuration files and provides a detailed explanation of how the SAS/C transient library finds these files.
You should have already created the relevant files this section discusses when you installed your communications software, such as IBM TCP/IP.
124 Installation Instructions and System Manager's Guide
Appendix O, Post-Installation Setup for SAS/CONNECT Software
IBM's TCP/IP
The SAS System uses IBM's TCPIP.DATA file or TCPPARMS file to determine resolver configuration and IBM defaults. By default, SAS will search the following to locate the configuration data set:
❏ TCPIP.TCPIP.DATA ❏ SYS1.TCPPARMS(TCPDATA)
If your configuration file is not in one of the default locations, the TCPIPPRF= SAS system option can be set to the TCP/IP prefix of your IBM files. For example, if your TCPIP.DATA file is installed in SYS2.VER2.TCP.TCPIP.DATA, the TCPIPPRF option should be set to SYS2.VER2.TCP.
If you do not use IBM defaults for resolver configuration, refer to the section, "Ensure TCP/IP Configuration Data is Accessible" below.
Interlink's SNS/TCP
Interlink provides an LSCNCOM interface to the SAS/C transient library. The LSCNCOM routine, and its alias L$CNCOM, should replace or be placed before the SAS-supplied module in the link-list search order. The routine is dynamically loaded on the first call to a SAS Socket Library function. The LSCNCOM interface will be searched for in the following locations:
❏ steplib(tasklib) ❏ lla(link list lookaside) ❏ lpa(link pack area) ❏ link list.
By default, SAS will use the Interlink name resolver. The SAS system option, ICSRSLV, can be used to specify the order in which the Interlink name resolver (DNR) and the SAS/C resolver are used. See the section, "Setting TCP/IP-Related SAS System Options" for more information.
If you do not use the Interlink name resolver (DNR), refer to the section "Ensure TCP/IP Configuration Data is Accessible" below.
For information on the LSCNCOM interface, refer to the Interlink documentation.
Ensure TCP/IP Configuration Data Is Accessible
Note: If you do not use IBM defaults for resolver configuration, or Interlink's name resolver (DNR), then this task is required in order to use the TELNET or TCP/IP access method.
The TCP/IP access method requires that certain data sets containing configuration data are available to the SAS System. The SAS System locates these data sets by their common DS name prefix. One of the methods below must be used to inform the SAS System of the DS name prefix of these data sets.
Installation Instructions and System Manager's Guide 125
Appendix O, Post-Installation Setup for SAS/CONNECT Software
Most sites already have these data sets available for existing TCP/IP applications. Furthermore, if your site already has TCP/IP applications running under the SAS/C library, you have probably already completed this step.
Method 1: Use the default high-level qualifier ETC, or the default prefix TCPIP.
This is probably the most common and easiest way to configure your system; give the configuration data sets the ETC high-level qualifier, for example, ETC.HOSTS or ETC.RESOLV.CONF. If this convention is not possible at your site, and there are no conflicting DS names with the ETC high-level qualifier, you may utilize the default prefix to produce names like TCPIP.ETC.HOSTS or TCPIP.ETC.RESOLV.CONF.
For either style of default naming convention there are two restrictions. In each SAS session that acts as a local or remote execution, do not use the TCPIPPRF= option to override the default value of the TCP/IP prefix, TCPIP. Also do not apply the zap described in Method 2 to change the default value of the TCP/IP prefix in the transient library.
Method 2: Zap the default TCP/IP prefix to your prefix.
The default TCP/IP prefix is stored in a 26-character string array in L$CNDBA in the SAS/C transient library. You may change this value to suit your site's choice for configuration data set name prefix. For example, if names of the form SYS.PROD.CONFIG.ETC.HOSTS or SYS.PROD.CONFIG.ETC.RESOLV.CONF are desired, change the TCP/IP prefix to SYS.PROD.CONFIG. Apply zap number Z5504151 for this purpose.
Once the default TCP/IP prefix is changed, one restriction applies. In each SAS session that acts as a local or remote execution, do not use the TCPIPPRF= option to override the default value of the TCP/IP prefix.
Method 3: Use the TCPIPPRF= option to set your TCP/IP prefix.
The TCPIPPRF= SAS system option is an initialization time option that explicitly sets the TCP/IP prefix for that SAS session. Each local and/or remote SAS session that uses the TCP/IP access method must set this option to the site value at SAS invocation time. For example, if the names of your configuration data sets have the form SYS2.VER2.TCP.ETC.HOSTS or SYS2.VER2.TCP.ETC.RESOLV.CONF, set the option as follows:
TCPIPPRF=SYS2.VER2.TCP
This option is intended primarily for additional flexibility when more than one set of TCP/IP configuration data sets is available at a site.
126 Installation Instructions and System Manager's Guide
Appendix O, Post-Installation Setup for SAS/CONNECT Software
Search Logic
The transient library uses the following methods to look for each of the configuration data sets where dsname is replaced by ETC.RESOLV.CONF or ETC.HOSTS.
❏ <TSO prefix>.dsname under TSO or <userid>.dsname under batch execution
❏ dsname, if the TCP/IP prefix has the default value, TCPIP.
❏ <TCP/IP prefix>.dsname, if <TCP/IP prefix> is not blank.
When the library finds a data set with one of the above names, the name is retained for the duration of the SAS execution. You may need to restart SAS to cause it to find a different filename.
Create an ETC.RESOLV.CONF File for Name Resolution
Note: This task is optional.
If you want to use the resolver for name server resolution, create a <prefix.>ETC.RESOLV.CONF file. IBM TCP/IP sites do not need this file. They can use the pre-existing <prefix.>TCPIP.DATA file to supply resolver configuration.
Finding Host Names and Addresses
Programs that need host names and addresses may use the ETC.HOSTS file, or they may call the resolver to contact the name server for the host name information.
If you are running a name server, the name server addresses are determined from the ETC.RESOLV.CONF file. If this file does not exist and you are using IBM’s TCP/IP, the TCPIP.DATA file is used instead to determine resolver configuration and IBM defaults. The TCP/IP access method only recognizes the first three name servers specified in this file.
The transient library does not support the IBM TCPIP files, HOSTS.LOCAL and HOSTS.SITEINFO. The previous SAS TCP/IP access method used these files through Pascal transient library services. Sites that use these files must either switch to using name servers or create an equivalent ETC.HOSTS file.
The SAS/C transient library has default logic for finding host names and addresses. It uses this logic when interfacing to IBM TCP/IP. Other TCP/IP vendors may use this logic, augment it, or replace it. Refer to their documentation for details.
Installation Instructions and System Manager's Guide 127
Appendix O, Post-Installation Setup for SAS/CONNECT Software
The default logic uses the following algorithm:
1. It looks for the ETC.RESOLV.CONF file, using steps 1, 2, and 3 of the search logic listed above. If it does not find this file, it goes to step 2. Otherwise, if the nameserver statement in this data set specifies the use of the resolver and name server, the library performs the specified queries. It returns any answer it receives. If attempts to connect to the nameservers are refused, it goes to step 3.
2. It looks for a data set in the format of the IBM TCP/IP file TCPIP.DATA, using steps 1 and 3 of the search logic listed above.
If the NSINTERADDR statement in this data set specifies the use of the resolver and name server, the library performs the specified queries. It returns any answer it receives. If attempts to connect to the nameservers are refused, it goes to step 3.
3. It looks for an ETC.HOSTS file, using steps 1, 2, and 3 of the search logic listed above. If it finds an ETC.HOSTS file, it returns the result, including failure.
The determination of the domain name in name server queries follows the same logic as the DOMAINORIGIN statement of the TCPIP.DATA file.
Configuration Data Sets
On MVS, the following data sets usually contain site-dependent configuration information for TCP/IP:
❏ ETC.HOSTS ❏ ETC.RESOLV.CONF.
Note: There should be physical sequential (PS) files with any format such as FB or VB, and they should not contain line numbers.
128 Installation Instructions and System Manager's Guide
Appendix O, Post-Installation Setup for SAS/CONNECT Software
The following is an example of the contents of an ETC.HOSTS file:
The form for each entry is:
<internet address> <official hostname> <aliases>
For example:
192.1.2.34 hpfcrm loghost
See the hosts(4) manual page for more information. Note: The entries cannot be preceded by a space. The format described in this file is the correct format. The original Berkeley manual page contains an error in the format description.
127.0.0.1 localhost loopback 151.174.130.8 bigserver.yourcompany.com bigserver 151.174.130.27 copland.yourcompany.com copland 151.174.130.28 ives.yourcompany.com ives 151.174.130.29 byrd.yourcompany.com byrd
The following is example contents of an ETC.RESOLV.CONF file:
domain yourcompany.com nameserver 151.174.166.251 nameserver 151.174.52.151 nameserver 151.174.52.113
Setting TCP/IP-Related SAS System Options
The following SAS options are available as invocation options only.
sdssas s609...o('tcpipmch=name icrslv=<options>...
❏ ICSRSLV=ONLY | FIRST|LAST|NEVER
This option is only useful to sites using Interlink's TCP/IP. The value of this option specifies the order in which the Interlink name revolver (DNR) and the SAS/C resolver are used. The value specified for the ICSRSLV option is stored in the SAS/C environment variable ICS_RESOLVER.
❏ ONLY
(default) call the Interlink name resolver only and return OK or error.
❏ FIRST
call the Interlink name resolver first and if there is an error, call the SAS/C resolver.
❏ LAST
call the SAS/C resolver first and if there is an error, call the Interlink name resolver.
Installation Instructions and System Manager's Guide 129
Appendix O, Post-Installation Setup for SAS/CONNECT Software
❏ NEVER
call the SAS/C resolver only and return OK or error.
❏ TCPIPMCH=name
This option is useful to sites that run either multiple TCP/IP vendor packages or multiple instances of the same vendor's TCP/IP simultaneously. The TCPIPMCH option can be used to specify the name of the started task that is the instance of TCP/IP to be used.
The value specified for the TCPIPMCH option is stored in the SAS/C environment variable TCPIP_MACH and defines the name of the address space running TCP/IP. The default value for the TCPIP_MACH environment variable for Interlink's TCP/IP is ACSS. For all other TCP/IP packages, the default is TCPIP.
Troubleshooting
Error messages that occur in SAS/C transient library routines that support the TCP/IP access method are written to the SASCTCPE DDname, if allocated, or to the terminal or JES2 log. The TCP/IP access method will write a message to the SAS log to reflect any situation described by a message generated by the transient library routines. The DDname of SASCTCPE has been reserved in order to redirect the error messages that may be generated by the SAS/C transient library routines. We recommend that you direct SASCTCPE to DUMMY to prevent error messages from being written to the terminal, including a message concerning the lack of a defined error message file. If you experience difficulty in establishing a TCP/IP connection, you may want to direct SASCTCPE to a SYSOUT data set or permanent file in the local and/or remote SAS execution to aid in problem determination.
References
For detailed information about the SAS/C Socket Library for TCP/IP refer to SAS Technical Report C-111, SAS/C Socket Library for TCP/IP, Release 5.01
System Configuration for the APPC Access Method
Note: This task is required in order to use the APPC access method.
Software Requirements
SAS/CONNECT software requires the following levels of system software to support the APPC access method:
❏ VTAM Version 3, Release 2 or later
❏ In order to support SAS/CONNECT access from another MVS, OS/2 (without a TSO logon), or VM/CMS environment, MVS/ESA Version 4, Release 2 or later with APPC/MVS configured is required.
130 Installation Instructions and System Manager's Guide
Appendix O, Post-Installation Setup for SAS/CONNECT Software
Note: If you have an earlier release of MVS, an OS/2 SAS/CONNECT session can perform a scripted logon to a TSO userid in order to establish a connection from OS/2 to MVS.
❏ NCP Version 4 Release 3 or later for 3725 communications controllers, or Version 5 Release 2 or later for 3745 communications controllers, is recommended for peripheral node attachment.
System Configuration for APPC
System configuration tasks, in the form of resource definitions, must be performed prior to using the APPC access method with SAS/CONNECT software. The steps for defining SNA end nodes and their logical units for MVS environments are described in this section.
The following VTAM definitions are required to allow MVS to function as either a local or a remote host in a SAS/CONNECT conversation.
Step 1: Define application nodes.
Define local-domain VTAM application minor node identifiers for the collection of host logical units. This is done by VTAM systems personnel through the specification of APPL definition statements to define a pool of APPLs for SAS/CONNECT users. A sample APPL definition follows:
N02SVnnn APPL APPC=YES,AUTOSES=1,MODETAB=modetab, DLOGMOD=modeent,DDRAINL=NALLOW, DMINWNL=16384,DMINWNR=0,DSESLIM=32767, DRESPL=NALLOW,EAS=3,SECACPT=CONV, VPACING=n
❏ APPC=YES allows the application to exploit the APPCCMD interface.
❏ MODETAB=modetab defines the session parameter mode table.
❏ DLOGMOD=modeent defines the default session parameter mode table entry.
❏ DDRAINL=NALLOW disallows conversation allocation quiescence during shutdown.
❏ DMINWNL=16384 specifies the initial negotiation value for local contention manner sessions.
❏ DMINWNR=0 specifies to use the remote partner's contention winner sessions request.
❏ DSESLIM=32767 defines maximum session limits.
❏ DRESPL=NALLOW requires the remote partner to deactivate sessions.

Installation Instructions and System Manager's Guide 131
Appendix O, Post-Installation Setup for SAS/CONNECT Software
❏ EAS=3 specifies that a user has one session at a time.
❏ SECACPT=CONV indicates that FMH5 security subfield information is accepted.
❏ VPACING=n sets per site network requirements.
Refer to VTAM Installation and Resource Definition (SC23-0111) for further information.
Step 2: Define session mode entries.
Session mode entries, which defines protocol and performance parameters, are required to support session binding to a secondary logical unit residing within the local VTAM domain. Examples are provided below. Refer to the BIND RU description in Technical Reference 3, SNA Formats, and the MODEENT discussion in Technical Reference 5, VTAM Customization, for detailed descriptions.
Note that the SNASVCMG entry is required to support SNA services sessions initiated through a boundary NCP. The MAPPCIND entry specifies parallel session and CNOS support for independent LUs, while the MAPPCDEP entry, for dependent LUs, does not. Both examples specify access security field acceptance. The RUSIZES and COS settings are site specific.
SNASVCMG MODEENT LOGMODE=SNASVCMG, FMPROF=X'13', TSPROF=X'07', PRIPROT=X'B0', SECPROT=X'B0', COMPROT=X'50B1', RUSIZES=X'xxxx', PSERVIC=X'060200000000000000000300', TYPE=0
MAPPCIND MODEENT LOGMODE=MAPPCIND, FMPROF=X'13', TSPROF=X'07', PRIPROT=X'B0', SECPROT=X'B0', COMPROT=X'50B1', RUSIZES=X'xxxx', PSERVIC=X'060200000000000000102F00', COS=n, TYPE=0
MAPPCDEP MODEENT LOGMODE=MAPPCDEP, FMPROF=X'13', TSPROF=X'07', PRIPROT=X'B0', SECPROT=X'B0', COMPROT=X'50B1', RUSIZES=X'xxxx', PSERVIC=X'060200000000000000102C00', COS=n, TYPE=0
132 Installation Instructions and System Manager's Guide
Appendix O, Post-Installation Setup for SAS/CONNECT Software
Setting APPC-Related SAS System Options
Note: This task is required.
The following SAS system options are required by SAS/CONNECT software for APPC access method support.
❏ LUNAME=name
defines the explicit VTAM LU name (eight characters maximum) to use for the session. This name is used to define a user-dedicated LU rather than making use of pooled acquisition and can be used for both local and remote sessions on MVS.
❏ APPCSEC=userid.password
specifies a userid.password string, _PROMPT_, or _NONE_. You can specify this as an option in an options statement, or in the configuration file on the local host. The default is _NONE_. Both the userid and password can contain alpha-numeric characters and the special characters @, #, $. If the remote host is case-sensitive for the userid and password, specify the value in the appropriate case and enclose it in quotation marks.
Keep in mind that specifying this value in the configuration file undermines security by putting the userid and password as readable values in the SAS configuration file. If you specify _PROMPT_, the user is prompted for a userid and password for the remote host.
You must specify either the userid.password string or _PROMPT_ to sign on to MVS, CMS, or VSE. The userid is optional and is usually omitted when both the MVS and CMS hosts have the same userid. In this case, the MVS session derives the userid from the appropriate Accessor Environment Element (ACEE).
If you are connecting to an OS/2 session, you can omit this parameter (which causes the value to default to _NONE_) unless you have established a user profile on the OS/2 host with Communications Manager or with User Profile Management.
Unlike most other SAS system options for APPC, this option will probably be specified by the end user.
Installation Instructions and System Manager's Guide 133
Appendix O, Post-Installation Setup for SAS/CONNECT Software
You should include the following common options in a globally available system configuration file so that your end users do not need to be aware of them.
❏ COMAMID=APPC
specifies that the APPC access method should be used for communication between SAS/CONNECT local and remote sessions.
❏ LUPOOL=USER/ALL
specifies when a LU should be acquired from a pool. Setting this option to USER enables pool use for local MVS SAS sessions; this is the default value. Setting this option to ALL enables pool use for both local and remote MVS SAS sessions.
❏ LU62MODE=name
specifies the communications mode to use. SASAPPC is the default mode name. The mode name, whether specified with the LU62MODE option or the default of SASAPPC, must be defined in both the local and the remote environments; for MVS, this is done with a MODEENT macro as shown previously.
The following options are used together to produce a LU name. The LU name is what you specify for the REMOTE= option prior to establishing a SAS/CONNECT conversation. The LUPREFIX, LUFIRST, and LULAST options describe the pool of LUs from which a LU is dynamically selected. These options are used only when pool use is enabled. (Setting LUPOOL=USER enables LU pool use only for local sessions on MVS; setting LUPOOL=ALL enables pool use for both local and remote sessions on MVS.) These options can be used to specify an actual LU name or an ACBNAME chosen by you to eliminate dependency between the SAS configuration and naming changes in your network.
❏ LUFIRST=suffix
specifies the numeric LU (ACBNAME) suffix of the first LU in the pool.
❏ LULAST=suffix
specifies the numeric LU (ACBNAME) suffix of the last LU in the pool. The size of a pool is determined as follows:
pool-depth = LULAST - LUFIRST + 1
If a LU is not acquired after cycling through the pool, the signon fails.
❏ LUPREFIX=name
specifies the LU (ACBNAME) prefix to use to create a pool of LUs.
134 Installation Instructions and System Manager's Guide
Appendix O, Post-Installation Setup for SAS/CONNECT Software
LUPREFIX=||suffix specifies the ACBNAME associated with this LU. The zero filling done to produce an ABCNAME (as defined in the user application pool) using the LUPREFIX system option is dynamic based on the magnitude of the LULAST value, rather than always filling to 8 bytes as was done in previous releases. For example, a 5-byte LUPREFIX value combined with LULAST=9 is not zero-filled to produce a 6-byte ABCNAME; combined with LULAST=99 is zero filled with a single zero to produce a 7-byte ABCNAME and so on. Sites that have defined 8-byte ABCNAMES in the user application pool should ensure that LUPREFIX and LULAST values are specified that generate 8-byte ABCNAMES (LUPREFIX=SASIUO LULAST=10 for example). Although this parameter is not required, it is recommended to insulate your SAS/SHARE configuration from changes in LU naming conventions and to allow the same configuration to be shared by more than one MVS system in the SNA network (since ACBNAMEs must be unique only within a single domain). The prefix used should be specified to the SAS System via the SAS system option LUPREFIX=. The lower and upper bounds of the suffix range used should be specified via the system options LUFIRST= and LULAST=, respectively. If the ACBNAME= parameter is omitted it defaults to lu-name, which should then be constructed as a name prefix and numeric suffix.
Note: LU Pool naming assumes a zero leading suffix; that is, if LUFIRST is 1, LULAST is 99, and LUPREFIX is N02SV, the first LU in the pool should be named N02SV01, not N02SV1.
Implementing SAS/CONNECT MVS/ESA APPC/MVS Subsystem Exploitation
Note: This task is optional.
You need to perform the additional steps described in this section to enable MVS to be a remote session of a SAS/CONNECT conversation initiated from another MVS, OS/2 (without a TSO logon), or CMS environment. These types of connections depend on SAS/CONNECT MVS/ESA APPC/MVS subsystem capabilities.
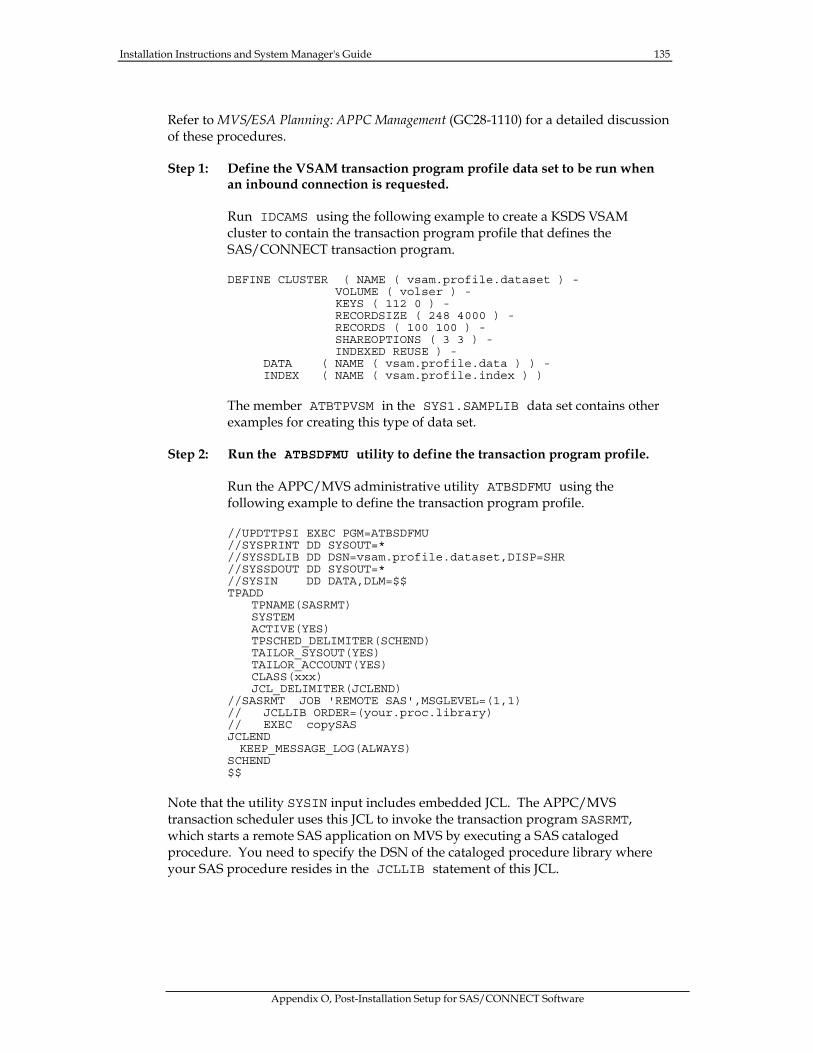
Installation Instructions and System Manager's Guide 135
Appendix O, Post-Installation Setup for SAS/CONNECT Software
Refer to MVS/ESA Planning: APPC Management (GC28-1110) for a detailed discussion of these procedures.
Step 1: Define the VSAM transaction program profile data set to be run when an inbound connection is requested.
Run IDCAMS using the following example to create a KSDS VSAM cluster to contain the transaction program profile that defines the SAS/CONNECT transaction program.
DEFINE CLUSTER ( NAME ( vsam.profile.dataset ) - VOLUME ( volser ) - KEYS ( 112 0 ) - RECORDSIZE ( 248 4000 ) - RECORDS ( 100 100 ) - SHAREOPTIONS ( 3 3 ) - INDEXED REUSE ) -
DATA ( NAME ( vsam.profile.data ) ) - INDEX ( NAME ( vsam.profile.index ) )
The member ATBTPVSM in the SYS1.SAMPLIB data set contains other examples for creating this type of data set.
Step 2: Run the ATBSDFMU utility to define the transaction program profile.
Run the APPC/MVS administrative utility ATBSDFMU using the following example to define the transaction program profile.
//UPDTTPSI EXEC PGM=ATBSDFMU //SYSPRINT DD SYSOUT=* //SYSSDLIB DD DSN=vsam.profile.dataset,DISP=SHR //SYSSDOUT DD SYSOUT=* //SYSIN DD DATA,DLM=$$ TPADD
TPNAME(SASRMT) SYSTEM ACTIVE(YES) TPSCHED_DELIMITER(SCHEND) TAILOR_SYSOUT(YES) TAILOR_ACCOUNT(YES) CLASS(xxx) JCL_DELIMITER(JCLEND)
//SASRMT JOB 'REMOTE SAS',MSGLEVEL=(1,1) // JCLLIB ORDER=(your.proc.library) // EXEC copySAS JCLEND KEEP_MESSAGE_LOG(ALWAYS)
SCHEND $$
Note that the utility SYSIN input includes embedded JCL. The APPC/MVS transaction scheduler uses this JCL to invoke the transaction program SASRMT, which starts a remote SAS application on MVS by executing a SAS cataloged procedure. You need to specify the DSN of the cataloged procedure library where your SAS procedure resides in the JCLLIB statement of this JCL.
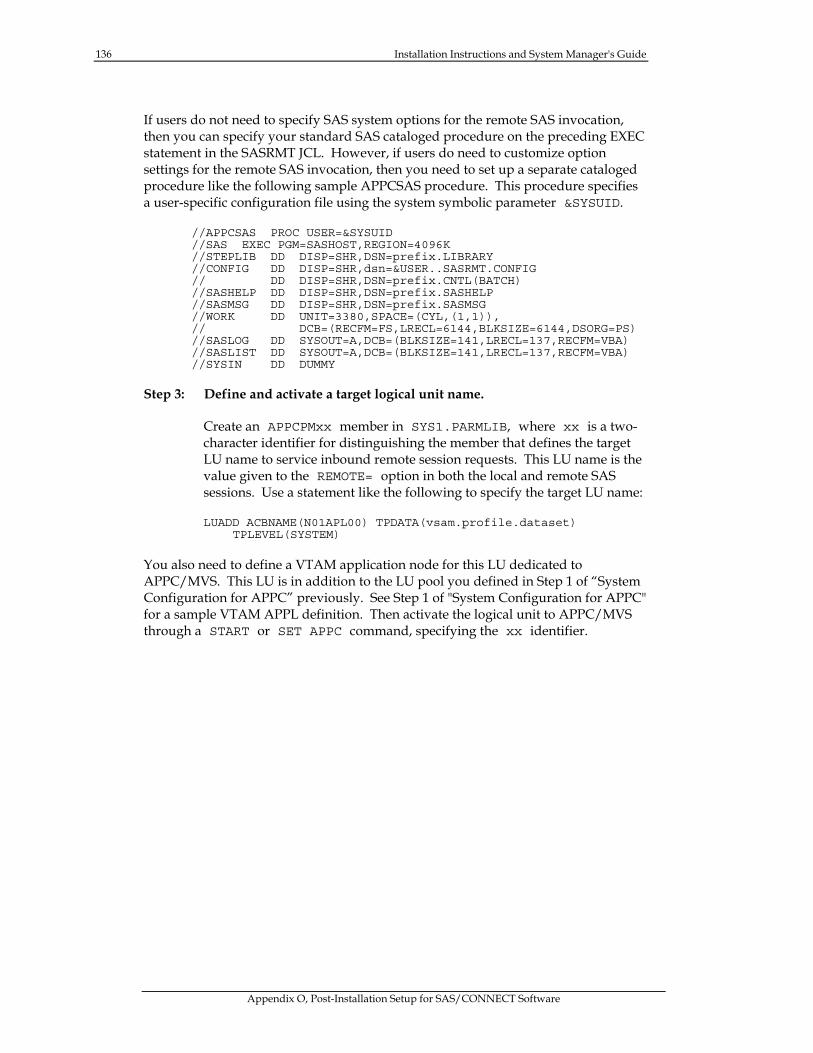
136 Installation Instructions and System Manager's Guide
Appendix O, Post-Installation Setup for SAS/CONNECT Software
If users do not need to specify SAS system options for the remote SAS invocation, then you can specify your standard SAS cataloged procedure on the preceding EXEC statement in the SASRMT JCL. However, if users do need to customize option settings for the remote SAS invocation, then you need to set up a separate cataloged procedure like the following sample APPCSAS procedure. This procedure specifies a user-specific configuration file using the system symbolic parameter &SYSUID.
//APPCSAS PROC USER=&SYSUID //SAS EXEC PGM=SASHOST,REGION=4096K //STEPLIB DD DISP=SHR,DSN=prefix.LIBRARY //CONFIG DD DISP=SHR,dsn=&USER..SASRMT.CONFIG // DD DISP=SHR,DSN=prefix.CNTL(BATCH) //SASHELP DD DISP=SHR,DSN=prefix.SASHELP //SASMSG DD DISP=SHR,DSN=prefix.SASMSG //WORK DD UNIT=3380,SPACE=(CYL,(1,1)), // DCB=(RECFM=FS,LRECL=6144,BLKSIZE=6144,DSORG=PS) //SASLOG DD SYSOUT=A,DCB=(BLKSIZE=141,LRECL=137,RECFM=VBA) //SASLIST DD SYSOUT=A,DCB=(BLKSIZE=141,LRECL=137,RECFM=VBA) //SYSIN DD DUMMY
Step 3: Define and activate a target logical unit name.
Create an APPCPMxx member in SYS1.PARMLIB, where xx is a two-character identifier for distinguishing the member that defines the target LU name to service inbound remote session requests. This LU name is the value given to the REMOTE= option in both the local and remote SAS sessions. Use a statement like the following to specify the target LU name:
LUADD ACBNAME(N01APL00) TPDATA(vsam.profile.dataset) TPLEVEL(SYSTEM)
You also need to define a VTAM application node for this LU dedicated to APPC/MVS. This LU is in addition to the LU pool you defined in Step 1 of “System Configuration for APPC” previously. See Step 1 of "System Configuration for APPC" for a sample VTAM APPL definition. Then activate the logical unit to APPC/MVS through a START or SET APPC command, specifying the xx identifier.
Installation Instructions and System Manager's Guide 137
Appendix O, Post-Installation Setup for SAS/CONNECT Software
References
Establishing communications within an SNA network, especially for a host subarea peripheral node, can be extremely trying until the configuration is properly specified. The APPC communications access method reflects failures as they are reported by the operating system components with which it interfaces. Often this information will be in the form of operation codes, return codes, and sense data. No attempt is made to interpret these failures. Rather, given the numerous possibilities for failure that are a function of your particular environment, it is expected that you will work with network systems and SAS support personnel at your site to attain resolution. Refer to the following IBM publications for additional information:
❏ SNA Technical Overview (GC30-3073)
❏ SNA Formats (GA27-3136)
❏ VTAM Programming for LU6.2 (SC30-3400)
❏ Extended Services for OS/2 Communications Manager User's Guide (S04G-1015)
❏ Extended Services for OS/2 Communications Manager Configuration Guide (S04G-1002)
❏ Extended Services for OS/2 Problem Determination Guide for the Service Coordinator (S04G-1006)
❏ Extended Services for OS/2 Programming Services and Advanced Problem Determination for Communications (S04G-1007)
❏ Extended Services for OS/2 Communications Manager System Management Programming Reference (S04G-1116)
❏ Extended Services for OS/2 APPC Programming Reference (S04G-1025).
If you cannot resolve your connectivity problem, call SAS Institute Technical Support for assistance. You will likely be requested to generate traces to assist in documenting the problem, so ensure that you or your site support personnel are familiar with the tracing services available through VTAM and OS/2 Extended Services.

Page 139
Appendix P, Implementing SAS/CPE® Software
Please refer to the guide Installation Instructions for IT Service Vision Software for information about implementing SAS/CPE Software.

Page 141
Appendix Q, Implementing SAS/GRAPH® Software
Understanding How this Appendix Is Organized
This appendix is divided into four parts. Each part describes a part of the post-installation tasks that may be necessary to use SAS/GRAPH software at your site. The list is an overview of each part. Use this overview to help locate the information for which you are looking.
❏ Part 1, Accessing the SAS/GRAPH Maps Data Sets
describes how to allocate the MAPS library in your installed CLIST or catalogued procedure. You must perform this task if users at your site need to access maps.
❏ Part 2, Customizing Devices
provides the information necessary to customize device drivers for your graphic devices. The following is a list of the major tasks described in this part:
❏ Setting up a Graphics Translate Table
describes how to create SAS/GRAPH translation tables. These tables translate graphics commands from ASCII to EBCDIC and back to ASCII, so that you can print your graphics from ASCII terminals with plotters attached. You do not need to perform the task described in this section if all of your asynchronous devices are used with supported 3270- or 3287-type protocol converters.
❏ Using SAS/GRAPH Software with ASCII Terminals and ASCII Terminal Emulators
describes the interfaces to use with ASCII terminals and ASCII terminal emulators.
❏ Using SAS/GRAPH software with ASCII printers or plotters
describes the steps necessary to customize Institute-supplied drivers for use with ASCII printers or plotters. If you use Versatec or CalComp plotters (other than the 81 and 84 models), or any other ASCII device that does not have an Institute-supplied driver but uses CalComp-compatible plotting routines, see the section on "Installing the Linkable Driver."
142 Installation Instructions and System Manager's Guide
Appendix Q, Implementing SAS/GRAPH Software
❏ Installing the Linkable Driver
describes how to create a driver that can be used with devices that come with a library of CalComp-compatible subroutines. Refer to this part only if you have such a subroutine library and no Institute-supplied driver is available for the device. Devices using the Linkable driver include those from such manufacturers as CalComp, Versatec, and, when used with EPIC or XPPI software, various Xerox printers. If you have a linkable driver from the 6.06 or 5.18 Release (but not 6.07 or 6.08), you must reinstall the driver for Release 6.09.
❏ Using SAS/GRAPH Software with IBM 3270-type Terminals and 3270 Emulators
describes requirements for using Institute-supplied drivers for IBM 3270-type terminals (such as the IBM 3279 and the 3179 Model G) and 3270 emulation packages for personal computers, such as IRMA and Attachmate Extra. In addition to stand-alone drivers, the Institute supplies a set of drivers that interface with IBM's GDDM product to produce output on IBM 3270-type terminals. If you want to use these drivers, see the section "Using SAS/GRAPH Software with GDDM."
❏ Using SAS/GRAPH Software with IBM 3287, 3268, and 4224 Printers
describes requirements for using Institute-supplied drivers for IBM 3287, 3268, and 4224 printers. In addition to stand-alone drivers, the Institute supplies a set of drivers that interface with IBM's GDDM product to produce output on these printers. If you want to use these drivers, see the section "Using SAS/GRAPH Software with GDDM".
❏ Using SAS/GRAPH Software with GDDM
describes how to use the SAS/GRAPH device drivers that interface with IBM's GDDM base product to produce output on a variety of IBM devices, including 3270-type terminals, 3268, 3287, and 4224 printers, 3800 and 3820 printers, and IEEE-attached plotters.
❏ Part 3, Setting up and Modifying Device Catalogs
describes how to create or modify device catalog entries in order to customize device driver output to the needs of your site.
❏ Part 4, Device Help Screens
describes how to set up system parameters that are required to use certain drivers.
Installation Instructions and System Manager's Guide 143
Appendix Q, Implementing SAS/GRAPH Software
Part 1, Accessing the SAS/GRAPH Maps Data Sets
All installed SAS/GRAPH maps data sets are merged into the common MAPS library by the SASIxxxx jobs. To enable your users to access the maps data sets when operating under TSO, modify your installed SAS CLIST to include the following allocate statement for the MAPS library. Include it after the allocation of the SAMPSIO library.
ALLOC F(MAPS) DA('&prefix.MAPS') SHR REU
To access the maps data sets when running under MVS Batch, modify your installed SAS cataloged procedure to include the following DD statement to the JCL for the MAPS library.
//MAPS DD DSN=&prefix.MAPS,DISP=SHR
Part 2, Customizing Devices
Setting Up a SAS/GRAPH Translate Table
Note: A translate table is only needed if you are using ASCII terminals or attached plotters interactively on ASCII lines. (You do not have to complete this step if all of your asynchronous devices are used with 3270- or 3287-type protocol converters).
In order for SAS/GRAPH software to communicate with ASCII devices, you must translate graphics commands from ASCII to EBCDIC, and back to ASCII again. This requires both system and SAS/GRAPH translate tables. GTABTCAM and SASGTAB0 are translate tables in the catalog SASHELP.HOST that are designed for use with TCAM and VTAM respectively. Generally, you should be able to use one of these tables along with your system tables to produce correct translation. However, if these tables are not able to perform all of the translation correctly, you may need to create your own SAS translate table. Refer to SAS Technical Report P-197, The TRANTAB Procedure, for details on creating your own translate table.
If you created your own translate table in Release 6.06, 6.07, or 6.08 you can use that translate table with Release 6.09. Copy your table from your Release 6.06, 6.07, or 6.08 SASHELP.HOST catalog to your Release 6.09 SASHELP.HOST catalog. In Version 5 SAS/GRAPH software, SAS/GRAPH translate tables were stored as load modules. In Version 6, the Institute-supplied tables are stored as members of the catalog SASHELP.HOST. If you created your own translate table in Version 5 of SAS/GRAPH software, you must convert the Version 5 module to a Version 6 catalog entry.
144 Installation Instructions and System Manager's Guide
Appendix Q, Implementing SAS/GRAPH Software
The TRANTAB= graphics option and the TRANTAB device parameter select a translate table for your system. The default TRANTAB value in Version 6 SAS/GRAPH software is SASGTAB0. If you have been using ASCII devices under Version 5 with TRANTAB=GTABVTAM, you do not need to change the default value. If you had to use the GTABTCAM table or a user-created table converted from Version 5, you should change the default TRANTAB option. The TRANTAB value can be specified either in a device entry or in a GOPTIONS statement. You can set a new default in either of the following two ways:
❏ Modify device catalog entries for all ASCII terminals and interactive plotters that you will be using at your site. To do this, use the following SAS statements:
PROC GDEVICE C=SASHELP.DEVICES NOFS; MODIFY entryname TRANTAB=tablename; QUIT;
Replace entryname with the name of the entry you want to modify, and tablename with the new TRANTAB value.
❏ Create a sequential file containing the following statement:
GOPTIONS TRANTAB=tablename;
You can then concatenate this file ahead of the user AUTOEXEC file in your SAS CLIST and cataloged procedure.
Note: This option may be more efficient if you have many types of ASCII terminals and plotters.
Using SAS/GRAPH Software with ASCII Terminals and ASCII Terminal Emulators
ASCII terminals and PCs running ASCII terminal emulation software are most commonly attached to MVS systems through a 3270-type protocol converter. When this is the case, it is necessary to provide both a device driver AND a GPROTOCOL value on your GOPTIONS statement. For terminals and PCs running ASCII emulation software, the DEVICE= parameter on the GOPTIONS statement will reflect the type of graphics terminal your software emulates. If your PC or terminal is connected directly or through a modem to a controller running ACF/NCP/NTO and is not attached to a 3270-type protocol converter, you only need to specify a device driver. Contact SAS Institute Technical Support if you have problems using this type of configuration.
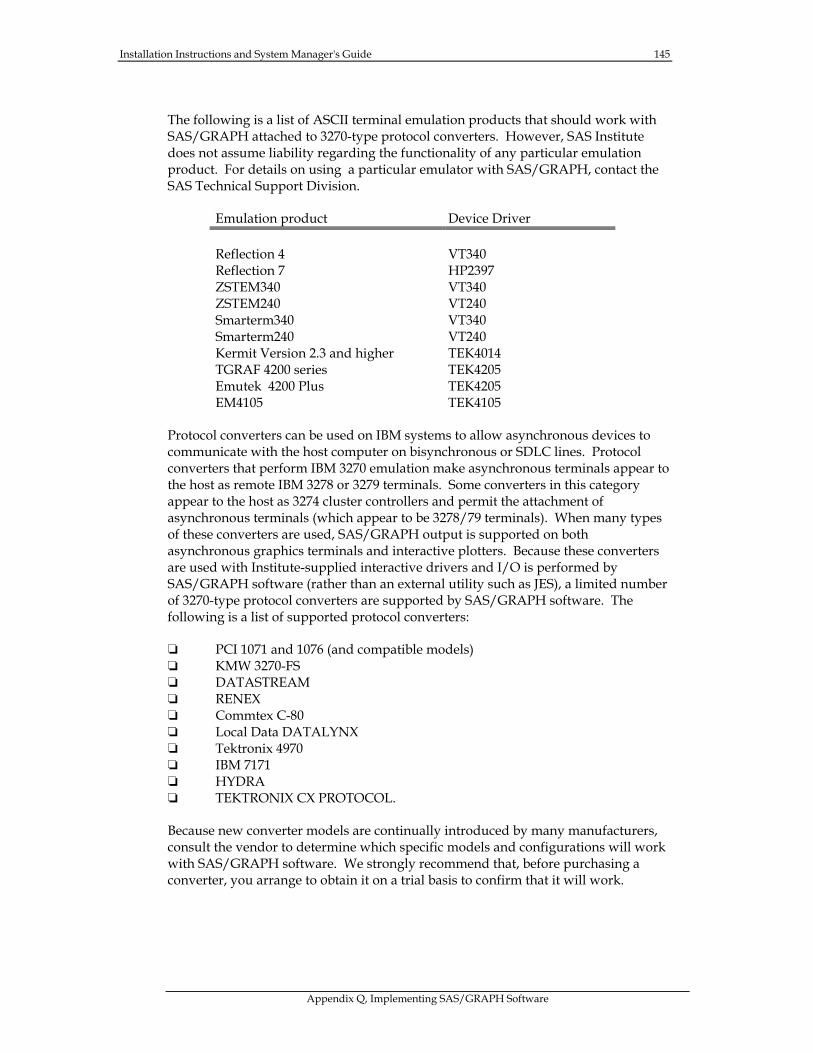
Installation Instructions and System Manager's Guide 145
Appendix Q, Implementing SAS/GRAPH Software
The following is a list of ASCII terminal emulation products that should work with SAS/GRAPH attached to 3270-type protocol converters. However, SAS Institute does not assume liability regarding the functionality of any particular emulation product. For details on using a particular emulator with SAS/GRAPH, contact the SAS Technical Support Division.
Emulation product Device Driver
Reflection 4 VT340 Reflection 7 HP2397 ZSTEM340 VT340 ZSTEM240 VT240 Smarterm340 VT340 Smarterm240 VT240 Kermit Version 2.3 and higher TEK4014 TGRAF 4200 series TEK4205 Emutek 4200 Plus TEK4205 EM4105 TEK4105
Protocol converters can be used on IBM systems to allow asynchronous devices to communicate with the host computer on bisynchronous or SDLC lines. Protocol converters that perform IBM 3270 emulation make asynchronous terminals appear to the host as remote IBM 3278 or 3279 terminals. Some converters in this category appear to the host as 3274 cluster controllers and permit the attachment of asynchronous terminals (which appear to be 3278/79 terminals). When many types of these converters are used, SAS/GRAPH output is supported on both asynchronous graphics terminals and interactive plotters. Because these converters are used with Institute-supplied interactive drivers and I/O is performed by SAS/GRAPH software (rather than an external utility such as JES), a limited number of 3270-type protocol converters are supported by SAS/GRAPH software. The following is a list of supported protocol converters:
❏ PCI 1071 and 1076 (and compatible models) ❏ KMW 3270-FS ❏ DATASTREAM ❏ RENEX ❏ Commtex C-80 ❏ Local Data DATALYNX ❏ Tektronix 4970 ❏ IBM 7171 ❏ HYDRA ❏ TEKTRONIX CX PROTOCOL.
Because new converter models are continually introduced by many manufacturers, consult the vendor to determine which specific models and configurations will work with SAS/GRAPH software. We strongly recommend that, before purchasing a converter, you arrange to obtain it on a trial basis to confirm that it will work.
146 Installation Instructions and System Manager's Guide
Appendix Q, Implementing SAS/GRAPH Software
To use SAS/GRAPH software with these converters, you must attach the asynchronous terminals directly to the converter. If you are using an interactive plotter, it should be in "eavesdrop" mode, between an asynchronous terminal and the protocol converter.
These converters are designed for interactive use. If you are using an ASCII hardcopy device in batch mode with a protocol converter (such as an AGILE 5287 or Local Data INTERLYNX), see the next section.
To obtain graphics output with the interactive converters listed previously, invoke SAS/GRAPH under TSO. If you are using a Local Data DATALYNX, specify:
GOPTIONS GPROTOCOL=SASGPSTE;
If you are using an IBM 7171 converter, specify the following:
GOPTIONS GPROTOCOL=SASGP71;
If you are using a HYDRA protocol converter, specify the following:
GOPTION GPROTOCOL=SASGPHYD;
For any of the other supported models, specify the following:
GOPTIONS GPROTOCOL=SASGPSTD;
Also specify the name of the graphics device you use in an OPTIONS or GOPTIONS statement. Then proceed to use SAS/GRAPH software as you normally would with an interactive device.
Note to Version 5 Users: GPROTOCOL values have changed between Version 5 and Version 6. However, you can still use the Version 5 equivalents (GSASPSTE, GSAS7171, and GSASPSTD) in Version 6.
The PCI 1067 protocol converter and the IBM 3708 converter (when used in protocol enveloping mode) make asynchronous terminals appear to IBM host computers as SDLC 3767 hardcopy terminals. These converters can be used with asynchronous graphics terminals and interactive plotters. The 3708 is supported by SAS/GRAPH software only in protocol enveloping mode. It is not supported in protocol conversion mode. If you are installing SAS/GRAPH for the first time and using either of these devices, contact Technical Support for details.
Using SAS/GRAPH Software with ASCII Printers or Plotters
When you use ASCII printers or plotters on an MVS system, the device must be connected to a 3287-type converter that is normally attached to a 3174 or 3274 control unit, and appear to the host as an IBM 3287 printer. You can attach various types of ASCII hardcopy devices to these converters and "spool" output to them.
Installation Instructions and System Manager's Guide 147
Appendix Q, Implementing SAS/GRAPH Software
To create output that can be sent to the device, specify the following GOPTIONS:
GOPTIONS DEVICE = drivername GACCESS = GSASFILE GSFMODE = REPLACE GPROTOCOL = protocolvalue HANDSHAKE = XONXOFF GSFLEN = logical record length divided by 2;
These options cause output to be written to the DDname GSASFILE, which can point to a file or directly to the device. When using SAS/GRAPH software with a 3287-type converter, be sure to use the proper driver for your graphics device (for example, a QMS printer or Hewlett-Packard plotter). You must also specify a value for the GPROTOCOL option. If the converter can send all characters in the data stream to the device, or if the data stream contains only printable characters, specify GPROTOCOL=' '. This value can also be used for most devices with a direct coaxial attachment, such as the Zeta 887 plotter, or Xerox printers with a coax interface.
To fully automate this process for the end user, the parameters in the preceding GOPTIONS statement can be incorporated into an Institute-supplied device driver entry. See Part 3, "Setting up and Modifying Device Catalogs" for details on using PROC GDEVICE to customize a device driver.
If the data stream for the device contains unprintable characters that the converter cannot process, you must specify an appropriate value for the GPROTOCOL option so that the data stream is modified to a format that will pass through the converter. GPROTOCOL= values for selected converters are:
SASGPAGL Agile 5287 and 6287 SASGPISI ISI 87 SASGPVAT Avatar SASGPIDX IDEX SASGPNET NetCommander and I-Data SASGPDCA IRMAprint, IRMAprint2, TEK 4512, and QMS AFPlink SASGPLCL Local Data Interlynx, KMW 3287, Andrew (Newport, Malibu,
Laguna)
The following new GPROTOCOL= values have been added with Release 6.09:
SASGPAXI Axis SASGPCAB CableNet SASGPCHK Cherokee SASGPIOC I/O Corporation
Note to Version 5 users: GPROTOCOL= values have changed between Version 5 and Version 6. However, you can still use the Version 5 equivalents (GSASAGIL, GSASLDIL, and GSASISI) in Version 6.
If your converter is not in the preceding list, but can process your device's data stream without modification, try using GPROTOCOL=' '.
148 Installation Instructions and System Manager's Guide
Appendix Q, Implementing SAS/GRAPH Software
To send output to the device, you need system software that can direct output to a 3287-type printer. If you have software such as VPS or JES328X (Version 2), which can send output to a 3287 printer through JES, you can use a JCL statement or TSO ALLOCATE statement to direct output to the printer. For example:
//GSASFILE DD SYSOUT=class,DEST=destination
or
ALLOC FI(GSASFILE) SYSOUT(class) DEST(destination)
Another approach is to direct your output to a file and use a utility (such as DSPRINT or IEBGENER) to copy the file to the JES output queue.
SASWTR (the Institute-supplied writer) can only be used with IBM 3268 and 3287 printers. Do not use it to send output to other devices.
Make sure that your spooling software or subsystem is not inserting extra characters (line-feeds, page ejects, etc.) in the data stream. Version 1 of JES328X may insert extra characters and reblock data; therefore, it is not recommended for transmitting graphics data. Also make sure that your printer is not set to do automatic page ejects after a certain number of data lines. Finally, check to see that your printer has sufficient memory to process the graph you are sending to it. If any of the above conditions are true for your output device, you may receive distorted graphs, partial graphs, or graphs split between pages on a printer or plotter attached to a 3287-type protocol converter.
Installing the Linkable Driver
This section describes the steps necessary to install the Linkable driver. The Linkable driver makes calls to user-supplied "CalComp compatible" plotting subroutines. These subroutines are normally provided by the plotter vendor when the plotter is purchased. Other plotting subroutine libraries may be available from third party vendors. The subroutine library should contain routines named PLOT, PLOTS, SYMBOL, and NEWPEN (or TONE). If your site does not have a device that uses vendor-supplied subroutines, skip this section and refer to the instructions appropriate for your devices.
You can direct the output from the Linkable driver to a tape file for an off-line device, to a SYSOUT class for an online device (that appears to the system as a punch or a 3287 printer), or to a disk file for later spooling to the device.
To install a Linkable driver, you must perform the following two steps:
1. Create an executable driver module.
2. Create a device catalog entry containing characteristics of the device.
ATTENTION: Before you can use the Linkable driver, parts of it must be compiled and link-edited with your plotting subroutines.
Installation Instructions and System Manager's Guide 149
Appendix Q, Implementing SAS/GRAPH Software
If you built the Linkable driver in a previous release of SAS Software, locate and read the appropriate section:
❏ If you built a Linkable driver in Release 6.06, but not in Release 6.07 or 6.08,
you must rebuild the driver for Release 6.09.
❏ If you built a Linkable driver in Release 6.07 or 6.08,
you can copy your 6.07 or 6.08 device entry to your 6.09 device catalog, and your 6.07 or 6.08 executable module to your 6.09 load library (or modify your 6.09 SAS cataloged procedure or CLIST to use the load library where your 6.07 or 6.08 executable module is stored).
❏ If you built your last Linkable driver for use with Version 5 SAS/GRAPH software
The Linkable driver has been redesigned for Version 6 and uses the Metagraphics Driver facility. The installation process for the driver has changed somewhat, but to the end user, use of the driver is the same as the Version 5 driver. For information on the new Linkable driver, read the next section.
Understanding the Linkable Driver Used in Version 6 of the SAS System
This section explains the changes and enhancements made to the Linkable driver for Version 6 of the SAS Software. This discussion is divided into the following eight topics:
❏ Overview of the linkable driver
describes how the Linkable driver operates and provides a description of the calls made to the plotting routines by the driver.
❏ Generating an executable module
provides instructions for compiling an Institute-supplied FORTRAN program and linking it with a library of plotting routines. Before following the instructions in this section, you should read over the remaining sections to determine whether you want to make any modifications to the driver or your routines.
❏ Customizing device characteristics
The characteristics of the device (such as size of plotting area, default colors, rows and columns) are stored in a device catalog entry. This section shows how to edit the device catalog entry to supply the specific characteristics of your device.
150 Installation Instructions and System Manager's Guide
Appendix Q, Implementing SAS/GRAPH Software
❏ Testing the driver
illustrates a sample program that you can use to make sure the driver and device are working correctly.
❏ Special instructions for Versatec plotter users
If you are creating a driver for a Versatec monochrome or color plotter, refer to this section before attempting to build a driver. This section contains special instructions for creating a driver that calls the Versatec TONE routine (instead of NEWPEN) and invokes Versatec RANDOM or VGS routines.
❏ Special instructions for Xerox EPIC or XPPI Version 1.0 users
If you are creating a driver with Xerox EPIC or XPPI 1.0 subroutines, refer to this section before attempting to build a driver. This section contains special instructions for creating a driver that calls the EPIC or XPPI routines.
❏ Special instructions for Xerox XPPI Version 1.1 users
If you are creating a driver with Xerox XPPI 1.1 subroutines, refer to this section before attempting to build a driver. This section contains special instructions for creating a driver that calls the XPPI routines. If you are creating a driver with XEROX XPPI Version 2.0 or higher, contact the SAS Institute Technical Support Division.
❏ Common problems and solutions
describes some of the most common problems encountered when trying to install and/or use the Linkable driver. If you have any problems, please consult this section before calling SAS Institute.
Overview of the Linkable Device Driver
The Linkable device driver is a special driver supplied with SAS/GRAPH software that is incomplete until link-edited with user-supplied plotting routines. These routines are normally provided by the manufacturer when the plotter is purchased or obtained from a third party vendor. Since these plotting routines perform all the driver output, this driver does not depend on ASCII translate tables.
How the Linkable Device Driver Works
The driver consists of two parts: a device catalog entry that contains the characteristics of the device and an executable module. The executable module is created by compiling an Institute-supplied FORTRAN program and linking it with the plotting subroutines that are supplied with your device.
Installation Instructions and System Manager's Guide 151
Appendix Q, Implementing SAS/GRAPH Software
The Linkable driver uses the SAS Metagraphics Driver facility to produce its output. When a SAS/GRAPH procedure (that produces a graph) is executed, the following happens:
1. An "internal" (Institute-supplied) driver module, using information on device characteristics from a device catalog entry, produces a metafile of graphics data.
2. An "external driver" (the executable module that you create by compiling the LINKAIBM FORTRAN program and linking it with your vendor-supplied plotting routines) reads the metafile and makes calls to the plotting subroutines. The plotting subroutines actually produce the output.
Plotting Routines Used by the Linkable Device Driver
The LINKAIBM FORTRAN program is installed in &prefix.GRMISC as member LINKAIBM. This program makes calls to four subroutines (PLOTS, PLOT, SYMBOL, and NEWPEN) that must comply with the CalComp standard format as documented in the following list.
PLOTS(0,0,14)
The PLOTS subroutine is normally used to initialize the device, and the third parameter of 14 causes the driver to write output to the FORTRAN unit 14 (FT14F001). To change the value of the first two parameters, you can modify the values of the PLOTS1 and PLOTS2 variables in the LINKAIBM FORTRAN program.
To modify the FORTRAN output unit used by the driver, change the value of the variable OUT in the INIDVR subroutine of the LINKAIBM FORTRAN program.
PLOT(X,Y,Ipen)
PLOT indicates the direction of the pen and when to terminate the plotting. X and Y indicate the pen coordinates in inches. Ipen codes are used to move the pen up or down as well as coding origin reset, and terminating the plot . The following are valid Ipen codes:
Ipen=-3 move and reset origin Ipen=2 draw Ipen=3 move Ipen=999 move and terminate plot
NEWPEN(Ipen#)
The NEWPEN routine is used to select the current pen or color. By default, the Linkable device driver assumes there are four pens named BLACK, RED, GREEN, and BLUE associated with Ipen numbers 1, 2, 3, and 4 respectively. To change the number of pens or the default colors, see the section, "Customizing Device Characteristics."
152 Installation Instructions and System Manager's Guide
Appendix Q, Implementing SAS/GRAPH Software
SYMBOL(X,Y,Height,String,Angle,Nchar)
The SYMBOL routine writes hardware text and symbols. The following arguments are passed:
X and Y pen coordinates in inches Height= height of characters in inches String= string of characters Angle= angle in degrees (0.0 or -90.0) Nchar= number of characters in string
Subroutines written in FORTRAN 77 may have a SYMBOL routine that takes seven parameters, as follows:
SYMBOL(X,Y,Height,String,INTEQ,Angle,Nchar)
where INTEQ is a dummy argument. If your SYMBOL routine expects seven parameters, you must modify the LINKAIBM program, as described in "Generating an executable module."
The relevant routines in some plotter libraries may not be named as shown in above but contain the correct arguments. In this case, the linkage editor can rename the routines to match the information in the previous example. In some cases, the arguments of a routine may not agree in type, number, or meaning with what is expected by the plotter. When the arguments do not agree, you can write interface routines that pass the expected subroutines to the plotter.
In addition to calls to the preceding routines, calls can be made to a series of routines to customize the driver to suit the requirements of your site or nonstandard plotting libraries. These are described more fully in "Additional Routines" in the next section.
Generating an Executable Module
You may not need to read this section. Use the following list to determine which section is appropriate for your site:
❏ If you are creating a driver for a Versatec plotter, you should read "Special Instructions for Versatec Plotter Users" instead of this section.
❏ If you are creating a driver for a Xerox printer and using Xerox EPIC or XPPI 1.0 software routines, you should read "Special Instructions for Xerox EPIC or XPPI version 1.0 users" instead of this section.
❏ If you are creating a driver for a Xerox printer and using Xerox XPPI 1.1 software routines, you should read "Special Instructions for Xerox XPPI version 1.1 users" instead of this section. If you have XPPI Version 2.0 or above, contact Technical Support for details.
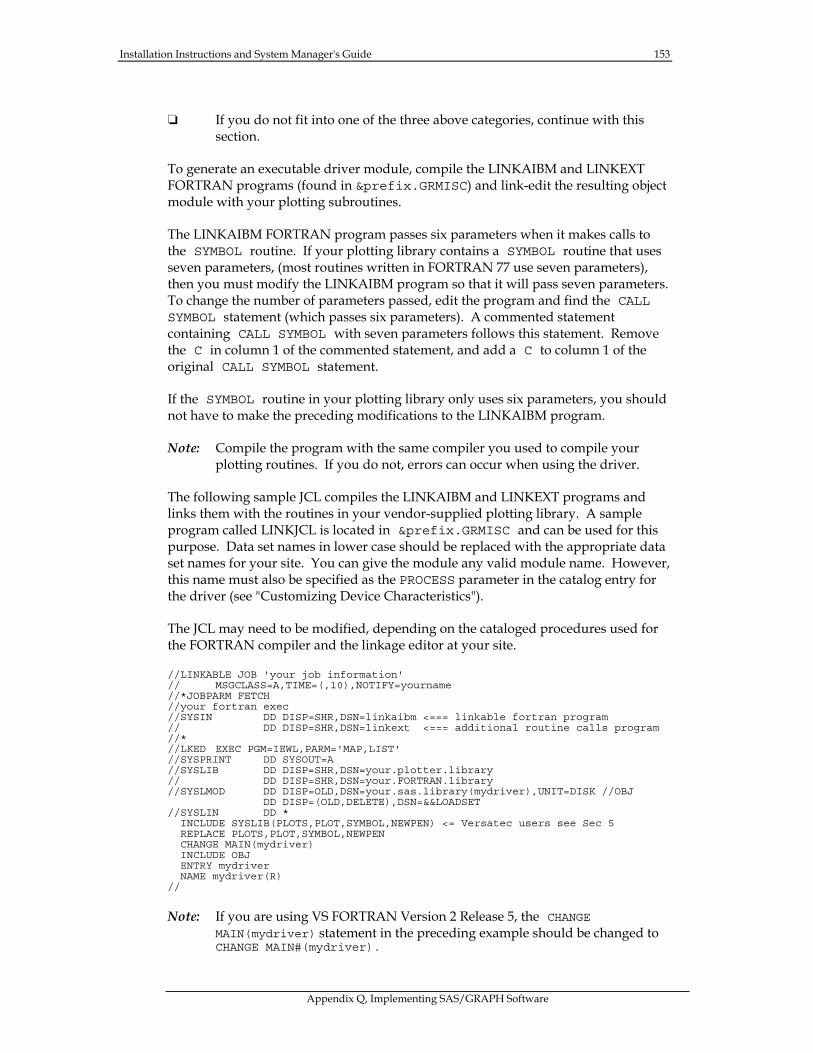
Installation Instructions and System Manager's Guide 153
Appendix Q, Implementing SAS/GRAPH Software
❏ If you do not fit into one of the three above categories, continue with this section.
To generate an executable driver module, compile the LINKAIBM and LINKEXT FORTRAN programs (found in &prefix.GRMISC) and link-edit the resulting object module with your plotting subroutines.
The LINKAIBM FORTRAN program passes six parameters when it makes calls to the SYMBOL routine. If your plotting library contains a SYMBOL routine that uses seven parameters, (most routines written in FORTRAN 77 use seven parameters), then you must modify the LINKAIBM program so that it will pass seven parameters. To change the number of parameters passed, edit the program and find the CALL SYMBOL statement (which passes six parameters). A commented statement containing CALL SYMBOL with seven parameters follows this statement. Remove the C in column 1 of the commented statement, and add a C to column 1 of the original CALL SYMBOL statement.
If the SYMBOL routine in your plotting library only uses six parameters, you should not have to make the preceding modifications to the LINKAIBM program.
Note: Compile the program with the same compiler you used to compile your plotting routines. If you do not, errors can occur when using the driver.
The following sample JCL compiles the LINKAIBM and LINKEXT programs and links them with the routines in your vendor-supplied plotting library. A sample program called LINKJCL is located in &prefix.GRMISC and can be used for this purpose. Data set names in lower case should be replaced with the appropriate data set names for your site. You can give the module any valid module name. However, this name must also be specified as the PROCESS parameter in the catalog entry for the driver (see "Customizing Device Characteristics").
The JCL may need to be modified, depending on the cataloged procedures used for the FORTRAN compiler and the linkage editor at your site.
//LINKABLE JOB 'your job information' // MSGCLASS=A,TIME=(,10),NOTIFY=yourname //*JOBPARM FETCH //your fortran exec //SYSIN DD DISP=SHR,DSN=linkaibm <=== linkable fortran program // DD DISP=SHR,DSN=linkext <=== additional routine calls program //* //LKED EXEC PGM=IEWL,PARM='MAP,LIST' //SYSPRINT DD SYSOUT=A //SYSLIB DD DISP=SHR,DSN=your.plotter.library // DD DISP=SHR,DSN=your.FORTRAN.library //SYSLMOD DD DISP=OLD,DSN=your.sas.library(mydriver),UNIT=DISK //OBJ
DD DISP=(OLD,DELETE),DSN=&&LOADSET //SYSLIN DD * INCLUDE SYSLIB(PLOTS,PLOT,SYMBOL,NEWPEN) <= Versatec users see Sec 5 REPLACE PLOTS,PLOT,SYMBOL,NEWPEN CHANGE MAIN(mydriver) INCLUDE OBJ ENTRY mydriver NAME mydriver(R) //
Note: If you are using VS FORTRAN Version 2 Release 5, the CHANGE MAIN(mydriver) statement in the preceding example should be changed to CHANGE MAIN#(mydriver).
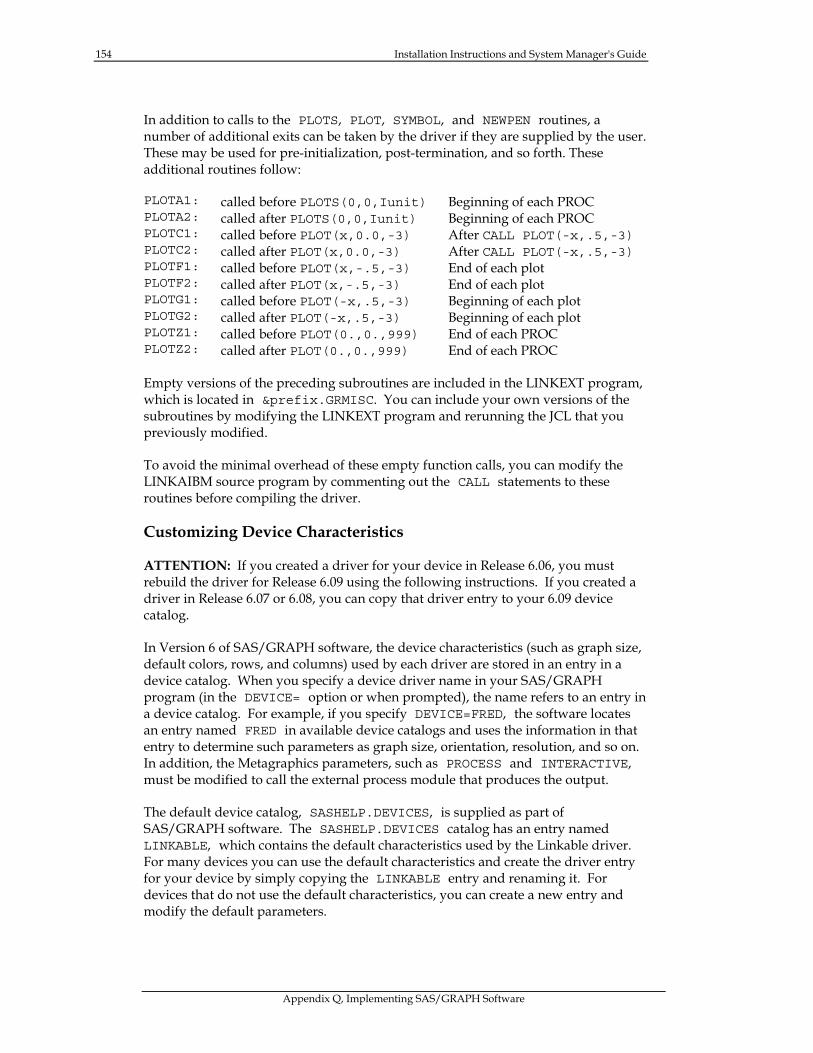
154 Installation Instructions and System Manager's Guide
Appendix Q, Implementing SAS/GRAPH Software
In addition to calls to the PLOTS, PLOT, SYMBOL, and NEWPEN routines, a number of additional exits can be taken by the driver if they are supplied by the user. These may be used for pre-initialization, post-termination, and so forth. These additional routines follow:
PLOTA1: called before PLOTS(0,0,Iunit) Beginning of each PROC PLOTA2: called after PLOTS(0,0,Iunit) Beginning of each PROC PLOTC1: called before PLOT(x,0.0,-3) After CALL PLOT(-x,.5,-3) PLOTC2: called after PLOT(x,0.0,-3) After CALL PLOT(-x,.5,-3) PLOTF1: called before PLOT(x,-.5,-3) End of each plot PLOTF2: called after PLOT(x,-.5,-3) End of each plot PLOTG1: called before PLOT(-x,.5,-3) Beginning of each plot PLOTG2: called after PLOT(-x,.5,-3) Beginning of each plot PLOTZ1: called before PLOT(0.,0.,999) End of each PROC PLOTZ2: called after PLOT(0.,0.,999) End of each PROC
Empty versions of the preceding subroutines are included in the LINKEXT program, which is located in &prefix.GRMISC. You can include your own versions of the subroutines by modifying the LINKEXT program and rerunning the JCL that you previously modified.
To avoid the minimal overhead of these empty function calls, you can modify the LINKAIBM source program by commenting out the CALL statements to these routines before compiling the driver.
Customizing Device Characteristics
ATTENTION: If you created a driver for your device in Release 6.06, you must rebuild the driver for Release 6.09 using the following instructions. If you created a driver in Release 6.07 or 6.08, you can copy that driver entry to your 6.09 device catalog.
In Version 6 of SAS/GRAPH software, the device characteristics (such as graph size, default colors, rows, and columns) used by each driver are stored in an entry in a device catalog. When you specify a device driver name in your SAS/GRAPH program (in the DEVICE= option or when prompted), the name refers to an entry in a device catalog. For example, if you specify DEVICE=FRED, the software locates an entry named FRED in available device catalogs and uses the information in that entry to determine such parameters as graph size, orientation, resolution, and so on. In addition, the Metagraphics parameters, such as PROCESS and INTERACTIVE, must be modified to call the external process module that produces the output.
The default device catalog, SASHELP.DEVICES, is supplied as part of SAS/GRAPH software. The SASHELP.DEVICES catalog has an entry named LINKABLE, which contains the default characteristics used by the Linkable driver. For many devices you can use the default characteristics and create the driver entry for your device by simply copying the LINKABLE entry and renaming it. For devices that do not use the default characteristics, you can create a new entry and modify the default parameters.

Installation Instructions and System Manager's Guide 155
Appendix Q, Implementing SAS/GRAPH Software
To get a list of the default characteristics used by the Linkable driver, you can use the GDEVICE procedure to list the contents of the LINKABLE entry in SASHELP.DEVICES. To do this, submit the following SAS statements:
PROC GDEVICE NOFS C=SASHELP.DEVICES; LIST LINKABLE; END;
Important parameters from the LINKABLE entry are listed below. Refer to SAS/GRAPH Reference, Version 6 Edition for additional details on the parameters.
Lrows: 0 Hsize: 7.500 in Lcols: 0 Vsize: 10.000 in Prows: 66 Xmax: 7.500 in Pcols: 75 Ymax 10.000 in Aspect: 1.500 Rotate: PORTRAIT Xpixels: 1500 Paperfeed: 8.500 in Ypixels: 2000 Fillinc: 3 Maxcolors: 5 Devopts: '2003800400000000'x Background color: WHITE Color list: BLACK,RED,GREEN,BLUE
METAGRAPHICS INFORMATION Process: XEQ:LINKABLE Interactive: PROC
If the default parameters are correct for your device, create a new entry simply by making a copy of the LINKABLE entry. Assuming that you want to name the new driver MYDRIVER, you can do this with the following PROC GDEVICE statements:
PROC GDEVICE NOFS C=SASHELP.DEVICES; COPY LINKABLE NEWNAME=MYDRIVER; MOD MYDRIVER DES='COPIED LINKABLE DRIVER' PROCESS='XEQ:modulename'; END;
The modulename in the PROCESS= parameter should be the name of the module that you created by compiling the LINKAIBM FORTRAN program and linking it with your vendor-supplied routines. (This task is described in Generating an executable module" earlier in this appendix.) You must have write access to the SASHELP.DEVICES catalog to run the program.
In many cases you will want or need to modify some of the parameters in the LINKABLE entry to fit your particular device. For example, if you have an 8-pen plotter with the following colors: BLACK, RED, GREEN, BLUE, ORANGE, BROWN, YELLOW, GOLD you will need to create a modified device entry.
To create a modified device entry, use the following PROC GDEVICE statements:
PROC GDEVICE NOFS C=SASHELP.DEVICES; COPY LINKABLE NEWNAME=MYDRIVER; MOD MYDRIVER DES='MODIFIED LINKABLE DRIVER' MAXCOLORS=9 COLORS=(BLACK,RED,GREEN,BLUE,ORANGE,BROWN,YELLOW,GOLD) PROCESS='XEQ:modulename'; END;
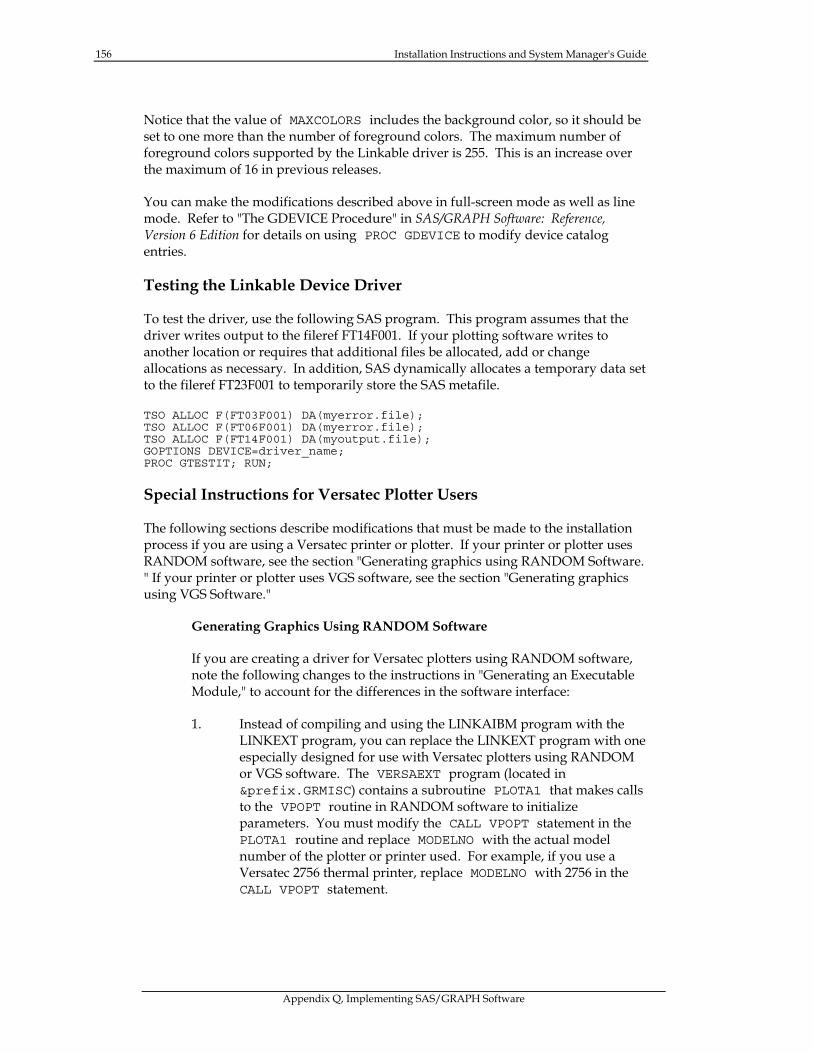
156 Installation Instructions and System Manager's Guide
Appendix Q, Implementing SAS/GRAPH Software
Notice that the value of MAXCOLORS includes the background color, so it should be set to one more than the number of foreground colors. The maximum number of foreground colors supported by the Linkable driver is 255. This is an increase over the maximum of 16 in previous releases.
You can make the modifications described above in full-screen mode as well as line mode. Refer to "The GDEVICE Procedure" in SAS/GRAPH Software: Reference, Version 6 Edition for details on using PROC GDEVICE to modify device catalog entries.
Testing the Linkable Device Driver
To test the driver, use the following SAS program. This program assumes that the driver writes output to the fileref FT14F001. If your plotting software writes to another location or requires that additional files be allocated, add or change allocations as necessary. In addition, SAS dynamically allocates a temporary data set to the fileref FT23F001 to temporarily store the SAS metafile.
TSO ALLOC F(FT03F001) DA(myerror.file); TSO ALLOC F(FT06F001) DA(myerror.file); TSO ALLOC F(FT14F001) DA(myoutput.file); GOPTIONS DEVICE=driver_name; PROC GTESTIT; RUN;
Special Instructions for Versatec Plotter Users
The following sections describe modifications that must be made to the installation process if you are using a Versatec printer or plotter. If your printer or plotter uses RANDOM software, see the section "Generating graphics using RANDOM Software. " If your printer or plotter uses VGS software, see the section "Generating graphics using VGS Software."
Generating Graphics Using RANDOM Software
If you are creating a driver for Versatec plotters using RANDOM software, note the following changes to the instructions in "Generating an Executable Module," to account for the differences in the software interface:
1. Instead of compiling and using the LINKAIBM program with the LINKEXT program, you can replace the LINKEXT program with one especially designed for use with Versatec plotters using RANDOM or VGS software. The VERSAEXT program (located in &prefix.GRMISC) contains a subroutine PLOTA1 that makes calls to the VPOPT routine in RANDOM software to initialize parameters. You must modify the CALL VPOPT statement in the PLOTA1 routine and replace MODELNO with the actual model number of the plotter or printer used. For example, if you use a Versatec 2756 thermal printer, replace MODELNO with 2756 in the CALL VPOPT statement.
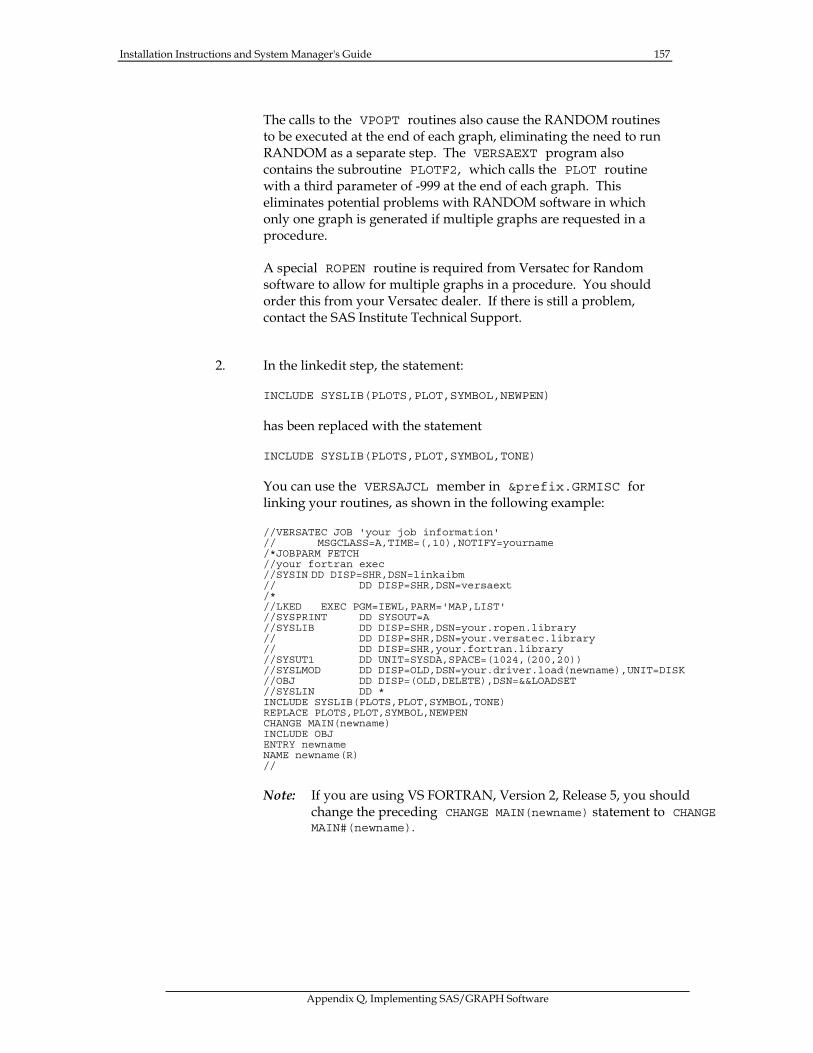
Installation Instructions and System Manager's Guide 157
Appendix Q, Implementing SAS/GRAPH Software
The calls to the VPOPT routines also cause the RANDOM routines to be executed at the end of each graph, eliminating the need to run RANDOM as a separate step. The VERSAEXT program also contains the subroutine PLOTF2, which calls the PLOT routine with a third parameter of -999 at the end of each graph. This eliminates potential problems with RANDOM software in which only one graph is generated if multiple graphs are requested in a procedure.
A special ROPEN routine is required from Versatec for Random software to allow for multiple graphs in a procedure. You should order this from your Versatec dealer. If there is still a problem, contact the SAS Institute Technical Support.
2. In the linkedit step, the statement:
INCLUDE SYSLIB(PLOTS,PLOT,SYMBOL,NEWPEN)
has been replaced with the statement
INCLUDE SYSLIB(PLOTS,PLOT,SYMBOL,TONE)
You can use the VERSAJCL member in &prefix.GRMISC for linking your routines, as shown in the following example:
//VERSATEC JOB 'your job information' // MSGCLASS=A,TIME=(,10),NOTIFY=yourname /*JOBPARM FETCH //your fortran exec //SYSIN DD DISP=SHR,DSN=linkaibm // DD DISP=SHR,DSN=versaext /* //LKED EXEC PGM=IEWL,PARM='MAP,LIST' //SYSPRINT DD SYSOUT=A //SYSLIB DD DISP=SHR,DSN=your.ropen.library // DD DISP=SHR,DSN=your.versatec.library // DD DISP=SHR,your.fortran.library //SYSUT1 DD UNIT=SYSDA,SPACE=(1024,(200,20)) //SYSLMOD DD DISP=OLD,DSN=your.driver.load(newname),UNIT=DISK //OBJ DD DISP=(OLD,DELETE),DSN=&&LOADSET //SYSLIN DD * INCLUDE SYSLIB(PLOTS,PLOT,SYMBOL,TONE) REPLACE PLOTS,PLOT,SYMBOL,NEWPEN CHANGE MAIN(newname) INCLUDE OBJ ENTRY newname NAME newname(R) //
Note: If you are using VS FORTRAN, Version 2, Release 5, you should change the preceding CHANGE MAIN(newname) statement to CHANGE MAIN#(newname).
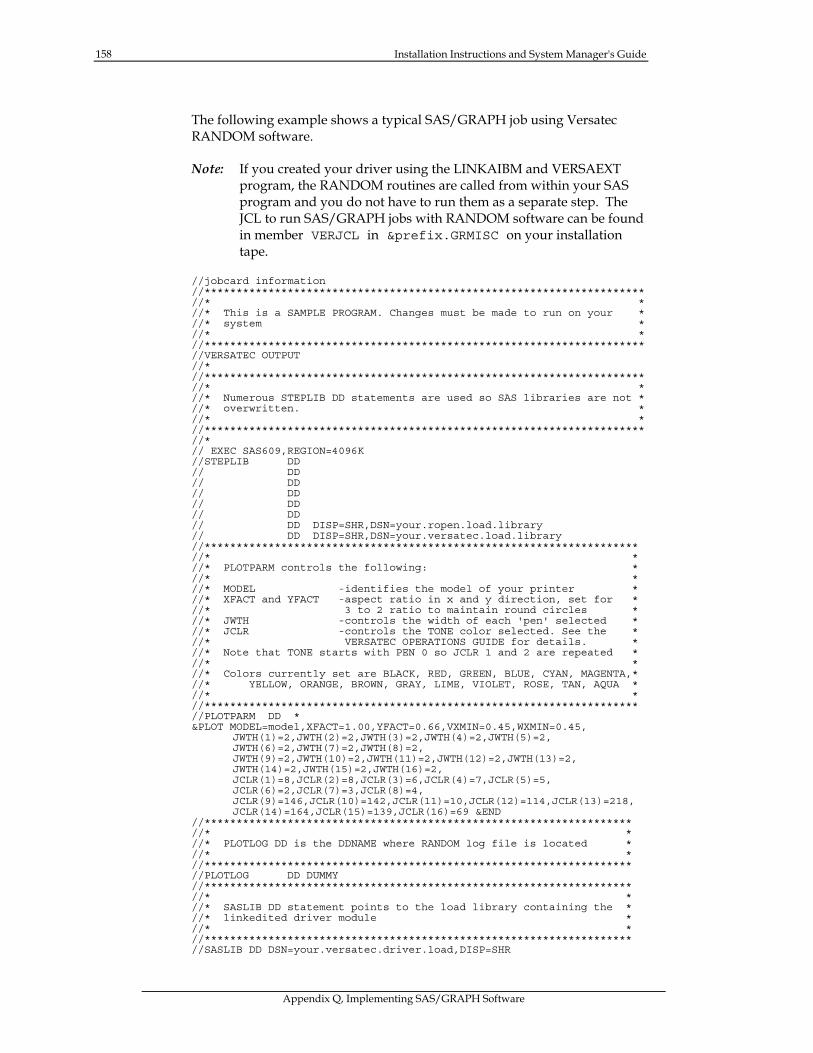
158 Installation Instructions and System Manager's Guide
Appendix Q, Implementing SAS/GRAPH Software
The following example shows a typical SAS/GRAPH job using Versatec RANDOM software.
Note: If you created your driver using the LINKAIBM and VERSAEXT program, the RANDOM routines are called from within your SAS program and you do not have to run them as a separate step. The JCL to run SAS/GRAPH jobs with RANDOM software can be found in member VERJCL in &prefix.GRMISC on your installation tape.
//jobcard information //********************************************************************* //* * //* This is a SAMPLE PROGRAM. Changes must be made to run on your * //* system * //* * //********************************************************************* //VERSATEC OUTPUT //* //********************************************************************* //* * //* Numerous STEPLIB DD statements are used so SAS libraries are not * //* overwritten. * //* * //********************************************************************* //* // EXEC SAS609,REGION=4096K //STEPLIB DD // DD // DD // DD // DD // DD // DD DISP=SHR,DSN=your.ropen.load.library // DD DISP=SHR,DSN=your.versatec.load.library //******************************************************************** //* * //* PLOTPARM controls the following: * //* * //* MODEL -identifies the model of your printer * //* XFACT and YFACT -aspect ratio in x and y direction, set for * //* 3 to 2 ratio to maintain round circles * //* JWTH -controls the width of each 'pen' selected * //* JCLR -controls the TONE color selected. See the * //* VERSATEC OPERATIONS GUIDE for details. * //* Note that TONE starts with PEN 0 so JCLR 1 and 2 are repeated * //* * //* Colors currently set are BLACK, RED, GREEN, BLUE, CYAN, MAGENTA,* //* YELLOW, ORANGE, BROWN, GRAY, LIME, VIOLET, ROSE, TAN, AQUA * //* * //******************************************************************** //PLOTPARM DD * &PLOT MODEL=model,XFACT=1.00,YFACT=0.66,VXMIN=0.45,WXMIN=0.45,
JWTH(1)=2,JWTH(2)=2,JWTH(3)=2,JWTH(4)=2,JWTH(5)=2, JWTH(6)=2,JWTH(7)=2,JWTH(8)=2, JWTH(9)=2,JWTH(10)=2,JWTH(11)=2,JWTH(12)=2,JWTH(13)=2, JWTH(14)=2,JWTH(15)=2,JWTH(16)=2, JCLR(1)=8,JCLR(2)=8,JCLR(3)=6,JCLR(4)=7,JCLR(5)=5, JCLR(6)=2,JCLR(7)=3,JCLR(8)=4, JCLR(9)=146,JCLR(10)=142,JCLR(11)=10,JCLR(12)=114,JCLR(13)=218, JCLR(14)=164,JCLR(15)=139,JCLR(16)=69 &END
//******************************************************************* //* * //* PLOTLOG DD is the DDNAME where RANDOM log file is located * //* * //******************************************************************* //PLOTLOG DD DUMMY //******************************************************************* //* * //* SASLIB DD statement points to the load library containing the * //* linkedited driver module * //* * //******************************************************************* //SASLIB DD DSN=your.versatec.driver.load,DISP=SHR
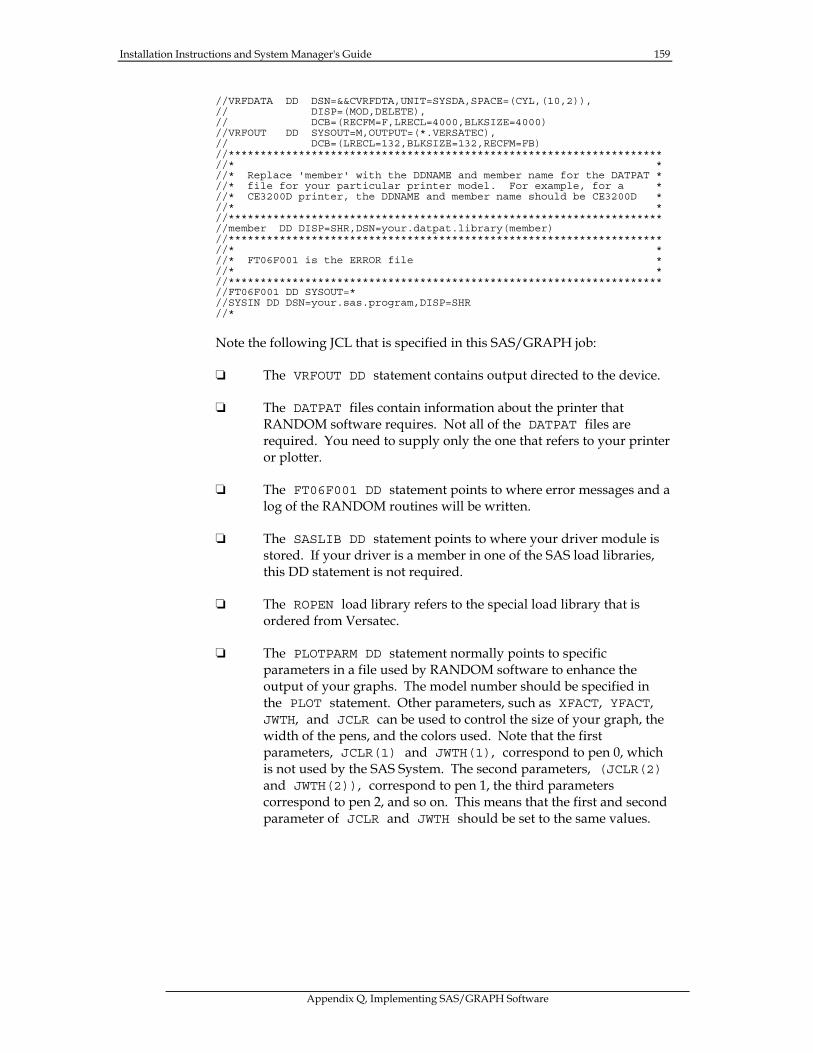
Installation Instructions and System Manager's Guide 159
Appendix Q, Implementing SAS/GRAPH Software
//VRFDATA DD DSN=&&CVRFDTA,UNIT=SYSDA,SPACE=(CYL,(10,2)), // DISP=(MOD,DELETE), // DCB=(RECFM=F,LRECL=4000,BLKSIZE=4000) //VRFOUT DD SYSOUT=M,OUTPUT=(*.VERSATEC), // DCB=(LRECL=132,BLKSIZE=132,RECFM=FB) //******************************************************************** //* * //* Replace 'member' with the DDNAME and member name for the DATPAT * //* file for your particular printer model. For example, for a * //* CE3200D printer, the DDNAME and member name should be CE3200D * //* * //******************************************************************** //member DD DISP=SHR,DSN=your.datpat.library(member) //******************************************************************** //* * //* FT06F001 is the ERROR file * //* * //******************************************************************** //FT06F001 DD SYSOUT=* //SYSIN DD DSN=your.sas.program,DISP=SHR //*
Note the following JCL that is specified in this SAS/GRAPH job:
❏ The VRFOUT DD statement contains output directed to the device.
❏ The DATPAT files contain information about the printer that RANDOM software requires. Not all of the DATPAT files are required. You need to supply only the one that refers to your printer or plotter.
❏ The FT06F001 DD statement points to where error messages and a log of the RANDOM routines will be written.
❏ The SASLIB DD statement points to where your driver module is stored. If your driver is a member in one of the SAS load libraries, this DD statement is not required.
❏ The ROPEN load library refers to the special load library that is ordered from Versatec.
❏ The PLOTPARM DD statement normally points to specific parameters in a file used by RANDOM software to enhance the output of your graphs. The model number should be specified in the PLOT statement. Other parameters, such as XFACT, YFACT, JWTH, and JCLR can be used to control the size of your graph, the width of the pens, and the colors used. Note that the first parameters, JCLR(1) and JWTH(1), correspond to pen 0, which is not used by the SAS System. The second parameters, (JCLR(2) and JWTH(2)), correspond to pen 1, the third parameters correspond to pen 2, and so on. This means that the first and second parameter of JCLR and JWTH should be set to the same values.
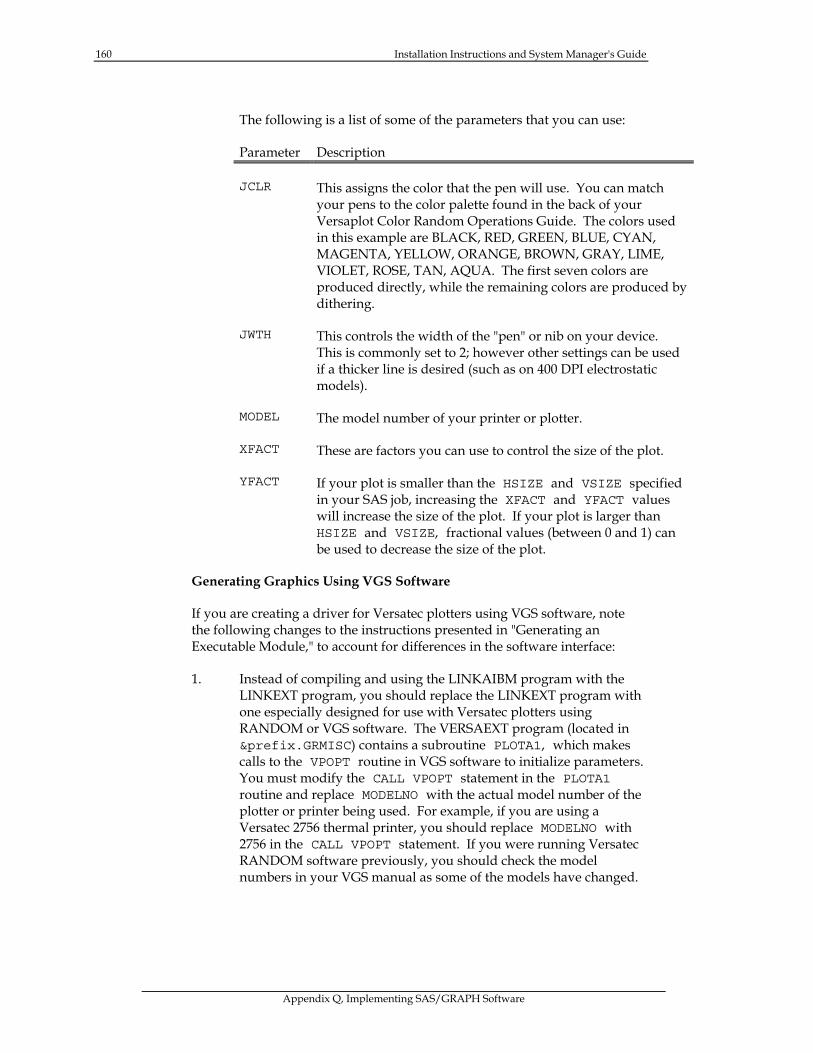
160 Installation Instructions and System Manager's Guide
Appendix Q, Implementing SAS/GRAPH Software
The following is a list of some of the parameters that you can use:
Parameter Description
JCLR This assigns the color that the pen will use. You can match your pens to the color palette found in the back of your Versaplot Color Random Operations Guide. The colors used in this example are BLACK, RED, GREEN, BLUE, CYAN, MAGENTA, YELLOW, ORANGE, BROWN, GRAY, LIME, VIOLET, ROSE, TAN, AQUA. The first seven colors are produced directly, while the remaining colors are produced by dithering.
JWTH This controls the width of the "pen" or nib on your device. This is commonly set to 2; however other settings can be used if a thicker line is desired (such as on 400 DPI electrostatic models).
MODEL The model number of your printer or plotter.
XFACT These are factors you can use to control the size of the plot.
YFACT If your plot is smaller than the HSIZE and VSIZE specified in your SAS job, increasing the XFACT and YFACT values will increase the size of the plot. If your plot is larger than HSIZE and VSIZE, fractional values (between 0 and 1) can be used to decrease the size of the plot.
Generating Graphics Using VGS Software
If you are creating a driver for Versatec plotters using VGS software, note the following changes to the instructions presented in "Generating an Executable Module," to account for differences in the software interface:
1. Instead of compiling and using the LINKAIBM program with the LINKEXT program, you should replace the LINKEXT program with one especially designed for use with Versatec plotters using RANDOM or VGS software. The VERSAEXT program (located in &prefix.GRMISC) contains a subroutine PLOTA1, which makes calls to the VPOPT routine in VGS software to initialize parameters. You must modify the CALL VPOPT statement in the PLOTA1 routine and replace MODELNO with the actual model number of the plotter or printer being used. For example, if you are using a Versatec 2756 thermal printer, you should replace MODELNO with 2756 in the CALL VPOPT statement. If you were running Versatec RANDOM software previously, you should check the model numbers in your VGS manual as some of the models have changed.
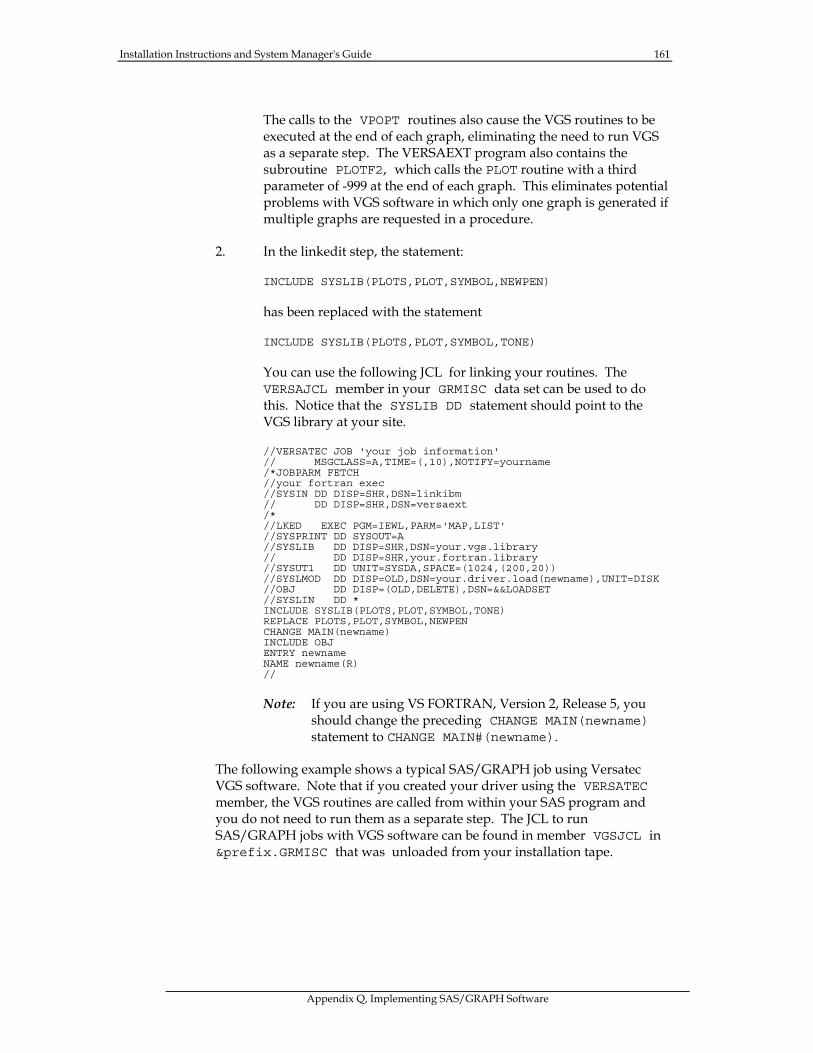
Installation Instructions and System Manager's Guide 161
Appendix Q, Implementing SAS/GRAPH Software
The calls to the VPOPT routines also cause the VGS routines to be executed at the end of each graph, eliminating the need to run VGS as a separate step. The VERSAEXT program also contains the subroutine PLOTF2, which calls the PLOT routine with a third parameter of -999 at the end of each graph. This eliminates potential problems with VGS software in which only one graph is generated if multiple graphs are requested in a procedure.
2. In the linkedit step, the statement:
INCLUDE SYSLIB(PLOTS,PLOT,SYMBOL,NEWPEN)
has been replaced with the statement
INCLUDE SYSLIB(PLOTS,PLOT,SYMBOL,TONE)
You can use the following JCL for linking your routines. The VERSAJCL member in your GRMISC data set can be used to do this. Notice that the SYSLIB DD statement should point to the VGS library at your site.
//VERSATEC JOB 'your job information' // MSGCLASS=A,TIME=(,10),NOTIFY=yourname /*JOBPARM FETCH //your fortran exec //SYSIN DD DISP=SHR,DSN=linkibm // DD DISP=SHR,DSN=versaext /* //LKED EXEC PGM=IEWL,PARM='MAP,LIST' //SYSPRINT DD SYSOUT=A //SYSLIB DD DISP=SHR,DSN=your.vgs.library // DD DISP=SHR,your.fortran.library //SYSUT1 DD UNIT=SYSDA,SPACE=(1024,(200,20)) //SYSLMOD DD DISP=OLD,DSN=your.driver.load(newname),UNIT=DISK //OBJ DD DISP=(OLD,DELETE),DSN=&&LOADSET //SYSLIN DD * INCLUDE SYSLIB(PLOTS,PLOT,SYMBOL,TONE) REPLACE PLOTS,PLOT,SYMBOL,NEWPEN CHANGE MAIN(newname) INCLUDE OBJ ENTRY newname NAME newname(R) //
Note: If you are using VS FORTRAN, Version 2, Release 5, you should change the preceding CHANGE MAIN(newname) statement to CHANGE MAIN#(newname).
The following example shows a typical SAS/GRAPH job using Versatec VGS software. Note that if you created your driver using the VERSATEC member, the VGS routines are called from within your SAS program and you do not need to run them as a separate step. The JCL to run SAS/GRAPH jobs with VGS software can be found in member VGSJCL in &prefix.GRMISC that was unloaded from your installation tape.
162 Installation Instructions and System Manager's Guide
Appendix Q, Implementing SAS/GRAPH Software
//jobcard information //****************************************************************** //* * //* This is a SAMPLE PROGRAM. Changes must be made to run on your * //* system * //* * //****************************************************************** //VERSATEC OUTPUT FORMS=PLOT //* // EXEC SAS609,REGION=4096K //STEPLIB DD // DD DISP=SHR,DSN=your.fortran.library // DD DISP=SHR,DSN=VTECVGS.VTxxxxxx.LINKLIB // DD DISP=SHR,DSN=VTECVGS.VTxxxxxx.IVPLIB //PLOTLOG DD DUMMY //SASLIB DD DISP=SHR,DSN=your.linked.library //****************************************************************** //* * //* VGS PARAMETER FILE (VGSPARM DD). * //* * //* THIS DATASET CONTROLS PEN SELECTIONS AND PENWIDTHS AND SHOULD * //* BE MODIFIED TO WORK WITH SAS GRAPH * //* * //****************************************************************** //VGSPARM DD DSN=yourid.VTECVGS.VTxxxxxx.DATALIB(VGSPARM), // DISP=SHR //****************************************************************** //* * //* VGS CONFIGURATION FILES (VGSCFXX). * //* * //* THE VGS INSTALLER SHOULD HAVE CUSTOMIZED THE DATA SETS BELOW TO* //* TEST THEM WITH THIS INSTALLATION VERIFICATION PROCEDURE (IVP).* //* * //* DEPENDING ON THE OUTPUT DRIVER USED IN THE VGS PARAMETER FILE * //* (VGSPARM DD), ONE OF THE VGS CONFIGURATION FILES WILL BE USED.* //* * //****************************************************************** //VGSCFRL DD DSN=VTECVGS.VTxxxxxx.DATALIB(RLCNFG),DISP=SHR //VGSCFRF DD DSN=VTECVGS.VTxxxxxx.DATALIB(RFCNFG),DISP=SHR //VGSCFBR DD DSN=VTECVGS.VTxxxxxx.DATALIB(BRCNFG),DISP=SHR //****************************************************************** //* * //* VGS FONTS FILE (VGSFONT DD). * //* VGS PLOTTER MODEL FILE (VGSMODL DD). * //* VGS OUTPUT DRIVER FILE (VGSDRVR DD). * //* * //****************************************************************** //VGSFONT DD DSN=VTECVGS.VTxxxxxx.FONTDATA,DISP=SHR //VGSMODL DD DSN=VTECVGS.VTxxxxxx.DATALIB(VGSMODL),DISP=SHR //VGSDRVR DD DSN=VTECVGS.VTxxxxxx.DATALIB(VGSDRVR),DISP=SHR //****************************************************************** //* * //* VGS COLOR DATA FILES (XXXXXXD). * //* * //* DEPENDING ON THE PLOTTER MODEL USED IN THE VGS PARAMETER FILE * //* (VGSPARM DD), ONE OF THE VGS COLOR DATA FILES WILL BE USED. * //* * //****************************************************************** //CE3200D DD DSN=VTECVGS.VTxxxxxx.DATALIB(CE3200D),DISP=SHR //CE3400D DD DSN=VTECVGS.VTxxxxxx.DATALIB(CE3400D),DISP=SHR //C2502D DD DSN=VTECVGS.VTxxxxxx.DATALIB(C2502D),DISP=SHR //C2508D DD DSN=VTECVGS.VTxxxxxx.DATALIB(C2508D),DISP=SHR //C2706AD DD DSN=VTECVGS.VTxxxxxx.DATALIB(C2706AD),DISP=SHR //C2706D DD DSN=VTECVGS.VTxxxxxx.DATALIB(C2706D),DISP=SHR //ECP42D DD DSN=VTECVGS.VTxxxxxx.DATALIB(ECP42D),DISP=SHR //M8800D DD DSN=VTECVGS.VTxxxxxx.DATALIB(M8800D),DISP=SHR //****************************************************************** //* * //* VGS PATTERN DATA FILES (XXXXXXP). * //* * //* DEPENDING ON THE PLOTTER MODEL USED IN THE VGS PARAMETER FILE * //* (VGSPARM DD), ONE OF THE VGS PATTERN DATA FILES WILL BE USED. * //* * //****************************************************************** //CE3200P DD DSN=VTECVGS.VTxxxxxx.DATALIB(CE3200P),DISP=SHR //CE3400P DD DSN=VTECVGS.VTxxxxxx.DATALIB(CE3400P),DISP=SHR //C2502P DD DSN=VTECVGS.VTxxxxxx.DATALIB(C2502P),DISP=SHR //C2508P DD DSN=VTECVGS.VTxxxxxx.DATALIB(C2508P),DISP=SHR //C2706P DD DSN=VTECVGS.VTxxxxxx.DATALIB(C2706P),DISP=SHR
Installation Instructions and System Manager's Guide 163
Appendix Q, Implementing SAS/GRAPH Software
//C2706AP DD DSN=VTECVGS.VTxxxxxx.DATALIB(C2706AP),DISP=SHR //ECP42P DD DSN=VTECVGS.VTxxxxxx.DATALIB(ECP42P),DISP=SHR //M8800P DD DSN=VTECVGS.VTxxxxxx.DATALIB(M8800P),DISP=SHR //****************************************************************** //* * //* VGS LOG FILE (FT06F001 DD). * //* VGS GRAPHICS DATA FILE (VGSPLOT DD). * //* VGS INTERMEDIATE FILE (VGSUT01 DD). * //* * //* NOTES : * //* * //* THE LISTING UNIT IN THE VGS PARAMETER FILE DETERMINES THE VGS * //* LOG FILE DDNAME (FTNNF001). FOR THIS VGSIVP PROCEDURE, USE THE* //* DEFAULT VALUE 6 FOR THE LISTING UNIT. * //* * //* FOR THE VGS GRAPHICS DATA FILE, THE LRECL AND BLKSIZE MUST BE * //* EVEN-NUMBERED AND MUST BE WITHIN THE FOLLOWING RANGES: * //* * //* LRECL RANGE : 00018 TO 32760 * //* BLKSIZE RANGE : 00018 TO 32760 * //* * //* FOR CHANNEL-ATTACHED VERSATEC GRAPHICS CONTROLLERS AND INTER- * //* FACE BOXES, THE LRECL OF THE VGS GRAPHICS DATA FILE SHOULD BE * //* THE SAME AS THE LRECL OF THE GRAPHICS CONTROLLER OR INTERFACE * //* BOX. * //* * //* CHECK WITH THE SYSTEM PROGRAMMER OF THE INSTALLATION SITE * //* ABOUT THE PLOTTER/CONTROLLER LRECL AND SYSOUT CLASS. * //* * //* FOR A DESCRIPTION OF THE GRAPHICS DATA ATTRIBUTES AND HOW IT * //* MAY BE ROUTED, SEE THE TOPIC, GRAPHICS DATA ATTRIBUTES, IN THE* //* IBM ENVIRONMENT CONSIDERATIONS SUBSECTION IN YOUR VGS MANUAL. * //* SYSOUT CLASS CHANGED TO M BY INSTALLER * //****************************************************************** //VGSPLOT DD SYSOUT=M,OUTPUT=(*.VERSATEC), // DCB=(LRECL=132,BLKSIZE=2640) //VGSUT01 DD UNIT=SYSDA, // SPACE=(TRK,(30,15)), // DISP=(MOD,PASS) //FT06F001 DD SYSOUT=* //SYSIN DD DSN=your.sas.program //*
Note the following JCL specified in this SAS/GRAPH job:
❏ The VGSPLOT DD statement contains output directed to the device.
❏ The VGSUT01 DD statement contains an intermediate file used by Versatec. The DISP= parameter should be set to (MOD,PASS).
❏ The pattern, model, and color data files contain information that VGS software requires. Not all of the files listed in this sample job are required. You need only supply the ones needed for your printer or plotter.
❏ The FT06F001 DD statement points to where error messages and a log of the VGS routines will be written.
❏ The SASLIB DD statement points to where your driver module is stored. If your driver is a member in one of your SAS load libraries, this DD statement is not required.
164 Installation Instructions and System Manager's Guide
Appendix Q, Implementing SAS/GRAPH Software
❏ The VGSPARM DD statement points to a file that can control specific parameters to enhance the output of your graphs. The model of your printer or plotter number should be specified in the VGSPARM statement. A VGSPARM file is shown in the following example. Other parameters, such as PEN_COLOR and PEN_WIDTH can be used to control the colors and width of "pens" used on your graph. Note that PEN_COLOR 0 and PEN_WIDTH 0 are not used by the SAS System.
The following is a list of some of the parameters you can use:
Parameter Description
PEN_COLOR This assigns the color that the pen will use. You can match your pens to colors found in the Versatec default color table found in the back of your VGS users guide. The colors used in this example are BLACK, RED, GREEN, BLUE, CYAN, MAGENTA, YELLOW, ORANGE, BROWN, GRAY, LIME, VIOLET, ROSE, LTBLUE, AQUA. The first seven colors are produced directly, while the remaining colors are produced by dithering.
PEN_WIDTH This controls the width of the "pen" or nib on your device. This is commonly set to 2; however other settings can be used if a thicker line is desired, (such as on 400 DPI electrostatic models).
MODEL The model number of your printer or plotter.
X_SCALE
Y_SCALE
These are the scaling factors used to control plot size. If your plot is smaller than the HSIZE and VSIZE values specified in your SAS job, increasing the X_SCALE and Y_SCALE values will increase size of the plot. If your plot is larger than HSIZE and VSIZE, fractional values (between 0 and 1) can be used to decrease the size of the plot. Normally Y_SCALE is set to 0.66, but other values can be used.
Installation Instructions and System Manager's Guide 165
Appendix Q, Implementing SAS/GRAPH Software
The following is an example of a typical SAS/GRAPH VGSPARM data set:
* VGS parameter file.
* OUTPUT_DRIVER and MODEL are required entries
OUTPUT_DRIVER RPM_VRF * RPM_VRF, RPM_VCGL, RASTER MODEL C2736 * See Appendix D
* of your VGS manual
* Optional entries are shown below, with acceptable values listed to the right.
* OPTIONAL ENTRIES ASSIGNED VALUE ACCEPTABLE VALUES * ================ ============== =================
* PAPER, VIEWPORT, and WINDOW defaults are based on a V80 model.
* PAPER 0.0 10.555 0.0 10.555
* >= 0.0
* VIEWPORT 0.0 10.555 0.0 10.555
* >= 0.0
* WINDOW 0.0 10.555 0.0 10.555
* Any Real Numbers
* COPIES 1 * >= 1 * DRAWING_MODE TRANSPARENT * TRANSPARENT, OPAQUE * END_JOB_CODE 999 * Not -2,-3,-12,-
13,2,3,12,13 * END_PLOT_CODE 1 999 * Not -2,-3,-12,-
13,2,3,12,13 * END_PLOT_CODE 2 -999 * Not -2,-3,-12,-
13,2,3,12,13 * END_PLOT_CODE 3 23 * Not -2,-3,-12,-
13,2,3,12,13 * END_PLOT_CODE 4 -23 * Not -2,-3,-12,-
13,2,3,12,13 * FONT 0 * >= 0 * GRAY_SCALE_LINES OFF * ON, OFF * INITIAL_PEN 1 * 0 to 63 * LISTING_UNIT 6 * 0 to 99 * OPTIONS_SUMMARY ON * ON, OFF *PEN_COLOR 0 1 * 1 to 4095 PEN_COLOR 1 8 * 1 to 4095 PEN_COLOR 2 6 * 1 to 4095 PEN_COLOR 3 7 * 1 to 4095 PEN_COLOR 4 5 * 1 to 4095 PEN_COLOR 5 2 * 1 to 4095 PEN_COLOR 6 3 * 1 to 4095 PEN_COLOR 7 4 * 1 to 4095 PEN_COLOR 8 146 * 1 to 4095 PEN_COLOR 9 142 * 1 to 4095 PEN_COLOR 10 10 * 1 to 4095 PEN_COLOR 11 114 * 1 to 4095 PEN_COLOR 12 218 * 1 to 4095 PEN_COLOR 13 164 * 1 to 4095 PEN_COLOR 14 60 * 1 to 4095 PEN_COLOR 15 69 * 1 to 4095 * * * . * * * . * * * . * PEN_COLOR 63 1 * 1 to 4095 * PEN_WIDTH 0 0 * 1 to 31 PEN_WIDTH 1 2 * 1 to 31 PEN_WIDTH 2 2 * 1 to 31 PEN_WIDTH 3 2 * 1 to 31 PEN_WIDTH 4 2 * 1 to 31 PEN_WIDTH 5 2 * 1 to 31 PEN_WIDTH 6 2 * 1 to 31 PEN_WIDTH 7 2 * 1 to 31 PEN_WIDTH 8 2 * 1 to 31 PEN_WIDTH 9 2 * 1 to 31 PEN_WIDTH 10 2 * 1 to 31 PEN_WIDTH 11 2 * 1 to 31
166 Installation Instructions and System Manager's Guide
Appendix Q, Implementing SAS/GRAPH Software
PEN_WIDTH 12 2 * 1 to 31 PEN_WIDTH 13 2 * 1 to 31 PEN_WIDTH 14 2 * 1 to 31 PEN_WIDTH 15 2 * 1 to 31 * * * . * * * . * * * . * PEN_WIDTH 31 31 * 1 to 31 * PEN_WIDTH 32 31 * 1 to 31 * * * . * * * . * * * . * PEN_WIDTH 63 31 * 1 to 31 * PLOT_IDENTIFIER OFF * ON, OFF * PLOT_STRIP 1 * >= 1 * PLOT_SUMMARY ON * ON, OFF * RESERVED_UNITS 49 54 * 0 to 99 * ROTATE OFF * ON, OFF * SCALE 1.00 * > 0.0 * TEXT_PRECISION STRING * STROKE, CHAR,
STRING * TONE_COLOR 1 * 1 to 4095 * TONE_FLAG HATCH * HATCH, TONE * UNITS 1.0 * > 0.0 * X_SCALE 1.0 * > 0.0 Y_SCALE 0.66 * > 0.0 * X_START 0.0 * Any Real Number * Y_START 0.0 * Any Real Number
Special Instructions for Xerox EPIC or XPPI Version 1.0 Users
Modifications to the Installation Process
If you are creating a driver for Xerox printers using EPIC Version 3.1 or higher or XPPI Version 1.0 software, you must make the following changes to the instructions in "Generating an Executable Module" to account for the differences in the software interface:
1. Install EPIC in SINGLE PHASE. This allows SAS/GRAPH and EPIC to generate graphics in a single step. Release 3.1 is the earliest release of EPIC that will run with SAS Software.
2. Instead of compiling and using the LINKAIBM program with the LINKEXT program, you should replace the LINKEXT program with one especially designed for use with Xerox printers using the EPIC interface. Use the members LINKAIBM and EPICEXT (located in &prefix.GRMISC) in the //FORT.SYSIN DD statement. The EPICEXT program contains a subroutine PLOTA1, which makes calls to the DJDE files in the EPIC software to initialize parameters.
The EPICEXT program also contains the subroutine PLOTC1, which calls the PLOT routine with a third parameter of -23 at the end of each graph. This eliminates potential problems with EPIC software in which only one graph is generated if multiple graphs are requested in a procedure.
Installation Instructions and System Manager's Guide 167
Appendix Q, Implementing SAS/GRAPH Software
The value for PIXELS in the LINKAIBM FORTRAN program should be changed from 200 to 300 dots per inch in subroutine INIDVR. You should increase the XPIXELS and YPIXELS values in your catalog driver entry using the GDEVICE procedure in order to create the correct sized graph. To calculate the number of pixels, use the following formula:
PIXELS = (XMAX or YMAX) x 300
You should also change the NEWPEN routine in the LINKAIBM FORTRAN program so that the NEWPEN routine remaps pen color 3 to pen color 4. This should be done because the width of pens 2 and 3 appear to be the same. This can be done by adding the following statement in the "SELECT COLOR" section of the LINKAIBM FORTRAN program just before the CALL NEWPEN(COLOR) statement.
IF (COLOR .EQ. 3) COLOR=4
3. The driver allows for three pen widths. You should set MAXCOLORS=4 and have three colors in your device driver entry. For example, if the colors list in the device entry has PEN1, PEN2, PEN3 for the colors specified, PEN1 is the thinnest pen and PEN3 is the thickest pen used.
You can use the following EPICJCL member located in &prefix.GRMISC for linking your routines:
//NEWEPIC1 JOB 'your job information' // MSGCLASS=A,TIME=(,10),NOTIFY=yourname /*JOBPARM FETCH //your fortran exec //SYSIN DD DISP=SHR,DSN=linkaibm // DD DISP=SHR,DSN=epicext /* //LKED EXEC PGM=IEWL,PARM='MAP,LIST' //SYSPRINT DD SYSOUT=A //SYSLIB DD DISP=SHR,DSN=your.epic.library // DD DISP=SHR,DSN=your.fortran.library //SYSUT1 DD UNIT=SYSDA,SPACE=(1024,(200,20)) //SYSLMOD DD DISP=OLD,DSN=your.driver.load(newname),UNIT=DISK //OBJ DD DISP=(OLD,DELETE),DSN=&&LOADSET //SYSLIN DD * INCLUDE SYSLIB(PLOTS,PLOT,SYMBOL,NEWPEN) REPLACE PLOTS,PLOT,SYMBOL,NEWPEN CHANGE MAIN(newname) INCLUDE OBJ ENTRY newname NAME newname(R) //
Note: If you are using VS FORTRAN Version 2 Release 5, the CHANGE MAIN(newname) statement above should be changed to CHANGE MAIN#(newname).
168 Installation Instructions and System Manager's Guide
Appendix Q, Implementing SAS/GRAPH Software
Generating Graphics Using EPIC or XPPI 1.0 Software
The following shows a typical SAS/GRAPH job using Xerox EPIC or XPPI 1.0 software. Note that if you created your driver using the LINKAIBM and EPICEXT FORTRAN programs, the EPIC routines are called from within your SAS program and you do not have to run them as a separate step. Source for the job can be found in member EPICJCL in &prefix.GRMISC on your installation tape.
The following is an example of a typical SAS/GRAPH job using EPIC or XPPI 1.0 software:
//jobcard information //****************************************************************** //* * //* This is a SAMPLE PROGRAM. Changes must be made to run on your * //* system * //* * //****************************************************************** //* //SASSTEP EXEC SAS6,REGION=4096K //STEPLIB DD // DD DISP=SHR,DSN=your.fortan.library // DD DISP=SHR,DSN=your.EPIC.single.phase.library //SASLIB DD DISP=SHR,DSN=your.linked.driver.library //****************************************************************** //* * //* FT05F001 is the namelist file that controls EPIC parameters * //* * //****************************************************************** //FT05F001 DD DSN=your.namelist.file,DISP=SHR //****************************************************************** //* * //* FT06F001 is the EPIC log file * //* * //****************************************************************** //FT06F001 DD SYSOUT=* //****************************************************************** //* * //* EPICITMP and EPICVECT are intermediate scratch files that * //* are used in the EPIC process * //* * //****************************************************************** //EPICITMP DD DSN=&&IMAGE,SPACE=(6144,(10,5)), // DCB=(BLKSIZE=6144,RECFM=FB), // UNIT=SYSDA,DISP=(,DELETE) //EPICVECT DD DSN=&&VECTORS,SPACE=(6144,(50,100)), // UNIT=SYSDA,DISP=(MOD,DELETE) //***************************************************************** //* * //* FT02F001 is the EPIC output file * //* * //***************************************************************** //FT02F001 DD SYSOUT=*,DCB=RECFM=UA //SYSIN DD DSN=your.sas.program,DISP=SHR //*
Note the following JCL specified in this SAS/GRAPH job:
❏ The FT02F001 DD statement contains the transportable output file that is normally sent to the device.
❏ The EPICVECT DD statement contains an intermediate file used by EPIC. The DISP= parameter should be set to (MOD,DELETE). This file normally will hold DJDE information and printer font text strings.

Installation Instructions and System Manager's Guide 169
Appendix Q, Implementing SAS/GRAPH Software
❏ The FT06F001 DD statement points to where error messages and a log from the EPIC routines will be written.
❏ The SASLIB DD statement points to where your SAS/GRAPH driver module is stored. If your driver module is a member in one of your SAS load libraries, this DD statement is not required.
❏ The FT07F001 DD statement normally points the FORTRAN logical unit IOMUN. It is only required if DJDE's or linemode data are read and merged between images on the transportable output file. It is rarely used with SAS/GRAPH output. Refer to your EPIC manual for details.
❏ The FT05F001 DD statement normally points to a file that can control specific parameters to enhance the output of your graphs. This is called the NAMELIST file. A sample file is listed below:
&EPIC IMGDSP=3,MSGLVD=1,IFNTXD=-2,MGDJDE=0,DPRESO=300,
DBRUSH=0.003333 &END
The following is a list of some of the parameters that you can use:
Parameter Default Description
DBRUSH 0.003333 Controls the width of the pen that will be used.
DPRESO 300 Controls the resolution in dots per inch on your device.
IMGDSP 1 The recommended value is 3.
Sets the characteristics of the transportable data set. Setting the value to 3 produces on-line I/O.
IFNTXD -2
This controls the processing of printer fonts. Setting the value to -2 means the printer fonts are not used.
MSGLVD 1 Possible values for this parameter are:
This controls what is written to your FT06F001 file. The value supplied is the SUM of specific options requested; for example, a value of 5 causes the IMAGE SUMMARY and NAMELIST data to print. This can be useful in debugging problems in your graphics jobs.
0 Print only error messages
1 Print image summary information
2 Print detailed information from XPPI
4 Print NAMELIST parameter data
8 List fonts definition file
16 List clipped/undrawable vectors
32 List user level calls
170 Installation Instructions and System Manager's Guide
Appendix Q, Implementing SAS/GRAPH Software
Special Instructions for Xerox XPPI Version 1.1 Users
Modifications to the Installation Process
If you are creating a driver for Xerox printers using XPPI Version 1.1 software, you must make the following changes to the instructions in "Generating an Executable Module" account for the following differences in the software interface:
Note: If you are running XPPI Version 2 or later, contact the SAS Technical Support Division for details.
1. You should install XPPI in SINGLE PHASE. This allows SAS/GRAPH and XPPI to generate graphics in a single step. Release 1.1 is the earliest release of XPPI that will run with SAS/GRAPH software and generate color scaling. If you are using Release 1.0, follow the instructions on building a Linkable driver with EPIC software. These instructions are given in the previous section.
2. Combine the members LINKAIBM and EPICEXT (found in &prefix.GRMISC), and name the combined program NEWXPPI1.
3. The EPICEXT program adds the following subroutines to the LINKAIBM FORTRAN program. The subroutine PLOTA1 is used to initialize the XPPI namelist parameter file and the DJDE file before each graphics procedure. The subroutine PLOTC1 is used to call the PLOT routine with a third parameter of -23 at the end of each graph. This eliminates potential problems with XPPI software in which only one graph is generated if multiple graphs are requested in a procedure.
4. Change the statement PIXELS=200. to read PIXELS=300. in the NEWXPPI1 program. This statement is in the section titled "PREVIOUS USER 'ZAPPABLE' VALUES." This change causes the driver to produce output at 300 dots per inch. You should also increase the XPIXELS and YPIXELS values in the device driver entry using the GDEVICE procedure in order to create correctly sized graphs. See "Customizing Device Characteristics" for more details.
5. Change the statement CALL NEWPEN(COLOR) to read CALL COLPEN(COLOR) in the NEWXPPI1 program. This statement is in the section titled "SELECT COLOR." This change causes the driver to make a call to the correct XPPI routine, which selects color or gray shades.
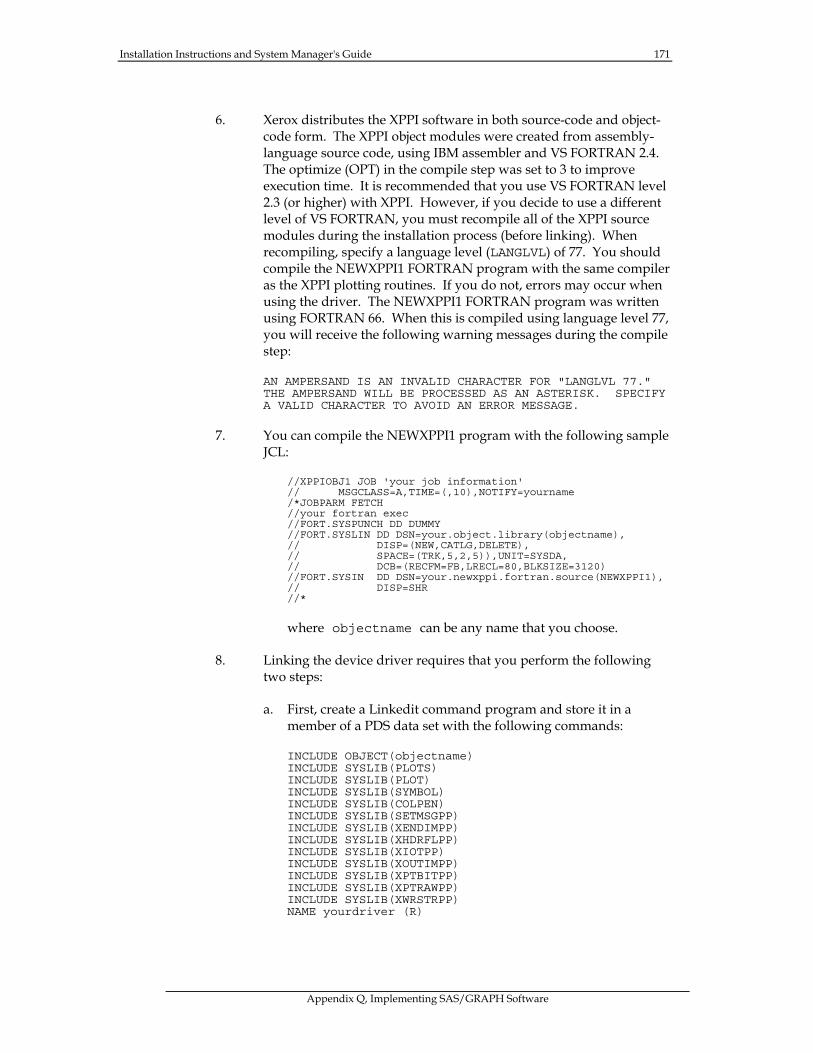
Installation Instructions and System Manager's Guide 171
Appendix Q, Implementing SAS/GRAPH Software
6. Xerox distributes the XPPI software in both source-code and object-code form. The XPPI object modules were created from assembly-language source code, using IBM assembler and VS FORTRAN 2.4. The optimize (OPT) in the compile step was set to 3 to improve execution time. It is recommended that you use VS FORTRAN level 2.3 (or higher) with XPPI. However, if you decide to use a different level of VS FORTRAN, you must recompile all of the XPPI source modules during the installation process (before linking). When recompiling, specify a language level (LANGLVL) of 77. You should compile the NEWXPPI1 FORTRAN program with the same compiler as the XPPI plotting routines. If you do not, errors may occur when using the driver. The NEWXPPI1 FORTRAN program was written using FORTRAN 66. When this is compiled using language level 77, you will receive the following warning messages during the compile step:
AN AMPERSAND IS AN INVALID CHARACTER FOR "LANGLVL 77." THE AMPERSAND WILL BE PROCESSED AS AN ASTERISK. SPECIFY A VALID CHARACTER TO AVOID AN ERROR MESSAGE.
7. You can compile the NEWXPPI1 program with the following sample JCL:
//XPPIOBJ1 JOB 'your job information' // MSGCLASS=A,TIME=(,10),NOTIFY=yourname /*JOBPARM FETCH //your fortran exec //FORT.SYSPUNCH DD DUMMY //FORT.SYSLIN DD DSN=your.object.library(objectname), // DISP=(NEW,CATLG,DELETE), // SPACE=(TRK,5,2,5)),UNIT=SYSDA, // DCB=(RECFM=FB,LRECL=80,BLKSIZE=3120) //FORT.SYSIN DD DSN=your.newxppi.fortran.source(NEWXPPI1), // DISP=SHR //*
where objectname can be any name that you choose.
8. Linking the device driver requires that you perform the following two steps:
a. First, create a Linkedit command program and store it in a member of a PDS data set with the following commands:
INCLUDE OBJECT(objectname) INCLUDE SYSLIB(PLOTS) INCLUDE SYSLIB(PLOT) INCLUDE SYSLIB(SYMBOL) INCLUDE SYSLIB(COLPEN) INCLUDE SYSLIB(SETMSGPP) INCLUDE SYSLIB(XENDIMPP) INCLUDE SYSLIB(XHDRFLPP) INCLUDE SYSLIB(XIOTPP) INCLUDE SYSLIB(XOUTIMPP) INCLUDE SYSLIB(XPTBITPP) INCLUDE SYSLIB(XPTRAWPP) INCLUDE SYSLIB(XWRSTRPP) NAME yourdriver (R)
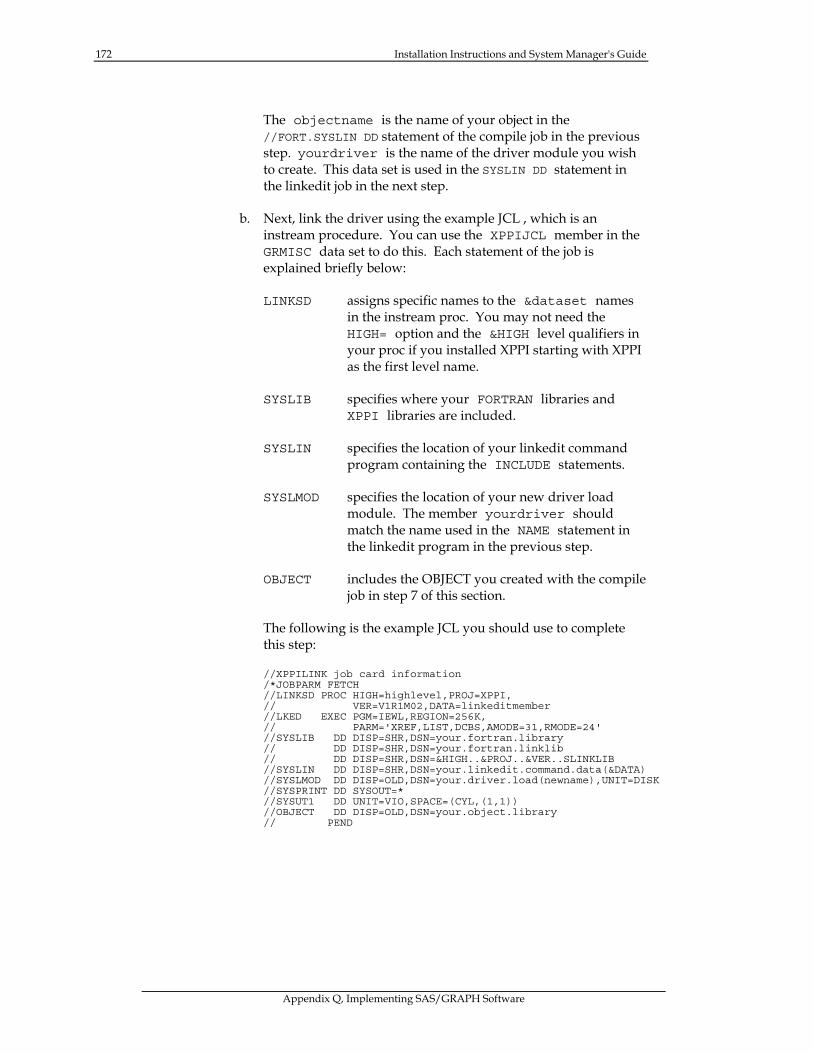
172 Installation Instructions and System Manager's Guide
Appendix Q, Implementing SAS/GRAPH Software
The objectname is the name of your object in the //FORT.SYSLIN DD statement of the compile job in the previous step. yourdriver is the name of the driver module you wish to create. This data set is used in the SYSLIN DD statement in the linkedit job in the next step.
b. Next, link the driver using the example JCL , which is an instream procedure. You can use the XPPIJCL member in the GRMISC data set to do this. Each statement of the job is explained briefly below:
LINKSD assigns specific names to the &dataset names in the instream proc. You may not need the HIGH= option and the &HIGH level qualifiers in your proc if you installed XPPI starting with XPPI as the first level name.
SYSLIB specifies where your FORTRAN libraries and XPPI libraries are included.
SYSLIN specifies the location of your linkedit command program containing the INCLUDE statements.
SYSLMOD specifies the location of your new driver load module. The member yourdriver should match the name used in the NAME statement in the linkedit program in the previous step.
OBJECT includes the OBJECT you created with the compile job in step 7 of this section.
The following is the example JCL you should use to complete this step:
//XPPILINK job card information /*JOBPARM FETCH //LINKSD PROC HIGH=highlevel,PROJ=XPPI, // VER=V1R1M02,DATA=linkeditmember //LKED EXEC PGM=IEWL,REGION=256K, // PARM='XREF,LIST,DCBS,AMODE=31,RMODE=24' //SYSLIB DD DISP=SHR,DSN=your.fortran.library // DD DISP=SHR,DSN=your.fortran.linklib // DD DISP=SHR,DSN=&HIGH..&PROJ..&VER..SLINKLIB //SYSLIN DD DISP=SHR,DSN=your.linkedit.command.data(&DATA) //SYSLMOD DD DISP=OLD,DSN=your.driver.load(newname),UNIT=DISK //SYSPRINT DD SYSOUT=* //SYSUT1 DD UNIT=VIO,SPACE=(CYL,(1,1)) //OBJECT DD DISP=OLD,DSN=your.object.library // PEND

Installation Instructions and System Manager's Guide 173
Appendix Q, Implementing SAS/GRAPH Software
Generating Graphics Using XPPI Version 1.1 Software
The following examples show a typical SAS/GRAPH job using Xerox XPPI software. Note that if you created your driver using the NEWXPPI1 FORTRAN program, and you have a large centralized printer that is channel attached (such as a 9700 or HIGHLIGHT printer) the XPPI routines are called from within your SAS program and you do not have to run them as a separate step. If you have a decentralized printer that is defined to the host as a 3287 or 3780 remote (such as a 3700 or 4045 printer) you must run the COPYIMG program as a separate step. An explanation of the JCL follows the sample programs. Source for these jobs can be found in member XPPICENT (for centralized printers) or member XPPIDEC (for decentralized printers) in &prefix.GRMISC on your installation tape.
The following is an example of a typical SAS/GRAPH job using XPPI software for Centralized printers:
//jobcard information //XPPISAS PROC HIGH=yourhighlevel,PROJ=XPPI,VER=V1R1M02, // NLIST=COLGFXW,NLDSN=NAMELIST,PCNTL=STD, // PALETTE=HILIGHT,FONT=A03,ENTRY=yourentry, // SAS=yoursasprogramname, // PRODFIX='your.sas.high.level', // CONFIG=NULLFILE,OPTIONS=,WORK='500,200' //SAS608 EXEC PGM=&ENTRY,PARM='&OPTIONS',REGION=4096K //STEPLIB DD DISP=SHR,DSN=&PRODFIX..LIBRARY // DD DISP=SHR,DSN=your.fortan.library // DD DISP=SHR,DSN=your.fortan.load //CONFIG DD DISP=SHR,DSN=&PRODFIX..CNTL(BATCHXA) // DD DISP=SHR,DSN=&CONFIG //WORK DD UNIT=SYSDA,SPACE=(6144,(&WORK),,,ROUND), // DCB=(RECFM=FS,,DSORG=PS,LRECL=6144,BLKSIZE=6144) //SASHELP DD DISP=SHR,DSN=&PRODFIX..SASHELP //SASMSG DD DISP=SHR,DSN=&PRODFIX..SASMSG //SASLOG DD SYSOUT=* //SASLIST DD SYSOUT=* //SASPARM DD UNIT=SYSDA,SPACE=(400,(100,300)), // DCB=(RECFM=FB,LRECL=80,BLKSIZE=400,BUFNO=1) //SASLIB DD DISP=SHR,DSN=your.new.xppi.module.LOAD //FT02F001 DD SYSOUT=X,DCB=RECFM=UA //FT04F001 DD DISP=SHR,DSN=&HIGH..&PROJ..&VER..FONTS(&FONT) //FT05F001 DD DISP=SHR,DSN=&HIGH..&PROJ..&VER..&NLDSN(&NLIST) //FT06F001 DD SYSOUT=* //FT07F001 DD DISP=SHR,DSN=&HIGH..&PROJ..&VER..PTRCNTL(&PCNTL) //FT10F001 DD DISP=SHR,DSN=&HIGH..&PROJ..&VER..PALETTES(&PALETTE) //MAPS DD DISP=SHR,DSN=&PRODFIX..MAPS //XPPIVECT DD DSN=&&VECTORS,SPACE=(6144,(50,100)), // UNIT=VIO,DISP=(MOD,DELETE) //IMGTMP DD DSN=&&IMAGE,SPACE=(6144,(50,100)), // DCB=(BLKSIZE=6144,RECFM=FB), // UNIT=VIO,DISP=(,DELETE) //SYSIN DD DISP=SHR,DSN=&HIGH..&PROJ..&VER..SASPGMS(&SAS) // PEND //* //STEP1 EXEC XPPISAS
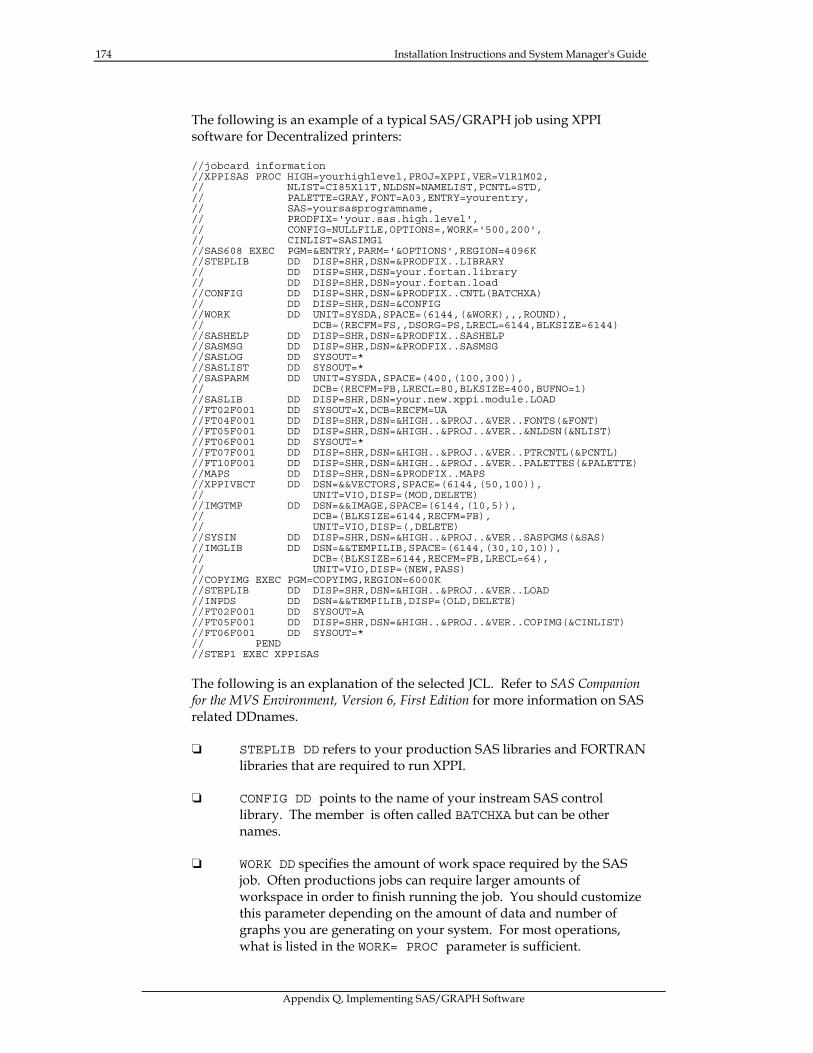
174 Installation Instructions and System Manager's Guide
Appendix Q, Implementing SAS/GRAPH Software
The following is an example of a typical SAS/GRAPH job using XPPI software for Decentralized printers:
//jobcard information //XPPISAS PROC HIGH=yourhighlevel,PROJ=XPPI,VER=V1R1M02, // NLIST=CI85X11T,NLDSN=NAMELIST,PCNTL=STD, // PALETTE=GRAY,FONT=A03,ENTRY=yourentry, // SAS=yoursasprogramname, // PRODFIX='your.sas.high.level', // CONFIG=NULLFILE,OPTIONS=,WORK='500,200', // CINLIST=SASIMG1 //SAS608 EXEC PGM=&ENTRY,PARM='&OPTIONS',REGION=4096K //STEPLIB DD DISP=SHR,DSN=&PRODFIX..LIBRARY // DD DISP=SHR,DSN=your.fortan.library // DD DISP=SHR,DSN=your.fortan.load //CONFIG DD DISP=SHR,DSN=&PRODFIX..CNTL(BATCHXA) // DD DISP=SHR,DSN=&CONFIG //WORK DD UNIT=SYSDA,SPACE=(6144,(&WORK),,,ROUND), // DCB=(RECFM=FS,,DSORG=PS,LRECL=6144,BLKSIZE=6144) //SASHELP DD DISP=SHR,DSN=&PRODFIX..SASHELP //SASMSG DD DISP=SHR,DSN=&PRODFIX..SASMSG //SASLOG DD SYSOUT=* //SASLIST DD SYSOUT=* //SASPARM DD UNIT=SYSDA,SPACE=(400,(100,300)), // DCB=(RECFM=FB,LRECL=80,BLKSIZE=400,BUFNO=1) //SASLIB DD DISP=SHR,DSN=your.new.xppi.module.LOAD //FT02F001 DD SYSOUT=X,DCB=RECFM=UA //FT04F001 DD DISP=SHR,DSN=&HIGH..&PROJ..&VER..FONTS(&FONT) //FT05F001 DD DISP=SHR,DSN=&HIGH..&PROJ..&VER..&NLDSN(&NLIST) //FT06F001 DD SYSOUT=* //FT07F001 DD DISP=SHR,DSN=&HIGH..&PROJ..&VER..PTRCNTL(&PCNTL) //FT10F001 DD DISP=SHR,DSN=&HIGH..&PROJ..&VER..PALETTES(&PALETTE) //MAPS DD DISP=SHR,DSN=&PRODFIX..MAPS //XPPIVECT DD DSN=&&VECTORS,SPACE=(6144,(50,100)), // UNIT=VIO,DISP=(MOD,DELETE) //IMGTMP DD DSN=&&IMAGE,SPACE=(6144,(10,5)), // DCB=(BLKSIZE=6144,RECFM=FB), // UNIT=VIO,DISP=(,DELETE) //SYSIN DD DISP=SHR,DSN=&HIGH..&PROJ..&VER..SASPGMS(&SAS) //IMGLIB DD DSN=&&TEMPILIB,SPACE=(6144,(30,10,10)), // DCB=(BLKSIZE=6144,RECFM=FB,LRECL=64), // UNIT=VIO,DISP=(NEW,PASS) //COPYIMG EXEC PGM=COPYIMG,REGION=6000K //STEPLIB DD DISP=SHR,DSN=&HIGH..&PROJ..&VER..LOAD //INPDS DD DSN=&&TEMPILIB,DISP=(OLD,DELETE) //FT02F001 DD SYSOUT=A //FT05F001 DD DISP=SHR,DSN=&HIGH..&PROJ..&VER..COPIMG(&CINLIST) //FT06F001 DD SYSOUT=* // PEND //STEP1 EXEC XPPISAS
The following is an explanation of the selected JCL. Refer to SAS Companion for the MVS Environment, Version 6, First Edition for more information on SAS related DDnames.
❏ STEPLIB DD refers to your production SAS libraries and FORTRAN libraries that are required to run XPPI.
❏ CONFIG DD points to the name of your instream SAS control library. The member is often called BATCHXA but can be other names.
❏ WORK DD specifies the amount of work space required by the SAS job. Often productions jobs can require larger amounts of workspace in order to finish running the job. You should customize this parameter depending on the amount of data and number of graphs you are generating on your system. For most operations, what is listed in the WORK= PROC parameter is sufficient.
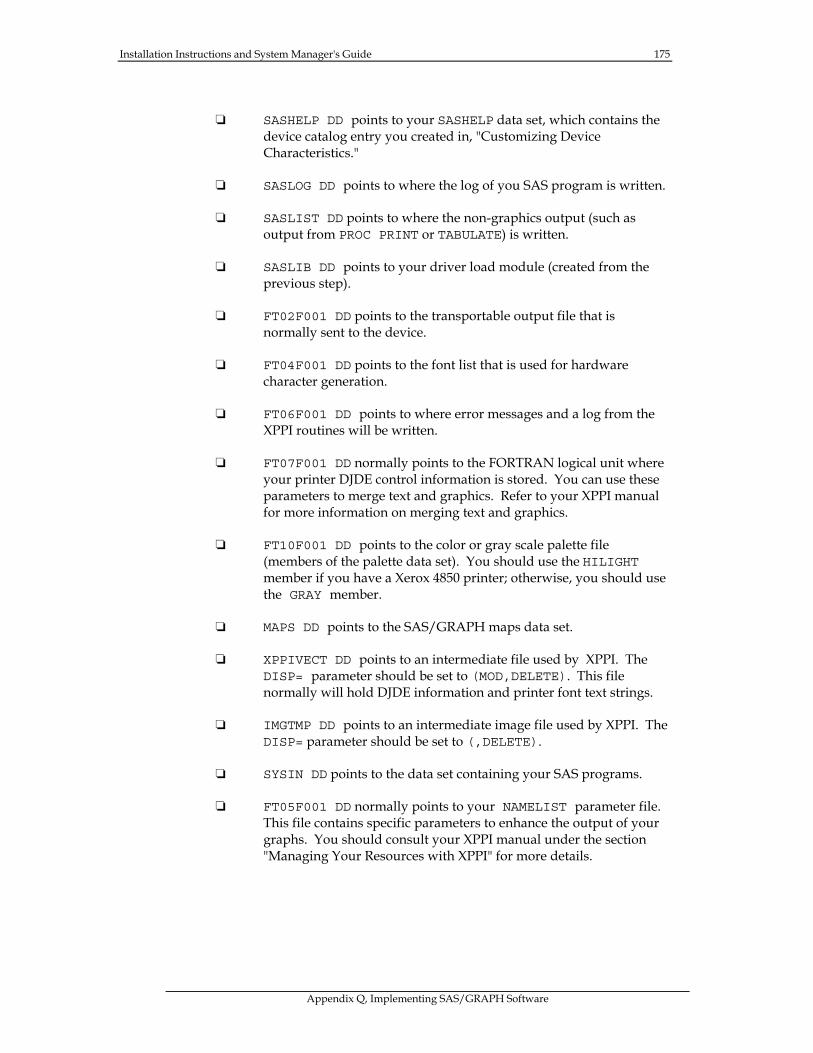
Installation Instructions and System Manager's Guide 175
Appendix Q, Implementing SAS/GRAPH Software
❏ SASHELP DD points to your SASHELP data set, which contains the device catalog entry you created in, "Customizing Device Characteristics."
❏ SASLOG DD points to where the log of you SAS program is written.
❏ SASLIST DD points to where the non-graphics output (such as output from PROC PRINT or TABULATE) is written.
❏ SASLIB DD points to your driver load module (created from the previous step).
❏ FT02F001 DD points to the transportable output file that is normally sent to the device.
❏ FT04F001 DD points to the font list that is used for hardware character generation.
❏ FT06F001 DD points to where error messages and a log from the XPPI routines will be written.
❏ FT07F001 DD normally points to the FORTRAN logical unit where your printer DJDE control information is stored. You can use these parameters to merge text and graphics. Refer to your XPPI manual for more information on merging text and graphics.
❏ FT10F001 DD points to the color or gray scale palette file (members of the palette data set). You should use the HILIGHT member if you have a Xerox 4850 printer; otherwise, you should use the GRAY member.
❏ MAPS DD points to the SAS/GRAPH maps data set.
❏ XPPIVECT DD points to an intermediate file used by XPPI. The DISP= parameter should be set to (MOD,DELETE). This file normally will hold DJDE information and printer font text strings.
❏ IMGTMP DD points to an intermediate image file used by XPPI. The DISP= parameter should be set to (,DELETE).
❏ SYSIN DD points to the data set containing your SAS programs.
❏ FT05F001 DD normally points to your NAMELIST parameter file. This file contains specific parameters to enhance the output of your graphs. You should consult your XPPI manual under the section "Managing Your Resources with XPPI" for more details.
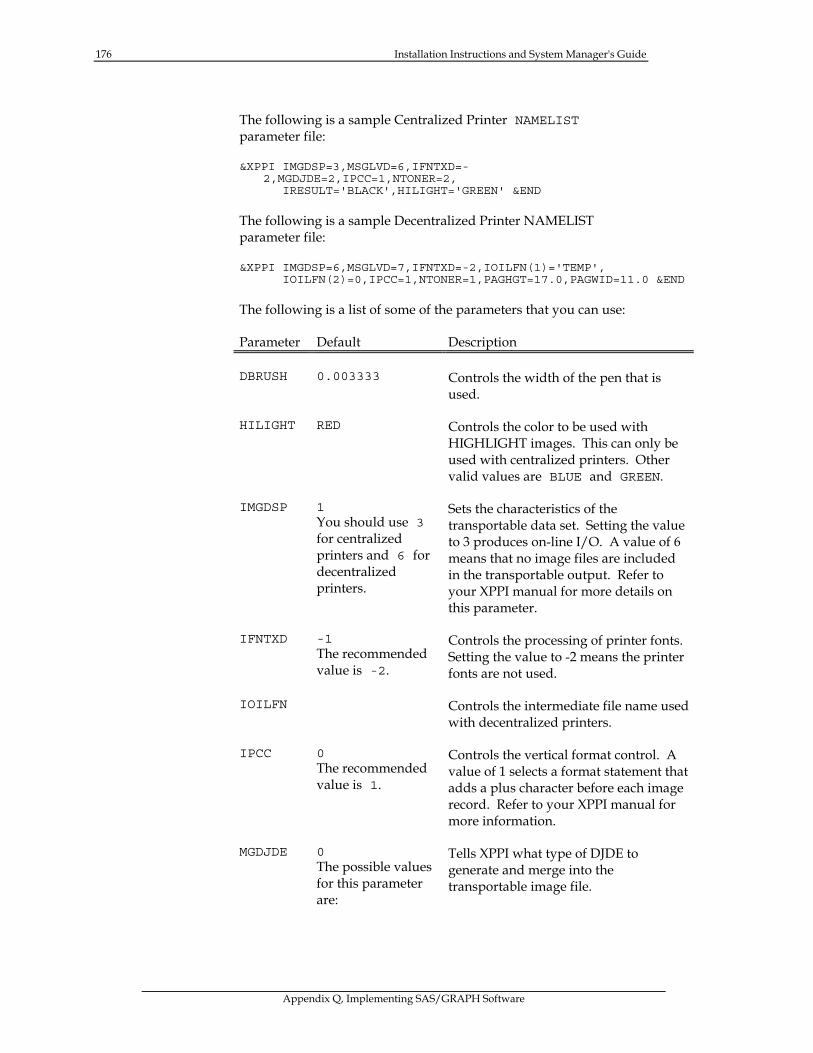
176 Installation Instructions and System Manager's Guide
Appendix Q, Implementing SAS/GRAPH Software
The following is a sample Centralized Printer NAMELIST parameter file:
&XPPI IMGDSP=3,MSGLVD=6,IFNTXD=- 2,MGDJDE=2,IPCC=1,NTONER=2,
IRESULT='BLACK',HILIGHT='GREEN' &END
The following is a sample Decentralized Printer NAMELIST parameter file:
&XPPI IMGDSP=6,MSGLVD=7,IFNTXD=-2,IOILFN(1)='TEMP', IOILFN(2)=0,IPCC=1,NTONER=1,PAGHGT=17.0,PAGWID=11.0 &END
The following is a list of some of the parameters that you can use:
Parameter Default Description
DBRUSH 0.003333 Controls the width of the pen that is used.
HILIGHT RED Controls the color to be used with HIGHLIGHT images. This can only be used with centralized printers. Other valid values are BLUE and GREEN.
IMGDSP 1 You should use 3 for centralized printers and 6 for decentralized printers.
Sets the characteristics of the transportable data set. Setting the value to 3 produces on-line I/O. A value of 6 means that no image files are included in the transportable output. Refer to your XPPI manual for more details on this parameter.
IFNTXD -1 The recommended value is -2.
Controls the processing of printer fonts. Setting the value to -2 means the printer fonts are not used.
IOILFN Controls the intermediate file name used with decentralized printers.
IPCC 0 The recommended value is 1.
Controls the vertical format control. A value of 1 selects a format statement that adds a plus character before each image record. Refer to your XPPI manual for more information.
MGDJDE 0 The possible values for this parameter are:
Tells XPPI what type of DJDE to generate and merge into the transportable image file.
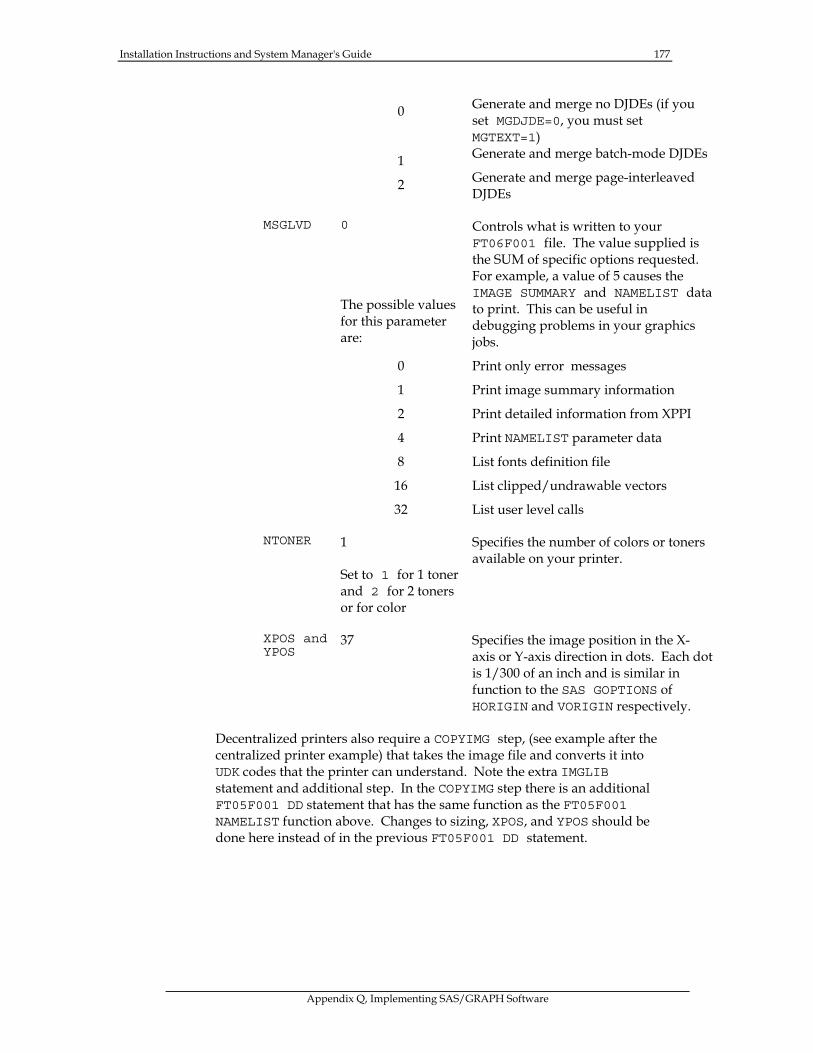
Installation Instructions and System Manager's Guide 177
Appendix Q, Implementing SAS/GRAPH Software
0 Generate and merge no DJDEs (if you set MGDJDE=0, you must set MGTEXT=1)
1 Generate and merge batch-mode DJDEs
2 Generate and merge page-interleaved DJDEs
MSGLVD 0
The possible values for this parameter are:
Controls what is written to your FT06F001 file. The value supplied is the SUM of specific options requested. For example, a value of 5 causes the IMAGE SUMMARY and NAMELIST data to print. This can be useful in debugging problems in your graphics jobs.
0 Print only error messages
1 Print image summary information
2 Print detailed information from XPPI
4 Print NAMELIST parameter data
8 List fonts definition file
16 List clipped/undrawable vectors
32 List user level calls
NTONER 1
Set to 1 for 1 toner and 2 for 2 toners or for color
Specifies the number of colors or toners available on your printer.
XPOS and YPOS
37 Specifies the image position in the X-axis or Y-axis direction in dots. Each dot is 1/300 of an inch and is similar in function to the SAS GOPTIONS of HORIGIN and VORIGIN respectively.
Decentralized printers also require a COPYIMG step, (see example after the centralized printer example) that takes the image file and converts it into UDK codes that the printer can understand. Note the extra IMGLIB statement and additional step. In the COPYIMG step there is an additional FT05F001 DD statement that has the same function as the FT05F001 NAMELIST function above. Changes to sizing, XPOS, and YPOS should be done here instead of in the previous FT05F001 DD statement.
178 Installation Instructions and System Manager's Guide
Appendix Q, Implementing SAS/GRAPH Software
Common Problems and Solutions
This section describes some problems you may encounter when installing or trying to use the Linkable driver. If you have any problems, please check the following list of problems and solutions before calling SAS Institute.
PROBLEM:
If the driver always produces an ABEND when executed, check the following possibilities:
SOLUTION:
First, look at the listing from the linkedit that created the driver. Make sure the LET option is not specified in the linkedit step. All external references must be resolved when the driver is linked. If the LET option appears, rerun the LKED step without specifying LET and make sure there were no unresolved references.
Make sure you have provided all the necessary allocations required by your plotting subroutines prior to execution of the driver. Generally, any file allocations required when you use these routines in a FORTRAN program would also be necessary when the LINKABLE driver is executed. This includes the driver output file (usually FT14F001) and a file for FORTRAN error messages (FT03F001 or FT06F001 depending on your FORTRAN installation). If the required logical names are not available, the driver will produce an ABEND.
PROBLEM:
IEW0132 messages appear on the LINKEDIT step for VFEIM# and other VF modules when using VS FORTRAN.
SOLUTION:
Make sure that all of the FORTRAN libraries are available when linking the driver. VS FORTRAN has several libraries that can be concatenated in your SYSLIB DD statement in the linkedit step.
PROBLEM:
Portions of a graph are missing when the Linkable driver is used with a plotter with only one pen.
SOLUTION:
The Linkable driver assumes that there are four pens available. If the SAS/GRAPH System tries to use multiple colors and there is only one pen available, anything using a color other than the first default color may not be drawn. To circumvent this, use the GDEVICE procedure to change the MAXCOLORS value in the device entry to 2.
Installation Instructions and System Manager's Guide 179
Appendix Q, Implementing SAS/GRAPH Software
PROBLEM:
Multiple graphics procedures are invoked, but only output from the first or last one comes out.
SOLUTION:
If output is written to a file, specify DISP=MOD. Even this may not suffice for some rare plotter control units that refuse to go past the first 999 record they encounter. Each graphics procedure causes another 999 record to be written as the procedure is terminating. If your plotter does not read past the 999 record for additional plots, you may be able to modify the plotter subroutines so that the 999 record is not written as a 999 record, but rather as a 3 record (see Ipen values for subroutine PLOT). You then invoke a special procedure at the end of your SAS step that would add a 999 record to the end of the plot file.
An alternative solution is to specify the GOUT= option on each procedure so that the output from each procedure is stored in a graphics catalog but not plotted. Then at the end of the job, use PROC GREPLAY to produce the plotting commands in one plot file. The call to PLOT (0, 0, 999) is only made when the procedure is terminated.
PROBLEM:
IFYVLBCM messages are received when using the driver if VS FORTRAN is used.
SOLUTION:
Some releases of FORTRAN require that the FORTRAN runtime library be available. This library should be added to your STEPLIB concatenation in your LOGON PROC or in your JCL.
PROBLEM:
IEY0081 OR IGY0081 ALLOCATION errors received when compiling the LINKAIBM FORTRAN program if using the FORTRAN G compiler.
SOLUTION:
Compile the program with a newer version of FORTRAN compiler. The FORTRAN G compiler cannot handle this type of logic.
180 Installation Instructions and System Manager's Guide
Appendix Q, Implementing SAS/GRAPH Software
PROBLEM:
DEVICE INITIALIZATION FAILED error messages are received when using the LINKABLE driver.
SOLUTION:
A device catalog entry has not been created as described in "Customizing Device Characteristics", or a LIBNAME GDEVICE0 statement is needed if you created your own personal catalog.
Using SAS/GRAPH Software with IBM 3270-Type Terminals and 3270 Emulators
This section describes the steps necessary to use SAS/GRAPH software with IBM 3270-type graphics terminals and emulators.
Note: You do not need GDDM to use SAS/GRAPH software with IBM 3270-type graphics terminals. However, a GDDM device driver is required when using an IEEE-attached pen plotter or when creating GDF and ADMGDF files. For more information on the SAS/GRAPH interface to GDDM, see "Using SAS/GRAPH Software with GDDM" in this appendix.
The following sections discuss using SAS/GRAPH software with IBM 3270-type graphics terminals. This discussion is divided into the following six topics:
❏ Specifying the correct device driver
describes the IBM 3270-type terminals that support graphics and the available SAS/GRAPH device drivers.
❏ Customization of the control unit
describes the customization requirements for the IBM 3274 control unit to support "presentation graphics." Most IBM 3174 control units come standard with graphics support and require no extra customization.
❏ Specifying VTAM node definitions and mode tables
contains sample VTAM node definitions and mode tables for IBM 3270-type terminals. These definitions and tables are valid for use with either the IBMxxxx or GDDMxxxx drivers. If your VTAM definitions are not correct, you may receive Screen Erasure messages, PROGxxx communication errors, or the message Error: Your device does not support graphics when you attempt to display graphics.
❏ Requirements for 3270 emulators
explains the general requirements for displaying host graphics on a PC or PS/2 using 3270 emulation software. Also listed are several emulation packages and their appropriate device driver to use with SAS/GRAPH.

Installation Instructions and System Manager's Guide 181
Appendix Q, Implementing SAS/GRAPH Software
❏ Support for Canadian-French keyboards
describes the steps necessary to add support for the IBM 327x Canadian-French keyboards. This step is optional.
❏ Common installation problems and how to solve them
describes some of the most common problems encountered when trying to use the IBMxxxx device drivers. If you have any difficulties, please refer to this section before calling SAS Institute.
Specifying the Correct Device Driver
In Version 6, all SAS/GRAPH device drivers exist as entries in a SAS catalog. You can browse and manage device driver entries using PROC GDEVICE. The default device catalog is SASHELP.DEVICES. The following is a list of IBM 3270-type terminals that support graphics along with the appropriate device driver. The device driver can either be specified in the DEVICE= parameter of an options statement, a GOPTIONS statement, or when prompted.
Device Driver
IBM 3179 G IBM3179
IBM 3192 G IBM3192
IBM 3472 GC IBM3472
IBM 3270 PC/G IBMPCG
IBM 3270 PC/GX IBMPCGX
IBM 3278 (with PS) IBM3278
IBM 3279 (with PS) IBM3279
IBM 3270 PC (with PS) IBM3270
IBM 3290 IBM3290 IBM PC or PS/2 running GDDM-OS/2 LINK
IBMOS2CM
IBM 3278 and 3279 terminals (as well as IBM 3270 PCs) must have a PS (Programmed Symbols) adapter installed before they are capable of displaying graphics. If you are using an emulator, specify the driver for the device being emulated. Version 6 supports the SAS/GRAPH graphics window. When running with the Display Manager system, the SAS/GRAPH graphics window is enabled by default. To disable it, specify:
OPTIONS NOGWINDOW;

182 Installation Instructions and System Manager's Guide
Appendix Q, Implementing SAS/GRAPH Software
If GWINDOW is in effect and you are using one of the devices previously listed (or one that emulates a previously listed device) within the Display Manager System (DMS), you do not have to specify a device driver. A default GWINDOW driver will be chosen for you. Note that in Version 6, most device drivers for IBM 3270-type terminals are interchangeable. You can use the IBM3179 driver on an IBM 3472 terminal and vice-versa.
Customizing of the IBM 3274 Control Unit
The IBM 3274 control unit to which your 3270-type terminal or PC is connected must be properly customized in order to use the terminal for "presentation graphics." Most IBM 3174 control units come standard with graphics support. The following items apply only to 3274 control units.
If the 3274 is pre-Configuration Support "D," the necessary customization questions and answers are as follows:
Question Number Answer
161 1 162 1 163 same answer as question 112 164 1 165 1 if 3274 is a "C" model (remote), 0 otherwise
If the 3274 has Configuration Support "D" installed (for example, the newer 41 and 61 models), the questions and answers are as follows:
Question Number Answer
160 1 161 1 165 1 if 3274 is a "C" model (remote), 0 otherwise
Note that attachment to IBM 3274-1B, 3274-21A, 3274-21B, 3274-21C, 3274-21D, or 3276 control units is not supported.
Specifying VTAM Node Definitions and Mode Tables
The following sample VTAM node definitions and mode tables are provided as an aid to setting up your IBM graphics terminal for use with TSO. There are three sets of node definitions: (1) local non-SNA, (2) remote BSC, and (3) SNA (local and remote). The relevant mode table entries to be used will depend upon whether you are SNA or non-SNA. These are examples of definitions currently in use at SAS Institute. Your own definitions and tables may vary slightly, depending on the types of terminals you use.
The following VTAM node definitions and mode tables are valid for both the IBMxxxx and GDDMxxx drivers. If you are using the GDDMxxx drivers, refer to GDDM Installation and System Management (SC33-0321-2) for additional details on node definitions and mode tables.

Installation Instructions and System Manager's Guide 183
Appendix Q, Implementing SAS/GRAPH Software
Failure to specify the proper information to VTAM when using IBM graphics terminals causes SCREEN ERASURE errors, PROGxxx communication errors, or the message Error: Device does not support graphics. Note that the standard IBM 3278 and 3279 terminals (as well as IBM 3270 PCs) do not support graphics, unless they have the PS (Programmed Symbols) option installed. With IBM 3179 and 3192 terminals, only those designated as Model G devices support graphics.
The following examples are sample VTAM node definitions:
* * VTAM configuration statements for graphics devices attached * to a local non-SNA control unit * IBM32793 LOCAL TERM=3277,CUADDR=521,ISTATUS=ACTIVE, X
FEATUR2=(MODEL2,EDATS), <=== Color display X MODETAB=M3274,DLOGMOD=L3279M3, X USSTAB=USSTAB00
IBM32784 LOCAL TERM=3277,CUADDR=53E,ISTATUS=ACTIVE, X FEATUR2=(MODEL2,EDATS), <=== EDS display X MODETAB=M3274,DLOGMOD=L3278M4, <== 3278-4 graphics X USSTAB=USSTAB00
* * VTAM configuration statements for graphics devices attached * to remote BSC control units *
BSC79M3 TERMINAL TERM=3277, A 3277 terminal X ADDR=6060C1C1, Installation specific to port # X POLL=4040C1C1, X FEATUR2=(MODEL2,EDATS), <== Color display X USSTAB=USSTAB00, USS table for VTAM X MODETAB=MT3274, EDS mode table X DLOGMOD=L3279M3 A model 3 3279
BSC78M4 TERMINAL TERM=3277, A 3277 terminal X ADDR=6060C2C2, Installation specific to port # X POLL=4040C2C42, X FEATUR2=(MODEL2,EDATS),<== Graphics display X USSTAB=USSTAB00, USS table for VTAM X MODETAB=MT3274, EDS Mode table X DLOGMOD=L3278M4 A 3278 Model 4
* * VTAM configuration statements for graphics devices attached to * SNA control units (A and C models) * IBM32793 LU LOCADDR=4, X
ISTATUS=ACTIVE, X MODETAB=M3274, 3274 mode table X DLOGMOD=S3279M3, <<=== 3279 color graphics X USSTAB=USSSNA00
IBM32784 LU LOCADDR=5, X STATUS=INACTIVE, X MODETAB=M3274, 3274 mode table X DLOGMOD=S3278M4, <<<=== 3278 EDS X USSTAB=USSSNA00
184 Installation Instructions and System Manager's Guide
Appendix Q, Implementing SAS/GRAPH Software
The following examples are sample VTAM mode tables:
MT3274 TITLE 'SAS LOGON MODE TABLE FOR USE WITH 3274 CONTROL UNITS' MT3274 MODETAB
TITLE 'SAS LOGON MODE TABLE FOR NON-SNA (D & C(BISYNC)) UNITS' L3278M2 MODEENT LOGMODE=L3278M2,FMPROF=X'02', X
TSPROF=X'02',PRIPROT=X'71',SECPROT=X'40', X COMPROT=X'2000', X PSERVIC=X'00C000000000185018507F00'
L3278M3 MODEENT LOGMODE=L3278M3,FMPROF=X'02', X TSPROF=X'02',PRIPROT=X'71',SECPROT=X'40', X COMPROT=X'2000', X PSERVIC=X'00C000000000185020507F00'
L3278M4 MODEENT LOGMODE=L3278M4,FMPROF=X'02', X TSPROF=X'02',PRIPROT=X'71',SECPROT=X'40', X COMPROT=X'2000', X PSERVIC=X'00C00000000018502B507F00'
L3279M2 MODEENT LOGMODE=L3279M2,FMPROF=X'02', 3270/3279 X TSPROF=X'02',PRIPROT=X'71',SECPROT=X'40', X COMPROT=X'2000', X PSERVIC=X'00C000000000185018507F00'
L3279M3 MODEENT LOGMODE=L3279M3,FMPROF=X'02', 3270/3279 X TSPROF=X'02',PRIPROT=X'71',SECPROT=X'40', X COMPROT=X'2000', X PSERVIC=X'00C000000000185020507F00'
L3290Q MODEENT LOGMODE=L3290Q,FMPROF=X'02', X TSPROF=X'02',PRIPROT=X'71',SECPROT=X'40', X COMPROT=X'2000', X PSERVIC=X'00C000000000185018507F00'
L3290V MODEENT LOGMODE=L3290V,FMPROF=X'02', X TSPROF=X'02',PRIPROT=X'71',SECPROT=X'40', X COMPROT=X'2000', X PSERVIC=X'00C00000000018502B507F00'
L3290H MODEENT LOGMODE=L3290H,FMPROF=X'02', X TSPROF=X'02',PRIPROT=X'71',SECPROT=X'40', X COMPROT=X'2000', X PSERVIC=X'00C00000000018501B847F00'
L3290B MODEENT LOGMODE=L3290B,FMPROF=X'02', X TSPROF=X'02',PRIPROT=X'71',SECPROT=X'40', X COMPROT=X'2000', X PSERVIC=X'00C00000000018503EA07F00' .
TITLE 'SAS LOGON MODE TABLE FOR SNA (A & C(SDLC)) UNITS' S3278M2 MODEENT LOGMODE=S3278M2,FMPROF=X'03', X
TSPROF=X'03',PRIPROT=X'B1',SECPROT=X'90', X COMPROT=X'3080',RUSIZES=X'87C7', X PSERVIC=X'028000000000185018507F00'
S3278M3 MODEENT LOGMODE=S3278M3,FMPROF=X'03', X TSPROF=X'03',PRIPROT=X'B1',SECPROT=X'90', X COMPROT=X'3080',RUSIZES=X'87C7', X PSERVIC=X'028000000000185020507F00'
S3278M4 MODEENT LOGMODE=S3278M4,FMPROF=X'03', X TSPROF=X'03',PRIPROT=X'B1',SECPROT=X'90', X COMPROT=X'3080',RUSIZES=X'87C7' X PSERVIC=X'02800000000018502B507F00'
S3279M2 MODEENT LOGMODE=S3279M2,FMPROF=X'03', 3270/3279/8775 X TSPROF=X'03',PRIPROT=X'B1',SECPROT=X'90', X COMPROT=X'3080',RUSIZES=X'87C7', X PSERVIC=X'028000000000185018507F00'
S3279M3 MODEENT LOGMODE=S3279M3,FMPROF=X'03', 3270/3279/8775 X TSPROF=X'03',PRIPROT=X'B1',SECPROT=X'90', X COMPROT=X'3080',RUSIZES=X'87C7', X PSERVIC=X'028000000000185020507F00'
S3290Q MODEENT LOGMODE=S3290Q,FMPROF=X'03', X TSPROF=X'03',PRIPROT=X'B1',SECPROT=X'90', X COMPROT=X'3080',RUSIZES=X'87C7', X PSERVIC=X'028000000000185018507F00'
Installation Instructions and System Manager's Guide 185
Appendix Q, Implementing SAS/GRAPH Software
S3290V MODEENT LOGMODE=S3290V,FMPROF=X'03', X TSPROF=X'03',PRIPROT=X'B1',SECPROT=X'90', X COMPROT=X'3080',RUSIZES=X'87C7', X PSERVIC=X'02800000000018502B507F00'
S3290H MODEENT LOGMODE=S3290H,FMPROF=X'03', X TSPROF=X'03',PRIPROT=X'B1',SECPROT=X'90', X COMPROT=X'3080',RUSIZES=X'87C7', X PSERVIC=X'02800000000018501B847F00'
S3290B MODEENT LOGMODE=S3290B,FMPROF=X'03', X TSPROF=X'03',PRIPROT=X'B1',SECPROT=X'90', X COMPROT=X'3080',RUSIZES=X'87C7', X PSERVIC=X'02800000000018503EA07F00'
MODEEND END
All of the preceding information can be found in the ACF/VTAM installation manual.
Requirements for 3270 Emulators
When attempting to display SAS/GRAPH output on PCs and PS/2s attached to an MVS system and running 3270 emulation software, it is important to remember that not all 3270 emulation packages support mainframe graphics. In order for most 3270 emulation packages to support mainframe graphics, an additional graphics "module" must also be installed and configured in order for that 3270-emulation package to support mainframe graphics. In addition, before mainframe graphics can be displayed on a PC or PS/2 emulating a 3270-type terminal, it must be defined to VTAM as a device that supports extended data streams. See "Specifying VTAM node definitions and mode tables" for more details on configuring your PC or PS/2 as a mainframe graphics device.
The following is a list of some emulation packages that can be used with SAS/GRAPH Software:
Base Emulation Product Additional Graphics Product
Attachmate Extra Extended for DOS Attachmate HGO (Host Graphics Option) for DOS
Attachmate Extra for Windows Attachmate HGO for Windows
IBM OS/2 Communications Manager IBM GDDM-OS/2 LINK product
IBM PC3270 for DOS IBM GDDM-PCLK product
IRMA Workstation for DOS IRMA Graphics for DOS
IRMA Workstation for Windows IRMA Graphics for Windows
Novell NetWare 3270 MultiWorkstation Novell NetWare 3270 Vector Graphics
3270 Passport 3270 Passport APA Graphics
RabbitGATE/RabbitSTATION Rabbit Software Open Advantage Graphics
RUMBA for Windows RUMBA Graphics for Windows

186 Installation Instructions and System Manager's Guide
Appendix Q, Implementing SAS/GRAPH Software
If your emulation package is configured for vector graphics, use the SAS/GRAPH device driver IBM3179 to display graphics on your PC or PS/2. GDDM-PCLK users should use the GDDMPCG driver. GDDM-OS/2 LINK users can use either the Institute-supplied driver IBMOS2CM or the GDDMPCG driver. If the IBM3179 driver is being used with any of the preceding emulation packages and the graphics being generated do not appear as expected, the GDDMPCG driver can be used as a substitute if the GDDM base product is installed on your system.
Support for Canadian-French Keyboards
Note: This task is optional.
Canadian-French keyboards have accent keys that result in composite characters when used with certain letters. These accent keys are considered "dead keys" unless used with a second valid character, and thus the EBCDIC code points that represent them cannot be used as a programmed symbol code point. To remove these five code points from use with the programmed symbols data stream, specify the $FSOPT2 system option when invoking the SAS System, as follows:
SAS OPTIONS($FSOPT2)
Common Installation Problems and How to Solve Them
This section describes some of the most common problems encountered when installing or trying to run SAS/GRAPH software on IBM graphics terminals. If you have any problems, please consult the following list of problems and solutions before calling SAS Institute.
PROBLEM:
PROG 470 or PROG 471 error
SOLUTION:
If the terminal is an IBM 3278 or 3279, make sure it has a programmed symbols board installed. If you get this error on an IBM graphics terminal, do the following:
1. Press RESET and then ALT/TEST.
2. Type /6 and press ENTER. This causes several lines to appear on the upper left part of the screen. The second of these lines will initially be 00.
3. Press ENTER. This causes the second line to change to 04. Keep pressing ENTER until the second line equals 14. If the terminal locks up after the second line is 0C, read the discussion below about proper customization of the 3274.
Installation Instructions and System Manager's Guide 187
Appendix Q, Implementing SAS/GRAPH Software
4. Several lines of hexadecimal code will appear under this line—get the first three halfwords of the bottom line and have them ready when you call SAS Institute to report the problem.
188 Installation Instructions and System Manager's Guide
Appendix Q, Implementing SAS/GRAPH Software
PROBLEM:
Error: Device does not support graphics
SOLUTION:
First, make sure that the device you are using is a graphics device. If you are using a PC with emulation software, be sure that the emulator is designed to support host graphics. Second, check to make sure that your VTAM node definitions are correct. Third, make sure that the control unit to which your device is attached supports graphics data streams.
PROBLEM:
Incomplete graphs with question marks or solid blocks at the bottom
SOLUTION:
This problem only occurs on devices that support programmed symbols (such as the IBM 3279, 3270 PC, and 3290) when you attempt to display a complex graph. The only way to correct this problem (other than upgrading the device itself to support additional programmed symbol sets) is to simplify the graph as much as possible.
PROBLEM: PROG 401 or PROG 474 error
SOLUTION:
Make sure that items 161-165 on your 3274 control unit have been set correctly, particularly item 163, which should be set to the number of extended data stream terminals you have attached to the control unit.
PROBLEM: PROG 450 error
SOLUTION:
This error usually occurs when an SNA terminal has a mode table entry defined for a non-SNA terminal.
PROBLEM:
Graphs on an IBM 3279 Model 2 do not fill the entire screen
SOLUTION:
This results from the fact that the Model 2 has only 24 lines. If the SAS/GRAPH System were to try to use the entire screen, there would be gaps in the graph; to avoid this problem, only about 2/3 of the screen is used.
Installation Instructions and System Manager's Guide 189
Appendix Q, Implementing SAS/GRAPH Software
Using SAS/GRAPH Software with IBM 3287, 3268, and 4224 Printers
This section describes the steps necessary for using SAS/GRAPH software with IBM 3287, 3268, and 4224 printers using stand-alone (non-GDDM) device drivers. As alternatives to the stand-alone device drivers, device drivers for IBM 3287, 3268, and 4224 printers are available that interface with IBM's GDDM (Graphical Data Display Manager) product. If you choose to use a GDDM device driver instead of a stand-alone device driver, see "Using SAS/GRAPH Software with GDDM" in this document.
As with other SAS/GRAPH device drivers, the IBM3287, IBM3268, and IBM4224 drivers exist as entries in the default device catalog, SASHELP.DEVICES. You can browse and manage device driver entries using PROC GDEVICE. The IBM3287, IBM3268, and IBM4224 drivers require an additional spooling utility that handles the 'transfer' of graphics data between the driver and the printer. The spooling utility provided on the SAS/GRAPH installation tape for 3287 and 3268 printers is the SASWTR external writer. The SASWTR external writer cannot be used with the IBM4224 printer.
This section is divided into the following five topics:
❏ Using SAS/GRAPH software with IBM 3287 and 3268 printers
details the requirements for using SAS/GRAPH software with IBM 3287 and 3268 printers as well as the GOPTIONS statement you specify to generate graphics output.
❏ Using SAS/GRAPH software with an IBM 4224 printer
details the requirements for using SAS/GRAPH software with an IBM 4224 printer, as well as the GOPTIONS statement you specify to generate graphics output.
❏ The SASWTR external writer
describes how to use the SASWTR external writer program. You can only use SASWTR with graphics output from the IBM3287 and IBM3268 drivers. SASWTR only supports IBM 3287 and 3268 graphics printers (as well as 'clones' from vendors such as Memorex/Telex and Interface Systems Inc.). SASWTR does not support graphics output produced by the IBM4224 device driver.
❏ Common installation problems and how to solve them
describes common installation problems and how to solve them. If you encounter problems, please consult this section before calling SAS Institute.
190 Installation Instructions and System Manager's Guide
Appendix Q, Implementing SAS/GRAPH Software
❏ VTAM definitions for IBM 3287, 3268, and 4224 printers
describes the necessary VTAM definitions that are required when using SAS/GRAPH software with IBM 3287, 3268, and 4224 printers.
Using SAS/GRAPH Software with IBM 3287 and 3268 Printers
The IBM 3287 and 3268 printers are four-color dot matrix printers that are capable of producing graphics. These devices can be used only with an IBM 3274 or 3174 control unit capable of supporting graphics devices.
With the IBM 3287 and 3268, the printer itself must be capable of producing graphics and must have the Extended Character Set Adapter and PS (Programmed Symbols) installed. While SAS/GRAPH software will work with PS-2, PS-4, or PS-4A, SAS Institute recommends that you install PS-4A; otherwise, the quality of your graphics output may diminish. The IBM 3268 Model 2C printer has pre-installed programmed symbol sets that emulate either PS-4 (six sets) or PS-4A (four sets—one multicolor) based on the setting of the Language Select Switches (which the 3287 does not have). If you will be using SAS/GRAPH software with an IBM 3268 Model 2C printer, set the first switch of the Language Select Switches to ON.
GOPTIONS Statement for Use with IBM 3287 and 3268 Printers
The IBM3287 and IBM3268 device drivers work equally well from batch or interactive modes. To use SAS/GRAPH software with an IBM 3287 or IBM 3268 printer, specify the following:
GOPTIONS DEVICE = IBM3287x (or IBM3268x) DEVADDR = (SAS,.,VTAM nodename);
Where the device driver suffix x should be D, E, or F (usually F). The suffix denotes the Programmed Symbol (PS) memory option on your printer. These are the suffixes that the drivers support:
PS-2 PS-4 PS-4A D E F
For example, to use an IBM 3287 that has PS-4A (the most common configuration), set the DEVICE= parameter to IBM3287F. Note that the emulation of PS-4 or PS-4A on an IBM 3268 is controlled by the setting of the Language Select Switches. For PS-4A, the first switch of the Language Select Switches should be in the ON position.
For Release 6.08 of SAS/GRAPH software, the following device drivers have been added for paper size that is 8.5 inches vertically: IBM328SF, IBM328SD, IBM326SF, and IBM326SE.
Use of the IBM3287 or IBM3268 device driver also requires the DEVADDR= option. Specify the DEVADDR= parameter as follows:
GOPTIONS DEVADDR = (applname,applpw,nodename);
Installation Instructions and System Manager's Guide 191
Appendix Q, Implementing SAS/GRAPH Software
The following is an explanation of each parameter:
❏ applname is the ACF/VTAM application name defined on the APPL statements in the network definition. If the applname is SAS, the writer looks for application names on APPL statements of SASnnn, where nnn is 001, 002, 003, and so on. This allows the writer to choose one of many APPL statements, some of which may already be busy. If the applname is not SAS, the APPL statement must contain the same name as the DEVADDR operand.
❏ applpw is the password for the applname as defined in the ACF/VTAM network definition. If no password is defined (which is usually the case), enter the password as a single period:
GOPTIONS DEVADDR = (xxx,.,yyy);
❏ nodename is the ACF/VTAM-defined network name (LU name) of the IBM 3287 or 3268 printer where the output is to be routed. For example, GOPTIONS DEVADDR=(SAS,.,PRINTER1) tells the external writer to sign on to VTAM as SAS001 and send the graphics output to the printer with the VTAM nodename of PRINTER1.
Five GOPTIONS are available to control routing and characteristics of the output to SASWTR. The GWRITER= option specifies the external writer name to be used for IBM 3287 and 3268 graphics output (the default is SASWTR). The GCLASS=, GCOPIES=, and GFORMS= options specify the SYSOUT class, number of copies, and forms name for output. These default to G, 1, and STD, respectively. The GDEST= option sets the destination for the JES SYSOUT for the printer—this defaults to LOCAL
GDEST must specify a valid JES destination code. For example, to send graphics output to a SYSOUT class of A and to request three copies of each graph, specify:
GOPTIONS GCLASS=G GCOPIES=3;
JCL for Special SYSOUT Handling
The IBM3287 and IBM3268 drivers dynamically allocate a JES SYSOUT file with the external writer name of SASWTR. If you want to do some special SYSOUT handling and do not want to use the options discussed in the previous section, include a //SAS3287 DD statement in your SAS job, and the device driver will write the output to the SAS3287 file. For example, if you want to specify COPIES= in a batch job, specify:
//SAS3287 DD SYSOUT=(G,SASWTR),COPIES=nn
It is not possible to specify the SYSOUT writer name using the TSO ALLOC statement. If you run under TSO and are using SASWTR, use the GOPTIONS statement to control the SYSOUT parameters.
192 Installation Instructions and System Manager's Guide
Appendix Q, Implementing SAS/GRAPH Software
Using SAS/GRAPH Software with an IBM 4224 Printer
The IBM 4224 Model 2E2 is a monochrome graphics printer, and the IBM 4224 Model 2C2 is a color graphics printer. The 4224 Model 2C2 supports either four colors or eight colors (depending on the type of ribbon installed in the printer).
To use SAS/GRAPH software with an IBM 4224 graphics printer, specify the following:
GOPTIONS DEVICE = IBM4224 (or IBM42241, or IBM42244) GACCESS = GSASFILE ;
For Release 6.08 of SAS/GRAPH software, the following device drivers have been added for paper size that is 8.5 inches vertically: IBM424S, IBM424S1, and IBM424S4.
The IBM4224 and IBM424S drivers support eight colors (blue, red, magenta, green, cyan, yellow, black, and brown). The IBM42241 and IBM424S1 drivers support one color (black). The IBM42244 and IBM454S4 drivers support four colors (blue, red, green, and black). The graphics file that the driver produces (in IPDS format) is sent to the destination pointed to by the DDname of GSASFILE. For example, to send graphics output to an IBM 4224 in batch, add the following statement to your JCL:
//GSASFILE DD SYSOUT=class,DEST=printer destination, DCB=(RECFM=vb, LRECL=506)
A spooling utility that can process native IPDS output, such as VPS, is required to spool the graphics output to the printer. SASWTR does not support graphics output created by the IBM4224 device drivers.
The SASWTR External Writer Program
Upon installation of the SAS/GRAPH product, SASWTR exists as a member in the SAS loadlib (SASWTR is actually an alias for SGWTRO). SASWTR is an external writer program that you use to spool graphics output from the IBM3287 and IBM3268 drivers to IBM 3287 or 3268 printers. SASWTR does not support output from the IBM4224 device driver or other drivers such as the HP7550 driver. If you are not using the IBM3287 or IBM3268 drivers or are using an alternative product such as VPS for spooling, skip this section.
If you plan to use SASWTR, the first step is to copy the SASWTR member (along with SGWTRO) from the SAS loadlib to an APF authorized library on your system (usually your system link list). You can use IBM's IEBGENER utility to perform the copy.
Installation Instructions and System Manager's Guide 193
Appendix Q, Implementing SAS/GRAPH Software
If you are using SASWTR for the first time, place the following JCL in a member called SASWTR in your system PROCLIB. Do not change the PARM= specification or the position of the IEFRDER DD statement (if you must add a DD statement, place it after the IEFRDER DD statement). If you are currently using the Version 5 SASWTR, you should install the Version 6 SASWTR . The program IASXWR00 is the IBM external writer. Specification of WRITER=SASWTR on the OS MODIFY ('F') command causes the SASWTR module to be loaded when output is presented by JES that has SASWTR in the SYSOUT writer name field.
//SASWTR PROC //* Do not insert a DD card between the following two statements //IEFPROC EXEC PGM=IASXWR00,PARM='P',TIME=1440 //IEFRDER DD DUMMY,DCB=BLKSIZE=137 //* Do not insert a DD card between the preceding two statements //SYSUDUMP DD SYSOUT=%PRINT
Starting and Modifying the Writer
Only a few commands control the SASWTR external writer. However, these commands must all be entered from an operator's console. To start the writer, enter the following:
S SASWTR.name
where name is any name that you choose. All subsequent MODIFY statements that control the writer use this name. After the IEF176I WAITING FOR WORK message, enter the following:
F name,WRITER=SASWTR,C=G
This tells the writer to accept all work in SYSOUT class G with the writer name of SASWTR. If your output for SASWTR is not in SYSOUT class G, specify the appropriate class. The writer now runs until a STOP command is issued. To stop the writer, enter the following:
P name
It is not necessary to restart the writer each time the SAS/GRAPH System sends output to the 3287/3268. You need to start the writer only when you IPL the system and can leave the writer running continuously, using almost no CPU resources while waiting for input. When active, the writer will issue "IEF176I ... WAITING FOR WORK" messages — this is normal. The writer will normally issue the IEF302A and IEF383A operator action messages for the first job processed by the writer; both messages should be given the reply of "U" (Use).
194 Installation Instructions and System Manager's Guide
Appendix Q, Implementing SAS/GRAPH Software
You can have as many writers active concurrently as you want. However, each must have a different name so that commands can be directed to a particular external writer. The Version 6 SASWTR puts the name you assign in parentheses preceding each console message for easy identification of multiple SASWTRs. You may want to have as many writers active as there are 3287 and 3268 printers available for SAS/GRAPH output. All writers have access to all available printers; thus multiple writers enable you to use more than one printer at a time. Note, however, that more than one writer may attempt to direct output to the same printer. In this case, the second writer must wait until the first is finished before gaining access to the printer. This causes both writers to be tied up while the second printer is idle. The following example illustrates the use of multiple writers and how to segregate the processing for certain printers:
S SASWTR.PRT1 Start S SASWTR.PRT2 Three S SASWTR.PRT3 SASWTR's F PRT1,WRITER=SASWTR,CLASS=A,FORM=PRT1 DEST=LOCAL by default F PRT2,WRITER=SASWTR,CLASS=G,DEST=RMT2 Get any FORM specified for R2 F PRT3,W=SASWTR,C=G,FORM=PRT3 DEST=LOCAL by default
Specify valid combinations of GWRITER, GCLASS, GFORMS, and GDEST in a SAS GOPTIONS statement to direct the output through the appropriate SASWTR for one or more printer groups.
Aborting the Writer
If necessary, SASWTR can be aborted during a VTAM session from a VTAM operator's console. You must first know either the VTAM APPL name (ACBNAME) of the active SASWTR session or the printer's VTAM network name (LU name). The SASWTR application name identifies the Primary Logical Unit (PLU) in the VTAM session, and the printer name represents the Secondary Logical Unit (SLU). To abort the SASWTR session, enter one of the following VTAM commands at the operator's console:
V NET,TERM,PLU=applname V NET,TERM,SLU=luname
SASWTR should then issue message SASG035A to allow the operator to specify whether to purge or requeue the JES data set.
Alternative Routing for Operator's Messages
You may route messages to a log file, rather than the console, by supplying a WTRLOG DD statement in the SASWTR procedure in your PROCLIB. SASWTR automatically replies to messages that require a response. (The specific reply depends on the message; in general, if CANCEL or PURGE is a valid reply to a SASWTR message, one of these is used.) The WTRLOG DD statement can either be for a SYSOUT data set or for a disk data set; however, since DISP=MOD should be specified for a disk data set, a SYSOUT data set is recommended. The DCB attributes for the log data set must be LRECL=133, BLKSIZE=133, and RECFM=F. If the WTRLOG DD
Installation Instructions and System Manager's Guide 195
Appendix Q, Implementing SAS/GRAPH Software
statement is not present, all messages are displayed on the operator's console.
196 Installation Instructions and System Manager's Guide
Appendix Q, Implementing SAS/GRAPH Software
SASWTR Messages
The external writer may display the following messages on the operator's console or in the WTRLOG data set. Some messages may have alternate text appear after the semicolons in the messages. To help you identify which writer is issuing messages, the S SASWTR.step name appears in parentheses, preceding the message. Messages sent to the WTRLOG DD have a date/time stamp preceding the message text.
SASG000I job_name (jesjobid) ON SASWTR VERSION v.rr; CLASS=c, FORMS=form, DEST=jes_dest
Informational message that may appear at either the operator's console or on the printer when SASWTR starts processing output.
SASG001I PURGING DATA SET FOR job_name (jesjobid)
The JES data set currently being processed for the named job or TSO user is being purged either at the request of the operator or by automatic error recovery processing when the WTRLOG is used.
SASG002U APPLID "vtamappl" IS NOT AUTHORIZED TO ACQUIRE NODES
The ACF/VTAM APPL statement for the "vtamappl" name shown did not specify AUTH=(ACQ). The application must be allowed to dynamically acquire nodes. Update the APPL statement and vary the application major node inactive, then active again. Then restart SASWTR.
SASG003A PRINTER "vtamnode" NOT FOUND; REPLY WITH NEW-NAME/PURGE/REQUEUE
The ACF/VTAM node name shown is not defined to VTAM or is in a major node that is not currently active. Reply with a new node name or PURGE or REQUEUE to purge or requeue the SYSOUT data set. You can check with ACF/VTAM by issuing the D NET,E,ID=vtamnode command to display the status of the node in question.
SASG004I PRINTER "vtamnode" IN USE BY ANOTHER WRITER; THIS WRITER WILL WAIT
The 3287 or 3268 printer with the VTAM node name shown is printing another job for another external writer. This writer is waiting for the other to finish so that it can acquire control of the printer.
Installation Instructions and System Manager's Guide 197
Appendix Q, Implementing SAS/GRAPH Software
SASG005W PRINTER "vtamnode" HAS PS-nn BUT USER SPECIFIED DEVICE DRIVER SUFFIX s
An incorrect device driver suffix was specified by the SAS user when the spool file for the printer named "vtamnode" was generated. See the SAS INTERFACE section and make sure that the correct device driver and suffix was specified. You may have specified a device driver suffix corresponding to a programmed symbols option not installed on the named printer.
SASG006A PRINTER "vtamnode" I/O ERROR: RC=rr FDBK=ff SENSE=ssssssss; REPLY PURGE/REQUEUE
This message is caused whenever an unknown I/O error is detected on the 3287 or 3268 printer. Reply to purge the current data set or requeue it. To force an abend, reply "A" and the writer will issue a SASG015U message and abend.
SASG007A PRINTER "vtamnode" LENGTH I/O ERROR; REPLY PURGE/REQUEUE
This message is caused only on local non-SNA-attached 3287 or 3268 printers. The problem is probably a known IBM hardware bug. Call SAS Institute Technical Support and request the IBM fix number for your CE.
SASG008A APPLID "vtamappl" PASSWORD INCORRECT; REPLY NEW-PASSWORD/PURGE/REQUEUE
SASWTR was given an incorrect password for the ACF/VTAM application shown. The VTAM APPL definition defines a different password for the application. Reply with the correct password or PURGE or REQUEUE to purge or requeue the current SYSOUT data set.
SASG009A APPLID "vtamappl" IS INVALID; REPLY NEW- APPLID/PURGE/REQUEUE
The application name shown is not defined to VTAM or is in an application major node that is not active. Enter the correct VTAM application name or PURGE or REQUEUE to purge or requeue the data set. You can check with ACF/VTAM by issuing the D NET,E,ID=vtamappl command to display the status of the APPL in question.
SASG010A APPLID "vtamappl" ALREADY IN SESSION; REPLY NEW-APPLID/PURGE/REQUEUE
The ACF/VTAM application name shown is already in session with VTAM. Reply with the correct VTAM application name or PURGE or REQUEUE to purge or requeue the current SYSOUT data set. You may check the APPL status by issuing the D NET,E,ID=vtamappl command to display the APPL in question.
198 Installation Instructions and System Manager's Guide
Appendix Q, Implementing SAS/GRAPH Software
SASG011A APPLID "vtamappl" REQUIRES PASSWORD; REPLY NEW-PASSWORD/PURGE/REQUEUE
The SAS programmer did not specify a password for the VTAM application name shown and the VTAM APPL statement has one defined. Reply with the correct password for the application or PURGE or REQUEUE to purge or requeue the current SYSOUT data set.
SASG012A ALL SAS VTAM ACB'S ARE IN USE; REPLY PURGE/REQUEUE/CONTINUE
All the SASnnn APPL statements are in use. The probable cause is that more external writers are started than are defined by ACF/VTAM APPL statements. A reply of CONTINUE will cause the writer to try again to sign-on, or you can reply PURGE or REQUEUE to purge or requeue the current data set. Make sure that you have at least as many SASnnn statements as you have writers started.
SASG013I "MODIFY writerid" COMMAND MUST BE RE-ENTERED TO RESTART SASWTR
An F writerid,W=SASWTR,... command must be entered at the console for this writer to restart. It will not resume printing until the command is entered. This message reminds you when another MODIFY command is required to restart the writer.
SASG014A EXCESSIVE WAIT TIME TO ACQUIRE PRINTER "vtamnode"; REPLY PURGE/REQUEUE
The writer has waited for an unacceptable length of time to acquire a printer; the printer may be "owned" by another application that will not release it, or ACF/VTAM may not know that the printer has been disconnected from the 3274 control unit. The appropriate reply either purges or requeues the current SYSOUT data set.
SASG015U TERMINATION ERROR Unnnn; RC=rr, FDBK=ff, SENSE=ssssssss
The writer has experienced an uncorrectable error. You can call SAS Institute with the Unnnn code and the information in this message, or you may be able to diagnose the problem yourself by checking the VTAM return, feedback, and sense codes. The return code and feedback codes can be found in ACF/VTAM Programming Manual (SC27-0449) in the appendix "Return Codes and Sense Fields."

Installation Instructions and System Manager's Guide 199
Appendix Q, Implementing SAS/GRAPH Software
SASG016U PRINTER "vtamnode" REJECTED VTAM BIND — CHECK LOGMODE ENTRY
The DLOGMOD operand on the LU or LOCAL VTAM definition statement for the named printer points to a LOGMODE table entry that is incorrect. Check that the proper BIND image is defined and then restart SASWTR.
SASG017U PRINTER "vtamnode" LOGMODE ENTRY INVALID; LUTYPE=xx FMPROF=yy
The LU type in the message in combination with the FMPROF in the message are invalid for an IBM 3287 or 3268 printer. The mode table entry specifies conflicting parameters. Correct the mode table and reassemble, linkedit, and restart VTAM to insure that the parameters are correct.
SASG018A PRINTER "vtamnode" REQUIRES INTERVENTION; REPLY CONTINUE/PURGE/REQUEUE
The named IBM 3287 or 3268 printer requires operator intervention. Reply CONTINUE to the message when the printer is ready and the writer continues, or PURGE or REQUEUE to purge or requeue the current SYSOUT data set.
SASG019U PRINTER "vtamnode" SENT INVALID AID BYTE FOR QUERY REPLY
The printer gave an invalid response to a Read Partition-Query (RPQ) command. This could be caused by a 3287 or 3268 printer that does not have the graphics features or by another hardware-related error.
SASG020A SASWTR HEADER RECORD NOT PRESENT; REPLY PURGE/REQUEUE/CONTINUE
The writer has started processing a SYSOUT data set that does not have a SASWTR header record at the beginning. This may be caused by the writer attempting to write a SYSOUT data set not created by SAS/GRAPH software. Check the job on the interface to see if it was created by SAS Software. If so, reply with CONTINUE and the writer will continue scanning to find the header record; if not, reply either PURGE or REQUEUE to purge or requeue the current SYSOUT data set.
SASG021A PRINTER "vtamnode" UNAVAILABLE; REPLY NEW-NAME/PURGE/REQUEUE
The VTAM node name shown is not available to the writer. Check the status of the node listed and reply with the correct node name or with the same node name after correcting the situation. Reply PURGE to purge the SYSOUT data set for the job requesting the unavailable node, or REQUEUE to requeue the SYSOUT data set.
200 Installation Instructions and System Manager's Guide
Appendix Q, Implementing SAS/GRAPH Software
SASG022U PRINTER "vtamnode" LOGMODE ENTRY INVALID: NAME NOT FOUND
The VTAM LOCAL or LU definition for the node shown contains a MODETAB entry that could not be found. Correct the LOCAL or LU definition, or insure that VTAM can find the mode table then restart SASWTR.
SASG023U PRINTER "vtamnode" LOGMODE ENTRY INVALID: NO FMHDR BIT IN COMPROT
The VTAM mode entry for the node shown is an SCS (LU type 1) bind and the bit that allows the application to use function management headers is not set in the COMPROT. Correct the mode entry and restart SASWTR.
SASG024U PRINTER "vtamnode" LOGMODE ENTRY INVALID: INCORRECT FMPROF=xx
The VTAM mode entry for the node shown contains an invalid function management profile value. The only valid values for FMPROF are x'02' or x'03'. Correct the mode table and restart SASWTR.
SASG025W PRINTER "vtamnode" HAS nn COLORS BUT USER SPECIFIED mm COLORS
The named printer does not have the number of colors available that the device driver expected it to have when the spool file was generated for the named printer. One of two things may have happened: either a monochrome ribbon has been installed on the 3287 or 3268 printer, or a different color map was supplied to the IBM3287/3268 device driver by the $DEVADDR routine (to support such color variance). The SYSOUT data set will still be printed, but the output may be distorted due to incorrect color attributes given in the data stream.
SASG026U TERMINATION ERROR U0098 DUE TO VTAM HALT OR VARY ACB INACTIVE COMMAND
The VTAM operator has issued either the HALT NET,QUICK command or a VARY NET,INACT,ID=vtamappl,I command for the SASWTR using ACBNAME "vtamappl." SASWTR will terminate with user error code U0098.
Note: The latter command is useful when SASWTR must be terminated but does not respond to the STOP SASWTR command. If the VARY INACT command is used to terminate SASWTR, and no system IPL occurs before restarting the SASWTR, issue the following two commands:
"VARY NET,INACT,ID=xxxxxxxx,F" and "VARY NET,ACT,ID=xxxxxxxx".
Installation Instructions and System Manager's Guide 201
Appendix Q, Implementing SAS/GRAPH Software
SASG027U PRINTER "vtamnode" SENT INVALID QUERY REPLY IDENTIFIER
The named printer has sent an invalid data stream in response to the Read Partition-Query (RPQ) command. This is a probable hardware error.
SASG028U TERMINATION ERROR U0097 DUE TO CLSDST IN LOSTERM EXIT
SASWTR has experienced an uncorrectable error for the CLSDST issued by the ACF/VTAM LOSTERM exit to terminate the ACB for the session.
SASG029I TERMINATION DUE TO LOSTERM EXIT NOTIFY
SASWTR has been notified by the ACF/VTAM LOSTERM exit that either the printer has been disconnected or the session has been terminated by the operator.
SASG030I PRINTER "vtamnode" OUTPUT ROUTED TO PRINTER "vtamnode"
This message will be issued when SASWTR switches from one printer to another, either when an operator replies to a message with a new printer name or when automatic switching is indicated in the WTROUCTL user control table (making no operator reply necessary).
SASG031W SASWTR/DEVICE DRIVER OUTPUT VERSION MISMATCH
SASWTR has detected that the SYSOUT data set being processed was not created by a compatible version of the IBM3287/3268 SAS/GRAPH device driver. Some inconsistencies in output processing may result.
SASG032I INPUT DATA SET TRUNCATED; PICTURE MAY BE INCOMPLETE
SASWTR has detected that the SYSOUT data set being processed was not complete; this may have been caused by the abnormal termination of the job or TSO session that created the SYSOUT data set.
SASG033U DEVICE "vtamnode" IS NOT A PRINTER
The device named "vtamnode" was specified by the programmer to receive the output of the IBM3287/3268 device driver, but SASWTR has determined that the named device is not a 3287 or 3268 printer. The SYSOUT data set being processed will be purged.
202 Installation Instructions and System Manager's Guide
Appendix Q, Implementing SAS/GRAPH Software
SASG034T SASWTR SENT OUTPUT TO PRINTER "vtamnode"
This message only appears at the terminal of a logged-on TSO user when the output generated by his or her TSO session has been processed by SASWTR. The request for the message attempt is controlled by an entry in the $DEVADDR "exit" for the IBM3287/3268 device driver.
SASG035A APPLID "vtamappl" & PRINTER "vtamnode" SESSION CANCELED; REPLY PURGE/REQUEUE
The VTAM session between the named application and printer has been terminated by the operator. Reply PURGE or REQUEUE for appropriate action on the SYSOUT data set. See the section entitled "Aborting the Writer" for information on session termination.
SASG036I APPLID "vtamappl" MUST BE RE-ACTIVATED BY ISSUING VTAM VARY ACB ACTIVE COMMAND
This message appears as a reminder that SASWTR is unable to use the named VTAM application until the VARY NET,ACT,ID=vtamappl command is issued. This message should only appear after session termination via the VARY NET,INACT,ID=vtamappl,I command.
SASG037A APPLID "vtamappl" IS INACTIVE; REPLY NEW- APPLID/PURGE/REQUEUE
The named VTAM application has been varied inactive by an operator or was never activated after starting VTAM. A new application name can be specified, or the PURGE or REQUEUE reply purges or requeues the SYSOUT data set being processed. The status of the application can be checked by issuing the VTAM command D NET,E,ID=vtamappl.
SASG038I VTAM IS INACTIVE; INPUT WILL BE REQUEUED
VTAM is inactive; SASWTR can not send the output in the SYSOUT data set to a 3287 or 3268 printer. The output is automatically requeued. When VTAM becomes active, processing can be restarted by issuing the command F writerid,W=SASWTR,... at the operator's console.

Installation Instructions and System Manager's Guide 203
Appendix Q, Implementing SAS/GRAPH Software
Common Installation Problems and How to Solve Them
This section describes some of the most common problems encountered when installing and using the IBM3287, IBM3268, and IBM4224 device drivers, and SASWTR. If you have any problems, please consult the following list of problems and solutions before calling SAS Institute.
PROBLEM:
SASGxxxx error message on the operator's console.
SOLUTION:
Before calling SAS Institute with the problem, please have the following information ready:
❏ Is your printer SNA or non-SNA?
❏ Is your printer local or remote?
❏ What is the type and model number of the control unit you are using?
❏ If your printer is an SNA printer, what is the LU Type?
❏ What is your release of ACF/VTAM?
❏ What version of SAS and SASWTR are you running?
❏ If SASG006A or SASG015U, also obtain:
❏ RC
❏ FDBK
❏ SENSE
❏ Abend code in IEF438I message (this is in hex but should be reported in its decimal equivalent if at all possible)
If the error message is SASG006A or SASG007A, reply with an A; if the error message is SASG003A or SASG021A, reply with ABEND. The A or ABEND reply will cause a SASG015U error. When you get this error, collect the information asked for in the preceding list before calling SAS Institute.
204 Installation Instructions and System Manager's Guide
Appendix Q, Implementing SAS/GRAPH Software
PROBLEM:
Rough boundaries between boundaries of filled areas on graphs—for example, diagonal lines on pie charts look like stairsteps.
SOLUTION:
This is a hardware limitation, resulting from having either PS-2 or PS-4 rather than PS-4A on your 3287. To determine which of these features you have installed, run Offline Diagnostic Test #5 in the IBM 3287 Maintenance Information Manual.
PROBLEM:
Distorted output on IBM 3287 when hardcopy key is hit on IBM 3279.
SOLUTION:
The hardcopy key on the 3279 cannot be used to produce graphics on the 3287. You must use the IBM3287 driver.
PROBLEM:
Message ERROR: DYNAMIC ALLOCATION FOR SYSOUT DATA SET FAILED.
SOLUTION:
GOPTIONS GDEST= destination specifies a destination unknown to JES.
PROBLEM:
SASWTR output gets printed on system printers in JES2/SP systems
SOLUTION:
Specify the Work Selection criteria parameter on the PRINTERnn definition in the JES2 initialization parameters to require a match for writer name. Example: PRINTER1 UNIT=00E,...,WS=(W,../..)
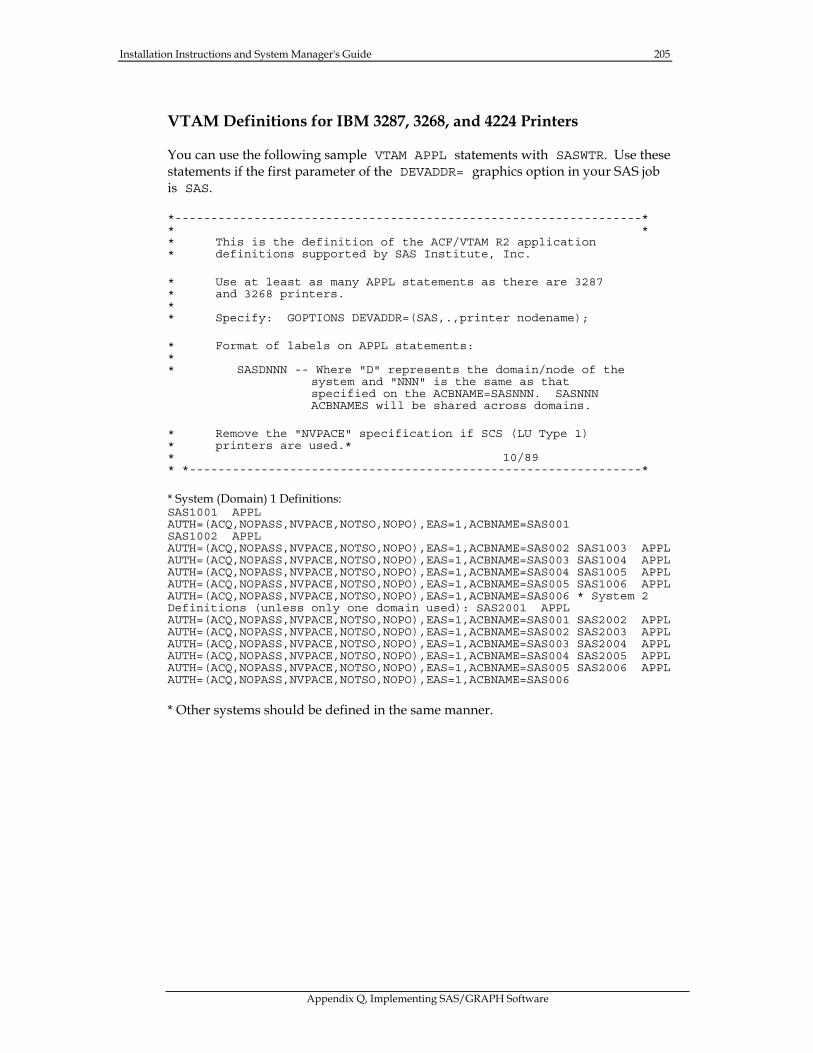
Installation Instructions and System Manager's Guide 205
Appendix Q, Implementing SAS/GRAPH Software
VTAM Definitions for IBM 3287, 3268, and 4224 Printers
You can use the following sample VTAM APPL statements with SASWTR. Use these statements if the first parameter of the DEVADDR= graphics option in your SAS job is SAS.
*-----------------------------------------------------------------* * * * This is the definition of the ACF/VTAM R2 application * definitions supported by SAS Institute, Inc.
* Use at least as many APPL statements as there are 3287 * and 3268 printers. * * Specify: GOPTIONS DEVADDR=(SAS,.,printer nodename);
* Format of labels on APPL statements: * * SASDNNN -- Where "D" represents the domain/node of the
system and "NNN" is the same as that specified on the ACBNAME=SASNNN. SASNNN ACBNAMES will be shared across domains.
* Remove the "NVPACE" specification if SCS (LU Type 1) * printers are used.* * 10/89 * *---------------------------------------------------------------*
* System (Domain) 1 Definitions: SAS1001 APPL AUTH=(ACQ,NOPASS,NVPACE,NOTSO,NOPO),EAS=1,ACBNAME=SAS001 SAS1002 APPL AUTH=(ACQ,NOPASS,NVPACE,NOTSO,NOPO),EAS=1,ACBNAME=SAS002 SAS1003 APPL AUTH=(ACQ,NOPASS,NVPACE,NOTSO,NOPO),EAS=1,ACBNAME=SAS003 SAS1004 APPL AUTH=(ACQ,NOPASS,NVPACE,NOTSO,NOPO),EAS=1,ACBNAME=SAS004 SAS1005 APPL AUTH=(ACQ,NOPASS,NVPACE,NOTSO,NOPO),EAS=1,ACBNAME=SAS005 SAS1006 APPL AUTH=(ACQ,NOPASS,NVPACE,NOTSO,NOPO),EAS=1,ACBNAME=SAS006 * System 2 Definitions (unless only one domain used): SAS2001 APPL AUTH=(ACQ,NOPASS,NVPACE,NOTSO,NOPO),EAS=1,ACBNAME=SAS001 SAS2002 APPL AUTH=(ACQ,NOPASS,NVPACE,NOTSO,NOPO),EAS=1,ACBNAME=SAS002 SAS2003 APPL AUTH=(ACQ,NOPASS,NVPACE,NOTSO,NOPO),EAS=1,ACBNAME=SAS003 SAS2004 APPL AUTH=(ACQ,NOPASS,NVPACE,NOTSO,NOPO),EAS=1,ACBNAME=SAS004 SAS2005 APPL AUTH=(ACQ,NOPASS,NVPACE,NOTSO,NOPO),EAS=1,ACBNAME=SAS005 SAS2006 APPL AUTH=(ACQ,NOPASS,NVPACE,NOTSO,NOPO),EAS=1,ACBNAME=SAS006
* Other systems should be defined in the same manner.
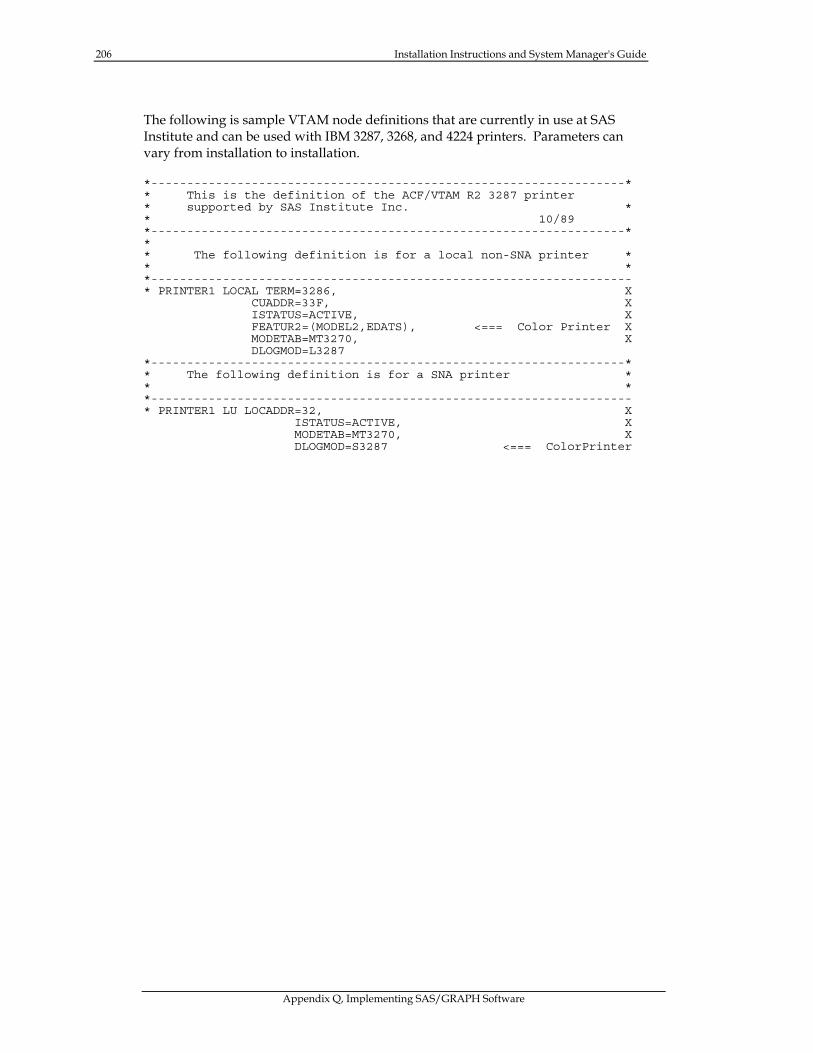
206 Installation Instructions and System Manager's Guide
Appendix Q, Implementing SAS/GRAPH Software
The following is sample VTAM node definitions that are currently in use at SAS Institute and can be used with IBM 3287, 3268, and 4224 printers. Parameters can vary from installation to installation.
*------------------------------------------------------------------* * This is the definition of the ACF/VTAM R2 3287 printer * supported by SAS Institute Inc. * * 10/89 *------------------------------------------------------------------* * * The following definition is for a local non-SNA printer * * * *------------------------------------------------------------------- * PRINTER1 LOCAL TERM=3286, X CUADDR=33F, X ISTATUS=ACTIVE, X FEATUR2=(MODEL2,EDATS), <=== Color Printer X MODETAB=MT3270, X DLOGMOD=L3287 *------------------------------------------------------------------* * The following definition is for a SNA printer * * * *------------------------------------------------------------------- * PRINTER1 LU LOCADDR=32, X ISTATUS=ACTIVE, X MODETAB=MT3270, X DLOGMOD=S3287 <=== ColorPrinter
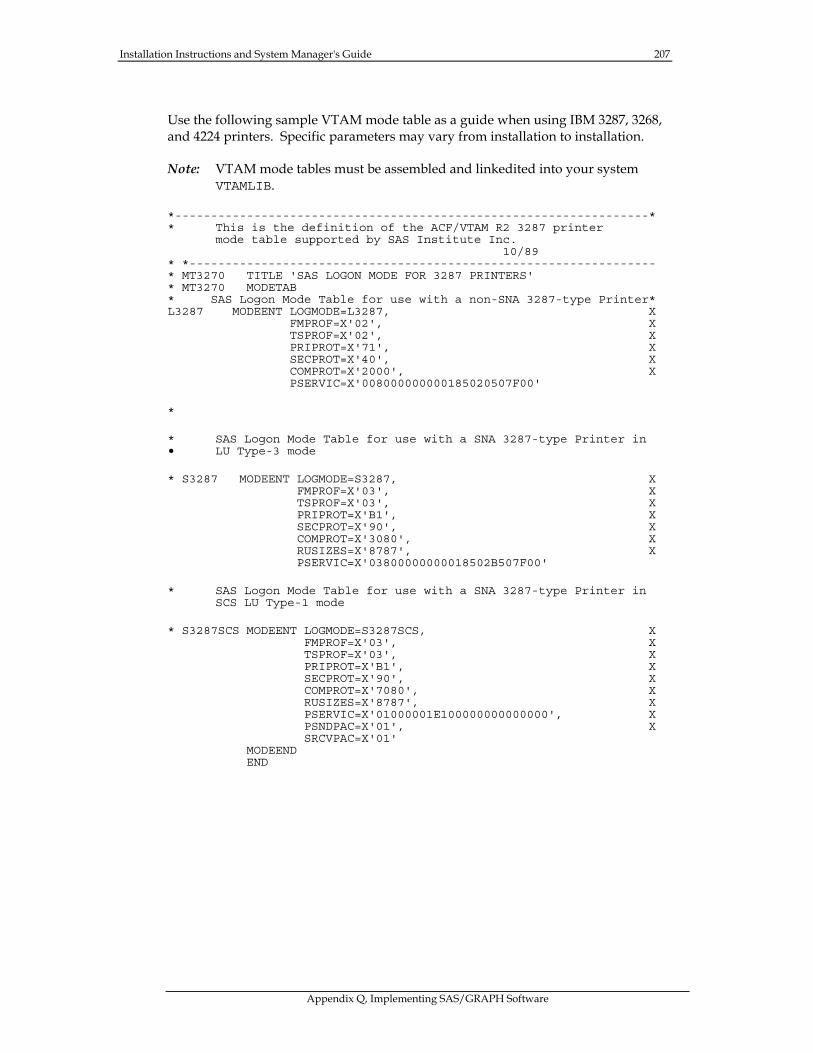
Installation Instructions and System Manager's Guide 207
Appendix Q, Implementing SAS/GRAPH Software
Use the following sample VTAM mode table as a guide when using IBM 3287, 3268, and 4224 printers. Specific parameters may vary from installation to installation.
Note: VTAM mode tables must be assembled and linkedited into your system VTAMLIB.
*------------------------------------------------------------------* * This is the definition of the ACF/VTAM R2 3287 printer mode table supported by SAS Institute Inc. 10/89 * *----------------------------------------------------------------- * MT3270 TITLE 'SAS LOGON MODE FOR 3287 PRINTERS' * MT3270 MODETAB * SAS Logon Mode Table for use with a non-SNA 3287-type Printer* L3287 MODEENT LOGMODE=L3287, X FMPROF=X'02', X TSPROF=X'02', X PRIPROT=X'71', X SECPROT=X'40', X COMPROT=X'2000', X PSERVIC=X'008000000000185020507F00'
*
* SAS Logon Mode Table for use with a SNA 3287-type Printer in • LU Type-3 mode
* S3287 MODEENT LOGMODE=S3287, X FMPROF=X'03', X TSPROF=X'03', X PRIPROT=X'B1', X SECPROT=X'90', X COMPROT=X'3080', X RUSIZES=X'8787', X PSERVIC=X'03800000000018502B507F00'
* SAS Logon Mode Table for use with a SNA 3287-type Printer in SCS LU Type-1 mode
* S3287SCS MODEENT LOGMODE=S3287SCS, X FMPROF=X'03', X TSPROF=X'03', X PRIPROT=X'B1', X SECPROT=X'90', X COMPROT=X'7080', X RUSIZES=X'8787', X PSERVIC=X'01000001E100000000000000', X PSNDPAC=X'01', X SRCVPAC=X'01' MODEEND END
208 Installation Instructions and System Manager's Guide
Appendix Q, Implementing SAS/GRAPH Software
Using SAS/GRAPH Software with GDDM
SAS Institute provides a set of drivers that interface with IBM's GDDM base product and can be used to direct output to any device supported by GDDM. The set of GDDM drivers comes standard with SAS/GRAPH software. You do not need to do anything extra to install the GDDM device drivers. Some of the GDDM device drivers are provided as an alternative to the SAS/GRAPH device drivers. For example, both the GDDMPCG and IBM3179 drivers produce graphics on an IBM 3179 Model G graphics terminal. The advantages of one over the other vary and depend on a particular site's requirements. On the other hand, some graphics devices require the use of a GDDM driver. These devices include IEEE-attached plotters (IBM 7372, IBM 6180, etc.) and IBM 3800-type laser printers (IBM 3800, 3812, 3820, etc.).
To use any of the GDDM drivers, the GDDM base product (IBM Program Number 5748-XXH) must be installed on your system. The GDDM load library is commonly installed in a system link list so that the SAS/GRAPH GDDM drivers can load the module ADMASPT. ADMASPT is GDDM's System Programmer Interface routine. If the GDDM load library is not installed in a system link list, concatenate it to the STEPLIB DD statement (if MVS batch) or use the LOAD parameter in the SAS CLIST (if running interactively under TSO).
The information in this section is discussed in the following nine tasks:
❏ GDDM nicknames
❏ GDDM tokens
❏ GDDM drivers for graphics terminals
❏ GDDM drivers for IEEE-attached plotters
❏ GDDM drivers for IBM 3287, 3268, and 4224 printers
❏ GDDM drivers for the IBM 3812 Model 2 and IBM3816 printers (with IPDS)
❏ GDDM drivers for IBM 3800-type printers (3800, 3820, etc.)
❏ Creating GDF and ADMGDF files
❏ Using SAS/GRAPH software with GDDM/PCLK
Installation Instructions and System Manager's Guide 209
Appendix Q, Implementing SAS/GRAPH Software
GDDM Nicknames
GDDM nicknames are device definitions that tell GDDM what type of device you are using, what type of graphics output to generate, and where to send the graphics output. GDDM nicknames are normally placed in a source-format sequential file with an LRECL of 80 and a RECFM of FB. You can use a partitioned data set to store nicknames as long as you specify the member name when you allocate the data set. You can name the data set containing nicknames anything you choose. However, you must allocate it (whether in batch or TSO) with a DDname of ADMDEFS. For example, if your GDDM ADMDEFS nickname file has a name of SYS1.ADMDEFS and you are running interactively under TSO, allocate your GDDM ADMDEFS nickname file as follows:
ALLOC F(ADMDEFS) DA('SYS1.ADMDEFS') SHR
The information in the ADMDEFS nickname file should be in uppercase and begin in column 2. Column 1 should be blank (or an asterisk for a comment). Nickname definitions are not required for all GDDM drivers. The drivers that require nickname definitions are those drivers that support IEEE-attached plotters, IBM 3287, 3268, and 4224 printers (when writing ADMPRINT files directly to the JES output queue), IBM 3800-type printers, and GDDM/PCLK. See the individual device sections that follow for sample nicknames.
GDDM Tokens
GDDM tokens are default device definitions stored in load module format when GDDM is installed. For graphics terminals, IEEE-attached plotters, IBM 3287, 3268, and 4224 printers, and GDDM/PCLK, the default tokens are located in the ADMLSYS1 member of your GDDM sample library. Tokens for IBM 3800-type printers are located in the ADMLSYS4 member in your GDDM sample library.
Note that not all GDDM device drivers require the use of a device token. The only device driver that requires the use of a token is the GDDMFAM4 driver, which you use for IBM 3800-type printers. The token is passed to GDDM using either the GDDMT= (or GDDMTOKEN=) parameter in the SAS GOPTIONS statement or the DEVTOK= parameter in the device nickname. See the section on IBM 3800-type printers for a further discussion on device tokens.
GDDM Drivers for Graphics Terminals
If your graphics device supports APA (All-Points-Addressable) graphics and seven colors (such as the IBM 3179 Model G, 3192 Model G, the 3270 PC/G, or the 3472 Model GC), specify the following:
GOPTIONS DEVICE = GDDMPCG;
For the IBM 3270 PC/GX, which supports 15 colors, specify the following:
GOPTIONS DEVICE = GDDMPCGX;
210 Installation Instructions and System Manager's Guide
Appendix Q, Implementing SAS/GRAPH Software
For graphics devices that support PS (Programmed Symbols) graphics and seven colors, such as the IBM 3279 Model S3G and 3270 PC, specify the following:
GOPTIONS DEVICE = GDDM79;
For monochrome graphics devices that support PS (Programmed Symbols) graphics, such as the IBM 3278 Models 2 and 4 with Programmed Symbols, specify the following:
GOPTIONS DEVICE = GDDM78;
To display graphs on the screen of a graphics terminal, you must be running interactively under TSO. The drivers mentioned previously can be used in batch but only to create members of a graphics catalog or to create GDF or ADMGDF files. To terminate a graph that is displayed on the screen of a graphics terminal, press Enter, PF3, or PF15.
Note : The GDDM drivers do not support the Version 6 SAS/GRAPH Graphics Window.
GDDM Drivers for IEEE-attached Plotters
The GDDMPLT2, GDDMPLT6, and GDDMPLT8 drivers can be used to drive 2, 6, and 8-pen plotters attached to an IBM 3179 Model G, 3192 Model G, 3270 PC/G, or 3270 PC/GX via an IEEE interface. There are two methods for sending graphics output to an IEEE-attached plotter. The first method sends the graphics output directly to the plotter. With the second method, the graph is initially displayed on the screen of the terminal and then sent to the plotter by pressing PF4 or PF16. To send a graph directly to the plotter in an interactive session, use the following GOPTIONS statement:
GOPTIONS DEVICE = GDDMPLTx GDDMN = SASPLOT;
The driver suffix should match the number of pens in the plotter. The name you specify on the GDDMN= option should match a nickname (SASPLOT, in this case) that you define within your GDDM ADMDEFS nickname file (described earlier in this section). Define the nickname of SASPLOT in the GDDM ADMDEFS nickname file as follows:
NICKNAME NAME=SASPLOT, TOFAM=1, TONAME=(*,ADMPLOT)
The keyword NICKNAME should begin in column 2 of the ADMDEFS file and the value for the NAME= parameter should match the name given in the GDDMN= option within the SAS job.
Installation Instructions and System Manager's Guide 211
Appendix Q, Implementing SAS/GRAPH Software
The second method for producing SAS/GRAPH output on an IEEE-attached plotter is to display a graph initially on the screen of the terminal and then send the graph to the plotter by pressing PF4 or PF16. For this method, specify the following:
GOPTIONS DEVICE = GDDMPCG GDDMN = * DEVADDR = (.,.,SASPLOT);
The nickname for the plotter is specified as the last parameter in the DEVADDR= option. In this example, the nickname of SASPLOT is the same nickname that you use when sending graphs directly to the plotter.
GDDM Drivers for the IBM 3287, 3268, and 4224 Printers
As alternatives to the IBM3287, IBM3268, and IBM4224 drivers (as well as SASWTR), GDDM drivers are available that produce graphics output on IBM 3287, 3268, and 4224 graphics printers. To use these drivers, specify the following:
GOPTIONS DEVICE = GDDM87 (or GDDM68, or GDDM4224) GDDMN = printer nodename or device nickname ;
For Release 6.08 of SAS/GRAPH software, the following device drivers have been added for paper size that is 8.5 inches vertically: GDDM87S, GDDM68S, and GDDM424S.
The GDDM87, GDDM87S, GDDM68, and GDDM68S drivers support four colors while the GDDM4224 and GDDM424S drivers support eight colors. The GDDMN= parameter is equivalent to specifying DEVADDR=(.,.,printer nodename or device nickname). The GDDMN= parameter can be used in one of two methods. With the first method, specify the VTAM nodename of the printer you want to use. Each printer that you are going to use with GDDM must be made known to GDDM by including the VTAM nodename of each printer in GDDM's system request queue data set.
Specifying the VTAM nodename of a printer in the GDDMN= graphics option causes an ADMPRINT file to be created (either on the TSO user's default disk pack or a public disk pack, if run in batch). In order to print the ADMPRINT file, start the GDDM utility ADMPRINT (either as a started task or as a batch job). Please note that with MVS batch jobs, GDDM no longer uses the TSO user's high-level qualifier when creating each ADMPRINT file.
As an alternative, you can specify GDDMN= device nickname. This method is most commonly used when writing ADMPRINT files directly to the JES output queue. Once on the JES output queue, the ADMPRINT file can be printed by either version 2.2 of JES328X or version 5 of VPS. To direct the ADMPRINT file to the JES output queue, specify the following:
GOPTIONS DEVICE = GDDM87 (or GDDM68, or GDDM4224) GDDMN = SPOOL;
Define the nickname of SPOOL in the GDDM ADMDEFS nickname file as follows:
NICKNAME NAME=SPOOL, FAM=2, PROCOPT=((PRINTDST,sysout class,printer destination))
212 Installation Instructions and System Manager's Guide
Appendix Q, Implementing SAS/GRAPH Software
GDDM Drivers for the IBM 3812 Model 2 and IBM 3816 Printers (with IPDS)
The IBM 3812 Model 2 and IBM 3816 printers are available with the IPDS (Intelligent Printer Data Stream) feature. The IPDS feature allows these printers to support the same type of graphics that the IBM 4224 printer supports. To send SAS/GRAPH output to the IBM 3812 Model 2 or IBM 3816 printer with the IPDS feature, specify the following:
GOPTIONS DEVICE = GDDM381p (or GDDM381L) GDDMN = IBM3812;
The GDDM381P driver defaults to portrait mode while the GDDM381L driver defaults to landscape mode.
Define the nickname of IBM3812 in the GDDM ADMDEFS nickname file as follows:
NICKNAME NAME=IBM3812, FAM=1, TOFAM=2, DEVTOK=S3812Q, TONAME=(VTAM nodename of your printer)
The token of S3812Q is for a 3812 printer attached to an SNA control unit. Check the ADMLSYS1 member of the GDDM sample library for additional 3812 device tokens. To spool the graphics file directly to the JES output queue, replace the TONAME= parameter in the nickname with:
PROCOPT=((PRINTDST,sysout class,printer destination))
GDDM Drivers for IBM 3800-Type Printers
Use the GDDMFAM4 device driver to produce SAS/GRAPH output on high-resolution graphics printers such as the IBM 3800 and 3820 laser printers. The output produced by the GDDMFAM4 driver is a bit-image, device dependent file known as an ADMIMAGE file. This file can be sent directly to a high-resolution printer using a print utility such as IBM's Print Services Facility (PSF). By default, the IBM 3800 printer produces graphics output in landscape mode on paper that is 8.5 inches vertically and 11 inches horizontally. To produce SAS/GRAPH output on an IBM 3800 printer, specify the following:
GOPTIONS DEVICE = GDDMFAM4 GDDMN = IBM3800 GDDMT = IMG240X;
The token of IMG240X is a default token supplied by IBM for a 3800 laser printer. Other default tokens for 3800-type printers can be found in the ADMLSYS4 member of the GDDM sample library.
Installation Instructions and System Manager's Guide 213
Appendix Q, Implementing SAS/GRAPH Software
Define the nickname of IBM3800 in the GDDM ADMDEFS nickname file as follows:
NICKNAME NAME=IBM3800, TONAME=(*), PROCOPT=((CDPFTYPE,PRIM), (HRIFORMT,CDPF), (HRISPILL,NO), (HRISWATH,10), (HRIPSIZE,110,75,TENTHS))
Most other IBM 3800-type printers (such as the 3820) produce graphics output in portrait format on paper that is 11 inches vertically and 8.5 inches horizontally. To produce SAS/GRAPH output on a 3820-type printer, specify the following:
GOPTIONS DEVICE = GDDMFAM4 GDDMN = IBM3820 GDDMT = IMG240;
For Release 6.08 of SAS/GRAPH software, the following device drivers have been added for IBM3820-type printers: GDDM382P (defaults to portrait mode) and GDDM382L (defaults to landscape mode).
The token of IMG240 is a default token supplied by IBM for a 3820 laser printer. Define the nickname of IBM3820 in the GDDM ADMDEFS nickname file as follows:
NICKNAME NAME=IBM3820, TONAME=(*), PROCOPT=((CDPFTYPE,PRIM), (HRIFORMT,CDPF), (HRISPILL,NO), (HRISWATH,10), (HRIPSIZE,80,105,TENTHS))
Setting the TONAME= parameter in the nickname to an asterisk (*) directs GDDM to write the ADMIMAGE graphics file to the DDname of ADMIMAGE. For example, use the following DD statement in a batch job to send output directly to a 3800-type printer:
//ADMIMAGE DD SYSOUT=A,DEST=printer destination, // DCB=(LRECL=8206,BLKSIZE=8210,RECFM=VBM)
Setting the CDPFTYPE parameter in the nickname to PRIM, which is the default, tells GDDM to write out an ADMIMAGE file as a primary page document. Primary page documents are normally printed by themselves, one to a page. To create a secondary page segment that can be included in a DCF or Script document, set the CDPFTYPE parameter in the nickname to SEC.
Setting the HRIFORMT parameter in the nickname to CDPF tells GDDM to create the ADMIMAGE file as a structured bit-map file, which most printers use. If you need an unformatted bit-map file, set the HRIFORMT parameter in the nickname to BITMAP.
Setting the HRISPILL parameter in the nickname to NO tells GDDM not to use an external spill file when building the ADMIMAGE bit-map in memory. If the HRISPILL parameter is set to YES, which is the default, graph procedures that normally produce multiple graphs produce only one graph.
214 Installation Instructions and System Manager's Guide
Appendix Q, Implementing SAS/GRAPH Software
The HRISWATH parameter in the nickname tells GDDM how many horizontal 'slices' to divide the picture into when building the bit-map in memory. Increasing this number will cause the job to use less memory but more CPU time. A good overall value is 10.
The HRIPSIZE parameter in the nickname determines the actual graph size. The first value is the width of the page (in tenths of inches). The second value is the depth of the page (in tenths of inches). Use the HRIPSIZE parameter to reduce the size of the graphics image (especially when creating secondary page segments). For example, use an HRIPSIZE setting of 50,40,TENTHS for a graph size of 5 inches horizontally and 4 inches vertically.
Creating GDF and ADMGDF Files
GDF (Graphics Data Format) and ADMGDF files are device-independent files containing general graphics orders and commands. You can create GDF and ADMGDF files with SAS/GRAPH software and GDDM but you cannot currently display or import GDF and ADMGDF files into the SAS System. To create a GDF file, use the following GOPTIONS statement:
GOPTIONS DEVICE = GDDMPCG GSFNAME = ADMPIF GSFMODE = REPLACE GSFLEN = 400 CHARTYPE = 2 NODISPLAY;
Setting GSFNAME=ADMPIF causes the GDF file to be written to the file with a DDname of ADMPIF. This should be either a sequential file or a partitioned data set with a record format of fixed block and a record length of 400. If you use a PDS to store the GDF files, specify the desired member name when you allocate the DDname of ADMPIF.
ADMGDF files are similar to GDF files except that ADMGDF files contain header information in the first 16 bytes of each record. The first eight bytes of each record contain the PDS member name and the second eight bytes contain the keyword ADMGDF. To create an ADMGDF file, specify the following:
GOPTIONS DEVICE = GDDMPCG GSFNAME = GRAF GSFMODE = REPLACE NODISPLAY ADMGDF;
Before running the job, allocate a partitioned data set with the DDname of ADMGDF. This partitioned data set must have a LRECL of 400. The members of the PDS are the actual ADMGDF files. The member name is automatically created by appending a sequence number to the end of the GSFNAME= option. For example, the preceding GOPTIONS statement, followed by a graphics procedure, creates a member with the name GRAF0000 in the partitioned data set that was allocated with the DDname of ADMGDF.
Installation Instructions and System Manager's Guide 215
Appendix Q, Implementing SAS/GRAPH Software
Using SAS/GRAPH Software with GDDM/PCLK
GDDM/PCLK is terminal emulation software for a PC or PS/2 that provides mainframe graphics support. GDDM/PCLK requires the following three parts:
❏ The GDDM base product (installed on the host) ❏ The GDDM PCLKF feature (installed on the host) ❏ The GDDM/PCLK product (installed on the PC or PS/2).
To display graphics on the monitor of a PC or PS/2 running GDDM/PCLK, specify the following:
GOPTIONS DEVICE = GDDMPCG; (or GDDMPCGX for 15 color support)
In the GDDM ADMDEFS nickname file, specify the following:
NICKNAME FAM=1, PROCOPT=((PCLK,YES))
To send SAS/GRAPH output to attached printers using GDDM/PCLK, specify the following:
GOPTIONS DEVICE = GDDMPCG GDDMN = PCPRINT;
Define the nickname of PCPRINT in the GDDM ADMDEFS nickname file as follows:
NICKNAME NAME=PCPRINT, FAM=0, TOFAM=1, DEVTOK=device token, TONAME=(*,ADMPCPRT), PROCOPT=((PCLK,YES))
To send SAS/GRAPH output to attached plotters using GDDM/PCLK, specify the following:
GOPTIONS DEVICE = GDDMPLT8 GDDMN = PCPLOT;
Define the nickname of PCPLOT in the GDDM ADMDEFS nickname file as follows:
NICKNAME NAME=PCPLOT, FAM=0, TOFAM=1, DEVTOK=device token, TONAME=(*,ADMPLOT), PROCOPT=((PCLK,YES))
Consult the GDDM/PCLK documentation for a list of valid device tokens to specify in the DEVTOK= nickname parameter. Before displaying graphics with GDDM/PCLK, allocate the DDname of ADMPC to the GDDM sample library and the DDname of ADMSYMBL to the GDDM symbol library.

216 Installation Instructions and System Manager's Guide
Appendix Q, Implementing SAS/GRAPH Software
Consult the following manuals for further information about GDDM calls, nicknames, and tokens:
❏ GDDM Base Programming Reference (SC33-0332) ❏ GDDM Installation and System Management (SC33-0321) ❏ GDDM Application Programming Guide (SC33-0337).
Part 3, Setting Up and Modifying Device Catalogs
Note: The tasks described in this section are optional.
After installing SAS/GRAPH software, you may need to create or modify device catalog entries in order to customize device driver output to your site's needs. This section gives a brief explanation of device catalogs, and how to handle situations where catalog entries may need to be modified. For complete details on managing device catalogs, refer to Chapter 25, "The GDEVICE Procedure," in SAS/GRAPH Software: Reference, Version 6 Edition and SAS Technical Report P-215, SAS/GRAPH Software: Changes and Enhancements, Release 6.07.
How Device Catalogs Are Used
In Version 6 SAS/GRAPH software, when you specify the name of a graphics device driver with the DEVICE= or TARGET= options, or when prompted, the name you specify corresponds to an entry in a device catalog. Device catalog entries contain default characteristics used by the driver. For example, the parameters can determine details such as graph size, picture orientation, default colors, and whether to send the graphics output directly to a device or store it in a file. A device catalog entry can also be set up to control the attributes of a graphics stream file or to execute the necessary host commands to send graphics output directly to the device. This feature enables you to develop applications that do not require the end user to specify special GOPTIONS or issue host commands to produce hardcopy output. You can change the characteristics used by a driver either by modifying its entry in the device catalog, or by specifying GOPTIONS that override settings in the catalog.
For example, if you specify DEVICE=HP7550, the SAS/GRAPH procedure attempts to find an entry named HP7550 in available device catalogs. The parameters found in the entry (such as the default graph size, graph orientation, or where output is sent) are used in generating the graph. If you want to change the way the driver produces output, you can use the GDEVICE procedure to modify parameters in the catalog entry, or you can override them with a GOPTIONS statement. In general, if you want to change defaults for a single session or job, you can use a GOPTIONS statement. If you want to permanently change the default parameters used by a driver, you can create a new device entry or modify an existing one.
Installation Instructions and System Manager's Guide 217
Appendix Q, Implementing SAS/GRAPH Software
An Institute-supplied device catalog, SASHELP.DEVICES, is installed and made available as part of the overall SAS/GRAPH installation process. This catalog contains over 300 entries, covering each graphics device and model that SAS/GRAPH software supports. Individual users or groups can also create their own device catalogs. These are given the names GDEVICE0.DEVICES, GDEVICE1.DEVICES and so on, through GDEVICE9.DEVICES. When a driver name is specified in a SAS program, the SAS System looks for the corresponding entry in GDEVICE0.DEVICES, GDEVICE1.DEVICES, etc. If the entry is not found in any of the user catalogs (or the catalogs do not exist), the Institute-supplied catalog, SASHELP.DEVICES, is searched.
How and When to Modify Catalog Entries
If you need to make changes to a device entry, how you do so depends on whether the changes affect an individual user or most or all users at a site. If the change affects only one user, that user should create his or her own device catalog (GDEVICE0.DEVICES), copy the device entry from SASHELP.DEVICES, and make the changes to the entry in GDEVICE0.DEVICES. Note that GDEVICE0.DEVICES, being a "personal" catalog, is usually a different catalog for each user. If the modification affects a large number of users, the SAS Installation Representative or SAS Software Representative can make modifications to an entry in SASHELP.DEVICES.
The following guidelines should be used when creating or modifying device entries:
❏ Only the SAS Installation Representative or SAS Software Representative should add or modify entries in SASHELP.DEVICES. End users should not have update access to SASHELP.DEVICES. If individual users need to make modifications, they should create their own GDEVICE0.DEVICES catalog.
❏ If a catalog entry needs to be modified, create a new entry (with a different name) and modify the new entry. By renaming modified entries, users are ensured that the original entries supplied in the SASHELP.DEVICES catalog use default settings.
❏ Any options specified in a GOPTIONS statement override equivalent parameters in device catalogs. If a parameter needs to be changed only for a single session, it is probably easier to use a GOPTIONS statement than to create a new device entry.
Examples
The following examples illustrate how to use device catalog parameters to create graphics stream files or to spool output directly to a hardcopy device. The examples first illustrate GOPTIONS and FILENAME or host statements that can be used to produce output, and then show how equivalent parameters can be specified in device entries, eliminating the need for the statements in the end users programs. For complete details on managing device catalogs, refer to Chapter 25, "The GDEVICE Procedure," in the SAS/GRAPH Software: Reference, Version 6 Edition and
218 Installation Instructions and System Manager's Guide
Appendix Q, Implementing SAS/GRAPH Software
pages 36-52 in SAS Technical Report P-215, SAS/GRAPH Software: Changes and Enhancements, Release 6.07.
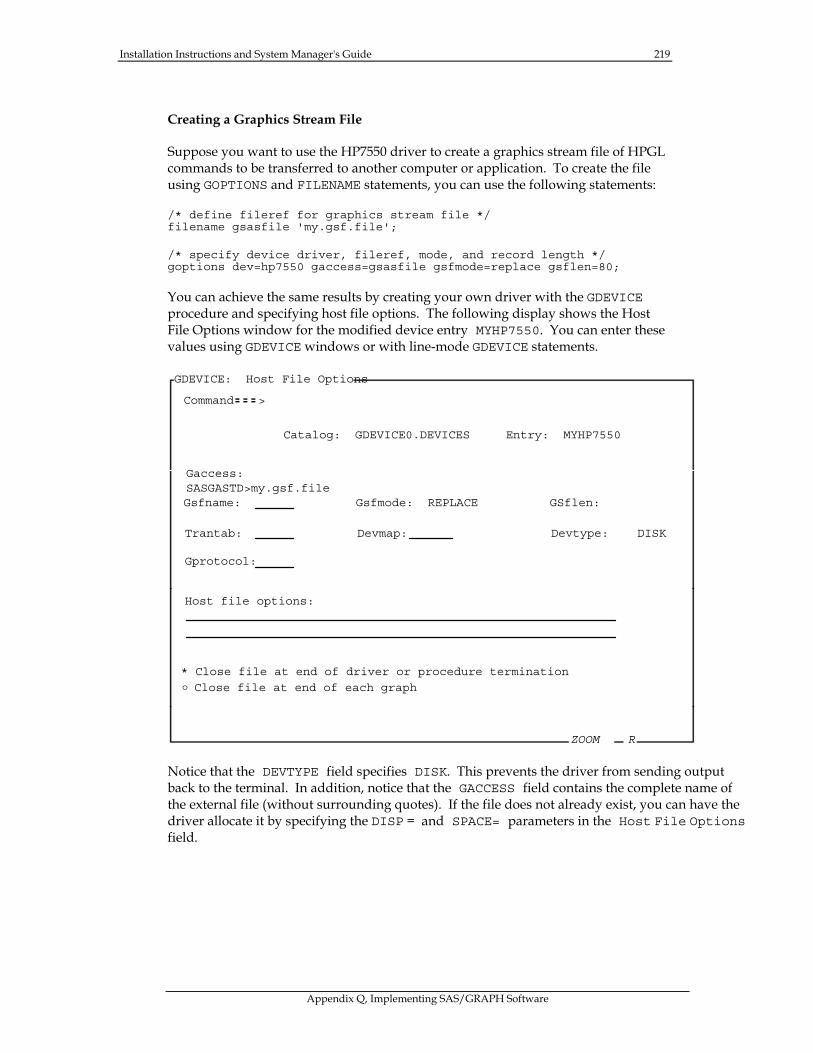
Installation Instructions and System Manager's Guide 219
Appendix Q, Implementing SAS/GRAPH Software
Creating a Graphics Stream File
Suppose you want to use the HP7550 driver to create a graphics stream file of HPGL commands to be transferred to another computer or application. To create the file using GOPTIONS and FILENAME statements, you can use the following statements:
/* define fileref for graphics stream file */ filename gsasfile 'my.gsf.file';
/* specify device driver, fileref, mode, and record length */ goptions dev=hp7550 gaccess=gsasfile gsfmode=replace gsflen=80;
You can achieve the same results by creating your own driver with the GDEVICE procedure and specifying host file options. The following display shows the Host File Options window for the modified device entry MYHP7550. You can enter these values using GDEVICE windows or with line-mode GDEVICE statements.
GDEVICE: Host File Options
Command >
Catalog: GDEVICE0.DEVICES Entry: MYHP7550
Gaccess: SASGASTD>my.gsf.fileGsfname: Gsfmode: REPLACE GSflen:
Trantab: Devmap: Devtype: DISK
Gprotocol:
Host file options:
* Close file at end of driver or procedure termination
ZOOM R
Close file at end of each grapho
Notice that the DEVTYPE field specifies DISK. This prevents the driver from sending output back to the terminal. In addition, notice that the GACCESS field contains the complete name of the external file (without surrounding quotes). If the file does not already exist, you can have the driver allocate it by specifying the DISP = and SPACE= parameters in the Host File Options field.
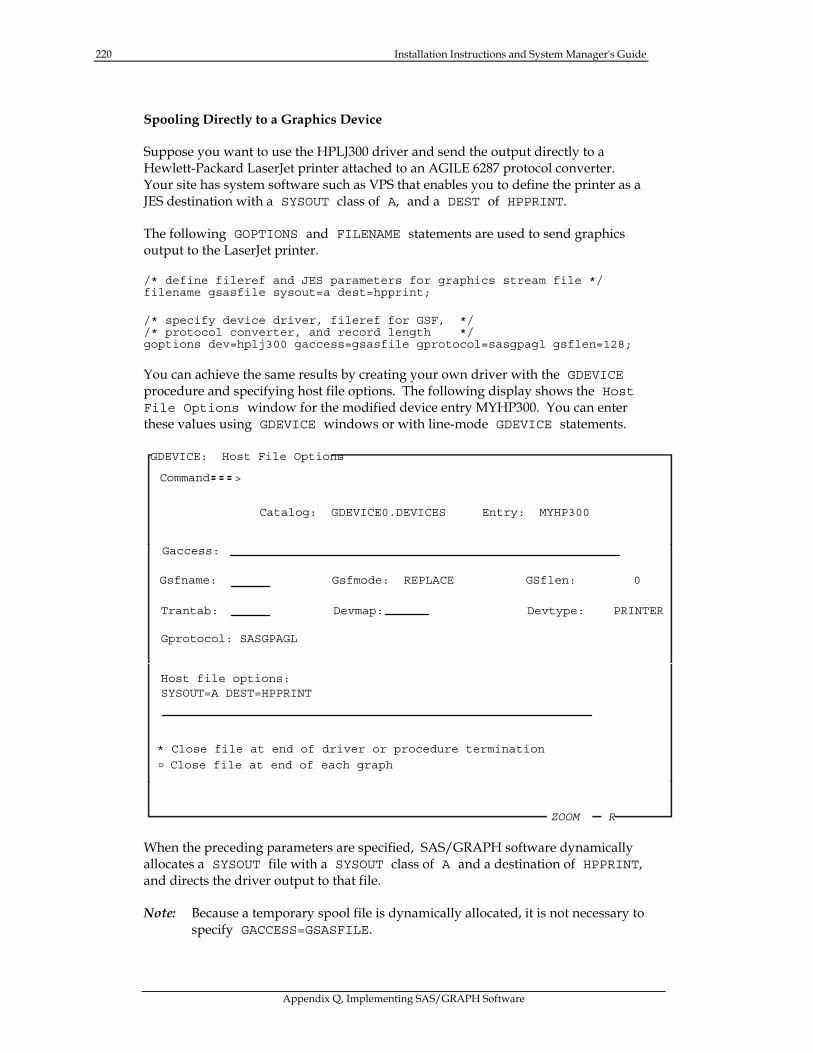
220 Installation Instructions and System Manager's Guide
Appendix Q, Implementing SAS/GRAPH Software
Spooling Directly to a Graphics Device
Suppose you want to use the HPLJ300 driver and send the output directly to a Hewlett-Packard LaserJet printer attached to an AGILE 6287 protocol converter. Your site has system software such as VPS that enables you to define the printer as a JES destination with a SYSOUT class of A, and a DEST of HPPRINT.
The following GOPTIONS and FILENAME statements are used to send graphics output to the LaserJet printer.
/* define fileref and JES parameters for graphics stream file */ filename gsasfile sysout=a dest=hpprint;
/* specify device driver, fileref for GSF, */ /* protocol converter, and record length */ goptions dev=hplj300 gaccess=gsasfile gprotocol=sasgpagl gsflen=128;
You can achieve the same results by creating your own driver with the GDEVICE procedure and specifying host file options. The following display shows the Host File Options window for the modified device entry MYHP300. You can enter these values using GDEVICE windows or with line-mode GDEVICE statements.
GDEVICE: Host File Options
Command >
Catalog: GDEVICE0.DEVICES Entry: MYHP300
Gaccess:
Gsfname: Gsfmode: REPLACE GSflen: 0
Trantab: Devmap: Devtype: PRINTER
Gprotocol: SASGPAGL
Host file options: SYSOUT=A DEST=HPPRINT
* Close file at end of driver or procedure termination
ZOOM R
Close file at end of each grapho
When the preceding parameters are specified, SAS/GRAPH software dynamically allocates a SYSOUT file with a SYSOUT class of A and a destination of HPPRINT, and directs the driver output to that file.
Note: Because a temporary spool file is dynamically allocated, it is not necessary to specify GACCESS=GSASFILE.
Installation Instructions and System Manager's Guide 221
Appendix Q, Implementing SAS/GRAPH Software
Part 4, Device HELP Screens
These instructions contain information on setting up system parameters required to use certain drivers and how to build drivers where necessary. Additional information on configuring and using graphics devices is available in SAS/GRAPH Software: Using Graphics Devices in the MVS Environment.
If you are using the SAS System interactively on a full-screen terminal, you can also obtain details on using graphics devices by entering HELP on any Display Manager command line. When the main HELP menu is displayed, select GRAPHICS, and then select GRAPHICS DEVICES AND DRIVERS from the GRAPHICS HELP menu. These HELP screens contain information on configuring specific devices and GOPTIONS required to send output to them.

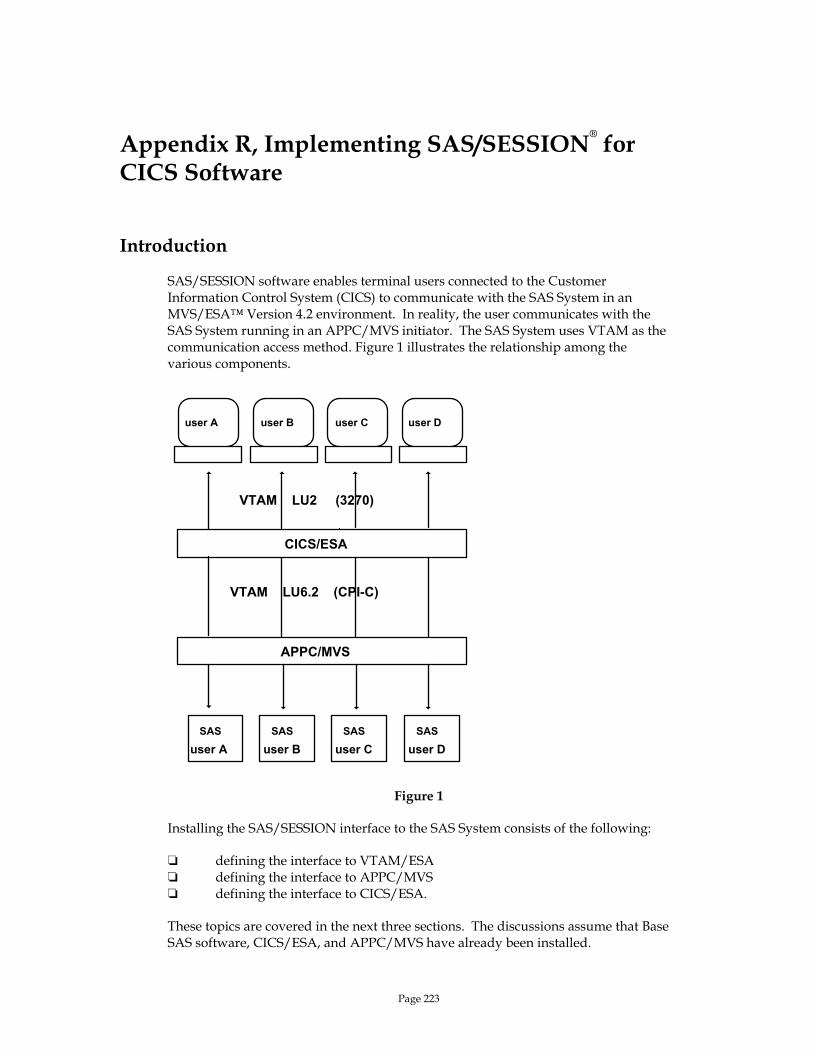
Page 223
Appendix R, Implementing SAS/SESSION® for CICS Software
Introduction
SAS/SESSION software enables terminal users connected to the Customer Information Control System (CICS) to communicate with the SAS System in an MVS/ESA™ Version 4.2 environment. In reality, the user communicates with the SAS System running in an APPC/MVS initiator. The SAS System uses VTAM as the communication access method. Figure 1 illustrates the relationship among the various components.
CICS/ESA
APPC/MVS
VTAM LU2 (3270)
VTAM LU6.2 (CPI-C)
user A user B user C user D
user A user B user C user DSASSASSASSAS
Figure 1
Installing the SAS/SESSION interface to the SAS System consists of the following:
❏ defining the interface to VTAM/ESA ❏ defining the interface to APPC/MVS ❏ defining the interface to CICS/ESA.
These topics are covered in the next three sections. The discussions assume that Base SAS software, CICS/ESA, and APPC/MVS have already been installed.
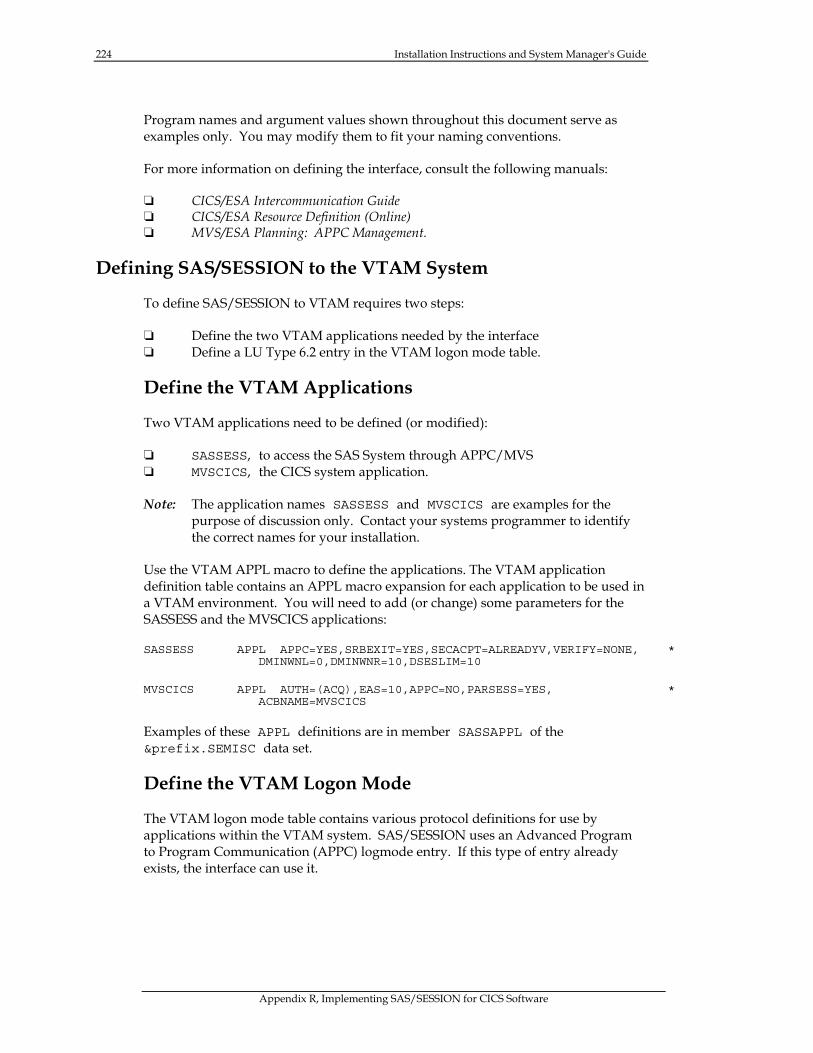
224 Installation Instructions and System Manager's Guide
Appendix R, Implementing SAS/SESSION for CICS Software
Program names and argument values shown throughout this document serve as examples only. You may modify them to fit your naming conventions.
For more information on defining the interface, consult the following manuals:
❏ CICS/ESA Intercommunication Guide ❏ CICS/ESA Resource Definition (Online) ❏ MVS/ESA Planning: APPC Management.
Defining SAS/SESSION to the VTAM System
To define SAS/SESSION to VTAM requires two steps:
❏ Define the two VTAM applications needed by the interface ❏ Define a LU Type 6.2 entry in the VTAM logon mode table.
Define the VTAM Applications
Two VTAM applications need to be defined (or modified):
❏ SASSESS, to access the SAS System through APPC/MVS ❏ MVSCICS, the CICS system application.
Note: The application names SASSESS and MVSCICS are examples for the purpose of discussion only. Contact your systems programmer to identify the correct names for your installation.
Use the VTAM APPL macro to define the applications. The VTAM application definition table contains an APPL macro expansion for each application to be used in a VTAM environment. You will need to add (or change) some parameters for the SASSESS and the MVSCICS applications:
SASSESS APPL APPC=YES,SRBEXIT=YES,SECACPT=ALREADYV,VERIFY=NONE, * DMINWNL=0,DMINWNR=10,DSESLIM=10
MVSCICS APPL AUTH=(ACQ),EAS=10,APPC=NO,PARSESS=YES, * ACBNAME=MVSCICS
Examples of these APPL definitions are in member SASSAPPL of the &prefix.SEMISC data set.
Define the VTAM Logon Mode
The VTAM logon mode table contains various protocol definitions for use by applications within the VTAM system. SAS/SESSION uses an Advanced Program to Program Communication (APPC) logmode entry. If this type of entry already exists, the interface can use it.
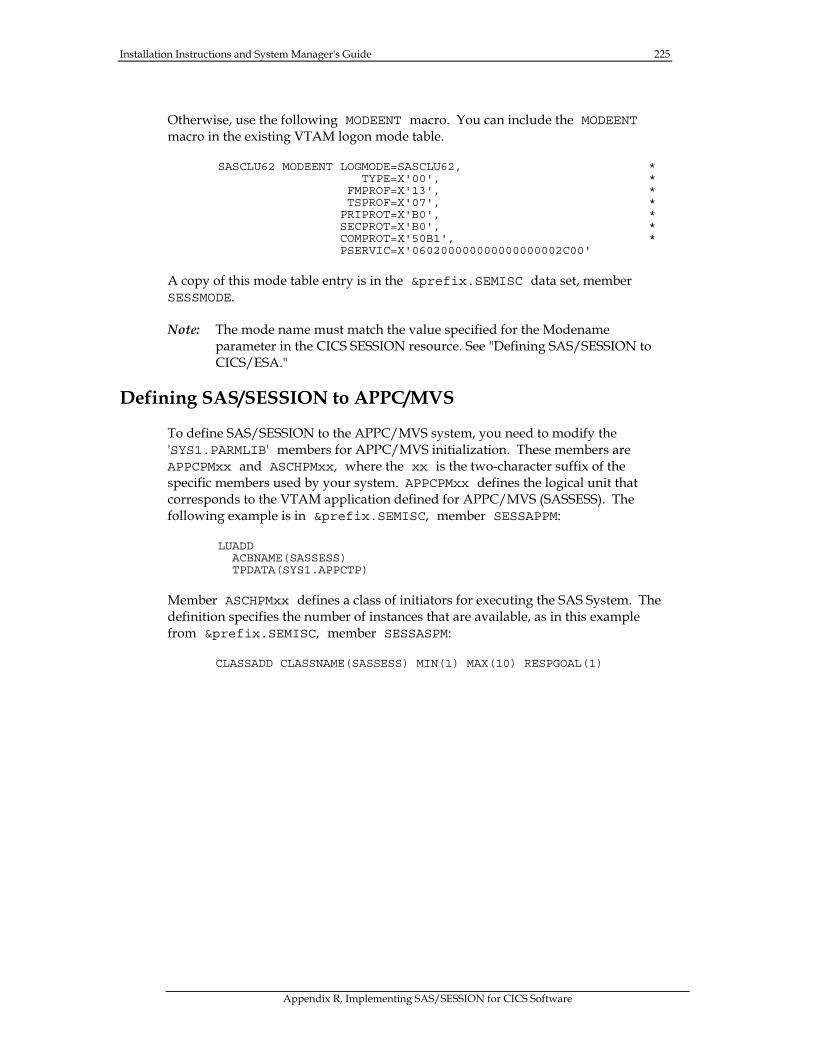
Installation Instructions and System Manager's Guide 225
Appendix R, Implementing SAS/SESSION for CICS Software
Otherwise, use the following MODEENT macro. You can include the MODEENT macro in the existing VTAM logon mode table.
SASCLU62 MODEENT LOGMODE=SASCLU62, * TYPE=X'00', * FMPROF=X'13', * TSPROF=X'07', * PRIPROT=X'B0', * SECPROT=X'B0', * COMPROT=X'50B1', * PSERVIC=X'060200000000000000002C00'
A copy of this mode table entry is in the &prefix.SEMISC data set, member SESSMODE.
Note: The mode name must match the value specified for the Modename parameter in the CICS SESSION resource. See "Defining SAS/SESSION to CICS/ESA."
Defining SAS/SESSION to APPC/MVS
To define SAS/SESSION to the APPC/MVS system, you need to modify the 'SYS1.PARMLIB' members for APPC/MVS initialization. These members are APPCPMxx and ASCHPMxx, where the xx is the two-character suffix of the specific members used by your system. APPCPMxx defines the logical unit that corresponds to the VTAM application defined for APPC/MVS (SASSESS). The following example is in &prefix.SEMISC, member SESSAPPM:
LUADD ACBNAME(SASSESS) TPDATA(SYS1.APPCTP)
Member ASCHPMxx defines a class of initiators for executing the SAS System. The definition specifies the number of instances that are available, as in this example from &prefix.SEMISC, member SESSASPM:
CLASSADD CLASSNAME(SASSESS) MIN(1) MAX(10) RESPGOAL(1)
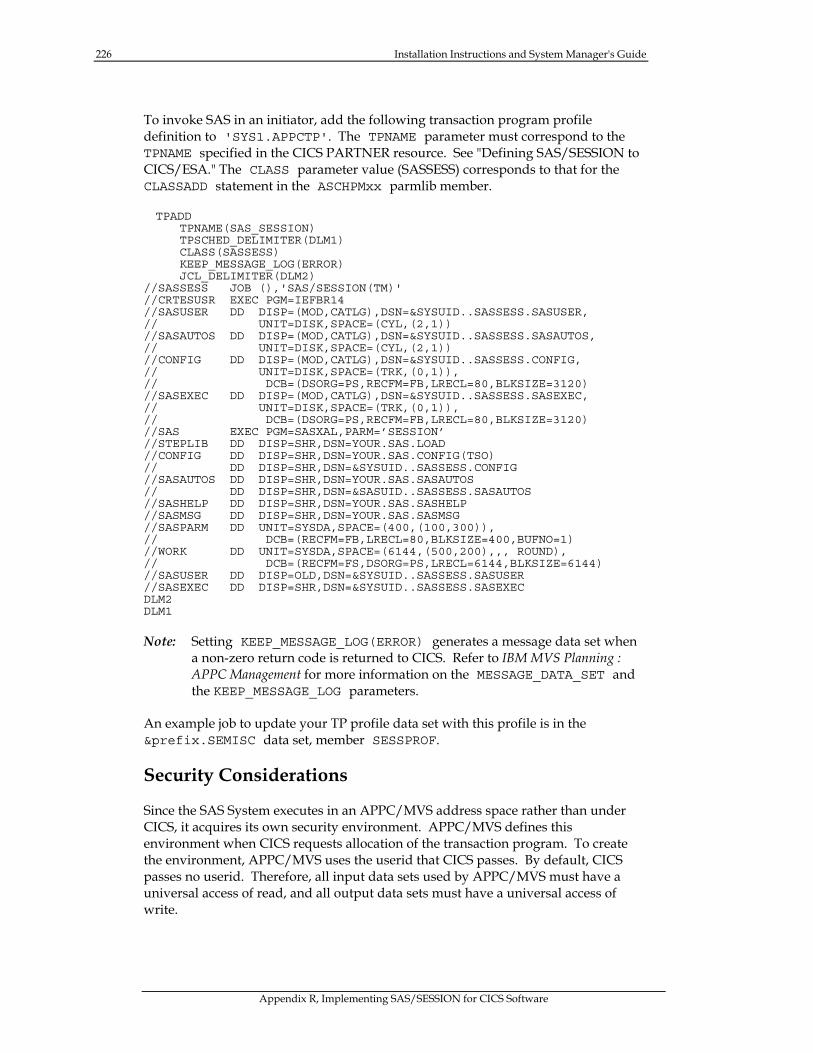
226 Installation Instructions and System Manager's Guide
Appendix R, Implementing SAS/SESSION for CICS Software
To invoke SAS in an initiator, add the following transaction program profile definition to 'SYS1.APPCTP'. The TPNAME parameter must correspond to the TPNAME specified in the CICS PARTNER resource. See "Defining SAS/SESSION to CICS/ESA." The CLASS parameter value (SASSESS) corresponds to that for the CLASSADD statement in the ASCHPMxx parmlib member.
TPADD TPNAME(SAS_SESSION) TPSCHED_DELIMITER(DLM1) CLASS(SASSESS) KEEP_MESSAGE_LOG(ERROR) JCL_DELIMITER(DLM2)
//SASSESS JOB (),'SAS/SESSION(TM)' //CRTESUSR EXEC PGM=IEFBR14 //SASUSER DD DISP=(MOD,CATLG),DSN=&SYSUID..SASSESS.SASUSER, // UNIT=DISK,SPACE=(CYL,(2,1)) //SASAUTOS DD DISP=(MOD,CATLG),DSN=&SYSUID..SASSESS.SASAUTOS, // UNIT=DISK,SPACE=(CYL,(2,1)) //CONFIG DD DISP=(MOD,CATLG),DSN=&SYSUID..SASSESS.CONFIG, // UNIT=DISK,SPACE=(TRK,(0,1)), // DCB=(DSORG=PS,RECFM=FB,LRECL=80,BLKSIZE=3120) //SASEXEC DD DISP=(MOD,CATLG),DSN=&SYSUID..SASSESS.SASEXEC, // UNIT=DISK,SPACE=(TRK,(0,1)), // DCB=(DSORG=PS,RECFM=FB,LRECL=80,BLKSIZE=3120) //SAS EXEC PGM=SASXAL,PARM=’SESSION’ //STEPLIB DD DISP=SHR,DSN=YOUR.SAS.LOAD //CONFIG DD DISP=SHR,DSN=YOUR.SAS.CONFIG(TSO) // DD DISP=SHR,DSN=&SYSUID..SASSESS.CONFIG //SASAUTOS DD DISP=SHR,DSN=YOUR.SAS.SASAUTOS // DD DISP=SHR,DSN=&SASUID..SASSESS.SASAUTOS //SASHELP DD DISP=SHR,DSN=YOUR.SAS.SASHELP //SASMSG DD DISP=SHR,DSN=YOUR.SAS.SASMSG //SASPARM DD UNIT=SYSDA,SPACE=(400,(100,300)), // DCB=(RECFM=FB,LRECL=80,BLKSIZE=400,BUFNO=1) //WORK DD UNIT=SYSDA,SPACE=(6144,(500,200),,, ROUND), // DCB=(RECFM=FS,DSORG=PS,LRECL=6144,BLKSIZE=6144) //SASUSER DD DISP=OLD,DSN=&SYSUID..SASSESS.SASUSER //SASEXEC DD DISP=SHR,DSN=&SYSUID..SASSESS.SASEXEC DLM2 DLM1
Note: Setting KEEP_MESSAGE_LOG(ERROR) generates a message data set when a non-zero return code is returned to CICS. Refer to IBM MVS Planning : APPC Management for more information on the MESSAGE_DATA_SET and the KEEP_MESSAGE_LOG parameters.
An example job to update your TP profile data set with this profile is in the &prefix.SEMISC data set, member SESSPROF.
Security Considerations
Since the SAS System executes in an APPC/MVS address space rather than under CICS, it acquires its own security environment. APPC/MVS defines this environment when CICS requests allocation of the transaction program. To create the environment, APPC/MVS uses the userid that CICS passes. By default, CICS passes no userid. Therefore, all input data sets used by APPC/MVS must have a universal access of read, and all output data sets must have a universal access of write.
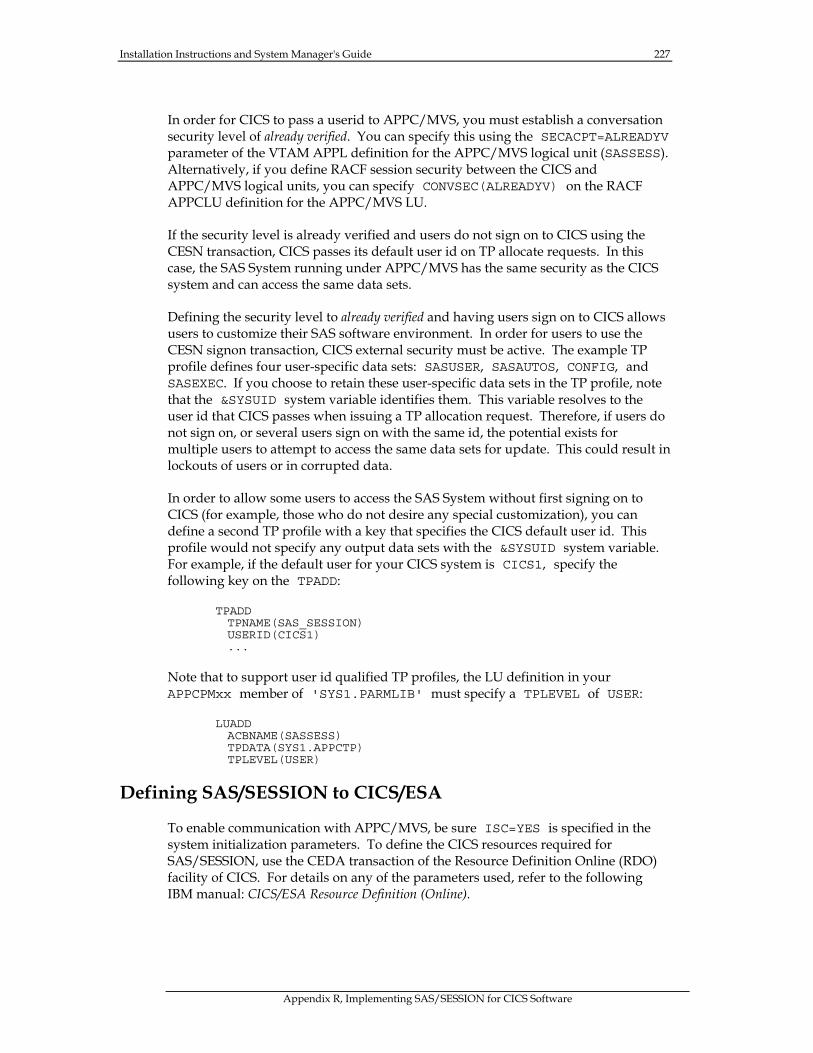
Installation Instructions and System Manager's Guide 227
Appendix R, Implementing SAS/SESSION for CICS Software
In order for CICS to pass a userid to APPC/MVS, you must establish a conversation security level of already verified. You can specify this using the SECACPT=ALREADYV parameter of the VTAM APPL definition for the APPC/MVS logical unit (SASSESS). Alternatively, if you define RACF session security between the CICS and APPC/MVS logical units, you can specify CONVSEC(ALREADYV) on the RACF APPCLU definition for the APPC/MVS LU.
If the security level is already verified and users do not sign on to CICS using the CESN transaction, CICS passes its default user id on TP allocate requests. In this case, the SAS System running under APPC/MVS has the same security as the CICS system and can access the same data sets.
Defining the security level to already verified and having users sign on to CICS allows users to customize their SAS software environment. In order for users to use the CESN signon transaction, CICS external security must be active. The example TP profile defines four user-specific data sets: SASUSER, SASAUTOS, CONFIG, and SASEXEC. If you choose to retain these user-specific data sets in the TP profile, note that the &SYSUID system variable identifies them. This variable resolves to the user id that CICS passes when issuing a TP allocation request. Therefore, if users do not sign on, or several users sign on with the same id, the potential exists for multiple users to attempt to access the same data sets for update. This could result in lockouts of users or in corrupted data.
In order to allow some users to access the SAS System without first signing on to CICS (for example, those who do not desire any special customization), you can define a second TP profile with a key that specifies the CICS default user id. This profile would not specify any output data sets with the &SYSUID system variable. For example, if the default user for your CICS system is CICS1, specify the following key on the TPADD:
TPADD TPNAME(SAS_SESSION) USERID(CICS1) ...
Note that to support user id qualified TP profiles, the LU definition in your APPCPMxx member of 'SYS1.PARMLIB' must specify a TPLEVEL of USER:
LUADD ACBNAME(SASSESS) TPDATA(SYS1.APPCTP) TPLEVEL(USER)
Defining SAS/SESSION to CICS/ESA
To enable communication with APPC/MVS, be sure ISC=YES is specified in the system initialization parameters. To define the CICS resources required for SAS/SESSION, use the CEDA transaction of the Resource Definition Online (RDO) facility of CICS. For details on any of the parameters used, refer to the following IBM manual: CICS/ESA Resource Definition (Online).
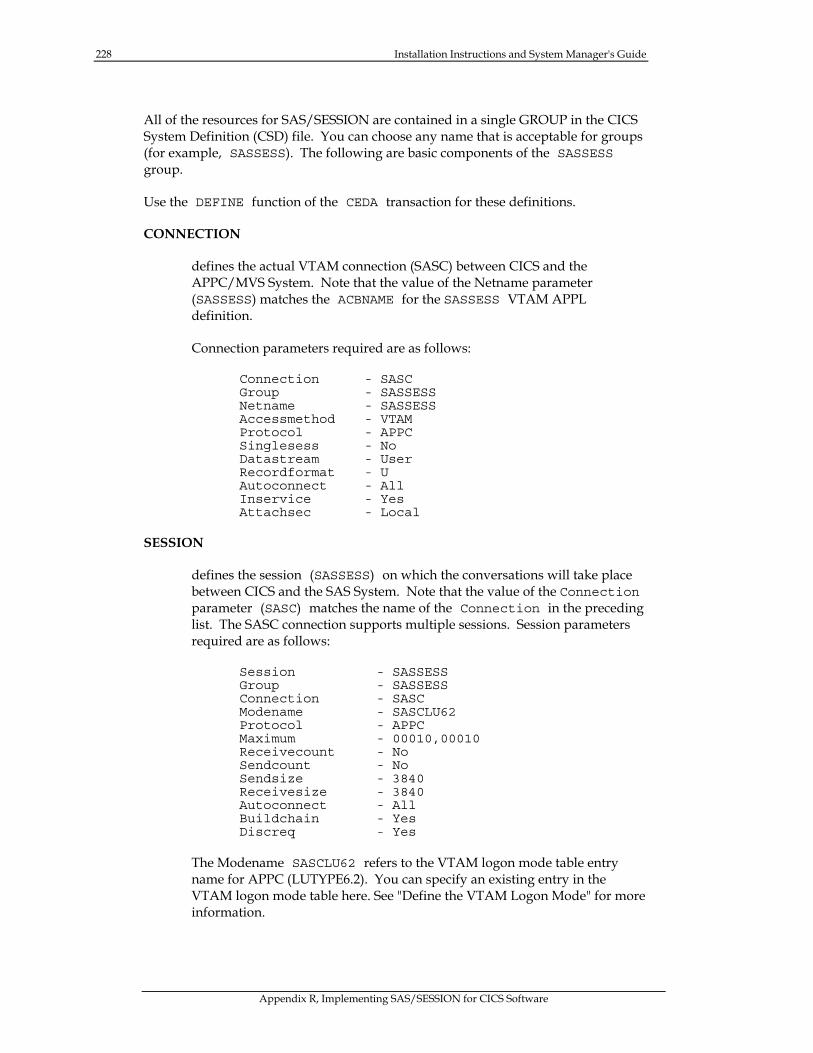
228 Installation Instructions and System Manager's Guide
Appendix R, Implementing SAS/SESSION for CICS Software
All of the resources for SAS/SESSION are contained in a single GROUP in the CICS System Definition (CSD) file. You can choose any name that is acceptable for groups (for example, SASSESS). The following are basic components of the SASSESS group.
Use the DEFINE function of the CEDA transaction for these definitions.
CONNECTION
defines the actual VTAM connection (SASC) between CICS and the APPC/MVS System. Note that the value of the Netname parameter (SASSESS) matches the ACBNAME for the SASSESS VTAM APPL definition.
Connection parameters required are as follows:
Connection - SASC Group - SASSESS Netname - SASSESS Accessmethod - VTAM Protocol - APPC Singlesess - No Datastream - User Recordformat - U Autoconnect - All Inservice - Yes Attachsec - Local
SESSION
defines the session (SASSESS) on which the conversations will take place between CICS and the SAS System. Note that the value of the Connection parameter (SASC) matches the name of the Connection in the preceding list. The SASC connection supports multiple sessions. Session parameters required are as follows:
Session - SASSESS Group - SASSESS Connection - SASC Modename - SASCLU62 Protocol - APPC Maximum - 00010,00010 Receivecount - No Sendcount - No Sendsize - 3840 Receivesize - 3840 Autoconnect - All Buildchain - Yes Discreq - Yes
The Modename SASCLU62 refers to the VTAM logon mode table entry name for APPC (LUTYPE6.2). You can specify an existing entry in the VTAM logon mode table here. See "Define the VTAM Logon Mode" for more information.
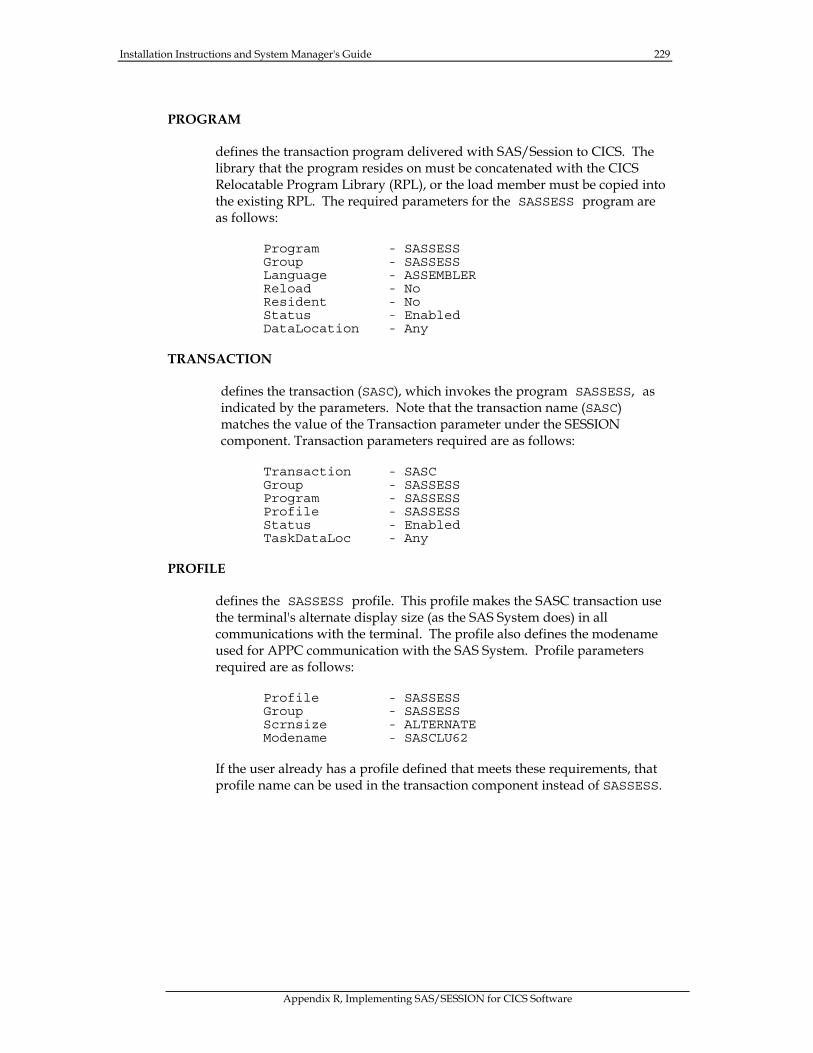
Installation Instructions and System Manager's Guide 229
Appendix R, Implementing SAS/SESSION for CICS Software
PROGRAM
defines the transaction program delivered with SAS/Session to CICS. The library that the program resides on must be concatenated with the CICS Relocatable Program Library (RPL), or the load member must be copied into the existing RPL. The required parameters for the SASSESS program are as follows:
Program - SASSESS Group - SASSESS Language - ASSEMBLER Reload - No Resident - No Status - Enabled DataLocation - Any
TRANSACTION
defines the transaction (SASC), which invokes the program SASSESS, as indicated by the parameters. Note that the transaction name (SASC) matches the value of the Transaction parameter under the SESSION component. Transaction parameters required are as follows:
Transaction - SASC Group - SASSESS Program - SASSESS Profile - SASSESS Status - Enabled TaskDataLoc - Any
PROFILE
defines the SASSESS profile. This profile makes the SASC transaction use the terminal's alternate display size (as the SAS System does) in all communications with the terminal. The profile also defines the modename used for APPC communication with the SAS System. Profile parameters required are as follows:
Profile - SASSESS Group - SASSESS Scrnsize - ALTERNATE Modename - SASCLU62
If the user already has a profile defined that meets these requirements, that profile name can be used in the transaction component instead of SASSESS.
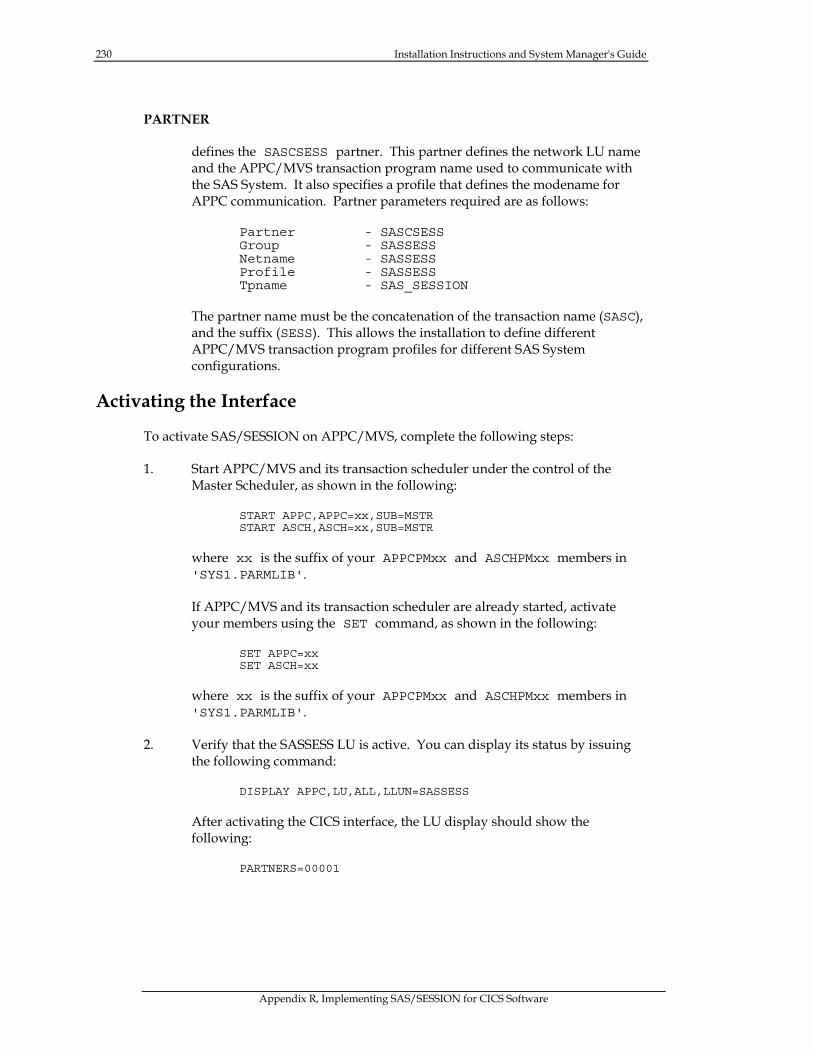
230 Installation Instructions and System Manager's Guide
Appendix R, Implementing SAS/SESSION for CICS Software
PARTNER
defines the SASCSESS partner. This partner defines the network LU name and the APPC/MVS transaction program name used to communicate with the SAS System. It also specifies a profile that defines the modename for APPC communication. Partner parameters required are as follows:
Partner - SASCSESS Group - SASSESS Netname - SASSESS Profile - SASSESS Tpname - SAS_SESSION
The partner name must be the concatenation of the transaction name (SASC), and the suffix (SESS). This allows the installation to define different APPC/MVS transaction program profiles for different SAS System configurations.
Activating the Interface
To activate SAS/SESSION on APPC/MVS, complete the following steps:
1. Start APPC/MVS and its transaction scheduler under the control of the Master Scheduler, as shown in the following:
START APPC,APPC=xx,SUB=MSTR START ASCH,ASCH=xx,SUB=MSTR
where xx is the suffix of your APPCPMxx and ASCHPMxx members in 'SYS1.PARMLIB'.
If APPC/MVS and its transaction scheduler are already started, activate your members using the SET command, as shown in the following:
SET APPC=xx SET ASCH=xx
where xx is the suffix of your APPCPMxx and ASCHPMxx members in 'SYS1.PARMLIB'.
2. Verify that the SASSESS LU is active. You can display its status by issuing the following command:
DISPLAY APPC,LU,ALL,LLUN=SASSESS
After activating the CICS interface, the LU display should show the following:
PARTNERS=00001
Installation Instructions and System Manager's Guide 231
Appendix R, Implementing SAS/SESSION for CICS Software
3. After the CICS interface is active and users begin using SAS/SESSION, periodically display the status of the transaction programs. You can display its status by issuing the following command:
DISPLAY APPC,TP,ALL,LLUN=SASSESS
For more information on managing APPC/MVS resources, refer to MVS/ESA Planning: APPC Management.
To activate SAS/SESSION on CICS, complete the following steps:
1. Install the group SASSESS by issuing the CEDA command:
CEDA INSTALL GROUP(SASSESS)
A message on the CEDA output display should say Install Successful. If it does not, check the parameters you supplied to determine the problem and reissue the command.
2. Press PF15 to terminate CEDA processing.
Note: If the auto install list includes the group SASSESS, you do not need to issue the CEDA command.
3. Issue the following command to verify the connection to APPC/MVS:
CEMT I CONN
The status of the SASC connection appears on the screen. After the group SASSESS is installed, the status shown should be Ins Acq (inservice and acquired).
Once the connection has been acquired, the sessions associated with that connection are allocated automatically.
4. Press PF15 to terminate CEMT processing.
5. Clear the display.
Executing the SAS System
To execute the SAS System, first sign on to CICS to enter your userid and password if required by your SAS administrator:
CESN
Then, use the SASC transaction to execute the SAS System:
SASC <options>
where options are any valid SAS system options.

232 Installation Instructions and System Manager's Guide
Appendix R, Implementing SAS/SESSION for CICS Software
Note: SASC refers to the CICS transaction name as defined in the Transaction component. See "Defining SAS/SESSION to CICS/ESA" for more information.
The session proceeds as if you had entered the SAS command from a TSO terminal. Refer to Chapter 2, "Using the SAS System Under MVS," in the SAS Companion for the MVS Operating System for more information.
At the end of the session, the following message indicates that all resources associated with this transaction have been released in the CICS region:
SAS/SESSION complete, return code is 0
Refer to MVS/ESA Application Development: Writing Transaction Programs for APPC/MVS for information on other return codes.
Page 233
Appendix S, Implementing SAS/SHARE® Software
Special Files for Use with SAS/SHARE Software
Customizing the Started Task JCL Procedure for a Server
Note: This task is required.
Step 1: Edit the SHREDITP member of the CNTL data set and specify the following parameter values.
❏ SASSNM= specifies the JCL procedure name and member name in the started task procedure library for the started task JCL
❏ SERVERID= specifies the default server id
Step 2: Edit and submit the SHRPOST job.
This job modifies the SAS/SHARE started task JCL procedure, member SHPROC01 in the CNTL data set, with the SHREDITP parameter values and copies the procedure to the library specified with PROCDSN.
PROCDSN= specifies the data set name of the cataloged procedure library to which the started task procedure is copied. The default is the procedure library specified for the SAS System.
Step 3: Notify the server administrator that this file has been provided.
Configuration File for a Server
Member SRVCNFG of the CNTL data set is provided as a default configuration file for a server's SAS execution. This member contains recommended SAS system option settings and is included in the CONFIG concatenation in the started task JCL procedure customized according to the procedure described in the previous section.
234 Installation Instructions and System Manager's Guide
Appendix S, Implementing SAS/SHARE Software
Customizing the SAS/SHARE Autocall Macros
Note: This task is required.
The installed SASSAML data set is an APPLSYS macro library created when you run the SASIxxxx jobs and used by the SAS/SHARE autocall macros. This library contains the required members DEFAULTS and SERVERID. These members contain instructions with examples in comment headers for adding entries to the tables used by the macros. To use this library, you must specify its name in the SHRMACS autocall macro.
Step 1: Edit the SHRMACS autocall macro (required).
Member SHRMACS in the AUTOLIB data set must contain the correct data set reference for the APPLSYS macro library. Edit this member to change the name SAS.SASSAML to the correct installed &PREFIX.SASSAML data set name for your installation.
Step 2: Notify the server administrator that this file has been provided.
Installing the SAS SVC Routine
Note: This task is required.
Step 1: Install the SAS SVC routine (required).
If you have already installed the SAS SVC for Release 6.09 SAS software, it is not necessary to repeat that now. You can find the details on installing the SAS SVC in Section II, Part 1 of this document under the heading "Installing the SAS SVC."
Release 6.09 SAS SVC is backward compatible and replaces the SAS SVC routines from previous releases. You can continue to execute previous releases of the SAS System and SAS/SHARE software with the Release 6.09 SAS SVC installed on your system.
Step 2: Verify the SVC routine SAS system options.
Be sure the SVC routine SAS system options accurately reflect the way the SAS SVC is installed. The SAS system option SVC0SVC= should be set to the number at which the SAS SVC is installed (for example, 251 or 109). If the SAS SVC is installed at 109 as an ESR SVC, the SAS system option SVC0R15= should be set to the ESR code (for example, 4).
Step 3: Verify installation on all CPUs, as needed.
If you have more than one CPU, be certain that the SAS SVC is installed on the systems that will be executing SAS/SHARE software at your installation.
Installation Instructions and System Manager's Guide 235
Appendix S, Implementing SAS/SHARE Software
Selecting Communications Access Methods to Use
Note: This task is required.
Step 1: Determine the access method to use.
Communication between a SAS/SHARE server and user is handled by a part of SAS software called a communications access method. There are four communications access methods available for use with this release of SAS/SHARE software under MVS:
a. cross-memory services b. VTAM LU 6.2 c. VTAM LU 0 d. TCP/IP.
To use the cross-memory services access method, a server and user must be running on the same MVS system.
You can choose to use one access method exclusively, or you can choose one as your primary access method and others as secondary access methods. If you choose to define primary and secondary access methods, SAS/SHARE software will attempt to establish a user-to-server connection using the primary access method first. If that attempt fails, SAS/SHARE software will then attempt to establish the connection using each of the secondary access methods in turn.
You should choose the access methods you will use based on your site's requirements and restrictions. The cross-memory access method is the default and is faster than the other access methods. However, the cross-memory access method can only be used for within-system communication and requires installation of a module in an authorized link list library and definition of an inactive MVS subsystem. The VTAM LU 6.2 access method is faster than the VTAM LU0 access method.
Step 2: Set SAS system options to specify selected access methods.
The SAS system option COMAMID= specifies which access method SAS/SHARE software should use as the primary or only access method. The SAS System options COMAUX1= and COMAUX2= specify secondary access methods. These options are specified, typically in a SAS System configuration file, by the SAS/SHARE Software Consultant.
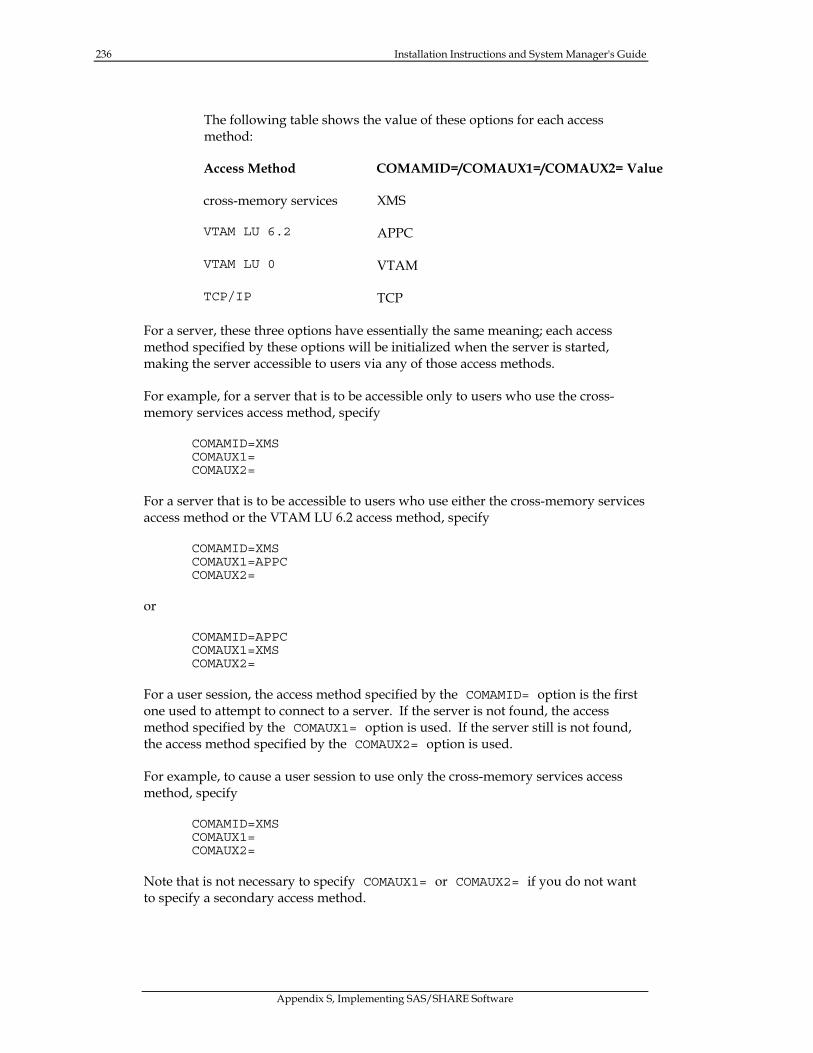
236 Installation Instructions and System Manager's Guide
Appendix S, Implementing SAS/SHARE Software
The following table shows the value of these options for each access method:
Access Method COMAMID=/COMAUX1=/COMAUX2= Value
cross-memory services XMS
VTAM LU 6.2 APPC
VTAM LU 0 VTAM
TCP/IP TCP
For a server, these three options have essentially the same meaning; each access method specified by these options will be initialized when the server is started, making the server accessible to users via any of those access methods.
For example, for a server that is to be accessible only to users who use the cross-memory services access method, specify
COMAMID=XMS COMAUX1= COMAUX2=
For a server that is to be accessible to users who use either the cross-memory services access method or the VTAM LU 6.2 access method, specify
COMAMID=XMS COMAUX1=APPC COMAUX2=
or
COMAMID=APPC COMAUX1=XMS COMAUX2=
For a user session, the access method specified by the COMAMID= option is the first one used to attempt to connect to a server. If the server is not found, the access method specified by the COMAUX1= option is used. If the server still is not found, the access method specified by the COMAUX2= option is used.
For example, to cause a user session to use only the cross-memory services access method, specify
COMAMID=XMS COMAUX1= COMAUX2=
Note that is not necessary to specify COMAUX1= or COMAUX2= if you do not want to specify a secondary access method.
Installation Instructions and System Manager's Guide 237
Appendix S, Implementing SAS/SHARE Software
To cause a user session to first try to locate a server using the cross- memory services access method and then to use the VTAM LU 0 access method if the server is not found, specify
COMAMID=XMS COMAUX1=VTAM COMAUX2=
To cause a user session to try the cross-memory services, VTAM LU 6.2, and TCP/IP access methods, in that order, specify
COMAMID=XMS COMAUX1=APPC COMAUX2=TCP
System Configuration for the Cross-Memory Access Method
Installing the SASVXMS Load Module
Note: This task is required.
To use the cross-memory access method for communication between a SAS/SHARE server and user, you must copy the module SASVXMS0 from the SAS load library data set into an authorized link list library. You must then rename this module SASVXMS (removing the 0). It is very important that you perform these two tasks in that order.
When SAS/SHARE software loads the module SASVXMS, it must find that module to be marked authorized, re-entrant, and reusable, and to have been loaded from an authorized library.
The version of SASVXMS that is distributed with each release of SAS/SHARE software can be used ONLY with that release. If you have a previous version of SAS/SHARE software installed, be sure to follow the special instructions in Step 2.
Step 1: Copy SASVXMS0 into an authorized link list library.
You can copy the module SASVXMS0 into any authorized library that is part of the link list. Alternatively, you can install this module into the link pack area. You can use any standard utility program to copy the module SASVXMS0 from your &prefix.LIBRARY data set to your link list library.
Step 2: Rename SASVXMS0.
After copying SASVXMS0 into the appropriate library, you must rename it. You can use any standard utility to rename the module.
If you do not have a previous version of SAS/SHARE software installed, rename SASVXMS0 to SASVXMS. Specify the SAS system option COMAMID=XMS as described earlier.
238 Installation Instructions and System Manager's Guide
Appendix S, Implementing SAS/SHARE Software
If you have a previous version of SAS/SHARE software installed, rename SASVXMS0 to SASVXMSn, where n is the last digit of the release of the SAS System. Specify the SAS system option COMAMID=XMSn. For example, for Release 6.08, rename SASVXMS0 to SASVXMS8 and specify COMAMID=XMS8.
Defining an Anchor Point
Note: This task is required.
To use the default cross-memory access method for communication between a SAS/SHARE server and user, you must define an anchor point. The anchor point is a place in common memory that can be located by servers and users and used to store and retrieve cross-memory communication information. If you have defined an anchor point for a previous release of SAS/SHARE software, it is not necessary to repeat this step now.
Step 1: Define an inactive MVS subsystem.
The anchor point is specified by defining an inactive MVS subsystem. Defining an inactive subsystem causes MVS to create a subsystem communications vector table (SSCVT) at IPL time. The SSCVT chain is in common memory and easily accessible to the cross-memory access method routines. The SSCTSUSE field of the SSCVT is available to these routines and is used as the anchor point for their control blocks.
You should note that, although you define a subsystem to MVS, it will never be considered active and will provide no system services because the SSCTSSVT field of the SSCVT will never be non-zero.
You can define the inactive subsystem by adding an entry to any of the following:
❏ the SCHEDULER SYSGEN macro instruction ❏ the IEFJSSNT member of 'SYS1.LINKLIB' ❏ an IEFSSNxx member of 'SYS1.PARMLIB'.
Consult MVS system initialization and tuning documentation for the details of each alternative.
Regardless of which method you choose, you must include the subsystem name and you must not specify an initialization routine name. Use the name SAS0 unless it conflicts with standards or conventions at your site.
Installation Instructions and System Manager's Guide 239
Appendix S, Implementing SAS/SHARE Software
Step 2: Set the SAS system option SUBSYSID= to specify the inactive subsystem you defined.
The name you specify for the inactive subsystem defined as the anchor point for the cross-memory access method must also be specified as the value of the SAS system option SUBSYSID=. This option is specified, typically in a SAS System configuration file, by the SAS/SHARE Software Consultant. This option is described in the Technical Report "SAS/SHARE Software for the MVS Environment."
System Configuration for the VTAM LU 6.2 Access Method
Software Requirements
In order to use the VTAM LU 6.2 access method, you must have ACF/VTAM Version 3 Release 2 or higher installed.
Configuration for a Server
Step 1: Specify the SAS system option APPCSEC=_SECURE_.
Note: This task is required.
Specify the SAS system option APPCSEC=_SECURE_ to cause the VTAM LU 6.2 access method to require users to supply a valid userid and password for the MVS system where the server is running in order to connect to the server.
Step 2: Define an LU for the Server to VTAM.
Note: This task is required.
You must define a logical unit (LU) for the server to VTAM via an APPL statement. This LU must be defined in the VTAM domain in which the server will run. The APPL statement for a server should be of the form
serverid APPL APPC=YES MODETAB=mode-table DLOGMOD=default-mode DDRAINL=NALLOW, DMINWNL=0, DMINWNR=0, DSESLIM=32767, SECACPT=CONV
serverid specifies the name of the server. This name will be specified as the value for the SERVER= option on the PROC SERVER, PROC OPERATE, and LIBNAME statements.
mode-table specifies the communications mode table in which to look up mode names
240 Installation Instructions and System Manager's Guide
Appendix S, Implementing SAS/SHARE Software
default-mode specifies the communications mode to use when no mode name is specified by a connecting user session
All APPL statements must follow a VBUILD TYPE=APPL statement.
Step 3: Define the Server as a Cross-Domain Resource.
Note: This task may be required.
If the server will be communicating with users in a different VTAM domain, you must define the server as a cross-domain resource in the users’ domain via a CDRSC statement. The CDRSC statement for a server should be of the form
serverid CDRSC CDRM=cdrmname,ISTATUS=ACTIVE
serverid specifies the name of the server. This name must be the same as that in the name field of the APPL statement for the server in the controlling domain.
cdrmname specifies the name of the CDRM in the domain in which the server is defined as an APPL.
Configuration for Users
Step 1: Define a User LU Pool to VTAM.
Note: This task is required.
You must define to VTAM a pool of logical units (LU’s) for the users via a series of APPL statements. This LU pool must be defined in the VTAM domain where the users will run. The VTAM LU 6.2 access method dynamically selects an available LU for a user in order to connect to a server. The number of LU’s in the pool should be equal to or greater than the maximum number of users that will be connected to servers via the VTAM LU 6.2 access method simultaneously. The APPL statement for a user should be of the form
lu-name APPL ACBNAME=LUPREFIX=||suffix, APPC=YES, MODETAB=mode-table DLOGMOD=default-mode, DDRAINL=NALLOW, DMINWNL=conwin, DMINWNR=0, DSESLIM=seslimit, SECACPT=CONV
lu-name is the LU name. This name must be unique across the SNA network.

Installation Instructions and System Manager's Guide 241
Appendix S, Implementing SAS/SHARE Software
LUPREFIX=||suffix specifies the ACBNAME associated with this LU. The zero filling done to produce an ABCNAME (as defined in the user application pool) using the LUPREFIX system option is dynamic based on the magnitude of the LULAST value, rather than always filling to 8 bytes as was done in previous releases. For example, a 5-byte LUPREFIX value combined with LULAST=9 is not zero-filled to produce a 6-byte ABCNAME; combined with LULAST=99 is zero filled with a single zero to produce a 7-byte ABCNAME and so on. Sites that have defined 8-byte ABCNAMES in the user application pool should ensure that LUPREFIX and LULAST values are specified that generate 8-byte ABCNAMES (LUPREFIX=SASIUO LULAST=10 for example). Although this parameter is not required, it is recommended to insulate your SAS/SHARE configuration from changes in LU naming conventions and to allow the same configuration to be shared by more than one MVS system in the SNA network (since ACBNAMEs must be unique only within a single domain). The prefix used should be specified to the SAS System via the SAS system option LUPREFIX=. The lower and upper bounds of the suffix range used should be specified via the system options LUFIRST= and LULAST=, respectively. If the ACBNAME= parameter is omitted it defaults to lu-name, which should then be constructed as a name prefix and numeric suffix.
mode-table specifies the communications mode table in which to look up mode names
default-mode specifies the communications mode to use when no mode name is specified by an incoming connection. Although mode-table and default-mode are not used by a SAS/SHARE user session, you should specify these parameters if this LU pool will be used by SAS/CONNECT remote sessions on MVS.
conwin specifies the minimum number of contention winner sessions. This value should be roughly half of seslimit.
seslimit specifies the maximum number of concurrent sessions for this LU. As a general rule of thumb, you should allow for two sessions for each SAS file or catalog entry accessed concurrently by user.
All APPL statements should follow a VBUILD TYPE=APPL statement. The ACBNAMEs for the APPLs in the pool should be constructed according to the description given for the SAS system options below.
242 Installation Instructions and System Manager's Guide
Appendix S, Implementing SAS/SHARE Software
This LU pool can also be used by the VTAM LU 6.2 access method for SAS/CONNECT remote sessions on MVS. It can also be used by the VTAM LU 0 access method for SAS/SHARE user sessions.
Step 2: Describe Your VTAM Configuration to the SAS System.
Note: This task is required.
You must describe your VTAM configuration to the SAS System via the VTAM LU 6.2 access method system options LU62MODE=, LUPREFIX=, LUFIRST=, and LULAST=.
The LU62MODE= system option specifies the name of the communications mode for the SNA session between the user and server LU’s.
The LUPREFIX= system option specifies the prefix used in constructing the LU names or ACBNAMEs for the user LU pool.
The LUFIRST= and LULAST= system options specify the first and last numeric suffix used in constructing the LU names of ACBNAMEs for the user LU pool. In dynamically selecting an LU for a user, the VTAM LU 6.2 access method constructs an ACBNAME by appending a numeric suffix (zero-padded on the left to make a total ACBNAME length of 8) between LUFIRST= and LULAST= to the value of the LUPREFIX= option.
System Configuration for the VTAM LU 0 Access Method
Software Requirements
In order to use the VTAM LU 0 access method, you must have ACF/VTAM Version 2.1 or higher installed. If a link connection is used in your network, you must have ACF/NCP/VS Version 1.3 or higher installed.
Enabling the VTAM LU 0 Access Method
In order to use the VTAM LU 0 access method, you must specify the SAS system options LU0SEC=_TRUST_ and APPCSEC=_SECURE_ in the SAS configuration file for the server. If you omit these options, the server will refuse to start.
When you specify LU0SEC=_TRUST_ for a server’s SAS execution, the VTAM LU 0 access method presents the userid of a connecting user to the server as if it had been validated with a password. The server then uses that userid to validate the user’s authority to access SAS libraries. Note that the VTAM LU 0 access method does NOT in fact validate the userid. This means that if the userid of a connecting user is defined to the security software on the server’s system and belongs to that user, the authorization checks for SAS libraries made by the server will be valid. But if the connecting user’s userid is defined but belongs to another user, the authorization check will be inappropriate and may allow the user to access SAS libraries that he would not be able to access directly.
Installation Instructions and System Manager's Guide 243
Appendix S, Implementing SAS/SHARE Software
Specifying LU0SEC=_TRUST_ preserves the behavior of the VTAM LU 0 access method and the server in previous releases of SAS/SHARE software.
Overview from the VTAM Perspective
SAS/SHARE software includes two basic functions, the server function and the user function, each of which runs as a VTAM application and must be defined to ACF/VTAM. The VTAM definition process described here must be performed by, or under the direction of, the installation systems or technical staff.
For each SAS server, a unique VTAM application ID is assigned and used as the server name. The VTAM systems programmer who defines a server name to ACF/VTAM with an APPL statement must give the name (APPL ID) to the SAS/SHARE Software Consultant for use as the server name in the SAS program that executes PROC SERVER and in SAS applications that access the server. Each SAS server should also be defined as a cross domain resource in other domains with CDRSC statements. Multiple SAS servers can be executed in the network as long as a unique VTAM APPL ID is assigned to each server and each server is defined correctly as a cross domain resource in other domains. Choose VTAM application names that avoid conflicts with your existing SAS servers.
For users, VTAM application IDs are defined to form a pool in each domain, much like the application pool defined for TSO/VTAM under MVS. All VTAM APPL IDs must be unique throughout the network. The VTAM APPL ID for each user is obtained dynamically from this pool. The number of applications defined in the pool is up to your installation, but it should be equal to or greater than the maximum number of concurrent SAS/SHARE VTAM users in the domain.
Planning Your SAS/SHARE VTAM Configuration
In order to create appropriate VTAM definitions, you first need to determine in which domains servers and users will execute, and how they will communicate. Plan to create VTAM definitions in a given domain as follows:
❏ Define an application for each server or user that will execute in that domain.
❏ Define each server that runs in another domain as a cross-domain resource. ❏ If your installation does not support dynamic CDRSC definition, define a
pool of cross-domain resources to match each user application pool defined in another domain.
Creating VTAM Definitions
Note: This task is required.
Step 1: Define applications.
The SAS/SHARE servers and users that execute in a domain should be defined as applications to the ACF/VTAM that controls that domain. This is done using a VBUILD statement followed by APPL statements.
244 Installation Instructions and System Manager's Guide
Appendix S, Implementing SAS/SHARE Software
The following information describes these ACF/VTAM network definition statements and their selected parameters for SAS/SHARE servers and users. Refer to VTAM Installation and Resource Definition (SC27-0610 for ACF/VTAM Version 2, SC23-0111 for ACF/VTAM Version 3) for additional information. These definitions should be filed in members of your installation's VTAMLST data set. The member names should be added to the configuration startup list (member ATCCONxx).
The APPL IDs and ABCNAMEs referred to should be eight characters long, using zeroes where necessary to expand numbers to the requisite number of characters.
VBUILD Statement
VBUILD TYPE=APPL
TYPE=APPL specifies that this VBUILD statement defines an application major node.
APPL Statement for a SAS Server
name APPL AUTH=(ACQ),EAS=#eas,PARSESS=YES
name specifies the unique name for the server in the network (1 to 8 characters in length).
AUTH=(ACQ) specifies that this APPL can initiate a session.
#eas specifies the estimated number of concurrent sessions the server will have with users in the network. A good estimate for this number is the number of users that you expect to be connected to the server simultaneously, multiplied by three.
PARSESS=YES specifies parallel session capability
APPL Statements for SAS/SHARE Users
There should be one APPL statement for each application in the user application pool.
name APPL ACBNAME=acbname,AUTH=(ACQ),EAS=3,PARSESS=YES
name the VTAM APPL ID for the associated SAS/SHARE user application. This name must be unique for each statement across all domains in the network (1 to 8 characters in length).
Installation Instructions and System Manager's Guide 245
Appendix S, Implementing SAS/SHARE Software
acbname consists of the LUPREFIX value and a numeric suffix beginning with LUFIRST and incrementing by 1 through LULAST.
AUTH=(ACQ) specifies that this APPL can initiate a session.
EAS=3 specifies that a user has only three sessions at a time.
PARSESS=YES specifies parallel session capability.
Step 2: Define cross domain resources.
A multiple domain network is a set of connected domains, each controlled by an ACF/VTAM with a cross domain resource manager (CDRM). In a multiple domain network, information about other domains must be provided to each ACF/VTAM.
A SAS/SHARE server in a domain must be defined as a cross domain resource (CDRSC) to any other domains from which users will attempt to access that server. This is done using a VBUILD statement followed by CDRSC statements. In each ACF/VTAM domain there should be one CDRSC statement for each SAS server within another domain with which users in this domain can have a session.
If your installation does not use dynamic CDRSC definition, then all user applications in other domains which can have sessions with servers in this domain must also be defined as cross domain resources. SAS Institute recommends that you use dynamic CDRSC definition to reduce the number of CDRSC statements needed. For further explanation of dynamic cross domain resource definition, refer to VTAM Installation and Resource Definition (SC27-0610 for ACF/VTAM Version 2, SC23-0111 for ACF/VTAM Version 3).
VBUILD Statement
VBUILD TYPE=CDRSC
TYPE=CDRSC specifies that this is a cross domain resource major node.
CDRSC Statement for SAS Servers and SAS/SHARE Users
name CDRSC CDRM=cdrmname,ISTATUS=ACTIVE
name specifies the name of a server or user application program in another domain. This name must be the same as that in the name field of the APPL statement for the SAS server or user in the controlling domain (1 to 8 characters in length).
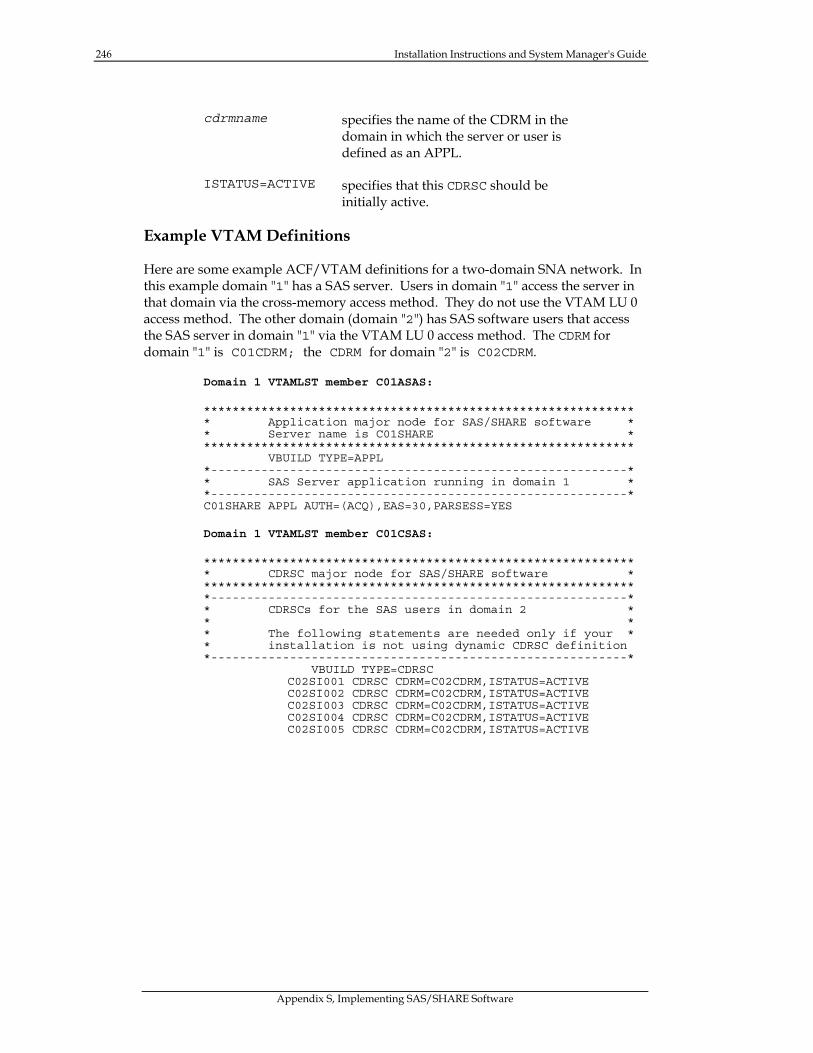
246 Installation Instructions and System Manager's Guide
Appendix S, Implementing SAS/SHARE Software
cdrmname specifies the name of the CDRM in the domain in which the server or user is defined as an APPL.
ISTATUS=ACTIVE specifies that this CDRSC should be initially active.
Example VTAM Definitions
Here are some example ACF/VTAM definitions for a two-domain SNA network. In this example domain "1" has a SAS server. Users in domain "1" access the server in that domain via the cross-memory access method. They do not use the VTAM LU 0 access method. The other domain (domain "2") has SAS software users that access the SAS server in domain "1" via the VTAM LU 0 access method. The CDRM for domain "1" is C01CDRM; the CDRM for domain "2" is C02CDRM.
Domain 1 VTAMLST member C01ASAS:
************************************************************ * Application major node for SAS/SHARE software * * Server name is C01SHARE * ************************************************************ VBUILD TYPE=APPL *----------------------------------------------------------* * SAS Server application running in domain 1 * *----------------------------------------------------------* C01SHARE APPL AUTH=(ACQ),EAS=30,PARSESS=YES
Domain 1 VTAMLST member C01CSAS:
************************************************************ * CDRSC major node for SAS/SHARE software * ************************************************************ *----------------------------------------------------------* * CDRSCs for the SAS users in domain 2 * * * * The following statements are needed only if your * * installation is not using dynamic CDRSC definition *----------------------------------------------------------*
VBUILD TYPE=CDRSC C02SI001 CDRSC CDRM=C02CDRM,ISTATUS=ACTIVE C02SI002 CDRSC CDRM=C02CDRM,ISTATUS=ACTIVE C02SI003 CDRSC CDRM=C02CDRM,ISTATUS=ACTIVE C02SI004 CDRSC CDRM=C02CDRM,ISTATUS=ACTIVE C02SI005 CDRSC CDRM=C02CDRM,ISTATUS=ACTIVE
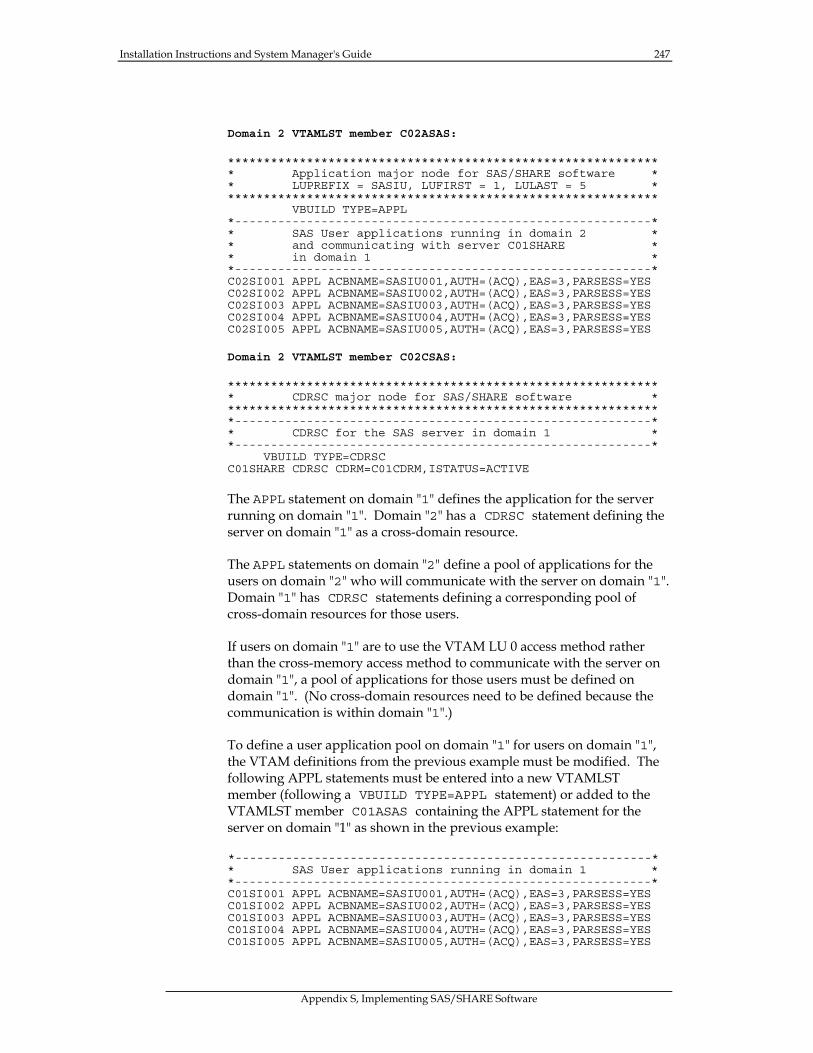
Installation Instructions and System Manager's Guide 247
Appendix S, Implementing SAS/SHARE Software
Domain 2 VTAMLST member C02ASAS:
************************************************************ * Application major node for SAS/SHARE software * * LUPREFIX = SASIU, LUFIRST = 1, LULAST = 5 * ************************************************************ VBUILD TYPE=APPL *----------------------------------------------------------* * SAS User applications running in domain 2 * * and communicating with server C01SHARE * * in domain 1 * *----------------------------------------------------------* C02SI001 APPL ACBNAME=SASIU001,AUTH=(ACQ),EAS=3,PARSESS=YES C02SI002 APPL ACBNAME=SASIU002,AUTH=(ACQ),EAS=3,PARSESS=YES C02SI003 APPL ACBNAME=SASIU003,AUTH=(ACQ),EAS=3,PARSESS=YES C02SI004 APPL ACBNAME=SASIU004,AUTH=(ACQ),EAS=3,PARSESS=YES C02SI005 APPL ACBNAME=SASIU005,AUTH=(ACQ),EAS=3,PARSESS=YES
Domain 2 VTAMLST member C02CSAS:
************************************************************ * CDRSC major node for SAS/SHARE software * ************************************************************ *----------------------------------------------------------* * CDRSC for the SAS server in domain 1 * *----------------------------------------------------------*
VBUILD TYPE=CDRSC C01SHARE CDRSC CDRM=C01CDRM,ISTATUS=ACTIVE
The APPL statement on domain "1" defines the application for the server running on domain "1". Domain "2" has a CDRSC statement defining the server on domain "1" as a cross-domain resource.
The APPL statements on domain "2" define a pool of applications for the users on domain "2" who will communicate with the server on domain "1". Domain "1" has CDRSC statements defining a corresponding pool of cross-domain resources for those users.
If users on domain "1" are to use the VTAM LU 0 access method rather than the cross-memory access method to communicate with the server on domain "1", a pool of applications for those users must be defined on domain "1". (No cross-domain resources need to be defined because the communication is within domain "1".)
To define a user application pool on domain "1" for users on domain "1", the VTAM definitions from the previous example must be modified. The following APPL statements must be entered into a new VTAMLST member (following a VBUILD TYPE=APPL statement) or added to the VTAMLST member C01ASAS containing the APPL statement for the server on domain "1" as shown in the previous example:
*----------------------------------------------------------* * SAS User applications running in domain 1 * *----------------------------------------------------------* C01SI001 APPL ACBNAME=SASIU001,AUTH=(ACQ),EAS=3,PARSESS=YES C01SI002 APPL ACBNAME=SASIU002,AUTH=(ACQ),EAS=3,PARSESS=YES C01SI003 APPL ACBNAME=SASIU003,AUTH=(ACQ),EAS=3,PARSESS=YES C01SI004 APPL ACBNAME=SASIU004,AUTH=(ACQ),EAS=3,PARSESS=YES C01SI005 APPL ACBNAME=SASIU005,AUTH=(ACQ),EAS=3,PARSESS=YES
248 Installation Instructions and System Manager's Guide
Appendix S, Implementing SAS/SHARE Software
Defining Your VTAM Configuration to the SAS System
Defining User Names
Information on the VTAM application pool for SAS/SHARE users is known to the SAS System through the SAS system options LUPREFIX=, LUFIRST=, and LULAST= which are typically specified in your system configuration file. These options describe the ACBNAMEs in the pool. The ACBNAMEs must be unique within the VTAM domain, while the APPL ID associated with each ACBNAME must be unique across all domains in the network.
The LUPREFIX= SAS system option specifies the prefix used in the ACBNAMEs for the user application pool. The LUFIRST= and LULAST= system options specify the first and last numeric suffixes used in these ACBNAMEs. The VTAM LU 0 access method constructs the user ACBNAME for communicating with a server by combining a numeric suffix between the values of the LUFIRST= and LULAST= options with the prefix specified by the LUPREFIX= system option. The zero filling done to produce an ABCNAME (as defined in the user application pool) using the LUPREFIX system option is dynamic based on the magnitude of the LULAST value, rather than always filling to 8 bytes as was done in previous releases. For example, a 5-byte LUPREFIX value combined with LULAST=9 is not zero-filled to produce a 6-byte ABCNAME; combined with LULAST=99 is zero-filled with a single zero to produce a 7-byte ABCNAME and so on. Sites that have defined 8-byte ABCNAMES in the user application pool should ensure that LUPREFIX and LULAST values are specified that generate 8-byte ABCNAMEs (LUPREFIX=SASIUO LULAST=10, for example).
Defining Server Names
The VTAM systems programmer who defines a server name to ACF/VTAM with an APPL statement must give the name (APPL ID) to the SAS/SHARE Software Consultant for use as the server name in the SAS program that executes PROC SERVER and in SAS applications that access the server.
System Configuration for the TCP/IP Access Method
Software Requirements
The SAS TCP/IP access method for MVS uses routines in the SAS/C transient library for communication services. This library in turn relies on an underlying layer of TCP/IP communication software such as IBM TCP/IP Version 2 for MVS. TCP/IP communications software handles the actual communications.
The SAS/C transient library has an open architecture that permits the use of TCP/IP products from different vendors. Vendors enable the transient library to utilize their communication software by providing an appropriate SAS/C transient library communications interface module. SAS Institute provides an interface module for IBM TCP/IP in the transient library.
Installation Instructions and System Manager's Guide 249
Appendix S, Implementing SAS/SHARE Software
To use the TCP/IP access method for MVS your site must have one of the following:
❏ IBM TCP/IP Release 2.0 or higher ❏ other communication software that supplies the required interface module.
The TCPIPMCH Option
If your site runs multiple instances of TCP/IP simultaneously, you can use this option to specify which TCP/IP to use. The value that you specify is the name of the started task for the TCP/IP that you want to use.
The value that you specify is stored into the SAS/C environment variable TCPIP_MACH. TCPIP_MACH defines the name of the address space that is running TCP/IP.
If the TCPIP_MACH environment variable is not defined, the value that SAS uses depends on which TCP/IP is used. If Interlink TCP/IP is used, then SAS uses the value ACSS; for all other TCP/IPs, SAS uses the value TCPIP.
System Configuration for TCP/IP
Specify the SAS System Option TCPSEC=_SECURE_ for the Server Execution
Note: This task is required.
Specify the SAS system option TCPSEC=_SECURE_ to cause the TCP/IP access method to require users to supply a valid userid and password for the MVS system where the server is running in order to connect to the server.
Installing the SAS/C Transient Library
Note: This task is required.
Under MVS, the TCP/IP access method requires the SAS/C transient library, release 5.50 or later. It is included with both the SAS/SHARE and SAS/CONNECT products.
If your site has installed release 5.50 of the SAS/C transient library, you must either replace it with the included transient library (see installation below) or apply zap Z5500974 to your installed library.
If your site does not have this library installed or if your site has an earlier version installed, you must install the included transient library as follows:
250 Installation Instructions and System Manager's Guide
Appendix S, Implementing SAS/SHARE Software
Step 1: Install the SAS/C transient library
The CNTL data set member ULCTRANL contains JCL updated with job, &_prefix and allocation information you supplied in the SASEDITP member. If you run this job as supplied, it unloads the SAS/C Transient Library Version 5.50 or later from your install tape to a data set named &prefix.SASC.TRANSLIB.
If you desire a different name for the library change the DSN= on the SASCTRAN DD statement in the IEFBR14 step, and on the DDOT0 DD statement in the IEBCOPY step.
Submit the job and verify successful completion.
Step 2: Allocate the SAS/C transient library for SAS execution
Alter your SAS CLIST to add a CTRANS allocation as follows:
ALLOC F(CTRANS) DA(‘your.sasc.translib’) SHR &SU11
Alter your SAS cataloged procedure to allocate the SAS/C Transient Library as follows:
//CTRANS DD DSN=your.sasc.translib, DISP=SHR
Note: If you choose to install your SAS/C Transient Library to a link list data set, you do not need to allocate it in your CLIST and cataloged procedure.
Specify Server Names and Ports
Note: This task is required.
To configure your installation for the TCP/IP access method, specify SAS/SHARE server names and port assignments. The server names and port assignments for the TCP/IP access method are defined in the services file (see "Network Configuration Data for TCP/IP" for more information on this file). A server name must be 1 to 8 characters in length. The first character must be a letter or underscore. The remaining seven characters can include letters, digits, underscores, the dollar sign ($) or the at sign (@).
Ensure TCP/IP Configuration Data Is Accessible
Note: This task is required.
The TCP/IP access method requires that certain data sets containing configuration data be available to the SAS System. The following section, "Network Configuration Data", lists each data set and how the SAS System searches for each one. The SAS System locates these data sets by their common data set name prefix. One of the methods below must be used to inform SAS of the data set name prefix of these data sets.
Installation Instructions and System Manager's Guide 251
Appendix S, Implementing SAS/SHARE Software
Most sites already have these data sets available for existing TCP/IP applications. Furthermore, if your site already has TCP/IP applications running under the SAS/C library, this step was probably completed when it was installed.
Method 1: Use the default high-level qualifier, ETC, or the default prefix, TCPIP.
The easiest way to configure your system is to give the configuration data sets the ETC high-level qualifier, for example, ETC.HOSTS, and ETC.SERVICES. If this convention is not possible at your site and there are no conflicting DS names with the ETC high-level qualifier, you may utilize the default prefix to produce names like TCPIP.ETC.HOSTS.
For either style of default naming convention there are two restrictions. In each SAS session that acts as a server or user execution, the TCPIPPRF= option must not be used to override the default value of the TCP/IP prefix, "TCPIP". Also you must not apply the zap to change the default value of the TCP/IP prefix in the transient library.
Method 2: Zap the default TCP/IP prefix to your prefix
The default TCP/IP prefix is stored in a 26-character string array in L$CNDBA in the SAS/C transient library. You may change this value to suit your site's choice for configuration data set name prefix. For example, if names of the form SYS.PROD.CONFIG.ETC.SERVICES are desired, change the TCP/IP prefix to "SYS.PROD.CONFIG". Apply zap number Z5504151 for this purpose.
Method 3: Use the TCPIPPRF= option to set your TCP/IP prefix
The TCPIPPRF= system option is an initialization time option that explicitly sets the TCP/IP prefix for that SAS session. Each SAS session that acts as a server or user employing the TCP/IP access method must set this option to the site value at initialization time. For example, if the names of you configuration data sets have the form SYS2.VER2.TCP.ETC.HOSTS, set the option thusly: TCPIPPRF=SYS2.VER2.TCP
This option is intended primarily for additional flexibility when more than one set of TCP/IP configuration data sets is available at a site.
Create an ETC.RESOLV.CONF File for Name Resolution
Note: This task is optional.
If you want to use the resolver for name resolution, create a <prefix.>ETC.RESOLV.CONF file. See the subsection below, "Finding Host Names and Addresses" for more information about name resolution.
IBM TCP/IP sites do not need this file. They can use the pre-existing <prefix.>TCPIP.DATA file to supply resolver configuration.
252 Installation Instructions and System Manager's Guide
Appendix S, Implementing SAS/SHARE Software
Allocate the SASCTCPE DDName in SAS Sessions that Use the TCP/IP Access Method
Note: This task is optional.
Errors that occur in SAS/C transient library routines that support the TCP/IP access method are logged to the SASCTCPE DDName. In UNIX terminology, this destination is the standard error output for those routines.
If you experience unusual TCP/IP communication conditions, define this DDName to a SYSOUT data set or permanent file in the server's and/or user's SAS execution. This will aid in problem determination and prevent confounding error messages concerning the lack of a defined error message file.
Network Configuration Data for TCP/IP
The operation of the TCP/IP access method depends on its ability to access the configuration information for a site. This section discusses the location of site configuration files and provides a detailed explanation of how the SAS/C transient library finds these files.
You should have already created the relevant files this section discusses when you installed your communications software, such as IBM TCP/IP.
Configuration Data Sets
On a UNIX operating system, the following five data sets usually contain site-dependent configuration information for TCP/IP.
❏ /etc/hosts ❏ /etc/networks ❏ /etc/services ❏ /etc/protocols ❏ /etc/resolv.conf.
The TCP/IP access method uses equivalent data sets under MVS. However this access method does not utilize the /etc/networks or /etc/protocols files, they are listed here for sake of completeness.
The MVS file system differs from the UNIX file system, and local security or organization considerations can affect how data sets are named. Although the name of the data set may be different, the data set that contains site configuration information is in the same format as the equivalent data set in a UNIX operating system.
Installation Instructions and System Manager's Guide 253
Appendix S, Implementing SAS/SHARE Software
Search Logic
Under MVS, the data set that contains configuration information usually has a name that is derived from the equivalent UNIX filename. For example, the data set name ETC.HOSTS is derived from the UNIX filename /etc/hosts.
The transient library uses the following methods to look for each of the configuration data sets.
/etc/services
The transient library looks for the following data set names while searching for the MVS data set that is equivalent to /etc/services:
❏ <TSO prefix>.ETC.SERVICES under TSO or <userid>.ETC.SERVICES under batch execution
❏ ETC.SERVICES, if the TCP/IP prefix has the default value, TCPIP.
❏ <TCP/IP prefix>.ETC.SERVICES, if <TCP/IP prefix> is not blank.
/etc/hosts
The transient library looks for the following data set names while searching for the MVS data set that is equivalent to /etc/hosts:
❏ <TSO prefix>.ETC.HOSTS under TSO or <userid>.ETC.HOSTS under batch execution
❏ ETC.HOSTS, if the TCP/IP prefix has the default value, TCPIP.
❏ <TCP/IP prefix>.ETC.HOSTS, if <TCP/IP prefix> is not blank.
/etc/resolv.conf
The transient library looks for the following data set names while searching for the MVS data set that is equivalent to /etc/resolv.conf:
❏ <TSO prefix>.ETC.RESOLV.CONF under TSO or <userid>.ETC.RESOLV.CONF under batch execution
❏ ETC.RESOLV.CONF, if the TCP/IP prefix has the default value, TCPIP.
❏ <TCP/IP prefix>.ETC.RESOLV.CONF, if <TCP/IP prefix> is not blank.
When the library finds a data set with one of the above names, the name is retained for the duration of the SAS execution. You may need to restart SAS to cause it to find a different filename.
254 Installation Instructions and System Manager's Guide
Appendix S, Implementing SAS/SHARE Software
Finding Host Names and Addresses
In the UNIX environment, programs that need host names and addresses may use the /etc/hosts file, or they may call the resolver to contact the name server for the host name information.
If you are running a name server, the name server addresses are determined from the /etc/resolv.conf file. If this file does not exist and you are using IBM’s TCP/IP, the TCPIP.DATA file is used instead to determine resolver configuration and IBM defaults. The TCP/IP access method only recognizes the first three name servers specified in this file. Both the UNIX operating system and the access method have a limit of three name servers.
Note that the transient library does not support the IBM TCPIP files, HOSTS.LOCAL and HOSTS.SITEINFO. The previous SAS TCP/IP access method used these files through Pascal transient library services. Sites that use these files must either switch to using name servers or create an equivalent ‘/etc/hosts’ file.
The SAS/C transient library has default logic for finding host names and addresses. It uses this logic when interfacing to IBM TCP/IP. Other TCP/IP vendors may use this logic, augment it, or replace it. Refer to their documentation for details.
The default logic uses the following algorithm:
1. It looks for the /etc/resolv.conf file, using the rules listed above. If it does not find this file, it goes to step 2. Otherwise, if the “nameserver” statement in this data set specifies the use of the resolver and name server, it performs the requested queries and returns any answer it receives. If attempts to connect to the nameservers are refused, it goes to step 3.
2. It looks for a data set in the format of the IBM TCP/IP file TCPIP.DATA. The search rules for this data set are those used by IBM TCP/IP:
a. It looks for <TSO prefix>.TCPIP.DATA under TSO or <userid>.TCPIP.DATA under batch execution.
b. It looks for <TCP/IP prefix>.TCPIP.DATA. If the NSINTERADDR statement in this data set specifies the use of the resolver and name server, the library performs the specified queries. It returns any answer it receives. If attempts to connect to the nameservers are refused, it goes to step 3.
3. It looks for an /etc/hosts file, using the rules listed above. If it finds an /etc/hosts file, it returns the result, including failure.
The determination of the domain name in name server queries follows the same logic as the UNIX operating system in using the ”domain” statement of the /etc/resolv.conf file, or the DOMAINORIGIN statement of TCPIP.DATA.
Installation Instructions and System Manager's Guide 255
Appendix S, Implementing SAS/SHARE Software
The ICSRSLV Option
Note: This option is available for Interlink sites only.
The ICSRSLV option enables sites that use Interlink TCP/IP to specify when or if the ICS name resolver is called to translate an IP address to a name.
The ICSRSLV option can be specified as part of a configuration file or as a SAS invocation option.
The syntax for the ICSRSLV option is as follows:
ICSRSLV=ONLY|FIRST|LAST|NEVER
where:
❏ ONLY specifies that only the ICS name resolver is called
❏ FIRST specifies that the ICS name resolver is called first. If there is an error, the SAS/C resolver is called.
❏ LAST specifies that the SAS/C resolver is called first. If there is an error, the ICS name resolver is called.
❏ NEVER specifies that the ICS name resolver is never called. The SAS/C resolver is always called.
If you do not specify a value for ICSRSLV=, then SAS acts as if ONLY had been specified.

Page 257
Appendix T, Implementing SAS/TOOLKIT® Software
The SAS/TOOLKIT installation CNTL data set for each language contains sample JCL members that include in-stream cataloged procedures. To make it easier for your users to take advantage of the SAS/TOOLKIT product, you can customize these cataloged procedures for your site and install them in your standard cataloged procedure library.
The member APROC in the &prefix.TOOLKIT.ASM.CNTL library contains the definitions of the cataloged procedures UWASM and UWLINKA. These are needed by SAS/TOOLKIT assembler users.
The member CPROC in the &prefix.TOOLKIT.C.CNTL library contains the definitions of the cataloged procedures UWC, UWCLINK, and UWLINKC. These are needed by SAS/TOOLKIT SAS/C users.
The member PPROC in the &prefix.TOOLKIT.PLI.CNTL library contains the definitions of the cataloged procedures UWPLI and UWLINKP. These are needed by SAS/TOOLKIT PL/I users.
The member FPROC in the &prefix.TOOLKIT.FORT.CNTL library contains the definitions of the cataloged procedures UWFORT and UWLINKF. These are needed by SAS/TOOLKIT FORTRAN users.
In all cases, the procedures are defined as in-stream procedures. You must remove the PEND line as you add each member to the cataloged procedure library at your site. Also, follow the notes in the cataloged procedure text to see where you need to change data set names, entry points, etc. Any lowercase data set names should be changed to the correct data set names for your installation.

Page 259
Appendix U, Implementing SAS/TUTOR® Courses
Verifying Data Set Access for Users
Note: This task is required.
If your installation uses IBM's RACF or other security software, insure that users have appropriate access rights to the installed data sets as follows:
1. Give student users READ access to:
&prefix.CBT.*
2. Give student users WRITE access to:
&prefix.CBT.CNTL (the control library)
Initializing the SAS/TUTOR System
Note: This task is required.
1. Once proper authorization has been assigned as previously described, initialize the SAS/TUTOR system by invoking the SASTUTOR CLIST at the system prompt. The SASTUTOR CLIST was copied to a CLIST library as specified in SASEDITP during installation.
2. On the Course Management System initialization screen, enter the password:
SAS$INIT
3. If prompted, enter the location of the control library (&prefix.CBT.CNTL) without using quotation marks. A message informs you when the SAS/TUTOR system is initialized.
4. Select the option Initialize a Course from the Course Management System Main Menu.
5. Enter the ID of each course you installed (for example, CBT101).
6. If prompted, specify or verify the fully qualified MVS data set names where course files were installed.
7. When you have initialized all courses, exit the SASTUTOR CLIST.
You have now completed initialization of your SAS/TUTOR courses.

260 Installation Instructions and System Manager's Guide
Appendix U, Implementing SAS/TUTOR Courses
Verifying Installation and Initialization of SAS/TUTOR Courses
Note: This task is required.
1. At the operating system prompt, invoke the SASTUTOR CLIST.
2. If the SAS/TUTOR system is properly installed and initialized, you should be taken to the Course Management System Main Menu because you are listed as a Course Administrator. Select the option Take a Course.
3. If courses are properly initialized, a menu of installed courses is displayed.
Adding a Course Administrator to the SAS/TUTOR System
Note: This task is optional.
1. At the operating system prompt, invoke the SASTUTOR CLIST.
2. From the Course Management System Main Menu, select Update the Course Administrator List.
3. Enter the user ID of additional course administrators. You can enter up to eight user IDs.
Note: Once a user ID is listed in the course administrator list, that individual is automatically taken to the Course Management System Main Menu each time he or she issues the SASTUTOR command.
Each course administrator has authority to perform the following tasks:
❏ add to or remove a course from the SAS/TUTOR Course Selection Menu ❏ activate, modify, and use student tracking system ❏ add or remove any logon ID from the course administrator list.
Restoring Tracking Data from Release 6.08 to Release 6.09
You can use your Release 6.08 tracking data by following these steps at any time after installing and initializing the SAS/TUTOR system.
1. Access Release 6.09 of the SAS System.
2. Assign librefs to the SAS/TUTOR control libraries for both Release 6.08 and Release 6.09 as follows:
libname OLD 'SAS-data-library'; /* Release 6.08 data */ libname NEW 'SAS-data-library'; /* Release 6.09 data */
Installation Instructions and System Manager's Guide 261
Appendix U, Implementing SAS/TUTOR Courses
3. Submit the following SAS program to append Release 6.08 tracking data to the Release 6.09 tracking data set:
proc append base=NEW.TRACK data=OLD.TRACK; proc sort data=NEW.TRACK noduplicates; by TRKVAR; run;
Renaming SAS/TUTOR Data Sets
The installation process creates a SAS data library, data set &prefix.CBT.CNTL, which all SAS/TUTOR courses use. This SAS library contains student records and other administrative data needed by the course administrator.
The installation process stores pointers in the &prefix.CBT.PROG.MAIN SAS library pointing to the control library and each course library. The MVS data sets containing SAS/TUTOR cannot be renamed without invalidating the pointers. If renaming (NOT recommended) becomes mandatory, the pointers can be reset by following these steps:
1. Move all course libraries and the &prefix.CBT.PROG.MAIN library to their new locations.
2. Allocate the new CNTL library with the same specifications as the previously installed &prefix.CBT.CNTL library. Then delete the previously installed &prefix.CBT.CNTL.
3. Invoke SAS with the display manager system.
4. Assign a libref to the Course Management System library. For example:
libname cbtmain 'prefix.CBT.PROG.MAIN';
5. Delete all members in the CBTMAIN library except for the MAIN catalog.
a. Issue the LIBNAME command to open the Libname window.
b. Select the CBTMAIN libref by placing an S beside the libref and pressing ENTER.
c. Delete each library member except MAIN.CATALOG by placing a D beside the member and pressing ENTER. Verify the deletions when prompted.
6. Modify the SASTUTOR CLIST to point to the new CBT.PROG.MAIN library.
7. Invoke the SASTUTOR CLIST and follow instructions to initialize the SAS/TUTOR course management system and all installed courses.
262 Installation Instructions and System Manager's Guide
Appendix U, Implementing SAS/TUTOR Courses
Note: If SAS/TUTOR data sets have been renamed and additional SAS/TUTOR courses are to be installed, the new CnnnPOST members of the CBT.CNTL data set must be manually updated after running the SASIxxxx jobs to reflect the new data set names. To determine if SAS/TUTOR courses have been renamed, examine the high-level qualifier of the production SAS libraries (for example, SAS609.SAS.SASHELP). If the prefix matches that of the SAS/TUTOR course libraries (for example, SAS609.SAS.CBT.PROG.MAIN), the data sets have not been renamed.

Page 263
Appendix V, Post-Installation Setup for SAS/ASSIST® Software
This appendix describes how to migrate profiles from previous releases, and how to add an optional master profile and optional group profile(s) to SAS/ASSIST software. A master profile can be used to override the default settings as sent by SAS Institute. This allows you to provide a customized setup for SAS/ASSIST software. With the master profile you can control the profile options of all SAS/ASSIST users from one central place. For information on the profile options, see Chapter 8, "Setting Up and Customizing Master, Group, and User Profiles" in SAS/ASSIST Software: Changes and Enhancements, Version 6.
This appendix also describes installing sample DB2 tables and a sample query manager for SAS/ASSIST query and reporting.
Profile Changes and Enhancements
To enhance the profile feature for Query and Reporting, some changes have been made to the profile structure. The profile option, Query exit which was previously in Type: System Administration, a master profile-only type, was moved to the Type: Query which exists at all profile levels. The profile option, Additional Information was moved from Type: Access to DB2 to Type: Query Manager. This enables users running queries against SAS data to obtain customized information about the data they are accessing. DB2 users can continue to utilize this option to obtain customized information about their DB2 data. Refer to SAS/ASSIST Software: Changes and Enhancements, Version 6 for additional information.
Converting User Profiles From a Previous Release
There are many ways to convert your user profile. One is to simply note any changes you have made to your user profile, exit SAS/ASSIST software, delete the profile, SASUSER.PROFILE.PASSIST.SLIST, and reinvoke SAS/ASSIST. A profile with the new format will be created. You can now update your new profile with the option values you noted in your original profile.
Another way you can convert your user profile is to use a conversion program that is provided with this release. In the Program Editor window type the following to convert to the new structure:
proc display cat=sashelp.qassist.profconv.scl; run;
264 Installation Instructions and System Manager's Guide
Appendix V, Post-Installation Setup for SAS/ASSIST Software
The SAS Administrator may want to ensure that all users of SAS/ASSIST software convert their user profiles soon after the new release is installed. This can be done using the Master Profile (see the section, "Adding a Master profile" for information on creating a master profile). You will be take advantage of the SAS/ASSIST start program, a profile option that runs a program when SAS/ASSIST software is invoked. The program must be a SOURCE entry, therefore you must save the code above in a source entry in a library that is accessible by all users such as SASHELP. In this example, the source is saved in SASHELP.QASSIST.PROFCONV.SOURCE. If you currently have a SAS/ASSIST start program that is used globally you can add the code below in that program. If individual users have their own SAS/ASSIST start programs, it may be best to have them type and submit the code in the Program Editor. Complete the following steps:
1. Type the following in the Program Editor window :
proc display cat=sashelp.qassist.profconv.scl; run;
2. Execute the Save command to save the entry:
SAVE SASHELP.QASSIST.PROFCONV.SOURCE
3. After the Master Profile has been created, open it and select Type: General
4. Specify the following: (The R status forces update)
Cmd Option Value Status
SAS/ASSIST start program
SASHELP.QASSIST.PROFCONV. SOURCE
R
Type of start program Catalog R
Note: Once the conversion program has run, it can run again and again without effect. The administrator will have to leave these values in place until he feels confident that all users have used SAS/ASSIST software. The users will see a pop-up window indicating the above profile value change when they first access SAS/ASSIST software after the new release is installed. You may want to let them know to expect it. The user must accept this change since the option has a restricted status.
When the administrator is confident that all users have invoked SAS/ASSIST software in the new release, he should clear the value specified for the SAS/ASSIST start program and make it available to the user, by removing its restricted status. Specify the following:
Cmd Option Value Status
SAS/ASSIST start program U
Type of start program Catalog U
Installation Instructions and System Manager's Guide 265
Appendix V, Post-Installation Setup for SAS/ASSIST Software
The U status enables users to enter their own values for these options.
A pop-up window indicating these profile changes may be displayed. You can choose to accept the changes and update your profile.
Note: If you currently have a SAS/ASSIST start program that is used globally, you can add the above code to that program. If individual users have their own SAS/ASSIST start programs, it may be best to have them type and submit the code in the Program Editor.
Converting Existing Master and Group Profiles
To convert the master profile, type the following in the Program Editor and then submit it:
%let lib=sasabc.sas430.master; proc display cat=sashelp.qassist.profconv.scl; run;
To convert group profiles, type the following in the Program Editor and then submit it:
%let lib=sasabc.sas430.master; %let cat=catalog.grpname; proc display cat=sashelp.qassist.profconv.scl; run;
Note: It is possible that some or all group profiles are stored in the same physical location as the master profile as sown in the above example. If you have multiple group profiles stored in the same physical location, you do not need to submit the %let lib= statement repeatedly. For example, if you have groups GRP1, GRP2, GRP3 all stored in sasabc.sas430.groups in the ASSIST catalog, you can submit the following to convert all three groups:
%let lib=sasabc.sas430.groups; %let cat=assist.grp1; proc display cat=sashelp.qassist.profconv.scl; run; %let cat=assist.grp2; proc display cat=sashelp.qassist.profconv.scl; run; %let cat=assist.grp3; proc display cat=sashelp.qassist.profconv.scl; run;
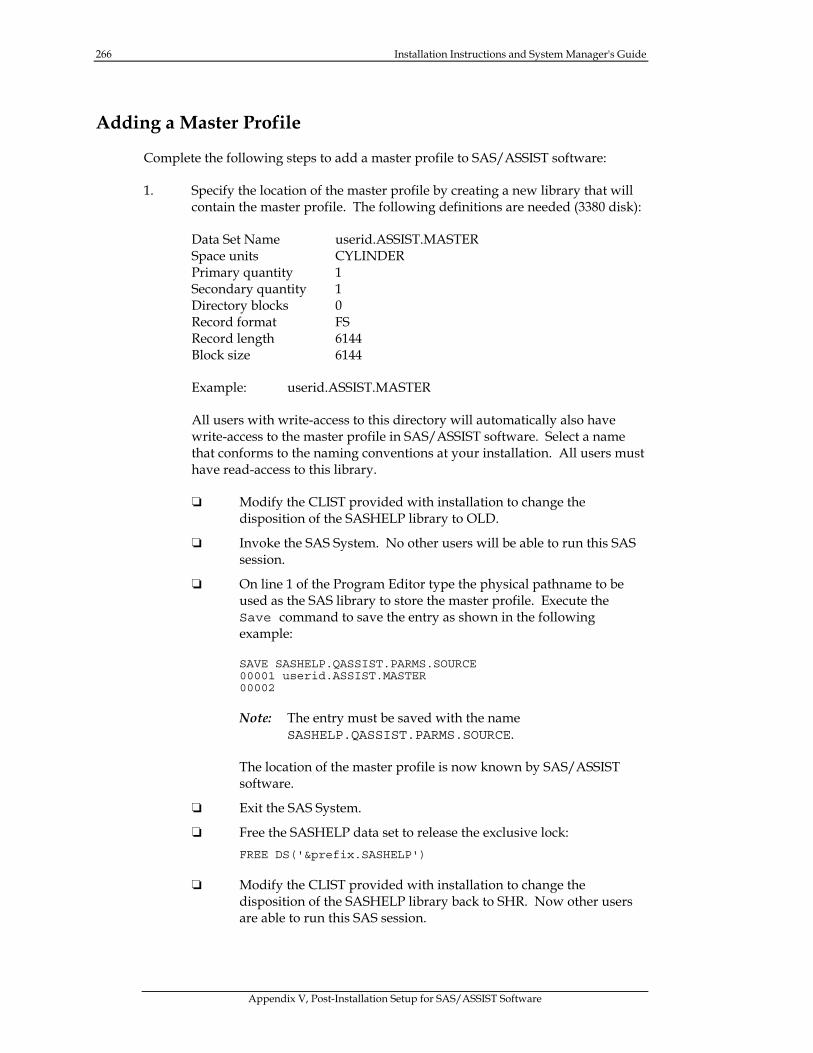
266 Installation Instructions and System Manager's Guide
Appendix V, Post-Installation Setup for SAS/ASSIST Software
Adding a Master Profile
Complete the following steps to add a master profile to SAS/ASSIST software:
1. Specify the location of the master profile by creating a new library that will contain the master profile. The following definitions are needed (3380 disk):
Data Set Name userid.ASSIST.MASTER Space units CYLINDER Primary quantity 1 Secondary quantity 1 Directory blocks 0 Record format FS Record length 6144 Block size 6144
Example: userid.ASSIST.MASTER
All users with write-access to this directory will automatically also have write-access to the master profile in SAS/ASSIST software. Select a name that conforms to the naming conventions at your installation. All users must have read-access to this library.
❏ Modify the CLIST provided with installation to change the disposition of the SASHELP library to OLD.
❏ Invoke the SAS System. No other users will be able to run this SAS session.
❏ On line 1 of the Program Editor type the physical pathname to be used as the SAS library to store the master profile. Execute the Save command to save the entry as shown in the following example:
SAVE SASHELP.QASSIST.PARMS.SOURCE 00001 userid.ASSIST.MASTER 00002
Note: The entry must be saved with the name SASHELP.QASSIST.PARMS.SOURCE.
The location of the master profile is now known by SAS/ASSIST software.
❏ Exit the SAS System.
❏ Free the SASHELP data set to release the exclusive lock: FREE DS('&prefix.SASHELP')
❏ Modify the CLIST provided with installation to change the disposition of the SASHELP library back to SHR. Now other users are able to run this SAS session.
Installation Instructions and System Manager's Guide 267
Appendix V, Post-Installation Setup for SAS/ASSIST Software
2. Create the master profile.
The first time SAS/ASSIST software is started a master profile is created if the SASHELP.QASSIST.PARMS.SOURCE contains the name of an existing library, and the person who starts SAS/ASSIST software has write-access to this library.
3. Customize the master profile by starting SAS/ASSIST and selecting SETUP ... Master/group...
If you have write-access to the SAS library containing the master profile you can specify default values for your installation. These values will be used by new users as they start SAS/ASSIST software.
Note: If you restrict values by typing R in Status, users will not be allowed to change the values you define.
SAS/ASSIST contains a command bar and a saving facility. Depending on the style you want to run, you must specify the following options in the master profile:
Run old style:
Save selections on end: No Confirm Changes: No Menu Style: Old
Run new style:
Save selections on end: Yes Confirm Changes: No Menu Style: New
For more information, see Chapter 8 in SAS/ASSIST Software: Changes and Enhancements, Version 6.
4. Create Group profiles.
From the master profile it is possible to create group profiles if you want to divide the users into several groups with different profiles. The master profile controls group and user profiles whereas the group profiles only controls the user profiles. You may want to set up group profiles as part of your post-installation tasks, or do it at a later time.
268 Installation Instructions and System Manager's Guide
Appendix V, Post-Installation Setup for SAS/ASSIST Software
Select Create Group Profile from the Locals menu. Specify a name, description, and location for the group profile. Edit the profile option values as desired. To add users to a group profile, select Update User Group from the Locals menu to enter the userids interactively. You can also use a SAS program to update the user group. To specify the name of the variable which contains the userid to be used in SAS/ASSIST, open the master profile, change the type to System Administration, and enter the variable name for the userid option. By default the userid is found in the macro variable &SYSJOBID. Change the value if your site uses another variable to keep the userid. If the value name starts with &, it is a macro variable; otherwise it is an environment variable, which is defined before starting the SAS System.
Installing Sample DB2 Tables and a Sample Query Manager
This section describes how to customize SAS/ASSIST software to run queries against DB2 sample data. It is recommended that you do this in order to get acquainted with the software before you start working with your own DB2 data. This example sets up a personal query manager. See Chapter 9, "Setting Up Query Managers," in SAS/ASSIST Software: Changes and Enhancements for more information.
Complete the following steps:
1. Create DB2 Sample Tables.
Query and Reporting contains its own sample DB2 tables. These tables are used in the documentation and in the SAS training courses. Complete the following steps to create DB2 sample tables:
a. Enter the following on the command line in the Program Editor:
COPY SASHELP.QASSIST.SAMPLTAB.SOURCE
b. Specify the DB2 subsystem id, creator, and database name (lines 54-59):
See documentation in the program for further information.
c. Execute this SAS program and the DB2 sample data will be created.
2. Create Query Manager Tables on the DB2 Sample Data
Complete the following steps to create query manager tables for installation verification purposes:
a. In the Program Editor, use the COPY command to copy the sample source from SASHELP.QASSIST.DB2METAU.SOURCE. This program will generate a set of Query Manager tables, which contain information on DB2 tables available to specific creators.
Installation Instructions and System Manager's Guide 269
Appendix V, Post-Installation Setup for SAS/ASSIST Software
b. Specify the creators you want to use in line 21 as shown in the following example:
%let creators=('SASQR','DSN8230',USER);
Note: In this example SASQR and DSN8230 are two specific creators which contain sample data from SAS Institute and IBM. Add USER if you want access to a DB2 table, which has a creator equal to your userid.
c. Specify the location of the Query Manager tables on line 25.
%let saslib=SASUSER; *<--User QM library;
d. Execute this SAS program and the Query Manager tables will be created. The following SAS tables will be created:
SASUSER_DB2TAB DB2 table information SASUSER_DB2COLS DB2 column information SASUSER_DB2RELS Relations for joining tables SASUSER_DB2INDX Defined indexes in DB2.
3. Create the Query Manager Definitions
The Query Manager contains information that indicates the database to be used as well as the location of the SAS Query Manager tables created in the last step. You can also specify the name of the program to be used to recreate (refresh) the SAS Query Manager tables. See Chapter 9 in SAS/ASSIST Software: Changes and Enhancements for more information.
a. Select the following from the SAS/ASSIST Primary menu to get to the Query Manager Administration window:
DATA MGMT... QUERY... Query and Reporting... SETUP... Administration
b. Enter the following information to identify the location of the Query Manager tables as shown below:
❏ For Database, enter DB2
❏ For Program to Generate Query Manager tables, select No
❏ For Location of the Query Manager tables, enter SASUSER
Note: The remaining parameters are selected by default.
270 Installation Instructions and System Manager's Guide
Appendix V, Post-Installation Setup for SAS/ASSIST Software
c. Save the Query Manager definition.
Select Save As from the File menu.
d. Enter name and description as shown in the following example (the Type and Catalog are already specified):
Type: MANAGER Name: db2samp Description: Sample DB2 data Catalog: SASUSER.MANAGER
e. Select OK to save it.
4. Using the Query Manager
a. Select the following from the SAS/ASSIST Primary menu to get to the Query window:
DATA MGMT... QUERY... Query and Reporting... QUERY...
The Query window may attempt to load a Query Manager other than the one you defined (in Step 3 above), or you might be notified that one or more Query Manager tables are not found. You will be asked if you want to generate them. Select No.
b. To use the Query Manager that you defined (see Steps 2 and 3 above), select Select Query Manager... from the Locals menu.
A pop-up menu is displayed. Select the Query Manager you just defined DB2SAMP (in Step 3 above).
c. Select the Select button to get a list of DB2 data.
See Chapter 6, "Querying Data" in SAS/ASSIST Software: Changes and Enhancements for more information.
Page 271
Appendix W, Logging Directly On to the SAS® System
MVS sites can choose to substitute the SAS System for the standard TSO terminal monitor program. Sites can insulate users from the TSO environment by automatically invoking the SAS System or a SAS application when users log on.
Because the SAS System is running as its own terminal monitor program, TSO commands are not accessible to users.
This technique is intended for MVS sites interested in restricting interactive user access to the TSO environment or shielding novice users from having to learn how to work in the mainframe environment. Sites that use this technique also save a little memory.
This appendix describes how to install and use the direct logon procedure, and provides an example. It also discusses the differences between logging on to the SAS System using display manager, using a windowing application, as well as the possibility of using the direct logon process with SAS/CONNECT software.
In most circumstances, only system administrators need to read this appendix. If you are not a system administrator and are interested in logging directly on to the SAS System, see your SAS Software Representative.
Installing the Direct Logon Procedure
When users log on to the system, a JCL stream called a logon procedure (logon proc) is automatically executed. Normally, the logon procedure activates the TSO terminal monitor program that sends the TSO READY prompt to the display when the logon process is complete. To make the SAS System the logon environment, replace this procedure with a logon procedure that activates the SAS System as the terminal monitor program.
To use this capability you must still start TSO. Any user logging on to the SAS System must have a valid TSO userid. However, invoking the SAS System directly results in a reduction of approximately 50K in working set size for each user.
Complete the following steps to allow users to log directly on to the SAS System:
❏ Create a logon procedure that is used by all users directly logging on to the SAS System.
❏ Install the logon procedure into your site's logon procedure library.
❏ Specify the SAS logon procedure as each user's logon procedure.
272 Installation Instructions and System Manager's Guide
Appendix W, Logging Directly On to the SAS System
The logon procedure that you create is similar to the standard SAS cataloged procedure. This procedure is in the BAPROC01 member of your site's CNTL installation data set. Documentation for the SAS cataloged procedure is in Chapter 8, "Using the SAS Cataloged Procedure," in the SAS Companion for the MVS Environment, Version 6, First Edition. Also, an example logon procedure is provided in the next section.
Example Logon Procedure
Example JCL for a logon procedure is shown below. This example is similar, but not identical to, the standard SAS cataloged procedure. Important changes from the standard SAS cataloged procedure are marked with the comment <=CHANGE in the right margin. These changes are summarized after the code.
//SAS609 PROC ENTRY={ob entry} , <=CHANGE // PRODFIX='{ob sas607.prefix} ', //* CONFIG=NULLFILE, <=CHANGE // OPTIONS=, // WORK='500,200' //****************************************************************** //* PRODUCT: MVS SAS RELEASE 6.09 *** //* DOCUMENTATION: SAS COMPANION FOR THE MVS ENVIRONMENT, V6 *** //* FROM: SAS INSTITUTE INC., SAS CAMPUS DR., CARY, NC 27513 *** //****************************************************************** //SAS607 EXEC PGM=&ENTRY,PARM='&OPTIONS',REGION=4096K //STEPLIB DD DISP=SHR,DSN=&PRODFIX..LIBRARY //CONFIG DD DISP=SHR,DSN=&PRODFIX..CNTL(TSOXA) <=CHANGE //* DD DISP=SHR,DSN=&CONFIG <=CHANGE //SASAUTOS DD DISP=SHR,DSN=&PRODFIX..AUTOLIB //SASHELP DD DISP=SHR,DSN=&PRODFIX..SASHELP //SASMSG DD DISP=SHR,DSN=&PRODFIX..SASMSG //WORK DD UNIT=SYSDA,SPACE=(6144,(&WORK),,,ROUND), // DCB=(RECFM=FS,DSORG=PS,LRECL=6144,BLKSIZE=6144) //*SASLOG DD SYSOUT=* <=CHANGE //*SASLIST DD SYSOUT=* <=CHANGE //SASPARM DD UNIT=SYSDA,SPACE=(400,(100,300)), // DCB=(RECFM=FB,LRECL=80,BLKSIZE=400,BUFNO=1) //SYSUDUMP DD SYSOUT=* //** ADD A LINE LIKE THE FOLLOWING TO CREATE A MACHINE-READABLE DUMP //*SYSMDUMP DD DSN=DUMP,UNIT=SYSDA,DISP=(NEW,CATLG),SPACE=(TRK,(20,5))
The following is a summary of the differences between this example logon procedure and the standard SAS cataloged procedure:
❏ The user CONFIG file has been removed.
❏ The system CONFIG file is changed to the TSOXA or TSO370 CONFIG file.
❏ The allocations for the SASLOG and SASLIST file are removed. The information written to these files is routed to the user's display manager session.
After you have modified the cataloged procedure, install it into the site's logon procedure library. To enable users to access the SAS direct logon facility, modify their userids to use the modified logon procedure.
Installation Instructions and System Manager's Guide 273
Appendix W, Logging Directly On to the SAS System
Using Direct Logon
You can use the direct logon technique to log on to the SAS System using display manager, or you can choose to log directly on to a windowing application. You can even use this technique in combination with SAS/CONNECT software to log directly on to the SAS System on the mainframe from your workstation.
The purpose of combining the direct logon technique with SAS/CONNECT software is to restrict users that connect to the mainframe from having access to the TSO environment. For information on using SAS/CONNECT software, refer to SAS/CONNECT Software, Usage and Reference, Version 6, First Edition and SAS Technical Report P-224, SAS/CONNECT Software: Changes and Enhancements, Release 6.08.
Logging On to the SAS Display Manager System
Use the example logon previously described. If you need to allocate special files for each user, such as individual SASUSER files, you must create a separate logon procedure for each user because of a system restriction.
Unless you are using the Amdahl Logon Pre-prompt Exit Version 2.7.5, you do not have any control over supplying customized SAS system options, configuration files, or the dynamic allocation of a user's SASUSER data set to a single logon procedure.
Logging On to a Windowing Application
To log directly on to a windowing application, specify an autoexec file for the application. To do this, add a SASEXEC statement that supplies the data set name of the file containing the autoexec code to the example logon procedure. This SASEXEC statement has the following form:
//SASEXEC DD DISP=SHR,DSN=OS-data-set-containing-autoexec-file
For more information on modifying the way in which the SAS System is invoked, see "Tailoring SAS Initialization Processing," in Chapter 2 of SAS Companion for the MVS Environment.
Restrictions
Using the SAS System as the logon environment implies certain restrictions. For example, because the SAS System is the terminal monitor program, users cannot execute TSO commands or access TSO facilities such as ISPF from their SAS sessions. Nor can users issue the TSO or X command from their SAS sessions to gain access to the TSO environment.

274 Installation Instructions and System Manager's Guide
Appendix W, Logging Directly On to the SAS System
However, The SAS Display Manager System contains operating-system-dependent statements, windows, and a full-function editor that perform many of the same utilities available in ISPF. These services are available to users that log directly on to the SAS System. Users can dynamically allocate any files they are authorized to access using LIBNAME and FILENAME statements. They can also use the INCLUDE command to include external files and members of partitioned data sets into SAS editor windows. The DSINFO, FNAME, and MEMLIST windows provide operating-system-dependent information about external files. For more information on these and other operating-system-dependent language features, see Chapter 13, "Windowing Considerations," and Chapter 16, "Other Host-Specific Language Features," in the {it SAS Companion for the MVS Environment}.
If the logon procedure you have provided includes a DDname assigned to the internal reader, users are able to submit batch jobs from within their SAS sessions.
Accounting Considerations
Substituting the SAS System for the standard IBM terminal monitor program affects records produced by SMF and TSO/MON. SMF type 30, 34, and 35 records have the SAS entry name in the program name field rather than IKJEFT01 or ADFMDF03. Type 32 (TSO command) records are not produced.
If you are using LEGENT Corporation's TSO/MON product, TSO/MON system records contain complete resource usage, transaction, and response time information, but no command information. TSO/MON command detail records are not produced.
Page 275
Appendix X, Licensing the SAS® System (Action G)
Introduction
Use this procedure to renew licensing for an existing SAS System. Some sites may have been notified that the SETINIT received on the installation tape is already expired. If this is the case for your site, enter the SETINIT information you received as part of your installation package into the RENEWPRM member of the CNTL data set before you run the jobs to update your system.
You will need to run this job for each version 6.08 SASHELP you have in service, including staged SASHELP.
For convenience, Actions A, B, and C create renew jobs using the prefix supplied in the SASEDITP member. The jobs are located in the CNTL data set with the following names:
RENEW updates the production libraries RENEWSTG updates the staging libraries RENEWNLS updates production NLS libraries RENEWSNL updates staging NLS libraries
You can modify these jobs to update any set of libraries you need to update. The modifications require that you know the location of the important data sets.
If you prefer, you can use the install process to generate the customized renew job. The instructions for that method are below.
Processing Renewal of the SAS System
Note: This task is required if you received an expired SETINIT.
Step 1: Supply SASEDITP parameter values.
❏ Blank out the *NO* that precedes the action name STANDALONE-RENEW. Verify that you have only one action value active. If more than one action is selected, a return code of 12 is set, and error messages specifying the duplicate selections are posted to SYSPRINT and SYSTERM.
❏ Specify the prefix of the SASHELP library to which the SETINIT will be applied. Specify this value as the RENEW-PREFIX value.
276 Installation Instructions and System Manager's Guide
Appendix X, Licensing the SAS System (Action G)
IMPORTANT: If base SAS is not included in &RENEW-PREFIX (&RENEW-PREFIX is a staging prefix which requires license renewal), also supply the following:
❏ RNW-BASE-PFX as the prefix to Release 6.09 of the SAS System containing at least a complete base SAS. This prefix is not updated, and is only used for execution. Be sure to blank out the *NO* on this line to enable it.
This parameter is contained in the installation ACTION G grouping in SASEDITP.
Step 2: Edit the RENEWPRM member of the CNTL data set to include the updated SETINIT parameters supplied at license renewal time by SAS Institute.
The information contained in the RENEWPRM member must appear exactly as it does on the renewal text received from SAS Institute in order for the renewal date to be properly updated.
Step 3: Supply SASINSGO/SASIHOLD parameter values.
First modify the jobcard information to reflect those values used by your site. Then modify the procedure parameters as described in the following:
❏ CNTLDSN= specifies the name of the installation CNTL data set you allocated using the IEBUPDTE job in Step 1 of "Unload the Installation Jobs" in this document.
❏ SASEDTP= specifies the name of the CNTL data set member that contains the SASEDITP user site parameter values you have entered to control installation jobs. The default is SASEDITP.
❏ PRODSEL= is not significant for Action G. You may use the default, PRODSEL.
❏ LIBSEL= is not significant for Action G. You may use the default, LIBSEL.
❏ DISKUNI= specifies the unit name at your site for temporary storage.
❏ SYSOUT= defaults to * and specifies the SYSOUT class you want to use for jobs.
Step 4: Submit the SASINSGO/SASIHOLD job.
Be sure to check the return code of the job to verify that the SAS software products have been renewed correctly. Also be sure to check the SAS log, regardless of the SASIRENW job's return code.
Installation Instructions and System Manager's Guide 277
Appendix X, Licensing the SAS System (Action G)
Note: This full process does not have to be executed every time you update your setinit. Once you have created the SASIRENW job, it resides in the CNTL data set. Your update process consists of updating the RENEWPRM member with the new information and resubmitting the SASIRENW job.
SETINIT Troubleshooting
The following is a list of common error messages and solutions that may occur when attempting to update your SETINIT information. If you still receive errors, contact the Technical Support department at SAS Institute. (Refer to the Transmittal letter enclosed in your installation package for information on contacting the Technical Support department).
ERROR:
ERROR: INCORRECT INFORMATION WAS ENTERED FOR THE PASSWORD XXXXXXX.
SOLUTION:
The SETINIT information in the RENEWPRM member of the CNTLDSN must be entered EXACTLY as it appears on the paper SETINIT. If any text of the SETINIT is not the same, the above error occurs when you attempt to execute the SASIRENW job.
Note: A common mistake is typing the letter 'O' in place of the numeral zero and vice versa. Also check for any unprintable characters that might appear in the text of the SETINIT information (not '40'x)
ERROR:
ERROR: THE SAS SYSTEM IS EXECUTING ON A PROCESSOR (CPU) WHOSE MODEL NAME, MODEL NUMBER, AND SERIAL NUMBER ARE NOT INCLUDED IN THE SETINIT DATA USED TO INITIALIZE THE SAS SYSTEM LIBRARY IN USE. THIS IS PERMITTED IF THIS PROCESSOR IS A DESIGNATED BACKUP PROCESSOR FOR A LICENSED CPU. FOR THIS SITE, THE SAS SYSTEM IS LICENSED FOR THE FOLLOWING CPU SERIAL NUMBERS:
MODEL IBM xxxx-xxxx SERIAL NUMBER yyyyyy
SOLUTION:
When the SETINIT is executing on a processor that is not included in the SETINIT, the above error message is issued. Be sure that the SAS System is running on the processor indicated in the SETINIT. If your model name, number, or serial number is different than the one listed in the SETINIT, contact your SAS Institute Customer Service Representative for an updated SETINIT.
278 Installation Instructions and System Manager's Guide
Appendix X, Licensing the SAS System (Action G)
ERROR:
ERROR: THE SITE VALIDATION DATA CANNOT BE UPDATED. THIS IS MOST LIKELY DUE TO THE FACT THAT THE SASHELP CATALOG IS NOT AVAILABLE IN WRITE MODE, AND/OR THAT THE SETINIT OPTION HAS NOT BEEN SPECIFIED WHEN USING THE SAS COMMAND.
SOLUTION:
The above error indicates that UPDATE access to the SASHELP library was denied. This is most likely due to not specifying the SETINIT option when using DISP=SHR, not having a DISP=OLD, or not having the appropriate access authority (UPDATE required) to the SASHELP library. Make the necessary changes to the SASIRENW job and resubmit.
The following is the information that appears in the SASLOG for the SASIRENW job after successful update of the SETINIT information. The information on the SECONDARY SETINIT is part of the SETINIT process, but does not relate to a site running in the MVS environment.
NOTE: SITEINFO DATA HAVE BEEN UPDATED NOTE: NO UPDATE OF SECONDARY SETINIT SINCE EITHER THE PASSWORD WAS OMITTED OR ZERO, OR THE SEC STATEMENT WAS OMITTED.
If the above notes appear, indicating a successful update of the SETINIT information, but your SAS System still indicates the previous expiration dates, then verify that the SASHELP DD in the SASIRENW job is the same as the SASHELP library being used by your CLIST and CATPROC.
Page 279
Appendix Y, Installing National Language Support (NLS)
This appendix provides the instructions you need to provide National Language Support, NLS, to your SAS System under MVS. You should be familiar with the installation of the SAS System before reading this appendix.
Important Notes
❏ NLS can ONLY be installed to a SAS System maintained to the same TSLEVEL as the national language support.
❏ All MVS NLS media contain the maintenance files to upgrade your system to the current NLS TSLEVEL .
❏ Circumventing the procedures in this supplement can cause a failed install, a non-functional SAS System, or corrupt data, or seriously complicate maintenance in the future. Some procedures may seem redundant, particularly if you are installing NLS beyond English and one NLS extension. These procedures ensure that modules from one maintenance level cannot interact with incompatible modules from a prior maintenance level and produce unpredictable results.
❏ Many TSLEVEL violations will be detected by the SASINEW/SASIHOLD/SASINSGO jobs and cause them to terminate abnormally without generating the installation jobs. In these cases, log messages in the abending step will explain the reasons for the rejection.
❏ Do not attempt to install additional NLS extensions to the same system without reading the section, "Installing a Subsequent Language."
General Information
The following principles govern the installation of language support and are helpful in understanding it:
❏ A default new system install from NLS media automatically installs language support unless disabled by the installer in the SASEDITP member of the control data set.
❏ Maintenance, NLS, and newly licensed products can all be installed simultaneously with a single install from an NLS media set. This is done by enabling the selection of any newly licensed products in the PRODSEL member of the control data set, and running an otherwise default install. This is the recommended method for existing systems.
280 Installation Instructions and System Manager's Guide
Appendix Y, Installing National Language Support (NLS)
❏ You should not attempt to install NLS without any maintenance or newly licensed products unless directed for specific situations.
❏ To save DASD space, the install only unloads NLS support for pre-existing products (and new products selected in PRODSEL) on your system. The pre-existing product list is automatically sensed by the install for each individual SAS System, and does not require any action by the installer.
❏ NLS does not replace the English component of your SAS System, it supplements it using an extension of your SAS prefix, which can be protected under RACF or other system security applications. This is represented elsewhere with &PREFIX.LX, where LX is the two character language extension for the particular NLS.
❏ NLS, when permanently installed, is an extension of your final &PREFIX. When language support is installed using a staged install (Action C), it is installed to an extension of your staging &PREFIX as shown in the following examples:
MVSSYS.SAS.V609 final SAS prefix in SASEDITP
MVSSYS.SAS.V609.ES final SAS prefix for Spanish support files
MVSSYS.SAS.V609.STAGELIB staging library prefix in SASEDITP
MVSSYS.SAS.V609.STAGELIB.ES staging library prefix for Spanish support files.
❏ The extension .ES is automatically assigned by the system based upon the language supported (Spanish in the previous example, .DA for Danish, and so on). Changing this extension from the system assignment can cause program failure at some point, and complicate future maintenance. Be sure NOT to include the language extension in any of the prefix specifications in SASEDITP except for RENEW-PREFIX when renewing your license with an Action G.
❏ The install provides a separate working CLIST and PROC (NLSCLIST & NLSPROC) in the control data set. These invoke SAS in the language on those media. These members should be renamed, moved, and amended as needed for your system.
❏ Libraries are searched in the following order when NLS CLISTs and PROCs are running. SASLIBX or SASNLIBX represent any of the various SAS component libraries.
Installation Instructions and System Manager's Guide 281
Appendix Y, Installing National Language Support (NLS)
Maintained, Production Status System:
1. Search NLS extension for translated modules. 2. Search production library for remaining modules.
//SASLIBX DD DSN=MVSSYS.SAS.V609.ES.SASLIBX // DD DSN=MVSSYS.SAS.V609.SASLIBX
Staged Maintenance & NLS in Staging Libraries:
1. Search NLS stagelib for translated and maintained modules. 2. Search regular stagelib for maintained modules. 3. Search production library for remaining modules.
//SASLIBX DD DSN=MVSSYS.SAS.V609.STAGELIB.ES.SASLIBX // DD DSN=MVSSYS.SAS.V609.STAGELIB.SASLIBX // DD DSN=MVSSYS.SAS.V609.SASLIBX
Note: Since SAS data libraries cannot be concatenated, each NLS language will have its own complete &PREFIX.LX.SASHELP .
❏ An NLS version of the SAS System is invoked with the corresponding NLS CLIST or PROC. The concatenations described above determine the language behavior. The language cannot be changed from within a SAS session.
❏ When maintenance is copied to production libraries (Action D) on a system with NLS installed, the following scheme is used:
1. Promotion of regular maintenance to production:
//SLIBFROM DD DSN=MVSSYS.SAS.V609.STAGELIB.SASLIBX //SLIBTO DD DSN=MVSSYS.SAS.V609.SASLIBX
Non-NLS maintenance and newly licensed product content is copied from staging libraries to final production libraries.
2. Promotion of NLS to production:
//NLIBFROM DD DSN=MVSSYS.SAS.V609.STAGELIB.ES.SASNLIBX //NLIBTO DD DSN=MVSSYS.SAS.V609.ES.SASNLIBX
NLS support for pre-existing and newly licensed products (including translated maintenance) is copied from the NLS extension of the staging libraries to the NLS extension of the final production libraries.
❏ Both phases are accomplished by a single install Action D from the control data set used to install the NLS extension.
282 Installation Instructions and System Manager's Guide
Appendix Y, Installing National Language Support (NLS)
Installing NLS for any Language
From the tables that follow in this section, choose the installation you want to perform and follow the specified procedure. Note the following before proceeding:
❏ If you have not already done so, unload SAS.SASROOT from your installation media using the utility described in the installation instructions.
❏ Examine the #CONTENT member of the control data set. Note whether or not the following are included: Base SAS software, any additional products for which you are licensed, system maintenance, and any desired language support. WARNING: If #CONTENT does not exist, lists the wrong language, or does not list language support, all of the products at your site, the products you intend to install, or maintenance/utility files for these products, or does not specify TS450 as the maintenance level, this media cannot be used to install your language. Check another media or contact your SAS Representative to obtain language support, products, and required maintenance.
❏ In the table below, #CONTENT, PRODSEL, and SASEDITP refer to the respective members of the control data set.
❏ If preparing for an Action D (Copy Stage to Final), read the section, "Promoting Subsequent Language Systems to Production Status," and follow any special procedures listed.
Installing a New SAS System Plus One NLS Language
Action
Installation Work Desired
Installation Situation Procedure
NA Installing a New SAS System with language
support
You are installing a new Release 6.09 SAS System and language support. Your media
contain Base SAS software, any products
for which you are licensed, and the desired language
support.
Perform a new system install (Action A). Leave SKIP-NLS and NLS-ONLY at their default settings (commented
out) in SASEDITP. All language support for your selected products
unloads by default. If you are installing additional languages as part
of the initial installation, use Action N2B, described in the section,
"Installing a Subsequent Language."
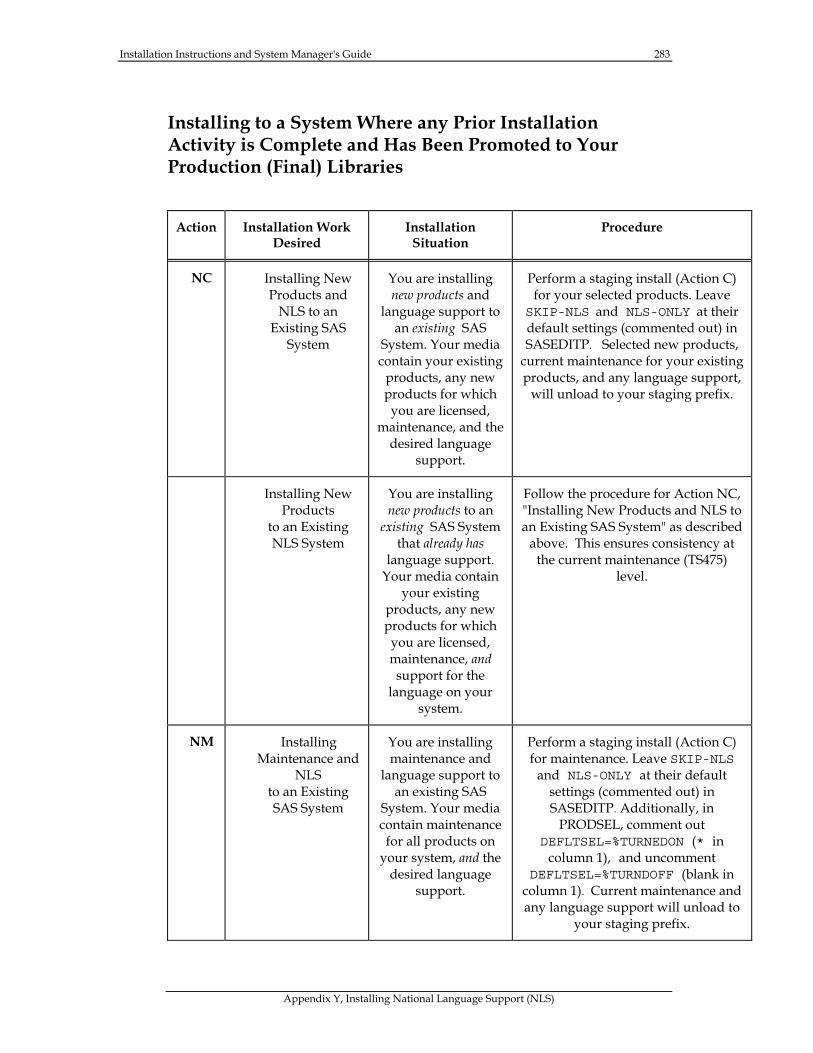
Installation Instructions and System Manager's Guide 283
Appendix Y, Installing National Language Support (NLS)
Installing to a System Where any Prior Installation Activity is Complete and Has Been Promoted to Your Production (Final) Libraries
Action Installation Work Desired
Installation Situation
Procedure
NC Installing New Products and
NLS to an Existing SAS
System
You are installing new products and
language support to an existing SAS
System. Your media contain your existing
products, any new products for which
you are licensed, maintenance, and the
desired language support.
Perform a staging install (Action C) for your selected products. Leave
SKIP-NLS and NLS-ONLY at their default settings (commented out) in SASEDITP. Selected new products,
current maintenance for your existing products, and any language support,
will unload to your staging prefix.
Installing New Products
to an Existing NLS System
You are installing new products to an
existing SAS System that already has
language support. Your media contain
your existing products, any new products for which
you are licensed, maintenance, and support for the
language on your system.
Follow the procedure for Action NC, "Installing New Products and NLS to an Existing SAS System" as described
above. This ensures consistency at the current maintenance (TS475)
level.
NM Installing Maintenance and
NLS to an Existing SAS System
You are installing maintenance and
language support to an existing SAS
System. Your media contain maintenance for all products on
your system, and the desired language
support.
Perform a staging install (Action C) for maintenance. Leave SKIP-NLS
and NLS-ONLY at their default settings (commented out) in SASEDITP. Additionally, in
PRODSEL, comment out DEFLTSEL=%TURNEDON (* in
column 1), and uncomment DEFLTSEL=%TURNDOFF (blank in
column 1). Current maintenance and any language support will unload to
your staging prefix.
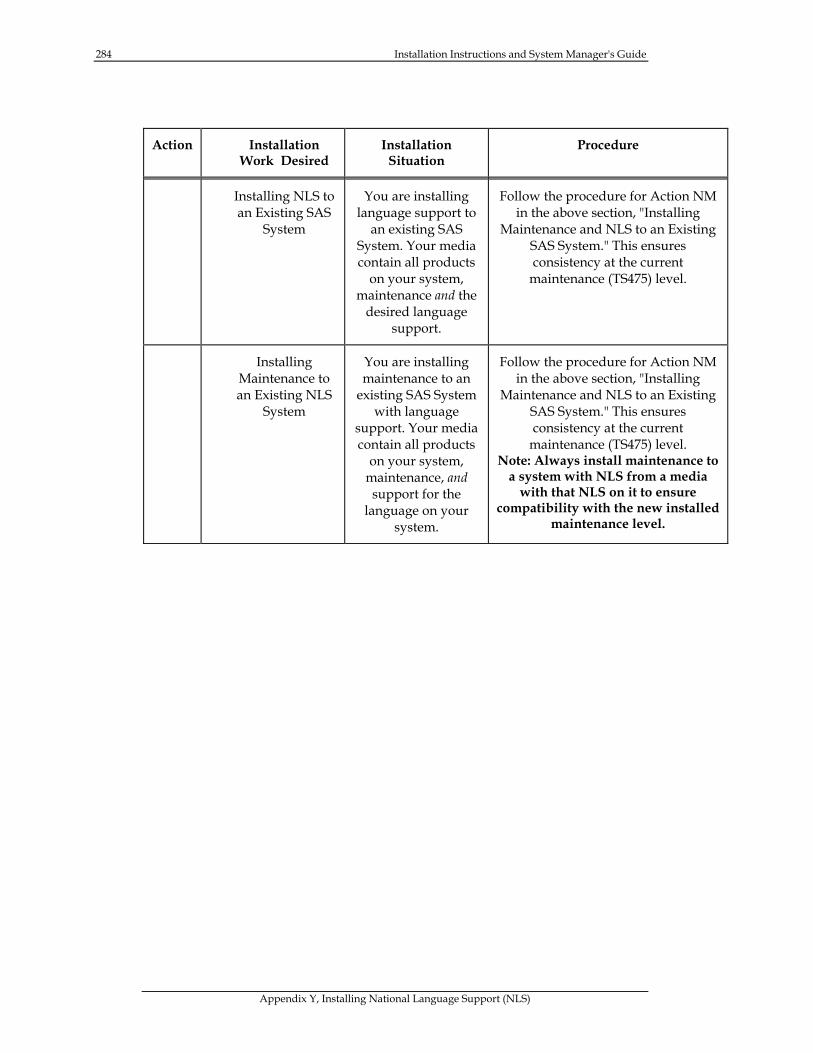
284 Installation Instructions and System Manager's Guide
Appendix Y, Installing National Language Support (NLS)
Action Installation Work Desired
Installation Situation
Procedure
Installing NLS to an Existing SAS
System
You are installing language support to
an existing SAS System. Your media contain all products
on your system, maintenance and the
desired language support.
Follow the procedure for Action NM in the above section, "Installing
Maintenance and NLS to an Existing SAS System." This ensures consistency at the current
maintenance (TS475) level.
Installing Maintenance to an Existing NLS
System
You are installing maintenance to an
existing SAS System with language
support. Your media contain all products
on your system, maintenance, and support for the
language on your system.
Follow the procedure for Action NM in the above section, "Installing
Maintenance and NLS to an Existing SAS System." This ensures consistency at the current
maintenance (TS475) level. Note: Always install maintenance to
a system with NLS from a media with that NLS on it to ensure
compatibility with the new installed maintenance level.
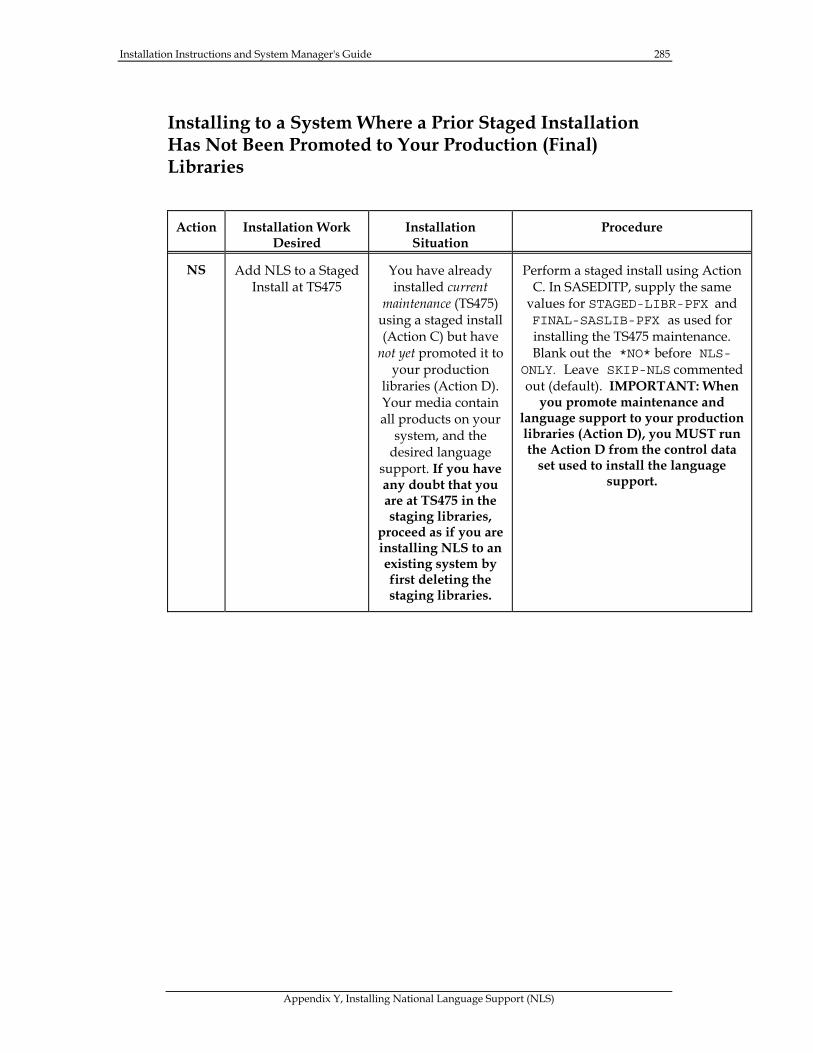
Installation Instructions and System Manager's Guide 285
Appendix Y, Installing National Language Support (NLS)
Installing to a System Where a Prior Staged Installation Has Not Been Promoted to Your Production (Final) Libraries
Action Installation Work Desired
Installation Situation
Procedure
NS Add NLS to a Staged Install at TS475
You have already installed current
maintenance (TS475) using a staged install (Action C) but have
not yet promoted it to your production
libraries (Action D). Your media contain all products on your
system, and the desired language
support. If you have any doubt that you are at TS475 in the staging libraries,
proceed as if you are installing NLS to an existing system by first deleting the staging libraries.
Perform a staged install using Action C. In SASEDITP, supply the same
values for STAGED-LIBR-PFX and FINAL-SASLIB-PFX as used for installing the TS475 maintenance. Blank out the *NO* before NLS-
ONLY. Leave SKIP-NLS commented out (default). IMPORTANT: When
you promote maintenance and language support to your production libraries (Action D), you MUST run the Action D from the control data
set used to install the language support.
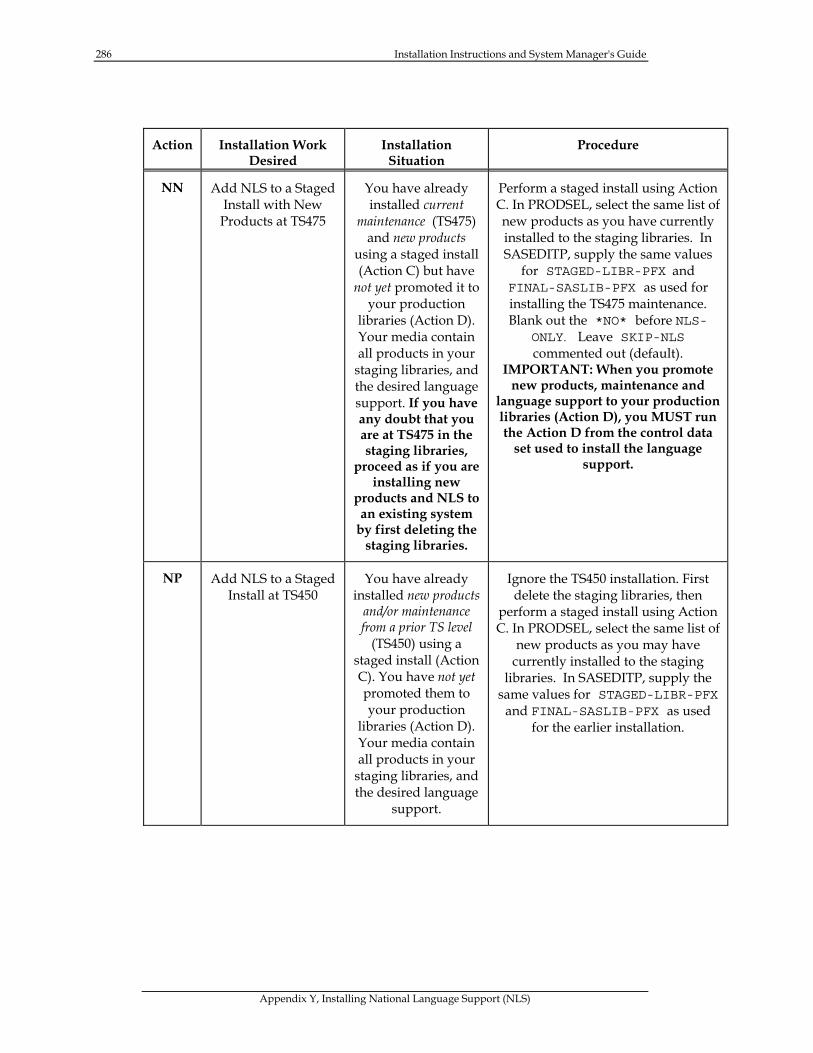
286 Installation Instructions and System Manager's Guide
Appendix Y, Installing National Language Support (NLS)
Action Installation Work Desired
Installation Situation
Procedure
NN Add NLS to a Staged Install with New Products at TS475
You have already installed current
maintenance (TS475) and new products
using a staged install (Action C) but have
not yet promoted it to your production
libraries (Action D). Your media contain all products in your
staging libraries, and the desired language support. If you have any doubt that you are at TS475 in the staging libraries,
proceed as if you are installing new
products and NLS to an existing system
by first deleting the staging libraries.
Perform a staged install using Action C. In PRODSEL, select the same list of new products as you have currently installed to the staging libraries. In SASEDITP, supply the same values
for STAGED-LIBR-PFX and FINAL-SASLIB-PFX as used for installing the TS475 maintenance. Blank out the *NO* before NLS-
ONLY. Leave SKIP-NLS commented out (default).
IMPORTANT: When you promote new products, maintenance and
language support to your production libraries (Action D), you MUST run the Action D from the control data
set used to install the language support.
NP Add NLS to a Staged Install at TS450
You have already installed new products
and/or maintenance from a prior TS level
(TS450) using a staged install (Action C). You have not yet promoted them to your production
libraries (Action D). Your media contain all products in your
staging libraries, and the desired language
support.
Ignore the TS450 installation. First delete the staging libraries, then
perform a staged install using Action C. In PRODSEL, select the same list of
new products as you may have currently installed to the staging
libraries. In SASEDITP, supply the same values for STAGED-LIBR-PFX
and FINAL-SASLIB-PFX as used for the earlier installation.
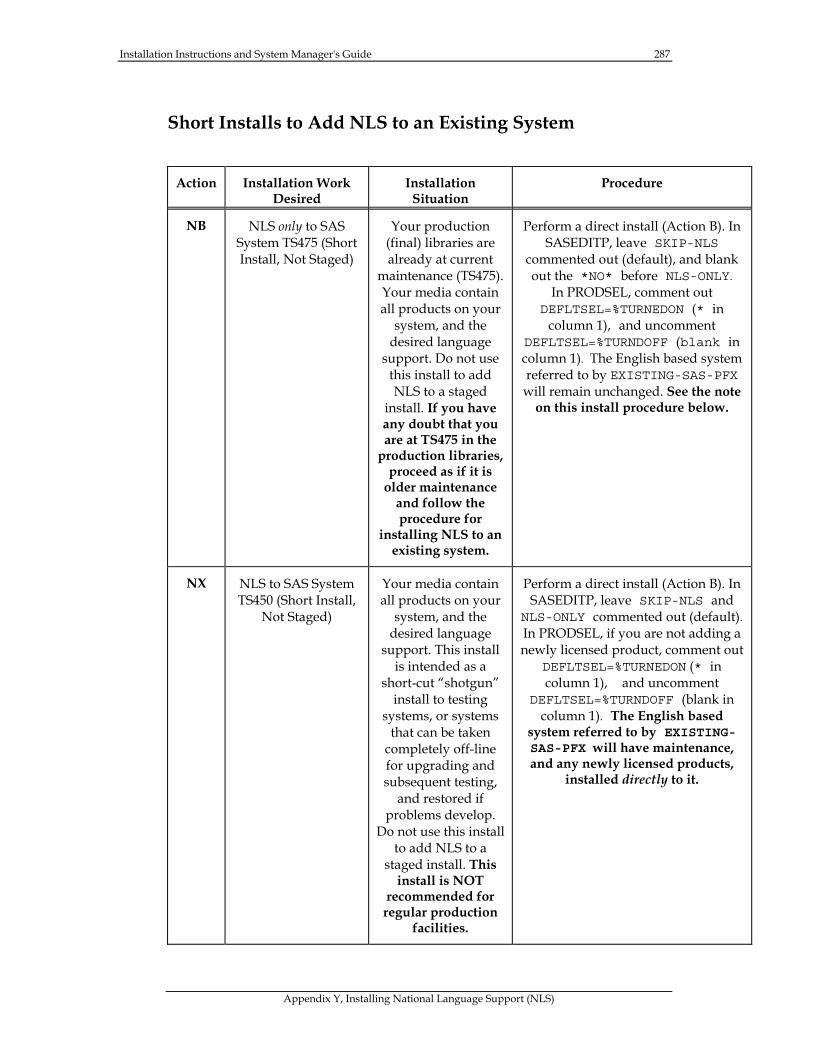
Installation Instructions and System Manager's Guide 287
Appendix Y, Installing National Language Support (NLS)
Short Installs to Add NLS to an Existing System
Action Installation Work Desired
Installation Situation
Procedure
NB NLS only to SAS System TS475 (Short Install, Not Staged)
Your production (final) libraries are already at current
maintenance (TS475). Your media contain all products on your
system, and the desired language
support. Do not use this install to add NLS to a staged
install. If you have any doubt that you are at TS475 in the
production libraries, proceed as if it is
older maintenance and follow the procedure for
installing NLS to an existing system.
Perform a direct install (Action B). In SASEDITP, leave SKIP-NLS
commented out (default), and blank out the *NO* before NLS-ONLY.
In PRODSEL, comment out DEFLTSEL=%TURNEDON (* in
column 1), and uncomment DEFLTSEL=%TURNDOFF (blank in column 1). The English based system referred to by EXISTING-SAS-PFX will remain unchanged. See the note
on this install procedure below.
NX NLS to SAS System TS450 (Short Install,
Not Staged)
Your media contain all products on your
system, and the desired language
support. This install is intended as a
short-cut “shotgun” install to testing
systems, or systems that can be taken
completely off-line for upgrading and subsequent testing,
and restored if problems develop.
Do not use this install to add NLS to a
staged install. This install is NOT
recommended for regular production
facilities.
Perform a direct install (Action B). In SASEDITP, leave SKIP-NLS and
NLS-ONLY commented out (default). In PRODSEL, if you are not adding a newly licensed product, comment out
DEFLTSEL=%TURNEDON (* in column 1), and uncomment
DEFLTSEL=%TURNDOFF (blank in column 1). The English based
system referred to by EXISTING-SAS-PFX will have maintenance, and any newly licensed products,
installed directly to it.

288 Installation Instructions and System Manager's Guide
Appendix Y, Installing National Language Support (NLS)
Note: Action NB (Installing NLS only to a TS475 SAS System) is equivalent to a staged install since all modules are installed under a language extension of EXISTING-SAS-PFX. For example, MVSSYS.SAS.V609.ES where EXISTING-SAS-PFX=MVSSYS.SAS.V609 in SASEDITP. As no existing or running applications will be referencing it, the access privileges for EXISTING-SAS-PFX.LX may be set differently than &prefix to suit installation needs at your site. Do not use this install if installing to a system with existing language support. See the section, "Installing a Subsequent Language," for information on the special considerations involved.
Installing a Subsequent Language
The following situations describe installations to place third language support (English plus two or more NLS extensions) on your system. See the section, "Promoting Subsequent Language Systems to Production Status," for important considerations for completing your installation with Action D.
IMPORTANT: If you have previously installed an NLS extension(s) to your system and your current maintenance level is not TS475, perform the following:
1. Make sure all prior installations to this system are complete before proceeding
2. Contact your SAS Representative to obtain TS475 language support media for all other languages on your system. Install TS475 maintenance and NLS support to the existing system for one existing NLS extension, using Action NM as described in the section, "Installing to a System Where any Prior Installation Activity is Complete and Has Been Promoted to your Production Libraries."
3. Install TS475 NLS support for any remaining preexisting languages, and for your new languages using Action N2C as described in the following section.
4. Perform Action D from each NLS control data set only after reading the section, "Promoting Subsequent Language Systems to Production Status."
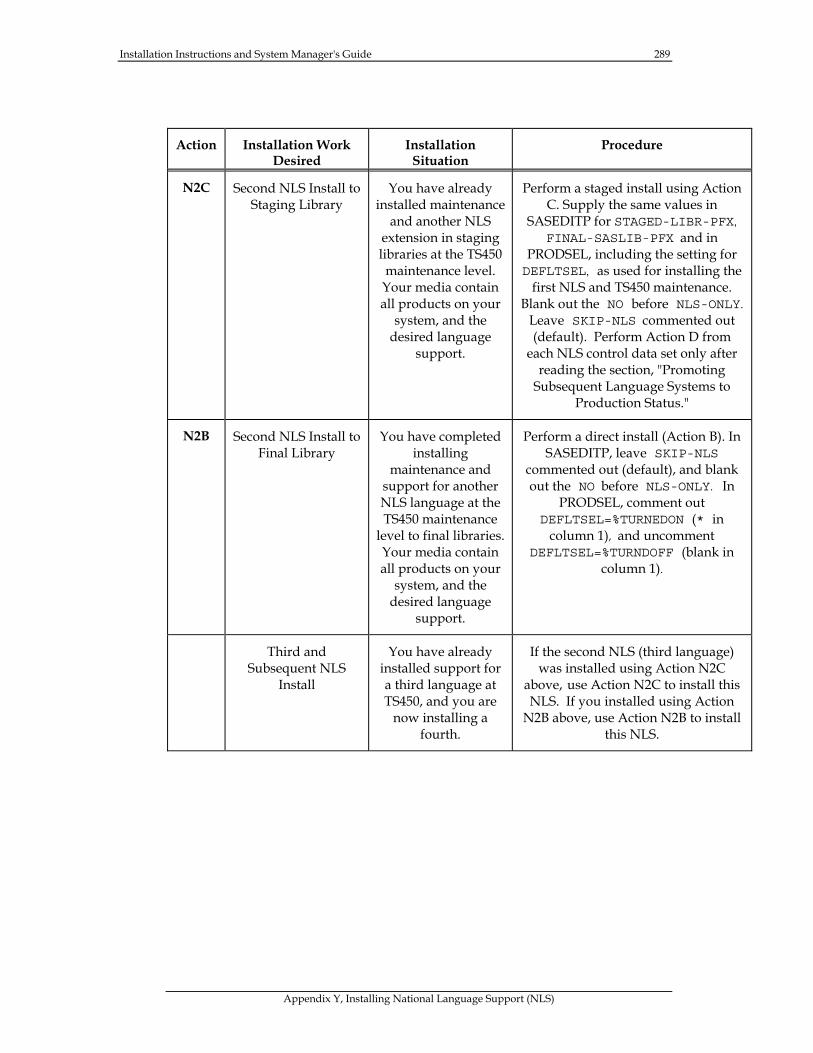
Installation Instructions and System Manager's Guide 289
Appendix Y, Installing National Language Support (NLS)
Action Installation Work Desired
Installation Situation
Procedure
N2C Second NLS Install to Staging Library
You have already installed maintenance
and another NLS extension in staging libraries at the TS450 maintenance level. Your media contain all products on your
system, and the desired language
support.
Perform a staged install using Action C. Supply the same values in
SASEDITP for STAGED-LIBR-PFX, FINAL-SASLIB-PFX and in
PRODSEL, including the setting for DEFLTSEL, as used for installing the
first NLS and TS450 maintenance. Blank out the NO before NLS-ONLY.
Leave SKIP-NLS commented out (default). Perform Action D from
each NLS control data set only after reading the section, "Promoting
Subsequent Language Systems to Production Status."
N2B Second NLS Install to Final Library
You have completed installing
maintenance and support for another NLS language at the TS450 maintenance
level to final libraries. Your media contain all products on your
system, and the desired language
support.
Perform a direct install (Action B). In SASEDITP, leave SKIP-NLS
commented out (default), and blank out the NO before NLS-ONLY. In
PRODSEL, comment out DEFLTSEL=%TURNEDON (* in
column 1), and uncomment DEFLTSEL=%TURNDOFF (blank in
column 1).
Third and Subsequent NLS
Install
You have already installed support for a third language at TS450, and you are
now installing a fourth.
If the second NLS (third language) was installed using Action N2C
above, use Action N2C to install this NLS. If you installed using Action
N2B above, use Action N2B to install this NLS.
290 Installation Instructions and System Manager's Guide
Appendix Y, Installing National Language Support (NLS)
Promoting Subsequent Language Systems to Production Status and Promoting any NLS to Production Status over a Prior TS Level NLS (Action D)
This section outlines important considerations for completing your installation with Action D (Copy Stage to Final), if you have used staging installations to install multiple NLS extensions, or a single NLS extension over prior NLS.
When promoting a system with three or more languages (two or more NLS) to production status, (or promoting NLS where the final libraries contain a prior NLS extension), note the following:
❏ You must perform one Action D for each NLS extension.
❏ Each Action D that is taken must be launched from the control data set used to install the particular NLS.
❏ The first (or only) Action D run must include copying maintenance from stage to final, even if all NLS extensions were installed with NLS-ONLY uncommented in SASEDITP. In the latter case, see the next item, otherwise first use the NLS which also installed maintenance ( NLS-ONLY commented out with NO in SASEDITP).
❏ If all your NLS installs were NLS-ONLY, then pick any NLS to run first. Comment out (specify NO starting in column 1 before) NLS-ONLY and otherwise run an Action D.
❏ If this maintenance/NLS promotion overlays an earlier TS-level and NLS installation, then access to any overlaid NLS must be disabled from the time maintenance begins to copy down, until that particular NLS Action D has safely completed. This must be done to prevent prior TS-level NLS from running with current TS-level maintenance. Use any method satisfactory to your site to accomplish this. This includes but is not limited to:
❏ Perform Action D jobs during system maintenance time, using SASIHOLD to prepare them in advance. After the Action D with maintenance is run successfully, remaining Action D jobs can be run in parallel if more than one remains. Action D normally runs fast compared to Actions A, B, or C.
❏ Rename CLISTs and PROCs accessing NLS support until promotion is complete. Make sure the libraries are not in use before promoting them.
❏ Clear users from, and then delete the production (final) &prefix.LX.SASHELP for each NLS extension just prior to starting the first Action D. (Using the prefix examples earlier in this appendix, MVSSYS.SAS.V609.ES.SASHELP.) Action D reallocates the file automatically.
Installation Instructions and System Manager's Guide 291
Appendix Y, Installing National Language Support (NLS)
Renewing the License for a System with One or More NLS Extensions
If it becomes necessary to renew your system license after installation of NLS extensions to your SAS System, you will have to run an Action G for each &prefix.SASHELP and &prefix.LX.SASHELP, including staging libraries. Run an individual Action G for each SASHELP, setting RENEW-PREFIX=&prefix.LX and RNW-BASE-PFX=&prefix for the NLS extension SASHELPs.
Using the examples from a Spanish NLS extension in the section, "General Information," the prefix settings for an Action G to renew the SETINIT of the Spanish extension SASHELP would appear as follows:
RENEW-PREFIX=MVSSYS.SAS.V609.ES RNW-BASE-PFX=MVSSYS.SAS.V609
If it were necessary to renew the SETINIT of the SASHELP of a language extension in a staging library, the prefix settings would be as follows:
RENEW-PREFIX=MVSSYS.SAS.V609.STAGELIB.ES RNW-BASE-PFX=MVSSYS.SAS.V609
Note that RNW-BASE-PFX must point to the final &prefix in the above examples.
Using NLS Media to Perform a Non-NLS Installation
To install a new system, maintenance, and/or new products from this media without installing language support, complete the following steps:
1. Examine the #CONTENT member of the control data set and verify that the media contains maintenance for your existing products and any new products.
2. Blank out the *NO* before SKIP-NLS in SASEDITP.
3. Perform any appropriate install. No language support will be installed.


Page 293
Government Notice
Reviewing the Federal Government Rights Notice
If your installation is a Federal Government site or a Federal Government Prime Contractor site, you are responsible for the information contained in a usage rights notice that has been included during installation.
Processing the Government Rights Notice
Note: This task is required.
Review the Government Rights Notice information that is contained in the GVTNOTE member of the CNTL data set.


![Naf orlando 9 steps pp tv[1].6.08](https://img.pdfslide.us/doc/110x75/5583c171d8b42a784f8b4b3f/naf-orlando-9-steps-pp-tv1608.jpg)