Embed Size (px)
Citation preview

Bluesy E Sansula Tuning
3G#
1E
1E
2F#
5B
4A
D7-
7-D5
B
The Bluesy E Tuning is a new tuning I made in 2015, specifically for the Kalimbula by Hands on Drums, but it will work on any Sansula. Why did I make this new tuning? The short answer is: “Because I am crazy that way - I just have to keep making new tunings,” and for now, I will leave it at that. I do like this tuning a lot. Each tuning will feel and sound different, and while this one is not quite as mystical as the standard A mi-nor Sansula tuning, I feel it is quite a bit more capable, and I love the mixolydian sound I get from it (without explaining, that high D, or 7-, which is a flat 7th or minor 7th, when played in context with the low or high E, is the essence of the mixolydian mode). I hope you like this tuning.
Music for the Bluesy E Sansula TuningMark Holdaway, PhD Kalimba Magic October 17 2015
If you don’t like this tuning, it is not difficult to tune to a different tuning. I would suggest you go to your hardware store and get the six-pointed star-shaped driver head that will let you loosen the bridge. Loosen the two bolts by one half a turn, and the tines will slide freely but will not fall out. Also a $20 electronic tuner will help - it has a digital display that shows you what note is closest to the one it hears, and will also indicate how flat or sharp the note is. If you need to go to a lower note, pull the tine out to make it longer. To go to a higher note, push the tine in a bit. When you have the tuning approximately correct, retighten the two bolts half a turn, check the tuning again, and make any final tuning adjustments. If pushing the tines hurts your fingers, do be careful. You can get some hard implement - a pen, a quarter, or whatever - to use to push the tines in or out, but be careful, and always ask yourself the question: “What will happen to me if this slips?” If the answer is not fun, try something else. Google “Tuning Kalimba” if you need more help than this.
This instructional download uses three different ways to transmit musical understanding: tablature, down-loadable MP3 files, and words guiding you on exactly what to do, or suggesting ways of thinking about the mu-sic, or how to make your own extensions of the exercises.
The tablature, or tab, is a graphical respresentation of the sansula’s notes. The four bent-up tines are represented by gray columns, while the five flat tines are represented by white columns. Musical note symbols are placed on the columns, and you start playing at the bottom of the page and work upward.
At any given moment, you might find the tablature to be confusing - syncopated rhythms are especially easy to get confused about. Yes, if you already knew everything there was to know about music, you could figure out the rhythm from the tablature notation, but if you were that person you probably wouldn’t be interested in playing the 9-note Sansula. For those moments when you need a bit more, you can go to this web page and get the MP3 files of each riff in this download:
http://www.kalimbamagic.com/downloads/sansula_bluesyE_D1

B
D
ED
A G#F#
EB
This exercise teaches at least four things:
* make a simple pattern with two Right notes fol-lowed by two Left notes - it will almost surely be great (see Measure 1).
* take that simple pattern and syncopate it to sound cool (see Measure 2).
* pick another two Right notes followed by two Left notes and it will also sound cool (see Measure 3).
* the lower tines define one space (Measures 1-2) while the upper tines define another space (Mea-sures 3-4).
** And by implication, there are really hundreds of patterns you can come up with that follow this basic description. Can you think of one?
B
D
ED
A G#F#
EB
Most kalimbas, and certainly all Sansulas, have odd idiosyn-cratic tunings. They are the opposite of the piano, which has all the notes laid out in a logical order.
On the other hand, the kalimba often has its own internal logic. You cannot tell right away what that logic is, but when you twiddle your thumbs and out pops music, you know that this internal logic is at work. A good tuning will make it easy to make good music. A bad tuning will make it difficult to play good music. Or perhaps most true, each tuning will have certain things that are easy to do and other things that are hard to do, and other things that are impossible to do.
The Bluesy E Sansula tuning has three pairs of octaves. An octave is the distance between “low Do” and “high Do” in “Do Re Mi Fa SO La Ti Do”. Both notes in an octave pair have the same name, and in some sense they sound the same even though (or perhaps because) the frequency of one is twice the other.
To make it easy, the Sansula’s low D and high D are right next to each other. The low E and high E are also right next to each other. There is another octave pair, the low B and the high B, but they are not right next to each other.
Here is an exercise for playing the octaves on the Bluesy E Sansula.
By the way, in Measure 4 we see the three lowest notes on the instrument, and in Measure 5 we see the three highest notes on the instrument. In between the lowest and the highest is a 5-note scale segment, which we will get to later.
In Measure 6, we play the low and high B, then the low and high D, and then the low and high E at the same time. Playing the notes in an octave pair together like this greatly increases the power of the instrument’s voice.
Riff 02 - Two notes on each sideRiff 01 - Octaves
By the way, those double (or triple) horizontal lines with two small dots above or below are repeat signs. When you get to a repeat sign with downward faces dots, jump back, without skipping a beat, either to the previous repeat sign with upward facing dots, or all the way back to the beginning. Confused? Listen to the MP3s from the URL given on page 1. You are free to repeat each section as many times as you like, but these recordings have just one repeat per repeat sign.
Oh yeah? Prove it.
OK - this one is a real straightforward variation on what we just looked at with Riff 02.
The details of the syncopation are differ-ent from the previous example. Yes, there must be 50 ways to syncopate a four note phrase.
B
D
ED
A G#F#
EB
B
D
ED
A G#F#
EB
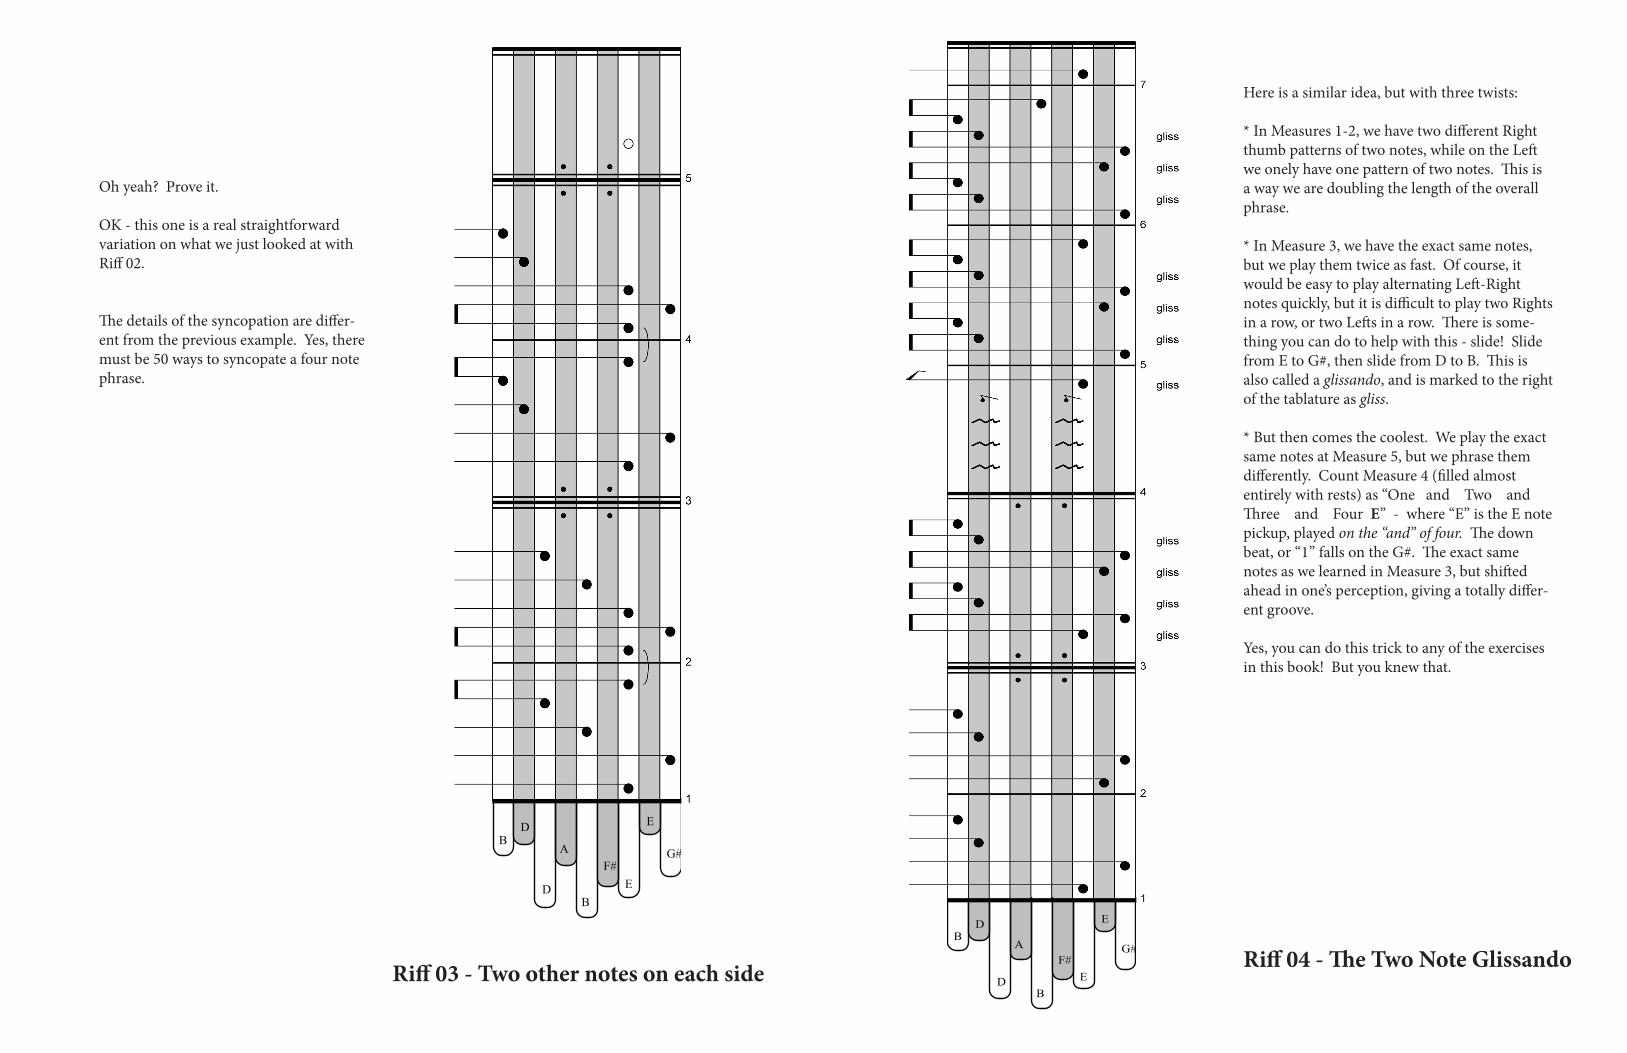
Here is a similar idea, but with three twists:
* In Measures 1-2, we have two different Right thumb patterns of two notes, while on the Left we onely have one pattern of two notes. This is a way we are doubling the length of the overall phrase.
* In Measure 3, we have the exact same notes, but we play them twice as fast. Of course, it would be easy to play alternating Left-Right notes quickly, but it is difficult to play two Rights in a row, or two Lefts in a row. There is some-thing you can do to help with this - slide! Slide from E to G#, then slide from D to B. This is also called a glissando, and is marked to the right of the tablature as gliss.
* But then comes the coolest. We play the exact same notes at Measure 5, but we phrase them differently. Count Measure 4 (filled almost entirely with rests) as “One and Two and Three and Four E” - where “E” is the E note pickup, played on the “and” of four. The down beat, or “1” falls on the G#. The exact same notes as we learned in Measure 3, but shifted ahead in one’s perception, giving a totally differ-ent groove.
Yes, you can do this trick to any of the exercises in this book! But you knew that.
Riff 03 - Two other notes on each side Riff 04 - The Two Note Glissando

B
D
ED
A G#F#
EB
On Riff 1, I introduced the octave pairs - low B, D, and E at the bottom of the in-strument, and high B, D, and E at the top. Please refamiliarize yourself with those notes.
Those bottom three and top three notes are drawn from the pentatonic scale. The pen-tatonic scale is sparse, and is skipping over several notes. If you look at the notes on a piano between B and E, you would find that this kalimba is missing three notes in that B, D, E figure. That is, we are missing half the notes here!
In between the low E (that is, the top note from the bottom three) and the high B (that is, the lowest note of the top three) there is a scale segment where every note in the diatonic (that is, “Do Re Mi”) scale is repre-sented. There are, hoever, three chromatic notes that are missing from this segment. But we are doing better, in this segment of 5 notes, we are only missing 3 notes.
Scales are not so easy on the Sansula as you have to play two or three notes in a row with the same thumb, which is awkward. In Measure 3 when we do the downward scale segment from B down to E, the play-ing is less akward if the final two notes, F# and E, are connected with a gliss.
On the other hand, going up the scale in measure 4 is not so hard because we can cross the Left thumb over to play the F# and the final two notes, A and B, can be connected with a gliss.
Riff 05 - Scale Segments
B
D
ED
A G#F#
EB
Chords are when you play two or more notes that harmonize. A two note chord is called a dyad, and a three note chord is a triad.
Not every pair of notes will sound good together...
(consider playing the G# and the A together - it sounds rather raw and a bit too close for comfort - but stay tuned, we will use that dissonant coupling later in this book, and it will sound good in context. That is, don’t be afraid of dissonance, you can make dissonance work.)
...and three notes that sound good together is even harder, right?
On the other hand, three notes together gives a rich array of possible sounds, levels of stability, and emo-tional overtones...
(Music is all about establishing one particular sense of stability or emotion, then going away from that to another place, and then back to the primary emotion and stability. In other words, starting with one har-mony or chord, shifting to another, and then return-ing. You can dress it up really fancy, but that is the fundamental motion of most music.)
...The bad news is that the Sansula, with only 9 notes, does not have most of those possibilities. But the possible chords that are left on the sansula are tilted in favor of sounding good. Some of those good-sounding three and four note chords are shown here.
If you are diligent, you can try all possible groups of three notes - there are (9 * 8 * 7)/(3 * 2) = 84 pos-sible combinations of three notes (the 3 * 2 accounts for the fact that the order of the notes doesn’t mat-ter). That is, if you approach the possible triads systematically, you can devote 30 seconds to each possible triad to discern if it is interesting and to notate it if it is, and you will make it through all 84 possible triads in under an hour. Many of these tri-ads will be harmonically identical, as low B and high B are largely the same when it comes to harmony.
By now you know - this page is a starting point for you. Now go and do some work, and pay attention with your ear, your mind, and your heart.
Riff 06 - Chords

Diads are two note chords, and they are also the easiest chord to play on the kalimba. Each thumb plays one note, and the two are sounded at the same time.
Of course, when you play first the Left thumb and then the Right thumb, the first note will still be ringing when you play the second note. That is, you do not have to play the two notes simulta-neously for all this talk about chords to be useful.
First try playing this piece at written, (Watch out, in Measures 3, 4, and 5 you will either want to play two notes with the same thumb, or cross over to bring one thumb on the opposite side. Do whichever feels more natural to you.)
Next, try leading with the Right thumb and answering each Right thumb note with the Left thumb note that is written next to it. Then try leading with the Left. Or you could even make something more complicated, with each differ-ent chord bouncing between Left and Right and even adding more of the same notes written. For example, you could play the first note with one hand twice for each answered note on the other side.
In other words, be imaginative, and have some great fun adding your own spin to all of these riffs. They are just starting points.
B
D
ED
A G#F#
EB
Riff 07 - Two Note Chords
B
D
ED
A G#F#
EB
The Sansula is really an arpeggio machine.
What is an arpeggio? The notes of a chord, played individually. What is a chord? Two or more notes that sound great (or at least interesting) when played at the same time.
This exercise shows two different ways to use a glissando to help you play arpeggios. In Measures 1-2, we are playing a three note glissando. It helps to have a thumb nail - you touch it to the first (lowest) note in the glissando, and you then drag it across the other two notes in the glissando. Note that the glissando in Measure 1 only uses lower row tines, while the glissando in Mea-sure 2 only uses upper row tines.
The glissandos in Measure 5 only use two notes, but there are two of them, one right after the other, first Left then Right.
Riff 08 - Arpeggios

Two vs Three.
This is not the classic rhythmic pattern “two against three”, in which beats line up and sometimes your right and left are beating together and sometimes not - it is a bit more subtle than that.
In Measure 1, the Right thumb is doing an “Um - Pa - Pa” phrase - that is, three beats long. It takes two of these patterns to fill a measure. In Measure 2 the Left thumb is doing a two note pattern “down up”, and it takes three of them to fill a measure.
Measure 3 is formed by combining the Mea-sure 1 Right thumb pattern and the Measure 2 Left thumb pattern, shifted the Left pat-tern by half a beat so the Left is always an-swering or echoing the Right thumb. This composite pattern takes an entire measure, or 12 notes, before it repeats - that is, is six beats long. The difference between the first six notes and the second six notes is subtle - the same notes on the left side are played, but their shape is reversed.
In other words, a more complex and unex-pected pattern emerged from combining two shorter, simpler patterns.
Measure 4 is just like Measure 3 except that every tine played has been shifted inward toward toward the center and upward onto the upper row of tines.
The tab above shows a strict arpeggio, with every note played being a note that is in the E, and then the D chord. Note how the last note in Measure 2 gets ready for the change to D, and the last note in Measure 4 prepares the way for a return to E upon repeat to Measure 1. By the way, feel free to repeat this as many times as you like.
The tab to the right is more challenging because it is in 6/4 - slightly wierd for western ears - and because it has passing tones or suspended notes - that is, notes that are not in the chord, or strictly speaking, in the arpeggio. However, I much prefer the richness of the passing tones and the suspensions to the straight arpeggios.
B
D
ED
A G#F#
EB
Riff 10 - Two against ThreeRiff 09 a, b - Arpegiated Melody
B
D
ED
A G#F#
EB
E
D
B
D
ED
A G#F#
EB

B
D
ED
A G#F#
EB
B
D
ED
A G#F#
EB
B
D
ED
A G#F#
EB
B
D
ED
A G#F#
EB
These two pages are all a unified piece of music, represent-ing variations around a simple foundation. That founda-tion? The Left thumb is jumping all around, but the Right thumb continues to do the same steady pattern of E and C#, always on the down beats. The Right side supports the Left side. But the coolest thing is that even if the Right thumb is constantly playing the same thing, the Left thumb notes still have the power to change the harmony.
Riff
11
- Bas
ed o
n R
ight
E -
G#
Stea
dy P
atte
rn

B
D
ED
A G#F#
EB
B
D
ED
A G#F#
EB
B
D
ED
A G#F#
EB
As always, I am trynig to show you more than one thing at a time. But you can handle it, I hope!
The first thing I am showing you here is exactly what we did in Riff 11, with a steady plodding part played by one thumb while the other thumb dances around. But this time, we make the Left thumb play the steady plodding part, and it sup-ports the Right thumb.
That describes the music all the way through Measure 6. At Measure 7, we flip, and the Right thumb is doing the podding on the beat support part for the Left.
We go back to Left support for Right in Measures 9-10, and Right supporting Left in Measures 11-12.
These Left to Right shifts correspond to harmonic shifts. In the measures dominated by the steady Left thumb, as are playing D and A - two of the three notes in the D major chord. When the Right thumb plays the steady role, we are playing E and G# - two of the three notes in the E major chord.
Just as important as these notes is the fact that we are playing the root notes of these chords - the D and then the E - on the down beats of these mea-sures.
A physical rule is enforcing a conceptual musical change. Your brain doesn’t need to understand, just your thumbs. This is the hallmark of a good tuning.
On the other hand, whatever you can understand with your mind will put you at an advantage. WHen you catch your thumbs doing something good, pay attention and see if you cannot figure out what you are doing and why it sounds good.
Riff 12 - Based on Two Patterns

Riff 14 - Other Harmonies: D
This music is playing around with the D major chord. D major has D, F#, and A in it. We are also throwing in the E for some variety or tension (in Measures 2 and 4). Notice how we go back and forth between a straight D chord in Measures 1 and 3 and a suspended D chord with the E in Measures 2 and 4.
The second phrase in the exercise, Measures 5-8, is just like the first phrase in Measures 1-4, except that we have rewritten Measure 6 to play an E7 chord (E, G#, B, and D - but we skipped the B).
This is a common way to expand music - estab-lish a phrase (ie, Measures 1-4), then repeat the phrase, but change something about it. Don’t make the change too small, or people might not notice it. By adding the G#, this really sticks out as different. By adding the three high D notes, this seems as if it were borrowed from Measure 4 (or 8). The low E makes it echo Measure 2. So, just one in four measures changed, the change was big with a new note that sticks out, but the rest of the measure is reassuring and similar to other things in the first phrase.
B
D
ED
A G#F#
EB
D
Dsus2
D
D
D
E7
B
D
ED
A G#F#
EB
Riff 13 - Most Notes Are in E7
Most of the notes in the Bluesy E tuning are in the E7 chord. The E major chord consists of E, G#, and B - so five of the nine notes on this tuning are in E major. The 7th of E is D, and as there are two D notes, this means that seven of the nine tines are in the E7 chord.
What does that mean?
First, it strongly suggests the E7 harmony will domi-nate this instrument. Anything you play will tend to sound as if you are in the key of E, with the 7th thrown in. The 7th is not normally there in the root note’s chord, unless you are playing blues. Hence the name: Bluesy E Tuning.
Also, if you just twiddle your thumbs, it will probably sound pretty good, but is likely to just sit on E7, with the F# (the 2nd of E) and the A (the 4th of E) - both suspensions of E - thrown in.
What is a suspension? A note like the 2, 4, or 6 that is not in the E chord (and by implication, left over from another chord), which builds tension, which is then released by removing that suspension note.
And last, the flip side of 7/9 of the notes being in the E7 chord: in order to play other chords or harmonies, you will have to work. You will have to learn those departures from E explicitly.
Complex songs may have 5 or more chords in them. Boring hippy jams may have only one chord. A good compromize for the a kalimba is to have two chords, a “here” chord, and a “there” chord, and you can alter-nate between them. The “heare” chord will usually be E or E7. You can learn some “there” chords in the coming pages.
Two other things to consider in this music. First, it is easiest playing a kalimba when you are doing a strictly alternating “Right-Left” pattern, or a “Left-Right” pattern. Second, this piece of music does maintain an alternating “Right-Left” pattern, but it does so by forc-ing the Left thumb to cross over to the Right thumb’s territory in Measure 2. That cross over is indicated by the “L” to the right of the E notes there.

B
D
ED
A G#F#
EB
Bm
Bm
D9
Bm
Bm
D
This riff mainly sits on B minor (Bm), and goes off to a D every so often to keep from being just a static riff.
That is a general technique - to go back and forth between two different chords. You could spend equal time on each chord, but it may be more interesting to make the division lopsided, as in this riff.
Look at the patterns played by the Right and the Left sides independently. The Left has one pattern in Measures 1 and 3, and another Pattern in Measures 2 and 4. The second pattern is made by changing just one note. We could say the Left thumb does an A - B - A - B pattern.
Now look at the Right thumb, which also has two patterns. Again, the first and second patterns are closely related and start out the same. However, the Right thumb makes a C - D - C - C pattern.
Just to be sure, A, B, C, and D here do not mean any particular chord - they just represent the different patterns played by Left and Right.
Again, this is the sort of way that varia-tions are made, or how you can take small patterns (A, B, C, and D are each one measure long) and expand it into a longer pattern.
Riff 15 - Other Harmonies: Bm
B
D
ED
A G#F#
EB
A
A6
A7
A6
Riff 16 - Other Harmonies: A
The A major chord has A, C#, and E, but this tuning doesn’t have the C#, so the A chord is just the A and the E, the root and the 5th.
For that reason I throw in the F# and G#, the 6th and Major 7th of the A chord.
There is a half-step dissonance between the G# and A at the start of Meaure 3, but those two notes are not played simultaneously elsewhere in the measure or anywhere else in the song, so that dissonance is bearable - to me at least.
There are two other techniques going on in this riff. The first is the Right thumb is play-ing a straight part while the Left thumb plays a synchopated part - we have seen this before.
The other technique: the Left thumb plays a quickly-changing pattern that is only one measure long, while the Right thumb plays a slowly changing pattern that takes the entire four measures to complete.
The take home message is always the same: there are hundreds of riffs that you can create that use the same two techniques with differ-ent notes, different lengths of patterns, maybe making the Left thumb do the slowly chang-ing long pattern while the Right thumb does a faster pattern.
That is, even though this is a very simple in-strument, there are so many things you can do. You might get tired of hearing this message, but I hope you won’t get tired of the sansula.

B
D
ED
A G#F#
EB
Riff 17- Other Harmonies: F#m
B
D
ED
A G#F#
EB
B
D
ED
A G#F#
EBRiff 18 - Combining Harmonies: F#m and E
By now, you are tired of hearing what I have to say, because, yes, I am a broken record.
To celebrate the end of this download, I will give you a break here.

I hope you enjoyed getting to know a bit about the Sansula and its Bluesy E tuning. I think its a pretty good tuning for jamming, especially with guitars, which love the key of E.
On every page, I have given you hints for how you can borrow the compositional tech-niques I have used, to make your own music. I hope that you can successfully employ these techniques to make something that reflects your own unique way of being, your own ways of understanding music.
And if you don’t like this tuning, or you feel you have become bored with it? Perhaps it is time to retune to a different tuning. There are several established tunings available, a few with instructional material similar to this download. Perhaps the most exciting thing to do is to create your own tunings and your own songs coming from a unique place.
The essential thing to remember is this - even though the sansula with only nine notes seems like a very small universe, the possibilities are truely astronomical. How many dif-ferent tunings are available to the Sansula? Lets say each tine could be left the same, or pulled out a half step, or pulled out a whole step (but not much more - it will fall off if you try to lower the pitch too much); or you could push the tine it to raise the pitch by a half step, a whole step, a step and a half, or two whole steps. That is 7 different tuning possibili-ties for each tine, or 7 raised to the 9th power different tunings for the instrument - which is just over 40 million tunings.
Some of those tunings will actually be the same. Then there are tunings which are es-sentially the same, but just shifted up or down in pitch to a different key. Then there are tunings that just sound bad. So, there will not be 40 million different good, unique tun-ings. Maybe there are hundreds of thousands of reasonable tunings. Maybe there are a few thousand great tunings. That is way more than either of us will ever explore - probably way more than everyone in the world playing sansula will ever explore. And for each of those thousands of tunings, how many different riffs or songs are possible? To say “thou-sands” on each would be an understatement.
So, from my point of view, this looks like an infinite sea of possibilities. Certainly enough to keep you busy for as long as you want to spend on this path of searching and discovery.
Just one last tip: be open to the randomness, but more open to the magic - let your thumbs off the leash, and when your thumbs do something that sounds great, try to capture it, remember what it is, maybe write it down in tablature, and try to understand what it was you did and why it was so cool.
Wishing you the best in the way of making your own Kalimba Magic!
Mark Holdaway Tucson AZ October 18, 2015