Embed Size (px)
Citation preview
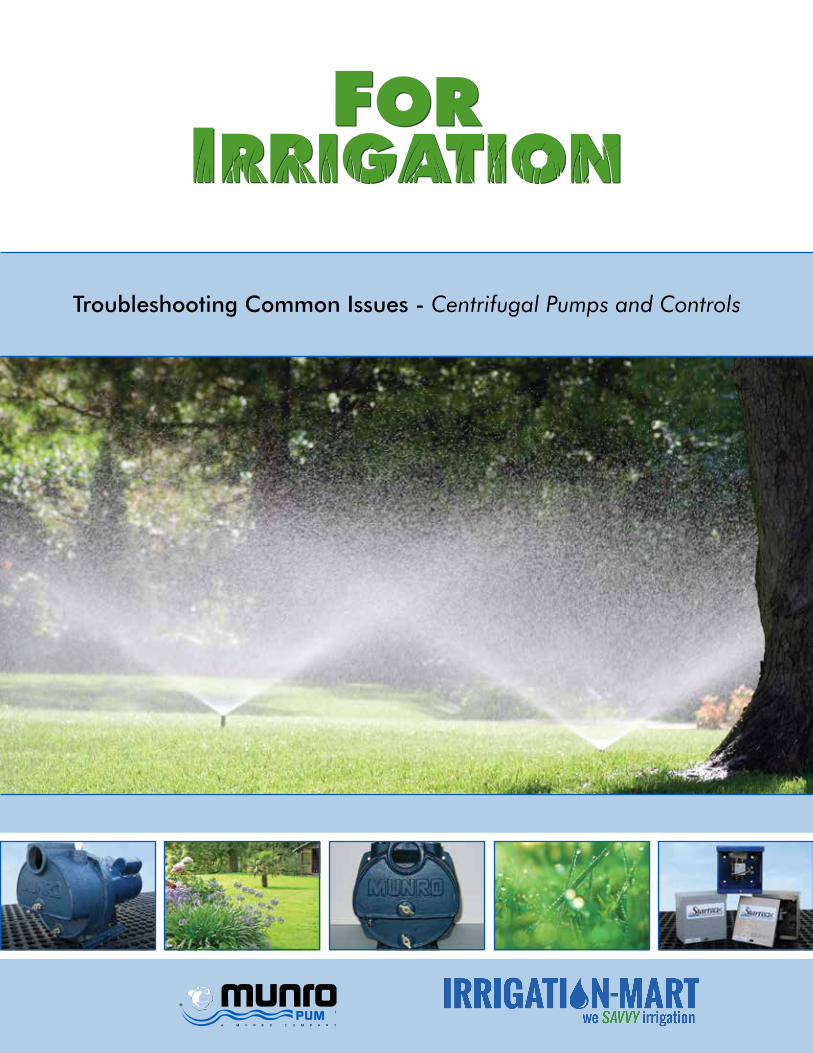
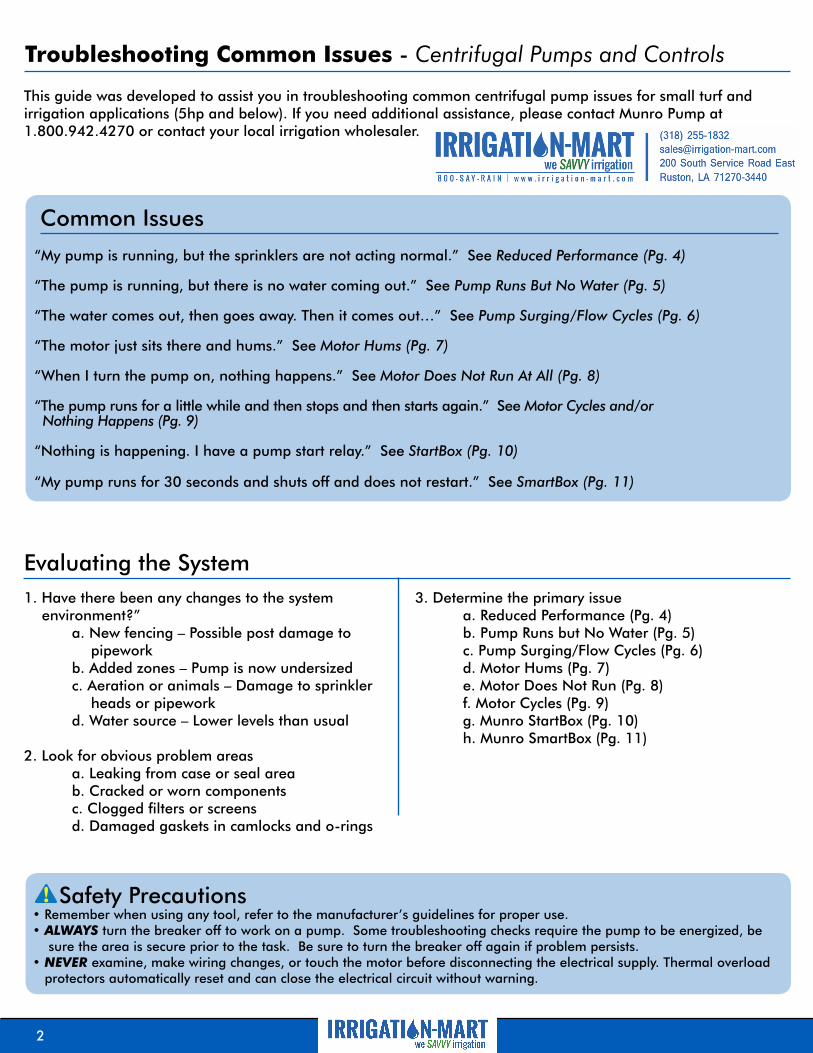
Troubleshooting Common Issues - Centrifugal Pumps and Controls
Troubleshooting Common Issues - Centrifugal Pumps and Controls
“My pump is running, but the sprinklers are not acting normal.” See Reduced Performance (Pg. 4)
“The pump is running, but there is no water coming out.” See Pump Runs But No Water (Pg. 5)
“The water comes out, then goes away. Then it comes out…” See Pump Surging/Flow Cycles (Pg. 6)
“The motor just sits there and hums.” See Motor Hums (Pg. 7)
“When I turn the pump on, nothing happens.” See Motor Does Not Run At All (Pg. 8)
“The pump runs for a little while and then stops and then starts again.” See Motor Cycles and/or Nothing Happens (Pg. 9)
“Nothing is happening. I have a pump start relay.” See StartBox (Pg. 10)
“My pump runs for 30 seconds and shuts off and does not restart.” See SmartBox (Pg. 11)
Common Issues
This guide was developed to assist you in troubleshooting common centrifugal pump issues for small turf and irrigation applications (5hp and below). If you need additional assistance, please contact Munro Pump at 1.800.942.4270 or contact your local irrigation wholesaler.
Evaluating the System 1. Have there been any changes to the system
environment?” a. New fencing – Possible post damage to
pipework b. Added zones – Pump is now undersized c. Aeration or animals – Damage to sprinkler
heads or pipework d. Water source – Lower levels than usual
2. Look for obvious problem areas a. Leaking from case or seal area b. Cracked or worn components c. Clogged filters or screens d. Damaged gaskets in camlocks and o-rings
3. Determine the primary issue a. Reduced Performance (Pg. 4) b. Pump Runs but No Water (Pg. 5) c. Pump Surging/Flow Cycles (Pg. 6) d. Motor Hums (Pg. 7) e. Motor Does Not Run (Pg. 8) f. Motor Cycles (Pg. 9) g. Munro StartBox (Pg. 10) h. Munro SmartBox (Pg. 11)
Safety Precautions • Remember when using any tool, refer to the manufacturer’s guidelines for proper use. • ALWAYS turn the breaker off to work on a pump. Some troubleshooting checks require the pump to be energized, be
sure the area is secure prior to the task. Be sure to turn the breaker off again if problem persists. • NEVER examine, make wiring changes, or touch the motor before disconnecting the electrical supply. Thermal overload protectors automatically reset and can close the electrical circuit without warning.
2
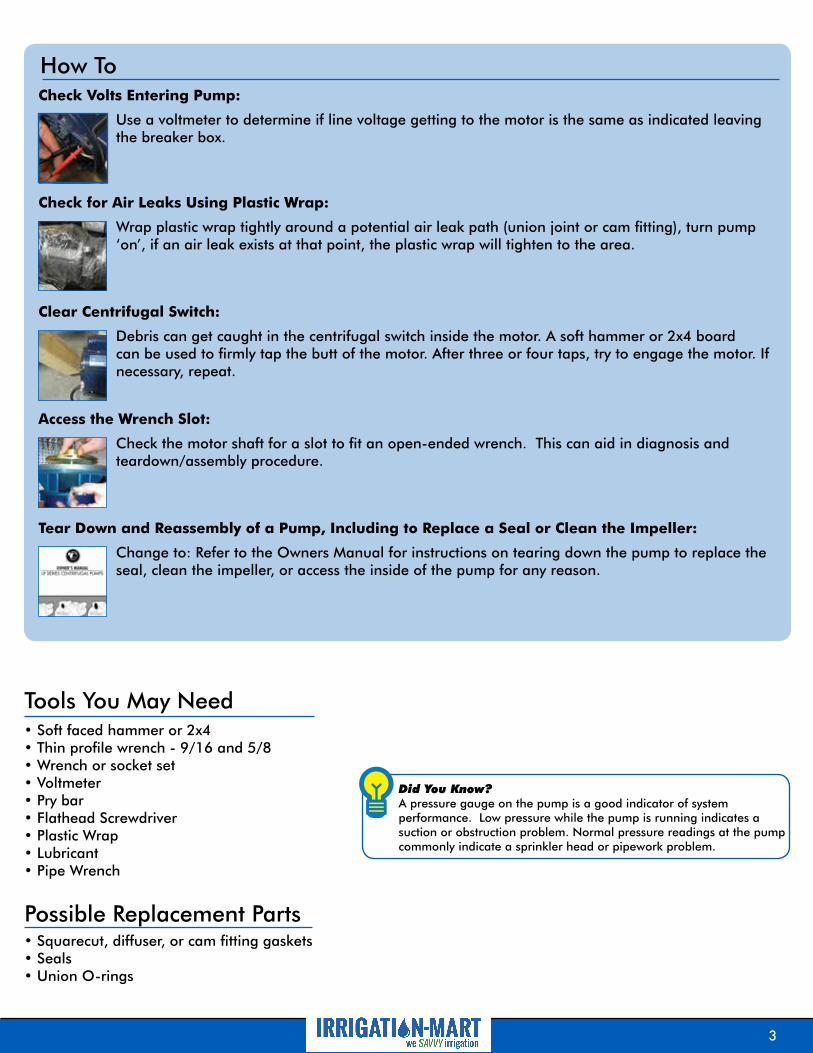
How To Check Volts Entering Pump:
Check for Air Leaks Using Plastic Wrap:
Clear Centrifugal Switch:
Tear Down and Reassembly of a Pump, Including to Replace a Seal or Clean the Impeller:
Access the Wrench Slot:
Use a voltmeter to determine if line voltage getting to the motor is the same as indicated leaving the breaker box.
Wrap plastic wrap tightly around a potential air leak path (union joint or cam fitting), turn pump ‘on’, if an air leak exists at that point, the plastic wrap will tighten to the area.
Debris can get caught in the centrifugal switch inside the motor. A soft hammer or 2x4 board can be used to firmly tap the butt of the motor. After three or four taps, try to engage the motor. If necessary, repeat.
Change to: Refer to the Owners Manual for instructions on tearing down the pump to replace the seal, clean the impeller, or access the inside of the pump for any reason.
Check the motor shaft for a slot to fit an open-ended wrench. This can aid in diagnosis and teardown/assembly procedure.
Tools You May Need • Soft faced hammer or 2x4 • Thin profile wrench - 9/16 and 5/8 • Wrench or socket set • Voltmeter • Pry bar • Flathead Screwdriver • Plastic Wrap • Lubricant • Pipe Wrench
Possible Replacement Parts • Squarecut, diffuser, or cam fitting gaskets • Seals • Union O-rings
Did You Know? A pressure gauge on the pump is a good indicator of system performance. Low pressure while the pump is running indicates a suction or obstruction problem. Normal pressure readings at the pump commonly indicate a sprinkler head or pipework problem.
3
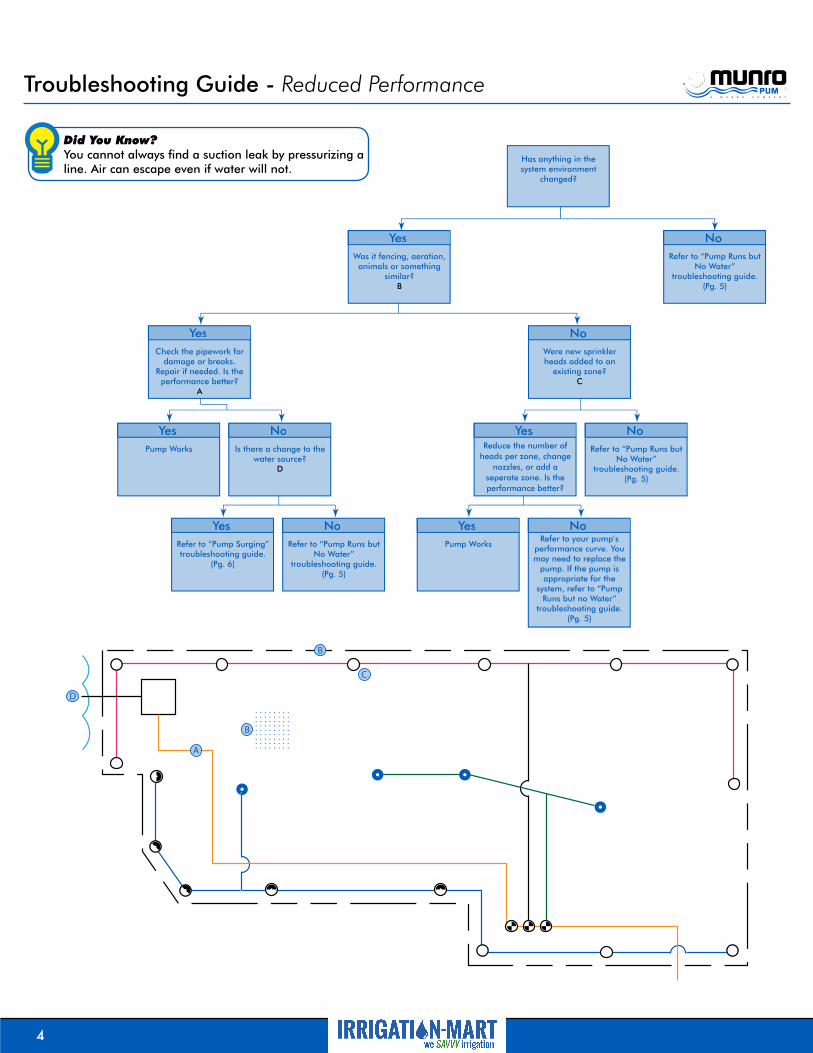
Troubleshooting Guide - Reduced Performance
Reduce the number of heads per zone, change
nozzles, or add a seperate zone. Is the performance better?
YesYes Refer to “Pump Runs but
No Water” troubleshooting guide.
(Pg. 5)
NoNo Pump Works
YesYes Is there a change to the
water source? D
NoNo
Refer to “Pump Surging” troubleshooting guide.
(Pg. 6)
YesYes Refer to “Pump Runs but
No Water” troubleshooting guide.
(Pg. 5)
NoNo Pump Works
YesYes Refer to your pump’s
performance curve. You may need to replace the
pump. If the pump is appropriate for the
system, refer to “Pump Runs but no Water”
troubleshooting guide. (Pg. 5)
NoNo
Was it fencing, aeration, animals or something
similar? B
YesYes
Check the pipework for damage or breaks.
Repair if needed. Is the performance better?
A
YesYes Were new sprinkler heads added to an
existing zone? C
No
Refer to “Pump Runs but No Water”
troubleshooting guide. (Pg. 5)
No
Has anything in the system environment
changed?
B
B
C
D
A
Did You Know? You cannot always find a suction leak by pressurizing a line. Air can escape even if water will not.
4
www.forirrigation.com • 1.800.942.4270 (8am - 5pm MT)
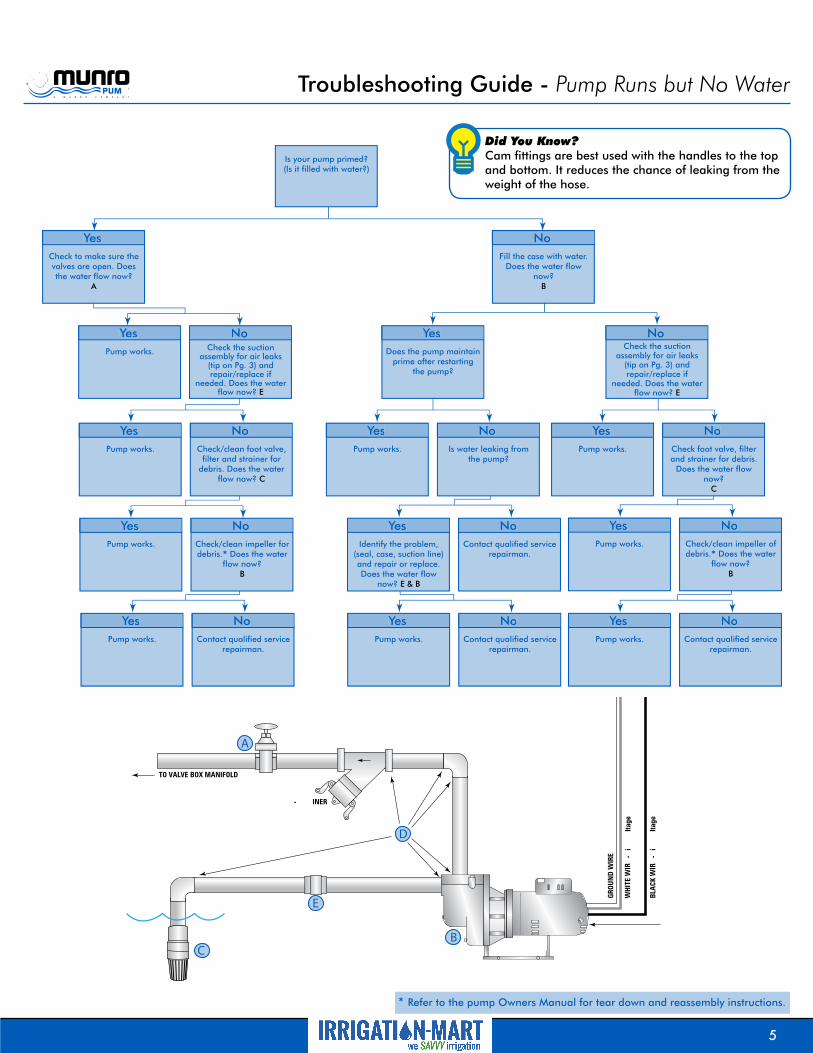
Troubleshooting Guide - Pump Runs but No Water
Pump works.
YesYes Is water leaking from
the pump?
NoNo Pump works.
YesYes Check/clean foot valve,
filter and strainer for debris. Does the water
flow now? C
NoNo
Pump works.
YesYes Check/clean impeller of debris.* Does the water
flow now? B
NoNo
Pump works.
YesYes Contact qualified service
repairman.
NoNo Pump works.
YesYes Contact qualified service
repairman.
NoNo Pump works.
YesYes Contact qualified service
repairman.
NoNo
Pump works.
YesYes Check/clean impeller for debris.* Does the water
flow now? B
NoNo Identify the problem,
(seal, case, suction line) and repair or replace. Does the water flow
now? E & B
YesYes Contact qualified service
repairman.
NoNo
Check to make sure the valves are open. Does the water flow now?
A
YesYes
Pump works.
YesYes Check the suction
assembly for air leaks (tip on Pg. 3) and repair/replace if
needed. Does the water flow now? E
NoNo Does the pump maintain
prime after restarting the pump?
YesYes Check the suction
assembly for air leaks (tip on Pg. 3) and repair/replace if
needed. Does the water flow now? E
No
Fill the case with water. Does the water flow
now? B
No
Is your pump primed? (Is it filled with water?)
Pump works.
YesYes Check foot valve, filter and strainer for debris.
Does the water flow now?
C
NoNo
B
D
E
C
A
Did You Know? Cam fittings are best used with the handles to the top and bottom. It reduces the chance of leaking from the weight of the hose.
* Refer to the pump Owners Manual for tear down and reassembly instructions.
5
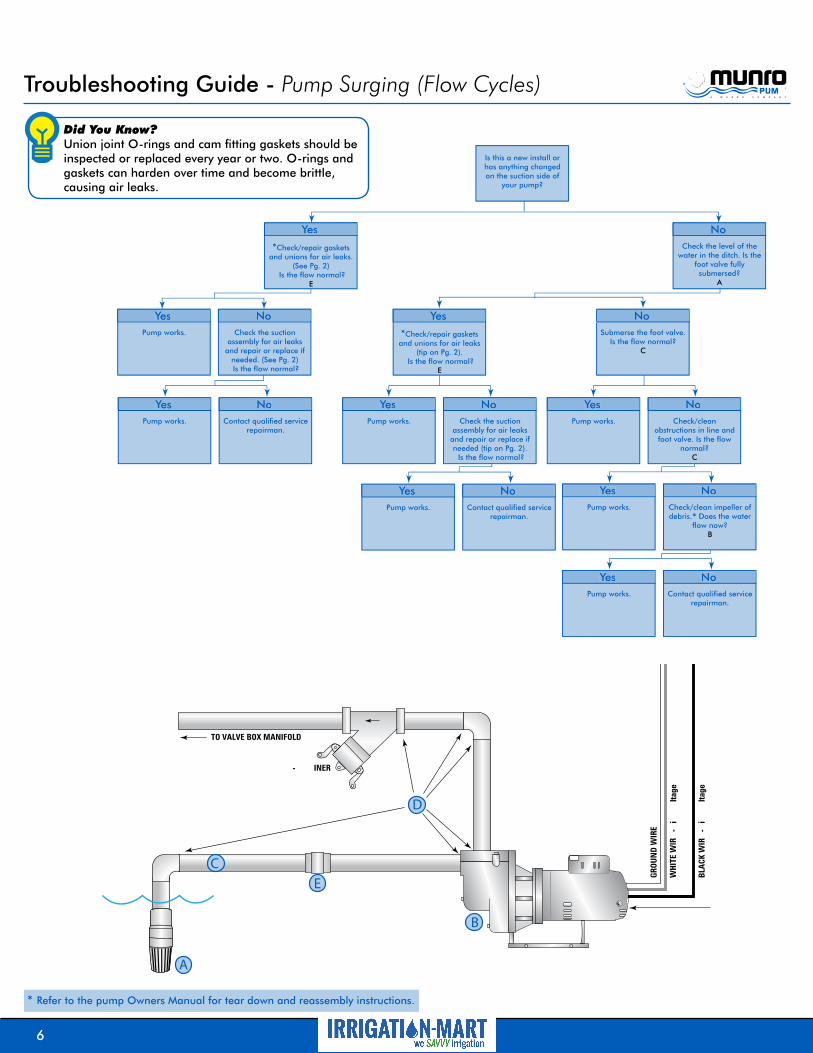
Troubleshooting Guide - Pump Surging (Flow Cycles)
Pump works.
YesYes Check the suction
assembly for air leaks and repair or replace if needed (tip on Pg. 2). Is the flow normal?
NoNo Pump works.
YesYes Contact qualified service
repairman.
NoNo
Pump works.
YesYes Check/clean impeller of debris.* Does the water
flow now? B
NoNo
Pump works.
YesYes Contact qualified service
repairman.
NoNo
Pump works.
YesYes Contact qualified service
repairman.
NoNo
*Check/repair gaskets and unions for air leaks.
(See Pg. 2) Is the flow normal?
E
YesYes
Pump works.
YesYes Check the suction
assembly for air leaks and repair or replace if
needed. (See Pg. 2) Is the flow normal?
NoNo
*Check/repair gaskets and unions for air leaks
(tip on Pg. 2). Is the flow normal?
E
YesYes Submerse the foot valve.
Is the flow normal? C
No
Check the level of the water in the ditch. Is the
foot valve fully submersed?
A
No
Is this a new install or has anything changed on the suction side of
your pump?
Pump works.
YesYes Check/clean
obstructions in line and foot valve. Is the flow
normal? C
NoNo
B
D
E
A
C
Did You Know? Union joint O-rings and cam fitting gaskets should be inspected or replaced every year or two. O-rings and gaskets can harden over time and become brittle, causing air leaks.
* Refer to the pump Owners Manual for tear down and reassembly instructions.
6

Troubleshooting Guide - Motor Hums
Pump works.
YesYes Take to motor shop for
diagnosis.
NoNo
Take motor to motor shop for diagnosis.
YesYes Call electrician to
troubleshoot wiring.
NoNo
Take the pump to motor shop for diagnosis.
YesYes Call an electrician to troubleshoot wiring.
NoNo
Firmly tap butt of motor 3-4 times with a
soft-faced hammer or 2x4 to jostle free debris. Does the pump turn on?
B
YesYes
YesYes Repeat the previous step. Does the motor
turn on now?
No
With a wrench in the wrench slot on the shaft, apply gentle torque on the wrench. Can you
break the impeller free? A
No
Does the shaft spin freely?
Does the pump run now?
YesYes Remove housing and
diffuser to clean.* Reassemble. Does the
pump run now?
No
Pump works.
YesYes Take to qualified repair
center.
NoNoYesYes Call electrician to
troubleshoot wiring.
NoNo While the pump is
turned on check voltageat the motor with a
voltmeter (tip on Pg. 3)Is the voltage the same
as indicated by thebreaker? T
While the pump isturned on check voltage
at the motor with a voltmeter (tip on Pg. 3)Is the voltage the same
as indicated by thebreaker? T
Did You Know? To avoid an unnecessary trip, try jostling any debris inside the pump free before bringing your pump to a repair man. (Tip on Pg. 3 “Clear Centrifugal Switch”)
A
B
T
* Refer to the pump Owners Manual for tear down and reassembly instructions.
7
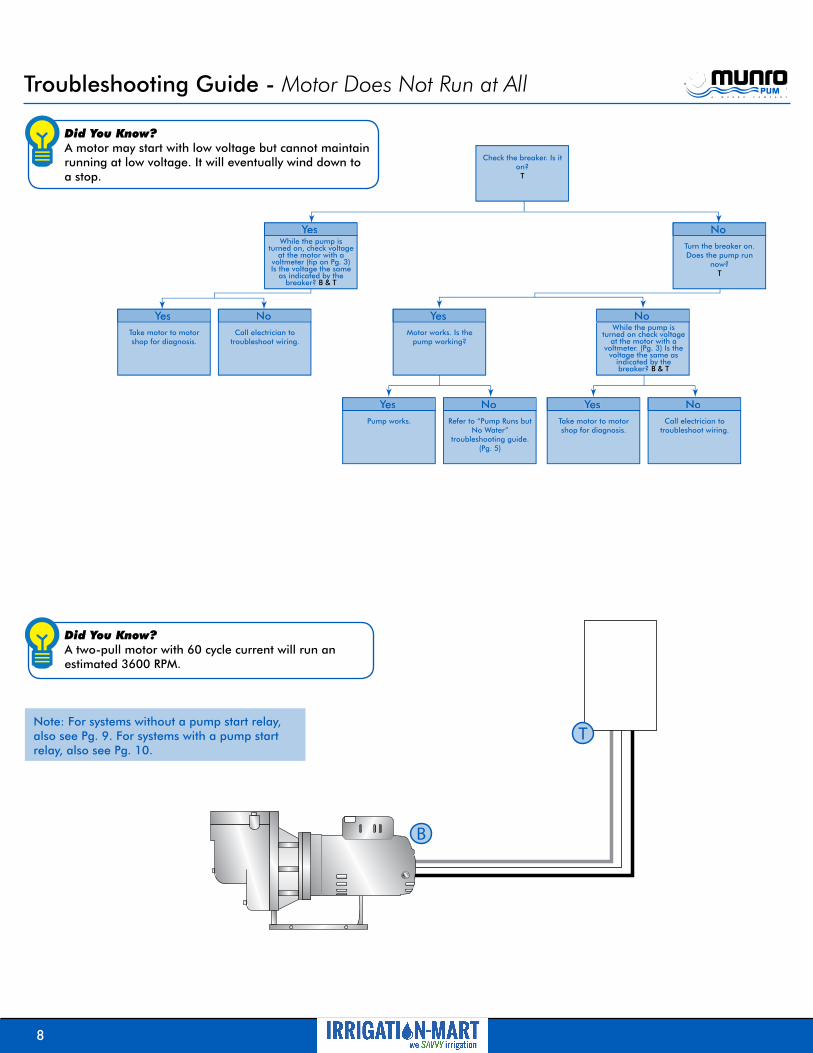
Troubleshooting Guide - Motor Does Not Run at All
Pump works.
YesYes Refer to “Pump Runs but
No Water” troubleshooting guide.
(Pg. 5)
NoNo
While the pump isturned on, check voltage
at the motor with a voltmeter (tip on Pg. 3)Is the voltage the same
as indicated by thebreaker? B & T
YesYes
Take motor to motor shop for diagnosis.
YesYes Call electrician to
troubleshoot wiring.
NoNo Motor works. Is the
pump working?
YesYes No
Turn the breaker on. Does the pump run
now? T
No
Check the breaker. Is it on?
T
Take motor to motor shop for diagnosis.
YesYes Call electrician to
troubleshoot wiring.
NoNo
While the pump isturned on check voltage
at the motor with a voltmeter. (Pg. 3) Is the
voltage the same asindicated by thebreaker? B & T
Did You Know? A motor may start with low voltage but cannot maintain running at low voltage. It will eventually wind down to a stop.
B
T
Did You Know? A two-pull motor with 60 cycle current will run an estimated 3600 RPM.
Note: For systems without a pump start relay, also see Pg. 9. For systems with a pump start relay, also see Pg. 10.
8

Troubleshooting Guide - Motor Cycles and/or Nothing Happens
Refer to “SmartBox” or “StartBox”
troubleshooting guide. (Pg. 10, 11)
YesYes Is the pump controlled
by a float?
NoNo
Verify float control configuration.
Does it work now?
YesYes Is the pump controlled
by a manual on-off switch?
NoNo The pump works!
YesYes Wiring may be
damaged. Call an electrician for
assistance.
NoNo
Verify switch wiring and functionality. Is the
pump working now?
YesYes Call electrician to
troubleshoot wiring.
NoNo
The pump works!
YesYes Call electrician to check
wiring.
NoNo
The pump works!
YesYes Call electrician to
troubleshoot wiring.
NoNo
Motor may be damaged. Contact local EASA
rated motor shop for assistance.
YesYes Rewire motor according to nameplate diagram. Does the pump work
now? V
NoNo
Using voltmeter, check wire voltage at the
pump (tip on Pg. 3) Are they the same? K & L
YesYes
Compare the "at the pump" voltage (from previous step) to the voltage listed on the
motor nameplate. Are they the same? V
YesYes Wiring between pump and the breaker box
may be damaged. Call an electrician to
troubleshoot wiring.
No The pump works!
YesYes Is the pump controlled by a lawn controller?
NoNo
Check breaker box to assure breaker is “on.”
Does the pump run now?
T
No
Does the pump run a short time and then
stop?
G H
T
K L
Start/Stop(Signal)Voltage
Pump Start Relay
Breaker Box
Nameplate(Wiring Diagram)
Did You Know? A capacitor start motor has 1.5 times more torque for starting a motor.
9

Troubleshooting Guide - StartBox
Does your relay click when the lawn controller
starts?
YesYes
Is there power at the top of the relay (110/220)?
C & D
YesYes
Is there continuity from the top of the relay to
the bottom? C to E or D to F
YesYes Is the breaker turned
on? T
No
Is the pump running?
YesYes Replace the relay.
No
The pump control works.
YesYes Refer to pump
troubleshooting guide. (See Pg. 2)
No
Wiring between the pump and the breaker box may be damaged.
Call electrician to troubleshoot wiring.
YesYes Turn it on.
No
The pump control works. Refer to pump
troubleshooting guide. (See Pg. 2)
YesYes Replace relay.
No
Does the signal voltage match the relay coil
voltage? S
YesYes Wiring problem between
start/stop signal and StartBox. Call electrician to troubleshoot wiring.
NoNo
Is the start/stop signal voltage the same
voltage getting to the coil? (24/110/220).
G & H to A & B
No
Is there a lawn controller?
A
G H
S
E F
C D
B
T
K L
Note: The StartBox & SmartBox troubleshooting guides do not apply to 2-wire decoder systems.
Did You Know? A pump start relay can be signalled by a float switch.
10
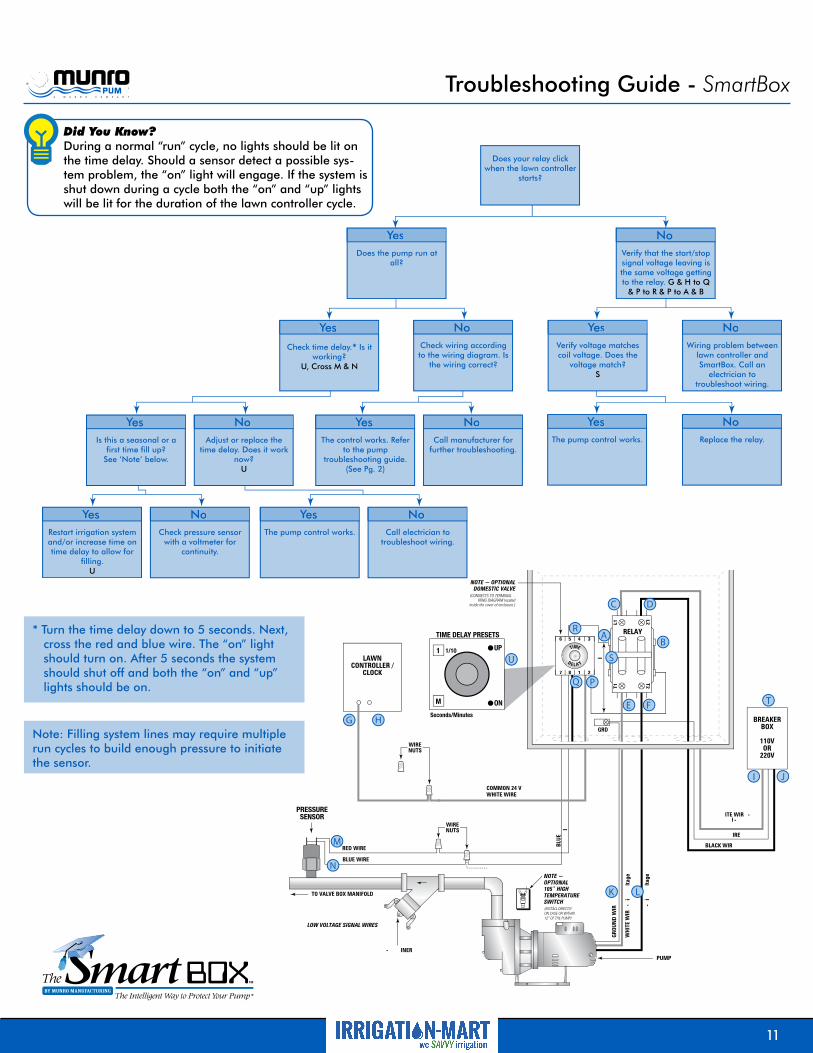
Troubleshooting Guide - SmartBox
The control works. Refer to the pump
troubleshooting guide. (See Pg. 2)
YesYes Call manufacturer for
further troubleshooting.
NoNo Is this a seasonal or a
first time fill up? See ‘Note’ below.
YesYes Adjust or replace the
time delay. Does it work now?
U
NoNo
Restart irrigation system and/or increase time on time delay to allow for
filling. U
YesYes Check pressure sensor
with a voltmeter for continuity.
NoNo The pump control works.
YesYes Call electrician to
troubleshoot wiring.
NoNo
Does the pump run at all?
YesYes
Check time delay.* Is it working?
U, Cross M & N
YesYes Check wiring according to the wiring diagram. Is
the wiring correct?
No
The pump control works.
YesYes Replace the relay.
No
Verify voltage matches coil voltage. Does the
voltage match? S
YesYes Wiring problem between
lawn controller and SmartBox. Call an
electrician to troubleshoot wiring.
NoNo
Verify that the start/stop signal voltage leaving is the same voltage getting to the relay. G & H to Q
& P to R & P to A & B
No
Does your relay click when the lawn controller
starts?
PRESSURE SENSOR
A
U
G
M
N
H
Q P
R
S
E F
C D
B
T
I
K L
J
TIME DELAY PRESETS
UP
ONM
Seconds/Minutes
1 1/10
* Turn the time delay down to 5 seconds. Next, cross the red and blue wire. The “on” light should turn on. After 5 seconds the system should shut off and both the “on” and “up” lights should be on.
Note: Filling system lines may require multiple run cycles to build enough pressure to initiate the sensor.
Did You Know? During a normal “run” cycle, no lights should be lit on the time delay. Should a sensor detect a possible system problem, the “on” light will engage. If the system is shut down during a cycle both the “on” and “up” lights will be lit for the duration of the lawn controller cycle.
11