Embed Size (px)
Citation preview

www.richlandone.org
MUNIS Requisition Entry/Approvals &
Quick Receipts
End-User Training Guide Richland County School District One

Page 2 of 29
Table of Content
Requisition Entry/Release……………………………..…………………………………….….……Page 4
Requisition Approval .................................................................................................. 11
Purchase Order Quick Receipt .................................................................................. 17
Returning Items After Entering a Receiving Record ................................................ 24

Page 3 of 29
Requisitions
Objective This guide provides a detailed description of the MUNIS process used to request items (good and services) using the Requisitions program. (Page 4-11)
Users School Secretaries, Administrative Assistants, Executive Secretaries, Bookkeepers, Media Specialists or Designees
Page 4 of 29
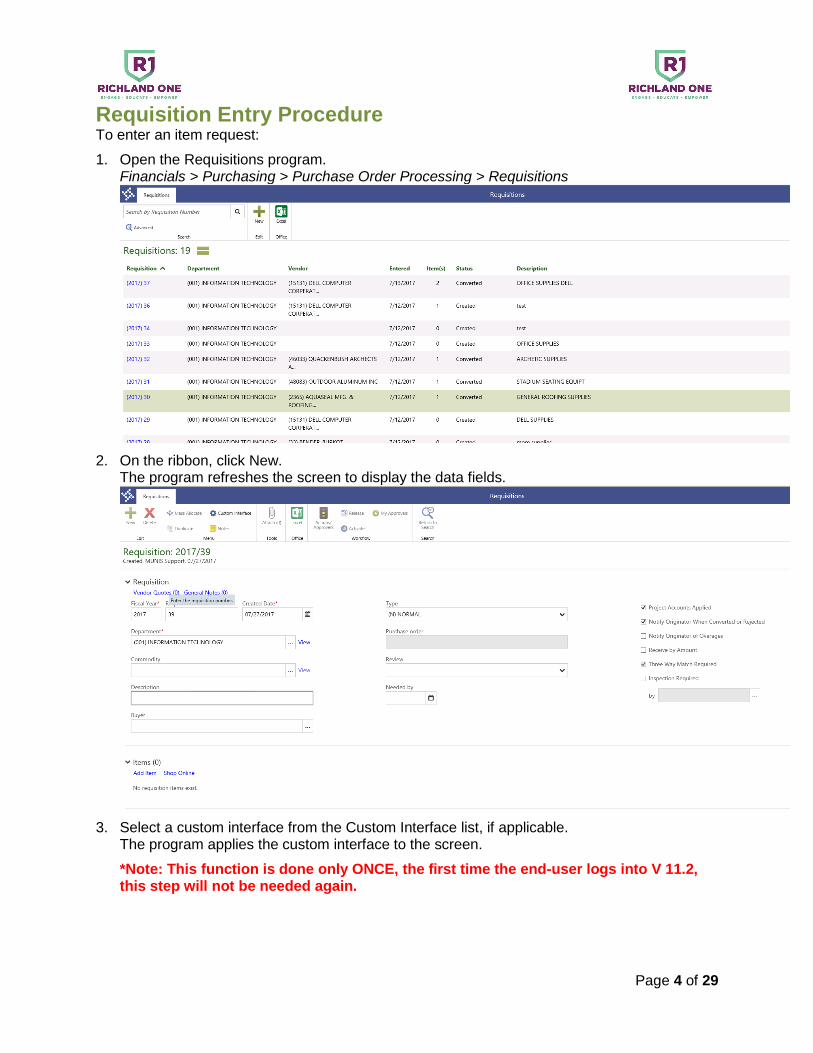
Requisition Entry Procedure To enter an item request:
1. Open the Requisitions program. Financials > Purchasing > Purchase Order Processing > Requisitions
2. On the ribbon, click New. The program refreshes the screen to display the data fields.
3. Select a custom interface from the Custom Interface list, if applicable. The program applies the custom interface to the screen.
*Note: This function is done only ONCE, the first time the end-user logs into V 11.2, this step will not be needed again.

Page 5 of 29
4. Complete the fields in the header section. Use the following table as a reference.
Field Description Richland County School District One
Requisition
Provides the fiscal year and requisition number. The program automatically enters the default values based on the current fiscal year and next available requisition number. The requisition number is drawn from the Purchasing Settings program.
These fields will auto populate the next default requisition number.
Created Date Contains the date the request was created.
This field will auto populate.
Department Indicates the department making the request. The program enters the department from your user ID as the default value, but you can change it.
Field will default the users department code
Commodity Sets the commodity code for the requested items, if applicable.
*REQUIRED – Select from list of 1 through 36
Description Provides a general description of the request.
the commodity description defaults from the previous 1 – 36 selections into this field.
Type Identifies the request type. Request types are typically used for reporting and grouping purposes.
Choose from either: Blanket (Blanket PO’s) or Normal (Line item PO’s).
Purchase Order Contains the purchase order number created when the request was converted. This box is not accessible, and will be blank until the request is successfully converted to a purchase order.
This field will auto populate with the PO number after the requisition is converted.
Buyer Defines the buyer for the request. Buyers are potentially notified at various points in the purchasing process based on your organization's settings.
The buyer is procurement specialist.
Review Indicates the review code for the request, if applicable.
N/A
Needed By Sets the date by which the request is needed.
Enter the need by date for delivery of product or services - CAN NOT BE TODAY’S DATE (MUST BE 10-30 DAYS ARO)

Page 6 of 29
Field Description Richland County School District One
Receive by Amount
Causes purchase orders created from the request to be received by dollar amount instead of quantity.
Richland will receive by “amount” for blanket purchase orders. For all other PO’s they will receive by Quantity.
Three Way Match Required
Indicates that a three-way match will be required for the purchase orders created from this request. The check box has no effect at the request level. It is intended as a method of speeding the data entry process, as the value of the check box is carried to the created purchase order when the request is converted. If you copy a request for which the check box is selected, the resulting copy also has the check box selected. Copying a request for which the check box is cleared causes the resulting copy to use the current default value of the Three Way Match Status list in Accounts Payable Settings.
N/A
Project Accounts Applied
Indicates that project strings apply to the request. When you select the check box, the program makes the Project Strings fields available in the Items group.
This check box will be selected for capital project expenditures. This allows the user to allocate the item to the project expense string.
Notify Originator when Converted to PO/Contract
Directs the program to send an email to the employee who entered the request when it has been successfully converted to a purchase order. If the Notify Originator When Requisition is Rejected or Converted to a PO check box in Department Codes is selected, this option is selected as well, but you can change this.
Default Setting based on the department code of the user.
Notify Originator of Overages
Causes the program to notify the requester when the request has liquidations greater than the specified amount.
N/A

Page 7 of 29
5. Click Add Item. The program refreshes the screen to display the data fields.
6. Complete the data fields in the Item section and the Optional Details section. Use the following table as a reference.
Field Description Richland County Schools District One
Items
Item WAREHOUSE Purchases ONLY Defines the requested item. If you complete this field, you must select an item that has been defined in the Items program. The field is not required.
N/A

Page 8 of 29
Field Description Richland County Schools District One
Click the field help button to search for an item. After you enter an item number, you can click View to open the Items program with that item as the active record.
Contract Holds the contract number with which the requested item is associated, if applicable. Use the field help button to select the contract from a list. The View link displays a selected contract in the Contract Inquiry program.
Only applicable to Construction related contracts - if the requisition (purchase) is tied to a contract.
Pick Ticket/Purchase
Identifies whether the request is intended for purchase of an item from a vendor, or if the request is for an item from the District WAREHOUSE inventory then Pick Ticket is selected. The default is PURCHASE
If you enter a value in the Item box, and that item is available as on-hand inventory, the program automatically selects Pick Ticket.
Description Contains a description of the requested item. If you selected an item, the program uses the description from the item (warehouse catalog) as the default value for this box.
* REQUIRED - End-user must enter a detailed description of the item being requesting in this field. (SEE THE ATTACHED, NOT ACCEPTABLE)
Vendor Displays the vendor from which to purchase the requested item. When you select an item that has associated item supplier records, or that is contracted to a vendor, the program automatically enters that vendor in the box. You can only change the vendor if you have the appropriate override permissions.
End-user must select vendor from pre- approved vendor maintenance list. Vendors not listed must complete a Vendor Application AND W-9 for review and approval before being added as a new vendor.
Ship To Defines the address to which the item should be sent. The default value is the address of the requesting department.
The ship to address will default into this field from the requisition.
Email Provides a contact email address of the end-users email address.
Enter 1 email address of person ordering the service or goods
Quantity Sets the requested item quantity. Enter the line item quantity.

Page 9 of 29
Unit Price Identifies the unit price for the requested item. If the item has a default unit price, the program enters it here.
Enter the line item unit price.
Line Item Total Displays the total amount for the line item. The amount is automatically calculated by the program and you cannot change it. Click the Line Item Total link to view the values and method by which the total was calculated.
This field will auto populate.
Project String Indicates the project string to which to charge the transaction for the item. The Project String fields are only available if you selected the Project Accounts Applied check box in the header.
Only applicable to CAPITAL PROJECTS – End-User will populate the project expense string for expenditures related to capital projects.
GL Account Contains the general ledger account or org/object/project combination to which to charge the item transaction.
End-User will enter the general ledger expense account into this field. GL Accounts field Accepts multiple lines (percentage per code can be split)
Optional Details
Department Identifies the department for which the item is requested. The default value matches the department from the header, but you can change it.
N/A
Fixed Asset Determines whether the requested item is a fixed asset, not a fixed asset, or is a master fixed asset.
N/A
Required By Defines the date by which the item is required.
N/A
Requested By Provides the Munis user ID of the person that requested the item.
N/A

Page 10 of 29
7. After you have completed the fields for the item, click Add Item again to create a new item, if applicable; The program adds another item line, and clears the fields.
8. Complete the fields for the second item. You can view any item line by clicking on it in the item list.
9. When you have finished adding item lines, click Save.
10. After reviewing the requisition items and fund codes for accuracy, click Release on the ribbon to submit the request. By clicking Release, the requisition is then routed to the next level of approval based on the workflow and project code.

Page 11 of 29
Requisition Approval
Objective This guide provides instruction for approving released requisitions. It is intended for personnel responsible for approving requisitions (i.e. Directors, Principals, Department Heads, etc.).
Users The Workflow Approvals establishes an electronic approval process for requisitions. When a requisition is released in Munis, the requisition is submitted to an approval process. The requisition must be approved by all necessary approvers in order for it to be converted into a purchase order or contract by the Procurement Department. This guide describes the approval steps that must be taken.

Page 12 of 29
Procedure Munis Workflow transactions are approved using the Approvals web part tile on the Tyler Dashboard.
To approve an item:
1. Double-click the Approvals tile to list all items currently awaiting approval. Use the By Date or By Process Code options to sort the items.

Page 13 of 29
2. Review the items awaiting approval.
3. To view additional information, click the Detail link to view the item in the applicable Munis program.

Page 14 of 29
4. To approve the item from the Requisitions program, use the options in the Workflow group highlighted at the top of the ribbon (My Approvals).
5. All approvals waiting your approval will funnel your way and then the user is able to click on the requisition line.
6. Select the “Actions/Approvers” button at the top of the ribbon.

Page 15 of 29
7. Select either approve, reject, hold or forward and click on the save button.
Page 16 of 29
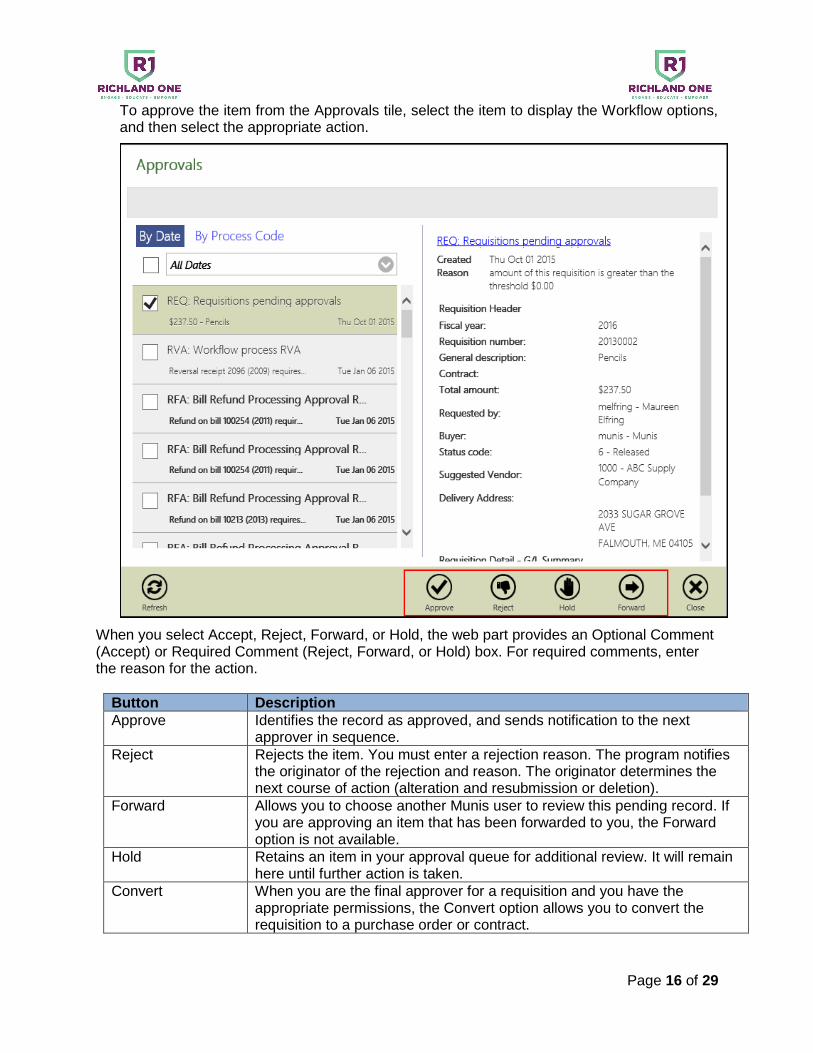
To approve the item from the Approvals tile, select the item to display the Workflow options, and then select the appropriate action.
When you select Accept, Reject, Forward, or Hold, the web part provides an Optional Comment (Accept) or Required Comment (Reject, Forward, or Hold) box. For required comments, enter the reason for the action.
Button Description
Approve Identifies the record as approved, and sends notification to the next approver in sequence.
Reject Rejects the item. You must enter a rejection reason. The program notifies the originator of the rejection and reason. The originator determines the next course of action (alteration and resubmission or deletion).
Forward Allows you to choose another Munis user to review this pending record. If you are approving an item that has been forwarded to you, the Forward option is not available.
Hold Retains an item in your approval queue for additional review. It will remain here until further action is taken.
Convert When you are the final approver for a requisition and you have the appropriate permissions, the Convert option allows you to convert the requisition to a purchase order or contract.

Page 17 of 29
Purchase Order Quick Receipt
Overview The Purchase Order Quick Receipt program creates receiving records for purchase orders. When searching for a purchase order in this program, End-User must know the purchase order number and the fiscal year. For purchase orders that apply to the current fiscal year, enter the purchase order number in the Search box. For purchase orders that apply to a different fiscal year, you must use the Advanced Search feature and complete the Fiscal Year and Purchase Order search fields. When a purchase order expiration grace period has been defined in the Purchasing Departments program, and the Enforce Purchase Order Expiration Date in PO Receiving check box is selected in Purchasing Settings, Purchase Order Quick Receipt does not allow entry of receiving records past the order's expiration or grace period dates.
Users School Secretaries, Administrative Assistants, Executive Secretaries, Bookkeepers, Media Specialists or Designees
Page 18 of 29
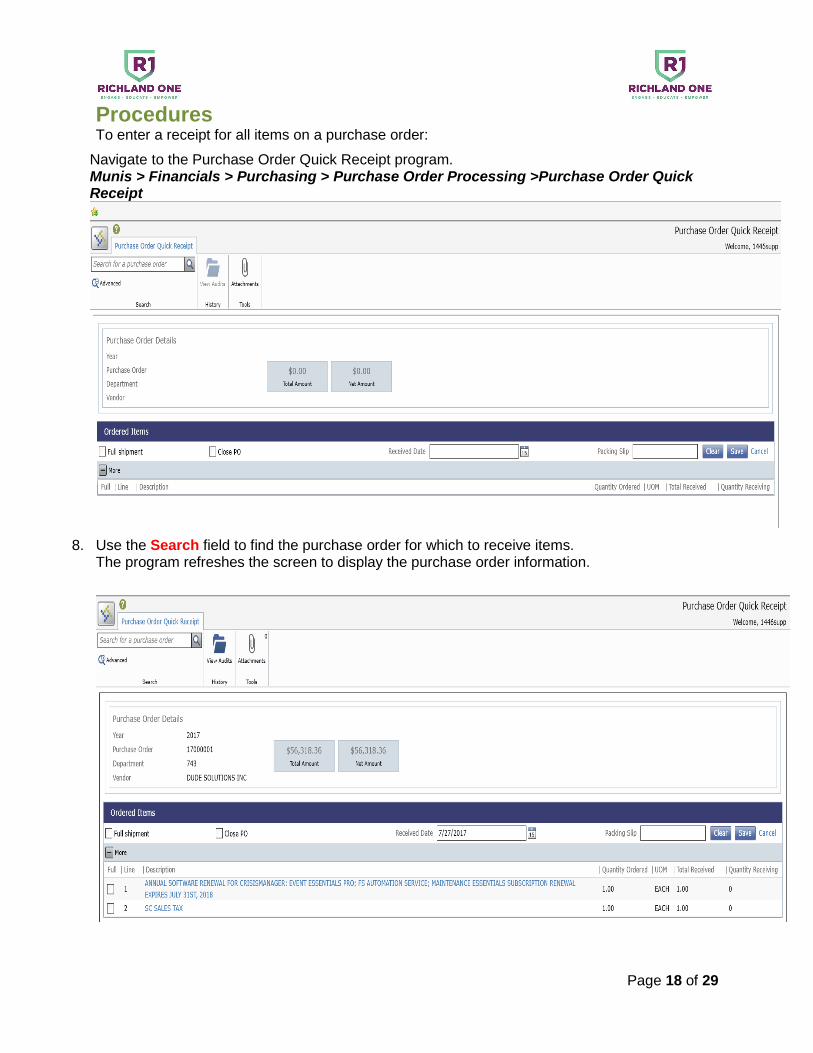
Procedures To enter a receipt for all items on a purchase order:
Navigate to the Purchase Order Quick Receipt program. Munis > Financials > Purchasing > Purchase Order Processing >Purchase Order Quick Receipt
8. Use the Search field to find the purchase order for which to receive items. The program refreshes the screen to display the purchase order information.
Page 19 of 29
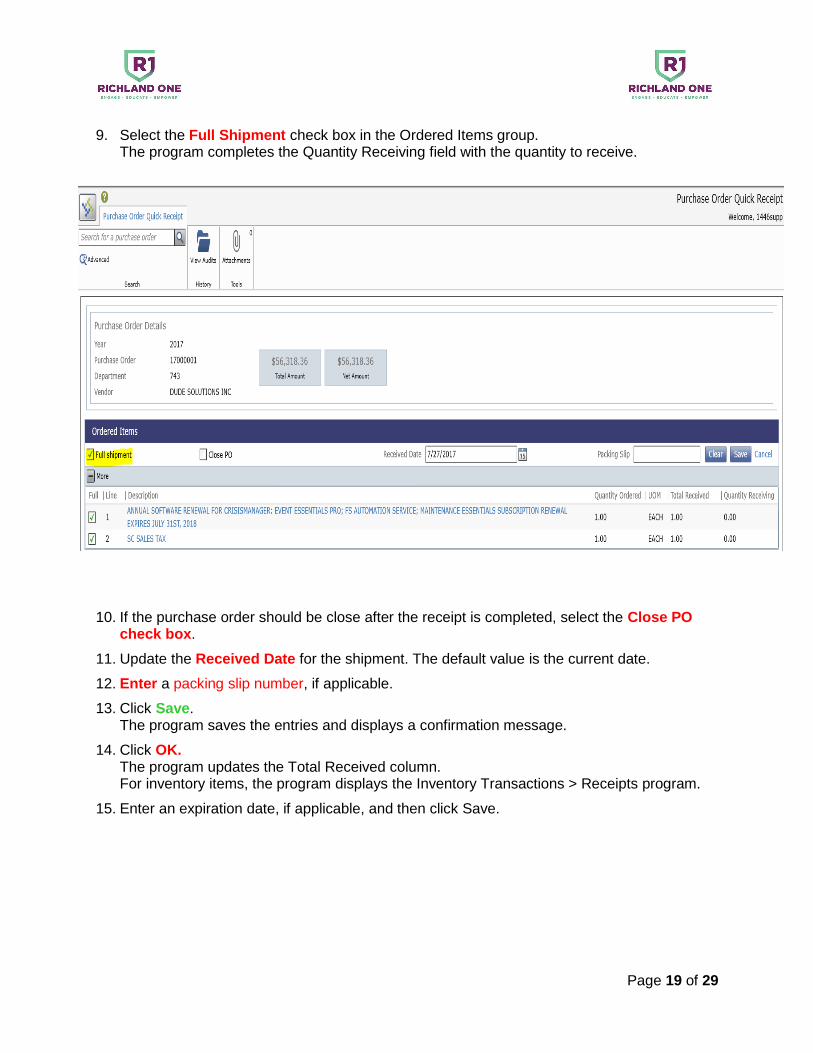
9. Select the Full Shipment check box in the Ordered Items group. The program completes the Quantity Receiving field with the quantity to receive.
10. If the purchase order should be close after the receipt is completed, select the Close PO check box.
11. Update the Received Date for the shipment. The default value is the current date.
12. Enter a packing slip number, if applicable.
13. Click Save. The program saves the entries and displays a confirmation message.
14. Click OK. The program updates the Total Received column. For inventory items, the program displays the Inventory Transactions > Receipts program.
15. Enter an expiration date, if applicable, and then click Save.

Page 20 of 29
To enter a receipt of a partial shipment:
1. Navigate to the Purchase Order Quick Receipt program. Munis > Financials > Purchasing > Purchase Order Processing > Purchase Order Quick Receipt
2. Use the search box to find the purchase order for which to receive items. The program refreshes the screen to display the purchase order information.
Search Box, enter PO #, click Magnifying Glass bottom

Page 21 of 29
3. Click on the line description for which to receive items. The program displays the Ordered Item Detail screen.
4. In the Quantity Box, ENTER the number of items to receive. The program updates the value of the Dollar Amount box.
5. UPDATE the Received Date field. The default value is the current date.
6. IMPORTANT - If the purchase order should be closed after completing the receipt, select the Close PO check box.
7. UPDATE the Dollar Amount box, if the dollar amount of the received items differs from the default value.
8. ENTER a packing slip number and any comments that apply to the receiving record.
#8

Page 22 of 29
9. If items from this shipment are or have been returned to the vendor, click the More (+) button in the Returned Items group. The program expands the group to display the Quantity and Comments fields.
10. Enter a quantity of returned items and a comment regarding the return.
11. If the receiving record is for a fixed asset, click the More (+) button in the Fixed Assets group to view the fixed asset information.
12. Click Add New to create a new fixed asset from the received items. The program adds a blank line to the Fixed Assets group.
13. ENTER an asset tag number and a manufacturer serial number for the item.

Page 23 of 29
14. If the asset record is imported from outside of Munis, select the Imported check box.
15. Click Save. The program saves your entries. If you entered a fixed asset as part of the receiving record, the Inventory Receiving program opens to allow you to complete the inventory receipt.
Use the ribbon options on the Order Item Detail screen to:
• Add additional purchase order receiving lines.
• Delete a receiving record.
• Add or view attachments to the receiving record.
• View or complete workflow activity.
Page 24 of 29
Returning Items After Entering a Receiving Record
Objective The following guide provides instructions on returning received items using the Purchase Order Quick Receipts program. The MUNIS Purchase Quick Receipt program allows end-users to indicate if a portion of items being received are being returned due to damage or any other issues with the shipment.
Users School Secretaries, Administrative Assistants, Executive Secretaries, Bookkeepers, Media Specialists or Designees

Page 25 of 29
Procedure Complete the following steps to enter returned items:
1. Open the Munis Purchase Quick Receipt program. Financials > Purchasing > Purchase Order Processing > Purchase Order Quick Receipt
2. Click Advanced in the Search group of the ribbon.
3. On the Advanced Search screen, enter the fiscal year and purchase order number.

Page 26 of 29
4. Click Search. The program displays an active set of the purchase order and the purchase order details and all the lines for the purchase order.
5. For the return item, click the on Description of the Line Item. The program displays the Ordered Item Detail screen.
Description of Line Item

Page 27 of 29
The Program displays the Ordered Item Detail Screen (see below)

Page 28 of 29
6. In the Returned Items group, click More (+) to complete the Enter Returned Item Information fields.
7. Enter the quantity returned and any applicable comments.
The Has Returns check box is automatically selected.
More (+) button

Page 29 of 29
8. If this receipt is for a fixed asset, click Add New.
9. Click in the Fixed Asset Tag column and enter the tag number.
11. Click Save.
12. Cose the Order Item Detail screen.
The program returns to the main Purchase Order Quick Receipt screen.


![[MU-IT-4-B][MU-IT-13-B] Exploring MUNIS Role …ohconnect.org/fiscal/files/munis_user_roles.pdf[MU-IT-4-B][MU-IT-13-B] Exploring MUNIS Role Based Access Control (RBAC) Munis: System](https://img.pdfslide.us/doc/110x75/5e6b43b17f31a13cd8257da8/mu-it-4-bmu-it-13-b-exploring-munis-role-mu-it-4-bmu-it-13-b-exploring-munis.jpg)