Embed Size (px)
Citation preview

Copyright© CionSystems Inc., All Rights Reserved 1 | P a g e
Multifactor Authentication
Installation and Configuration Guide
Software Version 5.0.0.0
General Information: [email protected] Online Support: [email protected]

Copyright© CionSystems Inc., All Rights Reserved 2 | P a g e
Copyright© CionSystems Inc. ALL RIGHTS RESERVED.
This guide may not be reproduced or transmitted in part or in whole by any means, electronic or mechanical,
including photocopying and recording for any purpose other than the purchaser's use under the licensing
agreement, without the written permission of CionSystems Inc.
The software application in this guide is provided under a software license (EULA) or non-disclosure
agreement. This product may only be used in accordance with the terms of the applicable licensing
agreement.
This guide contains proprietary information protected by copyright. For questions regarding the use of this
material and product, contact us at:
CionSystems Inc.
6640 185th Ave NE
Redmond, WA-98052, USA
http://www.CionSystems.com
Phone: +1.425.605.5325
Trademarks
CionSystems, CionSystems Inc., the CionSystems Inc. logo, CionSystems Enterprise Self-Service and two
factor authentication are trademarks of CionSystems. Other trademarks and registered trademarks used in
this guide are property of their respective owners.

Copyright© CionSystems Inc., All Rights Reserved 3 | P a g e
Table of Contents Introduction ........................................................................................................................................................ 4
Prerequisites ............................................................................................................................................. 4
System Requirements ............................................................................................................................... 4
Steps to Configure and Install MFA .......................................................................................................... 4
Installation of Cionsystems Enterprise Self-Service Portal ................................................................................. 5
Configuring database for Enterprise Self-Service Portal .......................................................................... 6
Configuring Enterprise Self-Service Portal ......................................................................................................... 8
Configuration of Domain .......................................................................................................................... 8
Create User Policy ..................................................................................................................................... 9
Configuring SMTP and SMS settings: ...................................................................................................... 10
Create User ............................................................................................................................................. 12
User Registration .................................................................................................................................... 13
Installer creation steps for “Multifactor” ......................................................................................................... 16
Installer creation with IExpress utility .................................................................................................... 16
IExpress ................................................................................................................................................... 16
Prerequisites ........................................................................................................................................... 16
IExpress Wizard ...................................................................................................................................... 16
User Login ......................................................................................................................................................... 28
Installing Multifactor .............................................................................................................................. 29
How to Use ............................................................................................................................................. 33
Update Off-Line Configuration ............................................................................................................... 36
Update Unlock Key ................................................................................................................................. 37

Copyright© CionSystems Inc., All Rights Reserved 4 | P a g e
Introduction
Your Laptop/PC is the key to many things you do on a day to day basis. It's important that only you have the
ability to access your device, update your device and access the data you store.
Multi Factor Authentication is an additional security feature for your Windows Machines that's designed to
prevent anyone from accessing or using your computer, even if they know your password.
It requires you to verify your identity using first factor i.e. your username and password and second factor
which only you knows or you have, it can be Your USB disk or OTP in send on your mobile or email address
and security questions which only you knows
Prerequisites
Cionsystems Enterprise Self-Service portal
System Requirements
• 8GB RAM
• 50 MB of disk space.
• Windows Server 2008, 2012 or 2016 domain controller.
Steps to Configure and Install MFA 1. Installation of Cionsystems Enterprise Self-Service portal(Run the setup from the folder
Enterprise_Self_Service_Setup and install ESS)
2. Configuring Enterprise Self-Service portal
3. After configuring the ESS portal. Create one user and register the user in ESS portal.
4. Creating the MFA Installer (Create the installer with iexpress using msi file present in the folder
Multifactor_Setup folder
Note: If the Enterprise Self-Service portal is configured with http, create a http installer else if the
ESS portal is configured with https, create a https installer.
5. Copy the created installer in the Temp folder of the ESS Portal
Eg : C:\inetpub\wwwroot\ADSelfService\Temp
6. Restart the IIS. (From Command Prompt -> Type iisreset)

Copyright© CionSystems Inc., All Rights Reserved 5 | P a g e
Installation of Cionsystems Enterprise Self-Service Portal
The Enterprise Self-Service Portal installation process is as follows:
1. Open the folder Enterprise_Self_Service_Setup.
2. Right click on “EnterpriseSelfServicePortal.msi” file and choose “Run as administrator”
3. Walk thru the step by step installation process by clicking Next
Copyright© CionSystems Inc., All Rights Reserved 6 | P a g e
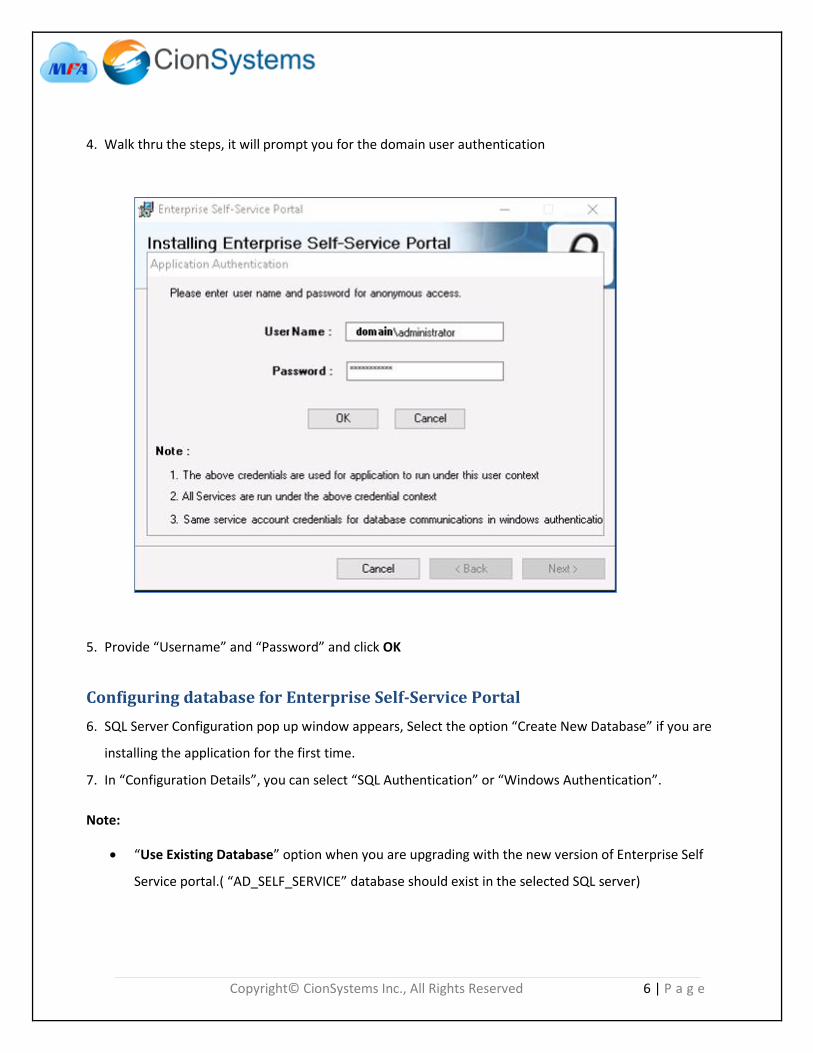
4. Walk thru the steps, it will prompt you for the domain user authentication
5. Provide “Username” and “Password” and click OK
Configuring database for Enterprise Self-Service Portal
6. SQL Server Configuration pop up window appears, Select the option “Create New Database” if you are
installing the application for the first time.
7. In “Configuration Details”, you can select “SQL Authentication” or “Windows Authentication”.
Note:
“Use Existing Database” option when you are upgrading with the new version of Enterprise Self
Service portal.( “AD_SELF_SERVICE” database should exist in the selected SQL server)

Copyright© CionSystems Inc., All Rights Reserved 7 | P a g e
• For SQL Authentication, enter SQL database server name, port number (default) Select SQL Authentication, and enter “Login” and “Password”. Enter valid details and click on Test Connection. This is to test the SQL server connectivity. If the connectivity is successful then click Next and proceed.
• For Windows Authentication, enter SQL database server name, select Windows Authentication, here “Login” and “Password” will be grayed out. Enter valid details and click Test Connection. If “Test Connection” displays “Connected Successfully” message, then click Next and proceed.
8. Click Close, This complete Installation completed successfully.

Copyright© CionSystems Inc., All Rights Reserved 8 | P a g e
Configuring Enterprise Self-Service Portal
• Configuration of Domain • Create User Policy • Configuring SMTP and SMS settings
Login as Admin and configures the Enterprise Self-Service Portal 1. Click windows Start button>All Programs>Enterprise Self-Service Portal >Enterprise Self-Service Portal
icon. (OR) Click “Enterprise Self-Service Portal” icon on desktop.
Figure: Login page in ESSP for Admin
2. The login screen will open in the default web browser. To login to the application for the first time; Enter “admin” in the User Name dialogue box
Enter “admin” in the Password dialogue box
Note: It is recommended that user name and password should be changed after the application has
been launched
Configuration of Domain
Enter all required domain details and Click Fetch to configure the domain.
a. Enter Domain Controller name
b. Domain name
c. Domain User name
d. Domain Password

Copyright© CionSystems Inc., All Rights Reserved 9 | P a g e
Figure: Domain configuration in ESSP
Select Is_Primary for one domain controller as primary and click Save.
Create User Policy
To create user policy, go to CustomizationClick User PolicyClick Create
• Enter Policy name
• Select OU
• Select the policies that you want to configure
• Click Save to save the policy

Copyright© CionSystems Inc., All Rights Reserved 10 | P a g e
Figure: User Policy creation in ESSP
Configuring SMTP and SMS settings:
To receive automated e-mail notifications and alerts from the Enterprise Self-Service application, these
settings must be configured properly. Fill in the fully qualified domain name or IP address of the SMTP
server (“Mail Server”) and the sender e-mail address (“From E-mail Address”) as indicated in below figure.

Copyright© CionSystems Inc., All Rights Reserved 11 | P a g e
Figure: SMTP and SMS settings in ESSP
Copyright© CionSystems Inc., All Rights Reserved 12 | P a g e
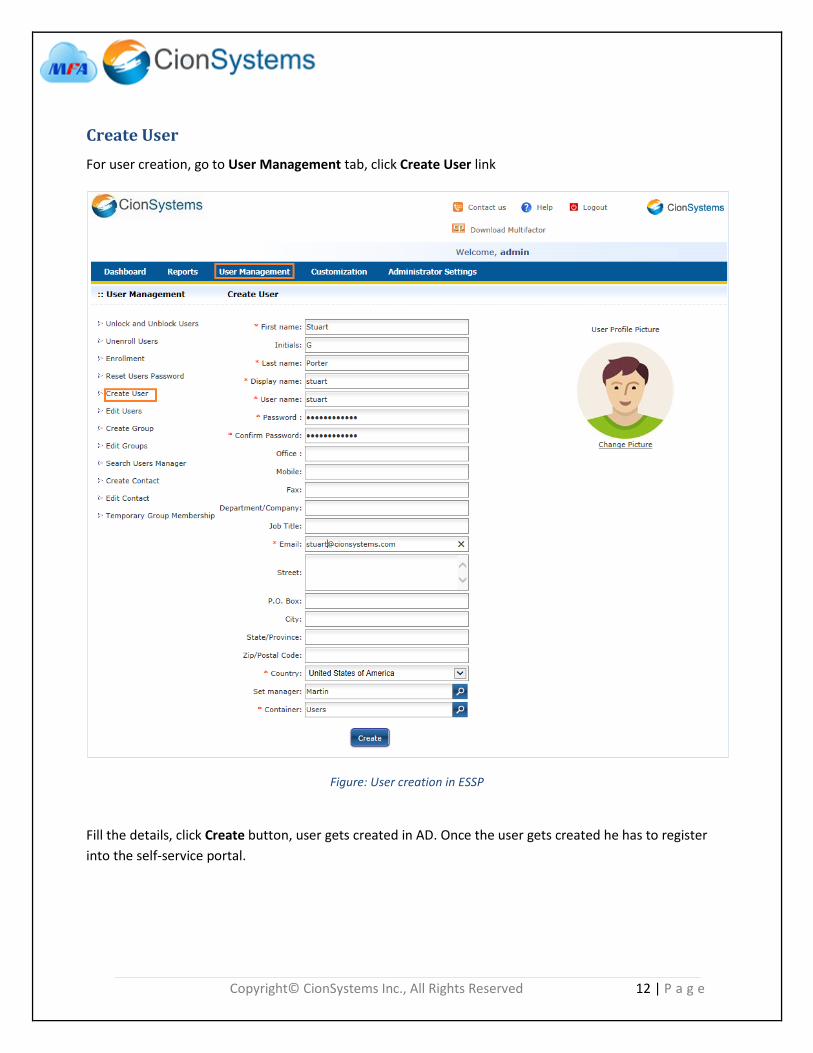
Create User
For user creation, go to User Management tab, click Create User link
Figure: User creation in ESSP
Fill the details, click Create button, user gets created in AD. Once the user gets created he has to register
into the self-service portal.

Copyright© CionSystems Inc., All Rights Reserved 13 | P a g e
User Registration
For user registration, go to User Login page, click Register User tab.
Figure: User Login page in ESSP
1. Provide Username and Password and click OK, an email will be sent to user specified email address

Copyright© CionSystems Inc., All Rights Reserved 14 | P a g e
2. Then user will receive a mail with security PIN
Click on the link Enterprise Self-Service Portal, enter the secret code and click ok

Copyright© CionSystems Inc., All Rights Reserved 15 | P a g e
Figure: User security questions configuration in ESSP
3. Now user has to configure the “Selectable Questions & Answers” (Challenging Questions) and click Save.
4. You should see a message that says “User registered successfully”. Click Ok
This completes the installation and configuration of Enterprise Self-Service Portal.
Now the admin has to create the Multifactor Installer. Please follow the below steps to create the installer.

Copyright© CionSystems Inc., All Rights Reserved 16 | P a g e
Installer creation steps for “Multifactor” As an admin, you have to create a “MultiFactorAuthInstaller.exe” file from the .msi file located in
Multifactor_Setup folder, Based on your Enterprise Self-Service Portal configuration, You can create a
http or https installer.
Installer creation with IExpress utility
By using IExpress utility you can create EXE format executable installer file from the MFA MSI file.
IExpress
IExpress is a Microsoft utility that comes with all the flavors of in Windows operating. It uses a Self-Extraction
Directive (.SED) file to store information about your package. When you run the IExpress Wizard, you can
start with an existing .SED file or create a new one by using the wizard. The .SED file contains information and
instructions about the setup package.
Prerequisites
Use 64-bit Windows machine for creating self-extractor.
IExpress Wizard
1. In search box or run type “iexpress”, this will start the IExpress Wizard as shown below.

Copyright© CionSystems Inc., All Rights Reserved 17 | P a g e
2. Select “Create new Self-Extraction Directive file” option and click Next
3. Select “Extract files and run an installation command” option and click Next
4. In the text box enter “CionSystems Multifactor”, click Next

Copyright© CionSystems Inc., All Rights Reserved 18 | P a g e
5. Select “Prompt user with” option and enter "Do you want to install CionSystems Multifactor?" in the
text box. Click Next. You can use the messages of your choice.
6. Select “Do not display a license” option and click Next

Copyright© CionSystems Inc., All Rights Reserved 19 | P a g e
7. Click Add button, It will open file selection window. Browse to location of the msi file -> select and
add it as shown below (Multifactor_Setup\http__Setup\ MultiFactorAuthInstaller.msi)
Copyright© CionSystems Inc., All Rights Reserved 20 | P a g e
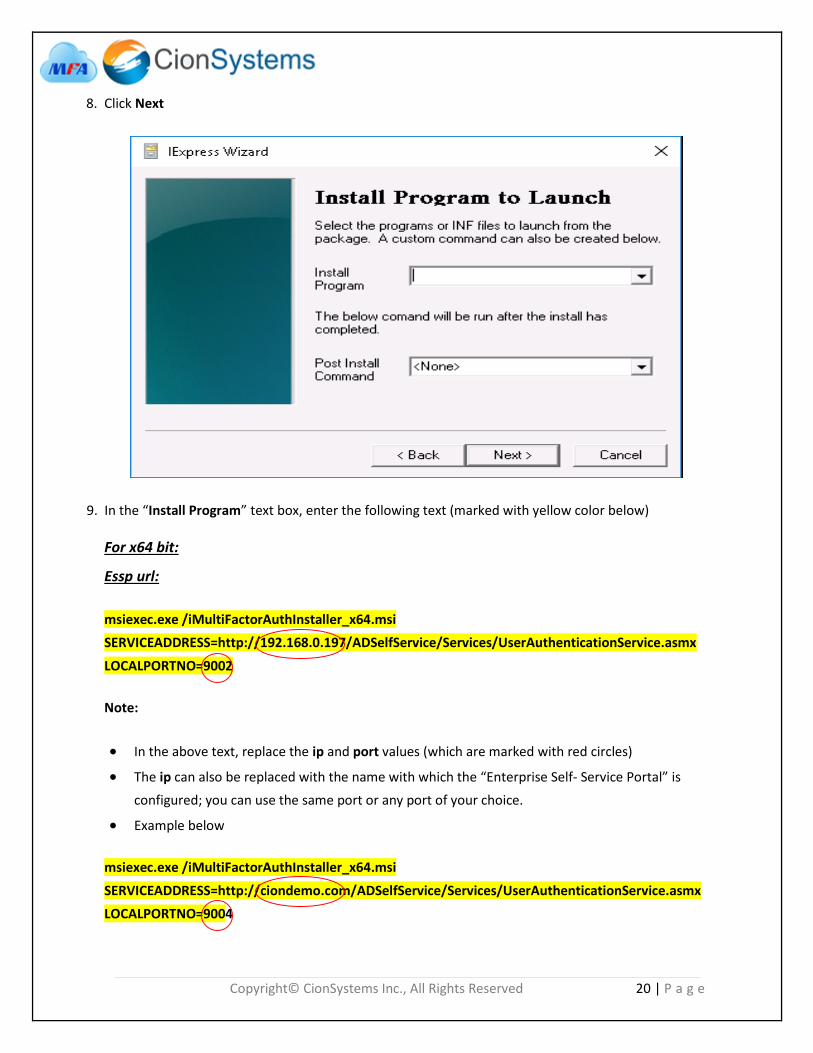
8. Click Next
9. In the “Install Program” text box, enter the following text (marked with yellow color below)
For x64 bit:
Essp url:
msiexec.exe /iMultiFactorAuthInstaller_x64.msi
SERVICEADDRESS=http://192.168.0.197/ADSelfService/Services/UserAuthenticationService.asmx
LOCALPORTNO=9002
Note:
In the above text, replace the ip and port values (which are marked with red circles)
The ip can also be replaced with the name with which the “Enterprise Self- Service Portal” is
configured; you can use the same port or any port of your choice.
Example below
msiexec.exe /iMultiFactorAuthInstaller_x64.msi
SERVICEADDRESS=http://ciondemo.com/ADSelfService/Services/UserAuthenticationService.asmx
LOCALPORTNO=9004
Copyright© CionSystems Inc., All Rights Reserved 21 | P a g e
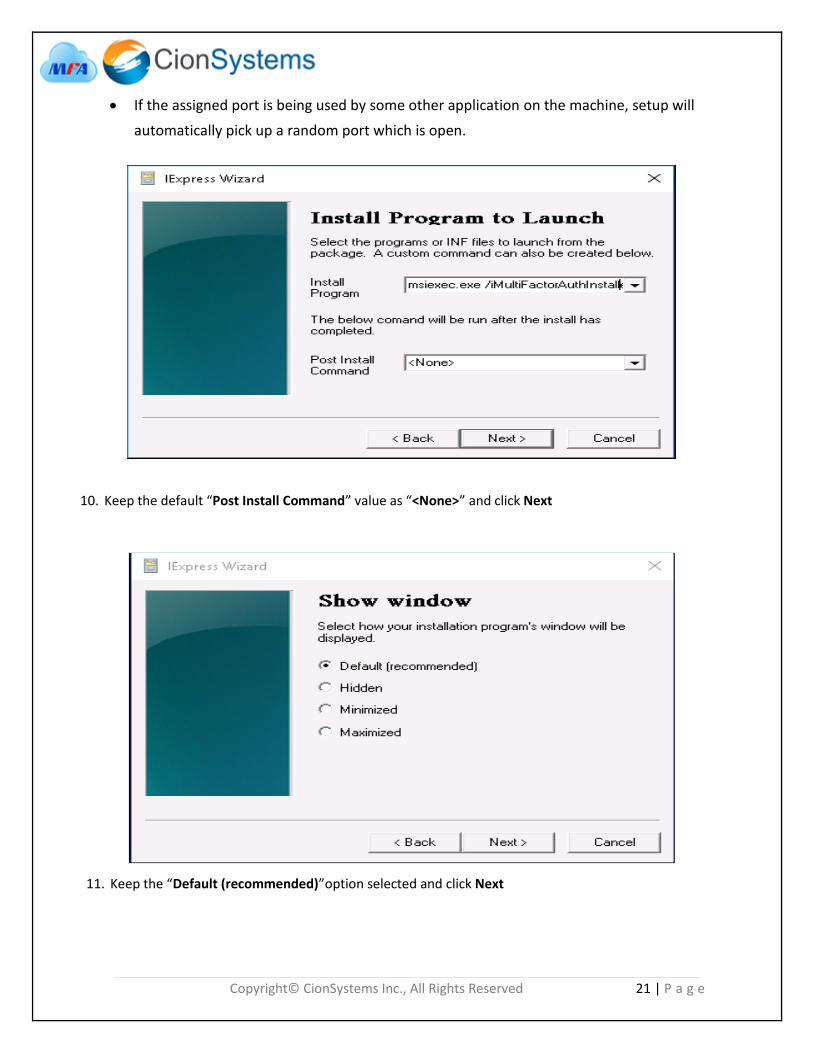
If the assigned port is being used by some other application on the machine, setup will
automatically pick up a random port which is open.
10. Keep the default “Post Install Command” value as “<None>” and click Next
11. Keep the “Default (recommended)”option selected and click Next

Copyright© CionSystems Inc., All Rights Reserved 22 | P a g e
12. Keep the default “No Message” option selected and click Next

Copyright© CionSystems Inc., All Rights Reserved 23 | P a g e
13. Click Browse button. A file dialog box will open
14. Go to location where you want to store self-extractor. In this case e.g. I kept the same location where
.msi file are placed. Also in file name, give the file name of self-extractor. I have given the same name as
msi “MultiFactorAuthInstaller_x64” and then click Save button.
Note: Use the same name as mention here MultiFactorAuthInstaller_x64

Copyright© CionSystems Inc., All Rights Reserved 24 | P a g e
15. Select the checkbox “Store files using Long File Name inside Package”
16. Click Yes on popup dialog box.
17. Click Next
Copyright© CionSystems Inc., All Rights Reserved 25 | P a g e
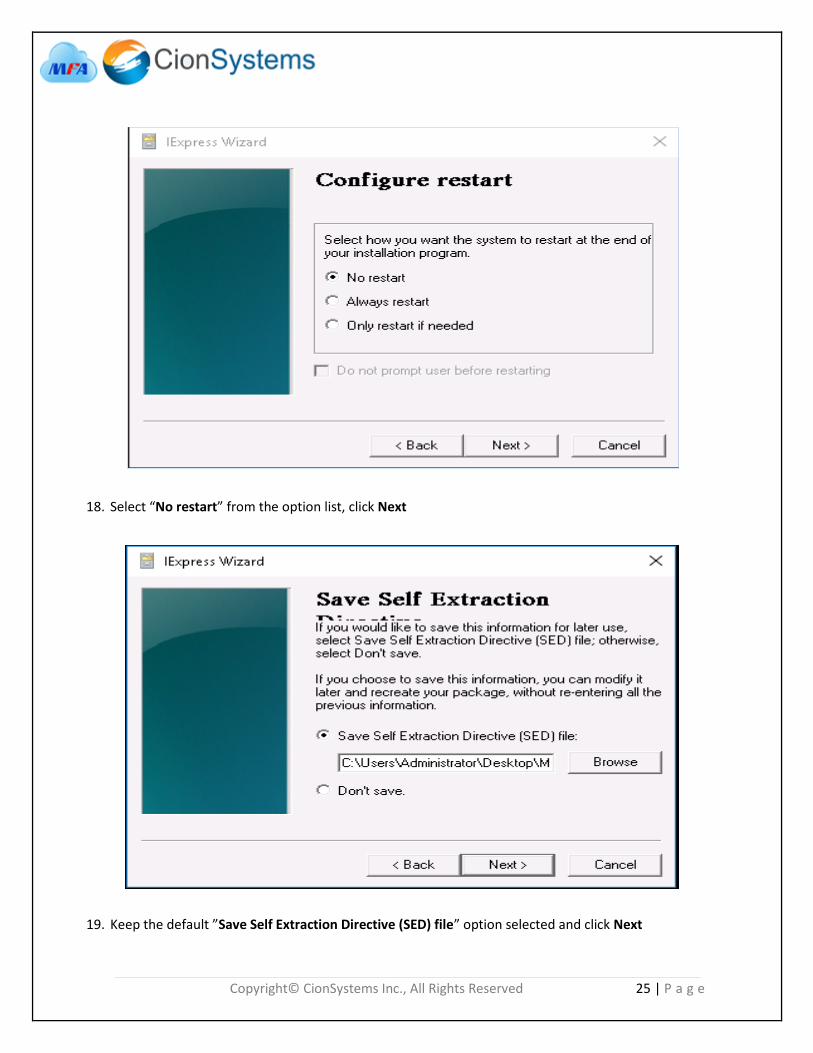
18. Select “No restart” from the option list, click Next
19. Keep the default ”Save Self Extraction Directive (SED) file” option selected and click Next

Copyright© CionSystems Inc., All Rights Reserved 26 | P a g e
20. Click Next
21. If the process is successful, self-extractor will be created in the location selected at step 14.

Copyright© CionSystems Inc., All Rights Reserved 27 | P a g e
22. Click Finish
23. Now copy the installer MultiFactorAuthInstaller_x64.exe into the Temp folder where ESS is installed
Example: “C:\inetpub\wwwroot\ADSelfService\Temp”
24. Changes will take effect after restart the IIS (Internet Information Services). To restart the IIS, open
command prompt in administrator mode, type IISReset and press Enter.

Copyright© CionSystems Inc., All Rights Reserved 28 | P a g e
User Login
After restarting the IIS, need to download and install the installer “MultiFactorAuthInstaller.exe”
1. Take one domain joined machine which is joined with a domain controller where the Enterprise Self-
Service portal is installed
2. Now access the url of “Enterprise Self-Service Portal” which is installed on domain controller
http://192.168.0.197/ADSelfService/frmUserLogin.aspx
3. Login with the registered Username
Figure: User Self Update page in ESSP
4. After login, click on “Download Multifactor” link
5. Installer will be downloaded.

Copyright© CionSystems Inc., All Rights Reserved 29 | P a g e
Installing Multifactor
The Multifactor Authentication installation process is as follows:
1. Double click on downloaded installer
2. Click on Run
3. Click on Yes on below pop up dialog box.
4. “Multif-Factor Auth For All”setup wizard will be started
5. Click Next

Copyright© CionSystems Inc., All Rights Reserved 30 | P a g e
6. Select the checkbox “I accept the terms in the License Agreement ” and click Next
7. If you want offline support, select “Yes”

Copyright© CionSystems Inc., All Rights Reserved 31 | P a g e
8. If you don’t want offline support, then select “No” and click Next

Copyright© CionSystems Inc., All Rights Reserved 32 | P a g e
9. If you select “Yes”, Offline support configuration window appears. The default key update is 7 days;
you can enter 7 to 30 days. You will need USB disk at the end of the installation to store offline key in
USB disk. Click Next
10. Click Install

Copyright© CionSystems Inc., All Rights Reserved 33 | P a g e
11. Click Finish
12. Immediately a popup will occur. To generate offline key click Yes
13. Select the USB disk to generate the key
14. It will show the message “Your unlock key has been generated and stored in USB disk successfully…”
15. Click on Close button
How to Use
1. After Installation of “Multifactor” in your system, lock your system (Ctrl+Alt+Del).
2. Before login to your system, remove “USB disk” from port.
3. Now, login to your system by entering username and password.

Copyright© CionSystems Inc., All Rights Reserved 34 | P a g e
After successfully authenticating your username and password, you will get the following multifactor
options to login.
a. USB Key (Support offline is set to “Yes” during installation)
b. Send OTP to Email
c. Send OTP to Mobile
d. Answer Security Questions
Figure: Multifactor authentication with USB Key

Copyright© CionSystems Inc., All Rights Reserved 35 | P a g e
If you choose the “USB Key” option then it’s ask to attach USB disk into your machine and click on
arrow to login. This option also works when the network is not available.
Figure: Multifactor authentication with Send OTP to Email
If you choose the “Send OTP to Email” option then OTP will be sent to your Email Id.
If you choose the “Send OTP to Mobile” option then OTP will be sent to your mobile phone.
If you choose the “Answer Security Questions” option then your security questions will be displayed, answer them correctly and login.
Figure:
Multifactor authentication with Answer Security Questions

Copyright© CionSystems Inc., All Rights Reserved 36 | P a g e
Update Off-Line Configuration
Steps to update the offline configuration settings are as follows:
1. Click “Show hidden icons” on the task bar and select “CionSystems Multi-Factor Auth For All”.
Copyright© CionSystems Inc., All Rights Reserved 37 | P a g e
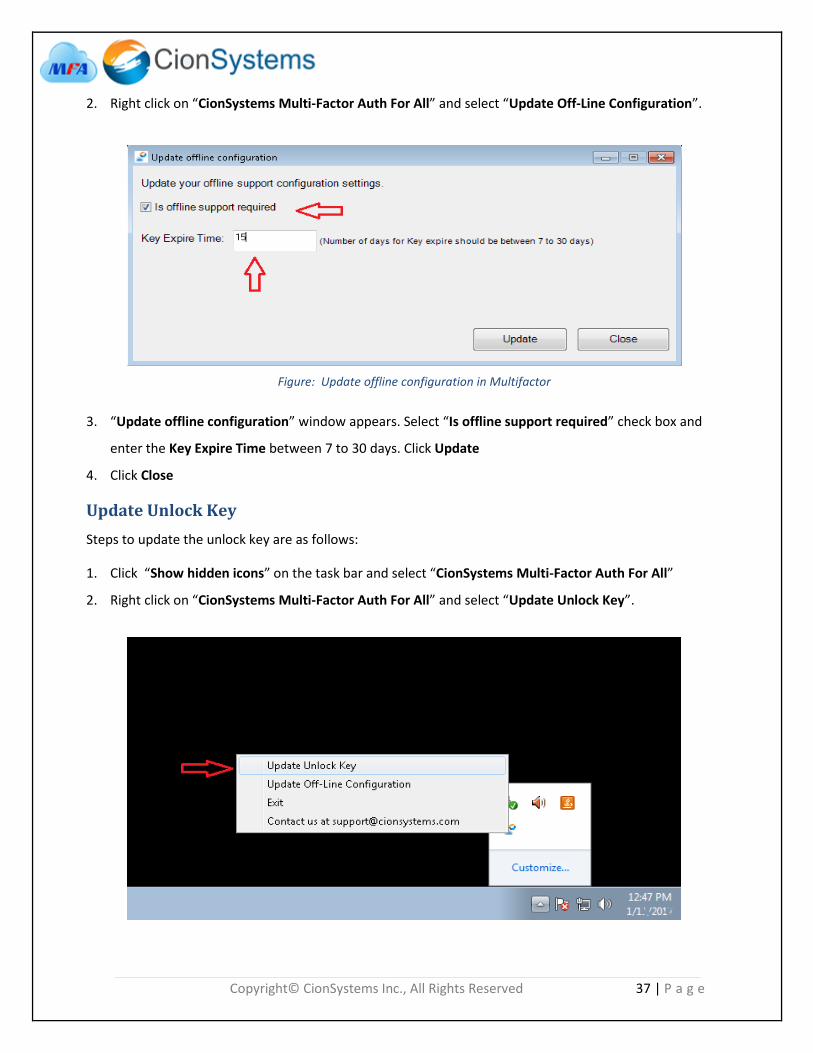
2. Right click on “CionSystems Multi-Factor Auth For All” and select “Update Off-Line Configuration”.
Figure: Update offline configuration in Multifactor
3. “Update offline configuration” window appears. Select “Is offline support required” check box and
enter the Key Expire Time between 7 to 30 days. Click Update
4. Click Close
Update Unlock Key
Steps to update the unlock key are as follows:
1. Click “Show hidden icons” on the task bar and select “CionSystems Multi-Factor Auth For All”
2. Right click on “CionSystems Multi-Factor Auth For All” and select “Update Unlock Key”.

Copyright© CionSystems Inc., All Rights Reserved 38 | P a g e
Figure: Update unlock key in Multifactor
3. Attach the USB disk to your machine and click Update Key button.
4. It will show the message “Unlock key has been updated successfully…”, finally click on Close.
For Troubleshooting and Configuring other domains
Please refer to the Troubleshooting Help Documents folder.
For issues related to iis and sql server refer the document Troubleshooting of IIS and SQL Server Common
errors

Copyright© CionSystems Inc., All Rights Reserved 39 | P a g e
Contact Notes: For technical support or feature requests, please contact us at [email protected] or 425.605.5325 For sales or other business inquiries, we can be reached at [email protected] or 425.605.5325 If you’d like to view a complete list of our Active Directory Management solutions, please visit us online at www.CionSystems.com
Disclaimer The information in this document is provided in connection with CionSystems products. No license, express or implied, to any intellectual property right is granted by this document or in connection with the sale of CionSystems products. EXCEPT AS SET FORTH IN CIONSYSTEMS’ LICENSE AGREEMENT FOR THIS PRODUCT, CIONSYSTEMS INC. ASSUMES NO LIABILITY WHATSOEVER AND DISCLAIMS ANY EXPRESS, IMPLIED OR STATUTORY WARRANTY RELATING TO ITS PRODUCTS INCLUDING BUT NOT LIMITED TO THE IMPLIED WARRANTY OF MERCHANTABILITY, FITNESS FOR A PARTICULAR PURPOSE, OR NON-INFRINGEMENT. IN NO EVENT SHALL CIONSYSTEMS INC. BE LIABLE FOR ANY DIRECT, INDIRECT, CONSEQUENTIAL, PUNITIVE, SPECIAL OR INCIDENTAL DAMAGES (INCLUDING, WITHOUT LIMITATION, DAMAGES FOR LOSS OF PROFITS, BUSINESS INTERRUPTION OR LOSS OF INFORMATION) ARISING OUT OF THE USE OR INABILITY TO USE THIS DOCUMENT, EVEN IF CIONSYSTEMS INC. HAS BEEN ADVISED IN WRITING OF THE POSSIBILITY OF SUCH DAMAGES. CionSystems may update this document or the software application without notice.
CionSystems Inc
6640 185th Ave NE,
Redmond, WA-98052, USA
www.CionSystems.com
Ph: +1.425.605.5325 This guide is provided for informational purposes only, and the contents may not be reproduced or transmitted in any form or by any means without our written permission.