Embed Size (px)
Citation preview
Multi-Seat
Stand-Alone
License Guide
(MSS)
Multi-Seat Stand Alone License Process
Page 2 of 30
Contents Multi-Seat Stand Alone License (MSS) .................................................................................................. 3
Get Ready ............................................................................................................................................... 4
Prepare System ..................................................................................................................................... 4
Check System Requirements ................................................................................................................ 4
Find Certified Hardware ........................................................................................................................ 4
Confirm Administrator Permissions ...................................................................................................... 4
Install Microsoft .NET Framework ........................................................................................................ 4
Empty your TEMP folder ....................................................................................................................... 4
Install System Updates & Exit Applications .......................................................................................... 4
Disable the User Account Control (UAC) .............................................................................................. 4
Download Product or Insert Media ...................................................................................................... 5
Review Documentation ......................................................................................................................... 6
Locate Serial Number and Product Key ................................................................................................... 6
Autodesk Resource Center-Serial Number & Product Key ................................................................... 6
Product Keys ......................................................................................................................................... 8
Download Product.................................................................................................................................... 9
Installation Process- Create Deployment .................................................................................... 12
Activation Process ............................................................................................................................. 23
Client Machine Installation and Activation .................................................................................. 29
Resources ............................................................................................................................................ 30
Multi-Seat Stand Alone License Process
Page 3 of 30
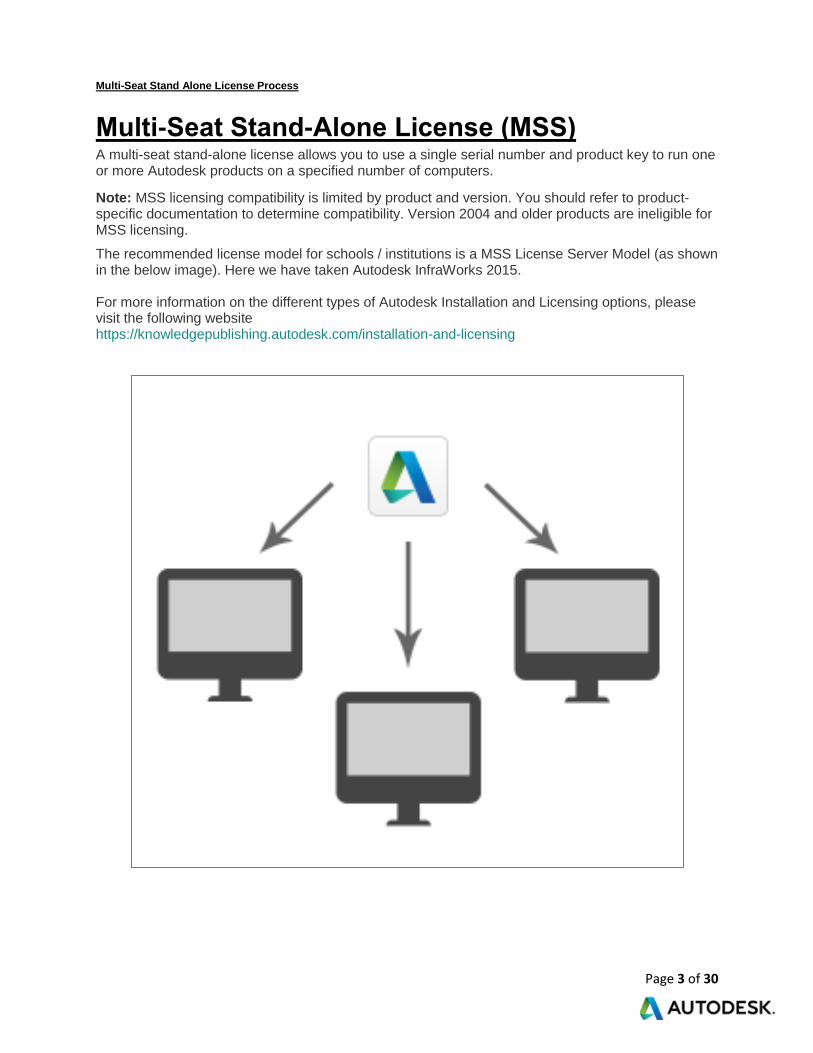
Multi-Seat Stand-Alone License (MSS) A multi-seat stand-alone license allows you to use a single serial number and product key to run one or more Autodesk products on a specified number of computers.
Note: MSS licensing compatibility is limited by product and version. You should refer to product-specific documentation to determine compatibility. Version 2004 and older products are ineligible for MSS licensing.
The recommended license model for schools / institutions is a MSS License Server Model (as shown in the below image). Here we have taken Autodesk InfraWorks 2015.
For more information on the different types of Autodesk Installation and Licensing options, please visit the following website https://knowledgepublishing.autodesk.com/installation-and-licensing
Multi-Seat Stand Alone License Process
Page 4 of 30
Get Ready
Prepare System For a smooth and successful installation of your Autodesk product, follow the steps below:
Check System Requirements Confirm that your computer meets the minimum system requirements for that product by visiting System Requirements.
Note: If you're running Windows, make sure to download/install the version that matches your operating system (32-bit or 64-bit).
Find Certified Hardware Find the certified and recommended computer hardware for the products or suites that you are planning to install.
Confirm Administrator Permissions If you're installing on your personal computer, you can skip this step.
If you're not installing on your own personal computer, you'll need to confirm that you have Local User Administrative permissions to install software. For Windows systems, check this by going to:
Control Panel > User Accounts > Manage User Accounts
Note: Domain User Administrative permissions may not be sufficient to install Autodesk software on your computer. Contact your system administrator if you don't have Local User Administrative permissions.
Install Microsoft .NET Framework Many Autodesk products require the Microsoft .NET Framework to be installed:
Microsoft .NET 3.5 – for Windows 8
Microsoft .NET 4.0 – for Windows 7/Vista
Empty your TEMP folder To open the TEMP folder, type %TEMP% in the address bar of Windows Explorer and press Enter.
Note: If your product installation fails and you decide to open a Support Request with Autodesk Product Support, we would need to review install logs created in your TEMP folder during this product installation attempt.
Install System Updates & Exit Applications Install all system updates and reboot your computer. The final step before beginning installation is to exit all applications that are currently running on your system. Some applications, for example Microsoft Outlook, can interfere with the installation process.
Note: Anti-virus programs can sometimes interfere with the installation process. Temporarily disabling your anti-virus program may help if you're having trouble with your installation.
Disable the User Account Control (UAC)
Multi-Seat Stand Alone License Process
Page 5 of 30
Instructions for turning off UAC:
For Windows 7
For Windows 8
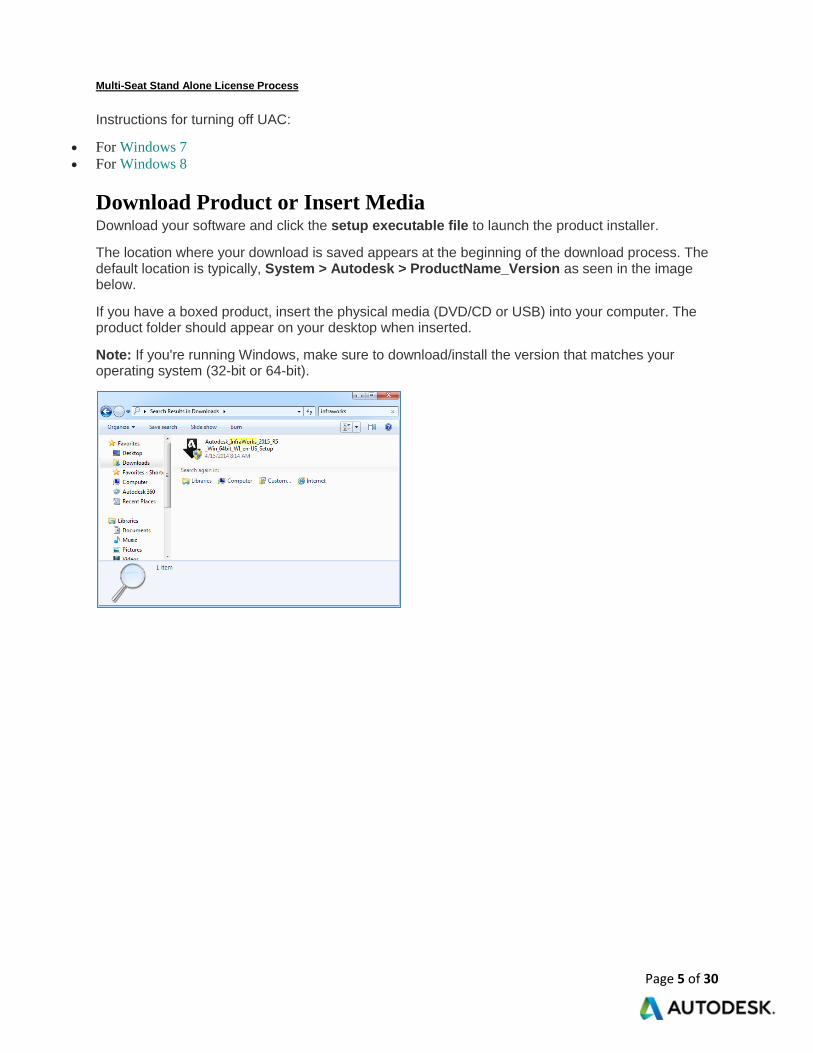
Download Product or Insert Media Download your software and click the setup executable file to launch the product installer.
The location where your download is saved appears at the beginning of the download process. The default location is typically, System > Autodesk > ProductName_Version as seen in the image below.
If you have a boxed product, insert the physical media (DVD/CD or USB) into your computer. The product folder should appear on your desktop when inserted.
Note: If you're running Windows, make sure to download/install the version that matches your operating system (32-bit or 64-bit).
Multi-Seat Stand Alone License Process
Page 6 of 30
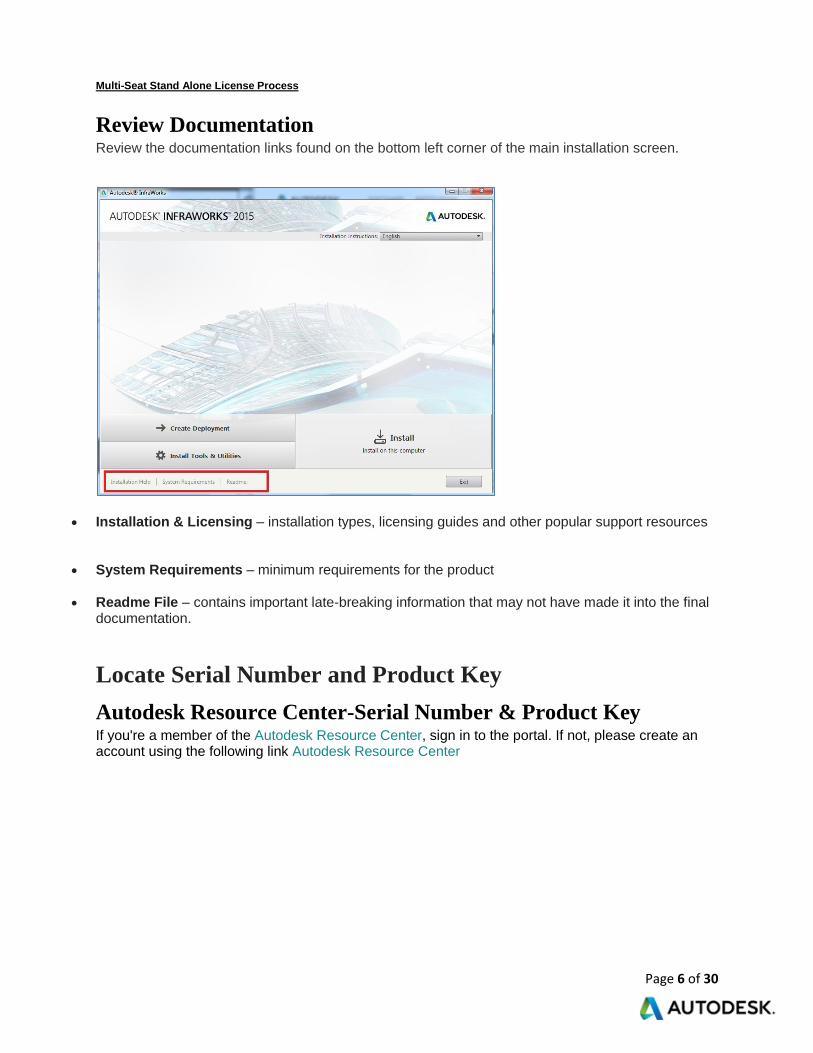
Review Documentation Review the documentation links found on the bottom left corner of the main installation screen.
Installation & Licensing – installation types, licensing guides and other popular support resources
System Requirements – minimum requirements for the product
Readme File – contains important late-breaking information that may not have made it into the final documentation.
Locate Serial Number and Product Key
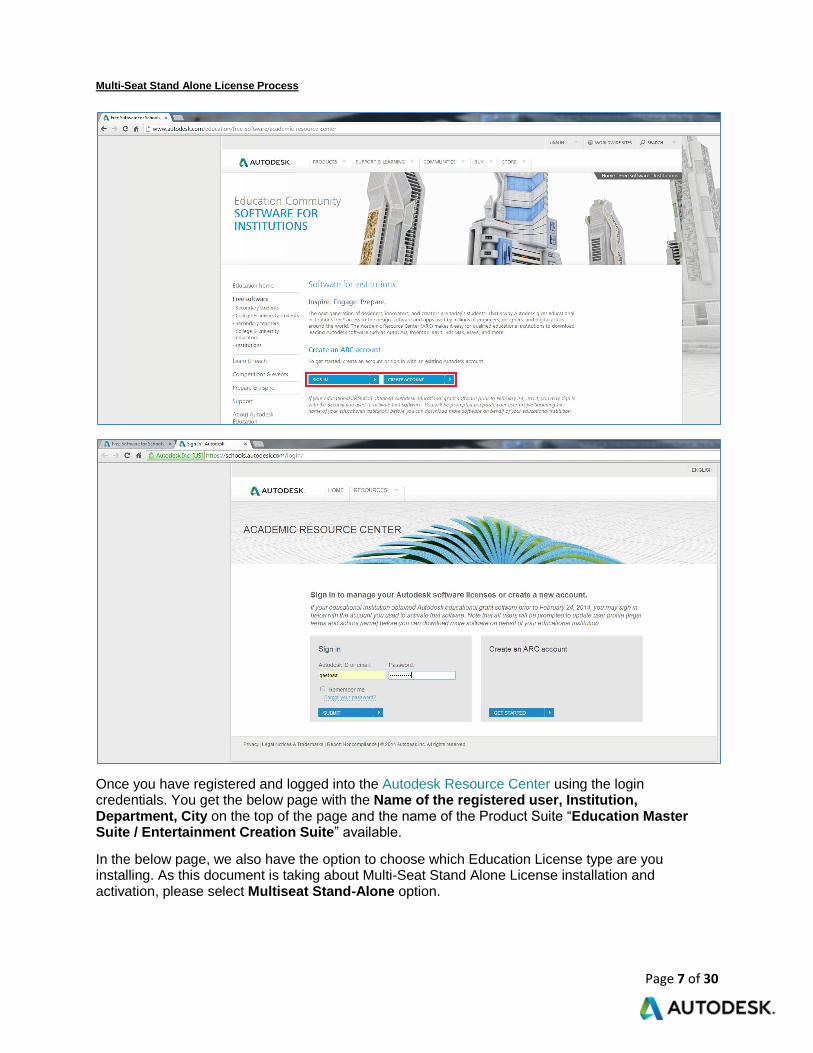
Autodesk Resource Center-Serial Number & Product Key If you're a member of the Autodesk Resource Center, sign in to the portal. If not, please create an account using the following link Autodesk Resource Center
Multi-Seat Stand Alone License Process
Page 7 of 30
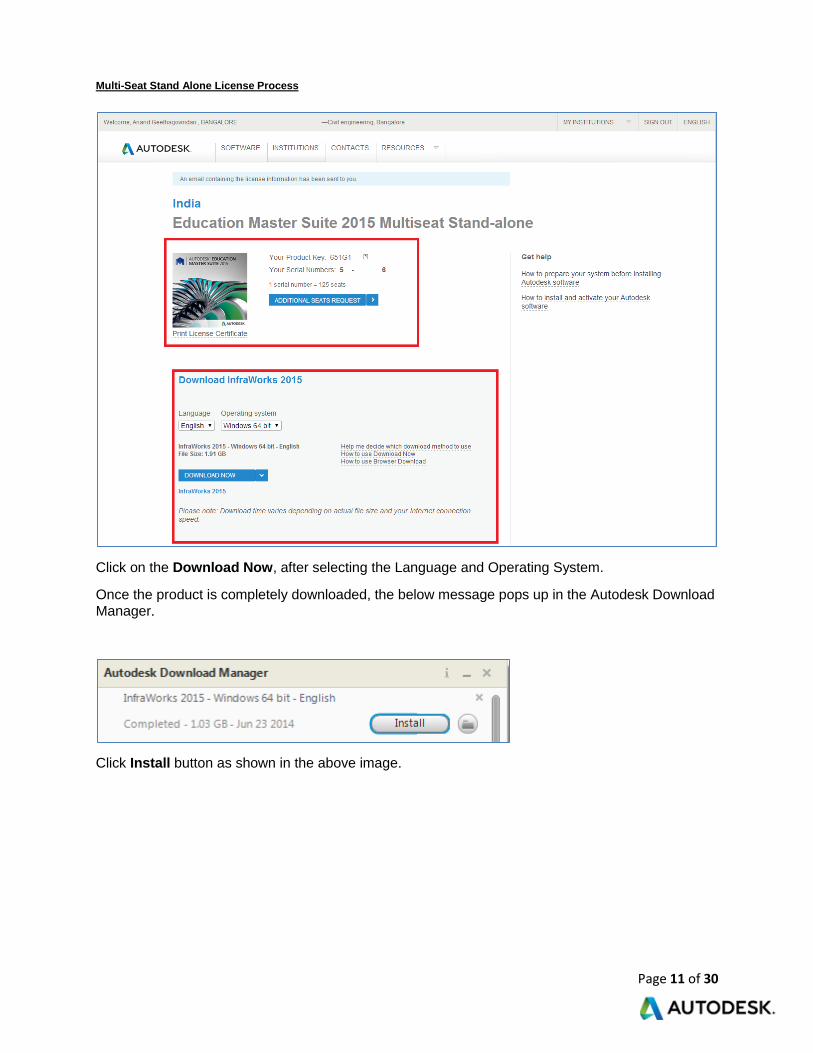
Once you have registered and logged into the Autodesk Resource Center using the login credentials. You get the below page with the Name of the registered user, Institution, Department, City on the top of the page and the name of the Product Suite “Education Master Suite / Entertainment Creation Suite” available.
In the below page, we also have the option to choose which Education License type are you installing. As this document is taking about Multi-Seat Stand Alone License installation and activation, please select Multiseat Stand-Alone option.
Multi-Seat Stand Alone License Process
Page 8 of 30
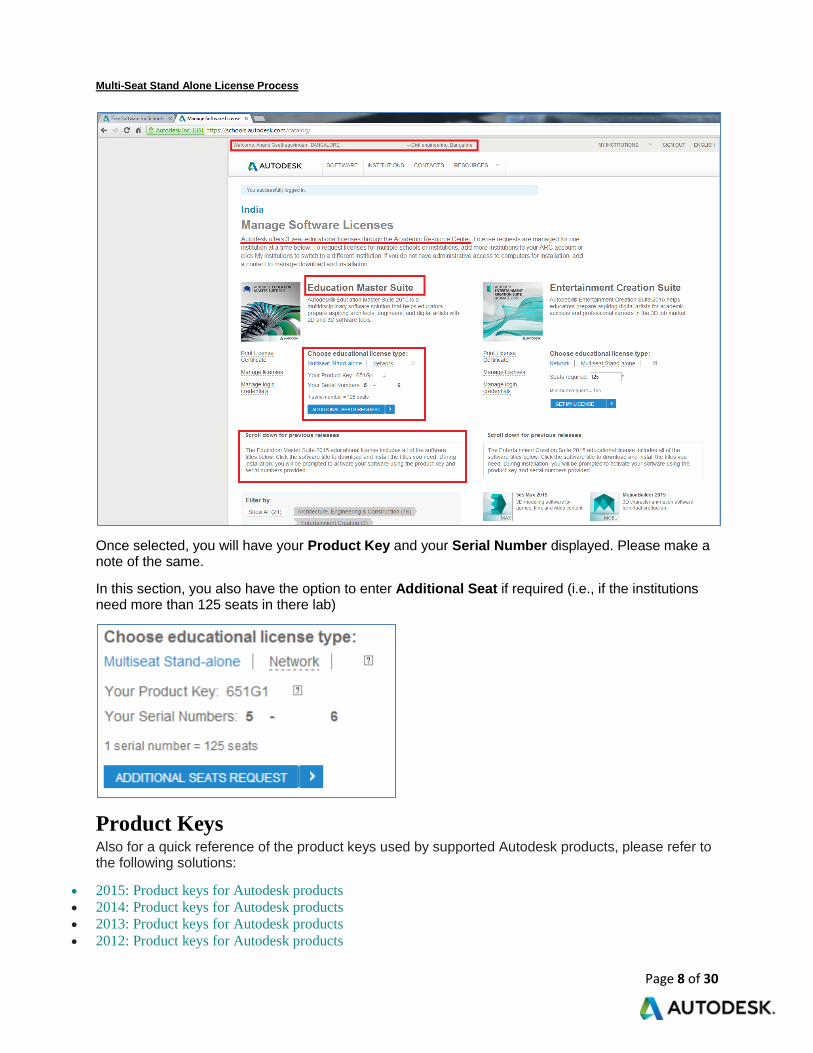
Once selected, you will have your Product Key and your Serial Number displayed. Please make a note of the same.
In this section, you also have the option to enter Additional Seat if required (i.e., if the institutions need more than 125 seats in there lab)
Product Keys Also for a quick reference of the product keys used by supported Autodesk products, please refer to the following solutions:
2015: Product keys for Autodesk products 2014: Product keys for Autodesk products
2013: Product keys for Autodesk products
2012: Product keys for Autodesk products

Multi-Seat Stand Alone License Process
Page 9 of 30
2011: Product keys for Autodesk products
2010: Product keys for Autodesk products
Note: Please ensure you are using the correct product key for the Autodesk product and version you are
installing. Entering an incorrect product key will result in activation errors for that product.
Download Product
Now click on the Product that you want to freely download from the below page
Multi-Seat Stand Alone License Process
Page 10 of 30
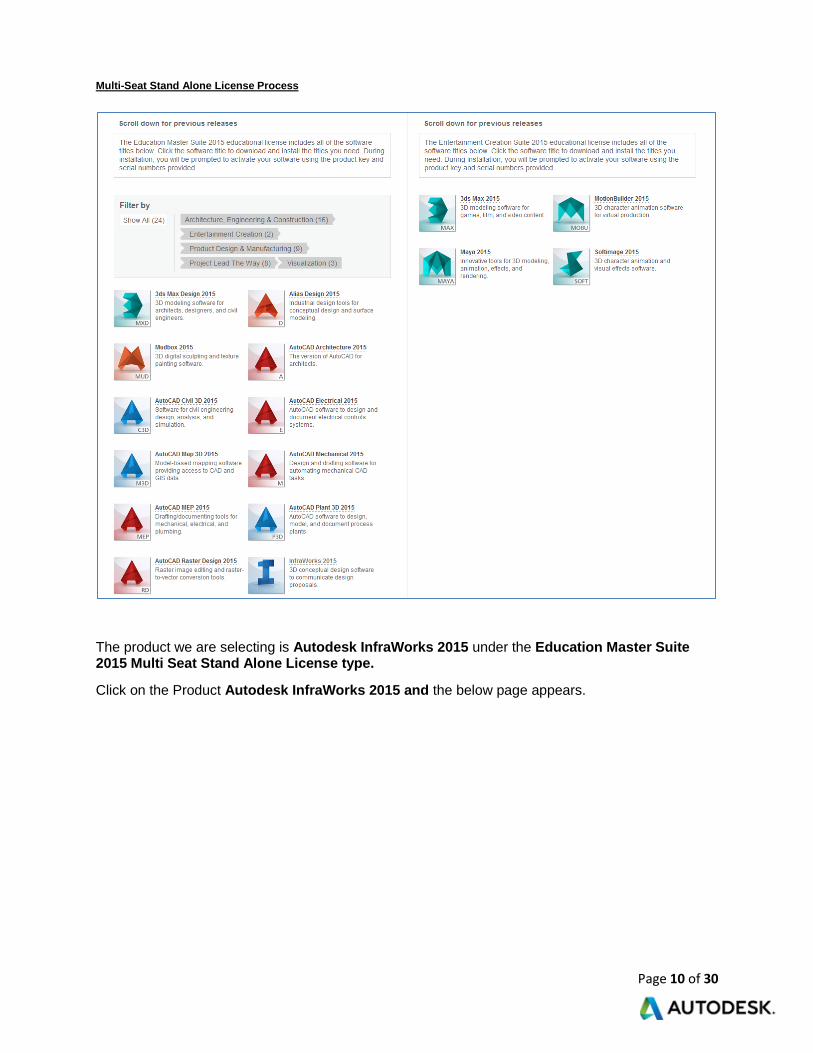
The product we are selecting is Autodesk InfraWorks 2015 under the Education Master Suite 2015 Multi Seat Stand Alone License type.
Click on the Product Autodesk InfraWorks 2015 and the below page appears.
Multi-Seat Stand Alone License Process
Page 11 of 30
Click on the Download Now, after selecting the Language and Operating System.
Once the product is completely downloaded, the below message pops up in the Autodesk Download Manager.
Click Install button as shown in the above image.
Multi-Seat Stand Alone License Process
Page 12 of 30
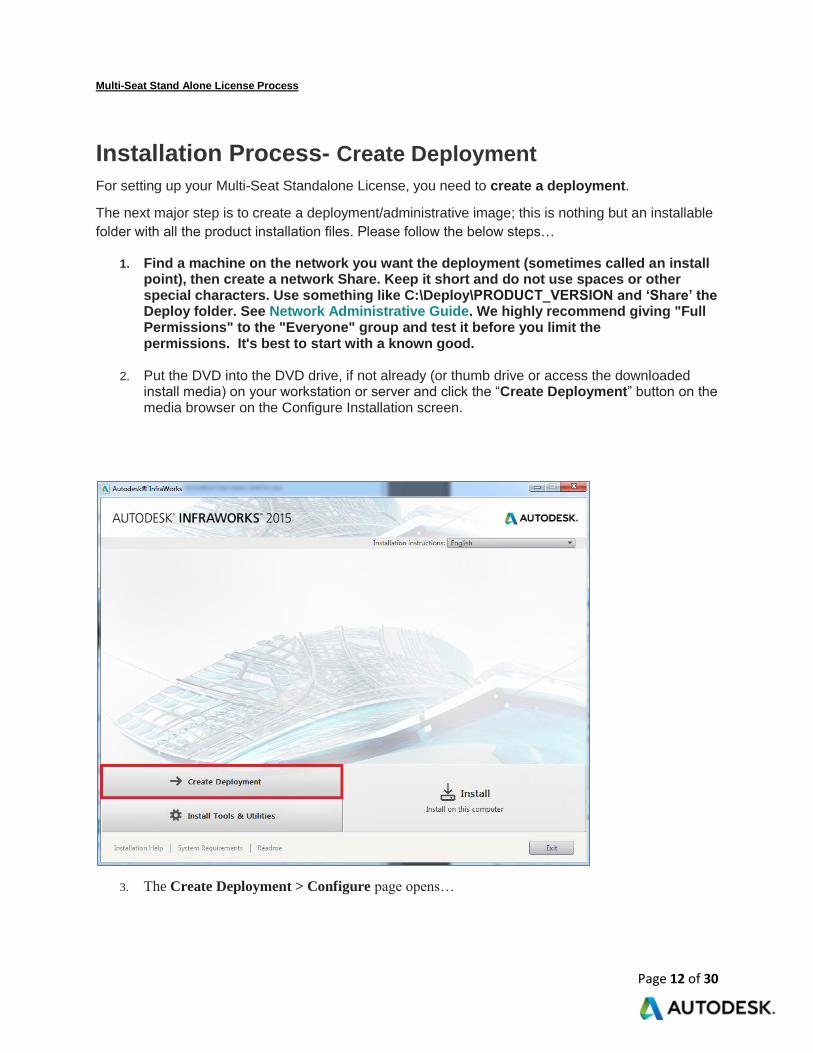
Installation Process- Create Deployment
For setting up your Multi-Seat Standalone License, you need to create a deployment.
The next major step is to create a deployment/administrative image; this is nothing but an installable
folder with all the product installation files. Please follow the below steps…
1. Find a machine on the network you want the deployment (sometimes called an install point), then create a network Share. Keep it short and do not use spaces or other special characters. Use something like C:\Deploy\PRODUCT_VERSION and ‘Share’ the Deploy folder. See Network Administrative Guide. We highly recommend giving "Full Permissions" to the "Everyone" group and test it before you limit the permissions. It's best to start with a known good.
2. Put the DVD into the DVD drive, if not already (or thumb drive or access the downloaded install media) on your workstation or server and click the “Create Deployment” button on the media browser on the Configure Installation screen.
3. The Create Deployment > Configure page opens…

Multi-Seat Stand Alone License Process
Page 13 of 30
4. You need to enter the below fields…
Multi-Seat Stand Alone License Process
Page 14 of 30
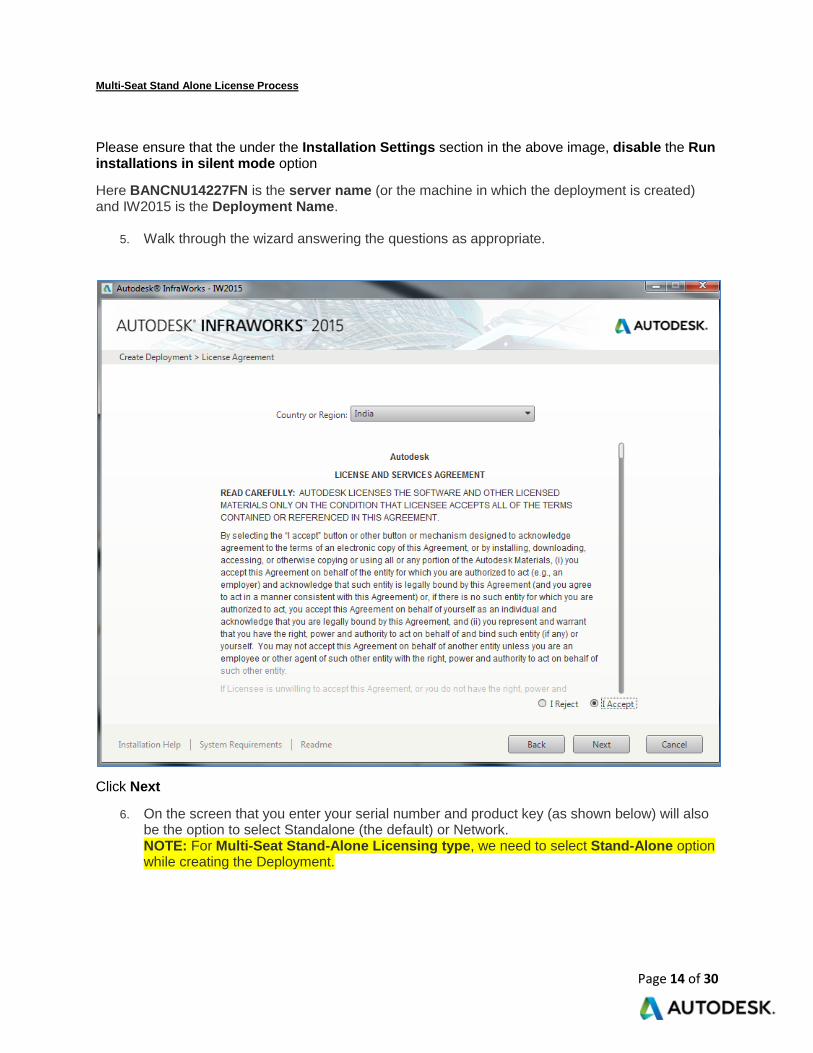
Please ensure that the under the Installation Settings section in the above image, disable the Run installations in silent mode option
Here BANCNU14227FN is the server name (or the machine in which the deployment is created) and IW2015 is the Deployment Name.
5. Walk through the wizard answering the questions as appropriate.
Click Next
6. On the screen that you enter your serial number and product key (as shown below) will also be the option to select Standalone (the default) or Network. NOTE: For Multi-Seat Stand-Alone Licensing type, we need to select Stand-Alone option while creating the Deployment.
Multi-Seat Stand Alone License Process
Page 15 of 30
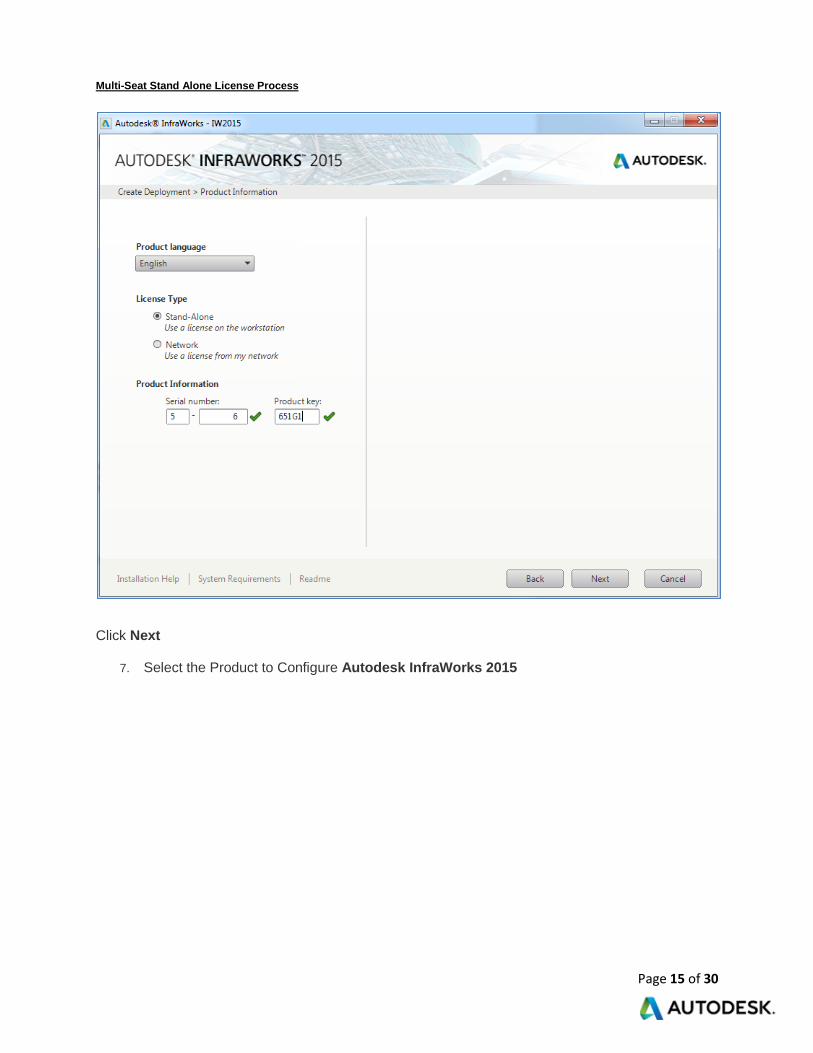
Click Next
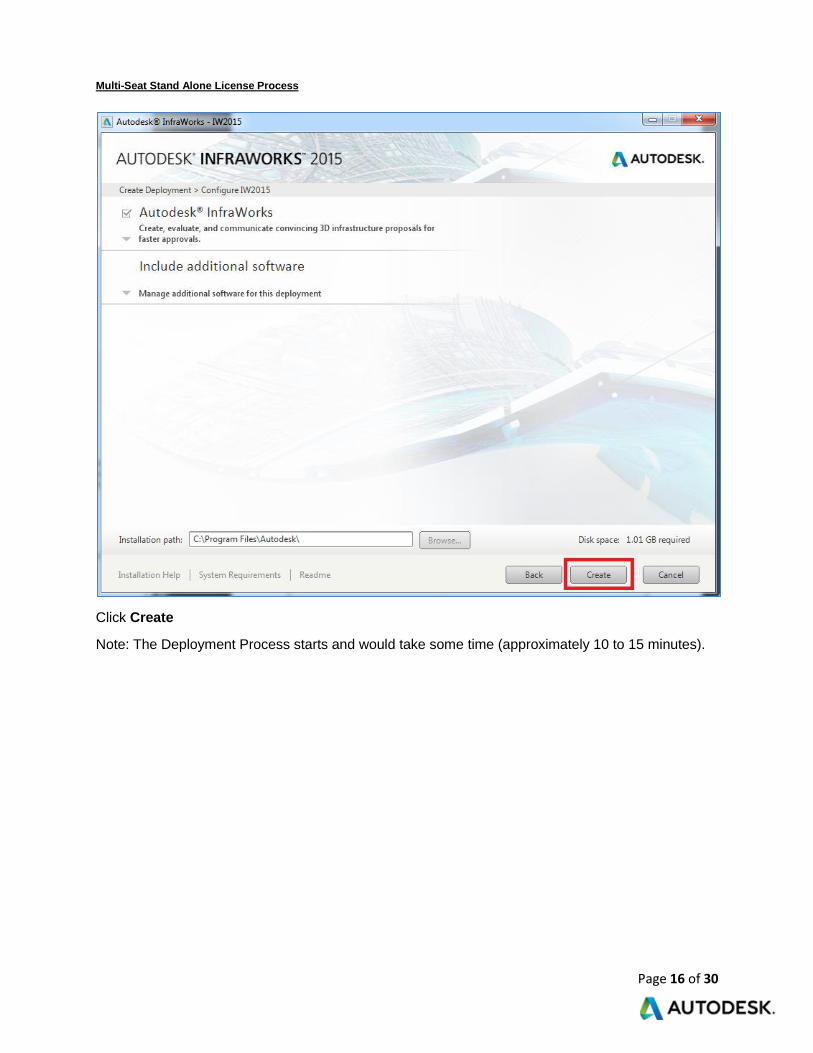
7. Select the Product to Configure Autodesk InfraWorks 2015
Multi-Seat Stand Alone License Process
Page 16 of 30
Click Create
Note: The Deployment Process starts and would take some time (approximately 10 to 15 minutes).
Multi-Seat Stand Alone License Process
Page 17 of 30
Multi-Seat Stand Alone License Process
Page 18 of 30
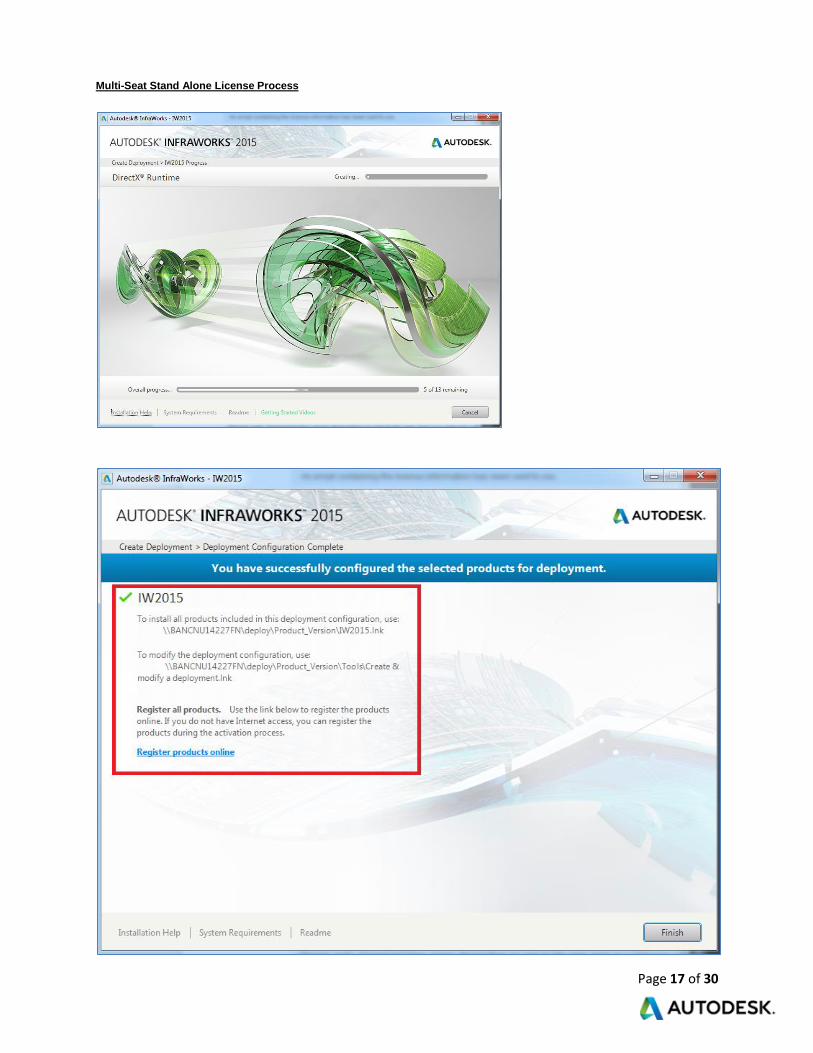
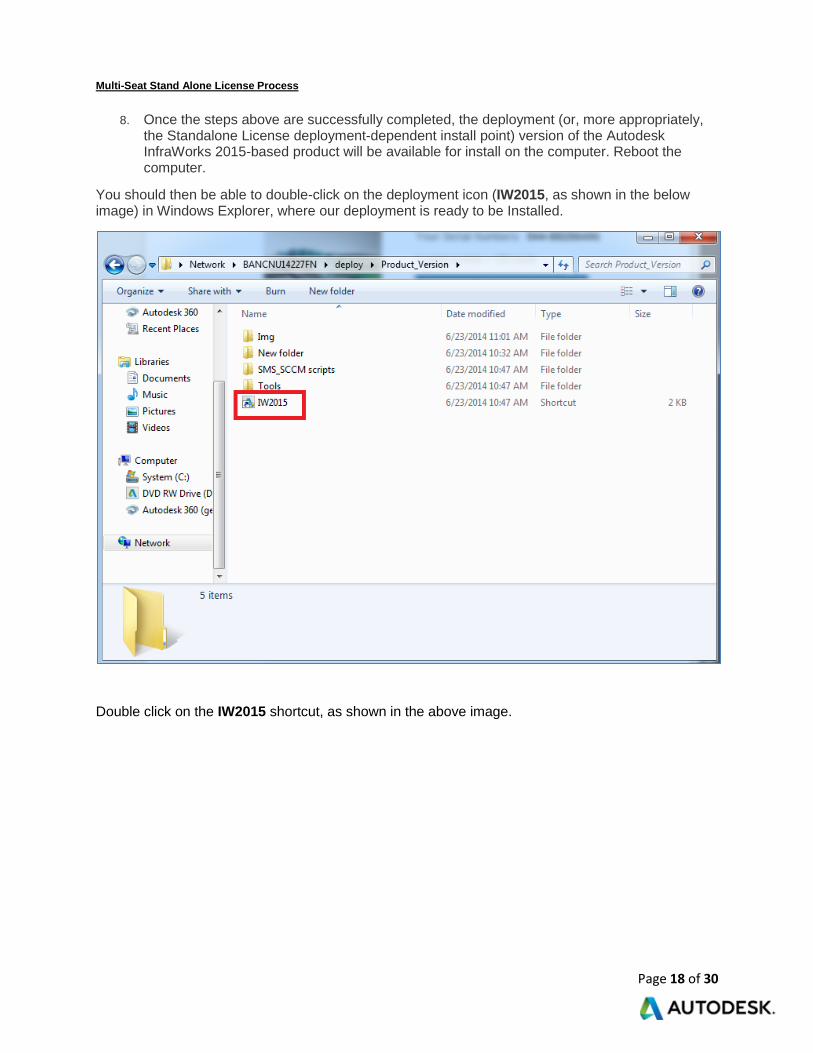
8. Once the steps above are successfully completed, the deployment (or, more appropriately, the Standalone License deployment-dependent install point) version of the Autodesk InfraWorks 2015-based product will be available for install on the computer. Reboot the computer.
You should then be able to double-click on the deployment icon (IW2015, as shown in the below image) in Windows Explorer, where our deployment is ready to be Installed.
Double click on the IW2015 shortcut, as shown in the above image.
Multi-Seat Stand Alone License Process
Page 19 of 30
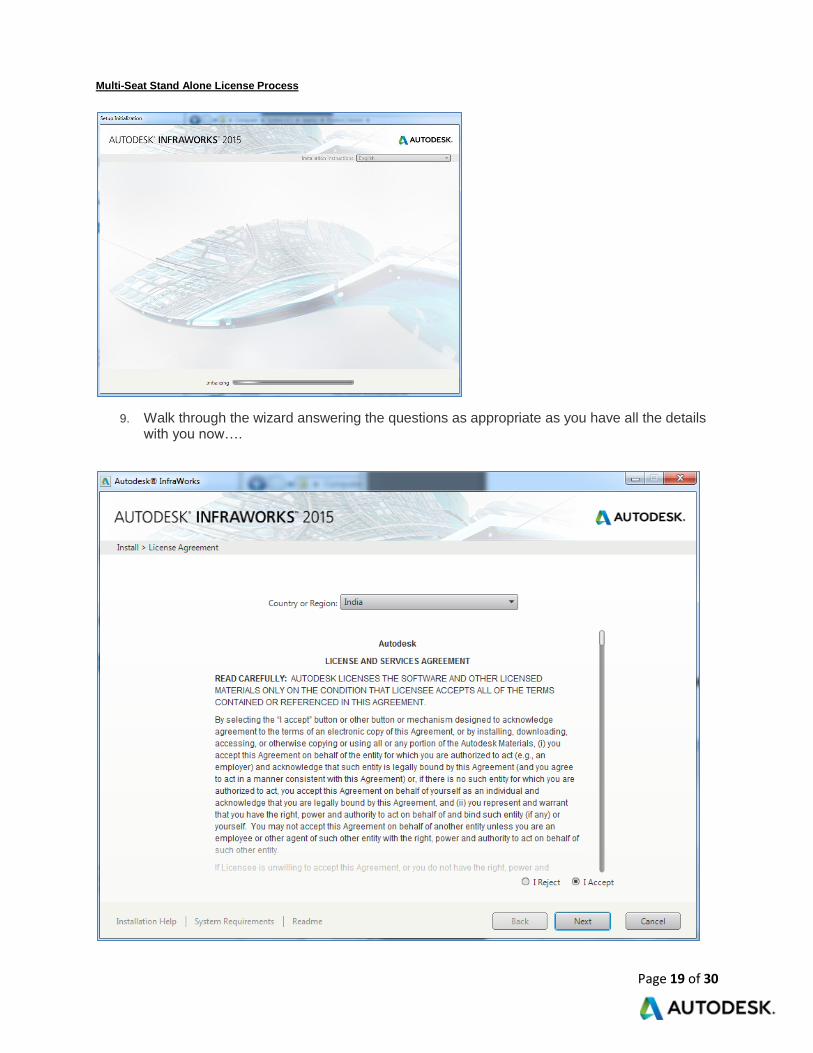
9. Walk through the wizard answering the questions as appropriate as you have all the details with you now….
Multi-Seat Stand Alone License Process
Page 20 of 30
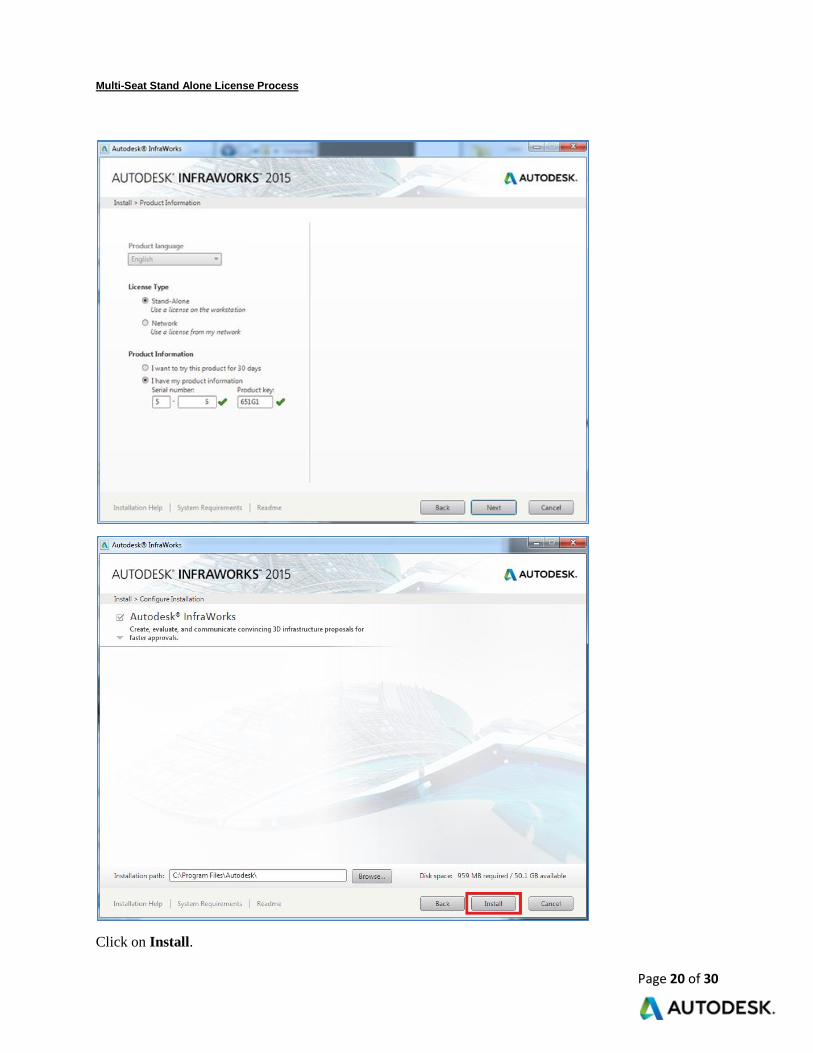
Click on Install.
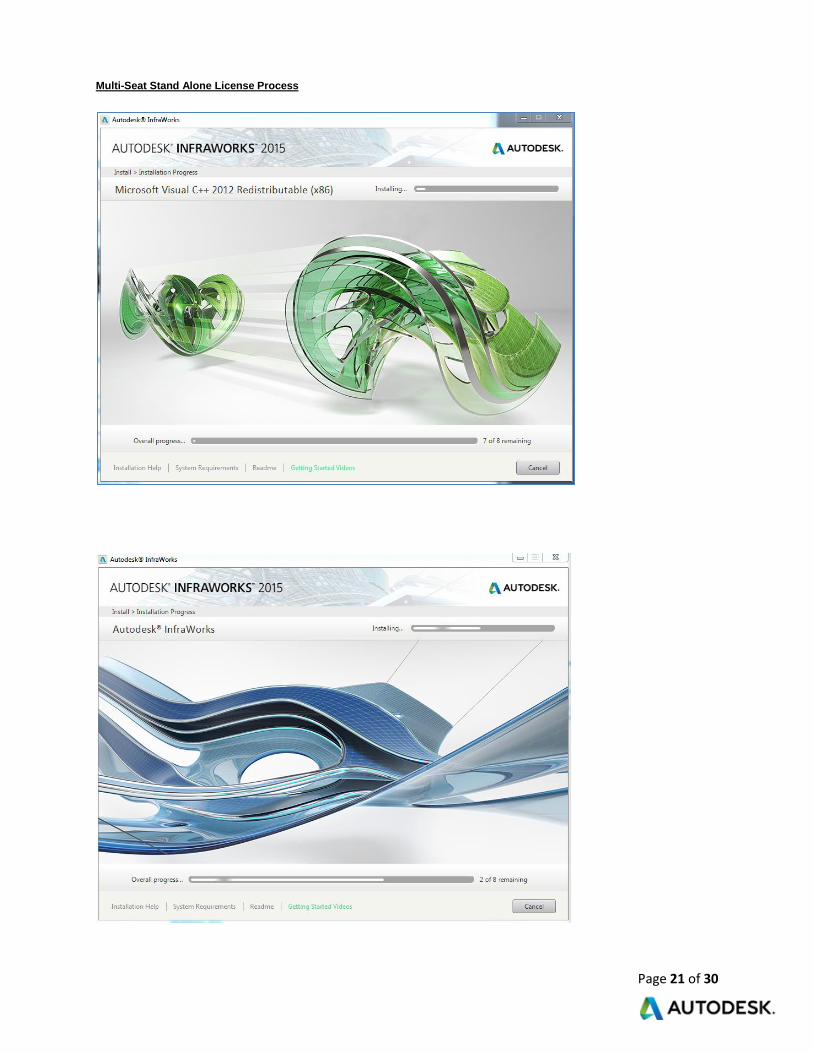
Multi-Seat Stand Alone License Process
Page 21 of 30
Multi-Seat Stand Alone License Process
Page 22 of 30
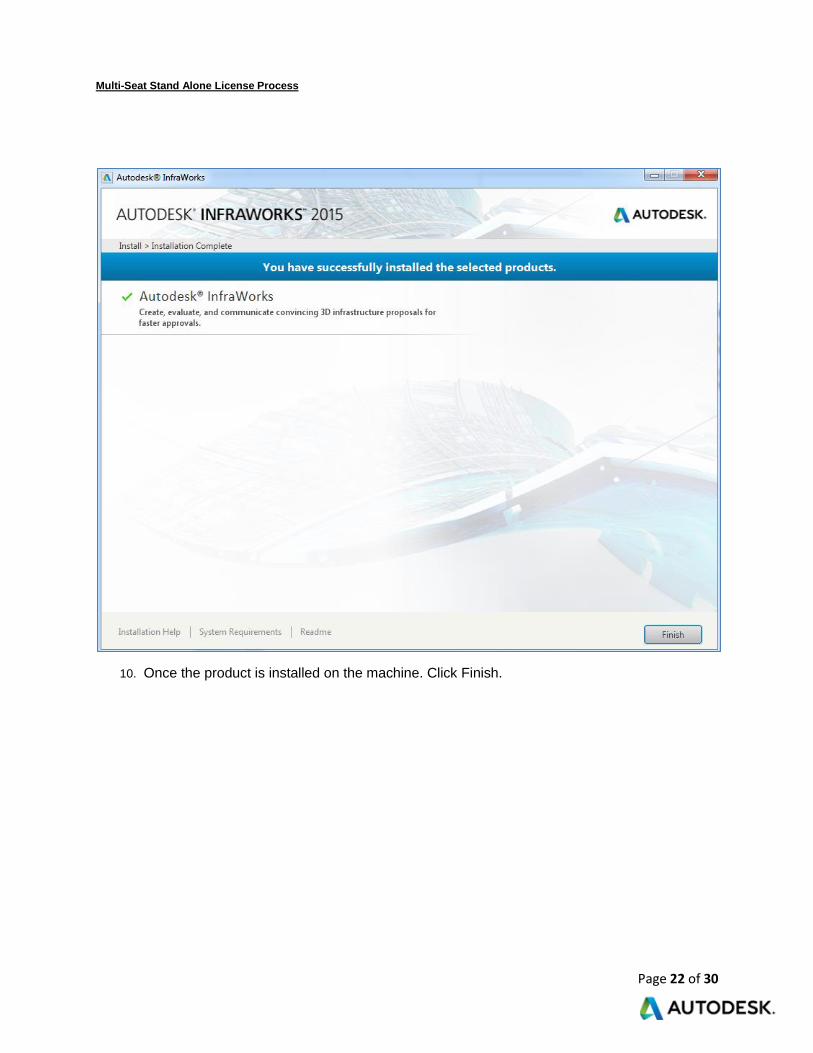
10. Once the product is installed on the machine. Click Finish.
Multi-Seat Stand Alone License Process
Page 23 of 30
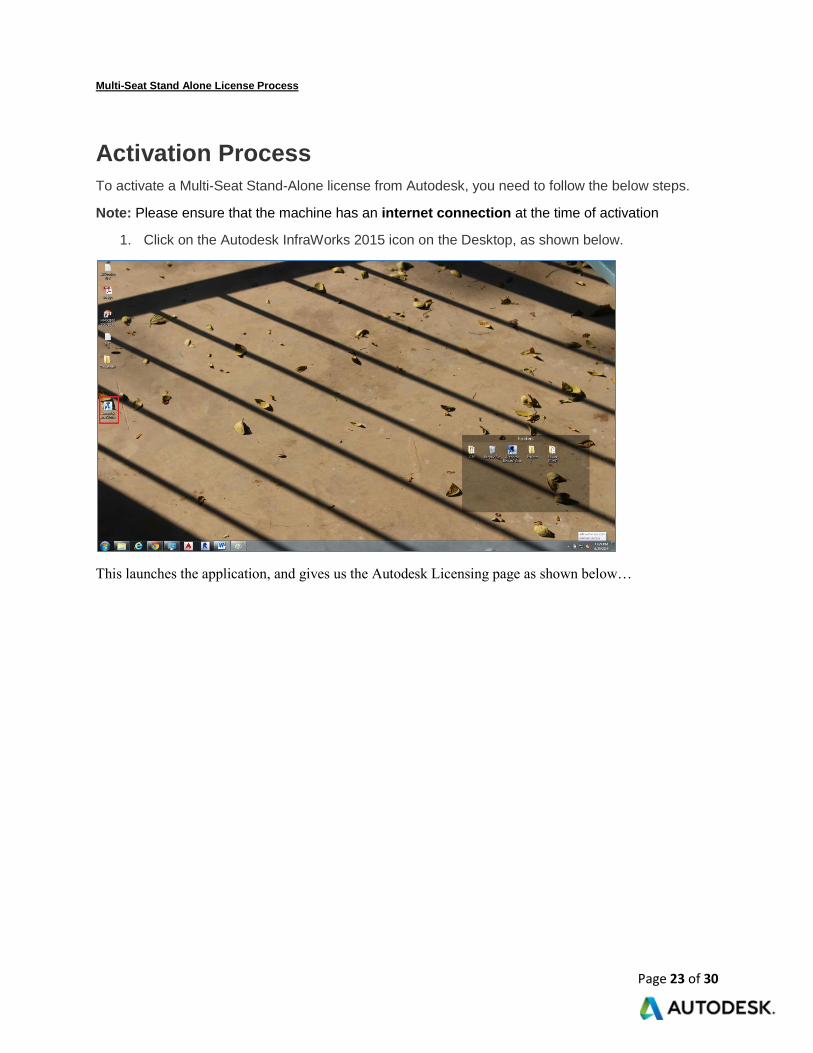
Activation Process
To activate a Multi-Seat Stand-Alone license from Autodesk, you need to follow the below steps.
Note: Please ensure that the machine has an internet connection at the time of activation
1. Click on the Autodesk InfraWorks 2015 icon on the Desktop, as shown below.
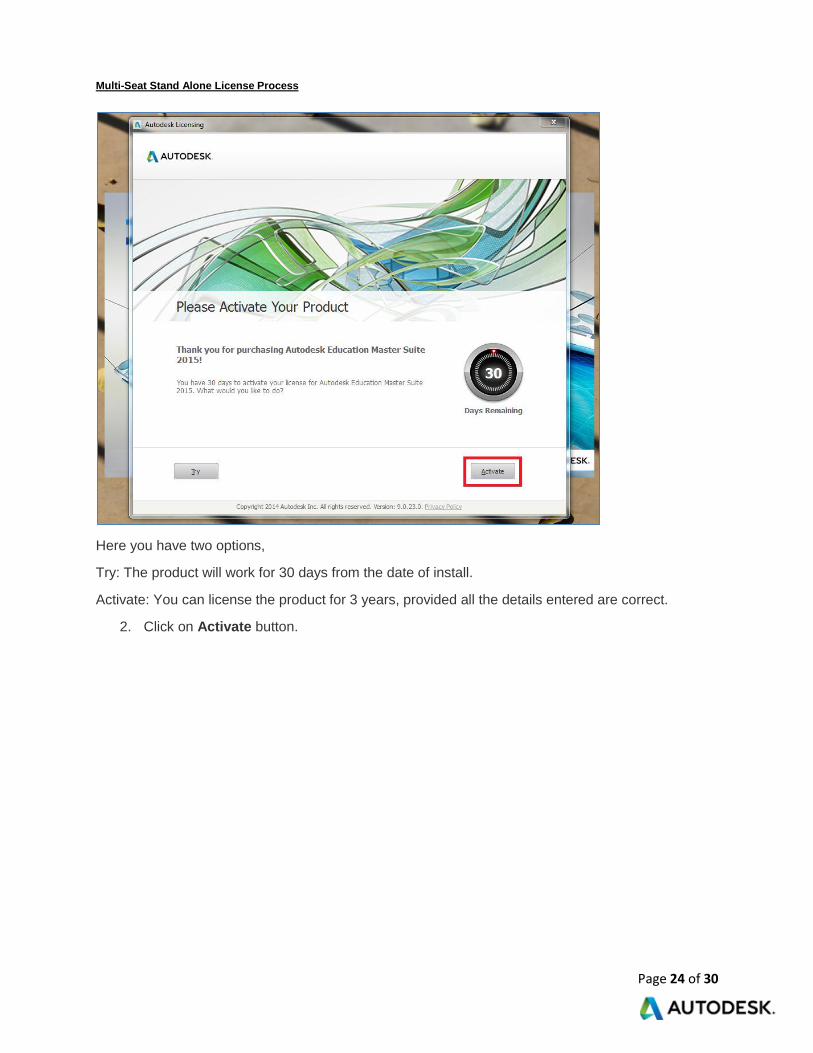
This launches the application, and gives us the Autodesk Licensing page as shown below…
Multi-Seat Stand Alone License Process
Page 24 of 30
Here you have two options,
Try: The product will work for 30 days from the date of install.
Activate: You can license the product for 3 years, provided all the details entered are correct.
2. Click on Activate button.
Multi-Seat Stand Alone License Process
Page 25 of 30
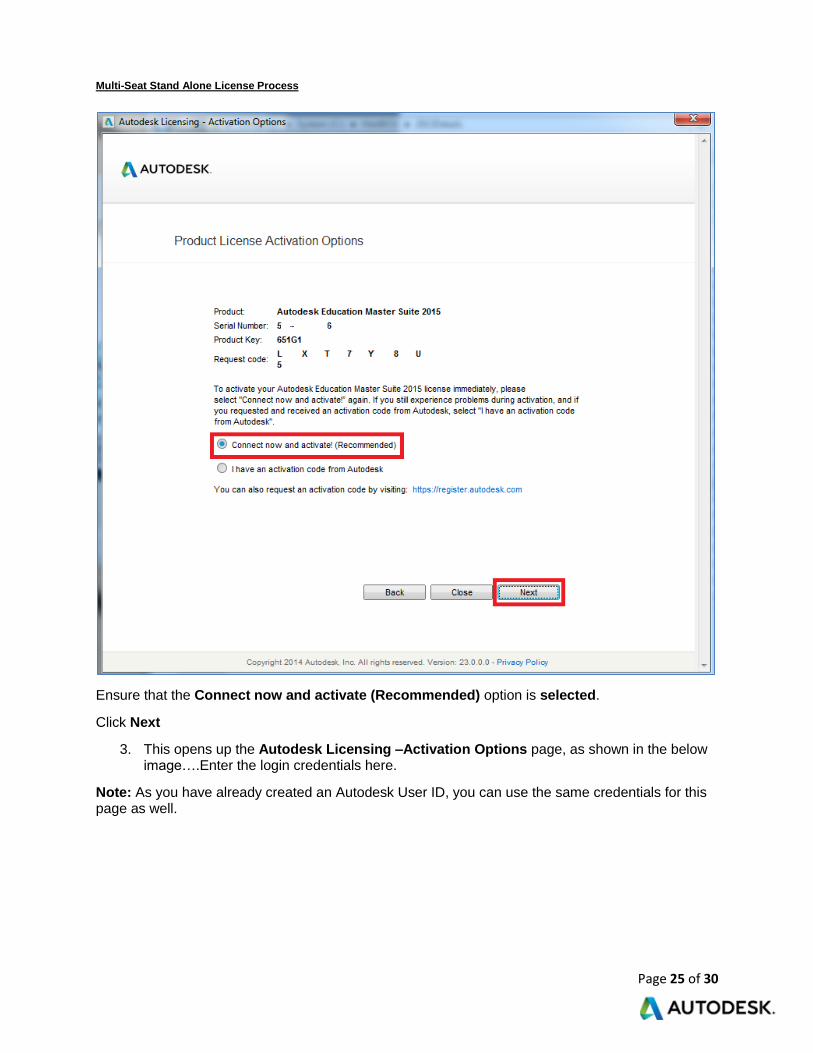
Ensure that the Connect now and activate (Recommended) option is selected.
Click Next
3. This opens up the Autodesk Licensing –Activation Options page, as shown in the below image….Enter the login credentials here.
Note: As you have already created an Autodesk User ID, you can use the same credentials for this page as well.
Multi-Seat Stand Alone License Process
Page 26 of 30
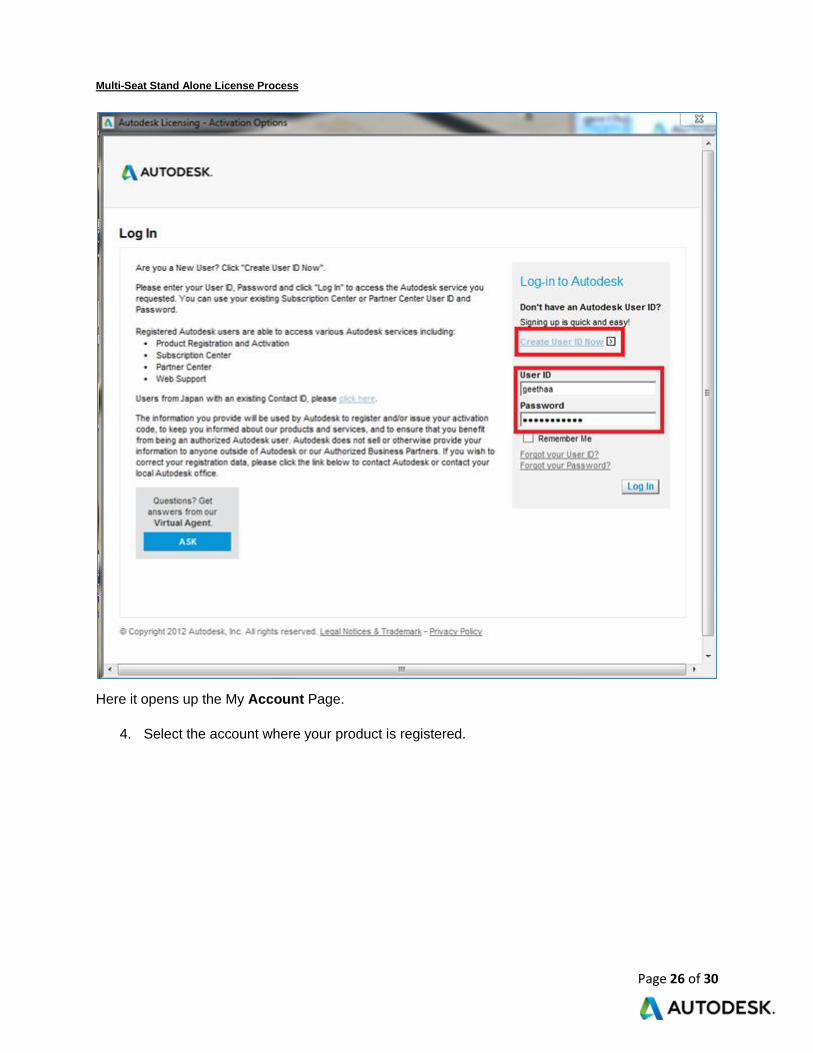
Here it opens up the My Account Page.
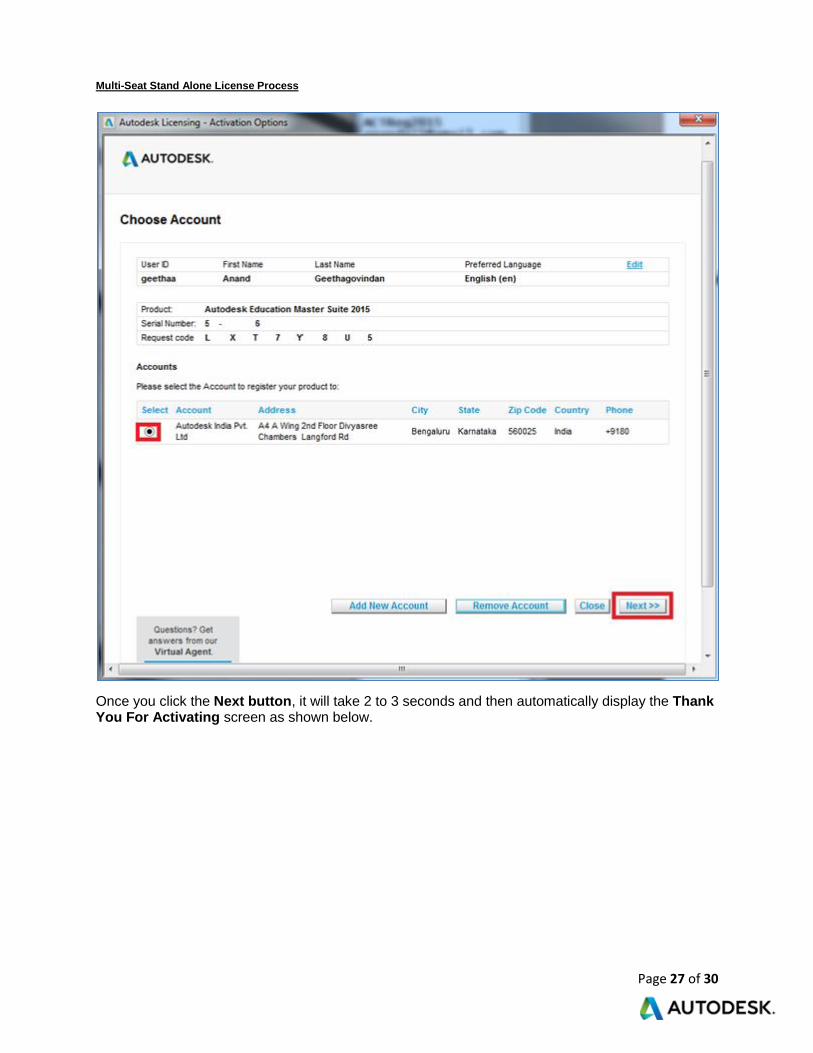
4. Select the account where your product is registered.
Multi-Seat Stand Alone License Process
Page 27 of 30
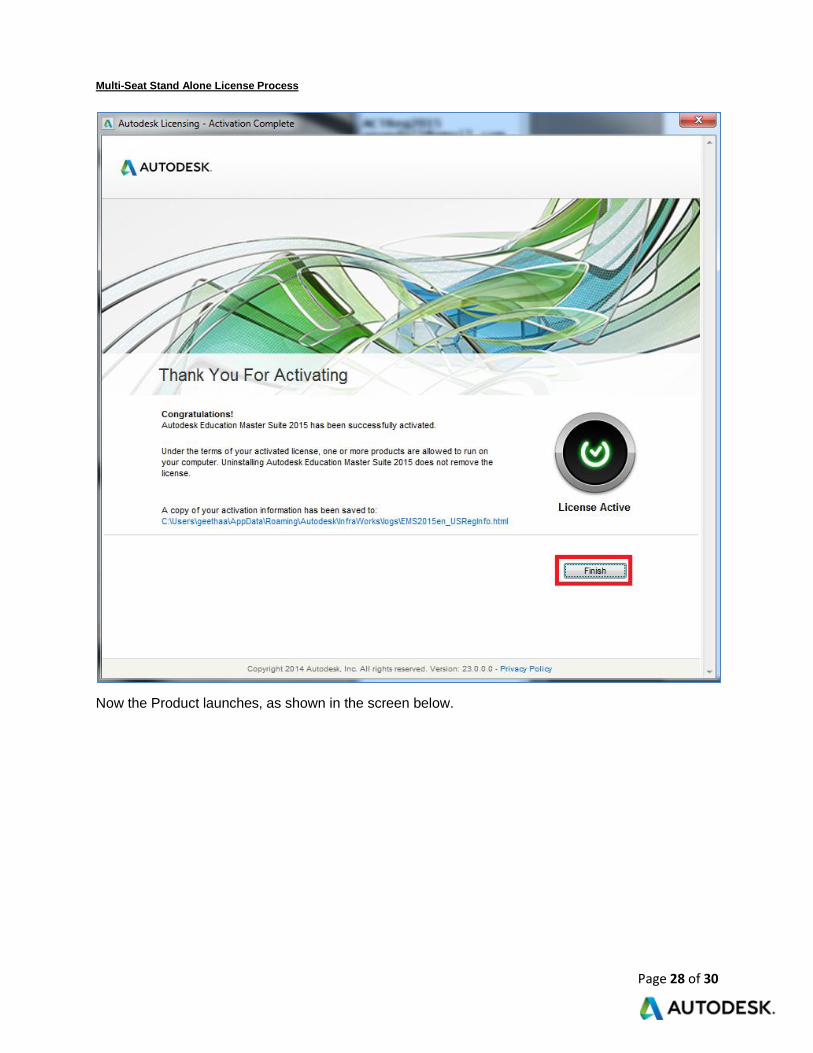
Once you click the Next button, it will take 2 to 3 seconds and then automatically display the Thank You For Activating screen as shown below.
Multi-Seat Stand Alone License Process
Page 28 of 30
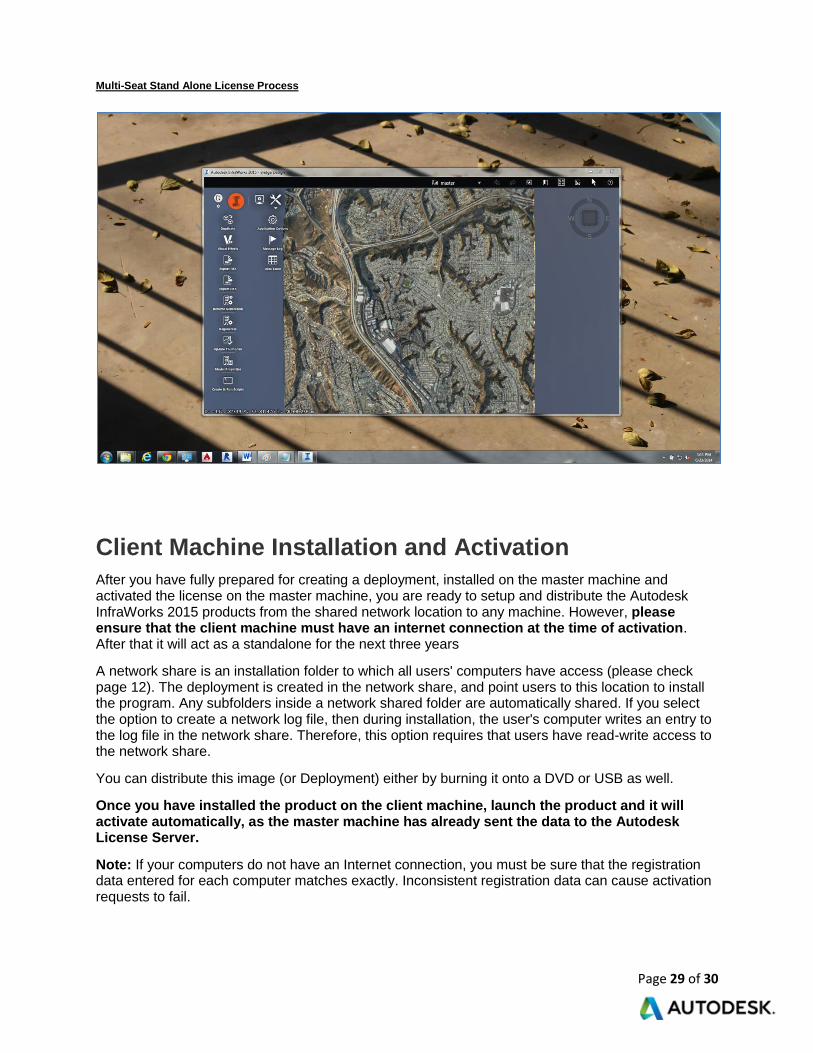
Now the Product launches, as shown in the screen below.
Multi-Seat Stand Alone License Process
Page 29 of 30
Client Machine Installation and Activation
After you have fully prepared for creating a deployment, installed on the master machine and activated the license on the master machine, you are ready to setup and distribute the Autodesk InfraWorks 2015 products from the shared network location to any machine. However, please ensure that the client machine must have an internet connection at the time of activation. After that it will act as a standalone for the next three years
A network share is an installation folder to which all users' computers have access (please check page 12). The deployment is created in the network share, and point users to this location to install the program. Any subfolders inside a network shared folder are automatically shared. If you select the option to create a network log file, then during installation, the user's computer writes an entry to the log file in the network share. Therefore, this option requires that users have read-write access to the network share.
You can distribute this image (or Deployment) either by burning it onto a DVD or USB as well.
Once you have installed the product on the client machine, launch the product and it will activate automatically, as the master machine has already sent the data to the Autodesk License Server.
Note: If your computers do not have an Internet connection, you must be sure that the registration data entered for each computer matches exactly. Inconsistent registration data can cause activation requests to fail.
Multi-Seat Stand Alone License Process
Page 30 of 30
Resources
For more information on Creating Deployment, please check YouTube video…
http://www.youtube.com/watch?v=H4EDq-MucbI
System Requirements for all Autodesk Products:
http://knowledge.autodesk.com/support/system-requirements
Note: For more information, please search for the same in the following website
Autodesk website: www.autodesk.com
Autodesk Education: www.autodesk.com/education
Autodesk Register Once (For Activation): https://registeronce.autodesk.com/
Autodesk Knowledge Network: http://knowledge.autodesk.com/
_____________________________________________________________________________________________