Embed Size (px)
Citation preview
— ~~ ~~ operation -~ ~--~ ~
~ ancj~ ~ - ~ ~: ~ ~
maintenance ~ ~ ~ ~
— I
TES
U~S~MA~L
UNITED STATES POSTAL SERVICE
Washington, D.C. 20260
Transmittal Letter 3March 1, 1981
STREET LETI’ER BOX IVIAINTENANCEMaintenance Series Handbook, MS-22
1. MATERIAL TRANSMITTED
This handbook contains information on installing, refinishing, maintaining and repairing Item No. 1168Letter Box (Post); Item No. 1170 Box, Street Collection; and Item No. 1171 Box, Relay.
2. DISTRIBUTION
This handbook will be furnished regional Plant Maintenance Section Personnel, Postmasters, and Mainte-nance Personnel directly concerned with street letter box maintenance.
3. IMPLEMENTATION
.1 Procedures outlined in this handbook are effective immediately.
.2 Facilities having recently completed arefinishing and repainting cycle on all their street letterboxes should not begin a new repainting cycle until the need arises, provided the followingconditions are met:a. All boxes are painted in accordance with examples shown in chapter 3 of this handbook
and in Publication 165, Design Control Guidelines.b. All boxes bear only current approved labels as specified in part 131 and illustrated in
chapter 3 of this handbook and in Publication 165..3 If the above conditions are not satisfied, action should be initiated promptly to comply with
these paint and label requirements.
4. RESPONSIBILITIES
The Postmaster is responsible for implementing the policy and practices prescribed in MS-22.
5. SUPERSEDED MATERIAL
All maintenance instructions on Items No. 1168, 1170, and 1171, issued before publication of this bookare rescinded. All copies of Handbook MS-22 issued with Transmittal Letter 2, dated October 8, 1973are to be destroyed upon receipt of this handbook.
,,~Peter A. J obsonDirectorOffice of Maintenance Management

Preface Street Letter Box Maintenance
PREFACE
This handbook contain procedures for developing a uniform nationwide maintenance program for letterboxes) other than the prototype models used in the field for testing purposes. This handbook should beused as a guidelines in updating letter box maintenance, installation, refinishing and painting programs.
The success of this program depends on each postmaster fully implementing these procedures and thenmaintaining close overall supervision of the entire program.
TL-3,3-1-81
Street Letter Box Maintenance Contents
CONTENTS
Chapter 1 INTRODUCTION
110 Purpose120 General130 Policies
131 Labels, Decals, Signs132 Safety Considerations133 Cost Factors of Repairs134 Equipment and Supplies135 AMO Assistance136 Type of Paint
Chapter 2 INSTALLATION
210 Site Preparation211 Accessibility/Safety212 Motorist Mail Chutes
220 Installation Instructions221 Anchoring Preparation222 Anchoring Methods
230 Tools Required for Installation231 Paved Surfaces232 Non-paved Surfaces
Chapter 3 DECAL AND COLLECTIONSCHEDULE CARDS
310 Labeling Requirements320 Labels and Signs
Chapter 4 PREVENTIVE MAINTENANCE
410 Equipment/Supplies411 Cautionary Notes412 Tools Required413 Materials Required
420 Appearance of Letter Boxes421 Obscene/Other Writing on
Surfaces
422 Dirty and Grimy Surface423 Painting Frequency424 Defaced Boxes
430 Painting Letter Boxes431 Surface Preparation432 Priming433 Painting Procedures
440 Decals and Labels441 Removal Procedure442 Application Procedure
450 Contracting for Painting451 General452 Contracting Methods
460 Motorist Mailchute Installation461 New Collection Boxes462 Old Collection Boxes
Chapter 5 REPAIRS
510 Repair Costs520 Repair Procedure
521 Estimates522 Contract Requirements523 Parts524 Work Form
530 Disposal Procedure
Chapter 6 PARTS AND MATERIALS
610 Hardware611 Box Attachments612 Schedule Card Items613 Lock Equipment
620 Maintenance Supplies621 Cleaning Materials622 Painting Materials
630 Labels
TL-3,3-1-81

Illustrations Street Letter Box Maintenance
LLUSTRAT~ONS
Figure 2-1. Measurement Details - Collection Box Anchoring Devices, page 2-7.
Figure 3-1. Label 5, Eagle Decal, Positioning, page 3-2.
Figure 3-2. Label 59, A through G, Last Pickup, Positioning, page 3-3.
Figure 3-3. Label 55 and 55A, Collection Schedule, Positioning, page 3-4.
Figure 3-4. Label 162, Local Delivery, Positioning, page 3-5.
Figure 3-5. Item D-1175, Hours of Collection Card, Positioning, page 3-6.
Figure 4-1. Motorist Mail Chute Installation, page 4-6.
TL-3,3-1-81

Street Letter Box Maintenance 131.2
CHAPTER 1INTRODUCTION
110 PURPOSE
This handbook is for use by postmasters, postalplant engineers, building superintendents, andother concerned maintenance personnel as a guide-line for conducting an economical and effectivestreet letter box maintenance program.
Throughout this handbook are referencesto National Stock Number, Supply Center Itemnumbers and label numbers. These numbers arecorrect as of the publication date of this handbook,however, it is recommended that before orderingfrom GSA or the Supply Centers, the appropriatecatalog be checked to determine the validity of thenumbers.
120 GENERAL
121 Street letter and collection boxes shallbe inspected (and replaced as required) upon receiptof report from Delivery Services personnel indi-cating that a box requires maintenance. Localpersonnel and other reliable sources will also per-form routine inspection of mail boxes to determineneed for maintenance. The frequency of routineinspection should be determined by local ex-perience.
122 The following letter boxes are coveredby this handbook:
a. Item 1170, street collection box.b. Item 1171-B, relay box.c. Item 1177, motorist mail chute
installed on Item 1170, collection box, at curbinstallations.
d. Post letter box - No longer listedin Publication 24, Supply Catalog as an item ofsupply (see section 133.2).
130 POLICIES
131 Labels, Decals, Signs
131.1 Only current, approved labels shall bedisplayed on collection boxes in accordance withapplicable instructions. Changes in label require-ments are announced in Headquarters Postal Bul-letin.
131.2 Collection schedules should be clearlyand consistently printed/typed on the schedulelabels 55, 55A and D-1175 by one of the follow-ing methods:
a. Printed using a speedball pen, B6,with waterproof black ink (item 0-212 availablefrom the supply center) and allowing approxi-mately 36 hours for drying.
b. Type in capital letters using ribboncontaining waterproof ink. Large bulletin type orspeech typewriter is preferred.
c. Other procedures may be usedwhich have been determined by the maintenancedirector for the immediate geographical area to bemore durable than the two above methods.
d. Use a clear plastic enamel spray(such as 3-M sealer) to cover the entire surfaceof D-1175 in order to seal and protect the labelfrom weather.
TL-3,3-1-81
Street Letter Box Maintenance132
132 Safety Considerations
132.1 Confer with local officials beforeinstalling street letter boxes to avoid violation oflocal ordinances or to avoid creation of a safetyhazard.
132.2 All employees installing street letterboxes will make sure that each box is installedso that all foreseeable possibilities of injury tocustomers or employees are eliminated. When re-moving street letter boxes from an existing location,also remove all anchoring devices, projections,stakes, and mounting slabs. Fill anchoring holes anddo other necessary repair work to return the site toits original condition and to blend it in with thesurrounding area.
132.3 Do not use angle iron stakes or com-mercially available auger-type anchors in locationswhere electrical cables are buried. Since cables canbe buried as shallow as 24 inches and be in com-pliance with the National Electrical Code, it ispossible for such anchoring devices to penetratecable insulation resulting in a lethal voltage beingapplied to the collection box.
1324 Proper protective equipment mustbe worn during each phase of installation, pre-ventive maintenance and repairs. Approved re-spiratory protection, engineering controls (i.e.,spray paint booths), hearing protection and otherprotection equipment (i.e., safety glasses) may berequired. All equipment should meet OSIiA and beNIOSH approved.
133 Cost Factors of Repairs
133.1 Street letter boxes eventually reacha state where repair is no longer economical. Whenrepairs exceed allowable cost limitations (see part510) boxes will be discarded, as noted in subchapter530.
133.2 Repaint post mounted boxes as the
need arisies and retain in service. Do not repairdamaged post boxes. Dispose of damaged postboxes as outlined in subchapter 530.
134 EQUIPMENT AND SUPPLIES
134.1 Specified street letter box paint andprimer materials may be obtained from the GeneralServices Administration. Application instructionsfor these materials must be strictly followed.
134.2 All requisitions for equipment neededin maintenance activities assisted by AMO personnelmust be approved by the Management SectionalCenter, Manager/Postmaster.
134.3 This handbook does not specify man-datory equipment purchasing requirements formaintenance tools listed in chapter 4. Rather, itpresents uniform guidelines to do the specific job ofstreet letter box refinishing. Many facilities alreadyhave adequate equipment to carry out these pro-cedures.
135 AMO ASSISTANCE
135.1 At the request of the Postmaster,the area maintenance office will exchange repaintedor new letter boxes for letter boxes requiringmaintenance. The area maintenance offices willremove the old letter box and install the repairedbox. The area maintenance office will provide thisexchange service to those post offices which do nothave a maintenance capability.
135.2 Area Maintenance Office personnelwill provide advice and assistance to small officesas required by their Management Sectional Center,Manager/Postmaster. Such assistance may include,but is not limited to replacement of boxes for smalloffices that do not have maintenance capabilities,provided such activity is economically feasible with-out additional Area Maintenance Office staffingand is approved by the Management Sectional Cen-ter, Manager/Postmaster.
TL-3,,3-1-81
Street LetterBox Maintenance 136.3
136 TYPE OF PAINT
136.1 This handbook provides for refinishingboxes either with polyurethane or modified acryliccoatings. it is recommended that polyurethane beused in all cases where its advantages of longer lifecan be realized. Mixing and application of poly-urethane paint containing toluene di-isocyante(TDI) requires special precautions. Acrylic paintshould be used only in those areas where vandalismand/or graffitti are prevalent and the life of polyure-
thane coatings would be predicitably reduced.
136.2 Polyurethane and acrylic coating ma-terials are available from GSA. National StockNumbers for the materials are listed in Part 630.
136.3 Spray equipment should be used forpainting collection boxes regardless of the paintmaterial being used to obtain maximum finish life.Brush application is not recommended, except forminor street repair of damaged finishes such as thepaintingof small nicks and scratches.
TL-3,3-1-81
Street Letter Box Maintenance 221.21
CHAPTER 2INSTALLATION
210
211
SITE PREPARATION
Accessibility/Safety
211.1 Install letter boxes to provide max-imum accessibility after considering customerand employee safety, and non-interference withnormal traffic pattern.
211.2 Position street letter boxes so thatthe box door will not open into a street therebyexposing the carrier or collector to road traffic.Inside buildings, place letter box equipment sothat the ~~arrier or collector will not be endan-gered by swinging or opening doors.
211.3 All boxes with motorist mail chutesand all standard collection and relay boxes, in-cluding those inside buildings, must be securelyfastened by all four legs so that they cannot bemoved or tipped (see subchapter 220 on instal-latlon).
211.4 Where it is impractical to fasten thelegs of collection boxes located inside of build-ings, the methods of fastening is left to the dis-cretion of local management. Obtain written per-mission from the building management beforefastening relay or collection boxes inside build-ings.
212 MOTORIST MAIL CHUTE
212.1 Motorist mail chute boxes must belocated so that, when anchored, the end of the
mail chute is not less than 6 inches from the curbline.
212.2 Adjust height of motorist mail chuteto be approximately 50 inches above the roadsurface.
220
221
221.1
INSTALLATION INSTRUCTIONS
AnchoringPreparation
General
Before anchoring any box, makecertain the bolts holding the legs to the box aresecurely tightened. All street letter boxes havinglegs with open toes (open slot), at the anchor pointon the box feet should have such legs replaced withlegs D-1168 or D-1169 with closed toe.
221.11 Position street collection boxes (notmotorist mail chute) and relay boxes at the site sothat no part of the foot to be fastened is closerthan 3 inches to the edge of the sidewalk, con-crete block or expansion joint.
221.12 Fastenings placed closer to an edgemay split the concrete, resulting in a poor fas-tening. Marking of the concrete for positioning ofthe box feet is explained in part 222.
221.2 In Dirt, Sand, Soft Soil
221.21 When installing collection or relayboxes in dirt, sand, or other soft soil, prepare siteby one of the followingmethods:
TL-3,3-1-81
221.21 Street Letter Box Maintenance
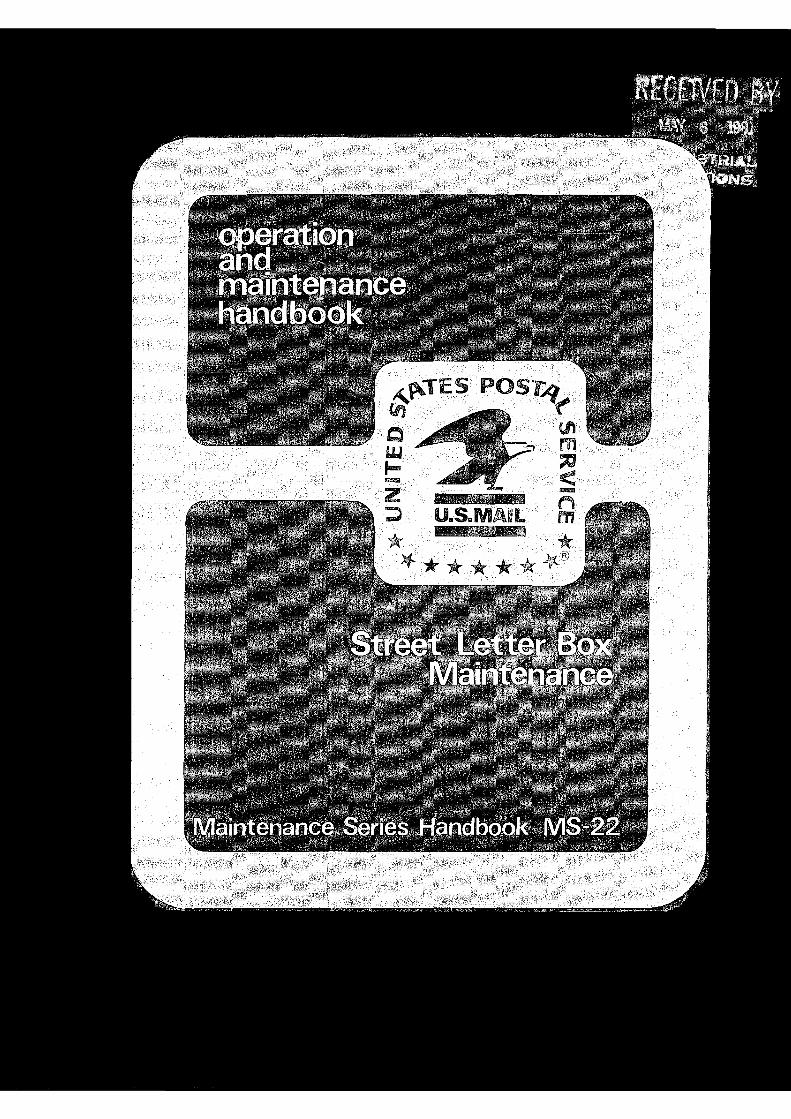
a. Using a post-hole digger, pre-pare four holes 14 inches deep and approximately8 inches in diameter to accept four Type F (round)or Type G (square) concrete pillars (see Figure 2-1).
b. Prepare a hole 4 inches deepand 29 inches square to accept a precast concreteslab for anchoring a standard collection box. Forthe larger concrete slab needed for mounting arelay box, prepare a hole 4 inches deep and 35inches square.
221.22 Use caution when preparing concreteslab or pillar holes. Maintenance personnel shouldbe aware of gas, electric, or water conduits nearinstallations sites. The site must be level. Concreteslabs and pillars must be installed flush with theground and the soil repacked around the slab orpillar to eliminate possible tripping or safetyhazards.
221.23 If necessary to install a collection orrelay box in areas such as between utility poles,fire hydrants or other fixtures, where the instal-lation site may be non-standard in size or shape,ready-mix cement or other suitable materials maybe brought to the job site and used in the spaceavailable.
222
222.1
ANCHORING METHODS
General
Motorist mail chute, standard col-lection, and relay boxes must have all four legsfastened to the concrete or anchoring devices.Place shims under the legs as required to level thebox. Locate motorist mail chute boxes only wherethey can be fastened to an integral part of concretesidewalk or slab.
222.2Soil)
Ground Area Installation (Sand or
222.21 This type of installation is the mostsusceptible to safety hazards. Use utmost care inobtaining a stable and positive anchor. For one-man
handling capability, the concrete pillar installation is
recommended. These pillars, type F and G may bemanufactured locally by maintenance personnel, orthe postmaster may solicit informal competitiveprice quotations as outlined in Publication 41,Postal Contracting Manual. The installation of typeH may also be utilized at location where it is notfeasible to have type F or G (see Figure 2-1).
222.22 Prefabricated concrete slabs are alsorecommended for box installation in soft soilconditions. However, due to the extreme weightof the finished slab, two men and a maintenancevehicle equipped with a crane or powered tailgateare normally required to handle and place theslab. Concrete slab specifications for a standardcollection box are shown in Figure 2-1. A slab 4inches thick by 35 inches square is required to alarge relay box. Concrete slabs may be manu-factured locally by maintenance personnel or thepostmaster may solicit informal, competitive pricequotations, as described in Publication 41, PostalContracting Manual. If the cost involved exceeds thepostmaster’s local procurement authority, obtainapproval for the expenditure as specified in Publi.cation 41.
222.3 Paved Area Installation (Asphalt orBlack-Top Surface)
222.31 If the asphalt pavement is laid oversubsoil, cut out the pavement under each leg ofthe box and remove the subsoil to a depth suff-icient to accept a concrete pillar as explained insection 222.21.
222.32 An alternate method for positiveanchoring when asphalt pavement occurs oversubsoil is to cut out sufficient pavement in thesite area to accept a concrete slab as explained insection 222.22. Install the slab so that the topsurface is flush with the asphalt pavement surface.
222.33 Make certain that the bolts holdingthe legs to the box are securely tightened. Posi-tion the box as outlined in part 211 and/or 212.Mark the position of the mounting holes in thebox feet on the pavement. Move the box asideand prepare to install fasteners.
TL-3,3-1-81
Street Letter Box Maintenance 232
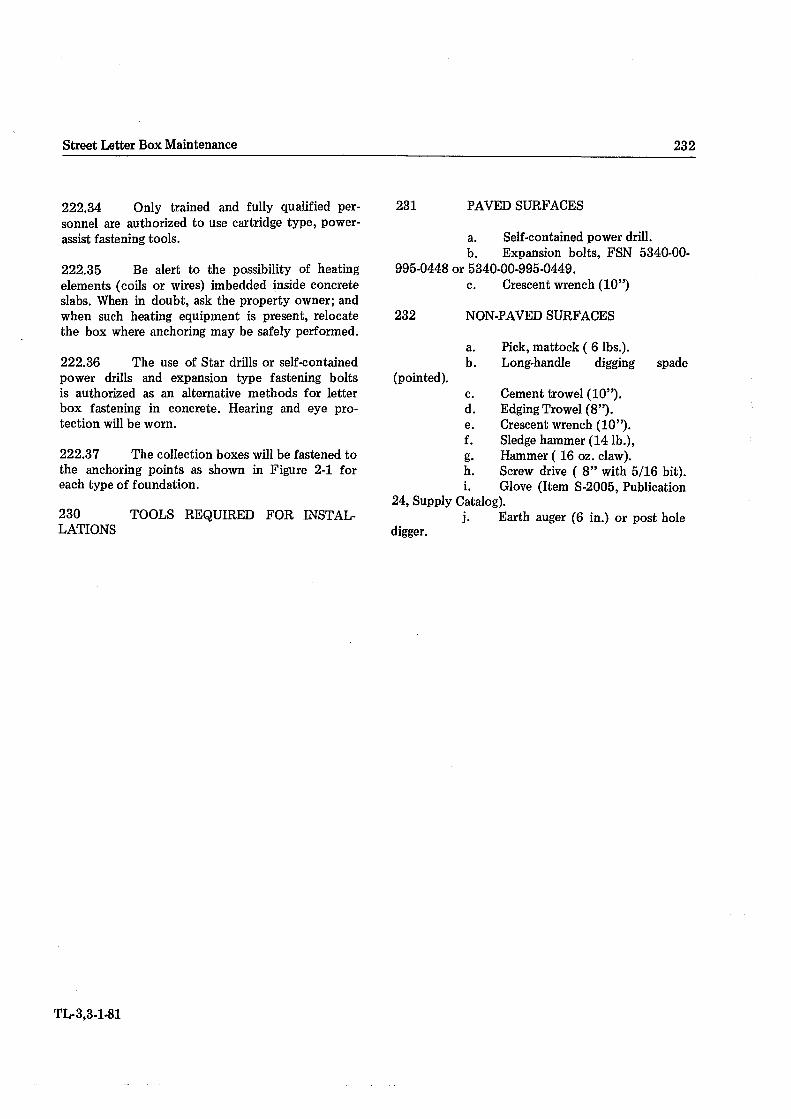
222.34 Only trained and fully qualified per-sonnel are authorized to use cartridge type, power-assist fastening tools.
222.35 Be alert to the possibility of heatingelements (coils or wires) imbedded inside concreteslabs. When in doubt, ask the property owner; andwhen such heating equipment is present, relocatethe box where anchoring may be safely performed.
222.36 The use of Star drills or self-containedpower drills and expansion type fastening boltsis authorized as an alternative methods for letterbox fastening in concrete. Hearing and eye pro-tection will be worn.
222.37 The collection boxes will be fastened tothe anchoring points as shown in Figure 2-1 foreach type of foundation.
230LATIONS
TOOLS REQUIRED FOR INSTAL-
231 PAVED SURFACES
a. Self-contained power drill.b. Expansion bolts, FSN 5340-00-
995-0448 or 5340-00-995-0449.c. Crescent wrench (10”)
232
(pointed).
NON-PAVED SURFACES
a. Pick, mattock ( 6 lbs.).b. Long-handle digging spade
c. Cement trowel (10”).d. EdgingTrowel (8”).e. Crescent wrench (10”).f. Sledge hammer (14 lb.),g. Hammer ( 16 oz. claw).h. Screw drive ( 8” with 5/16 bit).i. Glove (Item S-2005, Publication
24, Supply Catalog).j. Earth auger (6 in.) or post hole
digger.
TL-3,3-1-81

Figure 2-1 StreetLetter Box Maiutenance
3/8” x 2 1/2” LAG SCREW‘C’ FLAT WASHER & EXPANSION
SHIELD-CADMIUM PLATED
3/8 lix 2 1/2” BR, MACH.‘E’ BOLT, BR. FLAT WASHER &
EXPANSION SHIELD
3/8” x 5” SQ. HD. BRASSBOLT, NUT, & FLAT WASHER
24” ,_1l
GALVANIZED ANGLE‘ , IRONType H
311 SQ. HEAD BRASSNUT, & FLAT WASHER
i~ NCRETE ~A SLAB BlllIIt~IftUIIIIIIIi UI!! Il1.1
M~~SideView)~llH1!1~i1
TYPE D—1 A=26”B=28”
TYPE D-2 A=32”B=35”
4 BOLTS TO COINCIDEWITH HOLES U’4 BOX LEGS
MOUNTING SLAB
WELD~/2”FILLET
I 12.,
ii /
k
F I! s ‘ I
I (Sid~ ,‘
+4+V1—@ — <~(Top)
CAST STEEL FLAT PLATE
Figure 2-1 Measurement Details - Collection Box Anchoring Devices
Type ‘C’&’E’ Type ‘D’
IType ‘F’o” DIA. ROUND
Type ‘G’o”SQUARE
TL-3,3-1-81
Street Letter Box Maintenance 322
310
CHAPTER 3
DECAL AND COLLECTION SCHEDULE CARDS
LABELING REQUIREMENTS
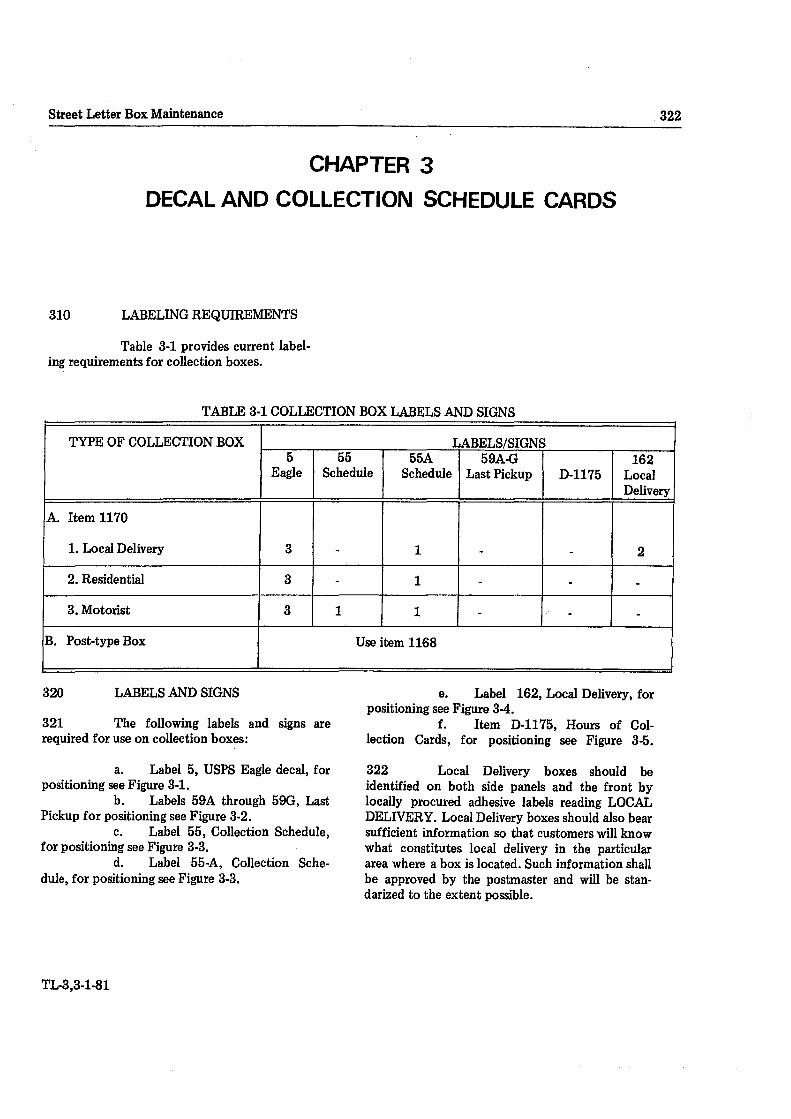
Table 3-1 provides current label-ing requirements for collection boxes.
TABLE 3-1 COLLECTION BOX LABELS AND SIGNS
TYPE OF COLLECTIONBOX LABELS/SIGNS5
Eagle55
Schedule55A
Schedule59A-G
Last Pickup D-1175162
LocalDelivery
A. Item 1170
1. Local Delivery 3 - 1 - - 2
2. Residential 3 - 1 - - .
3. Motorist 3 1 1 - . -
B. Post-typeBox Use item 1168
320 LABELS AND SIGNS
321 The following labelsrequired for use on collection boxes:
and signs are
e. Label 162, Local Delivery, forpositioning see Figure 3-4.
f. Item D-1175, Hours of Col-lection Cards, for positioning see Figure 3-5.
a. Label 5, USPS Eagle decal, forpositioning see Figure 3-1.
b. Labels 59A through 59G, LastPickup forpositioning see Figure 3-2.
c. Label 55, Collection Schedule,for positioning see Figure 3-3.
d. Label 55-A, Collection Sche-dule, for positioning see Figure 3-3.
322 Local Delivery boxes should beidentified on both side panels and the front bylocally procured adhesive labels reading LOCALDELIVERY. Local Delivery boxes should also bearsufficient information so that customers will knowwhat constitutes local delivery in the particulararea where a box is located. Such informationshallbe approved by the postmaster and will be stan-darized to the extent possible.
TL.3,3-1-81
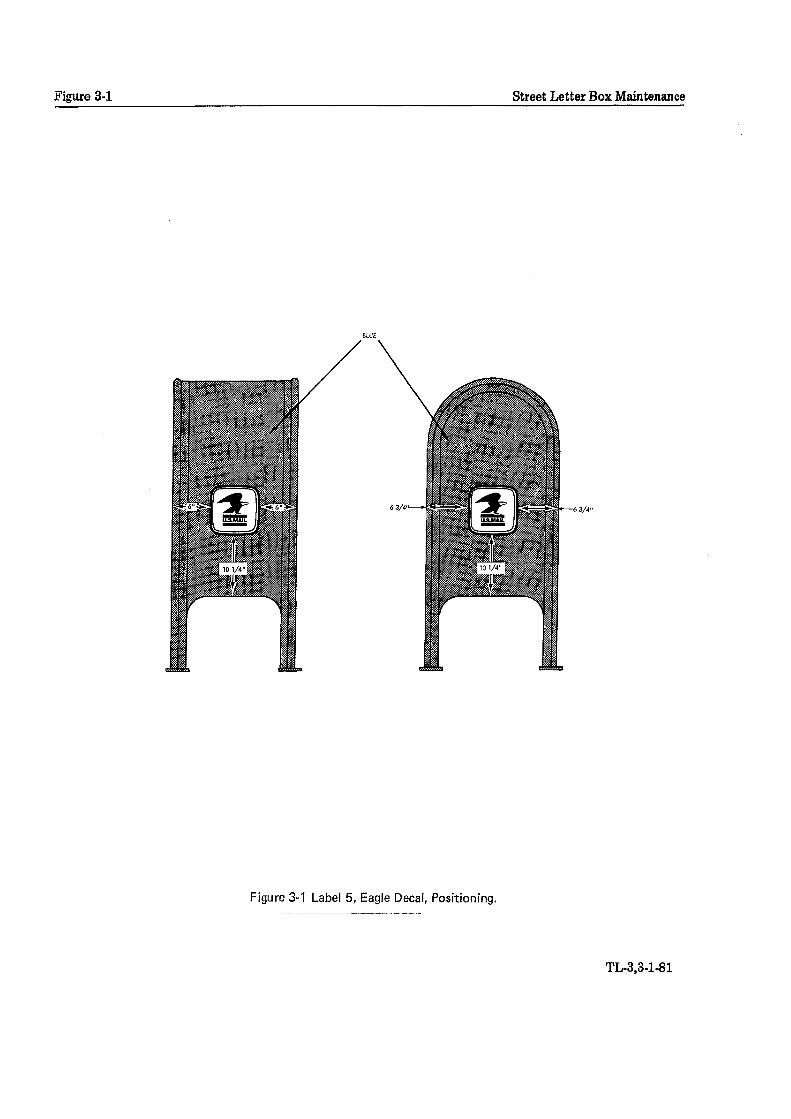
Figure 3-1 Street Letter Box Maintenance
Figure 3-1 Label 5, Eagle Decal, Positioning.
TL-3,3-1-81

Street Letter Box Maintenance Figure 3-2
Figure 3-2 Label 59, A through G, Last Pickup, Positioning.
TL-3,3-1-81

Figure 3-3 Street Letter Box Maintenance
LABEL 55 & 55—A
(CENTERED)
Figure 3-3 Label 55 and 55A, Collection Schedule, Positioning.
TL 3,3-1.81

Street Letter Box Maintenance Figure 3-4
Figure 3-4 Label 162, Local Delivery, Positioning.
I120
TL 3,3-1.81
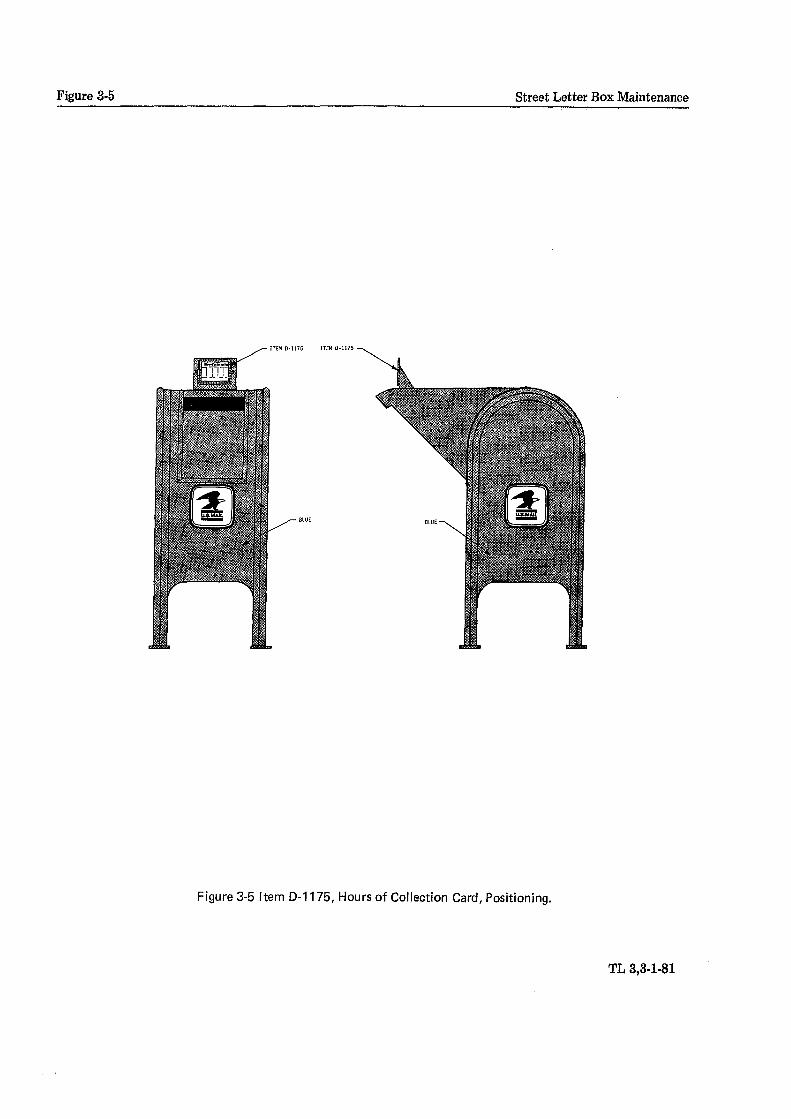
Figure 3-5 Street Letter Box Maintenance
ITEM D-1175
Figure 3-5 Item D-1 175, Hours of Collection Card, Positioning.
ITEM 0-1175
TL 3,3-1-81

StreetLetter Box Maintenance 413
CHAPTER 4PREVENTIVE MAINTENANCE
410
411
EQUIPMENT/SUPPIES
Cautionary Notes
411.1 Compressors, sanding tools, sprayequipment, and other tools should be maintainedin optimum condition. In-shop preventive main-tenance and regular cleaning procedures will reducelost time due to on-site breakdowns and subse-quent repairs.
411.2 Hearing and eye protection will beworn. Approved respiratory protection may berequired when sand blasting, spray painting, orapplying solvent or paint strippers.
412 Tools Required
a. Air compressor equipped with25 feet of 5/16 inch hose and air regulator. Thecompressor should be a minumum of 3 horsepowercapable of delivering 6 cubic feet of air per minuteor more at the spray gun, with an air filter, orextractor to remove oil and water from compressor.Thisequipment permits spray painting at controlled,uniform pressure for high quality work.
b. Spray gun capable of deliveringa spray pattern adjustable from round to fan withall intermediate patterns. When overspray must bereduced because of proximity of the painting areato other work areas, consideration should be givento the use of spray guns which are specificallydesigned to reduce overspray such as the BendixSicmo spray gun. Consult the Federal SupplySchedule for spray equipment.
c. High speed air sander or sandblasting equipment for rapid removal of rust, scale,cracked or broken finishes or for featheredging.These items are available on Federal Supply Sche-dule.
d. Portable abrading attachmentdesigned for use on ‘4-inch drill motor which oper-ates between 1800 and 3000 rpm.
e. Floor type spray booth 8 feetwide, 6 feet deep, and 7 feet high. Prefabricated ormanufactured from 18 gauge steel panels rein-forced with rolled edge flanges and welded corners.The booth should be constructed to comply withthe local civil codes and building safety require-ments.
413 MATERIALS REQUIRED
a. Wax and grease remover, NSN6810-00-664-0387, in one-gallon cans. This item isalso available in 55-gallon drums, NSN 6810-00-551-1487.
b. Tack rags or clean cloths.c. Sandpaper, No. 40 production
for scale removal; No. 80 production for rustremoval; No. 320 finishing paper.
d. Masking tape (2-inch) NSN 7510-00.290-2026.
e. Safety cans, one-gallon size NSN7240-00-240-6957, five-gallon size NSN 7240-00-240.6958.
f. Decal remover, Western AreaSupply Center, Repair Parts Section, NSN 6850.00-000-4205.
g. Aerosol cans of spray paint,NSN 8010-00-159-4521.
TL 3,3-1-81

420 Street Letter Box Maintenance
420 APPEARANCE OF LETTER BOXES
421 Obscene and Other Writing on Surface
Lewd or obscene matter and otherwriting should be erased by all postal employeesservicing mailboxes when it can be done withmaterial available. Writing that cannot be rubbedoff will be reported immediately on Form 1621,Carrier’s Route Report. Obscenity, if occuringregularly in the same area, will be reported to thedesignated collection services supervisor. Aerosolcans of spray paint should be used to refinish suchboxes at the site.
422 Dirty and Grimy Surfaces
Letter boxes which accumulate dirt,grime and oil should be frequently washed toreturn them to like new appearance.
423 Painting Frequency
To maintain neat letter box ap-pearance, letter boxes will be repainted on an asrequired basis.
424 Defaced Boxes
Street letter boxes which have beendefaced in such a manner as to require minorrefinishing, may be sanded, primed, and paintedusing aerosol cans of primer and/or enamel ma-terial. Offices with maintenance capabilities shouldrestrict use of those materials to touch-up acti-vities. Compatibility of existing coating andtouch-up material should be verified before actualuse. See 632.4.
430 PAINTING LETTERBOXES
431 Surface Preparation
431.1 Removing Attachments
.11 Scrape off all decals, includingcollection schedule labels. Also remove the sche-dule on the motorist collection box.
installed)..12 Remove the arrow lock (if
.13 Cover the hole located in thearea of the holding bracket, item D-1176A. Someoffices have painted the reverse side of item 1175blue and inserted it into the sliding bracket thuscovering the hole and blending it in with the solidblue of the box.
431.2 Cleaning/sanding
.21 Before sanding and painting,thoroughly clean boxes and legs. Purpose ofcleaning is to remove oil and grease that may notbe visible but which results in fish eyes, or areaswhere primer or color will not adhere properly.Slight deposits of oil are caused by handling(fingers and hands).
.22 Use a solvent type cleanerdesigned especially to remove wax, grease, oil,dust, and other foreign substances from the sur-face. Use of soaps or detergents is not recom-mended because these products leave a film layerwhich results in paint peeling and deterioration.
.23 Completely strip boxes by sandblasting instead of cleaning with solvent if either ofthe two following conditions are present.
a. First time for the box tobe painted with polyurethane paint.
b. If four or more coatingshave been applied since the last time the box wascompletely stripped to the metal.
.24 Brush off the dust and wipe thebox with the tack rag. Clean sanding dust from theimmediate area to reduce dust and debris fromblowing on the box during priming and finishpainting.
432 PRIMING
432.1 Follow the paint manufacturer’s in-structions for priming the letter boxes.
432.2 Prime the entire surface of the box asnecessary including the bottom of the box, innerlegs, and the inside of the letter box.
.21 Boxes that have not beenpreviously painted with polyurethane materialsshould be well sanded and completely primed.
TL 3,3-1-81
Street Letter Box Maintenance 441
.22 Boxes that have been previouslypainted with polyurethane materials need only havebaremetal areas painted.
.23 After the box is prime coated,clean spraying equipment as necessary.
433 PAINTINGPROCEDURES
433.1 Collection boxes must be painted toconform with the configuration illustrated inChapter 3.
433.2 In general, follow the paint manu-facturer’s instructions for painting the letter boxes.
.21 Mixing instructions (paint canlabel information) are usually written for optimumconditions. The individual painter must vary mixingproportions to satisfy changing conditions of tem-perature, drying requirements, equipment, andpainting methods. The day-to-day mixing pro-portions is then a formulation of environmentalcondition and painter experience.
NOTE: Viscosity cup should beused to obtain proper paint/thinner proportions.Color variations may occur when different amountsof thinner are used.
.22 Proper spray painting techniquesrequire training and practice. A mixing proportionthat provides the best spraying viscosity must bebalanced by:
a. Applying the material at areasonable distance from the box (usually 8 to 12inches).
b. Keeping the nozzle at rightangles to the surface being painted.
c. Correcting fluid to airadjustment.
d. Making smooth strokeswith a fan spray pattern that provides uniformdistribution of material over the area.
e. Applying material at a
f. Applying the material inoverlaps so as to prevent zebra stripes.
g. Applying the second suc-cessive coat on letter boxes in a direction oppositeto the first coat.
.23 Rust problem areas, such asschedule card holders on motorist mail chutes andbottoms of boxes, require particular attentionduring the regular paint cycle.
433.3 Permit the freshly painted boxes to dryin accordance with the paint manufacturer’s in-structions.
433.4 Clean the paint equipment and paintingwork area as necessary.
433.5 Polyurethane paint is supplied in kits.Each kit contains two components. One componentis a pigmented base and the other is a catalyst. Bothcomponents must be mixed together in equalamounts and only the amount of paint that can beused immediately should be mixed since pot life islimited and is variable, depending on relative humi-dity. Approved respiratory protection, protectiveclothing and eye protection must be worn whilemixing and spraying polyurethane paints containingTDI. Supplied air respirator with full face piece andapproved air source will be used. Shop compressorsrequire special equipment before they may be usedto supply breathing air. Protective clothing must becleaned after each use. Shoe covers are required.Indoor spray booths or rooms must meet OSHAcriteria (CFR 1910.107)
440 DECALS AND LABELS
441 RemovalProcedure
Decals and/or labels may be removedusing the decal remover (NSN 6850-000-4205) andperforming the following steps:
a. Using a rag, apply thedecal remover sparingly and directly to the decalsurface and rub. Too much decal remover will strip
enough paint to the metal surface. Therefore, conduct afor proper flow-out, but not so slow as to produce trial application of the remover to oh vé~thesags or wrinkles, reaction of the solution on the paint.- b. Continue to rub untilthe
decal remover solution has disappeared. Apply moredecal remover and rub again until decal has beenremoved.
TL 3,3-1-81
441 Street Letter Box Maintenance
c. If the decal still remainsaffixed, use steel wool to loosen it; then apply moreremover and repeat the rubbing procedure.
d. After the decal has beenremoved, continue to rub the immediate area with arag to remove all of the glue and excess decalremover. Apply mineral spirits to the immediatearea and then wipe with a clean rag or cloth.
442 APPLICATION PROCEDURE
Perform the following steps to affixdecals and collection schedule labels to letter boxes:
a. For best results, affix thedecals and labels, which have self-adherent backing,only when air temperatures are above 45 degreesFahrenheit.
b. Check condition of paint,remove scale and flaky paint. Use good householddetergent to remove dust, dirt, oils, and othercontaminants. If necessary, prime area area wheredecal or label is to be affixed.
c. Be careful when removingthe protective backing and applying the new decalsor labels because they may become prematurelyattracted to the collection box or some other objectbefore the desired positioning has been accom-plished (see Chapter 3 for proper positioning of thelabels or decals).
d. After the decal or label isattached, use a round, heavy object or plasticsqueegee to roll it down firmly from middle out-ward to removeair bubbles.
e. Use a clear plastic enamelspray (such as 3-M clear sealer) to cover the entiresurface and edges of the decal or label to seal and toprovide protection from weather and vandalism.
450 CONTRACTING FOR PAINTING
451 General
Postmasters who have solicited bids forletter box painting before publication of this hand-book will consummate the contract as advertised.
Other postmasters shall follow these guidelines fordetermining when to arrange for the refinishing orrepainting of letter box equipment. If necessary, re-quest further instructions, clarification, or technicalmaintenance information, and a list of prospectivebidders, from the General Manager, Regional Main-tenance Management Divison.
452
452.1
CONTRACTING METHODS
Small Purchase Procedure
.11 Small purchase procedures maybe used when permitted by Publication 41, PostalContracting Manual.
.12 The procedures and forms ap-plicable to small purchases are described in Pub-lication 41.
.13 Include Notice 52, Street LetterBox Painting Specification, as part of the solicita-tion document.
.14 Specify quantity and types ofletter or relay boxes to be painted. Request cost perbox for each type and a total aggregate cost.
.15 To insure fair competition, soli-cit at least three quotations.
452.2 Competitive Bidding Procedure
.21 Observe formal competitive bid-ding procedures when the estimated amount of anyone transaction exceeds the maximum limitationapplicable to small purchase procedures.
.22 Procurement procedures andforms are described in Publication 41, Postal Con-tracting Manual.
invitation..23 Include Notice 52 as part of the
.24 Specify quantity and types ofletter or relay boxes to be painted.
.25 In addition to mailing bidinvitations to known prospective bidders, post acopy of the bid invitations on bulletin boards.Obtain maximum publicity and competition with-out the expense to the Postal Service as specified inPublication 41.
TL 3,3.1-81

Street Letter Box Maintenance 462
460STALLATION
461
MOTORIST MAIL CHUTE IN-
New Collection Boxes
are drilled, to draw chute flange down tightagainst the box.
e. Paint rivet heads and chute (ifnot already painted) to match the box.
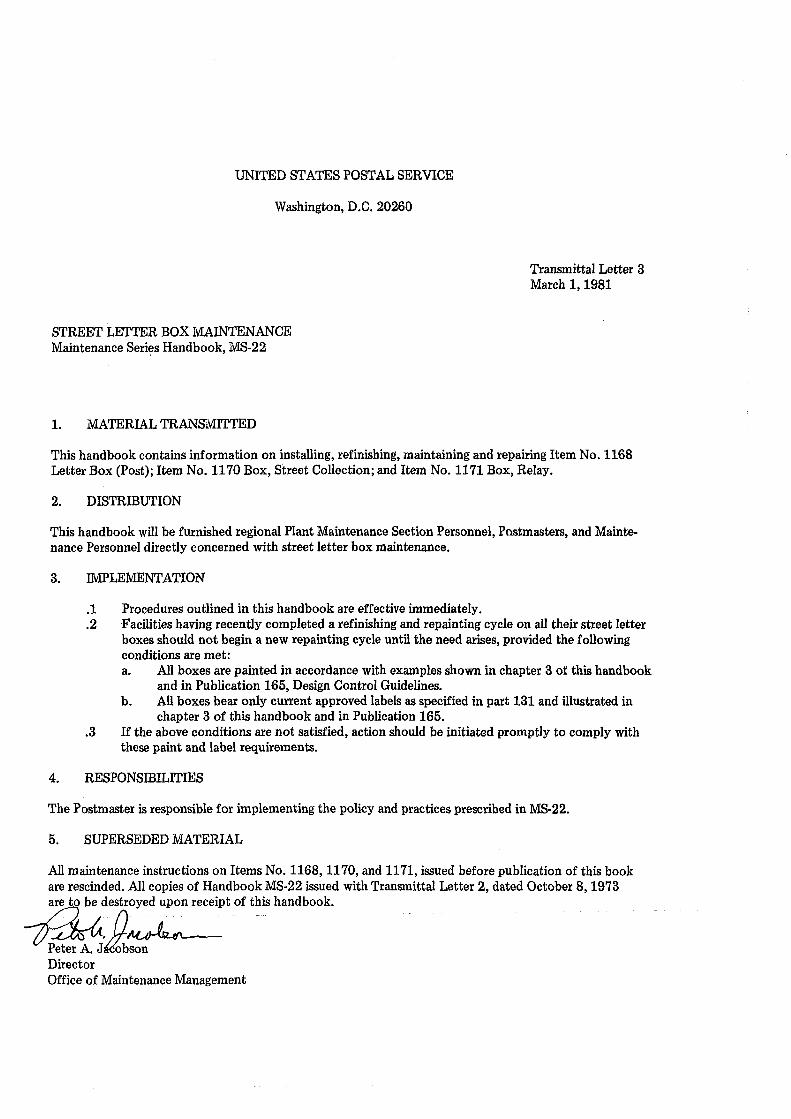
a. Remove back plate (Figure4-1) by cutting heads of 12 rivets.
b. Secure chute in position using“C” or bar clamps.
c. Drill four holes in top ofchute to align with rivet holes already existing intop of box using 3/16 inch drill. Insert four 3/16x ‘/~inch water proof blind rivets.
d. Drill remainder of holes one ata time on each side and insert rivets as the holes
462 OLD COLLECTION BOXES
a. On old collection boxes with-out back plate, cut hole in box shown in Figure4-1.
b. Complete installation follow-ing procedure described in 461.b through e. withthe exception that rivet holes must be drilledthrough both the box and chute. Rivet holes mustbe equally spaced.
TL 3,3-1-81
Street Letter Box Maintenance
VIEW 3
REAR ELEVATIONOLD BOX
VIEW 2
REAR ELEVATIONNEW BOX
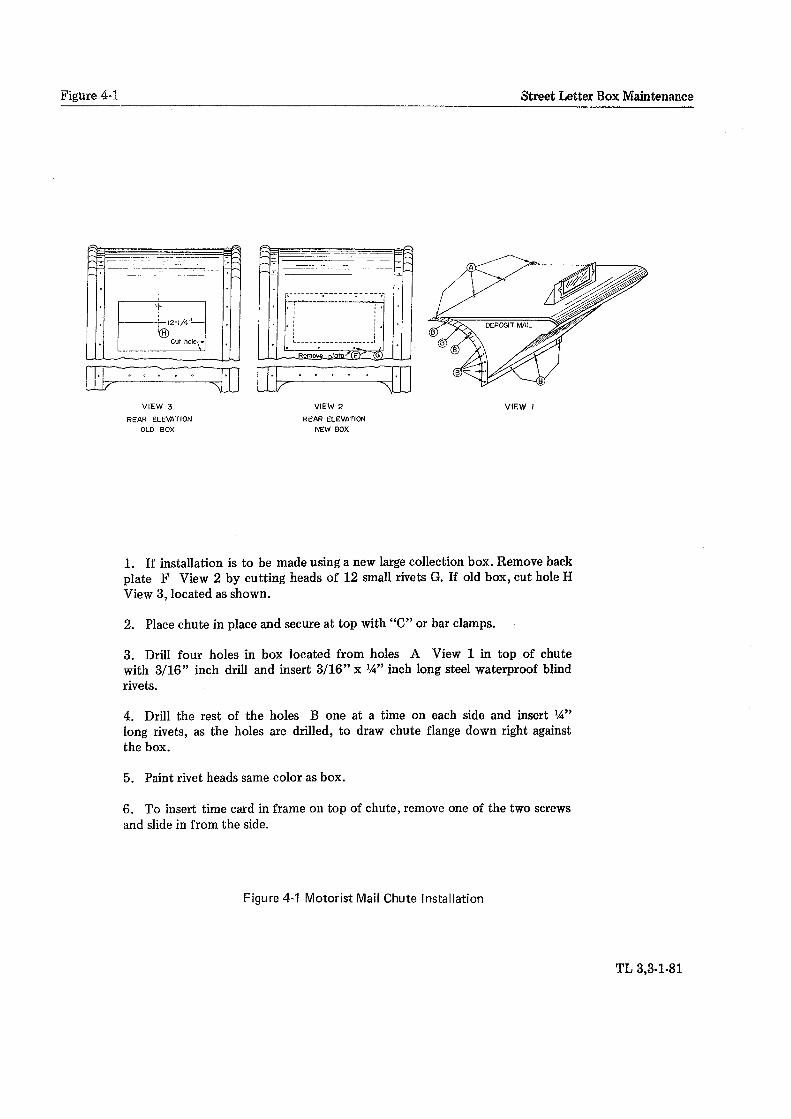
1. If installation is to be made using a new large collection box. Remove backplate F View 2 by cutting heads of 12 small rivets G. If old box, cut hole HView 3, located as shown.
2. Place chute in place and secure at top with “C” or bar clamps.
3. Drill four holes in box located from holes A View 1 in top of chutewith 3/16” inch drifi and insert 3/16” x 1/4~’inch long steel waterproof blindrivets.
4. Drill the rest of the holes B one at a time on each side and insert ‘A”long rivets, as the holes are drilled, to draw chute flange down right againstthe box.
5. Paint rivet heads same color as box.
6. To insert time card in frame on top of chute, remove one of the two screwsand slide in from the side.
Figure 4-1 Motorist Mail Chute Installation
Figure 4-1
VIEW I
TL 3,3-1-81
Street Letter Box~Maãntenance 532
CHAPTER 5REPAIRS
REPAIRS replace parts than to repair them.
Demolish and sell as scrap, in ac-cordance with rules set forth in the Postal Servicemanual, any collection box when repair costestimate exceeds 80 percent of the replacementcost of a new box.
520 REPAIR PROCEDURE
521 Estimates
Get local estimates for mailboxprinting and repairs, especially for damage done bymotorists. Compare Postal Service probable costwith bid estimate. When bid is within ten percent,allow work to be done by contractor, unless asurplus of skilled postal service manpower exists.
522 REQUIREMENTS
All contractors must meet paintingspecifications listed in Notice 52.
523 Parts
Consult Publication 24, Supply Cata-log, for letter box parts information. Keep spareparts on hand; generally, it is more economical to
524 WORK FORM
When work is being done by thepostal service, record repairs on Form 4805, WorkRecord Sheet.
a. The supervisor re-sponsible for ordering worked performed will fillout the necessary items on Form 4805.
b. The supervisor will givethe work order form to the repairing employee.
c. Upon completion of re-pairs, the repairing employee will return Form4805 to his supervisor and complete form asdirected (see MS-63 or MS-65).
530 DISPOSAL PROCEDURE
531 When salvaging mail boxes by thelocal post office is impractical, the postmastershould make arrangements with the nearest postoffice which has the capability to perform salvageoperations.
532 When the disposal schedule indicatesthat the box should not be repaired, remove allsalvageable parts. Sell the remaining metal, ifpossible.
510
TL 3,3-1-81

Street Letter Box Maintenance 631.2
CHAPTER 6
PARTS & MATERIALS
610 HARDWARE
611 Box Attachments
a. Legs, replaceable, modified formotorist mail chute collection boxes, D-1168.
b. Legs, replaceable, for Items1170 and 1171, collection and relay boxes,D4169.
c. Repair Parts, Door Stop AngleIron, Street Letter Box, D-1189B.
612 SCHEDULE CARD ITEMS
a. Cards, time schedule for use onthe motorist collection boxes, D-1175B andD-1 175D.
(1) Metal, for boxes withoutprotective covers.
(2) Paper, for boxes withprotective plastic covers.
(3) Plastic, same as D-1175,metal.
b. Frames, time card size 3¾x 5½(with side ears) for use on motorist collection box,D-1176A.
c. Covers, time schedule card, size3¾x 5½,plastic, for use in frames on motoristmail chutes, D-1178B.
d. Screws and bolts for attachingtime card frames to letter boxes, D-1182.
(1) ‘A” long, for frame withside ears.
(2) ¾”long, for frame withbottom and top ears.
620 LOCK EQUIPMENT
a. Double-end bar devices D-1187for depot letter box where two separate locks areused.
b. Three point locking device,D-1170E.
c. Hasp-staple kit to convert fromArrow Lock, D-1190.
630 PAINTiNG MATERIALS
631 Polyurethane Coatings
631.1 Primer (MIL.P.23377)
a. 2 qt. kit,NSN 8010-00-142-9279.
b. ½qt.kit,NSN 8010-00-935-7080.
c. 2 gal, kit,NSN 8010-00.082-2450.
d. 10 gal. kit,NSN 8010-00-082-2477.
631.2 Thinner (MIL-T-81 772)
a. 1 gal,NSN 8010-00-181-8080.
b. 5 gal.NSN 8010-00-181-8079.
TL 3,3-1.81
631.3 Street Letter Box Maintenance
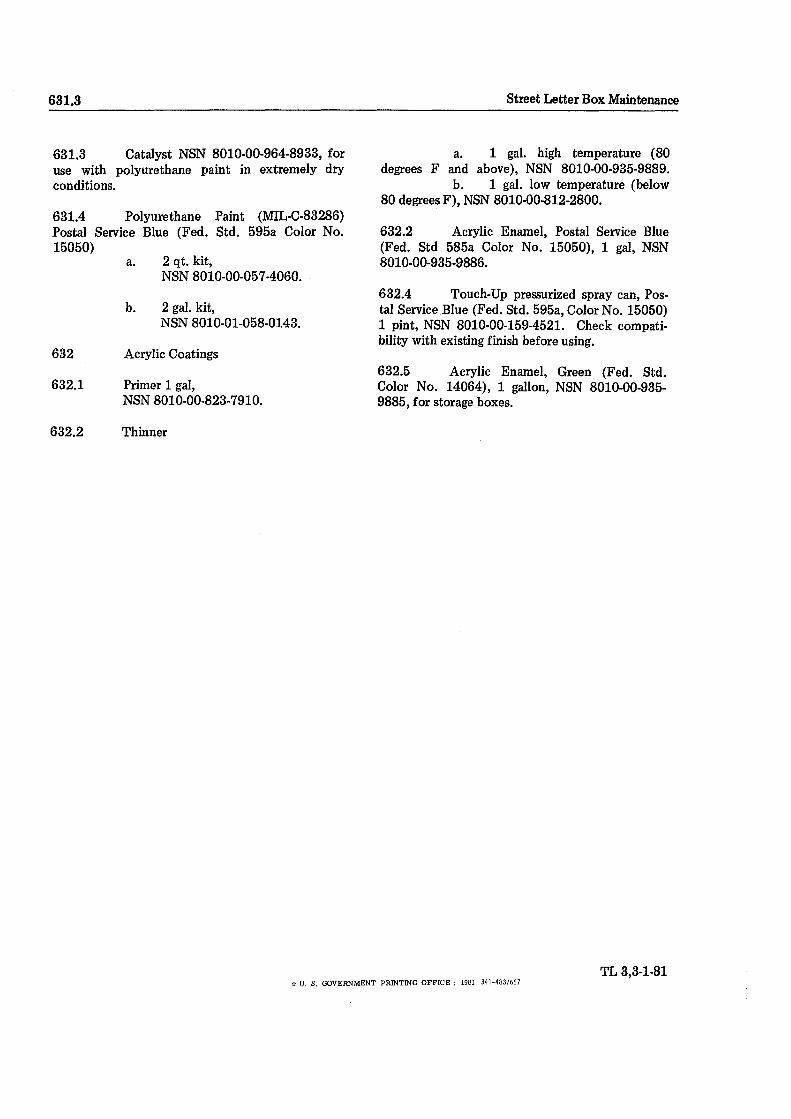
63L3 Catalyst NSN 8010-00-964-8933, for a. 1 gal. high temperature (80use with polyurethane paint in extremely dry degrees F and above), NSN 8010-00-935-9889.conditions. b. 1 gal. low temperature (below
80 degrees F), NSN 8010-00-812-2800.631.4 Polyurethane Paint (MIL”C-83286)Postal Service Blue (Fed. Std. 595a Color No. 632.2 Acrylic Enamel, Postal Service Blue15050) (Fed. Std 585a Color No. 15050), 1 gal, NSN
a. 2 qt. kit, 8010-00-935-9886.NSN 8010-00-057-4060.
632.4 Touch-Up pressurized spray can, Pos.b. 2 gal. kit, tal Service Blue (Fed. Std. 595a, Color No. 15050)
NSN 8010.01-058-0143. 1 pint, NSN 8010-00-159-4521. Check compati-bility with existing finish before using.
632 Acrylic Coatings632.5 Acrylic Enamel, Green (Fed. Std.
632.1 Primer 1 gal, Color No. 14064), 1 gallon, NSN 8010-00-935-NSN 8010-00-823-7910. 9885, for storage boxes.
632.2 Thinner
TL 3,3-1-81~ U. S. GOVERNMENT PRINTING OFFICE: 1981 341-483/667