Embed Size (px)
Citation preview
Instructor: I-Chun Tsai MP5 Hypermedia Integration
Instructional Technology, Educational Foundations and Leadership
1
MP5: Hypermedia Integration- Dreamweaver
MP5: Learning Objectives
- Explore the features of Dreamweaver to polish the layout design and text editing on web pages - Demonstrate how to use Dreamweaver, a web editor, to create web pages - Understand/Apply more editorial style and ways to design web pages (Textbook2: Ch9 & 10)
Required Readings
- Textbook2: Ch9 & Ch10 - Dreamweaver manuals (Choose the one that fits your need) CS4 – http://www.atomiclearning.com/highed/en/drmwvrcs4_pc CS5 – http://www.atomiclearning.com/highed/en/browse (Search for Dreamweaver CS5) CC- https://helpx.adobe.com/dreamweaver.html
Recommended Resources
- Dreamweaver CC version: online tutorials https://helpx.adobe.com/dreamweaver/topics.html
Since the first week of the class, you have already learned about how to create a website from “scratch” (yes – doing hand-code writing), and now you should have a sense about the nuts and bolts of HTML/XHTML :). I know that some of you already had some experiences in developing website by using web editor. What is web editor? Anything that writes HTML for you like Macromedia Dreamweaver, Netscape Composer, Adobe GoLive, FrontPage, etc.
In this unit, you will learn about the basics of Macromedia Dreamweaver, the most common web editor that is used in this time. It has been a very powerful editor which encompasses both client-side techniques, such as HTML, CSS, and JavaScript, and server-side techniques, such as ASP, PHP, and ColdFusion. In addition, Dreamweaver provides three types of work views: code, design and split view. What you see in the Design View would be exactly the same with what you see on the web page. You can also use Code View to modify your source code. Split View is a combination of both Code View and Design View. Unlike other WYSIWYG (What You See Is What You Get) web editors, which only support design view, you can take advantage of split view in Dreamweaver to work simultaneously in the source code and the visual display. However, before we start using Dreamweaver, I would like you to know some basic concepts about table and later in Dreamweaver you will know how to adjust the tags to create specific table width and height.
I. Important Concepts for Using Dreamweaver
1. Hand-Coding v.s. Web Editor Some of you may question why we made you learn hand-coding but now we introduce Dreamweaver and require you to use it to create a page in this unit. WYSIWYG web editors seem to be more intuitive than hand-coding at first. However, without knowing any HTML source code, your ability is constrained by the features in web editors. Web editors make web page development more efficient; however, knowing hand-coding empower you to modify the HTML source code directly.
2. How to get Dreamweaver In order to complete mini project two, you need to have Macromedia Dreamweaver. The PC computer lab in Zook 335 has the newest version installed. You may also check computers in your school computer labs to see if they have Dreamweaver installed. If you have Dreamweaver CS4, or CS5, you can just use this version. All the .html files can be read by different versions of Dreamweaver. However, if you don’t have access to Dreamweaver, you will need to download a 30-day free trial of Dreamweaver newest version at: http://www.adobe.com/downloads/. If you feel the benefits of using Dreamweaver during designing/developing your webpage, you may consider purchasing Dreamweaver from the website: http://www.adobe.com/products/dreamweaver/.
Instructor: I-Chun Tsai MP5 Hypermedia Integration
Instructional Technology, Educational Foundations and Leadership
2
This unit helps you experience basic functions of Dreamweaver CS or CC versions which you will really use in more advanced course. Also, you can use Dreamweaver for developing your final website. But you will apply what you have learned from hand-coding to debug and fix the codes.
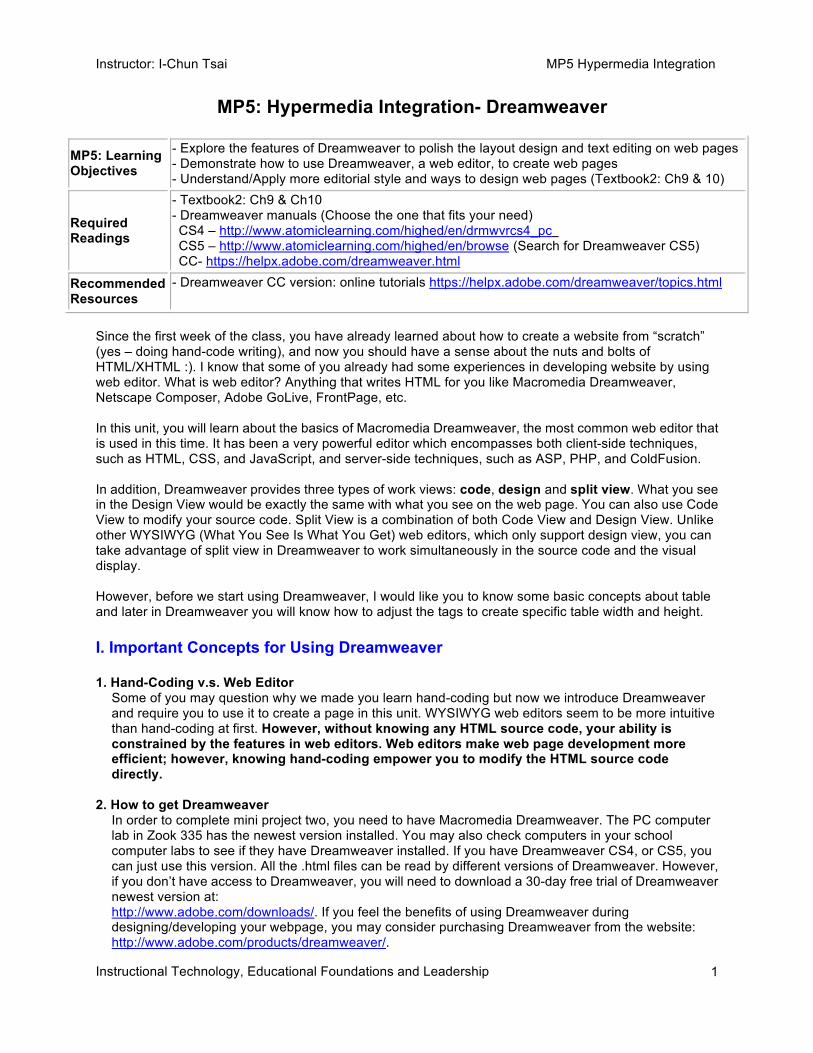
3. Getting Started with Dreamweaver The basic functions of Dreamweaver versions are similar. Thus, it does not matter if you use either Dreamweaver CS5 or CC version. The illustrations below should be very similar in both versions. The Chapter 2 of ADOBE Dreamweaver CS3 User Guide (required reading) provides you basic concepts of the myriad of windows, panels, inspectors, bars, and menus of Dreamweaver CS5 and CC version. The rest of chapters provide more detailed information of the functions. You are very welcome to use other chapters of the guides to help you play around with Dreamweaver. Once Dreamweaver is launched, you will be prompted with the Dreamweaver start page as below. Click on “HTML” under “Create New” to create a new .html web page file. You can also open existing pages, such as the pages that you have created in previous units, by clicking on “open” under “open a recent item” to locate the files.
Instructor: I-Chun Tsai MP5 Hypermedia Integration
Instructional Technology, Educational Foundations and Leadership
3
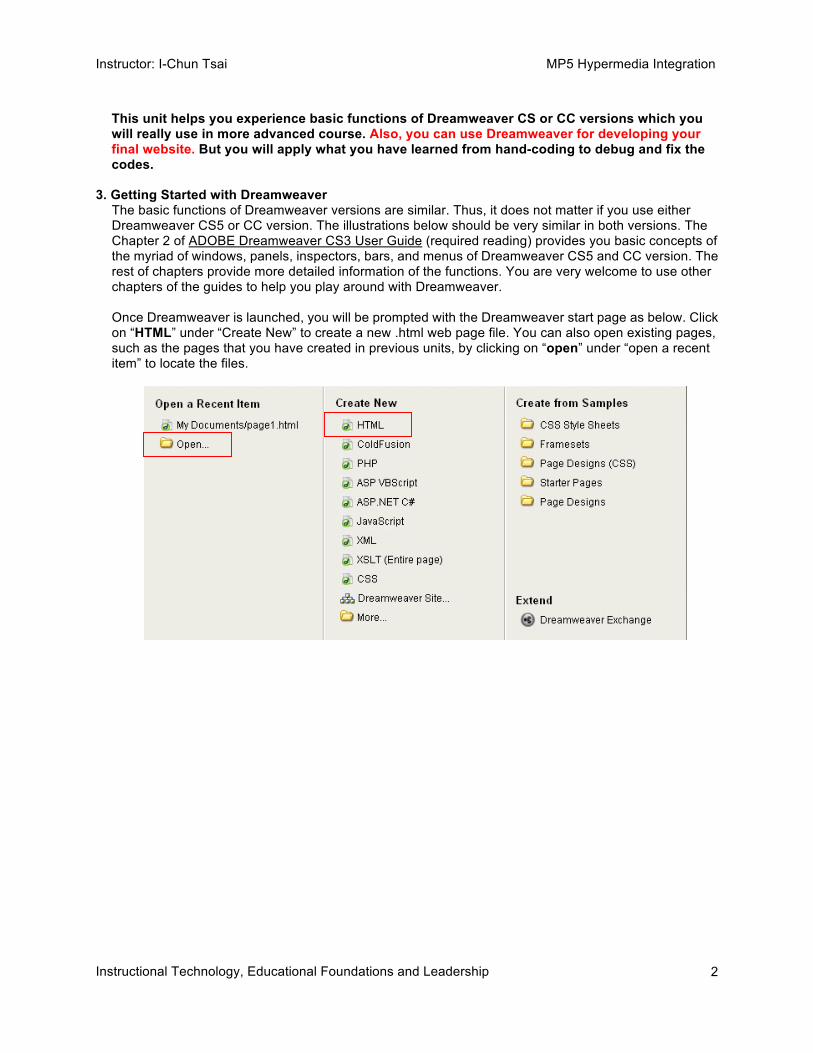
3.1 Preferences Setting for New Document Once you are in Dreamweaver, go to Edit (or Dreamweaver for Mac)>Preferences>New Document under Category. Make sure the setting of new document is the same as the picture shows below.
In this way, when a new document is created, the basic structural tags and the DOCTYPE will be generated automatically as below. If you don’t see the source code as the picture below, make sure that you switch the view mode to “Split” view. The code should be looked pretty familiar to you, right?
7 5
Instructor: I-Chun Tsai MP5 Hypermedia Integration
Instructional Technology, Educational Foundations and Leadership
4
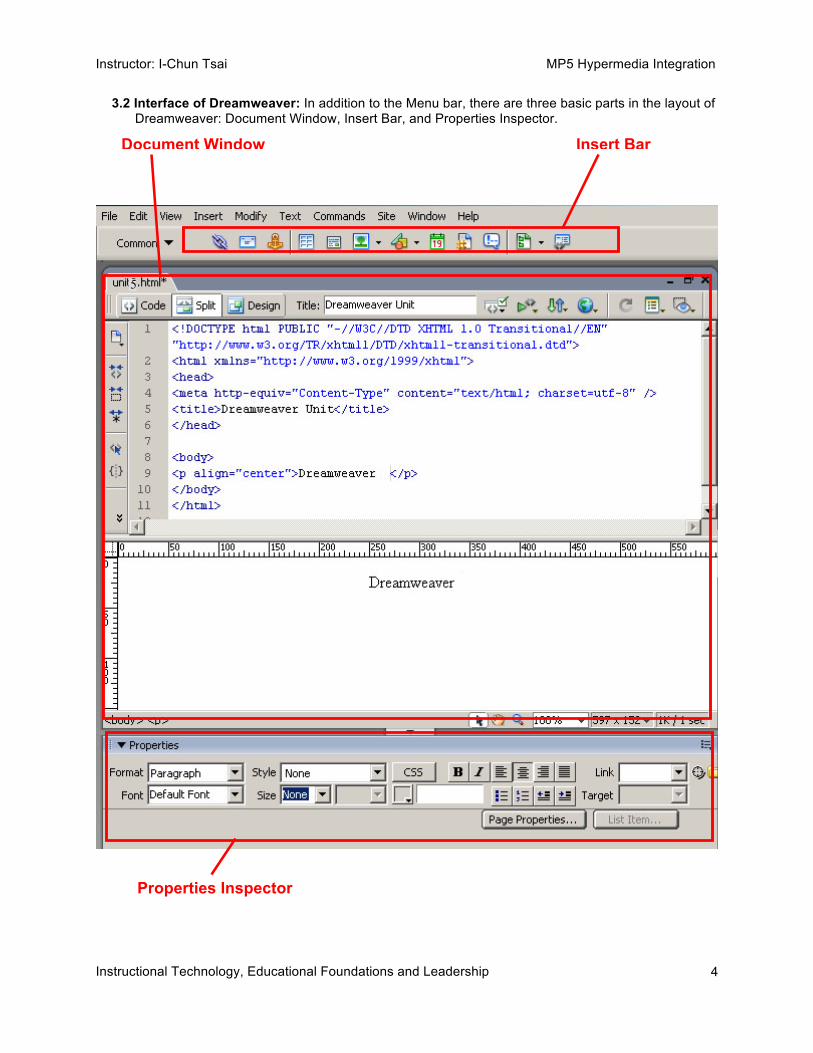
3.2 Interface of Dreamweaver: In addition to the Menu bar, there are three basic parts in the layout of Dreamweaver: Document Window, Insert Bar, and Properties Inspector.
Document Window Insert Bar
Properties Inspector
5
Instructor: I-Chun Tsai MP5 Hypermedia Integration
Instructional Technology, Educational Foundations and Leadership
5
3.2.1 Document Window: The document window is where all the actions happen and where you develop the design. Split View is a combination of both Code View and Design View, which allows you to work simultaneously in the source code and the visual display.
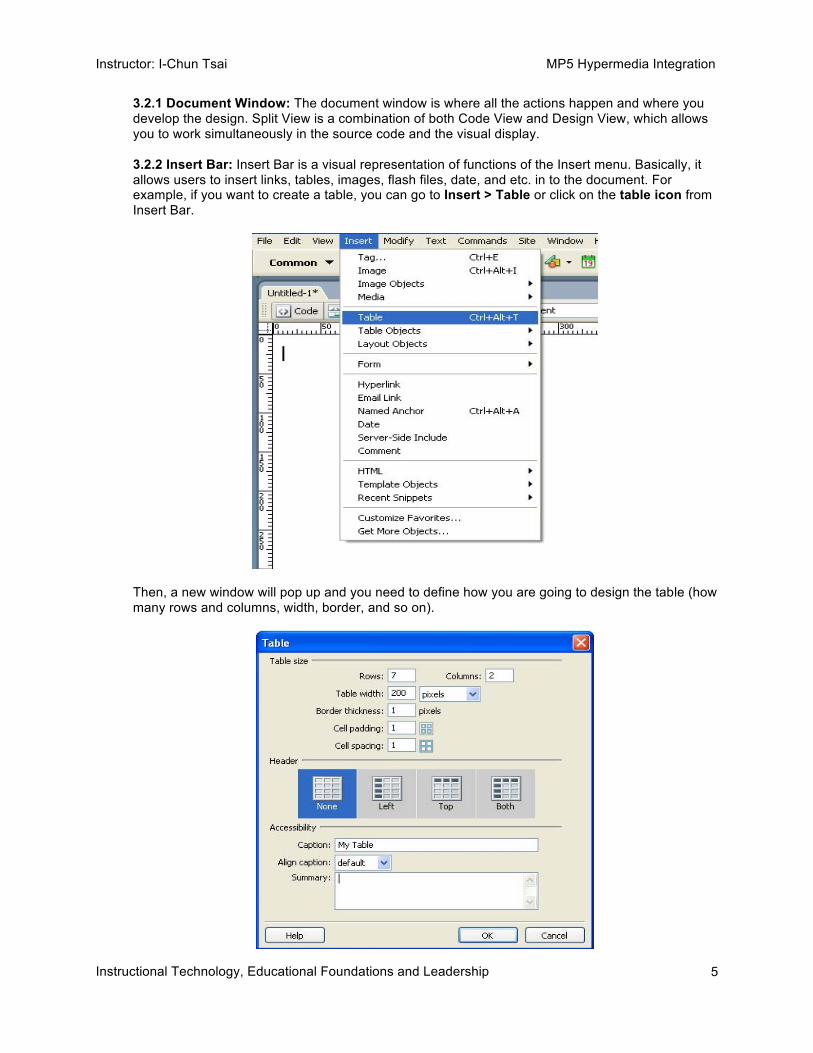
3.2.2 Insert Bar: Insert Bar is a visual representation of functions of the Insert menu. Basically, it allows users to insert links, tables, images, flash files, date, and etc. in to the document. For example, if you want to create a table, you can go to Insert > Table or click on the table icon from Insert Bar.
Then, a new window will pop up and you need to define how you are going to design the table (how many rows and columns, width, border, and so on).

Instructor: I-Chun Tsai MP5 Hypermedia Integration
Instructional Technology, Educational Foundations and Leadership
6
After you click the OK button, you will be prompted with the outline of the table. So the thing that you need to do is to fill them up with the information you need
3.2.3 Properties Inspector: The properties inspector allows users to adjust its editable properties based on the task at hand. For example, users can edit the font style or size for particular text or modify the URL for a particular link.
3.3 Code Hints The code hints feature helps you insert and edit code quickly and without mistakes. When you type certain characters in Code view, such as the first letters of a tag or attribute or CSS property name, a list appears, suggesting options to complete your entry. To insert code in Code view using code hints, type the beginning of a piece of code.
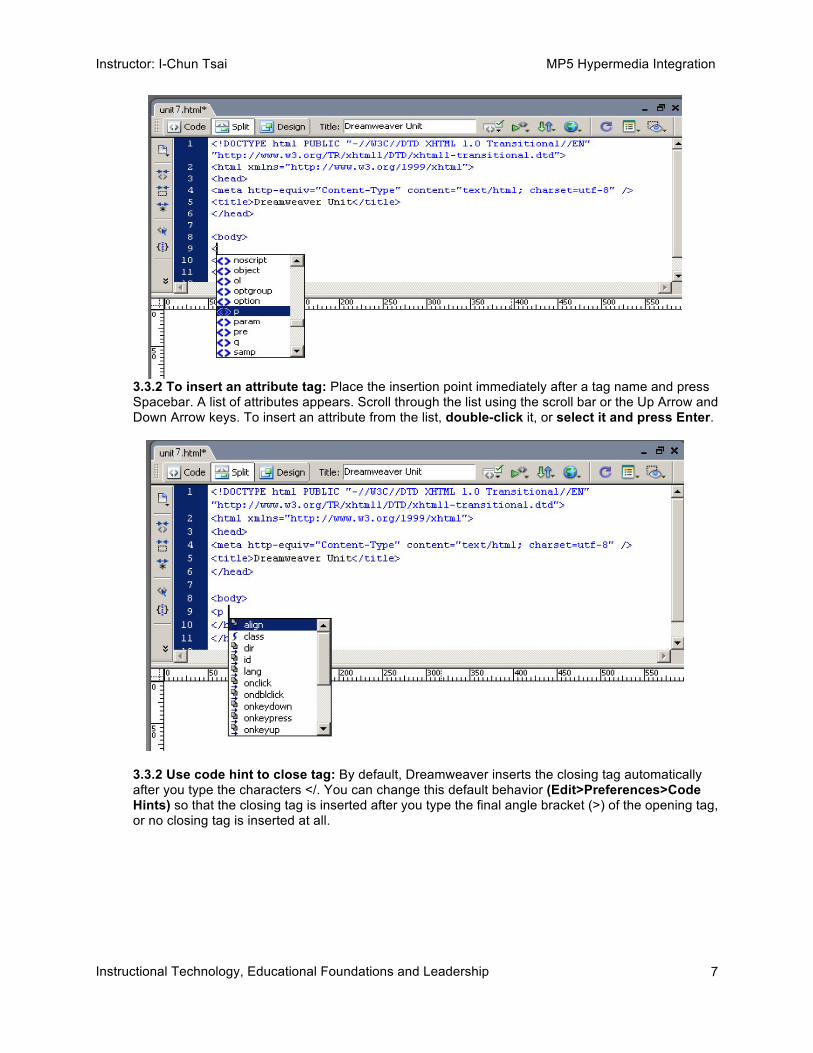
3.3.1 To insert a tag: Type a start bracket (<) then a list of tags appears. Scroll through the list using the scroll bar or the Up Arrow and Down Arrow keys. To insert a tag from the list, double-click it, or select it and press Enter.
Instructor: I-Chun Tsai MP5 Hypermedia Integration
Instructional Technology, Educational Foundations and Leadership
7
3.3.2 To insert an attribute tag: Place the insertion point immediately after a tag name and press Spacebar. A list of attributes appears. Scroll through the list using the scroll bar or the Up Arrow and Down Arrow keys. To insert an attribute from the list, double-click it, or select it and press Enter.
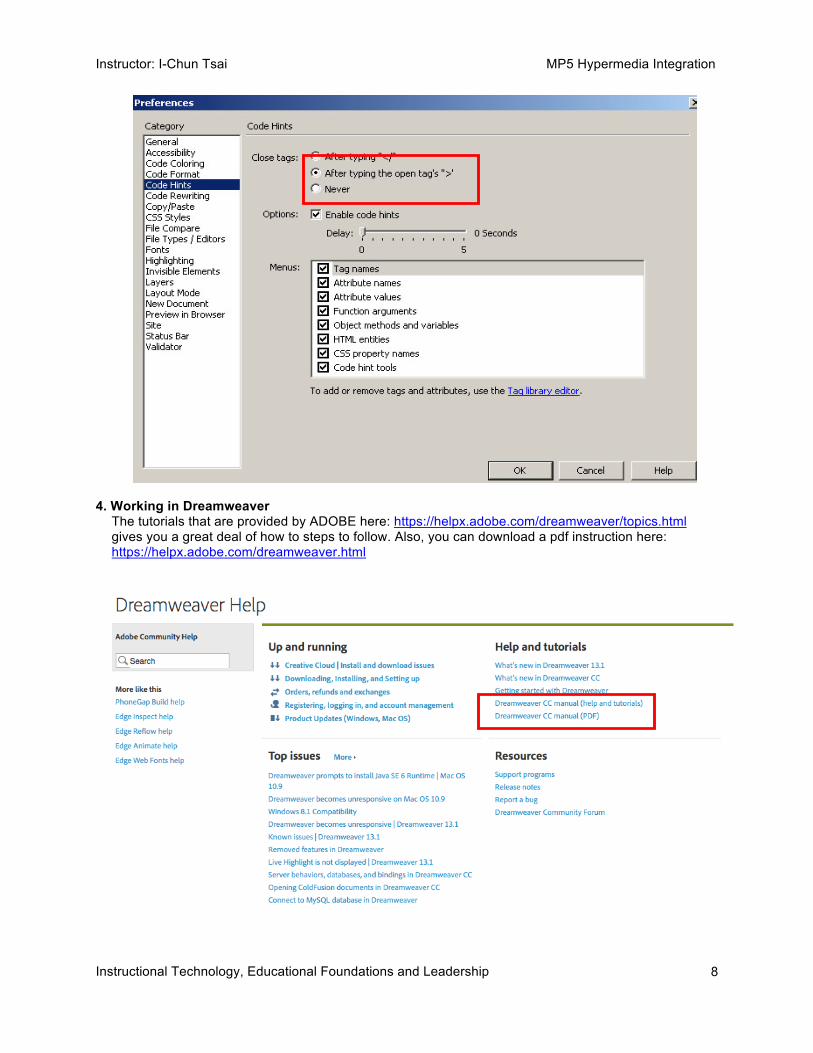
3.3.2 Use code hint to close tag: By default, Dreamweaver inserts the closing tag automatically after you type the characters </. You can change this default behavior (Edit>Preferences>Code Hints) so that the closing tag is inserted after you type the final angle bracket (>) of the opening tag, or no closing tag is inserted at all.
7
7
Instructor: I-Chun Tsai MP5 Hypermedia Integration
Instructional Technology, Educational Foundations and Leadership
8
4. Working in Dreamweaver
The tutorials that are provided by ADOBE here: https://helpx.adobe.com/dreamweaver/topics.html gives you a great deal of how to steps to follow. Also, you can download a pdf instruction here: https://helpx.adobe.com/dreamweaver.html