Embed Size (px)
Citation preview
© stilum GmbH, 56271 Kleinmaischeid • Tel. +49 (0) 2689 92790-0 • All rights and product modifications reserved State: 24.05.2017 p. 1
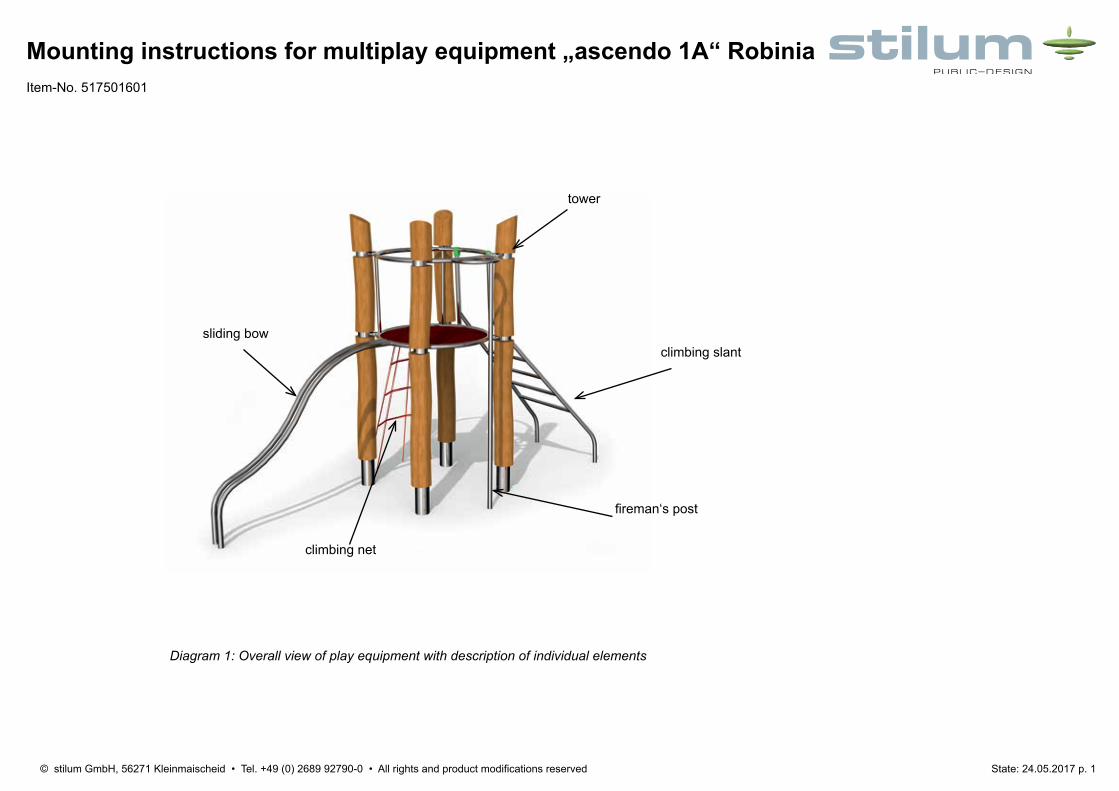
Mounting instructions for multiplay equipment „ascendo 1A“ RobiniaItem-No. 517501601
sliding bow
tower
climbing slant
fireman‘s post
Diagram 1: Overall view of play equipment with description of individual elements
climbing net
© stilum GmbH, 56271 Kleinmaischeid • Tel. +49 (0) 2689 92790-0 • All rights and product modifications reserved State: 24.05.2017 p. 2
Mounting instructions for multiplay equipment „ascendo 1A“ RobiniaItem-No. 517501601
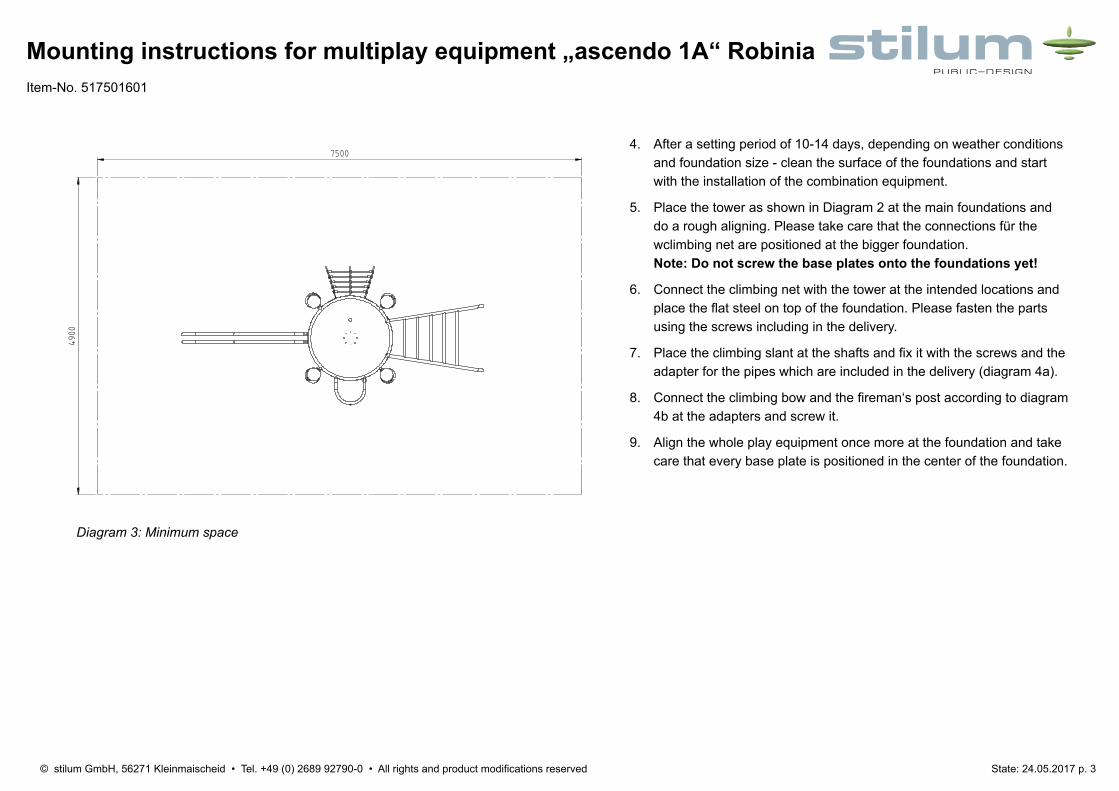
1. Select the play equipment location in consideration of the required safety area (see Diagram 4: 7500 x 4900mm).
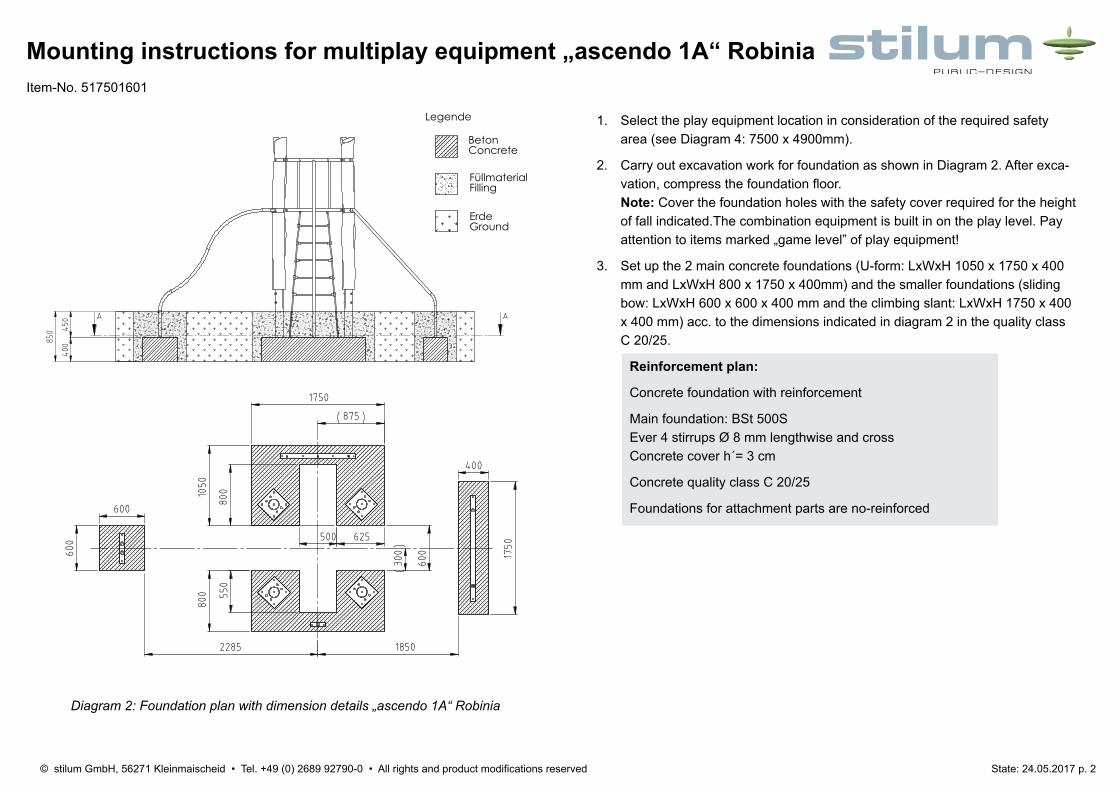
2. Carry out excavation work for foundation as shown in Diagram 2. After exca-vation, compress the foundation floor. Note: Cover the foundation holes with the safety cover required for the height of fall indicated.The combination equipment is built in on the play level. Pay attention to items marked „game level” of play equipment!
3. Set up the 2 main concrete foundations (U-form: LxWxH 1050 x 1750 x 400 mm and LxWxH 800 x 1750 x 400mm) and the smaller foundations (sliding bow: LxWxH 600 x 600 x 400 mm and the climbing slant: LxWxH 1750 x 400 x 400 mm) acc. to the dimensions indicated in diagram 2 in the quality class C 20/25.
Diagram 2: Foundation plan with dimension details „ascendo 1A“ Robinia
Reinforcement plan:
Concrete foundation with reinforcement
Main foundation: BSt 500S Ever 4 stirrups Ø 8 mm lengthwise and cross Concrete cover h´= 3 cm
Concrete quality class C 20/25
Foundations for attachment parts are no-reinforced
450
40085
0
A A
600
600
600
625500
8001050
400
1850
1750
1750
2285
800 55
0
875
300
A-A
OHNE SCHRIFTLICHE ZUSTIMMUNG DER CONRADI+KAISER GMBH DARF DIESE TECHNISCHE UNTERLAGE WEDER VERVIELFÄLTIGT, NOCH DRITTEN MITGETEILT ODER ZUGÄNGLICH GEMACHT WERDEN, NOCH IN SONSTIGER WEISE MISSBRÄEUCHLICH VER- WENDET WERDEN. ZUWIDERHANDLUNGEN WERDEN URHEBERRECHTLICH VERFOLGT.
Oberflächen nachDIN ISO 1302Reihe 2
Zul. AbweichungDIN 2768 - mH
1
ascendo 1A
Benennung
Gepr.
Werkstoff
Blatt
Datum
Projekt
Gez.
Zuschnitt
Zeichnungsnummer
Rev Änderung Datum
1:30
A3
Gewicht
Name
Name Fundament
1026-00-00
491.9 Maßstab
Mattheis 28.03.17
Gewerbegebiet Larsheck56271 Kleinmaischeid
Deutschland
BetonConcrete
FüllmaterialFilling
ErdeGround
Legende
© stilum GmbH, 56271 Kleinmaischeid • Tel. +49 (0) 2689 92790-0 • All rights and product modifications reserved State: 24.05.2017 p. 3
Mounting instructions for multiplay equipment „ascendo 1A“ RobiniaItem-No. 517501601
4. After a setting period of 10-14 days, depending on weather conditions and foundation size - clean the surface of the foundations and start with the installation of the combination equipment.
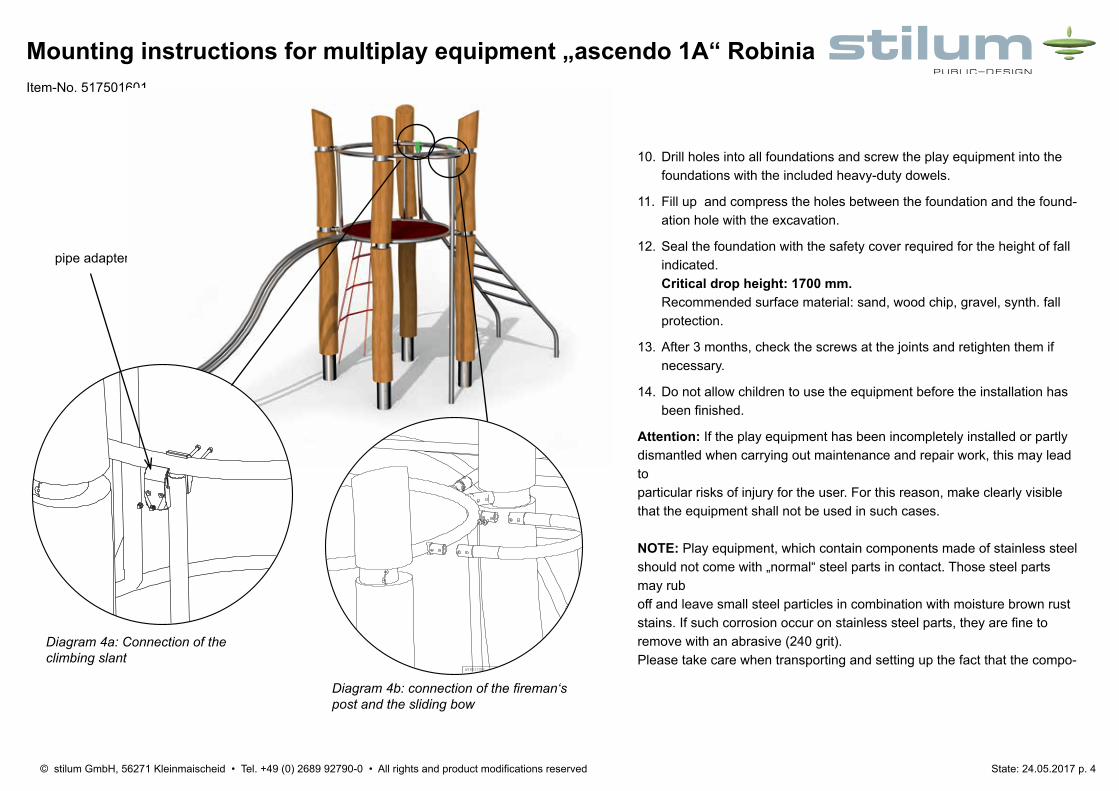
5. Place the tower as shown in Diagram 2 at the main foundations and do a rough aligning. Please take care that the connections für the wclimbing net are positioned at the bigger foundation. Note: Do not screw the base plates onto the foundations yet!
6. Connect the climbing net with the tower at the intended locations and place the flat steel on top of the foundation. Please fasten the parts using the screws including in the delivery.
7. Place the climbing slant at the shafts and fix it with the screws and the adapter for the pipes which are included in the delivery (diagram 4a).
8. Connect the climbing bow and the fireman‘s post according to diagram 4b at the adapters and screw it.
9. Align the whole play equipment once more at the foundation and take care that every base plate is positioned in the center of the foundation.
4900
7500
OHNE SCHRIFTLICHE ZUSTIMMUNG DER CONRADI+KAISER GMBH DARF DIESE TECHNISCHE UNTERLAGE WEDER VERVIELFÄLTIGT, NOCH DRITTEN MITGETEILT ODER ZUGÄNGLICH GEMACHT WERDEN, NOCH IN SONSTIGER WEISE MISSBRÄEUCHLICH VER- WENDET WERDEN. ZUWIDERHANDLUNGEN WERDEN URHEBERRECHTLICH VERFOLGT.
Oberflächen nachDIN ISO 1302Reihe 2
Zul. AbweichungDIN 2768 - mH
1
ascendo 1A
Benennung
Gepr.
Werkstoff
Blatt
Datum
Projekt
Gez.
Zuschnitt
Zeichnungsnummer
Rev Änderung Datum
1:30
A3
Gewicht
Name
Name Draufsicht
1026-00-00
491.9 Maßstab
Mattheis 29.03.17
Gewerbegebiet Larsheck56271 Kleinmaischeid
Deutschland
Diagram 3: Minimum space
© stilum GmbH, 56271 Kleinmaischeid • Tel. +49 (0) 2689 92790-0 • All rights and product modifications reserved State: 24.05.2017 p. 4
Mounting instructions for multiplay equipment „ascendo 1A“ RobiniaItem-No. 517501601
Diagram 4b: connection of the fireman‘s post and the sliding bow
pipe adapter
Diagram 4a: Connection of the climbing slant
Rev.:
Projekt:
BESTELL-NR:
ZG-NR:
BENENNUNG:
OHNE SCHRIFTLICHE ZUSTIMMUNG DER CONRADI + KAISER GMBH DARF DIESE TECHNISCHE UNTERLAGE WEDER VERVIELFÄLTIGT NOCH DRITTEN MITGETEILT ODER ZUGÄNGLICH GEMACHT WERDEN NOCH IN SONSTIGER WEISE MISSBRÄEUCHLICH VERWENDET
WERDEN. ZUWIDERHANDLUNGEN WERDEN URHEBERRECHTLICH VERFOLGT.
FREIG:
GEPR:
GEZ:
DATUM: NAME:WERKSTOFF
MAßSTAB:
OBERFLAECHEN NACH
DIN ISO 1302 REIHE 2
ZUL. ABWEICHUNG
DIN 2768 - mH
+0,3-0,3WERKSTUECKKANTEN
NACH DIN 6784
Gewerbegebiet Larsheck56271 Kleinmaischeid
Deutschland
A3
0201-00-00
29.04.2016Abmaße:
Fertigung:
x
x
Gewicht:1573587.9ascendo robinie2
Rev.:
Projekt:
BESTELL-NR:
ZG-NR:
BENENNUNG:
OHNE SCHRIFTLICHE ZUSTIMMUNG DER CONRADI + KAISER GMBH DARF DIESE TECHNISCHE UNTERLAGE WEDER VERVIELFÄLTIGT NOCH DRITTEN MITGETEILT ODER ZUGÄNGLICH GEMACHT WERDEN NOCH IN SONSTIGER WEISE MISSBRÄEUCHLICH VERWENDET
WERDEN. ZUWIDERHANDLUNGEN WERDEN URHEBERRECHTLICH VERFOLGT.
FREIG:
GEPR:
GEZ:
DATUM: NAME:WERKSTOFF
MAßSTAB:
OBERFLAECHEN NACH
DIN ISO 1302 REIHE 2
ZUL. ABWEICHUNG
DIN 2768 - mH
+0,3-0,3WERKSTUECKKANTEN
NACH DIN 6784
Gewerbegebiet Larsheck56271 Kleinmaischeid
Deutschland
A3
0201-00-00
29.04.2016Abmaße:
Fertigung:
x
x
Gewicht:1573590.1ascendo robinie2
10. Drill holes into all foundations and screw the play equipment into the foundations with the included heavy-duty dowels.
11. Fill up and compress the holes between the foundation and the found-ation hole with the excavation.
12. Seal the foundation with the safety cover required for the height of fall indicated. Critical drop height: 1700 mm. Recommended surface material: sand, wood chip, gravel, synth. fall protection.
13. After 3 months, check the screws at the joints and retighten them if necessary.
14. Do not allow children to use the equipment before the installation has been finished.
Attention: If the play equipment has been incompletely installed or partly dismantled when carrying out maintenance and repair work, this may lead toparticular risks of injury for the user. For this reason, make clearly visible that the equipment shall not be used in such cases.
NOTE: Play equipment, which contain components made of stainless steel should not come with „normal“ steel parts in contact. Those steel parts may ruboff and leave small steel particles in combination with moisture brown rust stains. If such corrosion occur on stainless steel parts, they are fine to remove with an abrasive (240 grit).Please take care when transporting and setting up the fact that the compo-
© stilum GmbH, 56271 Kleinmaischeid • Tel. +49 (0) 2689 92790-0 • All rights and product modifications reserved State: 24.05.2017 p. 5
Mounting instructions for multiplay equipment „ascendo 1A“ RobiniaItem-No. 517501601
nents are made of stainless steel with no „normal“ steel parts in contact.
In order to preserve a good visual appearance of your stilum playground equipment over a long period one should take care of maintenance of the stainlesssurface even despite of their corrosion resistance. Especially areas, which can not be reached by rainfall, should be frequently cleaned from dirt and deposits due to air pollution and dirt caused by the atmosphere. Light soiling can easily be removed by using a high pressure cleaner. For persistent deposits use a clean cloth moistened with a special liquid cleaner (e.g. on phosphoric acid) and rinse off with clear water after a short application time. During cleaning with mild abrasive components, only wipe over stainless steel surface in polishing direction. For heavi-ly soiled surfaces, polishes can be used (e.g. for cleaning chrome on cars) or for greasy and oily dirt alcoholic cleaning agents and solvents (e.g. ethyl alcohol, isopropyl alcohol or acetone). However, it should be noted that the dissolved soiling is not spread over the surface again. Do not use any chloride or hydrochloric containing cleaning products nor scouring powder, bleaching - or silver polish cleaner. Cleaning intervals depend on type and degree of soiling as well as on demands made on optical characteristics. Therefore cleaning is advisable at intervals of six to twelve months – whereby in the case of strong soiling it is appropriate to clean the playground equipment at intervals of 3 to 6 months.


![Variable micro- inspection system - Qioptiq1].pdfVariable micro-inspection system mag.x system 125 02 03 Designed for large Sensors ... ISO 2768-mH und ISO 8015 Optikdarstellung nach](https://img.pdfslide.us/doc/110x75/5aca82047f8b9aa1298dc023/variable-micro-inspection-system-1pdfvariable-micro-inspection-system-magx.jpg)