Embed Size (px)
Citation preview
Installation of Motohooligan Airbox to KTM Superduke 990 1
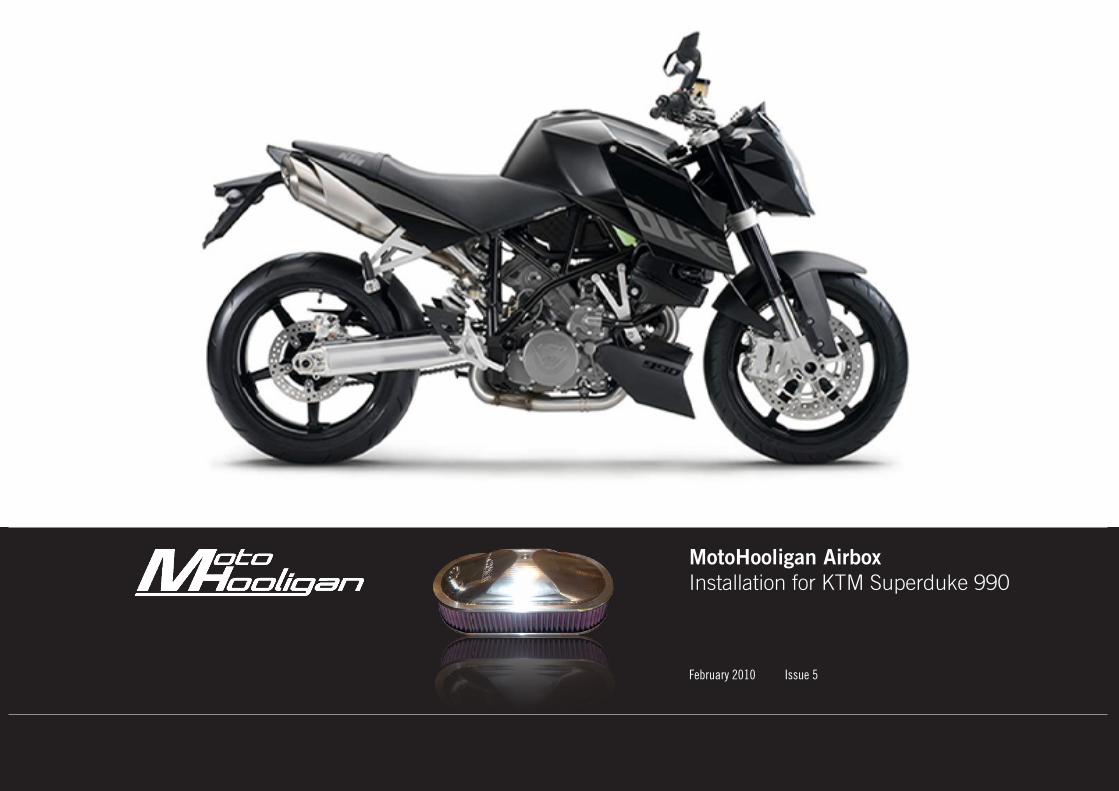
MotoHooligan AirboxInstallation for KTM Superduke 990
February 2010 Issue 5
Installation of Motohooligan Airbox to KTM Superduke 990 2
Contents
3 Introduction
4 Disclaimer
5 Benefits of the Motohooligan airbox
6 Dyno chart examples
7 Associated modifications to KTM engines
8 Testimonials
9 Installation instructions
10 Stage 1 Remove spoilers and tank
11 Stage 2 Detach breather hose and air temperature sensor
12 Stage 3 Remove airbox cover, velocity stacks and air filter
13 Stage 4 Remove airbox side covers and expansion bottle
14 Stage 5 Unplug the large grey FI electrical connector
15 Stage 6 Loosen rubber manifold and disconnect fuel line
16 Stage 7 Lift off the throttle bodies
17 Stage 8 Remove airbox and rear SAS plate
18 Stage 9 Remove SAS valve, hoses and front SAS plate
19 Stage 10 Modify SAS plug with resistor
20 Stage 11 Re-attach throttle bodies
21 Stage 12 Attach the Motobox base plate
22 Stage 13 Attach air filter and Motobox cover
23 Stage 14 Re-attach breather hose and temperature sensor
24 Stage 15 Refit tank and spoilers
Installation of Motohooligan Airbox to KTM Superduke 990 3
All Motohooligan Performance products manufactured and/or distributed are offered and designed for use with off road, closed course machines. There are no claims as to the product’s effectiveness on modified machines. Buyer assumes all risk for any and all damage caused to themselves, a third party and/or property by virtue of failure of these products. By purchasing installing and/or using Motohooligan Performance products, you hereby accept and understand these stated terms and conditions.
The Motohooligan airbox is designed for off-road and track use only and must be fitted by a suitably qualified and experienced mechanic.
Motohooligan airboxes are not approved by KTM or its dealers for use on KTM motorcycles and may invalidate the bike’s warranty.
Disclaimer
Installation of Motohooligan Airbox to KTM Superduke 990 4
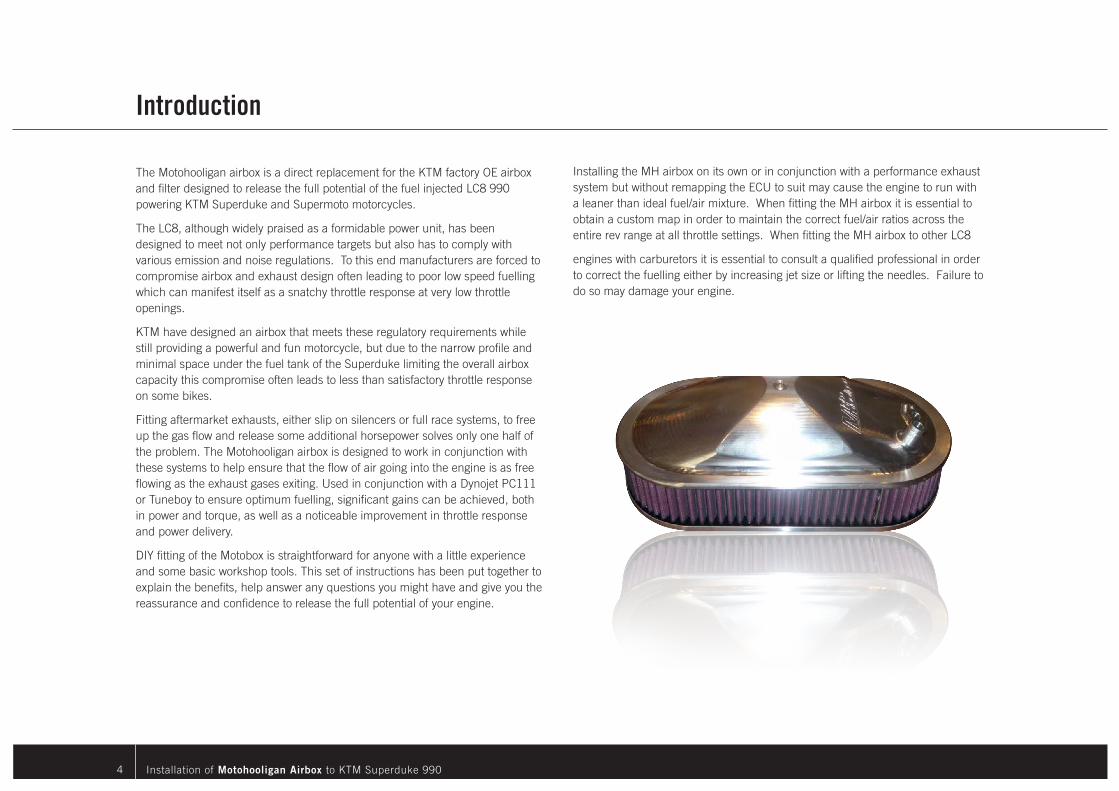
The Motohooligan airbox is a direct replacement for the KTM factory OE airbox and filter designed to release the full potential of the fuel injected LC8 990 powering KTM Superduke and Supermoto motorcycles.
The LC8, although widely praised as a formidable power unit, has been designed to meet not only performance targets but also has to comply with various emission and noise regulations. To this end manufacturers are forced to compromise airbox and exhaust design often leading to poor low speed fuelling which can manifest itself as a snatchy throttle response at very low throttle openings.
KTM have designed an airbox that meets these regulatory requirements while still providing a powerful and fun motorcycle, but due to the narrow profile and minimal space under the fuel tank of the Superduke limiting the overall airbox capacity this compromise often leads to less than satisfactory throttle response on some bikes.
Fitting aftermarket exhausts, either slip on silencers or full race systems, to free up the gas flow and release some additional horsepower solves only one half of the problem. The Motohooligan airbox is designed to work in conjunction with these systems to help ensure that the flow of air going into the engine is as free flowing as the exhaust gases exiting. Used in conjunction with a Dynojet PC111 or Tuneboy to ensure optimum fuelling, significant gains can be achieved, both in power and torque, as well as a noticeable improvement in throttle response and power delivery.
DIY fitting of the Motobox is straightforward for anyone with a little experience and some basic workshop tools. This set of instructions has been put together to explain the benefits, help answer any questions you might have and give you the reassurance and confidence to release the full potential of your engine.
Introduction
Installing the MH airbox on its own or in conjunction with a performance exhaust system but without remapping the ECU to suit may cause the engine to run with a leaner than ideal fuel/air mixture. When fitting the MH airbox it is essential to obtain a custom map in order to maintain the correct fuel/air ratios across the entire rev range at all throttle settings. When fitting the MH airbox to other LC8
engines with carburetors it is essential to consult a qualified professional in order to correct the fuelling either by increasing jet size or lifting the needles. Failure to do so may damage your engine.
Installation of Motohooligan Airbox to KTM Superduke 990 5
easy to remove so makes DIY maintenance a more attractive proposition as well as reducing the labour time during dealer servicing. Having said that, reports suggest that KTM dealers are not reflecting this time saving when presenting their service bills.
Acoustics
Breathing through a large, unrestricted air filter alters the induction sound of the engine considerably. This is not immediately evident when the engine is at idle or low revs but once over 3 or 4,000rpm the acoustics change noticeably and at higher revs the induction roar can be louder than performance exhausts, even with baffles removed. This is seen, by most owners, as an appealing feature but be warned that for prolonged high speeds it would be advisable to get ear plugs if you don’t already use them and the increased intake noise could exceed some track day decibel levels.
There are several reports of other noises appearing after fitting the Motobox, including whistling on the over-run but the general consensus is that these are not new sounds caused by the change over, merely existing sounds that can now be heard without the OE airbox’s dampening effect. Any pinking sounds should be immediately investigated and fuelling checked. It is essential that the fuel/air ratio is optimised for the Motobox and this may require an alternative fuel map.
Aesthetics
Designed as a naked, pared-back sports bike, the Superduke aesthetics benefit from having superfluous components removed, especially when they serve no purpose other than to comply with emissions legislation. Removing the airbox, (and SAS system), visually unblocks the area below the tank, reveals the aesthetics of the throttle bodies and lets light show through the frame rails.
Weight
There’s weight saving as well but no one is doing it purely for this reason. The OE airbox and filter is 2068g and the SAS system is 500g. Total Motobox weighs in at 875g.
Air intake
Replacing the restrictive KTM OE air intake system with the Motohooligan airbox allows the engine to breath more easily throughout the whole rev range. Combined with the correct FI map this improves the overall performance of the LC8 engine considerably and addresses many of the problems experienced by Superduke owners.
Engine running
Fitment of a Motobox significantly improves the well documented issue of jerky, on/off throttle response at lower revs and results in an enhanced, smoother power delivery as well as an engine that feels quicker to rev out. Some owners who have previously resorted to throttle cam mods in an effort to cure the snatch have been able to revert back to the quicker cams with confidence.
Performance
Motobox is rarely used in isolation and is usually fitted with a combination of other modifications including aftermarket exhausts, O2 sensor eliminators and Dynojet / Tuneboy fuel injection controllers. All reports and examples of performance gains available to date are unique to that particular bike, and combination of additional modifications, but in general there appears to be a genuine 5 - 10bhp improvement, this is typically more pronounced across the mid range. Torque is significantly up as well averaging an increase of 6ftlbs.
Cooling
Removing the OE airbox creates a large area of open space around the throttle bodies and between the two cylinders. This dramatically improves airflow to aid cooling which is never a bad thing, especially on a V twin, as this helps keep the rear cylinder temperature down as well maintaining the throttle bodies at the lowest operating temperature possible.
Access
For many basic service tasks, such as valve checking and adjustment and spark plug inspection, the OE airbox requires removal. Motobox is quick and
Benefits
Installation of Motohooligan Airbox to KTM Superduke 990 6
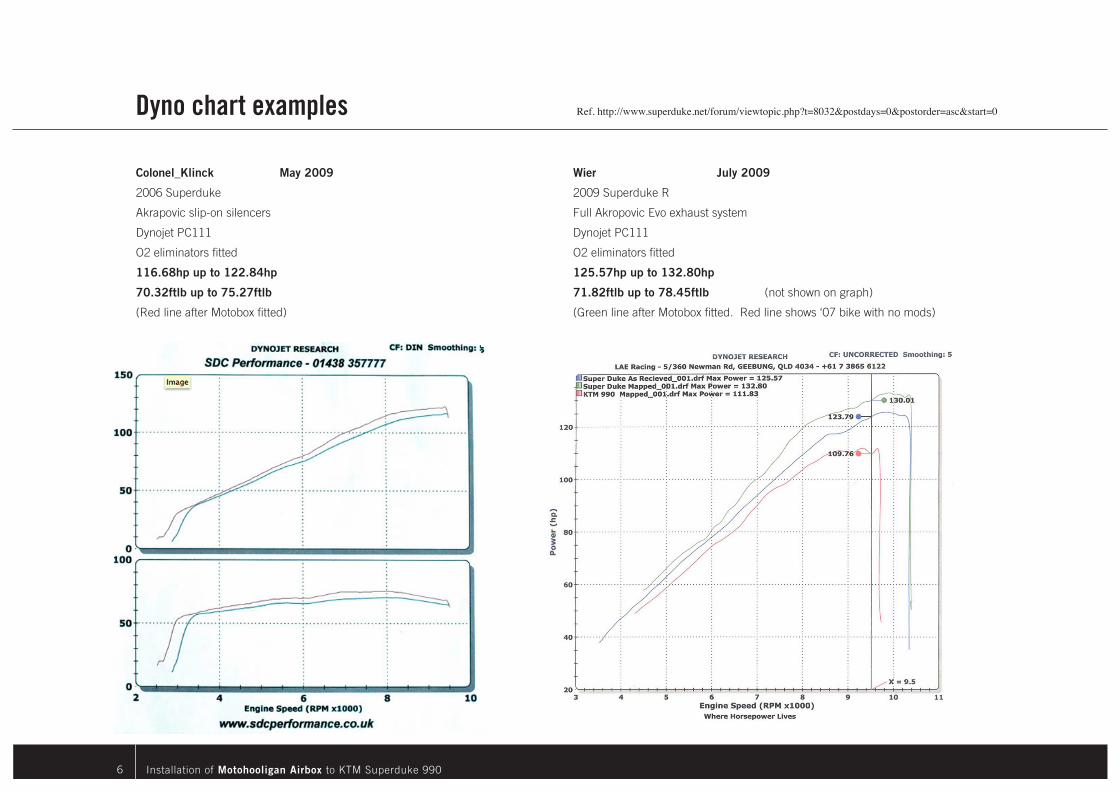
Wier July 2009
2009 Superduke R
Full Akropovic Evo exhaust system
Dynojet PC111
O2 eliminators fitted
125.57hp up to 132.80hp
71.82ftlb up to 78.45ftlb (not shown on graph)
(Green line after Motobox fitted. Red line shows ‘07 bike with no mods)
Dyno chart examples Ref. http://www.superduke.net/forum/viewtopic.php?t=8032&postdays=0&postorder=asc&start=0
Colonel_Klinck May 2009
2006 Superduke
Akrapovic slip-on silencers
Dynojet PC111
O2 eliminators fitted
116.68hp up to 122.84hp
70.32ftlb up to 75.27ftlb
(Red line after Motobox fitted)
Installation of Motohooligan Airbox to KTM Superduke 990 7
throttle response that is jerky and hard to live with. Fitting a PC111 overcomes this problem by supplying two eliminator plugs that remove the input from the sensors and also keeps the ECU happy so no error code is displayed. Dynojet no longer supply the eliminator plugs separately from the PC but you can make your own plugs relatively easily and fit them without installing a PC111. There are threads on how to do this.
http://www.superduke.net/forum/viewtopic.php?t=8258
Fuel injection maps
After any modifications to the exhaust or intake systems, it is essential that the ECU is remapped to ensure that the fuel/air mixture remains optimum throughout the whole rev range. Failure to do so may cause the engine to be permanently damaged, especially if it runs with too weak a mixture. There are two official KTM/Akrapovic maps which can be installed onto the ECU by your dealer. However, these are specifically designed to work with either a standard bike with slip-on silencers and catalytic converter, or a full system and will not be optimum for a Motobox.
PC111
Installing a PC111, (or Tuneboy), allows you to install new maps which work in conjunction with the data from the ECU. There is a variety of maps available from the Dynojet website designed to work with a wide range of exhaust brands and engine modifications but, as with the Akro maps, you need to ensure that your bike matches the same specification as the bike for which the map was created.
Custom maps
The best solution is to create a custom map, specifically for your modified engine. This can be done at a dyno center and will ensure that the air/fuel mixture is correct for your unique engine characteristics. You should be aiming for an AF ratio of about 13.5. Dual maps can be created, one for each cylinder, but, to do this, modifications may need to be made below the threaded sensor attachment points on the headers so that the broad band sensors can be attached. Check with your dyno center for specific details.
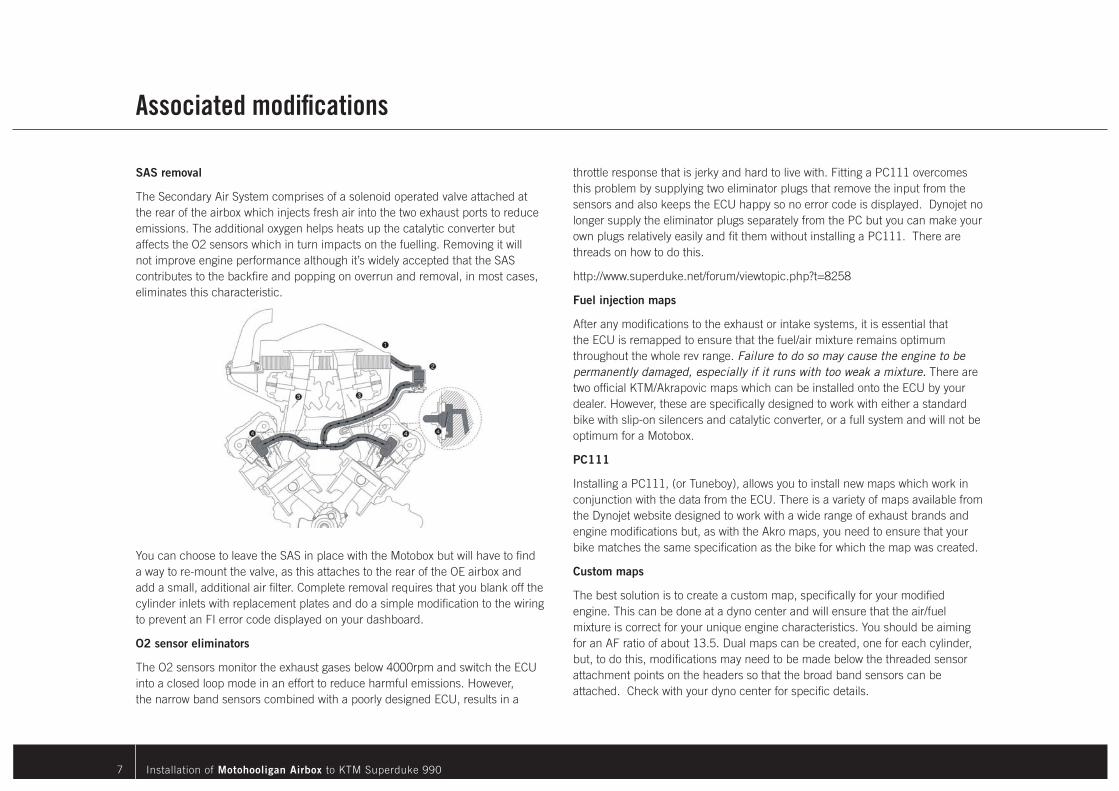
SAS removal
The Secondary Air System comprises of a solenoid operated valve attached at the rear of the airbox which injects fresh air into the two exhaust ports to reduce emissions. The additional oxygen helps heats up the catalytic converter but affects the O2 sensors which in turn impacts on the fuelling. Removing it will not improve engine performance although it’s widely accepted that the SAS contributes to the backfire and popping on overrun and removal, in most cases, eliminates this characteristic.
You can choose to leave the SAS in place with the Motobox but will have to find a way to re-mount the valve, as this attaches to the rear of the OE airbox and add a small, additional air filter. Complete removal requires that you blank off the cylinder inlets with replacement plates and do a simple modification to the wiring to prevent an FI error code displayed on your dashboard.
O2 sensor eliminators
The O2 sensors monitor the exhaust gases below 4000rpm and switch the ECU into a closed loop mode in an effort to reduce harmful emissions. However, the narrow band sensors combined with a poorly designed ECU, results in a
Associated modifications
Installation of Motohooligan Airbox to KTM Superduke 990 8
“Just got back from the dyno shop after installing the “MOTOBOX” Wow what a great improvment! 8 horsepower, and 6 more foot pounds of torque!”
ktim
“The fuelling on mine was perfect before, so nothing to complain on that side, and now the throttle response is just a little more smooth but so much stronger... At little openings I feel the bike is pulling more and now in the bends opening the throttle make the rear slide very frequently...
And the sound.... OMFG!!! That roar..... aaahhhhh!!!!! All in all a must-have mod!!!
Thanks to Aaron MH!!! “
dade
“Had bike Dyno’d this morning. Guy said it was breathing really well with the Motobox on it. Biggest gains were in the mid range. Not a hint of any kind of throttle snatch now and it pulls like a beast. Very happy man and recommend this mod to all.”
Colonel_Klinck
“I already convinced Joe many times over but this is a great thing for those that want to make a meaningful mod on their SD/SDR. I always estimate the gains to be 3-6% soo... live it gentlemen.”
Jehadjoe
Thunder pumpkin rider
“Holy SuperDukedum!!!!!! Just got back and took the beast out for its maiden run with the MotoBox. Un-frickin- beleavable!!!! I cannot say enough how much it changed the bike. It was fast before, but it is now a totally brutal machine – the beast is a BEAST. It absolutely rips through the gears. When it climbs past six grand it now rushes to redline instead of the previous steady climb to redline. I’m frankly overwhelmed by the power increase.”
dirt4breakfast
“The real significant improvement in jerky throttle response came first with doing the throttle body sync. This was a huge leap towards smoothness. The second most significant improvement I felt was adding Motohooligan’s airbox.”
Flow with the Go
“More importantly I don’t need a dyno to tell me there is a big improvement with the Motobox in power and how the bike runs / fuels. I am more than satisfied with its performance, build quality and value. I can’t imagine anyone being unhappy with the purchase. Just my 2 cents.”
Talmadge
“Beg, borrow or steal the cash to buy this airbox. It is the single best mod I’ve made to this bike powerwise. It absolutely launches out of corners like a cat- launch off an aircraft carrier. The difference is nothing short of incredible. I still can’t wipe the smile off of my face.”
Lowrance
Testimonials
Installation of Motohooligan Airbox to KTM Superduke 990 9
MotoHooligan AirboxInstallation instructions
All facts and information contained within this document are correct, to the best of our knowledge, but Motohooligan cannot be held responsible for any damage sustained from following the advice or recommendations given.
Installation of Motohooligan Airbox to KTM Superduke 990 10
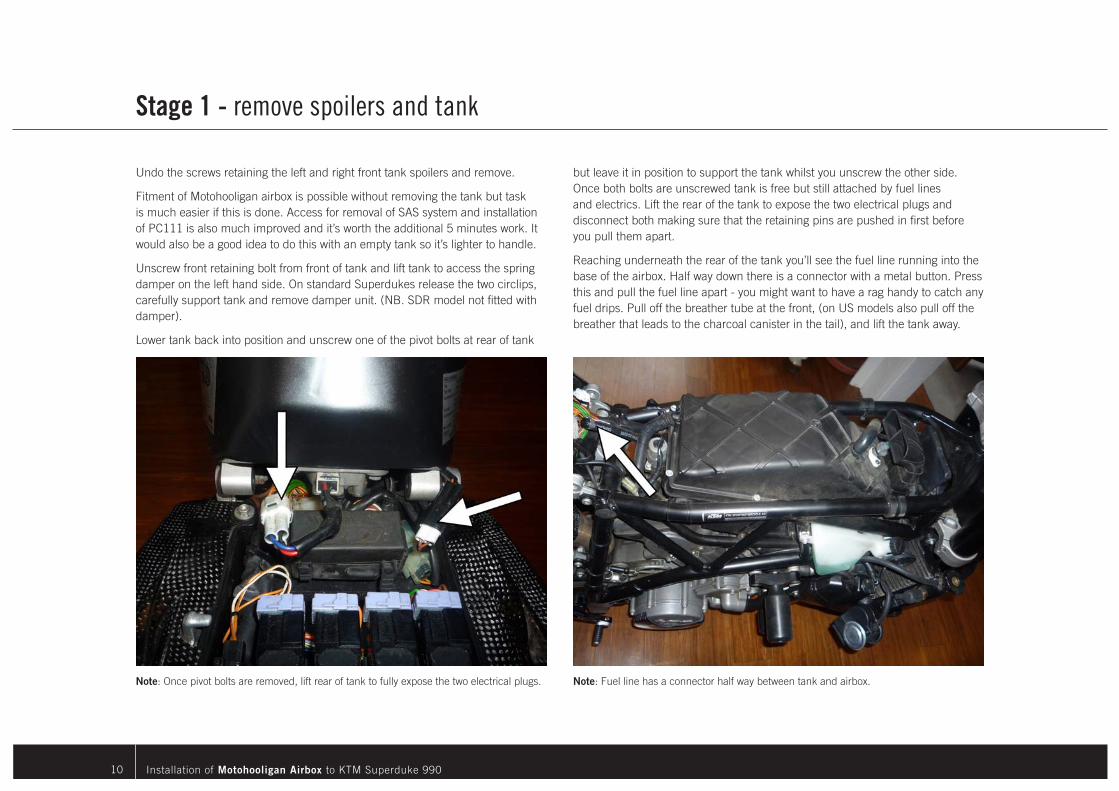
Note: Once pivot bolts are removed, lift rear of tank to fully expose the two electrical plugs.
Undo the screws retaining the left and right front tank spoilers and remove.
Fitment of Motohooligan airbox is possible without removing the tank but task is much easier if this is done. Access for removal of SAS system and installation of PC111 is also much improved and it’s worth the additional 5 minutes work. It would also be a good idea to do this with an empty tank so it’s lighter to handle.
Unscrew front retaining bolt from front of tank and lift tank to access the spring damper on the left hand side. On standard Superdukes release the two circlips, carefully support tank and remove damper unit. (NB. SDR model not fitted with damper).
Lower tank back into position and unscrew one of the pivot bolts at rear of tank
Stage 1 - remove spoilers and tank
Note: Fuel line has a connector half way between tank and airbox.
but leave it in position to support the tank whilst you unscrew the other side. Once both bolts are unscrewed tank is free but still attached by fuel lines and electrics. Lift the rear of the tank to expose the two electrical plugs and disconnect both making sure that the retaining pins are pushed in first before you pull them apart.
Reaching underneath the rear of the tank you’ll see the fuel line running into the base of the airbox. Half way down there is a connector with a metal button. Press this and pull the fuel line apart - you might want to have a rag handy to catch any fuel drips. Pull off the breather tube at the front, (on US models also pull off the breather that leads to the charcoal canister in the tail), and lift the tank away.
Installation of Motohooligan Airbox to KTM Superduke 990 11
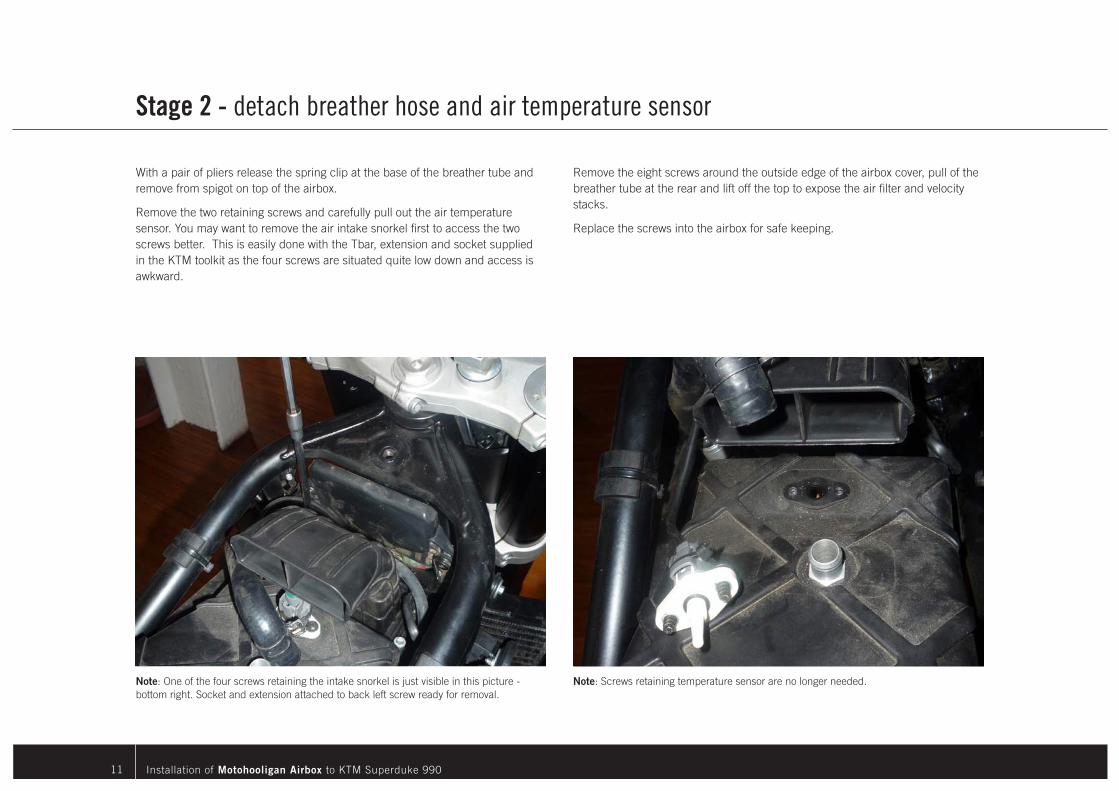
Note: One of the four screws retaining the intake snorkel is just visible in this picture - bottom right. Socket and extension attached to back left screw ready for removal.
With a pair of pliers release the spring clip at the base of the breather tube and remove from spigot on top of the airbox.
Remove the two retaining screws and carefully pull out the air temperature sensor. You may want to remove the air intake snorkel first to access the two screws better. This is easily done with the Tbar, extension and socket supplied in the KTM toolkit as the four screws are situated quite low down and access is awkward.
Stage 2 - detach breather hose and air temperature sensor
Note: Screws retaining temperature sensor are no longer needed.
Remove the eight screws around the outside edge of the airbox cover, pull of the breather tube at the rear and lift off the top to expose the air filter and velocity stacks.
Replace the screws into the airbox for safe keeping.
Installation of Motohooligan Airbox to KTM Superduke 990 12
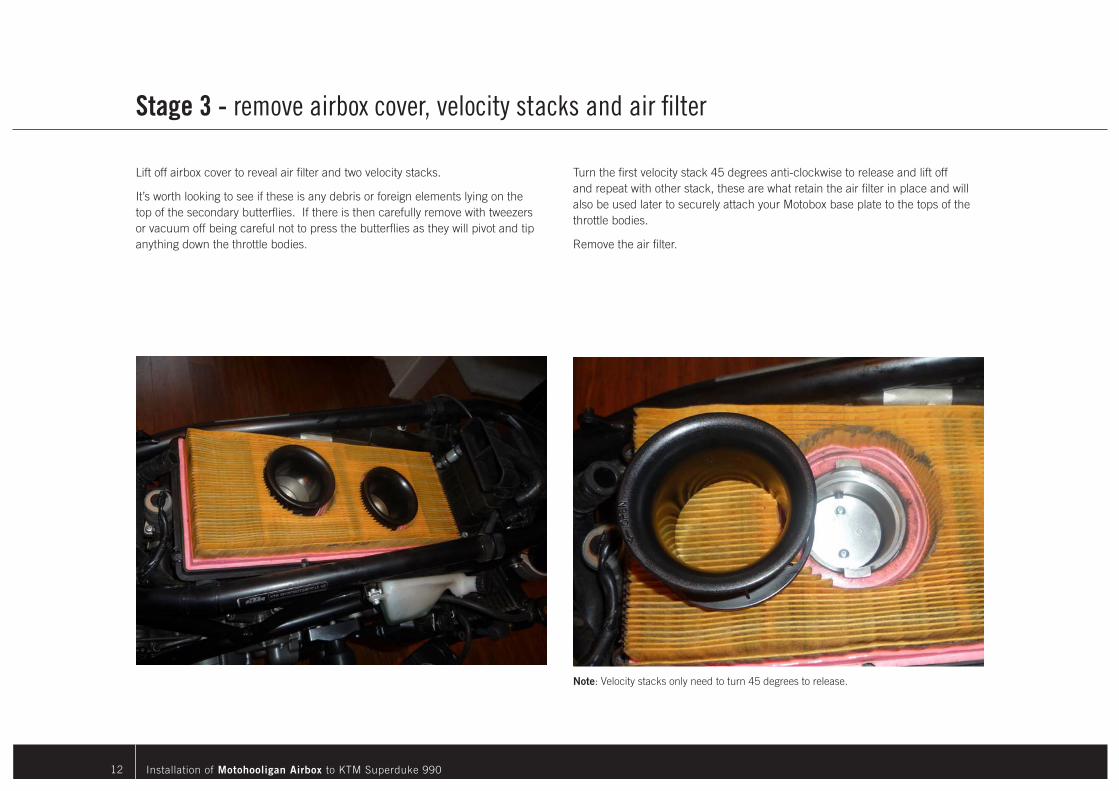
Lift off airbox cover to reveal air filter and two velocity stacks.
It’s worth looking to see if these is any debris or foreign elements lying on the top of the secondary butterflies. If there is then carefully remove with tweezers or vacuum off being careful not to press the butterflies as they will pivot and tip anything down the throttle bodies.
Stage 3 - remove airbox cover, velocity stacks and air filter
Note: Velocity stacks only need to turn 45 degrees to release.
Turn the first velocity stack 45 degrees anti-clockwise to release and lift off and repeat with other stack, these are what retain the air filter in place and will also be used later to securely attach your Motobox base plate to the tops of the throttle bodies.
Remove the air filter.
Installation of Motohooligan Airbox to KTM Superduke 990 13
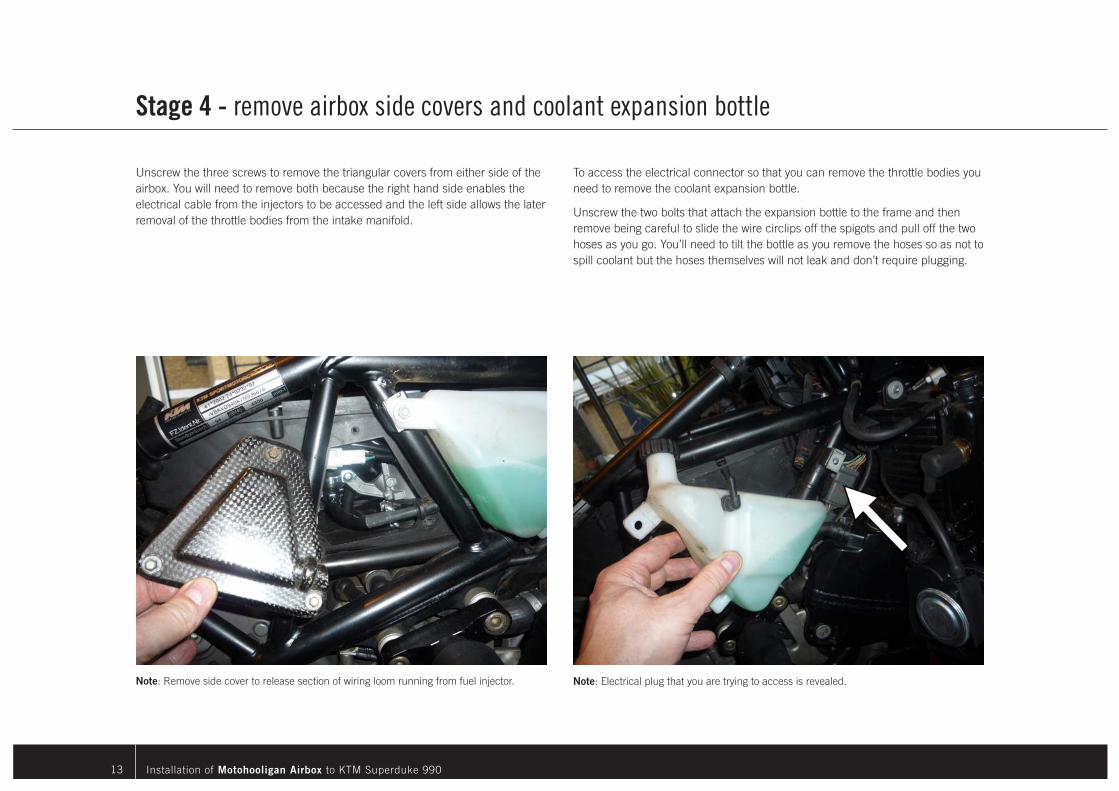
Unscrew the three screws to remove the triangular covers from either side of the airbox. You will need to remove both because the right hand side enables the electrical cable from the injectors to be accessed and the left side allows the later removal of the throttle bodies from the intake manifold.
Stage 4 - remove airbox side covers and coolant expansion bottle
Note: Electrical plug that you are trying to access is revealed.
To access the electrical connector so that you can remove the throttle bodies you need to remove the coolant expansion bottle.
Unscrew the two bolts that attach the expansion bottle to the frame and then remove being careful to slide the wire circlips off the spigots and pull off the two hoses as you go. You’ll need to tilt the bottle as you remove the hoses so as not to spill coolant but the hoses themselves will not leak and don’t require plugging.
Note: Remove side cover to release section of wiring loom running from fuel injector.
Installation of Motohooligan Airbox to KTM Superduke 990 14
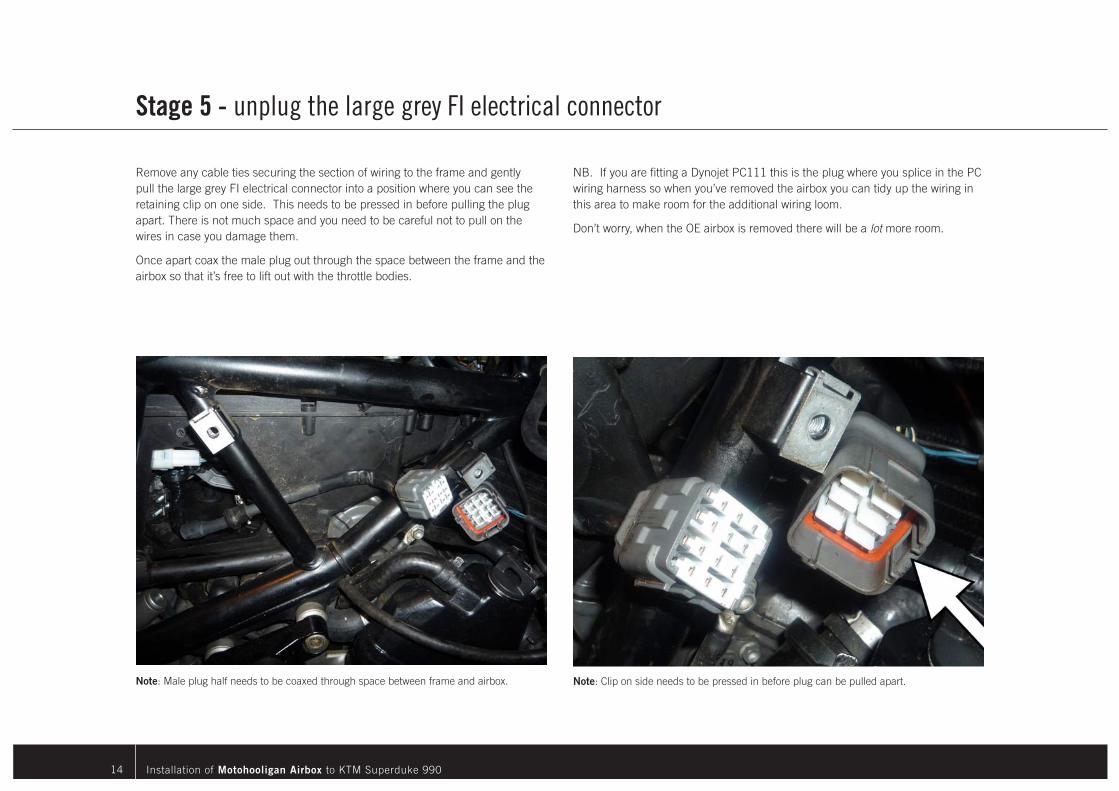
Remove any cable ties securing the section of wiring to the frame and gently pull the large grey FI electrical connector into a position where you can see the retaining clip on one side. This needs to be pressed in before pulling the plug apart. There is not much space and you need to be careful not to pull on the wires in case you damage them.
Once apart coax the male plug out through the space between the frame and the airbox so that it’s free to lift out with the throttle bodies.
Stage 5 - unplug the large grey FI electrical connector
Note: Clip on side needs to be pressed in before plug can be pulled apart.
NB. If you are fitting a Dynojet PC111 this is the plug where you splice in the PC wiring harness so when you’ve removed the airbox you can tidy up the wiring in this area to make room for the additional wiring loom.
Don’t worry, when the OE airbox is removed there will be a lot more room.
Note: Male plug half needs to be coaxed through space between frame and airbox.
Installation of Motohooligan Airbox to KTM Superduke 990 15
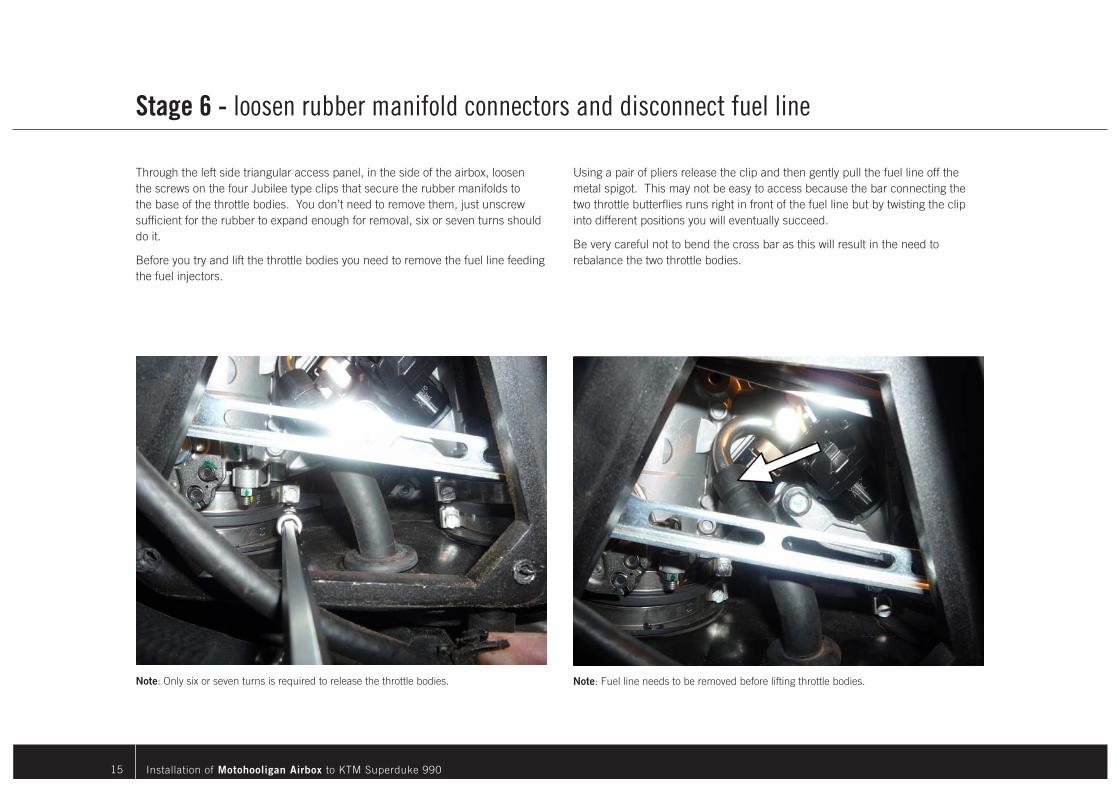
Through the left side triangular access panel, in the side of the airbox, loosen the screws on the four Jubilee type clips that secure the rubber manifolds to the base of the throttle bodies. You don’t need to remove them, just unscrew sufficient for the rubber to expand enough for removal, six or seven turns should do it.
Before you try and lift the throttle bodies you need to remove the fuel line feeding the fuel injectors.
Stage 6 - loosen rubber manifold connectors and disconnect fuel line
Note: Fuel line needs to be removed before lifting throttle bodies.
Using a pair of pliers release the clip and then gently pull the fuel line off the metal spigot. This may not be easy to access because the bar connecting the two throttle butterflies runs right in front of the fuel line but by twisting the clip into different positions you will eventually succeed.
Be very careful not to bend the cross bar as this will result in the need to rebalance the two throttle bodies.
Note: Only six or seven turns is required to release the throttle bodies.
Installation of Motohooligan Airbox to KTM Superduke 990 16
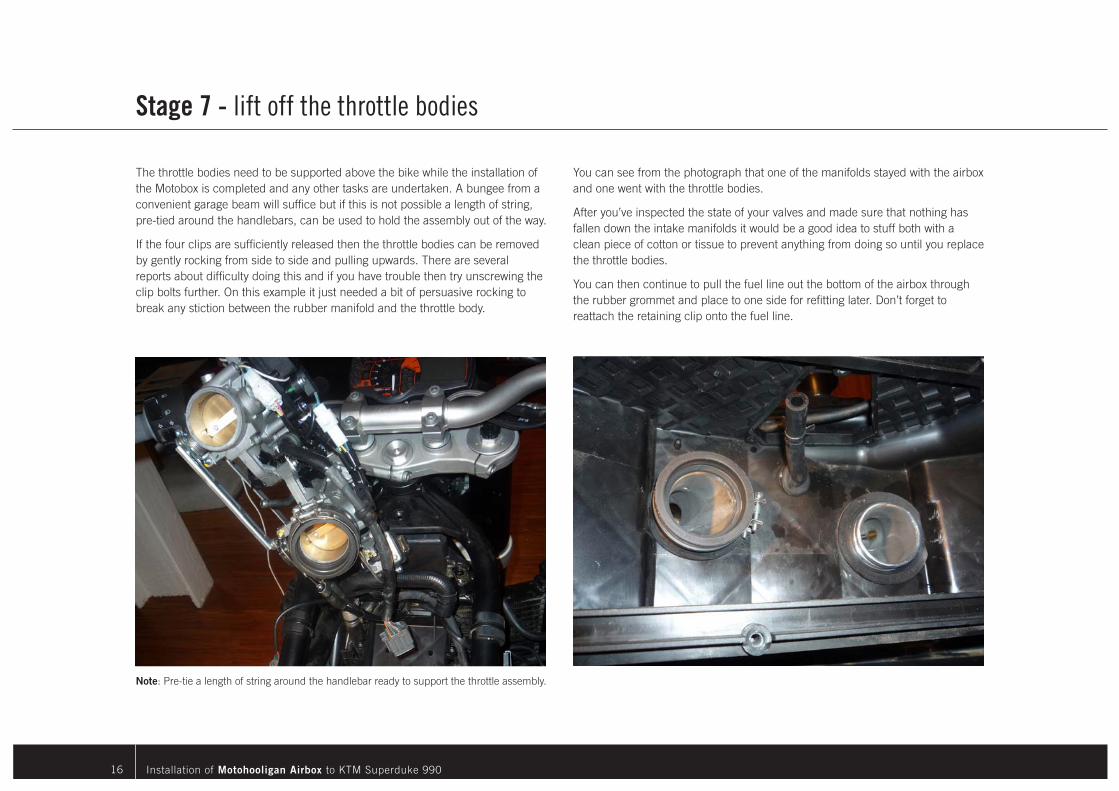
The throttle bodies need to be supported above the bike while the installation of the Motobox is completed and any other tasks are undertaken. A bungee from a convenient garage beam will suffice but if this is not possible a length of string, pre-tied around the handlebars, can be used to hold the assembly out of the way.
If the four clips are sufficiently released then the throttle bodies can be removed by gently rocking from side to side and pulling upwards. There are several reports about difficulty doing this and if you have trouble then try unscrewing the clip bolts further. On this example it just needed a bit of persuasive rocking to break any stiction between the rubber manifold and the throttle body.
Stage 7 - lift off the throttle bodies
You can see from the photograph that one of the manifolds stayed with the airbox and one went with the throttle bodies.
After you’ve inspected the state of your valves and made sure that nothing has fallen down the intake manifolds it would be a good idea to stuff both with a clean piece of cotton or tissue to prevent anything from doing so until you replace the throttle bodies.
You can then continue to pull the fuel line out the bottom of the airbox through the rubber grommet and place to one side for refitting later. Don’t forget to reattach the retaining clip onto the fuel line.
Note: Pre-tie a length of string around the handlebar ready to support the throttle assembly.
Installation of Motohooligan Airbox to KTM Superduke 990 17
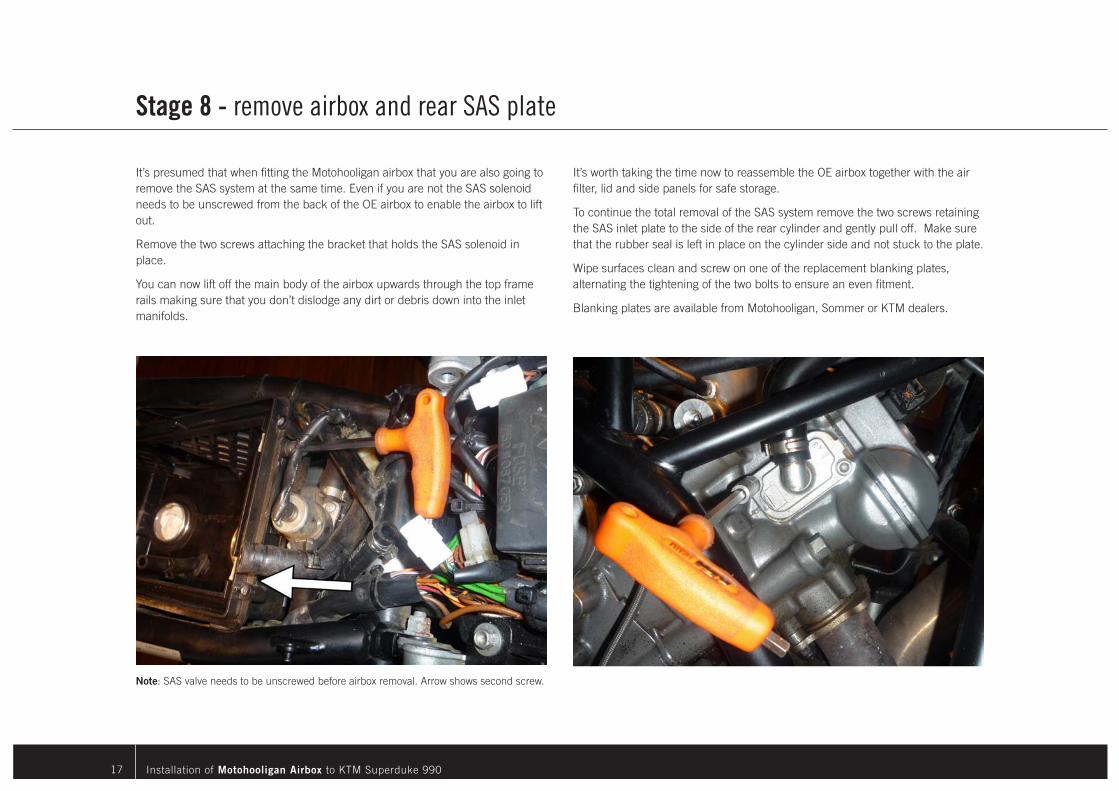
It’s presumed that when fitting the Motohooligan airbox that you are also going to remove the SAS system at the same time. Even if you are not the SAS solenoid needs to be unscrewed from the back of the OE airbox to enable the airbox to lift out.
Remove the two screws attaching the bracket that holds the SAS solenoid in place.
You can now lift off the main body of the airbox upwards through the top frame rails making sure that you don’t dislodge any dirt or debris down into the inlet manifolds.
Stage 8 - remove airbox and rear SAS plate
It’s worth taking the time now to reassemble the OE airbox together with the air filter, lid and side panels for safe storage.
To continue the total removal of the SAS system remove the two screws retaining the SAS inlet plate to the side of the rear cylinder and gently pull off. Make sure that the rubber seal is left in place on the cylinder side and not stuck to the plate.
Wipe surfaces clean and screw on one of the replacement blanking plates, alternating the tightening of the two bolts to ensure an even fitment.
Blanking plates are available from Motohooligan, Sommer or KTM dealers.
Note: SAS valve needs to be unscrewed before airbox removal. Arrow shows second screw.
Installation of Motohooligan Airbox to KTM Superduke 990 18
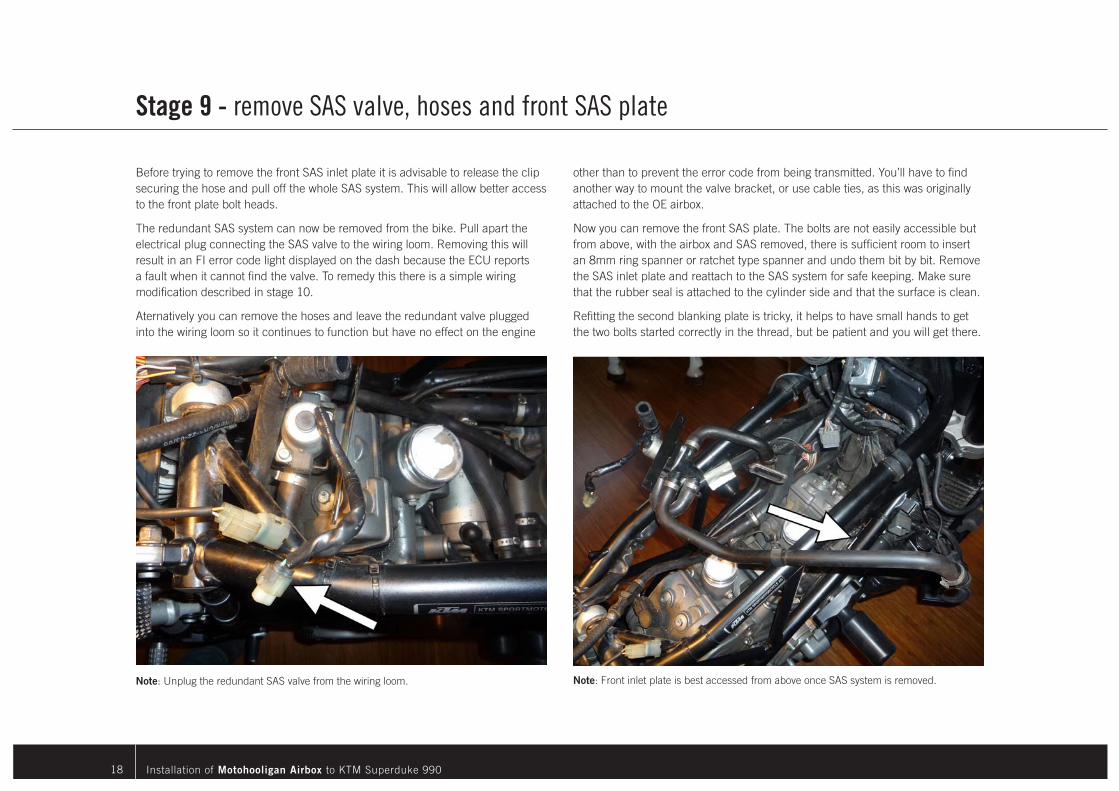
Before trying to remove the front SAS inlet plate it is advisable to release the clip securing the hose and pull off the whole SAS system. This will allow better access to the front plate bolt heads.
The redundant SAS system can now be removed from the bike. Pull apart the electrical plug connecting the SAS valve to the wiring loom. Removing this will result in an FI error code light displayed on the dash because the ECU reports a fault when it cannot find the valve. To remedy this there is a simple wiring modification described in stage 10.
Aternatively you can remove the hoses and leave the redundant valve plugged into the wiring loom so it continues to function but have no effect on the engine
Stage 9 - remove SAS valve, hoses and front SAS plate
other than to prevent the error code from being transmitted. You’ll have to find another way to mount the valve bracket, or use cable ties, as this was originally attached to the OE airbox.
Now you can remove the front SAS plate. The bolts are not easily accessible but from above, with the airbox and SAS removed, there is sufficient room to insert an 8mm ring spanner or ratchet type spanner and undo them bit by bit. Remove the SAS inlet plate and reattach to the SAS system for safe keeping. Make sure that the rubber seal is attached to the cylinder side and that the surface is clean.
Refitting the second blanking plate is tricky, it helps to have small hands to get the two bolts started correctly in the thread, but be patient and you will get there.
Note: Unplug the redundant SAS valve from the wiring loom. Note: Front inlet plate is best accessed from above once SAS system is removed.
Installation of Motohooligan Airbox to KTM Superduke 990 19
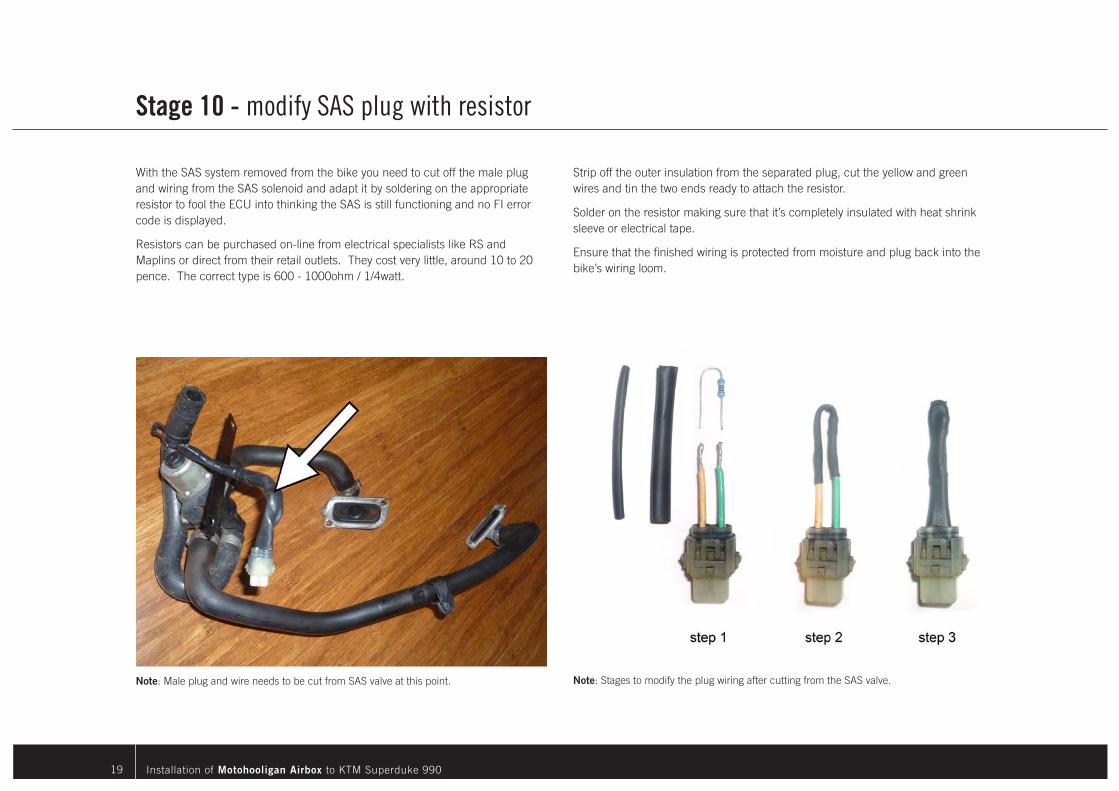
With the SAS system removed from the bike you need to cut off the male plug and wiring from the SAS solenoid and adapt it by soldering on the appropriate resistor to fool the ECU into thinking the SAS is still functioning and no FI error code is displayed.
Resistors can be purchased on-line from electrical specialists like RS and Maplins or direct from their retail outlets. They cost very little, around 10 to 20 pence. The correct type is 600 - 1000ohm / 1/4watt.
Stage 10 - modify SAS plug with resistor
Strip off the outer insulation from the separated plug, cut the yellow and green wires and tin the two ends ready to attach the resistor.
Solder on the resistor making sure that it’s completely insulated with heat shrink sleeve or electrical tape.
Ensure that the finished wiring is protected from moisture and plug back into the bike’s wiring loom.
Note: Male plug and wire needs to be cut from SAS valve at this point. Note: Stages to modify the plug wiring after cutting from the SAS valve.
Installation of Motohooligan Airbox to KTM Superduke 990 20
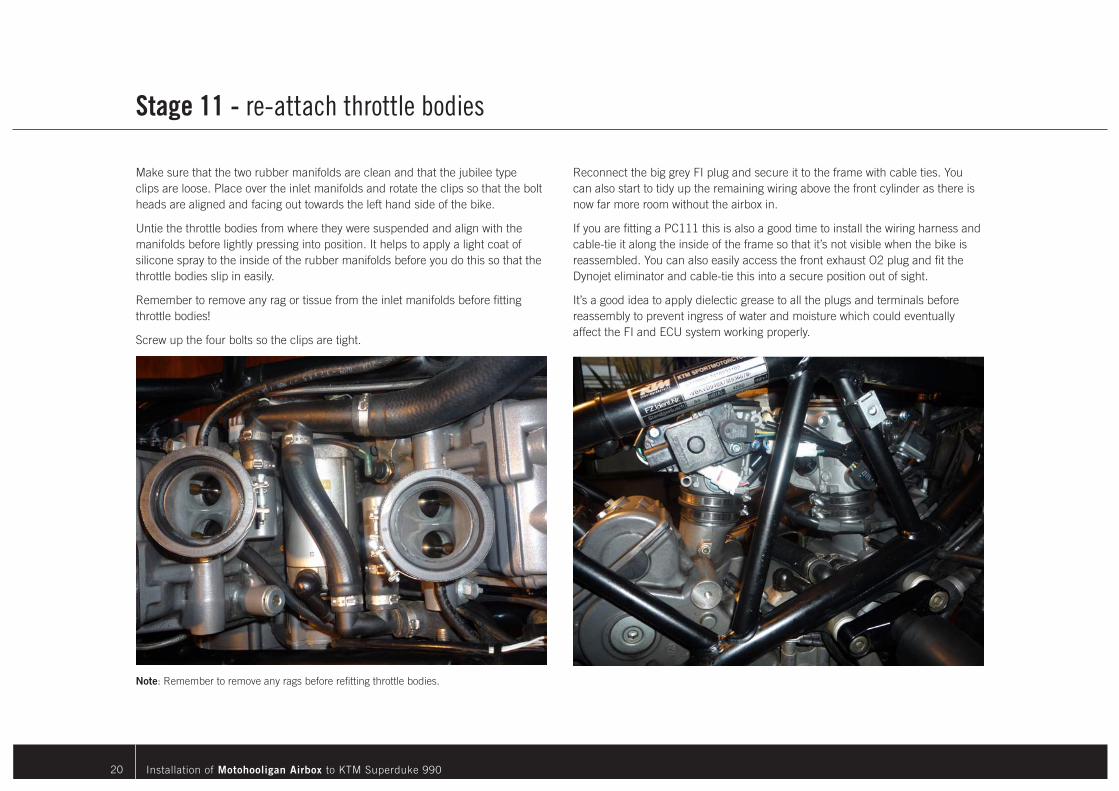
Make sure that the two rubber manifolds are clean and that the jubilee type clips are loose. Place over the inlet manifolds and rotate the clips so that the bolt heads are aligned and facing out towards the left hand side of the bike.
Untie the throttle bodies from where they were suspended and align with the manifolds before lightly pressing into position. It helps to apply a light coat of silicone spray to the inside of the rubber manifolds before you do this so that the throttle bodies slip in easily.
Remember to remove any rag or tissue from the inlet manifolds before fitting throttle bodies!
Screw up the four bolts so the clips are tight.
Stage 11 - re-attach throttle bodies
Reconnect the big grey FI plug and secure it to the frame with cable ties. You can also start to tidy up the remaining wiring above the front cylinder as there is now far more room without the airbox in.
If you are fitting a PC111 this is also a good time to install the wiring harness and cable-tie it along the inside of the frame so that it’s not visible when the bike is reassembled. You can also easily access the front exhaust O2 plug and fit the Dynojet eliminator and cable-tie this into a secure position out of sight.
It’s a good idea to apply dielectic grease to all the plugs and terminals before reassembly to prevent ingress of water and moisture which could eventually affect the FI and ECU system working properly.
Note: Remember to remove any rags before refitting throttle bodies.
Installation of Motohooligan Airbox to KTM Superduke 990 21
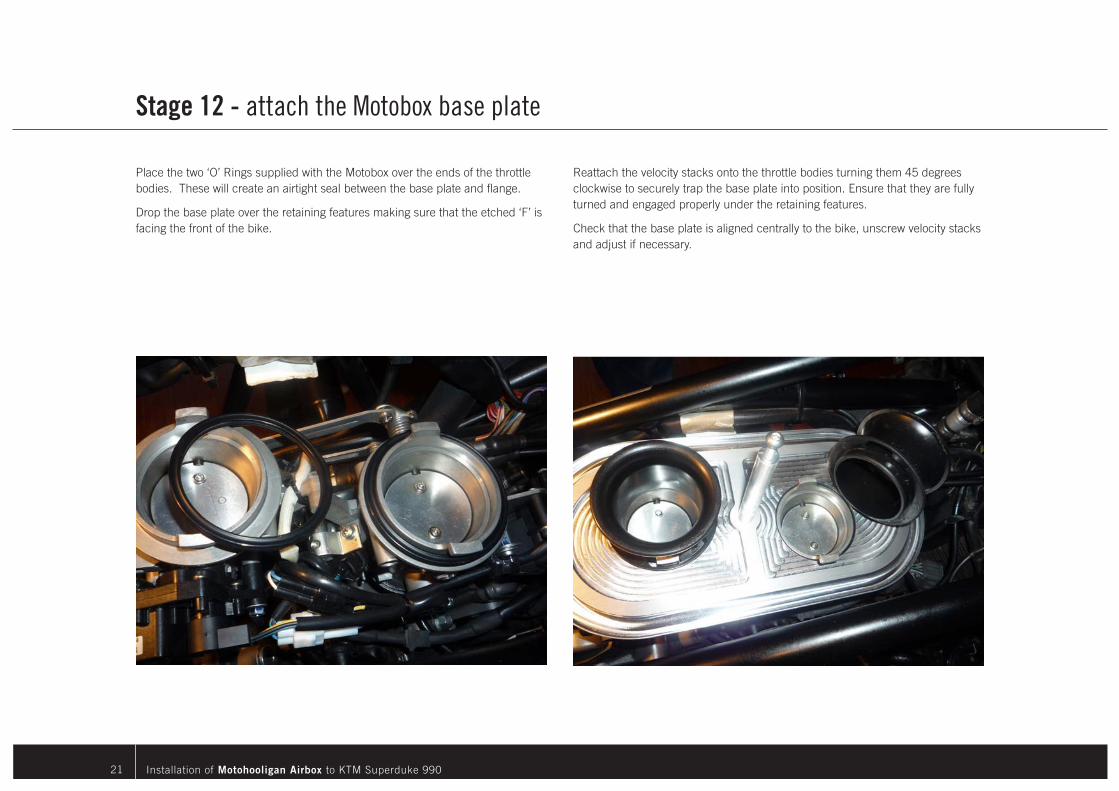
Place the two ‘O’ Rings supplied with the Motobox over the ends of the throttle bodies. These will create an airtight seal between the base plate and flange.
Drop the base plate over the retaining features making sure that the etched ‘F’ is facing the front of the bike.
Stage 12 - attach the Motobox base plate
Reattach the velocity stacks onto the throttle bodies turning them 45 degrees clockwise to securely trap the base plate into position. Ensure that they are fully turned and engaged properly under the retaining features.
Check that the base plate is aligned centrally to the bike, unscrew velocity stacks and adjust if necessary.
Installation of Motohooligan Airbox to KTM Superduke 990 22
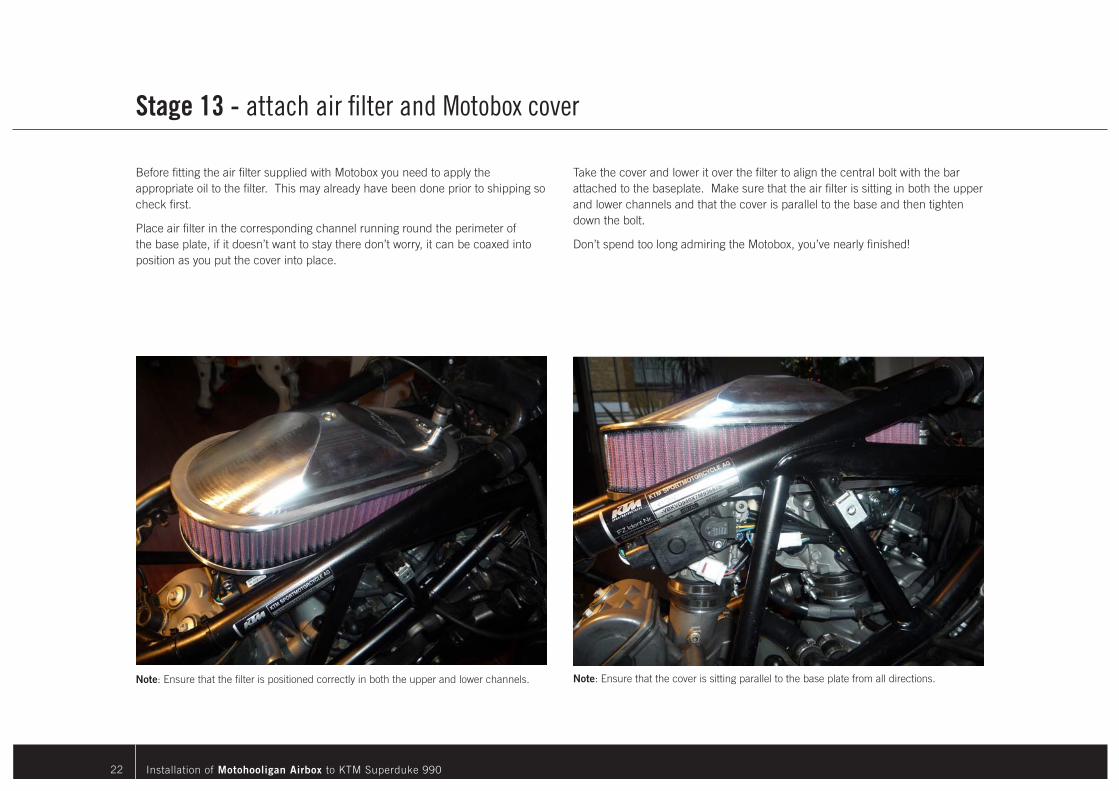
Before fitting the air filter supplied with Motobox you need to apply the appropriate oil to the filter. This may already have been done prior to shipping so check first.
Place air filter in the corresponding channel running round the perimeter of the base plate, if it doesn’t want to stay there don’t worry, it can be coaxed into position as you put the cover into place.
Stage 13 - attach air filter and Motobox cover
Take the cover and lower it over the filter to align the central bolt with the bar attached to the baseplate. Make sure that the air filter is sitting in both the upper and lower channels and that the cover is parallel to the base and then tighten down the bolt.
Don’t spend too long admiring the Motobox, you’ve nearly finished!
Note: Ensure that the filter is positioned correctly in both the upper and lower channels. Note: Ensure that the cover is sitting parallel to the base plate from all directions.
Installation of Motohooligan Airbox to KTM Superduke 990 23
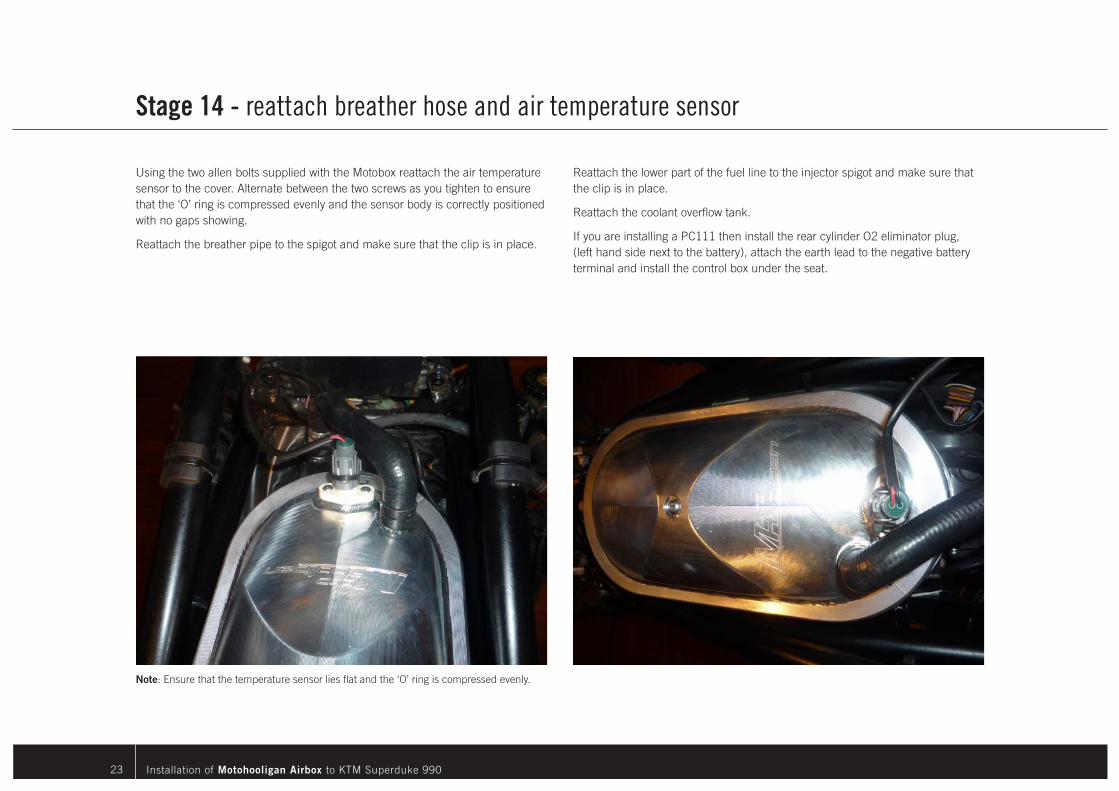
Using the two allen bolts supplied with the Motobox reattach the air temperature sensor to the cover. Alternate between the two screws as you tighten to ensure that the ‘O’ ring is compressed evenly and the sensor body is correctly positioned with no gaps showing.
Reattach the breather pipe to the spigot and make sure that the clip is in place.
Stage 14 - reattach breather hose and air temperature sensor
Reattach the lower part of the fuel line to the injector spigot and make sure that the clip is in place.
Reattach the coolant overflow tank.
If you are installing a PC111 then install the rear cylinder O2 eliminator plug, (left hand side next to the battery), attach the earth lead to the negative battery terminal and install the control box under the seat.
Note: Ensure that the temperature sensor lies flat and the ‘O’ ring is compressed evenly.
Installation of Motohooligan Airbox to KTM Superduke 990 24
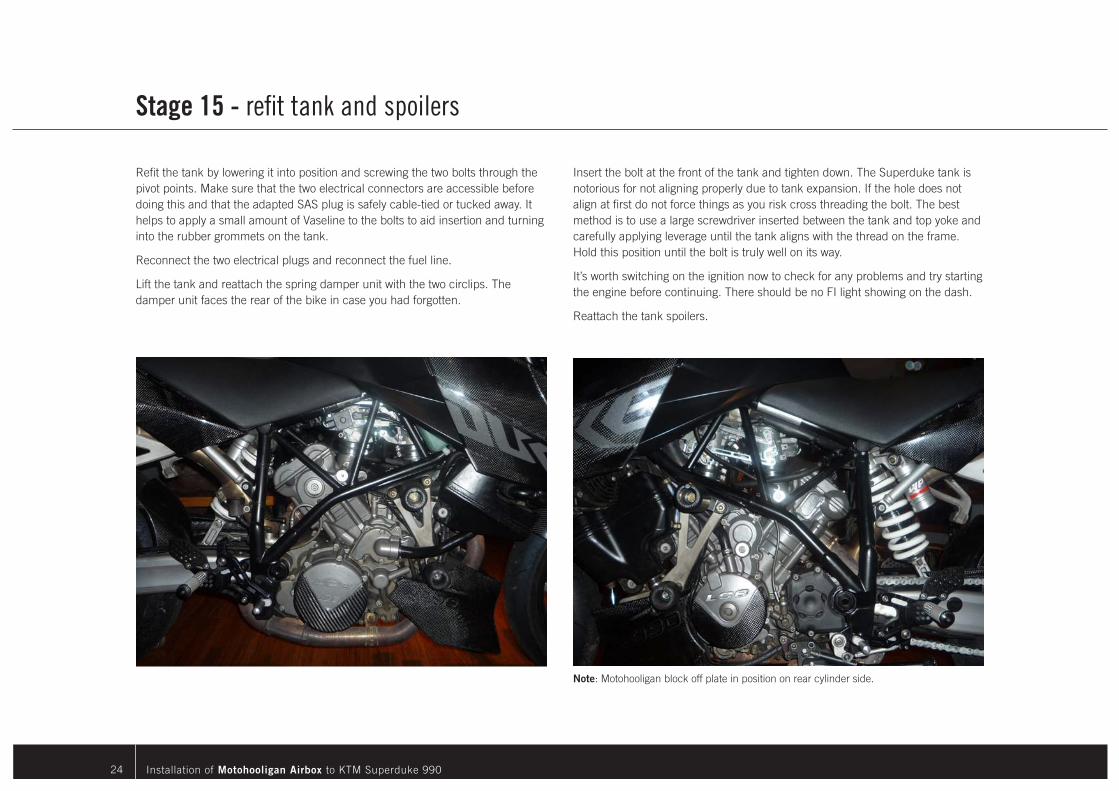
Refit the tank by lowering it into position and screwing the two bolts through the pivot points. Make sure that the two electrical connectors are accessible before doing this and that the adapted SAS plug is safely cable-tied or tucked away. It helps to apply a small amount of Vaseline to the bolts to aid insertion and turning into the rubber grommets on the tank.
Reconnect the two electrical plugs and reconnect the fuel line.
Lift the tank and reattach the spring damper unit with the two circlips. The damper unit faces the rear of the bike in case you had forgotten.
Stage 15 - refit tank and spoilers
Insert the bolt at the front of the tank and tighten down. The Superduke tank is notorious for not aligning properly due to tank expansion. If the hole does not align at first do not force things as you risk cross threading the bolt. The best method is to use a large screwdriver inserted between the tank and top yoke and carefully applying leverage until the tank aligns with the thread on the frame. Hold this position until the bolt is truly well on its way.
It’s worth switching on the ignition now to check for any problems and try starting the engine before continuing. There should be no FI light showing on the dash.
Reattach the tank spoilers.
Note: Motohooligan block off plate in position on rear cylinder side.
Installation of Motohooligan Airbox to KTM Superduke 990 25
Go for a test ride and enjoy
Installation of Motohooligan Airbox to KTM Superduke 990 26
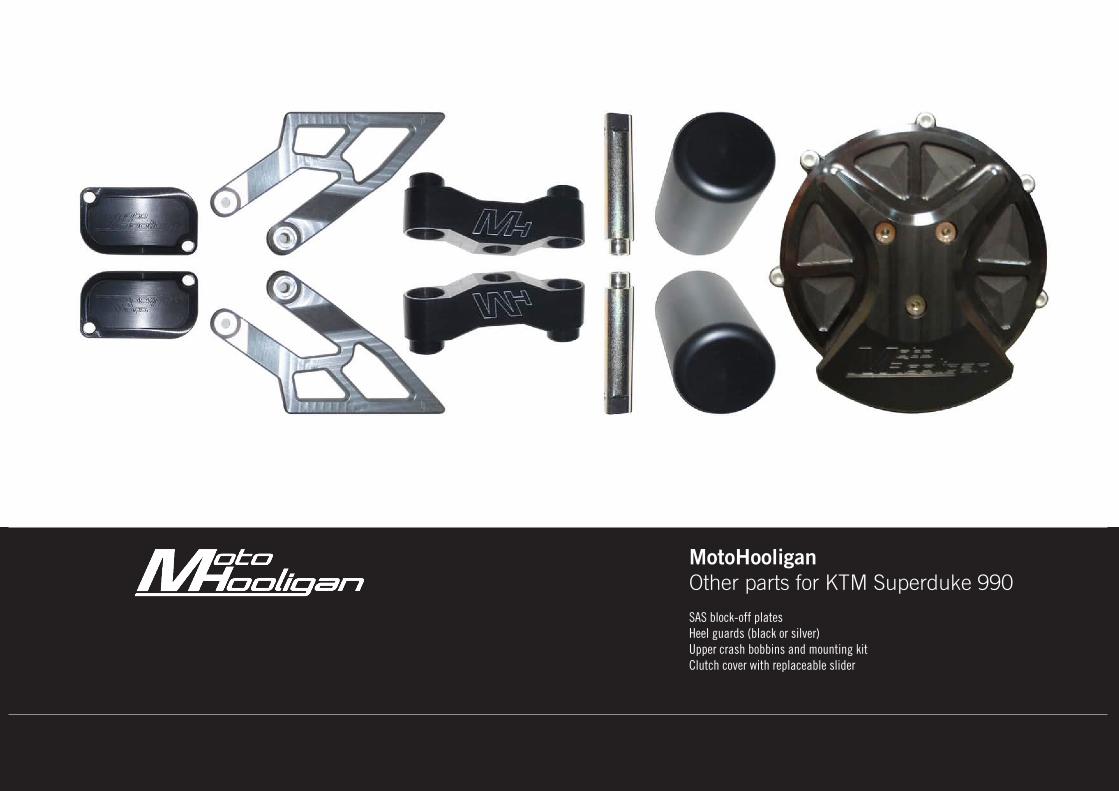
MotoHooligan Other parts for KTM Superduke 990
SAS block-off platesHeel guards (black or silver)Upper crash bobbins and mounting kitClutch cover with replaceable slider
Installation of Motohooligan Airbox to KTM Superduke 990 27
Design by [email protected]
Thanks to:The majority of information contained within this document was found on the Superduke Forum within the many threads covering the topic of airbox modifications, fueling, mapping and generally improving the Superduke performance.
There are hundreds of comments and views, far too many people to mention, but a few stand out as valuable contributors to the debate and their knowledge, enthusiasm and willingness to share their experiences have made this possible.
Motohooligan, Dr.F, Plipton, jehadjoe, The Joker, smoky, Joely Boy, KTMax, Gregz, ktmguy, bigash, Colonel_Klinck, Twisted Jester