Embed Size (px)
Citation preview
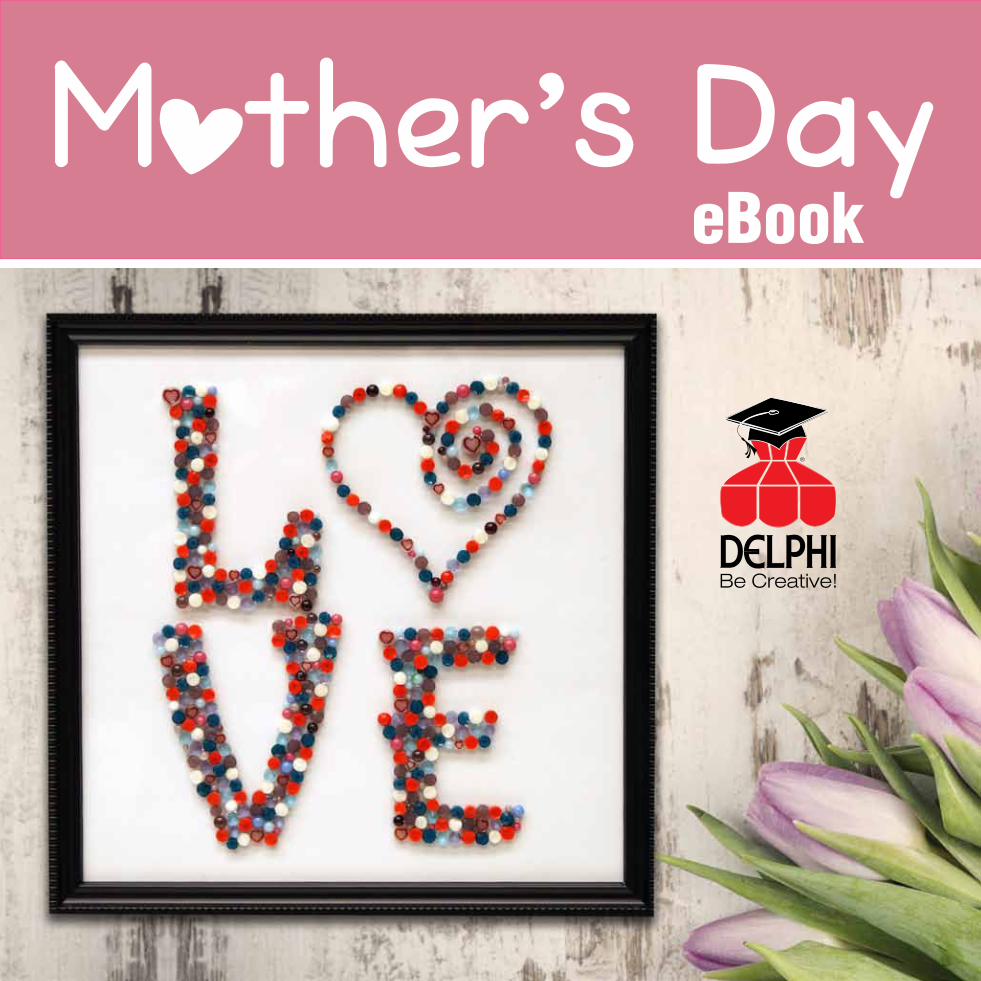
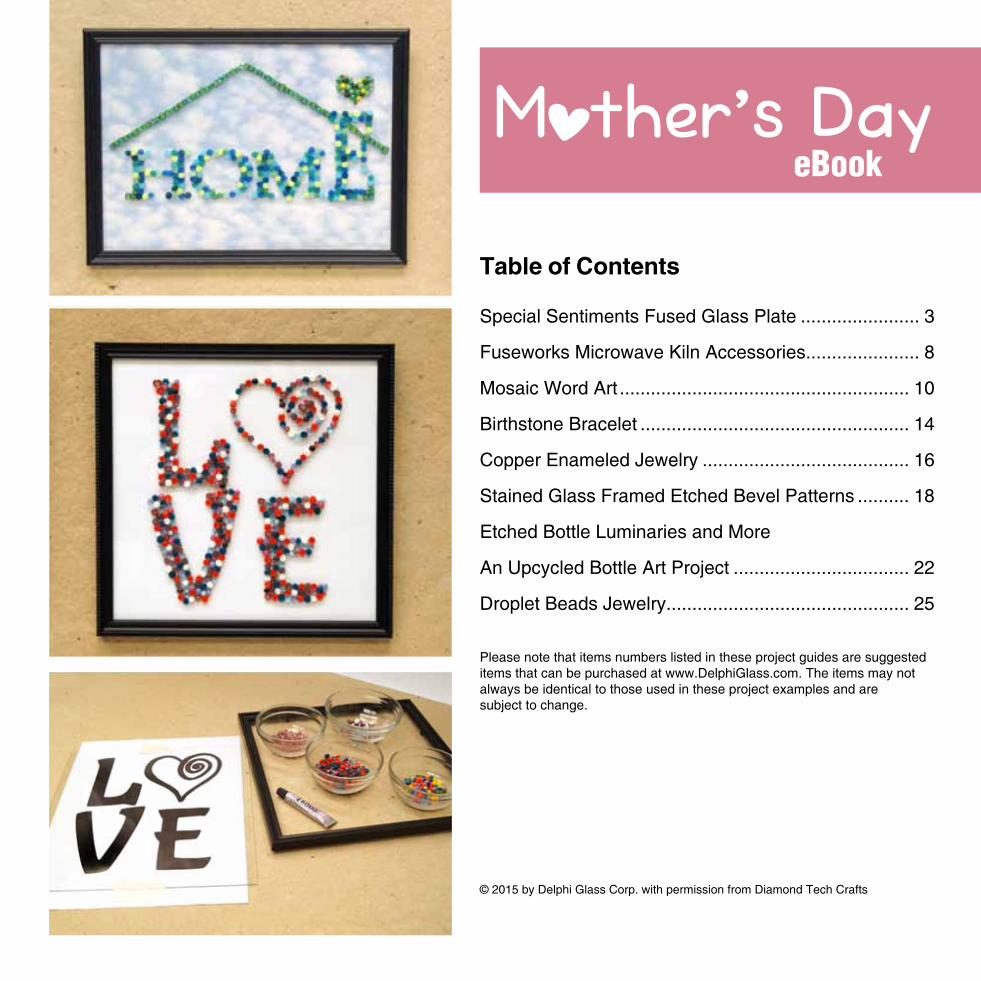
Mother,s DayeBook
Special Sentiments Fused Glass Plate ....................... 3
Fuseworks Microwave Kiln Accessories...................... 8
Mosaic Word Art ........................................................ 10
Birthstone Bracelet .................................................... 14
Copper Enameled Jewelry ........................................ 16
Stained Glass Framed Etched Bevel Patterns .......... 18
Etched Bottle Luminaries and More
An Upcycled Bottle Art Project .................................. 22
Droplet Beads Jewelry............................................... 25
Please note that items numbers listed in these project guides are suggested items that can be purchased at www.DelphiGlass.com. The items may not always be identical to those used in these project examples and are subject to change.
© 2015 by Delphi Glass Corp. with permission from Diamond Tech Crafts
Table of Contents
eBookMother,s Day
DELPHIGLASS.COM
Project Help Line • 800.821.9450© 2015 Delphi Glass Corp.
3
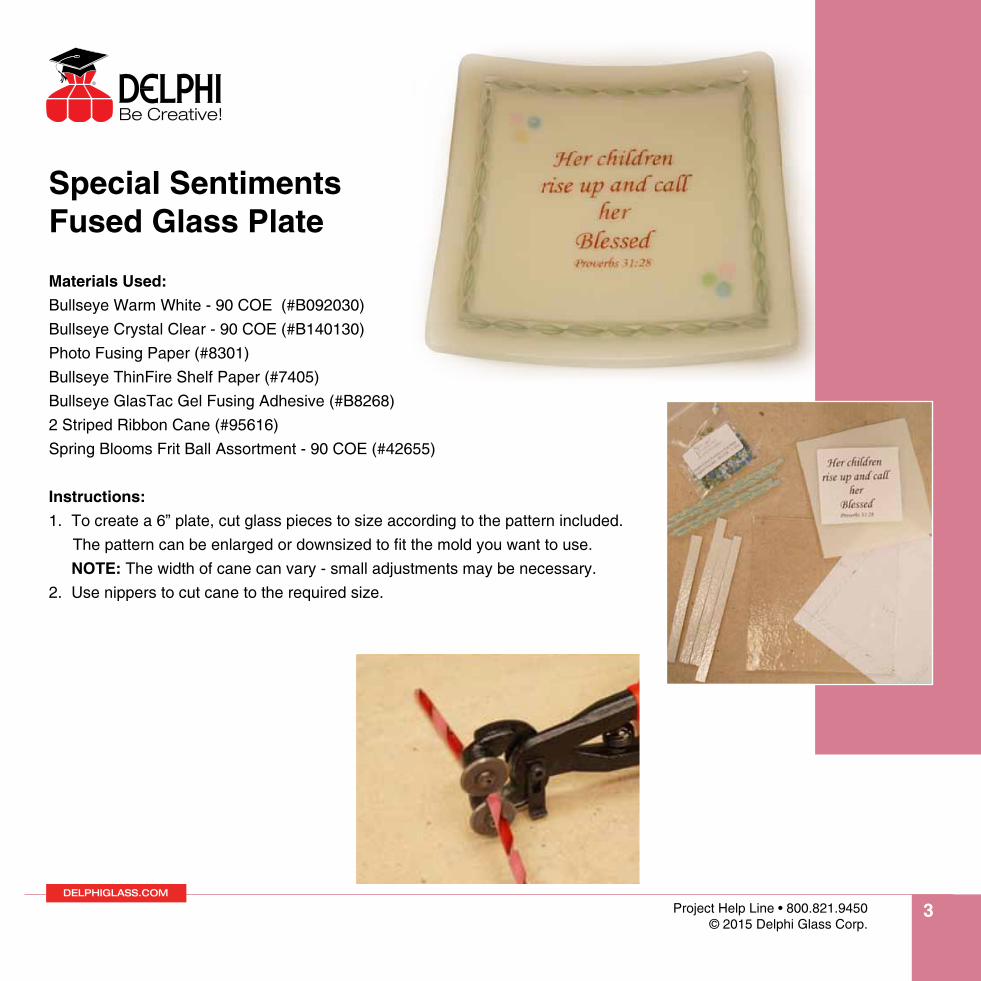
Special Sentiments Fused Glass Plate
Materials Used:Bullseye Warm White - 90 COE (#B092030)Bullseye Crystal Clear - 90 COE (#B140130)Photo Fusing Paper (#8301)Bullseye ThinFire Shelf Paper (#7405)Bullseye GlasTac Gel Fusing Adhesive (#B8268)2 Striped Ribbon Cane (#95616)Spring Blooms Frit Ball Assortment - 90 COE (#42655)
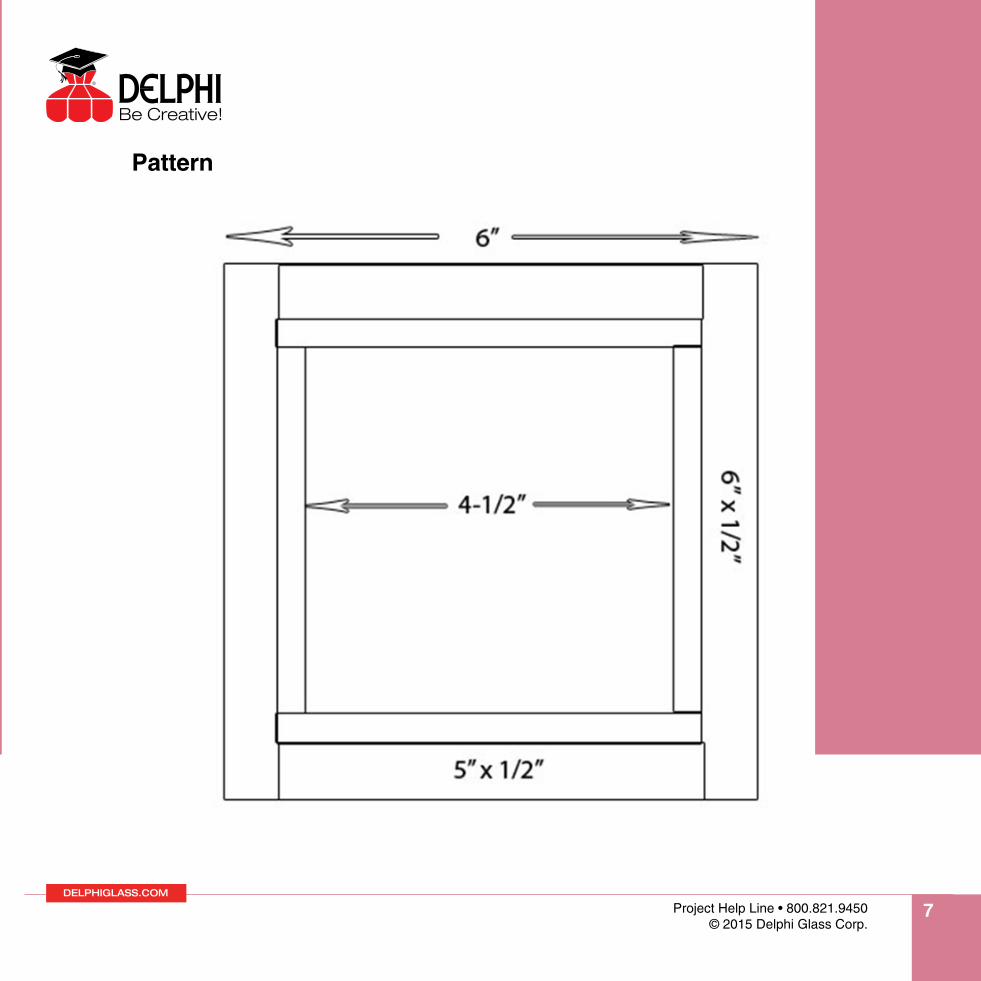
Instructions:1. To create a 6” plate, cut glass pieces to size according to the pattern included.
The pattern can be enlarged or downsized to fit the mold you want to use. NOTE: The width of cane can vary - small adjustments may be necessary. 2. Use nippers to cut cane to the required size.
DELPHIGLASS.COM
Project Help Line • 800.821.9450© 2015 Delphi Glass Corp.
4
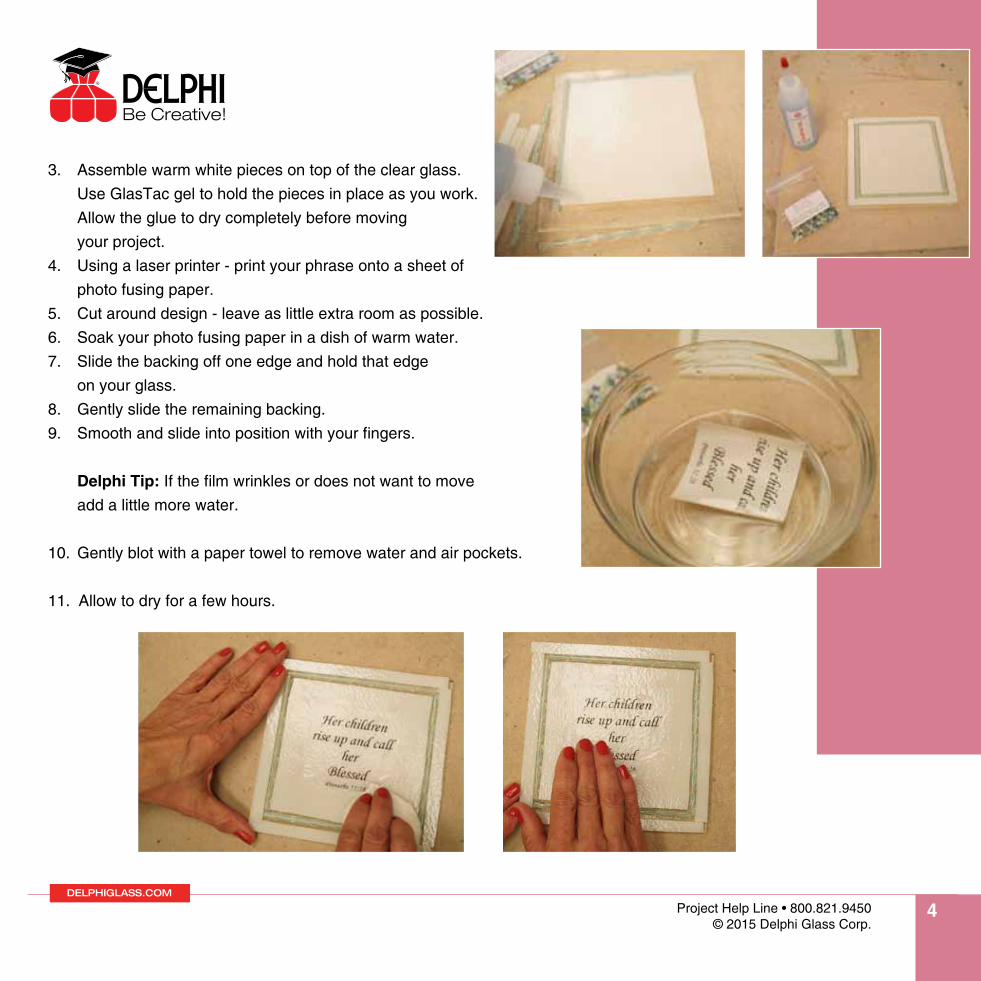
3. Assemble warm white pieces on top of the clear glass. Use GlasTac gel to hold the pieces in place as you work. Allow the glue to dry completely before moving
your project. 4. Using a laser printer - print your phrase onto a sheet of
photo fusing paper. 5. Cut around design - leave as little extra room as possible. 6. Soak your photo fusing paper in a dish of warm water. 7. Slide the backing off one edge and hold that edge on your glass. 8. Gently slide the remaining backing. 9. Smooth and slide into position with your fingers.
Delphi Tip: If the film wrinkles or does not want to move add a little more water.
10. Gently blot with a paper towel to remove water and air pockets.
11. Allow to dry for a few hours.
DELPHIGLASS.COM
Project Help Line • 800.821.9450© 2015 Delphi Glass Corp.
5
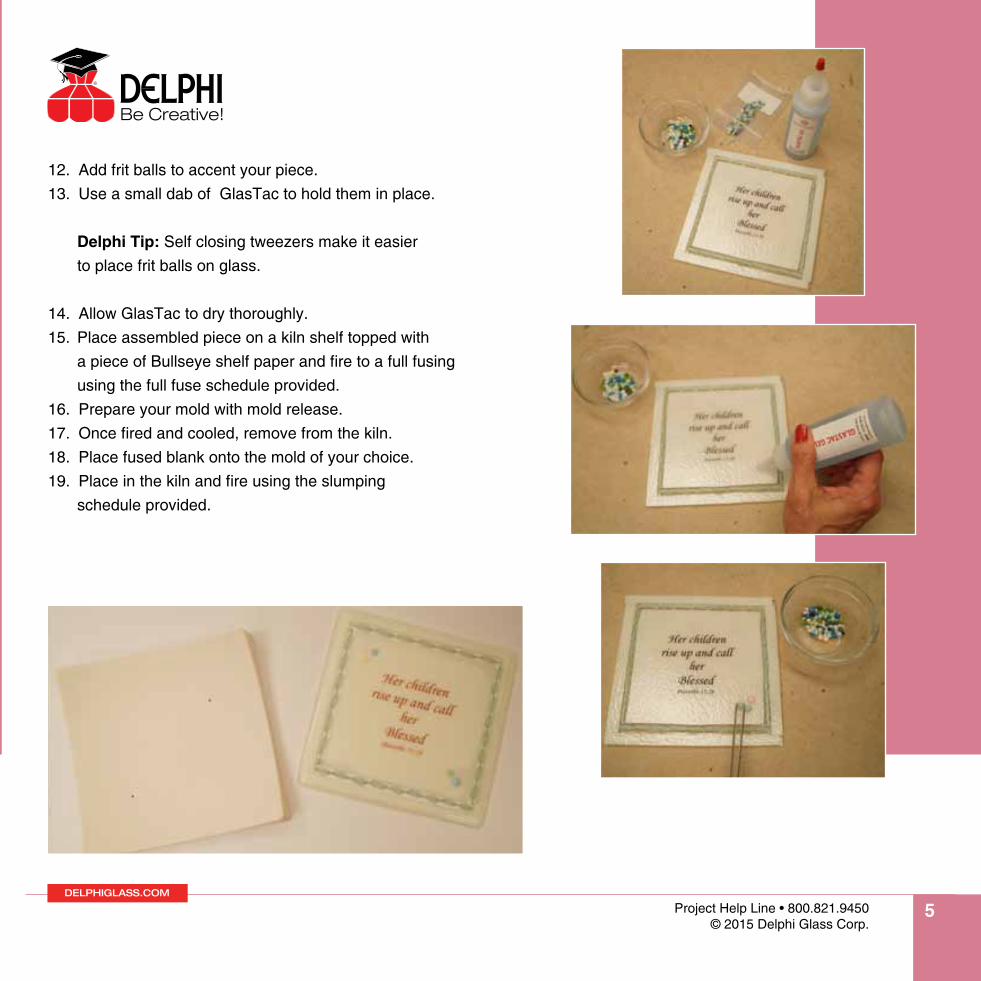
12. Add frit balls to accent your piece. 13. Use a small dab of GlasTac to hold them in place.
Delphi Tip: Self closing tweezers make it easier to place frit balls on glass.
14. Allow GlasTac to dry thoroughly. 15. Place assembled piece on a kiln shelf topped with a piece of Bullseye shelf paper and fire to a full fusing
using the full fuse schedule provided. 16. Prepare your mold with mold release. 17. Once fired and cooled, remove from the kiln. 18. Place fused blank onto the mold of your choice. 19. Place in the kiln and fire using the slumping schedule provided.
DELPHIGLASS.COM
Project Help Line • 800.821.9450© 2015 Delphi Glass Corp.
6
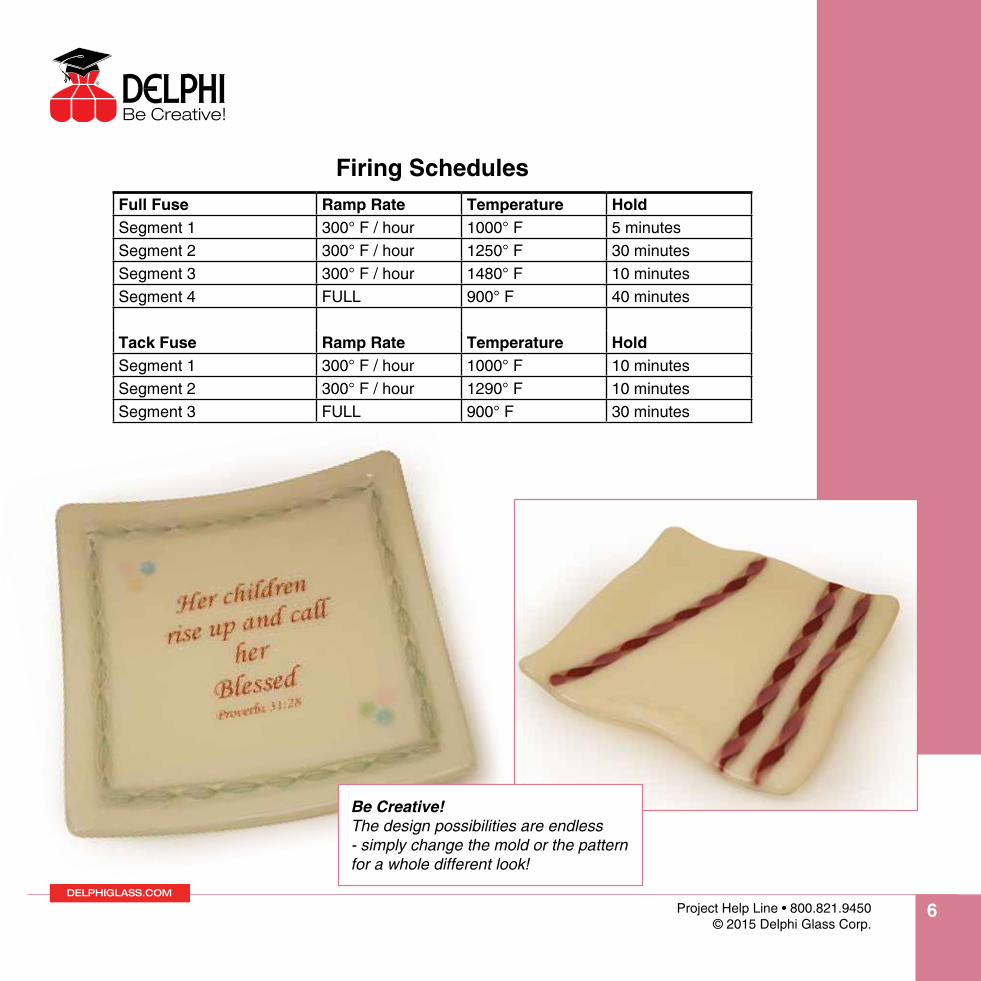
Firing SchedulesFull Fuse Ramp Rate Temperature HoldSegment 1 300° F / hour 1000° F 5 minutes Segment 2 300° F / hour 1250° F 30 minutes Segment 3 300° F / hour 1480° F 10 minutesSegment 4 FULL 900° F 40 minutes
Tack Fuse Ramp Rate Temperature HoldSegment 1 300° F / hour 1000° F 10 minutes Segment 2 300° F / hour 1290° F 10 minutes Segment 3 FULL 900° F 30 minutes
Be Creative! The design possibilities are endless - simply change the mold or the pattern for a whole different look!
DELPHIGLASS.COM
Project Help Line • 800.821.9450© 2015 Delphi Glass Corp.
7
Pattern
DELPHIGLASS.COM
8
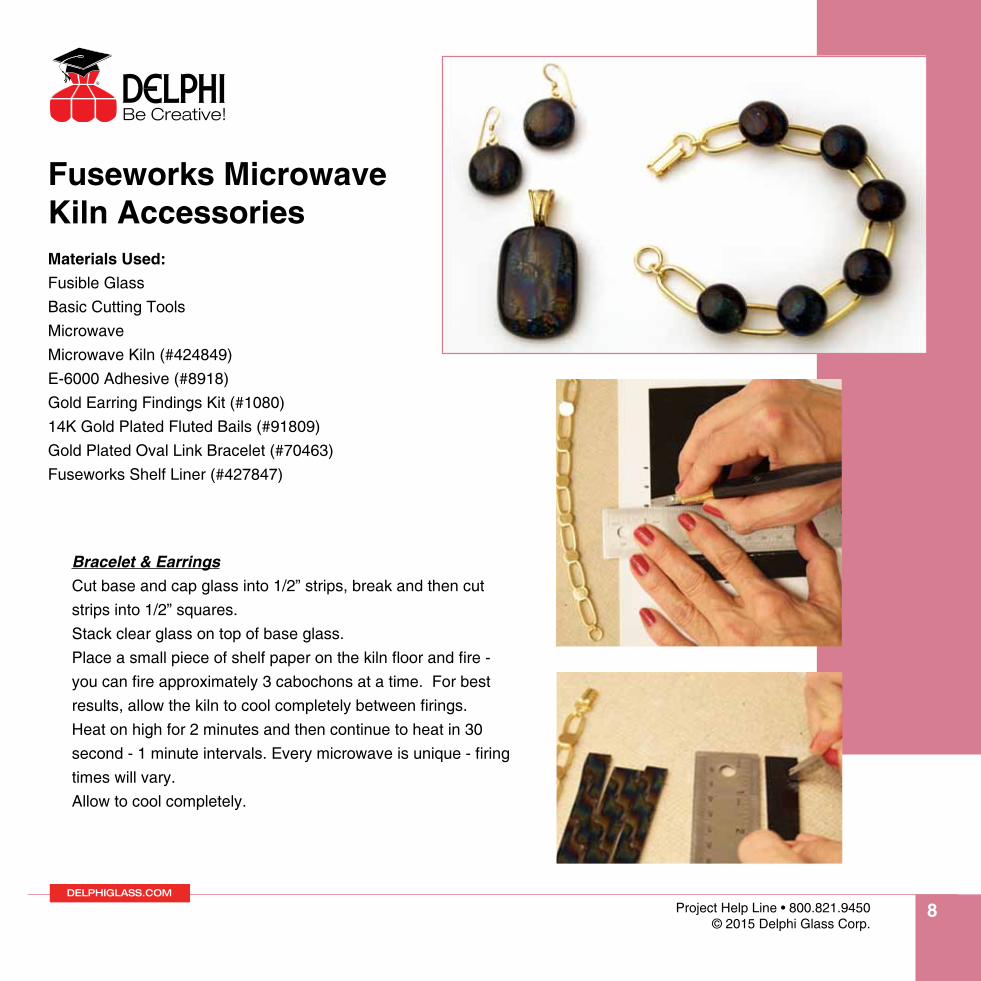
Fuseworks Microwave Kiln Accessories Materials Used:Fusible Glass Basic Cutting Tools Microwave Microwave Kiln (#424849)E-6000 Adhesive (#8918)Gold Earring Findings Kit (#1080)14K Gold Plated Fluted Bails (#91809)Gold Plated Oval Link Bracelet (#70463)Fuseworks Shelf Liner (#427847)
Project Help Line • 800.821.9450© 2015 Delphi Glass Corp.
Bracelet & EarringsCut base and cap glass into 1/2” strips, break and then cut strips into 1/2” squares. Stack clear glass on top of base glass. Place a small piece of shelf paper on the kiln floor and fire - you can fire approximately 3 cabochons at a time. For best results, allow the kiln to cool completely between firings.Heat on high for 2 minutes and then continue to heat in 30 second - 1 minute intervals. Every microwave is unique - firing times will vary.Allow to cool completely.
DELPHIGLASS.COM
Project Help Line • 800.821.9450© 2015 Delphi Glass Corp.
9
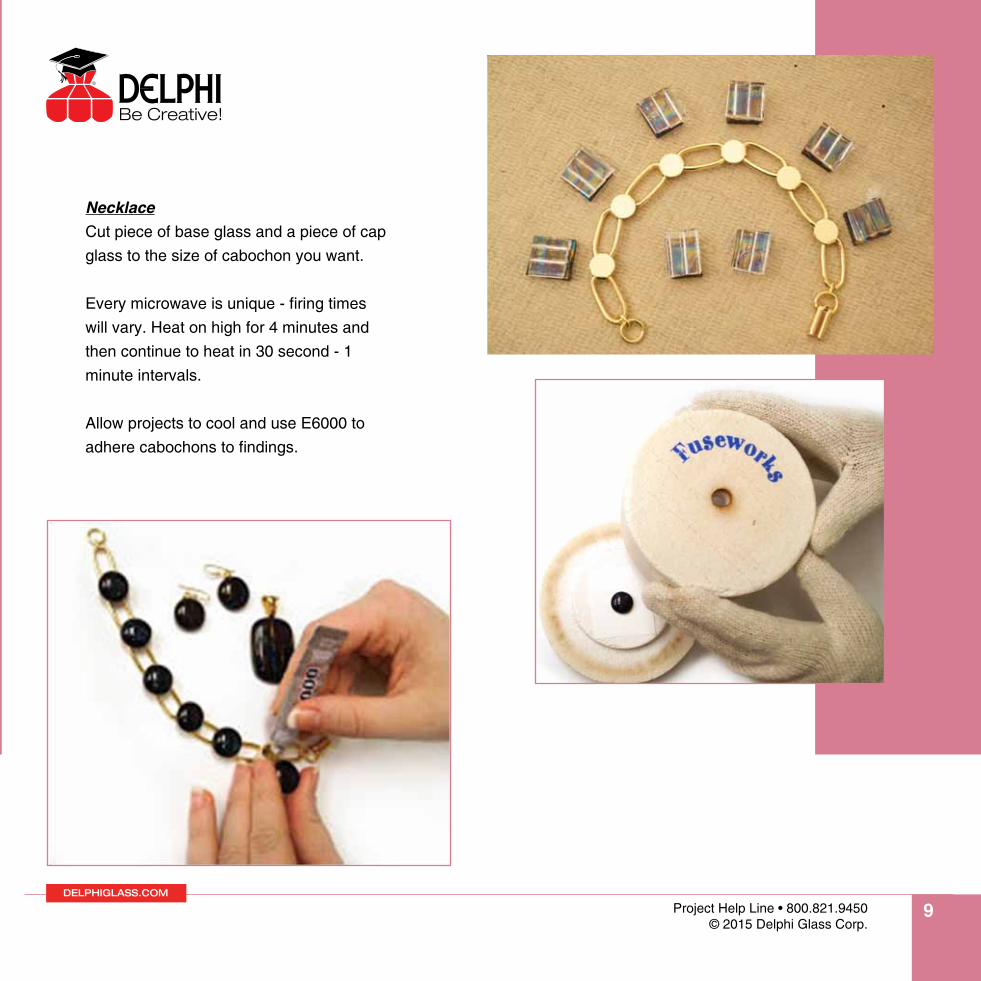
NecklaceCut piece of base glass and a piece of cap glass to the size of cabochon you want.
Every microwave is unique - firing times will vary. Heat on high for 4 minutes and then continue to heat in 30 second - 1 minute intervals.
Allow projects to cool and use E6000 to adhere cabochons to findings.
DELPHIGLASS.COM
Project Help Line • 800.821.9450© 2015 Delphi Glass Corp.
10
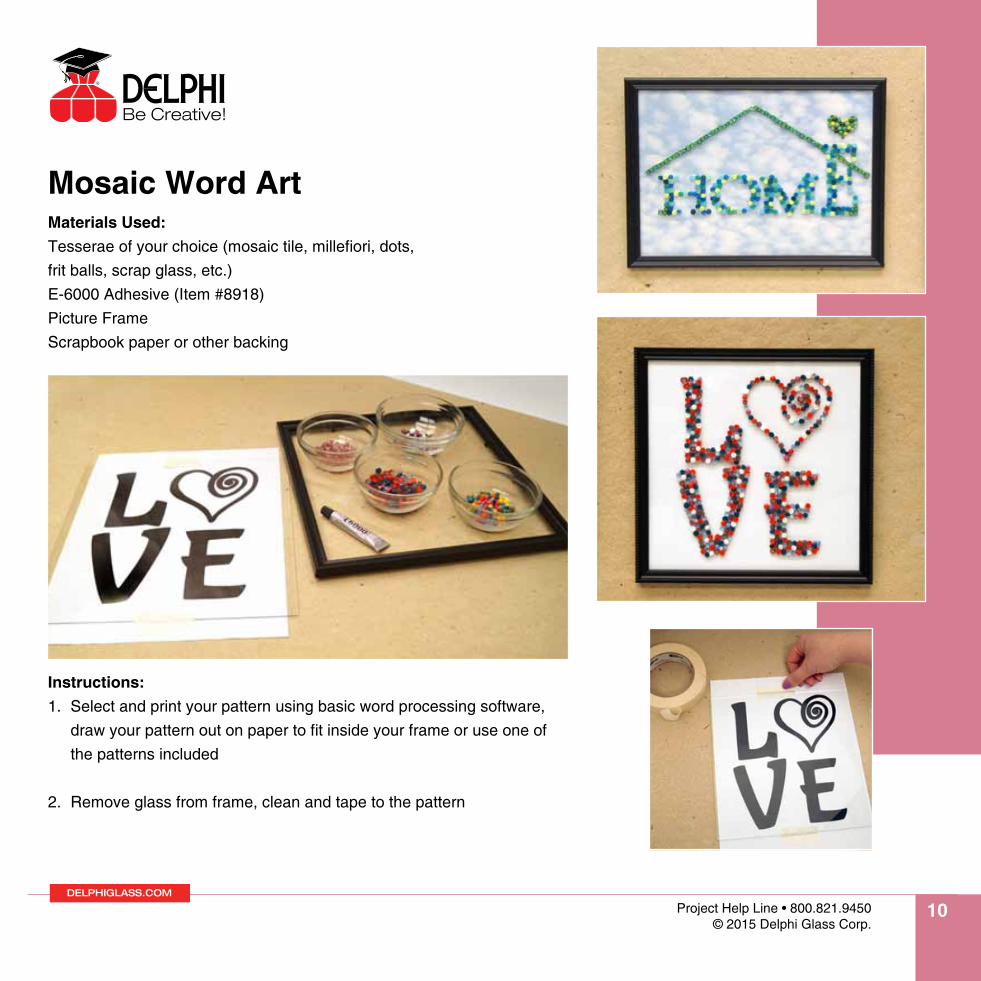
Mosaic Word ArtMaterials Used:Tesserae of your choice (mosaic tile, millefiori, dots, frit balls, scrap glass, etc.) E-6000 Adhesive (Item #8918) Picture Frame Scrapbook paper or other backing
Instructions: 1. Select and print your pattern using basic word processing software,
draw your pattern out on paper to fit inside your frame or use one of the patterns included
2. Remove glass from frame, clean and tape to the pattern
DELPHIGLASS.COM
Project Help Line • 800.821.9450© 2015 Delphi Glass Corp.
11
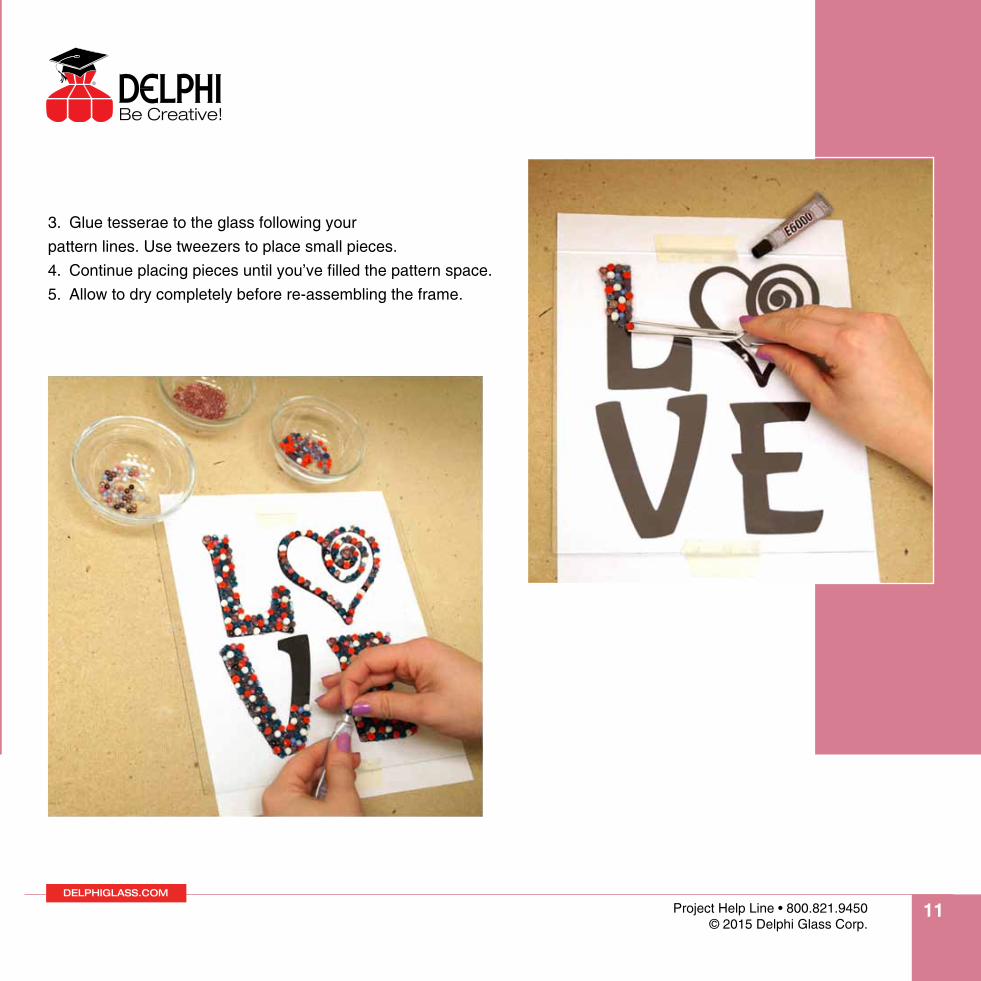
3. Glue tesserae to the glass following your pattern lines. Use tweezers to place small pieces.4. Continue placing pieces until you’ve filled the pattern space. 5. Allow to dry completely before re-assembling the frame.
DELPHIGLASS.COM
Project Help Line • 800.821.9450© 2015 Delphi Glass Corp.
12
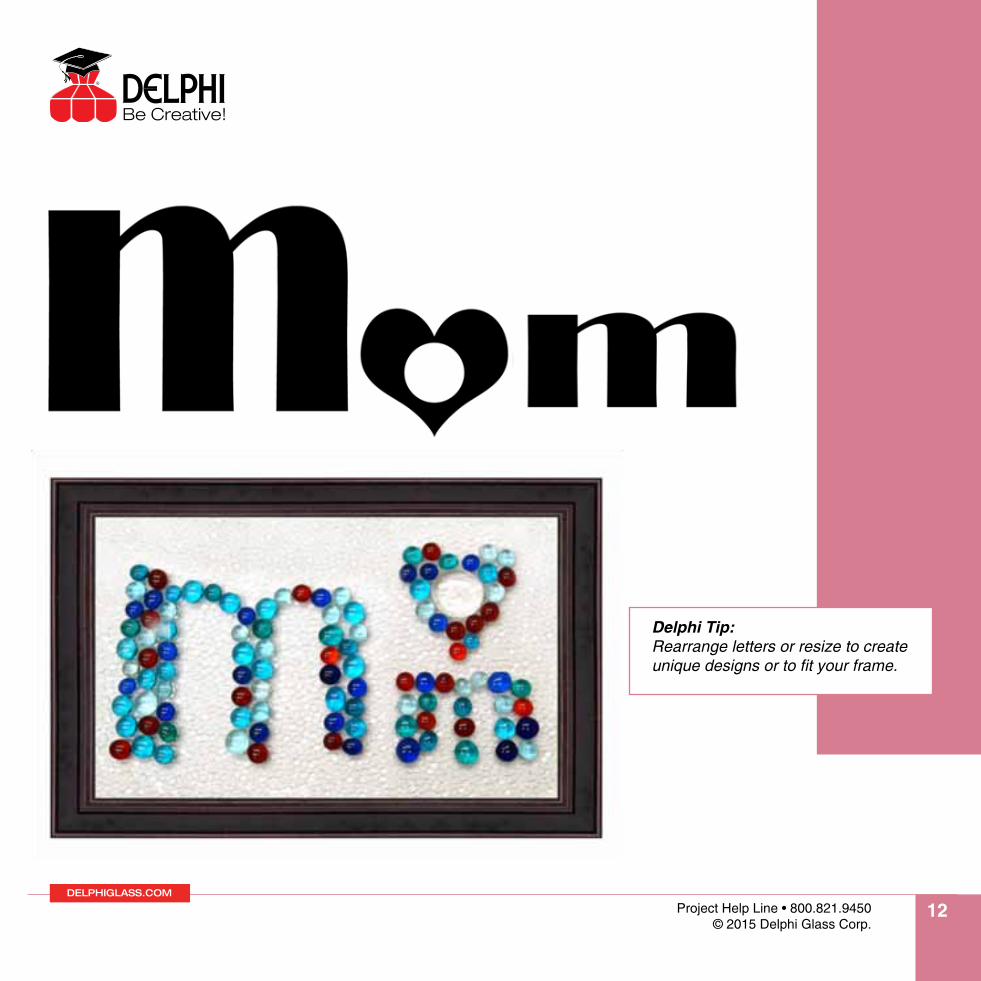
Delphi Tip: Rearrange letters or resize to create unique designs or to fit your frame.

DELPHIGLASS.COM
Project Help Line • 800.821.9450© 2015 Delphi Glass Corp.
13

DELPHIGLASS.COM
Project Help Line • 800.821.9450© 2015 Delphi Glass Corp.
14
Birthstone Bracelet Make a beautiful bracelet that Mom will treasure for years to come!
Materials:PMC+ Metal Clay, 18 gm (#67002)Texture Sheet Set (#94501)3/8” Pattern Cutter Set (#68705) 20 Gauge Fine Silver Wire (#63240)Link Bracelet (#70466) Fire & Ice Cubic Zirconia Assortment (#67054)
Instructions:1. Roll clay out on selected texture sheet so it is 4 playing cards thick. 2. Flip rolled clay over on work surface with the texture side up. Use the tear drop pattern cutter to cut out 8 petals. Remove excess clap and wrap to prevent drying. 3. Position 4 of the petals, pointed side in, on work surface. Paste ends. 4. Place additional 4 petals, pointed side in and staggered, on top. Press into paste to secure. 5. Use thin straws or skewers to prop and curl top petals. 6. Press the CZ of your choice into the center so that the clay captures the widest part of the CZ. Set aside to dry.
DELPHIGLASS.COM
Project Help Line • 800.821.9450© 2015 Delphi Glass Corp.
15
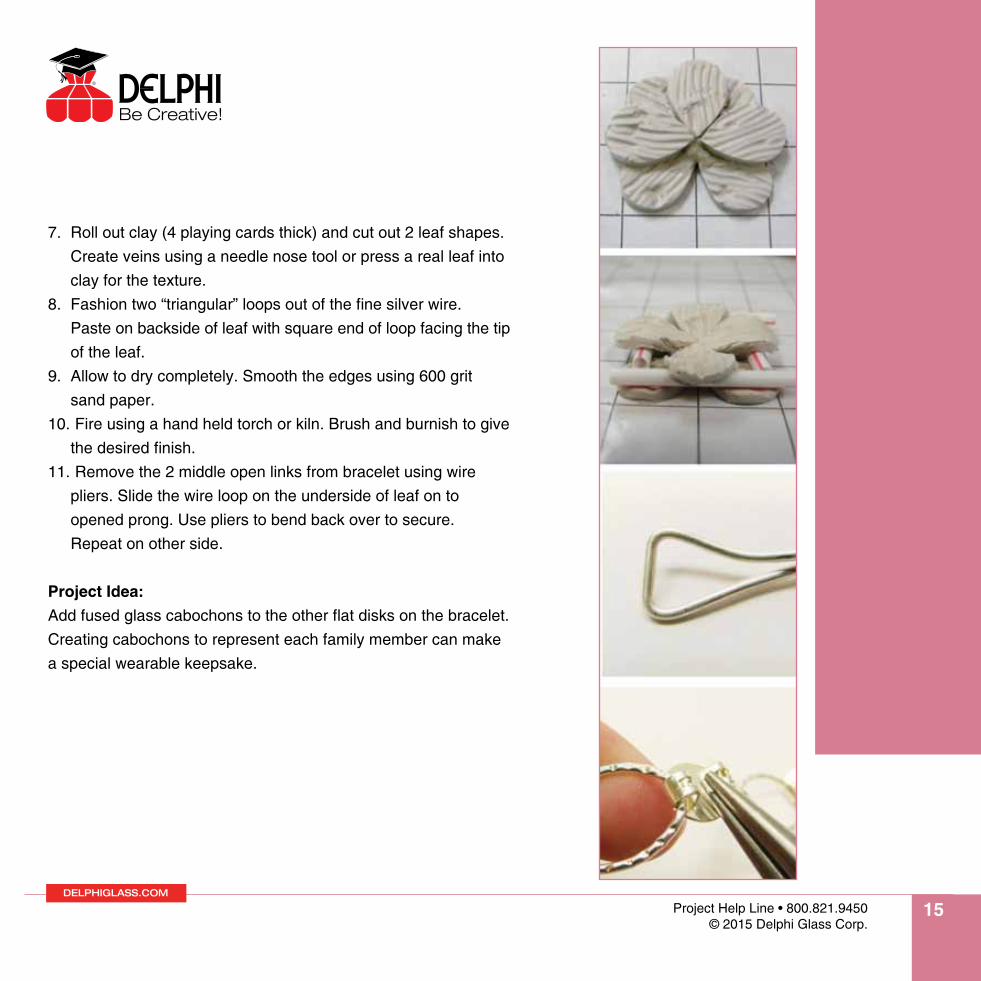
7. Roll out clay (4 playing cards thick) and cut out 2 leaf shapes. Create veins using a needle nose tool or press a real leaf into clay for the texture. 8. Fashion two “triangular” loops out of the fine silver wire. Paste on backside of leaf with square end of loop facing the tip of the leaf. 9. Allow to dry completely. Smooth the edges using 600 grit sand paper. 10. Fire using a hand held torch or kiln. Brush and burnish to give the desired finish. 11. Remove the 2 middle open links from bracelet using wire pliers. Slide the wire loop on the underside of leaf on to opened prong. Use pliers to bend back over to secure. Repeat on other side.
Project Idea: Add fused glass cabochons to the other flat disks on the bracelet. Creating cabochons to represent each family member can make a special wearable keepsake.
DELPHIGLASS.COM
Project Help Line • 800.821.9450© 2015 Delphi Glass Corp.
16
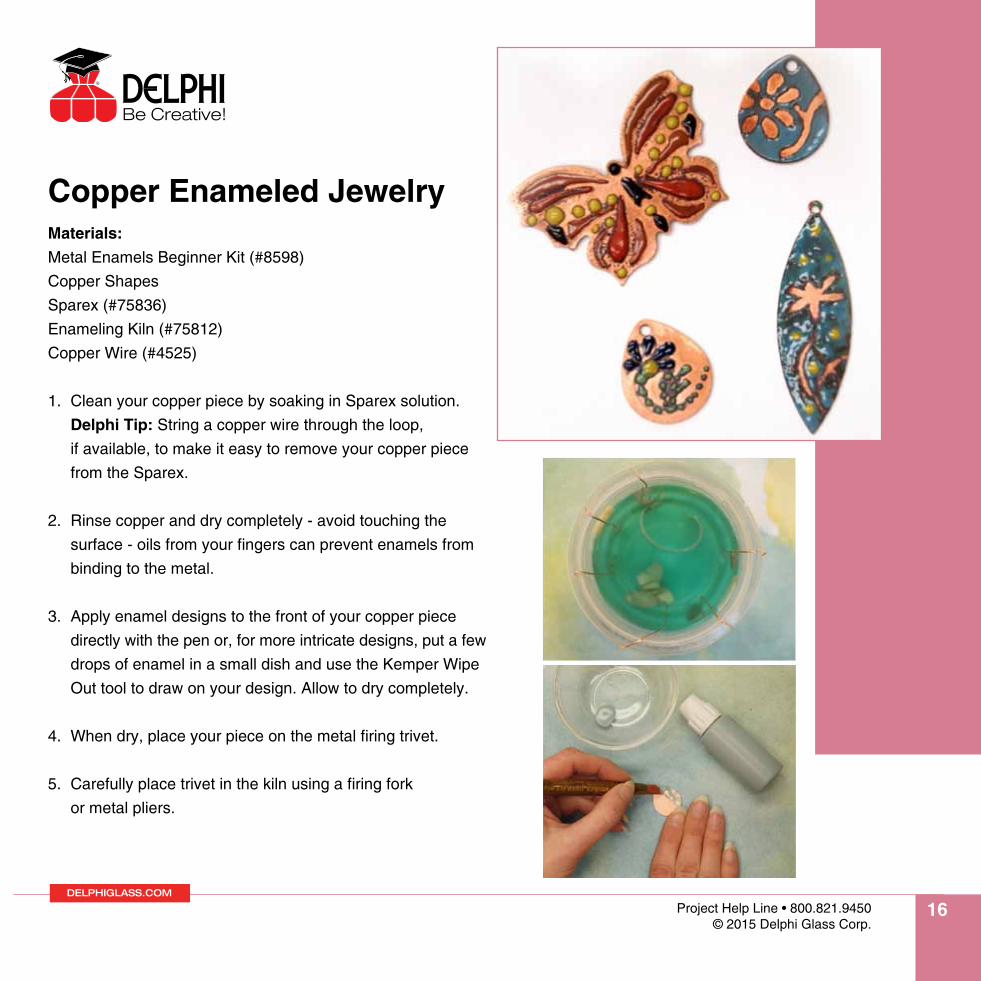
Copper Enameled Jewelry Materials:Metal Enamels Beginner Kit (#8598)Copper Shapes Sparex (#75836)Enameling Kiln (#75812)Copper Wire (#4525)
1. Clean your copper piece by soaking in Sparex solution. Delphi Tip: String a copper wire through the loop, if available, to make it easy to remove your copper piece from the Sparex.
2. Rinse copper and dry completely - avoid touching the surface - oils from your fingers can prevent enamels from binding to the metal.
3. Apply enamel designs to the front of your copper piece directly with the pen or, for more intricate designs, put a few drops of enamel in a small dish and use the Kemper Wipe Out tool to draw on your design. Allow to dry completely.
4. When dry, place your piece on the metal firing trivet.
5. Carefully place trivet in the kiln using a firing fork or metal pliers.
DELPHIGLASS.COM
Project Help Line • 800.821.9450© 2015 Delphi Glass Corp.
17
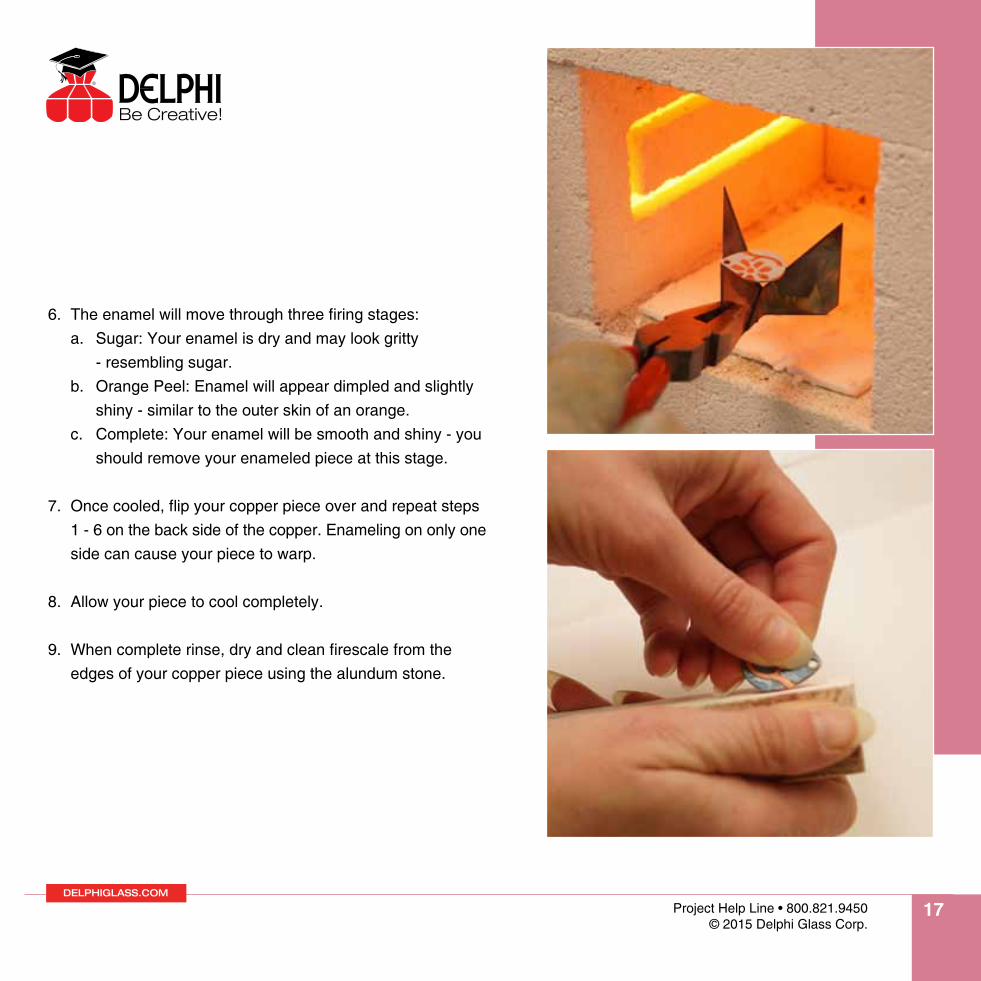
6. The enamel will move through three firing stages: a. Sugar: Your enamel is dry and may look gritty - resembling sugar. b. Orange Peel: Enamel will appear dimpled and slightly shiny - similar to the outer skin of an orange. c. Complete: Your enamel will be smooth and shiny - you should remove your enameled piece at this stage.
7. Once cooled, flip your copper piece over and repeat steps 1 - 6 on the back side of the copper. Enameling on only one side can cause your piece to warp.
8. Allow your piece to cool completely.
9. When complete rinse, dry and clean firescale from the edges of your copper piece using the alundum stone.

DELPHIGLASS.COM
Project Help Line • 800.821.9450© 2015 Delphi Glass Corp.
18
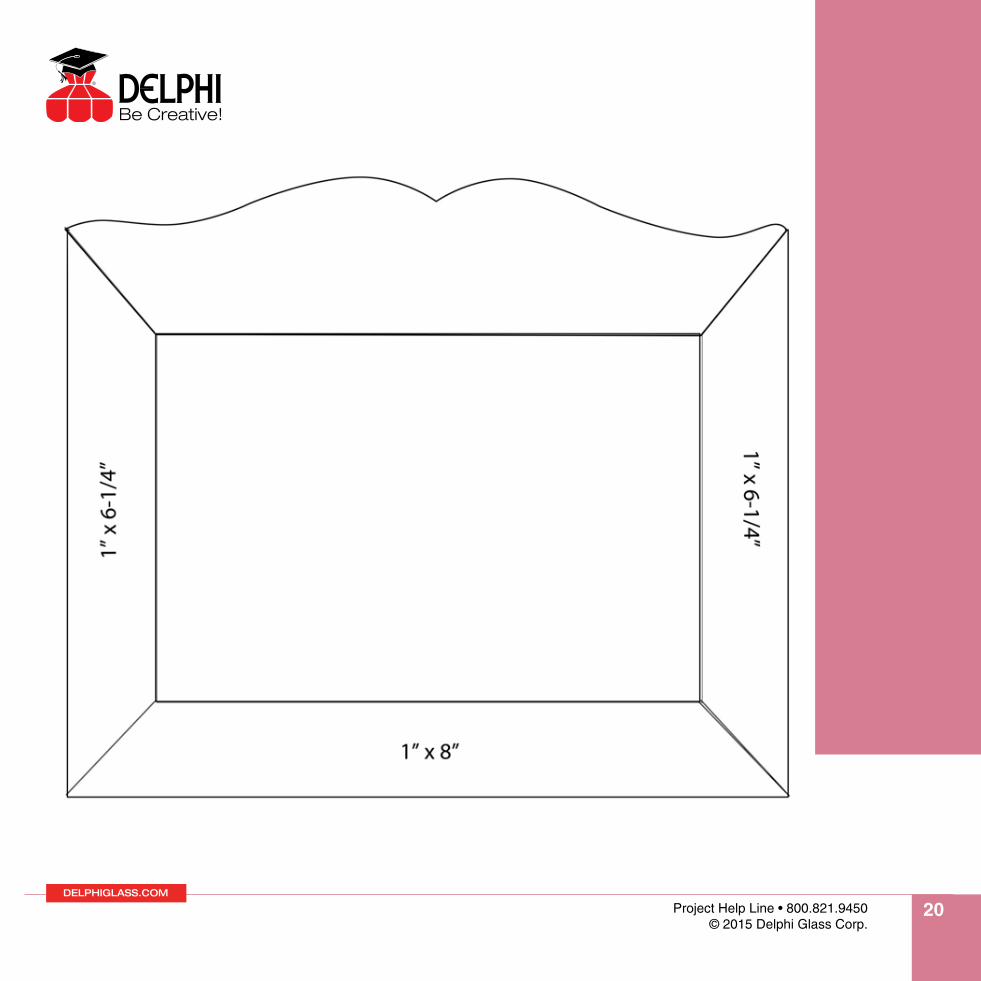
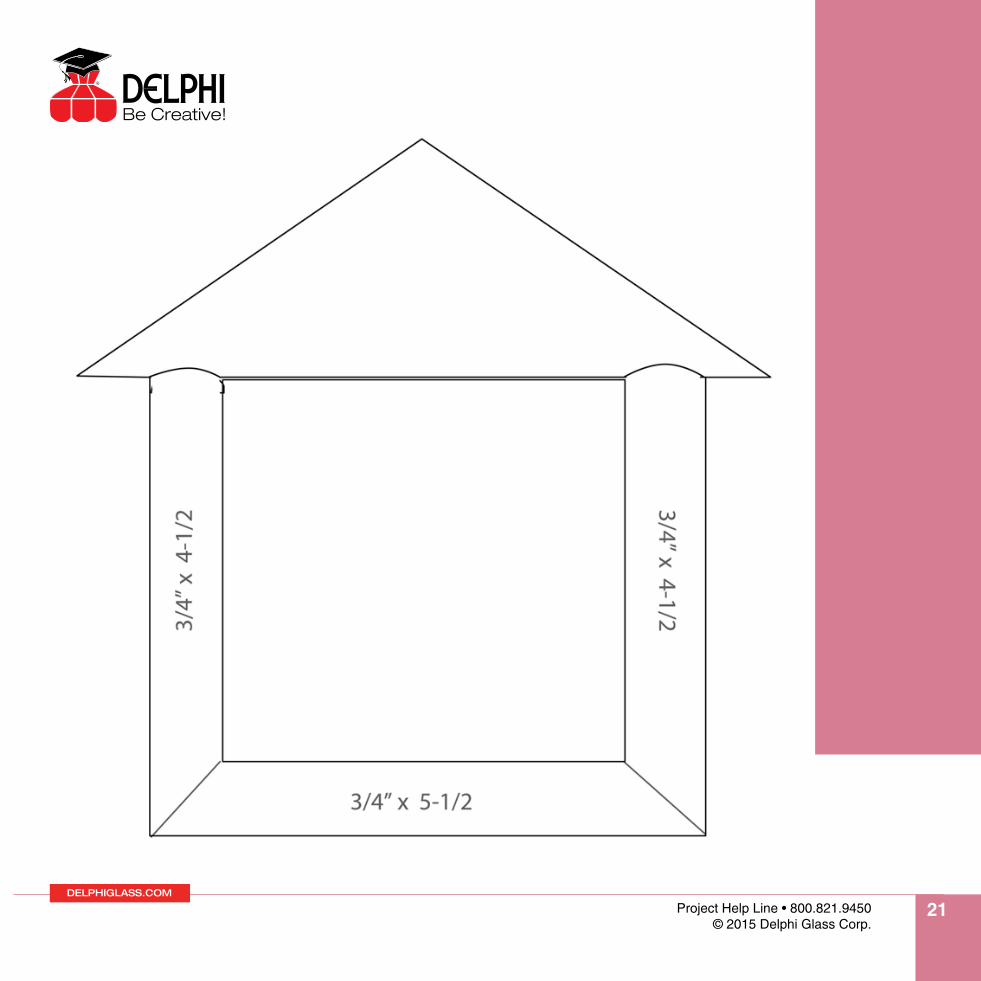
Stained Glass Framed Etched Bevel Patterns
Materials Needed: Basic glass cutting tools Basic Stained Glass Supplies 4 - 3/4” Bevels (#5260) 4 - 1” Bevels (#5261)4 - 1-1/2” Pre-Tinned Curly Q Hangers (#130001)
Delphi Etched Bevels: Mother Engraved Bevel (#19254)Family Engraved Bevel (#19250)Home Engraved Bevel (#19257)

DELPHIGLASS.COM
Project Help Line • 800.821.9450© 2015 Delphi Glass Corp.
19
DELPHIGLASS.COM
Project Help Line • 800.821.9450© 2015 Delphi Glass Corp.
20
DELPHIGLASS.COM
Project Help Line • 800.821.9450© 2015 Delphi Glass Corp.
21
DELPHIGLASS.COM
Project Help Line • 800.821.9450© 2015 Delphi Glass Corp.
22
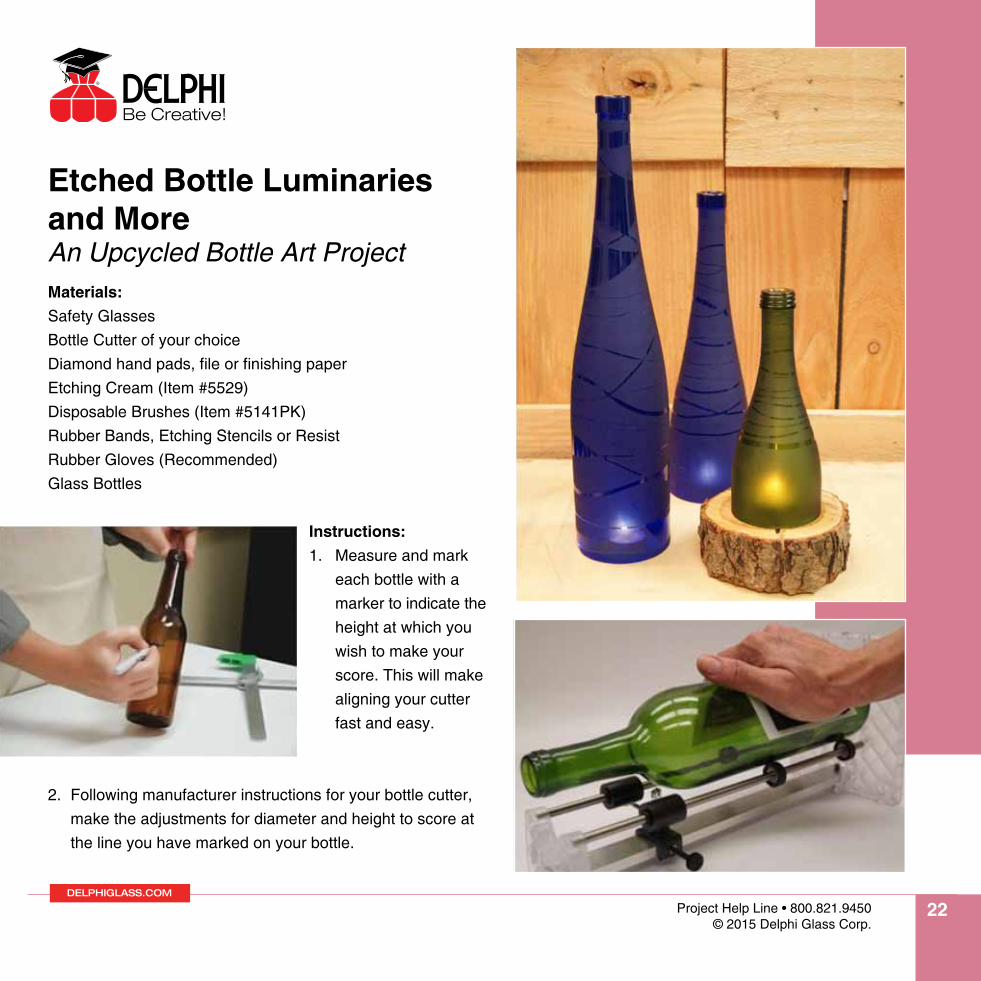
Etched Bottle Luminaries and MoreAn Upcycled Bottle Art ProjectMaterials:Safety Glasses Bottle Cutter of your choice Diamond hand pads, file or finishing paper Etching Cream (Item #5529) Disposable Brushes (Item #5141PK) Rubber Bands, Etching Stencils or ResistRubber Gloves (Recommended) Glass Bottles
Instructions: 1. Measure and mark each bottle with a marker to indicate the height at which you wish to make your score. This will make aligning your cutter fast and easy.
2. Following manufacturer instructions for your bottle cutter, make the adjustments for diameter and height to score at the line you have marked on your bottle.
DELPHIGLASS.COM
Project Help Line • 800.821.9450© 2015 Delphi Glass Corp.
23
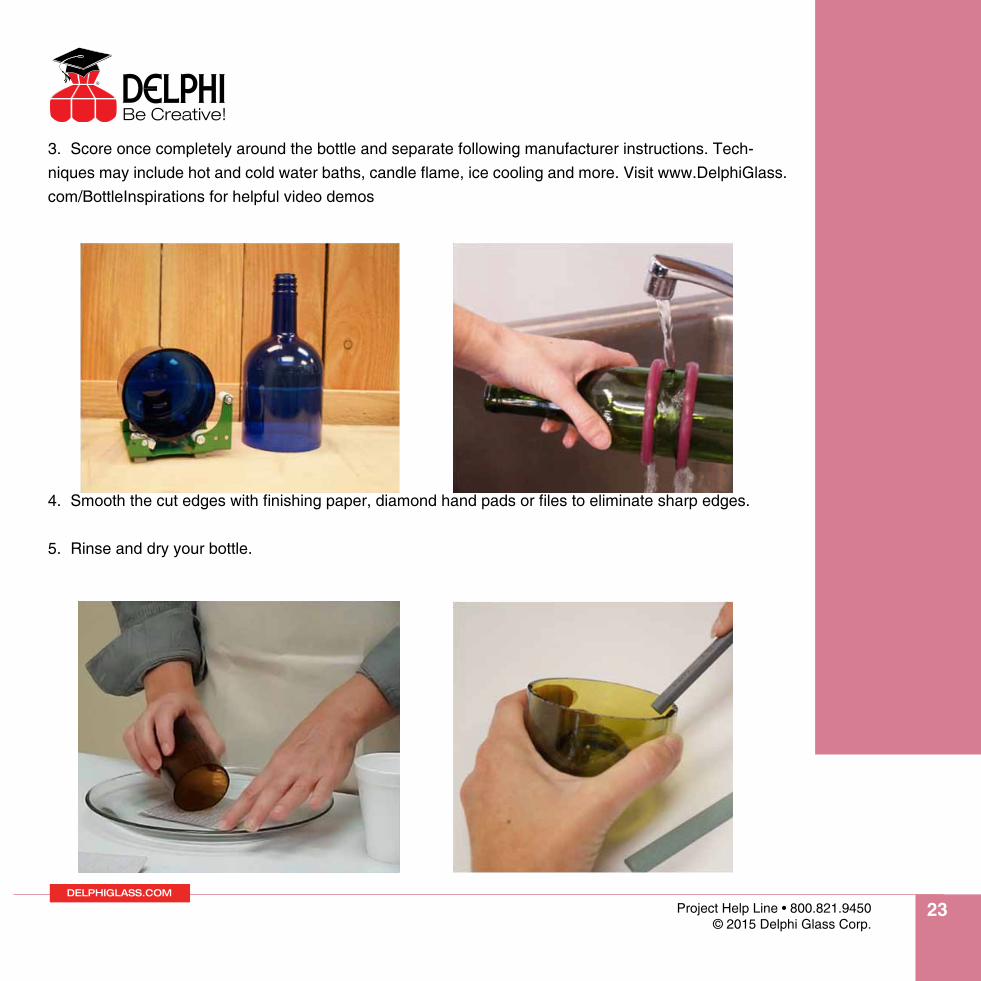
3. Score once completely around the bottle and separate following manufacturer instructions. Tech-niques may include hot and cold water baths, candle flame, ice cooling and more. Visit www.DelphiGlass.com/BottleInspirations for helpful video demos
4. Smooth the cut edges with finishing paper, diamond hand pads or files to eliminate sharp edges.
5. Rinse and dry your bottle.
DELPHIGLASS.COM
Project Help Line • 800.821.9450© 2015 Delphi Glass Corp.
24
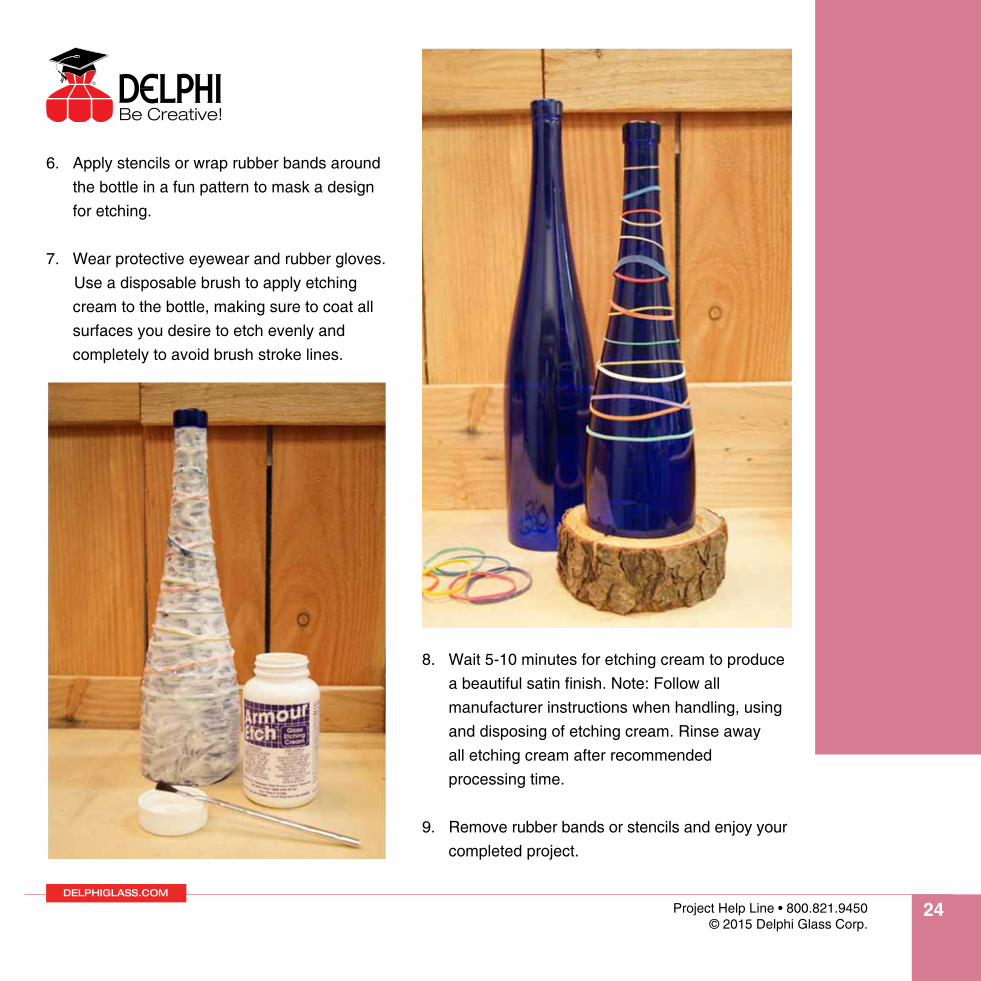
6. Apply stencils or wrap rubber bands around the bottle in a fun pattern to mask a design
for etching.
7. Wear protective eyewear and rubber gloves. Use a disposable brush to apply etching cream to the bottle, making sure to coat all surfaces you desire to etch evenly and
completely to avoid brush stroke lines.
8. Wait 5-10 minutes for etching cream to produce a beautiful satin finish. Note: Follow all
manufacturer instructions when handling, using and disposing of etching cream. Rinse away
all etching cream after recommended processing time.
9. Remove rubber bands or stencils and enjoy your completed project.
DELPHIGLASS.COM
Project Help Line • 800.821.9450© 2015 Delphi Glass Corp.
25
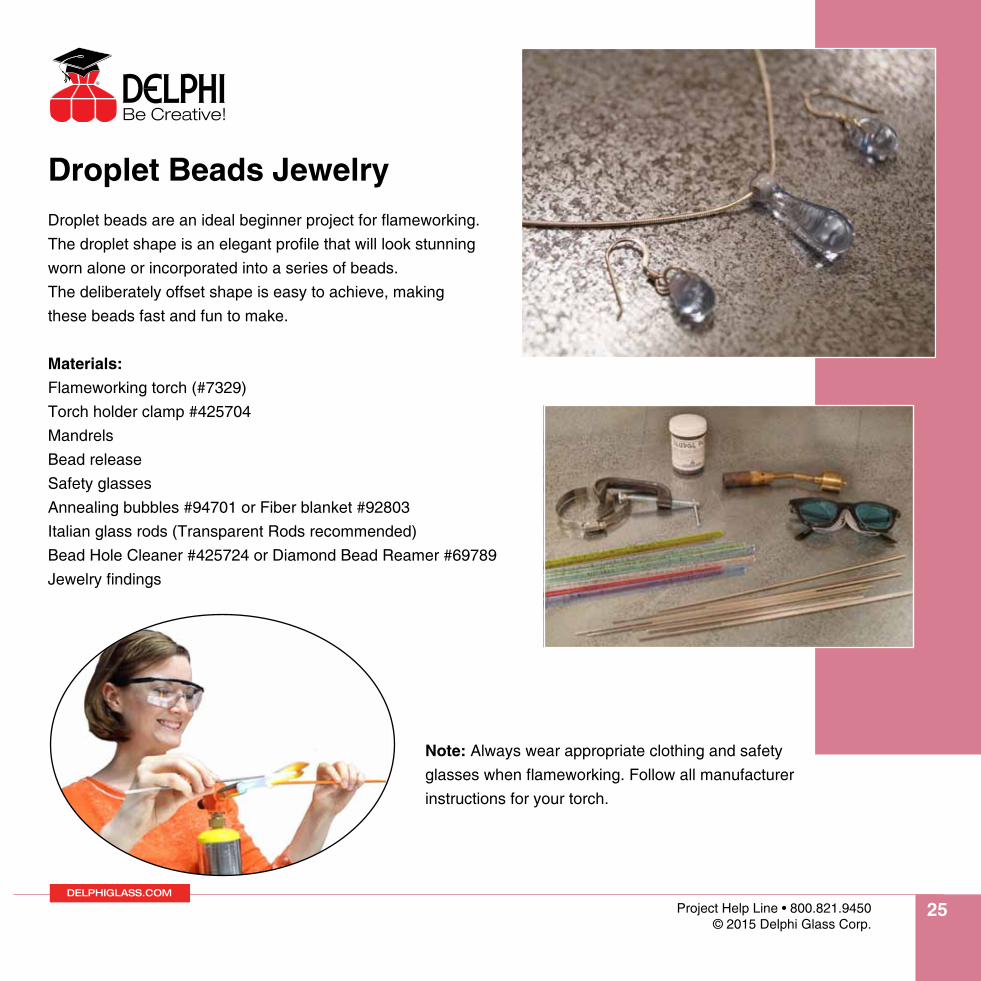
Droplet Beads JewelryDroplet beads are an ideal beginner project for flameworking. The droplet shape is an elegant profile that will look stunning worn alone or incorporated into a series of beads. The deliberately offset shape is easy to achieve, making these beads fast and fun to make.
Materials:Flameworking torch (#7329)Torch holder clamp #425704MandrelsBead releaseSafety glassesAnnealing bubbles #94701 or Fiber blanket #92803Italian glass rods (Transparent Rods recommended)Bead Hole Cleaner #425724 or Diamond Bead Reamer #69789Jewelry findings
Note: Always wear appropriate clothing and safety glasses when flameworking. Follow all manufacturer instructions for your torch.
DELPHIGLASS.COM
Project Help Line • 800.821.9450© 2015 Delphi Glass Corp.
26
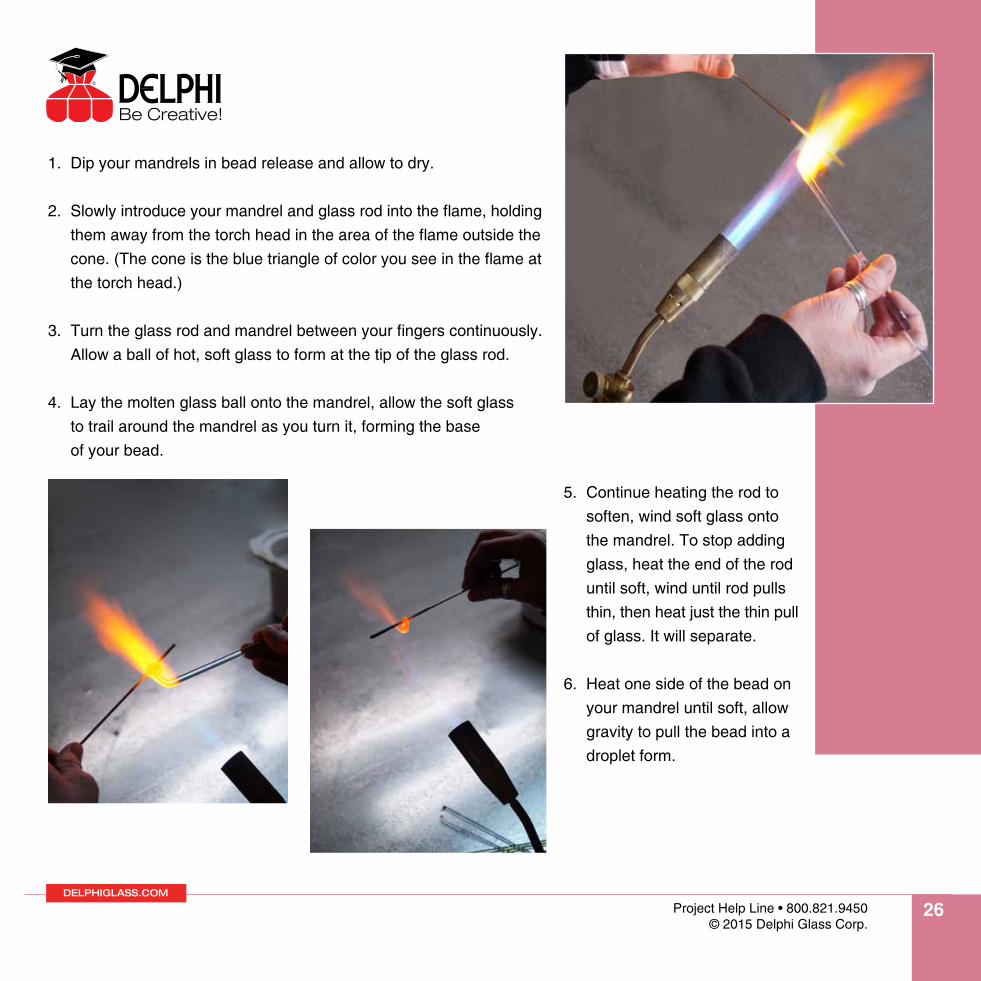
1. Dip your mandrels in bead release and allow to dry.
2. Slowly introduce your mandrel and glass rod into the flame, holding them away from the torch head in the area of the flame outside the cone. (The cone is the blue triangle of color you see in the flame at the torch head.)
3. Turn the glass rod and mandrel between your fingers continuously. Allow a ball of hot, soft glass to form at the tip of the glass rod.
4. Lay the molten glass ball onto the mandrel, allow the soft glass to trail around the mandrel as you turn it, forming the base of your bead.
5. Continue heating the rod to soften, wind soft glass onto the mandrel. To stop adding glass, heat the end of the rod until soft, wind until rod pulls thin, then heat just the thin pull of glass. It will separate.
6. Heat one side of the bead on your mandrel until soft, allow gravity to pull the bead into a droplet form.

DELPHIGLASS.COM
Project Help Line • 800.821.9450© 2015 Delphi Glass Corp.
27
7. Cool just outside the flame to set the shape of your bead. Place your bead in a container of Annealing Bubbles or between layers of Fiber Blanket to cool.
8. Remove beads when fully annealed (cooled) and remove from mandrels.
Use bead hole cleaner or diamond bead reamer to clean the mandrel holes
9. Place finished beads on your choice of findings and enjoy!